TL8230A1003
7-Day Programmable Thermostat
Owner’s Guide
Read before installing
69-1803ES-09
M38427A

Overview
Before you start............................................................. 3
About your thermostat............................................... 4
Controls............................................................................. 5
Display ............................................................................... 6
Installation
Installing the thermostat.......................................... 7
Wiring diagram.............................................................. 8
Setting the configuration switches..................... 9
Setup
Time and day .................................................................. 10
Daylight Saving Time.................................................. 11
Preset temperatures................................................... 12
Default schedule...........................................................13
Modifying the schedule ............................................ 14
Operation
Running the schedule (Automatic mode) ....... 15
Temporary override of schedule ...........................15
Permanent override (Manual mode) ................. 16
Appendices
Error messages..............................................................17
Technical specifications ........................................... 18
Warranty............................................................................ 19
Customer assistance.................................................. 20
Table of contents

TL8230A1003
3
Read the entire document
CAUTION:
• Installation must be carried out by a certified electrician and must comply with national and
local electrical codes.
• To prevent severe shock or electrocution, always cut the power at the service panel before
working with wiring.
• Use this thermostat for resistive loads only.
• Do NOT install the thermostat in an area where it can be exposed to water or rain.
• Avoid locations where there are air drafts (top of staircase, air outlet), dead air spots (behind a
door), direct sunlight or concealed chimney or stove pipes (except for floor heating systems).
• For a new installation, choose a location about 5 ft. (1.5 m) above the floor.
• Install the thermostat on an inside wall facing the heating system.
• Install the thermostat onto an electrical box.
• Use special CO/ALR solderless connectors if you connect the thermostat to aluminum wires.
• Keep the thermostat's top and bottom air vents (openings) clean and unobstructed at all times.
Before you start

Owner’s Guide
4
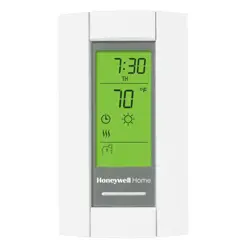
Resideo’s TL8230A1003 thermostat can be connected to an electric heater to control the room
temperature.
Supplied Parts
• One (1) thermostat
•Two (2) mounting screws
• Four (4) solderless connectors for copper wires
About your thermostat
TL8230A1003
5
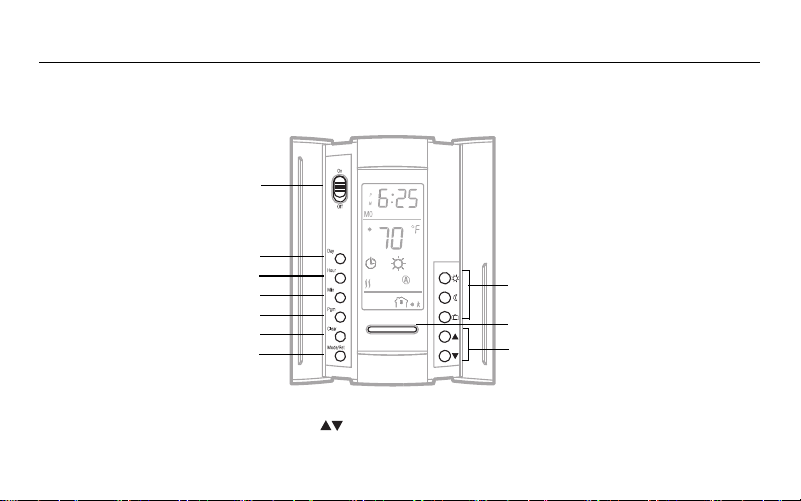
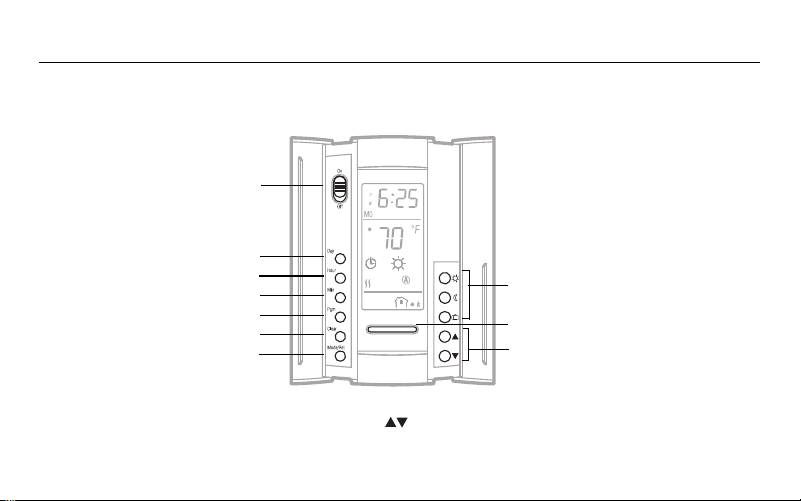
Controls
M38978
On/Off switch
*
Day button
Temperature adjustment buttons
**
Program button
Mode selection / program
exit
Preset temperature
buttons (see page 12)
Backlight button
**
Program clear button
Hour button
Minutes button
*
Place at Off to cut power to the heater (e.g., in the summer). This will not affect the time and temperature settings.
**
When the backlight button or either of the buttons is pressed, the display illuminates for 12 seconds.
Owner’s Guide
6
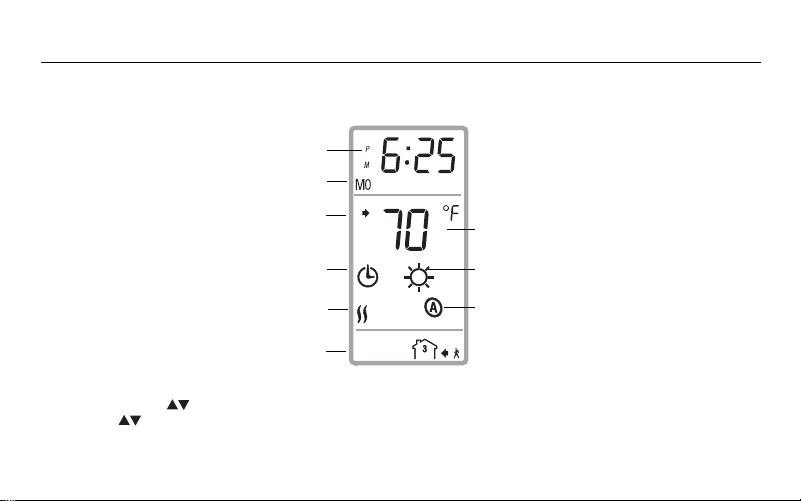
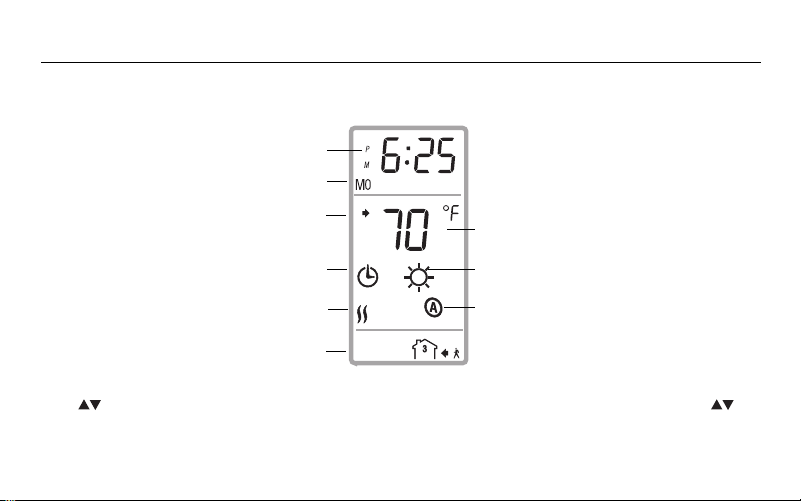
Display
M38980
Temperature
*
Operation mode icon
(see pages 15 & 16)
Period (see page 13)
Time
Number of flames varies
according to heating intensity
Preset temperature icon (see page 12)
Appears when the setpoint
temperature is displayed
*
Indicates this thermostat model is
used to control the ambient
temperature
Day
* The thermostat normally displays the actual (measured) temperature. To view the setpoint temperature, briefly
press either of the buttons. The setpoint will appear for 5 seconds. To change the setpoint temperature, press
one of the buttons until the desired temperature is displayed. To scroll faster, press and hold the button.
TL8230A1003
7
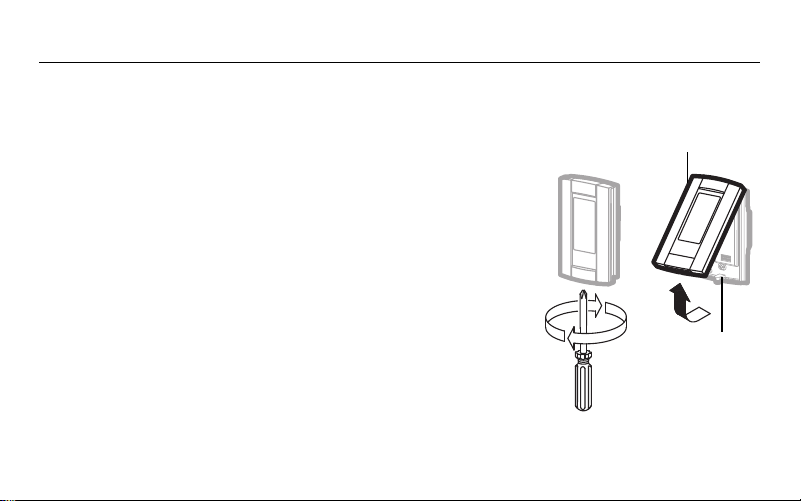
1) Turn the heating system off at the main electrical panel.
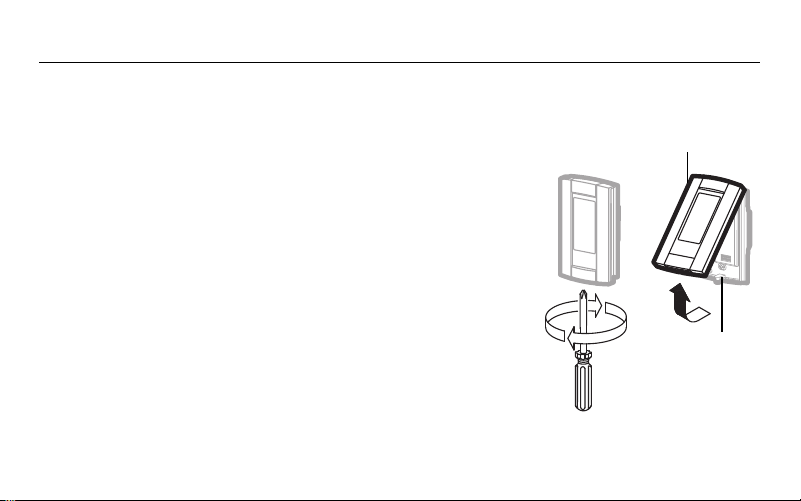
2) Loosen the bottom screw and remove the thermostat
faceplate from its wallplate. (The screw cannot be completely
removed.)
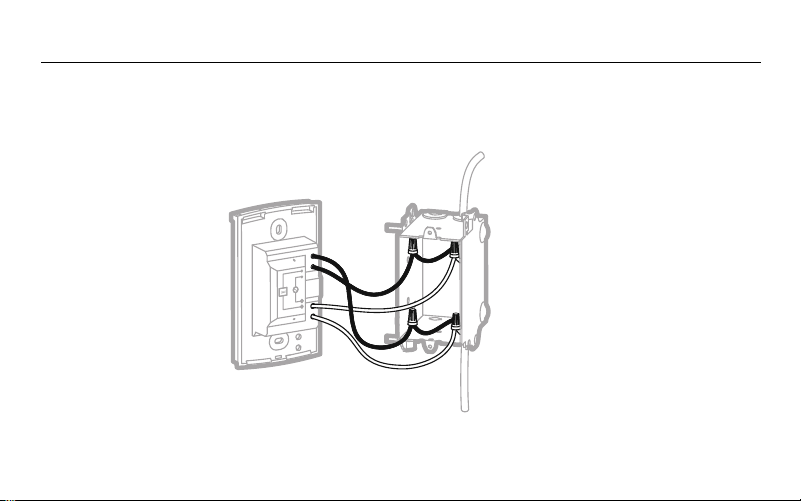
3) Connect the thermostat to the load and to the power supply
(see page 8).
4) Install the wallplate to the electrical box using the provided
screws.
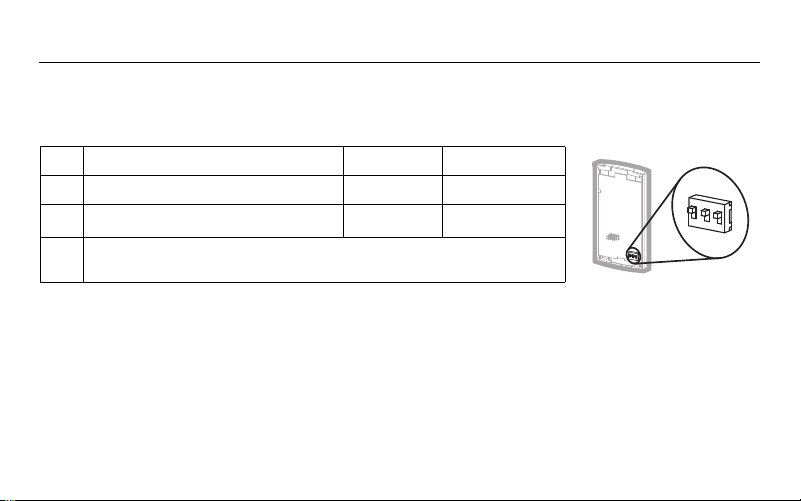
5) Set the configuration switches on the back of the faceplate
(see page 9).
6) Install the faceplate back on the wallplate and tighten the
screw. If there is a sticker on the screen, peel it off.
7) Return power to the heating system at the main electrical
panel.
Installing the thermostat
M38979
Wallplate
Faceplate
Owner’s Guide
8
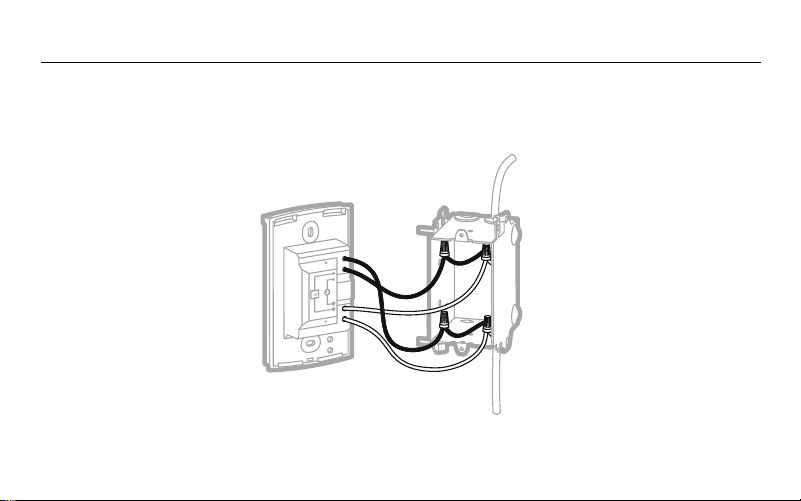
NOTE: Connect the wires using the provided solderless connectors for copper wires.
Wiring diagram
M38971
Power
Load
TL8230A1003
9
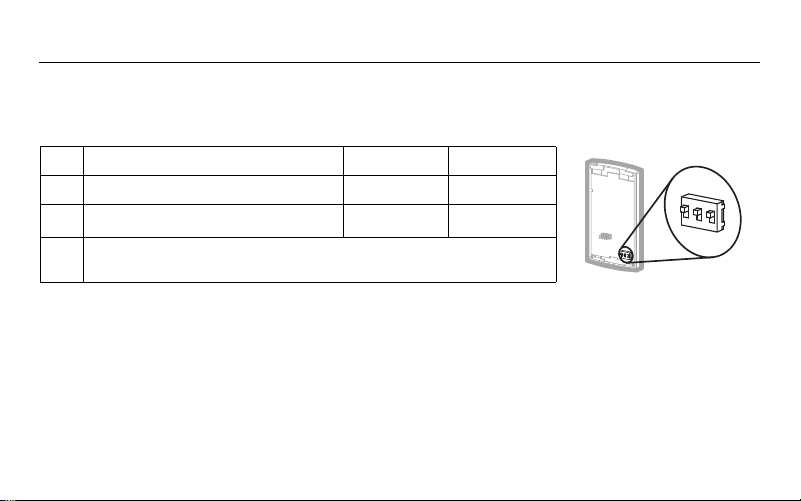
Configuration switches are on the back of the faceplate.
Set the configuration switches
# Configurations Up Down
1 Display format °F / 12 h °C / 24 h
2
Early Start
1
1. Early Start is used in Automatic mode only. When Early Start is enabled (on), the thermostat
determines when to start heating so the Comfort temperature is attained at the beginning of
periods 1 and 3. When Early Start is disabled (off), heating starts only at the beginning of periods
1 and 3; thus there is a delay before the Comfort temperature is reached.
Enable Disable
3Not Used
M38981
1
2
3

Owner’s Guide
10
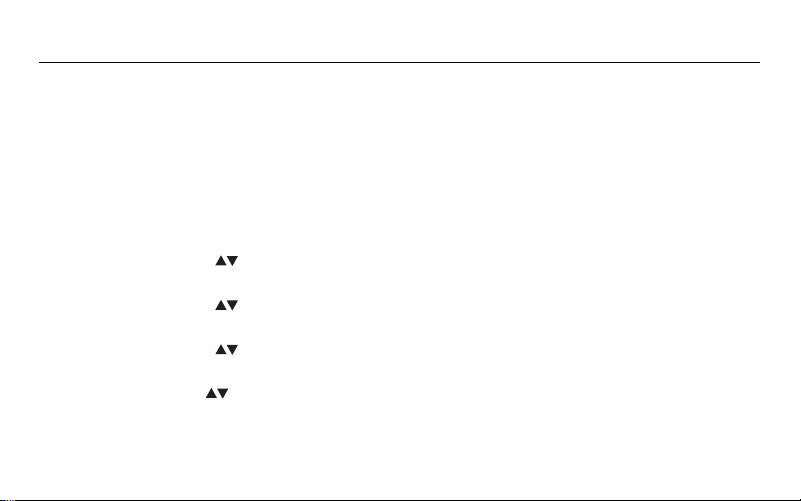
To set the clock and the day:
1) Press the Hour button to set the hour.
2) Press the Min button to set the minutes.
3) Press the Day button to set the day.
4) Press the Mode/Ret button to return the thermostat to normal display.
NOTE: The thermostat will automatically return to normal display if no button is pressed for
60 seconds.
Time and day
TL8230A1003
11
When the Daylight Saving Time function is enabled (On), the thermostat automatically switches to
Daylight Saving Time on the second Sunday of March and to normal time on the first Sunday of
November.
NOTE: The Daylight Saving Time function is disabled (default setting) when the clock loses its
setting.
To set the
Daylight Saving Time function and to set the date:
1) Press the Day button (3 seconds) until DLS appears on the screen.
2) Press either of the buttons to toggle between On (enabled) and Off (disabled).
3) Press the Day button briefly. The year setting is displayed.
4) Press either of the buttons to set the current year.
5) Press the Day button briefly. The month setting is displayed.
6) Press either of the buttons to set the current month.
7) Press the Day button briefly. The date setting is displayed.
8) Press either of the buttons to set the current date.
9) Press the Mode/Ret button to return the thermostat to normal display.
NOTE: The thermostat will automatically return to normal display if no button is pressed for 60
seconds.
Daylight Saving Time
Owner’s Guide
12
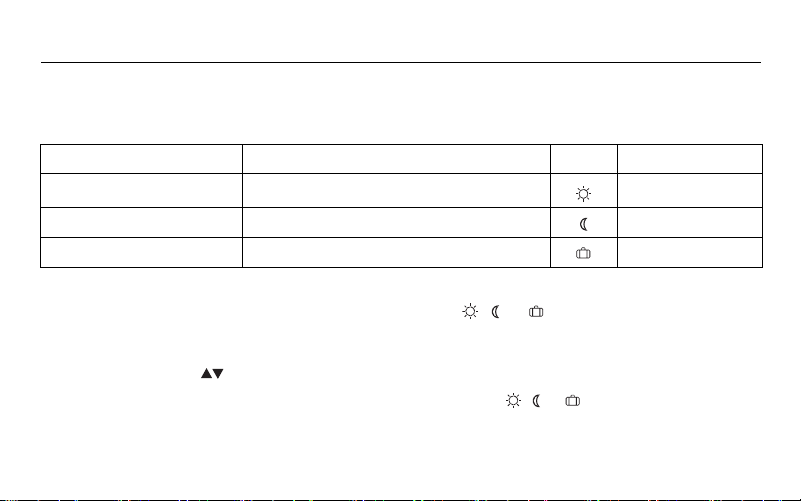
The thermostat has 3 preset temperatures. Their default settings are shown in the following table.
To use a preset temperature:
Briefly press the appropriate preset temperature button ( , or ). The preset temperature will
become the current setpoint and its icon will appear on the screen.
To modify a preset temperature:
1) Press one of the buttons to display the desired temperature.
2) Press and hold the appropriate preset temperature button ( , or ) until its icon is
displayed.
Preset temperatures
Preset temperature Intended use Icon Default Settings
Comfort When at home 70°F (21.0°C)
Economy When asleep or away from home 62°F (16.5°C)
Vacation During prolonged absence 50°F (10.0°C)
TL8230A1003
13
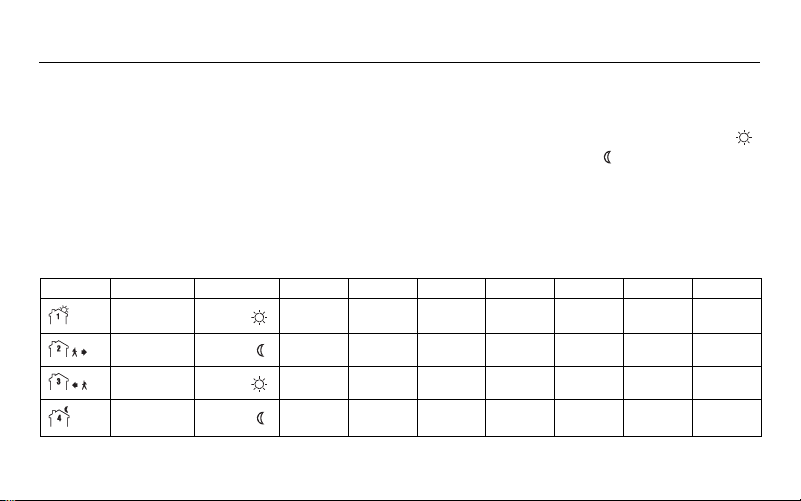
The schedule consists of 4 periods per day, which represents a typical work day. The Comfort ( )
preset temperature is automatically used in Periods 1 and 3 and the Economy ( ) preset temperature
in Periods 2 and 4. You can program the thermostat to skip (cancel) the periods that do not apply to
your situation. For example, you can skip periods 2 and 3 for the weekend.
NOTE: If you wish to use only 2 periods, use the following combinations: “1 and 4” or “2 and 3”. Early
Start (see page 11) will not work with any other combinations.
You can have a different program every day; i.e., each period can start at a different time every day.
The thermostat has been programmed with the following schedule.
Default schedule
Period Description Setting MO TU WE TH FR SA SU
Wake
Comfort
6:00 AM 6:00 AM 6:00 AM 6:00 AM 6:00 AM 6:00 AM 6:00 AM
Leave
Economy
8:00 AM 8:00 AM 8:00 AM 8:00 AM 8:00 AM --:-- --:--
Return
Comfort
6:00 PM 6:00 PM 6:00 PM 6:00 PM 6:00 PM --:-- --:--
Sleep
Economy
10:00 PM 10:00 PM 10:00 PM 10:00 PM 10:00 PM 10:00 PM 10:00 PM

Owner’s Guide
14
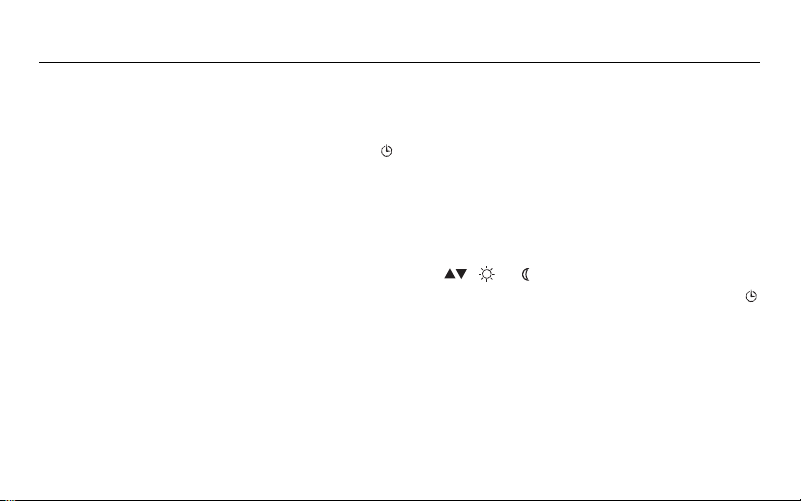
1) Press Pgm. Period 1 for Monday is displayed.
2) To program another period, press Pgm to display that period.
3) To program another day, press Day to display that day (hold for 3 seconds to select the entire
week).
4) Press Hour and Min to set the period start time, or press Clear to skip (cancel) the period (--:--
will be displayed).
5) Repeat steps 2 to 4 to program another period.
6) Press Mode/Ret to return the thermostat to normal display.
NOTE: The thermostat will automatically return to normal display if no button is pressed for
60 seconds.
Modifying the schedule
TL8230A1003
15
In Automatic mode, the thermostat follows the programmed schedule (see page 13). To place the
thermostat in this mode, press Mode/Ret until is displayed.
If you modify the setpoint temperature (by pressing the , or button) when the thermostat is
in Automatic mode, the new temperature will be used until the beginning of the next period.
flashes during the temporary override. You can cancel the temporary override by pressing Mode/Ret.
Running the schedule (Automatic mode)
Temporary override of schedule
Owner’s Guide
16
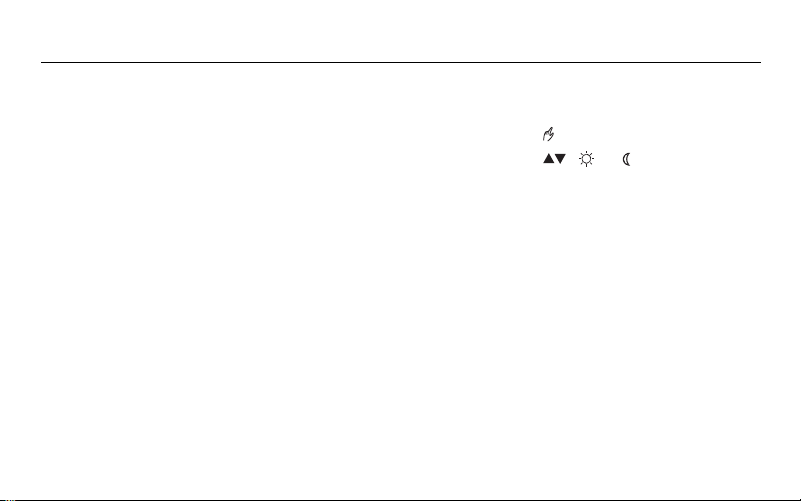
To place the thermostat in Manual mode, press Mode/Ret to display on the screen. In this mode,
the thermostat does not follow the programmed schedule. Press the , or button to set the
temperature.
Permanent override of schedule (Manual mode)
TL8230A1003
17
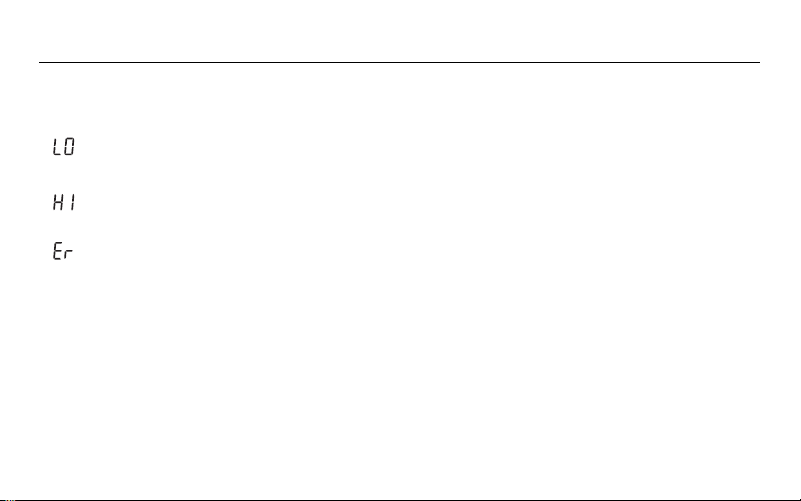
The measured temperature is below the display range. Heating is activated.
The measured temperature is above the display range. Heating is deactivated.
Verify the thermostat connection and sensor connection.
Error Messages

Owner’s Guide
18
Power supply: 240/208 VAC, 50/60 Hz
Maximum load: 15.0 A (3600 W @ 240 VAC)
(3120 W @ 208 VAC)
Heating cycle: 15 minutes
Setpoint range: 40 °F to 86 °F (5 °C to 30 °C)
Display range: 32 °F to 158 °F (0 °C to 70 °C)
Resolution: 1 °F (0.5 °C)
Data protection: In the event of a power failure, most settings are saved. However the time and
Daylight Saving Time must be set if the power failure lasts more than 6 hours. The thermostat will
return to the mode that was active prior to the power failure.
Technical Specifications
273699
Energy Verified
Only

TL8230A1003
19
Resideo warrants this product, excluding battery, to be free from defects in workmanship or materials, under normal use and service, for a period of five (5)
years from the date of first purchase by the original purchaser. If at any time during the warranty period the product is determined to be defective due to
workmanship or materials, Resideo shall repair or replace it (at Resideo’s option).
If the product is defective,
(i) return it, with a bill of sale or other dated proof of purchase, to the place from which you purchased it; or
(ii) call Resideo Customer Care at 1-800-468-1502. Customer Care will make the determination whether the product should be returned to the following
address: Resideo Return Goods, 1985 Douglas Dr. N., Golden Valley, MN 55422, or whether a replacement product can be sent to you.
This warranty does not cover removal or reinstallation costs. This warranty shall not apply if it is shown by Resideo that the defect was caused by damage
which occurred while the product was in the possession of a consumer.
Resideo’s sole responsibility shall be to repair or replace the product within the terms stated above. RESIDEO SHALL NOT BE LIABLE FOR ANY LOSS OR
DAMAGE OF ANY KIND, INCLUDING ANY INCIDENTAL OR CONSEQUENTIAL DAMAGES RESULTING, DIRECTLY OR INDIRECTLY, FROM ANY BREACH OF
ANY WARRANTY, EXPRESS OR IMPLIED, OR ANY OTHER FAILURE OF THIS PRODUCT.
Some states do not allow the exclusion or limitation of incidental or consequential damages, so this limitation may not apply to you.
THIS WARRANTY IS THE ONLY EXPRESS WARRANTY RESIDEO MAKES ON THIS PRODUCT. THE DURATION OF ANY IMPLIED WARRANTIES, INCLUDING
THE WARRANTIES OF MERCHANTABILITY AND FITNESS FOR A PARTICULAR PURPOSE, IS HEREBY LIMITED TO THE FIVE YEAR DURATION OF THIS
WARRANTY. Some states do not allow limitations on how long an implied warranty lasts, so the above limitation may not apply to you.
This warranty gives you specific legal rights, and you may have other rights which vary from state to state. If you have any questions concerning this war-
ranty, please write Resideo Customer Care, 1985 Douglas Dr, Golden Valley, MN 55422 or call 1-800-468-1502.
Warranty

Owner’s Guide
20
If you have any questions about the operation of your thermostat, please go to resideo.com.
Customer assistance

TL8230A1003
21

www.resideo.com
Resideo Technologies, Inc.
1985 Douglas Drive North, Golden Valley, MN 55422
69-1803ES—09 M.S. Rev. 05-22 | Printed in United States
© 2022 Resideo Technologies, Inc. All rights reserved.
The Honeywell Home trademark is used under license from Honeywell International, Inc.
This product is manufactured by Resideo Technologies, Inc. and its affiliates.
Todos los derechos reservados. La marca comercial Honeywell Home se utiliza bajo licencia de Honeywell International, Inc.
Este producto es fabricado por Resideo Technologies, Inc. y sus afiliados.
CAUTION: ELECTRONIC WASTE NOTICE
The product should not be disposed of with other household waste. Check for the nearest authorized
collection centers or authorized recyclers. The correct disposal of end-of-life equipment will help
prevent potential negative consequences for the environment and human health.
TL8230A1003
Termostato que se programa por 7 días
Guía para el usuario
Leer antes de instalar
M38427A

Panorama general
Antes de comenzar...................................................... 3
Sobre el termostato..................................................... 4
Controles .......................................................................... 5
Pantalla ............................................................................. 6
Instalación
Instalación del termostato....................................... 7
Diagrama de conexión............................................... 8
Ajuste de los conmutadores de configuración
.. 9
Configuración
Hora y día.......................................................................... 10
Horario de verano......................................................... 11
Temperaturas predefinidas..................................... 12
Horario de fábrica.........................................................13
Para modificar el horario ..........................................14
Funcionamiento
Uso del horario (Modo Automático) ...................15
Cancelación temporaria ...........................................15
Cancelación permanente (Modo Manual) ..... 16
Anexos
Mensajes de error......................................................... 17
Especificaciones técnicas ....................................... 18
Garantía.............................................................................19
Assistencia al cliente ..................................................21
Índice

TL8230A1003
3
Leer el documento completo
ADVERTENCIA:
• La instalación debe hacerla un electricista y debe conformarse a los códigos de electricidad
nacionales y locales.
• Para prevenir choques eléctricos graves o electrocuciones, CORTAR siempre la corriente desde
el panel eléctrico principal antes de trabajar en el cableado.
• Utilizar este termostato con una carga resistiva solamente.
• NO instalar el termostato en un lugar en el que corra el riesgo de quedar expuesto al agua o a la
lluvia.
• Deben evitarse los sitios en los haya corrientes de aire (arriba de una escalera, de una salida de
aire...) los puntos en los que el aire no circule (detrás de una puerta), los rayos directos del sol,
los conductos disimulados o las chimeneas.
• En el caso de una nueva instalación, colocar el termostato a alrededor de 5 pies (1,5 m) sobre el
nivel del piso.
• Instalar el termostato en una caja de electricidad.
• Utilizar conectores marcados CO/ALR para conectar el termostato a cables de aluminio.
• Mantener siempre las aberturas de aereación del termostato limpias y sin obstrucciones.
Antes de comenzar

Owner’s Guide
4
El termostato TL8230A1003 de Resideo puede conectarse a un calentador eléctrico destinado a
controlar la temperatura de la habitación.
Partes provistas
• Un (1) termostato
•Dos (2) tornillos de montaje
• Cuatro (4) conectores sin soldadura para cables de cobre
Sobre el termostato
TL8230A1003
5
Controles
M38978
Conmutador On/Off
(encendido/apagado)*
Ajuste del día
Botón de ajuste de la
temperatura
**
Programación
Selección del modo /
fin de la programación
Botón de ajuste predefinido de
temperatura (ver la página 12)
Botón de retroiluminación
**
Anulación
Ajuste de la hora
Ajuste de los minutos
*
Poner el conmutador en Off para apagar el aparato. Esto no afectará los ajustes de hora y temperatura.
**
Cuando se presiona el botón de retroiluminación o uno de los botones , la pantalla se ilumina durante 12 segundos.
Owner’s Guide
6
Pantalla
M38980
Temperatura
*
Ícono de modo de funcionamiento
(ver las páginas 15 y 16)
Período (ver la página 13)
Hora
La cantidad de llamas indica la
intensidad de la temperatura
Ícono de temperatura predefinida (ver
la página 12)
Aparece cuando aparece
el punto de ajuste
*
Indica que este modelo de
termostato se usa para controlar la
temperatura ambiente
Día
* El termostato indica normalmente la temperatura real (medida). Para ver la temperatura del punto de ajuste, presionar brevemente uno de los bot-
ones . El punto de ajuste aparecerá durante 5 segundos. Para cambiar la temperatura del punto de ajuste, presionar uno de los botones
hasta que se visualice la temperatura deseada. Para hacer desfilar más rápido la temperatura del punto de ajuste, mantener el botón presionado.
TL8230A1003
7
1) Desconectar el sistema de calefacción en el panel eléctrico
principal.
2) Destornillar el tornillo debajo del termostato y separar la tapa
de la placa mural. (El tornillo no puede sacarse
completamente)
3) Conectar el termostato al sistema de calefacción y a la
alimentación (ver la página 8).
4) Fijar la placa mural a la caja eléctrica con los tornillos
provistos.
5) Ajustar los conmutadores de configuración que están detrás
de la tapa (ver la página 9).
6) Reponer la tapa sobre la placa mural y ajustar el tornillo.
Quitar el autoadhesivo de la pantalla, si lo hubiera.
7) Conectar el sistema de calefacción desde el panel eléctrico
principal.
Instalación del termostato
M38979
Placa
mural
Tapa
Owner’s Guide
8
NOTA: conectar los cables utilizando conectores sin soldadura para cables de cobre.
Diagramas de conexiones
M38971
alimentación
carga
TL8230A1003
9
Los conmutadores de configuración están detrás de la tapa.
Ajuste de los conmutadores de configuración
# Configuraciones Arriba Abajo
1 Formato de visualización °F / 12 h °C / 24 h
2
Encendido anticipado
1
1. El encendido anticipado funciona en Modo Automático solamente. Cuando la función está
activada, el termostato calcula la hora óptima para encender la calefacción a fin de obtener la
temperatura de Confort al comienzo de los períodos 1 y 3. Cuando esta función está desactivada
(Off) la calefacción se enciende solamente al comienzo de los períodos 1 y 3, por lo que hay una
demora antes de que se alcance la temperatura de Confort.
Activado Desactivado
3 No utilizado
M38981
1
2
3

Owner’s Guide
10
Para fijar la hora y el día:
1) Presionar el botón Hour para ajustar la hora.
2) Presionar el botón Min para ajustar los minutos.
3) Presionar el botón Day para ajustar el día de la semana.
4) Presionar el botón Mode/Ret para terminar.
NOTA: el termostato volverá automáticamente a la pantalla normal si no se presiona ningún botón
durante 60 segundos.
Hora y el día
TL8230A1003
11
Cuando la función de horario de verano está activada (On), el termostato puede pasar
automáticamente a la hora avanzada el segundo domingo de marzo y a la hora normal el primer
domingo de noviembre.
NOTA: la función de horario de verano se desactiva (configuración de fábrica) cuando el reloj pierde
su ajuste.
Para fijar la función de horario de verano y ajustar la fecha:
1) Presionar el botón Day (3 segundos) hasta que aparezca en la pantalla DLS.
2) Presionar cualquiera de los botones para cambiar entre On (función activada) y Off
(función desactivada).
3) Presionar el botón Day brevemente y aparecerá el año.
4) Presionar cualquiera de los botones para poner el año en curso.
5) Presionar el botón Day brevemente y aparecerá el mes.
6) Presionar cualquiera de los botones para poner el mes en curso.
7) Presionar el botón Day brevemente y aparecerá la fecha.
8) Presionar cualquiera de los botones para poner la fecha actual.
9) Presionar el botón Mode/Ret para volver a la pantalla normal.
NOTE: el termostato volverá automáticamente a la pantalla normal si no se presiona ningún botón
durante 60 segundos.
Horario de verano
Owner’s Guide
12
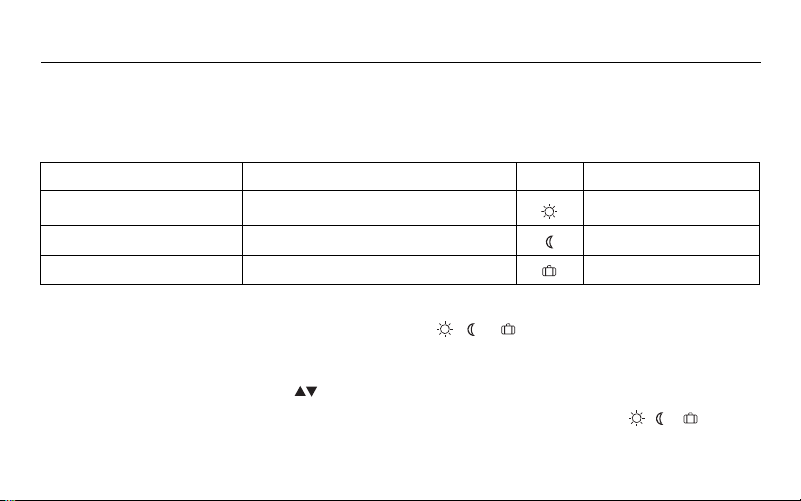
El termostato tiene 3 temperaturas predefinidas. En el cuadro siguiente se indican los valores de
fábrica.
Para utilizar una temperatura predefinida:
Presionar brevemente el botón de ajuste adecuado ( , o ). La temperatura predefinida se
transformará en temperatura del punto de ajuste y su ícono aparecerá en la pantalla.
Para modificar una temperatura predefinida:
1) Presionar uno de los botones para hacer aparecer en pantalla la temperatura deseada.
2) Presionar y mantener el botón de temperatura predefinido correspondiente ( , o ) hasta
que su ícono aparezca en pantalla.
Temperaturas predefinidas
Predefinido Uso previsto Ícono Valores de fábrica
Comfort When at home 70°F (21.0°C)
Economy When asleep or away from home 62°F (16.5°C)
Vacation During prolonged absence 50°F (10.0°C)
TL8230A1003
13
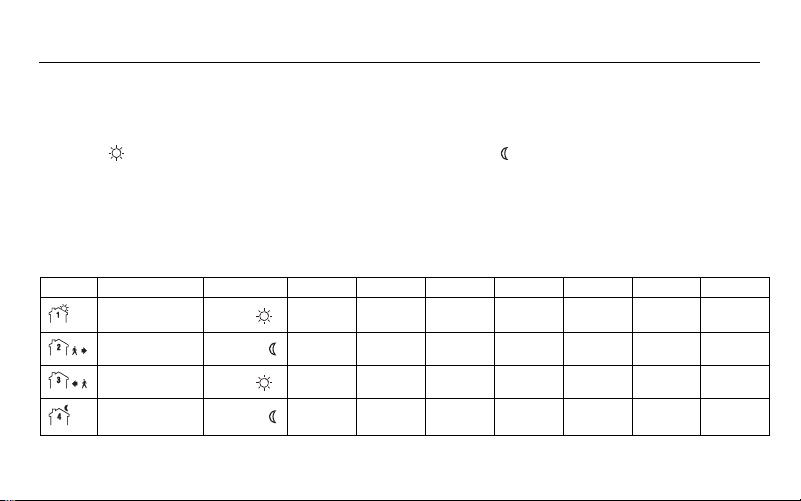
El horario tiene 4 períodos por día, es decir, un día típico de trabajo. La temperatura predefinida de
Confort ( ) se usa en los Períodos 1 y 3 y la de Economía ( ) en los Períodos 2 y 4. Se puede
programar el termostato para saltear los períodos que no se usen. Por ejemplo, se pueden saltear los
períodos 2 y 3 los fines de semana.
NOTA: si se desea utilizar solamente 2 períodos, elegir la combinación de períodos "1 y 4" o "2 y 3". El
encendido anticipado (ver la página 11) no se activará con otras combinaciones.
Se puede hacer un programa diferente para cada día de la semana, es decir, cada período puede
comenzar a una hora diferente para cada día de la semana. El termostato ha sido programado en
fábrica con el siguiente horario.
Horario por defecto
Período Descripción Ajuste LU (MO) MA (TU) MIE (WE) JUE (TH) VIE (FR) SA (SA) DO (SU)
Despertar
Confort
6:00 AM 6:00 AM 6:00 AM 6:00 AM 6:00 AM 6:00 AM 6:00 AM
Salida de la casa
Economía
8:00 AM 8:00 AM 8:00 AM 8:00 AM 8:00 AM --:-- --:--
Return
Confort
6:00 PM 6:00 PM 6:00 PM 6:00 PM 6:00 PM --:-- --:--
Sleep
Economía
10:00 PM 10:00 PM 10:00 PM 10:00 PM 10:00 PM 10:00 PM 10:00 PM

Owner’s Guide
14
1) Presionar Pgm. Aparece el período 1 para el lunes.
2) Para programar otro período, presionar PGM para que aparezca en pantalla.
3) Para programar otro día, presionar Day para seleccionarlo (presionar durante 3 segundos para
seleccionar la semana entera).
4) Presionar Hour y Min para ajustar la hora de comienzo del período o presionar Clear para
saltear (cancelar) el período (aparece --.--).
5) Repetir los pasos 2 y 4 para programar otro período.
6) Presionar Mode/Ret para volver a la pantalla normal.
NOTA: El termostato volverá automáticamente a la pantalla normal si no se presiona ningún botón
durante 60 segundos.
Para modificar el horario

TL8230A1003
15
En Modo Automático, el termostato sigue el horario programado (ver la página 16). Para ponerlo en
este modo, presionar el botón Mode/Ret hasta que aparezca .
Si se modifica el punto de ajuste de la temperatura (presionando el botón , o ) cuando el
termostato está en Modo Automático, la nueva temperatura se usará hasta el comienzo del período
siguiente. parpadeará durante la cancelación temporaria. Se puede anular la cancelación
temporaria presionando el botón Mode/Ret.
Uso del horario (Modo Automático)
Cancelación temporaria

Owner’s Guide
16
Para poner el termostato en Modo Manual, presionar Mode/Ret para que en la pantalla aparezca
En este modo, el termostato no sigue el horario programado. Presionar los botones , o para
ajustar la temperatura.
Cancelación permanente del horario (Modo Manual)
TL8230A1003
17
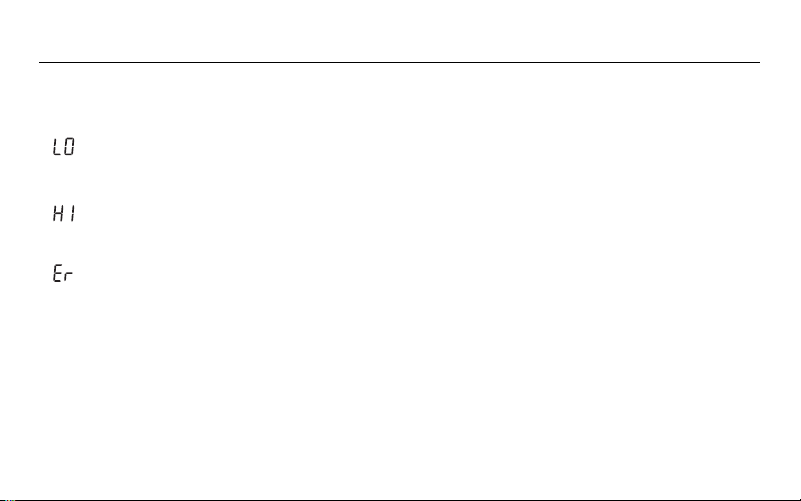
La temperatura medida es inferior al margen de visualización del termostato. La calefacción
está activada.
La temperatura medida es superior al margen de visualización del termostato. La
calefacción está desactivada.
Verificar las conexiones del termostato y del sensor de temperatura.
Mensajes de error

Owner’s Guide
18
Alimentación: 240 VAC/208 VAC, 50 Hz/60 Hz
Carga máxima: 15.0 A (3600 W @ 240 VAC)
(3120 W @ 208 VAC)
Duración del ciclo de calefacción: 15 minutos
Margen de ajuste: 40 °F a 86 °F (5 °C a 30 °C)
Margen de visualización: 32 °F a 158 °F (0 °C a 70 °C)
Resolución: 1 °F (0.5 °C)
Protección de los datos: la mayor parte de los datos están salvaguardados en prevención de un
corte de corriente. Sólo la hora y el horario de verano deben reajustarse si la interrupción de
electricidad dura más de 6 horas. El termostato volverá al modo en el que estaba antes del corte.
Especificaciones técnicas
273699
Energy Verified
Only

TL8230A1003
19
IMPORTADO EN MEXICO POR:
INSTROMET MEXICANA S DE R L DE C V
Avenida Insurgentes 2453, Piso 6,
Tizapan, Alvaro Obregon,
Ciudad de Mexico, CP 01090
Telefono: 01 (55) 800 00423
Instromet Mexicana S. de R.L. de C.V. garantiza que éste producto está libre de defectos en su mano de obra y materiales contra cualquier defecto de fabricación y funcionamiento, bajo uso
normal, por el término de 5 años a partir de la fecha de la compra por el consumidor. Si se determina que el producto esta defectuoso o presenta algún funcionamiento erróneo, Instromet
Mexicana S. de R.L. de C.V. deberá reparar o reemplazar (a opción de Instromet) el producto bajo las siguientes condiciones:
1.Regresar el producto y la póliza de garantía, acompañado de la factura de venta o algún otro comprobante de compra fechadoal establecimiento donde se realizó la compra, o a la sigui-
ente dirección. En la cual también tendrá la información para obtenerlas partes, componentes, consumibles y accesorios del producto:
Av. Salvador Nava Martinez 3125, Col. Colinas del Parque. SanLuis Potosi, SLP Mexico 78294.
2.O puedes llamar al centro de atención al cliente al 01-800-083-5925 para México (ver teléfonos para otros países) donde sedeterminará si el producto debe regresarse o si se enviará
un reemplazo del producto al consumidor sin costo alguno cubriendolos gastos que se deriven del cumplimiento de la presente garantía incluyendo los gastos de transporte. No es nece-
sario pedirpiezas ni accesorios. El producto será reemplazado bajo esta garantía.
Nota: Esta garantía no cubre gastos de mano de obra por re-instalación. No ampara el reemplazo de la pieza si el defecto ocurre por daño causado por el consumidor o desgaste normal
La única responsabilidad de Instromet será reparar o reemplazar el producto dentro de los términos establecidos más arriba. Instromet Mexicana S. de R.L. de C.V. no será responsable de
ninguna pérdida o daño de ningún tipo, incluidos los daños incidentales oderivados, que resulten, de manera directa o indirecta, del incumplimiento de la garantía, expresa o implícita, o de
cualquier otrafalla de este producto.
Esta garantía es la única garantía expresa que Instromet Mexicana S. de R.L. de C.V. ofrece respecto de este producto. La duración de cualquier garantía implícita, incluidas las garantías de
comerciabilidad e idoneidad para un fin específico, se limita por el presente a la duración de un año de esta garantía.
Garantía
Owner’s Guide
20
Esta garantía no es válida en los siguientes casos:
1.Cuando el producto haya sido utilizado en condiciones distintas a las normales (aquellas para las que está destinado)
2.Cuando el producto no ha sido operado de acuerdo con el instructivo de uso e instalación proporcionado.
3.Cuando el producto ha sido alterado o reparado por personas no autorizadas por Instromet Mexicana S. de R.L. de C.V.
Datos del producto:
Marca: _________________________
Modelo: _________________________
Número de serie: _________________________
Nombre del consumidor: _____________________________
Dirección (calle y número): ____________________________
Delegación o municipio: ________________________________________________________
Ciudad, estado y código postal: ________________________________________________________
Sello del establecimiento y fecha de compra

TL8230A1003
21
Si tiene preguntas acerca del funcionamiento del termostato, visite resideo.com.
Asistencia al cliente

www.resideo.com
Resideo Technologies, Inc.
1985 Douglas Drive North, Golden Valley, MN 55422
69-1803ES—09 M.S. Rev. 05-22 | Impreso en EE. UU.
© 2022 Resideo Technologies, Inc. All rights reserved.
The Honeywell Home trademark is used under license from Honeywell International, Inc.
This product is manufactured by Resideo Technologies, Inc. and its affiliates.
Todos los derechos reservados. La marca comercial Honeywell Home se utiliza bajo licencia de Honeywell International, Inc.
Este producto es fabricado por Resideo Technologies, Inc. y sus afiliados.
PRECAUCIÓN: AVISO DE DESPERDICIO ELECTRÓNICO
El producto no se debe tirar con otros desechos domésticos. Verifique los centros de recolección
autorizados más cercanos o centros de reciclaje autorizados. La eliminación correcta del equipo al
final de su vida útil ayudará a evitar posibles consecuencias negativas para el medio ambiente y la
salud humana.