VER 1.0
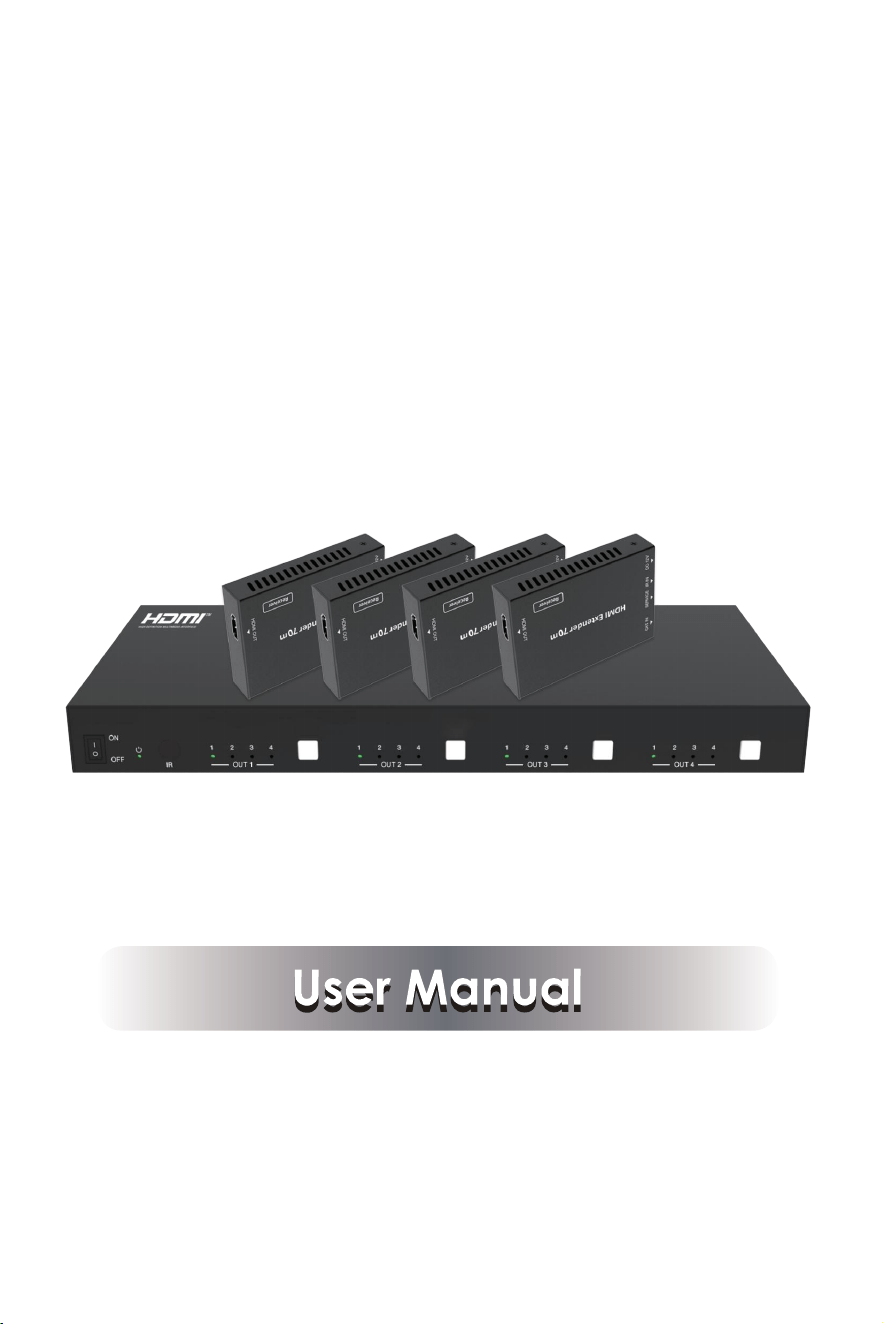
18Gbps 4 x 4 HDMI Matrix (70M)

Thank you for purchasing this product
Surge protection device recommended
Table of Contents
For optimum performance and safety, please read these instructions carefully before connecting,
operating or adjusting this product. Please keep this manual for future reference.
This product contains sensitive electrical components that may be damaged by electrical
spikes, surges, electric shock, lighting strikes, etc. Use of surge protection systems is highly
recommended in order to protect and extend the life of your equipment.
1. Introduction.....................................................................................................................
2. Features...........................................................................................................................
3. Package Contents........................................................................................................
4. Specifications................................................................................................................
5. Operation Controls and Functions..............................................................................
5.1. Matrix Panel..........................................................................................................
5.2. CAT Receiver Panel...............................................................................................
6. IR Remote.....................................................................................................................
7. IR Cable Pin Assignment..............................................................................................
8. EDID Management........................................................................................................
9. Web GUI User Guide....................................................................................................
10. RS-232 Control Command...........................................................................................
11. Application Example...................................................................................................
1
1
2
2
4
4
5
6
6
7
9
16
21

1. Introduction
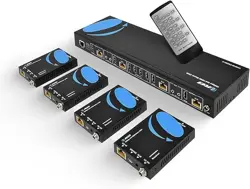
The 18Gbps 4x4 HDMI Matrix can connect four HDMI sources to eight displays. It features
four HDMI outputs and each HDMI output is mirrored to provide a CAT-Cable output which
runs simultaneously. It supports the transmission of video (resolution is up to 1080p Full HD
and 4Kx2K@60Hz 4:4:4) and supports HD digital audio formats such as LPCM 7.1CH, Dolby
TrueHD, Dolby Digital Plus and DTS-HD Master Audio. Connect a CAT Receiver to each of
the CAT-Cable outputs to extend the HDMI signal up to 230ft/70m for multi-room connectivity.
Each HDMI output supports 4K2K to 1080P downscaler independently. The product supports
control via front panel buttons, IR remote, RS-232, LAN, and Web GUI.
☆ HDMI 2.0b and HDCP 2.2/1.x compliant
☆ Video resolution up to 4K2K@60Hz (YUV 4:4:4) on all HDMI & CAT ports
☆ 4 HDMI inputs, 4 HDMI & CAT mirrored outputs
☆ HDMI ports support 18Gbps lossless uncompressed video bandwidth
☆ Support 4K->1080P Down Scaler for each output port
☆ HDR, HDR10, HDR10+, Dolby Vision, HLG are supported
☆ CAT output can extend the transmission distance up to 230ft/70m via a single CAT6 cable
☆ HDMI audio pass-through up to 7.1CH HD audio (LPCM, Dolby TrueHD and DTS-HD
Master Audio)
☆ Advanced EDID management and CEC control are supported
☆ 12V POC on all CAT ports
☆ Control via front panel buttons, IR remote, RS-232, LAN and Web GUI
2. Features
- 1 / 21 -

3. Package Contents
① 1 x 18Gbps 4x4 HDMI Matrix
② 4 x CAT Receiver
③ 1 x Matrix IR Remote
④ 1 x 12V2.5A Power Supply
⑤ 1 x RS-232 serial Cable (1.5 meters, male to female head)
⑥ 1 x 3-pin Phoenix Connector
⑦ 4 x IR Blaster Cable (1.5 meters)
⑧ 4 x IR Receiver Cable (1.5 meters)
⑨ 10 x Mounting Ear (Matrix and Receiver)
⑩ 1x User Manual
4. Specifications
Technical
HDCP Compliance HDCP 2.2/1.x
Video Bandwidth 18Gbps
Video Resolution Up to 4K2K@50/60Hz (4:4:4)
Color Space RGB 4:4:4, YCbCr 4:4:4/4:2:2/4:2:0
Color Depth
8-bit, 10-bit, 12-bit (1080p@60Hz)
8-bit (4K2K@60Hz YUV4:4:4)
8-bit,10-bit,12-bit (4K2K@60Hz YCbCr 4:2:2/4:2:0)
HDMI Audio Formats
LPCM 2.0/2.1/5.1/6.1/7.1, Dolby Digital, Dolby TrueHD,
Dolby Digital Plus (DD+), DTS-ES, DTS HD Master,
DTS HD-HRA, DTS-X
ESD Protection
Human-body Model:
±8kV (Air-gap discharge) , ±4kV (Contact discharge)
- 2 / 21 -
HDMI Compliance HDMI 2.0b
HDR HDR10, HDR10+, Dolby Vision, HLG
Transmission Distance 230ft / 70m (via a single CAT6 cable)

CAT Receiver
Mechanical
Housing Metal Enclosure
Color
Black
Dimensions
Matrix: 320mm (W) × 100mm (D) × 36mm (H)
Receiver: 61mm (W) x 88mm (D) x 18mm (H)
Weight Matrix: 915g, Receiver: 155g
Power Supply
Input: AC 90 - 260V 50/60Hz
Output: DC 12V/2.5A
(US/EU standards, CE/FCC/UL certified)
Power Consumption 19.68W (Max)
0°C ~ 40°C / 32°F ~ 104°F
-20°C ~ 60°C / -4°F ~ 140°F
Operating Temperature
Storage Temperature
Relative Humidity 20~90% RH (non-condensing)
Connection
Matrix
4K60 -
Feet / Meters
4K30 -
Feet / Meters
HDMI IN / OUT 32ft / 10M16ft / 5M
The use of “Premium High Speed HDMI” cable is highly recommended.
1080P60 -
Feet / Meters
50ft / 15M
Resolution / Cable length
- 3 / 21 -
Inputs: 1x IR IN [3.5mm Stereo Mini-jack]
1x CAT port [RJ45]
Output: 1x HDMI Type A [19-pin female]
Control: 1x SERVICE [Micro USB, Update port]
Inputs: 4 x HDMI Type A [19-pin female]
Outputs: 4 x HDMI Type A [19-pin female]
4 x CAT port [RJ45]
4 x IR OUT [3.5mm Stereo Mini-jack]
Controls: 1 x TCP/IP [RJ45]
1 x RS-232 [3-pin phoenix connector]
5. Operation Controls and Functions
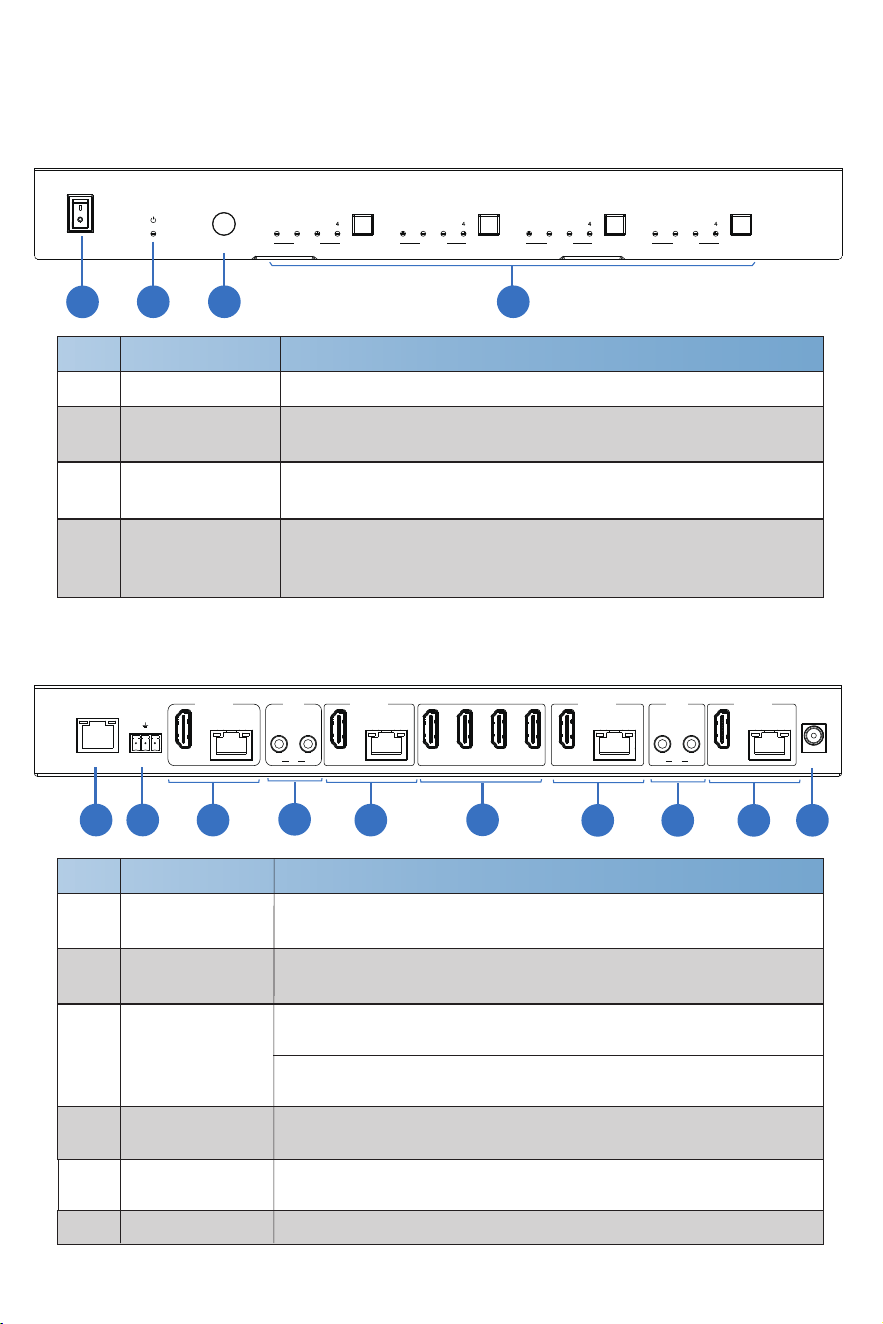
5.1 Matrix Panel
Front Panel
Rear Panel
HDMI IN 1-4
ports
HDMI signal input ports, connect to HDMI source device such
as DVD or PS4 with HDMI cable.
OUTPUT 1-4
ports
CAT mirrored output ports, connect to CAT Receivers with CAT
cable.
HDMI output ports, connect to HDMI display devices such as
TV or monitor with HDMI cable.
5
- 4 / 21 -
5
4
NO. Name Function Description
1 Power switch
2
Press the switch to power on/off the Matrix.
3
Press the OUT 1/2/3/4 button to circularly select HDMI source
signal for the corresponding output port, then the
corresponding source LED will be on.
4
Power LED
The LED will illuminate in green when the Matrix is working
normally, and red when the Matrix is on standby.
IR Window
IR receiver window, it only receives the IR remote signal
from this Matrix.
IR
1 2 3
1 2 3 1 2 3 1 2 3
ON
OFF
OUT 1 OUT 2 OUT 3 OUT 4
TCP/IP HDMI
RJ45
OUTPUT 1
HDMI
RJ45
1 2
OUTPUT 2
HDMI
RJ45
OUTPUT 3
HDMI
RJ45
OUTPUT 4
1 2 3 4
OUT
IR 4
OUT
IR DC 12V3
RXTX
RS-232
HDMI IN
1
2 3
4
OUT 1-4 buttons
&
Source LED 1~4
1 2
6
3 3
3 3
4
4
4
No. Name Function Description
1 TCP/IP port
2
The link port for TCP/IP control. Connect to an active Ethernet
link with an RJ45 cable.
3
4
RS-232 port
RS-232 command control port. Connect to a PC or control
system with a D-Sub 9-pin cable to control the Matrix.
Connect to IR blaster cable, the IR signal is from the “IR IN”
port of the CAT Receiver.
IR OUT 1-4
ports
DC 12V power supply port.
DC 12V
6
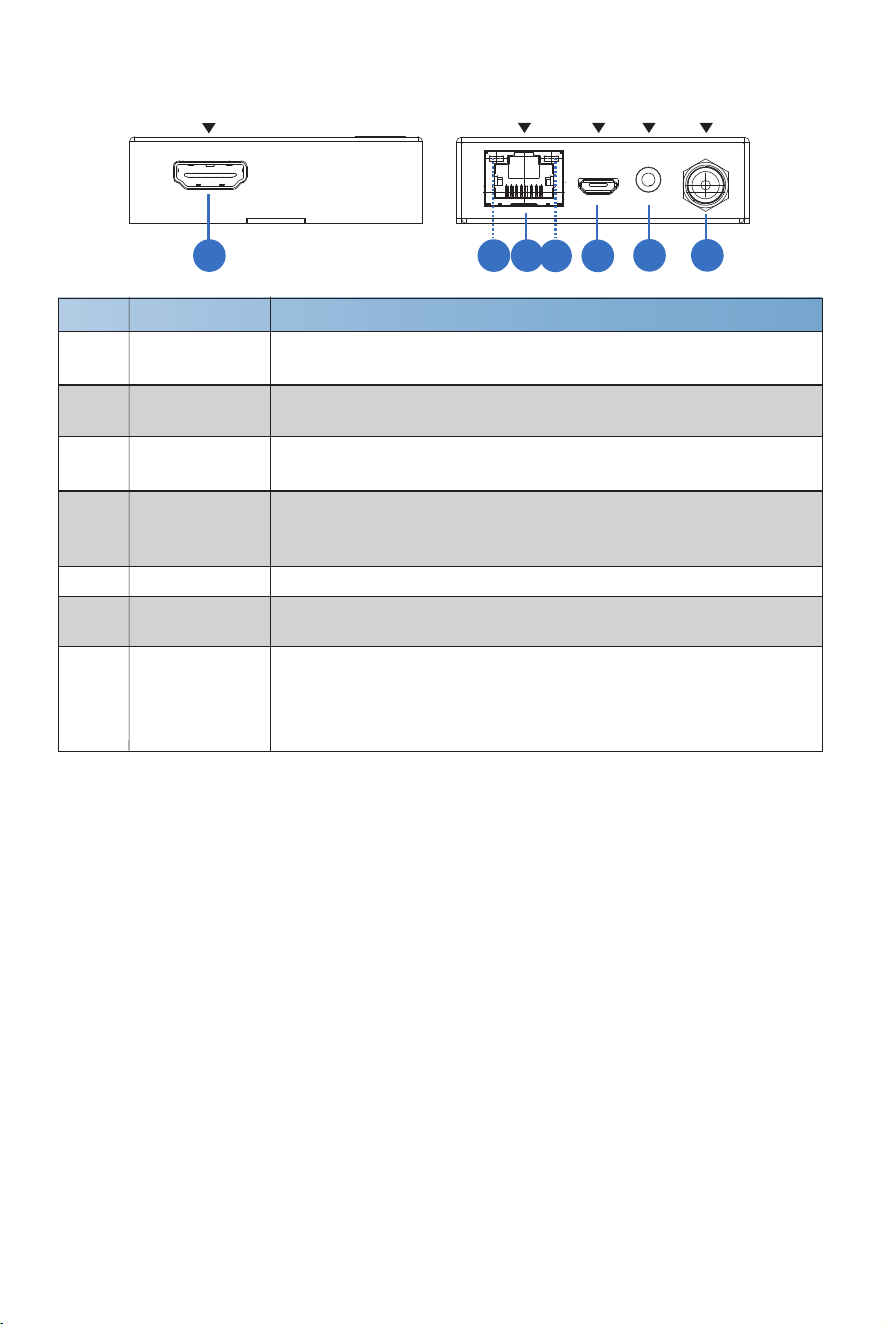
5.2 CAT Receiver Panel
- 5 / 21 -
HDMI OUT
DC 12VIR INSERVICECAT IN
CAT IN
Connect to the CAT OUTPUT port on the Matrix with a CAT
cable.
HDMI OUT
HDMI output port, connect to HDMI display device such as
TV or Projector with an HDMI cable.
No. Name Function Description
1
2
3
Data signal
Indicator Lamp
(Orange)
When there is signal transmission between the Matrix and the
receiver, the lamp will be on.
Power Indicator
Lamp (Green)
When the receiver is powered on, the power indicator lamp
will be on.
4
SERVICE port Used for firmware update.
IR IN
Connect to the IR Receiver cable. The IR signal will send to
the IR OUT port of the Matrix.
5
6
7 DC 12V
Plug DC 12V/1A power supply into the unit and connect the
adapter to an AC outlet.
(Note: The CAT receiver also can be powered by the Matrix
via a CAT cable. )
1 3 2
4 5
6 7
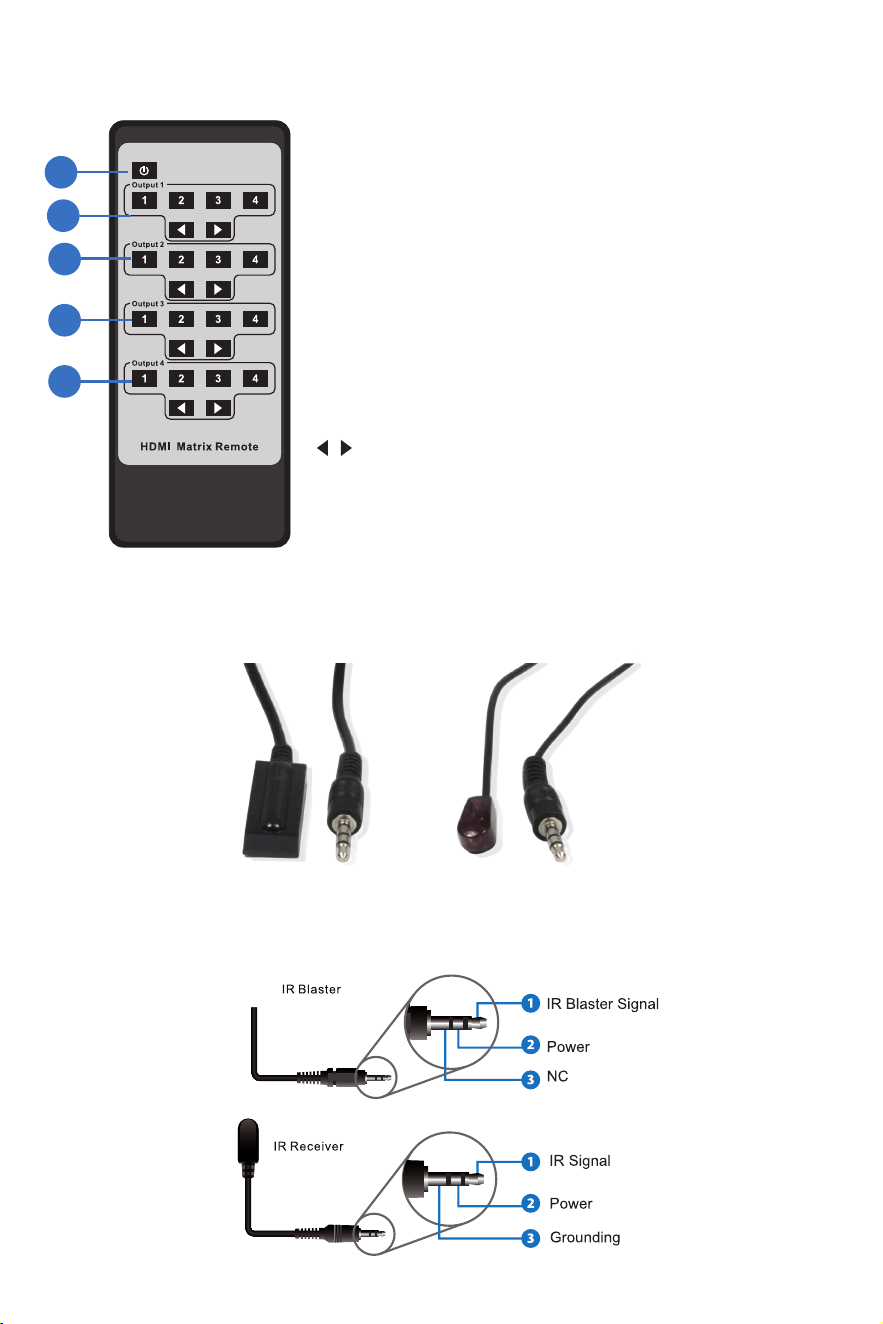
7. IR Cable Pin Assignment
IR RECEIVER IR BLASTER
- 6 / 21 -
6. IR Remote
1
2
3
4
5
① Power on or Standby: Power on the Matrix or set
it to standby mode.
② Output 1: Press 1\2\3\4 button to select input source to
HDMI OUTPUT 1.
③ Output 2: Press 1\2\3\4 button to select input source to
HDMI OUTPUT 2.
④ Output 3: Press 1\2\3\4 button to select input source to
HDMI OUTPUT 3.
⑤ Output 4: Press 1\2\3\4 button to select input source to
HDMI OUTPUT 4.
: Select the last or next input source button.
- 7 / 21 -
8. EDID Management
This Matrix has 21 factory defined EDID settings, 2 user-defined EDID modes and 8 copy EDID
modes. You can select defined EDID mode or copy EDID mode to input port through RS-232
control or Web GUI.
RS-232 control operation: Connect the Matrix to PC with a serial cable, then open a Serial
Command tool on PC to send ASCII command “s edid in x from z!” to set EDID. For details,
please refer to “EDID Setting” in the ASCII command list of “10. RS-232 Control Command”.
Web GUI Operation: Please check the EDID management in the “Input page” of “9. Web
GUI User Guide”.

- 8 / 21 -
The defined EDID setting list of the product is shown as below:
EDID Mode EDID Description
1 1080P, Stereo Audio 2.0
2
3
4
5
6
7
1080P, Dolby/DTS 5.1
1080P, HD Audio 7.1
1080I, Stereo Audio 2.0
1080I, HD Audio 7.1
1080I, Dolby/DTS 5.1
8
9
3D, Stereo Audio 2.0
3D, Dolby/DTS 5.1
3D, HD Audio 7.1
10
11
12
13
14
15
16
17
18
4K2K30_444, Stereo Audio 2.0
4K2K30_444, Dolby/DTS 5.1
4K2K30_444, HD Audio 7.1
4K2K60_420, Stereo Audio 2.0
4K2K60_420, Dolby/DTS 5.1
4K2K60_420, HD Audio 7.1
4K2K60_444, Stereo Audio 2.0
4K2K60_444, Dolby/DTS 5.1
4K2K60_444, HD Audio 7.1
20
21
22
23
User Define1
User Define2
19 4K2K60, Stereo Audio 2.0 HDR
4K2K60, Dolby/DTS 5.1 HDR
4K2K60, HD Audio 7.1HDR
COPY_FROM_HDMI 1
COPY_FROM_HDMI 2
24
25
26
27
28
29
COPY_FROM_CAT 1
COPY_FROM_CAT 2
COPY_FROM_HDMI 3
COPY_FROM_HDMI 4
COPY_FROM_CAT 3
COPY_FROM_CAT 4
30
31
- 9/ 21 -
9. Web GUI User Guide
The Matrix can be controlled by Web GUI. The operation method is shown as below:
Step 1: Get the current IP Address.
The default IP address is 192.168.1.100. You can get the current Matrix IP address via RS-232
control. Send the ASCII command “ r ipconfig!” through a Serial Command tool, then you’ll get
the feedback information as shown below:
LAN
PC
IP:192.168.2.209 in the above figure is the current Matrix IP address (this IP address is
variable, depending on what the specific machine returns).
For the details of RS-232 control, please refer to “10. RS-232 Control Command”.
Step 3: Input the current IP address of Matrix into your browser on the PC to enter Web GUI page.
LAN
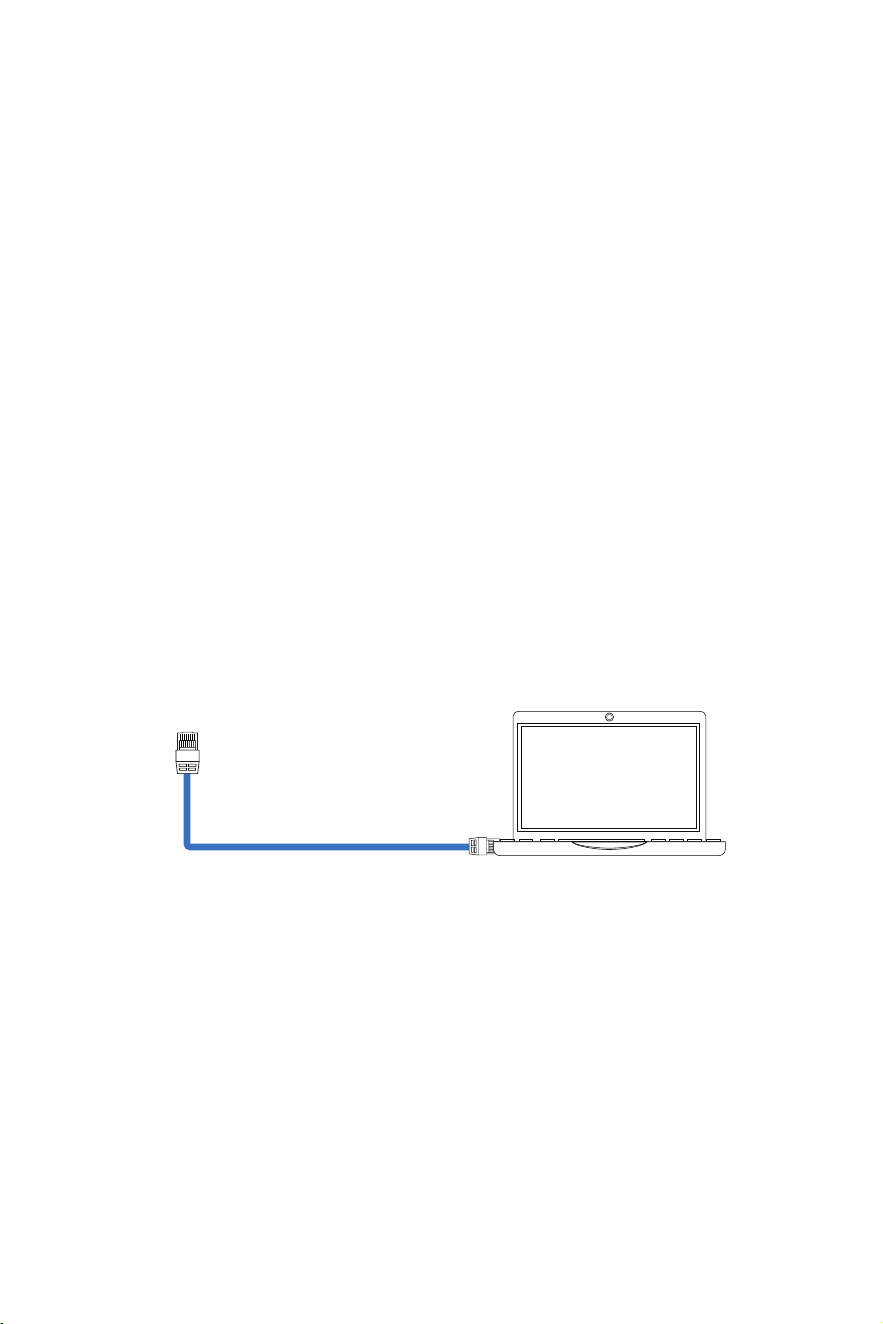
Step 2: Connect the TCP/IP port of the Matrix to a PC with an UTP cable (as shown in the
following figure), and set the IP address of the PC to be in the same network segment with
the Matrix.
- 10 / 21 -
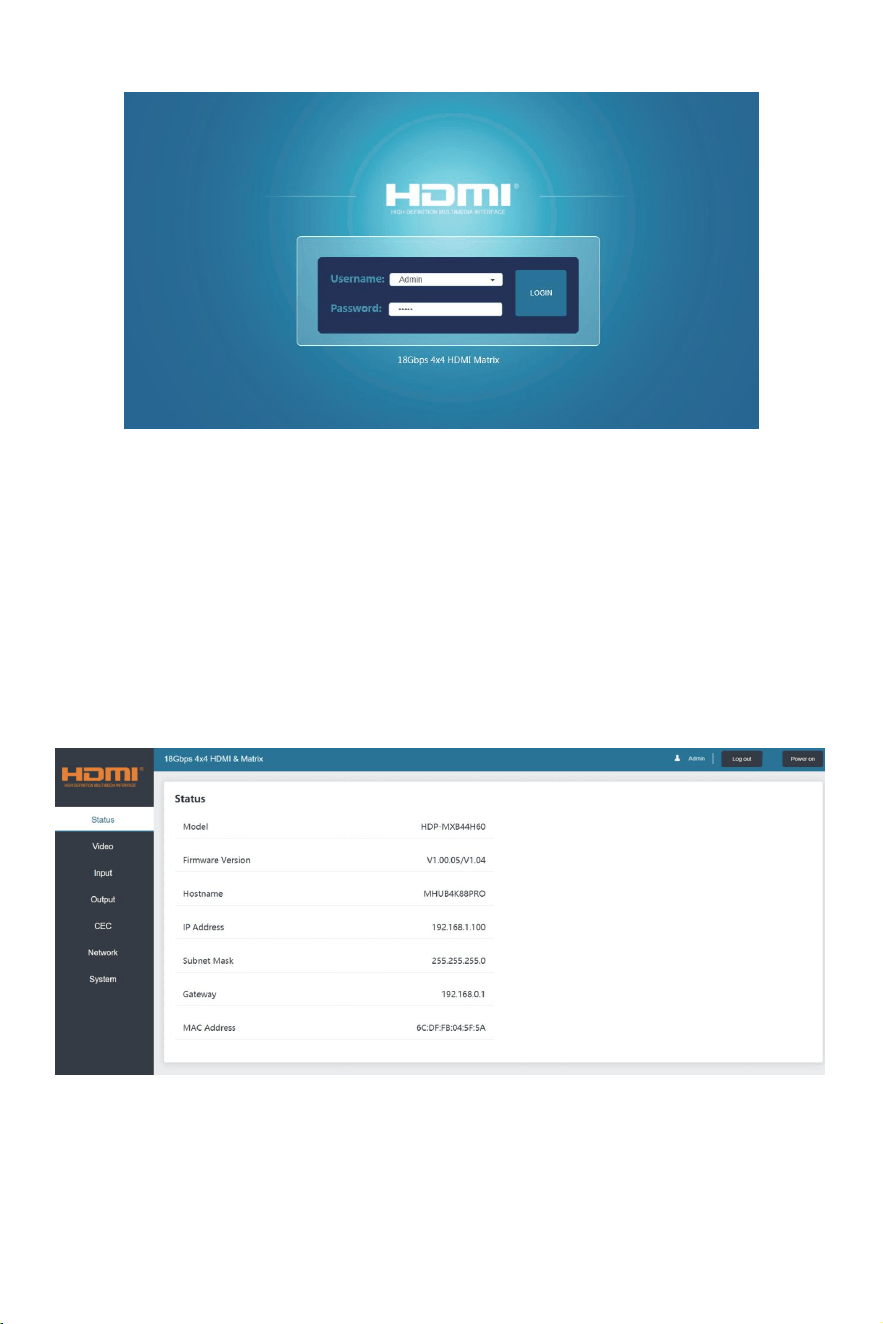
After entering the Web GUI page, there will be a Login page, as shown below:
Select the Username from the list and enter the password. The default passwords are:
Username User Admin
Password user admin
After entering the password, click the “LOGIN” button and the following Status page will
appear.
■ Status Page
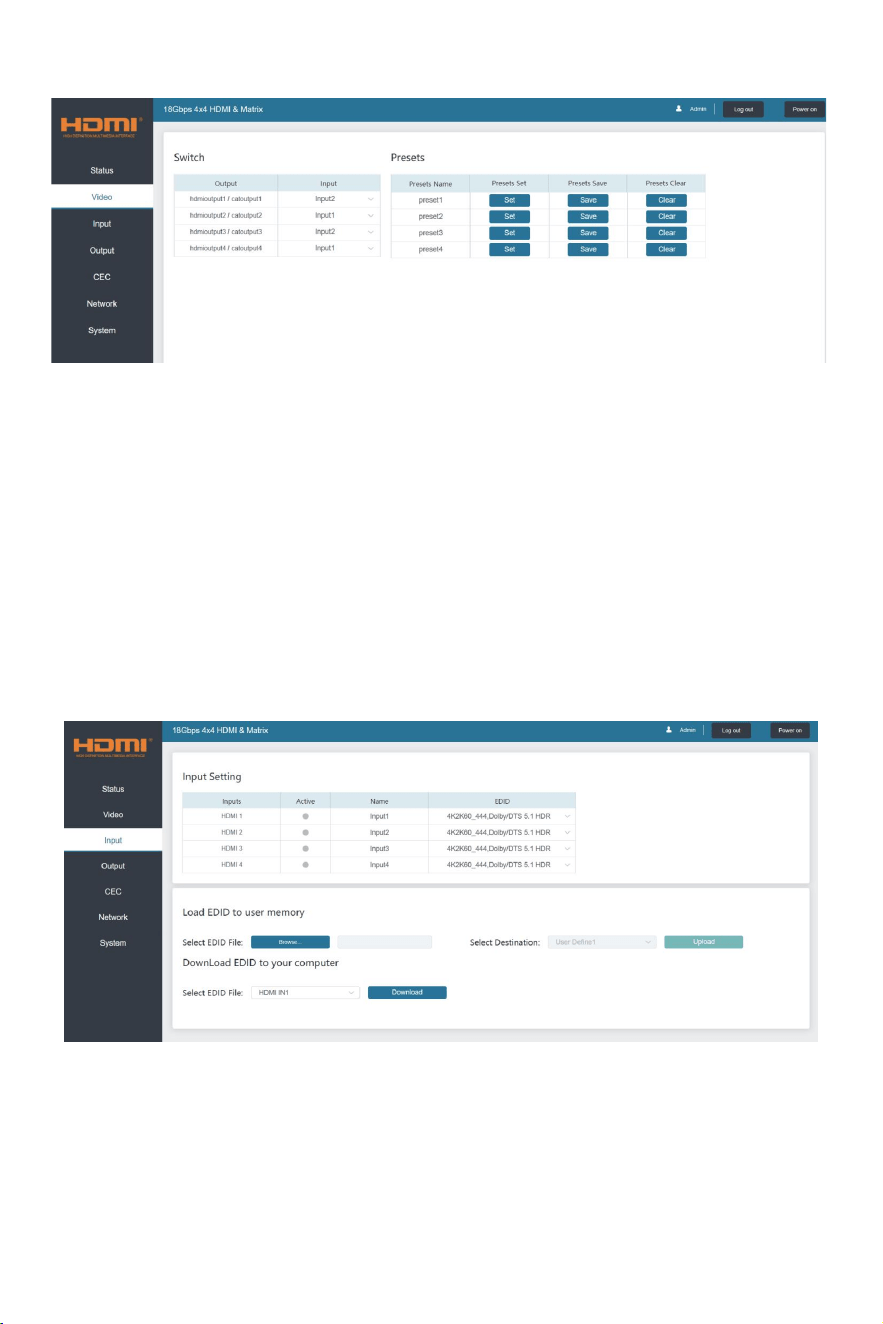
The Status page provides basic information about the product model, installed firmware
version and the network settings of the device.
■ Video Page
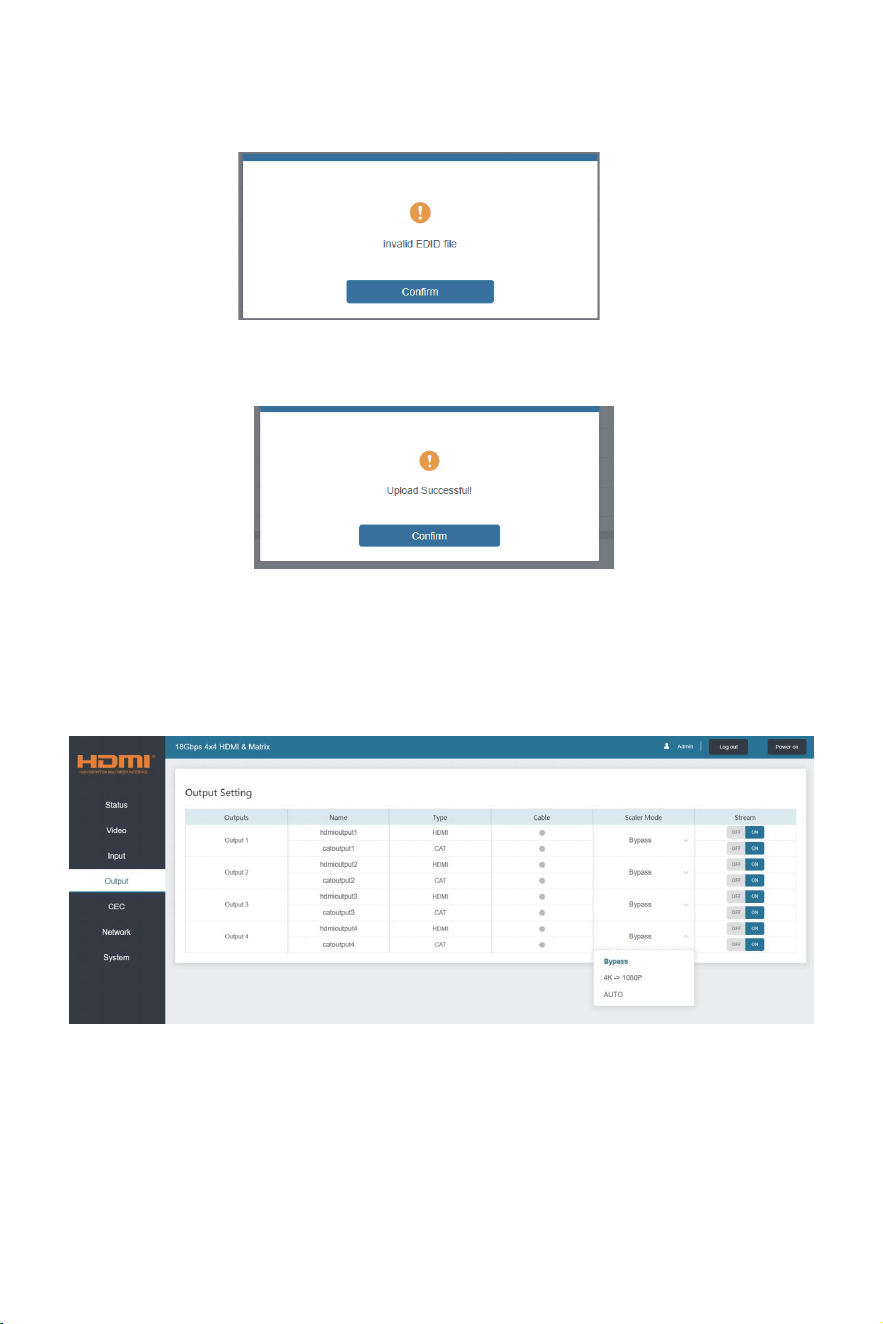
You can do the following operations on the Video page:
① Output: The current device’s OUTPUT port. You can select signal source for it.
② Input: You can click the drop-down menu to select signal source for the corresponding
OUTPUT port .
③ Presets Name: You can name the current scene with maximum length of 12 characters
(Chinese name is unsupported).
④ Presets Set: You can restore the settings of the last saved audio-video matrix switching
relationship.
⑤ Presets Save: You can save audio-video matrix switching relationship.
⑥ Presets Clear: You can clear the saved audio-video matrix switching relationship.
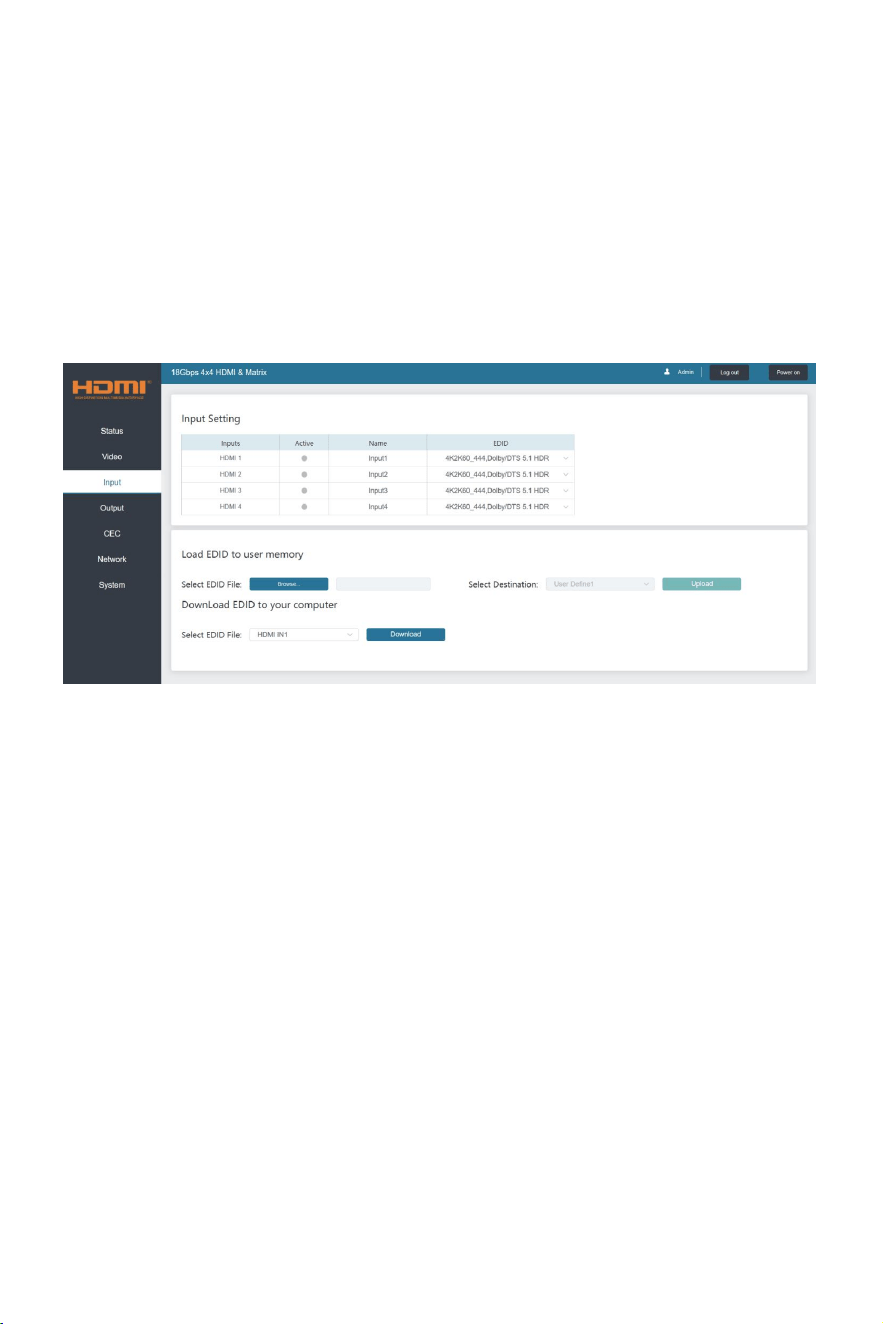
■ Input Page
You can do the following operations on the Input page:
① Inputs: Input channel of the device.
② Active: It indicates whether the channel is connected to a signal source.
③ Name: The input channel’s name. You can modify it by entering the corresponding name
(max length: 12 characters) in the input box (Chinese name is unsupported).
④ EDID: You can set the current channel’s EDID. The specific operation is as follows:
- 11 / 21 -
Set EDID for the User
Click the “Browse” button, then select the bin file. If you select the wrong EDID file, there will
be a prompt, as shown in the following figure:
Make sure to select the correct file, then you can check the name of the selected file. Select
“User 1” or “User 2”, then click “Upload”. After successful setting, it will prompt as follows:
Download the EDID File for the Corresponding Input Channel
Click the drop-down box of “Select EDID File” to select the corresponding input channel. Then
click “Download” to download the corresponding EDID file.
■ Output Page
You can do the following operations on the Output page:
① Outputs: Output channel of the device.
② Name: The current output channel’s name. You can modify it by entering the corresponding
name (max length: 12 characters) in the input box (Chinese name is unsupported).
③ Type: The current output channel’s type (HDMI or CAT).
④ Cable: It indicates the connection status of output ports. When the output port is connected
to the display, it shows green, otherwise, it shows gray.
⑤ Scaler Mode: Set the current output resolution mode.
⑥ Stream: Turn on/off the output stream.
- 12 / 21 -
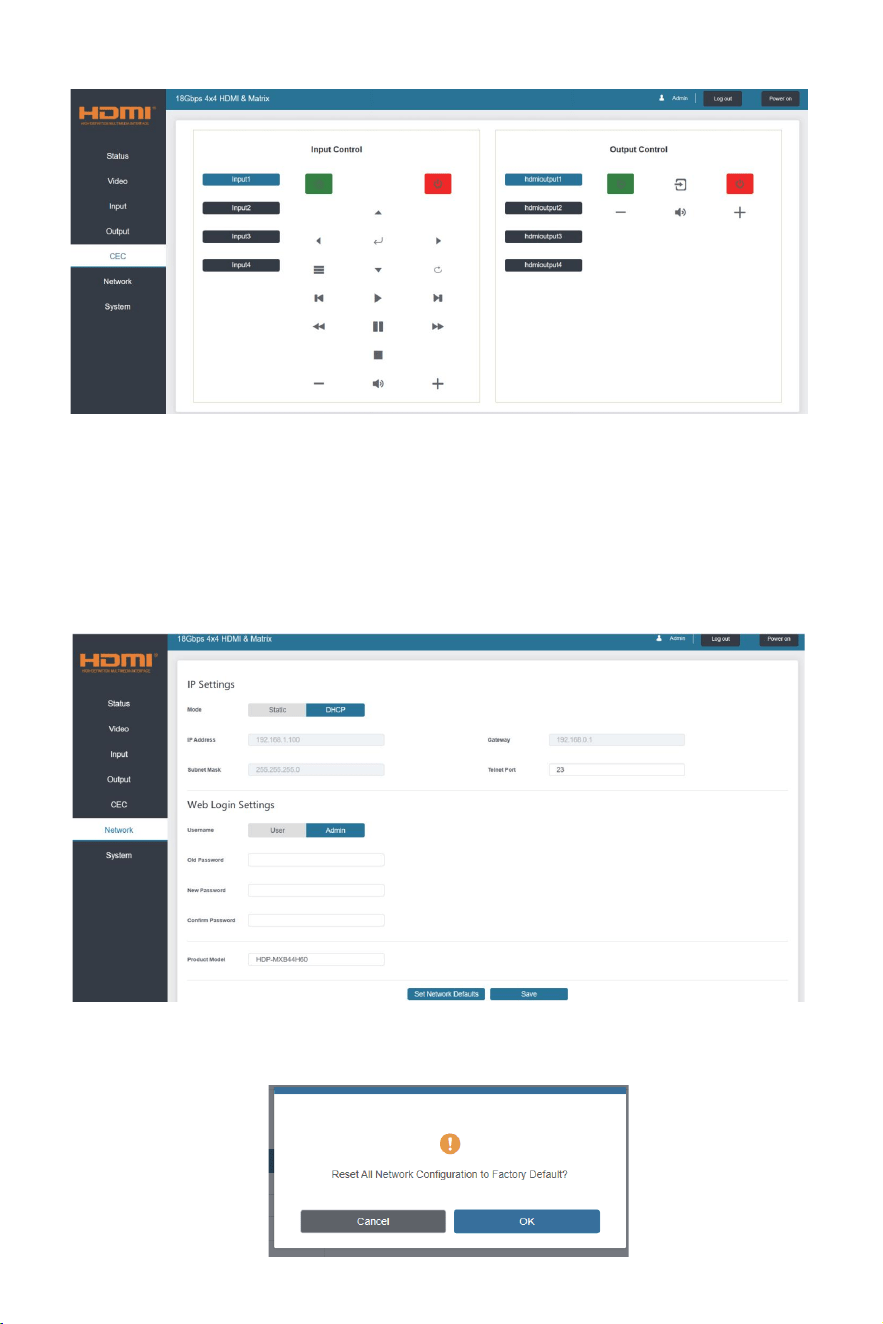
■ Network Page
Set the Default Network
Click “Set Network Defaults” button, there will be a prompt, as shown in the following figure:
- 13 / 21 -
■ CEC Page
You can perform CEC management on this page:
① Input Control: You can control the operation of each input source by pressing the icons
on the page. (You can control multiple inputs simultaneously.)
② Output Control: You can control the operation of each display, such as power on/off,
volume +/-, active source switching. (You can control multiple outputs simultaneously.)
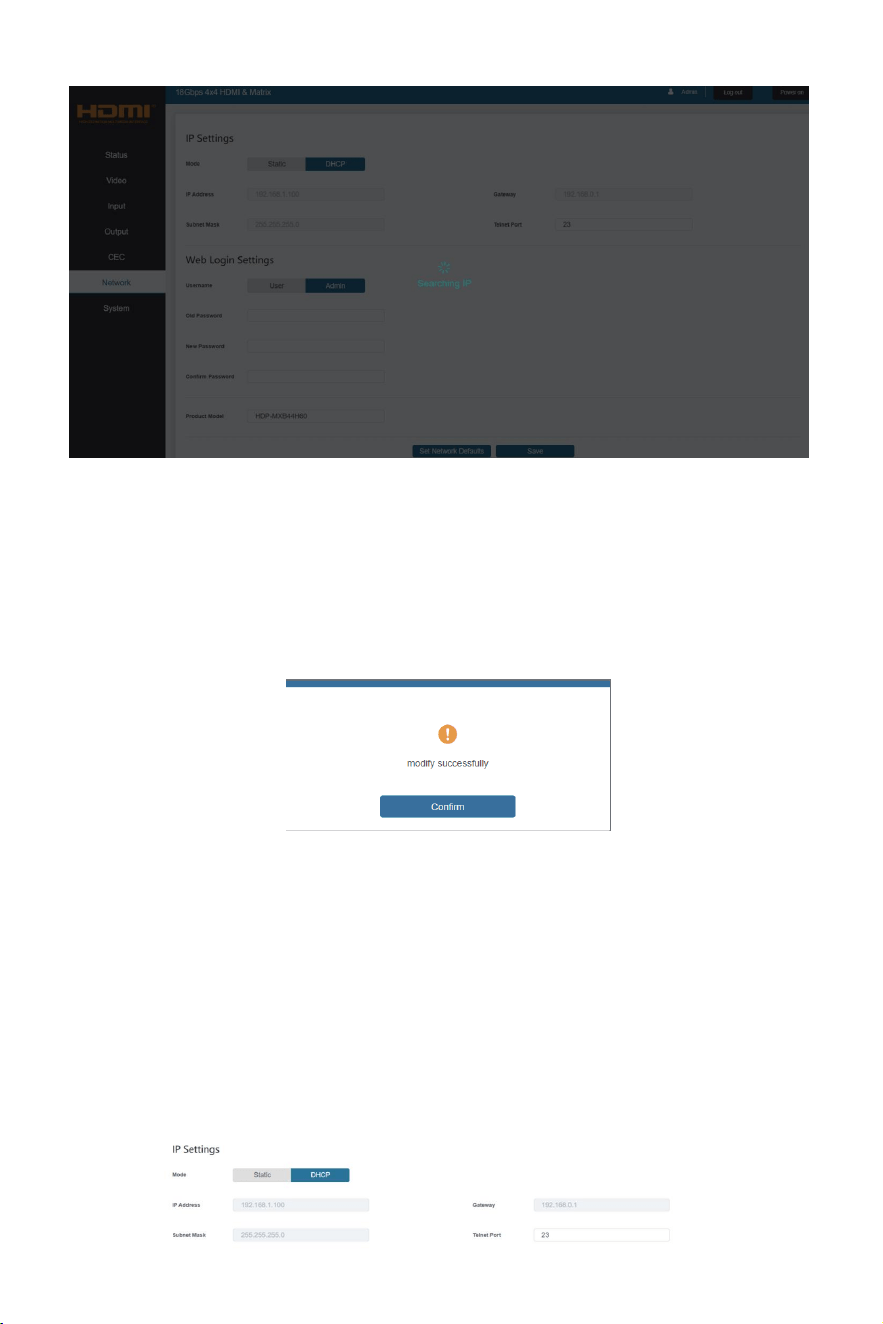
Click “OK” to search the IP Address again, as shown in the figure below.
Modify User Password
Click the “User” button, enter the correct Old Password, New Password, and Confirm
Password, then click “Save”. After successful modification, there will be a prompt, as shown
in the following figure:
Note: Input rules for changing passwords:
(1) The password can’t be empty.
(2) New Password can’t be the same as Old Password.
(3) New Password and Confirm Password must be the same.
Modify Network Setting
Modify the Mode/IP Address/Gateway/Subnet Mask/Telnet Port as required, click “Save”
to save the settings, then it will come into effect.
After modification, if the Mode is “Static”, it will switch to the corresponding IP Address;
if the Mode is “DHCP”, it will automatically search and switch to the IP Address assigned
by the router.
- 14 / 21 -
After searching is completed, it will switch to the login page, the default network setting is
completed.

■ System Page
① Panel Lock: Click to lock/unlock panel buttons. “On” indicates that panel buttons are
unavailable; “Off” indicates panel buttons are available.
② Beep: Click to turn on/off the beep.
③ Serial Baud Rate: Click the value to set the Serial Baud Rate.
④ Firmware Update: Click “Browse” to select the update file, then click “Update” to complete
firmware update.
⑤ Factory Reset: You can reset the machine to factory defaults by clicking “Reset”.
⑥ Reboot: You can reboot the machine by clicking “Reboot”.
Note: After reset/reboot, it will switch to the login page.
- 15 / 21 -
- 16 / 21 -
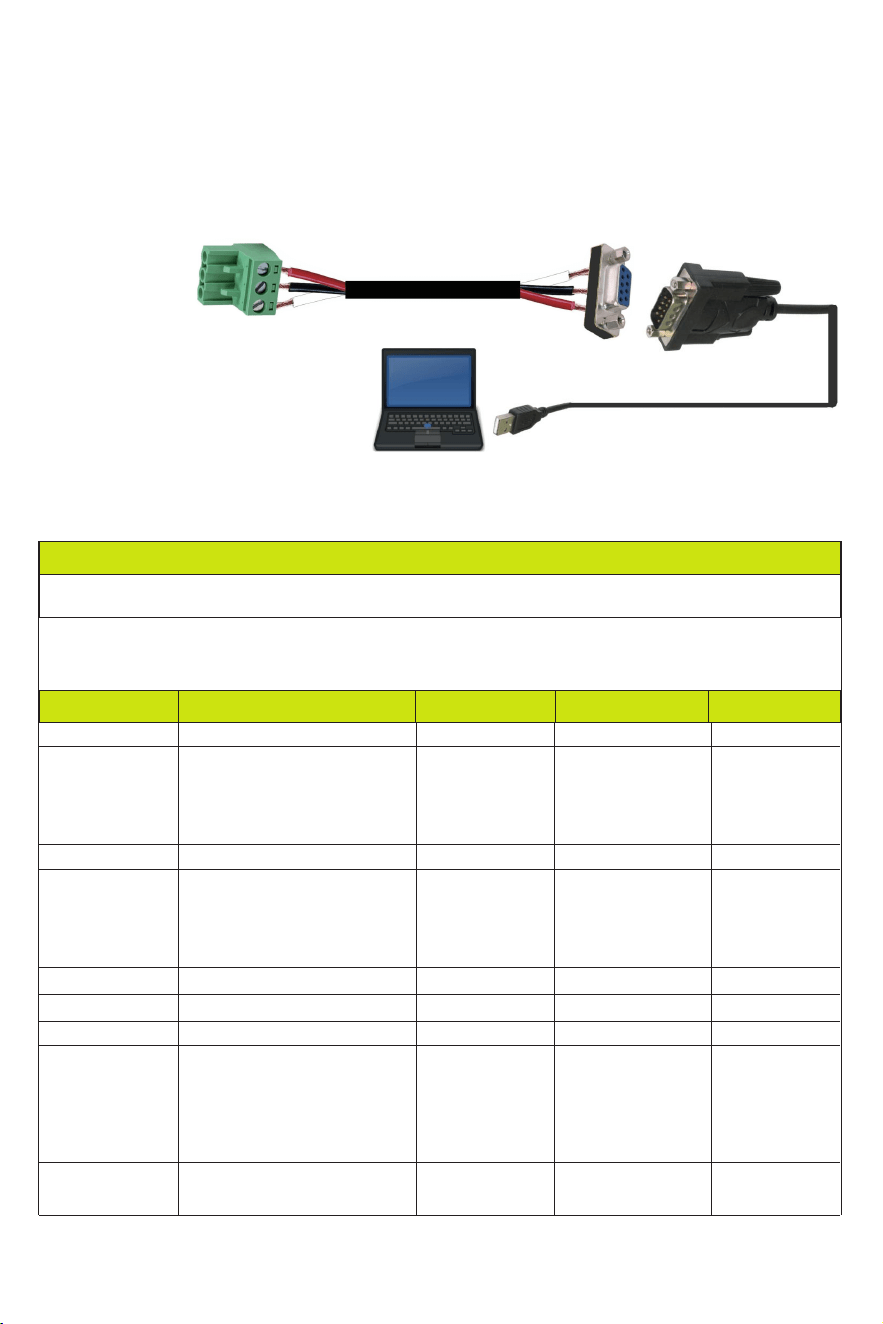
The product also supports RS-232 control. You need a serial cable with RS-232 phoenix
connector and RS-232 male head. The RS-232 phoenix connector is connected to the Matrix,
and the RS-232 male head of the serial cable is connected to the RS-232 female head of an
RS-232 to USB cable, while the USB head of the RS-232 to USB cable is connected to a PC.
The connection method is as follows:
Then, open a Serial Command tool on PC to send ASCII command to control the Matrix.
10. RS-232 Control Command
The ASCII command list about the product is shown as below.
ASCII Command
Serial port protocol. Baud rate: 115200, Data bits: 8bit, Stop bits:1, Check bit: 0
x - Parameter 1
y - Parameter 2
! - Delimiter
Command Code
Function Description Feedback
Default Setting
Power
s power z!
Power on/off the device,z=0~1
(z=0 power off, z=1 power on)
Power on
System Initializing...
Initialization Finished!
FW version x.xx.xx
r power! Get current power state power on/power off
s reboot! Reboot the device
Reboot...
System Initializing...
Initialization Finished!
FW version x.xx.xx
help! List all commands
r type! Get device model
HDP-MXB44D70
r status! Get device current status
Get the unit all status:
power, beep, lock, in/
out connection, video/
audio crosspoint,
edid, scaler,hdcp,
network status
power on
System Setup
Example
s power 1!
r power!
s reboot!
help!
r type!
r status!
r fw version! Get Firmware version
MCU BOOT:Vx.xx.xx
MCU APP :Vx.xx.xx
WEB GUI :Vx.xx
r fw version!
RS-232 to USB cable
TX
Ground
RX
3-pin Phoenix Connector
RS-232
PC

- 17 / 21 -
r link in x!
Get the connection status of the
x input port,x=0~4(0=all)
r link out y!
Get the connection status of the
y output port,y=0~4(0=all)
hdmi output 1: connect
hdmi input 1: connect
s reset! Reset to factory defaults
Reset to factory defaults
System Initializing...
Initialization Finished!
FW version x.xx.xx
s beep z!
Enable/Disable buzzer function,
z=0~1(z=0 beep off, z=1 beep on)
beep on
beep off
r beep!
Get buzzer state
beep on / beep off
s lock z!
Lock/Unlock front panel button,
z=0~1 (z=0 lock off,z=1 lock on)
r lock!
Get panel button lock state panel button lock on/off
s save preset z!
Save switch state between all
output port and the input port to
preset z, z=1~4
save to preset 1
s recall preset z!
Call saved preset z scenarios,
z=1~4
recall from preset 1
s clear preset z!
Clear stored preset z scenarios,
z=1~4
clear preset 1
r preset z!
Get preset z information, z=1~4
video/audio crosspoint
Output Setting
s in x av out y!
Set input x to output y,
x=1~4,y=0~4(0=all)
input 1 -> output 2
r av out y!
Get output y signal status
y=0~4(0=all)
input 1 -> output 1
input 2 -> output 2
input 3 -> output 3
input 4 -> output 4
s hdmi y stream z!
Set hdmi output y stream on/off,
y=0~4(0=all)
z=0~1(0:disable,1:enable)
enable hdmi output 1
stream
disable hdmi output 1
stream
enable hdmi all outputs
stream
disable hdmi all outputs
stream
r hdmi y stream!
Get hdmi output y stream status,
y=0~4(0=all)
enable hdmi output 1
stream
Command Code
Function Description Feedback
Default Setting
beep on
panel button lock on
panel button lock off
panel button
lock off
ptp
enable
s cat y stream z!
Set cat output y stream on/off,
y=0~4(0=all)
z=0~1(0:disable,1:enable)
enable cat output 1
stream
disable cat output 1
stream
enable cat all outputs
stream
disable cat all outputs
stream
enable
Example
r link in 1!
r link out 1!
s reset!
s beep 1!
r beep!
s lock 1!
r lock!
s save preset 1!
s recall preset 1!
s clear preset 1!
r preset 1!
s in 1 av out 2!
r av out 0!
s hdmi 1 stream 1!
s hdmi 0 stream 1!
r hdmi 1 stream!
s cat 1 stream 1!
s cat 0 stream 1!
s baud rate xxx!
Set the serial port baud rate of
RS02 module, z=(115200,57600,
38400,19200,9600,4800)
Baudrate:115200
r baud rate!
Get the serial port baud rate of
RS02 module
Baudrate:115200
s id z!
Set the control ID of the product,
z=000~999
id 888
s baud rate
115200!
r baud rate!
s id 888!
0

- 18 / 21 -
Command Code
Function Description Feedback
Default Setting
r cat y stream!
Get cat output y stream status,
y=0~4(0=all)
enable cat output 1
stream
s hdmi y scaler z!
Set hdmi output y port output
scaler mode,y=0~4(0=all),
z=1~3(1=bypass,2=4k->1080p,
3=Auto)
r hdmi y scaler!
Get hdmi output y port output
mode y=0~4(0=all)
hdmi output 1 set to
bypass mode
hdmi all outputs set to
bypass mode
hdmi output 1 set to
bypass mode
hdmi all outputs
set to bypass
mode
EDID Setting
s edid in x from z!
Set input x EDID from default
EDID z,
x=0~4(0=all),z=1~31
1, 1080p,Stereo Audio 2.0
2, 1080p,Dolby/DTS 5.1
3, 1080p,HD Audio 7.1
4, 1080i,Stereo Audio 2.0
5, 1080i,Dolby/DTS 5.1
6, 1080i,HD Audio 7.1
7, 3D,Stereo Audio 2.0
8, 3D,Dolby/DTS 5.1
9, 3D,HD Audio 7.1
10, 4K2K30_444,Stereo Audio 2.0
11, 4K2K30_444,Dolby/DTS 5.1
12, 4K2K30_444,HD Audio 7.1
13, 4K2K60_420,Stereo Audio 2.0
14, 4K2K60_420,Dolby/DTS 5.1
15, 4K2K60_420,HD Audio 7.1
16, 4K2K60_444,Stereo Audio 2.0
17, 4K2K60_444,Dolby/DTS 5.1
18, 4K2K60_444,HD Audio 7.1
19, 4K2K60_444,Stereo Audio 2.0
HDR
20, 4K2K60_444,Dolby/DTS 5.1
HDR
21, 4K2K60_444,HD Audio 7.1
HDR
22, User define1
23, User define2
24, copy from hdmi output 1
25, copy from hdmi output 2
26, copy from hdmi output 3
27, copy from hdmi output 4
28, copy from cat output 1
29, copy from cat output 2
30, copy from cat output 3
31, copy from cat output 4
input 1 EDID:1080p,
Stereo Audio 2.0
all inputs EDID:1080p,
Stereo Audio 2.0
1080p,
Stereo Audio 2.0
Example
r cat 1 stream!
s hdmi 1 scaler 1!
s hdmi 0 scaler 1!
r hdmi 1 scaler!
s edid in 1 from 1!
s edid in 0 from 1!
r edid in x!
Get EDID status of the input x,
x=0~4(0=all input)
input1 EDID: 4K2K60_
444,Stereo Audio 2.0
input2 EDID: 4K2K60_
444,Stereo Audio 2.0
input3 EDID: 4K2K60_
444,Stereo Audio 2.0
input4 EDID: 4K2K60_
444,Stereo Audio 2.0
r edid data hdmi y!
Get the EDID data of the hdmi
output y port,y=1~4
EDID: 00 FF FF FF FF
FF FF 00 ………
hdmi output 1:
disconnect
CEC Setting
s cec in x on!
set input x power on by CEC,
x=0~4(0=all input)
input 1 power on
r edid in 0!
r edid data hdmi 1!
s cec in 1 on!
s cec in x off!
set input x power off by CEC,
x=0~4(0=all input)
input 1 power off
s cec in 1 off!

- 19 / 21 -
Command Code
Function Description Feedback
Default Setting
Example
s cec in x menu!
set input x open menu by CEC,
x=0~4(0=all input)
input 1 open menu
s cec in 1 menu!
s cec in x pause!
set input x pause by CEC,
x=0~4(0=all input)
input 1 pause
operation
s cec in 1 pause!
s cec in x play!
set input x play by CEC,
x=0~4(0=all input)
input 1 play operation
s cec in 1 play!
Network Setting
r ipconfig! Get the Current IP Configuration
IP Mode: Static
IP: 192.168.1.72
Subnet Mask:
255.255.255.0
Gateway: 192.168.1.1
TCP/IP port=8000
Telnet port=10
Mac address:
00:1C:91:03:80:01
r ipconfig!
s cec in x stop!
set input x stop by CEC,
x=0~4(0=all input)
input 1 stop operation
s cec in x rew!
set input x rewind by CEC,
x=0~4(0=all input)
input 1 rewind
operation
s cec in x ff!
set input x fast forward by CEC,
x=0~4(0=all input)
input 1 fast forward
operation
s cec in x previous!
set input x previous by CEC,
x=0~4(0=all input)
input 1 previous
operation
s cec in x next!
set input x next by CEC,
x=0~4(0=all input)
input 1 next operation
s cec in 1 stop!
s cec in 1 rew!
s cec in 1 ff!
s cec in 1 previous!
s cec in 1 next!
s cec in x mute!
set input x volume mute by CEC,
x=0~4(0=all input)
input 1 volume mute
s cec in 1 mute!
s cec in x vol-!
set input x volume down by CEC,
x=0~4(0=all input)
input 1 volume down
s cec in 1 vol-!
s cec in x vol+!
set input x volume up by CEC,
x=0~4(0=all input)
input 1 volume up
s cec in 1 vol+!
s cec hdmi out y
on!
set hdmi output y power on by
CEC, y=0~4(0=all hdmi output)
hdmi output 1 power
on
s cec hdmi out 1
on!
s cec hdmi out y
off!
set hdmi output y power off by
CEC, y=0~4(0=all hdmi output)
hdmi output 1 power
off
s cec hdmi out 1
off!
s cec hdmi out y
mute!
set hdmi output y volume mute by
CEC, y=0~4(0=all hdmi output)
hdmi output 1 volume
mute
s cec hdmi out y
vol+!
set hdmi output y volume up by
CEC, y=0~4(0=all output)
hdmi output 1 volume
up
s cec hdmi out y
active!
set hdmi output y active source
by CEC, y=0~4(0=all output)
hdmi output 1 active
source
s cec hdmi out 1
mute!
s cec hdmi out 1
vol+!
s cec hdmi out 1
active!
s cec hdmi out y
vol-!
set hdmi output y volume down
by CEC, y=0~4(0=all output)
hdmi output 1 volume
down
s cec hdmi out 1
vol-!
s cec in x up!
s cec in x back!
s cec in x down!
s cec in x left!
s cec in x right!
s cec in x enter!
set input x back operation by
CEC, x=0~4(0=all input)
input 1 back operation
s cec in 1 back!
set input x menu up operation by
CEC, x=0~4(0=all input)
input 1 menu up
operation
s cec in 1 up!
set input x menu down operation
by CEC, x=0~4(0=all input)
input 1 menu down
operation
s cec in 1 down!
set input x menu left operation by
CEC, x=0~4(0=all input)
input 1 menu left
operation
s cec in 1 left!
set input x menu right operation
by CEC, x=0~4(0=all input)
input 1 menu right
operation
s cec in 1 right!
set input x menu enter operation
by CEC, x=0~4(0=all input)
input 1 menu enter
operation
s cec in 1 enter!

- 20 / 21 -
Command Code
Function Description Feedback
Default Setting
Example
r gateway! Get network gateway Gateway:192.168.1.1
s tcp/ip port x!
Set network TCP/IP port
(x=1~65535)
Set TCP/IP port:8000
s subnet
xxx.xxx.xxx.xxx!
Set network subnet mask
Set subnet Mask
address:255.255.255.0
(Please use "s net
reboot!" command or
repower device to
apply new config!)
DHCP on, Device can't
config subnet mask,
set DHCP off first.
r subnet!
Get network subnet mask
Subnet Mask:
255.255.255.0
s net reboot! Reboot network modules
Network reboot…
IP Mode: Static
IP: 192.168.1.72
Subnet Mask:
255.255.255.0
Gateway: 192.168.1.1
TCP/IP port=8000
Telnet port=10
Mac address:
00:1C:91:03:80:01
s gateway
xxx.xxx.xxx.xxx!
Set network gateway
Set gateway:
192.168.1.1
Please use "s net
reboot!" command or
repower device to
apply new config!
DHCP on, Device can't
config gateway, set
DHCP off first.
r tcp/ip port! Get network TCP/IP port TCP/IP port:8000
s telnet port x!
Set network telnet port
(x=1~65535)
Set Telnet port:23
r telnet port! Get network telnet port Telnet port:23
r ip addr! Get network IP address IP:192.168.1.100r ip addr!
r gateway!
s tcp/ip port 8000!
s subnet
255.255.255.0!
r subnet!
s net reboot!
s gateway
192.168.1.1!
r tcp/ip port!
s telnet port 23!
r telnet port!
r mac addr! Get network MAC address
Mac address:
00:1C:91:03:80:01
s ip mode z!
Set network IP mode to static IP
or DHCP,
z=0~1 (z=0 Static, z=1 DHCP )
Set IP mode:Static
(Please use "s net
reboot!" command or
repower device to
apply new config!)
r ip mode! Get network IP mode IP Mode: Static
s ip addr
xxx.xxx.xxx.xxx!
Set network IP address
Set IP address:
192.168.1.100 (Please
use "s net reboot!"
command or repower
device to apply new
config!)
DHCP on, Device can't
config static address,
set DHCP off first.
r mac addr!
s ip mode 0!
r ip mode!
s ip addr
192.168.1.100!
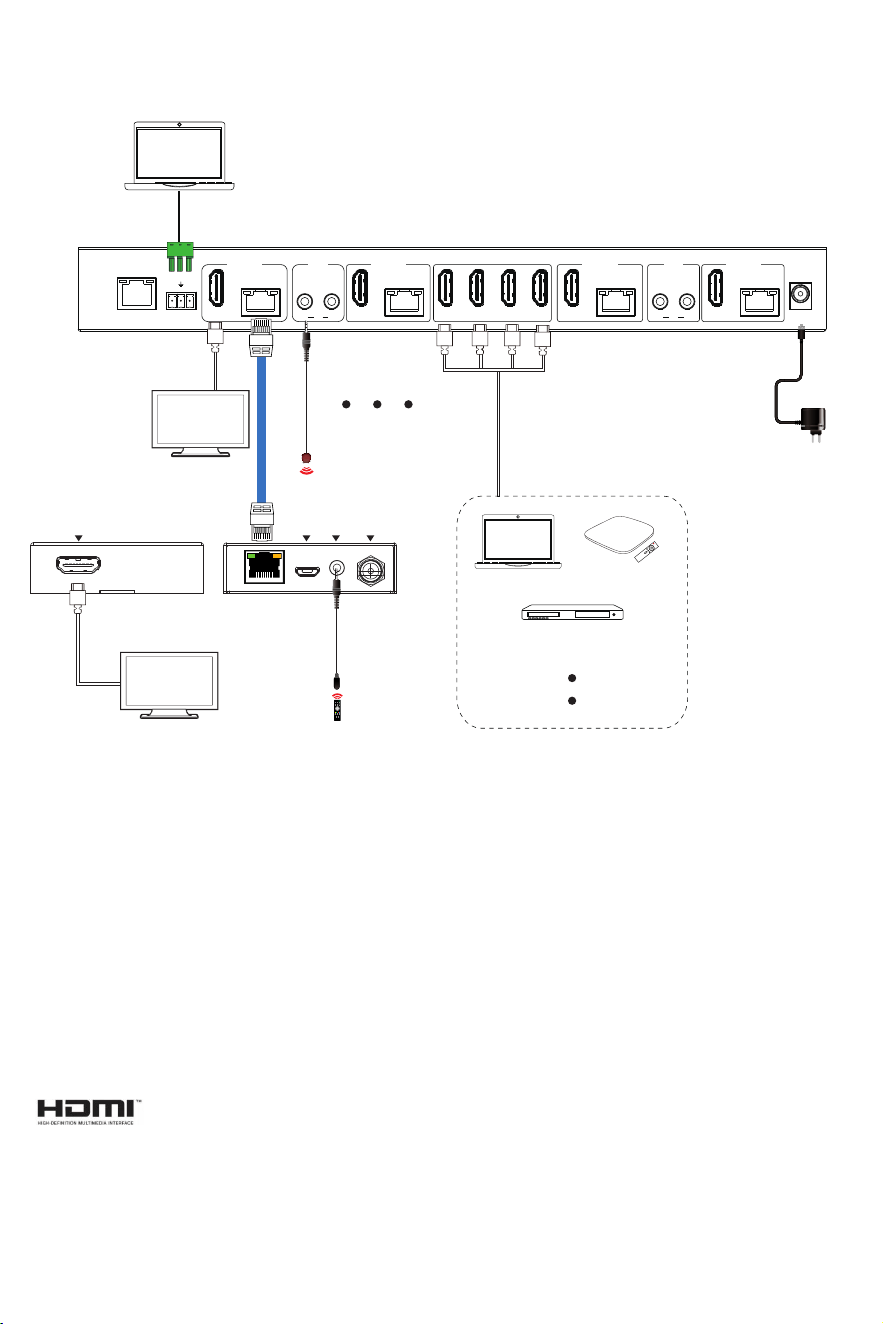
11. Application Example
- 21 / 21 -
The terms HDMI and HDMI High-Definition Multimedia interface, and the HDMI Logo are
trademarks or registered trademarks of HDMI Licensing LLC in the United States and other
countries.
TCP/IP HDMI
RJ45
OUTPUT 1
HDMI
RJ45
1 2
OUTPUT 2
HDMI
RJ45
OUTPUT 3
HDMI
RJ45
OUTPUT 4
1 2 3 4
OUT
IR 4
OUT
IR DC 12V
3
RXTX
RS-232
HDMI IN
IR Receiver
HDMI OUT DC 12VIR INSERVICECAT IN
LAN
LAN
Receiver
CAT6
IR Blaster
TV
TV
Power Supply
PC
DVD or Blu-ray Player
TV box
x 4
PC