

Technical Support and E-Warranty Certificate www.vevor.com/support
Drywall Patch
Instruction Manual
MODEL: SET
We continue to be committed to provide you tools with competitive price.
"Save Half", "Half Price" or any other similar expressions used by us only
represents an estimate of savings you might benefit from buying certain tools
with us compared to the major top brands and does not necessarily mean to cover
all categories of tools offered by us. You are kindly reminded to verify carefully
when you are placing an order with us if you are actually Saving
Half in comparison with the top major brands.
MODEL: SET
★ The picture is for reference only, please refer to the actual.
NEED HELP? CONTACT US!
Have product questions? Need technical support? Please feel free to
contact us:
Technical Support and E-Warranty Certificate
www.vevor.com/support
This is the original instruction, please read all manual instructions
carefully before operating. VEVOR reserves a clear interpretation of our
user manual. The appearance of the product shall be subject to the
product you received. Please forgive us that we won't inform you again if
there are any technology or software updates on our product.
Drywall Patch
Warning-To reduce the risk of injury, user must read
instructions manual carefully.
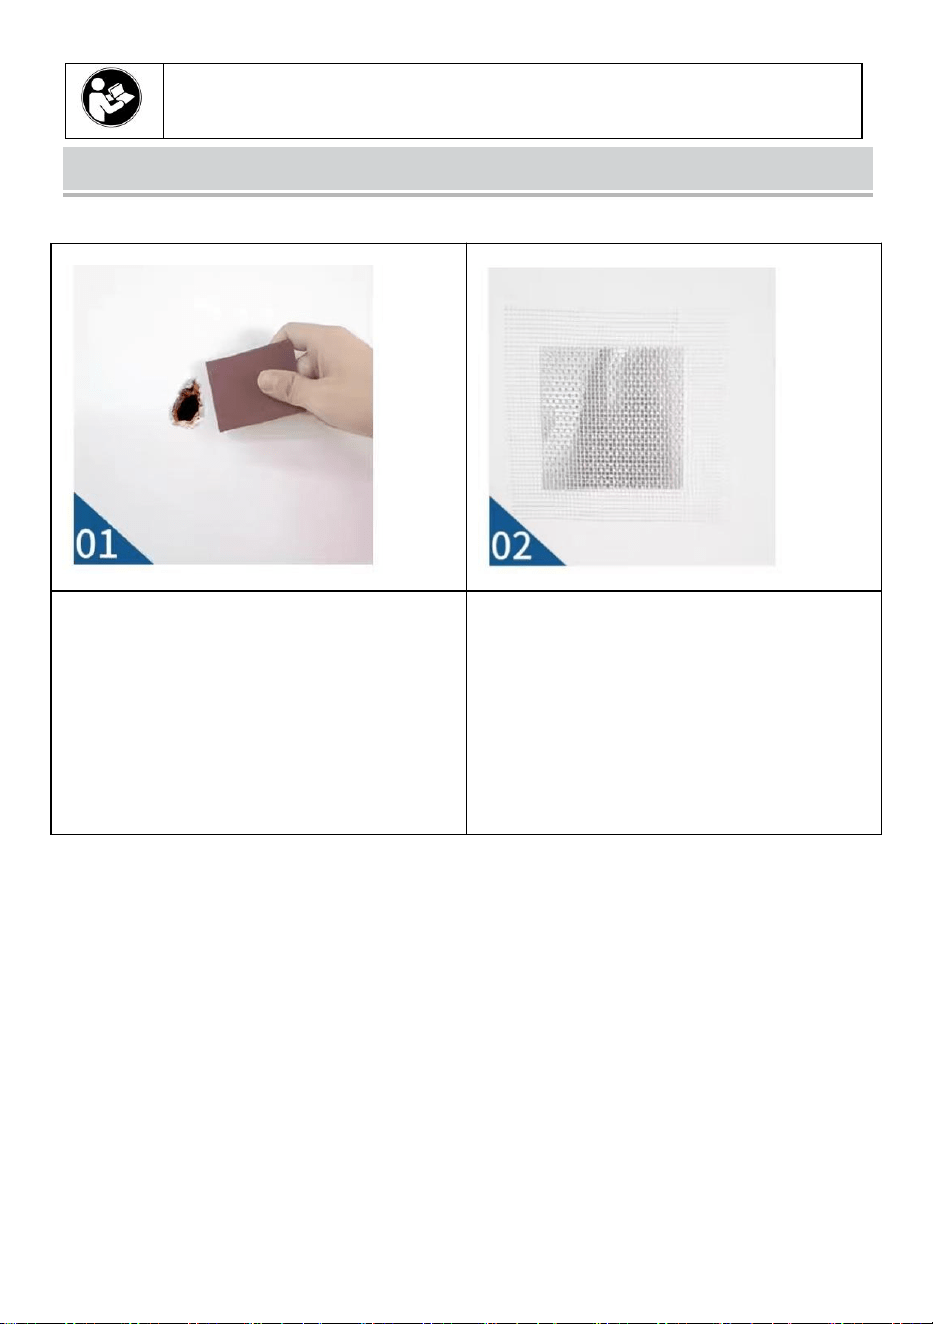
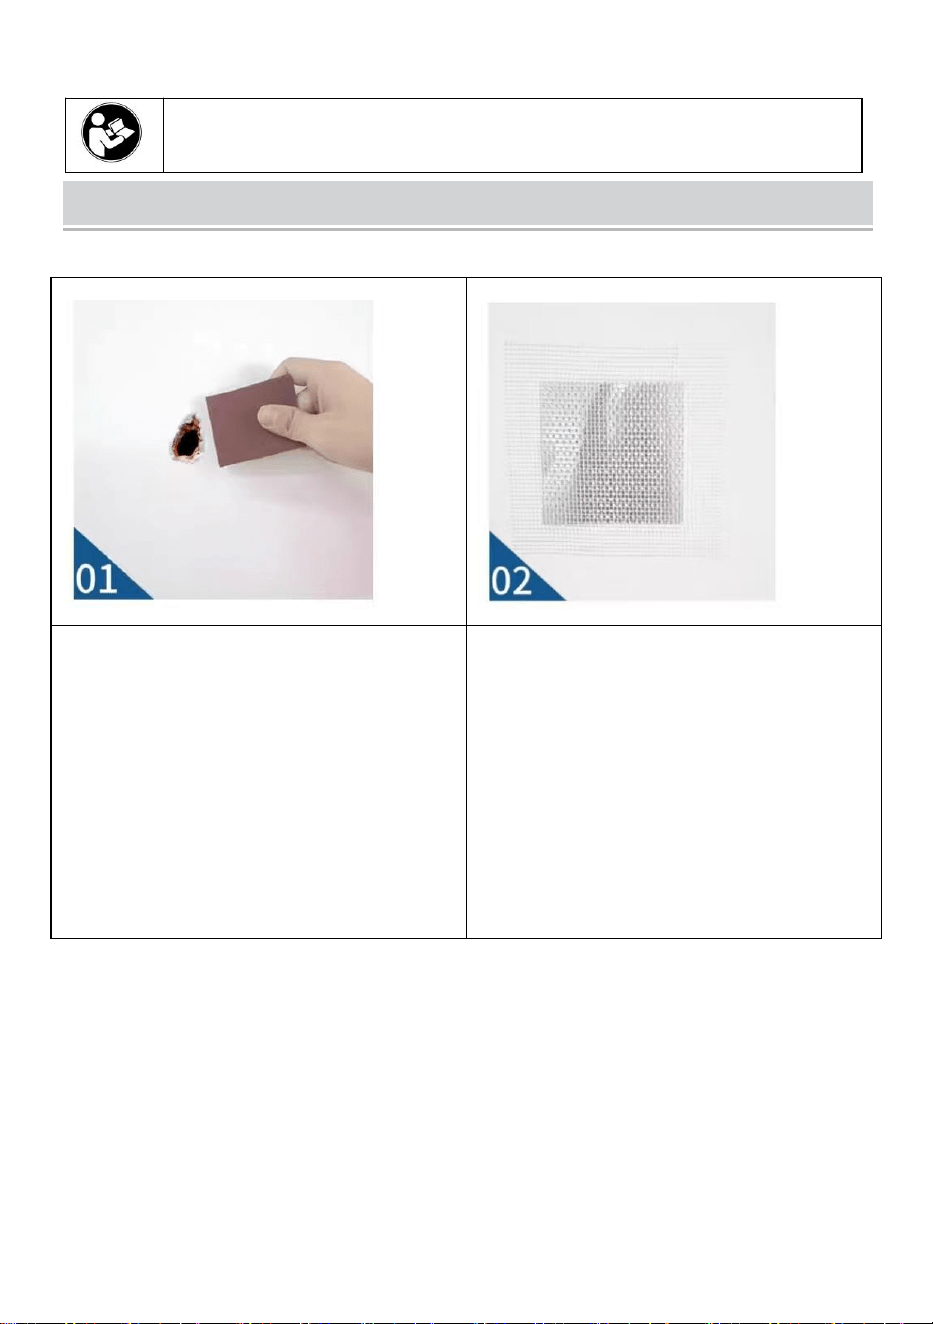
Instruction
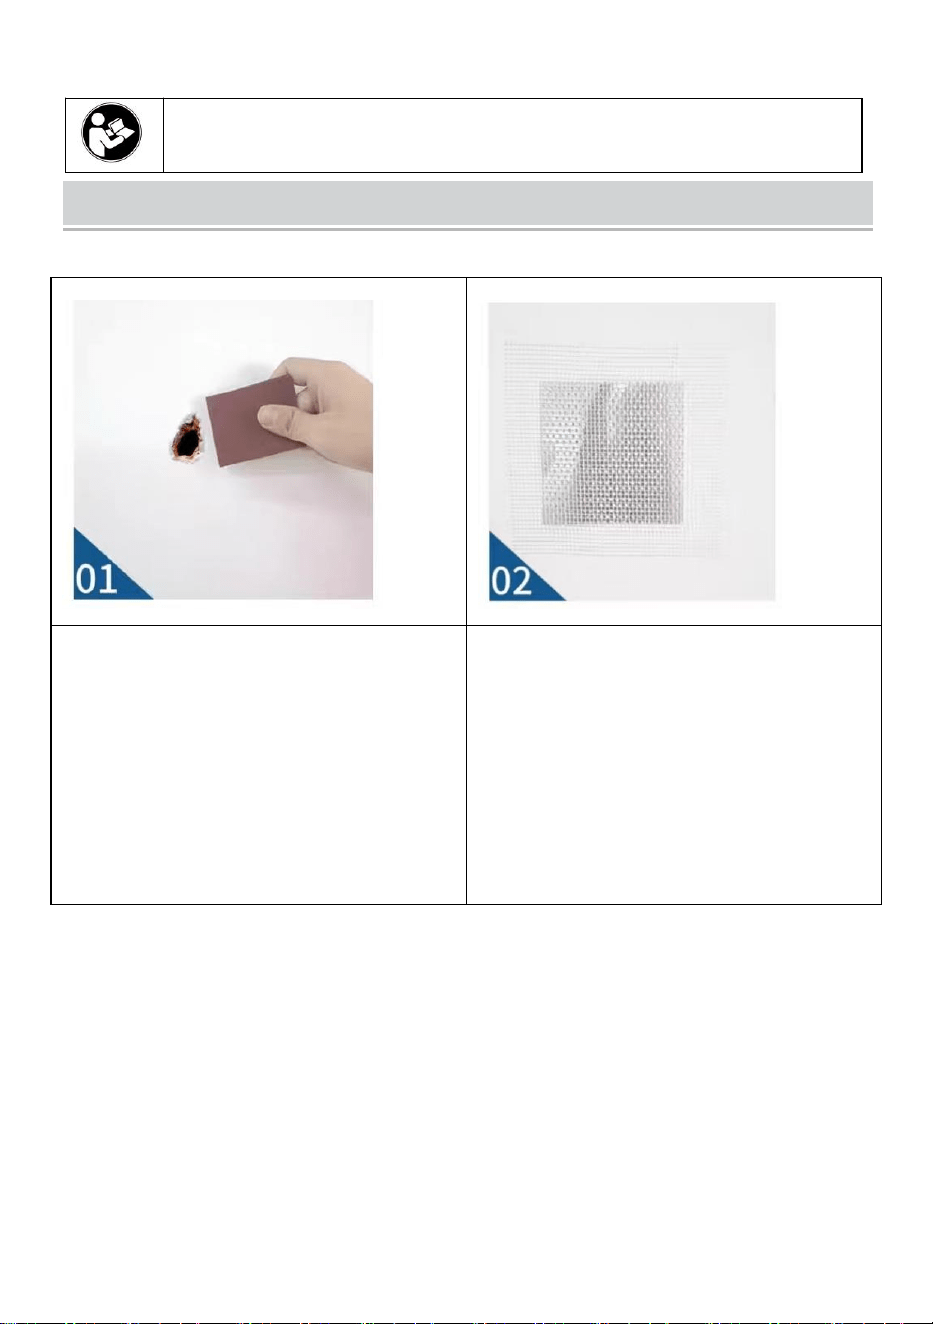
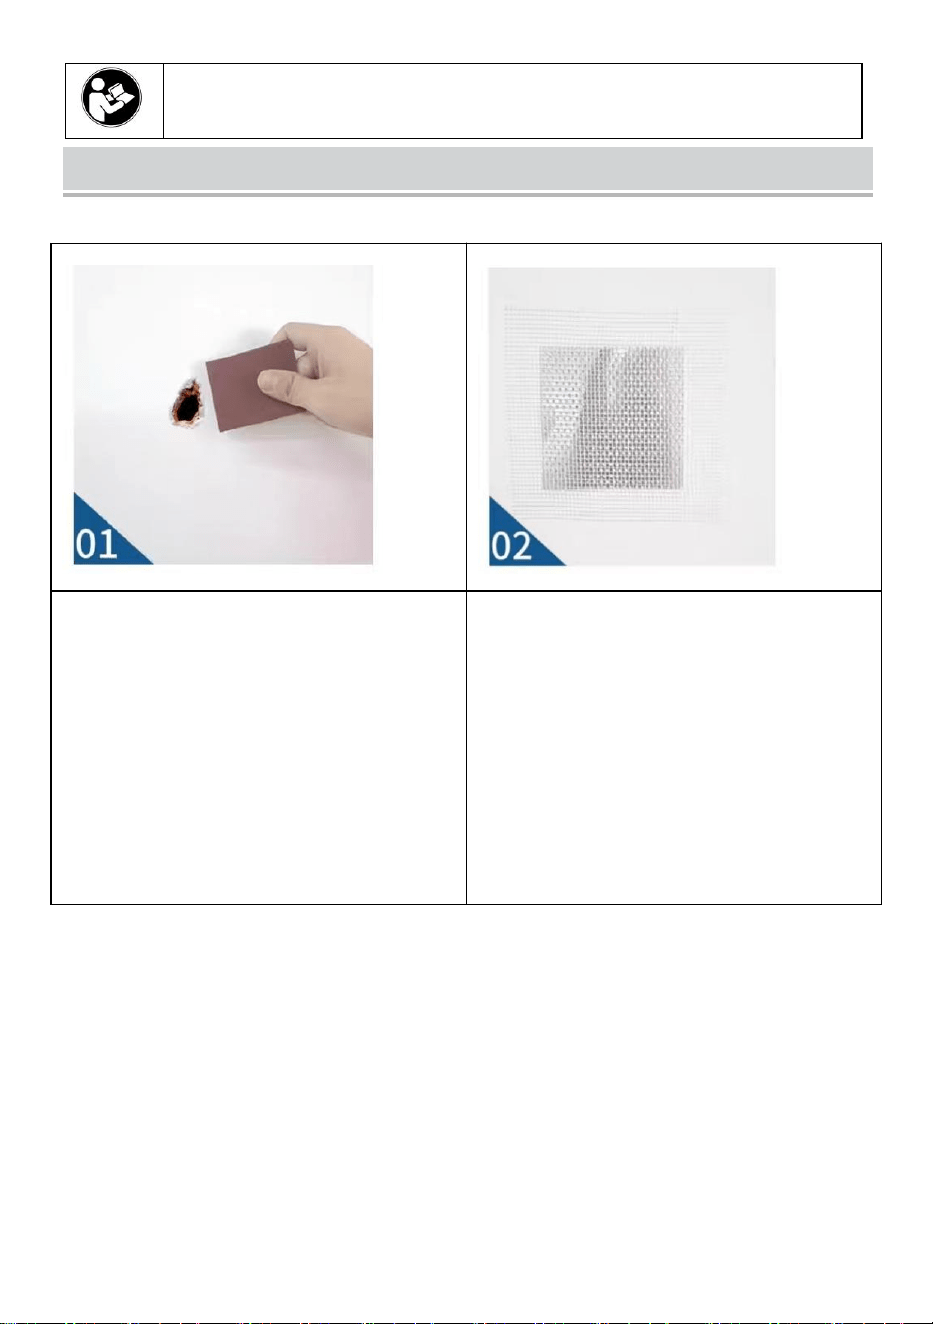
① Clean the base surface
Polish the area around the hole
with sandpaper and clean any
floating dust to ensure a smooth
and even contact surface.
②Stick on the repair patch
Tear off the protective paper
behind the repair patch, align the
metal plate area with the hole,
and apply pressure to flatten it.
Note:Users can repair wall holes according to actual situation and
their own needs.
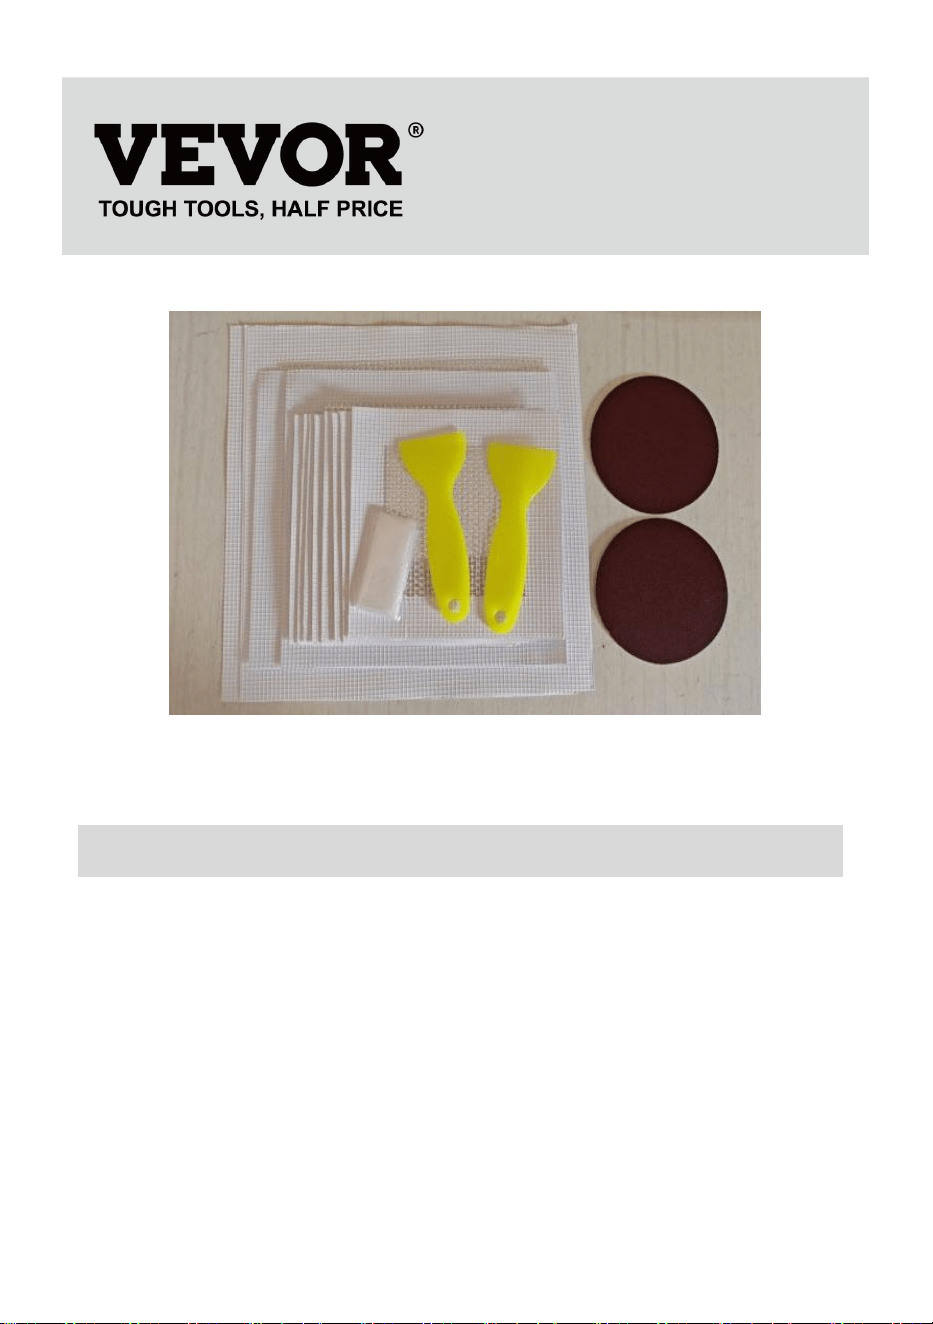
Product Parameter
Model
SET
Size
8 small repair patches(4*4inch)
2 medium repair patches(6*6inch)
2 large repair patches(8*8inch)
Material
aluminium
Parts
2 scrapers
2 sandpapers
Sanven Technology Ltd.
Address: Suite 250, 9166 Anaheim Place, Rancho Cucamonga, CA
91730
Technical Support and E-Warranty Certificate
www.vevor.com/support

Techniczny Wsparcie i certyfikat gwarancji elektronicznej www.vevor.com/support
Łatka do płyt gipsowo-kartonowych
Instrukcja obsługi
MODEL: USTAWIĆ
Nadal staramy się oferować Państwu narzędzia w konkurencyjnych cenach.
„Oszczędź połowę”, „Połowa ceny” lub jakiekolwiek inne podobne wyrażenia używane
wyłącznie przez nas
przedstawia szacunkowe oszczędności, jakie możesz uzyskać kupując określone
narzędzia
z nami w porównaniu do głównych, najlepszych marek i niekoniecznie oznacza to okładka
wszystkie kategorie narzędzi oferowanych przez nas. Przypominamy o sprawdzeniu
ostrożnie
gdy składasz u nas zamówienie, jeśli faktycznie Oszczędność
Połowa w porównaniu z wiodącymi markami.

MODEL: ZESTAW
★ Zdjęcie ma charakter poglądowy, proszę odnieść się do stanu faktycznego.
POTRZEBUJESZ POMOCY? SKONTAKTUJ SIĘ Z NAMI!
Masz pytania dotyczące produktu? Potrzebujesz wsparcia
technicznego? Skontaktuj się z nami:
Wsparcie techniczne i certyfikat e-gwarancji
www.vevor.com/support
To jest oryginalna instrukcja, przed użyciem należy uważnie przeczytać
wszystkie instrukcje. VEVOR zastrzega sobie jasną interpretację naszej
instrukcji obsługi. Wygląd produktu będzie zależał od produktu, który
otrzymałeś. Prosimy o wybaczenie, że nie poinformujemy Cię ponownie,
jeśli w naszym produkcie pojawią się jakiekolwiek aktualizacje
technologiczne lub oprogramowania.
Drywall Patch
Ostrzeżenie: Aby zminimalizować ryzyko obrażeń, użytkownik
powinien uważnie przeczytać instrukcję obsługi.
Instruction
① Wyczyść powierzchnię
podstawy
Wypoleruj obszar wokół otworu
papierem ściernym i usuń
unoszący się pył, aby uzyskać
gładką i równą powierzchnię
styku .
②Naklej łatkę naprawczą
Oderwij papier ochronny
znajdujący się za łatką
naprawczą, wyrównaj
powierzchnię płytki metalowej z
otworem i dociśnij, aby ją
spłaszczyć .
Uwaga: Użytkownicy mogą naprawiać otwory w ścianach zależnie
od aktualnej sytuacji i własnych potrzeb .

Product Parameter
Model
USTAWIĆ
Rozmiar
8 małych łatek naprawczych (4*4 cale)
2 średnie łatki naprawcze ( 6*6 cali )
2 duże łatki naprawcze ( 8*8 cali )
Tworzywo
aluminium
Części
2 skrobaki
2 papiery ścierne
Sanven Technology Ltd.
Adres: Suite 250, 9166 Anaheim Place, Rancho Cucamonga, CA 91730
Techniczny Wsparcie i certyfikat e-gwarancji
www.vevor.com/support

Technisch Ondersteuning en E-garantiecertificaat www.vevor.com/support
Gipsplaat patch
Gebruiksaanwijzing
MODEL: SET
Wij streven er voortdurend naar om u gereedschappen tegen concurrerende prijzen te
leveren.
"Bespaar de helft", "halve prijs" of andere soortgelijke uitdrukkingen die alleen door ons
worden gebruikt
geeft een schatting van de besparingen die u kunt behalen door bepaalde gereedschappen
te kopen
bij ons vergeleken met de grote topmerken en betekent niet per se dat omslag
alle categorieën van tools die wij aanbieden. U wordt vriendelijk verzocht om te verifiëren
voorzichtig
wanneer u een bestelling bij ons plaatst, als u daadwerkelijk Besparing
Half in vergelijking met de grote topmerken.

MODEL: SET
★ De afbeelding is alleen ter referentie, raadpleeg de werkelijke versie.
HULP NODIG? NEEM CONTACT MET ONS OP!
Heeft u vragen over het product? Heeft u technische ondersteuning
nodig? Neem dan gerust contact met ons op:
Technische ondersteuning en e-garantiecertificaat
www.vevor.com/support
Dit is de originele instructie, lees alle handleidingen zorgvuldig door
voordat u het product gebruikt. VEVOR behoudt zich een duidelijke
interpretatie van onze gebruikershandleiding voor. Het uiterlijk van het
product is afhankelijk van het product dat u hebt ontvangen. Vergeef ons
dat we u niet opnieuw zullen informeren als er technologie- of
software-updates voor ons product zijn .
Drywall Patch

Waarschuwing: om het risico op letsel te verkleinen, moet de
gebruiker de gebruiksaanwijzing zorgvuldig lezen.
Instruction
① Maak het basisoppervlak
schoon
Schuur het gebied rond het gat
met schuurpapier en verwijder
eventueel zwevend stof, zodat u
een glad en egaal
contactoppervlak krijgt .
② Plak de reparatiepatch op
Scheur het beschermpapier
achter de reparatiepatch af, lijn
het metalen plaatje uit met het
gat en oefen druk uit om het plat
te maken .
Let op: Gebruikers kunnen gaten in de muur repareren op basis van
de werkelijke situatie en hun eigen behoeften .
Product Parameter
Model
SET
Maat
8 kleine reparatiepleisters (4*4 inch)
2 middelgrote reparatiepleisters ( 6*6 inch )
2 grote reparatiepleisters ( 8*8 inch )
Materiaal
aluminium
Delen
2 schrapers
2 schuurpapiertjes
Sanven Technologie Ltd.
Adres: Suite 250, 9166 Anaheim Place, Rancho Cucamonga, CA 91730
Technisch Ondersteuning en E-garantiecertificaat
www.vevor.com/support

Tecnico Supporto e certificato di garanzia elettronica www.vevor.com/support
Toppa per cartongesso
Manuale di istruzioni
MODELLO: IMPOSTATO
Continuiamo a impegnarci per fornirvi strumenti a prezzi competitivi.
"Risparmia la metà", "Metà prezzo" o altre espressioni simili utilizzate solo da noi
rappresenta una stima dei risparmi che potresti ottenere acquistando determinati strumenti
con noi rispetto ai principali marchi top e non significa necessariamente copertina
tutte le categorie di strumenti da noi offerti. Ti ricordiamo cortesemente di verificare
accuratamente
quando effettui un ordine con noi se sei effettivamente Risparmio
Metà rispetto ai marchi più importanti.

MODELLO: SET
★ L'immagine è solo a scopo illustrativo, fare riferimento alla realtà.
HAI BISOGNO DI AIUTO? CONTATTACI!
Hai domande sui prodotti? Hai bisogno di supporto tecnico? Non
esitare a contattarci:
Supporto tecnico e certificato di garanzia elettronica
www.vevor.com/support
Questa è l'istruzione originale, si prega di leggere attentamente tutte le
istruzioni del manuale prima di utilizzare. VEVOR si riserva una chiara
interpretazione del nostro manuale utente. L'aspetto del prodotto sarà
soggetto al prodotto ricevuto. Vi preghiamo di perdonarci se non vi
informeremo di nuovo se ci sono aggiornamenti tecnologici o software sul
nostro prodotto.
Drywall Patch

Attenzione: per ridurre il rischio di lesioni, l'utente deve leggere
attentamente il manuale di istruzioni.
Instruction
① Pulisci la superficie di base
Lucidare la zona attorno al foro
con carta vetrata e pulire la
polvere in sospensione per
garantire una superficie di
contatto liscia e uniforme .
②Applicare la toppa di
riparazione
Strappare la carta protettiva
dietro la toppa di riparazione,
allineare l'area della piastra
metallica con il foro ed esercitare
pressione per appiattirla .
Nota: gli utenti possono riparare i buchi nel muro in base alla
situazione reale e alle proprie esigenze .
Product Parameter
Modello
IMPOSTATO
Misurare
8 piccole toppe di riparazione (4*4 pollici)
2 toppe di riparazione medie ( 6*6 pollici )
2 grandi toppe di riparazione ( 8*8 pollici )
Materiale
alluminio
Parti
2 raschiatori
2 carte vetrate
Azienda
Indirizzo: Suite 250, 9166 Anaheim Place, Rancho Cucamonga, CA
91730
Tecnico Supporto e certificato di garanzia elettronica
www.vevor.com/support

Technisch Support und E-Garantie-Zertifikat www.vevor.com/support
Trockenbau-Flicken
Bedienungsanleitung
MODELL: SATZ
Wir sind weiterhin bestrebt, Ihnen Werkzeuge zu wettbewerbsfähigen Preisen anzubieten.
"Sparen Sie die Hälfte", "Halber Preis" oder andere ähnliche Ausdrücke, die wir nur
verwenden
stellt eine Schätzung der Einsparungen dar, die Sie durch den Kauf bestimmter Werkzeuge
erzielen können
mit uns im Vergleich zu den großen Top-Marken und bedeutet nicht unbedingt, Abdeckung
alle von uns angebotenen Werkzeugkategorien. Wir möchten Sie bitten, zu überprüfen
sorgfältig
wenn Sie bei uns eine Bestellung aufgeben, wenn Sie tatsächlich Speichern
Hälfte im Vergleich mit den Top-Großmarken.

MODELL: SET
★ Das Bild dient nur als Referenz. Bitte beachten Sie das tatsächliche Bild.
Brauchen Sie Hilfe? Kontaktieren Sie uns!
Sie haben Fragen zu unseren Produkten? Sie benötigen technischen
Support? Dann kontaktieren Sie uns gerne:
Technischer Support und E-Garantie-Zertifikat
www.vevor.com/support
Dies ist die Originalanleitung. Bitte lesen Sie alle Anweisungen sorgfältig
durch, bevor Sie das Gerät in Betrieb nehmen. VEVOR behält sich eine
klare Auslegung unserer Bedienungsanleitung vor. Das Erscheinungsbild
des Produkts richtet sich nach dem Produkt, das Sie erhalten haben. Bitte
verzeihen Sie uns, dass wir Sie nicht erneut informieren, wenn es
Technologie- oder Software-Updates für unser Produkt gibt .
Drywall Patch
Warnung: Um das Verletzungsrisiko zu verringern, muss der
Benutzer die Bedienungsanleitung sorgfältig lesen.
Instruction
① Reinigen Sie die Grundfläche
Polieren Sie den Bereich um das
Loch mit Schleifpapier und
entfernen Sie jeglichen Staub,
um eine glatte und ebene
Kontaktfläche zu gewährleisten .
②Reparaturpflaster aufkleben
Reißen Sie das Schutzpapier
hinter dem Reparaturflicken ab,
richten Sie die Metallplatte auf
das Loch aus und drücken Sie
sie durch Druck flach .
Hinweis: Benutzer können Wandlöcher je nach tatsächlicher
Situation und ihren eigenen Bedürfnissen reparieren .
Product Parameter
Modell
SATZ
Größe
8 kleine Reparaturflicken (4 x 4 Zoll)
2 mittlere Reparaturflicken ( 6 x 6 Zoll )
2 große Reparaturflicken ( 8 x 8 Zoll )
Material
Aluminium
Teile
2 Schaber
2 Schleifpapiere
Sanven Technology Ltd.
Adresse: Suite 250, 9166 Anaheim Place, Rancho Cucamonga, CA
91730
Technisch Support und E-Garantie-Zertifikat
www.vevor.com/support

Technique Certificat d'assistance et de garantie électronique
www.vevor.com/support
Réparation de cloison sèche
Manuel d'instructions
MODÈLE: ENSEMBLE
Nous continuons à nous engager à vous fournir des outils à des prix compétitifs.
« Économisez la moitié », « Moitié prix » ou toute autre expression similaire utilisée par
nous uniquement
représente une estimation des économies dont vous pourriez bénéficier en achetant
certains outils
avec nous par rapport aux grandes marques et ne signifie pas nécessairement couverture
toutes les catégories d'outils que nous proposons. Nous vous rappelons de bien vouloir
vérifier soigneusement
lorsque vous passez une commande chez nous si vous êtes réellement Économie
Moitié par rapport aux plus grandes marques.

MODÈLE : SET
★ L'image est à titre de référence uniquement, veuillez vous référer à la réalité.
BESOIN D'AIDE? CONTACTEZ-NOUS!
Vous avez des questions sur nos produits ? Vous avez besoin
d'assistance technique ? N'hésitez pas à nous contacter :
Assistance technique et certificat de garantie électronique
www.vevor.com/support
Il s'agit de la notice d'utilisation d'origine. Veuillez lire attentivement toutes
les instructions du manuel avant de l'utiliser. VEVOR se réserve le droit
d'interpréter clairement notre manuel d'utilisation. L'apparence du produit
dépend du produit que vous avez reçu. Veuillez nous excuser, nous ne
vous informerons plus en cas de mise à jour technologique ou logicielle
de notre produit.
Drywall Patch
Avertissement - Pour réduire le risque de blessure, l'utilisateur
doit lire attentivement le manuel d'instructions.
Instruction
① Nettoyer la surface de la base
Polissez la zone autour du trou
avec du papier de verre et
nettoyez toute poussière flottante
pour assurer une surface de
contact lisse et uniforme .
②Collez le patch de réparation
Déchirez le papier protecteur
derrière le patch de réparation,
alignez la zone de la plaque
métallique avec le trou et
appliquez une pression pour
l'aplatir .
Remarque : les utilisateurs peuvent réparer les trous dans les murs
en fonction de la situation réelle et de leurs propres besoins .

Product Parameter
Modèle
ENSEMBLE
Taille
8 petits patchs de réparation (4*4 pouces)
2 patchs de réparation moyens ( 6*6 pouces )
2 grands patchs de réparation ( 8*8 pouces )
Matériel
aluminium
Pièces
2 grattoirs
2 papiers de verre
Sanven Technologie Ltée.
Adresse : Suite 250, 9166 Anaheim Place, Rancho Cucamonga, CA
91730
Technique Certificat d'assistance et de garantie électronique
www.vevor.com/support

Teknisk Support och e-garanticertifikat www.vevor.com/support
Gipsplåster
Instruktionsmanual
MODELL: UPPSÄTTNING
Vi fortsätter att vara engagerade i att ge dig verktyg till konkurrenskraftiga priser.
"Spara hälften", "Halva priset" eller andra liknande uttryck som endast används av oss
representerar en uppskattning av besparingar du kan dra nytta av att köpa vissa verktyg
med oss jämfört med de stora toppmärkena och betyder inte nödvändigtvis att täcka
alla kategorier av verktyg som vi erbjuder. Du påminns vänligen om att verifiera försiktigt
när du gör en beställning hos oss om du faktiskt gör det Sparande
Halv i jämförelse med de främsta varumärkena.

MODELL: SET
★ Bilden är endast för referens, se den faktiska.
BEHÖVER HJÄLP? KONTAKTA OSS!
Har du produktfrågor? Behöver du teknisk support? Kontakta oss
gärna:
Teknisk support och e-garanticertifikat
www.vevor.com/support
Detta är den ursprungliga instruktionen, läs alla instruktioner noggrant
innan du använder den. VEVOR reserverar sig för en tydlig tolkning av vår
användarmanual. Utseendet på produkten är beroende av den produkt du
fått. Ursäkta oss att vi inte kommer att informera dig igen om det finns
någon teknik eller mjukvaruuppdateringar på vår produkt.
Drywall Patch

Varning - För att minska risken för skada måste användaren
läsa instruktionerna noggrant.
Instruction
① Rengör basytan
Polera området runt hålet med
sandpapper och rengör
eventuellt flytande damm för att
säkerställa en jämn och jämn
kontaktyta .
②Fäst på reparationsplåstret
Riv av skyddspapperet bakom
reparationsplåstret, rikta in
metallplattans område med hålet
och tryck på för att platta till det .
Obs: Användare kan reparera vägghål enligt den faktiska situationen
och deras egna behov .

Product Parameter
Modell
UPPSÄTTNING
Storlek
8 små reparationslappar (4*4 tum)
2 medelstora reparationslappar ( 6*6 tum )
2 stora reparationslappar ( 8*8 tum )
Material
aluminium
P arts
2 skrapor
2 sandpapper
Sanven Technology Ltd.
Adress: Suite 250, 9166 Anaheim Place, Rancho Cucamonga, CA
91730
Teknisk Support och e-garanticertifikat
www.vevor.com/support

Técnico Soporte y certificado de garantía electrónica www.vevor.com/support
Parche para paneles de yeso
Manual de instrucciones
MODELO: COLOCAR
Seguimos comprometidos a brindarle herramientas a precios competitivos.
"Ahorra la mitad", "mitad de precio" o cualquier otra expresión similar utilizada únicamente
por nosotros
Representa una estimación de los ahorros que podría obtener al comprar ciertas
herramientas.
con nosotros en comparación con las principales marcas líderes y no significa
necesariamente cubrir
Todas las categorías de herramientas que ofrecemos. Le recordamos que debe verificar
con cuidado
Cuando realiza un pedido con nosotros, si realmente está Ahorro
Medio en comparación con las principales marcas líderes.

MODELO: SET
★ La imagen es solo de referencia, consulte la real.
¿NECESITA AYUDA? ¡CONTÁCTENOS!
¿Tiene preguntas sobre el producto? ¿Necesita asistencia técnica? No
dude en ponerse en contacto con nosotros:
Soporte técnico y certificado de garantía electrónica
www.vevor.com/support
Estas son las instrucciones originales, lea atentamente todas las
instrucciones del manual antes de utilizar el producto. VEVOR se reserva
una interpretación clara de nuestro manual de usuario. La apariencia del
producto estará sujeta al producto que recibió. Perdónenos por no
informarle nuevamente si hay actualizaciones de tecnología o software
en nuestro producto.
Drywall Patch

Advertencia: Para reducir el riesgo de lesiones, el usuario
debe leer atentamente el manual de instrucciones.
Instruction
① Limpiar la superficie base
Pula el área alrededor del
agujero con papel de lija y limpie
el polvo flotante para asegurar
una superficie de contacto lisa y
uniforme .
②Pega el parche de reparación
Retire el papel protector detrás
del parche de reparación, alinee
el área de la placa de metal con
el orificio y aplique presión para
aplanarla .
Nota: Los usuarios pueden reparar los agujeros de la pared según la
situación real y sus propias necesidades .

Product Parameter
Modelo
COLOCAR
Tamaño
8 parches de reparación pequeños (4 x 4
pulgadas)
2 parches de reparación medianos ( 6 x 6
pulgadas )
2 parches de reparación grandes ( 8 x 8
pulgadas )
Material
aluminio
Partes
2 raspadores
2 papeles de lija
Tecnología Sanven Ltd.
Dirección: Suite 250, 9166 Anaheim Place, Rancho Cucamonga, CA
91730
Técnico Certificado de soporte y garantía electrónica
www.vevor.com/support
