Sample to Insight
January 2026
QIAmini User Manual
For Research Use Only. Not for use in diagnostic procedures.
9003607
QIAGEN GmbH, QIAGEN Strasse 1, 40724 Hilden, GERMANY

[QIAmini User Manual xx/2026
2
GLO-SOP-52-01-006-A09 Rev.02
1 Introduction .............................................................................................................................................................. 6
About this user manual ................................................................................................................................. 6
General information ..................................................................................................................................... 7
Technical assistance ............................................................................................................................ 7
Policy statement ................................................................................................................................... 7
Intended use of the QIAmini ........................................................................................................................ 8
Requirements for QIAmini ............................................................................................................................. 8
2 Safety Information ................................................................................................................................................... 9
Proper use .................................................................................................................................................... 10
Electrical safety ........................................................................................................................................... 11
Operating Conditions ................................................................................................................................. 12
Biological safety .......................................................................................................................................... 14
Chemicals .................................................................................................................................................... 14
Waste disposal ............................................................................................................................................. 15
Mechanical hazards ................................................................................................................................... 15
Heat hazard ................................................................................................................................................. 16
Radiation ...................................................................................................................................................... 16
Maintenance safety ............................................................................................................................... 16
Symbols on the QIAmini ......................................................................................................................... 18
3 General Description .............................................................................................................................................. 19
QIAmini principle ......................................................................................................................................... 19
External features of the QIAmini ................................................................................................................ 21
4.3-inch Touch Display ....................................................................................................................... 22
Status indicator Light .......................................................................................................................... 23
Transparent Door ................................................................................................................................ 23
Power Switch....................................................................................................................................... 24
Power Cord Socket ............................................................................................................................ 24
Barcode Scanner Port ....................................................................................................................... 25
USB Port ................................................................................................................................................ 25
Internal features of the QIAmini ................................................................................................................. 26
Processing Unit .................................................................................................................................... 26
Heater block ....................................................................................................................................... 26

[QIAmini User Manual xx/2026
3
GLO-SOP-52-01-006-A09 Rev.02
UV lamp ............................................................................................................................................... 27
Bluetooth ............................................................................................................................................. 27
Disposables .................................................................................................................................................. 28
QIAmini Cartridge .............................................................................................................................. 28
QIAmini Cartridge Frame .................................................................................................................. 29
QIAmini Rod Cover ............................................................................................................................ 30
4 Installation Procedures .......................................................................................................................................... 31
System delivery and installation................................................................................................................. 31
Site requirements ......................................................................................................................................... 31
Power requirements .................................................................................................................................... 32
Grounding requirements ............................................................................................................................ 33
Unpacking of the QIAmini .......................................................................................................................... 33
Removal of the transport security screw .......................................................................................... 34
Connection of the AC power cord .................................................................................................. 35
Installation of the external barcode scanner (optional) ................................................................ 36
Repacking and Transport of the QIAmini ................................................................................................. 37
Installation of transport lock screw ................................................................................................... 41
5 Operating Procedures .......................................................................................................................................... 42
Use of the QIAmini instrument software .................................................................................................... 43
The Protocol Run menu...................................................................................................................... 44
Run Report Menu ............................................................................................................................... 45
The Settings menu .............................................................................................................................. 46
Protocol Management ............................................................................................................................... 46
Import/Export of protocols via USB drive .......................................................................................... 47
Import of Protocols via QR code. ..................................................................................................... 48
Import via mobile device using Bluetooth connection .................................................................. 49
Adding protocols to the favorite view ............................................................................................. 49
Deleting Protocols .............................................................................................................................. 50
Protocol Preview ................................................................................................................................. 50
Start a run ..................................................................................................................................................... 52
Preparation of Cartriges and Cartridge Frame ............................................................................... 52
Procedure on the QIAmini instrument .............................................................................................. 53

[QIAmini User Manual xx/2026
4
GLO-SOP-52-01-006-A09 Rev.02
Run status ............................................................................................................................................ 55
Unload the instrument........................................................................................................................ 57
QIAmini Report(s) ........................................................................................................................................ 57
Search for reports ............................................................................................................................... 58
Download of report(s) ....................................................................................................................... 59
Delete Reports .................................................................................................................................... 60
Change and Update Settings ................................................................................................................... 60
Date and Time settings of the QIAmini ............................................................................................ 61
Language ........................................................................................................................................... 62
Bluetooth connection ........................................................................................................................ 62
Software Update ................................................................................................................................ 63
Version ................................................................................................................................................. 64
Internal fan .......................................................................................................................................... 65
Internal light ........................................................................................................................................ 65
6 Maintenance ......................................................................................................................................................... 66
Cleaning agents ......................................................................................................................................... 66
Instrument cleaning and decontamination ............................................................................................. 67
Cleaning agents for QIAmini instrument .......................................................................................... 67
Cleaning procedure for QIAmini instrument ................................................................................... 67
Cleaning and decontamination of accessories...................................................................................... 68
Cleaning agents for QIAmini Cartridge frame ................................................................................ 68
Cleaning procedure for QIAmini cartridge frame .......................................................................... 68
UV decontamination run ............................................................................................................................ 69
7 Troubleshooting ..................................................................................................................................................... 71
General troubleshooting measures ........................................................................................................... 71
Help with specific error cases .................................................................................................................... 72
Replacement of UV lamp .......................................................................................................................... 72
Replacement of the magnetic head ....................................................................................................... 73
8 Technical Specifications ....................................................................................................................................... 76
Environmental conditions – operating conditions ................................................................................... 76
Environmental conditions – transport Conditions .................................................................................... 76
Environmental conditions – storage conditions ....................................................................................... 76

[QIAmini User Manual xx/2026
5
GLO-SOP-52-01-006-A09 Rev.02
Mechanical data and hardware features ............................................................................................... 77
Appendix A........................................................................................................................................................................ 78
License Terms ......................................................................................................................................................... 78
Waste Electrical and Electronic Equipment (WEEE) ........................................................................................... 79
California Proposition 65 Warning ........................................................................................................................ 79
FCC Declaration (US) and Compliance with ICES (Canada) .......................................................................... 80
Liability Clause ....................................................................................................................................................... 83
Appendix A........................................................................................................................................................................ 84
Ordering information ............................................................................................................................................. 84
Document Revision History ............................................................................................................................................... 86

[QIAmini User Manual xx/2026
6
GLO-SOP-52-01-006-A09 Rev.02
To Do List
- Replace all sw pictures by original screenshots (Jessi)
- Ensure that all placeholder pictures are added to photo shoot list (Anna-Lena)
- Replace all other pictures after the photo shoot (Jessi)
- Check list of SAP numbers
1 Introduction
Thank you for choosing the QIAmini Instrument. We are confident it will become an integral part of your research
laboratory. Before using the QIAmini, read this user manual carefully and pay attention to the safety information.
The instructions and safety information in the user manual must be followed to ensure safe operation of the instrument
and to maintain the instrument in a safe condition.
About this user manual
This user manual provides information about the QIAmini in the following sections:
⚫ Introduction – contains information regarding the intended use and requirements of the QIAmini
⚫ Safety Information – includes important information on any hazards related to the QIAmini and how
to properly use the instrument
⚫ General Description – an overview of the features of the QIAmini
⚫ Installation Procedures – instructions on how to set up the instrument before its first use
⚫ Operating Procedures – includes instructions related to protocol runs
⚫ Maintenance – contains information about cleaning and maintenance
⚫ Troubleshooting – instructions on what to do in case of any problems
⚫ Technical Specifications – includes technical specifications
⚫ Appendices
⚫ Index
The appendices contain the following information:[List all applicable appendices in bullets]
⚫ License Terms
⚫ Waste Electrical and Electronic Equipment (WEEE)
⚫ California Proposition 65 Warning
⚫ FCC Declaration (US) and Compliance with ICES (Canada)

[QIAmini User Manual xx/2026
7
GLO-SOP-52-01-006-A09 Rev.02
⚫ Liability Clause
⚫ Ordering information
⚫ Document Revision History
General information
Technical assistance
At QIAGEN, we pride ourselves on the quality and availability of our technical support. Our Technical Support
Departments are staffed by experienced scientists with extensive practical and theoretical expertise in molecular
biology and the use of QIAGEN products. If you have any questions or experience any difficulties regarding the
QIAmini Instrument or QIAGEN products in general, do not hesitate to contact us.
QIAGEN customers are a major source of information regarding advanced or specialized uses of our products. This
information is helpful to other scientists as well as to the researchers at QIAGEN. We therefore encourage you to
contact us if you have any suggestions about product performance or new applications and techniques.
For technical assistance and more information, please visit QIAmini Suite or see our Technical Support Center at
support.qiagen.com or call one of the QIAGEN Technical Support Departments or local distributors.
Website: support.qiagen.com
When contacting QIAGEN Technical Support about errors, please have the following information ready:
• QIAmini serial number and Error code (if applicable)
• Sample material and pretreatment
• Protocol file
• Timepoint when the error occurred for the first time
• Frequency of error occurrence (i.e., intermittent or persistent error)
• Copy of Report file (if applicable)
Policy statement
It is the policy of QIAGEN to improve products as new techniques and components become available. QIAGEN
reserves the right to change specifications at any time. In an effort to produce useful and appropriate

[QIAmini User Manual xx/2026
8
GLO-SOP-52-01-006-A09 Rev.02
documentation, we appreciate your comments on this user manual. Please contact QIAGEN Technical Support.
Intended use of the QIAmini
The QIAmini instrument is designed to perform automated isolation and purification of nucleic acids. The instrument
is intended for use by professional operators, such as technicians, trained in molecular biological techniques and
the operation of the QIAmini instrument. The instrument is intended for research use only and not for use in diagnostic
procedures.
Requirements for QIAmini
The table below covers the general level of competence and training necessary for transportation, installation, use,
maintenance and servicing of the QIAmini.
Sample table title
Task
Personnel
Training and experience
Delivery
No special requirements
No special requirements
Installation, routine use (running protocols),
and maintenance (including defined service
procedures)
Laboratory technicians or equivalent
Appropriately trained and experienced
personnel familiar with use of computers and
automation in general.
Servicing
QIAGEN Field Service specialists or service
technicians of an authorized agent
Trained and authorized by QIAGEN

[QIAmini User Manual xx/2026
9
GLO-SOP-52-01-006-A09 Rev.02
2 Safety Information
Before using the QIAmini system, it is essential that you read this user manual carefully and pay particular attention
to the safety information. The instructions and safety information in the user manual must be followed to ensure safe
operation of the instrument and to maintain the instrument in a safe condition.
Possible hazards that could harm the user or result in damage to the instrument are clearly stated at the appropriate
places throughout this consolidated operating guide. If the equipment is used in a manner not specified by the
manufacturer, the protection provided by the equipment may be impaired.
Note: Translation of the user manual to some languages is provided and available in the QIAGEN webpage
Expected life of QIAmini is 5 years. After reaching the expected life, unless QIAGEN provides clear indications that
beyond this time its performance requirements cannot continue to be met, by following the specified maintenance
plan, the instrument can continue to be serviced and safely used by customers until either depreciation policies
recommend its decommission or failure rate makes the maintenance cost unacceptable.
The following types of safety information appear throughout the QIAmini User Manual.
WARNING
The term WARNING is used to inform you about situations that could result in personal injury
to you or others.
Details about these circumstances are given in a box like this one.
CAUTION
The term CAUTION is used to inform you about situations that could result in damage to an
instrument or other equipment.
Details about these circumstances are given in a box like this one.
The guidance provided in this manual is intended to supplement, not supersede, the normal safety requirements
prevailing in the user’s country.
[QIAmini User Manual xx/2026
10
GLO-SOP-52-01-006-A09 Rev.02
Proper use
Perform the maintenance as described in section 6. QIAGEN charges for repairs that are required due to incorrect
maintenance.
In case of emergency, power OFF the QIAmini at the power switch located in back of the instrument and unplug
the power cord from the power outlet.
WARNING
Risk of personal injury and material damage.
Improper use of the QIAmini may cause personal injuries or damage to the instrument. The
QIAmini must only be operated by qualified personnel who have been appropriately trained.
WARNING/
CAUTION
Risk of personal injury and material damage
The QIAmini UV lamp is a high-pressure component and can break unexpectedly during
handling or operation. Handle the lamp gently, avoid mechanical stress and follow strict
safety measure. Breakage can release glass fragment.
WARNING
Risk of fire or explosion
When using ethanol or ethanol-based liquids on the QIAmini, handle such liquids carefully
and in accordance with the required safety regulations. If liquid has been spilled, wipe it off
and leave the QIAmini door open to allow flammable vapors to disperse.
WARNING
Risk of explosion
The QIAmini is intended for use with reagents and substances supplied with QIAGEN kits as
outlined in respective instructions for use. Use of other reagents and substances may lead to
fire or explosion.
WARNING
Risk of overheating
To ensure proper ventilation, maintain a minimum clearance of 10 cm at the sides and back
of the QIAmini.
Slits and openings that ensure the ventilation of the instrument must not be covered.
CAUTION
Risk of personal injury and material damage
Do not move the QIAmini during operation.
CAUTION
Damage to the instrument
[QIAmini User Manual xx/2026
11
GLO-SOP-52-01-006-A09 Rev.02
Avoid spilling water or chemicals onto the QIAmini. Instrument damage caused by water or
chemical spillage will void your warranty.
CAUTION
Damage to the instrument
Ensure that the QIAmini is switched off (power OFF) and main plug removed from power outlet
before you manually move the mechanical components of the instrument.
CAUTION
Damage to the instrument
Do not lean on/against the instrument or touchscreen.
Note: If hazardous material is spilled on or inside the QIAmini, the user is responsible for carrying out appropriate
decontamination.
Electrical safety
QIAmini is powered by a Safety Extra–Low Voltage (SELV) 24 V DC supply provided through a certified power
adapter connected to the mains. The instrument itself is not connected to the mains.
Note: If operation of the instrument is interrupted in any way (e.g., due to interruption of the power supply or a
mechanical error), first switch off the QIAmini instrument, then disconnect the electrical cord from the power supply
before attempting troubleshooting or service activity.
To ensure satisfactory and safe operation of the QIAmini, follow the advice below:
• The line power cord of the power adapter must be connected to a line power outlet that has a protective
conductor (earth/ground).
• Place the instrument in a location so that the power cord is accessible and can be readily
connected/disconnected.
• Use only the power cord delivered by QIAGEN.
• Do not operate the instrument with any covers or parts removed.
[QIAmini User Manual xx/2026
12
GLO-SOP-52-01-006-A09 Rev.02
• If liquid has spilled inside the instrument, switch off the instrument, disconnect it from the power outlet, and
contact QIAGEN Technical Support for advice before attempting any troubleshooting.
• If the instrument becomes electrically unsafe, prevent other personnel from operating it and contact
QIAGEN Technical Support.
The instrument may be electrically unsafe when:
• The QIAmini or the line power cord appears to be damaged.
• The QIAmini has been stored in unfavorable conditions for a prolonged period.
• The QIAmini has been subjected to severe transport stresses.
• Liquids have come into direct contact with electrical components of the QIAmini.
• The power cord has been exchanged with a power cord that was not intended to be used with the
QIAmini.
Operating Conditions
Parameters such as temperature range and humidity range are described in Section 9 (see page x).
Before proceeding, it is recommended that you familiarize yourself with the features of the instrument as described
in Sections 0-0.
The door of the QIAmini must remain closed. Open the door only when instructed to do so by the user manual or
instrument software.
WARNING
Explosive atmosphere
The QIAmini is not designed for use in an explosive atmosphere.
WARNING
Risk of overheating
To ensure proper ventilation, maintain a minimum clearance of 10 cm at the sides and rear
of the QIAmini.
Slits and openings that ensure the ventilation of the instrument must not be covered.
[QIAmini User Manual xx/2026
13
GLO-SOP-52-01-006-A09 Rev.02
WARNING
Risk of explosion
The QIAmini is intended for use with reagents and substances supplied with QIAGEN kits. Use
of other reagents and substances may lead to fire or explosion.
CAUTION
Damage to the instrument
Direct sunlight may bleach parts of the instrument, cause damage to plastic parts. The
QIAmini must be located out of direct sunlight.
CAUTION
Damage to the instrument
Do not use the QIAmini in the vicinity of sources of strong electromagnetic radiation (for
example, unshielded, deliberately operated high-frequency sources or mobile radio
devices), or close to a centrifuge, because these can interfere with the proper operation.
[QIAmini User Manual xx/2026
14
GLO-SOP-52-01-006-A09 Rev.02
Biological safety
Specimens and reagents containing materials from humans should be treated as potentially infectious. Use safe
laboratory procedures as outlined in publications such as Biosafety in Microbiological and Biomedical Laboratories,
HHS (www.cdc.gov/labs/BMBL.html). You should be aware of the health hazard presented by such agents and
should use, store, and dispose of such samples according to the required safety regulations.
WARNING
Samples containing infectious agents
Samples used with the QIAmini may contain infectious agents. Handle such samples with the
greatest of care and in accordance with the required safety regulations.
Always wear safety glasses, gloves, and a lab coat.
The responsible body (for example, a laboratory manager) must take the necessary
precautions to ensure that the surrounding workplace is safe, and that the instrument
operators are suitably trained and not exposed to hazardous levels of infectious agents as
defined in the applicable Material Safety Data Sheets (MSDSs) or the OSHA1,* ACGIH,† or
COSHH‡ documents.
Venting for fumes and disposal of waste must be in accordance with all national, state, and
local health and safety regulations and laws.
* OSHA — Occupational Safety and Health Organization (United States of America)
† ACGIH – American Conference of Government Industrial Hygienists (United States of America)
‡ COSHH – Control of Substances Hazardous to Health (United Kingdom)
Chemicals
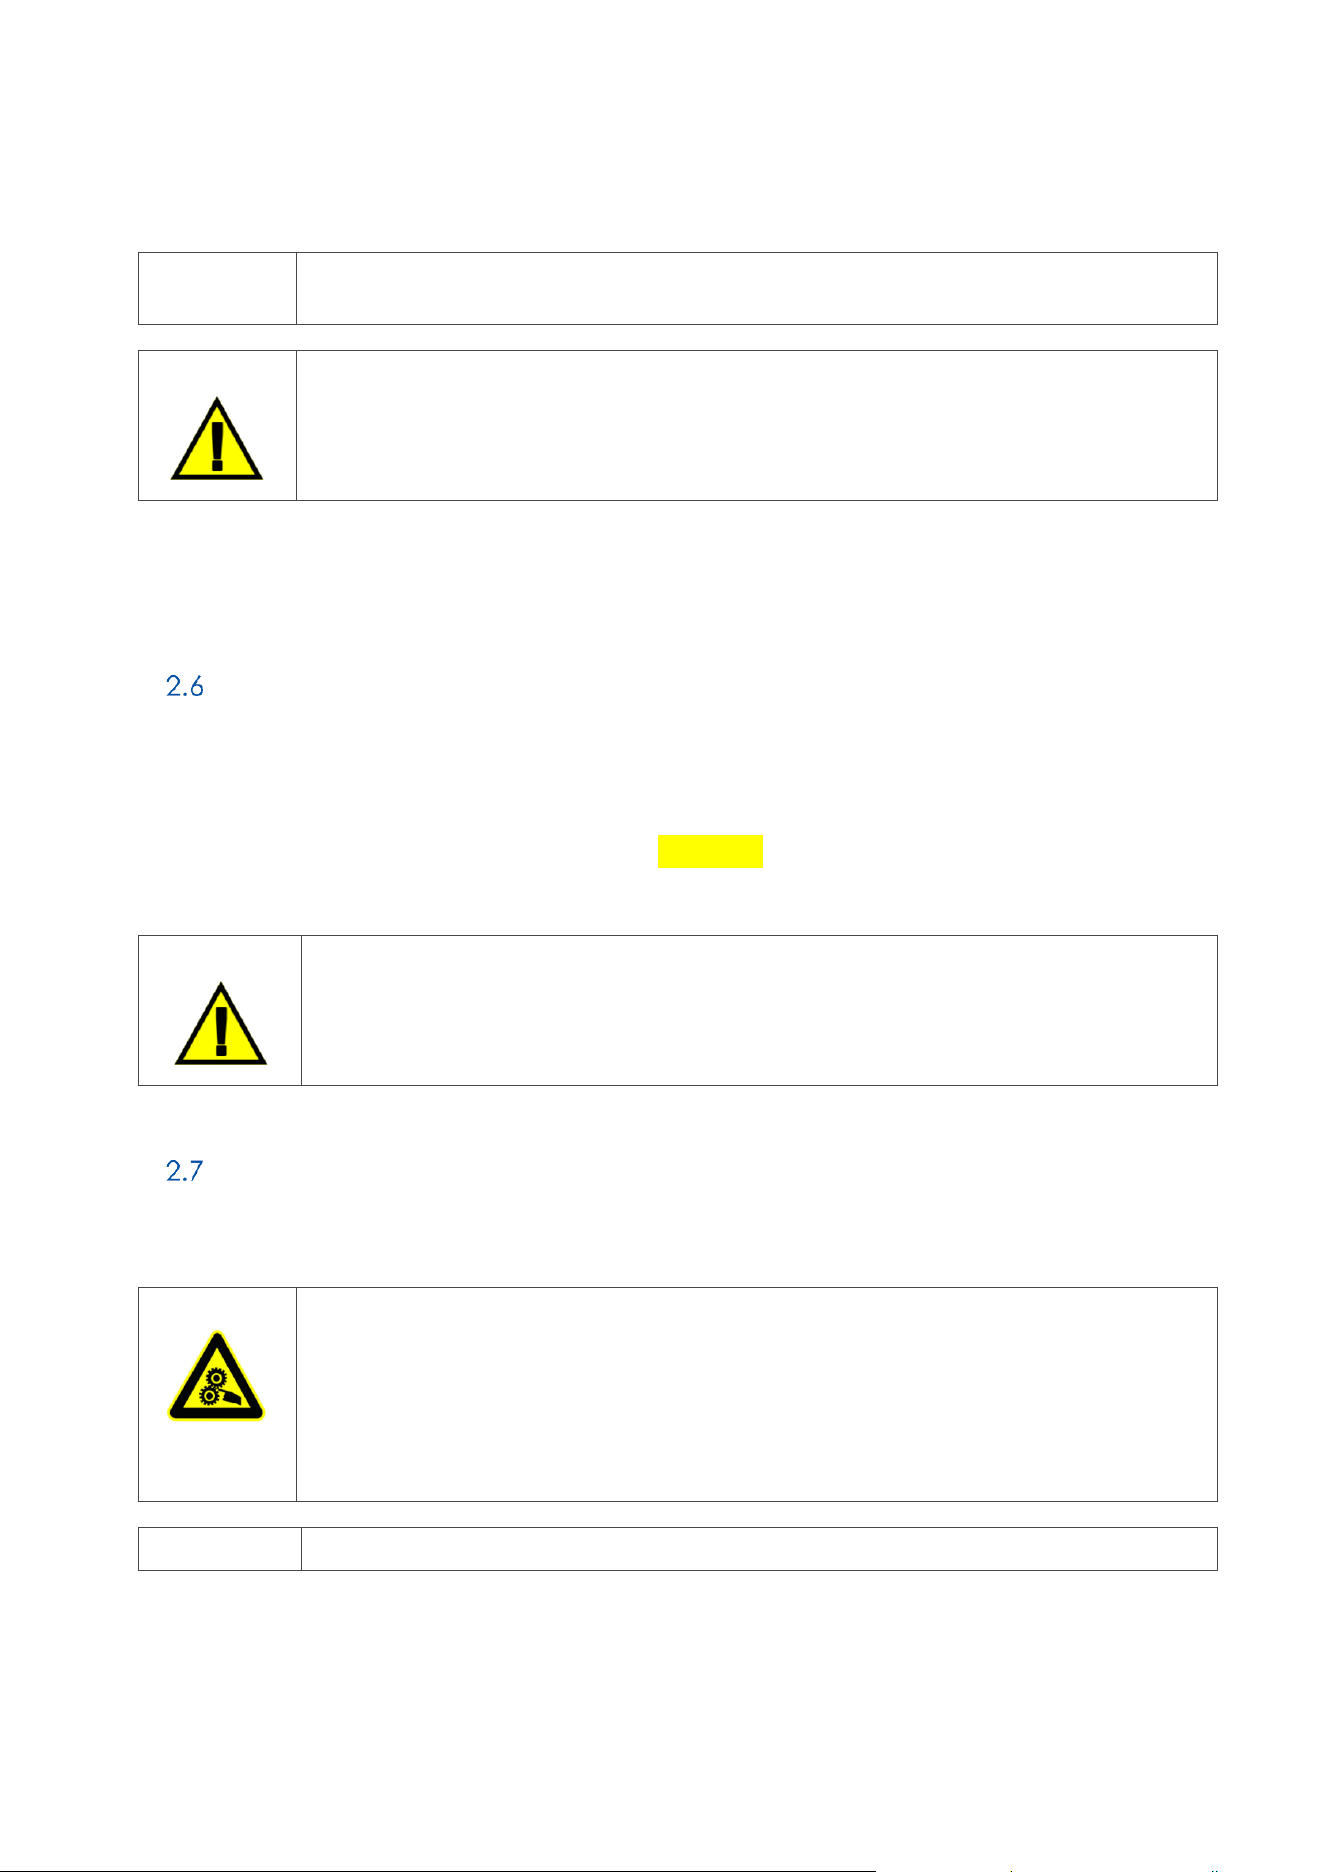
WARNING/
CAUTION
Risk of release of hazardous mercury
The QIAmini UV lamp contains mercury, which can be released upon breakage.
In case of breakage, the area must be ventilated and the lamp debris treated as hazardous
waste due to the presence of mercury
WARNING
Hazardous chemicals
Some chemicals used with the QIAmini may be hazardous or may become hazardous after
completion of purification. Always wear safety glasses, gloves, and a lab coat.
The responsible body (for example, a laboratory manager) must take the necessary
precautions to ensure that the surrounding workplace is safe, and that the instrument
operators are suitably trained and not exposed to hazardous levels of infectious agents as
defined in the applicable Material Safety Data Sheets (MSDSs) or the OSHA1,* ACGIH,† or
COSHH‡ documents.
[QIAmini User Manual xx/2026
15
GLO-SOP-52-01-006-A09 Rev.02
Venting for fumes and disposal of waste must be in accordance with all national, state, and
local health and safety regulations and laws.
WARNING
Toxic fumes
Do not use bleach to clean or disinfect the QIAmini or the labware, as bleach in contact with
salts from the buffers can produce toxic fumes.
Note: If you work with volatile solvents, toxic substances, etc., you must provide an efficient laboratory ventilation
system to remove vapors that may be produced.
Waste disposal
Used consumables, such as QIAmini cartridges and rod covers, may contain hazardous chemicals or infectious agents
from the purification process. Such waste must be collected and disposed of properly, according to local safety
regulations.
For information about how to dispose of the QIAmini, see Appendix A: Waste Electrical and Electronic Equipment
(WEEE).
CAUTION
Hazardous chemicals and infectious agents
Waste may contain toxic or infectious material and must be disposed of properly. Refer to
your local safety regulations for proper disposal procedures.
Mechanical hazards
The door of the QIAmini must remain closed during operation of the instrument.
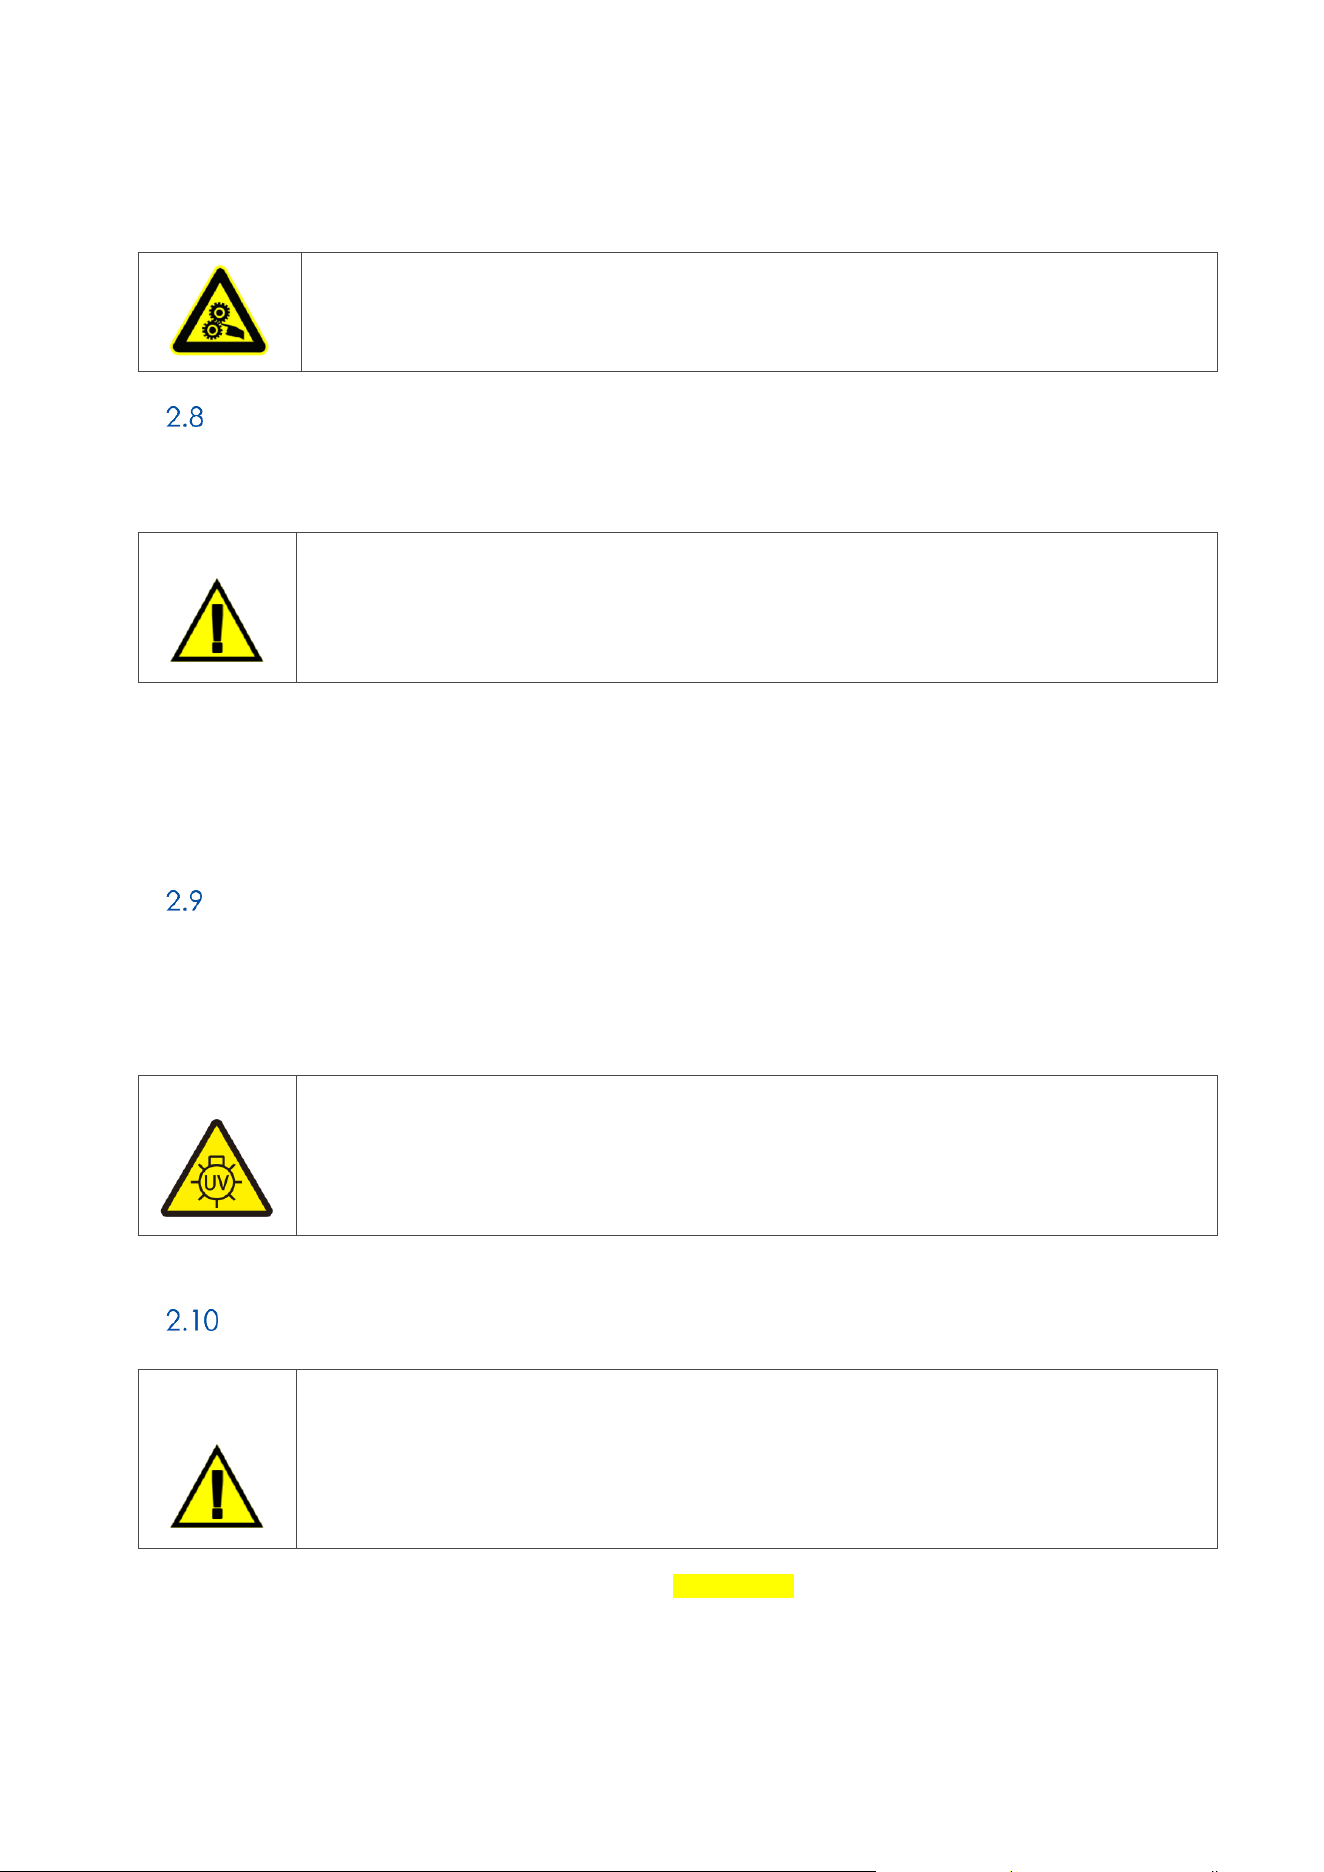
WARNING
Moving parts
To avoid contact with moving parts during the operation of the QIAmini, the instrument must
be operated with the door closed.
The door shall be closed during operation. A door sensor detects the door position during
protocol runs. If the door sensor is not functioning correctly, contact QIAGEN Technical
SupportSupport.
WARNING
Moving parts
[QIAmini User Manual xx/2026
16
GLO-SOP-52-01-006-A09 Rev.02
Avoid contact with moving parts during operation of the QIAmini. Under no circumstances
should hands be placed behind the rear cover. Do not attempt to remove any plasticware
from the worktable while the instrument is operating.
Heat hazard
The QIAmini worktable contains a heating system.
WARNING
Hot surface
The heating system can reach temperatures of up to 120C . Avoid touching it when it is hot,
in particular, shortly after a run has been carried out.
Radiation
The QIAmini instrument has a UV-C lamp, which can be used to support decontamination procedures. A door sensor
ensures that the operation of the UV lamp stops if door is opened. If the door sensor is not functioning correctly,
contact QIAGEN Technical Support.
WARNING
UV radiation
Avoid looking directly into UV light. Do not expose your skin to UV light.
Maintenance safety
WARNING/
CAUTION
Risk of personal injury and material damage
Only perform maintenance that is specifically described in this user manual.
Perform the maintenance as described in the Section 6 (see page 66). QIAGEN charges for repairs that are
required due to incorrect maintenance.
[QIAmini User Manual xx/2026
17
GLO-SOP-52-01-006-A09 Rev.02
WARNING/
CAUTION
Risk of personal injury and material damage
Improper use of the QIAmini may cause personal injuries or damage to the instrument. The
QIAmini must only be operated by qualified personnel who have been appropriately trained.
Operate the QIAmini only as described in the Section 5 (see page 42). QIAGEN charges for repairs that are required
due to incorrect operation.
Warning
Risk of fire
After cleaning the QIAmini with alcohol-based disinfectant, leave the instrument door open
to allow flammable vapors to disperse.
Only clean the QIAmini with alcohol-based disinfectant when worktable components have
cooled down.
CAUTION
Damage to the instrument
Do not use bleach, solvents, or reagents containing acids, alkalis, or abrasives to clean the
QIAmini.
CAUTION
Damage to the instrument
Direct sunlight may bleach parts of the instrument, cause damage to plastic parts. The
QIAmini must be located out of direct sunlight.
CAUTION
Damage to the instrument
Do not use spray bottles containing alcohol or disinfectant to clean surfaces of the QIAmini.
Spray bottles should be used only to clean items that have been removed from the
worktable and if permitted by local laboratory operating practices.
CAUTION
Damage to the instrument
After wiping the worktable with paper towels, make sure that no residual pieces of paper
towel remain. Pieces of paper towel remaining on the worktable could lead to a worktable
collision.
WARNING/
CAUTION
Risk of personal injury and material damage
Do not open any panels on QIAmini.
Only perform maintenance as described in this user manual.
[QIAmini User Manual xx/2026
18
GLO-SOP-52-01-006-A09 Rev.02
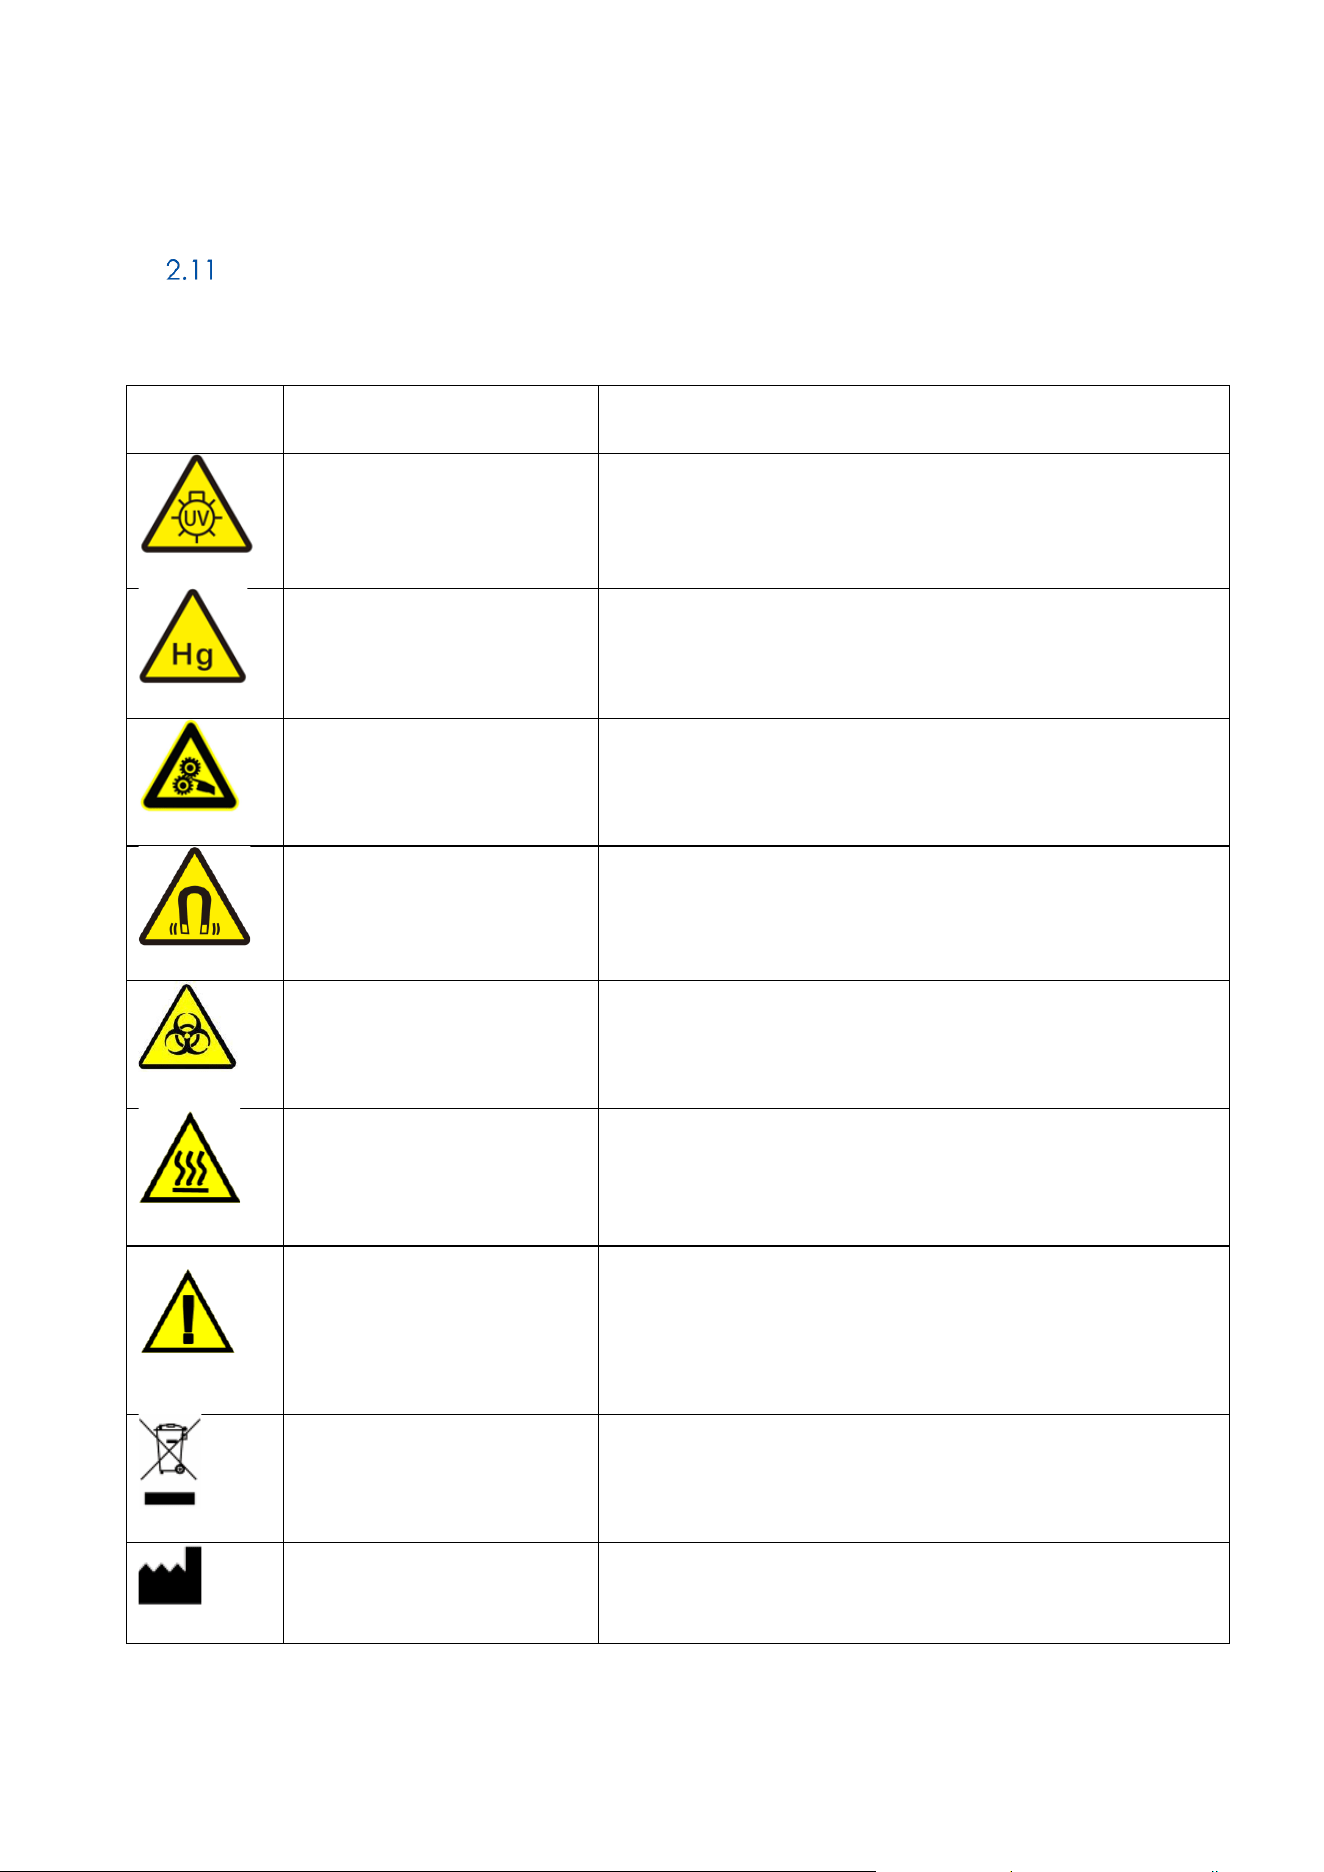
Symbols on the QIAmini
The following symbols appear on the QIAmini instrument.
Symbol
Location
Description
Inside instrument on the
workdeck
UV irradiation
Inside instrument on the
workdeck
Hg
Inside instrument on the
workdeck
Finger squeezing
Inside instrument on the
workdeck
Strong magnetic field – Take care to avoid exposure to a strong
magnetic field
Inside instrument on the
workdeck
Biohazard — the workdeck may be contaminated with
biohazardous material and must be handled with gloves.
Inside instrument on the
workdeck and on the
Cartridge Frame
Heat hazard – do not perform maintenance before the system
has cooled down.
Bottom of the instrument
Storage Position for transport safety screw
Note: .For Placing the screw after removal, to prevent the srew
loss, for next use.
Type plate on the right side
panel
WEEE about the disposal of waste electrical and electronic
equipment for Europe and rest of the world.
Type plate on the right side
panel
Manufacturer.
[QIAmini User Manual xx/2026
19
GLO-SOP-52-01-006-A09 Rev.02
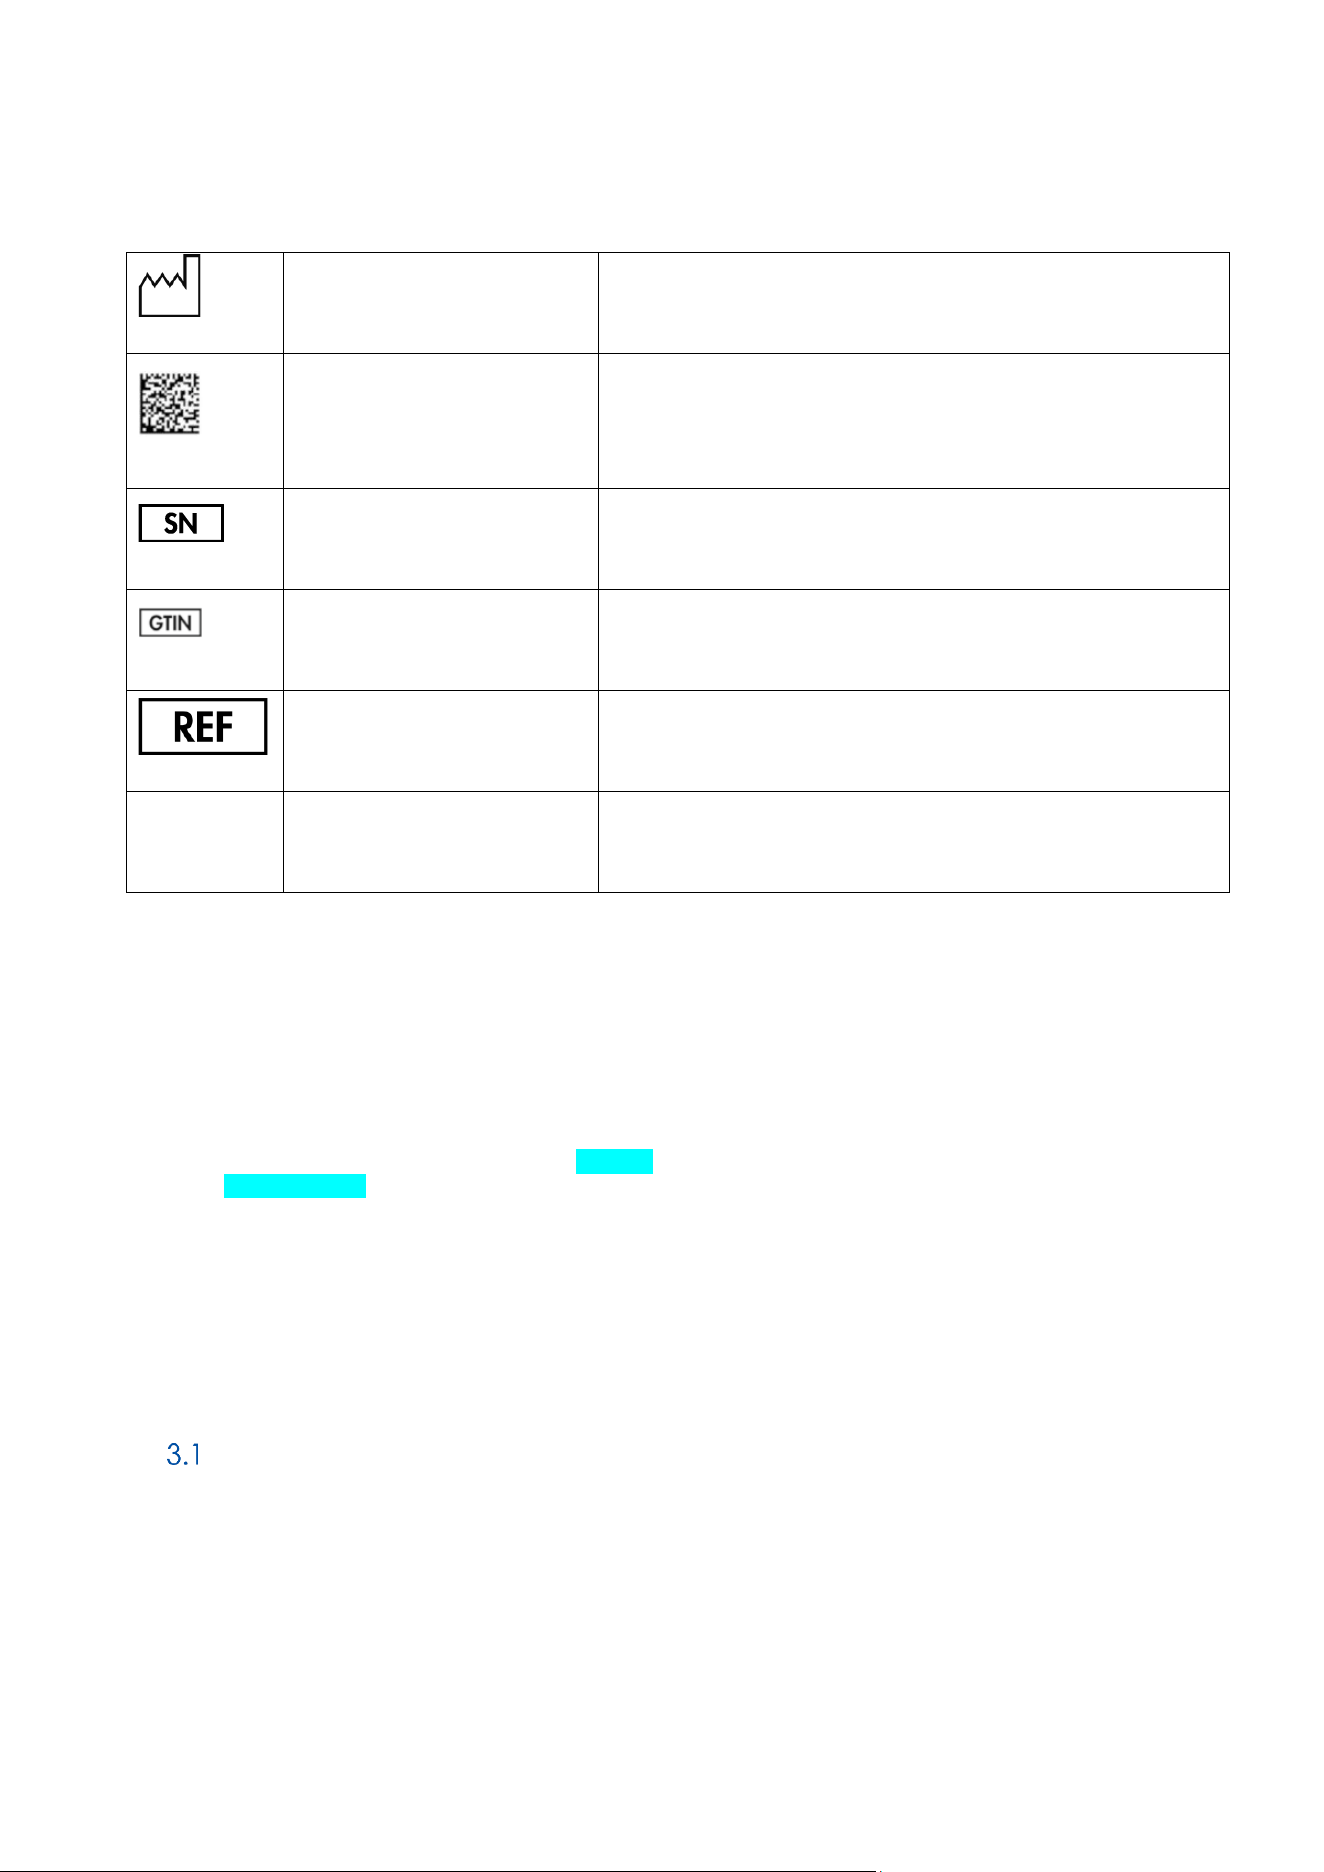
Type plate on the back of the
instrument
Instrument manufacturing date
Type plate on the back of the
instrument
Unique Device Identifier (UDI) as a 2D bar code in Data
Matrix format
Type plate on the back of the
instrument
Instrument serial number
Type plate on the back of the
instrument
Global Trade Item Number
Type plate on the back of the
instrument
Catalog number
Type plate on the back of the
instrument
Bluetooth
3 General Description
The QIAmini is used for research use only applications and performs automated nucleic acid purification from up
to 8 samples per single run using magnetic-particle technology.
QIAGEN QIAmini kits developed to purify nucleic acids using the QIAmini system come with specific protocols that
can be downloaded on the QIAGEN website (add link), or accessed using the QIAmini Suite (QIAmini companion
software)(add reference). The protocols can be adapted according to experimental setup needs via QIAGEN
Suite and transferred to the instrument via USB drive, Bluetooth or Barcode scanner. The instrument’s touchscreen
display allows the user to easily select and start protocols.
When the protocol run starts, the isolation of nucleic acids is carried out automatically. The mixing and separation
of magnetic particles are performed by the processing unit consisting of the rod cover holder carrying the rod
cover and the magnet head module. If required by the protocol, the temperature of the reagents is controlled by
the heating system to enable heated lysis or elution.
QIAmini principle
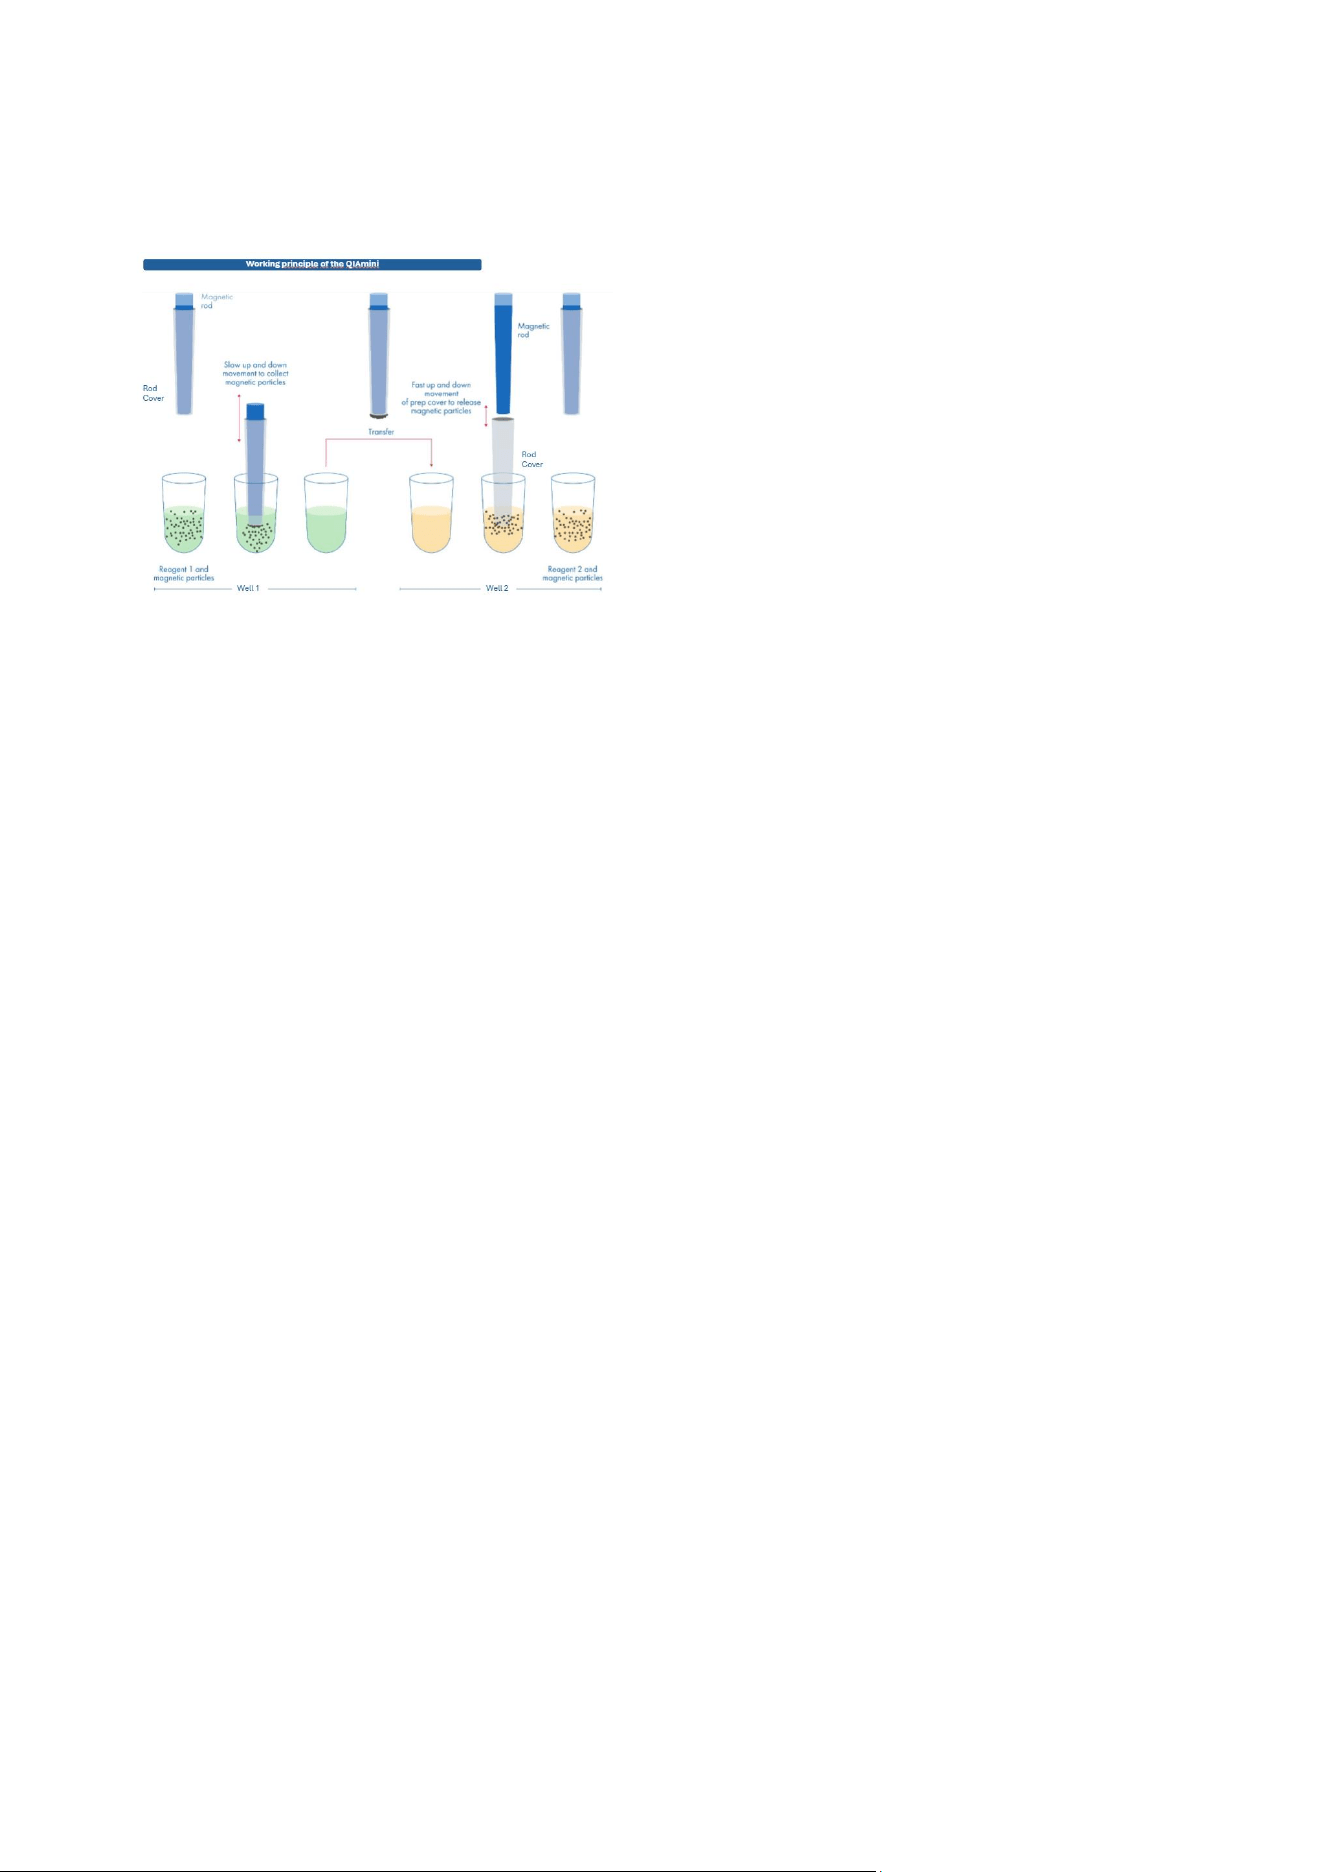
Sample preparation using the QIAmini usually consists of four main steps: lyse, bind, wash, and elute.
• Samples are lysed and heat incubated, if required by the protocol.
• Nucleic acids bind to the surface of the magnetic particles and are washed to remove contaminants.
• Purified nucleic acid is eluted.
[QIAmini User Manual xx/2026
20
GLO-SOP-52-01-006-A09 Rev.02
Figure 1: QIAmini working principle
Attracting magnetic particles
To attract magnetic particles, the magnetic rods are first fully inserted into the QIAmini rod covers. The magnetic
rods with rod covers then move slowly up and down in the well containing the sample to ensure maximal attraction
of magnetic particles.
Washing magnetic particles
The QIAmini washes magnetic particles by transferring them from one wash solution to another. To improve washing
efficiency, the rod covers are designed to minimize liquid transfer along with the magnetic particles. To ensure that
magnetic particles are evenly distributed in a solution during a long incubation, the QIAmini either mixes the solution
continuously or periodically by moving the rod cover.
Transfer magnetic particles
To transfer magnetic particles, the magnetic rods with rod cover are first moved down into a well. The magnetic
rods are then withdrawn from the rod cover, and the rod cover is lowered into the well. The rod cover is moved
quickly up and down to ensure maximal release and mixing of magnetic particles in the solution in the well.
Concentrating magnetic particles
The QIAmini concentrates magnetic particles by attracting the magnetic particles from a solution of large volume
and releasing the particles in a solution of low volume.
[QIAmini User Manual xx/2026
21
GLO-SOP-52-01-006-A09 Rev.02
External features of the QIAmini
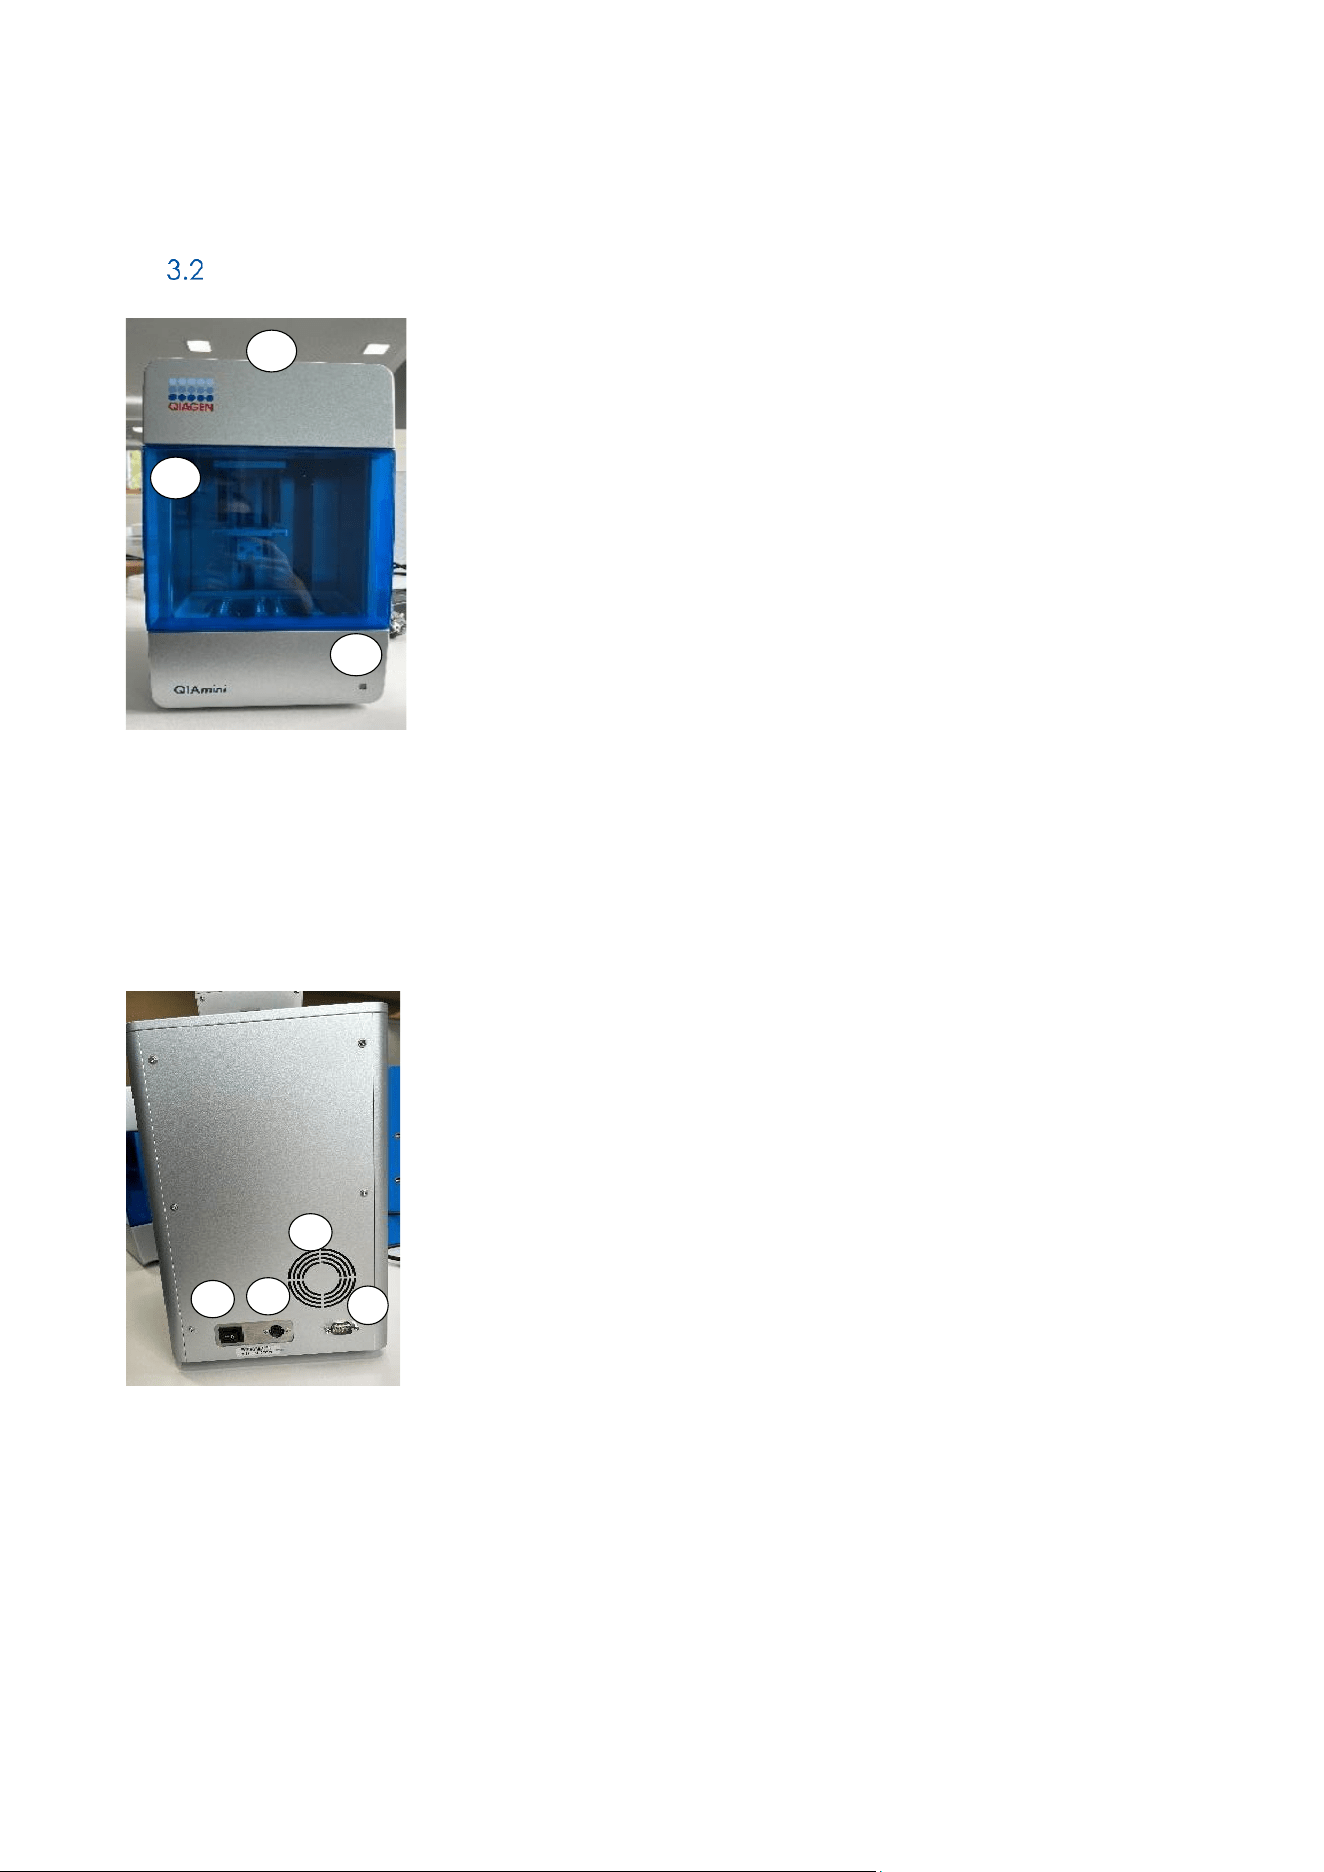
Figure 2. The front of the QIAmini.
1
Transparent Door (Cover)
2
4.3-inch Touch Display
3
Status indicator Light
Figure 3. The back of the QIAmini.
4
Power Switch
5
Power Socket
6
Ventilation opening
7
Barcode Scanner Port
1
2
3
4
5
6
7
[QIAmini User Manual xx/2026
22
GLO-SOP-52-01-006-A09 Rev.02
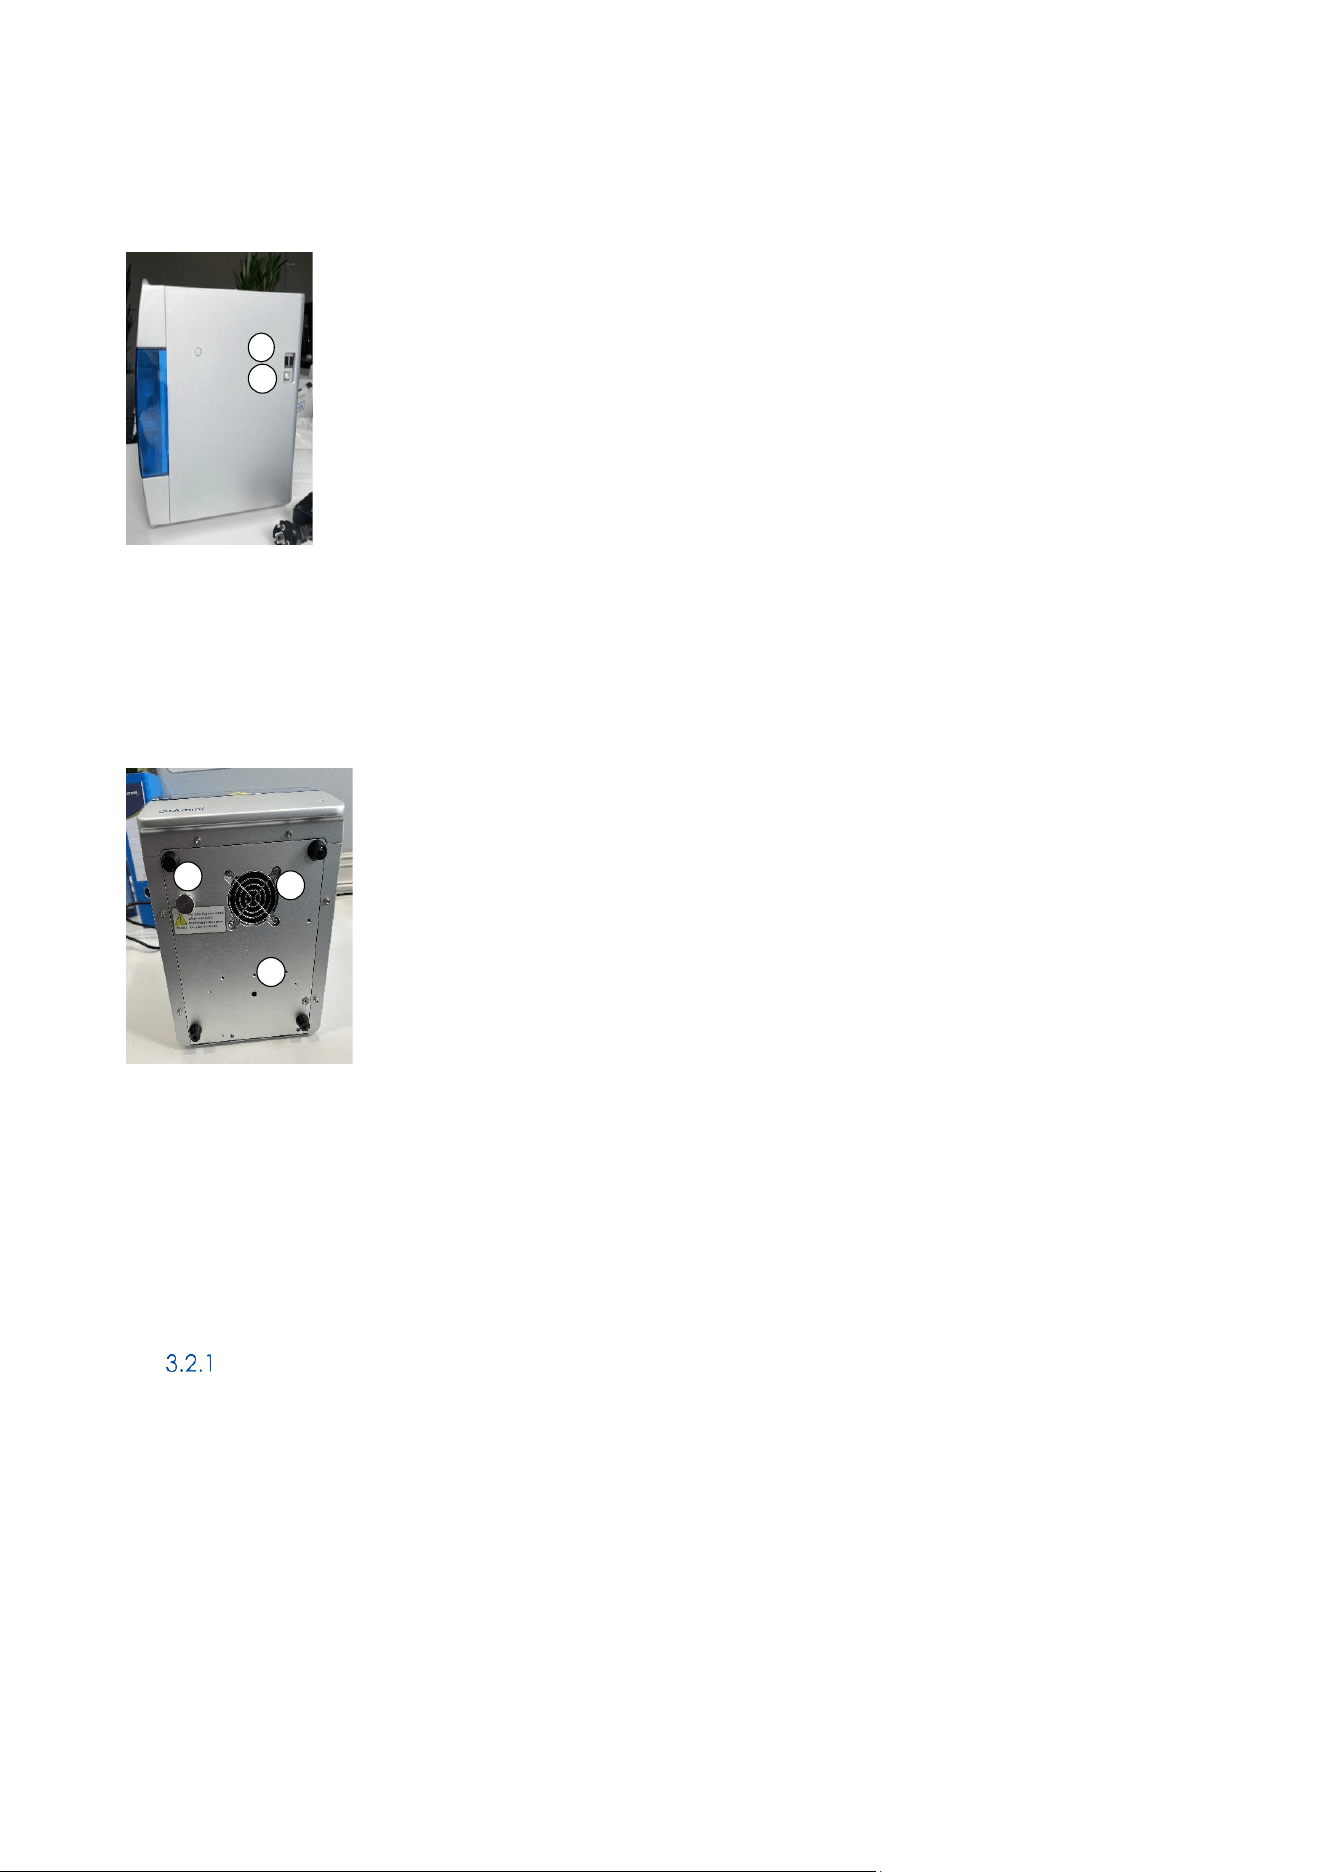
Figure 4. The right side of the QIAmini
8
USB Port
9
PC Port (only for production)
Figure 5. The underside of the QIAmini.
10
Storage Position for Transport Screw
11
Transport Screw Position
12
Ventilation outlet
4.3-inch Touch Display
The QIAmini is controlled using a swivel-mounted 4.3-inch touchscreen. The GUI is displayed on the touchscreen,
allowing the user to operate the instrument, upload and download protocols and reports, start runs and change
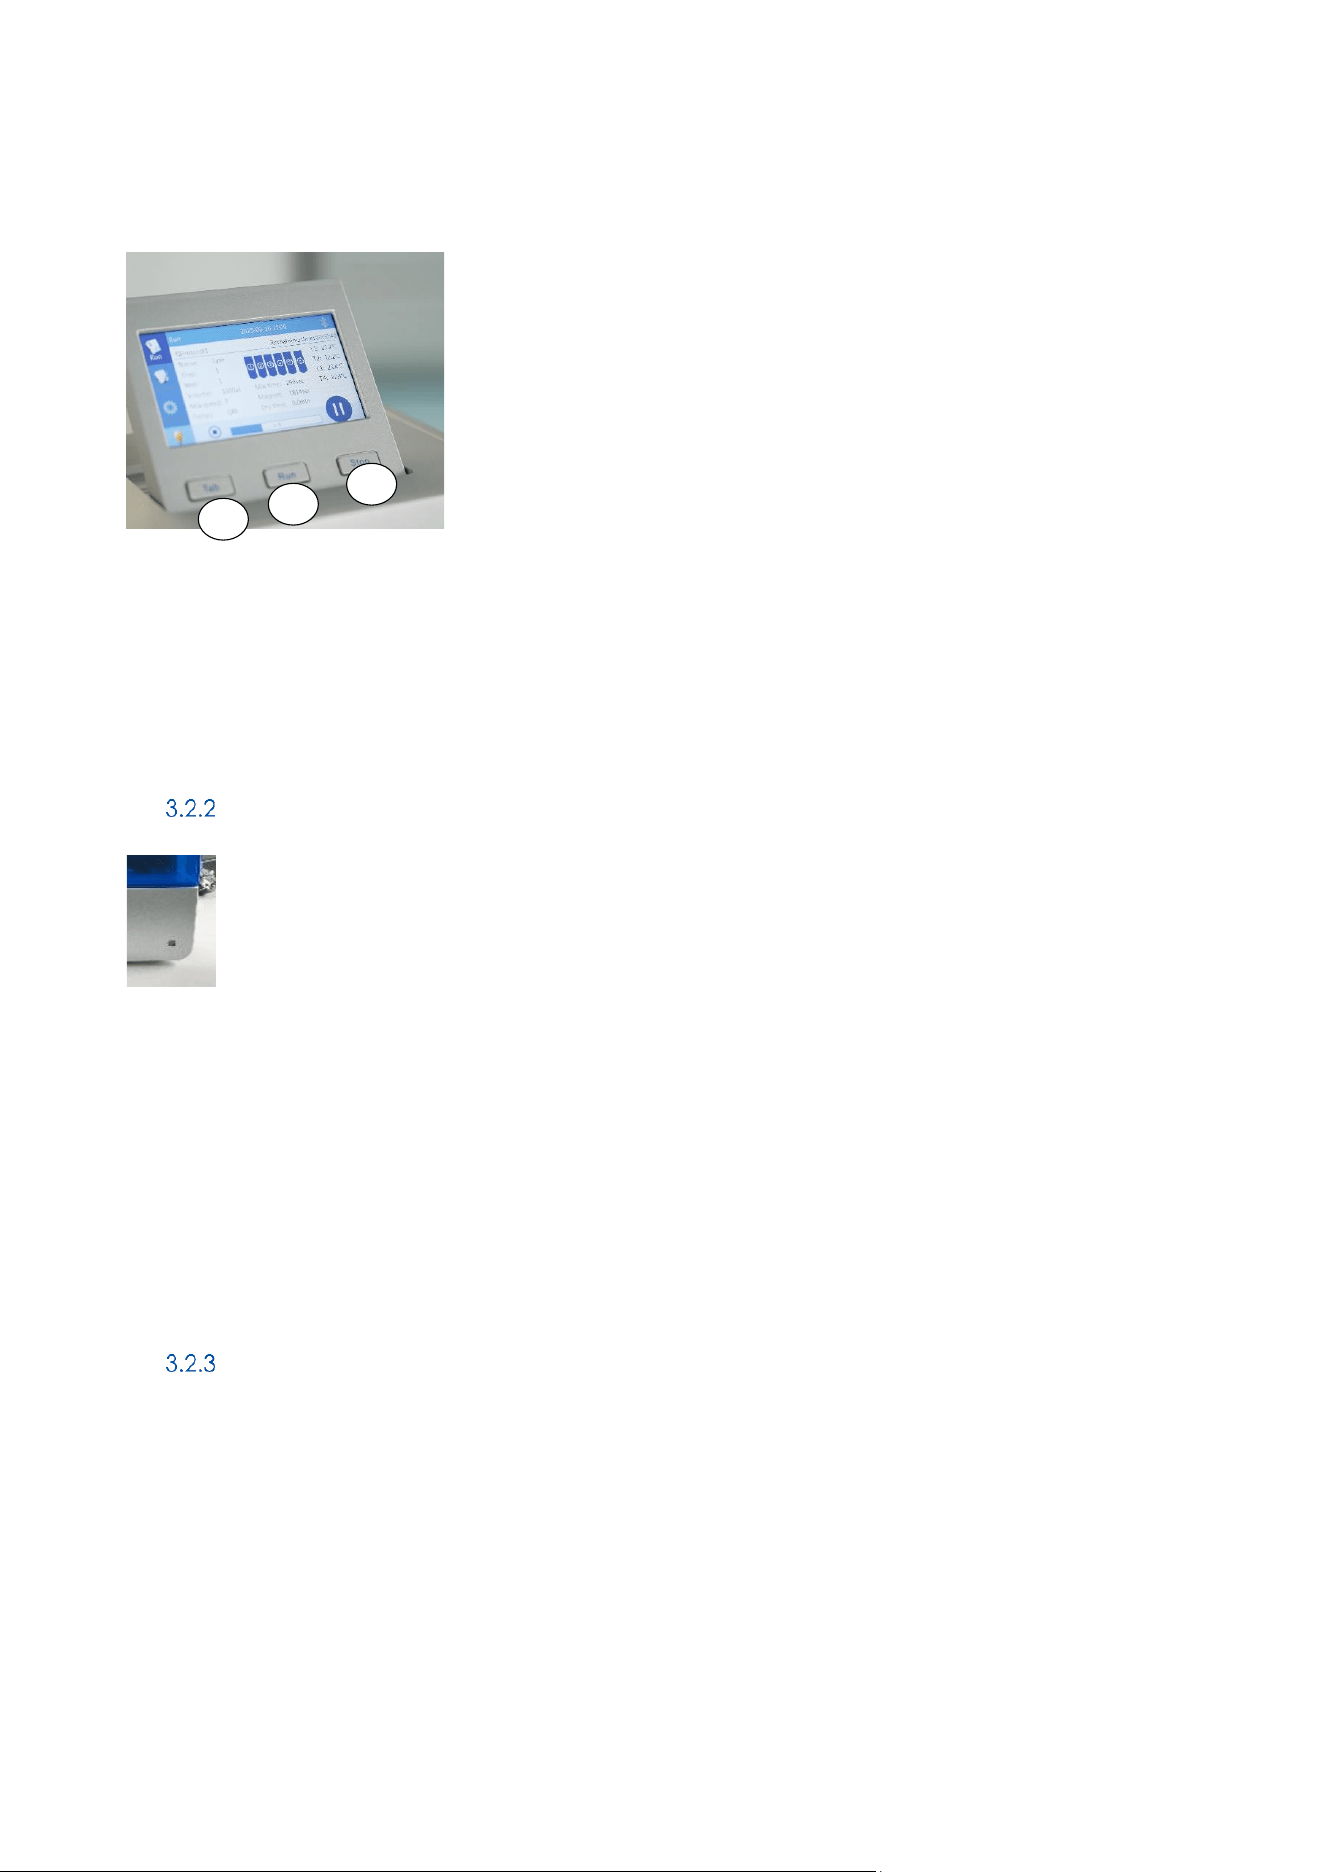
settings. During sample processing, the touchscreen shows the protocol status and remaining time. Three shortcut
keys for operations can be found beneath the touchscreen, which can be used to switch between protocols
(Fehler! Verweisquelle konnte nicht gefunden werden., 13), start the protocol (Fehler! Verweisquelle konnte nicht
gefunden werden., 14) or stop the run (Fehler! Verweisquelle konnte nicht gefunden werden., 15).
8
9
10
11
12
[QIAmini User Manual xx/2026
23
GLO-SOP-52-01-006-A09 Rev.02
Figure 6: The QIAmini Touch Display
13
Tab: Switch between protocols
14
Run: Start the protocol
15
Stop: Stop the protocol
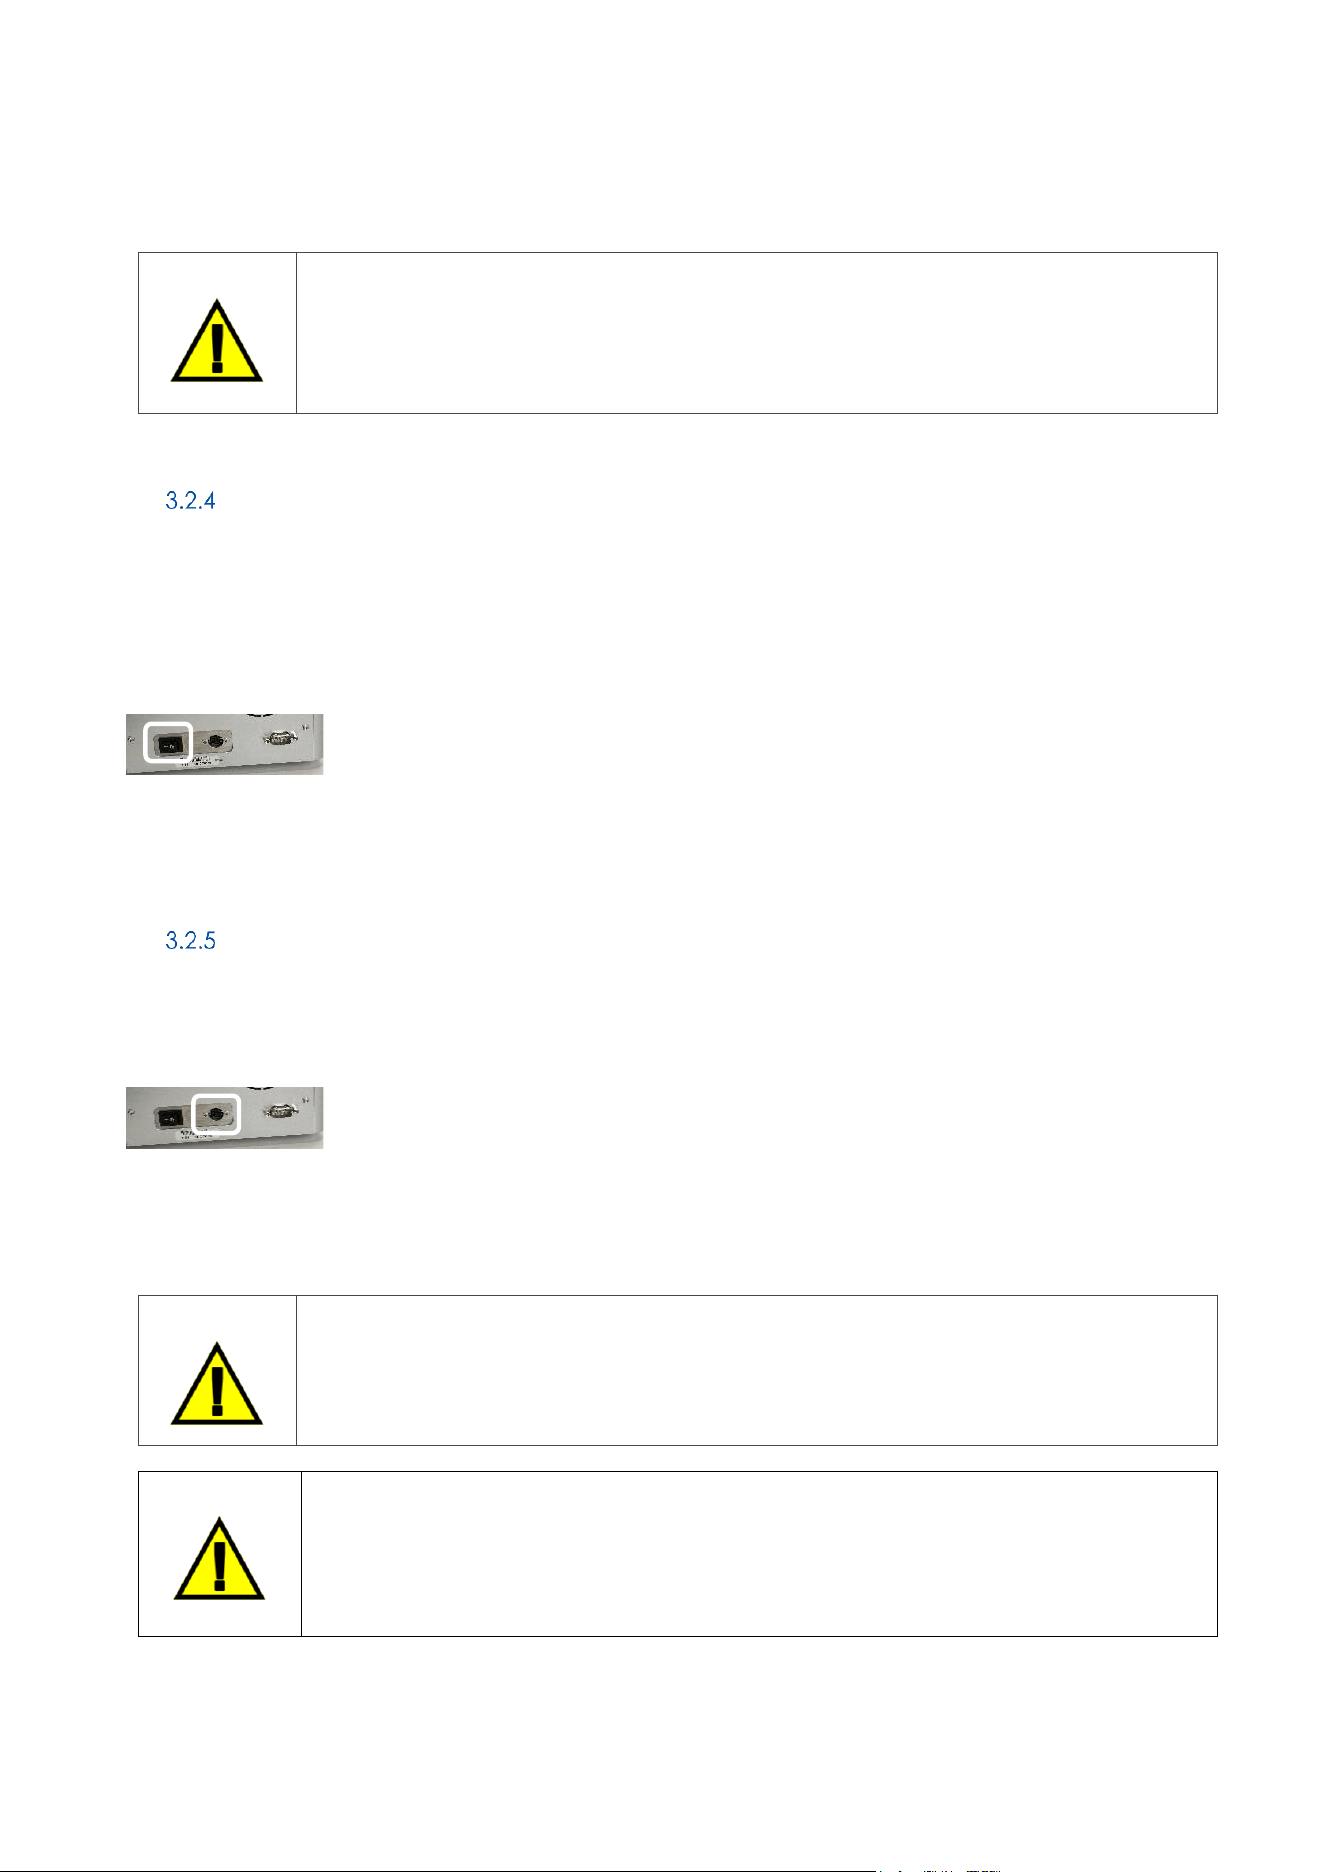
Status indicator Light
Figure 7: The QIAmini Status Light
The QIAmini status indicator light is positioned in the lower right corner of the instrument front cover.
Green status light: Protocol run ongoing
Blue status light: Protocol paused
Red status light: UV-Run ongoing or Alarm (e.g. run interrupted by open door)
Transparent Door
The QIAmini door protects the interior of the instrument from external contamination during protocol runs.
Additionally, the door protects operators from moving parts during protocol runs and UV irradiation during
decontamination procedures.
The door must be closed to start a protocol run and must remain closed until the GUI notifies the operator that the
run is finished. A door sensor ensures that operation is interrupted if the door is opened during protocol or UV
decontamination run. The door can be manually opened to gain access to the workdeck when no protocol is
running.
13
14
15
[QIAmini User Manual xx/2026
24
GLO-SOP-52-01-006-A09 Rev.02
WARNING
Moving parts
To avoid contact with moving parts during the operation of the QIAmini, the instrument must
be operated with the door closed. The door sensor detects the door position and interrupts
instrument operation if the door is opened. If the door sensor is not functioning correctly,
contact QIAGEN Technical Support.
Power Switch
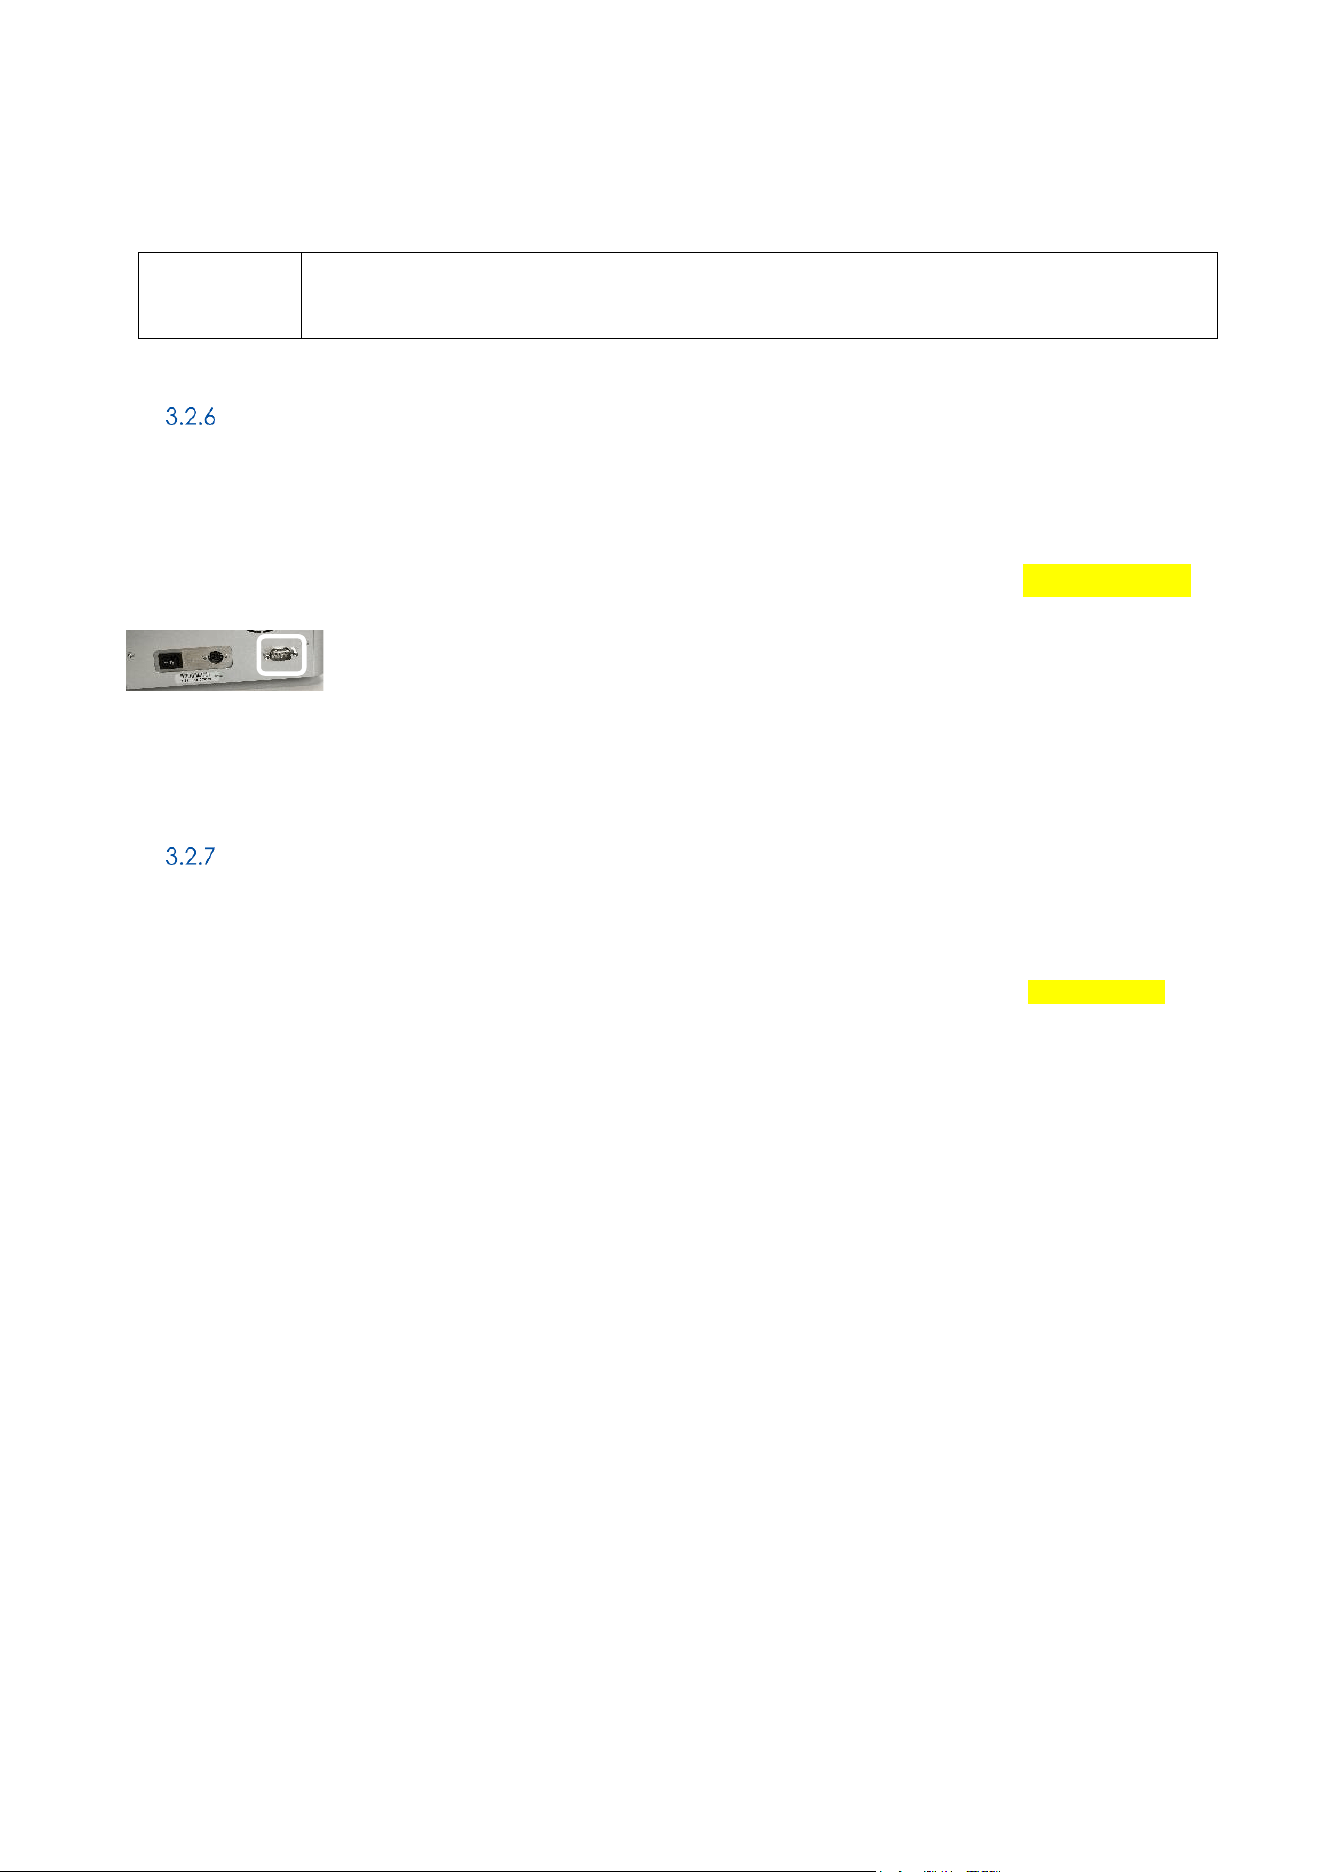
The power switch is located on the back of the QIAmini. To turn on the QIAmini, press the button. After pressing the
button, the status indicator (3.2.2) lights up, the startup screen appears on the touchscreen, and the instrument
initializes. To save energy, the QIAmini can be turned off when not in use. To turn off the QIAmini, press the power
switch; the instrument software does not need to be shut down separately.
Figure 8: Location of the power switch highlighted by white frame
Power Cord Socket
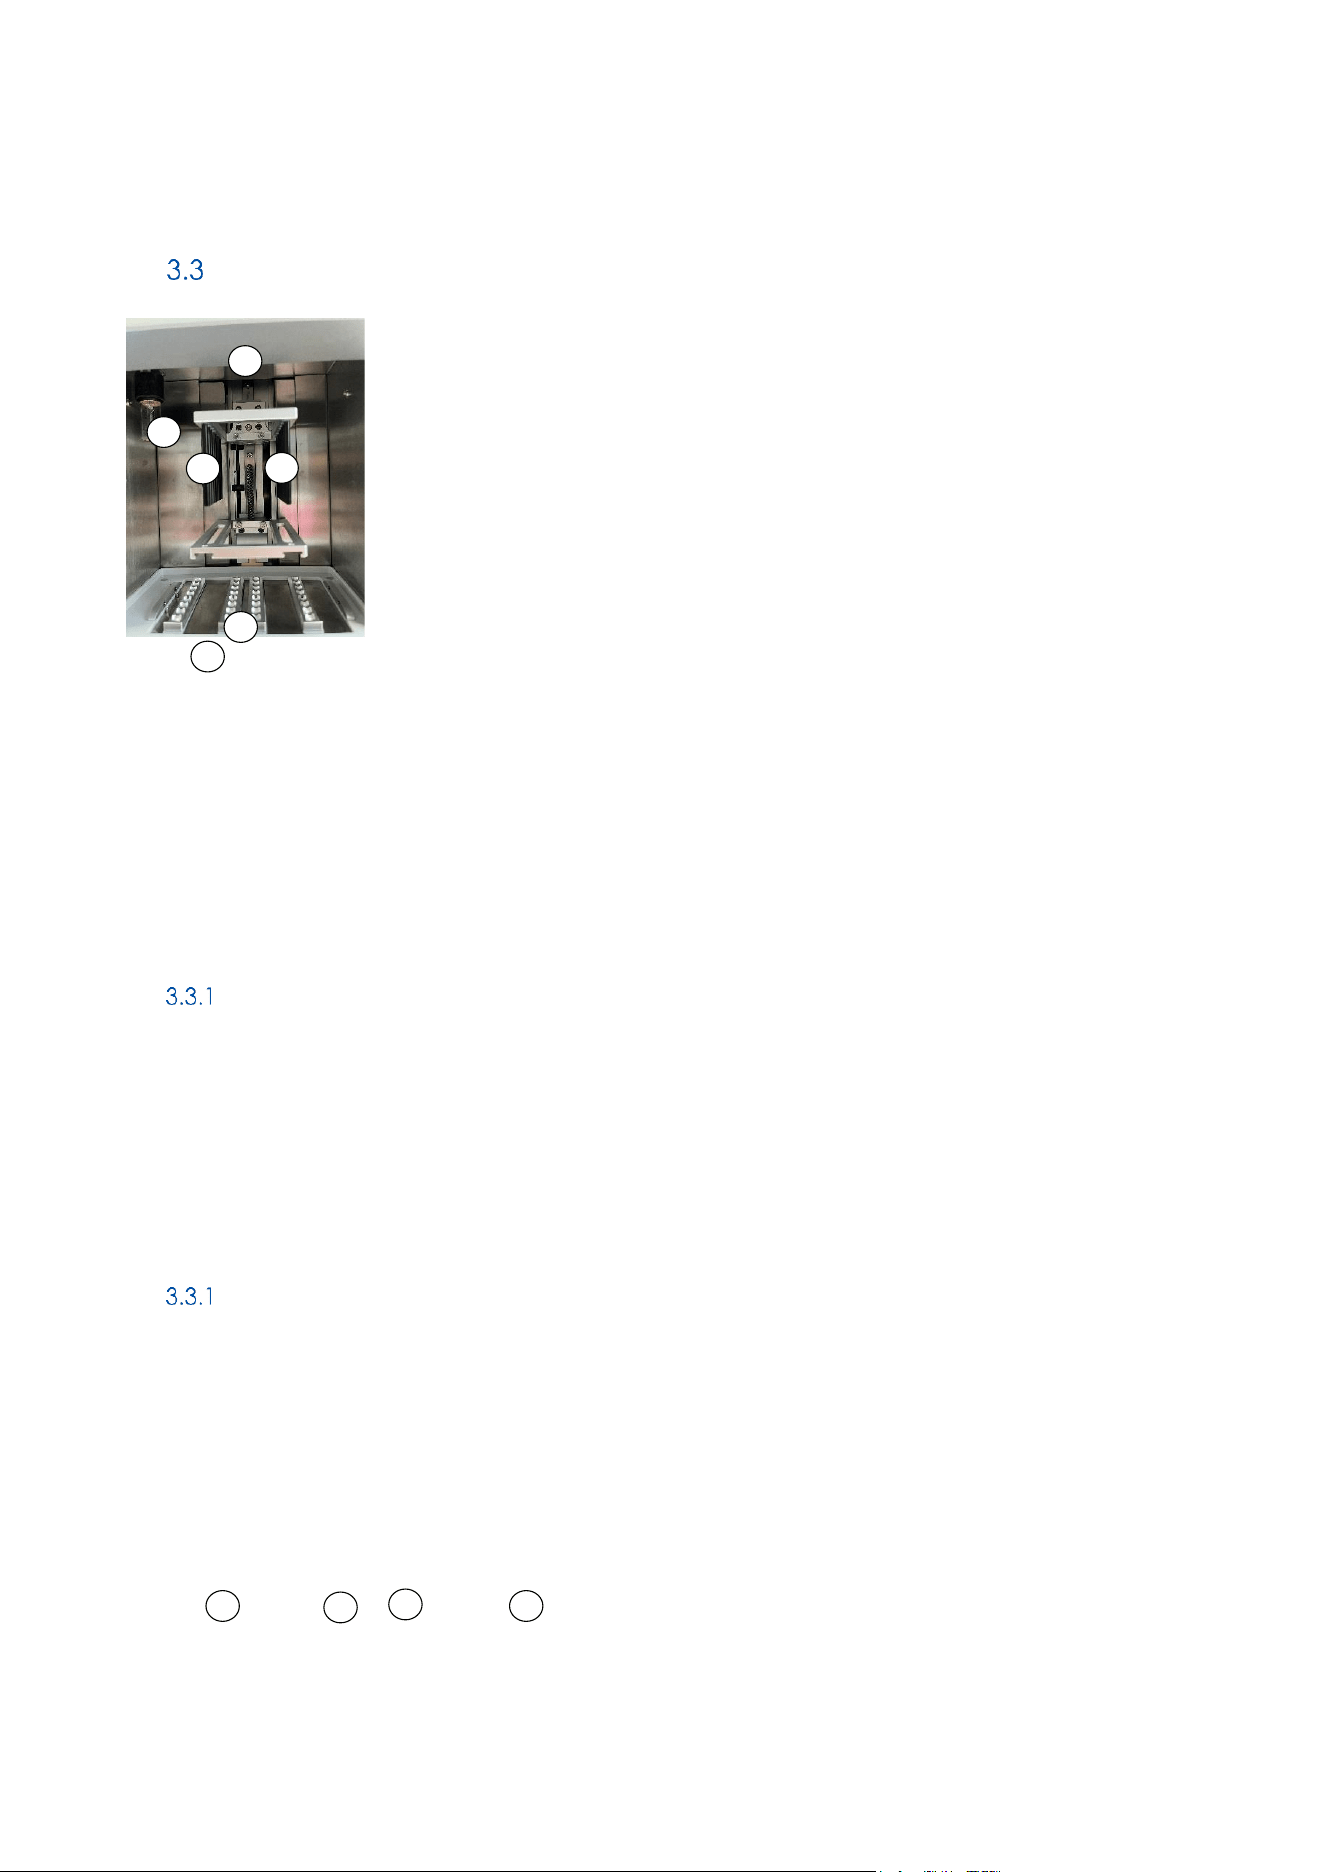
The power cord socket is located on the back of the QIAmini (highlighted white in image below) and is used for
connecting the instrument to a power outlet via the supplied power cord and AC/DC adaptor.
Figure 9. Location of the power cord socket (highlighted by white frame).
Note: The QIAmini is equipped with a country specific cable.
WARNING
Electrical hazard
Any interruption of the protective conductor (earth/ground lead) inside or outside the
instrument or disconnection of the protective conductor terminal is likely to make the
instrument dangerous. Intentional interruption is prohibited.
WARNING
Damage to electronics
Before powering ON the instrument, make sure that the QIAmini power supply is used.
Use of an AC/DC power adapter other than the one supplied by QIAGEN may damage
the electronics.
[QIAmini User Manual xx/2026
25
GLO-SOP-52-01-006-A09 Rev.02
Barcode Scanner Port
The barcode scanner of the QIAmini is an optional accessory and can be connected to the QIAmini using the barcode
scanner (RS232 Pot) port in the back of the instrument (Figure 10). The scanner is used for transferring protocols via
QR-code to the QIAmini
For more information on how to use the barcode scanner, refer to the Import/Export of protocols (see section 5.2.1).
Figure 10. Location of the Barcode Scanner port (highlighted with a white frame).
USB Port
The QIAmini has two USB ports which are located on the right side panel of the instrument. The USB ports allow you
to connect a USB drive. The USB drive can be used to import or export protocols (Section 5.2.1), export run reports
(Section Fehler! Verweisquelle konnte nicht gefunden werden.) or create a support package (Section 5.1.2).
Important: Use only the USB drive provided by QIAGEN. Do not connect other USB drive devices to USB ports.
Important: Do not remove the USB drive or interrupt power while downloading or transferring data to and from the
instrument.
[QIAmini User Manual xx/2026
26
GLO-SOP-52-01-006-A09 Rev.02
Internal features of the QIAmini
Figure 11. Internal view of the QIAmini.
Processing Unit
The processing unit consists of the magnet head (Figure 11, 1a) and the rod cover holder (Figure 11, 1b). The magnet
head is comprised of two rows with 8 magnetic rods each. The rod cover holder carries the rod covers during the
run. It performs the mixing steps and, when synchronized with the magnet head, extracts the beads from the well
liquid for transfer into the next well.
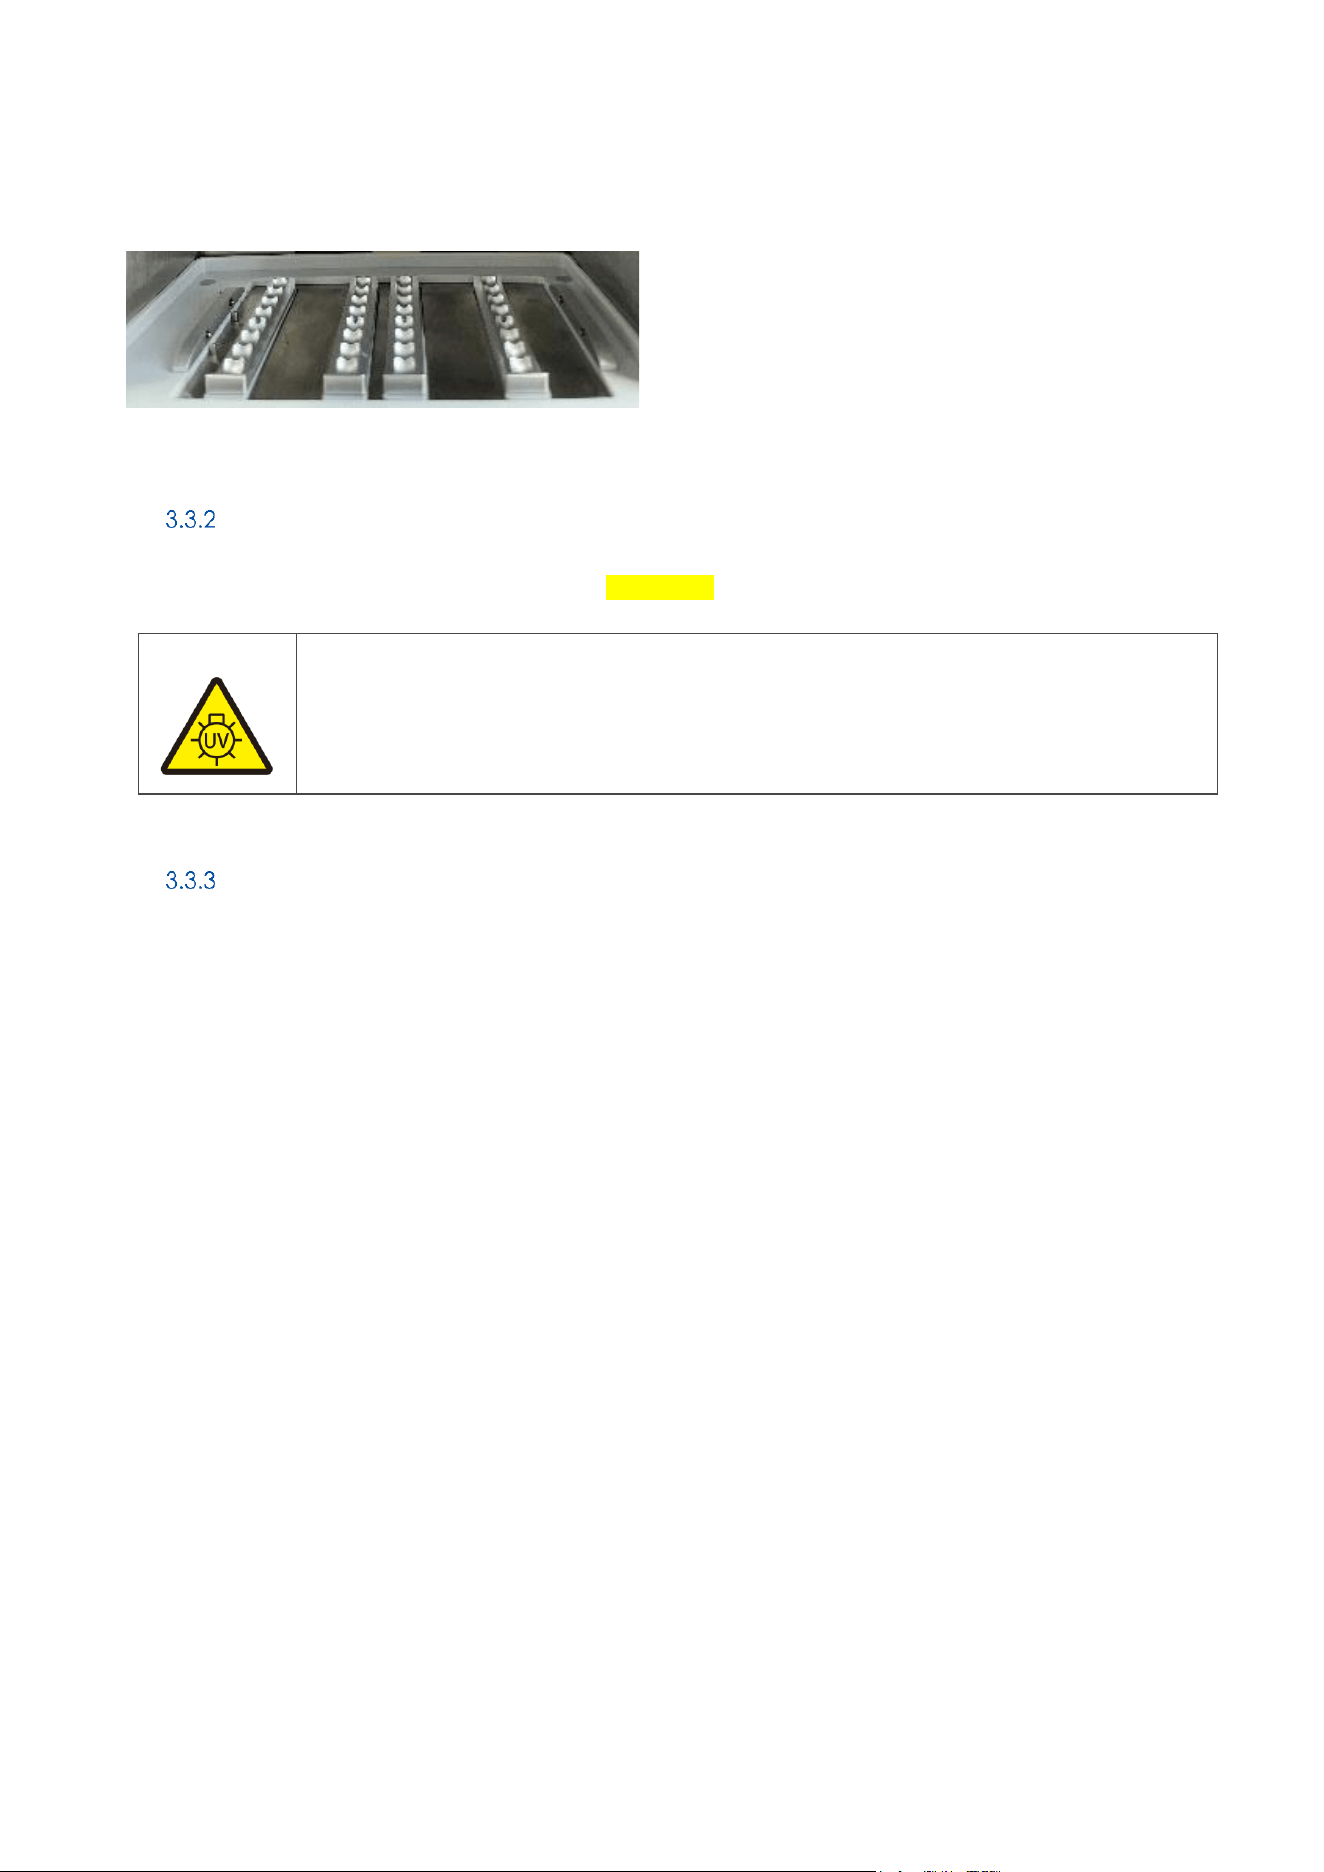
Heater block
The purpose of the heater block is to support temperature incubation steps within the protocol, such as lysis or
elution. The heater block consists of four rows (Figure 12) designed to support the interfacing with the Cartridges
and operate in a range of ambient temperature up to 120°C.
1
Processing unit
2
Heater Block
1a
Magnet Head
3
UV lamp
1b
Rod cover Holder
4
Internal light
1b
3
4
5
1a
1a
T1
T3
T2
T4
[QIAmini User Manual xx/2026
27
GLO-SOP-52-01-006-A09 Rev.02
Figure 12: The heater block of the QIAmini.
UV lamp
The UV lamp is used for UV decontamination run (Section bla).
WARNING
UV radiation
Avoid looking directly into UV light. Do not expose your skin to UV light.
Bluetooth
The QIAmini is equipped with Bluetooth functionality.
[QIAmini User Manual xx/2026
28
GLO-SOP-52-01-006-A09 Rev.02
Disposables
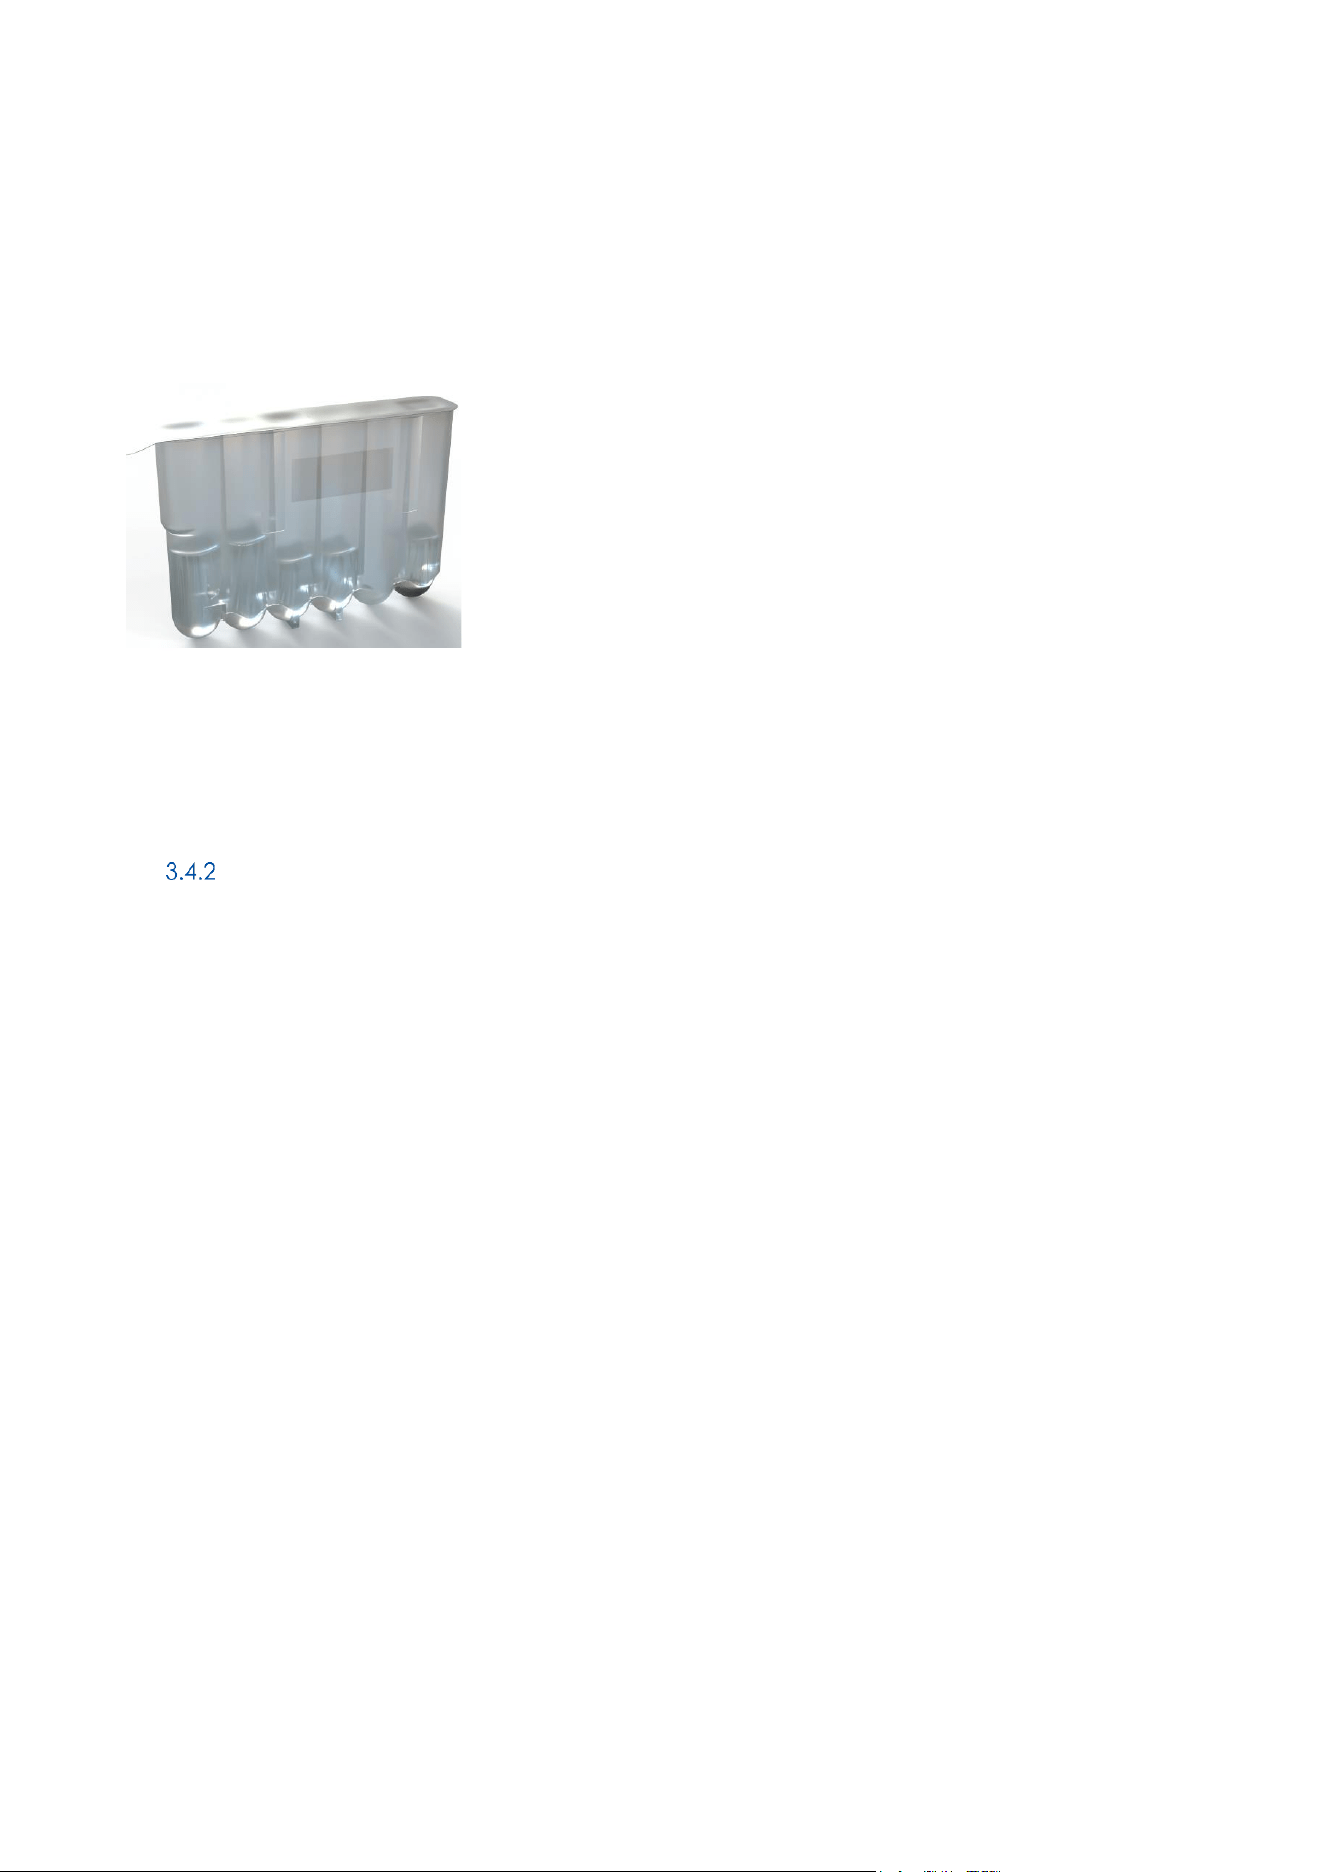
The QIAmini instrument is intended for use in combination with the QIAmini Cartridge Frame, which is designed to
accommodate up to eight prefilled QIAmini Cartridges, enabling the simultaneous processing of up to eight
samples.
The Cartridge Frame provides precise positioning of the cartridges within an SBS-compatible footprint and serves as
a stable, reusable interface between the instrument and the consumables.
The QIAmini Cartridges, together with the dedicated Rod Covers, are specifically designed to operate in this
integrated setup. Their coordinated geometry ensures consistent interaction with all wells, supporting uniform
processing conditions and reliable, reproducible results across all samples.
Figure 13: QIAmini disposables.
Note: Only use disposables manufactured by QIAGEN.
QIAmini Cartridge
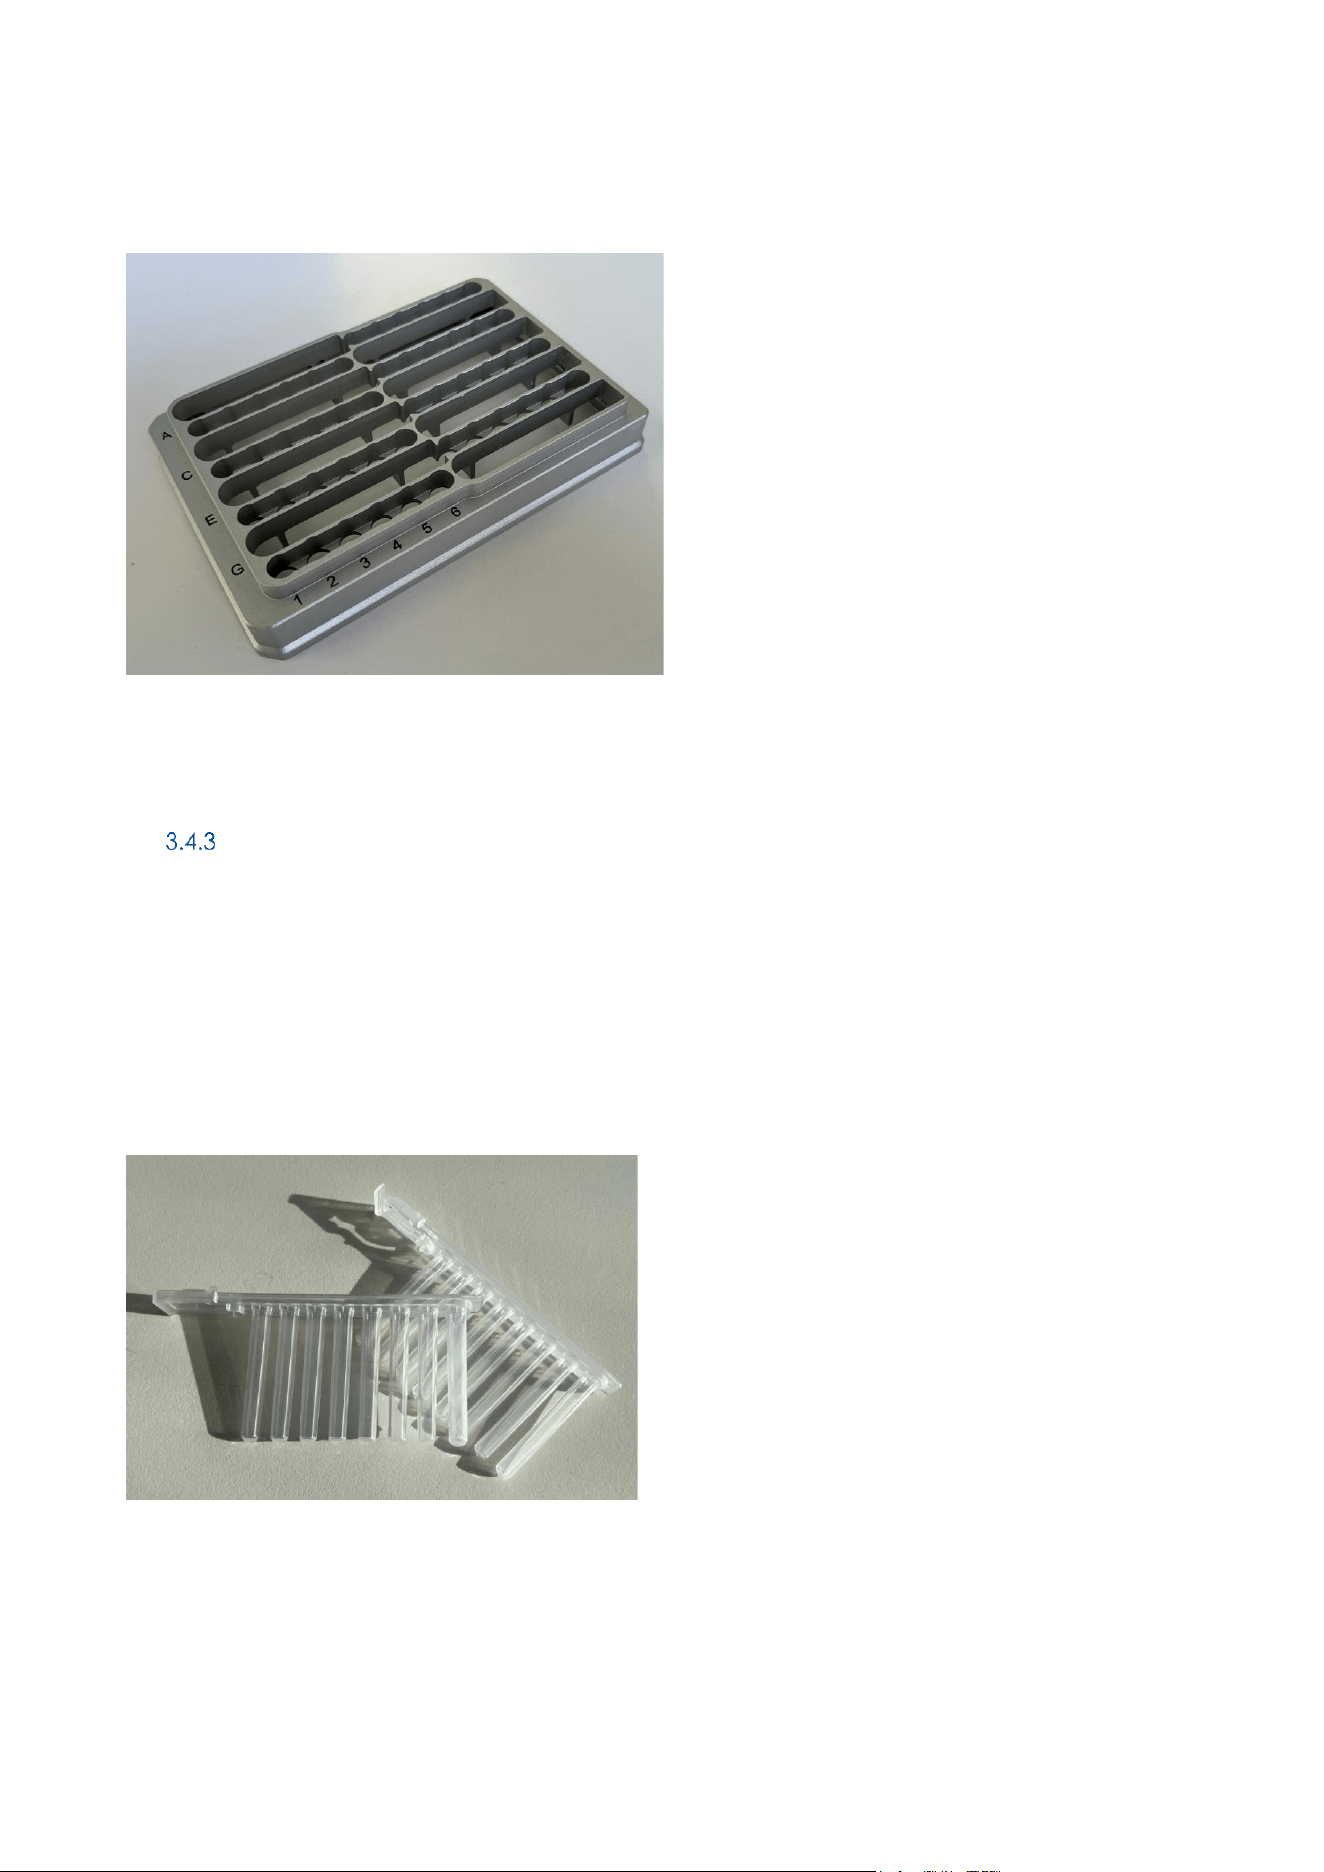
The QIAmini cartridges are pre-filled consumables designed for automated sample processing on the instrument.
Each cartridge is sealed with a protective sealing foil to ensure reagent integrity during storage and handling. The
sealing foil is equipped with an integrated pull tab (flap), enabling safe and controlled removal immediately prior
to use. The flap is designed to be easily accessible to support proper handling and to minimize the risk of spillage or
contamination.
[QIAmini User Manual xx/2026
29
GLO-SOP-52-01-006-A09 Rev.02
In addition, each cartridge features a lateral labeling field that allows clear identification of the corresponding
sample. This labeling area supports user-specific marking (e.g. sample ID), facilitating reliable sample tracking
throughout the workflow.
Figure 14: Prefilled QIAmini cartridge
Note: The foil of the sealed cartridges needs to be removed gently prior to loading the instrument.
QIAmini Cartridge Frame
The Cartridge Frame is designed to accommodate up to eight prefilled QIAmini Cartridges, enabling the parallel
processing of up to eight samples. It is manufactured from aluminum and features a protective, chemically resistant
coating, ensuring durability and reusability.
Dedicated positions for the QIAmini Cartridges are clearly labeled (C1–C8), and the corresponding well positions
(1–6) are also marked to facilitate proper placement and minimize handling errors.
Safe loading and unloading of the cartridge frame and cartridges are described in detail in section Fehler!
Verweisquelle konnte nicht gefunden werden..
[QIAmini User Manual xx/2026
30
GLO-SOP-52-01-006-A09 Rev.02
Figure 15: QIAmini Cartridge frame
QIAmini Rod Cover
The QIAmini Rod Covers are designed for use in combination with the QIAmini Cartridges and support reliable
sample processing by providing defined interaction with the cartridge wells. Each Rod Cover aligns precisely with
the cartridge positions, ensuring consistent and reproducible operation across all samples.
Two Rod Covers are required for a complete run, ensuring full coverage of all processing
Figure 16: QIAmini Rod Covers.

[QIAmini User Manual xx/2026
31
GLO-SOP-52-01-006-A09 Rev.02
4 Installation Procedures
System delivery and installation
The following items are delivered:
⚫ QIAmini instrument
⚫ Important Note – Online Availability of Instrument Instructions for Use and Protocols
⚫ Power cord set
⚫ QIAmini Cartridge Frame (1)
⚫ USB drive
Site requirements
The QIAmini must be located out of direct sunlight, away from heat sources and away from sources of vibration and
electrical interference. Refer to the Technical Specifications section for the operating conditions (temperature and
humidity). The installation site should be free of drafts, moisture, and dust, and should not be subject to large
temperature fluctuations.
Use a level workbench that is large and strong enough to accommodate the QIAmini. Refer to the section 8, Technical
Specifications, for the weight and dimensions of the QIAmini.
Ensure that the workbench is dry, clean, and vibration-proof, and has additional space for accessories. Do not use
this device in close proximity to sources of strong electromagnetic radiation (e.g., unshielded intentional RF sources),
as these can interfere with proper operation.
The QIAmini must be placed within approximately 1.5 m of a properly grounded (earthed) AC power outlet.. Ensure
that the QIAmini is positioned so that the power connector and power switch on the back of the instrument are easily
accessible at all times, allowing the instrument to be powered OFF and disconnected without difficulty.
Note: It is recommended to plug the instrument directly into its own power outlet and not to share the power outlet
with another lab equipment.
WARNING
Explosive atmosphere
The QIAmini is not designed for use in an explosive atmosphere.
[QIAmini User Manual xx/2026
32
GLO-SOP-52-01-006-A09 Rev.02
WARNING
Risk of overheating
To ensure proper ventilation, maintain a minimum clearance of 10 cm at the sides and rear of the
QIAmini.
Slits and openings that ensure the ventilation of the instrument must not be covered.
CAUTION
Damage to the instrument
Direct sunlight may bleach parts of the instrument and cause damage to plastic parts. The QIAmini
must be located out of direct sunlight.
WARNING
Risk of personal injury and material damage through falling of the instrument
Improper handling of the QIAmini during transport and installation can lead to user injury.
Particularly when lifting the instrument above head height, the instrument can fall and lead to
serious injury.
Ensure that the transport safety screw is inserted properly to avoid damage of the magnet head
during transport.
Transport the instrument close to the floor and avoid lifting above the head.
Install the instrument on a sufficiently large, solid, and stable surface that is protected against
oscillations.
Ensure that all instrument feet are sitting stably and evenly on the surface.
Power requirements
The QIAmini operates at 24 V DC supplied by an AC/DC adaptor 100–240 V AC, 50/60 Hz.
Make sure that the voltage rating of the QIAmini power adaptor is compatible with the AC voltage available at the
installation site.
WARNING
Damage to electronics
Before turning the instrument on, make sure that the correct supply voltage is used.
Use of incorrect supply voltage may damage the electronics.
To check the recommended supply voltage, refer to the specifications indicated on
the type plate of the instrument.
[QIAmini User Manual xx/2026
33
GLO-SOP-52-01-006-A09 Rev.02
WARNING
Electrical hazards
Any interruption of the protective conductor (earth/ground lead) of the power
adaptor or disconnection of the protective conductor terminal is likely to make the
instrument dangerous.
Intentional interruption is prohibited.
Grounding requirements
To protect operating personnel, the AC/DC power adaptor of QIAmini must be correctly grounded (earthed). The power
coord includes 3-conductors that when connected to an appropriate AC power outlet, grounds (earths) the AC/DC
power adaptor. To preserve this protection feature, do not operate the instrument from an AC power outlet that has no
ground (earth) connection.
Unpacking of the QIAmini
1. Before unpacking the QIAmini, move the package to the site of installation and check that the arrows on
the package point upward. In addition, check whether the package is damaged. If the package is
damaged, contact QIAGEN Technical Support.
2. Open the outer and inner Box and remove the white foam layer containing the power supply and the USB
drive.
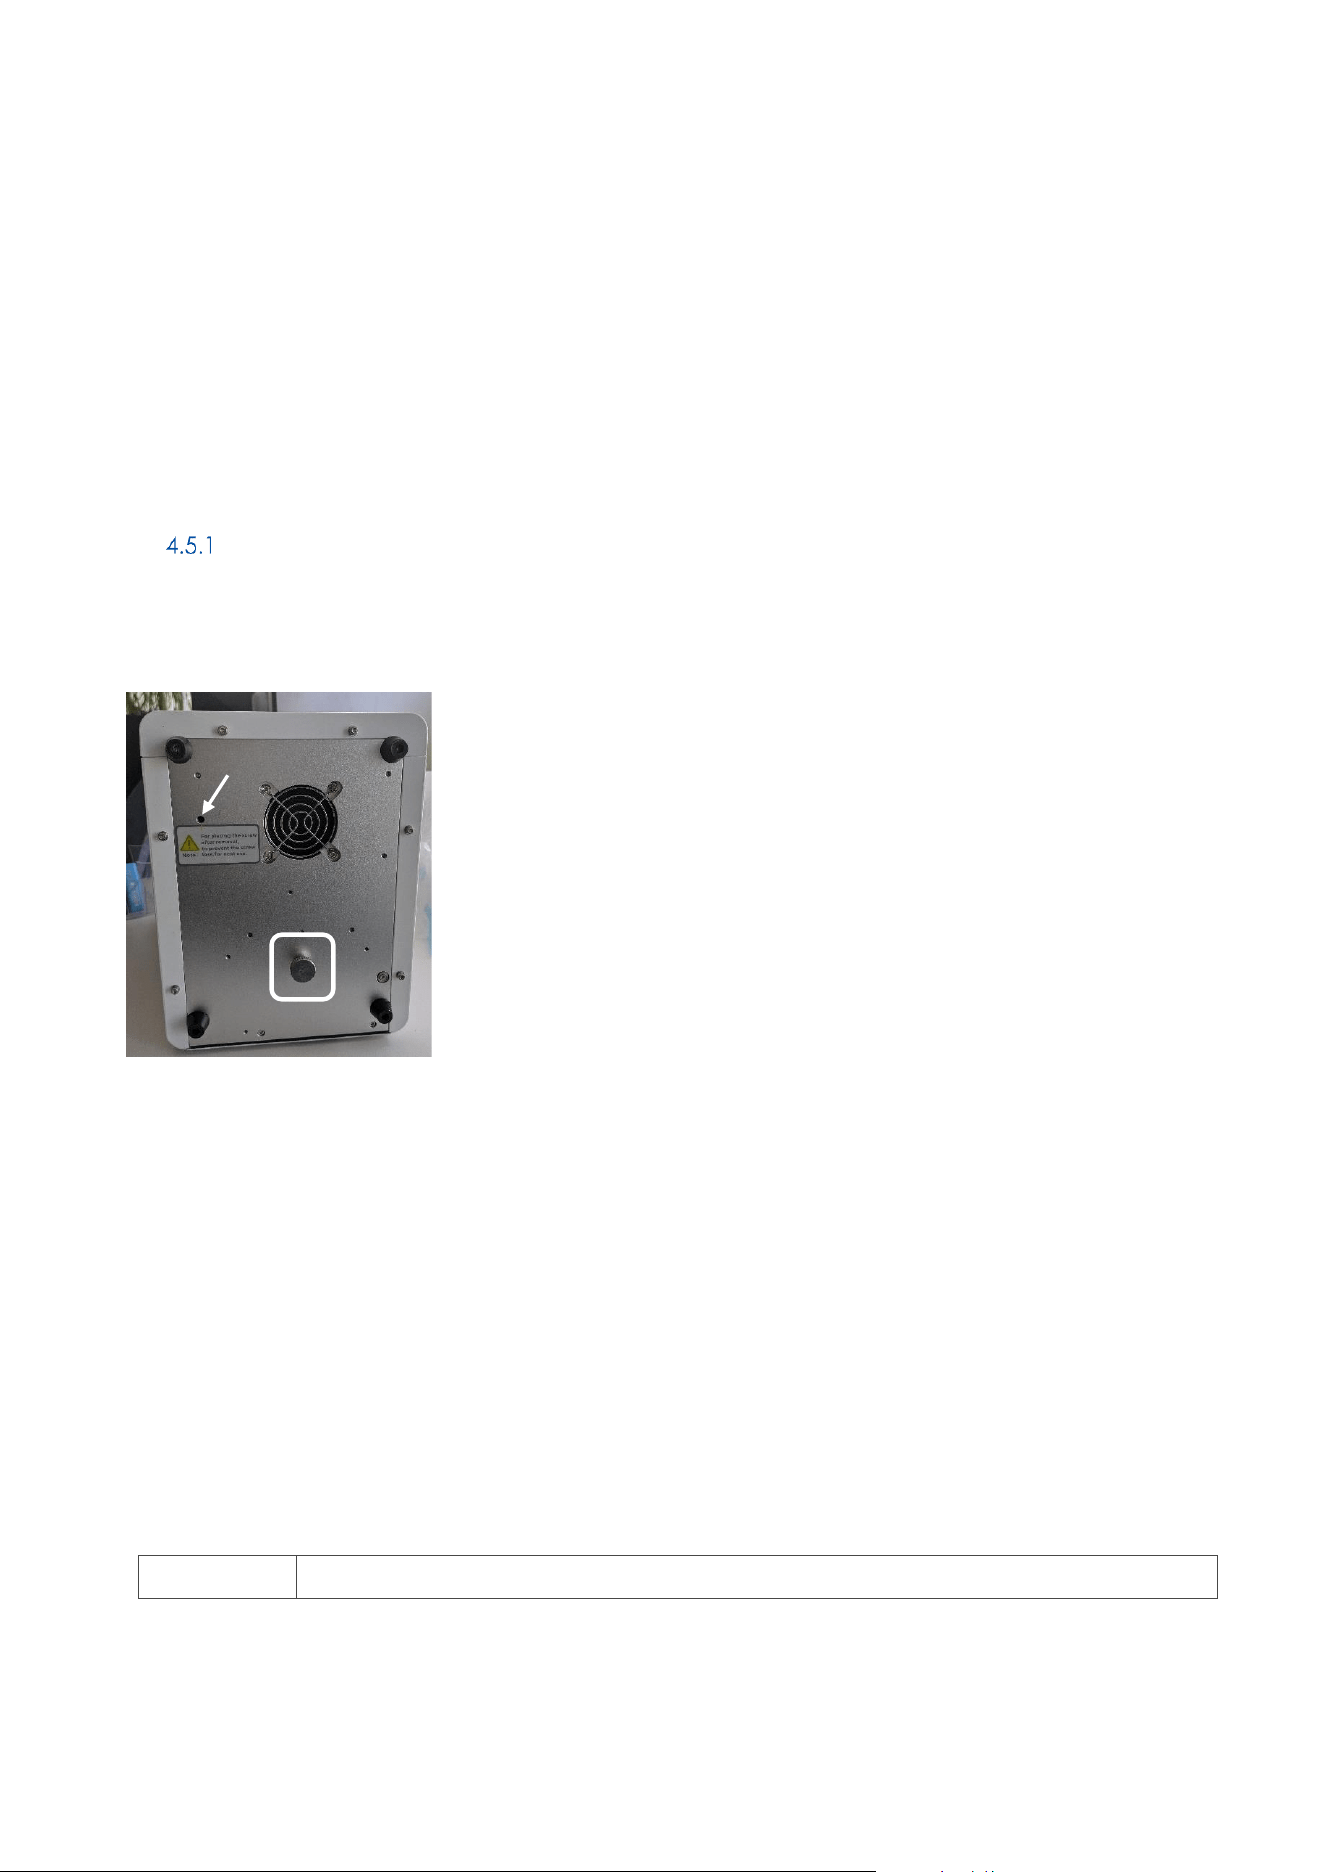
3. Remove the instrument from the outer packaging by lifting it with both hands. Grip the instrument from
below using the designated cut-outs, positioning your hands at the front and back under the rim.
Figure 17: tbd
4. Position the instrument on a lab bench.
[QIAmini User Manual xx/2026
34
GLO-SOP-52-01-006-A09 Rev.02
Note: Please retain the original packaging for future transportation, storage, or service purposes. The packaging is
designed to provide optimal protection for the instrument.
Removal of the transport security screw
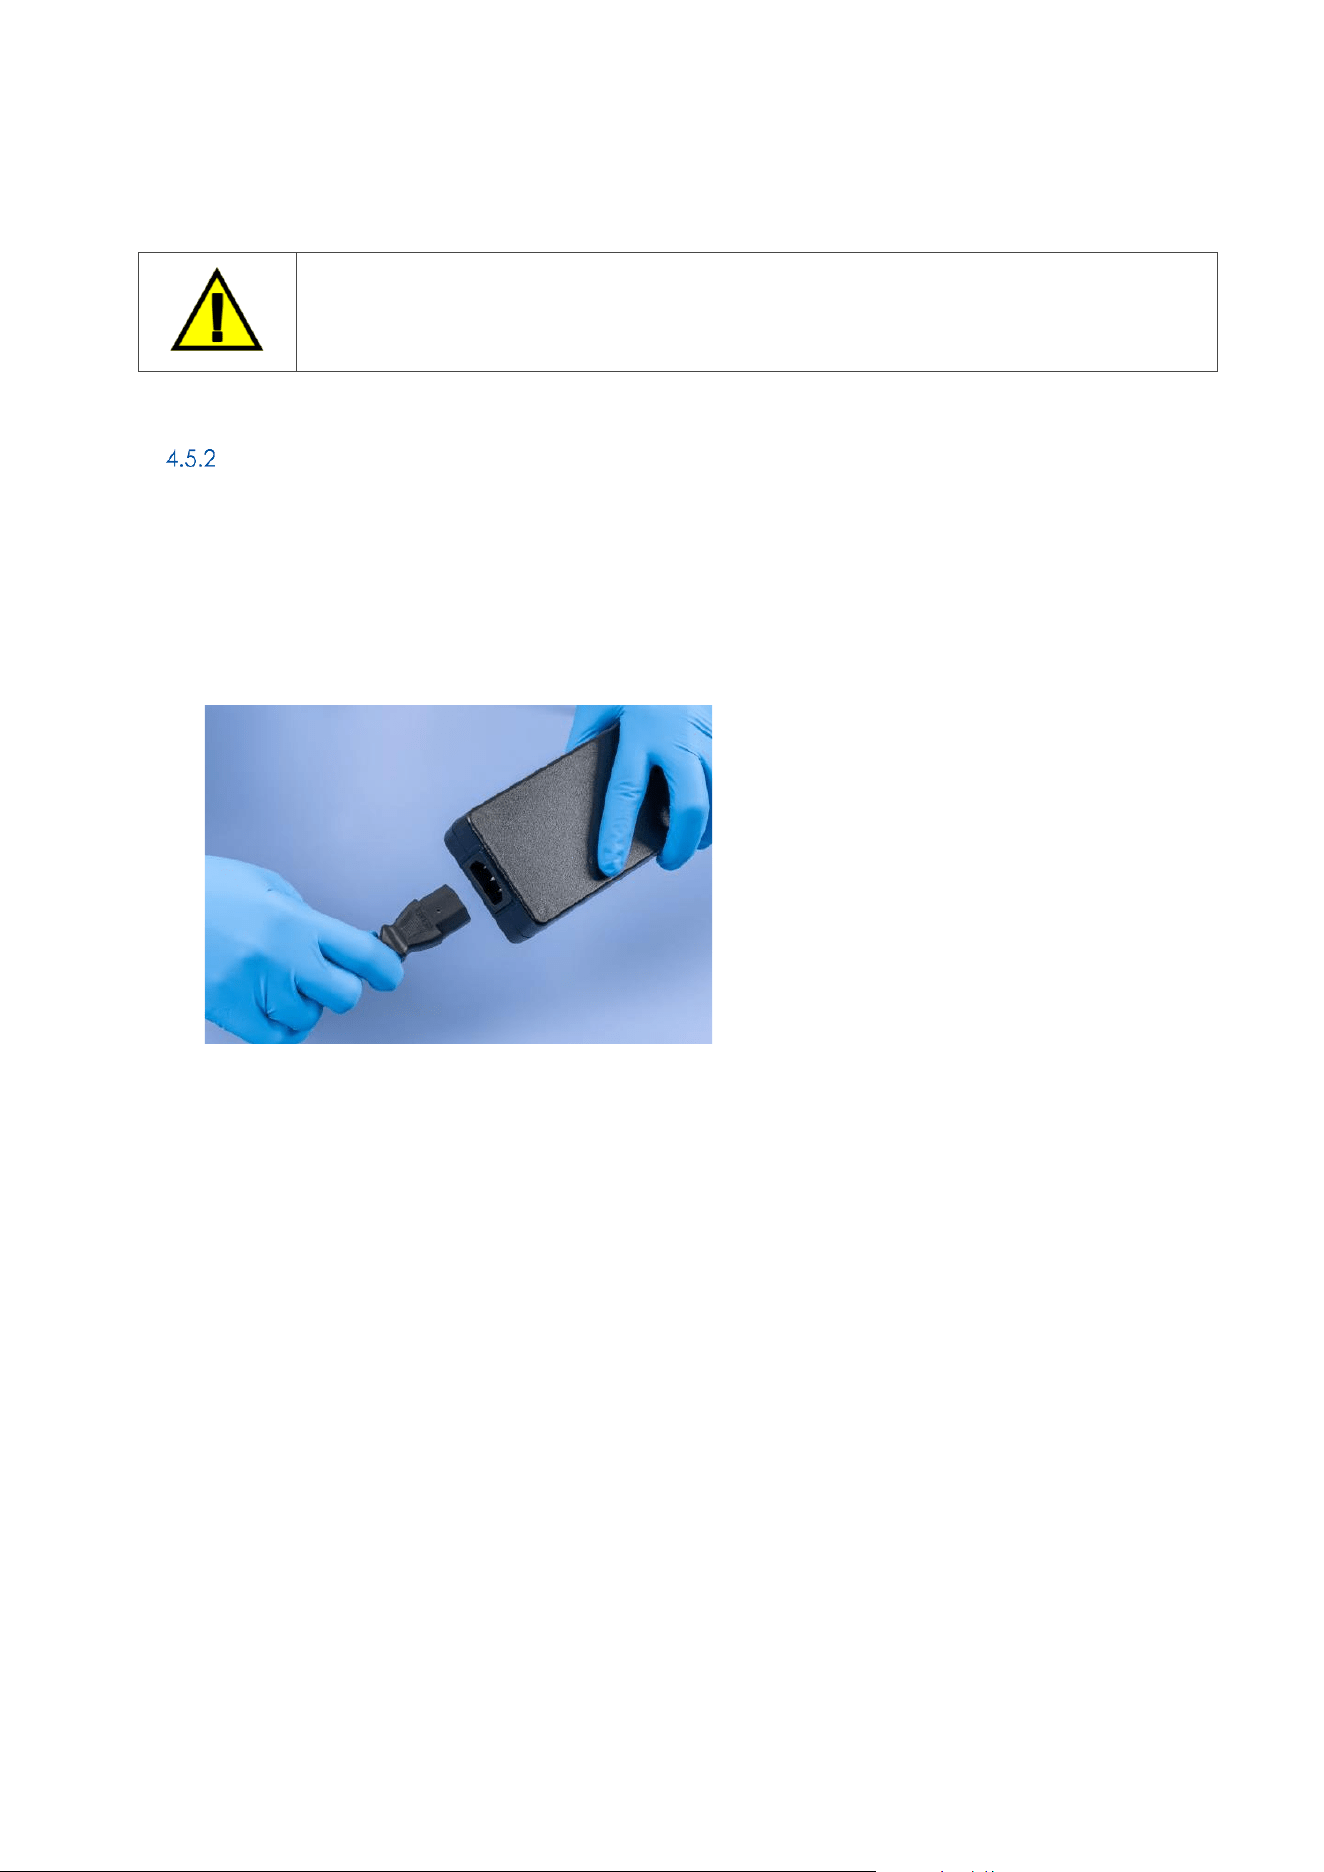
To protect the QIAmini during transport, a transport security screw is located on the underside of the instrument. It
is important to remove the transport security screw before powering on the QIAmini to avoid any damage.
Figure 18. Location of the transport lock screw(highlighted by a white frame)and the storage position (highlighted
by a white arrow) on the underside of the QIAmini.
To remove the transport lock screw, follow the following steps:
1) Rotate the QIAmini onto the back and place it on a soft surface. Ensure that the instrument is protected
against tilting at all times.
2) Remove the transport lock. It is a screw located in a recess at the center of the base plate (Figure 18,
white box).
3) Insert the transport lock screw completely into the storage location (Figure 18, white arrow).
4) Rotate the QIAmini back onto its feet.
5) The QIAmini is now ready for use.
CAUTION
Damage to the instrument
[QIAmini User Manual xx/2026
35
GLO-SOP-52-01-006-A09 Rev.02
Operation of the QIAmini with the transport lock screw installed can lead to damage to the
mechanical components of the instrument.
Connection of the AC power cord
1. Remove the power supply from the foam packing material on top of the QIAmini.
2. The QIAmini Power Cord will be delivered in a separate Package. Remove the Power Cord and
3. Connect the Power Cord to the Power Supply as shown in the picture below.
Figure 19:tbd
Note: Only use the power supply and Power supply that is supplied with the QIAmini.
4. Ensure that the power button is set to OFF.
5. Check that the voltage rating on the type plate at the back of the QIAmini AC/DC power adaptor matches
the voltage available at the installation site.
Note: The QIAmini AC/DC power adaptor is set up to accept all input voltages within the range 100–240 V
AC and does not need to be configured manually.
6. Plug the power cord into the instrument power cord socket.
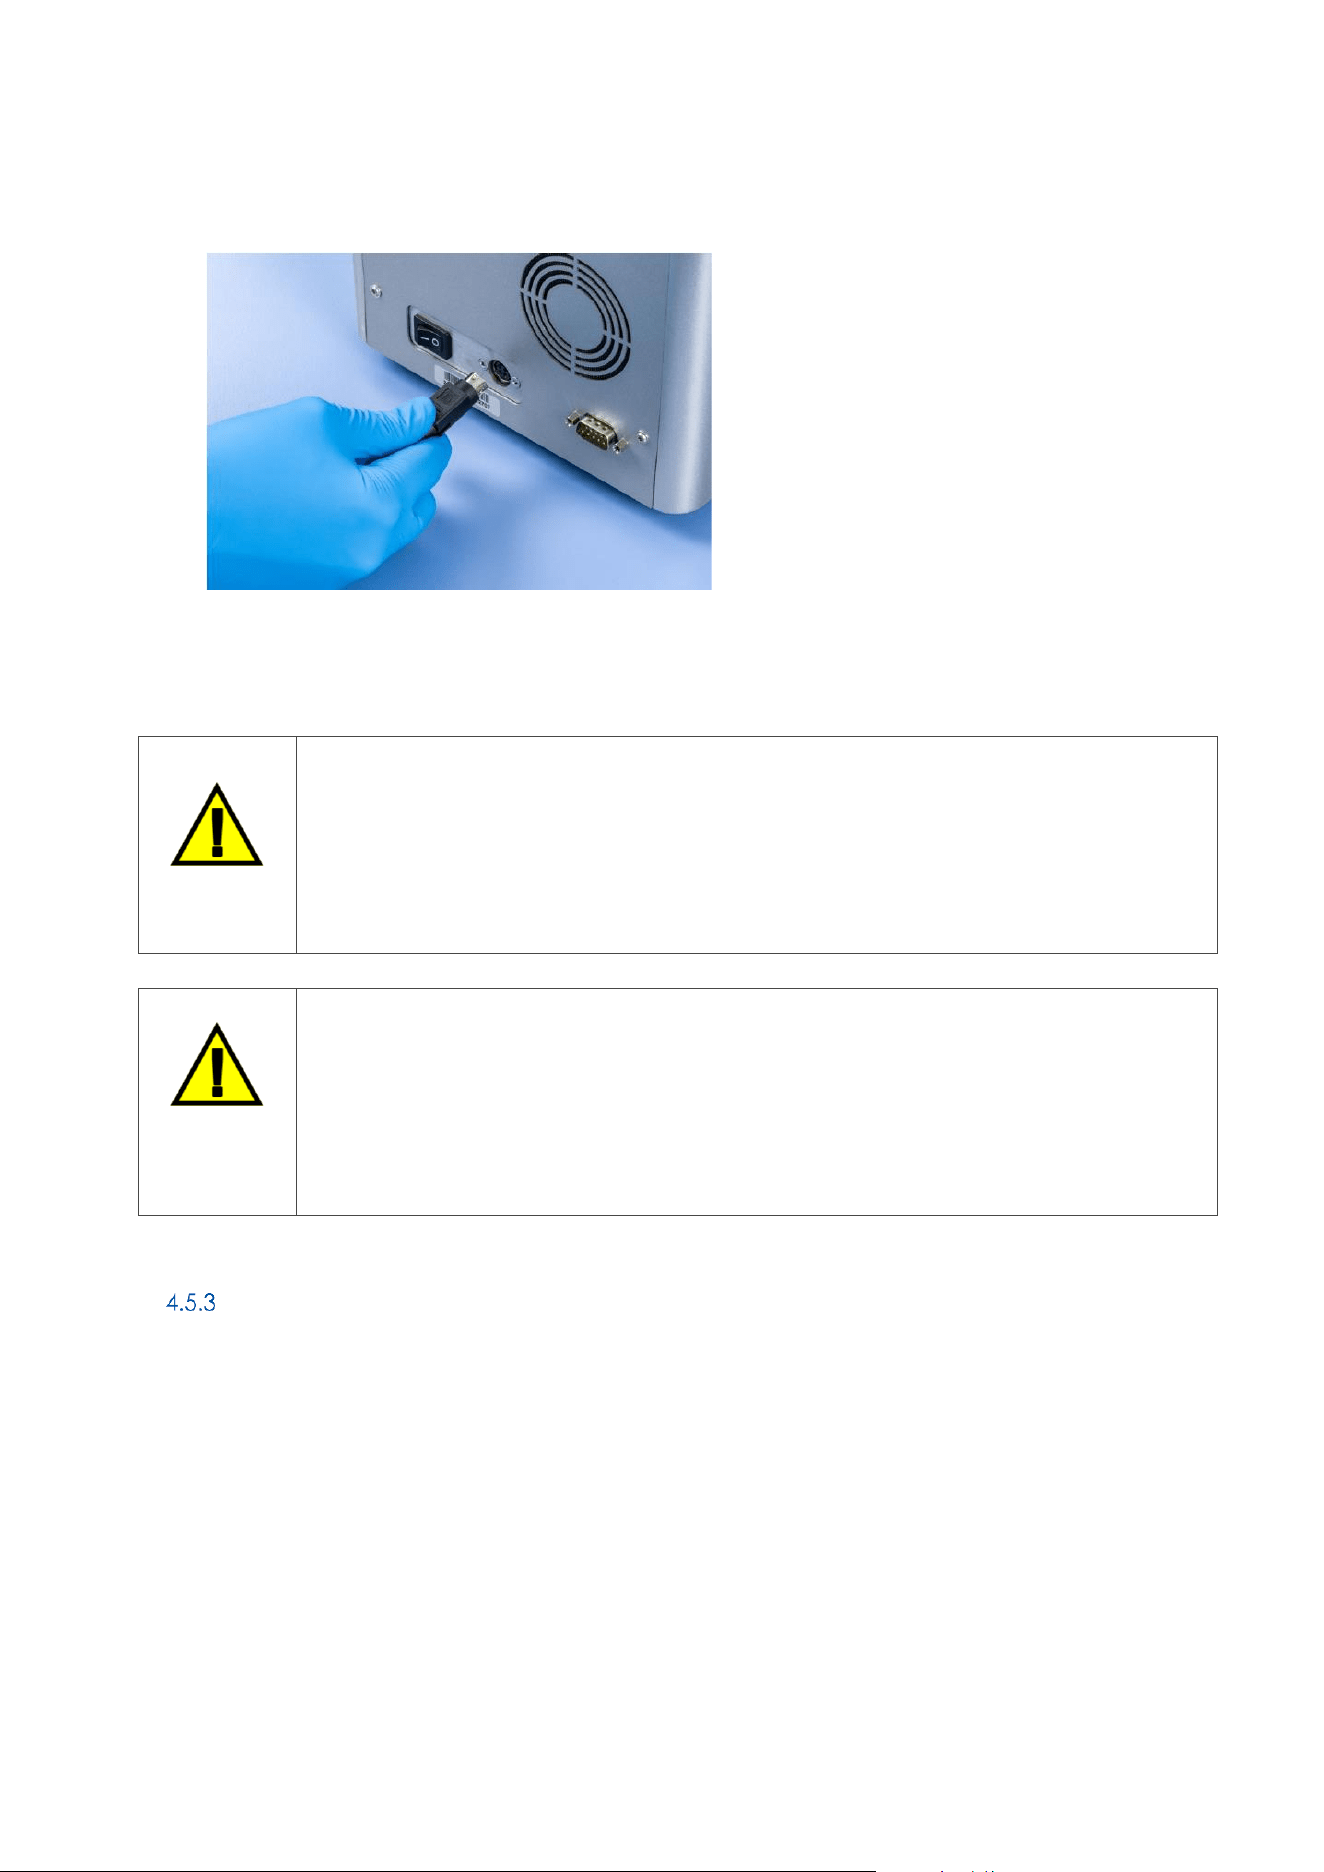
[QIAmini User Manual xx/2026
36
GLO-SOP-52-01-006-A09 Rev.02
Figure 20: tbd
7. Plug the power cord into a grounded power outlet.
WARNING
Damage to electronics
Before powering ON the instrument, make sure that the correct supply voltage is used.
Use of incorrect supply voltage may damage the electronics.
To check the recommended supply voltage, refer to the specifications indicated in the type plate
of the instrument.
WARNING
Electrical hazard
Any interruption of the protective conductor (earth/ground lead) inside or outside the
instrument or disconnection of the protective conductor terminal is likely to make the
instrument dangerous.
Intentional interruption is prohibited.
Installation of the external barcode scanner (optional)
1. Remove the barcode scanner from the box.
2. Before powering on the instrument, connect the barcode scanner to the RS232 Port on the back of the
instrument.
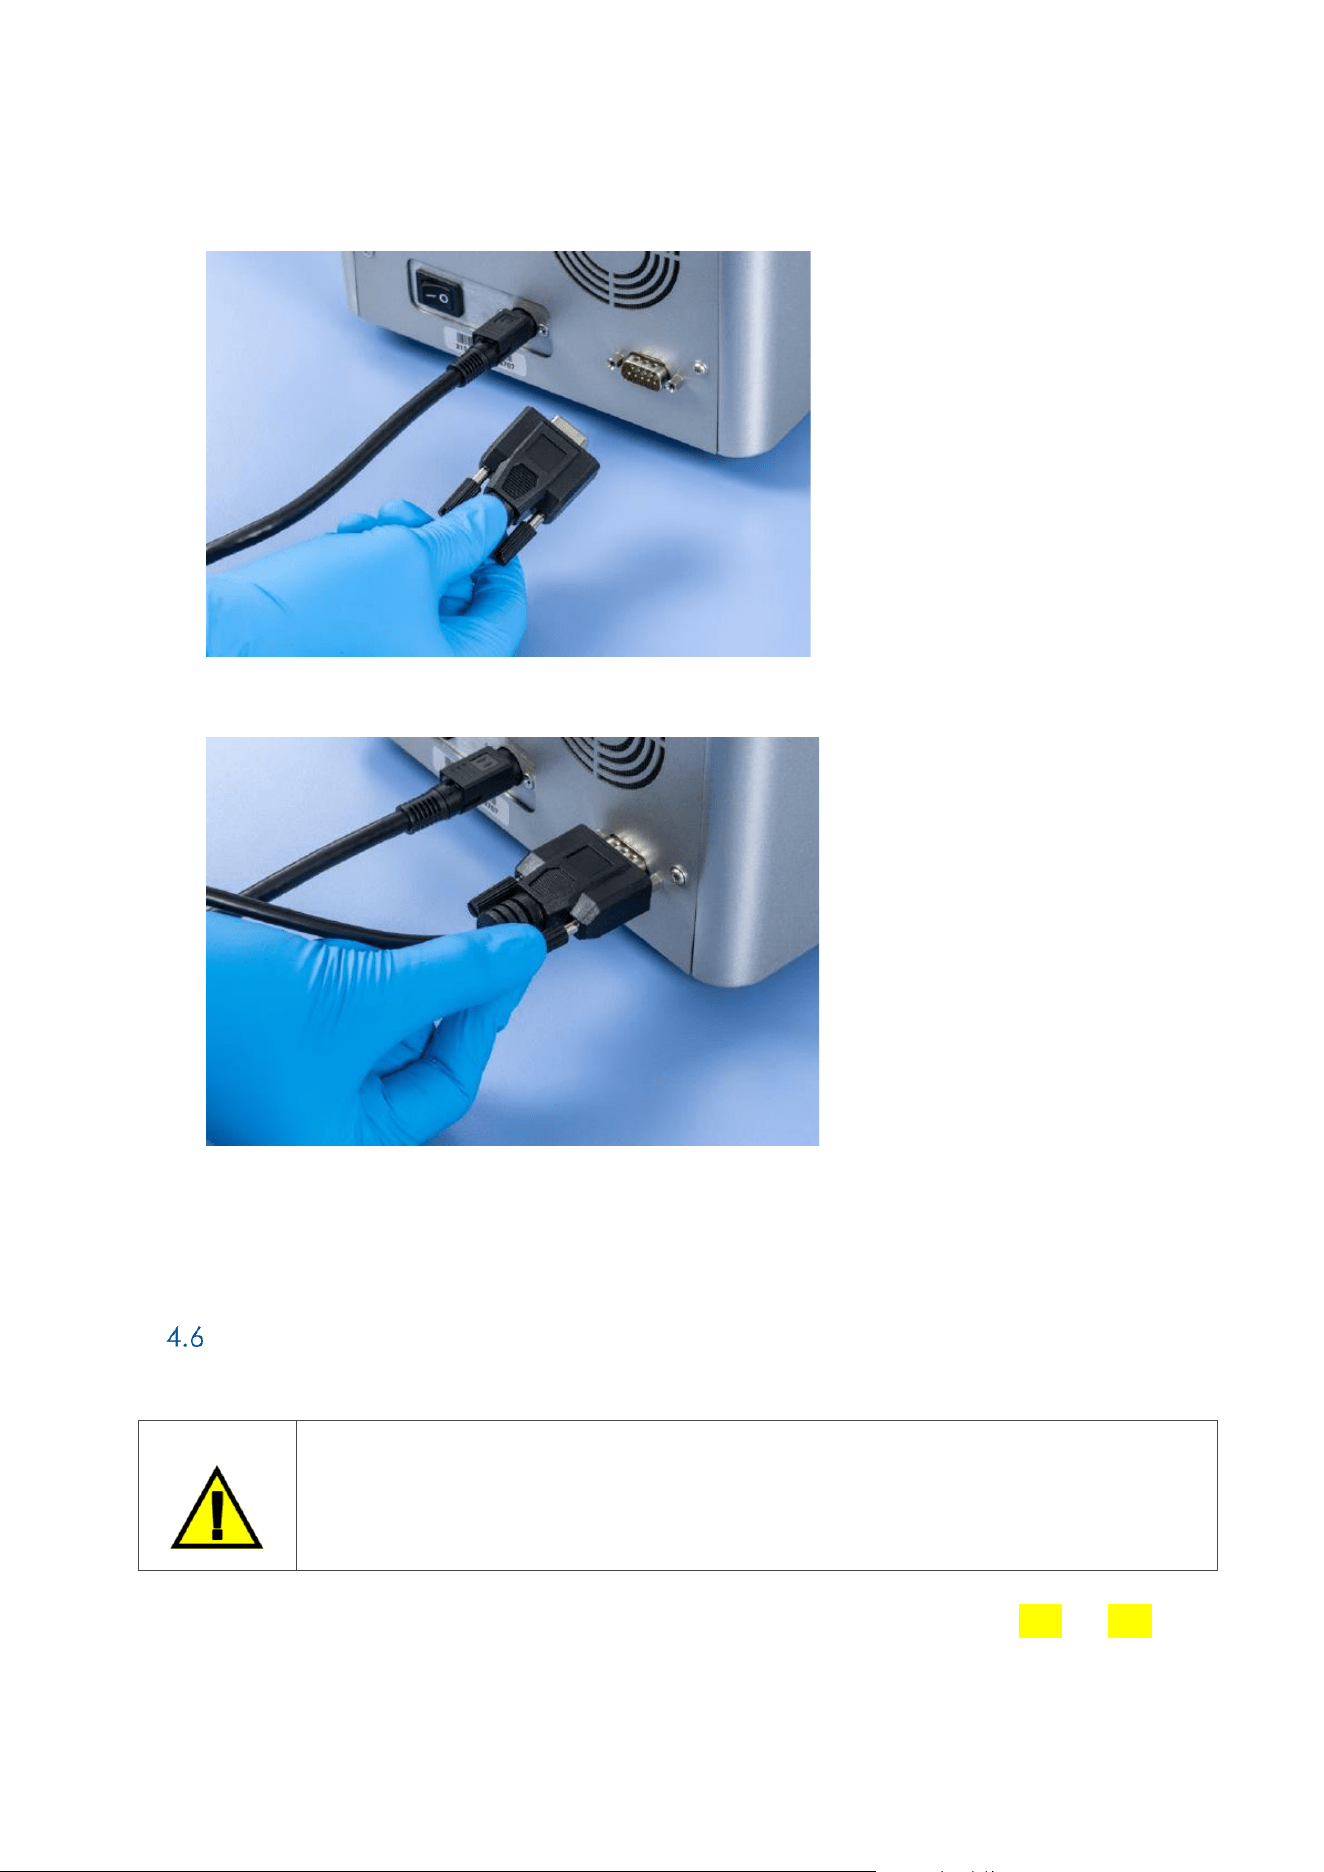
[QIAmini User Manual xx/2026
37
GLO-SOP-52-01-006-A09 Rev.02
Figure 21: tbd
3. Tighten the screws to
Figure 22: tbd
4. Installation of the QIAmini barcode scanner is now complete and the scanner can be used to load protocols via
QR code (5.2.2)
Repacking and Transport of the QIAmini
WARNING
Damage to the instrument
Transport of the QIAmini without the transport lock screw installed, can lead to damage to the
mechanical components of the instrument.
Before transporting the QIAmini, the instrument must first be decontaminated. Refer to Sections 6.1.1 and 6.1.2 for
more details. Then prepare the instrument as follows.
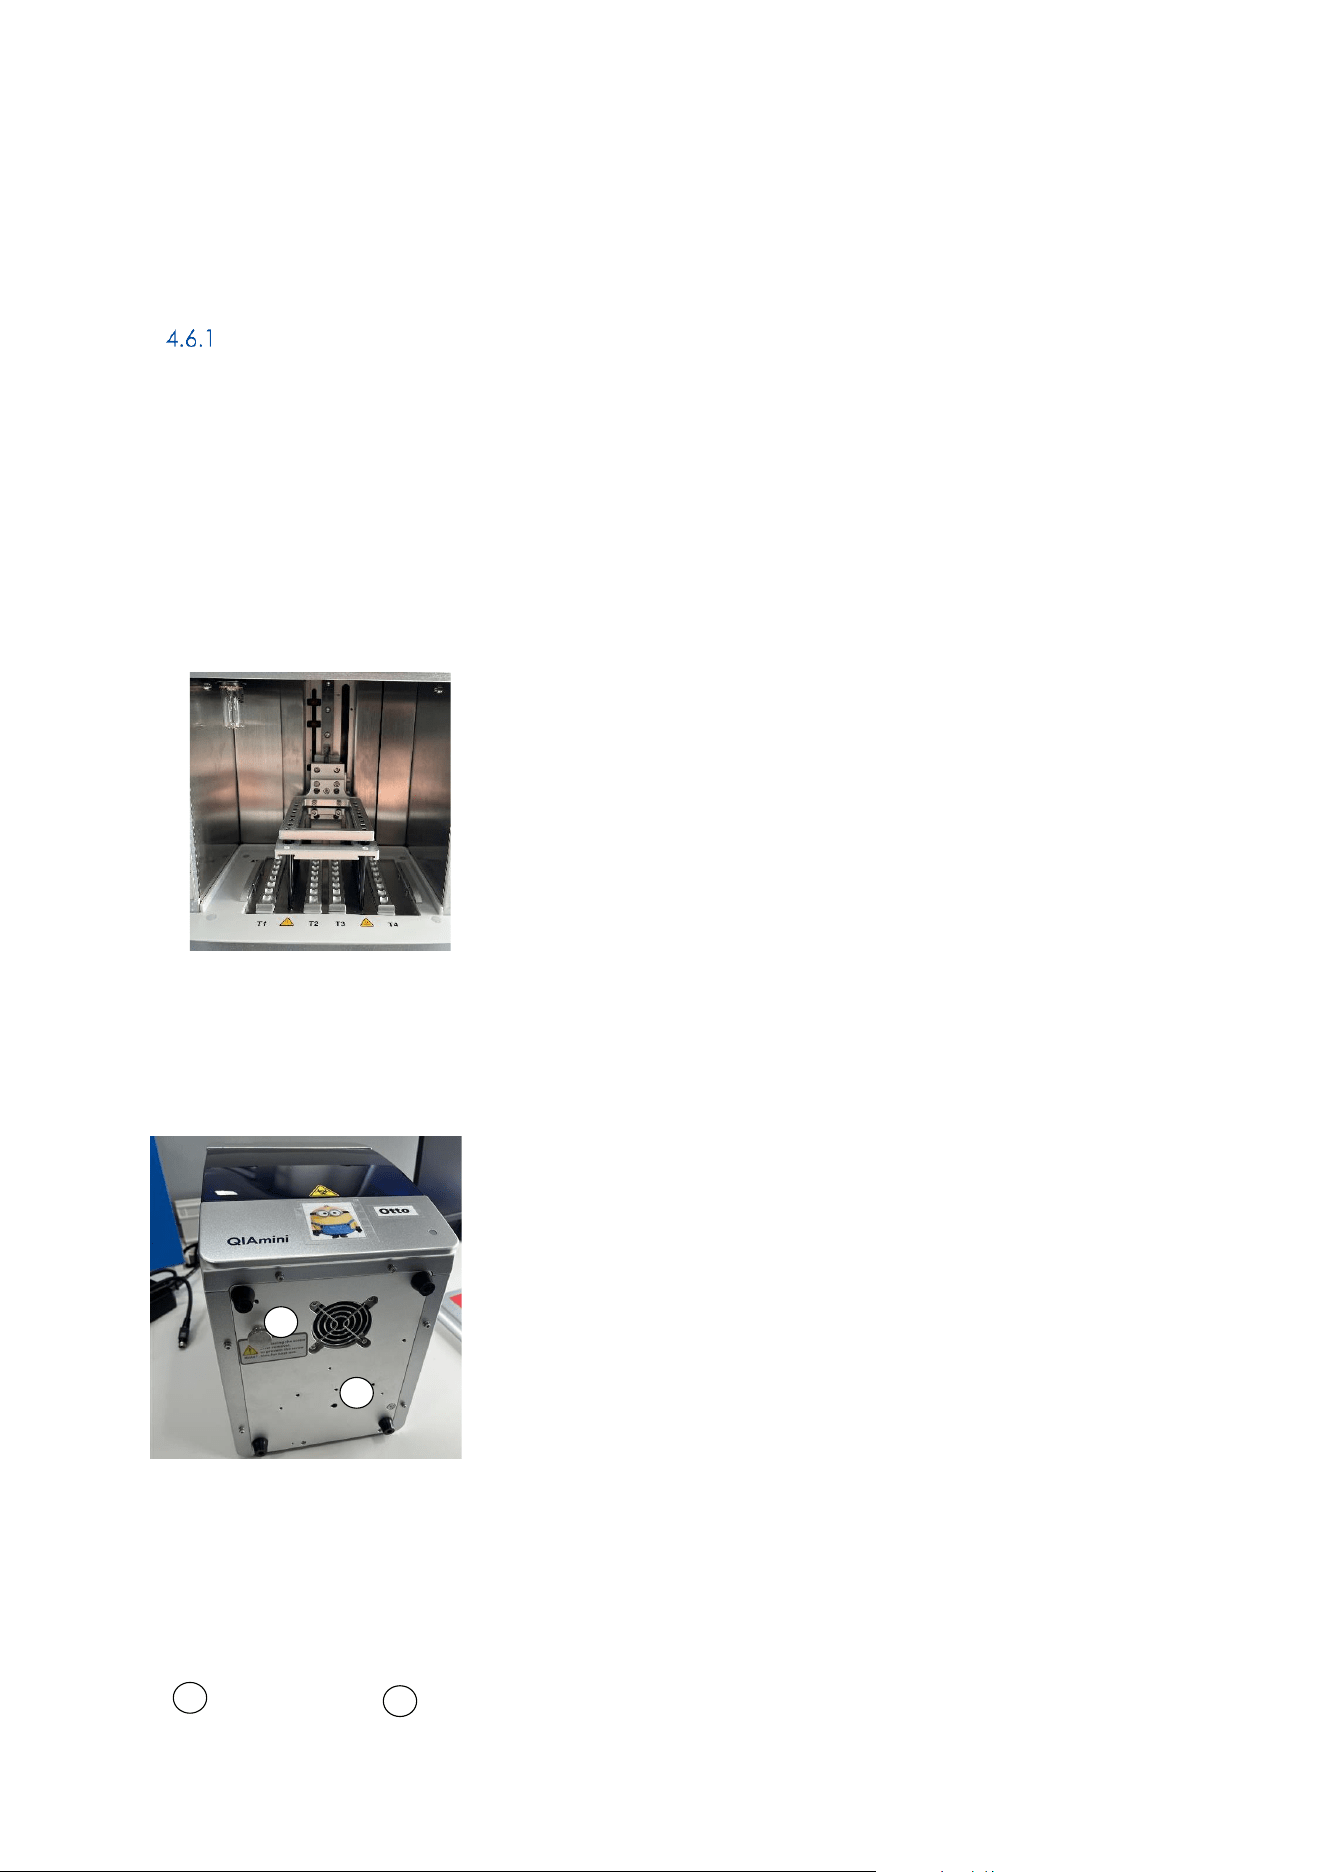
[QIAmini User Manual xx/2026
38
GLO-SOP-52-01-006-A09 Rev.02
Installation of transport lock screw
To install the transport lock screw, follow the following steps:
1) Power-off the instrument
2) Remove the power cord and the barcode scanner
3) Prepare the instrument for insertion of the transport lock screw by manually moving the rod cover holder
and magnetic bars to the middle of the instrument and then to the bottom of the instrument. Endposition is
shown in
Figure 23. Position of rod cover holder and magnet bars for installation of transport lock screw.
4) Rotate the QIAmini carefully onto the back. Ensure that the instrument is protected against tilting at all
times ().
Figure 24. Instrument position for insertion of transport lock screw.
5) Remove the transport lock screw from the storage position ( Position marked with 1)
6) Insert the screw into the transport position
1
2
a
b
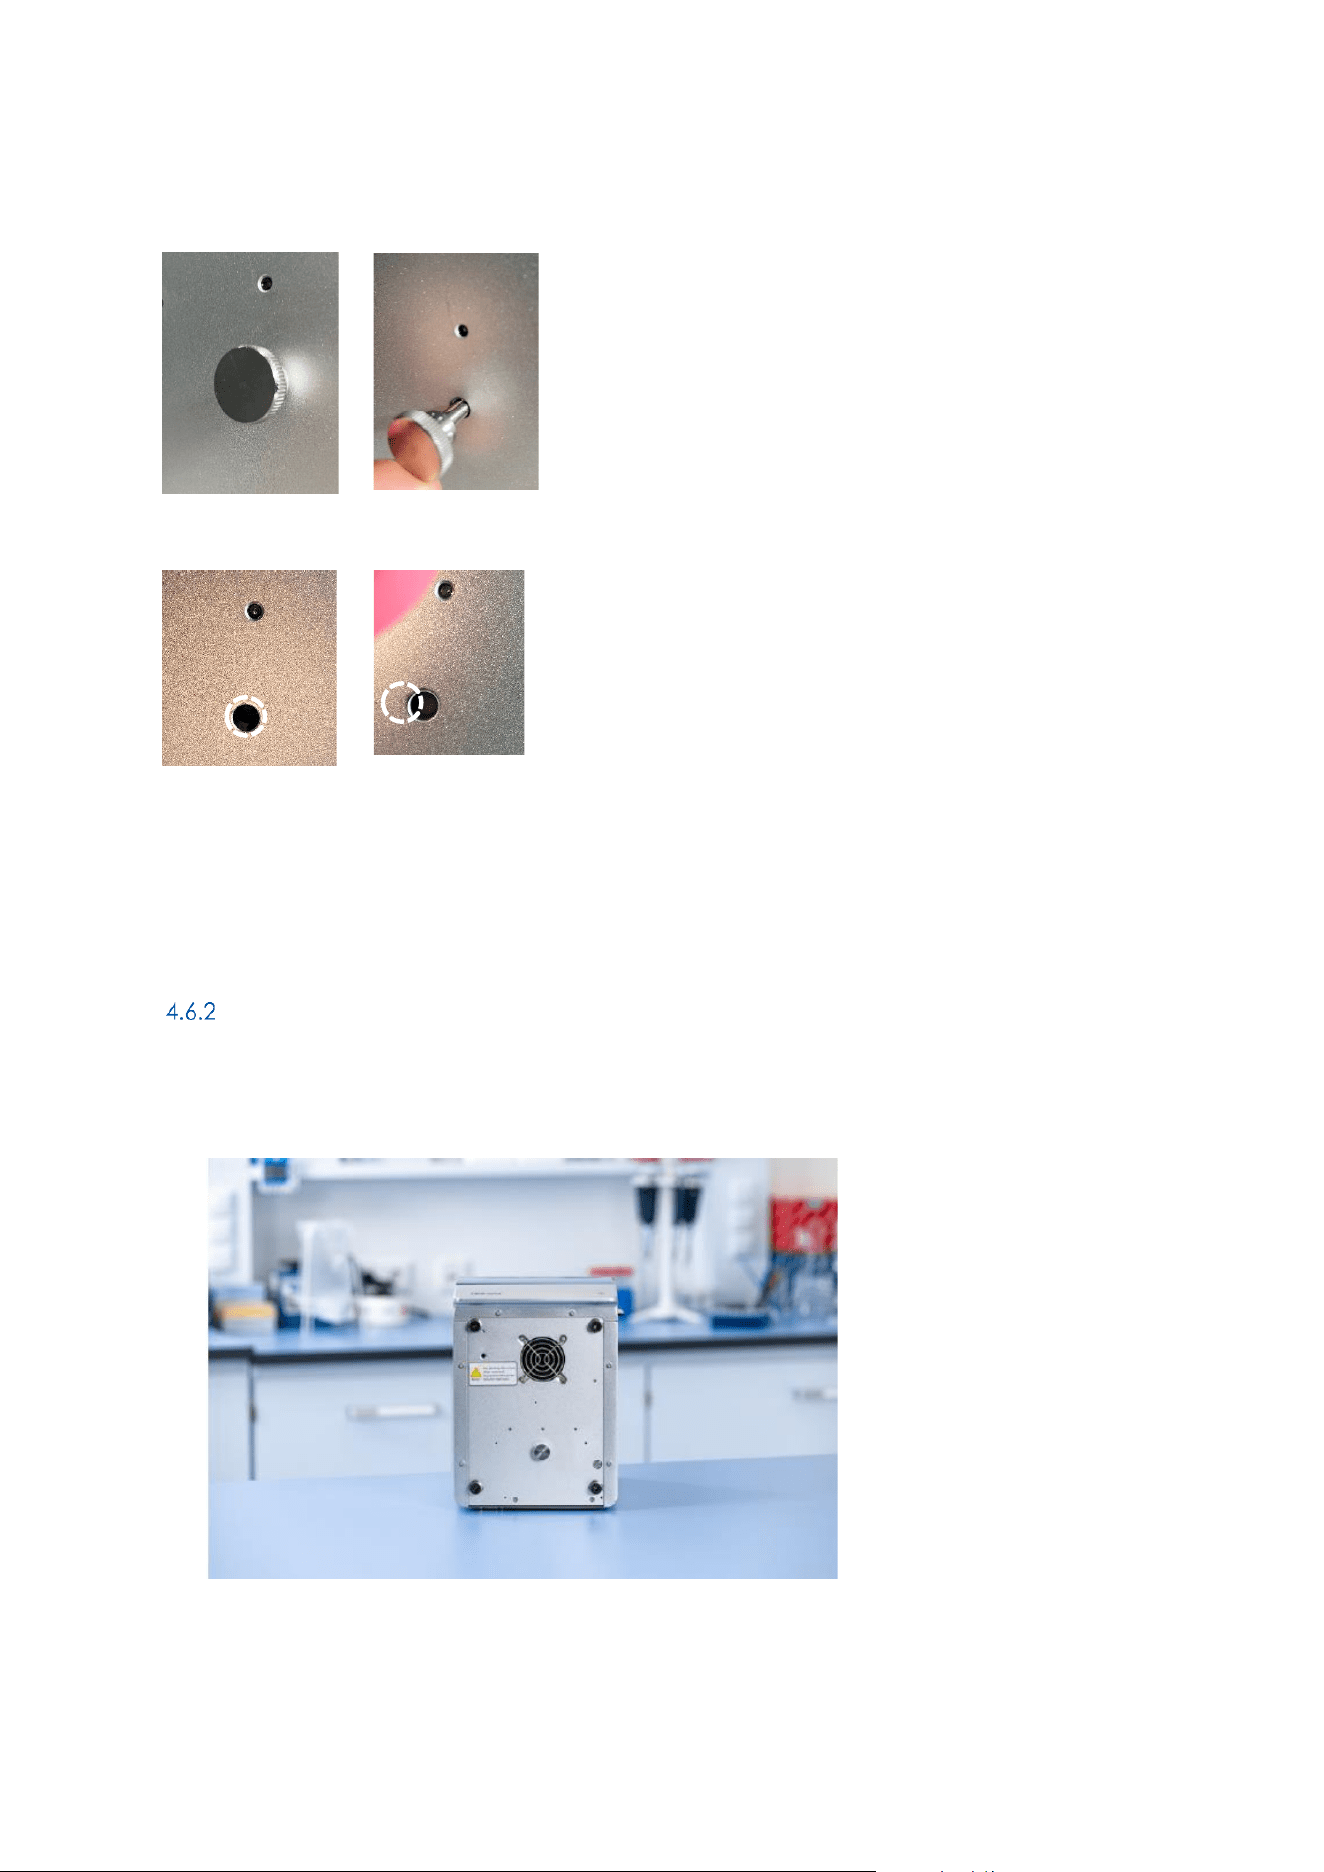
[QIAmini User Manual xx/2026
39
GLO-SOP-52-01-006-A09 Rev.02
Figure 25: Transport screw in storage position. On the left side the correct insertion is displayed (a). If the holes are
not properly aligned the screw cannot be inserted properly and the alignment needs to be corrected.
Figure 26: ddd
Note: If you are not able to insert the screw completely the alignment of the holes needs to be corrected.
Please open the door of the instrument and move magnet bars and rod-cover holder carefully sideways until
you can see the opening (refer to ).
Packing of the QIAmini
1. Prepare the packing materials.
2. Install transport lock screw on the bottom of the instrument (for detailed instruction read 0 )
Figure 27: tbd
3. Fold down the display and secure it with a piece of adhesive tape.

[QIAmini User Manual xx/2026
40
GLO-SOP-52-01-006-A09 Rev.02
Figure 28: tbd
4. Close the instrument door and secure it with a piece of tape. Move instrument to transportation box base.
Figure 29: tbd
5. Move instrument to transportation box base.
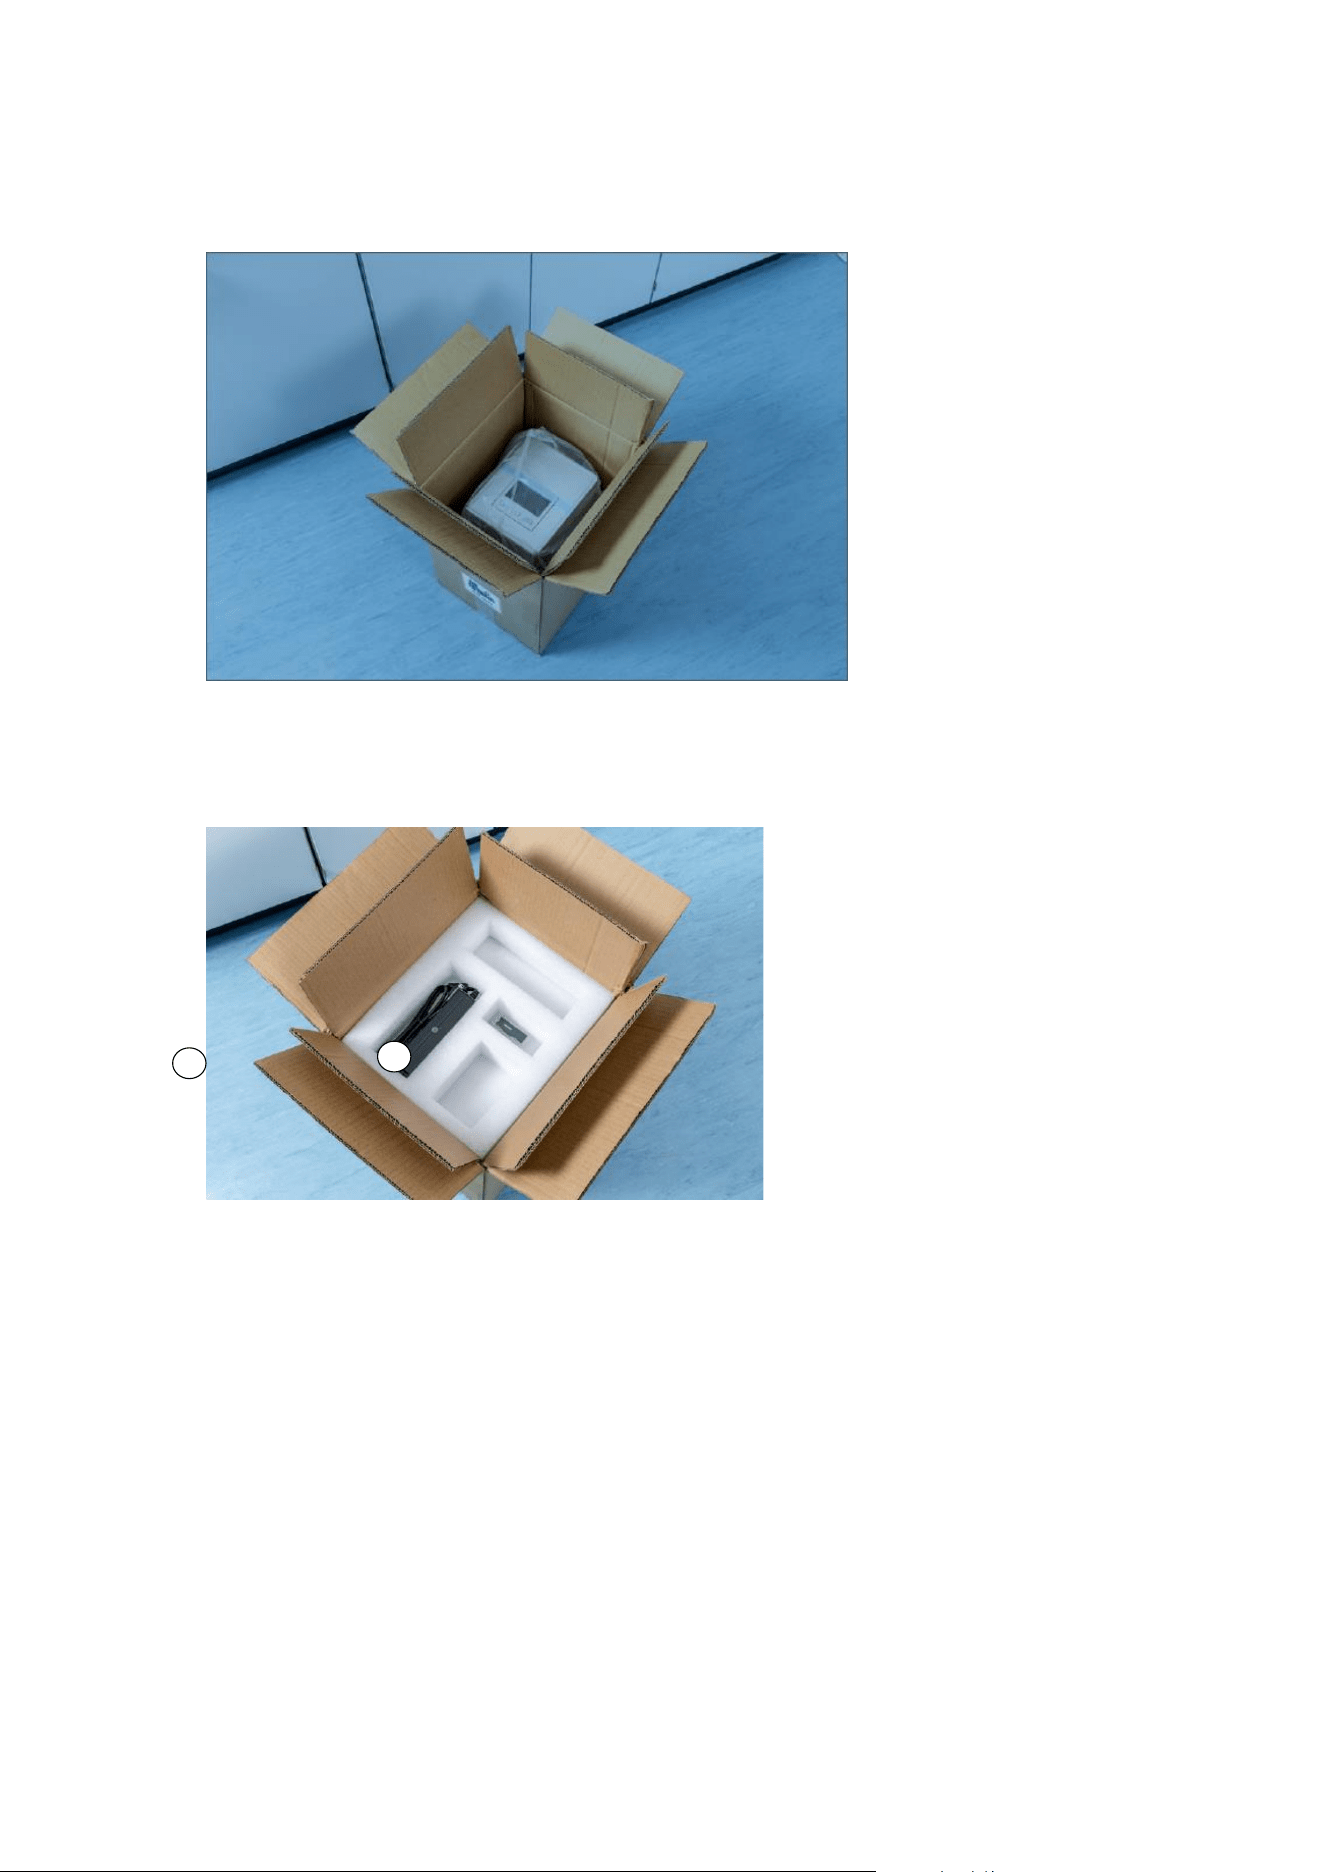
[QIAmini User Manual xx/2026
41
GLO-SOP-52-01-006-A09 Rev.02
Figure 30: tbd
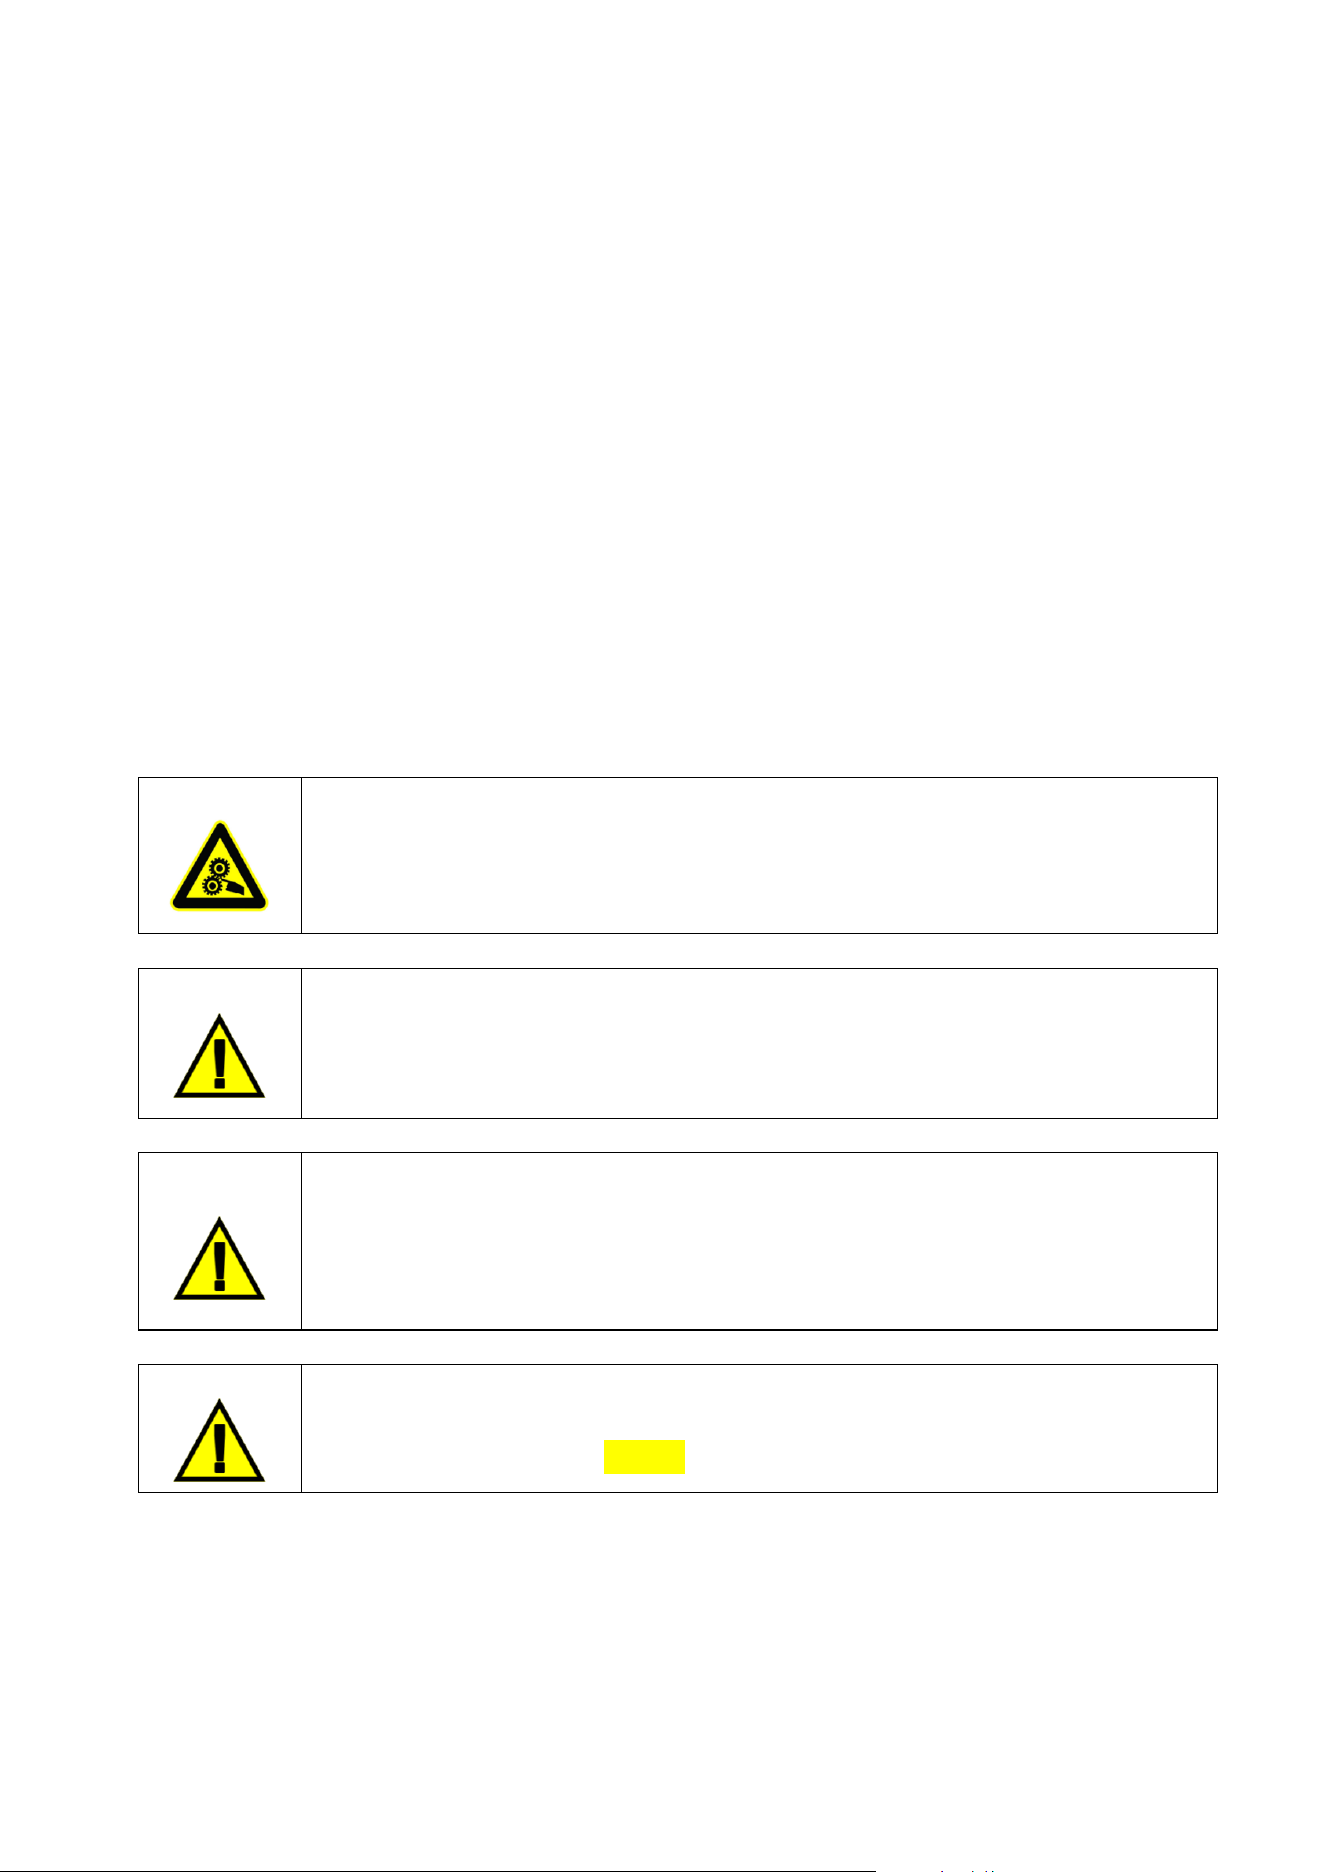
6. Package accessories into the accessories box, place onto the top of the transportation box together with the
PE foam.
Figure 31: tbd
7. Seal the outside edges of the carton with tape.
Note: Using the original package minimizes potential damage during transportation of the QIAmini
a
b
[QIAmini User Manual xx/2026
42
GLO-SOP-52-01-006-A09 Rev.02
5 Operating Procedures
This section describes how to operate the QIAmini .
Before proceeding, we recommend that you familiarize yourself with the features of the instrument by referring to
the Section 0.
The QIAmini is intended to be used only in combination with QIAGEN kits indicated for use with the QIAmini for the
applications described in the kit handbooks.
The door of the QIAmini must remain closed during operation of the instrument.
The magnetic bars and rod cover holder of the QIAmini move during operation of the instrument. Never open the
QIAmini door while the instrument is operating.
Warning
Moving parts
To avoid contact with moving parts during the operation of the QIAmini, the instrument must
be operated with the door closed.
If the door sensor or lock is not functioning properly, contact QIAGEN Technical Support.
WARNING
Risk of personal injury
Do not attempt to move the QIAmini during operation.
WARNING/
CAUTION
Risk of personal injury and material damage
Improper use of the QIAmini may cause personal injuries or damage to the instrument. The
QIAmini must only be operated by qualified personnel who have been appropriately trained.
Servicing of the QIAmini, which is not described in this handbook, must only be performed by a
QIAGEN Field Service Specialist.
CAUTION
Damage to the instrument
Avoid spilling water or chemicals onto the QIAmini. Instrument damage caused by water or
chemical spillage will void your warranty.
[QIAmini User Manual xx/2026
43
GLO-SOP-52-01-006-A09 Rev.02
Use of the QIAmini instrument software
The QIAmini is operated using a touch display. The following actions can be done using the user menu:
• Start, Pause or Stop Runs
• Check the status of the run and the instrument
• Upload or Download protocols
• Download run reports
• Change instrument settings to customize your QIAmini
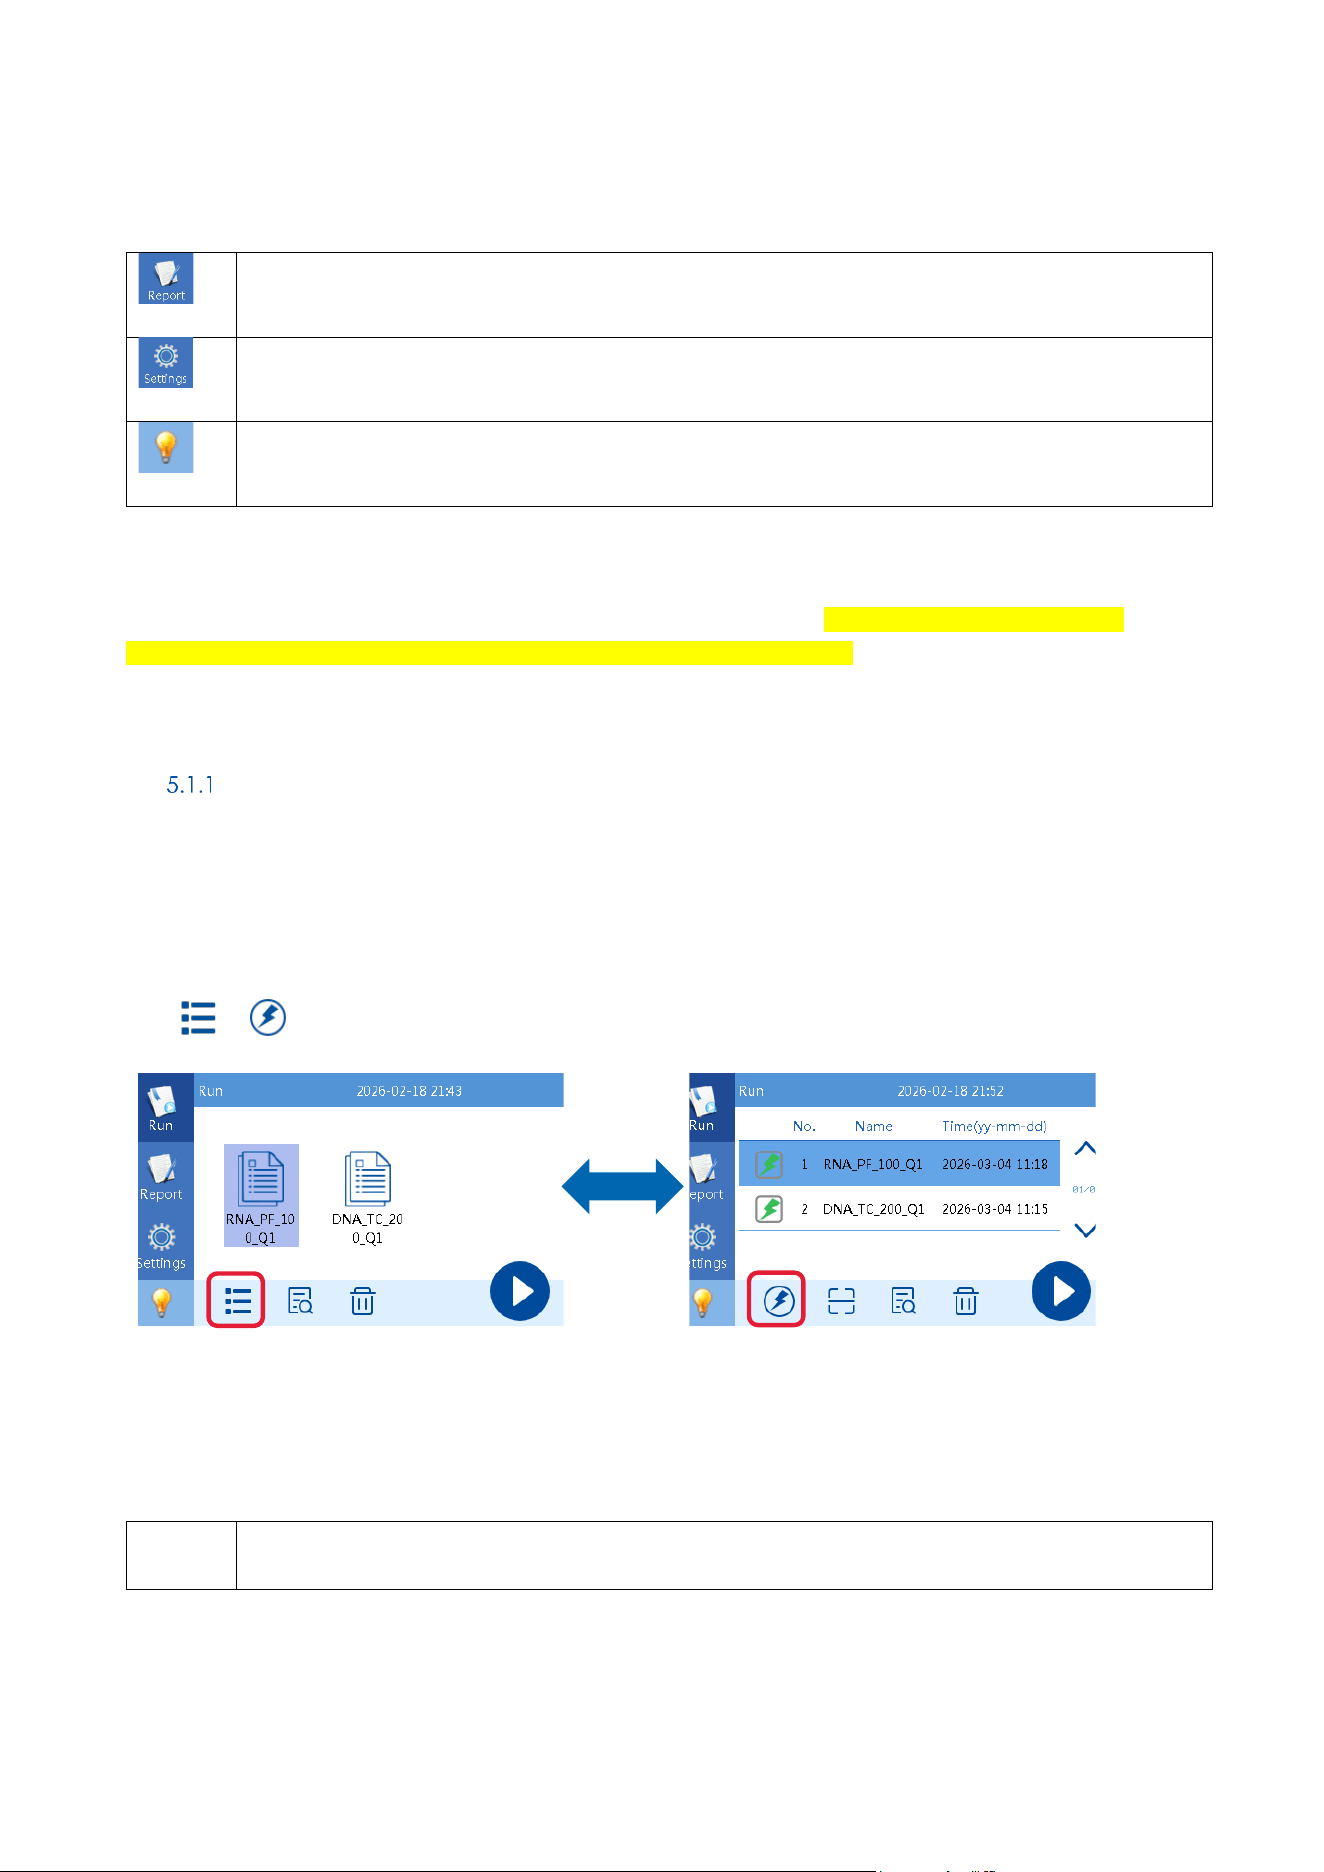
The QIAmini software functionalities are structured in three menus: Run, Report and Settings. The toolbar on the left
side can be used to navigate between these menus. Each screen of the user menu consists of three elements: the
toolbar, the main content, and the footer.
After the QIAmini is switched on the instrument will perform initialization of all axis and show the protocol run menu.
Figure 32: Homescreen of the QIAmini. The toolbar on the left side (highlighted by red rectangle)allows navigation
between the three main menus: Run, Report and Settings. In addition the internal workdeck light can be
controlled by usage of the light bulb symbol (include icon).
Icon
Definition
View protocol Run menu.
[QIAmini User Manual xx/2026
44
GLO-SOP-52-01-006-A09 Rev.02
View protocol Report menu.
View Settings menu.
Turn off and on internal light.
Note: The instrument’s touchscreen does not support swiping and multi gestures.
Note: The QIAmini does not come with preloaded protocols, please visit the QIAmini product page, the
respective QIAmini kit product page on QIAGEN.com or QIAmini Suite (link) to download protocols.
The Protocol Run menu
The Protocol Run menu provides two views: Favorites view (Figure 33) and List view (Figure 34).
The list view always contains all protocols available on the instrument, whereas the favorite view is reduced to the
protocols selected by the user (for details refer to 5.2.4).
Press or to toggle between views.
Figure 33: Favorites View
Figure 34: List view
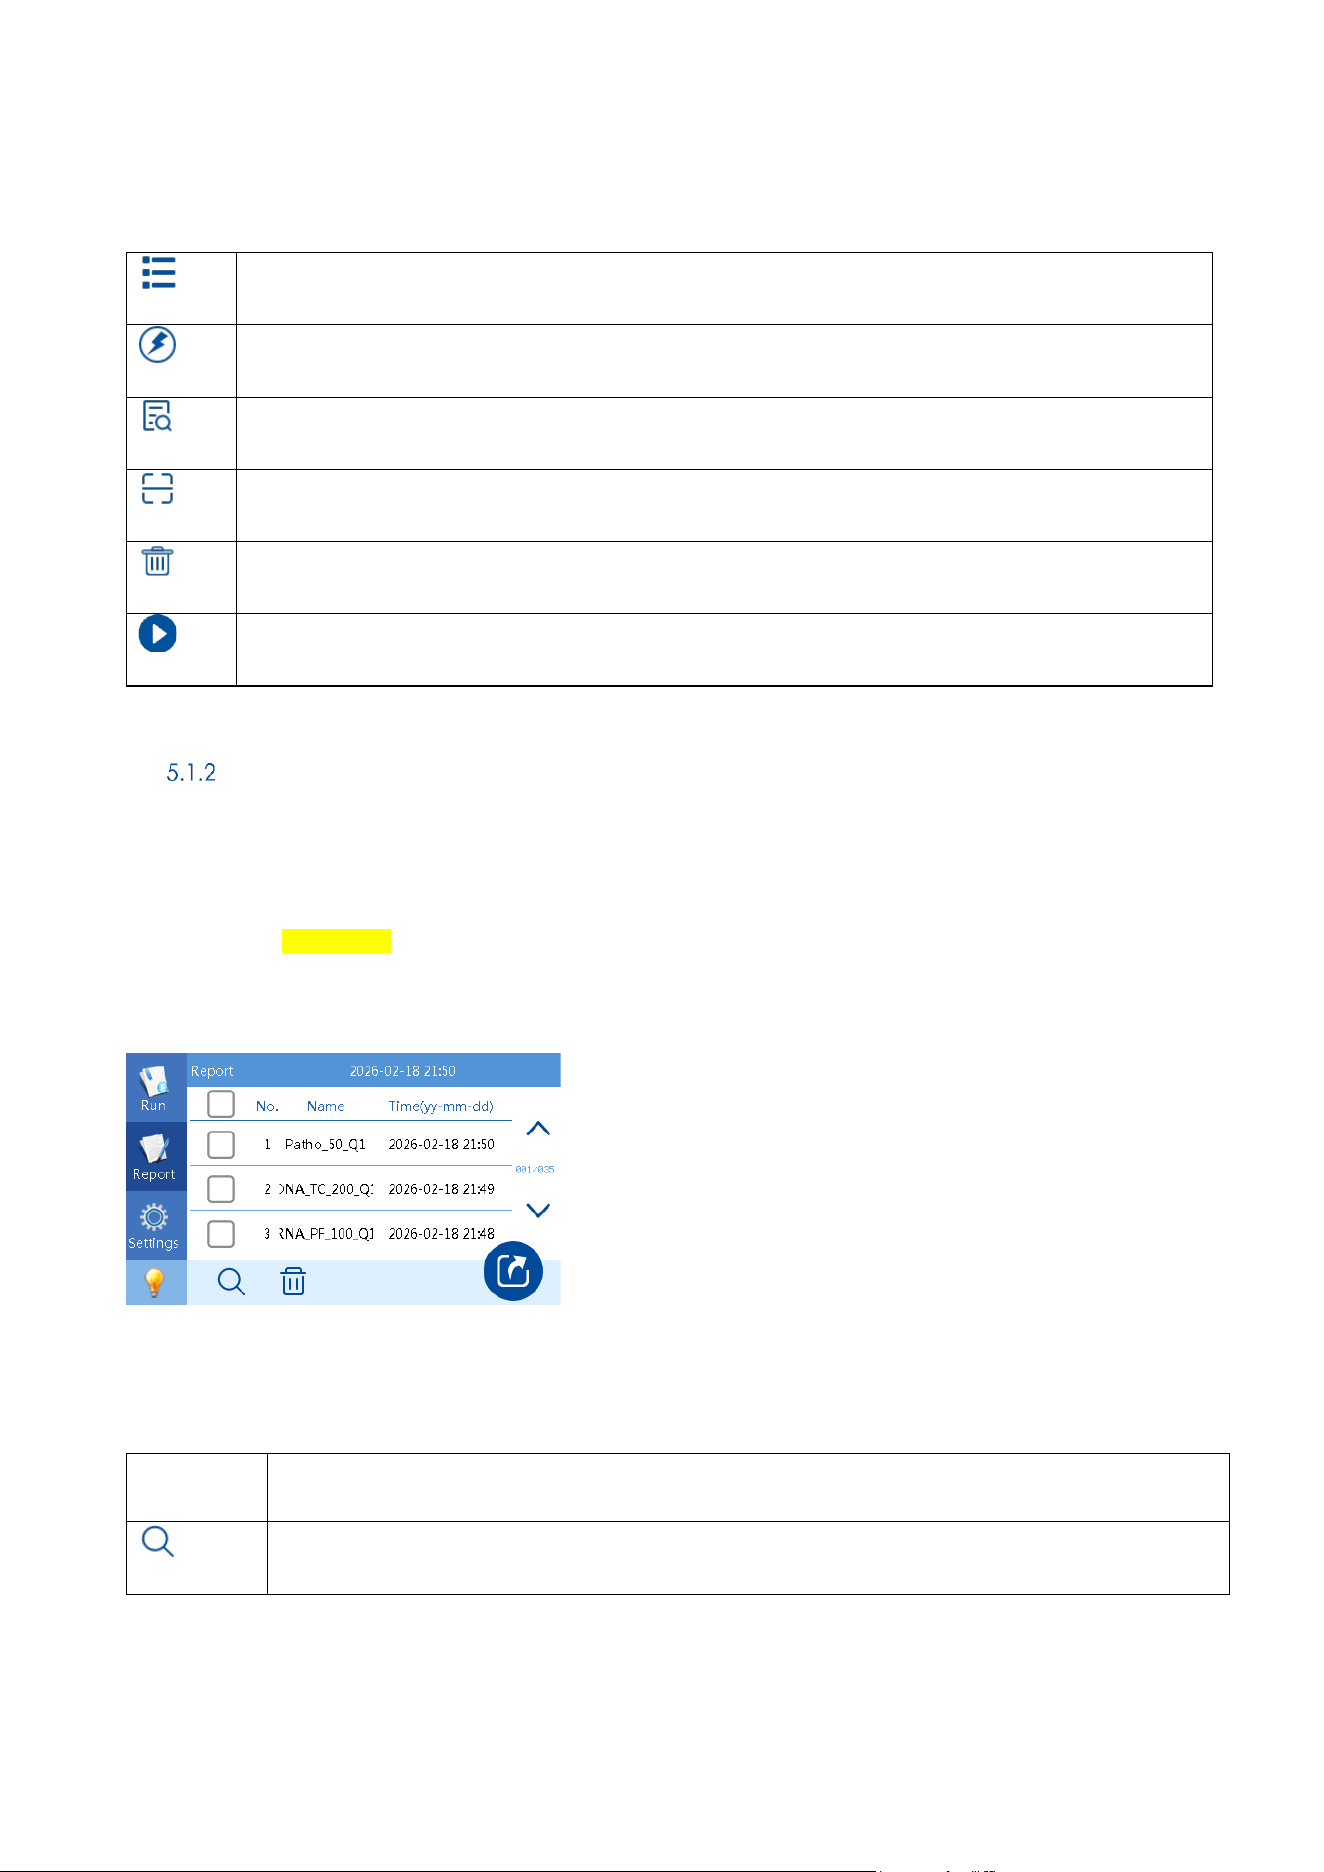
table 1: Protocol Run menu icons
Icon
Definition
[QIAmini User Manual xx/2026
45
GLO-SOP-52-01-006-A09 Rev.02
Switch from favorite to list view.
Switch from list to favorite view.
Preview protocol steps and setting.
Add protocol via QR code (optional barcode scanner required).
Delete the selected protocol from instrument internal memory.
Run the selected protocol.
Run Report Menu
The QIAmini automatically generates and stores run reports of each protocol run. The instrument can store up to
1000 run reports. Selected run reports can be downloaded to a USB drive attached to one of the USB ports of the
instrument, or if a Bluetooth connection is established imported can be started via QIAmini suite app on a mobile
device (refer to SW manual).
Recommendet: Download and deletion of the reports on a regular basis is
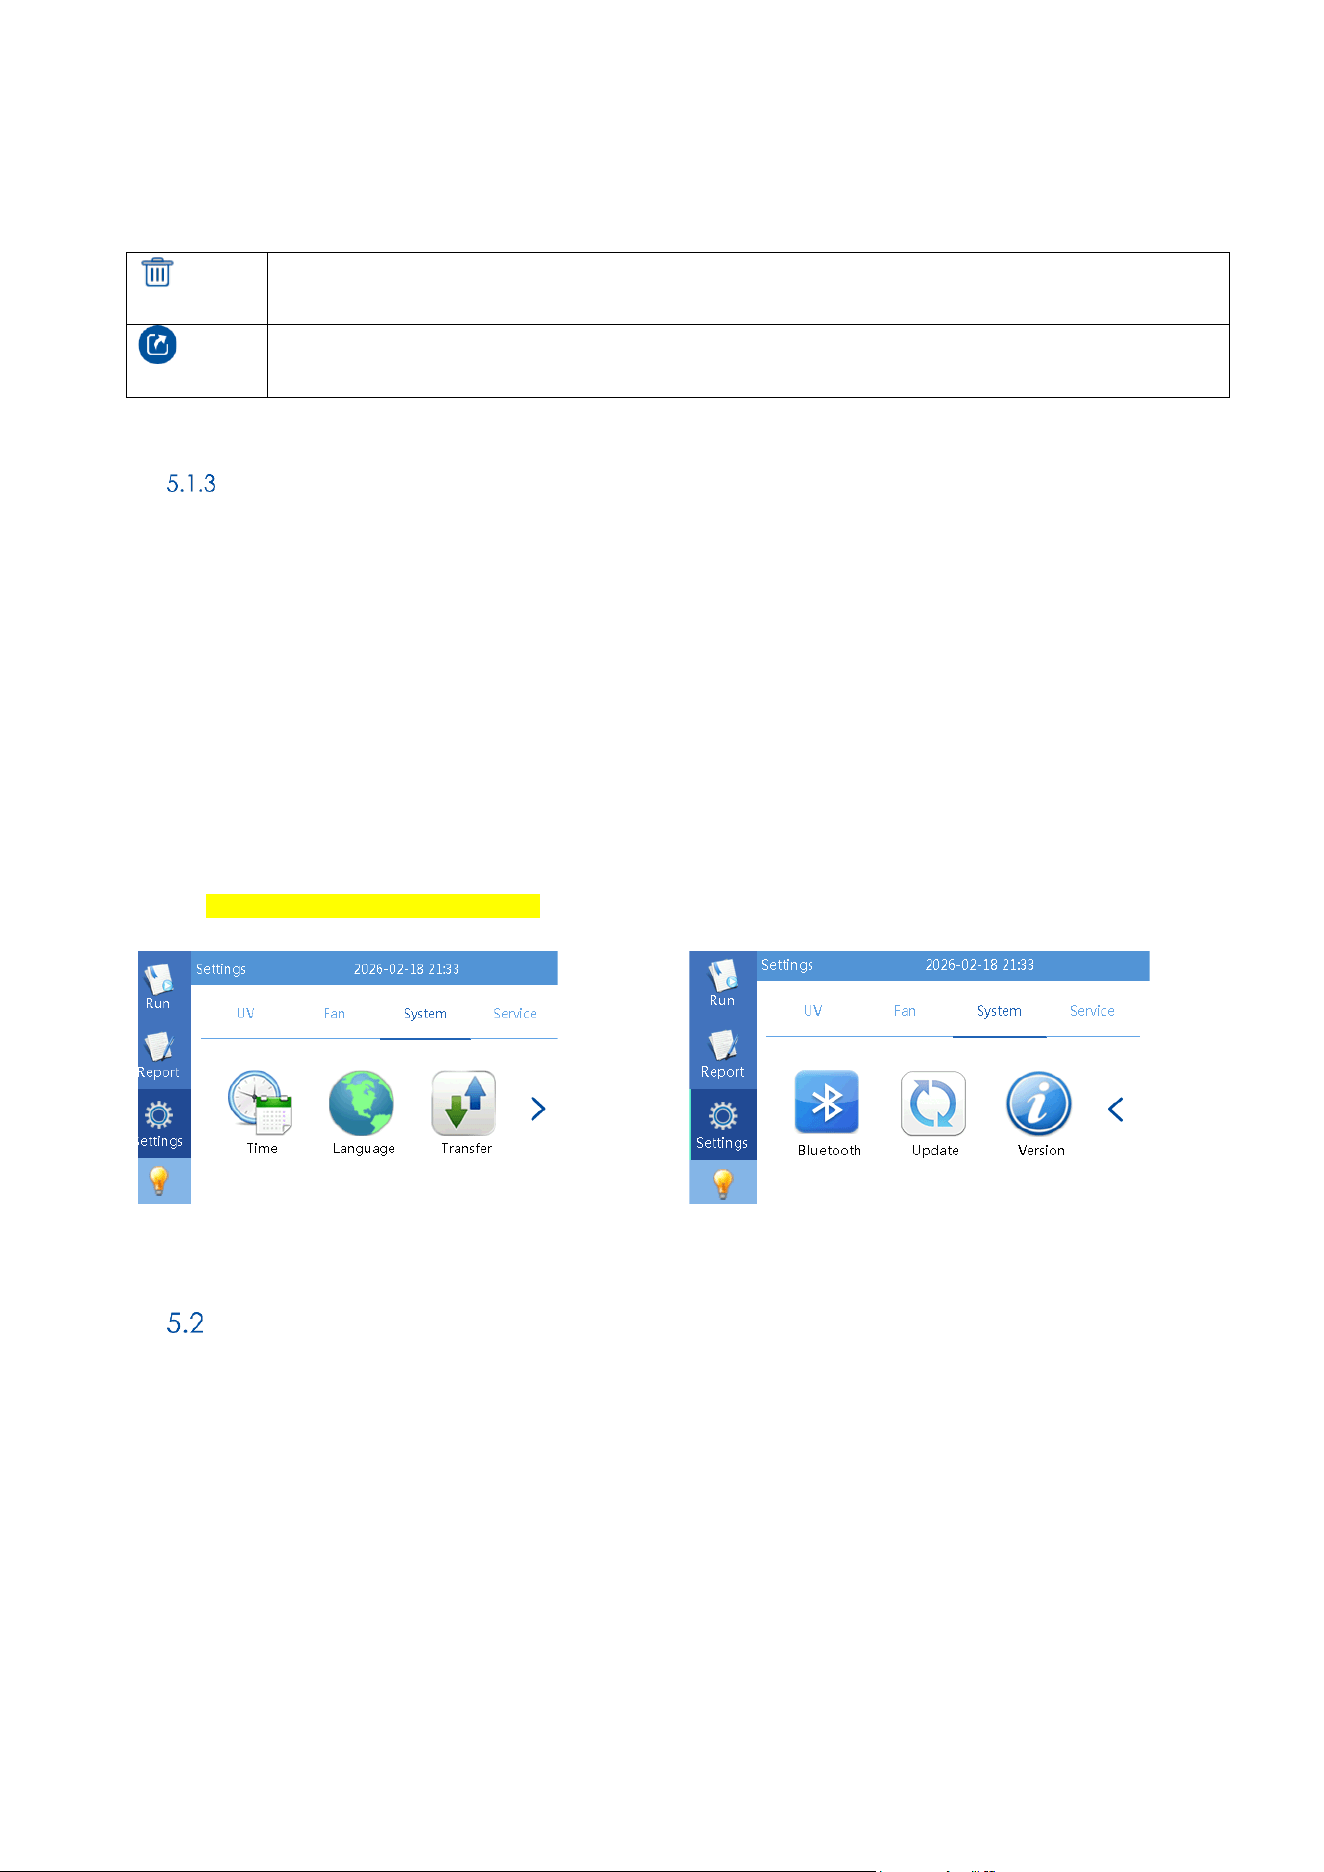
Figure 35. Run Report Menu.
Icon
Function
Search, used to search for the specified report
[QIAmini User Manual xx/2026
46
GLO-SOP-52-01-006-A09 Rev.02
Delete selected report.
Export selected reports to USB drive.
The Settings menu
The Settings menu mainly has four functions:
1) UV decontamination
2) Control of the fan
3) Systems settings
a. Time
b. Language
c. Transfer of data
d. Bluetooth connection
e. Version information
4) Service
Link to detailed description missing
Protocol Management
QIAmini protocols can be downloaded via the QIAmini Suite (link) running on a desktop PC or a mobile device
(Android or IOS), QIAmini product page (link) or from the QIAmini Kit product page.
To import or export protocols the QIAmini offers three options.
1) Import/Export of Protocols via USB drive

[QIAmini User Manual xx/2026
47
GLO-SOP-52-01-006-A09 Rev.02
2) Import of Protocols via QR code with barcode scanner
3) Import/Export of Protocols via Bluetooth with QIAmini Suite
Note: The QIAmini does not come with pre-installed protocols. Please download the latest protocol relevant to your
application.
All QIAGEN protocols for dedicated QIAmini kits are free of charge. The individual protocol files (txt files and QR
codes) are available on the QIAmini product page or on the respective product page of the QIAmini kit on
www.qiagen.com. In addition, you can find all protocols in QIAmini Suite.
Import/Export of protocols via USB drive
Import of protocols via USB drive.
Protocols can be exported as txt files from QIAmini Suite (link) relevant to your application (for details see QIAmini
Suite handbook). To import the files to QIAmini the QIAmini USB drive is required.
1. Prepare the USB drive for protocol upload. The instrument will only recognize protocols within a folder called
“Items” on the first layer of the USB drive. If this is the first time using the QIAmini USB drive, the folder needs to
be created first.
Figure 36: USB drive folder structure for protocol upload. All protocols to be uploaded onto the QIAmini need to
be localized in a folder named items.
2. Connect the prepared USB drive, to one of the USB ports on the right side of the instrument.
3. In the Settings Menu, select System from the menu and tap on Transfer. Select import and confirm to view
the list of protocols available on the USB drive.
4. Select one or multiple protocols and press the to start import of the protocols.
5. After confirmation of the import to be successful return to the main menu .
6. Remove USB drive.

[QIAmini User Manual xx/2026
48
GLO-SOP-52-01-006-A09 Rev.02
Note: Renaming if the protocol file can lead to errors during upload to the instrument.
Export of protocols via USB drive.
Protocols can be exported from the QIAmini instrument as txt files.
1. Connect a USB drive to one of the USB ports of the instrument.
2. In the Settings Menu, select Transfer from the menu. Select export and confirm to view the list of
protocols available on the instrument.
3. Select one or multiple protocols and press the to start export of the protocols
4. After confirmation of the export to be successful return to the main menu .
Note: The protocols can be found in a folder called “Items” on the first layer of the USB drive folder structure. If
this is the first time using this specific USB drive, the instrument will create the folder on its own.
Import of Protocols via QR code.
Protocols can be exported from QIAmini Suite (companion software) as QR codes(for details see companion
software handbook). In addition, QR codes can be found on the product pages of the instrument and QIAmini kits
on www.qiagen.com. To import protocols the optional QIAmini barcode scanner (ref ) is required. The QR code
can be presented on a mobile device or as a printout.
1. Attach the barcode scanner to the barcode scanner port on the back of the QIAmini.
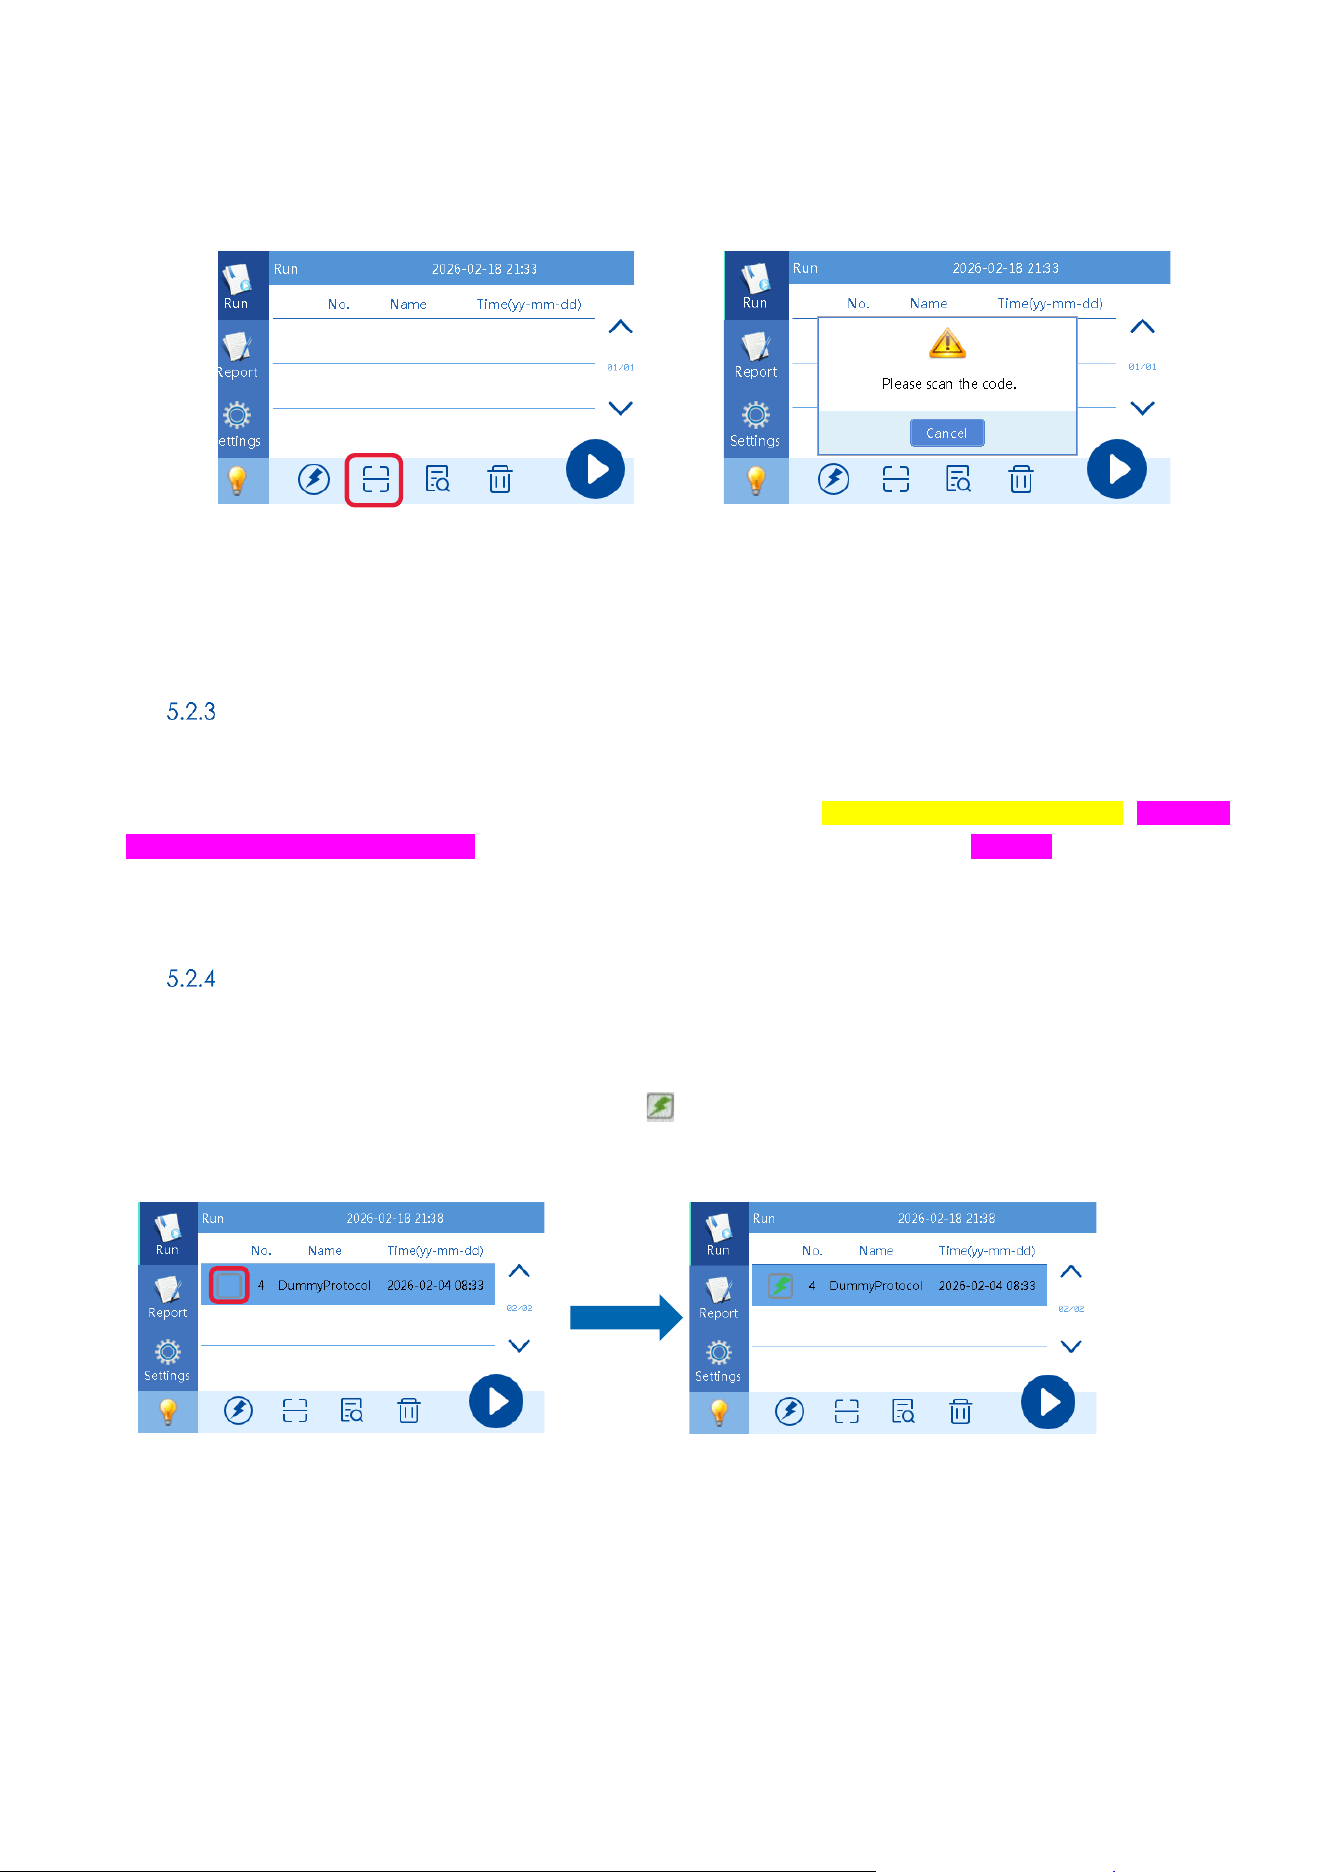
2. Open the Run Menu and switch to list view . Press to scan the QR code of the protocol.
[QIAmini User Manual xx/2026
49
GLO-SOP-52-01-006-A09 Rev.02
Figure 37: The run menu- List view – Scan protocol QR code.
3. The protocol is automatically added to the list of protocols.
Import via mobile device using Bluetooth connection
Protocols can be directly imported from QIAmini Suite (QIAmini companion App) on a mobile device. For this
feature the Bluetooth connection of the instrument has to be activated (reference to Bluetooth chapter)(for details
see companion software handbook). To import the files please follow instructions in the QIAmini Suite.
Adding protocols to the favorite view
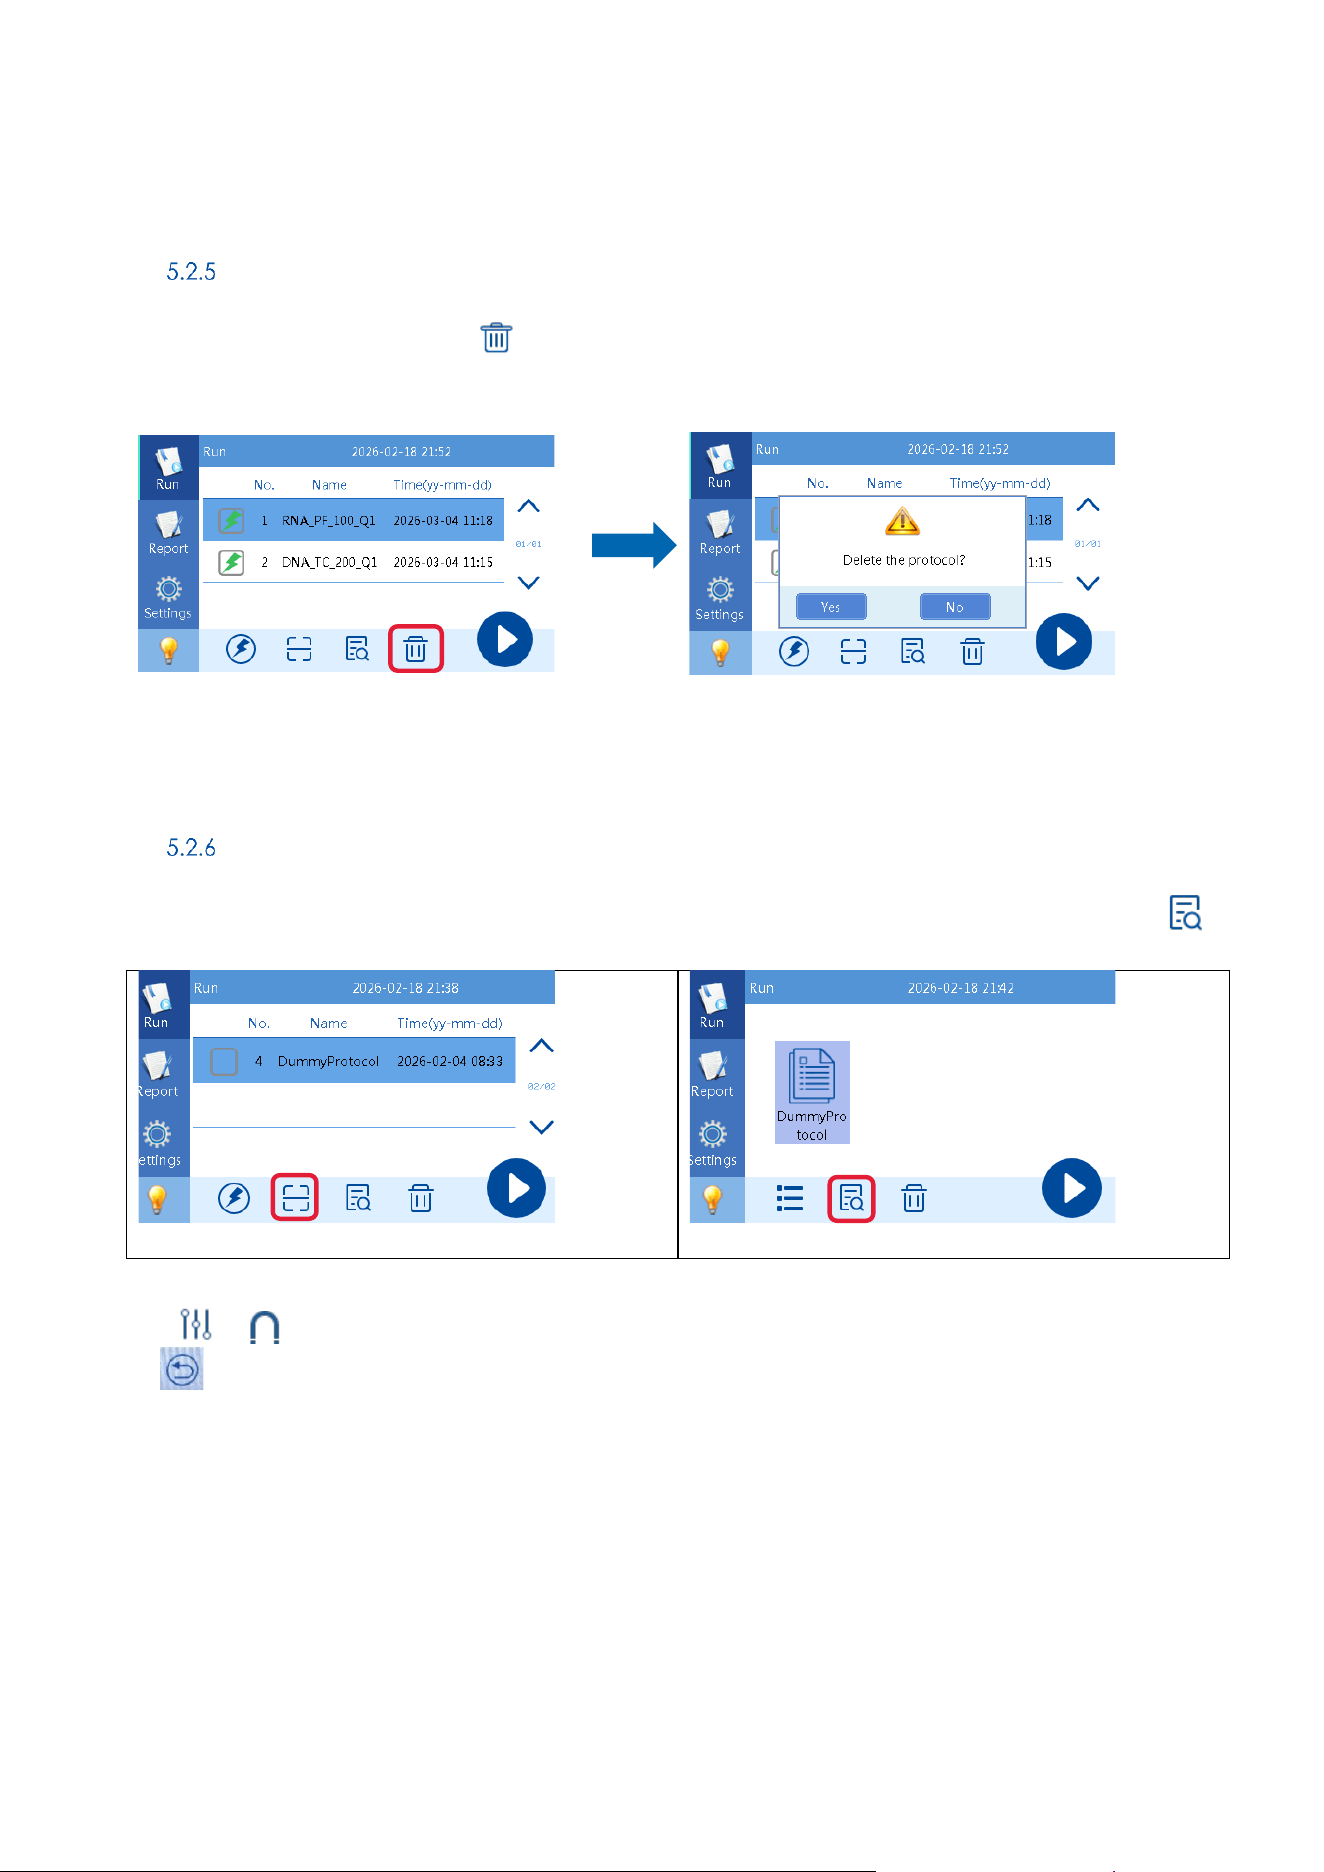
The favorites view allows the user to create shortcuts and display only a selected subset of the protocols available
on the QIAmini instrument. Protocols can be marked or unmarked as favorites in the list view of the protocol run
menu by selecting the checkbox in front of the respective protocol. Only protocols marked by will be
visible in the favorites view.
Figure 38: The run menu – List view – Create Favorite.
[QIAmini User Manual xx/2026
50
GLO-SOP-52-01-006-A09 Rev.02
Deleting Protocols
To delete a selected protocol press (Figure 39, highlighted by red rectangle). After confirmation the protocol
(Fehler! Verweisquelle konnte nicht gefunden werden.) will be deleted from the internal memory.
Figure 39: The run menu - Delete protocols
Note: Deletion of the protocol cannot be undone.
Protocol Preview
The protocol preview is available in the protocol Run menu. To preview details of the selected protocol tap .
Figure 40: The Run menu – list view(left), favorite view (right) - View Protocol details.
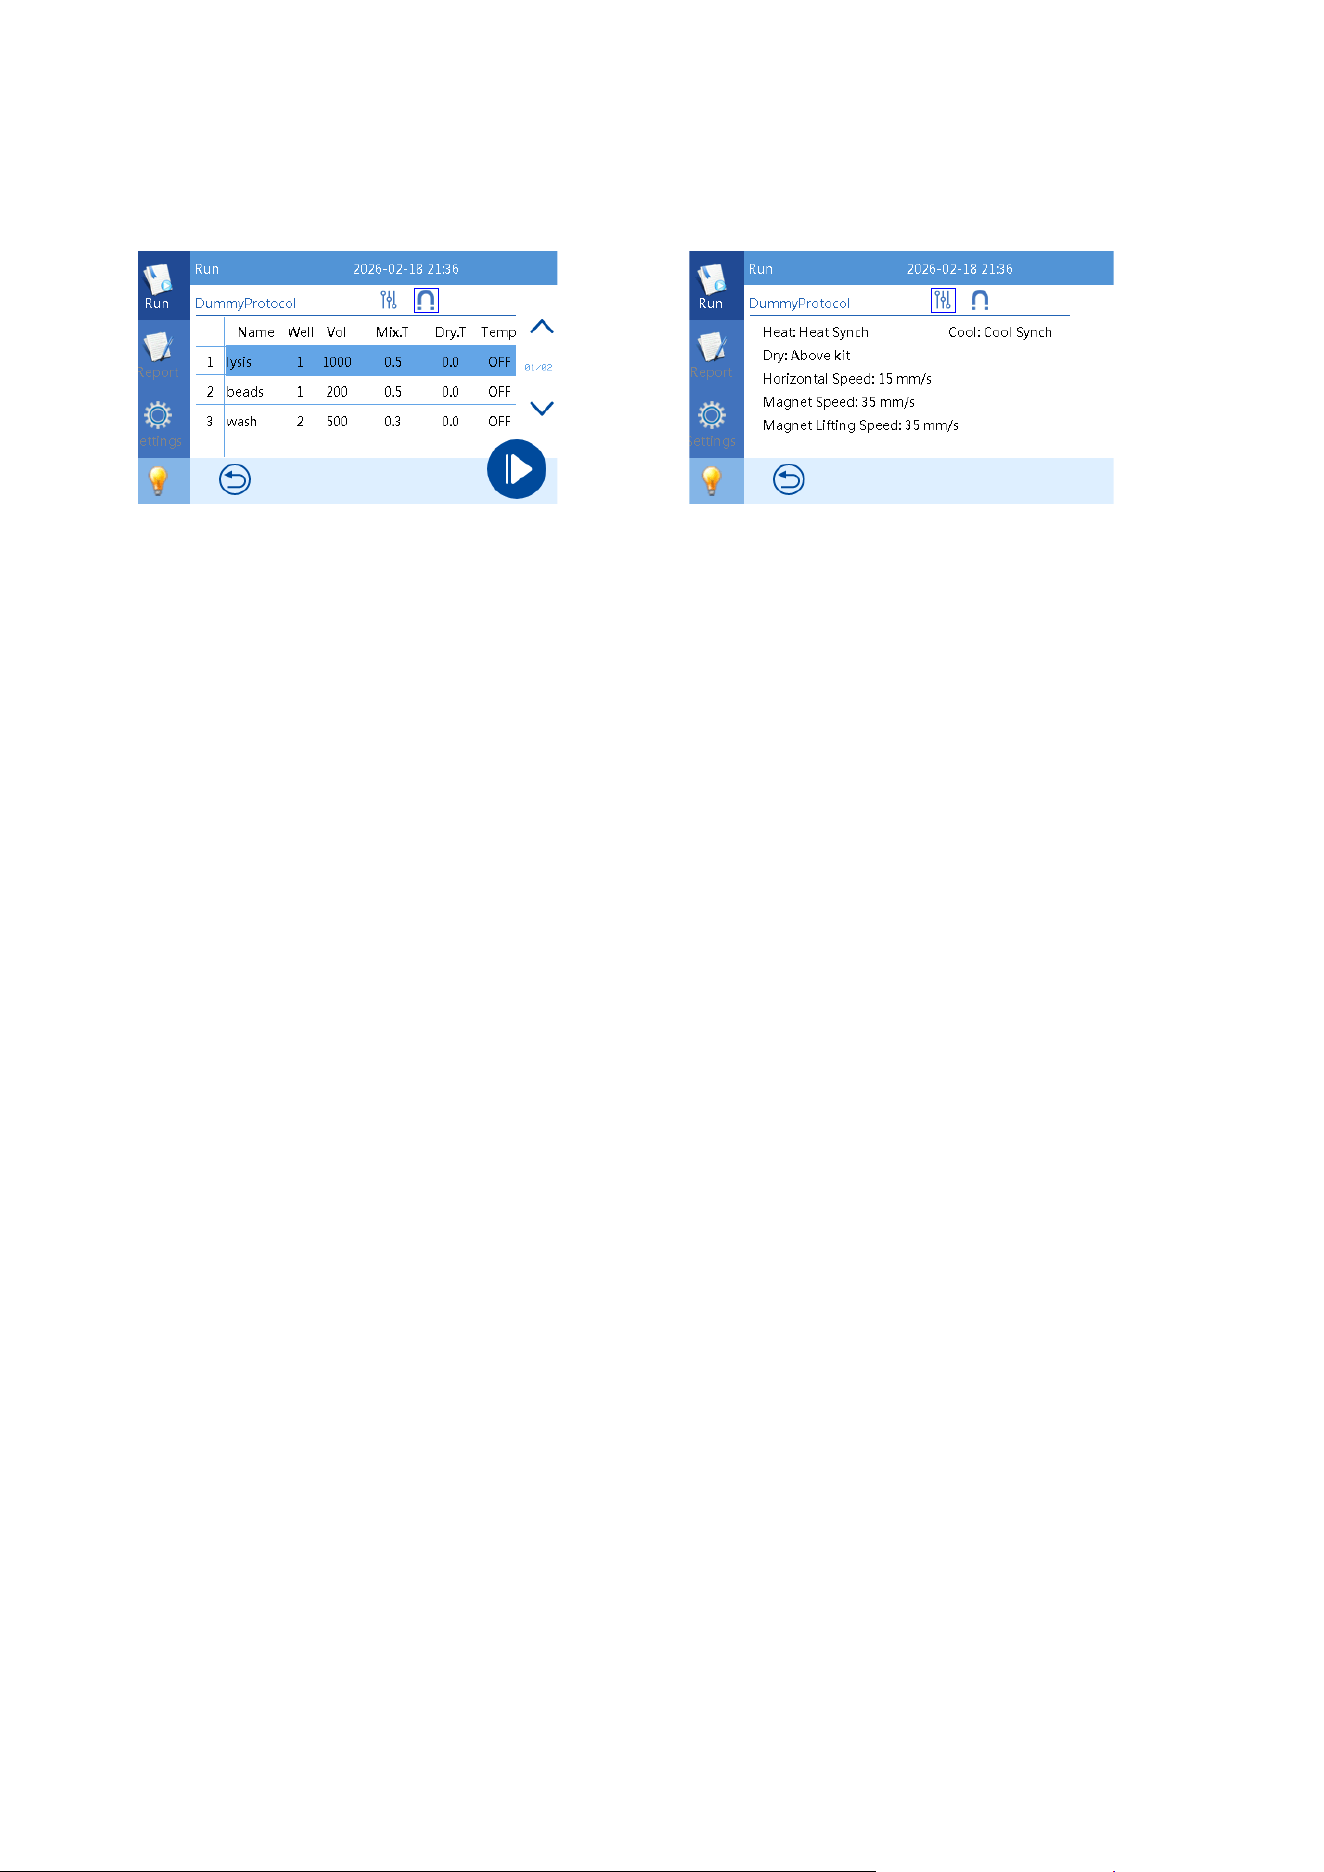
Press or to switch between protocol step (Figure 41)and protocol settings (Figure 42) overview. Afterwards
tap to return to the protocol overview.
[QIAmini User Manual xx/2026
51
GLO-SOP-52-01-006-A09 Rev.02
Figure 41: Protocol Step overview
Figure 42: Protocol Settings overview
[QIAmini User Manual xx/2026
52
GLO-SOP-52-01-006-A09 Rev.02
Start a run
For each run up to 8 Cartridges can be used. Read the manual of the respective kit carefully before starting to load
the QIAmini.
Note: The instrument will apply the same protocol to all cartridges. Do not mix kits of different applications.
Preparation of Cartriges and Cartridge Frame
Loading of the QIAmini includes preparation of the Cartridge, loading of Cartridges into the cartridge frames and
removing the foil. o load the cartridge frame, follow the steps below .
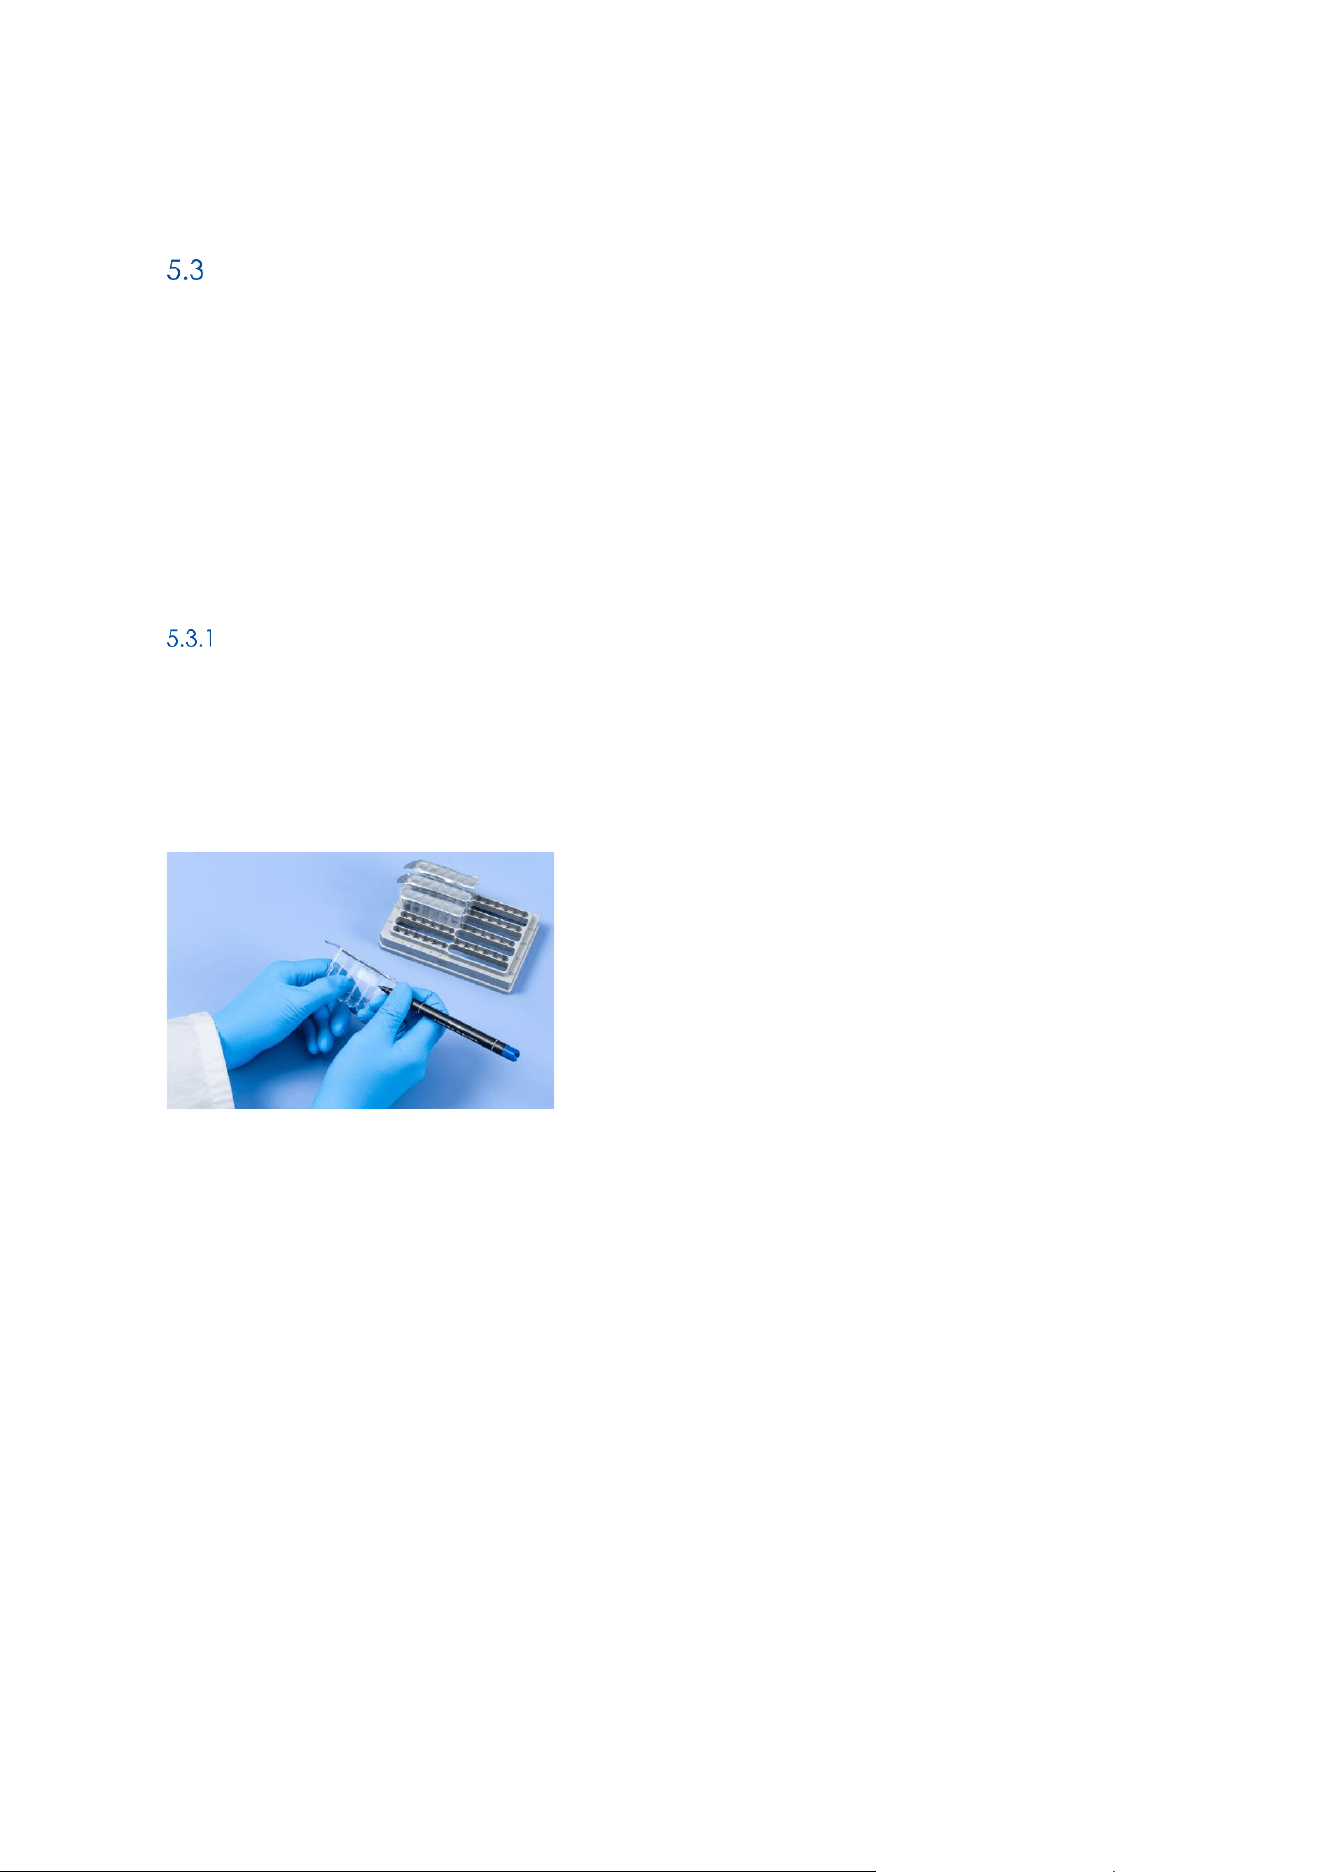
1. Label the cartridges according to your needs using the labeling field.
Figure 43. Cartridge labelling
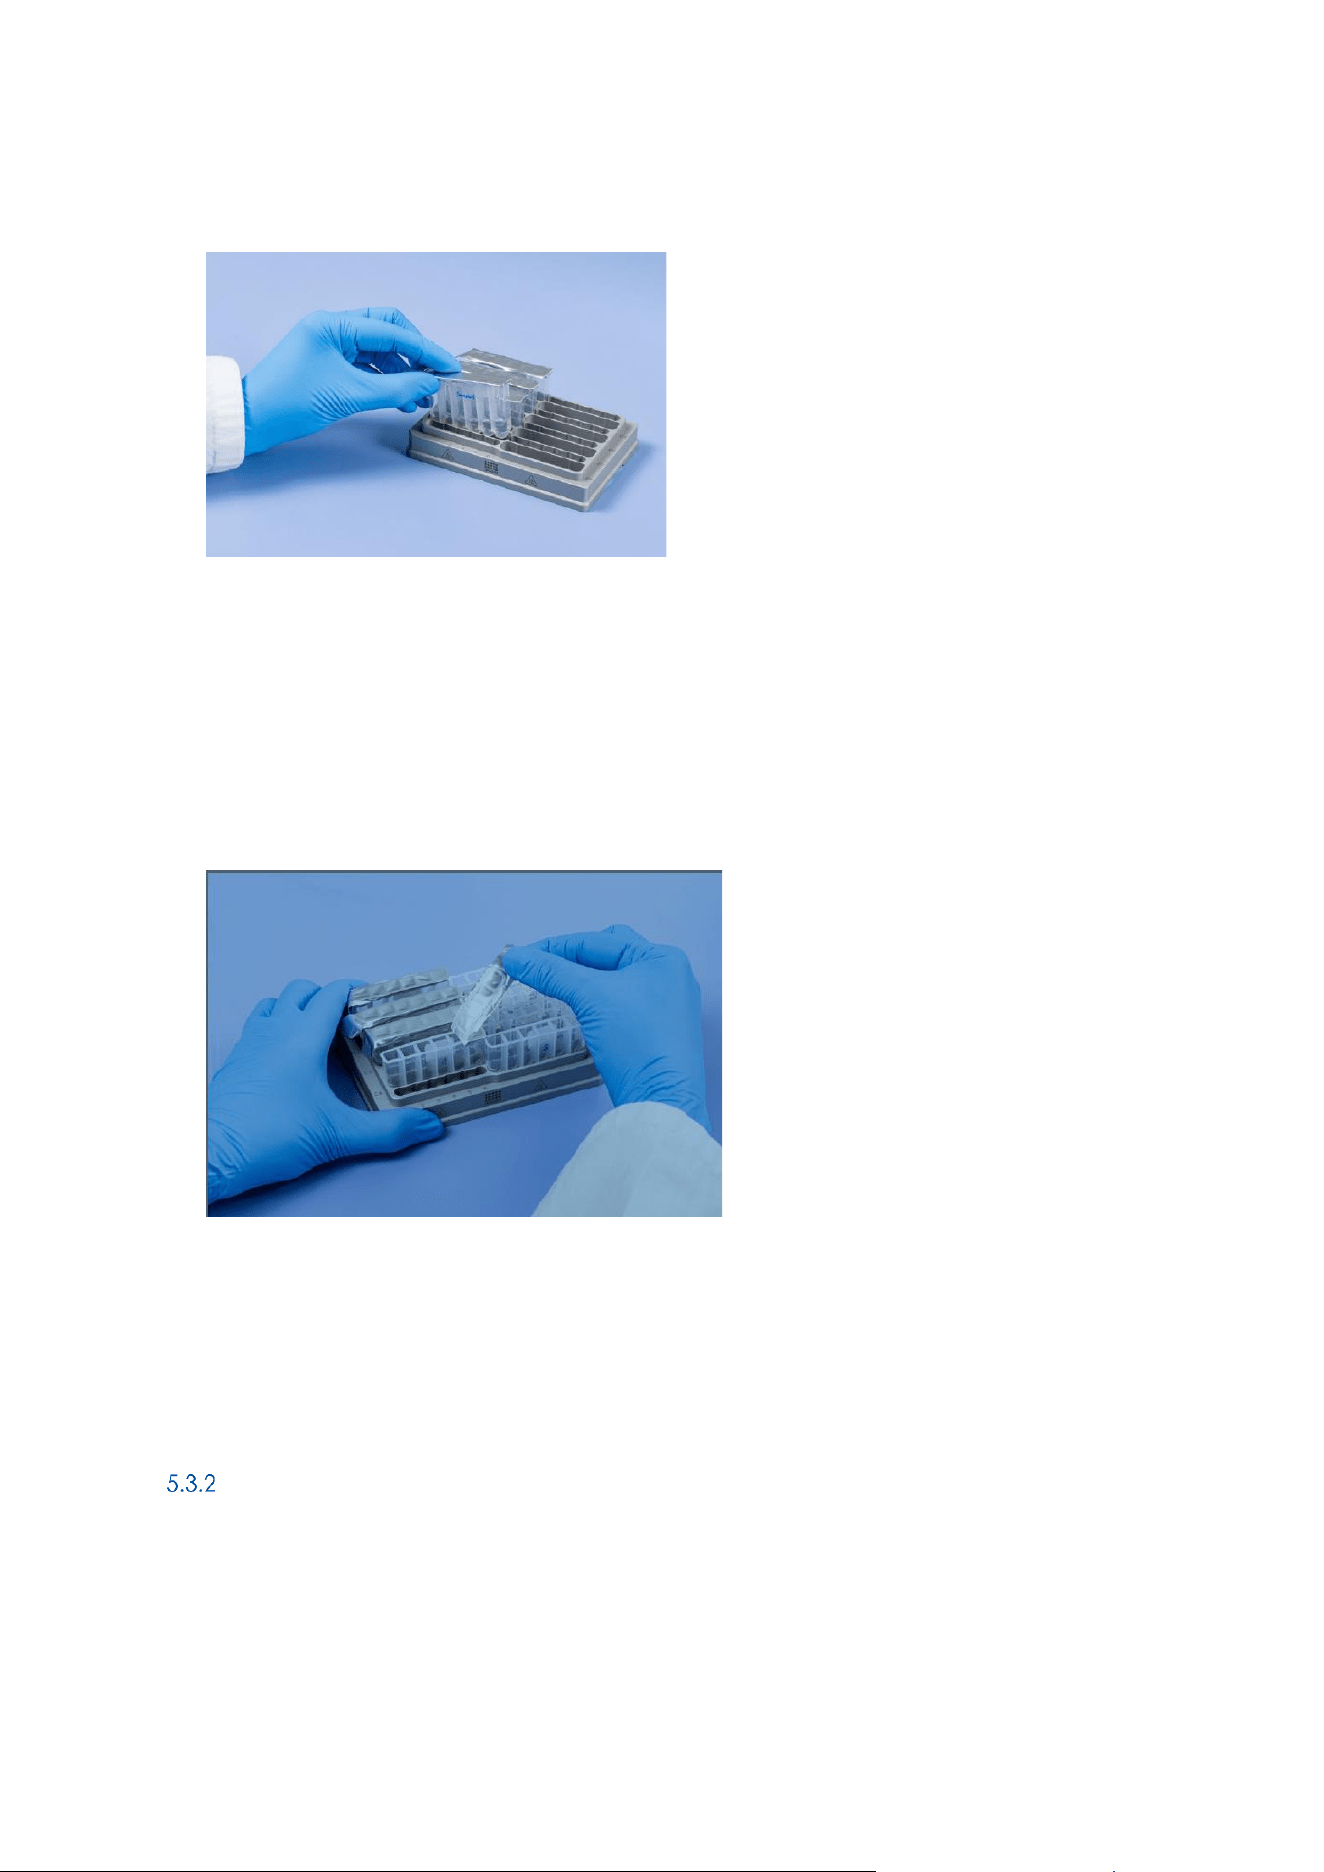
2. Invert pre-filled cartridge(s) to resuspend magnetic beads. Flick down to remove reagents and bead
suspension from under the foil.
3. Place the cartridge(s), with the flap on the left side and the label containing the Kit information to the back,
into the cartridge frame (QIAGEN logo facing to the front) and push down gently. Ensure correct orientation
by positioning the cartridge frame such that the QIAGEN logo faces the front.
[QIAmini User Manual xx/2026
53
GLO-SOP-52-01-006-A09 Rev.02
Figure 44: tbd
Note: If loading cartridges on both sides of the frame ensure that all flaps of the Cartridge foil are accessible.
Note: Asymmetrical loading can lead to slight instability of the frame on the workdeck. If possible always
prefer symmetrical loading.
4. Important: Carefully remove the sealing foil to avoid splashing of reagents.
Figure 45: Removal of cartridge foil
5. Follow the instructions of the respective kit handbook on how to treat the reagent cartridge(s) and where
to add the sample. There might also be other manual steps required.
Procedure on the QIAmini instrument
1. Turn on the QIAmini instrument.
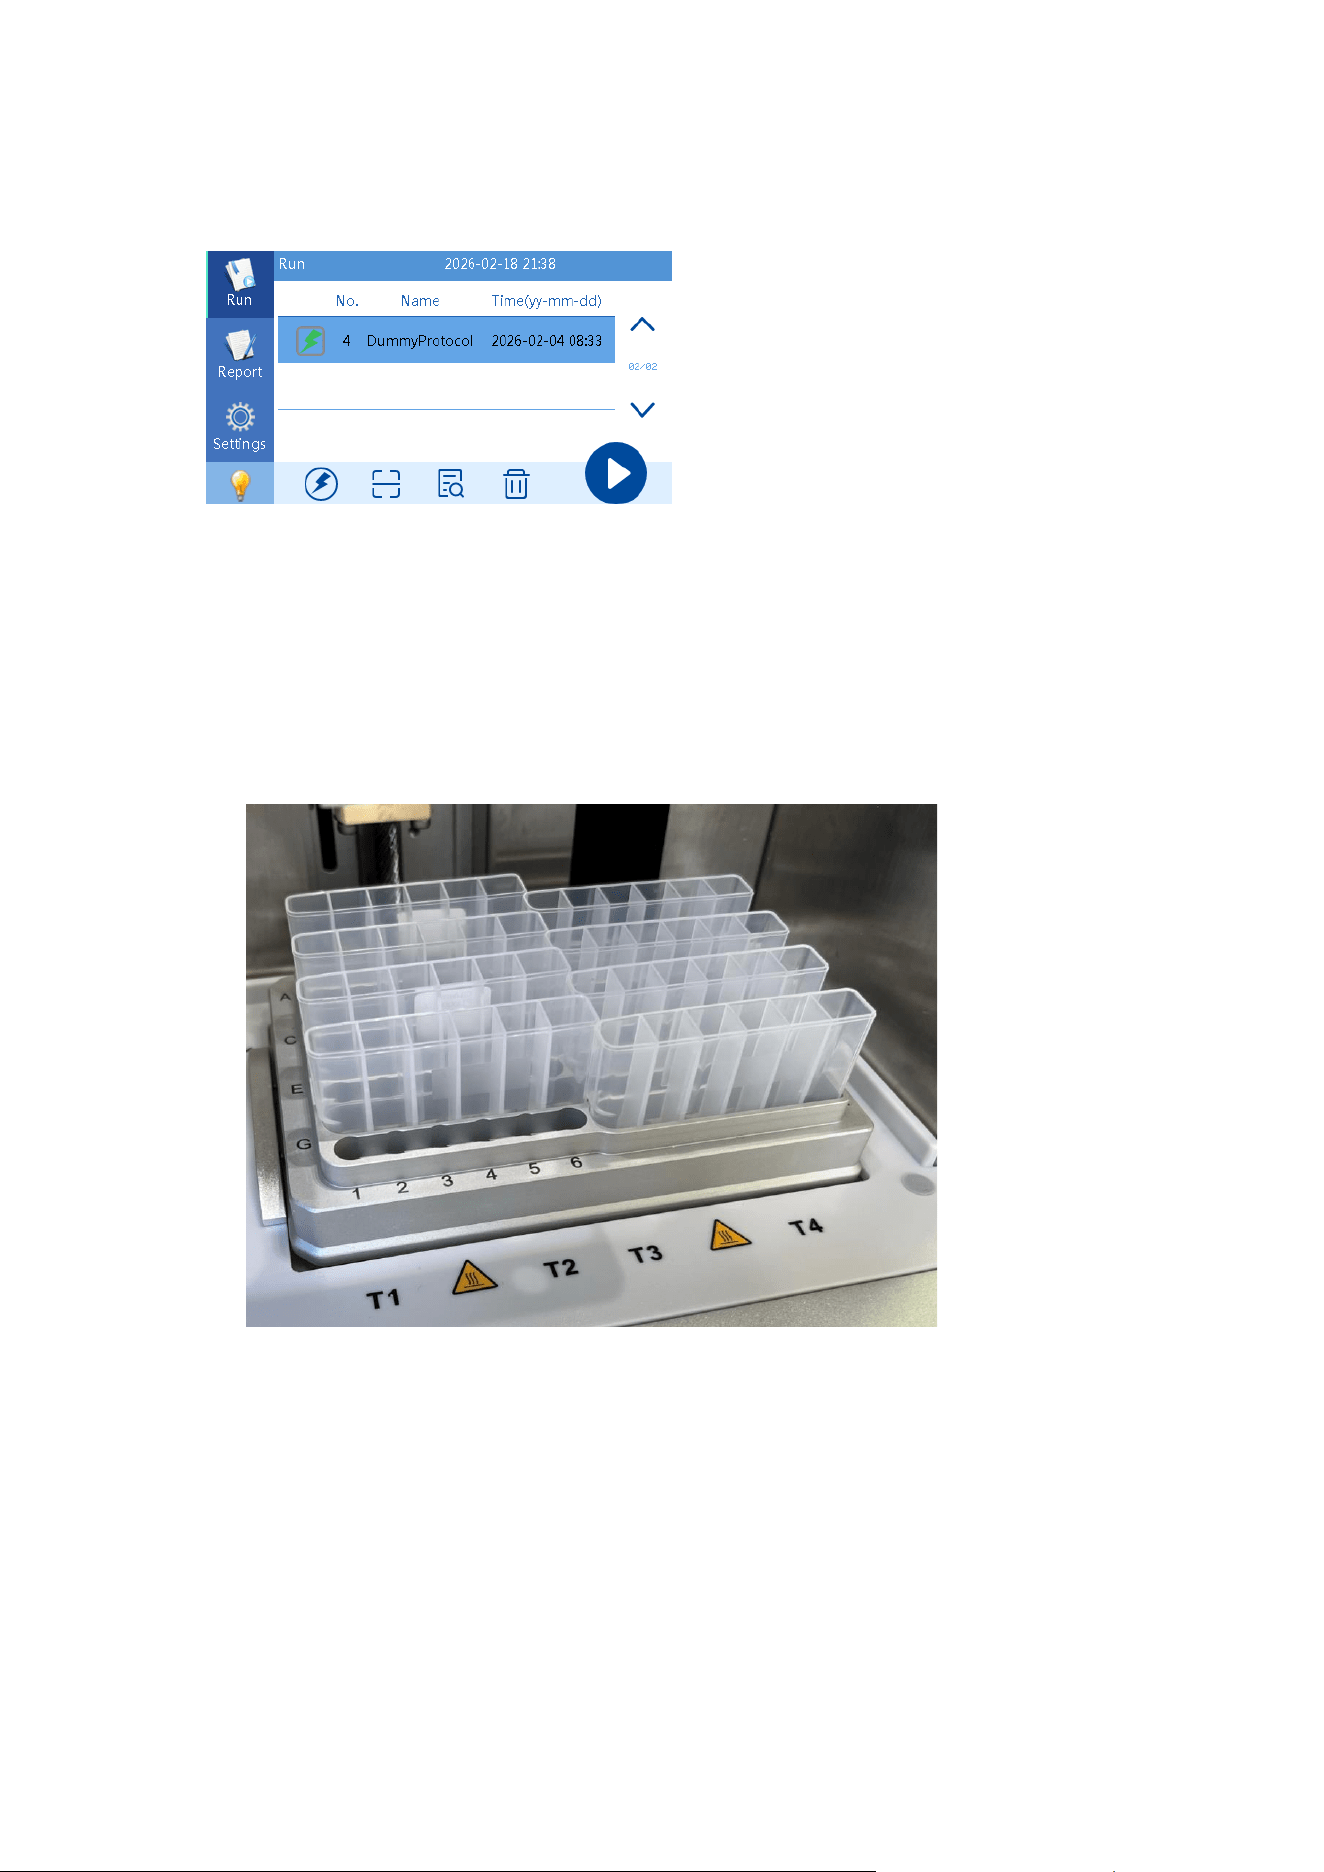
2. Select the desired protocol (Find a list of all protocols in the list view of the Run menu). The selected
protocol appears with a blue color highlight in the list view.
[QIAmini User Manual xx/2026
54
GLO-SOP-52-01-006-A09 Rev.02
Figure 46: The Run menu – list view- Protocol selected for run.
Note: For details regarding protocol selection, refer to the Kit handbook. If the protocol is not visible in the
list, please follow the instructions for protocol upload first (5.2.1).
Note: The “flash” icon only indicates that the protocol has been selected as favorites and will be visible in
list view as well as favorited view.
3. Open the instrument door. Load the Cartridge Frame holding the cartridge(s) into the instrument.
Figure 47:Cartridge frame loaded with eight reagent cartridges on the workdeck.
Note: Ensure the cartridge frame is placed in the correct orientation (QIAGEN logo facing the front). Press
the cartridges down to fully engage with the heater block.
4. Slide a set of rod covers into the rod cover holder.
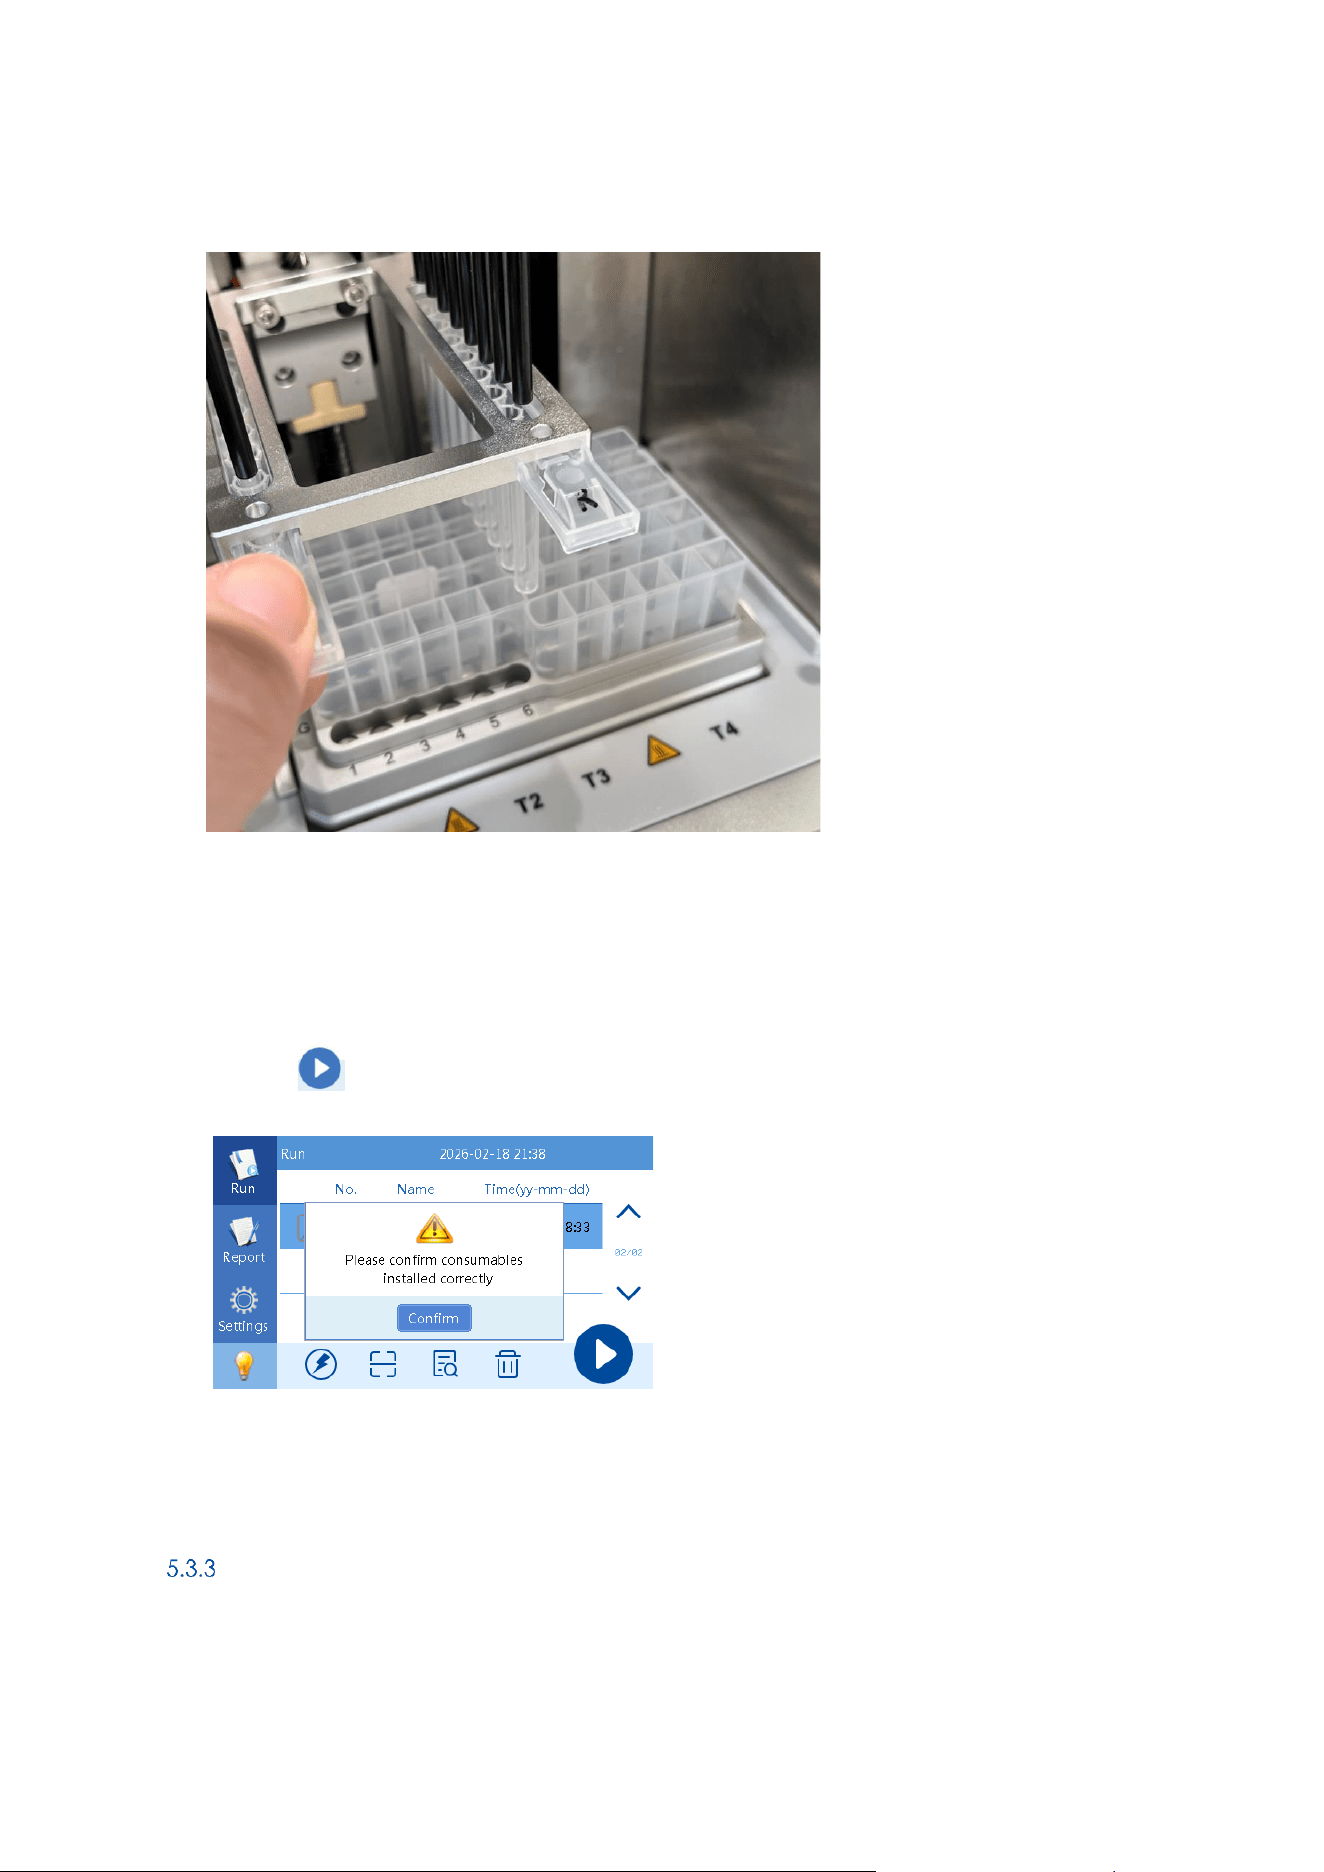
[QIAmini User Manual xx/2026
55
GLO-SOP-52-01-006-A09 Rev.02
Figure 48: tbd
Note: Press the clip down to allow full insertion of the rod-cover holder.
5. Close the door
6. Press to start a run. Check and confirm that consumables have been installed correctly to
initiate the protocol. The instrument will initialize all axis and start the run.
Figure 49: Starting protocol dialog box.
Note: If the run was started by mistake, select „Confirm“ and cancel the run immediately during the initialization
phase of the instrument.
Run status
The run status screen provides information of the ongoing run.
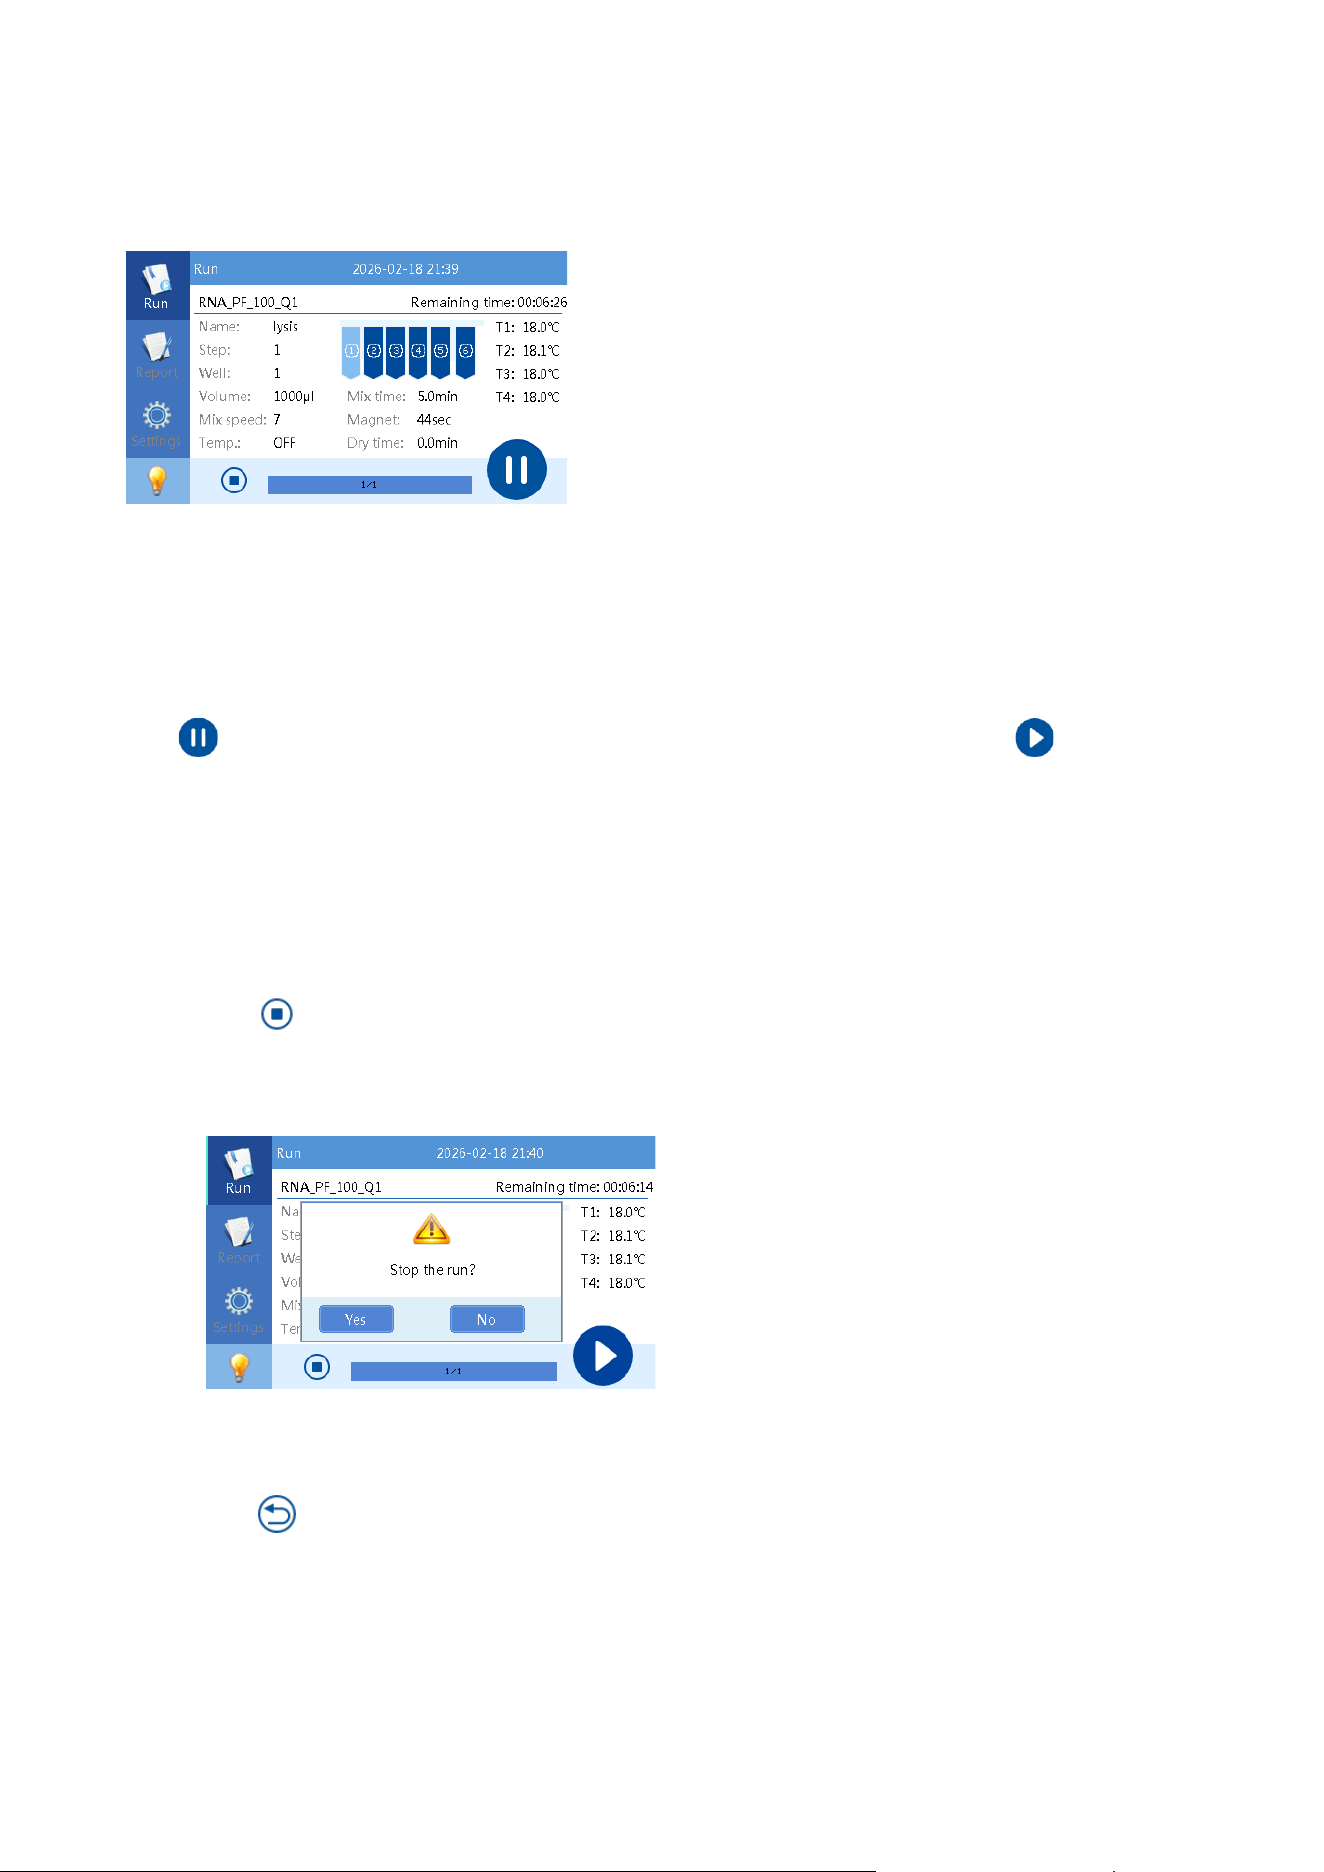
[QIAmini User Manual xx/2026
56
GLO-SOP-52-01-006-A09 Rev.02
Figure 50: The run menu – Run status screen
The screen enables the following actions:
Pause the run
Press to pause the run. The instrument will immediately stop all actions. As soon as the button is pressed,
the run will continue.
Note: Pausing a run might have an impact on the application performance. If protocol includes heating the heater
can still be hot and shall not be touched.
Stop the run
1) Press to stop the run.
2) A dialog box will appear and in case the protocol shall be stopped a confirmation is required.
Figure 51: Stopping protocol dialog box.
Note
3) Press button to return to the protocol run menu.
Note: Reuse of cartridges after a stopped run is not recommended.
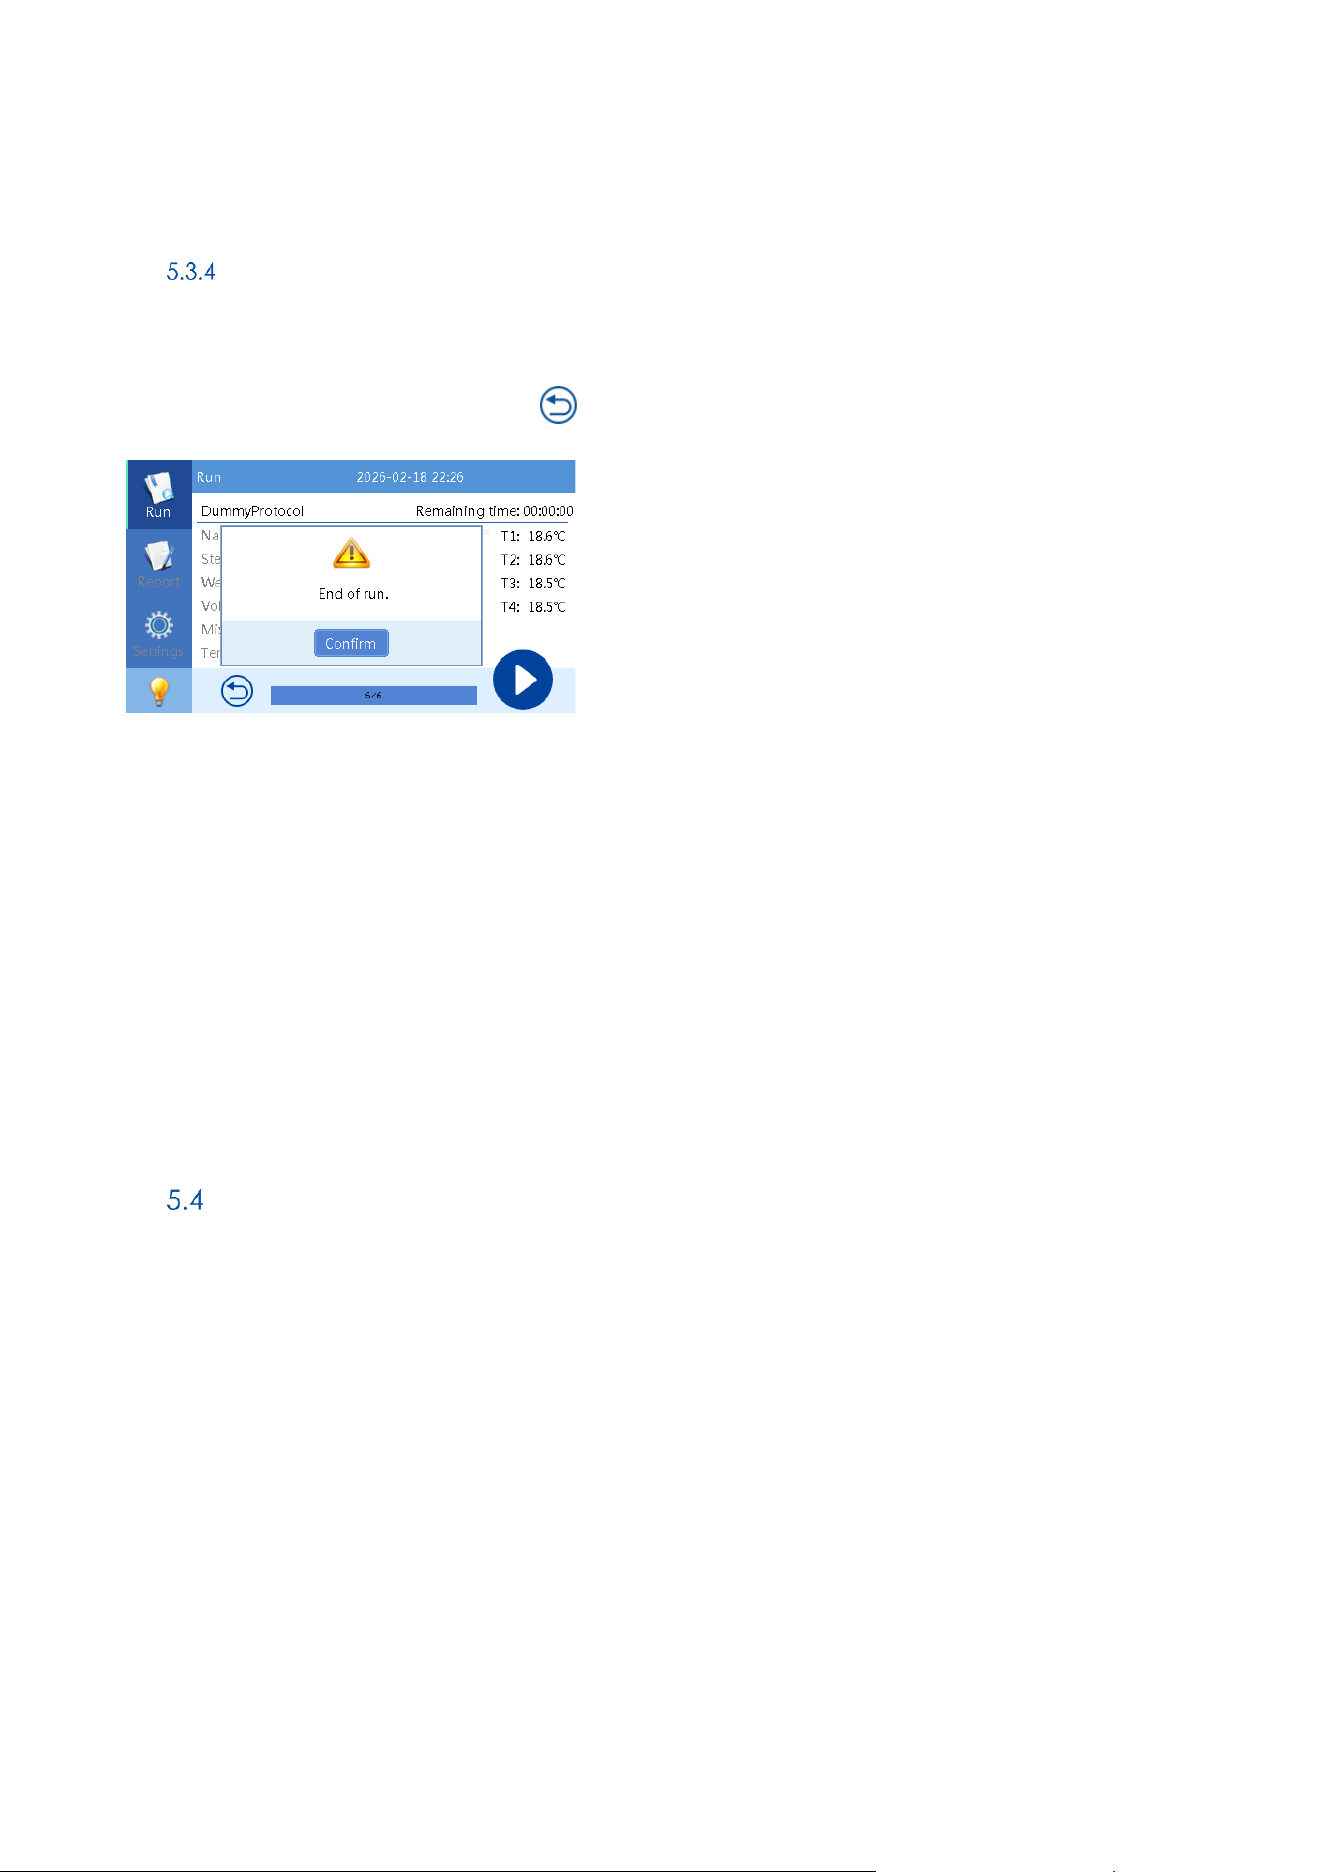
[QIAmini User Manual xx/2026
57
GLO-SOP-52-01-006-A09 Rev.02
Unload the instrument
After a protocol run is completed, an audible signal will sound and a pop-up message appears.
1) Confirm the notification and press .
Figure 52: End of run dialog box.
2) Open the instrument door.
3) Remove the rod cover(s) by pressing down the clip and sliding them out of the rod cover holder.
4) Remove Cartridge frame with cartridge(s).
5) Follow the instructions of the respective kit handbook on how to retrieve your eluate.
6) Dispose cartridges and rod-covers according to local safety regulations.
7) Clean the instrument (for details see section 6)
QIAmini Report(s)
The QIAmini automatically generates and stores a report for each run performed. The QIAmini can store up to 1000
run reports. In case the QIAmini report memory is full the earliest memory will be overwritten.
To view the list of reports navigate to the Report menu.
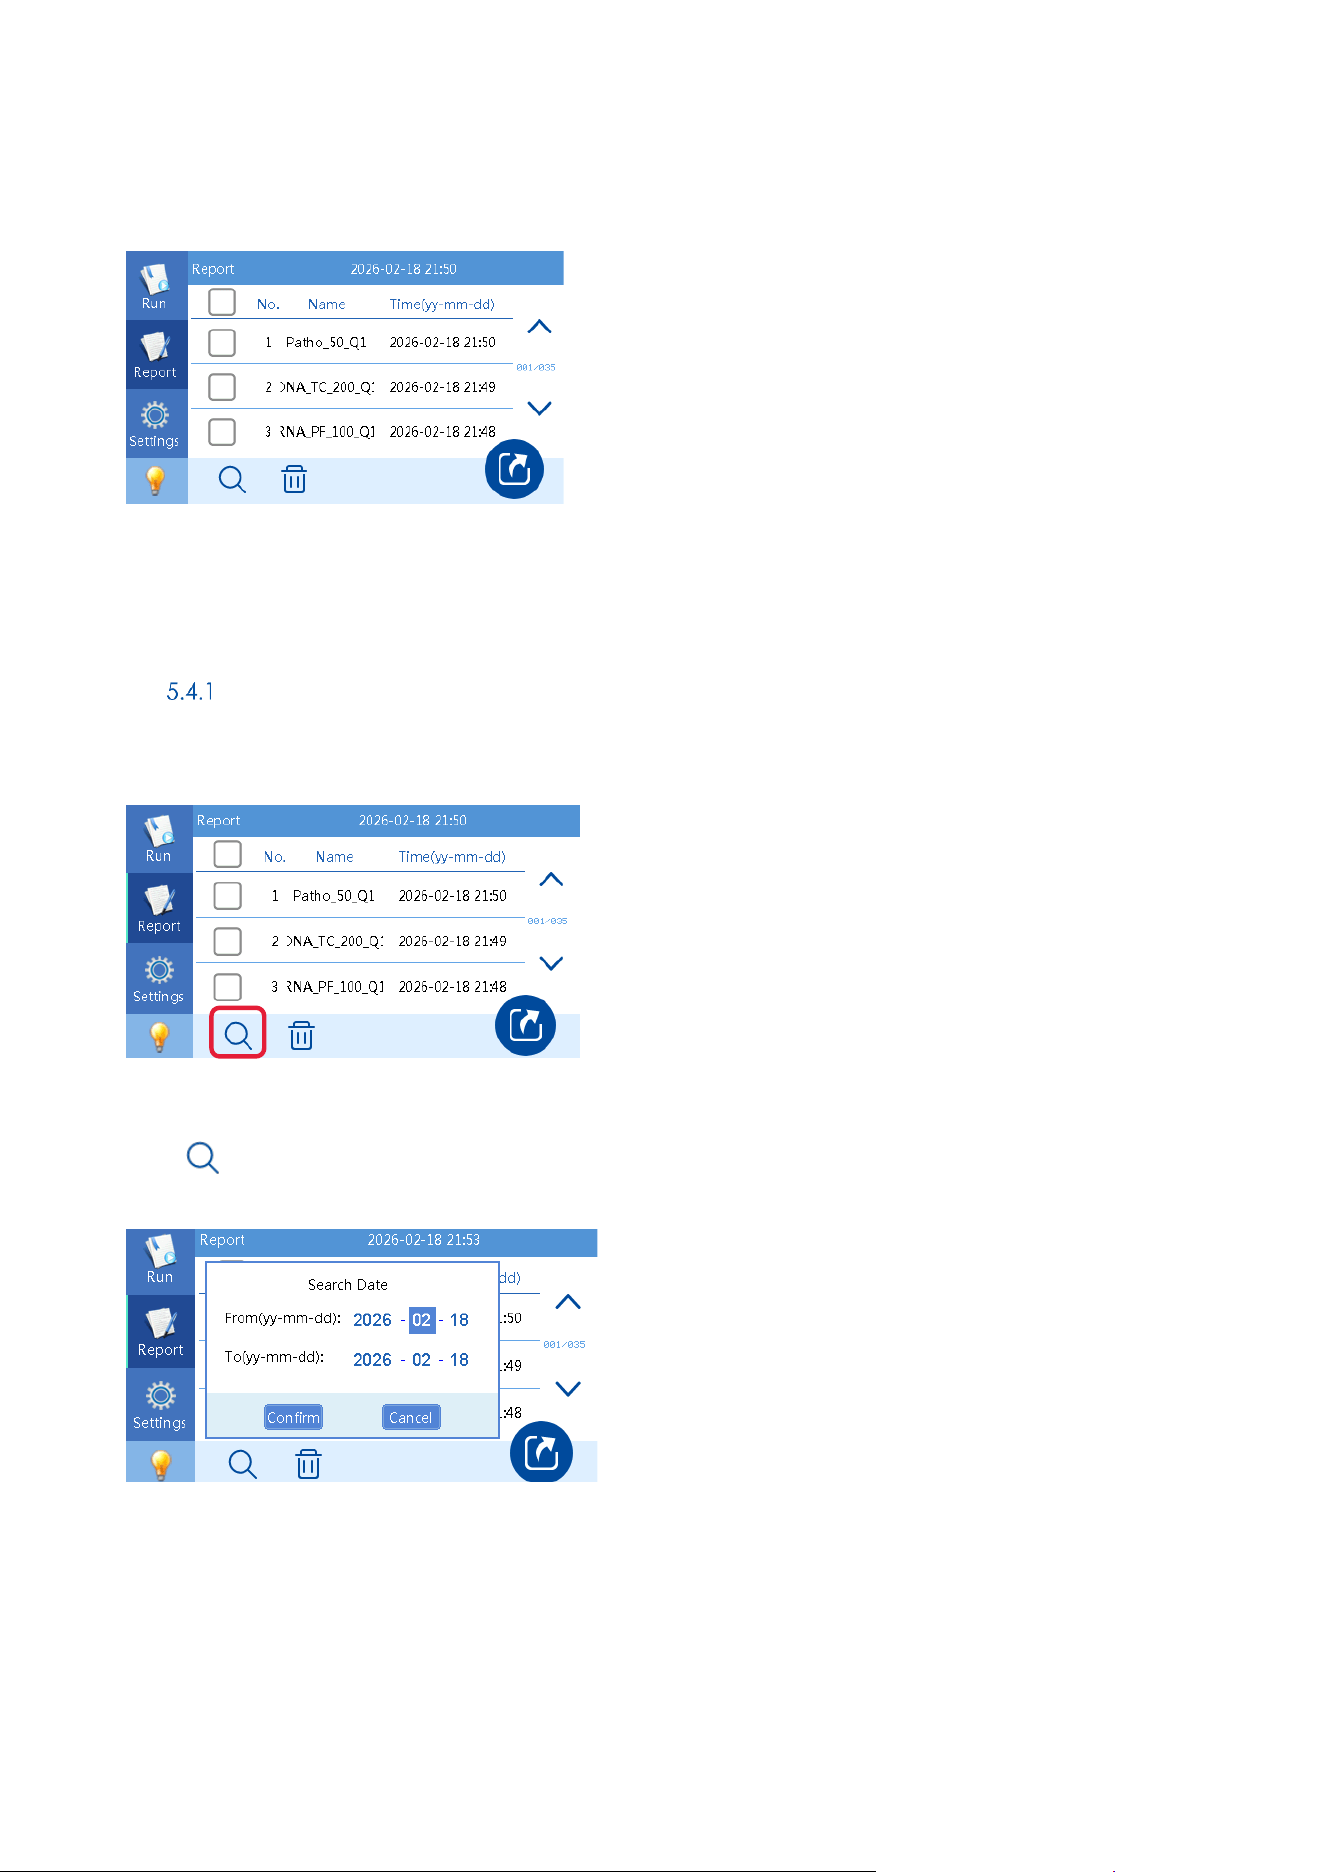
[QIAmini User Manual xx/2026
58
GLO-SOP-52-01-006-A09 Rev.02
Note: Please download the reports on a regular basis to avoid loss of reports.
Search for reports
If a specific report is required, the instrument can filter the list of reports by creation date.
Figure 53: The report menu – Search for reports
. Tap o search for a specific report and the “Search Date” dialog box will appear (Figure 54) which allows
limiting the list of reports to a specific creation timeframe.
Figure 54: The report menu – Search date dialog box
To enter a customized timeframe, tap on the date and use the virtual keyboard (Figure 55) to change the dates
as desired.
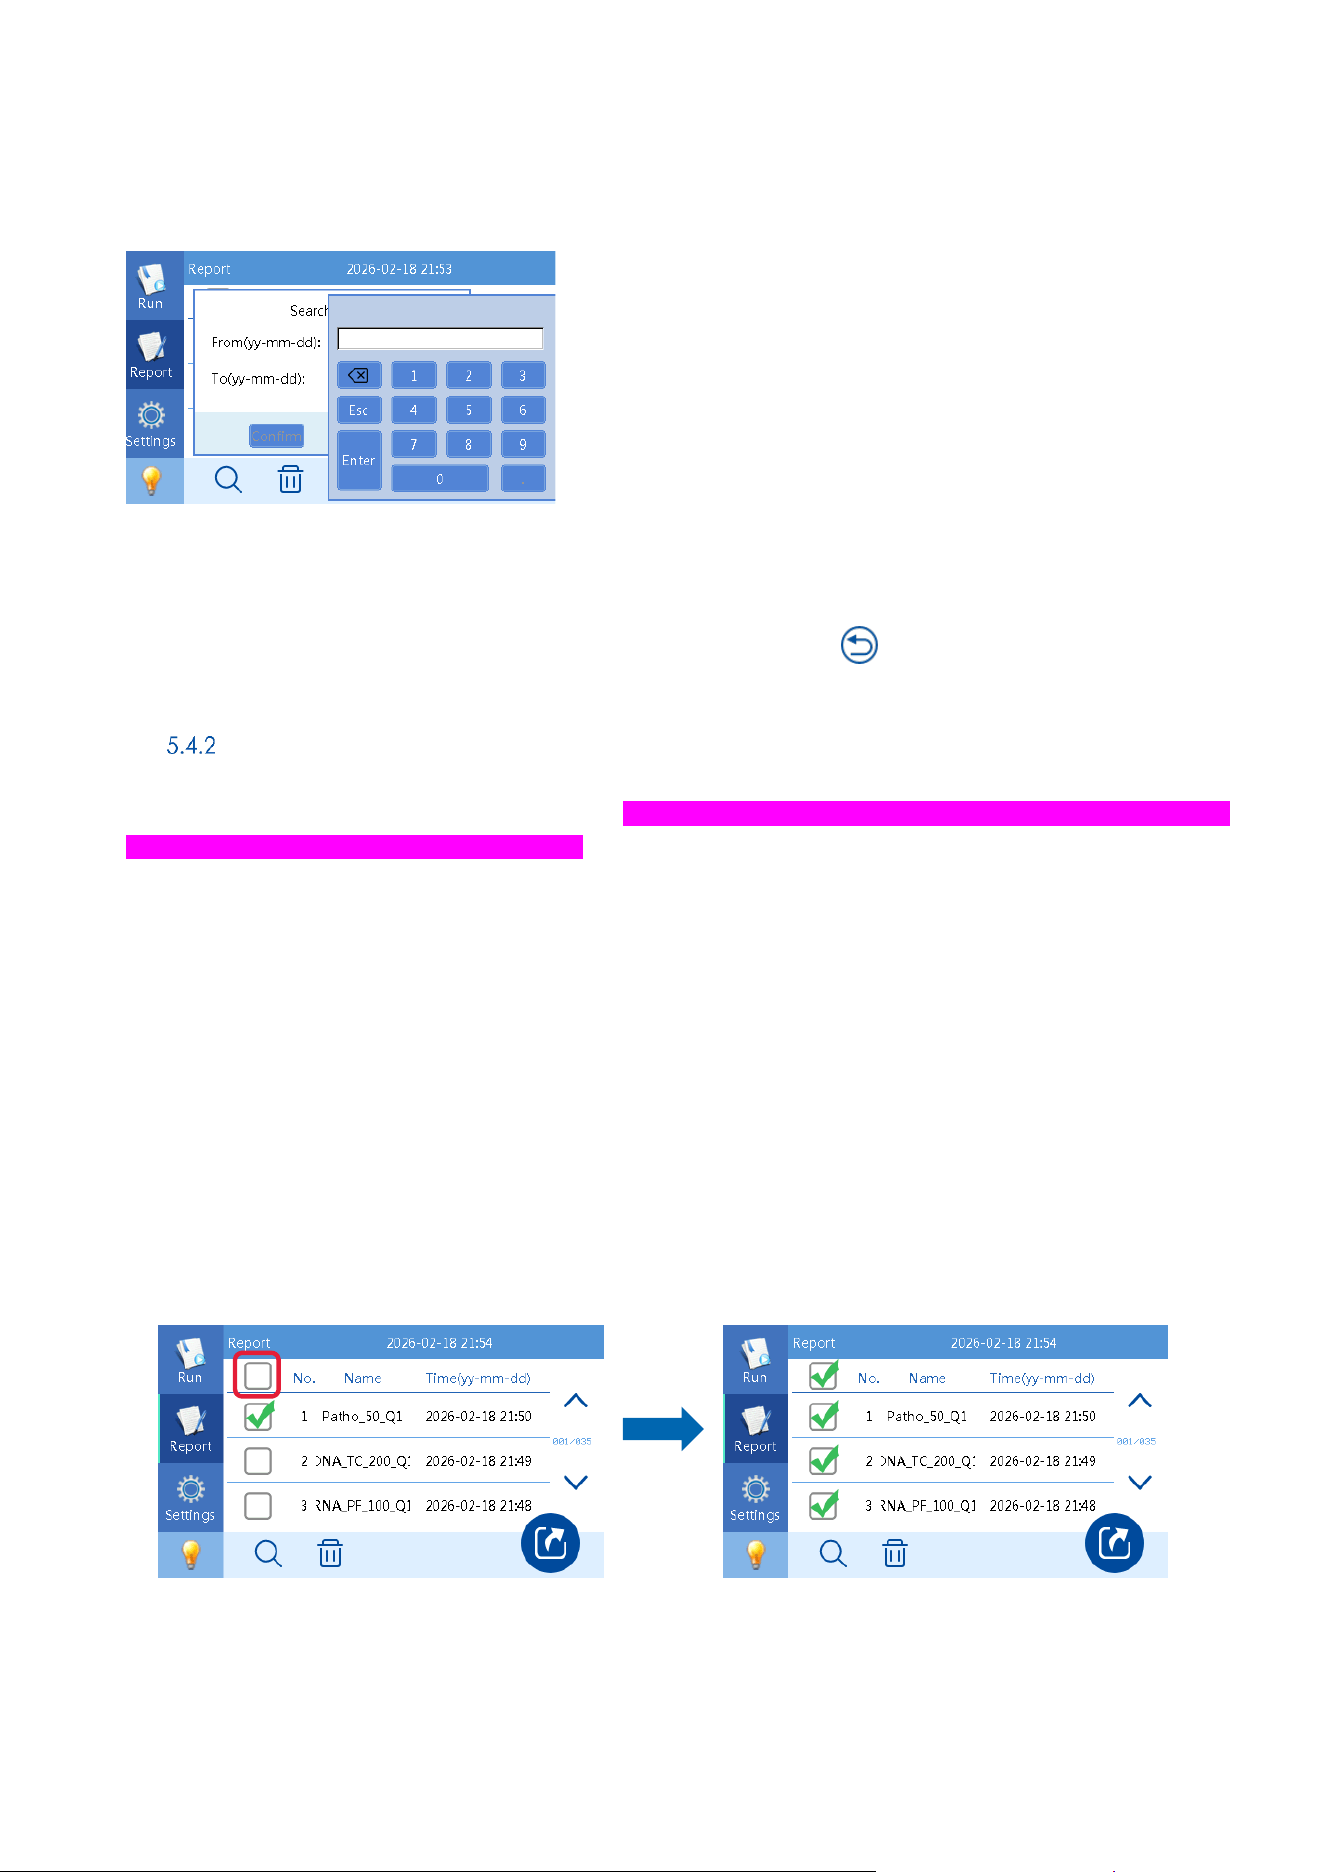
[QIAmini User Manual xx/2026
59
GLO-SOP-52-01-006-A09 Rev.02
Figure 55: The report menu – virtual keyboard
After pressing “Confirm” the list of reports will be reduced to the reports created within the selected timeframe.
To leave the reduced view and return to the complete list of reports press .
Download of report(s)
The reports can be downloaded to USB drive (ref) or if bluetooth is activitaed they can be directly transferred to
you mobile device equipped with QIAmini app (ref)
To download reports to a USB drive please follow the instruction below.
1) Plug in a USB drive to one of the USB-ports on the right side of the instrument.
Note: Please use the QIAGEN USB drive delivered with the instrument.
2) Navigate to the Report menu.
3) Select the reports(s) designated for download using the checkbox. To download all reports at once the
checkbox in the header can be used (Figure 56).
Figure 56: QIAmini report menu – selection of report(s). The checkbox highlighted by red rectangle can be used to
select all reports at once.

[QIAmini User Manual xx/2026
60
GLO-SOP-52-01-006-A09 Rev.02
4) Start the download by pressing .
5) A dialog box will confirm as soon as the export is finished.
6) Remove the USB drive from the instrument.
Note: The reports can be found in a folder called “Runlog” on the first layer of the USB drive folder structure. If
this is the first time using this specific USB drive, the instrument will create the folder on its own.
Delete Reports
The QIAmini offers an easy way to delete one, multiple or all reports on the instrument. To delete reports follow the
instruction bellow:
1) Navigate to the Report menu.
2) Select the reports(s) designated for deletion using the checkbox. To delete all reports at once the checkbox
in the header can be used (Figure 56).
3) Press .
4) Confirm deletion of the report by pressing “Yes” on the “Delete report” dialog box.
5) The selected report(s) will be deleted from the internal memory of the instrument.
Note: Deletion of report(s) cannot be undone.
Change and Update Settings
In the Settings menu various configurations can be adjusted and instrument information can be accessed.
1) Time settings
2) Language settings
3) Transfer
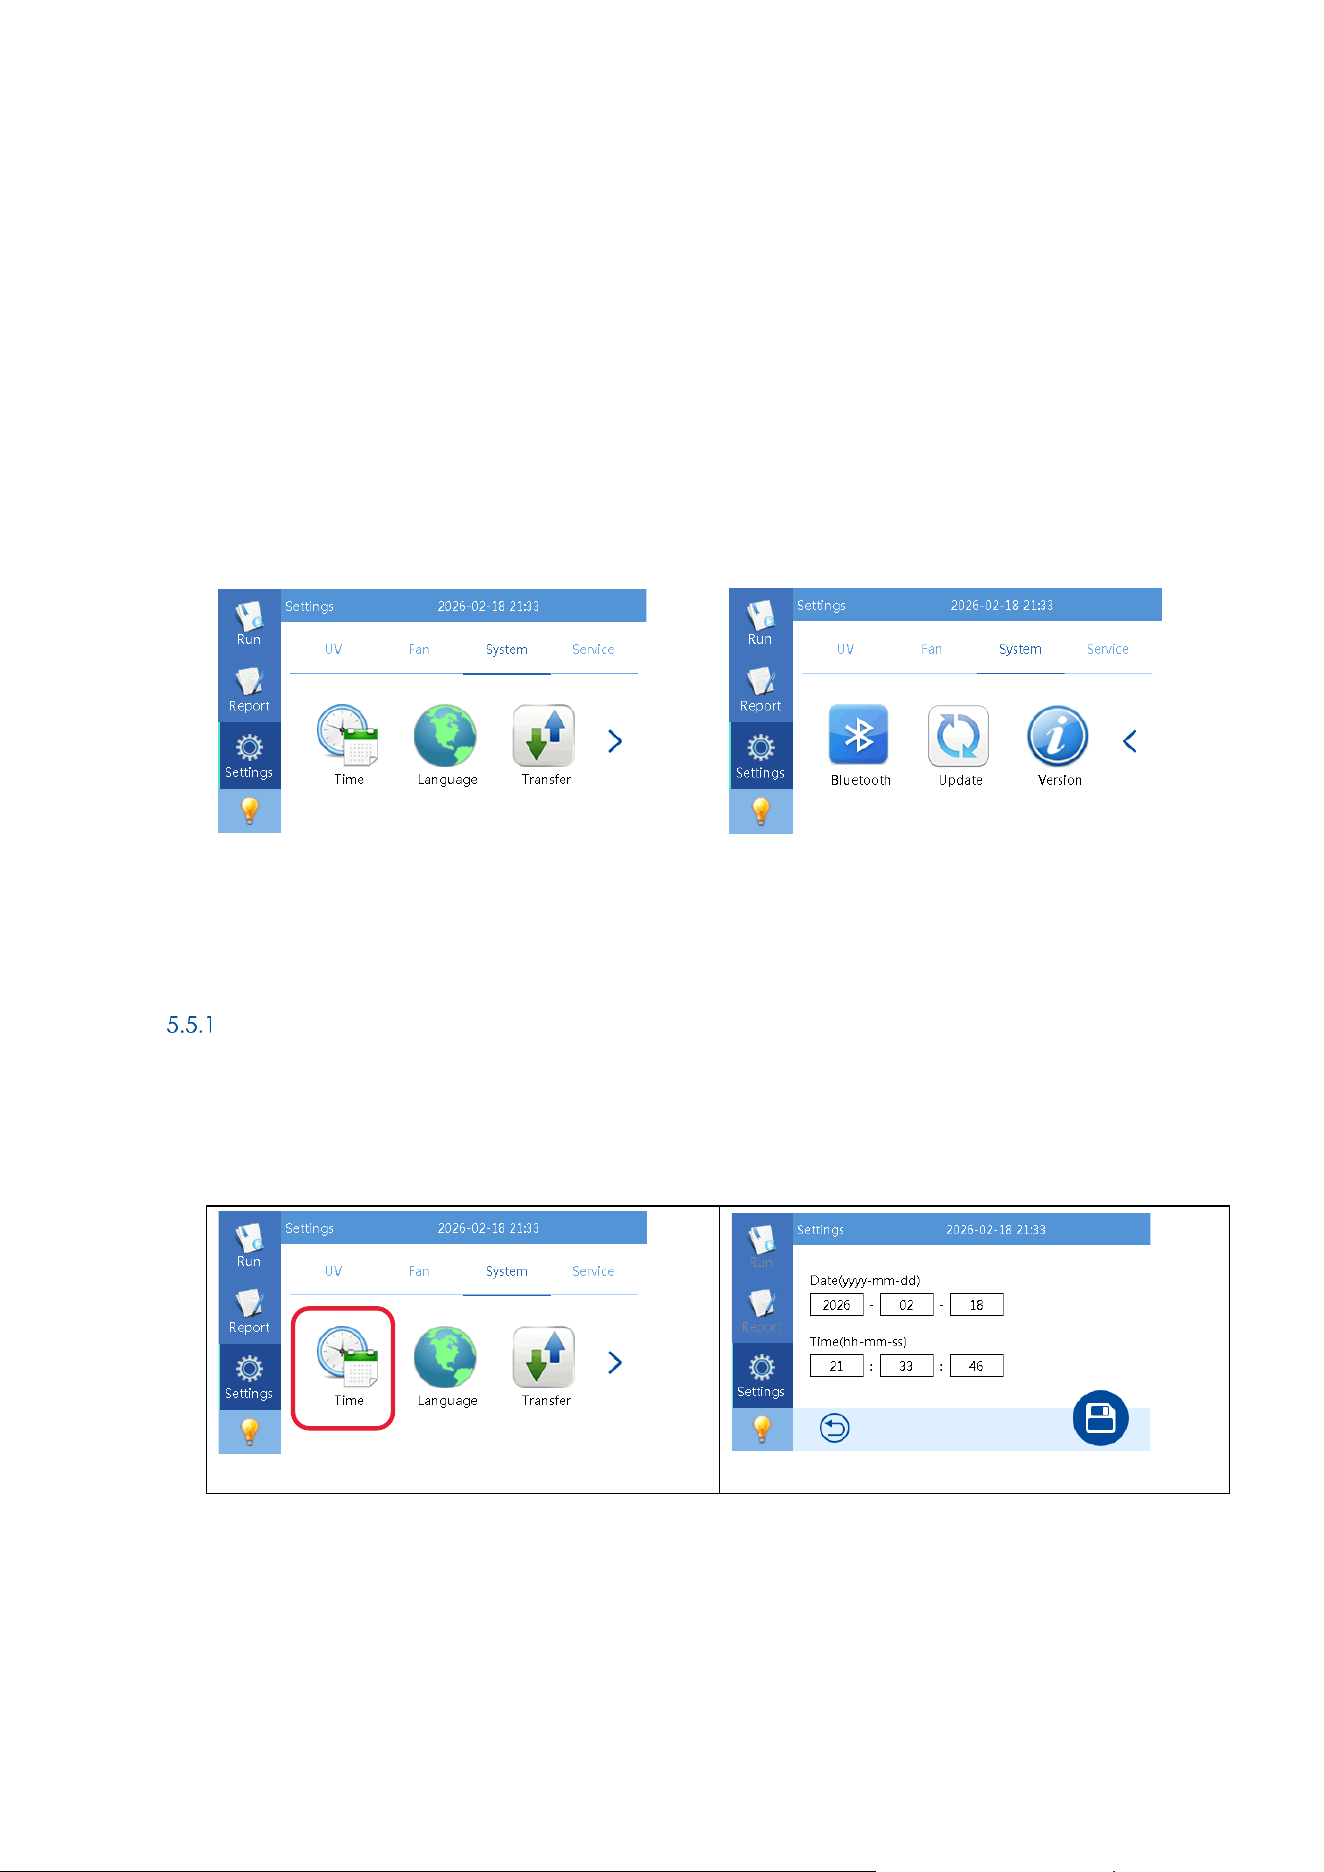
[QIAmini User Manual xx/2026
61
GLO-SOP-52-01-006-A09 Rev.02
4) Bluetooth
5) Update (Software)
6) Version (System information)
7) Control of internal Fan
8) Control of internal light
Note: The transfer functionality is covered by chapter 5.2.1(Import/Export of protocols via ).
Date and Time settings of the QIAmini
To adjust date and time settings follow the instruction below:
1) In the Settings Menu, select System from the menu and Tap on the Time icon.
Figure 57: The Settings Menu – System- Time Settings
2) To adjust date or time, tap on the corresponding field. A virtual keyboard will appear and allow to update
data. Confirm new entry by pressing “Enter”.
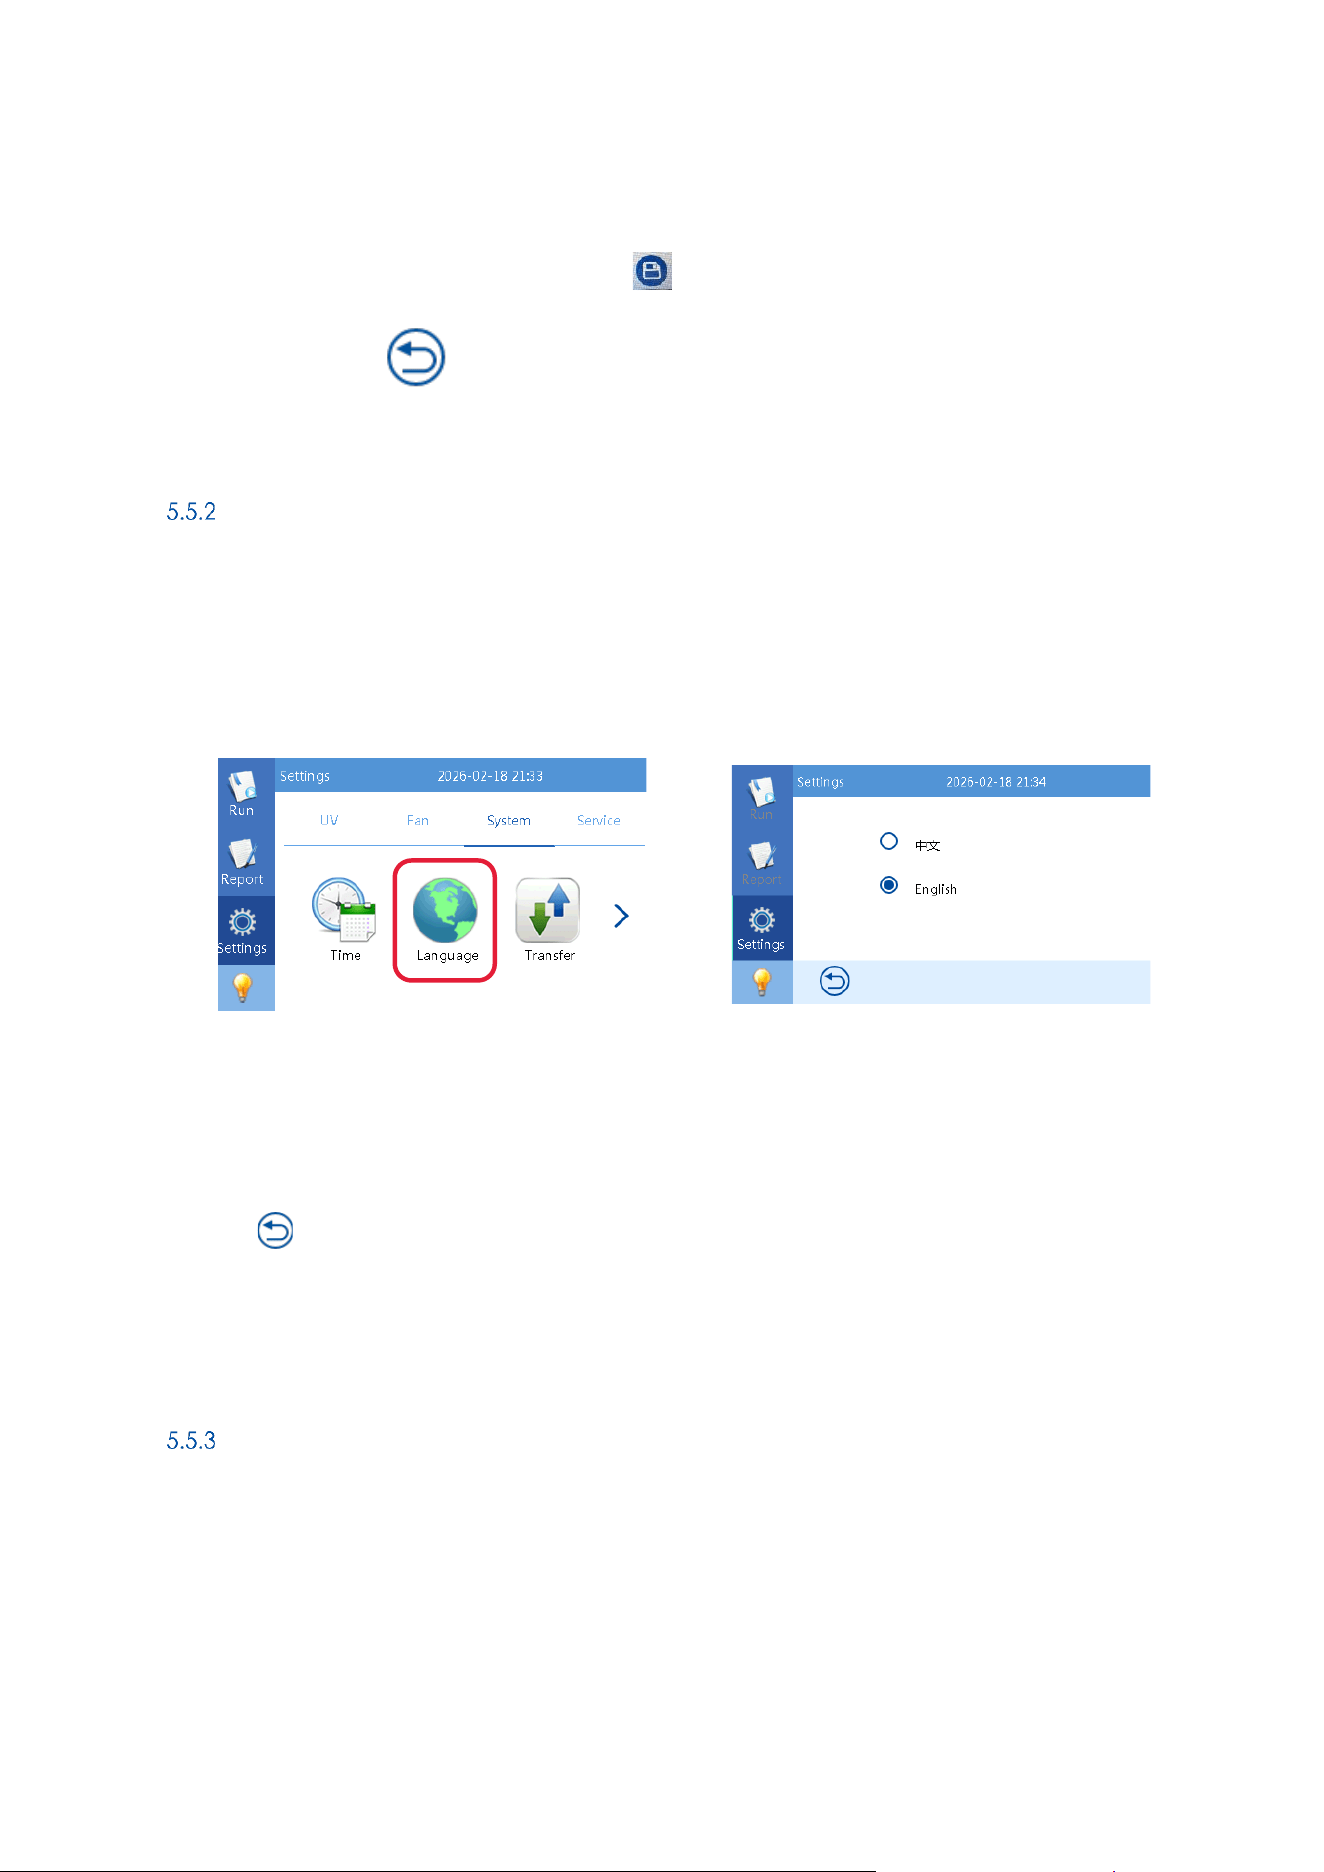
[QIAmini User Manual xx/2026
62
GLO-SOP-52-01-006-A09 Rev.02
3) After updating all required fields, press save .
4) Confirm and press to return to the System setting screen.
Language
To adjust language settings follow the instruction below:
1) In the Settings Menu, select System from the menu and Tap on the Language icon.
2) Select the required language for the QIAmini instrument software by toggeling between the options English
and Chinese.
3) Press to return to the System setting screen.
Note: Change of language will be applied to the complete system.
Bluetooth connection
The QIAmini offers Bluetooth functionality to establish a connection to a mobile device. Activated Bluetooth
functionality is shown by the Bluetooth symbol displayed in the upper right corner (Figure 58, highlighted by red
rectangle).
To turn the Bluetooth connection on or off please follow the instruction below.
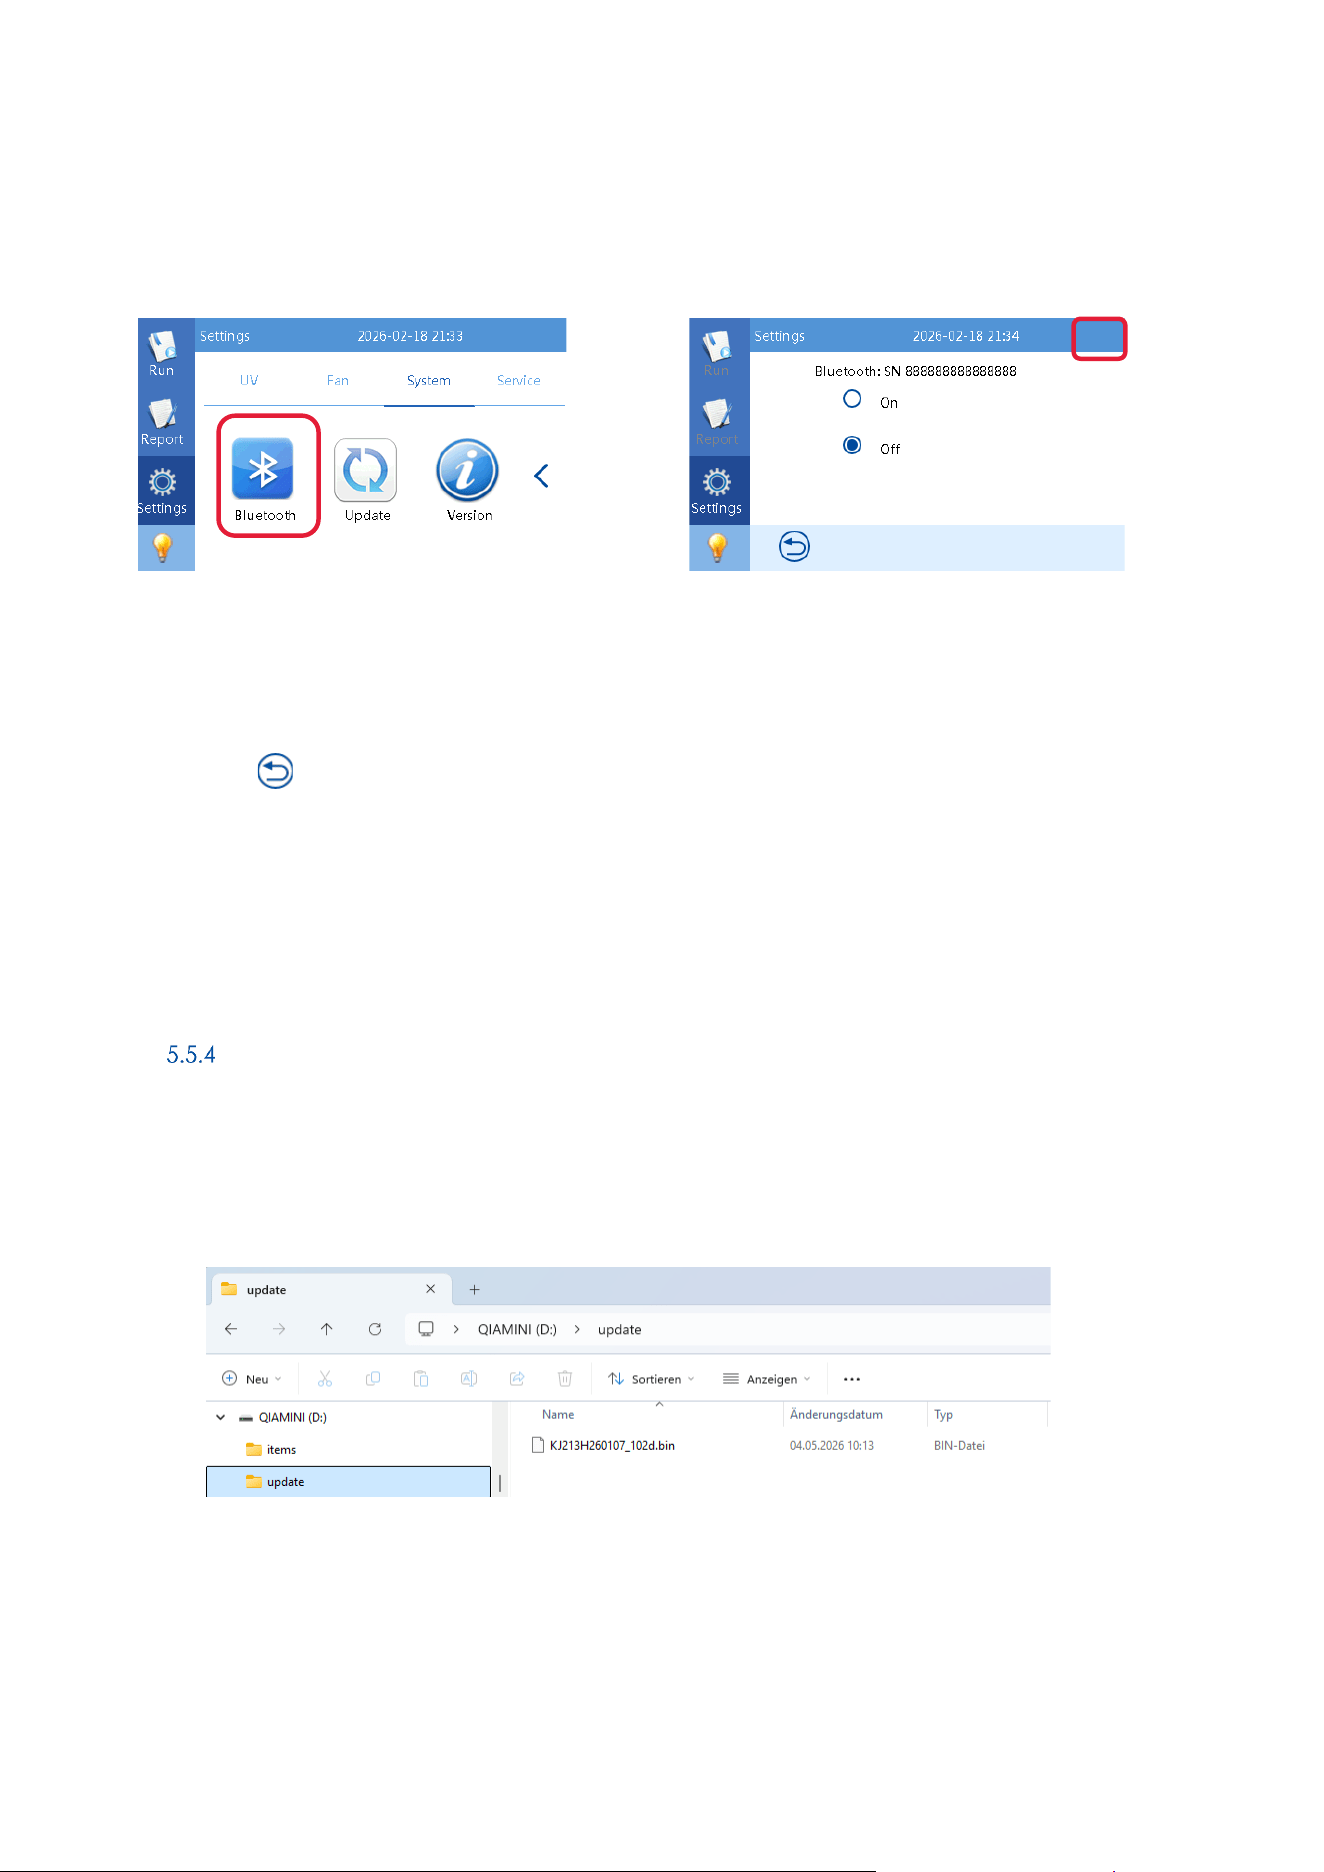
[QIAmini User Manual xx/2026
63
GLO-SOP-52-01-006-A09 Rev.02
1) In the Settings Menu, select System from the menu and Tap on the Bluetooth icon.
Figure 58The QIAmini settings menu – Bluetooth connection
2) To activate or deactivate Bluetooth toggle between on and off. If Bluetooth is activated the Bluetooth icon
will be presented in the upper right corner.
3) Press to return to the System setting screen.
Note: The ID of the instrument is presented in the Bluetooth connection screen and will be required when
establishing the connection to the mobile device.
Software Update
To update the QIAmini software please follow the instruction below.
1) Prepare the QIAmini USB drive and create a folder called “update” on the first layer of the device. Place
the bin file for Software update inside the “update” folder.
2) Connect the USB drive to one of the USB ports on the right side of the QIAmini.
3) In the Settings Menu, select System from the menu and Tap on the Update icon.
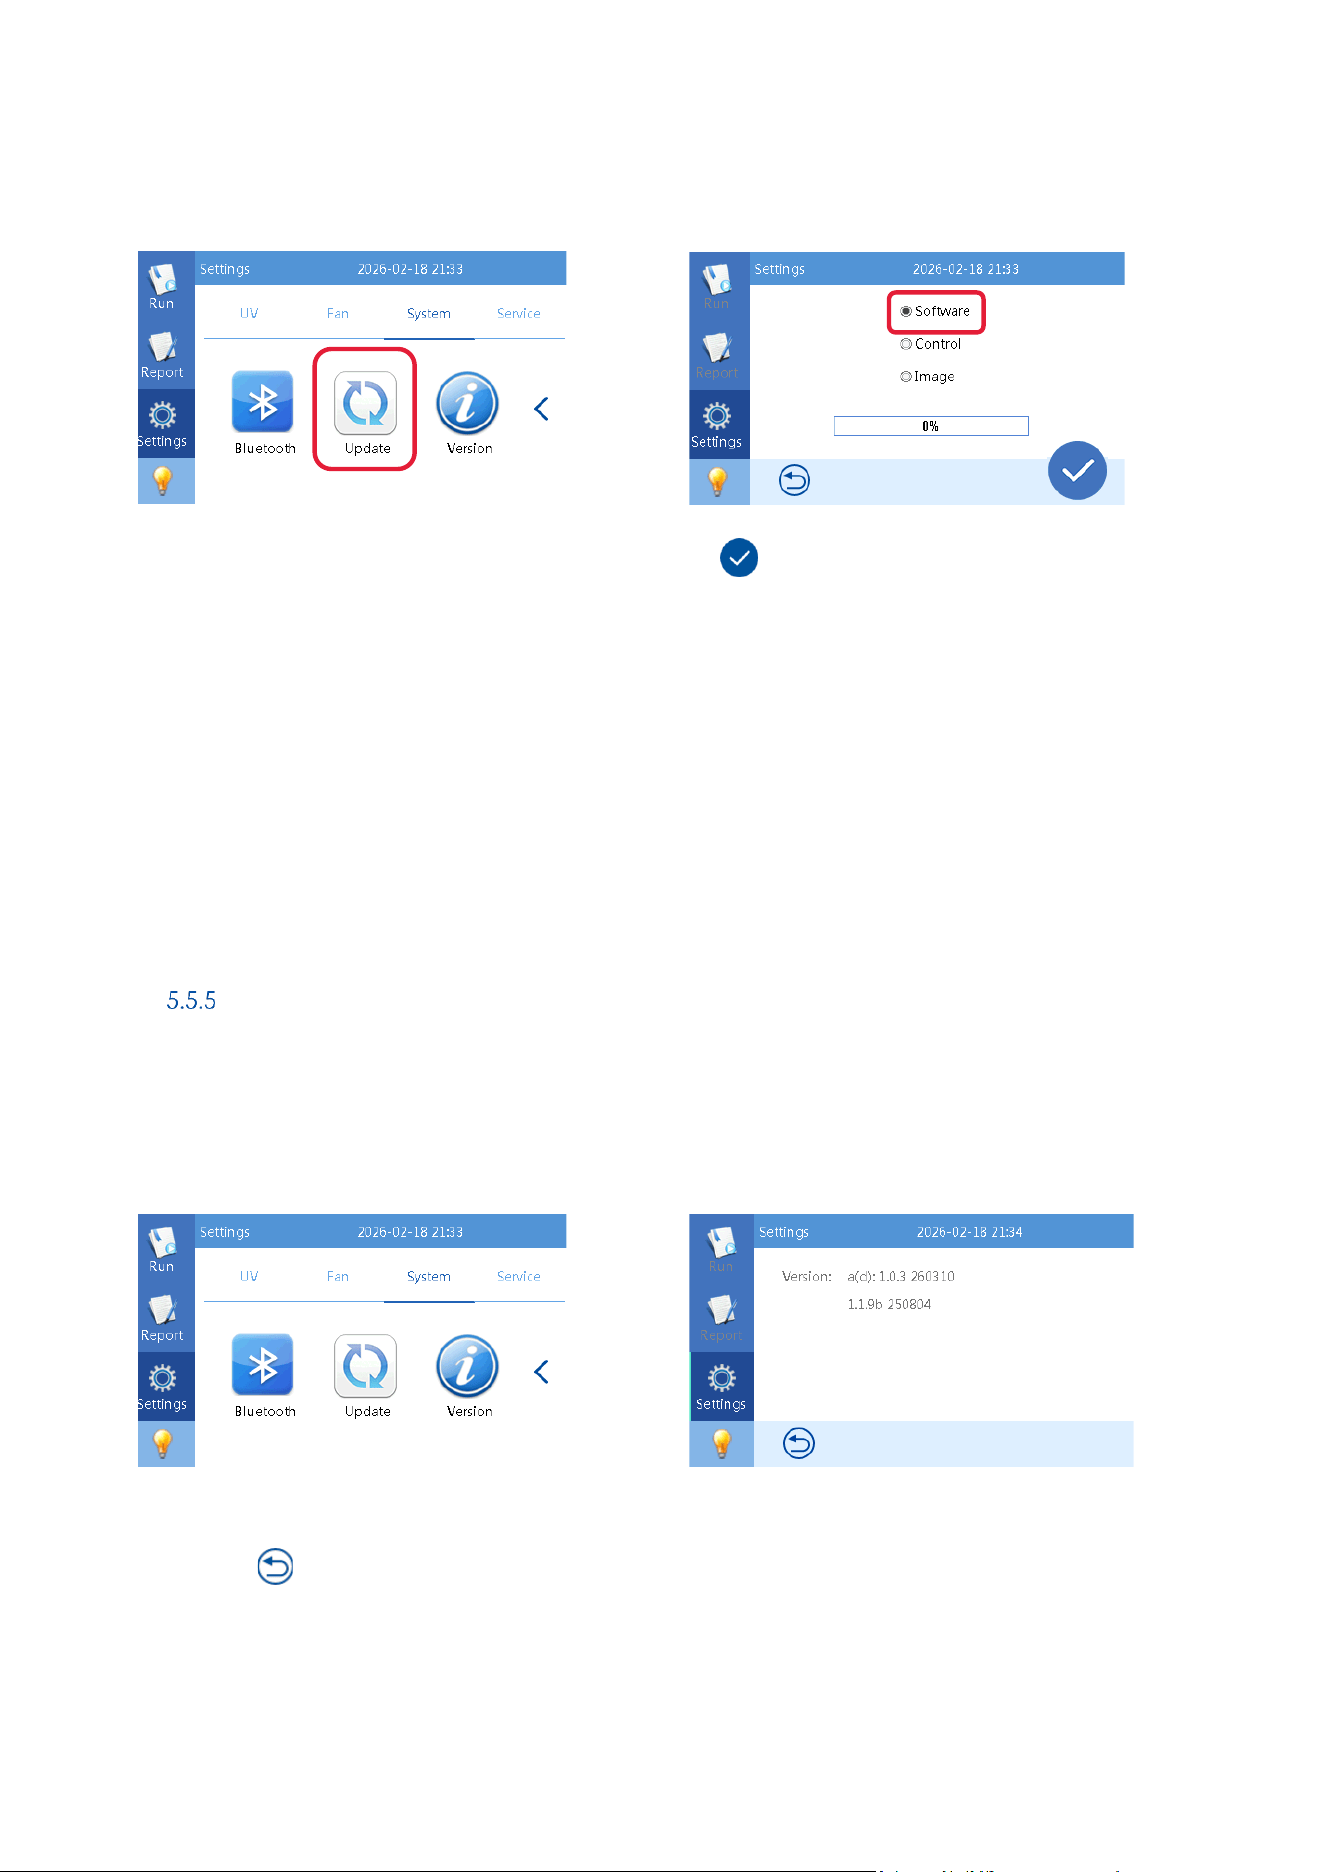
[QIAmini User Manual xx/2026
64
GLO-SOP-52-01-006-A09 Rev.02
4) To start the update select “Software” and tap on the icon once.
Note: The update might take a second to start.
5) After the progress bar reached 100% a blue screen will appear and the instrument will complete the update.
An accoustic signal will appear as soon as the update is completed successfully.
Note: Do not turn of the instrument before the update is completed.
6) As soon as the message “Update Ok, Please reset!” please turn off the power and restart the instrument.
Version
To check the Software version of the instrument follow the instruction below:
1) In the Settings Menu, select System from the menu and Tap on the Version icon. The instrument software
version will be presented on the screen
Figure 59: The settings menu – System – Software Version
2) Press to return to the System setting screen.
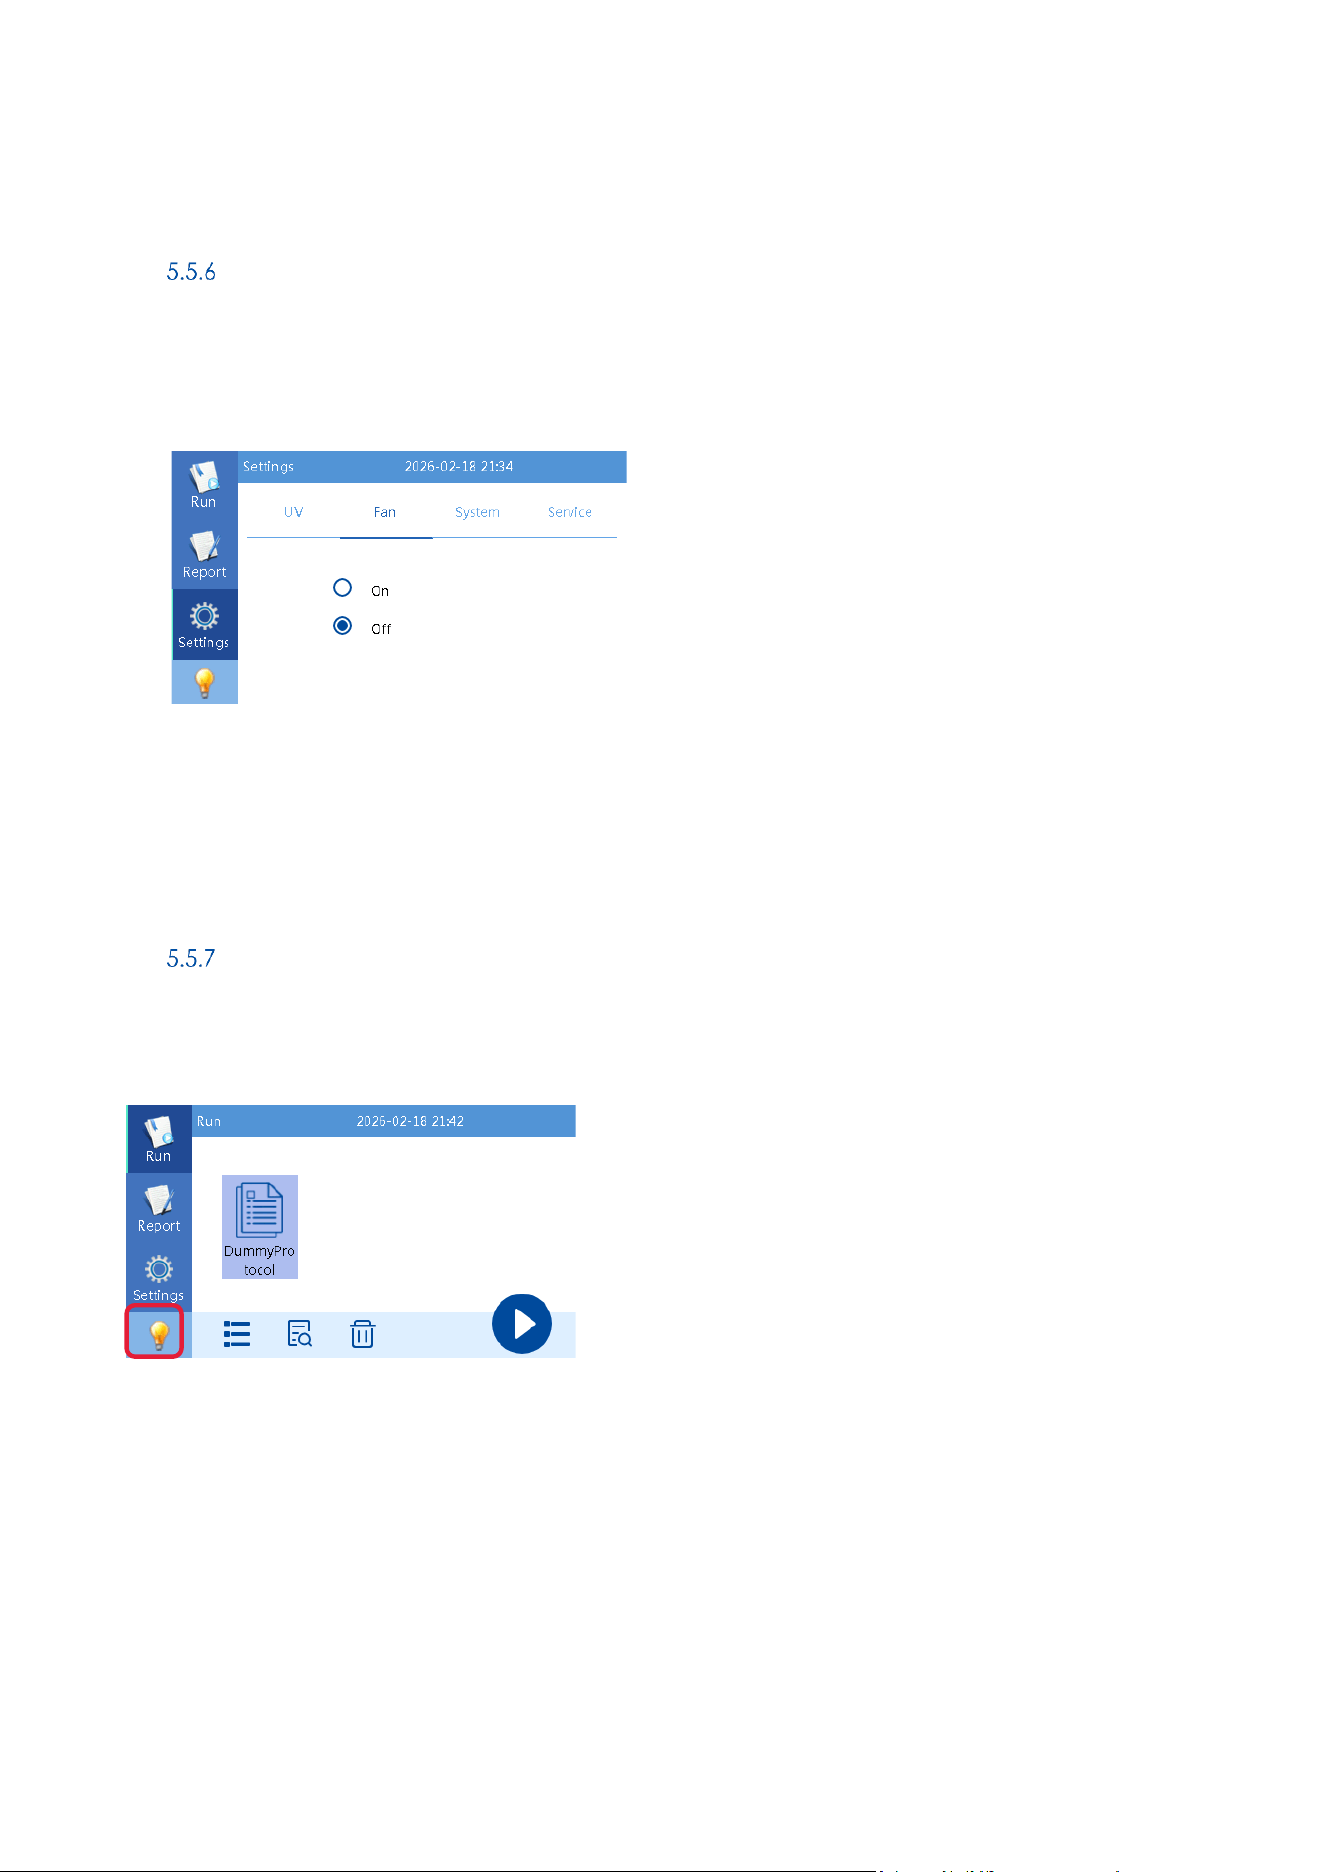
[QIAmini User Manual xx/2026
65
GLO-SOP-52-01-006-A09 Rev.02
Internal fan
To turn on or off the internal fan follow the instruction below:
1) In the Settings Menu, select Fan from the menu.
2) To control the status of the internal fan toggle between on and off to reach the required status.
Internal light
The option to turn off or on the internal light is available on the main screen. The light can be controlled by tapping
on the light bulb in the lower left corner.
Figure 60 Activation or deactivation of interlnal light (highlighted by red rectangle).
[QIAmini User Manual xx/2026
66
GLO-SOP-52-01-006-A09 Rev.02
6 Maintenance
WARNING/
CAUTION
Risk of personal injury and material damage
Only perform maintenance that is specifically described in this user manual.
To ensure reliable operation of the QIAmini, maintenance procedures must be performed. The procedures are
shown in the table below. Each maintenance procedure must be carried out by appropriate laboratory
technicians or equivalent.
Type of task(s)
Frequency
Personnel
Cleaning and decontamination of
QIAmini instrument
After each run
Laboratory technicians or
equivalent
Cleaning and decontamination of
Cartrige frame
After each run
Laboratory technicians or
equivalent
Optionally, a UV decontamination procedure may be performed as required to reduce pathogen and nucleic
acid contamination. See section 6.4 for further details.
Cleaning agents
The surfaces and the cartridge frame of the QIAmini must be cleaned and disinfected with compatible detergents
and disinfectants. Please follow the instructions provided by the manufacturer of such materials to safely clean the
instrument.
Note: If different disinfectants are used than the recommended ones, ensure that they have the same composition.
If you are unsure about the suitability of the detergents or disinfectants to be used with the QIAmini, do not use
them.
General cleaning of the QIAmini, with the exception of the door, can be done using mild detergents, such 70%
ethanol. The door should only be cleaned with lint-free tissue moistened with water.
CAUTION
Damage to the instrument
Do not use spray bottles containing alcohol or disinfectant to clean surfaces of the QIAmini.
Spray bottles should be used only to clean items that have been removed from the workdeck
and if permitted by local laboratory operating practices.
WSRNING
Risk of fire

[QIAmini User Manual xx/2026
67
GLO-SOP-52-01-006-A09 Rev.02
After cleaning the QIAmini with alcohol-based disinfectant, leave the instrument door open
to allow flammable vapors to disperse. Only clean the QIAmini with alcohol-based
disinfectant when workdeck components have cooled down.
WSRNING
Risk of fire
Do not allow cleaning fluid or decontamination agents to come into contact with the
electrical parts of the QIAmini.
Instrument cleaning and decontamination
Cleaning agents for QIAmini instrument
Ethanol-based disinfectants can be used for disinfecting surfaces such as the worktable. An example of
ethanol-based disinfectant are the Mikrozid Liquid (Mikrozid Liquid consists of 25 g ethanol and 35 g 1-propanol
per 100 g) or Mikrozid AF wipes. For countries where Mikrozid Liquid is not available, 70% ethanol can be used.
Note: The housing should only be cleaned with 70% ethanol.
Note: The door should only be cleaned with lint-free tissue moistened with water
Cleaning procedure for QIAmini instrument
The following procedure should be performed after each run to ensure the safe operation of the instrument:
1. Wear appropriate personal protective equipment for the kind of used samples and cleaning agents (such
as lab coat, gloves, protective glasses).
2. Remove Rod covers from the Rod cover holder and remove the Cartridge frame including cartridges.
Dispose of waste according to your local safety regulations.
Important: The Cartridge frame need to be cleaned after each use (for details see section 6.3).
3. Power down the instrument.
4. Wipe the inner surfaces of the instrument with 70% ethanol. Ensure that no traces of visible contamination,
such as buffer or sample spots, remain. If necessary, repeat the cleaning procedure.

[QIAmini User Manual xx/2026
68
GLO-SOP-52-01-006-A09 Rev.02
Important: The magnetic head is a fragile part. Please handle with care and do not collide with it to avoid the
risk of damage.
5. Optionally, perform the automatic UV decontamination (Section 6.4).
6. Leave the instrument open for some time to allow any vapors to disperse. Only power on the instrument
after the vapors have dispersed.
7. If required clean the door with lint-free tissue moistened with water.
8. If required clean the housing with lint-free cloth and 70% ethanol.
Cleaning and decontamination of accessories
Cleaning agents for QIAmini Cartridge frame
Disinfectants based on quaternary ammonium salt can be used for submerging accessories. An example of
such disinfectants are Lysetol® AF or Gigasept® Instru AF (Schülke & Mayr GmbH, see www.schuelke.com).
These disinfectants consist of 14 g cocospropylene–diamine–guanidine diacetate, 35 g phenoxypropanol, and
2.5 g benzalkonium chloride per 100 g, with anticorrosion components, fragrance, and 15–30% nonionic
surfactants.
Note: If you want to use different disinfectants than the recommended ones, make sure that they have the
same composition.
Cleaning procedure for QIAmini cartridge frame
The QIAmini cartridge frame should be cleaned when visible contamination is present and decontaminated
when infectious agents have been used.
1. Wear appropriate personal protective equipment for the kind of used samples and cleaning agents (such
as lab coat, gloves, protective glasses).
2. Remove the cartridge frame from the instrument.
3. Remove any visible contamination by wiping with a lint-free cloth doused in 70% ethanol or Mikrozid AF
Liquid. Alternatively, Mikrozid AF wipes can be used.
4. Submerge the accessory for 1 hour in an appropriate decontamination solution (Section 6.3.1).
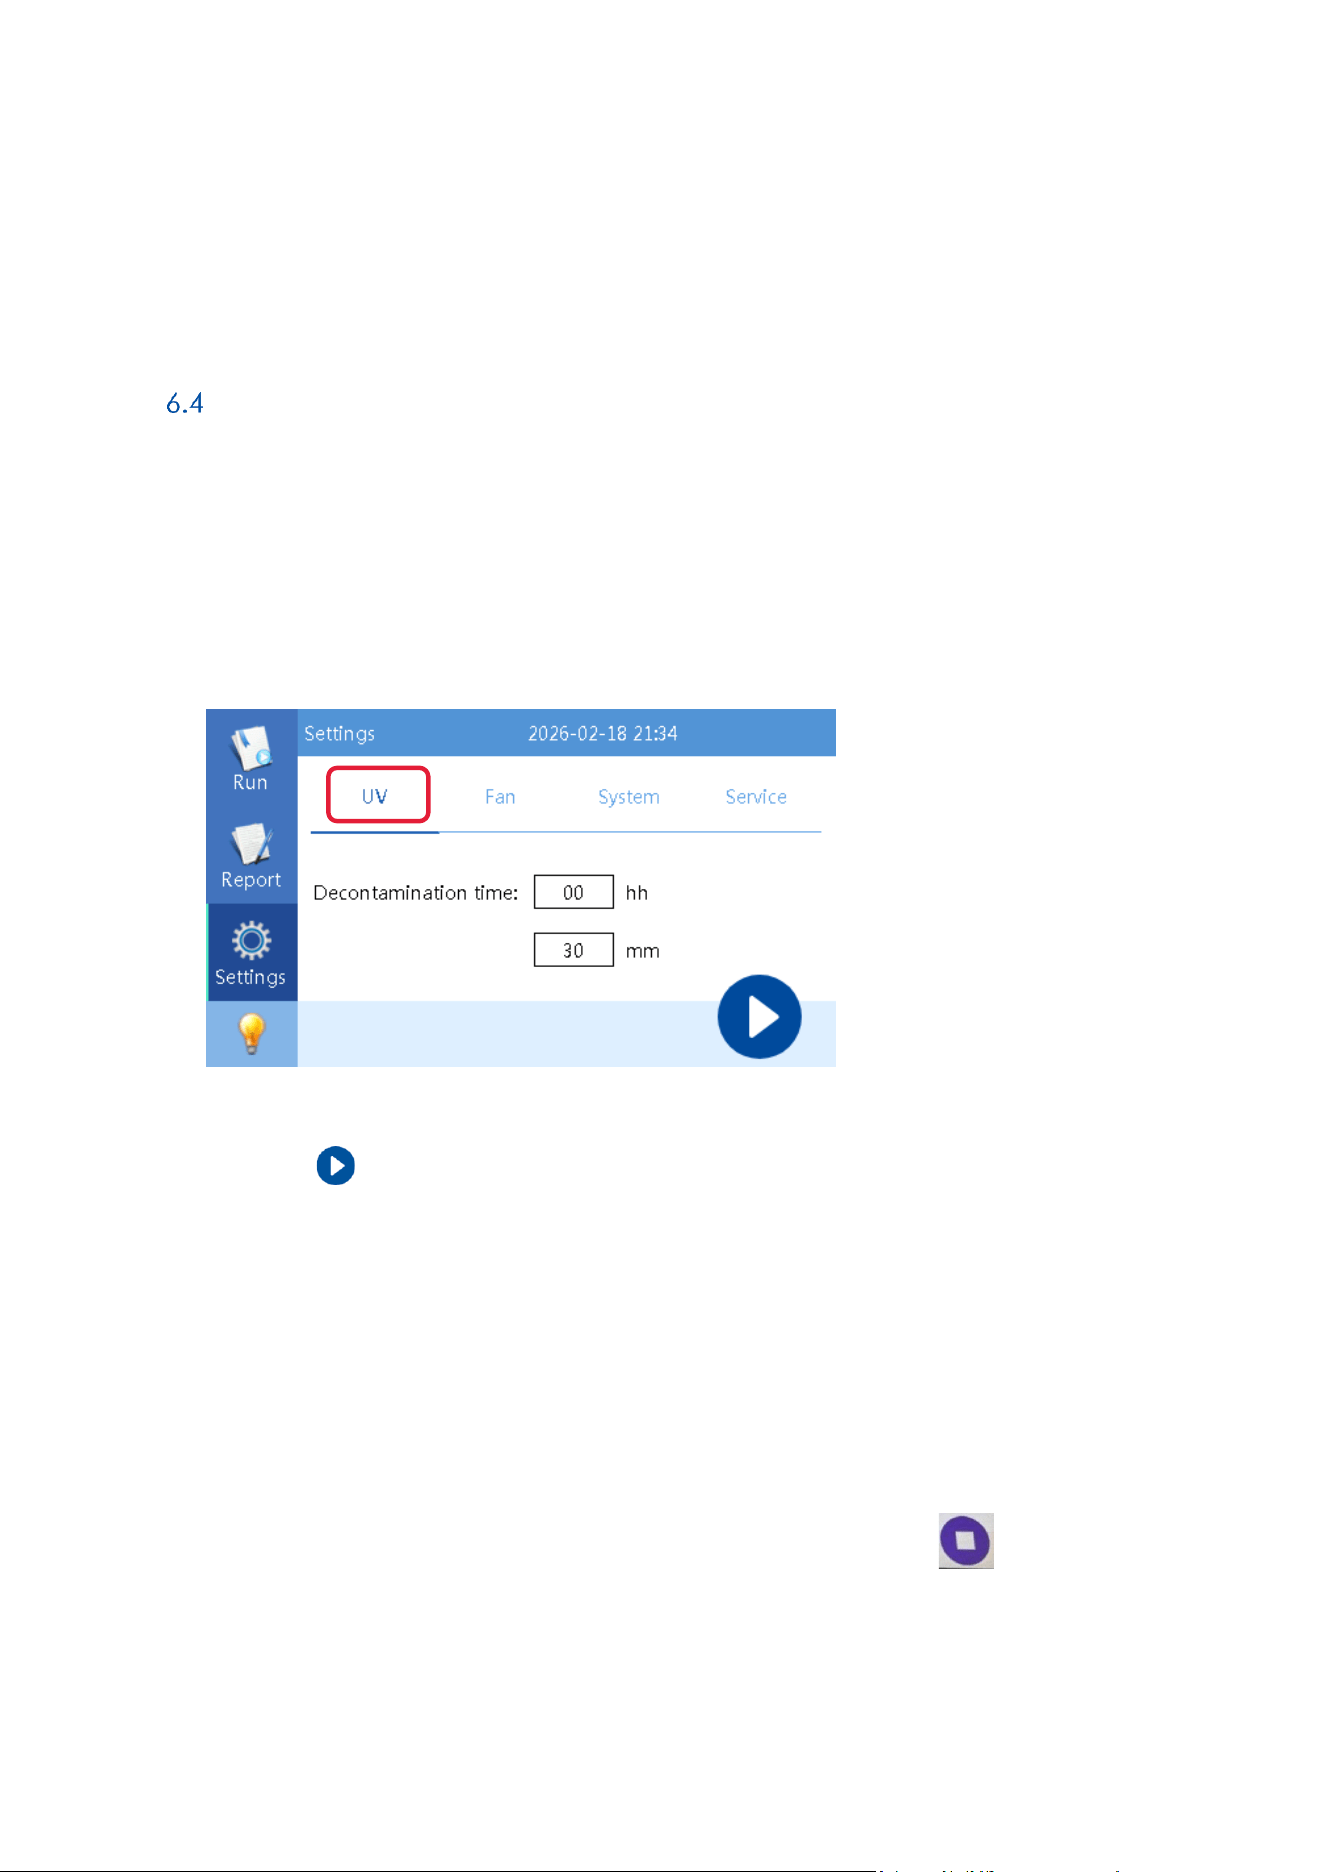
[QIAmini User Manual xx/2026
69
GLO-SOP-52-01-006-A09 Rev.02
5. Rinse the accessory with deionized water and allow to dry before the next run.
UV decontamination run
Before starting the UV decontamination, remove the cartridge frame and disposables from the instrument. Clean
the instrument to remove visible reagent or sample contaminations (Section6.2).
1) Close the instrument door.
2) Select UV in the Settings Menu.
figure 61: The settings screen – UV decontamination
3) Either Press to start a decontamination run with the default duration (30 min) or change duration with
the automatically displayed keyboard as required and press start afterwards. The required
decontamination time depends on the biological material processed on the device.
Note: Contact QIAGEN Technical Support for assistance with choosing the right irradiation time for
particular contaminants.
4. During decontamination procedure the remaining time will be displayed on the screen and the status light
will turn red.
Note: Do not open the instrument door during the UV procedure.
Note: The UV decontamination run can be stopped at any time by pressing .
4) Once the set decontamination time has elapsed, the UV light turns off and an acoustic signal sounds.

[QIAmini User Manual xx/2026
70
GLO-SOP-52-01-006-A09 Rev.02

[QIAmini User Manual xx/2026
71
GLO-SOP-52-01-006-A09 Rev.02
7 Troubleshooting
This section provides information about what to do if an error occurs when using the QIAmini system.
If further assistance is required, contact QIAGEN Technical Support using the contact information below:
Website: support.qiagen.com
When contacting QIAGEN Technical Support about an error with the [Instrument Name], note the steps leading up
to the error and any information appearing in any dialog boxes. This information will help the QIAGEN Technical
Support solve the problem.
When contacting QIAGEN Technical Support about errors, please have the following information ready:
⚫ QIAmini serial number (Printed on the type plate on the back of the instrument)
⚫ Software version (Go to the Settings Menu, select System from the menu and Tap on the Version icon.)
⚫ Lot No and Name of the Kit
⚫ Timepoint when the error occurred for the first time
⚫ Frequency of error occurrence (i.e., intermittent or persistent error)
⚫ Error message and error code
⚫ Detailed description of the steps leading to the error situation
⚫ Photos of the error situation, particularly the state of the instrument when the error occurred
⚫ Protocol file and Report (if the error occurred during protocol run execution)
This information will help you and your QIAGEN Technical Service Specialist to deal most efficiently with your issue.
Please note that QIAGEN Technical Support can only assist the troubleshooting of protocol issues if the protocol
uses QIAGEN chemistry, for example, when using a QIAGEN kit.
Note: Information about the latest software and protocol versions can be found at www.qiagen.com. In some
cases, updates may be available for addressing specific problems.
General troubleshooting measures
If a run is interrupted due to an error, the instrument needs to be returned to a safe state, which includes removal of all
disposables and accessories. To gain access to the accessories the axes can be moved manually after the instrument is
turned off,
If it is unclear how to recover instrument state, contact QIAGEN Technical Support for assistance.
[QIAmini User Manual xx/2026
72
GLO-SOP-52-01-006-A09 Rev.02
Help with specific error cases
Error
Measure
No UV light
Replace UV bulb (7.3)
Error 425
Ensure that the transport security screw is removed.
Magnetic rods broken
Replace the magnetic rods (link to appendix A).
Protocol not visible on USB drive
Ensure that “items” folder is created according to
instructions (ref chapter).
Error during protocol upload from USB drive
Ensure that the protocol name is not changed after
download from the QIAmini Suite software.
Replacement of UV lamp
After the UV lamp has been used for ≥2000h, recommend to replace the new UV lamp.
1. Ensure that the instrument is turned off
2. Open the door and move the processing unit (magnetic head and rod cover holder) to the right side and the
down.
3. Remove the old UV lamp from and replace with the new one.
WARNING/
CAUTION
Risk of personal injury and material damage
The QIAmini UV lamp is a high-pressure component and can break unexpectedly during
handling or operation. Handle the lamp gently, avoid mechanical stress and follow strict
safety measure. Breakage can release glass fragment.
Always wear appropriate personal protective equipment (PPE), including safety glasses and
protective gloves, when handling or replacing the UV lamp.
WARNING/
CAUTION
Risk of release of hazardous mercury
The QIAmini UV lamp contains mercury, which can be release upon breakage.
In case of breakage, the area must be ventilated and the lamp debris treated as hazardous
waste due to the presence of mercury. The lamp must not be disposed of in household or
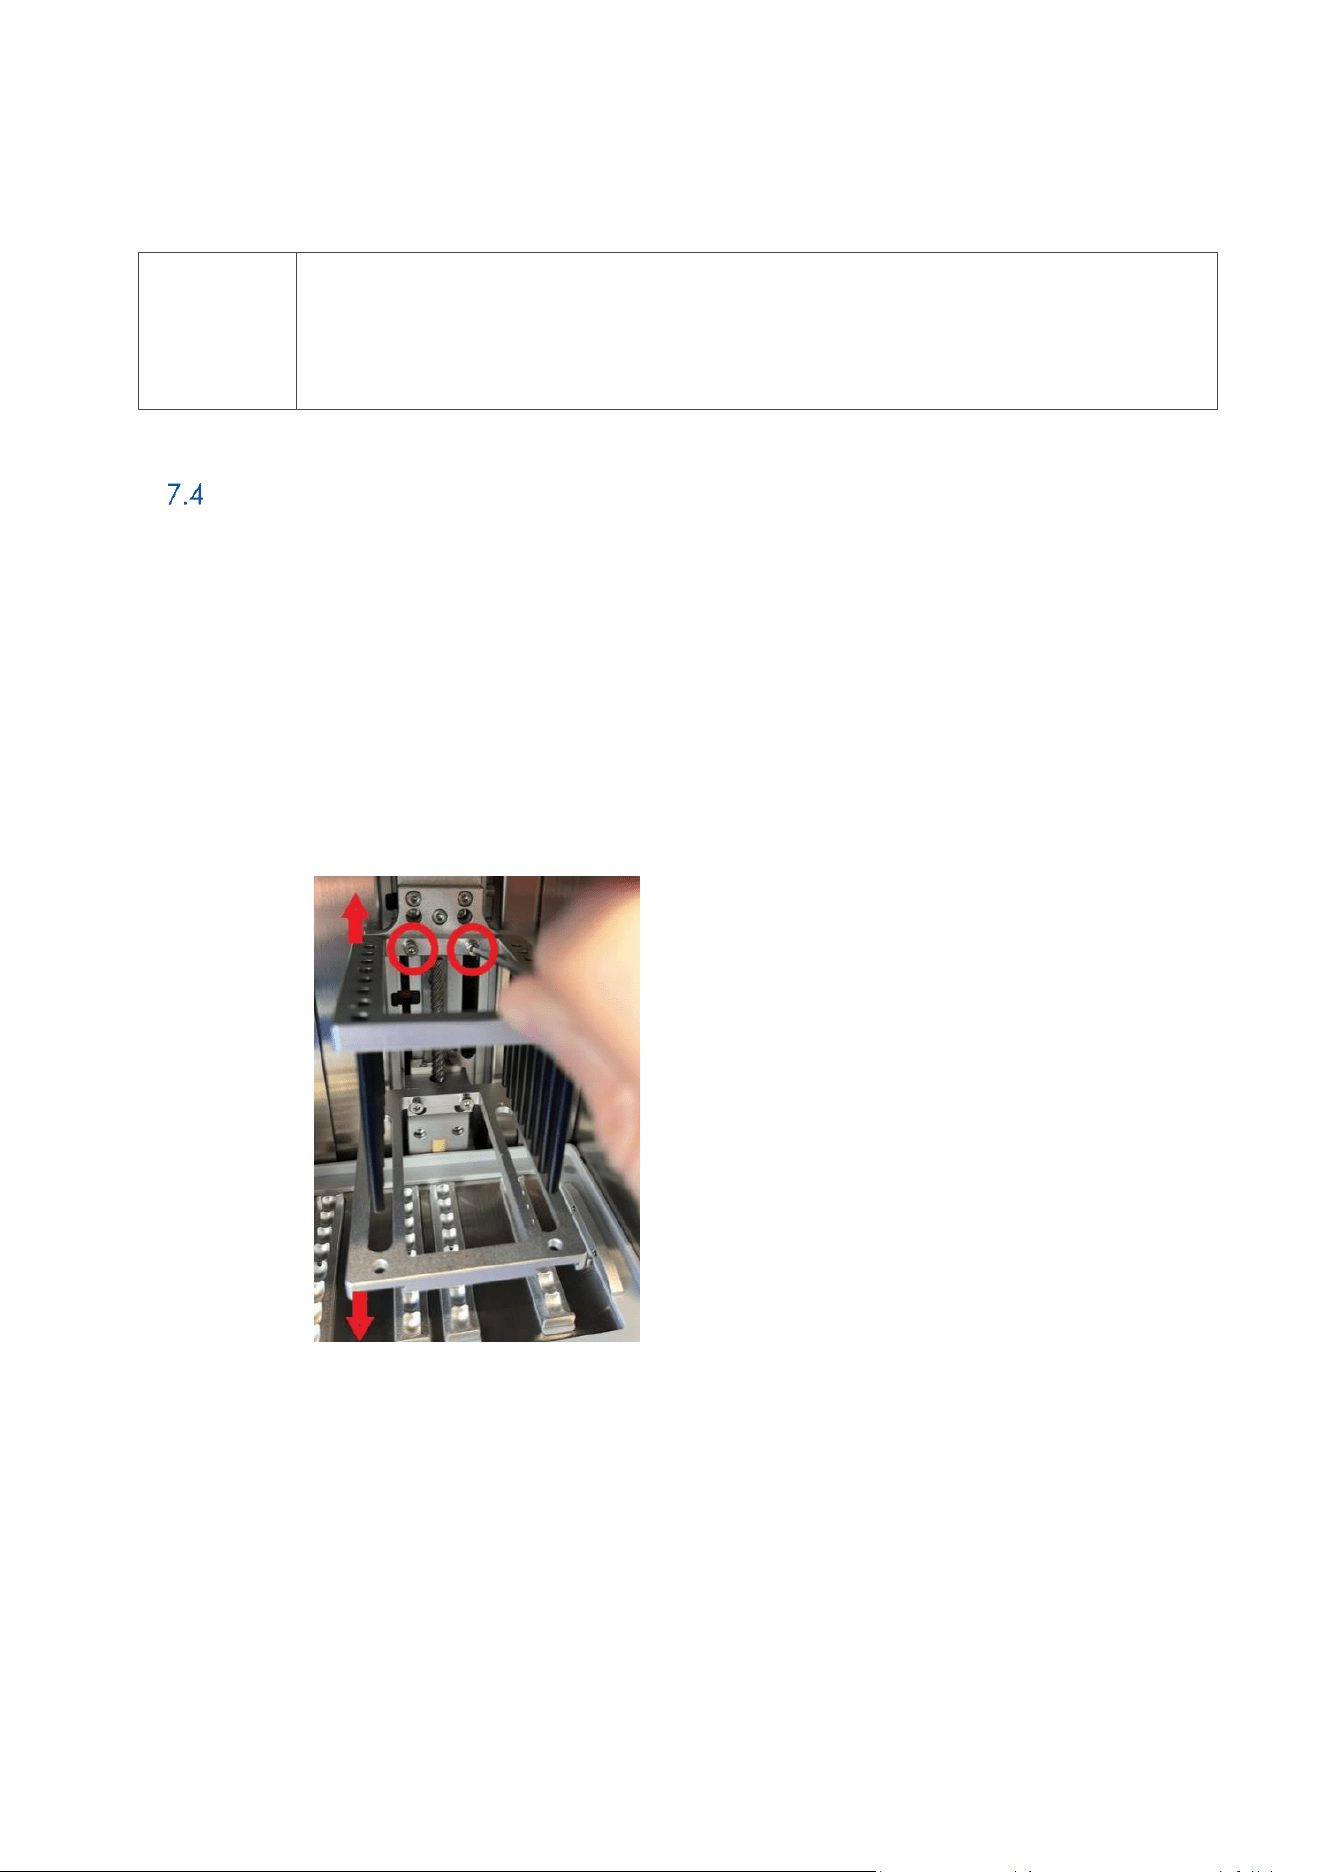
[QIAmini User Manual xx/2026
73
GLO-SOP-52-01-006-A09 Rev.02
general waste. After replacement, dispose of the used lamp through an authorized hazardous
waste or recycling program in accordance with applicable regulations.
Replacement of the magnetic head
Follow the steps below to replace the magnetic head of the QIAmini using the Magnetic Head Replacement Kit
(refer to Appendix).
1. Switch off the instrument and disconnect it from the power supply.
2. Open the instrument door.
3. Move the rod cover holder to the lower position.
4. Move the magnetic head to a position where the mounting screws (highlighted in picture below) are
accessible.
5. Using the screwdriver provided in the Magnetic head replacement Kit (refer to Appendix), remove the two
screws securing the magnetic head
6. Carefully remove the magnetic head.
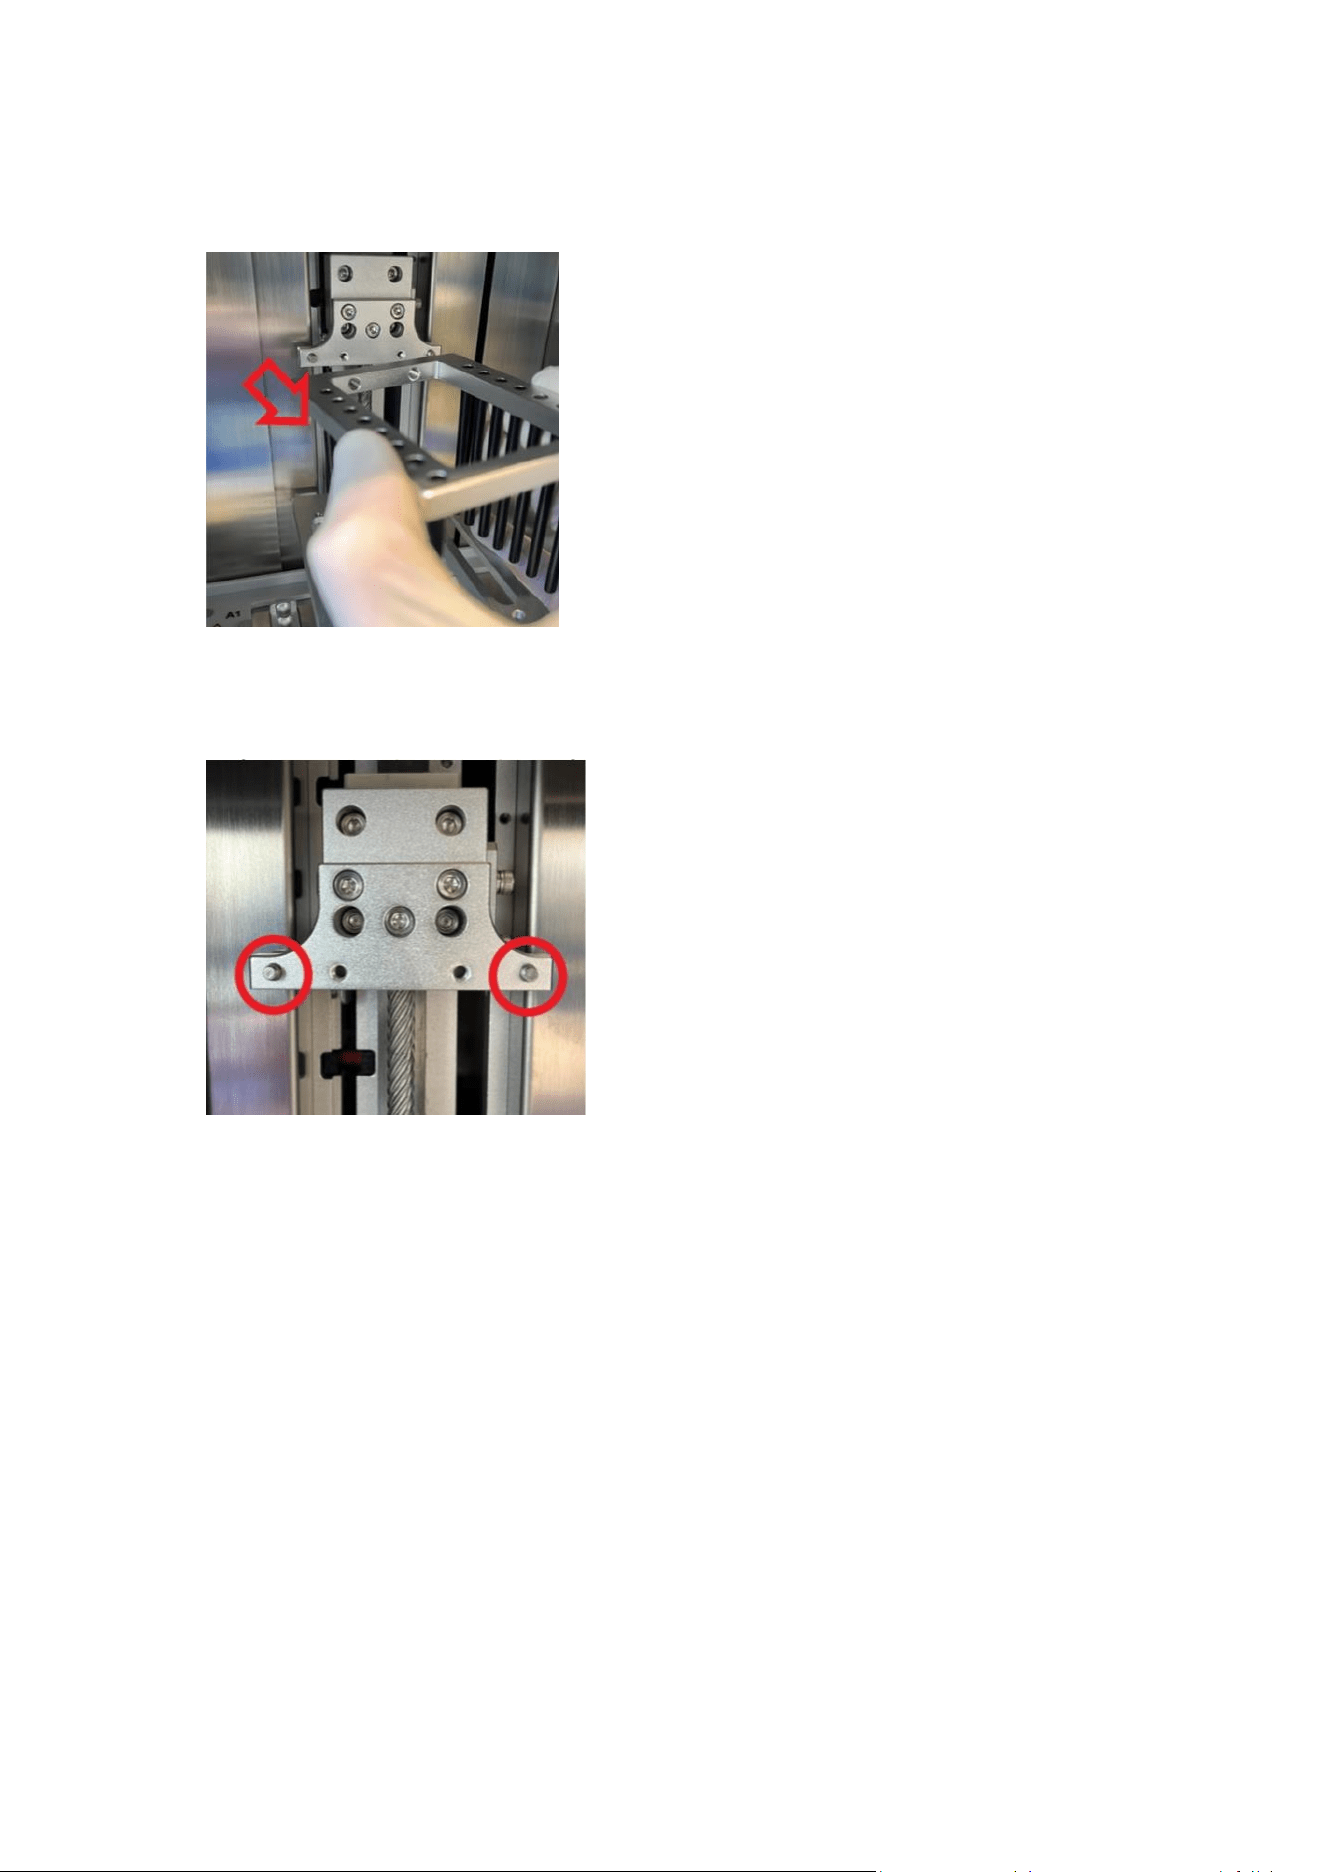
[QIAmini User Manual xx/2026
74
GLO-SOP-52-01-006-A09 Rev.02
7. Position the new magnetic head. The two alignment pins will ensure correct positioning of the magnetic
head.
8. Reinstall and securely tighten the two mounting screws.
Manual Check
9. Slide in a set of rod covers and manually move the magnetic head down. The magnetic rods should be
able to enter the rod covers without collision.
Important if collision occurs please repeat steps 4 to 9. In case the magnetic rods are still crashing into the rod
cover holder please contact QIAGEN technical service for further instructions.
10. Close the door and connect the instrument to the power supply.
11. Turn on the instrument and allow the initialization process to be completed.
12. Verify that the instrument initializes successfully and that no errors are reported.

[QIAmini User Manual xx/2026
75
GLO-SOP-52-01-006-A09 Rev.02
13. Remove the rod covers.

[QIAmini User Manual xx/2026
76
GLO-SOP-52-01-006-A09 Rev.02
8 Technical Specifications
Environmental conditions – operating conditions
Description
Requirement
Power
AC/DC Power Adaptor
Input: 24V DC , 5.7 A
Input: 100-240 V AC, 50/60 Hz, 2.0-1.0 A
Output: 24 V DC, 6.67 A, 160 W
Overvoltage category
I
Fuse
None
Air temperature
10℃ - 30℃
Relative humidity
≤80%
Altitude
up to 2000m (6500 ft)
Place of operation
For indoor use only
Pollution degree
2
Average noise level
<65 db
Environmental conditions – transport Conditions
Description
Requirement
Air temperature
−25ºC to 60ºC (−13ºF to 140ºF) in manufacturer’s package
Note: If the QIAmini is transported in temperatures below 0ºC (32ºF), it is recommended to
wait 24 hours before switching on the instrument to allow it to reach the temperature
conditions of the installation environment.
Relative humidity
≤80%RH
Environmental class
2K11 (IEC 60721-3-2)
2M4 (IEC 60721-3-2)
Environmental conditions – storage conditions
Description
Requirement
Air temperature
5−40°C (41−104°F) in manufacturer's package
Relative humidity
≤80% RH
Environmental class
2K11 (IEC 60721-3-2)
2M4 (IEC 60721-3-2)

[QIAmini User Manual xx/2026
77
GLO-SOP-52-01-006-A09 Rev.02
Mechanical data and hardware features
Description
Requirement
Dimensions
Height: 327 mm
Width: 215 mm
Depth: 274 mm
Weight
With packaging: 12 kg
Without packaging: 8.7 kg

[QIAmini User Manual xx/2026
78
GLO-SOP-52-01-006-A09 Rev.02
Appendix A
License Terms
The license terms for all software used with [Instrument Name], including QIAGEN software components,
commercial software components and open source software components, are provided in the files licenses.rtf and
Prerequisite.LicenseAgreements.rtf located on the [Instrument Name] workstation under the following paths:
C:\ProgramData\QIAGEN\QIAmini]\licenses.rtf
C:\ProgramData\QIAGEN\QIAmini Prerequisite.LicenseAgreements.rtf.

[QIAmini User Manual xx/2026
79
GLO-SOP-52-01-006-A09 Rev.02
Waste Electrical and Electronic Equipment (WEEE)
This section provides information about disposal of waste electrical and electronic equipment by users.
The crossed-out wheeled bin symbol (see below) indicates that this product must not be disposed of with other
waste; it must be taken to an approved treatment facility or to a designated collection point for recycling,
according to local laws and regulations.
The separate collection and recycling of waste electronic equipment at the time of disposal helps to conserve
natural resources and ensures that the product is recycled in a manner that protects human health and the
environment.
Recycling can be provided by QIAGEN upon request at additional cost. In the European Union, in accordance with
the specific WEEE recycling requirements and where a replacement product is being supplied by QIAGEN, free
recycling of its WEEE-marked electronic equipment is provided.
To recycle electronic equipment, contact your local QIAGEN sales office for the required return form. Once the
form is submitted, you will be contacted by QIAGEN either to request follow-up information for scheduling collection
of the electronic waste or to provide you with an individual quote.
California Proposition 65 Warning
This product contains chemicals known to the State of California to cause cancer, birth defect or other reproducti
ve harm.

[QIAmini User Manual xx/2026
80
GLO-SOP-52-01-006-A09 Rev.02
FCC Declaration (US) and Compliance with ICES (Canada)
This equipment has been tested and found to comply with the limits for a Class B digital device, pursuant to part 15
of the FCC Rules. These limits are designed to provide reasonable protection against harmful interference in a
residential installation. This equipment generates, uses and can radiate radio frequency energy and, if not installed
and used in accordance with the instructions, may cause harmful interference to radio communications. However,
there is no guarantee that interference will not occur in a particular installation. If this equipment does cause harmful
interference to radio or television reception, which can be determined by turning the equipment off and on, the
user is encouraged to try to correct the interference by one or more of the following measures
—Reorient or relocate the receiving antenna.
—Increase the separation between the equipment and receiver.
—Connect the equipment into an outlet on a circuit different from that to which the receiver is connected.
—Consult the dealer or an experienced radio/TV technician for help.
.
For Canada, this is a Class B digital apparatus compliant with Canadian ICES-003 “Information Technology
Equipment” standard.

[QIAmini User Manual xx/2026
81
GLO-SOP-52-01-006-A09 Rev.02
RF Regulatory and Exposure information
The QIAmini is equipped with Bluetooth functionality and is therefore classified as radio equipment. The following
statements apply in the countries where the product is marketed.
European Union
EU Conformity Statement
QIAGEN GmbH declares that the radio equipment type QIAmini is in compliance with Directive
RF Exposure Information
This device has been tested and meets applicable limits for Radio Frequency (RF) exposure.
This equipment must be installed and operated in accordance with provided instructions and the antenna(s) used
for this transmitter must be installed to provide a separation distance of at least 20 cm from all persons and must not
be co-located or operating in conjunction with any other antenna or transmitter.
Power: BLE:1.15dBm for EU
United States of America
FCC warning:
Please take attention that changes or modification not expressly approved by the party responsible for
compliance could void the user’s authority to operate the equipment.
This device complies with Part 15 of the FCC Rules. Operation is subject to the following two conditions:
(1) This device may not cause harmful interference, and
(2) This device must accept any interference received, including interference that may cause undesired
operation.
This equipment complies with FCC radiation exposure limits set forth for an uncontrolled environment. This
equipment should be installed and operated with minimum distance 20 cm between the radiator & your body.
Canada
IC Warning:
This device contains licence-exempt transmitter(s)/receiver(s) that comply with Innovation, Science and
Economic Development Canada’s licence-exempt RSS(s). Operation is subject to the following two conditions:
(1) This device may not cause interference.

[QIAmini User Manual xx/2026
82
GLO-SOP-52-01-006-A09 Rev.02
(2) This device must accept any interference, including interference that may cause undesired operation of
the device.
l'appareil contient des émetteurs/récepteurs exempts de licence qui sont conformes aux CNR exempts de
licence d’Innovation, Sciences et Développement économique Canada. L’exploitation est soumise aux deux
conditions suivantes :
(1) l'appareil ne doit pas produire de brouillage,
(2) l'utilisateur de l'appareil doit accepter tout brouillage radioélectrique subi, même si le brouillage est
susceptible d'en compromettre le fonctionnement.
This equipment complies with IC RSS-102 radiation exposure limits set forth for an uncontrolled environment. This
equipment should be installed and operated with minimum distance 20 cm between the radiator & your body.
ce matériel est conforme aux limites de dose d'exposition aux rayonnements, CNR-102 énoncée dans un autre
environnement.cette eqipment devrait être installé et exploité avec distance minimale de 20 entre le radiateur et
votre corps.

[QIAmini User Manual xx/2026
83
GLO-SOP-52-01-006-A09 Rev.02
Liability Clause
QIAGEN shall be released from all obligations under its warranty in the event repairs or modifications are made by
persons other than its own personnel, except in cases where the Company has given its written consent to perform
such repairs or modifications.
All materials replaced under this warranty will be warranted only for the duration of the original warranty period,
and in no case beyond the original expiration date of original warranty unless authorized in writing by an officer of
the Company. Read-out devices, interfacing devices, and associated software will be warranted only for the period
offered by the original manufacturer of these products. Representations and warranties made by any person,
including representatives of QIAGEN, which are inconsistent or in conflict with the conditions in this warranty shall
not be binding upon the Company unless produced in writing and approved by an officer of QIAGEN.

[QIAmini User Manual xx/2026
84
GLO-SOP-52-01-006-A09 Rev.02
Appendix A
Ordering information
Note: Only use accessories supplied by QIAGEN.
Product
Contents
Cat. no.
QIAmini
[Description]
9003607
QIAmini (AU)
[Description]
9003637
QIAmini (CH)
[Description]
9003638
QIAmini (EU)
[Description]
9003634
QIAmini (IND)
[Description]
9003639
QIAmini (JP)
[Description]
9003641
QIAmini (KR)
[Description]
9003640
QIAmini (NA)
[Description]
9003635
QIAmini (UK)
[Description]
9003636
Accessories
QIAmini Cartridge Frame (1)
[Description]
9028648
QIAmini Barcode Scanner
[Description]
9028657
QIAmini UV Bulb
[Description]
9028506
QIAmini USB Drive
[Description]
9028658
QIAmini Magnet Head
Replacement Set
[Description]
9028659
Related products
QIAmini DNA Blood Kit (48)
[Description]
590105
QIAmini Pathogen Kit (48)
[Description]
590205
QIAmini DNA Tissue/Cells Kit (48)
[Description]
591005
QIAmini RNA Tissue/Cells Kit (48)
[Description]
591105
QIAmini PowerFecal Pro DNA/RNA
Kit (48)
[Description]
591205
QIAmini Rod Covers (50)
[Description]
590025

[QIAmini User Manual xx/2026
85
GLO-SOP-52-01-006-A09 Rev.02
For up-to-date licensing and product-specific disclaimers, see the respective QIAGEN kit handbook or user manual.
QIAGEN kit handbooks and user manuals are available at www.qiagen.com or can be requested from QIAGEN
Technical Support or your local distributor.

[QIAmini User Manual xx/2026
86
GLO-SOP-52-01-006-A09 Rev.02
Document Revision History
Revision
Description
RX, [Month Year]
Sample description
RX, [Month Year]
Sample description
Sample description
Sample description
RX [Month Year]
Sample description

[QIAmini User Manual xx/2026
87
GLO-SOP-52-01-006-A09 Rev.02
Trademarks: QIAGEN
®
, Sample to Insight
®
(QIAGEN Group); Other
®
(Other); Other™ (Other). Registered names, trademarks, etc. used in this document, even when not specifically marked as such, are not
to be considered unprotected by law.
[Month]-20XX HB-XXXX-00X XXXXXXX © 20XX–20XX QIAGEN, all rights reserved.

[QIAmini User Manual xx/2026
88
GLO-SOP-52-01-006-A09 Rev.02
Ordering www.qiagen.com/shop | Technical Support support.qiagen.com | Website www.qiagen.com