
User Guide
SUMMARY
This guide provides basic information for using and upgrading this product, including topics such as
components, features, networks, and HP resources.

Legal information
© Copyright 2023 HP Development
Company, L.P.
Linux® is the registered trademark of
Linus Torvalds in the U.S. and other
countries. Microsoft and Windows are either
registered trademarks or trademarks of
Microsoft Corporation in the United States
and/or other countries. Red Hat and Red
Hat Enterprise Linux are trademarks or
registered trademarks of Red Hat, Inc. or
its subsidiaries in the United States and
other countries. SUSE and the SUSE logo
are registered trademarks of SUSE LLC or
its subsidiaries or affiliates. USB Type-C is a
registered trademark of USB Implementers
Forum, Inc.
The information contained herein is subject
to change without notice. The only
warranties for HP products and services are
set forth in the express warranty statements
accompanying such products and services.
Nothing herein should be construed as
constituting an additional warranty. HP shall
not be liable for technical or editorial errors
or omissions contained herein.
First Edition: September 2023
Part number: N59144-001
Product notice
This guide describes features that are
common to most products. Some features
may not be available on your computer.
Not all features are available in all
editions or versions of Windows. Systems
may require upgraded and/or separately
purchased hardware, drivers, software
or BIOS update to take full advantage
of Windows functionality. Windows is
automatically updated, which is always
enabled. High-speed internet and Microsoft
account required. ISP fees may apply and
additional requirements may apply over time
for updates. See
http://www.microsoft.com.
If your product ships with Windows in S
Mode: Windows in S Mode works exclusively
with apps from the Microsoft Store within
Windows. Certain default settings, features,
and apps cannot be changed. Some
accessories and apps that are compatible
with Windows may not work (including some
antivirus, PDF writers, driver utilities, and
accessibility apps), and performance may
vary, even if you switch out of S Mode. If you
switch to Windows, you cannot switch back
to S Mode. Learn more at Windows.com/
SmodeFAQ.
To access the latest user guides, go to
http://www.hp.com/support, and follow the
instructions to find your product. Then select
Manuals.
Software terms
By installing, copying, downloading, or
otherwise using any software product
preinstalled on this computer, you agree
to be bound by the terms of the HP End
User License Agreement (EULA). If you
do not accept these license terms, your
sole remedy is to return the entire unused
product (hardware and software) within 14
days for a full refund subject to the refund
policy of your seller.
For any further information or to request
a full refund of the price of the computer,
please contact your seller.

Warning notices
Harmful radio interference might occur if this system is used in a residential environment.
WARNING! This equipment has been tested and found to comply with the limits for a Class A digital
device, pursuant to Part 15 of the FCC Rules and EN 55032. These limits are designed to provide
reasonable protection against harmful interference when the equipment is operated in a commercial
environment. This equipment generates, uses, and can radiate radio frequency energy and, if not
installed and used in accordance with the instruction manual, may cause harmful interference to radio
communications. Operation of this equipment in a residential area is likely to cause harmful
interference in which case the user will be required to correct the interference at his own expense.
iii

Table of contents
1 About this guide..................................................................................................................................................................................................................................... 1
2 Locating HP resources.................................................................................................................................................................................................................... 2
Product information.................................................................................................................................................................................................................... 2
Support ................................................................................................................................................................................................................................................ 2
Product documentation........................................................................................................................................................................................................... 3
Product diagnostics.................................................................................................................................................................................................................... 3
Product updates............................................................................................................................................................................................................................ 4
3 Computer features............................................................................................................................................................................................................................5
What's new ........................................................................................................................................................................................................................................ 5
Front........................................................................................................................................................................................................................................................ 5
Rear..........................................................................................................................................................................................................................................................7
Top.............................................................................................................................................................................................................................................................7
Serial number location ............................................................................................................................................................................................................. 8
Power rating label location ....................................................................................................................................................................................................8
Product specifications..............................................................................................................................................................................................................8
4 Setting up the rack rail (select products only) and computer..........................................................................................................................10
Ensuring proper ventilation.................................................................................................................................................................................................10
Setup procedures........................................................................................................................................................................................................................ 11
Installing optional components........................................................................................................................................................................................ 13
Security..............................................................................................................................................................................................................................................14
Product recycling ........................................................................................................................................................................................................................ 14
5 Backing up, restoring, and recovering...............................................................................................................................................................................15
Backing up information and creating recovery media....................................................................................................................................15
Using Windows tools for backing up..................................................................................................................................................................15
Using the HP Cloud Recovery Download Tool to create recovery media (select products only)..........................15
Restoring and recovering your system.......................................................................................................................................................................15
Creating a system restore .......................................................................................................................................................................................16
Restoring and recovery methods ........................................................................................................................................................................16
Recovering using HP Recovery media .............................................................................................................................................................16
Changing the computer boot order ....................................................................................................................................................................17
Using HP Sure Recover (select products only)............................................................................................................................................17
6 Setting up Linux..................................................................................................................................................................................................................................18
Linux-ready systems................................................................................................................................................................................................................. 18
Setting up Red Hat Enterprise Linux.............................................................................................................................................................................18
iv

Setting up SUSE Linux Enterprise Desktop (SLED).............................................................................................................................................18
Setting up Ubuntu.......................................................................................................................................................................................................................19
Open source graphics drivers ...............................................................................................................................................................................19
Proprietary graphics drivers...............................................................................................................................................................................................19
7 Updating the computer................................................................................................................................................................................................................. 21
Updating the BIOS ....................................................................................................................................................................................................................21
Determining the current BIOS version ............................................................................................................................................................ 21
Upgrading the BIOS ....................................................................................................................................................................................................... 21
Upgrading device drivers..................................................................................................................................................................................................... 22
8 Maintenance, diagnostics, and minor troubleshooting....................................................................................................................................... 23
Turning off the computer...................................................................................................................................................................................................... 23
If you encounter issues ......................................................................................................................................................................................................... 23
For more information................................................................................................................................................................................................... 23
Visual inspection............................................................................................................................................................................................................. 23
At startup....................................................................................................................................................................................................................24
During operation ...................................................................................................................................................................................................24
Customer Self Repair....................................................................................................................................................................................... 25
Blink or beep codes: interpreting POST diagnostic lights and audible codes................................................................... 25
Basic troubleshooting................................................................................................................................................................................................. 25
HP Support .......................................................................................................................................................................................................................... 25
Online support....................................................................................................................................................................................................... 26
Customer support for computers................................................................................................................................................ 26
Advisories or bulletins and notices............................................................................................................................................. 26
Product Change Notifications........................................................................................................................................................ 26
Calling support...................................................................................................................................................................................................... 26
Locating warranty information...................................................................................................................................................................27
9 Using HP PC Hardware Diagnostics.................................................................................................................................................................................. 28
Using HP PC Hardware Diagnostics Windows (select products only)................................................................................................ 28
Using an HP PC Hardware Diagnostics Windows hardware failure ID code....................................................................... 28
Accessing HP PC Hardware Diagnostics Windows..............................................................................................................................28
Accessing HP PC Hardware Diagnostics Windows from HP Support Assistant................................................. 28
Accessing HP PC Hardware Diagnostics Windows from the Start menu (select products only)............ 29
Downloading HP PC Hardware Diagnostics Windows........................................................................................................................ 29
Downloading the latest HP PC Hardware Diagnostics Windows version from HP............................................. 29
Downloading the HP PC Hardware Diagnostics Windows from the Microsoft Store....................................... 29
Downloading HP Hardware Diagnostics Windows by product name or number (select products
only) ............................................................................................................................................................................................................................... 29
Installing HP PC Hardware Diagnostics Windows..................................................................................................................................30
Using HP PC Hardware Diagnostics UEFI ................................................................................................................................................................30
Using an HP PC Hardware Diagnostics UEFI hardware failure ID code..................................................................................30
Starting HP PC Hardware Diagnostics UEFI...............................................................................................................................................30
Starting HP PC Hardware Diagnostics UEFI through HP Hotkey Support software (select
products only).......................................................................................................................................................................................................... 31
Downloading HP PC Hardware Diagnostics UEFI to a USB flash drive.................................................................................... 31
Downloading the latest HP PC Hardware Diagnostics UEFI version............................................................................. 32
v

Downloading HP PC Hardware Diagnostics UEFI by product name or number (select products
only) ............................................................................................................................................................................................................................... 32
Using Remote HP PC Hardware Diagnostics UEFI settings (select products only)................................................................... 32
Downloading Remote HP PC Hardware Diagnostics UEFI............................................................................................................... 32
Downloading the latest Remote HP PC Hardware Diagnostics UEFI version.........................................................32
Downloading Remote HP PC Hardware Diagnostics UEFI by product name or number................................ 32
Customizing Remote HP PC Hardware Diagnostics UEFI settings............................................................................................ 33
10 Computer operating guidelines, routine care, and shipping preparation............................................................................................34
Operating guidelines and routine care ......................................................................................................................................................................34
Cleaning your computer.......................................................................................................................................................................................................34
Removing dirt and debris from your computer.........................................................................................................................................35
Cleaning your computer with a disinfectant...............................................................................................................................................35
Shipping preparation .............................................................................................................................................................................................................. 36
11 Electrostatic discharge ...............................................................................................................................................................................................................37
12 Accessibility.......................................................................................................................................................................................................................................38
HP and accessibility.................................................................................................................................................................................................................38
Finding the technology tools you need...........................................................................................................................................................38
The HP commitment.....................................................................................................................................................................................................38
International Association of Accessibility Professionals (IAAP)..................................................................................................39
Finding the best assistive technology............................................................................................................................................................. 39
Assessing your needs ..................................................................................................................................................................................... 39
Accessibility for HP products..................................................................................................................................................................... 39
Standards and legislation ...................................................................................................................................................................................................40
Standards.............................................................................................................................................................................................................................40
Mandate 376 – EN 301 549 ............................................................................................................................................................................40
Web Content Accessibility Guidelines (WCAG).............................................................................................................................40
Legislation and regulations...................................................................................................................................................................................... 41
Useful accessibility resources and links ................................................................................................................................................................... 41
Organizations..................................................................................................................................................................................................................... 41
Educational institutions .............................................................................................................................................................................................. 41
Other disability resources ....................................................................................................................................................................................... 42
HP links................................................................................................................................................................................................................................... 42
Contacting support.................................................................................................................................................................................................................. 42
Index................................................................................................................................................................................................................................................................ 43
vi

About this guide1
This guide provides basic information for using and upgrading this product.
WARNING! Indicates a hazardous situation that, if not avoided, could result in serious injury or death.
CAUTION: Indicates a hazardous situation that, if not avoided, could result in minor or moderate
injury.
IMPORTANT: Indicates information considered important but not hazard-related (for example,
messages related to property damage). Warns the user that failure to follow a procedure exactly as
described could result in loss of data or in damage to hardware or software. Also contains essential
information to explain a concept or to complete a task.
NOTE: Contains additional information to emphasize or supplement important points of the main text.
TIP: Provides helpful hints for completing a task.
About this guide
1

Locating HP resources2
Read this chapter to learn about where to find additional HP resources.
Product information
To locate resources that provide product details, how-to information, and more, use this table.
Table 2-1
Where to find product information
Topic Location
Technical specifications To find the QuickSpecs for your product, go to http://www.hp.com/go/quickspecs, and
then select the link. Select Search all QuickSpecs, type your model name in the
search box, and then select Go.
Regulatory, Safety, and Environmental
Notices
See the
Regulatory, Safety, and Environmental Notices
for product regulatory
information. You can also see the Agency/Environmental label.
To access this guide:
■
Select the Search icon in the taskbar, type HP Documentation in the search
box, and then select HP Documentation.
System board A diagram of the system board is located on the inside of the chassis. Additional
information is located in the computer
Maintenance and Service Guide
on the web
at http://www.hp.com/support. Follow the instructions to find your product, and then
select Manuals.
Serial number, Agency/Environmental,
and operating system labels
The serial number, Agency/Environmental, and operating system labels might be on
the bottom of the computer, on the rear panel of the computer, or under the service
door.
Support
To locate resources that provide support and warranty information, use this table.
Table 2-2
Where to find support information
Topic Location
Product support For HP support, go to http://www.hp.com/support.
Here you can access the following types of support:
● Online chat with an HP technician
● Support telephone numbers
● HP service center locations
2 Chapter 2 Locating HP resources

Table 2-2 Where to find support information (continued)
Topic Location
Warranty information To access this document:
■
Select the Search icon in the taskbar, type HP Documentation in the search
box, and then select
HP Documentation.
– or –
■
Go to http://www.hp.com/go/orderdocuments.
IMPORTANT: You must be connected to the internet to access the latest version
of the warranty.
You can find your HP Limited Warranty located with the user guides on your product.
The warranty might be on a CD or DVD provided in the box. In some countries or
regions, HP might provide a printed warranty in the box. For countries or regions
where the warranty is not provided in printed format, you can request a copy from
http://www.hp.com/go/orderdocuments. For products purchased in Asia Pacific, you
can write to HP at POD, PO Box 161, Kitchener Road Post Office, Singapore 912006.
Include your name, phone number, address, and product name.
Product documentation
To locate resources that provide product documentation, use this table.
Table 2-3
Where to find product documentation
Topic Location
HP user documentation, white papers,
and third-party documentation
User documentation is located on your hard drive. Select the Search icon in
the taskbar, type HP Documentation in the search box, and then select HP
Documentation. For the latest online documentation, go to http://www.hp.com/
support and follow the instructions to find your product. Then select Manuals. The
documentation includes this user guide and the
Maintenance and Service Guide
.
Product notifications Subscriber's Choice is an HP program that allows you to sign up to receive driver and
software alerts, proactive change notifications (PCNs), the HP newsletter, customer
advisories, and more. Sign up at https://h41369.www4.hp.com/.
Technical specifications The Product Bulletin application contains QuickSpecs for HP computers. QuickSpecs
include information about the operating system, power supply, memory, processor,
and many other system components. To access the QuickSpecs, go to
http://www.hp.com/go/quickspecs/.
Bulletins and Notices To find advisories, bulletins, and notices:
1. Go to http://www.hp.com/support.
2. Follow the instructions to find your product.
3. Select Advisories or Bulletins and Notices.
Product diagnostics
To locate resources that provide product diagnostics tools, use this table.
Product documentation
3

Table 2-4 Where to find diagnostics tools
Topic Location
Diagnostics tools For additional information, see the computer
Maintenance and Service Guide
at
http://www.hp.com/support. Follow the instructions to find your product, and then
select Manuals.
Audible beep and light code definitions See the computer
Maintenance and Service Guide
at http://www.hp.com/support.
Follow the instructions to find your product, and then select Manuals.
POST error codes See the computer
Maintenance and Service Guide
at http://www.hp.com/support.
Follow the instructions to find your product, and then select Manuals.
Product updates
To locate resources that provide product updates, use this table.
Table 2-5
Where to find product updates
Topic Location
Driver and BIOS updates Go to http://www.hp.com/support and select Software and Drivers to verify that you
have the latest drivers for the computer.
Operating systems For information about Windows® operating systems, go to
http://www.support.microsoft.com.
4 Chapter 2 Locating HP resources
Computer features3
This chapter provides you with an overview of your computer's features.
What's new
Your computer includes new features that are not available on other HP products. Carefully review this
guide to be sure that you are aware of these features.
They include:
● Power supply blink/LED codes (see Blink or beep codes: interpreting POST diagnostic lights and
audible codes on page 25).
● Front access to power supplies that you can replace while the computer is on
● Front access to hard drives that you cannot replace while the computer is on
● PCIe card brackets
● Installation and removal of rack mounting rails on the side of the computer
NOTE: Details of these additional features are in the
Maintenance & Service Guide
for your
computer, which is available on the HP website.
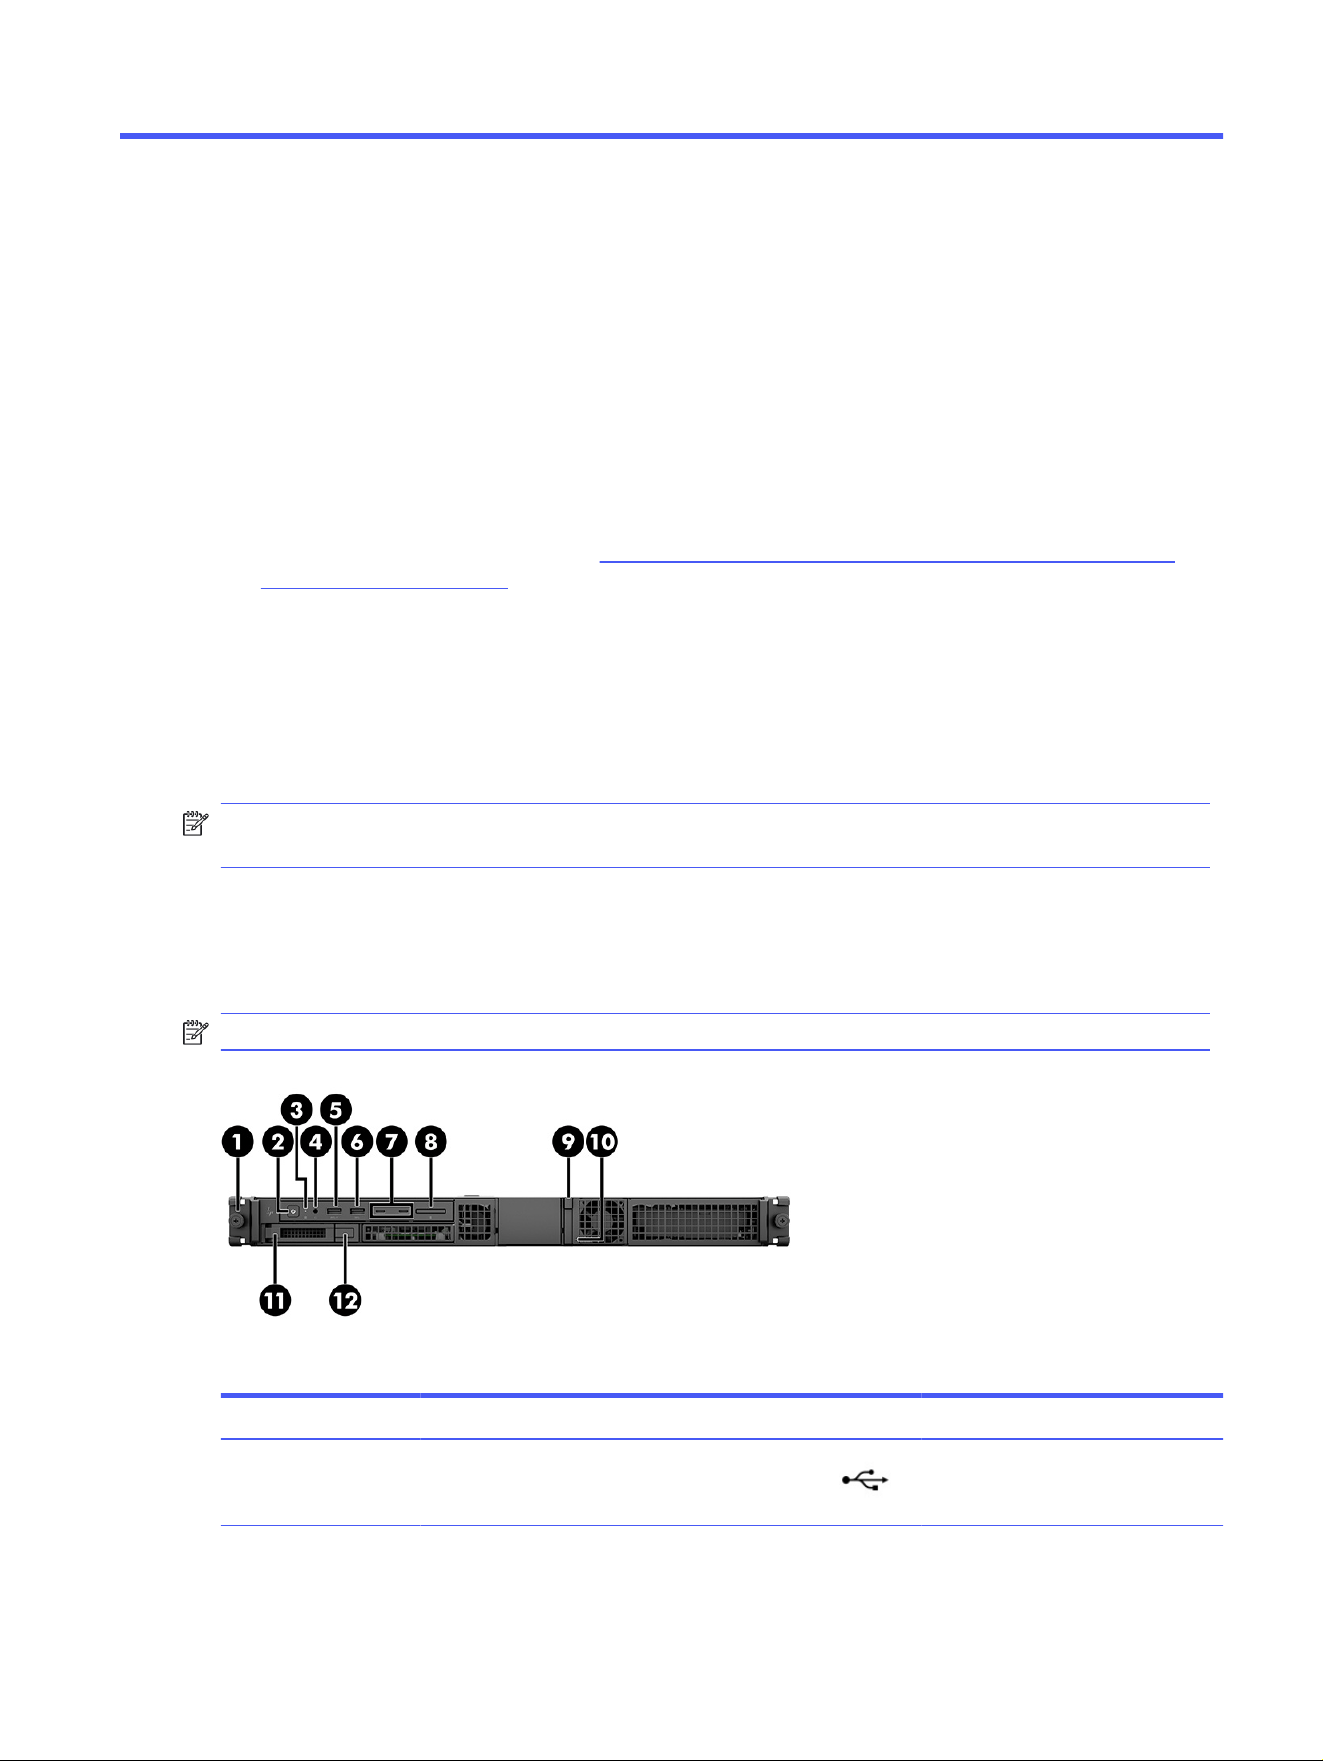
Front
To identify the front panel components, use this illustration and table.
NOTE: Refer to the illustration that most closely matches your computer.
Table 3-1
Front components and their descriptions
Item Icon Component Item Icon Component
1 Rack pull screw 7 USB Type-C® ports (2)
Computer features 5
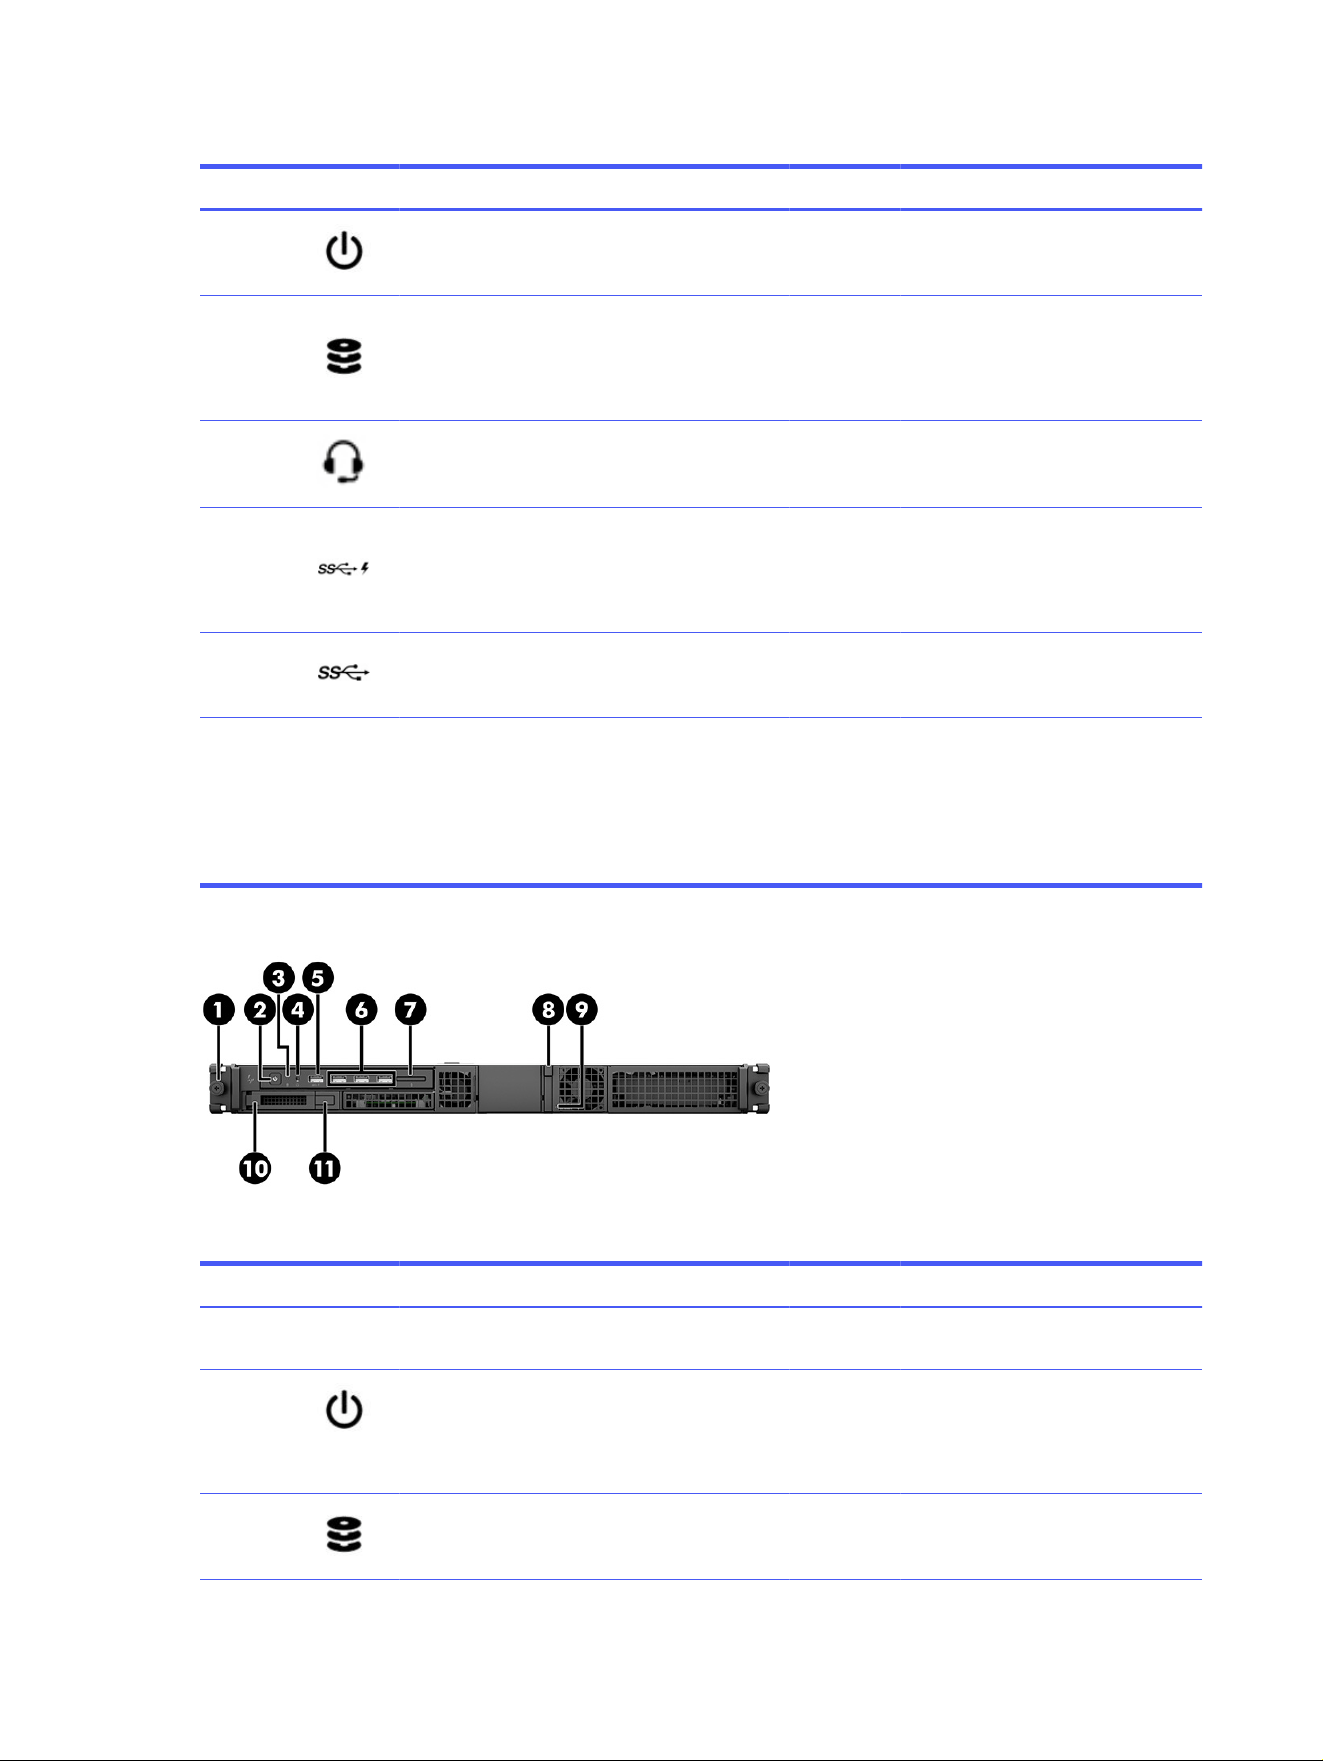
Table 3-1 Front components and their descriptions (continued)
Item Icon Component Item Icon Component
2 Power button 8 Memory card reader (select
products only)
3 Hard drive activity light 9
Power supply release button
NOTE: You can remove or replace
power supplies when the computer
is on.
4
Audio-out (headphone)/Audio-in
(microphone) combo jack
10 Power supply light
5
USB SuperSpeed 10 Gbps port with
HP Sleep and Charge
11
Hard drive pull handle
NOTE: You cannot remove or
replace hard drives while the
computer is on.
6 USB SuperSpeed 5 Gbps port 12 Hard drive pull handle eject button
NOTE: The combo jack supports headphones, line output devices, microphones, line input devices, CTIA-style headsets, or
OMTP-style headsets.
NOTE: Your model might have additional components available from HP.
NOTE: The light on the power button is normally white when the power is on. If the light blinks red, the computer displays a
diagnostic code to indicate a problem. See the
Maintenance and Service Guide
to interpret the code.
Table 3-2 Front components and their descriptions
Item Icon Component Item Icon Component
1 Rack pull screw 7 Memory card reader (select
products only)
2 Power button 8 Power supply release button
NOTE: You can remove or replace
power supplies when the computer
is on.
3 Hard drive activity light 9 Power supply light
6 Chapter 3 Computer features
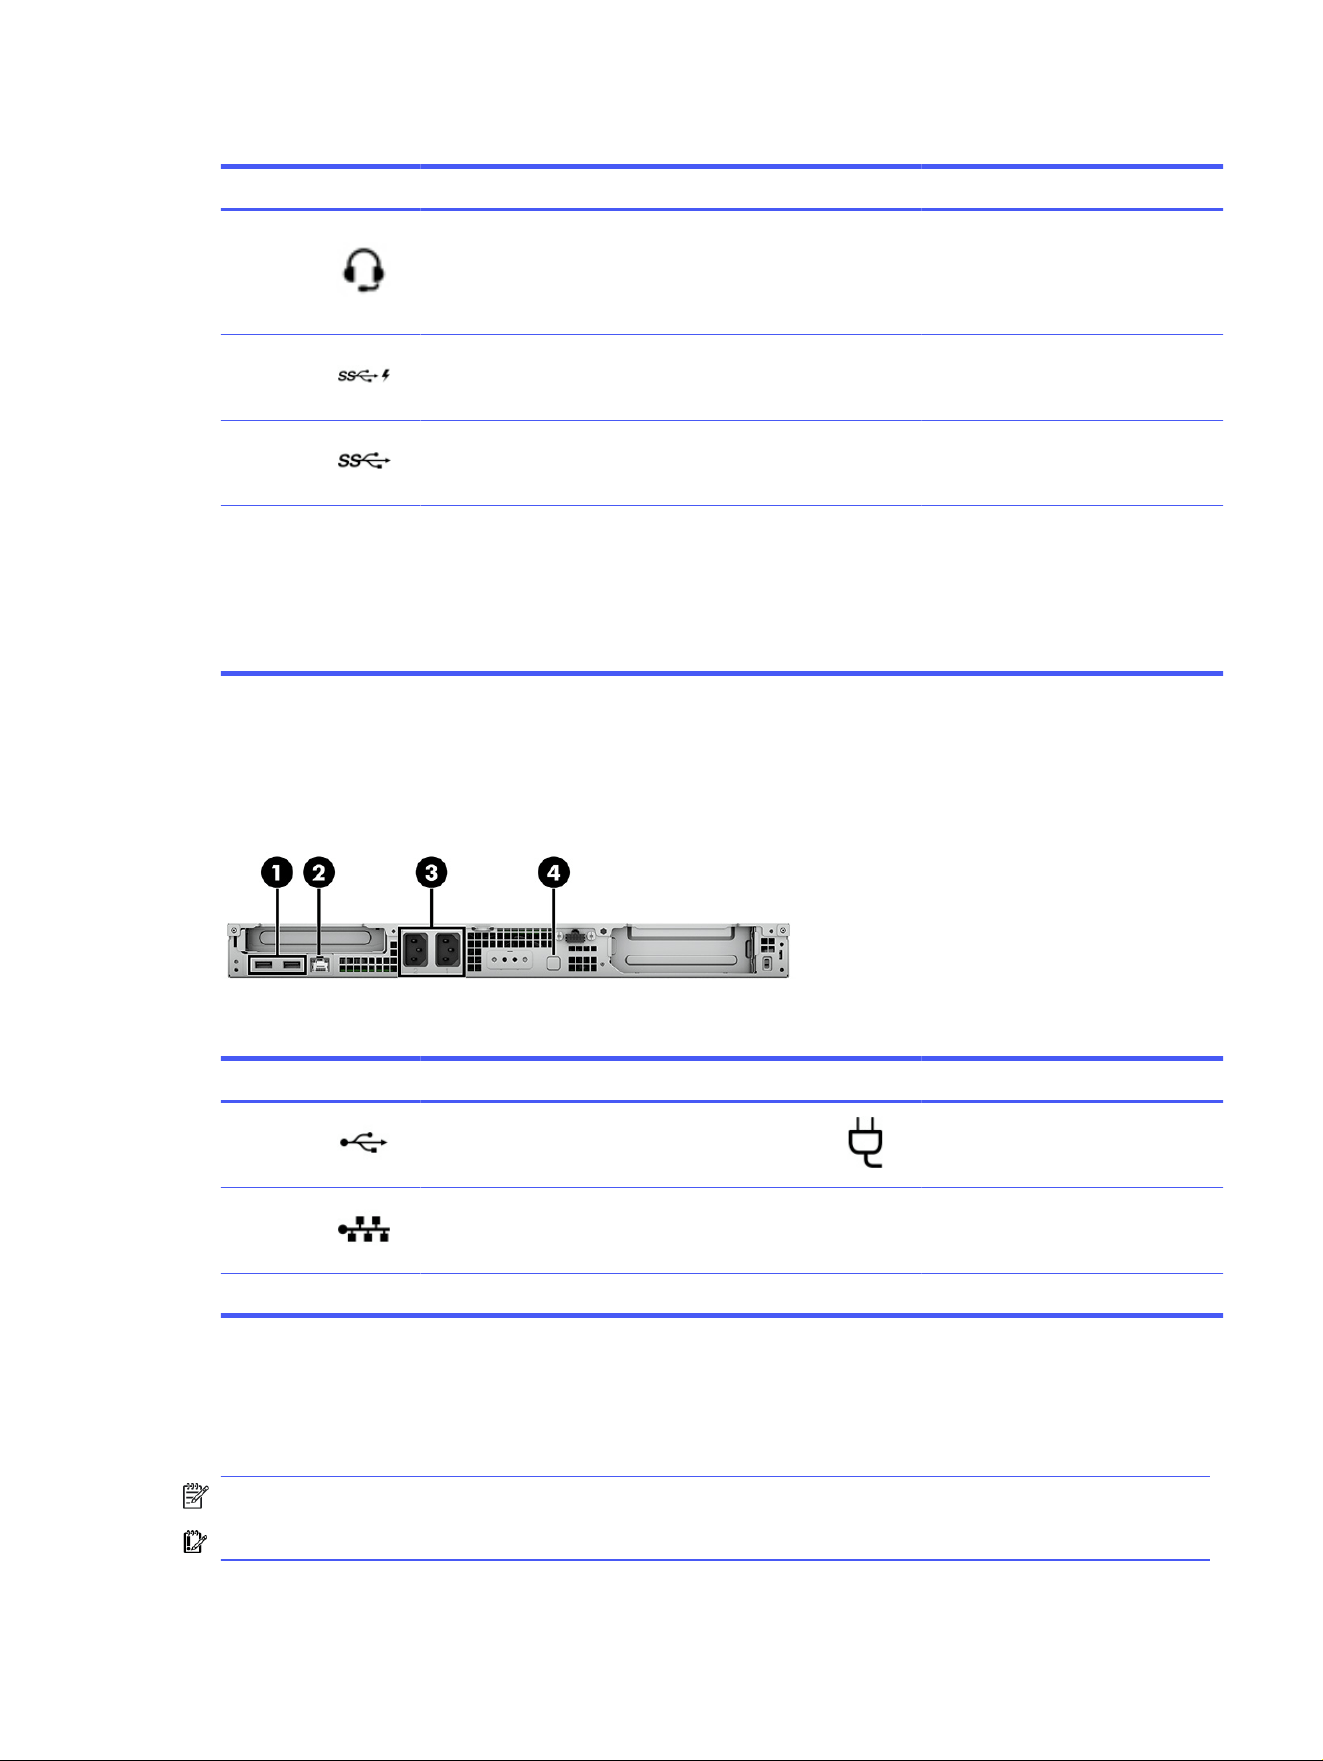
Table 3-2 Front components and their descriptions (continued)
Item Icon Component Item Icon Component
4
Audio-out (headphone)/Audio-in
(microphone) combo jack
10
Hard drive pull handle
NOTE: You cannot remove or
replace hard drives while the
computer is on.
5
USB SuperSpeed port with HP Sleep
and Charge
11 Hard drive pull handle eject button
6 USB SuperSpeed ports (3)
NOTE: The combo jack supports headphones, line output devices, microphones, line input devices, CTIA-style headsets, or
OMTP-style headsets.
NOTE: Your model might have additional components available from HP.
NOTE: The light on the power button is normally white when the power is on. If the light blinks red, the computer displays a
diagnostic code to indicate a problem. See the
Maintenance and Service Guide
to interpret the code.
Rear
To identify the rear panel components, use this illustration and table.
Table 3-3
Rear components and their descriptions
Item Icon Component Item Icon Component
1 USB ports (2) 3 Power connectors (2)
2 RJ-45 (network) jack 4 Power button
NOTE: The labels for the rear panel connectors use industry-standard icons and colors.
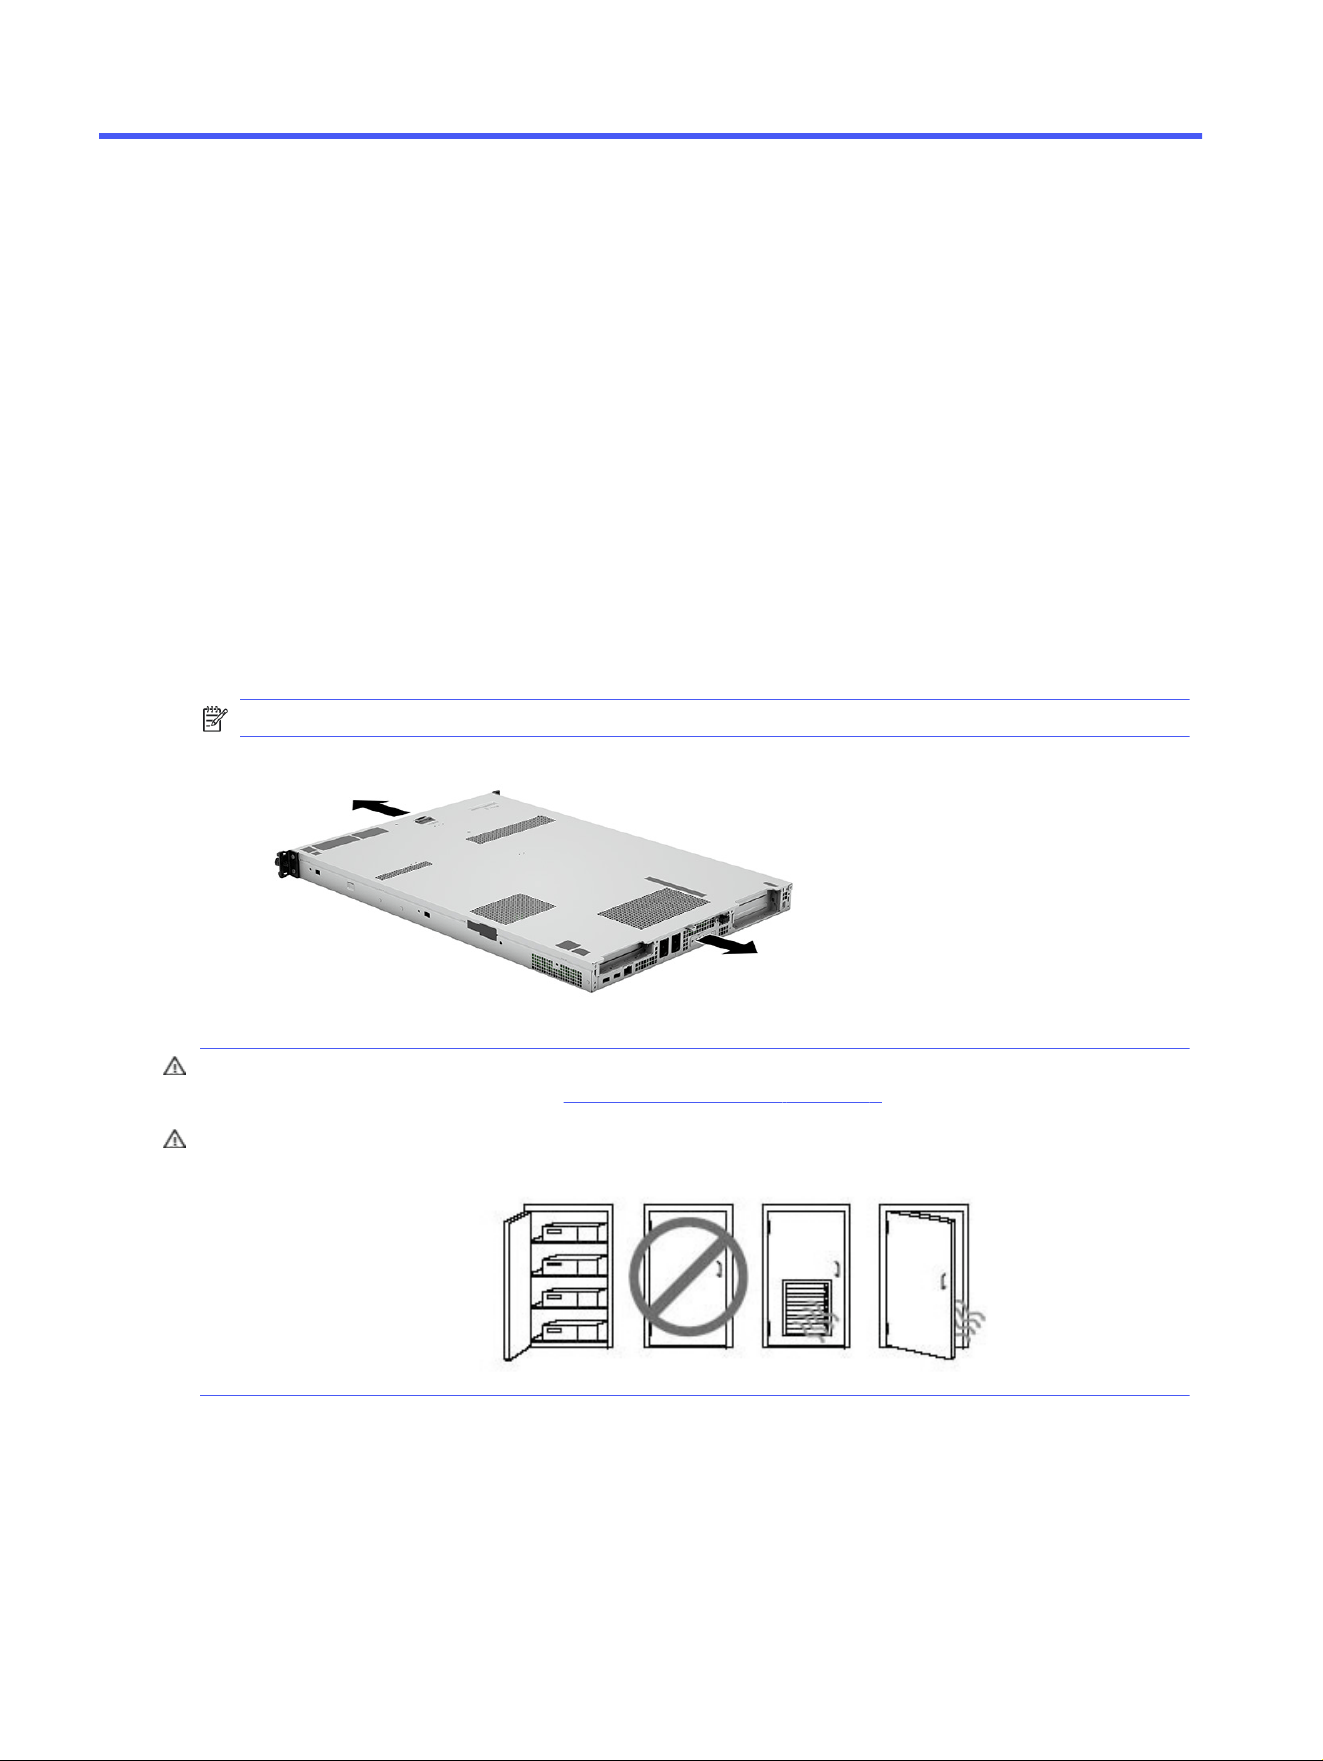
Top
To identify the top cover components, use this illustration and table.
NOTE: Your computer model might look slightly different from the illustration in this section.
IMPORTANT: Your computer will not turn on if the top is open or removed.
Rear
7
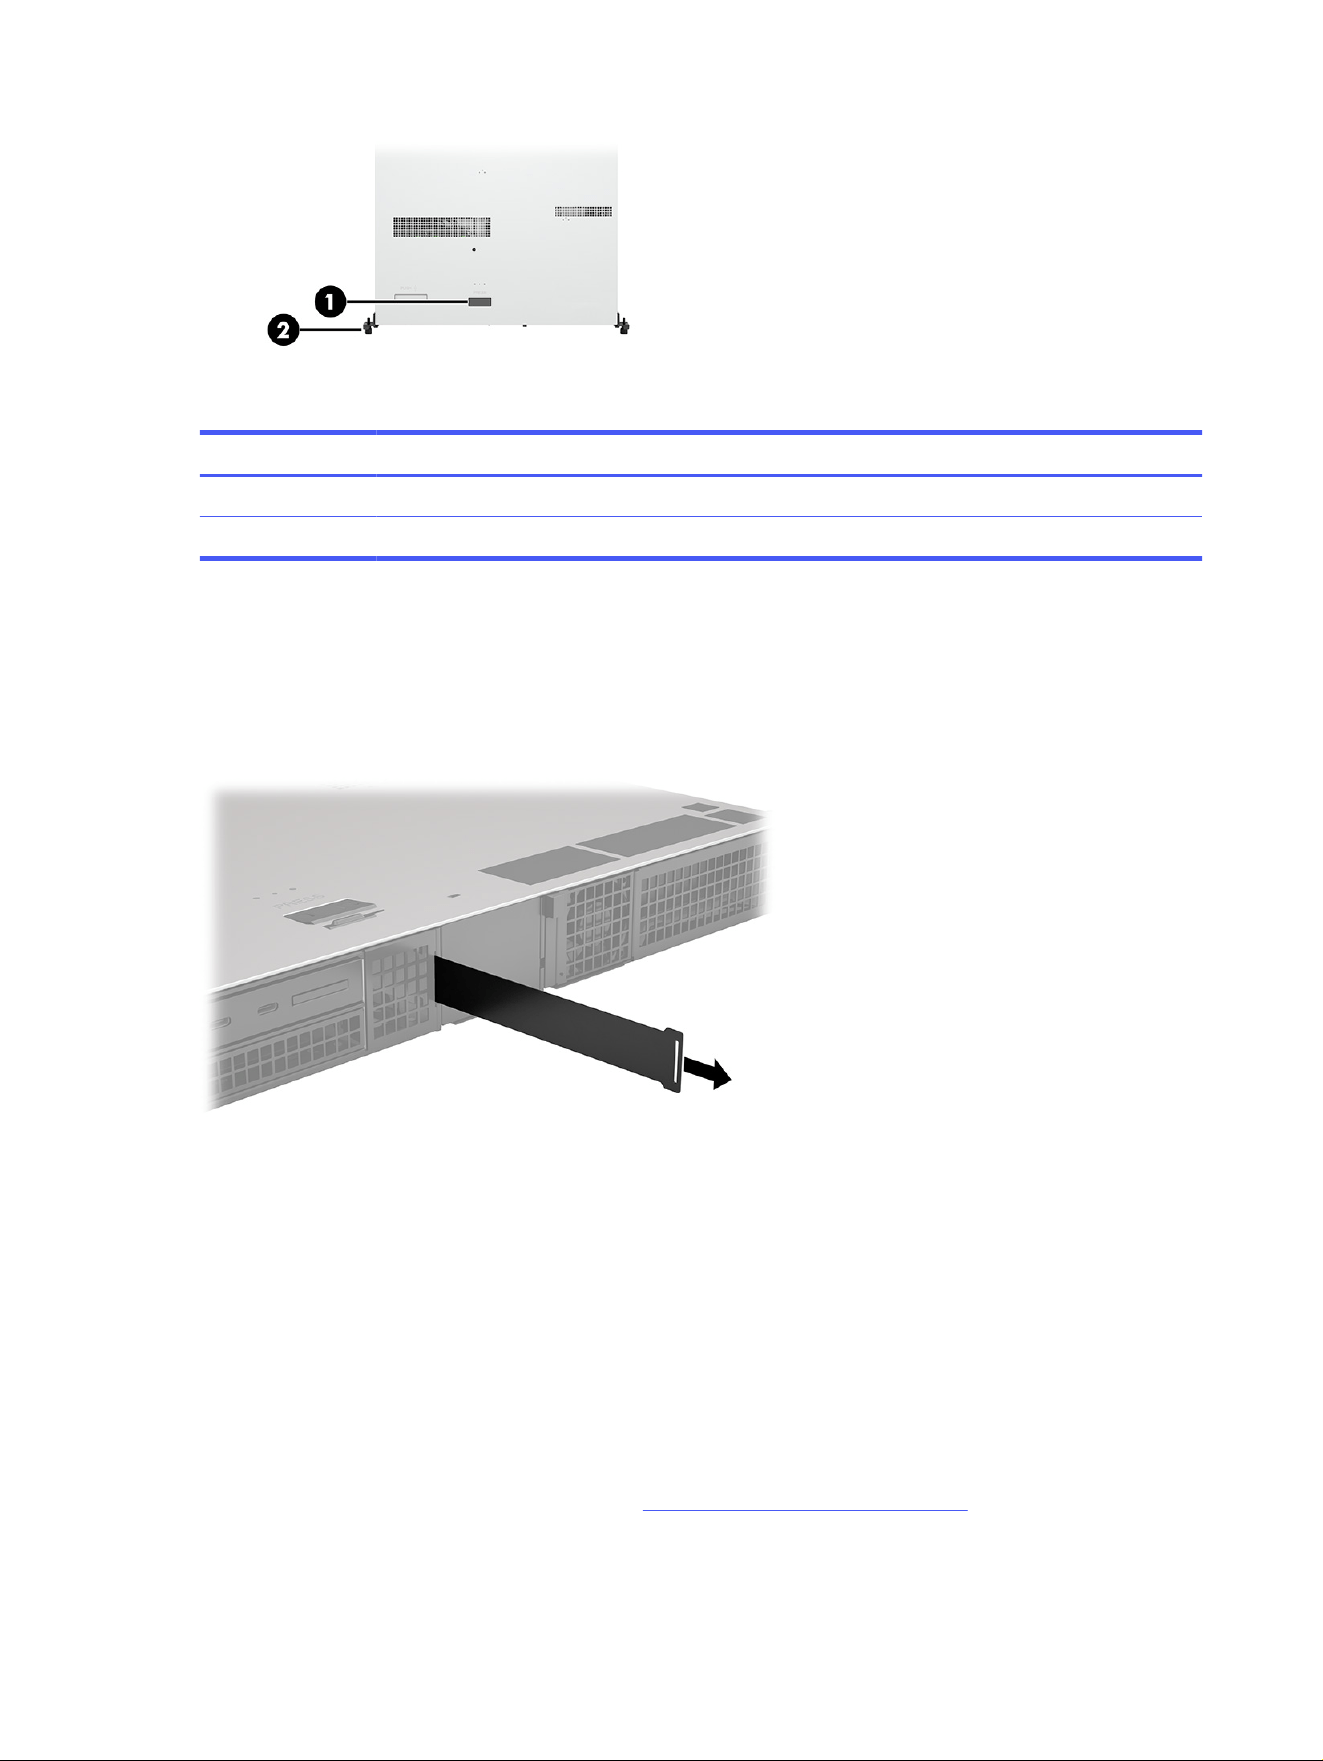
Table 3-4 Top components and their descriptions
Item Component Description
1 Release latch Allows access to the interior of the computer.
2 Rack top screw Used to remove the computer from a rack mount.
Serial number location
Each computer has a unique serial number and a product ID number that are located on a pullout
tag on the front of the computer. Keep these numbers available when contacting customer service for
assistance.
Power rating label location
The power rating label is located on the bottom of the computer.
Product specifications
Read this section to learn where to find the technical specifications about your computer.
To find the QuickSpecs for your product, go to http://www.hp.com/go/quickspecs, and then select the
Search all QuickSpecs link. Type your model name in the search box, and then select Go.
– or –
8
Chapter 3 Computer features

Setting up the rack rail (select products
only) and computer
4
This chapter describes how to set up your computer.
Ensuring proper ventilation
Proper ventilation for the system is important for computer operation. Follow these guidelines.
● Operate the computer on a sturdy, level surface.
● Never restrict the incoming or outgoing airflow of the computer by blocking any vents or air intakes.
● Provide at least 15.24 cm (6.00 in) of clearance at the front and back of the computer. This distance is
the
minimum
for all computer models.
NOTE: Your computer might look slightly different from the illustration in this section.
WARNING! Be sure that the ambient air temperature is within specified limits. To locate
specifications for your computer, see Product specifications on page 8.
WARNING! For cabinet installation, ensure adequate cabinet ventilation and be sure that the ambient
temperature within the cabinet does not exceed specified limits.
10
Chapter 4 Setting up the rack rail (select products only) and computer

Setup procedures
Read this section to learn how to set up your computer.
IMPORTANT: Your computer will not turn on if the top is open or removed.
WARNING! This equipment is not suitable for use in locations where children are likely to be present.
WARNING! To reduce the risk of electric shock :
● Plug the power cord into an AC outlet that is easily accessible at all times.
● The power cord has a three-pin attachment plug. Plug the cord into a grounded (earthed) three-pin
outlet.
● Disconnect all power sources. More than one power supply cable might be connected to the
computer. To reduce the risk of electrical shock, disconnect all power supply cables before
servicing the system.
NOTE: Your computer can use one or two power supply units in one of three configurations:
● Single—One power supply with one power cord is installed in the computer.
● Redundant—Two power supplies with two power cords are installed in the computer, but only
one power supply is in use at a time. If the power supply currently in use fails, the computer
automatically switches to the second power supply.
● Aggregate—Two power supplies with two power cords are installed in the computer, and both are in
use at the same time.
NOTE: Do not use your computer as a desktop model. Instead, install it in a rack where its operational
sounds do not disturb a quiet environment.
NOTE: Your computer is not intended for use with a monitor that is directly connected to the
computer.
For first-time installation and setup:
Setup procedures
11
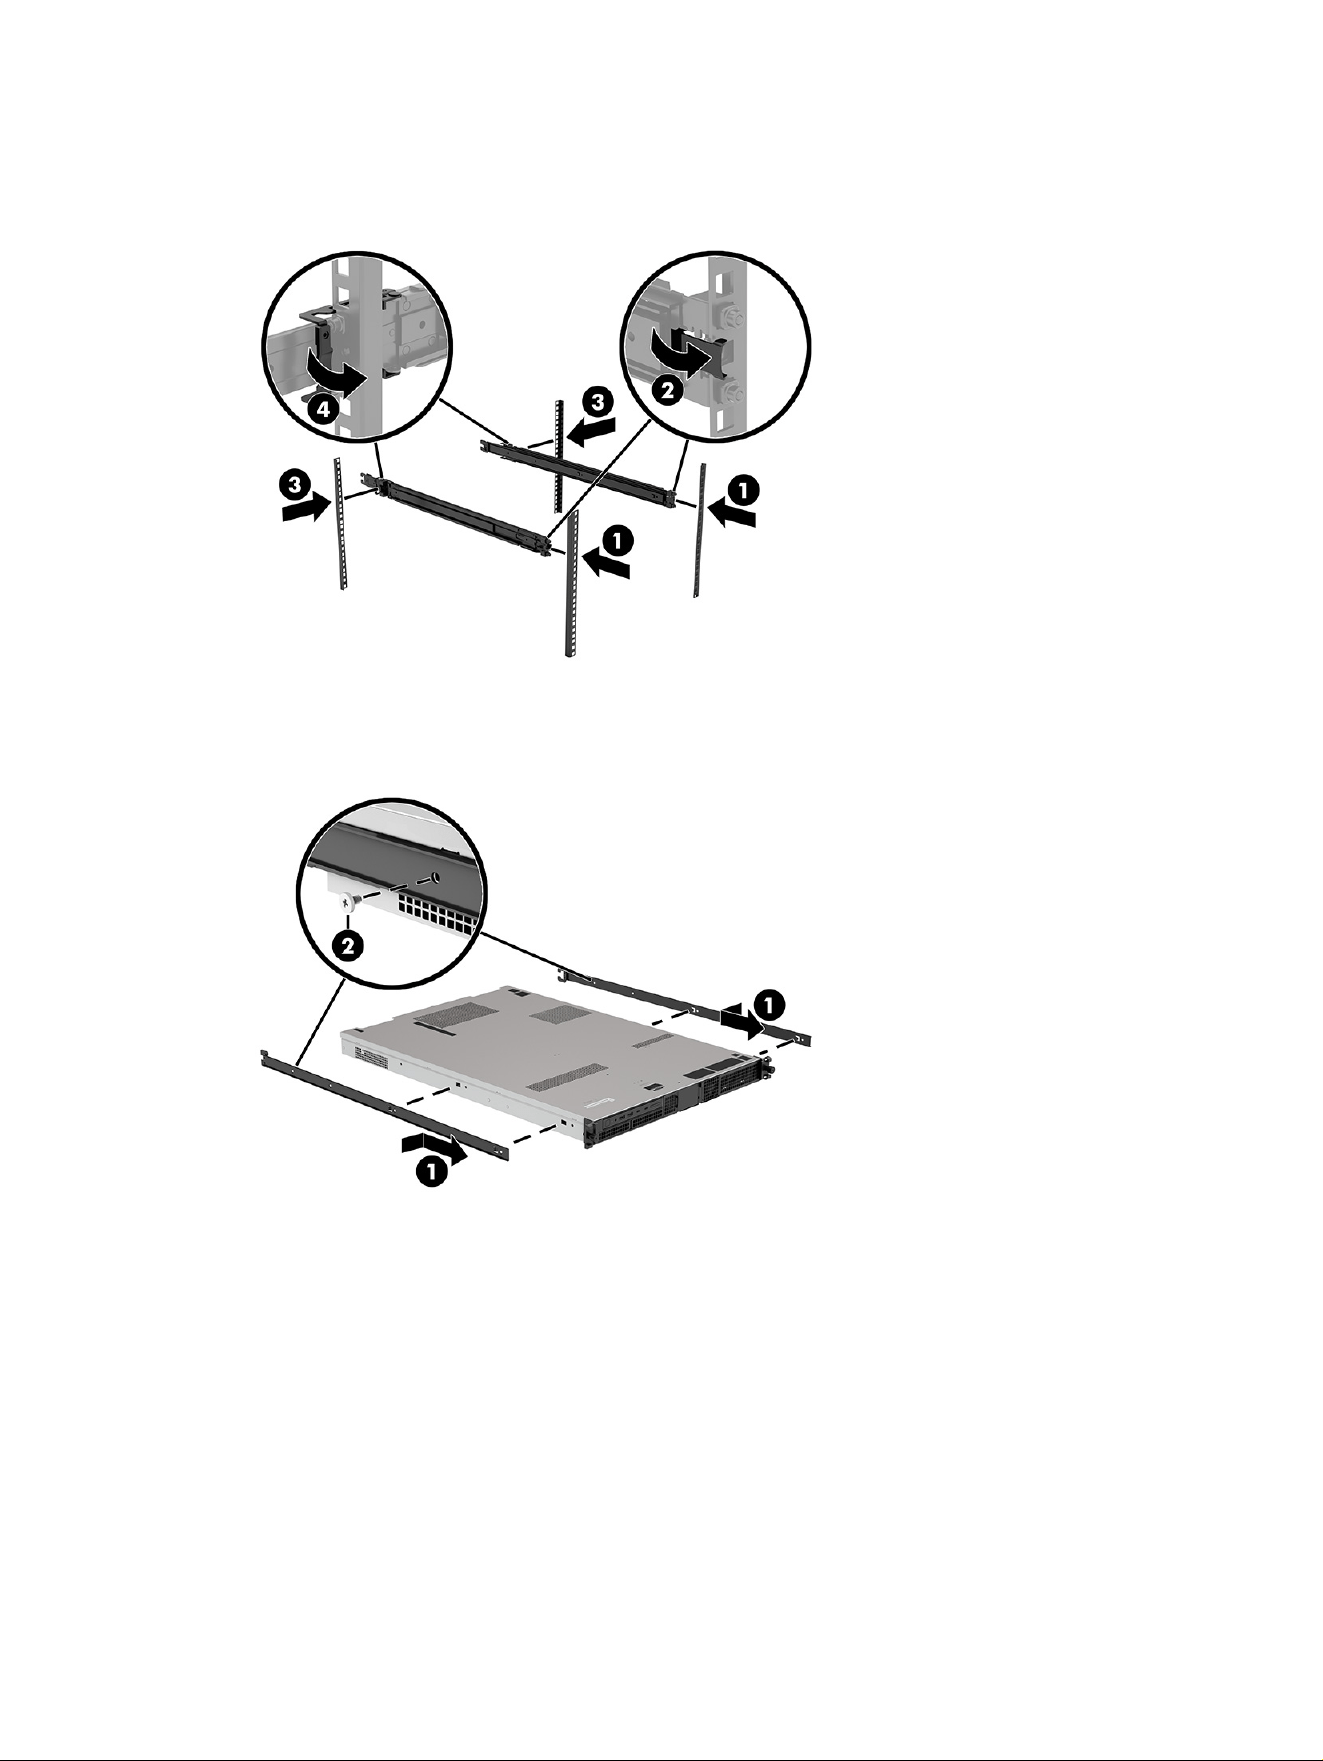
1. On select models, install the rails on the computer rack by inserting them into the mounting holes
on the front of the rack (1). The spring clips secure the front to the rack (2). Then attach the rails to
the mounting holes at the rear (3), where a second set of spring clips secure the rear (4).
2. Install the glides onto the computer by inserting the tabs into the side of the computer and then
sliding the glide forward (1). Then attach the rear of the glides with screws (2).
12
Chapter 4 Setting up the rack rail (select products only) and computer
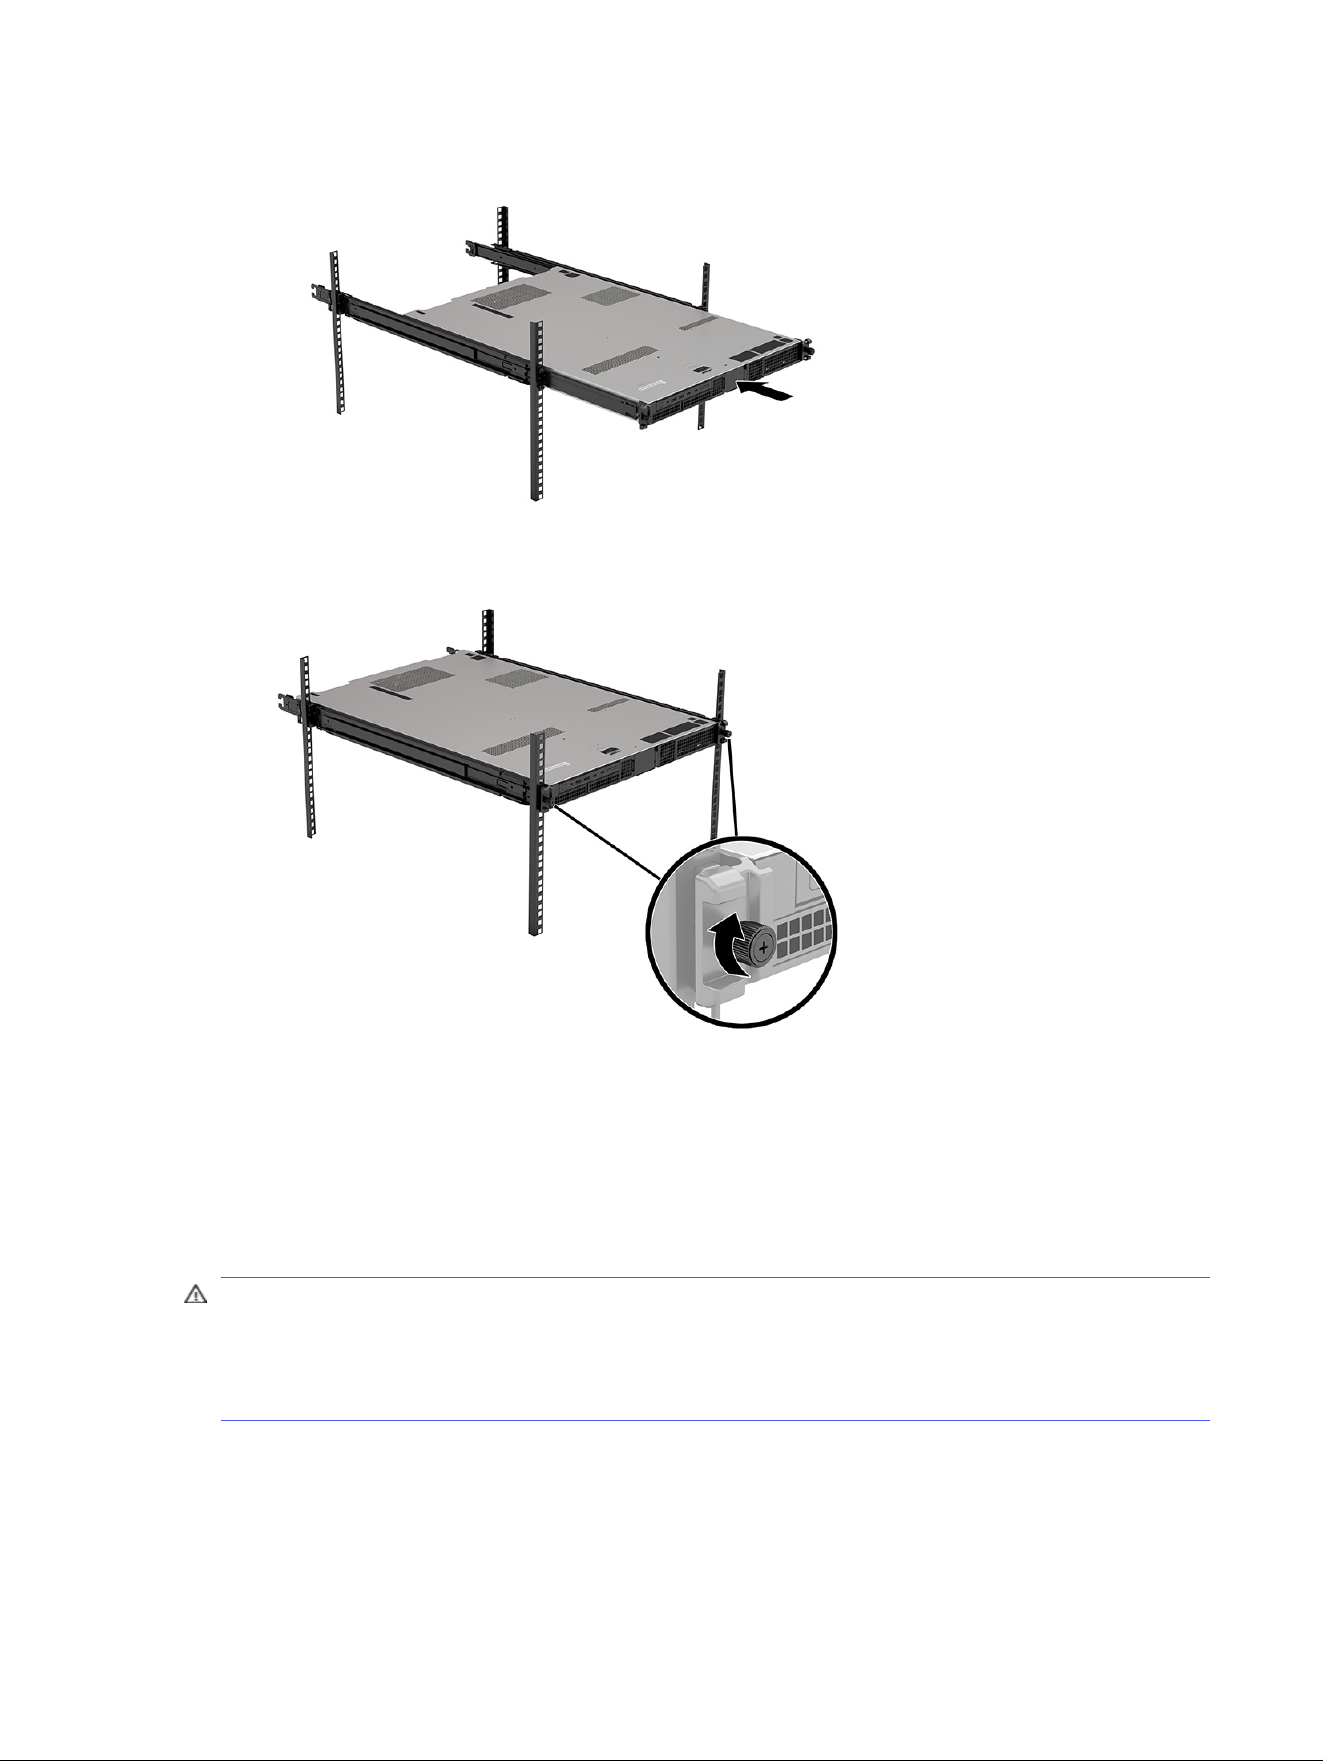
3. Slide the computer into the rack, being sure to place the glides into the rails.
4. Secure the computer in the rack by turning the rack pull screws clockwise until tight.
5. Connect the power cords to the computer.
6. Connect a network cable to the computer and to a network router or LAN device.
7. Plug the computer power cords into an AC outlet.
To remove the rack rail-mounted computer, reverse the installation procedure. See the
Maintenance and
Service Guide
for your computer for additional information about the removal procedure.
WARNING! Improperly removing or extending the computer from the rack poses a stability hazard.
The rack may tip over, causing serious personal injury. Before removing or extending the rack rail-
mounted computer from the rack, read the removal instructions in the
Maintenance and Service Guide
.
Do not put any load on the rack rail-mounted computer in the extended position. Do not leave the rack
rail-mounted computer in the extended position.
Installing optional components
Depending on the computer model, you can install additional components (such as memory, hard drives,
optical drives, PCIe cards, or a second processor) on your computer.
Installing optional components
13

● To view component installation videos, go to https://www.youtube.com/hpsupport.
● For installation guidelines and technical information, see the
Maintenance and Service Guide
for
your computer at http://www.hp.com/support. Follow the instructions to find your product, and then
select Manuals.
Security
Some HP computers have a lock on the side access panel. The key for this lock is shipped attached to
the back panel of the computer chassis.
Additional security features reduce the risk of theft and alert you when there is a chassis intrusion.
For information about additional hardware and software security features available for your system,
see
Maintenance and Service Guide
for your computer at http://www.hp.com/support. Follow the
instructions to find your product, and then select Manuals.
Product recycling
HP encourages customers to recycle used electronic hardware, HP original print cartridges, and
rechargeable batteries.
For information about recycling HP components or products, go to http://www.hp.com/go/recycle.
14
Chapter 4 Setting up the rack rail (select products only) and computer

Backing up, restoring, and recovering5
You can use Windows tools or HP software to back up your information, create a restore point, reset
your computer, create recovery media, or restore your computer to its factory state. Performing these
standard procedures can return your computer to a working state faster.
IMPORTANT: If you are performing recovery procedures on a tablet, the tablet battery must be at
least 70% charged before you start the recovery process.
IMPORTANT: For a tablet with a detachable keyboard, connect the tablet to the keyboard base before
beginning any recovery process.
Backing up information and creating recovery media
These methods of creating recovery media and backups are available on select products only.
Using Windows tools for backing up
HP recommends that you back up your information immediately after initial setup. You can do this task
either using Windows Backup locally with an external USB flash drive or using online tools.
NOTE: If computer storage is 32 GB or less, Microsoft® System Restore is disabled by default.
Using the HP Cloud Recovery Download Tool to create recovery media (select
products only)
You can use the HP Cloud Recovery Download Tool to create HP Recovery media on a bootable USB
flash drive.
For details:
■
Go to http://www.hp.com, search for HP Cloud Recovery, and then select the result that matches the
type of computer that you have.
NOTE: If you cannot create recovery media yourself, contact support to obtain recovery discs. Go to
http://www.hp.com/support, select your country or region, and then follow the on-screen instructions.
IMPORTANT: HP recommends that you follow the Restoring and recovery methods on page 16 to
restore your computer before you obtain and use the HP recovery discs. Using a recent backup can
return your machine to a working state sooner than using the HP recovery discs. After the system is
restored, reinstalling all the operating system software released since your initial purchase can be a
lengthy process.
Restoring and recovering your system
You have several tools available to recover your system both within and outside of Windows if the
desktop cannot load.
Backing up, restoring, and recovering
15

HP recommends that you attempt to restore your system using the Restoring and recovery methods on
page 16.
Creating a system restore
System Restore is available in Windows. The System Restore software can automatically or manually
create restore points, or snapshots, of the system files and settings on the computer at a particular
point.
When you use System Restore, it returns your computer to its state at the time you made the restore
point. Your personal files and documents should not be affected.
Restoring and recovery methods
After you run the first method, test to see whether the issue still exists before you proceed to the next
method, which might now be unnecessary.
1. Run a Microsoft System Restore.
2. Run Reset this PC.
NOTE: The options Remove everything and then Fully clean the drive can take several hours to
complete and leave no information on your computer. It is the safest way to reset your computer
before you recycle it.
3. Recover using HP Recovery media. For more information, see Recovering using HP Recovery media
on page 16.
For more information about the first two methods, see the Get Help app:
■
Select the Start button, select All apps, select the Get Help app, and then enter the task you want to
perform.
NOTE: You must be connected to the internet to access the Get Help app.
Recovering using HP Recovery media
You can use HP Recovery media to recover the operating system and drivers that were installed at the
factory. On select products, you can create recovery media on a bootable USB flash drive using the HP
Cloud Recovery Download Tool.
For details, see Using the HP Cloud Recovery Download Tool to create recovery media (select products
only) on page 15.
NOTE: If you cannot create recovery media yourself, contact support to obtain recovery discs. Go to
http://www.hp.com/support, select your country or region, and then follow the on-screen instructions.
To recover your system:
■
Insert the HP Recovery media, and then restart the computer.
NOTE: HP recommends that you follow the Restoring and recovery methods on page 16 to restore
your computer before you obtain and use the HP recovery discs. Using a recent backup can return your
machine to a working state sooner than using the HP recovery discs. After the system is restored,
reinstalling all the operating system software released since your initial purchase can be a lengthy
process.
16
Chapter 5 Backing up, restoring, and recovering

Changing the computer boot order
If your computer does not restart using the HP Recovery media, you can change the computer boot
order, which is the order of devices listed in BIOS for startup information. You can select an optical drive
or a USB flash drive, depending on the location of your HP Recovery media.
IMPORTANT: For a tablet with a detachable keyboard, connect the tablet to the keyboard base before
beginning these steps.
To change the boot order:
1. Insert the HP Recovery media.
2. Access the system Startup menu.
● For computers or tablets with keyboards attached, turn on or restart the computer or tablet,
quickly press esc, and then press f9 for boot options.
● For tablets without keyboards, turn on or restart the tablet, quickly press and hold the volume
up button, and then select f9.
‒ or –
Turn on or restart the tablet, quickly press and hold the volume down button, and then select f9.
3. Select the optical drive or USB flash drive from which you want to boot, and then follow the
on-screen instructions.
Using HP Sure Recover (select products only)
Select computer models are configured with HP Sure Recover, a PC operating system (OS) recovery
solution built into the hardware and software. HP Sure Recover can fully restore the HP OS image
without installed recovery software.
Using HP Sure Recover, an administrator or user can restore the system and install:
● Latest version of the operating system
● Platform-specific device drivers
● Software applications, in the case of a custom image
To access the latest documentation for HP Sure Recover, go to http://www.hp.com/support. Follow the
on-screen instructions to find your product and locate your documentation.
Changing the computer boot order
17

Setting up Linux6
This chapter describes how to set up and restore the Linux® operating system.
IMPORTANT: Do not add optional hardware or third-party devices to the computer until the operating
system is successfully installed. Adding hardware might cause errors and prevent the operating
system from installing correctly.
NOTE: After you set up the operating system, be sure that the latest BIOS, drivers, and software
updates are installed. See Updating the computer on page 21.
Linux-ready systems
The Linux-ready option provides a system with a minimally functional OS preload (for example, FreeDOS).
It is intended for situations where the customer will install an OS when the system arrives. The option
does not include a license for any operating system.
The Linux-ready option does not include the Linux operating system, which you must supply. Commercial
Linux distributions are available for purchase from vendors such as Red Hat® and SUSE®. A variety
of other Linux distributions are available for free (for example, Ubuntu). To view HP-evaluated
configurations and operating systems, go to http://www.hp.com/support/linux_hardware_matrix.
Setting up Red Hat Enterprise Linux
Various versions of Red Hat® Enterprise Linux® (RHEL) are certified and supported by Red Hat on HP
computers.
For details of RHEL support for a particular platform, see the
Linux Hardware Matrix for HP
Workstations
at http://www.hp.com/support/linux_hardware_matrix.
For information about Red Hat certifications on HP computers, go to
https://access.redhat.com/ecosystem, select Certified Hardware, and then follow the on-screen
instructions.
Additionally, if HP has tested and packaged selected third-party proprietary drivers compatible with
Red Hat Enterprise Linux installations on your HP Workstation, then you can obtain them directly from
http://www.hp.com/support as described in Proprietary graphics drivers on page 19.
Setting up SUSE Linux Enterprise Desktop (SLED)
Various versions of SLED are certified and supported by SUSE on HP computers.
For more information, go to the SUSE certification bulletin search page at
https://www.suse.com/yessearch/Search.jsp.
Additionally, if HP has tested and packaged selected third-party proprietary drivers compatible with
SUSE Linux Enterprise Desktop installations on your HP Workstation, then you can obtain them directly
from http://www.hp.com/support as described in Proprietary graphics drivers on page 19.
18
Chapter 6 Setting up Linux

Setting up Ubuntu
Various versions of Ubuntu are certified and supported by Canonical on HP computers. Also, you can
buy select HP computers with certified versions of Ubuntu preloaded and ready to use.
For more information, go to the Ubuntu Desktop certified hardware search page at
https://www.ubuntu.com/certified/desktops and search for your computer product. Ubuntu is available
at no cost from http://www.ubuntu.com.
Open source graphics drivers
Most distributions of the Linux operating system support graphics hardware through combinations
of software technologies built into the kernel and higher-level graphics applications such as display
servers (Xorg, Wayland) and display managers (Gnome, KDE).
Graphics hardware performance depends upon setup by the running kernel and timing information
obtained by attached display hardware. When the kernel cannot correctly calibrate its initialization
of graphics hardware to available display hardware, the results can yield distorted or blank display
screens.
Interaction with open source graphics drivers can occur during:
● Graphical interactive installation sessions from downloaded Linux distribution media
● Use of Linux installations not supplemented with vendor-proprietary graphics drivers
In cases of unusable display screens, HP recommends adding the nomodeset option to the kernel boot
parameters to suppress mode-setting driver behavior and prioritize the use of alternate compatible
display drivers. You can usually edit the persistent inclusion of this parameter (in cases of the grub
family of boot loaders) into kernel boot parameters in configuration files usually found in: /etc/default/
grub. See your distribution's documentation for boot loader settings parameters.
NOTE: Some computer configurations might have graphics cards and CPUs with native integrated
graphics support. Some recent systems might enable integrated graphics simultaneously with discrete
graphics cards instead of hiding the integrated options (a previously common operational mode). In this
case, some Linux installations might select the integrated graphics ports as the default while consoles
and displays that are connected to graphics cards might look blank when started. To disable use of
integrated graphics when additional graphics cards are present,
clear
the Integrated Video option in
the Advanced / Built-In Device Options menu for the F10 Setup Menu of system BIOS options.
Proprietary graphics drivers
Read this section to learn about proprietary graphics drivers.
Most HP computers can be ordered with graphics cards that have been through extensive
verification by HP. For a list of supported cards, see
Linux Hardware Matrix for HP Workstations
at
http://www.hp.com/support/linux_hardware_matrix.
NOTE: Not all graphics cards are supported on every computer. Limitations generally occur for cards
that consume large amounts of power in lower-power computers.
HP supports third-party proprietary graphics drivers. For drivers that have been tested, go to
http://www.hp.com/support, and follow the on-screen instructions to find your product and locate the
documentation.
Setting up Ubuntu
19

These proprietary drivers are not a standard part of the RHEL, SLED, or Ubuntu distributions because
they are not open source. Driver revisions more recent than those at the HP support website are
supported directly by the vendor.
20 Chapter 6 Setting up Linux

Updating the computer7
HP is constantly working to improve your total computer experience. To ensure that the computer uses
the latest enhancements, HP recommends that you install the latest BIOS, driver, and software updates
on a regular basis.
After successfully starting the computer for the first time, follow these guidelines to be sure that the
computer is up to date:
● Be sure that you have the latest system BIOS version loaded. See Updating the BIOS on page 21.
● Be sure that you have the latest drivers for your system. See Upgrading device drivers on page 22.
● Become familiar with your available HP resources. See Online support on page 26.
● Consider a subscription to Driver Alerts at https://h41369.www4.hp.com/alerts-signup.php.
Updating the BIOS
For optimum performance, determine the BIOS version on the computer, and upgrade it if necessary.
Determining the current BIOS version
This section describes how to determine the current BIOS version.
To determine the current BIOS version:
1. Press esc during startup.
2. Repeatedly press f10 to enter Computer Setup (F10).
3. Select Main, and then select System Information. Note the Computer System BIOS version.
NOTE: For procedures for upgrading the BIOS as well as the Computer Setup (F10) BIOS Menu
settings, see the
Maintenance and Service Guide
at http://www.hp.com/support. Follow the
instructions to find your product, and then select Manuals.
Upgrading the BIOS
Follow these instructions to find and download the latest available BIOS version, which includes the
latest enhancements.
1. Go to http://www.hp.com/support and select your product.
2. Select Software and Drivers and follow the instructions to locate the latest BIOS version available
for the computer.
3. Compare the BIOS version on your computer to the BIOS versions on the website (see Determining
the current BIOS version on page 21). If the BIOS version on the website is the same as the version
on your system, no further action is required.
Updating the computer
21

4. If the BIOS version on the website is a version later than the one on your system, download the
appropriate version for the computer. Follow the instructions in the release notes to complete the
installation.
Upgrading device drivers
To learn how to upgrade device drivers, read this section.
If you install a peripheral device (such as a printer, display adapter, or network adapter), confirm that you
have the latest device drivers loaded. If you purchased your device through HP, go to the HP website
to download the latest drivers for your device. These drivers have been tested to ensure the best
compatibility between your device and your HP computer.
If you did not purchase your device from HP, HP recommends that you go to the HP website first to see if
your device and its drivers have been tested for HP computer compatibility. If no driver is available, go to
the device manufacturer's website to download the latest drivers.
To upgrade device drivers:
1. Go to http://www.hp.com/support and select your product.
2. Follow the instructions to find the latest drivers available for the computer.
If a required driver is not found, see the website of the manufacturer of the peripheral device.
22
Chapter 7 Updating the computer

Maintenance, diagnostics, and minor
troubleshooting
8
This section provides information about maintenance, diagnostics, and minor troubleshooting.
Turning off the computer
To properly turn off the computer, shut down the operating system software.
IMPORTANT: Holding down the power button to shut off the computer can cause loss of user data
and might damage the storage device. If the system becomes unstable and no other alternative is
available, give the system sufficient time to wake completely after you restart the computer. This might
take several minutes, especially on larger-capacity or solid-state devices.
■
Select the Start button, select the Power button, and then select Shut down.
If you encounter issues
To diagnose and resolve issues, HP recommends a sequential troubleshooting approach.
● Visual inspection
● Blink or beep codes
● Basic troubleshooting, including HP PC Hardware Diagnostics
● HP support
● System restore and recovery
These troubleshooting strategies are explained in the following sections.
For more information
For more troubleshooting information, read this section.
You can find more troubleshooting information in the comprehensive
Maintenance and Service Guide
(English only) available at http://www.hp.com/support. Follow the instructions to find your product, and
then select Manuals.
Visual inspection
If you encounter a problem with the computer, monitor, or software, the following general suggestions
might help you isolate and focus on the problem before taking further action.
Maintenance, diagnostics, and minor troubleshooting
23

At startup
This section outlines what to check if your computer does not start.
IMPORTANT: Your computer will not turn on if the top is open or removed.
● Verify that the computer is plugged into a functional AC outlet.
● Remove all optical discs and USB flash drives before starting the computer.
● Verify that the computer is on and the power light is on.
● If you have installed an operating system other than the factory-installed operating system, confirm
that it is supported on your system by going to http://www.hp.com/go/quickspecs.
● Verify that the monitor is plugged into a functional AC outlet and that the monitor power light is on.
● If the monitor is dim, turn up the brightness and contrast controls.
During operation
This section outlines various items to check if your computer has problems while you are using it.
● Beeps and blinking lights on the computer are error codes that can help you diagnose problems.
For more information about interpreting these codes, see the "Diagnostic light and audible (beep)
codes" section in the
Maintenance and Service Guide
for your computer.
● Press and hold any key. If the system beeps, your keyboard is operating correctly.
● Check all cables for loose or incorrect connections.
● Wake the computer by pressing the power button or any key on the keyboard. If the system remains
in standby, shut down the system by pressing and holding the power button for at least 4 seconds.
Then press the power button again to restart the system.
If the system does not shut down, unplug the power cord, wait a few seconds, and then plug it in
again. If the system does not restart, press the power button.
● Be sure that all required device drivers are installed. For example, if you connect a printer, you must
install a printer driver.
● If you are working on a network, use another cable to plug your computer into the network
connection. If you still cannot connect, there might be a problem with the network plug.
● If you recently added new hardware, remove the hardware to see whether the computer functions
properly.
● If you recently installed new software, uninstall the software to see whether the computer functions
properly.
● Upgrade the BIOS. A new release of the BIOS might support new features or fix your problem.
● For more detailed information, see the troubleshooting chapter in the
Maintenance and Service
Guide
at http://www.hp.com/support. Follow the instructions to find your product, and then select
Manuals.
24
Chapter 8 Maintenance, diagnostics, and minor troubleshooting

Customer Self Repair
Under the Customer Self Repair program, you can order a replacement part and install the part without
on-site HP technical assistance.
Customer Self Repair might be required for some components. For more information, go to
http://www.hp.com/go/selfrepair and select your product.
NOTE: Some components are not eligible for Customer Self Repair and must be returned to HP for
service. Call support for further instructions before attempting to remove or repair these components.
Blink or beep codes: interpreting POST diagnostic lights and audible codes
If the power button light or the power supply light on the computer is blinking or if you hear beeps, see
the
Maintenance and Service Guide
(English only) for interpretation and recommended action.
Basic troubleshooting
For basic troubleshooting tips, read this section.
WARNING! When the computer is plugged into an AC power source, voltage is always applied to the
system board. To reduce the risk of personal injury from electric shock, hot surfaces, or both, be sure to
disconnect the power cord from the wall outlet and allow the internal system components to cool
before you touch them.
If you have problems with the computer, try the appropriate solutions as described in the previous
sections and summarized here to try to isolate the exact problem before you call for technical support.
● If the screen is blank, plug the monitor into a different video port on the computer if one is available,
or replace the monitor with a monitor that you know is functioning properly.
● If your monitor is connected with a cable adapter (for example, DisplayPort-to-DVI adapter), replace
the adapter with one that you know is functioning properly.
● If you are working on a network:
– Use a different network cable to connect your computer to the network.
– Connect a different computer with a different cable to the network.
If your problem is not resolved, the network jack on your computer or the network wall jack might be
faulty.
● If you recently added new hardware, remove the hardware.
● If you recently installed new software, uninstall the software.
● If a USB storage device is connected to the computer, disconnect the device.
● If the computer will turn on but the operating system will not start, run the preboot diagnostics utility,
HP PC Hardware Diagnostics. See Using HP PC Hardware Diagnostics on page 28 .
HP Support
This section outlines the different ways to contact HP support.
Customer Self Repair
25

Online support
Online support resources include web-based troubleshooting tools, technical knowledge databases,
driver and patch downloads, online communities, and product change notification services.
The following websites are also available to you:
● http://www.hp.com—Provides useful product information.
● http://www.hp.com/support—Provides the latest online documentation, worldwide technical support,
and access to software and drivers for computers.
Customer support for computers
To look for different types of troubleshooting topics, follow these steps.
1. Go to http://www.hp.com/support.
2. Search for your product.
3. Select Troubleshooting.
4. Select the problem that you are troubleshooting.
Advisories or bulletins and notices
Go to the HP Support site to find advisories or bulletins and notices.
1. Go to http://www.hp.com/support.
2. Search for your product.
3. Select Advisories or Bulletins and Notices.
4. Select an item to view.
Product Change Notifications
Product change notifications (PCNs) are proactive notifications for product changes occurring within a
30- to 60-day window of the effective date of the change in the manufacturing process.
PCNs give you advance notice of changes to your product, such as an updated BIOS version that
you might decide to download before the product change is required. To view a list of PCNs, go to the
Bulletins and Notices page for your product.
Calling support
At times, you might encounter an issue that requires support. Before you call support, take these actions
to prepare.
● Have the computer readily accessible.
● Write down the computer serial number, product number, model name, and model number and have
them in front of you. This information is provided on labels. The labels might be on the bottom and
top of the computer, the rear and side panels of the computer, or under the service door.
● Note any applicable error messages.
● Note any add-on options.
● Note the operating system.
26
Chapter 8 Maintenance, diagnostics, and minor troubleshooting

● Note any third-party hardware or software.
● Note the details of any blinking lights on the front of the computer (tower and desktop
configurations) or on the side of the computer (all-in-one configurations).
● Note the applications that you were using when you encountered the problem.
NOTE: When you call in for service or support, you might be asked for the product number of the
computer (for example: PS988AV). If the computer has a product number, it is usually located next to
the 10- or 12-digit serial number of the computer.
For a support phone number, go to http://www.hp.com/support, select Contact Support, and then follow
the on-screen instructions.
Locating warranty information
If you did not receive a printed warranty with your computer, you can locate warranty information in
other ways.
1. Select the Start button, select Help and Support, and then select HP Documentation.
– or –
2. Go to http://www.hp.com/go/orderdocuments.
IMPORTANT: You must be connected to the internet to access the latest version of the warranty.
HP Care Pack Services offer upgraded service levels to extend and expand a standard product
warranty.
NOTE: For sales information and warranty upgrades (HP Care Packs), call your local authorized
service provider or dealer.
Locating warranty information
27

Using HP PC Hardware Diagnostics9
You can use the HP PC Hardware Diagnostics utility to determine whether your computer hardware
is running properly. The three versions are HP PC Hardware Diagnostics Windows, HP PC Hardware
Diagnostics UEFI (Unified Extensible Firmware Interface), and (for select products only) Remote HP PC
Hardware Diagnostics UEFI, a firmware feature.
Using HP PC Hardware Diagnostics Windows (select products
only)
HP PC Hardware Diagnostics Windows is a Windows-based utility that allows you to run diagnostic tests
to determine whether the computer hardware is functioning properly. The tool runs within the Windows
operating system to diagnose hardware failures.
If HP PC Hardware Diagnostics Windows is not installed on your computer, you must download and
install it. To download HP PC Hardware Diagnostics Windows, see Downloading HP PC Hardware
Diagnostics Windows on page 29.
Using an HP PC Hardware Diagnostics Windows hardware failure ID code
When HP PC Hardware Diagnostics Windows detects a failure that requires hardware replacement, a
24-digit failure ID code is generated for select component tests. For interactive tests, such as keyboard,
mouse, or audio and video palette, you must perform troubleshooting steps before you can receive a
failure ID.
■
You have several options after you receive a failure ID:
● Select Next to open the Event Automation Service (EAS) page, where you can log the case.
● Scan the QR code with your mobile device, which takes you to the EAS page, where you can log
the case.
● Select the box next to the 24-digit failure ID to copy your failure code and send it to support.
Accessing HP PC Hardware Diagnostics Windows
After HP PC Hardware Diagnostics Windows is installed, you can access it from HP Support Assistant or
the Start menu.
Accessing HP PC Hardware Diagnostics Windows from HP Support Assistant
After HP PC Hardware Diagnostics Windows is installed, follow these steps to access it from HP Support
Assistant:
1. Complete one of the following tasks:
● Select the Search icon in the taskbar, type support in the search box, and then select the HP
Support Assistant app.
● Select the question mark icon in the taskbar.
2. Select Fixes & Diagnostics.
28
Chapter 9 Using HP PC Hardware Diagnostics

3. Select Run hardware diagnostics, and then select Launch.
4. When the tool opens, select the type of diagnostic test that you want to run, and then follow the
on-screen instructions.
NOTE: To stop a diagnostic test, select Cancel.
Accessing HP PC Hardware Diagnostics Windows from the Start menu (select products only)
After HP PC Hardware Diagnostics Windows is installed, follow these steps to access it from the Start
menu:
1. Select the Start button, and then select All apps.
2. Select HP PC Hardware Diagnostics Windows.
3. When the tool opens, select the type of diagnostic test that you want to run, and then follow the
on-screen instructions.
NOTE: To stop a diagnostic test, select Cancel.
Downloading HP PC Hardware Diagnostics Windows
The HP PC Hardware Diagnostics Windows downloading instructions are provided in English only. You
must use a Windows computer to download this tool because only .exe files are provided.
Downloading the latest HP PC Hardware Diagnostics Windows version from HP
To download HP PC Hardware Diagnostics Windows from HP, follow these steps:
1. Go to http://www.hp.com/go/techcenter/pcdiags. The HP PC Diagnostics home page is displayed.
2. Select Download HP Diagnostics Windows, and then select the specific Windows diagnostics
version to download to your computer or a USB flash drive.
The tool downloads to the selected location.
Downloading the HP PC Hardware Diagnostics Windows from the Microsoft Store
You can download the HP PC Hardware Diagnostics Windows from the Microsoft Store:
1. Select the Microsoft Store app on your desktop or select the Search icon in the taskbar, and then
type Microsoft Store in the search box.
2. Type HP PC Hardware Diagnostics Windows in the Microsoft Store search box.
3. Follow the on-screen directions.
The tool downloads to the selected location.
Downloading HP Hardware Diagnostics Windows by product name or number (select products
only)
You can download HP PC Hardware Diagnostics Windows by product name or number.
NOTE: For some products, you might have to download the software to a USB flash drive by using the
product name or number.
Accessing HP PC Hardware Diagnostics Windows from the Start menu (select products only)
29

1. Go to http://www.hp.com/support.
2. Select Software and Drivers, select your type of product, and then enter the product name or
number in the search box that is displayed.
3. In the Diagnostics section, select Download, and then follow the on-screen instructions to select
the specific Windows diagnostics version to be downloaded to your computer or USB flash drive.
The tool downloads to the selected location.
Installing HP PC Hardware Diagnostics Windows
To install HP PC Hardware Diagnostics Windows, navigate to the folder on your computer or the USB
flash drive where the .exe file downloaded, double-click the .exe file, and then follow the on-screen
instructions.
Using HP PC Hardware Diagnostics UEFI
HP PC Hardware Diagnostics Unified Extensible Firmware Interface (UEFI) allows you to run diagnostic
tests to determine whether the computer hardware is functioning properly. The tool runs outside the
operating system so that it can isolate hardware failures from issues that are caused by the operating
system or other software components.
NOTE: For some products, you must use a Windows computer and a USB flash drive to download and
create the HP UEFI support environment because only .exe files are provided. For more information,
see Downloading HP PC Hardware Diagnostics UEFI to a USB flash drive on page 31.
If your PC does not start in Windows, you can use HP PC Hardware Diagnostics UEFI to diagnose
hardware issues.
Using an HP PC Hardware Diagnostics UEFI hardware failure ID code
When HP PC Hardware Diagnostics UEFI detects a failure that requires hardware replacement, a 24-digit
failure ID code is generated.
For assistance in solving the problem, complete one of these tasks:
● Select Contact HP, accept the HP privacy disclaimer, and then use a mobile device to scan the
failure ID code that appears on the next screen. The HP Customer Support - Service Center
page appears with your failure ID and product number automatically filled in. Follow the on-screen
instructions.
● Contact support, and provide the failure ID code.
Starting HP PC Hardware Diagnostics UEFI
To start HP PC Hardware Diagnostics UEFI, follow this procedure.
1. Turn on or restart the computer, and quickly press esc.
2. Press f2.
The BIOS searches three places for the diagnostic tools, in the following order:
30
Chapter 9 Using HP PC Hardware Diagnostics

a. Connected USB flash drive
NOTE: To download the HP PC Hardware Diagnostics UEFI tool to a USB flash drive, see
Downloading the latest HP PC Hardware Diagnostics UEFI version on page 32.
b. Hard drive
c. BIOS
3. When the diagnostic tool opens, select the type of diagnostic test that you want to run, and then
follow the on-screen instructions.
Starting HP PC Hardware Diagnostics UEFI through HP Hotkey Support software (select
products only)
This section describes how to start HP PC Hardware Diagnostics UEFI through HP Hotkey Support
software.
NOTE: You must disable fast boot to access HP PC Hardware Diagnostics UEFI from the HP System
Information application.
To disable fast boot:
1. Turn on or restart the computer, and when the HP logo appears, press f10 to enter Computer Setup.
2. Select Advanced, and then select Boot Options.
3. Clear Fast Boot.
4. Select Save Changes and Exit, and then select Yes.
To start HP PC Hardware Diagnostics UEFI through HP Hotkey Support software, follow this procedure.:
1. From the Start menu, open the HP System Information Application or press fn+esc.
2. In HP System Information screen, select Run System Diagnostics, select Yes to run the application,
and then select Restart.
IMPORTANT: To prevent loss of data, save your work in all open apps before restarting your computer.
NOTE: When the restart is complete, the computer opens the HP PC Hardware Diagnostics UEFI
Application. Proceed with the troubleshooting tests.
Downloading HP PC Hardware Diagnostics UEFI to a USB flash drive
Downloading HP PC Hardware Diagnostics UEFI to a USB flash drive can be useful in some situations.
● HP PC Hardware Diagnostics UEFI is not included in the preinstallation image.
● HP PC Hardware Diagnostics UEFI is not included in the HP Tool partition.
● The hard drive is damaged.
NOTE: The HP PC Hardware Diagnostics UEFI downloading instructions are provided in English only,
and you must use a Windows computer to download and create the HP UEFI support environment
because only .exe files are provided.
Starting HP PC Hardware Diagnostics UEFI through HP Hotkey Support software (select products only)
31

Downloading the latest HP PC Hardware Diagnostics UEFI version
To download the latest HP PC Hardware Diagnostics UEFI version to a USB flash drive, follow this
procedure:
1. Go to http://www.hp.com/go/techcenter/pcdiags. The HP PC Diagnostics home page is displayed.
2. Select Download HP Diagnostics UEFI, and then select Run.
Downloading HP PC Hardware Diagnostics UEFI by product name or number (select products
only)
You can download HP PC Hardware Diagnostics UEFI by product name or number (select products only)
to a USB flash drive.
NOTE: For some products, you might have to download the software to a USB flash drive by using the
product name or number.
1. Go to http://www.hp.com/support.
2. Enter the product name or number, select your computer, and then select your operating system.
3. In the Diagnostics section, follow the on-screen instructions to select and download the specific
UEFI Diagnostics version for your computer.
Using Remote HP PC Hardware Diagnostics UEFI settings
(select products only)
Remote HP PC Hardware Diagnostics UEFI is a firmware (BIOS) feature that downloads HP PC Hardware
Diagnostics UEFI to your computer. It can then run the diagnostics on your computer, and it might upload
results to a preconfigured server.
For more information about Remote HP PC Hardware Diagnostics UEFI, go to
http://www.hp.com/go/techcenter/pcdiags, and then select Find out more.
Downloading Remote HP PC Hardware Diagnostics UEFI
Remote HP PC Hardware Diagnostics UEFI is also available as a SoftPaq that you can download to a
server.
Downloading the latest Remote HP PC Hardware Diagnostics UEFI version
You can download the latest Remote HP PC Hardware Diagnostics UEFI version to a USB flash drive.
1. Go to http://www.hp.com/go/techcenter/pcdiags. The HP PC Diagnostics home page is displayed.
2. Select Download Remote Diagnostics, and then select Run.
Downloading Remote HP PC Hardware Diagnostics UEFI by product name or number
You can download Remote HP PC Hardware Diagnostics UEFI by product name or number.
NOTE: For some products, you might have to download the software by using the product name or
number.
1. Go to http://www.hp.com/support.
32
Chapter 9 Using HP PC Hardware Diagnostics

2. Select Software and Drivers, select your type of product, enter the product name or number in the
search box that is displayed, select your computer, and then select your operating system.
3. In the Diagnostics section, follow the on-screen instructions to select and download the Remote
UEFI version for the product.
Customizing Remote HP PC Hardware Diagnostics UEFI settings
Using the Remote HP PC Hardware Diagnostics setting in Computer Setup (BIOS), you can perform
several customizations.
● Set a schedule for running diagnostics unattended. You can also start diagnostics immediately in
interactive mode by selecting Execute Remote HP PC Hardware Diagnostics UEFI.
● Set the location for downloading the diagnostic tools. This feature provides access to the tools
from the HP website or from a server that has been preconfigured for use. Your computer does
not require the traditional local storage, such as a hard drive or USB flash drive, to run remote
diagnostics.
● Set a location for storing the test results. You can also set the user name and password that you use
for uploads.
● Display status information about the diagnostics run previously.
To customize Remote HP PC Hardware Diagnostics UEFI settings, follow these steps:
1. Turn on or restart the computer, and when the HP logo appears, press f10 to enter Computer Setup.
2. Select Advanced, and then select Settings.
3. Make your customization selections.
4. Select Main, then select Save Changes and Exit to save your settings.
Your changes take effect when the computer restarts.
Customizing Remote HP PC Hardware Diagnostics UEFI settings
33

Computer operating guidelines, routine
care, and shipping preparation
10
Follow these guidelines to ensure the best performance and useful life of your computer.
Operating guidelines and routine care
HP has developed guidelines to help you properly set up and care for the computer and monitor.
● Keep the computer away from excessive moisture, direct sunlight, and extreme heat and cold.
● Operate the computer on a sturdy, level surface. Leave a 10.2 cm (4 inch) clearance on all vented
sides of the computer and above the monitor to permit the required airflow.
● Never restrict the airflow into the computer by blocking any vents or air intakes. Do not place the
keyboard, with the keyboard feet down, directly against the front of the desktop unit because this
also restricts airflow.
● Never operate the computer with the access panel or any of the expansion card slot covers
removed.
● Do not stack computers on top of each other or place computers so near each other that they are
subject to each other’s recirculated or preheated air.
● To operate a computer within a separate enclosure, intake and exhaust ventilation must be provided
on the enclosure, and the previous operating guidelines still apply.
● Keep liquids away from the computer and keyboard.
● Never cover the ventilation slots on the monitor with any type of material.
● Install or enable power management functions of the operating system or other software, including
sleep states.
● Turn off the computer before you do either of the following tasks:
– Wipe the exterior of the computer with a soft, damp cloth as needed. Cleaning products might
discolor or damage the finish. See Removing dirt and debris from your computer on page
35 for the recommended steps to clean the high-touch, external surfaces on your computer.
After you remove the dirt and debris, you can also clean the surfaces with a disinfectant. See
Cleaning your computer with a disinfectant on page 35 for guidelines to help prevent the
spread of harmful bacteria and viruses.
– Occasionally clean the air vents on all vented sides of the computer. Lint, dust, and other foreign
matter can block the vents and limit the airflow.
Cleaning your computer
Cleaning your computer regularly removes dirt and debris so that your device continues to operate at its
best. Use the following information to safely clean the external surfaces of your computer.
34
Chapter 10 Computer operating guidelines, routine care, and shipping preparation

Removing dirt and debris from your computer
Here are the recommended steps to clean dirt and debris from your computer.
1. Wear disposable gloves made of latex (or nitrile gloves, if you are latex-sensitive) when cleaning the
surfaces.
2. Turn off your device and unplug the power cord and other connected external devices. Remove any
installed batteries from items such as wireless keyboards.
CAUTION: To prevent electric shock or damage to components, never clean a product while it is
turned on or plugged in.
3. Moisten a microfiber cloth with water. The cloth should be moist, but not dripping wet.
IMPORTANT: To avoid damaging the surface, avoid abrasive cloths, towels, and paper towels.
4. Wipe the exterior of the product gently with the moistened cloth.
IMPORTANT: Keep liquids away from the product. Avoid getting moisture in any openings. If liquid
makes its way inside your HP product, it can cause damage to the product. Do not spray liquids
directly on the product. Do not use aerosol sprays, solvents, abrasives, or cleaners containing
hydrogen peroxide or bleach that might damage the finish.
5. Start with the display (if applicable). Wipe carefully in one direction, and move from the top of the
display to the bottom. Finish with any flexible cables, like power cord, keyboard cable, and USB
cables.
6. Be sure that surfaces have completely air-dried before turning the device on after cleaning.
7. Discard the gloves after each cleaning. Clean your hands immediately after you remove the gloves.
See Cleaning your computer with a disinfectant on page 35 for recommended steps to clean the
high-touch, external surfaces on your computer to help prevent the spread of harmful bacteria and
viruses.
Cleaning your computer with a disinfectant
The World Health Organization (WHO) recommends cleaning surfaces, followed by disinfection, as a
best practice for preventing the spread of viral respiratory illnesses and harmful bacteria.
After cleaning the external surfaces of your computer using the steps in Removing dirt and debris
from your computer on page 35, you might also choose to clean the surfaces with a disinfectant. A
disinfectant that is within HP’s cleaning guidelines is an alcohol solution consisting of 70% isopropyl
alcohol and 30% water. This solution is also known as rubbing alcohol and is sold in most stores.
Follow these steps when disinfecting high-touch, external surfaces on your computer:
1. Wear disposable gloves made of latex (or nitrile gloves, if you are latex-sensitive) when cleaning the
surfaces.
2. Turn off your device and unplug the power cord and other connected external devices. Remove any
installed batteries from items such as wireless keyboards.
CAUTION: To prevent electric shock or damage to components, never clean a product while it is
turned on or plugged in.
Removing dirt and debris from your computer
35

3. Moisten a microfiber cloth with a mixture of 70% isopropyl alcohol and 30% water. The cloth should
be moist, but not dripping wet.
CAUTION: Do not use any of the following chemicals or any solutions that contain them, including
spray-based surface cleaners: bleach, peroxides (including hydrogen peroxide), acetone, ammonia,
ethyl alcohol, methylene chloride, or any petroleum-based materials, such as gasoline, paint thinner,
benzene, or toluene.
IMPORTANT: To avoid damaging the surface, avoid abrasive cloths, towels, and paper towels.
4. Wipe the exterior of the product gently with the moistened cloth.
IMPORTANT: Keep liquids away from the product. Avoid getting moisture in any openings. If liquid
makes its way inside your HP product, it can cause damage to the product. Do not spray liquids
directly on the product. Do not use aerosol sprays, solvents, abrasives, or cleaners containing
hydrogen peroxide or bleach that might damage the finish.
5. Start with the display (if applicable). Wipe carefully in one direction, and move from the top of the
display to the bottom. Finish with any flexible cables, like power cord, keyboard cable, and USB
cables.
6. Be sure that surfaces have completely air-dried before turning the device on after cleaning.
7. Discard the gloves after each cleaning. Clean your hands immediately after you remove the gloves.
Shipping preparation
If you have to ship your computer, follow these tips to keep your equipment safe.
1. Back up the hard drive files to an external storage device. Be sure that the backup media is not
exposed to electrical or magnetic impulses while stored or in transit.
NOTE: The hard drive locks automatically when the system power is turned off.
2. Remove and store all removable media.
3. Turn off the computer and external devices.
4. Disconnect the power cord from the AC outlet, and then from the computer.
5. Disconnect the system components and external devices from their power sources and then from
the computer.
NOTE: Be sure that all boards are seated properly and secured in the board slots before shipping
the computer.
6. Pack the system components and external devices in their original packing boxes or similar
packaging with sufficient packing material to protect them.
36
Chapter 10 Computer operating guidelines, routine care, and shipping preparation

Electrostatic discharge11
Electrostatic discharge is the release of static electricity when two objects come into contact—for
example, the shock you receive when you walk across the carpet and touch a metal door knob.
A discharge of static electricity from fingers or other electrostatic conductors may damage electronic
components.
IMPORTANT: To prevent damage to the computer, damage to a drive, or loss of information, observe
these precautions:
● If removal or installation instructions direct you to unplug the computer, first be sure that it is
properly grounded.
● Keep components in their electrostatic-safe containers until you are ready to install them.
● Avoid touching pins, leads, and circuitry. Handle electronic components as little as possible.
● Use nonmagnetic tools.
● Before handling components, discharge static electricity by touching an unpainted metal surface.
● If you remove a component, place it in an electrostatic-safe container.
Electrostatic discharge
37

Accessibility12
HP's goal is to design, produce, and market products, services, and information that everyone
everywhere can use, either on a standalone basis or with appropriate third-party assistive technology
(AT) devices or applications.
HP and accessibility
Because HP works to weave diversity, inclusion, and work/life into the fabric of the company, it is
reflected in everything HP does. HP strives to create an inclusive environment focused on connecting
people to the power of technology throughout the world.
Finding the technology tools you need
Technology can unleash your human potential. Assistive technology removes barriers and helps you
create independence at home, at work, and in the community. Assistive technology helps increase,
maintain, and improve the functional capabilities of electronic and information technology.
For more information, see Finding the best assistive technology on page 39.
The HP commitment
HP is committed to providing products and services that are accessible for people with disabilities.
This commitment supports the company's diversity objectives and helps ensure that the benefits of
technology are available to all.
The HP accessibility goal is to design, produce, and market products and services that can be effectively
used by everyone, including people with disabilities, either on a standalone basis or with appropriate
assistive devices.
To achieve that goal, this Accessibility Policy establishes seven key objectives to guide HP actions. All
HP managers and employees are expected to support these objectives and their implementation in
accordance with their roles and responsibilities:
● Raise the level of awareness of accessibility issues within HP, and provide employees with the
training they need to design, produce, market, and deliver accessible products and services.
● Develop accessibility guidelines for products and services, and hold product development groups
accountable for implementing these guidelines where competitively, technically, and economically
feasible.
● Involve people with disabilities in the development of accessibility guidelines and in the design and
testing of products and services.
● Document accessibility features, and make information about HP products and services publicly
available in an accessible form.
● Establish relationships with leading assistive technology and solution providers.
● Support internal and external research and development that improves assistive technology
relevant to HP products and services.
38
Chapter 12 Accessibility

● Support and contribute to industry standards and guidelines for accessibility.
International Association of Accessibility Professionals (IAAP)
IAAP is a not-for-profit association focused on advancing the accessibility profession through
networking, education, and certification. The objective is to help accessibility professionals develop and
advance their careers and to better enable organizations to integrate accessibility into their products
and infrastructure.
As a founding member, HP joined to participate with other organizations to advance the field of
accessibility. This commitment supports HP’s accessibility goal of designing, producing, and marketing
products and services that people with disabilities can effectively use.
IAAP will make the profession strong by globally connecting individuals, students, and
organizations to learn from one another. If you are interested in learning more, go to
http://www.accessibilityassociation.org to join the online community, sign up for newsletters, and learn
about membership options.
Finding the best assistive technology
Everyone, including people with disabilities or age-related limitations, should be able to communicate,
express themselves, and connect with the world using technology. HP is committed to increasing
accessibility awareness within HP and with our customers and partners.
Whether it’s large fonts that are easy on the eyes, voice recognition that lets you give your hands a rest,
or any other assistive technology to help with your specific situation—a variety of assistive technologies
make HP products easier to use. How do you choose?
Assessing your needs
Technology can unleash your potential. Assistive technology removes barriers and helps you create
independence at home, at work, and in the community. Assistive technology (AT) helps increase,
maintain, and improve the functional capabilities of electronic and information technology.
You can choose from many AT products. Your AT assessment should allow you to evaluate several
products, answer your questions, and facilitate your selection of the best solution for your situation.
You will find that professionals qualified to do AT assessments come from many fields, including those
licensed or certified in physical therapy, occupational therapy, speech/language pathology, and other
areas of expertise. Others, while not certified or licensed, can also provide evaluation information.
You will want to ask about the individual's experience, expertise, and fees to determine if they are
appropriate for your needs.
Accessibility for HP products
These links provide information about accessibility features and assistive technology, if applicable and
available in your country or region, that are included in various HP products. These resources will help
you select the specific assistive technology features and products most appropriate for your situation.
● HP Aging & Accessibility: Go to http://www.hp.com, type Accessibility in the search box. Select
Office of Aging and Accessibility.
● HP computers: For Windows products, go to http://www.hp.com/support, type Windows
Accessibility Options in the Search our knowledge search box. Select the appropriate
operating system in the results.
● HP Shopping, peripherals for HP products: Go to http://store.hp.com, select Shop, and then select
Monitors or Accessories.
International Association of Accessibility Professionals (IAAP)
39

If you need additional support with the accessibility features on your HP product, see Contacting
support on page 42.
Additional links to external partners and suppliers that may provide additional assistance:
● Microsoft Accessibility information (Windows and Microsoft Office)
● Google Products accessibility information (Android, Chrome, Google Apps)
Standards and legislation
Countries worldwide are enacting regulations to improve access to products and services for persons
with disabilities. These regulations are historically applicable to telecommunications products and
services, PCs and printers with certain communications and video playback features, their associated
user documentation, and their customer support.
Standards
The US Access Board created Section 508 of the Federal Acquisition Regulation (FAR) standards to
address access to information and communication technology (ICT) for people with physical, sensory, or
cognitive disabilities.
The standards contain technical criteria specific to various types of technologies, as well as
performance-based requirements which focus on functional capabilities of covered products. Specific
criteria cover software applications and operating systems, web-based information and applications,
computers, telecommunications products, video and multimedia, and self-contained closed products.
Mandate 376 – EN 301 549
The European Union created the EN 301 549 standard within Mandate 376 as an online toolkit for public
procurement of ICT products. The standard specifies the accessibility requirements applicable to ICT
products and services, with a description of the test procedures and evaluation methodology for each
requirement.
Web Content Accessibility Guidelines (WCAG)
Web Content Accessibility Guidelines (WCAG) from the W3C's Web Accessibility Initiative (WAI) helps
web designers and developers create sites that better meet the needs of people with disabilities or
age-related limitations.
WCAG advances accessibility across the full range of web content (text, images, audio, and video)
and web applications. WCAG can be precisely tested, is easy to understand and use, and allows web
developers flexibility for innovation. WCAG 2.0 has also been approved as ISO/IEC 40500:2012.
WCAG specifically addresses barriers to accessing the web experienced by people with visual, auditory,
physical, cognitive, and neurological disabilities, and by older web users with accessibility needs. WCAG
2.0 provides characteristics of accessible content:
● Perceivable (for instance, by addressing text alternatives for images, captions for audio, adaptability
of presentation, and color contrast)
● Operable (by addressing keyboard access, color contrast, timing of input, seizure avoidance, and
navigability)
● Understandable (by addressing readability, predictability, and input assistance)
● Robust (for instance, by addressing compatibility with assistive technologies)
40
Chapter 12 Accessibility

Legislation and regulations
Accessibility of IT and information has become an area of increasing legislative importance.
The HP policy landscape website provides information about key legislation, regulations, and standards
in the following locations:
● United States
● Canada
● Europe
● Australia
Useful accessibility resources and links
These organizations, institutions, and resources might be good sources of information about disabilities
and age-related limitations.
NOTE: This is not an exhaustive list. These organizations are provided for informational purposes
only. HP assumes no responsibility for information or contacts you encounter on the internet. Listing on
this page does not imply endorsement by HP.
Organizations
These organizations are a few of the many that provide information about disabilities and age-related
limitations.
● American Association of People with Disabilities (AAPD)
● The Association of Assistive Technology Act Programs (ATAP)
● Hearing Loss Association of America (HLAA)
● Information Technology Technical Assistance and Training Center (ITTATC)
● Lighthouse International
● National Association of the Deaf
● National Federation of the Blind
● Rehabilitation Engineering & Assistive Technology Society of North America (RESNA)
● Telecommunications for the Deaf and Hard of Hearing, Inc. (TDI)
● W3C Web Accessibility Initiative (WAI)
Educational institutions
Many educational institutions, including these examples, provide information about disabilities and
age-related limitations.
● California State University, Northridge, Center on Disabilities (CSUN)
● University of Wisconsin - Madison, Trace Center
Legislation and regulations
41

● University of Minnesota computer accommodations program
Other disability resources
Many resources, including these examples, provide information about disabilities and age-related
limitations.
● ADA (Americans with Disabilities Act) Technical Assistance Program
● ILO Global Business and Disability network
● EnableMart
● European Disability Forum
● Job Accommodation Network
● Microsoft Enable
HP links
These HP-specific links provide information that relates to disabilities and age-related limitations.
HP comfort and safety guide
HP public sector sales
Contacting support
HP offers technical support and assistance with accessibility options for customers with disabilities.
NOTE: Support is in English only.
● Customers who are deaf or hard of hearing who have questions about technical support or
accessibility of HP products:
– Use TRS/VRS/WebCapTel to call (877) 656-7058 Monday through Friday, 6 a.m. to 9 p.m. Mountain
Time.
● Customers with other disabilities or age-related limitations who have questions about technical
support or accessibility of HP products:
– Call (888) 259-5707 Monday through Friday, 6 a.m. to 9 p.m. Mountain Time.
42
Chapter 12 Accessibility

Index
A
accessibility 38, 39, 41, 42
accessibility needs
assessment 39
assistive technology (AT)
finding 39
purpose 38
AT (assistive technology)
finding 39
purpose 38
audio-out (headphone)/audio-in
(microphone) combo jack,
identifying 6, 7
B
backup, creating 15
backups 15
BIOS
determining version 21
updating 21
upgrading 21
blink or beep codes 25
boot order, changing 17
C
caring for your computer 34
cleaning your computer 34
disinfecting 35
removing dirt and debris 35
components
bottom 8
front 5
rear 7
top cover 7
computer features 5
computer operating
guidelines 34
computer setup 10
product recycling 14
security 14
setup procedures 11
computer, diagnostics 23
computer, maintenance 23
computer, troubleshooting 23
computer, updating 21
connectors
power 7
Customer Self Repair 25
customer support,
accessibility 42
D
diagnostics 3
documentation 3
E
electrostatic discharge 37
F
features, new 5
H
hard drive activity light,
identifying 6
HP Assistive Policy 38
HP driver disc
Ubuntu setup 19
HP PC Hardware Diagnostics UEFI
downloading 31
failure ID code 30
HP Hotkey Support
software 31
starting 30, 31
using 30
HP PC Hardware Diagnostics
Windows
accessing 28, 29
downloading 29
failure ID code 28
installing 30
using 28
HP Recovery media
recovery 16
HP resources 2
HP Sure Recover 17
I
International Association of
Accessibility Professionals 39
J
jacks
audio-out (headphone)/audio-in
(microphone) 6, 7
network 7
RJ-45 (network) 7
L
links
contact information for HP
US 26
HP Customer Self Repair 25
Linux Hardware Matrix for HP
computers 18
Red Hat Certification 18
SUSE certification bulletin
search page 18
Ubuntu 19
Linux
proprietary graphics
drivers 19
RHEL 18
setup 18
solutions 18
Linux-ready systems
creating a disc 18
Linux versions 18
N
network jack, identifying 7
P
ports
USB 7
USB SuperSpeed 6, 7
USB SuperSpeed 10 Gbps with
HP Sleep and Charge 6
USB SuperSpeed Gbps with HP
Sleep and Charge 7
USB Type-C 5
power button, identifying 6, 7
power connector
identifying 7
power rating label 8
power supply light, identifying 6
power supply release button,
identifying 6
Index
43

product change notifications 26
product ID location 8
product information 2
proper ventilation, ensuring 10
R
rack pull screw, identifying 5, 6, 8
recovery 15
discs 16
media 16
USB flash drive 16
recovery media 15
creating using HP Cloud
Recovery Download Tool 15
creating using Windows
tools 15
Remote HP PC Hardware
Diagnostics UEFI settings
customizing 33
using 32
resources, accessibility 41
restoring 15
restoring and recovery
methods 16
RHEL
Linux 18
setup 18
RJ-45 (network) jack, identifying 7
S
Section 508 accessibility
standards 40
serial number location 8
setup
Linux 18
RHEL 18
SLED 18
Ubuntu 19
shipping preparation 36
SLED
setup 18
slots
memory card reader 6
microSD memory card
reader 6
specifications, product 8
standards and legislation,
accessibility 40
support
advisories 26
bulletins 26
computers 26
contacting 26
general resources 2
HP resources 2
HP Support 25
online 26
system restore 16
system restore point, creating 15
T
technical support 25
top cover release latch,
identifying 8
troubleshooting 23
at startup 24
Customer Self Repair 25
during operation 24
visual inspection 23
turning off computer 23
U
Ubuntu
HP driver disc 19
setup 19
updates 4
updating the computer 21
upgrading device drivers 22
URLs
contact information for HP
US 26
HP Customer Self Repair 25
Linux Hardware Matrix for HP
computers 18
Red Hat Certification 18
SUSE certification bulletin
search page 18
Ubuntu 19
USB port, identifying 7
USB SuperSpeed 10 Gbps port
with HP Sleep and Charge,
identifying 6
USB SuperSpeed 5 Gbps port,
identifying 6
USB SuperSpeed Gbps port with
HP Sleep and Charge,
identifying 7
USB SuperSpeed port,
identifying 7
USB Type-C port, identifying 5
V
ventilation guidelines 34
W
warning notices iii
warranty information 27
Windows
backup 15
recovery media 15
system restore point 15
Windows tools, using 15
44 Index