
HP Remote System Controller User Guide
SUMMARY
The HP Remote System Controller provides a secure and easy to use, out-of-band remote management solution
for supported HP platforms, with the remote KVM capabilities providing universal remote keyboard, video, and
mouse support for almost any computer device.

Legal information
© Copyright 2023-2024 HP Development
Company, L.P.
Redfish is a registered trademark of DMTF.
Chrome is a trademark of Google LLC.
Linux® is the registered trademark of Linus
Torvalds in the U.S. and other countries.
Edge, Microsoft, and Windows are registered
trademarks or trademarks of Microsoft
Corporation in the United States and/or
other countries.
Confidential computer software. Valid
license from HP required for possession,
use or copying. Consistent with FAR 12.211
and 12.212, Commercial Computer Software,
Computer Software Documentation, and
Technical Data for Commercial Items are
licensed to the U.S. Government under
vendor's standard commercial license.
The information contained herein is subject
to change without notice. The only
warranties for HP products and services are
set forth in the express warranty statements
accompanying such products and services.
Nothing herein should be construed as
constituting an additional warranty. HP shall
not be liable for technical or editorial errors
or omissions contained herein.
Second Edition: January 2024
First Edition: May 2023
Document Part Number: N55811-002
Third-party software notice
Third-party source code and licenses are
redistributed, if required, with HP Remote
System Controller Software.

User input syntax key
Text that you must enter into a user interface is indicated by fixed-width font.
User input syntax key
Item Description
Text without brackets or braces
Items you must type exactly as shown
<Text inside angle brackets>
A placeholder for a value you must provide; omit the brackets
[Text inside square brackets]
Optional items; omit the brackets
{Text inside braces}
A set of items from which you must choose only one; omit the braces
|
A separator for items from which you must choose only one; omit the vertical
bar
...
Items that can or must repeat; omit the ellipsis
iii

Table of contents
1 Getting started ....................................................................................................................................................................................................................................... 1
Requirements ................................................................................................................................................................................................................................... 1
Supported features..................................................................................................................................................................................................................... 2
Front panel components (external).................................................................................................................................................................................. 2
Left and right panel components (external) .............................................................................................................................................................. 3
Front components (internal) .................................................................................................................................................................................................4
Connecting the computer (external)...............................................................................................................................................................................4
Connecting to AC power (select products only) .................................................................................................................................................... 5
Disconnecting the HP Remote System Controller...............................................................................................................................................6
2 Configuring the HP Remote System Controller.............................................................................................................................................................7
Initial setup for the HP Remote System Controller ..............................................................................................................................................7
Accessing the software interface for the HP Remote System Controller.......................................................................................... 8
Configure IP Assignment ........................................................................................................................................................................................................ 8
Configure the DNS Server Assignment....................................................................................................................................................................... 9
Configure the Proxy settings................................................................................................................................................................................................ 9
Configure KVM................................................................................................................................................................................................................................9
Configuring the access security ....................................................................................................................................................................................10
Configure the password........................................................................................................................................................................................................10
Manage TLS certificates.......................................................................................................................................................................................................10
Configure Firmware Updates settings......................................................................................................................................................................... 11
Configure directory-based authentication.............................................................................................................................................................. 12
Configuring the domain controller address................................................................................................................................................. 12
Configuring the base search entry .................................................................................................................................................................... 12
Configuring the groups allowed to authenticate ..................................................................................................................................... 12
Log in with domain credentials .............................................................................................................................................................................. 12
Managing user sessions.......................................................................................................................................................................................................13
3 Accessing and controlling the remote host .................................................................................................................................................................. 14
Control the remote host power.........................................................................................................................................................................................14
Turn on the remote host..............................................................................................................................................................................................14
Turn off the remote host............................................................................................................................................................................................. 14
Restart the remote host.............................................................................................................................................................................................. 15
Stopping the boot process in the BIOS menu ............................................................................................................................................ 15
Accessing the remote host using KVM....................................................................................................................................................................... 15
KVM hardware compatibility ...................................................................................................................................................................................15
Using the KVM menu.....................................................................................................................................................................................................16
iv

Start a KVM session ......................................................................................................................................................................................................16
Using KVM.............................................................................................................................................................................................................................16
Using the keyboard...............................................................................................................................................................................................17
Viewing the video...................................................................................................................................................................................................17
Using the mouse ....................................................................................................................................................................................................17
Mounting a virtual drive using Virtual Media...........................................................................................................................................................17
Using Virtual Media .........................................................................................................................................................................................................17
Choosing a Virtual Media Mode ................................................................................................................................................................18
Mounting the file ...................................................................................................................................................................................................18
Unmounting the file.............................................................................................................................................................................................18
Removing a file.......................................................................................................................................................................................................18
Navigating and configuring BIOS settings .............................................................................................................................................................18
Accessing BIOS settings...........................................................................................................................................................................................18
Navigating the BIOS interface...............................................................................................................................................................................19
Adjusting BIOS settings..............................................................................................................................................................................................19
Booting to the virtual media drive...................................................................................................................................................................................19
4 Administering the Remote System Controller............................................................................................................................................................. 21
Perform a factory reset.......................................................................................................................................................................................................... 21
Restart the Remote System Controller ...................................................................................................................................................................... 21
Appendix A Specifications............................................................................................................................................................................................................ 22
Input power..................................................................................................................................................................................................................................... 22
Operating environment ......................................................................................................................................................................................................... 22
Appendix B Troubleshooting ........................................................................................................................................................................................................24
LED display status......................................................................................................................................................................................................................24
Remote host LED display status...........................................................................................................................................................................24
Remote System Controller LED status............................................................................................................................................................24
Network LED display status.....................................................................................................................................................................................24
Issue resolution........................................................................................................................................................................................................................... 25
Generating log file information.........................................................................................................................................................................................27
Appendix C Accessibility................................................................................................................................................................................................................ 29
HP and accessibility.................................................................................................................................................................................................................29
Finding the technology tools you need........................................................................................................................................................... 29
The HP commitment..................................................................................................................................................................................................... 29
International Association of Accessibility Professionals (IAAP)..................................................................................................30
Finding the best assistive technology.............................................................................................................................................................30
Assessing your needs .....................................................................................................................................................................................30
Accessibility for HP products.....................................................................................................................................................................30
Standards and legislation ....................................................................................................................................................................................................31
Standards.............................................................................................................................................................................................................................. 31
Mandate 376 – EN 301 549 .............................................................................................................................................................................31
Web Content Accessibility Guidelines (WCAG).............................................................................................................................. 31
Legislation and regulations.....................................................................................................................................................................................32
Useful accessibility resources and links .................................................................................................................................................................. 32
v

Organizations.................................................................................................................................................................................................................... 32
Educational institutions ............................................................................................................................................................................................. 32
Other disability resources .......................................................................................................................................................................................33
HP links...................................................................................................................................................................................................................................33
Contacting support..................................................................................................................................................................................................................33
Index................................................................................................................................................................................................................................................................34
vi

Getting started1
HP Remote System Controller enables you to monitor, troubleshoot, and control power and hardware
alerts on a remote host and has other out-of-band workstation management capabilities.
Features include:
● Access to the workstation and hardware information at any time
● Ability to initiate a keyboard, video, and mouse (KVM) session to control the remote host
● Ability to control power to the remote host
● Access to BIOS
Change host BIOS settings on the remote host without KVM
● Editing the Remote System Controller settings
● Checking event logs
● Mount virtual media to the host, for imaging or updates
Requirements
Before you use HP Remote System Controller, make sure that your environment meets the following
requirements.
● Locate the laser-etched label on the bottom next to the QR code for the HP Remote System
Controller, or on a sticker on the HP Integrated Remote System Controller. You can also scan the QR
code with a smartphone camera to see the following information as a comma-separated list:
– Serial number
– Default password
– MAC address
NOTE: You can change only the password. You cannot change the MAC address or serial
number.
● The Remote System Controller is connected to the network, and an IP address is assigned to it. The
Remote System Controller displays the IP address.
NOTE:
● The HP Integrated Remote System Controller does not have an LCD display to view
information.
● A dedicated network port, which does not support network traffic passthrough to the host, is
required for the HP Integrated Remote System Controller.
Getting started
1

● An AC outlet is required for the HP Remote System Controller for Universal KVM (7K7N2AA)
version of the product.
● Use either Chrome™ or Microsoft® Edge® to view the Remote System Controller interface.
● Workstations shipped to certain regions have the Maximum Power Savings BIOS setting enabled,
which prevents the HP Remote System Controller from getting power from the host main board. HP
recommends that you disable this setting so that the Remote System Controller has power when
the host workstation is turned off.
Supported features
The features are supported by the following platforms.
NOTE: For Z4, Z6, Z8 G4 and ZCentral G4, the latest BIOS update is required to enable the host to
provide power to the HP Integrated Remote System Controller in all host power states.
Table 1-1
Supported features by platform
Feature Z4, Z6, Z8/Fury G5, and Z2
G9
Z4, Z6, Z8 G4, ZCentral 4R Non-Z computers
Power button control Yes Yes Not available
Direct BIOS
communication
Yes Not available Not available
Remote Virtual Storage Yes Yes Yes
IP KVM Yes Yes Yes
Hardware system
inventory
Yes Not available Not available
Hardware alerts Yes Partial Not available
Remote System Controller
firmware updates
Yes Yes Yes
Front panel components (external)
To identify the front panel components for the HP Remote System Controller, use this illustration and
table.
2
Chapter 1 Getting started
Table 1-2 Identifying the front panel components
Front panel components
(1) LCD screen
(2) Remote host status LED
(3) Remote System Controller status LED
(4) Network status LED
Left and right panel components (external)
To identify the left and right panel components for the HP Remote System Controller, use this illustration
and table.
NOTE: *If you install the HP Z4/Z6/Z8 G4 / ZCentral 4R Remote System Controller Cable Adapter
(7K6E5AA), the HP Remote System Controller or HP Integrated Remote System Controller redirects
power from the front USB ports on the workstation to power the Remote System Controller in all host
states. In this situation, bus-powered devices such as keyboards, mice, USB thumb drives, and other
peripherals cannot be powered when they are installed in the front USB ports. Powering the HP Remote
System Controller or HP Integrated Remote System Controller in all host states requires an update to
the latest available BIOS for the ZCentral 4R, Z4G4, Z6G4, and Z8G4 platforms.
Table 1-3
Identifying the left and right panel components
Left panel components Right panel components
(1) 10-pin cable connector (5) Security cable slot
(2) Mini DisplayPort™ connector (6) Power cable connector
Left and right panel components (external) 3
Table 1-3 Identifying the left and right panel components (continued)
Left panel components Right panel components
(3) USB 5 Gbps port* (7) RJ-45 network port
(4) RJ-45 network port
Front components (internal)
To identify the front panel components for the HP Integrated Remote System Controller, use this
illustration and table.
Table 1-4
Identifying the front components
Front components
(1) Host status LED
(2) Remote System Controller status LED
(3) Remote host status LED
(4)
USB for Mouse/Keyboard/Mass Storage Emulation
*
(5) Mini DisplayPort for graphics input
(6) RJ-45 network cable connector
(7) Soft reset/factory reset button
*
The front USB port is not needed if the internal USB 3.0 connector is used.
Connecting the computer (external)
To connect the computer to the HP Remote System Controller, use this illustration and table.
4
Chapter 1 Getting started
Table 1-5 Connecting the computer
Cables
(1) 10-pin cable connector
(2) Mini DisplayPort cable
(3) USB cable
(4) RJ-45 (network) cable
(5) Power input (optional when a 10-pin cable is connected)
(6) RJ-45 network uplink cable
Connecting to AC power (select products only)
An AC outlet is required for the HP Remote System Controller for Universal KVM (7K7N2AA) version of
the product. You must connect the AC adapter to an AC power source. When connected to power, the
AC power source provides up to 40 W of power through the power connector. The HP Remote System
Controller uses up to 18 W when all computer resources are in use, but typically idles at less than 5 W of
power.
WARNING! To reduce the risk of electric shock or damage to the equipment:
● Plug the power cord into an AC outlet that is easily accessible at all times.
● Disconnect power from the equipment by unplugging the power cord from the AC outlet.
● If provided with a 3-pin attachment plug on the power cord, plug the cord into a grounded (earthed)
3-pin outlet. Do not disable the power cord grounding pin, for example, by attaching a 2-pin adapter.
The grounding pin is an important safety feature.
To ensure the correct performance of all features, connect the HP Remote System Controller to an AC
power source using the AC adapter.
1. Connect one end of the power cord to the AC adapter (1), and connect the other end of the power
cord to an AC outlet (2).
Connecting to AC power (select products only)
5
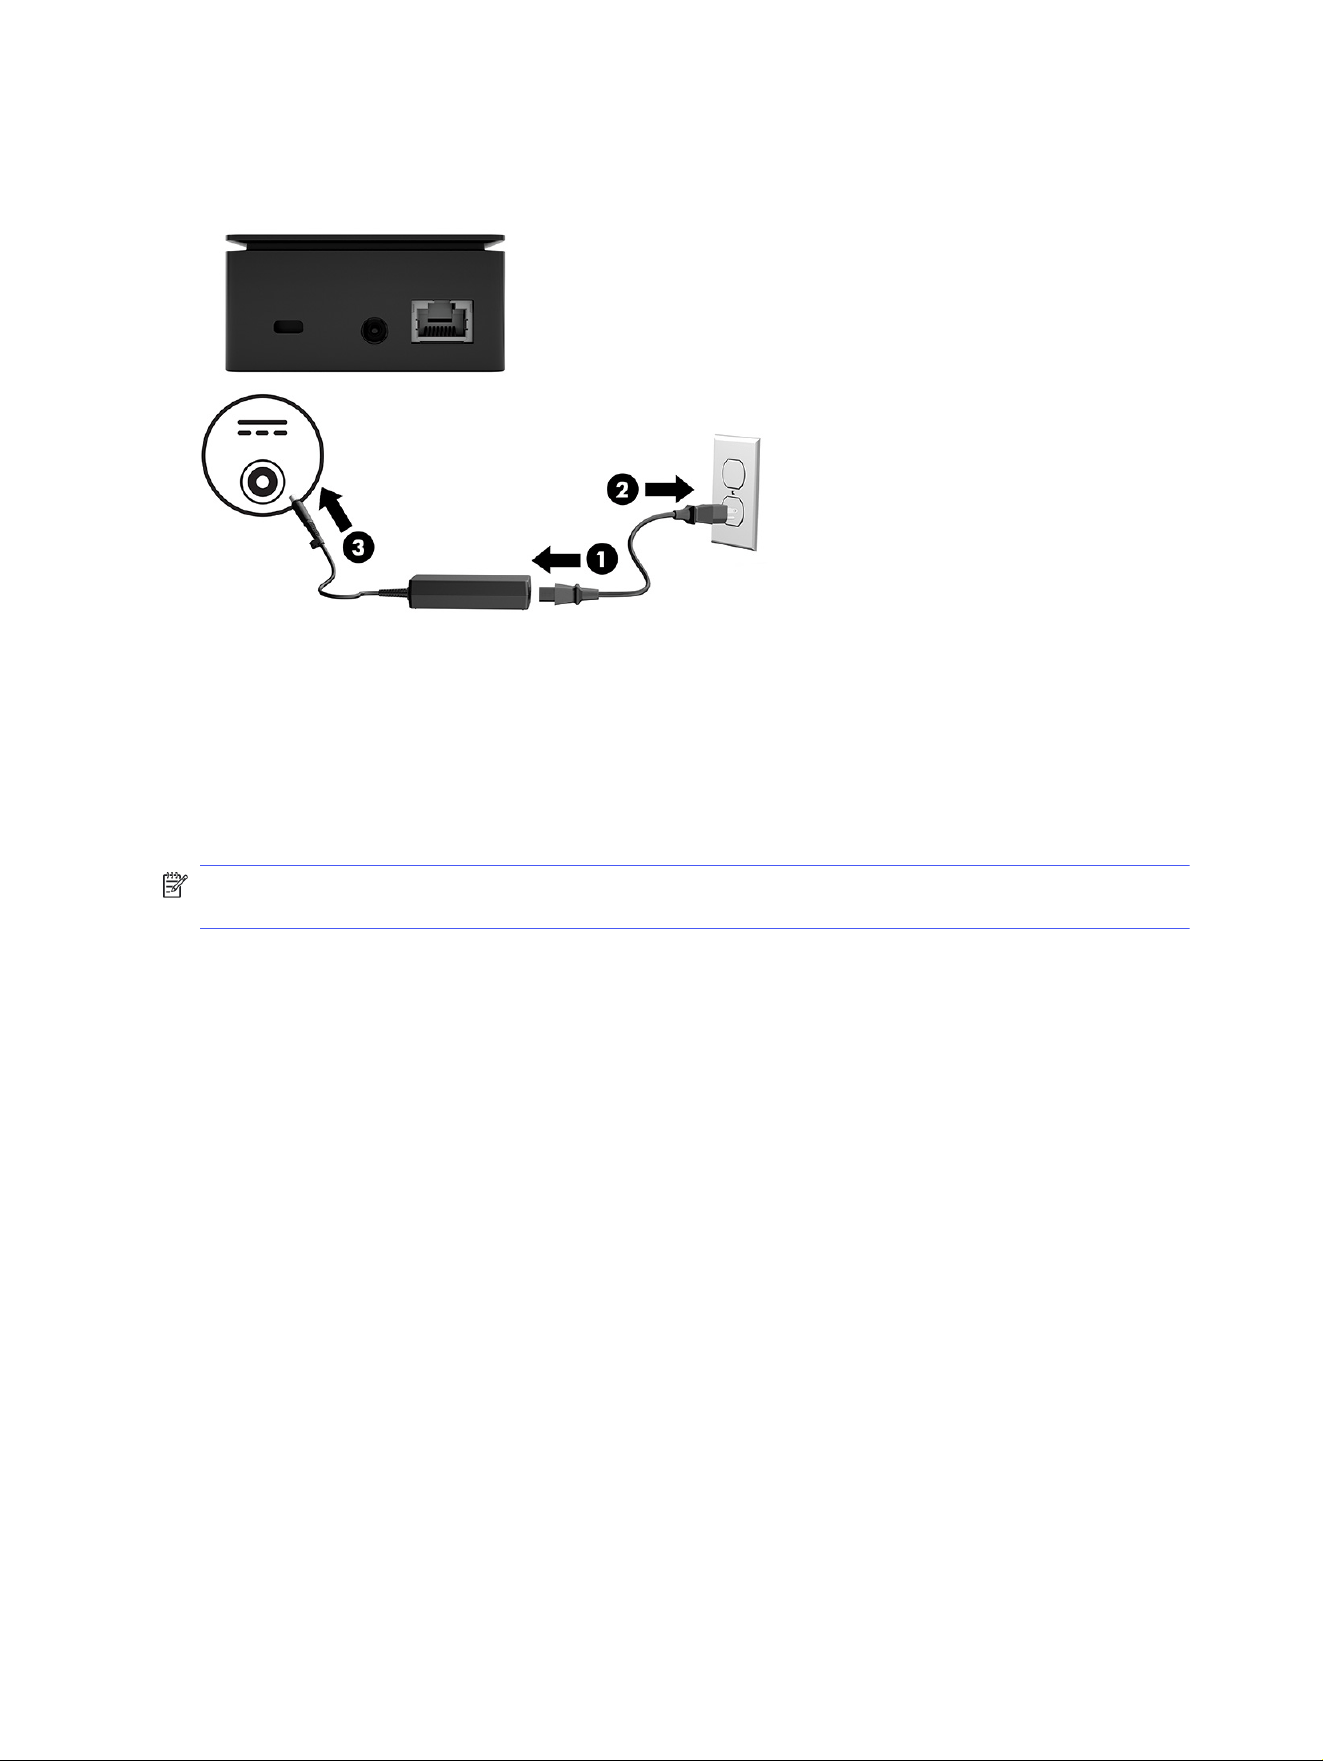
2. Connect the AC adapter to the power connector (3) on the HP Remote System Controller.
Disconnecting the HP Remote System Controller
To disconnect the HP Remote System Controller, do the following:
● Disconnect the cables from the computer
● Disconnect the power cable from the HP Remote System Controller
NOTE: Do not disconnect the HP Remote System Controller while you are updating the software.
Doing so might cause the HP Remote System Controller to become unusable.
6
Chapter 1 Getting started

Configuring the HP Remote System
Controller
2
You can adjust settings for the HP Remote System Controller either programmatically or through the
embedded graphical user interface.
Initial setup for the HP Remote System Controller
The first time you use the Remote System Controller, you must perform the following setup tasks.
1. Open a web browser (either Chrome or Microsoft Edge) and type the Remote System Controller
URL in the address field.
To determine the URL, access the user interface by typing https://<hostname>.<domain>,
where the default hostname is rsc-<serial_number>.
NOTE: You must be connected to the same network switch as the Remote System Controller.
If there is no enterprise DHCP and DNS, a local address is assigned to the Remote System
Controller and you can access it by typing https://rsc-<serial_number>.local, where:
● rsc is a fixed keyword
● <serial_number> is a variable you replace with the serial number for your Remote System
Controller
● local is the network domain
NOTE: When no DHCP is in the network, the RSC starts and falls back to the link-local IPv4
configuration automatically, enabling a unique IP that can be reached in the local network for RSC
configuration/provisioning. Be sure that a route or a subnet on the client operating system is
running the browser to reach the link-loop network, and then type the URL https://rsc-
%3cserial%3e.local to start the configuration. IPv4 link-local addresses are assigned from
address block 169.254. 0.0/16 (169.254. 0.0 through 169.254. 255.255).
2. Enter admin as the user name and the default password that is printed on the Remote System
Controller label.
3. Accept the license agreement.
NOTE: You must accept the license agreement to be able to use the Remote System Controller.
4. Change the password from the default password that is printed on the Remote System Controller
label to a new one following the recommended security criteria. See Configure the password on
page 10.
Configuring the HP Remote System Controller
7

5. Set the firmware update policy.
NOTE: You must be connected to the same network as the Remote System Controller for initial
access.
NOTE: For optimum security, configure certificates in the Remote System Controller.
Accessing the software interface for the HP Remote System
Controller
You can access the internal functions of the HP Remote System Controller using the following methods:
● Use an application program interface (API) to build programmatic access from an external program.
The API follows the industry-standard Redfish® specification.
● Access the web interface using an internet browser and the Remote System Controller IP address
shown in the interface. The web interface is designed to handle different desktop screen sizes.
During a typical session you might perform the following functions:
● Open a browser and enter the Remote System Controller URL.
NOTE: If you perform a directory login, you can also use your directory user name and password.
See Configure directory-based authentication on page 12 for setup instructions.
● Enter the admin as the user name and the password to log in.
● Perform any host management tasks required.
● If you open a KVM session, a new browser window opens. To close a KVM session, close the window
or use the toolbar icon to exit.
● To close the Remote System Controller session, select the user icon in the upper-right corner and
select Sign out.
NOTE: If your session is inactive for one hour, the session closes automatically and the login screen
is displayed. All sessions expire after eight hours, even if the session is active.
Configure IP Assignment
Follow this procedure to configure IP Assignment.
1. Select RSC Settings on the left side of the dashboard.
2. In the Network Configuration section under IP Assignment, select Edit.
3. Do one of the following:
● Select Manual from the drop-down menu to manually type the following values:
– IPv4 Address
– Subnet Mask
– Gateway
8
Chapter 2 Configuring the HP Remote System Controller

● Select Automatic (DHCP) to have the settings automatically detected.
4. Select Confirm to confirm the change to the settings.
5. After changing the settings, select Close to close the confirmation message.
NOTE: The current IP settings are shown under IPv4 Address in the Network Configuration
section.
Configure the DNS Server Assignment
Follow this procedure to configure the DNS Server Assignment.
1. Select RSC Settings on the left side of the dashboard.
2. In the Network Configuration section, under DNS Server Assignment, select Edit.
3. Do one of the following:
● Select Manual from the drop-down menu to manually type the following values:
– Preferred DNS
– Alternate DNS
● Select Automatic (DHCP) to have the settings automatically detected.
4. Select Confirm to confirm the change to the settings.
5. After changing the settings, select Close to close the confirmation message.
NOTE: A list of DNS servers is displayed under Edit.
Configure the Proxy settings
Follow this procedure to configure the Proxy settings.
1. Select RSC Settings on the left side of the dashboard.
2. In the Network Configuration section, under Proxy, select Edit.
3. By default, the proxy server is disabled. Select the Disabled toggle to enable the proxy server.
4. Type the address for the proxy server to access, for example,
https://yourproxyserver.domain:8088.
5. If you have any addresses that need to be accessed without proxy, enter the addresses, separating
them by a semicolon (;), for example, 10.10.10.254;192.34.154.13.
6. Select Confirm to implement the updates.
7. After changing the settings, select Close to close the confirmation message.
Configure KVM
Follow this procedure to configure the KVM settings.
Configure the DNS Server Assignment
9

1. Select RSC Settings on the left side of the dashboard.
2. In the KVM Configuration section, enable or disable the following setting:
■
Enable HP vDisplay Only During KVM Session
NOTE: When this feature is enabled, the RSC displays a virtual monitor to the remote host only
when there is an active KVM session. If this feature is disabled, the virtual monitor is always
displayed to the remote host.
Configuring the access security
Use this information to configure the Remote System Controller for the optimum web server and API
access security.
● Use a strong password. See Configure the password on page 10.
● Install a trusted certificate
Configure the password
Use this information to configure the password.
1. Select RSC Settings on the left side of the dashboard.
2. In the Passwords section, click Change. Type the new information in the Old password, New
password, and Confirm new password fields.
NOTE: You cannot use a password that has already been used as one of the last 24 passwords you
created.
● Use a minimum of 12 characters
● Make sure that the password contains at least three of the following:
– Lowercase character
– Uppercase character
– Number
– Special character
Manage TLS certificates
The HTTPS server certificate is used by the Remote System Controller web service and KVM to provide
TLS connections. You can change the server certificate the Remote System Controller uses through the
web interface or API.
Trusted certificates are used to authenticate external servers, such as the fleet manager, or a server
that is storing a virtual media image, update package, or subscribers to hardware alerts. Trusted
certificates can be added or removed through the UI or API.
NOTE: Not installing your own server certificate causes the Remote System Controller to use self-
signed certificates, which is not recommended.
10
Chapter 2 Configuring the HP Remote System Controller

Configure Firmware Updates settings
Follow this procedure to configure the RSC Firmware Updates settings.
1. Select RSC Settings on the left side of the dashboard.
2. In the Operations section, select the Firmware Updates button.
3. On the Automatic Updates tab, you can change the automatic update mode and frequency using
these options:
● Automatically check and install updates: When this mode is selected, the RSC automatically
downloads and installs the latest updates.
● Notify me of updates, and I will install it manually: When this mode is selected, the RSC checks
for the latest updates automatically but does not download or install them. You must follow
step 5 to update the fireware manually.
● Do not check for updates: When this mode is selected, the RSC does not check for the updates
automatically. You must follow step 4 or 5 to update the firmware manually.
NOTE: The checks for these two modes happens according to the selected Schedule frequency
(Daily, Weekly, or Monthly).
4. On the Manual Updates tab, you can perform a firmware update manually by following this
procedure:
a. Select the blank field to open a file explorer window.
b. Find and select the firmware file with the extension tar.gz on the local computer.
NOTE: Be sure to match the firmware update file to the version of Remote System Controller
that you are using, depending on whether the file name contains
external
or
internal
, which
correlates to the Remote System Controller and Integrated Remote System Controller,
respectively.
The file transfers, and the update starts automatically. This might take several minutes. When
the update is complete, a message is displayed, notifying you of the result of the operation.
If the update is successful, you can see the new firmware version in RSC Settings. When security
updates are included, the login page is displayed and you must restart the session.
5. The information about available updates is displayed at the top of the page. If you select the Check
for updates button to get the latest updated information, you can see your current installed version,
and the last time it was checked.
a. When a new update is available, select the Release Notes button to check the release notes.
b. Install the new update by selecting the Update Now button.
c. Accept all the prompts that come next.
If the update is successful, you can see the new firmware version in RSC Settings. When security
updates are included, the login page is displayed and you must restart the session.
Configure Firmware Updates settings
11

Configure directory-based authentication
The RSC can be configured to allow users to log in with their domain user names and passwords.
You need to specify which groups users must be members of in your directory to be allowed to
authenticate into the RSC. Being a member of any of the groups specified enables authentication.
Every authenticated user in the RSC has the same permission levels as the admin user.
Follow the steps in the next sections to configure a directory-based authentication.
The RSC uses LDAPS (secure LDAP) to access the domain controllers. A root certificate that can verify
the LDAP server certificate needs to be added to the RSC. Refer to the Manage TLS certificates on page
10 section on how to add trusted certificates.
Configuring the domain controller address
Use this procedure to configure the domain controller address.
■
Enter the domain controller’s IP address or hostname into the Server Host Name form field. For
example, 18.2.3.4 or domaincontroller.mydomain.com. If DNS is setup properly, entering
only the domain name might be sufficient, for example, mydomain.com.
The default port for LDAPS is used. If a different port is needed, follow the IP address or hostname
with a colon and the port number, for example.,
myserver.mydomain.com:8123.
Configuring the base search entry
Use this procedure to configure the base search entry.
■
Enter a distinguished name (DN), of the base search entry in the Base DN form field.
This entry is the search root for users and groups in the domain. For example,
CN=Users,DC=mydomain,DC=com
Configuring the groups allowed to authenticate
Use this procedure to configure the groups allowed to authenticate to the RSC.
■
To add groups allowed to authenticate into the RSC, select the Add Group button, then enter the
distinguished name of the group.
Optionally, if you are targeting a Microsoft Active Directory domain, you can additionally enter the
group’s security identifier (SID) string. In this case, groups fetched through their distinguished names
must also match the SID.
Log in with domain credentials
After the directory-based authentication is enabled and configured, users can log in to the RSC using
one of the following formats of user name.
● Distinguished name (DN) (for example, CN=John Smith,CN=Users,DC=mydomain,DC=com)
● Domain email address (for example, [email protected])
● Domain\username (for example, mydomain\johnsmith)
12
Chapter 2 Configuring the HP Remote System Controller

Managing user sessions
Follow this procedure to manage user sessions for HP Remote System Controller.
1. To view the current number of active sessions, select the user icon and expand Other active
sessions for this user.
2. To log out from all other sessions, select Log out from all other active sessions.
Managing user sessions 13

Accessing and controlling the remote host3
Learn how to use the HP Remote System Controller software interface to monitor and control a remote
host.
Control the remote host power
The HP Remote System Controller can directly manipulate the power button signal on the remote host to
control power.
The power options that are displayed are based on the remote host power status, which is determined
by looking at the remote host power button LED signals. For the power controls to function properly, you
should ensure that the 10-pin power and signal cable is connected to the remote host.
NOTE: Only certain Z by HP Desktop Workstation models currently support this feature. For a
complete list of supported features, see Supported features on page 2.
Turn on the remote host
Follow this procedure to turn on the remote host.
1. Click Host on the left side of the dashboard.
2. Click Power On in the Controls section.
The remote host turns on.
NOTE: You can start a KVM session at any time to view the remote host display. See Accessing the
remote host using KVM on page 15.
Turn off the remote host
Follow this procedure to turn off the remote host.
1. Select Host on the left side of the dashboard.
2. Do one of the following to turn off the remote host:
● Select Shutdown, which is similar to turning off the remote host with a short press of the power
button.
● Select Force Power Off, which is similar to turning off the remote host with a long press of the
power button.
NOTE: During the Shutdown operation, you can start a KVM session to monitor the progress of
the shutdown. See Accessing the remote host using KVM on page 15.
After the remote host has been turned off, a message is displayed to alert you that no video output has
been detected. Select OK to close the dialog, or select Restart to restart the remote host.
14
Chapter 3 Accessing and controlling the remote host

Restart the remote host
Use this procedure to restart the remote host.
1. Click Host on the left side of the dashboard.
2. Do one of the following:
● Click Restart. This action is equivalent to a short press of the remote host power button,
which triggers the operating system shutdown and power off according to the power button
configuration in the operating system. After the remote host is turned off, the Remote System
Controller automatically turns on the remote host.
● Click Force Restart. This action is equivalent to a long press of the remote host power button to
turn power off immediately, and then a short press of the power button to start the remote host.
NOTE: During the shutdown, you can start a KVM session to monitor progress.
While the remote host is turned off, a message displays to alert you that no video output has been
detected. The video stream displays automatically when the remote host restarts.
Stopping the boot process in the BIOS menu
To stop the boot process and enter the workstation BIOS menus, without having to manually connect
KVM and press the esc key to stop the boot, follow this procedure.
1. Access the embedded web interface of the Remote Systems Controller device.
2. In the Host screen, search for Stop the boot process in the BIOS menu switch.
3. Toggle the switch to the ON state to enable this feature.
4. Restart the remote host using the Restart button.
Accessing the remote host using KVM
You can use the keyboard, video, and mouse (KVM) functionality to access the remote host and control
functions remotely.
KVM hardware compatibility
Refer to the information below to determine the KVM hardware compatibility for your environment.
Table 3-1
KVM hardware compatibility
Function Non-Z remote host Z4, Z6, or Z8 G4 Z2 Mini, Z4, Z6, or Z8 G9
Video resolution in pixels and
frames per second
Up to 1920 × 1200 at 60 fps Up to 1920 × 1200 at 60 fps Up to 1920 × 1200 at 60 fps
Mouse cursor Yes Yes, no physical monitor, or
two mirrored monitors
Yes, no physical monitor, or
two mirrored monitors
USB in preboot Yes Yes Yes
USB in operating system Yes Yes Yes
Support Noncertified, supported in
best effort approach
Certified, minimum firmware
2.90, full KVM support
Certified, full KVM support
Restart the remote host 15
Using the KVM menu
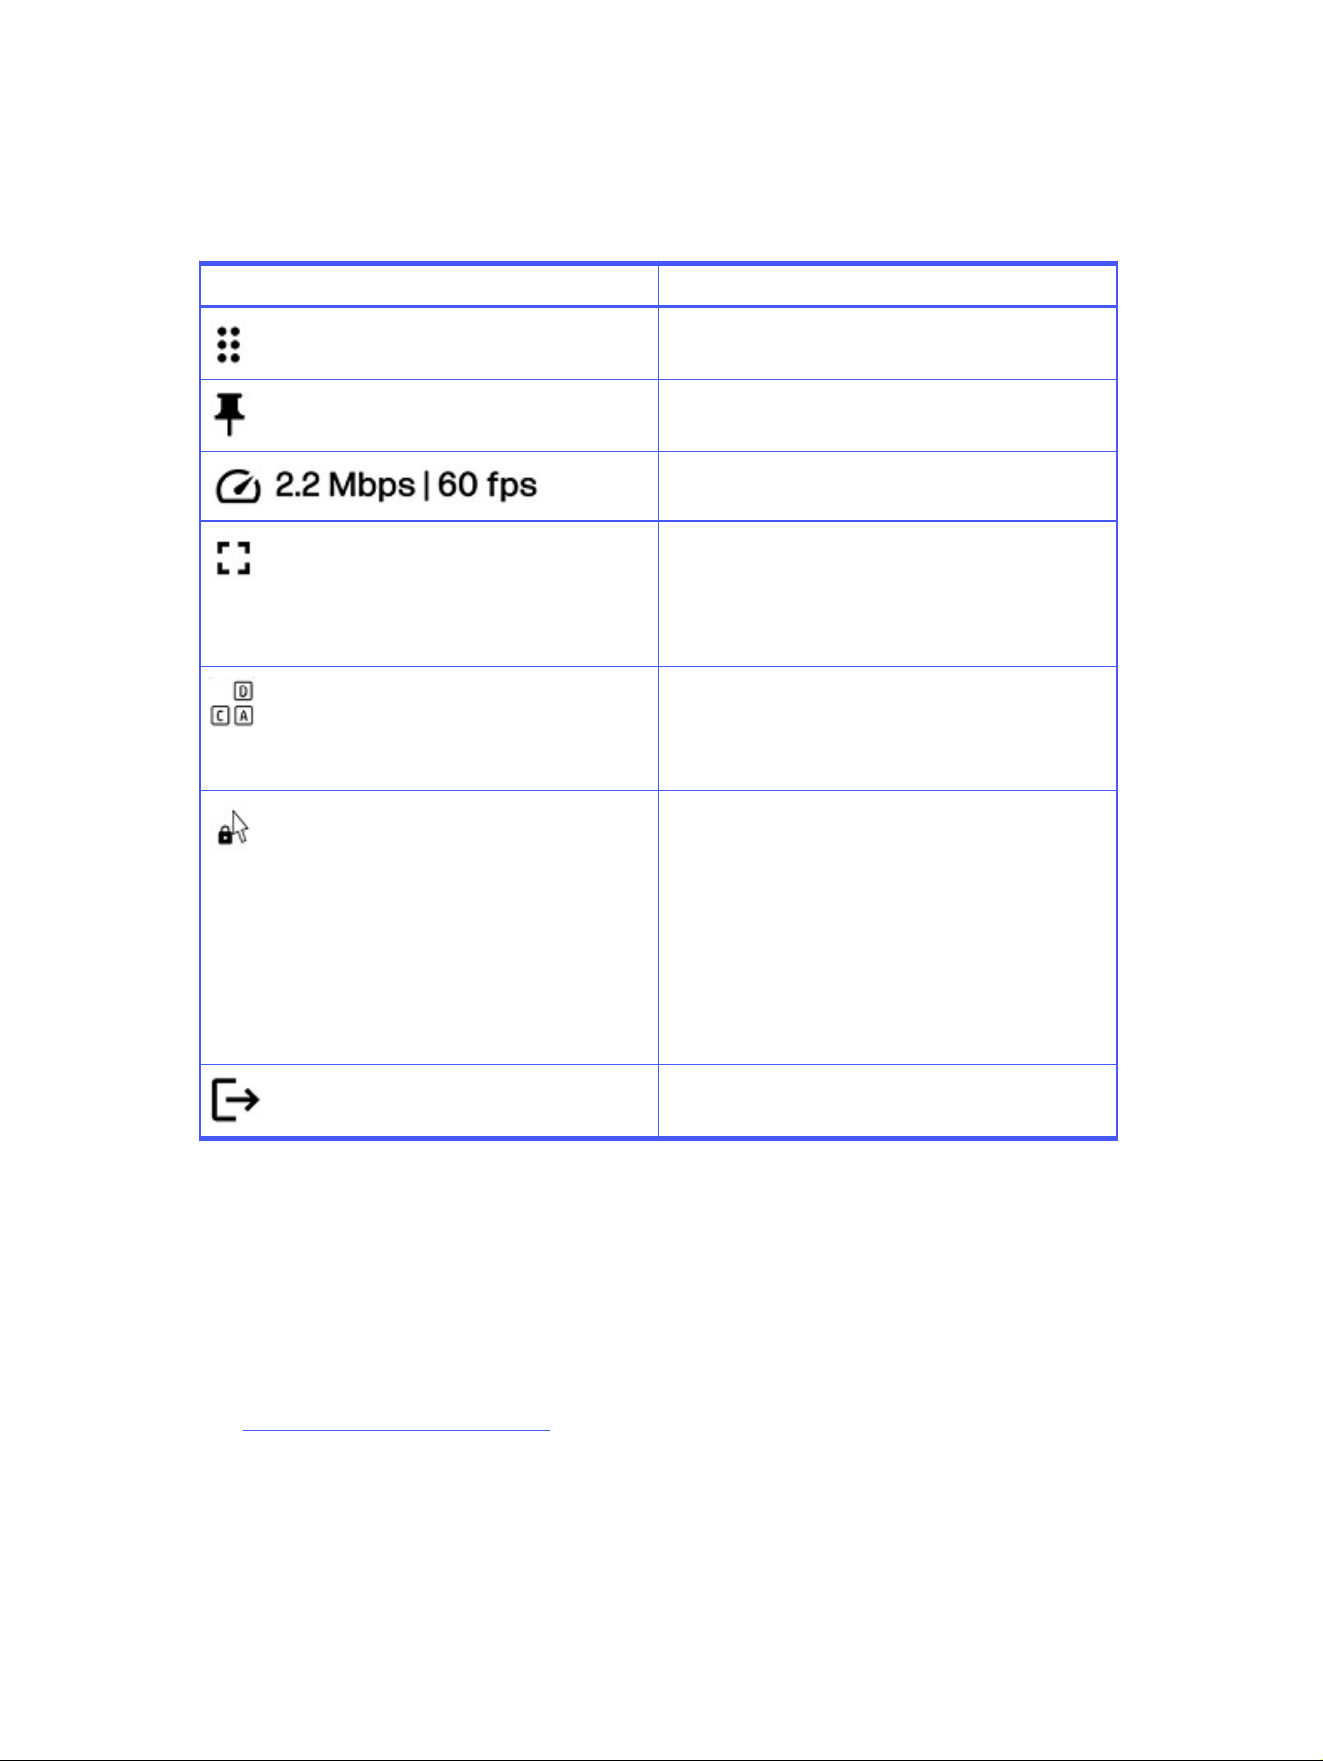
Use the KVM floating menu to perform the following tasks on the remote system.
Table 3-2 KVM floating menu tasks
Icon Definition
Select and hold the Drag icon to move the KVM floating
menu.
Click the Pin icon to make the KVM menu visible at all
times.
Displays the connection speed and the frames per
second for the current session.
Click the Fullscreen icon to view the remote session in
fullscreen mode. Click it again to exit fullscreen mode.
NOTE: While the current sessions is in fullscreen mode,
you can execute common key press combinations on the
remote system, for example, alt + tab.
Click the Ctrl + Alt + Del icon to execute the ctrl + alt + del
key press combination on the managed host.
NOTE: To use other key press combinations on the
managed host, use your keyboard in fullscreen mode.
Click the Pointer Lock icon to control the cursor directly
only on the managed host. Press esc to return to your
local cursor. If you are in fullscreen mode, press esc for
two seconds to recover your cursor.
NOTE: Due to some application limitations, Pointer Lock
mode activates the relative mouse mode as an
alternative method to send mouse coordinates to the
managed host. For example, mouse pointer positioning
with some BIOS interfaces and some Linux® login
screens only works properly using relative mouse
coordinates.
Click the Exit icon to close the remote session.
Start a KVM session
Follow this procedure to start a KVM session.
1. Click Host on the left side of the dashboard.
2. Click Start Session (KVM) in the Controls section.
The KVM session appears in a new window and remains active as long as the remote host is turned on.
See Using the KVM menu on page 16 for a complete list of the KVM menu options.
Using KVM
Follow these recommendations when you are working in a KVM session.
16
Chapter 3 Accessing and controlling the remote host

Using the keyboard
See the following recommendations for using the keyboard during a KVM session.
● Use the same keyboard layout on your local and remote host. If there are keyboard layout
mismatches, some key presses might be incorrectly sent to the remote host.
● To ensure that key press combinations are correctly sent to the remote host, HP recommends that
you use a Chrome or Microsoft Edge browser in fullscreen mode. If you are not in fullscreen mode,
some key press combinations might not be sent correctly.
Viewing the video
See the following recommendations for viewing the video during a KVM session.
● The video on the remote host behaves like a physical monitor. The DisplayPort video stream is sent
to the KVM browser window. The maximum resolution is 1920 × 1200.
● Because BIOS and pre-boot are displayed only in the primary physical monitor, you must ensure that
the controller cable is connected to the primary display port on the remote host for the best quality
video.
● If both the local monitor and the Remote System Controller require video streams, HP recommends
that you use a DisplayPort splitter adapter that duplicates the DisplayPort stream from the primary
display port to both the local monitor and the Remote System Controller mDP input.
● For optimum operating system desktop visualization with one or more physical monitors attached,
HP recommends that you set duplicate monitors at the operating system level.
NOTE: The cursor might not behave as expected on the lock screen for this configuration due to
operating system limitations.
Using the mouse
See the following recommendations for using the mouse during a KVM session.
● Mouse movements and button presses are sent to the remote host. In the default mode, both the
local and remote mouse cursors are visible. You can turn on the pointer lock mode by clicking the
Pointer Lock icon in the toolbar. This mode hides your local cursor and moves the remote
cursor using relative coordinates, which might be required by some applications, for example, some
BIOS interfaces.
● If the remote cursor does not move, HP recommends that you use the pointer lock mode feature in
the toolbar. To exit pointer lock mode, press the esc key. When you are in fullscreen mode, press and
hold the esc key for two seconds to exit pointer lock mode.
Mounting a virtual drive using Virtual Media
You can use the Virtual Media functionality to mount a drive image, such as ISO files, and present it to
the host as if it were physically attached. This drive can be used as a boot target by the BIOS, making it
useful for reimaging the host workstation.
Using Virtual Media
Follow the steps in the following sections to use an image file as a virtual media in the host.
Using the keyboard
17

Choosing a Virtual Media Mode
You choose between these modes for accessing the contents of an image file.
● Upload an image file to the RSC internal storage.
● Instruct the RSC to download a file from a network location.
● Streaming a file from a network location.
The RSC has limited internal storage: The maximum file size for the download and upload methods is 4.7
GB. Larger files should use the streaming option.
Mounting the file
Follow this procedure to mount an image from the file menu.
■
After the file is in the RSC internal storage, or the streaming target has been defined, mount the
image from the file menu by toggling the Mount key.
Only one file can be mounted at a time. If a previously unmounted image is mounted and another
image was already mounted, a confirmation dialog is displayed to confirm that you want to unmount
the previous image.
The host detects that a new drive is being attached if an operating system is running. You can also target
the virtual device as a boot target, if the image is capable of being booted.
Unmounting the file
Use this procedure to unmount the file.
■
Toggle the Mount key to unmount a file.
The file is still available for mounting again.
Removing a file
Use this procedure to remove a file from the RSC storage.
■
Select the trash bin icon next to a file to either delete the file from the RSC storage, or remove the
streaming target setup. In either case, the file will be unmounted first.
Navigating and configuring BIOS settings
This section describes how to navigate and configure BIOS settings.
Accessing BIOS settings
Follow the instructions outlined here to enter the Host BIOS settings section.
1. Select Host on the left side of the dashboard.
18
Chapter 3 Accessing and controlling the remote host

2. Scroll down to locate the Host BIOS settings.
NOTE: The Host BIOS Settings that is displayed depends on what the host BIOS supports. HP
recommends that you update the host BIOS to the latest version to gain access to the most number of
BIOS settings.
Navigating the BIOS interface
The BIOS settings page offers an overview and several navigational tabs.
Table 3-3 BIOS settings tabs
Tab Description
Main General information about your system and basic settings
Advanced Detailed settings for your hardware components
Security Security features such as passwords and boot integrity settings
Boot Settings Configuration for boot order and other options
Other Additional settings not covered in the other tabs.
Adjusting BIOS settings
Follow this procedure to adjust BIOS settings.
1. Select a tab to view and adjust settings.
2. Navigate through the available options and adjust settings as needed.
3. Select Apply Changes. A dialog box opens with the following options:
● Apply Now and Reboot: Immediately applies the changes and restarts your system.
● Apply on Next Reboot: Changes are applied the next time you restart your system.
● Cancel: No changes are applied, and you are returned to the previous screen.
IMPORTANT:
● Changes in BIOS settings are not applied until you choose to apply them. Be sure to select the
correct option in configuration modal.
● Incorrect BIOS configurations can affect system stability. If you are uncertain, use the default
settings or consult support documentation.
Booting to the virtual media drive
Use this procedure to boot to the virtual media drive in HP Remote System Controller.
The Virtual Media drive is attached through USB to the host workstation.
■
To enable booting from the Virtual Media drive, perform either of the following procedures:
● Select the USB boot option in the BIOS boot menu.
Navigating the BIOS interface
19

● Change the boot order BIOS configuration so that the USB option is located at the top.
20 Chapter 3 Accessing and controlling the remote host

Administering the Remote System
Controller
4
Learn about the HP Remote System Controller administration features.
Perform a factory reset
When you perform a factory reset, the HP Remote System Controller resets to its initial configuration
state. Complete one of the following tasks to perform a factory reset:
NOTE: The HP Remote System Controller does not retain any user data after a factory reset.
● Click Factory Reset in the Operations section in the RSC Settings tab.
● While the Remote System Controller is turned on, use a paper clip to carefully push the button (long
press) in the RESET hole on the bottom of the controller (external), or on the PCIe bracket (internal)
for 10 seconds.
● Use a Redfish API call
NOTE: When you perform a factory reset, the connection is closed and all configuration data
pertaining to that particular Remote System Controller is not retained.
NOTE: A factory reset does not remove any firmware updates.
Restart the Remote System Controller
Complete one of the following tasks to restart the Remote System Controller:
NOTE: When you restart the Remote System Controller, it interrupts any activity that is currently
occurring.
● Using a paper clip, carefully push the reset button (short press) in the RESET hole on the bottom of
the controller (external), or on the PCIe plate (internal).
● Disconnect, and then reconnect the power cord from the Remote System Controller.
● Restart the controller using API or through the web interface.
Administering the Remote System Controller
21

SpecificationsA
This section contains technical specifications for the physical aspects of your product, such as the
weight and dimensions, as well as required environmental operating conditions and power source
ranges.
Input power
The power information in this section can be helpful if you plan to travel internationally with the HP
Remote System Controller.
NOTE: The AC power source must be rated at 100 - 240 V, 50/60 Hz. Although the Remote System
Controller can be powered from a standalone AC power source, it should be powered only with the AC
adapter that is supplied and approved by HP for use with the HP Remote System Controller, or by DC
power from the remote host.
The HP Remote System Controller operates with the AC power adapter within the following
specifications.
Table A-1
Input power ratings
Input Power Rating
Operating voltage and current 40 W; Input 100–240 V 1.2 A, 50/60 Hz. Output is 12.0 V at
3.33 A.
NOTE: This product is designed for IT power systems in Norway with phase-to-phase voltage not to
exceed 240 V rms.
NOTE: You can find the HP Remote System Controller operating voltage and current on the regulatory
label on the device.
Operating environment
This section provides information about the recommended operating environment for the HP Remote
System Controller.
Table A-2
Operating environment specifications
Factor Metric U.S.
Temperature
Operating 0°C to 40°C with AC adapter, 0° C to
50°C without AC adapter
32°F to 104°F with AC adapter, 32°F to
122°F without AC adapter
Nonoperating –40°C to 60°C –40°F to 140°F
Relative humidity (noncondensing)
Operating 10% to 90% 10% to 90%
22 Appendix A Specifications

Table A-2 Operating environment specifications (continued)
Factor Metric U.S.
Nonoperating 5% to 95% 5% to 95%
Maximum altitude (unpressurized)
Operating –15 m to 5000 m –50 ft to 16,404 ft
Nonoperating –15 m to 12,192 m –50 ft to 40,000 ft
Operating environment 23

TroubleshootingB
Use this information to troubleshoot issues with the HP Remote System Controller.
LED display status
The HP Remote System Controller LEDs indicate the following status information.
Remote host LED display status
The remote host LED indicates the following status information.
Table B-1
Remote host LED status
LED status Definition
Off Remote host is off.
Slow green blinking Remote host is powered on.
Solid red Remote host detects an error.
Remote System Controller LED status
The Remote System Controller LED indicates the following status information.
Table B-2
Remote System Controller LED status
LED status Definition
Off Remote System Controller is off.
Slow green blinking Remote System Controller is starting up.
Fast green blinking Remote System Controller is updating.
Solid green Remote System Controller has completed startup.
Solid red Remote System Controller error.
Network LED display status
The network LED indicates the following status information.
Table B-3
Network LED status
LED status Definition
Off Network is not connected.
Slow green blinking Network is connected.
Solid red Network error.
24 Appendix B Troubleshooting

Issue resolution
Use this information to resolve HP Remote System Controller issues.
Table B-4 Issue resolution
Issue Cause Solution
Login Invalid user name or
password
Wrong user name or
password
● Make sure that you use
admin (all lowercase)
as the user name, and
that you are typing
the correct password,
including capitalized
letters.
NOTE: If you forget the
password, you can reset
the Remote System
Controller to the factory
default settings and go
through initial setup
again.
Server could not be
contacted.
The certificate has changed. Refresh the login page.
Power state Unknown or inconsistent ● 10-pin cable is not
connected.
● State on while the
remote host is in
suspended mode.
● Reconnect the 10-pin
cable.
● Wake up the remote
host by moving the
mouse or pressing a key
on the keyboard.
Health status Status is critical. Hardware component failure
detected by remote host
hardware.
Check Logs menu for detailed
information.
Host information Host information is unknown. ● Remote host is not
supported.
● Remote host firmware is
not supported.
● See Supported features
on page 2 for more
information.
● Update the firmware for
the remote host.
NOTE: The Remote System
Controller must be up and
running when the remote host
starts to see the remote host
information.
Issue resolution 25

Table B-4 Issue resolution (continued)
Issue Cause Solution
KVM No video detected and
remote host power status is
On.
● Video cable is
disconnected or
damaged.
● Remote host is sleeping
or suspended.
● Reconnect or replace
the video cable.
● Wake up the remote
host by moving the
mouse or pressing a key
on the keyboard.
Remote cursor is not showing
up or is not aligned to the
local cursor.
Remote host cursor might
be positioned by another
monitor.
● Activate Pointer Lock
mode in the KVM toolbar.
See. Using the KVM
menu on page 16.
● Unplug the monitor
attached to the remote
host.
No video is detected and the
remote host power is on.
● Video cable might
be damaged or
disconnected.
● Remote host is sleeping
or suspended.
● Reconnect or replace
the video cable.
● Wake up the remote
host by moving the
mouse or pressing a key
on the keyboard.
Screen is visible but the
keyboard and mouse do not
respond.
● Interrupted remote
session.
● USB cable disconnected
or damaged.
Do one of the following:
● Exit the session from the
KVM toolbar, and then
start a new session.
● Use the Remote
System Controller
restart function to reset
the controller.
Image in the KVM video
stream shows only a blank
screen.
This might happen in the
preboot state when a monitor
is attached to the remote
host and the main screen is
not on the Remote System
Controller.
Unplug the monitor or make
sure that the Remote System
Controller is the primary
display.
Firmware update "Update Failed" message is
displayed.
● Possible mismatch in
the firmware image
by selecting Internal
to update an external
controller and vice
versa.
● A previous version of the
firmware was selected
for updating rather than
the current version.
Make sure that you
are selecting the current
firmware version.
Date and time Wrong date and time are
displayed.
NTP configuration with invalid
data.
Make sure that the NTP
server is valid, for example,
Time.google.com.
Factory reset After a factory reset, the
current Remote System
Controller firmware version is
still shown.
The factory reset does
not downgrade Remote
System Controller firmware
to the factory state. Only
configuration and data revert
to the factory state.
Expected behavior, no action
required.
26 Appendix B Troubleshooting

Table B-4 Issue resolution (continued)
Issue Cause Solution
Restart The browser reload does not
return to the login page when
you restart.
The Remote System
Controller is still starting up.
Wait a few minutes, and then
reload the page manually.
Browser does not reload
automatically.
The Remote System
Controller is still starting up.
Wait a few minutes, and then
reload the page manually.
Passwords You are unable to change the
password.
● You cannot use the last
24 passwords as your
new password.
● Password does not
meet the minimum
requirements.
Create a new password
following the guidelines in
Configure the password on
page 10.
Network Connectivity Cannot access the link loop
address to start configuring
the RSC for the first time.
The network does not
have a DHCP, and the
client computer running the
browser does not have a
route to the link loop network.
Manually add a route in your
client computer operating
system. IPv4 link-local
addresses are assigned from
address block 169.254. 0.0/16
(169.254. 0.0 through 169.254.
255.255). You need to add a
route or a subnet to be able to
access RSC addr with the
URL
https://rsc-%3cserial%3e.local
. It is an operating system task
in the machine where you
have started the browser.
RSC Power RSC is not powered in all host
states.
The BIOS settings are
configured to remove power
in certain states.
Maximum Power Savings:
This setting removes power
to the RSC when the host
is powered off. Therefore, HP
recommends that you disable
the setting when an RSC is
installed.
Energy/Performance BIOS
Control = BIOS Controls EPB:
On the ZCentral 4R, Z4 G4,
Z6 G4, and Z8 G4 workstation
platforms, power for the RSC
is directed from the front USB
ports. This setting can affect
the power that is normally
delivered to the front USB
ports. To ensure that the BIOS
maintains power to the RSC,
HP recommends that you
use the
BIOS Controls EPB
setting.
If you cannot resolve an issue, contact HP Support for further assistance. Be sure that you have the
Remote System Controller log files available. See Generating log file information on page 27.
Generating log file information
If you are not able to resolve an issue, you can generate log files to use when you contact support for
more assistance.
Generating log file information
27

1. Click RSC Settings on the left side of the dashboard.
2. Click Download Diagnostics Data to create a .zip file containing the internal log files. You can use
these log files to help resolve issues in the following areas:
● Firmware
● Network
● Security
● Services
● Remote access
● API
28
Appendix B Troubleshooting

AccessibilityC
HP's goal is to design, produce, and market products, services, and information that everyone
everywhere can use, either on a standalone basis or with appropriate third-party assistive technology
(AT) devices or applications.
HP and accessibility
Because HP works to weave diversity, inclusion, and work/life into the fabric of the company, it is
reflected in everything HP does. HP strives to create an inclusive environment focused on connecting
people to the power of technology throughout the world.
Finding the technology tools you need
Technology can unleash your human potential. Assistive technology removes barriers and helps you
create independence at home, at work, and in the community. Assistive technology helps increase,
maintain, and improve the functional capabilities of electronic and information technology.
For more information, see Finding the best assistive technology on page 30.
The HP commitment
HP is committed to providing products and services that are accessible for people with disabilities.
This commitment supports the company's diversity objectives and helps ensure that the benefits of
technology are available to all.
The HP accessibility goal is to design, produce, and market products and services that can be effectively
used by everyone, including people with disabilities, either on a standalone basis or with appropriate
assistive devices.
To achieve that goal, this Accessibility Policy establishes seven key objectives to guide HP actions. All
HP managers and employees are expected to support these objectives and their implementation in
accordance with their roles and responsibilities:
● Raise the level of awareness of accessibility issues within HP, and provide employees with the
training they need to design, produce, market, and deliver accessible products and services.
● Develop accessibility guidelines for products and services, and hold product development groups
accountable for implementing these guidelines where competitively, technically, and economically
feasible.
● Involve people with disabilities in the development of accessibility guidelines and in the design and
testing of products and services.
● Document accessibility features, and make information about HP products and services publicly
available in an accessible form.
● Establish relationships with leading assistive technology and solution providers.
● Support internal and external research and development that improves assistive technology
relevant to HP products and services.
Accessibility
29

● Support and contribute to industry standards and guidelines for accessibility.
International Association of Accessibility Professionals (IAAP)
IAAP is a not-for-profit association focused on advancing the accessibility profession through
networking, education, and certification. The objective is to help accessibility professionals develop and
advance their careers and to better enable organizations to integrate accessibility into their products
and infrastructure.
As a founding member, HP joined to participate with other organizations to advance the field of
accessibility. This commitment supports HP’s accessibility goal of designing, producing, and marketing
products and services that people with disabilities can effectively use.
IAAP will make the profession strong by globally connecting individuals, students, and
organizations to learn from one another. If you are interested in learning more, go to
http://www.accessibilityassociation.org to join the online community, sign up for newsletters, and learn
about membership options.
Finding the best assistive technology
Everyone, including people with disabilities or age-related limitations, should be able to communicate,
express themselves, and connect with the world using technology. HP is committed to increasing
accessibility awareness within HP and with our customers and partners.
Whether it’s large fonts that are easy on the eyes, voice recognition that lets you give your hands a rest,
or any other assistive technology to help with your specific situation—a variety of assistive technologies
make HP products easier to use. How do you choose?
Assessing your needs
Technology can unleash your potential. Assistive technology removes barriers and helps you create
independence at home, at work, and in the community. Assistive technology (AT) helps increase,
maintain, and improve the functional capabilities of electronic and information technology.
You can choose from many AT products. Your AT assessment should allow you to evaluate several
products, answer your questions, and facilitate your selection of the best solution for your situation.
You will find that professionals qualified to do AT assessments come from many fields, including those
licensed or certified in physical therapy, occupational therapy, speech/language pathology, and other
areas of expertise. Others, while not certified or licensed, can also provide evaluation information.
You will want to ask about the individual's experience, expertise, and fees to determine if they are
appropriate for your needs.
Accessibility for HP products
These links provide information about accessibility features and assistive technology, if applicable and
available in your country or region, that are included in various HP products. These resources will help
you select the specific assistive technology features and products most appropriate for your situation.
● HP Aging & Accessibility: Go to http://www.hp.com, type Accessibility in the search box. Select
Office of Aging and Accessibility.
● HP computers: For Windows® products, go to http://www.hp.com/support, type Windows
Accessibility Options in the Search our knowledge search box. Select the appropriate
operating system in the results.
● HP Shopping, peripherals for HP products: Go to http://store.hp.com, select Shop, and then select
Monitors or Accessories.
30
Appendix C Accessibility

If you need additional support with the accessibility features on your HP product, see Contacting
support on page 33.
Additional links to external partners and suppliers that may provide additional assistance:
● Microsoft Accessibility information (Windows and Microsoft Office)
● Google Products accessibility information (Android, Chrome, Google Apps)
Standards and legislation
Countries worldwide are enacting regulations to improve access to products and services for persons
with disabilities. These regulations are historically applicable to telecommunications products and
services, PCs and printers with certain communications and video playback features, their associated
user documentation, and their customer support.
Standards
The US Access Board created Section 508 of the Federal Acquisition Regulation (FAR) standards to
address access to information and communication technology (ICT) for people with physical, sensory, or
cognitive disabilities.
The standards contain technical criteria specific to various types of technologies, as well as
performance-based requirements which focus on functional capabilities of covered products. Specific
criteria cover software applications and operating systems, web-based information and applications,
computers, telecommunications products, video and multimedia, and self-contained closed products.
Mandate 376 – EN 301 549
The European Union created the EN 301 549 standard within Mandate 376 as an online toolkit for public
procurement of ICT products. The standard specifies the accessibility requirements applicable to ICT
products and services, with a description of the test procedures and evaluation methodology for each
requirement.
Web Content Accessibility Guidelines (WCAG)
Web Content Accessibility Guidelines (WCAG) from the W3C's Web Accessibility Initiative (WAI) helps
web designers and developers create sites that better meet the needs of people with disabilities or
age-related limitations.
WCAG advances accessibility across the full range of web content (text, images, audio, and video)
and web applications. WCAG can be precisely tested, is easy to understand and use, and allows web
developers flexibility for innovation. WCAG 2.0 has also been approved as ISO/IEC 40500:2012.
WCAG specifically addresses barriers to accessing the web experienced by people with visual, auditory,
physical, cognitive, and neurological disabilities, and by older web users with accessibility needs. WCAG
2.0 provides characteristics of accessible content:
● Perceivable (for instance, by addressing text alternatives for images, captions for audio, adaptability
of presentation, and color contrast)
● Operable (by addressing keyboard access, color contrast, timing of input, seizure avoidance, and
navigability)
● Understandable (by addressing readability, predictability, and input assistance)
● Robust (for instance, by addressing compatibility with assistive technologies)
Standards and legislation
31

Legislation and regulations
Accessibility of IT and information has become an area of increasing legislative importance.
The HP policy landscape website provides information about key legislation, regulations, and standards
in the following locations:
● United States
● Canada
● Europe
● Australia
Useful accessibility resources and links
These organizations, institutions, and resources might be good sources of information about disabilities
and age-related limitations.
NOTE: This is not an exhaustive list. These organizations are provided for informational purposes
only. HP assumes no responsibility for information or contacts you encounter on the internet. Listing on
this page does not imply endorsement by HP.
Organizations
These organizations are a few of the many that provide information about disabilities and age-related
limitations.
● American Association of People with Disabilities (AAPD)
● The Association of Assistive Technology Act Programs (ATAP)
● Hearing Loss Association of America (HLAA)
● Information Technology Technical Assistance and Training Center (ITTATC)
● Lighthouse International
● National Association of the Deaf
● National Federation of the Blind
● Rehabilitation Engineering & Assistive Technology Society of North America (RESNA)
● Telecommunications for the Deaf and Hard of Hearing, Inc. (TDI)
● W3C Web Accessibility Initiative (WAI)
Educational institutions
Many educational institutions, including these examples, provide information about disabilities and
age-related limitations.
● California State University, Northridge, Center on Disabilities (CSUN)
● University of Wisconsin - Madison, Trace Center
32
Appendix C Accessibility

● University of Minnesota computer accommodations program
Other disability resources
Many resources, including these examples, provide information about disabilities and age-related
limitations.
● ADA (Americans with Disabilities Act) Technical Assistance Program
● ILO Global Business and Disability network
● EnableMart
● European Disability Forum
● Job Accommodation Network
● Microsoft Enable
HP links
These HP-specific links provide information that relates to disabilities and age-related limitations.
HP comfort and safety guide
HP public sector sales
Contacting support
HP offers technical support and assistance with accessibility options for customers with disabilities.
NOTE: Support is in English only.
● Customers who are deaf or hard of hearing who have questions about technical support or
accessibility of HP products:
– Use TRS/VRS/WebCapTel to call (877) 656-7058 Monday through Friday, 6 a.m. to 9 p.m. Mountain
Time.
● Customers with other disabilities or age-related limitations who have questions about technical
support or accessibility of HP products:
– Call (888) 259-5707 Monday through Friday, 6 a.m. to 9 p.m. Mountain Time.
Other disability resources
33

Index
A
access security 10
accessibility 29, 30, 32, 33
accessibility needs
assessment 30
administration 21
assistive technology (AT)
finding 30
purpose 29
AT (assistive technology)
finding 30
purpose 29
C
connecting the computer
(external) 4
connecting to AC power 5
controller 7
customer support,
accessibility 33
D
disconnect the controller 6
DNS Server Assignment
configure 9
F
factory reset 21
features 2
first use 7
front components (internal) 4
front panel components 2
G
getting started
software features 1
H
HP Assistive Policy 29
I
input power 22
interface 14
International Association of
Accessibility Professionals 30
IP assignment
configure 8
issue resolution 25
K
KVM
icons 16
menu 16
using 15
KVM compatibility 15
KVM session 16
keyboard 17
starting 16
L
LEDs 24
left panel components 3
logs 27
M
mouse 17
O
operating environment 22
P
passwords 10
power off
remote system 14
power on
remote system 14
Proxy settings
configure 9
R
Remote System Controller LED
status 24
requirements 1
resources, accessibility 32
restart 21
restart remote host 15
right panel components 3
S
Section 508 accessibility
standards 31
specifications 22
standards and legislation,
accessibility 31
T
TLS certificates 10
troubleshooting 24
turn off
remote system 14
turn on
remote system 14
U
using the interface 8
V
video 17
34
Index


