AT2 Series Two-way Radio
User Manual
Please read this manual carefully before using the product and retain it for future reference
Android IOS
Radio Overview
Keys
Press
Press and hold
SK1 Vol+ Increase volume, step 1 Monitor Function
SK2
Vol- Decrease volume, step 1
Menu Mode/Confirm Button
TK Exit menu Power On/Off
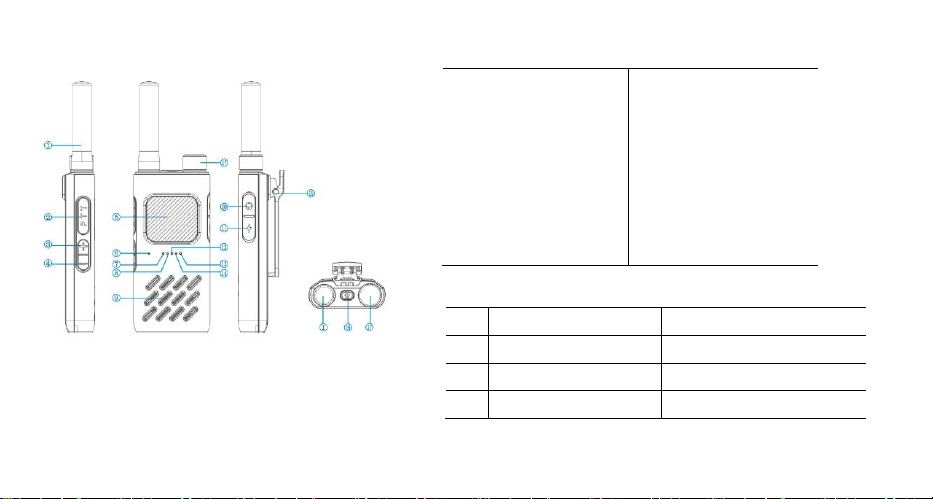
1. Antenna
2. PTT button
3. Volume Up/Monitor
4. Volume Down/Menu
5. PTT button
6. Microphone
7. TX indicator (red light)
8. RX indicator (green light)
9.Built-in speaker
10. Headset/Programming port
11. Type-C charging port
12. BT Bluetooth indicator (blue
light)
13. Charging complete (white
light)
14. Charging in progress (white
light)
15. Back clip
16. Power switch/Exit key
17. Encoder/Menu list toggle
Status Indications
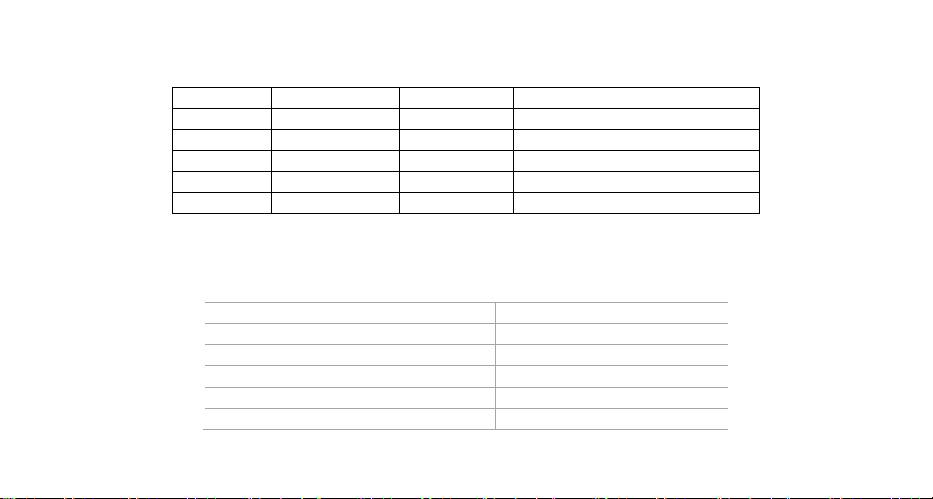
The top LED will help you to identify the current radio status.
Always on
Not lit
Bright
7
Red light
Transmitting...
Standby
------
8
Green light
Receiving...
Standby
Scanning
12
Blue light Bluetooth enabled Bluetooth off Bluetooth disconnected
13
White light
Charging complete
Charging...
-----
14
White light Charging... Battery failure (no battery detected)
|Packing List
Welcome to ALEVITES Two-way Radio. Before use, we recommend:
Please unpack carefully and check that you have received the following items. If any item is missing or damaged, contact your dealer.
Item
Quantity (PCS)
Radio
1
Battery
1
Charge Cable 1
Belt Clip
1
User Manual
1
Note: Figures in this manual are for reference only.

|Before Use
1. Attaching the Battery
a. Use the approved battery to avoid the risk of explosion.
b. Dispose of the used battery according to "Precautions for Disposal" in the Safety Information Booklet.
2. Attaching the Belt Clip
Align the belt clip bracket with the clip slot on the back of the radio. Slide it downward until the clip locks into place.
To remove, press the locking pivot on the clip to disengage it, then slide the clip upward until it separates from the radio.
3. Attaching the Audio Accessory
Open the audio jack cover, and then insert the audio accessory into the jack.
4. Charging the Battery
Use the approved charger to charge the battery.
NOTE: The remaining lithium-ion battery power is limited to 30% pursuant to the new lithium battery shipment regulation approved by the International Air Transport
Association (IATA).
Before initial use, charge the battery.
Use the USB Type-C charge cable to connect the radio with battery attached to the power adapter, power bank, or PC.
When powered off, the indicator light glows red during charging and turns green when fully charged.
When powered on, the top notification bar’s battery icon displays green during charging, the top indicator glows red, and it switches to green once fully charged.

|Basic Operations
1. Turn the radio on and off
Press and hold the key to turn the radio on or off.
• Turning the radio on will be accompanied by the voice prompt “Power on” and the current channel.
• Turning the radio off will be accompanied by the voice prompt “Power off”.
2. Eight-level volume adjustment.
• Press the SK1 key (Vol+) to increase the volume by one level each time.
• Press the SK2 key (Vol-) to decrease the volume by one level each time.
3. Channel Selection
Rotate the channel knob to select channels. Turning clockwise changes the channel incrementally by one. Turning counterclockwise decreases the channel incrementally by one.
1)Voice announcement of channel sequence. For digital channels, prompts “Digital”.
2)Empty Channel (Unedited Parameters) Alert Prompt.
4. Call Service
Making a Call
• Rotate the channel knob to select a channel, then press and hold the PTT button to initiate a call. The red indicator light remains solid.
• Release the PTT button and wait to receive the call.
Receiving Calls
• For analog calls, the RX indicator illuminates solid green.
• For digital calls, the RX indicator illuminates solid amber (combination of red and green lights).
Dual PTT Transmission Function

1)The PTT button on the left side of the radio is the Main PTT, which always transmits and receives on the main channel.
2)The PTT button on the front of the radio is the sub-PTT.
• When the sub-PTT is set to follow the PTT channel, it functions identically to the Main PTT, transmitting on the current channel.
• When the sub-PTT is set to a designated channel, it always transmits on the preset channel. The radio enables dual-channel monitoring, simultaneously monitoring the main
channel (current channel) and the channel associated with the sub-P T T.
5. Monitor
Press and hold [SK1] (Monitor function) to keep the speaker active (disable squelch) and listen for faint wireless signals. Release to exit monitoring mode.
6. Frequency Sweep Function
• Rotate the channel knob to Channel 1 to turn off the radio.
• Press and hold the 【PTT】 + 【SK1】 keys to power on. The voice prompt “On (Frequency Sweep Function On), Power On” will sound, entering the sweep function with
the green LED flashing. Press the 【SK1】 key to hear a “beep” and see the green LED turn solid, initiating the sweep. Upon completion, frequencies are automatically stored
with two “beep” tones. (Green LED stays on during scanning; flashes when stopped)
• Rotate the channel knob to Channel 2. Briefly press [SK1] to resume scanning. After completion, frequencies are stored with two “beep” tones and indicator lights behave as
described above.
• Rotate the channel knob to Channel 3, briefly press the [SK1] key to continue scanning. Upon completion, the frequency will be automatically stored with a “beep-beep” sound
prompt. Repeat this process sequentially up to Channel 16.
• After completing the scanning task, power off and restart to exit scan mode, concluding the scanning operation.
7. Wireless Cloning Function
• Rotate the channel knob to Channel 2 and turn off the radio.
• On the transmitter, press and hold [PTT] + [SK1] to power on. The transmitter will beep once to enter wireless cloning mode.
• On the receiver, press and hold [PTT] + [SK1] to power on. The receiver will beep once to enter wireless cloning mode.
• Press the transmitter's [PTT] button. The red light stays on, and the receiver's green light automatically stays on. All configuration parameters for channels 1-16 on the receiver
are copied. The transmitter beeps twice (“beep-beep”) to indicate copying is complete. Both units' indicator lights turn off, automatically powering back on. The copying task is

finished.
8. Low Battery Warning
The low battery warning alerts you that the battery requires recharging.
If the battery level drops to a predetermined threshold during transmission, the radio will emit a “Please replace battery” tone every 10 seconds. When the beep sounds, the
radio will cease transmission.
|Menu Functions
Press and hold [SK2] to enter the menu. Options will be accessed or adjusted sequentially (encoder can rotate clockwise or counterclockwise). Press [SK2] to save and return to
the previous menu level. Briefly press the top power button to exit menu mode. If no menu operation occurs within 30 seconds, the device will automatically exit menu mode.
Transmit Power
Rotate the encoder until the voice prompt announces “High Power” (current power state). Briefly press [SK2] to confirm. Rotate the encoder to toggle between “High Power”
and “Low Power”. Briefly press [SK2] to confirm and return to the main menu. Briefly press the top power button to exit the menu.
Channel Type
Rotate the encoder until the voice prompt announces “Analog Channel” (current channel type). Briefly press the [SK2] key to confirm. Rotate the encoder to toggle between
“Analog Channel” and “Digital Channel”. Briefly press the [SK2] key to confirm and return to the main menu. Briefly press the top power button to exit the menu.
Voice Activation Switch
Rotate the encoder until the voice prompt says “VOX Off” (current voice control status). Briefly press the [SK2] key to confirm. Rotate the encoder to toggle between “VOX On”
and “VOX Off”. Briefly press the [SK2] key to confirm and return to the main menu. Briefly press the top power button to exit the menu.
Bluetooth Switch
Rotate the encoder until the voice prompt “Bluetooth On” (current Bluetooth status) is heard. Briefly press the [SK2] key to confirm. Rotate the encoder to toggle between
“Bluetooth On” and “Bluetooth Off”. Briefly press the [SK2] key to confirm and return to the main menu. Briefly press the top power button to exit the menu.
Enable Bluetooth functionality; the Bluetooth indicator (blue light) illuminates. This enables pairing with compatible terminal devices via the app. In radio mode, configure:

1)Channel parameters: Frequency, Subtone, Occupied Bandwidth, Frequency Hopping, Talk Mode, Key.
2)Radio functions: Squelch Level, Voice Switch, Power-Saving Mode, Prompt Tone, Noise Reduction Switch, Voice Activation Switch, and Voice Activation Level.
Scanning Activation
Rotate the encoder until the voice prompt “Scanning” is heard. Briefly press SK2 to confirm. The voice prompt “Scanning Started” will sound, and scanning will begin (configure
scanning and add channels via the app). Press the top power button to exit scanning.
TEST: Did not enter scan function. During scanning, the device cycles through channels in the scan list with the indicator light flashing slowly.
Channel Memory Access
Rotate the encoder until the voice prompt “Channel Memory” is heard. Press SK2 briefly to confirm. The voice will announce the current channel memory information
(receive/transmit frequency, transmit power, sub-tone, etc.). Press SK2 briefly to replay. Press the top power button briefly to exit the menu.
TEST: Sub-audio announcement abnormal (announces “analog”; normal is “analog sub-audio and value”)
Battery Level Access
Rotate the encoder until the voice prompt says “High battery” (current battery status). Press SK2 briefly to replay. Press the top power button briefly to exit the menu.
|Download the App
Scan the QR code on the front page of the manual or visit the download links:
Android: https://play.google.com/store/apps/details?id=com.aewt.app.friends
iOS: https://apps.apple.com/us/app/ola-radio/id6740220159
User Registration
Open the OLA App (Ola Radio), enter your mobile phone number, or authorize a third-party application to complete the user registration.
Binding the Device
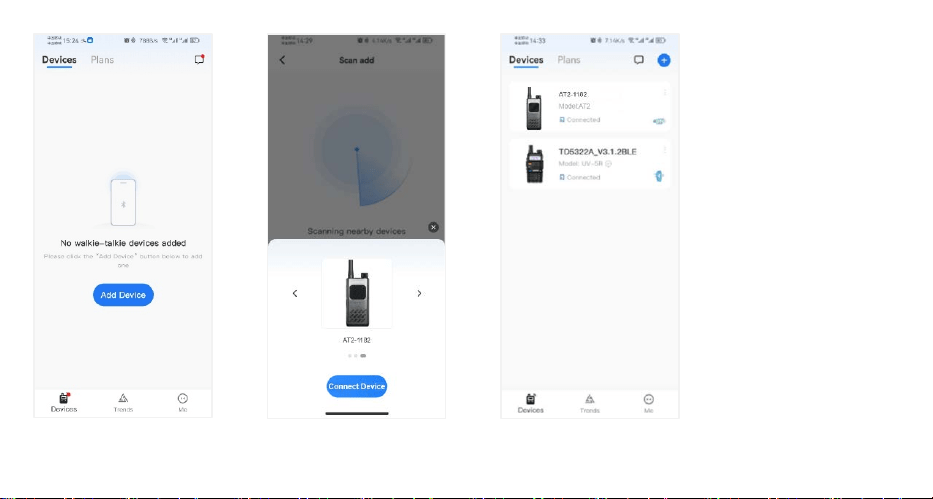
1. Turn on the walkie-talkie, and double-press the power button to turn on the Bluetooth function. The walkie-talkie will play a voice prompt, and the blue LED will flash.
2. Go to the "Device" page, and tap [Add Device] to proceed to the Bluetooth page.
3. The app will search for and detect the AT2, then pop up an AT2 information card. Tap "Connect Device" to bind the device.
4. After successful binding, it will automatically return to the Device page and display the AT2 device information.
|Bluetooth Control
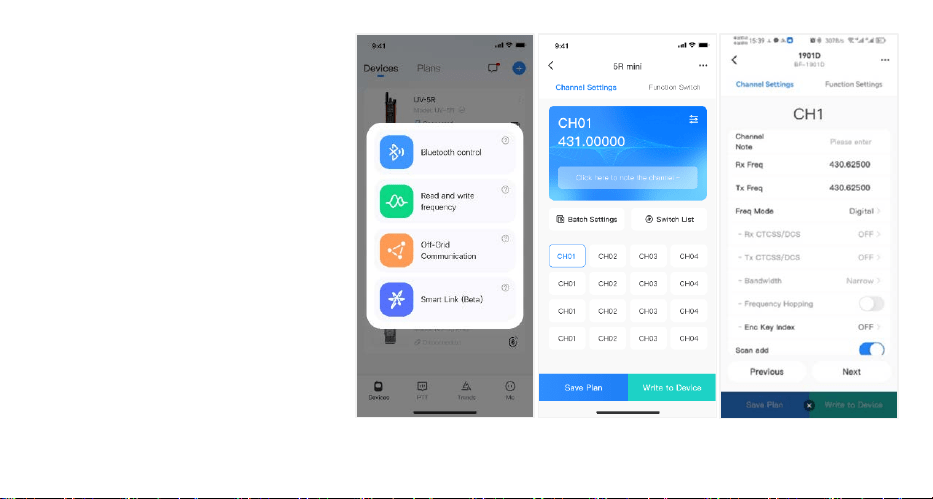
1. Turn on the walkie-talkie and enable Bluetooth to connect
to the app. Tap the "AT2" device card and select "Bluetooth
Control" to enter the Bluetooth Control page.
2. Tap a channel button at the bottom to switch the walkie-
talkie to that channel. Tap the settings icon in the upper right
corner of a channel to edit its parameters.
3. Tap the [Batch Settings] button to configure parameters
for multiple channels at once.
4. Tap the [Switch to List] button to go to the channel list and
view all channel parameters. On the list page, tap "Back" to
return to the control page.
5. Tap the [Function Switch] button to enter the function
parameter settings page. Tap the corresponding parameter to
toggle it on/off or adjust its settings.
6. Tap the […] icon in the upper right corner to open the
menu, and select [Save Profile]. This saves the current walkie-
talkie configuration parameters as a profile file, making it
convenient to reuse the channel and function parameters on
other devices.
7. Tap the […] icon in the upper right corner to open the
menu, and select [Factory Reset] to restore the walkie-talkie to its default factory settings.
|Wireless Programming
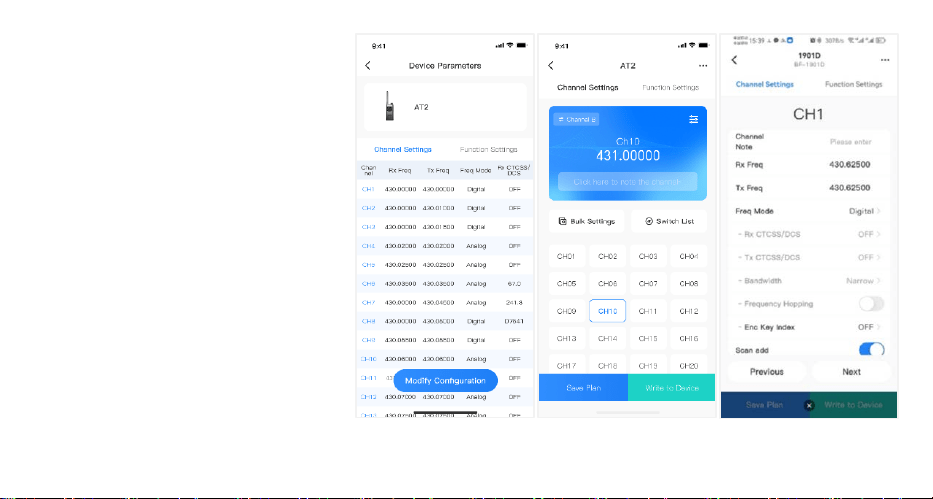
1. Turn on the walkie-talkie and enable Bluetooth to connect
to the app. Tap the "AT2" device card and select "
Wireless
Programming " to enter the Device Reading page.
2. Wait a few seconds, and the bottom of the screen will
display all channel and function parameters stored on the
current device. You can view them by switching tabs and
scrolling up and down.
3. Tap [Edit Configuration] to enter the Device Parameter
Editing - Channel Settings page.
4. Tap a channel button at the bottom to select a channel.
Tap the settings icon in the upper right corner of the channel
to edit its parameters.
5. Tap the [Batch Settings] button to generate or modify
multiple channels at once.
6. Tap the [Switch to List] button to go to the channel list and
view all channel parameters. On the list page, tap "Back" to
return to the control page.
7. Tap the [Function Switch] button to enter the function
parameter settings page. Tap the corresponding parameter to
toggle it on/off or adjust its settings.
8. Tap the […] icon in the upper right corner to open the menu, and select [Factory Reset] to restore the walkie-talkie to its default factory settings.
9. Tap the […] icon in the upper right corner to open the menu, and select [Apply to Other Models]. You can select a different device model and synchronize all parameters to

match that model's configuration.
10. Tap [Save Profile] at the bottom to save the current walkie-talkie configuration parameters as a profile file. This makes it convenient to reuse the channel and function
parameters on other device models.
11. Tap [Write to Device] at the bottom to write all parameters into the walkie-talkie currently connected via Bluetooth.
|Off-Grid Communication
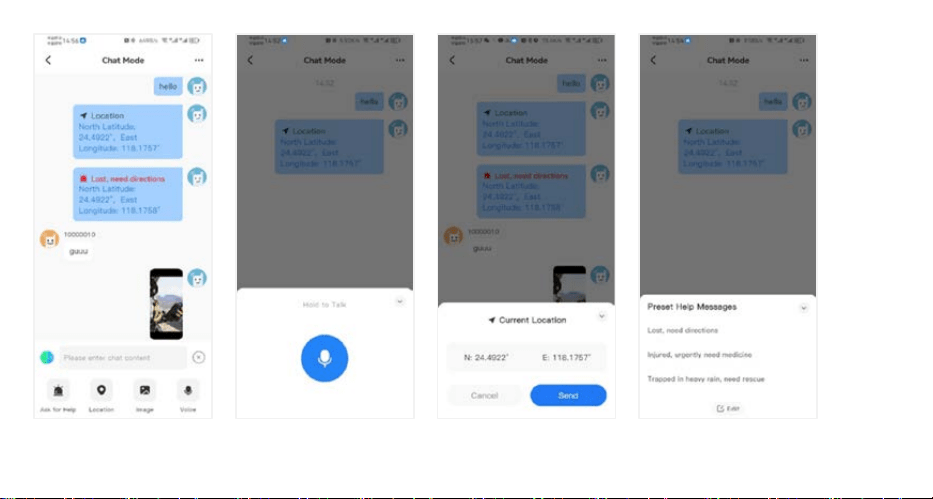
1. Turn on the walkie-talkie and enable Bluetooth to connect to the app. Tap the "AT2" device card and select "Off-Grid Communication" to enter the offline chat list page.
2. Tap the text box at the bottom of the screen to enter text, then tap the [Send] button to send the message.
3. Tap the [+] icon in the lower right corner and select [Help] to open the list of preset help messages. You can quickly select a preset or edit your own, then tap to send the help
message directly.
4. Tap the [+] icon in the lower right corner and select [Location]. This opens a pop-up displaying your current latitude and longitude coordinates to send as a location message.
5. Tap the [+] icon in the lower right corner and select [Photo]. Choose to take a picture or select one from your album, select the desired photo, and send it as a picture message.
6. Tap the [+] icon in the lower right corner and select [Microphone]. This opens a voice recording pop-up. Press and hold the microphone icon to start recording, and release it
to send the voice message.
7. Tap the [Walkie-Talkie] icon in the lower left corner to enter real-time intercom mode. Here you can switch channels and adjust frequencies; press and hold the PTT button
to directly initiate a transmission.
|Smart Link (Beta)
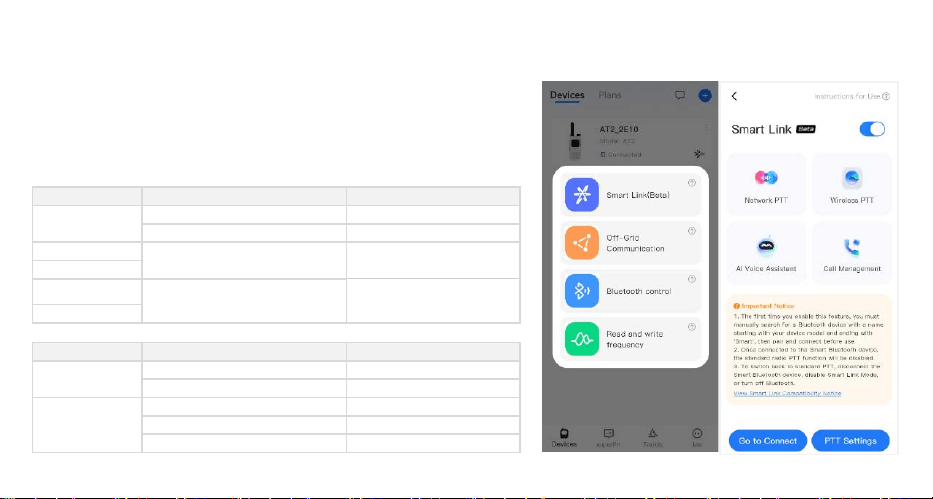
1. Turn on the walkie-talkie and enable Bluetooth to connect to the app. Tap the "AT2" device card and select "Smart Link (Beta)" to enter the Smart Link Mode page.
2. Tap the switch in the upper right corner to enable "Smart Link Mode ".
3. Tap the [Go to Connect] button in the lower left corner to jump to the phone's system Bluetooth
settings page. Search for and pair with the Bluetooth device whose name uses the device name as
a prefix and "Smart" as a suffix (e.g., DeviceName_Smart).
4. Tap the [PTT Settings] button in the lower right corner to open the "Main PTT Long Press Settings"
pop-up window, and select a compatible third-party network intercom app.
Options
Description
Supported OS
Zello
For "Zello PTT" control
Android, Android native
For "NSPTT" control
IOS、Android
Others1
For "Totalk PTT" and "NSPTT" control
iOS, Android, HarmonyOS NEXT,
Android Native
Others2
Others3
For "Totalk PTT" control Android, Android Native
Others4
5. Button Functions:
Button
Action
Function
Main PTT
Short Press
Reject Call (Incoming Call)
Long press
Network PTT (Configurable)
Sub PTT
Short Press
Answer Call (Incoming Call)
Double click
Wake Mobile AI
Long press
Network PTT
+ key
Short Press
Volume Up
- Key
Short Press
Volume Down
Note: This mode is an exploratory Beta feature. Due to the complex ecosystem of smartphones and apps, compatibility variations may exist. Once Smart Link Mode is enabled,
the walkie-talkie's conventional radio intercom and Off-Grid Communication functions will be temporarily unavailable. Disabling Smart Link Mode will restore the standard
intercom functions.
For more operating instructions on Smart Link Mode, please visit: https://docs.qq.com/pdf/DUUFITERRdk9weFpB
| Firmware Upgrade Tool
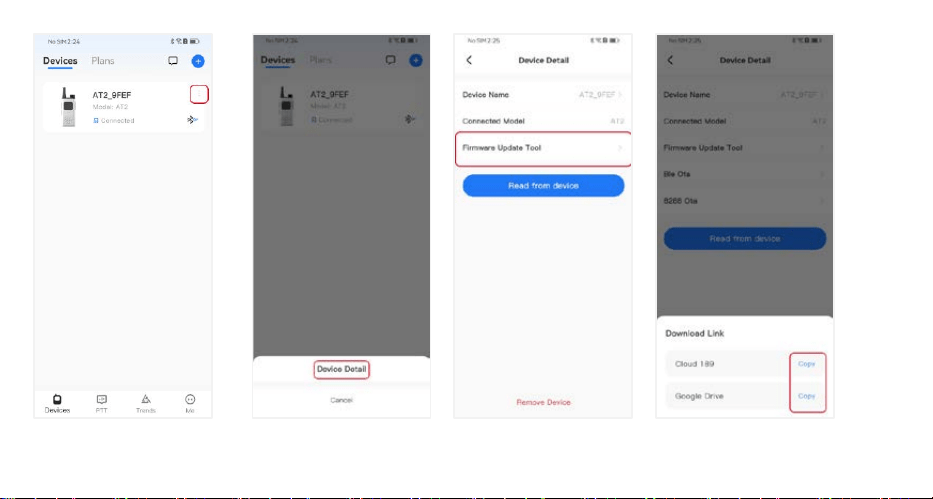
1. Open the app, tap the […] icon on the right side of the "AT2" device card, and select "Device Details" to enter the Device Details page.
2. Tap the [Firmware Upgrade Tool] menu to open the download link menu. Copy any cloud drive URL, paste it into your computer's browser, and download the firmware
upgrade software and the firmware package.
3. Turn off the walkie-talkie. Press and hold the [PTT + Volume Down] buttons, then press the power button to turn on the walkie-talkie and enter upgrade mode (the blue LED
will remain solid).
4. Connect the walkie-talkie to the computer using a USB to Type-C data cable, then open the programming software. (When the walkie-talkie is
in upgrade mode, the serial port status will display "Unknown - Not Connected").
5. Click [Firmware Upgrade] to open the firmware upgrade pop-up window, then click [Select File] to choose the downloaded .bin firmware file.
Finally, click the [Start] button to begin writing the firmware. Wait until the screen displays "Firmware Upgrade Successful" to complete the process.
For more operating instructions on app functions, please visit: https://docs.qq.com/pdf/DUWRZdHZid1JHZndX

| Safety and General Information
WARNING:
Changes or modifications to this unit not expressly approved by the party responsible for compliance could void the user’s authority to operate the equipment. This device
complies with Part 15 of the FCC Rules. Operation is subject to the following two conditions: 1) This device may not cause harmful interference, and 2) this device must accept
any interference received, including interference that may cause undesired operation.
NOTE: This equipment has been tested and found to comply with the limits for a Class B digital device, pursuant to Part 15 of the FCC Rules.
These limits are designed to provide reasonable protection against harmful interference in a residential installation. This equipment generates, uses and can radiate radio
frequency energy and, if not installed and used in accordance with the instructions, may cause harmful interference to radio communications. However, there is no guarantee
that interference will not occur in a particular installation.
If this equipment does cause harmful interference to radio or television reception, which can be determined by turning the equipment off and on, the user is encouraged to try
to correct the interference by one or more of the following measures:
• Reorient or relocate the receiving antenna.
• Increase the separation between the equipment and receiver.
• Connect the equipment into an outlet on a circuit different from that to which the receiver is connected.
• Consult the dealer or an experienced radio/TV technician for help.
Safety Information for Radios
Your wireless handheld portable transceiver contains a low power transmitter. When the talk key is pushed, it sends out radio frequency (RF) signals. The device is authorized to
operate at a duty factor not to exceed 50%. In August 1996, the Federal Communications Commissions(FCC) adopted RF exposure guidelines with safety levels for handheld
wireless devices. a minimum distance of 2.5 cm must be maintained when held-to-face, and body-worn operations are restricted to the approved original accessories (belt clip),
a minimum distance of 0 cm. Do not use this device when antenna shows obvious damages.
Important
FCC RF Exposure Requirements: For body-worn operation, this radio has been tested and meets the FCC RF exposure guidelines when used with Pofung accessories supplied or
designated for this product. Use of other accessories may not ensure compliance with FCC RF exposure guidelines. Use only the supplied antenna. Unauthorized antennas,
modifications or attachments could damage the transmitter and may violate FCC regulations.

Normal Position
Hold the transmitter approximately 2 inches from your face and speak in a normal voice, with the antenna pointed up and away.
FCC Part 15.21 Warning Statement-
NOTE: THE GRANTEE IS NOT RESPONSIBLE FOR ANY CHANGES OR MODIFICATIONS NOT EXPRESSLY APPROVED BY THE PARTY RESPONSIBLE FOR COMPLIANCE. SUCH
MODIFICATIONS COULD VOID THE USER’S AUTHORITY TO OPERATE THE EQUIPMENT.
Warning: modification of this device to receive cellular radiotelephone service signals is prohibited under FCC Rules and federal law.
IC RSS-GEN
This device complies with Industry Canada license-exempt RSS standard(s). Operation is subject to the following two conditions:
(1) this device may not cause interference, and
(2) this device must accept any interference, including interference that may cause undesired operation of the device.
Le présent appareil est conforme aux CNR d’Industrie Canada applicables aux appareils radio excempts de licence. L;exploitation est autorisée aux deux condtions suivantes:
(1) l’appariel ne doit pas produire de brouillage, et
(2) l’utilisateur de l’appareil doit accepter tout brouillage radioélectrique subi, même si le brouillage est susceptible d’en compromettre le fonctionnement.
Radiation Exposure Statement:
Under ISEDC regulations, this radio transmitter may only operate using the antenna that is affixed to the radio transmitter. Use only the supplied antenna. Unauthorized
antennas, modifications, or attachments could damage the transmitter and may void the user’s authority to operate the radio.
Any changes of modifications not expressly approved by the party responsible for compliance could void the user’s ability to operate the equipment.
SAR tests are conducted using standard operating positions accepted by the FCC/ISEDC with the device transmitting at its highest certified power level in all tested frequency
bands.
Although the SAR is determined at the highest certified power level, the actual SAR level of the device while operating can be well below the maximum value.
This device has been tested and certified to not exceed the exposure limit established by the FCC/ISEDC. Tests for each device are performed in positions and locations (e.g. at
the ear and worn on the body) as required by the FCC/ISEDC.
For body worn operation, this device has been tested and meets the FCC/ISEDC RF exposure guidelines when used with an accessory designated for this product or when used
with an accessory that contains no metal and that positions the handset a minimum of 10mm from the body. Non-compliance with the above restrictions may result in a

violation of RF exposure guidelines.
| Appendix A. – Technical Specifications
General Part
Channels 30
Sub-Codes 50 CTCSS Tones/ 105 DCS Codes
Frequency Range 406.1-468.0MHz
Working temperature -10℃ to +40℃
Operation Voltage DC 3.7 V ±10%
Operation Mode Simplex
Transmitter Part
RF Output Power 2W
FM Modulation 11K0F3E@12.5KHz
Adjacent Channel Power 60dB @ 12.5KHz
Transmission current ≤1200mA
Receiver Part
Receive Sensitivity 0.25μV (12dB SINAD)
Adjacent Channel Selectivity ≥55dB@12.5KHz
Inter Modulation and Rejection ≥55dB@12.5KHz
Conducted Spurious Emission ≤-57dB@12.5KHz
Rated Audio Power Output 0.75W @8 ohms
Receive current ≤380mA
Rated Audio Distortion ≤5%
NOTE: All specifications may be modified without prior notice or liability.
| Appendix B. – Trouble shooting guide
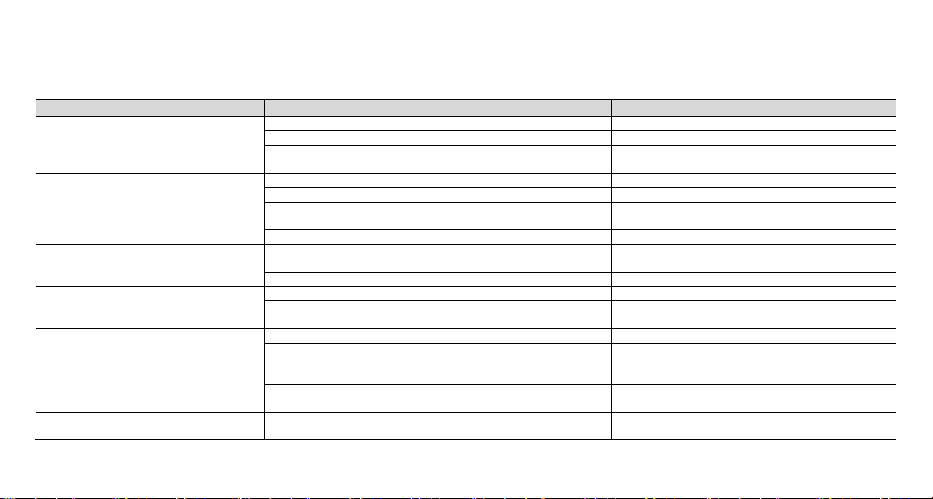
Phenomena
Analysis
Solution
You cannot turn on the radio.
The battery may be installed improperly.
Remove and reattach the battery.
The battery power may run out.
Recharge or replace the battery.
The battery may suffer from poor contact caused by dirty or damaged
battery contacts.
Clean the battery contacts or replace the battery.
During receiving, the voice is weak or
intermittent.
The battery voltage maybe low.
Recharge or replace the battery.
The volume level may be low.
Increase the volume.
The antenna maybe loose or maybe installed incorrectly.
Turnoff the radio, and then remove and reattach the
antenna.
The speaker maybe blocked.
Clean the surface of the speaker.
You cannot communicate with other group
members.
The frequency or signaling type maybe inconsistent with that of other
members.
Verify that your TX/RX frequency and signaling type are
correct.
You may be too far away from other members.
Move towards other members.
You hear unknown voices or noise.
You may be interrupted by radios using the same frequency.
Change the frequency, or adjust the squelch level.
The radio in analog mode maybe set with no signaling.
Request your dealer to set signaling for the current
channel to avoid interference
You are unable to hear anyone because of too
much noise and hiss.
You may be too far away from other members.
Move towards other members.
You may be in an unfavorable position. For example, your
communication may be blocked by high buildings or blocked in an
underground area.
Move to an open and flat area, restart the radio, and try
again.
It may be the result of external disturbance (such as electromagnetic
interference).
Stay away from equipment that may cause interference.
The radio keeps transmitting.
VOX may be turned on or the headset is not installed in place
Turn off the VOX function. Check that the headphones are
in place.
NOTE: If the above solutions cannot fix your problems, or you may have some other queries, please contact your dealer for more technical support.

|Care and Cleaning
To guarantee optimum performance as well as a long service life of the radio, follow the tips below.
1. Product Care
• Do not pierce or scrape the radio.
• Keep the radio far away from substances that can corrode the circuitry.
• Do not hold the radio by the earpiece cable.
• Close the accessory connector cover when no accessory is in use.
2. Product Cleaning
Turn off the radio and remove the battery before cleaning.
• Clean up the dust and fine particles on the radio surface with a clean and dry lint-free cloth or a brush regularly.
• Use neutral cleanser and a non-woven fabric to clean the keys, knobs, and front case after long-time use. Do not use chemical preparations such as stain removers,
alcohol, sprays, or oil preparations, so as to avoid surface case damage.
• Make sure that the radio is completely dry before use.

ALERVITES
PO FUNG ELECTRONIC (HK) INTERNATONAL GROUP COMPANY LIMITED All rights reserved.
Address: Room 1508, 15/F, Office Tower II, Grand Plaza, 625 Nathan Road, Kowloon, Hong Kong
Printed version:AT2-BT-FCC_V1.0