
MPJ-00004 - Issue 02 DRAFT - DRAFT
Tait Open2 Portables
User Manual

Contents
Contents 2
Contact Information 5
Preface 6
Scope of Manual 6
Alerts 6
Associated Documentation 6
1 For Your Safety 7
1.1 Radio Frequency Exposure 7
1.2 Battery Warning 7
1.3 Charger Warning 7
1.4 Blocking of Radio and Battery Vent Holes 7
2 Before Using Your Radio 8
2.1 Attaching Labels to the Radio or Battery 8
2.2 Attaching or Removing the Antenna 8
2.3 Charging the Battery Before First Use 9
2.4 Attaching or Removing the Battery 9
2.5 Attaching or Removing the Belt Clip 9
2.6 Attaching an Audio Accessory 10
3 Radio Controls and Indicators 11
3.1 Radio Controls 11
3.2 Radio Display Icons 12
3.3 Status Indicators 13
3.4 Channel and Zone Identification 13
3.5 Low Battery Warning 13
3.6 Voice Annunciation 13
4 Getting Started 14
4.1 Powering On and Off 14
4.2 Navigating the Menus 14
4.3 Long and Short Keypress Actions 14
4.4 Keypad Lock 15
4.5 Adjusting the Volume 15
Tait Open2 Portables User Manual
Tait International Ltd - Issue 02 DRAFT - DRAFT
2

4.6 Using the PTT Key 15
4.7 Receiving a Call 15
4.8 Selecting Channels, Talkgroups, and Zones 16
4.8.1 Selecting a channel 16
4.8.2 Selecting a talkgroup 16
4.8.3 Selecting a zone 16
4.9 Scanning 17
4.9.1 Turning scanning on or off 17
4.9.2 Making a call while scanning 17
4.10 Making a Call 18
4.10.1 Making a call using channels and talkgroups 18
4.10.2 Making an individual call 18
4.10.3 Limiting call time 18
4.11 Emergency Operation 19
4.11.1 Emergency callout 19
4.11.2 Emergency cycling 20
4.12 Lone Worker Alert 21
4.12.1 Receiving a lone worker alert 22
5 Radio Menu Options 23
5.1 Missed Calls 23
5.2 Zones 23
5.3 Individual Call 23
5.4 Talkgroups 24
5.5 Services 24
5.5.1 Messages 24
5.5.2 Status update 25
5.5.3 Call alert 25
5.5.4 Radio check 26
5.5.5 Radio monitor 26
5.5.6 Radio inhibit 27
5.5.7 Radio uninhibit 27
5.6 Bluetooth 27
5.6.1 Bluetooth device compatibility 27
5.6.2 Pairing a device with the radio 28
5.6.3 Managing Bluetooth devices 28
5.6.4 Power-on status 28
5.7 Own Location 29
Tait Open2 Portables User Manual
Tait International Ltd - Issue 02 DRAFT - DRAFT
3

5.8 Program Groups 29
5.9 Time and Date 30
5.10 Radio Settings 31
5.10.1 Functions 31
5.10.2 Alert settings 31
5.10.3 Display settings 31
5.10.4 Radio info 32
5.11 Diagnostics 32
6 Additional Features 33
6.1 Low Power Transmit 33
6.2 Talkaround 33
7 General Care 34
7.1 Cleaning the Radio 34
7.2 Cleaning the Battery Contacts 34
8 Troubleshooting 35
Simplified Declaration of Conformity 36
Tait Open2 Portables User Manual
Tait International Ltd - Issue 02 DRAFT - DRAFT
4

Tait Communications
Corporate Head Office
Tait International Limited
P.O. Box 1645
Christchurch
New Zealand
Imported into the EU by:
Tait Communications
GmbH
Strozzigasse 10/14
Vienna 1080
Austria
Imported into the UK by:
Tait Europe Limited
Unit A, Buckingway Business
Park
Anderson Road
Swavesey
Cambridge, CB24 4UQ
United Kingdom
For the address and telephone number of regional offices,
refer to our website: www.taitcommunications.com
Copyright and Trademarks
All information contained in this document is the property
of Tait International Limited. Allrights reserved. This
document may not, in whole or in part, be copied,
photocopied, reproduced, translated, stored, or reduced to
any electronic medium or machine-readable form, without
prior written permission from Tait International Limited.
The word TAIT, AXIOM, and the TAIT logo are trademarks
of Tait International Limited.
All trade names referenced are the service mark,
trademark or registered trademark of the respective
manufacturers.
By using a Tait product you are agreeing to be bound by
the terms of the Tait Software Licence Agreement. Please
read the Tait Software Licence Agreement carefully before
using this Tait product. If you do not agree to the terms of
the Tait Software Licence Agreement, do not use the Tait
Product. The full agreement is available at
www.taitcommunications.com/our-resources/legal#Tait_
Software_Licence_Agreement
Disclaimer
There are no warranties extended or granted by this
document. Tait International Limited accepts no
responsibility for damage arising from use of the
information contained in the document or of the
equipment and software it describes. It is the responsibility
of the user to ensure that use of such information,
equipment and software complies with the laws, rules and
regulations of the applicable jurisdictions.
Enquiries and Comments
If you have any enquiries regarding this document, or any
comments, suggestions and notifications of errors, please
contact your regional Tait office.
Updates of Manual and Equipment
In the interests of improving the performance, reliability or
servicing of the equipment, Tait International Limited
reserves the right to update the equipment or this
document or both without priornotice.
Intellectual Property Rights
This product may be protected by one or more patents or
designs of Tait International Limited together with their
international equivalents, pending patent or design
applications, and registered trade marks, for a complete list
please check www.taitcommunications.com/our-
resources/legal#Intellectual_Property
The AMBE+2™ voice coding Technology embodied in this
product is protected by intellectual property rights
including patent rights, copyrights and trade secrets of
Digital Voice Systems, Inc. This voice coding Technology is
licensed solely for use within this Communications
Equipment. The user of this Technology is explicitly
prohibited from attempting to decompile, reverse engineer,
or disassemble the Object Code, or in any other way
convert the Object Code into a human-readable form.
Environmental Responsibilities
Tait International Limited is an environmentally
responsible company that supports waste
minimization, material recovery and restrictions
in the use of hazardous materials. TheEuropean
Union’s Waste Electrical and Electronic
Equipment (WEEE) Directive and UK WEEE Regulation
2013 requires that this product be disposed of separately
from the general waste stream when its service life is
over. For more information about how to dispose of your
unwanted Tait product, visit the Tait WEEE website at
www.taitcommunications.com/our-
resources/compliance#WEEE. Please be environmentally
responsible and dispose through the original supplier, or
contact Tait International Limited.
Tait will comply with environmental requirements in
other markets as they are introduced.
Contact Information
Tait Open2 Portables User Manual
Tait International Ltd - Issue 02 DRAFT - DRAFT 5
Preface
Scope of Manual
This manual provides information on the use of Tait Open2 Portables. It is intended for the
end user of the product.
Alerts
Please follow exactly any instruction that appears in the text as an ‘alert’. An alert provides
necessary safety information as well as instructions about the proper use of the product. This
manual uses the following types of alert:
Warning This alert is used when there is a hazardous situation which, if not
avoided, could result in serious injury, death, or irreversible equipment damage.
Caution This alert is used when there is a hazardous situation which, if not avoided,
could result in minor or moderate injury. Incorrectly performed procedures could
result in unexpected equipment behavior, malfunction, or damage.
This alert is used to highlight information that may be required to ensure
procedures are performed correctly, or to draw attention to actions that can
improve efficiency or effectiveness.
Associated Documentation
The following associated documentation for this product is available on the One Tait Portal
website, https://onetaitportal.taitcommunications.com.
l
401-00153-xx Portables Safety and Compliance Information
l
MPJ-00003-xx Tait Open2 Portables Single Battery Charger User Guide
l
MPJ-00006-xx Tait Open2 Portables Single Battery Charger Safety Information
The characters xx represent the issue number of the documentation.
Technical notes are published from time to time to describe applications for Tait products, to
provide technical details not included in manuals, and to offer solutions to any problems that
arise. Look for new or updated technical notes on the One Tait Portal website.
Tait Open2 Portables User Manual
Tait International Ltd - Issue 02 DRAFT - DRAFT
6
1 For Your Safety
Before using the radio, read the safety, compliance, and user information supplied with each
radio, battery, and charger. Make sure you are familiar with any warnings or specific operating
conditions.
1.1 Radio Frequency Exposure
Warning This radio emits radio frequency (RF) energy. Read the Safety and
Compliance Information (401-00153-xx) supplied with this radio, ensuring you
comply with the conditions listed, before use.
1.2 Battery Warning
Warning This radio uses a Lithium-ion (Li-ion) battery. If the battery is damaged or
handled in an unsafe manner it can cause personal injury and/or damage to
property. Read the Li-ion Battery Safety Information (MPC-00006-xx), included with
your battery, before use.
1.3 Charger Warning
Warning Incorrect use of the battery charger can damage the battery and/or radio
and cause personal injury or damage to property. Read the Battery Charger Safety
Information (MPJ-00006-xx) and the Battery Charger User Guide (MPJ-00003-xx),
included with your battery charger, before use.
1.4 Blocking of Radio and Battery Vent Holes
Warning Do not cover the battery vent hole or the vent hole on the radio chassis.
l
If the vent on the battery is obstructed the battery may explode causing
personal injury and/or damage to property.
l
If the vent on the radio chassis is obstructed, radio operation may deteriorate
and the radio may be damaged.
Vent holes are found on the back of the radio chassis and front surface of the battery. They
are not accessible when the battery and radio are assembled together.
Tait Open2 Portables User Manual
Tait International Ltd - Issue 02 DRAFT - DRAFT
7
2 Before Using Your Radio
Before using your radio follow the instructions in this section to fit any additional labels,
attach the antenna, belt clip, and audio accessory, and charge the battery for the first time.
2.1 Attaching Labels to the Radio or Battery
Caution Do not affix additional labels to the surfaces between the radio chassis
and the battery. The fit between these surfaces is intentionally firm and any added
thickness will damage the points of attachment between radio and battery.
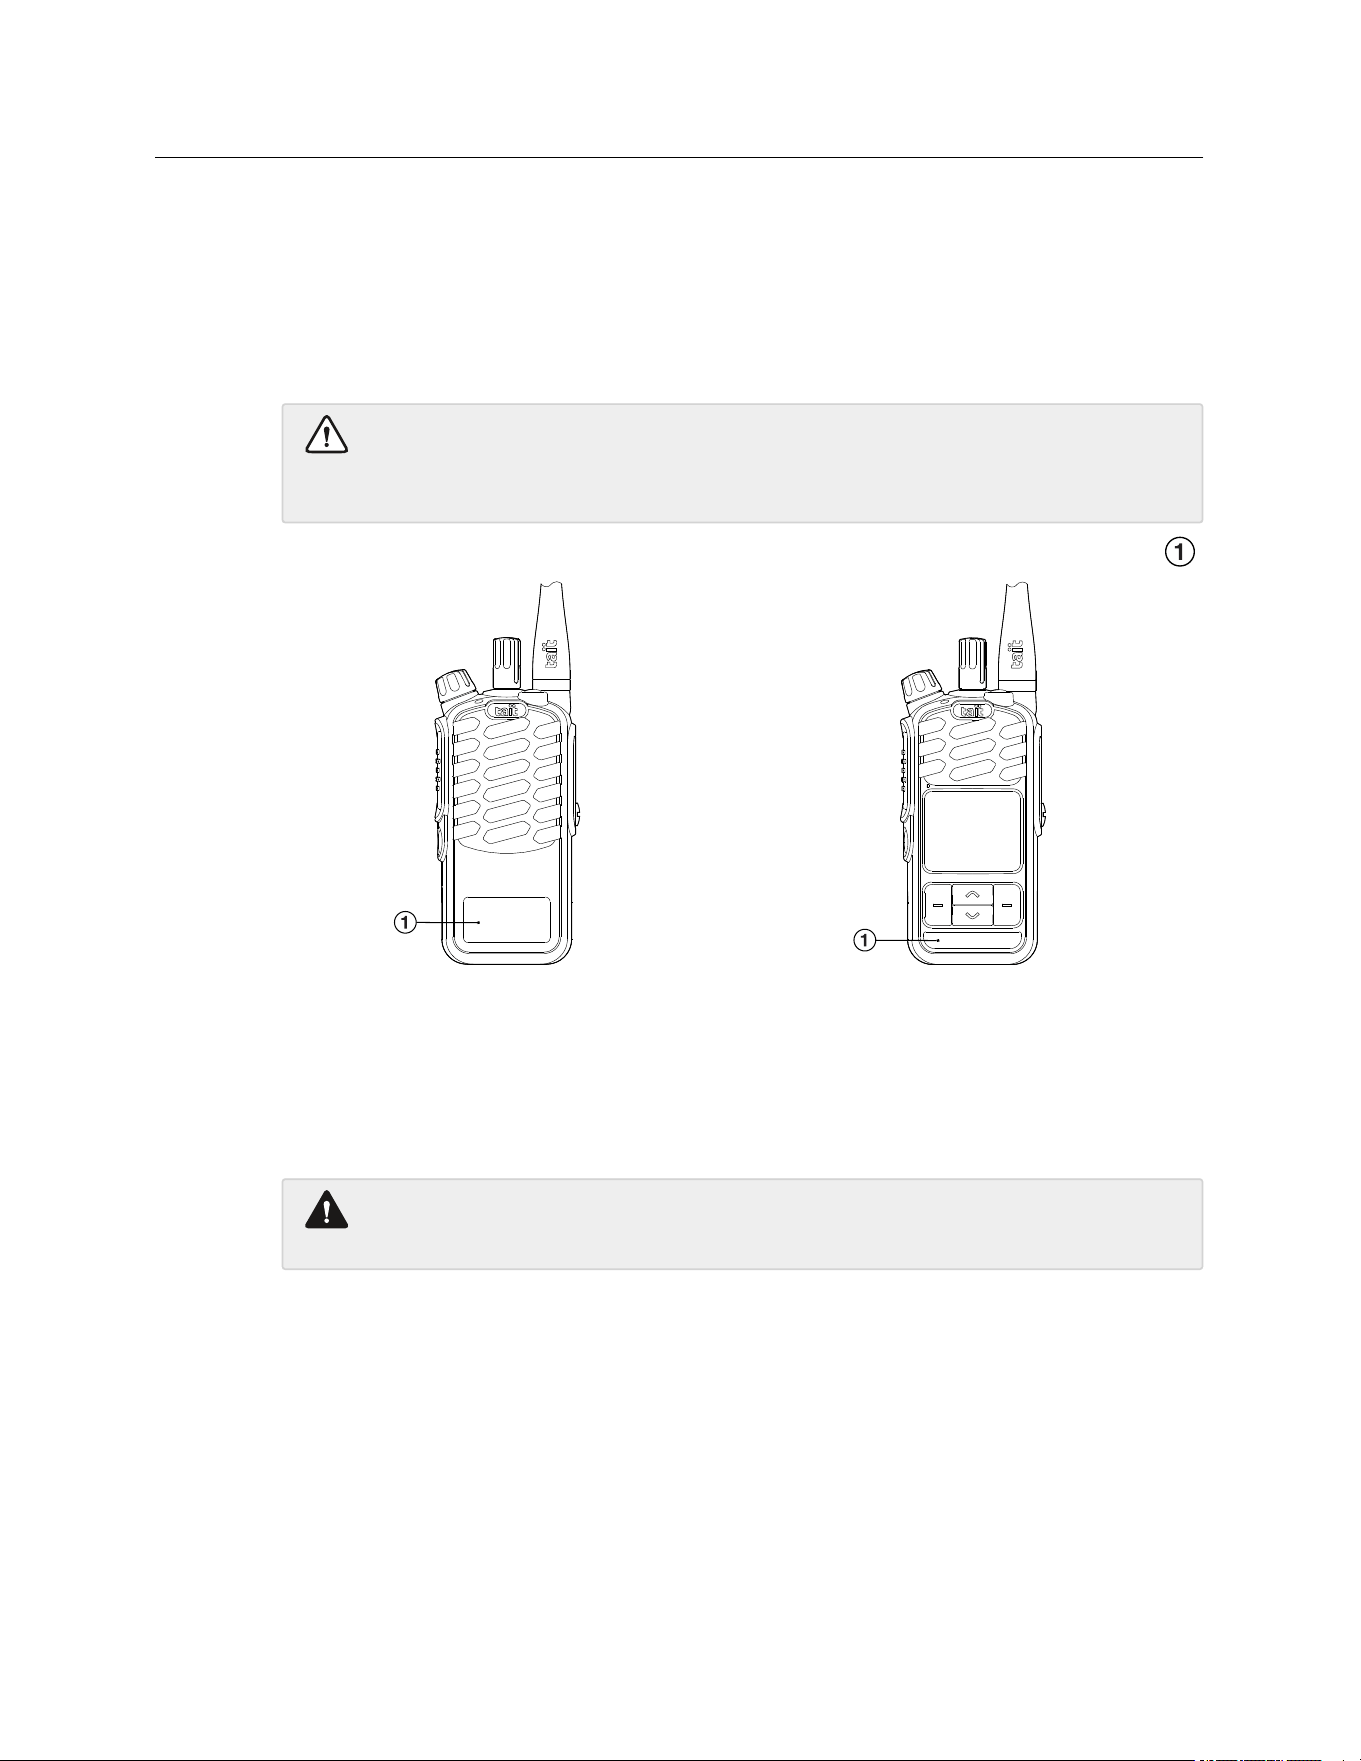
If required, attach any label to the label recess on the bottom of the front face of the radio .
Figure 2.1 Label recess (0-Key radio) Figure 2.2 Label recess (4-Key radio)
2.2 Attaching or Removing the Antenna
Attach the antenna before using the radio.
Warning Do not change the antenna in a hazardous location. This could cause an
explosion, which could cause serious injury or death.
To attach the antenna:
1.
Screw the antenna clockwise into the antenna connector.
2.
Tighten the antenna sufficiently so that it doesn’t unscrew easily. This is important as it
creates a seal.
To remove the antenna:
1.
Use a firm grip and turn the antenna counterclockwise half a turn.
2.
Use a lighter grip to fully unscrew the antenna, and carefully remove it.
Tait Open2 Portables User Manual
Tait International Ltd - Issue 02 DRAFT - DRAFT
8
2.3 Charging the Battery Before First Use
Before using your battery for the first time, it must be fully charged. The battery can be
inserted into the charger, or alternatively, the radio with a battery fitted can be inserted into
the charger.
Follow the instructions included with your Tait charger.
For best charging performance, switch off the radio before placing it in the charger.
2.4 Attaching or Removing the Battery
To attach the battery:
1.
Rotate the power/volume control knob counterclockwise to turn off the radio.
2.
Holding the radio firmly, align the back of the battery with the back of the chassis.
3.
Slide the battery into the back of the radio until it clicks into position.
If the battery has been attached or removed while the radio is turned on, turn the
radio off and then on again before use.
To remove the battery:
1.
Rotate the power/volume control knob counterclockwise to turn off the radio.
2.
Push up the catch on the base of the battery.
3.
Slide the battery out of the back of the radio.
2.5 Attaching or Removing the Belt Clip
To attach the belt clip to the radio:
1.
Slide the belt clip into the two grooves at the top of the battery.
2.
Press down on the belt clip until it snaps into place.
To remove the belt clip from the radio:
1.
Insert a flat screwdriver blade or similar flat object under the edge of the metal release
lock, between the lock and the back of the battery.
2.
Lift the release lock up (away from the back of the battery) and hold it in position.
3.
Slide the belt clip out.
Tait Open2 Portables User Manual
Tait International Ltd - Issue 02 DRAFT - DRAFT
9
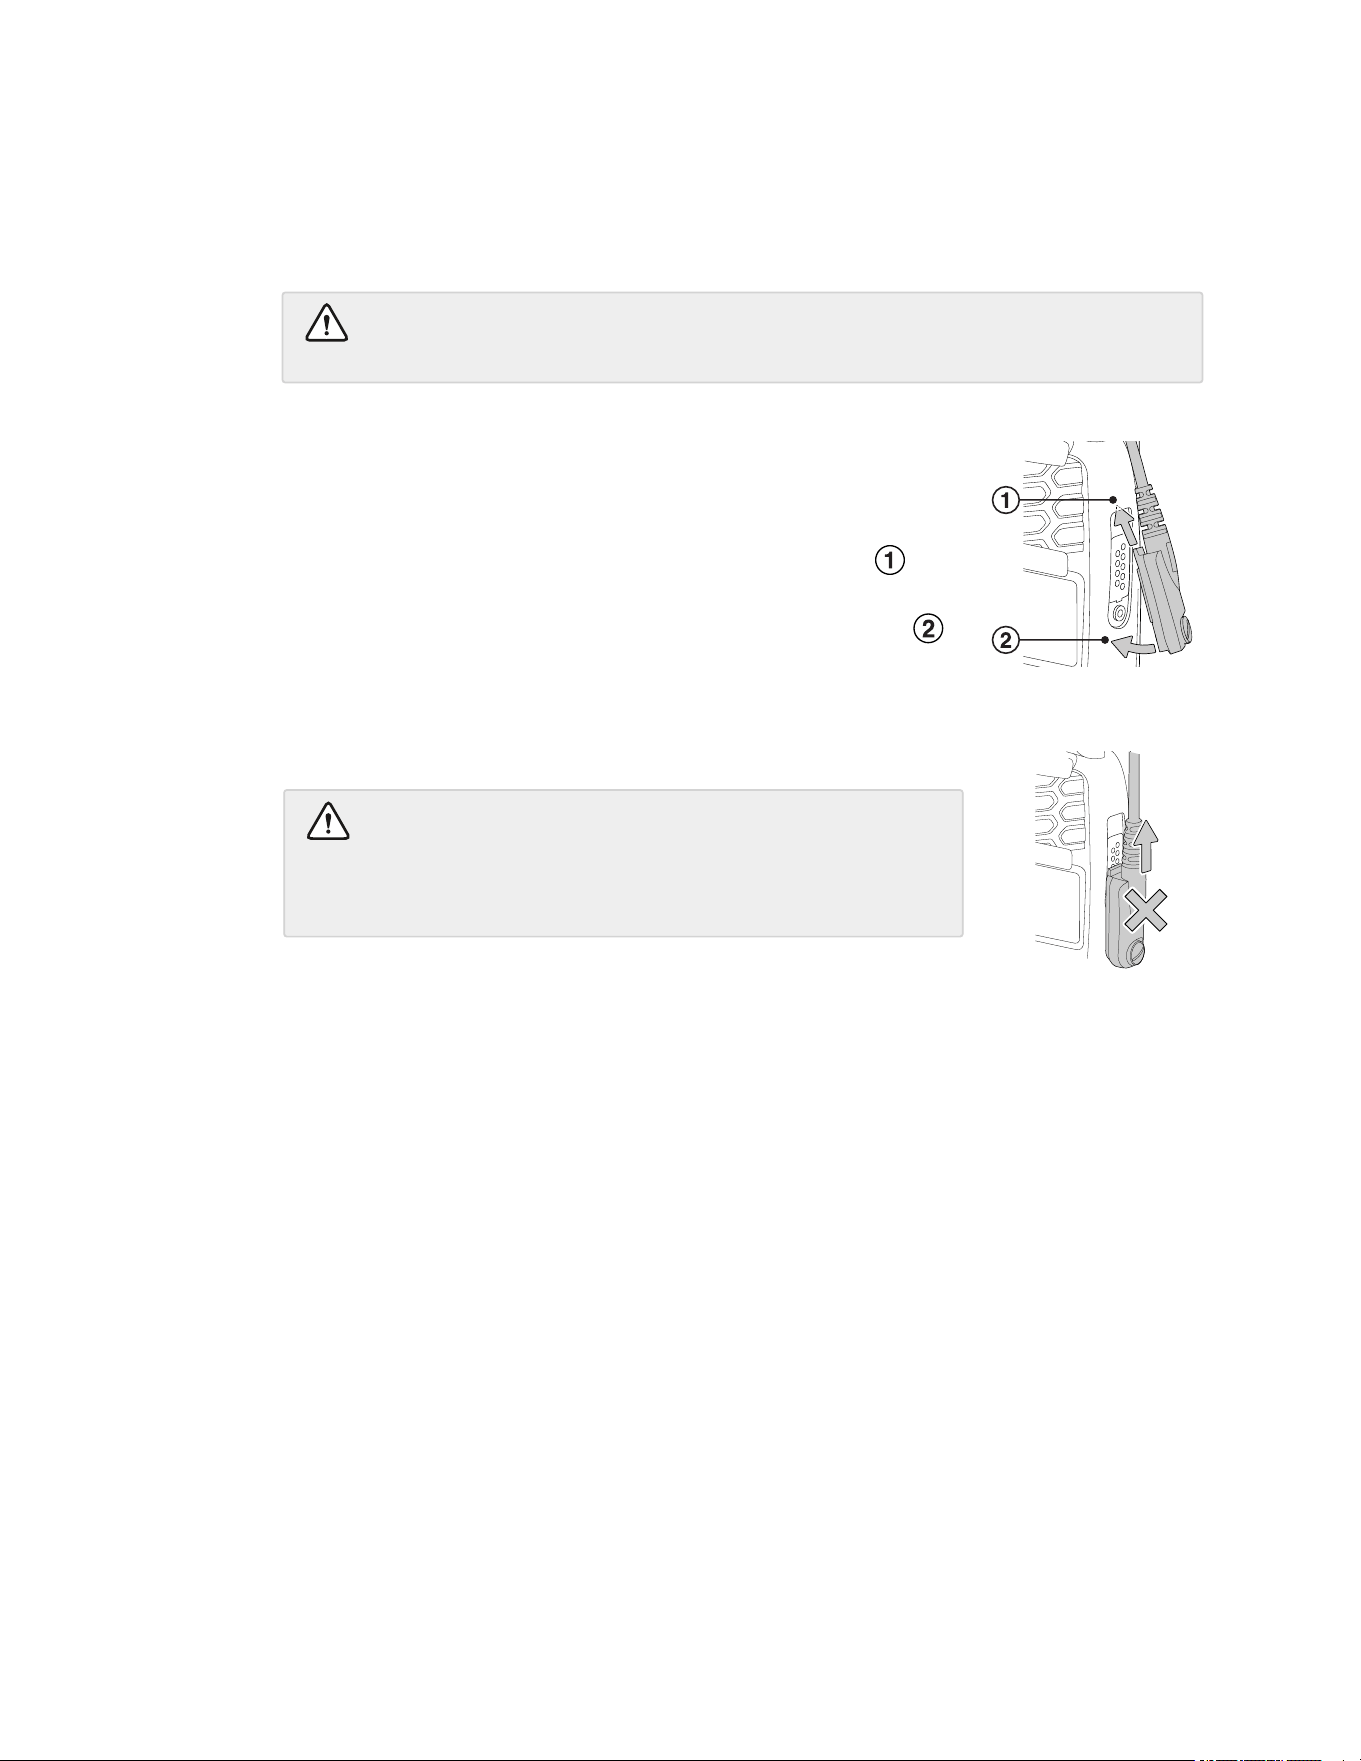
2.6 Attaching an Audio Accessory
Audio accessories plug in to the radio’s accessory connector. The radio's accessory
connector is protected by a cover, which needs to be removed before an accessory can be
installed. For location of the accessory connector see Radio Controls and Indicators on page
11.
Caution The accessory cover protects the accessory connector from electrostatic
discharge. Keep the cover in place unless the connector is in use.
To attach an audio accessory:
1. Use a coin or other blunt object to loosen the radio's accessory
cover screw.
2. Remove the accessory cover and store it in a safe place.
3.
Insert the top part of the audio accessory's connector into
the designated groove.
4.
Press the bottom part of the audio accessory's connector
onto the pins.
5. Tighten the screw on the audio accessory's connector.
Figure 2.3 Correct method
Caution Do not slide the audio accessory's connector
along the radio connector’s pins; doing so will damage the
radio’s connector and may prevent a reliable connection to
the accessory.
Figure 2.4 Incorrect method
Tait Open2 Portables User Manual
Tait International Ltd - Issue 02 DRAFT - DRAFT
10
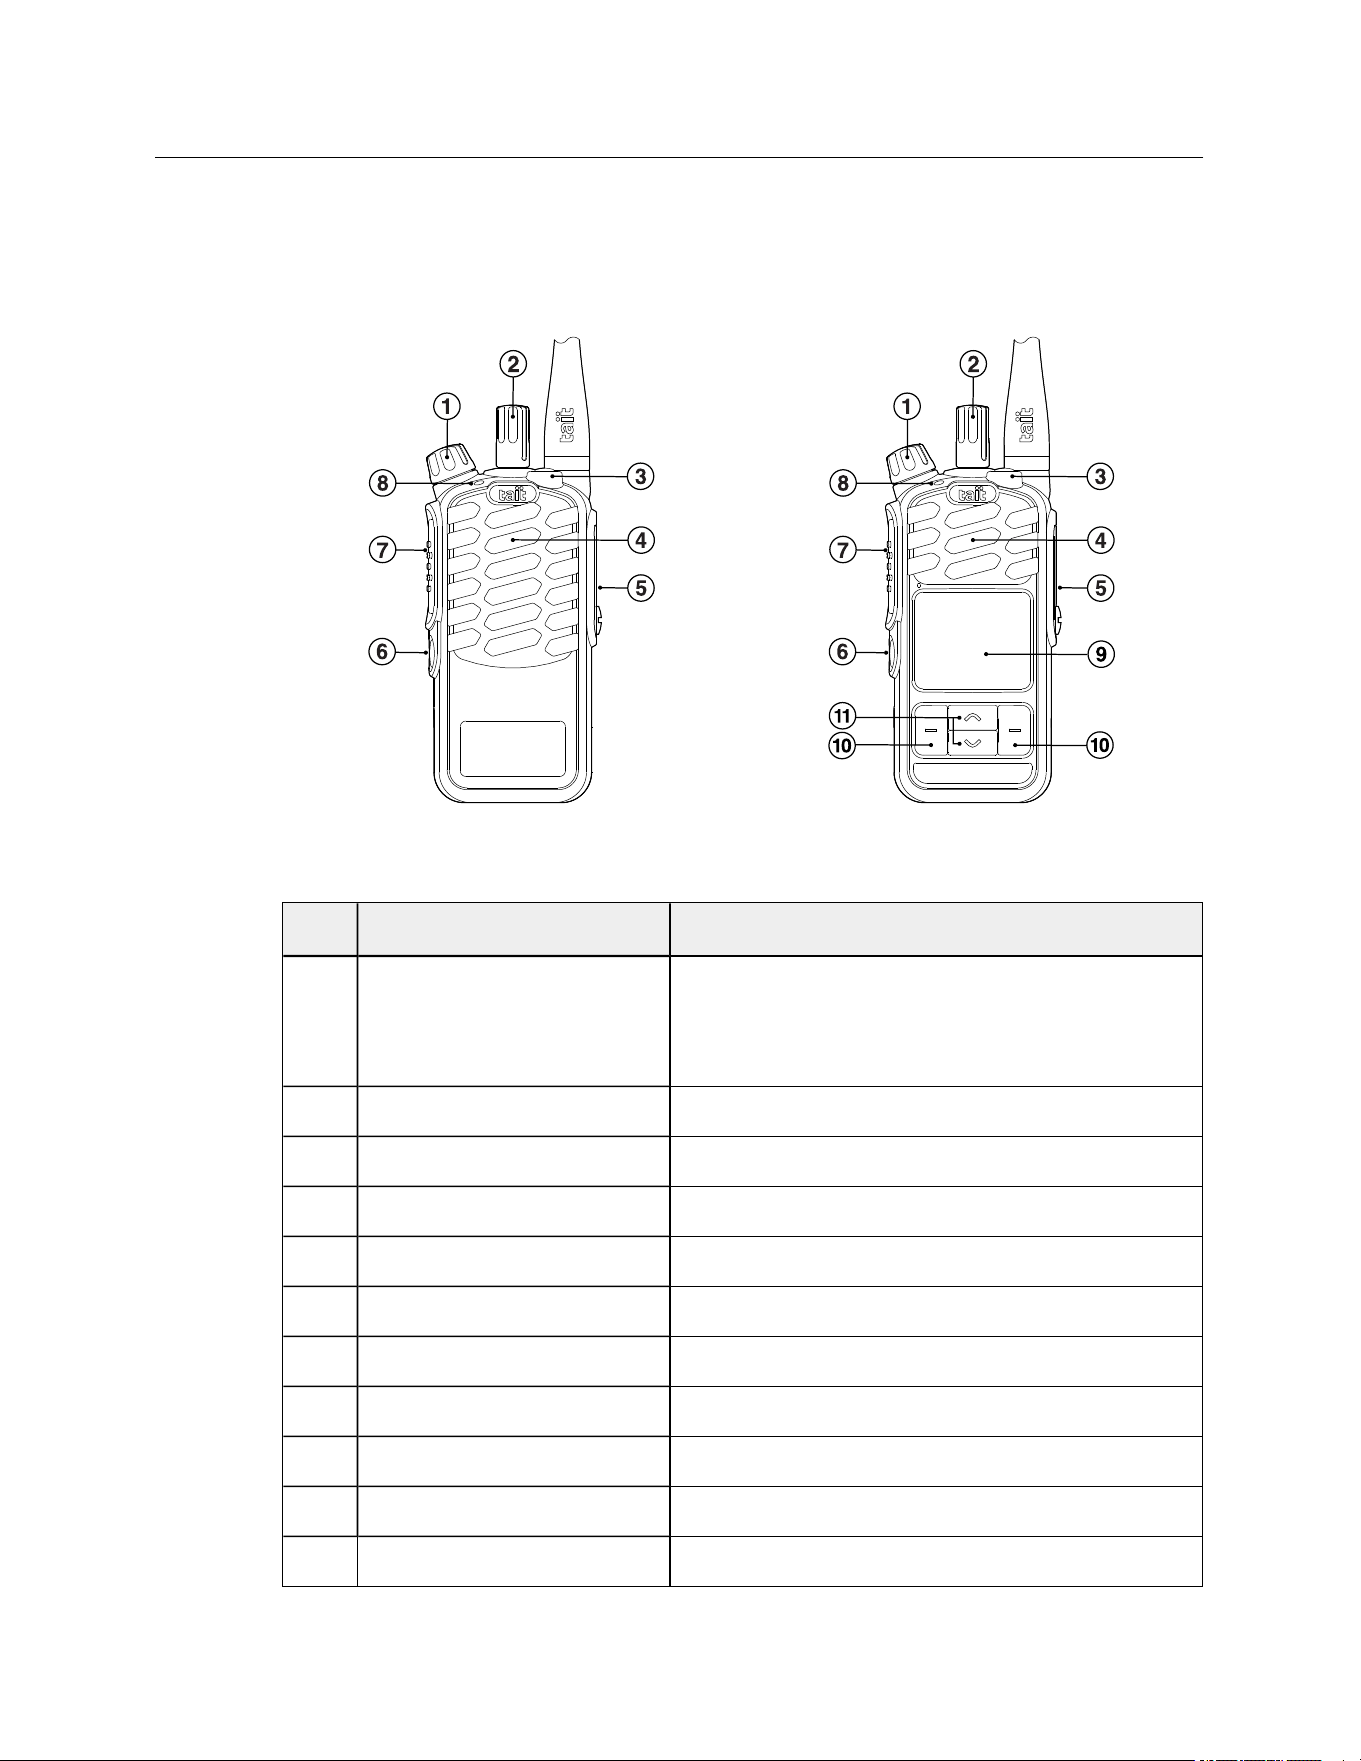
3 Radio Controls and Indicators
3.1 Radio Controls
The locations and functions of the radio controls and indicators are detailed below.
Figure 3.1 O-Key radio Figure 3.2 4-Key radio
Description Function
1
Power on/off and volume
control knob
Rotate to:
l
turn the radio on or off.
l
change the output volume.
2 Channel knob Rotate to select a channel.
3 Function key Typically configured as the emergency mode button.
4 Microphone/Speaker Used for audio input and output.
5 Accessory connector Remove cover to connect an audio accessory.
6 Function key May be programmed for frequently used options.
7 Push to Talk (PTT) key Press and hold to transmit, release to listen.
8 Status LED Color indicates your radio's status.
9 User display View device operation and configuration information.
10 Menu selection keys Press to select menu options.
11 Menu up and down scroll keys Press to scroll up and down through the menu options.
Table 3.1 Radio controls and functions
Tait Open2 Portables User Manual
Tait International Ltd - Issue 02 DRAFT - DRAFT
11
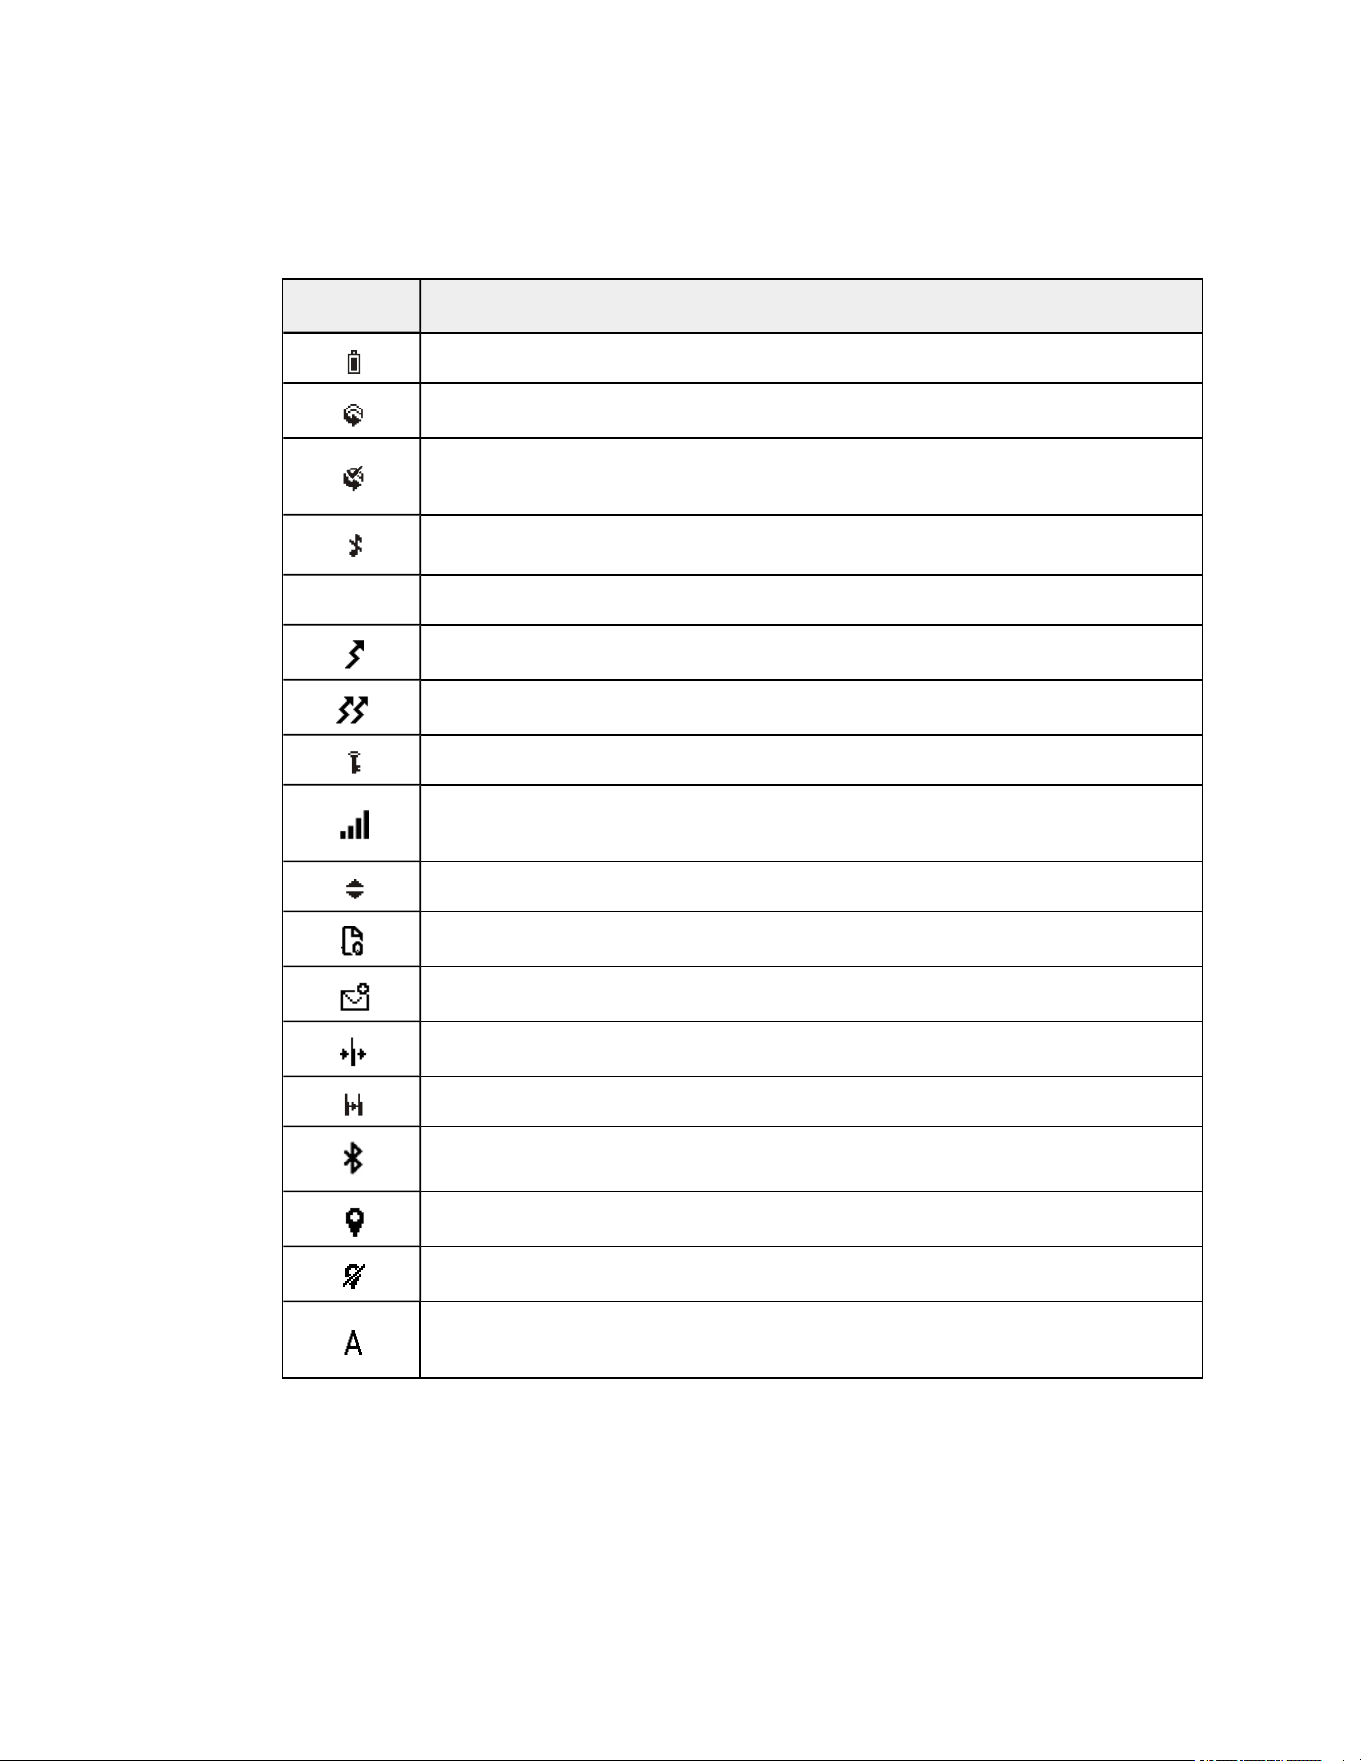
3.2 Radio Display Icons
The icons seen on the radio display, if the radio has a display fitted, depend on the mode in
which the radio is operating and the way it is programmed. SeeTable 3.2 below.
Icon Description
Indicates the charge status of the battery.
Scanning: your radio is monitoring a group of channels or talkgroups for activity.
Scanning: your radio is monitoring a group of channels for activity, and the currently
selected channel is a member of the scan group.
Silent operation: your radio’s audible tones have been turned off.
L
Low-power transmit: your radio is set to transmit on low power.
Your radio is transmitting at low power.
Your radio is transmitting at standard power.
Encryption is on: your radio's transmissions are encrypted.
Signal strength indicator: the more bars that are visible, the stronger the signal
received by the radio.
Scroll keys: use these to move through a list or access a pre-programmed menu.
There are calls in the queue.
There are messages in the inbox.
Your radio is operating on a repeater channel.
Repeater talkaround is on.
Bluetooth
®
is enabled.
Radio location is on, location information is available.
Radio location is on, location information is not available.
Zone: this letter represents the zone in which your radio is operating, where A is zone
1, and Z is zone 26.
Table 3.2 Radio display icons
Tait Open2 Portables User Manual
Tait International Ltd - Issue 02 DRAFT - DRAFT
12
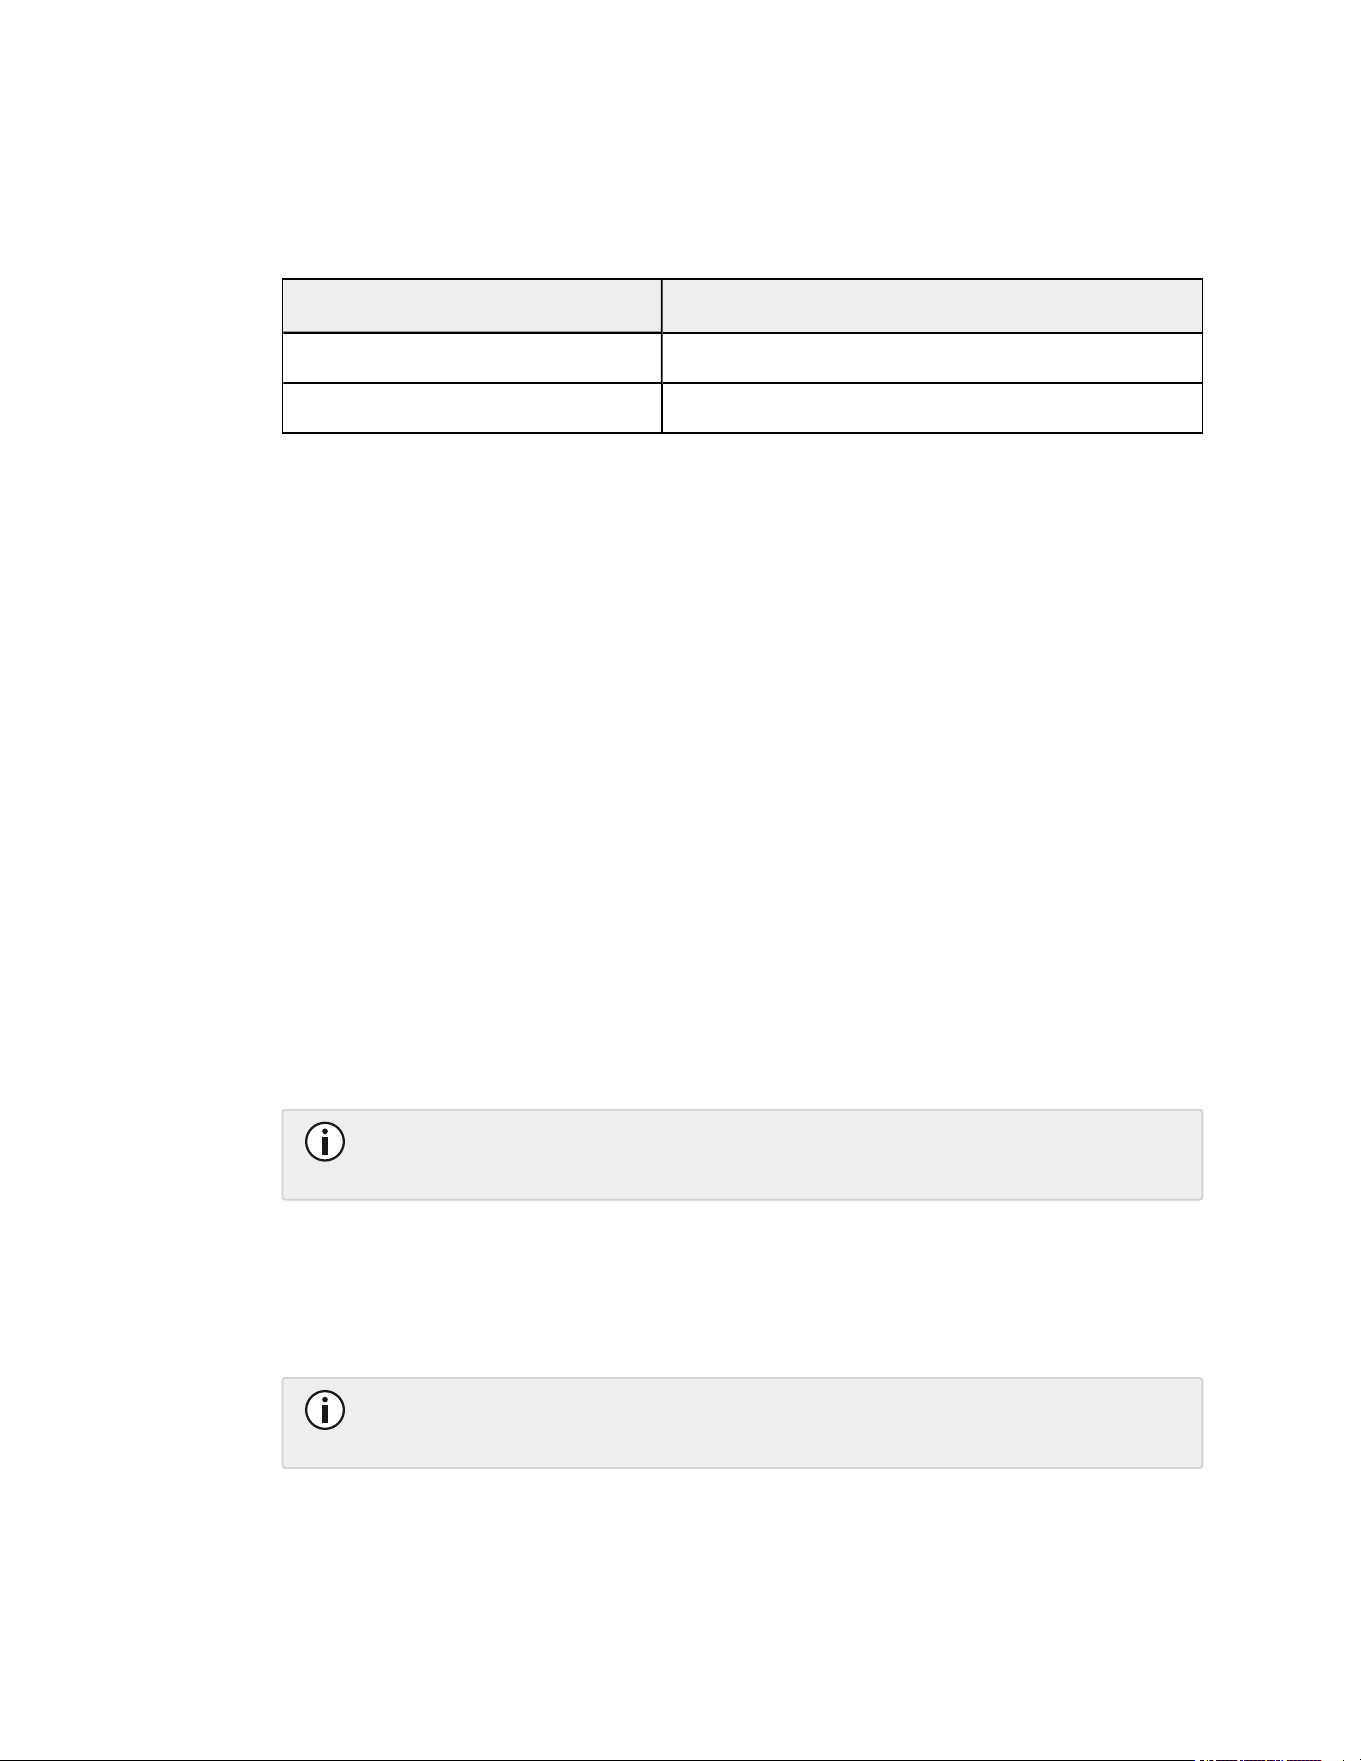
3.3 Status Indicators
The radio has one multicolor LED, located on the top edge of the radio body by the volume
control knob, to indicate the current state of the radio.
LED color and state Radio state
Red, On In call, transmitting.
Green, On In call, receiving.
Table 3.3 Status indicator
3.4 Channel and Zone Identification
Your radio display may indicate the following:
l
the name of the selected channel.
l
the name of the selected zone.
Channel and zone names are defined during radio configuration.
3.5 Low Battery Warning
When the battery is low, you will receive the following warnings:
l
the battery symbol on the radio display looks empty and turns red.
l
when trying to transmit, the message "Battery is low" appears on the display and
transmission is blocked.
When the battery is empty the radio turns off. Recharge or replace the battery as soon as
possible.
Do not allow the radio battery to fully discharge every time it is used, as this will
shorten the service life of the battery.
3.6 Voice Annunciation
If enabled, voice annunciation will give you a verbal indication of some radio actions.
To hear voice annunciation, the radio's volume control must be set to a sufficient
level.
Tait Open2 Portables User Manual
Tait International Ltd - Issue 02 DRAFT - DRAFT
13
4 Getting Started
This radio may be configured to operate on analog and/or Digital Mobile Radio
(DMR) networks. Radio features are dependent on radio model, configuration, and
network type.
0-Key radio models have no scroll or selection keys and are unable to access menu
options. Operation of these radios is limited to the preset functionality of the radio
controls only.
In order to communicate effectively with other radio users, it is important to select
the correct channel, talkgroup, and zone where available.
4.1 Powering On and Off
Rotate the volume control knob to turn the radio either on or off.
When the radio is first turned on:
l
the status LED momentarily illuminates red.
l
a brief message appears on the display.
l
two short beeps and voice annunciation are heard if the volume is immediately
increased to a sufficient level.
4.2 Navigating the Menus
To access a menu:
1.
Press the right selection key whenever the word "Menu" appears above it.
2.
Use the up and down scroll keys to move through menu items.
3.
When the desired menu item is highlighted, press Select to open it.
To exit a menu:
1.
Press the left selection key when the word "Back" appears above it.
4.3 Long and Short Keypress Actions
Some features can be started and stopped by pressing the same key for a different period of
time. A short keypress is momentary while a long keypress is at least one second.
Tait Open2 Portables User Manual
Tait International Ltd - Issue 02 DRAFT - DRAFT
14

4.4 Keypad Lock
To manually lock and unlock the radio's keys, give a long press to the right selection key.
4.5 Adjusting the Volume
Use the volume control knob to adjust the volume level of speech and audible tones.
4.6 Using the PTT Key
To use the PTT key to make or answer calls:
1.
Hold the radio about 2 inches (5 cm) from your mouth.
2.
Press and hold the PTT key throughout transmission and:
l
avoid speaking before pressing the PTT key to prevent cutting off the start of your
sentence.
l
refrain from shouting.
3.
Release the PTT key when you have finished talking.
4.7 Receiving a Call
An incoming call is indicated by:
l
an audible tone.
l
a green status LED.
l
the radio display showing caller details and received signal strength .
To answer the call:
1.
Press the PTT key and speak into the microphone.
While you are transmitting, the status LED is red and the transmit icon , or low
power transmit icon , appears on the display.
Tait Open2 Portables User Manual
Tait International Ltd - Issue 02 DRAFT - DRAFT
15
4.8 Selecting Channels, Talkgroups, and Zones
Before making a call to other users you may be required select the correct Channel,
Talkgroup, or Zone.
4.8.1 Selecting a channel
An analog or digital channel, is a specific radio frequency that is available for communication.
To select a channel:
1.
Rotate the channel knob on the top of the radio.
The selected channel name is shown on the display.
4.8.2 Selecting a talkgroup
This feature is available for digital channels only.
A talkgroup is a preconfigured group of radio users.
To select a talkgroup:
1.
Navigate to Menu > Talkgroups and then press Select.
2.
Choose a talkgroup from the list and then press Select.
When making a call, the talkgroup name will appear on the display.
4.8.3 Selecting a zone
A zone is a unique grouping of channels and talkgroups.
To select a zone:
1.
Navigate to Menu > Zones and then press Select.
2.
Choose a zone from the list and then press Select.
The name of the zone appears below the channel name on the radio display.
Tait Open2 Portables User Manual
Tait International Ltd - Issue 02 DRAFT - DRAFT
16
4.9 Scanning
Scanning monitors a group of channels (scan group) simultaneously, looking for call activity.
When call activity is detected on a channel in the scan group, the radio stops on that channel
so you can hear the activity and respond if necessary. Scanning resumes once the channel is
no longer busy.
Scan groups can contain analog channels, digital channels, or a combination of both.
To add channels to a scan group, manage existing scan groups, or view scan group
membership, see Program Groups on page29.
4.9.1 Turning scanning on or off
To turn scanning on:
1.
Press the radio function key programmed to turn scanning on and off.
l
“Scanning on” appears on the display and an audible beep is heard.
l
“No Scan list!" appears on the display if the currently selected channel is not a
member of a scan group.
While the radio is scanning for activity:
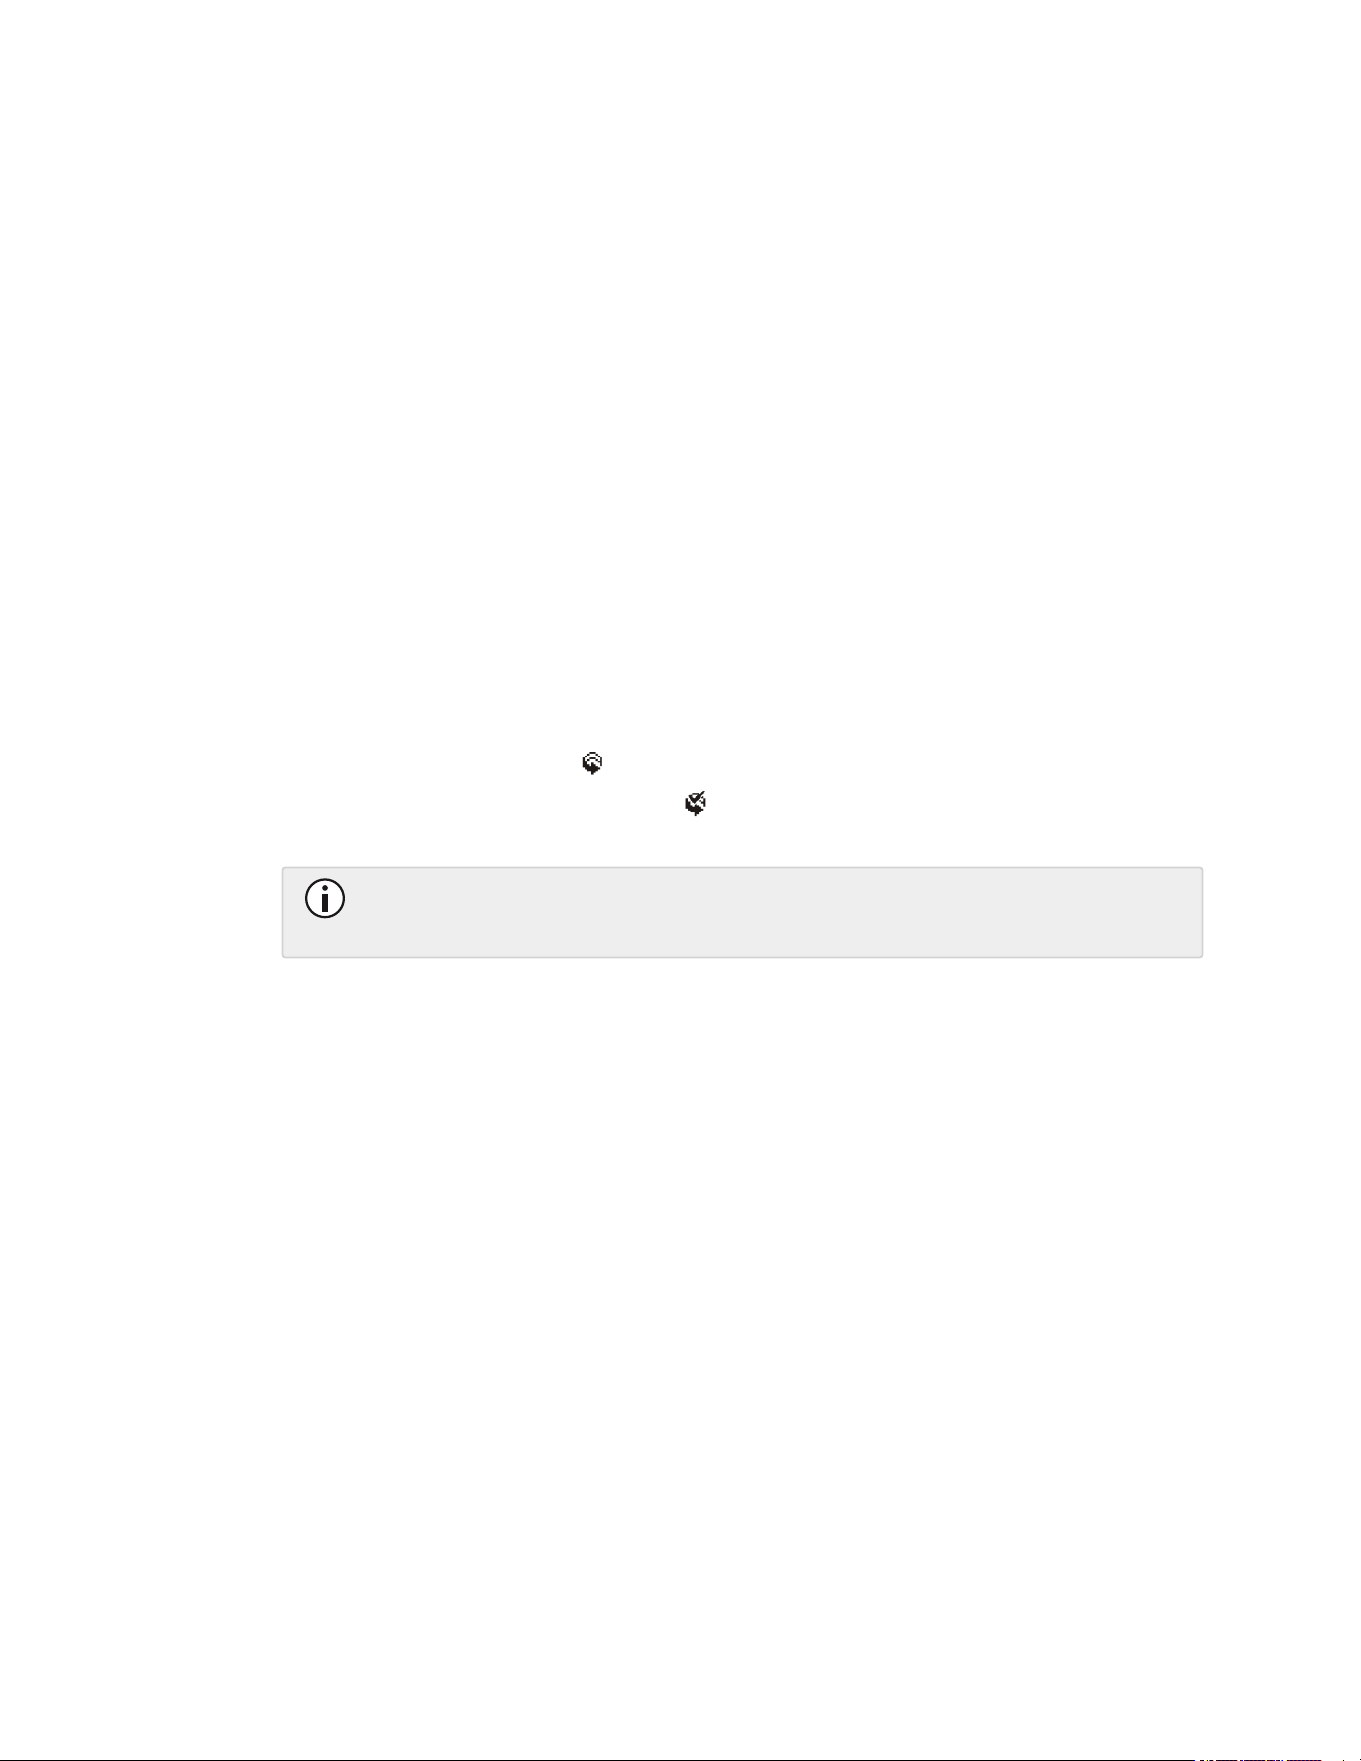
l
the animated scan icon appears on the display.
l
the animated scan icon with a tick appears on the display, if the current selected
channel is member of the scan group.
Switching to a channel that is not part of a scan group stops scanning. Scanning
resumes once you switch back to the original scan group channel.
To turn scanning off:
1.
Press the radio function key programmed to turn scanning on and off.
4.9.2 Making a call while scanning
When making a call while scanning is on and call activity is detected, the channel that is
called is dependent on the way radio has been programmed. Calls may be made to:
l
a predetermined channel, for example, the dispatcher.
l
the channel where call activity was last detected.
l
the current selected channel.
To make a call when call activity is detected during scanning:
1.
Press the PTT key and speak into the microphone.
Tait Open2 Portables User Manual
Tait International Ltd - Issue 02 DRAFT - DRAFT
17
4.10 Making a Call
Calls on digital channels have an inactivity timeout. If a pause in the conversation
exceeds the timeout the call will end. If this happens, press the PTT key again to
establish a new call.
4.10.1 Making a call using channels and talkgroups
To make a call:
1.
Select a zone if required. See Selecting a zone on page16.
2.
Select a channel or talkgroup. See Selecting a channel on page16 or Selecting a
talkgroup on page16.
You cannot change channels while transmitting.
3.
Check that the channel is clear. If the status LED is green, the channel is busy and you
may not be able to transmit. Wait until the status LED has turned off.
4.
Press the PTT key, wait for the go-ahead double beep, and speak into the microphone.
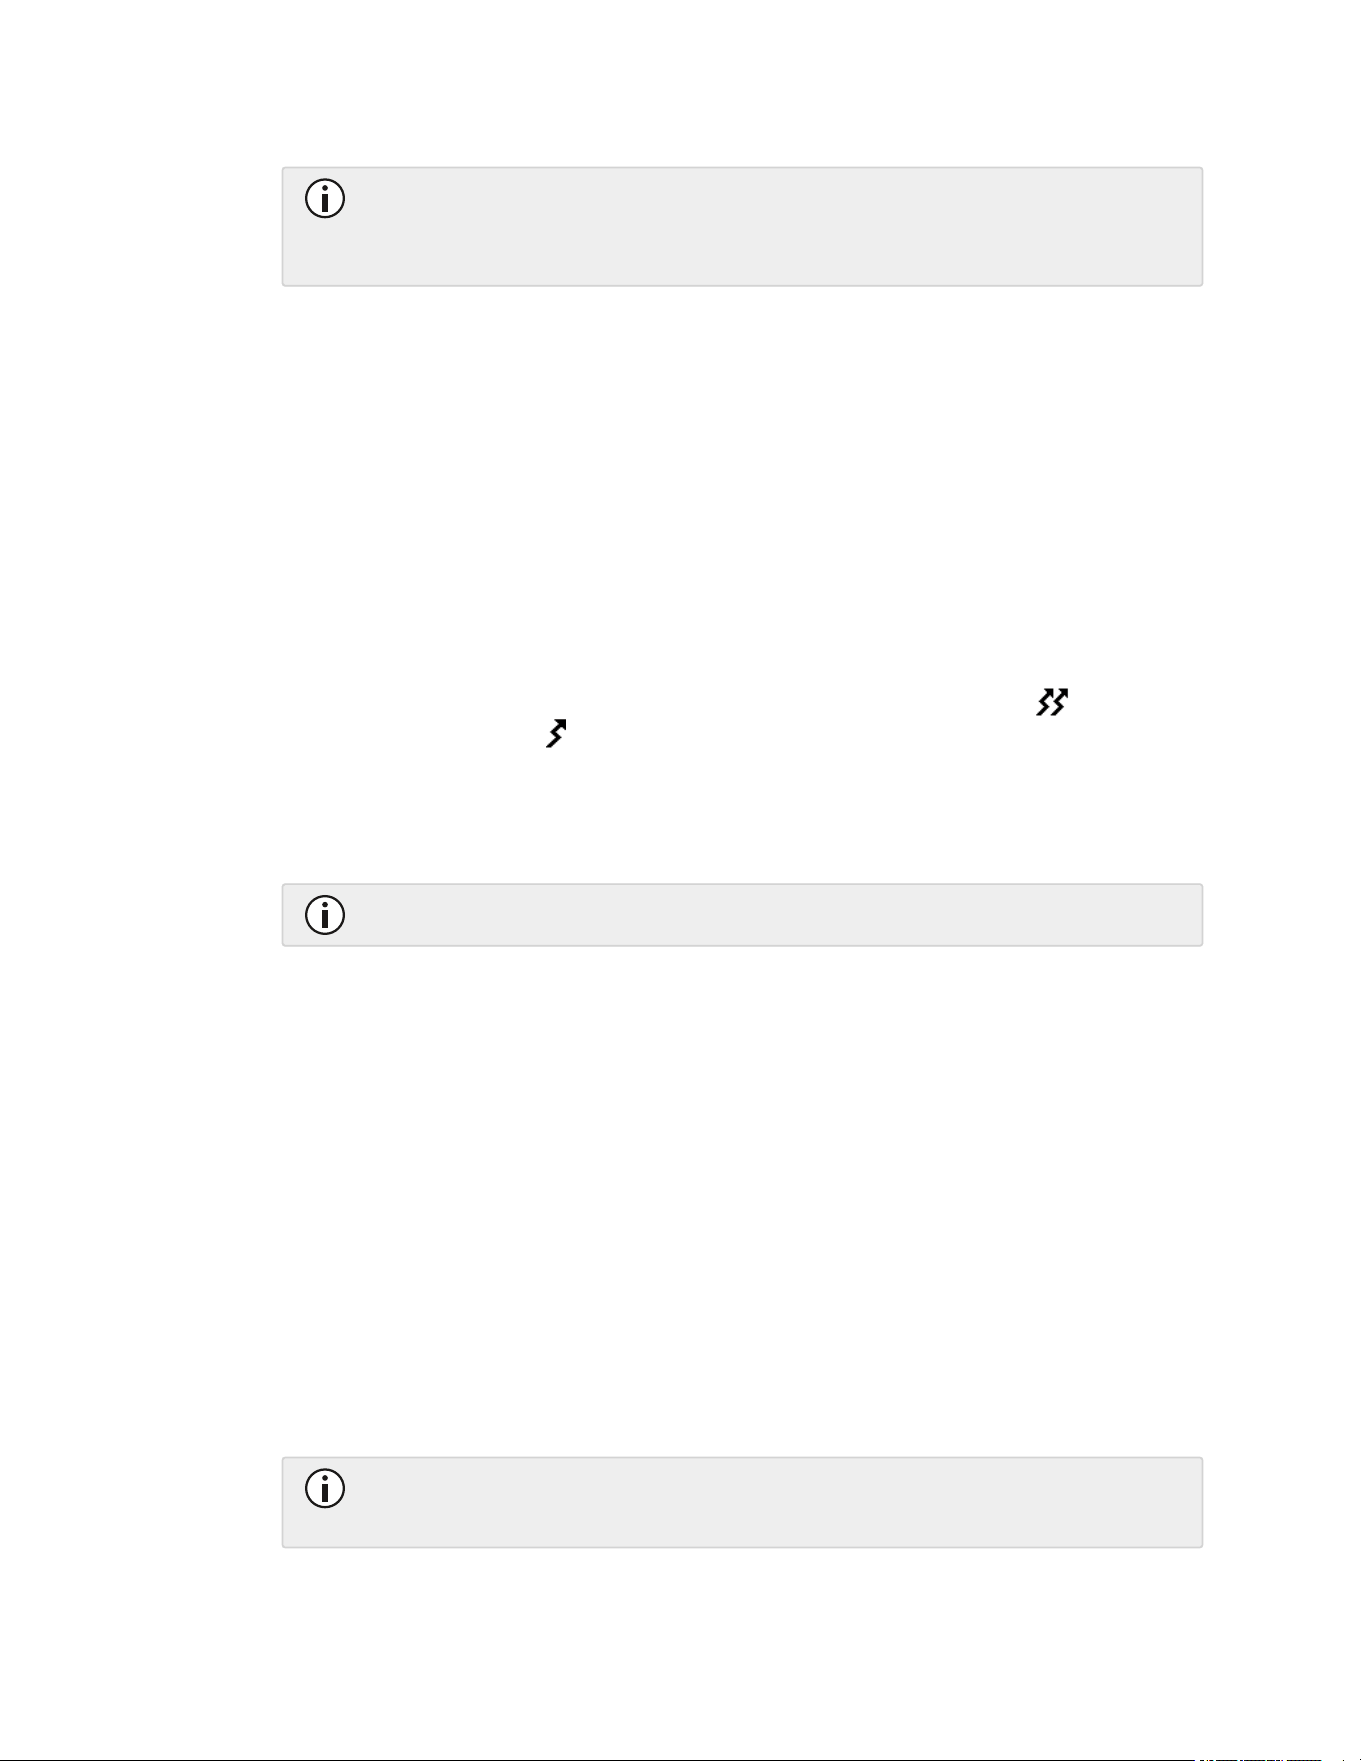
While you are transmitting, the status LED is red and the transmit icon , or low
power transmit icon , appears on the display.
5.
When you have finished speaking, release the PTT key.
4.10.2 Making an individual call
This feature is available for digital channels only.
To make a call to an individual:
1.
Navigate to Menu > Individual call and then press Select.
A preconfigured list is displayed. The person you made the last individual call to is
highlighted.
2.
Choose an individual you wish to call from the list and then press Select.
3.
Press the PTT key to make the call.
4.10.3 Limiting call time
Your radio may limit the amount of time you can talk (transmit) continuously by using a
transmit timer. This allows other radio users to make calls on that channel.
Your radio warns you before the transmit timer expires by beeping three times and displaying
a "Call timeout" message.
If the transmit timer expires you must release the PTT key before you can transmit again.
Your radio may be unable to transmit for a short configured time period after the
transmit timer has expired.
Tait Open2 Portables User Manual
Tait International Ltd - Issue 02 DRAFT - DRAFT
18
4.11 Emergency Operation
When activated, an emergency notification can be sent to predefined location such as an
individual, group, or dispatcher.
While the emergency is active, your radio may automatically cycle between receive and
transmit so that the individual or group receiving the emergency can hear any nearby activity
without you having to use the PTT key.
Two emergency operations are available, emergency callout and emergency cycling. Your
radio may have one, or both of these operations enabled.
4.11.1 Emergency callout
To activate an emergency callout:
1.
Press the emergency mode button.
l
"Emergency mode" appears on the display.
l
The display background color will turn red.
l
The status LED will turn red during the automatic transmit periods of the callout.
In some radio configurations, you cannot transmit by pressing the PTT key during
the automatic transmit periods of the emergency callout. If this is the case,
"Cannot transmit" appears on the display.
Once an emergency callout is activated, your radio will do one of the following depending on
how it is configured:
l
automatically end the callout after a set number of receive and transmit cycles.
l
wait for an acknowledgment from another radio and then automatically end the callout.
l
wait for you to manually cancel the callout by pressing the emergency mode button.
Depending on your radio configuration you may see the following on the display:
l
"No Ack received" indicates that there have been no acknowledgments from any radio
that is receiving the callout.
l
"Ack received" indicates that there is an acknowledgment from a radio that is receiving
the callout.
l
"Emergency complete" indicates the alert has ended because:
l
the callout has been acknowledged by another radio.
l
your radio has reached a set number of alert transmit and receive cycles.
l
"Emergency canceled" indicates that you have manually canceled the callout.
A request to make an emergency call to a group, with an existing call in progress,
will end the normal group call and start the emergency call instead.
Tait Open2 Portables User Manual
Tait International Ltd - Issue 02 DRAFT - DRAFT
19

Receiving an emergency callout
If an emergency callout is generated by another radio, and your radio is configured to receive
that callout, your radio will:
l
emit initial audible alert beeps.
l
display the message "Emergency alert [name of the radio sending alert]".
l
turn the display background color red.
l
turn the status LED green while receiving transmissions from the radio generating the
callout.
You can then choose to:
l
listen to any transmissions coming from the sending radio as that radio automatically
cycles between receive and transmit.
l
press the PTT key to call the sending radio.
l
clear the callout from your radio by pressing:
l
Clear on 4-key radios.
l
the emergency mode button on 0-key radios.
4.11.2 Emergency cycling
To activate emergency cycling:
1.
Press the emergency mode button.
l
"Emergency mode" appears on the display.
l
The display background color will turn red.
l
The status LED will turn red during the automatic transmit periods of the emergency
cycling.
Once emergency cycling is activated, your radio will do one of the following depending on
how it is configured:
l
automatically end the emergency cycling after a set number of receive and transmit
cycles.
l
wait for you to manually cancel the emergency cycling by pressing the PTT key or
emergency mode button.
Depending on your radio configuration you may see the following on the display:
l
"Emergency complete" indicates that the emergency cycling has ended because your
radio has reached a set number of transmit and receive cycles.
l
"Emergency canceled" indicates that you have manually canceled the emergency
cycling.
A request to make an emergency call to a group, with an existing call in progress,
will end the normal group call and start the emergency call instead.
Tait Open2 Portables User Manual
Tait International Ltd - Issue 02 DRAFT - DRAFT
20
Receiving an emergency call
If emergency cycling is started by another radio, and your radio is configured to receive that
emergency call, your radio will:
l
emit initial audible alert beeps.
l
display the message "Emergency call [name of the radio sending alert]".
l
turn the display background color red.
l
turn the status LED green while receiving transmissions from the radio generating the
emergency call.
You can then choose to:
l
listen to any transmissions coming from the sending radio as that radio automatically
cycles between receive and transmit.
l
press the PTT key to call the sending radio.
4.12 Lone Worker Alert
This feature is available for digital channels only.
Lone worker monitors your radio for activity. If you haven't pressed any radio keys within a
configured timeout period, your radio starts a lone worker alert. The emergency alert can be
sent to an individual, group, or a dispatcher.
To enable and disable this feature see Functions on page31.
"Lone worker activated" or "Lone worker deactivated" briefly appears on the display when the
feature is enabled or disabled.
If you turn your radio off, you will need to re-enable lone worker when you turn your
radio back on.
The lone worker timer countdown bar appears on the display when the feature is enabled,
indicating the time remaining until a lone worker alert is activated.
To reset the lone worker timer and countdown bar:
1.
Press any key.
Once the lone worker timer has expired, and before a lone worker alert is generated, a rapid
countdown bar graph with the message "Lone worker awaiting" appears on the display.
To cancel the lone worker alert before it is generated:
1.
Press Cancel.
Tait Open2 Portables User Manual
Tait International Ltd - Issue 02 DRAFT - DRAFT
21

Once a lone worker alert is generated you can:
l
do nothing and allow an emergency alert to be raised. The alert may be configured to
automatically end after a set time period.
"Emergency complete" appears on the display when the alert has ended.
l
cancel the emergency alert by pressing the emergency mode button.
"Emergency canceled" appears on the display when the alert is canceled.
During the alert you may briefly see the message "Ack received", indicating that there is an
acknowledgment from a radio that is receiving the alert.
4.12.1 Receiving a lone worker alert
If a lone worker alert is generated by another radio, and your radio is configured to receive
that alert, your radio will:
l
emit initial audible alert beeps.
l
display the message "Emergency alert [name of the radio sending alert]".
l
turn the display background color red.
l
turn the status LED green while the radio receives transmissions from the radio
generating the alert.
You can then choose to:
l
press the PTT key to call the sending radio.
l
press Clear to remove the alert from your radio.
Tait Open2 Portables User Manual
Tait International Ltd - Issue 02 DRAFT - DRAFT
22
5 Radio Menu Options
This section details menu options that you might find on your radio.
5.1 Missed Calls
This feature is available for digital channels only.
If you have missed an incoming call or call alert it may be stored in the missed calls queue.
The missed call icon , along with information about the missed call, may be shown on the
display.
The missed call icon will still be visible if you have queued items that were received
on a digital channel and you switch to an analog channel. You cannot access the
queue from an analog channel, switch to a digital channel to access the queue.
In some situations the Bluetooth icon may cover the queue icon.
Your radio may be programmed to:
l
store multiple calls, or just the last call.
l
emit audible tones to indicate a queued item.
To view and manage missed calls in the queue:
1.
Navigate to Menu > Missed calls and then press Select.
2.
Choose a queued item from list and then press Select.
3.
Choose one of the following options and then press Select.
l
Call sender—make a voice call to the sender by pressing the PTT key.
l
Details—review missed call and message details.
l
Delete—delete an individual queued item.
l
Delete all—delete all queued items.
5.2 Zones
For details see Selecting a zone on page16.
5.3 Individual Call
This feature is available for digital channels only.
For details see Making an individual call on page18.
Tait Open2 Portables User Manual
Tait International Ltd - Issue 02 DRAFT - DRAFT
23
5.4 Talkgroups
This feature is available for digital channels only.
For details see Selecting a talkgroup on page16.
5.5 Services
The Services menu and its associated features are available for digital channels
only.
5.5.1 Messages
Send and manage outgoing and incoming messages using the menu options below.
Inbox
If you have received a status or text message it may be stored in the messages inbox. The
messages icon , along with information about the message, may be shown on the display.
Your radio may be programmed to store multiple messages, or just the last message.
To review a list of incoming messages:
1.
Navigate to Menu > Services > Messages and then press Select.
2.
Choose Inbox from the list and then press Select.
3.
Choose a message from the inbox list and then press Select.
4.
Press Options, choose one of the following, and then press Select.
l
Reply—send a message back to the sender.
l
Call sender—make a voice call to the sender by pressing the PTT key.
l
Details—review sent message details with the option to send a reply message.
l
Delete—delete an individual message.
l
Delete all—delete all stored messages.
Preset message
To send a preset message to an individual radio or group:
1.
Navigate to Menu > Services > Messages and then press Select.
2.
Choose preset message from the list and then press Select.
3.
Select an individual radio or group from the list and then press Send.
The message "Sending message to [individual radio or group]" appears followed by
"Delivery confirmed" if successful.
Tait Open2 Portables User Manual
Tait International Ltd - Issue 02 DRAFT - DRAFT
24

Sent
To review a list of sent messages:
1.
Navigate to Menu > Services > Messages and then press Select.
2.
Choose Sent from the list and then press Select.
3.
Choose a message from the Sent list and then press Select.
4.
Choose one of the following options and then press Select.
l
Details—review sent message details.
l
Delete all—delete all stored messages.
5.5.2 Status update
A status update message is sent to another party to indicate current activity or location, such
as “enroute” or “at lunch”.
If a status message is received, the message is automatically added to the messages inbox.
To send a status message:
1.
Navigate to Menu > Services > Status update and then press Select.
2.
Select a message from the displayed list and then press Select.
3.
Select an individual or group from the list and then press Send.
The message "Sending status to [individual radio or group]" appears on the display,
followed by "Delivery confirmed" if successful.
5.5.3 Call alert
You can let other radio users know you wish to communicate by sending them a call alert
page.
When the receiving radio user receives the call alert page they can call back immediately or
when it is convenient by accessing the call alert details from the missed calls menu.
Sending a call alert page
To send a call alert page:
1.
Navigate to Menu > Services > Call alert and then press Select.
2.
Select a radio to page from the preset list of radios and then press Send.
The message "Sending page to [selected radio]" appears on the display, followed by
"Delivery confirmed" if successful.
Tait Open2 Portables User Manual
Tait International Ltd - Issue 02 DRAFT - DRAFT
25

Receiving a call alert page
If a call alert page is received from another radio user, "Call alert" and the caller name appears
on the display.
If a call alert page is received, select:
l
Call and press the PTT key to call the sender.
l
Clear to delete the call alert.
If the call alert page is missed, a call alert entry is added to the missed calls queue.
5.5.4 Radio check
Use radio check to find out if another user's radio is communicating.
To send a radio check:
1.
Navigate to Menu > Services > Radio check and then press Select.
2.
Select from the preset list of radios and then press Send.
The message "Sending radio check to [selected radio]" appears on the display, followed
by "Response received" if successful.
5.5.5 Radio monitor
You can use radio monitor when you are concerned about the safety of another radio user on
the same digital channel.
When sending a radio monitor request to a radio, that radio calls you back without giving any
indication that it is making a call. You can hear any activity near the radio for a short time
period.
To send a radio monitor request:
1.
Navigate to Menu > Services > Radio monitor and then press Select.
2.
Select a radio from the preset list of radios and then press Send.
The message "Sending R.U.M to radio" appears on the display and you should be able
to hear activity near the other radio if successful.
If an acknowledgment is not received from the recipient’s radio, you will have the option of
either canceling or resending the request.
Tait Open2 Portables User Manual
Tait International Ltd - Issue 02 DRAFT - DRAFT
26
5.5.6 Radio inhibit
You can use the radio inhibit feature to make another radio on the system inoperable.
To the user of the inhibited radio it appears as though the radio is idle, but status LED flashes
red and the radio is made inoperable. The radio remains inoperable even if it is turned off and
then on again.
The inhibited radio cannot return to operation until it receives an uninhibit request. See Radio
uninhibit below.
To send a radio inhibit request:
1.
Navigate to Menu > Services > Radio inhibit and then press Select.
2.
Choose a radio from the preset list of radios and then press Send.
If successful, the message "Inhibit confirmed" appears on the display.
5.5.7 Radio uninhibit
You can use the radio uninhibit feature to make an inhibited radio on the system operable.
To send a radio uninhibit request:
1.
Navigate to Menu > Services > Radio uninhibit and then press Select.
2.
Choose a radio from the preset list of radios and then press Send.
If successful, the message "Uninhibit confirmed" appears on the display and the
uninhibited radio will return to normal operation.
5.6 Bluetooth
To use a Bluetooth audio device, the device must first be paired with your radio. Pairing
creates a unique and encrypted wireless link between the radio and the device.
To enable or disable this feature see Functions on page31.
The Bluetooth icon appears on the display when the feature is enabled.
The Bluetooth enable and disable feature can be overridden at radio power-on by
the Bluetooth power-on status feature. See Power-on status on the next page.
To get the best performance from a Bluetooth audio device avoid coming into
contact with, or blocking, the internal Bluetooth antenna of a device or the radio.
5.6.1 Bluetooth device compatibility
Bluetooth audio devices must be compatible with the Bluetooth Specification Version 2.0 or
higher. Additionally, the device must include Bluetooth Headset Profile (HSP) version 1.1 or
1.2, or Bluetooth Handsfree Profile (HFP) version 1.5 or 1.6.
Not all Bluetooth devices will work with this radio.
Tait Open2 Portables User Manual
Tait International Ltd - Issue 02 DRAFT - DRAFT
27
5.6.2 Pairing a device with the radio
To pair with a Bluetooth audio device:
1.
Put the Bluetooth audio device into pairing mode.
2.
Navigate to Menu > Bluetooth > Find new devices and then press Select.
The New devices menu opens, and the message "Searching ..." appears.
3.
Select the required Bluetooth device from the list of discovered devices and then press
Connect.
l
"Connecting to [device name]" briefly appears while the radio attempts to pair with
the device. This message may disappear from the display even though the
connection process is still in progress.
l
"[Device name] Connected" appears when the radio is paired with the device.
l
When the device is successfully paired, it is visible in the Manage device list.
If a Bluetooth device is currently paired with the radio and you attempt to
pair a new device while the currently paired device is active, you will see
the message "Already paired with [device name]".
4.
Repeat the previous steps to add additional Bluetooth audio devices.
5.6.3 Managing Bluetooth devices
To manage Bluetooth devices:
1.
Navigate to Menu > Bluetooth > Manage device and then press Select.
2.
Choose a device from the list and then press Select.
3.
Choose one of the following options and then press Select.
l
Disconnect—disconnect the paired device. The device will still remain in the devices
list and can be reconnected to at any time.
l
Remove—remove the selected device from the paired devices list.
If you have used the "Remove" option you will need to pair the Bluetooth device
with the radio again before use.
5.6.4 Power-on status
Use power-on status to set the Bluetooth state at radio power-on.
Bluetooth power-on status overrides the Bluetooth enable and disable feature in
the Radio settings > Functions > Bluetooth menu. See Functions on page31.
Tait Open2 Portables User Manual
Tait International Ltd - Issue 02 DRAFT - DRAFT
28
To change the power-on status:
1.
Navigate to Menu > Bluetooth > Power-on status and then press Select.
2.
Choose one of the following options and then press Select:
l
On—enable Bluetooth at power-on.
l
Off—disable Bluetooth at power-on.
l
Previous—return to the last Bluetooth state at power-on.
3.
Choose On or Off and then press Select.
5.7 Own Location
This feature is available for digital channels only.
Own location displays the current location information for your radio. To enable this feature
see Functions on page31.
The location icon on the display indicates that the feature is on. The icon will be if the
feature is on but location information is not available.
To display location information:
1.
Navigate to Menu > Own location and then press Select.
If the radio cannot report the location, "invalid" is shown on the display.
5.8 Program Groups
Options within the Program groups menu allow you to manage channels associated with a
scan group.
If the current selected channel is not a member of a scan group, the message “No
Scan list!" appears on the display and you cannot access the Program Groups
menu.
Group members
To view members of a selected scan group:
1.
Navigate to Menu > Program groups > Group members and then press Select.
Add channel
It is recommended to limit the number of channels in a scan group. Listening
across multiple channels may cause you to miss some, or all, of a call on a channel
of interest.
Tait Open2 Portables User Manual
Tait International Ltd - Issue 02 DRAFT - DRAFT
29

To add a channel to a selected scan group:
1.
Navigate to Menu > Program groups and then press Select.
2.
Choose a scan group from the displayed list and then press Select.
3.
Choose Add channel and then press Select.
4.
Choose a channel from the displayed list and then press Select.
The message "Channel added" appears on the display if successful.
Delete channel
To delete a channel from a selected scan group:
1.
Navigate to Menu > Program groups and then press Select.
2.
Choose a scan group from the displayed list and then press Select.
3.
Choose Delete channel and then press Select.
4.
Choose a channel from the displayed list and then press Delete.
The message "Channel deleted" appears on the display if successful.
Change Tx
To change the transmit (Tx) channel of a scan group:
1.
Navigate to Menu > Program groups and then press Select.
2.
Choose a scan group from the displayed list and then press Select.
3.
Choose Change Tx and then press Select
4.
Choose a channel from the displayed list and then press Select.
The message "Tx channel changed" will appear on the display if successful.
5.9 Time and Date
Use the following options to view and set the current date and time:
1.
Navigate to Menu > Time and date and then press Select.
2.
Choose one of the following options and then press Select.
l
View clock—view the current date and time.
l
Set date—use the up and down scroll keys and the left selection key marked Next to
adjust the date, and then press Save.
l
Set time—use the up and down scroll keys and the left selection key marked Next to
adjust the time, and then press Save.
Tait Open2 Portables User Manual
Tait International Ltd - Issue 02 DRAFT - DRAFT
30

5.10 Radio Settings
Options within the radio settings menu allow you to turn features on or off, adjust settings,
and view radio information.
5.10.1 Functions
The function options available are dependent on type of channel in use, analog or
digital, and how the radio is programmed. You may not see all options.
To turn the radio's function options on or off:
1.
Navigate to Menu > Radio settings > Functions and then press Select.
2.
Choose one of the following function options and then press Select.
l
Low power Tx—for more details see Low Power Transmit on page33.
l
Location—for more details see Own Location on page29.
l
Bluetooth—for more details see Bluetooth on page27.
l
Lone worker—for more details see Lone Worker Alert on page21.
l
Talkaround—for more details see Talkaround on page33.
3.
Choose On or Off for the selected function and then press OK.
The associated function icon appears on the display when the function is enabled.
5.10.2 Alert settings
To set your radio's alert tones to silent operation:
1.
Navigate to Menu > Radio settings > Alert settings > Silent operation and then press
Select.
2.
Choose On or Off and then press Select.
The silent operation icon appears on the display.
5.10.3 Display settings
Shortening the time the backlight remains on, or lowering the backlight level, can lower the
radio's power consumption extending the life of the battery during a shift.
Backlighting
To set the time the backlight remains on once a user control is accessed or a call is received:
1.
Navigate to Menu > Radio settings > Display settings > Backlighting and press Select.
2.
Choose between Continuous (always on), five seconds (5s), ten seconds (10s), 30
seconds (30s), or 60 seconds (60s) and then press Select.
If you turn your radio off, the backlight timer will reset to the default value. You will
need to set this back to the desired time period when you turn your radio back on.
Tait Open2 Portables User Manual
Tait International Ltd - Issue 02 DRAFT - DRAFT
31

Backlight level
To set the display backlight level:
1.
Navigate to Menu > Radio settings > Display settings > Backlight level and then press
Select.
2.
Use the up and down scroll keys to choose a backlight level, one (1) to five (5), and then
press Select.
The backlight level is indicated on the displayed bar graph.
5.10.4 Radio info
To access radio diagnostics:
1.
Navigate to Menu > Radio setting > Radio info and then press Select.
2.
Choose a diagnostic option from the following list and then press Select.
l
Radio ID—display the radio's identifier.
l
Version Info—display the radio's hardware (HW) and firmware (FW) version number.
l
Serial number—display the radio's serial number.
5.11 Diagnostics
To access radio diagnostics:
1.
Navigate to Menu > Diagnostics and then press Select.
2.
Choose a diagnostic option from the following list and then press Select.
l
Display frequency—display the receive and transmit frequency of the current
channel.
l
RSSI—display the current Received Signal Strength Indicator (RSSI) value.
l
Supply voltage—display the current battery voltage.
Tait Open2 Portables User Manual
Tait International Ltd - Issue 02 DRAFT - DRAFT
32
6 Additional Features
6.1 Low Power Transmit
The radio's power consumption can be reduced, extending the life of the battery during a shift,
by transmitting at low power (Low power Tx).
To enable and disable this feature see Functions on page31.
If you turn your radio off, you will need to re-enable Low power Tx when you turn
your radio back on.
The low power transmit icon L appears on the display when the feature is enabled.
When transmitting at low power, you will see the low power transmission icon appear in
conjunction with the low power transmit feature enabled icon .
6.2 Talkaround
Talkaround allows you to bypass the radio repeater and communicate directly with another
radio. This can be done, for example, when the radio is out of range of the repeater, if the
repeater is busy, or it stops working.
To enable and disable this feature see Functions on page31.
The talkaround icon appears on the display when the feature is enabled.
Tait Open2 Portables User Manual
Tait International Ltd - Issue 02 DRAFT - DRAFT
33
7 General Care
The only regular maintenance required is ensuring that the battery has sufficient charge, and
that the antenna and battery are not damaged.
7.1 Cleaning the Radio
Caution Risk of permanent damage to the radio housing! Do not clean the radio
with solvents or alcohol based products. This includes (but is not limited to)
ethylene glycol (antifreeze), propanone (acetone), ethanol (methylated spirits),
isopropyl alcohol, and pool chlorine (calcium hypochlorite).
Caution Risk of internal damage! To avoid damaging the inside of the radio, do not
allow excess liquid to enter the radio body (speaker grille, buttons, and
connectors).
Caution Health risk! Always use protective equipment (gloves, face mask) when
handling bleach.
If you need to clean the radio:
1.
Use a lint-free, dry cloth to remove surface dirt, oil, or grease.
2.
Use an alcohol-free, antibacterial wipe to disinfect the radio.
3.
Use a water-dampened, lint-free, microfibre cloth to remove any remaining dirt.
a.
If the damp cloth is ineffective, use a dilute (5 to 10%) solution of alcohol-free
dishwashing liquid in clean water, on a cloth, to remove remaining dirt.
b.
If the dishwashing liquid solution is ineffective, use a solution of one part
household bleach to two parts clean water, on a cloth, to wipe away remaining dirt.
Caution Do not immerse the radio in fluids.
7.2 Cleaning the Battery Contacts
If necessary, wipe the contacts of the battery with a dry, lint-free cloth to remove any dirt, oil,
or grease.
Caution Do not scratch or scrape the contacts of the battery.
Tait Open2 Portables User Manual
Tait International Ltd - Issue 02 DRAFT - DRAFT
34
8 Troubleshooting
For troubleshooting basic issues with the radio, see Table 8.1 below.
Issue Check the following
The radio does not power on.
l
Is the battery is firmly attached to the radio?
l
Is the battery is charged?
The battery is not charging.
l
Is the radio or battery seated properly in the charger?
l
Is the charger plugged properly into the originally supplied
power supply?
l
Are the battery and charger contacts are clean? To clean, wipe
the contacts with a dry lint-free cloth to remove any dirt, oil, or
grease.
The radio is left in an inoperable state
after a firmware update.
If an unexpected termination occurs during the
firmware update process, the radio may be left in an
inoperable state. This is not a hardware failure.
To recover the radio, repeat the firmware update process again.
To ensure the update process is successful:
l
do not interrupt the process or power cycle the radio.
l
check there sufficient battery charge so the radio does not
shut down during the process.
l
check that the programming cable is secure and connected to
the radio throughout the process.
Table 8.1 Troubleshooting
Tait Open2 Portables User Manual
Tait International Ltd - Issue 02 DRAFT - DRAFT
35

Simplified Declaration of Conformity
EN Hereby, Tait International Limited declares that the radio equipment type TPJB1A,
TPJB1B, TPJHGA, TPJHGB is in compliance with Directive 2014/53/EU. The full text of the EU
declaration of conformity is available at the following internet address:
https://www.taitcommunications.com/our-resources/compliance/declarations-of-conformity
BG С настоящото Tait International Limited декларира, че този тип радиосъоръжение
TPJB1A, TPJB1B, TPJHGA, TPJHGB е в съответствие с Директива 2014/53/ЕС.
Цялостният текст на ЕС декларацията за съответствие може да се намери на следния
интернет адрес: https://www.taitcommunications.com/our-
resources/compliance/declarations-of-conformity
ES Por la presente, Tait International Limited declara que el tipo de equipo radioeléctrico
TPJB1A, TPJB1B, TPJHGA, TPJHGB es conforme con la Directiva 2014/53/UE. El texto
completo de la declaración UE de conformidad está disponible en la dirección Internet
siguiente:
https://www.taitcommunications.com/our-resources/compliance/declarations-of-
conformity
CS Tímto Tait International Limited prohlašuje, že typ rádiového zařízení TPJB1A, TPJB1B,
TPJHGA, TPJHGB je v souladu se směrnicí 2014/53/EU. Úplné znění EU prohlášení o shodě je
k dispozici na této internetové adrese: https://www.taitcommunications.com/our-
resources/compliance/declarations-of-conformity
DA Hermed erklærer Tait International Limited, at radioudstyrstypen TPJB1A, TPJB1B,
TPJHGA, TPJHGB er i overensstemmelse med direktiv 2014/53/EU. EU-overensstemmelses-
erklæringens fulde tekst kan findes på følgende internetadresse:
https://www.taitcommunications.com/our-resources/compliance/declarations-of-conformity
DE Hiermit erklärt Tait International Limited, dass der Funkanlagentyp TPJB1A, TPJB1B,
TPJHGA, TPJHGB der Richtlinie 2014/53/EU entspricht. Der vollständige Text der
EU-Konformitätserklärung ist unter der folgenden Internetadresse verfügbar:
https://www.taitcommunications.com/our-resources/compliance/declarations-of-conformity
ET Käesolevaga deklareerib Tait TPJB1A, TPJB1B, TPJHGA, TPJHGB vastab direktiivi
2014/53/EL nõuetele. ELivastavusdeklaratsiooni täielik tekst on kättesaadav järgmisel
internetiaadressil: https://www.taitcommunications.com/our-
resources/compliance/declarations-of-conformity
EL Με την παρούσα ο/η Tait International Limited, δηλώνει ότι ο ραδιοεξοπλισμός TPJB1A,
TPJB1B, TPJHGA, TPJHGB πληροί την οδηγία 2014/53/ΕΕ. Το πλήρες κείμενο της
δήλωσης συμμόρφωσης ΕΕ διατίθεται στην ακόλουθη ιστοσελίδα στο διαδίκτυο:
https://www.taitcommunications.com/our-resources/compliance/declarations-of-conformity
FR Le soussigné Tait International Limited, déclare que l'équipement radioélectrique du type
TPJB1A, TPJB1B, TPJHGA, TPJHGB est conforme à la directive 2014/53/UE. Le texte
complet de la déclaration UE de conformité est disponible à l'adresse internet suivante:
https://www.taitcommunications.com/our-resources/compliance/declarations-of-conformity
HR Tait International Limited ovime izjavljuje da je radijska oprema tipa TPJB1A, TPJB1B,
TPJHGA, TPJHGB u skladu s Direktivom 2014/53/EU. Cjeloviti tekst EU izjave o sukladnosti
dostupan je na sljedećoj internetskoj adresi: https://www.taitcommunications.com/our-
resources/compliance/declarations-of-conformity
Tait Open2 Portables User Manual
Tait International Ltd - Issue 02 DRAFT - DRAFT
36

IT Il fabbricante, Tait International Limited, dichiara che il tipo di apparecchiatura radio
TPJB1A, TPJB1B, TPJHGA, TPJHGB è conforme alla direttiva 2014/53/UE. Il testo completo
della dichiarazione di conformità UE è disponibile al seguente indirizzo Internet:
https://www.taitcommunications.com/our-resources/compliance/declarations-of-conformity
LV Ar šo Tait International Limited deklarē, ka radioiekārta TPJB1A, TPJB1B, TPJHGA,
TPJHGB atbilst Direktīvai 2014/53/ES. Pilns ES atbilstības deklarācijas teksts ir pieejams
šādā interneta vietnē: https://www.taitcommunications.com/our-
resources/compliance/declarations-of-conformity
LT Aš, Tait International Limited, patvirtinu, kad radijo įrenginių tipas TPJB1A, TPJB1B,
TPJHGA, TPJHGB atitinka Direktyvą 2014/53/ES. Visas ES atitikties deklaracijos tekstas
prieinamas šiuo interneto adresu: https://www.taitcommunications.com/our-
resources/compliance/declarations-of-conformity
HU Tait International Limited igazolja, hogy a TPJB1A, TPJB1B, TPJHGA, TPJHGB típusú
rádióberendezés megfelel a 2014/53/EU irányelvnek. Az EU-megfelelőségi nyilatkozat teljes
szövege elérhető a következő internetes címen: https://www.taitcommunications.com/our-
resources/compliance/declarations-of-conformity
MT B'dan, Tait International Limited, niddikjara li dan it-tip ta' tagħmir tar-radju TPJB1A,
TPJB1B, TPJHGA, TPJHGB huwa konformi mad-Direttiva 2014/53/UE. It-test kollu tad-
dikjarazzjoni ta' konformità tal-UE huwa disponibbli f'dan l-indirizz tal-Internet li ġej:
https://www.taitcommunications.com/our-resources/compliance/declarations-of-conformity
NL Hierbij verklaar ik, Tait International Limited, dat het type radioapparatuur TPJB1A,
TPJB1B, TPJHGA, TPJHGB conform is met Richtlijn 2014/53/EU. De volledige tekst van de
EU-conformiteitsverklaring kan worden geraadpleegd op het volgende internetadres:
https://www.taitcommunications.com/our-resources/compliance/declarations-of-conformity
PL Tait International Limited niniejszym oświadcza, że typ urządzenia radiowego TPJB1A,
TPJB1B, TPJHGA, TPJHGB jest zgodny z dyrektywą 2014/53/UE. Pełny tekst deklaracji
zgodności UE jest dostępny pod następującym adresem internetowym:
https://www.taitcommunications.com/our-resources/compliance/declarations-of-conformity
PT O(a) abaixo assinado(a) Tait International Limited declara que o presente tipo de
equipamento de rádio TPJB1A, TPJB1B, TPJHGA, TPJHGB está em conformidade com a
Diretiva 2014/53/UE. O texto integral da declaração de conformidade está disponível no
seguinte endereço de Internet: https://www.taitcommunications.com/our-
resources/compliance/declarations-of-conformity
RO Prin prezenta, Tait International Limited declară că tipul de echipamente radio TPJB1A,
TPJB1B, TPJHGA, TPJHGB este în conformitate cu Directiva 2014/53/UE. Textul integral al
declarației UE de conformitate este disponibil la următoarea adresă internet:
https://www.taitcommunications.com/our-resources/compliance/declarations-of-conformity
SK Tait International Limited týmto vyhlasuje, že rádiové zariadenie typu TPJB1A, TPJB1B,
TPJHGA, TPJHGB je v súlade so smernicou 2014/53/EÚ. Úplné EÚ vyhlásenie o zhode je k
dispozícii na tejto internetovej adrese:
SL Tait International Limited potrjuje, da je tip radijske opreme TPJB1A, TPJB1B, TPJHGA,
TPJHGB skladen z Direktivo 2014/53/EU. Celotno besedilo izjave EU o skladnosti je na voljo
na naslednjem spletnem naslovu: https://www.taitcommunications.com/our-
resources/compliance/declarations-of-conformity
FI Tait International Limited vakuuttaa, että radiolaitetyyppi TPJB1A, TPJB1B, TPJHGA,
TPJHGB on direktiivin 2014/53/EU mukainen. EU-vaatimusten-mukaisuus-vakuutuksen
täysimittainen teksti on saatavilla seuraavassa internetosoitteessa:
https://www.taitcommunications.com/our-resources/compliance/declarations-of-conformity
Tait Open2 Portables User Manual
Tait International Ltd - Issue 02 DRAFT - DRAFT
37

SV Härmed försäkrar Tait International Limited att denna typ av radioutrustning TPJB1A,
TPJB1B, TPJHGA, TPJHGB överensstämmer med direktiv 2014/53/EU. Den fullständiga
texten till EU-försäkran om överensstämmelse finns på följande webbadress:
https://www.taitcommunications.com/our-resources/compliance/declarations-of-conformity
Tait Open2 Portables User Manual
Tait International Ltd - Issue 02 DRAFT - DRAFT
38