1
OWNER’S MANUAL
Amplify

2
IMPORTANT SAFETY GUIDES
READ AND FOLLOW ALL INSTRUCTIONS
IT IS UNLAWFUL TO INSTALL THIS UNIT WITHOUT FIRST OBTAINING A
PERMIT FROM THE LOCAL
ELECTRICAL INSPECTION AUTHORITY.
A
)
Reference to the warning marking provided with the heater, indicating the
importance
of attaching the marking. There are the relevant explainations for all kinds of
warning
notice; also there is the limit for the location of warning notice as below;
1) The hyperthermia warning marking should be located on the outside of the
door at eye level.
2) The fire warning marking should be located on the interior wall above the
heater at eye level.
B) All wiring to the sauna heater and accessories shall be routed away from any direct
radiation form the sauna heater.
C) Any receptacle shall not be installed inside the heated room.
D) The sauna heater shall not be subjected to water spray and that shower
heads shall not
be installed above the sauna heaters.
E) No plumbing fixtures (taps, etc) are to be installed in the sauna room.
F) The door of the heated room do not include any locking or latching system,
malfunction of which could cause entrapment inside the heated room.
G) The dry-bath bathing room shall be provided with intended ventilation.
H) Hyperthermia occurs when the internal temperature of the body reaches a
level several
degrees above the normal body temperature of 98.6
℉
H. the symptoms of
hyperthermia
include an increase in the internal temperature of the body, dizziness,lethargy,drowsiness, and
fainting. The effects of hyperthermia include:
a)Failure to perceive heat;
b)Failure to recognize the need to exit the room;
c)Unawareness of impending hazard;
d)Fetal damage in pregnant women;
e)Physical inability to exit the room; and
f)Unconsciousness.
WARING- The use of alcohol, drugs, or medication is capable of greatly
increasing the
risk of fatal hyperthermia.
SAVE THESE INSTRUCTIONS

3
TABLE OF CONTENTS
PRE-INSTALLATION
Control Panel ....................................................................... 13
Warm-Up Time/Usage ..........................................................
Specifications ........................................................................ 4
Pre-Installation Info ............................................................... 4
ASSEMBLY INSTRUCTIONS............................................... 5
OPERATING INSTRUCTIONS
14
Sauna Protocol ...................................................................... 15
Amplify
OWNER’S MANUAL
ASSEMBLY INSTRUCTIONS................................................ ..16
WARNING........................................................................16
4
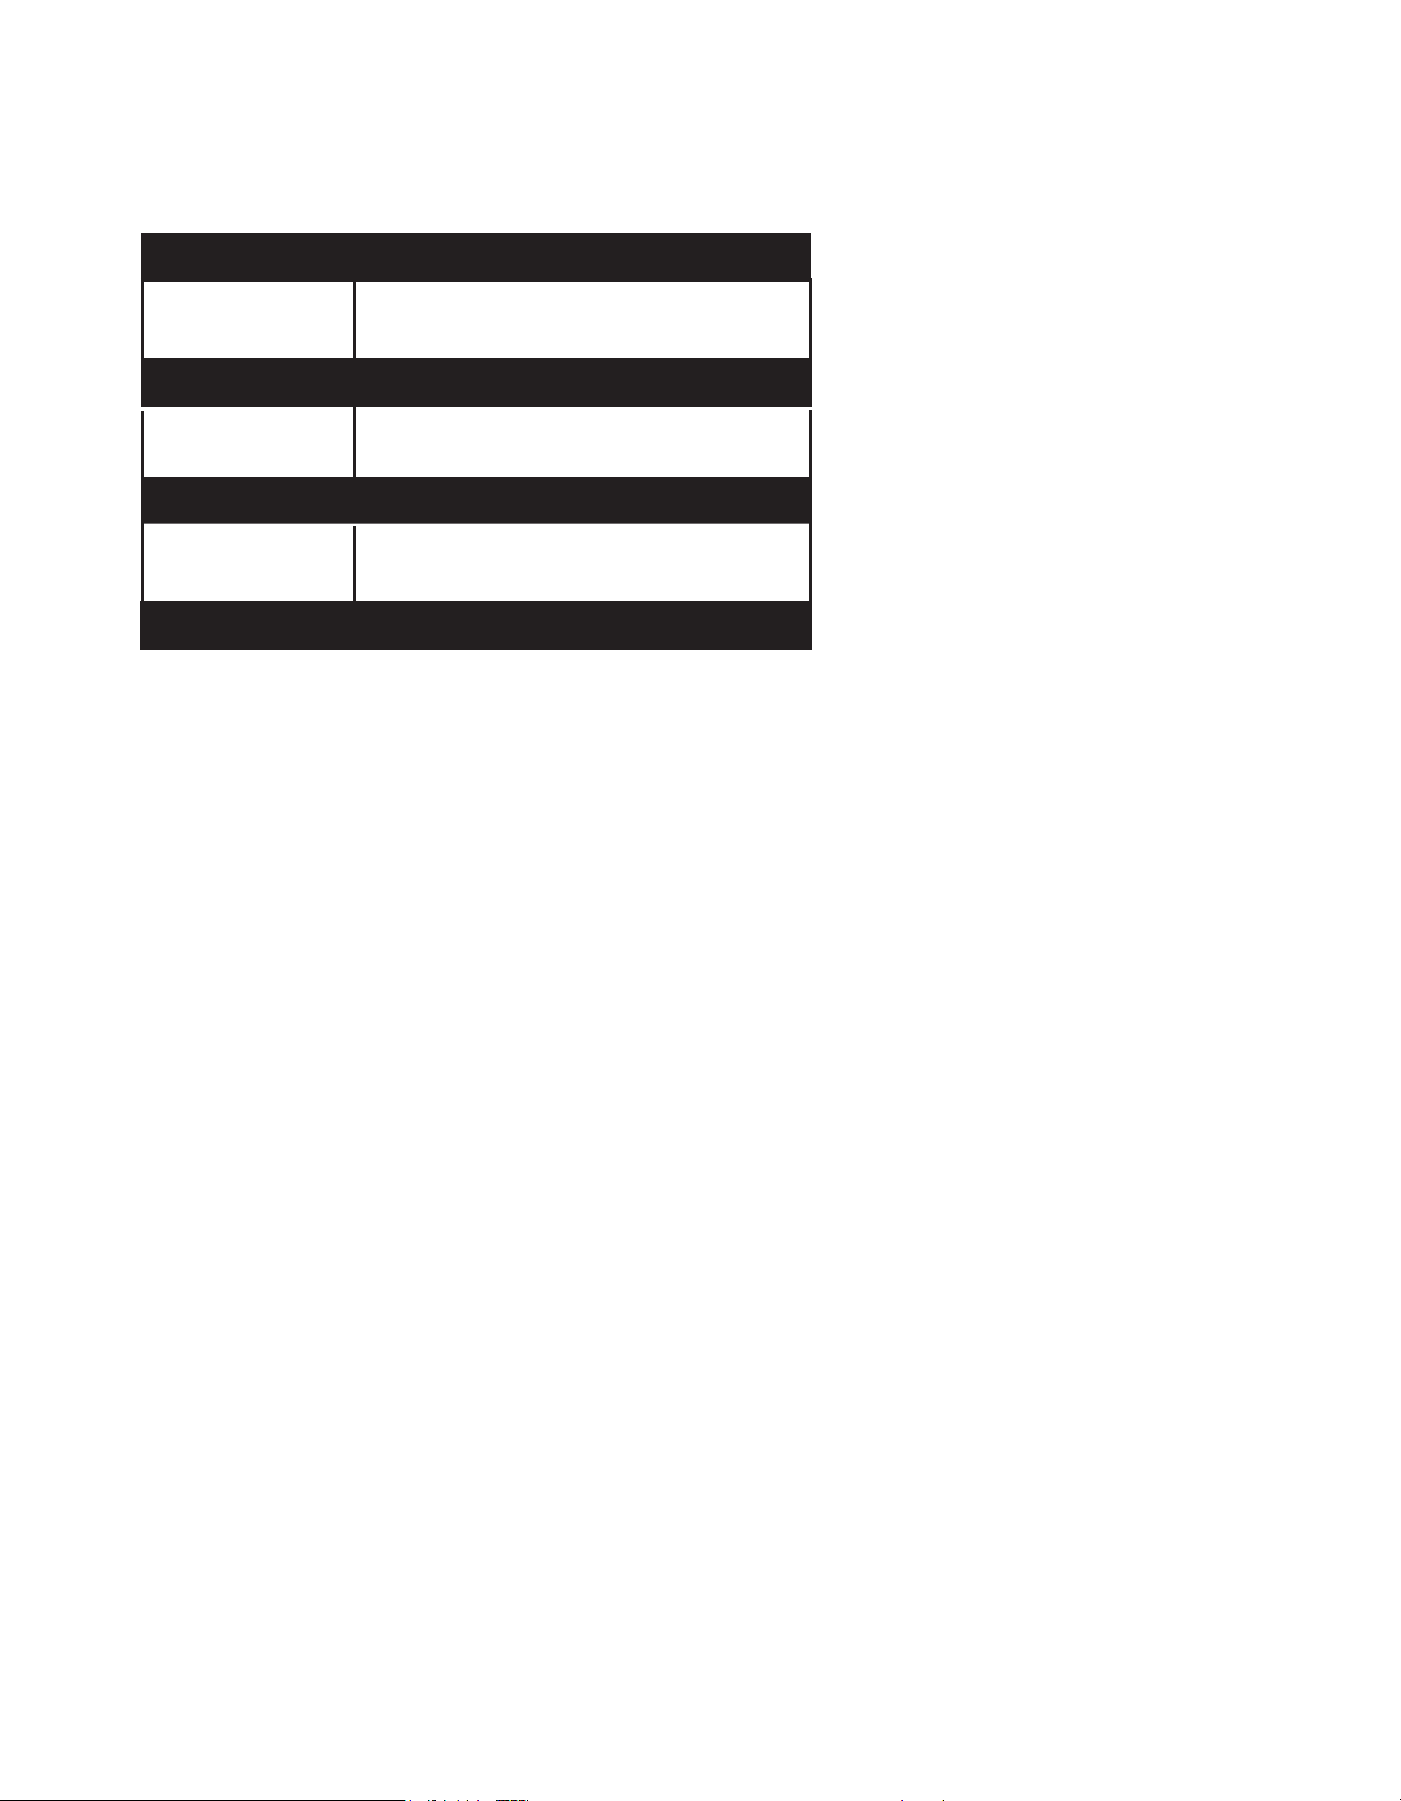
Amplify SERIES SPECIFICATIONS
AMPLIFY 2
Dimensions
Power
1,35 cm x 1,22 cm x 1,97cm
AMPLIFY 3
Dimensions
Power
1,64cm x 1,22 cm 1,97 cm
Power
Dimensions
A true dedicated outlet is an outlet that runs from the wall outlet on your home
to the breaker box with nothing else on that line. Plugging your sauna into your
wall outlet with any other electrical device is not a true dedicated outlet and will
hinder the sauna’s ability to warm up properly.
120V,18.92A,2270W
240V,13.67A,3280W
AMPLIFY 4
1,70cm x 1,71 cm x 1,97cm
240V,16.25A,3900W
PRE-INSTALLATION
1. If your sauna requires a dedicated outlet , please have a certied electrician install a
dedicated outlet for sauna.
2. Remember your sauna should be assembled by two or more people.
3. Do not place plumbing or plumbing xtures in the sauna.
4. Keep all liquids away from the heating panels and electronics.
5. Install sauna on a level surface.
6. Install sauna in an area that is dry and protected from the weather.
7. Keep ammable objects and corrosive chemical substances away from the sauna.
8. Installation of the sauna in an area below standard room temperature can increase warm-
up time.
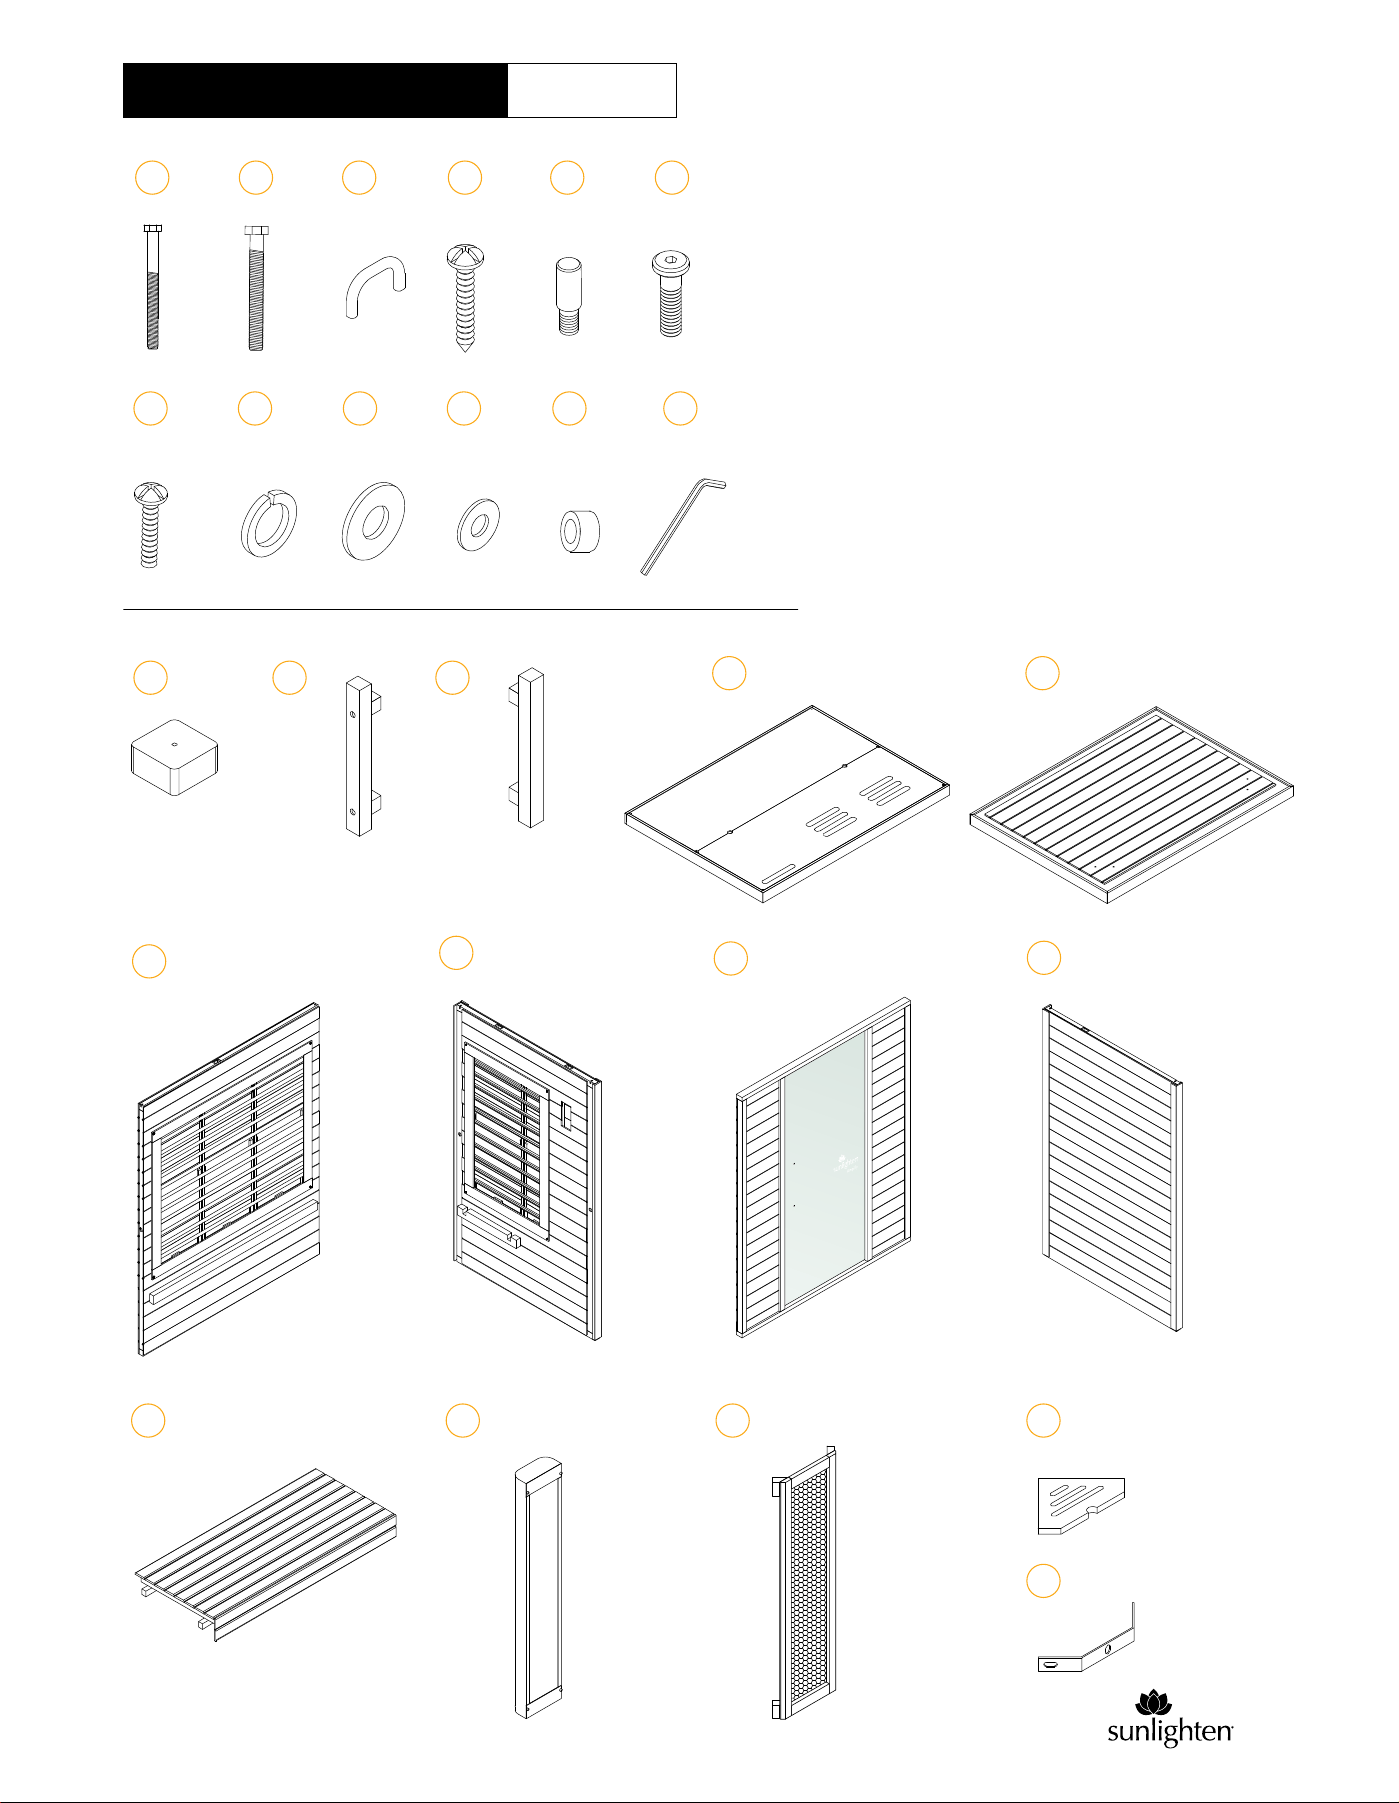
2x Full Spectrum (FS) Heater
1x Floor
1x Bench
J
2x
FS Heater Covers
LK
2x
FS Heater Top Panel
M
4x
FS Heater brackets
N
1x
Right Wall
G
1x
Back Wall
F
1x
Left Wall
I
1x
Front Wall with glass panel
H
1x 1x6x
A B C
1x
Roof
D E
12
1x
Allen wrench
8
12x
9
12x
10
12x
7
12x
11
2x
2x
1 2
6x
3
4x
4
4x
5
8x
6
12x
ȩ!33%-",9ȩ).3425#4)/.3
Amplify
5
9OUȩWILLȩWANTȩTWOȩORȩMOREȩPEOPLEȩTOȩASSEMBLEȩYOURȩSAUNA
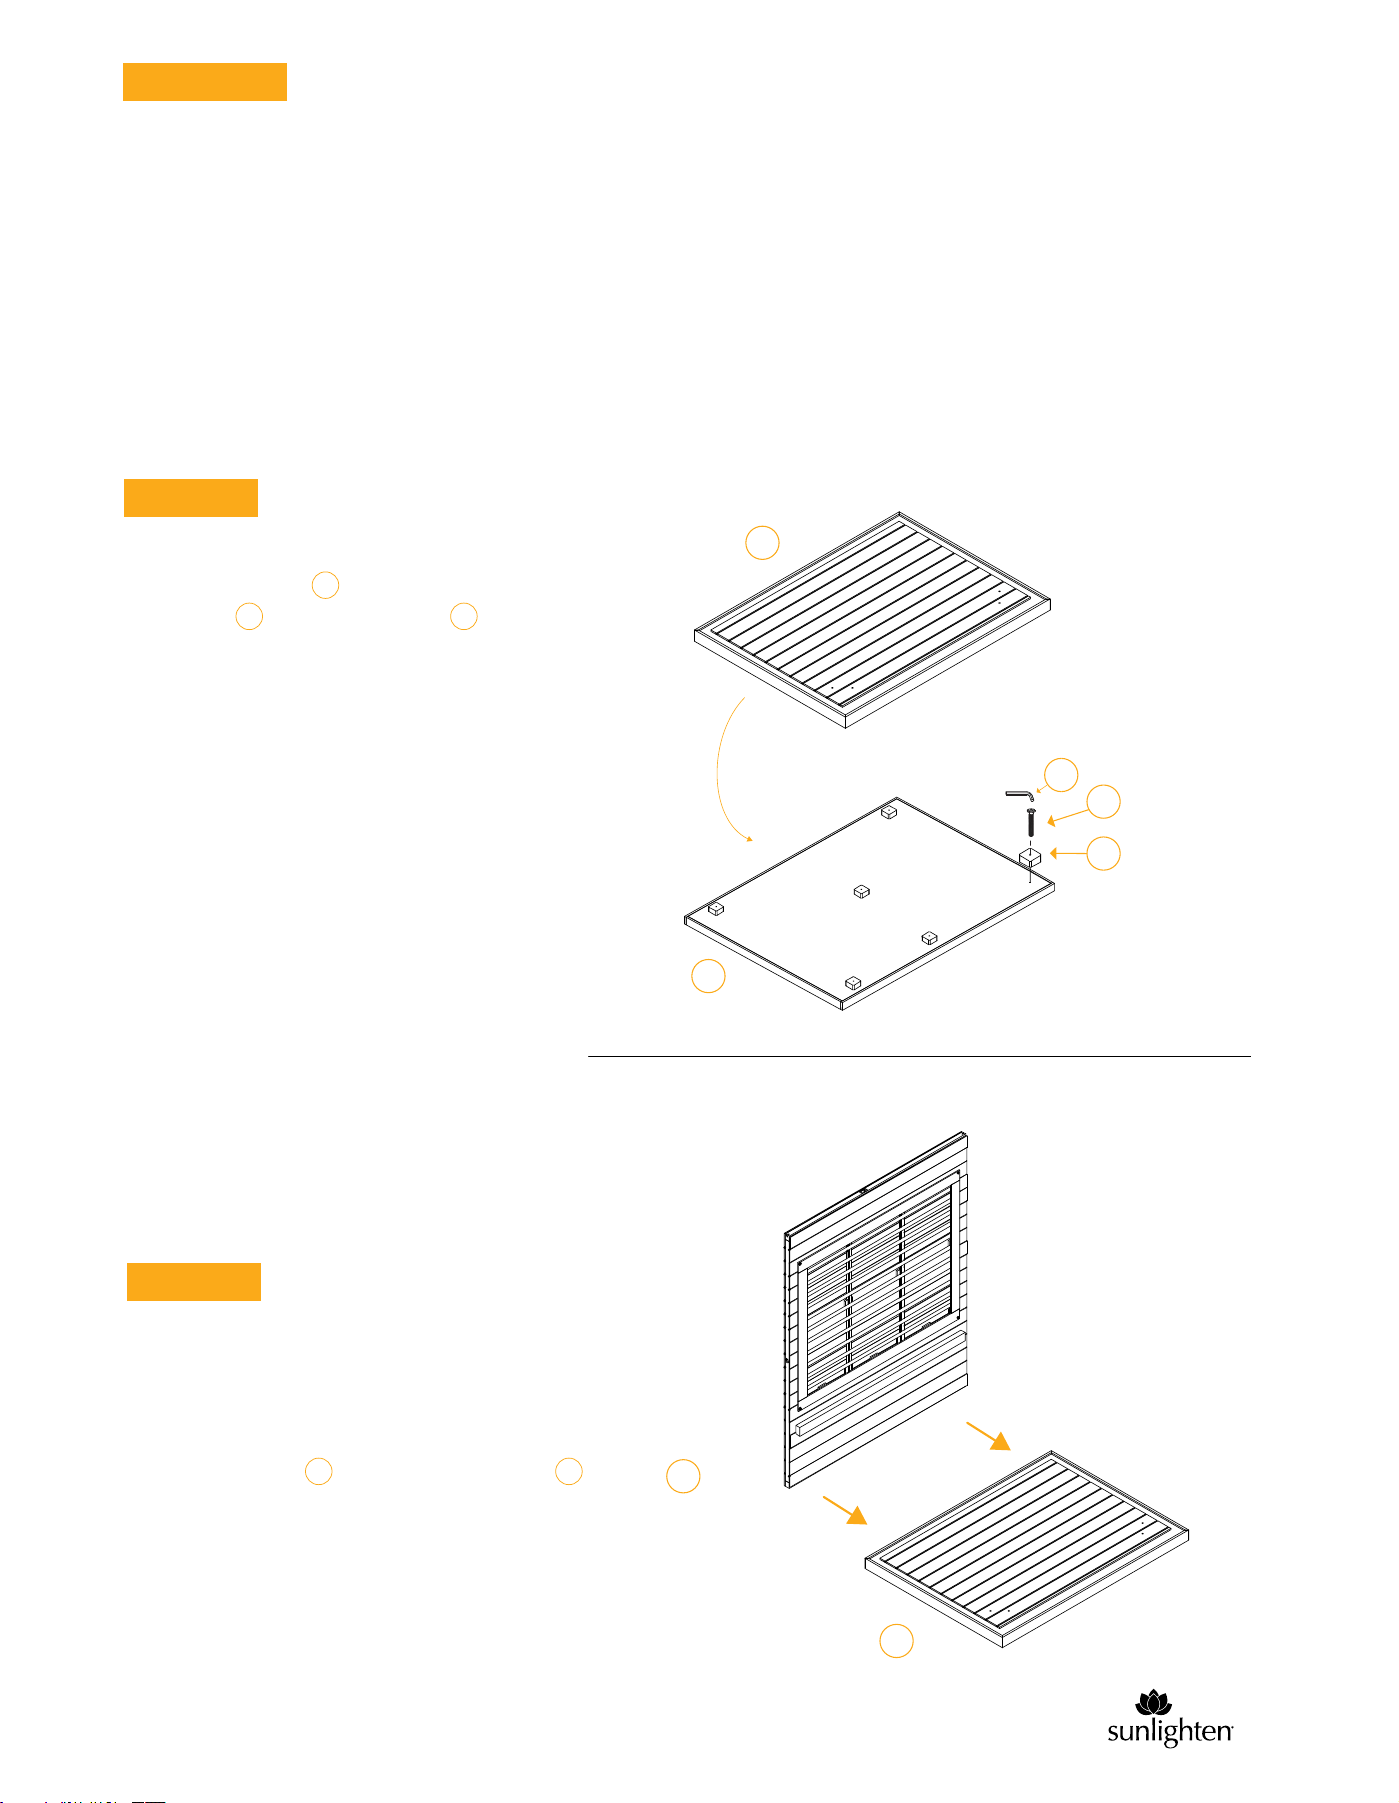
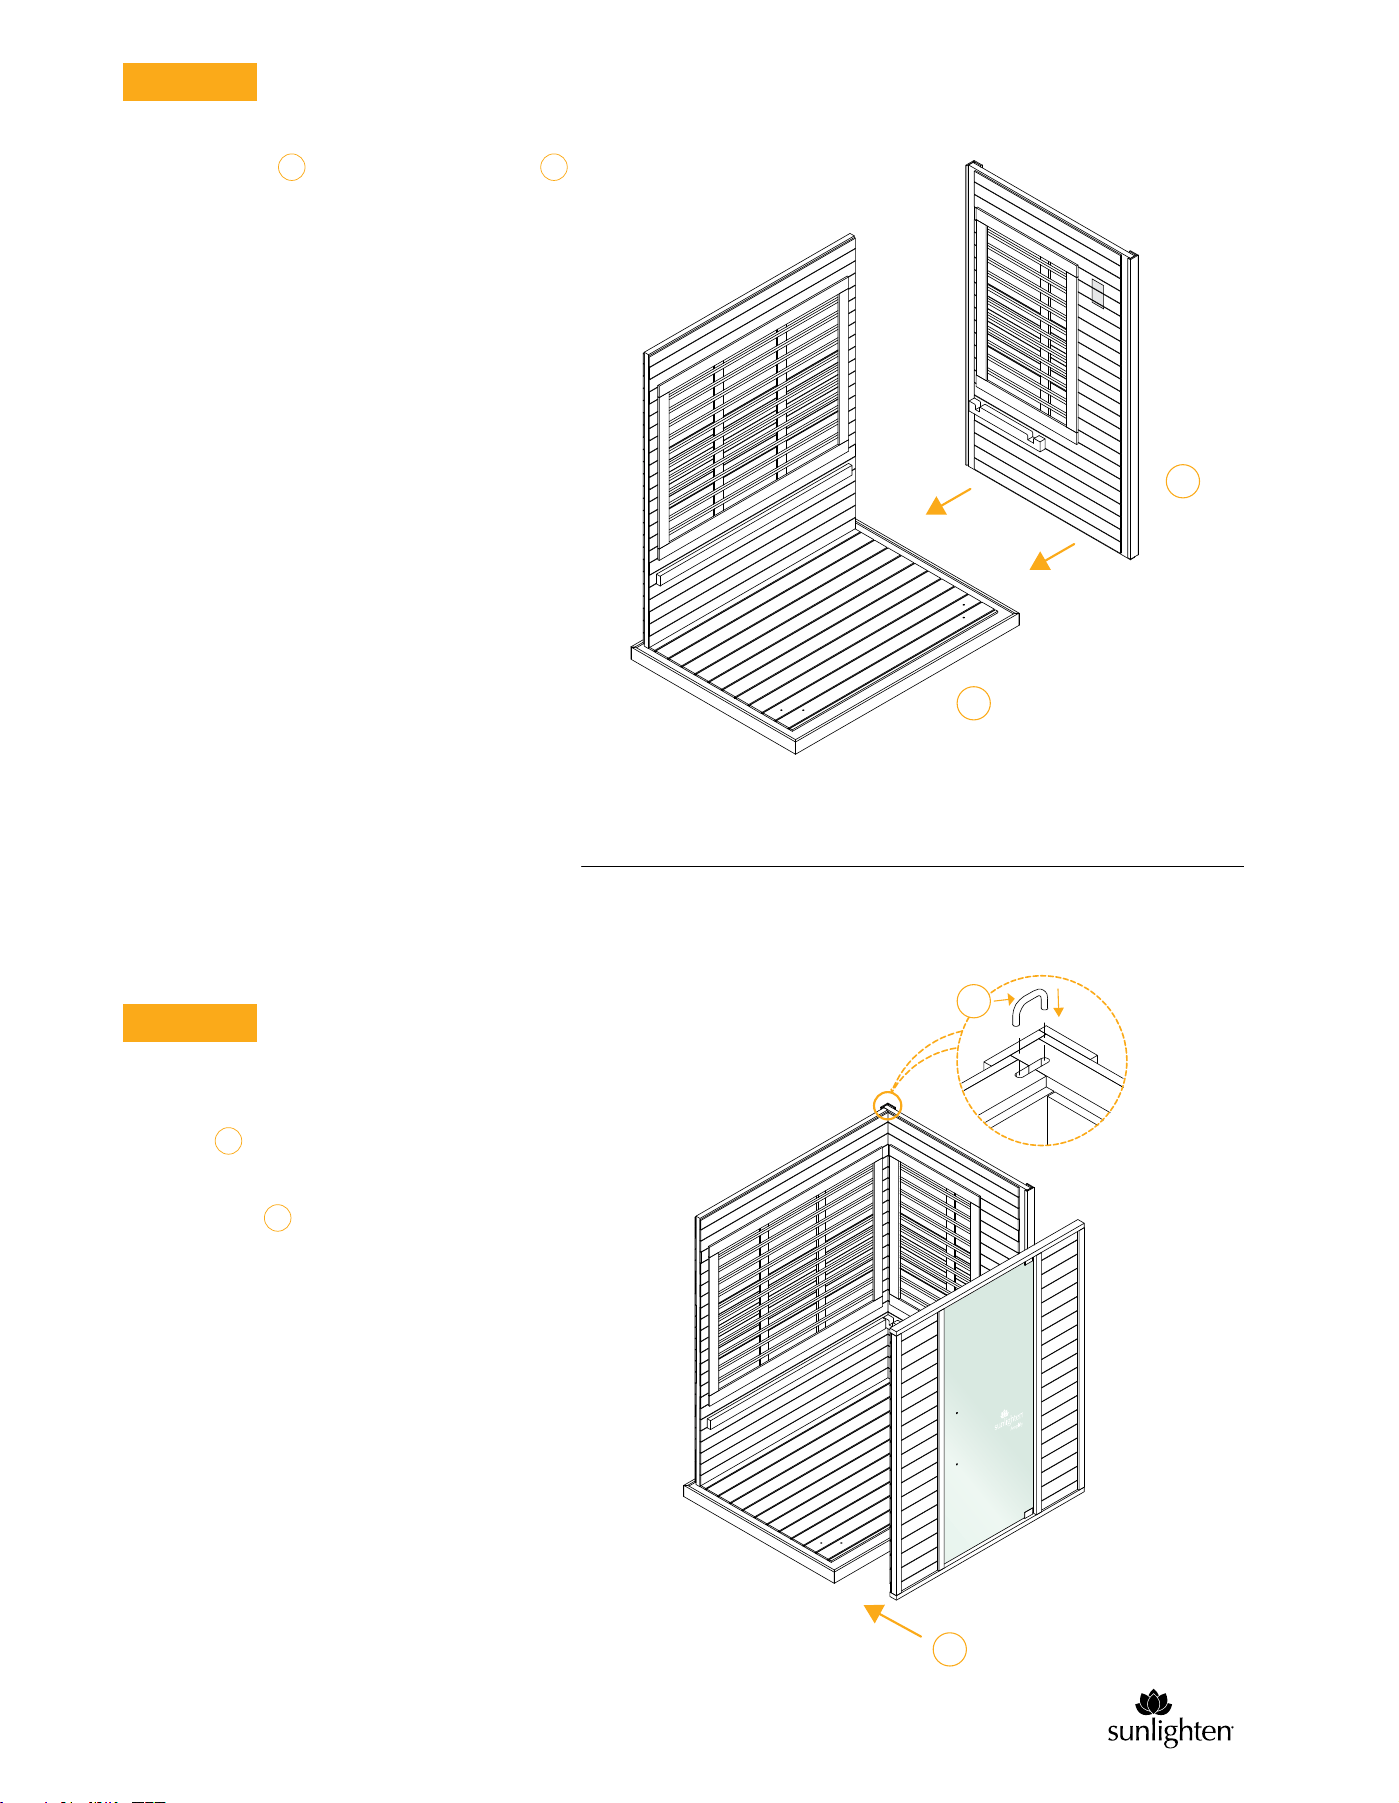
Unpack each wall segment from the shipping material. Stage
each wall segment in the room you will be assembling the unit.
STEP 1
Be sure you have two people assisting with this step.
This is the side with the sauna information label
Place the back wall on the back of the floor panel .
on the bottom edge.
STEP 2
PRE-
STEPS
A
2
12
F
E
E
E
E
F
Attach the feet pegs with supplied Allen wrench
and bolts to the underside of floor .
NOTE: Make sure the floor panel is on a
surface that is perfectly level and relatively
smooth. Failure to do so can cause the door to
not close all the way in the later steps.
2 E
A
NOTE: Before you begin installing the walls, be sure
you have at least:
• 6 in between the back of the sauna and the
outlet wall.
• 12 in gap from the top of the sauna to the ceiling.
• Place the sauna next to the wall power outlet to
ensure you have access to the wall power socket
outlet to cut the power to the unit if required.
In this step, make sure one person is holding the
wall while the other helps balance it and press it in
place.
6
STEP 3
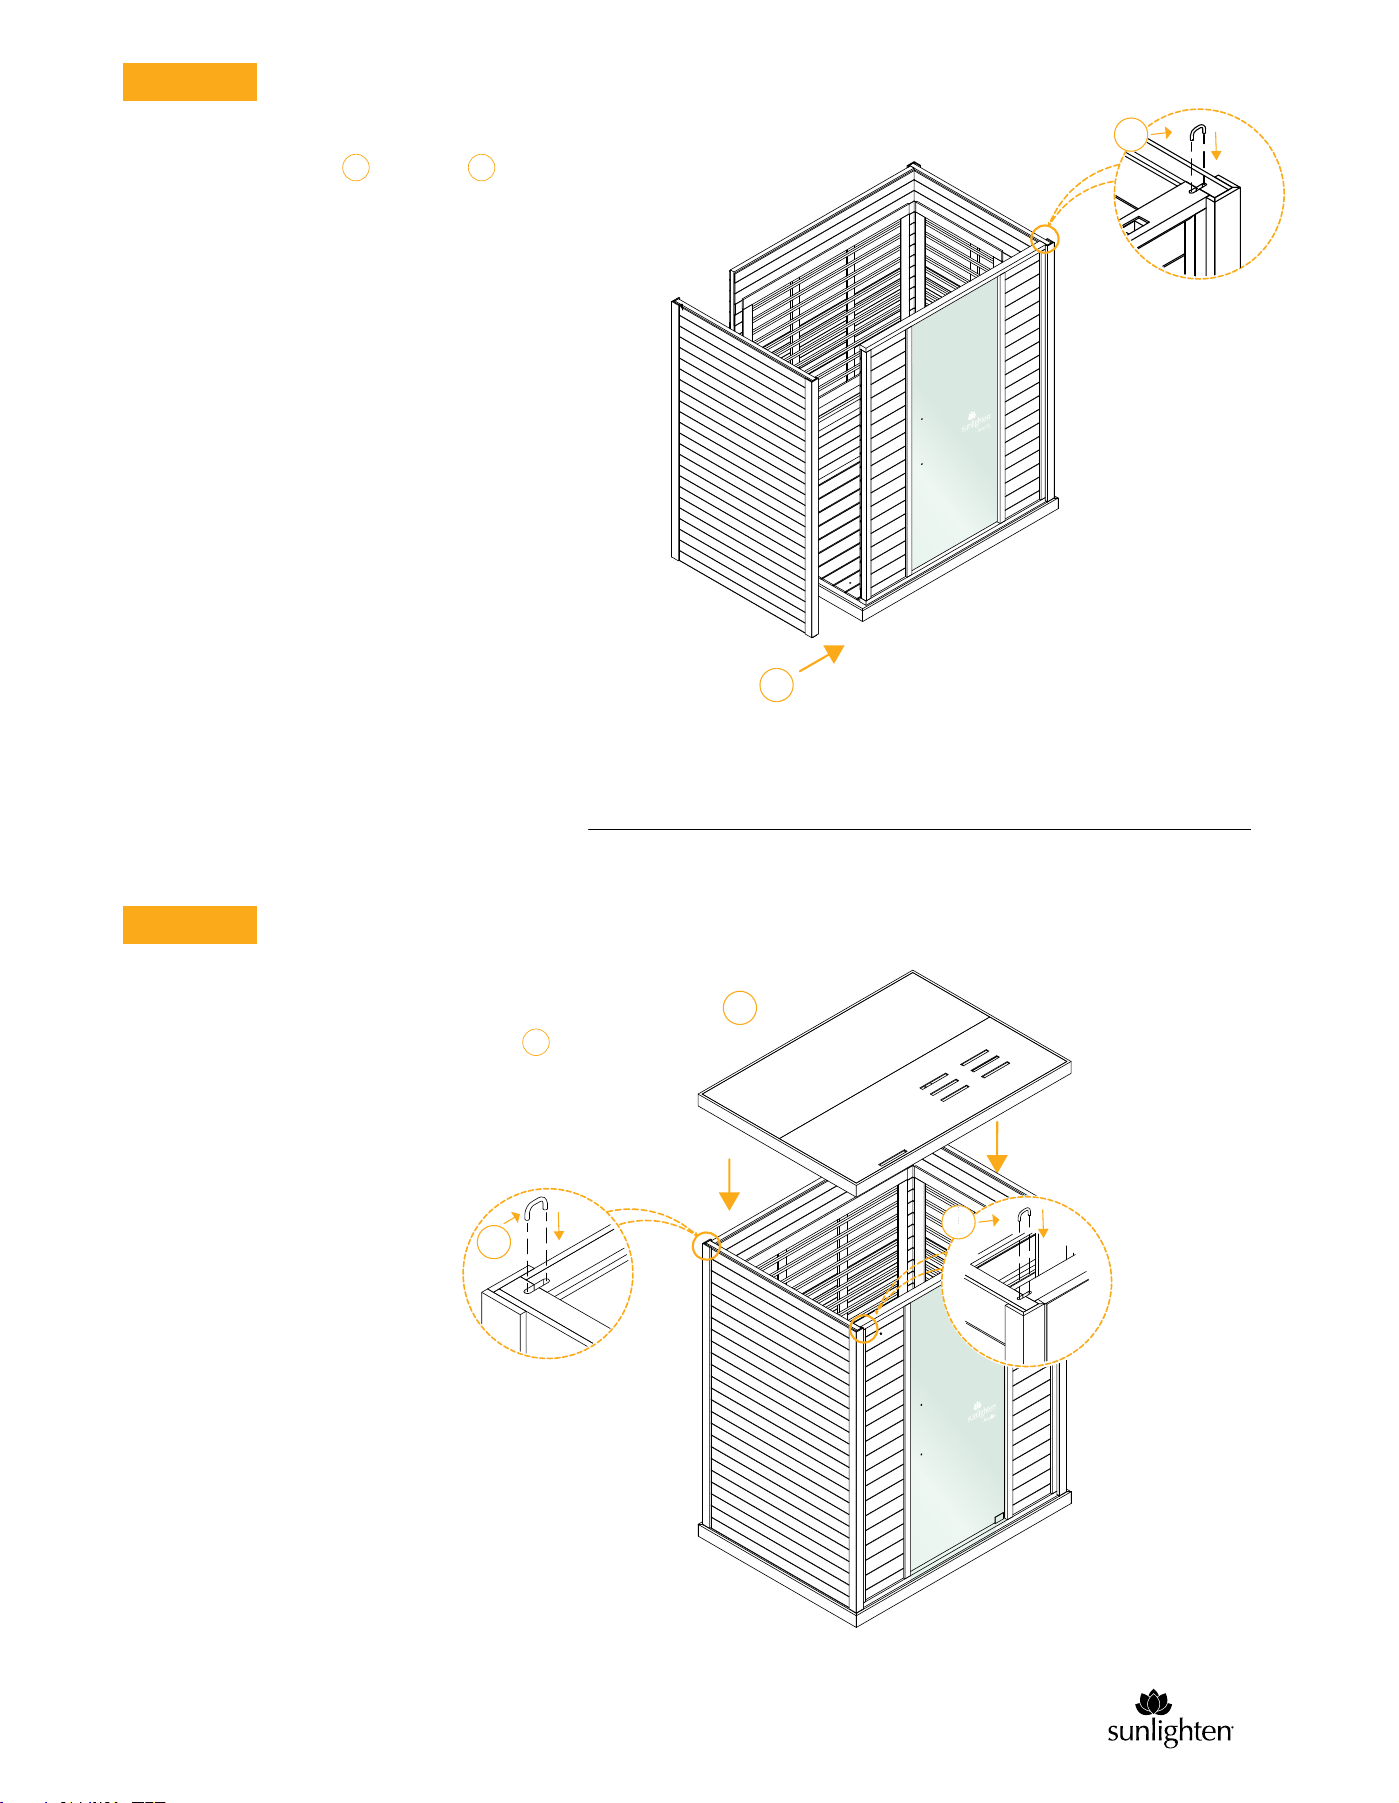
As you insert each wall segment, you will insert the
U-clips in the pre-drilled holes in the corner.
This will keep the walls sealed together.
The front wall will be inserted next. Be careful
of the glass door and panel as you insert the wall.
Place right wall on the right side of floor panel .
This wall panel should sit flush once properly seated.
Make sure no gaps are visible in the corner of the two
walls as you insert it. It should be inserted flush.
STEP 4
H
G E
3
3
H
E
G
7
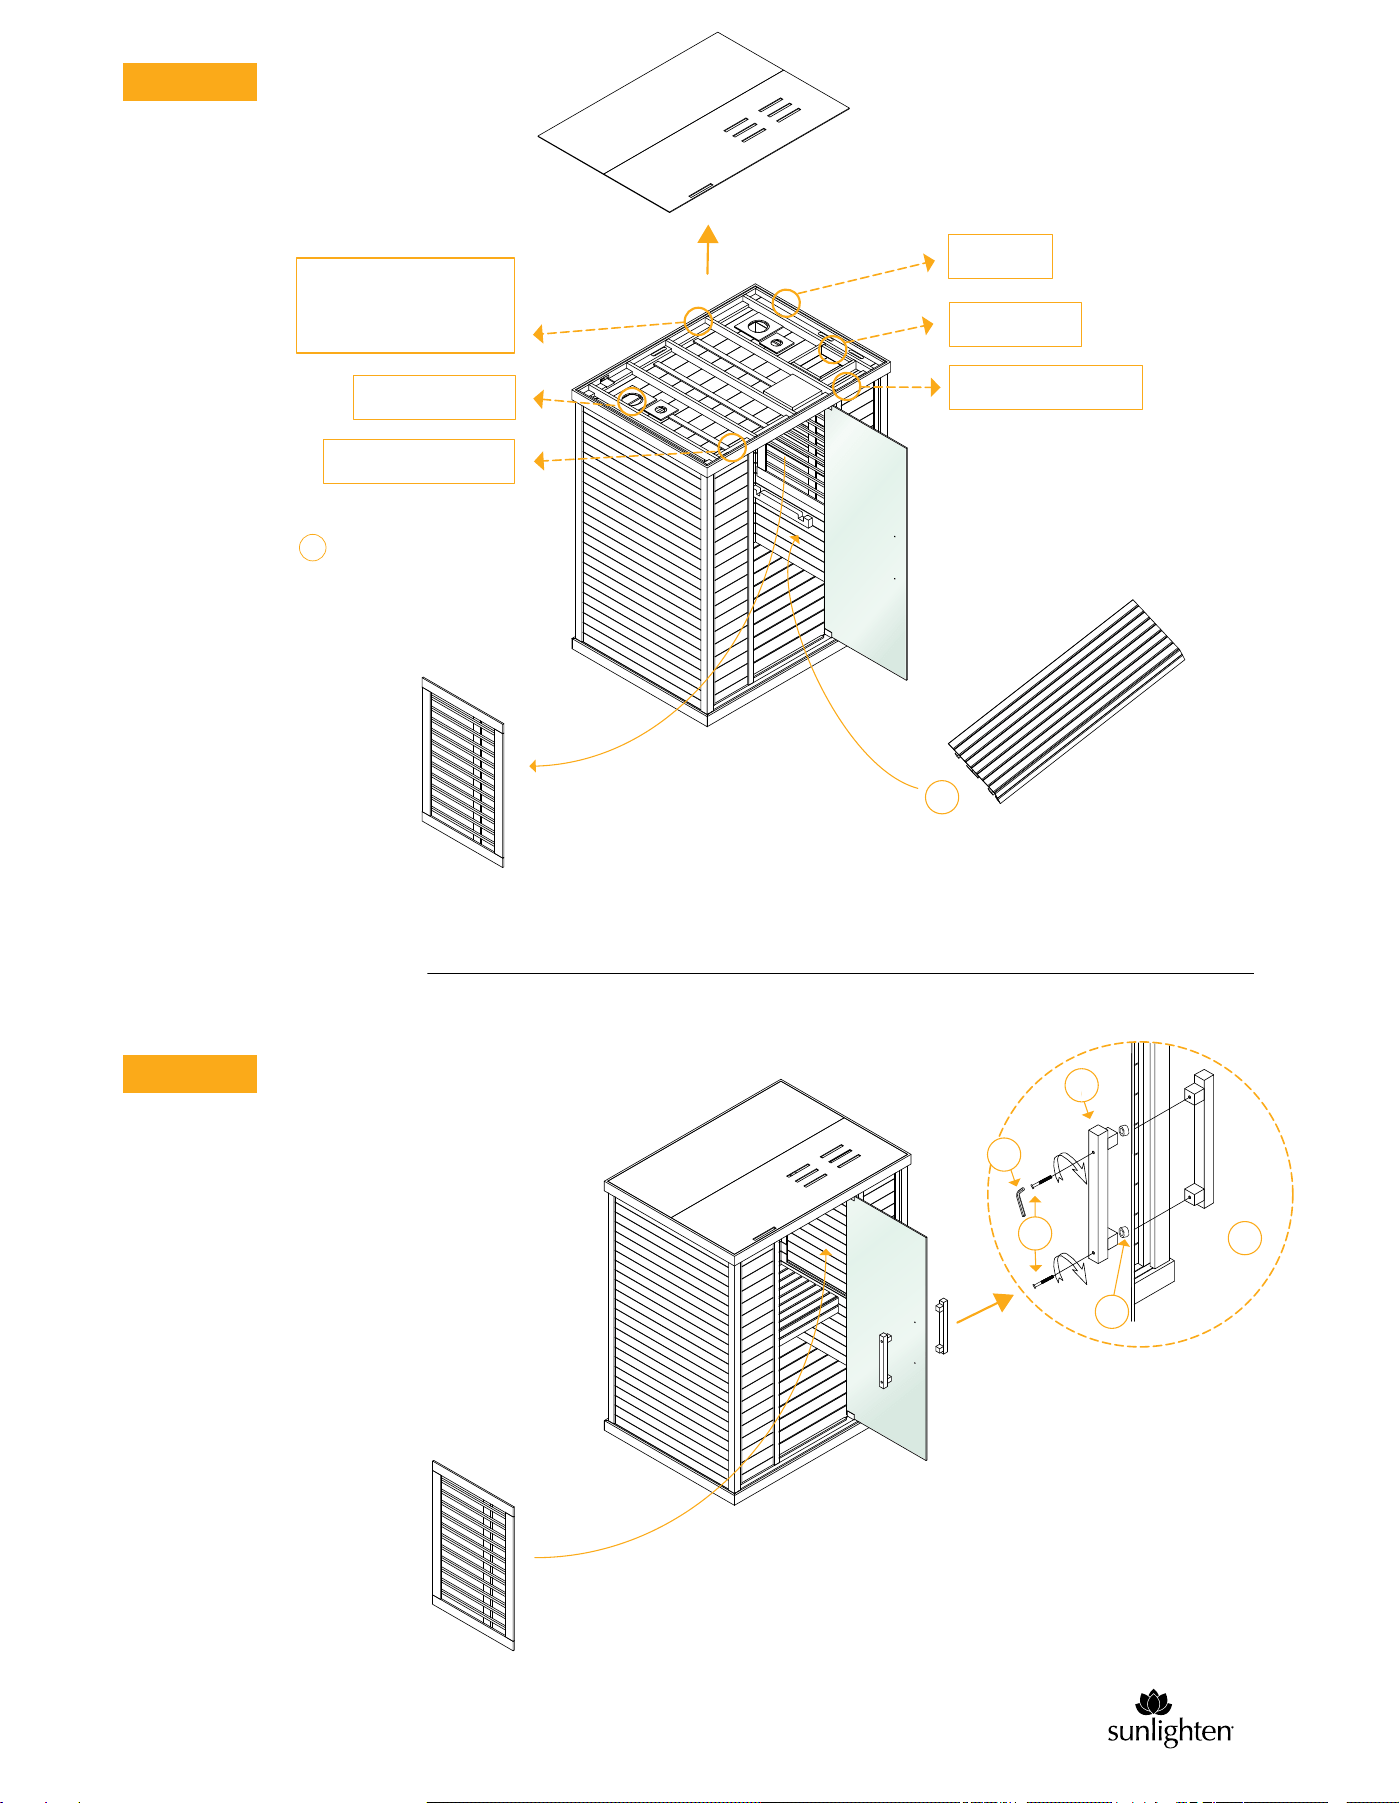
STEP 5
Once all the U-clips have been inserted in the
corners, the next step will be to place the roof
on top. Make sure the side with the main power
cord receptacle faces the back.
After securing the U-clip , the left wall will
be the last to be inserted. Make sure it is flush and
no gaps are showing in the corners.
NOTE: If you ever have trouble getting a U-clip
to slide in, this can be resolved by tapping it with
a hammer.
STEP 6
3 I
3
3
3
D
I
D
8
11
STEP 7
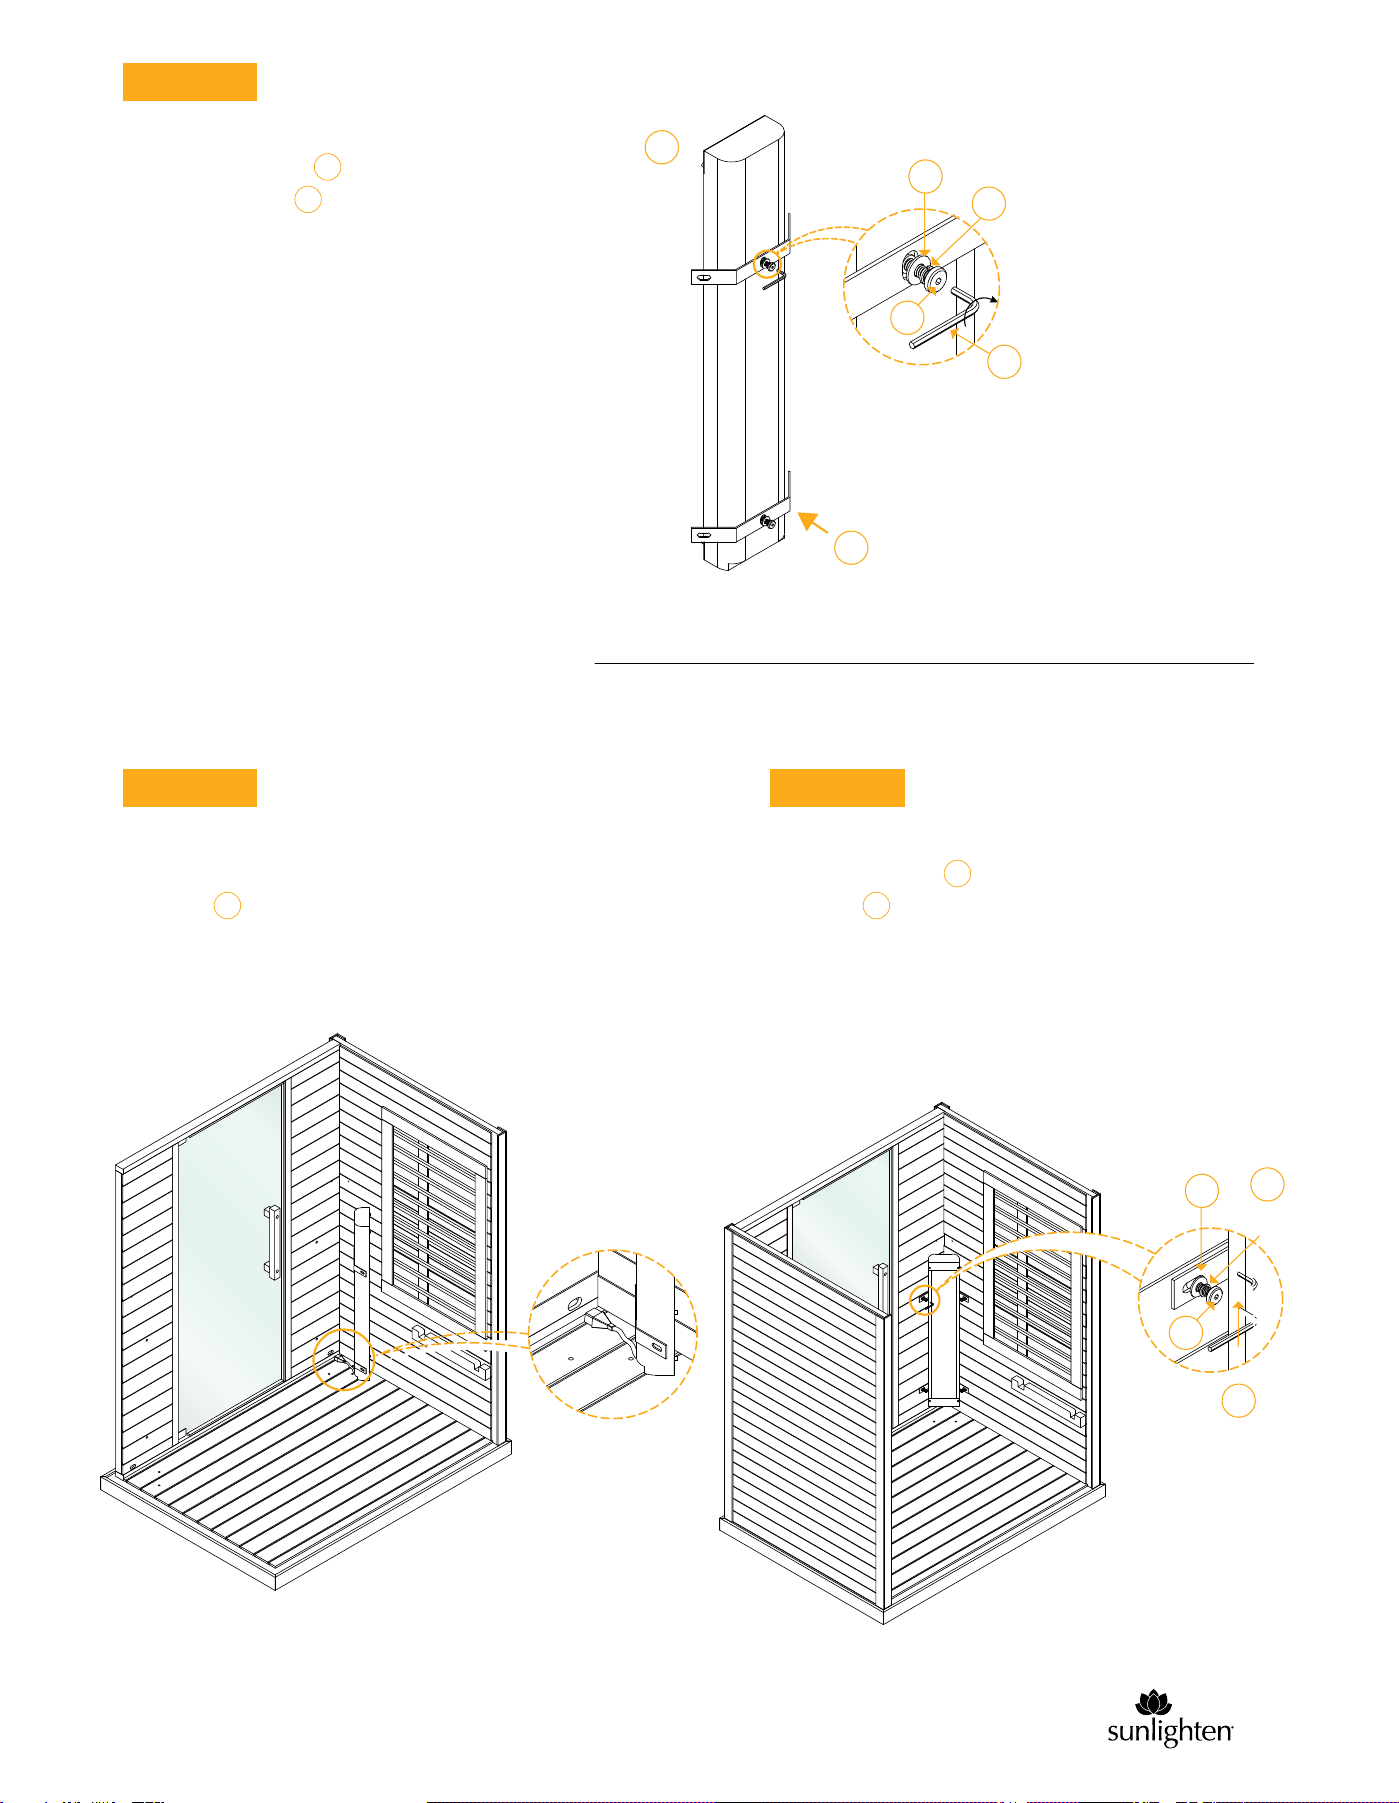
Please make all connections on roof of sauna as
illustrated.ȩ4OȩDOȩTHISȩYOUȩWILLȩFIRSTȩNEEDȩTOȩ
REMOVEȩTHEȩDUSTȩCOVERȩBYȩREMOVINGȩMANYȩSCREWS
STEP 8
With the bench installed, the heater panel
frames can be inserted back into their
respectable walls.
The door handles come with the hard-
ware and can easily be screwed right in.
A second person should hold the handle
while the other screws the bolts in
with the Allen wrench. The dust
cover should also be replaced.
Before the bench is placed, make
sure the heater frames are taken out
to allow the bench to be placed on
its support.
Left Wall Heaters
Full Spectrum Heater
Back Heater/"LAUPUNKTȩ
2ECEIVERSound Therapy
Reeceiver
Right Wall
Control Panel
Full Spectrum Heater
J
heater frame
heater frame
C
B
1
12
J
1
9
STEP 9
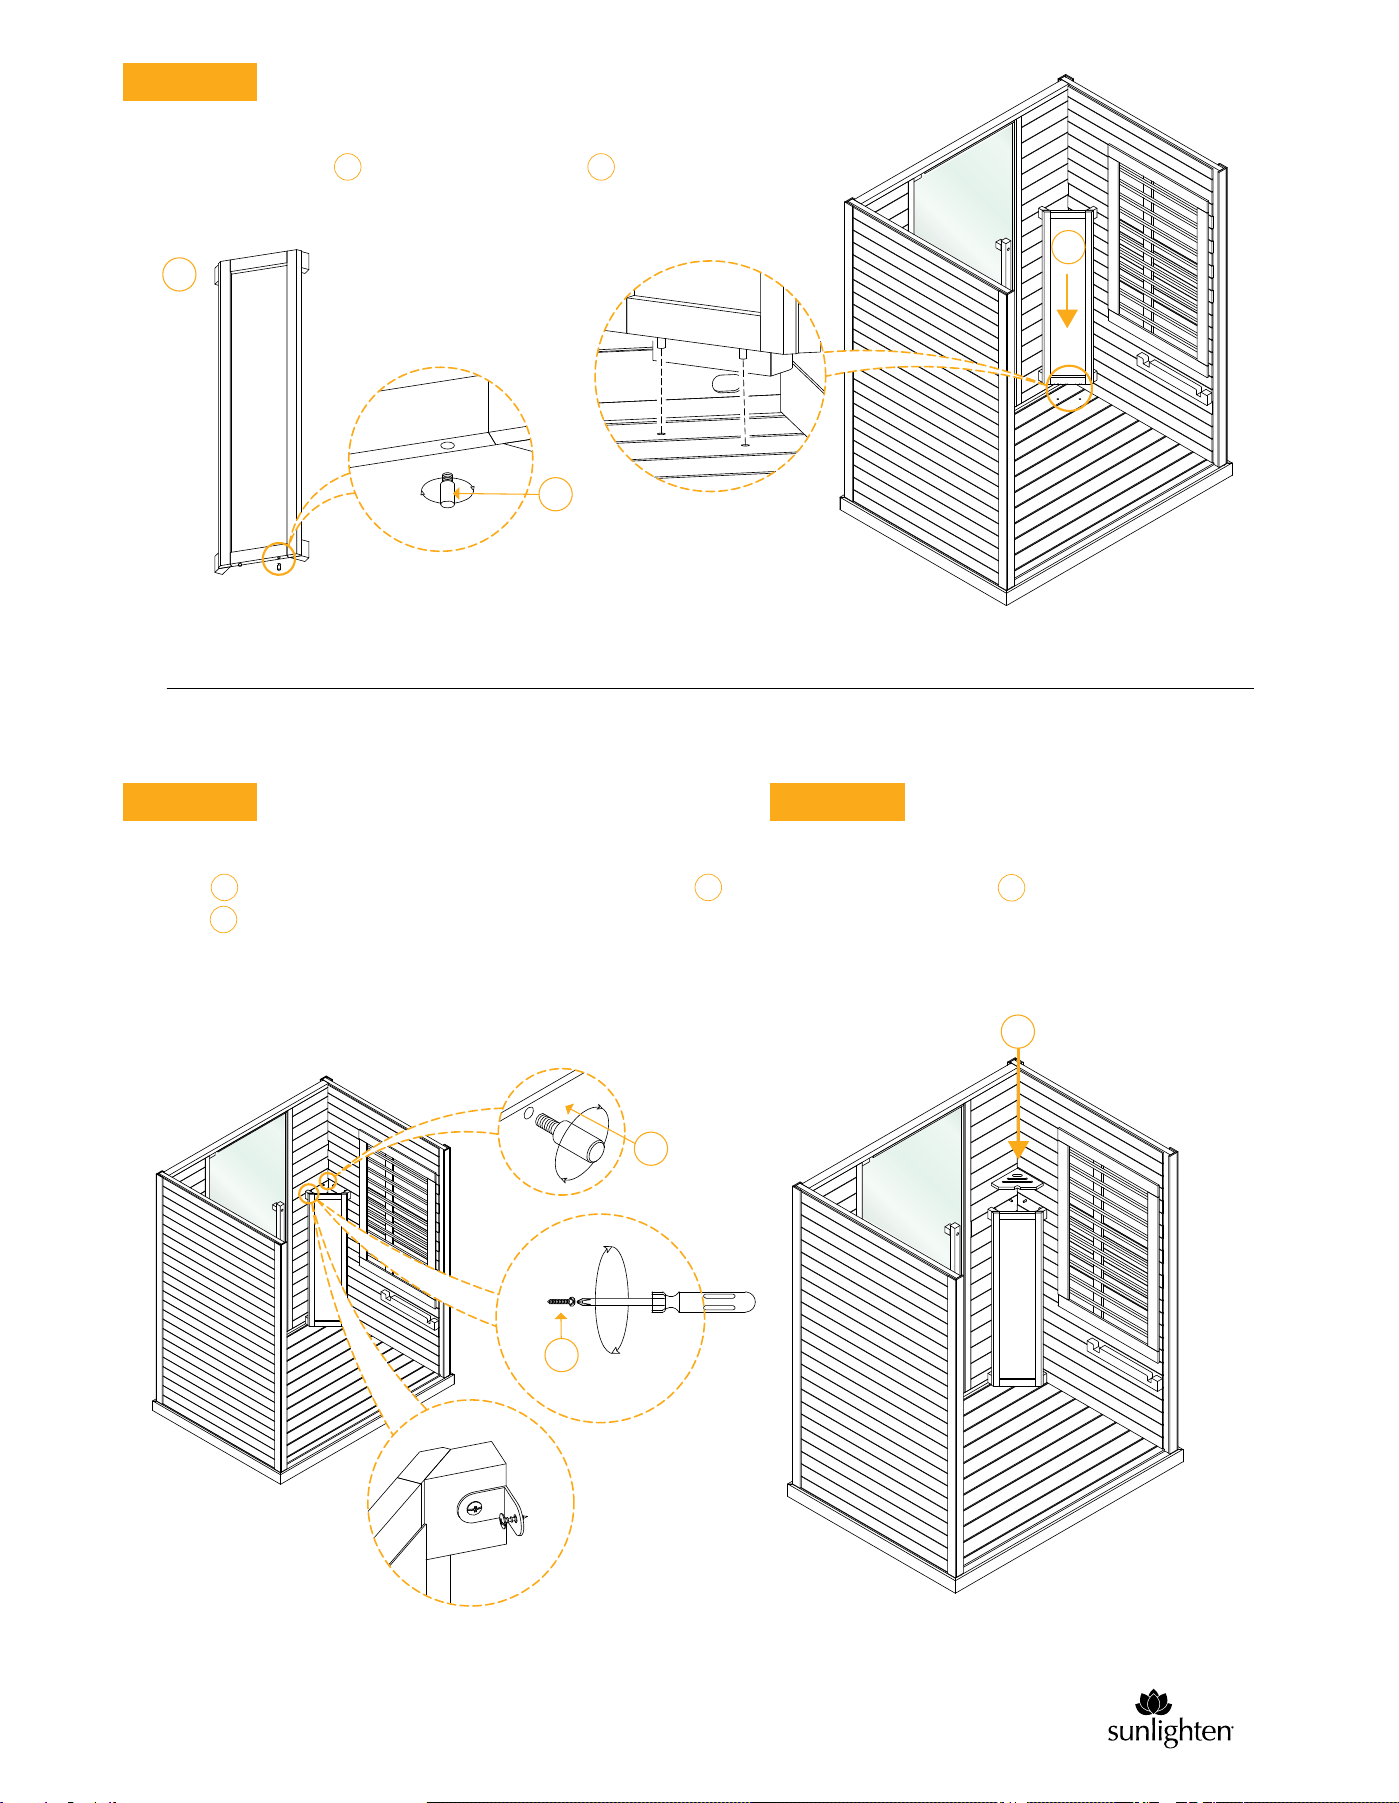
Connect 2 brackets to the back of the Full
Spectrum heater .
STEP 10
Connect the cable at the base of the Full Spectrum
heater to the socket at the base of the inside
front wall.
STEP 11
Fix both brackets attached to Full Spectrum
heater on either side of heater into pre-drilled
holes on front right inside corner sauna walls.
Repeat Steps 9-11 for the second FS Heater on
front left inside corner sauna walls.
N
K
8
12
9
6
12
N
K
8
9
6
N
KK
10
L
STEP 12
Place FS Heater Cover to the Full Spectrum heater
by securing into pre-drilled holes in floor panel.
STEP 13
L K
Insert into pre-drilled holes on walls for the FS heater top panel .
Screw into pre-drilled holes to secure brackets.
5
4
N
5
L
5
4
STEP 14
Add FS heater top panel to both FS heaters.
N
N
11
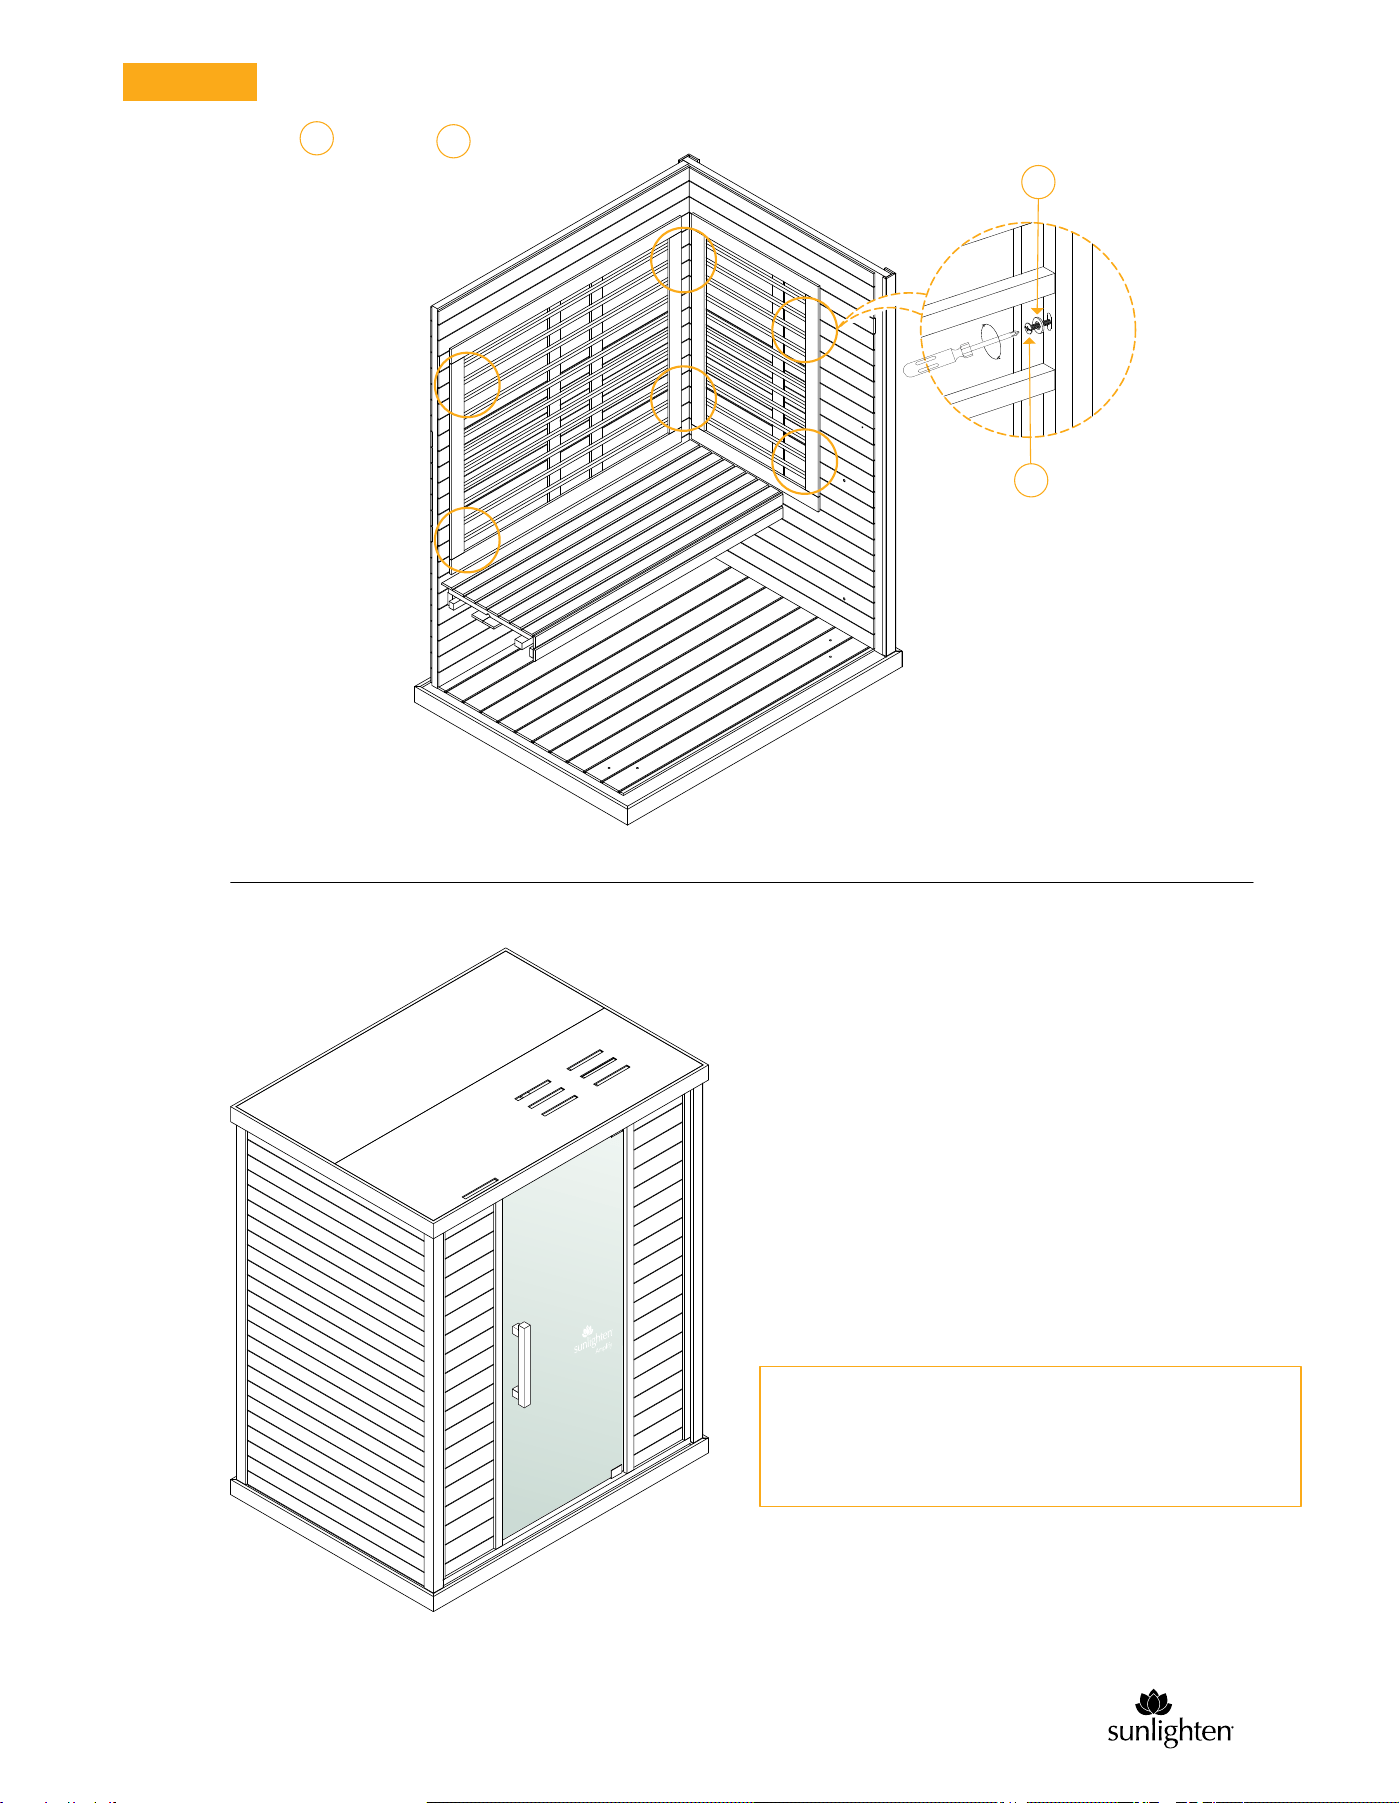
CONGRATULATIONS, your sauna is now ready to enjoy!
If you have any questions, please call
Sunlighten Customer Support at 1-877-292-0020.
STEP 15
10
7
Make sure that screws and washers are fully
secure in their pre-drilled holes using a Phillips
screwdriver.
7
10
12
OPERATING INSTR
13
UCTIONS
INSTRUCTIONS
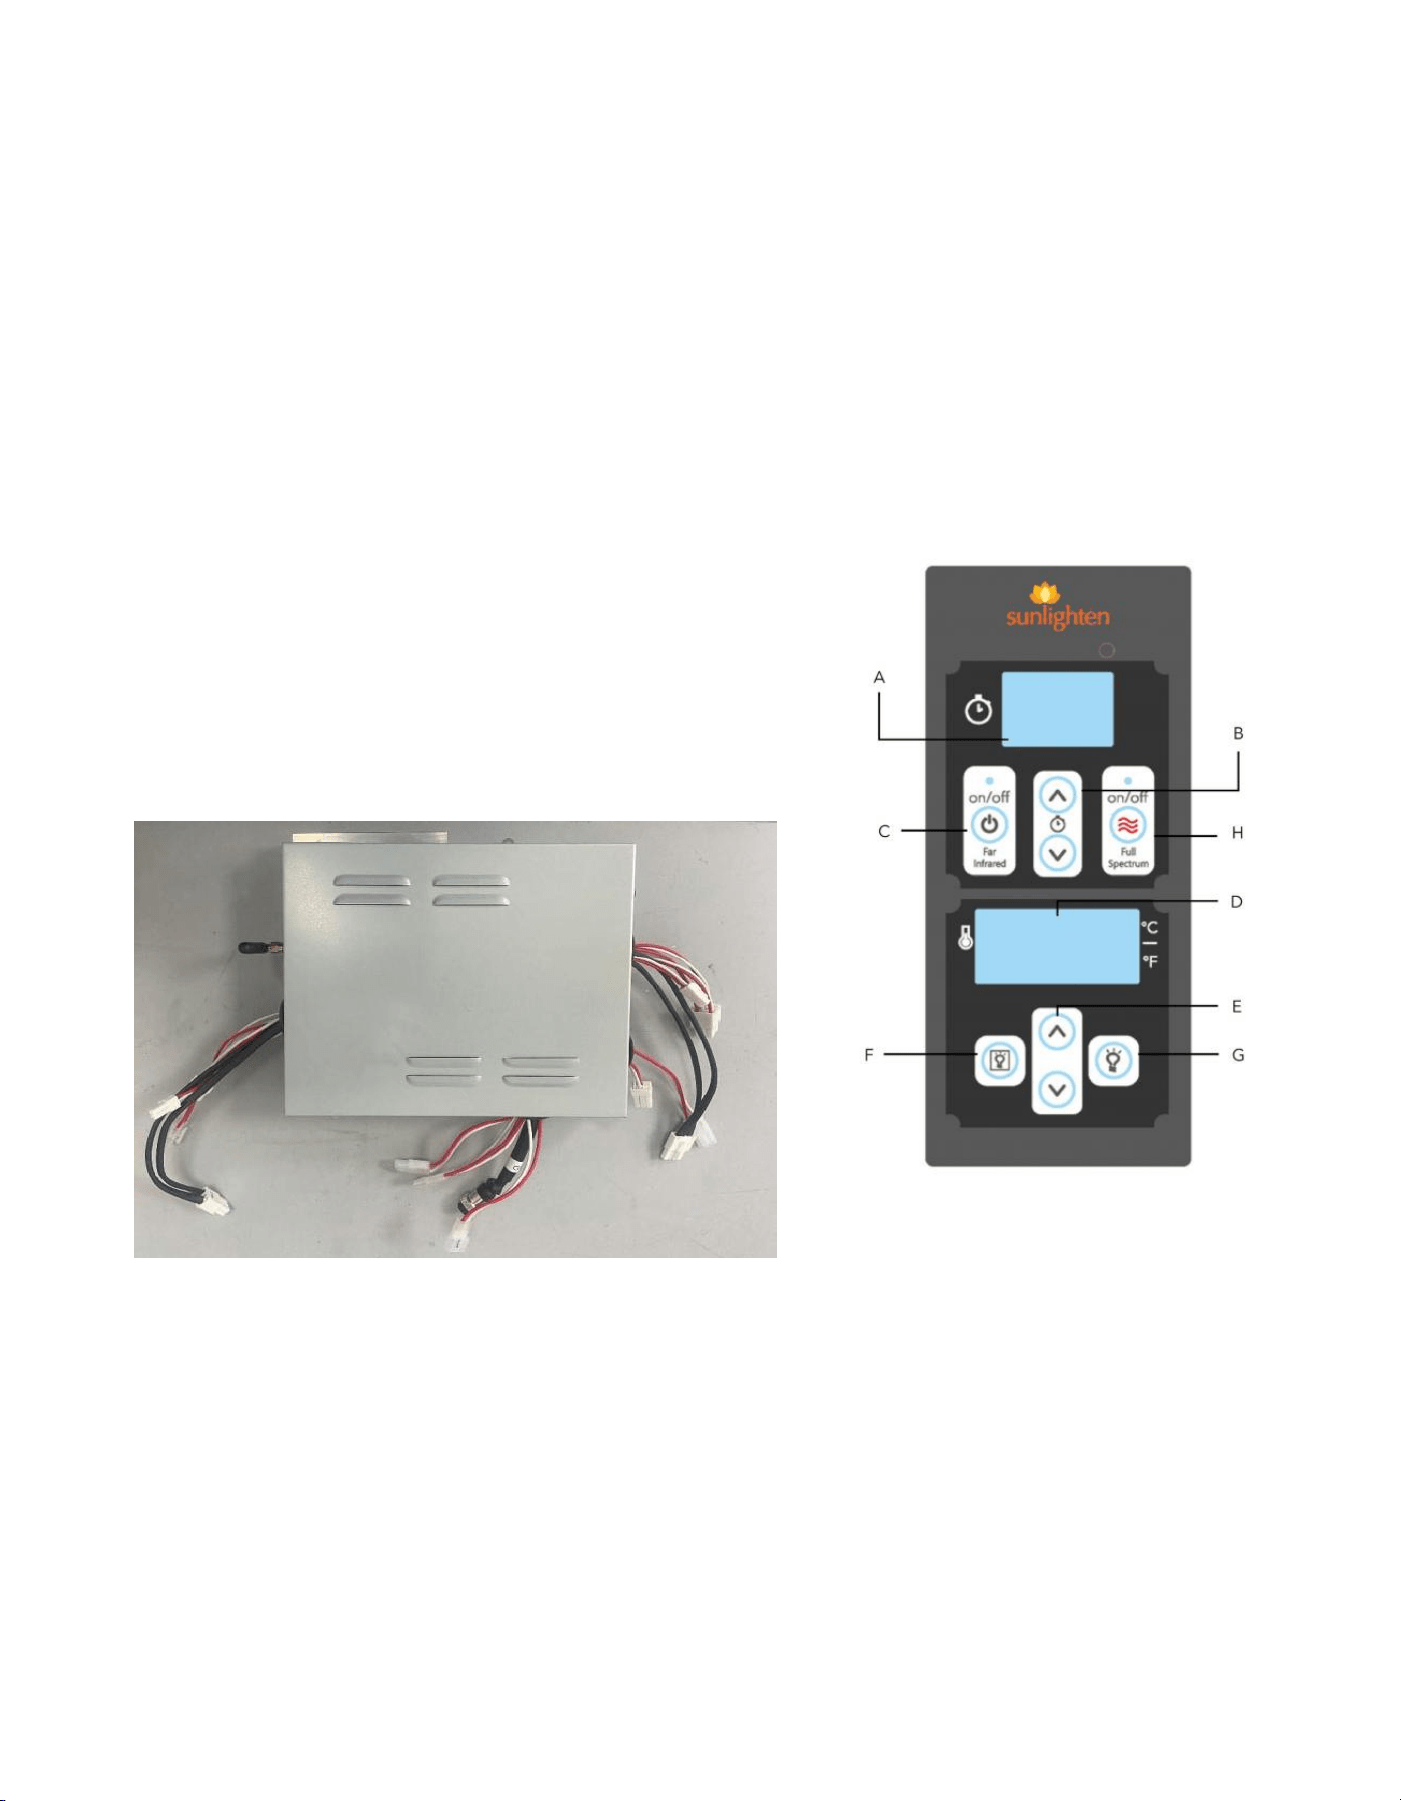
1. Plug in sauna.
2. Press the On/Off button to turn on your sauna.
3. Press the Full Spectrum On/Off button to cycle through
various intensity levels.
4. Top Display: Press arrow Up or Down to set desired
session time (sauna heaters will automatically turn off
when time has reached 0).
5. Bottom Display: Press arrow Up or Down to set desired
temperature.
Note: Press both temperature arrows simultaneously to
change from Celsius to Fahrenheit. After 5 seconds the
display will show actual interior temperature.
6. Press outside lights button (G) to turn On/Off exterior
lights.
7. Press inside lights button (F) to turn On/Off interior lights.

The controls are preset to 60 minutes at 165°F (74°C). This is the maximum temperature
setting, as the actual temperature will not reach this during normal use. If the system reads
a temperature exceeding the set temperature, it will deactivate the heaters to bring the air
temperature back down under the limit. Our saunas are based on the infrared wavelength and
not cabin temperature. Allow the sauna to warm-up for 30-45 minutes. The sauna heats up at
14
WARM-UP TIME & USAGE GUIDELINES
an average of 1 degree per minute. Follow these steps for proper warm-up:
Step 1: Make sure your sauna is plugged into a dedicated outlet installed by
a certied electrician.
Step 2: Check the settings on the keypad. The default setting should be set to
151°F (66°C) and the timer set to 60 minutes.
Step 3: When turning sauna on for the rst time, ensure each heater is warming up
after a couple of minutes. If they are not, check roof connections.
NOTE: If your sauna is outside or in an unheated garage, sun room, basement, or patio,
it may require additional time to warm the sauna up. Warm time is impacted by the
temperature of the surrounding surface and room. Keep in mind you are required to have
an authorized Sunlighten cover over your sauna if it is outside or exposed to the weather in
order to maintain your warranty.
RESERVATION MODE
WARNING: The full-spectrum heaters are extremely hot.
Touching the heater or wooden frames may cause burns.
• Turn off the sauna.
• Press the timer up and timer down arrows simultaneously.
• A digit will appear on the timer section of the screen to indicate the number of hours
before the sauna turns on.
• When the timer counts down to “0,” the sauna will turn on for a 60-minute session and
will be set to 151°F (66°C).
To cancel a reservation, press the timer up and timer down arrows simultaneously until the
time display turns off. At this point you can turn the sauna on normally.
Do not place objects on or around the full-spectrum heaters.

15
SAUNA PROTOCOL
• Hydrate with at least 8 oz (.24 L) of water to prepare your body for an increase in core
Follow this quick guide for the optimal sauna experience.
PRE SAUNA SESSION
temperature.
• Pre-heat for approx. 45 minutes. Depending on room temperature, your sauna will
heat up one degree per minute.
• Use towels to absorb sweat during sessions.
SAUNA SESSIONS
• Begin your session when your sauna reaches 100.4°F (38°C).
• The optimal sauna experience occurs between 100.4°F (38°C) and 129°F (54°C).
• To get your body accustomed to infrared therapy, start with 10-15 minute sessions at
100.4°F (38°C) every other day.
• Gradually increase towards 40-minute daily sessions in the optimal temperature range.*
• Don’t be surprised if you don’t sweat during the rst few sessions.
• Sweating will increase with regular use, removing toxins and leaving you feeling
refreshed and rejuvenated.
• For added intensity, use Pure Sweat amplifying cream to increase sweating,
circulation, and to boost results.
POST SAUNA SESSION
• Drink at least 24 oz (.7 L) of water or electrolyte to rehydrate.
• Dry off with a towel. Cool down naturally or with a refreshing shower.
• Every six months, clean wood and glass with our Natural Sauna Cleaning Kit available at
sunlighten.com.
*Listen to your body. Be aware of excessive detoxifying. If you begin to feel symptoms
such as nausea, fatigue, or u-like symptoms during your sauna session, discontinue use
immediately. If these symptoms continue, consult your physician.
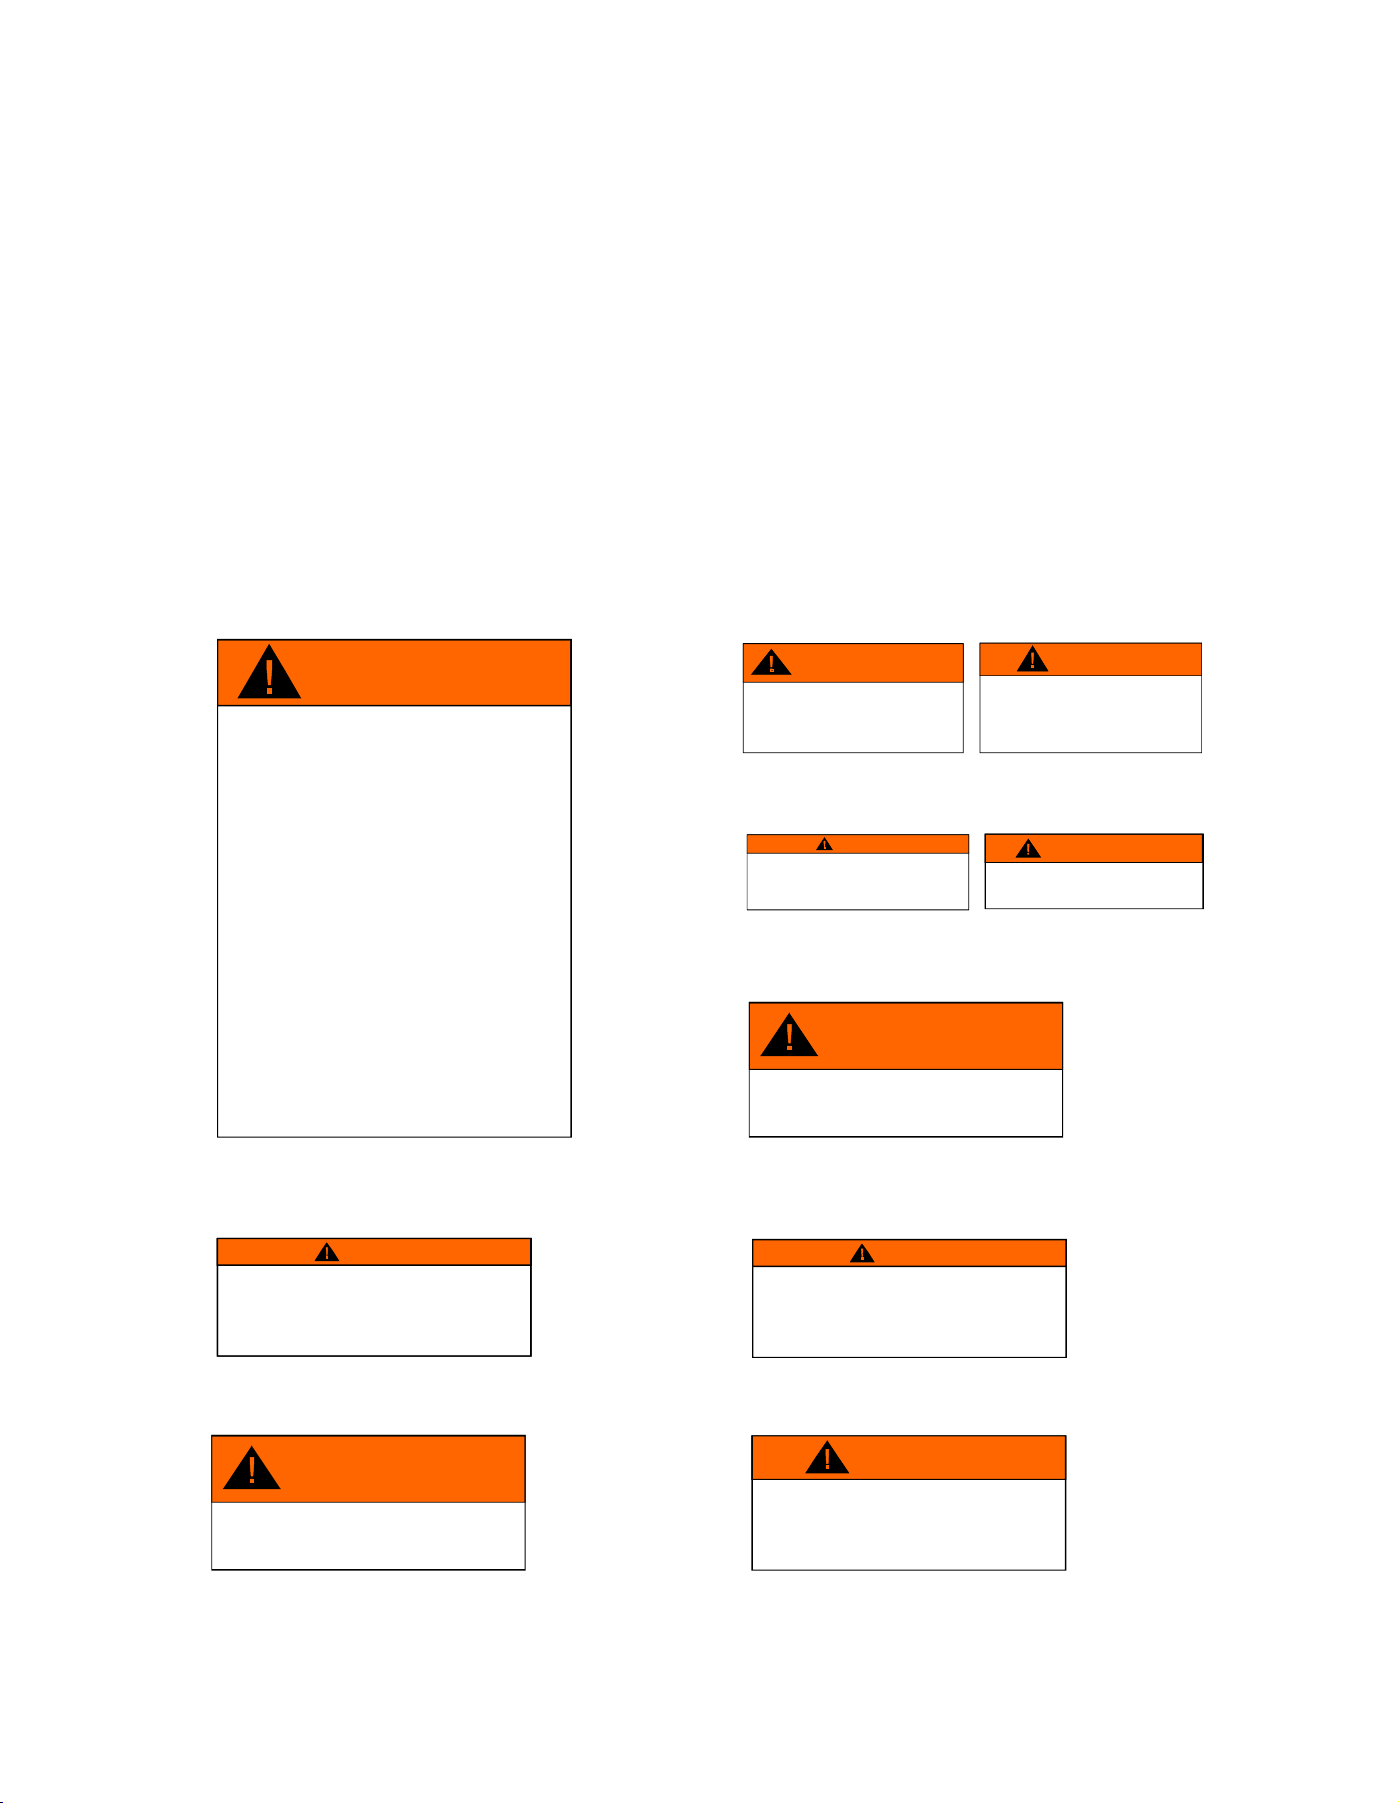
Do Not Place Combustible Material On Heater At Any Time.
WARNING
DANGER GÉNÉRAL
REDUCETHERISKOFFIRE
RÉDUIRE LES RISQUES DE FEU
CAUTION
REDUCETHERISKOFELECTROCUTION AND BURNS
Do Not Operate Unless Guard Is In Place.
Interdiction d'apporter de I'eau et/ou une servietle mouillée
CAUTION :DO NOT INSTALL SHOWER HEADS OR WATER SPRAY
DEVICES ABOVE THE SAUNA HEATER
ATTENTION :NE PAS INSTALLER DE POMMES DE DOUCHE NI
D'AUTRES DISPOSITIFS D'ARROSAGE AU-DESSUS DU CHAUFFE-
SAUNA.
CAUTION :USE ONLYTIME DELAY FUSES OR LOW-MELTING POINT
FUSES MARKED D P,OR HRC FROM I FUSES;“”OR“”
CAUTION
REDUCETHERISKOFOVERHEATING
4.Breathing heated air in conjunction with consumption
health, or under medical care.
of alcohol, or drugs, or medication is capable of
causing unconsciousness.
1.Exit immediately if uncomfortable, dizzy, or sleepy.
Staying too long in a heated area is capable of
causing overheating.
2.Supervise children at all times.
3.Check with a doctor before use if pregnant, in poor
1.Si vous ressentez un ou plusieurs de ces symptômes:
étourdissements, fatigue ou inconfort, veuillez sortir
immédiateme. Rester dans un environnement trop
chaud pour une longue durée peut causer des coups
2.Superviser les enfants en tout temps.
de chqleur.
3.Vérifier auprès de votre médecin avant d’utiliser si
environnement chaud pourrait causer i’évanouissement.
vousêtes enceinte, en mauvaise santé ou sous
médications.
4.La combinaison de la cvonsommation d’ alcool et d’un
RÉDUIRE LES RISQUES DE COUP DE CHALEUR
NRALDANGER GÉÉ
WARNING
16
CircuitDiagram
Excess Exposure Can Be Harmful For Health. Persons With Poor
Health Should Consult Their Physicians Before Using Sauna
Une exposition Excessive peut Ê tre Nuisible À La santé.Les
Personnes Qui Ne Jouissent Pas D’une Bonne Santé Devraien:
Consulter Leur Médecin Avant D’ utiliser Ce Sauna.
CAUTION
Disconnect All Supply Connections Before Serving
NRALDANGER GÉÉ
WARNING
REDUCETHERISKOFELECTROCUTION
RISQUES D’ÉLECTROCUTION
Débrancher toutes les connections avant d’effectuer
le service et/ou la réparation.
CAUTION
CAUTION : THE MANUAL RESET LIMIT SHALL BE WIRED IN THE
CIRCUIT
ATTENTION: INTERCALER LE LIMITEUR À RÈ ARMEMENT MANUEL DANS
LE CIRCUIT
Do Not Install Closer Than 12.7mm(0.5 inches)To A (Vertical/
Horizontal) Surface
NRAL
DANGER GÉÉ
WARNING
REDUCETHERISKOFFIRE
RÉDUIRE LES RISQUES DE FEU
Ne jamais placer des matériaux combustibies près et/ou sur I'
élément chauffant.
Warning
ATTENTION :UTILISER UNIQUEMENT DES FUSIBLES À ACTION
DIFFERÉE OU DES FUSIBLES À POINT DE FUSION PEU ÉLEVÉ DE
TYPES “D”,“P”,OU HPC FORMAT I
CAUTION
CAUTION : DO NOT INSULATE THE CEILING,WALLS OR FLOOR MORE THAN
R-12.
ATTENTION :NE PAS UTILISER UN ISOLANT D'UNE VALEUR SUPÉ RIEURE
À R-12 POUR LE PLAFOND, LES MURS OU LE PLANCHER
WARNING
DANGER GÉNÉRAL
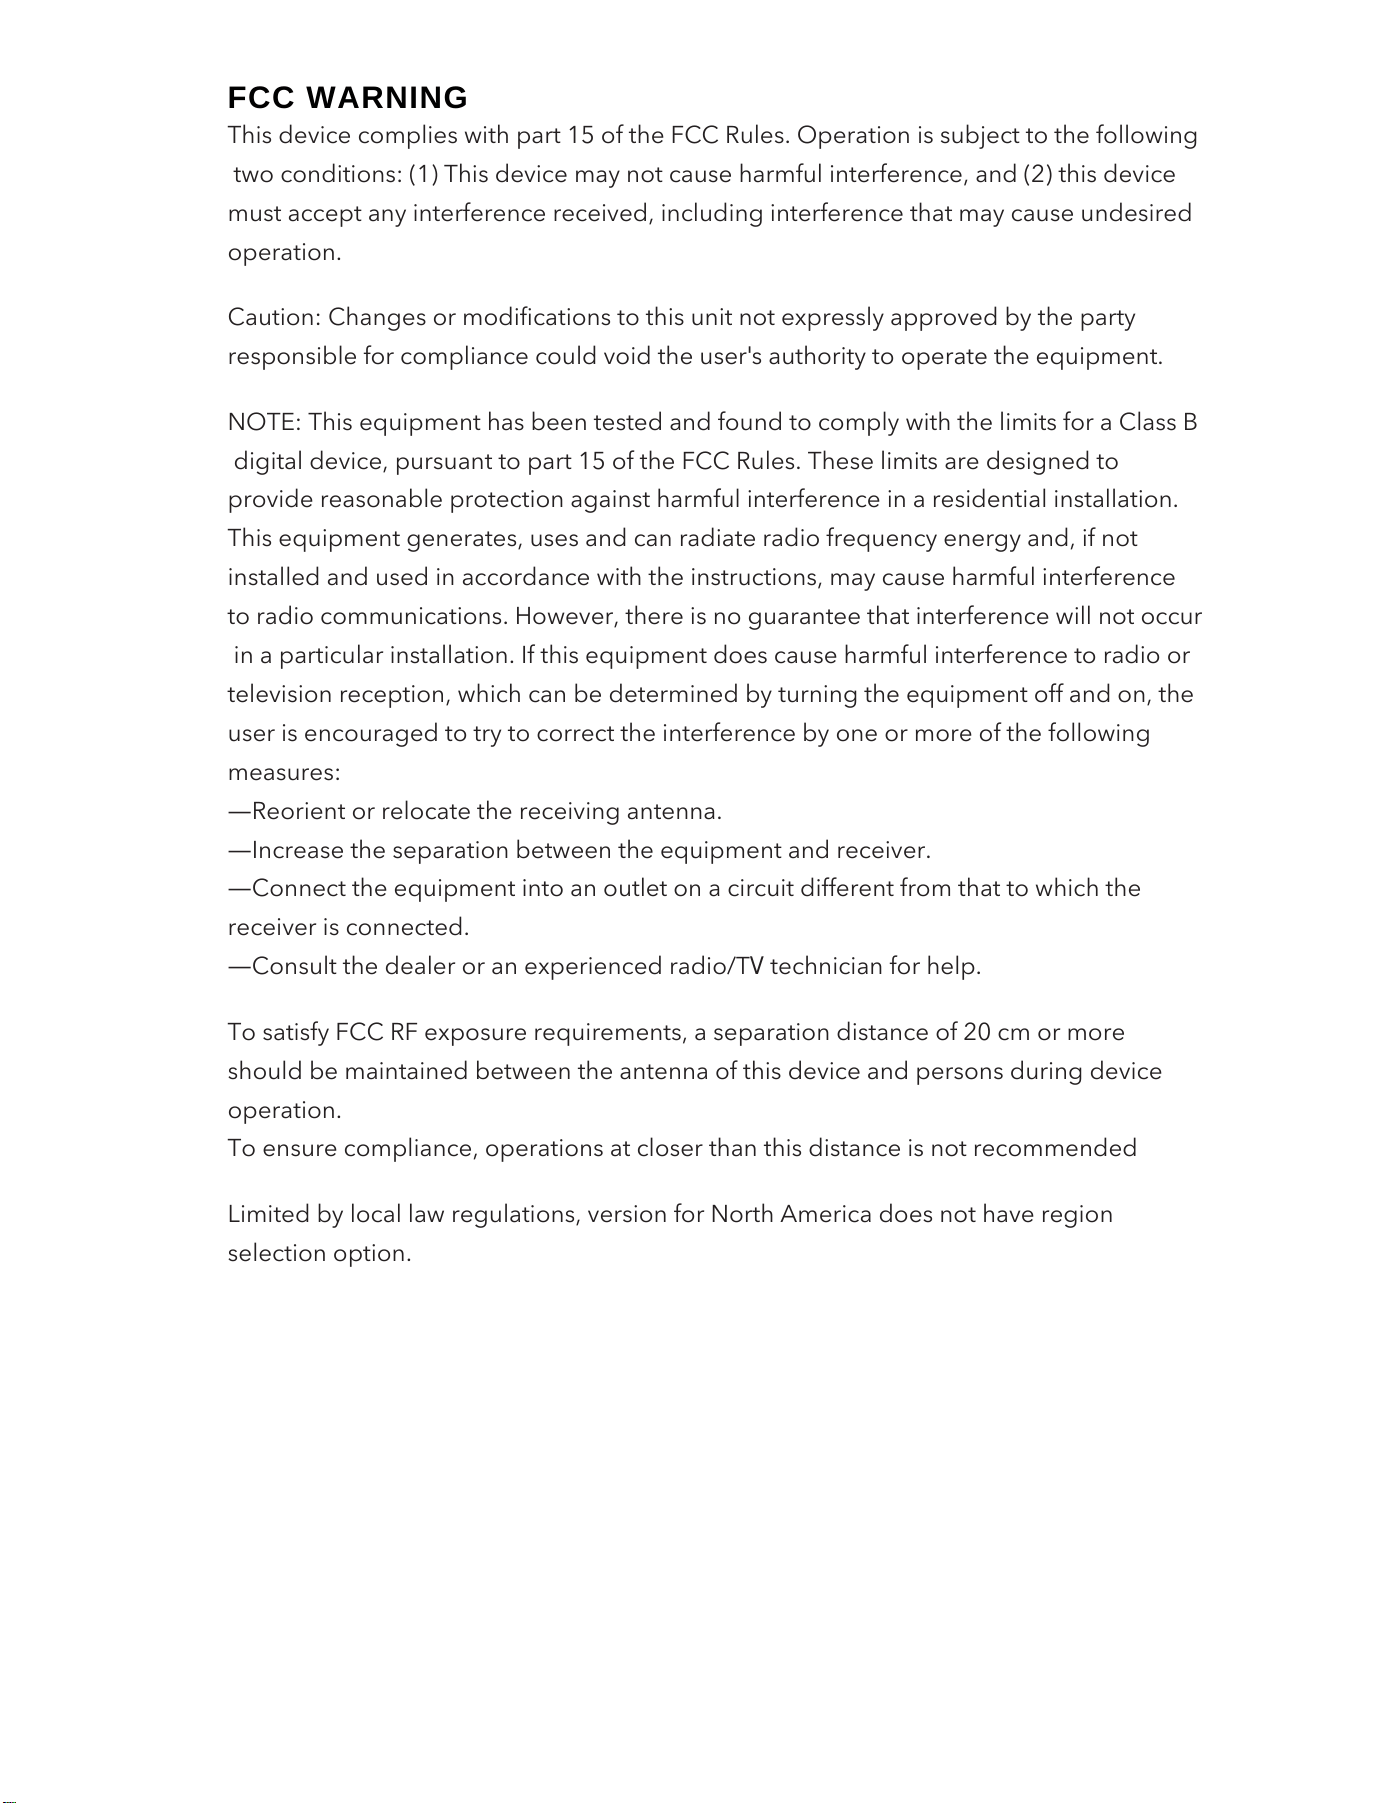
FCC WARNING
This device complies with part 15 of the FCC Rules. Operation is subject to the following
two conditions: (1) This device may not cause harmful interference, and (2) this device
must accept any interference received, including interference that may cause undesired
operation.
Caution: Changes or modifications to this unit not expressly approved by the party
responsible for compliance could void the user's authority to operate the equipment.
NOTE: This equipment has been tested and found to comply with the limits for a Class B
digital device, pursuant to part 15 of the FCC Rules. These limits are designed to
provide reasonable protection against harmful interference in a residential installation.
This equipment generates, uses and can radiate radio frequency energy and, if not
installed and used in accordance with the instructions, may cause harmful interference
to radio communications. However, there is no guarantee that interference will not occur
in a particular installation. If this equipment does cause harmful interference to radio or
television reception, which can be determined by turning the equipment off and on, the
user is encouraged to try to correct the interference by one or more of the following
measures:
—Reorient or relocate the receiving antenna.
—Increase the separation between the equipment and receiver.
—Connect the equipment into an outlet on a circuit different from that to which the
receiver is connected.
—Consult the dealer or an experienced radio/TV technician for help.
To satisfy FCC RF exposure requirements, a separation distance of 20 cm or more
should be maintained between the antenna of this device and persons during device
operation.
To ensure compliance, operations at closer than this distance is not recommended
Limited by local law regulations, version for North America does not have region
selection option.
17

US / CAN 7373 W. 107th St. | Overland Park, KS 66212
913.754.0831 | sunlighten.com
Toll Free: 877.292.0020
International sunlighten.com
or contact your local Sunlighten representative
AMPLIFY OWNER’S MANUAL