START
PROGRAMMING
MODES
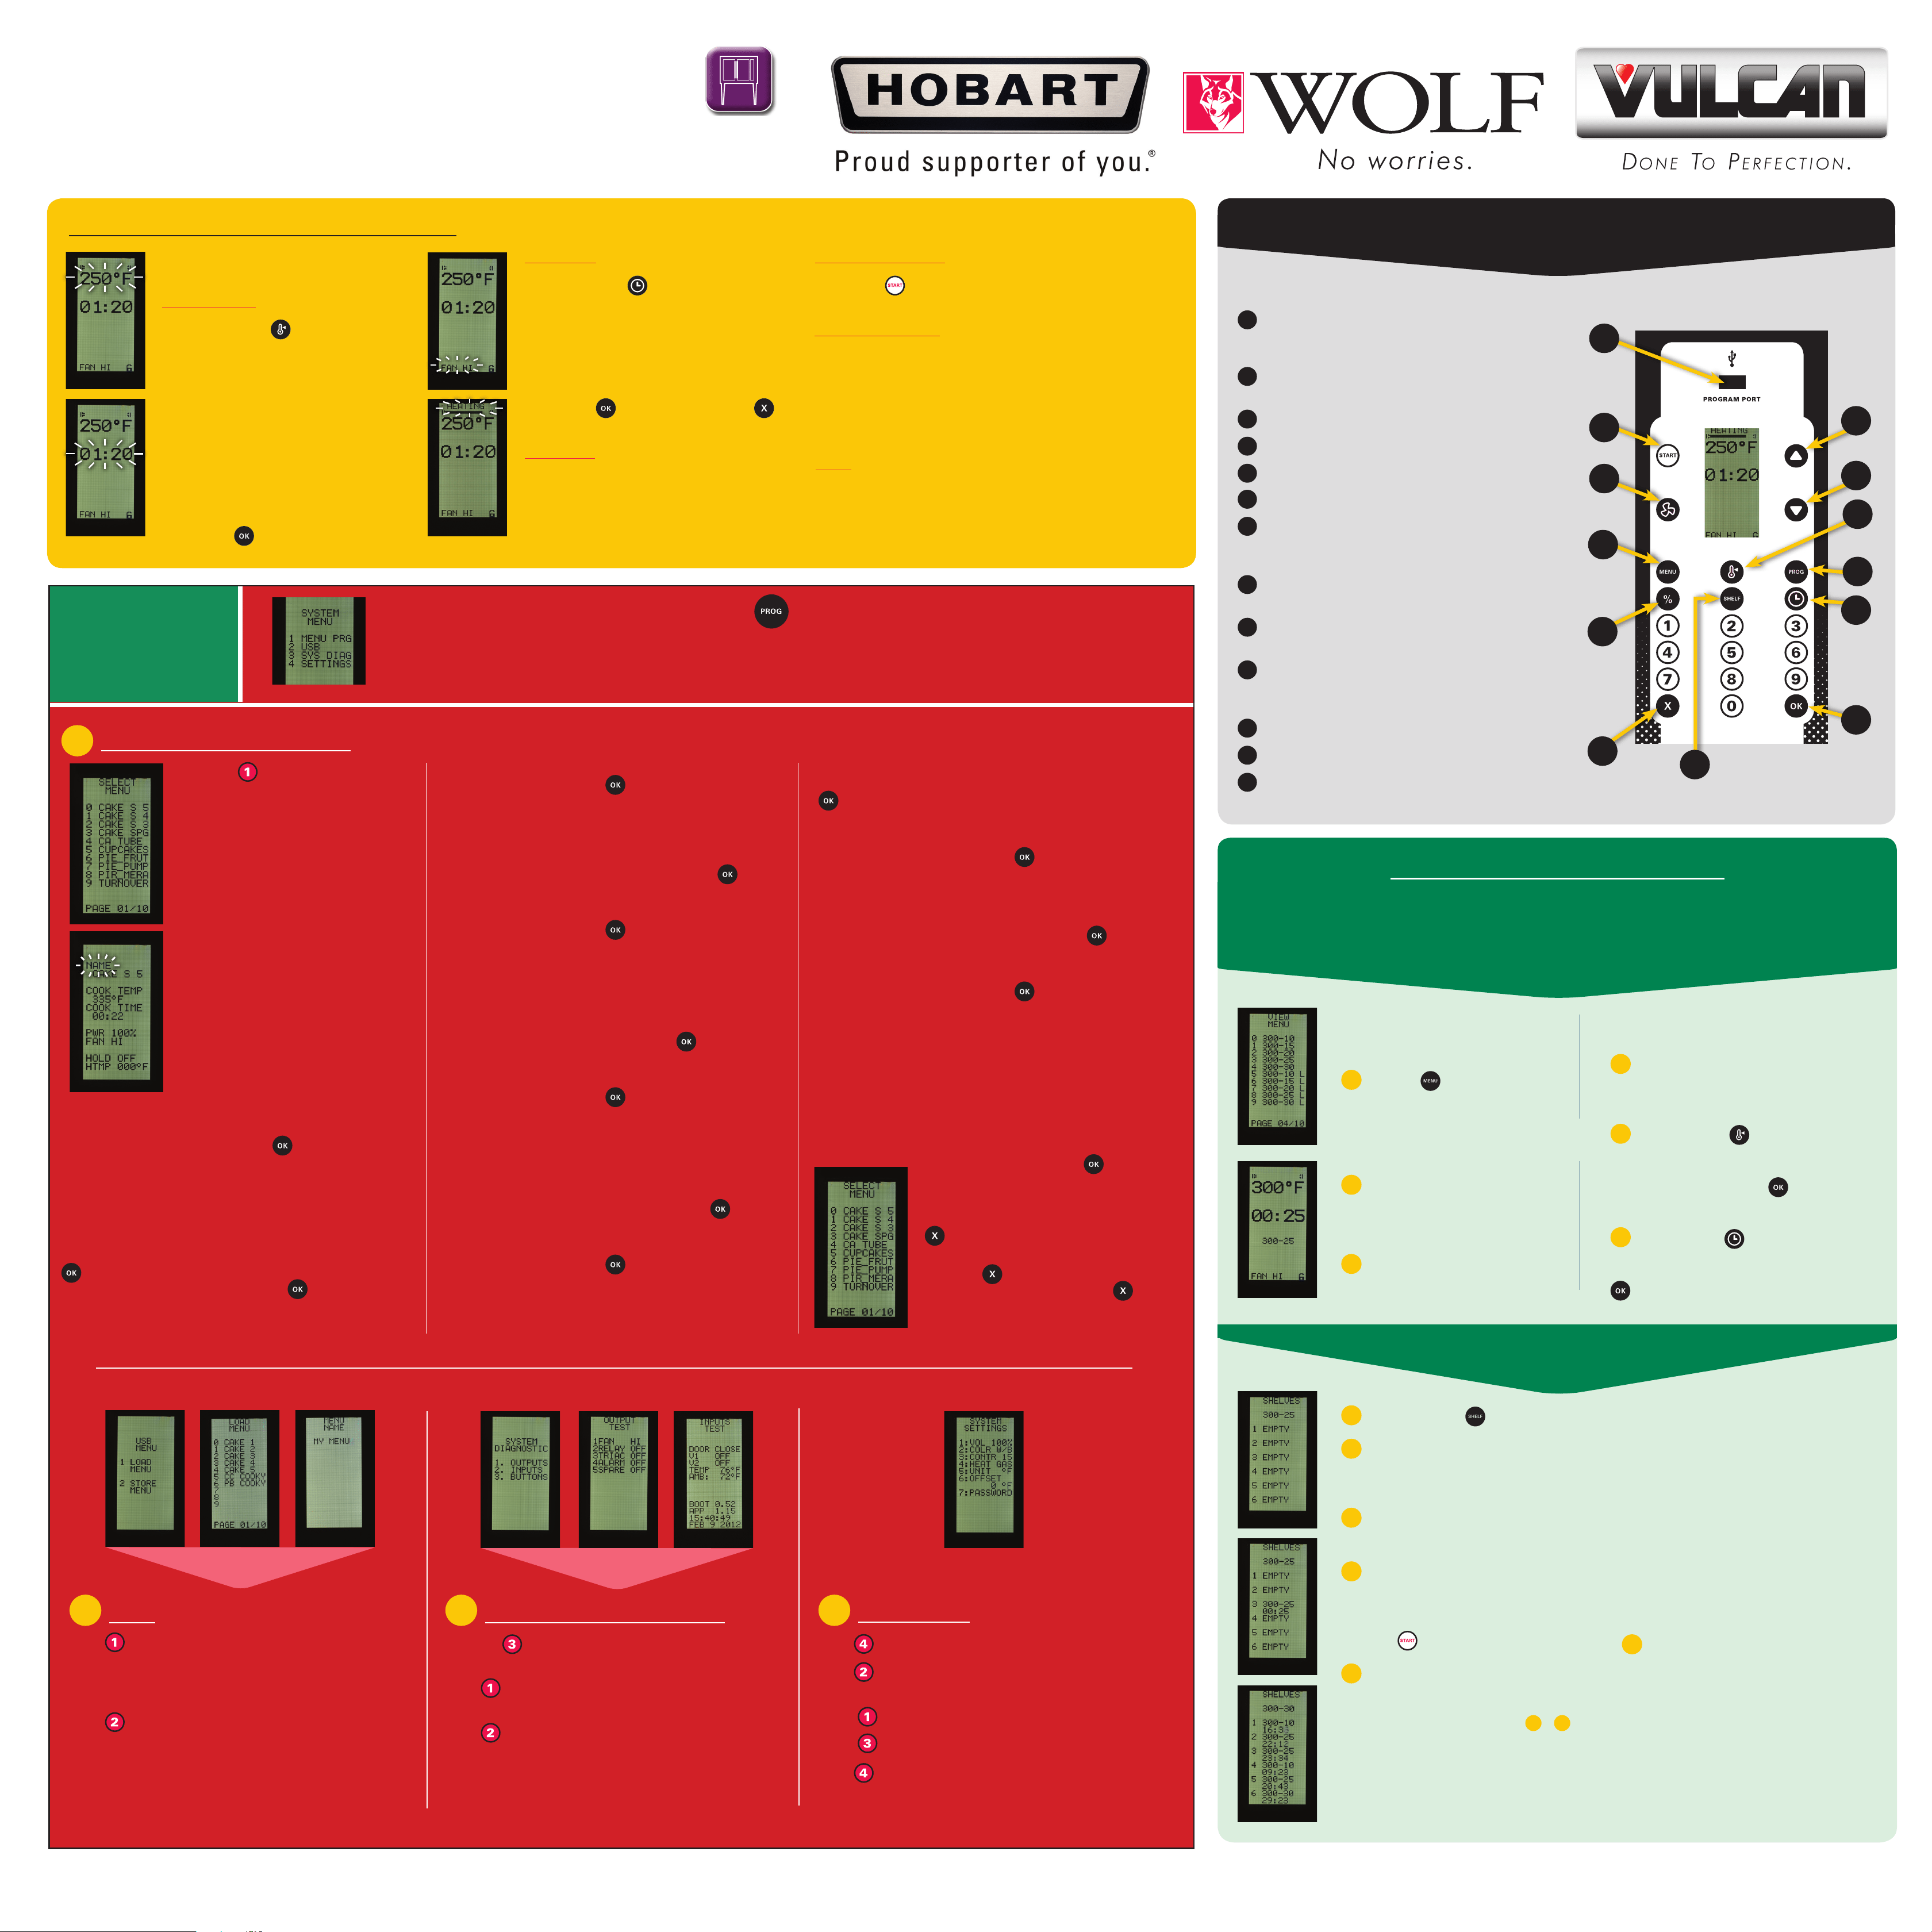
To begin programming, Press the PROG button, to display the SYSTEM MENU.
The available choices are:
1. Menu Programming
2. USB
3. System Diagnostics
4. Settings
COMPUTER CONTROLS GUIDE
CONVECTION OVEN
F-45402 (July 2012)
www.VulcanHart.com • Oven Technical Support: 1-888-878-4764
www.HobartCorp.com • Oven Technical Support: 1-888-4 HOBART
2
USB
Press to select “LOAD MENU.” (Fig. 4) Press the
number on the key pad that corresponds to the menu of
choice. (Fig. 5) The menu is loaded and the display returns
to (Fig. 4)
Press to store a menu on the computer to a USB. To
assign a name to the program, follow the instructions for
“NAME:” in menu programming above. (Fig. 6)
3
SYSTEM DIAGNOSTIC
Press the button on the keypad for system
diagnostics. (Fig. 7)
Press for output tests. Display shows the status of
FAN, HEAT relay and ALARMS. (Fig. 8)
Press for input tests. Display shows the status of
DOOR, V1, V2, act. Temp. software boot date. (Fig. 9)
4
SETTINGS
Press for settings menu. (Fig. 10)
Press to toggle to change from white on black to
black on white.
Select to change the volume of the alarm.
Select to change the contrast of the display.
Press to toggle to switch from GAS to ELEC. heat source.
(If gas heat source is selected, choosing fan off will disable heat.
Verify that this setting matches the heat source of your oven.)
1
MENU PROGRAMMING
Press the button on the keypad.
The display to the left appears.
Use the up down arrows to select a
page of menu items. Once you see the
menu item you wish to edit, press the
number on the key pad that corresponds
to the menu item to be edited.
The display to the left appears, with
“NAME” ashing. The following items can
be edited:
• NAME
• COOK TEMPERATURE
• COOK TIME
• POWER %
• HOLD FUNCTION
• HOLD TEMPERATURE
Once a menu item is displayed, you can
edit any or all of the displayed functions.
The item to be edited will be the item name
that is ashing. Use the up down arrows to select the function
to edit. When it is ashing, press the button.
NAME: The curser will ash over the rst letter location. Use
the up down arrows to change the letters and numbers in the
space. The up down arrows run through the alphabet, down
increases the letters, up decreases the letters.
After selecting the character for the name location, press the
button to proceed to the next location. Once the name is
as you would like it, press and hold the button for three
(3) seconds to save the name and move on to the next item.
Use the up down arrows to select the next function to edit.
When it is ashing, press the button.
COOK TEMPERATURE: The display will ash, the 3 digit
number for the set temperature. Press the numbers on the
key pad that corresponds to the temperature of the menu item.
After selecting the 3 digit temperature, press the button
to proceed.
Use the up down arrows to select the next function to edit.
When it is ashing, press the button.
COOK TIME: The display will ash time as “00:00” Hours :
Minutes. Press the numbers on the key pad that corresponds
to the time of the menu item. (Example: Enter 1, display
shows “00:01.” Enter 120, display shows “01:20”)
After selecting the correct time, press the button to
proceed.
Use the up down arrows to select the next function to edit.
When it is ashing, press the button.
POWER %: The current power level will ash.
Press the number on the key pad that corresponds to the
Power level required for the menu item. Each number on the
pad represents a 10% power level. 1=10%. 2=20%...0=100%.
After selecting the correct power level, press the button to
proceed.
Use the up down arrows to select the next function to edit.
When it is ashing, press the button. (NOTE: Default
setting is 100%)
FAN: The fan speed will ash.
Use the up down arrows to scan between speeds. “HI”, “LO”
and “OFF”. After selecting the correct fan speed, press the
button to proceed. [note: gas ovens will not cook with the
fan set to off.]
Use the up down button arrows to select the next function to
edit. When it is ashing, press the button.
HOLD FUNCTION: “ON” or “OFF” will ash.
Use the up down arrows to scan between HOLD ON or HOLD
OFF. After selecting the hold function, press the button to
proceed.
Use the up down button arrows to select the next function to
edit. When it is ashing, press the button.
HOLD TEMPERATURE HTMP: The display will ash, the 3
digit number for the HOLD temperature. Press the numbers on
the key pad that correspond to the temperature of the menu
item. The hold temperature can only be set to a temperature
between 100°F and 200°F. (If attempted to set the Hold tem-
perature below 100°F, it will give you a hold temperature of
100°F. If attempted to set the Hold temperature above 200°F, it
will give you a hold temperature of 200°F). After selecting the 3
digit temperature, press the button to
proceed.
After editing the menu item, and the display
shows all of your preferences, press the
button, to exit the edit function. The
screen to the left appears.
Press the button again to exit the
system menu window. Press the
button again to exit.
1
SHELF key, used to assign menu items to up to 6 different
shelves. The computer will track up to 6 menu items in 6
shelf positions.
2
X key, used to EXIT or cancel programming or operational
functions.
3
% key, used to program the power level in 10% increments.
4
MENU key, used to select a menu item.
5
FAN key, used to set the fan speed.
6
START key, used to start a cooking timing cycle.
7
PROG. PORT, used with standard USB thumb drive, to
import software updates and to upload cooking menus
created externally with the C3700 menu editor.
8
UP arrow, used to scroll through menu and programming
functions in the UP direction.
9
DOWN arrow, used to scroll through menu and programming
functions in the DOWN direction.
10
TEMP key, used to set the cooking temperature, manually.
Press and hold for 3 seconds to display the actual internal oven
temperature.
11
PROG key, used to access all programming functions.
12
TIME key, used to set the cook time, manually.
13
OK key, used to accept programmed inputs.
DISPLAY PANEL GUIDE
3
13
5
6
4
1
2
7
8
9
10
11
12
Turn the oven on and the display will show
the last used setting.
TEMPERATURE:
1. Press the TEMP button, the set
temperature will ash. (Fig. 1.2)
2. Enter the desired temperature using
the keypad. The new temperature will
ash. (If needed, press the TEMP key and
hold for 3 seconds, to display the internal
oven temperature. The actual internal oven
temperature will continue to be displayed
as long as the key is depressed and for 3
seconds after the key is released. The default
temperature display is the set temperature.)
3. Press the button to accept.
COOK TIME:
1. Press the TIME button, the set time will
ash. (Fig. 2.2)
2. Enter the desired time in hours and minutes
using the keypad. The new time will ash.
(Example: Enter 1, display shows “00:01.” Enter
120, display shows “01:20”)
3. Press the button to accept or the key
to cancel.
FAN SPEED:
1. Press the FAN button to toggle through fan
speeds: HI, LOW, or OFF. (Fig. 3.2) (If gas heat
source is selected, choosing fan off will disable
heat. Verify that this setting matches the heat
source of your oven.)
START COOK CYCLE:
1. Press the button. Display will show count down time.
(More than 1 hour = HR:MIN, Less than 1 hour = MIN:SEC)
ADD TIME FEATURE:
1. ADD TIME to the current cooking cycle by pressing any of
the Number Pad keys.
2. You may add from 1 to 10 minutes by pressing a number
pad key during the timing cycle of any cook time. (Note
the“0” key represents 10 minutes of add time)
NOTE: When the actual temperature is more than 10°F,
below set temperature, the display will say HEATING (Fig.
4.2), with a heating progress bar shown below the HEATING.
When the actual temperature is less than 10°F, below the set
point, the HEATING display will change to READY.
QUICK START / MANUAL SETTINGS
Figure 1.2
Figure 2.2
Figure 3.2
Pre-Programmed
Menus:
1
Press the button, a list of 10
menu items will appear. (Fig. 1.1) Press
the up down arrows to scroll through
the 10 pages of 10 menus saved to
the C3700. (100 menu items total)
2
Once you nd the menu item you
require, press the number on the num-
ber pad that is shown in front of the
menu item in the display.
3
The display will show (Fig. 2.1)
Figure 1.1
4
Press the SHELF button.
5
The display will show the status of all 6
shelves. If nothing has been sent to a shelf,
its status is “EMPTY”. (Fig. 3.1)
6
Determine which shelf you want this
menu item to be cooked on.
7
Press the button, on the number pad,
that corresponds to the shelf of choice.
Open the oven doors, place the menu item
on the selected shelf, close the door and
press the button.
8
The shelf time for the selected shelf will
start counting down. (Fig. 4.1)
To add an additional item, follow steps
1
–
8
above, selecting a different shelf. You can use the
same menu item or choose a different menu item.
When you access the “MENU” button, only those
menu items with the same cook temperature will
be available for selection, after you have selected a
menu item for a shelf. This is because the oven cannot
maintain multiple temperatures. All menu items must
be the same temperature when using the shelf function.
You can repeat this process for up to 6 different
shelves. All ovens do not have a 6 shelf capacity.
Some products require spacing between racks that
allow for less than 5 shelves. You must decide the
shelf spacing for a given cooking cycle. You must
determine the order of the shelves. 1-5, bottom to
top or 1-5, top to bottom. The computer does not
know where the shelves are, only that you have
selected them.
9
The shelf display will show all shelves
counting down simultaneously.(Fig. 5.1)
To cancel the times on the shelf display, while the
times are displayed as above, press the number pad
that corresponds to the shelf time to be cancelled and
hold it for 3 seconds. Pressing 1 through 6 and holding
each for 3 seconds will return the shelf display to
“EMPTY” (Fig. 3.1).
Figure 4.2
SHELF TIMER USAGE
Choose either PRE-PROGRAMMED or MANUAL shelf programming methods.
Follow steps 1-3 then SHELF PROGRAMMING steps 4-9
Figure 2.1
Figure 3.1
Figure 4.1
Figure 5.1
Manual Shelf Timing:
1
Determine the temperature of all of the
items to be cooked on all of the shelves.
There can be only one set temperature.
2
Press the TEMP button, the
temperature displayed will ash. Use the
number pad to enter the desired cook
temperature then press the button to
set the temperature.
3
Press the TIME button, the time
displayed will ash. Use the number pad to
enter the desired cook time, press the
button to set the time.
STEPS 1-3
STEPS 4-9
OR
Figure 10
Figure 4
Figure 6
Figure 5
Figure 7 Figure 8 Figure 9