USER GUIDE
NZ AU
HEAT PUMP CLOTHES DRYER
DH1060MZB5


3
CONTENTS
Safety and warnings 4
Product overview 8
Control panel 9
Menu 10
Get the best results from your dryer 11
Understanding fibre types 12
Sort your items 13
Load the dryer 14
Set a cycle 15
Drying options 18
Set delayed start 19
Fit drying rack 20
Adjust settings 21
Save favourite cycles 23
Cycle selections 25
Wi-Fi connection and remote mode 28
Clean and maintain the dryer 31
Clean the lint filter 32
Clean the lower filter 33
Troubleshooting 34
Fault codes 37
Compliance information 38
Manufacturer’s Warranty and Service Guide 39
Registration
To register your product visit our website: fisherpaykel.com/register
4
SAFETY AND WARNINGS
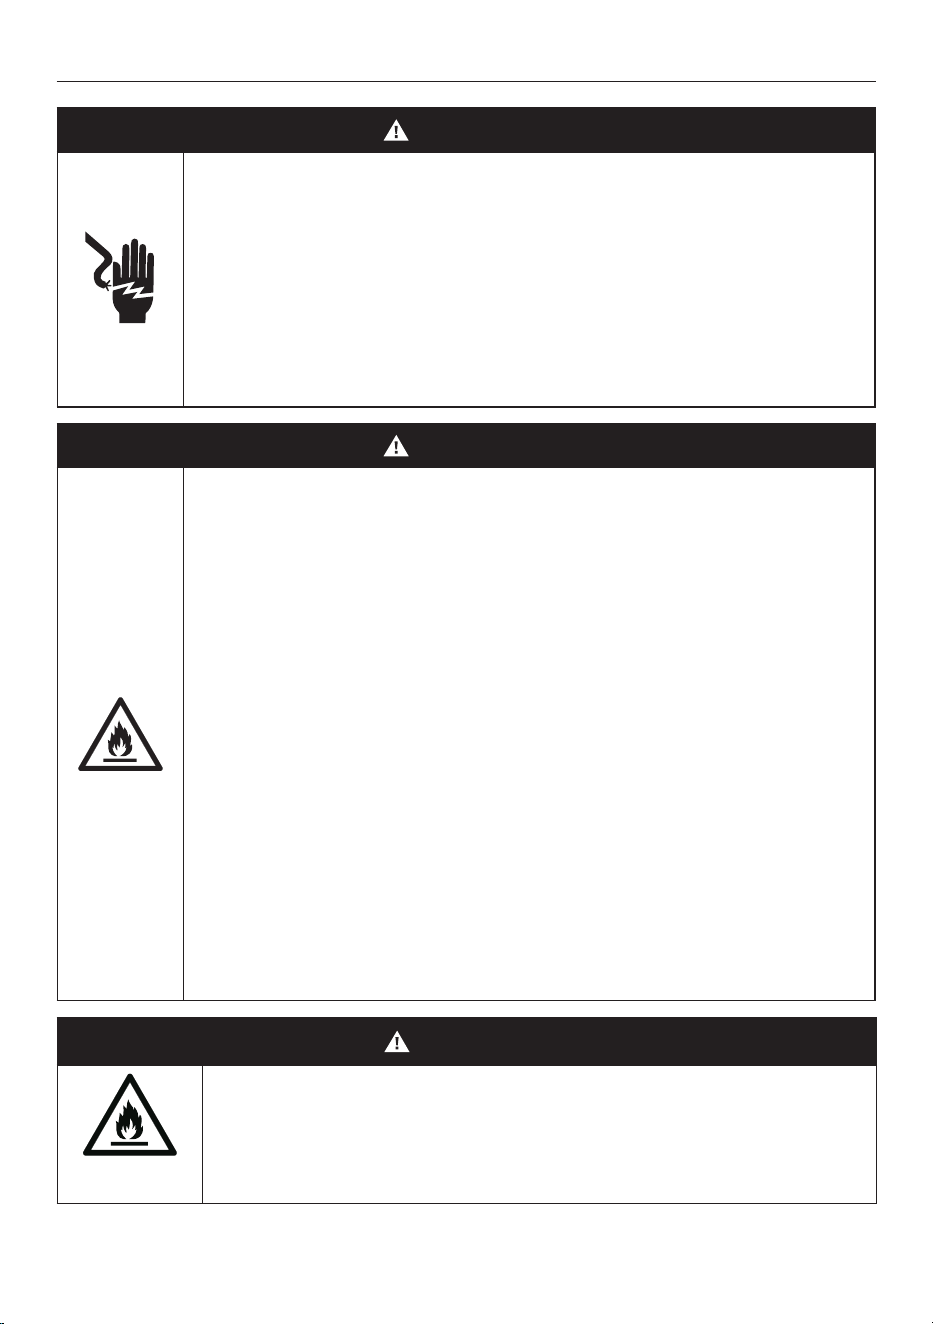
WARNING!
Electric Shock Hazard
Failure to follow this advice may result in
electric shock or death.
• If you are using an extension cord or a portable
electrical outlet device (eg multi-socket outlet box),
ensure that it is positioned so that it does not come
into contact with water or moisture.
WARNING!
Fire Hazard
• Only dry fabrics that have been washed with water.
• Do not use heat to dry articles containing foam
rubber or similarly textured rubber–like materials.
• Never stop a tumble clothes dryer before the end
of the drying cycle unless all items are removed and
spread out in order to dissipate the heat.
• A clothes dryer produces combustible lint; the lint
filter must be cleaned before each drying cycle.
• Failure to follow the warnings outlined in these user
instructions can cause a fire hazard.
• Failure to follow these instructions can result in
death or personal injury.
WARNING!
R290
This appliance contains flammable
refrigerant isobutane (R290).

5
SAFETY AND WARNINGS
Read the instructions
WARNING!
Read Safety Guide. Failure to follow all guides and rules could cause personal injury or
property damage. Use this appliance only for the intended purpose as described in the
user guide and installation guide of this appliance. When using this appliance, always
exercise basic safety precautions including the following:
General
z
Do not touch or operate the appliance with wet hands or with bare feet.
z
A damaged power cord must be replaced by a Fisher & Paykel trained and supported
service technician or similarly qualified person in order to avoid a hazard. Do not use the
machine until it has been repaired to avoid a risk of electric shock.
z
Do not operate this appliance if it has been damaged during transport. Contact your
Fisher & Paykel dealer or Fisher & Paykel trained and supported service technician.
z
This product has been designed for personal, family or household use. This product is
not designed for any commercial use. Any commercial use will terminate this products
manufacturer’s warranty.
z
This appliance is not intended for use by persons (including children) with reduced physical,
sensory or mental capabilities, or lack of experience and knowledge, unless they are
supervised or given instructions on how to use the appliance by someone responsible for
their safety.
z
Supervise children to ensure they do not play with the appliance or climb inside the drum.
z
Do not swing on or put weight on the door.
z
Undergarments that contain metal reinforcements should not be placed in the dryer.
Damage to the dryer can result if the metal reinforcements come loose during drying. If you
wish to dry these items use a drying rack or place in a garment bag.
z
Check and remove all objects from pockets, eg lighters and matches.
z
Items should go through the cooling phase in the final part of the cycle. This ensures items
are left at a temperature where they will not be damaged. If for any reason the cycle is
stopped before it has finished, dry clothes should be removed immediately and not left in
the appliance. Items should be quickly spread out flat to cool so heat can dissipate, not left
bunched up, eg in a clothes basket or in a pile.
z
In the event of a power outage the cycle will be paused when power is restored. Press
Confirm, then Start/Pause to resume the cycle.
z
The only user-removable parts of the dryer are the filters and drying rack. No other parts
are designed to be removed by anyone other than a Fisher & Paykel trained and supported
service technician.
z
For problems that cannot be solved from information in the user guide, turn off and unplug
your appliance and contact a Fisher & Paykel trained and supported service technician.
z
Never attempt to repair the appliance yourself.
z
Never put dripping wet clothes in or on top of the dryer as excess water may cause an
electrical hazard.
z
Do not under any circumstances place an electric blanket or any other electrical, plastic or
rubber items in the appliance, unless the care label specifically states it is safe to do so.

6
SAFETY AND WARNINGS
z
Do not overload your dryer beyond its rated capacity.
MODEL MAXIMUM CAPACITY* (KG)
DH1060MZB5 10
*Capacity refers to the maximum dry weight of items the dryer can dry at any one time
z
Do not dry curtains in your dryer.
z
This model does not have a water tank. The drain hose must be connected before
operating. Do not run the dryer without the drain hose connected.
Lint
z
Do not operate this appliance without the lint filters in place, or allow lint to accumulate in
or around the appliance.
z
Accumulated lint in the appliance can become a fire hazard; it also reduces the efficiency of
the appliance by causing longer drying times and increased power consumption.
z
Clean the lint filter before every load.
z
Ensure the area around the appliance is clear of lint.
z
If the lint filter becomes damaged, contact your Fisher & Paykel trained and supported
service technician to arrange getting a new filter. Do not operate your appliance with a
damaged lint filter or without the filter in place, as this will cause damage to your appliance.
Spontaneous combustion
To reduce the risk of fire the following should be observed:
z
Items that have been spotted or soaked with vegetable oil or cooking oil are a fire hazard
and should not be placed in the appliance.
z
Oil-affected items can ignite spontaneously, especially when exposed to heat sources such
as this appliance. The items become warm causing an oxidation reaction in the oil. This
oxidation creates heat. If the heat cannot escape the items can become hot enough to catch
fire. Piling, stacking or storing oil-affected items can prevent heat from escaping creating a
fire hazard.
z
If it is unavoidable that fabrics that contain vegetable oil, cooking oil or have been
contaminated by hair care products be placed in this appliance, they should first be washed
in hot water with extra detergent — this will reduce, but not eliminate the fire hazard. The
cooling cycle should be used to reduce the temperature of these items. They should not be
removed from the appliance and piled or stacked while hot.
z
Items that have previously been cleaned in, washed in, soaked in or spotted with flammable
liquids or solids, eg petrol/gasoline, kerosene, dry cleaning solvents, vegetable or cooking
oil, acetone, denatured alcohol, some brands of spot removers, turpentine, waxes and
wax removers or other flammable or explosive substances should not be placed in the
appliance.
z
The appliance is not to be used if industrial chemicals have been used for cleaning.
z
Fabric softeners or similar products should not be used in the appliance to
eliminate the effects of static electricity, unless this practice is specifically recommended by
the manufacturer of the fabric softener product.
z
Items such as foam rubber (latex foam), shower caps, rubber backed articles, clothes or
pillows fitted with foam rubber pads, waterproof textiles, shoes containing rubber or plastic
items should not be placed in the appliance. These materials can spontaneously combust
when heated.
z
Do not dry unwashed items in the appliance.
z
When using REFRESH cycles on unwashed clothing ensure there are no flammable
substances on them.

7
Installation
z
This appliance is heavy. We recommend two persons to move and install the appliance.
z
The appliance must not be supplied through an external switching device, such as a timer,
or connected to a circuit that is regularly switched on and off by a utility.
z
We do not recommend the use of extension cords or portable electrical outlet devices for
safety reasons.
z
Install the appliance on a solid and level floor surface.
z
The appliance must be installed in a well-ventilated, dust-free environment.
z
The appliance must not be installed on any textured floor coverings (eg carpet, rugs).
Ensure that openings at the base of the appliance are not obstructed.
z
The appliance must not be installed behind a lockable door, a sliding door or a door with
the hinge on the opposite side to that of the tumble dryer, in such a way that a full opening
of the tumble dryer door is restricted.
z
If installing behind a cabinetry door, it must be hinged on the same side as the dryer
and there must be a minimum clearance of 40mm from the front of the dryer door to the
internal face of the cabinetry door for the product to operate safely. The enclosed space
must be provided with sufficient ventilation to meet local building code requirements or the
door must be open while the product is operating.
z
This appliance can be installed on a compatible Fisher & Paykel plinth. To ensure stability,
the plinth must be fitted correctly with the appliance. For installation instructions and
compatible plinth models, refer to fisherpaykel.com.
z
Do not install or operate this appliance on any other plinth or structure.
z
For more information refer to the installation guide. To access, go to fisherpaykel.com/
specify and search by appliance type, product name or model.
Water supply requirements
z
Inlet water pressure: Max. 1MPa (145psi), Min. 30kPa (4.5psi)
z
Inlet water flow rate: Min. 6 litres/minute
z
The cold water temperature should not exceed 35°C. Temperatures above these may cause
the appliance to fault or cause damage to it.
z
A pressure-reducing valve must be installed if pressure is higher than 1Mpa.
z
New hose sets provided should be used to connect the appliance to the water mains. Old
hose sets should not be re-used.
z
We recommend the inlet hose(s) are changed every 5 years. WARNING: Failure to do so
may result in a flood and damage to property.
Disposal
z
When disposing of this appliance, it is recommended that the door is removed to
avoid children getting trapped inside and that the electrical cable is cut off close to
the dryer.
SAFETY AND WARNINGS
8
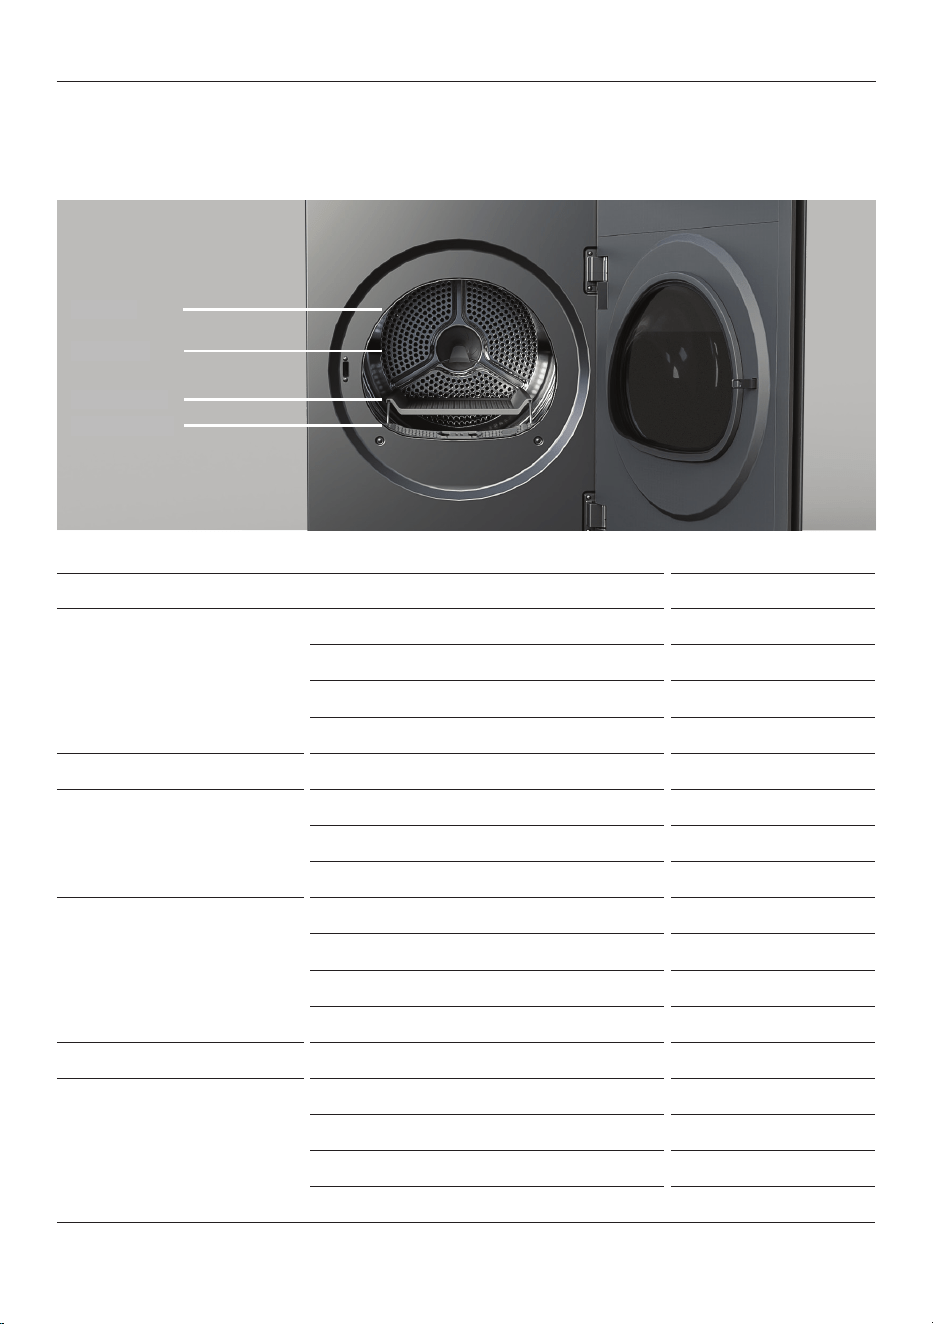
PRODUCT OVERVIEW
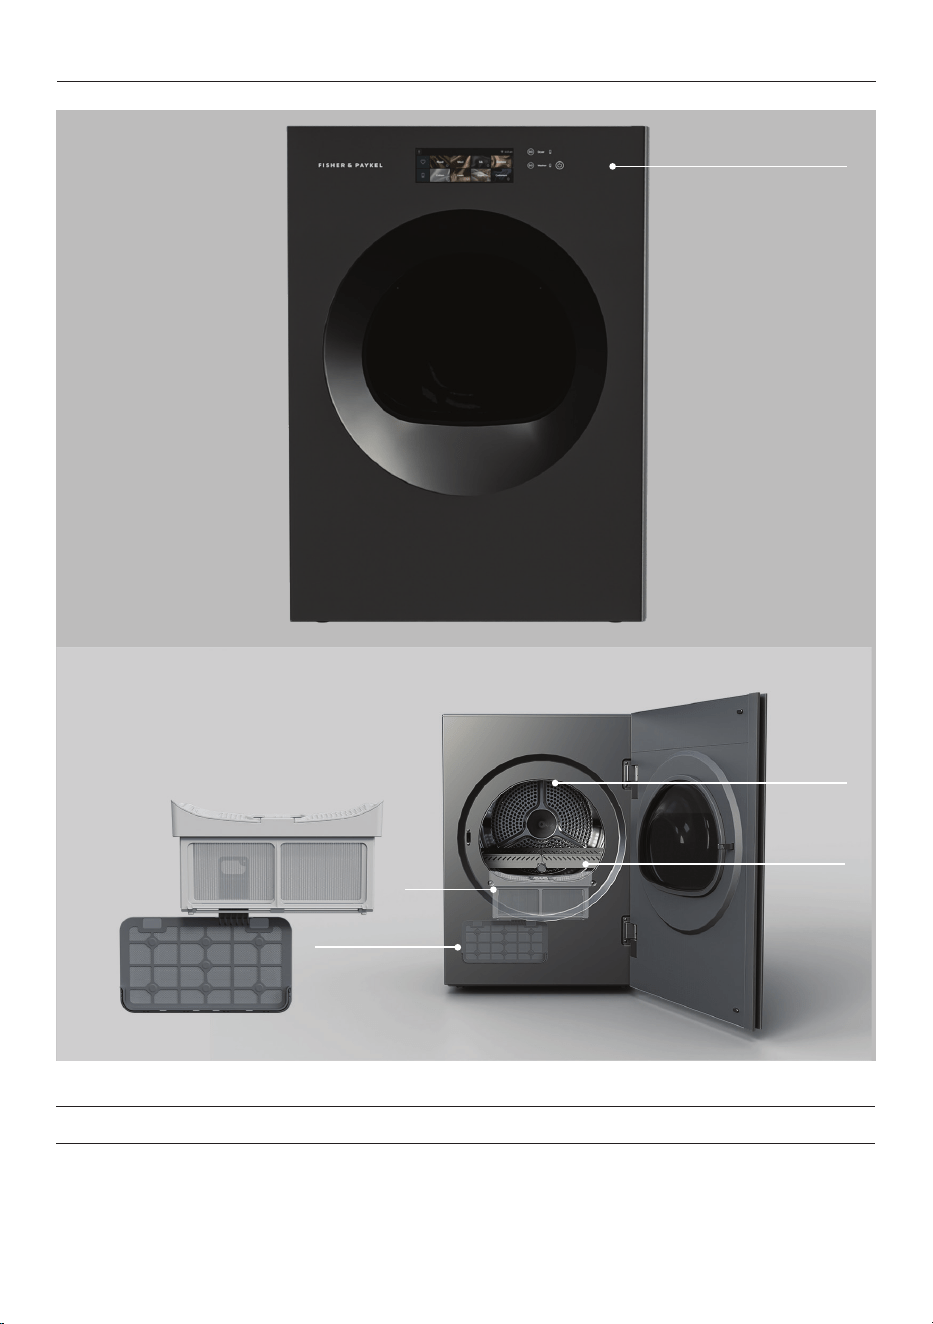
FEATURES AND ACCESSORIES
1 Control panel
2 Lint filter
3 Lower lint filter (under lint filter)
4 Drying rack
5 Drum light (inside drum)
1
5
4
3
2
9
CONTROL PANEL
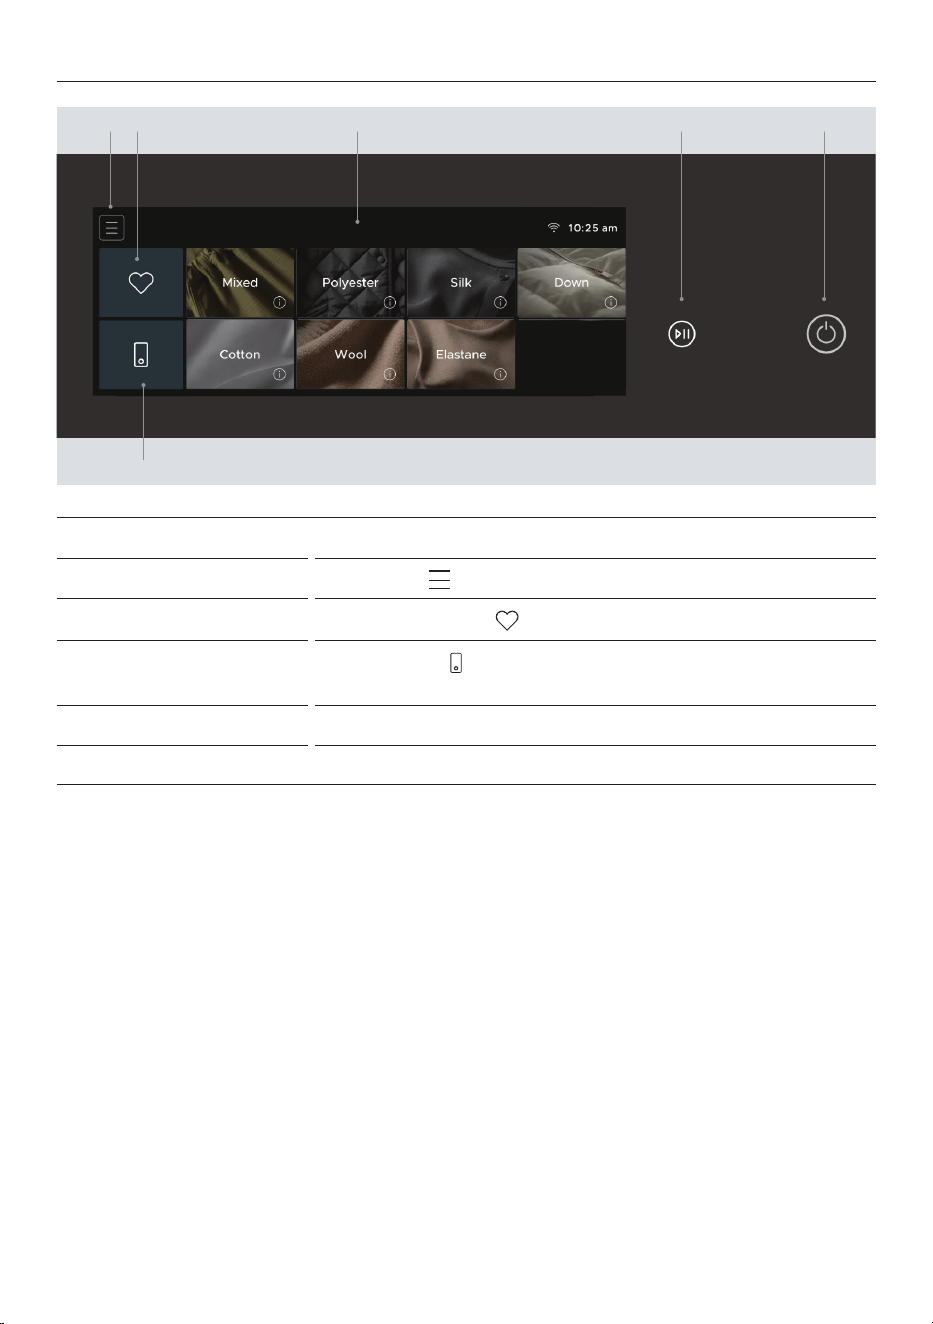
1 Touchscreen display Use to navigate and select cycles, features and settings.
2 Menu
Press MENU
to access additional features and settings.
3 Favourites
Press FAVOURITES
to access saved favourite cycles.
4 Remote
Press REMOTE
to connect appliance to your mobile device and
operate it via the app.
5 Start/Pause Press to start or pause a cycle or enable Remote mode.
6 Power Press to turn the appliance ON/OFF.
2
4
3 5 6
1
10
MENU
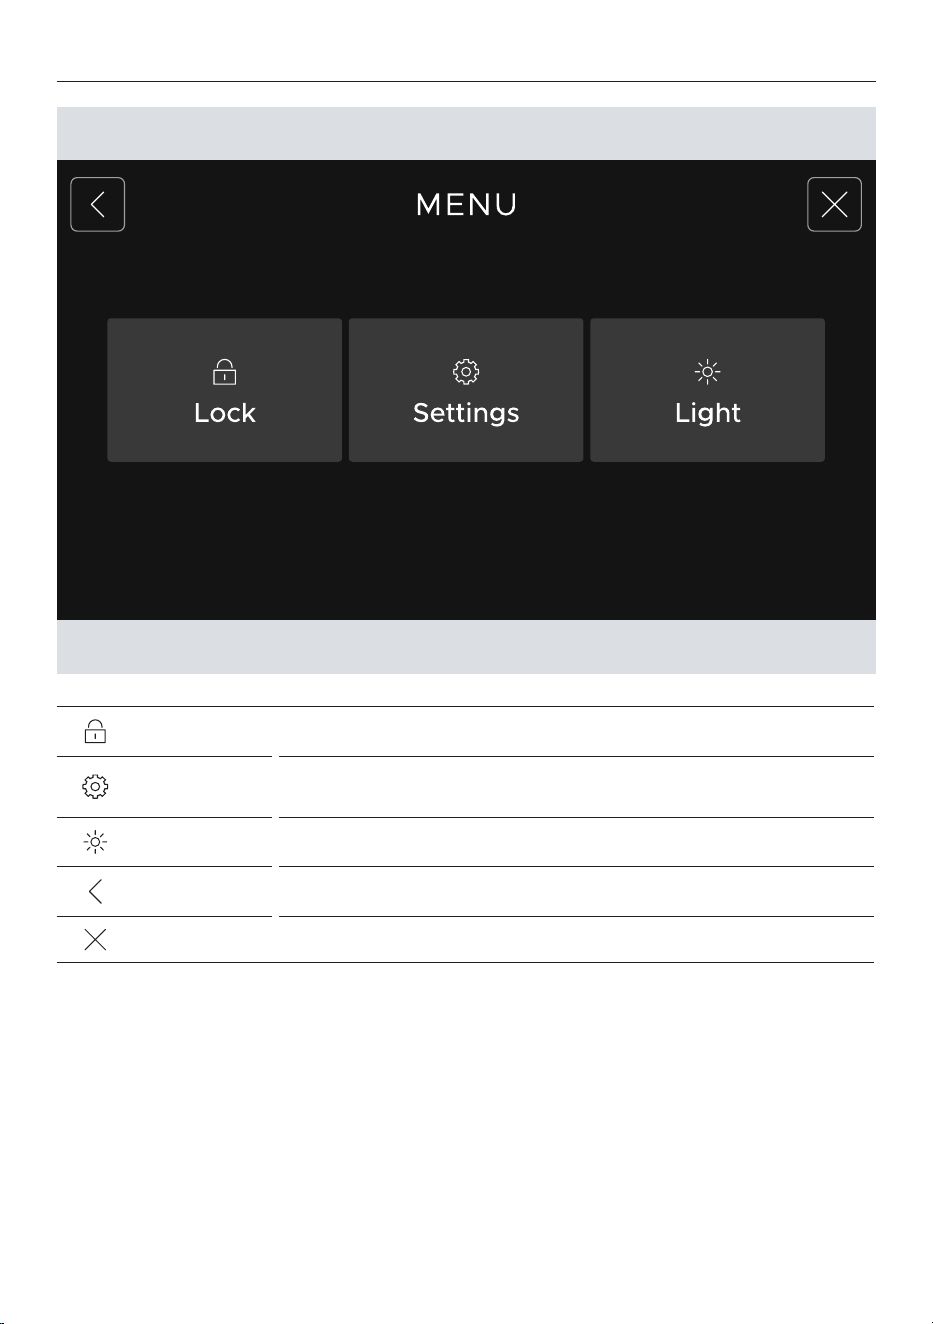
LOCK Lock the controls and prevent accidental use.
SETTINGS
Adjust the appliance settings to suit your preferences.
See ‘Adjust settings’.
LIGHT Turn the drum light off or set it to turn on automatically.
BACK Go back one level.
EXIT Return to the home screen.
11
GET THE BEST RESULTS FROM YOUR DRYER
Loading items directly from the washing machine
Make sure items have been through a spin cycle to remove excess water before
placing them in the dryer. Overly wet items will extend the drying cycle and
may affect drying performance.
Finishing air-dried items in the dryer
Use a
TIME DRY cycle for at least 30 minutes to finish partially dry items. This
allows time for the dryer to reach temperature.
Recognising post-dryer feel
Items may feel slightly damp when first removed from a heat pump dryer,
but they will feel completely dry within a few minutes and are ready to wear
immediately. If you prefer your items to feel completely dry as soon as the
drying cycle ends, you can adjust the dryness level. See ‘Select Dryness’.
Get the app for a smarter experience
z
Access extra features and information
z
Track and run cycles from your phone
z
Customise your favourite cycles
z
Get the latest software updates
z
Register your product for streamlined support
Heat pump versus vented dryer
Your heat pump dryer is different to a traditional vented dryer. Heat pump technology dries
your items at a lower temperature than a vented dryer to ensure gentle, energy-efficient fabric
care without overdrying your items.
Get to know your dryer
Take the time to become familiar with cycle selections and how they suit your items. Save your
favourite cycles for quick and easy access on the product or in the app, and clean and maintain
your dryer to keep it performing at its best.
12
UNDERSTANDING FIBRE TYPES
Every cycle starts with fibre type
Each fibre type responds differently to washing and drying. This appliance uses a fibre-led
system and precision sensing to dry your items, so selecting the right fibre type for each load is
key to setting the best cycle each time.
Treat for the most delicate fibre
Items may be a blend of multiple fibres — some more delicate than others. The care label on an
item will tell you what fibre or fibres the item is made of and how to care for it.
Select the fibre type on your dryer that applies to the most sensitive or delicate fibre in the
blend, even if it is only a small percentage.
Identify delicate fibres
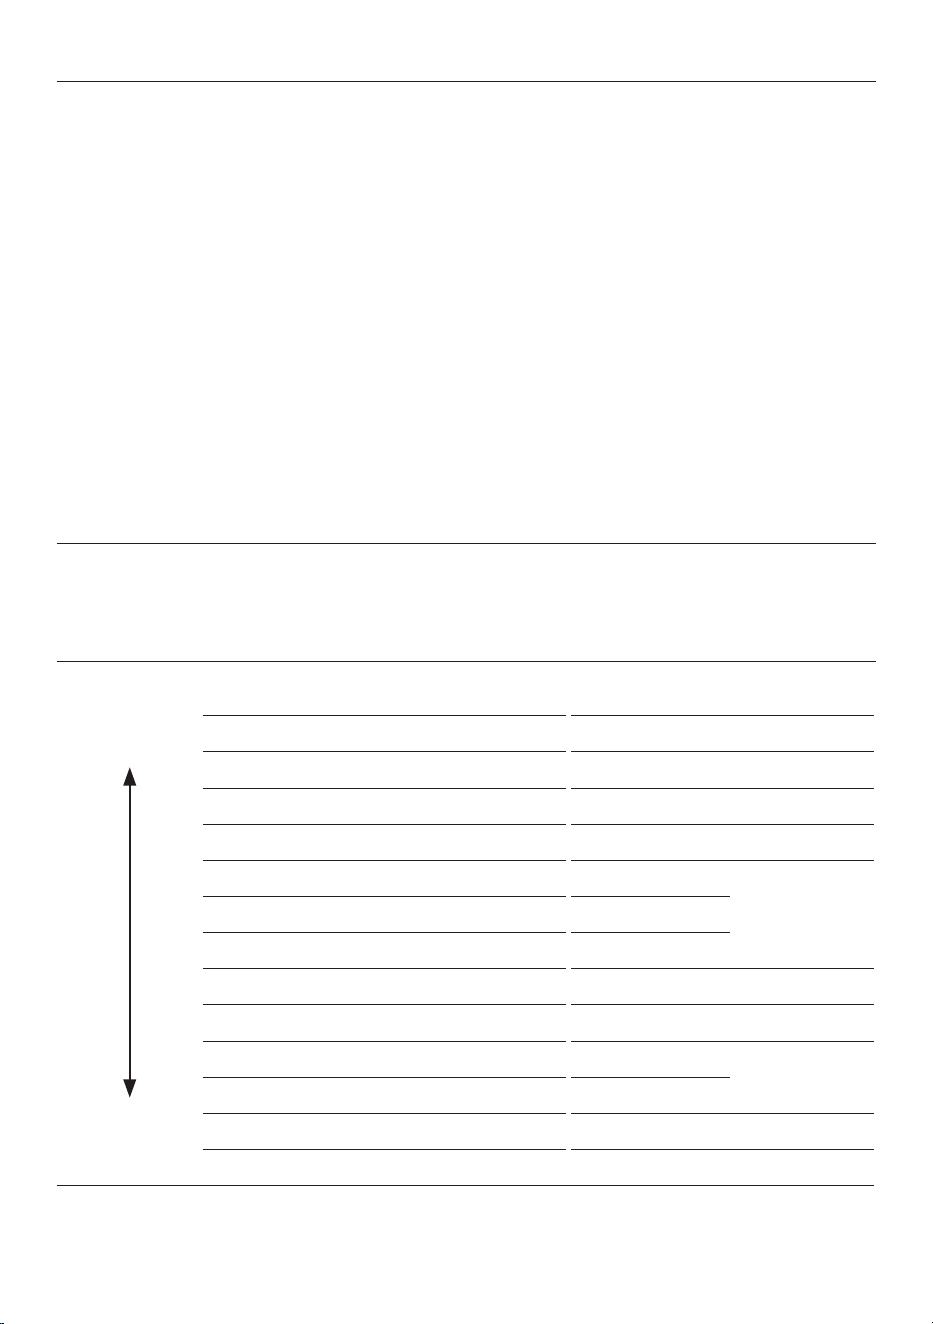
This table helps identify the most delicate or sensitive fibres commonly found on care labels. It
also offers alternative cycle suggestions for most specialist fibres. Recommendations may not
suit all items — always check your care label first.
SENSITIVITY COMMON FIBRES FIBRE TYPE ITEM TYPE
High Cashmere, Angora, Mohair Not suited for machine drying in
this model
Down Down
Silk Silk
Wool, Merino, Lambswool Wool
Elastane, Spandex, Lycra Elastane
Viscose, Bamboo, Rayon, Modal
Cotton
Ultra delicate
Lyocell, Tencel™
Cotton
Acrylic Polyester
Linen
Cotton Denim
Hemp
Cotton Ultra delicate
Ramie
Cotton
Ultra delicate
Nylon, Polyamide Polyester
Polyester Polyester, Mixed
Low Cotton Cotton, Mixed
13
SORT YOUR ITEMS
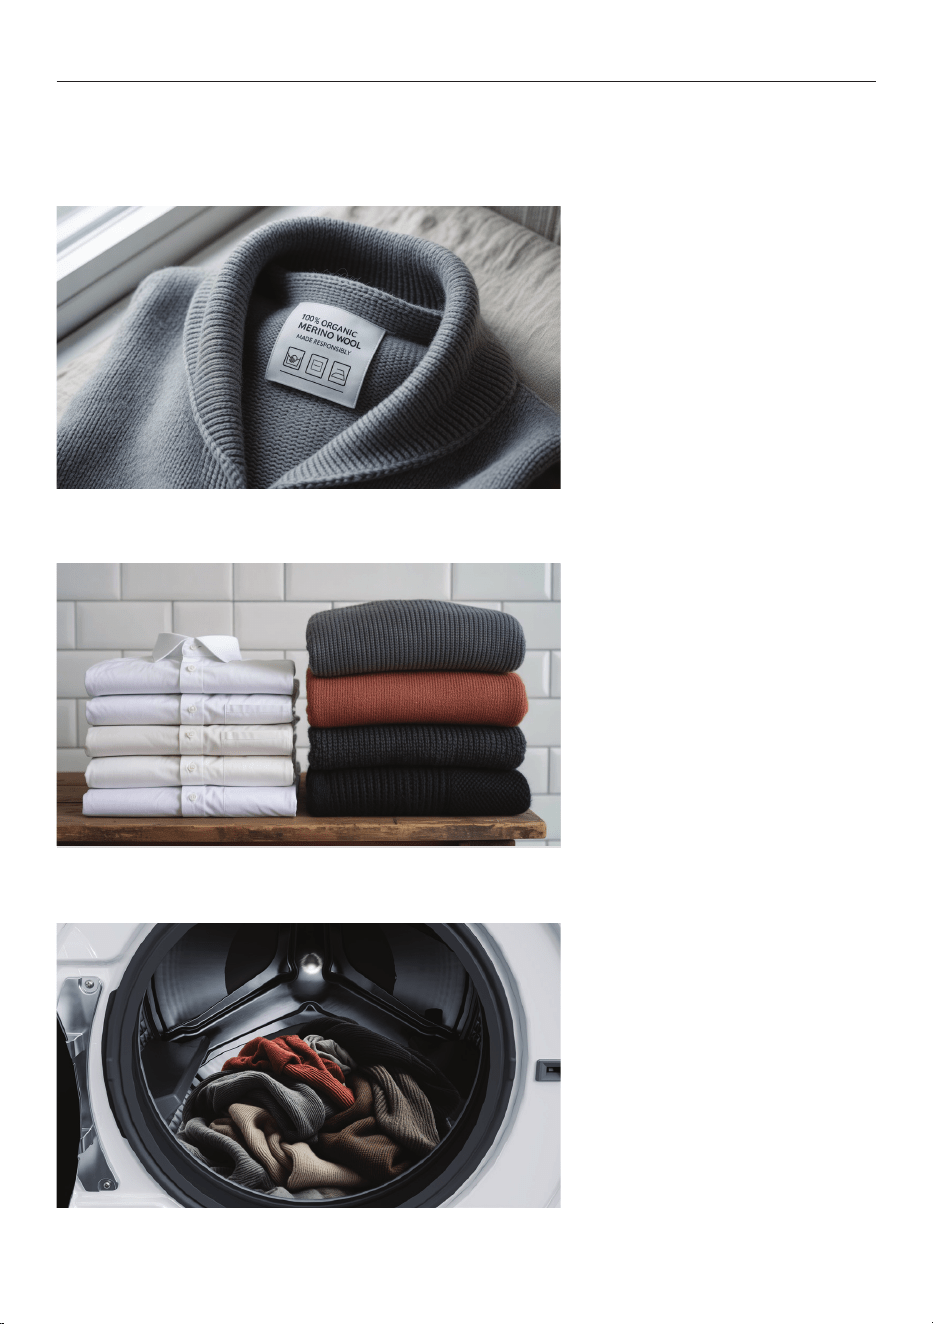
Sorting your items well is essential for taking care of your clothes and getting the best results
from your dryer. Follow these steps every time you use the dryer:
1. Check each care label to see
the fibre composition and how
each garment should be dried.
Always follow the care
label advice.
2. Sort items into loads of
similar fibre, durability and item
type.
3. Check pockets, secure
fasteners and untangle items
before loading.
Allow enough room for items to
tumble freely.
14
LOAD THE DRYER
Maximum load size
The maximum load size changes based on the type of items in a load. Follow the guide below to
avoid overfilling the dryer and to maintain good drying performance.
ITEM TYPES MAX LOAD SIZE
Mixed, Cotton, Polyester Ultra-delicate
Extra small
Delicate
Small
Moderate, Durable
Large
Sheets, Towels, Denim, Sports, Bulky
Medium
Wool Ultra-delicate, Delicate
Extra small
Elastane Ultra-delicate
Extra small
Delicate
Small
Moderate
Medium
Down Ultra-delicate
Extra small
Delicate
Small
Bulky
Medium
Quilts & duvets
1 item
Silk Ultra-delicate
Extra small
Other Treatments Rack dry
1 or 2 items
Steam refresh
1, 2 or 3 items
Sanitise dry
Medium
Allergy care
Medium to large
Large
Medium
Small
Extra small
MAX LOAD SIZE GUIDE
15
SET A CYCLE
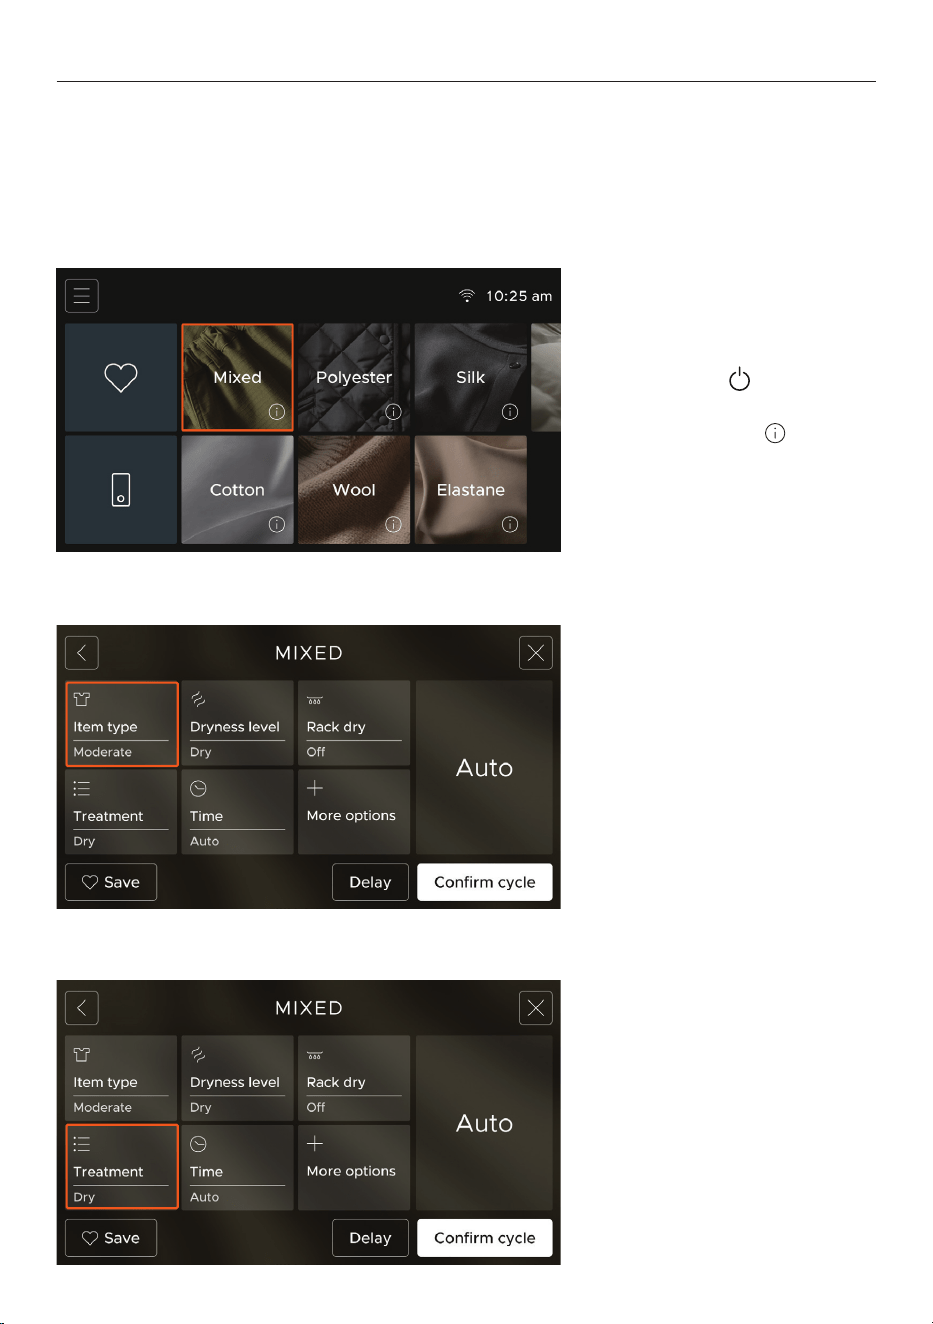
1. Press POWER to turn the
dryer on, then select a fibre type.
Press
INFORMATION for a
description of each fibre.
2. Press ITEM TYPE to access the
options and see a description
and examples for each type.
Scroll to select an item type.
Your dryer has specialised cycles for specific fibre types. Start by selecting a fibre type, then
select an item type based on durability or specific items, such as sheets or towels, and the
required treatment. You can also adjust additional settings for dryness and time. The available
cycle options may vary depending on the fibre type you select.
See ‘Cycle selections’ for details.
3. Press
TREATMENT to access
the options and descriptions.
Scroll to select a treatment.
16
SET A CYCLE
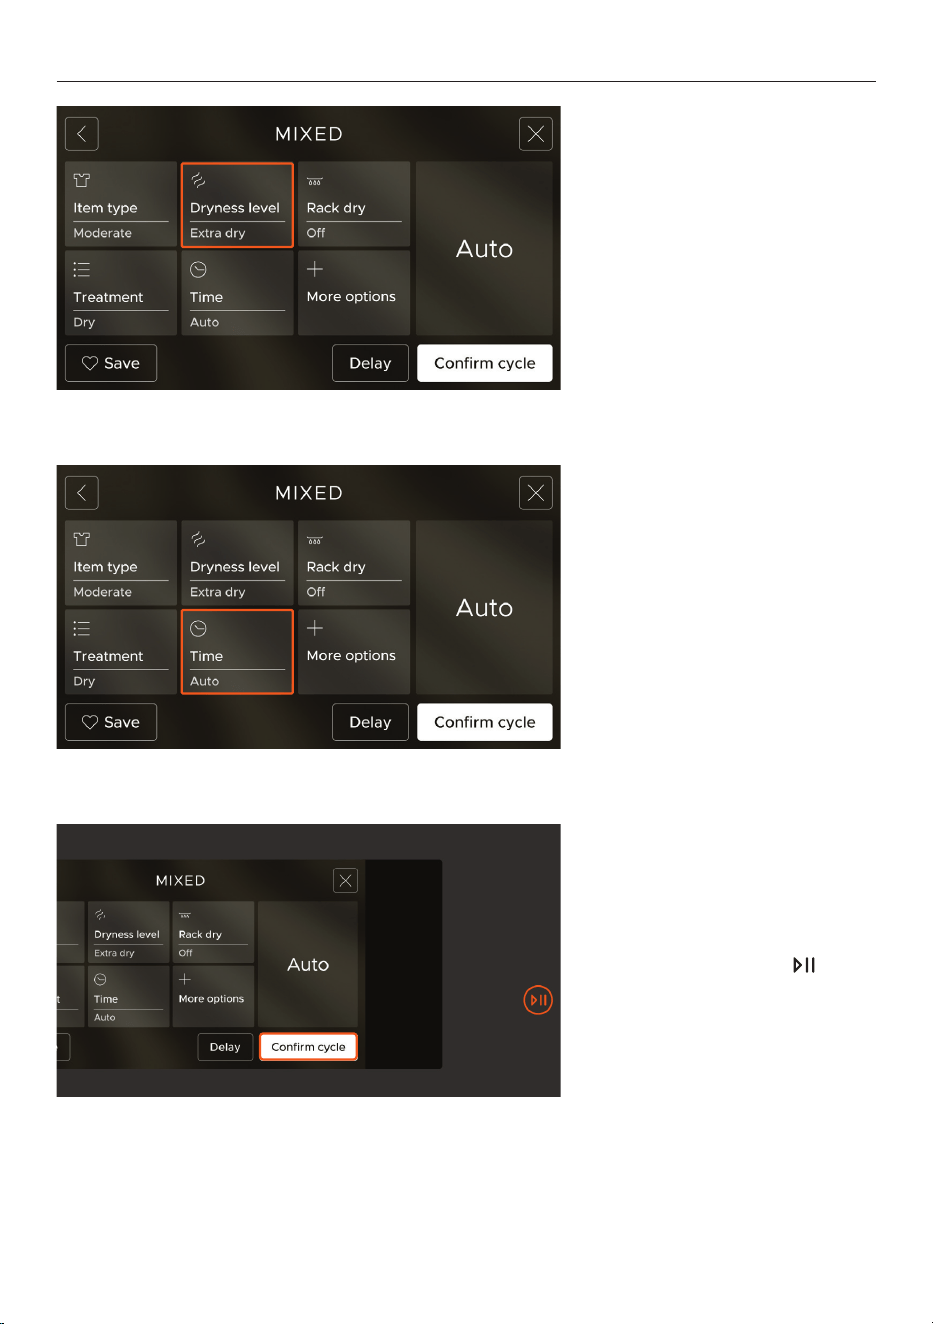
4. Select a DRYNESS LEVEL or
select RACK DRY for items that
cannot be tumbled.
See ‘Fit drying rack’ for how to fit
the rack.
5. Set a drying duration or Auto.
Press
MORE OPTIONS to access
additional drying options. See
‘Drying options’ for details.
6. Press
CONFIRM CYCLE, then
press the START/PAUSE button
to begin the cycle.
17
SET A CYCLE
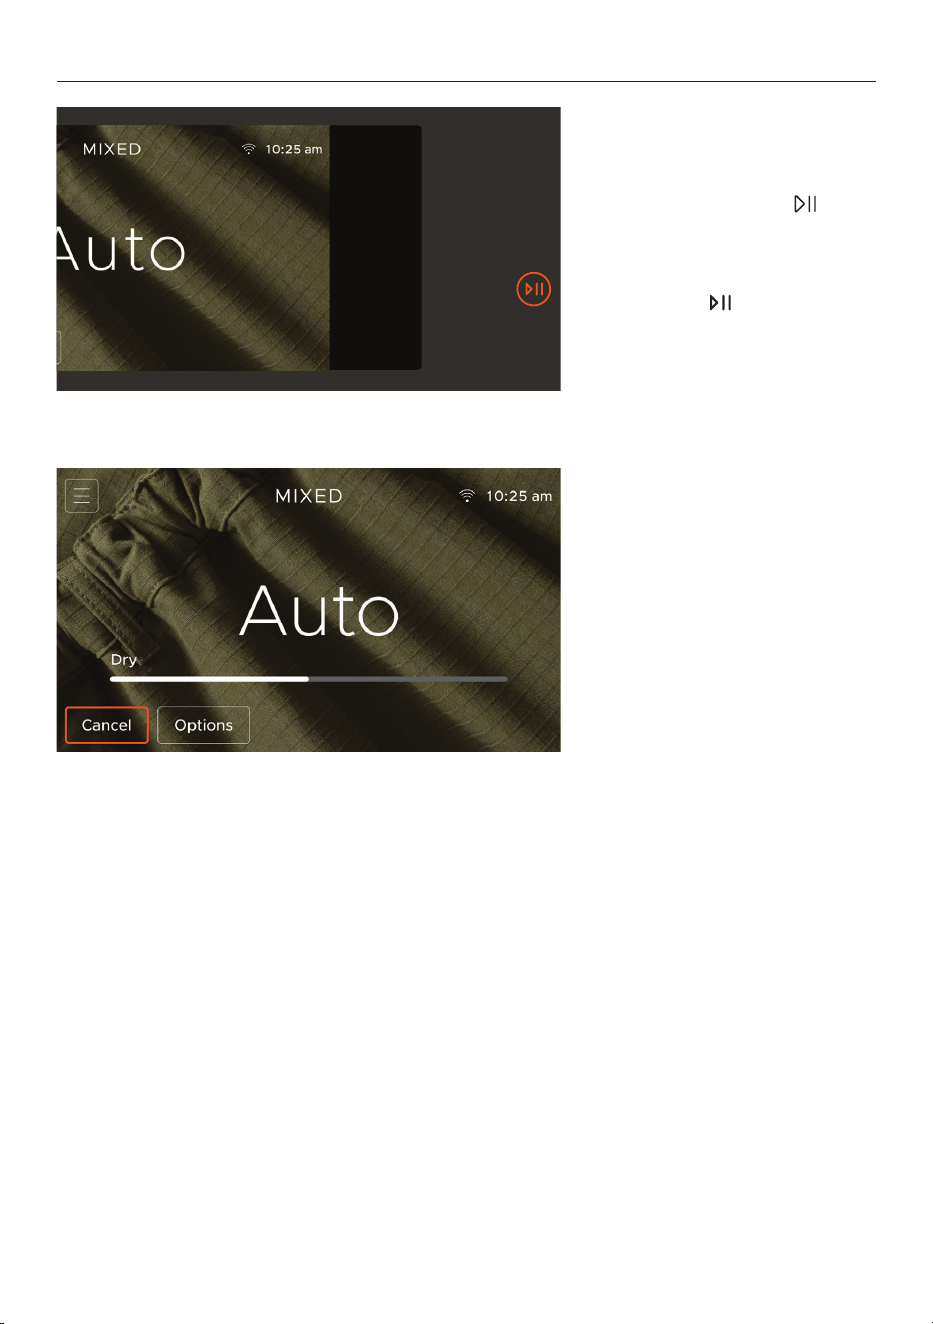
Cancelling the cycle
Press
CANCEL to cancel
the cycle.
Remove items immediately and
spread them out to cool. Take
care as the drum and items may
be hot.
Pausing the cycle
Press the
START/PAUSE
button to pause the cycle if you
want to add or remove an item.
Press
RESUME, then the
START/PAUSE button to
resume the cycle.
18
DRYING OPTIONS
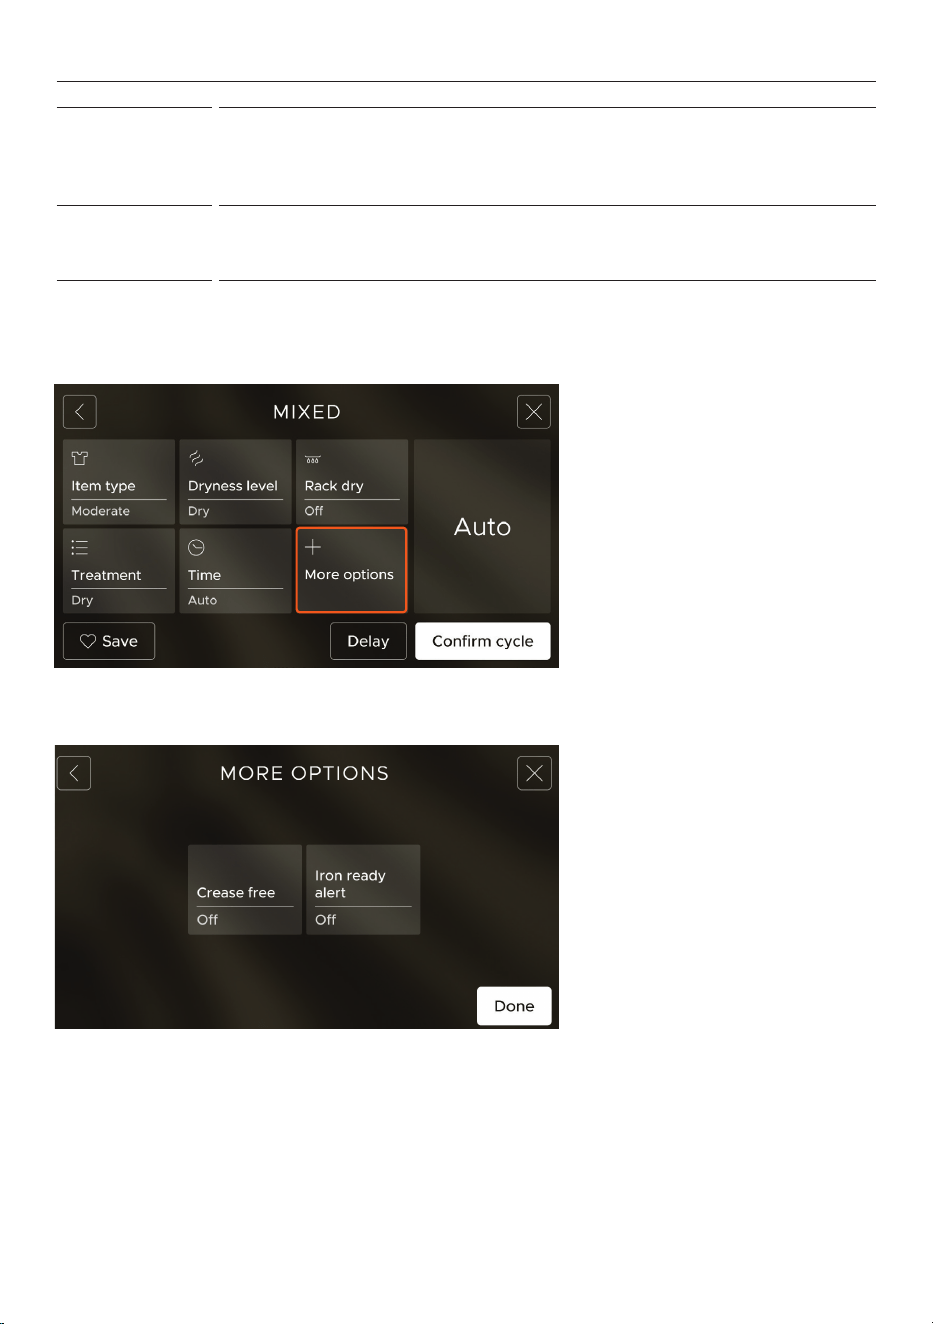
1. Press MORE OPTIONS to
access additional cycle options.
Crease free
After the cycle is complete the load will continue to tumble periodically to
help reduce creases. Crease free will remain active for up to 8 hours or until
cancelled. To cancel, touch the screen or open the door. Defaults to
ON for
some cycles.
Iron ready alert
Set an alert for when the load reaches the iron ready dryness stage. Pause the
cycle to remove items that do not need further drying. Resume the cycle to
continue drying the remaining load.
2. Select an option and follow
the onscreen instructions to set
it.
Press
DONE to confirm.
19
SET DELAYED START
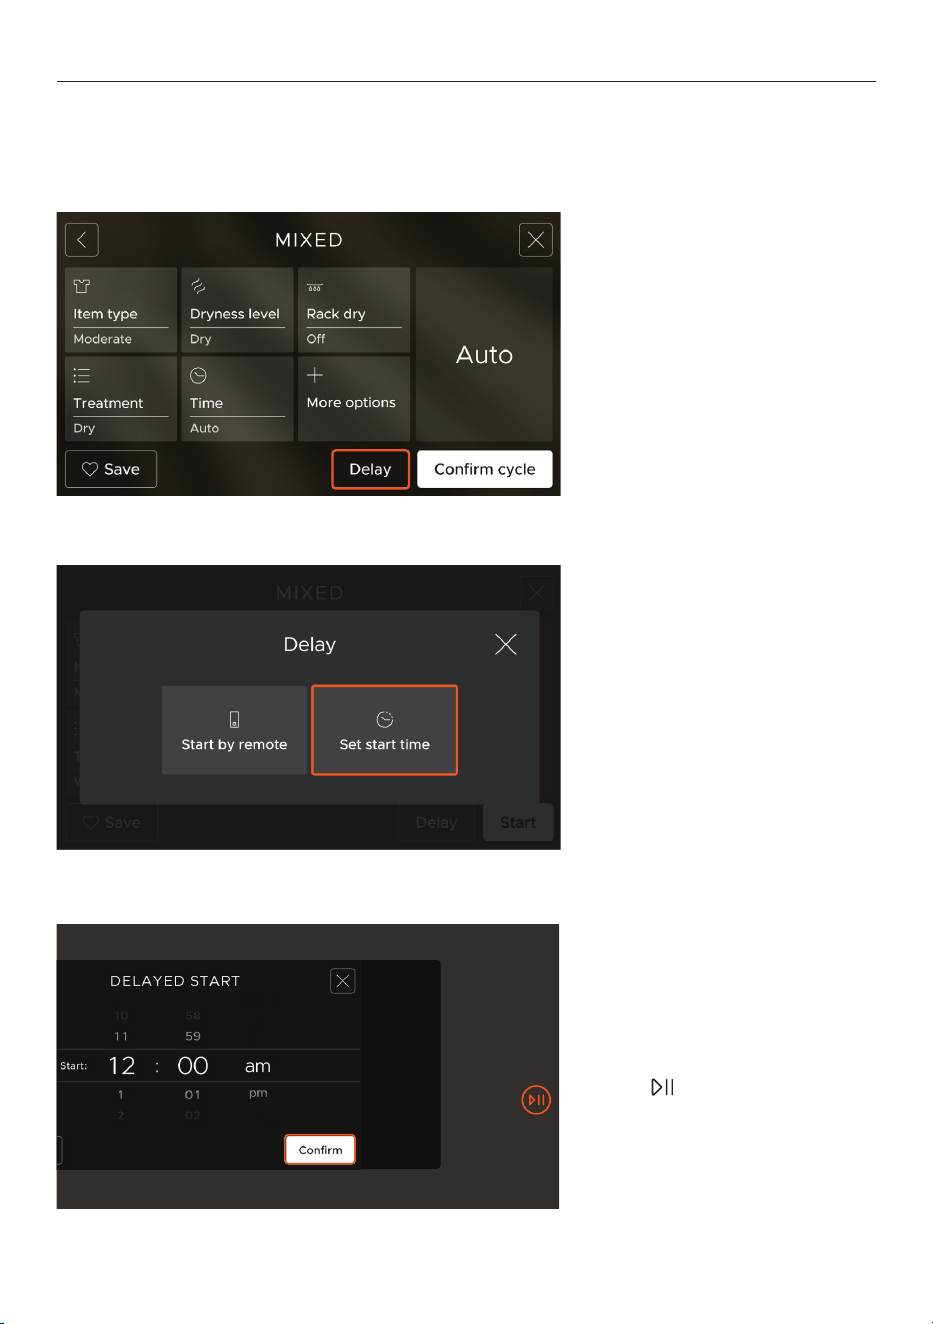
1. After setting the drying
cycle, press DELAY to open
the Delay screen, then
press SET START TIME and set
a start time.
DELAY allows you to schedule a cycle to begin at a later time. You can set a time on the dryer or
start a cycle remotely through the app.
2. Press SET START TIME and
follow the onscreen instructions
to set a delayed start time.
3. Press confirm to save the new
start time, then press the START/
PAUSE
button.
20
FIT DRYING RACK
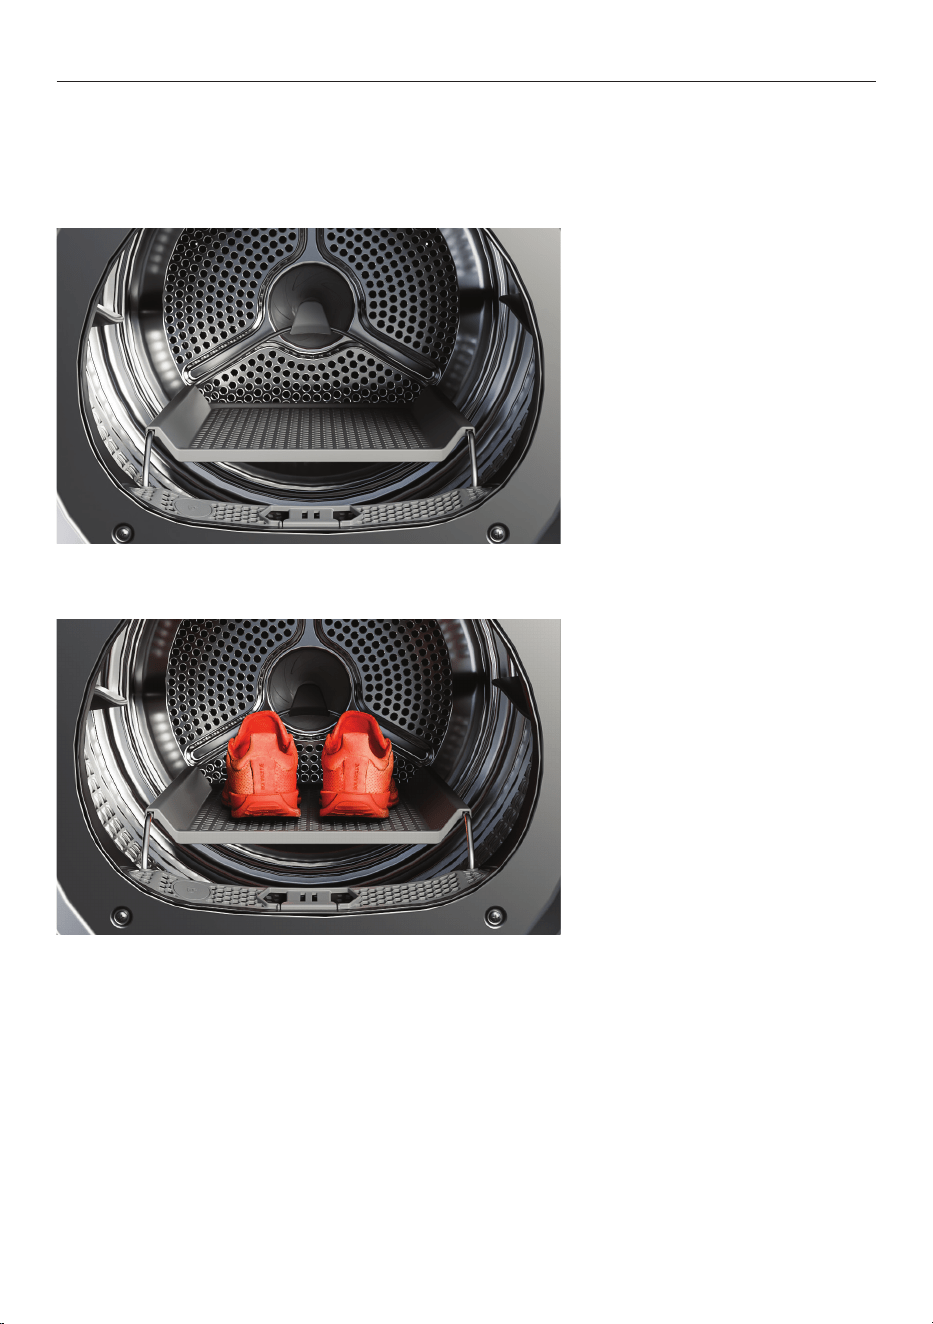
Fit the drying rack when you use the RACK DRY option. The rack is designed for items that
cannot be tumbled. When RACK DRY is selected, you have to set a cycle duration, so DRYNESS is
not available.
1. Insert the rack legs into the
slots in the lint filter, then lower
into place.
2. Place the item onto the drying
rack, then close the dryer door.
Follow the onscreen instructions
to confirm the rest of the settings
and begin the cycle.
For sneakers, check them
throughout the cycle. Save as a
Favourite if intending to use this
cycle regularly.
21
ADJUST SETTINGS
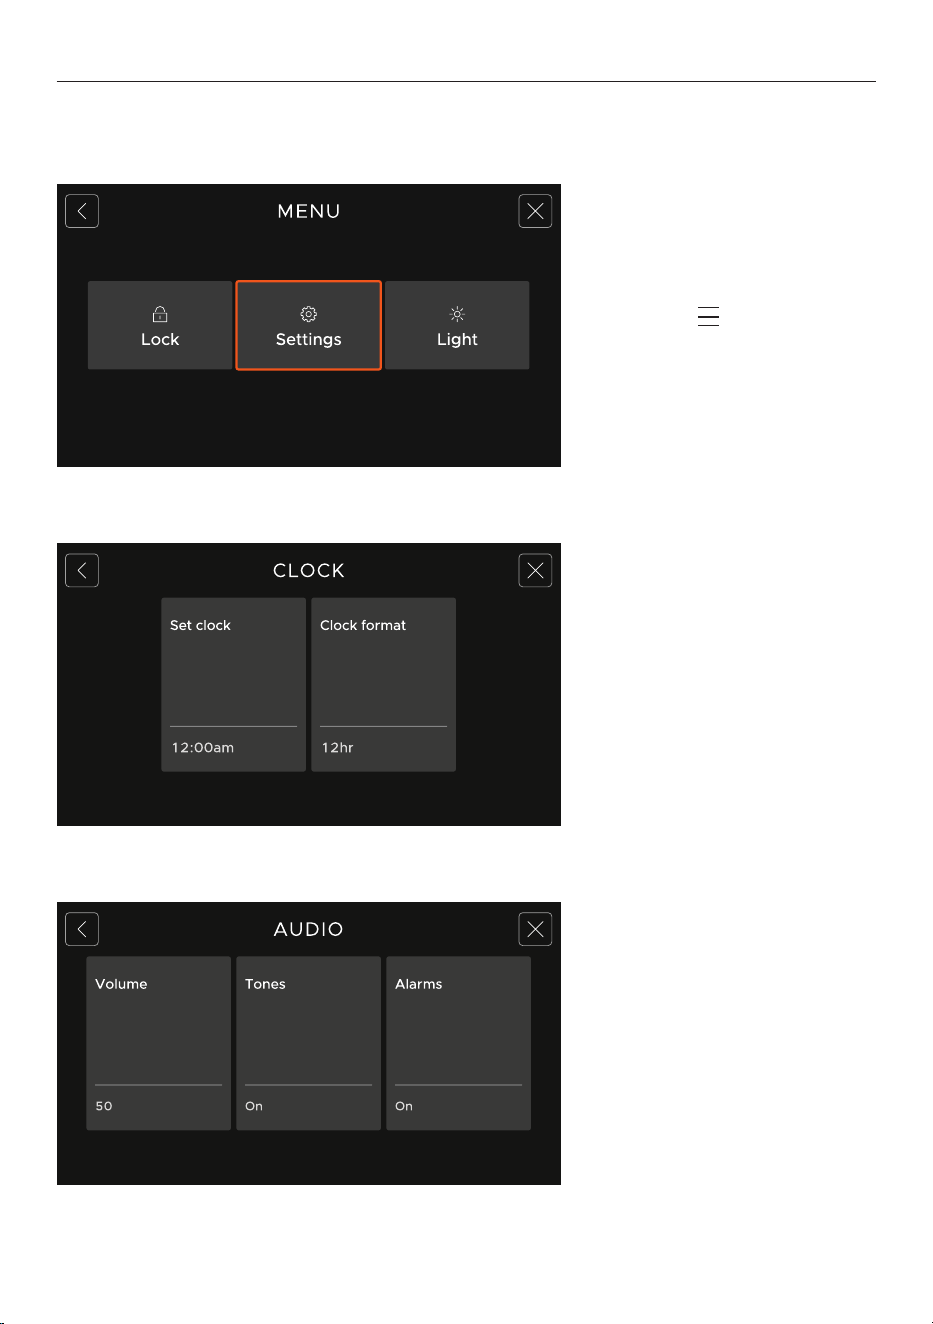
Audio
Set volume or turn sounds on or
off.
Clock
Set time, format and time zone.
Time updates automatically when
connected to Wi-Fi.
Adjust the appliance settings to suit your preferences.
Go to MENU and select
SETTINGS.
22
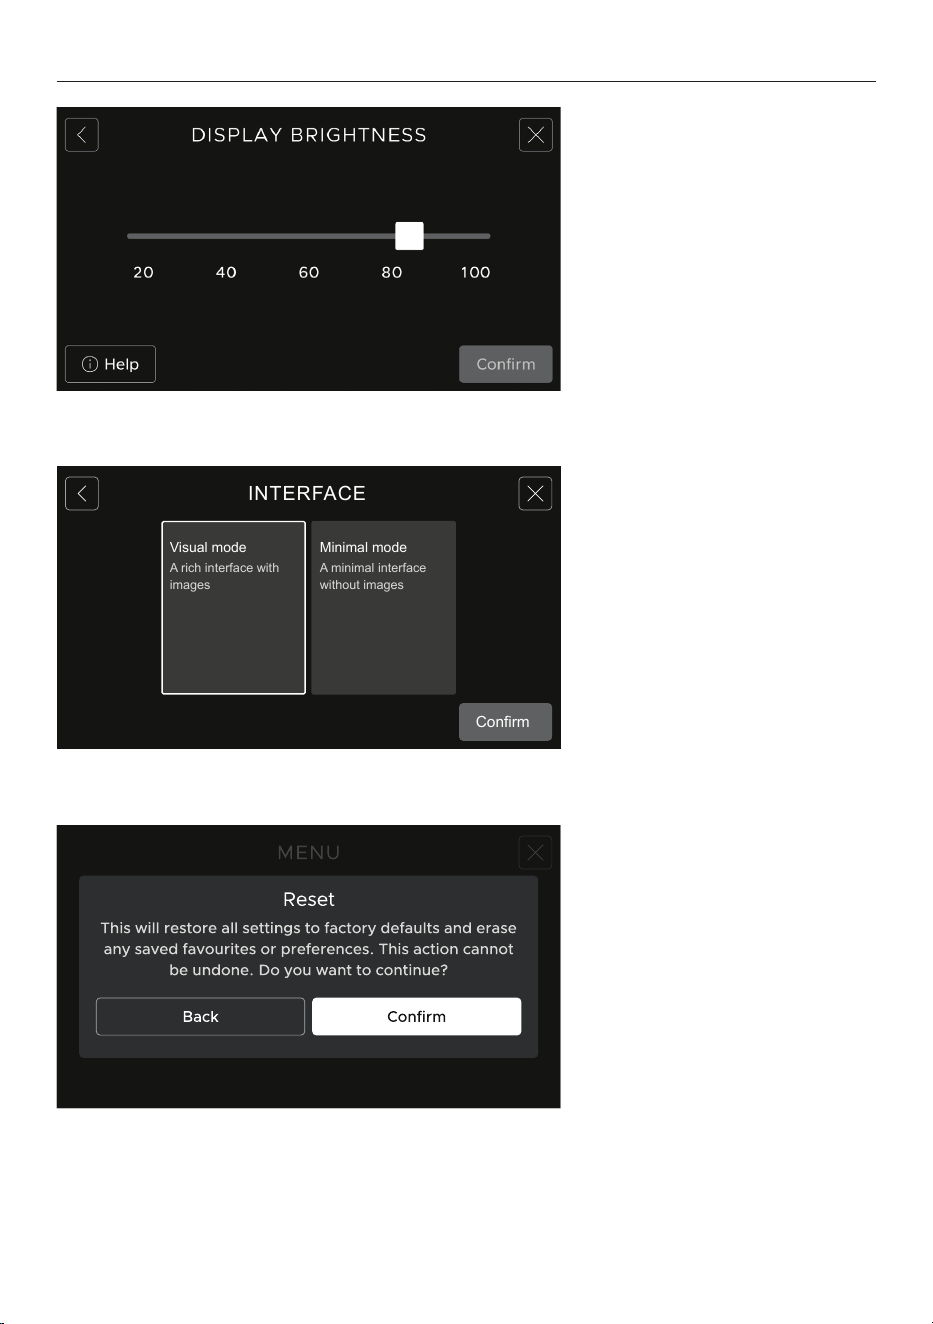
Display
Adjust the brightness of
the display screen. Set a
lower brightness to improve
energy efficiency.
ADJUST SETTINGS
Interface
Set visual or minimal modes
on the display.
Visual mode
A rich interface with
images
Minimal mode
A minimal interface
without images
Confirm
INTERFACE
Factory default resest
Restore all settings to
factory defaults.
This action cannot be undone.
23
SAVE FAVOURITE CYCLES
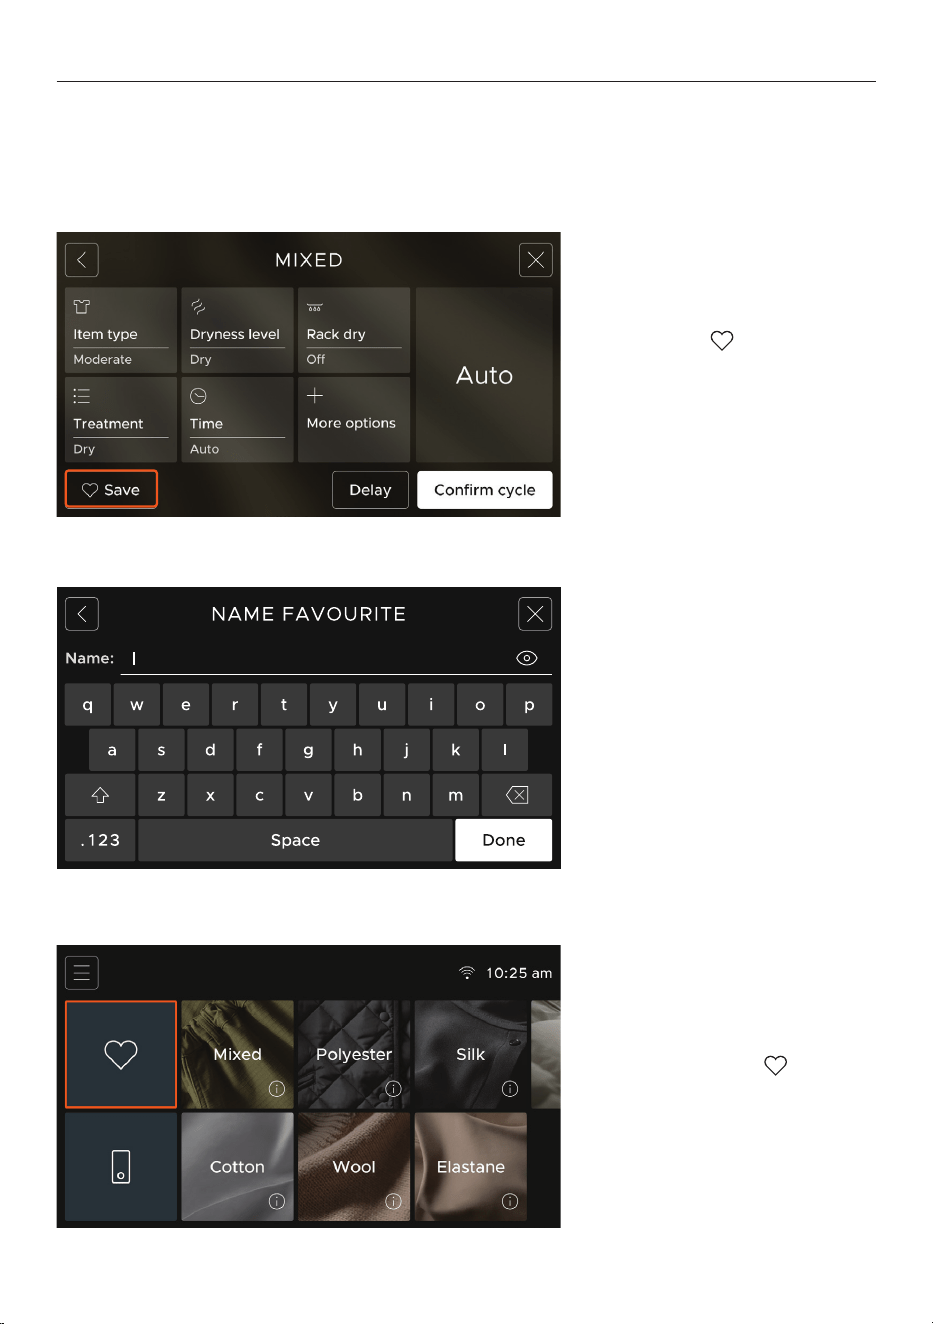
Save your favourite cycles for a quick start to your dry cycle. Favourites comes with a preset
DELICATE REFRESH COTTON cycle, and you can save up to 14 more on the appliance and manage
them in the app.
2. Create a custom name for
your cycle, or skip that step and
save it with a default name.
Moderate dry
3. Press FAVOURITE on the
home screen to access your
saved favourite cycles.
1. Press
SAVE from the cycle
settings screen, from the Options
menu or at the end of a cycle to
add the cycle to Favourite.
24
SAVE FAVOURITE CYCLES
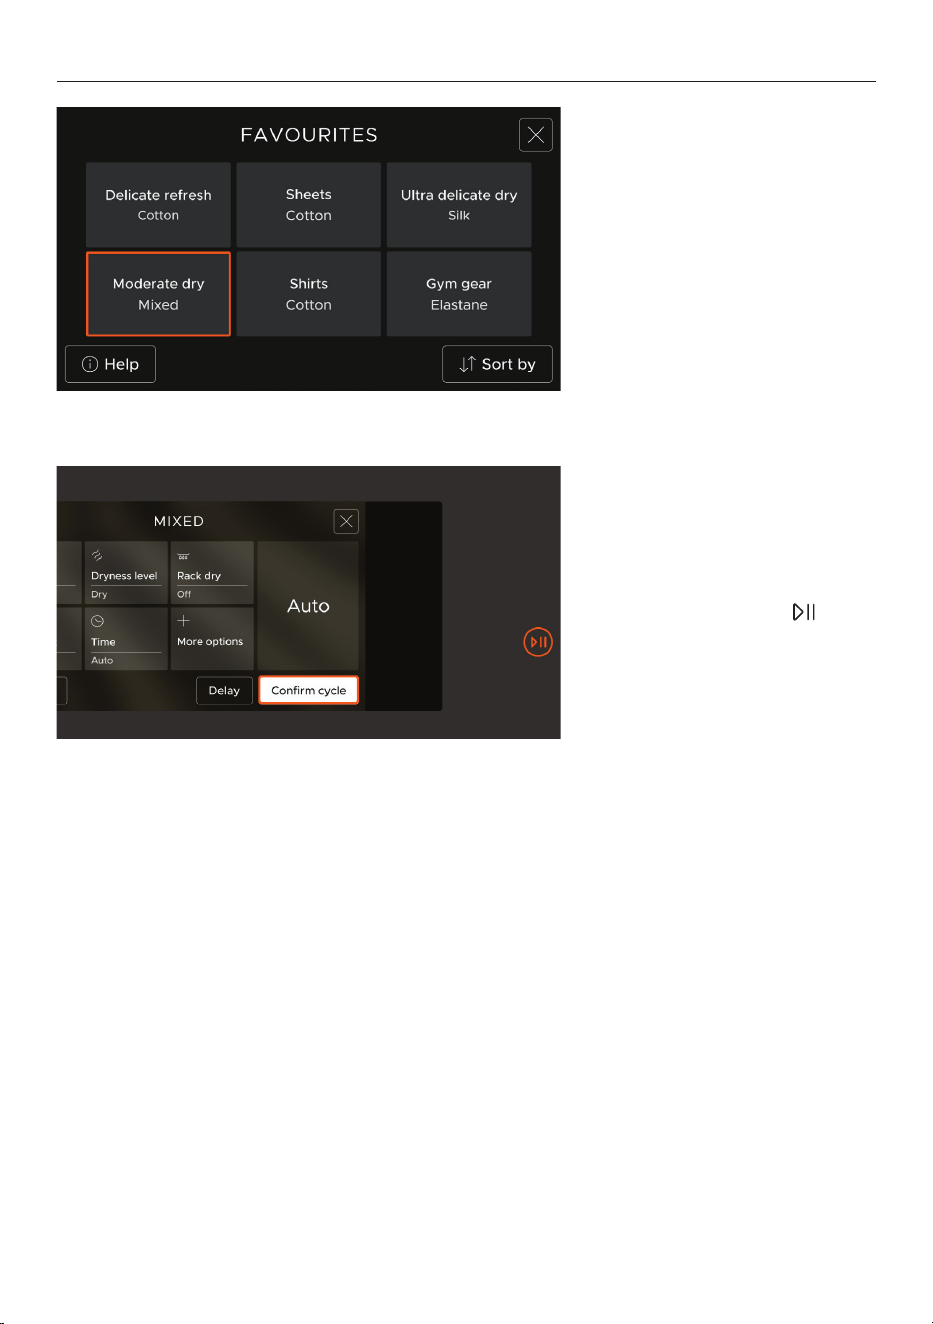
4. Select a favourite cycle from
the Favourites menu.
5. Press
CONFIRM CYCLE to
confirm the cycle selection, then
press the START/PAUSE button
to start the dry cycle.

25
CYCLE SELECTIONS
FIBRE TYPE
Select the specific fibre type that matches the load or choose the fibre type that applies to
the most delicate fibre. The drying cycle will adjust to suit. See ‘Understanding fibre types’ for
guidance about which fibre types are the most delicate.
Mixed
For everyday mixed loads with a variety of fibres, and for cotton-polyester blends.
Cotton
For 100% cotton items.
Polyester
For 100% polyester items.
Wool
For 100% woollen items and wool blends. This cycle meets the Woolmark requirements
for machine washable items.
Elastane
For items containing 10-50% elastane fibre, also known as spandex.
Down
For items containing down fill.
Silk
For 100% silk items and silk blends.
ITEM TYPE
Item type relates to the durability of items in your load in terms of fabric thickness.
Dry garments and items of similar thickness together to prevent some items becoming over-
dried while others are still damp.
Ultra delicate
For items that are very fragile, needing extra gentle care. Ideal for lace, lingerie and
fine knitwear.
Delicate
Light and easily damaged or torn items like blouses, dresses and other items.

26
CYCLE SELECTIONS
Moderate
Everyday items like t-shirts, shirts, lined dresses, shorts, pants and denim.
Durable
Strong and resilient everyday items like workwear and outerwear.
Sheets
Items such as bed sheets, pillow cases and duvet covers.
Towels
High absorbency towelling fabric items like bath, beach and hand towels.
Sports
Durable sportswear items made from synthetic fibre blends.
Denim
Items made of denim or stretch denim such as jeans, jackets and skirts.
Bulky
Cotton/Mixed/Polyester - For items that are thick and insulating, such as blankets, quilts,
comforters, and duvet or doona inners.
Down - For smaller thick and insulating items like jackets and sleeping bags.
Quilts and duvets
For larger thick and insulating items like quilts, comforters and duvet inners.
TREATMENT
Dry
Designed for everyday drying.
Steam refresh
A steam treatment to refresh 1 to 3 dry items. For best results, refresh larger items like dresses
individually, but set the cycle for two items.
Rack dry
For items that cannot be tumbled. This option requires the drying rack to be fitted.
Allergy care
Uses sustained higher temperatures to reduce allergens like dust mites and pollen. Ideal for
helping to manage allergies or sensitive skin.

27
CYCLE SELECTIONS
Sanitise dry
High temperature drying to eliminate bacteria. Ideal for towels and sheets, but unsuitable for
delicate items.
METHOD
You can select a drying method that automatically ends the cycle when the load reaches the
selected dryness level or after a set duration.
Auto
Ends the cycle automatically when the load reaches the selected dryness level. You will be
prompted to select a dryness level for the next step.
Not available for Wool cycle.
Time
Ends the cycle after a set duration. You will be prompted to set a drying duration for the next
step. Dryness level is not available with this option.
DRYNESS
Dryness options let you select a dryness level that prepares items for storing, wearing or
ironing. Sensors in the dryer can detect remaining moisture in the load and will end the cycle
when the load reaches your preferred dryness level.
Not available if drying method is set as Time.
Iron ready
Leaves some moisture in the load to help reduce wrinkles and prepare items for ironing.
Dry
Dries the load thoroughly leaving items ready to wear.
Dry plus
Dry plus is ideal for thicker fabrics or absorbent items that might need extra drying time.
Extra dry
An ultra-dry option for thick or heavy items. Ideal for thick or heavy items, or items that are
going to be placed in storage.
28
WI-FI CONNECTION AND REMOTE MODE
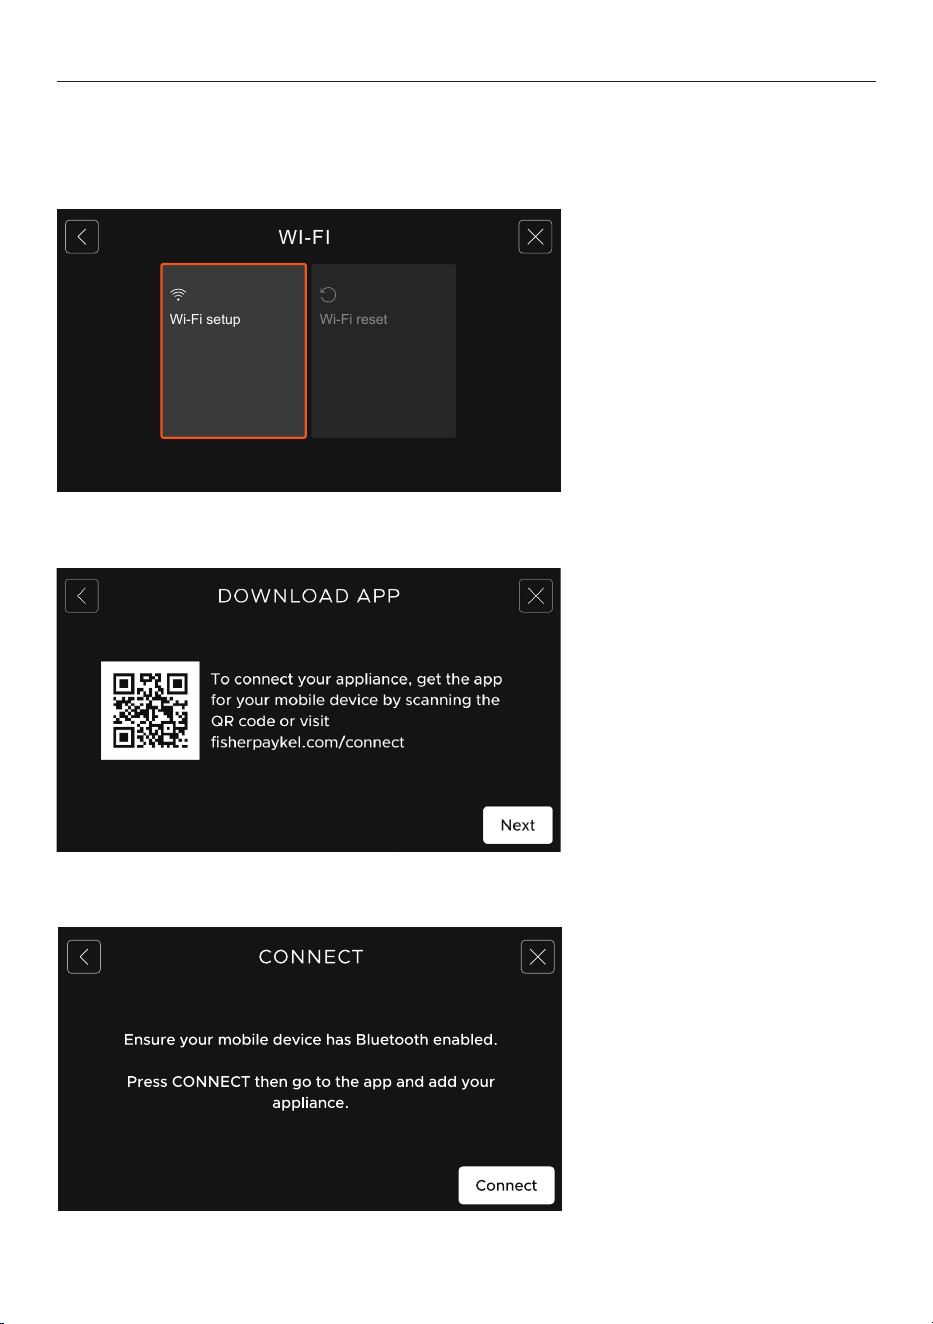
Connect your appliance to your home wireless network to receive updates and to operate the
appliance remotely using the app.
2. Download the app, and
follow the app instructions.
3. Enable Bluetooth on your
mobile device, then press
CONNECT.
Go to the app to complete
the connection.
Connect to Wi-Fi
1. Go to the menu and
select
SETTINGS, WI-FI, then
WI-FI SETUP.
WI-FI
Wi-Fi setup
Wi-Fi reset
29
WI-FI CONNECTION AND REMOTE MODE
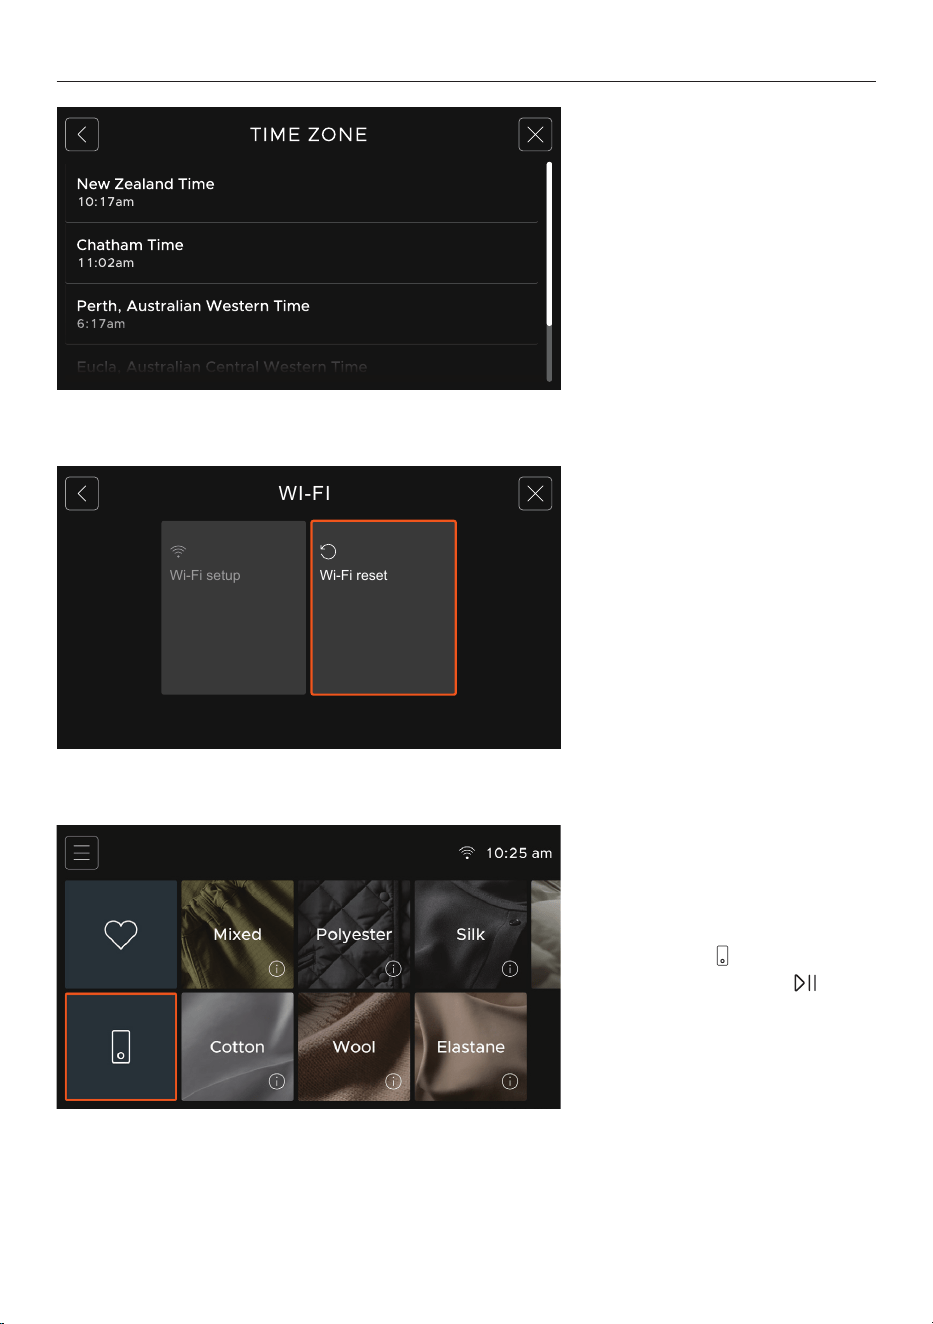
4. On your appliance, select
the relevant time zone.
Disconnect Wi-Fi
Go to
SETTINGS and select WI-FI,
then RESET to disconnect.
WI-FI
Wi-Fi setup
Wi-Fi reset
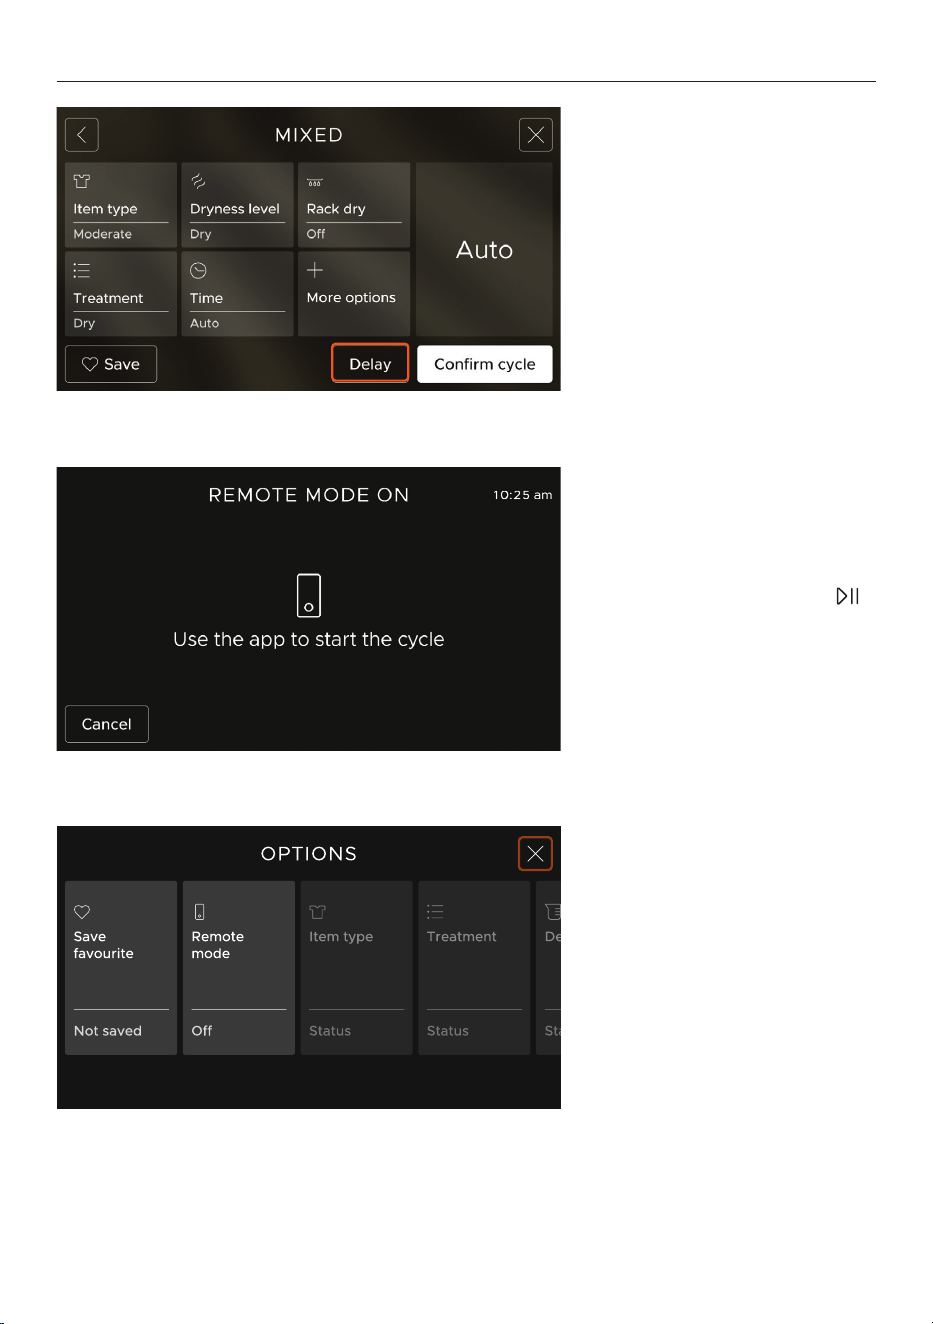
Enable Remote mode from
the home screen
Press
REMOTE , then ENABLE.
Press the
START/PAUSE
button to enable Remote mode
and manage cycles in the app.
30
WI-FI CONNECTION AND REMOTE MODE
2. Press START BY REMOTE,
then press the START/PAUSE
button to enable Remote mode
and manage cycles in the app.
Enable Remote mode
during cycle setup
1. Press
DELAY in the cycle
setting screen.
Turn Remote mode off
On the cycle screen, press
OPTIONS, then REMOTE MODE to
turn off, or open the dryer door.
31
CLEAN AND MAINTAIN THE DRYER
Surfaces and accessories
Wipe with a damp cloth and mild detergent, then dry with a clean, lint-free cloth. We do not
recommend using the following cleaning products as they may cause damage:
z
Plastic or stainless steel scouring pads
z
Abrasive, solvent, household cleaners
z
Acid or alkaline cleaners
z
Hand washing liquids or soap
z
Stainless steel cleaners or polishes
z
Laundry detergents or disinfectants
Inside the dryer
Check and clean the inside of the drum regularly with a damp cloth to remove any dirt or lint.
Do not leave any metal objects in the drum as these may cause rust.
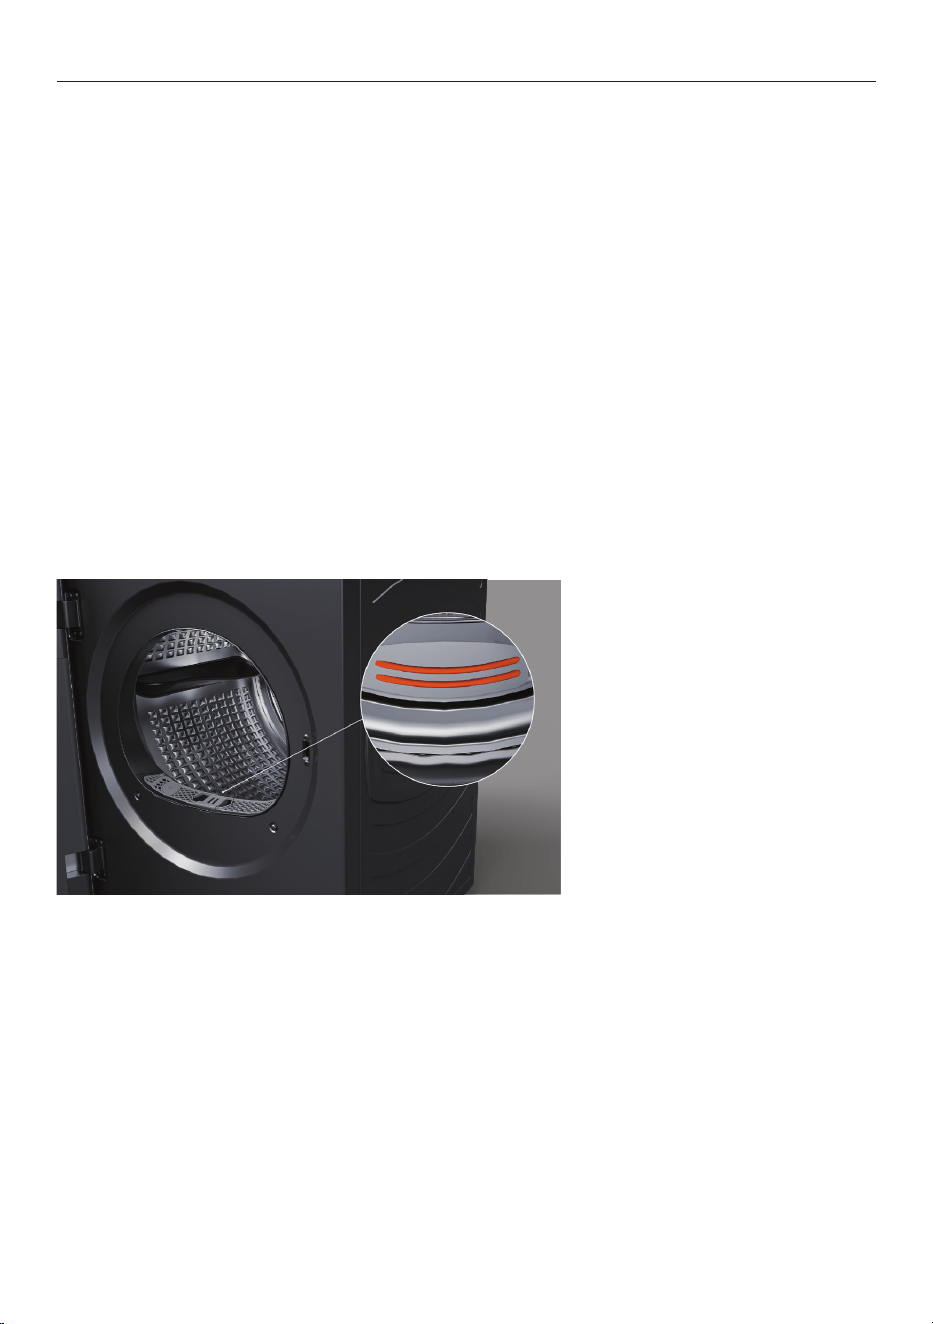
Sensors
The sensors are located behind the lint filter and detect whether the laundry is dry or not. Clean
the sensors regularly to maintain drying performance.
Cleaning the sensors
Wipe clean with a soft, damp
cloth.
32
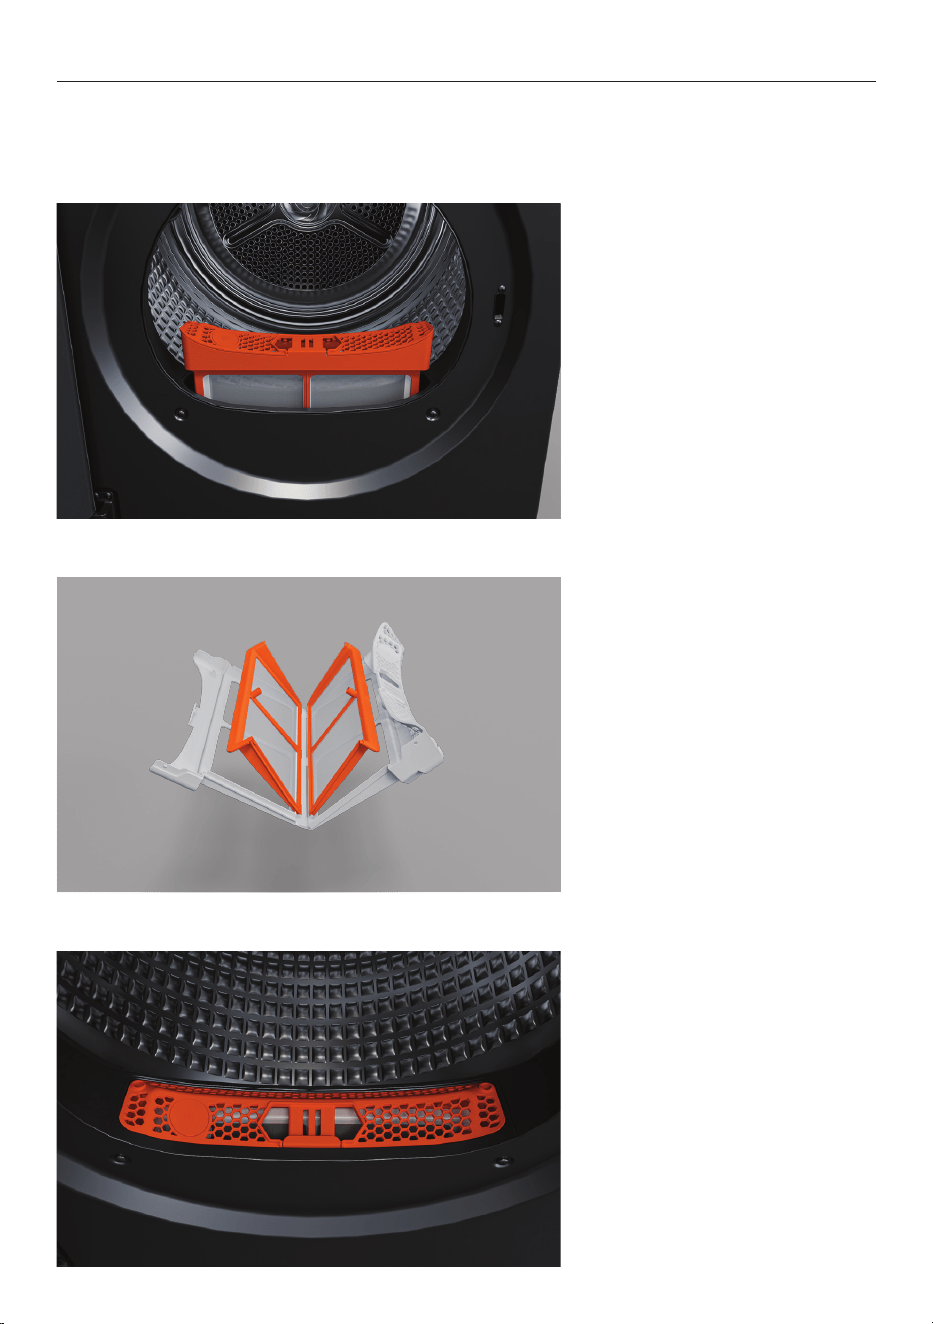
CLEAN THE LINT FILTER
The CLEAN LINT FILTER reminder will pop up at the end of a cycle. Remove and clean the filter
each time you use the dryer as blocked filters will reduce drying performance, and lint can
become a fire hazard if it builds up in or around your dryer.
1. Open the dryer door and
remove the lint filter.
2. Open the filter and separate
the parts. Use your hand or a
soft cloth to remove the lint from
both parts.
3. Refit the internal filter part
to the outer part, then close
the filter and place it back in
the dryer.
33
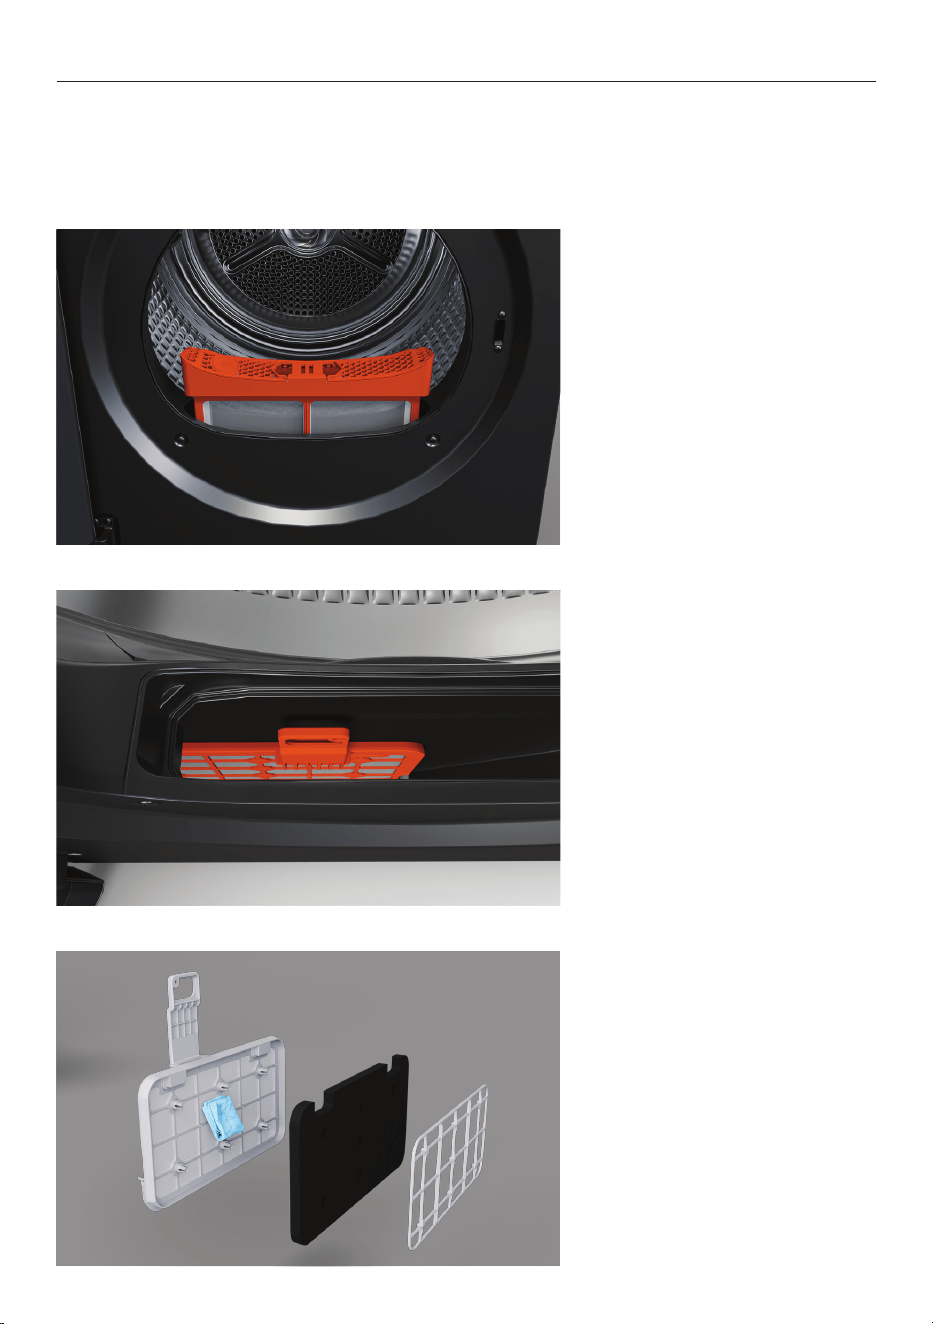
The lower lint filter sits below the lint filter. The CLEAN LOWER LINT FILTER reminder will pop
up after every 10 cycles to prompt you to remove and clean the lower filter. Clean it when the
reminder pops up, or when you notice the drying cycle is taking longer than usual. This will help
to maintain drying performance.
CLEAN THE LOWER FILTER
4. Remove the lower lint filter,
open it and take out the foam.
5. Use a cloth or vacuum
cleaner to remove lint, then refit
the foam to the mesh. Place
lower filter back into the dryer,
and refit the lint filter.
1. Remove the lint filter to access
the lower lint filter.
34
TROUBLESHOOTING
General use
Why will the dryer not turn on?
No power. Check the dryer is connected to the power supply.
Why is the display not responding?
z
Dryer needs to be reset. Press POWER to turn the dryer off. Wait a few seconds, then
turn the dryer back on. If the problem persists, disconnect the dryer from the power
supply, wait a few seconds, then reconnect and press POWER to turn the dryer on.
z
Dryer may require a software update. Connect dryer to Wi-Fi and check for updates in the
app.
Why is the dryer not starting?
z
Dryer door not closed. Check nothing is obstructing the door, and close it firmly.
z
Dryer is overloaded. Remove some items and restart the cycle.
z
Delayed start is set. See ‘Setting Delayed start’.
z
The controls are locked. Press and hold LOCK .
z
There is a fault. See ‘Fault codes’.
Why is the dryer stopping and starting?
The crease free setting is turned on. Turn off in Options. See ‘Drying options’.
Why did the dryer stop mid-cycle?
z
Drying cycle has been paused. Press START/PAUSE to resume the cycle.
z
The door is open. Close the door and press START/PAUSE to resume the cycle.
z
The lint filters need to be cleaned. Remove and clean the lint filters.
Why is the dryer vibrating or making noises?
z
Dryer is overloaded. Press START/PAUSE to pause the cycle and remove some items.
z
Dryer is not level. Refer to installation guide for instructions about levelling the dryer.
z
The cycle has ended. Items can be removed.
z
Dryer has a fault. See ‘Fault codes’.
Why do the items feel damp after a drying cycle?
z
Items are just warm and will feel dry once they have cooled down.
z
Incorrect drying settings for the load. Check settings and adjust if required.

35
TROUBLESHOOTING
Why is the drying cycle taking so long?
z
Dryer is overloaded. Pause the cycle and remove some items.
z
Items are tangled. Untangle the items and resume the cycle.
z
Lint filters need to be cleaned. Remove and clean the lint filters.
z
Incorrect drying settings for the load. Check the selected fibre type, item type, treatment,
method and dryness, and adjust if required.
z
Load was overly wet at the start of the cycle. Remove from dryer and run on a spin cycle
in the washing machine to remove excess water.
z
Items are very large. Large items, like duvets, require longer drying times.
z
Dryer is not draining. (Plumbed set-up only.) Check the drain hose for blockages and
correct if possible. If the problem persists contact Customer Care.
z
Air intake is blocked. Check that nothing is covering the air intake.
z
Air temperature in the space surrounding the dryer is too hot, humid or cold. The dryer is less
efficient in very hot or cold conditions. Ensure the dryer is installed in a well-ventilated space.
Do not operate this dryer inside a cupboard.
Why is there lint on the load after a drying cycle?
z
The lint filters need to be cleaned. Remove and clean the lint filters.
z
Lint-shedding items are mixed in a load with lint-collecting items. See ‘Sort your load’.
z
Clothes are over-dried and attracting lint. Use AUTO method to sense when items are at the
appropriate dryness level.
Why is the fabric damaged after a drying cycle?
z
Cycle settings not appropriate for the load type. Follow instructions on care labels and
sort items accordingly. See ‘Sort your load’.
z
Metal parts on the items or in the load may catch on fabric. Always fasten zips and other
clasps before placing items in the dryer.
Why do items in the dryer keep getting tangled?
z
Loads not separated before going in the dryer. Load items individually and try separating
larger items from smaller items.
z
Load size is too large. Try drying smaller loads. See ‘Sort your load’.
z
Cycle settings not the best option for the load type. Try SHEETS for sheets, duvet/doona
covers and TOWELS for towels.
z
Delicate items not separated. Dry pantyhose, bras and stockings in a mesh bag.
Why do items in the dryer keep getting creased?
z
Items have been left in the dryer after the cycle ended. Turn CREASE FREE on at the start of
the cycle to minimise creasing.
z
Dryer is overloaded. Pause the cycle and remove some items.
z
Dryness level is not appropriate for the load. Select a lower dryness level.

36
TROUBLESHOOTING
Why is dye transferring onto my clothes?
z
Items not sorted before going in the dryer. Separate white and coloured items into
separate loads.
z
Wet items left sitting in the dryer before the drying cycle.
Why is the dryer not draining?
z
Drain hose or drain is blocked. (Plumbed set-up only.) Check the drain hose and drain for
blockages and correct if possible. If the problem persists contact Customer Care.
z
Drain hose not connected correctly. See the installation guide for instructions.
Why is the dryer beeping?
z
The cycle has ended. Items can be removed.
z
Dryer has a fault. See ‘Fault codes’.
Why is water coming from under the dryer?
z
Dryer door not closed. Check nothing is obstructing the door, and close it firmly.
z
Drain hose or drain is blocked. (Plumbed set-up only.) Check the drain hose and drain for
blockages and correct if possible. If the problem persists contact Customer Care.
z
Drain hose not connected correctly. See the installation guide for instructions.
Why is there water in the dryer drum after a cycle?
z
Air temperature in the space surrounding the dryer is too hot, humid or cold, and water may
be recondensing in the dryer. Ensure the dryer is installed in a well-ventilated space. Do not
operate this dryer inside a cupboard.
Can I dry my sneakers in the dryer?
Yes, sneakers can be dried using the drying rack and
RACK DRY. See ‘Fit drying rack’.
How do I refresh my shirts?
Refresh only works with Select the relevant fibre type, and set the item type to
DELICATE and
the treatment to REFRESH. Suitable for up to 3 items at a time.
Do I need to use the Sanitise cycle on my dryer if I used the Sanitise cycle on my washer?
No. You only need to use the
SANITISE cycle on one of your products to sanitise a load.
37
FAULT CODES
How do I know if there is a problem?
Your dryer will beep and an alert will show in the display.
What to do
First try to fix the issue and clear the alert according to the onscreen instructions or the steps in
the table below.
If the problem persists
1 Note down the fault code.
2 Contact Customer Care or a Fisher & Paykel trained and supported service technician. Refer
to the Service and Warranty booklet for contact details.
ALERT WHAT TO DO
LOCKED
Press and hold the screen to unlock the controls.
CHECK FILTERS
Clean both lint filters and check they are not damaged.
Check there is nothing else trapped in the filters that may be blocking the air
flow.
CLOSE DOOR
Ensure the door is firmly shut, then press to resume the cycle.
Try opening and closing the door again.
Reposition the load, ensuring items are not in the way of the door.
COOLING
DOWN
Wait for the dryer to cool. The cycle will resume once the drum has cooled.
ROOM TEMP
LOW
The room temperature is too low for the dryer to work effectively. Ensure that
the room temperature is above 5°C to avoid loss of efficiency.
ROOM TEMP
HIGH
The room temperature is too hot for the dryer to work effectively. Wait for
environment to cool before resuming.
MAX TIME
REACHED
There are a number of reasons the maximum cycle time might be reached.
Refer to ‘Troubleshooting’.
38
COMPLIANCE INFORMATION
Energy label cycle
The cycle for energy labelling in accordance with AS/NZS 2442: 2021 is as follows: Cotton, Item:
Durable, Dryness: Dry. This cycle is the recommended energy saving cycle for everyday drying,
equal to the rated capacity.
Woolmark Wool Care
The wool drying cycle of this machine has been tested and approved by
The Woolmark Company for the drying of machine washable wool products provided
that the products are washed and dried according to the instructions on the garment
label and those issued by the manufacturer of this machine. M2445.
The maximum capacity of the Woolmark Wool Care cycle is 1kg.
Approved cycle: WOOL, Item Type: DELICATE, Treatment: DRY, Method: TIMED.
39
MANUFACTURER’S WARRANTY AND SERVICE GUIDE
To access your Warranty and Service Guide
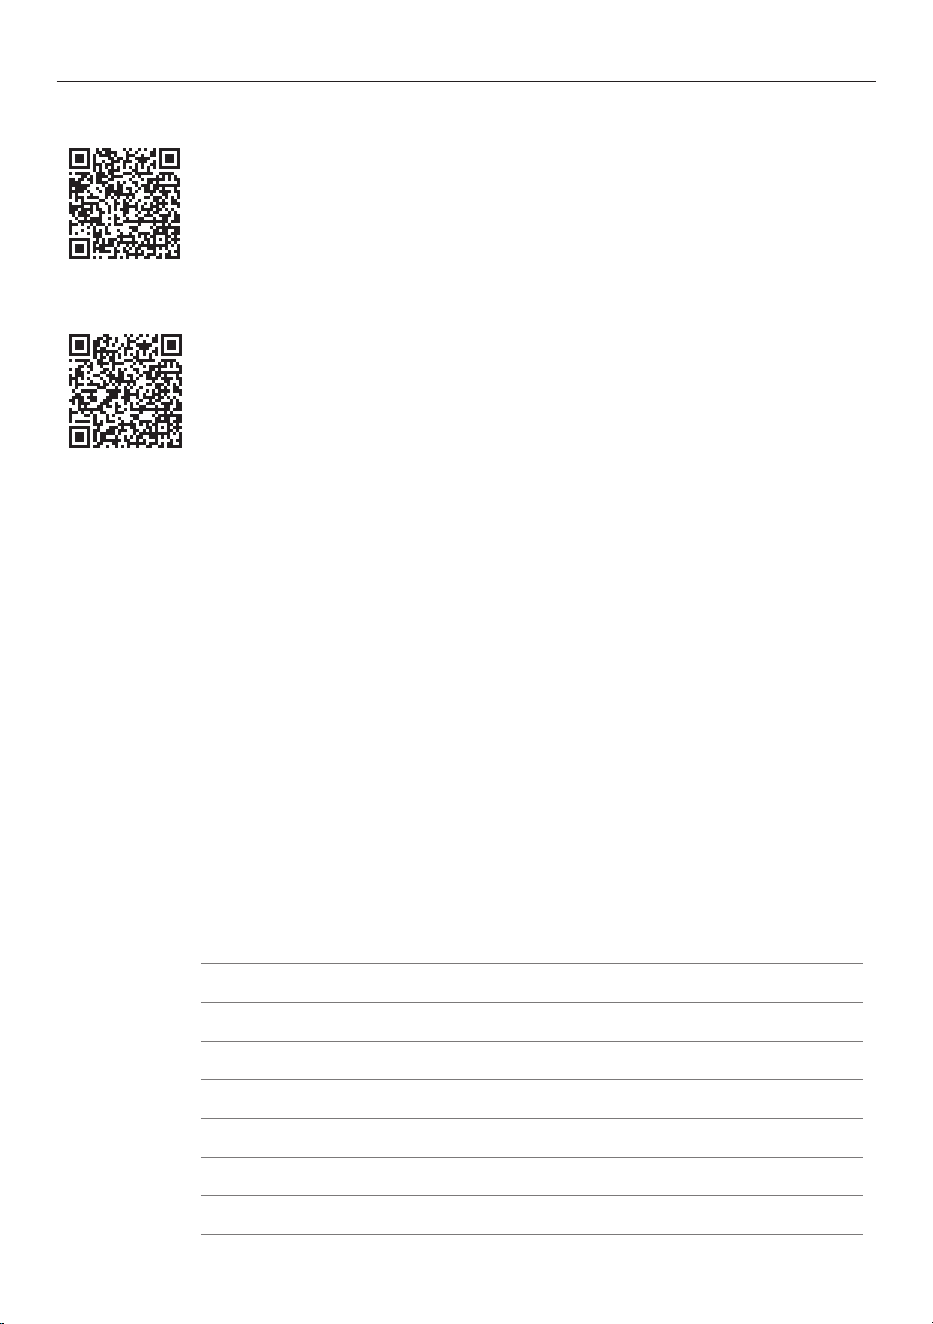
Scan the QR code with your smartphone to access your warranty and
book a service, or view online at https://www.fisherpaykel.com/nz/
help-and-support/warranty-information
This product has been designed for use in a domestic (residential) environment. This product
is not designed for any commercial use. Any commercial use by the customer will affect this
product’s Manufacturer’s Warranty.
To access your Warranty and Service Guide
Scan the QR code with your smartphone to access your warranty and
book a service, refer to your separate warranty and service book or
view online at https://www.fisherpaykel.com/au/help-and-support/
warranty-information
NZ
AU
Complete and keep for safe reference:
Model
Serial No.
Purchase Date
Purchaser
Dealer
Suburb
Town
Country

432967A 04.26
FISHERPAYKEL.COM
© Fisher & Paykel Appliances 2026. All rights reserved.
The models shown in this guide may not be available in all markets
and are subject to change at any time.
The product specifications in this guide apply to the specific products and
models described at the date of issue. Under our policy of continuous product
improvement, these specifications may change at any time.
For current details about model and specification availability in your country,
please go to our website or contact your local Fisher & Paykel dealer.