QUICK INSTALLATION GUIDE
GUIDE D'INSTALLATION RAPIDE
DM8210/DM8220
EXPERIENCE
facebook.com/ @oneforall.worldwide linkedin.com/ youtube.com/
oneforallworldwide company/one-for-all-worldwide/ user/oneforallproducts
Connect with us
ENGLISH
Congratulations on the purchase of this One for All product! The product you now have
in your possession is made of durable materials and is based on a design, every detail
of which has been meticulously thoughtout. That is why One for All gives you a 10-year
guarantee for defects in materials or manufacturing.
GUARANTEE TERMS AND CONDITIONS
1. One for All guarantees that if during the guarantee period of a product, faults arise
due to defects in manufacturing and/or materials, it will, at its discretion, repair or if
necessary replace the product, free of cost. A guarantee for normal wear and tear is
hereby expressly excluded.
2. If the guarantee is invoked, the product should be sent to One for All together with the
original purchase document (invoice, sales slip or cash receipt). The purchase document
should clearly show the name of the supplier and the date of purchase.
3. One for All guarantee shall lapse in the following cases: - If the product has not been
drilled, installed and used in accordance with the Instructions for Use; - If the product
has been altered or repaired by someone a party other than One for All; - If a fault
arises due to external causes (outside the product) such as for example lightning,
water nuisance, re, scung, exposure to extreme temperatures, weather conditions,
solvents or acids, wrong use or negligence; - If the product is used for dierent
equipment than is mentioned on or in the packing.
UNIVERSAL ELECTRONICS BV, COLOSSEUM 2, 7521 PT ENSCHEDE, THE NETHERLANDS
WARNING
Correct installation is extremely essential, and falls outside the scope of responsibility
of One for All. The fastening material provided is exclusively intended for installation
on walls made of solid wood, bricks, concrete or solid-wood columns with a maximum
of 3 mm wall nishing. For walls made of other materials, for example hollow bricks,
please consult your installer and/or specialist supplier. During installation, please also
follow the instructions for installation and use of the apparatus to be installed/xed (for
example the LCD/plasma screen).
FRANÇAIS
Nous vous felicitons pour l’achat de ce produit One for All ! Vous venez d’acquerir un
produit realise a partir de materiaux durables et d’une conception ingenieuse jusque dans
les moindres details. One for All est ainsi en mesure de garantir ses produits pendant 10
ans contre les defauts de materiaux et de fabrication.
CONDITIONS GÉNÉRALES DE GARANTIE
1. One for All garantit que, si le produit presente - pendant la periode de garantie - un
probleme consecutif a des defauts de materiaux et/ou de fabrication, le produit sera
gratuitement repare ou remplace (a l’appreciation de One for All). L’usure normale est
expressement exclue de la garantie.
2. S’il est fait appel a la garantie, le produit doit etre remis a One for All avec presentation
de la preuve d’achat originale (facture, ticket de caisse ou quittance). La preuve d’achat
doit clairement mentionner le nom du fournisseur et la date d’achat.
3. La garantie de One for All prend n dans les cas suivants: - si le produit n’est pas fore,
assemble et utilise conformement aux instructions du mode d’emploi; - si le produit
a subi des modications ou des reparations par des tiers autres que One for All; - si
le probleme est la consequence de facteurs externes (exterieurs au produit) tels que
foudre, degats des eaux, incendie, eraures, exposition a des temperatures extremes,
intemperies, solvants ou acides, mauvaise utilisation ou negligence; - si le produit est
utilise pour des appareils autres que ceux species sur ou a l’interieur de l’emballage.
UNIVERSAL ELECTRONICS BV, COLOSSEUM 2, 7521 PT ENSCHEDE, PAYS-BAS
AVERTISSEMENT
Le montage correct est d’une importance fondamentale et ne releve pas de
la responsabilite de One for All. Le materiel de xation fourni est uniquement prevu
pour un montage sur des parois en bois massif, en briques, en beton ou sur des piliers en
bois massif, avec une nition de 3 mm maximum. Veuillez consulter votre installateur
et/ou votre detaillant specialise pour les parois constituees d’autres materiaux, comme
la brique creuse. Lors du montage, il convient egalement de respecter les consignes
d’installation et d’utilisation du materiel a placer/xer proprement dit (par exemple, de
l’ecran LCD/plasma).
ONE FOR ALL
ASSISTANT APP
45
14
VESA
M-A
8 x
M5x12mm
M-B
8 x D58 x
4 x 2 x
2 x
2 x
M4x12mm
M-C
A
G H
B C
D E F
I
J K
M6x12
M8x105
D
4
5
M-A
M-C
M-B
6
START
FINISH
3
7
2b
L
M
M
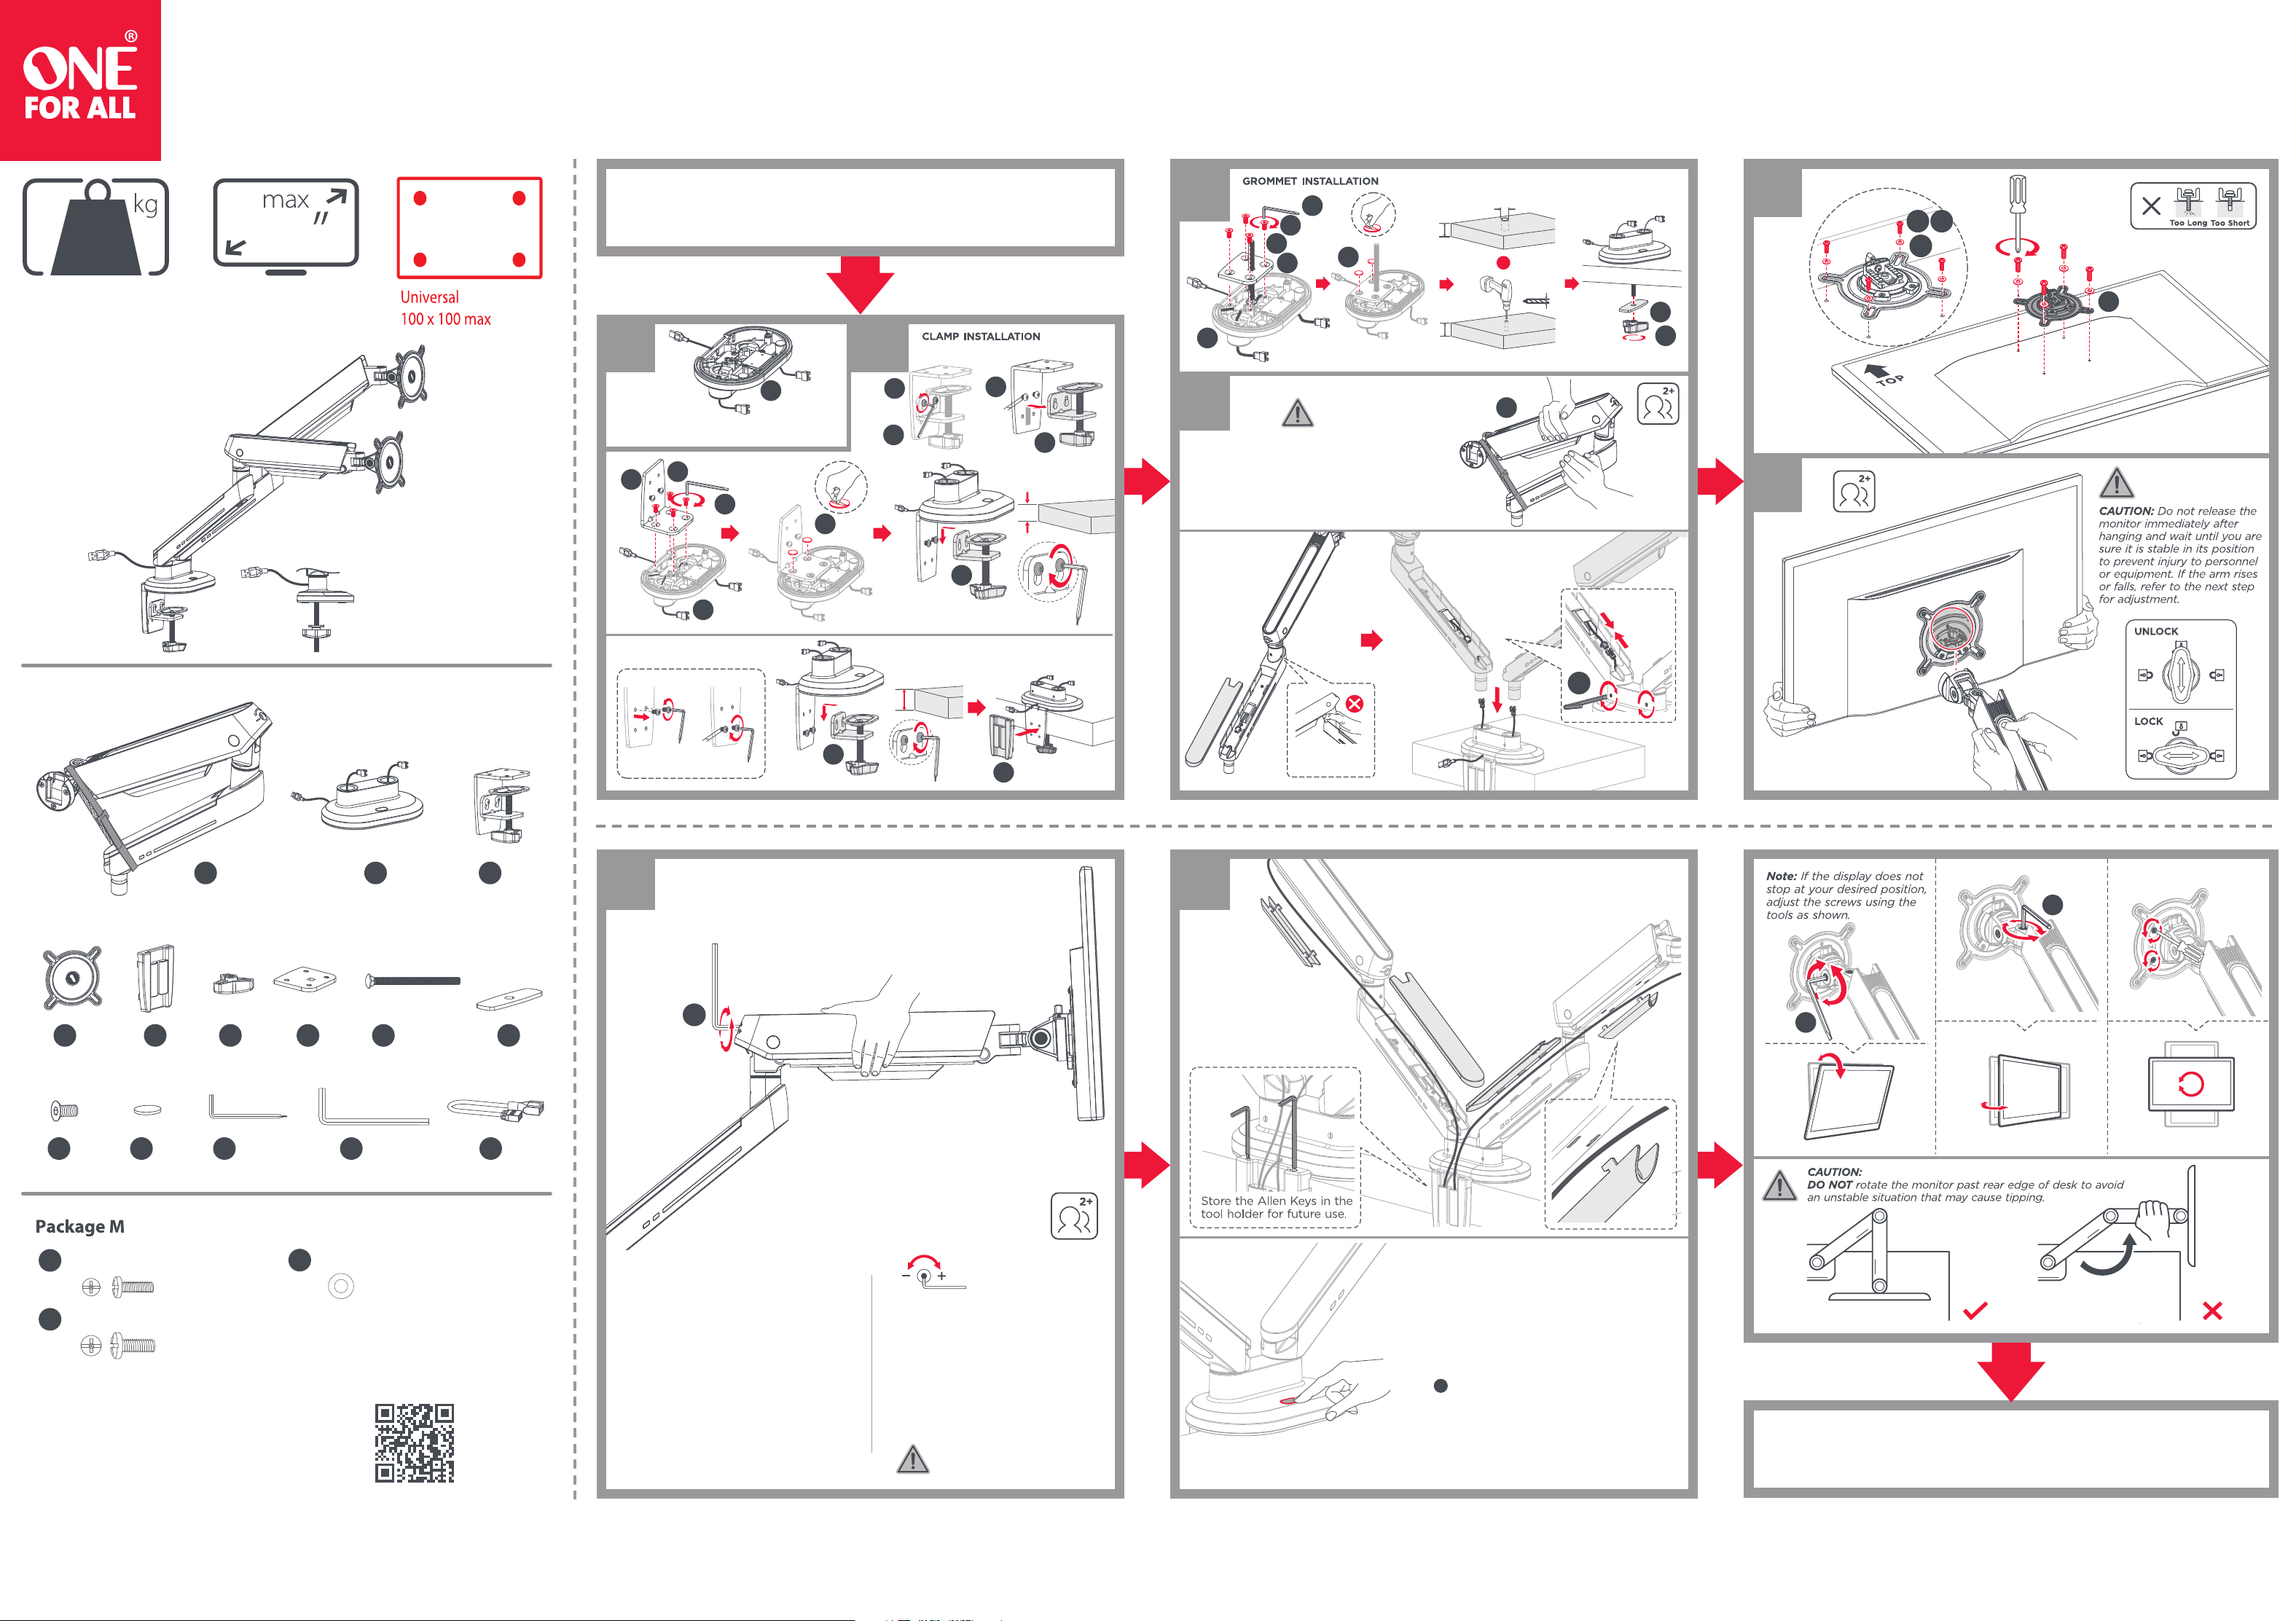
If the arm drops, turn the
adjustment screw in the
+ direction until it remains
in a horizontal position.
If the arm rises, turn the
adjustment screw in the
- direction until it remains
in a horizontal position.
Before adjusting the spring tension
and during the adjustment process,
position and hold the arm
horizontally as shown. Use the
supplied Allen Key for adjustment.
Ask for assistance should you
require it.
Note: Manage the USB cables as shown
prior to the grommet or clamp installation.
1 2a
B
I
F
J
E
B
L
A
J
G
H
B
10-80mm
10-80mm
ø10-60mm
Desktop with Existing Through-Hole.
ø 10mm
(ø 3/8")
or
Stored energy hazard!
Do not put hands
around or near the
joint as shown.
CAUTION: DO NOT over
tighten the screws.
For 10~55mm thickness desks
For 50~85mm thickness desks
L
6mm
6mm
C
C1
C1
C2
C2
C2
L
L
K
K
10-55mm
50-85mm
1. Firmly hold the two halves of the spring arm together
and have another person loosen and remove the
hook-and-loop fastener from around the spring arm.
2. Slowly release the pressure on the spring arm and
allow it to gradually stretch to its full extension.
L M N
4mm 5mm
Allen key Allen key
ARGB Signal Input from External Device:
Connect to external lighting control devices
with a 5V 3-pin ARGB interface. (Use the Adapter
Cable in the accessory package for connection.)
ARGB Signal Input from ONE FOR ALL ARGB Hub:
Connect to the slave USB port of the Controller.
(The ONE FOR ALL ARGB Hub is not included in the
package.)
N
4. Memory Setting:
The system automatically saves the lighting mode
from the last shutdown.
Button Function of Lighting:
1. On/Off: Press and hold it for 2 seconds
2. Light Mode Switch: Quick press to the next light
mode (20 modes in total)
3. Extended Functionality: Double click the button
to enter slave mode (the static rainbow lighting will
flash once), and click once or twice to exit the mode.
Separate the waste
Dierenzia i Riuti
http://www.oneforall.com/documents
Universal Electronics BV – Europe & International
P.O. Box 3332, 7500 DH Enschede
The Netherlands
DM8210/DM8220
714037
RDN-1020625
45
14
VESA
M-A
8 x
M5x12mm
M-B
8 x D58 x
4 x 2 x
2 x
2 x
M4x12mm
M-C
A
G H
B C
D E F
I
J K
M6x12
M8x105
D
4
5
M-A
M-C
M-B
6
START
FINISH
3
7
2b
L
M
M
If the arm drops, turn the
adjustment screw in the
+ direction until it remains
in a horizontal position.
If the arm rises, turn the
adjustment screw in the
- direction until it remains
in a horizontal position.
Before adjusting the spring tension
and during the adjustment process,
position and hold the arm
horizontally as shown. Use the
supplied Allen Key for adjustment.
Ask for assistance should you
require it.
Note: Manage the USB cables as shown
prior to the grommet or clamp installation.
1 2a
B
I
F
J
E
B
L
A
J
G
H
B
10-80mm
10-80mm
ø10-60mm
Desktop with Existing Through-Hole.
ø 10mm
(ø 3/8")
or
Stored energy hazard!
Do not put hands
around or near the
joint as shown.
CAUTION: DO NOT over
tighten the screws.
For 10~55mm thickness desks
For 50~85mm thickness desks
L
6mm
6mm
C
C1
C1
C2
C2
C2
L
L
K
K
10-55mm
50-85mm
1. Firmly hold the two halves of the spring arm together
and have another person loosen and remove the
hook-and-loop fastener from around the spring arm.
2. Slowly release the pressure on the spring arm and
allow it to gradually stretch to its full extension.
L M N
4mm 5mm
Allen key Allen key
ARGB Signal Input from External Device:
Connect to external lighting control devices
with a 5V 3-pin ARGB interface. (Use the Adapter
Cable in the accessory package for connection.)
ARGB Signal Input from ONE FOR ALL ARGB Hub:
Connect to the slave USB port of the Controller.
(The ONE FOR ALL ARGB Hub is not included in the
package.)
N
4. Memory Setting:
The system automatically saves the lighting mode
from the last shutdown.
Button Function of Lighting:
1. On/Off: Press and hold it for 2 seconds
2. Light Mode Switch: Quick press to the next light
mode (20 modes in total)
3. Extended Functionality: Double click the button
to enter slave mode (the static rainbow lighting will
flash once), and click once or twice to exit the mode.