
CONFIDENTIAL DRAFT
Cisco Wireless Phone 9821 User Guide

CONFIDENTIAL DRAFT
Chapter 1. Special Notes
This User Guide contains information about the phone's hardware features, installation instructions, and
available software features as to the time of le generation.
Note:
• The contents of this le are condential. Do not distribute it until its ocial release.
• The contents of this le are subject to change as the development progresses.
CONFIDENTIAL DRAFT
Chapter 2. Get started with your phone
About Cisco Wireless Phone 9821
Cisco Wireless Phone 9821 is a 802.11 triple-band wireless device running Cisco Unied PhoneOS. It
supports Cisco Unied Communications Manager (Unied CM), Webex Calling, and third-party call control
platforms, offering exibility to meet evolving business needs. This phone enables comprehensive voice
communication over the same wireless LAN used by your computer, allowing you to place and receive
calls, hold, transfer, and conduct conference calls seamlessly.
Cisco Wireless Phone 9821 is a 802.11 triple-band wireless device running Cisco Unied PhoneOS. It
supports Cisco Unied Communications Manager (Unied CM) and Webex Calling, offering exibility to
meet evolving business needs. This phone enables comprehensive voice communication over the same
wireless LAN used by your computer, allowing you to place and receive calls, hold, and transfer calls
seamlessly.
Audio and codec support

CONFIDENTIAL DRAFT
Cisco Wireless Phone 9821 User Guide | 2 - Get started with your phone | 4
Cisco Wireless Phone 9821 supports a wide range of codecs, including G.711a, G.711u, G.722, G.722.2,
G.729a, G.729ab, iLBC, iSAC, and OPUS. It also supports uncompressed wideband audio (16 bits, 16 kHz)
for superior voice quality. Designed for demanding environments, Cisco Wireless Phone 9821 features AI-
powered noise removal technology to ensure crystal-clear conversations even in noisy settings.
Accessibility and physical features
• Hearing aid compatible (HAC); however, it does not support TTY features.
• The number 5 key includes tactile ridges for easy identication.
• The physical characteristics include:
◦ Shockproof and vibration-proof
◦ IP54-rated for dust and water resistance
◦ Tolerance of antibacterial wipes
◦ Latex-free and lead-free
◦ USB On-the-Go (OTG) 2.0 interface
• A customizable red Action button allows quick access to critical functions.
• Integrated man-down detection enhances safety for at-risk employees.
• Compatibility with existing Cisco Wireless IP Phone 8821 desktop charger and multichargers,
maximizing your investment and simplifying upgrades. Charge with a desktop charger for a single
phone or a multicharger for up to six phones. For more information, see Accessories.
For details about your phone specications and features, see the Cisco Wireless Phone 9821 Data Sheet.
Enhanced productivity features
Beyond basic call handling, the phone supports advanced productivity features depending on
conguration:
• Bluetooth wireless headset support, including certain hands-free call capabilities.
• Access to your phone number and corporate directory.
• Access to network data, XML applications, and web-based services.
• Online customization of phone features and services via the Cisco Unied Communications Self
Care Portal.
• Location reporting upon initial registration, with updates when the phone moves (for example,
walking around a building) and periodic reports every 24 hours if stationary.
For more information, see the Cisco Unied CM documentation and the administration articles in the Help
Center.
CONFIDENTIAL DRAFT
Cisco Wireless Phone 9821 User Guide | 2 - Get started with your phone | 5
What's in the box
The following items are bundled with your Cisco Wireless Phone 9821 (part number WP-9821-BUN-K9
and WP-9821-BUN-CN-K9). If any items are missing, contact your administrator.
• Battery x 1
• Power adapter x 1
• Power adapter replacement plug x 1
• USB cable x 1
• Pointer card x 1, containing the links to the product help and compliance information
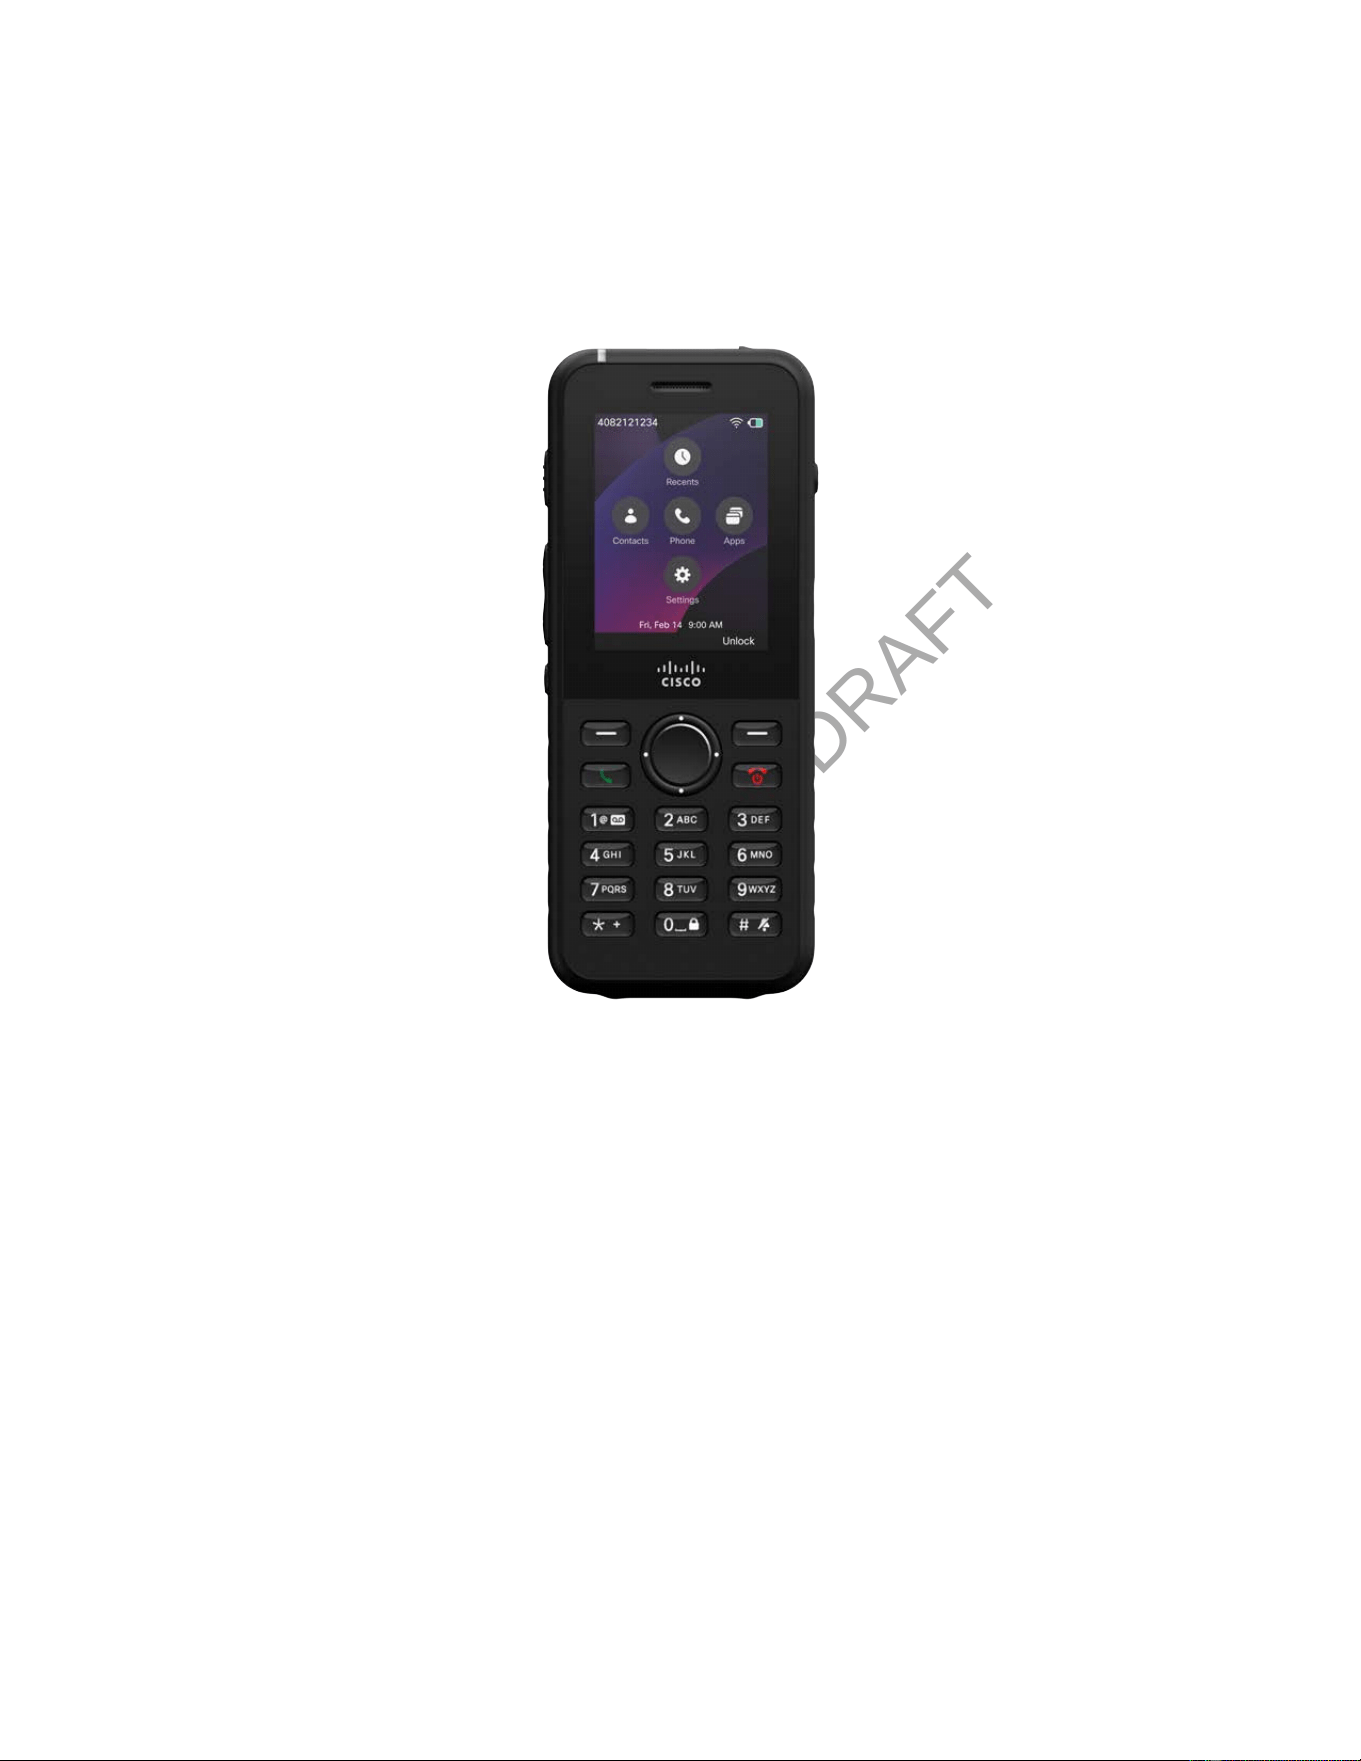
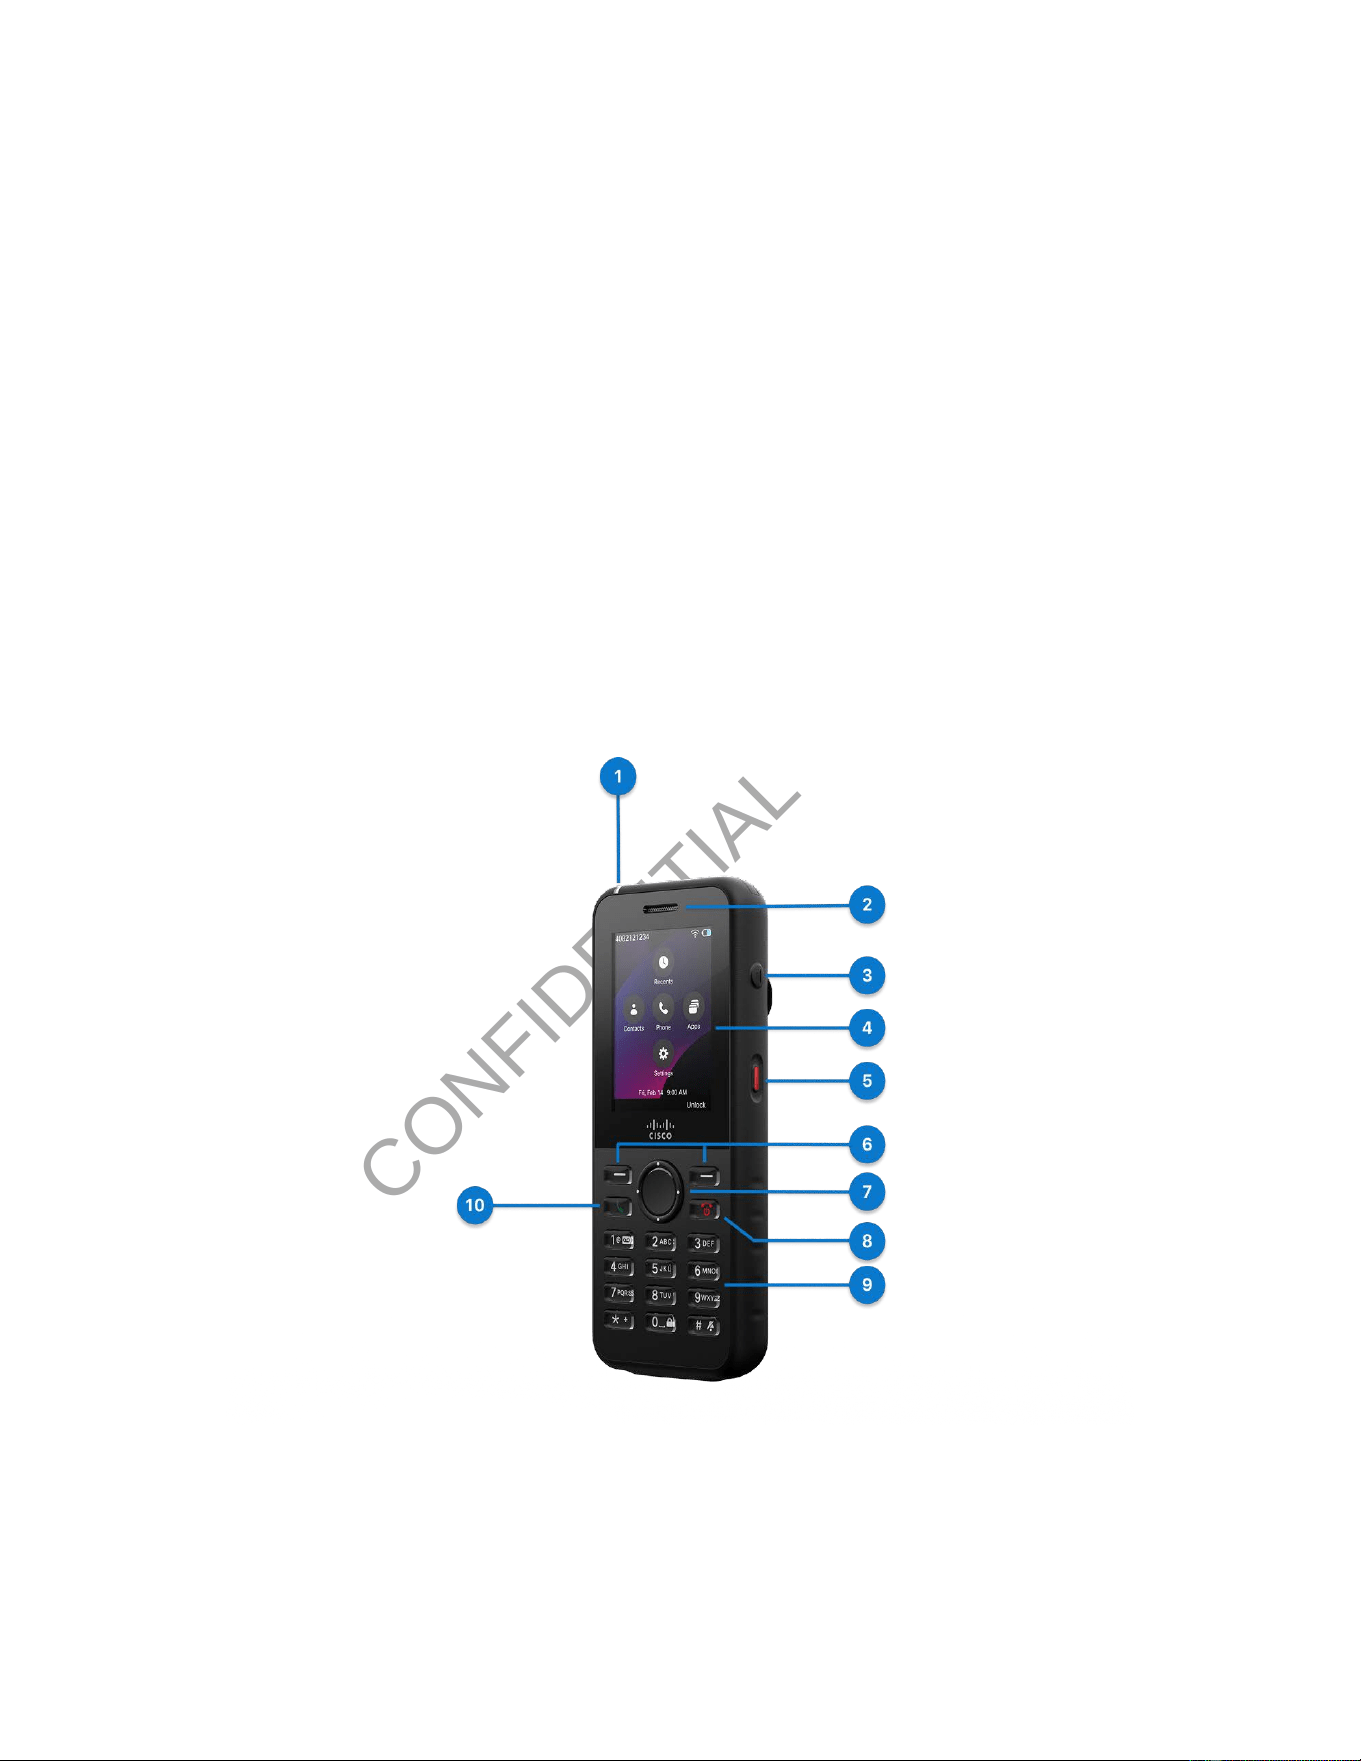
Hardware and buttons
Your wireless phone has many buttons and hardware features that you will use regularly. Use the
following gures and tables to identify the important button and hardware features.
Figure 1. Cisco Wireless Phone 9821 front and right view

CONFIDENTIAL DRAFT
Cisco Wireless Phone 9821 User Guide | 2 - Get started with your phone | 6
Table 1. Hardware and buttons on the front and right side
Number
Hardware Feature Purpose
1 Indicator light (LED) Indicates the states of call, message, and the phone.
• Steady amber: The phone is connected to the AC
power source and the battery is charging.
• Steady green: The phone is connected to the AC
power source and the battery is fully charged.
• Fast blinking amber: The phone may be in one of
the following states: Incoming call, Remote incom
ing call.
• Fast blinking green: There is a voice message.
When the phone is connected to the AC power
source, the green light displays longer than when
using only the battery.
• Slow blinking green (every 2.5 seconds): The phone
is operating on battery power and is registered to
the wireless network within the service coverage
area. The phone may be in one of the following
states: Idle, Display off, Ongoing call, Call on hold,
Remote in use, Remote on hold, Muted, Missed call.
• Off: The phone has a network or SIP connection
failure. Or, the phone is in a silent emergency call.
2 Receiver The phone’s built-in receiver.
3 Speaker button Toggle the speaker mode on or off for the phone.
When there is more than one audio path, press and hold
for 3 seconds to change the audio path.
4 Phone screen 2.4" color screen (Resolution 240 x 320)

CONFIDENTIAL DRAFT
Cisco Wireless Phone 9821 User Guide | 2 - Get started with your phone | 7
Table 1. Hardware and buttons on the front and right side (continued)
Number
Hardware Feature Purpose
5 Action button Press the button to place a service call, such as an emer
gency call, or to run a service application, if configured.
6 Softkey buttons Access to functions and services.
7 Navigation Cluster The Navigation Cluster consists of the Navigation Ring
and Select button.
Navigation Ring (outer ring):
• In the Applications view, move up, down, left, or
right to select the Recents, Contacts, Apps, and
Settings apps.
• Scroll up and down menus to highlight options and
to move left and right through phone numbers and
text entries.
• In the Line view, press left on the Navigation Ring to
go to the Applications view.
Select button (center of the Navigation Cluster):
• Make a call from the main screen.
• Select a menu item, a softkey, a call, or an action.
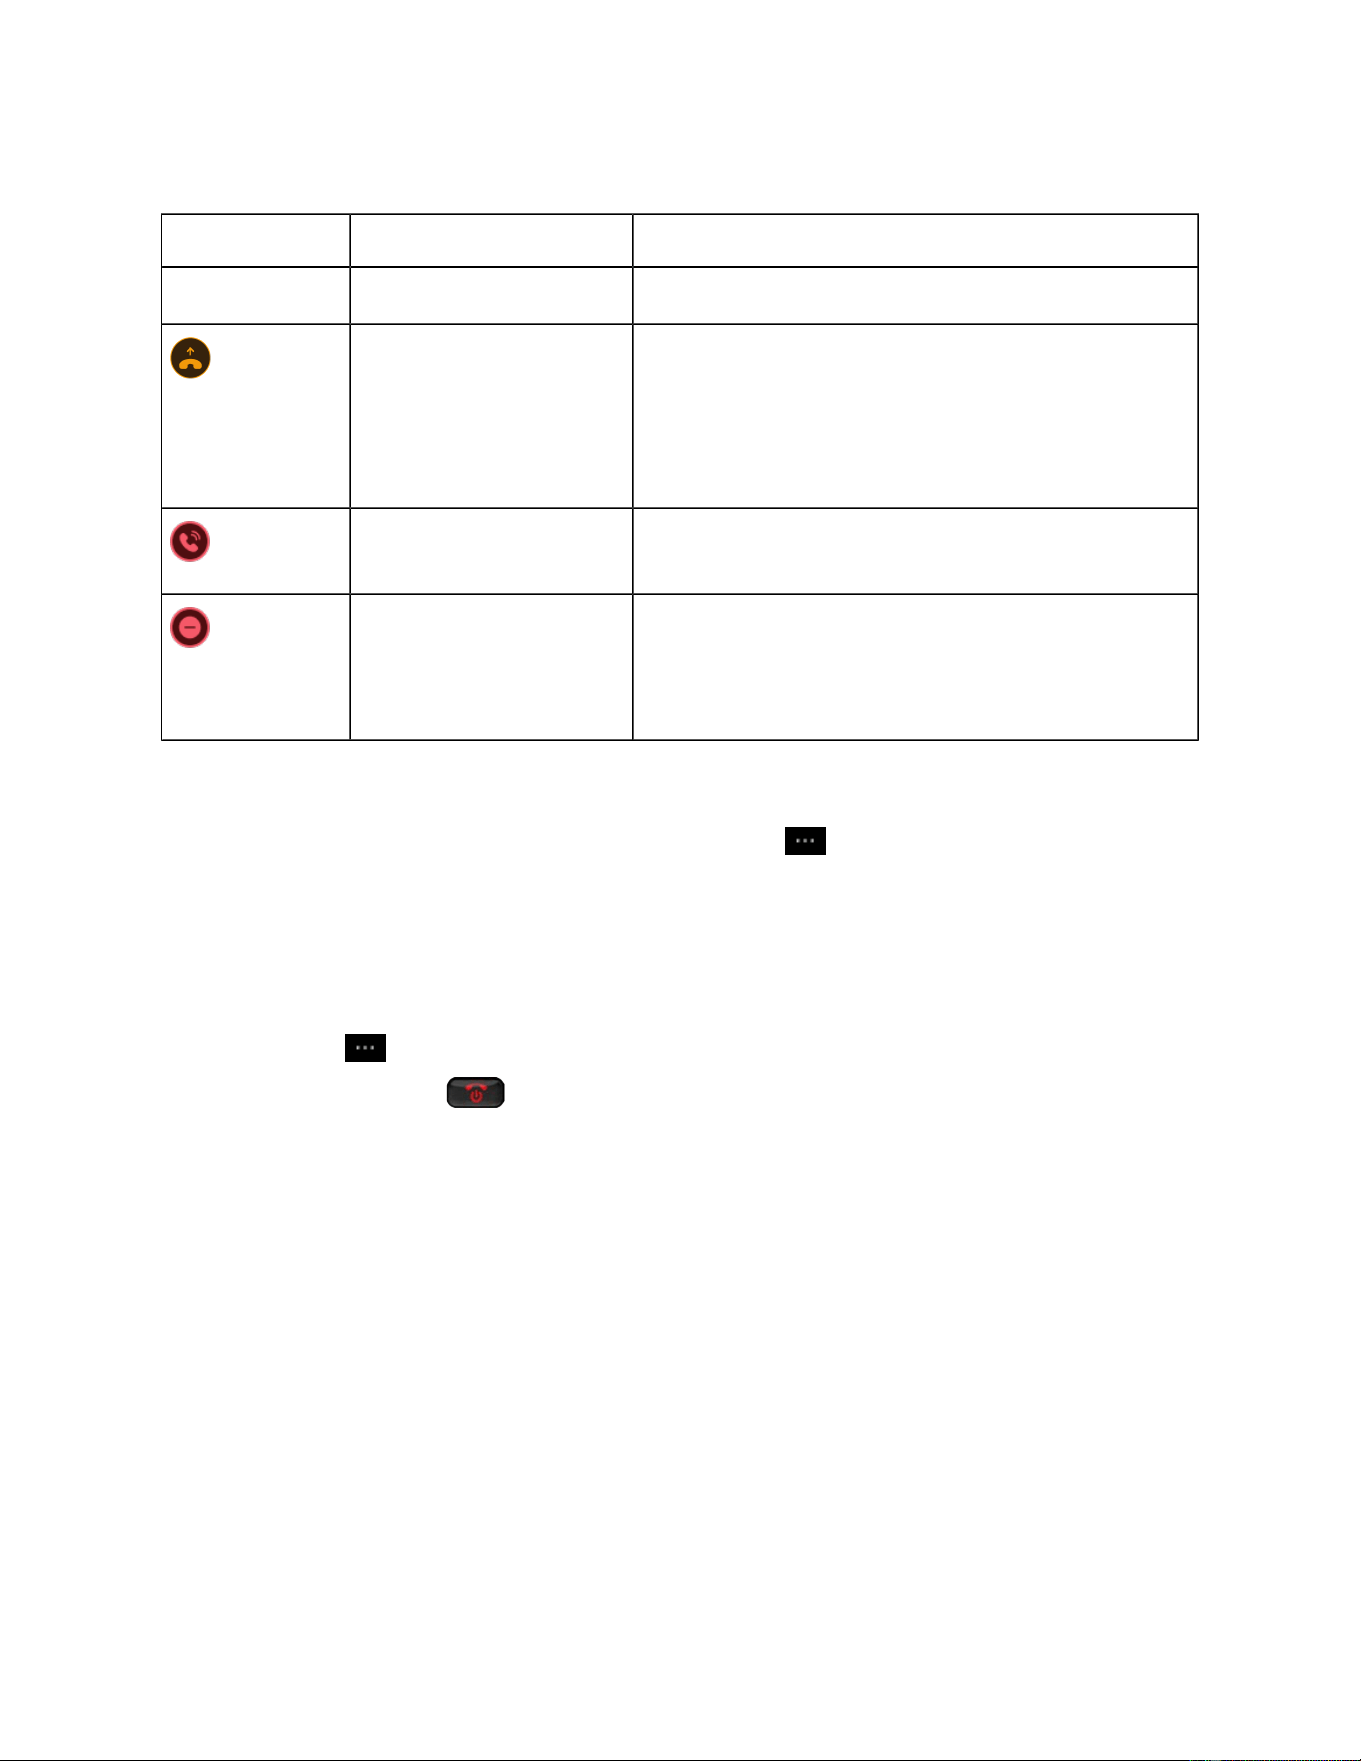
8 Power/End Call button
• Turn the phone on or off.
• Return to the home screen when you are in an app.
• Decline an incoming call.
• End a connected call.
• Cancel call transfer.
9 Alphanumeric keypad Use the keypad to dial numbers, enter letters and symbols,
and choose menu items by number.

CONFIDENTIAL DRAFT
Cisco Wireless Phone 9821 User Guide | 2 - Get started with your phone | 8
Table 1. Hardware and buttons on the front and right side (continued)
Number
Hardware Feature Purpose
One (1)
• Enter 1 when you dial a number.
• Access voicemail. Press and hold to automatically
dial the voicemail system.
• Enter these special text characters: / . @ : ; = ? - _ &
%
Asterisk (*)
• Before you enter an international phone number,
press and hold for a few seconds to add the plus
(+) symbol to the phone number. If you are off-hook,
you hear that the dial tone changes when the plus
symbol is displayed.
• Enter these special text characters: + * ~ ` < >
Zero (0)
• Enter 0 when you dial a number.
• Lock the keypad.
• Enter a space or these special text characters: 0 , ! ^
' " |
Pound (#)
• Press to silence the phone ringer. If configured, the
phone will vibrate instead.
• Enter these special text characters: # $ £ ¤ ( ) { } [ ]
10 Answer/Send button
• Answer a ringing call.
• Place a call after dialing the number.
CONFIDENTIAL DRAFT
Cisco Wireless Phone 9821 User Guide | 2 - Get started with your phone | 9
Table 1. Hardware and buttons on the front and right side (continued)
Number
Hardware Feature Purpose
• Press twice to redial the last dialed number.
• Open the new call window using the selected line.
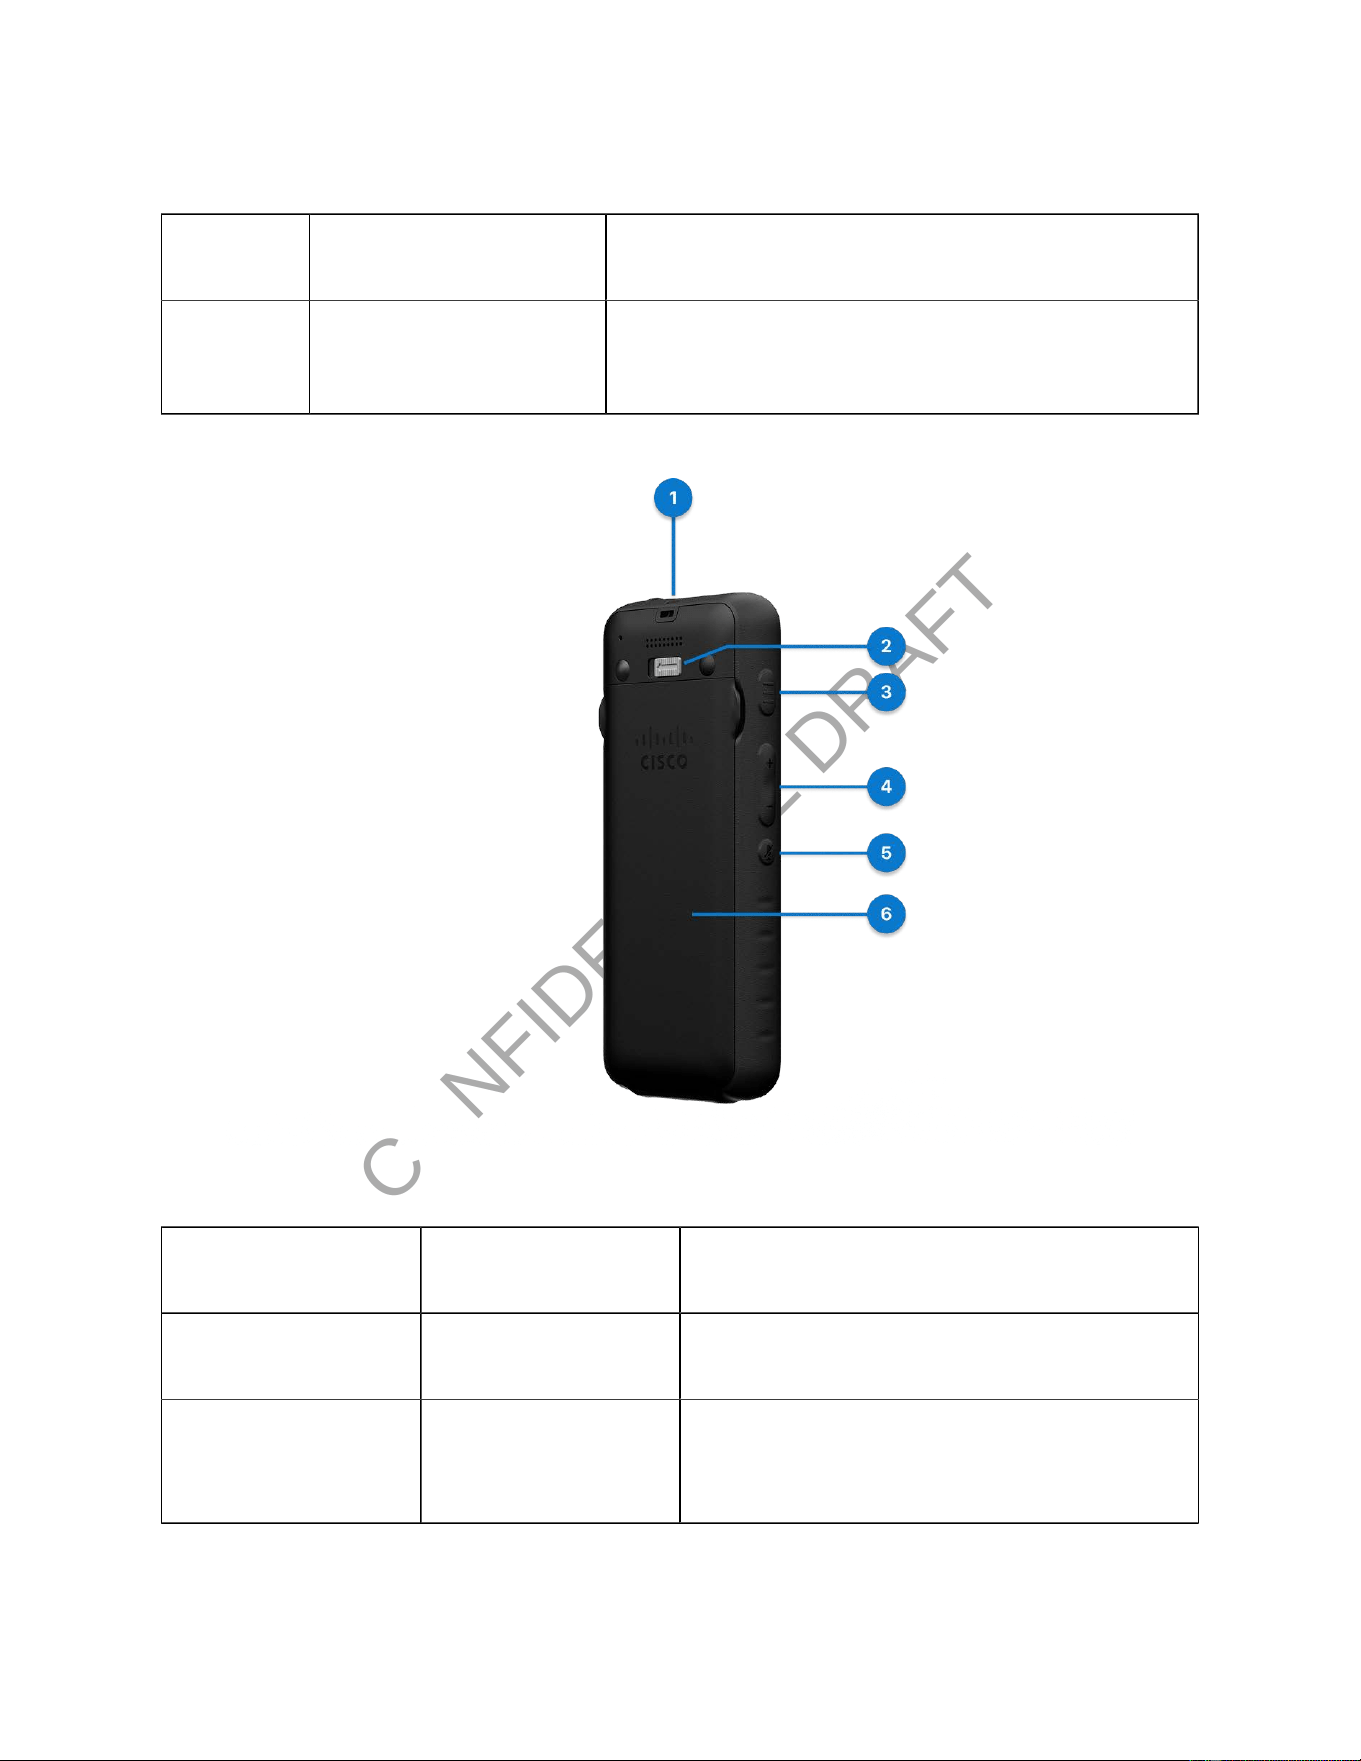
Figure 2. Cisco Wireless Phone 9821 back and left view
Table 2. Hardware and buttons on the back and left side
Number
Hardware Feature Description
1 Lanyard slot Used for tying the lanyard.
2 Latch lock Push and hold the latch lock to the left to release
the battery door.

CONFIDENTIAL DRAFT
Cisco Wireless Phone 9821 User Guide | 2 - Get started with your phone | 10
Table 2. Hardware and buttons on the back and left side (continued)
Number
Hardware Feature Description
3 Application button Use with XML applications, such as Push to Talk.
Depending on how your administrator sets up the
button, you may be able to use it from the Applica
tions screen only, or you may use it from any menu
or service, or even when the phone is locked.
The button can also be configured to start an appli
cation immediately after you press it or only after
you hold it for several seconds.
For more information, contact your administrator.
4 Volume button
• When the phone is idle, change the ring vol
ume or turn off the ringer.
• When you have an incoming (ringing) call,
press the button once to silence the ringer.
• During a call, control the speaker volume for
the active handset, headset, or speaker.
• When the phone is docked in the desktop
charger, control the volume of the charger
speaker.
5 Mute button Toggle the mute feature on or off.
6 Battery door Cover of the battery compartment.
Figure 3. Cisco Wireless Phone 9821 top view
CONFIDENTIAL DRAFTCONFIDENTIAL DRAFT
Cisco Wireless Phone 9821 User Guide | 2 - Get started with your phone | 11
Table 3. Hardware on the top
Number
Hardware Feature Description
1 Speakerphone The phone’s built-in speaker.
2 Headset port Lift the protective cover and plug in a headset.
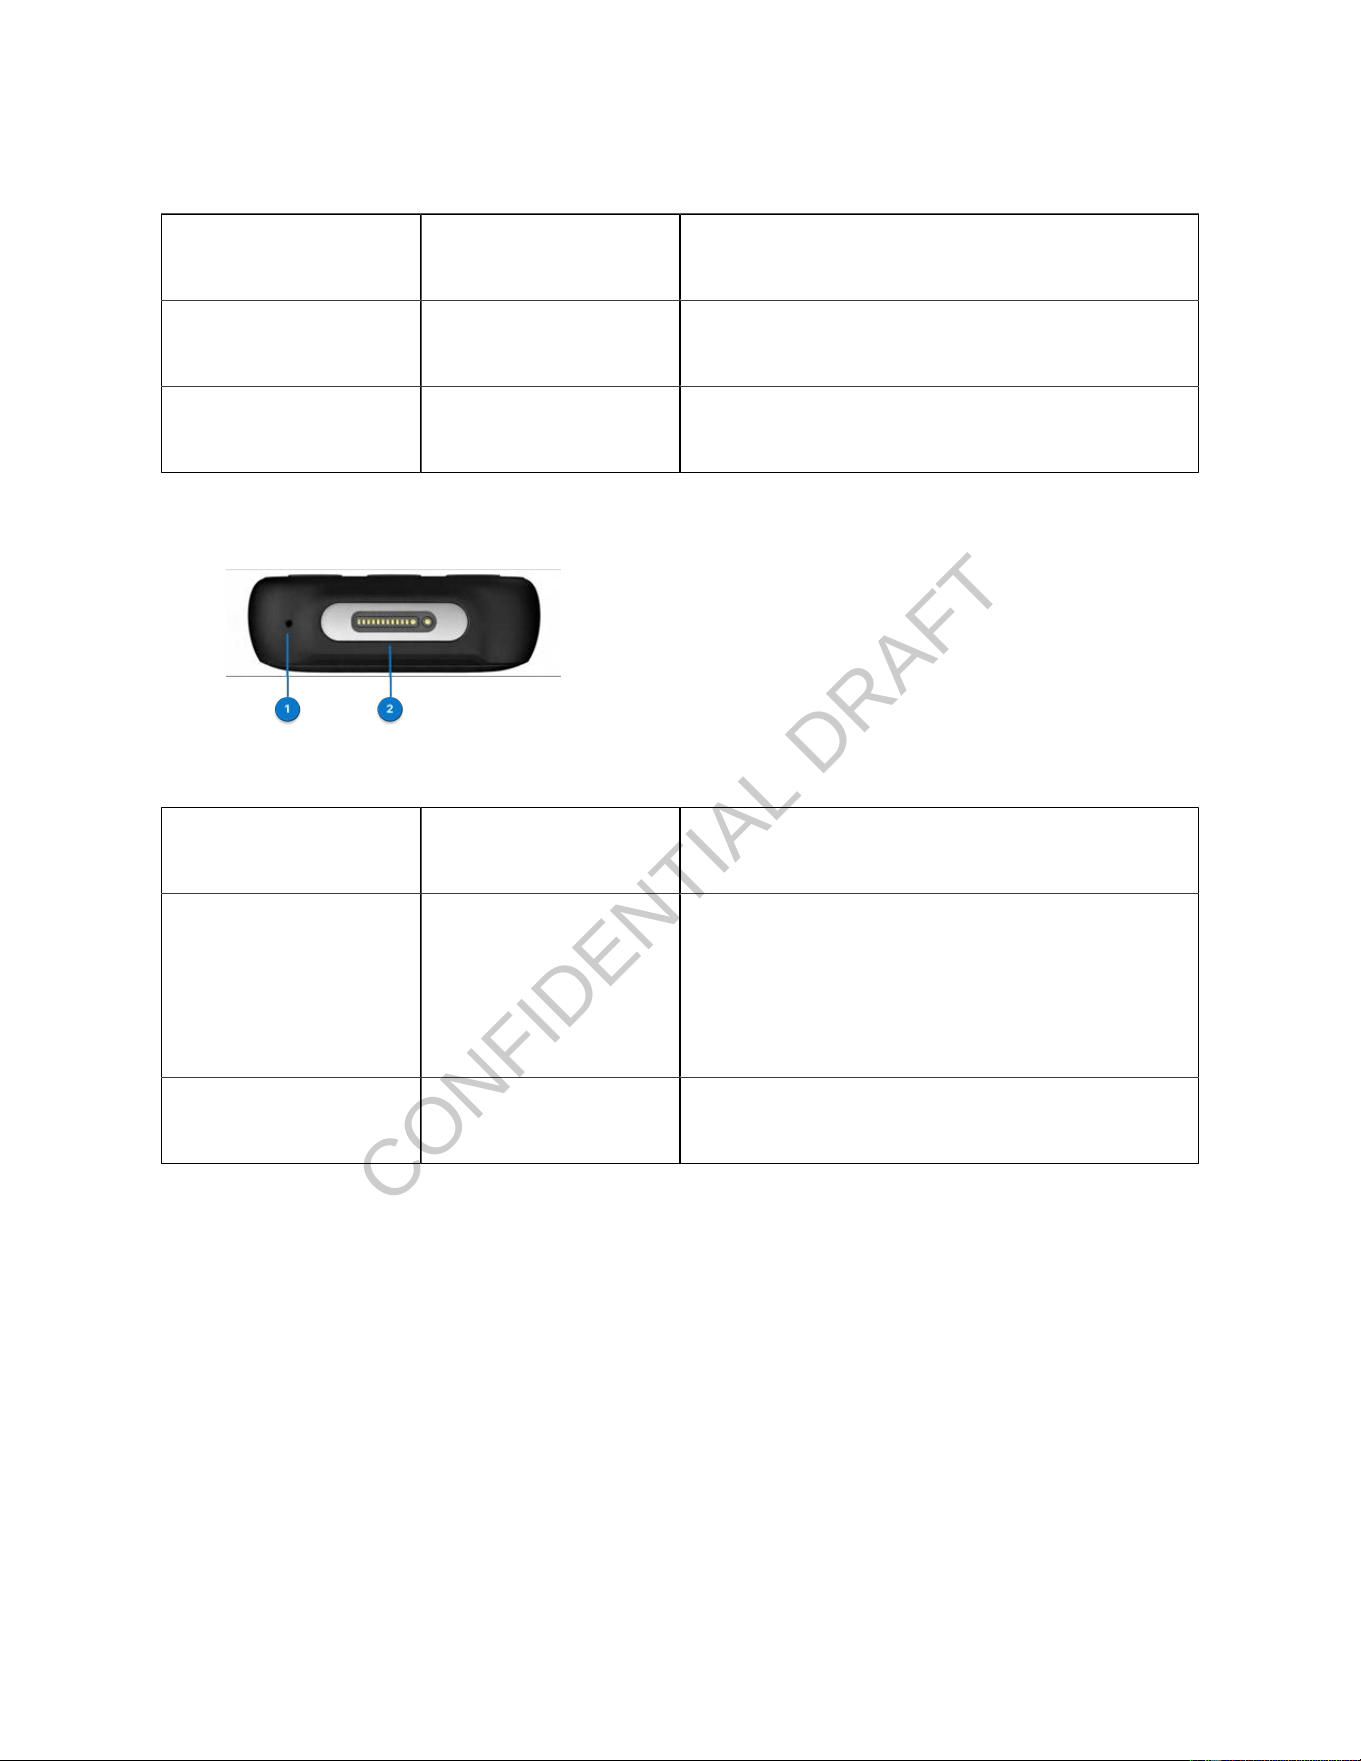
Figure 4. Cisco Wireless Phone 9821 bottom view
Table 4. Hardware on the bottom
Number
Hardware Feature Description
1 microphone The phone’s built-in microphone.
Remove the protective sticker before using the
phone.
2 Charging port Used for charging the phone.
Register your phone
Depending on how your administrator congures your phone on the call control system, you might use
one of the following methods to register your phone:
• Zero-touch: No manual intervention is required during the phone registration. The registration is
done automatically.
• Activation code: (Webex Calling registration only) A 16-digit activation code is required during the
phone registration. You can get it from your administrator in advance. Enter the activation code
when you are prompted for it.

CONFIDENTIAL DRAFT
Cisco Wireless Phone 9821 User Guide | 2 - Get started with your phone | 12
• Opted UCM registration: Select Cisco UCM when you are prompted to choose a call service. The
registration is done automatically.
• Alternate TFTP: (Cisco Unified CM registration only) An alternate TFTP server address is required
if your phone is missing a TFTP address. You can get it from your administrator when this situation
occurs. You need to manually enter the alternate TFTP server to continue the registration.
Warning:
• During registration, the phone checks the DHCP options in the default sequence of 66,
160, 159, 150, 60, 43, and 125 to obtain the URL of the provisioning server. The rst valid
conguration response the phone receives (which includes a 401 authorization request)
will determine its provisioning server. Ensure that your server is properly congured to
process phone registrations successfully.
• By default, 802.1X authentication is disabled on your phone.
If your network uses the 802.1X protocol, ensure that you enable 802.1X authentication on
your phone by accessing Settings > Wi-Fi > <Prole name> > WLAN conguration.
Otherwise, your phone will fail to connect to the network.
• If your phone has HTTP connection issues during the registration, you might be prompted
to set up an HTTP proxy server on the phone. The HTTP proxy setting is only required for
the phones registered to Webex Calling or BroadWorks. For more information about how to
set up the HTTP proxy, see HTTP proxy settings.
With zero-touch registration
• You have turned on your phone.
• Your phone connects to a wireless network.
• Your administrator has congured your phone on the call control system.
CONFIDENTIAL DRAFTCONFIDENTIAL DRAFT
Cisco Wireless Phone 9821 User Guide | 2 - Get started with your phone | 13
Your phone gets registered automatically when it boots up and connects to the network. In this zero-touch
registration scenario, you don't need to enter any input or make any selection as the whole registration
proceeds automatically.
1. Select Start on the Welcome screen. Your phone tries to connect to the network and goes to the
next step at timeout.
2. The screen displays that your phone successfully connects to Wi-Fi. At timeout, the phone starts
checking the conguration and then starts the registration automatically.
Typically, the registration takes about 3 minutes depending on the network condition.
After the registration succeeds, your primary line name or number displays on the top left of the
phone screen.
3. When the registration is complete, you will be prompted to enable or disable the noise removal
feature.
If you don't take any action, the phone enables the feature at timeout.
This feature can lter out background noises during a call. If you choose to disable the feature now,
you can still enable it later.
With activation code
• You have turned on your phone.
• Your phone connects to a wireless network.
• Get a 16-digit activation code from your administrator.
After your phone boots up, it checks the conguration automatically, and you will be prompted to enter an
activation code. If you don't have a new activation code, contact your administrator.
Activation codes are used to set up your new phone. They can only be used once, and expire after 1 week.
Note:
You might be prompted to choose a call service during the registration, depending on your
network condition and your administrator's congurations on the call control system.
CONFIDENTIAL DRAFTCONFIDENTIAL DRAFT
Cisco Wireless Phone 9821 User Guide | 2 - Get started with your phone | 14
1. Select Start on the Welcome screen. Your phone tries to connect to the network.
If you don't take any action, the phone goes to the next step at timeout.
2. Select Next on the phone screen showing that your phone successfully connects to the network.
If you don't take any action, the phone starts checking the conguration at timeout.
If you are prompted to choose a call service, do one of the following actions according to your
network environment and the platform where the phone will be registered:
◦ If your phone connects to the corporate network and will be registered to Cisco Unied
Communications Manager (Unied CM), select Cisco UCM > Register.
◦ If your phone connects to the corporate network and will be registered to Webex Calling,
select Cisco cloud service > Register.
◦ If your phone uses Mobile and Remote Access (MRA) to connect to the corporate network,
select Cisco cloud service > Register.
Note:
Contact your administrator if you don't know which service to select.
3. Depending on your network condition and your administrator's congurations on the call control
system, the phone may prompt you to choose a call service. In this case, select Cisco cloud
service > Register. Otherwise, continue with the next step.
4. When prompted for an activation code, enter your activation code, and select Activate.
Your phone starts the registration immediately. Typically, it takes about 3 minutes depending on
the network condition.
After the registration succeeds, your primary line name or number displays on the top left of the
phone screen.
5. When the registration is complete, you will be prompted to enable or disable the noise removal
feature.
If you don't take any action, the phone enables the feature at timeout.
This feature can lter out background noises during a call. If you choose to disable the feature now,
you can still enable it later.

CONFIDENTIAL DRAFT
CONFIDENTIAL DRAFT
Cisco Wireless Phone 9821 User Guide | 2 - Get started with your phone | 15
With opted UCM registration
• You have turned on your phone.
• Your phone connects to a wireless network.
• Your administrator has congured your phone on Cisco Unied CM.
Register your phone to Cisco Unied CM when it boots up and connects to the network. In this opted
UCM registration scenario, the only action from you is to select the Cisco UCM service and the rest of the
registration proceeds automatically.
1. Select Start on the Welcome screen. Your phone tries to connect to the network.
If you don't take any action, the phone goes to the next step at timeout.
2. Select Next on the phone screen showing that your phone successfully connects to the network.
If you don't take any action, the phone starts checking the conguration at timeout.
3. Depending on your network condition and your administrator's congurations on the call control
system, the phone prompts you to choose a call service. In this case, select Cisco UCM > Register.
4. Your phone starts the registration immediately. Typically, it takes about 3 minutes depending on
the network condition.
After the registration succeeds, your primary line name or number displays on the top left of the
phone screen.
5. When the registration is complete, you will be prompted to enable or disable the noise removal
feature.
If you don't take any action, the phone enables the feature at timeout.
This feature can lter out background noises during a call. If you choose to disable the feature now,
you can still enable it later.
With alternate TFTP
• You have turned on your phone.
• Get a TFTP server address from your administrator.
• Your administrator has enabled autoregistration on Cisco Unied CM
• Get a 16-digit activation code from your administrator, if needed.

CONFIDENTIAL DRAFTCONFIDENTIAL DRAFT
Cisco Wireless Phone 9821 User Guide | 2 - Get started with your phone | 16
In some situation, the Cisco DHCP server doesn't contain the network information of the TFTP servers.
To accomplish the registration, you need to manually enter an alternate TFTP server address that your
administrator provides.
1. Select Start on the Welcome screen. Your phone tries to connect to the network.
If you don't take any action, the phone goes to the next step at timeout.
2. Select Next on the phone screen showing that your phone successfully connects to the network.
If you don't take any action, the phone goes to the next step at timeout. Then the phone starts
checking the conguration, and then prompts you to choose a call service.
3. Press Settings.
4. Select Admin settings > Network conguration > IPv4 setup.
5. Toggle on Alternate TFTP.
6. Enter an IP address in TFTP Server <n>, where <n> represents the type of the TFTP server.
TFTP Server 1 is the primary server, TFTP Server 2 is the secondary server.
7. Press Save.
The registration starts automatically. If your phone requires an activation code to continue, do the
following:
a. Get an activation code from your administrator if you don't receive it yet.
b. Enter your activation code, and select Activate.
The registration starts automatically. Typically, the registration takes about 1 minute depending on
the network condition.
After the registration succeeds, your primary line name or number displays on the top left of the
phone screen.
8. When the registration is complete, you will be prompted to enable or disable the noise removal
feature.
If you don't take any action, the phone enables the feature at timeout.
This feature can lter out background noises during a call. If you choose to disable the feature now,
you can still enable it later.
CONFIDENTIAL DRAFTCONFIDENTIAL DRAFT
Cisco Wireless Phone 9821 User Guide | 2 - Get started with your phone | 17
With domain credentials
• You have turned on your phone.
• Your phone connects to a wireless network.
• Get a service domain, user ID, and password from your administrator.
After your phone boots up, it checks the conguration automatically. If you're prompted to enter an
activation code, but you want to use the domain credentials for this registration, select Domain. If you
don't have a valid service domain and user credentials, contact your administrator.
Note:
• You might be prompted to choose a call service during the registration, depending on your
network condition and your administrator's congurations on the call control system.
• This registration method is only available for the phones registered to Cisco Unied
Communications Manager (Unied CM).
1. Select Start on the Welcome screen.
If you don't take any action, the phone goes to the next step at timeout.
Your phone tries to connect to the network. If you use the wireless network, perform the next step.
Otherwise, skip it.
2. Optional: Choose your wireless network from the list, enter your credentials, and select Apply.
3. Select Next on the phone screen showing that your phone successfully connects to the network.
4. When prompted to choose a call service, select Cisco cloud service > Register.
5. When prompted for an activation code, select Domain to switch to the domain activation screen.
6. Enter a valid service domain, and select Continue.
7. Enter your user ID and password, and press Sign in.
Your phone starts the registration immediately. Typically, it takes about 3 minutes depending on
the network condition.
After the registration succeeds, your primary line name or number displays on the top left of the
phone screen.
8. When the registration is complete, you will be prompted to enable or disable the noise removal
feature.

CONFIDENTIAL DRAFT
CONFIDENTIAL DRAFT
Cisco Wireless Phone 9821 User Guide | 2 - Get started with your phone | 18
If you don't take any action, the phone enables the feature at timeout.
This feature can lter out background noises during a call. If you choose to disable the feature now,
you can still enable it later.
Additional help and information
Browse this Help Center to get help content about your Cisco Wireless Phone 9821. If you don't nd the
topic of your interest there, try to search for it and use the lters on the left to narrow down the results, if
necessary.
If you have questions about the functions available on your phone, you should contact your administrator.
See the following sections for more help information:
• To look for quick start guides, accessory guides, go to ...
• To look for technical support, go to Cisco technical support.
• To view the hardware warranty terms, go to Cisco one-year limited hardware warranty terms.
Technical support
Cisco provides around-the-clock technical support services, both online and over the phone to all
customers, partners, resellers, and distributors who hold valid Cisco service contracts.
You should have your Cisco.com User ID, Contract, and Serial numbers ready when you contact Cisco
Support to prevent any delays with your support request.
In addition, support staff need the following information:
• Serial number—Every device has a serial number on the back.
• Time and date issue occurred—Support staff use device logs or cloud metrics to troubleshoot
issues. It is helpful to have the approximate local time and date.
• Device Logs—Support staff may require the device logs to identify the root cause of your issue.
• Brief description—Include any actions prior to the incident.
Support staff can resolve most rmware issues without a Return Material Authorization (RMA). It is best
to use the RMA process for hardware issues.

CONFIDENTIAL DRAFT
CONFIDENTIAL DRAFT
Cisco Wireless Phone 9821 User Guide | 2 - Get started with your phone | 19
You can nd a list of Cisco worldwide support centers at https://www.cisco.com/c/en/us/support/web/
tsd-cisco-worldwide-contacts.html.
Cisco one-year limited hardware warranty terms
Special terms apply to your hardware warranty and services that you can use during the warranty period.
Your formal Warranty Statement, including the warranties and license agreements applicable to Cisco
software, is available at Product Warranties.
Battery warranty
The warranty period of the battery is six months after the manufacturing date.
The Cisco Wireless Phone 9821 battery only has a limited 90-day warranty after being shipped out from
Cisco.
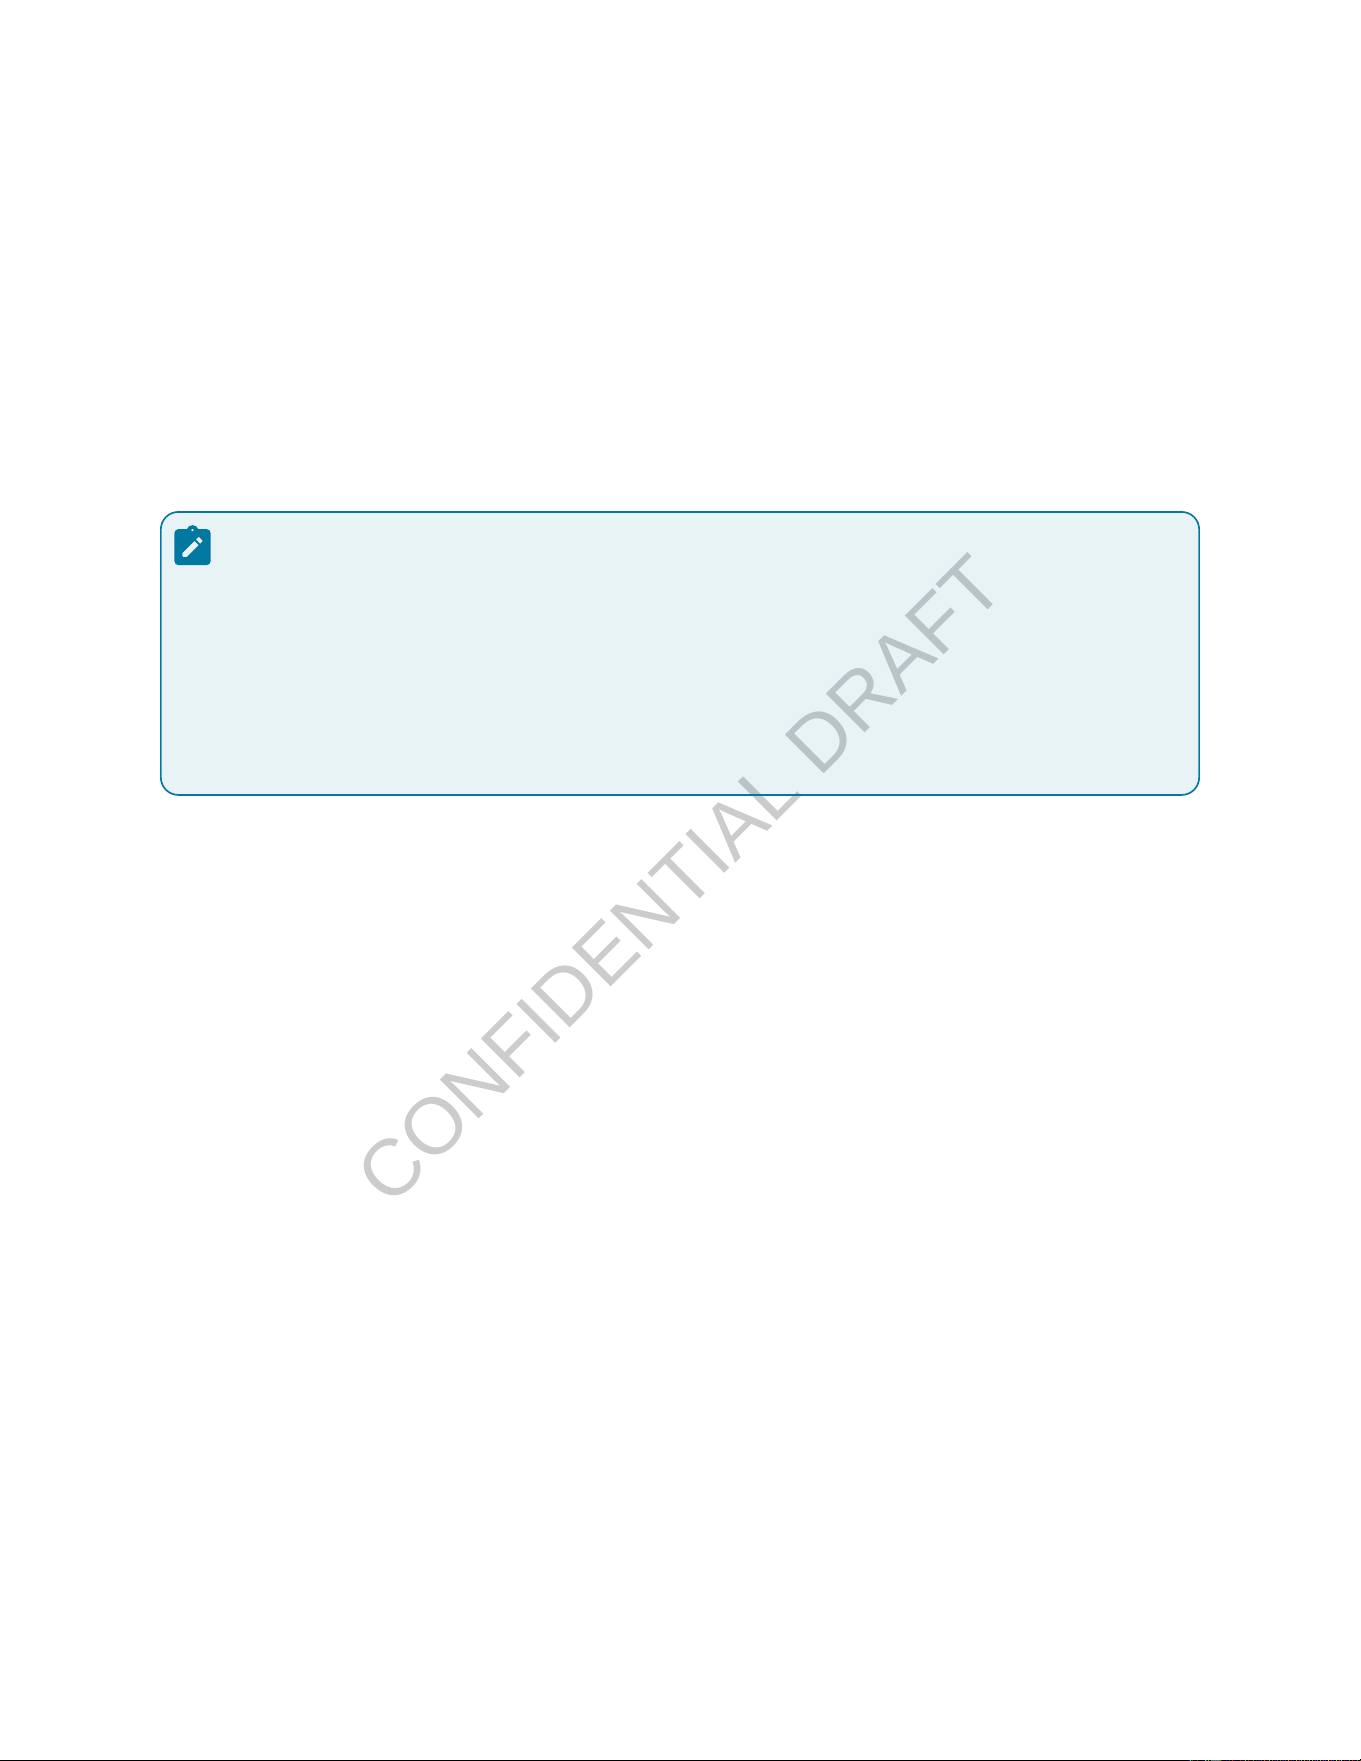
Phone screen features overview
The Cisco Wireless Phone 9821 phone home screen shows information such as directory number,
active call and line status, softkeys, speed dials, and placed calls. The home screen is made up of these
sections:
• Header section—displays the phone number, Wi-Fi strength, battery capacity, and a number of
feature icons. The feature icons display when features are active.
• Middle section—displays the Application icons or phone lines.
• Footer section—displays the current date and time or softkey labels. Each softkey label indicates
the action for the softkey button below the screen.
CONFIDENTIAL DRAFT
CONFIDENTIAL DRAFT
Cisco Wireless Phone 9821 User Guide | 2 - Get started with your phone | 20
Depending on your administrator's conguration, the Cisco Wireless Phone 9821 home screen can be
either the Application view or the Line view. If you frequently make or receive calls, you may prefer the Line
view as your default home screen.
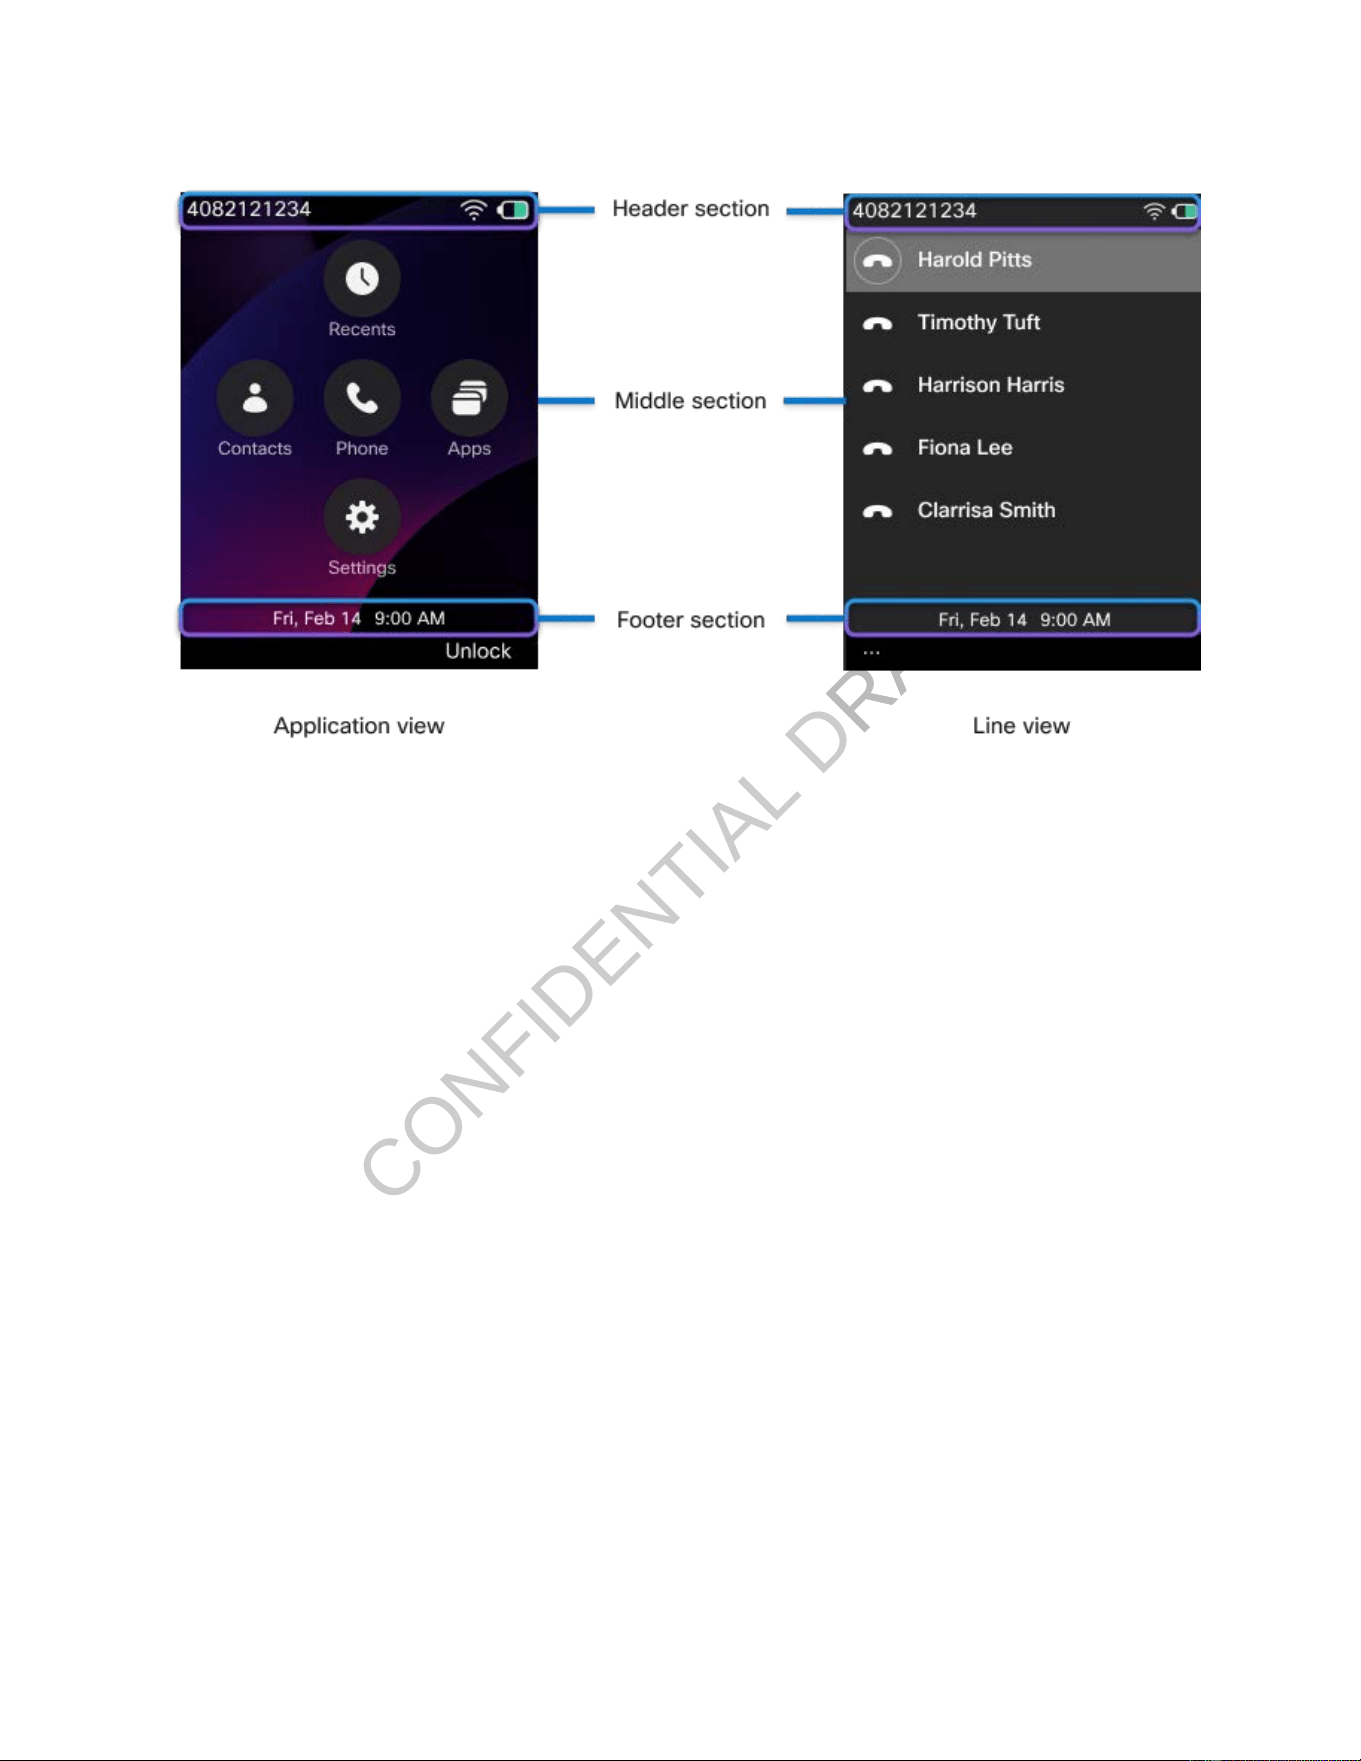
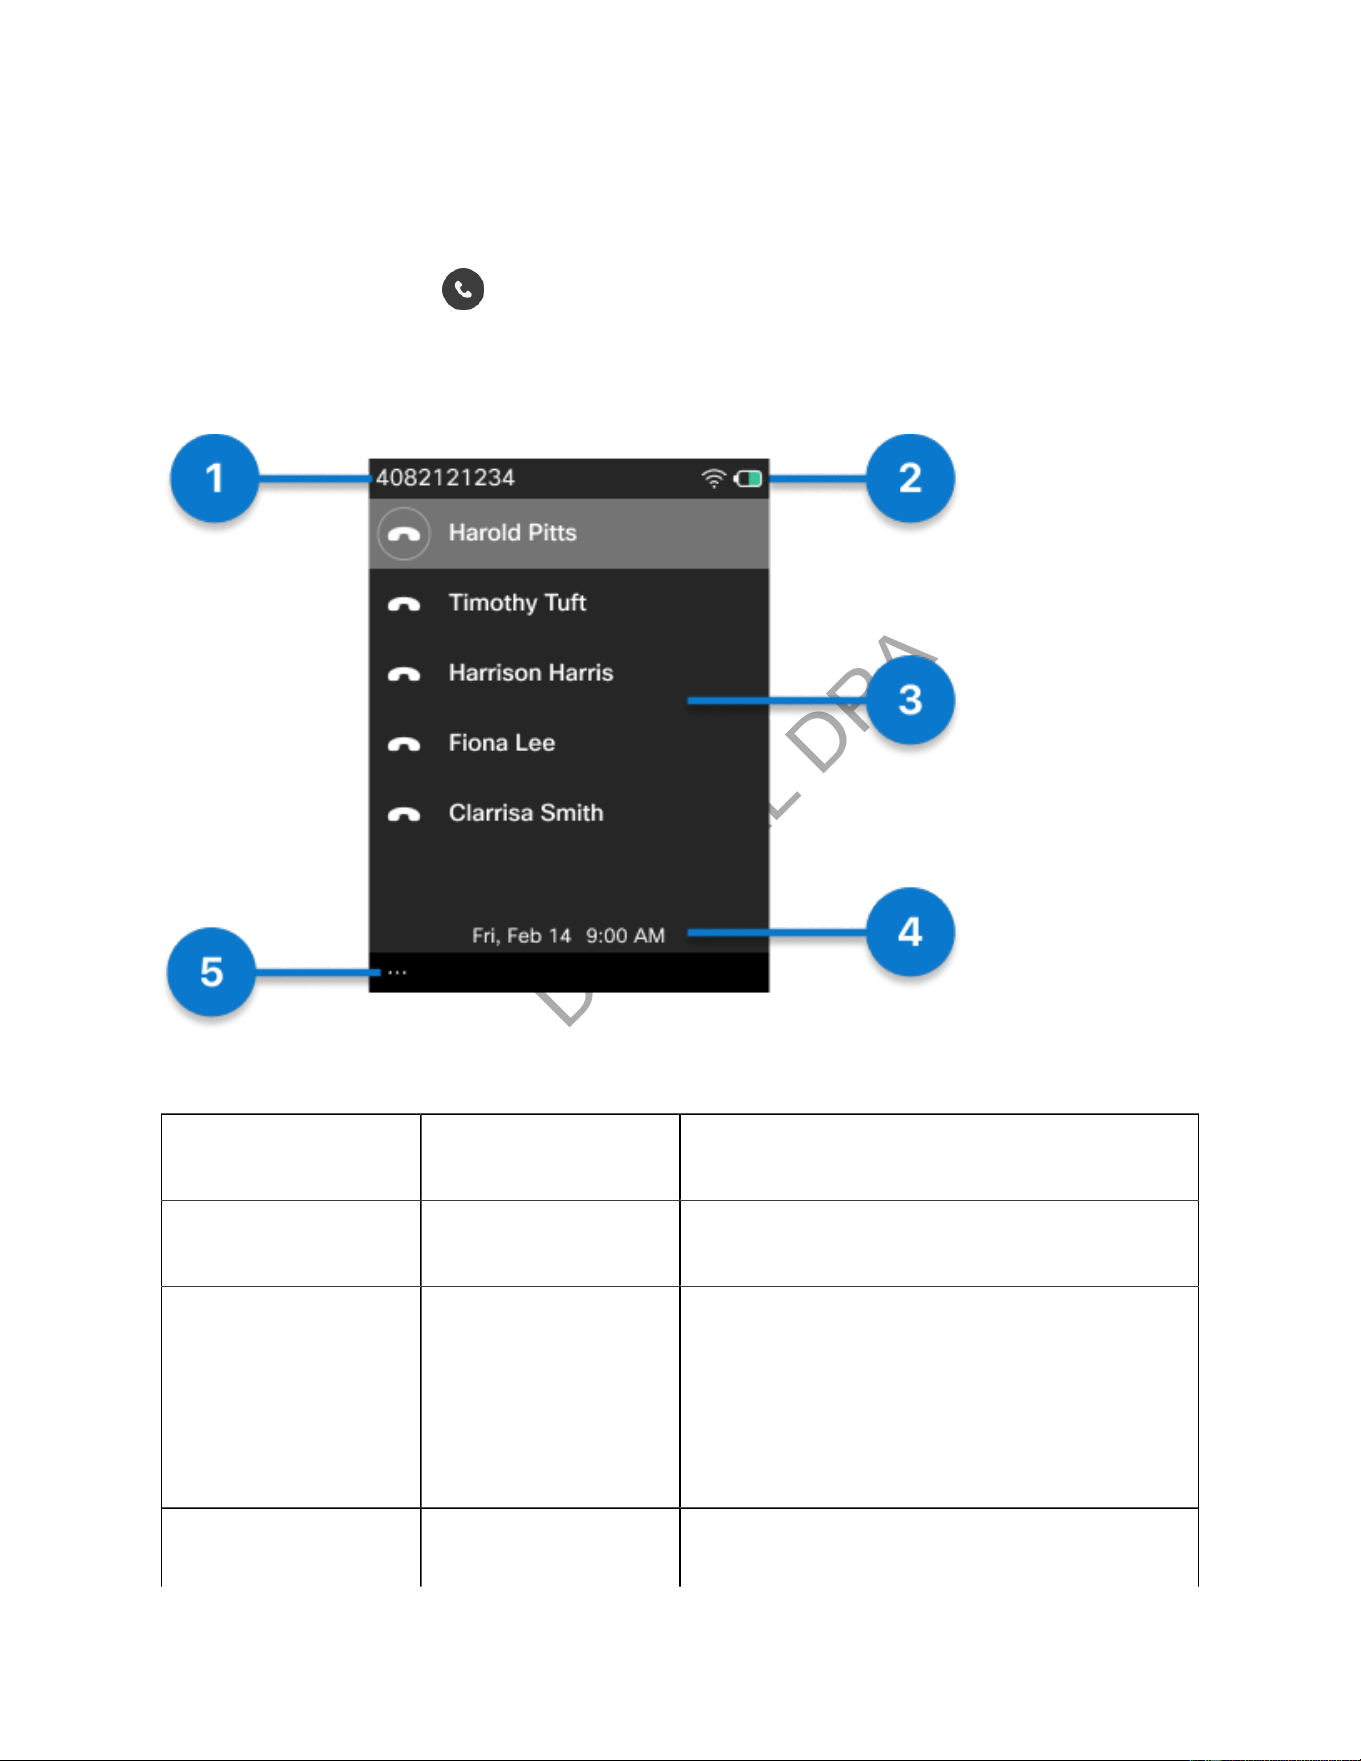
Application view
The following gure is a home screen in Applications view.
CONFIDENTIAL DRAFT
Cisco Wireless Phone 9821 User Guide | 2 - Get started with your phone | 21
Table 5. Home screen items
Number UI element Description
1 Line number Displays the line number.
2 Header icons Displays the Wi-Fi strength, battery capacity, and
so on. The icons display when the corresponding
features are active.
See Header icons for details.
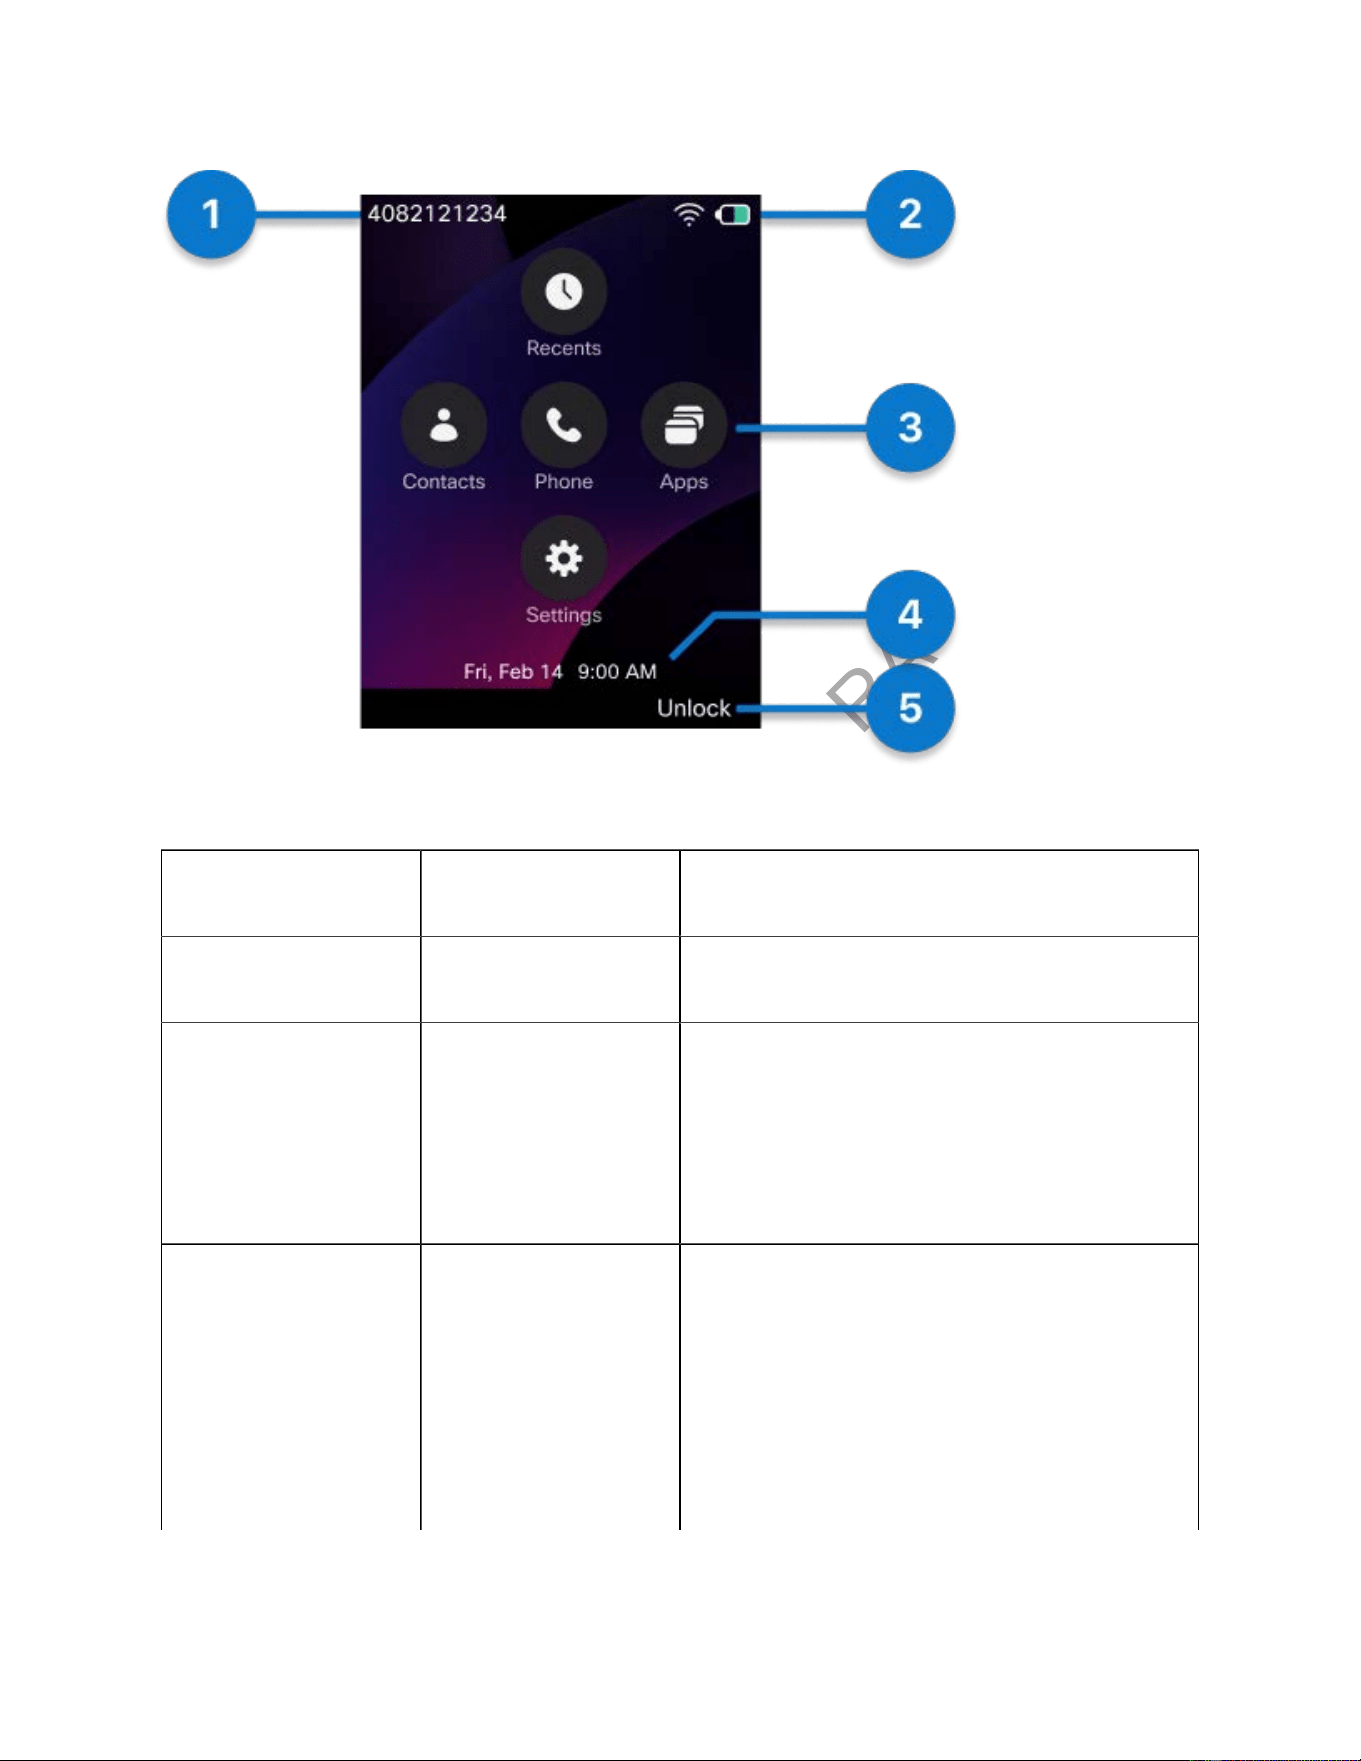
3 Application icons Entries to the respective applications.
• Recents: Access your voicemail messages,
missed calls, and recent calls.
• Contacts: Access Corporate directory, Per
sonal directory, Local contacts, and Fa
vorites.
CONFIDENTIAL DRAFT
Cisco Wireless Phone 9821 User Guide | 2 - Get started with your phone | 22
Table 5. Home screen items (continued)
Number UI element Description
• Apps: Access special services on the phone.
• Settings: Set up, manage, and customize
your phone.
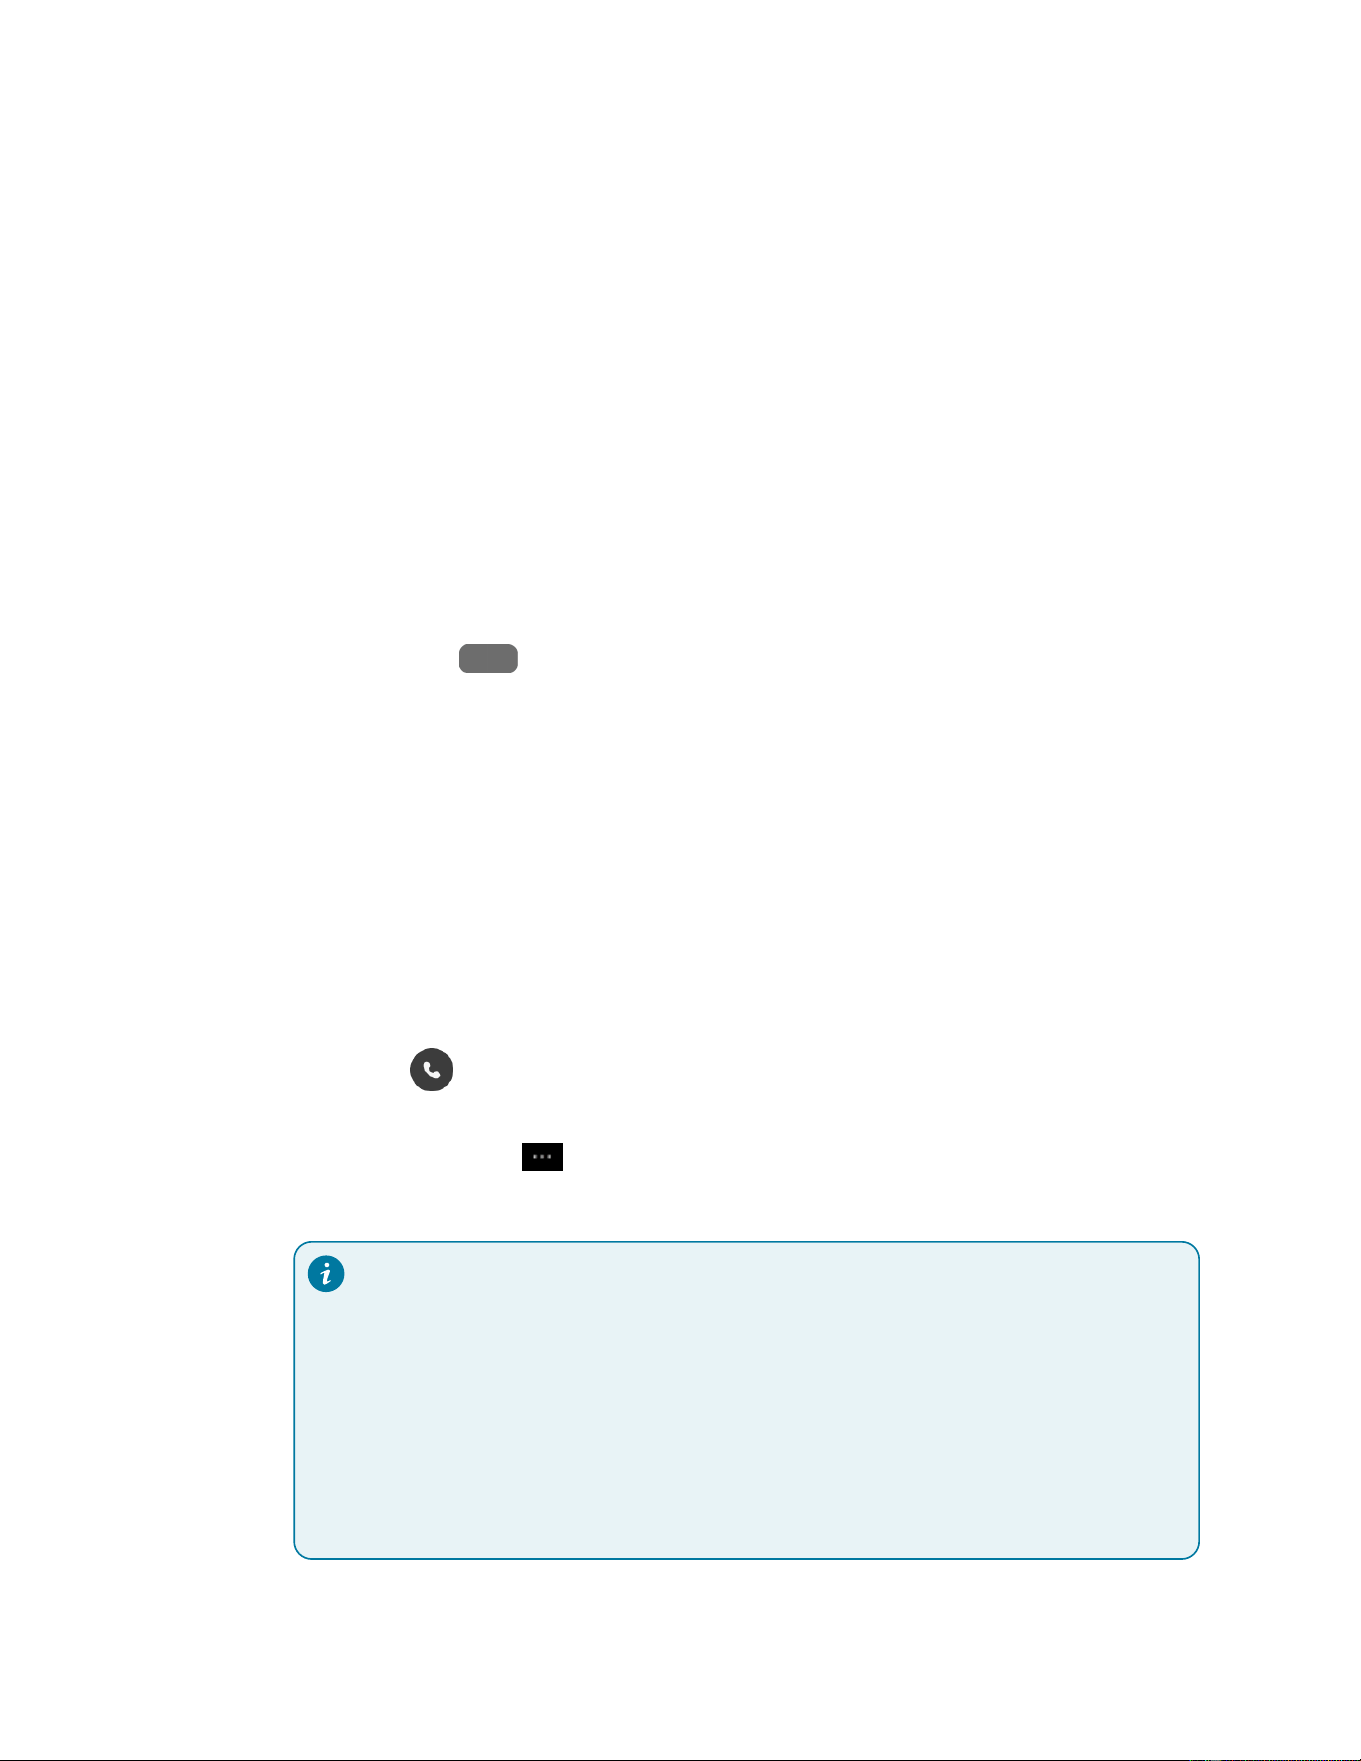
The Phone app icon indicates the existing call ses
sion type.
• : The phone is idle.
• : The phone is in an active call or in a
two-way intercom call.
• : Any line on the phone has an incoming
call or reverting call.
• : The shared line is in use.
• : The phone is on hold.
• : The shared line is on hold.
• : Any line on the phone is set to forward
all calls.
4 Time and date Displays the current time and date.
5 Softkey label Displays the action for the softkey button below
the screen.
CONFIDENTIAL DRAFT
Cisco Wireless Phone 9821 User Guide | 2 - Get started with your phone | 23
Line view
To see your phone lines from the Application view, press the Select button in the center of the Navigation
Cluster to access the Phone app. Depending on congurations, your phone can have a single line or
multiple lines.
The following gure is a home screen in Line view.
Table 6. Home screen items
Number UI element Description
1 Line number Displays the line number.
2 Header icons Displays the Wi-Fi strength, battery capacity, and
so on. The icons display when the corresponding
features are active.
See Header icons for details.
3 Lines Use the registered lines for calls.

CONFIDENTIAL DRAFT
Cisco Wireless Phone 9821 User Guide | 2 - Get started with your phone | 24
Table 6. Home screen items (continued)
Number UI element Description
Each line corresponds to a directory number or
intercom number that others can use to call you.
Your phone supports up to six lines.
Each line can support multiple calls. Your system
administrator can adjust the number of calls on a
line according to your needs. Only one call can be
active at any time, and other calls are automatical
ly placed on hold.
4 Time and date Displays the current time and date.
5 More softkey Label for the More softkey below the screen.
Press the More softkey on a line to access a list of
menus or functions.
To return to the Applications view when all lines are idle, press More and select Exit. Alternatively,
press the left arrow on the Navigation Cluster.
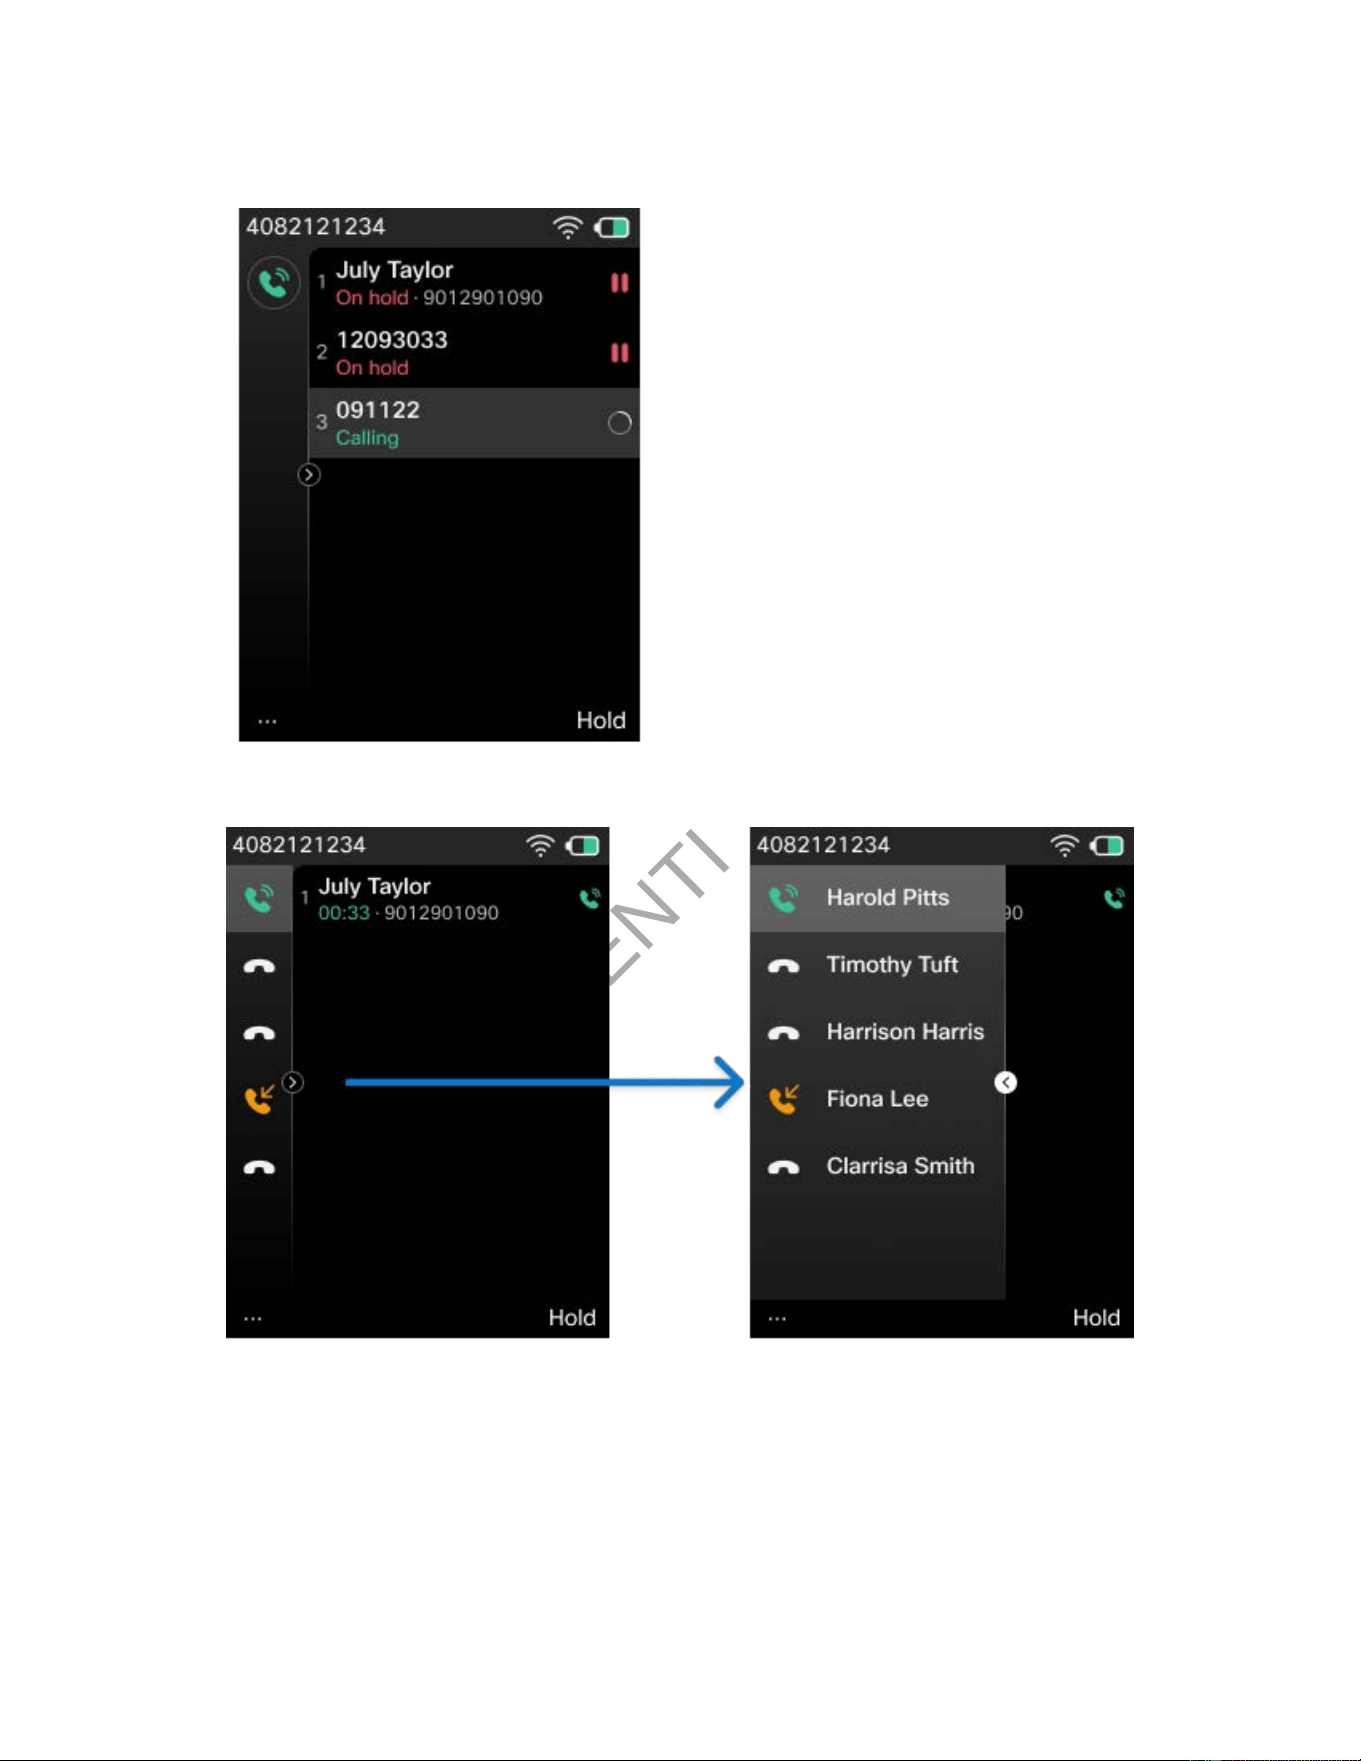
The following gures are screens in Line view with ongoing calls.
CONFIDENTIAL DRAFT
Cisco Wireless Phone 9821 User Guide | 2 - Get started with your phone | 25
Figure 5. Line view: single line with ongoing calls
Figure 6. Line view: multiple lines with an ongoing call
Press the right arrow on the Navigation Cluster to expand the Lines panel. The line that is currently
selected displays at the top of the list.
When the Lines panel is expanded, press the left arrow on the Navigation Cluster to collapse the Lines
panel.

CONFIDENTIAL DRAFT
Cisco Wireless Phone 9821 User Guide | 2 - Get started with your phone | 26
Header icons
The screen header displays many icons as interpreted in the following tables.
Table 7. Home screen header icons
Icon Description
The speakerphone or desktop charger speaker is active.
The speakerphone or desktop charger speaker is muted.
A wired headset or Bluetooth headset is active.
A wired headset or Bluetooth headset is muted.
A Bluetooth headset is active.
A Bluetooth headset is muted.
The microphone is muted.
There is a new voice message.
The phone ringer is muted.
Bluetooth is turned on.
Wi-Fi connection status. The number of bars indicates the signal strength.

CONFIDENTIAL DRAFT
Cisco Wireless Phone 9821 User Guide | 2 - Get started with your phone | 27
Table 7. Home screen header icons (continued)
Icon Description
The phone is connected to the Ethernet.
By default, your phone displays the battery charge icons. You can enable the phone to display the battery
level as a percentage. For more information, see Set battery level display.
Table 8. Battery icons
Not charging Charging Description
The battery is fully charged.
The battery remaining capacity is at about 10% to
100%.
The battery remaining capacity is at about 10%.
The battery remaining capacity is at about 2%.
Recharge the battery or exchange it for a charged
battery.
Get started with your Cisco Wireless Phone 9821
Read the Product safety and security information before installing or charging the battery.
Your phone is powered by a rechargeable Lithium-ion battery. Before using your phone, you must install
the battery and fully charge it.
To operate, your phone must connect to the corporate wireless network and the IP telephony network.
Depending on your organization’s setup, your administrator may congure your new wireless phone, or
you may need to set it up yourself.
Once the phone is set up, it is ready for use.
CONFIDENTIAL DRAFT
Cisco Wireless Phone 9821 User Guide | 2 - Get started with your phone | 28
Turn on your phone
When you turn the phone on, you may need to enter a username and password to access the wireless
network. After the phone authenticates and registers with the call control system, the main screen
displays and you can make or receive calls.
Press and hold Power/End Call for four seconds. The red LED lights up.
Wake up the screen display
By default, the phone screen dims after 10 seconds of inactivity. After 10 more seconds of inactivity, the
screen display turns off. When the screen display is off, the phone uses less battery power.
If the screen display is off, you must wake it up to make a call.
Press any key.
Turn off your phone
To conserve the battery, turn off the phone when you are not using it to make or receive calls.
Do one of the following actions:
• Press and hold Power/End Call for four seconds. When prompted, press Power off to
conrm.
Note:
If the phone is currently on a call or undergoing a rmware upgrade, this method will not
power off the phone immediately. Use this method again when the call ends or upgrade
completes.

CONFIDENTIAL DRAFTCONFIDENTIAL DRAFT
Cisco Wireless Phone 9821 User Guide | 2 - Get started with your phone | 29
• Press and hold Power/End Call for ten seconds.
The phone will power off immediately, regardless of active calls or rmware upgrades.
Lock the phone keypad
You can lock the keypad so that you don't press any key by mistake.
Press and hold Zero (0) until you see the message that the keypad is locked.
Unlock the phone keypad
If you lock the keypad, you need to unlock it to use the phone.
1. Press Unlock.
2. Press Zero (0) .
Access your voicemail
You can access your voicemail by calling the voicemail system phone number. But, if your administrator
has enabled quick access, you can access voicemail with a single button. The button automatically dials
the voicemail system for you.
Your voicemail system is separate from the phone. If you need information about the voicemail system
phone numbers for internal and external access and other voicemail system information, contact your
administrator.
Your administrator can congure the left softkey in the Applications view to be Voicemail.
1. Press and hold One (1) on the keypad or press Voicemail.
2. Follow the prompts.

CONFIDENTIAL DRAFT
Chapter 3. Phone setup
Install the Cisco Wireless Phone 9821 battery
Follow the instructions below to install the Cisco Wireless Phone 9821 battery. Phone life and functions
could be compromised if:
• The battery is installed incorrectly.
• The battery cover is not closed properly.
• The IP54 gasket is poorly maintained or damaged.
The IP54 gasket is a sealing component on the inner edge of the battery compartment cover that
is designed to meet the IP54 Ingress Protection standard, ensuring protection against limited dust
ingress and water splashes from any direction.
• The phone is frequently dropped on a hard surface.
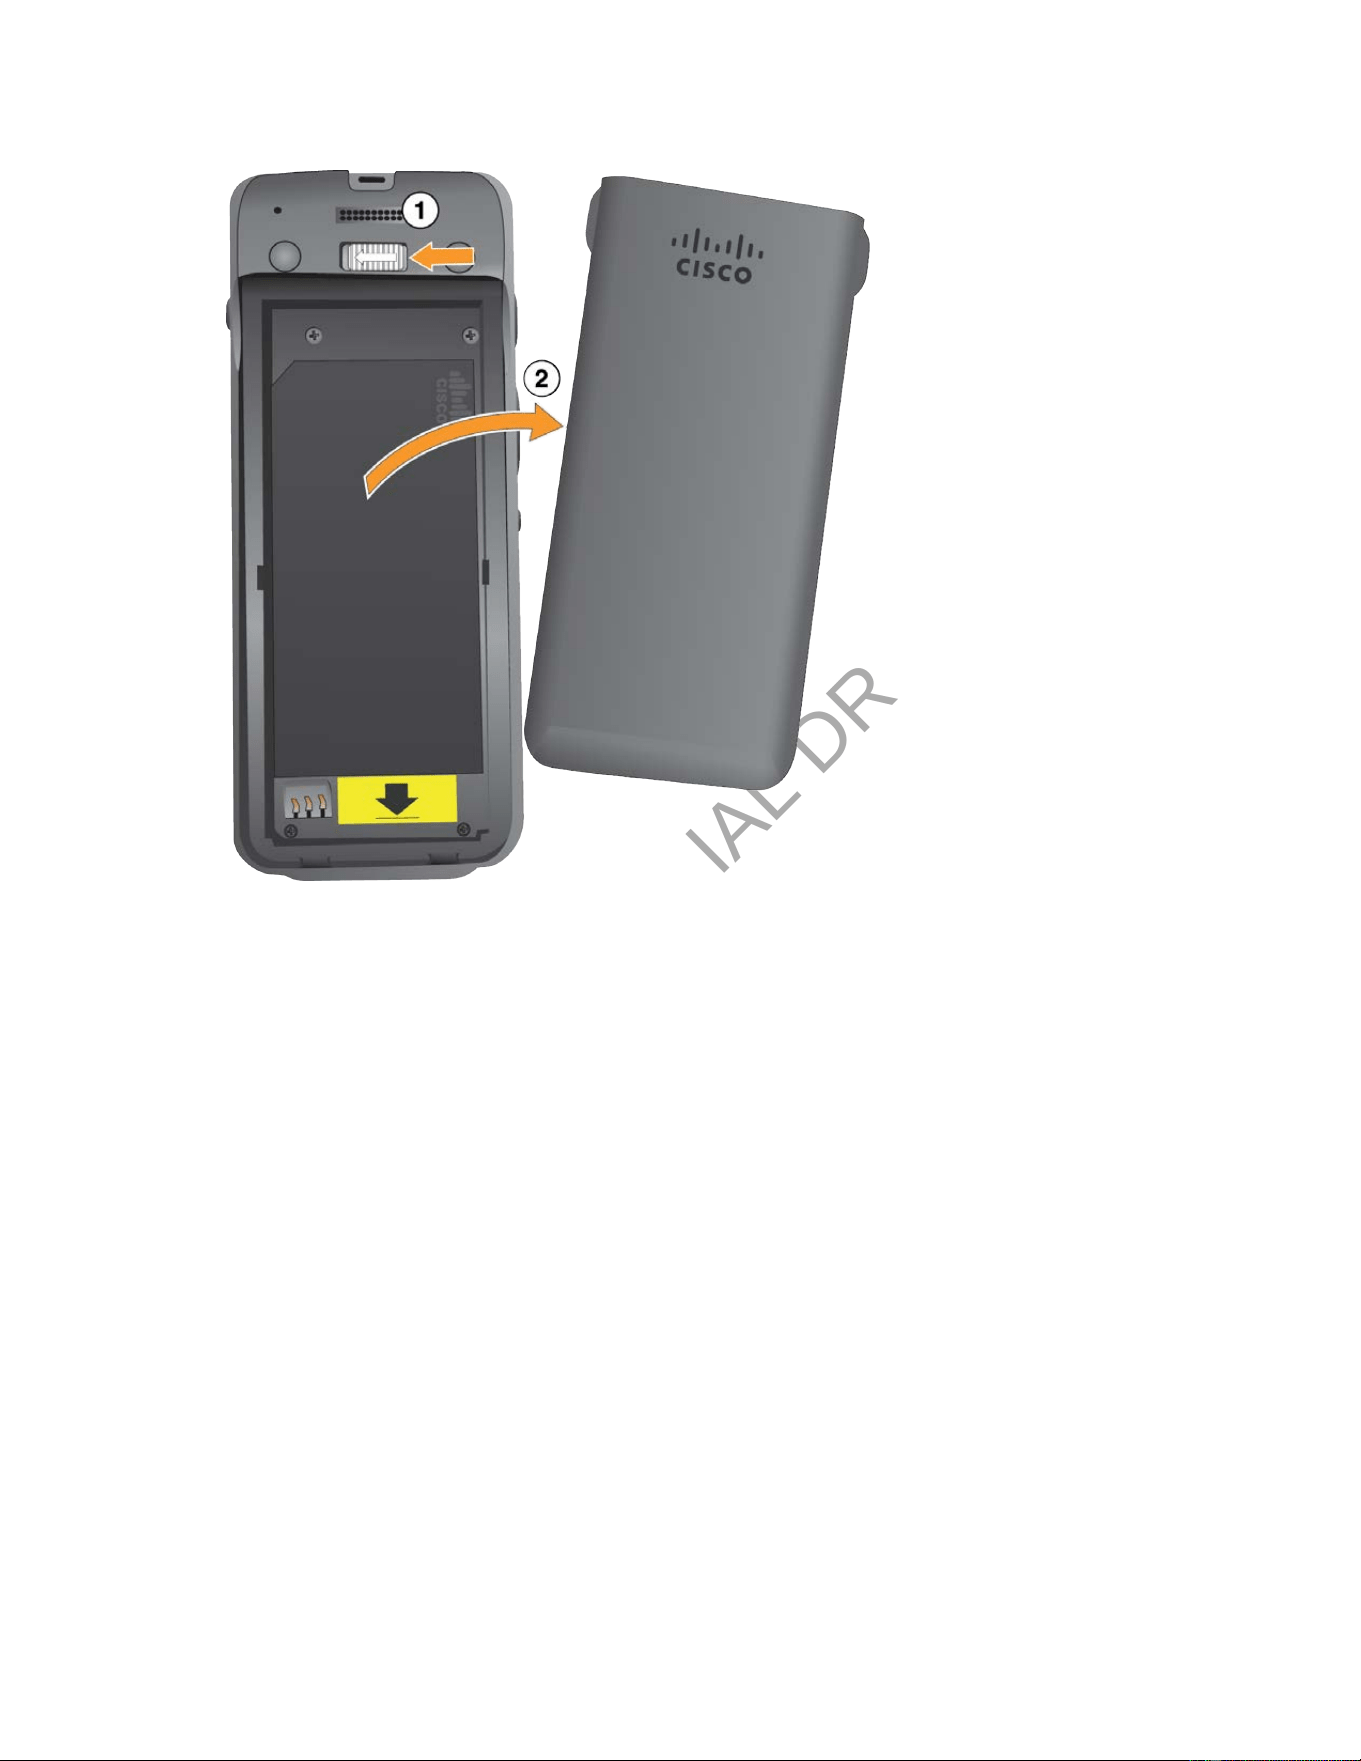
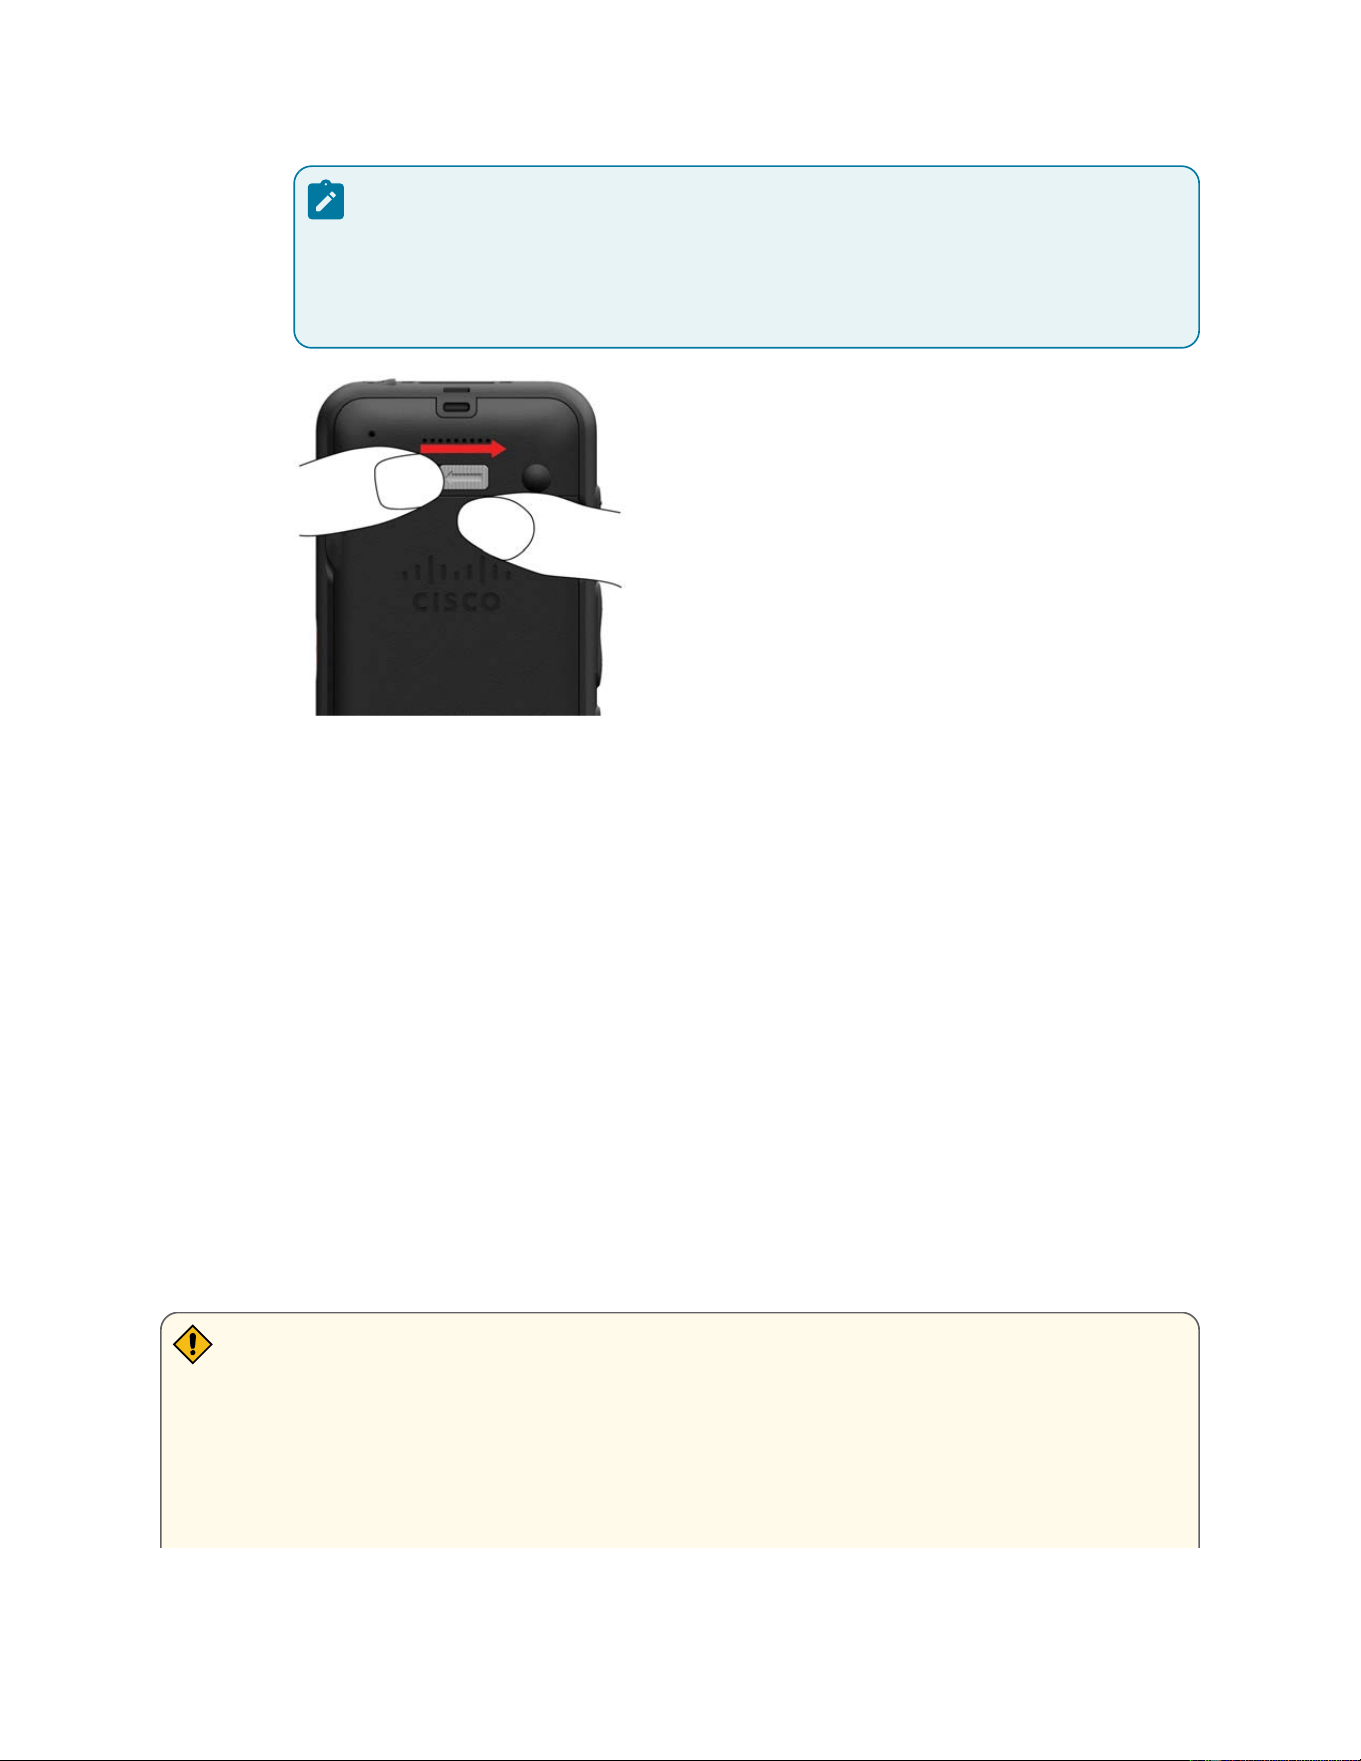
1. Remove the cover from the battery compartment.
Your Cisco Wireless Phone 9821 is factory-sealed against dust and water. Ensure you are working
in a clean, dry environment to maintain the phone's dust and water resistance. In addition, don't use
tools to pry open the cover.
CONFIDENTIAL DRAFT
Cisco Wireless Phone 9821 User Guide | 3 - Phone setup | 31
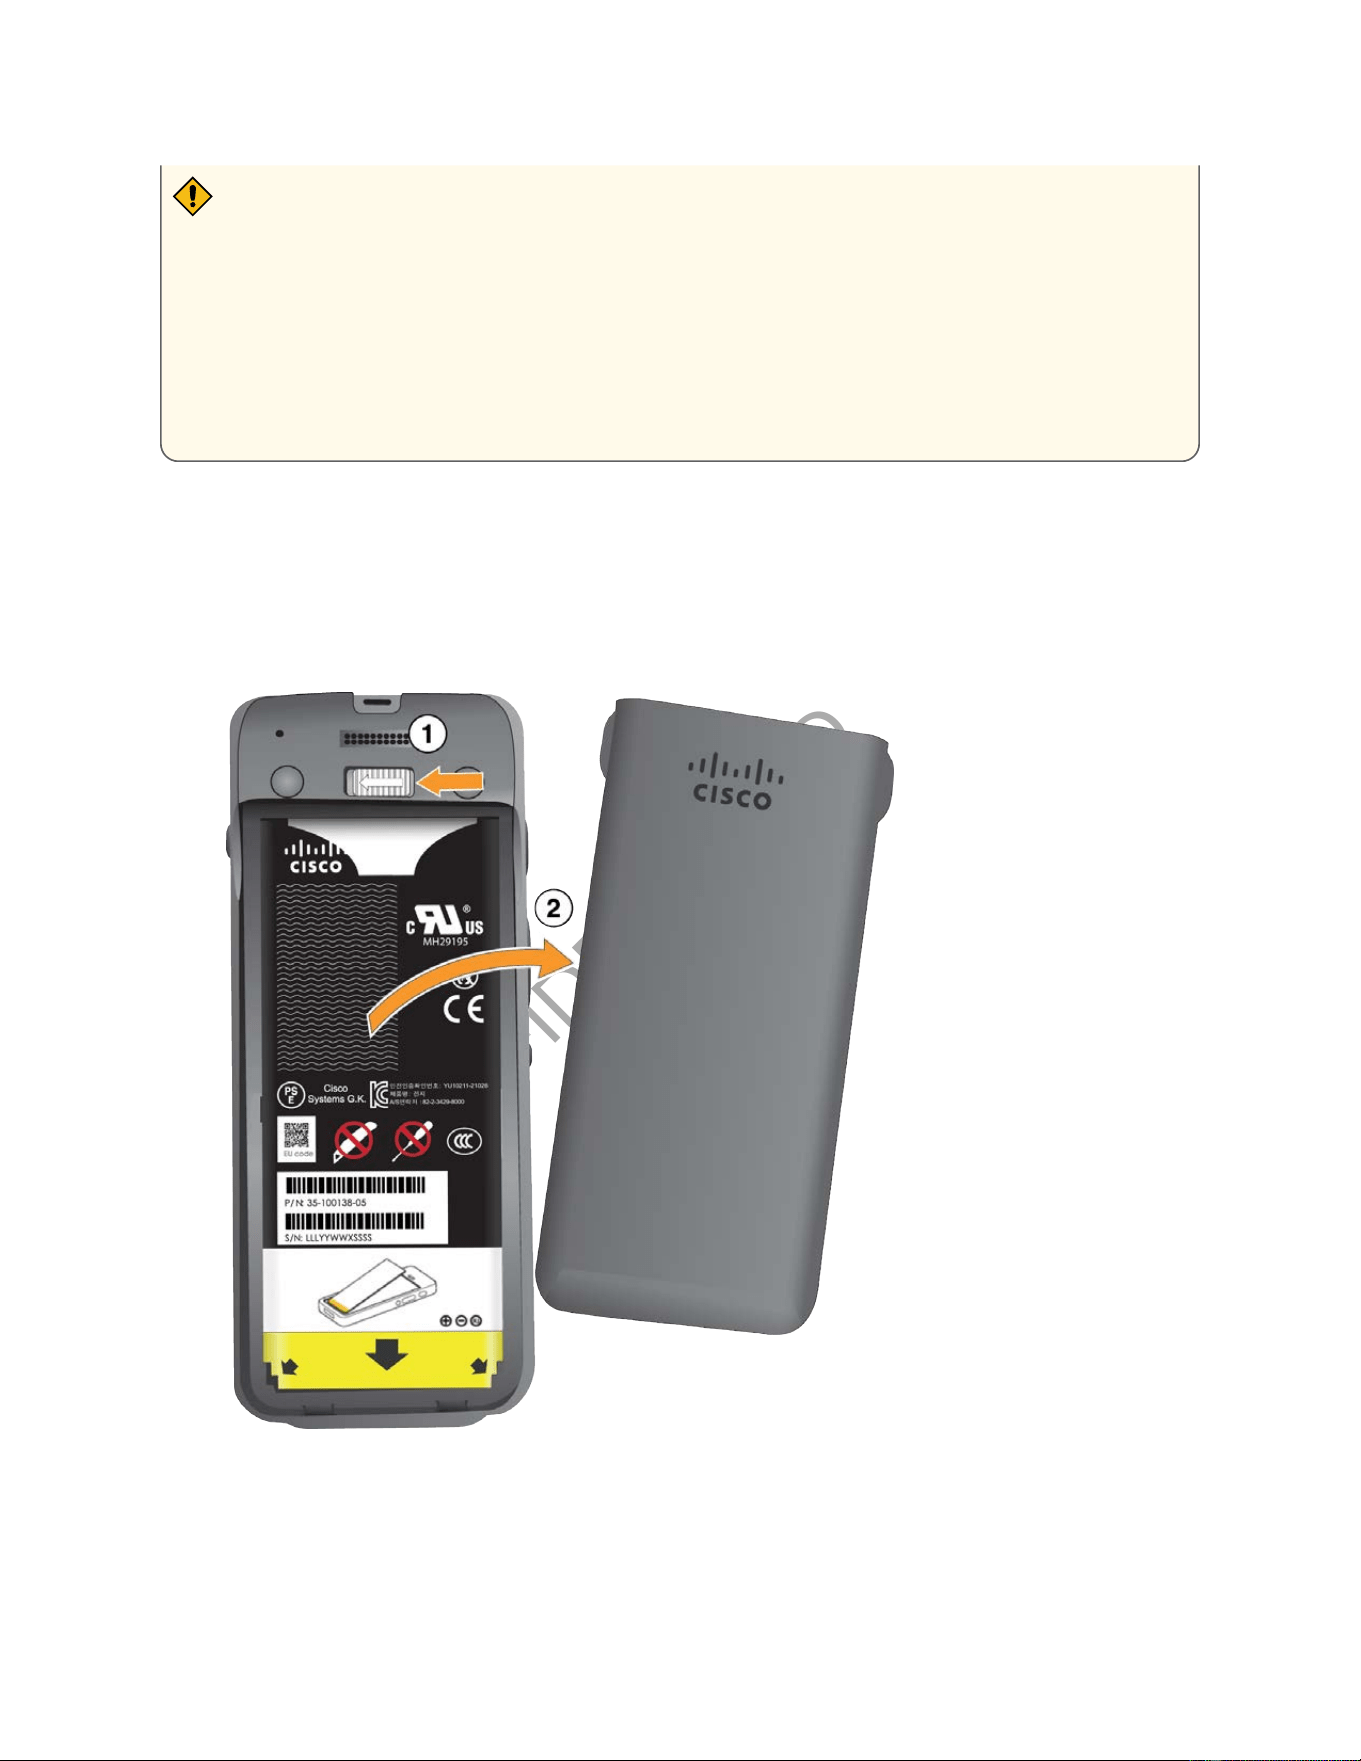
a. Push and hold the locking catch to the left to release the cover.
b. Use the tabs on the sides of the cover to lift the top of the cover and lift the cover up to
unlock the bottom tabs.
2. Install the battery.
CONFIDENTIAL DRAFT
Cisco Wireless Phone 9821 User Guide | 3 - Phone setup | 32
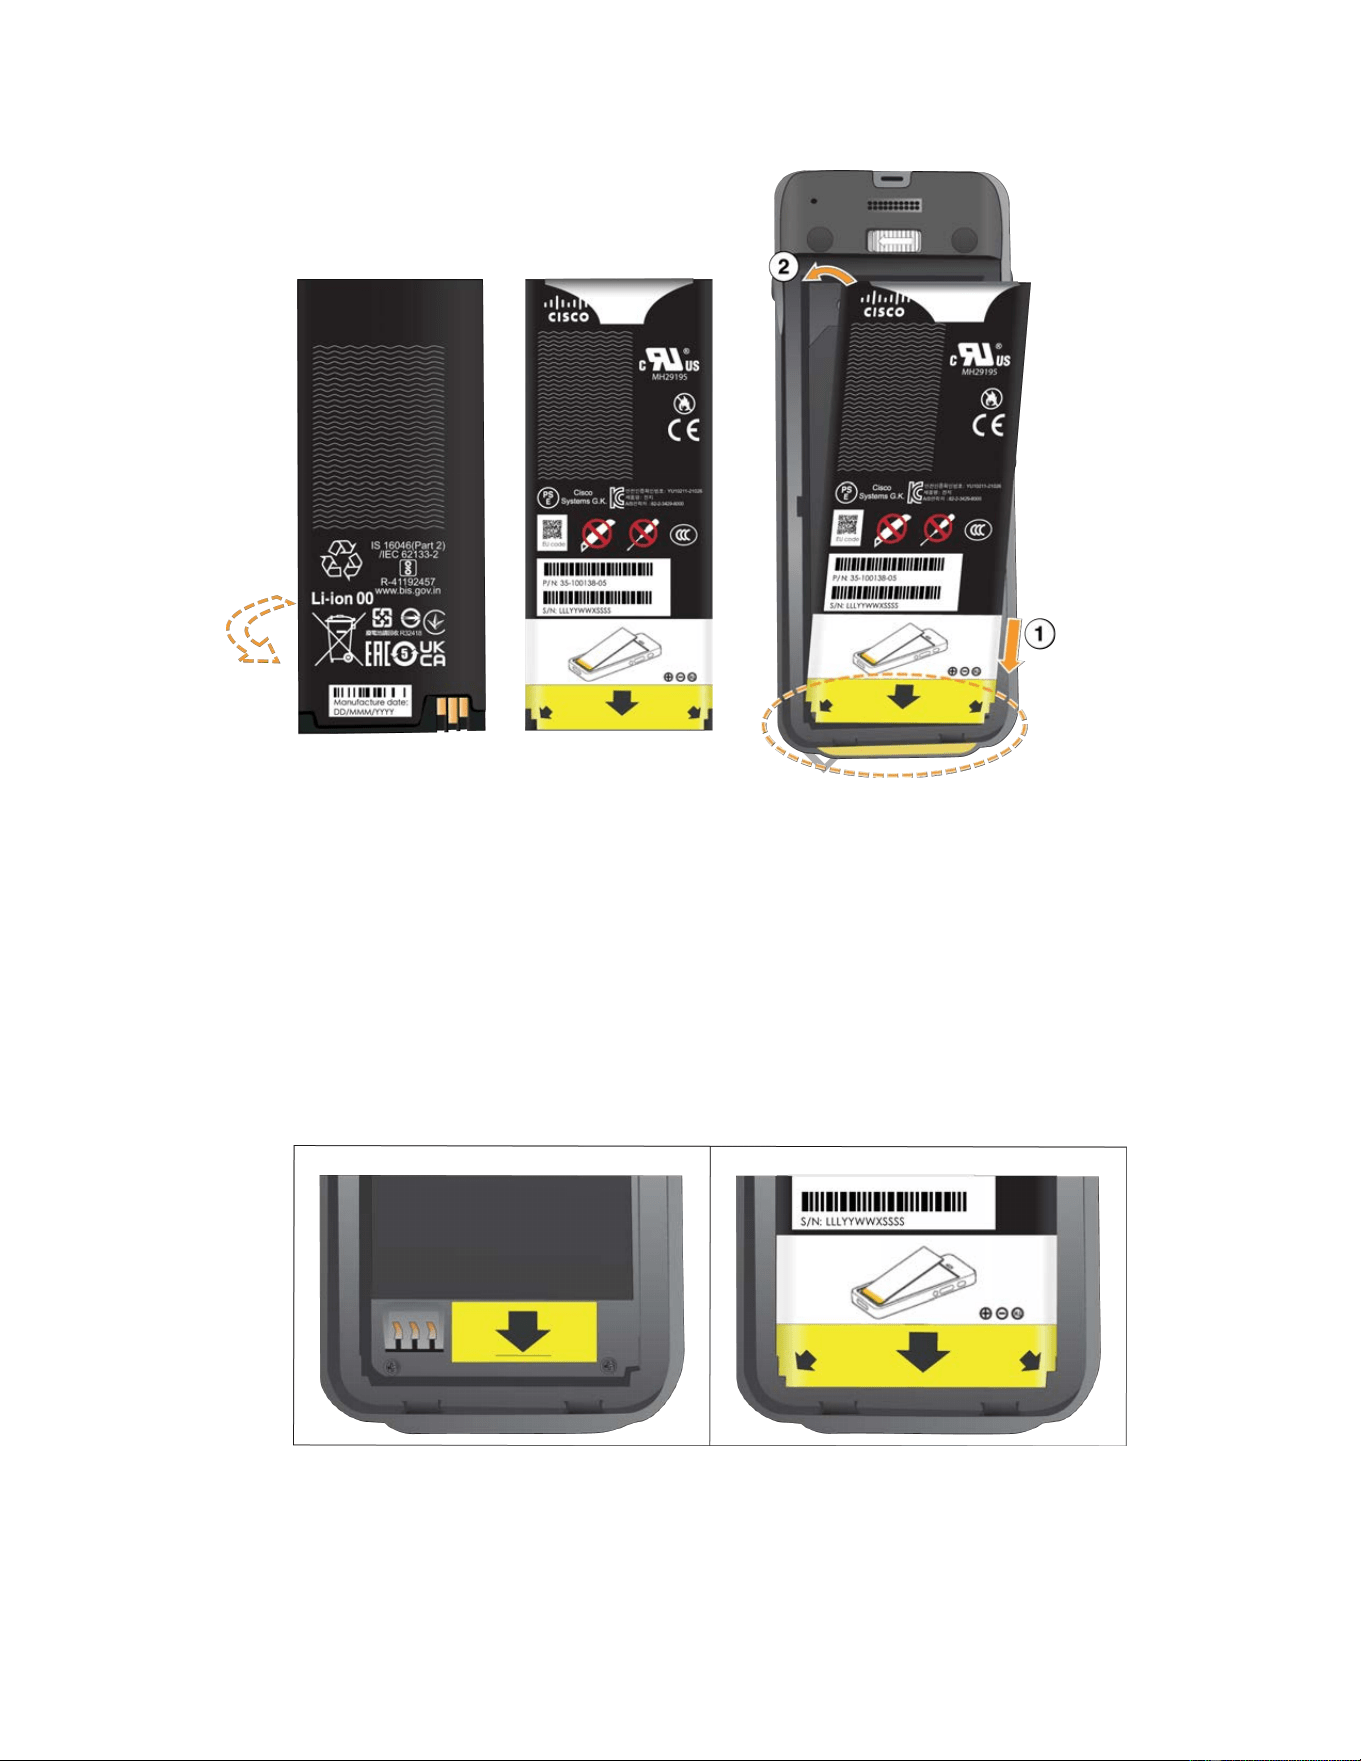
a. Hold the battery so that the lower edge is close to the bottom of the compartment. Make
sure that the metal contacts on the phone and battery face each other. On the battery, the
Cisco logo must be near the locking catch and the arrow must point to the base of the
phone.
b. Slide the bottom of the battery under the tabs in the bottom of the battery compartment.
The following graphic shows the battery compartment without and with the battery correctly
installed.
c. Press the battery into the battery compartment until it is at in the compartment.
CONFIDENTIAL DRAFT
Cisco Wireless Phone 9821 User Guide | 3 - Phone setup | 33
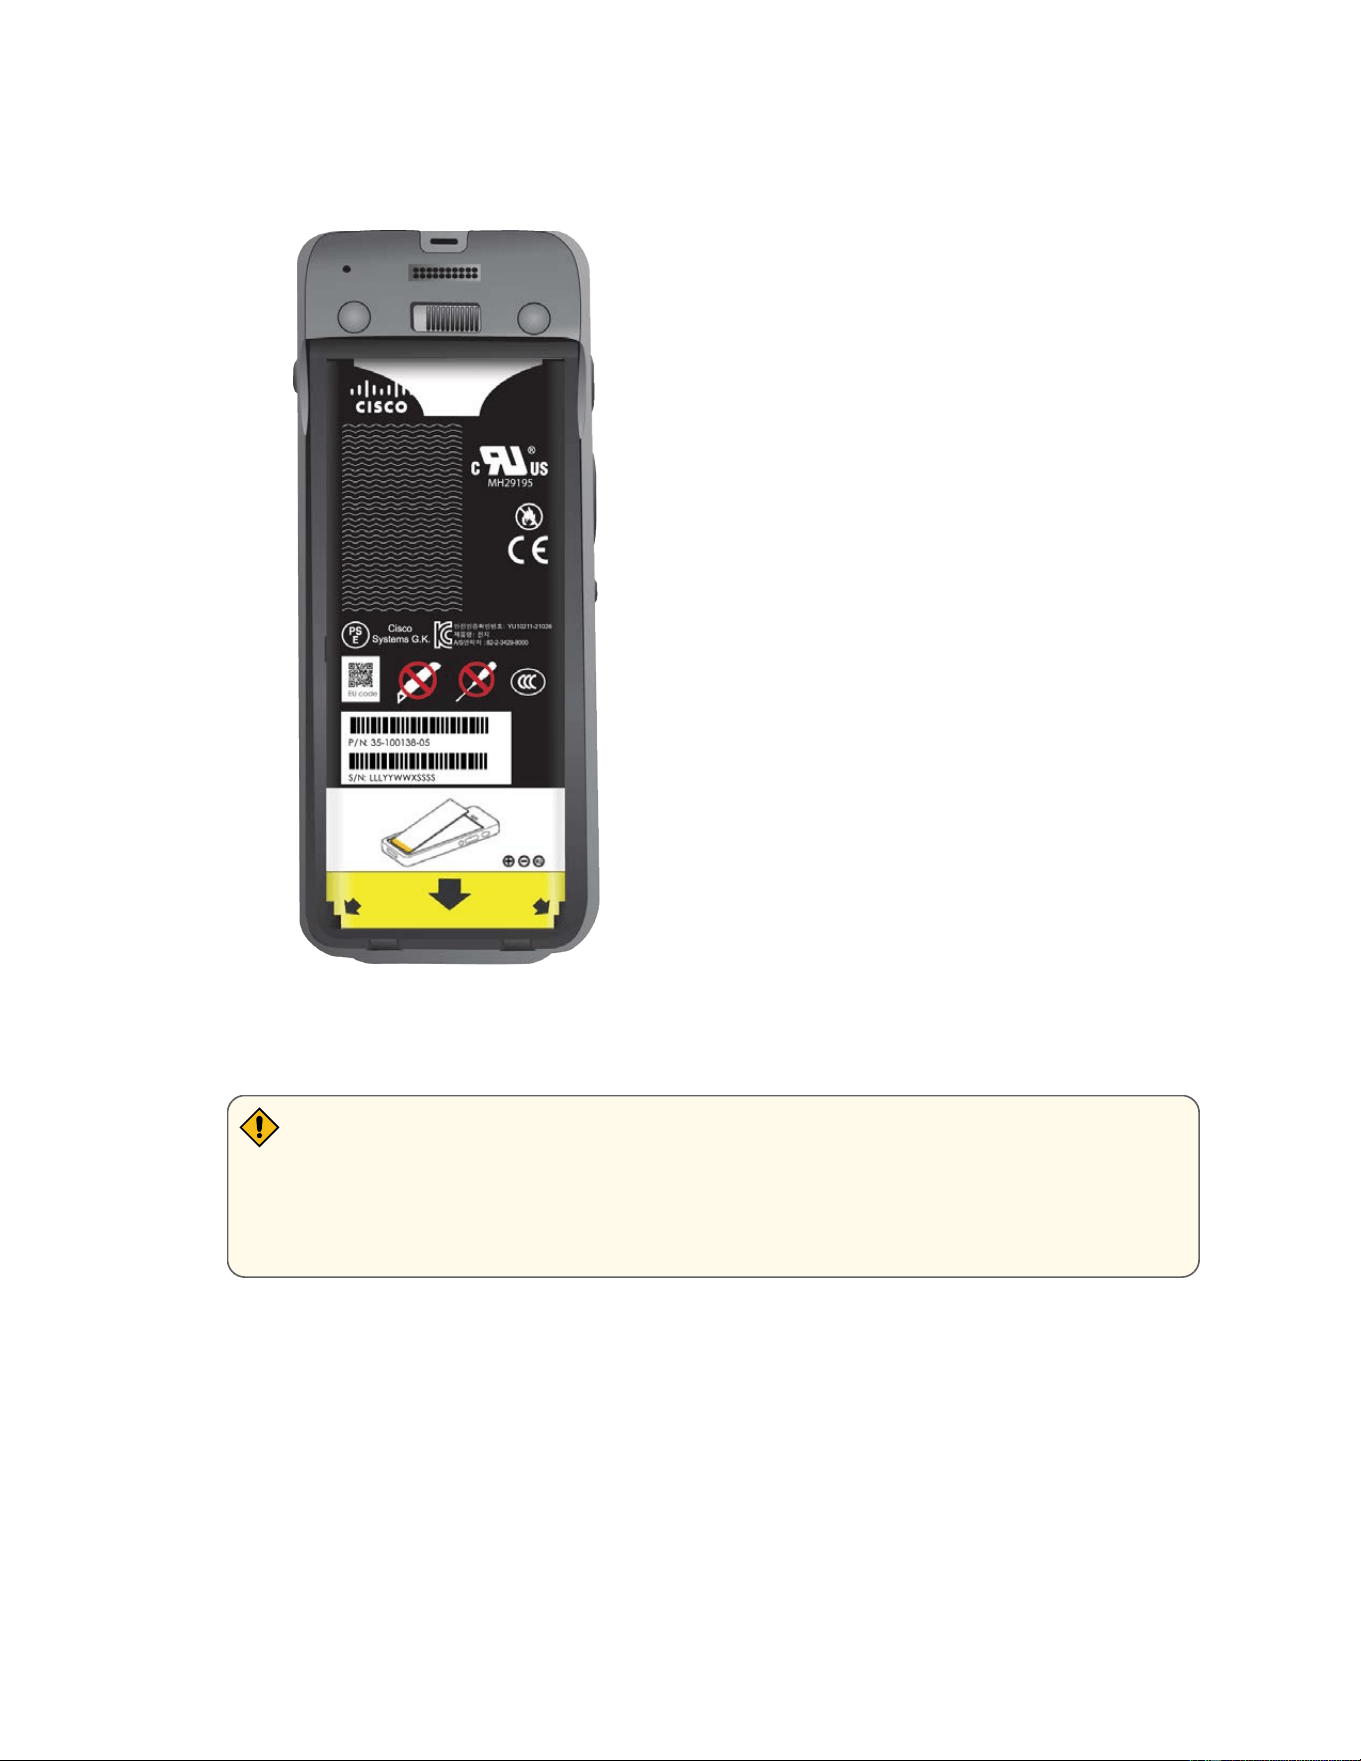
The following graphic shows a properly-installed battery.
3. The IP54 gasket on the battery cover ensures water and dust resistance. Inspect the IP54 gasket
and, if necessary, clean it with a cloth dampened with water.
CAUTION:
Do not use oil-based or alcohol-based cleaners on the IP54 gasket. These cleaners will
damage the IP54 gasket and void the phone warranty.
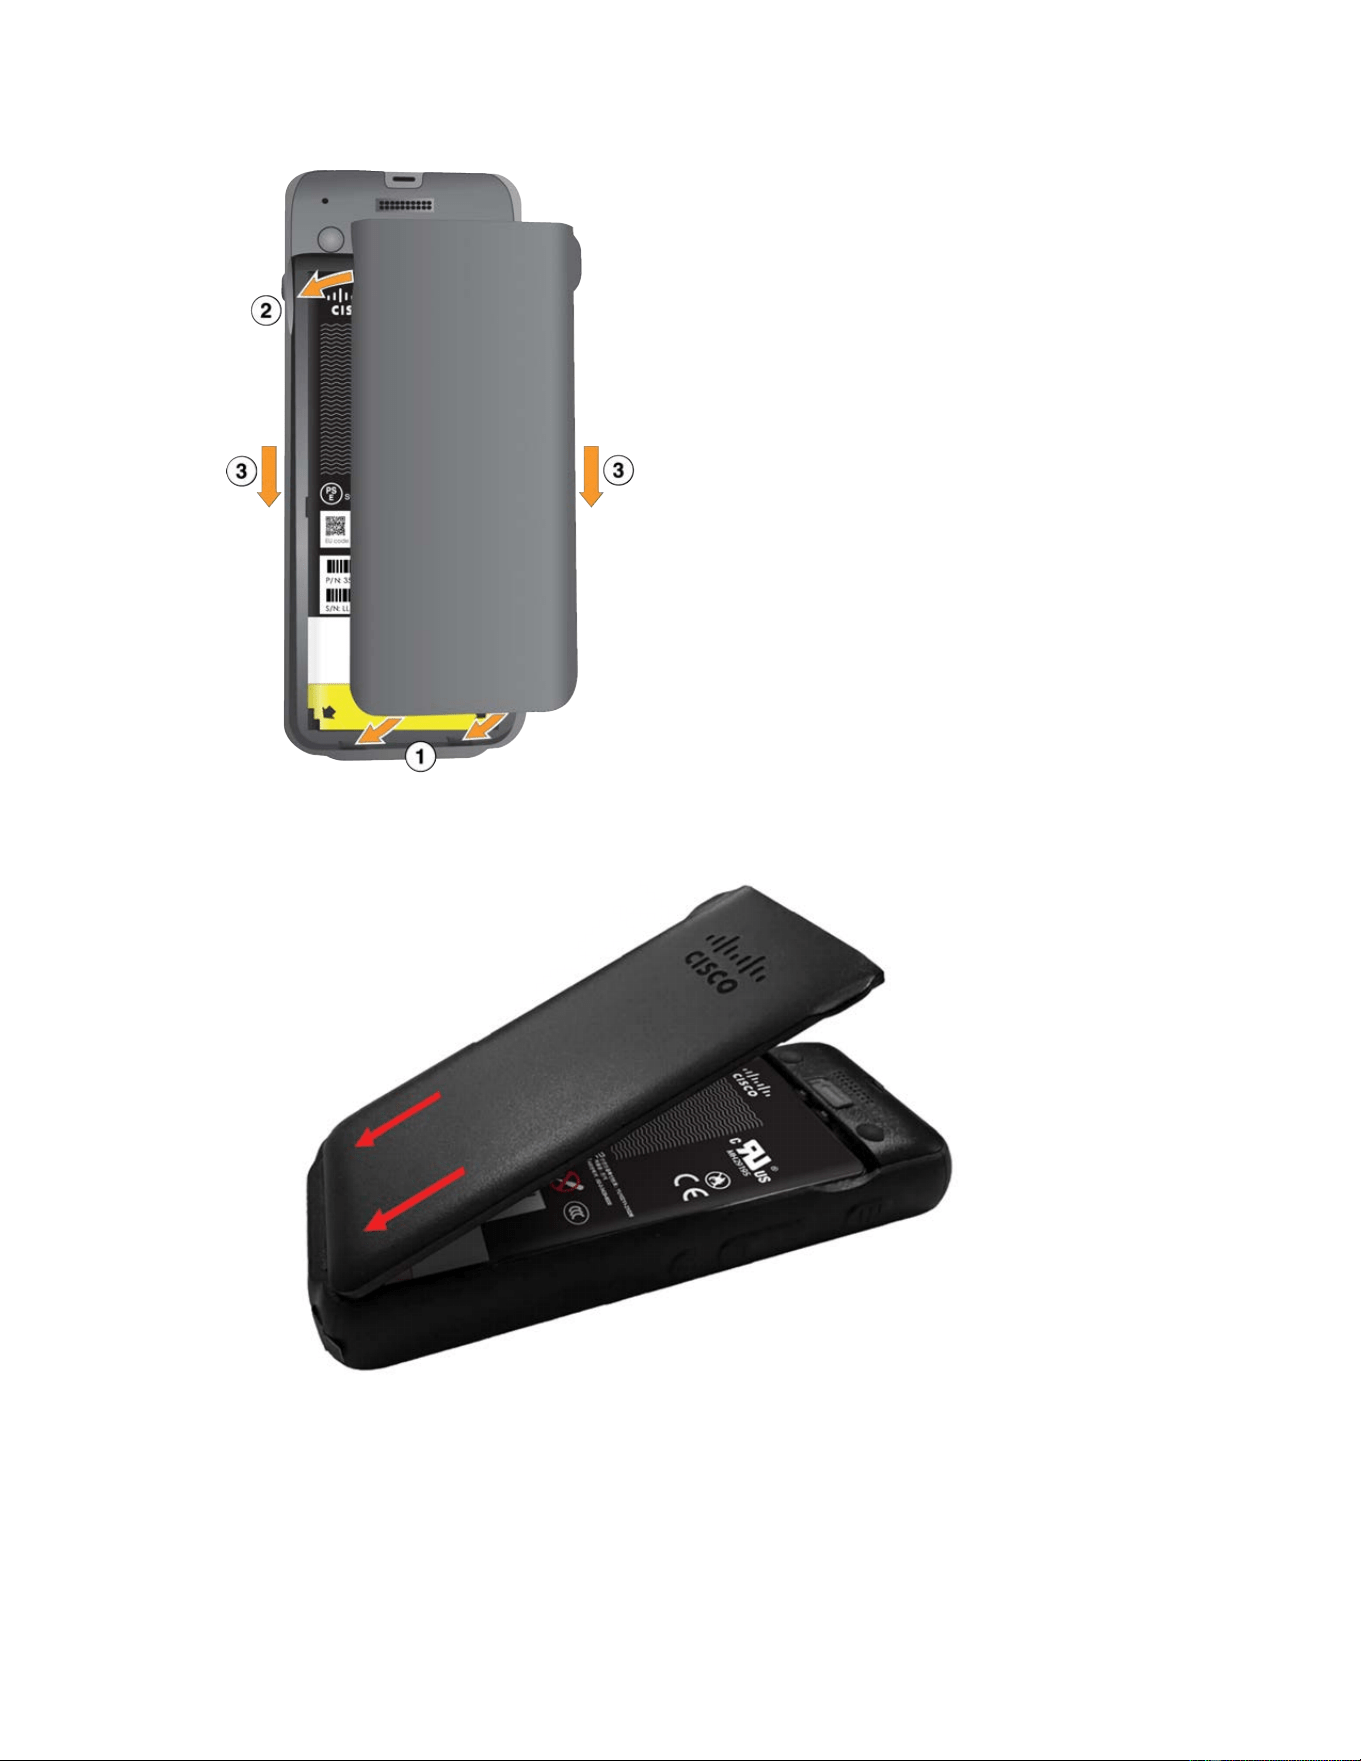
4. Replace the cover to the battery compartment. Make sure that it is completely closed. Otherwise
dust and water can enter the battery compartment.
CONFIDENTIAL DRAFT
Cisco Wireless Phone 9821 User Guide | 3 - Phone setup | 34
a. Align the tabs at the bottom of the cover into the notches on the phone.
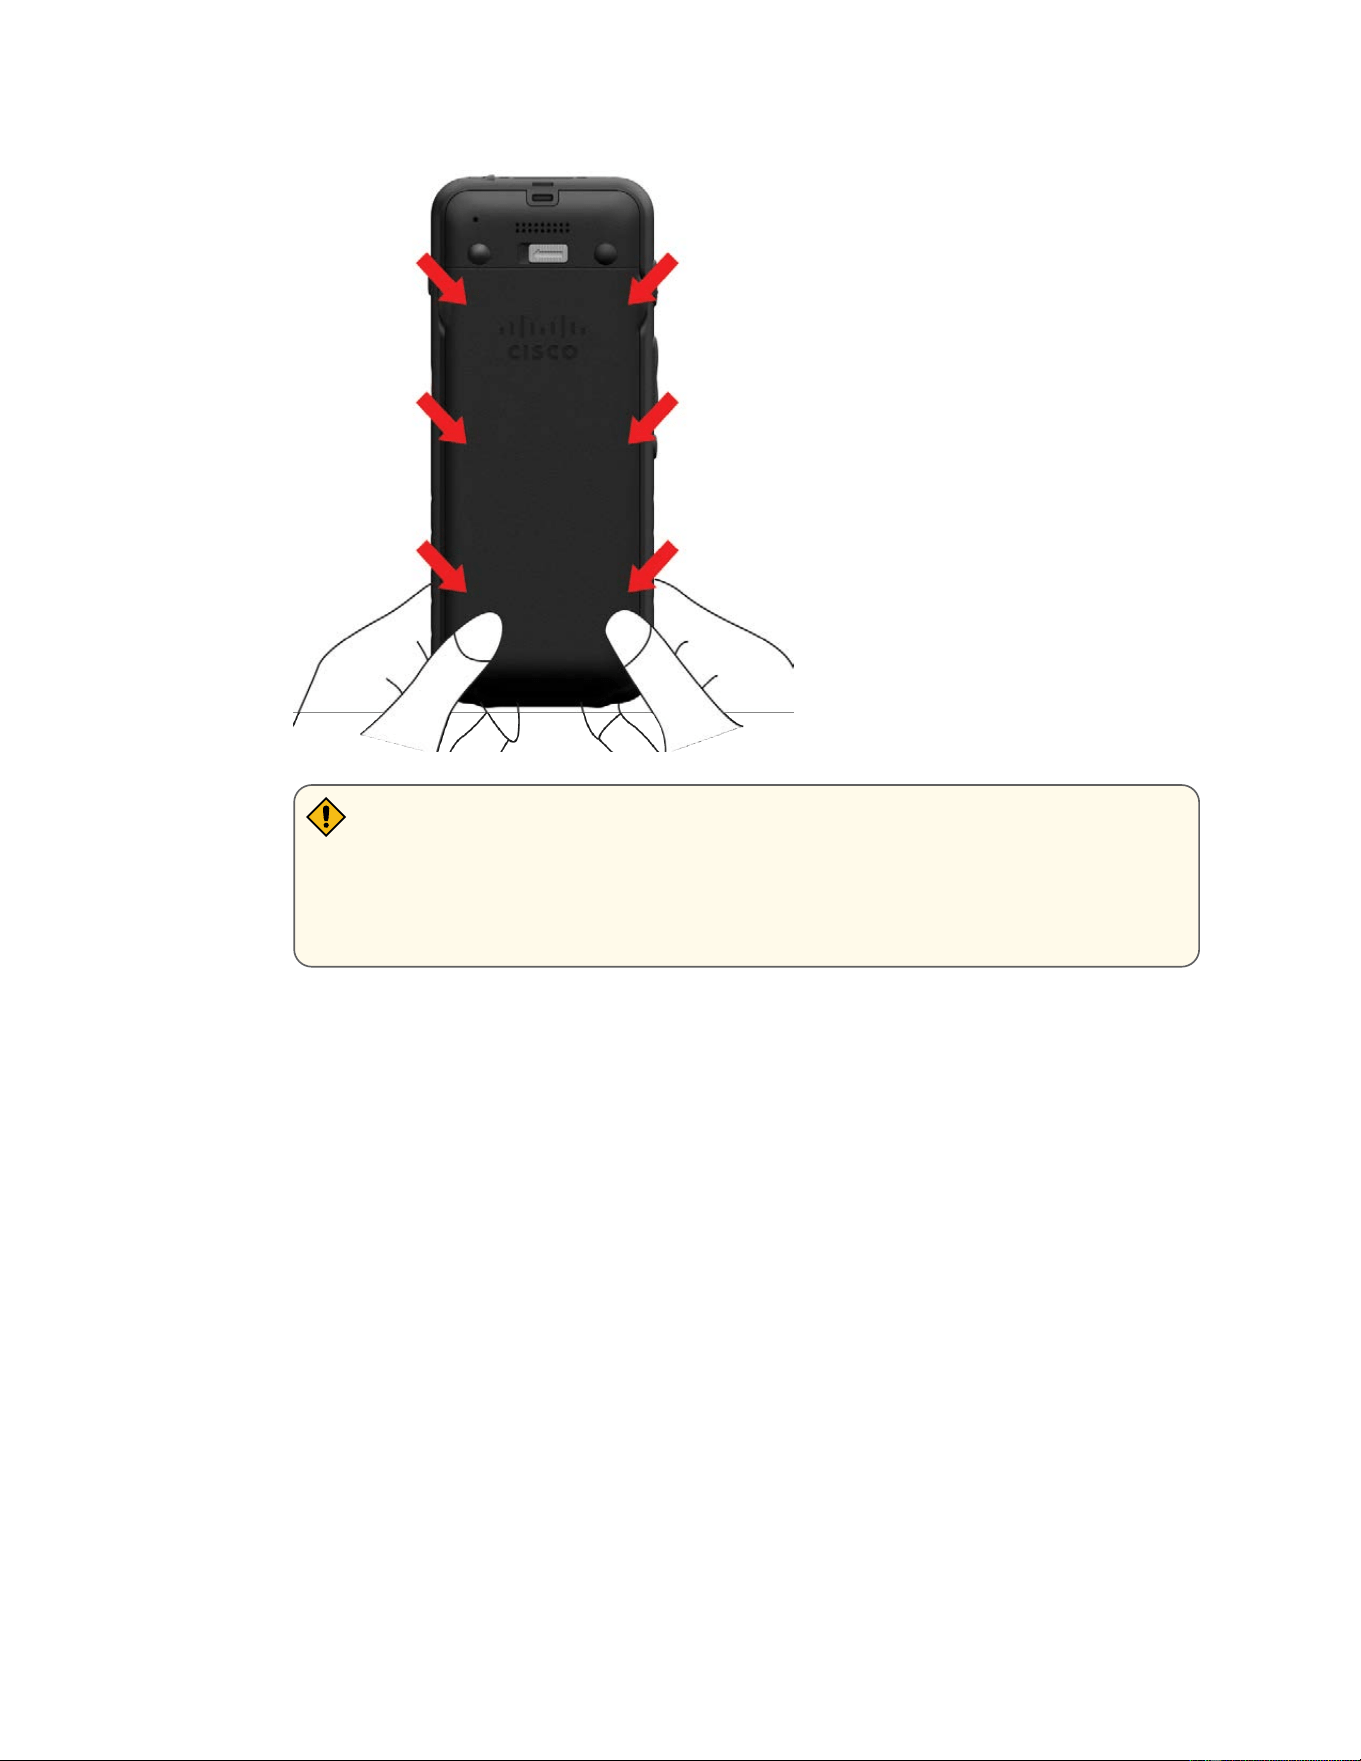
b. Press the cover rmly against the phone until it clicks in place. Press at the top, middle, and
bottom of the cover on each side.
CONFIDENTIAL DRAFT
Cisco Wireless Phone 9821 User Guide | 3 - Phone setup | 35
CAUTION:
Do not force the cover. If it doesn't click into place easily, remove the cover and
check that the battery is inserted correctly.
c. Check that the cover is ush with the phone along all four sides of the cover, then slide the
lock to the right to lock the cover in place.
CONFIDENTIAL DRAFT
Cisco Wireless Phone 9821 User Guide | 3 - Phone setup | 36
Note:
If the cover is not ush at the top, press the cover between the latch and the Cisco
logo.
Replace the Cisco Wireless Phone 9821 battery
Follow the instructions below to replace a depleted battery with a charged battery. Phone life and
functions could be compromised if:
• The battery is installed incorrectly.
• The battery cover is not closed properly.
• The IP54 gasket is poorly maintained or damaged.
The IP54 gasket is a sealing component on the inner edge of the battery compartment cover that
is designed to meet the IP54 Ingress Protection standard, ensuring protection against limited dust
ingress and water splashes from any direction.
• The phone is frequently dropped on a hard surface.
CAUTION:
• The expected lifecycle for a battery is two years. Based on the average usage, this
corresponds to approximately 500 charges. You can check the date printed on the battery
to calculate the age of the battery. We recommend you to replace the battery when it
reaches its end of life.
CONFIDENTIAL DRAFT
Cisco Wireless Phone 9821 User Guide | 3 - Phone setup | 37
• Dirt, oil, alcohol, or other products can damage the IP54 gasket on the battery
compartment cover, resulting in a poor seal. Every time you change the battery, inspect the
gasket for damage. If the gasket is damaged, you can order a replacement cover.
• Check the battery and battery compartment for physical signs of damage before you
replace your battery. Don't use a damaged battery in your phone. Properly dispose of the
damaged battery and use a new one.
1. Remove the cover from the battery compartment.
Your Cisco Wireless Phone 9821 is factory-sealed against dust and water. Ensure you are working
in a clean, dry environment to maintain the phone's dust and water resistance. In addition, don't use
tools to pry open the cover.
a. Push and hold the locking catch to the left to release the cover.
b. Use the tabs on the sides of the cover to lift the top of the cover and lift the cover up to
unlock the bottom tabs.
CONFIDENTIAL DRAFT
Cisco Wireless Phone 9821 User Guide | 3 - Phone setup | 38
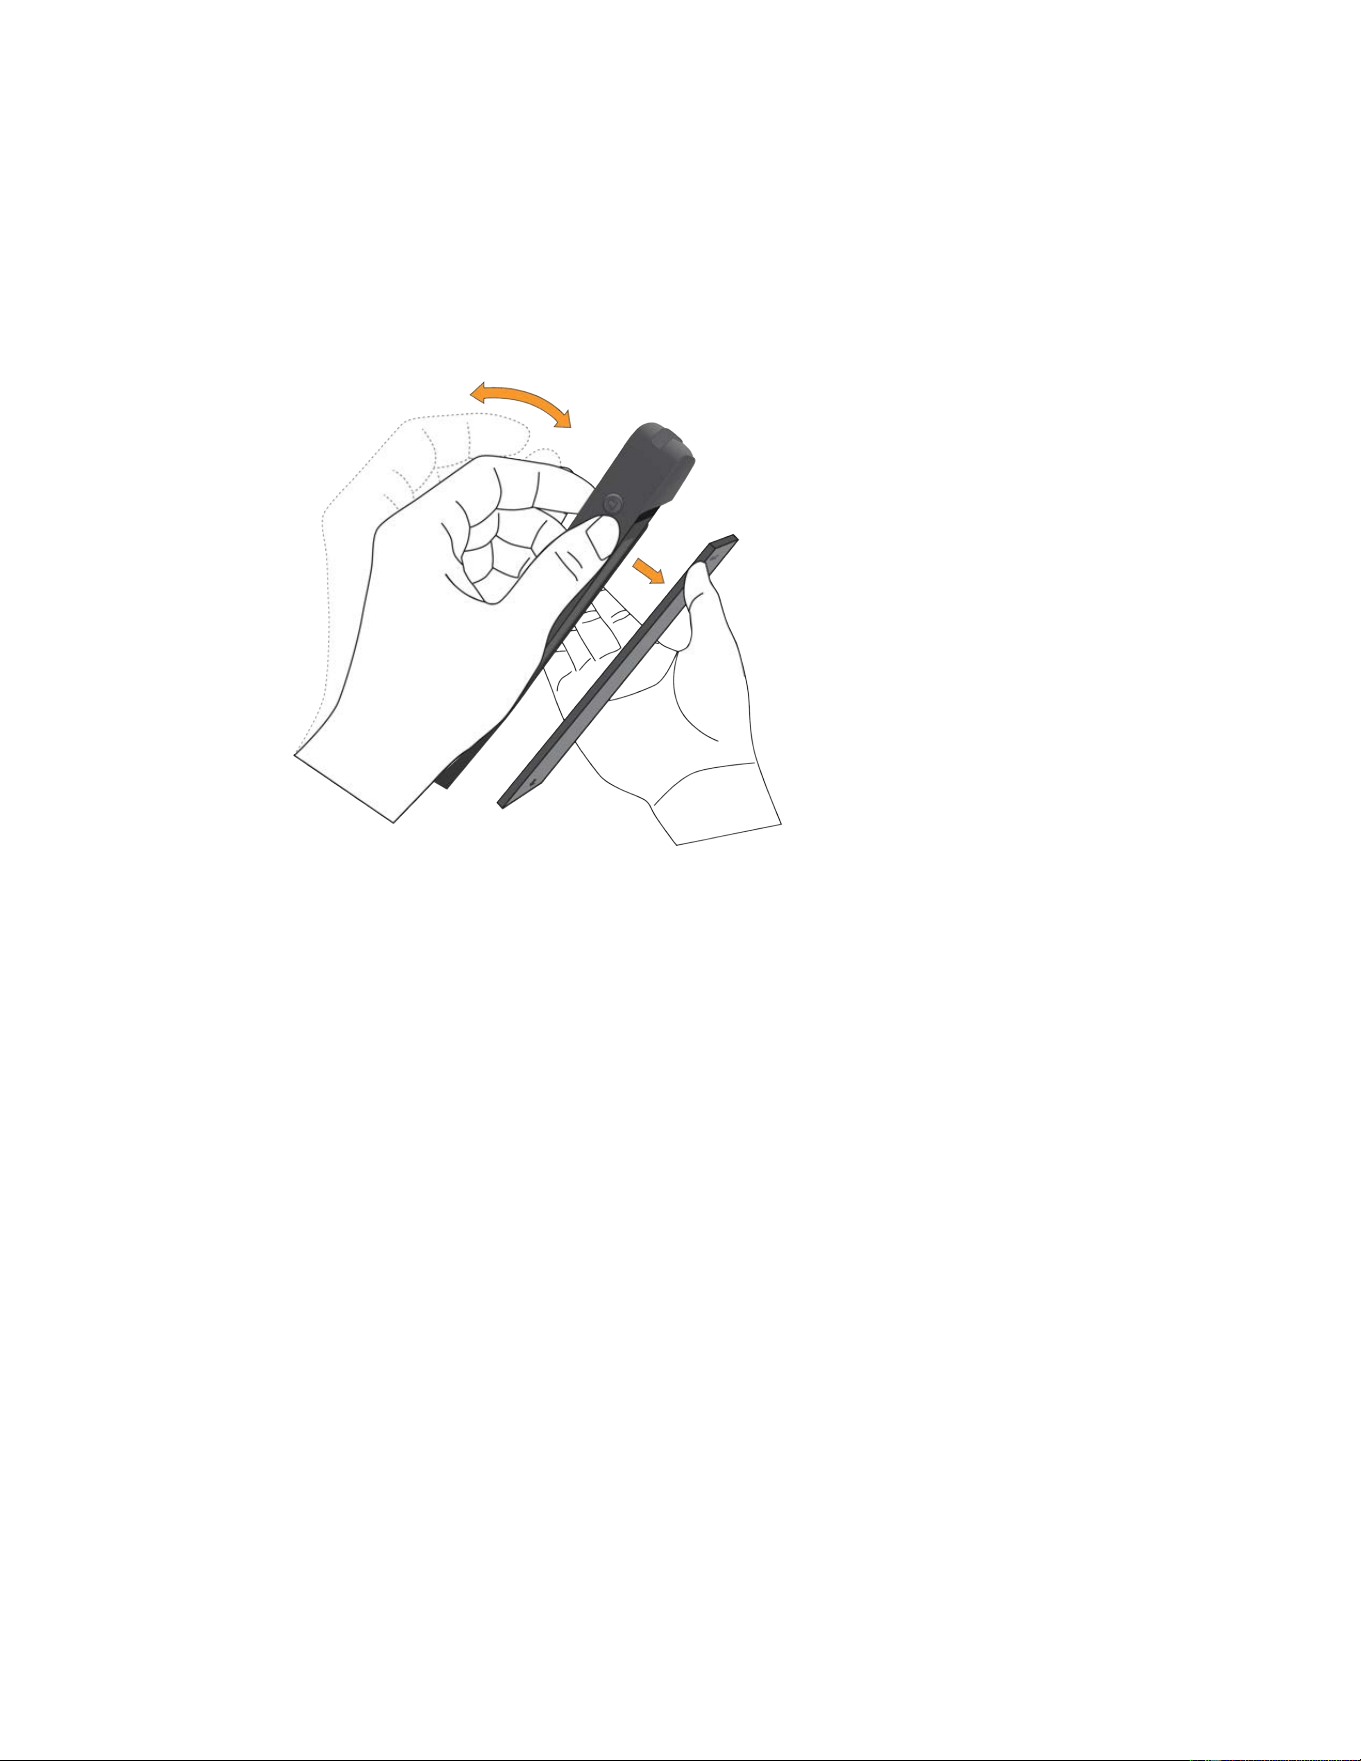
2. Do one of these actions:
◦ Pull the battery tab away from the phone.
◦ (Optional) Hold the phone in one hand with the screen towards the palm of your hand. Cup
your other hand near the base of the phone. Shake the phone to make the battery fall into
your hand.
3. Refer to Install the Cisco Wireless Phone 9821 battery for detailed instructions about how to install
a new battery.
Identify damaged battery
Your phone battery can develop physical signs of damage. Physical signs include:
• Swelling
• Bending
• Broken end caps

CONFIDENTIAL DRAFT
CONFIDENTIAL D AFT
Cisco Wireless Phone 9821 User Guide | 3 - Phone setup | 40
Swollen battery
Identication
• The battery doesn't sit at on a table. It may rock if you touch the corners.
• The installed battery is not at in the battery compartment.
• The back cover won't completely close (especially in the middle of the door)
• The battery doesn't fall out of the battery compartment when you try to remove it. You may think
that you need to pry the battery out of the compartment.
CAUTION:
The battery may swell along the length or width, which makes the battery hard to remove.
Don't use tools to pry open the battery door or remove the battery out of the compartment.
CONFIDENTIAL DRAFT
Cisco Wireless Phone 9821 User Guide | 3 - Phone setup | 41
Bent battery
Identication
The battery doesn't sit at on a table. It may rock if you touch the corners.
End caps are broken or damaged
Identication
The plastic caps at the ends of the battery aren't properly attached.
You can charge the battery using any of the following options:
• USB cable—Charge the phone using an AC power adapter or your computer.
• Desktop charger—Charge the phone while using it simultaneously.
• Multicharger—Charge up to six phones and six batteries at the same time.
The battery takes about 3 hours to charge in the AC power adapter, desktop charger, or multicharger. It
takes about 6 hours to charge using the USB cable and your computer.
If you need longer talk times, having a spare, fully charged battery is recommended. Spare batteries can
be charged using the desktop charger or multicharger.
CAUTION:
Do not charge the phone in a hazardous environment.
Do not charge the phone if it is wet.
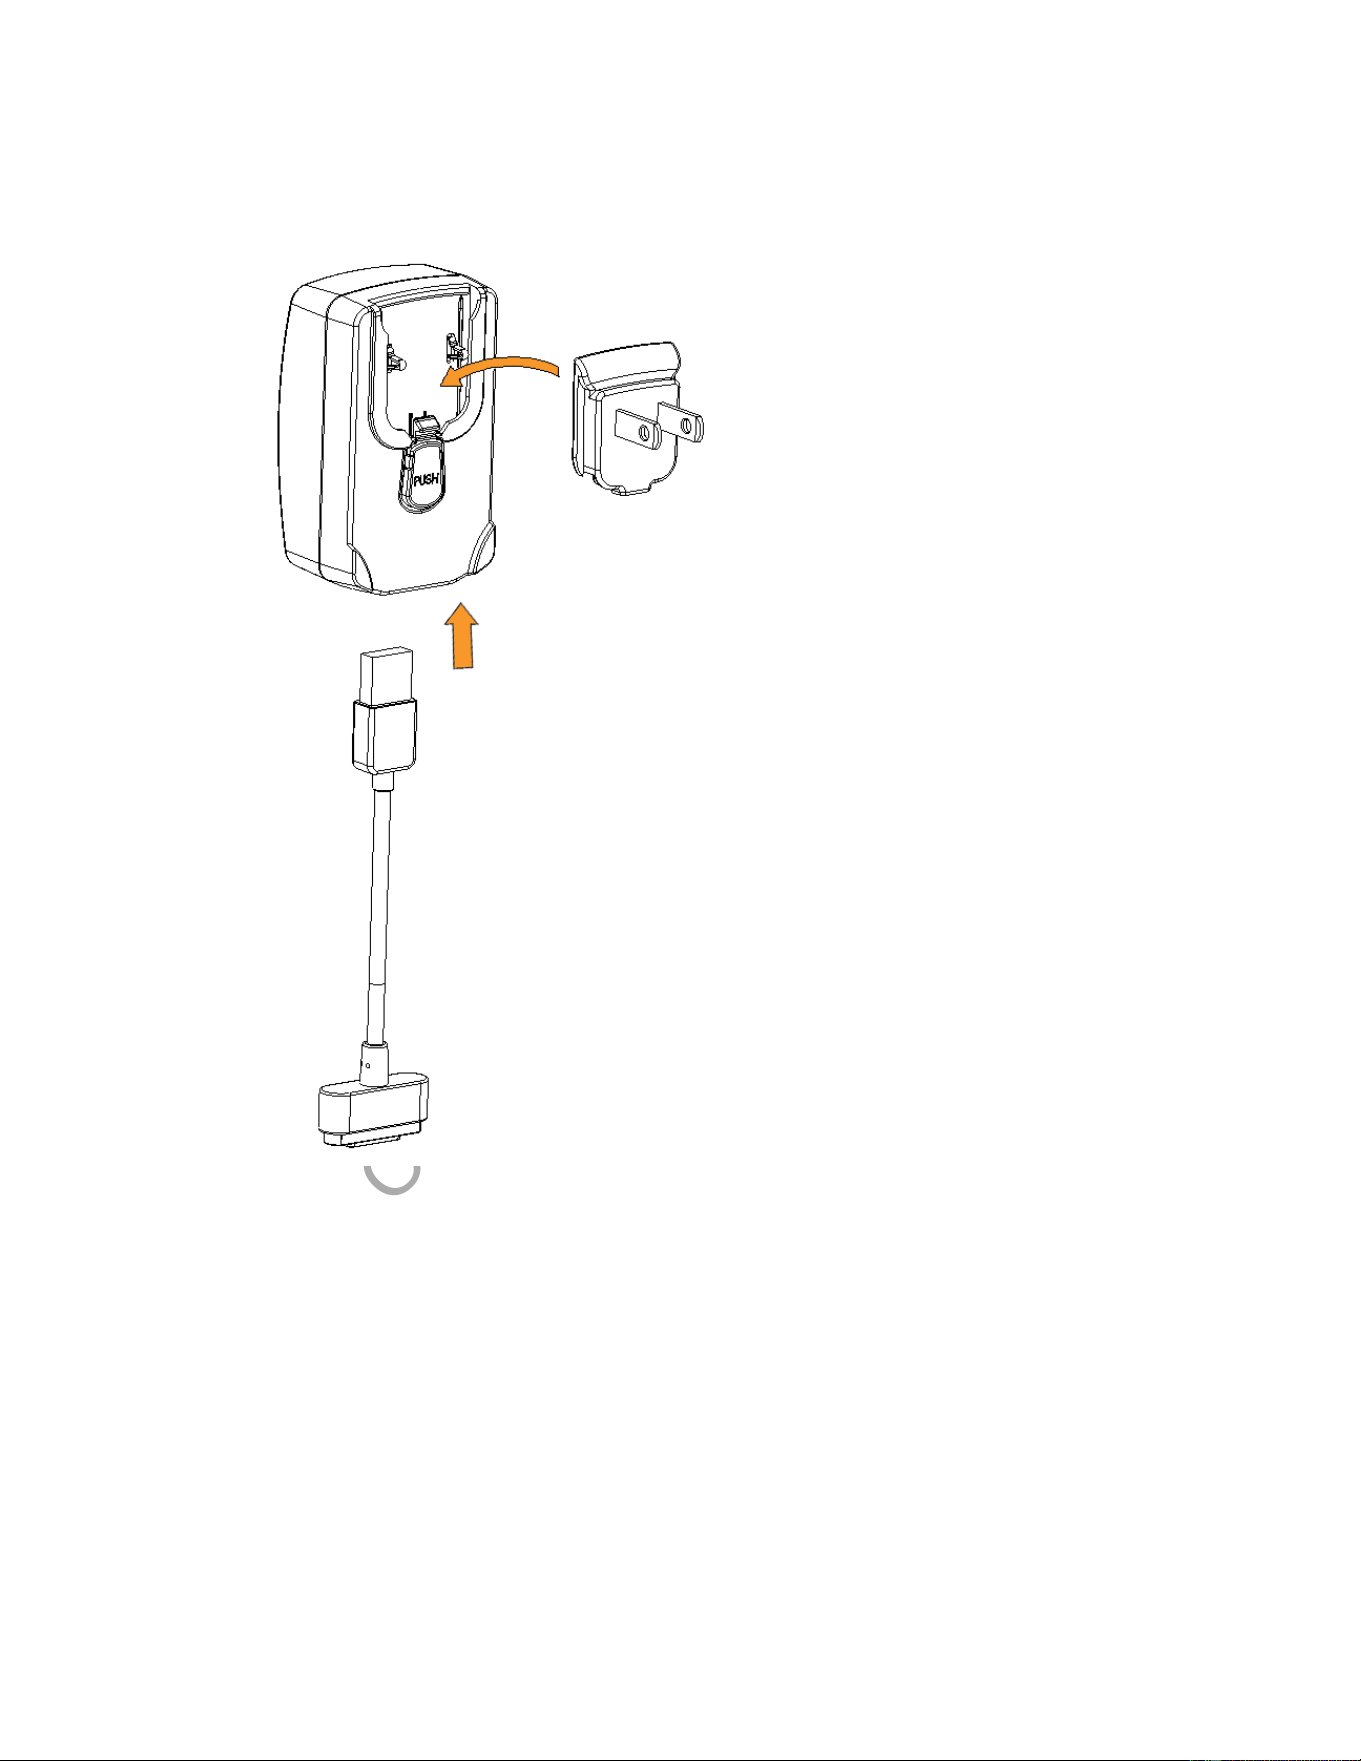
Prepare the power adapter
The power adapter for your phone is split. Before using the power adapter, you have to attach the power
adapter replacement plug to the power adapter.
Charge phone battery
CONFIDENTIAL DRAFT
Cisco Wireless Phone 9821 User Guide | 3 - Phone setup | 42
1. Align the tabs on the underside of the plug with the recesses on the power adapter.
2. Slide the plug into the power adapter until it clicks into place.
To remove the power adapter replacement plug, press and hold the PUSH button and slide the power
adapter replacement plug up.
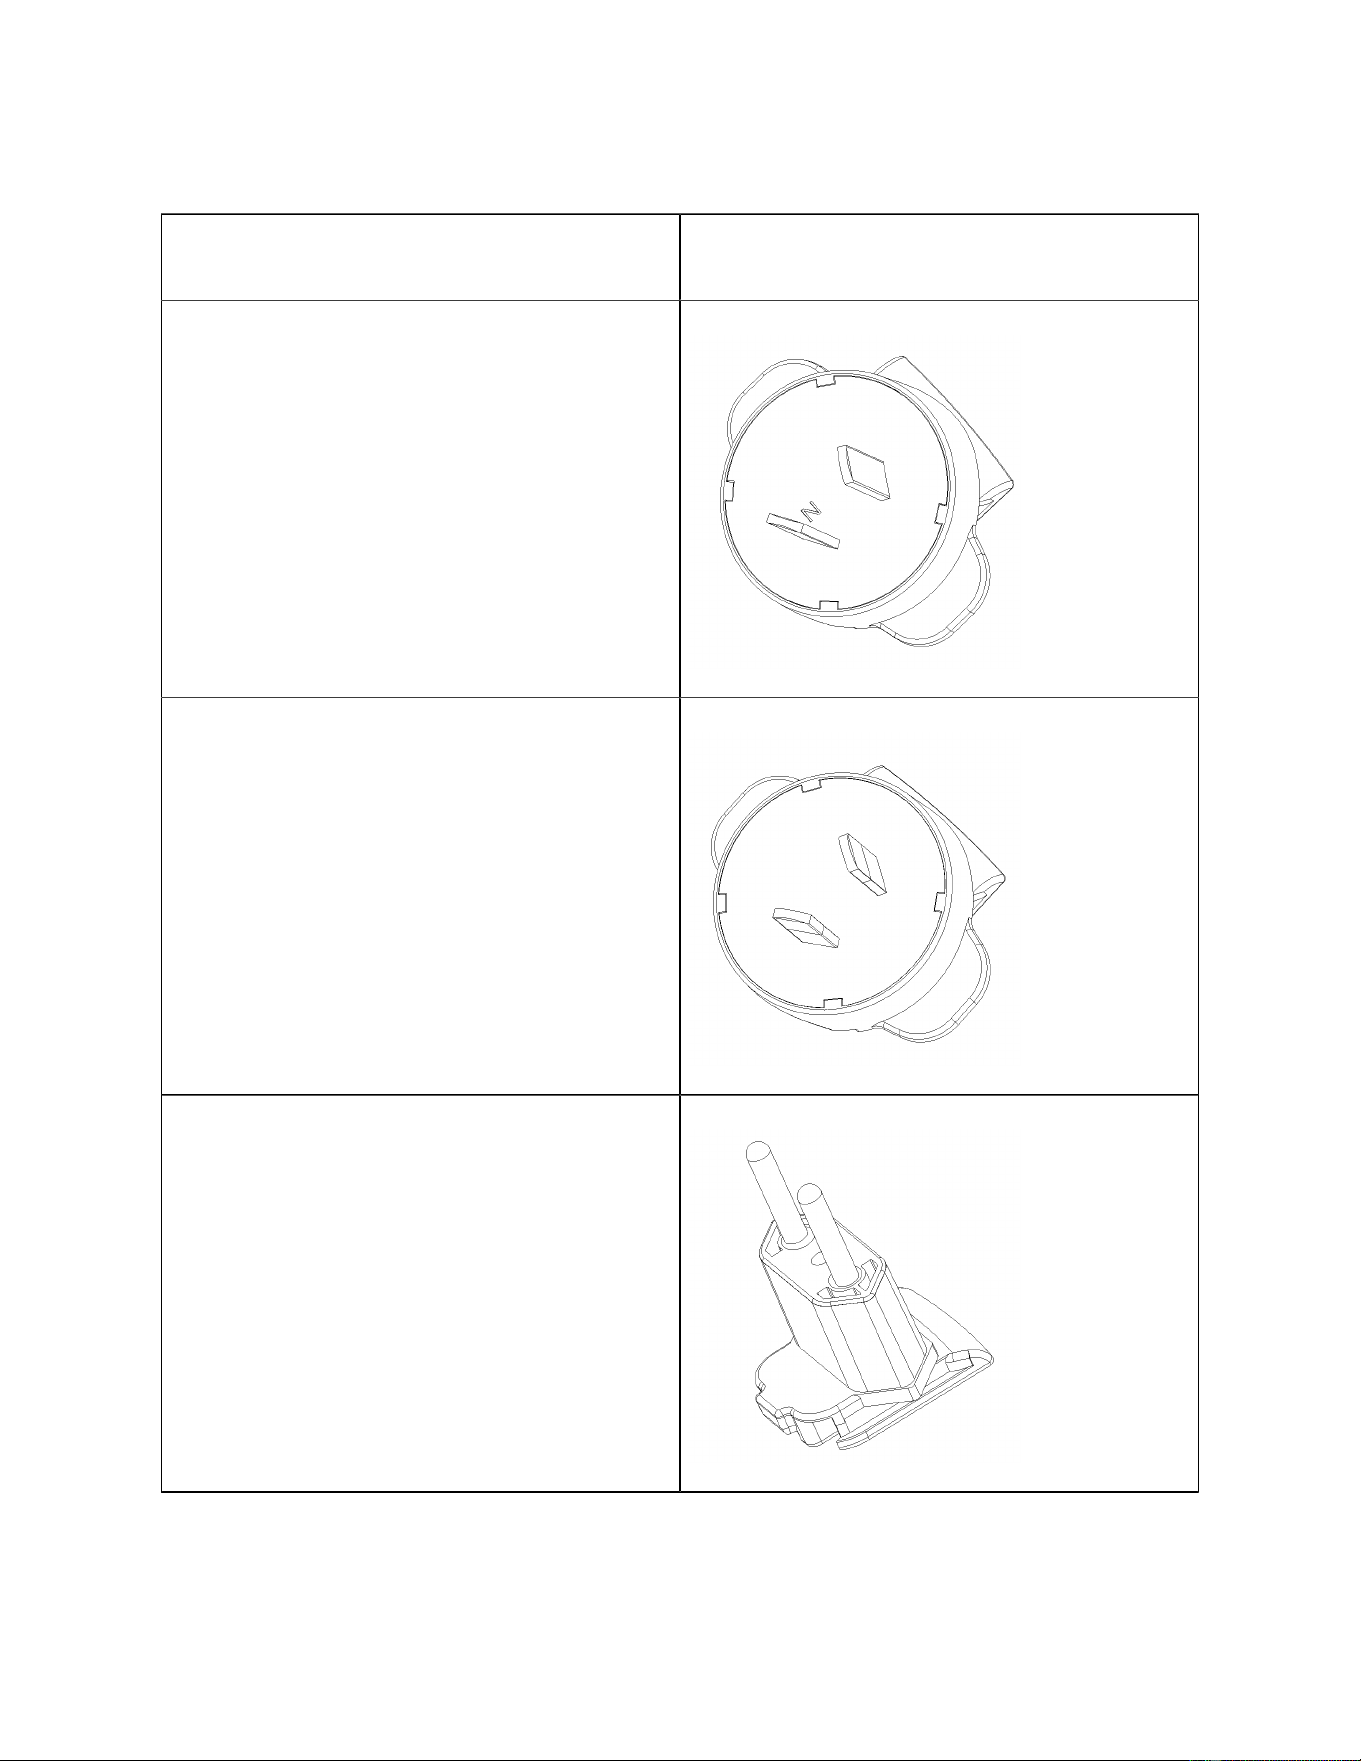
AC adapter replacement plugs
Based on the country or region you're in, your Cisco Wireless Phone 9821 includes one of the eight
different AC adapter replacement plugs.
CONFIDENTIAL DRAFT
Cisco Wireless Phone 9821 User Guide | 3 - Phone setup | 43
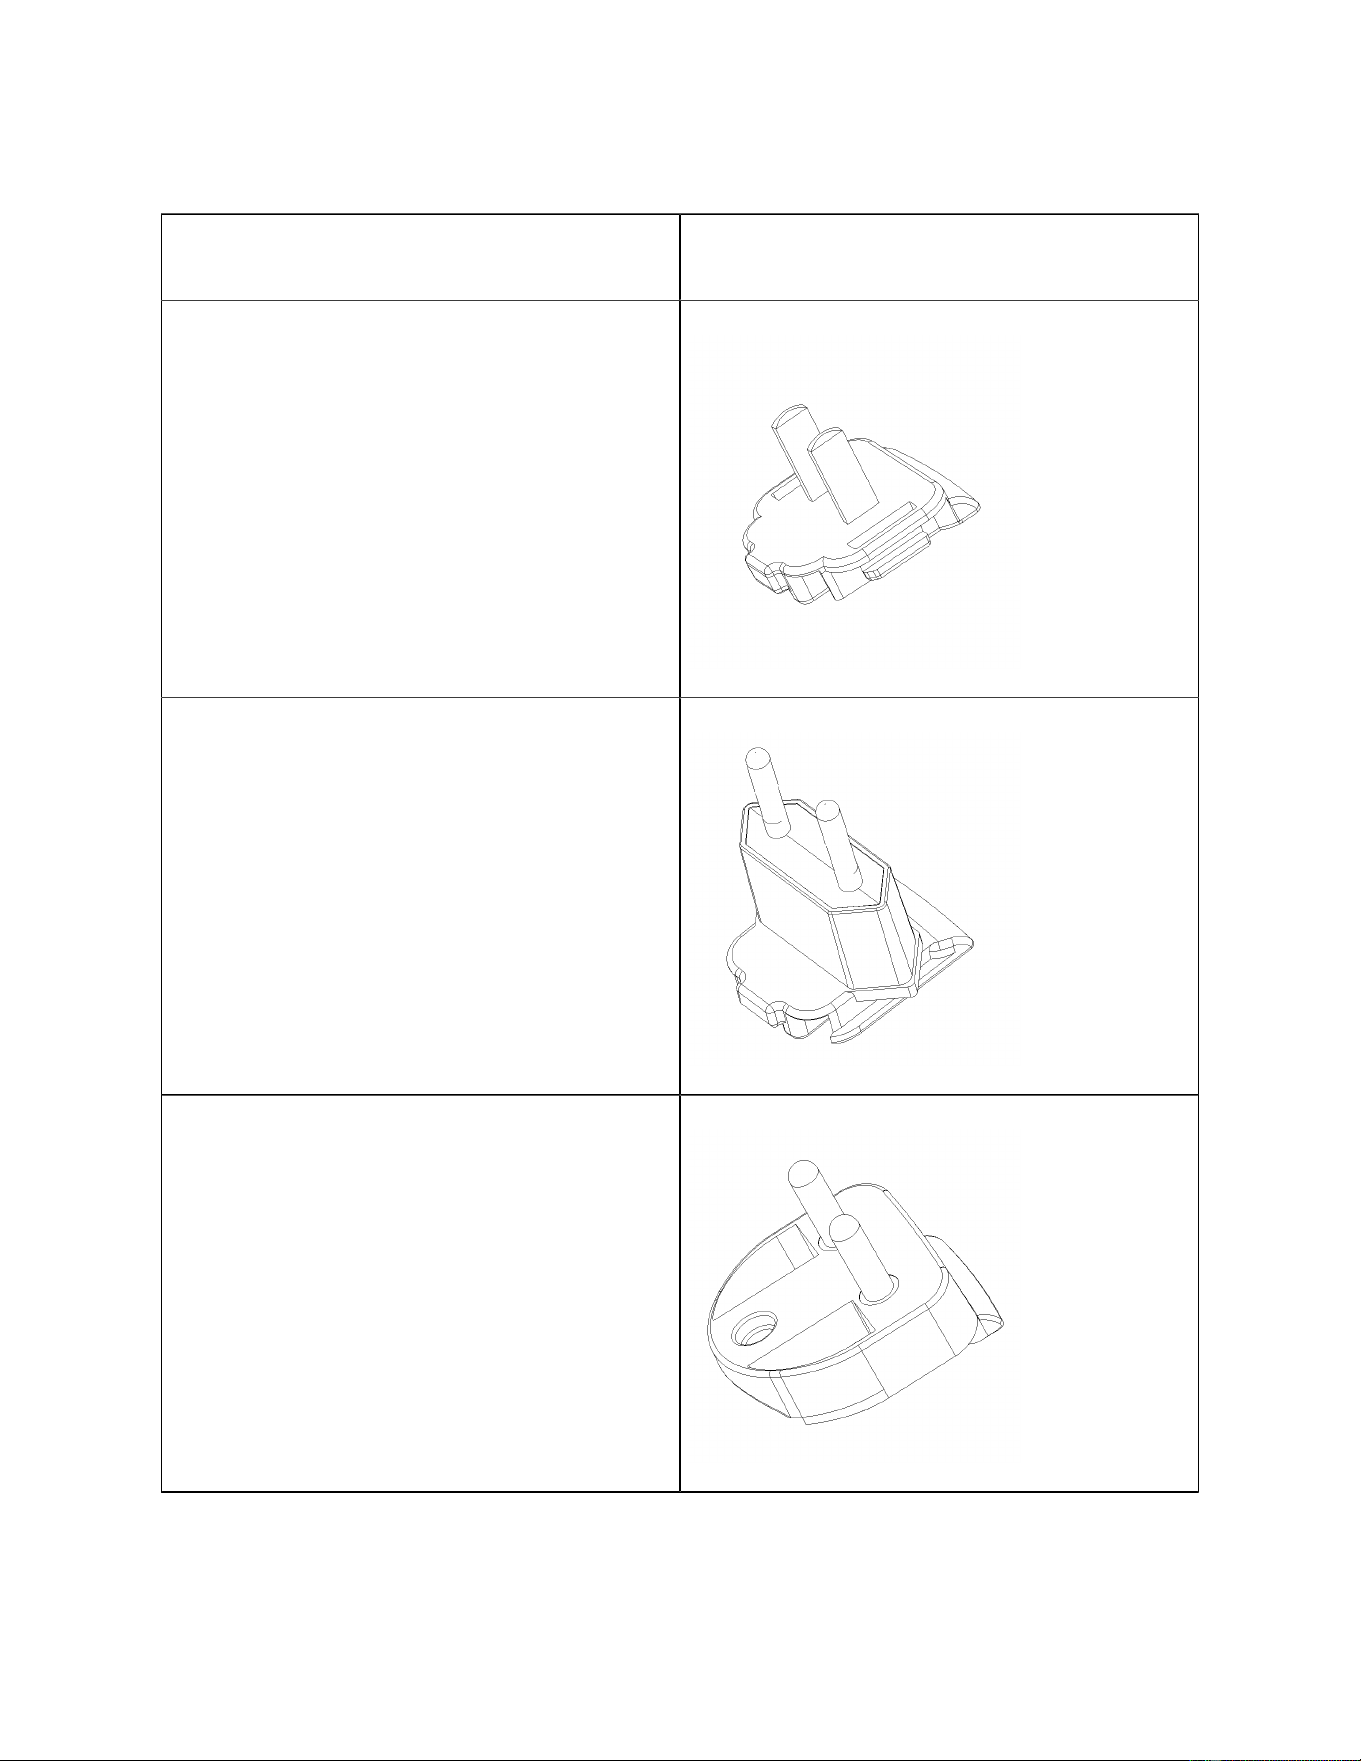
Table 9. AC adapter replacement plugs
Country or region AC adapter replacement plugs
Argentina
Australia
Brazil
CONFIDENTIAL DRAFT
Cisco Wireless Phone 9821 User Guide | 3 - Phone setup | 44
Table 9. AC adapter replacement plugs (continued)
Country or region AC adapter replacement plugs
China
European Union
India
CONFIDENTIAL DRAFT
Cisco Wireless Phone 9821 User Guide | 3 - Phone setup | 45
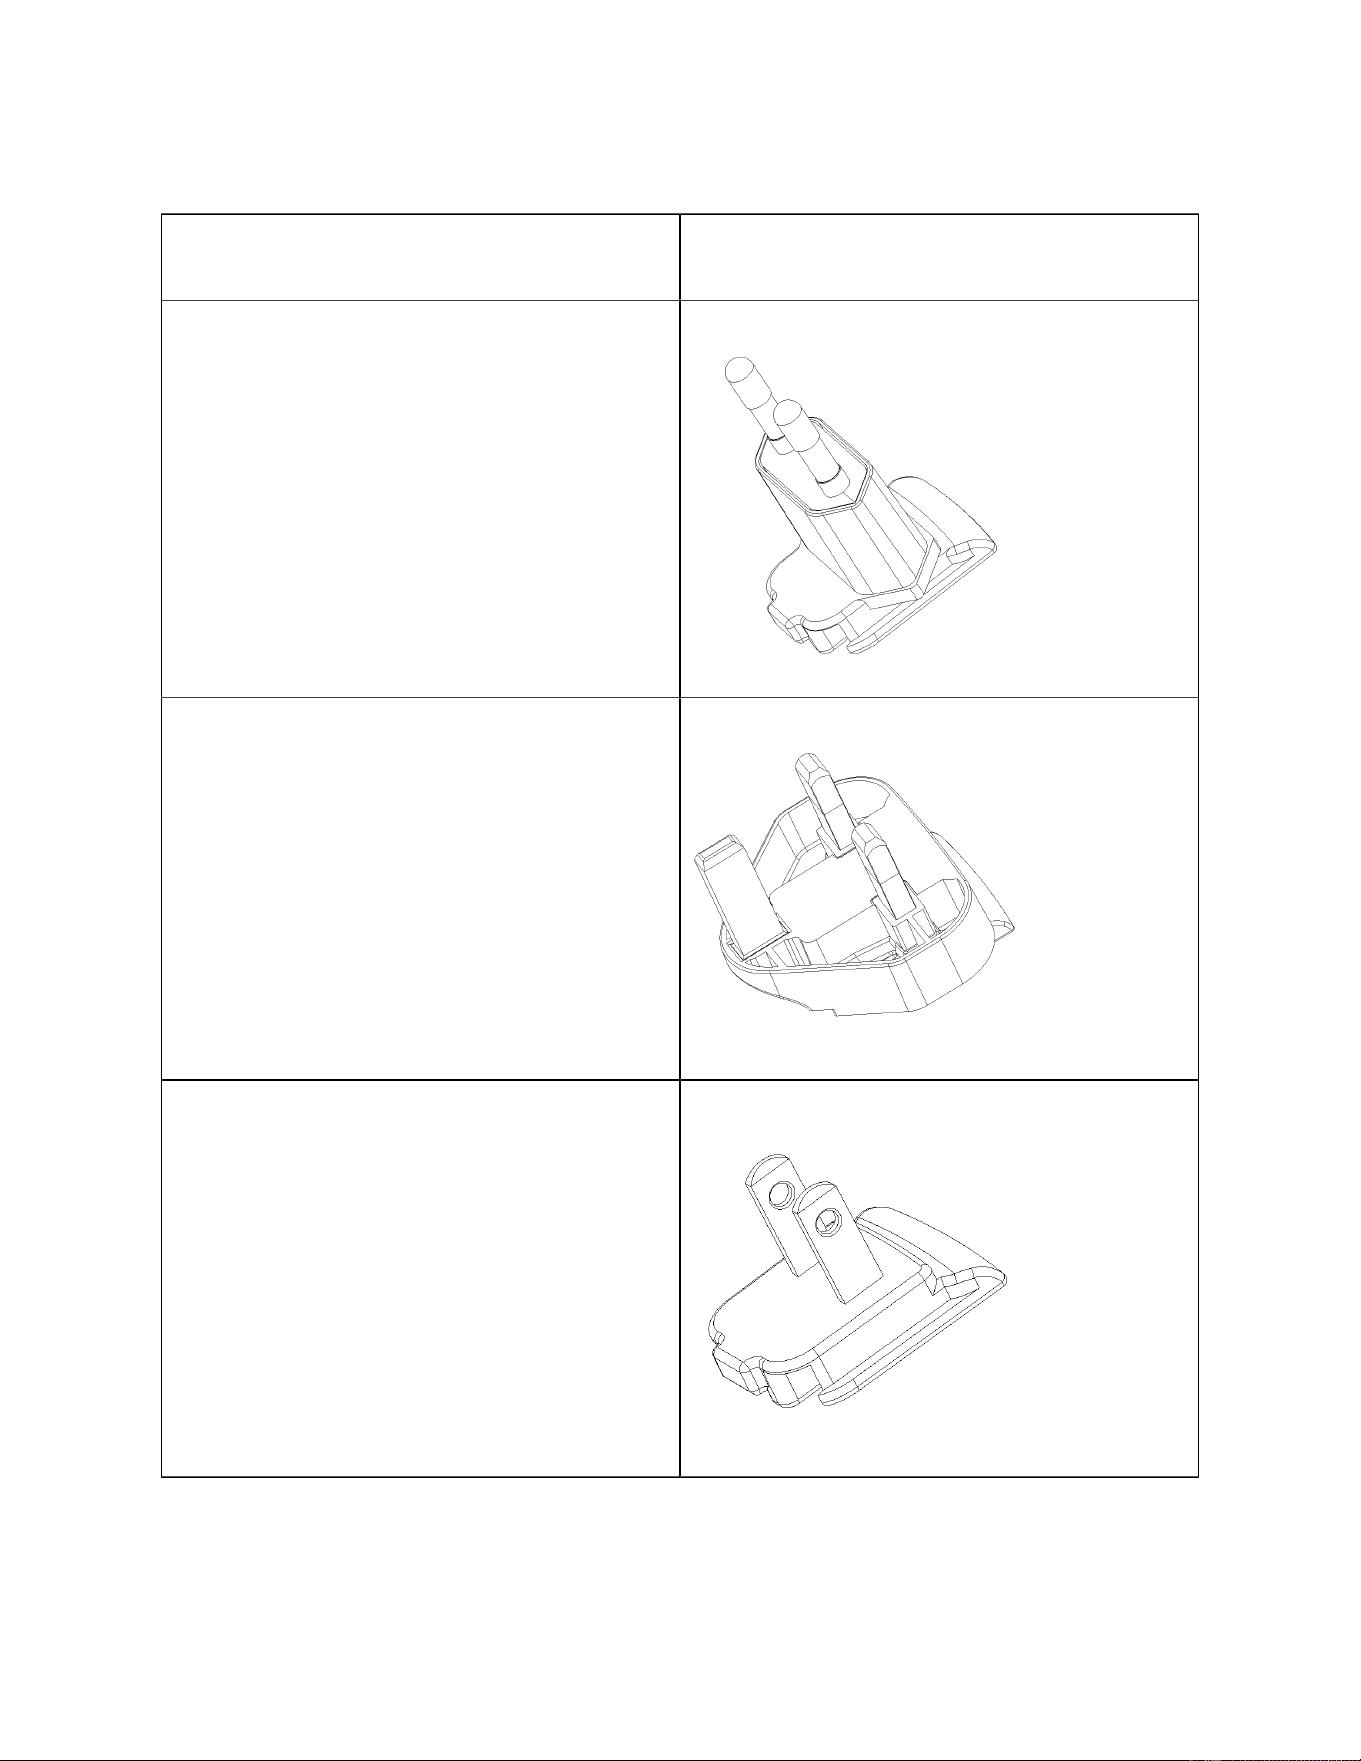
Table 9. AC adapter replacement plugs (continued)
Country or region AC adapter replacement plugs
Korea
United Kingdom
United States
CONFIDENTIAL DRAFT
Cisco Wireless Phone 9821 User Guide | 3 - Phone setup | 46
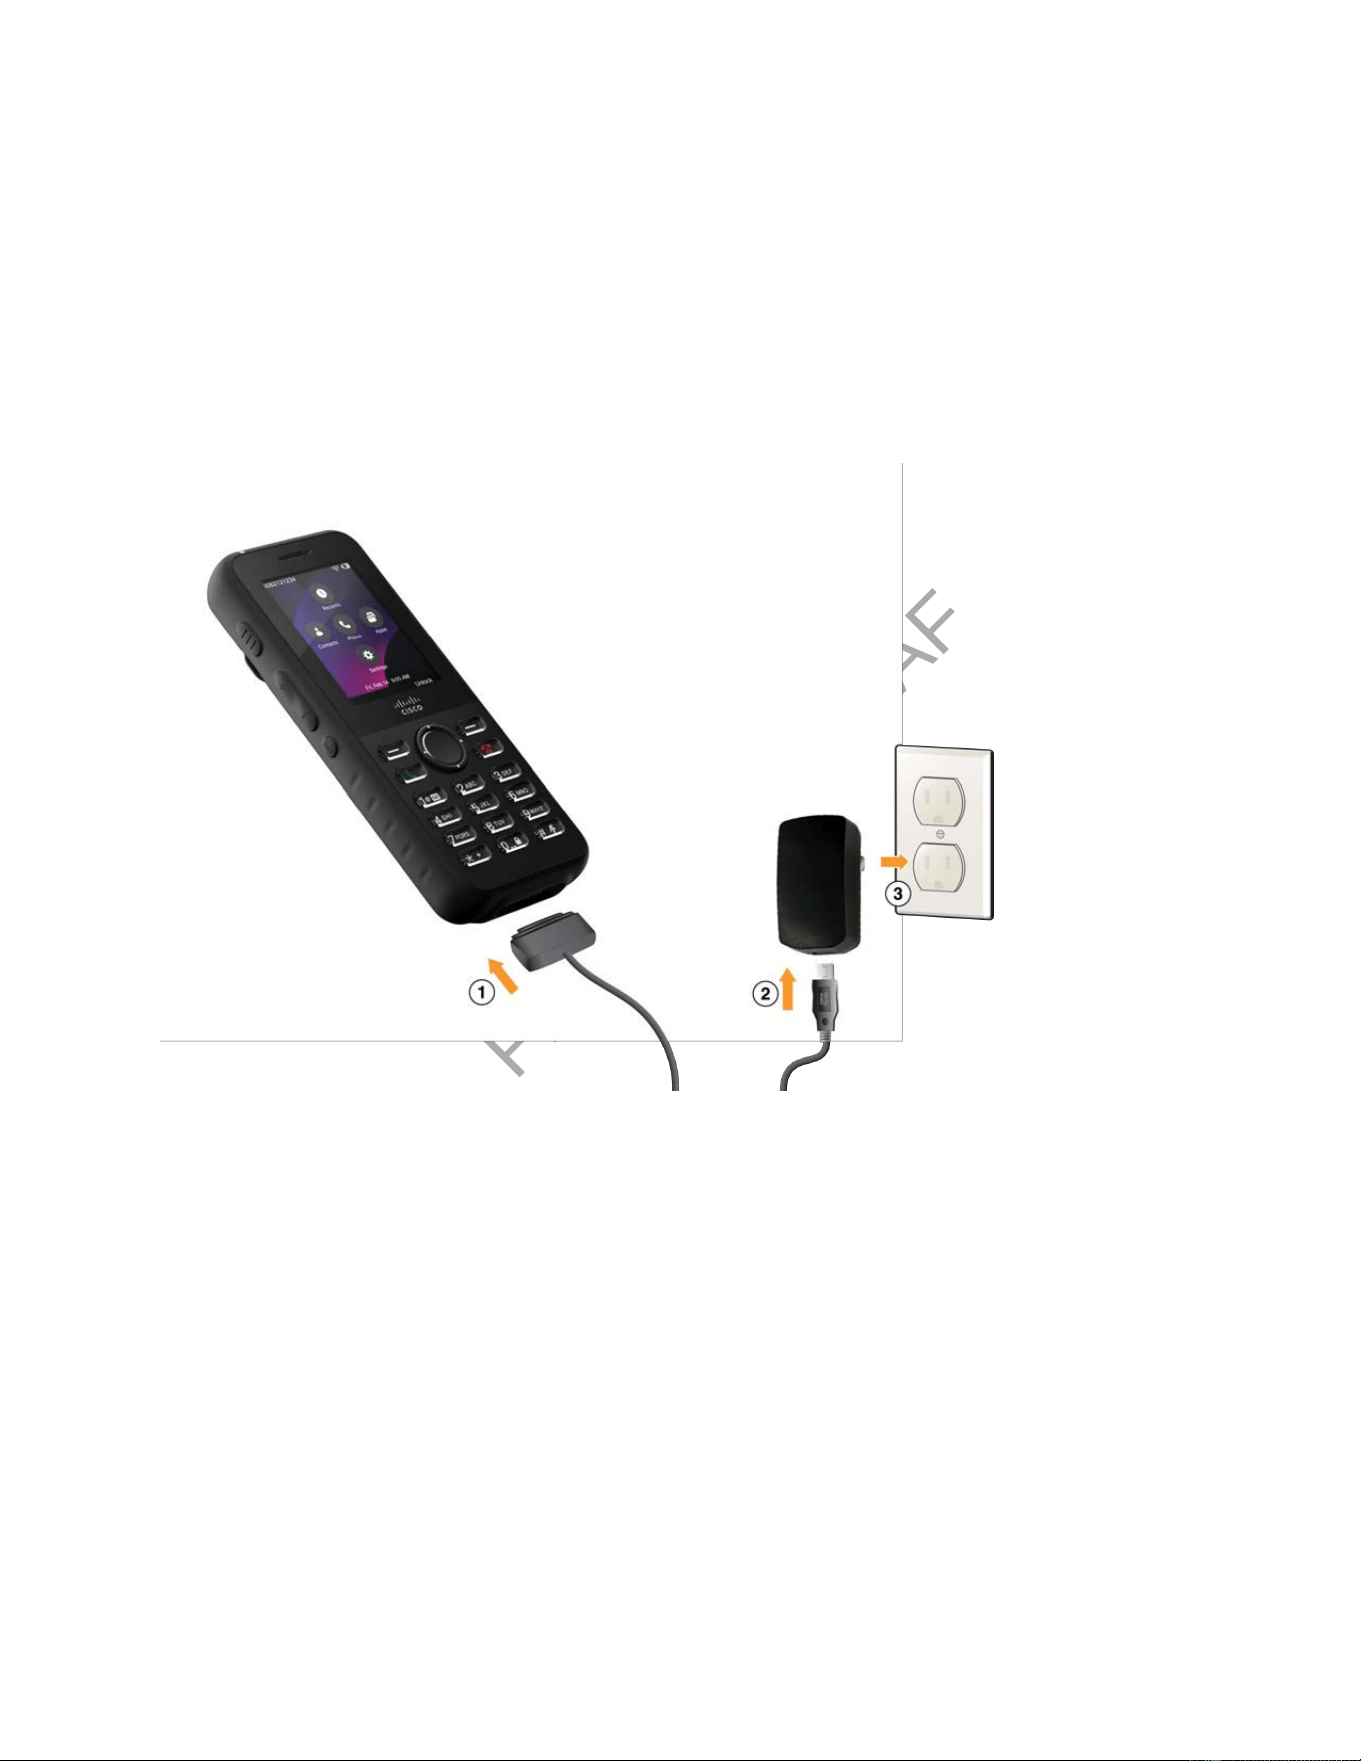
Charge the battery with the AC power supply
You can charge your phone using an AC power supply. When charging with the power supply, the battery
may take up to 3 hours to fully charge.
The wide connector on the USB cable attaches to the phone magnetically to hold it securely in place. It
has pins that must be aligned correctly. When holding the phone with the screen facing you, the battery
icon on the connector will be visible.
1. Plug the wide connector of the USB cable into the charging port of the phone with the pins aligned.
If you hold the phone so that the screen is towards you, the battery icon on the connector is visible.
2. Plug the other end of the USB cable into the power adapter.
3. Plug the power adapter into the electrical outlet.
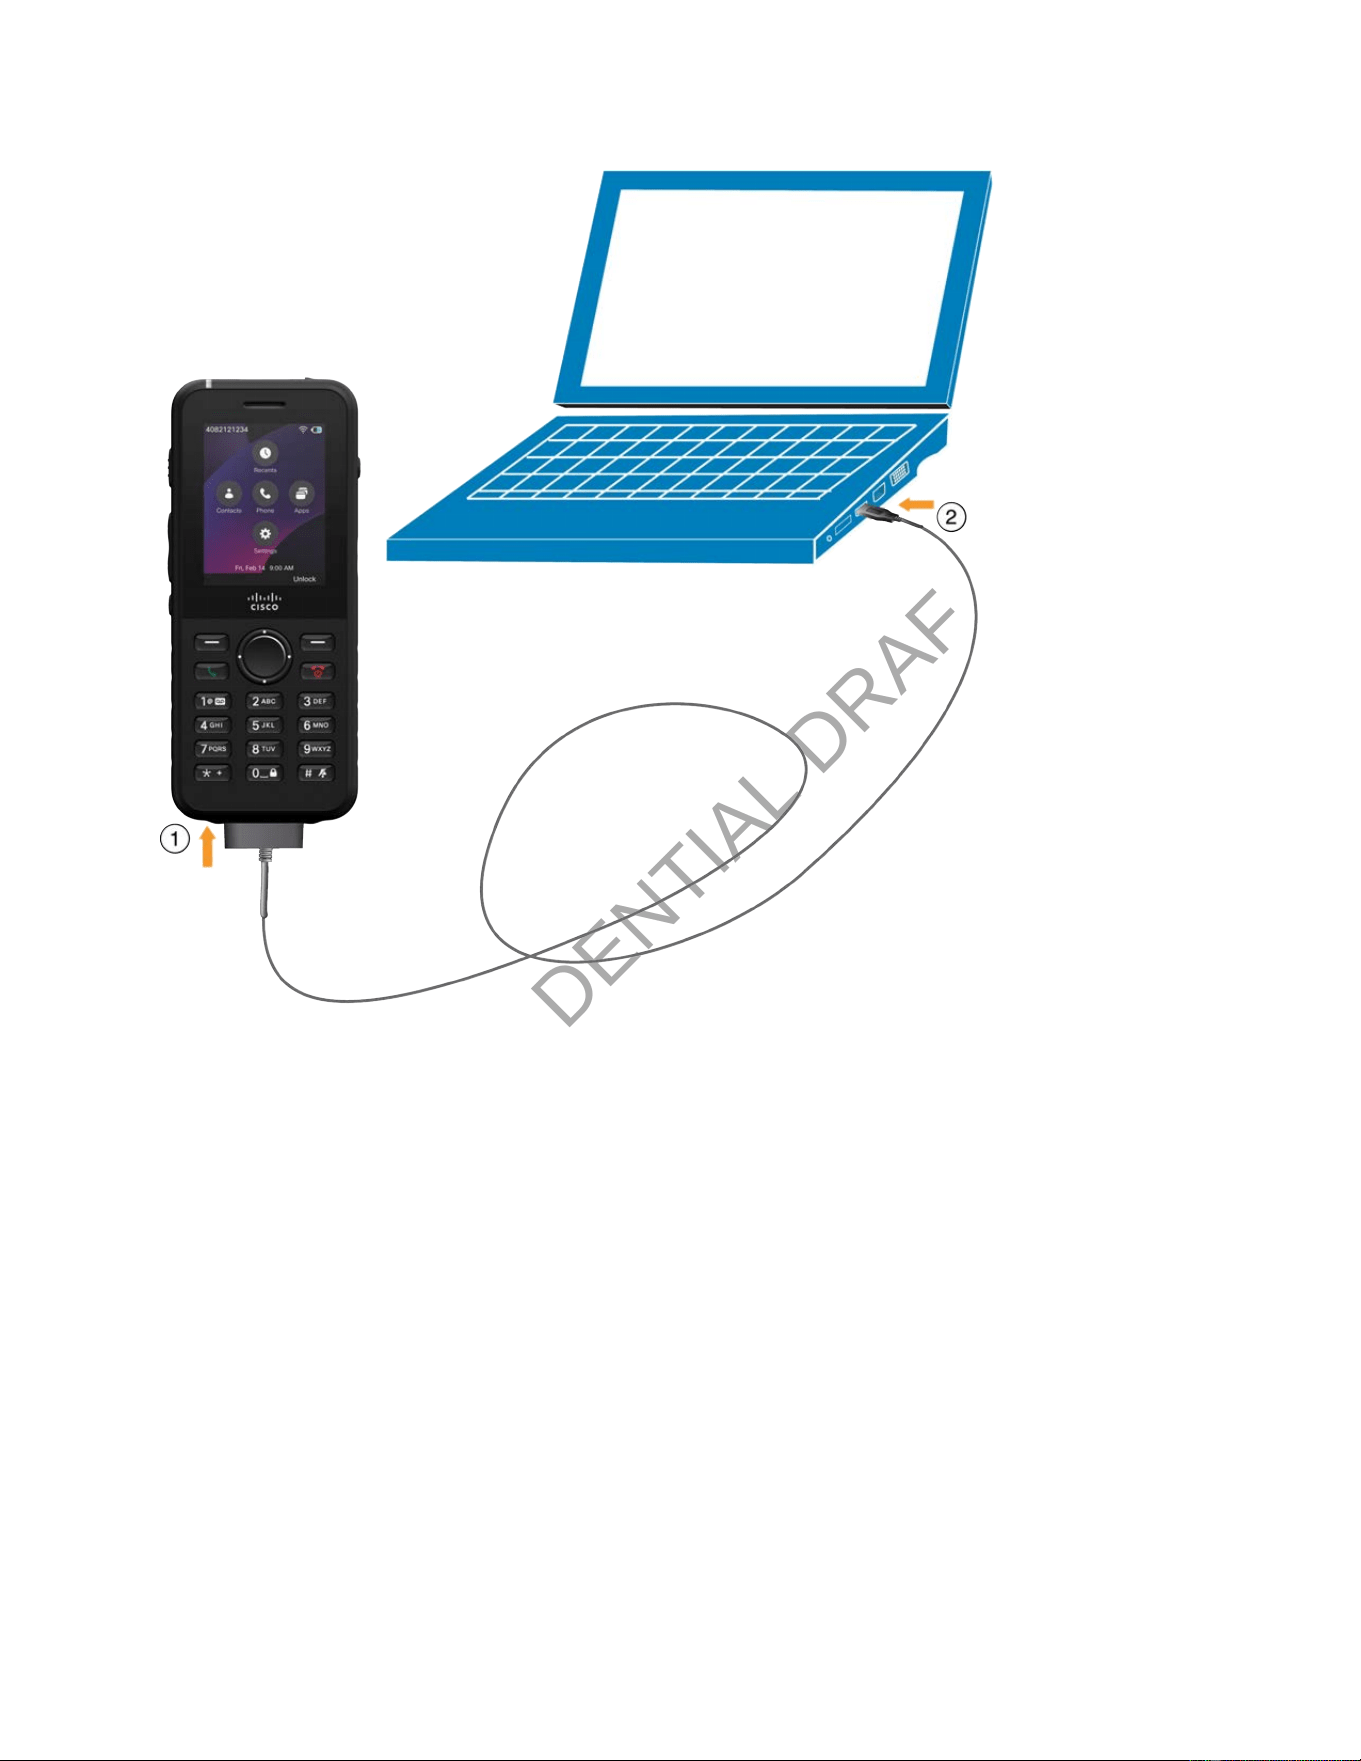
Charge the battery with your computer
You can charge your phone using your computer. When charging with the computer, the battery may take
up to 6 hours to fully charge.
The wide connector on the USB cable attaches to the phone magnetically to hold it securely in place. It
has pins that must be aligned correctly. When holding the phone with the screen facing you, the battery
icon on the connector will be visible.
CONFIDENTIAL DRAFT
Cisco Wireless Phone 9821 User Guide | 3 - Phone setup | 47
1. Plug the wide connector of the USB cable into the charging port of the phone with the pins aligned.
If you hold the phone so that the screen is towards you, the battery icon on the connector is visible.
2. Plug the other end of the USB cable into the USB port in the computer.
To charge a Cisco Wireless Phone 9821 with a spare battery at the same time, see Desktop charger.
To charge up to six Cisco Wireless Phone 9821 with six spare batteries at the same time, see
Multicharger.
Phone battery life
Your phone contains a lithium ion battery. When fully charged, the battery provides:
CONFIDENTIAL DRAFT
Cisco Wireless Phone 9821 User Guide | 3 - Phone setup | 48
• Up to 11.5 hours of talk time
• Up to 145 hours of standby time
Battery life depends on a number of factors, including:
• On time—Battery life decreases when the phone is turned on. Activities such as calls, messaging,
application use, Bluetooth usage, and menu navigation consume power.
• Scan mode—The phone can scan access points in three different ways (Continuous, Auto, and
Single AP). Using Continuous or Auto scan modes requires more power, which reduces talk time.
• Background noise lter—Talk time may reduce to 8.5 or 9.5 hours when this feature is turned on.
If you need longer talk times, it is advisable to have a spare, fully charged battery available.
Warning:
Use only approved batteries that come with your Cisco Wireless Phone 9821 or are specied by
Cisco. Use of unapproved batteries might be dangerous and invalidates the warranty on your
phone. To obtain replacement batteries, contact your local dealer and use only Cisco specied
batteries with the correct part number.
Note:
The expected lifecycle for a battery is two years. Based on the average usage, this corresponds to
approximately 500 charges. You can check the date printed on the battery to calculate the age of
the battery. We recommend you to replace the battery when it reaches its end of life.
Low battery warning
Your phone has two low battery warning levels. When the battery charge reaches each level, a low battery
alarm sounds and a warning message appears on the screen. Depending on the warning level, you have a
specic amount of time to either charge or replace the battery before the phone automatically powers off.
The following table describes the low battery warning levels.

CONFIDENTIAL DRAFT
Cisco Wireless Phone 9821 User Guide | 3 - Phone setup | 49
Table 10. Low battery warning levels
Level
Warning appears at this
battery charge level
Onscreen warning
Length of time that the
warning stays on screen
2 10% Warning: Battery is low
Please connect charger.
5 seconds
1 2% Warning: Battery is low
Phone will power off.
Until the phone powers off
(1 minute)

CONFIDENTIAL DRAFT
Chapter 4. Calling
Access the Phone app
We make it easy for you to make and receive calls with the Phone app.
If your home screen is line view, then you are already in the Phone app.
Use one of these ways to access the Phone app:
• From the Application view screen, press the Select button in the center of the Navigation Cluster to
select Phone .
• Press Answer/Send to make a call or to answer an incoming call.
• Enter a number using the keypad to make a call.
Make and answer calls
Your Cisco Wireless Phone 9821 works just like a regular phone. For example, you can make an outgoing
call or answer an incoming call through the phone.
Make a call
You have different ways to make a call. If your phone has multiple lines congured, you can use a
particular line to make a call. The extension that displays on the top left is your currently selected line. If
you don't select an extension before you dial a number, then the primary line is used by default.
1. From the Applications view, do one of the following actions to make a call based on your
convenience.
◦ Enter a phone number. Press Answer/Send .
◦ Enter a phone number. Press More and select Call.
◦ Access the Phone app. Select a line. Enter a phone number and then press Answer/Send.
◦ Access the Phone app. Select a line. Select a number in the Recents list and then press Call.
2. Optional: If you want to make a new call to another person during the current active call, press
Hold to put the active call on hold, and then press New call.
CONFIDENTIAL DRAFT
CONFIDENTIAL DRAFT
Cisco Wireless Phone 9821 User Guide | 4 - Calling | 51
Note:
According to your administrator's conguration, the New call softkey might appear during
the current active call. In this case, you can press the softkey to make a new call directly.
Once you press the softkey, the current active call will be put on hold automatically.
3. Optional: If you want to return to the Applications view during an active call, press the left arrow on
the Navigation Cluster.
Do one of the following actions to end a call:
• Press More and select End call.
• Press Power/End Call .
Make an emergency call
Your phone must be set up to obtain your physical location. Emergency services personnel need your
location to nd you when you make an emergency call.
Use your phone to make an emergency call, similar to any other call. When you dial the emergency
number, your emergency services get your phone number and location so that they can assist you. If your
call disconnects, the emergency services can call you back.
1. If your phone is not turned on, press Power/End Call for 4 seconds to power on the phone.
2. Use the keypad to enter your emergency number.
You can make an emergency call from your phone, even if the phone is locked. When you start to
dial the emergency number, the list of emergency numbers displays although you cannot select the
number. If you try to dial a number that is not in the list of emergency numbers, the phone does not
dial the number.
3. Press Answer/Send .
Make a call with a headset
You have a wired or Bluetooth headset connected to the phone.
You can make a call using a headset. If you disconnect the headset during a call, the phone continues the
call on the speakerphone.

CONFIDENTIAL DRAFT
Cisco Wireless Phone 9821 User Guide | 4 - Calling | 52
1. Access the Phone app.
2. Optional: Select a line.
3. Enter a phone number.
4. Press Answer/Send .
Make a call with the phone speaker
You can make a call with the speakerphone built into the phone.
1. Press and hold Speakerphone to activate the speaker.
2. Dial the phone number.
3. Press Answer/Send to place your call.
4. Press and hold Speakerphone again to turn off speaker mode.
Make a call with the desktop charger speaker
When your phone is in the desktop charger, you automatically use the speakerphone built into the charger.
If you remove the phone from the charger when you are on the call, hold the phone to your ear to hear the
call.
1. Dial the phone number.
2. Press Answer/Send to place your call.
Make a call with a phone or video address (URI dialing)
Sometimes, instead of just having someone’s phone number, you might also have a alphanumeric phone
or video address that you can use to place the call instead. These addresses might look like an email
address, such as [email protected], or it might contain numbers like [email protected].
1. Access the Phone app.
2. Optional: Select a line.
3. Press More and select ABC, and you’ll be able to enter text using the keypad.
4. Press a number on the keypad to see the available options, and then press the number again to
move through the choices.
For example, press One (1) three times to enter the @ symbol.
5. Press Answer/Send .

CONFIDENTIAL DRAFTCONFIDENTIAL DRAFT
Cisco Wireless Phone 9821 User Guide | 4 - Calling | 53
Redial a number
You can call the most recently dialed phone number from the Phone app.
1. Access the Phone app.
2. Press Redial or press Answer/Send twice.
Your phone dials the most recent number from a line that just placed a call.
Make a Speed Dial call
Your administrator must set up a Speed Dial line for you.
1. Access the Phone app.
2. Select a Speed dial line.
3. Press Select.
Use call back
Your administrators has congured this feature on your phone.
If you nd that the person you called is busy or doesn't answer your call, you can choose to be notied
with a special ringtone and a notication message later when the person is available.
1. When you are making a call to a person who is busy or doesn't answer your call, press Call back.
2. Optional: In the next screen, do one of the following actions:
◦ Press Cancel to deactivate the call back, and then press Exit to exit the conrmation screen.
◦ Press Exit to exit the conformation screen directly. In this case, the call back is still
activated.
3. When the person is available, you will hear the ringtone and see the message. Press Call to make
the call again.
Calls that require authorization code or client matter code
Your administrator may require that you enter an authorization code or a client matter code, or both,
after you dial a phone number. The authorization code, called Forced Authorization Code (FAC), controls
access to certain phone numbers. The Client Matter Code (CMC), also called as billing code, is used for
accounting or billing purposes.

CONFIDENTIAL DRAFTCONFIDENTIAL DRAFT
Cisco Wireless Phone 9821 User Guide | 4 - Calling | 54
• When an authorization code is required, the phone displays Authorization code, followed by #.
Your entered number is hidden by dots for security reasons, and you hear a special tone.
If you want to check the code that you entered, press Show PWD.
• When a billing code is required, the phone displays Client matter code, followed by # and you
hear a special tone.
• When both a billing code and an authorization code are required, you are prompted for the
authorization code rst. Then you are prompted for the billing code.
Make and answer calls
Your Cisco Wireless Phone 9821 works just like a regular phone. For example, you can make an outgoing
call or answer an incoming call through the phone.
Make a call
You have different ways to make a call. If your phone has multiple lines congured, you can use a
particular line to make a call. The extension that displays on the top left is your currently selected line. If
you don't select an extension before you dial a number, then the primary line is used by default.
1. From the Applications view, do one of the following actions to make a call based on your
convenience.
◦ Enter a phone number. Press Answer/Send .
◦ Enter a phone number. Press More and select Call.
◦ Access the Phone app. Select a line. Enter a phone number and then press Answer/Send.
◦ Access the Phone app. Select a line. Select a number in the Recents list and then press Call.
2. Optional: If you want to make a new call to another person during the current active call, press
Hold to put the active call on hold, and then press New call.
3. Optional: If you want to return to the Applications view during an active call, press the left arrow on
the Navigation Cluster.
Do one of the following actions to end a call:
• Press More and select End call.
• Press Power/End Call .

CONFIDENTIAL DRAFT
Cisco Wireless Phone 9821 User Guide | 4 - Calling | 55
Make an emergency call
Your phone must be set up to obtain your physical location. Emergency services personnel need your
location to nd you when you make an emergency call.
Use your phone to make an emergency call, similar to any other call. When you dial the emergency
number, your emergency services get your phone number and location so that they can assist you. If your
call disconnects, the emergency services can call you back.
1. If your phone is not turned on, press Power/End Call for 4 seconds to power on the phone.
2. Use the keypad to enter your emergency number.
You can make an emergency call from your phone, even if the phone is locked. When you start to
dial the emergency number, the list of emergency numbers displays although you cannot select the
number. If you try to dial a number that is not in the list of emergency numbers, the phone does not
dial the number.
3. Press Answer/Send .
Make a call with a headset
You have a wired or Bluetooth headset connected to the phone.
You can make a call using a headset. If you disconnect the headset during a call, the phone continues the
call on the speakerphone.
1. Access the Phone app.
2. Optional: Select a line.
3. Enter a phone number.
4. Press Answer/Send .
Make a call with the phone speaker
You can make a call with the speakerphone built into the phone.
1. Press and hold Speakerphone to activate the speaker.
2. Dial the phone number.
3. Press Answer/Send to place your call.
4. Press and hold Speakerphone again to turn off speaker mode.

CONFIDENTIAL DRAFT
Cisco Wireless Phone 9821 User Guide | 4 - Calling | 56
Make a call with the desktop charger speaker
When your phone is in the desktop charger, you automatically use the speakerphone built into the charger.
If you remove the phone from the charger when you are on the call, hold the phone to your ear to hear the
call.
1. Dial the phone number.
2. Press Answer/Send to place your call.
Make a call with a phone or video address (URI dialing)
Sometimes, instead of just having someone’s phone number, you might also have a alphanumeric phone
or video address that you can use to place the call instead. These addresses might look like an email
address, such as [email protected], or it might contain numbers like [email protected].
1. Access the Phone app.
2. Optional: Select a line.
3. Press More and select ABC, and you’ll be able to enter text using the keypad.
4. Press a number on the keypad to see the available options, and then press the number again to
move through the choices.
For example, press One (1) three times to enter the @ symbol.
5. Press Answer/Send .
Redial a number
You can call the most recently dialed phone number from the Phone app.
1. Access the Phone app.
2. Press Redial or press Answer/Send twice.
Your phone dials the most recent number from a line that just placed a call.
Make a Speed Dial call
Your administrator must set up a Speed Dial line for you.

CONFIDENTIAL DRAFTCONFIDENTIAL DRAFT
Cisco Wireless Phone 9821 User Guide | 4 - Calling | 57
1. Access the Phone app.
2. Select a Speed dial line.
3. Press Select.
Make and answer calls
Your Cisco Wireless Phone 9821 works just like a regular phone. For example, you can make an outgoing
call or answer an incoming call through the phone.
Answer a call
1. Do one of the following actions:
◦ Single incoming call:
Press Answer or Answer/Send .
◦ Single line with multiple incoming calls:
a. Access the Phone app.
b. Highlight an incoming call from the calls list.
c. Press Answer or Answer/Send .
◦ Multiple lines with multiple incoming calls:
a. Access the Phone app.
b. Select a line.
c. (Optional) To view the calls grouped by line, press More and select Group on. To
view all calls in chronological order, press More and select Group off.
d. Highlight an incoming call from the calls list.
e. Press Answer or Answer/Send .
2. Optional: If you want to make a new call to another person during the current active call, select
Hold to put the active call on hold, and then select New call.

CONFIDENTIAL DRAFT
Cisco Wireless Phone 9821 User Guide | 4 - Calling | 58
Note:
According to your administrator's conguration, the New call softkey might appear during
the current active call. In this case, you can press the softkey to make a new call directly.
Once you press the softkey, the current active call will be put on hold automatically.
3. Optional: If you want to return to the home screen during an active call, press the left arrow on the
Navigation Cluster.
Answer a waiting call
When you have an incoming call while you are on an active call, you hear a single beep. You can answer
the new call and automatically hold the active call.
1. Press Answer or Answer/Send .
2. Optional: If you have more than one call waiting, select an incoming call.
Decline a call
When prompted with an incoming call, you can decline it by sending a ringing call to your voicemail
system (if congured). If your administrator doesn't set up your voicemail system, the call is rejected and
the caller hears a busy tone.
If you don't see the Decline softkey, then your administrator has disabled the ability to decline a call.
Do one of the following actions:
• Single line: When prompted with an incoming call, press Decline.
• Multiple lines:
a. Access the Phone app.
b. Select a line.
c. Select an incoming call from the calls list and press Decline.
Ignore a call
When you get an incoming call that you don't want to answer, you can ignore the call. The call shows up in
your call list.

CONFIDENTIAL DRAFT
Cisco Wireless Phone 9821 User Guide | 4 - Calling | 59
Press the Up or Down arrow on the Navigation Cluster.
Silence a single incoming call
You can silence the phone ringer for an individual call.
1. Press Volume down.
2. Do one of the following actions:
◦ Press Volume down.
◦ Press Pound (#) for 2 seconds to turn the ringer off or on.
Silence incoming calls on your phone (DND)
Your administrator has enabled the DND soft key on your phone.
Do Not Disturb (DND) silences your phone and rejects incoming calls. If congured, your phone directs
incoming calls to your voicemail.
However, you will always receive intercom and emergency calls, even when DND is turned on.
If Multilevel Precedence and Preemption (MLPP) is set up for your phone and DND is turned on, priority
calls can still ring your phone depending on your administrator's conguration.
Choose one of these options:
• From the Self Care Portal, turn on Do Not Disturb.
• From your phone:
a. Access the Phone app.
b. (Optional) Select a line
c. Press More and select DND
When your phone is in DND mode, you can see a red bar and the DND icon in the header. If your
phone has multiple lines congured, the DND setting applies to all lines.
To turn off DND, press More and select DND off.

CONFIDENTIAL DRAFT
Cisco Wireless Phone 9821 User Guide | 4 - Calling | 60
Answer calls for your coworkers (Call Pickup)
If you share call handling responsibilities with your coworkers, the Call Pickup feature allows you to
answer a call that is ringing on their phones. You can answer calls for your coworkers both within or
outside of your call pickup group.
Answer a call within your group (Pickup)
Your administrator has assigned you to a call pickup group and congured the feature key on your phone.
When there's an incoming call on your group members' phone, a notication appears on your phone. Even
if the notication disappears, you can still answer the call as long as it's still waiting to be answered.
If multiple calls are available for pickup, you'll answer the call that has been ringing the longest.
1. Access the Phone app.
2. Optional: Select a line.
3. Press More and select Pickup.
4. Press Answer when the call rings on your phone.
If your administrator has enabled auto answer, the call is automatically answered when you press
Pickup.
Answer a call from another group (Group pickup)
Your administrator has assigned you to a call pickup group and congured the feature key on your phone.
Group pickup allows you to answer a call to a phone outside your designated call pickup group. You can
redirect the call to your own phone using the group pickup number or the number of the phone line that is
ringing. This is helpful if you're responsible for answering calls for multiple groups.
1. Access the Phone app.
2. Optional: Select a line.
3. Press More and select Group pickup.
4. Enter the number of the other call pickup group or the directory number of the phone line that is
ringing.
5. Press More and select Call.
6. Press Answer when the call rings on your phone.
CONFIDENTIAL DRAFT
Cisco Wireless Phone 9821 User Guide | 4 - Calling | 61
Answer a call from an associated group (Other pickup)
Your administrator has assigned you to a call pickup group and congured the feature key on your phone.
If your administrator has associated your call pickup group with another, you can redirect a call that rings
on a phone from that group to your own phone. If you are responsible for answering the calls for that
group, use the Other pickup feature to answer the call.
1. Access the Phone app.
2. Optional: Select a line.
3. Press More and select Other pickup.
4. Press Answer when the call rings on your phone.
Monitor and answer calls for your coworkers (BLF with Call Pickup)
Your administrator has assigned you to a call pickup group and congured the Busy Lamp Field (BLF)
feature on your phone.
The BLF feature (with both speed dial and call pickup) provides you a visual indicator on the status of the
monitored line. With this feature, you can do the following actions:
• Check the status of the monitored line (Idle, Alerting, In use, or Do not disturb)
• Answer the incoming call for the monitored line
• Quickly dial the number of the monitored line
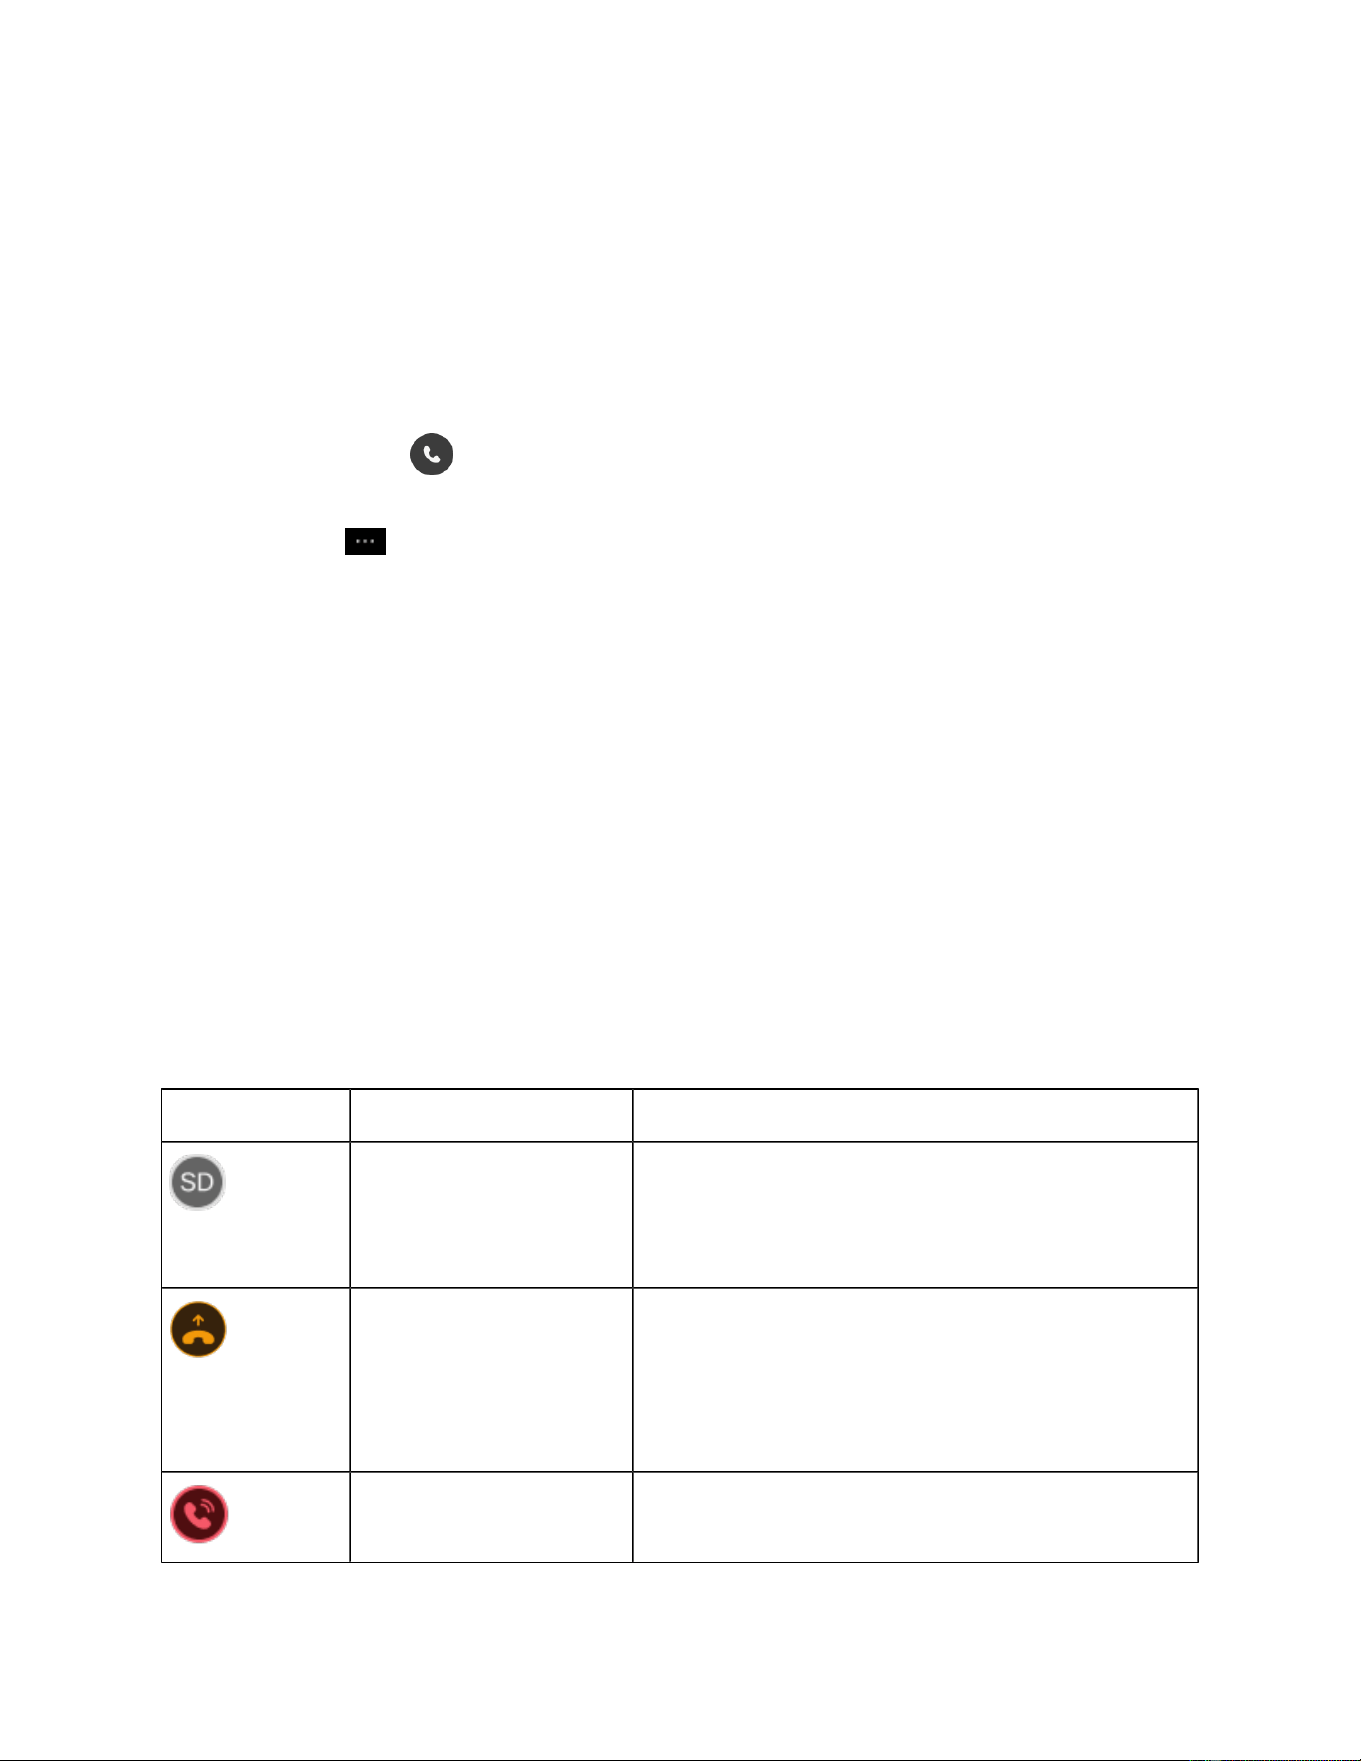
Table 11. Status indicators for BLF with both speed dial and call pickup
Icon Status Description
Idle
The monitored line is in idle mode.
You can select the line to call the monitored line.
Alerting
There's an incoming call waiting for picking up.
You can select the line to answer the call for the moni
tored line.
In use
The monitored line is in use.
CONFIDENTIAL DRAFTCONFIDENTIAL DRAFT
Cisco Wireless Phone 9821 User Guide | 4 - Calling | 62
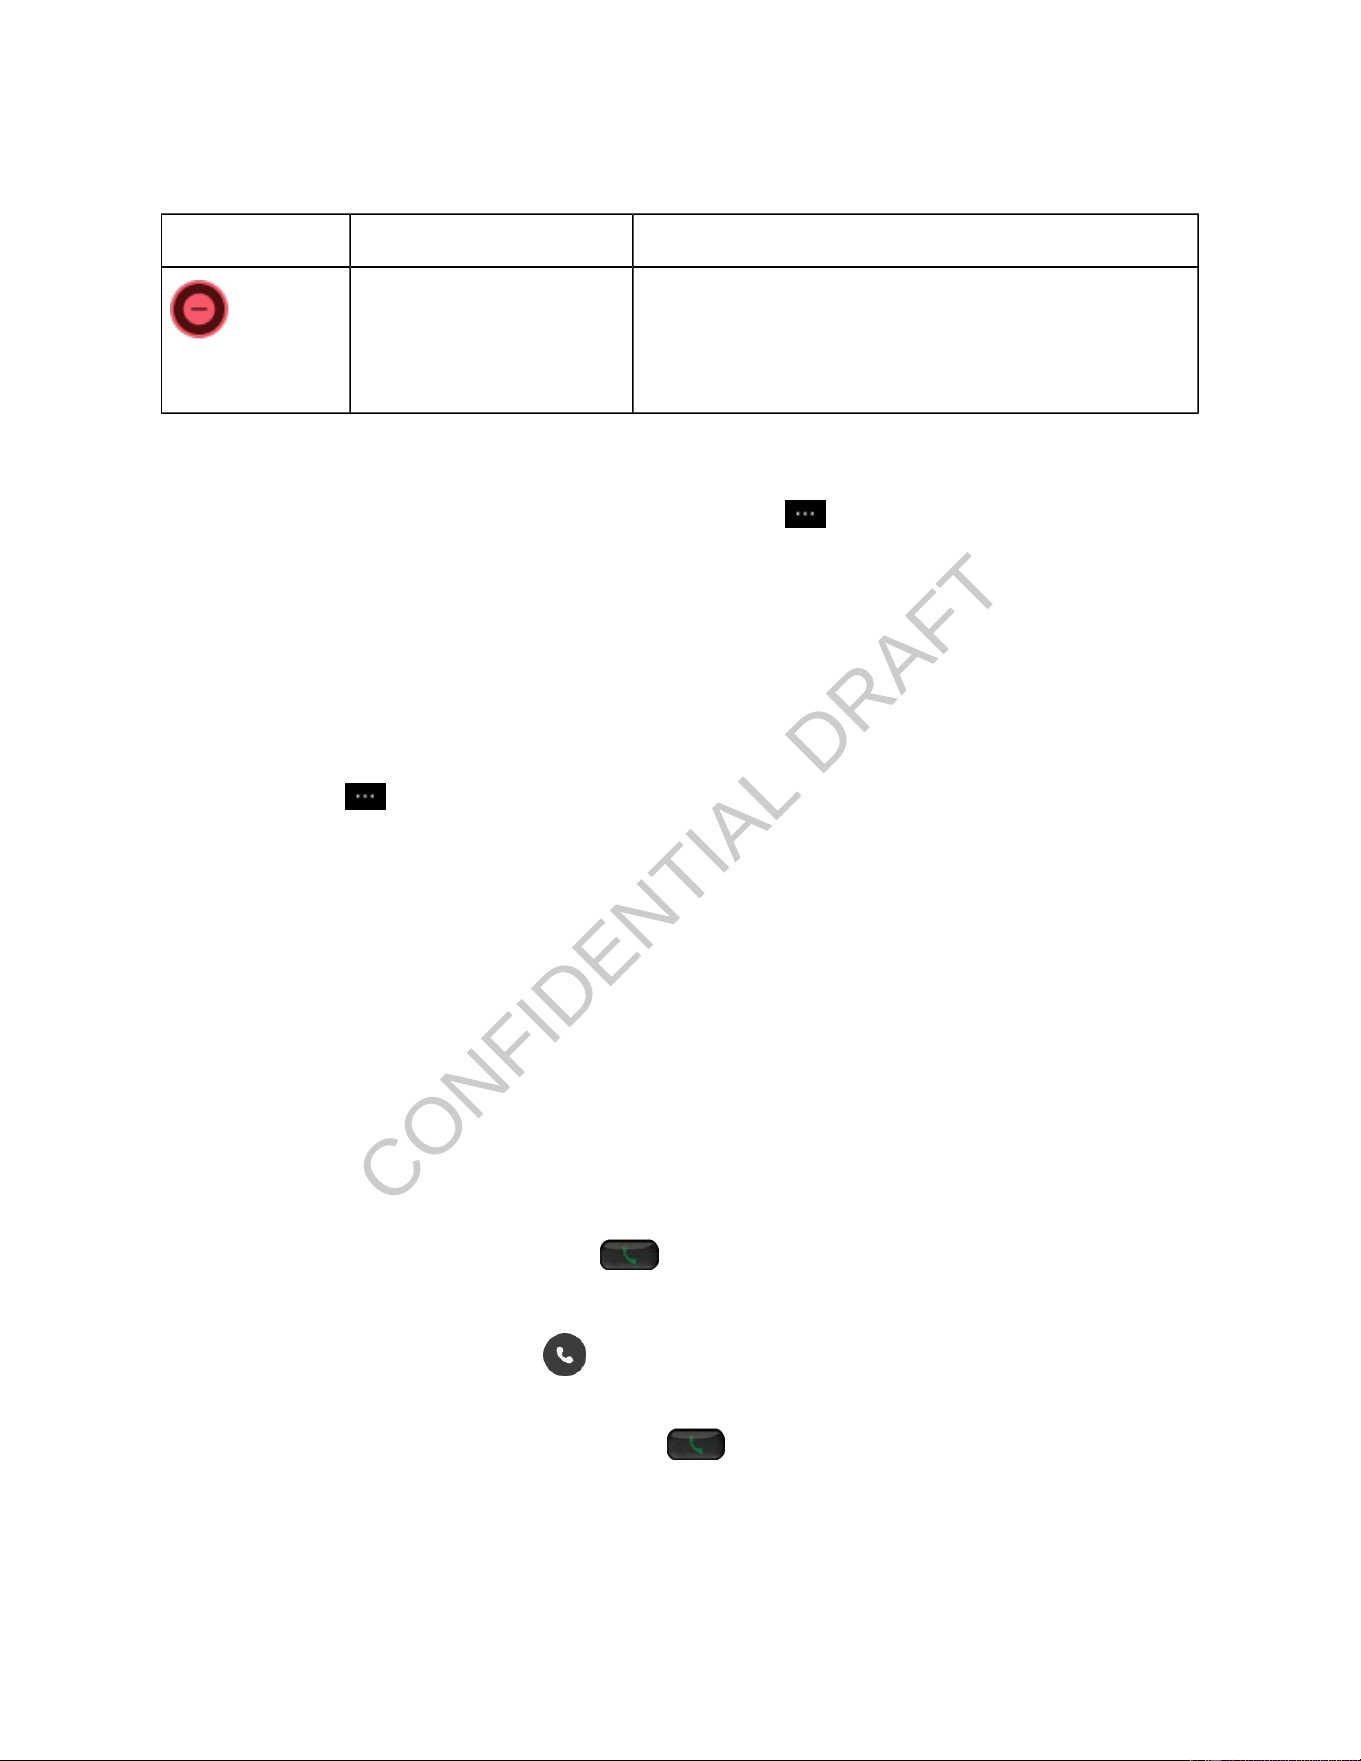
Table 11. Status indicators for BLF with both speed dial and call pickup (continued)
Icon Status Description
Do not disturb
The monitored line is set to Do Not Disturb (DND).
The calls to the line don't alert.
For more information about BLF with speed dial, see Use speed dials.
When an incoming call alerts on the monitored line, press More and select Answer.
Trace a suspicious call
If you receive unwanted or harassing calls, use malicious call identication (MCID) to alert your
administrator. Your phone sends a silent notication message to your administrator with information
about the call.
1. Press More and select Report caller.
2. End the call.
Make and answer calls
Your Cisco Wireless Phone 9821 works just like a regular phone. For example, you can make an outgoing
call or answer an incoming call through the phone.
Answer a call
1. Do one of the following actions:
◦ Single incoming call:
Press Answer or Answer/Send .
◦ Single line with multiple incoming calls:
a. Access the Phone app.
b. Highlight an incoming call from the calls list.
c. Press Answer or Answer/Send .
◦ Multiple lines with multiple incoming calls:

CONFIDENTIAL DRAFT
Cisco Wireless Phone 9821 User Guide | 4 - Calling | 63
a. Access the Phone app.
b. Select a line.
c. (Optional) To view the calls grouped by line, press More and select Group on. To
view all calls in chronological order, press More and select Group off.
d. Highlight an incoming call from the calls list.
e. Press Answer or Answer/Send .
2. Optional: If you want to make a new call to another person during the current active call, press
Hold to put the active call on hold and then press New call.
3. Optional: If you want to return to the home screen during an active call, press the left arrow on the
Navigation Cluster.
Answer a waiting call
When you have an incoming call while you are on an active call, you hear a single beep. You can answer
the new call and automatically hold the active call.
1. Press Answer or Answer/Send .
2. Optional: If you have more than one call waiting, select an incoming call.
Decline a call
When prompted with an incoming call, you can decline it by sending a ringing call to your voicemail
system (if congured). If your administrator doesn't set up your voicemail system, the call is rejected and
the caller hears a busy tone.
If you don't see the Decline softkey, then your administrator has disabled the ability to decline a call.
Do one of the following actions:
• Single line: When prompted with an incoming call, press Decline.
• Multiple lines:
a. Access the Phone app.
b. Select a line.
c. Select an incoming call from the calls list and press Decline.
CONFIDENTIAL DRAFT
Cisco Wireless Phone 9821 User Guide | 4 - Calling | 64
Ignore a call
When you get an incoming call that you don't want to answer, you can ignore the call. The call shows up in
your call list.
Press the Up or Down arrow on the Navigation Cluster.
Silence a single incoming call
You can silence the phone ringer for an individual call.
1. Press Volume down.
2. Do one of the following actions:
◦ Press Volume down.
◦ Press Pound (#) for 2 seconds to turn the ringer off or on.
Silence incoming calls on your phone (DND)
Your administrator has enabled the DND soft key on your phone.
DND silences your phone and rejects incoming calls. When DND is turned on, your phone directs incoming
calls to your voicemail. However, you will always receive emergency calls even when DND is on.
If you turn on DND for a specic line, the line can still receive paging calls. When the DND applies to all
lines, the paging calls will be ignored.
1. Access the Phone app.
2. Choose one of these options:
◦ Single line: press More and select DND.
◦ Multiple lines: select a line. Press More and select DND.
Tip:
On a line with either Feature Key Sync or XSI enabled, the DND setting applies to this
line only.
If a line has both Feature Key Sync and XSI disabled, the DND setting on this line
applies to all the lines on the phone that have both Feature Key Sync and XSI
disabled.

CONFIDENTIAL DRAFT
Cisco Wireless Phone 9821 User Guide | 4 - Calling | 65
Single line: when your phone is in DND mode, you can see a red bar and the DND icon in the
screen header.
Multiple lines: When the primary line is in DND mode, you can see the DND icon in the screen
header. When a specic line is in DND mode, you can see the DND icon on the line.
To turn off DND, press More and select DND off.
Answer calls for your coworkers (Call Pickup)
If you share call handling responsibilities with your coworkers, the Call Pickup feature allows you to
answer a call that is ringing on their phones. You can answer calls for your coworkers both within or
outside of your call pickup group.
Answer calls for a specic coworker (Pickup)
Your administrator has assigned you to a call pickup group and congured the feature key on your phone.
You can answer calls for specic coworkers either within or out of your pickup group. You must know the
coworkers' extension numbers before you answer calls for them.
1. Access the Phone app.
2. Optional: Select a line.
3. Press More and select Pickup. Dial the extension number.
Alternatively, you can use the feature access code by dialing *97 + <extension number> on your
phone. For example, if a coworker's extension is 1234, dial *971234.
Answer a call for coworkers within your group (Group Pickup)
Your administrator has assigned you to a call pickup group and congured the feature key on your phone.
You can answer a call that rings on another phone within your call pickup group. If multiple calls are
available for pickup, you'll answer the call that has been ringing the longest.
1. Access the Phone app.
2. Optional: Select a line.
CONFIDENTIAL DRAFT
Cisco Wireless Phone 9821 User Guide | 4 - Calling | 66
3. Press More and select Group pickup.
Alternatively, you can use the feature access code by dialing *98 on your phone.
Monitor and answer calls for your coworkers (BLF with Call Pickup)
Your administrator has assigned you to a call pickup group and congured the Busy Lamp Field (BLF)
feature on your phone.
The BLF feature provides you a visual indicator on the status of the monitored line. By using BLF, you can
quickly determine whether a colleague is available or on a call.
If your administrator has congured BLF with call pickup, you're able to answer incoming calls for the
monitored line.
The following tables show the status indicators of the monitored line.
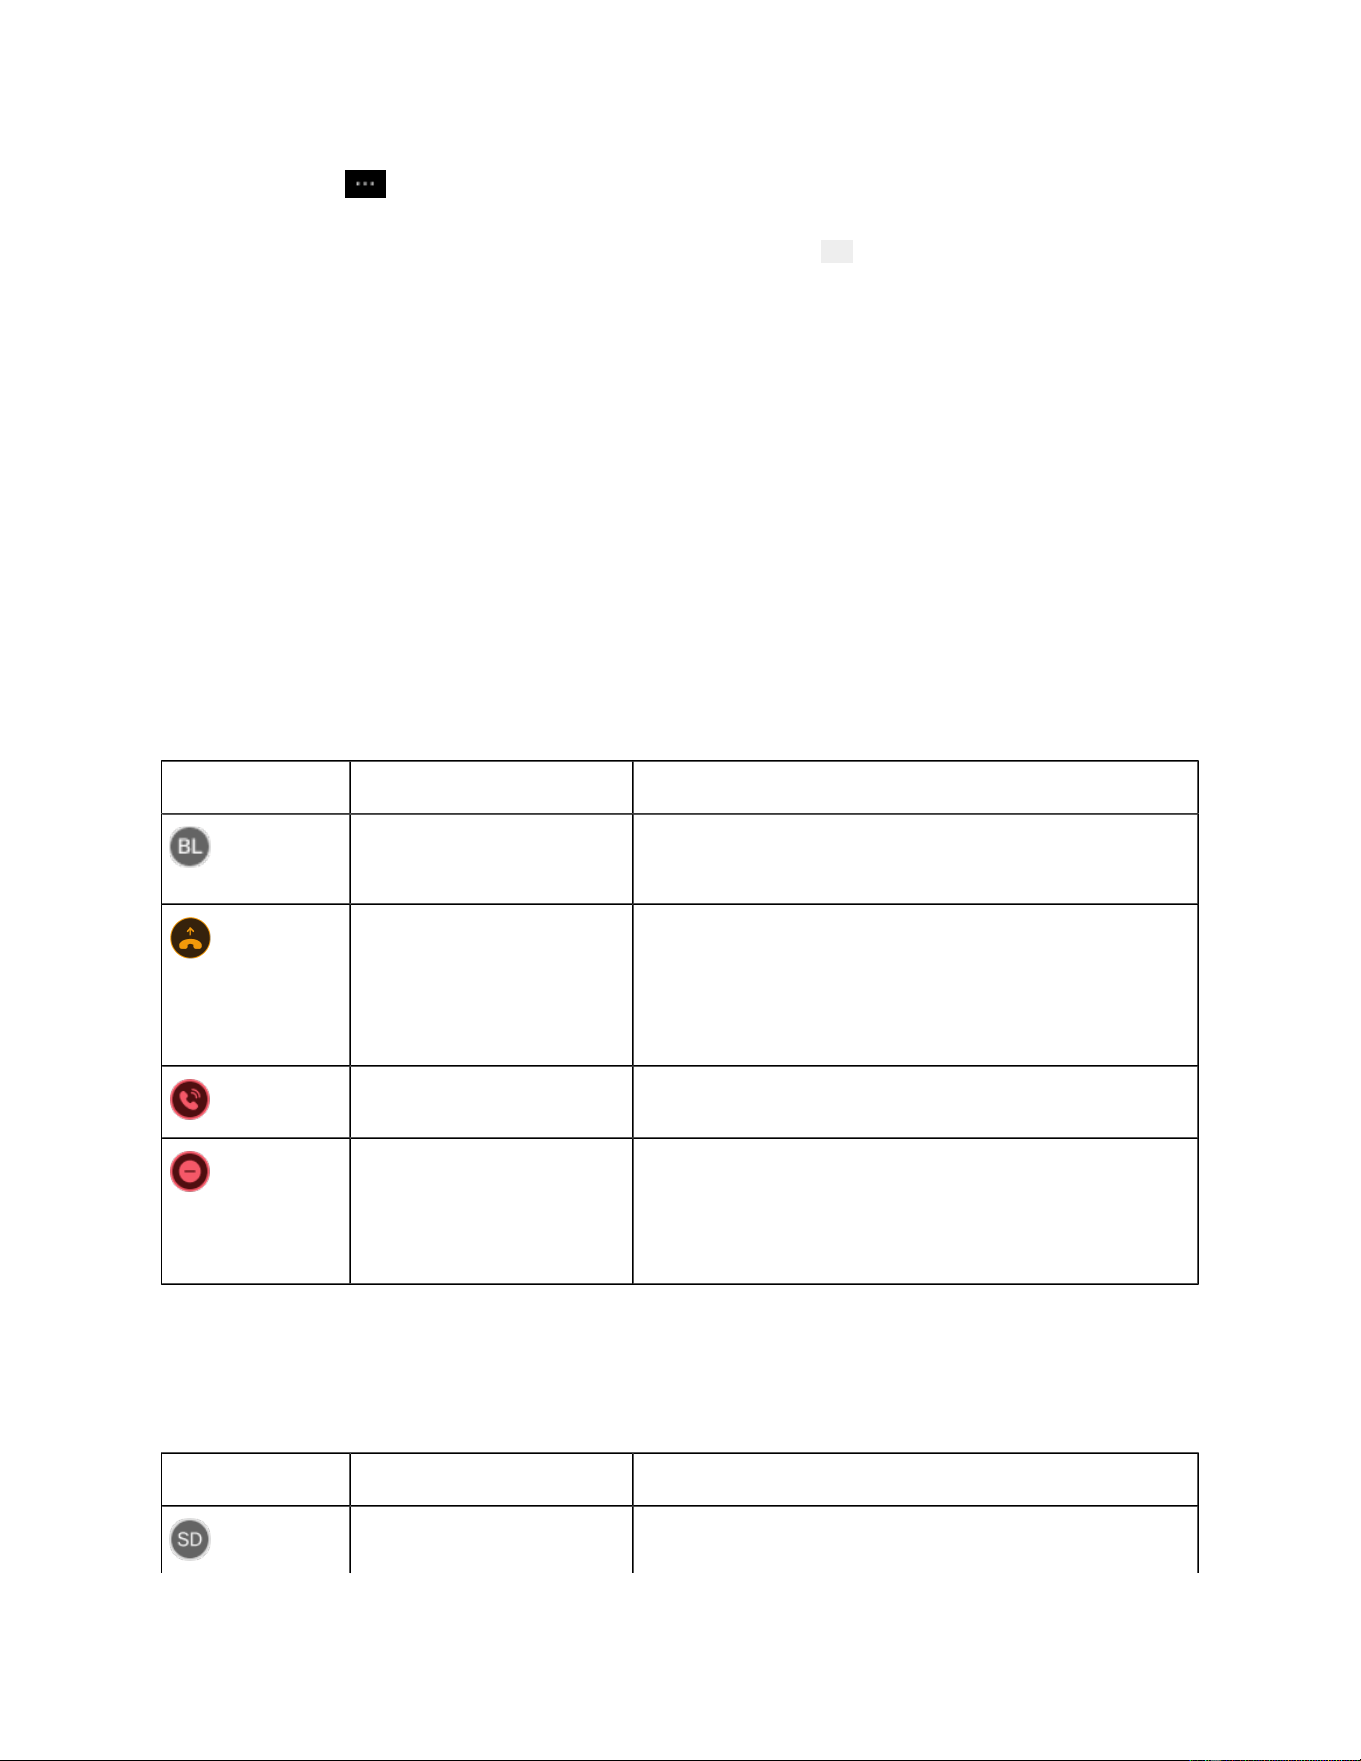
Table 12. Status indicators for BLF with call pickup
Icon Status Description
Idle The line is configured with call pickup. The monitored
line is in idle mode.
Alerting There's an incoming call waiting for picking up.
You can select the line to answer the call for the moni
tored line.
In use The monitored line is in use.
Do not disturb
The monitored line is set to Do Not Disturb (DND).
The calls to the line don't alert.
If a BLF key is congured with both call pickup and speed dial, the status indicators on the monitored line
will be slightly different:
Table 13. Status indicators for BLF with both speed dial and call pickup
Icon Status Description
Idle
The monitored line is in idle mode.
CONFIDENTIAL DRAFT
Cisco Wireless Phone 9821 User Guide | 4 - Calling | 67
Table 13. Status indicators for BLF with both speed dial and call pickup (continued)
Icon Status Description
You can select the line to call the monitored line.
Alerting
There's an incoming call waiting for picking up.
You can select the line to answer the call for the moni
tored line.
In use
The monitored line is in use.
Do not disturb
The monitored line is set to Do Not Disturb (DND).
The calls to the line don't alert.
For more information about BLF with speed dial, see Use speed dials.
When an incoming call alerts on the monitored line, press More and select Answer.
End a call
Do one of the following actions:
• Press More and select End call.
• Press Power/End Call .
Adjust audio volume
If the sound in your handset, headset, or speakerphone is too loud or too soft, you can change the volume
while you are listening to the other person. When you change the volume during a call, the change only
affects the speaker you're using at the time. For example, if you adjust the volume while you're using a
headset, the handset volume doesn't change.
You can check the screen header bar to know the active audio path. See the following table for the audio
path status:
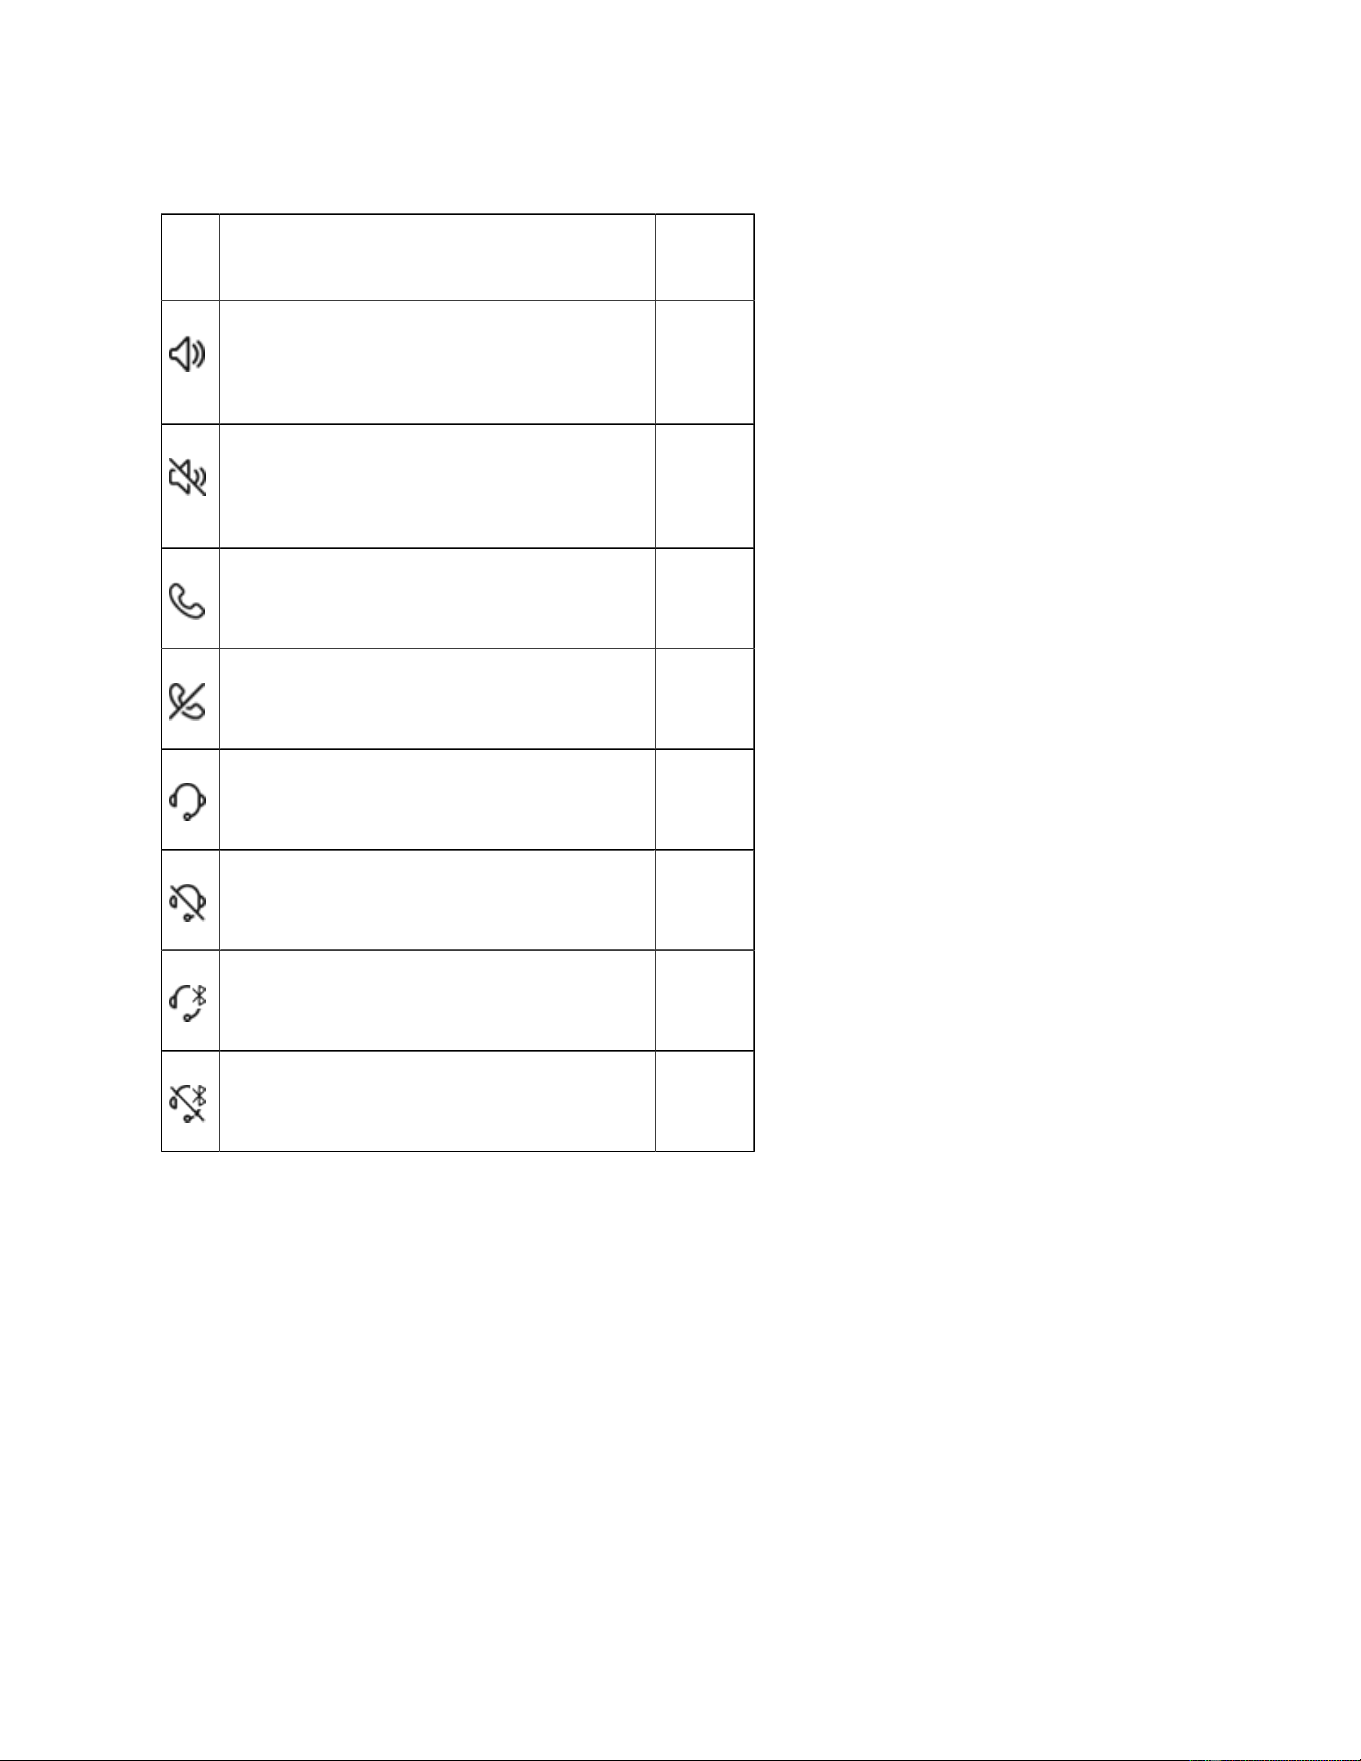
CONFIDENTIAL DRAFT
Cisco Wireless Phone 9821 User Guide | 4 - Calling | 68
Table 14. Audio path status displayed on the screen header
Icon Active audio path Status
Phone speaker or desktop charger speak
er
Active
Phone speaker or desktop charger speak
er
Silenced
Phone handset Active
Phone handset Silenced
Wired headset or Bluetooth headset Active
Wired headset or Bluetooth headset Silenced
Bluetooth headset Active
Bluetooth headset Silenced
When you’re on a call or in a meeting, do one of the following actions to adjust the volume:
CONFIDENTIAL DRAFT
Cisco Wireless Phone 9821 User Guide | 4 - Calling | 69
• Press - or + on the Volume button.
• Use the volume buttons on your Cisco Headset.
Note:
Only Cisco Headsets are supported to control the phone audio volume.
Mute your audio
You can mute the phone so that you can hear the other caller but they cannot hear you. The Mute
button is located below the Volume button on the left side of the phone.
When your phone is in the desktop charger, you mute the desktop charger speaker with the Mute
button on the lower right corner of the charger.
On an active call, press Mute to mute your audio.
Press Mute again to unmute your audio.
Switch the phone audio path
The phone handset and microphone are the default audio output and input paths. If you plug a headset
into the phone during an active call, the audio path automatically changes to the headset.
On header bar at the top of the screen, the audio path icon shows the default or active audio path. You
may see one of the following icons:
• Phone speaker or desktop charger speaker
• Wired headset or Bluetooth headset

CONFIDENTIAL DRAFT
Cisco Wireless Phone 9821 User Guide | 4 - Calling | 70
When there is more than one audio path, you can manually switch the audio path to the phone speaker,
handset, desktop charger speaker, or to a connected headset.
Note:
You can connect different types of headsets simultaneously to your phone. However, you can use
only one headset at a time. The last connected headset is used as the active headset.
1. Press and hold the Speaker button for three seconds.
2. Highlight an audio path.
3. Press Apply or Select.
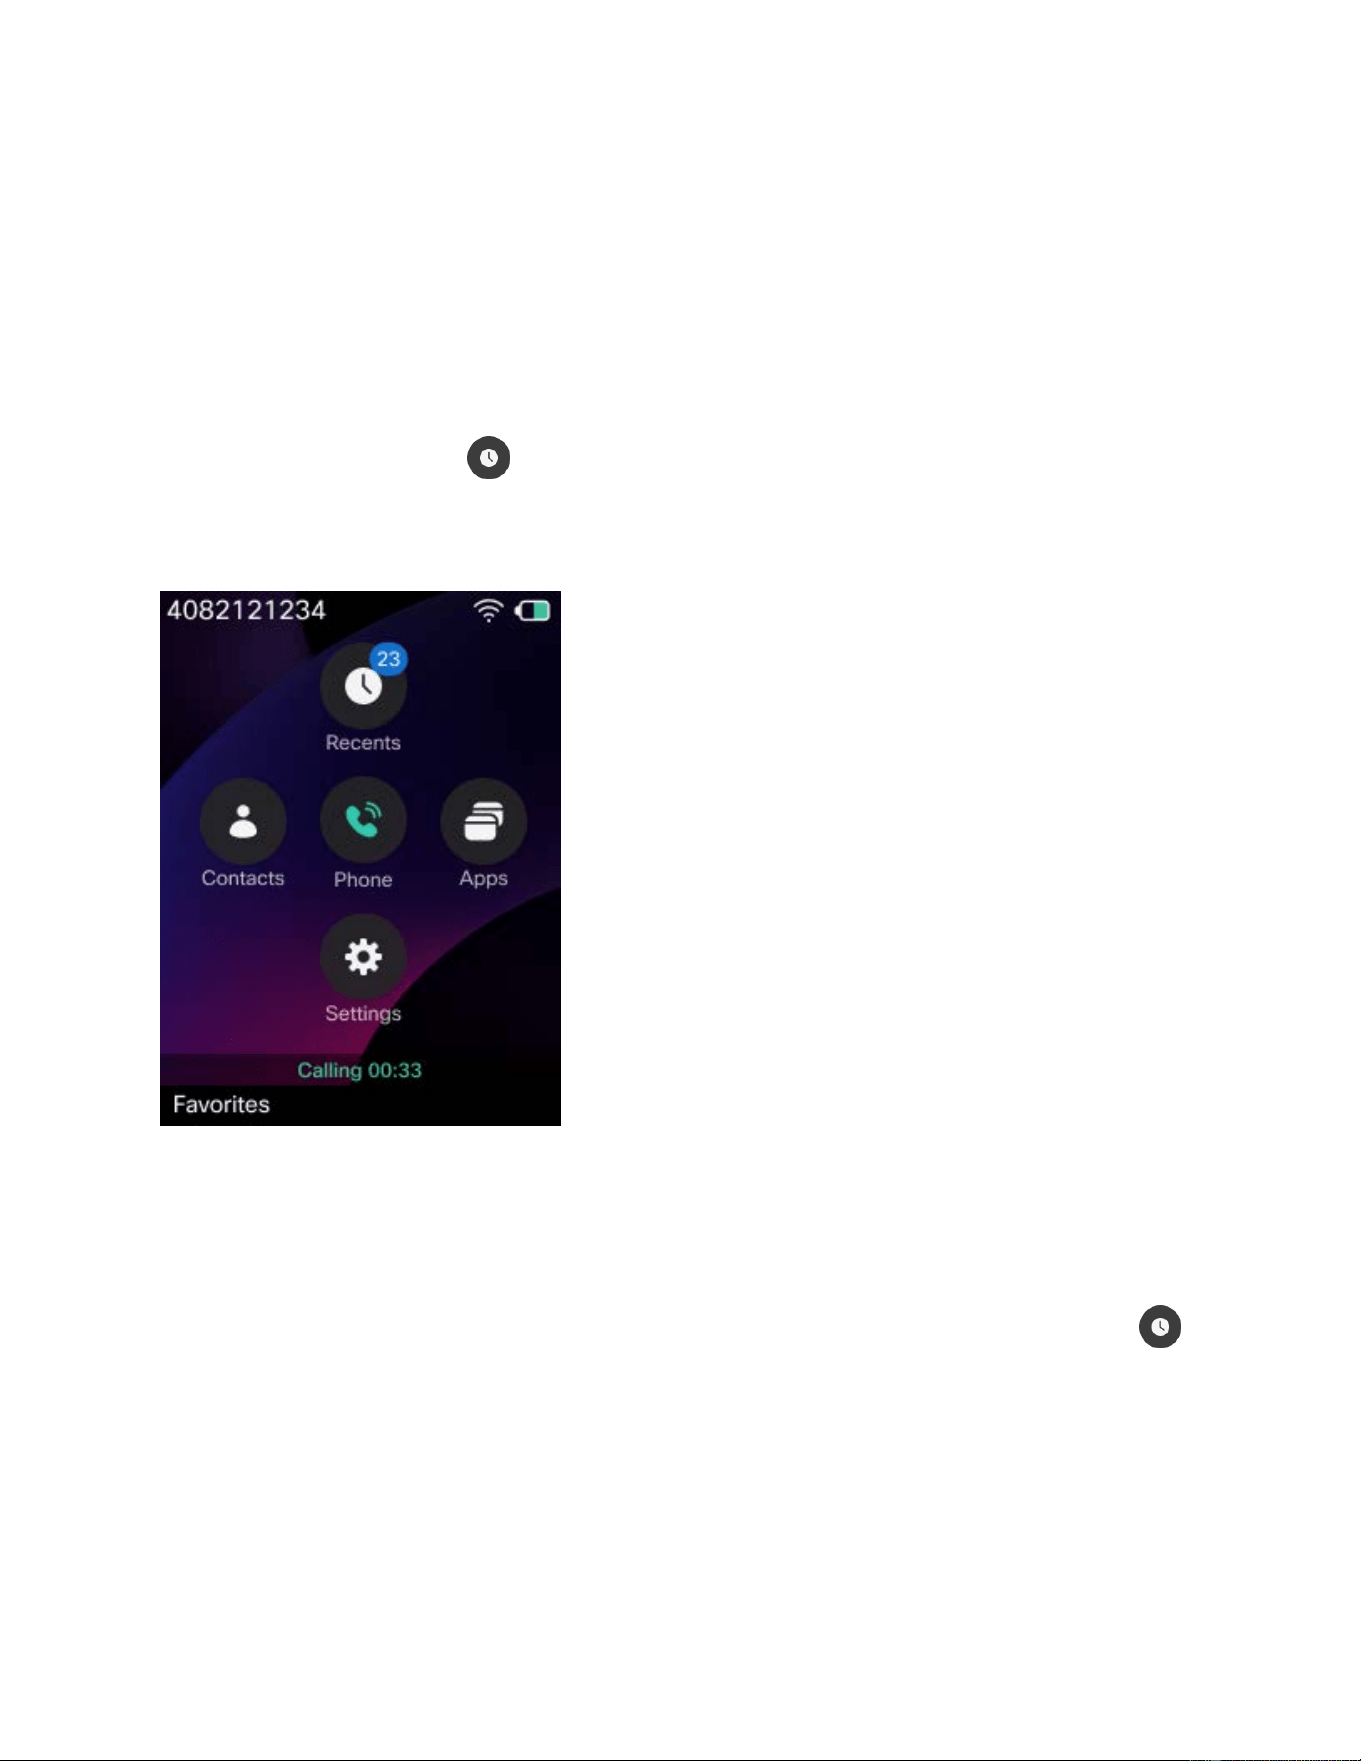
CONFIDENTIAL DRAFT
Chapter 5. Contacts and call history
Access the Recents app
You can access the Recents app from the Applications screen. From the Recents app, you can see your
voicemail messages, missed calls, and recent calls.
A digit appears on the Recents on the Application screen when your phone has new missed calls,
voice messages, or both. The digit represents the total number of new missed calls and voice messages
on the phone (including all lines).
On the Line view screen, the digit beside the line shows the count of missed calls.
1. From the Line view screen, press the left arrow of the Navigation Cluster to view the Applications
screen.
2. From the Applications screen, press the up arrow of the Navigation Cluster to select Recents .
Manage missed calls
You can use the Missed calls list to see the most recent individual calls and call groups. If your phone has
multiple lines, your administrator can set up the Missed calls list so that calls on all lines are in one list. If

CONFIDENTIAL DRAFT
Cisco Wireless Phone 9821 User Guide | 5 - Contacts and call history | 72
your phone is registered to Cisco Unied CM, calls in each line are grouped together if they are from the
same number and are consecutive.
A digit appears on the Missed calls list when your phone has new missed calls. The digit represents the
total number of new missed calls on the phone (including all lines). Access the Missed calls list, you will
nd that the All missed list has the same digit and each line has a digit represents the number of missed
calls for that line.
View your missed calls and nd details
1. Access the Recents app.
2. Select Missed calls.
3. Select a phone line or All missed.
4. To view the details of a specic missed call, select the call entry.
5. Do one of the following actions:
◦ Press More and select Details.
◦ Press the right arrow on the Navigation Cluster.
The Missed details page displays detailed information about the call you have selected, including
name, number, time, and call type. You can also press Call to return this call.
Return a missed call
Use the Missed calls list to quickly return a missed call.
1. Access the Recents app.
2. Select Missed calls.
3. Select a phone line or All missed.
4. Select a call entry.
5. Do one of the following actions:
◦ Press More and select Call.
◦ Press Select.
◦ Press .
6. (Optional) If you want to modify the dial number before you make a call, press More and select Edit
dial. Edit the number, and then continue to follow step 5.

CONFIDENTIAL DRAFT
Cisco Wireless Phone 9821 User Guide | 5 - Contacts and call history | 73
Create a new local contact from a missed call record (Unied
CM only)
You can add the person associated with a missed call record to your local contacts list.
1. Access the Recents app.
2. Select Missed calls.
3. Select a phone line or All missed.
4. Select a missed call entry.
5. Press More and select Create new local contact.
6. Press Save.
Delete a missed call entry
You can delete an entry from your Missed Call list.
1. Access the Recents app.
2. Select Missed calls.
3. Select a phone line or All missed.
4. Select a missed call entry.
5. Press More and select Delete.
6. Press Delete to conrm the deletion.
Clear the Missed calls list
You can delete all entries from your Missed calls list.
1. Access the Recents app.
2. Select Missed calls.
3. Select a phone line or All missed.
4. Press More and select Clear list.
5. Press Clear to conrm the deletion.
All missed call entries are cleared. Placed and received calls are not affected; these entries remain
available in Recents.

CONFIDENTIAL DRAFT
Cisco Wireless Phone 9821 User Guide | 5 - Contacts and call history | 74
Manage recent calls
You can use the Recents list to see the most recent individual calls and call groups. If your phone has
multiple lines, your administrator can set up the Recents list so that calls on all lines are in one list. If your
phone is registered to Cisco Unied CM, calls in each line are grouped together if they are to and from the
same number and are consecutive.
View your recent calls and nd details
1. Access the Recents app.
2. Select Recents.
3. Select a phone line or All recents.
4. To view the details of a specic recent call, select the call entry.
5. Do one of the following actions:
◦ Press More and select Details.
◦ Press the right arrow on the Navigation Cluster.
The Recents details page displays detailed information about the call you have selected, including
name, number, time, and call type. You can also press Call to return this call.
Return a recent call
Use the Recents list to quickly return or repeat a recent call without looking for the contact in your
directories.
1. Access the Recents app.
2. Select Recents.
3. Select a phone line or All recents.
4. Select a call entry.
5. Do one of the following actions:
◦ Press More and select Call.
◦ Press Select.
◦ Press .
6. Optional: If you want to modify the dial number before you make a call, press More and select Edit
dial. Edit the number, and then continue to follow step 5.

CONFIDENTIAL DRAFT
Cisco Wireless Phone 9821 User Guide | 5 - Contacts and call history | 75
Create a new local contact from a recent call (Unied CM
only)
You can add an entry from your Recents list into your Local contacts list.
1. Access the Recents app.
2. Select Recents.
3. Select a phone line or All recents.
4. Select a recent call entry.
5. Press More and select Create new local contact.
6. Press Save.
Add recent call information to a local contact
If the contact is already in your Local contacts list, but you see an alternate number, you can add
information to the existing Local contacts entry.
1. Access the Recents app.
2. Select Recents.
3. Select a phone line or All recents.
4. Select a recent call entry.
5. Press More and select Add to existing local contact.
6. Press Save.
Delete a recent call entry
You can delete an individual call from your Recent calls list.
1. Access the Recents app.
2. Select Recents.
3. Select a phone line or All recents.
4. Select a recent call entry.
5. Press More and select Delete.
6. Press Delete to conrm the deletion.
Clear the Recents list
You can clear all the entries from your Recents list.

CONFIDENTIAL DRAFT
Cisco Wireless Phone 9821 User Guide | 5 - Contacts and call history | 76
1. Access the Recents app.
2. Select Recents.
3. Select a phone line or All recents.
4. Press More and select Clear list.
5. Press Clear to conrm the deletion.
All recent call entries are cleared, including missed, placed, and received calls.
CONFIDENTIAL DRAFT
Chapter 6. Meeting
Make conference calls
You can converse with several people in a single call. When you’re on a phone call, you can dial another
person and add them to the conversation. If you have multiple phone lines, you can join two calls across
two lines.
As the conference host, you can remove individual participants from the conference. The conference ends
when all participants hang up.
Add more people to a call
You can invite additional participants to join your ongoing call and hold an ad-hoc conference. According
to the conguration on the server side, a conference call can accommodate up to 64 person (including
yourself).
1. Access the Phone app.
2. While you are on a call, press More and select Conference.
3. Do one of these actions.
◦ Dial a number and wait for the person to answer. Press Merge after the call is answered.
◦ Select an entry from your Recents list and wait for the person to answer. Press Merge after
the call is answered.
◦ Select another held call on the same line. Press More and select Merge. To merge all the
held calls on the current line into a conference, select Merge all.
◦ Press the right arrow on the Navigation Cluster to expand the Lines panel. Select a line, and
select a held call on that line. Press Merge.
4. Repeat Step 2 and Step 3 to add more person.
Tip:
When you add more than one person to a conference call, wait a few seconds between
adding participants.

CONFIDENTIAL DRAFT
Cisco Wireless Phone 9821 User Guide | 6 - Meeting | 78
View and remove conference participants
• You are in an active conference call.
• Your administrator allows you to view and manage the conference participants.
When you are in a conference call, you can view the conference participants. If you are the host of the
conference call, you can remove participants from the conference call. According to the administrator's
conguration, all participants might have the permission to remove participants. The screen displays a
star (*) beside the conference host.
1. Press More and select Details.
The participants list displays.
2. Optional: Select Update to refresh the participant list.
3. Optional: Select a participant and press Remove.
Make scheduled conference calls (Meet-me)
You can use your phone to host or join a conference by using a Meet-me conference number.
The conference doesn’t start until the host dials in, and it ends when all participants hang up. The
conference doesn't end automatically when the host hangs up.
Host a Meet-me conference
Get a meet me phone number from your administrator, and distribute the number to the conference
participants.
1. Access the Phone app.
2. Optional: Select a line.
3. Press More and select Meet me.
4. Dial the Meet-me conference number.
5. Enter the host password for the meeting.
Join a Meet-me conference
You can't join a Meet-me conference until the conference hosts dials in. If you hear a busy tone, the host
hasn't dialed into the conference. Hang up and try your call again.

CONFIDENTIAL DRAFT
Cisco Wireless Phone 9821 User Guide | 6 - Meeting | 79
1. Access the Phone app.
2. Optional: Select a line.
3. Press More and select Meet me.
4. Dial the Meet-me phone number that the conference host provides.
Make conference calls
You can converse with several people in a single call. When you’re on a phone call, you can dial another
person and add them into the conversation without having to schedule a meeting.
On Cisco Video Phone 8875, you (as a host) can also remove a participant from the conference call when
they nish their part. By default, if the host drops the conference call, it ends for all participants. However,
it is still possible for a 3-way conference to continue as a 2-way call when the host leaves according to
your administrator's conguration.
Add more people to a call
You can invite additional participants to join your ongoing call and hold an ad-hoc conference. According
to the conguration on the server side, a conference call can accommodate up to 6 person (including
yourself).
According to the call control system and the conguration on it, the maximum number of participants in a
conference call is different:
• On the phone registered to Webex Calling, a conference cal can accommodate up to 6 participants.
• On the phone registered to BroadWorks, a conference call can accommodate up to 15 participants.
1. Access the Phone app.
2. While you are on a call, press More and select Conference.
3. Do one of these actions.
◦ Select an entry from your Recents list.
◦ Enter a phone number in the search bar.
Tip:
You can also add a contact to the conference call by entering a complete URI
address of the contact. However, the phone doesn't support searching for a contact
by URI address.

CONFIDENTIAL DRAFT
Cisco Wireless Phone 9821 User Guide | 6 - Meeting | 80
4. Do one of these actions.
◦ To directly add the person to the call, press Conference.
◦ Wait for the person to answer your call, consult with them, and then press Conference to
add them to the conference call.
5. Repeat Step 2 and Step 4 to add more person.
CONFIDENTIAL DRAFT
Chapter 7. Settings
Access the Settings app
You use the Settings app to set up, manage, and customize your phone.
Menu entries that are unavailable mean that your administrator has restricted access to the menu.
1. From the Line view screen, press the left arrow of the navigation cluster to view the Applications
screen.
2. From the Applications screen, press the down arrow of the Navigation Cluster to select Settings
.
Make the phone vibrate for an incoming call
You can congure your phone to vibrate for incoming calls. Vibration settings can be customized
independently based on whether the phone rings or not.
Tip:
Placing a vibrating Cisco Wireless Phone 9821 into a desktop charger will immediately stop the
vibration. Once removed from the charger, the phone will resume vibrating.
Note:
If vibrate settings are enabled for a line, the phone will not vibrate for subsequent incoming calls
while that line is in an active call.
1. Access the Settings app.
2. Select Phone settings > Sounds > Vibrate
3. Select Vibrate on ring and press On to set the phone to vibrate when the phone rings.

CONFIDENTIAL DRAFT
Cisco Wireless Phone 9821 User Guide | 7 - Settings | 82
4. Select Vibrate on silent and press On to set the phone to vibrate when the ringer is silenced.
Note:
If the ringer is silenced, the phone still vibrates for incoming calls, provided the Vibrate on
ring setting is On and the phone volume is not zero.
Change the ringtone
A different ringtone helps you distinguish incoming calls on your line. You can change the sound that you
hear for incoming calls and you can set a different ringtone for each phone line.
1. Access the Settings app.
2. Select Phone settings > Sounds > Ringtone
3. Optional: Select a line.
4. Highlight a ringtone to hear an automatic preview.
The phone plays the corresponding ringtone automatically.
5. Optional: Press Play to listen to the full tone from the start.
6. Press Select to use the ringtone.
If your phone ringer is too loud or too soft when you get an incoming call, you can change the ringer
volume. Changes to the ringer volume do not affect the call volume you hear when you are on a call.
To adjust the ringer volume, press the Volume button up or down when the phone is idle. When the ringer
volume reaches zero, the silenced ringer icon appears on the home screen.
Select where you hear ringing
When you have an incoming call, you can set up your phone to play the ringtone on your headset or on the
speaker.
1. Access the Settings app.
2. Do one of the following actions:
◦ (Cisco Unied CM registration) Select Phone settings > Sounds > Ringer/PTT output
◦ (Webex Calling registration) Select Phone settings > Sounds > Ringer output
3. Highlight the option required.
4. Press Select.

CONFIDENTIAL DRAFTCONFIDENTIAL DRAFT
Cisco Wireless Phone 9821 User Guide | 7 - Settings | 83
Manage the keypad tone
You can turn off the keypad tone to silence audio feedback when pressing buttons on the keypad. This
setting also applies to the Action and Speaker buttons.
1. Access the Settings app.
2. Select Phone settings > Sounds > Keypad tone
3. Press Off to turn the tone off.
Press On to turn the tone on as required. When the keypad tone is on, the volume of the keypad is linked
to the audio volume of the phone. For more information, see Adjust the audio volume.
Change the screen display timeout
By default, the screen display dims after 15 seconds of inactivity, and then turns off after an additional 10
seconds. If you nd that 10 seconds of inactivity is too short, you can adjust the display timeout setting to
a longer duration.
1. Access the Settings app.
2. Select Phone settings > Display > Sleep.
3. Highlight a display timeout setting as required. The available options are:
◦ 15 seconds
◦ 20 seconds
◦ 1 minute
◦ 2 minutes
4. Press Select. The phone automatically saves your selection.
Control the LED indicator light
Your phone has an LED indicator light at the top that indicates the status of the phone.
• Steady amber: The phone is connected to the AC power source and the battery is charging.
• Steady green: The phone is connected to the AC power source and the battery is fully charged.
• Fast blinking amber: The phone may be in one of the following states: Incoming call, Remote
incoming call.
CONFIDENTIAL DRAFT
CONFIDENTIAL DRAFT
Cisco Wireless Phone 9821 User Guide | 7 - Settings | 84
• Fast blinking green: There is a voice message. When the phone is connected to the AC power
source, the green light displays longer than when using only the battery.
• Slow blinking green (every 2.5 seconds): The phone is operating on battery power and is registered
to the wireless network within the service coverage area. The phone may be in one of the following
states: Idle, Display off, Ongoing call, Call on hold, Remote in use, Remote on hold, Muted, Missed
call.
• Off: The phone has a network or SIP connection failure. Or, the phone is in a silent emergency call.
You can enable or disable the slow blinking green LED indicator. This setting does not affect other LED
indicators.
1. Access the Settings app.
2. Select Phone settings > Display > LED coverage indicator.
3. Press On or Off to update your preference.
Set the phone wallpaper and color theme
The phones provide six wallpapers with predened dark and light themes. You can choose a different
color theme to personalize the user interface on your phone. Each theme uses a unique color palette that
signicantly alters the overall appearance of the user interface.
If your administrator has deployed custom wallpapers, you can apply them and choose your desired color
theme. Additionally, your administrator can also deploy corporate logo on your phone, it will replace the
time and date display on the home screen when you enable it.
Switching the appearance theme doesn't require a phone restart.
Note:
You administrator can specify the wallpaper and the color theme on your phone. If your
administrator hides the appearance settings, you can't change the wallpaper or color theme on
your phone.
1. Access the Settings app.
2. Select Phone settings > Display > Appearance
3. To use a system-predened wallpaper, do the following:

CONFIDENTIAL DRAFTCONFIDENTIAL DRAFT
Cisco Wireless Phone 9821 User Guide | 7 - Settings | 85
a. Select System wallpaper.
b. Select a wallpaper with your desired color theme.
c. Press Preview to view the wallpaper.
d. Press Save.
4. To use a customized wallpaper, do the following:
a. Select Custom wallpaper.
b. Select a custom wallpaper with the default color theme.
c. Press Preview to view the wallpaper.
d. Press Light or Dark to change the color theme of the wallpaper.
e. Press Save.
Set time and date on your phone
You can manage some of the date and time settings on your phone. Typically, the phone automatically
sets the date, time, and time zone using the information from the call control system. But, you may need
to override the automatic settings.
Control the date and time manually
When the phone date and time is controlled manually, you can change the following settings:
• Automatic time zone
• Time
• Date
• Time zone
• 12-hour or 24-hour date format
• Date format
1. Access the Settings app.
2. Select Phone settings > Date and Time
3. Select Automatic date and time.
4. Press Off.
Control the date and time automatically
When the phone date and time is controlled automatically, you can change the following settings:

CONFIDENTIAL DRAFT
Cisco Wireless Phone 9821 User Guide | 7 - Settings | 86
• Automatic time zone
1. Access the Settings app.
2. Select Phone settings > Date and Time
3. Select Automatic date and time.
4. Press On.
Set the time zone automatically
You can set up your phone to automatically or manually set the time zone. When the Automatic time zone
eld is set to On, you cannot change the time zone that your phone uses. When the Automatic time zone
eld is set to Off, you can set the time zone that your phone uses.
1. Access the Settings app.
2. Select Phone settings > Date and Time > Automatic time zone
3. Press Off to enable you to set the time zone manually.
4. Press Set.
Set the time, date, and time zone
If your phone date, time, and time zone are manually controlled, you can set these settings.
1. Access the Settings app.
2. Select Phone settings > Date and Time and perform the following:
a. To set the time, select Time. Enter the time using the keypad. Use the right and left
navigation keys to move between the elds. Press Set.
b. To set the date, select Date. Enter the date using the keypad. Use the right and left
navigation keys to move between the elds. Press Set.
c. To set the time zone, select Time zone. Select the correct time zone. Press Set.
Use a 12-hour or 24-hour clock
If your phone date and time is manually controlled, you can change the time display.
1. Access the Settings app.
2. Select Phone settings > Date and Time

CONFIDENTIAL DRAFT
Cisco Wireless Phone 9821 User Guide | 7 - Settings | 87
3. Select Use 24-hour format.
4. Press Off for 12-hour format or press On for 24-hour format.
Set the date format
If your phone date and time is manually controlled, you can set your phone to display the date in one of
the preset formats.
1. Access the Settings app.
2. Select Phone settings > Date and Time > Date format
3. Select the required format.
4. Press Set.
Use a Bluetooth® headset
Before using Bluetooth on your phone, keep the following in mind:
• When you use Bluetooth, your phone battery has less talk time.
• Cisco Wireless Phone 9821 does not support other Bluetooth devices except Bluetooth headsets
and Bluetooth speakers.
• Effective signal range varies by headset model. Check with your headset manufacturer for the
maximum headset range. For example, you can take the Bang & Olufsen Cisco 980 headset as far
as 12 meters (40 feet) from the device before you experience a dip in signal quality.
• Your environment may affects your Bluetooth signal quality. Objects such as walls, windows, and
desks can reduce your headset range.
Turn on Bluetooth
Before you can use Bluetooth, you must turn on the ability for the phone to use Bluetooth.
1. Access the Settings app.
2. Select Bluetooth > Bluetooth.
3. Press On.
Add a new Bluetooth headset
You can add up to 5 Bluetooth headsets to Cisco Wireless Phone 9821.

CONFIDENTIAL DRAFT
Cisco Wireless Phone 9821 User Guide | 7 - Settings | 88
1. Access the Settings app.
2. Make sure that the Bluetooth headset is discoverable. Select Add Bluetooth device.
The phone searches for any Bluetooth devices in range. This scan can take a couple of minutes.
3. Select a device from the list and press Pair.
4. Optional: Enter the passkey for the device.
When your Bluetooth headset is paired with Cisco Wireless Phone 9821, it’s the active audio path until you
connect another headset or change the audio path. You can see on the phone home screen header. If
the phone audio is in silence, you can see on the header.
Connect a Bluetooth headset
Bluetooth must be turned on and the headset needs to be already added to the Bluetooth device list.
After you pair and connect a Bluetooth headset to your phone, the headset automatically connects when
it is turned on and close to your phone. Only one Bluetooth headset can be connected to the phone. But,
if you have two Bluetooth headsets turned on, the phone uses the most recently connected headset. You
can change which headset the phone uses.
1. Access the Settings app.
2. Select Bluetooth.
3. Select a device from the list.
4. Required: Press More and select Connect.
Rename a Bluetooth headset
If you have several entries in your Bluetooth device list that are identical, you can rename the entries to be
more meaningful.
1. Access the Settings app.
2. Select Bluetooth.
3. Select a device from the list.
4. Required: Press More and select Rename.
5. Use the keypad to enter a name.

CONFIDENTIAL DRAFT
Cisco Wireless Phone 9821 User Guide | 7 - Settings | 89
Disconnect a Bluetooth headset
If you have a Bluetooth headset connected to your phone and want to use it with your mobile phone or
computer, you can disconnect the Bluetooth headset. The headset remains in the list of Bluetooth devices
and you can reconnect it.
1. Access the Settings app.
2. Select Bluetooth.
3. Select a device from the list.
4. Press More and select Disconnect.
Delete a Bluetooth headset
When you do not want a Bluetooth headset in the list of devices available, you can delete it.
1. Access the Settings app.
2. Select Bluetooth.
3. Select a device from the list.
4. Required: Press More and select Delete.

CONFIDENTIAL DRAFT
Chapter 8. Accessories
Supported accessories
You can use a number of accessories with your Cisco Wireless Phone 9821.
• Batteries
• Cisco Wireless Phone 9821 AC Power Adapter
• USB cable
• Cisco Wireless Phone 9821 Desktop Charger
• Cisco Wireless Phone 9821 Multi Charger
• Carry cases
• Silicon case
• Headsets:
◦ Standard headsets that use a 3.5 mm jack
◦ Bluetooth headsets
• Other accessories, including lanyard and battery door
The phone does not support any other type of Bluetooth device than Bluetooth headsets and speakers.
USB cable
You can connect your phone to your computer or power adapter using a special USB cable.
The wide connector on the USB cable connects to the phone with magnets to hold it secure. It has pins
that you must align correctly. If you hold the phone so that the screen is toward you, the battery icon on
the connector is visible. For more information, see Charge phone battery.
Desktop charger
You can use the Cisco Wireless Phone 9821 Desktop Charger to charge your Cisco Wireless Phone 9821
and spare phone battery. The charger works on AC power or from a charged spare phone battery. It can
be secured with a standard laptop cable lock. The maximum voltage for the desktop charger is 4.35 V.
The following gure shows the desktop charger with a phone.
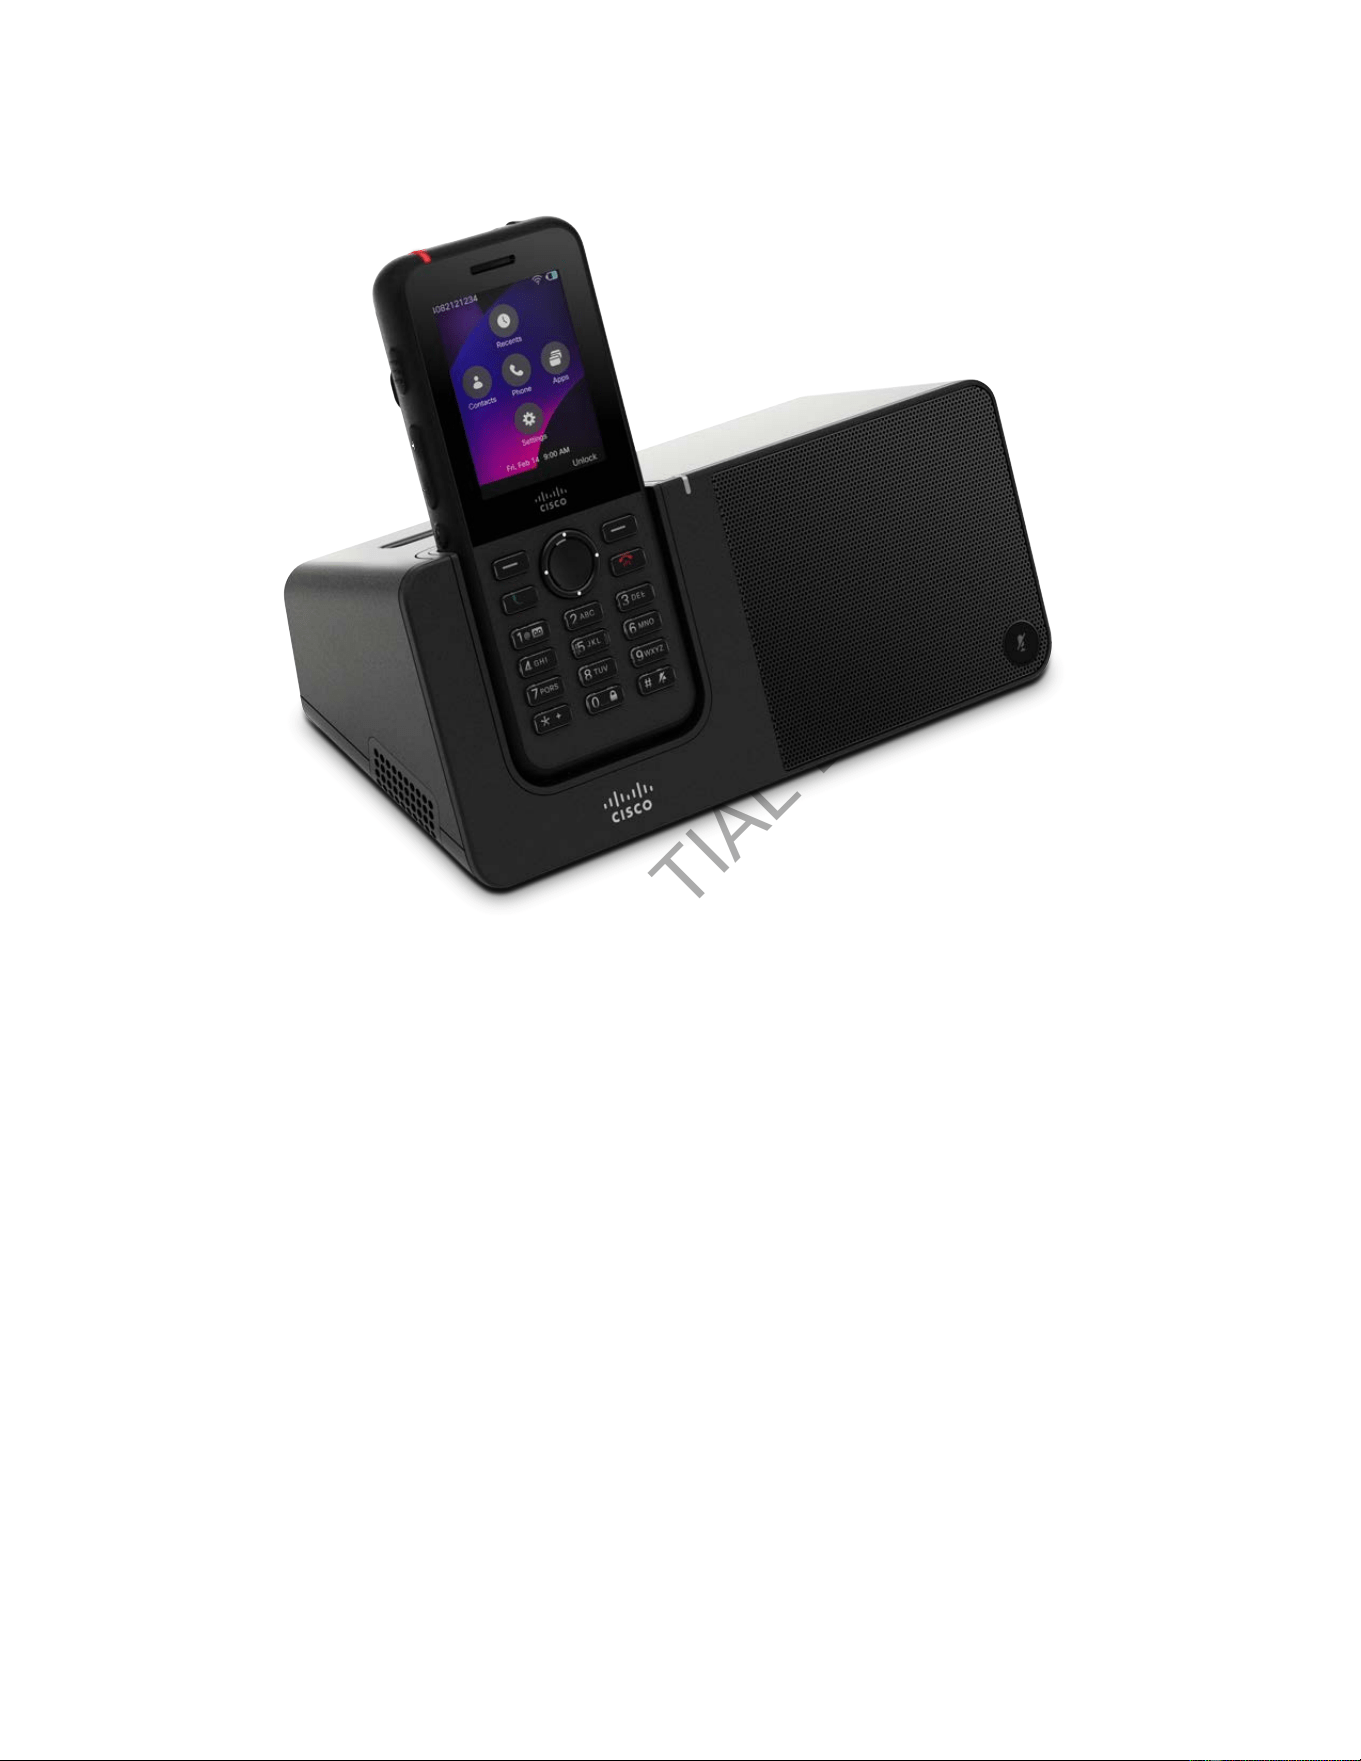
CONFIDENTIAL DRAFT
Cisco Wireless Phone 9821 User Guide | 8 - Accessories | 91
Figure 7. Cisco Wireless Phone 9821 and Cisco Wireless Phone 9821 Desktop Charger
If your phone has a protective case, you don't need to remove the case before you charge the phone in the
desktop charger. You adapt the charger to t the phone.
You can use a USB to Ethernet adapter (dongle) to connect the desktop charger to the Ethernet for only
automatic Wi-Fi prole provisioning and certicate enrollment purposes. You cannot use the dongle to
make voice calls over the Ethernet.
Built-in speakerphone and microphone
The charger includes a speakerphone and a microphone that you can use while the phone is docked. Use
the phone volume buttons to control the speakerphone volume, and the Mute button on the charger itself.
When the speakerphone is muted, the Mute button lights red.
Phone charging indications
When you put the phone into the charger, the phone indicates that the battery is charging with the red LED
on the top of the phone. If the phone is turned on when you put it into the charger, you see a message on

CONFIDENTIAL DRAFT
Cisco Wireless Phone 9821 User Guide | 8 - Accessories | 92
the screen. If the phone is turned off or the battery is too weak, you see an icon displayed on the screen.
When the battery is charged, the phone LED is green.
Spare battery charging indications
You can charge a spare battery with the additional charging port behind the main phone charging port.
When you put a spare battery into the charger, the Battery LED (to the right of the phone) lights to show
the charging status:
• Red—The spare battery is charging.
• Green—The spare battery is fully charged.
Set up the desktop charger
• You need the cable that comes with the charger. This cable has a round barrel plug on one end and
a USB connector on the other end.
• You need the power adapter that comes with the charger.
Place the desktop charger on a stable work surface.
1. Plug the round barrel plug end of the cable into the desktop charger.
2. Plug the USB end of the cable into the power adapter and plug the power adapter into the electrical
outlet.
Charge your phone with the desktop charger
You can tell when your phone is charging in the charger when the phone LED lights red and a message or
icon displays on the phone screen. When the battery is fully charged, the LED turns green. Your phone can
take up to 3 hours to recharge.
If your phone has a protective case, you don't need to remove the case before you charge the phone in the
desktop charger. You adapt the charger to t the phone.
When you put the phone into the charger, make sure that you align the charging pins on the bottom of the
phone with the connector in the charger. When the phone is correctly placed in the charger, it is held in
place with magnets. If the LED does not light, then the alignment is not correct.
CAUTION:
Do not charge the phone in a hazardous environment.
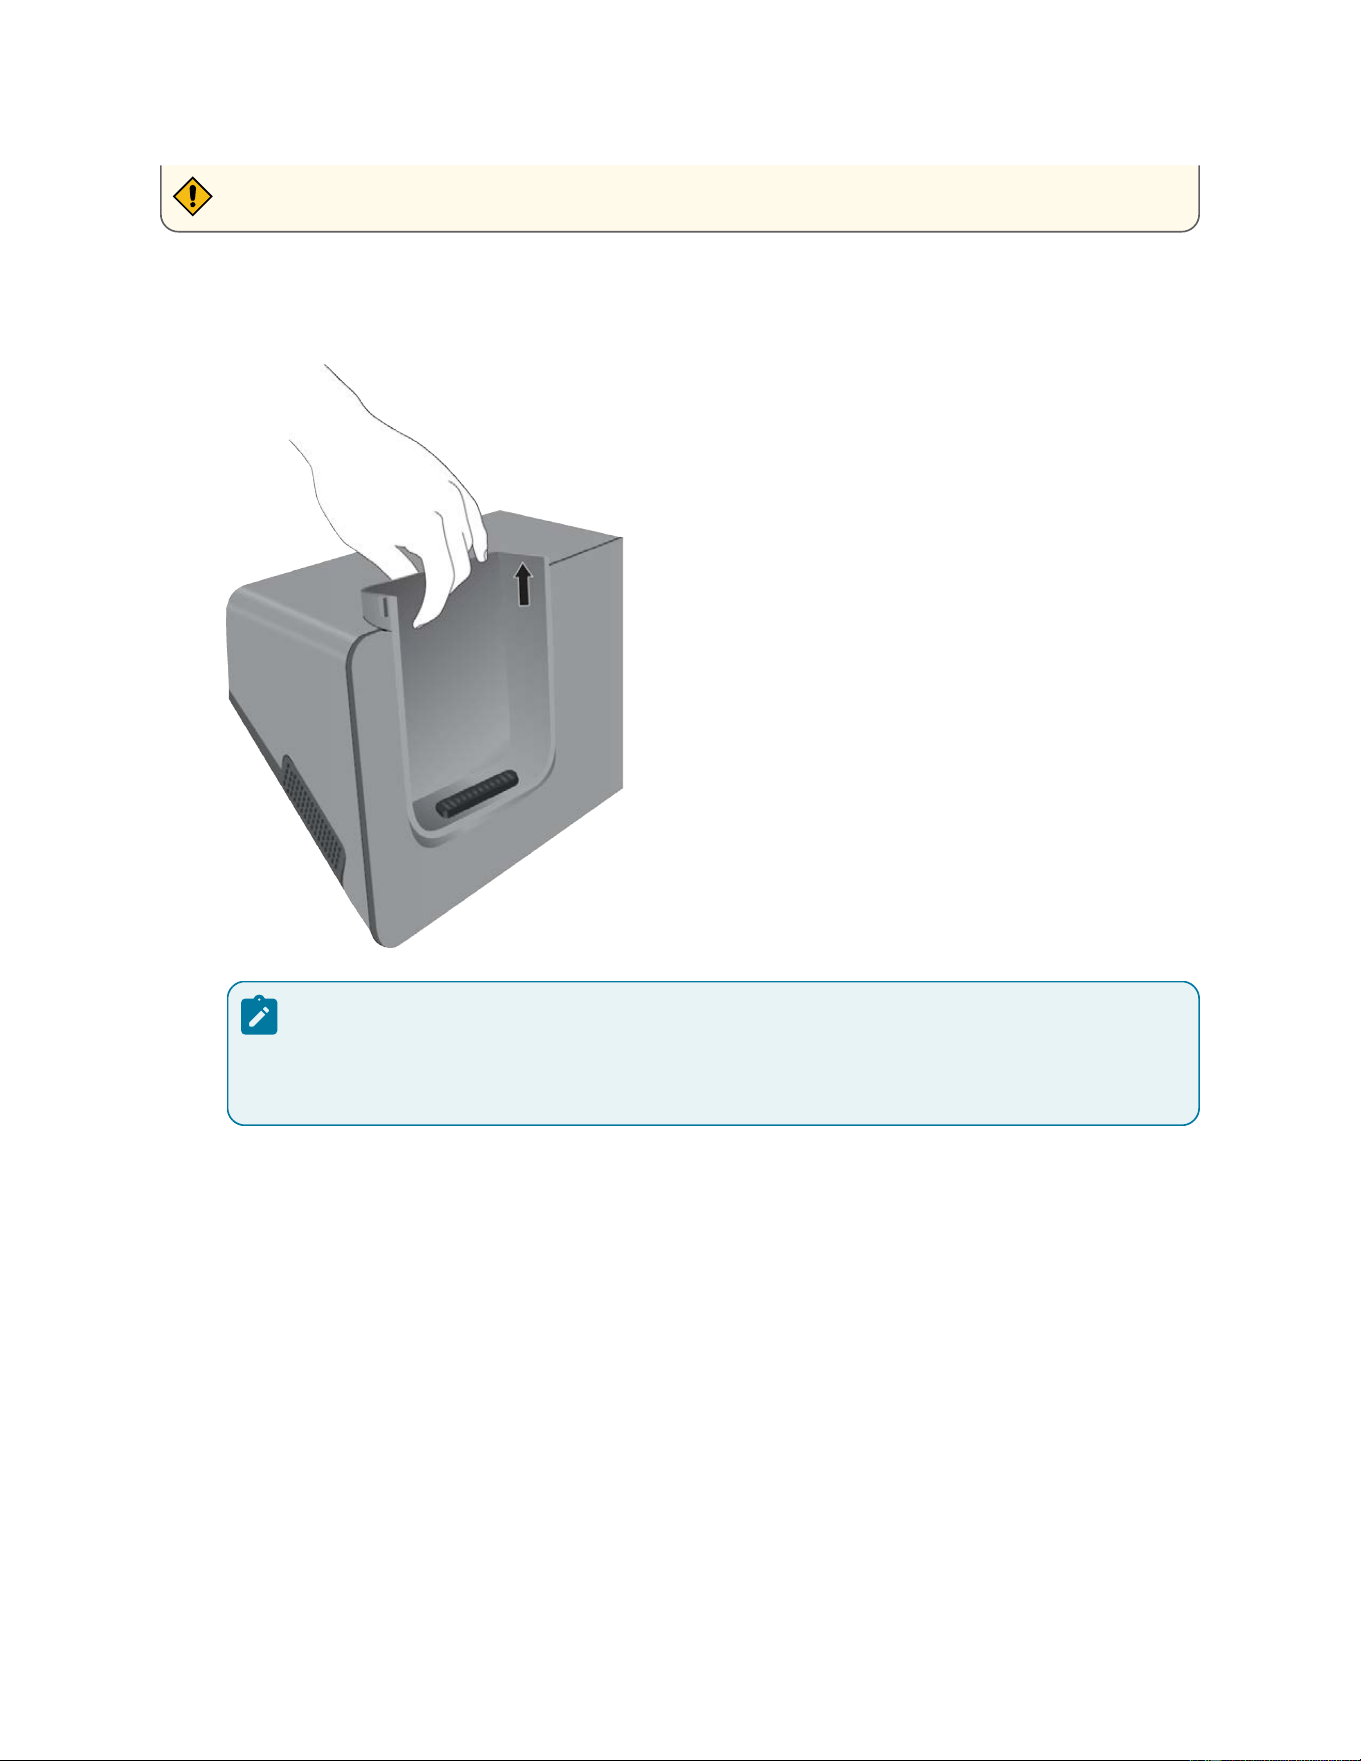
CONFIDENTIAL DRAFT
Cisco Wireless Phone 9821 User Guide | 8 - Accessories | 93
Do not charge the phone if it is wet.
1. Optional: Adapt the charger for a phone in a case. Turn the charger so that the back is facing you,
put three ngers about 3/4 of the way into the cup, press in, and lift. The cup should slide out.
Note:
You might need to use two hands to remove the cup the rst time.
2. Place your phone in the charging slot with the screen facing towards you. If your phone is in a case,
press the phone into the charging slot to ensure that the phone connects with the contacts.
Make sure that the LED on the phone lights red. If the LED does not light up, remove the phone and
reinsert it into the charger.
If your phone is in a case, the phone and case will tilt out because of the case.
3. When you remove the phone from the charger, tilt the phone forward and lift it up to disconnect the
connecter from the magnets.
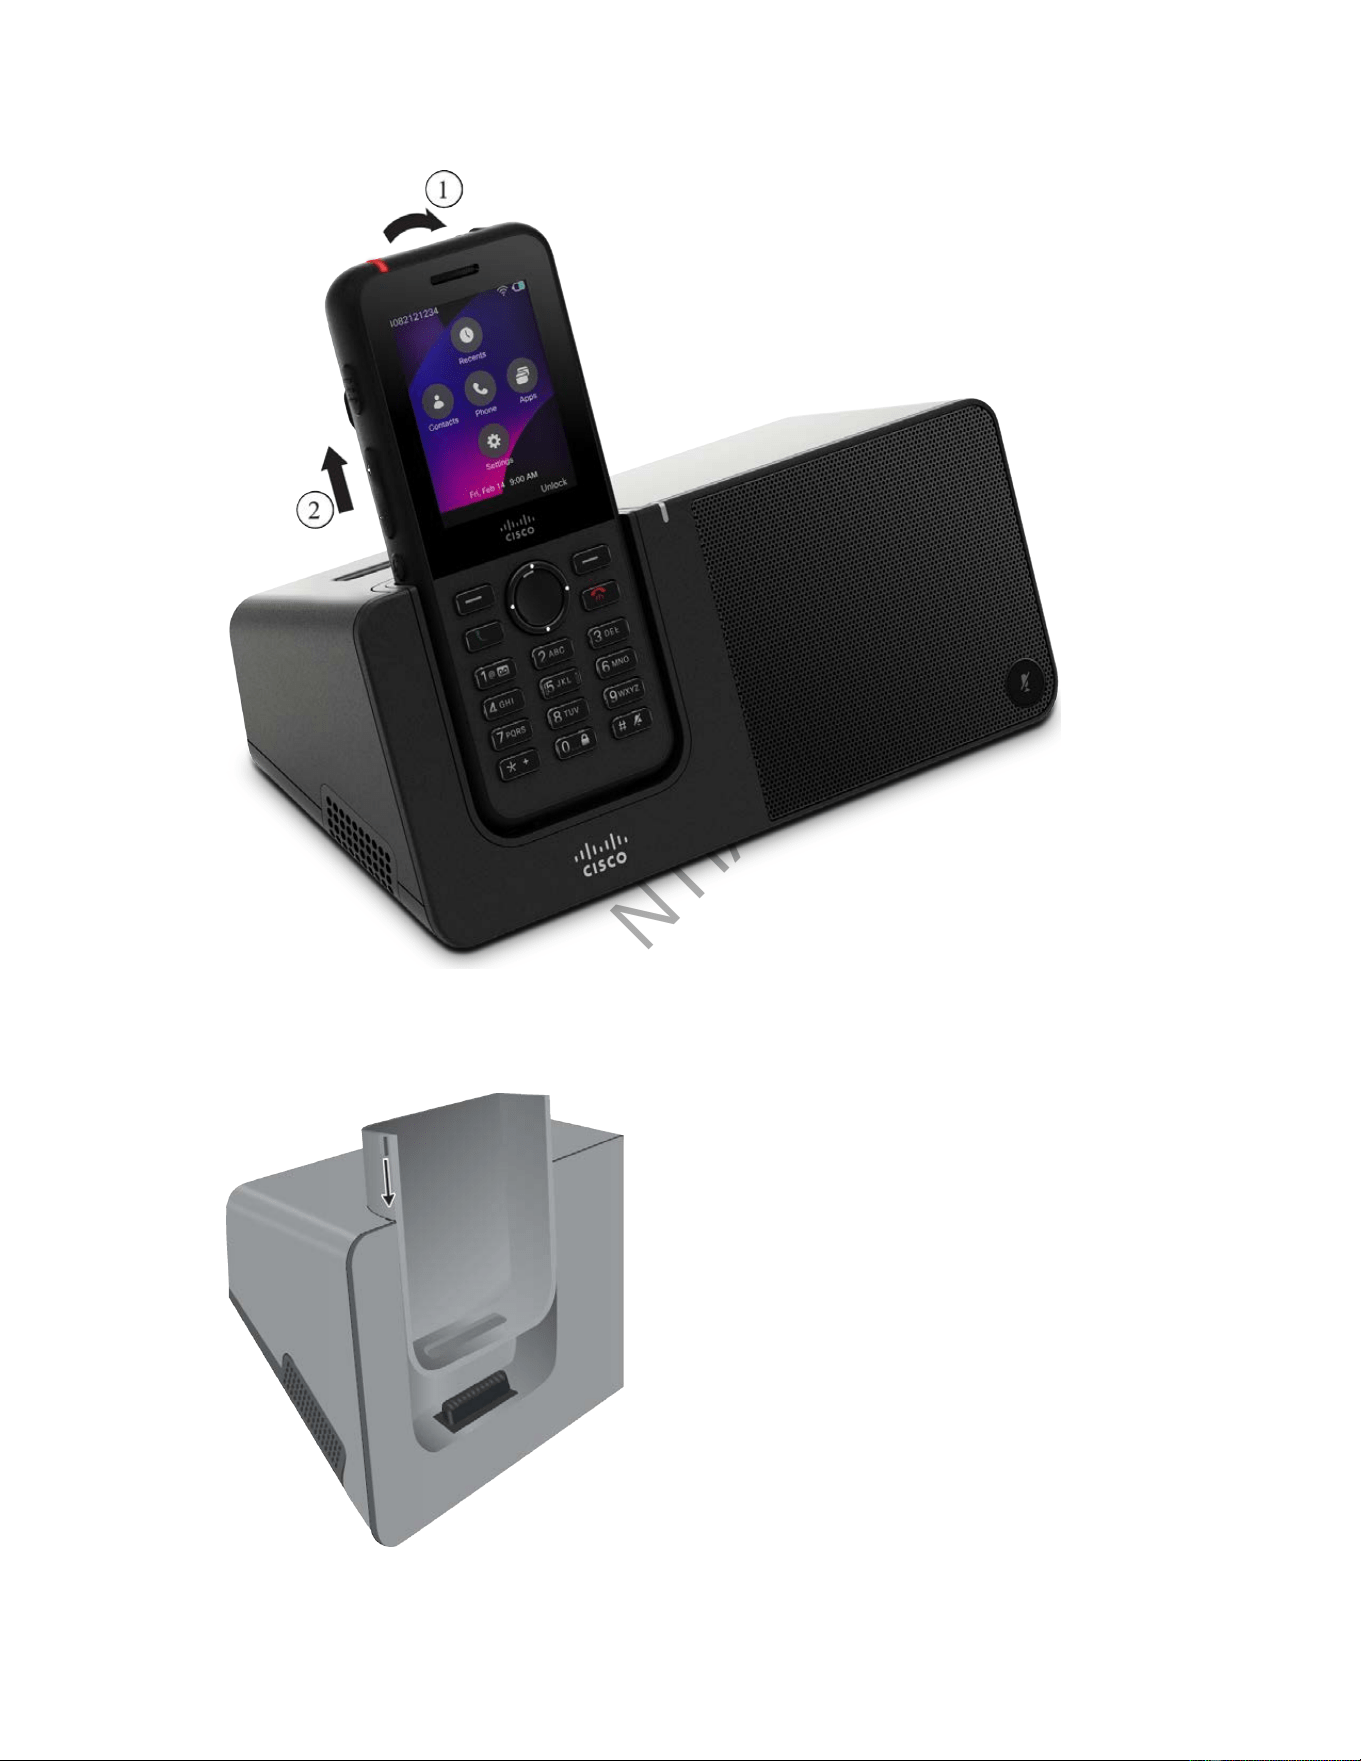
CONFIDENTIAL DRAFT
Cisco Wireless Phone 9821 User Guide | 8 - Accessories | 94
4. Optional: Slide the charging cup into the charger. Make sure that the cup is ush with the front and
top of the charger.
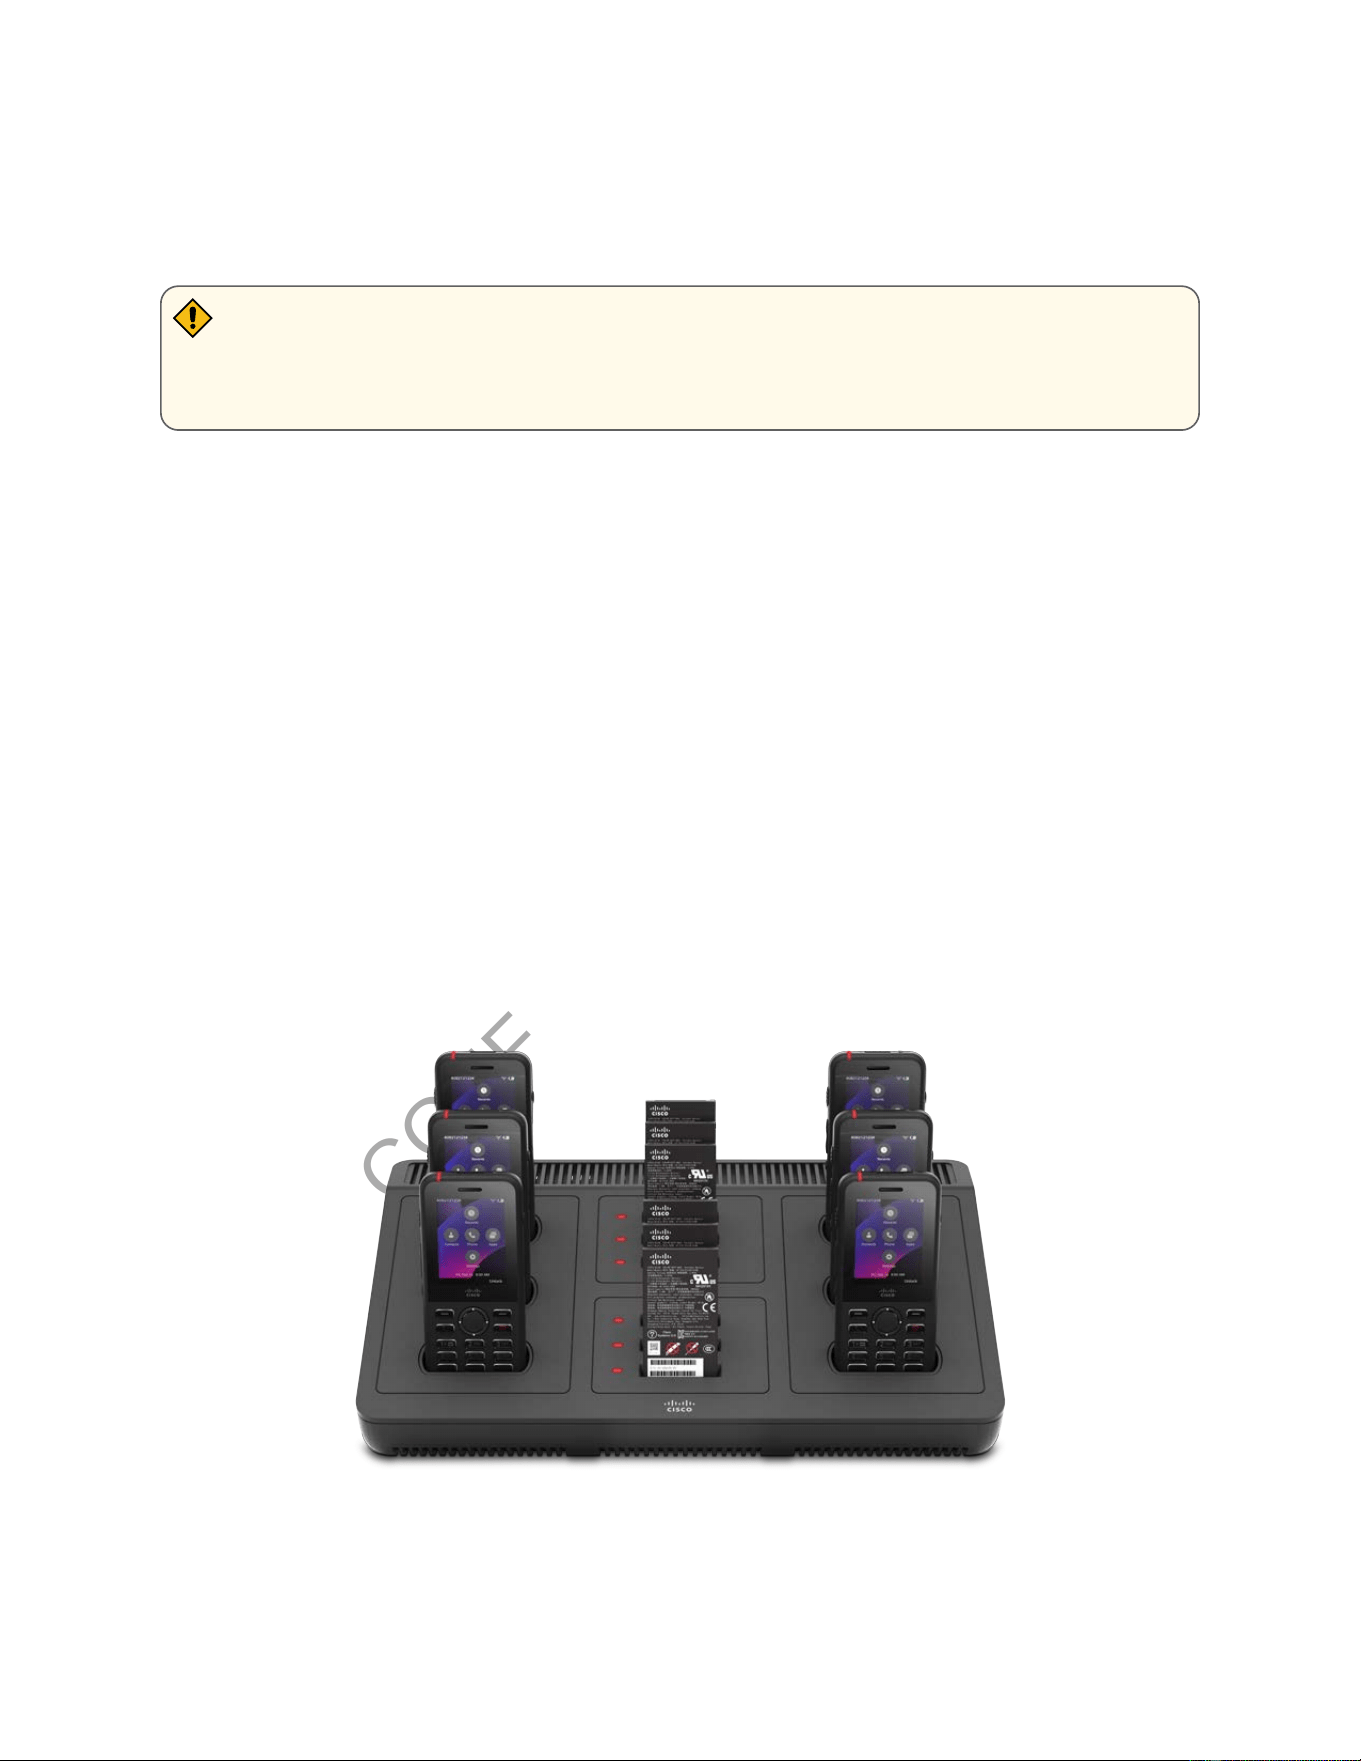
CONFIDENTIAL DRAFT
Cisco Wireless Phone 9821 User Guide | 8 - Accessories | 95
Charge your spare battery with the desktop charger
You can charge a spare battery in the desktop charger. The battery can take up to 3 hours to charge.
CAUTION:
Do not charge the battery in a hazardous environment.
When the battery is charging, the spare battery LED on the charger lights red. When the battery is charged,
the spare battery LED on the charger lights green.
1. Hold the battery so that the Cisco label faces you, and the arrows on the battery point down.
2. Place the spare battery in the slot behind the phone cradle and press down rmly.
Multicharger
You can charge up to six Cisco Wireless Phone 9821 and six spare batteries at the same time with the
Cisco Wireless Phone 9821 Multi Charger. If your phone is in a protective case, you can charge it without
removing the case. The maximum voltage for the multicharger is 4.35 V.
The following gure shows the multicharger. The phones are placed in the charging cups on the left and
right, and the spare batteries are placed in the center.
Figure 8. Cisco Wireless Phone 9821 and Cisco Wireless Phone 9821 Multi Charger

CONFIDENTIAL DRAFT
Cisco Wireless Phone 9821 User Guide | 8 - Accessories | 96
You can place the multicharger on a work surface or mount it on a wall with the wall mount kit. You can
also secure the multicharger with a standard laptop cable lock.
The LED on the phone shows the charging status. When the battery is charging, the LED lights red. When
the battery is charged, the LED lights green.
The LED beside the spare battery shows the charging status. When the battery is charging, the LED lights
red. When the battery is charged, the LED lights green.
Battery slot LEDs can take several minutes to indicate that the battery is fully charged. If you move a fully-
charged battery to another slot, the LED might initially light red before it turns green.
Set up the multicharger
The power jack is on the right side of the multicharger.
1. Plug the jack end of the power cord into the multicharger.
2. Plug the other end of the power cord into the power adapter.
3. Plug the power adapter into the electrical outlet.
4. Place the multicharger on a stable work surface.
Install the multicharger wall mount kit
You need the following tools:
• Drill and a 0.25 inch drill bit
• Pencil
• Level
• Philips #1 and #2 screwdrivers
You need the power cable and power adapter.
The wall mount kit comes with the following components:
• bracket
• package with 5 screws and 5 self-tapping wall anchors
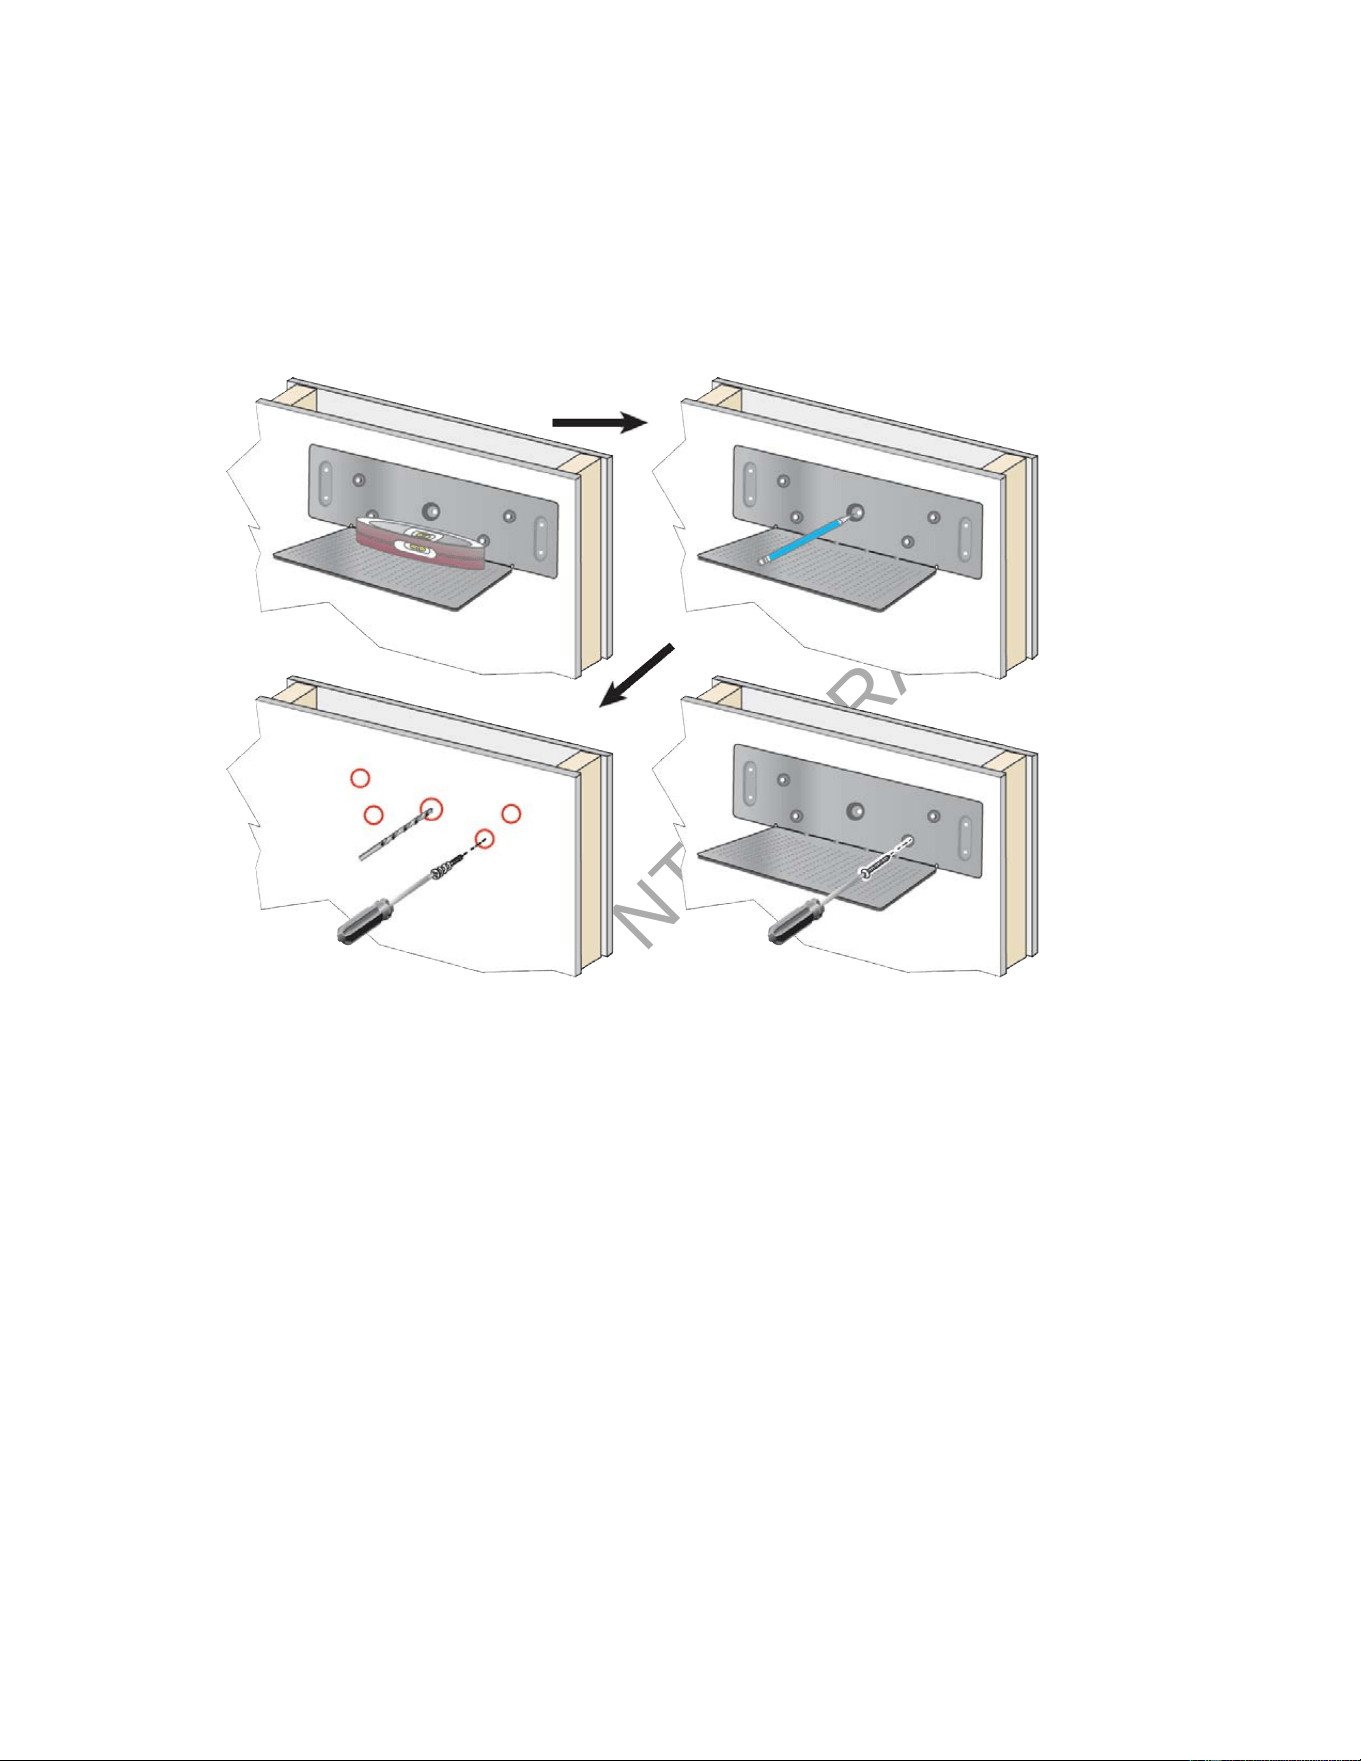
CONFIDENTIAL DRAFT
Cisco Wireless Phone 9821 User Guide | 8 - Accessories | 97
1. Determine the location for the bracket. The mounting location must be away from sinks, water
lines, and areas with high humidity or potential splashes. The bottom right corner of the bracket
must be less than 50 inches (127 cm) from an electrical outlet.
2. Mount the wall bracket.
a. Hold the bracket on the wall, as shown in the diagram.
b. Use the level to ensure that the bracket is level and use a pencil to mark the screw holes.
c. Install the anchors, using the drill and drill bit.
d. Screw the bracket to the wall.
3. Locate the post holders in the multicharger.
4. Hold the multicharger so that the post holders are in front of the posts on the bracket, press the
multicharger towards the wall, and then push the multicharger down so that the posts seat into the
holder.
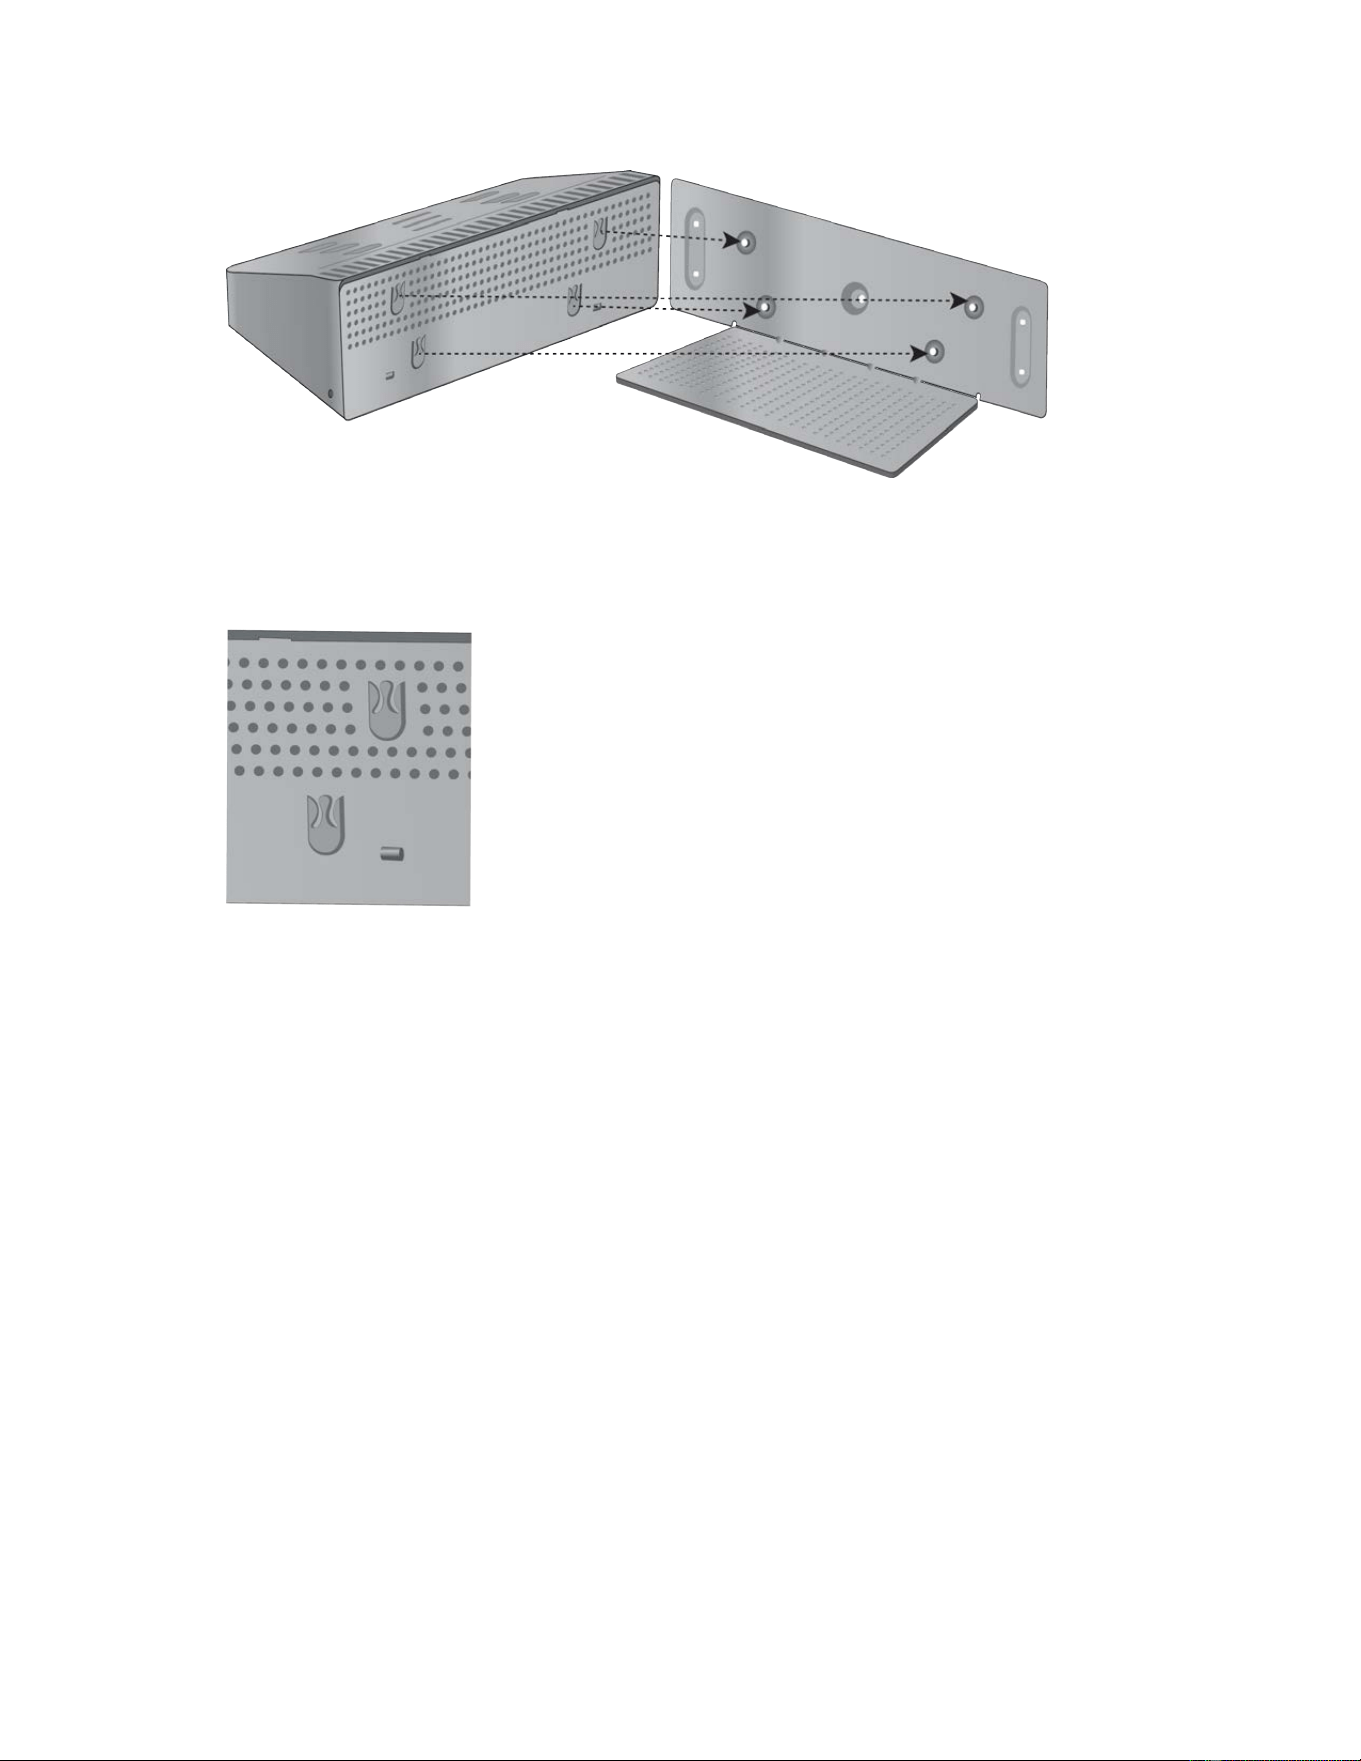
CONFIDENTIAL DRAFT
Cisco Wireless Phone 9821 User Guide | 8 - Accessories | 98
Here is a close-up of the post holder.
5. Plug the jack end of the power cord into the multicharger.
6. Plug the other end of the power cord into the power adapter.
7. Plug the power adapter into the electrical outlet.
Charge your phone with the multicharger
You can tell when your phone is charging in the multicharger when the phone LED lights red. When the
battery is fully charged, the LED turns green. Your phone can take up to 3 hours to recharge.
If your phone has a protective case, you don't need to remove the case before you charge the phone in the
multicharger. You adapt the multicharger to t the phone.
When you put the phone into the multicharger, make sure that you align the charging pins on the bottom
of the phone with the connector in the multicharger. If the LED does not light, then the alignment is not
correct.
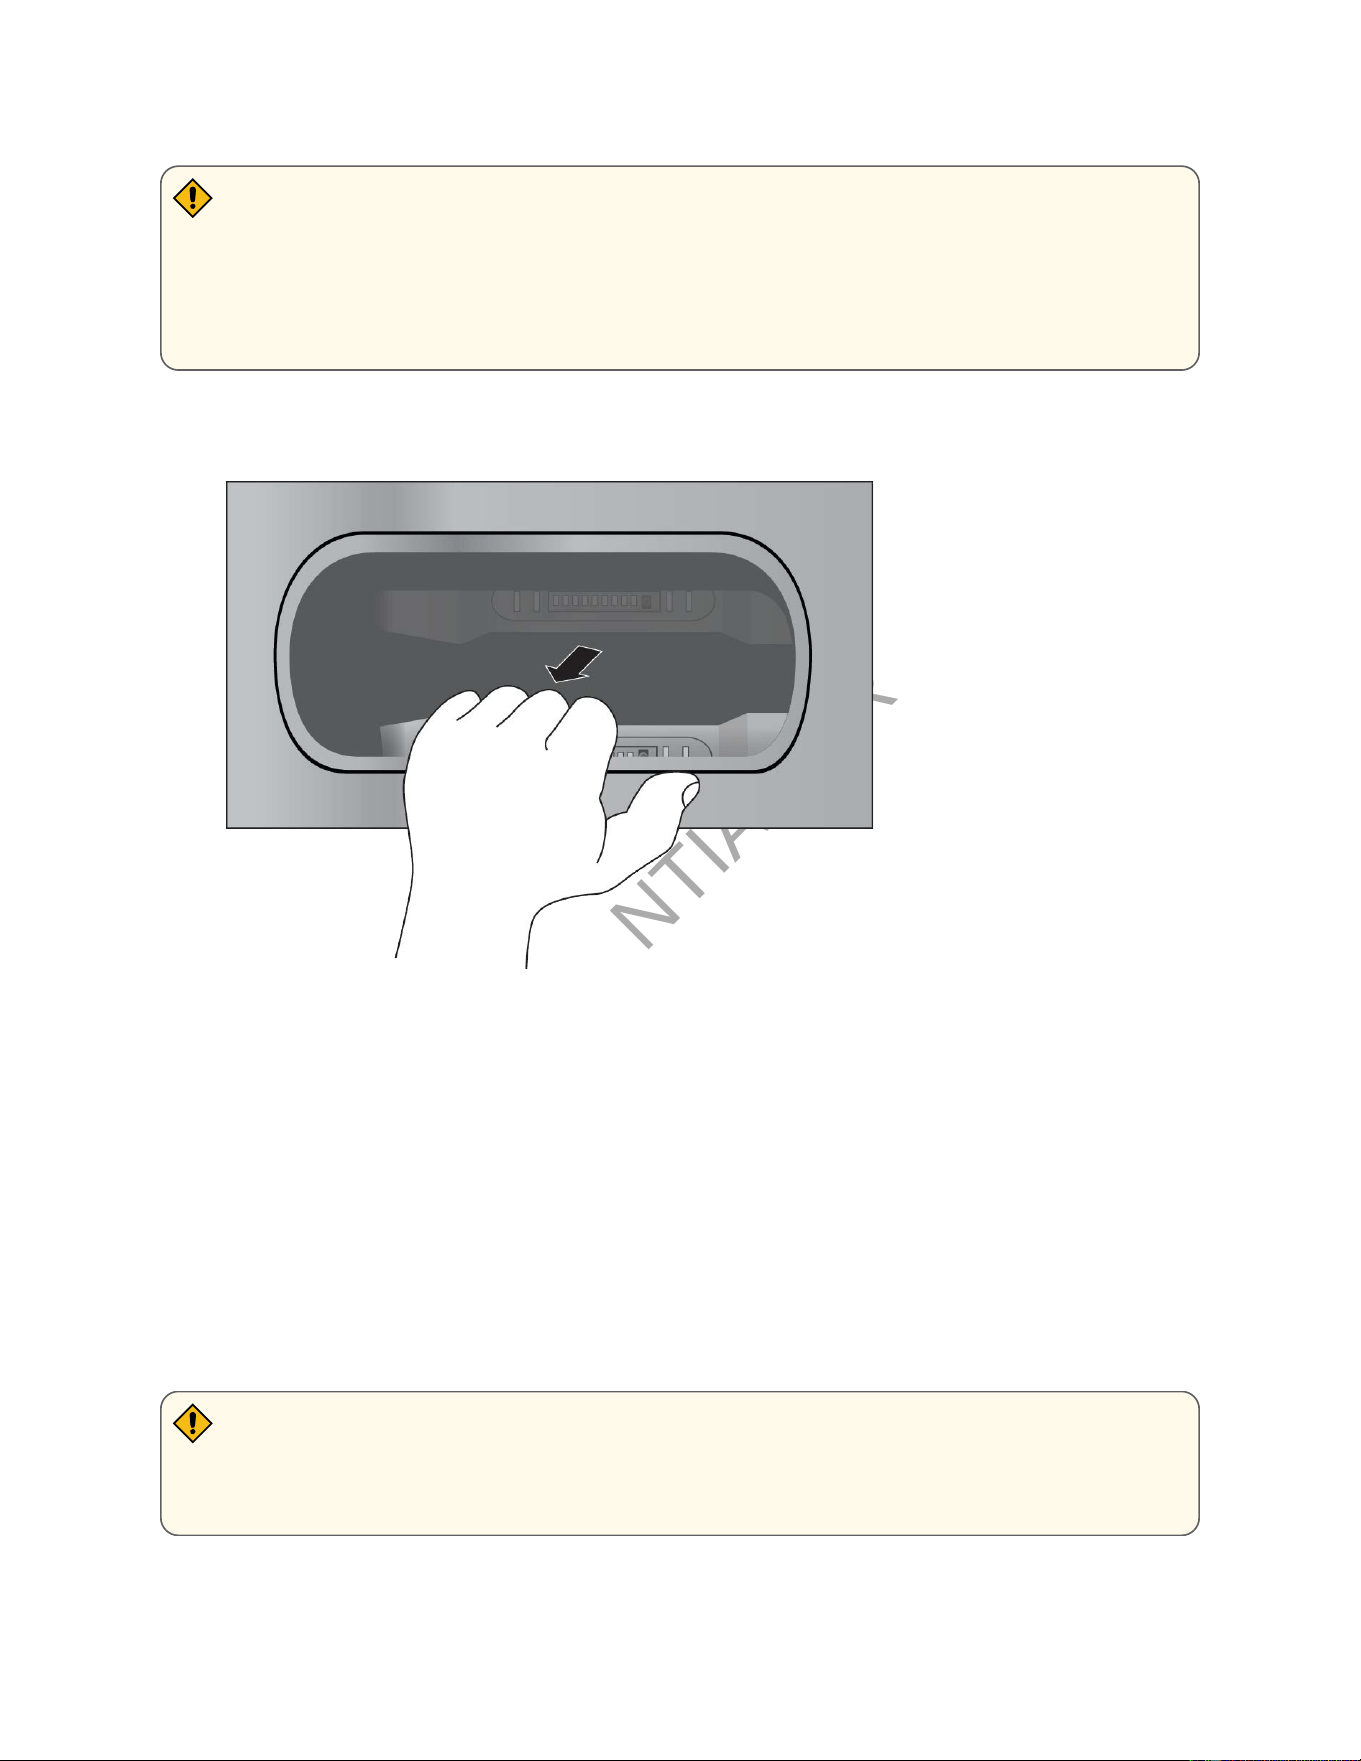
CONFIDENTIAL DRAFT
Cisco Wireless Phone 9821 User Guide | 8 - Accessories | 99
CAUTION:
Do not charge the phone in a hazardous environment.
Do not charge the phone if it is wet.
1. Optional: Adapt the charger for a phone in a case: Reach into the cup with three ngers, locate the
slots on the inside of the cup, and use the slots to pull the cup out.
2. Place your phone in the empty charging slot. If your phone is in a case, press the phone into the
charging slot to ensure that the phone connects with the contacts.
Make sure that the LED on the phone lights red. If the LED does not light up, remove the phone and
reinsert it into the multicharger.
3. Optional: Slide the charging cup into the multicharger and press the cup into place so that the cup
is ush with the top of the multicharger.
Charge your spare battery with the multicharger
You can charge a spare battery in the multicharger. The battery can take up to 3 hours to charge.
CAUTION:
Do not charge the battery in a hazardous environment.

CONFIDENTIAL DRAFT
Cisco Wireless Phone 9821 User Guide | 8 - Accessories | 100
When the battery is charging, the Battery LED beside the battery lights red. When the battery is charged,
the Battery LED lights green.
Place the battery in an empty spare battery slot, aligning the battery contacts with the charger connecter.
If the Battery LED does not light red, remove the battery and reinsert it into the battery slot.
Secure the charger with a cable lock
You can secure your desktop charger or multicharger with a laptop cable lock that is up to 20 mm wide.
1. Take the looped end of the cable lock and wrap it around the object to which you want to secure
your phone.
2. Pass the lock through the looped end of the cable.
3. Unlock the cable lock.
4. Press and hold the locking button to align the locking teeth.
5. Insert the cable lock into the lock slot of your charger and release the locking button.
6. Lock the cable lock.
Carry cases
You can put your phone into a carry case to make it easy to carry your wireless phone and to provide
some protection for the phone. When your phone is in the case, you don't have to remove the case to
charge the phone.
We have the following cases available:
• Cisco Wireless Phone 9821 Leather Case
• Cisco Wireless Phone 9821 Holster Case
You can attach a Cisco Wireless Phone 9821 Silicon Clip to either case. The following picture shows the
silicon clip.
[Graphical representation of the text]
When you buy a case, we supply this clip and you can also order replacement clips.

CONFIDENTIAL DRAFT
Cisco Wireless Phone 9821 User Guide | 8 - Accessories | 101
Note:
Cisco does not endorse, support, or test third party cases or covers for the 9821 Wireless
Phones. Using your Cisco Wireless Phone 9821 with third party cases or covers may void your
warranty.
Cisco Wireless Phone 9821 leather case
You can slide the phone into the leather case to protect the phone and then attach the case to the belt clip
or pocket clip. The button on the back of the case attaches to the clip. The following pictures show the
front and back of the leather case.
[Graphical representation of the text]
[Graphical representation of the text]
You can also clip a lanyard to the metal ring on the top of the leather case
When your phone is in the case, you don't have to remove the case to charge the phone.
Cisco Wireless Phone 9821 holster case
You can press the phone into the holster case to protect the phone and then attach the case to the belt
clip or pocket clip. The button on the back of the case attaches to the case to the clip. The following
pictures show the front and back of the holster case.
[Graphical representation of the text]
[Graphical representation of the text]
When your phone is in the case, you don't have to remove the case to charge the phone.
Silicone case
You can use the Cisco Wireless Phone 9821 Silicon Case to protect your wireless phone.
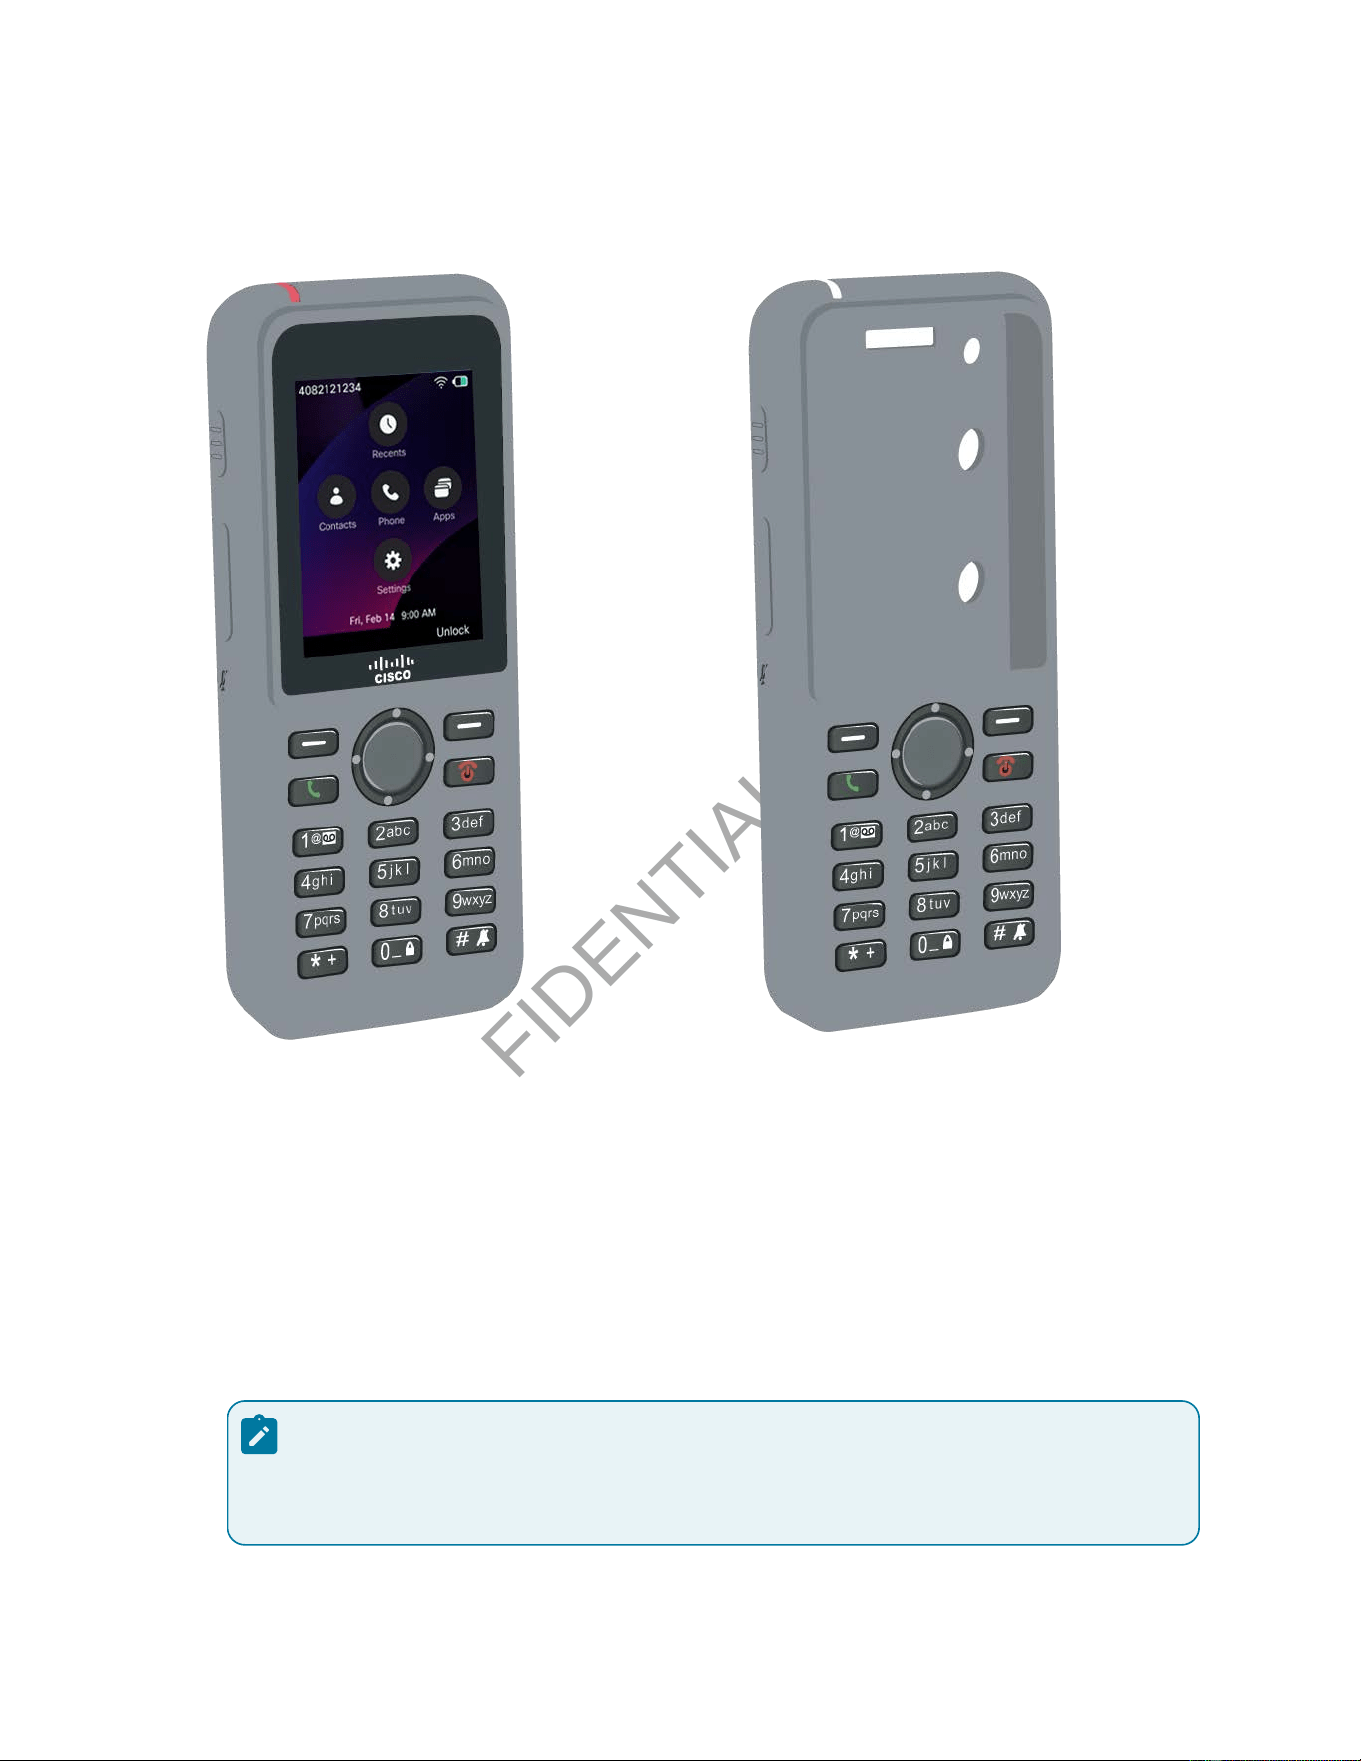
CONFIDENTIAL DRAFT
Cisco Wireless Phone 9821 User Guide | 8 - Accessories | 102
Figure 9. Cisco Wireless Phone 9821 and Cisco Wireless Phone 9821 Silicone Case
The case has these benets:
• Hypoallergenic
• Antimicrobial
• Resistant to wear from 15% alcohol, 75% alcohol, 2.5% hydrogen peroxide, mineral oil, soap, water,
bleach, and dish soap.
Note:
Use the lowest-strength cleaning agent to prolong the life and look of the case.
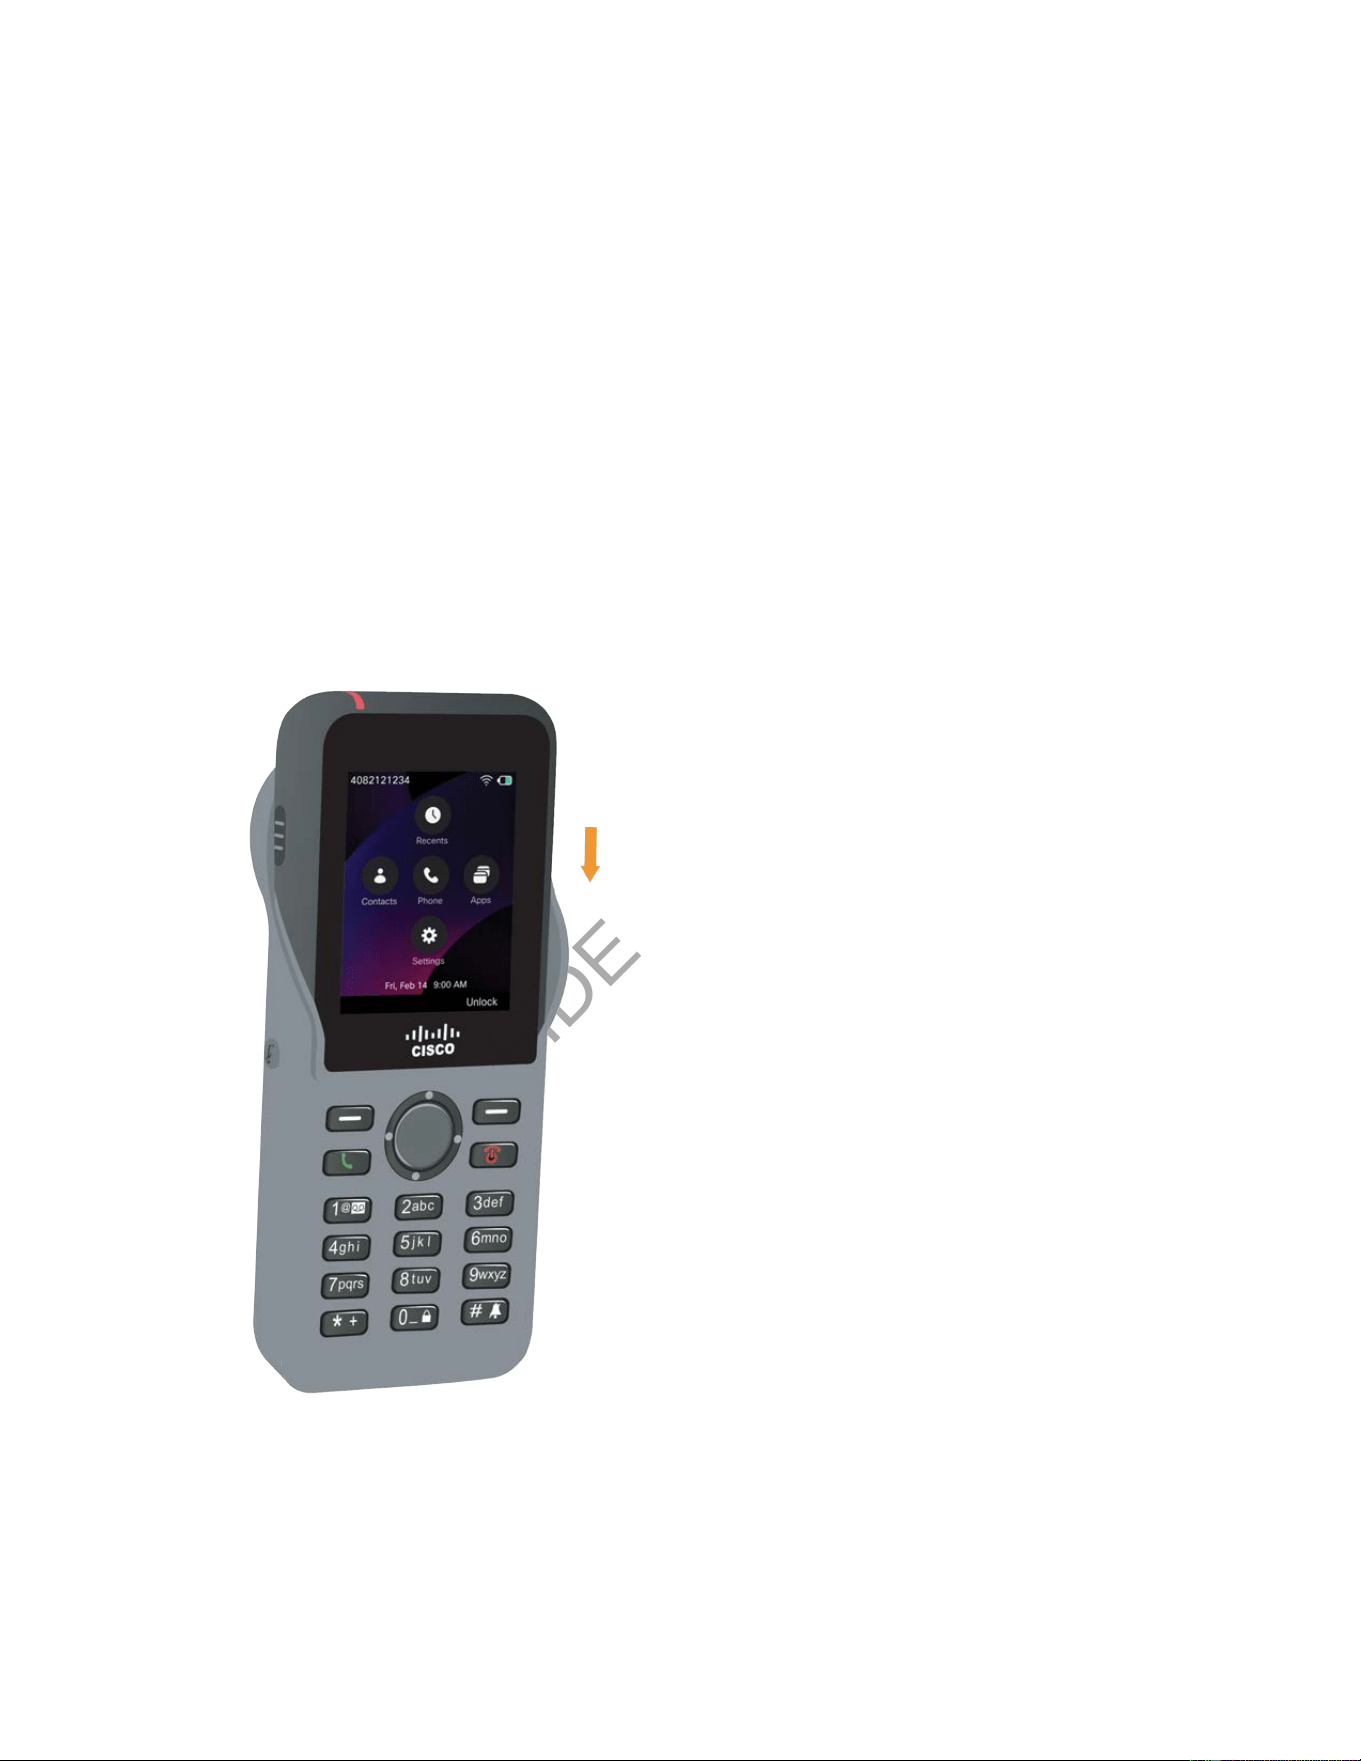
CONFIDENTIAL DRAFT
Cisco Wireless Phone 9821 User Guide | 8 - Accessories | 103
• Reduces damage when the phone is dropped
• Covers more of the phone than the other cases.
The case comes with an optional belt clip that you can slide onto the case.
The case doesn't need to be removed to charge the battery in the desktop charger or multicharger. You
remove the cup in the charger to place the phone and case into the charger.
Install the silicone case
You put the phone into the case through the screen opening in the case. If you need to remove the case,
reverse the steps below.
1. Slide the bottom of the phone into the screen opening until the phone is completely in the case.
2. If the screen opening has rolled up, unroll it until it is at.
3. One corner at a time, slide the case corner up to cover the phone.
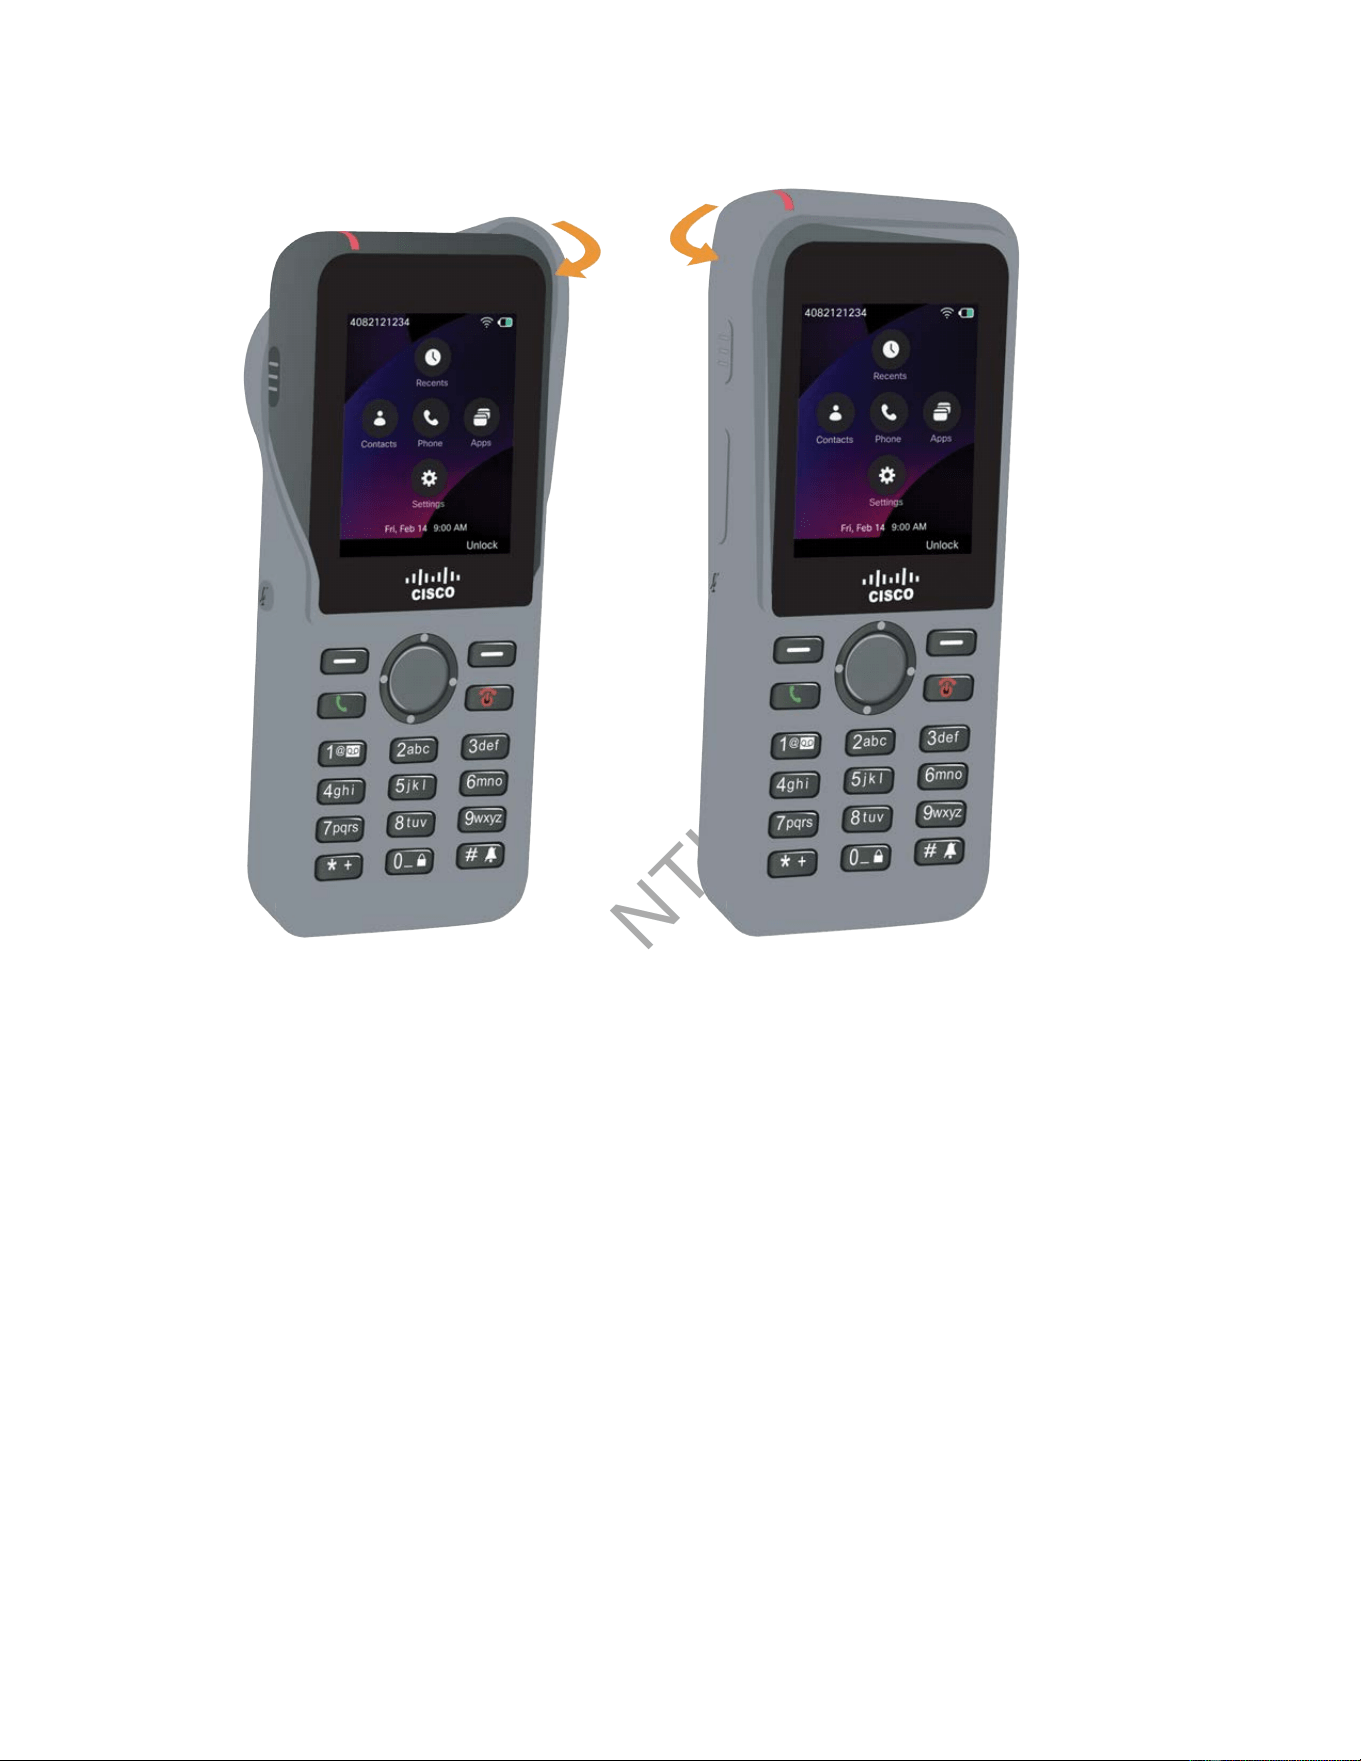
CONFIDENTIAL DRAFT
Cisco Wireless Phone 9821 User Guide | 8 - Accessories | 104
4. If the screen opening has rolled up, unroll it until it is at.
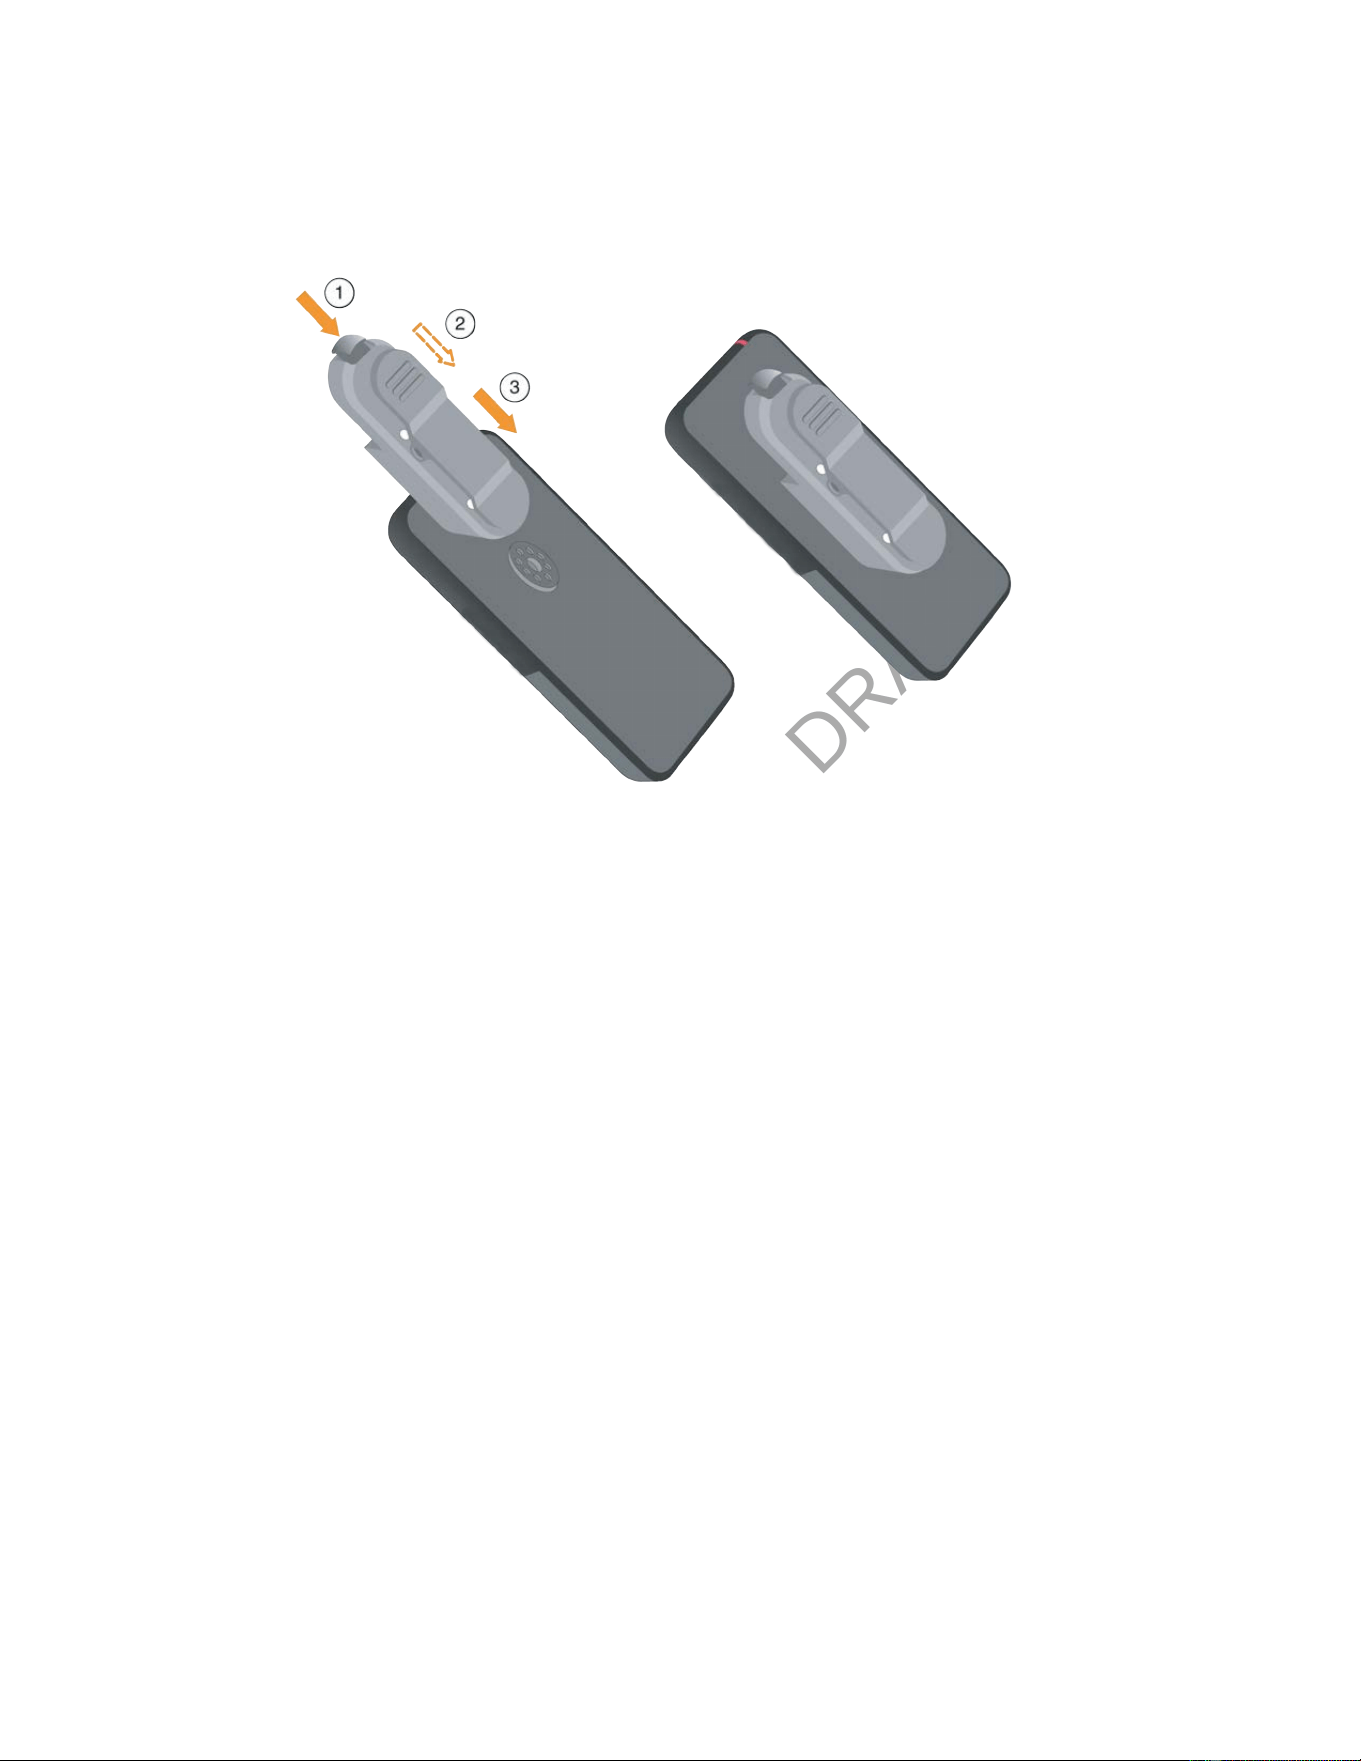
CONFIDENTIAL DRAFT
Cisco Wireless Phone 9821 User Guide | 8 - Accessories | 105
5. Optional: If required, press the base of the belt clip in and slip the clip onto the post in the back of
the case.
Clean the silicone case
1. Remove the silicone case. You reverse steps in Install the silicone case.
2. Clean the case,
3. Dry the case thoroughly. Don't put it back on the phone until it is completely dry.
4. Put the case back on the phone. See Install the silicone case.
Headsets
You can use wired and Bluetooth headsets with your phone. Although we perform some internal testing
of third-party wired and Bluetooth wireless headsets for use with Cisco Wireless Phone 9821, we do not
certify or support products from headset or handset vendors. Because of the inherent environmental and
hardware inconsistencies in the locations where phones are deployed, there is not a single best solution
that is optimal for all environments. We recommend that customers test the headsets that work best in
their environment before deploying a large number of units in their network.
We recommend the use of good quality external devices, like headsets that are screened against
unwanted radio frequency (RF) and audio frequency (AF) signals. Depending on the quality of these
devices and their proximity to other devices such as cell phones and two-way radios, some audio noise
may still occur.

CONFIDENTIAL DRAFT
Cisco Wireless Phone 9821 User Guide | 8 - Accessories | 106
Standard headsets
You can use a wired headset with your phone. The headset requires a 3.5 mm, 3-band, 4-connector plug.
We recommend the Cisco Headset 520 Series. This headset offers outstanding audio performance. It has
a 3.5 mm audio plug that you can plug into the wireless phone. You can also use the headset and its inline
controller with some of the desk phones in the Cisco IP Phone 8800 Series. For more information on the
headset, see https://www.cisco.com/c/en/us/products/collaboration-endpoints/headset-500-series/
index.html.
We recommend the Cisco Headset 520 Series. These headsets offer outstanding audio performance.
For more information about the headset, see https://www.cisco.com/c/en/us/products/collaboration-
endpoints/headset-500-series/index.html.
If you plug a headset into the phone during an active call, the audio path automatically changes to the
headset.
Bluetooth headsets
You can use a Bluetooth® headset with your phone. When you use a Bluetooth wireless headset, the
headset usually increases battery power consumption on your phone and may result in reducing battery
life.
For a Bluetooth wireless headset to work, it does not need to be within direct line-of-sight of the phone,
but some barriers, such as walls or doors, and interference from other electronic devices, can affect the
connection.
We recommend the Cisco Headset 560 Series and Cisco Headset 730. These headsets offer outstanding
audio performance. For more information about the headsets, see https://www.cisco.com/c/en/
us/products/collaboration-endpoints/headset-500-series/index.html and https://www.cisco.com/c/en/
us/products/collaboration-endpoints/headset-700-series/index.html.
Headset tips
If your headset has a control button, you can use the headset to listen (headphone mode) and the phone
microphone to pick up your voice. Just press the control button when you plug the phone headset in. If
you use this mode, the phone microphone automatically lters the background noise.
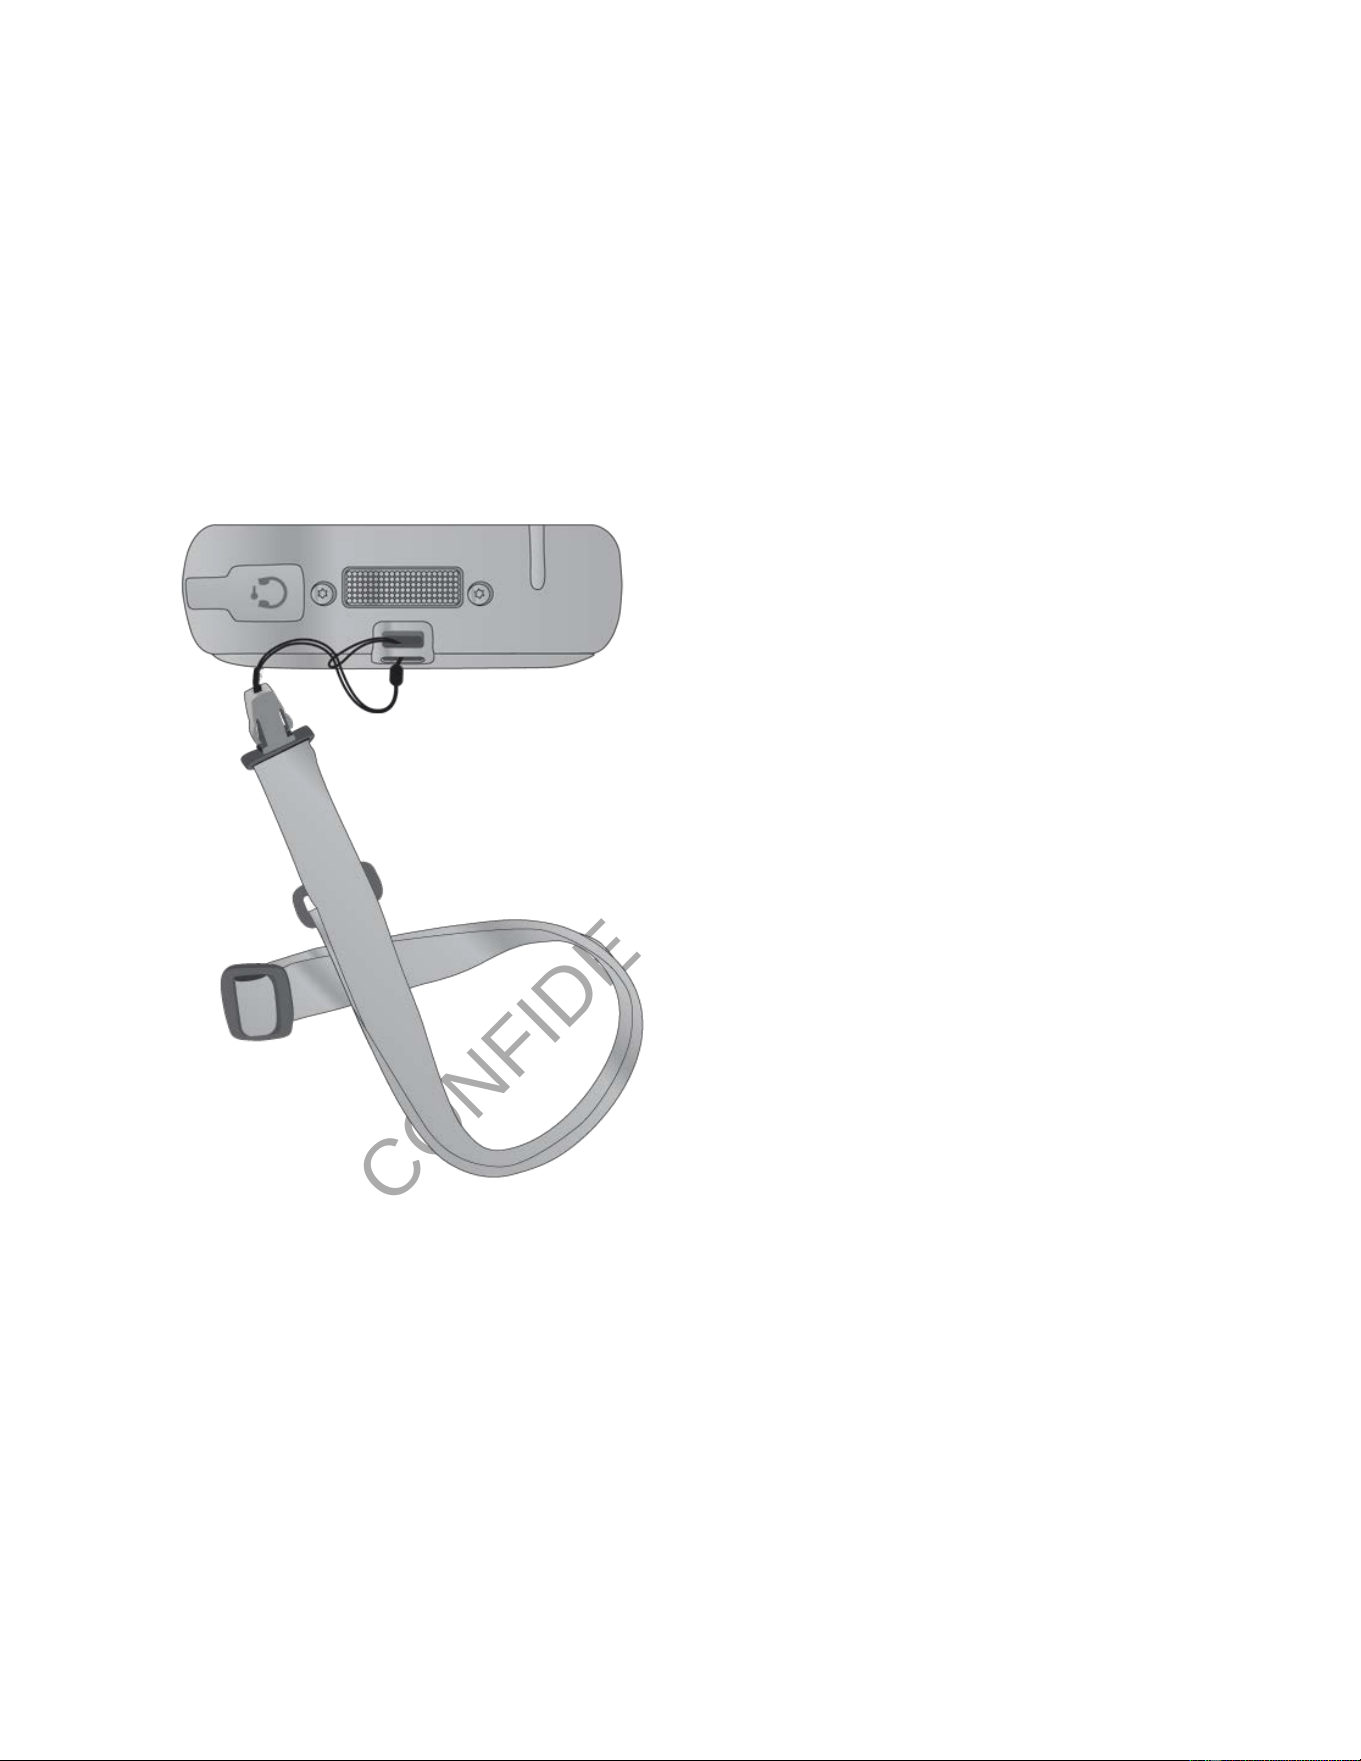
CONFIDENTIAL DRAFT
Cisco Wireless Phone 9821 User Guide | 8 - Accessories | 107
Other accessories
Cisco Wireless Phone 9821 lanyard
You can attach the lanyard to the top of the wireless phone. The following graphic shows the lanyard.
picture of the lanyard
To install the lanyard, slip the loop of cord around the bar on the back of the phone and pass the lanyard
through the loop.
Cisco Wireless Phone 9821 battery door
You can replace the battery door if the IP54 gasket on the door gets damaged. If the gasket is damaged,
dirt and liquids can get into the battery compartment and cause damage to the phone. Failure to replace a
damaged gasket voids the phone warranty.
CONFIDENTIAL DRAFT
Chapter 9. Maintenance
View phone statistics on your phone
You can access some statistics about the phone from the Admin settings menu. This information can
also be accessed remotely through the phone’s web interface, enabling comprehensive monitoring and
faster problem resolution.
1. Access the Settings app.
2. If prompted, enter the password to access the Settings menu. You can get the password from your
administrator.
3. Select Admin settings.
You can view the Neighbor list, Status, and System conguration information.
4. Select Back to exit the Admin settings screen.
Neighbor list
The Neighbor list displays detailed information about the current access point and its neighboring
access points. It includes identiers such as access point names, BSSID, SSID, and device capabilities.
This information enables effective monitoring of access point relationships and supports network
troubleshooting and management.
The following table describe the elds in the Neighbor list menu.
Table 15. Neighbor list
Field Description
AP name Name of the access point (AP) to which the phone is associated.
BSSID Basic Service Set Identifier (BSSID). The access point radio MAC ad
dress.
SSID Service Set Identifier (SSID) that the phone uses.

CONFIDENTIAL DRAFT
Cisco Wireless Phone 9821 User Guide | 9 - Maintenance | 109
Table 15. Neighbor list (continued)
Field Description
Channel Number of channels on the access point.
RSSI Received Signal Strength Indicator (RSSI) of the access point.
CU Channel Utilization (CU). Percentage of time, normalized to 255,
in which the AP sensed the medium was busy, as indicated by the
physical or virtual carrier sense (CS) mechanism.
Status
The Status menu on the phone provides administrators and users with access to detailed information
about phone health, network connectivity, and call control system interactions. It includes status
messages, network statistics, and call statistics that aid in ecient troubleshooting and effective device
management. Submenus in this menu vary slightly depending on the call control system that the phone is
registered to.
Table 16. Status menu submenus
Submenu Call control system Description
Status messages Both Provides a list of status mes
sages. Each message has a date
and time stamp. You can use
these messages to troubleshoot
problems.
Wireless statistics Both Displays real-time information
about the phone‘s detailed wire
less network performance met
rics. You can use this information
to monitor and troubleshoot con
nectivity issues.

CONFIDENTIAL DRAFT
Cisco Wireless Phone 9821 User Guide | 9 - Maintenance | 110
Table 16. Status menu submenus (continued)
Submenu Call control system Description
Call statistics Cisco Unified CM Displays real-time detailed call
performance data. You can use
this information to help monitor
and troubleshoot voice quality
and connectivity issues.
Trace settings Cisco Unified CM Displays diagnostic features that
enables capturing detailed logs
and network traces from Cisco IP
phones to assist in troubleshoot
ing and resolving issues.
The following tables describe the submenus and elds in the Status menu.
Table 17. Submenu: Wireless statistics
Field Description
tx bytes Number of bytes transmitted.
rx bytes Number of bytes received.
tx packets Number of packet transmitted.
rx packets Number of packet received.
tx packets dropped Number of packets transmitted that were dropped.
rx packets dropped Number of packets received that were dropped.

CONFIDENTIAL DRAFT
Cisco Wireless Phone 9821 User Guide | 9 - Maintenance | 111
Table 17. Submenu: Wireless statistics (continued)
Field Description
tx packets errors Number of transmitted packet errors.
rx packets errors Number of received packet errors.
tx frames Number of frames transmitted.
tx multicast frames Number of multicast frames transmitted.
tx retry Number of transmission retries.
tx multi retry Number of multicast transmission retries.
tx failure Number of transmission failures.
rts success Number of Request to Send (rts) successes.
rts failure Number of rts failures.
ack failure Number of Acknowledgment (ack) failures.
rx duplicate frames Number of duplicate frames received.
rx fragmented packets Number of fragmented packets received.
Roaming count Number of times the phone successfully transitions between Access
Points (APs) during a single session.

CONFIDENTIAL DRAFT
Cisco Wireless Phone 9821 User Guide | 9 - Maintenance | 112
Table 18. Submenu: Call statistics
Field Description
Receiver codec Type of audio encoding received by the phone: G.729, G.711 u-law,
G.711 A-law.
Sender codec Type of audio encoding sent by the phone: G.729, G.711 u-law, G.711
A-law.
Receiver size The packetization period of the incoming audio stream.
Sender size The packetization period of the outgoing audio stream.
Receiver packets Number of packets received by the phone.
Sender packets Number of packets sent by the phone.
Transmitter DSCP Differentiated Services Code Point (DSCP) of the outgoing audio
packets sent by the phone.
Receiver DSCP DSCP of the incoming audio packets received by the phone.
Transmitter WMM UP Wireless Multimedia (WMM) user priority used for outgoing audio
packets.
Receiver WMM UP Wireless Multimedia (WMM) user priority of incoming audio packets.
Avg jitter Estimated average RTP packet jitter (dynamic delay that a packet en
counters when going through the network).
Max jitter Maximum jitter observed since the receiving voice stream was
opened.

CONFIDENTIAL DRAFT
Cisco Wireless Phone 9821 User Guide | 9 - Maintenance | 113
Table 18. Submenu: Call statistics (continued)
Field Description
Receiver discarded Number of packets dropped by the phone during the receiving
process.
Receiver lost packets The number of packets that failed to reach the phone during the re
ceiving process.
Cumulative conceal ratio Total number of concealment frames divided by total number of
speech frames received from the start of the voice stream.
Interval conceal ratio Ratio of concealment frames to speech frames in preceding 3-sec
ond interval of active speech. If using voice activity detection (VAD),
a longer interval might be required to accumulate 3 seconds of ac
tive speech.
Max conceal ratio Highest interval concealment ratio from start of the voice stream.
Severely conceal seconds Number of seconds that have more than 5 percent concealment
events (lost frames) from the start of the voice stream.
Latency Delay time in audio transmission.
MOS-LQ Mean Opinion Score for Listening Quality (MOS-LQ) represents the
estimated subjective quality of the received audio.
MOS-CQ Mean Opinion Score for Conversational Quality (MOS-CQ) evaluates
the bidirectional quality of a voice session, incorporating the effects
of mouth-to-ear latency and packet loss on the conversation.

CONFIDENTIAL DRAFT
Cisco Wireless Phone 9821 User Guide | 9 - Maintenance | 114
Table 19. Submenu: Trace settings
Field Description
Remote syslog Displays whether remote system logging is enabled or not.
Log profile Displays the type of logging.
Additional debugs Displays the device log information.
You can congure the Remote Log, Log Prole, and Log Server settings on Cisco Unied CM. Once
congured, the Remote syslog, Log prole, and Additional debugs elds on the phone will update to
reect your settings.
System conguration
The System conguration menu on the phone displays key security settings, including the web access,
web admin, security mode, certicate status, and trust list. It enables administrators and users to monitor
and manage the phone’s security conguration effectively. Access to this menu can be controlled through
Cisco Unied Communications Manager to restrict or allow user permissions for viewing or modifying
security settings. Fields in the submenus vary slightly depending on the call control system that the phone
is registered to.
The following tables describe the submenus and elds in the System conguration menu.
Table 20. Submenu: Security
Field Call control system Description
Web access
Cisco Unified CM
Displays whether web access to the phone is en
abled or not.
Web admin
Cisco Unified CM
Displays whether the phone administration web
page is accessible or not.

CONFIDENTIAL DRAFTCONFIDENTIAL DRAFT
Cisco Wireless Phone 9821 User Guide | 9 - Maintenance | 115
Table 20. Submenu: Security (continued)
Field Call control system Description
Security mode
Cisco Unified CM
Displays the security information of the signaling
channel between the phone and Cisco Unified CM.
MIC
Both
Displays whether a Manufacturer Installed Certifi
cate (MIC) is installed or not.
LSC
Cisco Unified CM
Displays whether a Locally Significant Certificate
(LSC) is installed or not. This certificate is a local
ly issued device certificate signed by the enterprise
Cisco Unified CM specifically for IP phones. It is
used to authenticate the phone’s identity during run
time, helping to ensure secure communication and
device validation within the network.
You can press Select to set up an LSC. For more in
formation, see Cisco Wireless Phone 9821 securi
ty.
Trust list
Cisco Unified CM
Displays information for CTL le, ITL le, and
Configuration (signed). These les and configura
tion manage and enforce trust at both the cluster
and endpoint levels, securing communications and
configurations for Cisco IP phones and related ser
vices.
You can congure the Web Access, Web Admin, and Device Security Prole settings on Cisco Unied
CM. Once congured, the Web access, Web admin, and Security mode elds on the phone will update to
reect your settings.
CONFIDENTIAL DRAFT
Cisco Wireless Phone 9821 User Guide | 9 - Maintenance | 116
Table 21. Submenu: USB
Field Description
IP address Configure the IP address of the USB port to allow
access when the phone is connected to a comput
er via a USB cable. Once connected, an administra
tor can access the phone administration web page
using this IP address. Additionally, developers can
establish a Telnet connection to the phone through
the same IP address for further management and
troubleshooting.
Subnet mask Configure the subnet mask of the USB port.
Reboot the phone
You may need to restart your phone to resolve some issues or to ensure that the conguration is applied
to the phone. A phone restart doesn't erase the phone settings.
1. Access the Settings app.
2. Select Admin settings > Reset settings > Restart.
3. Press Restart.
Boot the phone to the alternate rmware
You can reboot the phone to the previous version of the phone rmware. This allows you to temporarily
use the previous rmware load.
When the phone next powers on, it will use the new rmware load.
1. Press and hold Power/End Call until the phone turns off.
2. Press and hold Asterisk (*) , and then press and hold Power/End Call.
3. When the LED changes to red, release the Asterisk (*) and Power/End Call keys.
The phone boots to the previous rmware version.

CONFIDENTIAL DRAFT
Cisco Wireless Phone 9821 User Guide | 9 - Maintenance | 117
Reset the phone to factory defaults from the phone menu
You can reset the phone to the factory defaults. The phone resets user and network setup settings to their
default values and then restarts.
1. Access the Settings app.
2. Select Admin settings > Reset settings > Factory reset.
3. Press Reset.
You have lost your current registration and all the conguration after a factory reset. You must register
and set up your phone as you do for a new phone before you can use it again.
Reset the phone to factory defaults from the phone keypad
You can reset the phone to factory defaults using the keypad. The phone resets user and network setup
settings to their default values and then restarts.
1. Press and hold Power/End Call until the phone turns off.
2. Press and hold Pound (#) , and then press and hold Power/End Call.
3. When the LED changes to amber, release the Pound (#) and Power/End Call keys.
4. Press 1 2 3 4 5 6 7 8 9 * 0 #.
If the LED blinks green, the factory reset is in progress.
If the LED blinks red, the factory reset was not accepted.
You have lost your current registration and all the conguration after a factory reset. You must register
and set up your phone as you do for a new phone before you can use it again.
Reset the phone to factory defaults from the phone web page
(Webex Calling)
You can remote restore your phone to its default settings from the phone administration web page only
when your phone is registered to Cisco BroadWorks or Webex Calling.
Reset your phone from the phone web page with one of the methods:
• In your web browser, enter the URL in the following format and click Conrm Factory Reset.
http://<Phone IP>/admin/factory-reset
Reset the phone

CONFIDENTIAL DRAFT
Cisco Wireless Phone 9821 User Guide | 9 - Maintenance | 118
where:
Phone IP = the actual IP address of your phone.
/admin = the path to access admin page of your phone.
/factory-reset = the command that you must enter in the phone web page to factory-reset your
phone.
• An administration access to the phone web page is required to use this method.
a. On the phone administration web page, select Admin Login > Advanced > Info > Debug Info.
b. Click Factory Reset in the Factory Reset section.
c. Click CONFIRM FACTORY RESET on the next page.
You have lost your current registration and all the conguration after a factory reset. You must register
and set up your phone as you do for a new phone before you can use it again.
Reset the network settings
You can reset the network settings on the phone to the factory defaults. The phone resets network setup
settings to their default values and then restarts.
1. Access the Settings app.
2. Select Admin settings > Reset settings > Network settings.
3. Press Reset.
You have lost your current network settings. You must set up the network settings again.
Reset the security settings
You can reset the security settings on the phone to the factory defaults. The phone resets security
settings to their default values and then restarts.
1. Access the Settings app.
2. Select Admin settings > Reset settings > Security settings.
3. Press Reset.
You have lost your current security settings. You must set up the scurity settings again.

CONFIDENTIAL DRAFT
Chapter 10. Troubleshooting
Find information about your phone
When you troubleshoot phone problems, you often need information from the phone. The phone
information in the menu is read-only.
1. Access the Settings app.
2. If prompted, enter the password to access the Settings menu. You can get the password from your
administrator.
3. Select Phone information.
You can view the Device information, Model information, and Firmware information.
4. Select Back to exit the Phone information screen.
Device information
The Device information menu and submenus provide information related to the connections between
the phone and the call control system. Submenus in this menu vary slightly depending on the call control
system that the phone is registered to.
Table 22. Device information submenus
Submenu Call control system Description
Call Manager Cisco Unified CM Displays information about the
Cisco Unified CM servers.
Network Both Displays information about the
IPv4 network.
WLAN Both Displays information about the
Wi-Fi connection.
HTTP Cisco Unified CM Displays information about con
figured URLs.

CONFIDENTIAL DRAFT
Cisco Wireless Phone 9821 User Guide | 10 - Troubleshooting | 120
Table 22. Device information submenus (continued)
Submenu Call control system Description
Locale Both Displays information about the
language locale.
Security Cisco Unified CM Displays information about the
security settings.
QoS Cisco Unified CM Displays information related to
the Quality of Service.
UI Cisco Unified CM Displays information related to
the user interface.
Battery Both Displays information related to
the battery.
The following tables describe the submenus and elds in the Device information menu.
Table 23. Submenu: Call Manager
Field Description
Server 1 Primary Cisco Unified CM server that the phone uses. Displays the IP
address and status.
Server 2 Secondary Cisco Unified CM server that the phones uses. Displays
the IP address and status, or is blank if not in use.
Server 3
Server 4
Server 5
Displays the IP address and status of an additional Cisco Unified CM
server, or is blank if not in use.

CONFIDENTIAL DRAFT
Cisco Wireless Phone 9821 User Guide | 10 - Troubleshooting | 121
Any of these Call Manager elds can also show the IP address of an SRST router that is capable of
providing limited call control system functionality.
Each available server displays the server IP address and one of the following states:
• Active: Call control system from which the phone is currently receiving call-processing services.
• Standby: Call control system to which the phone switches if the current server becomes
unavailable.
• Blank: No current connection to this call control system.
Table 24. Submenu: Network > IPv4
Field Call control system Description
MAC address Both MAC address of the phone.
Host name Both Unique, xed name that is automatically assigned
to the phone based on the MAC address.
Domain name Both Name of the DNS in which the phone resides.
DHCP server Both IP address of the DHCP server from which the
phone obtains its IP address.
IP address Both IP address of the phone.
Subnet mask Both Subnet mask used by the phone.
Default router Both IP address for the default gateway used by the
phone.
DNS server 1 Both Primary DNS server used by the phone.
DNS server 2 Both First backup DNS server used by the phone.

CONFIDENTIAL DRAFT
Cisco Wireless Phone 9821 User Guide | 10 - Troubleshooting | 122
Table 24. Submenu: Network > IPv4 (continued)
Field Call control system Description
DNS server 3 Both Second backup DNS server used by the phone.
Alternate TFTP Cisco Unified CM Address of the TFTP server (other than the one as
signed by DHCP).
TFTP server1 Cisco Unified CM Primary TFTP server used by the phone.
TFTP server 2 Cisco Unified CM Secondary TFTP server used by the phone.
Load server Cisco Unified CM Host name or IP address for the alternate server
that the phone uses for rmware upgrades.
BOOTP server Cisco Unified CM
CDP Both Cisco Discovery Protocol (CDP) usage.
GARP Both Gratuitous ARP used for MAC address discovery.
Table 25. Submenu: WLAN
Field Name Call control system Description
Profile name Both Name of the network profile that the phone is cur
rently using.
SSID Both Service Set ID (SSID) that the phone is currently us
ing.
Security mode Both Authentication method that the phone is currently
using in the wireless network.

CONFIDENTIAL DRAFT
Cisco Wireless Phone 9821 User Guide | 10 - Troubleshooting | 123
Table 25. Submenu: WLAN (continued)
Field Name Call control system Description
802.11 mode Both Wireless signal mode that the phone is currently
using.
On call power save Cisco Unified CM Type of power save mode that the phone uses to
save battery power: PS-Poll or U-APSD.
Scan mode Type of AP scanning.
WLAN SCEP server Both URL or host name of the Simple Certificate Enroll
ment Protocol (SCEP)server.
WLAN Root CA finger
print
Both SHA256 or SHA1 fingerprint of the Root CA for
WLAN authentication.
Table 26. Submenu: HTTP
Field Name Description
Authentication URL URL that the phone uses to validate requests made to the phone web
server.
Directories URL URL of the server from which the phone obtains directory informa
tion.
Idle URL URL of an XML service that the phone displays when the phone has
not been used for the time specified in the Idle URL Time option and
no menu is open.
For example, you could use the Idle URL option and the Idle URL
Time option to display a stock quote or a calendar on the LCD screen
when the phone has not been used for 5 minutes.

CONFIDENTIAL DRAFT
Cisco Wireless Phone 9821 User Guide | 10 - Troubleshooting | 124
Table 26. Submenu: HTTP (continued)
Field Name Description
Idle time Number of seconds that the phone has not been used and no menu
is open before the XML service specified in the Idle URL option is ac
tivated.
Information URL URL of the help text that appears on the phone.
Messages URL URL of the server from which the phone obtains message services.
IP phone proxy address URL of proxy server, which makes HTTP requests to remote host ad
dresses on behalf of the phone HTTP client and provides responses
from the remote host to the phone HTTP client.
Services URL URL of the server from which the phone obtains phone services.
Secured authentication URL Secure URL that the phone uses to validate requests made to the
phone web server.
Secured directory URL Secure URL of the server from which the phone obtains directory in
formation.
Secured idle URL Secure URL of an XML service that the phone displays when the
phone has not been used for the time specified in the Idle URL Time
option and no menu is open.
Secured information URL Secure URL of the help text that appears on the phone.
Secured messages URL Secure URL of the server from which the phone obtains message ser
vices.

CONFIDENTIAL DRAFT
Cisco Wireless Phone 9821 User Guide | 10 - Troubleshooting | 125
Table 26. Submenu: HTTP (continued)
Field Name Description
Secured services URL Secure URL of the server from which the phone obtains phone ser
vices.
Table 27. Submenu: Locale
Field Description
User locale User locale associated with the phone user. Identifies a set of de
tailed information to support users, including language, font, date
and time formatting, and alphanumeric keyboard text information.
Network locale Network locale associated with the phone user. Identifies a set of de
tailed information to support the phone in a specific location, includ
ing definitions of the tones and cadences used by the phone.
User locale version Version of the user locale loaded on the phone.
Network locale version Version of the network locale loaded on the phone.
Table 28. Submenu: Security
Field Description
Web access Indicated web access capability for the phone.
• Disabled—No Self Care Portal access.
• ReadOnly—Can view information only.
• Enabled: HTTP and HTTPS—Can use the configuration pages
Web admin Indicates if the web admin page is enabled.

CONFIDENTIAL DRAFT
Cisco Wireless Phone 9821 User Guide | 10 - Troubleshooting | 126
Table 28. Submenu: Security (continued)
Field Description
Security mode Security mode assigned to the phone.
Table 29. Submenu: QoS
Field Name Description
DSCP for call control Differentiated Services Code Point (DSCP) IP classification for call
control signaling.
DSCP for configuration DSCP IP classification for any phone configuration transfer.
DSCP for services DSCP IP classification for phone-based service.
Table 30. Submenu: UI
Field Name Description
BLF for call lists Indicates whether the Busy Lamp Field (BLF) is enabled for call lists.
Reverting focus priority Indicates whether the phone shifts the call focus on the phone
screen to an incoming call or a reverting hold call.
Personalization Indicates whether the phone has been enabled for configuration of
custom ring tones and wallpaper images.
Table 31. Submenu: Battery
Field Name Description
Battery health Indicates the overall health of the battery.

CONFIDENTIAL DRAFT
Cisco Wireless Phone 9821 User Guide | 10 - Troubleshooting | 127
Table 31. Submenu: Battery (continued)
Field Name Description
Battery temperature Indicates the current temperature of the battery. If the battery runs
excessively hot, the battery may fail soon.
Battery level Indicates the current charge level of the battery.
Model information
The Model information menu provides information related to the phone model.
The following table describes the elds and contents in the Model information menu.
Table 32. Model information elds
Field Description
Model number Set to WP-9821.
MAC address MAC address of the phone.
App load ID Firmware version running on the phone.
Serial number Phone serial number.
USB vendor ID Set to Cisco.
USB product ID Set to 9821.
RNDIS device address Remote Network Device Interface Specification
(RNDIS) address of the USB.
RNDIS host address RNDIS for the USB.

CONFIDENTIAL DRAFT
Cisco Wireless Phone 9821 User Guide | 10 - Troubleshooting | 128
Firmware information
The Firmware information menu provides information related to the rmware running on the phone.
The following table describes the elds and contents in the Firmware information menu.
Table 33. Firmware information elds
Field Description
Active load Firmware load that is active.
Last upgrade Upgrade status: date and time for successful up
date; otherwise messages about upgrade failure.
Boot load ID Identification of the boot loader version.
WLAN driver ID Identification of the WLAN driver.
WLAN rmware ID Identification of the WLAN rmware load.
Hardware diagnostics overview
When encountering problems with audio, WLAN, or Webex connection on your Cisco Wireless Phone
9821, you can access detailed statistics and data from Issue and diagnostics to help identify the issue.
This can assist you in troubleshooting the problem or ensure you have the necessary details when
reaching out to Cisco Support.
For more on how to contact Cisco Support, see Contact Support.
Perform audio diagnostics
You can check that the audio on your phone is working correctly.
1. Access the Settings app.
2. Select Issue and diagnostics > Diagnostics > Audio.
3. Listen to the tone on the handset speaker.

CONFIDENTIAL DRAFT
Cisco Wireless Phone 9821 User Guide | 10 - Troubleshooting | 129
4. Press the Speaker button to turn on handsfree, and listen to the tone.
5. Plug in a wired headset and listen to the tone.
Perform WLAN diagnostics
You can check the Wi-Fi connection for your phone. The phone lists the access points in order, from the
strongest signal to the weakest or oine access point. You can then view details of the wireless access
point.
1. Access the Settings app.
2. Select Issue and diagnostics > Diagnostics > WLAN.
3. Press Continue.
4. Scroll to an access point and press Select to see detailed information about the access point.
WLAN diagnostics elds
The following table describes the elds in the WLAN Diagnostics screen.
Field Description
AP name Name of the access point (AP) to which the phone is associated
BSSID The access point radio MAC address
SSID The Service Set Identifier (SSID) that the phone uses
Frequency The frequency that the phone uses
Current channel The channel that the AP uses
Last RSSI Last Received Signal Strength Indicator (RSSI) that the phone re
ceived.
Beacon interval Number of time units between beacons. A time unit is 1.024 millisec
onds.

CONFIDENTIAL DRAFT
Cisco Wireless Phone 9821 User Guide | 10 - Troubleshooting | 130
Field Description
Capability 802.11 capabilities
Basic rates Data rates required by the AP at which the station must be capable
of operating.
Optional rates Data rates supported by the AP that are optional for the station to op
erate at.
Supported HT MCS 802.11n data rates
Supported VHT (rx) rates 802.11ac receive data rates
Supported VHT (tx) rates 802.11ac transmit data rates
DTIM period Delivery Traffic Indication Map (DTIM) information
Country code A two-digit country code. Country information might not be displayed
if the country information element (IE) is not present in the beacon.
Channels List of supported channels (from the country IE).
Power constraint 802.11h power constraint offset in dB
Power limit Dynamic Transmit Power Control (DTCP) value advertised by the ac
cess point.
Channel utilization Percentage of time, normalized to 255, in which the AP sensed the
medium was busy, as indicated by the physical or virtual carrier
sense (CS) mechanism.

CONFIDENTIAL DRAFT
Cisco Wireless Phone 9821 User Guide | 10 - Troubleshooting | 131
Field Description
Station count Total number of spanning tree algorithms (STAs) currently associat
ed with this BSS.
Admission capacity An unsigned integer that specifies the remaining amount of medium
time available through explicit admission control, in units of 32 mi
croseconds per second.
WMM supported Support for Wi-Fi Multimedia Extensions.
UAPSD supported Unscheduled Automatic Power Save Delivery (UAPSD) is supported
by the AP. May only be available if WMM is supported. This feature is
critical to talk time and achieving maximum call density on the wire
less phone.
Proxy ARP CCX-compliant AP supports responding to IP ARP requests on behalf
of the associated station. This feature is critical to standby time on
the wireless phone.
CCX version Version of CCX if the AP is CCX compliant.
AC: Best effort, AC: Background,
AC: Video, and AC: Voice
• Admission control
• AIFSN
• ECWMin
• ECWMax
• TXOpLimit
Information for each Access Category (AC). There is one set of data
for best effort, background, video, and audio.
• Admission control—If yes, admission control must be used pri
or to transmission using the access parameters specific for
this AC.
• AIFSN—Number of slots after an SIFS duration a non-AP STA
should defer before invoking a backoff or starting a transmis
sion.
• ECWMin—Encodes value of CWmin in an exponent form to
provide the minimum amount of time in a random backoff.

CONFIDENTIAL DRAFT
Cisco Wireless Phone 9821 User Guide | 10 - Troubleshooting | 132
Field Description
• ECWMax—Encodes value of CWmax in an exponent form to
provide the maximum amount of time in a random backoff.
• TXOpLimit—Interval of time in which a particular quality of ser
vice (QoS) station has the right to initiate
Check Webex connection status (Webex Calling registration
only)
You can check the Webex connection status for your phone.
1. Access the Settings app.
2. Select Issue and diagnostics > Diagnostics > Webex connection details.
3. Scroll to an item and press Select to see detailed information. The available items are as follows.
◦ Call log
◦ Conguration
◦ Credentials
◦ Metrics
◦ Notications
◦ Phonebook
◦ Registration
If green check marks do not appear beside any of these items, the services are not working
properly. You may need to contact Cisco Support.
Report problem from your phone
When you seek for help on phone issues from your administrator, send your device logs to the
administrator for troubleshooting.
1. Access the Settings app.
2. Select Issue and diagnostics > Report problem.
3. Enter the date and time when the issue occurred.
By default, the current date and time are populated, you can further change them.

CONFIDENTIAL DRAFT
Cisco Wireless Phone 9821 User Guide | 10 - Troubleshooting | 133
4. Choose a description from the Problem description list.
5. Press Submit.
6. When the success message is displayed, notify your administrator that a problem report is
available.

CONFIDENTIAL DRAFT
Cisco Wireless Phone 9821 product safety and compliance | 2 - Compliance statements | 15
Maximum SAR for this Model and Conditions Under Which it was Recorded
Head SAR WLAN 5GHz xxxx W/kg
Body-worn SAR WLAN 5GHz xxxx W/kg
Déclaration d'Exposition aux RF Canadienne
CE PÉRIPHÉRIQUE RESPECTE LES LIMITES DÉCRITES PAR LA NORME RSS-102 R5 D'EXPOSITION À DES
ONDES RADIO
Votre appareil comprend un émetteur et un récepteur radio. Il est conçu pour ne pas dépasser les limites
applicables à la population générale (ne faisant pas l'objet de contrôles périodiques) d'exposition à des
ondes radio (champs électromagnétiques de fréquences radio) comme indiqué dans la norme RSS-102
qui sert de référence au règlement de sécurité n°6 sur l'état de santé du Canada et inclut une marge de
sécurité importantes conçue pour garantir la sécurité de toutes les personnes, quels que soient leur âge
et état de santé.
En tant que tels, les systèmes sont conçus pour être utilisés en évitant le contact avec les antennes par
l'utilisateur nal. Il est recommandé de positionner le système à un endroit où les antennes peuvent
demeurer à au moins une distance minimum préconisée de l'utilisateur, conformément aux instructions
des réglementations qui sont conçues pour réduire l'exposition globale de l'utilisateur ou de l'opérateur.
Cet équipement doit être installé et utilisé avec une distance minimale de 0.5 cm entre le radiateur et
votre corps.
Le périphérique a été testé et déclaré conforme aux réglementations applicables dans le cadre du
processus de certication radio.
DAS maximal pour ce modèle et conditions dans lesquelles il a été enregistré
DAS au niveau de la tête WLAN 5GHz xxxx W/kg
DAS près du corps WLAN 5GHz xxxx W/kg
CONFIDENTIAL DRAFT
Safety and performance information
Read the following safety notices before installing or using your IP phone.
Warning:
IMPORTANT SAFETY INSTRUCTIONS
This warning symbol means danger. You are in a situation that could cause bodily injury. Before
you work on any equipment, be aware of the hazards involved with electrical circuitry and be
familiar with standard practices for preventing accidents. Use the statement number provided
at the end of each warning to locate its translation in the translated safety warnings that
accompanied this device. Statement 1071
SAVE THESE INSTRUCTIONS
To see translations of the warnings that appear in this publication, refer to the statement number in
the Regulatory Compliance and Safety Information—Cisco Wireless Phone 9821 at the following URL:
https://www.cisco.com/c/dam/en/us/td/docs/voice_ip_comm/cuipph/9821/regulatory_compliance/
rcsi-0505-book.pdf
Warning:
Voice over IP (VoIP) service and the emergency calling service do not function if power fails or
is disrupted. After power is restored, you might have to reset or recongure equipment to regain
access to VoIP and the emergency calling service. In the USA, this emergency number is 911. You
need to be aware of the emergency number in your country. Statement 361
Warning:
Ultimate disposal of this product should be handled according to all national laws and
regulations. Statement 9001
Safety guidelines
The following are safety guidelines for using the in specic environments:
Chapter 11. Safety and compliance information
CONFIDENTIAL DRAFT
product safety and compliance | 1 - Safety and performance information | 5
• Do not use this product as the primary communications tool in healthcare environments, as it
may use an unregulated frequency band that is susceptible to interference from other devices or
equipment.
• The use of wireless devices in hospitals is restricted to the limits set forth by each hospital.
• The use of wireless devices in hazardous locations is limited to the constraints posed by the safety
directors of such environments.
• The use of wireless devices on airplanes is governed by the Federal Aviation Administration (FAA).
Battery safety notices
These battery safety notices apply to the batteries that are approved for the Cisco Wireless Phone 9821.
Warning:
There is the danger of explosion if the battery is replaced incorrectly. Replace the battery only
with the same or equivalent type recommended by the manufacturer. Dispose of used batteries
according to the manufacturer’s instructions. Statement 1015
Warning:
Explosion Hazard: Do not charge the phone battery in a potentially explosive environment.
Statement 431
Warning:
Lithium ion batteries have limited lifetimes. Any lithium ion battery that shows any signs of
damage, including swelling, should be properly discarded immediately.
CAUTION:
• Do not dispose of the battery pack in re or water. The battery may explode if placed in a
re.
• Do not disassemble, crush, puncture, or incinerate the battery pack.

CONFIDENTIAL DRAFT
product safety and compliance | 1 - Safety and performance information | 6
• Handle a damaged or leaking battery with extreme care. If you come in contact with the
electrolyte, wash the exposed area with soap and water. If the electrolyte has come in
contact with the eye, ush the eye with water for 15 minutes and seek medical attention.
• Do not charge the battery pack if the ambient temperature exceeds 104 degrees
Fahrenheit (40 degrees Celsius).
• Do not expose the battery pack to high storage temperatures (above 140 degrees
Fahrenheit, 60 degrees Celsius).
• When discarding a battery pack, contact your local waste disposal provider regarding local
restrictions on the disposal or recycling of batteries.
To obtain a battery, contact your local dealer. Use only the batteries that have a Cisco part number.
Battery
WP-9821-BATT=
Use only the Cisco power supply that is compatible with your phone. To order your power supply, contact
your local dealer and refer to the list of Cisco part numbers.
Argentina
CP-PWR-ADPT10W-AR=
Australia
CP-PWR-ADPT10W-AU=
Brazil
CP-PWR-ADPT10W-BR=
China
CP-PWR-ADPT10W-CN=
Europe / Switzerland
CP-PWR-ADPT10W-EU=
India
CP-PWR-ADPT10W-IN=
CONFIDENTIAL DRAFT
product safety and compliance | 1 - Safety and performance information | 7
Korea
CP-PWR-ADPT10W-KR=
North America / Japan
CP-PWR-ADPT10W-NA=
United Kingdom
CP-PWR-ADPT10W-UK=
Note:
The battery and power supply are not provided with your phone. To order the battery and power
supply, contact your local dealer.
Power outage
The ability to access emergency service through the phone depends on the wireless access point being
powered. If there is an interruption in the power supply, Service and Emergency Calling Service dialing will
not function until power is restored. In the case of a power failure or disruption, you may need to reset or
recongure equipment before using the Service or Emergency Calling Service dialing.
Regulatory domains
The radio frequency (RF) for this phone is congured for a specic regulatory domain. If you use this
phone outside of the specic regulatory domain, the phone will not function properly, and you might
violate local regulations.
Health-care environments
This product is not a medical device and uses an unlicensed frequency band that is susceptible to
interference from other devices or equipment.
External devices usage
The following information applies when you use external devices with the wireless phone.
Cisco recommends the use of good quality external devices (such as headsets) that are shielded against
unwanted radio frequency (RF) and audio frequency (AF) signals.
CONFIDENTIAL DRAFT
product safety and compliance | 1 - Safety and performance information | 8
Depending on the quality of these devices and their proximity to other devices such as mobile phones or
two-way radios, some audio noise may still occur. In these cases, Cisco recommends that you take one or
more of the following actions:
• Move the external device away from the source of the RF or AF signals.
• Route the external device cables away from the source of the RF or AF signals.
• Use shielded cables for the external device, or use cables with a better shield and connector.
• Shorten the length of the external device cable.
• Apply ferrites or other such devices on the cables for the external device.
Cisco cannot guarantee the performance of the system because Cisco has no control over the quality of
external devices, cables, and connectors. The system will perform adequately when suitable devices are
attached using good quality cables and connectors.
CAUTION:
In European Union countries, use only external headsets that are fully compliant with the EMC
Directive [89/336/EC].
Phone behavior during times of network congestion
Anything that degrades network performance can affect phone audio and, in some cases, can cause a call
to drop. Sources of network degradation can include, but are not limited to, the following activities:
• Administrative tasks, such as an internal port scan or security scan.
• Attacks that occur on your network, such as a Denial of Service attack.
SAR
This product meets applicable national SAR limits of 1.6W/kg.
The specific maximum SAR values can be found in the Com
pliance statements sections.
When carrying the product or using it while worn on your body,
either use an approved accessory such as a holster or other

CONFIDENTIAL DRAFT
product safety and compliance | 1 - Safety and performance information | 9
wise maintain a distance of 5 mm from the body to ensure
compliance with RF exposure requirements. Note that the
product may be transmitting even if you are not making a
phone call.
Energy star
The following phone have Energy Star certication:
• Cisco Wireless Phone 9821 (WP-9821)
Any phone model that isn't listed in the above list isn't certied.
Product label
The product label is located on the bottom of the device.
CONFIDENTIAL DRAFT
Compliance statements
Compliance statements for the European Union
CE marking
The following CE mark is axed to the equipment and packaging.
RF exposure statement for the European Union
This device has been evaluated and found compliant in accordance with EU Directive 2014/53/EU.
Wi-Fi statement for the European Union
5945-6425 MHz indoor use only.
For the following countries, the WLAN function for this device is restricted to indoor use only when
operating in the 5150 to 5250 MHz frequency range.
ES LU RO CZ FR HU SI
DK HR BE BG DE EE IE
EL IT Cy LV LT SK MT
NL AT PL PT FI SE TR
NO CH IS LI
Compliance statements for the US
SAR Statement
has been tested for body-worn Specic Absorption Rate (SAR) compliance using the specic belt-clip/
holster conguration provided with the handset. The FCC has established the detailed body-worn SAR
requirements and has established that these requirements have been met with the specic belt-clip/

CONFIDENTIAL DRAFT
product safety and compliance | 2 - Compliance statements | 11
holster provided with the handset. Other belt-clip/holsters or similar accessories that have not been
tested may not comply and therefore should be avoided.
RF exposure information
The radio module has been evaluated found to be compliant to the requirements as set forth in 47 CFR
Sections 2.1091, 2.1093, and 15.247 (b) (4) addressing RF Exposure from radio frequency devices. This
model meets the applicable government requirements for exposure to radio frequency waves.
THIS DEVICE MEETS THE LIMITS AS REFERENCED BY ISED RSS-102 R5 FOR EXPOSURE TO RADIO
WAVES
Your device includes a radio transmitter and receiver. It is designed not to exceed the General populace
(uncontrolled ) limits for exposure to radio waves (radio frequency electromagnetic elds) as referenced
in RSS-102 which references Health Canada Safety Code 6 and include a substantial safety margin
designed to assure the safety of all persons, regardless of age and health.
As such the systems are designed to be operated as to avoid contact with the antennas by the end user.
It is recommended to set the system in a location where the antennas can remain at least a minimum
distance as specied from the user in accordance to the regulatory guidelines which are designed to
reduce the overall exposure of the user or operator.
The device has been tested and found compliant with the applicable regulations as part of the radio
certication process.
Maximum SAR for this Model and Conditions Under Which it was Recorded
Maximum Head SAR (1g) 1.371 W/kg
Maximum Body-worn SAR (1g) 1.308 W/kg
This wireless phone contains a radio transceiver. The radio transceiver and antenna have been designed
to meet the RF emission requirements for human exposure as specied by the FCC as well as by other
agencies from other countries. These guidelines were developed by the industry based on guidance
from the World Health Organization (WHO). These industry standards have been developed to include
additional safety margins to ensure that the user is exposed to the least amount of RF radiation.
The radio transceiver uses a non ionization type of radiation as opposed to an ionized radiation such as
an X-Ray wave.

CONFIDENTIAL DRAFT
product safety and compliance | 2 - Compliance statements | 12
The exposure standard for these devices references a unit of measure known as SAR. The limit as set by
the FCC is 1.6W/kg. The tests for this emission level is done in an independent laboratory who employs
test methods and operating positions reviewed by the FCC and other agencies.
Before the phone was placed on the market, the product was tested and certied in accordance with the
FCC regulations to verify that the product did not exceed the FCC SAR requirements.
Additional information on SAR and RF Exposure can be obtained off the FCC website at: http://
www.fcc.gov/oet/rfsafety
There is no conclusive proof that these mobile phones are or are not a health risk. The FDA and numerous
researchers are continuing studies of RF radiation and health issues. Additional information on this
subject can be obtained from the FDA web site at: http://www.fda.gov
Cisco Wireless Phone 9821 operates at power levels that are 5 to 6 times lower than most standard
cellular, Personal Communications Service (PCS), or Global System for Mobile Communication (GSM)
phones. This lower power coupled with a lower transmitter duty cycle reduces the user’s exposure to the
RF fields.
There are several suggested methods to reduce exposure for the user. Among those include:
1. Using a hands-free handset to increase the distance between the antenna and the head of the user.
2. Orienting the antenna away from the user.
Additional information can be obtained from the following documentation:
• Cisco Systems Spread Spectrum Radios and RF Safety white paper at the following location: http://
www.cisco.com/warp/public/cc/pd/witc/ao340ap/prodlit/rfhr_wi.htm
• FCC Bulletin 56: Questions and Answers about Biological Effects and Potential Hazards of Radio
Frequency Electromagnetic Fields
• FCC Bulletin 65: Evaluating Compliance with the FCC guidelines for Human Exposure to Radio
Frequency Electromagnetic Fields
Additional information can also be obtained from the following organizations:
• World Health Organization Internal Commission on Non-Ionizing Radiation Protection at http://
www.who.int/emf
• United Kingdom, National Radiological Protection Board at http://www.nrpb.org.uk
• Cellular Telecommunications Association at http://www.wow-com.com

CONFIDENTIAL DRAFT
product safety and compliance | 2 - Compliance statements | 13
General RF exposure compliance
This device has been evaluated and found compliant to the ICNIRP (International Committee on Non-
Ionizing Radiation Protection) limits for Human Exposure of RF Exposure.
Part 15 radio device
CAUTION:
The Part 15 radio device operates on a non-interference basis with other devices operating at
this frequency. Any changes or modication to said product not expressly approved by Cisco,
including the use of non-Cisco antennas, could void the user’s authority to operate this device.
Wi-Fi statement
Control of or communications with unmanned aircraft systems is prohibited, including drones.
No direct intemet connection permitted.
limited to indoor use by low-power indoor access point associations.
Attestation Required.
Under the control of an access point, a network cannot be initiated.
Contention Based Protocol.
The device for operation in the band 5150–5250 MHz is only for indoor use to reduce the potential for
harmful interference to co-channel mobile satellite systems;
Les dispositifs fonctionnant dans la bande 5150-5250 MHz sont réservés uniquement pour une utilisation
à l’intérieur an de réduire les risques de brouillage préjudiciable aux systèmes de satellites mobiles
utilisant les mêmes canaux;
Compliance statements for Canada
This device complies with Industry Canada license-exempt RSS standard(s). Operation is subject to the
following two conditions: (1) this device may not cause interference, and (2) this device must accept
any interference, including interference that may cause undesired operation of the device. Privacy of
communications may not be ensured when using this phone.

CONFIDENTIAL DRAFT
product safety and compliance | 2 - Compliance statements | 14
This product meets the applicable Innovation, Science and Economic Development Canada technical
specications.
Avis de Conformité Canadien
Cet appareil est conforme aux normes RSS exemptes de licence RSS d’Industry Canada. Le
fonctionnement de cet appareil est soumis à deux conditions : (1) ce périphérique ne doit pas causer
d'interférence et (2) ce périphérique doit supporter les interférences, y compris celles susceptibles
d'entraîner un fonctionnement non souhaitable de l'appareil. La protection des communications ne peut
pas être assurée lors de l'utilisation de ce téléphone.
Le présent produit est conforme aux spécications techniques applicables d'Innovation, Sciences et
Développement économique Canada.
Canadian RF exposure statement
THIS DEVICE MEETS THE LIMITS AS REFERENCED BY ISED RSS-102 R5 FOR EXPOSURE TO RADIO
WAVES
Your device includes a radio transmitter and receiver. It is designed not to exceed the General populace
(uncontrolled) limits for exposure to radio waves (radio frequency electromagnetic elds) as referenced in
RSS-102 which references Health Canada Safety Code 6 and include a substantial safety margin designed
to assure the safety of all persons, regardless of age and health.
For body-worn operation, this device has been tested with the specic belt-clip/holster provided with the
handset at a separation distance of 15 mm. Use only provided or approved accessories and maintain
at least 15 mm separation between the device and the body to ensure compliance with FCC/ISED RF
exposure requirements.
This equipment should be installed and operated with minimum distance 1.5 cm between the radiator &
your body.
The device has been tested and found compliant with the applicable regulations as part of the radio
certication process.
Maximum SAR for this Model and Conditions Under Which it was Recorded
Maximum Head SAR (1g) 1.371 W/kg

CONFIDENTIAL DRAFT
product safety and compliance | 2 - Compliance statements | 15
Maximum SAR for this Model and Conditions Under Which it was Recorded
Maximum Body-worn SAR (1g) 1.308 W/kg
Déclaration d'Exposition aux RF Canadienne
CE PÉRIPHÉRIQUE RESPECTE LES LIMITES DÉCRITES PAR LA NORME RSS-102 R5 D'EXPOSITION À DES
ONDES RADIO
Votre appareil comprend un émetteur et un récepteur radio. Il est conçu pour ne pas dépasser les limites
applicables à la population générale (ne faisant pas l'objet de contrôles périodiques) d'exposition à des
ondes radio (champs électromagnétiques de fréquences radio) comme indiqué dans la norme RSS-102
qui sert de référence au règlement de sécurité n°6 sur l'état de santé du Canada et inclut une marge de
sécurité importantes conçue pour garantir la sécurité de toutes les personnes, quels que soient leur âge
et état de santé.
En tant que tels, les systèmes sont conçus pour être utilisés en évitant le contact avec les antennes par
l'utilisateur nal. Il est recommandé de positionner le système à un endroit où les antennes peuvent
demeurer à au moins une distance minimum préconisée de l'utilisateur, conformément aux instructions
des réglementations qui sont conçues pour réduire l'exposition globale de l'utilisateur ou de l'opérateur.
Cet équipement doit être installé et utilisé avec une distance minimale de 1.5 cm entre le radiateur et
votre corps.
Le périphérique a été testé et déclaré conforme aux réglementations applicables dans le cadre du
processus de certication radio.
DAS maximal pour ce modèle et conditions dans lesquelles il a été enregistré
DAS maximal tête (1g) 1.371 W/kg
DAS maximal près du corps (1g) 1.308 W/kg
Wi-Fi statement
Devices shall automatically stop transmitting if there is an absence of information to transmit or
an operational failure. Note that the intention is not to prohibit either the transmission of control or

CONFIDENTIAL DRAFT
product safety and compliance | 2 - Compliance statements | 16
signalling information, or the use of repetitive codes, where one or both are required by the technology. An
explanation of how transmitting is stopped shall be included in the certication ling.
Devices shall not be used for control of or communications with unmanned aircraft systems.
Devices shall not be used on oil platforms.
Devices shall not be used on aircraft.、
Client devices shall not be capable of initiating a network.
Low-power indoor access points, indoor subordinate devices, low-power client devices, and very low-
power devices operating in the 5925-6425 MHz band may be used on large aircraft, as dened in the
Canadian Aviation Regulations, while ying above 3,048 metres (10,000 feet).
Compliance Statements for New Zealand
Permit to Connect (PTC) General Warning
The grant of a Telepermit for any item of terminal equipment indicates only that Spark NZ has
accepted that the item complies with minimum conditions for connection to its network. It indicates no
endorsement of the product by Spark NZ, nor does it provide any sort of warranty. Above all, it provides no
assurance that any item will work correctly in all respects with another item of Telepermitted equipment
of a different make or model, nor does it imply that any product is compatible with all of Spark NZ network
services.
Use of IP Networks with the PSTN
Internet Protocol (IP) by its nature introduces delay into speech signals as each data packet is formulated
and addressed. Spark NZ Access Standards recommends that suppliers, designers and installers using
this technology for calls to or from the PSTN refer to ITU E Model requirements in the design of their
networks. The overall aim is to minimise delay, distortion and other transmission impairments, particularly
for those calls involving cellular and international networks, which already suffer extensive delay.
CONFIDENTIAL DRAFT
product safety and compliance | 2 - Compliance statements | 17
The Use of Voice Compression Through the PSTN
Because of the extensive delay already experienced when calling cellular and international networks,
some of which is already caused by their use of voice compression technologies. Spark NZ Access
Standards will only approve G711 voice technology for use on the PSTN. G711 is an ‘instantaneous
speech-encoding technique’ whereas G729 and all its variants are considered ‘near instantaneous’
introducing additional delay into the speech signal.
Echo Cancellation
Echo cancelers are not normally required in the Spark NZ PSTN because geographic delays are
acceptable where CPE return loss is maintained within Telepermit limits. However, those private networks
that make use of Voice-over-IP (VoIP) technology are required to provide echo cancellation for all voice
calls. The combined effect of audio/VoIP conversion delay and IP routing delay can cause the echo
cancellation time of 64 mS to be required.
Compliance Statements for Japan
Compliance Statements for Taiwan
DGT Warning Statement
取得審驗證明之低功率射頻器材,非經核准,公司、商號或使用者均不得擅自變更頻率、加大功率或變更
原設計之特性及功能。低功率射頻器材之使用不得影響飛航安全及干擾合法通信;經發現有干擾現象時,
應立即停用,並改善至無干擾時方得繼續使用。前述合法通信,指依電信管理法規定作業之無線電通信。
低功率射頻器材須忍受合法通信或工業、科學及醫療用電波輻射性電機設備之干擾。
電磁波警語:
減少電磁波影響,請妥適使用
警告:為避免電磁干擾,本產品不應安裝或使用於住宅環境。

CONFIDENTIAL DRAFT
product safety and compliance | 2 - Compliance statements | 18
BSMI Battery Statement
M.10 預防合理可預期之誤用之說明
結合於設備中的電池或與其相關組件(包括單電池及電力產生器)在一起的電池的結構應使得電擊或火焰
安全防護的失效(例:可燃性化學漏液起火或絕緣損壞)不會發生,考慮所有可能發生的條件。若可行,
應包括製造商指示的嚴苛條件,例:
— 電池在使用、儲存或運送期間可能承受的高低溫度;且
— 在高海拔的低氣壓。
考慮實際電池或包含電池的設備的本質功能,凡提供安全裝置或設計係不符合實際時,應提供參照 F.5 的指
示以保護電池免於極端的條件或使用者的誤用。應考慮的範例包括:
— 置換可能影響安全防護的錯誤型式的電池(例:在某些鋰電池類型的情形下);
— 電池丟入火焰或烤箱中,或將電池作可能導致爆炸的機械擠壓或切割;
— 電池置於可能導致爆炸或可燃性液體或氣體洩漏的高溫環境中;且
— 電池承受可能導致爆炸或可燃性液體或氣體洩漏的極度低氣壓。
對於含有可讓普通人員置換電池之設備,應依據 F.5 提供指示型安全防護,除非說明書中提供了完整的指示
型安全防護。
指示型安全防護之要素應如下:
— 要素 1a 或 1b:無要求
— 要素 2:「警告」或同義文字或語句
— 要素 3:「若置換不同型式之電池有起火或爆炸風險」或同義語句
— 要素 4:選項
由檢驗、評估製造商提供的資料查核其符合性。
Compliance Statement for Argentina
Advertencia
No utilizar una fuente de alimentación con caracteristícas distintas a las expresadas ya que podría ser
peligroso.

CONFIDENTIAL DRAFT
product safety and compliance | 2 - Compliance statements | 19
Compliance information for Brazil
This section contains special information for operation of in Brazil.
This equipment is not entitled to the protection from harmful interference and may not cause interference
with duly authorized systems.
Este equipamento não tem direito à proteção contra interferência prejudicial e não pode causar
interferência em sistemas devidamente autorizados.
Para maiores informações, consulte o site da ANATEL - www.anatel.gov.br
Model Certificate Number
Compliance Statement for Singapore

CONFIDENTIAL DRAFT
Cisco product security overview
This product contains cryptographic features and is subject to U.S. and local country laws that govern
import, export, transfer, and use. Delivery of Cisco cryptographic products does not imply third-party
authority to import, export, distribute, or use encryption. Importers, exporters, distributors, and users are
responsible for compliance with U.S. and local country laws. By using this product, you agree to comply
with applicable laws and regulations. If you are unable to comply with U.S. and local laws, return this
product immediately.
Further information regarding U.S. export regulations can be found at https://cisco.com/go/usear.

CONFIDENTIAL DRAFT
Important online information
End User License Agreement
Find the End User License Agreement (EULA) at:
https://www.cisco.com/go/eula
Regulatory Compliance and Safety Information
Find the Regulatory Compliance and Safety Information (RCSI) at:
https://www.cisco.com/c/dam/en/us/td/docs/voice_ip_comm/cuipph/9821/regulatory_compliance/
rcsi-0505-book.pdf