Installation guide
90cm built-in ovens
WARNING
The appliance must not be installed behind a decorative door in
order to avoid overheating.
To avoid any potential hazard, you must follow our instructions
when you install your appliance. Failure to install the appliance
correctly could invalidate any warranty or liability claims and
lead to prosecution.
• This appliance must be installed by an authorised person
according to all codes and regulations as in the local municipal
building code and other relevant statutory regulations.
• Wiring connections must be in accordance with AS/NZS 3000
Wiring Rules and any particular conditions of the local authority.
• Refer to data plate for rating information. The data plate is
positioned behind the oven door.
• For appliances with open cooking surfaces, a disconnect
functional switch should be provided near the appliance in
an accessible position. Refer to AS/NZS 3000 clause 4.7.1
• Wiring should be protected against mechanical failure.
Refer to AS/NZS 3000 clauses 3.3.2.6, 3.9, 3.10
• A means of disconnection with a contact separation of at
least 3mm must be supplied in the fixed wiring.
• This appliance must be connected with cable of 75°C rating
minimum.
• This product has passed the insulation resistance test after
manufacture. If the resistance reading is low at installation,
it is probably caused by moisture from the atmosphere being
absorbe
d by the elements after the appliance has been
produced. (pass at 0.01MΩ AS/NZS 3000 Wiring Rules Clause
8.3.6.3).
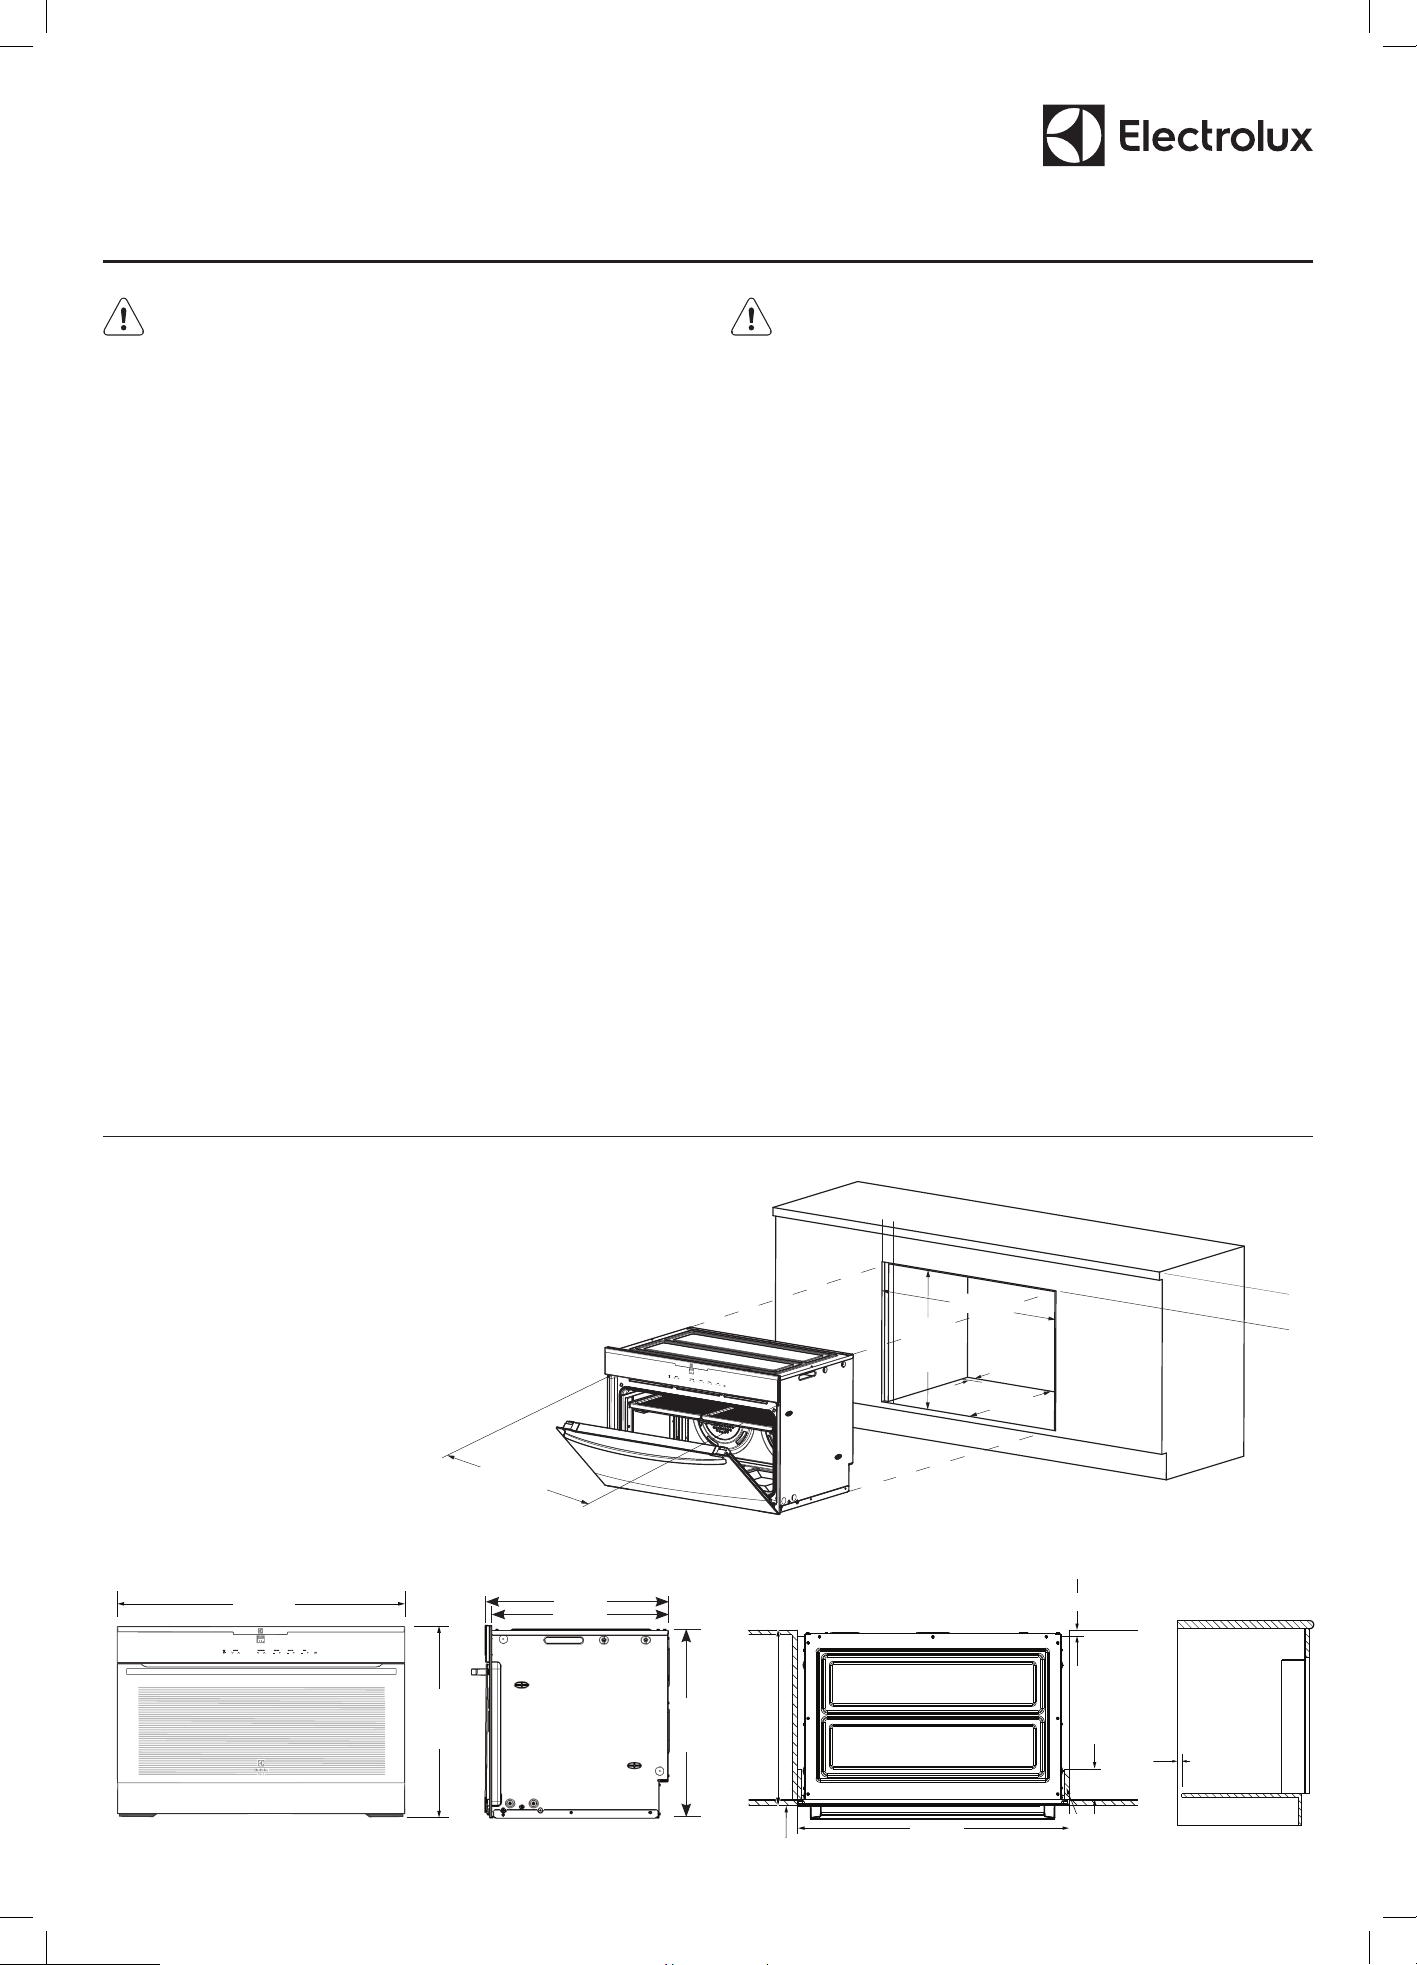
20mm
900mm
580mm min
Infill panel
max. 16mm
thickness
20-50mm
(see NOTE)
cupboard door
100mm max.
Cabinet construction for your appliance
F
or the best integration within a kitchen,
install this appliance in a cupboard that
gives a flush fit with the surrounding
cupboard fronts. A recess of 20mm is ideal.
NOTE: Your appliance must be mounted
on a flat horizontal surface for the full
width and depth of the product
NOTE: A ventilation slot 20-50mm wide
is required at the rear of the base of
the cabinet floor.
NOTE: Refer to cooktop installation
instructions for required clearance
between cooktop and oven.
WARNING
This appliance must be properly earthed.
• Do not lift the appliance by the door handles.
• Prepare the cupboard opening to match your appliance
measurements. (See diagrams)
• Slide appliance into the cupboard, ensuring that the supply
cable (where fitted) does not kink.
• To prevent tipping, use the screws supplied to secure your
appliance into the cupboard by fastening through the holes
to the front panel.
• The surrounding kitchen cabinets must be able to withstand
85°C. Electrolux WILL NOT accept responsibility for damage
caused by installation into kitchen cabinets which cannot
withstand 85°C.
• If the appliance is to be installed adjacent to vinyl wrapped
surfaces, use an installation kit available from the vinyl-wrap
supplier.
•
After installation, test and ensure that the appliance operates
correctly before handing it over to the customer.
NOTE: If a powerpoint is fitted it must be accessible
with the appliance installed, as the plug must be accessible
after installation.
552mm
572mm
586mm
895mm
596mm
900mm
600mm
580mm
*Refer to cooktop installation instructions for required
clearance between cooktop and oven.
876mm
mounting
holes
20-50mm
slot
100mm max
*
see note
below
Installation guide
90cm built-in ovens
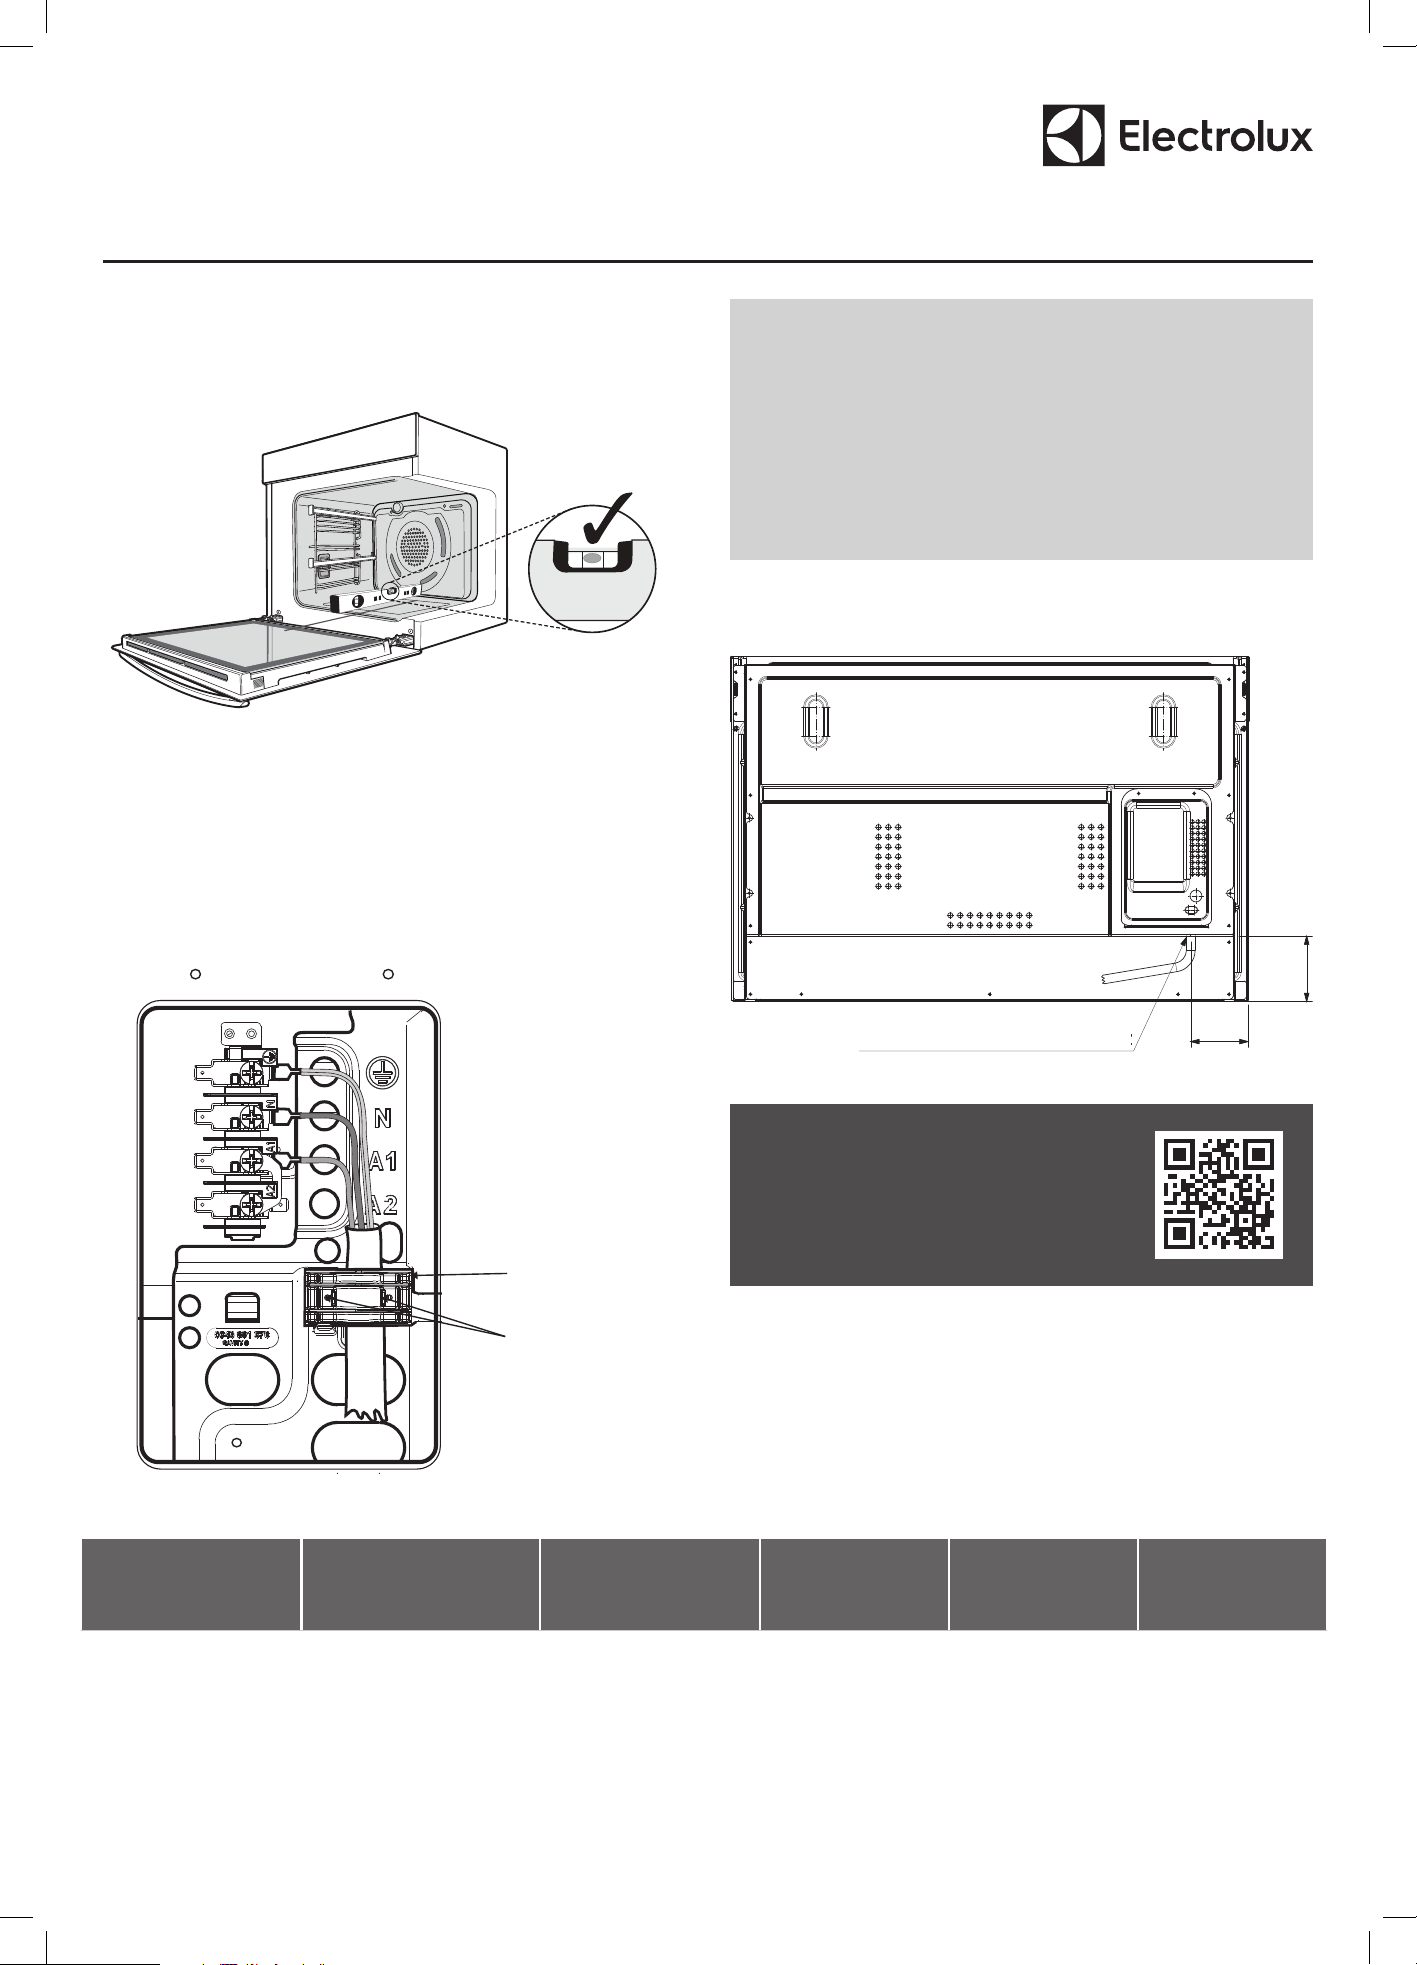
Leveling oven
Place a level in the oven as below making sure the level sits on the
front and rear forms. The level needs to be correct to prevent slides
from moving in or out with gravity.
Hard wiring details
1. Remove terminal cover plate from rear panel of appliance.
2.
Fit
wires through hole in step below terminal cover panel.
3. Engage wir
es into plastic clip. Secure plastic clip with two
long silver screws (supplied in separate bag).
4.
Replace
cover plate onto rear panel.
Plastic clips
Plastic clip
securing points
To access your detailed user
manual simply scan the QR code
on your smart phone or visit
electrolux.com.au/support/manuals
© 2026 Electrolux Home Products Pty Ltd. ABN 51 004 762 341 E_INS_90cm_oven_A4_Mar26 A23326202 Rev A
For New Zealand Only:
The cooking range must be connected to the supply by a
supply cord fitted with the appropriately rated plug that is
compatible with the socket-outlet fitted to the final sub-circuit
in the fixed wiring that is intended to supply this cooking
range.
Supply cord size required:
EVEP9616DF – 4mm
2
Electrical connection location - built-in models
Entry point of electrical cable
99
113
E
VE9615DF – 2.5mm
2
MODEL
PRODUCT DIMENSIONS
(HxWxD) MM
ELECTRICAL
CONNECTION
MIN
FUSE RATING
MAX POWER
RATING
MAX CURRENT
RATING
EVEP9616DF
597 x 895 x 572 230-240V/50Hz
25
A
5.2kW 21.
7A
EVE9615DF
597 x 895 x 572 230-240V/50Hz 16A 3.6kW 15A