Size: 140x210MM
CAN OPENER
USER MANUAL
Model:GCO001
120V~,60Hz 1.5A 70W
Operating and Safety Instructions
FOR INDOOR HOUSEHOLD USE ONLY
Definitions
- Whenever used, the following identify safety and property
damage messages and designate a level of hazard seriousness.
- This is the safety alert symbol. It alerts you to potential
personal injury hazards. Obey all safety messages that follow
this symbol to avoid possible injury or death.
DANGER:
- Indicates a hazardous situation, which, if not avoided, will
result in death or serious injury. Usage of this signal word is
limited to the most extreme situations.
WARNING:
- Indicates a hazardous situation, which, if not avoided, could
result in death or serious injury.
CAUTION:
- Indicates a hazardous situation, which, if not avoided, may
result in minor/moderate injury.
NOTICE:
- Addresses practices not related to personal injury, such as
product and/or property damage.
When using electrical appliances, always follow basic safety
precautions, including the following:
NOTE: To stop the product during the process, raise the Lever.
8.Carefully remove the lid from the Magnet.
WARNING: Can lids will be sharp; handle with care.
9. Unplug the product from the electrical outlet.
WARNING: Always unplug the product when not in
use.
CAUTION: Do not place finger underneath the lever where the
Cutting Blade and Geared Wheel are located; doing so may
cause injury.
CAUTION: Never remove the magnet without first unplugging
the cord and returning the lever to its flush, horizontal posi-
tion.
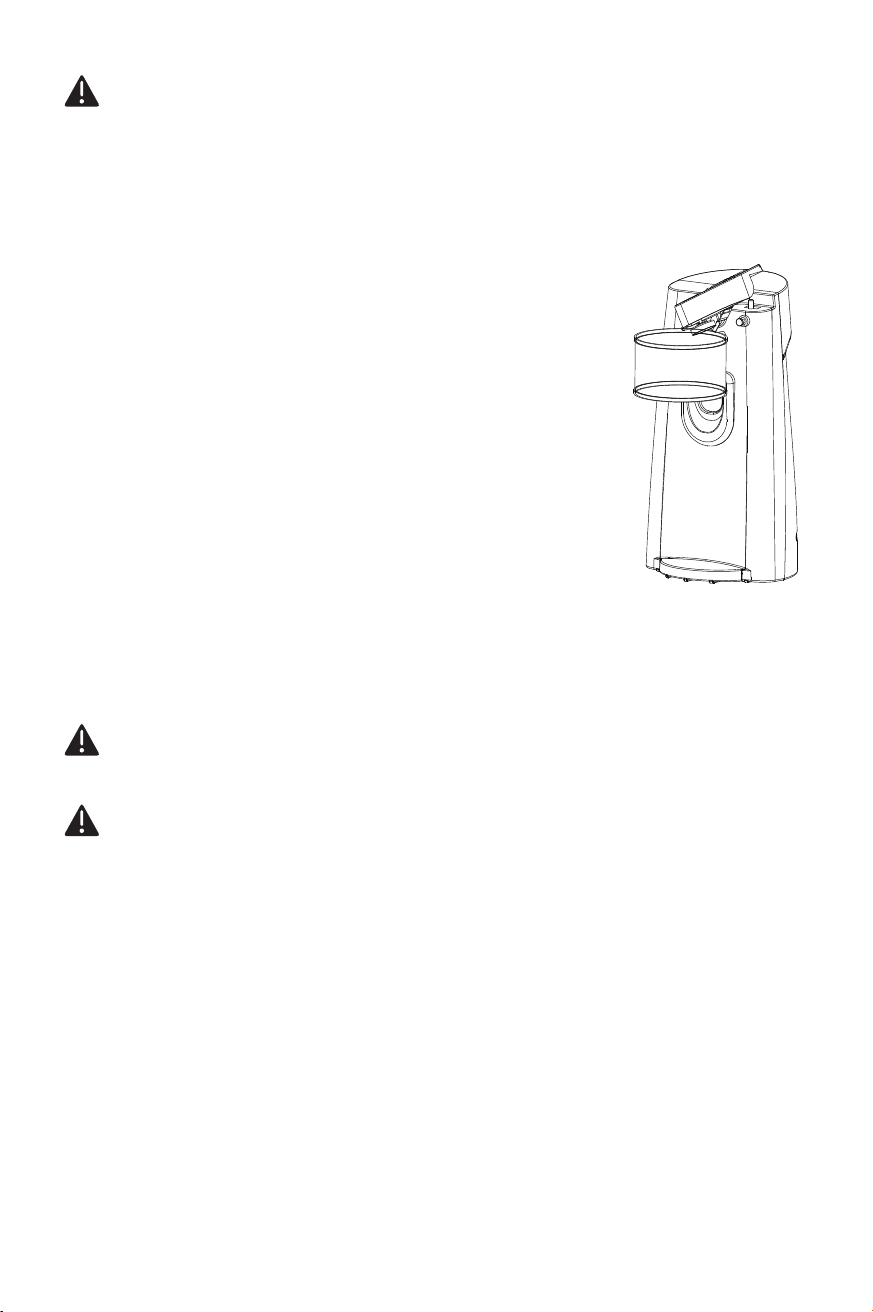
5.Push the Lever down until the Blade
punctures the lid of the can and the Magnet
attaches to the can(see Fig.3).
6.Push the Lever further down to activate
the Drive Wheel.
7.When the can and lid have been separat-
ed, hold the can with one hand and raise
the Lever with the other hand to remove
the can.
WARNING-- To reduce the risk of fire, electric shock,
or serious personal Injury:
• To protect against risk of electrical shock do not put plug or
body in water or other liquid.
• Close supervision is necessary when any appliance is used by
or near children.
• Unplug from outlet when not in use, before putting on or
taking off parts, and before cleaning.
• Avoid contacting moving parts.
• Do not operate any appliance with a damaged cord or plug or
after the appliance malfunctions, or is dropped or damaged in
any manner. Return appliance to the nearest authorized
service facility for examination, repair or electrical or mechani-
cal adjustment.
• The use of attachments not recommended or sold by the
manufacturer may cause fire, electric shock or injury.
• Do not use outdoors
Do not let cord hang over edge of table or counter.
• Do not use the product to open pressurized (aerosol-type)
cans or bottles.
as an explosion hazard exists.
Do not open cans of flammable liquids such as lighter fluids.
Do not leave the product unattended when it is in use.
• Keep hair, hands, fingers, or any other body parts from entan-
gling with the moving parts of the product while the product is
operating.
• Do not drop or insert objects into the openings of the prod-
uct (except as instructed for scissors); do not block the open-
ings of the product.
1. Place Knife Blade lightly in either left or right groove. Draw
knife slowly toward you with a slow, even motion.
2. Place Blade in other groove and do the same. Repeat this
alternating action 4 or 5 times, from one groove to the other
until desired sharpness is achieved.
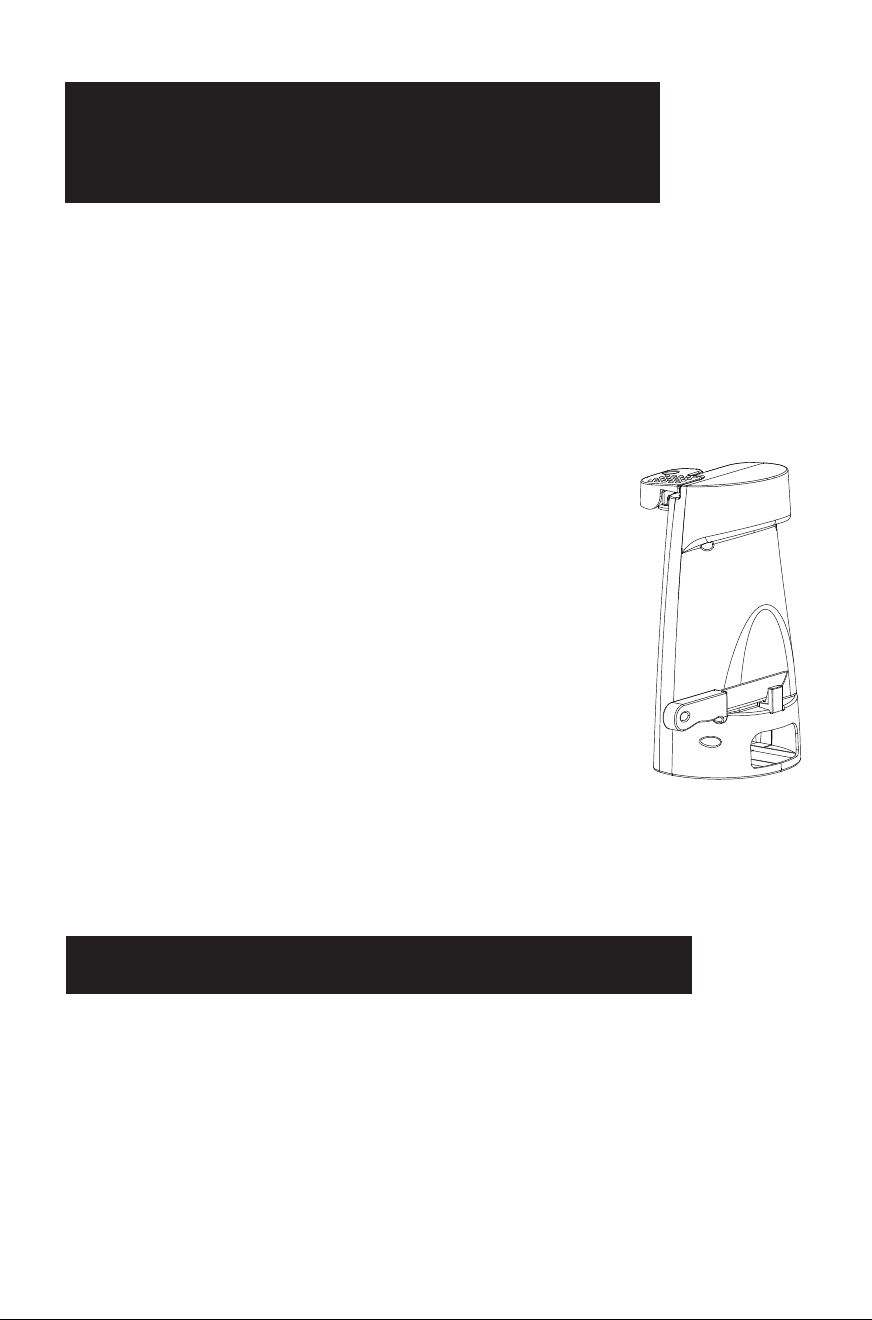
3. The Knife/Scissors Sharpener can also
be used for sharpening scissors. A large
groove at the side of the Sharpener is
designed especially for scissors. Place one
blade of the scissors in the groove, and
then draw it toward you slowly and evenly,
Repeat with the other Blade.(see Fig.4).
SPECIAL ATTENTION: Blades to be sharp-
ened should be clean. Do not sharpen
knives that have serrated blades.
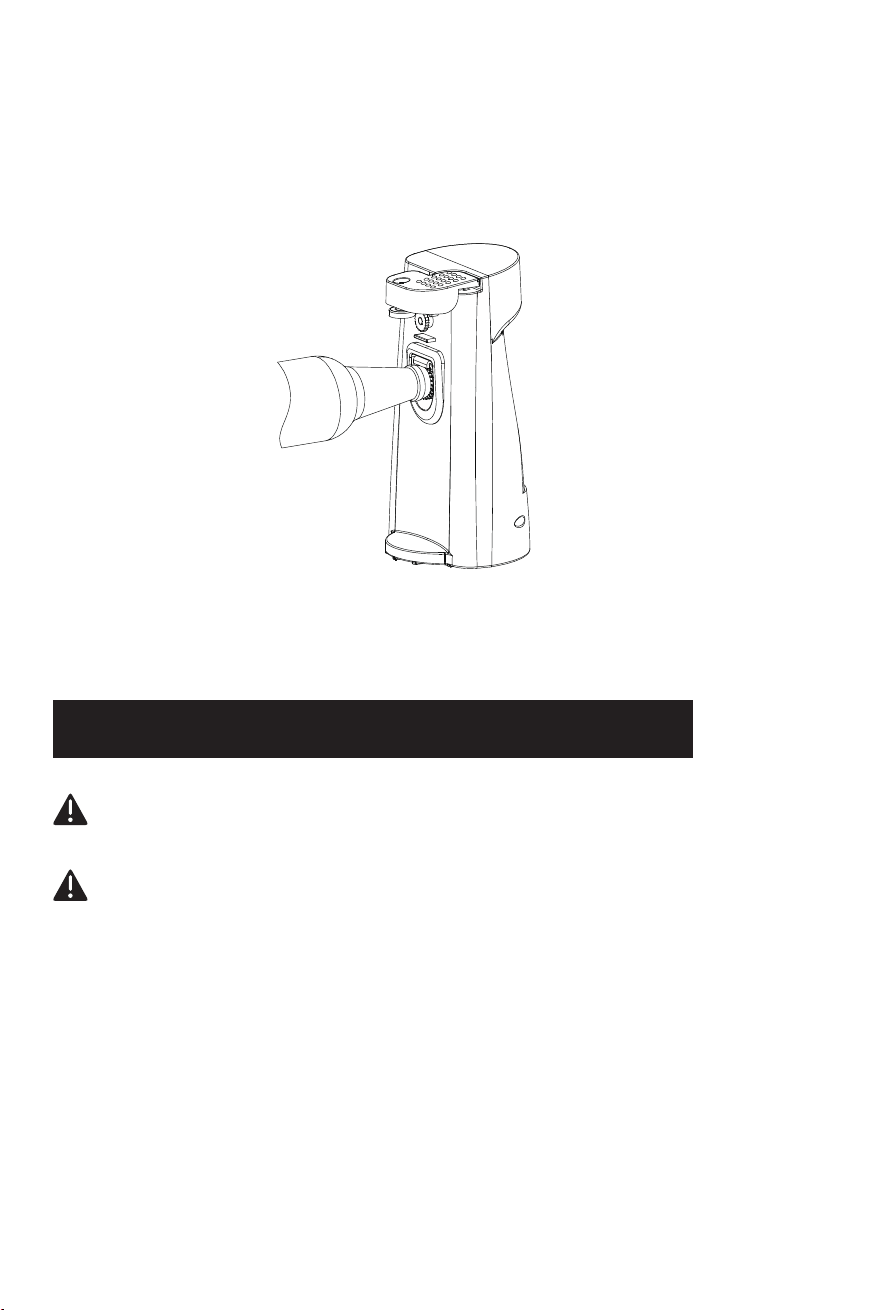
4. Apply pressure on bottle downward until bottle cap pops
off.(see Fig.5).
NOTE: This bottle opener is not recommended for bottles
having "Twist-Off" caps.
WARNING--
This product is equipped with a polarized plug (one blade is
wider than the other blade) to reduce the risk of electrical
shock. This is a safety feature. The plug will fit into a polarized
outlet only one way. If you are unable to insert the plug into
the electrical outlet, try reversing the plug. If the plug still does
not it, contact a qualified electrician. Never use the plug with
an extension cord unless you can fully insert the plug into the
extension cord. Do not alter the plug. Do not attempt to defeat
the safety purpose of the polarized plug.
1. Carefully unpack Can Opener.
2. Wipe with a soft cloth or sponge to remove small particles
collected during packing and handling.
3. Attach the magnetic part (used to hold the can in place
when cutting) to the front panel of the lever by sliding it down
over the 'hook', with the circular surface facing down. Press
down firmly in place until top surface is flush with the lever.
• Do not plug or unplug the product into/from the electrical
outlet with a wet hand.
• Always place the product on a flat, level, stable surface.
SAVE THESE INSTRUCTIONS
FOR HOUSEHOLD USE ONLY
NOTICE: Ensure the product is securely assembled before
plugging it into an electrical outlet.
WARNING: The Blade is sharp; handle with care.
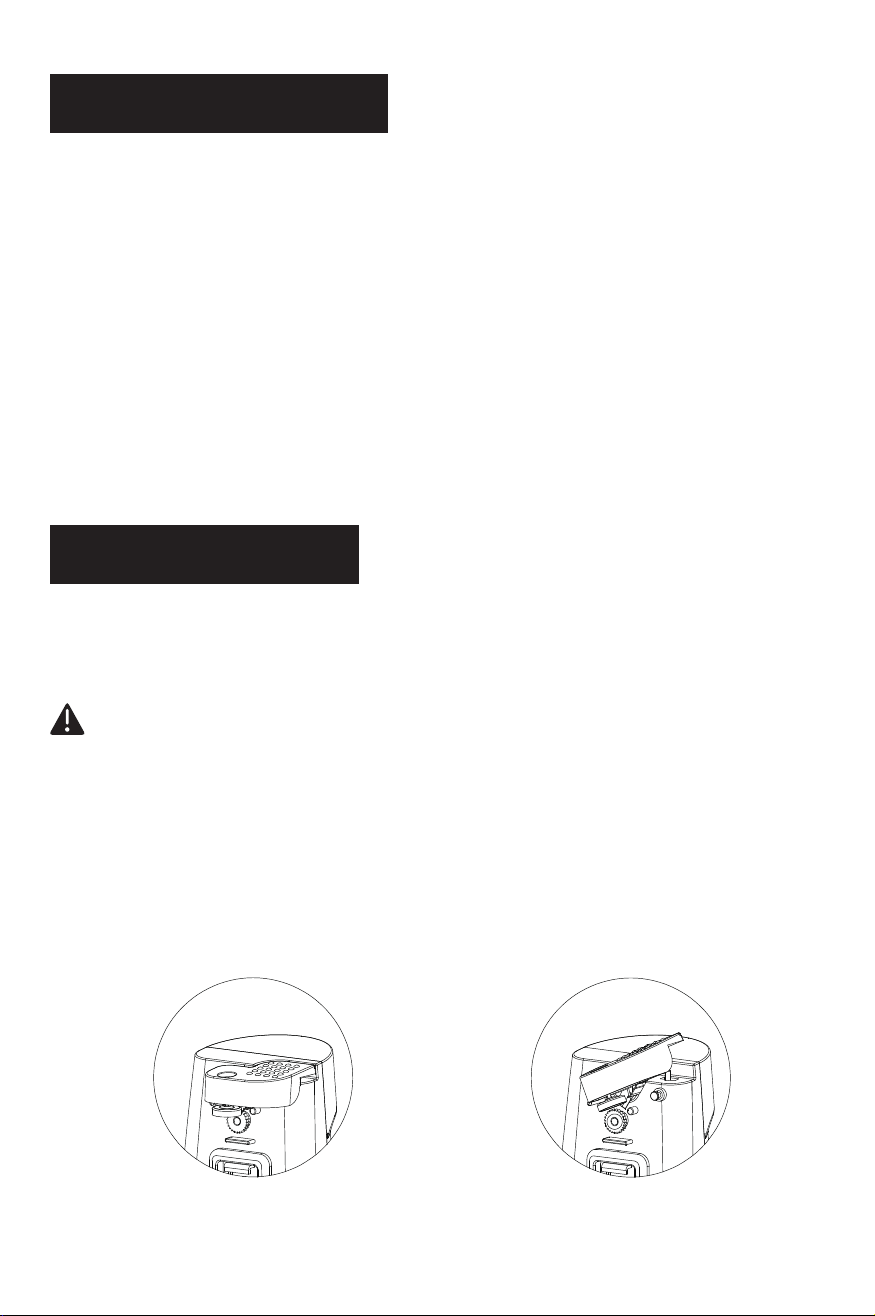
1. Place the product on a flat, level, stable surface and ensure
the product is unplugged from the electrical outlet.
2. Insert the Lever/Blade Assembly into the Keyhole in the
Motor Housing(see Fig. 1) and then slide the Magnet Assembly
into the slot under the Lever until it snaps into place (see
Fig.2).
2
65
43
87
Fig. 1 Fig. 2
Fig. 3
Fig. 4
Fig. 5
HOUSEHOLD USE ONLY
YUYAO HOLON ELECTRICAL APPLIANCE CO., LTD
Made In China
Add: SIBEI VILLAGE, SIMEN TOWN, YUYAO, NINGBO, ZHEJIANG,
Facebook Page: https://www.facebook.com/Reemix.Official/
Service: [email protected]
5000458
IMPORTANT SAFEGUARDS
READ ALL INSTRUCTIONS BEFORE USE
SAVE THESE INSTRUCTIONS
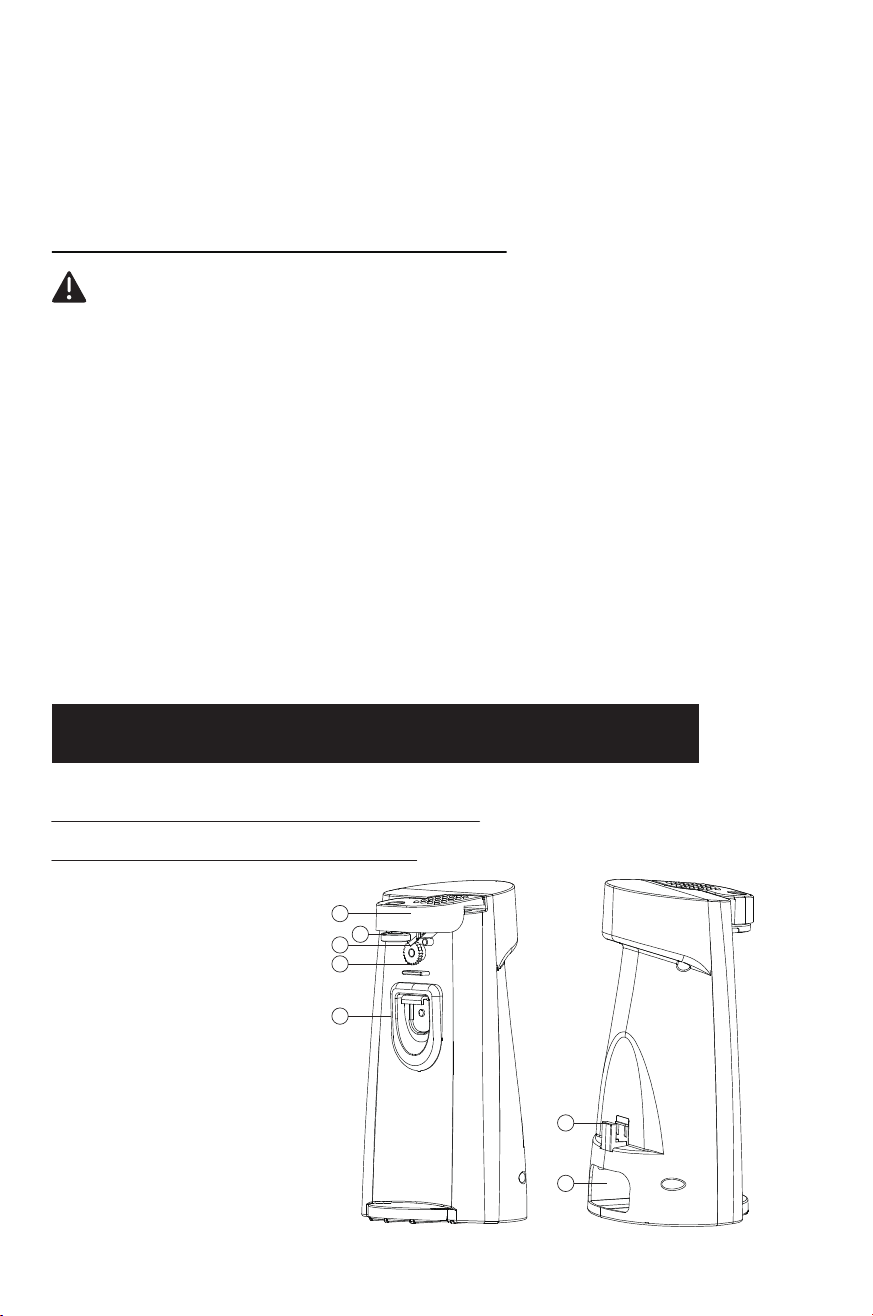
KNOW YOUR APPLIANCE PARTS
TO ASSEMBLE
BEFORE USING:
1.Lever
2.Magnet
3.Blade
4.Drive Wheel
5.Bottle opener
6.Blade Sharpener
7.Cord Storage
TO USE KNIFE/
SCISSORS SHARPENER
1. Unplug appliance from electrical socket.
2. Place Can Opener on a level surface. To steady, position on
hand on the top of the Can Opener.
3. Place bottle cap edge under Opener Flange.
TO USE BOTTLE OPENER
WARNING: Always unplug the product from the
electrical outlet before cleaning it.
WARNING: The Blade is sharp; handle with care.
• Remove the Lever/Blade Assembly from the Motor Housing,
and then clean The Lever/Blade Assembly and the exterior of
the Motor Housing with a soft, damp cloth and dry thoroughly.
NOTICE: Do not use abrasive cleaners, scouring pads, or a
dishwasher to clean any part of the product.
• Push the Power Cord inside the Motor Housing before storing
the product in a cool, dry place.
CARE AND MAINTENANCE
1
2
3
4
5
6
7
WARNING: Do not use this product to open cans of
flammable materials.
3.Plug the product into a standard 120-volt AC electrical outlet.
4.Raise the Lever and align the rim of the can with the top of
the Drive Wheel.

Size: 140x210MM
CAN OPENER
USER MANUAL
Model:GCO001
120V~,60Hz 1.5A 70W
Operating and Safety Instructions
FOR INDOOR HOUSEHOLD USE ONLY
Definitions
- Whenever used, the following identify safety and property
damage messages and designate a level of hazard seriousness.
- This is the safety alert symbol. It alerts you to potential
personal injury hazards. Obey all safety messages that follow
this symbol to avoid possible injury or death.
DANGER:
- Indicates a hazardous situation, which, if not avoided, will
result in death or serious injury. Usage of this signal word is
limited to the most extreme situations.
WARNING:
- Indicates a hazardous situation, which, if not avoided, could
result in death or serious injury.
CAUTION:
- Indicates a hazardous situation, which, if not avoided, may
result in minor/moderate injury.
NOTICE:
- Addresses practices not related to personal injury, such as
product and/or property damage.
When using electrical appliances, always follow basic safety
precautions, including the following:
NOTE: To stop the product during the process, raise the Lever.
8.Carefully remove the lid from the Magnet.
WARNING: Can lids will be sharp; handle with care.
9. Unplug the product from the electrical outlet.
WARNING: Always unplug the product when not in
use.
CAUTION: Do not place finger underneath the lever where the
Cutting Blade and Geared Wheel are located; doing so may
cause injury.
CAUTION: Never remove the magnet without first unplugging
the cord and returning the lever to its flush, horizontal posi-
tion.
5.Push the Lever down until the Blade
punctures the lid of the can and the Magnet
attaches to the can(see Fig.3).
6.Push the Lever further down to activate
the Drive Wheel.
7.When the can and lid have been separat-
ed, hold the can with one hand and raise
the Lever with the other hand to remove
the can.
WARNING-- To reduce the risk of fire, electric shock,
or serious personal Injury:
• To protect against risk of electrical shock do not put plug or
body in water or other liquid.
• Close supervision is necessary when any appliance is used by
or near children.
• Unplug from outlet when not in use, before putting on or
taking off parts, and before cleaning.
• Avoid contacting moving parts.
• Do not operate any appliance with a damaged cord or plug or
after the appliance malfunctions, or is dropped or damaged in
any manner. Return appliance to the nearest authorized
service facility for examination, repair or electrical or mechani-
cal adjustment.
• The use of attachments not recommended or sold by the
manufacturer may cause fire, electric shock or injury.
• Do not use outdoors
Do not let cord hang over edge of table or counter.
• Do not use the product to open pressurized (aerosol-type)
cans or bottles.
as an explosion hazard exists.
Do not open cans of flammable liquids such as lighter fluids.
Do not leave the product unattended when it is in use.
• Keep hair, hands, fingers, or any other body parts from entan-
gling with the moving parts of the product while the product is
operating.
• Do not drop or insert objects into the openings of the prod-
uct (except as instructed for scissors); do not block the open-
ings of the product.
1. Place Knife Blade lightly in either left or right groove. Draw
knife slowly toward you with a slow, even motion.
2. Place Blade in other groove and do the same. Repeat this
alternating action 4 or 5 times, from one groove to the other
until desired sharpness is achieved.
3. The Knife/Scissors Sharpener can also
be used for sharpening scissors. A large
groove at the side of the Sharpener is
designed especially for scissors. Place one
blade of the scissors in the groove, and
then draw it toward you slowly and evenly,
Repeat with the other Blade.(see Fig.4).
SPECIAL ATTENTION: Blades to be sharp-
ened should be clean. Do not sharpen
knives that have serrated blades.
4. Apply pressure on bottle downward until bottle cap pops
off.(see Fig.5).
NOTE: This bottle opener is not recommended for bottles
having "Twist-Off" caps.
WARNING--
This product is equipped with a polarized plug (one blade is
wider than the other blade) to reduce the risk of electrical
shock. This is a safety feature. The plug will fit into a polarized
outlet only one way. If you are unable to insert the plug into
the electrical outlet, try reversing the plug. If the plug still does
not it, contact a qualified electrician. Never use the plug with
an extension cord unless you can fully insert the plug into the
extension cord. Do not alter the plug. Do not attempt to defeat
the safety purpose of the polarized plug.
1. Carefully unpack Can Opener.
2. Wipe with a soft cloth or sponge to remove small particles
collected during packing and handling.
3. Attach the magnetic part (used to hold the can in place
when cutting) to the front panel of the lever by sliding it down
over the 'hook', with the circular surface facing down. Press
down firmly in place until top surface is flush with the lever.
• Do not plug or unplug the product into/from the electrical
outlet with a wet hand.
• Always place the product on a flat, level, stable surface.
SAVE THESE INSTRUCTIONS
FOR HOUSEHOLD USE ONLY
NOTICE: Ensure the product is securely assembled before
plugging it into an electrical outlet.
WARNING: The Blade is sharp; handle with care.
1. Place the product on a flat, level, stable surface and ensure
the product is unplugged from the electrical outlet.
2. Insert the Lever/Blade Assembly into the Keyhole in the
Motor Housing(see Fig. 1) and then slide the Magnet Assembly
into the slot under the Lever until it snaps into place (see
Fig.2).
2
65
43
87
Fig. 1 Fig. 2
Fig. 3
Fig. 4
Fig. 5
HOUSEHOLD USE ONLY
YUYAO HOLON ELECTRICAL APPLIANCE CO., LTD
Made In China
Add: SIBEI VILLAGE, SIMEN TOWN, YUYAO, NINGBO, ZHEJIANG,
Facebook Page: https://www.facebook.com/Reemix.Official/
Service: [email protected]
5000458
IMPORTANT SAFEGUARDS
READ ALL INSTRUCTIONS BEFORE USE
SAVE THESE INSTRUCTIONS
KNOW YOUR APPLIANCE PARTS
TO ASSEMBLE
BEFORE USING:
1.Lever
2.Magnet
3.Blade
4.Drive Wheel
5.Bottle opener
6.Blade Sharpener
7.Cord Storage
TO USE KNIFE/
SCISSORS SHARPENER
1. Unplug appliance from electrical socket.
2. Place Can Opener on a level surface. To steady, position on
hand on the top of the Can Opener.
3. Place bottle cap edge under Opener Flange.
TO USE BOTTLE OPENER
WARNING: Always unplug the product from the
electrical outlet before cleaning it.
WARNING: The Blade is sharp; handle with care.
• Remove the Lever/Blade Assembly from the Motor Housing,
and then clean The Lever/Blade Assembly and the exterior of
the Motor Housing with a soft, damp cloth and dry thoroughly.
NOTICE: Do not use abrasive cleaners, scouring pads, or a
dishwasher to clean any part of the product.
• Push the Power Cord inside the Motor Housing before storing
the product in a cool, dry place.
CARE AND MAINTENANCE
1
2
3
4
5
6
7
WARNING: Do not use this product to open cans of
flammable materials.
3.Plug the product into a standard 120-volt AC electrical outlet.
4.Raise the Lever and align the rim of the can with the top of
the Drive Wheel.