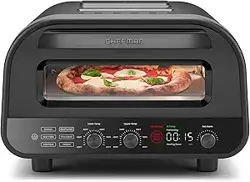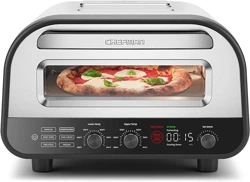
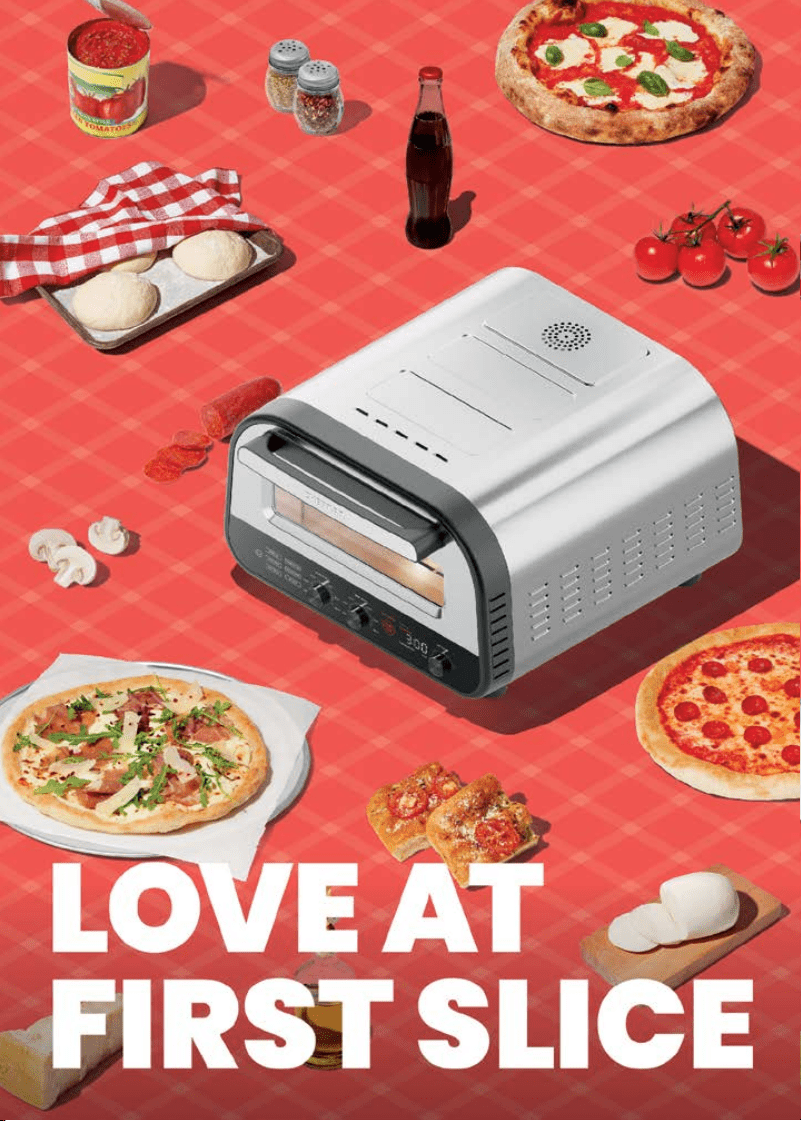
Home Slice
TM
Indoor Electric
Pizza Oven
RJ25-PO12-SS
2
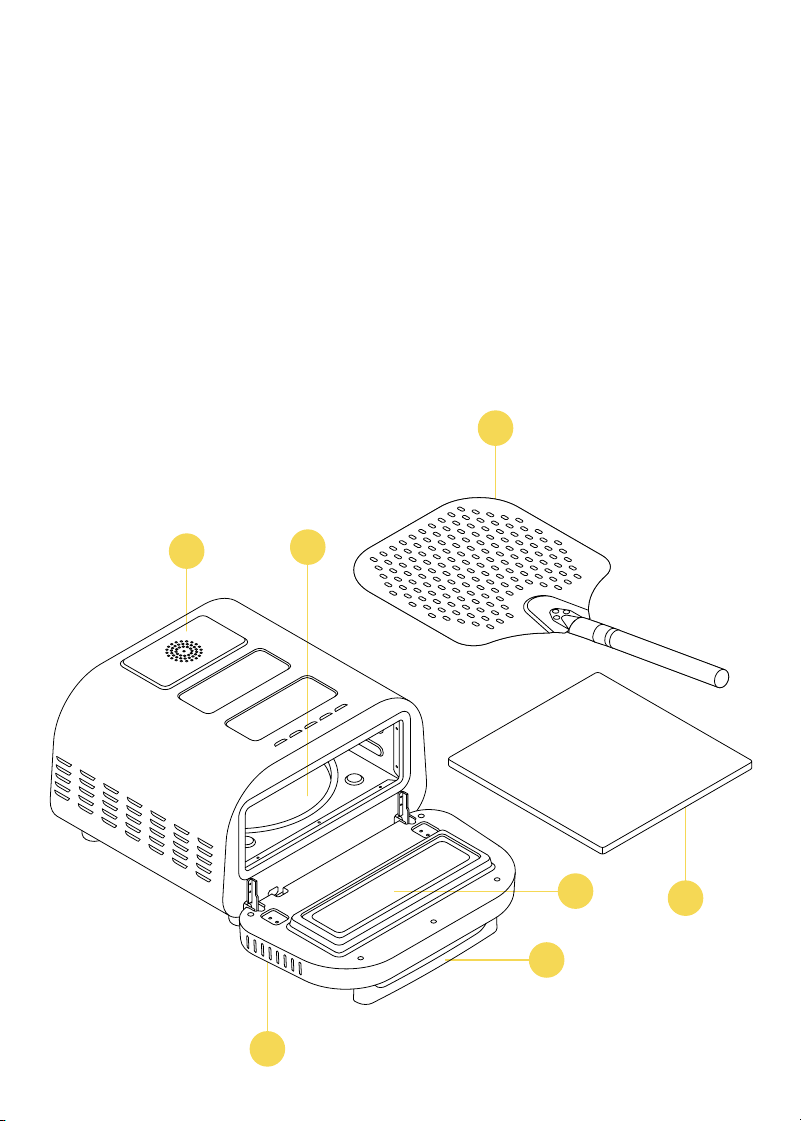
Get to Know Your Pizza Oven
1. Cooling fan
2. Pizza stone
3. Pizza peel
4. Lower heating element (Upper
heating element not shown)
5. Double-paned window
6. Cool-touch handle
7. Door
7
6
5
2
3
1
4
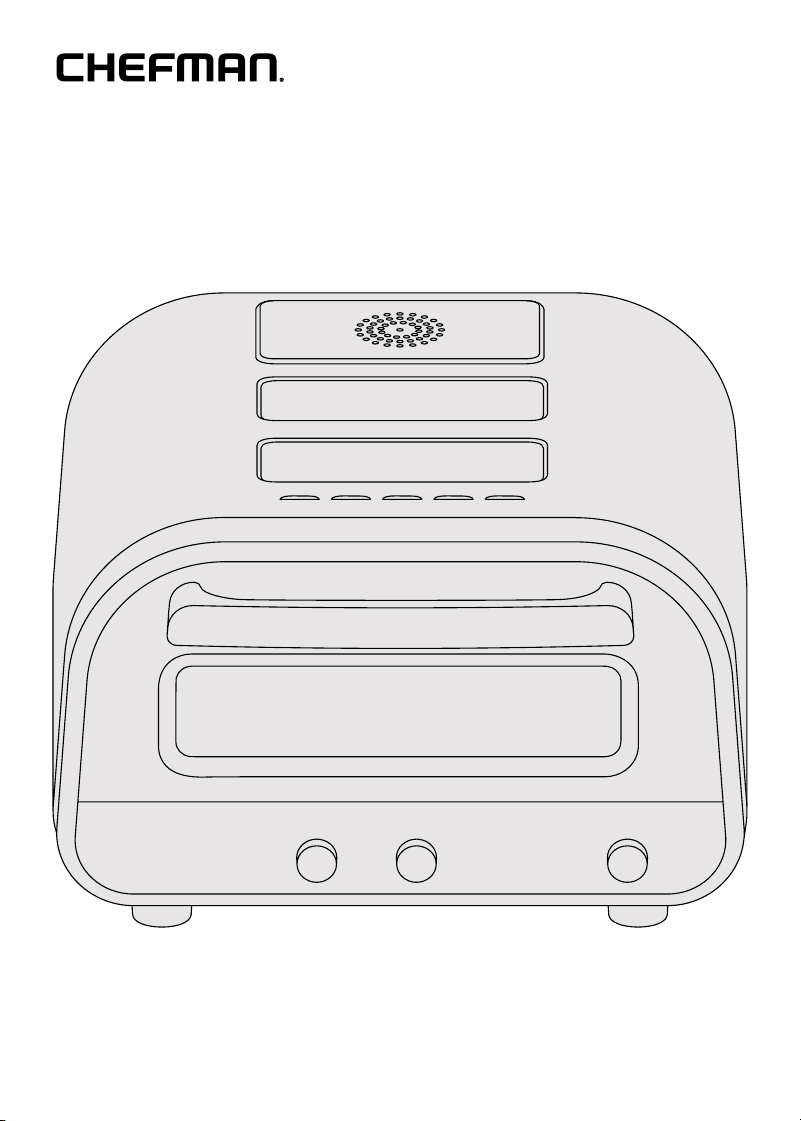
3
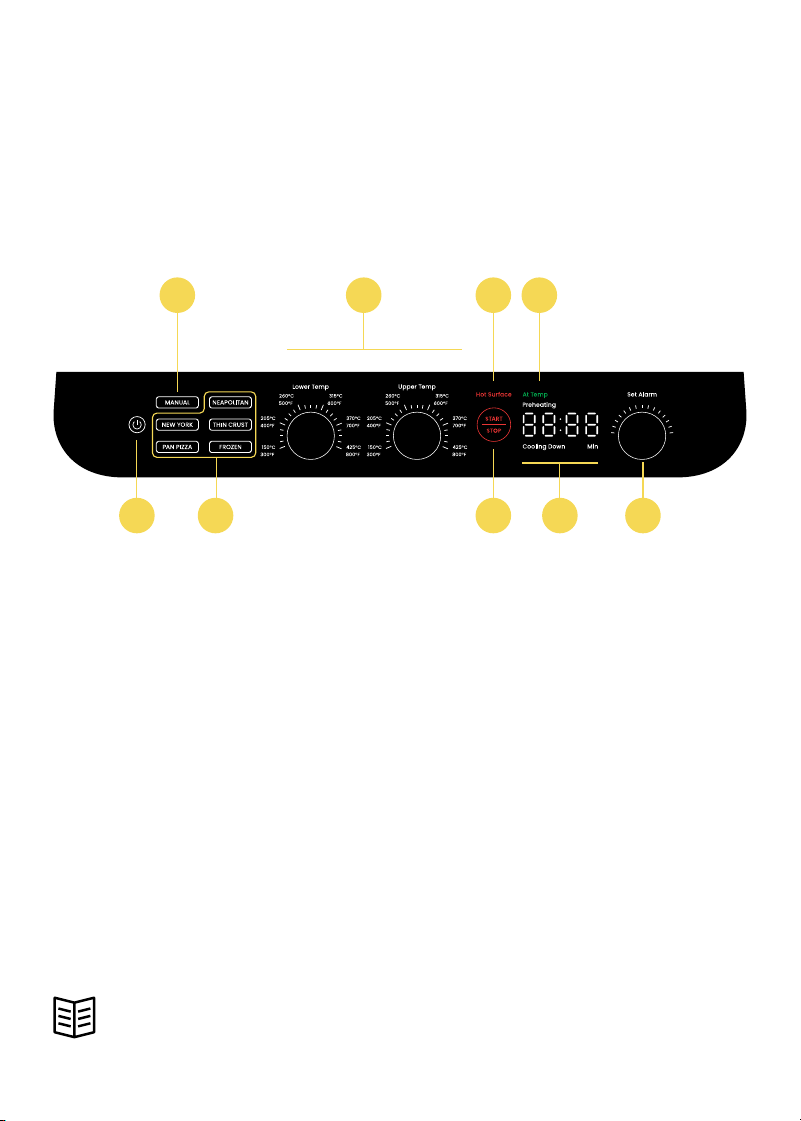
Control Panel
1. Power button
2. 5 pizza style preset buttons
3. Manual control button
4. Temperature adjustment knobs
1
5. Hot Surface indicator
6. Start-Stop button
7. At Temperature indicator
8. Preheat and alarm timer
9. Set Alarm knob
2
READ ALL INSTRUCTIONS BEFORE USE
For your safety and continued enjoyment of this product,
always read the instruction manual before using.
1
3
2
4
1
5
6 8 9
2
1 To toggle between displaying Fahrenheit or Celsius, press and hold either temperature
adjustment knob for 3 seconds.
2
To mute the oven’s beeps, press and hold the Set Alarm knob for 3 seconds. Press and
hold it again to turn the sounds back on.
7

4
Safety Instructions &
Important Safeguards
When using electrical appliances, basic safety precautions should always be
followed, including the following:
1. Read all Instructions.
2. Do NOT touch hot surfaces. Use handles or knobs.
3. To protect against electric shock do not immerse cord, plugs, or oven
body in water or other liquid.
4. Close supervision is necessary when any appliance is used by or
near children.
5. Unplug from outlet when not in use and before cleaning. Allow to cool before
putting on or taking off parts, and before cleaning the appliance.
6. Do NOT operate any appliance with a damaged cord or plug, or after the
appliance malfunctions, or has been damaged in any manner. Contact
Chefman® for examination, repair, or adjustment.
7. The use of accessory attachments not recommended by Chefman® may
cause injuries.
8. Do NOT use outdoors.
9. Do NOT let the cord hang over the edge of a table or counter, or touch hot
surfaces.
10. Do NOT place on or near a hot gas or electric burner, or in a heated oven.
11. Extreme caution must be used when moving an appliance containing hot
oil or other hot liquids.
12. To disconnect, turn any control to OFF, then remove the plug from the wall
outlet.
13. Do NOT use the appliance for other than its intended use.
14. Use extreme caution when removing the stone or disposing of hot grease.
15. Do NOT clean with metal scouring pads. Pieces can break off the pad and
touch electrical parts, creating a risk of electric shock.
16. Do NOT use parchment or baking paper in the oven.

5
Safety Instructions &
Important Safeguards
17. Do NOT use the oven without the included pizza stone.
18. Oven and pizza stone retain heat long after use. Do not attempt to handle
a hot stone. Do not attempt to move the oven until fully cooled.
19. To avoid burns, only use the included peel to insert and remove pizzas,
except pan pizzas, from the oven. When baking pan pizzas, use oven mitts
(not the peel) to handle the pan.
20. The oven exterior gets very hot. Do not place items on top or lean items
against the sides or door.
21. Excess flour and burnt food on the stone can ignite at high temperatures.
If this happens, keep the door closed and the flames will extinguish
themselves. If flames are not extinguished within 15 seconds, unplug
the unit.
22. When choosing a spot to use your oven, make sure there is room for
adequate ventilation on all sides.
23. If using bakeware in the oven, be sure it is rated for the temperature
you’re cooking at. Cast iron, anodized aluminum, and carbon steel are ideal.
Many nonstick pans are not. Do not use disposable aluminum pans.
Save these instructions
For household use only
WARNING: Improper use of the grounding plug can result in electric shock.
Grounding Instructions
This appliance must be grounded. In the event of an electrical short circuit,
grounding reduces the risk of electric shock by providing an escape wire for the
electric current. To protect against electrical shock, this appliance is equipped
with a cord having a 3-prong grounding-type plug for insertion into a proper
grounding-type electrical outlet.
Do NOT alter the plug for use in a 2-prong outlet. If the plug will not fit into an
outlet, have a proper outlet installed by a qualified electrician.

6
Safety Instructions &
Important Safeguards
Short Cord Instructions
A short power-supply cord is provided to reduce the hazards of entanglement
or tripping over a longer cord. Longer detachable power-supply cords or
extension cords are available and may be used if care is exercised in their
use. If a longer detachable power-supply extension cord is used:
1. The marked electrical rating of the extension cord should be at least as
great as the electrical rating of the appliance.
2. If the appliance is of the grounded type, the extension cord should be a
grounding-type 3-wire cord; and
3. The longer cord should be arranged so that it will not drape over the
countertop or tabletop where it can be pulled on by children or tripped over.
Power Cord Safety Tips
1. Never pull or yank on the cord or the appliance.
2. To insert the plug, grasp it firmly and guide it into the outlet.
3. To disconnect the appliance, grasp the plug and remove it from the outlet.
4. Never use the product if the power cord shows signs of abrasion or
excessive wear. Contact Chefman® Customer Support for additional
guidance and support.
5. Never wrap the cord tightly around the appliance, as this could place
undue stress on the cord where it enters the appliance and cause it to
fray and break.
DO NOT OPERATE THE APPLIANCE IF THE POWER CORD SHOWS ANY DAMAGE OR
IF THE APPLIANCE WORKS INTERMITTENTLY OR STOPS WORKING ENTIRELY.
California Proposition 65:
(Applicable for California Residents only)
WARNING: Cancer and Reproductive Harm
www.P65Warnings.ca.gov
Do not place the appliance on a
stovetop or any other heatable surface,
even if stovetop is not on.
Doing so is a fire hazard.

7
How to Use the Pizza Oven
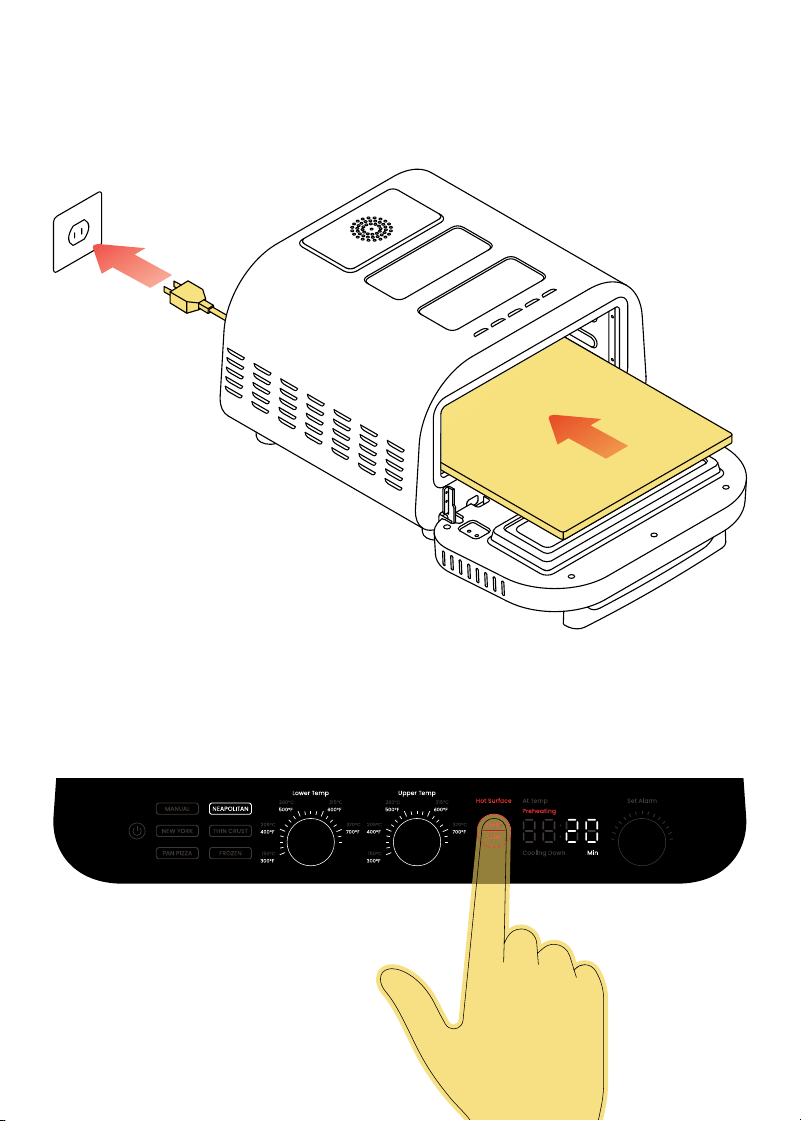
Before First Use:
1. Remove all packaging materials, such as plastic bags and foam inserts.
Check to ensure that all parts and accessories are accounted for.
2. Read and remove any stickers on the unit except for the rating label,
which should remain on the unit.
3. Assemble the peel: screw the handle into the cylindrical portion of the peel
until secure.
4. Wipe down the exterior of the oven and the stone with a damp cloth and
allow them to dry.
5. Place the stone in the oven and set to Manual, with both the Lower and
Upper Temps set to 800°F. Press the Start-Stop Button to begin preheating.
Once the oven is At Temp, set the Alarm Timer for 20 minutes to burn off
any manufacturing debris. NOTE: On first use, the unit may emit a slight odor;
this is normal and will dissipate with additional use.
6. After the Alarm Timer finishes counting down, press the Start-Stop button
to turn the oven heaters off. Do NOT unplug the oven while the Cooling Down
Light is still illuminated. (It takes a couple of hours for the oven to cool down
from 800°F; however, you can use it to make pizzas as soon as it’s cooled to
your desired temperature.)
8
Quick Start: How to Make a Pizza
1. Plug in the pizza oven. Ensure the pizza stone is inside the oven.
2. Turn the oven on by pressing the Power button. Press one of the five pizza
style presets. Alternatively, you can press the Manual control button and
set the upper and lower temperatures as you desire.
3. Press the Start-Stop button. The oven will begin preheating.
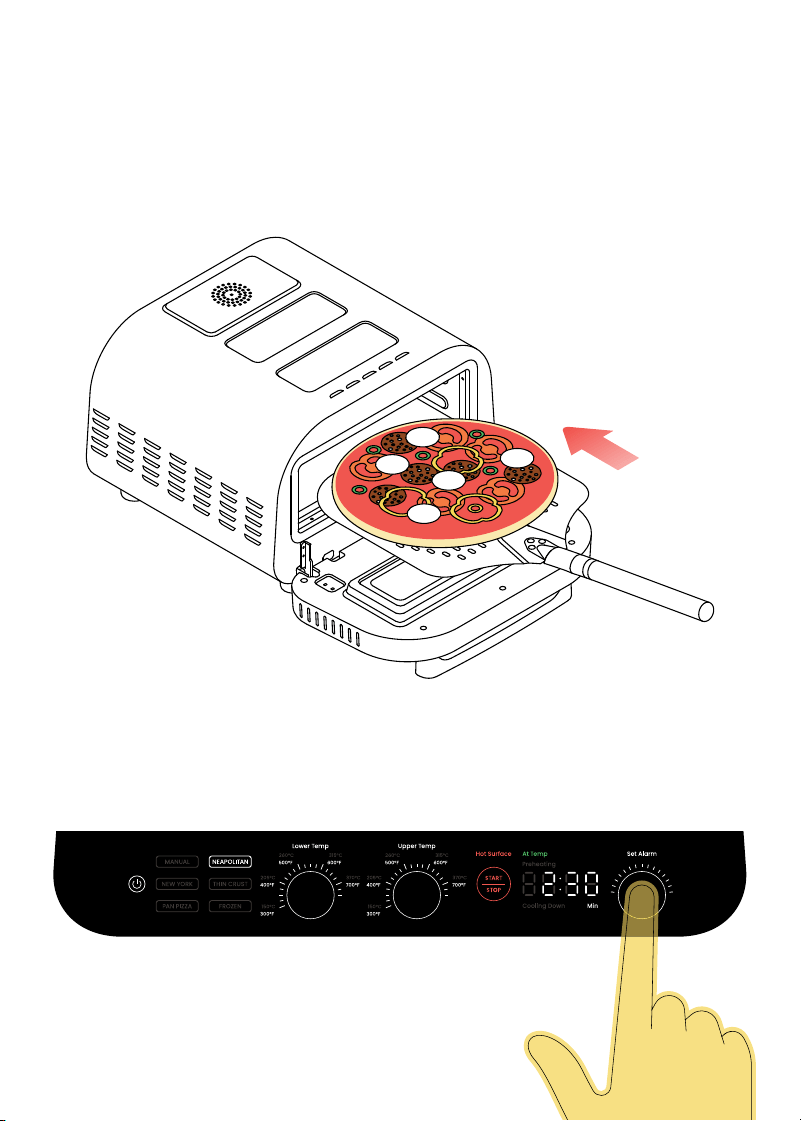
9
Quick Start: How to Make a Pizza
4. While the oven preheats, prep your toppings and flour the peel. Preheating
time depends on the selected temperature and the oven’s current
temperature, but ranges from 1 to 26 minutes.
5. When the At Temp indicator comes on, stretch your dough, place it on the
peel, and add sauce and toppings. Using the peel, insert the pizza into the
oven, slide the peel out, and close the door.
6. Turn the Set Alarm knob to set your desired time (see chart for estimated
times), then press the knob to start the timer. NOTE: After Set Alarm knob
is turned to any new time, the timer will autostart after a 5-second delay.
10
Quick Start: How to Make a Pizza
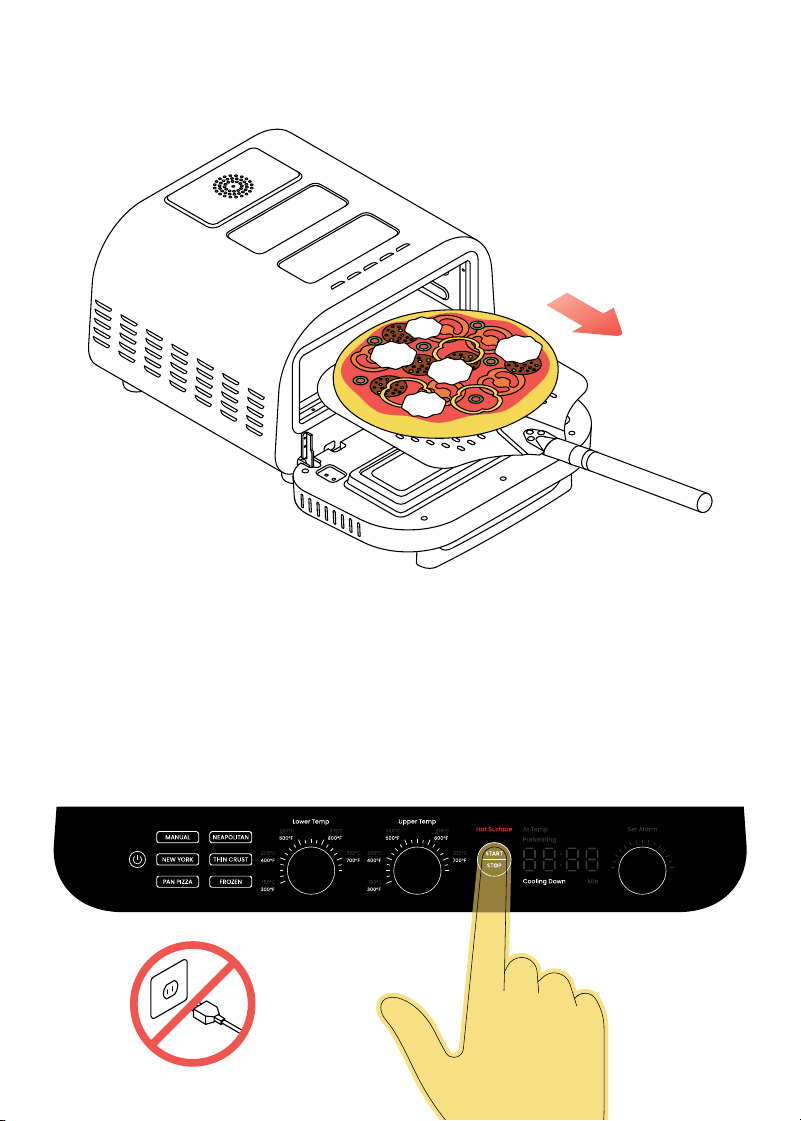
7. When the timer ends, the oven will beep three times. Open the door and
slide the peel under the pizza, then pull it out of the oven. Close the door.
NOTE: Heat does NOT turn off when timer ends.
8. If making more than one pizza, give the oven about 5 minutes to return to
temperature before baking the next one. (Assemble your next pizza while
the oven is heating back up.)
9. When you’ve finished baking, do NOT unplug the oven. Instead, press the
Start-Stop button to turn the oven off. During the cool-down cycle, fans run
to rapidly cool the oven and its electronics. Wait until the Cooling Down light
turns off before unplugging the oven. NOTE: The unit will automatically
enter a cool-down cycle after 60 minutes of inactivity.
11
Quick Start: How to Make a Pizza
12
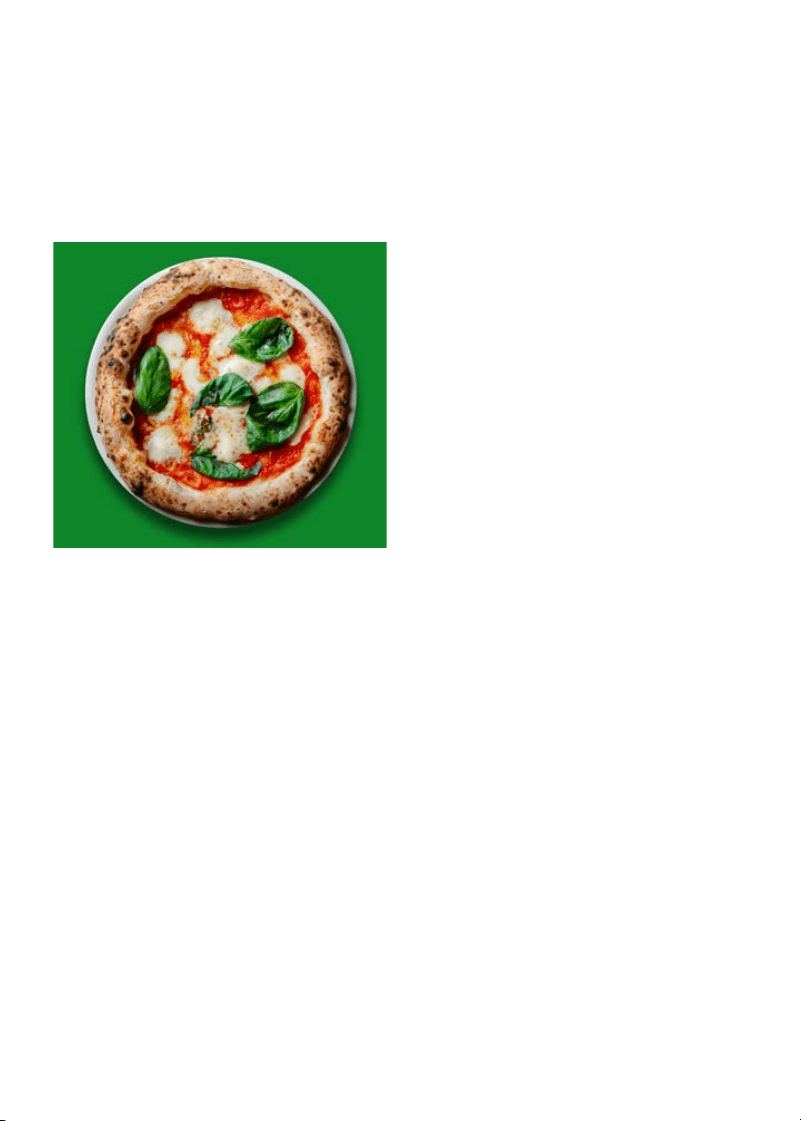
Neapolitan
Famous for its airy crust and charred
spots produced by the high heat of
a wood-fired oven. This preset sets
both the Lower Temp and Upper
Temp to a blistering 750°F. Stretch
out 8 oz. of dough to a 10- to 12-inch
round. Top with ¼ to 1/3 cup crushed
canned tomatoes and 3 to 4 oz fresh
mozzarella, torn into chunks. Bake
for 2 to 4 minutes (it cooks quickly at
that high temperature). After baking,
scatter with a handful of torn, fresh
basil.
New York
Traditionally enjoyed in large, foldable
slices, here this chewy-but-crisp,
tender-crusted pizza is scaled to
personal size. This preset puts the
Lower Temp to 650°F and the Upper
Temp to 600°F. Stretch out 8 oz of
dough to a 10- to 12-inch round, with a
thicker edge and thinner middle. Top
with 1/3 cup tomato sauce,
1 ¼ cups shredded mozzarella (for
those long, stretchy strands) and up
to 2 oz pepperoni. Bake for about
5 minutes. Savor with an attitude.
Thin Crust
A uniformly thin crust, with sauce and
toppings right up to the edge. A Lower
Temp of 700°F and Upper Temp of
500°F gives it a satisfying crunch.
Stretch and roll 5 oz of dough to a
10- to 12-inch round about 1/8- to
¼-inch thick. Top with ¼ cup sauce, ¾
cup shredded mozzarella, 2 to 3 oz
of your favorite toppings, and a little
grated Parmesan. Bake for about 7
minutes. This style is often cut into
rectangles instead of wedges.
Pizza Styles
The five pizza style presets let you quickly program the unit to chef-tested
parameters (upper temperature, lower temperature, and estimated cook time)
to produce the characteristics of that particular style.
13
Pizza Styles
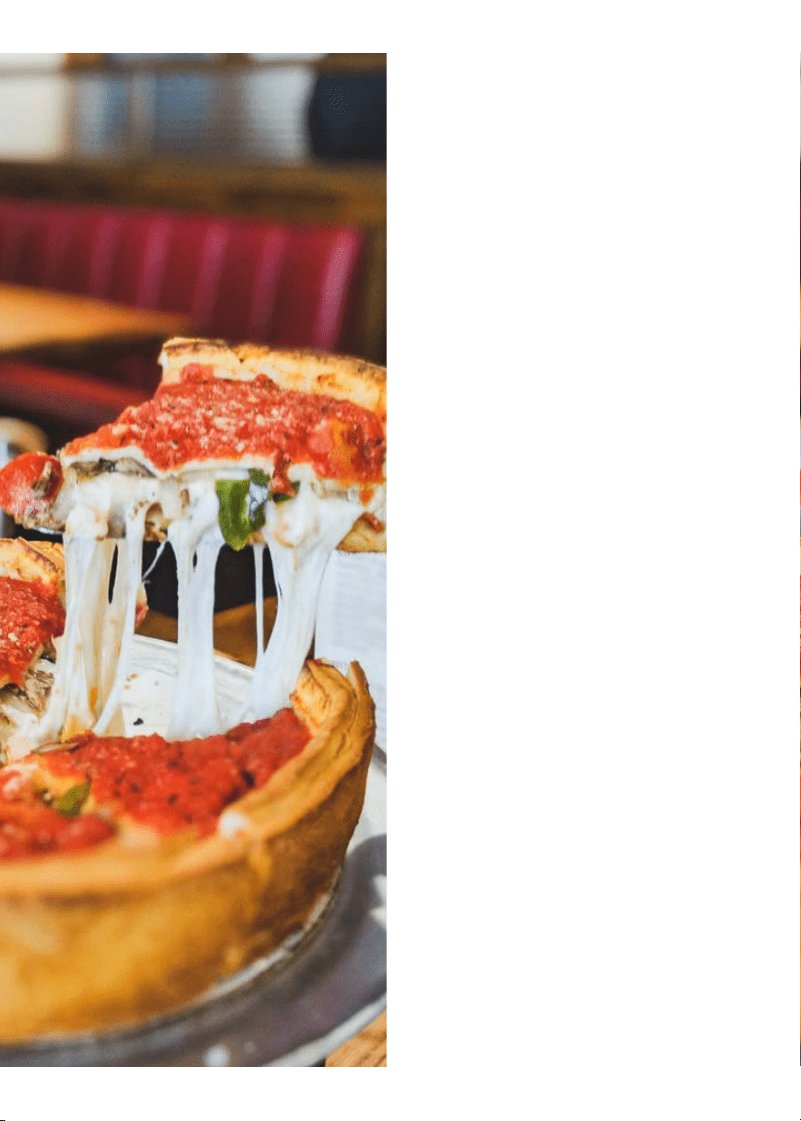
Pan Pizza (at left)
Aka Sicilian, Chicago or Grandma-
style pie: a thick, golden crust, crisp
on the bottom, and loaded with
toppings. The Lower Temp is set to
600°F and the Upper Temp to 475°F.
Stretch 8 to 16 oz dough to fit an oiled
9- to 12-inch round (or rectangular)
pan rated for high heat. Proof until
light and airy (1 to 2 hours). Top with
1/2 cup sauce and ¾ cup shredded
provolone-mozzarella blend (but
add more as needed depending on
the size of your pan), and about 6 oz
toppings. Bake for about 14 minutes.
Frozen
If you don’t have time for homemade,
the pizza oven’s hot stone helps bake
up frozen pies better than you’ve ever
had them! This preset sets the Lower
Temp to 475°F and the Upper Temp
to 450°F. Remove the cardboard base
and bake according to package
directions, but check for doneness 1 to
2 minutes early. To truly make it next-
level, finish with a drizzle of garlic oil or
extra-virgin olive oil and a scattering
of fresh herbs after baking.
DIY
Use the Manual setting to indepen-
dently set the Lower Temp and Upper
Temp. As for toppings, anything goes!
Keep in mind that some toppings,
such as sausage, mushrooms, and
broccoli, should be partly or fully
cooked before adding to pizza. Others,
such as baby spinach, arugula, herbs,
and prosciutto, are best added when
the pizza comes out of the oven.
Pan Pizza

14
Pizza Styles
Pizza Times & Temps at a Glance
In general, thicker-crust styles bake for longer at lower temperatures, while
thin-crust pies bake for a shorter time at higher temperatures. If setting
temperatures manually, keep in mind that the two temperatures cannot be
more than 200°F apart. The Temperature Adjustment Knobs can be adjusted
mid-cooking cycle. To toggle between displaying Fahrenheit and Celsius,
press and hold either temperature adjustment knob for 3 seconds. If making
multiple styles of pizza, start with the style that uses the lowest temperatures
and work your way up to higher temperature styles. Due to continued product
improvement, the times and temperatures listed here may vary slightly from
what is on the unit.
Pizza
Preset
Lower Element
Temperature
Upper Element
Temperature
Recommended
Time
Neapolitan 750°F 750°F 2 1/2 mins.
New York 650°F 600°F 5 mins.
Thin Crust 700°F 500°F 7 mins.
Pan Pizza 600°F 475°F 14 mins.
Frozen 475°F 450°F 16 mins.
Cookbook and Pizza Guide
Scan for a digital guide and cookbook, full of dough
techniques, baking tips, and delicious recipes created
just for your Home Slice™ Indoor Electric Pizza Oven.

16
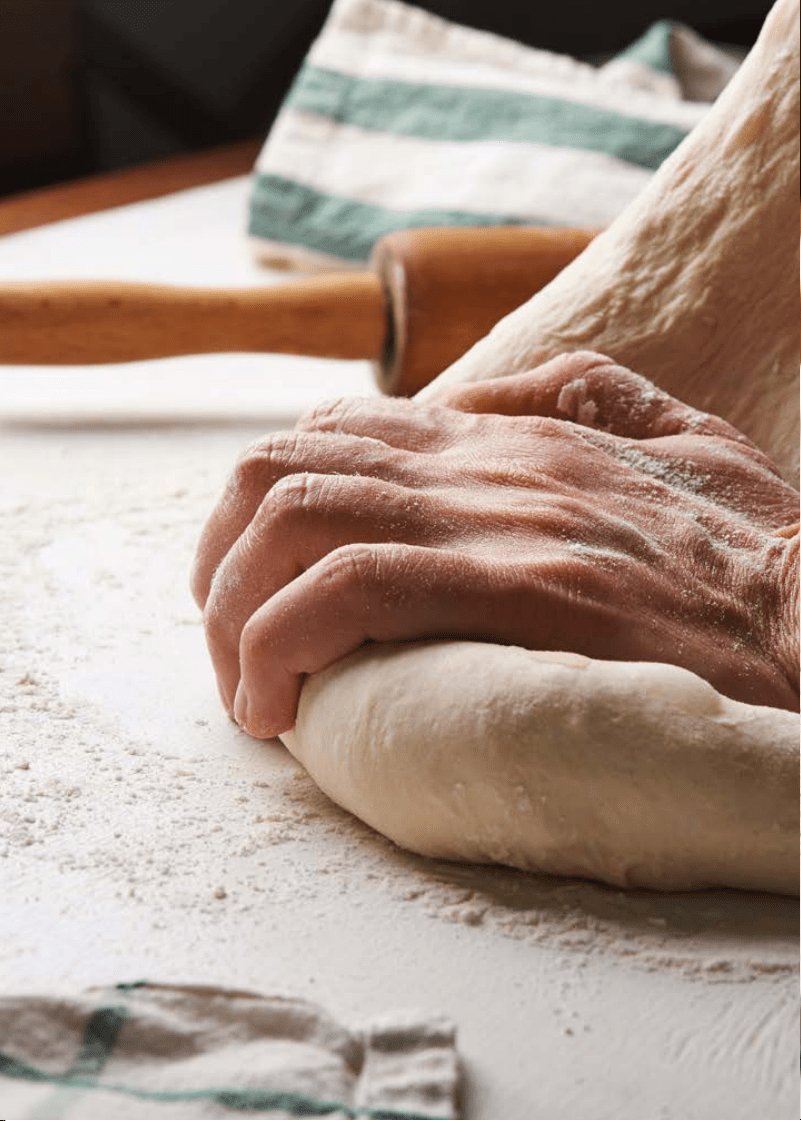
How to Stretch the Dough
Neapolitan, New York
1. Place a proofed dough ball (it should be airy and stretchable) on a lightly
floured work surface. Flour the top of the dough to prevent sticking when
stretching. If the dough resists stretching, allow it to rest longer.
2. Leaving a 1-inch border of airy dough around the rim of the ball for Neapolitan,
or a or ½-inch border for New York (this will become the outer crust), press the
dough ball with your fingertips, flattening out the center (the goal is to remove
the air in this section while maintaining the air in the crust).
3. Pick the dough up with two hands, holding it just inside the outer crust. Begin
rotating the dough circle while gently stretching for one or two rotations.
4. Transfer the dough to the back of your hands and gently stretch the dough
until a 10-12” round is formed. At this point the center should be an even
thickness. Make sure the dough is not sticky when handling, or it will also
stick to the peel.
5. Lay the dough on the floured peel. If needed, make small adjustments to
fix the circle, and top as desired.
Thin Crust
1. Place the proofed dough ball on a floured surface and dust the top of the
dough with flour to prevent sticking.
2. Gently flatten the dough with your hands.
3. Using a rolling pin, roll the dough to your desired size, rolling from the center
out in every direction to keep a circular shape.
4. Lay the dough on the floured peel. If needed, make small adjustments to fix
the circle, and top as desired.
Pan Pizza
1. Grease the bottom and sides of the pan.
2. Starting with un-proofed dough, place the dough ball in the center of the
pan. Cover with plastic wrap and let rise until airy, at least 1 hour for room-
temperature dough; refrigerated dough will take 2-3 hours.
3. Using your fingertips, gently press the dough so it fills the bottom of the
pan, Be careful not to press too much air out of the dough; the air keeps the
finished pizza crust fluffy. If you like, press some of the dough up the edges of
the pan to form a high crust.
4. Gently lift up the sides of the dough and ensure there are not large air
pockets on the bottom that may bake unevenly.
5. Top as desired and bake.

17
Pizza-Making Tips
Allow refrigerated dough to sit at room temperature for at least 1 to 2 hours
before stretching. For Neapolitan, New York, and pan pizza, it’s especially
important that the dough is fluffy, light, and no longer cold before stretching.
If using store-bought pizza dough, a typical 1-lb ball will yield 2 Neapolitan or
New York-style pizzas, 3 thin-crust pizzas, or 1 to 2 pan pizzas.
If possible, use all purpose or bread flour when shaping and stretching the
dough and semolina for dusting the peel. Semolina helps the pizza slide off
the peel, while all-purpose or bread flour reduces moisture and helps the crust
brown. If semolina isn’t available, regular flour will work for the peel.
If the dough resists stretching, let it rest on the counter for 10–15 minutes so the
gluten can relax, then stretch it the rest of the way.
When placing the dough on the peel, make sure there are no holes as this can
cause the pizza to stick to peel and tear in oven.
For pan pizzas, press the dough into an oiled 9- to 12-inch skillet that is rated for
high heat (cast iron or aluminum are perfect). Use mitts (not the peel) to insert in
the oven, and be sure the pan does not touch the upper heating element.
It’s easy to overestimate the amount of toppings to add. These are personal
pizzas and can’t hold as many toppings as a large restaurant pizza. Too much
sauce and topping will make it hard to get the pizza off the peel and make the
pie cook unevenly. Start with less and add more to the next pizza as needed.
Though you can prep toppings as the oven warms up, don’t stretch the dough or
build the pie until it’s fully heated. Once the oven is ready, transfer the stretched
dough to the peel, reshape it gently, and add the toppings, then quickly slide it
into the oven.
For even cooking, rotate your pizza partway through cooking times, using
the peel and tongs. The shorter cooking styles can even benefit from multiple
rotations but do not keep the oven door open too long or you’ll lose heat.
Think outside the pizza box. The oven is perfect for cooking pizza variants like
calzone or stromboli and other hearth-baked flatbreads like naan or pita, as
well as focaccia in a high-heatproof pan. Avoid foods that will spatter oil when
cooking, such as steaks or bacon, which can cause a fire hazard.

18
Keep It Clean
Cleaning your oven mainly means cleaning the stone, and since heat is the
best way to clean it, it’s a largely hands-off process.
1. After each pizza, gently brush the stone clean of flour and debris with a long-
handled, wire-bristled brush. A wood handle is less likely than plastic to melt
from the heat. Do not scrub the stone with the brush.
2. After the oven has run the full cool-down cycle, slide the stone out of the
oven and gently brush off any ash or burnt debris. If needed, flip the stone
over to brush off the underside.
3. Do NOT get the stone wet or immerse it in water, which could damage the
stone. The stone is NOT dishwasher safe.
4. Do NOT apply oil to the stone.
5. If necessary, brush or wipe any ash or debris out of the oven interior once the
oven is fully cooled. Alternatively, a vacuum with a nozzle attachment can
be used to remove ash from the oven. Do NOT use oven cleaning sprays or
metal scouring pads.
6. Wipe down the glass viewing window with paper towels to remove grease.
For more thorough cleaning, use soapy water to clean the window but make
sure the unit is completely dry before using it again.
7. It is important to remove as much food debris/stuck-on food from the
stone as possible to minimize smoking. If the stone has stuck-on food so
that the dough can no longer make good contact with it, flip the stone over
so the stuck-on food is on the underside, then return it to the oven and bake
the stone alone in the oven at 800°F, for 30 minutes. This allows the stuck-on
food to burn off the stone. After the baking cycle, allow the cool-down cycle
to run fully.
8. To clean the peel: Wash the metal portion in soapy water; rinse and dry well.
If needed, use a plastic scrubbing sponge to remove stubborn stuck-on food,
but do not use metal scouring pads. The peel is not dishwasher safe.
9. Store the stone in the oven in between uses, and only remove it to flip
it or during cleaning. The stone is fragile and sensitive to quick
temperature changes.
10. The stone and oven interior may become discolored with use over time, but
the discoloration will not affect performance. You can use either side of the
stone for baking.

19
Having Trouble?
Problem Likely Cause Solution
Uncooked pizza
sticks to peel
Not enough flour on
bottom; pizza sat too
long on peel; too much
topping weight
Be sure dough is well-floured on the bottom.
Build pizza right before it goes in the oven
and go light on the toppings; do not let the
topped pizza sit on the peel for more than
a minute or two, or it will start to stick. Use
quick, short movements to pull the peel back
after placing the pizza on the stone.
Oven smokes
excessively
during baking
Too much flour
on the stone
When building the pizza, use just enough
flour to keep your dough from sticking; brush
off excess flour from stone in between pizzas.
Raw base/top of
pizza too dark
Too much heat on top. This
can particularly happen to
pan pizzas or other thick
foods if they are very close
to the top heating element.
Reduce Upper Temp and/or increase Lower
Temp.
Undercooked
base
Stone isn’t hot enough
Be sure the At Temp Light is on before putting
pizza in oven. Stone needs at least 5 minutes
in between pizzas to come back up to
temperature. If the stone still isn’t hot enough,
increase the Lower Temp.
Pizza is burnt Temperature too high Cook for a longer time at a lower
temperature. Not all pizzas need the highest
heat. On Neapolitan pizza, which does use
very high heat, some char is desirable.
Food catches
on fire
Food is overcooked;
excess flour or baked-on
food on stone
If food ignites, do NOT open the door. The
flames will extinguish themself. Prevent fires
by staying near the oven and removing food
when done, and by brushing stone clean in
between uses.

20
Terms and Conditions
Limited Warranty
RJ Brands, LLC d/b/a Chefman® offers a limited 1-year Warranty (the “Warranty”)
available on sales through authorized distributors and retailers only. Please
note that this Warranty becomes valid from the date of initial retail purchase
and that the Warranty is non-transferable and applies only to the
original purchaser.
This Warranty is void without proof of purchase within the United States and
Canada. Please be aware that this Warranty supersedes all other warranties
and constitutes the entire agreement between the consumer and Chefman®.
Any changes to the Terms and Conditions of this Warranty must be in writing,
signed by a representative of Chefman®. No other party has the right or ability
to alter or change the Terms and Conditions of this Warranty.
We may ask you to please submit, via email, photos and/or video of the issue
you are experiencing. This is to help us better assess the matter and possibly
offer a quick fix. Photos and/or video may also be required to determine
Warranty eligibility.
We encourage you to register your product. Registering can make the Warranty
process easier and can keep you informed of any updates or recalls on your
product. To register, follow the directions on the Chefman® Warranty Registration
page in the Chefman® User Guide. Please retain your proof of purchase even
after registering. In the event that you do not have proof of your purchase date,
we may declare your Warranty void or we may, at our sole discretion, apply the
date of manufacture as the purchase date for purposes of this Warranty.

21
Terms and Conditions
What the Warranty Covers
• Manufacturer Defects - Chefman® products are warranted against defects
in material and workmanship, under normal household use, for a period of 1
year from the date of purchase when used in accordance with the directions
listed in the Chefman® User Guide. If your product does not work as it should,
please contact Customer Support at support@chefman.com so that we
may assist you.
This Warranty Does Not Cover
• Misuse
Damage that occurs from neglectful or improper use of products,
including, but not limited to, damage that occurs as a result of usage with
incompatible voltage, regardless of whether the product was used with a
converter or adapter. See Safety Instructions in the Chefman® User Guide for
information on proper use of product;
• Poor Maintenance
General lack of proper care. We encourage you to take care of your
Chefman® products so that you may continue to enjoy them. Please see
Cleaning and Maintenance directions in the Chefman® User Guide for
information on proper maintenance;
• Commercial Use
Damage that occurs from commercial use;
• Normal Wear and Tear
Damage or degradation expected to occur due to normal use over time;
• Altered Products
Damage that occurs from alterations or modifications by any entity other
than Chefman® such as the removal of the rating label affixed to the
product;
• Catastrophic Events - Damage that occurs from fire, floods, or natural
disasters; or
• Loss of Interest - Claims of loss of interest or enjoyment.

22
Terms and Conditions
For product information Please visit us at Chefman.com.
EXCEPT WHERE SUCH LIABILITY IS REQUIRED BY LAW, THIS WARRANTY DOES NOT
COVER, AND CHEFMAN® SHALL NOT BE LIABLE FOR, INCIDENTAL, INDIRECT, SPECIAL,
OR CONSEQUENTIAL DAMAGES, INCLUDING WITHOUT LIMITATION, DAMAGE TO, OR
LOSS OF USE OF THE PRODUCT, OR LOST SALES OR PROFITS OR DELAY OR FAILURE TO
PERFORM THIS WARRANTY OBLIGATION. THE REMEDIES PROVIDED HEREIN ARE THE
EXCLUSIVE REMEDIES UNDER THIS WARRANTY, WHETHER BASED ON CONTRACT, TORT
OR OTHERWISE.
23
How do I register my product?
All you need to do is fill out a simple Chefman® registration form.
You can easily access the form in one of the two ways listed below:
• Visit Chefman.com/register.
• Scan the QR code to the right to access site.
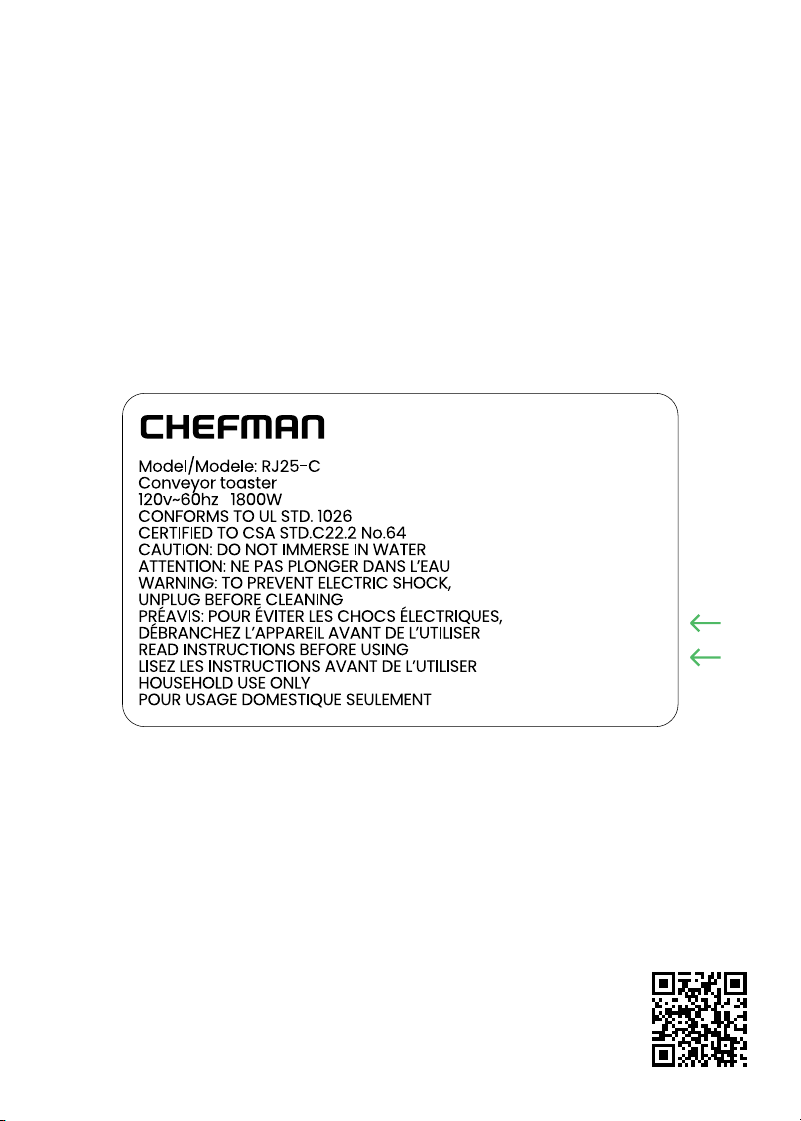
NOTE: Label depicted here is an example.
Date Code:
0000
Access Code:
Xxxxxxxx
Made in China/Fabrique en Chine
AC Only/ AC Seulement
Warranty Registration
What do I need to register my product?
• Contact Information
• Model Number
• Proof of Purchase (online confirmation, receipt, gift receipt)
• Date Code
• Access Code

Chefman® is a registered trademark of RJ Brands, LLC.
Home Slice™ is a trademark of RJ Brands, LLC.
Home Slice
TM
Indoor Electric Pizza Oven
RJ25PO12SSUG110623