
YY-BPM0088C-01(A/2)
User's Manual
YE650AR
Please read the user's manual closely before using!
Date of issue: 2024.08
Y
START|STOP
www.yuwell.com
JIANGSU YUYUE MEDICAL EQUIPMENT & SUPPLY CO.,LTD.
No.1 Baisheng Road Development Zone, Danyang, Jiangsu 212300 CHINA
Metrax GmbH
Rheinwaldstr. 22, 78628 Rottweil, GERMANY
EN
DE
IT
Electronic Blood Pressure Monitor
Elektronisches Blutdruckmessgerät
Misuratore elettronico della
pressione arteriosa

Contents
Before using
Product features.....................................................
Operation guide.......................................... .............
Product structure and parts.................................
Cautions.....................................................................
Important notes........ ...............................................
Battery charging ......................................................
and unit setting............... ...............
Measuring method
Using method of cuff.............................................
Measuring posture..................................................
Start measuring.......................................................
Blood pressure range indicator............................
Memory function.....................................................
Auxiliary measuring function................................
Static mode...................................................... .........
Common problems
Common questions of blood Pressure measurement......
Common fault and trouble shooting...................
Maintenance .... .................................................... ....
Features and technical parameters ............... ......
Electromagnetic compatibility information........
Time and date setting............................................
Voice volume
01
02
04
06
07
11
13
14
15
17
18
21
22
24
25
30
33
34
37
01
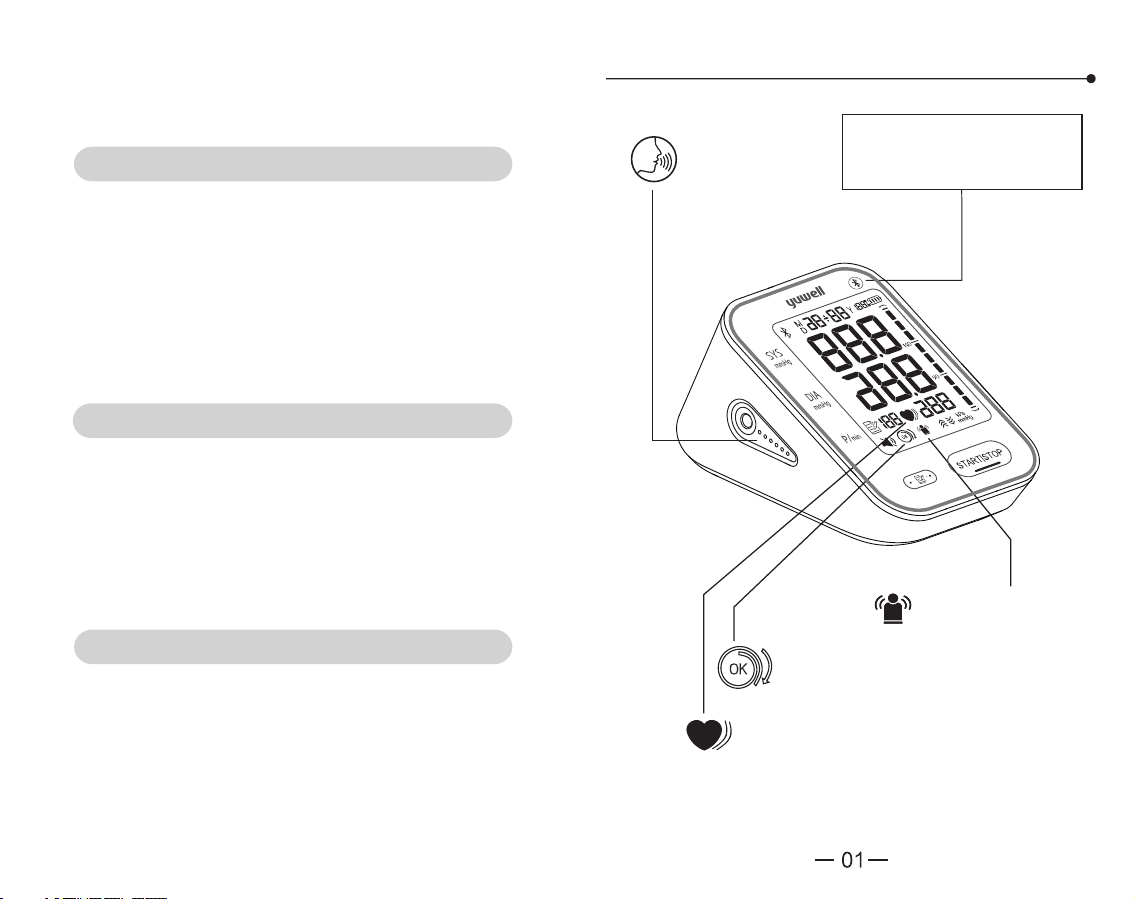
Product Features
27
Voice function
OK
Detection for cuff wearing
Indication for
movement error
Bluetooth icon is only
applicable to the model
with bluetooth function.
Indication for irregular heartbeats
Y
START|STOP
Alarm system...........................................................
32
Tips: The drawings printed in the User's Manual are only
for illustration. Please refer to the actual object for details.
EN EN
0302
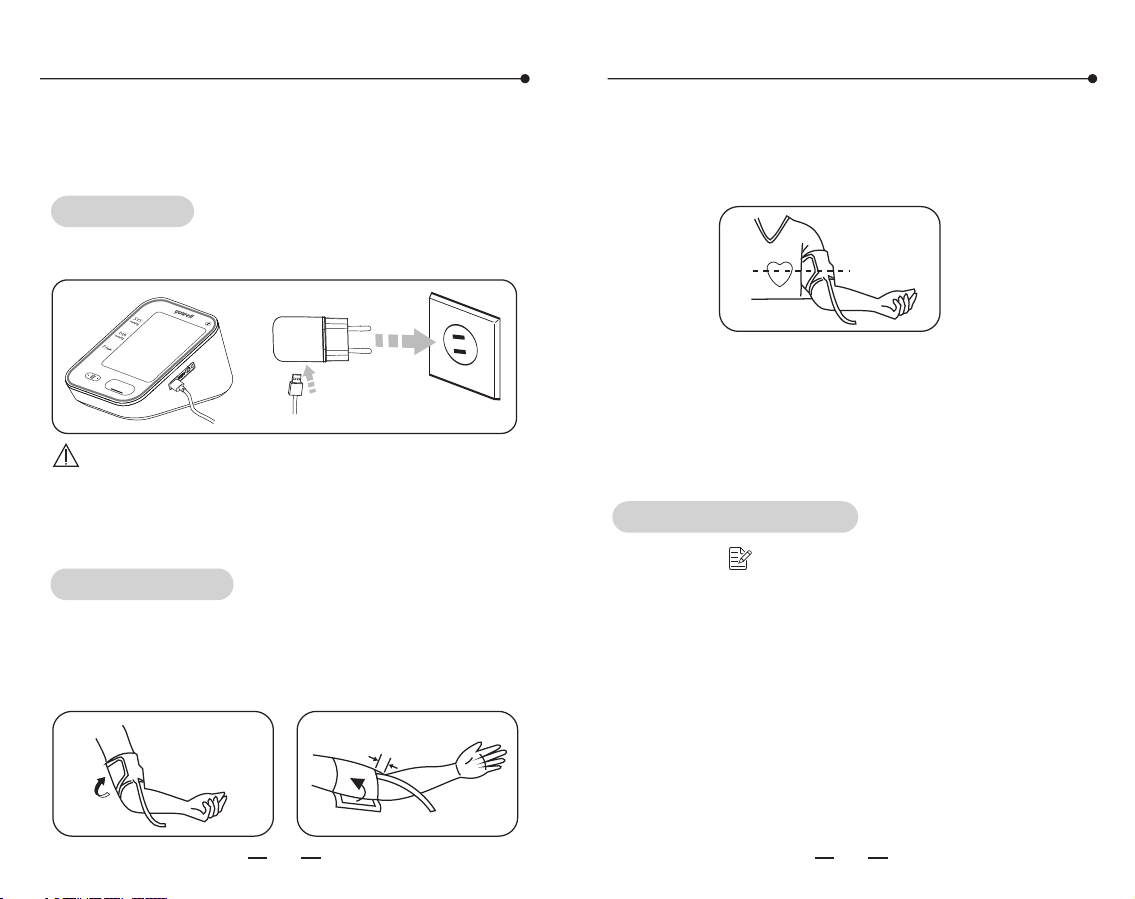
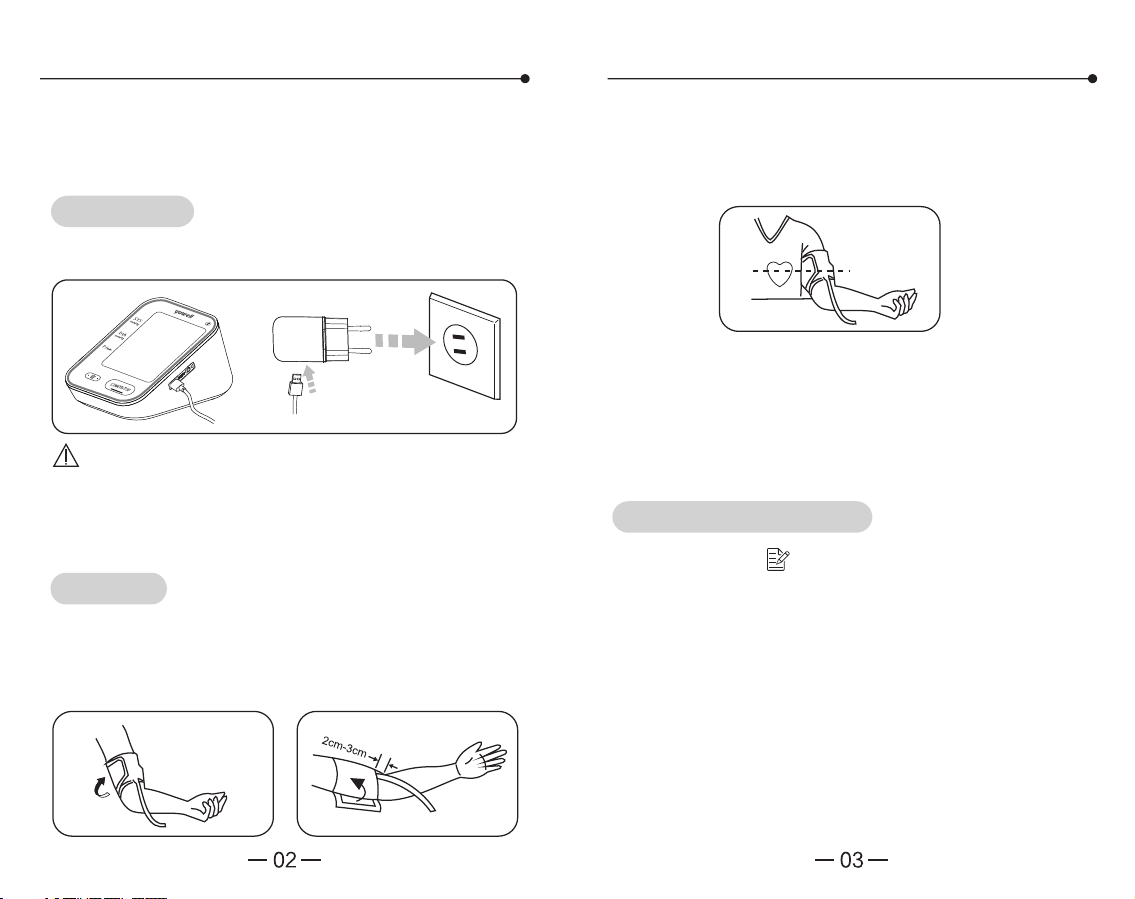
Connect the power source for charging
below.
as shown
Power-on
Operation guide Operation guide
2 Measuring posture.
3 Start measuring.
1. Using method of cuff
2 -3cmcm
Measurement
Check the records
Wearing the cuff and make the lower edge
2cm~3cm above the elbow, keep the air tube inside
of the arm. (Please turn to page 15 for details.)
Sit straightly, keep the center of cuff and heart at
the same level. (Please turn to page 17 for details.)
Sit still for 5 minutes and then press the
【 START|STOP】 button to measure. (Please
turn to page 18 for details.)
Press the【 】 button to check the measuring
records. This monitor can display the average
measurement and store 60 records. (Please turn
to page 22 for details.)
This device uses the oscillometric method of
blood pressure measurement.
Please follow the steps as shown below.
Except the power adapter supplied by the
manufacturer as spare parts, using any
unspecified accessories or power adapter may
cause increasing emission or decreasing immunity
of the instrument.
START|STOP
EN EN
05
04
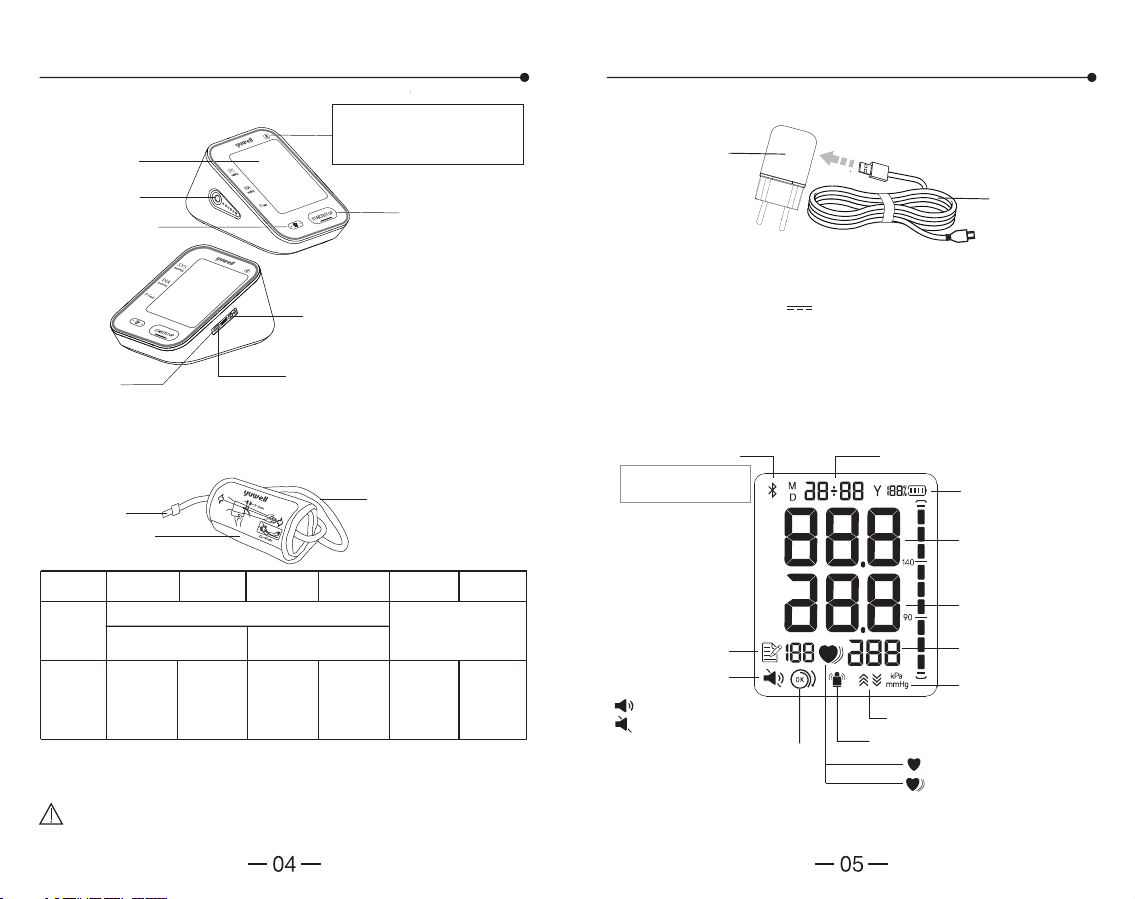
Product structure and parts
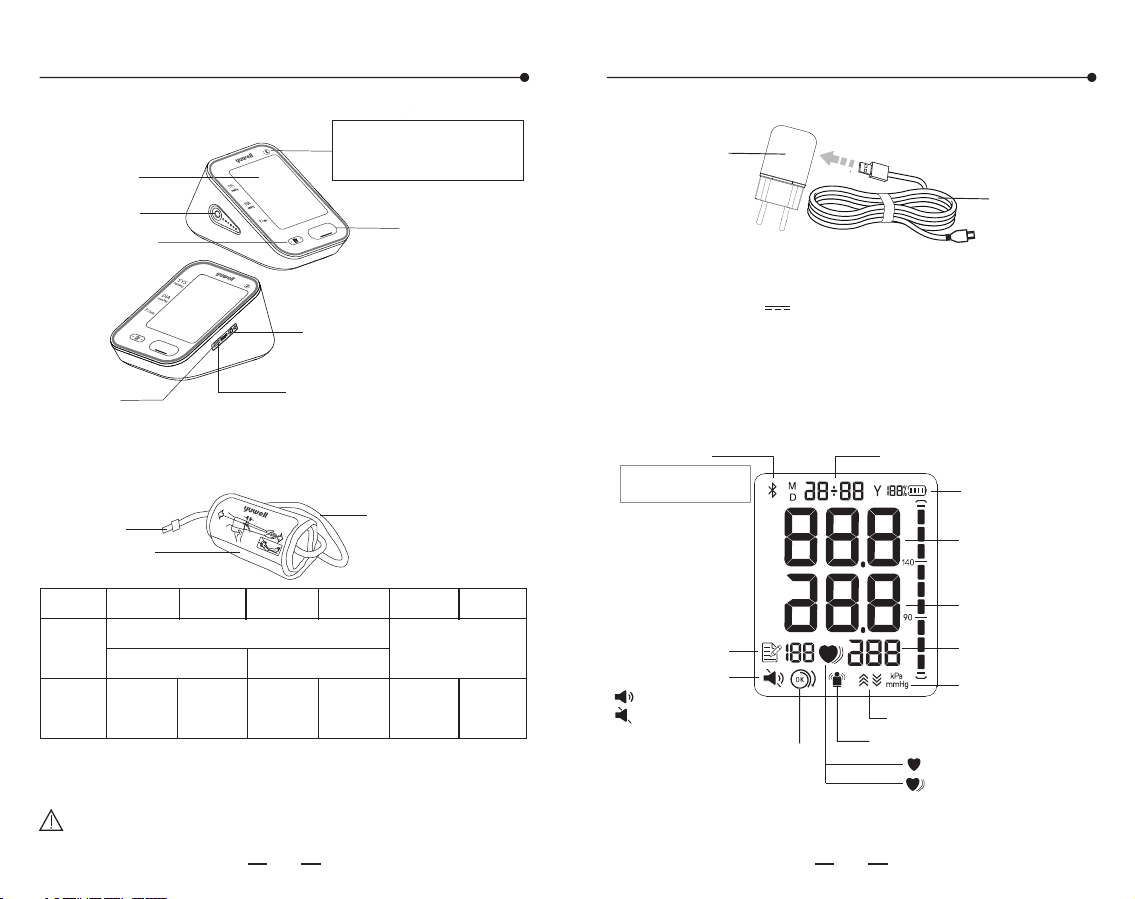
1. Main part
2. Cuff
There are 6 types of cuff provided by yuwell.
Please subject to the received type.
Battery power icon
Voice volume icon
SYS(systolic)
DIA(diastolic)
Time and date
kPa/mmHg unit
Pulse rate
Detection icon for cuff wearing
Indication icon for movement error
Records number
Indication icon for
irregular heartbeats
Inflation & Deflation icon
voice volume open
voice volume off
Bluetooth icon
Bluetooth icon is only
applicable to the model
with bluetooth function.
4. Display
5. Accessories
User's manual,Warranty card,
AC adapter(optional)
USB cable(optional)
Product structure and parts
Rubber air tube
Cuff
Air plug
22~45cm
2~3cm
3. AC adapter and USB cable
AC adapter
(optional)
USB cable
(optional)
AC adapter
INPUT: 100-240V~
50/60Hz 0.35A MAX
OUTPUT: 5V 1000mA
MFR: WEIHAI HITAI ELECTRONICS Co.,LTD.
EU Model: HT-C38B-0510EW
US Model: HT-C38B-0510WW
UK Model: HT-C38B-0510UW
Voice function - on/off key
reset hole
Bluetooth icon is only
applicable to the model
with bluetooth function.
Display
Memory button
Start/Stop button
Plug port
Power adapter socket
START|STOP
START|STOP
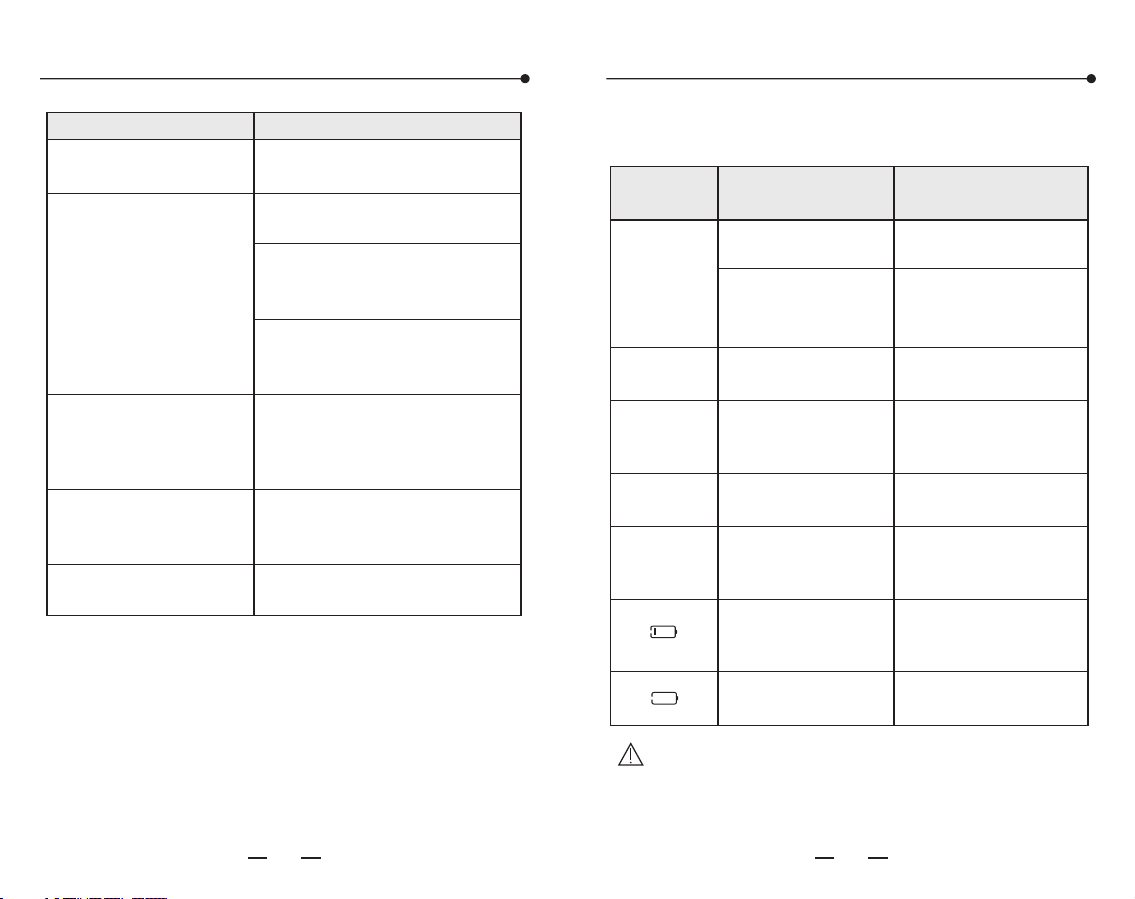
Please select a suitable size cuff according to the arm
circumference. Out of the given value can lead to
inaccurate results of measurements.
Warning: Please use cuff made by Yuwell, otherwise
the measurement results will be inaccurate.
Model
Charac-
eristict
The range
of arm
circumfe-
rence
YE-61MC YE-61LC
YE-62MC
YE-62LC YE-63MC YE-63LC
With hard support
Without hard support
Fabric: 210T polyester Fabric 250D polyester:
22cm
-
32cm
22cm
-
45cm
22cm
-
32cm
22cm
-
45cm
22cm
-
32cm
22cm
-
45cm
Heartbeat icon
EN EN
0706
Cautions
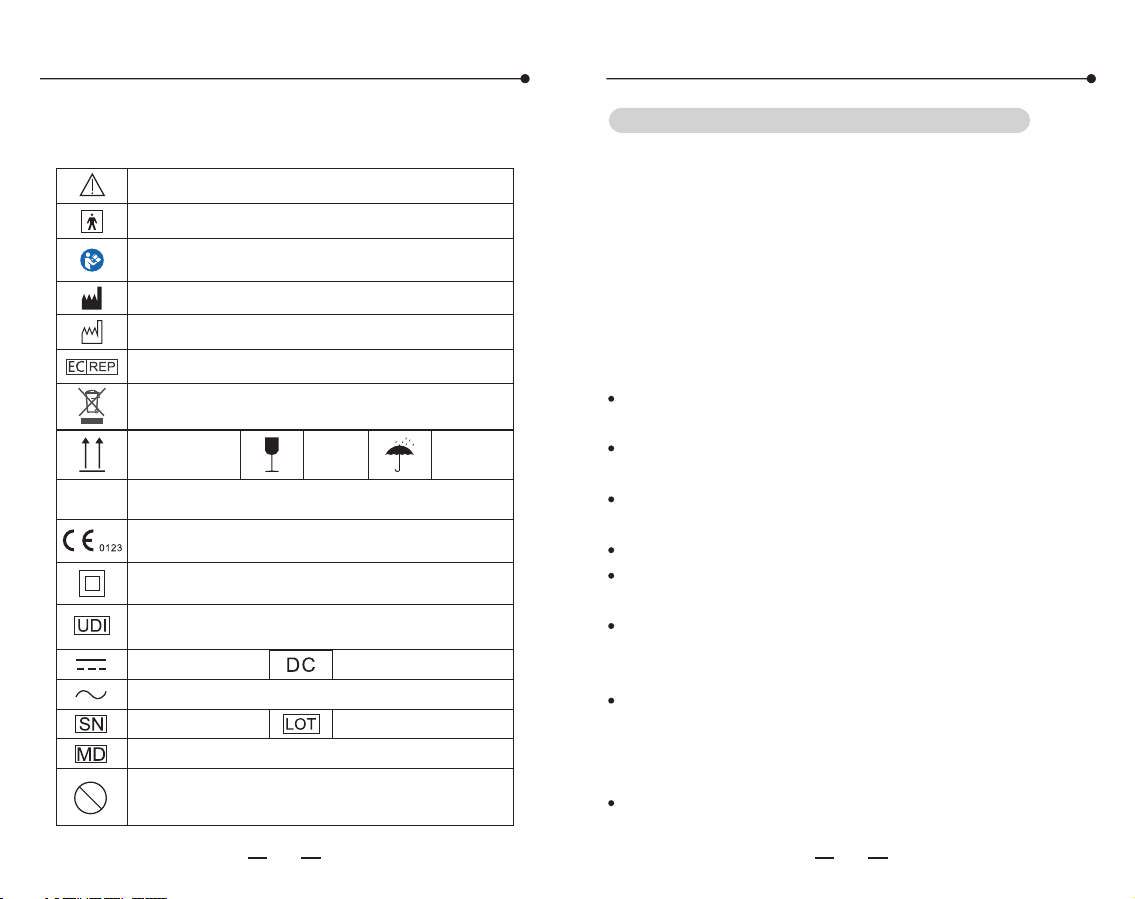
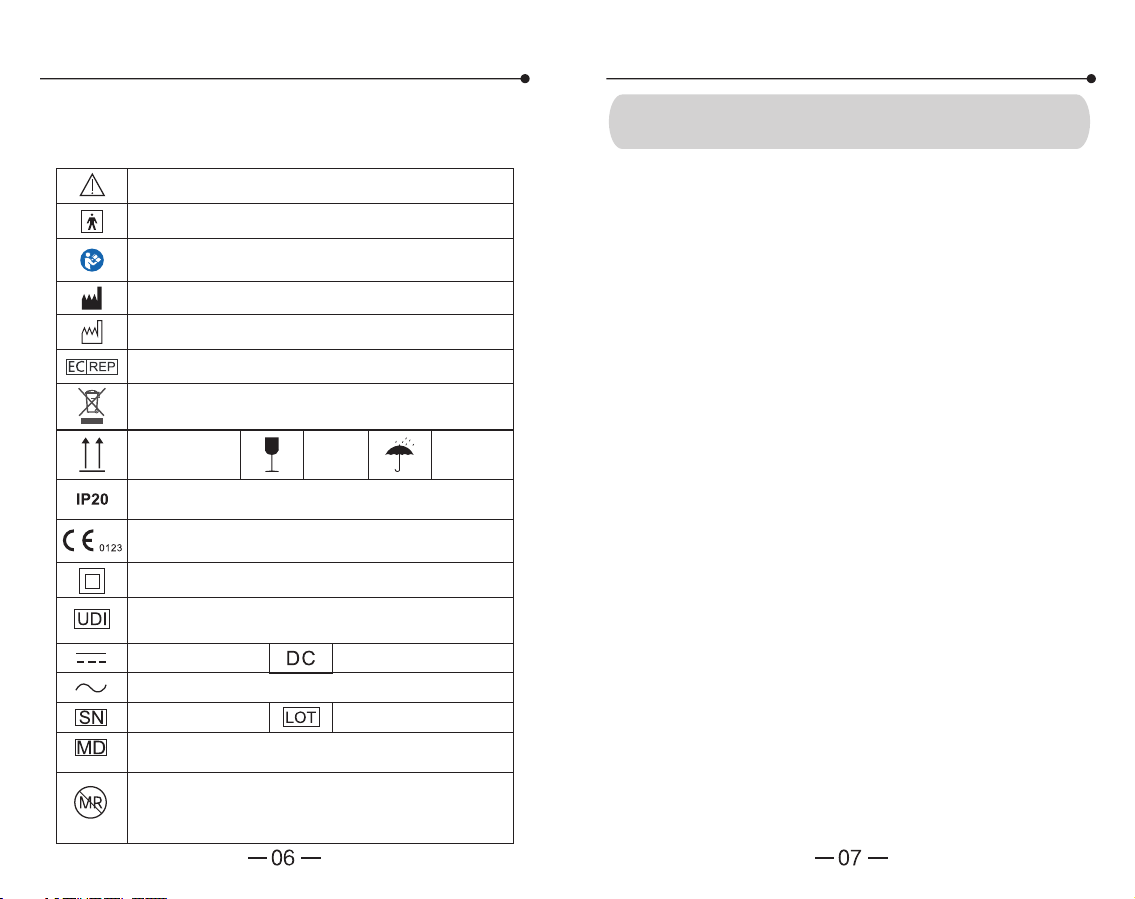
Pay attention with the symbols shown here to
prevent harm or damage to the user.
Important notes
1. Intended purpose
2. Attention items
This product is intended to measure the blood
pressure and pulse rate of adult who is more than
12 years old at household or medical center (not
suitable for neonate, pregnancy or pre-eclampsia).
Statement:The device is a medical device.
Sit still for 5 minutes before measuring to
quiet and stable mode.
Do not take the measurement within 1 hour of
eating, smoking, drinking wine or coffee (black tea).
Do not measure while standing, walking lying
down or having body pressed.
Do not take the measurement after sports or bath.
Do not speak, move, shake arm or bend fingers
while measuring.
Do not take the measurement at extreme
temperature condition or the varied severely
environment.
Do not take the measurement in a moving vehicle.
ensure
,
The incorrect measurements of the equipment
may be caused by external interference, such as
a c c e l e r a t i n g d u r i n g t r a n s p o r t a t i o n o r
transportation.
Pay attention to the following points when
measuring, otherwise it may cause damage or
incorrect results.
Caution
Type BF applied part
Follow instructions for use
(The icon color actually blue.) is
Manufacturer
Date of manufacture
EC-Representative
Recover waste electrical and electronic equipment
IP Classification
IP20
Class II Device
Direct current
Batch code
CE marking and notify body number
Serial Number
Indicates the item is a medical device
An item which poses unacceptable
patient, medical staff or other persons within the
MR(magnetic resonance) environment.
risks to the
MR
Keep Upright Fragile
Keep Dry
Indicates a carrier that contains unique device
identifier information
Alternating Current
Direct current
EN EN

Important notes
Important notes
08 09
Do not measure continuously. (At least 2~3
minutes or more should be spared between two
measurements.
Please start again if cannot measure.
For patient of arrhythmia, arterial sclerosis, poor
perfusion, diabetes, pergnancy, pre-eclampsia,
renal diseases, patient motion, trembling,
shivering, measuring results may not be accurate.
Do not keep the cuff in the aerated state for a
long time to avoid the injury to the patient.
The patient is an intended operator,this monitor is
used for adult who is more than 12 years old.
The AC adapter cable and rubber air tube
may cause accidental strangulation in infants.
Do not swallow small parts that may
cause choking hazard.
The device must not be used with high frequency
surgical equipments.
Warning: Do not use the CUFF over a wound arm
or being on an intravenous drip.
)
Warning:
Warning:
Warning: Do not use the device if the arm where
intravascular access or therapy, or an arterio-
venous (A-V) shunt is present because of
temporary interference with blood flow and could
result in injury to the patient.
Please pay attention to product storage to prevent
damage caused by pets, pests or children.
Operator can't touch the accessible part of
adapter/main unit and patient at the same time.
Warning: Do not use the cuff on the arm where the
side of a mastectomy or lymph node clearance.
Warning: Note that it will lose function
on the same limb
while cuff inflating.
Warning: Do not allow frequent measurements
the resulting restriction of the blood flow may
cause injury.
Avoid compression or bending of the cuff
connection tubing while using the device.
Otherwise the measurement results will be
inaccurate.
Warning: Do not tangle the connection tubing,
because the continuous cuff pressure can affect
blood flow interference, resulting harmful injury
to the patient.
According to the local laws and regulations to deal
with device and battery.
The patient operator could not touch the battery
and DC socket. Or the operator could not touch
the patient and the battery and DC socket at the
same time.
Please follow the battery requirement of
manufacturer.
Please report serious incident that has occurred in
relation to the device to the manufacturer and
the competent authority of the Member State.
of other
monitor devices simutaneously
Please disconnect the plug of adapter with mains
when you need to safely terminate operation of
ME EQUIPMENT.
Please turn off the device and unplug the adapter
before cleaning.
EN EN
Important notes
Battery charging
This product is powered by lithium battery.
make sure the battery is sufficient when using the
product.
Please
Power-on
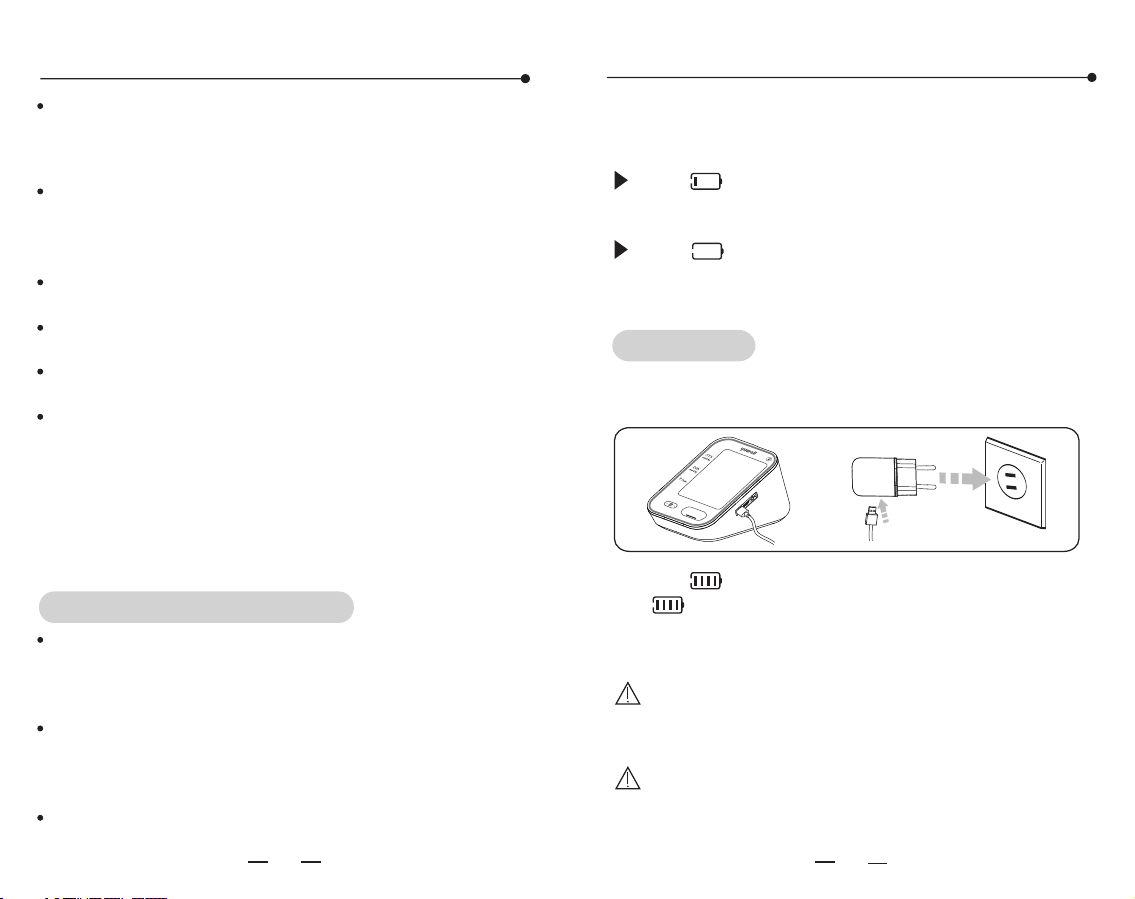
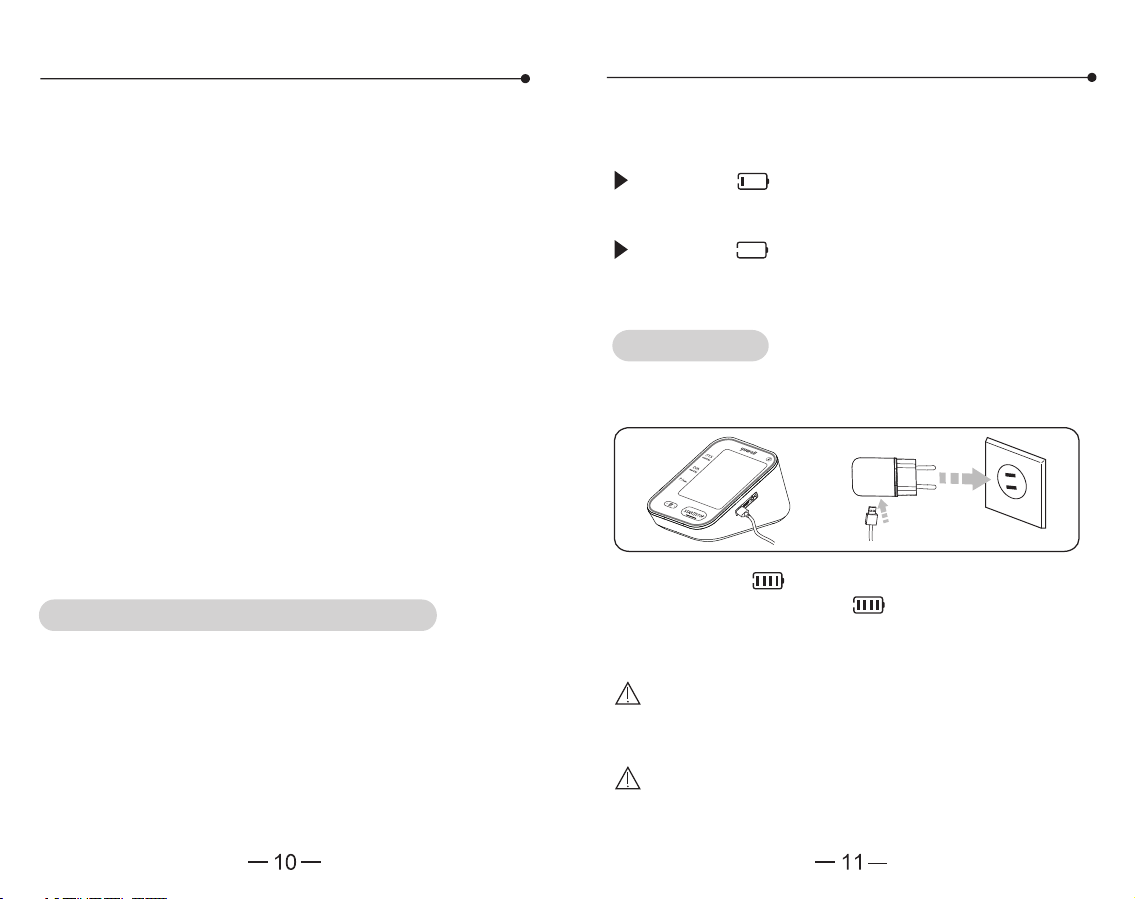
1. Connect the power source for charging as shown
below.
The showing 25% or
less mean the battery is low and needs to be
charged.
The " " icon appearing and showing 5% or
less mean the battery is running out. Please
charge before using.
" " icon appearing and
Note:
2. The
" " icon stops flashing when the battery is
fully charged.
3. Please unplug the power adapter after charging.
" " icon flashs during charging, and the
Note:
10 11
Do not measure blood pressure when
charging, so as not to cause abnormal
measurement.
Please charge the device in a position
where it is easy to disconnect from
supply mains.
When it is dirty in single patient daily use, clean the
monitor with soft dry cloth. If it is necessary, please
use wiped soft cloth with water before cleaning by
soft cloth. Then clean the device with 75% alcohol.
Please using soft dry cloth stained with 75% alcohol
to clean the device in the case of many people use
it, but do not let the alcohol flow into the monitor
and arm cuff.
Do not let the alcohol flow into the monitor and arm
cuff.
Do not interconnect this equipment to other
equipment not described in the instructions for use.
Note: Do not diagnose with the measurement,
please follow doctor's instruction.
Note: Software version can be viewed in engineering
mode by designated person. This mode is not
accessible for regular users, and please contact the
manufacturer for method to enter into the mode.
Statement: If the monitor has not been used and
stored in the required temperature, altitude and
humidity range, it may not conformance to
specification.
START|STOP
About bluetooth transmission
To ensure that the measurement results can be
transmitted through Bluetooth, please keep the
distance between the device and the mobile phone
no more than 10 meters.
If you want your blood pressure measurements to
be sent to your phone via Bluetooth, get a phone
that supports Android 5.0 and above or IOS 9.0 and
above to download Yuwell HealthCare+.
Note: This section applies only to the model with
bluetooth function.
EN EN
12 13
Time and date setting
Do not place equipment with lithium batteries
near the fire source.
Do not remove and replace the battery or squeeze
the battery with hard objects.
Please charge the device in time when the battery
is low.
In order to extend the service life of lithium
battery, it is recommended to maintain more than
half of the power.
When the equipment is not used for a long time
(more than 6 months), it is easy to cause the
passivation of the electrode material and lead to
the decline of the battery performance. It is
recommended to make it frequently.
Please dispose of waste batteries in accordance
with local environmental protection regulations.
Warning: Do not replace the battery without
authorization. Replacement of the battery by
untrained personnel may result in overtemperature,
fire, or explosion.
Battery charging
Tips!
Please use only the authorized Yuwell AC Adapter
(output DC 5V 1A) to charge, and you can contact
the local dealer for consultation about the relevant
information.
Time and date setting
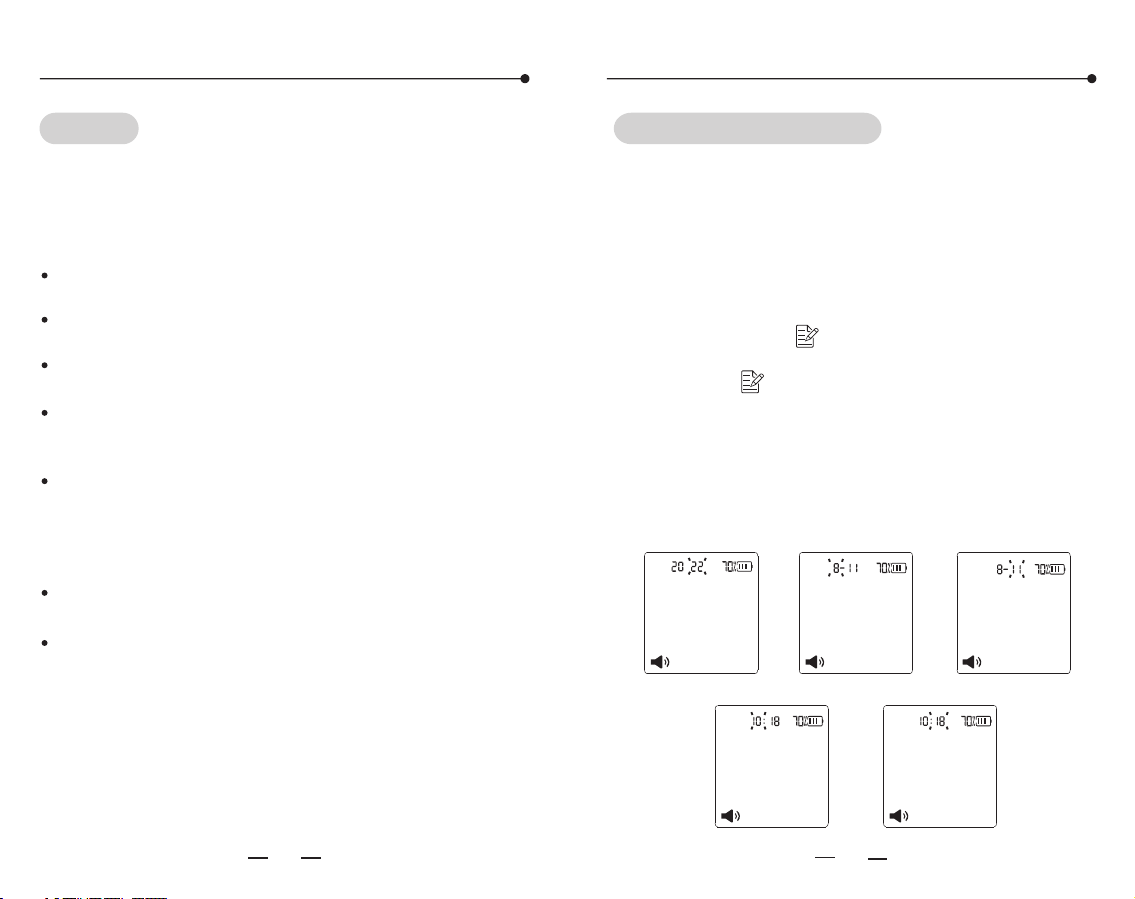
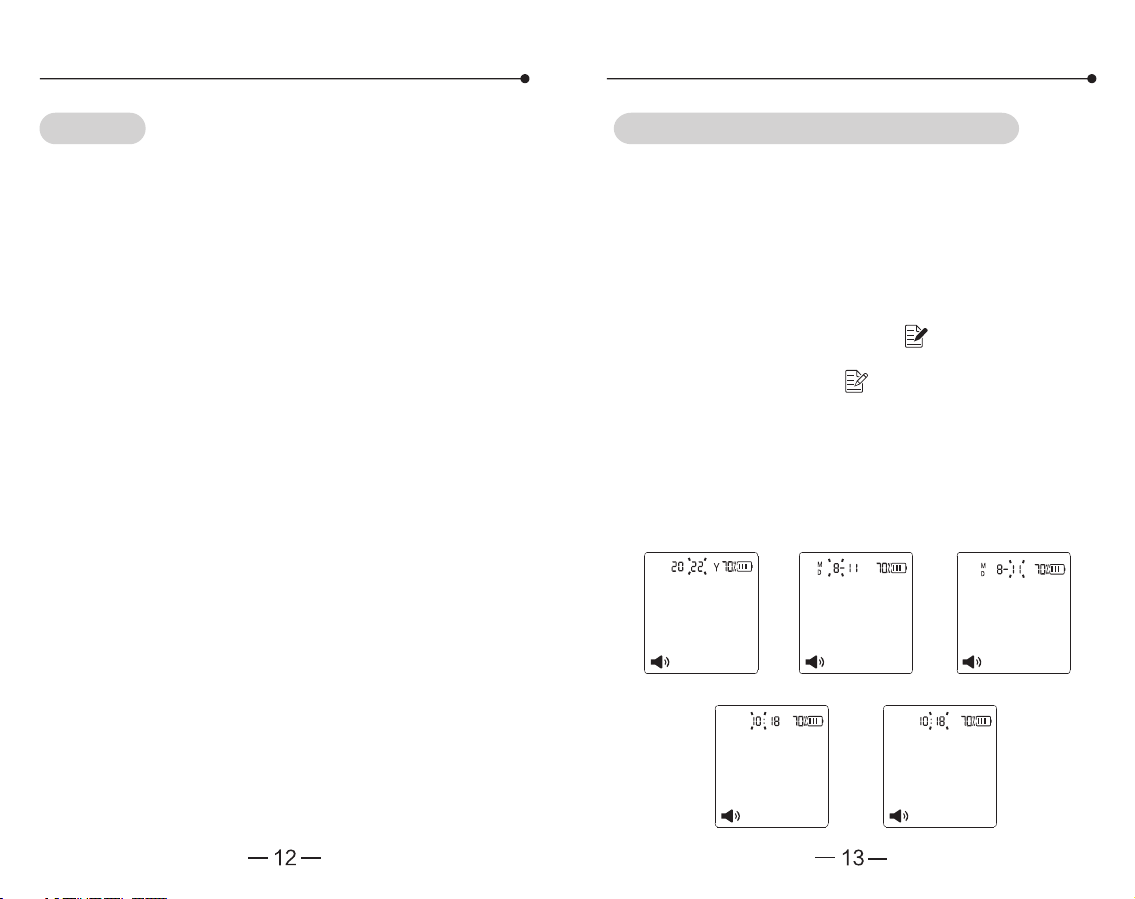
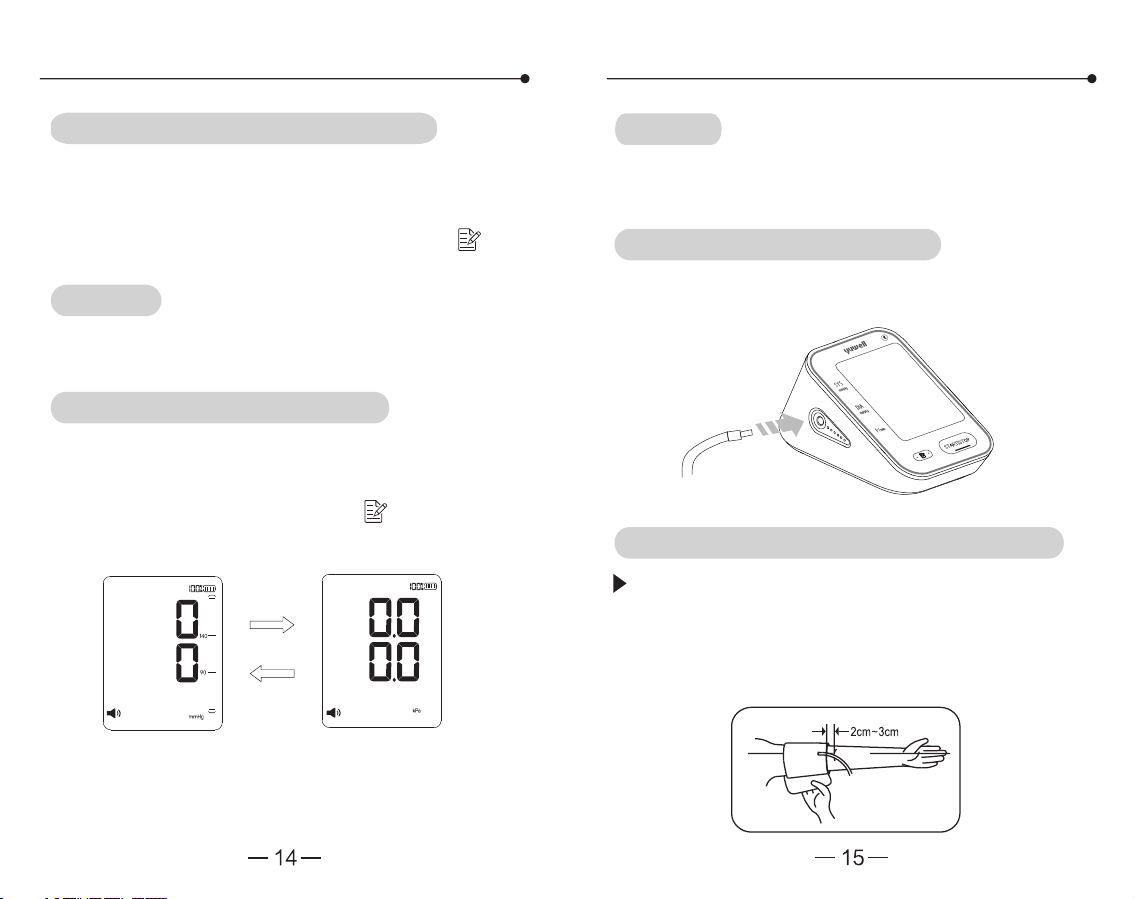
The monitor will store the measuring results
automatically by the management system. It is
necessary to reset time and date after charging
and starting up again. Please operate as following
steps. (For example: setting the date as 2022-08-
11 and time as 10:18)
1. In standby mode,
button and the【 】button for more than 3
seconds till the year's number starts flashing.
2. Press the【 】button to advance by increments
of one year.
3. After setting the year, press the【START|STOP】
button to switch to the month setting, indicating
that the month's number starts flashing.
4. Using the same way to set the month, day,
hour, and minute in turn.
press the【START|STOP】
Year character blink
Month character blink
Date character
Hour character blink
Minute character blink
Y
M
D
M
D
EN EN
14
15
Using method of cuff
Tips!
Either of the upper-arms can be measured. Do not
measure other parts of the body.
Cuff connecting
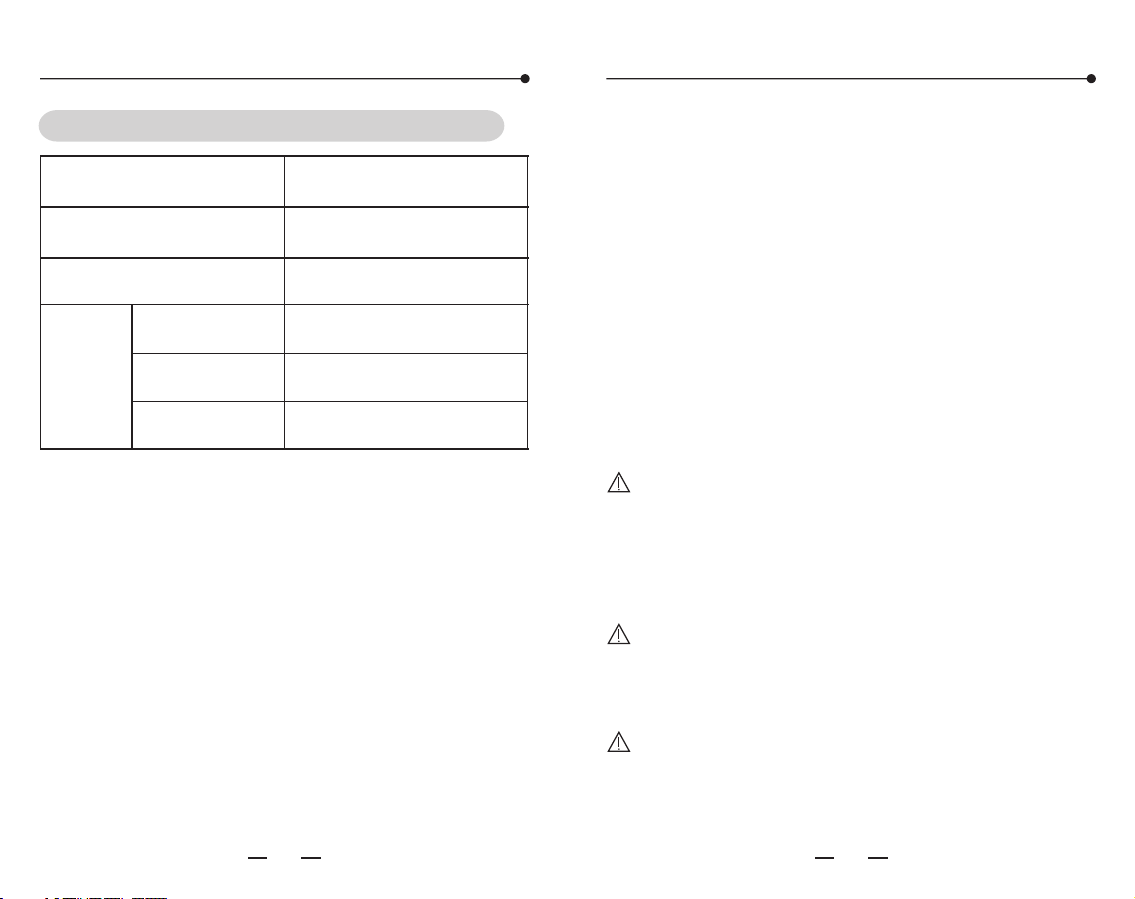
Voice volume and unit setting
Voice volume setting
After finishing the time and date setting, press
the【 START|STOP】 button to enter the voice
volume setting. The size of the sound ranges
from 01 to 04. Press the【 】 to choose the
sound which you need.
Tips!
When the voice function key is in a state of shut,
there is without voice broadcast function.
Unit setting
After finishing the voice volume setting, press
the【 START|STOP】 button to enter the unit
setting. Press the【 】 button to choose unit
between mmHg and kPa. Press【 】
to finish setting.
START|STOP
button unit
After finishing unit setting, press the【START|STOP】
button to shut down.
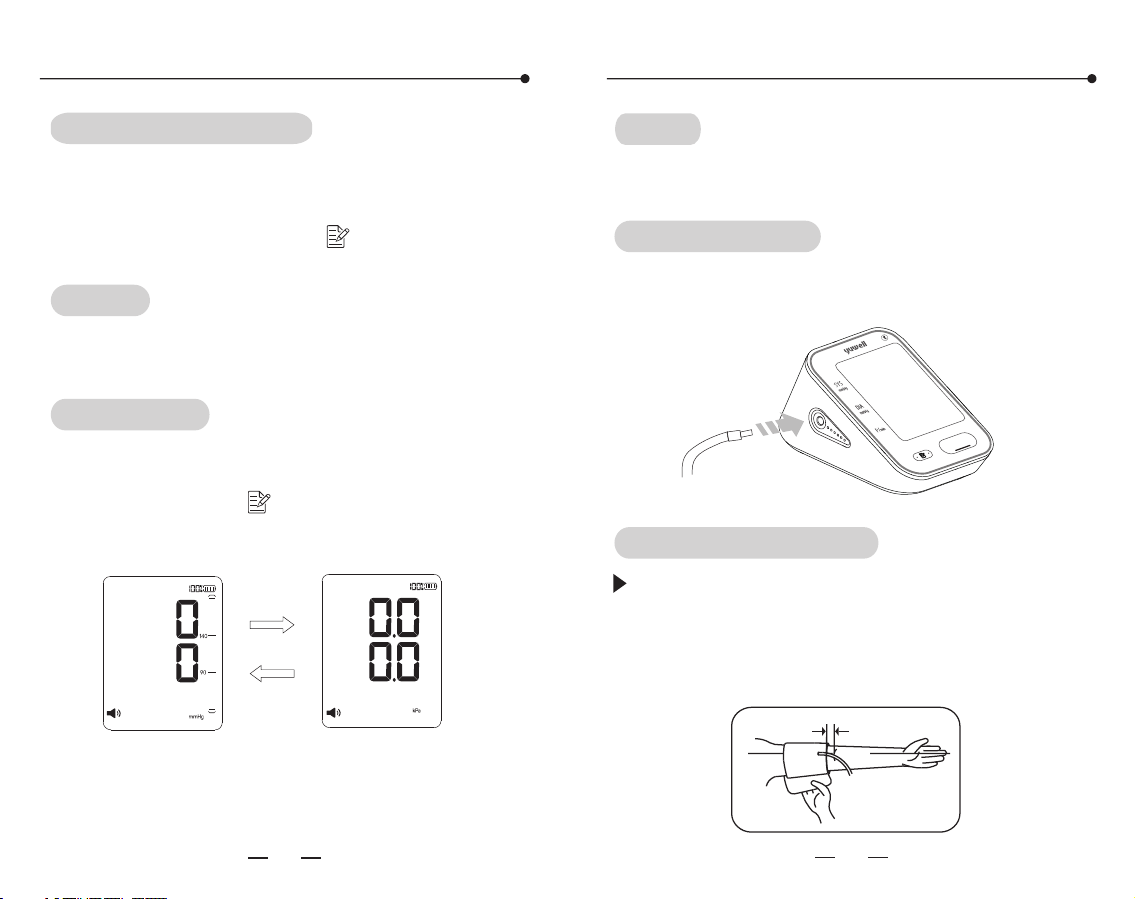
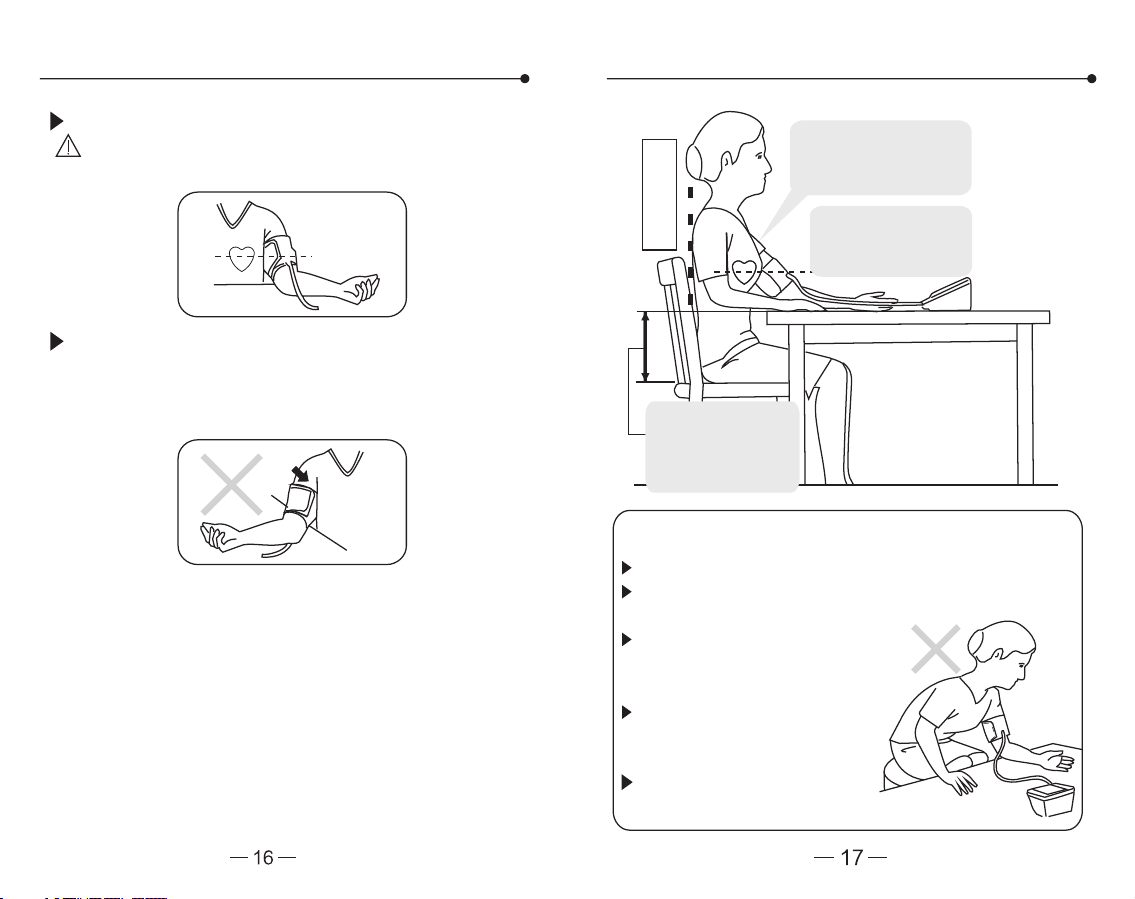
Connect the air connector of the cuff to the
socket which on the left side of the monitor.
Using method of cuff
Wind the cuff around the upper arm (as shown
in the picture). Keep the lower edge of the
cuff at the position above 2cm-3cm to the
elbow joint and keep the air inlet which
insert to the cuff at the inner side of arm.
2 ~3cmcm
START|STOP
EN EN

16
17
Using method of cuff
Measuring posture
Sit straight
Keep
bareness or wearing
thin clothes
the upper arm
Keep the center
of cuff and heart
at the same level
Wrong measurement postures
Do not bend down or body
bend forward.
Do not sit with legs crossed,
feet should flat on the floor.
Do not sit on a sofa. (Belly
pressure may increase the
blood pressure.)
Do not put the arm on the
low table. (May increase the
blood pressure.)
Do not lie down.
The ideally height
difference between
table and chair is
25 -30cmcm
Stick the cuff tightly.
Note: The cuff should be wearing comfortably,
avoiding too tight or loose.
Sit straight and flat the arm on table with palm
up, also keep the center of cuff and heart at the
same level. Also please ensure the air tube not
twisted.
Statement: Small-bore connector used in the
deivce complies with ISO 80369-1.
Warning: As this medical device uses an alternative
small-bore connector design different from those
specified in the ISO 80369 series,
there is a
possibility that a misconnection can occur between
this medical device and a medical device using a
different alternative small-bore connector, which
can result in a hazardous situation causing harm to
the patient. Special measures need be taken by the
user to mitigate these reasonable foreseeable risks.
EN EN
1918
Start measuring
Sit still for 5 minutes before the measurement
Start measuring
Don't eat, smoke, drink, take bath or do any high-
intensity sport within an hour before measuring.
Measurements shall be taken at the same time
every day.
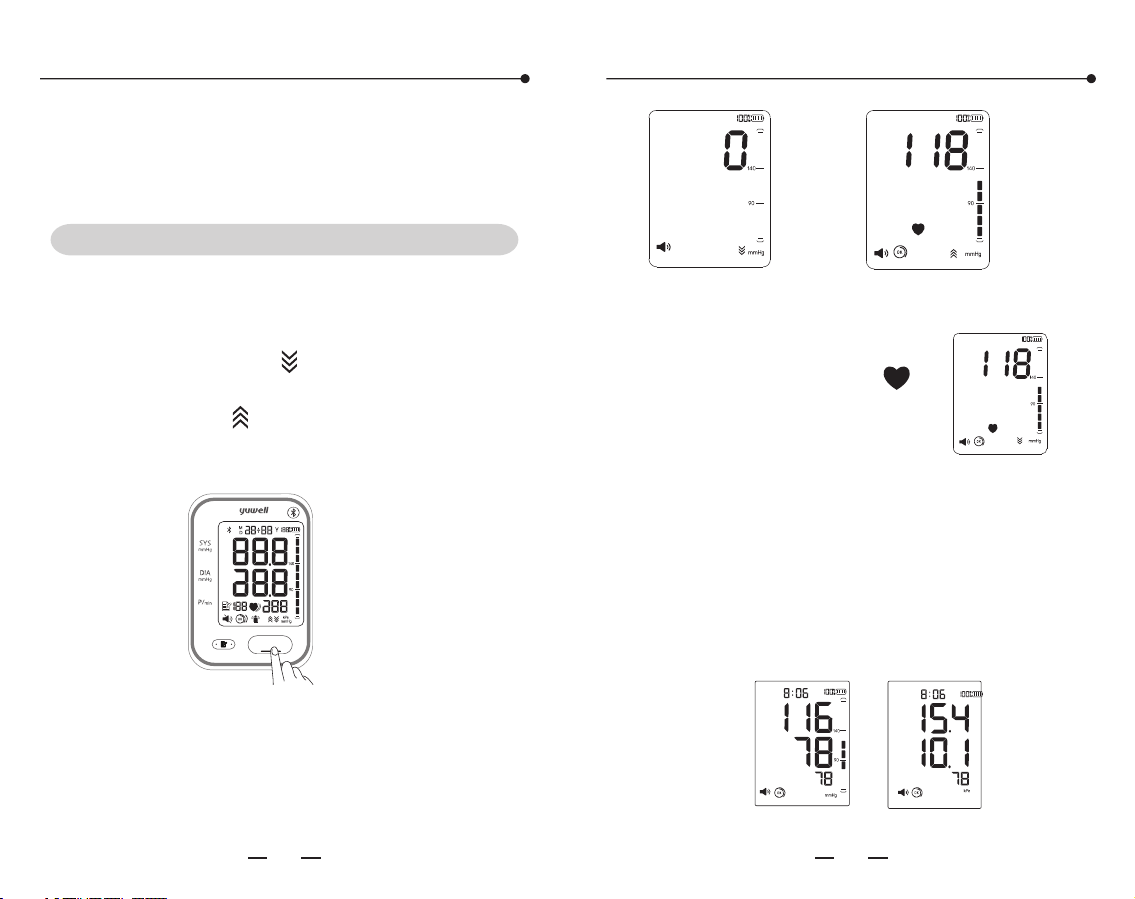
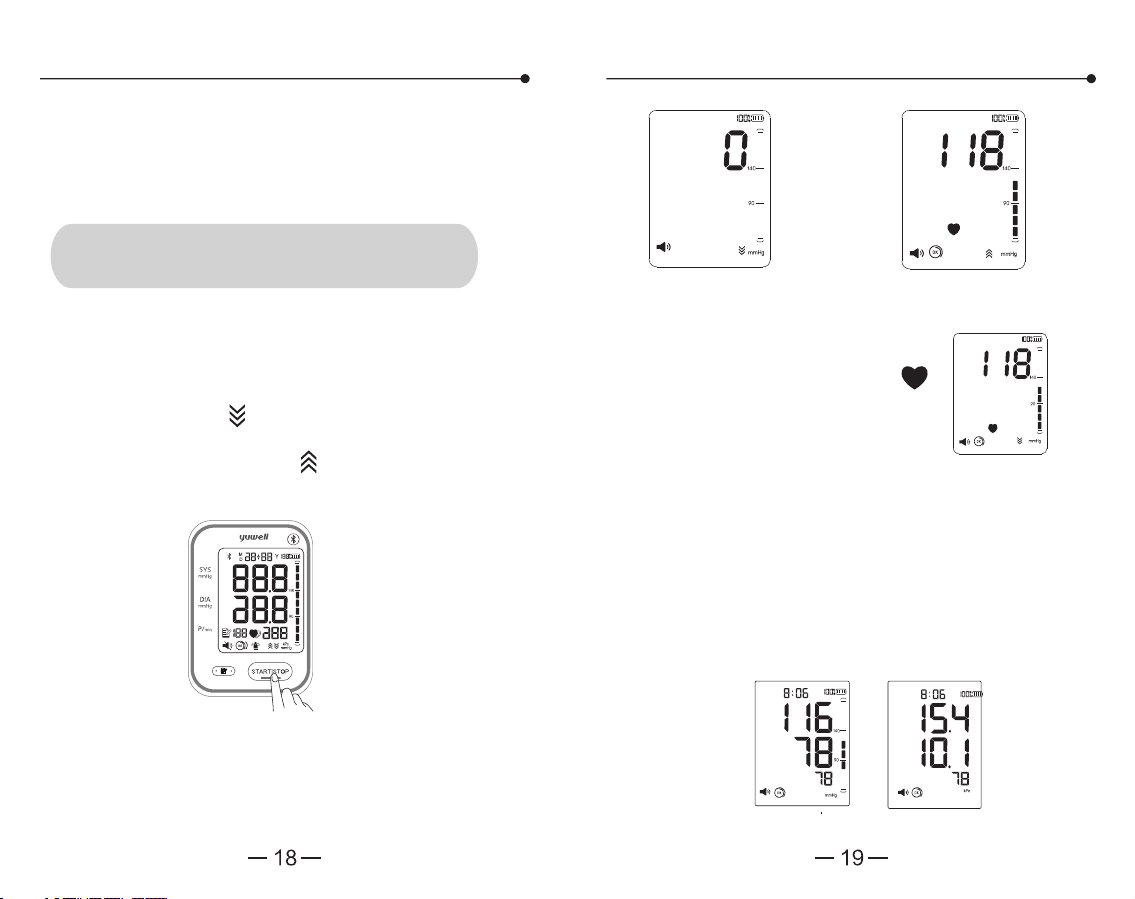
The monitor starts measuring
automatically after inflation
finished, and the heart icon " "
starts to flicker. The air escape
valve automatically exhausts
slowly, and the pressure value
drops continuously.
Please relax as much as possible and not talk or
move during the measurement procedure.
The measuring state
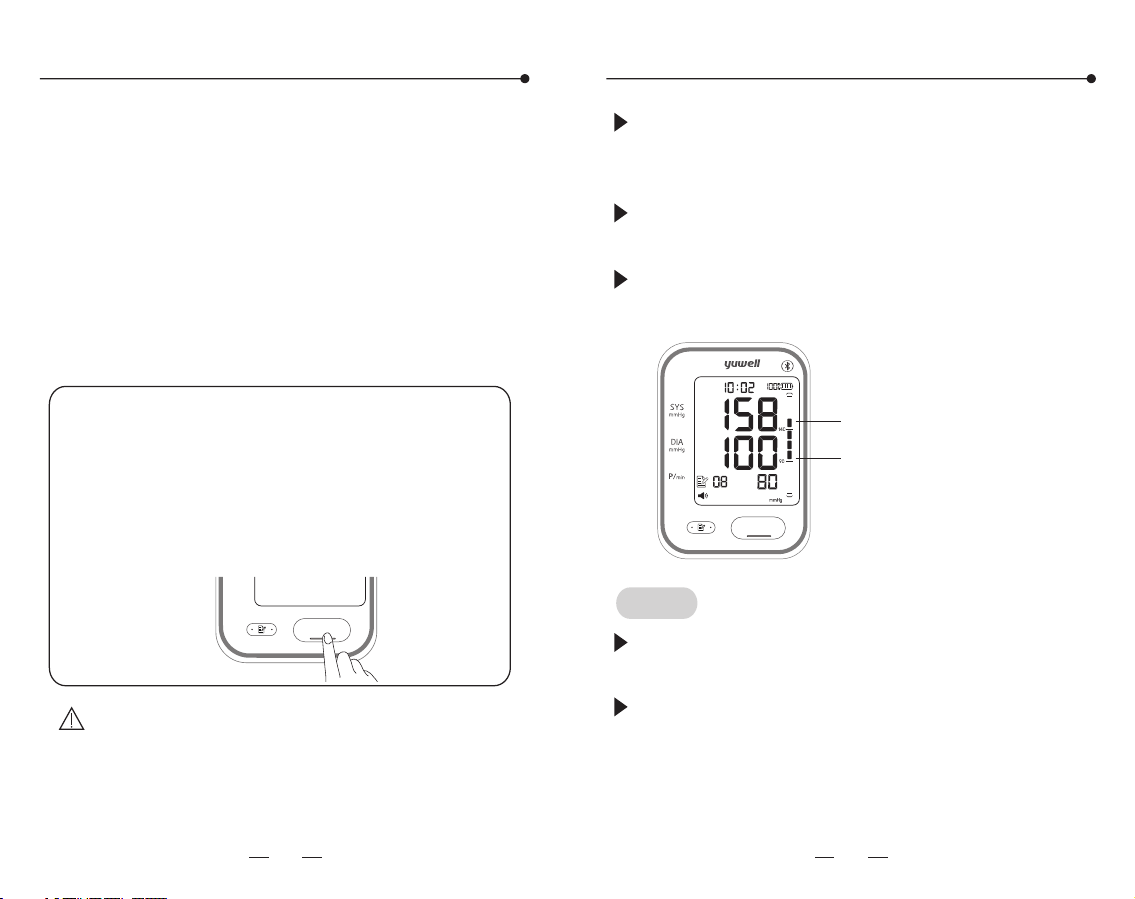
2. Measurement finished
After measurement, the monitor will show the
SYS, DIA and pulse rate, then daflate the air
automatically.
1. Measurement
All icons on screen appear for 1 sec after pressing
the
that the deflation icon " " flashes which means
the system is in zero testing. Several seconds later
the inflation icon " " flashes which means the
zero testing is finished. Then inflation starts.
【START|STOP】button, then disappear. After
Full screen display state
START|STOP
The zeroing state
The inflation state
kPa display
mmHg display
EN EN
20
21
Start measuring
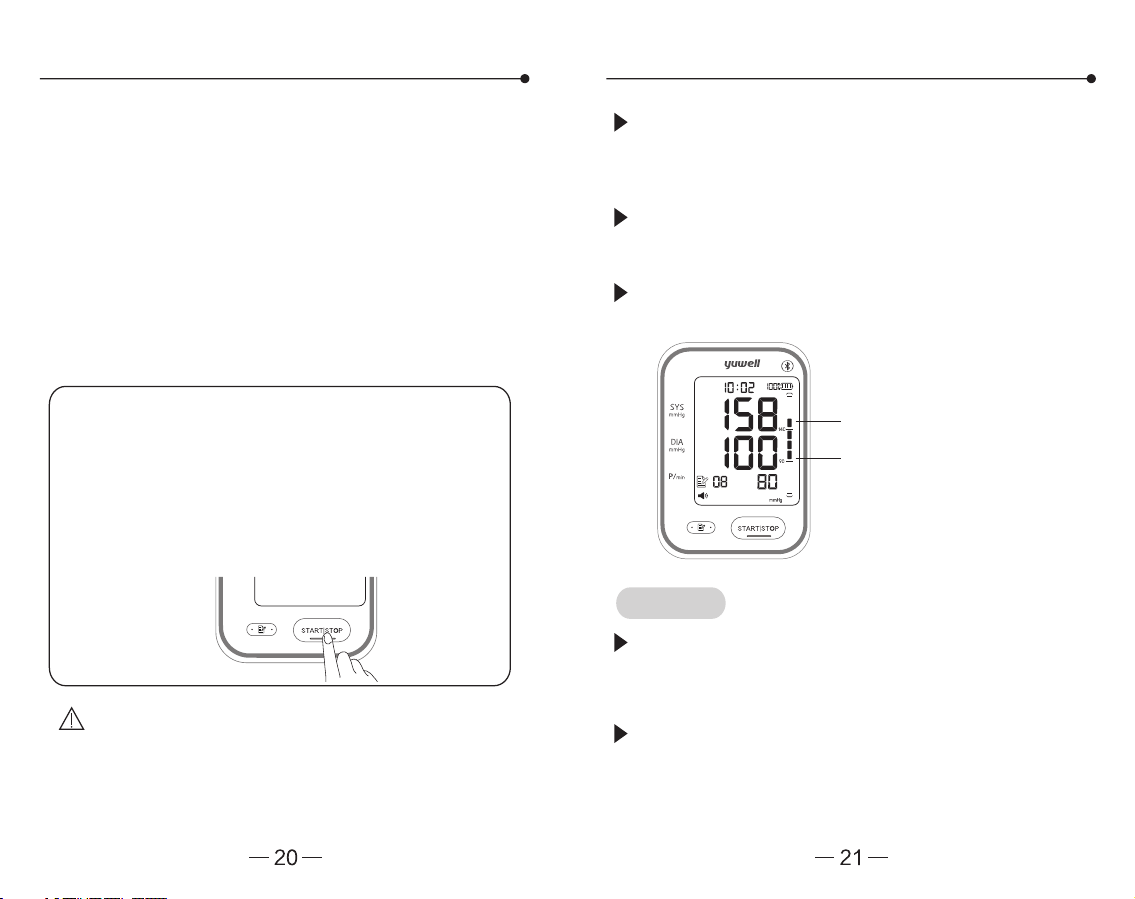
4. Shut down
3. Take off the cuff
Press the【START|STOP】button to shut down.
Also it will power off automatically in 3 minutes
without any operation.
Blood pressure range indicator
5. Power off
Unplug the adapter to safely disconnect it from
mains.
Do not position the device to make it difficult for
safely disconnection from supply mains.
Warning: Upper limit pressure of air inflation
is 300mmHg/40.0kPa. Don't keep the
inflated state for a long time to avoid damage.
If the SYS is higher than 139mmHg or DIA
higher than 89mmHg means having high blood
pressure, please contact with doctor for advice.
The blood pressure range indicator can show
the blood pressure intuitively.
Tips!
The time interval between two measurements
should be at least 2 minutes~3 minutes or longer.
Estimate the blood pressure condition according
to the BP classification table, and consult the
doctor.
If unexpected readings are obtained, please
measure again or consult your doctor
If the measurement need stopping for
uncomfortableness or other reasons, please
press the button, the 【START|STOP】
measurement will stop immediately and air
releases fast. Take off the cuff manually if the
is not 【START|STOP】button working.
Emergency stop during measurement
START|STOP
Higher than 89mmHg
Higher than 139mmHg
START|STOP
EN EN

22
23
Memory function Memory function
The monitor will store the measurement data
automatically (including blood pressure and pulse),
and the upper limit of records is 60. Press the
【 】button to check the measurement data.
Tips!
The average value The 1st group of memory
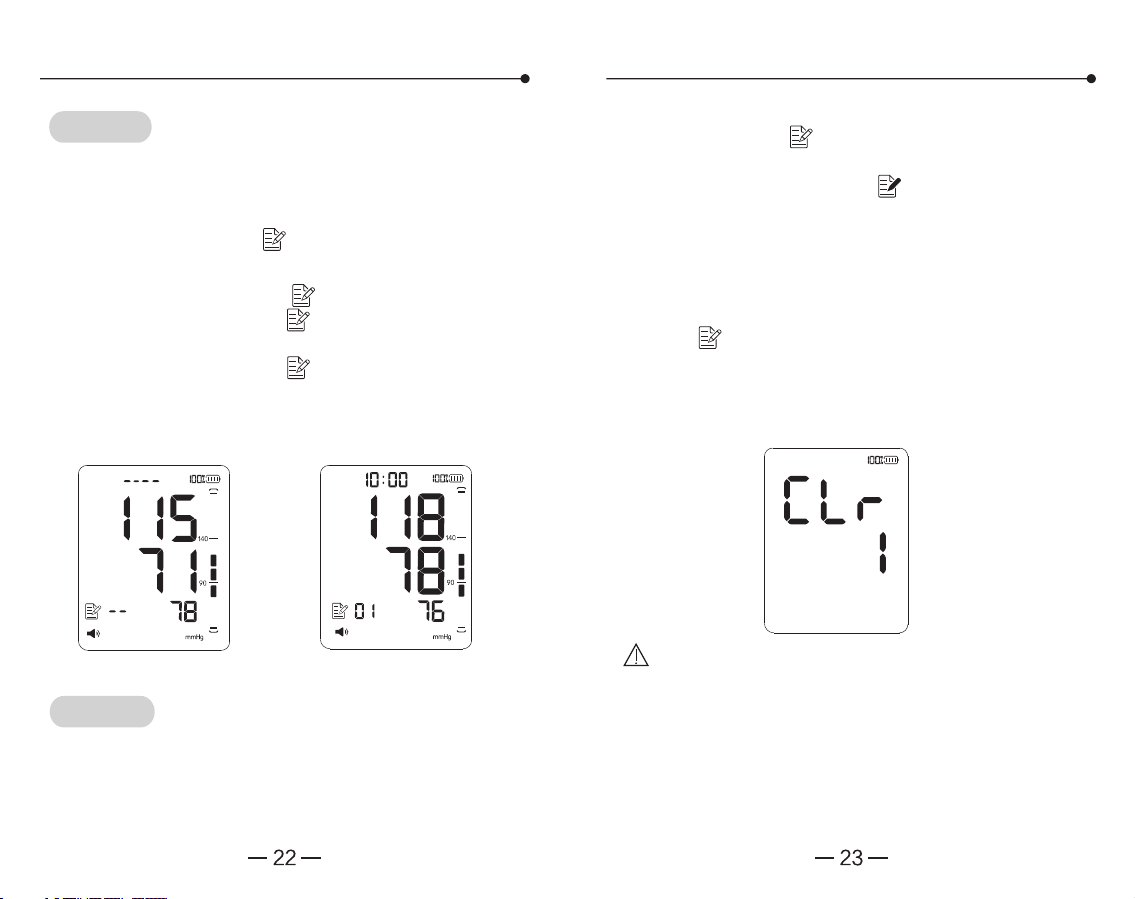
1. Press the【 】button for the records
A. Press the【 】button to show the average
value of the latest 3 times measurement.
B. Repress the【 】 button to display the 1st
group of memory, the serial number is displayed
as "01" to "60". "01" is the latest group and the
"60" is the earliest one.
Tips!
The 60th data may be replaced by the 59th when
the memory capacity is full.
C. Read the recorded data by pressing the【 】
button as the sequence: "01", "02" ......"60" (max).
Then return to the 1st. Holding the【 】button
to search the data quickly.
D. Press the【 START|STOP】 button to shut off
the monitor.
2. Delete the recorded data
Press the both【START|STOP】button and【 】
button until the display shown as the following
picture, which means the recorded data is cleared.
Press the【START|STOP】button to turn off the
monitor after deleting.
Note: This operation will delete all the
recorded data.
EN EN
25
24
Auxiliary measuring function
Static mode
System restores
This function is mainly for professional personnel
to enter the static mode to test the monitor
through standard pressure gauge.
Warning: Normal users don't need to know this
function and also do not operate. The company will
not take any responsibility for damage caused by
this operation.
The screen will show all of icons after pressing
the【START|STOP】button. After that, the screen
will show the '' '' icon which means the system is
in restore testing. Several seconds later, the '' ''
icon disappears and the air pump starts inflating at
the same time, which indicates the test ended.
Then press the【 START|STOP】 button to stop
inflating and take out the batteries to enter the
next step.
Note: It must restore the system before entering
the static mode, otherwise it may cause inaccurate
results.
Detection for cuff wearing
The icon " " appears when the cuff is wrapped
correctly, and the icon " " appears when the
cuff is wrapped loosely or tightly.
Indication for Movement Error
The product can automatic detection of the body
during the measurement of the wrong movement
and give the icon " " prompt . If the icon " "
appears during the measurement, measure it
again.
Indication for irregular heartbeats
the icon " " flashes if irregular pulse signal is
detected during measurement, and it indicates
that the measurement is abnormal and need to
be remeasured. If the icon " " appears during
multiple measurements, consult your doctor.
Entering the static mode
Press the【 】button and hold. At the same time,
poke the reset hole and release it. When you hear a
click, release the【 】button. Then the screen will
show the pressure value '' '', the time and date,
mmHg. Now the system has restored and entered
the static mode. Now can take the static test.
Please refer to article 201.12.1.102 of IEC 80601-2-
30: 2018 to verify the calibration of this device.
EN EN
2726
Static mode
Tips!
After entering the static mode, if the screen still
doesn't show '' '', please operate again as the
system restore. Please contact with the local
distributor if it still does not work.
The monitor will automatically power off if there is
no operation in 4 minutes.
Common question of blood pressure
measurement
1. What is blood pressure?
Blood pressure is the force exerted by blood
against the walls of the arteries. Systolic pressure
occurs when the heart contracts. Diastolic
pressure occurs when the heart expands. Blood
pressure is measured in millimetres of mercury
(mmHg). One's natural blood pressure is
represented by the fundamental pressure, which
is measured first thing in the morning while one is
still at rest and before eating.
2. What is Hypertension and how is it controlled?
Hypertension, an abnormally high arterial blood
pressure, if left unattended can cause many
health problems including stroke and heart attack.
Hypertension can be controlled by altering
lifestyle, avoiding stress, and with medication
under a doctor's supervision. To prevent
Hypertension or keep it under control: Do not
smoke, exercise regularly, reduce salt and fat
intake, have regular physical checkups, maintain
proper weight.
3. Why measure Blood Pressure at home?
Blood pressure measured at a clinic or doctor's
office may cause apprehension and can produce
an elevated reading, 25~30mmHg higher than
that measured at home. Home measurement
reduces the effects of outside influences on blood
pressure readings, supplements the doctor's
readings and provides a more accurate, complete
blood pressure history.
Method of verifying calibration
The verification system is determined by applying
a adapter to the pressure line and attaching a
reference standard.
Enter into the static mode, read the device and
the reference gauge simultaneously, the error of
3mmHg is normal by reducing the pressure from
300mmHg to zero at a rate of 3mmHg/s
±1mmHg/s.
If the error out of 3mmHg, please contact the
manufacturer for calibration.
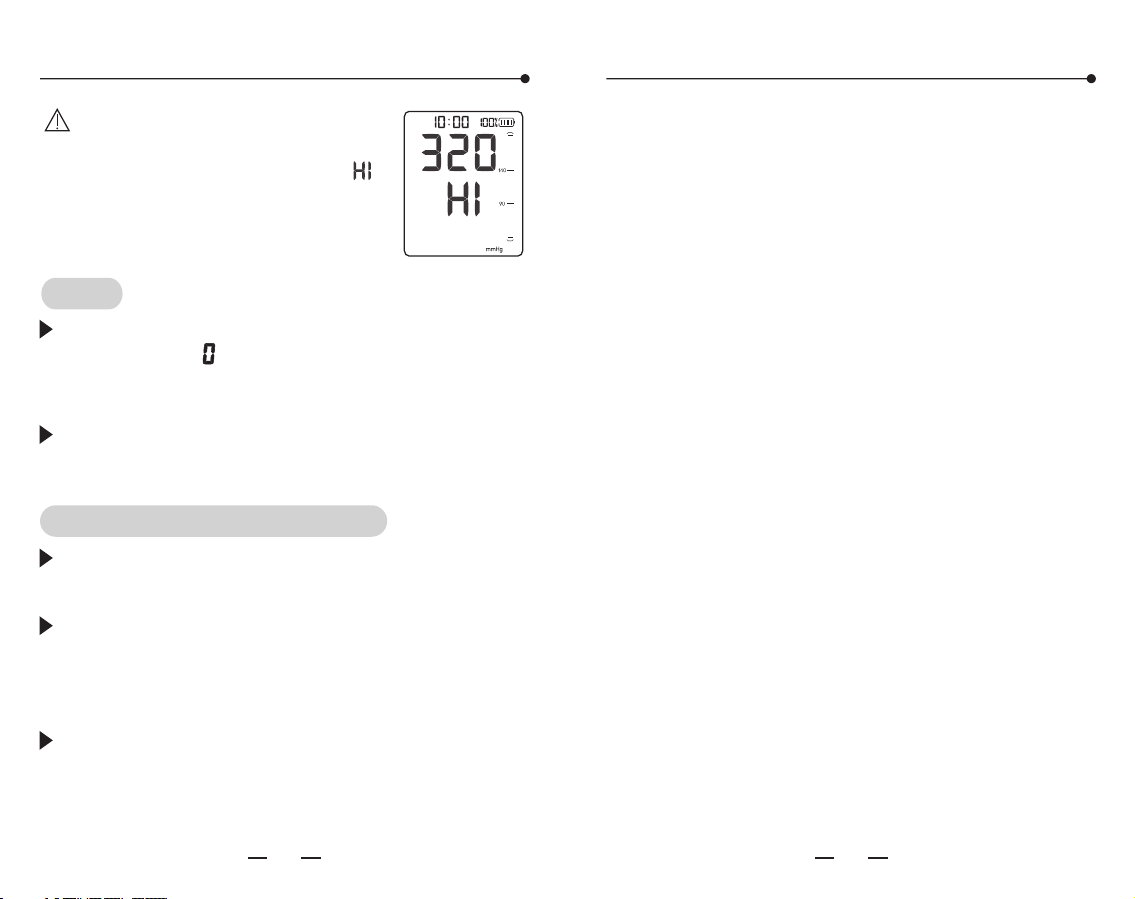
Note: When the measured
pressure exceeds 300mmHg during
static test, pressure value and " "
are displayed, indicating the
measurement result exceeds the
rated range and may be inaccurate.
EN EN
2928
kPa/mmHg kPa/mmHg
12.0~18.5kPa
90~139mmHg
18.7~21.2kPa
140~159mmHf
12.0~13.2kPa
90~99mmHg
21.3~23.9kPa
160~179mmHg
13.3~14.5kPa
100~109mmHg
≥24.0kPa
≥180mmHg
≥14.7kPa
≥110mmHg
8.0~11.9kPa
60~89mmHg
Common question of blood pressure
measurement
Common question of blood pressure
measurement
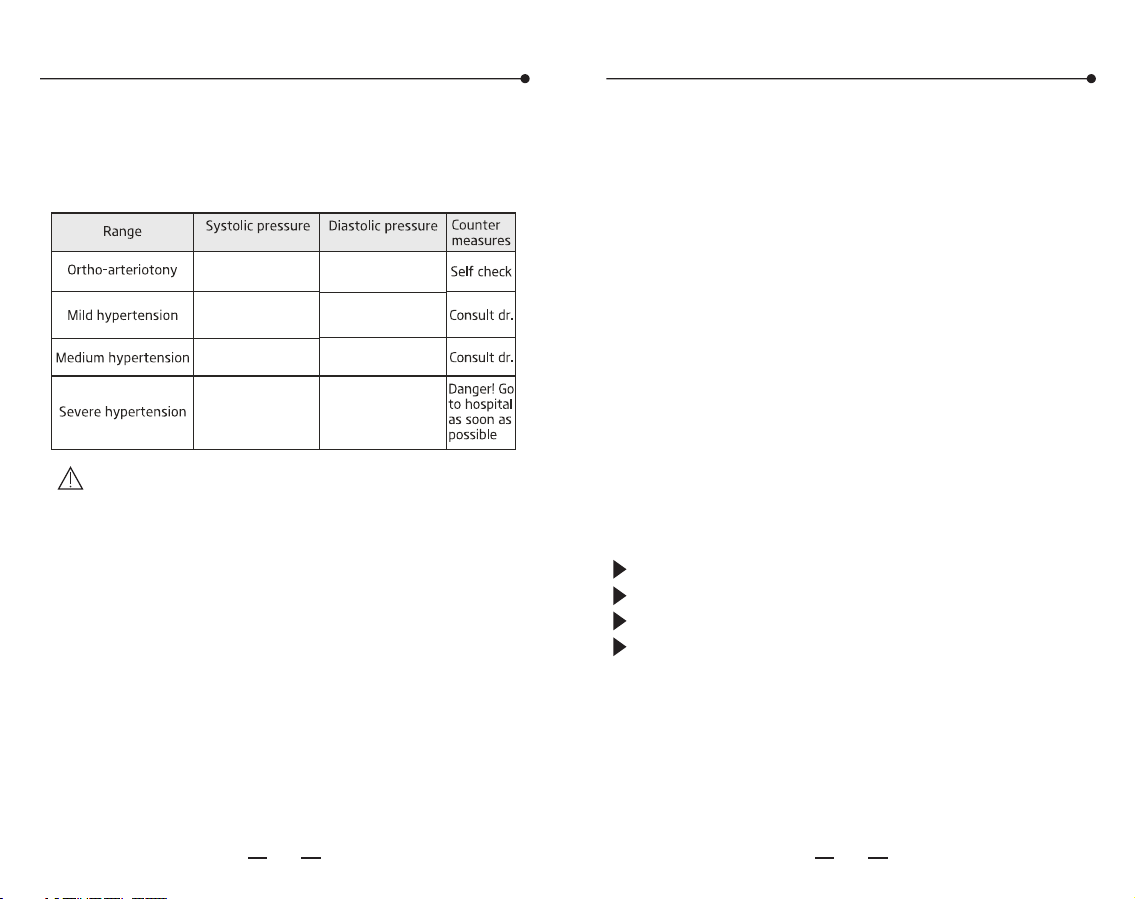
4. WHO Blood Pressure Classification?
Standards to assess high blood pressure, without
regard to age, have been established by the world
Health Organization (WHO), as shown below:
Note: There is no definition about hypopiesia,
and generally SYS (systolic pressure) less
than 90mmHg or DIA (diastolic pressure) less
than 60mmHg is called hypotension.
5. Blood pressure variations?
An individual's blood pressure varies greatly on a
daily and seasonal basis. It may vary by 30 to 50
mmHg due to various conditions during the day. In
hypertensive individuals variations are even more
pronounced. Normally, the blood pressure rises
while at work or play and falls to its lowest levels
during sleep. So do not be overly concerned by
the results of one measurement. Take
measurements at the same time every day using
the procedure described in this manual to get to
know your normal blood pressure. Regular
readings give a more comprehensive blood
pressure history. Be sure to note date and time
when recording your blood pressure. Consult
doctor to interpret the blood pressure data.
6. When is the best time to measure blood
pressure?
After urination, before breakfast in the morning.
Before sleeping at night.
Before taking medicine.
Please keep a stable body state and mind every
time measuring. We suggest taking
measurements at the same time every day.
EN EN
3130
Common fault
Solutions
It doesn't work after
pressing the
button
【START|STOP】
Please try again after charging
Multiple occurrences of
measuring failure, or
measured value is low
(or high)
Check the connection and winding
of cuff
Check if the cuff winded too tight
or too loose. Take off your clothes
if rolled too tight
Please ensure a quiet, relaxed body
state. Deep breathing to relax
yourself before measurement
Please read the "blood pressure
variations" carefully
The monitor is in good
condition, but the each
measuring result are
different
The value is different
from that measured at a
clinic or doctor's office
Pump works, but the
pressure doesn't rise
Check whether the cuff has
connected well
Write down the value every day,
and consult a doctor
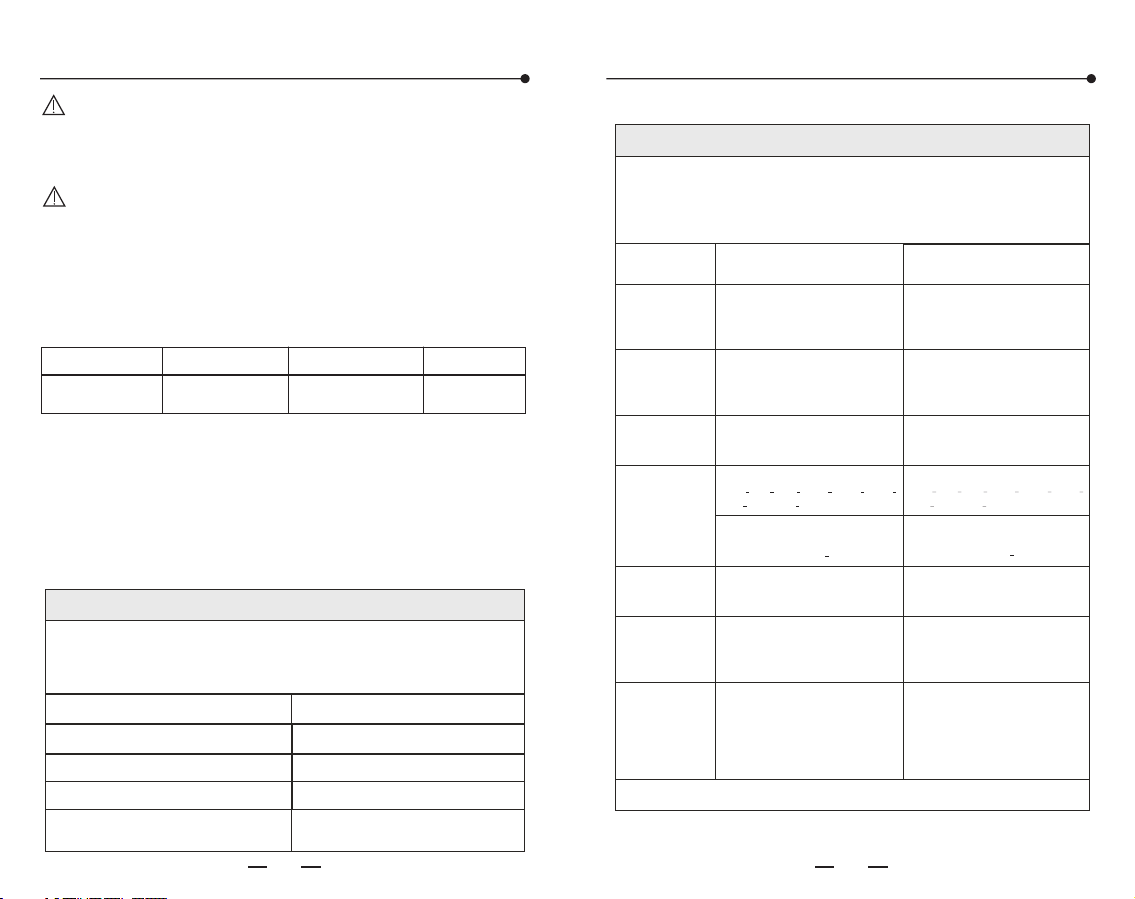
Common fault and trouble shootingCommon fault and trouble shooting
The table below shows the possible fault
displaying icon, possible reason, and solutions.
Fault cause
Wrong
indication
Solution
Err4
Err5
Err6
Err7
Err8
Pressurizing error
Check if there is air
leakage from the cuff
Pressurizing error
caused by arm or
body motion
Keep arm and body still
and measure again
Cuff is too lose or
fall off
Fasten cuff tightly
Pressure exceeds the
maximum value
(300mmHg)
Battery is low
Battery is running out
Measure again please
Connect the power
adapter for charging
Connect the power
adapter for charging
Warning: If the situations cannot be solved or
unexpected problem happens, please consult
the local distributor.
Un ble to measure
pressure
a
Fasten cuff correctly
before measurement
The measurement results
exceeds the measuring
range of diastolic or
systolic
Measure again please
EN EN

3332
MaintenanceAlarm system
the user feels uncomfortable, please consult the
doctor as soon as possible.
Note: If the alarm indication cannot be solved or
need to verify the functionality of the alarm system,
please consult the manufacturer.
Note: If the alarm indication cannot be solved and
When the above alarm indication shows, please measure
consult the doctor.
again or
①When SYS display area shows
the measurement result of systolic pressure is below
" ", it indicates
40mmHg.
②When DIA display area show
the measurement result of diastolic pressure is below
" ", it indicates
20mmHg.
①When SYS display area shows
the measurement result of systolic pressure exceeds
" " , it indicates
260mmHg.
②When DIA display area shows
the measurement result of diastolic pressure exceeds
" ", it indicates
210mmHg.
Alarm
indication
Display contents and causes
①
②
①
②
Please store the monitor and accessories properly
after use.
Do not place the monitor and accessories in high
temperature, moisture, dust, or exposure to
sunshine.
The cuff contains an airbag inside, please care in
applications, do not fold, pull or twist it.
Warning: Do not disassemble or repair the device
without authorization or modify the device without
authorization.
Do not service or maintain while the device is in use.
Using soft dry cloth or soft cloth stained with little
water to clean the device in the case of single
people use it, but do not let the water flow into the
monitor and cuff.
Using soft cloth stained with 75% ethanol to clean
the device in the case of many people use it, but do
not let the ethanol flow into the monitor and cuff.
Don't clean the device when it is connected to the
AC mains supply.
Manufacture will make available on request circuit
diagrams, component part lists, descriptions,
calibration instructions, or other information that
will assist service person to repair those parts of the
device that are designated by the manufacture as
repairable by service person.
Degraded sensors can degrade performance.
Please observe the following items to protect the
device and ensure the accuracy of measurement.
We advice to calibrate the monitor according to
local laws and regulations (at least once a year).
Tips!
When the determined blood pressure is outside
the rated range, there is a visual alarm signal on
the display screen. Please refer to below table for
details.
EN EN

3534
Features and technical parameters Features and technical parameters
Detection for cuff wearing
Indication for irregular heartbeats
60 groups of memory
Average value display of three times measurement
1. Features
Displaying: LCD digital display
Operating principle: Oscillometric method
Measuring range:
Cuff 0 ~300mmHg
Pulse rate: 40beats/min~200beats/min
Precision:
Pressure: within ±3mmHg (±0.4kPa)
Pulse rate: within 5% of reading value
Working system: continuous operation
IP Classification: IP20
Electric classification: Class II and internally powered,
type BF applied part (cuff is applied part)
Service life:
5 years (6 times for each day) for the monitor
5000 times for cuff
Power supply
battery:DC 3.7V
AC adapter:input 100-240V~ 50/60Hz 0.35A MAX
output 5V 1000mA
Maximum battery life: the battery can be used about
250 times on a full charge
Diastolic: 20mmHg-210mmHg
Systolic: 40mmHg-260mmHg
pressure: mmHg
2. Technical parameters
against ingress of solid foreign objects:
≥12.5mm diamater
Suitable upper-arm circumference: 22cm-45cm
Dimension: Approx.127x92x68 (mm)
Weight: about 306g
3. Operation and storage conditions
Operation conditions:
a temperature range of +5℃ to +40℃;
a relative humidity range of 15% to 90%,
non-condensing; and
an atmospheric pressure range of 70kPa to 106kPa.
Transportation and storage conditions:
-25℃ to +5℃, and
+5℃ to +35℃ at a relative humidity up to 90%,
non-condensing;
>35℃ to 70℃ at a water vapour pressure up to
5kPa.
Operation environment:
Avoid electromagnetic interference, violent shock
and noise environment.
Recovery time:
1.When the ambient temperature is 20 , the time
required for the device to warm from the minimum
storage temperature (-20℃ ) until the device is
ready for use is 2 hours.
2.When the ambient temperature is 20℃, the time
required for the device to cool from the maximum
storage temperature (55℃) until the device is ready
for use is 2 hours.
℃
EN EN
3736
Features and technical parameters
Electromagnetic compatibility information
Essential performance:
1. Limits of the error of the manometer:
Over the temperature range of 5℃ to 40℃ and the
relative humidity range of 15% to 90% (non-
condensing), the maximum error for the
measurement of the CUFF pressure at any point of
the NOMINAL measurement range shall be less than
or equal to ±3mmHg (±0.4kPa) of the reading.
2. Reproducibility of the BLOOD PRESSURE
DETERMINATION:
The laboratory reproducibility of the BLOOD
PRESSURE DETERMINATION of the AUTOMATED
SPHYGMOMANOMETER shall be less than or equal
to 3.0mmHg (0.4 kPa).
Portable RF communications equipment (including
peripherals such as antenna cables and external
antennas) should be used no closer than 30cm (12
inches) to any part of the SPHYGMOMANOMETER,
including cables specified by the manufacturer.
Otherwise, degradation of the performance of this
equipment could result.
This equipment might not offer adequate
protection to radio-frequency communication
services. The user might need to take mitigation
measures, such as relocating or re-orienting the
equipment.
When the instrument is in use, never put it near
other instruments or stack it on other instrument. if
you have to put it near other instruments or
instruments, please inspect and verify if the
instrument could run normally.
The SPHYGMOMANOMETER was clinically investi-
gated according to the requirement of ISO
81060-2.
The SPHYGMOMANOMETER complies with IEC
80601-2-30.
The contact materials detail of product
Rear Cover
ABS
Top Cover PC
Cuff
Nylon, Polyester
Air tube
PVC
Air plug connect
ABS
Part
Material
Arm band
EN EN
3938
Electromagnetic compatibility information Electromagnetic compatibility information
There is the potentia risk of radio frequency interference
between the device and other devices. If there is, please
find out the problems and take the following measures:
(1) Turn off the device, and turn on again.
(2) Change the direction of the device.
(3) Keep the product away from the interferential devices.
WARNING: The Operator should not use the
system and should inform the customer service, if
the ESSENTIAL PERFORMANCE is lost or degraded
due to EM DISTURBANCES.
WARNING: Use of accessories and cables other
than those specified or provided by the
manufacturer of this equipment could result in
increased electromagnetic emissions or decreased
electromagnetic immunity of this equipment and
result in improper operation.
List of cables and accessories is as follows:
Cable Name
DC power
supply cord
Cable Length
≤1.2m
Cable Shielded
Unshielded
Comments
None
Table 1 For all ME EQUIPMENT and ME SYSTEMS
Guidance and manufacture s declaration- electromagnetic emission
'
Emission test
Compliance
Class BRF emissions CISPR 11
Class A
Complies
Harmonic emissions IEC 61000-3-2
Voltage fluctuations/flicker
emissions IEC 61000-3-3
RF emissions CISPR 11
Group1
The YE650AR Electronic Blood Pressure Monitor is intended for use in
the the electromagnetic environment specified below. The customer or
user should assure that of YE650AR Electronic Blood Pressure Monitor
it is used in such an environment.
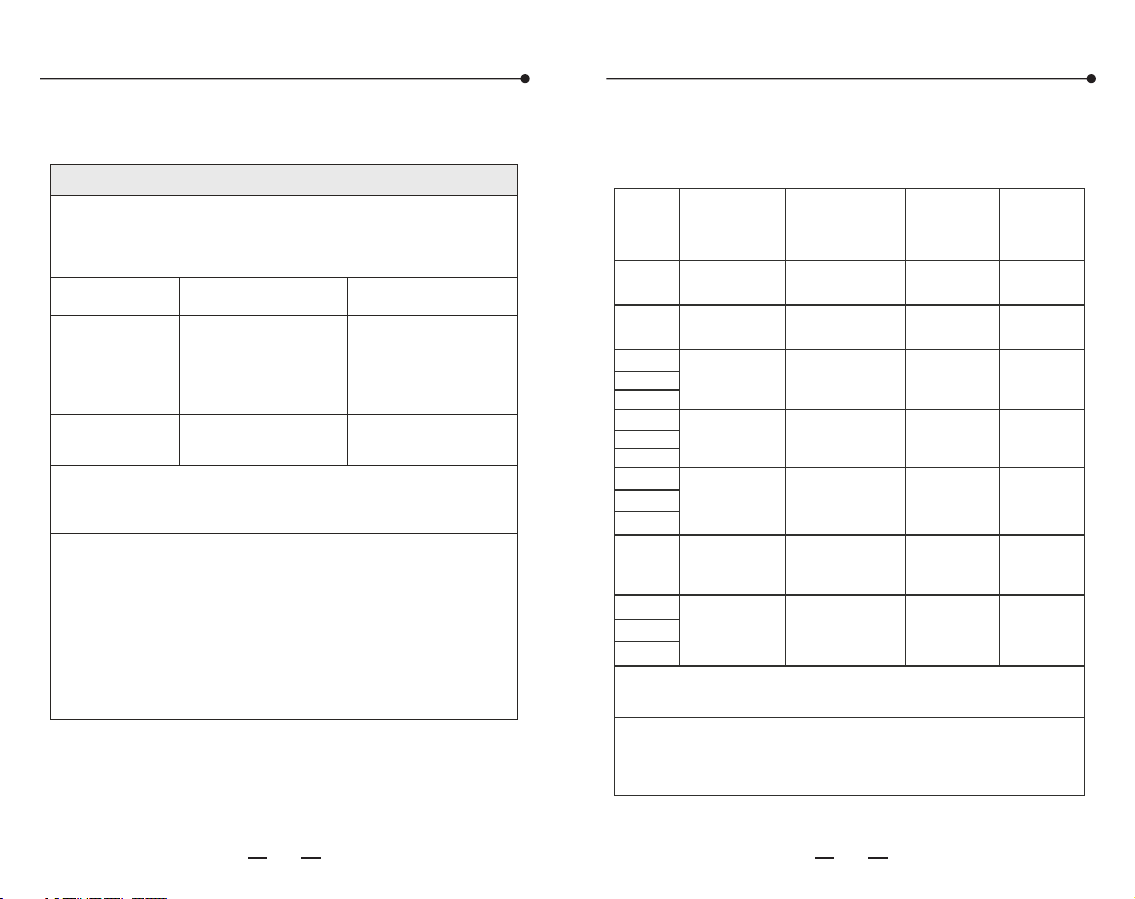
Table 2 For all ME EQUIPMENT and ME SYSTEMS
Guidance and manufacture s declaration-electromagnetic emission'
Immunity test
IEC 60601 test level
Compliance level
Electrostatic
discharge (ESD)
IEC 61000-4-2
Electrical
fasttransient
/burst IEC
61000-4-4
±2 kV
100kHz repetition
frequency
±8 kV contact
±15 kV air
±8 kV contact
±15 kV air
±2 kV
100kHz repetition
frequency
Surge IEC
61000-4-5
±1 kV line(s)to line(s)
±2 kV line(s)to earth
±1 kV line(s)to line(s)
0% U ; 0.5 cycleT
o o o o o
At 0 , 45 , 90 , 135 , 180 , 225 ,
o o
270 and 315
o
Voltage dips
IEC 61000-4-11
NOTE: U is the a.c. mains voltage prior to application of the test level.
T
30A/m
50Hz or 60Hz
Power frequency
(50/60 Hz)
magnetic field
IEC 61000-4-8
0% U ; 0.5 cycleT
o o o o o o
At 0 , 45 , 90 , 135 , 180 , 225 ,
o o
270 and 315
30A/m
50Hz or 60Hz
The YE650AR Electronic Blood Pressure Monitor is intended for use
in the electromagnetic environment specified below. The customer
or the user of the YE650AR Electronic Blood Pressure Monitor
should assure that it is used in such an environment.
0% U ; 1 cycle and 70% U ; T T
25/30 cycles
o
Single phase: at 0
0% U ; 250/300 cyclesT
Voltage
interruptions
IEC 61000-4-11
0% ; 1 cycle and 70% ; UT UT
25/30 cycles
o
Single phase: at 0
0% U ; 250/300 cyclesT
8A/m, CW for 30kHz
65A/m, 2,1kHz Pulse
modulation for 134,2kHz
7,5A/m, 50kHz Pulse
modulation for 13,56MHz
Proximity
magnetic fields
IEC 61000-4-39
8A/m, CW for 30kHz.
65A/m, 2,1kHz Pulse
modulation for 134,2kHz.
7,5A/m, 50kHz Pulse
modulation for 13,56MHz
EN EN
4140
Electromagnetic compatibility information Electromagnetic compatibility information
Guidance and manufacture s declaration-electromagnetic immunity'
Immunity test
IEC 60601 test level
Compliance level
3 Vrms
0,15 MHz-80 MHZ
6 V rms in ISM and amateur
radio bands between
0,15 MHz and 80 MHZ
80 % Am at 1 kHz
Conducted RF
IEC 61000-4-6
NOTE1 At 80 MHz and 800 MHz, the higher frequency range applies.
NOTE2 These guidelines may not apply in all situations.
Electromagnetic propagation is affected by absorption and reflection from
structures, objects and people.
a
b
Radiated RF
IEC 61000-4-3
10 V/m
80 MHZ to 2.7 GHz
3 Vrms
0,15 MHz-80 MHZ
6 V rms in ISM and amateur
radio bands between
0,15 MHz and 80 MHZ
80 % Am at 1 kHz
The is intended for use
in the electromagnetic environment specified below. The customer or
the user of the YE650AR should
assure that it is used in such an environment.
YE650AR Electronic Blood Pressure Monitor
Electronic Blood Pressure Monitor
Table 3 For ME EQUIPMENT and ME SYSTEMS
that are not LIFE-SUPPORTING
10 V/m
80 MHZ to 2.7 GHz
Field strengths from fixed transmitters, such as base stations for radio
(cellular/cordless) telephones and land mobile radios, amateur radio, AM and
FM radio broadcast and TV broadcast cannot be predicted theoretically with
accuracy. To assess the electromagnetic environment due to fixed RF
transmitters, an electromagnetic site survey should be considered. If the
measured field strength in the location in which the is used
exceeds the applicable RF compliance level above, the should be
observed to verify normal operation. If abnormal performance is
observed,additional measures may be necessary, such as reorienting or
r elocating the .
YE650AR
YE650AR
YE650AR
Over the frequency range 150 kHz to 80 MHz, field strengths should be less
than 3 V/m.
Modulation
Band
a)
(MHz)
Test
frequency
(MHz)
a)
Service
18 Hz
Pulse
modulation
b)
Table 4 Test specifications for ENCLOSURE PORT
IMMUNITY to RF wireless communications
equipment
IMMUNITY
TEST
LEVEL
(V/m)
380 to 390
TETRA 400
27
385
430 470 to
FM
±5 kHz deviation
1 kHz sine
28
450
GMRS 460, FRS 460
710
704 787 to
LTE Band 13, 17
9
745
780
Pulse
modulation
b)
217 Hz
810
800 960 to
GSM 800/900, TETRA 800,
iDEN 820, CDMA 850,
LTE Band 5
28
930
Pulse
modulation
b)
18 Hz
1720
1700 1990 to
GSM 1800; TETRA 1900;
GSM 1900; DECT; LTE Band
1, 3, 4, 25; UMTS
28
1970
Pulse
modulation
b)
217 Hz
870
1845
Bluetooth, WLAN,
802.11 b/g/n, RFID 2450,
LTE Band 7
2450
Pulse
modulation
b)
217 Hz
2400 2570 to
28
WLAN 802.11 a/n
Pulse
modulation
b)
217 Hz
5240
5500
5785
5100 5800 to
9
If necesary to achieve the IMMUNITY TEST LEVEL, the distance between the
transmitting antenna and the ME EQUIPMENT or ME SYSTEM may be reduced
to 1 m. The 1m test distance is permitted by IEC61000-4-3.
a) For some services, only the uplink frequencies are included.
b) The carrier shall be modulated using a 50% duty cycle square wave signal.
c) As an alternative to FM modulation, the carrier may be pulse modulated using
a 50 % duty cycle square wave signal at 18 Hz. While it does not represent
actual modulation, it would be worst case.
EN EN
Elektronisches Blutdruckmessgerät
Benutzerhandbuch
Bitte lesen Sie die Gebrauchsanweisung vor der Benutzung aufmerksam
durch!
Metrax GmbH
Rheinwaldstr. 22, 78628 Rottweil, DEUTSCHLAND
JIANGSU YUYUE MEDICAL EQUIPMENT & SUPPLY CO., LTD.
No.1 Baisheng Road Development Zone, Danyang, Jiangsu 212300 CHINA
www.yuwell.com
Herausgabedatum: 2024.08 YY-BPM0088C-01(A/2)
YE650AR
Inhalt
Produktmerkmale
Sprachfunktion
Das Bluetooth-Symbol gilt
nur für das Modell mit
Bluetooth-Funktion.
Anzeige von
Bewegungsfehlern
Erkennung der angelegten
Manschette
Anzeige von Herzrhythmusstörun-
gen
Tipps: Die im Benutzerhandbuch abgedruckten Zeichnungen
dienen nur der Veranschaulichung. Einzelheiten entnehmen
Sie bitte dem jeweiligen Objekt.
Vor der Verwendung
Produktmerkmale ................................................... 01
Betriebsanleitung.................................................... 02
Produktaufbau und Teile......................................... 04
Vorsicht................................................................... 06
Wichtige Hinweise .................................................. 07
Akku laden...............................................................11
Einstellung von Uhrzeit und Datum ........................ 13
Einstellung von Sprachlautstärke und Maßeinheit ..... 14
Messmethode
Verwendungsmethode der Manschette.................. 15
Körperhaltung während der Messung .................... 17
Start der Messung .................................................. 18
Anzeige des Blutdruckbereichs .............................. 21
Speicherfunktion..................................................... 22
Hilfsmessfunktion ................................................... 24
Statischer Modus.................................................... 25
Bekannte Probleme
Allgemeine Fragen zur Blutdruckmessung............. 27
Häufige Fehler und Fehlersuche ............................ 30
Alarmsystem........................................................... 32
Wartung .................................................................. 33
Merkmale und technische Parameter..................... 34
Angaben zur elektromagnetischen Verträglichkeit ..... 37
DE DE
Betriebsanleitung Betriebsanleitung
Dieses Gerät verwendet bei der Blutdruckmessung die
oszillometrische Methode.
Bitte befolgen Sie die unten aufgeführten Schritte.
Schließen Sie die Stromquelle zum Laden wie unten
gezeigt an.
Mit Ausnahme des vom Hersteller als Ersatzteil
gelieferten Netzteils kann die Verwendung von nicht
spezifiziertem Zubehör oder Netzteilen zu einer
Erhöhung der Emissionen oder einer Verringerung der
Störfestigkeit des Geräts führen.
1. Verwendungsmethode der Manschette
Die Manschette so anlegen, dass der untere Rand 2
bis 3 cm über dem Ellenbogen liegt. (Einzelheiten
finden Sie auf Seite 15).
2. Körperhaltung während der Messung
Halten Sie den Mittelpunkt der Manschette und das
Herz auf gleicher Höhe (Einzelheiten finden Sie auf
Seite 17).
3. Start der Messung
Bleiben Sie 5 Minuten lang ruhig sitzen und drücken
Sie dann die „[START|STOP]“ Taste, um zu messen.
(Einzelheiten finden Sie auf Seite 18).
Drücken Sie die [ ]-Taste, um die Messdaten
einzusehen. Dieses Blutdruckmessgerät kann die
Durchschnittsmessung anzeigen und 60 Datensätze
speichern. (Einzelheiten finden Sie auf Seite 22).
Einschalten
Messung
Prüfen Sie die Daten
DE DE
Produktaufbau und Teile Produktaufbau und Teile
1. Hauptteil
3. Netzteil und USB-Kabel
4. Display
5. Zubehör
2. Manschette
Das Bluetooth-Symbol gilt
nur für das Modell mit
Bluetooth-Funktion.
Display
Steckeran-
schluss
Speicher-
taste
Luftste-
cker
Manschette
Modell
Ohne feste Unterlage
Stoff: 210T
Polyester
Stoff: 250D
Polyester
Mit fester
Unterlage
22 cm
-
32 cm
22 cm
-
45 cm
22 cm
-
32 cm
22 cm
-
45 cm
22 cm
-
32 cm
22 cm
-
45 cm
Der
Bereich
des
Armum-
fangs
Beson-
derheit
YE-61MC YE-61LC YE-62MC YE-62LC YE-63MC YE-63LC
Gummi-Luft-
schlauch
Start/Stopp-Taste
Bluetoothsymbol Uhrzeit und Datum
Batteriesymbol
SYS
(systolisch)
DIA (diasto-
lisch)
Pulsfrequenz
Einheit
kPa/mmHg
Anzahl der
Aufzeichnungen
Sprachlautstär-
kensymbol
Sprachlautstärke ein
Sprachlautstärke aus
Erkennung der
angelegten Manschette
Symbol für Aufpumpen und
Entleeren
Herzschlag-Symbol
Anzeigesymbol bei
Herzrhythmusstörungen
Anzeigesymbol bei
Bewegungsfehlern
Das Bluetooth-Symbol gilt
nur für das Modell mit
Bluetooth-Funktion.
Netzteil
(optional)
USB-Kabel
(optional)
Sprachfunktion - Ein/Aus-Taste
Steckdose für Netzteil
Reset-Loch
Es gibt 6 Arten von Manschetten, die von yuwell angebo-
ten werden. Bitte beachten Sie den erworbenen Typ.
Bitte wählen Sie die für Ihren Armumfang passende
Manschettengröße. Eine Überschreitung der angegebenen
Maße kann zu ungenauen Messergebnissen führen.
Warnhinweis: Bitte verwenden Sie eine Manschette von
Yuwell, da sonst die Messergebnisse ungenau sind.
Benutzerhandbuch, Garantiekarte, USB-Kabel
(optional) Netzteil (optional)
Netzteil
EINGANG: 100-240V ~
50/60 HZ 0,35 A MAX
AUSGANG: 5V 1000mA
MFR: WEIHAI HITAI ELECTRONICS Co., LTD.
EU-Modell: HT-C38B-0510EW
US-Modell: HT-C38B-0510WW
UK-Modell: HT-C38B-051OUW
DE DE
Produktaufbau und Teile Vorsicht Wichtige Hinweise
Erklärung: Bei dem Gerät handelt es sich
um ein Medizinprodukt.
1. Verwendungszweck
2. Achtung
Achten Sie auf die hier gezeigten Symbole, um
Schäden für den Benutzer zu vermeiden.
Vorsicht
Anwendungsteil vom Typ BF
Hersteller
Herstellungsdatum
Vertreter der EG
Wiederverwertung von Elektro- und Elektronikalt-
geräten
IP-Klassifizierung
CE-Kennzeichnung und Nummer der Notifizie-
rungsstelle
Gerät der Klasse II
Gleichstrom
Wechselstrom
Seriennummer
Gibt an, dass es sich bei dem Artikel um ein
Medizinprodukt handelt
Ein Gegenstand, der unannehmbare Risiken für
den Patienten, das medizinische Personal oder
andere Personen in der MR-Umgebung (Magnetre-
sonanz) darstellt.
Chargennummer
Gleichstrom
Zeigt ein Gerät an, das eine einmalige Produktken-
nung aufweist
Aufrecht
halten
Zer-
brech-
lich
Trocken
halten
Befolgen Sie die Gebrauchsanweisung (Die Farbe
des Symbols ist tatsächlich blau.)
Dieses Produkt ist für die Messung des Blutdrucks
und der Pulsfrequenz von Erwachsenen über 12
Jahren im Privathaushalt oder in einer Klinik bestimmt
(nicht geeignet für Neugeborene, während der
Schwangerschaft oder bei Präeklampsie).
Achten Sie bei der Messung auf die folgenden Punkte,
da es sonst zu Schäden oder falschen Ergebnissen
kommen kann.
• Setzen Sie sich vor der Messung 5 Minuten lang still
hin, um einen ruhigen und stabilen Gebrauchsmodus
zu gewährleisten.
• Die Messung nicht innerhalb von 1 Stunde nach dem
Essen, Rauchen, Trinken von Wein oder Kaffee
(schwarzer Tee) vornehmen.
• Nicht im Stehen, Gehen, Liegen oder mit Körperdruck
messen.
• Die Messung nicht nach dem Sport oder Baden
vornehmen.
• Nicht sprechen, nicht bewegen, den Arm nicht schütteln
oder die Finger während der Messung beugen.
• Die Messung nicht unter extremen Temperaturbedin-
gungen oder in einer stark veränderten Umgebung
durchführen.
• Die fehlerhaften Messungen des Geräts können durch
äußere Störeinflüsse verursacht werden, z. B. durch
Beschleunigung während des Transports oder beim
Transport.
• Die Messung deshalb nicht in einem fahrenden
Fahrzeug vornehmen.
DE DE
Wichtige Hinweise Wichtige Hinweise
• Nicht kontinuierlich messen: (Zwischen zwei Messun-
gen sollten mindestens 2~3 Minuten oder mehr
vergehen).
• Bitte beginnen Sie erneut, wenn Sie nicht messen können.
• Bei Patienten mit Herzrhythmusstörungen, arterieller
Sklerose, schlechter Durchblutung, Diabetes,
Schwangerschaft, Präeklampsie, Nierenerkrankun-
gen, Bewegung des Patienten, Zittern oder Schüttelf-
rost können die Messergebnisse ungenau ausfallen.
• Die Manschette nicht über einen längeren Zeitraum
im aufgepumpten Zustand lassen, um Verletzungen
des Patienten zu vermeiden.
• Der Patient ist der vorgesehene Bediener, dieser
Monitor ist für Erwachsene über 12 Jahren geeignet.
• Warnhinweis: Das Netzteilkabel und der Gummiluftschlauch
können bei Kleinkindern zur Strangulation führen.
• Warnhinweis: Verschlucken Sie keine Kleinteile, die
eine Erstickungsgefahr darstellen können.
• Das Gerät darf nicht mit Hochfrequenz-Chirurgiegerä-
ten verwendet werden.
• Warnhinweis: Die MANSCHETTE nicht über einem
verwundeten Arm oder an Patienten mit intravenösem
Tropf benutzen.
• Warnhinweis: Das Gerät nicht verwenden, wenn am
Arm ein intravaskulärer Zugang oder eine intravasku-
läre Heilbehandlung oder ein arteriovenöser (A-V)
Shunt vorhanden ist, da dies zu einer vorübergehen-
den Beeinträchtigung des Blutflusses und damit zu
einer Verletzung des Patienten führen kann.
• Bitte lassen Sie Umsicht d´bei der Lagerung des
Produkts walten, um Schäden durch Haustiere,
Schädlinge oder Kinder zu vermeiden.
• Der Bediener darf den zugänglichen Teil des Adapters/
Hauptgeräts und den Patienten nicht gleichzeitig berühren.
• Warnhinweis: Verwenden Sie die Manschette nicht
am Arm, auf dessen Seite eine Mastektomie oder
Lymphknotenentfernung durchgeführt wurde.
• Warnhinweis: Beachten Sie, dass die Funktion
anderer Überwachungsgeräte, die gleichzeitig an
derselben Gliedmaße angebracht sind, während des
Aufpumpens der Manschette verlorengeht.
• Warnhinweis: Keine häufigen Messungen zulassen,
da die daraus resultierende Einschränkung des
Blutflusses zu Verletzungen führen kann.
• Vermeiden Sie das Zusammendrücken oder Biegen
des Manschettenanschlussschlauchs während der
Verwendung des Geräts. Andernfalls werden die
Messergebnisse ungenau ausfallen.
• Warnhinweis: Die Verbindungsschläuche nicht
verheddern, da der kontinuierliche Manschettendruck
den Blutfluss stören kann, was zu Verletzungen des
Patienten führen kann.
• Die Entsorgung muss gemäß den örtlichen Gesetzen
und Vorschriften zum Umgang mit diesem Gerät und
Batterie erfolgen.
• Der Patientenbediener darf die Batterie und die
Gleichstrombuchse nicht gleichzeitig berühren.
Ebenso darf der Bediener nicht gleichzeitig den
Patienten und die Batterie sowie die Gleichstrom-
buchse berühren.
• Bitte beachten Sie die Batterieanforderungen des
Herstellers.
• Bitte melden Sie dem Hersteller und der zuständigen
Behörde des Mitgliedstaates schwerwiegende
Vorfälle, die im Zusammenhang mit dem Produkt
aufgetreten sind.
• Bitte ziehen Sie den Netzstecker aus der Steckdose,
wenn Sie den Betrieb des ME-GERÄTS sicher
beenden wollen.
• Bitte schalten Sie das Gerät aus und ziehen Sie den
Adapter ab, bevor Sie es reinigen.
• Wenn der Monitor bei täglichem Gebrauch durch
einen einzelnen Patienten verschmutzt ist, diesen mit
einem weichen, trockenen Tuch reinigen. Wenn es
notwendig ist, verwenden Sie bitte ein mit Wasser
getränktes weiches Tuch, bevor Sie es mit einem
weichen Tuch reinigen. Reinigen Sie das Gerät
anschließend mit 75%igem Alkohol.
• Bitte verwenden Sie ein weiches, trockenes Tuch, das
mit 75%igem Alkohol getränkt ist, um das Gerät zu
reinigen, falls es von vielen Personen benutzt wird.
Lassen Sie den Alkohol jedoch nicht in den Monitor
und die Armmanschette fließen.
• Achten Sie darauf, dass der Alkohol nicht in den
Monitor und die Armmanschette fließt.
• Dieses Gerät nicht mit anderen Geräten verbinden, die
nicht in der Gebrauchsanweisung beschrieben sind.
• Hinweis: Bitte befolgen Sie die Anweisungen Ihres Arztes
und stellen Sie keine Diagnose anhand der Messung.
• Hinweis: Die Softwareversion kann im technischen
Modus von der dafür vorgesehenen Person eingesehen
werden. Dieser Modus ist für normale Benutzer nicht
zugänglich. Wenden Sie sich bitte an den Hersteller, um
die Methode zum Aufrufen des Modus zu erfahren.
Erklärung: Wenn der Monitor nicht im erforderlichen
Temperatur-, Höhen- und Feuchtigkeitsbereich verwen-
det und gelagert wurde, entspricht er möglicherweise
nicht den Spezifikationen.
DE DE
Wichtige Hinweise Akku laden
• Warnhinweis: Beachten Sie, dass die Funktion
anderer Überwachungsgeräte, die gleichzeitig an
derselben Gliedmaße angebracht sind, während des
Aufpumpens der Manschette verlorengeht.
• Warnhinweis: Keine häufigen Messungen zulassen,
da die daraus resultierende Einschränkung des
Blutflusses zu Verletzungen führen kann.
• Vermeiden Sie das Zusammendrücken oder Biegen
des Manschettenanschlussschlauchs während der
Verwendung des Geräts. Andernfalls werden die
Messergebnisse ungenau ausfallen.
• Warnhinweis: Die Verbindungsschläuche nicht
verheddern, da der kontinuierliche Manschettendruck
den Blutfluss stören kann, was zu Verletzungen des
Patienten führen kann.
• Die Entsorgung muss gemäß den örtlichen Gesetzen
und Vorschriften zum Umgang mit diesem Gerät und
Batterie erfolgen.
• Der Patientenbediener darf die Batterie und die
Gleichstrombuchse nicht gleichzeitig berühren.
Ebenso darf der Bediener nicht gleichzeitig den
Patienten und die Batterie sowie die Gleichstrom-
buchse berühren.
• Bitte beachten Sie die Batterieanforderungen des
Herstellers.
• Bitte melden Sie dem Hersteller und der zuständigen
Behörde des Mitgliedstaates schwerwiegende
Vorfälle, die im Zusammenhang mit dem Produkt
aufgetreten sind.
• Bitte ziehen Sie den Netzstecker aus der Steckdose,
wenn Sie den Betrieb des ME-GERÄTS sicher
beenden wollen.
• Bitte schalten Sie das Gerät aus und ziehen Sie den
Adapter ab, bevor Sie es reinigen.
• Wenn der Monitor bei täglichem Gebrauch durch
einen einzelnen Patienten verschmutzt ist, diesen mit
einem weichen, trockenen Tuch reinigen. Wenn es
notwendig ist, verwenden Sie bitte ein mit Wasser
getränktes weiches Tuch, bevor Sie es mit einem
weichen Tuch reinigen. Reinigen Sie das Gerät
anschließend mit 75%igem Alkohol.
• Bitte verwenden Sie ein weiches, trockenes Tuch, das
mit 75%igem Alkohol getränkt ist, um das Gerät zu
reinigen, falls es von vielen Personen benutzt wird.
Lassen Sie den Alkohol jedoch nicht in den Monitor
und die Armmanschette fließen.
• Achten Sie darauf, dass der Alkohol nicht in den
Monitor und die Armmanschette fließt.
• Dieses Gerät nicht mit anderen Geräten verbinden, die
nicht in der Gebrauchsanweisung beschrieben sind.
• Hinweis: Bitte befolgen Sie die Anweisungen Ihres Arztes
und stellen Sie keine Diagnose anhand der Messung.
• Hinweis: Die Softwareversion kann im technischen
Modus von der dafür vorgesehenen Person eingesehen
werden. Dieser Modus ist für normale Benutzer nicht
zugänglich. Wenden Sie sich bitte an den Hersteller, um
die Methode zum Aufrufen des Modus zu erfahren.
Erklärung: Wenn der Monitor nicht im erforderlichen
Temperatur-, Höhen- und Feuchtigkeitsbereich verwen-
det und gelagert wurde, entspricht er möglicherweise
nicht den Spezifikationen.
• Der Abstand zwischen dem Gerät und dem Mobiltele-
fon sollte nicht mehr als 10 Meter betragen, damit die
Messergebnisse per Bluetooth übertragen werden
können.
• Wenn Sie möchten, dass Ihre Blutdruckmessungen
über Bluetooth an Ihr Telefon gesendet werden,
benötigen Sie ein Telefon, das Android 5.0 und höher
oder IOS 9.0 und höher unterstützt, um Yuwell Health-
Care+ herunterzuladen.
• Hinweis: Dieser Abschnitt gilt nur für das Modell mit
Bluetooth-Funktion.
Dieses Produkt wird mit einem Lithium-Akku betrieben.
Bitte stellen Sie sicher, dass die Batterie ausreichend
ist, wenn Sie das Produkt verwenden.
Wenn das „ “-Symbol erscheint und 25 % oder
weniger anzeigt, ist der Akku schwach und muss
aufgeladen werden.
Wenn das „ “ -Symbol erscheint und 5 % oder
weniger anzeigt, bedeutet dies, dass die Batterie
fast leer ist. Bitte vor Gebrauch aufladen.
1. Schließen Sie die Stromquelle zum Laden wie unten
gezeigt an.
2. Das Symbol „ “ blinkt während des Ladevor-
gangs, und das Symbol „ “ hört auf zu blinken,
wenn der Akku vollständig geladen ist.
3. Bitte ziehen Sie nach dem Aufladen den Netzadap-
ter aus der Steckdose.
Hinweis: Messen Sie den Blutdruck nicht während
des Aufladens, um keine abnormalen
Messungen zu verursachen.
Hinweis: Bitte laden Sie das Gerät an einem Ort
auf, an dem es leicht vom Stromnetz
getrennt werden kann.
Über die Bluetooth-Übertragung
Einschalten
DE DE
Akku laden Einstellung von Uhrzeit und Datum
Bitte verwenden Sie zum Aufladen nur das autorisierte
Yuwell-Netzteil (Ausgang DC 5 V 1 A), und wenden
Sie sich an Ihren Händler vor Ort, um sich über die
relevanten Informationen zu informieren.
Der Monitor speichert die Messergebnisse automa-
tisch im Datenverwaltungssystem. Nach dem Aufladen
und der Wiederinbetriebnahme müssen Uhrzeit und
Datum neu eingestellt werden. Bitte gehen Sie wie
folgt vor. (Beispiel: Einstellen des Datums auf 2022-08-
11 und der Uhrzeit auf 10:18)
1. Drücken Sie im Standby-Modus die Taste [
START|STOP] und die Taste [ ] für mehr als 3
Sekunden, bis die Jahreszahl zu blinken beginnt.
2. Drücken Sie die Taste [ ] , um in Schritten von
einem Jahr weiterzuschalten.
3. Nachdem Sie das Jahr eingestellt haben, drücken
Sie die [ START|STOP]-Taste, um zur Monatsein-
stellung zu wechseln, wobei die Monatszahl zu
blinken beginnt.
4. Auf die gleiche Weise können Sie nacheinander
Monat, Tag, Stunde und Minute einstellen.
Tipps!
Einstellung von Uhrzeit und Datum
• Stellen Sie Geräte mit Lithiumbatterien nicht in der
Nähe einer Feuerquelle auf.
• Nehmen Sie den Akku nicht heraus und tauschen Sie
ihn nicht aus, und drücken Sie ihn nicht mit harten
Gegenständen zusammen.
• Bitte laden Sie das Gerät rechtzeitig auf, wenn der
Akku leer ist.
• Es wird empfohlen, mehr als die Hälfte der Leistung
zu erhalten, um die Lebensdauer der Lithiumbatterie
zu verlängern.
• Wenn das Gerät über einen längeren Zeitraum (mehr
als 6 Monate) nicht benutzt wird, kann es leicht zu
einer Passivierung des Elektrodenmaterials kommen,
was zu einer Verschlechterung der Batterieleistung
führt. Es wird empfohlen, es häufig zu machen.
• Bitte entsorgen Sie Altbatterien gemäß den nationalen
Umweltschutzbestimmungen.
• Warnhinweis: Tauschen Sie den Akku nicht ohne
Genehmigung aus. Das Auswechseln des Akkus
durch ungeschultes Personal kann zu Überhitzung,
Feuer oder Explosion führen.
Jahr-Zeichen blinkt
Stundenzeichen blinkt Minutenzeichen blinkt
Monat-Zeichen blinkt Datum-Zeichen
DE DE
Einstellung von Sprachlautstärke und Maßeinheit
Verwendungsmethode der Manschette
Nach Abschluss der Zeit- und Datumseinstellung
drücken Sie die Taste [START|STOP], um die Einstel-
lung der Sprachlautstärke aufzurufen. Die Tongrößen
reichen von 01 bis 04. Drücken Sie die Taste [ ], um
den gewünschten Ton auszuwählen.
Es kann an jedem der beiden Oberarme gemessen
werden. Nicht an anderen Körperteile messen.
Schließen Sie den Luftanschluss der Manschette an
die Buchse auf der linken Seite des Monitors an.
Wickeln Sie die Manschette um den Oberarm (wie
auf dem Bild gezeigt). Der untere Rand der
Manschette befindet sich 2 bis 3 cm über dem
Ellenbogengelenk, und der Lufteinlass der
Manschette befindet sich auf der Innenseite des
Oberarms.
Nachdem Sie die Einstellung der Sprachlautstärke
abgeschlossen haben, drücken Sie die
[START|STOP]-Taste, um die Geräteeinstellung
aufzurufen. Drücken Sie die Taste [ ], um die Einheit
zwischen mmHg und kPa zu wählen. Drücken Sie
[START|STOP], um die Einstellung zu beenden.
Drücken Sie nach Abschluss der Geräteeinstellung die
Taste [START|STOP], um das Gerät auszuschalten.
Wenn die Sprachfunktionstaste nicht aktiviert ist, gibt
es keine Sprachübertragungsfunktion.
Einstellung der Sprachlautstärke
Tipps!
Tipps!
Anschluss der Manschette
Verwendungsmethode der Manschette
Einstellung der Messeinheit
DE DE
Verwendungsmethode der Manschette Körperhaltung während der Messung
Der Oberarm sollte
unbekleidet sein, oder
durch dünne Kleidung
bedeckt sein
Halten Sie den
Mittelpunkt der
Manschette und das
Herz auf gleicher Höhe
Der ideale Höhenun-
terschied zwischen
Tisch und Stuhl
beträgt 25 cm - 30 cm
Falsche Messhaltungen
Kleben Sie die Manschette fest.
Hinweis: Die Manschette sollte bequem anliegen,
nicht zu eng und nicht zu locker.
Setzen Sie sich gerade hin und legen Sie den Arm
mit der Handfläche nach oben flach auf den Tisch,
halten Sie auch die Mitte der Manschette und des
Herzens auf gleicher Höhe. Achten Sie bitte auch
darauf, dass der Luftschlauch nicht verdreht ist.
Nicht bücken und den Körper nicht nach vorne beugen.
Sitzen Sie nicht mit gekreuzten Beinen, die Füße
sollten flach auf dem Boden stehen.
Setzen Sie sich nicht auf ein Sofa.
(Druck im Bauch kann den
Blutdruck erhöhen.)
Legen Sie den Arm nicht auf
den niedrigen Tisch. (Kann
den Blutdruck erhöhen.)
Nicht hinlegen.
Erklärung: Der bei der Entwicklung verwendete Small-Bo-
re-Stecker entspricht der ISO 80369-1.
Warnhinweis: Da dieses Medizinprodukt einen alternativen
Steckverbinder mit kleiner Bohrung verwendet, der sich
von den in der ISO 80369-Reihe spezifizierten Steckver-
bindern unterscheidet, besteht die Möglichkeit, dass es zu
einer Fehlverbindung zwischen diesem Medizinprodukt
und einem Medizinprodukt kommt, das einen anderen
alternativen Steckverbinder mit kleiner Bohrung verwen-
det, was zu einer gefährlichen Situation führen kann, die
dem Patienten Schaden zufügt. Der Nutzer muss beson-
dere Maßnahmen ergreifen, um diese vernünftigerweise
vorhersehbaren Risiken zu mindern.
Sitzen sie
aufrecht.
DE DE
Start der Messung Start der Messung
Eine Stunde vor der Messung nicht essen, rauchen,
trinken, baden oder hochintensiven Sport treiben. Die
Messungen müssen jeden Tag zur gleichen Zeit
durchgeführt werden.
1. Messung
Alle Symbole auf dem Bildschirm erscheinen nach
dem Drücken der [START|STOP]-Taste für 1 Sekun-
de und verschwinden dann. Danach blinkt das
Entlüftungssymbol „ “, was bedeutet, dass sich das
System im Nulltest befindet. Einige Sekunden später
blinkt das Aufpumpsymbol „ “, was bedeutet, dass
der Nulltest beendet ist. Dann beginnt das Aufpum-
pen.
2. Beenden der Messung
Nach der Messung zeigt der Monitor SYS, DIA und
die Pulsfrequenz an. Dann wird die Luft automatisch
abgelassen.
Der Monitor beginnt nach dem
Aufpumpen automatisch mit der
Messung, und das Herzsymbol „ “
beginnt zu flackern. Das Entlüftungs-
ventil entlüftet automatisch langsam,
und der Druckwert fällt kontinuierlich.
Bitte entspannen Sie sich so weit wie möglich und
sprechen oder bewegen Sie sich während des
Messvorgangs nicht.
Vor der Messung 5 Minuten lang
stillsitzen.
Zustand der Vollbildanzeige
Der Zustand der Nullstellung
mmHg-Anzeige kPa-Anzeige
Der Messzustand
Der Aufblaszustand
DE DE
Start der Messung Anzeige des Blutdruckbereichs
3. Abnehmen der Manschette
4. Abschaltung
Drücken Sie die Taste [ START|STOP ], um das
Gerät auszuschalten. Andernfalls schaltet sich das
Gerät nach 3 Minuten automatisch aus, ohne dass
eine Bedienung erforderlich ist.
5. Trennen des Anschlusses
Ziehen Sie den Stecker des Adapters, um ihn sicher
vom Netz zu trennen.
Das Gerät sollte nicht so aufgestellt sein, dass ein
sicheres Trennen vom Stromnetz erschwert wird.
Warnhinweis: Der obere Grenzdruck für das
Aufblasen der Luft beträgt 300 mmHg/40,0
kPa. Halten Sie den aufgeblasenen Zustand
nicht zu lange aufrecht, um Schäden zu
vermeiden.
Wenn der SYS-Wert höher als 139 mmHg bzw.
der DIA-Wert höher als 89 mmHg ist, bedeutet
dies, dass Sie Bluthochdruck haben und einen Arzt
aufsuchen sollten.
Wenn Sie unerwartete Messwerte erhalten,
messen Sie bitte erneut oder wenden Sie sich an
Ihren Arzt.
Die Blutdruckbereichsanzeige kann den Blutdruck
intuitiv anzeigen.
Der Zeitabstand zwischen zwei Messungen sollte
mindestens 2 Minuten~3 Minuten oder länger
betragen.
Schätzen Sie den Blutdruck gemäß der Blutdruck-
klassifizierungstabelle ein und konsultieren Sie
einen Arzt.
Höher als 139 mmHg
Höher als 89 mmHg
Not-Aus während der Messung
Wenn die Messung wegen Unbehaglichkeit oder
aus anderen Gründen unterbrochen werden
muss, drücken Sie bitte die Taste [START|STOP] ,
die Messung wird sofort gestoppt und die Luft
entweicht schnell. Nehmen Sie die Manschette
manuell ab, wenn die Taste [START|STOP] nicht
funktioniert.
Tipps!
DE DE
Speicherfunktion Speicherfunktion
Das Blutdruckmessgerät speichert die Messdaten
automatisch (einschließlich Blutdruck und Puls), und
die Obergrenze der Aufzeichnungen liegt bei 60.
Drücken Sie die Taste [ ], um die Messdaten
einzusehen.
Die 60. Daten können durch die 59. ersetzt werden,
wenn die Speicherkapazität voll ist.
C.Lesen Sie die aufgezeichneten Daten durch
Drücken der Taste [ ] in der Reihenfolge ab: „01“,
„02“...... „60“ (max). Dann zum 1. Datensatz zurück-
kehren. Halten Sie die Taste [ ] gedrückt, um die
Daten schnell zu durchsuchen.
D.Drücken Sie die Taste [ START|STOP ], um den
Monitor auszuschalten.
1.Drücken Sie die Taste [ ] für die Datensätze
A. Drücken Sie die Taste [ ], um den Durch-
schnittswert der letzten 3 Messungen anzuzeigen.
B. Drücken Sie die Taste [ ], um die erste
Speichergruppe anzuzeigen, die Seriennummer wird
als „01“ bis „60“ angezeigt. „01“ ist die jüngste
Gruppe und „60“ ist die älteste.
2. Löschen der aufgezeichneten Daten
Drücken Sie sowohl die [ START|STOP ]-Taste als
auch die [ ] -Taste, bis das folgende Bild auf dem
Display erscheint, d.h. die aufgezeichneten Daten
werden gelöscht. Drücken Sie die Taste
[ START|STOP ], um den Monitor nach dem Lösch-
vorgang auszuschalten.
Hinweis: Bei diesem Vorgang werden alle
aufgezeichneten Daten gelöscht.
Tipps!
Tipps!
Der Durchschnittswert Die 1. Gruppe der Speicher
DE DE
Speicherfunktion Hilfsmessfunktion Statischer Modus
Das Symbol „ “ erscheint, wenn die Manschette
richtig angelegt ist, und das Symbol „ “ erscheint,
wenn die Manschette zu locker oder zu fest angelegt
ist.
Diese Funktion ist hauptsächlich für professionelles
Personal gedacht, um den statischen Modus
aufzurufen und den Monitor mithilfe eines Standard-
druckmessers zu testen.
Auf dem Bildschirm werden alle Symbole angezeigt,
nachdem Sie die Taste [START|STOP] gedrückt
haben. Danach wird auf dem Bildschirm das Symbol
„ “ angezeigt, was bedeutet, dass sich das System
im Wiederherstellungstest befindet. Einige Sekunden
später verschwindet das Symbol „ “ und die
Luftpumpe beginnt gleichzeitig aufzupumpen, was
bedeutet, dass der Test beendet ist. Drücken Sie
dann die Taste [ STARTISTOP ], um das Aufblasen zu
stoppen und nehmen Sie die Batterien heraus, um
zum nächsten Schritt überzugehen.
Warnhinweis: Normale Benutzer müssen diese
Funktion nicht kennen und auch nicht verwenden. Der
Hersteller übernimmt keine Verantwortung für
Schäden, die durch diesen Vorgang entstehen.
Hinweis: Das System muss wiederhergestellt
werden, bevor es in den statischen Modus geht, da es
sonst zu ungenauen Ergebnissen kommen kann.
Drücken Sie die Taste [ ] und halten Sie sie gedrückt.
Stechen Sie gleichzeitig in das Rücksetzloch und
lassen Sie es los. Wenn Sie ein Klicken hören, lassen
Sie die Taste [ ] los. Auf dem Bildschirm erscheinen
dann der Druckwert „ “, die Uhrzeit und das Datum,
mmHg. Jetzt ist das System wiederhergestellt und
befindet sich im statischen Modus. Jetzt können Sie
den statischen Test durchführen. Siehe Artikel
201.12.1.102 der IEC 80601-2- 30: 2018, um die
Kalibrierung dieses Geräts zu überprüfen.
Das Produkt kann die automatische Erkennung des
Körpers während der Messung der falschen Bewe-
gung und gibt das Symbol „ “ aus. Wenn während
der Messung das Symbol „ “ erscheint, messen
Sie erneut.
Das Symbol „ “ blinkt, wenn während der
Messung ein unregelmäßiges Pulssignal festgestellt
wird, und zeigt an, dass die Messung anormal ist
und erneut gemessen werden muss. Wenn bei
mehreren Messungen das Symbol „ “ erscheint,
wenden Sie sich an Ihren Arzt.
Erkennung der angelegten Manschette
Anzeige von Bewegungsfehlern
Anzeige von Herzrhythmusstörungen
Systemwiederherstellungen
Aufrufen des statischen Modus
DE DE
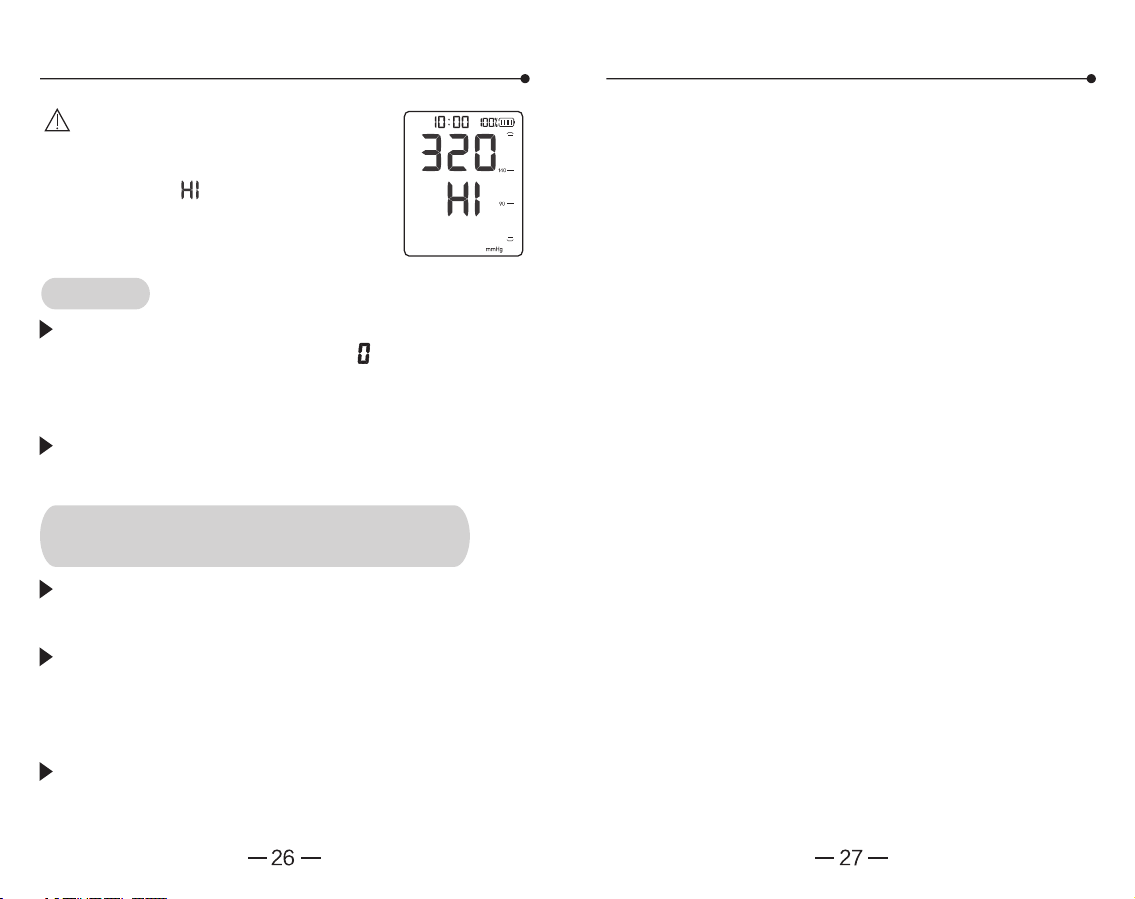
Hinweis: Wenn der gemessene
Druck während der statischen Prüfung
300 mmHg überschreitet, werden der
Druckwert und „ “ angezeigt, was
bedeutet, dass das Messergebnis den
Nennbereich überschreitet und mögli-
cherweise ungenau ist.
Wenn nach dem Aufrufen des statischen Modus auf
dem Bildschirm immer noch nicht „ “ angezeigt wird,
wiederholen Sie bitte die Systemwiederherstellung.
Sollte es trotzdem nicht funktionieren, wenden Sie
sich bitte an Ihren örtlichen Händler.
1. Was ist Blutdruck?
Der Blutdruck ist die Kraft, die das Blut auf die
Wände der Arterien ausübt. Der systolische Druck
entsteht, wenn sich das Herz zusammenzieht. Der
diastolische Druck entsteht, wenn sich das Herz
ausdehnt. Der Blutdruck wird in Millimeter Quecksil-
bersäule (mmHg) gemessen. Der natürliche
Blutdruck eines Menschen wird durch den Basis-
druck dargestellt, der morgens in Ruhe und vor dem
Essen gemessen wird.
2. Was ist Bluthochdruck und wie wird er kontrol-
liert?
Bluthochdruck, das heißt ein abnorm hoher arterieller
Blutdruck, kann, wenn er nicht behandelt wird, viele
Gesundheitsprobleme verursachen, einschließlich
Schlaganfall und Herzinfarkt. Bluthochdruck kann
durch eine Änderung des Lebensstils, die Vermei-
dung von Stress und durch Medikamente unter
ärztlicher Aufsicht kontrolliert werden. Um Bluthoch-
druck vorzubeugen oder ihn unter Kontrolle zu
halten, wird Folgendes empfohlen: Nicht rauchen,
treiben Sie regelmäßig Sport, reduzieren Sie den
Salz- und Fettkonsum, lassen Sie sich regelmäßig
ärztlich untersuchen und halten Sie Ihr Gewicht.
3. Warum sollte man den Blutdruck zu Hause
messen?
Die Blutdruckmessung in einer Klinik oder Arztpraxis
kann zu Befürchtungen führen und einen um 25 bis 30
mmHg höheren Wert ergeben als die Messung zu
Hause. Die Messung zu Hause verringert die Auswir-
kungen äußerer Einflüsse auf die Blutdruckwerte,
ergänzt die Messungen des Arztes und liefert eine
genauere und vollständigere Blutdruckgeschichte.
Das Eichsystem wird durch Anbringen eines Adapters
an der Druckleitung und Anbringen eines Referenz-
standards bestimmt.
Gehen Sie in den statischen Modus, lesen Sie das
Gerät und das Referenzmessgerät gleichzeitig ab, der
Fehler von 3 mmHg ist normal, indem Sie den Druck
von 300 mmHg auf Null mit einer Rate von 3 mmHg/s
± 1 mmHg/s reduzieren.
Wenn der Fehler über 3 mmHg liegt, wenden Sie sich
bitte an den Hersteller zur Kalibrierung.
Der Monitor schaltet sich automatisch aus, wenn
innerhalb von 4 Minuten keine Bedienung erfolgt.
Verfahren zur Überprüfung der Kali-
brierung
Tipps!
Statischer Modus Allgemeine Fragen zur Blutdruckmessung
DE DE
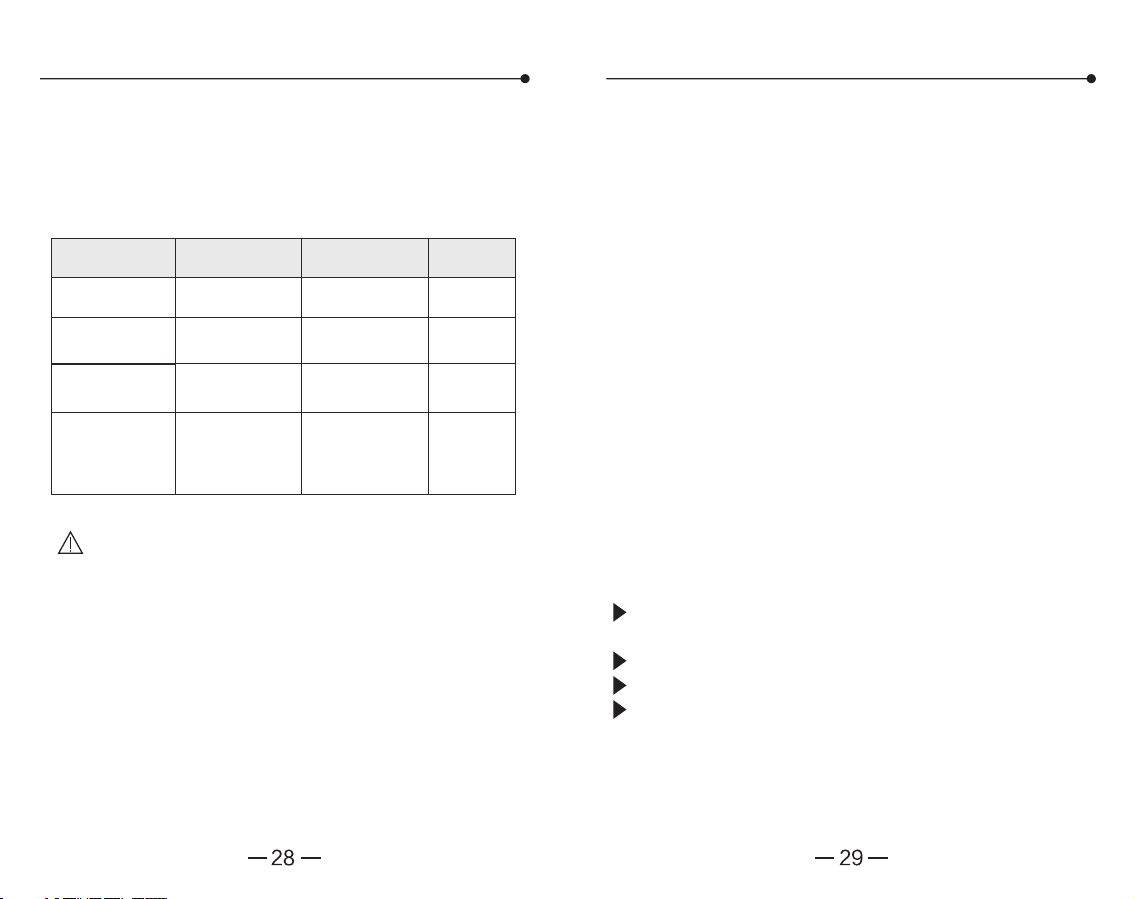
4. Blutdruck-Klassifikation laut WHO?
Die Weltgesundheitsorganisation (WHO) hat
Standards für die Bewertung von Bluthochdruck
ohne Berücksichtigung des Alters festgelegt (siehe
unten):
5. Blutdruckschwankungen?
Der Blutdruck eines Menschen schwankt täglich und
jahreszeitlich bedingt stark. Er kann je nach
Tagesform um 30 bis 50 mmHg schwanken. Bei
Menschen mit hohem Blutdruck sind die Abweichun-
gen sogar noch ausgeprägter. Normalerweise steigt
der Blutdruck bei der Arbeit oder beim Spielen an
und sinkt während des Schlafs auf seinen niedrigsten
Wert. Lassen Sie sich also nicht zu sehr von den
Ergebnissen einer einzigen Messung beeinflussen.
Messen Sie jeden Tag zur gleichen Zeit nach dem in
dieser Anleitung beschriebenen Verfahren, um Ihren
normalen Blutdruck zu ermitteln. Regelmäßige
Messungen ergeben eine umfassendere Blutdruck-
historie. Achten Sie darauf, dass Sie bei der
Aufzeichnung Ihres Blutdrucks Datum und Uhrzeit
notieren. Konsultieren Sie einen Arzt, um die
Blutdruckdaten zu interpretieren.
6. Wann ist der beste Zeitpunkt für eine
Blutdruckmessung?
Nach dem Wasserlassen, vor dem Frühstück am
Morgen.
Vor dem Schlafengehen in der Nacht.
Vor der Einnahme von Medikamenten.
Bitte achten Sie bei jeder Messung auf einen
stabilen Körper- und Geisteszustand. Wir
empfehlen, die Messungen jeden Tag zur
gleichen Zeit durchzuführen.
Hinweis: Es gibt keine Definition für Hypopiesie,
und im Allgemeinen wird SYS (systolischer
Druck) unter 90 mmHg oder DIA (diastolischer
Druck) unter 60 mmHg als Hypotonie bezeich-
net.
Bereich
Ortho-Arteriotonie
Leichter
Bluthochdruck
Mittlerer
Bluthochdruck
Schwerer
Bluthochdruck
Systolischer Druck
kPa/mmHg
12,0~18,5 kPa
90~139 mmHg
8,0~11,9 kPa
60~89 mmHg
12,0~13,2 kPa
90~99 mmHg
13,3~14,5 kPa
100~109 mmHg
≥ 14,7 kPa
≥ 110 mmHg
18,7~21,2 kPa
140~159 mmHg
21,3~23,9 kPa
160~179 mmHg
≥ 24,0 kPa
≥ 180 mmHg
Diastolischer Druck
kPa/mmHg
Gegenmaß-
nahmen
Selbstkont-
rolle
Konsultieren
Sie einen
Arzt
Konsultieren
Sie einen
Arzt
Gefahr! So
bald wie
möglich ein
Krankenhaus
aufsuchen
Allgemeine Fragen zur Blutdruckmessung Allgemeine Fragen zur Blutdruckmessung
DE DE

Häufiger Fehler
Fehlercode
Err4
Err5
Err6
Err7
Err8
Störungsursache
Druck kann nicht
gemessen werden
Legen Sie die Manschette
vor der Messung richtig an
Messen Sie bitte erneut
Prüfen Sie, ob Luft aus der
Manschette austritt
Halten Sie Arm und Körper
ruhig und messen Sie
erneut
Ziehen Sie die Manschette
fest an
Messen Sie bitte erneut
Schließen Sie den
Netzadapter zum Aufladen
an
Schließen Sie den
Netzadapter zum Aufladen
an
Die Messergebnisse
überschreiten den
Messbereich der
diastolischen oder
systolischen Werte
Druckmessfehler
Druckmessfehler durch
Arm- oder Körperbewe-
gung verursacht
Manschette ist zu locker
oder heruntergefallen
Der Druck überschreitet
den Maximalwert (300
mmHg)
Die Batterie ist schwach
Die Batterie ist leer
Lösung
Es funktioniert nicht, nachdem
Sie die Taste [ STARTISTOP ]
gedrückt haben
Mehrmaliges Auftreten von
Messfehlern, oder der
Messwert ist niedrig (oder
hoch)
Der Monitor ist in gutem
Zustand, aber die einzelnen
Messergebnisse fallen
unterschiedlich aus
Der Wert unterscheidet sich
von dem, der in einer Klinik
oder Arztpraxis gemessen
wird
Bitte versuchen Sie es nach dem
Aufladen erneut
Prüfen Sie den Anschluss und die
Wicklung der Manschette
Prüfen Sie, ob die Manschette zu
eng oder zu locker anliegt. Ziehen
Sie Ihre Kleidung aus, wenn sie zu
eng anliegt
Bitte achten Sie auf einen ruhigen,
entspannten Körperzustand. Es wird
tiefes Atmen empfohlen, um sich vor
der Messung zu entspannen
Bitte lesen Sie die „Blutdruck-
schwankungen“ sorgfältig durch
Täglich den Wert notieren und einen
Arzt konsultieren
Pumpe funktioniert, aber der
Druck steigt nicht an
Prüfen, ob die Manschette gut
angeschlossen ist
Lösungen
Häufige Fehler und Fehlersuche Häufige Fehler und Fehlersuche
In der nachstehenden Tabelle sind die möglichen
Fehler mit Symbolen, möglichen Ursachen und
Lösungen aufgeführt.
Warnhinweis: Wenn die Probleme nicht gelöst
werden können oder ein unerwartetes Problem
auftritt, wenden Sie sich bitte an Ihren örtlichen
Händler.
DE DE
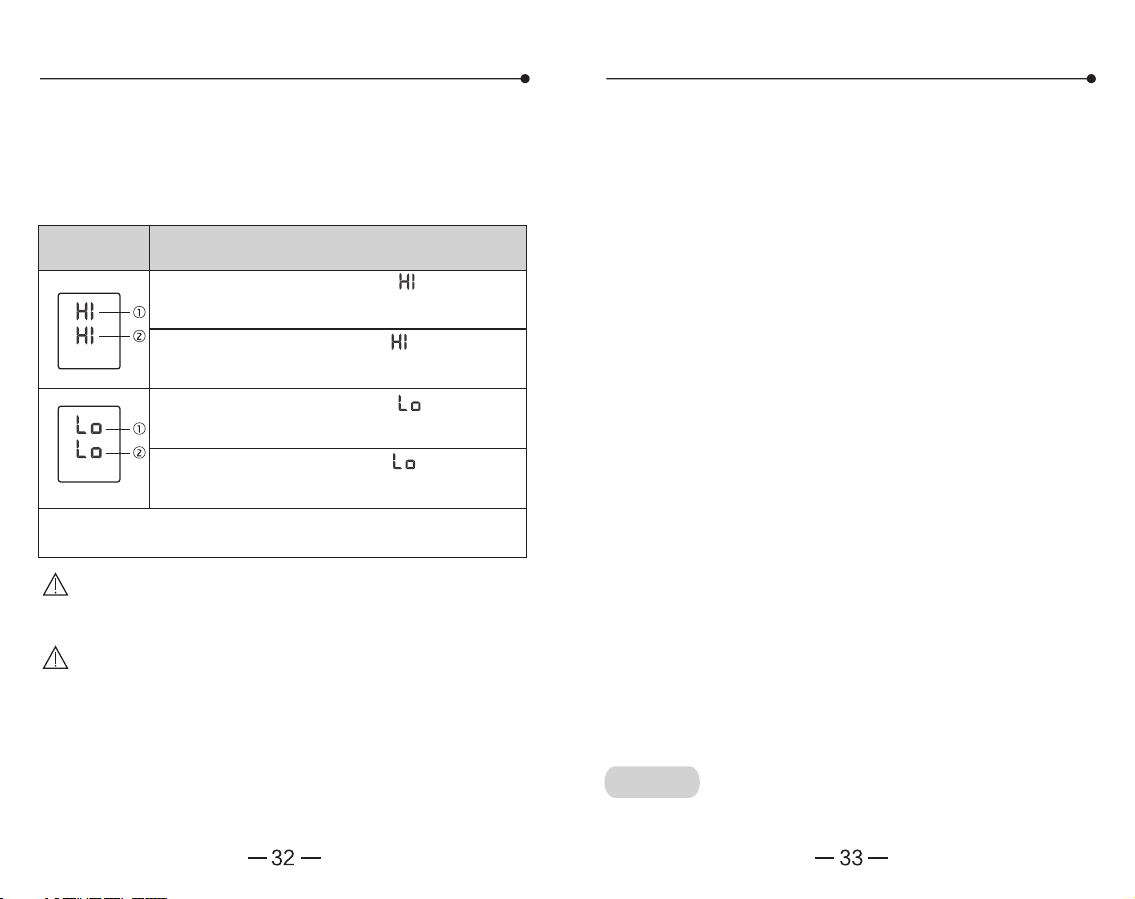
Alarmanzeige
Anzeigeinhalte und Ursachen
① Wenn im SYS-Anzeigebereich „ “,angezeigt
wird, bedeutet dies, dass das Messergebnis des
systolischen Drucks 260 mmHg überschreitet.
① Wenn im SYS-Anzeigebereich „ “ angezeigt
wird, bedeutet dies, dass das Messergebnis des
systolischen Drucks unter 40 mmHg liegt.
② Wenn im DIA-Anzeigebereich „ “ angezeigt
wird, bedeutet dies, dass das Messergebnis des
diastolischen Drucks unter 20 mmHg liegt.
Wenn die oben genannte Alarmanzeige erscheint, bitte erneut
messen oder einen Arzt konsultieren.
② Wenn im DIA-Anzeigebereich „ “ angezeigt wird,
bedeutet dies, dass das Messergebnis des
diastolischen Drucks 210 mmHg überschreitet.
Alarmsystem Wartung
Wenn der ermittelte Blutdruck außerhalb des
Nennbereichs liegt, erscheint ein visuelles Alarmsig-
nal auf dem Display. Einzelheiten entnehmen Sie
bitte der nachstehenden Tabelle.
Bitte beachten Sie die folgenden Punkte, um das
Gerät zu schützen und die Genauigkeit der Messung
zu gewährleisten.
Hinweis: Wenn der Alarm nicht behoben werden
kann und der Benutzer sich unwohl fühlt, bitte so
bald wie möglich einen Arzt aufsuchen.
Hinweis: Wenn der Alarm nicht behoben werden
kann oder die Funktionalität des Alarmsystems
überprüft werden muss, wenden Sie sich bitte an
den Hersteller.
SYS
mmHg
DIA
mmHg
P/min
SYS
mmHg
DIA
mmHg
P/min
• Bitte lagern Sie den Monitor und das Zubehör nach
dem Gebrauch ordnungsgemäß.
• Setzen Sie das Blutdruckmessgerät und das Zubehör
nicht hohen Temperaturen, Feuchtigkeit, Staub oder
Sonneneinstrahlung aus.
• Die Manschette enthält einen Airbag im Inneren, bitte
Vorsicht bei der Anwendung, nicht falten, ziehen oder
verdrehen.
• Warnhinweis: Das Gerät nicht ohne Genehmigung
zerlegen oder reparieren und es nicht ohne Genehmi-
gung modifizieren.
• Das Gerät darf nicht gewartet werden, während es in
Betrieb ist.
• Bitte verwenden Sie ein weiches, trockenes Tuch, das
mit etwas Wasser getränkt ist, um das Gerät zu
reinigen, falls es von einer einzelnen Person benutzt
wird, aber lassen Sie das Wasser nicht in das Gerät
und die Manschette fließen.
• Verwenden Sie ein weiches, mit 75%igem Ethanol
getränktes Tuch, um das Gerät zu reinigen, wenn es von
vielen Menschen benutzt wird, aber lassen Sie das Ethanol
nicht in den Monitor und auf die Manschette fließen.
• Reinigen Sie das Gerät nicht, wenn es an das
Stromnetz angeschlossen ist.
• Der Hersteller stellt auf Anfrage Schaltpläne, Bauteil-
listen, Beschreibungen, Kalibrierungsanweisungen
oder andere Informationen zur Verfügung, die dem
Kundendienst bei der Reparatur der Teile des Geräts
helfen, die vom Hersteller als vom Kundendienst
reparierbar eingestuft werden.
• Defekte Sensoren können die Leistung beeinträchtigen.
Wir empfehlen, den Monitor gemäß den örtlichen
Gesetzen und Vorschriften zu kalibrieren (mindestens
einmal pro Jahr).
Tipps!
DE DE
1. Funktionen
Erkennung der angelegten Manschette
Anzeige von Herzrhythmusstörungen
60 Speichergruppen
Durchschnittswertanzeige von drei Messungen
Geeigneter Oberarmumfang: 22 cm-45 cm
Abmessung: Etwa 127x92x68 (mm)
Gewicht: ca. 306 g
3. Betriebs- und Lagerbedingungen
Betriebsbedingungen:
im Temperaturbereich von + 5°C bis + 40°C;
relative Luftfeuchtigkeit von 15 % bis 90 %, nicht
kondensierend; und einem atmosphärischen Druck-
bereich von 70 kPa bis 106 kPa.
Transport- und Lagerbedingungen:
-25° C bis +5 °C, und
+ 5 °C bis + 35 °C bei einer relativen Luftfeuchtigkeit
von bis zu 90%, nicht kondensierend;
> 35 °C bis 70 °C bei einem Wasserdampfdruck von
bis zu 5 kPa.
Betriebsumgebung:
Vermeiden Sie elektromagnetische Störungen, heftige
Erschütterungen und Lärm in der Umgebung.
Erholungszeit:
1. Bei einer Umgebungstemperatur von 20 °C beträgt
die Zeit, die das Gerät benötigt, um von der minimalen
Lagertemperatur (-20 °C) bis zur Betriebsbereitschaft
aufzuwärmen, 2 Stunden.
2. Bei einer Umgebungstemperatur von 20 °C beträgt
die Zeit, die das Gerät benötigt, um von der maximalen
Lagertemperatur (55 °C) abzukühlen, bis es einsatzbe-
reit ist, 2 Stunden.
2. Technische Parameter
Display: LCD-Digitalanzeige
Funktionsprinzip: Oszillometrische Methode
Messbereich:
Diastolisch: 20 mmHg - 210 mmHg
Systolisch: 40 mmHg - 260 mmHg
Manschettendruck: 0 mmHg ~ 300 mmHg
Pulsfrequenz: 40 Schläge/min ~ 200 Schläge/min
Druck:
Druck: innerhalb ± 3 mmHg (± 0,4 kPa)
Pulsfrequenz: innerhalb von 5 % des Messwerts
Arbeitsweise: Dauerbetrieb
IP-Klassifizierung: IP20
Elektrische Klassifizierung: Klasse II und intern
gespeist, Typ BF Anwendungsteil (Manschette ist
Anwendungsteil)
Nutzungsdauer:
5 Jahre (6 Mal für jeden Tag) für den Monitor
5000 Mal für die Manschette
Stromversorgung
Batterie: DC 3,7 V
Netzgerät: Eingang 100 - 240 V~ 50 / 60 Hz 0,35 A MAX
Ausgang 5 V 1000 mA
Maximale Akkulaufzeit: der Akku kann mit einer vollen
Ladung etwa 250 Mal verwendet werden
gegen das Eindringen von festen
Fremdkörpern: ≥ 12,5 mm Durchmesser
Merkmale und technische Parameter Merkmale und technische Parameter
DE DE
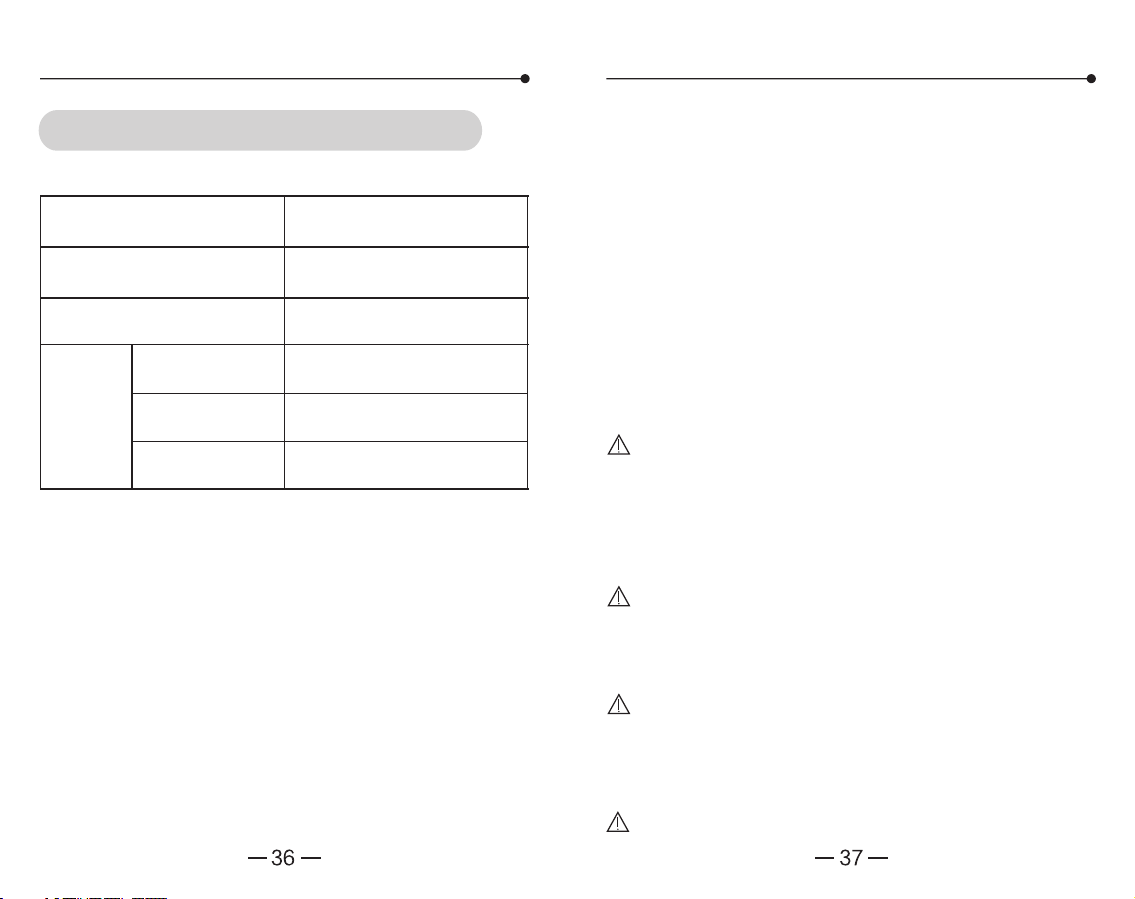
Das SPHYGMOMANOMETER wurde gemäß den
Anforderungen der ISO 81060-2 klinisch untersucht.
Das SPHYGMOMANOMETER entspricht der IEC
80601-2-30.
Wesentliche Leistung:
1. Fehlergrenzen des Messgeräts:
Im Temperaturbereich von 5 °C bis 40 °C und im
Bereich der relativen Luftfeuchtigkeit von 15 % bis 90
% (nicht kondensierend) darf der maximale Fehler bei
der Messung des CUFF-Drucks an jedem Punkt des
NOMINAL-Messbereichs höchstens ± 3 mmHg (± 0,4
kPa) des Messwerts betragen.
2. Reproduzierbarkeit der BLUTDRUCKBESTIMMUNG:
Die Abweichung der Laborreproduzierbarkeit der
BLUTDRUCKBESTIMMUNG des AUTOMATISCHEN
BLUTDRUCKMESSGERÄTS muss geringer als 3,0
mmHg (0,4 kPa) ausfallen oder genau diesem Wert
entsprechen.
WARNHINWEIS: Der Bediener sollte das System
Tragbare HF-Kommunikationsgeräte (einschließlich
Peripheriegeräte wie Antennenkabel und externe
Antennen) sollten nicht näher als 30 cm an irgendei-
nem Teil des SPHYGMOMANOMETERs verwendet
werden, einschließlich der vom Hersteller angegebe-
nen Kabel. Andernfalls kann es zu einer Beeinträchti-
gung der Geräteleistung kommen.
Dieses Gerät bietet möglicherweise keinen ausrei-
chenden Schutz für Hochfrequenz-Kommunikations-
dienste. Möglicherweise muss der Benutzer Maßnah-
men zur Schadensbegrenzung ergreifen, wie z. B. die
Verlegung oder Neuausrichtung des Geräts.
Wenn das Gerät in Gebrauch ist, stellen Sie es
niemals in die Nähe anderer Geräte oder stapeln es
auf andere Geräte. Wenn Sie es in die Nähe anderer
Geräte oder Instrumente stellen müssen, überprüfen
Sie bitte, ob das Gerät normal laufen kann.
Merkmale und technische Parameter
Angaben zur elektromagnetischen Verträglichkeit
Kontaktmaterialien, Produktdetails
Teil
Hintere Abdeckung ABS
PC
ABS
PVC
Obere Abdeckung
Manschette
Armbinde Nylon, Polyester
Luftsteckeranschluss
Luftschlauch
Material
nicht benutzen und den Kundendienst informieren,
wenn die WESENTLICHE LEISTUNG aufgrund von
EM-Störungen verloren geht oder sich verschlechtert.
DE DE
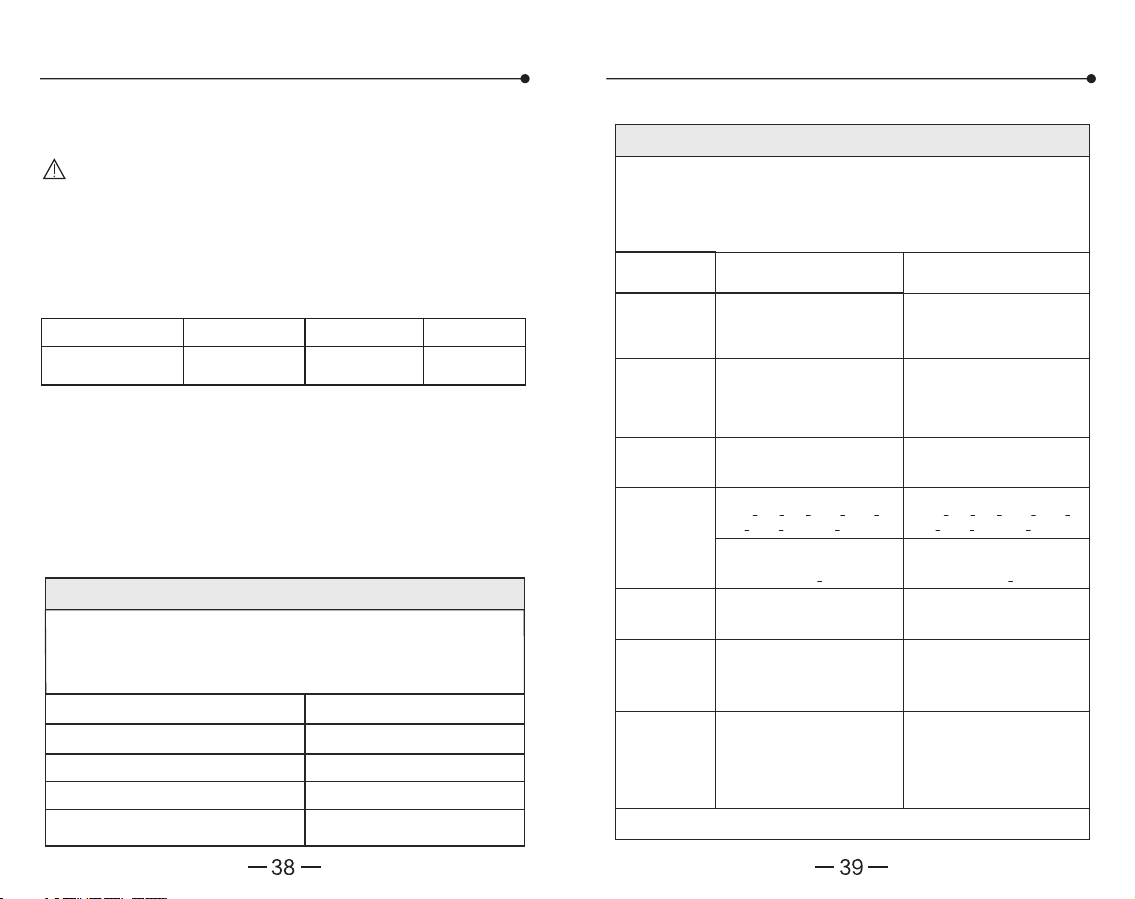
WARNHINWEIS: Der Bediener sollte das System
WARNHINWEIS: Die Verwendung von Zubehör und
Kabeln, die nicht vom Hersteller dieses Geräts vorge-
geben oder geliefert wurden, kann zu erhöhten
elektromagnetischen Emissionen oder einer verringer-
ten elektromagnetischen Störfestigkeit dieses Geräts
führen und einen fehlerhaften Betrieb zur Folge haben.
Die Liste der Kabel und des Zubehörs ist wie folgt:
Tabelle 1 Für alle ME-GERÄTE und ME-SYSTEME
Tabelle 2 Für alle ME-GERÄTE und ME-SYSTEME
Es besteht die Gefahr von Funkstörungen zwischen
dem Gerät und anderen Geräten. Wenn dies der Fall ist,
ermitteln Sie bitte die Probleme und ergreifen Sie die
folgenden Maßnahmen:
(1) Schalten Sie das Gerät aus und dann wieder ein.
(2) Ändern Sie die Richtung des Geräts.
(3) Halten Sie das Produkt von störenden Geräten fern.
Angaben zur elektromagnetischen Verträglichkeit Angaben zur elektromagnetischen Verträglichkeit
Kabelbezeichnung Kabellänge
≤ 1,2 m Ungeschirmt Keine
Kabelschirmung Kommentare
DC-Stromversor-
gungskabel
Leitfaden und Herstellererklärung - elektromagnetische Emission
Leitfaden und Herstellererklärung - Elektromagnetische Emission
Das elektronische Blutdruckmessgerät YE650AR ist für die
Verwendung in der unten angegebenen elektromagnetischen
Umgebung vorgesehen. Der Kunde oder der Benutzer des
elektronischen Blutdruckmessgeräts YE650AR sollte sicherstellen,
dass es in einer solchen Umgebung verwendet wird.
Elektrostatische
Entladung
(ESD) IEC
61000-4-2
± 8 kV Kontakt
± 15 kV Luft
± 8 kV Kontakt
± 15 kV Luft
Schnelle
elektrische
Transienten/-
Bursts IEC
61000-4-4
± 2 kV
100 kHz Wiederholfre-
quenz
± 2 kV
100 kHz Wiederholfre-
quenz
Überspannung
IEC 61000-4-5
± 1 kV Leitung(en) zu
Leitung(en)
±2 kV Leitung(en) gegen Erde
± 1 kV Leitung(en) zu
Leitung(en)
Spannungsein-
brüche IEC
61000-4-11
Spannungsun-
terbrechungen
IEC 61000-4-11
Netzfrequenz
(50/60 Hz)
Magnetfeld IEC
61000-4-8
Magnetische
Annäherungs-
felder IEC
61000-4-39
HINWEIS: U
T
ist die Netzwechselspannung vor der Anwendung des Prüfpegels.
0% U
T
; 0,5 Zyklus
Bei 0
0
, 45
0
, 90
0
, 135
0
, 180
0
,
225
0
, 270
0
und 315
0
0% U
T
; 1 Zyklus und 70%
U
T
; 25/30 Zyklen
Einphasig: bei 0
0
0% U
T
; 250/300 Zyklen
30 A/m
50Hz oder 60Hz
8 A/m, CW für 30 kHz
65 A/m, 2,1 kHz Pulsmodula-
tion für 134,2 kHz
7,5 A/m, 50 kHz Pulsmodula-
tion für 13,56 MHz
8 A/m, CW für 30 kHz,
65 A/m, 2,1 kHz Pulsmodula-
tion für 134,2 kHz,
7,5 A/m, 50 kHz Pulsmodula-
tion für 13,56 MHz
30 A/m
50Hz oder 60Hz
0% U
T
; 250/300 Zyklen
0% U
T
; 1 Zyklus und 70%
U
T
; 25/30 Zyklen
Einphasig: bei 0
0
0% U
T
; 0,5 Zyklus
Bei 0
0
, 45
0
, 90
0
, 135
0
, 180
0
,
225
0
, 270
0
und 315
0
Das elektronische Blutdruckmessgerät YE650AR ist für die Verwen-
dung in der unten angegebenen elektromagnetischen Umgebung
vorgesehen. Der Kunde oder der Benutzer des elektronischen
Blutdruckmessgeräts YE650AR sollte sicherstellen, dass es in einer
solchen Umgebung verwendet wird.
Emissionstest
Konformität
HF-Emissionen CISPR 11
Gruppe!
Klasse В
Klasse A
Konform
HF-Emissionen CISPR 11
Spannungsschwankungen/Fli-
cker-Emissionen IEC 61000-3-3
Oberwellenemissionen IEC 61000-3-2
IEC 60601 Prüfniveau Übereinstimmungspegel
Störfestig-
keitstest
nicht benutzen und den Kundendienst informieren,
wenn die WESENTLICHE LEISTUNG aufgrund von
EM-Störungen verloren geht oder sich verschlechtert.
DE DE

Tabelle 3 Für ME-AUSRÜSTUNG und ME-SYSTEME,
die nicht LEBENSERHALTEND sind
Tabelle 4 Prüfspezifikationen für ENCLOSURE PORT
IMMUNITY gegenüber drahtlosen HF-Kom-
munikationseinrichtungen
Angaben zur elektromagnetischen Verträglichkeit Angaben zur elektromagnetischen Verträglichkeit
Leitfaden und Herstellererklärung - Elektromagnetische Störfestigkeit
Das elektronische Blutdruckmessgerät YE650AR ist für die
Verwendung in der unten angegebenen elektromagnetischen
Umgebung vorgesehen. Der Kunde oder der Benutzer des
elektronischen Blutdruckmessgeräts YE650AR sollte sicherstellen,
dass es in einer solchen Umgebung verwendet wird.
Leitungsgebunde-
ne RF IEC
61000-4-6
Abgestrahlte RF
IEC 61000-4-3
3 Veff
0,15 MHz-80 MHZ
6 V rms in ISM- und
Amateurfunkbändern
zwischen
0,15 MHz und 80 MHZ
80 % Am bei 1 kHz
10 V/m
80 MHZ bis 2,7 GHz
10 V/m
80 MHZ bis 2,7 GHz
HINWEIS 1 Bei 80 MHz und 800 MHz gilt der höhere Frequenzbereich.
HINWEIS 2 Diese Leitlinien gelten nicht für alle Situationen.
Die elektromagnetische Ausbreitung wird durch Absorption und Reflexion an
Strukturen, Gegenständen und Personen beeinflusst.
Wenn es zum Erreichen der IMMUNITÄTSPRÜFUNG erforderlich ist, kann
der Abstand zwischen der Sendeantenne und der MEGERÄT oder dem
MEGERSYSTEM auf 1 m verringert werden. Der Prüfabstand von 1 m ist
nach IEC61000-4-3 zulässig.
a) Bei einigen Diensten sind nur die Uplink-Frequenzen enthalten.
b) Der Träger wird mit einem Rechtecksignal mit 50 % Tastverhältnis moduliert.
c) Als Alternative zur FM-Modulation kann der Träger mit einem Rechtecksignal
mit 50 % Tastverhältnis bei 18 Hz pulsmoduliert werden, was zwar nicht der
tatsächlichen Modulation entspricht, aber den ungünstigsten Fall darstellt.
a
Feldstärken von ortsfesten Sendern, wie Basisstationen für Funktelefone
(zellulare/schnurlose Telefone) und mobile Landfunkgeräte, Amateurfunk,
AM- und FM-Rundfunk und Fernsehsendungen können theoretisch nicht
genau vorhergesagt werden. Um die elektromagnetische Umgebung durch
ortsfeste HF-Sender zu beurteilen, sollte eine elektromagnetische
Standortuntersuchung in Betracht gezogen werden. Wenn die gemessene
Feldstärke an dem Ort, an dem das YE650AR verwendet wird, den oben
angegebenen HF-Konformitätspegel überschreitet, sollte das YE650AR
beobachtet werden, um den normalen Betrieb zu überprüfen. Wenn eine
abnormale Leistung beobachtet wird, können zusätzliche Maßnahmen
erforderlich sein, wie z. B. eine Neuausrichtung oder ein Standortwechsel
des YE650AR.
b
Im Frequenzbereich von 150 kHz bis 80 MHz sollten die Feldstärken
weniger als 3 V/m betragen.
3 Veff
0,15 MHz-80 MHZ
6 V rms in ISM- und
Amateurfunkbändern
zwischen
0,15 MHz und 80 MHZ
80 % Am bei 1 kHz
Testfre-
quenz
(MHz)
385 380 bis 390 TETRA 400
Impulsmodula-
tion
b)
18 Hz
27
28
9
28
28
28
9
FM
±5 kHz
Abweichung
1 kHz Sinus
Impulsmodula-
tion
b)
217 Hz
Impulsmodula-
tion
b)
18 Hz
Impulsmodula-
tion
b)
217 Hz
Impulsmodula-
tion
b)
217 Hz
Impulsmodula-
tion
b)
217 Hz
G MRS 460, FRS
460
LTE Band 13, 17
GSM 800/900,
TETRA 800, IDEM
820, CDMA 850,
LTE Band 5
GSM 1 800; TETRA
1900;
GSM 1 900; DECT;
LTE Band 1, 3, 4,
25; UMTS
Bluetooth, WLAN,
802.11 b/g/n, RFID
2450, LTE Band 7
WLAN 802,11 a/n
430 bis 470
704 bis 787
800 bis 960
1700 bis 1990
2400 bis 2570
5100 bis 5800
450
710
745
780
810
870
930
1720
1845
1970
2450
5240
5500
5785
Band
a)
(MHz)
Dienstleistung
a)
Modulation
STÖRFES-
TIGKEITSNI-
VEAU (V/m)
IEC 60601 Prüfniveau
Übereinstimmungs-
pegel
Störfestigkeits-
test
DE DE

Misuratore elettronico della pressione
arteriosa
Manuale d’istruzioni
Leggere attentamente il manuale d'uso prima di utilizzarlo!
Metrax GmbH
Rheinwaldstr. 22, 78628 Rottweil, GERMANIA
JIANGSU YUYUE MEDICAL EQUIPMENT & SUPPLY CO., LTD.
No.1 Baisheng Road Development Zone, Danyang, Jiangsu 212300 CINA
www.yuwell.com
Data di rilascio:08.2024 YY-BPM0088C-01(A/2)
YE650AR

Contenuti
Caratteristiche del prodotto
Funzione vocale
L'icona del Bluetooth è
applicabile solo al modello
con funzione Bluetooth.
Indicazione di errore
di movimento
Rilevamento per
l'uso del bracciale
Indicazione per battiti cardiaci
irregolari
Suggerimenti: I disegni stampati nel Manuale d'uso sono solo
a scopo illustrativo. Per i dettagli, fare riferimento all'oggetto
reale.
Prima dell'uso
Caratteristiche del prodotto .....................................01
Guida per l’uso ........................................................02
Struttura e parti del prodotto....................................04
Precauzioni..............................................................06
Note importanti ........................................................07
Carica della batteria ................................................ 11
Impostazione di data e ora ......................................13
Volume della voce e impostazione dell'unità...........14
Metodo di misurazione
Metodo di utilizzo del bracciale ...............................15
Postura per la misurazione......................................17
Iniziare la misurazione.............................................18
Indicatore dei valori della pressione arteriosa .........21
Funzione di memorizzazione...................................22
Funzione di misurazione ausiliaria ..........................24
Modo statico ............................................................25
Problema comune
Domande comuni sulla misurazione della pressione
arteriosa ..................................................................27
Guasti comuni e risoluzione dei problemi................30
Sistema di allarme...................................................32
Manutenzione..........................................................33
Caratteristiche e parametri tecnici...........................34
Informazioni sulla compatibilità elettromagnetica....37
IT IT
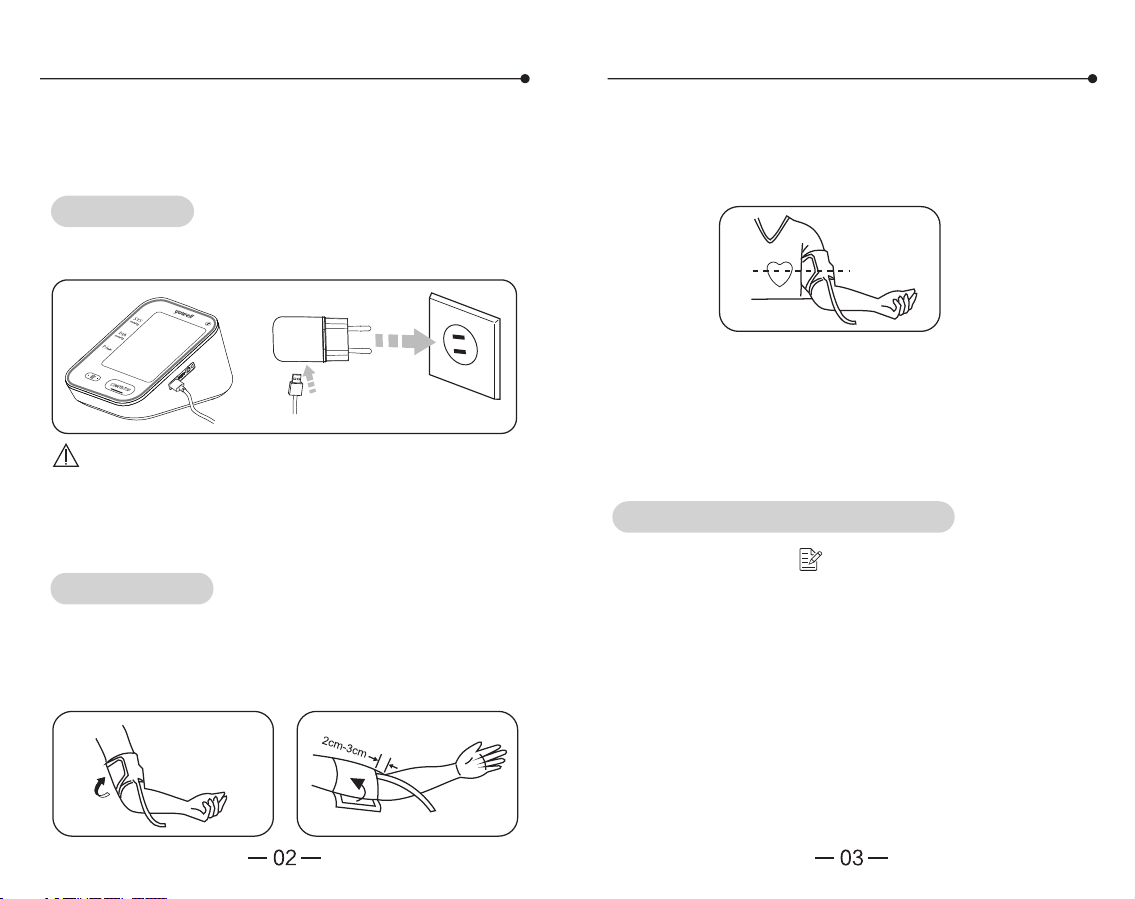
Guida per l’uso Guida per l’uso
Questo dispositivo di misurazione della pressione
arteriosa utilizza il metodo oscillometrico.
Seguire tutti i passaggi come mostrato di seguito.
Collegare la fonte di alimentazione per la ricarica
come illustrato di seguito.
Ad eccezione dell'adattatore di alimentazione
fornito dal produttore come parte di ricambio, l'utilizzo
di accessori non specificati o dell'adattatore di
alimentazione può causare un aumento delle emissio-
ni o una riduzione dell'immunità dello strumento.
1. Metodo di utilizzo del bracciale
Indossare il bracciale posizionando il bordo inferiore
2~3cm al di sopra del gomito, tenere il tubo dell'aria
all'interno. (Andare a pagina 15 per i dettagli.)
2. Postura per la misurazione
Sedersi in modo diritto, mantenendo il centro del polso
e il cuore allo stesso livello. (Andare a pagina 17 per i
dettagli.)
3. Iniziare la misurazione
Rimanere fermi per 5 minuti, quindi premere il
pulsante [START|STOP] per eseguire la misurazione.
(Andare a pagina 18 per i dettagli.)
Premere il pulsante [ ] per controllare i valori delle
misurazioni registrate. Questo monitor è in grado di
visualizzare il valore medio delle misurazioni e può
memorizzare fino a 60 misurazioni. (Andare a pagina
22 per i dettagli.)
Accensione
Misurazione
Controllare i valori registrati
IT IT

Struttura e parti del prodotto Struttura e parti del prodotto
1. Parte principale
3. Adattatore AC e cavo USB
4. Display
5. Accessori
2. Bracciale
L'icona del Bluetooth è
applicabile solo al modello
con funzione Bluetooth.
Display
Porta per la
spina
Tasto di
memoria
Connettore
aria
Bracciale
Modello
Senza supporto rigido
Materiale:
poliestere 210T
Materiale:
poliestere 250D
Con supporto
rigido
22cm
-
32cm
22cm
-
45cm
22cm
-
32cm
22cm
-
45cm
22cm
-
32cm
22cm
-
45cm
Range di
circonfe-
renza del
braccio
Caratteri-
stiche
YE-61MC YE-61LC YE-62MC YE-62LC YE-63MC YE-63LC
Tubo in gomma
dell'aria
Pulsante Avvia/
Arresta
Icona Bluetooth Ora e data
Icona della batteria
SYS (sistolica)
DIA (diastolica)
Frequenza
cardiaca
Unità kPa/mmHg
Numero
registrazioni
Icona volume
vocale
volume vocale aperto
volume vocale off
Icona di rilevamento per
l'uso del bracciale
Icona di Inflazione/Deflazione
Icona del battito cardiaco
Icona di indicazione per
battiti cardiaci irregolari
Icona di indicazione dell'errore di
movimento
L'icona del Bluetooth è
applicabile solo al modello
con funzione Bluetooth.
Adattatore AC
(opzionale)
Cavo USB
(opzionale)
Tasto funzione vocale-on/off
Presa per l’alimentatore
foro di
ripristino
Esistono 6 tipi di bracciale forniti da yuwell. Si prega di
fare riferimento al tipo di bracciale ricevuto.
Selezionare un bracciale di dimensioni adatte a seconda della
circonferenza del braccio. Un valore diverso da quello indicato
può portare a risultati di misurazione imprecisi.
Attenzione: Si prega di utilizzare un bracciale prodotto da
Yuwell, altrimenti i risultati della misurazione saranno imprecisi.
Manuale d'uso, scheda di garanzia, cavo USB (opziona-
le) Adattatore AC (opzionale)
Alimentatore AC
INGRESSO: 100-240V ~
50/60HZ 0,35A MAX
USCITA: 5 V 1000mA
MFR: WEIHAI HITAI ELECTRONICS Co.,LTD.
Modello UE: HT-C38B-0510EW
Modello USA: HT-C38B-0510WW
Modello UK: HT-C38B-051OUW
IT IT
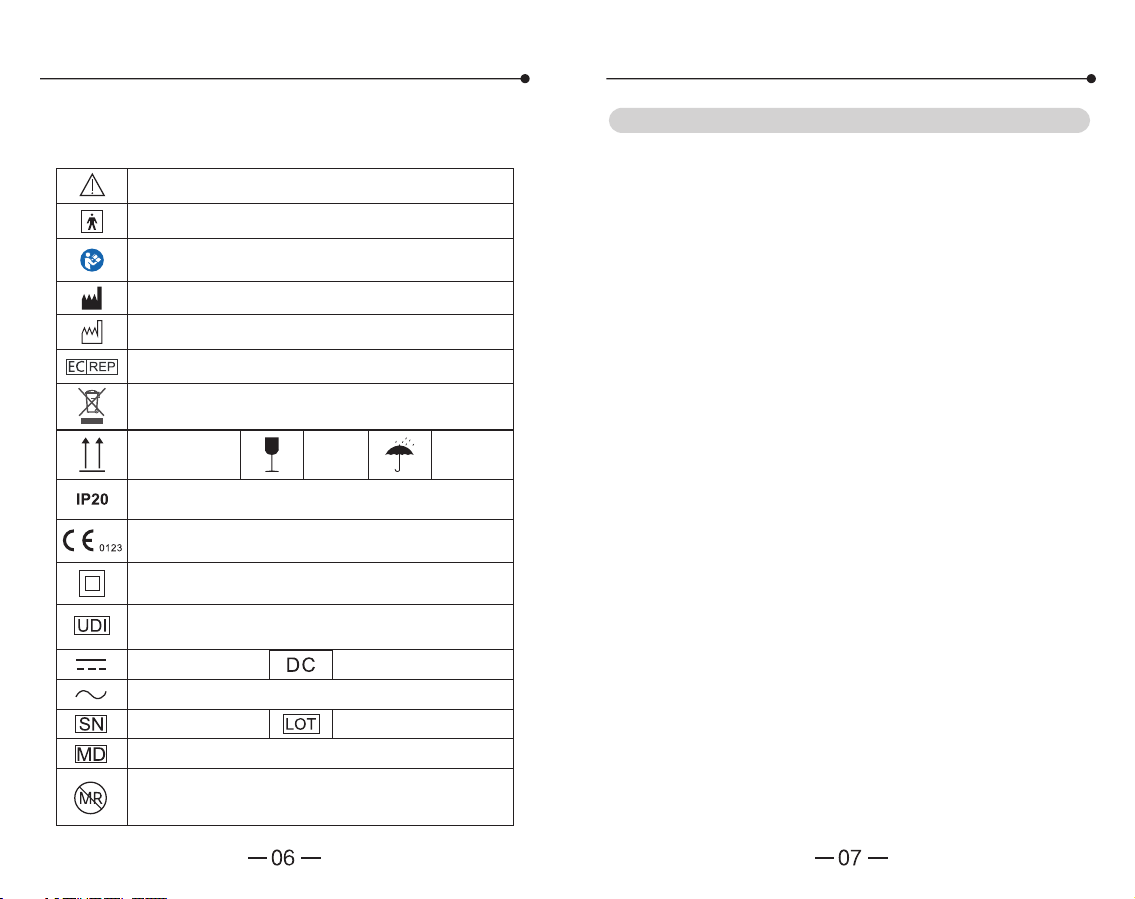
Precauzioni Note importanti
Dchiarazione: Il dispositivo è ad uso medico
1. Utilizzo previsto
2. Elementi di attenzione
Prestare attenzione ai simboli mostrati qui per
evitare danni o lesioni personali.
Attenzione
Parte applicata di tipo BF
Produttore
Data di fabbricazione
Rappresentante CE
Recuperare i rifiuti di apparecchiature elettriche ed
elettroniche
Classificazione IP
Marchio CE e numero dell'organismo notificante
Dispositivo di classe II
Corrente continua
Corrente alternata
Numero di serie
Indica che l'articolo è un dispositivo medico
Un oggetto che presenta rischi inaccettabili per il
paziente, il personale medico o altre persone
all'interno dell'ambiente MR (risonanza magnetica).
Codice del lotto
Corrente continua
Indica un vettore che contiene informazioni
sull'identificativo univoco del dispositivo
Mantenere in
posizione
verticale
Fragile
Mantene-
re
asciutto
Seguire le istruzioni per l'uso (il colore dell'icona è
in realtà blu).
Questo prodotto è destinato a misurare la pressione
arteriosa e la frequenza del polso di adulti di età superiore
a 12 anni in casa o in un centro medico (non è adatto per
neonati, donne in gravidanza o in casi di pre-eclampsia).
Al fine di evitare eventuali danni o misurazioni errate,
durante la misurazione prestare attenzione ai seguenti
punti.
• Prima della misurazione restare seduti per 5 minuti, in
modo da garantire tranquillità e stabilità.
• Dopo aver mangiato, fumato, bevuto vino o caffè (tè
nero) attendere almeno 1 ora prima di eseguire la
misurazione.
• Non effettuare la misurazione mentre si è in piedi, si
cammina, ci si sdraia o si esercita una pressione sul
corpo.
• Non effettuare la misurazione dopo lo sport o il bagno.
• Durante la misurazione non parlare, non muoversi,
non agitare il braccio o piegare le dita.
• Non eseguire alcuna misurazione in condizioni di
temperatura estrema, o in ambienti notevolmente diversi.
• Interferenze esterne, come l'accelerazione durante il
trasporto, o il trasporto, potrebbero causare misura-
zioni errate del dispositivo.
• Non eseguire la misurazione in un veicolo in movimento.
• Non misurare in modo continuativo. (Tra una misura-
zione e l'altra devono trascorrere almeno 2~3 minuti).
IT IT
Note importanti Note importanti
• Nel caso in cui non si riesca ad eseguire la misurazio-
ne, ricominciare.
• Per i pazienti affetti da aritmia, sclerosi arteriosa,
scarsa perfusione, diabete, gravidanza, pre-e-
clampsia, malattie renali, movimento del paziente,
tremori, brividi, i risultati della misurazione potrebbero
non essere accurati.
• Non tenere il bracciale in stato di aerazione per lungo
tempo per evitare lesioni al paziente.
• Il paziente è un utilizzatore previsto, questo misurato-
re è destinato ad adulti di età maggiore di 12 anni.
• Attenzione: Il cavo dell'adattatore AC e il tubo dell'aria
in gomma possono causare uno strangolamento
accidentale nei bambini.
• Attenzione: Non ingerire le parti piccole che potrebbe-
ro causare rischio di soffocamento.
• Il dispositivo non deve essere usato con attrezzature
chirurgiche ad alta frequenza.
• Attenzione: Non utilizzare il BRACCIALE su un
braccio ferito o con una flebo intravenosa.
• Attenzione: Non utilizzare il dispositivo nel braccio in
cui è presente un accesso o una terapia intravascola-
re o uno shunt artero-venoso (A-V), poiché potrebbe
interferire temporaneamente con il flusso sanguigno e
provocare lesioni al paziente.
• Prestare attenzione alla conservazione del prodotto,
al fine di evitare danni causati da animali domestici,
parassiti o bambini.
• L'operatore non può toccare la parte accessibile
dell'alimentatore/unità principale e il paziente allo
stesso tempo.
• Attenzione: Non usare il bracciale sul braccio che si
trova sul lato di una mastectomia o dell’asportazione
di un linfonodo.
• Attenzione: Si noti che durante il gonfiaggio del
bracciale si perderà la funzione di altri dispositivi di
monitoraggio presenti contemporaneamente sullo
stesso arto.
• Attenzione: Non effettuare misurazioni frequenti: la
conseguente restrizione del flusso sanguigno
potrebbe causare lesioni.
• Evitare di comprimere o piegare il tubo di collega-
mento del bracciale mentre si usa il dispositivo. In
caso contrario, i risultati della misurazione non
saranno accurati.
• Attenzione: Non aggrovigliare i tubi di collegamento,
perché la pressione continua del bracciale può
influire sull'interferenza del flusso sanguigno, con
conseguenti lesioni dannose per il paziente.
• In base alle leggi e alle normative locali, trattare il
dispositivo e la batteria.
• L'operatore paziente non può toccare la batteria e la
presa CC. Oppure l'operatore non può toccare
contemporaneamente il paziente, la batteria e la
presa CC.
• Rispettare i requisiti della batteria del produttore.
• Segnalare al fabbricante e all'autorità competente
dello Stato membro un incidente grave verificatosi in
relazione al dispositivo.
• Scollegare la spina dell'adattatore dalla rete elettrica
quando è necessario interrompere in modo sicuro il
funzionamento dell'APPARECCHIO ME.
• Prima della pulizia spegnere il dispositivo e scollega-
re l'alimentatore.
• Quando si sporca durante l'uso quotidiano da parte
di un singolo paziente, pulire il monitor con un panno
morbido e asciutto. Se necessario, utilizzare un
panno morbido con acqua prima di pulirlo con un
panno morbido. Pulire quindi il dispositivo con alcol al
75%.
• Per pulire il dispositivo, in caso di utilizzo da parte di
molte persone, utilizzare un panno morbido e
asciutto imbevuto con il 75% di alcol, ma non lasciare
che l'alcol penetri nel monitor e nel bracciale.
• Non lasciare che l'alcol penetri nel monitor e nel
bracciale.
• Non collegare questo apparecchio ad altri apparecchi
non descritti nelle istruzioni per l'uso.
• Nota: Non eseguire diagnosi in base alla misurazio-
ne, seguire le istruzioni del medico.
• Nota: la versione del software può essere visualizza-
ta in modalità di progettazione da una persona
designata. Questa modalità non è accessibile agli
utenti abituali e si prega di contattare il produttore per
conoscere il metodo di accesso alla modalità.
Dichiarazione: Se il monitor non è stato utilizzato e
conservato nell'intervallo di temperatura, altitudine e
umidità richiesto, potrebbe non essere conforme alle
specifiche.
IT IT
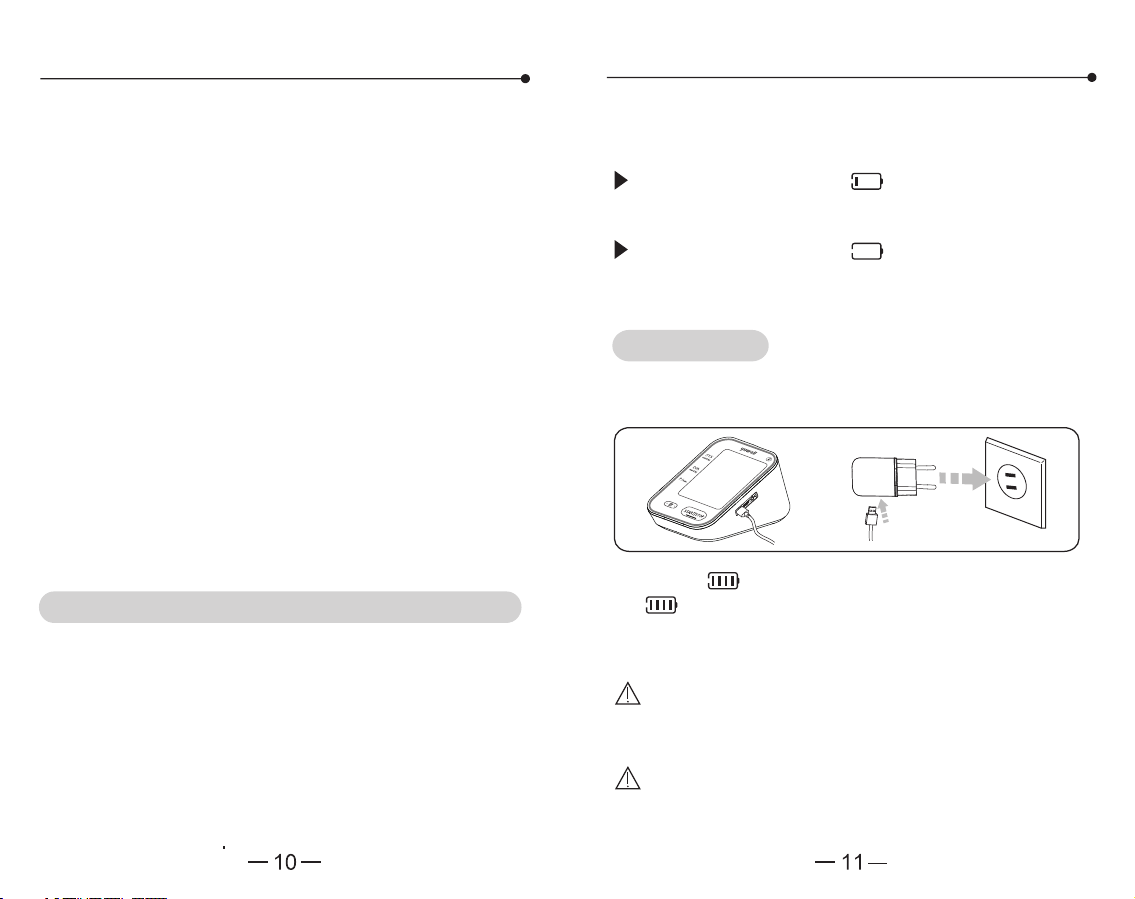
Note importanti Carica della batteria
• Attenzione: Si noti che durante il gonfiaggio del
bracciale si perderà la funzione di altri dispositivi di
monitoraggio presenti contemporaneamente sullo
stesso arto.
• Attenzione: Non effettuare misurazioni frequenti: la
conseguente restrizione del flusso sanguigno
potrebbe causare lesioni.
• Evitare di comprimere o piegare il tubo di collega-
mento del bracciale mentre si usa il dispositivo. In
caso contrario, i risultati della misurazione non
saranno accurati.
• Attenzione: Non aggrovigliare i tubi di collegamento,
perché la pressione continua del bracciale può
influire sull'interferenza del flusso sanguigno, con
conseguenti lesioni dannose per il paziente.
• In base alle leggi e alle normative locali, trattare il
dispositivo e la batteria.
• L'operatore paziente non può toccare la batteria e la
presa CC. Oppure l'operatore non può toccare
contemporaneamente il paziente, la batteria e la
presa CC.
• Rispettare i requisiti della batteria del produttore.
• Segnalare al fabbricante e all'autorità competente
dello Stato membro un incidente grave verificatosi in
relazione al dispositivo.
• Scollegare la spina dell'adattatore dalla rete elettrica
quando è necessario interrompere in modo sicuro il
funzionamento dell'APPARECCHIO ME.
• Prima della pulizia spegnere il dispositivo e scollega-
re l'alimentatore.
• Quando si sporca durante l'uso quotidiano da parte
di un singolo paziente, pulire il monitor con un panno
morbido e asciutto. Se necessario, utilizzare un
panno morbido con acqua prima di pulirlo con un
panno morbido. Pulire quindi il dispositivo con alcol al
75%.
• Per pulire il dispositivo, in caso di utilizzo da parte di
molte persone, utilizzare un panno morbido e
asciutto imbevuto con il 75% di alcol, ma non lasciare
che l'alcol penetri nel monitor e nel bracciale.
• Non lasciare che l'alcol penetri nel monitor e nel
bracciale.
• Non collegare questo apparecchio ad altri apparecchi
non descritti nelle istruzioni per l'uso.
• Nota: Non eseguire diagnosi in base alla misurazio-
ne, seguire le istruzioni del medico.
• Nota: la versione del software può essere visualizza-
ta in modalità di progettazione da una persona
designata. Questa modalità non è accessibile agli
utenti abituali e si prega di contattare il produttore per
conoscere il metodo di accesso alla modalità.
Dichiarazione: Se il monitor non è stato utilizzato e
conservato nell'intervallo di temperatura, altitudine e
umidità richiesto, potrebbe non essere conforme alle
specifiche.
• Per garantire la trasmissione dei risultati delle misurazio-
ni tramite Bluetooth, la distanza tra il dispositivo e il
telefono cellulare non deve superare i 10 metri.
• Se si desidera che le misurazioni della pressione
sanguigna vengano inviate al telefono tramite
Bluetooth, è necessario possedere un telefono che
supporti Android 5.0 o superiore o IOS 9.0 o superio-
re per scaricare Yuwell HealthCare+.
• Nota: Questa sezione si applica solo al modello con
bluetooth.
Questo prodotto è alimentato da una batteria al litio.
Assicurarsi che la carica della batteria sia sufficiente
quando si utilizza il prodotto.
La comparsa dell'icona " " e l'indicazione del 25%
o meno significano che la batteria è scarica e deve
essere ricaricata.
La comparsa dell'icona " " e l'indicazione del 5% o
meno significano che la batteria si sta scaricando. Si
prega di caricare prima dell'uso.
1. Collegare la fonte di alimentazione per la ricarica
come illustrato di seguito.
2. L'icona " " lampeggia durante la carica e l'icona
" " smette di lampeggiare quando la batteria è
completamente carica.
3. Dopo la ricarica, scollegare l'adattatore di alimenta-
zione.
Nota: Non misurare la pressione sanguigna
durante la carica, per non causare misura-
zioni anomale.
Nota: Non posizionare il dispositivo in modo da
compromettere la sicurezza durante la
disconnessione dalla rete elettrica.
Informazioni sulla trasmissione bluetooth
Accensione
IT IT
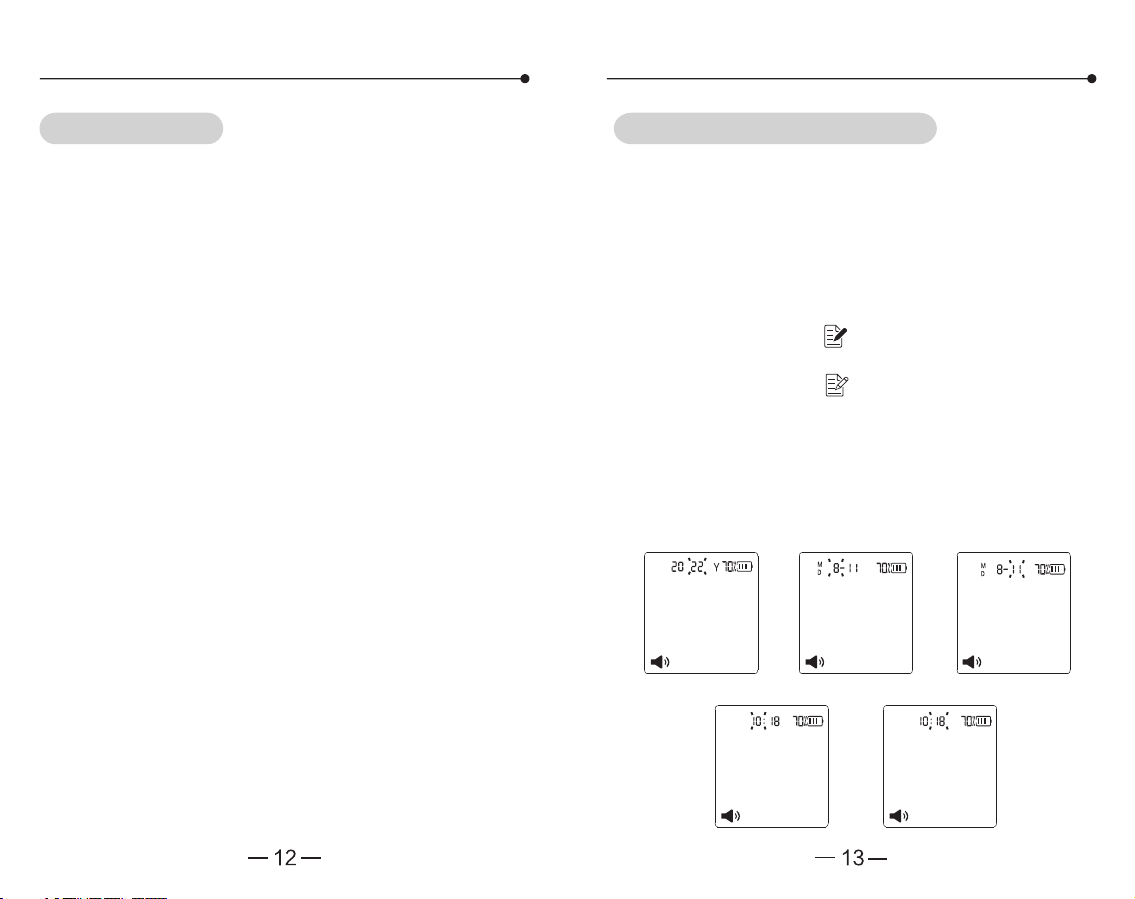
Carica della batteria Impostazione di data e ora
Per la ricarica, utilizza solo l'adattatore AC autorizzato
Yuwell (uscita DC 5V 1A) e contattare il rivenditore
locale per informazioni in merito.
Il monitor memorizzerà i risultati della misurazione
automaticamente dal sistema di gestione. È necessa-
rio reimpostare l'ora e la data dopo la ricarica e la
rimessa in funzione. Procedere come segue. (Ad
esempio, impostando la data come 2022-08- 11 e l'ora
come 10:18).
1. In modalità standby, premere il pulsante [ START|-
STOP] e il pulsante [ ] per più di 3 secondi fino a
quando il numero dell'anno inizia a lampeggiare.
2. Premere il pulsante [ ] per avanzare con incre-
menti di un anno.
3. Dopo aver impostato l'anno, premere il pulsante
[ START|STOP] per passare all'impostazione del
mese; il numero del mese inizia a lampeggiare.
4. Usare lo stesso metodo per impostare a turno il
mese, il giorno, l'ora e i minuti.
Suggerimenti!
Impostazione di data e ora
• Non posizionare l'apparecchiatura con batteria al litio
vicino a fonti di fuoco.
• Non rimuovere e sostituire la batteria e non schiac-
ciarla con oggetti duri.
• Se la batteria è scarica, si consiglia di ricaricare il
dispositivo in tempo.
• Per prolungare la durata della batteria al litio, si
raccomanda di mantenere più della metà della carica.
• Se l'apparecchiatura non viene utilizzata per molto
tempo (più di 6 mesi), è probabile che si verifichi la
passivazione del materiale dell'elettrodo e che le
prestazioni della batteria diminuiscano. Si consiglia di
utilizzarla spesso.
• Smaltire le batterie esauste in conformità alle normati-
ve locali in materia di tutela ambientale.
• Attenzione: Non sostituire le parti senza autorizzazio-
ne. La sostituzione della batteria da parte di personale
non addestrato può provocare sovratemperature,
incendi o esplosioni.
Lampeggio dei
caratteri dell'anno
Lampeggio dei caratteri dell'ora Lampeggio dei caratteri dei minuti
Lampeggio dei
caratteri del mese
Carattere della data
IT IT
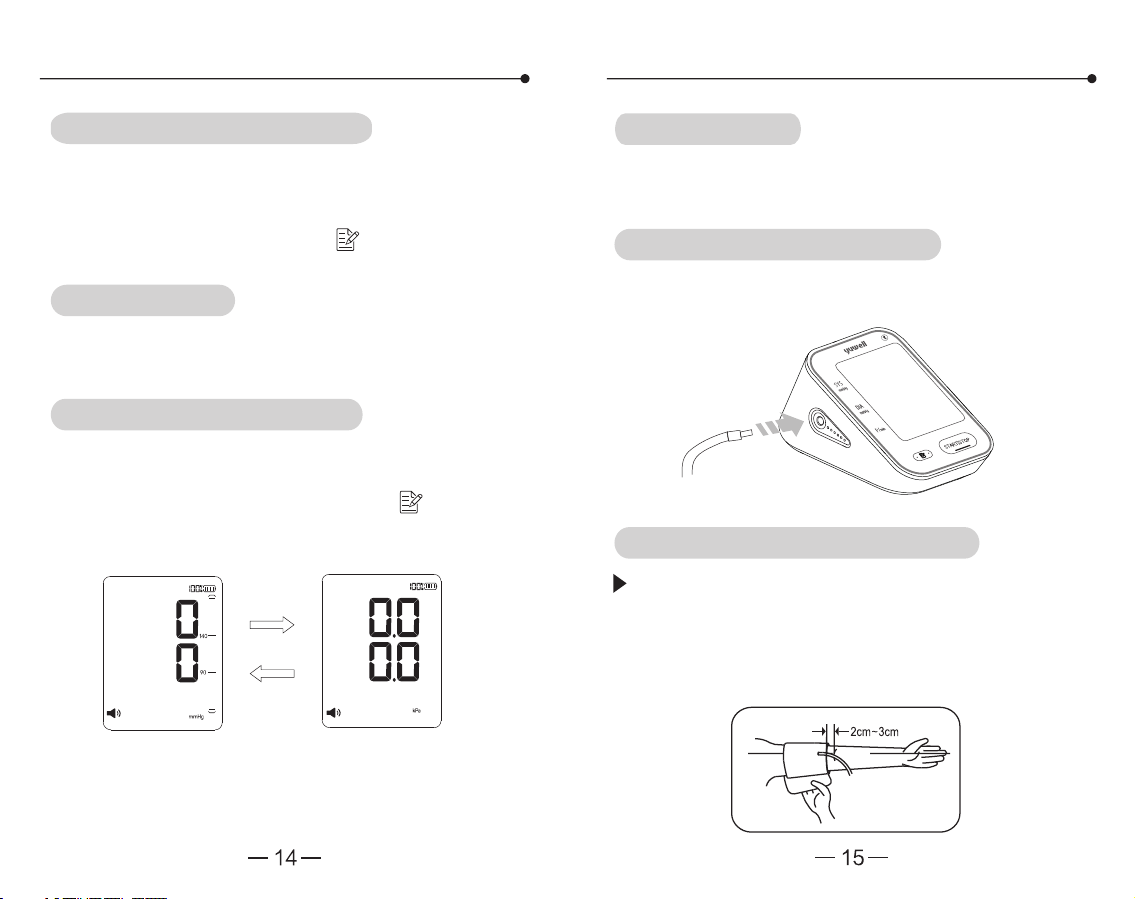
Volume della voce e impostazione dell'unità Metodo di utilizzo del bracciale
Dopo aver terminato l'impostazione dell'ora e della
data, premere il tasto [START|STOP] per accedere
all'impostazione del volume vocale. Il range del suono
va da 01 a 04. Premere il tasto [ ] per scegliere il
suono desiderato.
È possibile effettuare le misurazioni su entrambe le
braccia. Non effettuare le misurazioni su altre parti del
corpo.
Collegare il connettore dell'aria del bracciale alla presa
che si trova sul lato sinistro del misuratore.
Avvolgere il bracciale intorno al braccio (come
mostrato nell'immagine). Mantenere il bordo
inferiore del bracciale in posizione superiore a 2-3
cm rispetto all'articolazione del gomito e mantene-
re l'ingresso dell'aria che si inserisce nel bracciale
sul lato interno del braccio.
Una volta terminata l'impostazione del volume vocale,
premere il tasto [START|STOP] per accedere all'impo-
stazione dell'unità Premere il pulsante [ ] per
scegliere trammHg e kPa. Premere [START|STOP] per
terminare la configurazione.
Al termine dell'impostazione dell'unità, premere il
pulsante [START|STOP] per spegnerla.
Quando il tasto funzione vocale è in stato di spento,
non c'è la funzione di trasmissione vocale.
Impostazione di data e ora
Suggerimenti!
Suggerimenti!
Collegamento del bracciale
Metodo di utilizzo del bracciale
Configurazione dell'unità
IT IT
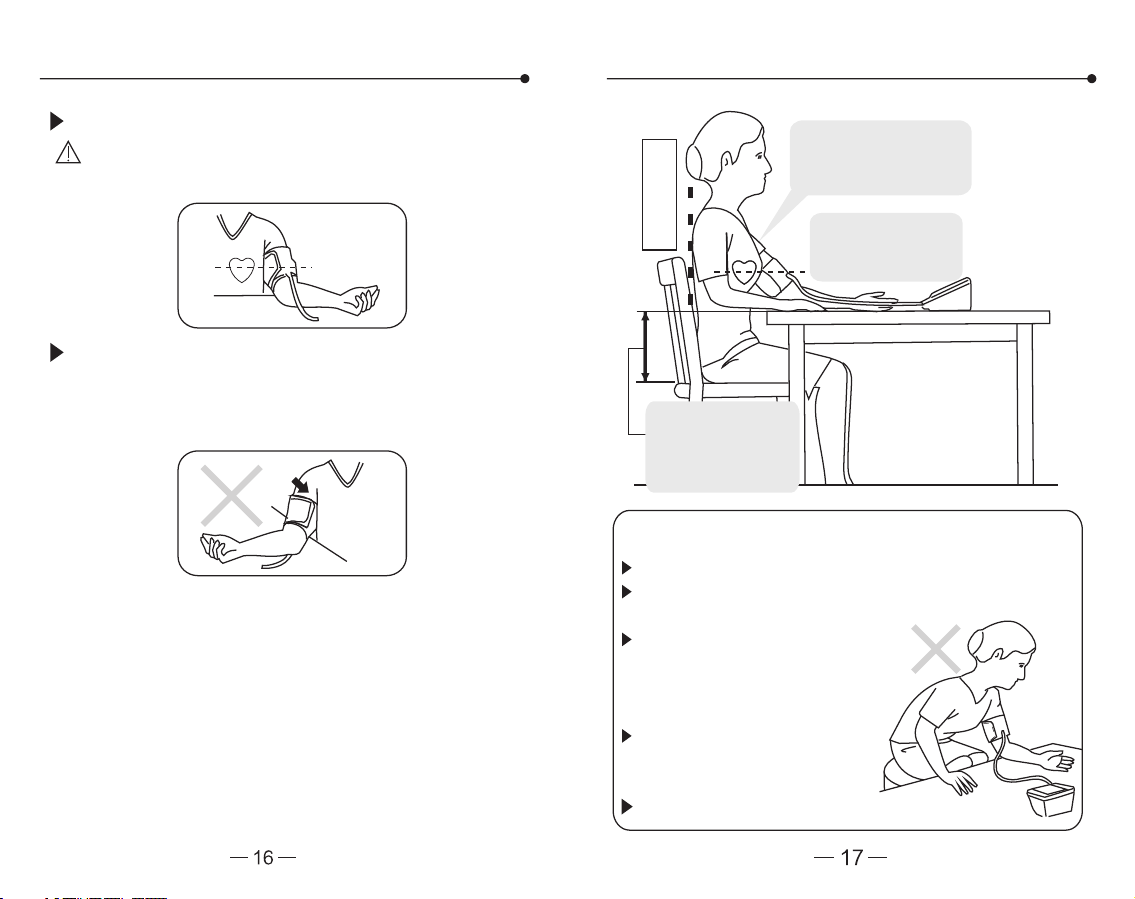
Metodo di utilizzo del bracciale Postura per la misurazione
Mantenere nuda la parte
superiore del braccio, o
indossare abiti leggeri.
Tenere la parte
centrale del bracciale
all’altezza del cuore
La differenza ideale
tra l’altezza del tavolo
e quella della sedia è
di 25-30 cm
Posture errate per la misurazione
Fissare saldamente il bracciale.
Nota: Il bracciale deve essere indossato in maniera
confortevole, né troppo stretto né troppo lento.
Sedersi con la schiena dritta e poggiare il braccio
sul tavolo con il palmo della mano rivolto verso
l’alto, e tenere la parte centrale del bracciale
all’altezza del cuore. Quindi accertarsi che il tubo
dell'aria non sia torto.
Non piegarsi o curvarsi in avanti.
Non sedersi con le gambe incrociate, i piedi
devono essere appoggiati sul pavimento.
Non sedersi sul divano. (La
pressione della pancia può
aumentare la pressione
sanguigna).
Non poggiare il braccio su un
tavolo basso (Può aumentare
la pressione sanguigna).
Non sdraiarsi.
Dichiarazione: Il connettore di piccole dimensioni utilizzato
per la realizzazione è conforme alla norma ISO 80369-1.
Attenzione: Poiché questo dispositivo medico utilizza un
connettore alternativo a foro piccolo diverso da quelli
specificati nella serie ISO 80369, è possibile che si
verifichi un collegamento errato tra questo dispositivo
medico e un dispositivo medico che utilizza un connettore
alternativo a foro piccolo diverso, con conseguente
pericolo per il paziente. L'utente deve adottare misure
speciali per ridurre questi rischi ragionevolmente prevedi-
bili.
Sedersi con la
schiena dritta
IT IT
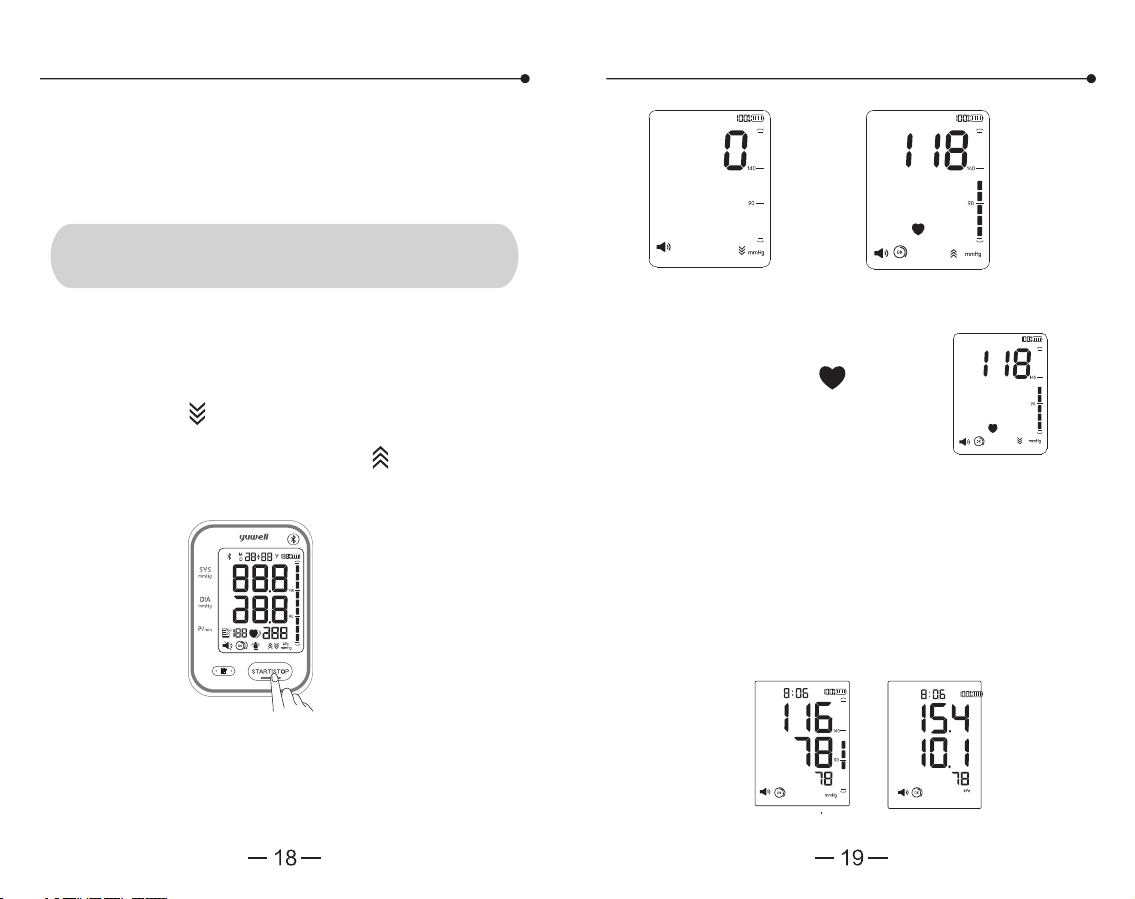
Iniziare la misurazione Iniziare la misurazione
Non mangiare, fumare, bere, fare il bagno o praticare
sport ad alta intensità un'ora prima della misurazione.
Le misurazioni devono essere eseguite ogni giorno
alla stessa ora.
1. Misurazione
Tutte le icone sullo schermo appaiono per 1 secondo
dopo aver premuto il tasto [START|STOP] e poi
scompaiono. Quindi comincia a lampeggiare l'icona
di sgonfiaggio " ", il che significa che il sistema è in
fase di preparazione. Alcuni secondi dopo, comincia
a lampeggiare l'icona di gonfiaggio " ", il che
significa che la fase di preparazione è terminata.
Quindi inizia il gonfiaggio.
2. Misurazione terminata
Terminata la misurazione, il misuratore mostrerà i
valori SYS, DIA e la frequenza del polso, quindi si
sgonfierà automaticamente.
Il monitor inizia a misurare automati-
camente al termine del gonfiaggio e
l'icona di misurazione " " inizia a
lampeggiare. La valvola di sfogo
dell'aria si scarica automaticamente
in modo lento e il valore della
pressione diminuisce
continuamente.
Si prega di rilassarsi il più possibile e di non parlare o
muoversi durante la procedura di misurazione.
Restare seduti per 5 minuti prima
della misurazione
Visualizzazione a schermo pieno
Fase di preparazione
DisplaymmHg Display kPa
Fase della misurazione
Fase di gonfiaggio
IT IT
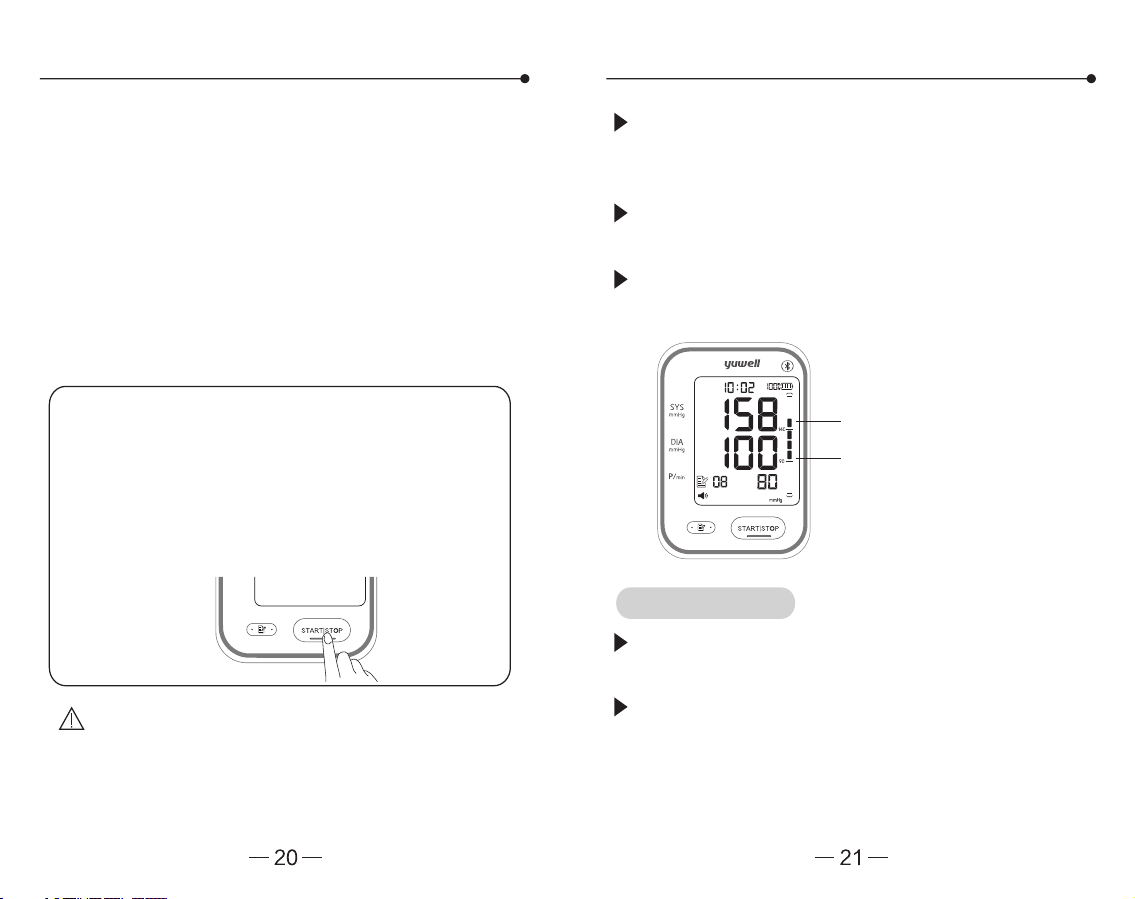
Iniziare la misurazione
Indicatore dei valori della pressione arteriosa
3. Togliere il bracciale
4. Spegnere
Premere il pulsante [ START|STOP ] per spegnere.
Dopo 3 minuti di inattività si spegnerà automatica-
mente.
5. Spegnimento
Staccare l'alimentatore per scollegarlo in modo sicuro
dalla rete elettrica.
Non posizionare il dispositivo in modo da compromet-
tere la sicurezza durante la disconnessione dalla rete
elettrica.
Attenzione: Il limite massimo della pressione di
gonfiaggio è 300mmHg/40.0kPa. Al fine di
evitare lesioni, evitare di prolungare eccessiva-
mente lo stato di gonfiaggio.
Se il valore di SYS è superiore a 139mmHg o di
DIA superiore a 89mmHg, significa che la pressio-
ne sanguigna è alta.
Se si ottengono letture inaspettate, misurare di
nuovo o consultare il medico.
L'indicatore dell'intervallo di pressione sanguigna
può mostrare la pressione sanguigna in modo
intuitivo.
L'intervallo di tempo tra due misurazioni deve essere
di almeno 2~3 minuti o più.
Valutare la condizione della pressione arteriosa
secondo la tabella di classificazione della BP e
consultare il medico.
Superiore a 139mmHg
Superiore a 89mmHg
Arresto di emergenza durante la misurazione
Se la misurazione deve essere interrotta per
motivi di disagio o altro, premere il pulsante
[START|STOP] ; la misurazione si interromperà
immediatamente e l'aria verrà rilasciata rapida-
mente. Se il pulsante [START|STOP] non funzio-
na, togliere il bracciale manualmente.
Suggerimenti!
IT IT
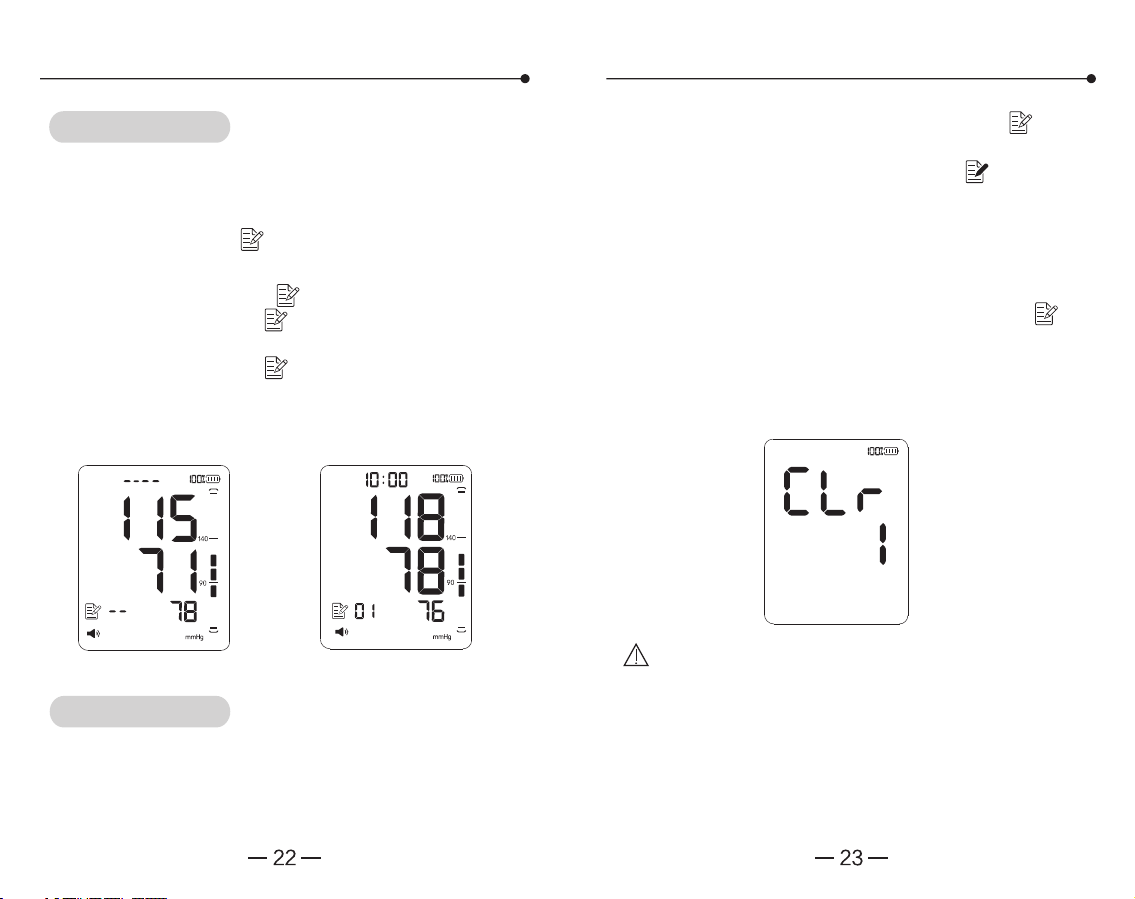
Funzione di memorizzazione Funzione di memorizzazione
Il misuratore memorizza automaticamente i dati delle
misurazioni (compresa la pressione arteriosa e le
pulsazioni), il limite massimo di registrazioni è 60.
Premere il pulsante [ ] per controllare i valori delle
misurazioni registrate.
Quando la memoria è piena, il 60° dato viene
sostituito dall'59°.
C. Leggere i dati registrati premendo il tasto [ ]
come sequenza: “01”, "02"……"60” (max). Quindi si
torna al 1°. Tenere premuto il pulsante [ ] per
cercare rapidamente i dati.
D. Premere il pulsante [ START|STOP ] per spegne-
re il misuratore.
1. Premere il pulsante [ ] per le registrazioni.
A. Premere il pulsante [ ] per visualizzare il valore
medio delle ultime 3 misurazioni.
B. Premere il pulsante [ ] per visualizzare il 1°
gruppo di memoria; il numero di serie viene visualiz-
zato da "01" a "60". "01" è l'ultimo gruppo e "60" è il
primo.
2. Cancellare i dati registrati
Premere entrambi i pulsanti [ START|STOP ] e [ ]
fino a quando il display mostra l'immagine seguente,
che indica che i dati registrati sono stati eliminati.
Premere il pulsante [ START|STOP ] per spegnere il
misuratore dopo l’eliminazione.
Nota: Questa operazione cancellerà tutti i dati
registrati.
Suggerimenti!
Suggerimenti!
Il valore medio Il 1° gruppo in memoria
IT IT
Funzione di misurazione ausiliaria Modo statico
L'icona " " appare quando il bracciale è avvolto
correttamente, mentre l'icona " " appare quando il
bracciale è allentato o stretto.
Questa funzione serve principalmente al personale
professionale per accedere alla modalità statica e
testare il monitor tramite un manometro standard.
Lo schermo mostrerà tutte le icone dopo aver
premuto il tasto [START|STOP]. Successivamente,
sullo schermo apparirà l'icona " ", che indica che il
sistema è in fase di test di ripristino. Alcuni secondi
dopo, l'icona " " scompare e la pompa dell'aria
inizia a gonfiarsi contemporaneamente, il che indica
che il test è terminato. Quindi premere il pulsante [
STARTISTOP ] per interrompere il gonfiaggio ed
estrarre le batterie per accedere alla fase successiva.
Attenzione: Gli utenti non professionisti non hanno
bisogno di conoscere questa funzione e non la
utilizzano. L'azienda non si assume alcuna responsa-
bilità per i danni causati da questa operazione.
Nota: È necessario ripristinare il sistema prima di
accedere alla modalità statica, altrimenti i risultati
potrebbero essere imprecisi.
Mantenere premuto il pulsante [ ]. Allo stesso tempo,
premere il foro di ripristino e rilasciarlo. Quando si sente
un clic, rilasciare il pulsante [ ]. Sullo schermo viene
visualizzato il valore della pressione " " ora e data,m-
mHg. Ora il sistema si è ripristinato ed è entrato in
modalità statica. Ora è possibile eseguire il test statico.
Fare riferimento all'articolo 201.12.1.102 della norma
IEC 80601-2- 30: 2018 per verificare la calibrazione di
questo dispositivo.
Il prodotto è in grado di rilevare automaticamente il
corpo durante la misurazione di un movimento errato
e di segnalare l'icona " ". Se durante la misurazio-
ne compare l'icona " ", eseguire nuovamente la
misurazione.
l'icona " " lampeggia se durante la misurazione
viene rilevato un segnale di impulso irregolare,
indicando che la misurazione è anomala e deve
essere ripetuta. Se l'icona " " compare durante
più misurazioni, consultare il medico.
Rilevamento per l'uso del bracciale
Indicazione di errore di movimento
Indicazione per battiti cardiaci irregolari
Ripristino del sistema
Accedere alla modalità statica
IT IT
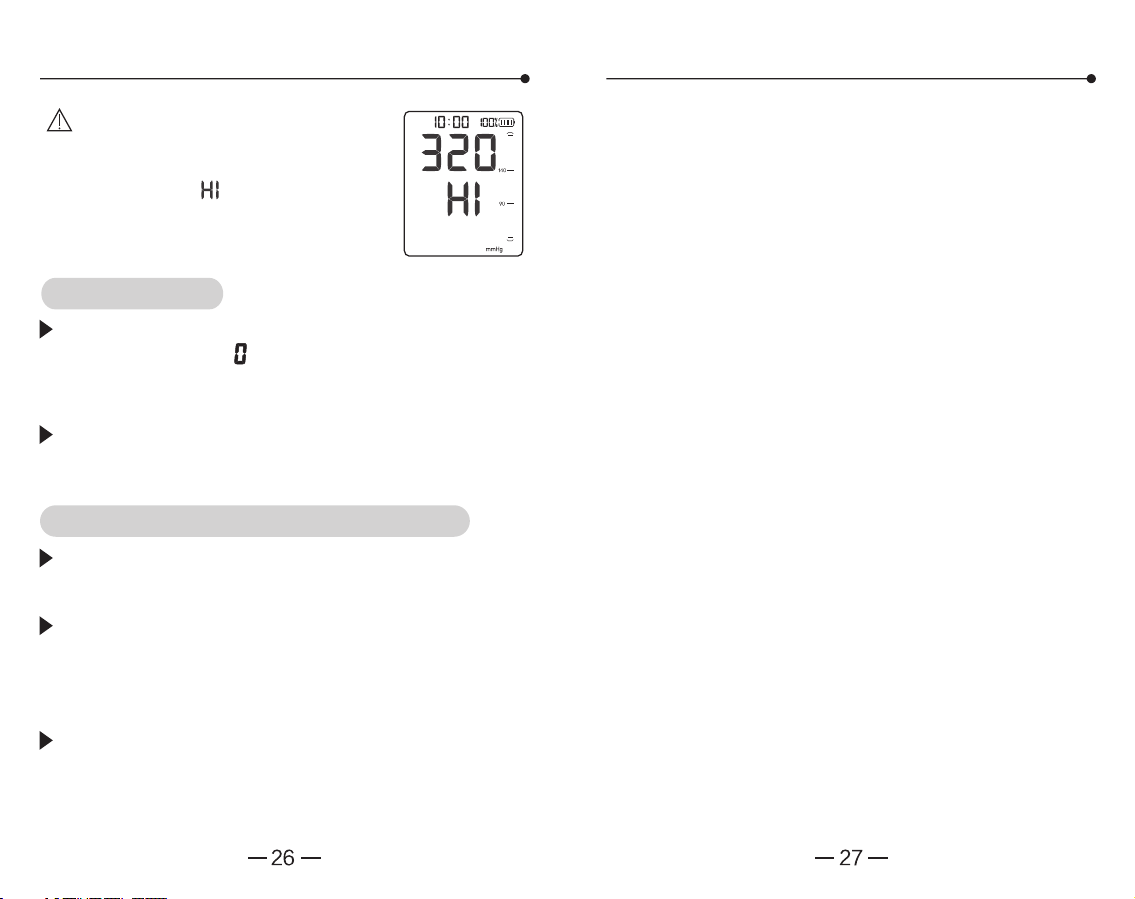
Nota: Quando la pressione misurata
supera i 300mmHg durante il test
statico, vengono visualizzati il valore
della pressione e " ", a indicare che il
risultato della misurazione supera
l'intervallo nominale e potrebbe essere
impreciso.
Dopo essere entrati in modalità statica, se lo schermo
non mostra ancora " ", eseguire nuovamente il
ripristino del sistema. Se non funziona ancora,
contattare il distributore locale.
1. Che cos'è la pressione sanguigna?
La pressione sanguigna è la forza esercitata dal
sangue contro le pareti delle arterie. La pressione
sistolica si verifica quando il cuore si contrae. La
pressione diastolica si verifica quando il cuore si
espande. La pressione arteriosa si misura in millime-
tri di mercurio (mmHg). La pressione arteriosa
naturale è rappresentata dalla pressione fondamen-
tale, che si misura al mattino presto quando si è
ancora a riposo e prima di mangiare.
2. Che cos'è l'ipertensione e come si controlla?
L'ipertensione, una pressione arteriosa anormalmen-
te alta, se lasciata senza attenzione può causare
molti problemi di salute, tra cui ictus e infarto.
L'ipertensione può essere controllata modificando lo
stile di vita, evitando lo stress e con l'assunzione di
farmaci sotto la supervisione di un medico. Per
prevenire l'ipertensione o tenerla sotto controllo: Non
fumare, fare esercizio fisico regolare, ridurre l'assun-
zione di sale e grassi, sottoporsi a controlli fisici
regolari, mantenere un peso adeguato.
3. Perché misurare la pressione arteriosa a casa?
La pressione arteriosa misurata in una clinica o in
uno studio medico può causare apprensione e può
produrre un valore elevato, superiore di 25-30mmHg
rispetto a quello misurato a casa. La misurazione a
domicilio riduce gli effetti delle influenze esterne sui
valori pressori, integra i valori rilevati dal medico e
fornisce un'anamnesi pressoria più accurata e
completa.
Il sistema di verifica viene determinato applicando un
adattatore " " alla linea di pressione e collegando uno
standard di riferimento.
Entrare in modalità statica, leggere simultaneamente il
dispositivo e il manometro di riferimento; l'errore di
3mmHg è normale riducendo la pressione da
300mmHg a zero a una velocità di 3mmHg/s
±1mmHg/s.
Se l'errore è superiore a 3mmHg, contattare il
produttore per la calibrazione.
Il monitor si spegne automaticamente se non viene
effettuato alcun intervento entro 4 minuti.
Metodo di verifica della calibrazione
Suggerimenti!
Modo statico Domande comuni sulla misurazione
della pressione arteriosa
IT IT
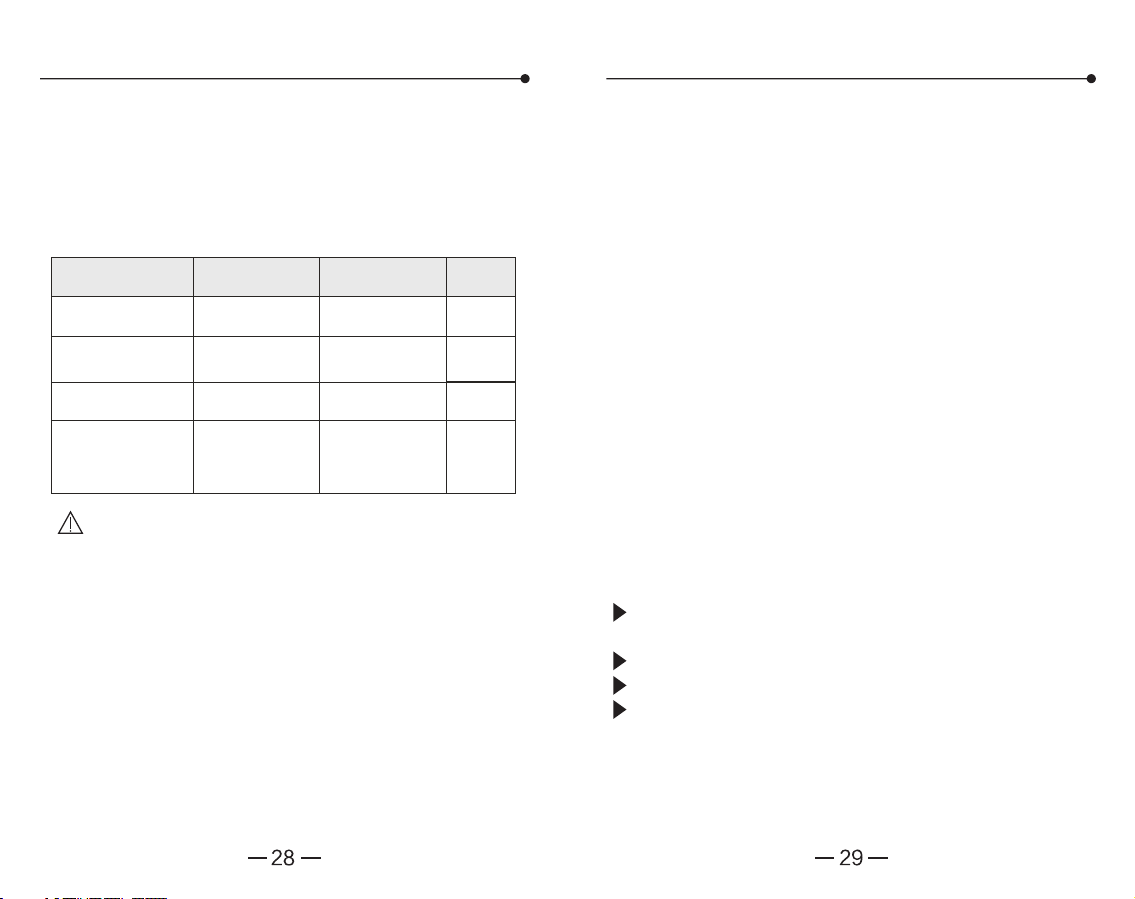
4. Classificazione della pressione arteriosa
dell'OMS?
L'Organizzazione Mondiale della Sanità (OMS) ha
stabilito degli standard per la valutazione dell'iperten-
sione arteriosa, senza tener conto dell'età, come
indicato di seguito:
5. Variazioni della pressione sanguigna?
La pressione sanguigna di un individuo varia
notevolmente su base giornaliera e stagionale. Può
variare da 30 a 50mmHg a causa di diverse condizio-
ni durante il giorno. Nei soggetti ipertesi le variazioni
sono ancora più marcate. Normalmente, la pressione
arteriosa aumenta durante il lavoro o lo svago e
scende ai livelli minimi durante il sonno. Non
preoccupatevi quindi eccessivamente dei risultati di
una sola misurazione. Effettuare le misurazioni ogni
giorno alla stessa ora seguendo la procedura
descritta in questo manuale per conoscere la propria
pressione arteriosa normale. Letture regolari
consentono di ottenere un'anamnesi più completa
della pressione arteriosa. Assicurarsi di annotare la
data e l'ora quando si registra la pressione sangui-
gna. Consultare il medico per interpretare i dati della
pressione sanguigna.
6. Qual è il momento migliore per misurare la
pressione sanguigna?
Dopo la minzione, prima della colazione del
mattino.
Prima di dormire la notte.
Prima di assumere il farmaco.
Mantenere uno stato corporeo e mentale stabile
ad ogni misurazione. Si consiglia di effettuare le
misurazioni ogni giorno alla stessa ora.
Nota: Non esiste una definizione di ipopiesia, e
in genere si parla di ipotensione per una
pressione sistolica (SYS) inferiore a 90mmHg o
una pressione diastolica (DIA) inferiore a
60mmHg.
Gamma
Orto-arteriotonia
Ipertensione lieve
Ipertensione media
Ipertensione grave
Pressione sistolica
kPa/mmHg
12,0~18,5kPa
90~139mmHg
8,0~11,9kPa
60~89mmHg
12,0~13,2kPa
90~99mmHg
13,3~14,5kPa
100~109mmHg
≥14,7kPa
≥110mmHg
18,7~21,2kPa
140~159mmHg
21,3~23,9kPa
160~179mmHg
≥24.0kPa
≥180mmHg
Pressione diastolica
kPa/mmHg
Contromi-
sure
Autocon-
trollo
Consulta-
re il dott.
Consulta-
re il dott.
Pericolo!
Recarsi in
ospedale
il prima
possibile
Domande comuni sulla misurazione
della pressione arteriosa
Domande comuni sulla misurazione
della pressione arteriosa
IT IT
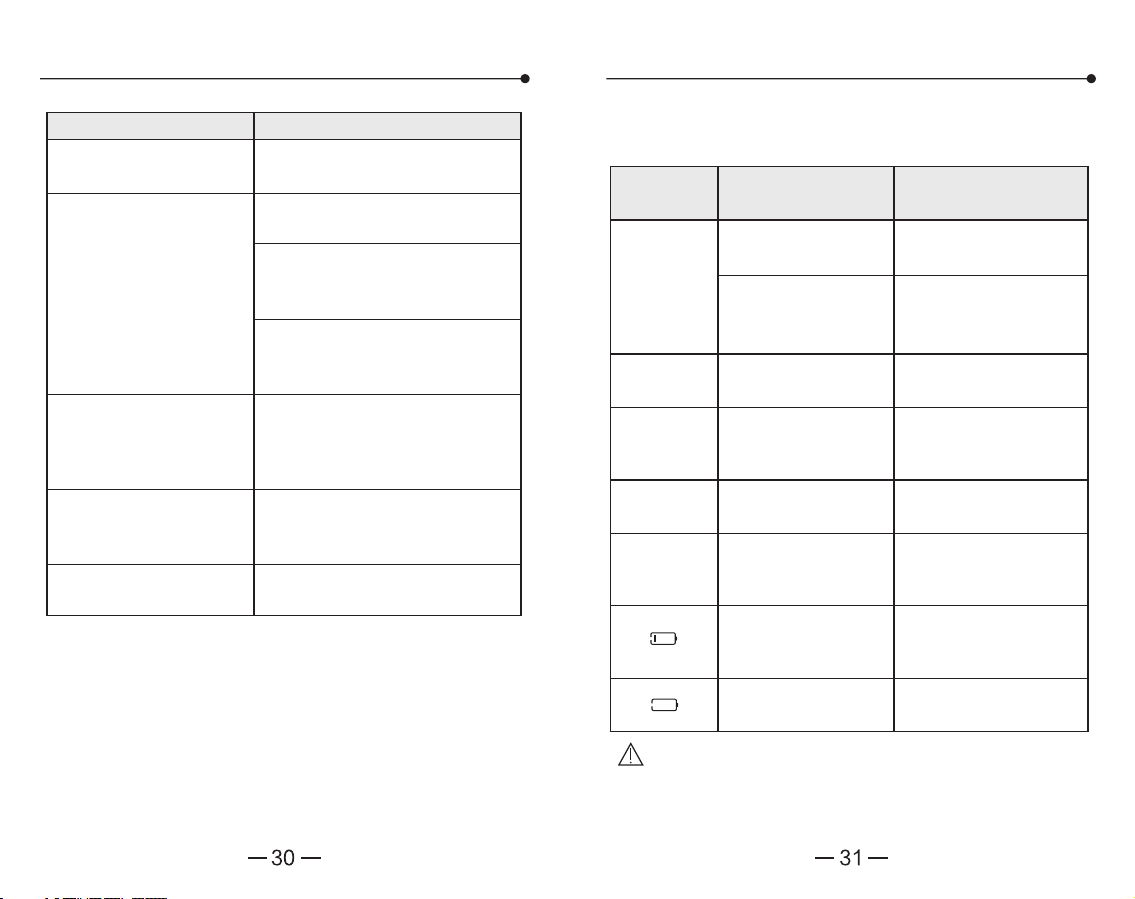
Guasto comune
Indicazione
errata
Err4
Err5
Err6
Err7
Err8
Motivo del guasto
Non è possibile misurare
la pressione
Allacciare correttamente il
bracciale prima della
misurazione
Misurare ancora
Controllare se c'è una
perdita d'aria dal bracciale
Mantenere il braccio e il
corpo fermi e misurare di
nuovo
Chiudere bene il bracciale
Misurare ancora
Collegare l'adattatore di
alimentazione per la ricarica
Collegare l'adattatore di
alimentazione per la ricarica
I risultati della
misurazione superano
l'intervallo di misurazione
della pressione diastolica
o sistolica
Errore di pressurizzazio-
ne
Errore di pressurizzazio-
ne causato dal
movimento del braccio o
del corpo
Il bracciale è troppo largo
o cade
La pressione supera il
valore massimo
(300mmHg)
La batteria è scarica
La batteria si sta
scaricando
Soluzione
Non funziona dopo aver
premuto il pulsante
[ STARTISTOP ]
Si verificano più volte errori di
misurazione o il valore
misurato è basso (o alto)
Il monitor è in buone
condizioni, ma i risultati di
ogni misurazione sono
diversi.
Il valore è diverso da quello
misurato in una clinica o in
uno studio medico.
Riprovare dopo la ricarica
Controllare il collegamento e
l'avvolgimento del bracciale
Controllare se il bracciale è troppo
stretto o troppo largo. Togliere i vestiti
se sono troppo stretti
Mantenere uno stato corporeo
tranquillo e rilassato. Respirare
profondamente per rilassarsi prima
della misurazione
Leggere attentamente le "variazioni
della pressione arteriosa"
Annotare il valore ogni giorno e
consultare un medico.
La pompa funziona, ma la
pressione non aumenta
Controllare se il bracciale è ben
collegato
Soluzioni
Guasti comuni e risoluzione dei problemi Guasti comuni e risoluzione dei problemi
La tabella che segue mostra i possibili guasti che
visualizzano l'icona, il possibile motivo e le soluzioni.
Attenzione: Se le situazioni non possono essere
risolte o si verificano problemi imprevisti, consul-
tare il distributore locale.
IT IT
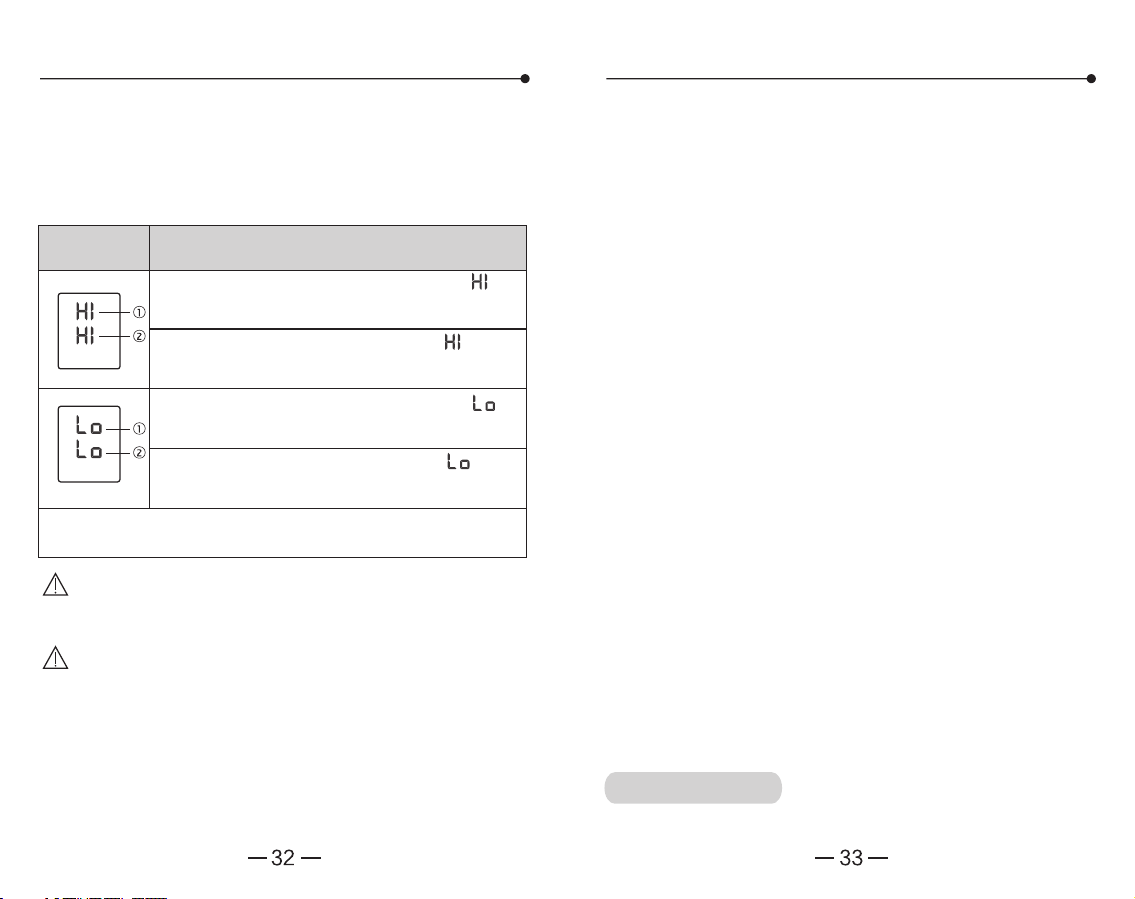
Indicazione di
allarme
Contenuto del display e cause
① Quando l'area del display SYS visualizza " ",
indica che il risultato della misurazione della
pressione sistolica supera i 260mmHg.
① Quando l'area del display SYS visualizza " ",
indica che il risultato della misurazione della
pressione sistolica è inferiore a 40mmHg.
② Quando l'area del display DIA mostra " ",
indica che il risultato della misurazione della
pressione diastolica è inferiore a 20mmHg.
Quando compare l'indicazione di allarme di cui sopra, misurare di
nuovo o consultare il medico.
② Quando l'area del display DIA mostra " ", indica
che il risultato della misurazione della pressione
diastolica supera i 210mmHg.
Sistema di allarme Manutenzione
Quando la pressione arteriosa determinata non
rientra nell'intervallo nominale, viene visualizzato un
segnale di allarme visivo sul display. Per i dettagli,
consultare la tabella seguente.
Osservare i seguenti punti per conservare il disposi-
tivo e garantire una misurazione accurata.
Nota: Se l'indicazione di allarme non può essere
risolta e l'utente si sente a disagio, si prega di
consultare il medico il prima possibile.
Nota: Se l'indicazione di allarme non può essere
risolta o se è necessario verificare la funzionalità del
sistema di allarme, consultare il produttore.
SIS
mmHg
DIA
mmHg
P/min
SIS
mmHg
DIA
mmHg
P/min
• Riporre correttamente il misuratore e gli accessori
dopo l'uso.
• Non esporre il misuratore e gli accessori a temperatu-
re elevate, umidità, polvere o sole.
• Il bracciale contiene una camera d’aria all'interno,
pertanto durante le applicazioni prestare attenzione a
non piegare, tirare o torcere.
• Attenzione: Non smontare o riparare il dispositivo
senza autorizzazione e non modificare il dispositivo
senza autorizzazione.
• Non eseguire interventi di manutenzione o riparazione
mentre il dispositivo è in uso.
• Utilizzare un panno morbido e asciutto o un panno
morbido inumidito con poca acqua per pulire il
dispositivo in caso di utilizzo da parte di singole
persone, ma non lasciare che l'acqua penetri nel
monitor e nel bracciale.
• Utilizzare un panno morbido inumidito con etanolo al
75% per pulire il dispositivo nel caso in cui molte
persone lo utilizzino, ma non lasciare che l'etanolo
penetri nel monitor e nel bracciale.
• Non pulire il dispositivo quando è collegato alla rete
elettrica.
• Il produttore metterà a disposizione, su richiesta,
diagrammi di circuito, elenchi di componenti, descri-
zioni, istruzioni di calibrazione o altre informazioni che
aiuteranno il personale di assistenza a riparare le parti
del dispositivo indicate dal produttore come riparabili
dal personale di assistenza.
• I sensori degradati possono ridurre le prestazioni.
Si consiglia di calibrare il monitor in base alle leggi e
alle normative locali (almeno una volta all'anno).
Suggerimenti!
IT IT
1. Caratteristiche
Rilevamento per l'uso del bracciale
Indicazione per battiti cardiaci irregolari
60 gruppi di memoria
Visualizzazione del valore medio di tre misurazioni
Circonferenza del braccio adatta: 22cm-45cm
Dimensioni: Circa 127x92x68 (mm)
Peso: circa 306 g
3. Condizioni di funzionamento e di stoccaggio:
Condizioni di funzionamento:
un intervallo di temperatura compreso tra +5°C e
+40°C;
un intervallo di umidità relativa compreso tra il 15% e
il 90%, senza condensa; e un intervallo di pressione
atmosferica compreso tra 70kPa e 106kPa.
Condizioni di trasporto e stoccaggio:
da -25°C a +5°C e
da + 5°C a + 35°C con un'umidità relativa fino al 90%,
senza condensa;
Da >35°C a 70°C con una pressione del vapore
acqueo fino a 5kPa.
Ambiente di funzionamento:
Evitare le interferenze elettromagnetiche, gli urti
violenti e gli ambienti rumorosi.
Tempo di recupero:
1. Quando la temperatura ambiente è di 20°C, il tempo
necessario per il riscaldamento del dispositivo dalla
temperatura minima di conservazione (-20°C) fino a
quando il dispositivo è pronto per l'uso è di 2 ore.
2. Quando la temperatura ambiente è di 20°C, il tempo
necessario per il raffreddamento del dispositivo dalla
temperatura massima di conservazione (55°C) fino a
quando il dispositivo è pronto per l'uso è di 2 ore.
2. Parametri Tecnici
Visualizzazione: Display digitale LCD
Principio di funzionamento: Metodo oscillometrico
Intervallo di misurazione:
Diastolica: 20mmHg-210mmHg
Sistolica: 40mmHg-260mmHg
Pressione del bracciale: 0mmHg~300mmHg
Frequenza cardiaca: 40 battiti/min~200 battiti/min
Precisione:
Pressione: entro ±3mmHg (±0,4kPa)
Frequenza del polso: entro il 5% del valore letto
Sistema di lavoro: funzionamento continuo
Classificazione IP: IP20
Classificazione Elettrica: Classe II e alimentato
internamente, parte applicata di tipo BF (il bracciale è
parte applicata)
Durata di utilizzo:
5 anni (6 volte per ogni giorno) per il monitor
5000 volte per il bracciale
Alimentazione
batteria: DC 3,7V
Adattatore AC: ingresso 100-240V~ 50/60Hz 0,35A MAX
uscita 5 V 1000mA
Durata massima della batteria: la batteria può essere
utilizzata circa 250 volte con una carica completa
contro l'ingresso di corpi estranei solidi:
Diametro ≥12,5 mm
Caratteristiche e parametri tecnici Caratteristiche e parametri tecnici
IT IT
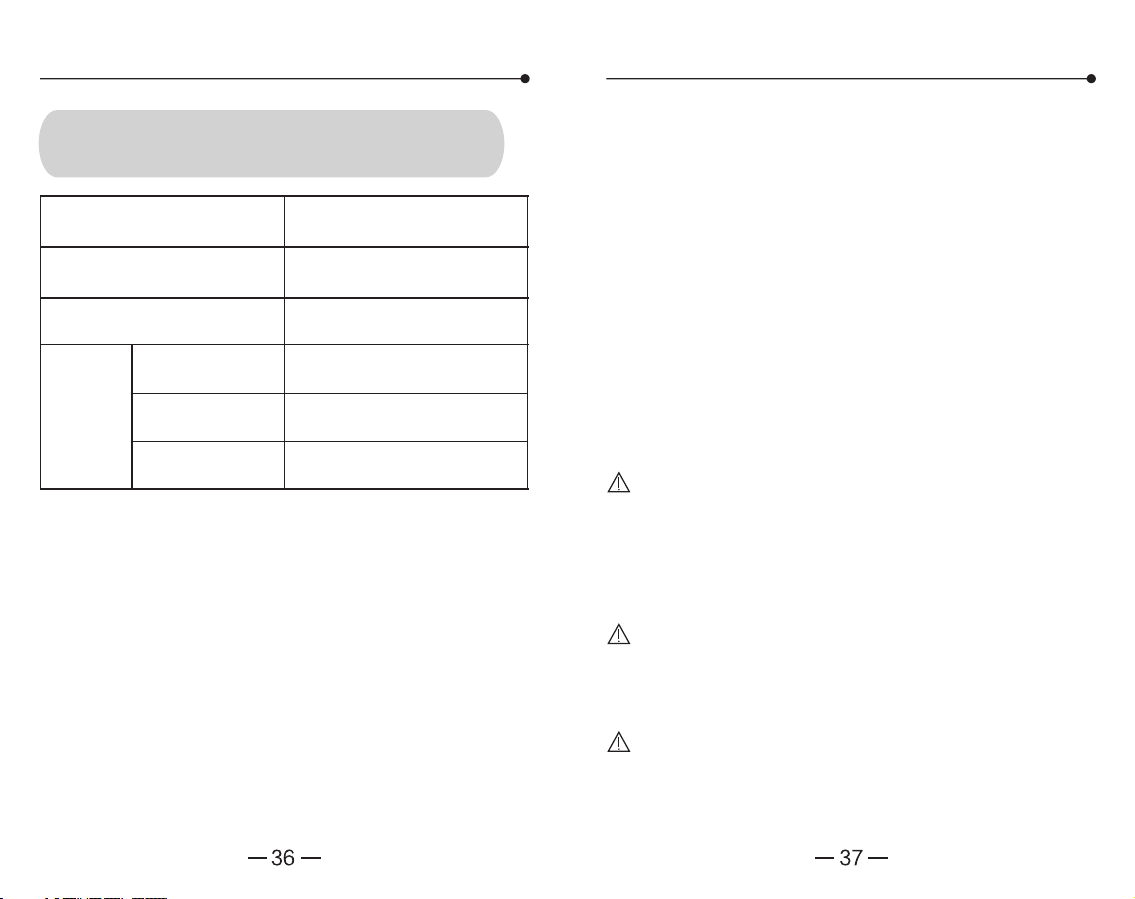
Lo SFIGMOMANOMETRO è stato esaminato
clinicamente in conformità a i requisiti della norma
ISO 81060-2.
Lo SFIGMOMANOMETRO è conforme alla norma
IEC 80601-2-30.
Prestazioni essenziali
1. Limiti dell'errore del manometro:
Nell'intervallo di temperatura compreso tra 5°C e 40°C
e nell'intervallo di umidità relativa compreso tra il 15%
e il 90% (senza condensa), l'errore massimo per la
misurazione della pressione del BRACCIALE in
qualsiasi punto dell'intervallo di misurazione NOMINA-
LE deve essere inferiore o uguale a ±3mmHg
(±0,4kPa) della lettura.
2. Riproducibilità della DETERMINAZIONE DELLA
PRESSIONE SANGUIGNA:
La riproducibilità in laboratorio della DETERMINAZIO-
NE DELLA PRESSIONE SANGUIGNA dello SFIGMO-
MANOMETRO AUTOMATIZZATO deve essere
inferiore o uguale a 3,0mmHg (0,4 kPa).
Le apparecchiature di comunicazione RF portatili
(comprese le periferiche come i cavi dell'antenna e le
antenne esterne) devono essere utilizzate a non meno
di 30 cm (12 pollici) da qualsiasi parte dello SFIGMO-
MANOMETRO, compresi i cavi specificati dal produtto-
re. In caso contrario, potrebbero compromettersi le
prestazioni del dispositivo.
Questa apparecchiatura potrebbe non offrire servizi di
comunicazione a radiofrequenza adeguati. L'utente
potrebbe aver bisogno di adottare misure di mitigazio-
ne, come ad esempio lo spostamento o il ri-orienta-
mento dell'apparecchiatura.
Quando lo strumento è in uso, non metterlo mai vicino
ad altri strumenti o impilarlo su altri strumenti. Se è
necessario metterlo vicino ad altri strumenti valutare e
verificare se lo strumento può funzionare normalmen-
te.
Caratteristiche e parametri tecnici
Informazioni sulla compatibilità elettromagnetica
Il dettaglio dei materiali di contatto del
prodotto
Parte
Coperchio posteriore ABS
PC
ABS
PVC
Coperchio superiore
Bracciale
Fascia da braccio Nylon, poliestere
Collegamento della
spina dell'aria
Tubo dell'aria
Materiale
IT IT
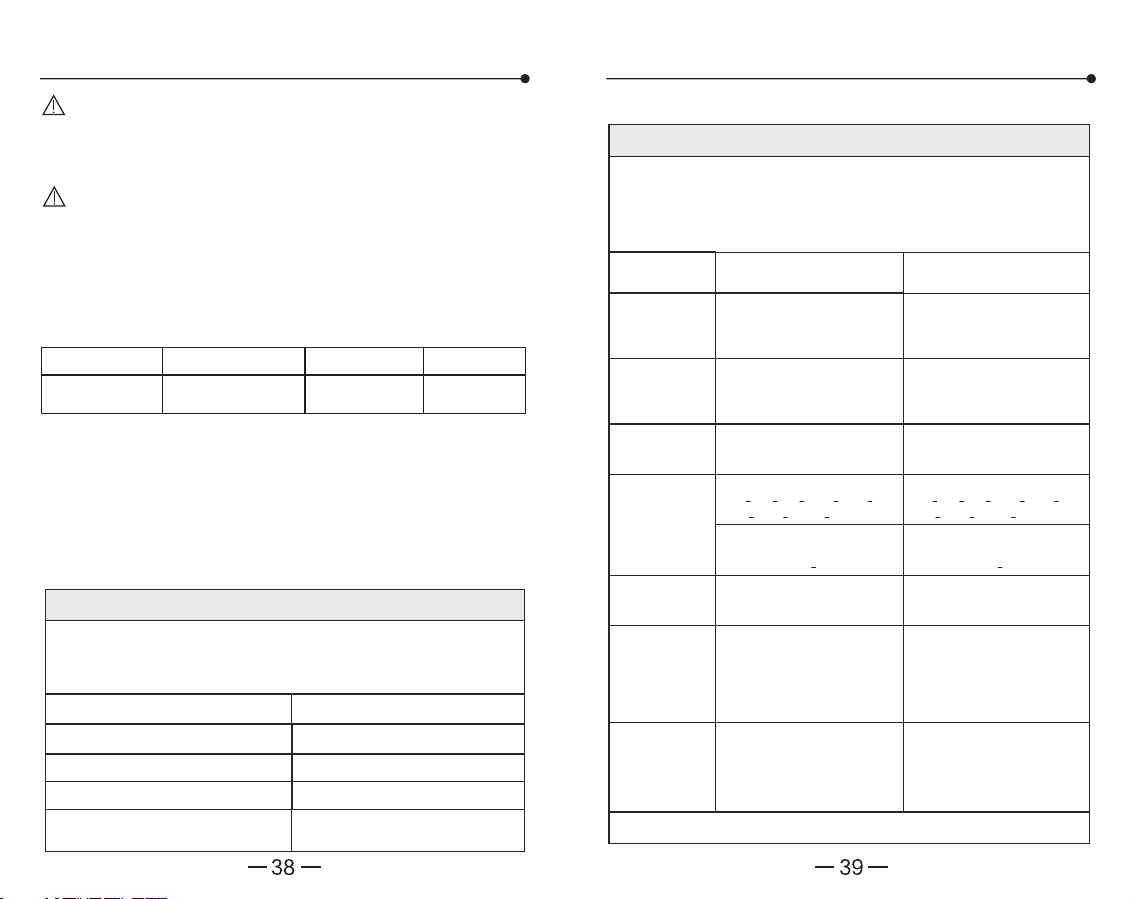
ATTENZIONE: L'Operatore non deve utilizzare il
sistema e deve informare il servizio clienti se le
PRESTAZIONI ESSENZIALI vengono perse o degra-
date a causa di DISTURBI EM.
ATTENZIONE: L'uso di accessori e cavi diversi da
quelli specificati o forniti dal produttore di questa
apparecchiatura potrebbe causare un aumento delle
emissioni elettromagnetiche o una riduzione dell'immu-
nità elettromagnetica di questa apparecchiatura e
provocare un funzionamento improprio.
L'elenco dei cavi e degli accessori è il seguente:
Tabella 1 Per tutte le APPARECCHIATURE e i SISTEMI ME
Tabella 2 Per tutte le APPARECCHIATURE e i SISTEMI ME
Esiste il rischio di interferenze a radiofrequenza tra il
dispositivo e altri dispositivi. In caso affermativo, si prega di
individuare i problemi e di adottare le seguenti misure:
(1) Spegnere il dispositivo e riaccenderlo.
(2) Cambiare la direzione del dispositivo.
(3) Tenere il prodotto lontano dai dispositivi di interferenza.
Informazioni sulla compatibilità elettromagnetica Informazioni sulla compatibilità elettromagnetica
Nome del cavo Lunghezza del cavo
≤1,2 m Non schermato Nessuno
Cavo schermato Commenti
Cavo di
alimentazione CC
Guida e dichiarazione del produttore - emissione elettromagnetica
Guida e dichiarazione di fabbricazione - emissione elettromagnetica
Il monitor elettronico della pressione sanguigna YE650AR è
destinato all'uso nell'ambiente elettromagnetico specificato di
seguito. Il cliente o l'utente del misuratore elettronico della
pressione arteriosa YE650AR deve assicurarsi che venga utilizzato
in un ambiente di questo tipo.
Scariche
elettrostatiche
(ESD) IEC
61000-4-2
±8kV contatto
±15kV aria
±8kV contatto
±15kV aria
Transitori
elettrici rapidi
/burst IEC
61000-4-4
±2kV
Frequenza di ripetizione a
100kHz
±2kV
Frequenza di ripetizione
100kHz
Sovraccarico
IEC 61000-4-5
±1kV da linea(e) a linea(e)
±2kV da linea(e) a terra
±1kV da linea(e) a linea(e)
Cadute di
tensione IEC
61000-4-11
Interruzioni di
tensione IEC
61000-4-11
Frequenza di
alimentazione
(50/60 Hz)
campo
magnetico
IEC 61000-4-8
Campi
magnetici di
prossimità IEC
61000-4-39
NOTA: U
T
è la tensione di rete CA prima dell'applicazione del livello di test.
0% U
T
; 0,5 ciclo
A 0
0
, 45
0
, 90
0
, 135
0
, 180
0
,
225
0
, 270
0
e 315
0
0% U
T
; 1 ciclo e 70% U
T
;
25/30 ciclo
Monofase: a 0
0
0% U
T
; 250/300 ciclo
30A/m
50Hz o 60Hz
8A/m, CW per 30kHz
65A/m, 2,1kHz Modulazione
di impulso per 134,2kHz
7,5A/m, 50kHz Modulazione
di impulso per 13,56MHz
8A/m, CW per 30kHz,
65A/m, 2,1kHz Modulazione
di impulso per 134,2kHz,
7,5A/m, 50kHz Modulazione
di impulso per 13,56MHz
30A/m
50Hz o 60Hz
0% U
T
; 250/300 ciclo
0% U
T
; 1 ciclo e 70% U
T
;
25/30 ciclo
Monofase: a 0
0
0% U
T
; 0,5 ciclo
A 0
0
, 45
0
, 90
0
, 135
0
, 180
0
,
225
0
, 270
0
e 315
0
Il monitor elettronico della pressione sanguigna YE650AR è destinato
all'uso nell'ambiente elettromagnetico specificato di seguito. Il cliente
o l'utente del misuratore elettronico della pressione arteriosa
YE650AR deve assicurarsi che venga utilizzato in un ambiente
Prova di emissione Conformità
Emissioni RF CISPR 11
Gruppo1
Classe B
Classe A
Conforme
Emissioni RF CISPR 11
Fluttuazioni di tensione/sfarfallio
IEC 61000-3-3
Emissioni armoniche IEC 61000-3-2
Test immunità Livello di test IEC 60601 Livello di conformità
IT IT
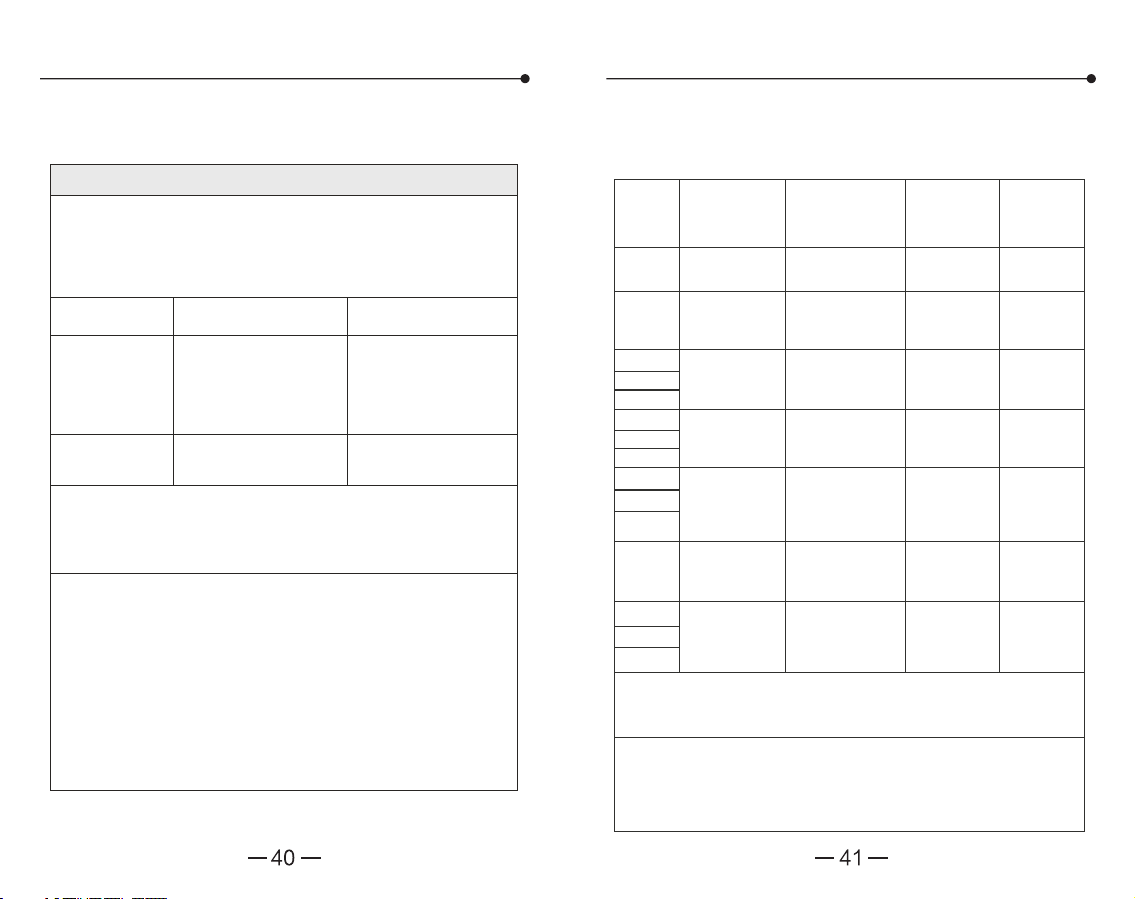
Tabella 3 Per le APPARECCHIATURE e i SISTEMI ME
che non sono LIFE-SUPPORTING
Tabella 4 Specifiche di prova per l'IMMUNITA' DELLA
PORTA DELL’INVOLUCRO alle apparecchia-
ture di comunicazione wireless RF
Informazioni sulla compatibilità elettromagnetica Informazioni sulla compatibilità elettromagnetica
Guida e dichiarazione del costruttore – immunità elettromagnetica
Il monitor elettronico della pressione sanguigna YE650AR è
destinato all'uso nell'ambiente elettromagnetico specificato di
seguito. Il cliente o l'utente del misuratore elettronico della
pressione arteriosa YE650AR deve assicurarsi che venga utilizzato
in un ambiente di questo tipo.
Condotta RF IEC
61000-4-6
RF irradiata IEC
61000-4-3
3 Vrms
0,15MHz - 80MHz
6V rms in bande radio
amatoriali e ISM tra
0,15MHz e 80MHz
80% AM a 1kHz
10 V/m
80MHZ a 2,7GHz
10 V/m
80MHZ a 2,7GHz
NOTA1 A 80MHz e 800MHz, si applica la gamma di frequenza superiore.
NOTA2 Queste linee guida potrebbero non essere applicabili in tutte le
situazioni.
La propagazione elettromagnetica è influenzata dall'assorbimento e dalla
riflessione di strutture, oggetti e persone.
Se necessario per raggiungere il LIVELLO DI PROVA DI IMMUNITA', la
distanza tra l'antenna di trasmissione e l'APPARECCHIO o il SISTEMA ME
può essere ridotta a 1 m. La distanza di prova di 1 m è consentita dalla norma
IEC61000-4-3.
a) Per alcuni servizi sono incluse solo le frequenze di uplink.
b) La portante deve essere modulata utilizzando un segnale ad onda quadra
con un ciclo di lavoro del 50%.
c) In alternativa alla modulazione FM, la portante può essere modulata a impulsi
utilizzando un segnale a onda quadra con duty cycle del 50% a 18 HZ.
Sebbene non rappresenti la modulazione effettiva, sarebbe il caso peggiore.
a
Le intensità di campo dei trasmettitori fissi, come le stazioni di base per i
telefoni cellulari e le radio mobili terrestri, i radioamatori, le trasmissioni
radiofoniche AM e FM e le trasmissioni televisive non possono essere
previste teoricamente con precisione. Per valutare l'ambiente
elettromagnetico dovuto ai trasmettitori RF fissi, è necessario prendere in
considerazione un'indagine elettromagnetica del sito. Se l'intensità di
campo misurata nel luogo in cui viene utilizzato il YE650AR supera il
livello di conformità RF applicabile di cui sopra, il YE650AR deve essere
osservato per verificare il normale funzionamento. Se si osservano
prestazioni anomale, potrebbero essere necessarie ulteriori misure, come
il riorientamento o la ricollocazione del YE650AR.
b
Oltre l'intervallo di frequenza da 150kHz a 80MHz, le intensità di campo
devono essere inferiori a 3V/m.
3 Vrms
0,15MHz - 80MHz
6V rms in bande radio
amatoriali e ISM tra
0,15MHz e 80MHz
80% AM a 1kHz
Frequenza
di prova
(MHz)
385 380 a 390 TETRA 400
Modulazione
dell’impulso
b)
18 Hz
27
28
9
28
28
28
9
FM
Deviazione
±5kHz1kHz
sinusoidale
Modulazione
dell’impulso
b)
217 Hz
Modulazione
dell’impulso
b)
18 Hz
Modulazione
dell’impulso
b)
217 Hz
Modulazione
dell’impulso
b)
217 Hz
Modulazione
dell’impulso
b)
217 Hz
GMRS 460, FRS
460
Banda LTE 13, 17
GSM 800/900,
TETRA 800, IDEM
820, CDMA 850,
Banda LTE 5
GSM 1800; TETRA
1900;
GSM 1900; DECT;
Banda LTE 1,3, 4,
25; UMTS
Bluetooth, WLAN,
802.11 b/g/n, RFID
2450, Banda LTE 7
WLAN 802.11 a/n
430 a 470
704 a 787
800 a 960
1700 a 1990
2400 a 2570
5100 a 5800
450
710
745
780
810
870
930
1720
1845
1970
2450
5240
5500
5785
Banda
a)
(MHz)
Servizio
a)
Modulazione
LIVELLO
TEST DI
IMMUNITÀ
(V/m)
Test immunità Livello di test IEC 60601 Livello di conformità
IT IT
