Instruction Manual
PETROL PRESSURE WASHER
HYW2500P, HYW3000P, HYW3000P2,
HYW3100P, HYW3100P2, HYW4000P
WARNING: Read the instructions carefully before use.

Page
HYW2500P_HYW3000P_HYW3100P_HYW3100P2_HYW4000P Combined user manual Rev 7.pdf 2 16/12/2015 11:43:50
1. INTRODUCTION 3
2. PRODUCT IDENTIFICATION 4
3. SAFETY 4 – 11
4. PETROL WASHER COMPONENTS 12
5. ASSEMBLY 13
6. PRE-OPERATION CHECK LIST 14
7. STARTING YOUR WASHER 14 – 18
8. SHUTTING DOWN YOU WASHER 18
9. QUICK RELEASE NOZZLES 19-20
10. TROUBLESHOOTING 21 -22
11. STORAGE 22 - 23
12. PARTS BREAKDOWN 24 - 31
13. MAINTENANCE 32
14. DECLARATION OF CONFORMITY 33
15. CONTACT DETAILS 34
2
HYW2500P_HYW3000P_HYW3100P_HYW3100P2_HYW4000P Combined user manual Rev 7.pdf 3 16/12/2015 11:43:50
1. INTRODUCTION
Attention: Read through the complete manual prior to the initial use of your pressure washer.
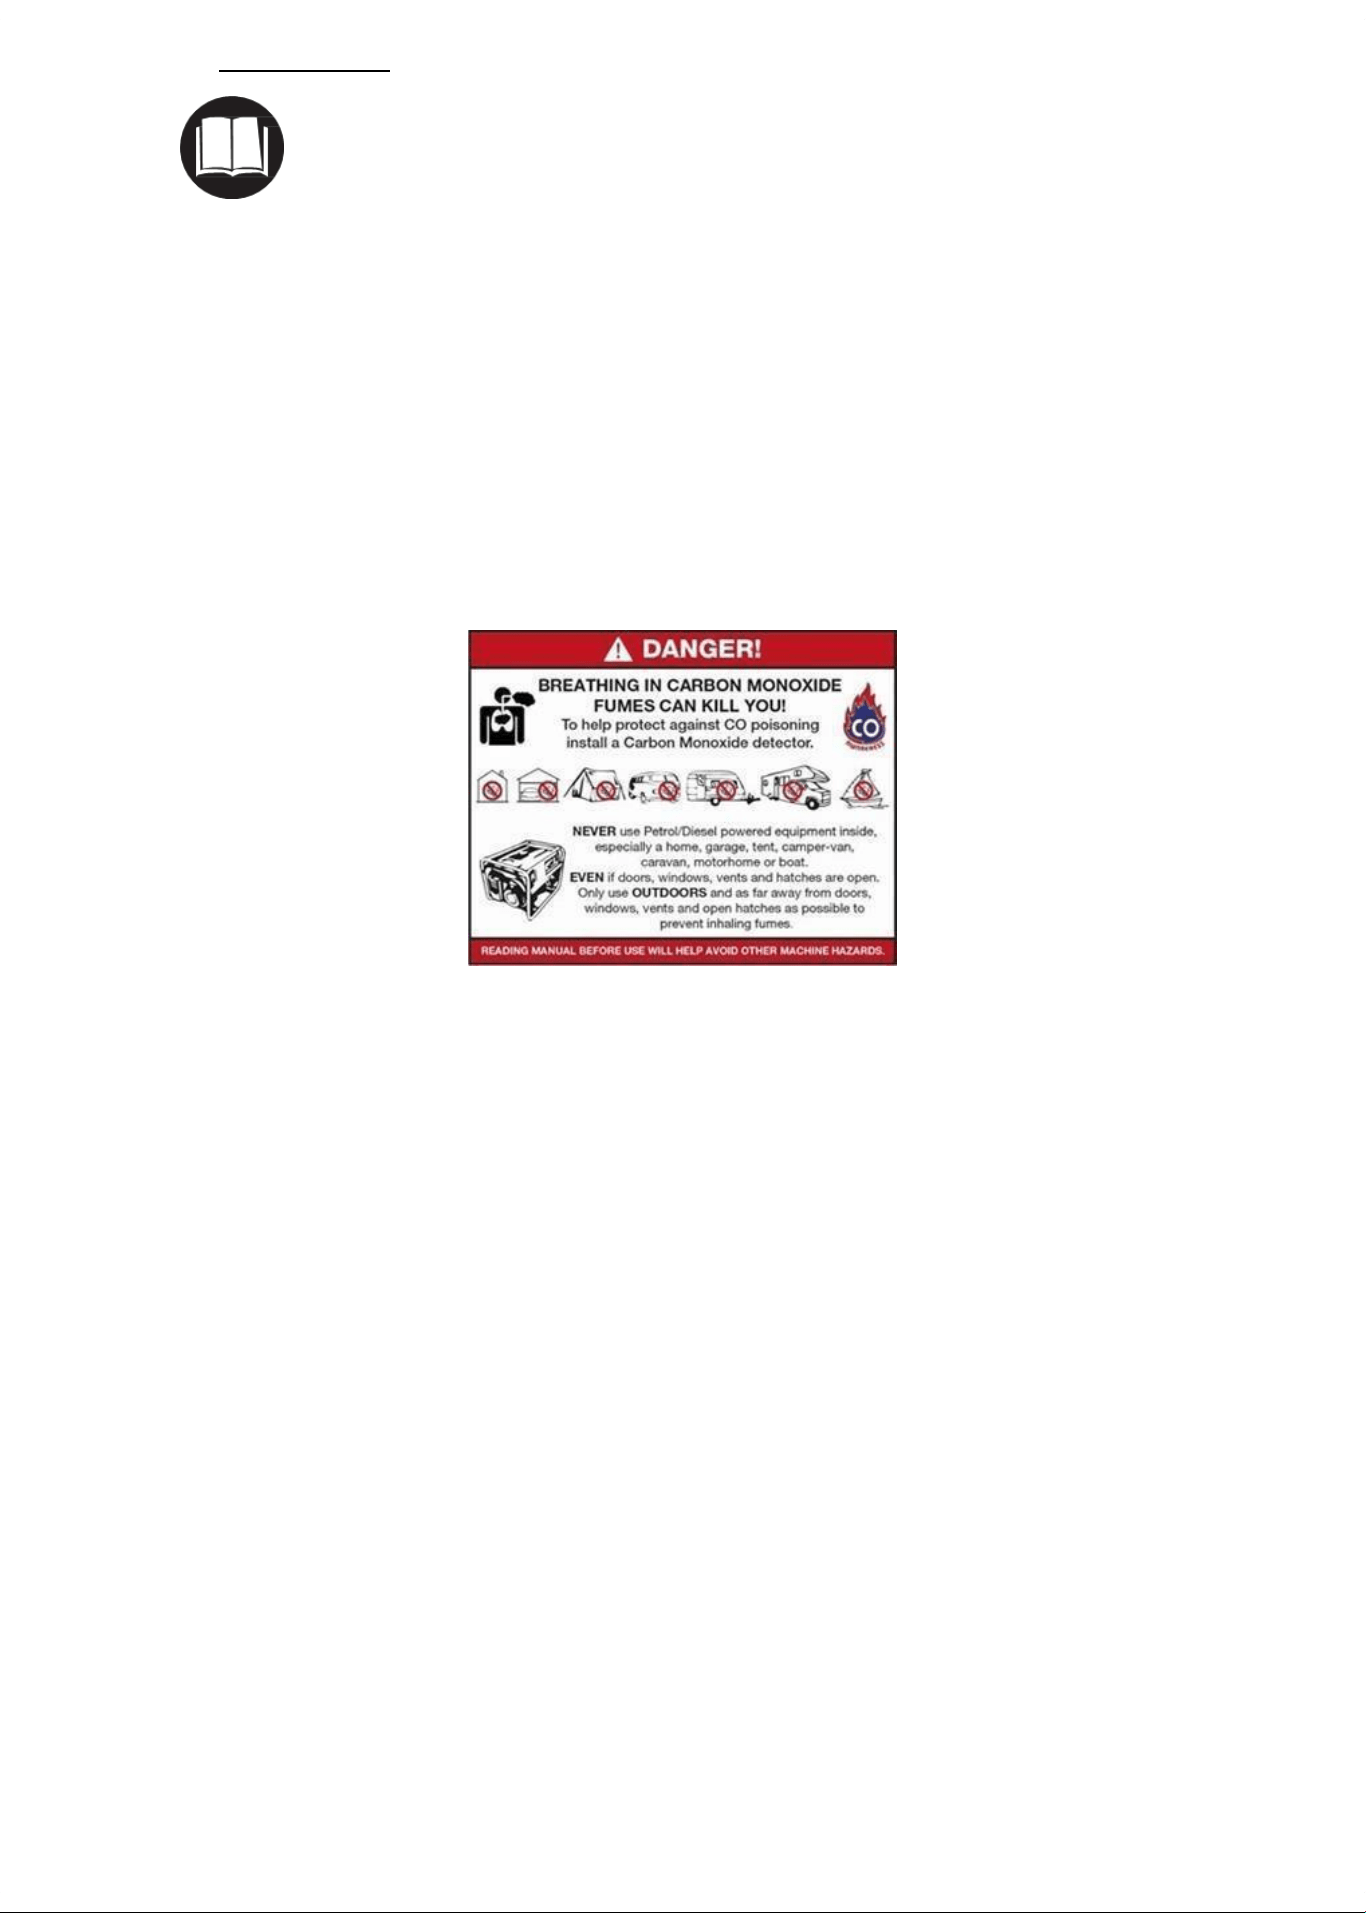
1.1. Carbon monoxide warning.
1.1.1. Carbon monoxide is a colourless and odourless gas. Inhaling this gas can cause
death as well as serious long term health problems such as brain damage. The
symptoms of carbon monoxide poisoning can include but not limited to the
following; headaches, dizziness, nausea, breathlessness, collapsing or loss of
consciousness.
1.1.2. DO NOT use in an enclosed area or a moving vehicle.
1.2. Using the operating manual.
1.2.1. The operating manual is an important part of your pressure washer and should
be read thoroughly before initial use, and referred to often to make sure
adequate safety and service concerns are being addressed.
1.2.2. Reading the instruction manual thoroughly will help avoid any personal injury
or damage to your machine. The information in this manual will offer you the
most effective tools for cleaning as well as the safest. By knowing how best to
operate this machine you will be better positioned to show others who may
also operate the unit.
1.2.3. This manual contains information for the complete range of pressure washers
and is placed in an order, starting from the safety requirements, to the
operating functions of your machine. You can refer back to the manual at any
time to help troubleshoot any specific operating functions, so store it with the
machine at all times.
1.3. Notice.
1.3.1. Actual pressure released at the point of discharge may vary by machine due
to varying factors including: Volume of water being fed to the machine by the
water source, the inclusion of a Chemical injector in the line, or variations in
Engine performance.
Page
3

HYW2500P_HYW3000P_HYW3100P_HYW3100P2_HYW4000P Combined user manual Rev 7.pdf 4 16/12/2015 11:43:50
2. PRODUCT IDENTIFICATION
2.1. Pressure Washer
2.1.1. If you need to contact an authorised dealer or customer service for
information on servicing, always provide the product model and
identification numbers.
2.1.2. You will need to locate the model and serial number for the machine and
record the information in the places provided below.
Date of purchase
Dealer name
Dealer phone
Model number
Serial number
Engine model number
3. SAFETY
3.1. Important safety instructions save these instructions.
3.1.1. WARNING – When using this product basic precautions should always be followed, including
the following:-
3.1.1.1. Read all the instructions before using the product.
3.1.1.2. To reduce the risk of injury, close supervision is necessary when a product is used
near children.
3.1.1.3. Know how to stop the product and bleed pressures quickly. Be thoroughly
familiar with the controls.
3.1.1.4. Stay alert – watch what you are doing.
3.1.1.5. Do not operate the product when fatigued or under the influence of alcohol or
drugs.
3.1.1.6. Keep operating area clear of all persons
3.1.1.7. Do not overreach or stand on unstable support. Keep good footing and balance
at all times.
3.1.1.8. Follow the maintenance instructions specified in the manual.
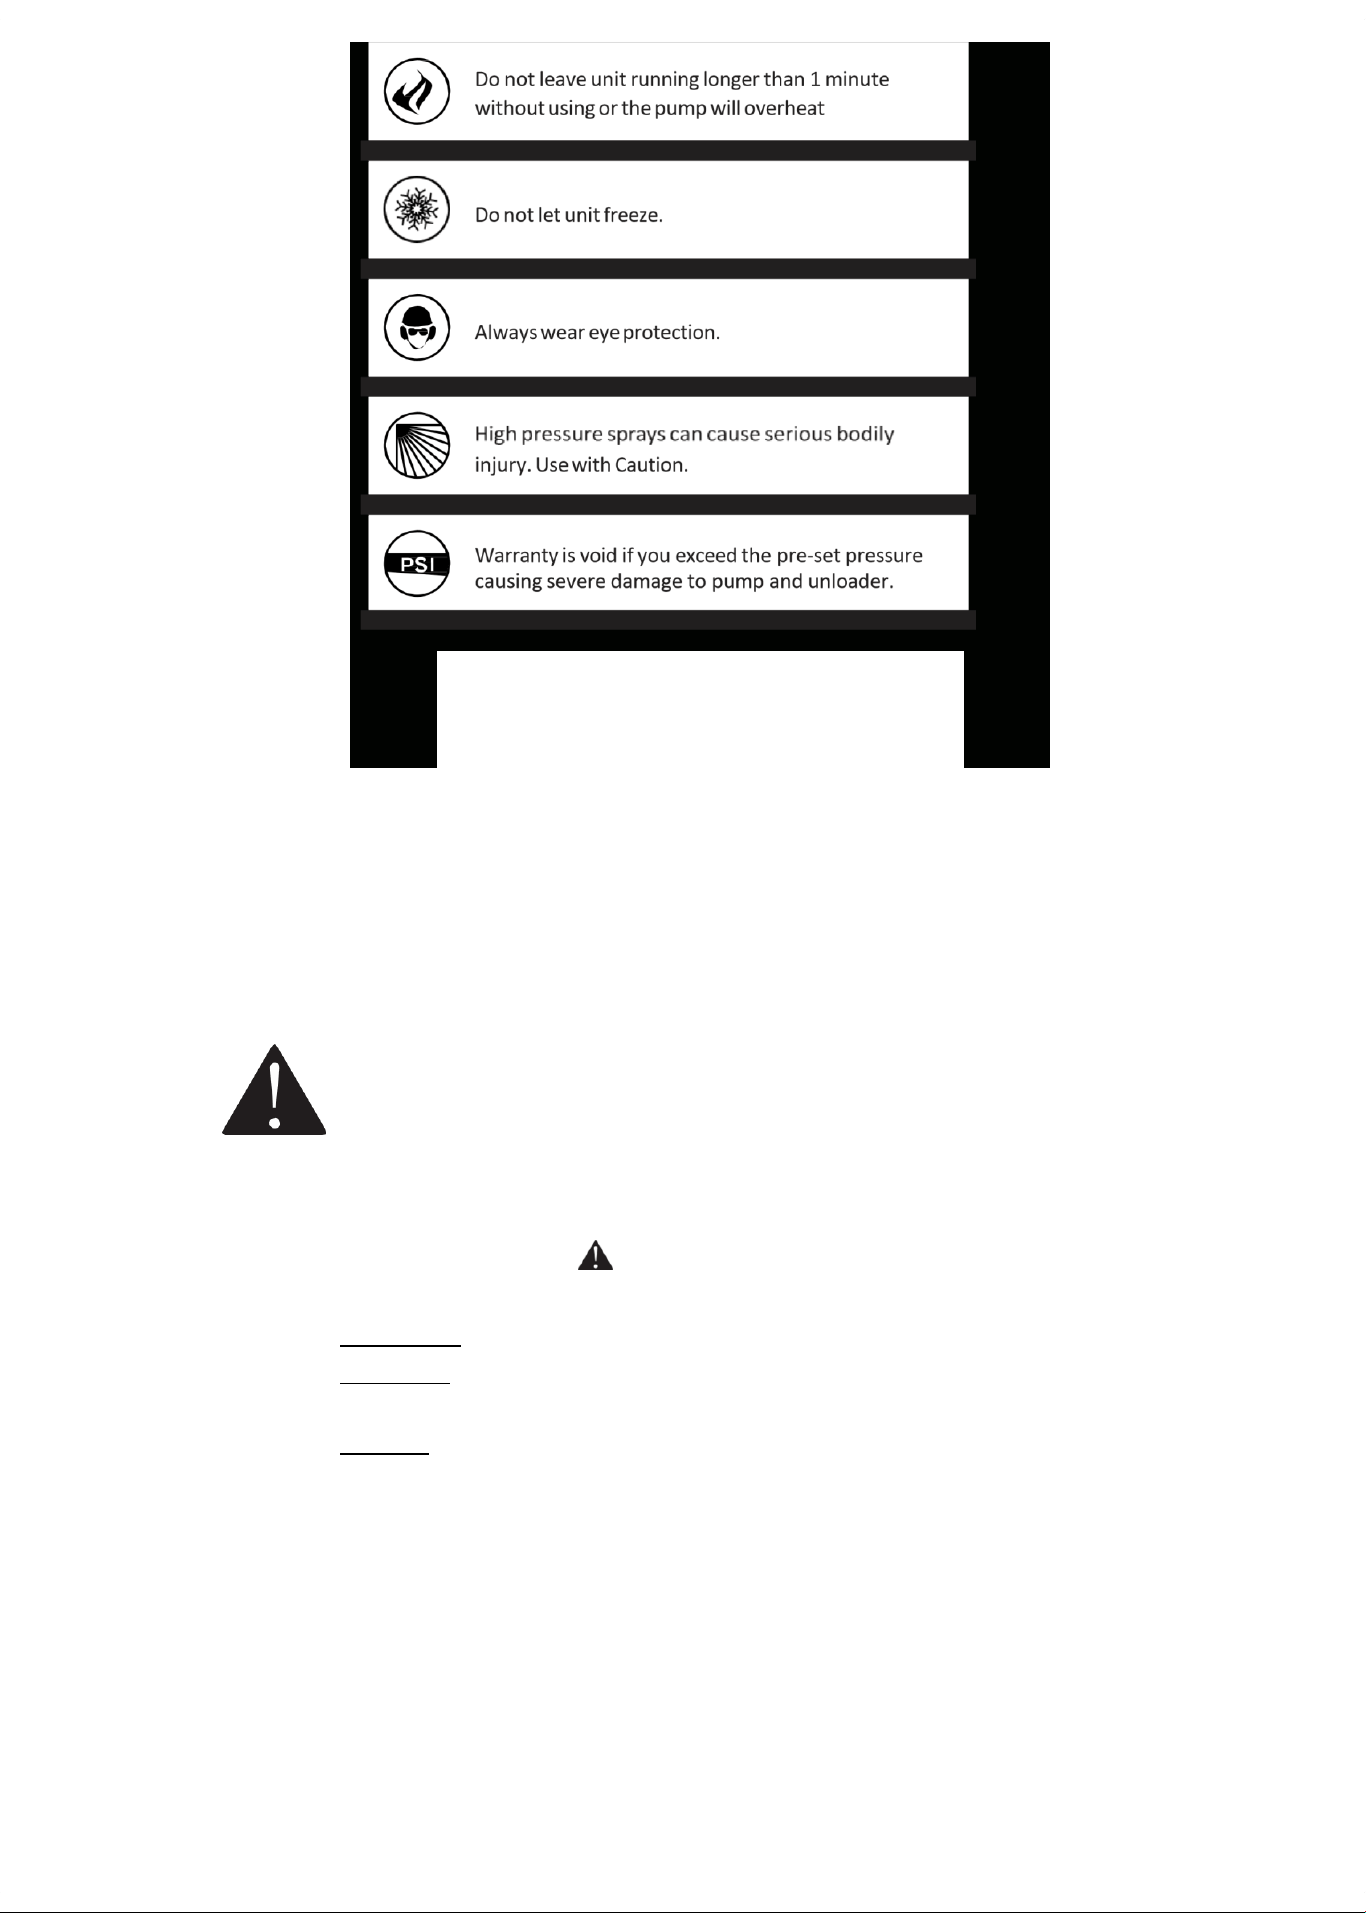
3.2. Understanding the Machine Safety Labels
3.2.1. The machine safety label shown below is placed on your machine to draw attention to
potential safety hazards.
WARNING!
Page
4
HYW2500P_HYW3000P_HYW3100P_HYW3100P2_HYW4000P Combined user manual Rev 7.pdf 5 16/12/2015 11:43:50
Do not use pressure washer in
enclosed space without ventilation.
Carbon Monoxide Kills.
3.3. Safety rules.
This is the safety alert symbol. It is used to alert you to potential personal injury
hazards. Obey all safety messages that follow this symbol to avoid possible injury or
death. The safety alert symbol ( ) is used with a signal word (DANGER, CAUTION,
WARNING), a pictorial and/or a safety message to alert you to hazards.
3.3.1. WARNING - Indicates a hazard which, if not avoided, could result in death or serious injury.
3.3.2. CAUTION - Indicates a hazard which, if not avoided, might result in minor or moderate
injury.
3.3.3. NOTICE - Indicates a situation that could result in equipment damage.
3.3.4. Follow safety messages to avoid or reduce the risk of injury or death.
Page
5

HYW2500P_HYW3000P_HYW3100P_HYW3100P2_HYW4000P Combined user manual Rev 7.pdf 6 16/12/2015 11:43:50
FALL FLUID INJECTION MOVING PARTS READ MANUAL
3.3.5. WARNING Risk of electrocution, contact with power source can cause electric shock or
burns.
3.3.6. WARNING Fuel and its vapours are extremely flammable and explosive.
3.3.7. WARNING Fire or explosion can cause severe burns or death.
3.3.7.1. When Adding or Draining Fuel 7
3.3.7.1.1. Turn pressure washer OFF and let it cool at least 2 minutes before
removing fuel cap. Loosen cap slowly to release pressure in tank.
3.3.7.1.2. Fill or drain fuel tank outdoors.
3.3.7.1.3. DO NOT overfill tank. Allow space for fuel expansion (25mm from
top).
3.3.7.1.4. If fuel spills, wait until it evaporates before starting engine.
3.3.7.1.5. Keep fuel away from sparks, open flames, pilot lights, heat, and other
ignition sources.
3.3.7.1.6. DO NOT light a cigarette or smoke.
3.3.7.2. When Starting Equipment
3.3.7.2.1. Ensure spark plug, exhaust, fuel cap, and air cleaner are in place.
3.3.7.2.2. DO NOT crank engine with spark plug removed.
3.3.7.3. When Operating Equipment
3.3.7.3.1. DO NOT tip engine or equipment at angle which causes fuel to
EXPLOSION
FIRE
ELECTRIC
SHOCK
KICKBACK
HOT
SURFACE
FLYING
OBJECTS
TOXIC
FUMES
SLIPPERY
Page
6

HYW2500P_HYW3000P_HYW3100P_HYW3100P2_HYW4000P Combined user manual Rev 7.pdf 7 16/12/2015 11:43:50
spill.
3.3.7.3.2. DO NOT spray flammable liquids.
3.3.7.4. When Transporting or Repairing Equipment
3.3.7.4.1. Transport/repair with fuel tank EMPTY or with fuel shutoff valve OFF.
3.3.7.4.2. Disconnect spark plug wire.
3.3.7.5. When Storing Fuel or Equipment with Fuel in Tank
3.3.7.5.1. Store away from furnaces, stoves, water heaters, clothes dryers, or
other appliances that have pilot light or other ignition source because
they can ignite fuel vapours.
3.3.8. WARNING Engine exhaust fumes contain carbon monoxide, an odourless, colourless, poison
gas. Breathing carbon monoxide can cause headache, fatigue, dizziness, vomiting, confusion,
seizures, nausea, fainting or death. Some chemicals or detergents may be harmful if inhaled
or ingested, causing severe nausea, fainting, or poisoning.
3.3.8.1. ONLY operate pressure washer outdoors.
3.3.8.2. Do not allow exhaust gas from entering a confined area through windows, doors,
ventilation intakes or other openings.
3.3.8.3. DO NOT start or run engine indoors or in an enclosed area, even if windows and
doors are open.
3.3.8.4. Use a respirator or mask whenever there is a chance that vapours may be
inhaled.
3.3.8.5. Read all instructions with the mask so you are certain the mask will provide the
necessary protection against inhaling harmful vapours.
3.3.9. WARNING Starter cord kickback (rapid retraction) can result in bodily injury.
Kickback will pull hand and arm toward engine faster than you can let go.
Broken bones, fractures, bruises, or sprains could result.
3.3.9.1. NEVER pull starter cord without first releasing spray gun pressure.
3.3.9.2. When starting engine, pull cord slowly until resistance is felt and then pull rapidly
to avoid kickback.
3.3.9.3. After each starting attempt, where engine fails to run, always point spray gun in
safe direction and squeeze spray gun trigger to release high pressure.
3.3.9.4. Firmly grasp spray gun with both hands when using high pressure spray to avoid
injury when spray gun kicks back.
Page
7

HYW2500P_HYW3000P_HYW3100P_HYW3100P2_HYW4000P Combined user manual Rev 7.pdf 8 16/12/2015 11:43:50
3.3.10. WARNING Use of pressure washer can create puddles and slippery surfaces.
3.3.11. WARNING Kickback from spray gun can cause you to fall.
3.3.11.1. Operate pressure washer from a stable surface.
3.3.11.2. The cleaning area should have adequate slopes and drainage to reduce the
possibility of a fall due to slippery surfaces.
3.3.11.3. Be extremely careful if you must use the pressure washer from scaffolding or any
other similar location.
3.3.11.4. Firmly grasp spray gun with both hands when using high pressure spray to avoid
injury when spray gun kicks back.
3.3.12. WARNING Contact with exhaust area can result in serious burns.
3.3.13. WARNING Exhaust heat/gases can ignite combustibles, structures or damage fuel tank
causing a fire.
3.3.13.1. DO NOT touch hot parts and AVOID hot exhaust gases.
3.3.13.2. Allow equipment to cool before touching.
Page
8

9 16/12/2015 11:43:50
3.3.13.3. Keep at least 5 feet (1.5 m) of clearance on all sides
of pressure washer including overhead.
3.3.14. WARNING Risk of eye injury. Spray can splash back or propel
objects.
3.3.14.1. Always wear safety goggles when using this
equipment or in vicinity of where equipment is in
use.
3.3.14.2. Before starting the pressure washer, be sure you are
wearing adequate safety goggles.
3.3.14.3. NEVER substitute safety glasses for safety goggles.
3.3.15. WARNING The high pressure stream of water that this
equipment produces can cut through skin and its underlying
tissues, leading to serious injury and possible amputation. Spray
gun traps high water pressure, even when engine is stopped
and water is disconnected, which can cause injury.
3.3.15.1. DO NOT allow CHILDREN to operate pressure
washer.
3.3.15.2. NEVER repair high pressure hose. Replace it.
3.3.15.3. NEVER repair leaking connections with sealant of
any kind. Replace O- ring or seal.
3.3.15.4. NEVER connect high pressure hose to nozzle
extension.
3.3.15.5. Keep high pressure hose connected to pump and
spray gun while system is pressurised.
3.3.15.6. ALWAYS point spray gun in safe direction and
squeeze spray gun trigger, to release high pressure,
every time you stop engine.
3.3.15.7. NEVER aim spray gun at people, animals, or plants.
3.3.15.8. DO NOT secure spray gun in open position.
3.3.15.9. DO NOT leave spray gun unattended while machine
is running.
3.3.15.10. NEVER use a spray gun which does not have a trigger
lock or trigger guard in place and in working order.
3.3.15.11. Always be certain spray gun, nozzles and accessories
are correctly attached.
Page
9

10 16/12/2015 11:43:50
3.3.16. WARNING Starter and other rotating parts can entangle hands,
hair, clothing, or accessories.
3.3.16.1. NEVER operate pressure washer without protective
housing or covers.
3.3.16.2. DO NOT wear loose clothing, jewellery or anything
that may be caught in the starter or other rotating
parts.
3.3.16.3. Tie up long hair and remove jewellery.
3.3.17. WARNING Unintentional sparking can result in fire or electric
shock.
3.3.17.1. When Adjusting or Making Repairs to Your Pressure
Washer
3.3.17.1.1. Disconnect the spark plug cap from the
spark plug and place it where it cannot
contact spark plug.
3.3.17.2. When Testing for Engine Spark
3.3.17.2.1. Use approved spark plug tester.
3.3.17.2.2. DO NOT check for spark with spark plug
removed.
3.3.18. NOTICE High pressure spray may damage fragile items including
glass.
3.3.18.1. DO NOT point spray gun at glass when using red 0°
spray tip.
3.3.18.2. NEVER aim spray gun at plants.
3.3.19. NOTICE Improper treatment of pressure washer can damage it
and shorten its life.
3.3.19.1. If you have questions about intended use, ask your
dealer or contact nearest authorised dealer.
3.3.19.2. NEVER operate units with broken or missing parts,
or without protective housing or covers.
3.3.19.3. DO NOT by-pass any safety device on this machine.
3.3.19.4. DO NOT tamper with governed speed.
Page
10

3.3.19.5. DO NOT operate pressure washer above rated
pressure.
3.3.19.6. DO NOT modify pressure washer in any way.
3.3.19.7. Before starting pressure washer in cold weather,
check all parts of the equipment to be sure ice has
not formed there.
3.3.19.8. NEVER move machine by pulling on hoses. Use
handle provided on unit.
3.3.19.9. Check fuel system for leaks or signs of deterioration,
such as chafed or spongy hose, loose or missing
clamps, or damaged tank or cap. Correct all defects
before operating pressure washer.
Page
11
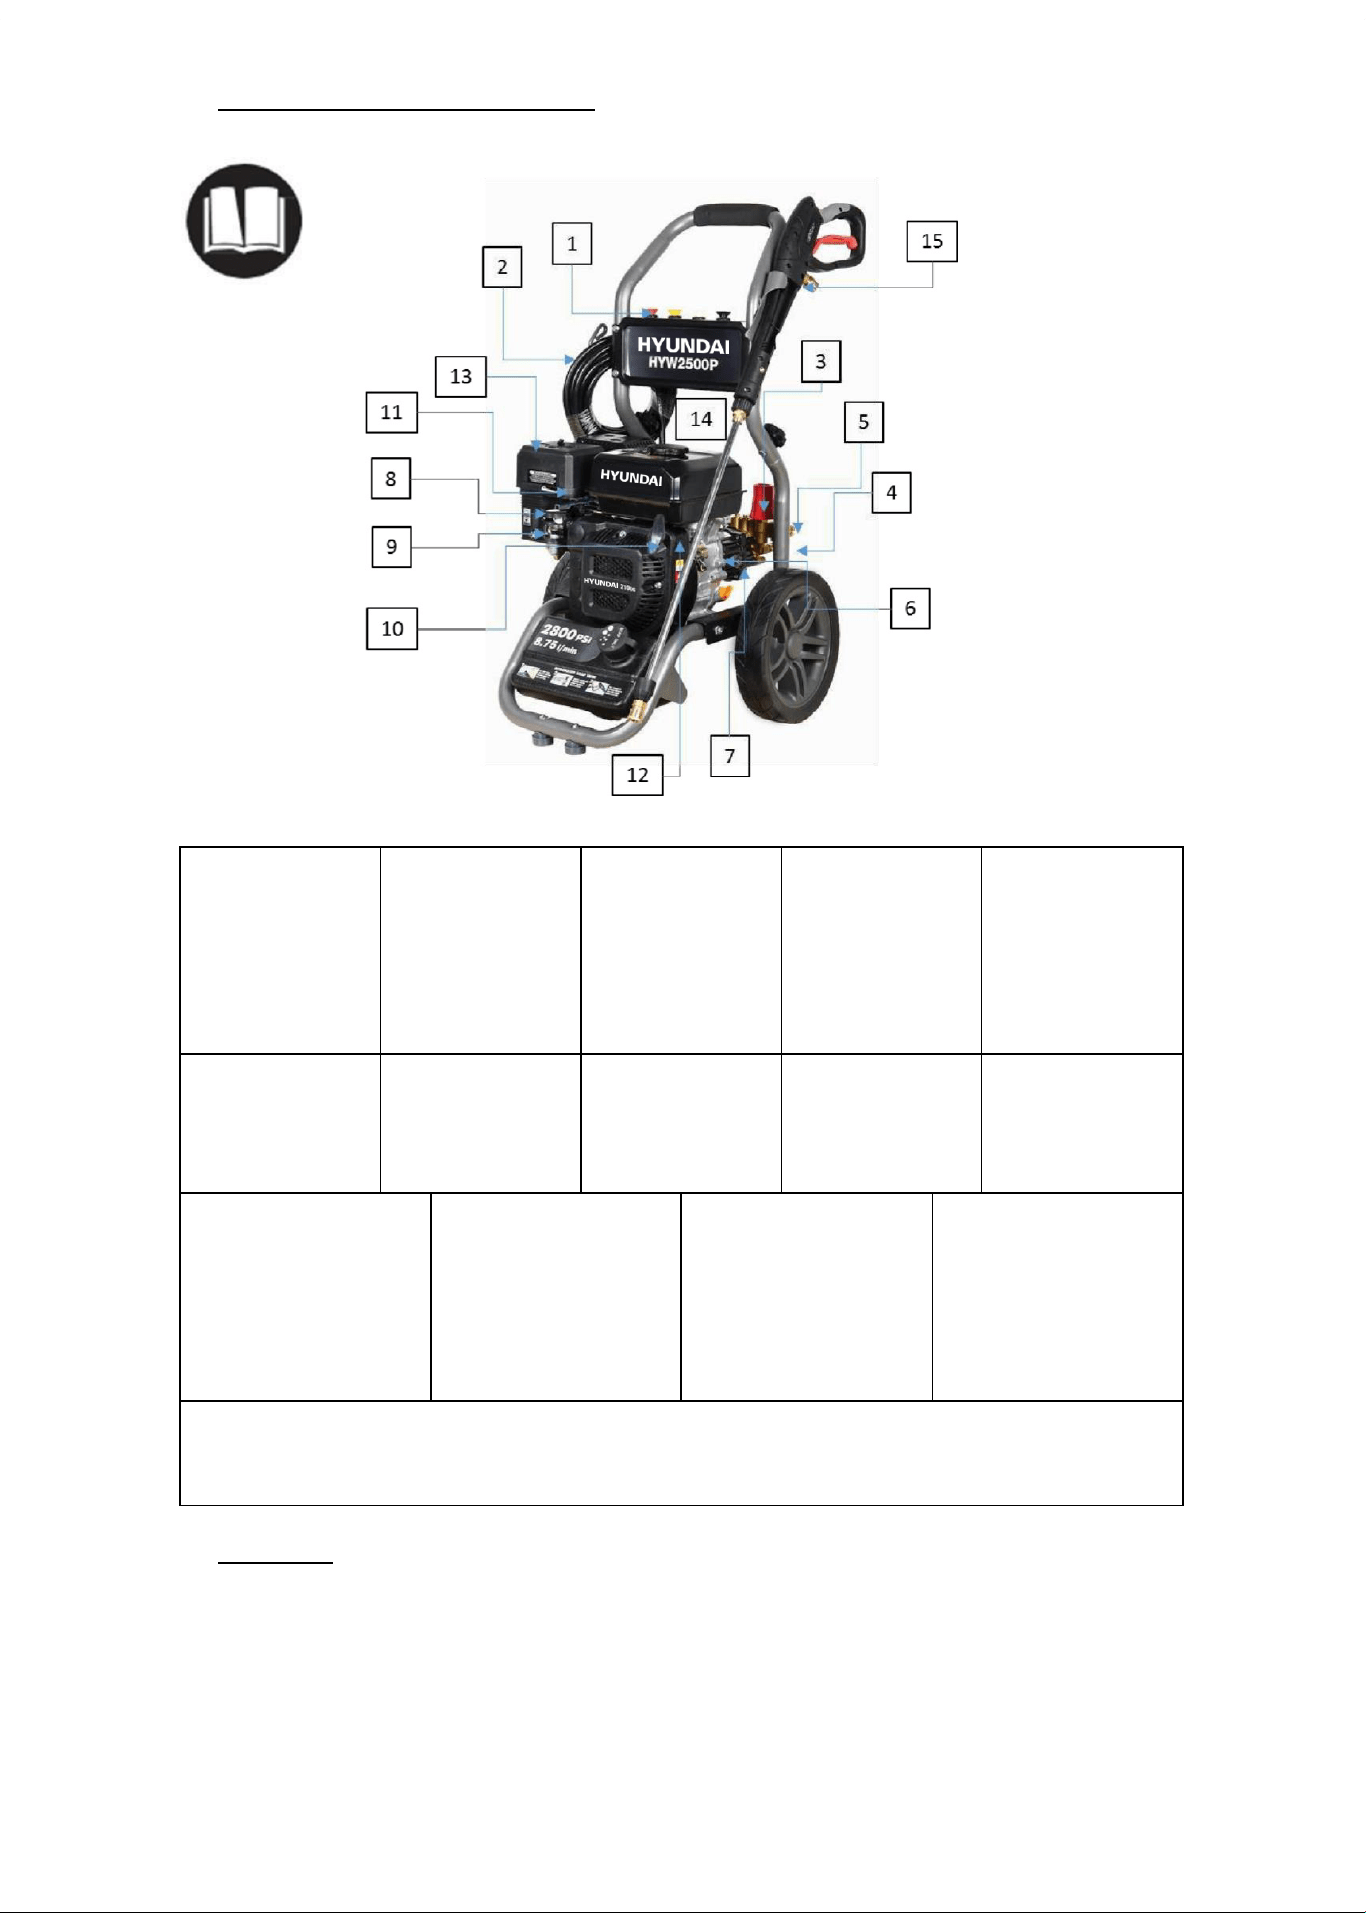
1. Nozzles
Detergent, 0°,
15°, 40° & Turbo
Nozzle: for high
pressure cleaning
applications.
2. High Pressure
Hose Connect
one end to water
pump and the
other end to
spray gun.
3. Pressure
Control Knob
Varies pressure
of high pressure
spray.
4. Water Inlet
Connection for
garden hose.
5. High Pressure
Outlet
Connection for
high pressure
hose.
6. Pump
Develops high
pressure.
7. Oil Level
Indicator Level
should be at
halfway
8. Choke Lever
Prepares a cold
engine for
starting.
9. Fuel Valve
used to turn fuel
supply on and off
to engine.
10. Recoil Starter
Used for starting
the engine
manually.
11. Throttle Lever
Sets engine in starting
mode for pull starter.
12. Engine Switch Set
switch to “On” for pull
starting. Set switch to
“Off” to stop a running
engine.
13. Air Filter Protects
engine by filtering
dust and debris out of
air intake.
14. Fuel Tank Fill tank
with regular unleaded
fuel. Always leave
room for fuel
expansion (25mm
from top)
15.Spray Gun Extension with Quick Connect Nozzles Controls the application of water onto
cleaning surface with trigger device. Includes trigger lock. Allows you to switch between five
different nozzles.
5. ASSEMBLY
5.1. Your pressure washer requires some assembly and is ready for use after it has been
properly filled with both the recommended oil and fuel.
5.2. If you have any problems with the assembly of your pressure washer, please call the
help line. If calling for assistance, please have the model and serial number from the
data tag available.
Page
12
4. PRESSURE WASHER COMPONENTS
Read this operating manual and safety rules before operating your pressure washer.

5.3. Unpack the Pressure Washer
5.3.1. Remove the parts bag, accessories, and inserts included with
pressure washer.
5.3.2. Remove machine from box.
5.3.3. Ensure you have all included items prior to assembly.
5.4. Attach Handle
5.4.1. Place handle (A) onto handle supports (B) connected to main
unit. Make sure holes (C) in handle align with holes on handle
supports.
5.4.2.
5.5. NOTE It may be necessary to move the handle supports from side to side in order to
align the handle so it will slide over the handle supports.
5.6. Insert carriage bolts through holes from outside of unit and attach a plastic knob
from inside of unit. Tighten by hand.
5.7. Insert multi coloured quick connect spray tips and other supplied accessories in
spaces provided on handle.
Page
13
14 16/12/2015 11:43:50
6.1. Follow the Checklist Below Prior to Using the Machine Each Time
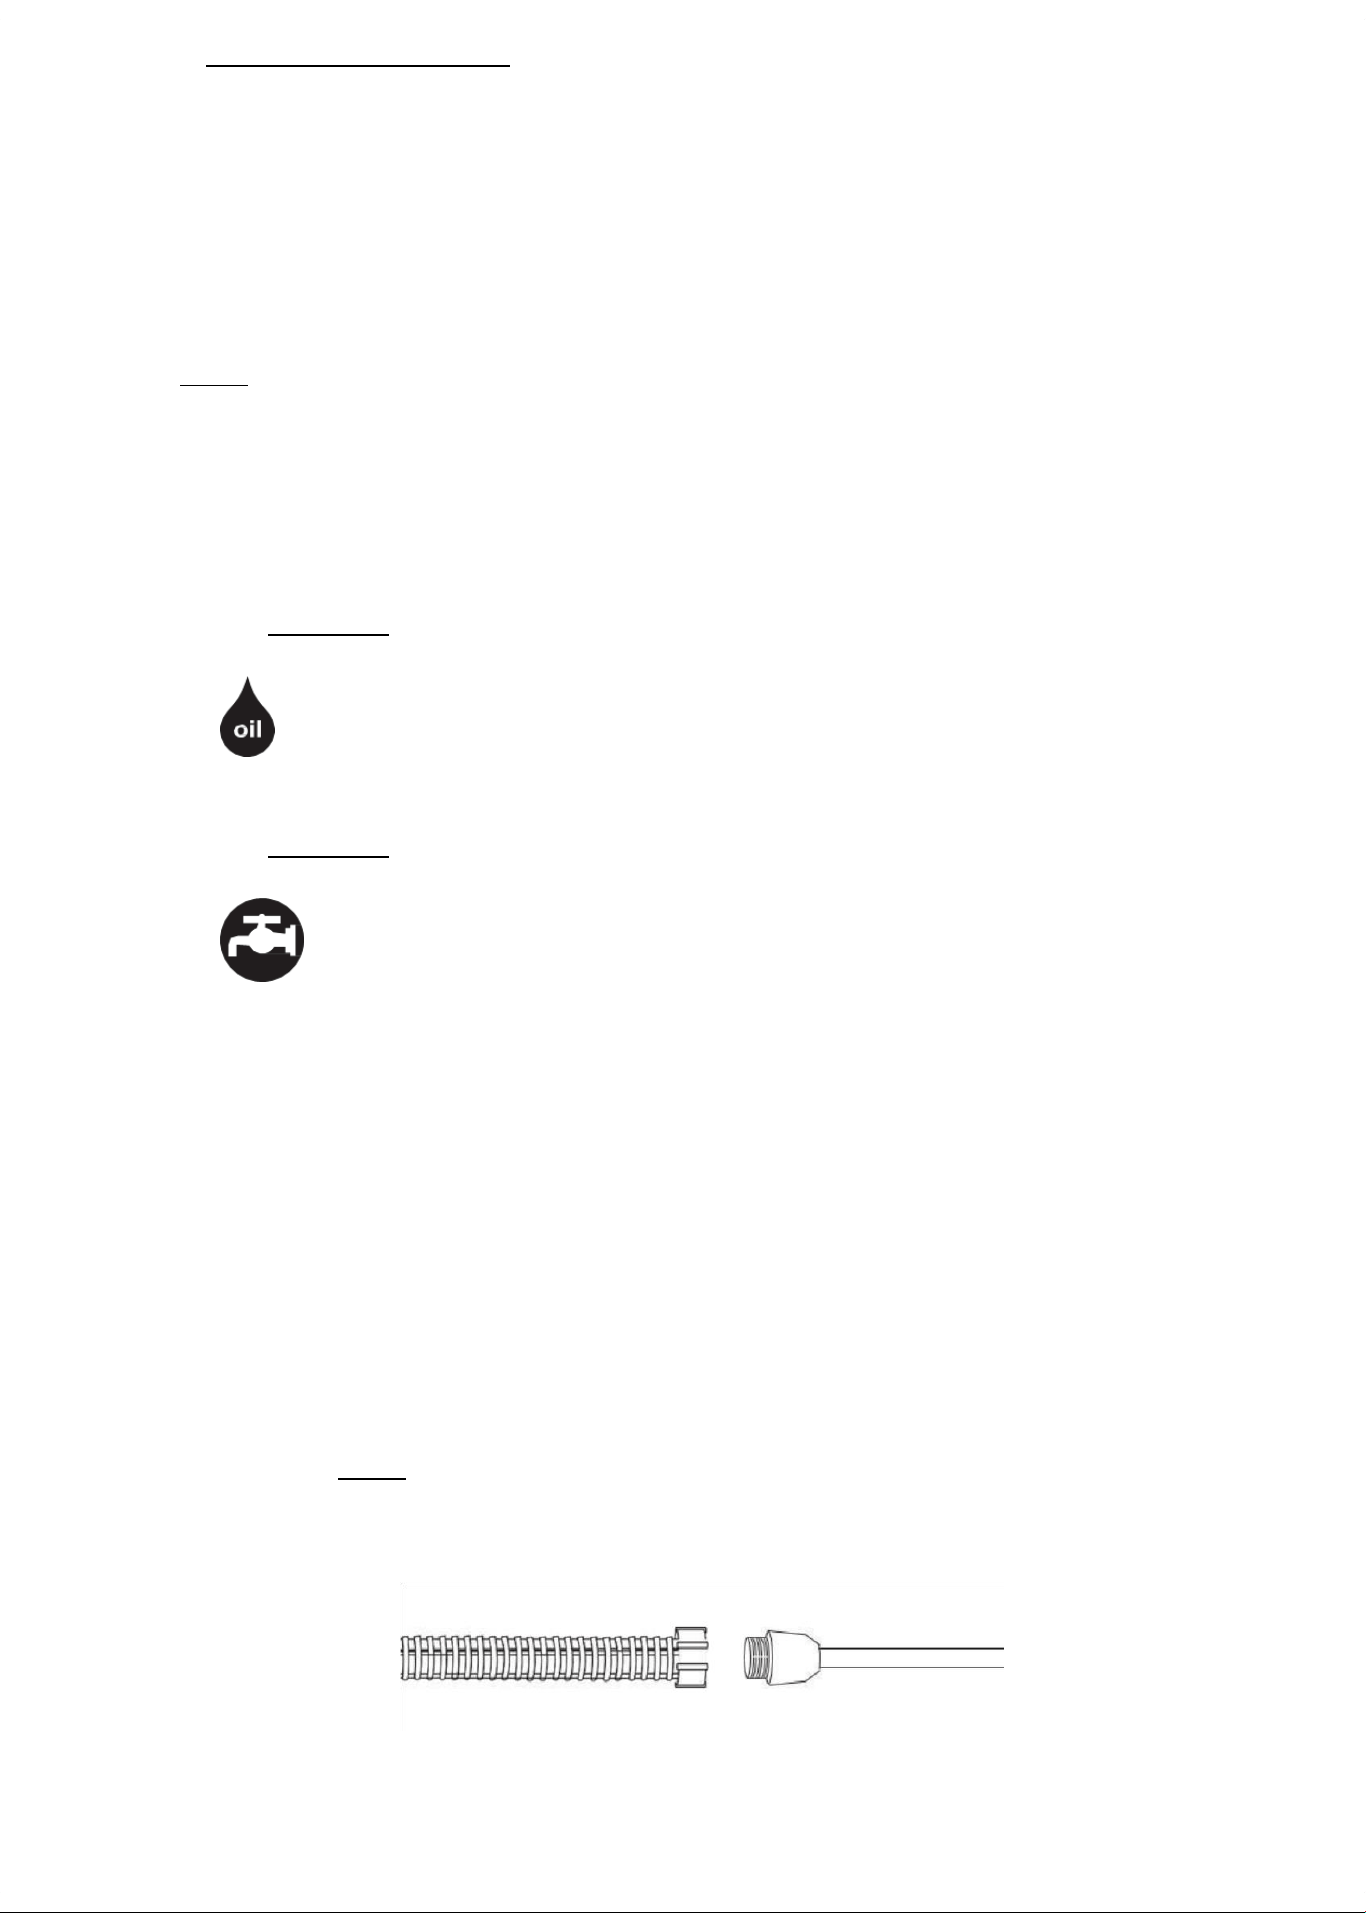
6.1.1. Check to ensure the engine oil is at the proper level.
6.1.2. Use SAE 15W40 Oil
6.1.3. Check the 2 handle knobs to ensure they are tight and will not vibrate loose.
6.1.4. Add fuel to the petrol tank - Regular Unleaded Petrol
6.1.5. Connect and tighten the garden hose to the garden hose attachment.
NOTE Water must be turned on prior to starting the washer, pull the spray trigger to ensure
water is moving the through the lines and out the nozzle without any leaks before starting
the unit.
6.1.6. Review the safety guidelines in the manual prior to starting the unit.
6.1.7. If you have any issues operating the pressure washer, call after sales on
01646 687880.
6.2. WARNING Always check the level of the engine and pump oil prior to starting the
washer.
6.2.1. Failure to do so could cause the engine and pump to seize if the oil is low or
empty.
6.3. WARNING Connect hose and water supply to pump before starting. DO NOT start
your pressure washer without the water supply turned on.
6.3.1. Failure to do so will result in damaging the pump from overheating and void
the warranty.
7. STARTING YOUR WASHER
7.1. To start your pressure washer for the first time, follow these instructions
step-by- step. This starting information also applies if you have let the
pressure washer sit idle for at least a day.
7.1.1. Place pressure washer near an outside water source capable of supplying
water at a flow rate greater than 14.4 litres per minute and no less than 20
PSI at pressure washer end of garden hose. DO NOT siphon supply water.
7.1.2. Make sure unit is in a level position.
7.1.3. Connect garden hose to water inlet on pressure washer pump.
7.2. NOTE DO NOT run the pump without the water supply connected and turned
on.
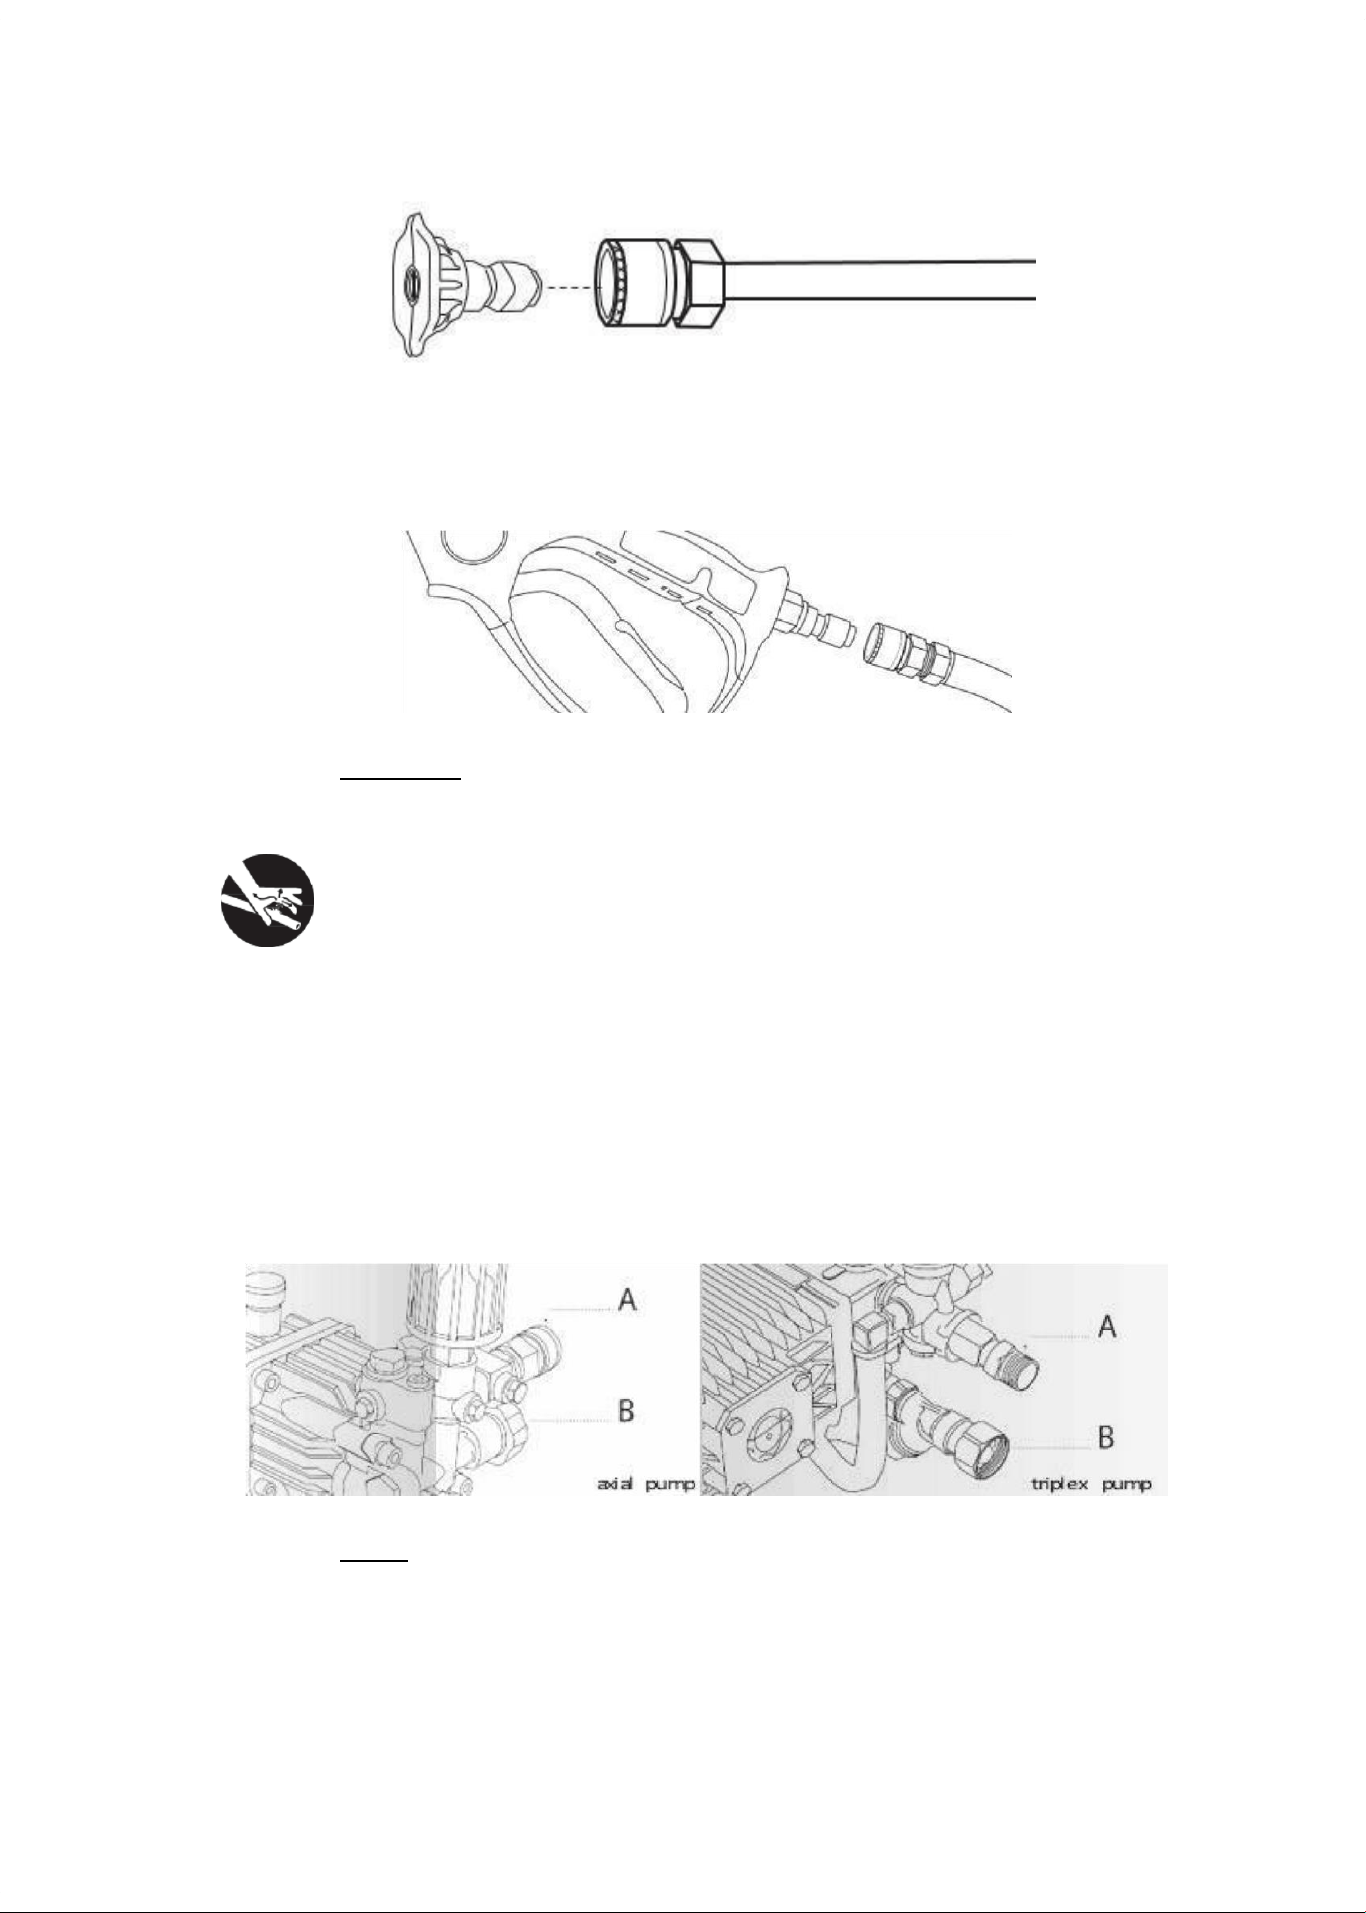
7.3. Attach wand extension to spray gun and tighten by hand.
6. PRE OPERATION CHECK LIST
Page
14
7.4. Choose desired nozzle, pull back nozzle extension collar, insert nozzle and
release collar. Tug on nozzle to make sure it is securely in place. See Nozzle
Selection Section.
7.5. Uncoil high pressure hose and attach quick connect end of hose to base of
spray gun. Pull down on collar of quick connect, slide onto spray gun and let
go of collar. Tug on hose to be sure of tight connection. Some models may
use a threaded hose connector.
7.6. WARNING The high pressure stream of water that this equipment produces
can cut through skin and its underlying tissues, leading to serious injury and
possible amputation.
7.6.1. NEVER connect high pressure hose to nozzle extension.
7.6.2. Keep high pressure hose connected to pump and spray gun while system is
pressurized.
7.6.3. Always be certain spray gun, nozzles and accessories are correctly attached.
7.7. attach other end of high pressure hose to high pressure outlet (A) on pump.
Pull down on collar of quick connect, slide onto pump and let go of collar.
Pull on hose to be sure of tight connection. *Some models may use a
threaded hose connector.
7.8. NOTE Pump Uses SAE 15W 40 Oil.
7.9. Turn Water Supply on, point gun in a safe direction and squeeze the trigger
to purge the pump of air and debris. Do this for at least 30 seconds.
Page
15

7.10. Take a look at all connections to make sure there are no leaks or loose
connections.
7.11. IMPORTANT If drawing water from a barrel, it is advisable to have a gravity-
fed supply. Use ONLY cold water (less than 38°C/100°F).
7.12. Connect the garden hose to the water inlet. Tighten by hand.
7.13. To start the machine, locate the engine switch on the side of the engine,
and switch it to the ON position. (see component chart to locate switch)
Check to ensure fuel valve is in the ON position and if starting cold apply the
choke.
7.14. Always release water pressure by squeezing trigger gun.
7.15. Pull recoil cord slowly until resistance is felt and then pull rapidly to avoid
kickback. Make sure to position yourself in a balanced position. DO NOT
place hand on engine exhaust for balance, this will result in severe burns.
7.16. WARNING Running engine gives off carbon monoxide, an odourless,
colourless, poison gas. Breathing carbon monoxide can cause headache,
fatigue, dizziness, vomiting, confusion, seizures, nausea, fainting or death.
7.16.1. Operate pressure washer ONLY outdoors.
7.16.2. Keep exhaust gas from entering a confined area through windows, doors,
ventilation intakes, or other openings.
7.16.3. DO NOT start or run engine indoors or in an enclosed area, even if windows
and doors are open.
7.17. IMPORTANT Before starting the pressure washer, be sure you are wearing
adequate safety goggles.
7.18. WARNING Risk of eye injury. Spray can splash back or propel objects.
7.18.1. Always wear safety goggles when using this equipment or in vicinity of
where equipment is in use.
7.18.2. Before starting the pressure washer, be sure you are wearing adequate
safety goggles.
7.18.3. NEVER substitute safety glasses for safety goggles.
7.19. WARNING Starter cord kickback (rapid retraction) can result in bodily injury.
Kickback will pull hand and arm toward engine faster than you can let go.
Broken bones, fractures, bruises, or sprains could result.
Page
16

7.19.1. NEVER pull starter cord without first relieving spray gun pressure.
7.19.2. When starting engine, pull cord slowly until resistance is felt and then pull
rapidly to avoid kickback.
7.19.3. After each starting attempt, where engine fails to run, always point spray
gun in safe direction and squeeze spray gun trigger to release high pressure.
7.19.4. Firmly grasp spray gun with both hands when using high pressure spray to
avoid injury when spray gun kicks back.
7.20. WARNING The high pressure stream of water that this equipment produces
can cut through skin and its underlying tissues, leading to serious injury and
possible amputation. Spray gun traps high water pressure, even when
engine is stopped and water is disconnected, which can cause injury.
7.20.1. DO NOT allow CHILDREN to operate pressure washer.
7.20.2. NEVER repair high pressure hose. Replace it.
7.20.3. NEVER repair leaking connections with sealant of any kind. Replace O-ring
or seal.
7.20.4. NEVER connect high pressure hose to nozzle extension.
7.20.5. Keep high pressure hose connected to pump and spray gun while system is
pressurized.
7.20.6. ALWAYS point spray gun in safe direction and squeeze spray gun trigger, to
release high pressure, every time you stop engine.
7.20.7. NEVER aim spray gun at people, animals, or plants.
7.20.8. DO NOT secure spray gun in open position.
7.20.9. DO NOT leave spray gun unattended while machine is running.
7.20.10. NEVER use a spray gun which does not have a trigger lock or trigger
guard in place and in working order.
7.20.11. ALWAYS be certain spray gun, nozzles and accessories are correctly
attached.
7.21. WARNING Contact with exhaust area can result in serious burns.
7.22. WARNING Exhaust heat/gases can ignite combustibles, structures or
damage fuel tank causing a fire.
7.22.1. DO NOT touch hot parts and AVOID hot exhaust gases.
7.22.2. Allow equipment to cool before touching.
Page
17

7.22.3. Keep at least1.5m (5 feet) of clearance on all sides of pressure washer
including overhead.
8. SHUTTING DOWN YOUR WASHER
8.1. How to Shut Down Your Pressure Washer
8.1.1. Release spray gun trigger and let engine idle down.
8.1.2. Turn the engine switch to the OFF position.
8.1.3. ALWAYS point spray gun in a safe direction, squeeze spray gun trigger to
release retained high water pressure.
8.2. IMPORTANT Spray gun traps high water pressure, even when engine is
stopped and water is disconnected. Couplings will not release if under
pressure.
8.3. WARNING The high pressure stream of water that this equipment produces
can cut through skin and its underlying tissues, leading to serious injury and
possible amputation. Spray gun traps high water pressure, even when
engine is stopped and water is disconnected, which can cause injury.
8.3.1. Keep high pressure hose connected to pump and spray gun while system is
pressurized.
8.3.2. ALWAYS point spray gun in safe direction and squeeze spray gun trigger, to
release high pressure, every time you stop engine.
9. QUICK RELEASE NOZZLES
9.1. The quick–release on the lance allows you to switch between four different
quick- release nozzles. The nozzles can be changed while pressure washer is
running once spray gun trigger safety lock is engaged. The different nozzles
vary the spray pattern as shown below.
Page
18

9.2. WARNING The high pressure stream of water that this equipment produces
can cut through skin and its underlying tissues, leading to serious injury and
possible amputation.
9.2.1. NEVER change nozzles without the trigger safety lock being engaged on the
spray gun.
9.2.2. DO NOT twist nozzles whilst spraying.
9.3. Follow these instructions to change the nozzles:
9.3.1. Pull back collar on quick–connect and pull current nozzle off. Store nozzles
in holder provided on the handle. Storing nozzles in the designated holder
will help prevent debris clogging the tip.
9.3.2. Select desired nozzle:
9.3.2.1. For gentle rinse, select white 40° nozzle.
9.3.2.2. To scour surface, select yellow 15° or red 0° nozzle.
9.3.2.3. To apply detergent, select black nozzle.
9.4.
9.3.2.4. Pull back on collar, insert new nozzle and release collar. Tug on
nozzle to make sure it is securely in place.
Usage tips.
9.4.1. For most effective cleaning, keep nozzle from 8 to 24 inches away from
cleaning surface.
9.4.2. If you get nozzle too close, especially using a high pressure nozzle, you may
damage surface being cleaned.
9.5. To apply detergent, follow these steps:
9.5.1. Fit black soap nozzle.
9.5.2. Prepare detergent solution as required by job.
9.5.3. Place small filter end of detergent siphoning tube into detergent container.
9.5.4. NOTE Make sure the filter is fully submerged in detergent while applying
detergent.
Page
19

9.5.5. NOTE This washer will only draw soap with the black soaper nozzle. The
White, Red, and Yellow nozzle will not draw soap.
9.6. Make sure black nozzle is installed.
9.7. Make sure garden hose is connected to water inlet. Check that high
pressure hose is connected to spray gun and pump. Turn on water.
9.8. NOTICE You must attach all hoses before you start the engine.
9.8.1. Starting the engine without all the hoses connected and without the water
turned ON will damage the pump.
9.8.2. Damage to equipment resulting from failure to follow this instruction will
void the warranty.
9.9. IMPORTANT You must flush the detergent siphoning system after each use
by placing the filter into a bucket of clean water, then run the pressure
washer at low pressure for 1-2 minutes.
9.10. CAUTION Chemicals can cause bodily injury and/or property damage.
9.10.1. NEVER use caustic liquid with pressure washer.
9.10.2. Use ONLY pressure washer safe detergent/soaps. Follow all manufacturer’s
instructions.
Page
20

HYW2500P_HYW3000P_HYW3100P_HYW3100P2_HYW4000P Combined user manual Rev
10. TROUBLESHOOTING
10.1. If you are experiencing a problem that is not listed in this chart, or have
checked all the possible cause listed and you are still experiencing the
problem, contact Aftersales on 01646 687880.
10.2. Petrol engine trouble shooting.
Problem Cause Correction
Unit has following problems:
Failure to produce pressure, erratic
pressure, chattering, loss of
pressure, low water volume.
1.
2.
3.
4.
5.
6.
7.
8.
9.
10.
Low pressure spray tip installed.
Water inlet is blocked.
Inadequate water supply.
Inlet hose is kinked or leaking.
Clogged inlet hose screen.
Water supply is over 100°F (38°C).
High pressure hose is blocked or
leaks.
Spray gun leaks.
Spray tip is obstructed.
Pump is faulty.
1.
2.
3.
4.
5.
6.
7.
8.
9.
10.
Replace with high pressure spray tip.
Clear inlet.
Provide adequate water flow.
Straighten inlet hose, patch leak.
Check and clean inlet hose screen.
Provide cooler water supply.
Clear blocks in outlet hose.
Replace spray gun.
Clean spray tip.
Contact local service agent.
Detergent fails to mix with spray.
1.
2.
3.
Detergent siphoning tube is not
submerged.
Detergent siphoning tube/ filter is
clogged or cracked.
High pressure spray tip installed.
1.
2.
3.
Insert detergent siphoning tube into
detergent.
Clean or replace filter/ detergent
siphoning tube.
Replace with low pressure spray tip.
Engine lacks power.
1.
Dirty air filter.
1.
Replace air filter.
Engine will not start
1.
2.
3.
4.
Throttle lever on/off switch in OFF
position
No fuel in engine
Worn fouled or dirty spark plug
Pressure build up in pump
1.
2.
3.
4.
Turn throttle lever to ON position
Fill fuel tank or turn on fuel supply
Replace with factory recommended
spark plug
Squeeze trigger on spray lance
Units with Oil alert
1.
Engine not level or Engine oil level too
low
1. Pl ace engine on level surface or fill
crankcases with SAE 15W40 oil.
Engine runs well at no load but “bogs”
down under full load
1.
Engine speed is too slow
1. Adjust Throttle Lever back to full
throttle.
Engine will not start; or starts and runs
rough
1.
2.
3.
4.
5.
6.
7.
8.
Low oil level
Dirty air cleaner
Out of petrol
Stale petrol
Spark plug wire not connected to
spark plug Bad spark plug
Water in petrol
Over choking
1.
2.
3.
4.
5.
6.
7.
8.
Fill crankcase to proper level
Clean or replace air cleaner
Fill fuel tank
Drain gas tank, fill with fresh fuel
Connect wire to spark plug
Replace spark plug
Drain gas tank, fill with fresh fuel
Open choke fully and crank engine
Engine shuts down during operation
1.
2.
Out of petrol
Low oil level
1.
2.
Fill fuel tank
Fill crankcase with oil, to proper
Engine lacks power
1.
Dirty air filter
1.
Replace air filter
Engine “putts” or falters
1.
Choke is opened too soon
1. Move choke to halfway position until
engine runs smoothly * All engine
servicing to be taken to manufacturer’s
authorized service outlet
Page
21

HYW2500P_HYW3000P_HYW3100P_HYW3100P2_HYW
Problem Causes Correction
No low pressure detergent delivery
1.
2.
Using wrong nozzle
Siphon hose or filter is plugged
1.
2.
Insert black soaper nozzle
Unplug siphon hose
Unit does not reach required pressure
1.
2.
3.
Restricted or insufficient water
supply.
Unsuitable or worn out nozzle.
Regulator set too low.
1.
2.
3.
Check supply hose, faucet and inlet
water filter. Must be connected to
water source which provides 6GPM
Replace nozzle
Reset unloader by turning knob
(clockwise increases pressure)
Thermal Relief Valve is open and discharging
water from side of pump
1.
2.
Water temperature is too high
Pump has operated more than 3
mins without pulling trigger.
1.
2.
Use cool water only.
Pull trigger at least 30
seconds every 3 mins
Leak in the fittings
1.
Water leak in high pressure fittings, hose
or gun.
1.
** If
your
Use Teflon tape or pipe sealant to
tighten hose fitting, replace hose or
gun
problem continues, take to
pressure washer dealer
Pump oil is low?
1.
Normal use consumes oil over
time
1. To gauge the oil level, look directly into
the sight glass. Oil level should
always be at the centre dot. Do not
overfill. Replace SAE 15W 40 oil.
Oil is milky color
1. Seals have worn from use and water
has leaked in
1. Bring unit to local service center to
have seals replaced.
11. STORAGE
11.1. NOTICE You must protect your unit from freezing temperatures.
11.1.1. Failure to do so will permanently damage your pump and render your unit
inoperable.
11.1.2. Freeze damage is not covered under warranty.
11.2. To protect the unit from freezing temperatures:.
11.2.1. Use Pump Saver to treat pump. This minimizes freeze damage and lubricates
pistons and seals. Contact your local dealer for Pump Saver Solution.
11.2.2. If pump saver is not available, connect a 1 metre section of garden hose to
11.2.3. water inlet adapter. Pour RV-antifreeze (antifreeze without alcohol) into
hose. Pull recoil handle twice. Disconnect 1 metre hose.
11.2.4. Store unit in a clean, dry area (heated area preferred).
11.3. Long term storage.
11.3.1. If you do not plan to use the pressure washer for more than 30 days, you
must prepare the engine and pump for long term storage.
11.4. Protect Fuel System
11.4.1. Fuel Additive:
11.4.2. Fuel will become stale when stored over 30 days. Stale fuel causes acids and
gum deposits to form in the fuel system or on essential carburetor parts. Prior
to storage, if petrol has not been treated with a fuel stabilizer, it must be
drained from the engine into an approved container. Then run engine until it
stops from lack of fuel. When fuel stabilizers are used according to their
instructions, there is no need to drain the petrol from the engine prior to
10.3. Pump troubleshooting.
Page
22

HYW2500P_HYW3000P_HYW3100P_HYW3100P2_HYW4000P Combined user manual Rev 7.pdf 24 16/12/2015 11:43:51
storage. Run the engine for a short time to circulate stabilizer throughout
the fuel system. Engine and fuel can then be stored up to 24 months.
11.4.3. If petrol is drained, the use of a fuel stabilizer in the storage container is still
recommended to maintain freshness.
11.5. NOTICE You must protect your unit from freezing temperatures.
11.5.1. Failure to do so will permanently damage your pump and render your unit
inoperable.
11.5.2. Freeze damage is not covered under warranty.
11.6. Other storage tips.
11.6.1. DO NOT store fuel from one season to another unless it has been treated as
described in Protect Fuel System.
11.6.2. Replace fuel container if it starts to rust. Rust and/or dirt in fuel can cause
problems if it’s used with this unit.
11.6.3. Cover unit with a suitable protective cover that does not retain moisture.
11.6.4. WARNING Storage covers can be flammable.
11.6.4.1. DO NOT place a storage cover over a hot pressure washer.
11.6.4.2. Let equipment cool for a sufficient time before placing the cover on
the equipment.
11.6.5. Store unit in a clean and dry area.
Page
23
HYW2500P_HYW3000P_HYW3100P_HYW3100P2_HYW4000P Combined user manual Rev 7.pdf 25 16/12/2015 11:43:51
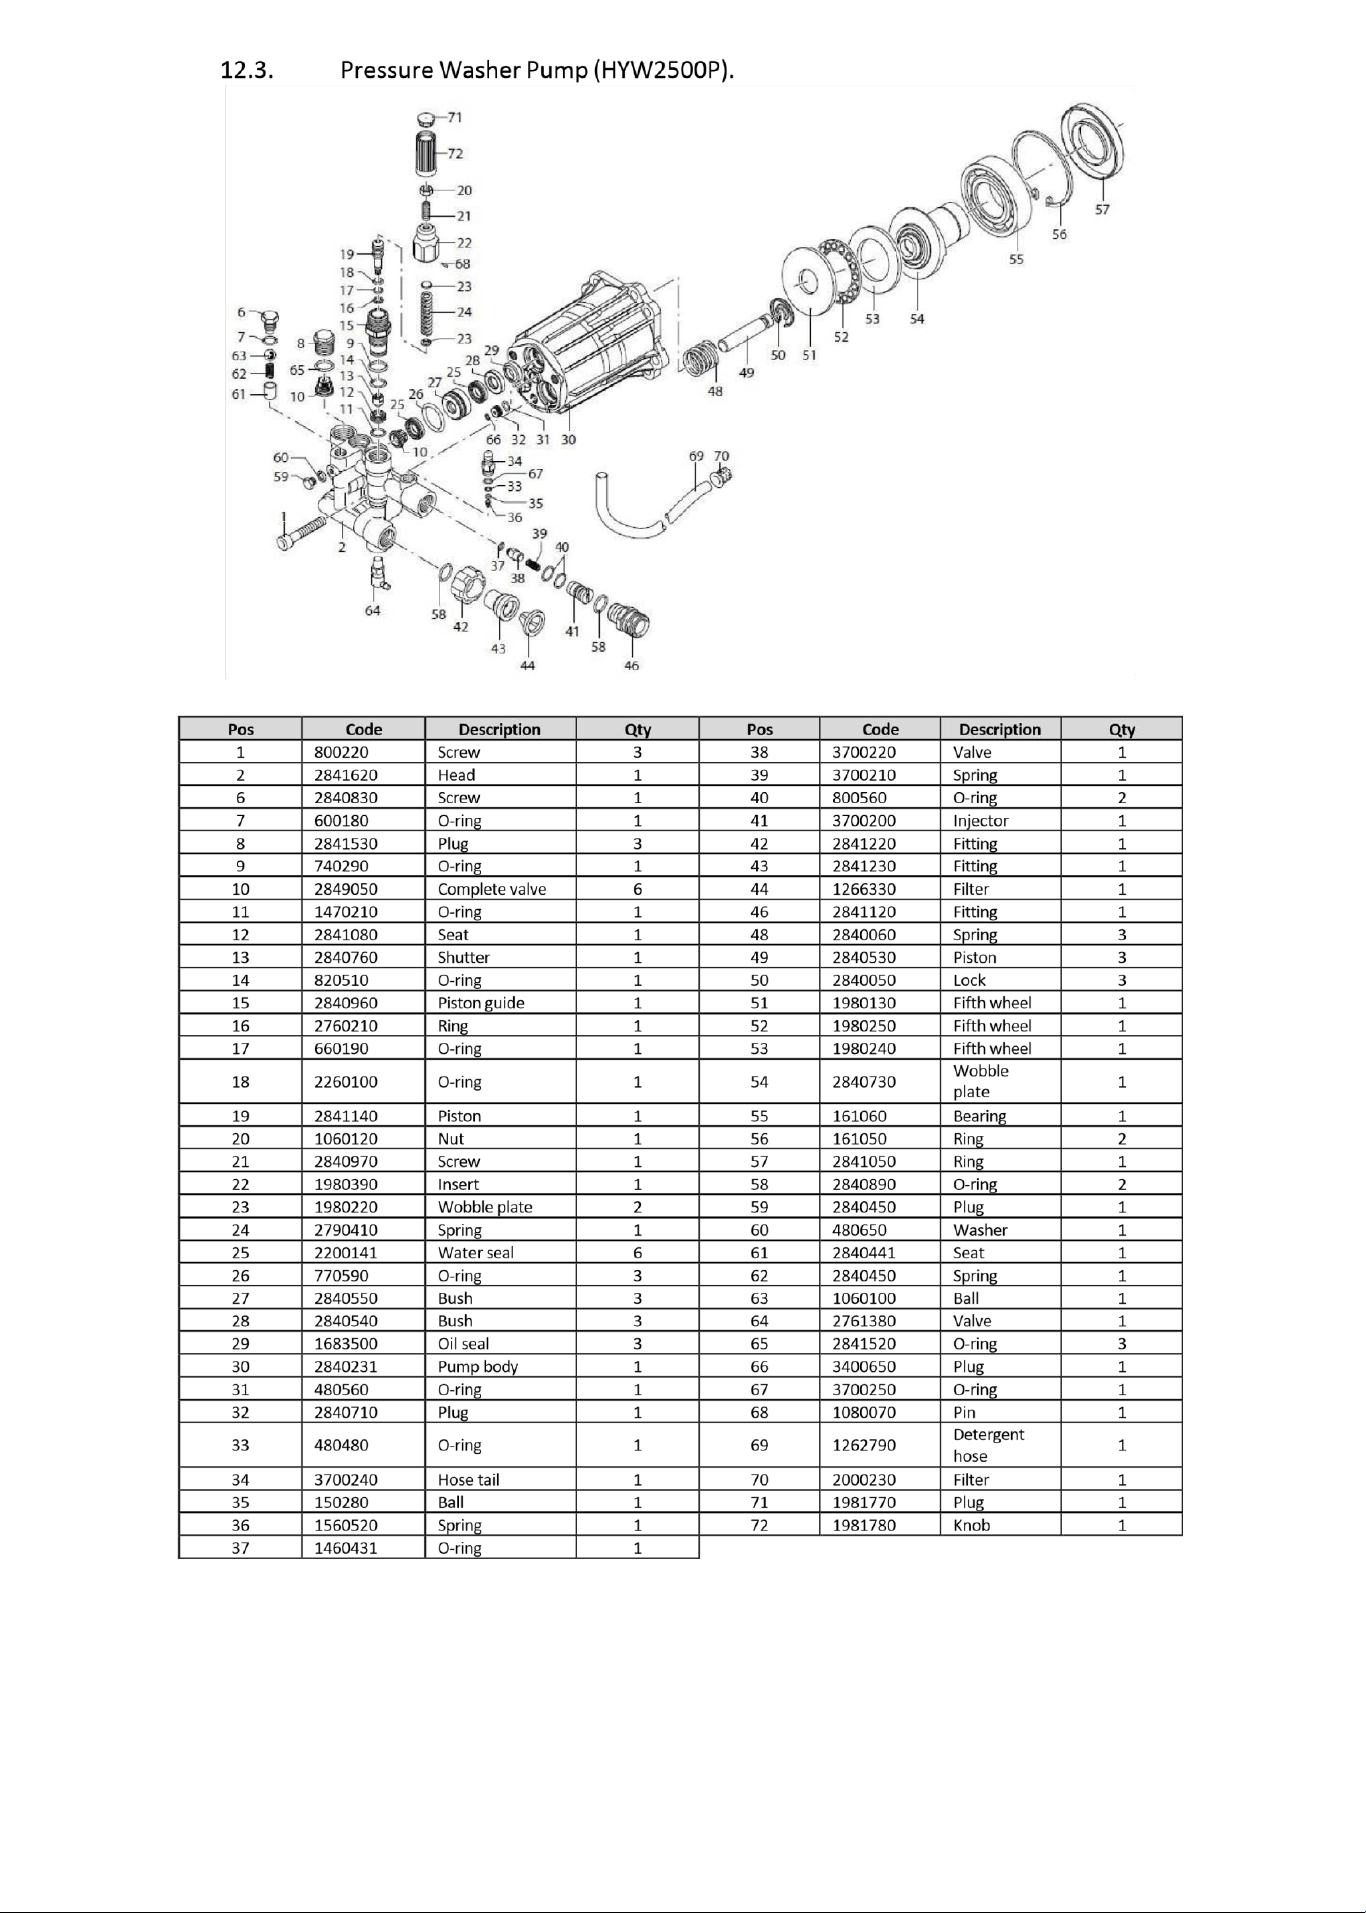
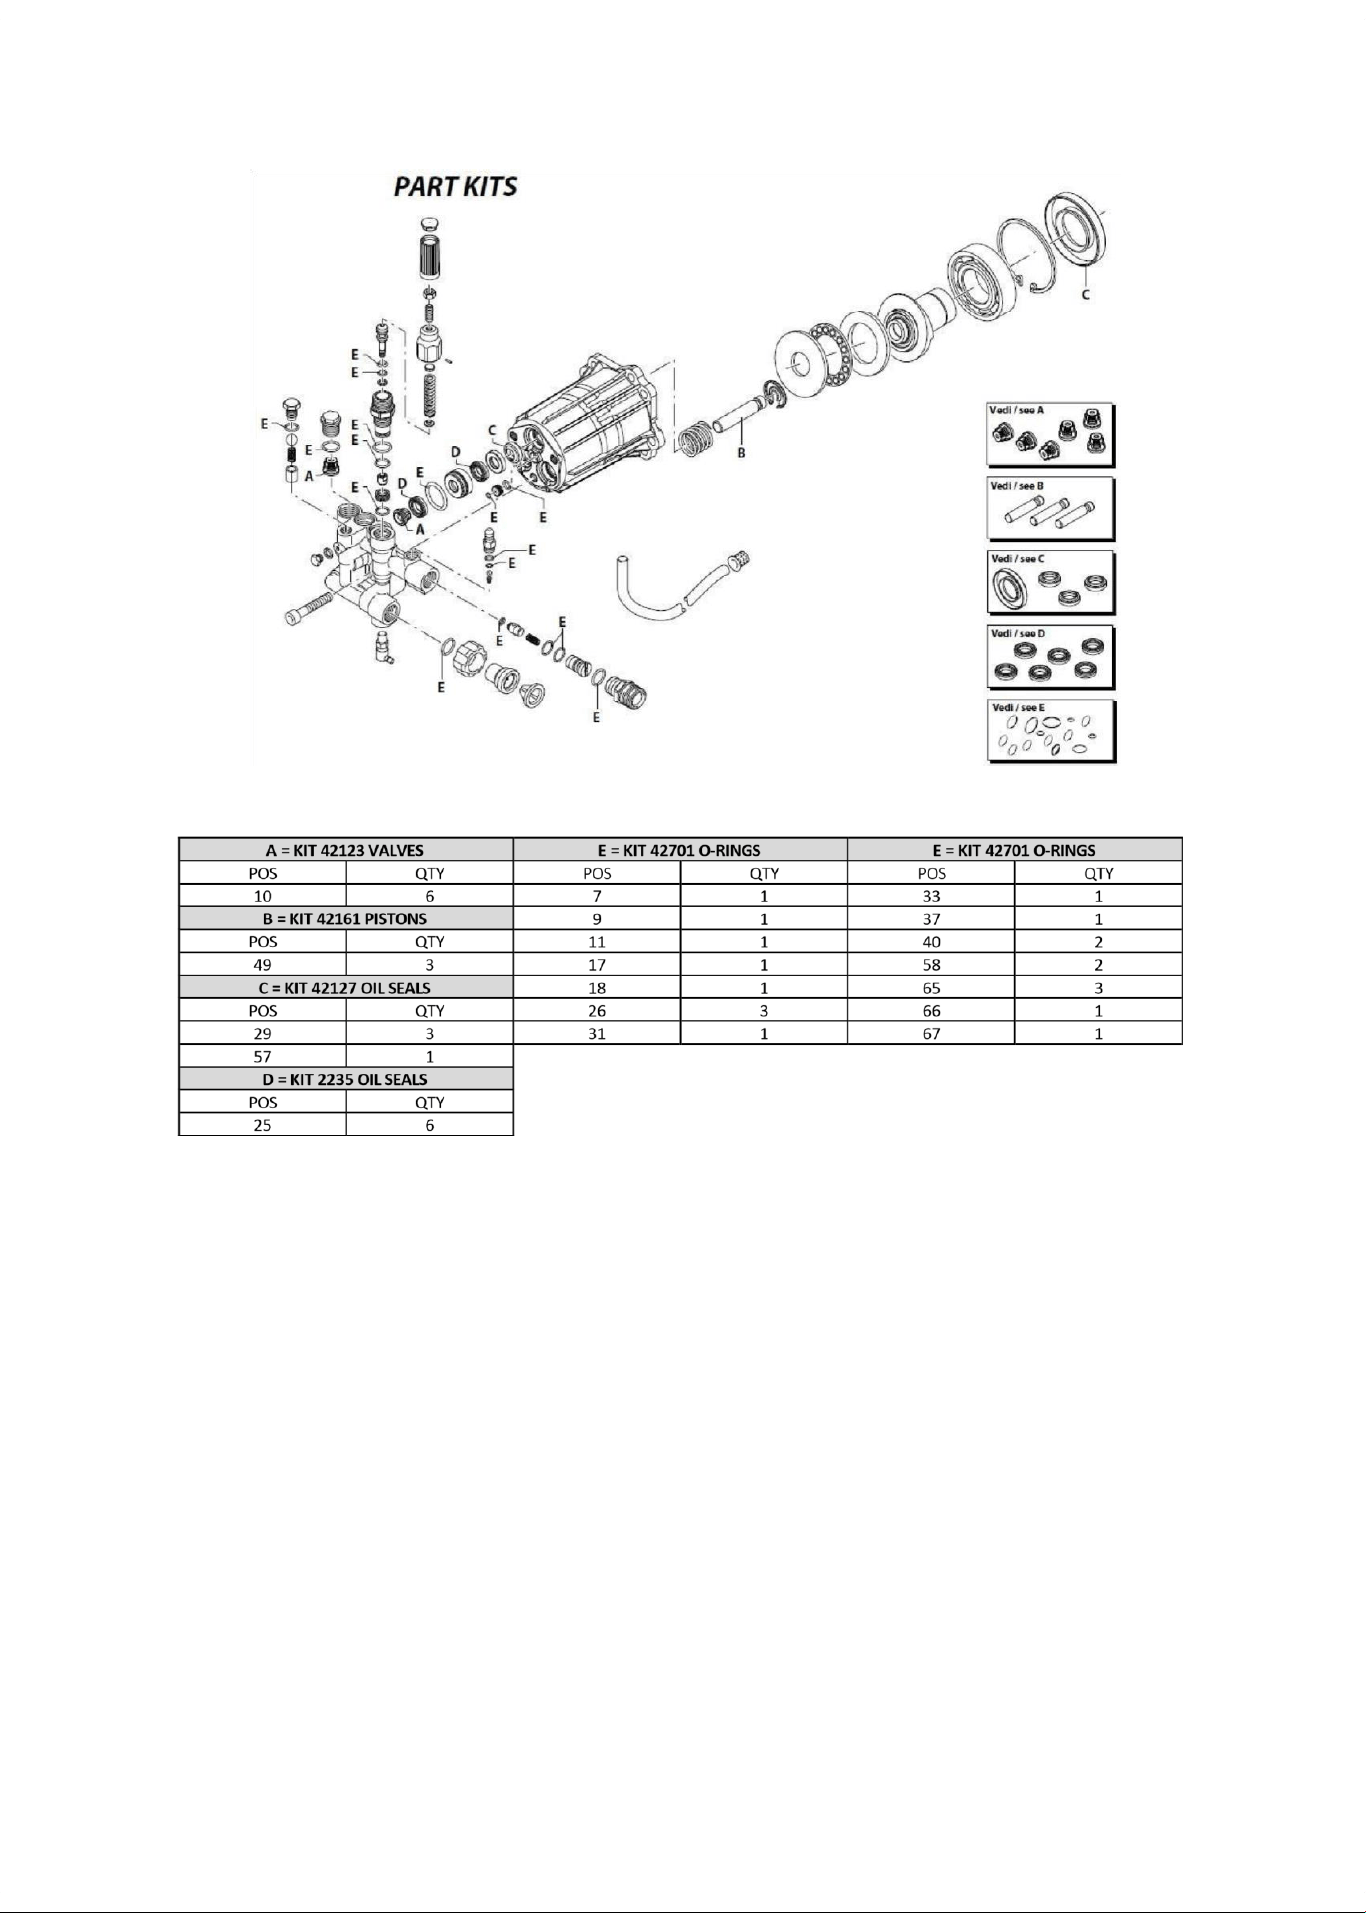
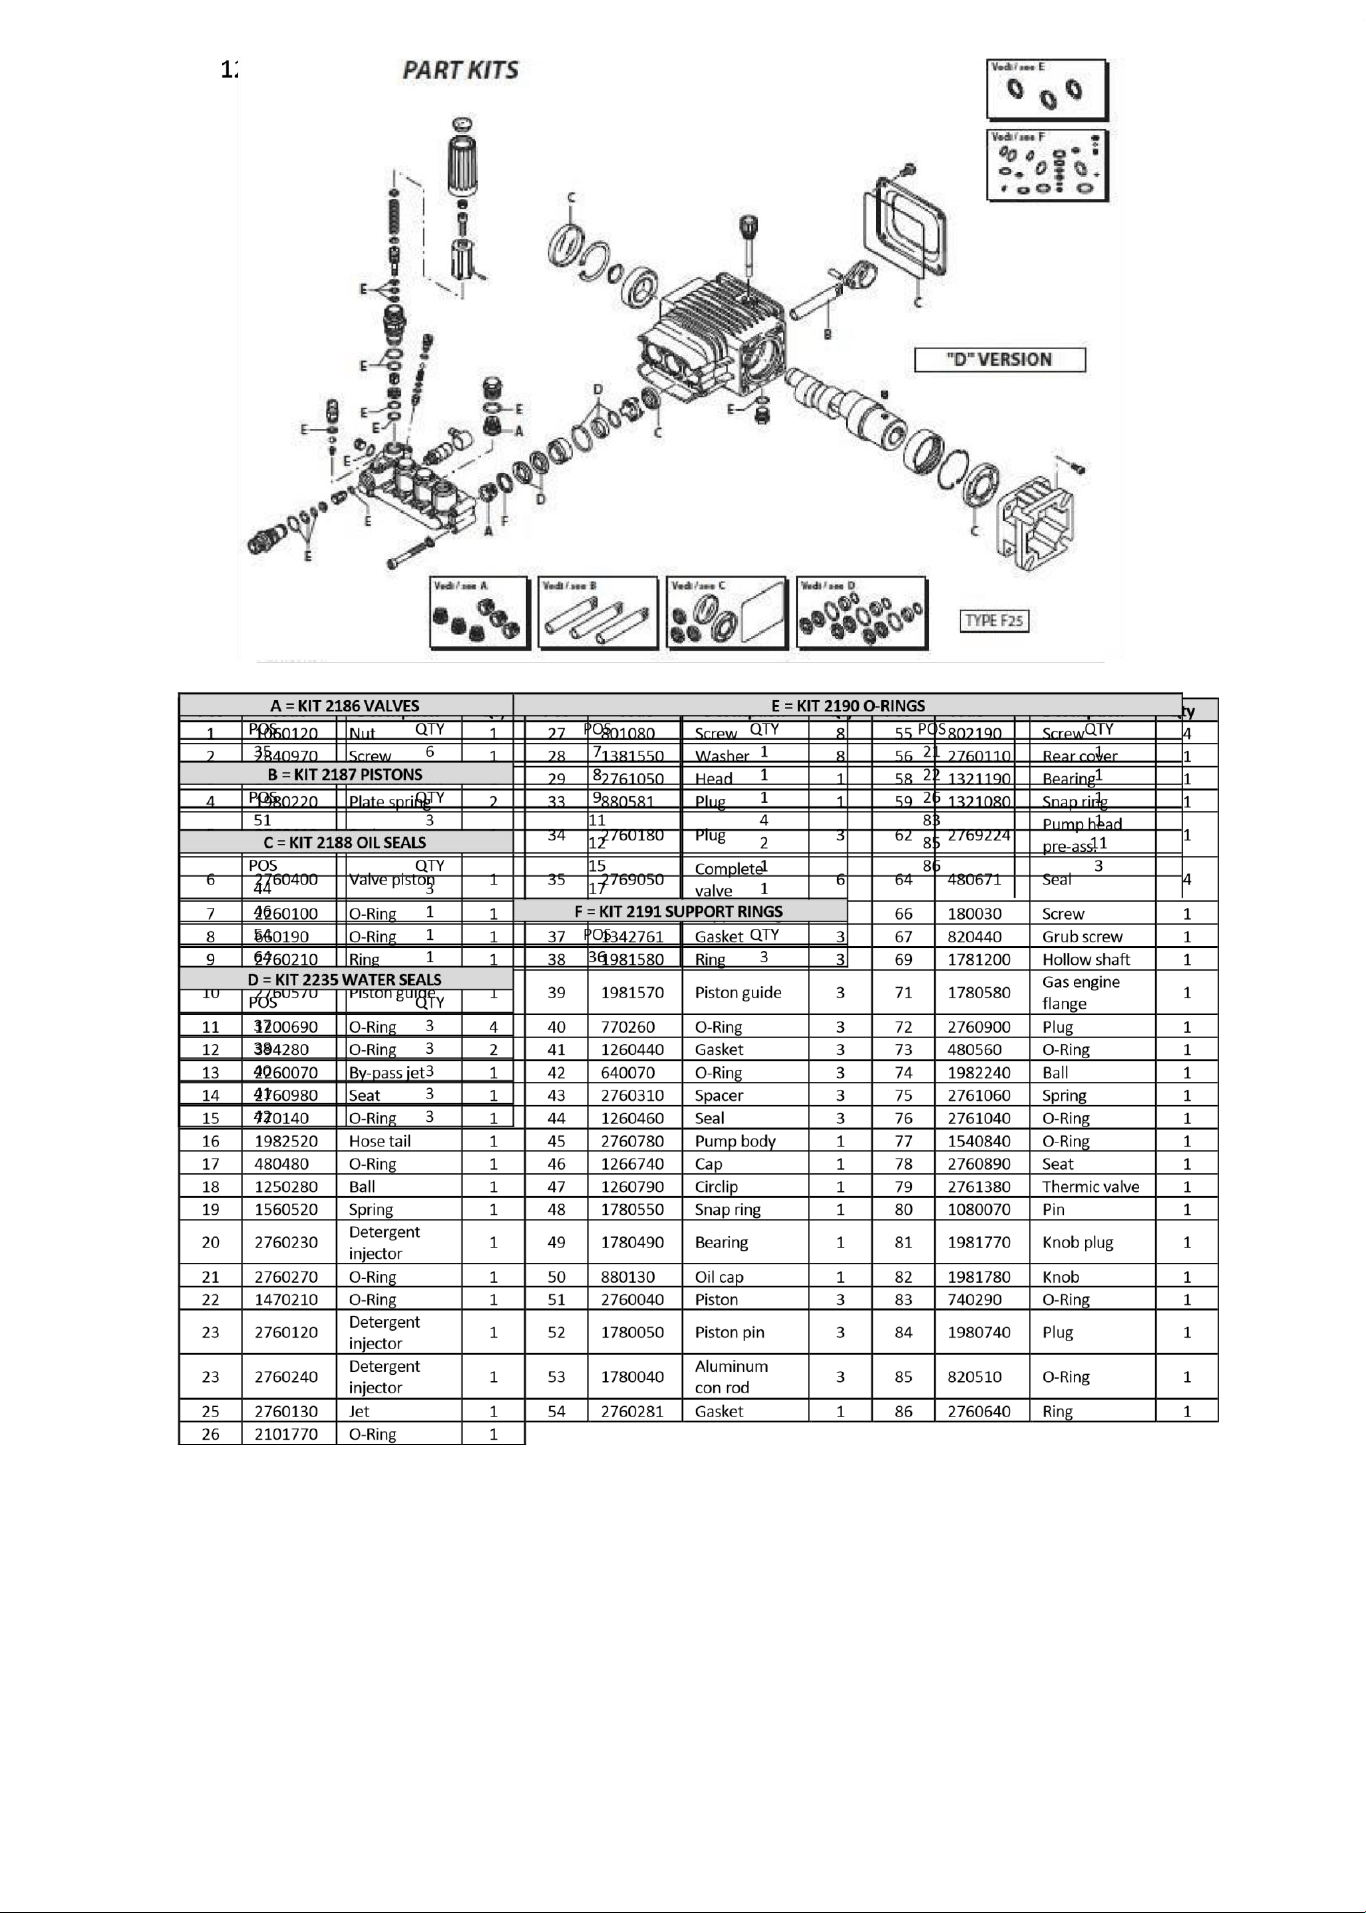
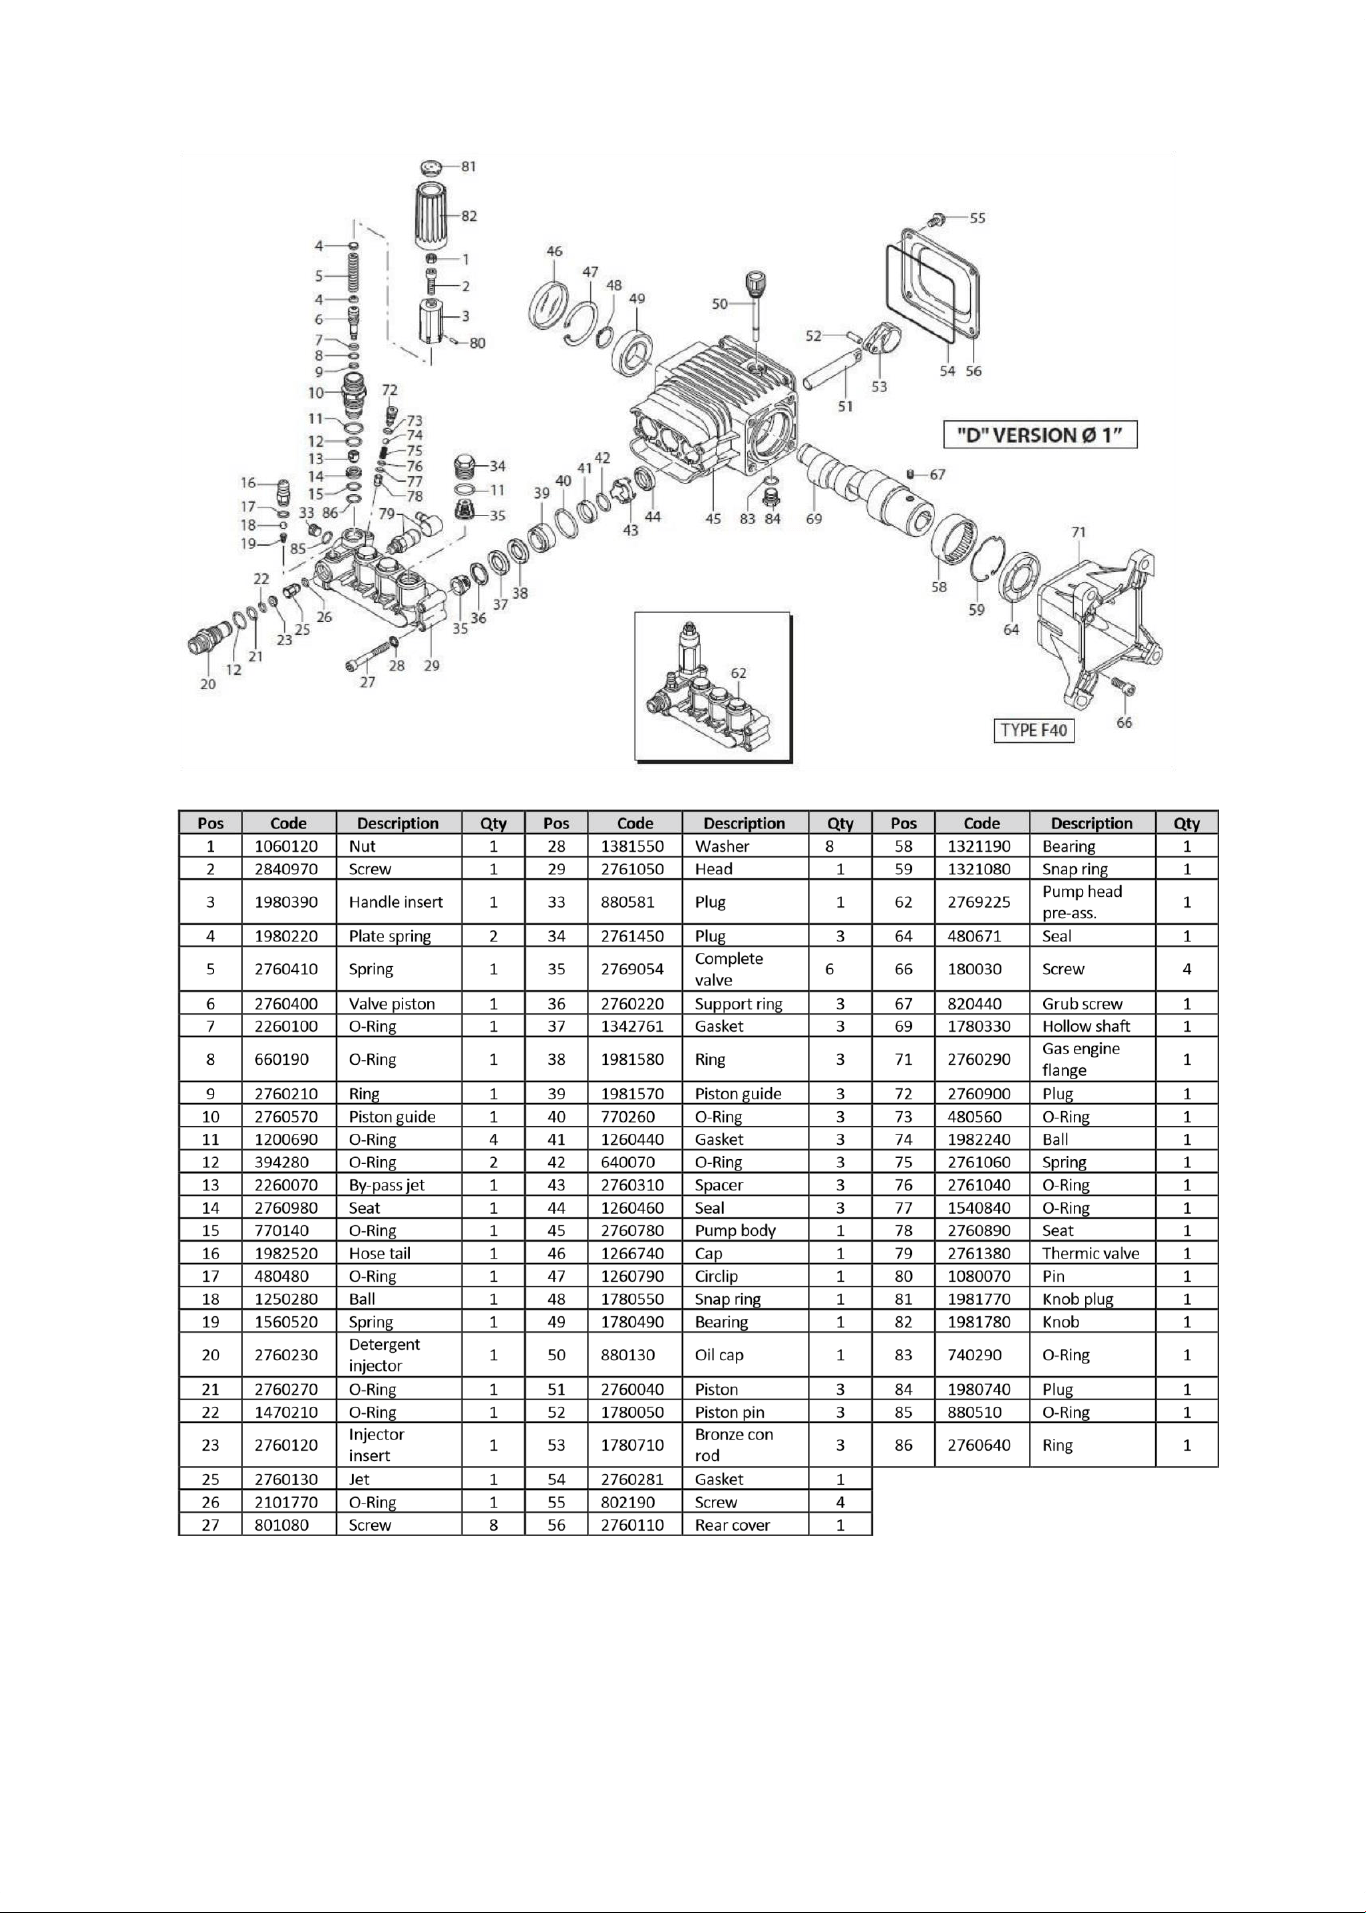
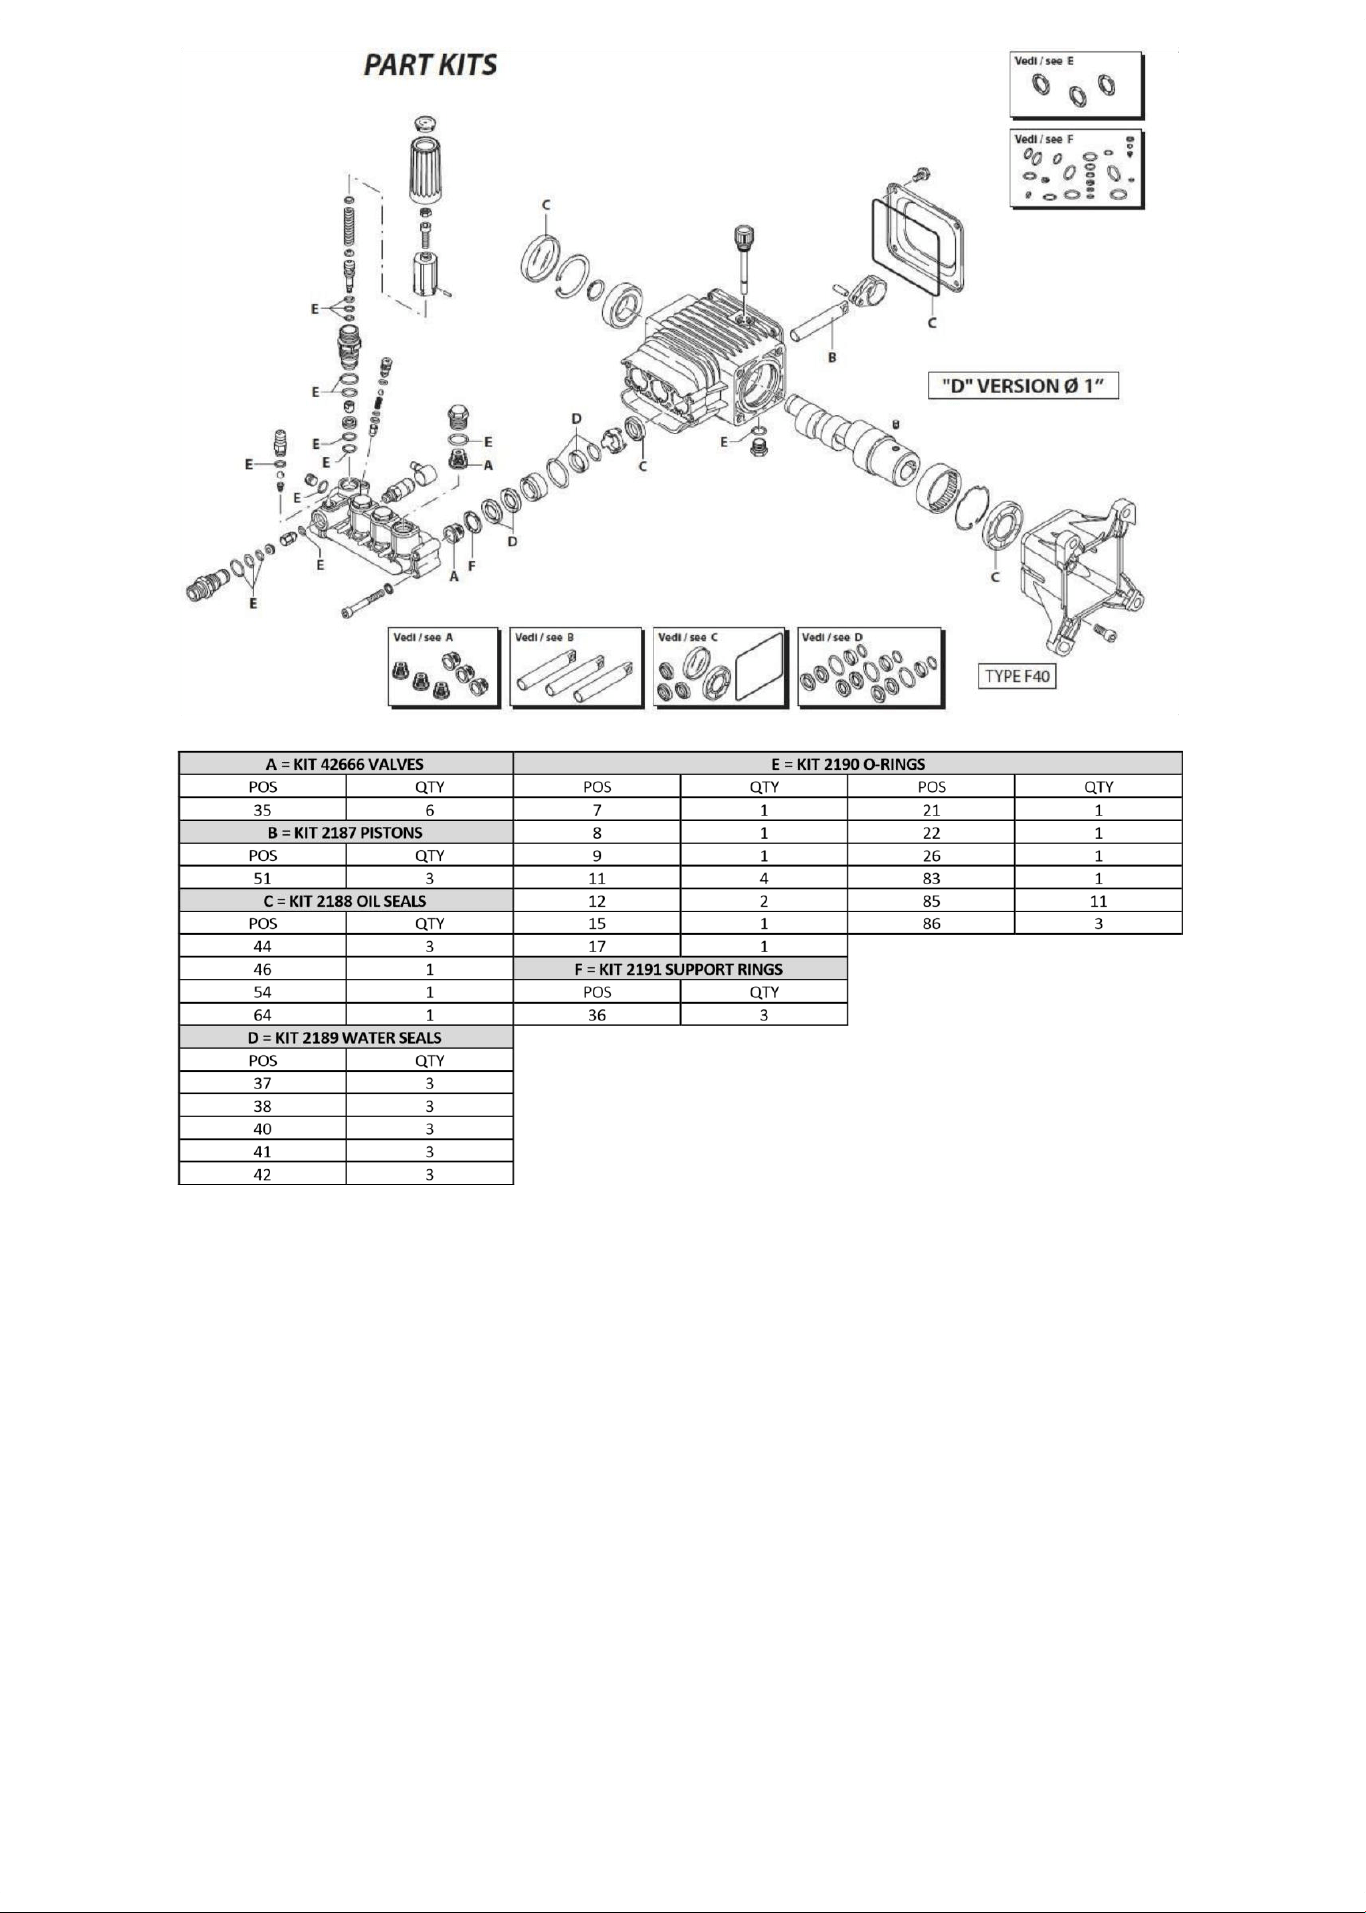
12. PARTS BREAKDOWN
NOTE Pressure washer HYW3100P (uses same pump and engine as the HYW2500P but
with traditional style frame like HYW4000P).
NOTE Pressure washer HYW3100P2 (which uses the same pump and engine as the
HYW3000P but with the traditional style frame like the HYW4000P).
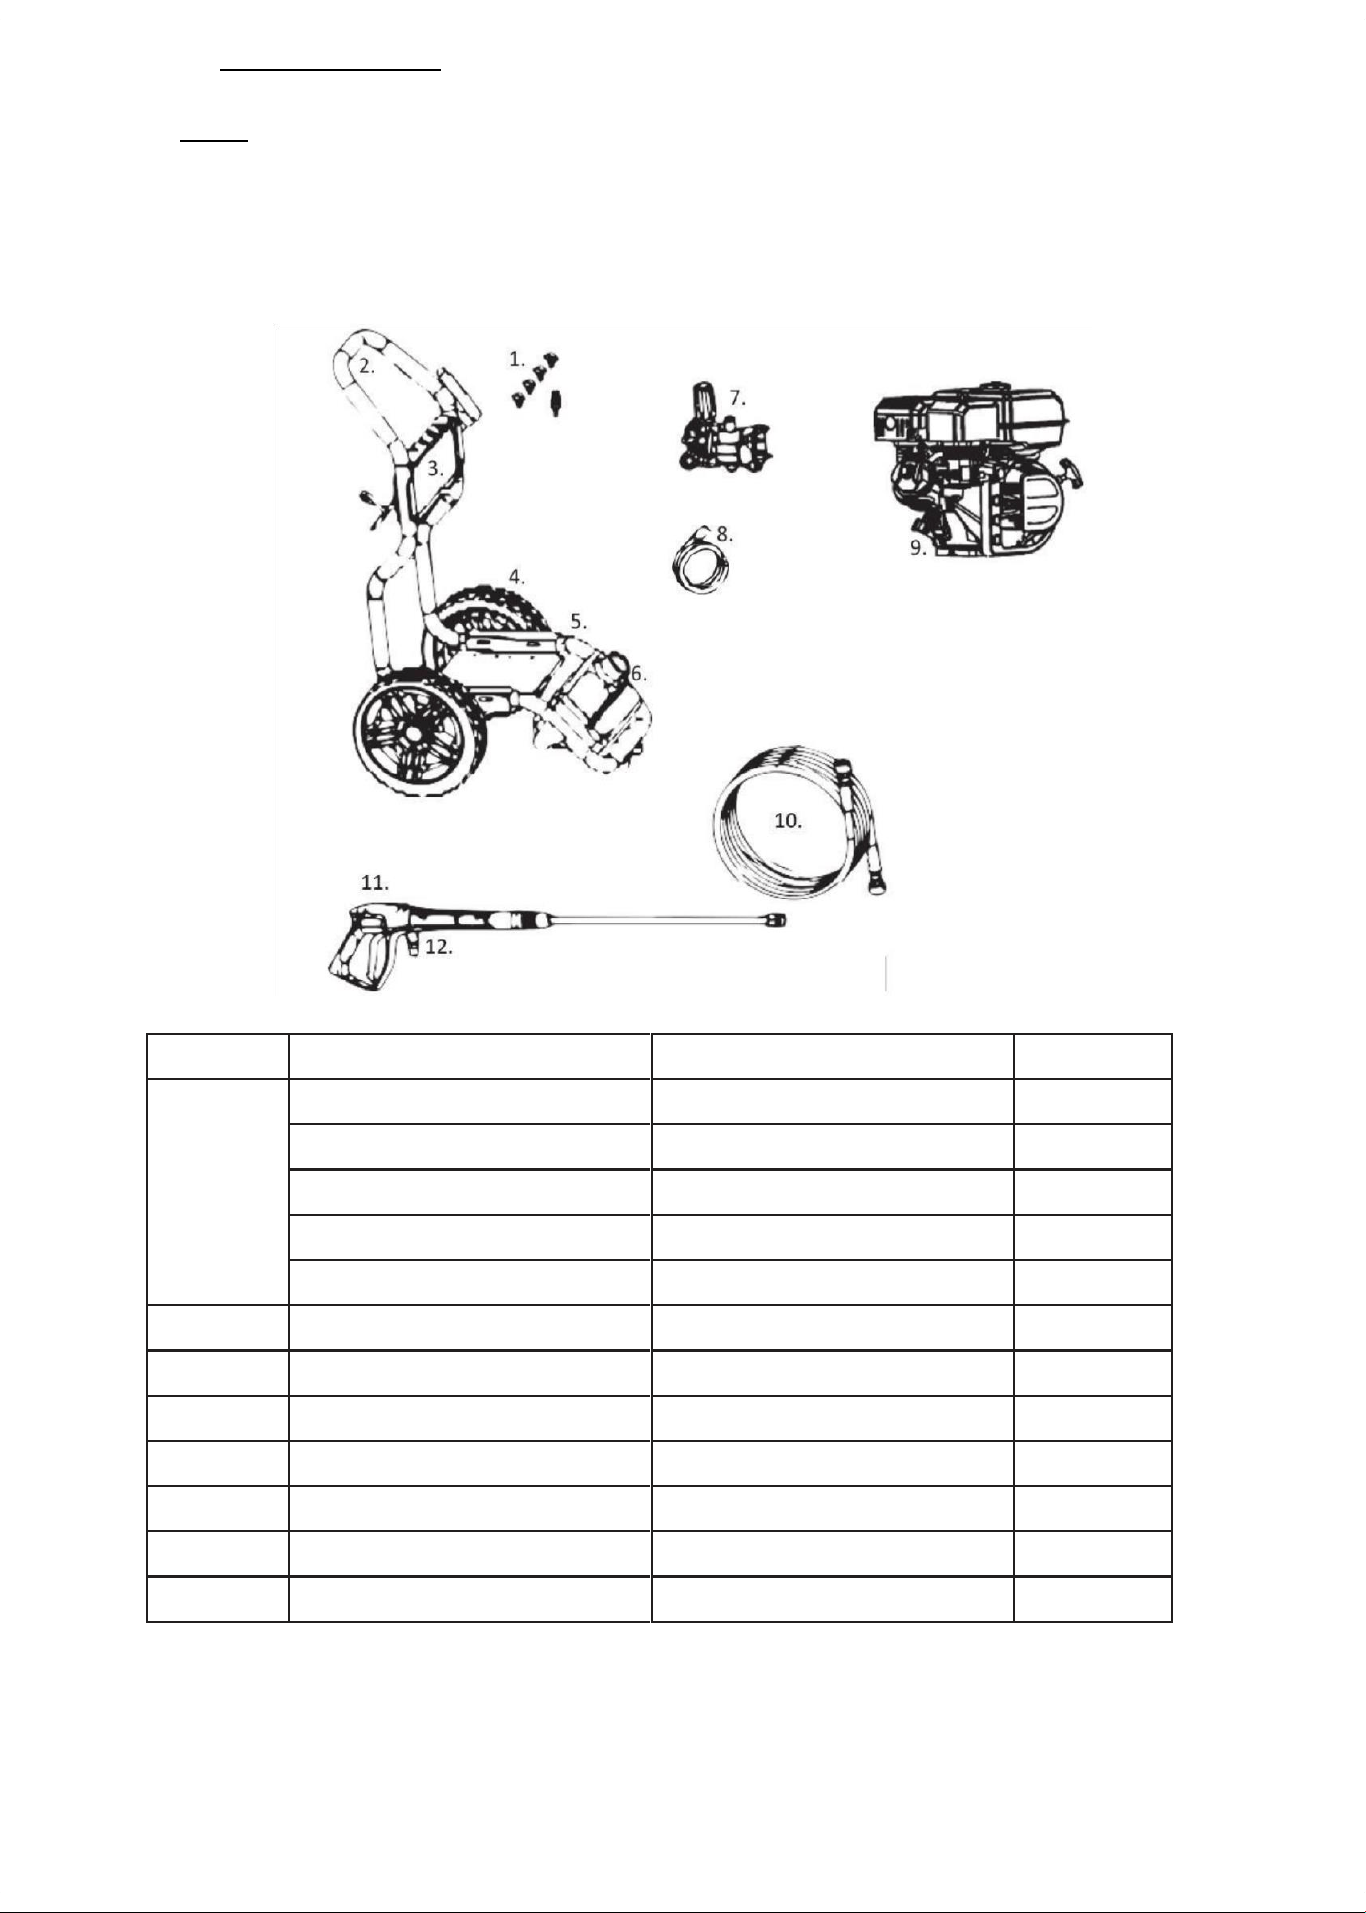
12.1. Pressure Washer (HYW2500P).
No. Part Code Description Qty.
1 85.201.025 QR Nozzle 0° - 0.25 1
85.216.025 QR Nozzle 15° - 0.25 1
85.241.025 QR Nozzle 40° - 0.25 1
85.266.401 Brass Soap Nozzle 1
RJ-3030-CS Turbo Nozzle 1
2 85.600.122-0.2 Handle Assembly 1
3 85.600.122-02.3 Decal Plate 1
4 85.600.122-05 Wheel Kit 2
5 85.600.122-03 Base Plate 1
6 85.600.122-06 Soap Container Kit 1
7 RMV2.5G30D Axial Pump 1
8 85.400.005 Soap Hose Assembly - 1m 1
Page
24
HYW2500P_HYW3000P_HYW3100P_HYW3100P2_HYW4000P Combined user manual Rev 7.pdf 26 16/12/2015 11:43:51
9
DH1003
Hyundai Engine - HY210
1
10
DN1059
Hose 1/4” - 10m
1
11
AC1020
Trigger Gun - 3200PSI
1
12
85.300.133
Plug 3/8MNPT x M22
1
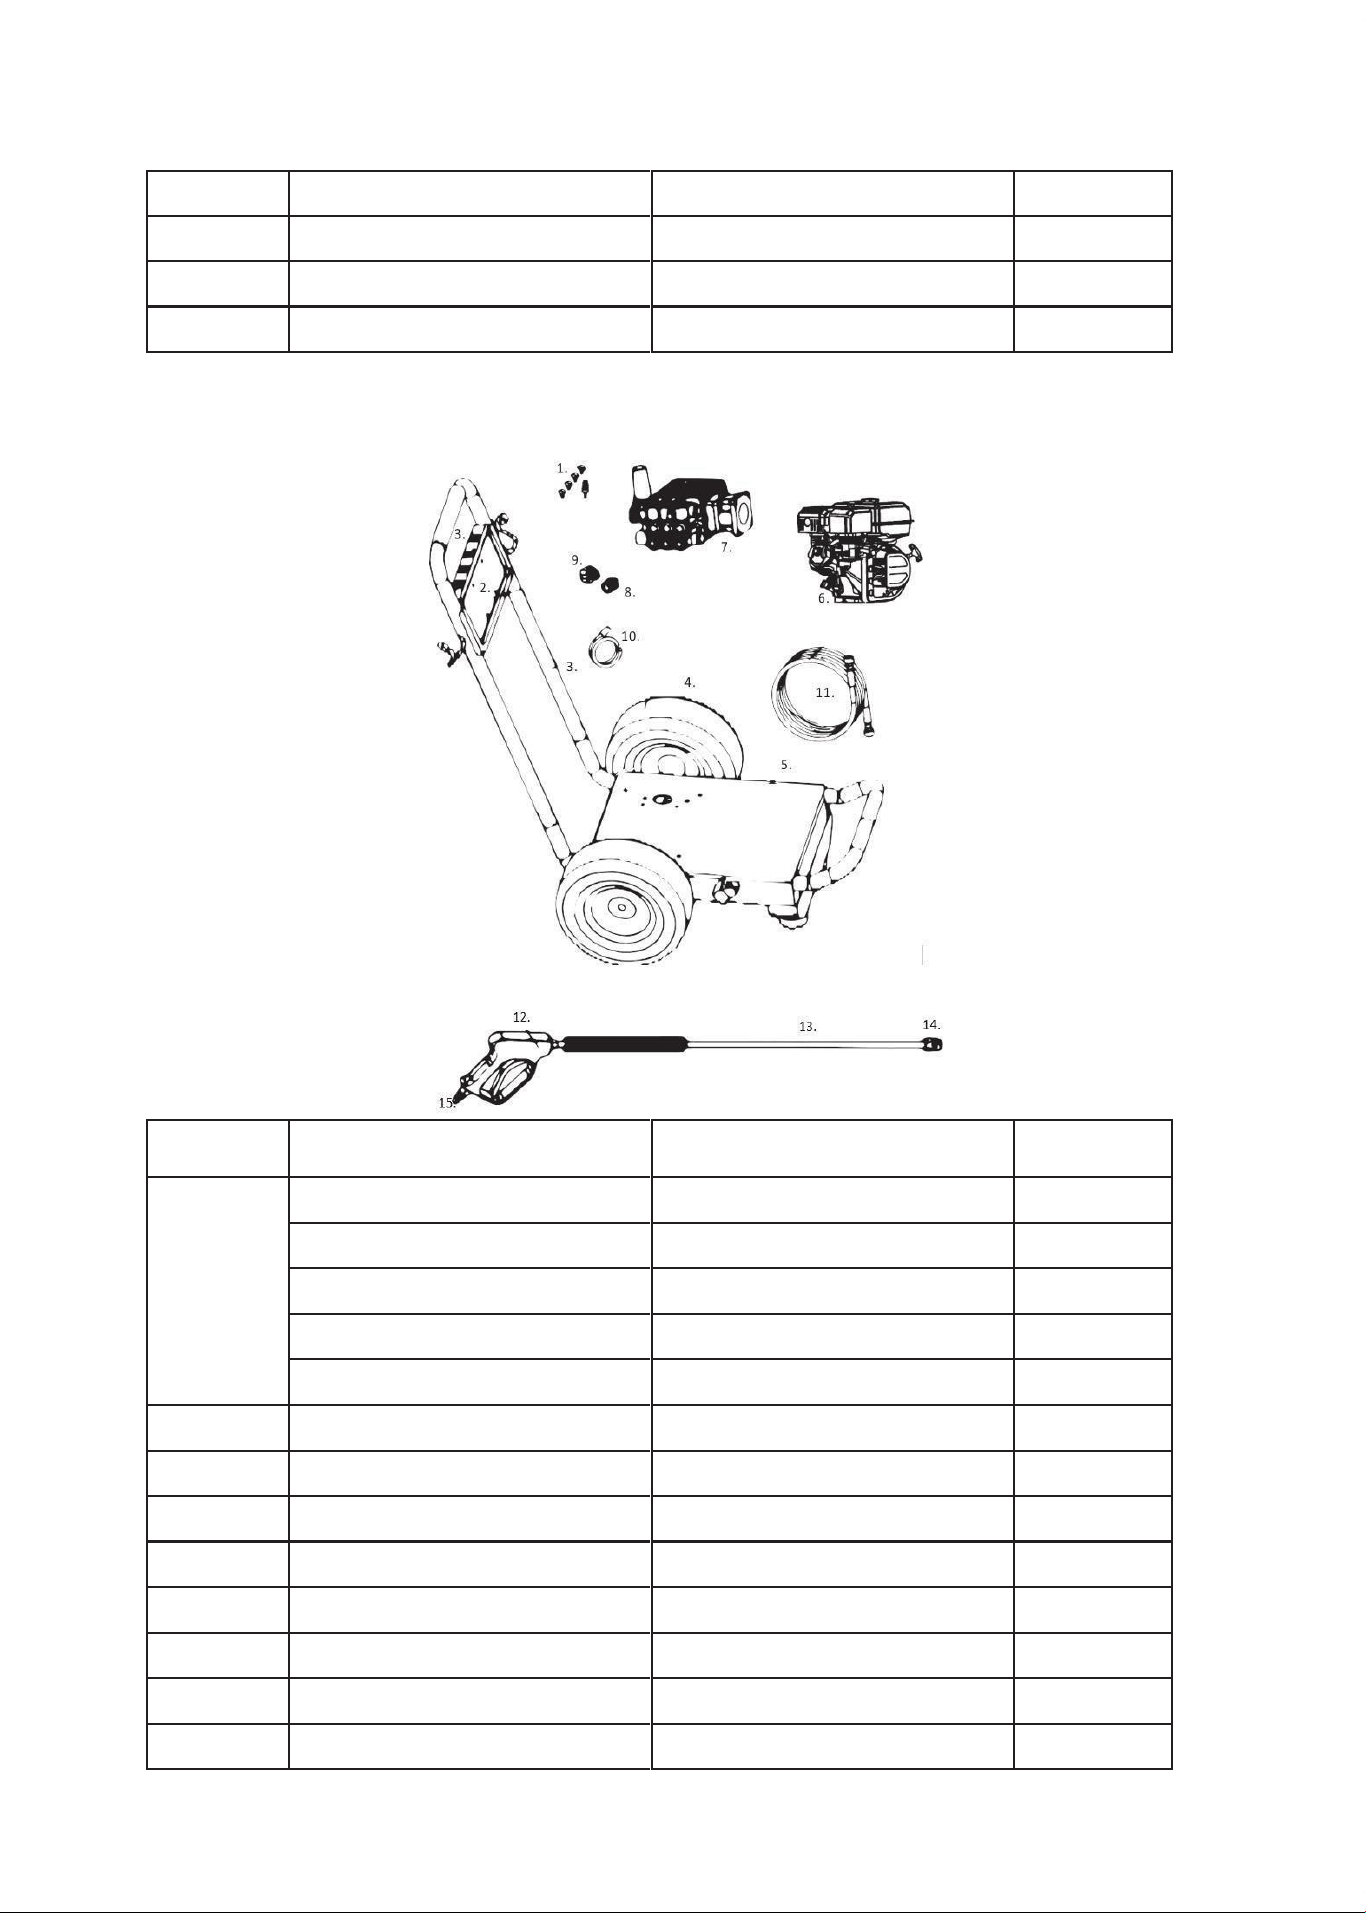
12.2. Pressure Washer (HYW4000P).
No.
Part Code
Description
Qty.
1
85.201.025
QR Nozzle 0° - 0.25
1
85.216.025
QR Nozzle 15° - 0.25
1
85.241.025
QR Nozzle 40° - 0.25
1
85.266.401
Brass Soap Nozzle
1
THA-15
Turbo Nozzle
1
2
85.600.125-02.2
Decal Plate
1
3
85.600.125-02R2
Handle Assembly
1
4
85.660.050B
12” Wheel
2
5
85.600.125-01R3
Frame Sub Assembly
1
6
DH1004
Hyundai Engine - HY420
1
7
RSV4G40
AR Triplex Pump
1
8
85.300.119
Adaptor Kit 3/8” Male
1
9
85.300.102
Coupler 1/4” QD Female
1
Page
25

HYW2500P_HYW3000P_HYW3100P_HYW3100P2_HYW4000P Combined user manual Rev 7.pdf 27 16/12/2015 11:43:51
10
85.400.005
Soap Hose Assembly - 1m
1
11
DN1028
HP Rubber Hose - 15m
1
85.300.103
Coupler 3/8” QD Female
1
85.300.104
Plug 3/8 Female (Steel)
1
12
85.202.108
Trigger Gun 5000PSI
1
13
85.202.026
Wand 38” Molded GR
1
14
85.300.102
Coupler 1/4” QD Female
1
15
85.300.105
Plug 3/8” MNPT (Steel)
1
Page
26
HYW2500P_HYW3000P_HYW3100P_HYW3100P2_HYW4000P Combined user manual Rev 7.pdf 28 16/12/2015 11:43:51
Page
27
HYW2500P_HYW3000P_HYW3100P_HYW3100P2_HYW4000P Combined user manual Rev 7.pdf 29 16/12/2015 11:43:51
Page
28
HYW2500P_HYW3000P_HYW3100P_HYW3100P2_HYW4000P Combined user manual Rev 7.pdf 30 16/12/2015 11:43:51
Page
29
HYW2500P_HYW3000P_HYW3100P_HYW3100P2_HYW4000P Combined user manual Rev 7.pdf 31 16/12/2015 11:43:51
12.5. Annovi Reverberi Pump HYW4000P.
Page 30
HYW2500P_HYW3000P_HYW3100P_HYW3100P2_HYW 16/12/2015 11:43:51
Page 31
HYW2500P_HYW3000P_HYW3100P_HYW3100P2_HYW4000P Combined user manual Rev 7.pdf 33 16/12/2015 11:43:51
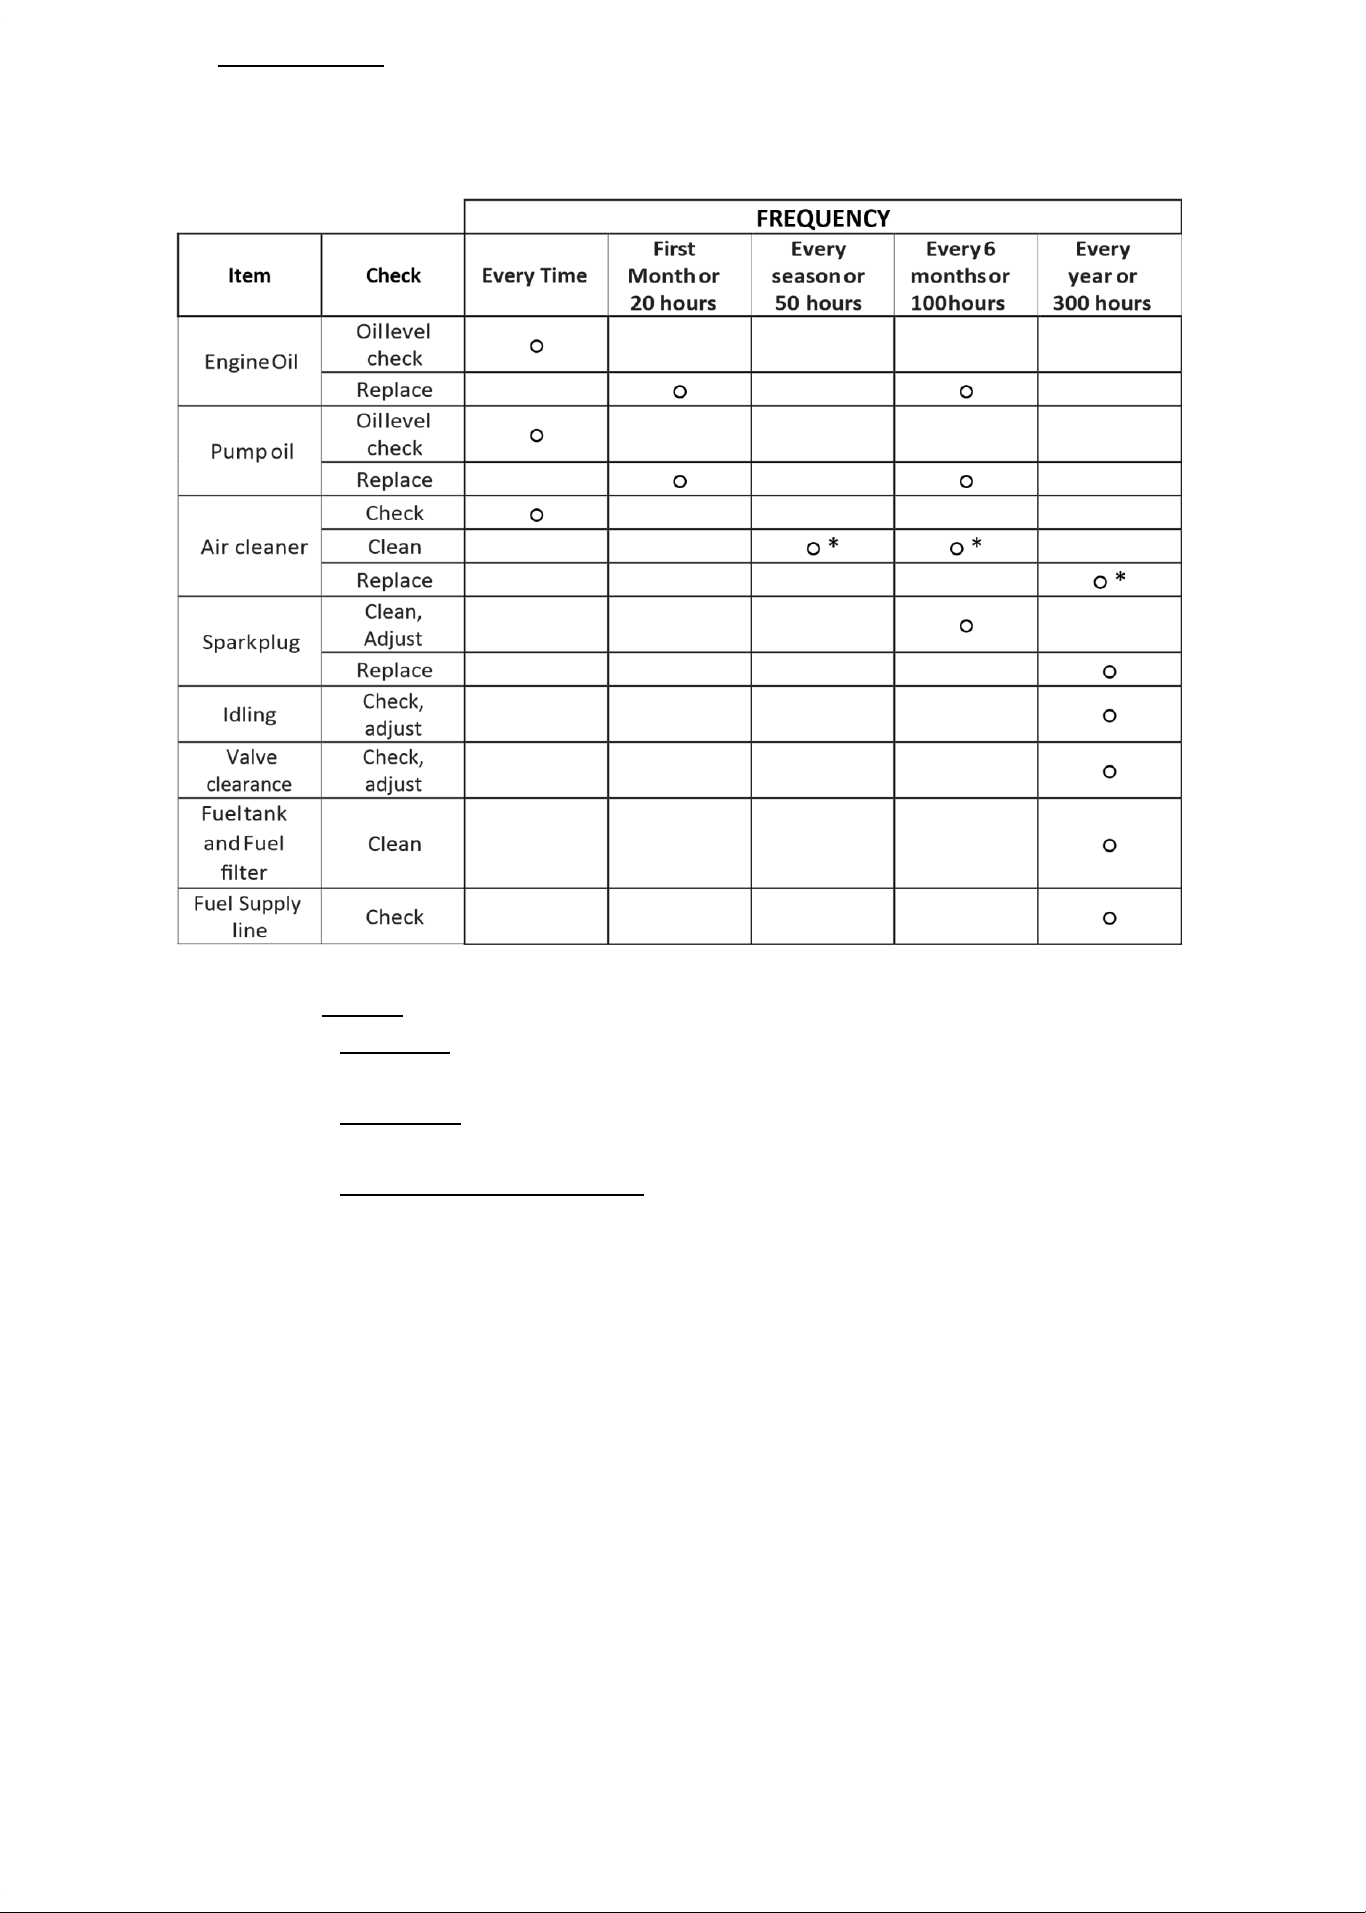
13.2. NOTES * = More often than in schedule if the unit is used in dusty conditions.
13.2.1. CAUTION Only use parts supplied by the manufacturer in order to reduce
the risk of damage to the machine.
13.2.2. WARNING Before servicing ensure that the machine is completely switched
off and ensure that there is good ventilation in the area.
13.2.3. ENGINE OIL REPLACEMENT Draining the engine oil whilst the engine is still
hot allows for a drainage that is quick and easy. Remember to check the drain
plug is securely fastened again after draining. When disposing of old oil and
oil containers please do so at a recycling station for environmental reasons.
13. MAINTENANCE
13.1. The user should take the table below into consideration make sure the
machine is kept in perfect working condition.
Page 32
CE Declaration of Conformity DoC
In accordance with EN ISO 17050-1:2010
We
Company name:
Genpower Ltd
Postal address:
Isaac Way, Pembroke Dock
Postcode:
SA72 4RW
City:
Pembrokeshire
Telephone number:
01646 687 880
E-Mail address:
declare that the DoC is issued under our sole responsibility and belongs to the following product:
Model/Product:
HYW2500P, HYW3000P2, HY3100P, HY3100P2, HYW4000P
Description
Pressure Washer
Object of the declaration (identification of apparatus allowing traceability; it may include a colour image of sufficient
clarity where necessary for the identification of the apparatus):
See Below
The object of the declaration described above is in conformity with the relevant Union harmonisation legislation:
2006/42/EC Machinery directive
2014/30/EU EMC directive
2000/14/EC Noise emissions directive
2014/35/EU Low Voltage Directive
The machine Conforms to the Directive: - 2000/14/EC (as amended)
Net Installed Power (HP)
HYW2500P=3.7, HYW3000P=3.7, HYW3100P=3.7,
HY3100P2=3.7, HYW4000P=7.2
Measured Sound Power Level LWA (dB)
HYW2500P=108, HYW3000P=109, HYW3100P=108,
HY3100P2=109, HYW4000P=112
Guaranteed Sound Power Level (dB)
HYW2500P=108, HYW3000P=109, HYW3100P=108,
HY3100P2=109, HYW4000P=112
Signed for and on behalf of:
Genpower Ltd
09/11/2022
Roland Llewellin,
Managing Director

UKCA Declaration of Conformity DoC
In accordance with EN ISO 17050-1:2010
We
Company name:
Genpower Ltd
Postal address:
Isaac Way, Pembroke Dock
Postcode:
SA72 4RW
City:
Pembrokeshire
Telephone number:
01646 687 880
E-Mail address:
declare that the DoC is issued under our sole responsibility and belongs to the following product:
Model/Product:
HYW2500P, HYW3000P2, HY3100P, HY3100P2, HYW4000P
Description
Petrol Powered Pressure Washer
Object of the declaration (identification of apparatus allowing traceability; it may include a colour image of sufficient
clarity where necessary for the identification of the apparatus):
See Below
The object of the declaration described above is in conformity with the relevant Union harmonisation legislation:
2008 (S.I. 2008/1597) Machinery Directive
2000/14/EC Noise Emissions Directive
Electromagnetic Compatibility Regulations 2016 (SI 2016
No. 1091)
Signed for and on behalf of:
Genpower Ltd
09/11/2022
Roland Llewellin,
Managing Director

15. CONTACT DETAILS
Address Genpower Limited, Isaac Way, Pembroke
Dock, Pembrokeshire, SA72 4RW, UK.
+44 (0) 1646 687880
+44 (0) 1646 686198.
Telephone
Fax.
Email contact; Technical
Web site;
www.hyundaipowerequipment.co.uk
33
Page 34

For Inquiries, Please Contact:
GENPOWER LTD
Isaac Way, London Road,
Pembroke Dock, UK, SA72 4RW.
T: +44 (0) 1646 687 880
E: info@hyundaipowerproducts.co.uk
www.hyundaipowerproducts.co.uk
Imported / Distributed by Genpower Ltd for
the United Kingdom & Ireland
Licensed by Hyundai Corporation Holdings, Korea