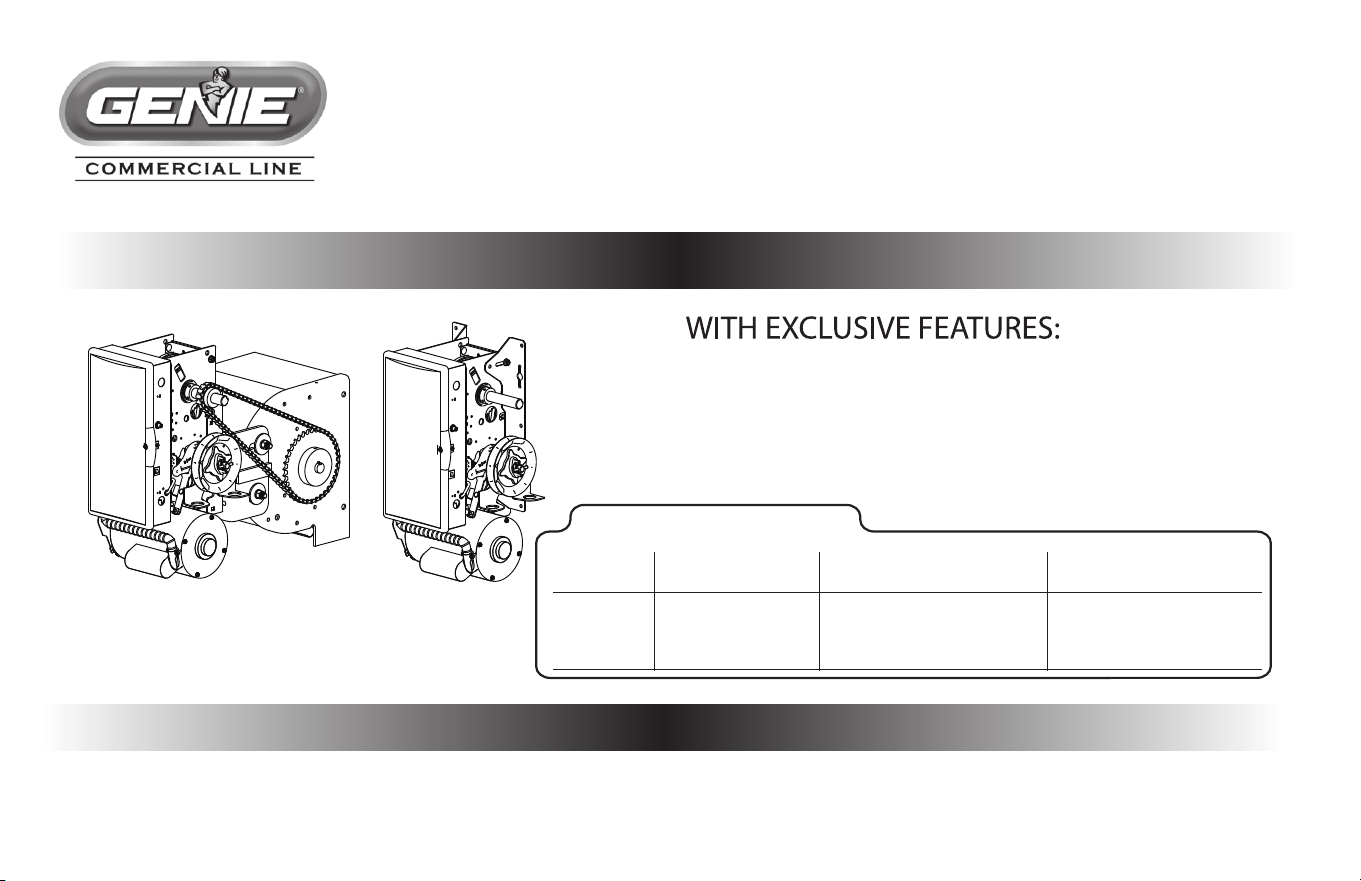
Standard Duty Operator
GCL-J
&
H
™
JACKSHAFT/HOIST
PROPER APPLICATION
ALL TYPES
Jackshaft/Hoist
Hood Mount or
Wall Mount
Door Type Operator Type HP/Max Door Weight HP/Max Door Weight
(Sectional) (Rolling Steel)
1/2HP = 1120 lbs
3/4HP = 1370 lbs
1HP = 1620 lbs
1/2HP = 998 lbs
3/4HP = 1220 lbs
1HP = 1440 lbs
NOT FOR RESIDENTIAL USE
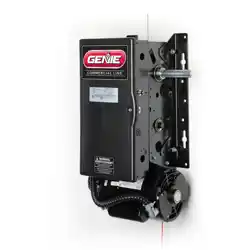
This Installation Manual provides the information required to install, troubleshoot and
maintain the GCL-J&H
™
Commercial / Industrial Door Operator.
111845.502351 04-14
MultiVolt®
EZ Limit®
TensiBelt®

THIS PAGE LEFT BLANK

TOC
............... . . . . . .
............... . . . . .
Table of Contents
Section 1 How to use this manual . . . . . . . . . . . . . . . . . . . . . . . . . . . . . . . 1.1
Section 2 Safety Information & Instructions . . . . . . . . . . . . . . . . 2.1-2.2
Section
3
Critical
Installation
Information . . . . . . . . . . . . . . . . . . . 3.1-3.5
Section 4 Installation . . . . . . . . . . . . . . . . . . . . . . . . . . . . . . . . . . . . . . 4.1-4.8
Rolling Steel Front of Hood...................... . . 4.1-4.2
Sectional Chain Couple . . . . . . . . .................. . .
Rolling Steel Door Chart................ . . .... . . . . . . . . . 3.3
Sectional Door Chart. ........................... . . . . . . . 3.4
Chain Hoist and Keeper ........................... . . . .
Clutch Adjustment............................ . . . . . . . .
Section 5 Wiring . . . . . . . . . . . . . . . . . . . . . . . . . . . . . . . . . . . . . . . . . . 5.1-5.14
Safety Information/ Line Votage Wiring . . . . . . . . . . . . . 5.1-5.2
Low Voltage Control Wiring....................... . . . . . 5.3
External Wire Diagram ........................... . . . . . . 5.4
Wall Control ............................. . . . . . . . . . . . . . . 5.5
Interlock Switches (Rolling Steel) . . . . 5.6
Interlock Switches (Sectional) . . . . 5.7
Photocell Wiring............................... .
. . . . . . . 5.8
Sensing Edge Wiring . .......................... . .
5.9-5.10
External Radio ............................. . . . . . . . . . . 5.11
Motor Connection/Safety Information.......... . 5.12-5.14
Section 6 Operator Setup Procedures . . . . . . . . . . . . . . . . . . . . . . . . 6.1-6.10
Setting Close Direction............................ . . . . . . . . 6.2
Setting Braking Rate ............................ . . . . . . . . . . 6.3
Setting Travel Limits............................ . . . . . . . . . .
............................ . . . . ... . . .
6.4
Setting Limit Overrun ............................ . . . . . . . . . 6.5
Monitored Reversing Devices................... . . ...... . 6.10
Setting Open & Close Modes ........................... . . . 6.6
(Optional) Transmitter Programming .................. . . .
. 6.7
Setting Mid-Stop Limit ........................... . . . . . . . . . 6.8
Resetting the MRT. . 6.9
Section 7 Special Operational Features. . . . . . . . . . . . . . . . . . . . . 7.1-7.2
Operator Cycle Count .......................... . . . . . . . 7.1
GDO & Display Firmware . . . . . . . . . . . . . . . . . . . . . . . . . . . . . . 7.1
Operator Type .............................. . . . . . . . . . . 7.2
Section 8 Troubleshooting . . . . . . . . . . . . . . . . . . . . . . . . . . . . . . . . 8.1-8.5
Display Operation.............................. . . . . . . . 8.1
Error Codes .............................. . . . . . . . . . 8.1-8.2
Run Codes .............................. . . . . . . . . . . 8.2-8.3
LED Indicators ............................. . . . . . . . . . . . 8.4
Safe-T-Beam® Self-Diagnostic Troubleshooting Chart . . 8.5
Section 9 Service & Maintenance . . . . . . . . . . . . . . . . . . . . . . . . . . . . . . 9.1
Section 10 Appendixes . . . . . . . . . . . . . . . . . . . . . . . . . . . . . . . . . . 10.1-10.13
Appendix A ............................. . . . . . . . . 10.1-10.9
Operator Parts Breakdown-Hoist. . . . . . . . . . . . . . . . . .10.1
Base Electric
Section 11 Warranty . . . . . . . . . . . . . . . . . . . . . .
. . . . . . . . . . . . . . . . . . . .11.1
Operator Parts Breakdown Jackshaft . . . . . . . . . . . . . .10.2
Operator Parts Breakdown Hoist/Jackshaft Combo
. .10.3
4.4-4.6
4.8
4.7
Box Parts Breakdown . ............ . . .10.8
Electric Box Layout ....................... . . . . . . . .10.9
Appendix B ............................... . . . . . . . . 10.10
Screw Terminal Assignments ................. . 10.10
Appendix C .......................... . . . . . . . . .10.11-10.13
Run Codes .............................. . . . . . . . . 10.11
Error Codes....................... . . . . . . . . 10.12-10.13
Shaft Parts Breakdown Hoist. . . . . . . . . . . . . . . .... . . .10.5
Shaft Parts Breakdown Jackshaft . . . . . . . . . . . . . . . . . .10.6
Shaft Parts Breakdown Hoist/Jackshaft Combo. . . . .10.7
Rolling Steel Wall Mount............................. . . 4.3
04-14
Alternate Motor Options . . . . . . . . . . . . . . . . . . . . . . . . .
. .10.4
Section 1: How to use this manual
The 11 sections of this Installation Manual provide the information required to install, troubleshoot and maintain this commercial/industrial
door operator.
Section 2
Section 3
Sections 4-6
FOR ASSISTANCE CALL 1-800-843-4084.
Sections 7-8
Sections 9-11
1.1
04-14
Failure to correctly perform all steps in sections 4-6 can result in serious injury or death.
WARNING
AVERTISSEMENT
Ne pas effectuer correctement toutes les étapes dans les sections 4-6 peut entraîner des
blessures graves voire la mort.
2.1
Section 2: Safety Information & Instructions
www.geniecompany.com 01-14
WARNING
Commercial/Industrial Sectional and Rolling Steel Doors are large, heavy objects that move with the help of springs
under high tension and electric motors. Since moving objects, springs under tension, and electric motors can cause
injuries, your safety and the safety of others depend on you reading the information in this manual. If you have any
questions or do not under stand the information presented, call your nearest service representative. For the number
of your local Genie® Dealer, call 800-OK-GENIE, and for Genie® Factory Technical Advice, call 800-843-4084.
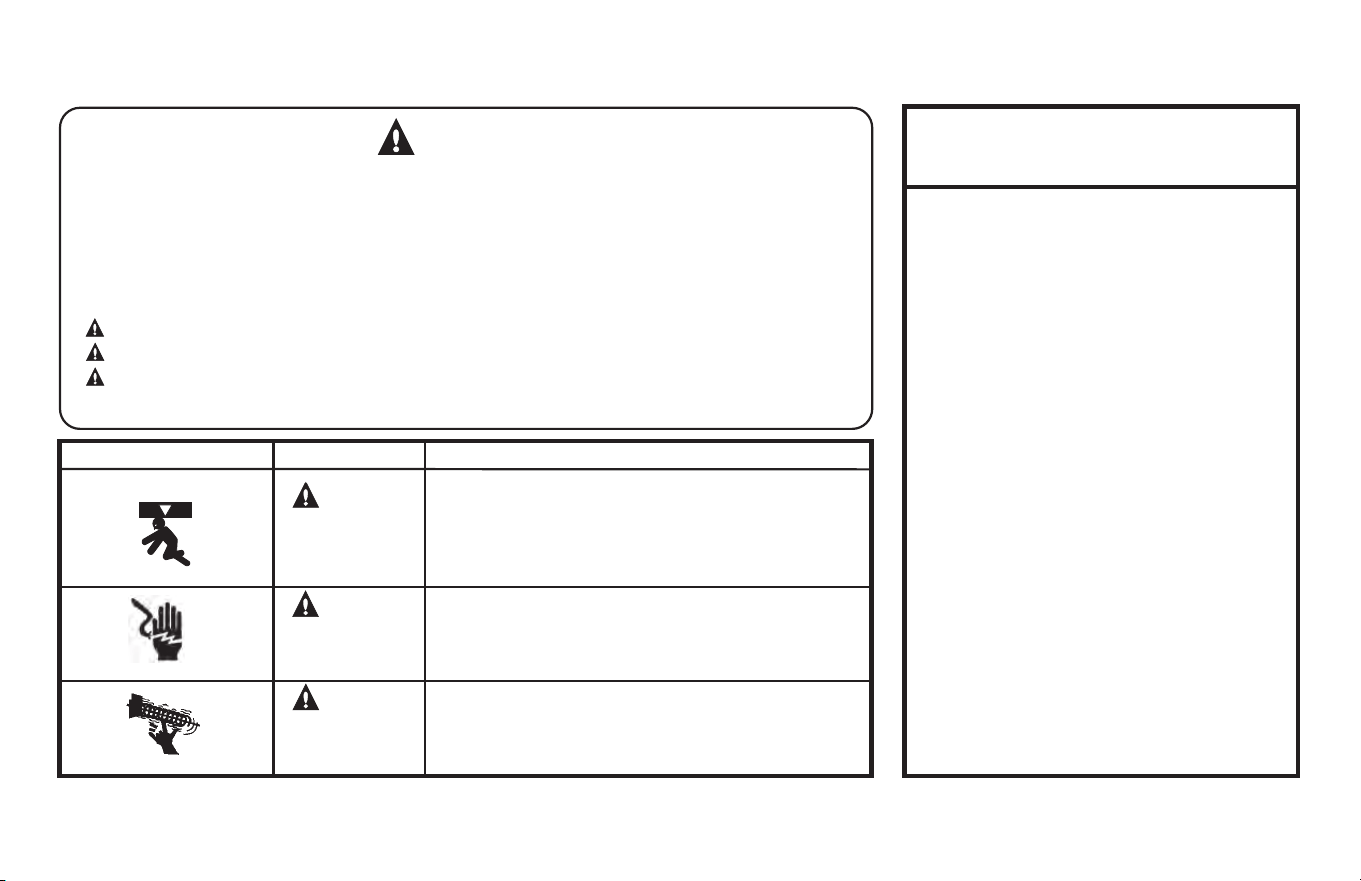
In this Manual, the words Danger, Warning, and Caution are used to stress important safety information. The word:
DANGER
indicates an imminently hazardous situation which, if not avoided, will result in death or serious injury.
WARNING
indicates a potentially hazardous situation which, if not avoided, could result in death or serious injury.
CAUTION
indicates a potentially hazardous situation which, if not avoided, may result in injury or property damage.
The word NOTE is used to indicate important steps to be followed or important considerations.
IMPORTANT
READ PRIOR TO ANY DOOR OPERATION
POTENTIAL HAZARD EFFECT PREVENTION
Do Not operate unless the doorway is in sight and free of
obstructions. Keep people clear of opening while door is moving.
Do Not allow children to play with the door operator.
Do Not change operator control to momentary contact unless an
external reversing means is installed.
Do Not operate a door that jams or one that has a broken spring.
Could result in
Serious Injury
or Death
Turn off electrical power before removing operator cover.
When replacing the cover, make sure wires are not pinched or near
moving parts.
Operator must be electrically grounded.
Do Not try to remove, repair or adjust springs or anything to which
door spring parts are fastened, such as, wood block, steel bracket,
cable or any other structure or like item.
Repairs and adjustments must be made by a trained service
representative using proper tools and instructions.
HIGH SPRING TENSION
WARNING
MOVING DOOR
1. Read manual and warnings carefully.
2. Keep the door in good working condition.
Periodically lubricate all moving parts of door.
3. If door has a sensing edge, check
operations monthly. Make any necessary
repairs to keep it functional.
4. AT LEAST twice a year, manually operate
door. The Door should open and close freely.
If it does not, the door must be taken out of
service and a traine
d service representative
must correct the condition causing
the malfunction.
5. The Operator Motor is protected against
overheating by an internal t
hermal protector.
If the operator ceases to function because
motor protector has tripped, a trained service
technician may need to correct the condition
which caused the overheating. When motor
has cooled, thermal protector will
automatically
reset and normal operation can
be resumed.
6. In case of power failure, the door can be
operated manually by pulling the release
cable to disconnect the operator drive system.
7. Keep instructions in a prominent location
near the pushbutton.
Could result in
Serious Injury
or Death
WARNING
Could result in
Serious Injury
or Death
WARNING
ELECTRICAL SHOCK
2.2
Section 2: Safety Information & Instructions
www.geniecompany.com 04-14
AVERTISSEMENT
Les portes de garage commerciales/industrielles à sections et en acier roulantes sont de gros objets lourds qui fonctionnent à l’aide de ressorts soumis à une haute tension et
de moteurs électriques. Dans la mesure où les objets en mouvement, les ressorts sous tension et les moteurs électriques peuvent entraîner des blessures, votre sécurité et celle
des autres exigent que vous preniez connaissance des informations stipulées dans ce manuel. Si vous avez des questions ou si vous ne comprenez pas les informations
ci-incluses, veuillez contacter le représentant de service le plus près. Pour obtenir le numéro du revendeur Genie® local, appelez le +1 (800)-OK-GENIE, et pour obtenir
des conseils techniques de l'usine Genie®, appelez le +1 (800)-843-4084.
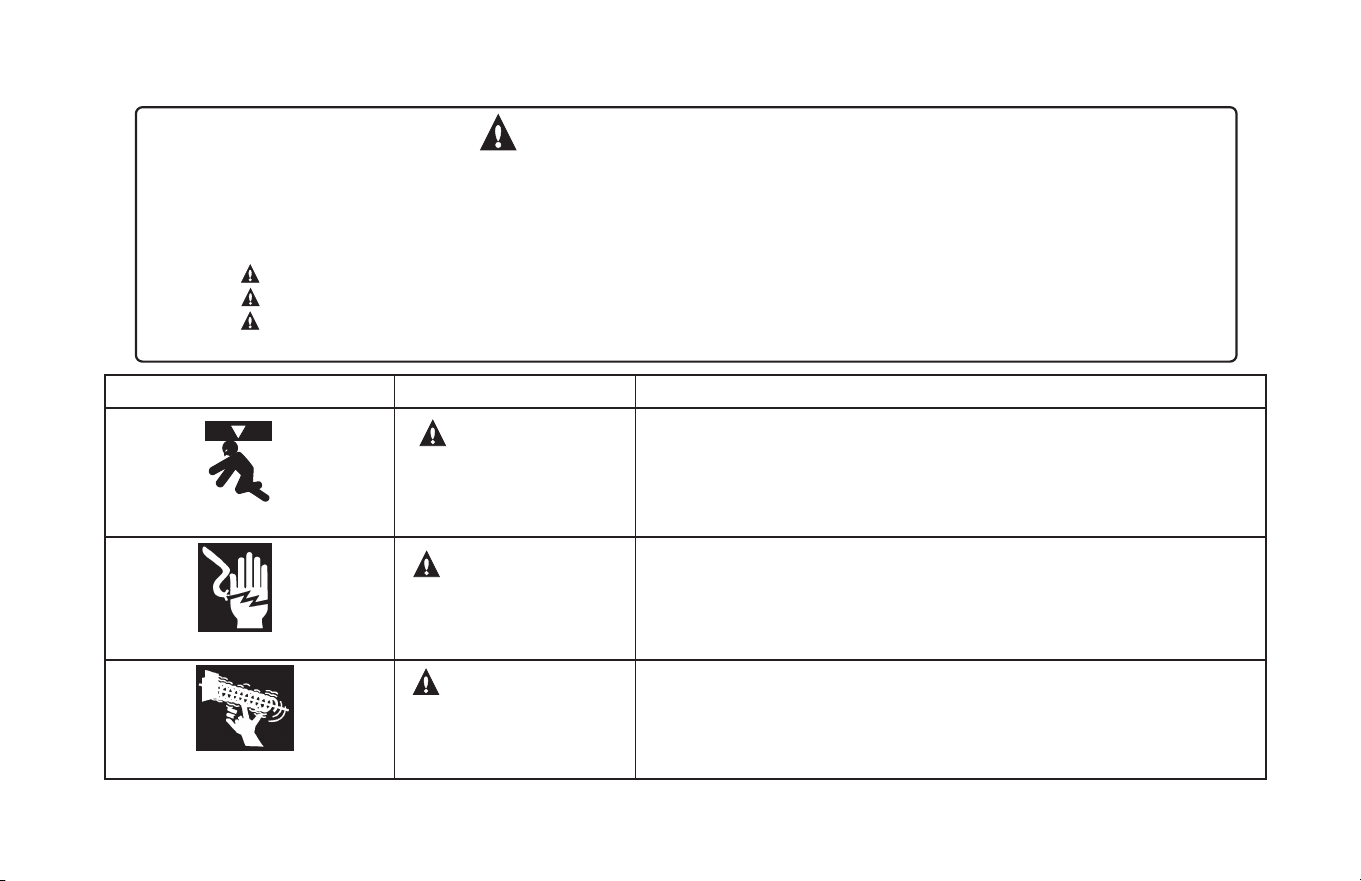
Dans ce manuel, les mots Danger, Avertissement, et Attention sont utilisés pour faire ressortir d’importantes informations relatives à la sécurité. Le mot :
DANGER
signale une situation dangereuse imminente qui si elle n'est pas évitée, risque d'entraîner des blessures graves, voire mortelles.
Le terme REMARQUE est utilisé pour signaler les étapes importantes à suivre ou d’importants éléments à prendre en considération.
DANGER POTENTIEL
EFFET
PRÉVENTION
Utiliser uniquement si la porte est en vue et libre de tout obstacle. Ne laisser personne
se tenir dans l’ouverture de la porte pendant qu’elle est en mouvement.
Ne pas permettre aux enfants de jouer avec l’opérateur de la porte.
Ne pas modifier la commande de l'opérateur à contact momentané à moins qu'un moyen
d'inversion externe soit installé.
Ne pas faire fonctionner une porte qui bloque ou dont le ressort est cassé.
Pourrait entraîner
des blessures
graves voire la mort
AVERTISSEMENT
Pourrait entraîner
des blessures
graves voire la mort
CHOC ÉLECTRIQUE
TENSION ÉLEVÉE DU RESSORT
PORTE EN MOUVEMENT
ATTENTION
signale une situation potentiellement dangereuse qui, si elle n'est pas évitée, risque d'entraîner des blessures ou des dommages matériels.
AVERTISSEMENT
signale une situation potentiellement dangereuse qui, si elle n'est pas évitée, risque d'entraîner la mort ou des blessures graves.
Pourrait entraîner
des blessures
graves voire la mort
Couper le courant avant d’enlever le couvercle de l'opérateur.
Lorsque le couvercle doit être remplacé, s’assurer que les fils ne sont ni
coincés ni près des pièces mobiles.
L’opérateur doit être correctement mis à la terre.
Ne pas essayer d’enlever, réparer ni ajuster les ressorts ou toute autre pièce à laquelle le
ressort de la porte est attaché, y compris blocs de bois, supports en acier, câbles ou autres
articles semblables.
Les réparations et les réglages doivent être effectués par technicien qualifié qui se sert
d’outils appropriés et qui respecte les instructions.
AVERTISSEMENT
AVERTISSEMENT
3.1
www.geniecompany.com 04-14
Job
Site Issues to Consider/Concerns
The following list of items should be considered prior to selecting an operator for a given job site.
1-Available power supply.
2-Type of door.
3-Potential operator mounting obstructions. Items to consider include, but are not limited to: side room, room above door shaft,
room below door shaft, available mounting
surface integrity, power supply location, and convenient chain hoist and release cable positioning.
4-Size of door for appropriate
operator torque and door travel speed selection.
ssenitsud ,ssenpmad dna noitacol rotarepo edulcni redisnoc ot smetI .tnemnorivne gnitnuom rotarepO-5
and corrosiveness of the location.
6-Door activation needs/requirements. Examples include 3
button control stations, 1 button control stations, radio controls, pull
cords,
loop detectors, photoelectric controls,
key switches, etc. See “Entrapment Protection” section below.
7-Interlock switches are required under certain conditions for
6-5.7..5 egap eeS .skcol rood dna srood ssap htiw srood
rof deriuqer( smaeb llecotohp
ro/dna segde gnisrever era selpmaxE .tnempiuqe yrosseccA-8
.cte ,sthgil gninraw ,syaler lortnoc yrailixua,),tcatnoc yratnemom sa etarepo ot tes srood
Section
3:
Critical
Installation
Information
ENTRAPMENT PROTECTION
The installation of a fail safe external reversing device (such as a monitored reversing edge or photocell system, etc.) is required on all momentary contact electronically
operated commercial doors. If such a reversing device is not installed, the operator will revert to a constant contact control switch for operation (Closing only).
The Reversing Devices currently UL Approved are:
MillerEdge ME and MT series monitored edge sensors used in combination with Timer-Close Module P/N OPABTCGX.S
MillerEdge ME and MT series monitored edge sensors used in combination with MillerEdge Interface Module OPAKMEIGX.S. (Direct connect through STB inputs.)
4)
Residential Safe-T-Beam® Monitored Photocells - P/N 37220R (GSTB-BX) & 38176R.S (includes extension brackets).
5)
Series II Commercial Safe-T-Beam® Monitored Photocells - P/N OPAKPE.S and OPAKPEN4GX.S (NEMA 4).
1)
2)
6) Monitored Retro-Reflective Photoeye - P/N OPGAKRPEN4X.S
MillerEdge Wireless monitored edge sensor OPAKMMWE.S.
3)
WARNING:
DO NOT apply line voltage until instructed to do so.
AVERTISSEMENT:
NE PAS mettre sous tension tant que l'instruction n'est pas donnée de le faire.
3.2
www.geniecompany.com 04-14
Section
3: Critical Installation Information
CAUTION:
Check working condition of door before installing the operator. Door must be free from sticking and binding.
If equipped, deactivate any door locking device(s). Door repairs and adjustments, including cables and spring assemblies MUST
be made by a trained service representative using proper tools and instructions.
ATTENTION:
Vérifiez l'état de fonctionnement de la porte avant d'installer l'opérateur.
La porte doit pouvoir bouger librement et ne pas coincer. Désactivez tous les dispositifs de verrouillage de la porte (si équipés).
Les réparations et les réglages de porte, plus particulièrement pour les câbles et les ressorts DOIVENT être effectués par un
technicien qualifié qui se sert d’outils appropriés et qui respecte les instructions.
Mult
— Offers all (available) voltage combinations in both single, and 3-phase units.
E
TensiBelt
®
Z Limit
®
— F
— Employs a self-adjustment feature for tensioning.
eatures patent pending electro-mechanical design that sets limits through the control panel that are maintainable even through a power outage.
New Features:
MultiVolt
®
ENTRAPMENT
PROTECTION
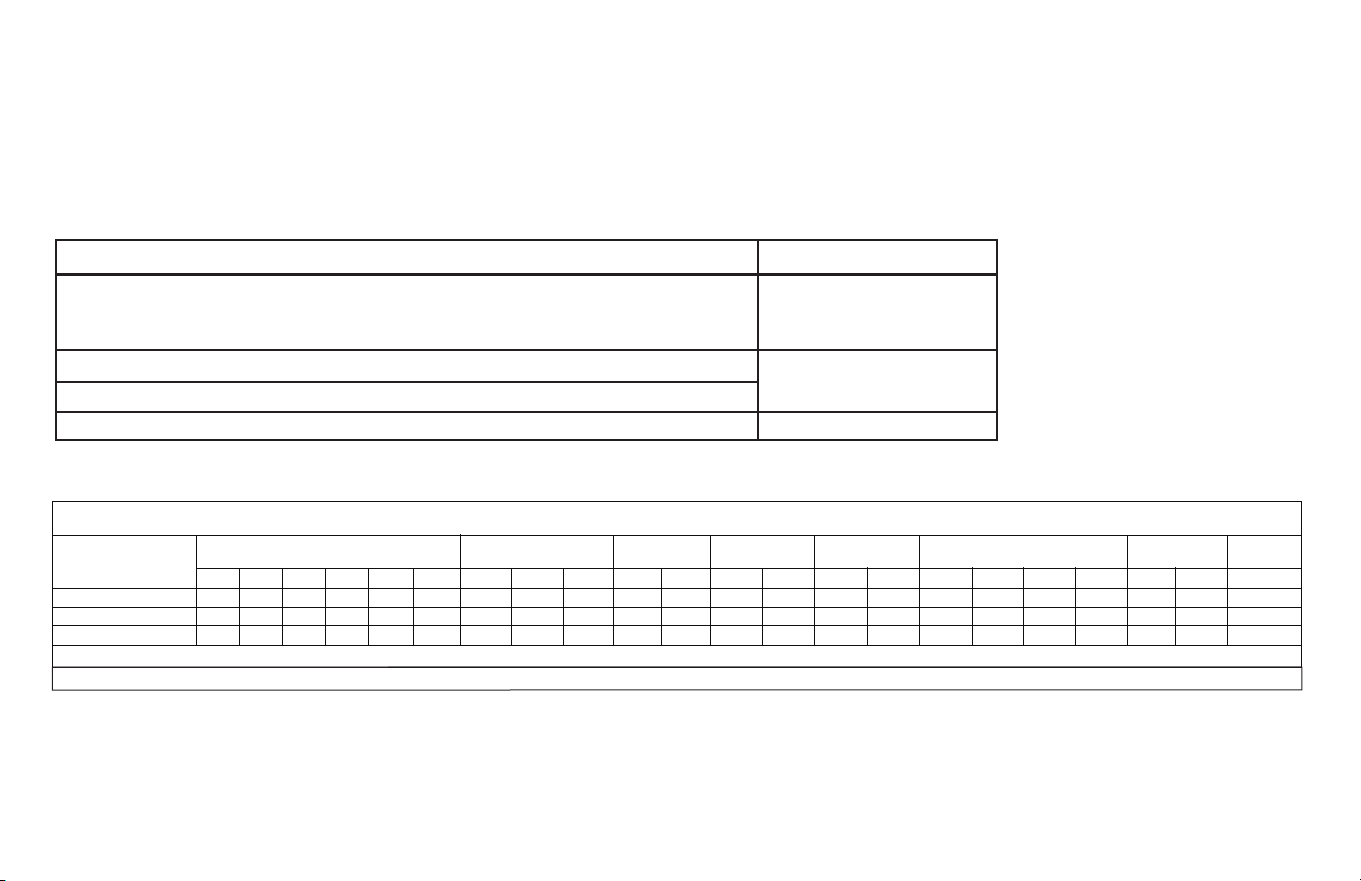
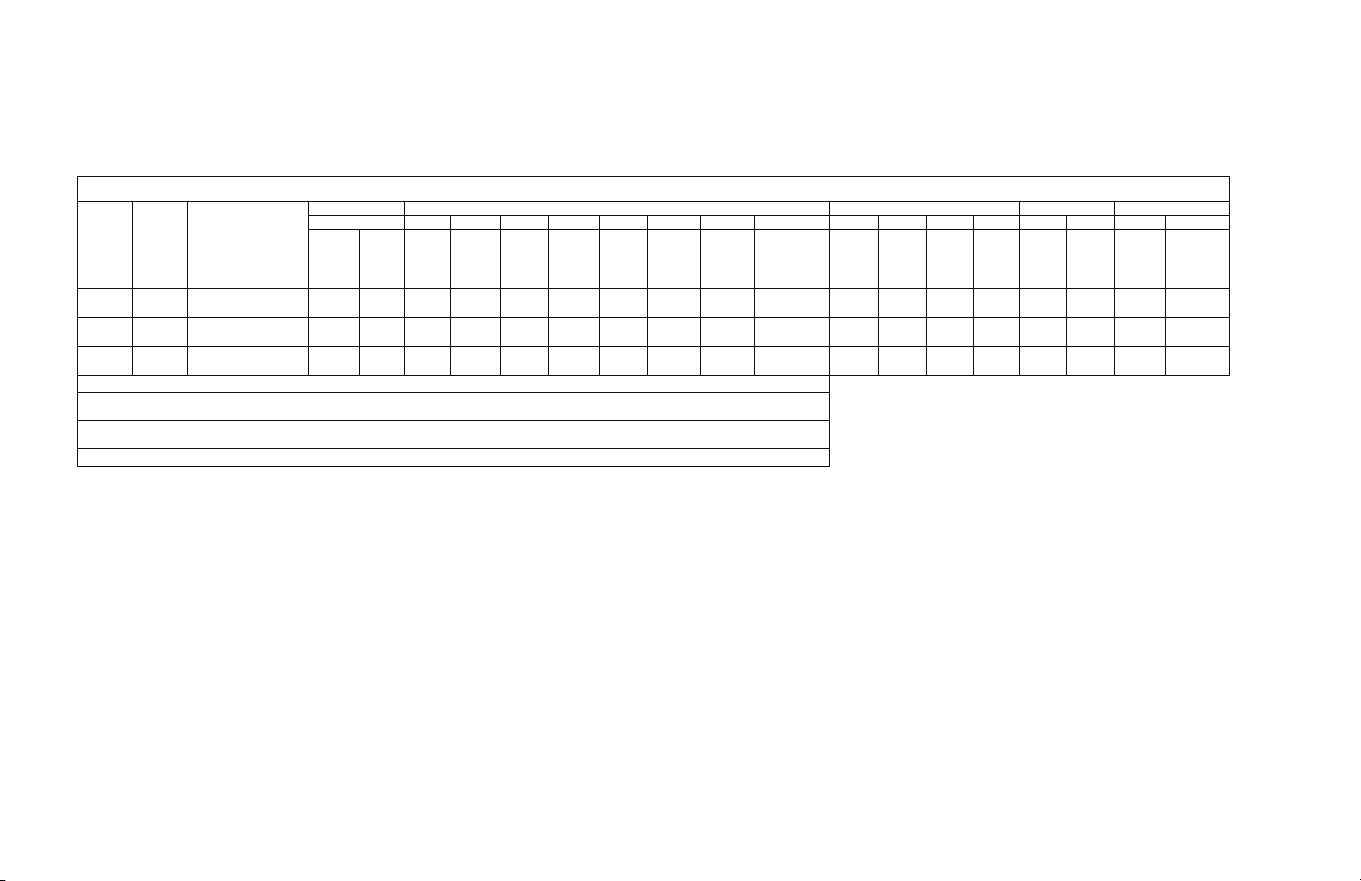
The operator can be used with the following UL Approved entrapment devices in compliance with UL325 requirements active starting August 29, 2010.
UNTIL ONE OF THESE MONITORED EXTERNAL ENTRAPMENT DEVICES IS INSTALLED, THE OPERATOR WILL NOT ALLOW MOMENTARY CONTACT OPERATION IN THE CLOSE DIRECTION.
Section
3: Critical Installation Information
3.3
Model HP
FireStar® 3” SLAT
FireStar® 3” SLAT
INSULATED
SHEET DOOR
16GA. 18GA. 20GA. 22GA. 24GA. 26GA. 18GA. 20GA. 22GA.
ALUM. STL/SST 20GA. 22GA.
350 240 N/A
N/A
N/A
N/A
N/A
N/A
N/A
STEEL, NON-INSULATED STEEL, INSULATED
UL
L is ted
FireStar® 2” SLATGRILLESCOUNTER DOOR
ALUM. STL/SST
126 126
Rolling Steel Door Chart (sq. ft.)
Note: Total door weight and not square footage is the critical factor in selecting the proper operator. These Sq.Ft. measurements are based on square doors, e.g. 16' x 16'.
Unbalanced Fire Shutters have a maximum square footage of 52 for 22GA. steel and 42 for 20GA. steel.
GCL-J&H™ 1/2 YES
GCL-J&H™ 3/4 YES
GCL-J&H™ 1 YES
www.geniecompany.com 04-14
297 333 333 416 476 476 238 238 274
450 310 N/A
126 126
359 419 419 552 618 N/A 276 276 309
610 450 N/A
126 126
388 461 461 606 621 N/A 297 297 382
16GA. 18GA. 20GA. 22GA.
N/A N/A N/A
20GA. 22GA. 26GA.
N/A N/A 256
N/A N/A N/A
N/A N/A N/A
N/A N/A N/A
N/A N/A N/A
Miller Edge ME & MT series monitored edge sensors used in
combination with OPABTCGX.S Timer-Close Module or MillerEdge
Interface Module OPAKMEIGX.S. Miller Edge Wireless monitored edge sensor OPAKMMWE.S
ANY WIDTH
Residential Safe-T-Beams® P/N 37220R (GSTB-BX) and 38176R.S (includes ext. brkt’s)
Commercial Photoeye Kit P/N OPAKPE.S and OPAKPEN4GX.S (NEMA 4)
LISTED DEVICES
ALLOWABLE DOOR WIDTH
30 FEET
35 FEET
Monitored Retro-Refective Photoeye Kit P/N OPGAKRPEN4X.S
Type
Mounting
Max.
Door
Weight
(Lbs)
16GA.
Flush
Steel
16GA.
Flush
Steel
Insulated
20GA.
Ribbed
Steel
20GA.
Ribbed
Steel
Insulated
24GA.
Ribbed
Steel
24GA.
Ribbed
Steel
Insulated
Nominal
24GA.
Ribbed
Steel
Nominal
24GA.
Ribbed Steel
Insulated
Insulated
PU/FIP
Insulated
PU/FIP
1.38"
1/8" Glass
1.38"
Glass
1.38"
Insulated
PU/FIP
2"
Insulated
PU/FIP
2"
20GA.
Yes TSC 1120 256 220 370 256 440 340 320 320 256 360 400 300 400 380 360 240
TSC 1370 330 256 440 310 530 400 320 320 256 450 450 370 460 440 400 330
TSC 1620 380 280 500 370 570 410 320 320 256 480 480 420 500 480 400 400
Yes
Yes
S=Jackshaft,SideMount
C=Jackshaft,CenterMount
UL L is tedHPModel
T=Trolley
Aluminum
Door S eries ->
Section 3: Critical Installation Information
3.4
Note: Total door weight, and not the square footage, is the critical factor in selecting the proper operator.
Square footage measurements are based on "square doors." (Example=16' x 16')
NOTE: Doors that require special windloading and wide doors, normally require increased strutting (reinforcement). Strutting doors can significantly increase door
weight beyond weight shown. Consult Customer Service for the impact of wind load andstrutting on square foot limits.
NOTE: "PU-FIP" stands for "polyurethane, foamed-in-place." If no notation is present, insulation is "polystyrene, layed-in-place."
Sectional Door Chart (sq. ft.)
GCL-J&H™ 1/2
GCL-J&H™ 3/4
GCL-J&H™ 1
www.geniecompany.com 04-14
216 216 ins. 220 220 ins. 2415 2415 ins. 2411 2411 ins. 125 150 200 200-20 5150 5200 451 452
CommercialSteelInsulated&Non-Insulated Thermospan Thermomark
Exterior
Insulated
PU/FIP
Raised
Panel
1.38"
Insulated 1/4" or 1/2"
PU/FIP
Raised
Panel
2"

3.5
www.geniecompany.com 04-14
IMPORTANT
INSTALLATION INSTRUCTIONS
WARNING-
To reduce the risk of severe
injury or death:
READ AND FOLLOW ALL INSTALLATION INSTRUCTIONS.
Install only on a properly operating and balanced door. A door that is
operating improperly could cause severe injury. Have qualified service
personnel make repairs to cables, spring assemblies and other
hardware before installing the operator.
Remove all pull ropes and remove, or make inoperative, all locks
(unless mechanically and/or electronically interlocked to the power
unit) that are connected to the door before installing the operator.
Install the door operator at least 8 feet above the floor if the operator
has exposed moving parts.
Do not connect the door operator to the power source until
instructed to do so.
Locate the control station: (a) within sight of the door, (b) a minimum
of 5 feet above the floor so that small children cannot reach it, and
(c) away from all moving parts of the door.
Install the Entrapment Warning Placard next to the control station
and in a prominent location.
For products having a manual release, instruct the end user on the
operation of the manual release.
IMPORTANT
INSTRUCTIONS D’INSTALLATION
AVERTISSEMENT-
Pour réduire les risques de
blessures graves ou de mort :
1)
LIRE ET RESPECTER TOUTES LES INSTRUCTIONS D'INSTALLATION.
2)
Installez uniquement sur une porte fonctionnant correctement et bien
équilibrée. Une porte qui fonctionne mal peut provoquer des blessures
graves. Demandez à un technicien qualifié d'effectuer les réparations
des câbles, des ressorts et de toute autre quincaillerie avant de
procéder à l'installation de l'opérateur.
Retirez toutes les cordes de traction ainsi que tous les verrous ou
rendez-les inopérants (à moins qu'ils ne soient mécaniquement et/ou
électroniquement interverrouillés à l'unité motrices) qui sont connectés
à la porte avant de procéderà l'installation de l'opérateur.
Installez l'opérateur de la porte à 2,4 m minimum au-dessus du sol
lorsque des pièces mobiles de l'opérateur sont exposées.
Ne pas raccorder l'opérateur de la porte à la source d’alimentation
avant que l'instruction ne soit donnée de le faire.
Installez la station de commande : (a) en vue de la porte, (b) à 1,5 m
minimum au-dessus du sol pour que les jeunes enfants ne puissent
pas l'atteindre, et (c) à l'écart de toutes les pièces mobiles de la porte.
Installez le poster d'avertissement de pincement à côté de la station de
commande à un endroit bien en vue.
Pour les produits ayant un déclenchement manuel, indiquez à l'utilisateur
comment déclencher manuellement.
3)
4)
5)
6)
7)
8)
1)
2)
3)
4)
5)
6)
7)
8)
Section 3: Critical Installation Information
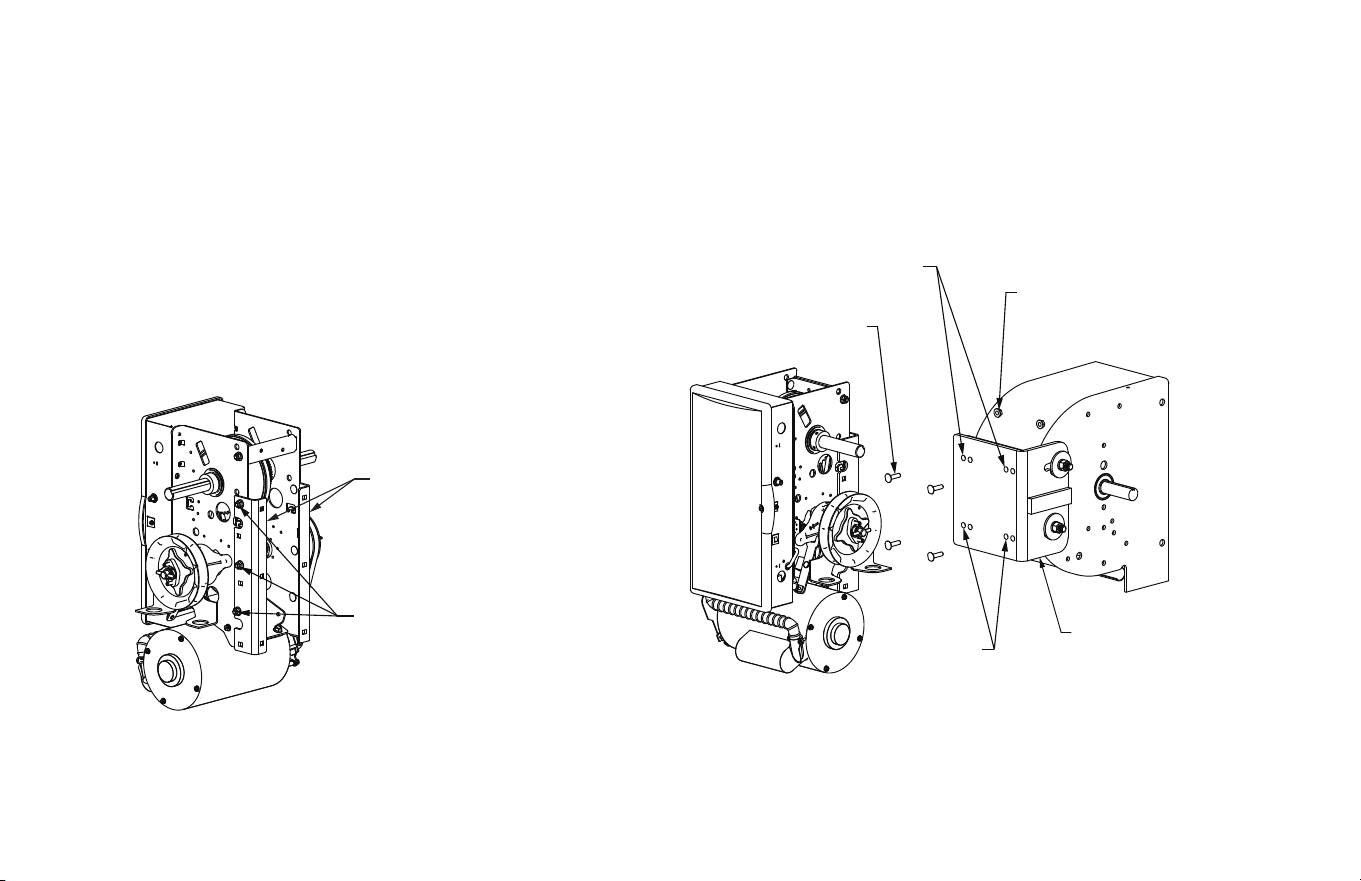
www.geniecompany.com 01-14 4.1
The Rolling Steel Door Operator can be assembled for right-hand or
left-hand (Each model can also be
Section 4: Installation
Rolling Steel Doors
Front of Hood Installation
1) Remove wall mount brackets from operator. Attach rolling steel mounting
brackets to the operator using the fasteners provided.
Figure 1.
Figure 1
NOTE:
On Jackshaft units, release cable must be installed on operator
before unit is installed.
mounting Front of Hood.
wall mounted.) Typical mounting arrangements are shown.
2) Attach Operator to Powerhead Support bracket using the fasteners
provided. Figure 2.
5/16-18 X 3/4 CARRIAGE BOLT
& 5/16-18 FLANGE NUT
(QTY 6 EACH)
ROLLING STEEL
MOUNTING BRACKETS
Figure 2
5/16-18 X 1-1/4
CARRIAGE BOLT
(QTY 4 EACH)
USE THIS SET
OF HOLES
5/16-18 FLANGE NUT
(QTY 4 EACH)
USE THIS SET
OF HOLES
POWER HEAD SUPPORT
BRACKET
www.geniecompany.com 01-14 4.2
Front of Hood Installation (continued)
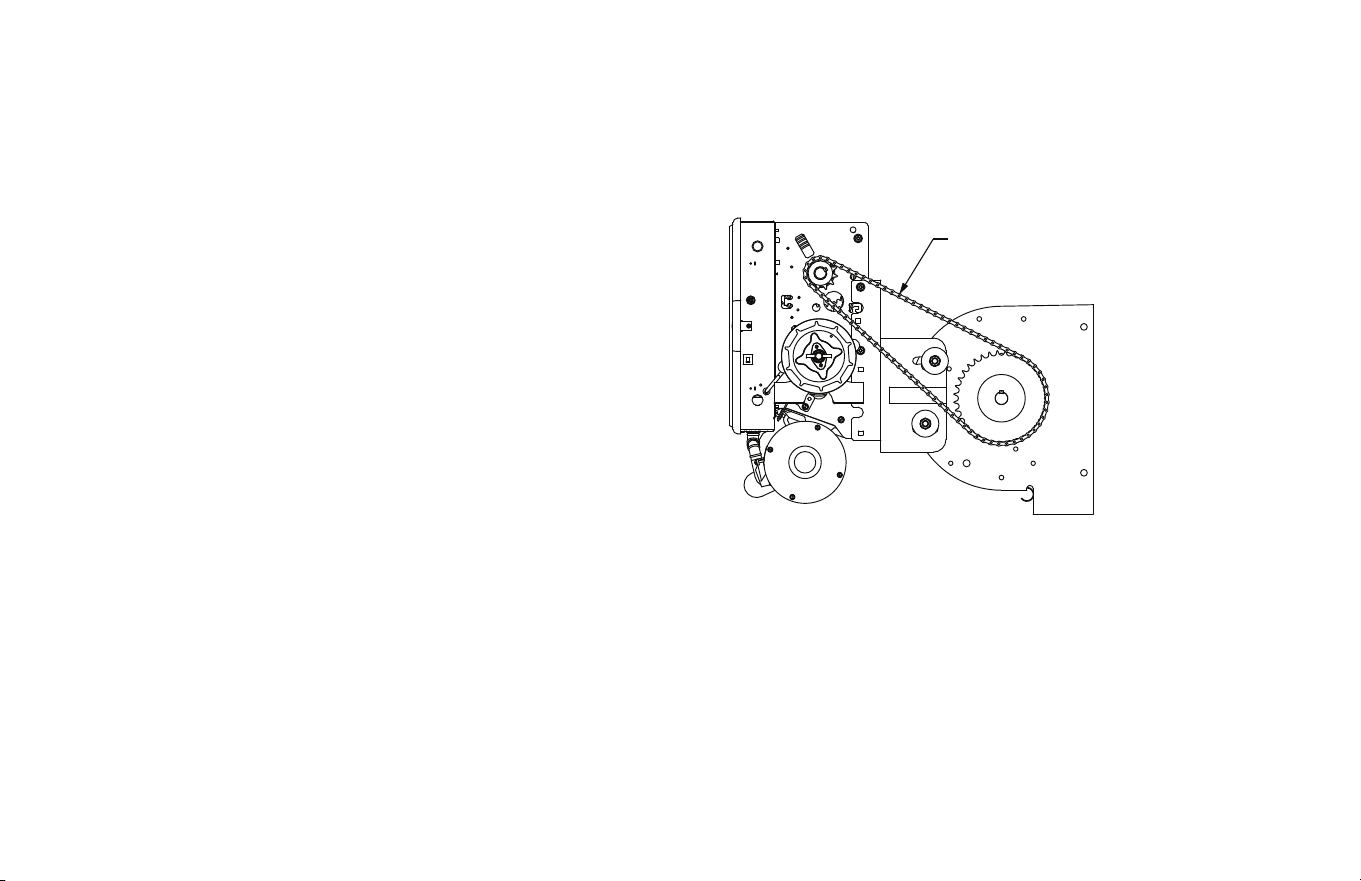
1) Install 12T #50 sprocket on operator output shaft.
2) Align keyways and insert ket into sprocket. Do not tighten set
screw at this time.
5) Assemble #50 chain using master link.
6) Align the door sprocket and operator output sprocket and
wrap #50 roller chain around both. Lock sprockets in place
by tightening their set screws.
7) Tension the drive chain using the slots in the powerhead
support bracket.
8) Tighten all mounting bracket hardware.
Figure 3
Chain Installation
(Figure 3)
#50 Drive Chain
3) Install #50 sprocket on door shaft.
4) Align keyways and insert ket into sprocket. Do not tighten set
screw at this time.
www.geniecompany.com 01-14 4.3
Rolling Steel Doors
Wall Mount Installation
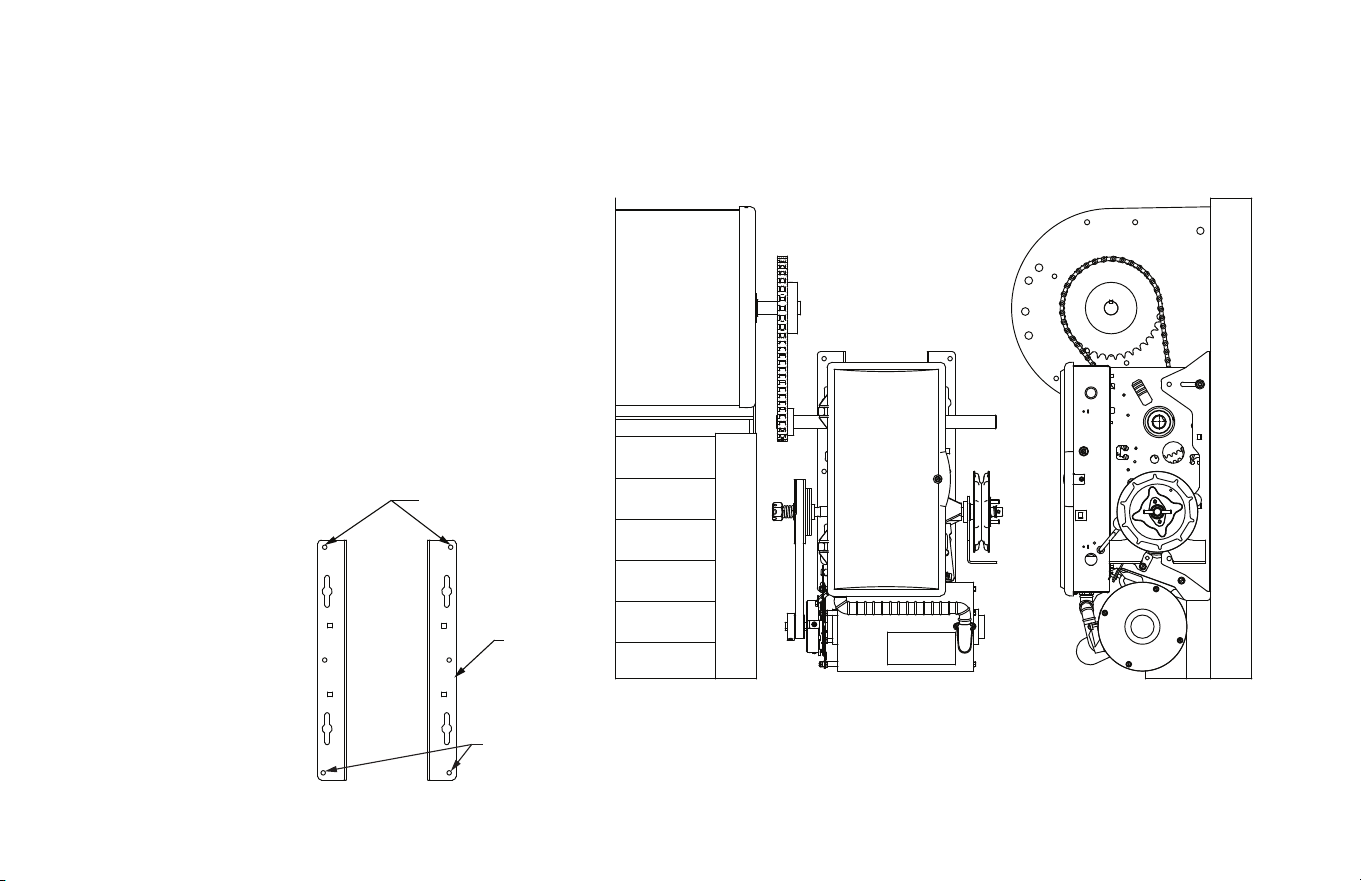
Figure 4.
1) Install 12T #50 sprocket on operator output shaft.
2) Align keyways and insert key into sprocket. Do not tighten set
screw at this time.
5) Assemble #50 chain using master link.
6) Align the door sprocket and operator output sprocket and
wrap #50 roller chain around both. Lock sprockets in place
by tightening their set screws.
7) Raise or lower operator to remove slack from the chain.
Ensure operator output shaft is parallel with door shaft.
8) Secure Operator to the wall using lock down holes. Lock down
holes must be used to ensure proper chain tension.
Figure 4
LOCK DOWN HOLES
LOCK DOWN
HOLES
NOTE: Operator must be
securely fastened to the wall
using lock down holes to
ensure proper chain tension.
If using slotted mounting
holes to mount the unit, you
must use at least (2) lock
down holes in opposite
corners to firmly mount
the unit to the wall.
OPERATOR
MOUNTING
BRACKETS
NOTE: Door shaft
and operator output
shaft must be parallel
3) Install #50 sprocket on door shaft.
4) Align keyways and insert key into sprocket. Do not tighten set
screw at this time.
NOTE: On Jackshafts units, release cable must be installed on operator
before unit is installed.
The Operator can be assembled for right or left hand
mounting above or below the door shaft and is available with or
without hoist.
If you will be using the Tension Plate Kit shown on page 4.6, slide the
bearing plates on the operator output shaft. Assembly of the kit will be
done after the drive chain is installed.
1) Install #50 sprocket on operator output shaft.
2) Align keyways and insert key into sprocket. Do not tighten set
screws at this time.
4)
Align keyways and insert key into sprocket. Do not tighten set
screws at this time.
3)
Install #50 sprocket on door shaft.
INSTALLATION TIP:
While sprocket set screws are loose, if possible, manually operate
door to help align chain. A properly tensioned drive chain should deflect
no more than 1/2” when thumb pressure is applied mid-way between the
2 sprockets. While there is no hard and fast rule governing chain tension,
it must be tight enough to prevent clicking, popping and jumping the
teeth of the sprocket. The 1/2” guideline will insure sufficient tension.
Figure
5
4.4
www.geniecompany.com 01-14
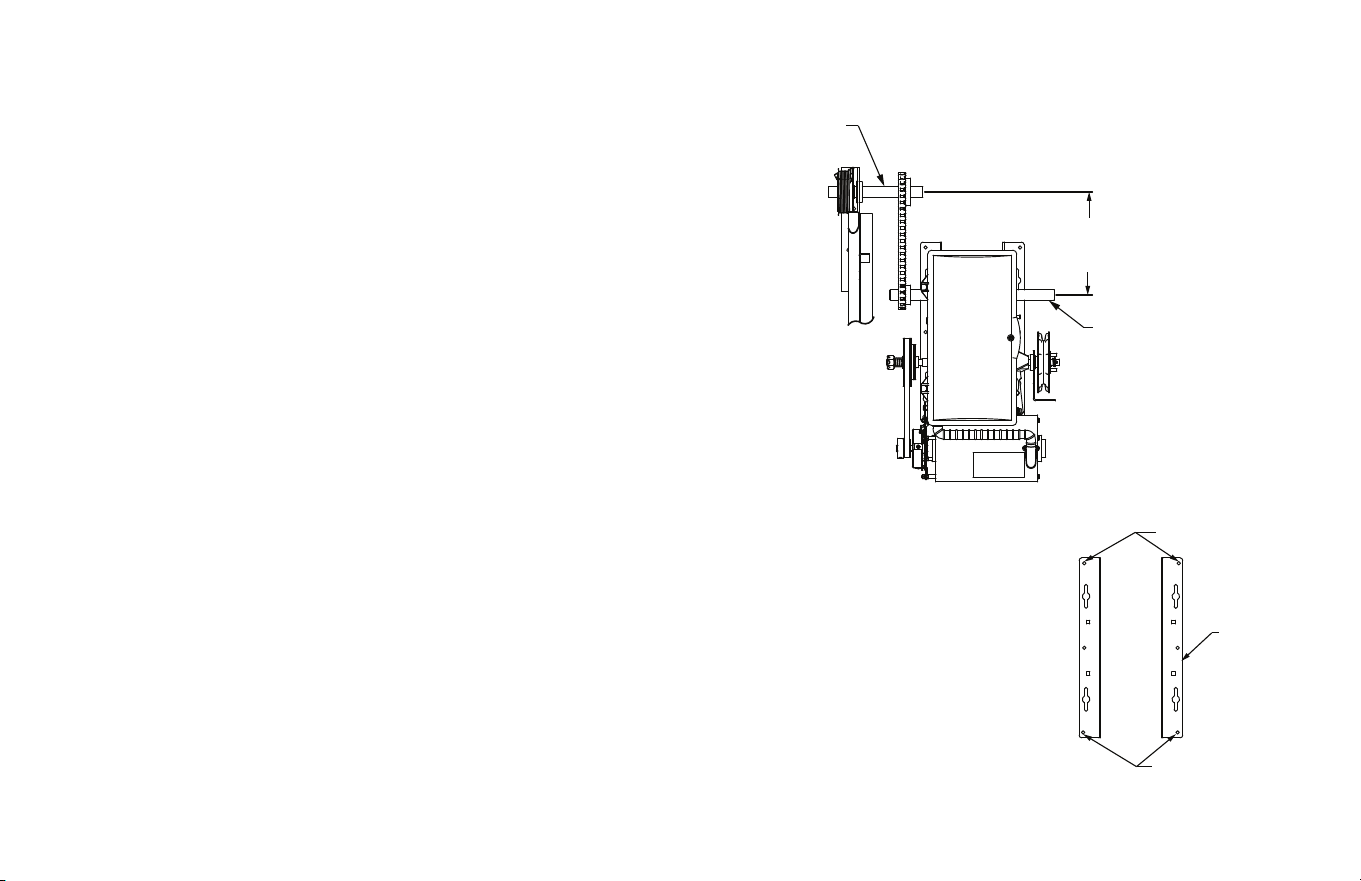
Chain Couple Installation Figure 5.
Sectional Doors
LOCK DOWN HOLES
LOCK DOWN
HOLES
OPERATOR
MOUNTING
BRACKETS
5) Assemble #50 chain using master link.
6) Align the door sprocket and operator output sprocket and
wrap #50 roller chain around both. Lock sprockets in place
by tightening their set screws.
7) Raise or lower operator to remove slack from the chain.
Ensure operator output shaft is parallel with door shaft.
8) Secure Operator to the wall using lock down holes. Lock down
holes must be used to ensure proper chain tension.
NOTE: Operator must be
securely fastened to the wall
using lock down holes to
ensure proper chain tension.
If using slotted mounting
holes to mount the unit, you
must use at least (2) lock
down holes in opposite
corners to firmly mount
the unit to the wall.
NOTE: Door shaft
and operator output
shaft must be parallel
12”-15”
CENTER
DISTANCE
OPERATOR
OUTPUT SHAFT
DOOR
SHAFT
NOTE: On Jackshafts units, release cable must be installed on operator
before unit is installed.

For Hollow Counterbalance Door Shaft:
1) Use non-threaded hole in door shaft sprocket as a guide and
drill a 3/8” diameter hole through one side of the door shaft.
Fig. 6A.
2) Insert clevis pin through sprocket and shaft to hold sprocket
in position.
3) Drill through opposite side of shaft to obtain proper hole
alignment. Fig. 6B.
4) Insert clevis pin through both holes and secure with cotter pin.
Fig. 6C.
For Solid Counterbalance Door Shaft
:
1) Insert key into door shaft keyway.
2) Slide sprocket into place and secure with set screws.
To Complete the Installation:
If needed, realign operator sprocket with door sprocket. If you have
excessive door shaft movement, an optional chain tension plate is
available. Fig. 7, pg 4.6.
Chain Couple (continued)
SPROCKET HUB
DRILL HOLE
IN THIS SIDE
OF SHAFT
DRILL HOLE IN
OPPOSITE SIDE
OF SHAFT
DOOR SHAFT
(TUBE)
DOOR SHAFT
(TUBE)
CLEVIS PIN
CLEVIS PIN
COTTER PIN
DOOR SHAFT
(TUBE)
Figure 6A
Figure 6B
Figure 6C
4.5
www.geniecompany.com 01-14
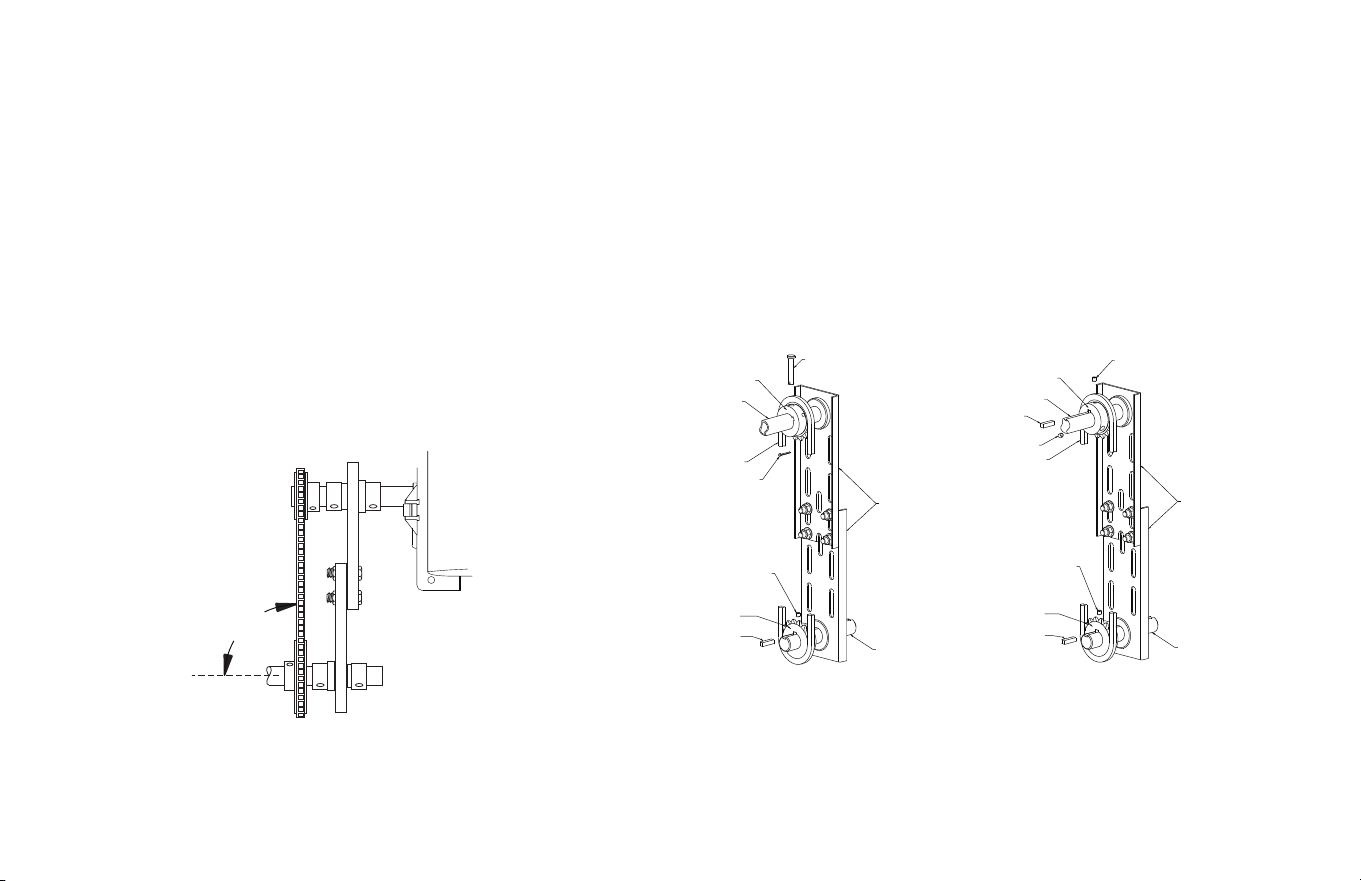
Kit available separately, P/N 111005.0001.S for 1" door shaft. 111005.0002.S for 1
1
/4" door shaft.
Installation of optional chain spreader bracket: Fig 7A & 7B
1) Place drive chain sprocket and bearing plate assembly on door
shaft as shown.
2) Place bearing plate assembly and sprocket on operator shaft
as shown.
3) Install door and operator sprockets and chain assembly as
described in preceding instructions. See page 4.4.
4) Install bolts and nuts through plates. Do not tighten.
5) Tension chain by raising or lowering the operator as needed.
Tighten operator mounting bolts.
6) Align sprockets to achieve a 90° angle between the chain and
the shafts. Tighten all set screws.
7) Tighten Tension Plate bolts.
Chain Couple (continued)
(Tension Plate Kit)
DOOR SHAFT
SPROCKET
DOOR SHAFT
CHAIN
CHAIN
TENSION
PLATE
OPERATOR
OUTPUT
SHAFT
KEY
SET SCREW
OPERATOR
SHAFT
SPROCKET
COTTER PIN
CLEVIS PIN
HOLLOW COUNTERBALANCE
DOOR SHAFT
Figure 7B
OPERATOR
SHAFT
DOOR
SHAFT
90°
Figure 7A
DOOR SHAFT
SPROCKET
DOOR SHAFT
KEY
SET SCREW
CHAIN
SET SCREW
CHAIN
TENSION
PLATE
OPERATOR
OUTPUT
SHAFT
KEY
SET SCREW
OPERATOR
SHAFT
SPROCKET
SOLID COUNTERBALANCE
DOOR SHAFT
4.6
www.geniecompany.com 01-14
4.7
www.geniecompany.com 01-14
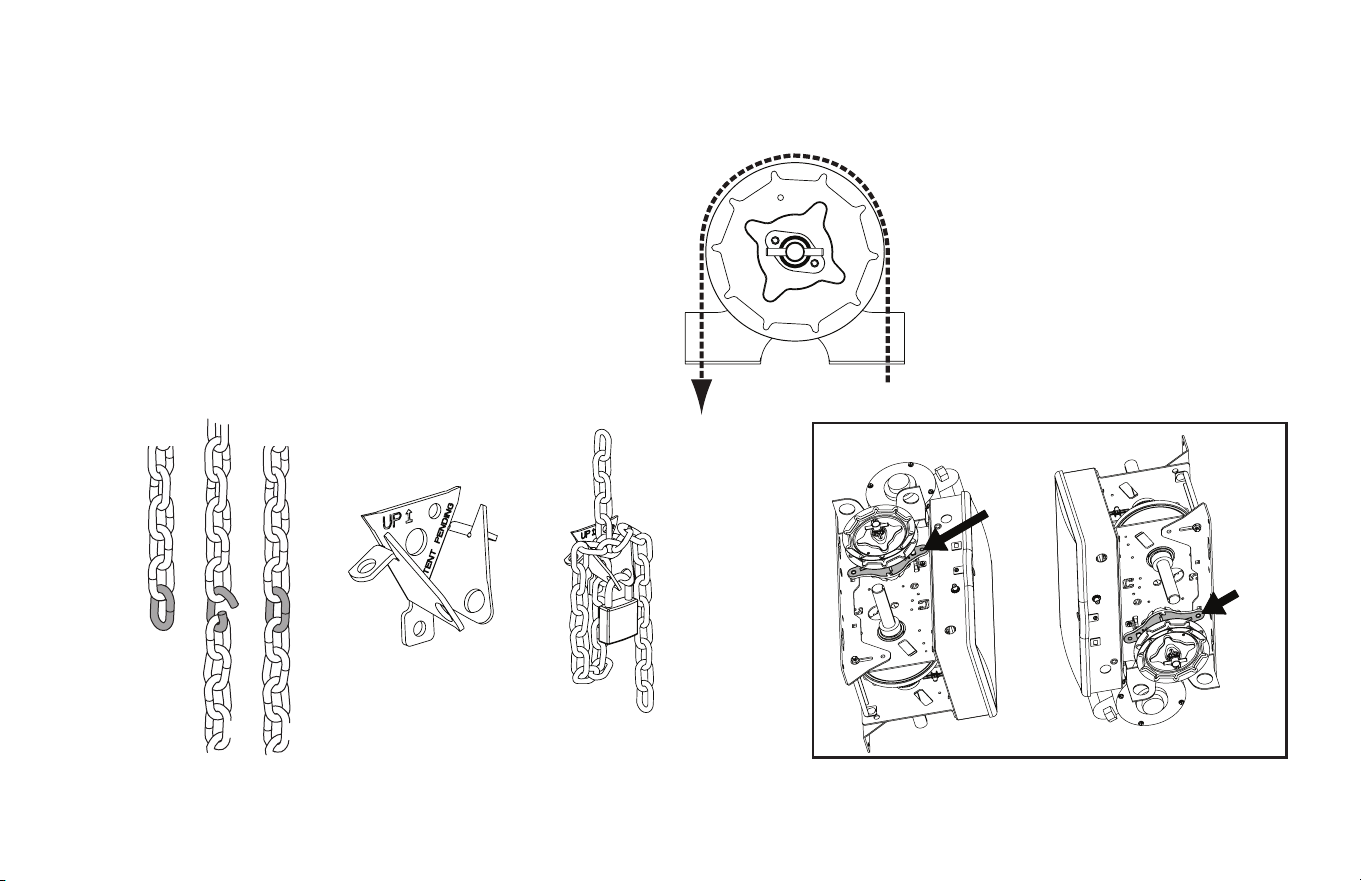
1) Route the hand chain through the chain guide, around the
pocket wheel and back through the chain guide. Fig. 8.
2) Connect the hand chain ends together as shown in Fig 9.
by twisting open the last link on one end of the chain, and
slipping the last link on the opposite end onto the open link.
3) Twist open link closed again.
4) Mount chain keeper to wall in line with chain approximately
4 feet from floor.
5) Loop chain around keeper as shown. Fig. 10. Optional Padlock
not provided.
6) Install hoist cable.
• With operator installed motor DOWN, attach hoist cable to
cam arm hole closest to mounting plate. Fig. 11.
• With operator installed motor UP, attach hoist cable to cam
arm hole closest to electric box. Fig. 11.
Hand Chain and Keeper
Figure 9
Figure 10
NOTE: To insure smooth operation, make sure there is no twist in the
hand chain before connecting the link ends together.
MOUNTED
MOTOR UP
MOUNTED
MOTOR DOWN
ATTACH
HOIST
CABLE
HERE
Figure 11
ATTACH
HOIST
CABLE
HERE
Figure 8
4.8
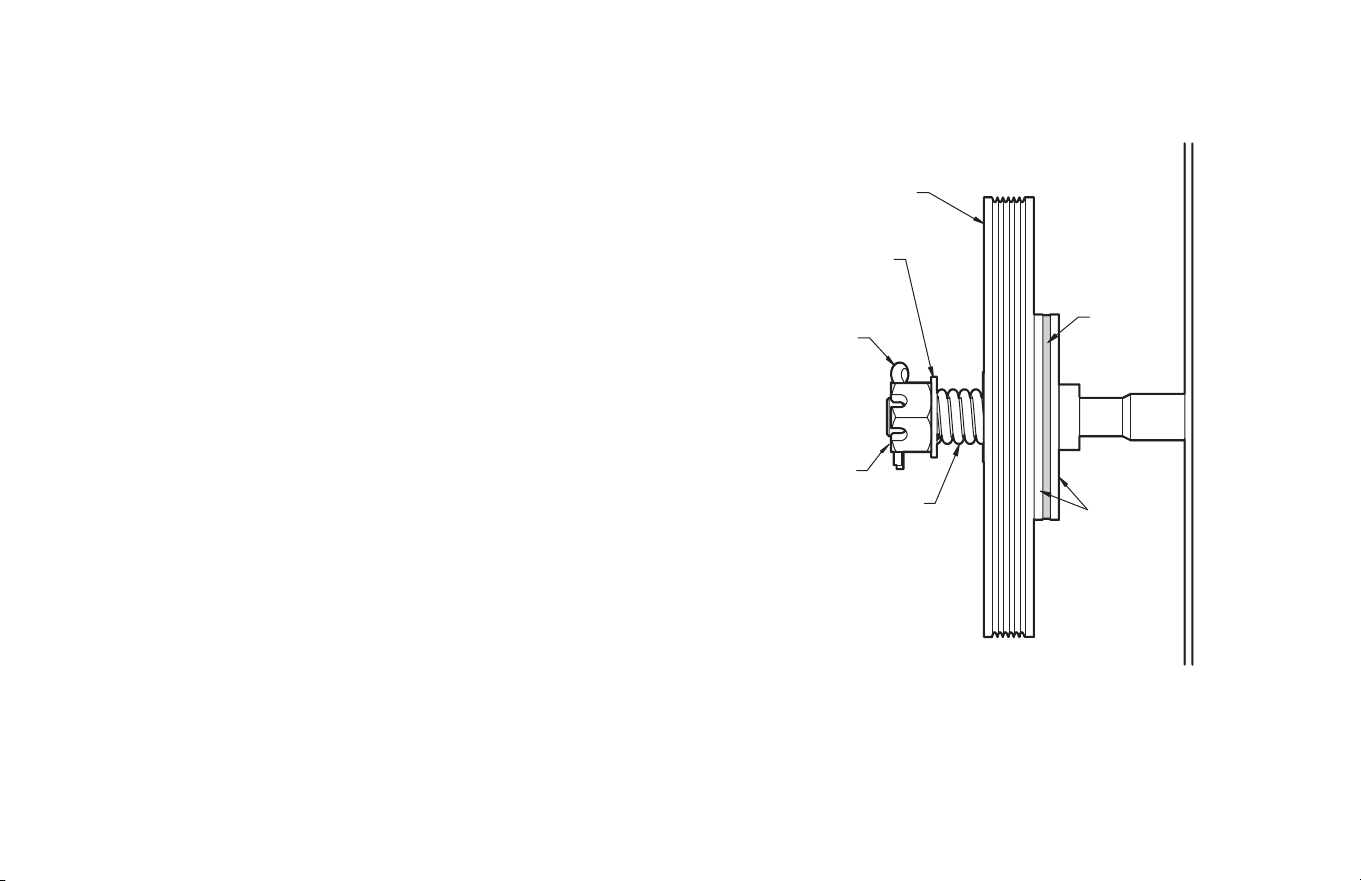
The Operators have a friction style clutch that can be adjusted.
NOTE: The clutch is intended to provide protection for the door, the
operator and associated equipment. It is not intended for entrapment
protection.
To Adjust the Clutch
1) Decrease the compression on the clutch until the operator will
not lift the door.
• Turning the adjustment castle nut counter-clockwise will
decrease compression and clockwise will increase compression.
2) Gradually increase compression until the operator will perform a
complete open and close cycle without clutch slippage.
3) Insert a cotter pin through the adjustment castle nut and bend a
leg of the cotter pin to hold it in place.
NOTE: Periodically check the system for proper clutch action. If clutch
starts to slip after working properly for some time , check manual
operation of door BEFORE adjusting clutch. The door may not be
operating freely or the counterbalance spring may need adjusting. Repairs
and adjustments must be performed by a trained service representative
using
proper tools and instructions.
Clutch Adjustment Fig. 12
CLUTCH PULLEY
WASHER
COTTER PIN
ADJUSTING NUT
CLUTCH
PAD
CLUTCH
PLATE
SPRING
www.geniecompany.com
Figure 12
01-14
5.1
Section 5: Wiring
www.geniecompany.com 04-14
WARNING
•
DO NOT apply power to operator until instructed to do so.
•
It is strongly recommended, and may be required by law
in some areas, that line voltage wiring be performed by
a qualified electrician.
•
Be sure that electrical power has been disconnected from
the input power wires being connected to the operator
prior to handling these wires. An appropriate lock-out/
tag-out procedure is recommended.
•
Line voltage wiring must meet all local building codes.
•
Make sure operator voltage, phase and frequency nameplate
ratings are identical to the job site line voltage ratings.
•
Input power wiring must be properly sized for the operators
amperage rating located on the nameplate.
•
To reduce the risk of electric shock, make sure the chassis of
this unit is properly grounded.
AVERTISSEMENT
•
NE PAS mettre sous tension tant que l'instruction n'est
pas donnée de le faire.
•
Il est fortement recommandé voire même exigé par la loi dans
certaines régions, de contacter un électricien qualifié pour
l'acheminement du fil électrique.
•
Assurez-vous que l'alimentation électrique a été déconnectée
des câbles d'alimentation d'entrée connectés à l'opérateur
avant de manipuler ces câbles. Une procédure de verrouillage/
étiquetage appropriée est recommandée.
•
Le câblage au secteur doit satisfaire à tous les codes de
construction locaux.
•
Assurez-vous que les valeurs nominales de la plaque
signalétique pour tension, phase et fréquence de l'opérateur
correspondent à celles des tensions de l'alimentation sur site.
•
La capacité d'entrée doit correspondre à la valeur nominale de
l'ampérage des opérateurs indiquée sur la plaque signalétique.
•
Pour réduire le risque de choc électrique, assurez-vous que le
châssis de l'unité est correctement mis à la terre.
5.2
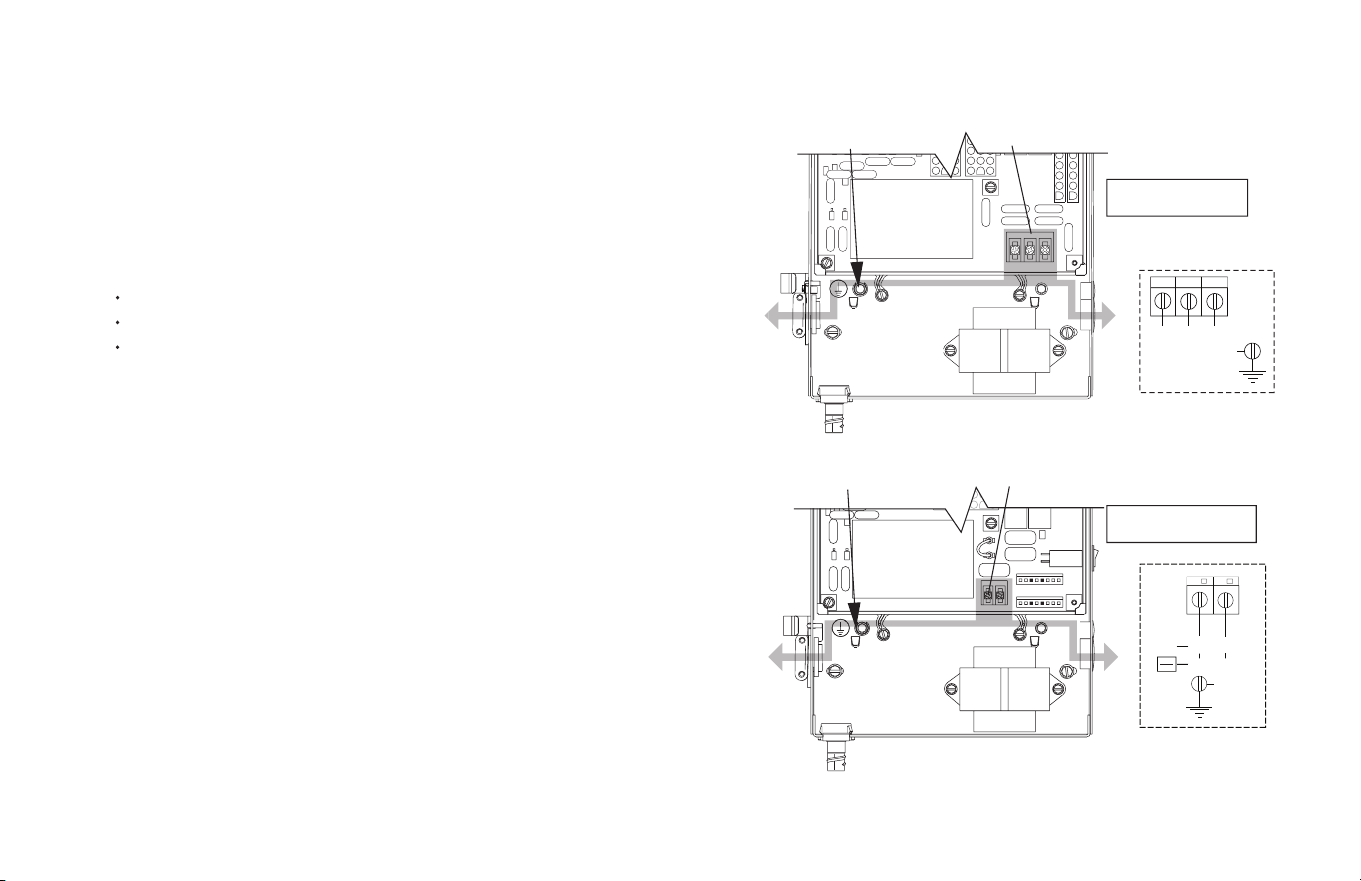
1) Remove LINE VOLTAGE INPUT PLUG and install proper
fittings and 1/2”conduit.
2) Route proper LINE VOLTAGE wires into operator.
3) Locate LINE INPUT terminals on circuit board. Using
correct connectors, attach wires to LINE INPUTS, and GROUND
terminal.
Keep low voltage and line voltage wires separate.
Route all line voltage wires as shown.
Plug all unused conduit holes.
P
HIGH
VOLTAGE
INPUT PLUGS
(Right & Left)
ROUTE HIGH VOLTAGE WIRING
IN THE SHADED AREA AS SHOWN
LINE INPUT
TERMINALS
LINE
GROUND
LINE INPUT
TERMINALS
LINE
GROUND
ROUTE HIGH VOLTAGE WIRING
IN THE SHADED AREA AS SHOWN
LINE IN
LINE IN
POWER CONNECTIONS
L1 L2 L3
GND
LINE 1
LINE 2 LINE 3
Three Phase
Single Phase
HIGH
VOLTAGE
INPUT PLUGS
(Right & Left)
Figure 1
Line Voltage Wiring Fig. 1
www.geniecompany.com 04-14
L1 / L1
N / L2
GND
LINE
(HOT)
NEUTRAL
LINE 1
LINE 2
115V
208V
230V
5.3
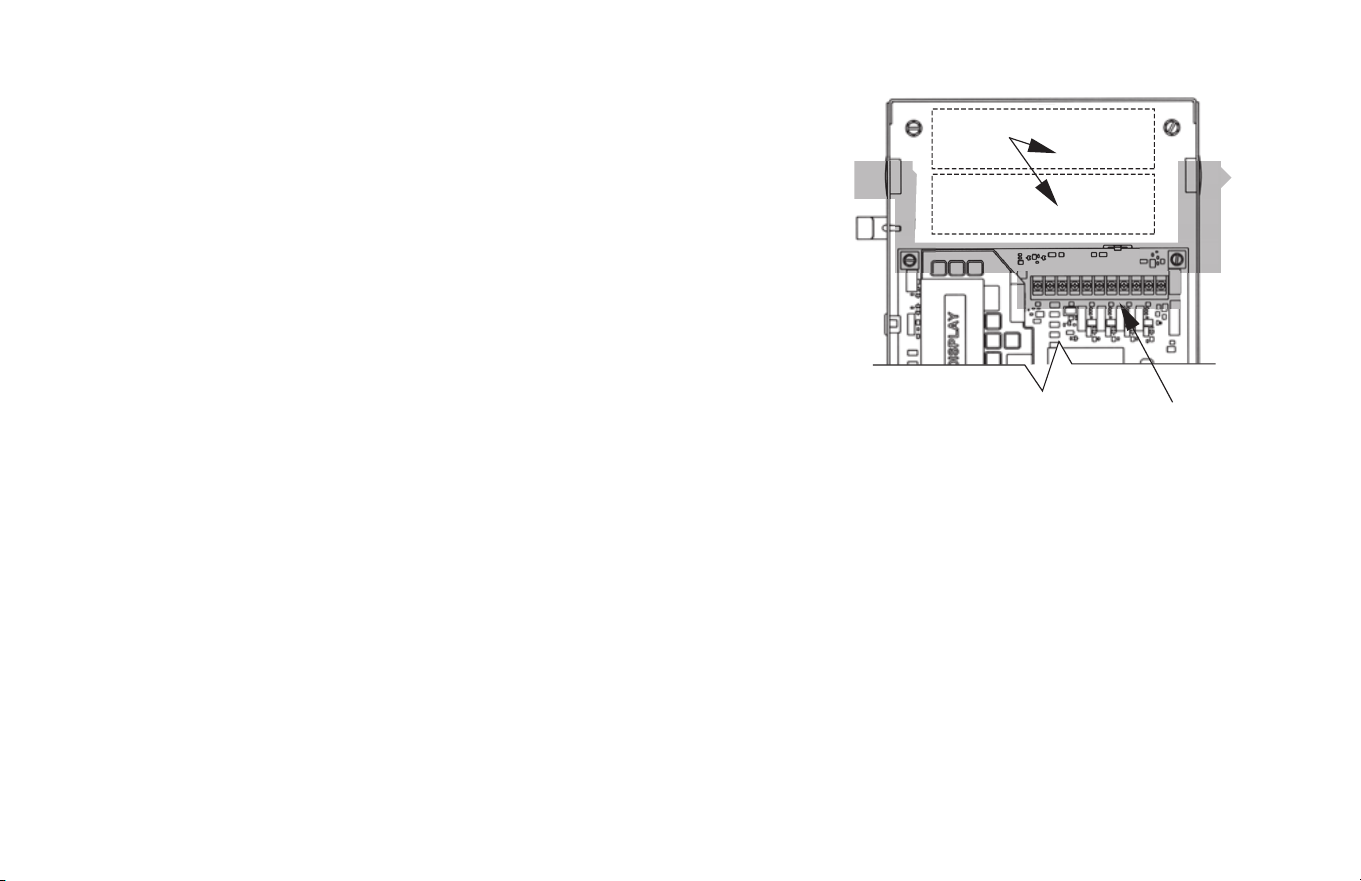
1) Connect all LOW VOLTAGE control circuit wires to this end of
electric box using 1/2” conduit or flexible convoluted tubing.
• Keep low voltage and line voltage wires separate.
• Route all low voltage control wiring as shown. This includes
all control circuit wires such as wall controls, timers and single
button input devices as well as radio control and safety
circuit wiring. See Figs 2 through 13 in this section.
• Plug all unused conduit holes.
Low Voltage Control Wiring (general) Fig. 2
ROUTE LOW VOLTAGE WIRING
IN THE SHADED AREA AS SHOWN
LOW
VOLTAGE
INPUT
PLUGS
(Left &
Right)
LOW VOLTAGE
CONTROL WIRE
TERMINALS
Optional
Accessory
Modules
Figure 2
NOTE: For a detailed description of control wire terminals see Appendix B.
www.geniecompany.com 04-14
5.4
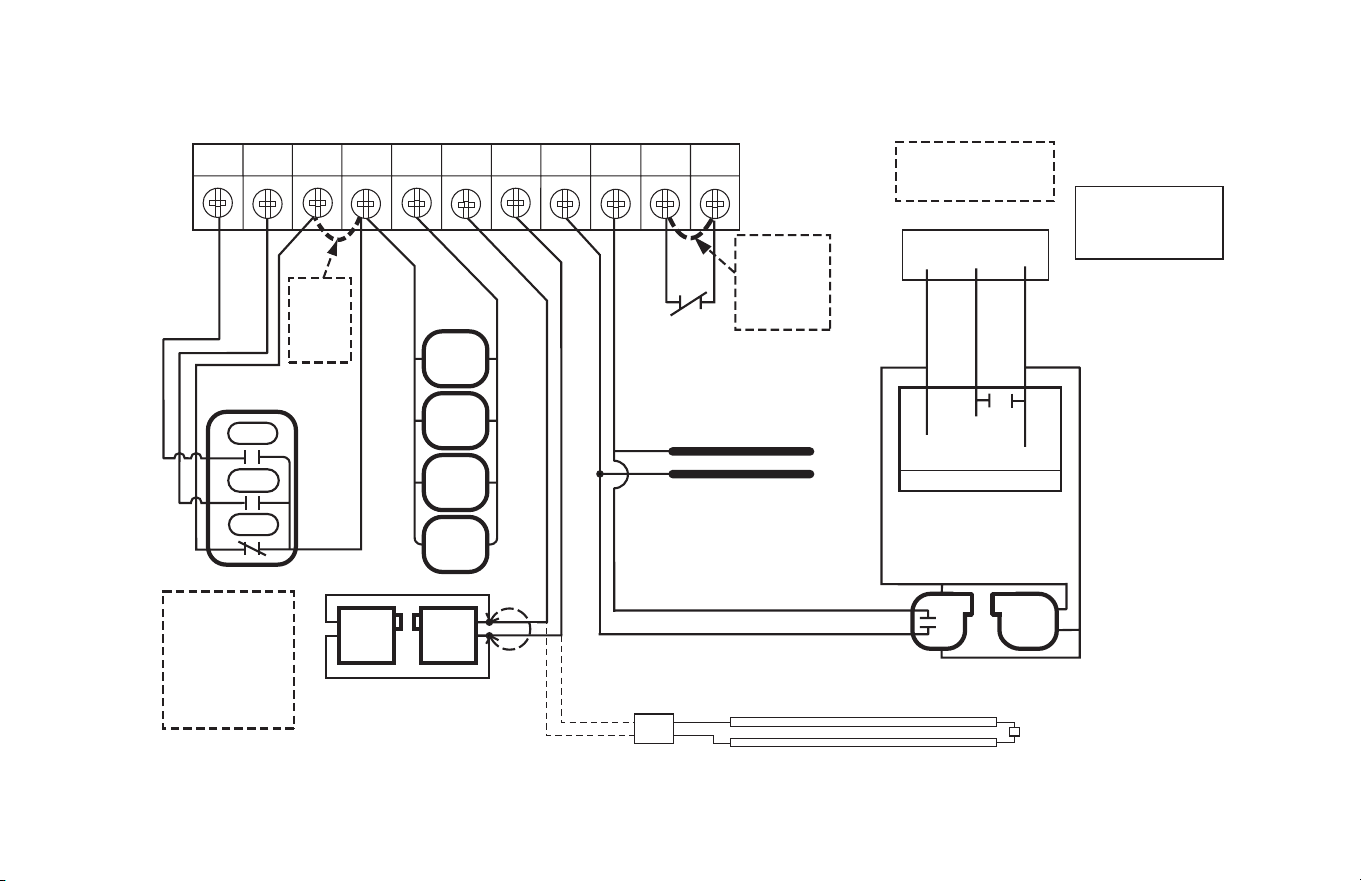
External Wire Diagram
See Appendix B for detailed description of terminals.
www.geniecompany.com 04-14
1-BTN
STATION
KEY
SWITCH
STATION
CARD
READER
O/C
PULL
SWITCH
N/O
N/O
N/O
N/O
REMOVE
JUMPER
WHEN
INSTALLING
EXTERNAL
INTERLOCK
MULTIPLE
3-BUTTON
STATION
INSTALLATIONS
REQUIRE THE
STOP BUTTON
TO BE WIRED
IN SERIES.
See Fig. 5, pg 5.5
*
EXT
INTLK
EXT
INTLK
N-O
REVERSE
N-O
REVERSE
ODC
STB
ODC
STB
1-BTNGNDSTOPCLOSEOPEN
EXT RADIO CONNECTOR
SENSING EDGE SWITCH
(DO NOT CONNECT
2-WIRE MONITORED
SENSING EDGE SWITCH
TO THESE INPUTS)
THRU-BEAM PHOTOCELLS
+
-
+
-
PWR
20-40 VDC @ 250mA
MAX CURRENT
RELAY
GND
NOM
+ 24VDC
RADIO
SERIES II SAFE-T-BEAM
®
(STB)
(
*
CONNECT STB WIRES
TO EITHER TERMINAL)
*
OPEN
CLOSE
STOP
REMOVE
JUMPER
IF STOP
BUTTON
IS USED
3-BUTTON
STATION
*
BLUE
ORANGE
YELLOW
Located inside
Electrical Box
2-WIRE MONITORED SENSING EDGE SWITCH
INTERFACE
MODULE
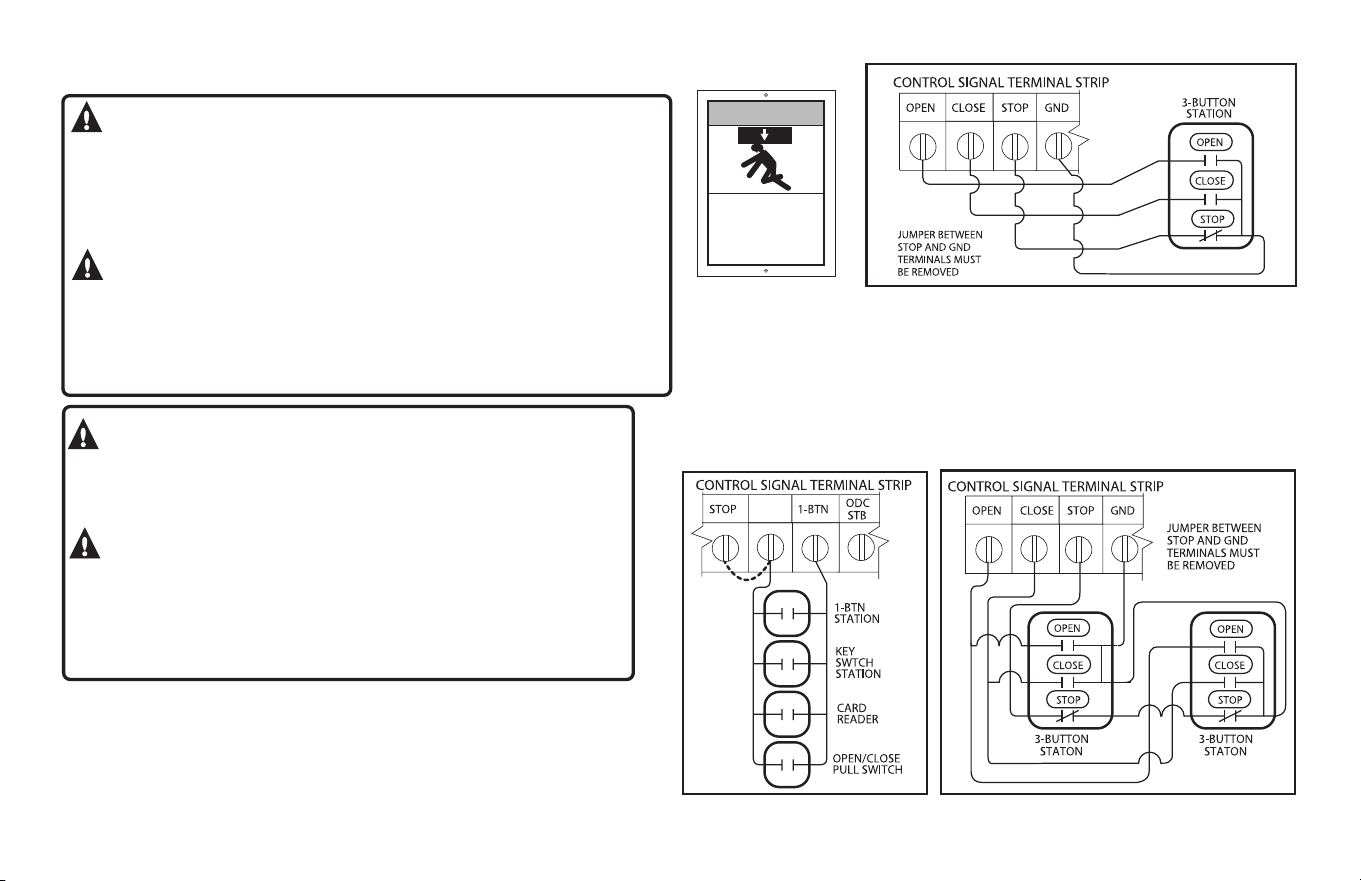
1) For a single 3-button installation, make connections as shown in Fig. 3.
2)
3)
NOTE: If an External STOP button is NOT being installed, a jumper wire must
be installed between the “STOP” and “GND” terminals as shown.
NOTE: Long Distance Relay Kit wiring is not required for long
distance control runs and should not be used.
5.5
Wall Control
NOTE
Figure 4
GND
Figure 5
NOTE
Figure
3
Entrapment
Warning Placard
Figure 3A
www.geniecompany.com 04-14
For single button accessory controls, make connections as
shown in Fig. 4.
For multiple 3-button installations, make connections as shown in Fig. 5.
WARNING:
•
Wall Control(s) must be located so that the door is within sight of
the user and is far enough from the door, or postioned such that
the user is prevented from coming in contact with the door while
operating controls.
•
Attach the Warning placard adjacent to the Wall Control. Fig. 3A.
AVERTISSEMENT:
•
La ou les commandes murales doivent être situées de telle sorte que
l'utilisateur puisse voir la porte et positionnées de telle sorte que
l'utilisateur ne puisse pas entrer en contact avec la porte lorsqu'il se
sert des commandes.
•
Fixez le poster d'avertissement à côté de la commande murale. Fig. 3A.
WARNING:
Before momentary contact control can
be used on the CLOSE button, a monitored external reversing device
such as a photocell system or sensing edge switch must be used.
See pages 5.8-5.10 for installation of entrapment protection devices.
AVERTISSEMENT:
Avant d'utiliser la
commande à contact momentané sur le bouton FERMETURE, un
dispositif d'inversion externe surveillée tel qu'un système de
cellule photoélectrique ou un commutateur de détection de bord
doit être utilisé. Voir l'installation des dispositifs de protection
contre le coincement en pages 5.8-5.10.
5.6
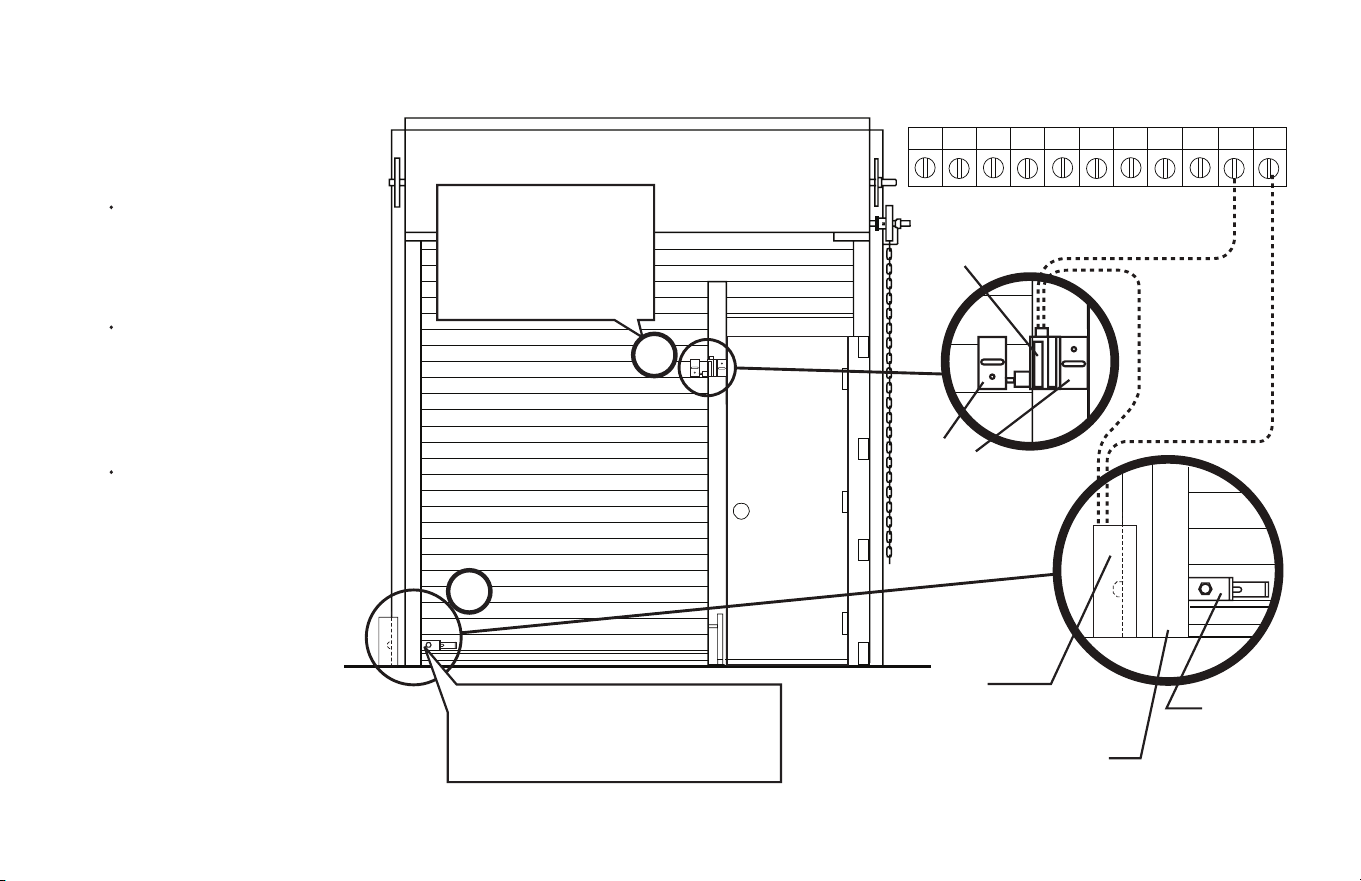
Interlock Switches (Rolling Steel)
OPEN CLOSE
STOP GND 1BTN
NO NO
REVERSE REVERSE
ODC
STB
ODC
STB
EXT
INTLK
EXT
INTLK
CONTROL SIGNAL TERMINAL STRIP
Figure 6A
NOTE: If External Interlock is used, THE JUMPER WIRE BETWEEN THE EXT INTLK TERMINALS MUST BE REMOVED.
SWITCH
075412-0000
(N.O.)
ANGLE
405964-0000
STANDARD
SLIDELOCK
TRACK
SWITCH
110325-0001 (N.C.)
Switches must
be set in
the field.
Pass door interlock:
Should be open when
door is open.
Closed when door is
closed.
Side lock interlock:
Should be open when door is locked.
Closed when door is unlocked.
B
A
1) Optional external interlock switches
are required with some Sectional or
Rolling Steel Doors to prevent the
door from operating under certain
conditions including the following:
If the door is equipped with a
functioning door lock, an
interlock switch (A) must be
installed to prevent electric
operation when the lock
is engaged.
If the door is equipped with a
pedestrian pass-through door,
an interlock switch (B) must be
installed at the pass-through
door in order to prevent
electrical operation when the
pass-through door is open.
The Switches must be set in
the field.
www.geniecompany.com 01-14
CONTROL SIGNAL TERMINAL STRIP
EXT
NTLK
EXT
NTLK
* REMOVE
JUMPER
WHEN
INSTALLING
EXTERNAL
INTERLOCK
*
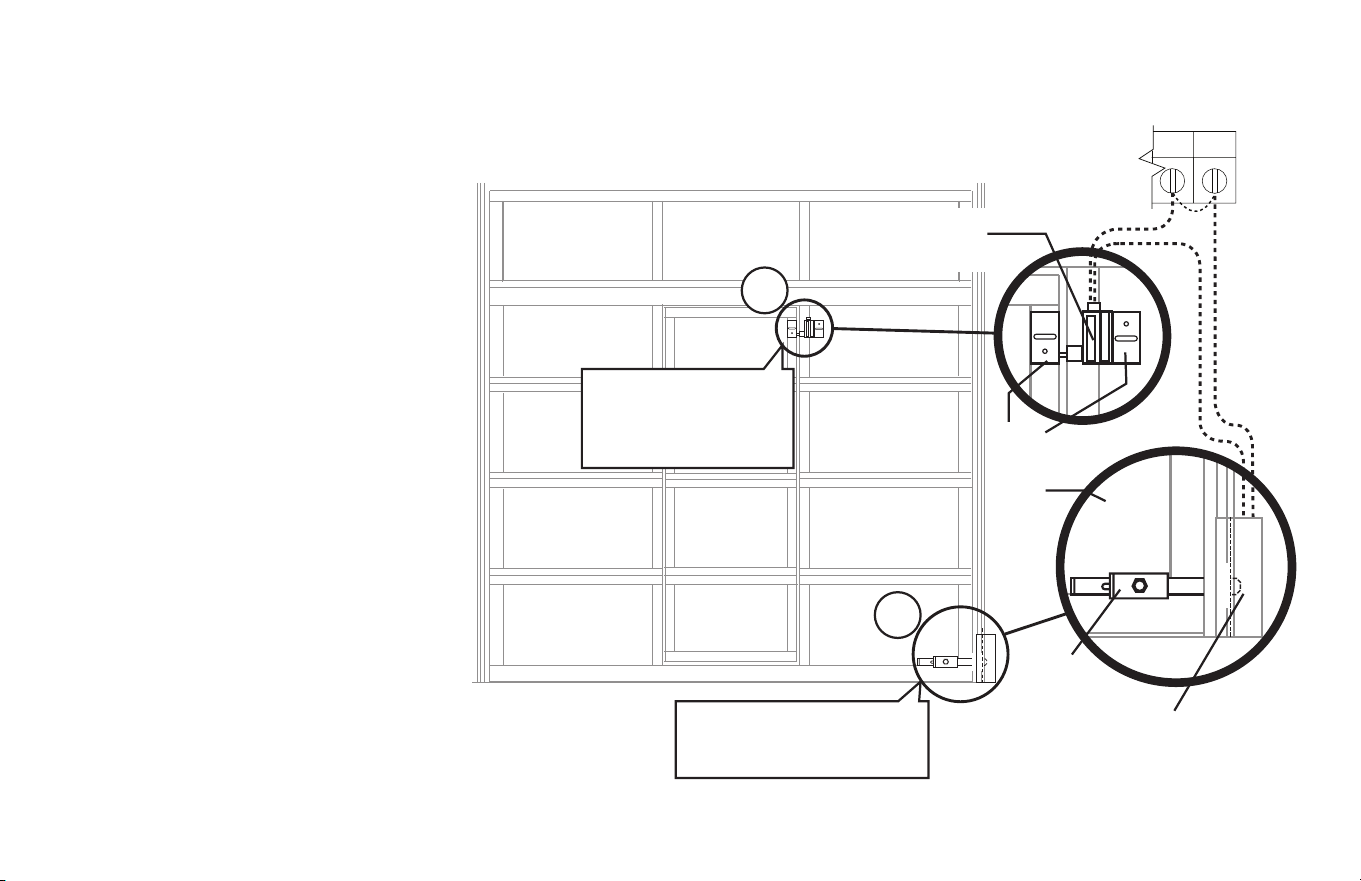
NOTE: If External Interlock is used, THE JUMPER WIRE BETWEEN THE
EXT INTLK TERMINALS MUST BE REMOVED.
1) Optional external interlock switches are
required with some Sectional or Rolling Steel
Doors to prevent the door from operating
under certain conditions including
the following:
• If the door is equipped with a
functioning door lock, an interlock
switch (A) must be installed to prevent
electric operation when the lock
is engaged.
• If the door is equipped with a pedestrian
pass-through door, an interlock switch (B)
must be installed at the pass-through
door in order to prevent electrical
operation when the pass-through door
is open.
2) The switches must be set in the field.
SWITCH
(N.O.)
ANGLE
405964-0000
STANDARD
SLIDELOCK
TRACK
SWITCH
110324-0001
(N.C.)
Interlock Switches (Sectional)
5.7
A
B
Pass door interlock:
Should be open when
door is open.
Closed when door
is closed.
Side lock interlock:
Should be open when door
is locked. Closed when door
is unlocked.
Figure 6B
www.geniecompany.com 01-14
075412-0000
5.8
Photocell Wiring
www.geniecompany.com
04-14
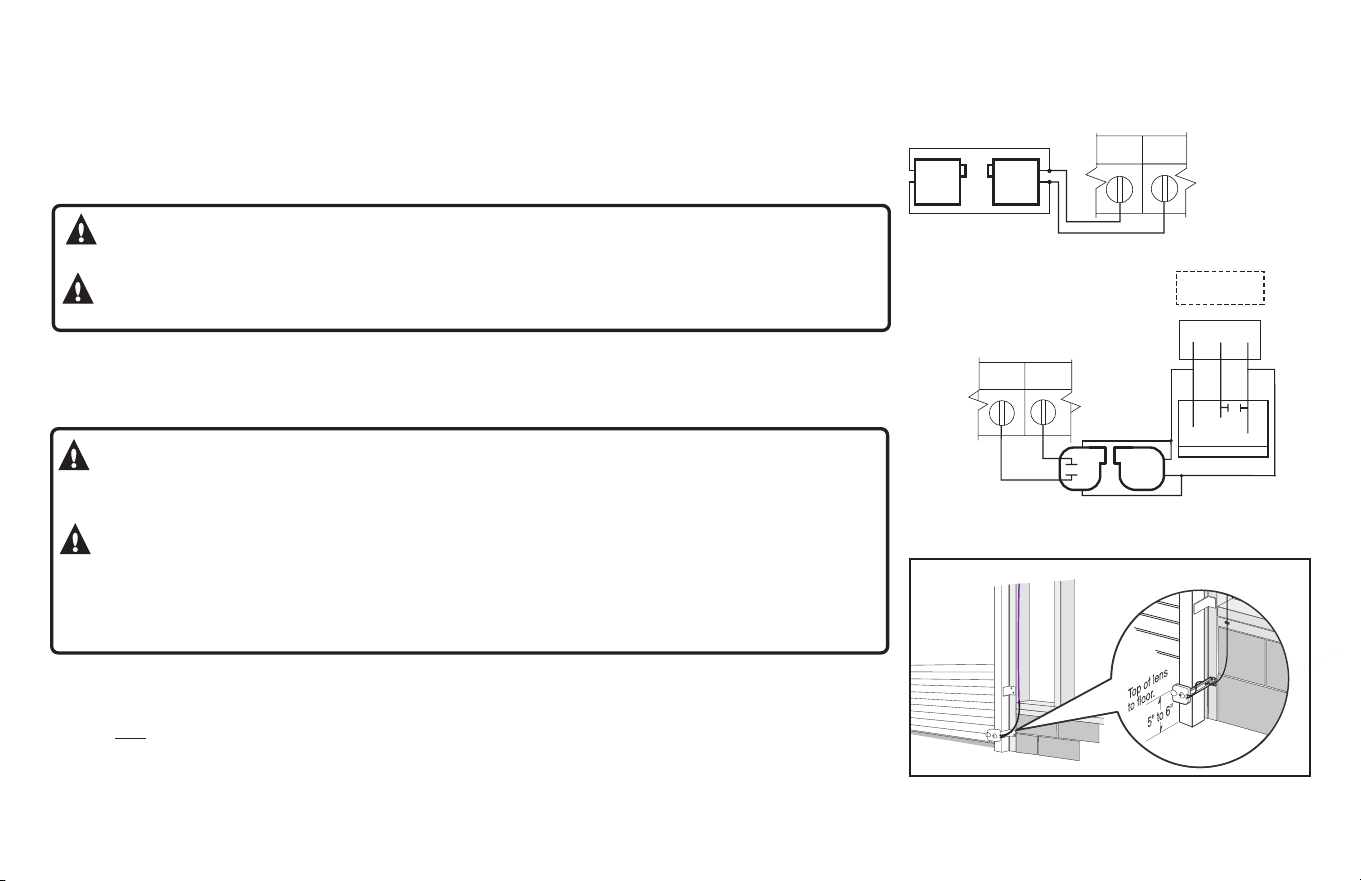
NOTE: Installer must enable ODC STB in calibration mode. See page 6.10.
2) To Mount Photocells: (Kit includes detailed Instructions).
• Determine location for mounting. They do not need to be directly adjacent to the door but must
be somewhere along the wall where there will be an unobstructed line between them. Fig. 9.
• They must extend out away from the wall sufficiently that no door hardware breaks the plane of the photo-beam.
1) Nominal 24 Volt DC Commercial photocells with normally open contacts can be
connected as shown in Fig. 8.
NOTE: Blue wire supplies 20 – 40VDC. Photocells used must be compatible with this voltage range.
NOTE: If no voltage is present at Blue wire, check fuse F-1 on
Control board.
Monitored Photocells
Commercial Non-Monitored Photocells
1) Monitored SERIES II (STB) photocells (P/N OPAKPE.S) and Residential Safe-T-Beam® Monitored
be connected to either terminal (they are not polarity sensitive.) (Troubleshooting in Section 8)
Photocells from Genie® (P/N 37220R & 38176R.S). Fig. 7. Wiring to these photocells can be
CONTROL SIGNAL
TERMINAL STRIP
ODC
STB
ODC
STB
Figure
7
CONNECT WIRES TO EITHER TERMINAL.
(NOT POLARITY SENSITIVE)
N-O
REVERSE
N-O
REVERSE
+
-
+
-
THRU-BEAM
PHOTOCELLS
CONTROL SIGNAL
TERMINAL STRIP
RECEIVER
TRANSMITTER
EXT RADIO CONNECTOR
PWR
20-40 VDC @ 250mA
MAX. CURRENT
RELAY
GND
NOM
+ 24VDC
RADIO
Blue
Orange
Yellow
Figure
8
WARNING:
Actuating the operator by using constant contact on the CLOSE button
will override non-functioning external reversing devices, including photocells.
AVERTISSEMENT:
L'activation de l'operateur en utilisant un contact constant
sur le bouton FERMER annulera les dispositifs d'inversions externes, y compris les cellules photoelectriques.
WARNING:
Photocell systems provide entrapment protection when mounted near the
doorway in such a way that the lower portion of an individual’s leg will break the photocell beam during
normal walking conditions.
AVERTISSEMENT:
Les systèmes de cellules photoélectriques fournissent
une protection contre le coincement pour le montage à proximité de la porte de manière à ce que la partie
inférieure de la jambe d'un individu ne puisse pas rompre le faisceau de la cellule photoélectrique lors de
passages normaux par la porte.
Figure 9
SERIES II (STB)
RESIDENTIAL PHOTOCELLS
5.9
www.geniecompany.com
04-14
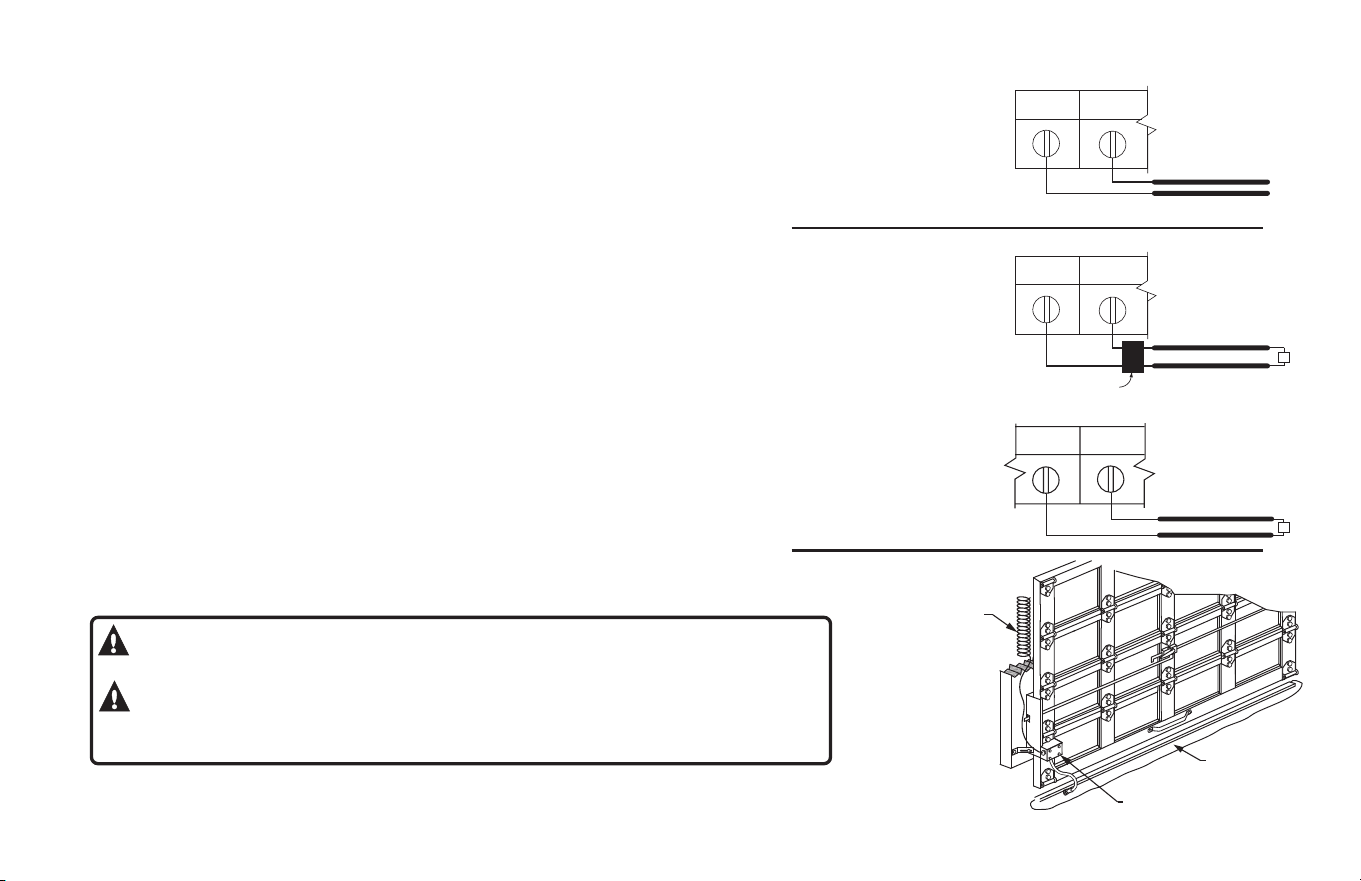
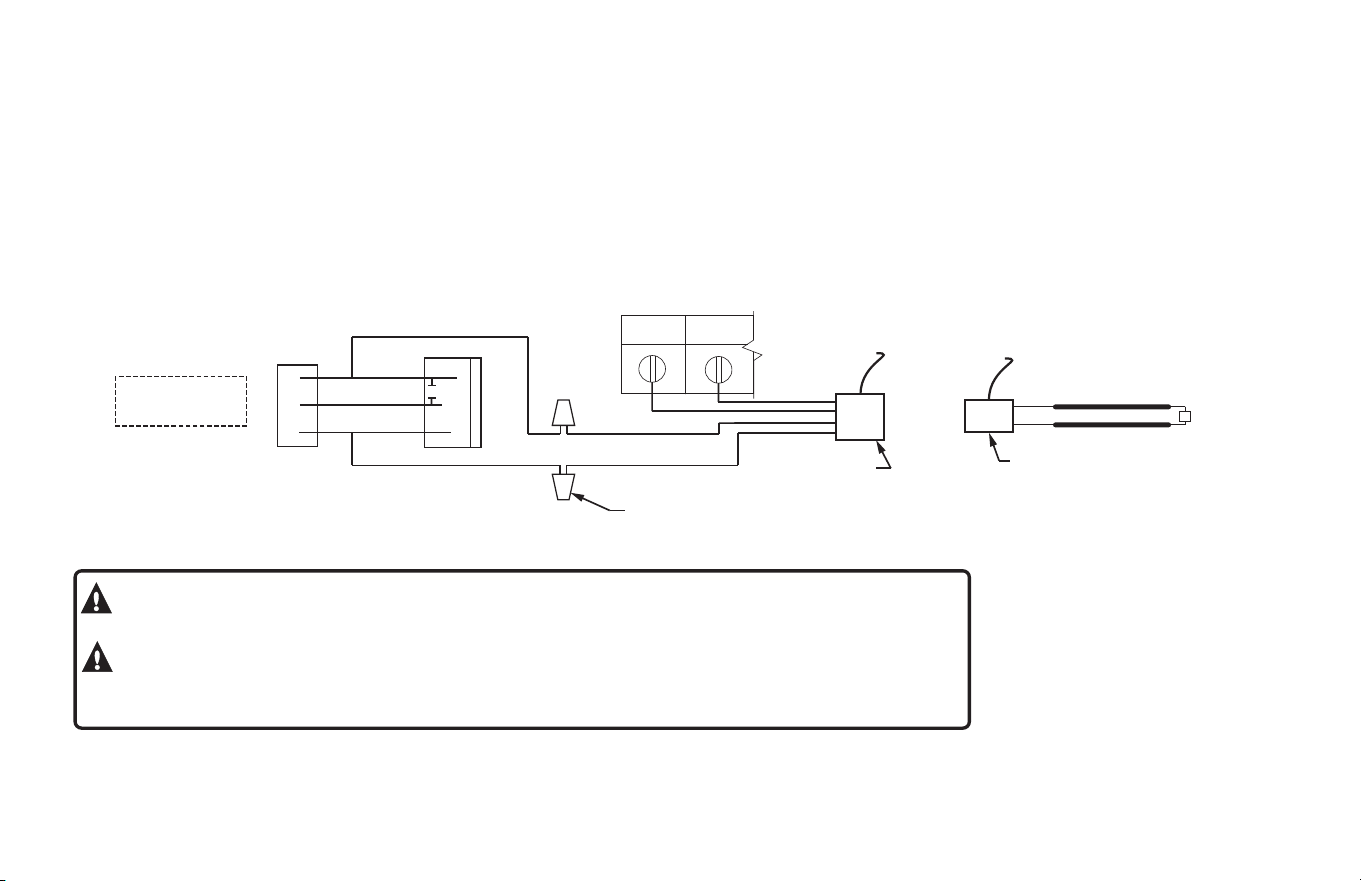
Figure 11
Figure
11
shows
an
example
of
a
typical
sensing
edge
installation.
Left
hand
side
is
shown
but
right
hand
is
a
mirror
image
of
this.
1A)
If the wiring from the sensing edge enclosure to the operator is a coiled cord or 2 wire
jacketed cord:
• Install junction box 12” above the center of the door opening on same side as
sensing edge enclosure.
• Secure one end of cord to junction box using a cable clamp.
1B) If connection is to be made through a take up reel cord:
• Install on same side as sensing edge enclosure and above door opening and
slightly to the side.
• Install junction box adjacent to take up reel and route the stationary cord from
the reel to the box and secure with a cable clamp.
2) Secure other end of cord (straight, coiled or reel) to sensing edge
enclosure using a cable clamp.
3) Connect wires of cord to sensing edge using wire nuts or other suitable wire connectors.
4) Run a straight 2 wire cord from the junction box (Step 1)
to the operator electrical box.
• Secure using cable clamp on each end.
5) Join wires in cord from operator to wires in cord from junction box using wire nuts or
other suitable wire connectors.
6A) Non-Monitored sensing edge connects to terminal strip on main board
using (N-O REVERSE) terminals. See Fig. 10A.
6B) Monitored sensing edge connects to Timer-Close Module terminals (MON EDGE and GND)
or to (ODC STB) terminals on main board through a Miller Edge Interface Module
as shown in Fig. 10B.
Sensing Edge Installation
Figure 10B
NOTE:
:
2-wire Monitored
Sensing Edge
must be connected
through the MillerEdge
Interface Module.
NOTE: Monitored 2-wire
Sensing Edge can also
be used in combination
with a Timer-Close Module.
Figure 10A
NOTE
Non-monitored
Pneumatic or Electric Sensing
Edge can be connected
directly to these terminals.
DO NOT connect a 2-wire
Monitored Sensing Edge
to these terminals.
INTERFACE MODULE
NOTE: DO NOT USE TAKE UP REEL IF INSTALLING A 2 WIRE MONITORED EDGE.
SENSING EDGE
SENSING EDGE
SENSING EDGE
TIMER-CLOSE MODULE TERMINAL STRIP
MON
EDGE
GND
CONTROL SIGNAL TERMINAL STRIP
ODC
STB
ODC
STB
CONTROL SIGNAL TERMINAL STRIP
COIL TO
CONTROL
BOX
SENSING
EDGE
SENSING EDGE
ENCLOSURE
N-O
REVERSE
N-O
REVERSE
WARNING:
Actuating the operator using constant contact on the CLOSE
button will override non-functioning external reversing devices, including sensing edges.
AVERTISSEMENT:
L'activation de l'opérateur avec un contact
constant sur le bouton FERMER annulera les dispositifs de renversement externes non
fonctionnels, y compris les systèmes de détection des bords.
CONTINUED ON NEXT PAGE
5.10
www.geniecompany.com 04-14
Sensing Edge Installation (continued)
shows the connection of OPAKMMWE.S MEL Miller Edge Monitored Wireless Sensing Edge.Figure 12
Figure 12
CONTROL SIGNAL TERMINAL STRIP
ODC
STB
ODC
STB
SENSING EDGE
WIRELESS
EDGE RECEIVER
WIRELESS EDGE
TRANSMITTER
EXT RADIO
CONNECTOR
PWR
20-40 VDC @ 250mA
MAX. CURRENT
RADIO
NOM
+24VDC
GND
RELAY
BLUE
YELLOW
ORANGE
BLK
RED
WIRE NUT
WHT
GRN
7) Operate the door to make certain cord is free to travel and does not become
snared during door opening or closing.
• Check sensing edge for proper operation.
8) While the door is closing actuate the sensing edge to verify the door reverses to open limit.
WARNING:
To obtain proper operation of the MEL edge sensor, each transmitter/receiver set
must be set to a unique address. Follow instructions provided with the Miller Edge MEL kit to set the address.
AVERTISSEMENT:
Pour obtenir un fonctionnement correct du capteur de
bord MEL, réglez chaque ensemble émetteur/récepteur sur une adresse unique. Suivez les instructions fournies
avec le kit Miller Edge MEL pour définir l'adresse.
5.11
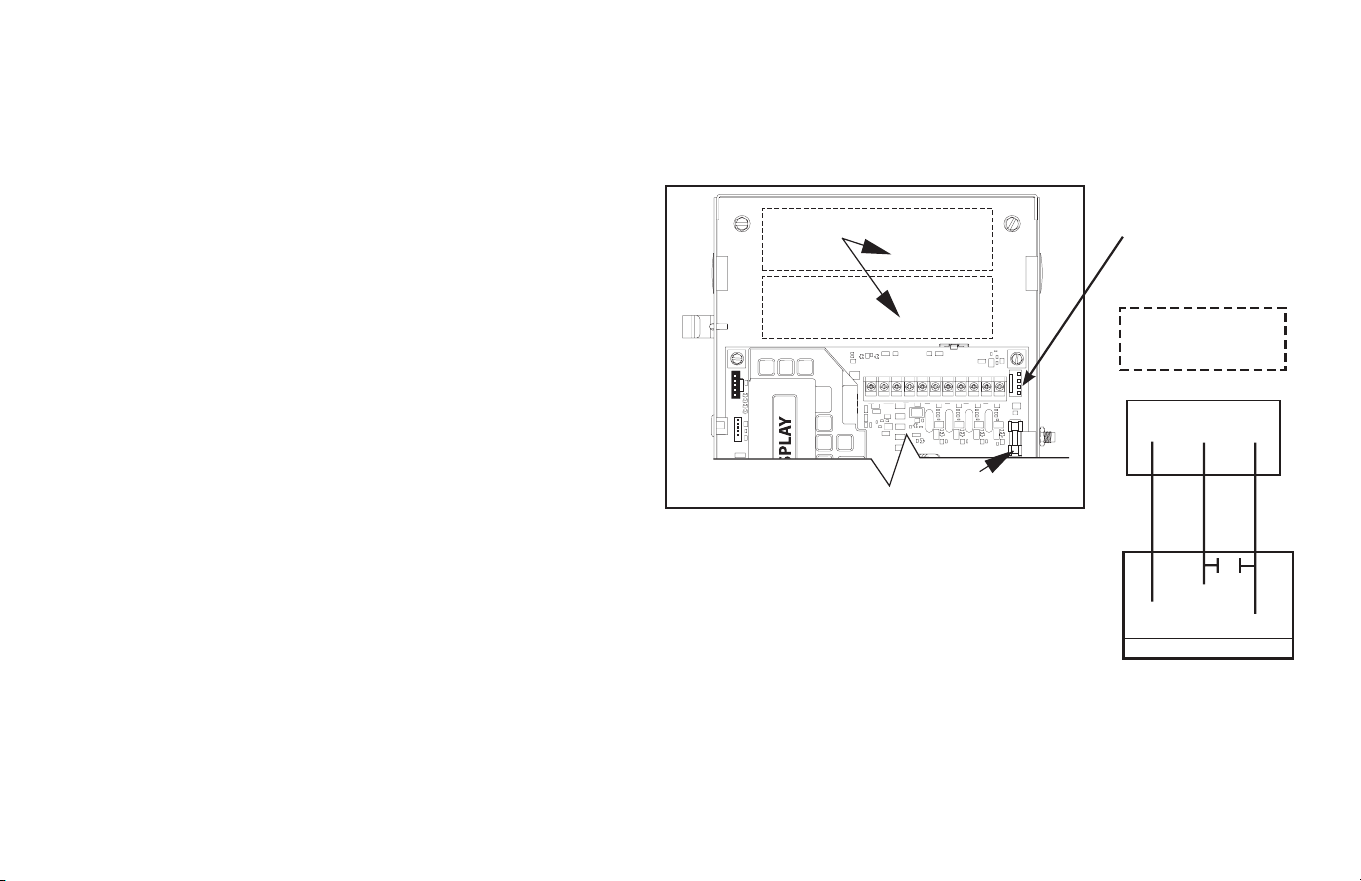
Although the Operators are equipped with an internal radio, they also
.oidar lanretxe na rof noitcennoc lasrevinu a edivorp
To Add the External Radio
1) Plug the 3-wire pigtail (provided) onto the plug connector marked
“EXT RADIO.” Fig. 13.
2) Make wiring connections to the radio terminal strip.
External Radio Installation
Figure 13
Optional
Accessory
Modules
EXTERNAL
RADIO
CONNECTOR
F1 (.25A)
EXT RADIO CONNECTOR
PWR
20-40 VDC @ 250 mA
MAX. CURRENT
RELAY
GND
NOM
+24VDC
RADIO
Blue
Orange
Yellow
www.geniecompany.com 04-14
5.12
www.geniecompany.com 04-14
208/
240V
120V
208/
240V
480/
575V
SINGLE PHASE
THREE PHASE
Motor
Connectors
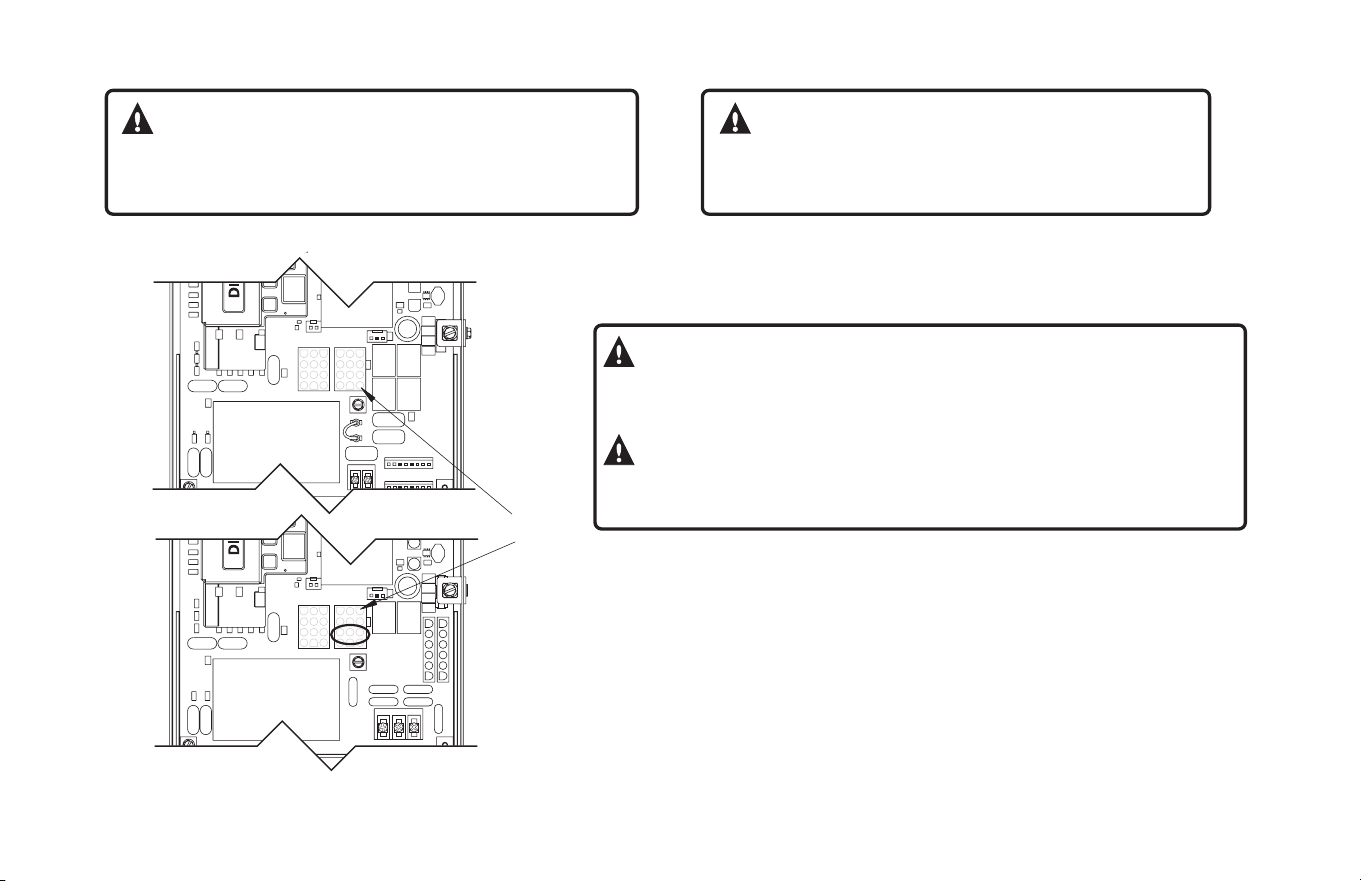
1) Plug motor harness into proper motor connector on circuit board in electric box. Fig. 14.
2) Apply primary power.
Figure 14
Motor Connection
WARNING:
Verify Line Voltage before making any connections to assure
that motor harness is connected to proper motor connector on
circuit board.
AVERTISSEMENT:
Vérifiez la tension avant d'effectuer les connexions pour
s'assurer que le harnais du moteur est relié au connecteur du
moteur appropriée sur la carte du circuit.
DANGER:
After power is supplied to the operator,
Do Not make contact with components inside the control panel
except for the Keypad Keys. Fig. 1, pg. 6.1.
DANGER:
Après avoir mis l'opérateur sous tension, NE PAS
entrer en contact avec des composants à l'intérieur du panneau de
commande, sauf pour les touches du pavé numérique. Fig. 1, pg. 6.1.

5.13
Safety Instructions
www.geniecompany.com 04-14
1) READ AND FOLLOW ALL INSTRUCTIONS.
2) Never let children operate or play with door controls. Keep the
remote control (where provided) away from children.
3) Personnel should keep away from a door in motion and keep the moving door
in sight until it is completely closed or opened. NO ONE SHOULD CROSS THE
PATH OF A MOVING DOOR.
4) Test the door’s safety features at least once a month. After adjusting either the
force or the limit of travel, retest the door operator’s safety features. Failure to
adjust the operator properly may cause severe injury or death.
5) For products having a manual release, if possible, use the manual release only
when the door is closed. Use caution when operating the release while the door
is open. Weak or broken springs may cause the door to fall rapidly, causing
severe injury or death.
6) KEEP DOOR PROPERLY OPERATING AND BALANCED. See Door Manufacturer’s
Owner’s Manual. An improperly operating or improperly balanced door could
cause severe injury or death. Have only trained door systems technicians make
repairs to cables, spring assemblies, other hardware and any wooden blocks
or like items to which they may be attached.
IMPORTANT
SAFETY INSTRUCTIONS
WARNING-
To reduce the risk of severe
injury or death:
7) SAVE THESE INSTRUCTIONS.

5.14
Safety Instructions (continued)
www.geniecompany.com 04-14
1) LIRE ET RESPECTER TOUTES LES INSTRUCTIONS.
2) Ne jamais permettre aux enfants d’actionner ni de jouer avec les commandes de la porte.
Tenir les télécommandes (si fournies) hors de la portée des enfants.
3) Le personnel doit se tenir à l'écart d'une porte en mouvement et garder bien en vue une porte en mouvement
jusqu'à ce qu'elle soit complètement fermée ou ouverte. PERSONNE NE DOIT TRAVERSER LA TRAJECTOIRE
D'UNE PORTE EN MOUVEMENT.
4) Testez les fonctionnalités de sécurité de la porte au moins une fois par mois. Après avoir réglé
la force ou la limite de la course, retestez les éléments de sécurité de l’opérateur de la porte. Un mauvais réglage
de l’ouvre-porte peut entraîner des blessures graves voire la mort.
5) Pour les produits ayant un déclenchement manuel, dans la mesure du possible, utilisez le déclenchement manuel
uniquement lorsque la porte est fermée. Prenez toutes les précautions nécessaires lors de l'utilisation du
déclenchement manuel alors que la porte est ouverte. Des ressorts faibles ou brisés peuvent faire descendre
la porte rapidement ce qui peut entraîner des blessures graves voire la mort.
6) VEILLER À CE QUE LA PORTE SOIT CORRECTEMENT ÉQUILIBRÉE ET FONCTIONNE BIEN. Consultez le manuel de
l’utilisateur du fabricant de la porte. Une porte déséquilibrée ou fonctionnant incorrectement pourrait entraîner
de graves blessures voire la mort. Seuls des techniciens formés sur systèmes de portes peuvent effectuer des
réparations aux câbles, aux ressorts, aux autres matériels et aux blocs de bois ou éléments
semblables auxquels ces éléments peuvent être attachés.
7) CONSERVER CES CONSIGNES.
CONSIGNES
DE SÉCURITÉ IMPORTANTES
AVERTISSEMENT-
Pour réduire les risques de
blessures graves ou de mort :
6.1
OPEN
CLOSE
STOP
CAL
RUN
SCROLL
SCROLL
SET
CLEAR
Section 6: Operator Setup Procedure
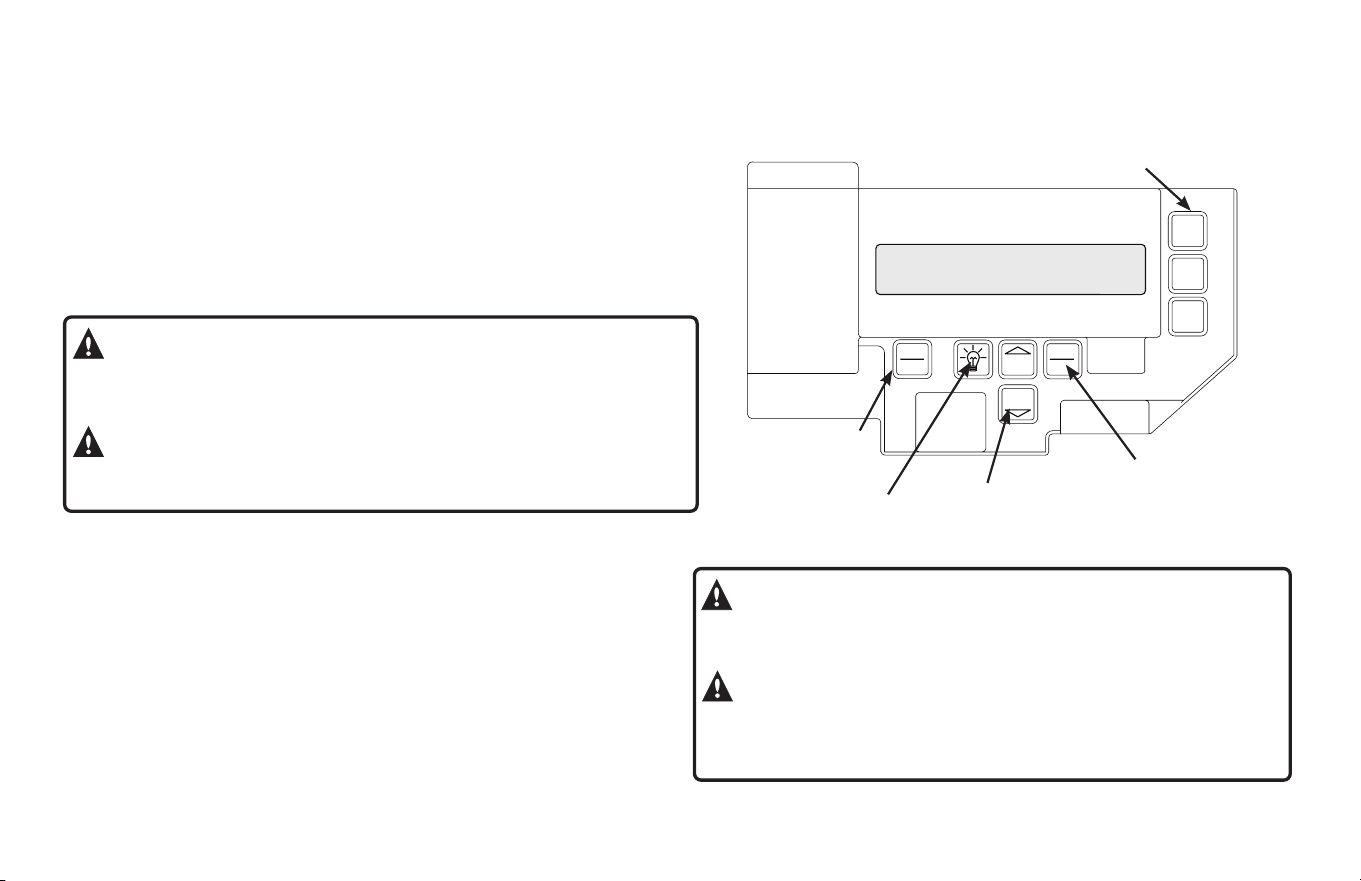
Operators include a full function control panel including a liquid crystal
display (LCD), calibration keys and Open, Close and Stop keys for on board
operator control. See Fig. 1. The open, close and stop keys function as a 3-button
wall control. The Display will show current operator conditions and calibration
information. Due to limited character space, some displays will be abbreviated.
See Appendix C (pgs. 10.11-10.13) for full display descriptions.
Operators include a non-volatile memory. The unit will remember all
calibration settings plus error code and run code logs, if power is removed from unit.
Control Operating Modes
Operator control boards operate in two modes: Run Mode and Calibration
Mode. The control board should normally operate in the Run Mode. The operator
is calibrated in Calibration Mode.
With the operator standing idle:
PRESS CAL/RUN TO TOGGLE BETWEEN OPERATING MODES.
• The first display in calibration mode is “SET CLOSE DIRECTION”
• The display in run mode will be one of the condition codes listed
in Appendix C.
Control Panel
Operation Keys, operate
unit like a 3-button
wall station.
Scroll Keys, used in
Calibration Mode.
Set/Clear Key, used to
reset and adjust
calibration settings.
Figure 1
Calibration & Run
Mode Toggle Key.
Display Backlighting
Toggle Key.
LCD DISPLAY
www.geniecompany.com 04-14
AFTER WIRING HAS BEEN COMPLETED, TURN ON POWER
TO THE OPERATOR.
DANGER:
After power is supplied to the operator,
Do Not make contact with components inside the control panel
except for the Keypad Keys. Fig. 1.
DANGER:
Après avoir mis l'opérateur sous tension, NE PAS
entrer en contact avec des composants à l'intérieur du panneau de
commande, sauf pour les touches du pavé numérique. Fig. 1.
WARNING:
DO NOT calibrate operator or operate
door unless doorway is in sight and free obstructions. Door will
move during setup. Keep people clear of opening while door is moving.
AVERTISSEMENT:
Calibrer l'opérateur et
utiliser la porte uniquement si la porte est en vue et libre de tout obstacle.
La porte se déplacera pendant la programmation. Ne laisser personne
se tenir dans l’ouverture de la porte pendant qu’elle est en mouvement.
OPEN
CLOSE
STOP
CAL SET
Figure 2
SET CLOSE DIR
6.2
OPEN
CLOSE
STOP
OPEN
CLOSE
STOP
Figure 3
Figure 4
OPEN
CLOSE
STOP
CAL
RUN
SCROLL
SCROLL
SET
CLEAR
Figure 5
CAL
RUN
SET
CLEAR
CLOSE
SCROLL
SET
CLEAR
CAL
RUN
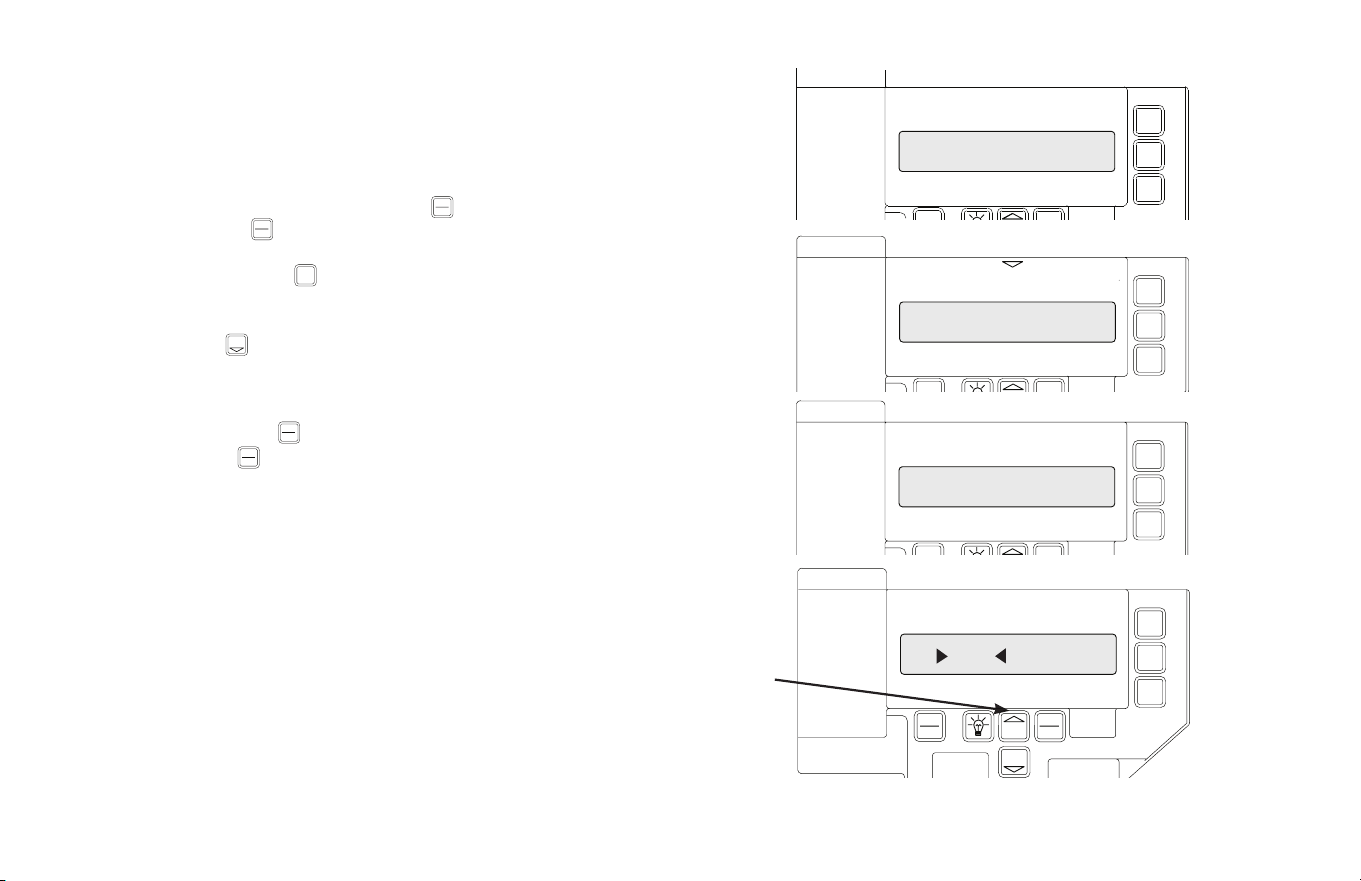
The direction of motor rotation depends on mounting position and/or how the
main input power phases are wired. This setting is used to insure the door is
closing and opening according to the input commands.
1) If operator is in RUN mode, press CAL/RUN key to enter calibration mode.
2) Press SET/CLEAR key to begin the calibration procedure and advance to
the next screen. Figure 3.
3 ) Briefly press the CLOSE key. (Pressing the Scroll key at this point will exit
this control function.)
The display will read “ DID DOOR CLOSE? “ Figure 4.
4) Press SCROLL key (up or down) to toggle between YES and NO.
Figure 5.
• If YES is selected, no change to operator calibration is made. If
NO is selected — the POD will change the operator’s down direction.
5) Press the SET/CLEAR key.
6) Press CAL/RUN key to return to run mode.
CAL SET
CAL SET
LO E
O
SCR LL
C AR
HIT CLOSE KEY
DID DOOR CLOSE?
YES NO
SCROLL KEY
Setting Close Direction
www.geniecompany.com 01-14
CAL
RUN
SET
CLEAR
SCROLL
CROLL
CAL
RUN
6.3
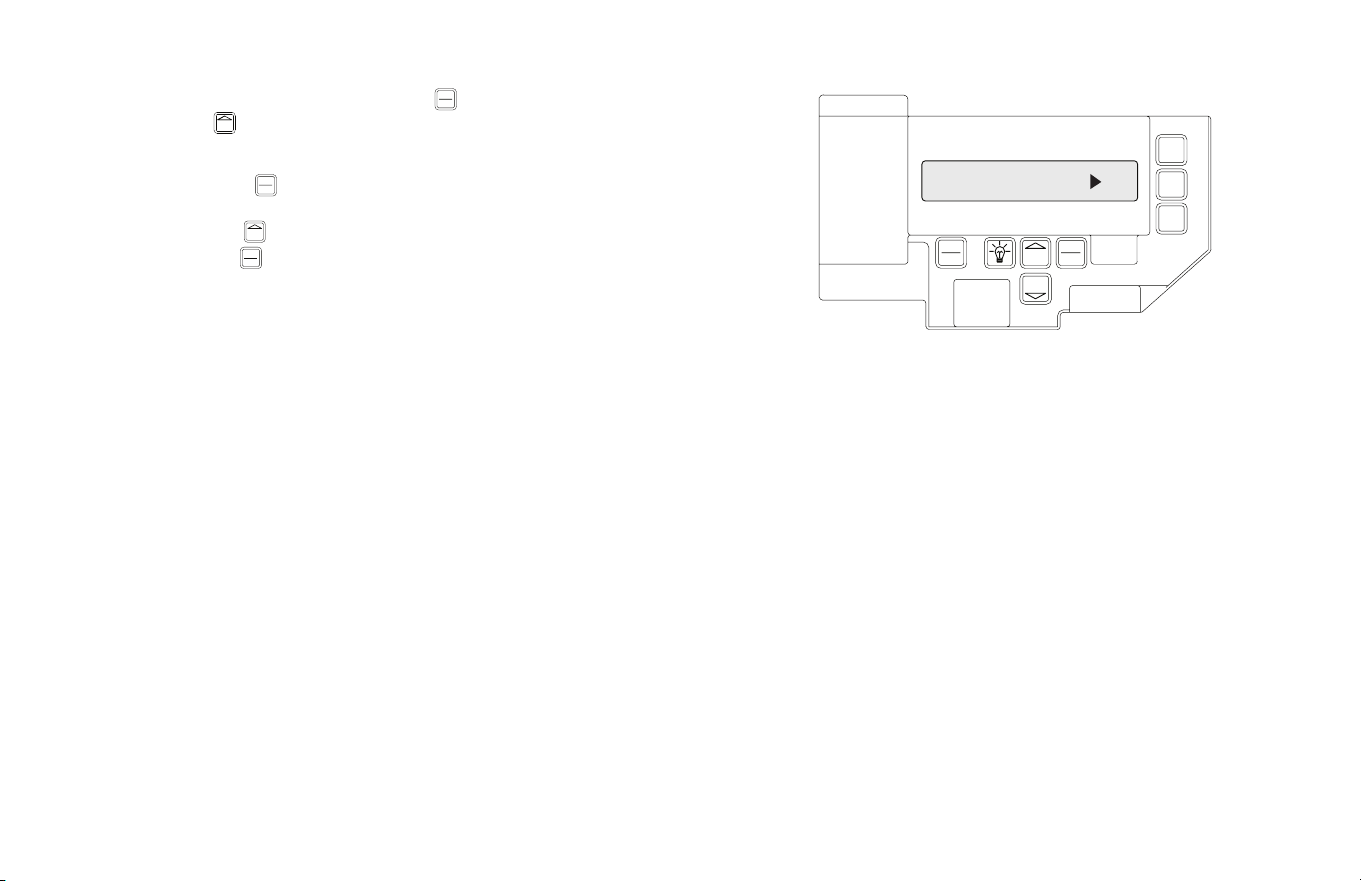
1) If operator is in RUN mode, press CAL/RUN key to enter calibration mode.
2) Press Scroll key until display reads “BRAKING RATE >#.” where # is the
deceleration rate, ranging from 0 to 9. 0=Max. braking. 9=Min. braking.
Figure 6.
3) Press SET/CLEAR key to toggle between 0 and 9—one digit at a time.
4) Pick a value and operate the door. Adjust as necessary.
5) Press a SCROLL key to shift to a new function and lock in the setting.
6) Press CAL/RUN key to return to run mode.
Setting Braking Rate
OPEN
CLOSE
STOP
CAL
RUN
SCROLL
SCROLL
SET
CLEAR
BRAKING RATE 0
Figure 6
www.geniecompany.com 01-14
S
6.4
OPEN
CLOSE
STOP
CAL
RUN
SCROLL
SCROLL
SET
CLEAR
Setting Travel Limits
UP LIMIT CLR
Figure 7
OPEN
CLOSE
STOP
CAL
RUN
SCROLL
SCROLL
SET
CLEAR
DOWN LIMIT SET
Figure 8
CAL
RUN
SCROLL
SET
CLEAR
OPEN
SCROLL
CAL
RUN
CLOSE
Resetting Travel Limits
CAL
RUN
CROL
OPEN
SET
CLEAR
CAL
RUN
CLOSE
SET
CLEAR
UP and/or DOWN
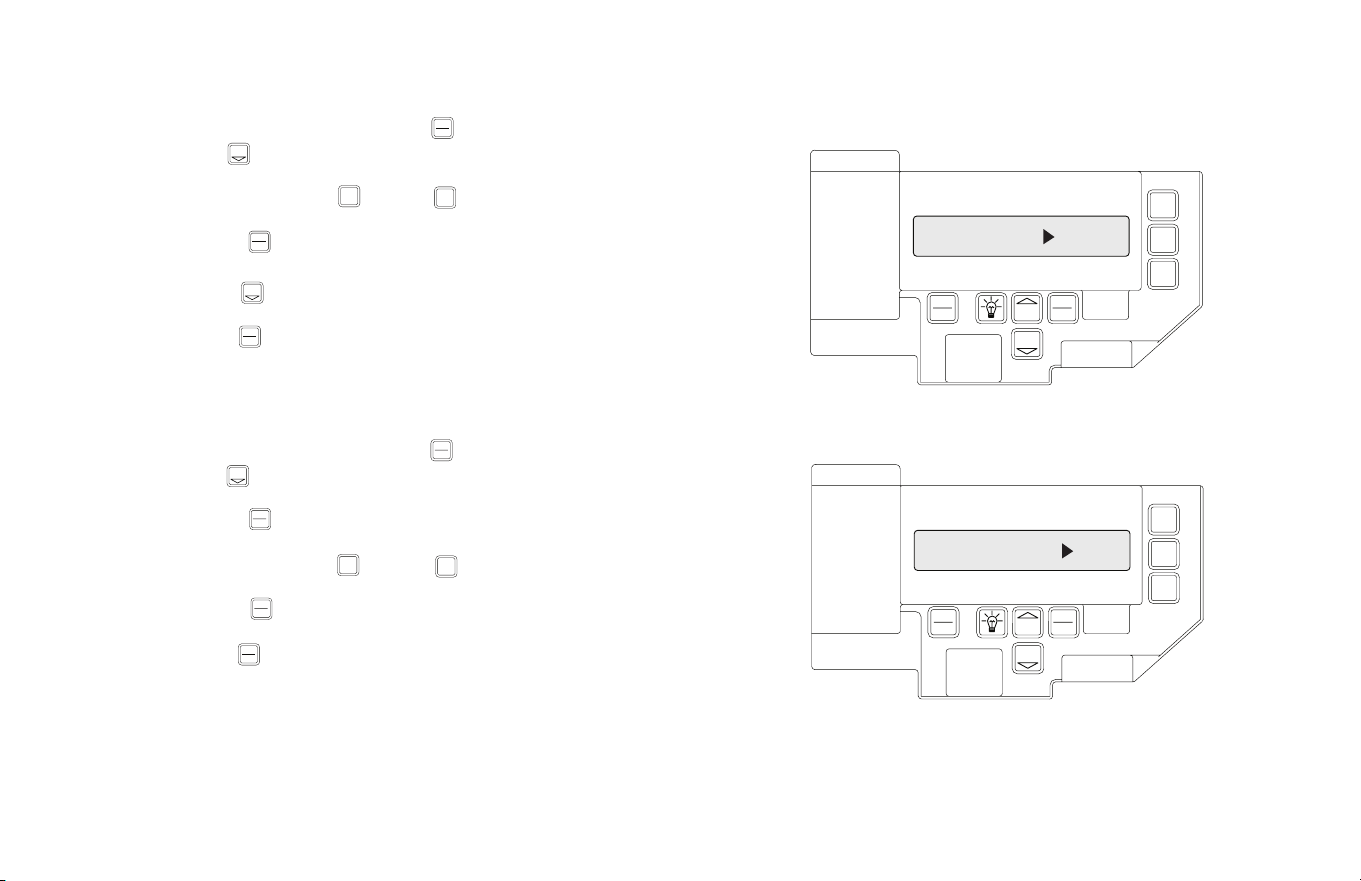
1) If operator is in RUN mode, press CAL/RUN key to enter calibration mode.
2) Press SCROLL key until display reads “UP LIMIT>CLR ” or
“DOWN LIMIT>CLR ” Figure 7.
3) Jog the door using the OPEN or CLOSE key until you reach the
desired height.
4) Press SET/CLEAR key to switch display to “UP LIMIT>SET “ or
“DOWN LIMIT>SET .“ Figure 8.
5) Press a SCROLL key to shift to a new function and lock in the
limit setting.
6) Press CAL/RUN key to return to run mode.
UP and/or DOWN
1) If operator is in RUN mode, press CAL/RUN key to enter calibration mode.
2) Press SCROLL key until display reads “UP LIMIT>SET ” or
“DOWN LIMIT>SET.” Figure 8 .
3) Press SET/CLEAR key to switch display to ”UP LIMIT>CLR” or
”DOWN LIMIT>CLR”
4) Jog the door using the OPEN or CLOSE key until you reach the
desired height.
5) Press SET/CLEAR key to switch display to ”UP LIMIT>SET” or
”DOWN LIMIT>SET”
6) Press CAL/RUN key to return to run mode.
www.geniecompany.com 01-14
NOTE: The recommended setpoint for the DOWN Travel Limit is normally at
approximately 2 inches off the floor. This final distance will be covered by the Limit
Overrun Function to establish a more accurate seal.
S
L
6.5
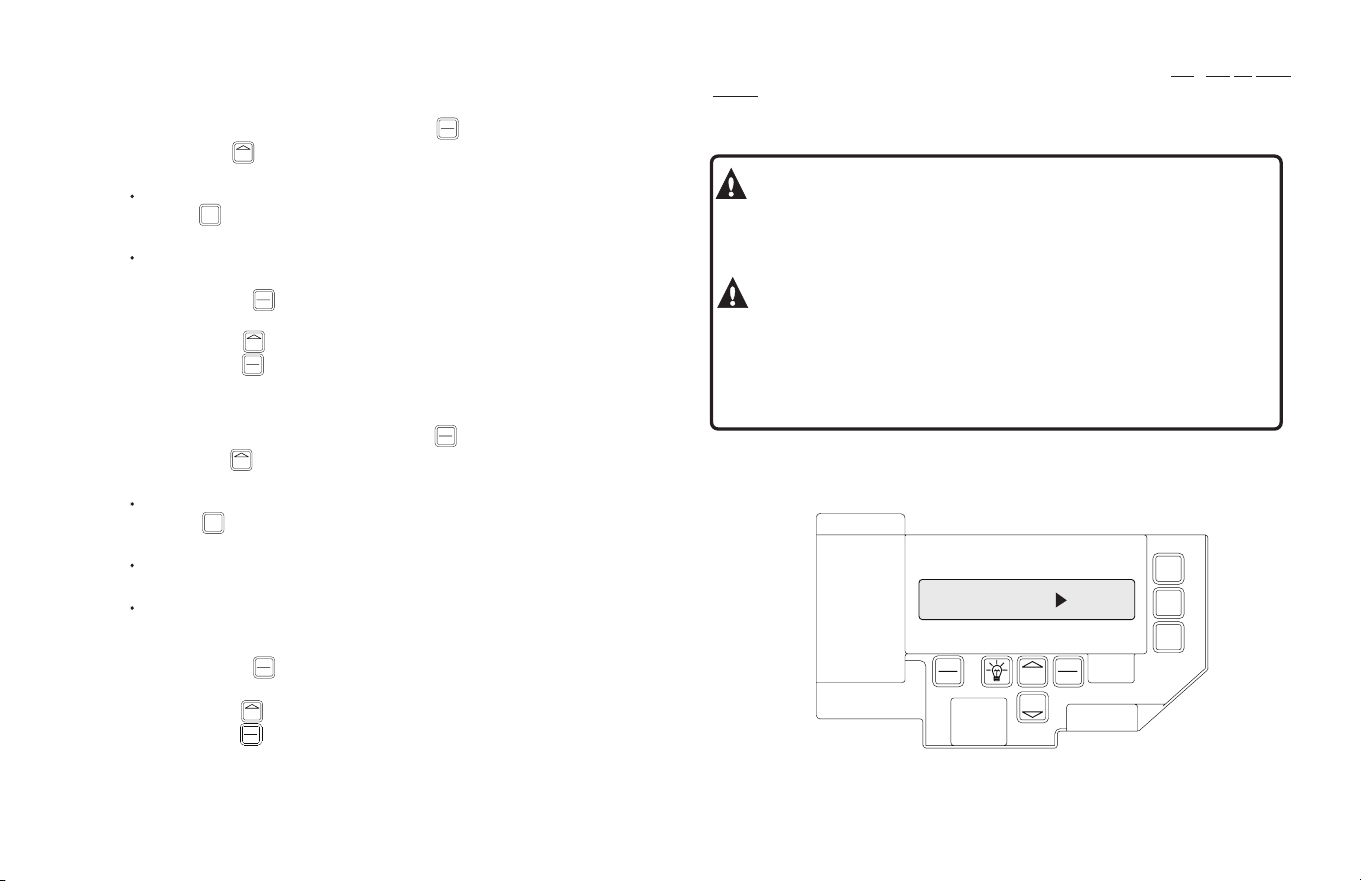
Setting Limit Overrun
www.geniecompany.com 04-14
A)
The Limit Overrun setting is a matter of trial and error. The goal is to adjust the Limit
Overrun until an appropriate seal is obtained between the bottom edge of the door
and the floor.
B)
The Limit Overrun setting can be varied between 0 and 9. 0 - disables the Limit
Overrun so that the door stops at the down limit switch setting. 9 - causes the greatest
amount of door tra
vel beyond the limit switch setting. Door should close gently with
light tension on door cables,or minimal stacking on rolling steel slats.
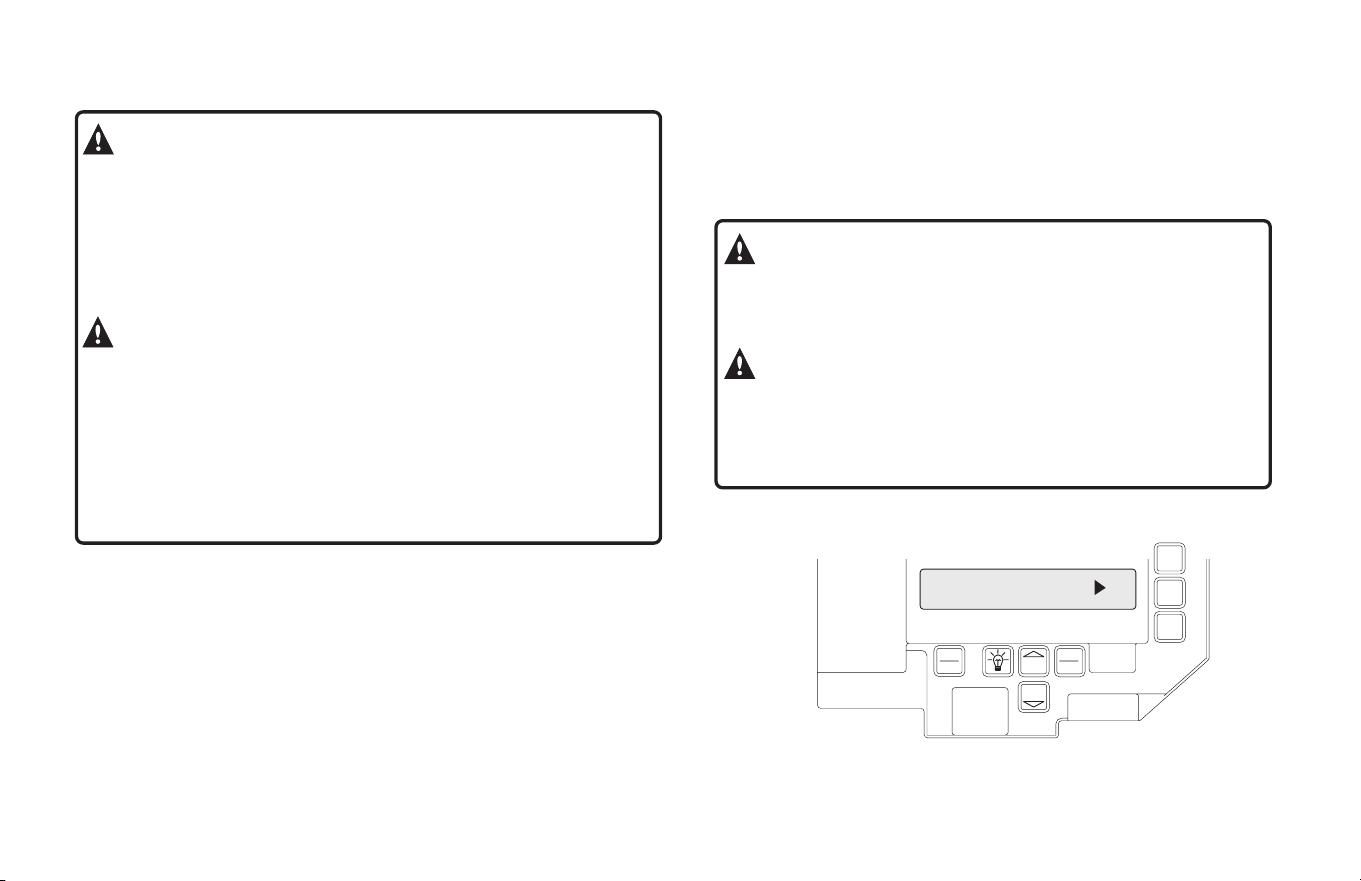
1) Press CAL-RUN to enter calibration mode
2) Press scroll (DN) until the display reads “LIMIT OVERRUN >(0-9).” Fig. 9.
3) Press SET/CLEAR until the display reads the desired value.
4) Press the OPEN key to open the door a few feet,then release
5) Press the CLOSE ke
y to close the door and hold until the operator stops.
6) Check the door seal and repeat steps 3-5 until the appropriate
seal is obtained between the door and the floor.
7) Press CAL-RUN to return to Run mode.
WARNING:
The Limit Overrun will override external
reversing devices, including photocells and sensing edges or
reversing edges. Therefore, any externally connected devices will
be disabled during that portion of the door travel controlled by the
Limit Overrun function.
The Down Limit Overrun function should be used to close the door
no more than the final 2”.
AVERTISSEMENT:
La fonction de
dépassement de limite annulera les dispositifs de renversement
externes, y compris les cellules photoélectriques et des systèmes
de détection ou d'inversion aux bords. En conséquence, tous les
dispositifs externes connectés seront désactivés pendant la partie
de la course de la porte qui est contrôlée par la fonction de
dépassement de limite.
La fonction de dépassement de limite inférieure doit être utilisée
pour fermer la porte uniquement aux derniers 5 cm.
CAUTION:
If proper seal cannot be obtained at a
setting of 9, Reset the Limit Overrun back to 0 and reset the
Down Limit position as described on 6.4. Then adjust the Limit
Overrun as instructed above.
ATTENTION:
Si une adhésion appropriée
ne peut être obtenue à un réglage de 9, réinitialiser le
dépassement de limite à 0 puis la position de déplacement de
la limite inférieure selon les instructions de la page 6.4. Régler
ensuite le dépassement de limite tel qu'indiqué ci-dessus.
OPEN
CLOSE
STOP
CAL
RUN
SCROLL
SCROLL
SET
CLEAR
LIMIT OVERRUN #
Figure 9
6.6
OPEN
CLOSE
STOP
CAL
RUN
SCROLL
SCROLL
SET
CLEAR
OPEN
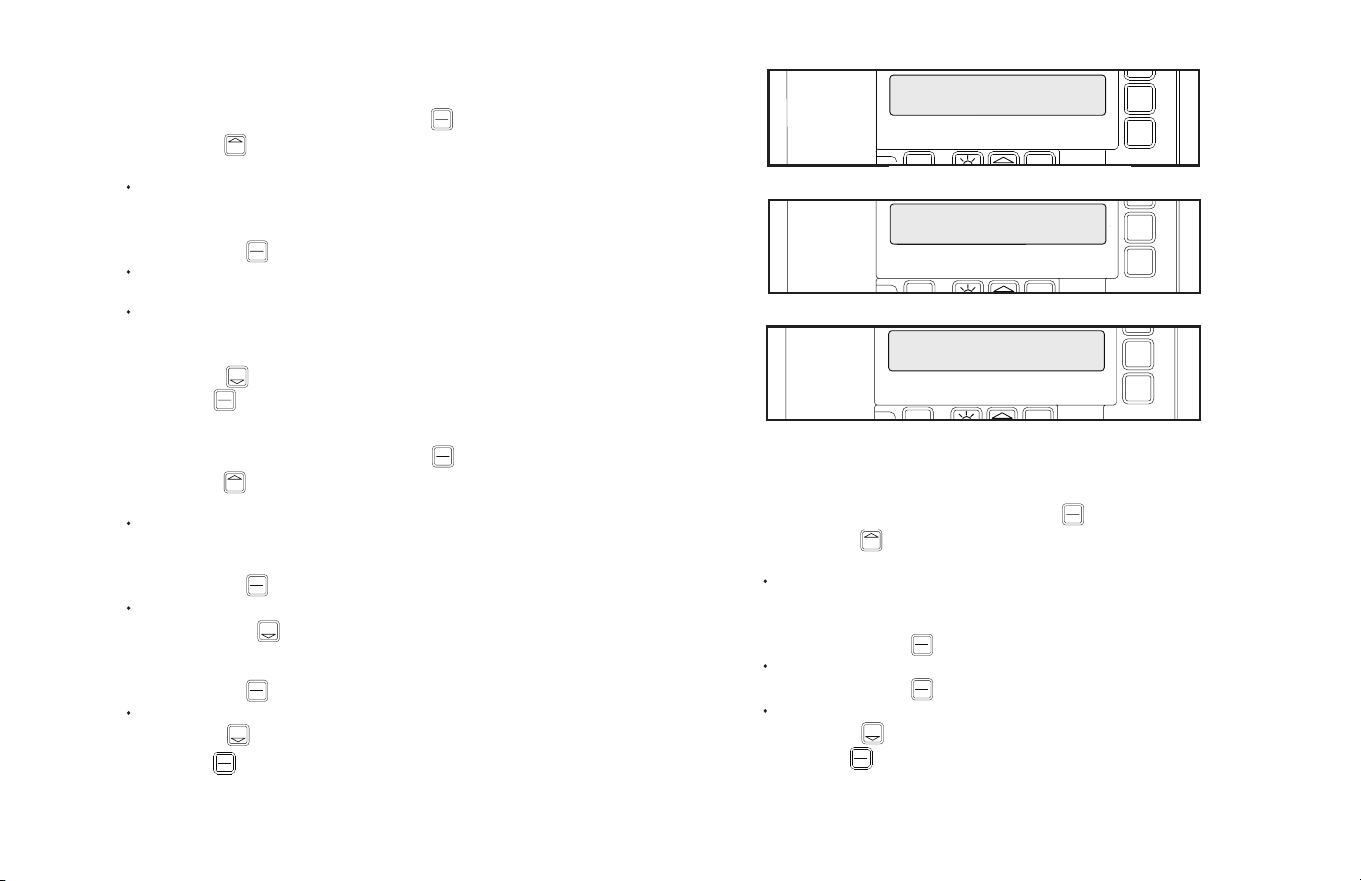
1) If operator is in RUN mode, press CAL/RUN key to enter calibration mode.
2) Press SCROLL key until display reads “OPEN MODE>MOM” or
“OPEN MODE>C-STP.” Figure 10.
MOM=momentary contact, meaning you press and release the
dna yek NEPO the door will continue to move
until
it reaches
its travel limit. (See NOTE)
C-STP=constant contact-stop, meaning if you release the key prior
to the door reaching its travel limit, the door will stop.
3) Press SET/CLEAR key to toggle between “OPEN MODE>C-STP” or
“OPEN MODE>MOM” on the display.
4) Press a SCROLL key to shift to a new function and lock in the setting.
5) Press CAL/RUN key to return to run mode.
CLOSE
1) If operator is in RUN mode, press CAL/RUN key to enter calibration mode.
2) Press SCROLL key until display reads “CLOSE MODE>MOM,”
“CLOSE MODE>C-STP” or “CLOSE MODE>C-REV.” Figure 10.
MOM=momentary contact, meaning you press and release the
CLOSE key and the door
will continue to move
until it reaches
its travel limit. (See NOTE)
C-STP=constant contact-stop, meaning if you release the key prior
to the door reaching its travel limit, the door will stop.
C-REV=constant contact-reverse, meaning if you release the key
prior to the door reaching its travel limit, the door will
reverse direction. (See NOTE)
3) Press SET/CLEAR key to toggle between “CLOSE MODE>C-STP” or
“CLOSE MODE>C-REV” or ”CLOSE MODE>MOM” on the display.
4) Press a SCROLL key to shift to a new function and lock in the setting.
5) Press CAL/RUN key to return to run mode.
Setting Open and Close Modes
(Constant vs Momentary Contact)
OPEN MODE MOM
Figure 10
NOTE: Momentary contact (MOM) or Constant Reverse (C-REV) may not be used
unless both the OPEN and CLOSE Limits have been set.
In situations where an external reversing device is either not installed or not
operating properly, Constant Contact (C-STP) MUST BE USED.
NOTE: During adjustment of a Travel Limit, the Open and Close Modes will
automatically fail-safe to Constant Contact until the Limit has been set or reset.
At that time the Open and Close Modes will revert to their previous setting.
CLOSE
CAL
RUN
S O L
SCROLL
SE
C EA
OPEN
SET
CLEAR
SCROLL
LOSE
T
CAL
RUN
SC L
CLEA
EN
LO E
CAL
RUN
ROLL
C L
SCROLL
SE
L AR
EN
CLOSE
SET
CLEAR
SCROLL
CAL
RUN
www.geniecompany.com 04-14
WARNING:
Before momentary contact control can
be used on the CLOSE button, a monitored external reversing device
such as a photocell system or sensing edge switch must be used.
See pages 5.8-5.10 for installation of entrapment protection devices.
AVERTISSEMENT:
Avant d'utiliser la
commande à contact momentané sur le bouton FERMETURE, un
dispositif d'inversion externe surveillée tel qu'un système de
cellule photoélectrique ou un commutateur de détection de bord
doit être utilisé. Voir l'installation des dispositifs de protection
contre le coincement en pages 5.8-5.10.
6.7
CLOSE
STOP
CAL SET
LEARN NEW XMTR?
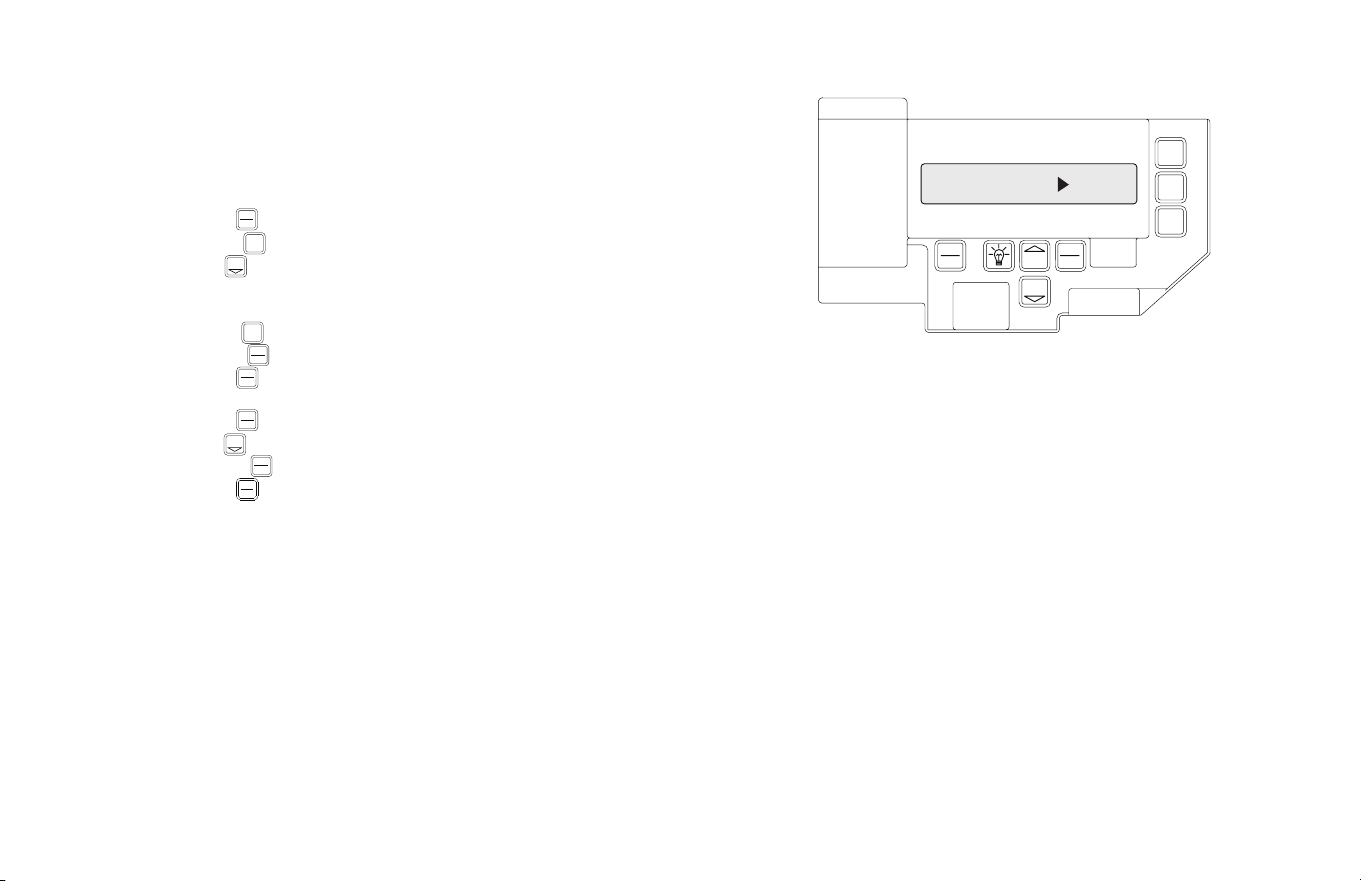
Adding a Transmitter
1) If operator is in RUN mode, press CAL/RUN key to enter calibration mode.
2) Press SCROLL key (up or down) until display reads “LEARN NEW XMTR? ”
Figure 11.
This question along with the instruction “HIT SET FOR YES” will
continuously pan across the display window. (Pressing SCROLL or
CAL/RUN will cancel the operation.)
3) Press SET/CLEAR key.
Display will read “PUSH XMTR BUTTON TWO TIMES TO LEARN XMTR.”
4) Press Transmitter button two times.
The display will read “XMTR ___LEARNED.” Where it assigns a random
number between 1 and 50 to the transmitter. That transmitter is
entered and ready to operate the door. (Label/mark the transmitter.)
5) Press SCROLL key (up or down) to move on to another menu item,
or CAL/RUN key to exit the CAL mode.
(Optional) Transmitter Programming
LO
CAL
RUN
C
SCROLL
C
SE
CL AR
SET
CLEAR
SCROLL
CAL
RUN
Removing Individual Transmitter
1) If operator is in RUN mode, press CAL/RUN key to enter calibration mode.
2)
Press SCROLL key (up or down) until display reads “REMOVE XMTR? ”
Figure 12.
This question along with the instruction “HIT SET FOR YES” will
continuously pan across the display window. (Pressing SCROLL or
CAL/RUN will cancel the operation.)
A menu displaying the available transmitter numbers will appear.
Press SCROLL key (up or down) to cycle through the menu to the
number of the transmitter to be removed. (Pressing CAL/RUN will
cancel the operation.)
The transmitter is removed.
5) Press SCROLL key (up or down) to move on to another menu item,
or CAL/RUN key to exit the CAL mode.
L E
CAL
RUN
C L
SCROLL
SCROLL
CAL
RUN
CLOSE
STOP
CAL SET
REMOVE XMTR?
Figure 12
Removing All Transmitters
1) If operator is in RUN mode, press CAL/RUN key to enter calibration mode.
2)
Press SCROLL key (up or down) until display reads “REMOVE ALL XMTRS”
Figure 13.
This question along with the instruction “HIT SET FOR YES” will
continuously pan across the display window. (Pressing SCROLL or
CAL/RUN will cancel the operation.)
3) Press the SET/CLEAR key.
The display will read “ARE YOU SURE.”
All transmitters are removed.
5) Press SCROLL key (up or down) to move on to another menu item,
or CAL/RUN key to exit the cal mode.
CAL
RUN
SCROLL
S O L
SET
CLEAR
4) Press the SET/CLEAR key.
SET
CLEAR
SCROLL
CAL
RUN
CLOSE
STOP
CAL SET
REMOVE ALL XMTRS?
Figure 13
SCROLL
3) Press SET/CLEAR key.
SET
CLEAR
4) Press SET/CLEAR key.
SET
CLEAR
Figure 11
www.geniecompany.com 04-14
6.8
OPEN
CLOSE
STOP
CAL
RUN
SCROLL
SCROLL
SET
CLEAR
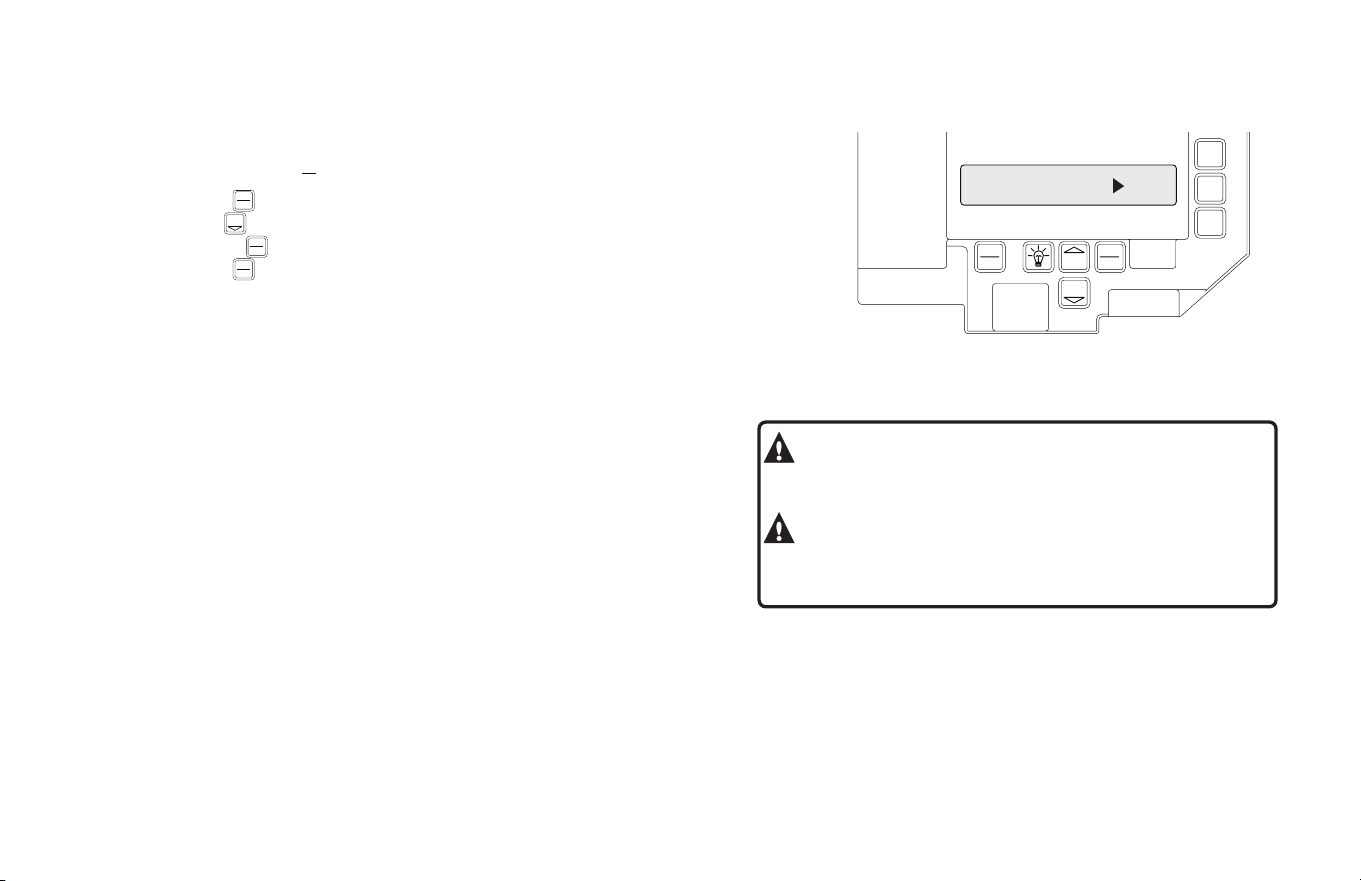
Setting Mid-Stop Limit
Figure
14
CAL
RUN
SCROLL
CLOSE
OPEN
CAL
RUN
CAL
RUN
SET
CLEAR
SCROLL
The Operator includes a programmable Mid-Stop. This feature allows the operator
to stop at a user selectable point when opening. It is used when operating very tall doors
that only open to their full height occasionally. The Mid-Stop does not effect the operator
when closing. To operate door to full open position from mid-stop, press open button again.
NOTE: Setting of the MID-STOP should only be performed AFTER Travel
Limit and Max Run Timer settings have been made.
1) Press CAL/RUN key to enter calibration mode.
2) Press the CLOSE key to close the door to the down limit.
3) Press SCROLL key until display reads “MID-STOP
>
CLR” Figure 14.
NOTE: If the display reads MID-STOP
>
SET at this point, first clear the
MID-STOP as described below then repeat steps 1-3 and continue.
4) Press the OPEN key to open the door to desired mid-stop height.
5) Press SET/CLEAR keyuntil the display reads ”
MID-STOP
>
SET”
6) Press CAL/RUN key to return to run mode.
To CLEAR the Limit
7) Press CAL/RUN to enter calibration mode.
8) Press SCROLL until display reads “MID-STOP
>
SET”
9) Press SET/CLEAR until the display reads ”
MID-STOP
>
CLR”
10) Press CAL/RUN to return to run mode.
SET
CLEAR
www.geniecompany.com 04-14
CAL
RUN
MID-STOP CLR
6.9
OPEN
CLOSE
STOP
CAL
RUN
SCROLL
SCROLL
SET
CLEAR
MAX RUN TMR SET
Figure
15
TO RESET
1) Press CAL/RUN to enter calibration mode.
2) Press SCROLL (up or down) until display reads
”MAX RUN TMR > SET.” Figure 15.
3) Press SET/CLEAR until display reads ”MAX RUN TMR > CLR.”
4) Press CAL/RUN to return to RUN mode.
5) Cycle the door between limits.
NOTE: The Max Run Timer must be reset each and every time the Travel Limits are adjusted.
Resetting the MRT (The Max Run Timer is set automatically once the unit is cycled between
Limits. The Max Run Timer prevents the unit from running continuously in the event of a problem.
The MRT’s are set to the time required to run from one limit to the other, plus 5 seconds (nominal).
When the MRT is exceeded, the operator stops and will not respond to any command until it is reset
by pressing one of the Calibration keys or by cycling power to the unit.
CAL
RUN
SET
CLEAR
CAL
RUN
SCROLL
www.geniecompany.com 04-14
CAUTION:
The MID-STOP feature must be
turned off in order to properly set the Max Run Timer.
ATTENTION:
La fonction MID-STOP doit
être désactivée afin de régler correctement la minuterie de
course maximum.
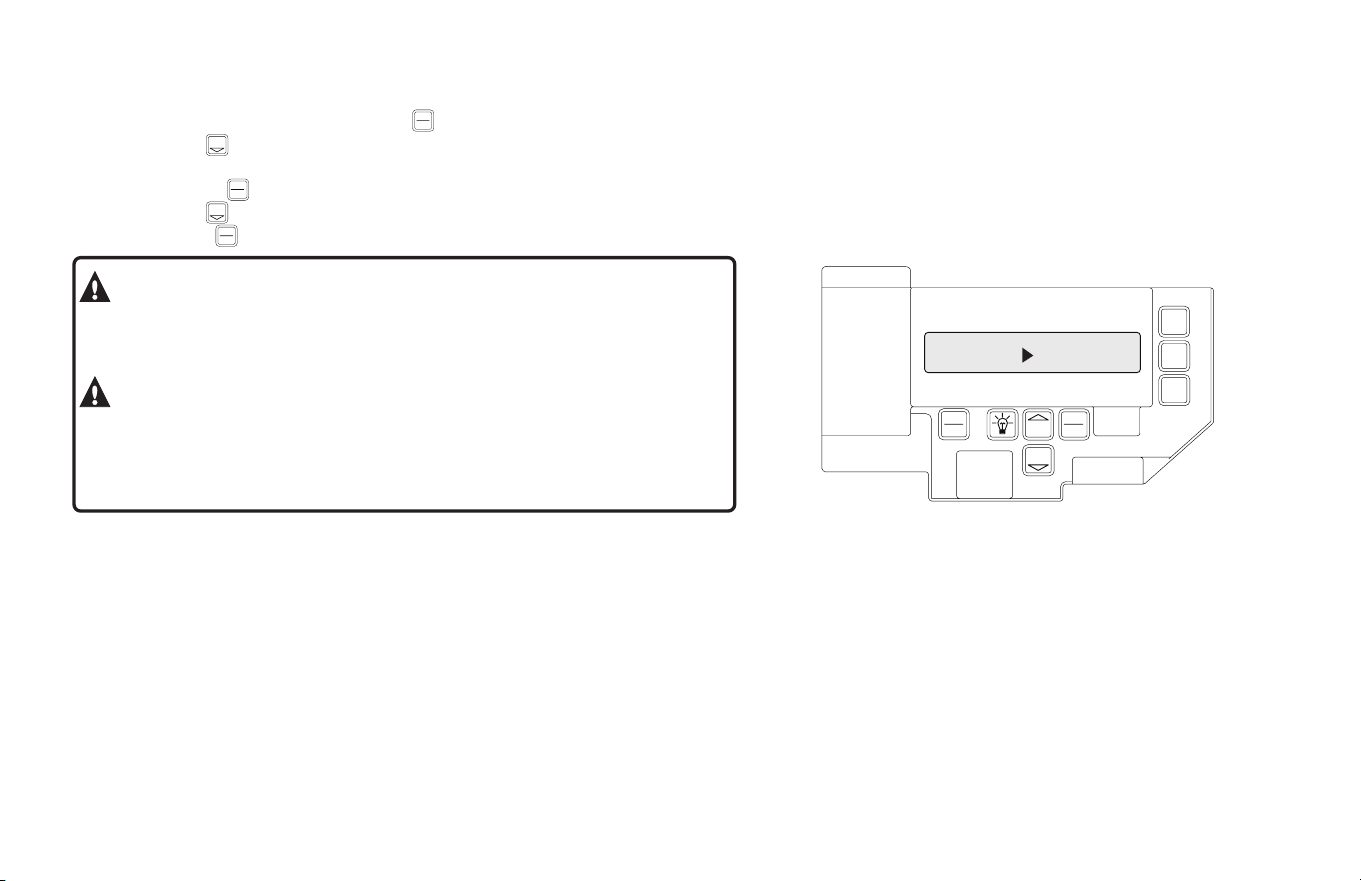
OPEN
CLOSE
STOP
CAL
RUN
SCROLL
SCROLL
SET
CLEAR
ODC STB ON
Figure 16
Monitored Reversing Devices
Safe-T-Beams® (OPTIONAL)
1) If operator is in RUN mode, press CAL/RUN key to enter calibration mode.
2) Press SCROLL key (up or down) until display reads “ ODC STB>ON” or
“ ODC STB>OFF”
Figure 16.
3) Press SET/CLEAR
key to toggle between ON and OFF.
4) Press SCROLL key (up or down)
to shift to a new function and lock setting.
5) Press CAL/RUN key to return to run mode.
O N
L E
CAL
RUN
C LL
S
SET
CLEAR
SCROLL
LOSE
STOP
CAL
RUN
SC OLL
CLE R
SCROLL
LEA
6.10
NOTE: Installation of photocells or residential Monitored
Photocells DOES NOT make the unit legal for residential use. The Genie®
Company strictly prohibits any installation of a unit in any
residentially zoned construction.
www.geniecompany.com 04-14
Current UL Approved Monitored Reversing Devices
with Timer-Close Module P/N OPABTCGX.S.
2) MillerEdge ME and MT series monitored edge sensors used in combination
with MillerEdge Interface Module OPAKMEIGX.S. (Direct connect through STB inputs).
4) Residential Safe-T-Beam® Monitored Photocells - P/N 37220R (GSTB-BX) and 38176R.S (includes extension brackets)
5) Series II Commercial Safe-T-Beam® Monitored Photocells - P/N OPAKPE.S and OPAKPEN4GX.S (NEMA 4).
1) MillerEdge ME and MT series monitored edge sensors used in combination
6) Monitored Retro-Reflective Photoeye - P/N OPGAKRPEN4X.S
3) MillerEdge Wireless monitored edge sensor OPAKMMWE.S.
WARNING:
Photocell systems provide entrapment protection
when mounted near the doorway in such a way that the lower portion of an
individuals leg will break the photocell beam during normal walking through
the doorway.
AVERTISSEMENT:
Les systèmes de cellules
photoélectriques fournissent une protection contre le coincement s'ils sont
installés à proximité de la porte de manière à ce que la partie inférieure de la
jambe d'un individu puisse rompre le faisceau de la cellule photoélectrique
lors de passages normaux par la porte.
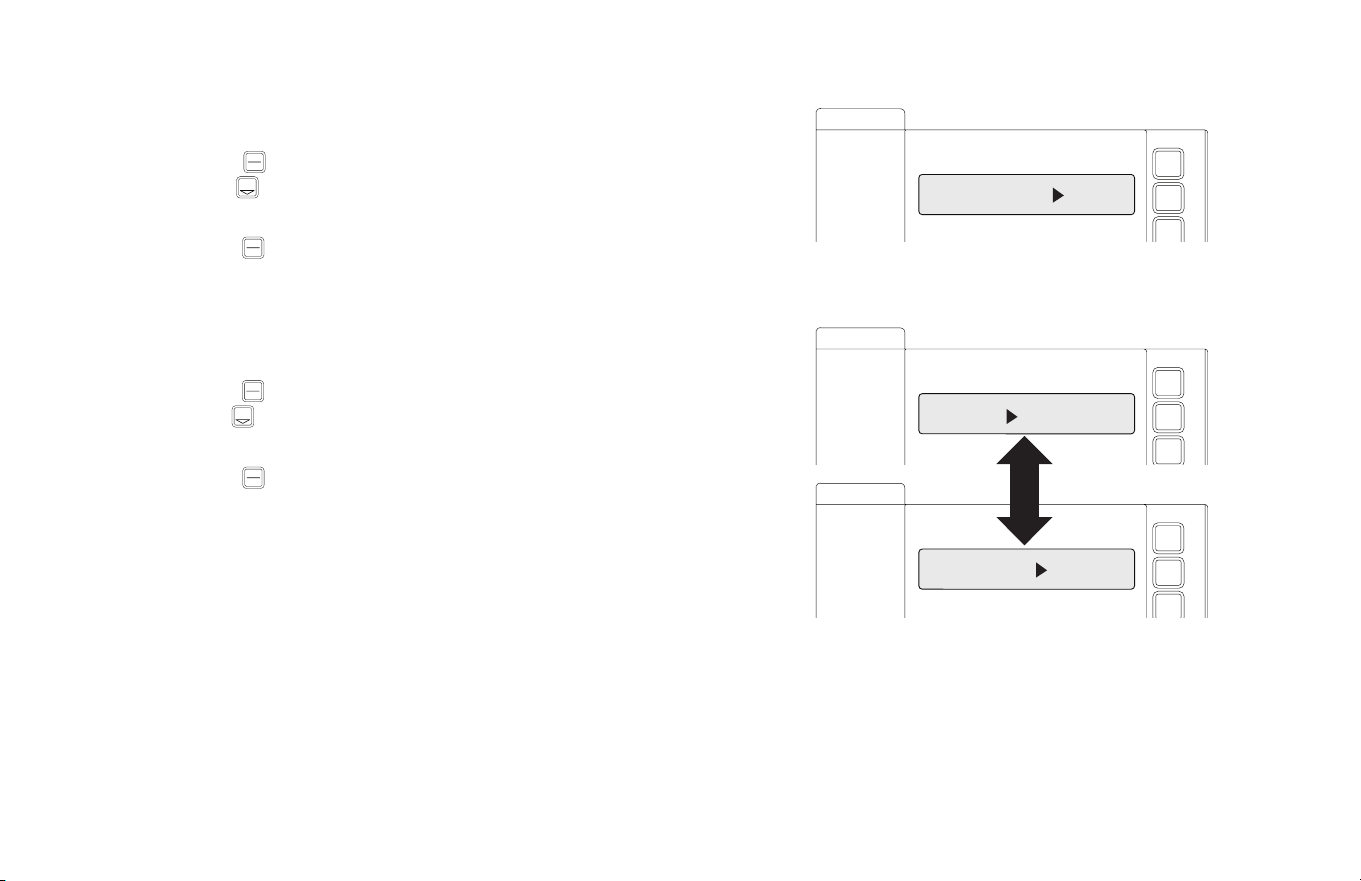
7.1
Section 7: Special Operator Features
(No user input)
OPEN
CLOSE
STOP
CYCLES 1
OPEN
CLOSE
STOP
GDO V# #########
OPEN
CLOSE
STOP
DISPLAY V# #######
1) Press CAL/RUN key to enter calibration mode.
2) Press SCROLL key until display reads “CYCLES>1,2,3 etc.
where the number is the number of open/close cycles the operator
has performed. Figure 1.
3) Press CAL/RUN key to return to run mode.
Operator Cycle Count
1) Press CAL/RUN key to enter calibration mode.
2) Press SCROLL key until display reads “GDO V# > ######.” Figure 2.
This display will cycle between the version number of the current GDO
firmware and the current Display Firmware.
3) Press CAL/RUN key to return to run mode.
GDO and Display Firmware
CAL
RUN
SC OL
SCROLL
R
CAL
RUN
E
CAL
RUN
RO
OLL
SCROLL
SE
C AR
CAL
RUN
www.geniecompany.com 01-14
Figure 1
Figure 2
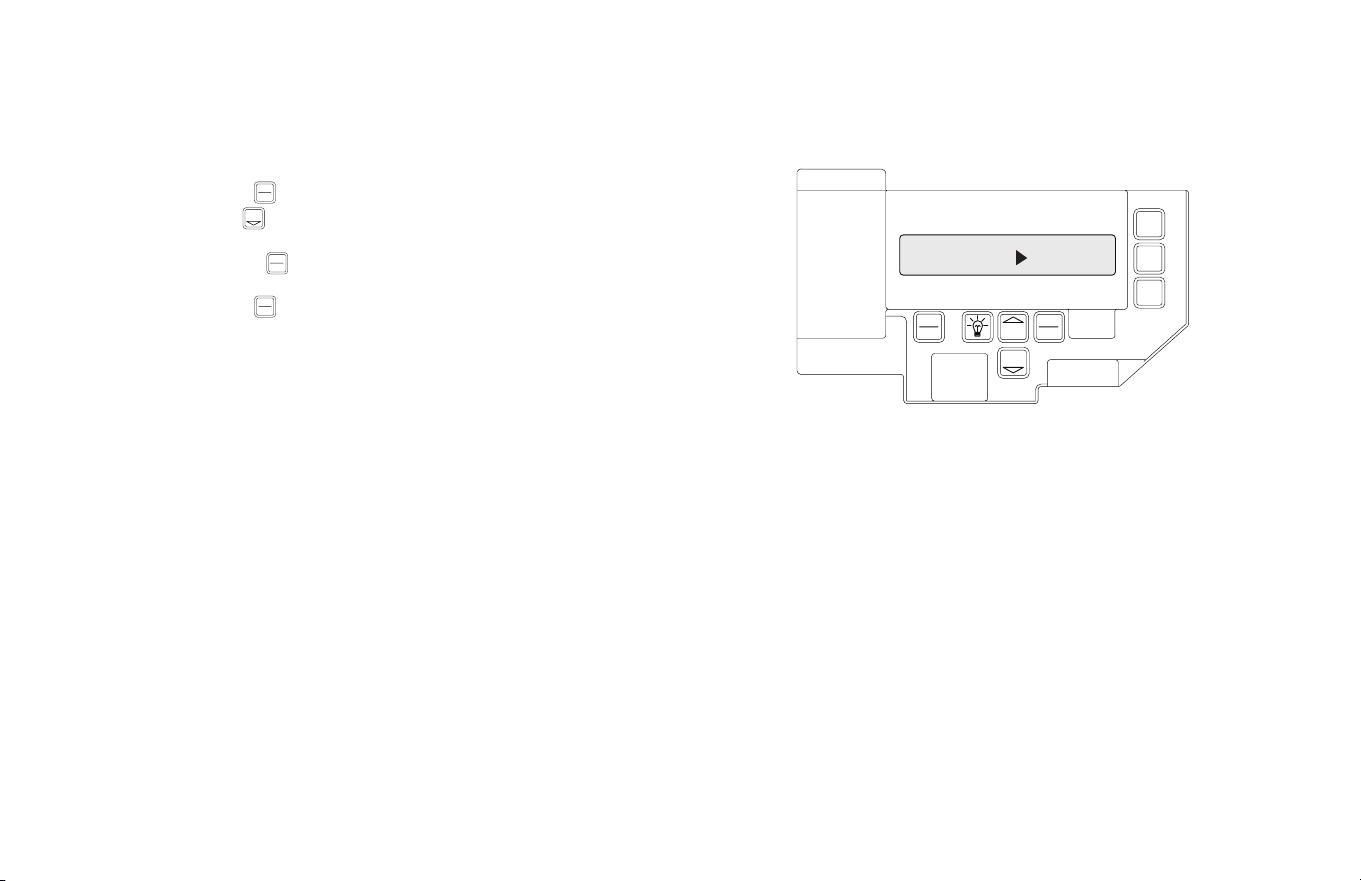
7.2
OPEN
CLOSE
STOP
CAL
RUN
SCROLL
SCROLL
SET
CLEAR
GDO TYPE J-SHAFT
Figure 3
Operator Type Fig. 3
CAL
RUN
CAL
RUN
SCROLL
SET
CLEAR
NOTE
: The GDO type is factory set. The installer should not have to set this
feature. However, if the GDO type is inadvertently changed, or if a board needs
to be replaced in the field, follow these instructions to set GDO type.
1) Press CAL/RUN key to enter calibration mode.
2) Press SCROLL key until display reads “GDO TYPE
>
.”
Figure 3.
This will display the current GDO type.
3) Press SET/CLEAR key until display indicates correct GDO type
( J-SHAFT or TROLLEY)
4) Press CAL/RUN key to return to run mode.
www.geniecompany.com 01-14
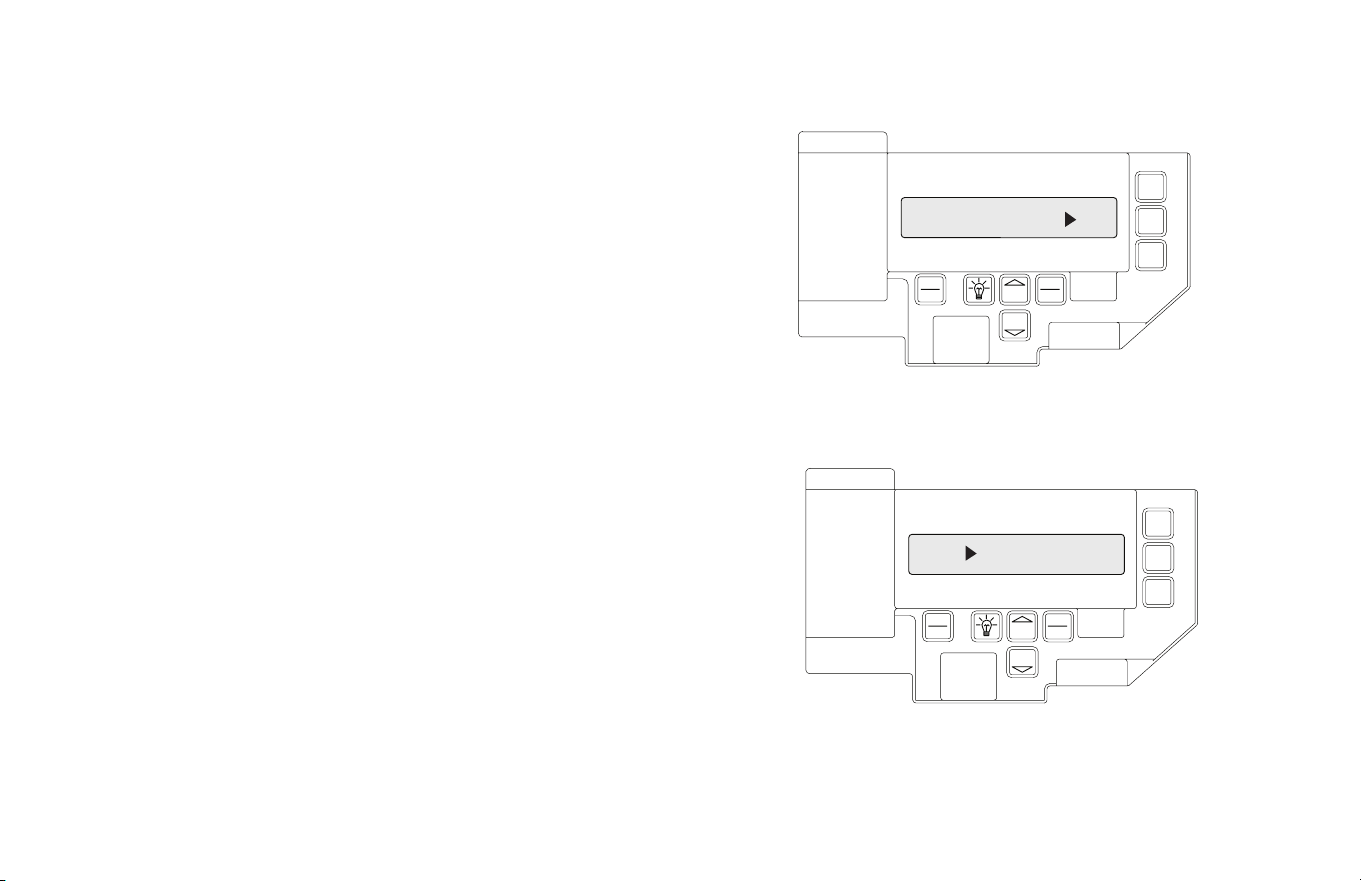
8.1
OPEN
CLOSE
STOP
CAL
RUN
SCROLL
SCROLL
SET
CLEAR
OPEN
CLOSE
STOP
CAL
RUN
SCROLL
SCROLL
SET
CLEAR
Section 8: Troubleshooting
Operators display their status on the integrated display. Each time the operator
runs, stops, reverses or refuses to run, the display will indicate why the action did, or did
not, take place.
Once an error code has been generated, the operator will continue to display the
error code while the operator is not running. This error code can be cleared by pressing
the STOP button or STOP key on the keypad. The error code will automatically clear
when the operator stops at the down limit. Error codes will continue to be stored in the
operator’s Error Code Memory after they have been cleared from the display in
the Run Mode.
Display Operation in Run Mode
To aid in troubleshooting problems, operators include an error code memory
that stores the last 10 error events. These codes are stored with or without power. The
last error code detected is also displayed on the LCD until the stop button or key is
pressed or the operator stops at the down limit.
The error code memory stores the last 10 error codes in sequence. Once 10 codes are
stored, the oldest code
is erased to make room for the newest code. These codes are
displayed in calibration mode. The display will flash the number of the error code and
the 2-digit error code followed by a description of the error code. Fig. 1 & 2.
Error Codes
ERROR CODE 1 41
Figure 1
REV ONE BUTTON
Figure 2
www.geniecompany.com 01-14
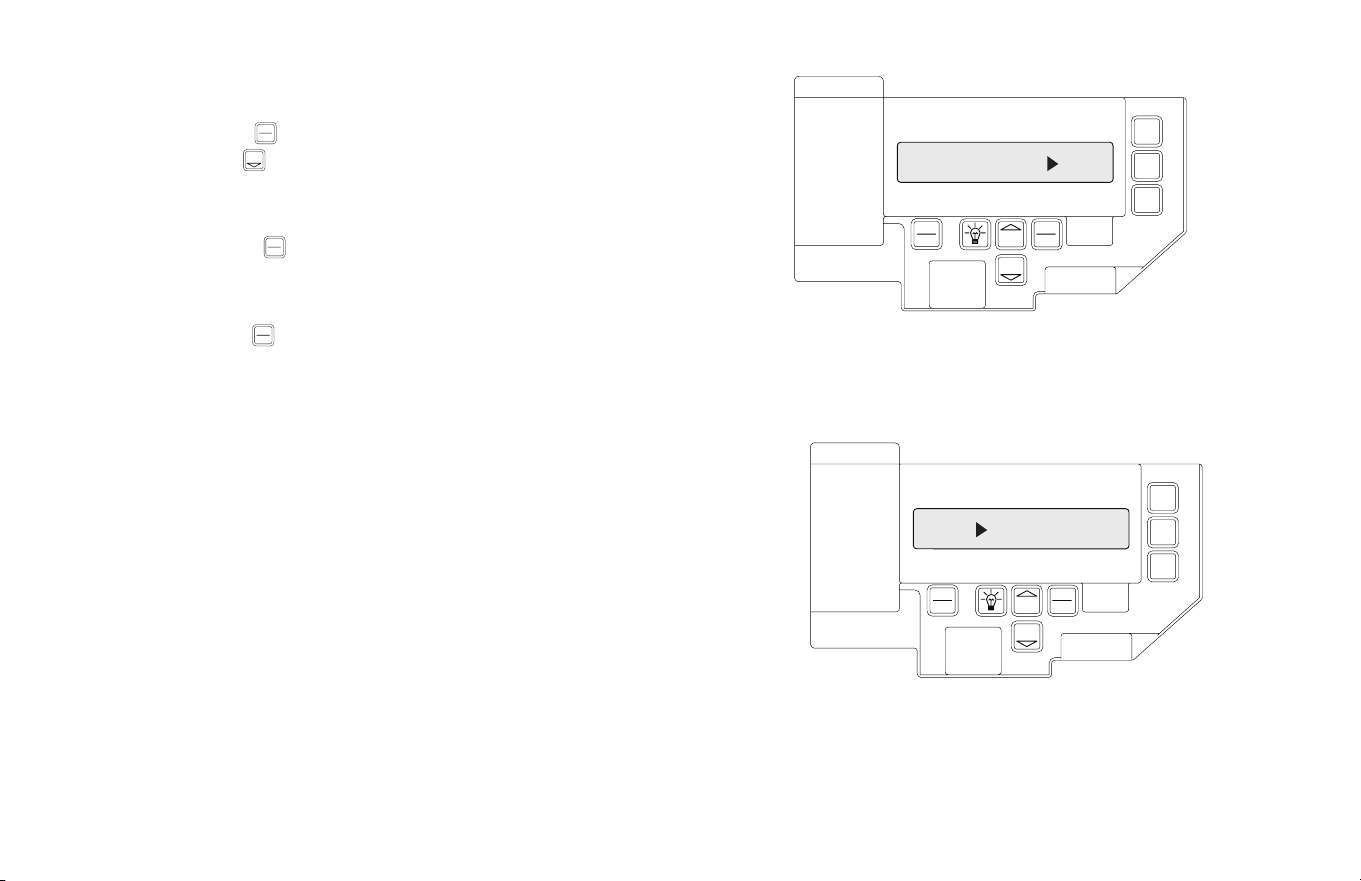
8.2
OPEN
CLOSE
STOP
CAL
RUN
SCROLL
SCROLL
SET
CLEAR
OPEN
CLOSE
STOP
CAL
RUN
SCROLL
SCROLL
SET
CLEAR
Operators also include a run code memory that stores the last 10 run events.
These codes are stored with or without power. Each time the operator runs or stops, it
generates a code that it stores in this memory (Why the operator ran or stopped). Used
together with the error code memory, it becomes a powerful troubleshooting aid.
The run code memory stores the last 10 codes in sequence. Once 10 codes are stored,
the oldest code is erased to make room for the newest code. These codes are displayed
in calibration mode. The display will flash the number of the run code and the 2-digit
run code followed by a description of the run code. Fig. 3 & 4.
Run Codes
RUN CODE 1 3C
Figure 3
HALT DOWN LIMIT
Figure 4
Error Codes (continued)
CAL
RUN
L
SCROLL
C
SET
CLEAR
CAL
RUN
To view the error code memory:
1) Press CAL/RUN key to enter calibration mode.
2) Press SCROLL key until display reads “ERROR CODE 1
>
”.
• The display will begin flashing the error code number and 2-digit
error code followed by its description.
• Reminder: Error code number 1 is the latest code generated.
3) Press SET/CLEAR key. The display will now read “ERROR CODE 2
>
.”
(This is the error code which was generated before error code 1.)
4) Repeat step 3 until all 10 error codes have been displayed or move on to
step 5 when ready.
5) Press CAL/RUN key to return to run mode.
NOTE: For all error codes see Appendix C, Pages 10.12 - 10.13.
www.geniecompany.com 01-14
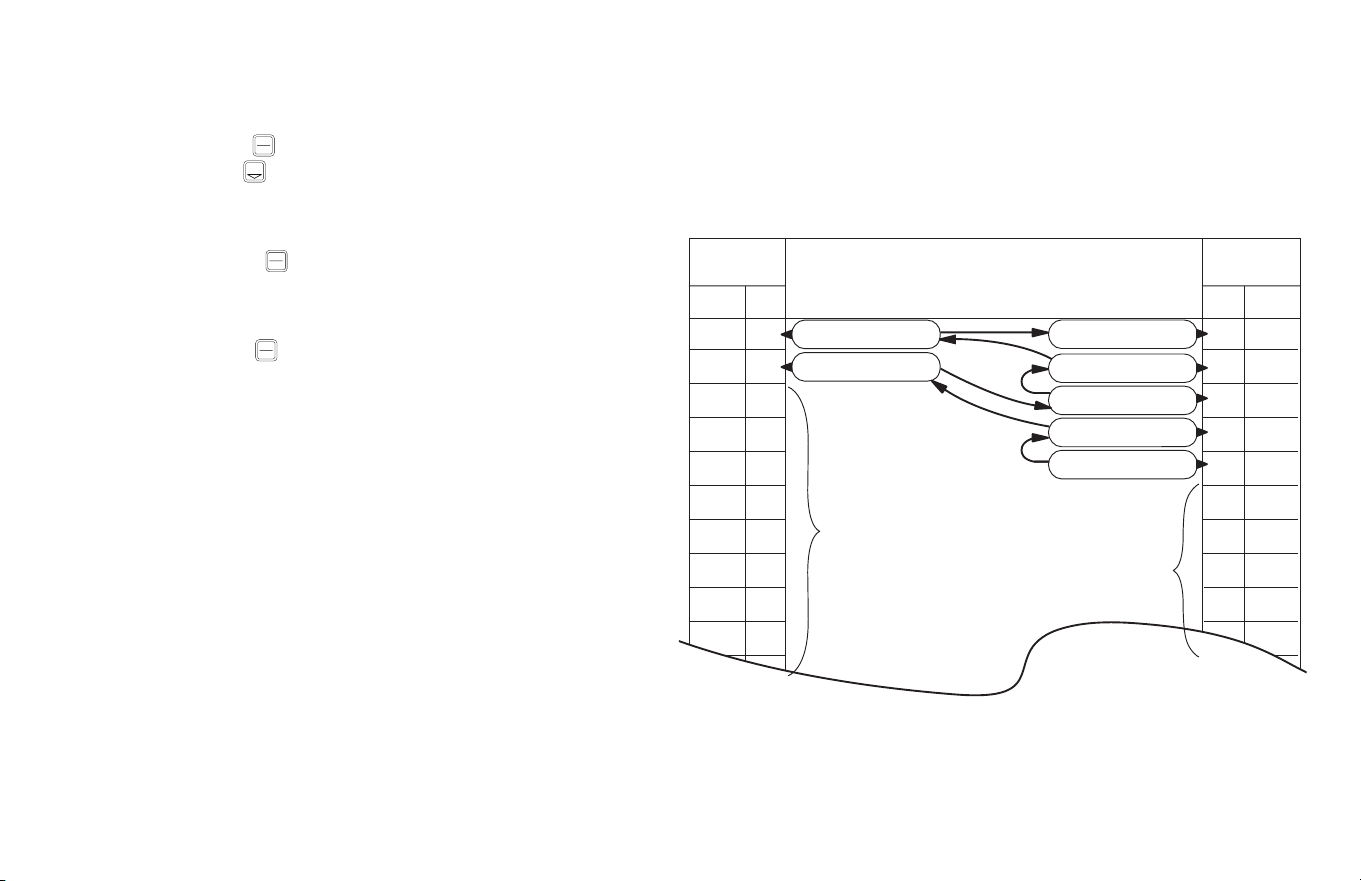
8.3
TROUBLESHOOTING EXAMPLE USING RUN AND ERROR
CODE MEMORIES. Fig. 5
1. In Calibration Mode, display and write down each Run Code and Error Code
stored in memory.
2. List as shown in Fig. 5.
3. Refer to Appendix C to interpret the codes.
In this example, the operator was opened using the OPEN key on the keypad and
stopped at the up limit. The OPEN wall button was then activated, causing the
“6D” code to be generated since the operator could not open when it is already at
the up limit. The CLOSE wall button was then activated, causing the operator to
close. While closing, the Normally-Open (N-O) Safety Input was activated, causing
the operator to stop and then reverse, stopping at the up limit.
ERROR
CODES
RUN
CODES
1
2
3
4
5
6
7
8
9
10
1
2
3
4
5
6
7
8
9
10
45
6D
00
00
00
00
00
00
00
00
00
00
00
00
00
3D
35
20
3D
14
REVERSED DUE TO ACTIVE
N-O SAFETY INPUT
WOULD NOT OPEN —
ALREADY AT UP LIMIT
STOPPED AT UP LIMIT
STOPPED DUE TO ACTIVE
N-O SAFETY INPUT
CLOSED FROM
CLOSE WALL BUTTON
STOPPED AT UP LIMIT
OPENED FROM
OPEN KEY ACTIVATION
OPERATOR STORES “00” CODES IN UNUSED RUN AND ERROR
CODE MEMORY LOCATIONS FROM THE FACTORY.
AS ERROR OR RUN CODES ARE RECORDED,
THE “00” CODES ARE REPLACED WITH VALID CODES.
NUMBER
CODE
NUMBER
CODE
Figure 5
Run Codes (continued)
CAL
RUN
SCROLL
SET
CLEAR
CAL
RUN
To view the run code memory:
1) Press CAL/RUN key to enter calibration mode.
2) Press SCROLL key until display reads “RUN CODE 1
>
.”
• The display will begin flashing the run code number and code
followed by its description.
• Remember: run code number 1 is the latest code generated.
3) Press SET/CLEAR key. The display will now read “RUN CODE 2
>
.”
(This is the run code which was generated before run code 1.)
4) Repeat step 3 until all 10 run codes have been displayed or move on to
step 5 when ready.
5) Press CAL/RUN key to return to run mode.
NOTE: For all run codes see Appendix C, Pages 10.11.
www.geniecompany.com 04-14
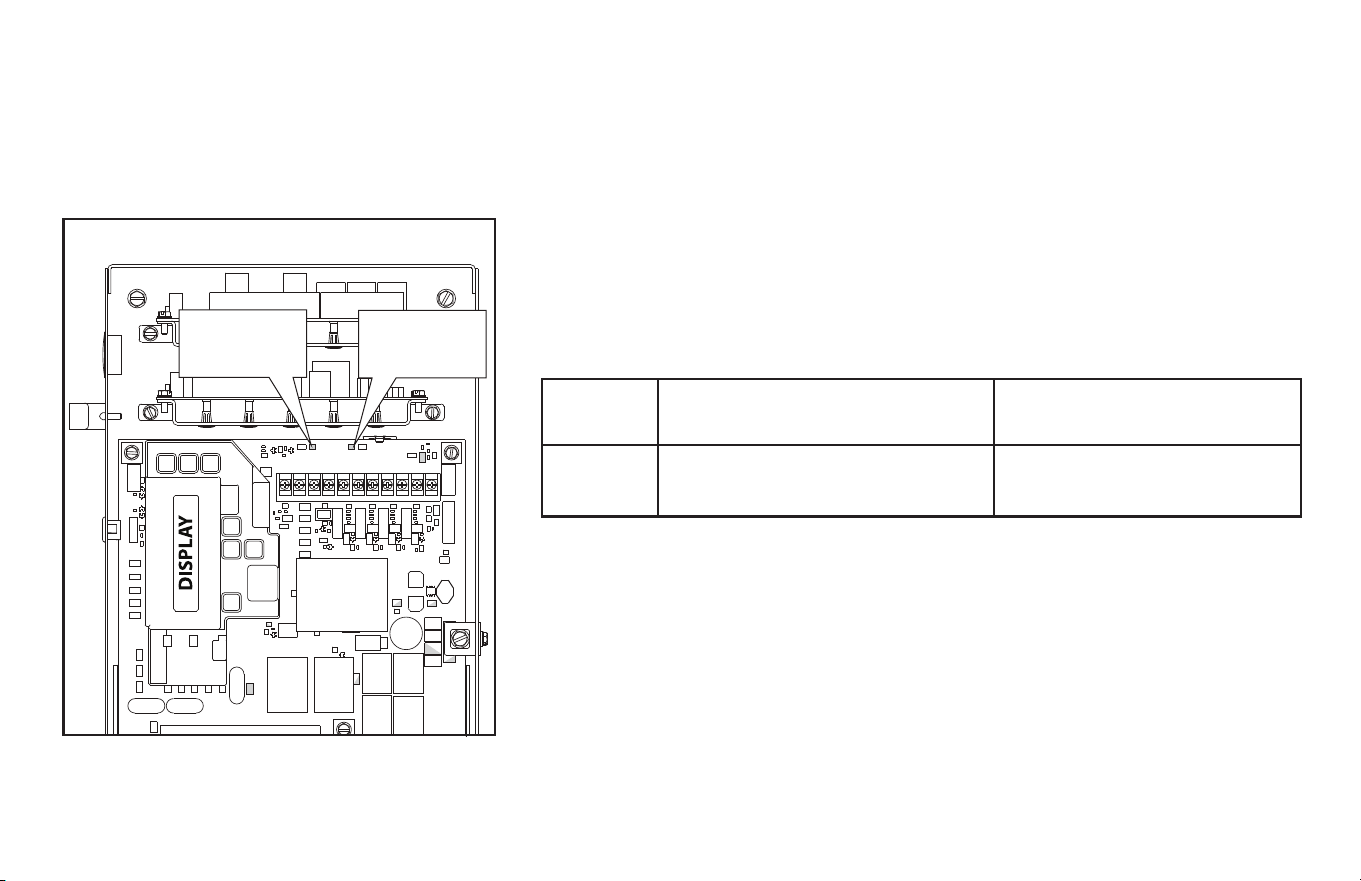
8.4
Operators include a self-diagnostic circuit board using troubleshooting LED
indicators to signal the technician of a problem.
LED Indicators Fig. 6
+24
VDC
STB
ENAB
Figure 6
TROUBLESHOOTING LED’s
+ 24 VOLTS
DC
STB
ENABLE
NORMALLY ON - STB ENABLED OFF - STB DISABLED
NORMALLY ON - POWER AVAILABLE
OFF - CHECK AC POWER SUPPLY
CHECK FUSES
www.geniecompany.com 04-14
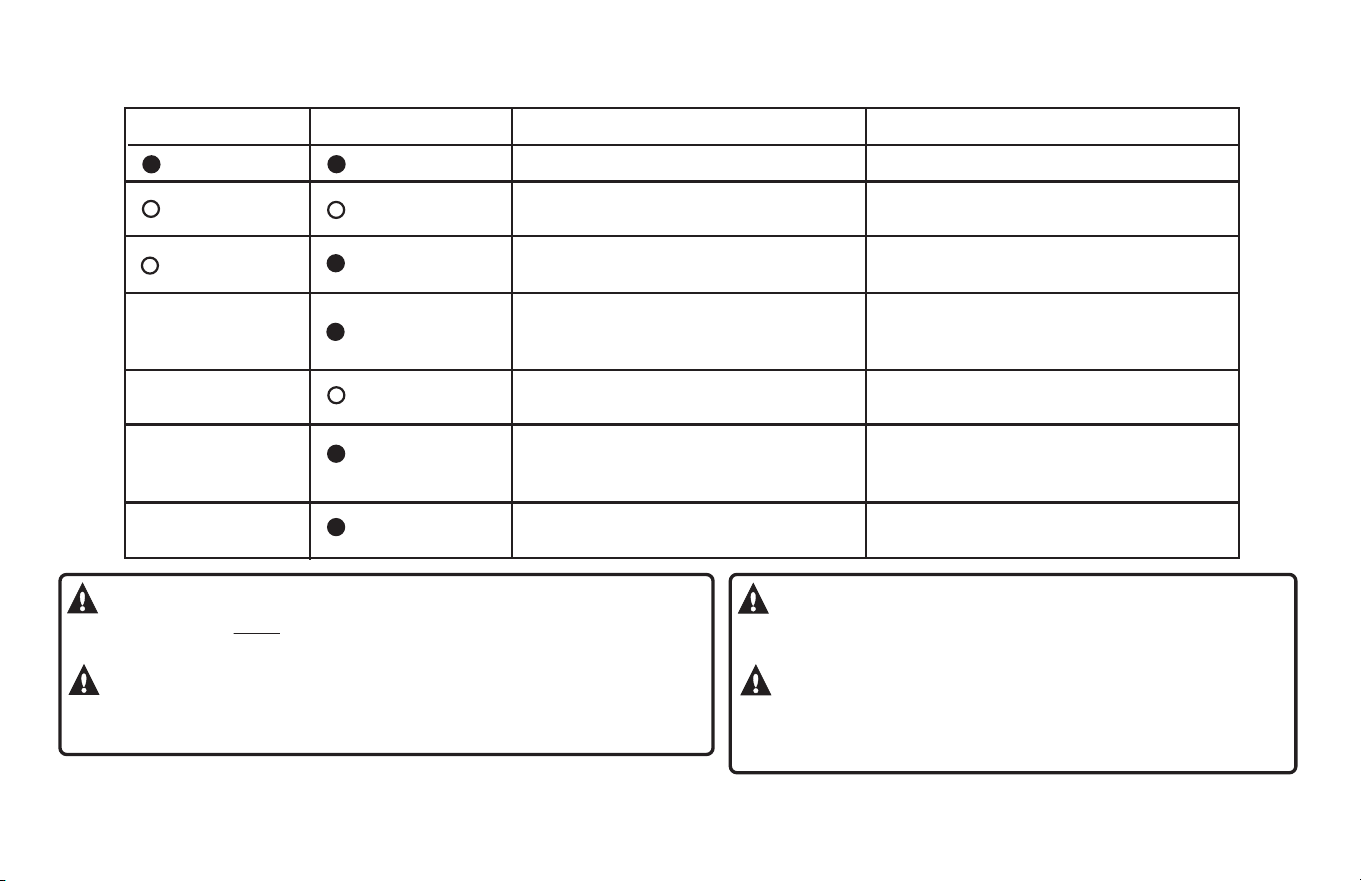
8.5
Monitored Photocell Self-diagnostic Troubleshooting Chart
www.geniecompany.com 04-14
ON
ON
NORMAL OPERATION
NONE REQUIRED
OFF
OFF
1. POWER HEAD NOT POWERED
2. WIRING FROM POWER HEAD BAD
1. CHECK BREAKERS, FUSES, PLUGS
2. CHECK WIRING FOR OBVIOUS SHORTS
OFF
ON
1. WIRING TO SOURCE MISSING OR BAD
2. POWER HAS BEEN INTERRUPTED
1. CHECK WIRING
2. REMOVE POWER AND REAPPLY
2 BLINKS, PAUSE
(REPEAT)
ON
1. BEAM NOT ALIGNED
2. BEAM OBSTRUCTED
3. SENSOR DEFECTIVE
1.CHECK ALIGNMENT
2. CHECK FOR OBSTRUCTION
3. CALL CUSTOMER SERVICE
1. WIRE TO SENSOR MISSING OR BAD
2. SENSOR DEFECTIVE
1. CHECK WIRING
2. CALL CUSTOMER SERVICE
OFF
ON
1. SENSOR RECEIVING INTERFERENCE
ON
1. SOURCE NOT SENDING PULSES
2. SOURCE DEFECTIVE
1. CALL CUSTOMER SERVICE
2. CALL CUSTOMER SERVICE
SOURCE
(
RED LED
)
SENSOR
(
GREEN LED
)
INDICATED CONDITION
REQUIRED ACTION
2 BLINKS, PAUSE
(REPEAT)
3 BLINKS, PAUSE
(REPEAT)
4 BLINKS, PAUSE
(REPEAT)
1. ATTEMPT TO DETERMINE SOURCE OF
INTERFERENCE
2. CALL CUSTOMER SERVICE
WARNING:
ACTUATING THE OPERATOR BY USING CONSTANT
CONTACT ON THE CLOSE BUTTON WILL OVERRIDE NON-FUNCTIONING EXTERNAL
REVERSING DEVICES, INCLUDING PHOTOCELLS.
AVERTISSEMENT:
L'ACTIVATION DE L'OPERATEUR
EN UTILISANT UN CONTACT CONSTANT SUR LE BOUTON FERMER ANNULERA LES
DISPOSITIFS D'INVERSIONS EXTERNES, Y COMPRIS LES CELLULES PHOTOELECTRIQUES.
WARNING:
The Genie® Company
recommends that line voltage wiring be performed by qualified
electrician. See Section 5 for additional wiring instructions.
AVERTISSEMENT:
Genie® Company
recommande que le câblage au secteur soit effectué
par un électricien qualifié. Voir la section 5 pour des instructions
supplémentaires sur le câblage.
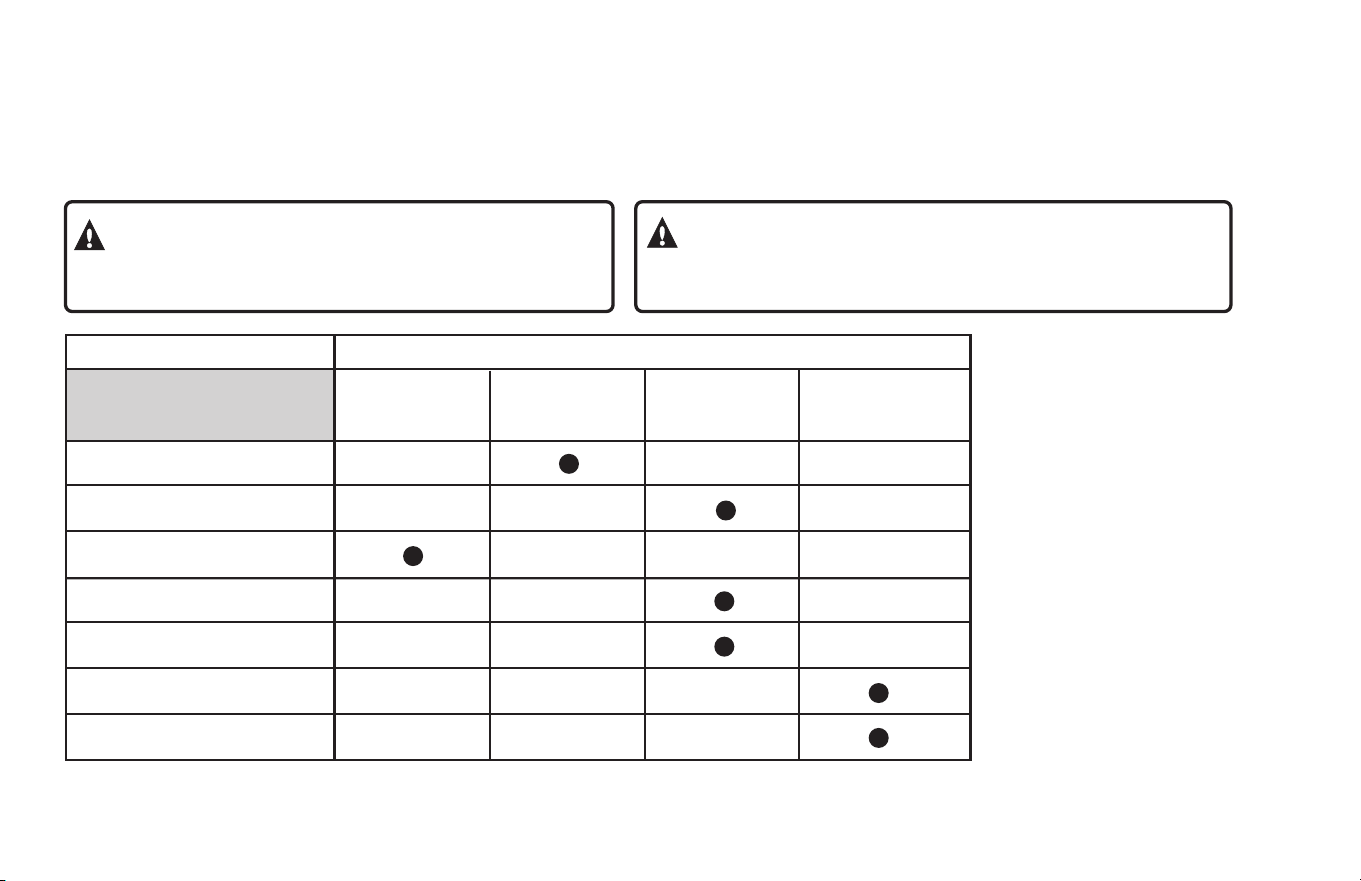
9.1
Section 9: Service and Maintenance
Maintenance Schedule
The following table provides a schedule of recommended Service and
Maintenance items to be completed by a trained service representative.
SERVICE ITEM SERVICE INTERVAL (FREQUENCY)
EVERY 6 MO. EVERY 12 MO. EVERY 36 MO.
MONTHLY OR OR OR
5,000 CYCLES 10,000 CYCLES 30,000 CYCLE
MANUAL OPERATION
OF DOOR
CHECK DRIVE CHAINS
AND LUBRICATE
PHOTOCELL/ SENSING EDGE
OPERATION
CLUTCH (OPTIONAL)
ADJUSTMENT
ESOOL ROF KCEHC
OR MISSING HARDWARE
CHECK LIMIT
POSITION
GEAR TRAIN
WEAR
www.geniecompany.com 04-14
CAUTION:
Failure to perform the recommended
Service & Maintenance may result in premature failure of
the operator.
ATTENTION:
Si les instructions de service et de
maintenance recommandés ne sont pas suivies, l'opérateur pourrait
tomber en panne prématurément.
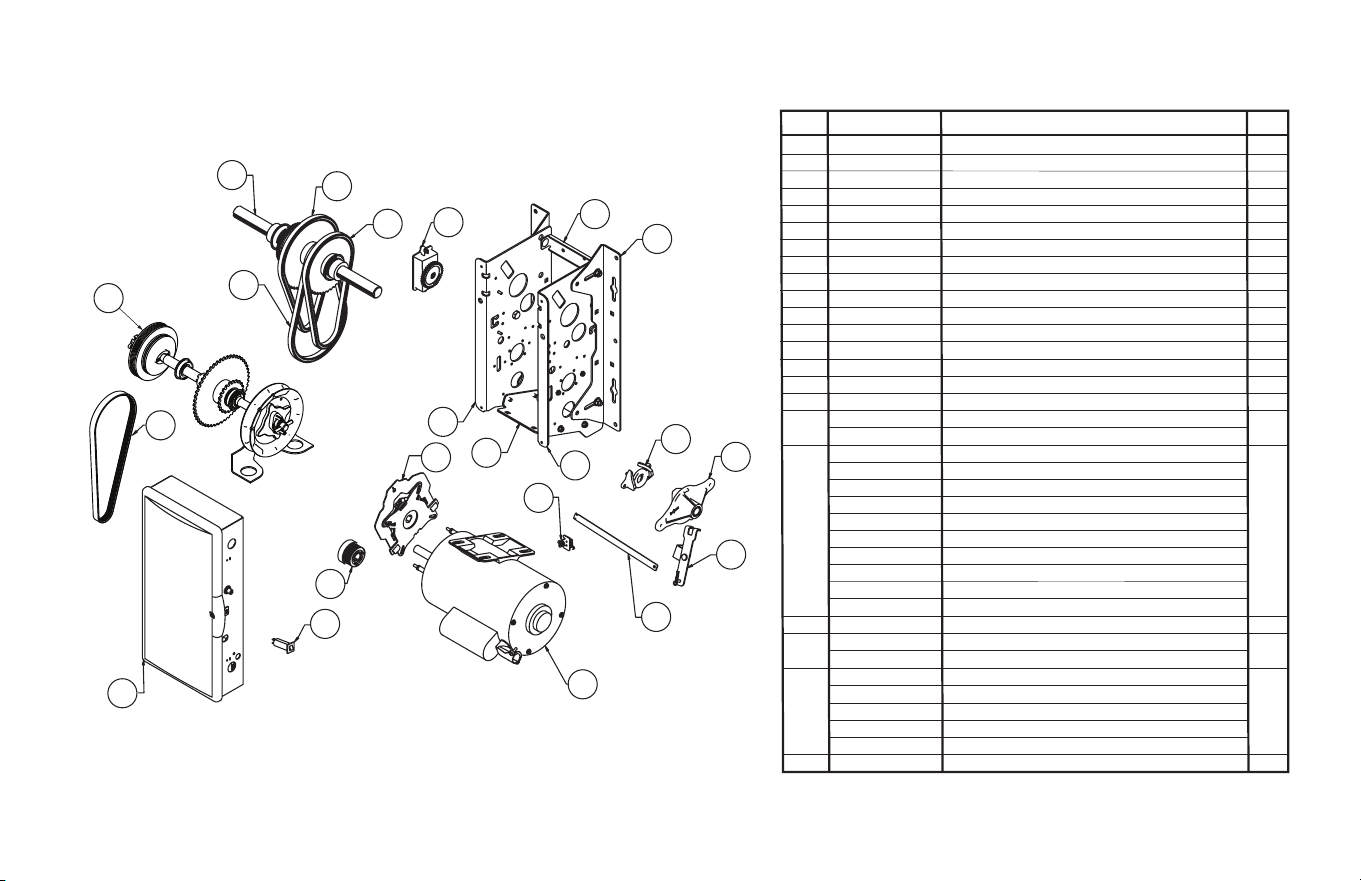
10.1
www.geniecompany.com
01-14
Section 10: Appendix A
Basic Operator Parts
Hoist
2
3
4
5
6
7
8
13
12
11
10
9
17
21
16
15
18
19
20
14
1
22
1 111438.0001
CLUTCH SHAFT ASSY
2 110877.0072
CHAIN, #35 X 72P
3
111392.0001
OUTPUT SHAFT ASSY
4 110877.0070
CHAIN, #35 X 70P
5 110877.0068
CHAIN, #35 X 68P
6 111421.0003
LIMIT MODULE
7 110627.0001
SUPPORT BRACE
8 110626.0001
MOUNTING BRACKET
9 110625.0002
LEFT HAND ENCLOSURE
10 110636.0001
MOTOR PLATE
11 110625.0001
RIGHT HAND ENCLOSURE
12 111036.0001
LIFTING RAMP
13 111089.0001
RELEASE LEVER ASSY
14 111088.0001
RELEASE BRACKET
15 111031.0001
HOIST LINK
16 111420.0001
INTERLOCK SWITCH
111396.0001
BRAKE ASSY, 1/2 HP, 1 PH
111396.0002
BRAKE ASSY, ALL OTHER MOTORS
110635.0001
MOTOR, 1/2 HP, 1 PHASE
110635.0002
MOTOR, 3/4 HP, 1 PHASE
110635.0003
MOTOR, 1 HP, 1 PHASE
110635.0004
MOTOR, 1/2 HP, 3 PHASE
110635.0005
MOTOR, 3/4 HP, 3 PHASE
110635.0006
MOTOR, 1 HP, 3 PHASE
110635.0007
MOTOR, 1/2 HP, 575V
110635.0008
MOTOR, 3/4 HP, 575V
110635.0009
MOTOR, 1 HP, 575V
19 111404.0001
MOTOR PULLEY
110100.0012
CIRCUIT BREAKER, 3/4 HP, 1 PHASE
110100.0015
CIRCUIT BREAKER, 1 HP, 1 PHASE
111858.0001
ELECTRIC BOX, 1 PHASE, 1/2 HP
111858.0002
ELECTRIC BOX, 1 PHASE, 3/4 HP
111858.0003
ELECTRIC BOX, 1 PHASE, 1 HP
111858.0005
ELECTRIC BOX, 3 PHASE
22 111010.0001
POLY-V BELT
111429.0001
MOTOR, 1/2 HP, 1 PHASE, W/O BRAKE
111858.0006
ELECTRIC BOX, 575V
Item Part Number Description Qty
18
17
20
21
1
1
1
1
1
1
1
2
1
1
1
1
1
1
1
1
1
1
1
1
1
1
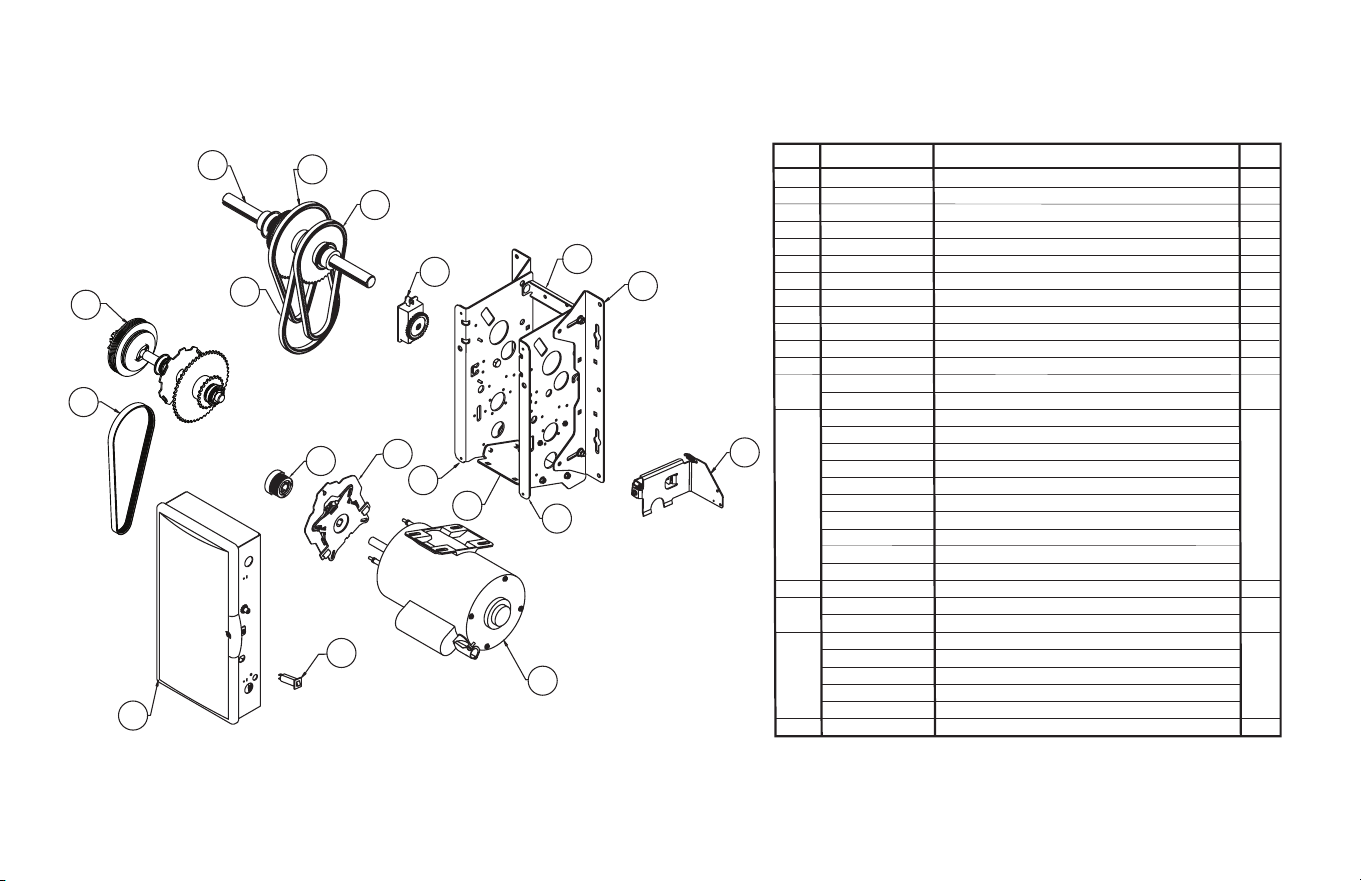
Section 10: Appendix A
Basic Operator Parts
Jackshaft
10.2
www.geniecompany.com 01-14
16
17
18
1
3
2
4
5
6
7
8
12
15
13
9
10
11
14
1 111437.0001
CLUTCH SHAFT ASSY
2 110877.0072
CHAIN, #35 X 72P
3
111392.0001
OUTPUT SHAFT ASSY
4 110877.0070
CHAIN, #35 X 70P
5 110877.0068
CHAIN, #35 X 68P
6 111421.0003
LIMIT MODULE
7 110627.0001
SUPPORT BRACE
8 110626.0001
MOUNTING BRACKET
9 110625.0002
LEFT HAND ENCLOSURE
10 110636.0001
MOTOR PLATE
11 110625.0001
RIGHT HAND ENCLOSURE
12 111030.0001
RELEASE ASSY
111396.0001
BRAKE ASSY, 1/2 HP, 1 PH
111396.0002
BRAKE ASSY, ALL OTHER MOTORS
110635.0001
MOTOR, 1/2 HP, 1 PHASE
110635.0002
MOTOR, 3/4 HP, 1 PHASE
110635.0003
MOTOR, 1 HP, 1 PHASE
110635.0004
MOTOR, 1/2 HP, 3 PHASE
110635.0005
MOTOR, 3/4 HP, 3 PHASE
110635.0006
MOTOR, 1 HP, 3 PHASE
110635.0007
MOTOR, 1/2 HP, 575V
110635.0008
MOTOR, 3/4 HP, 575V
110635.0009
MOTOR, 1 HP, 575V
15 111404.0001
MOTOR PULLEY
110100.0012
CIRCUIT BREAKER, 3/4 HP, 1 PHASE
110100.0015
CIRCUIT BREAKER, 1 HP, 1 PHASE
111858.0001
ELECTRIC BOX, 1 PHASE, 1/2 HP
111858.0002
ELECTRIC BOX, 1 PHASE, 3/4 HP
111858.0003
ELECTRIC BOX, 1 PHASE, 1 HP
111858.0005
ELECTRIC BOX, 3 PHASE
18 111010.0001
POLY-V BELT
111429.0001
MOTOR, 1/2 HP, 1 PHASE, W/O BRAKE
111858.0006
ELECTRIC BOX, 575V
Item Part Number Description Qty
14
13
16
17
1
1
1
1
1
1
1
2
1
1
1
1
1
1
1
1
1
1
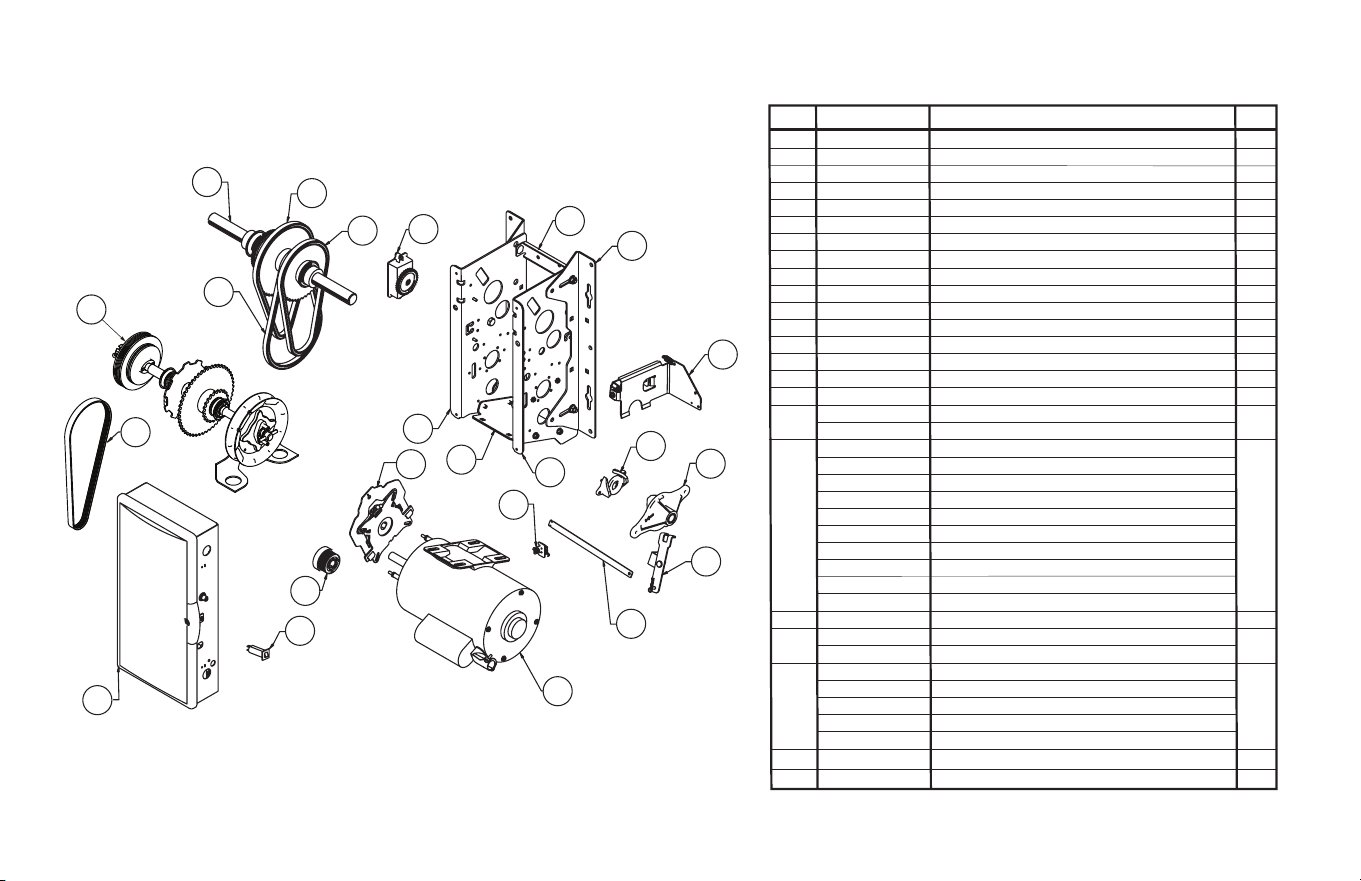
Section 10: Appendix A
Basic Operator Parts
Jackshaft/Hoist Combo
10.3
www.geniecompany.com 01-14
2
3
4
5
6
7
8
13
12
11
10
9
17
21
16
15
18
19
20
14
1
22
23
1 111388.0001
CLUTCH SHAFT ASSY
2 110877.0072
CHAIN, #35 X 72P
3
111392.0001
OUTPUT SHAFT ASSY
4 110877.0070
CHAIN, #35 X 70P
5 110877.0068
CHAIN, #35 X 68P
6 111421.0003
LIMIT MODULE
7 110627.0001
SUPPORT BRACE
8 110626.0001
MOUNTING BRACKET
9 110625.0002
LEFT HAND ENCLOSURE
10 110636.0001
MOTOR PLATE
11 110625.0001
RIGHT HAND ENCLOSURE
12 111036.0001
LIFTING RAMP
13 111089.0001
RELEASE LEVER ASSY
14 111088.0001
RELEASE BRACKET
15 111031.0001
HOIST LINK
16 111420.0001
INTERLOCK SWITCH
111396.0001
BRAKE ASSY, 1/2 HP, 1 PH
111396.0002
BRAKE ASSY, ALL OTHER MOTORS
110635.0001
MOTOR, 1/2 HP, 1 PHASE
110635.0002
MOTOR, 3/4 HP, 1 PHASE
110635.0003
MOTOR, 1 HP, 1 PHASE
110635.0004
MOTOR, 1/2 HP, 3 PHASE
110635.0005
MOTOR, 3/4 HP, 3 PHASE
110635.0006
MOTOR, 1 HP, 3 PHASE
110635.0007
MOTOR, 1/2 HP, 575V
110635.0008
MOTOR, 3/4 HP, 575V
110635.0009
MOTOR, 1 HP, 575V
19 111404.0001
MOTOR PULLEY
110100.0012
CIRCUIT BREAKER, 3/4 HP, 1 PHASE
110100.0015
CIRCUIT BREAKER, 1 HP, 1 PHASE
111858.0001
ELECTRIC BOX, 1 PHASE, 1/2 HP
111858.0002
ELECTRIC BOX, 1 PHASE, 3/4 HP
111858.0003
ELECTRIC BOX, 1 PHASE, 1 HP
111858.0005
ELECTRIC BOX, 3 PHASE
22 111010.0001
POLY-V BELT
111429.0001
MOTOR, 1/2 HP, 1 PHASE, W/O BRAKE
111858.0006
ELECTRIC BOX, 575V
Item Part Number Description Qty
18
17
20
21
1
1
1
1
1
1
1
2
1
1
1
1
1
1
1
1
1
1
1
1
1
123 111030.0001 RELEASE ASSY
1
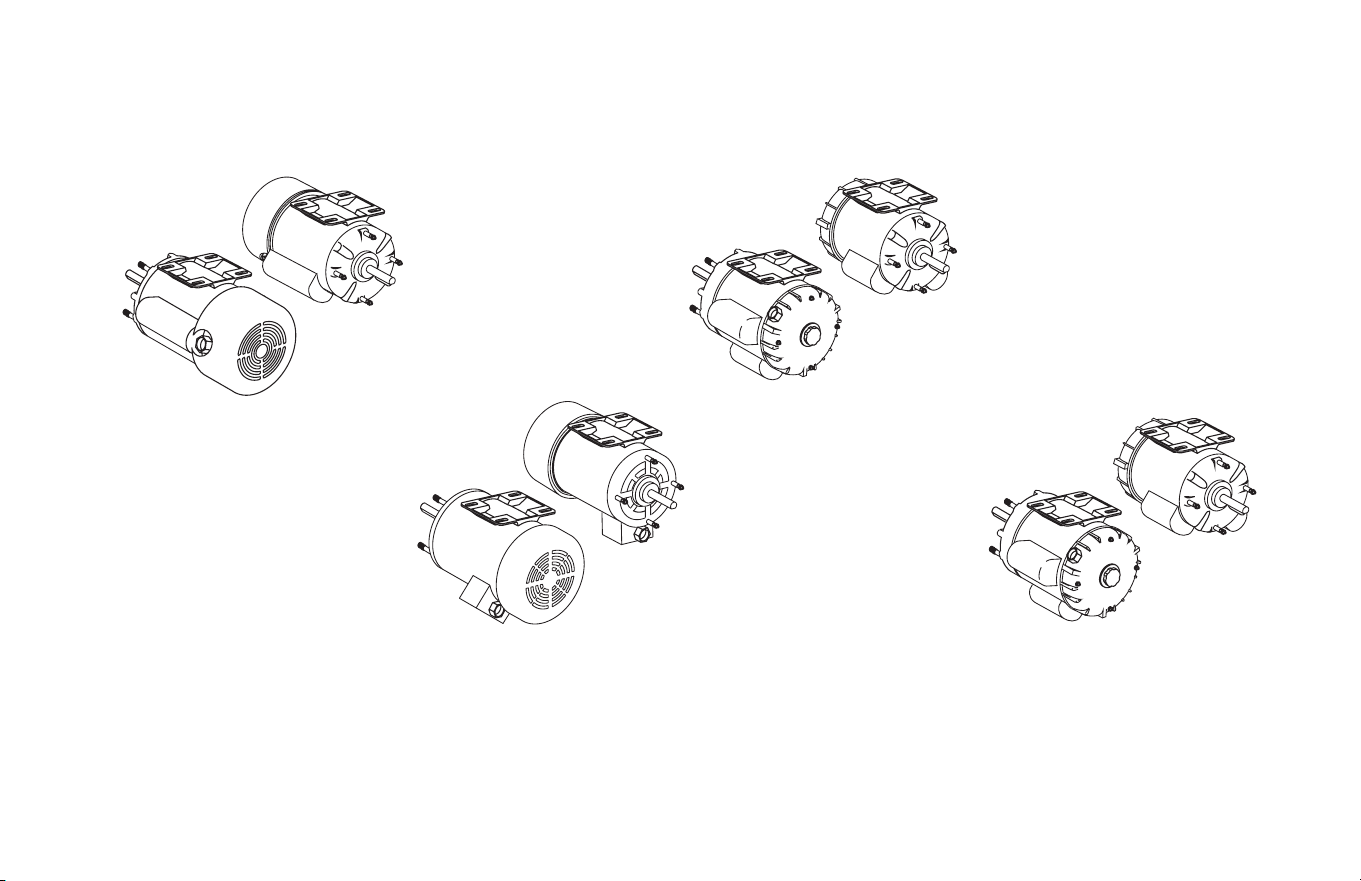
10.4
www.geniecompany.com
01-14
Section 10: Appendix A
Alternate Motor Options (Not UL Approved)
TEFC, SINGLE PHASE
*111306.0001, 1/2 HP, 115/208,230 V
111306.0002, 3/4 HP, 115/208/230 V
111306.0003, 1 HP, 115/208/230 V
TEFC, THREE PHASE
*111308.0001, 1/2 HP, 208/230/460 V
111308.0002, 3/4 HP, 208/230/460 V
111308.0003, 1 HP, 208/230/460 V
111308.0006, 1 HP, 575 V
TENV, SINGLE PHASE
*111309.0001, 1/2 HP, 115/208/230 V
111309.0002, 3/4 HP, 115/208/230 V
TENV, THREE PHASE
*111309.0004, 1/2 HP, 208/230/460 V
111309.0005, 3/4 HP, 208/230/460 V
111309.0006, 1 HP, 208/230/460 V
111309.0009, 1 HP, 575 V
*NOT AVAILIABLE ON
OPERATOR W/O BRAKE
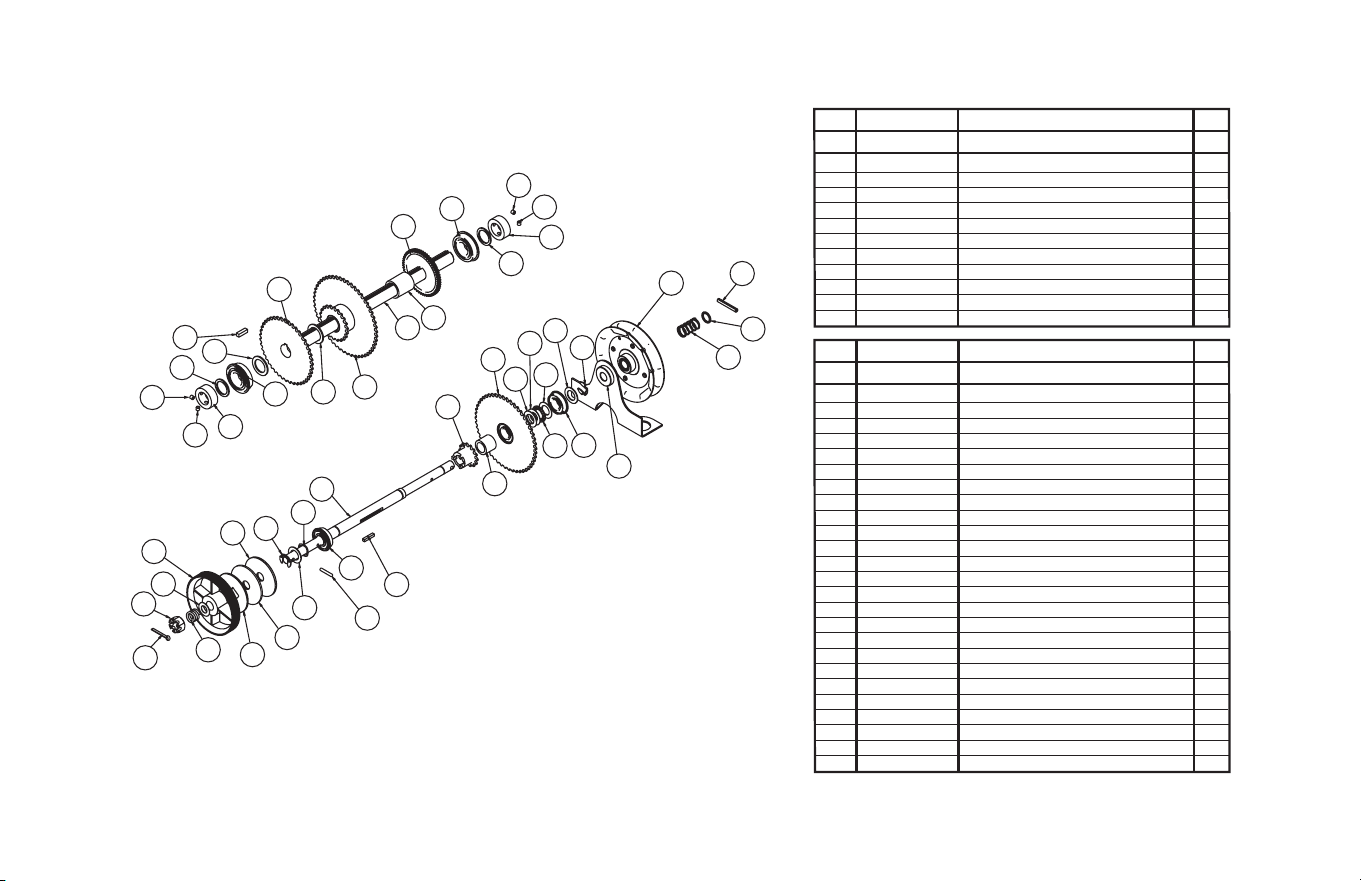
www.geniecompany.com 01-14
Appendix A (continued)
Basic Shafts Parts
Hoist
10.5
5
22
3
4
7
6
8
9
OUTPUT SHAFT
5
8
8
6
2
7
3
4
1
10
11
2
8
8
6
5
9
7
25
18
1
20
16
23
23
23
17
11
12
13
14
10
15
24
25
19
21
15
2
17
CLUTCH SHAFT
Item Part Number Description Qty
3
SHAFT, OUTPUT, 1” DIA, SDMT
110644.0001
1
111074.0001
GEAR, LIMIT, 56T, SDMT
1
11
080340.0074
KEY, SQ, 1/4” X 7/8” 19
1
10
604297.4100
080300.1604
SET COLLAR, 1”ID X 1-5/8” OD 2
6
SCR, SET, KNRLD, 1/4”-20 X 1/4”
4
8
110393.0001
WASHER, SPACER, 1.015” ID
2
7
BEARING, 1.000” ID
110694.0001
SPROCKET, 43T, #35, 3/8P
110663.0003
SPRKT & BUSHING ASSY, 22T-52T
111013.0001
WASHER, PLAIN, 1.026 ID
110819.0002
SPACER, OUTPUT SHAFT
111044.0001
111392.0001 OUTPUT SHAFT ASSY
1
2
4
5
1
2
1
2
Item Part Number Description Qty
3
SHAFT, CLUTCH, .75” DIA, HOIST110669.0001
1
080401.0624 PIN, COTTER, 3/16” X 1-1/2” L 19
1
10
075197.0000
110472.0001
SPRING, CLUTCH 1
6
NUT, HEX, SLOTTED, 5/8”-11
1
8
086649.0029 WASHER, THRUST, .64
1
7
PIN, DOWEL, .188 X 1.13/1.00110881.0001
LINING, CLUTCH075193.0000
DISC, CLUTCH108015.0001
PULLEY ASSY, CLUTCH111433.0001
CHAIN GUARD ASSY
110411.0001
111438.0001 CLUTCH SHAFT ASSY
1
2
4
5
1
1
1
1
13
HANDWHEEL, STANDARD CHAIN110872.0001
1
111045.0001 SPACER, CLUTCH SHAFT 1
19
1
20
111020.0001
110818.0004
SPROCKET ASSY, 22T-50T 1
16
WASHER, WAVE SPRING, .780” ID
1
18
110819.0003 WASHER, .770” ID
2
17
PIN, SPRING, .250 DIA X 2.00110313.0010
WASHER, PAIN, .651 ID110819.0001
SPRING, HANDWHEEL112389.0001
BEARING, .750 ID110695.0001
SPROCKET, 14T, .75” ID
110709.0001
11
12
14
15
1
1
1
2
111402.0001 BEARING, THRUST 1
24
2
25
111068.0001
111403.0001
KEY, SQUARE, 3/16” 1
21
WASHER, THRUST
3
23
111037.0001 DISC, CLUTCH
1
22
RING, RTNG, HIGH GRIP STRENGTH
111382.0001
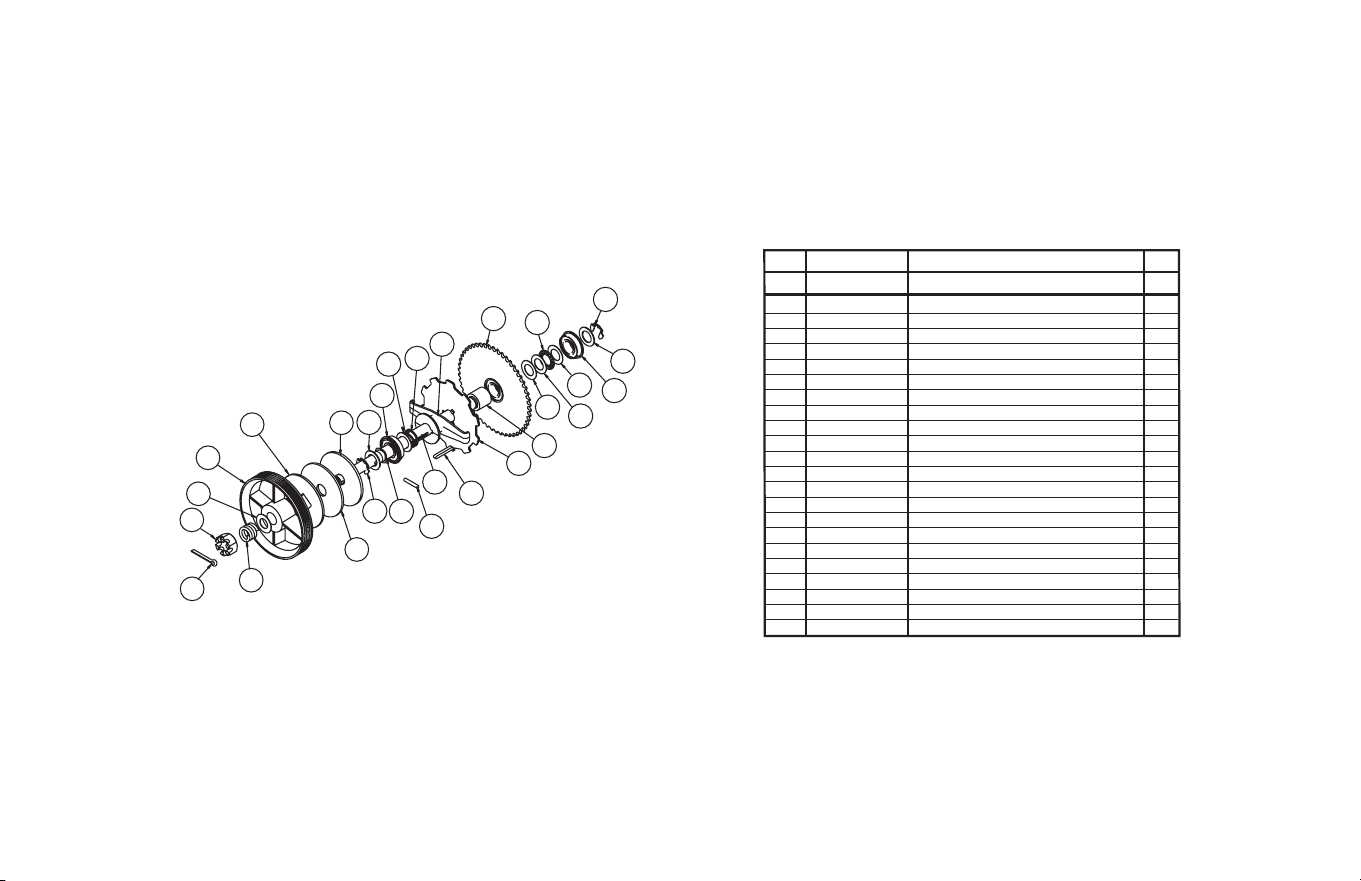
10.6
Appendix A (continued)
Basic Shaft Parts
Jackshaft
www.geniecompany.com 01-14
9
6
8
7
5
4
14
3
2
11
1
10
19
15
17
13
12
16
21
22
17
15
20
20
20
17
18
22
CLUTCH SHAFT
Item Part Number Description Qty
3
SHAFT, CLUTCH, .75” DIA111029.0001
1
080401.0624 PIN, COTTER, 3/16” X 1-1/2” L 19
1
10
075197.0000
110472.0001
SPRING, CLUTCH 1
6
NUT, HEX, SLOTTED, 5/8”-11
1
8
086649.0029 WASHER, THRUST, .64
1
7
PIN, DOWEL, .188 X 1.13/1.00110881.0001
LINING, CLUTCH075193.0000
DISC, CLUTCH108015.0001
PULLEY ASSY, CLUTCH111433.0001
111437.0001 CLUTCH SHAFT ASSY
1
2
4
5
1
1
1
1
13
1
111045.0001 SPACER, CLUTCH SHAFT 1
19
20
111020.0001
110818.0004
SPROCKET ASSY, 22T-50T 1
16
WASHER, WAVE SPRING, .780” ID
1
18
110819.0003 WASHER, .770” ID
3
17
BEARING, .750 ID110695.0001
11
12
14
15
1
1
1
2
111402.0001 BEARING, THRUST
1
2
111403.0001
21
WASHER, THRUST
3
111037.0001 DISC, CLUTCH
22
RING, RTNG, HIGH GRIP STRENGTH
111382.0001
110610.0001 SPRKT & ENGAGEMENT PLATE
110816.0001 KEY, ROUND END, .188 X 1.50
110387.0002 SLIDER, JACKSHAFT, SX
111175.0001 SPRING, 1.10” OD
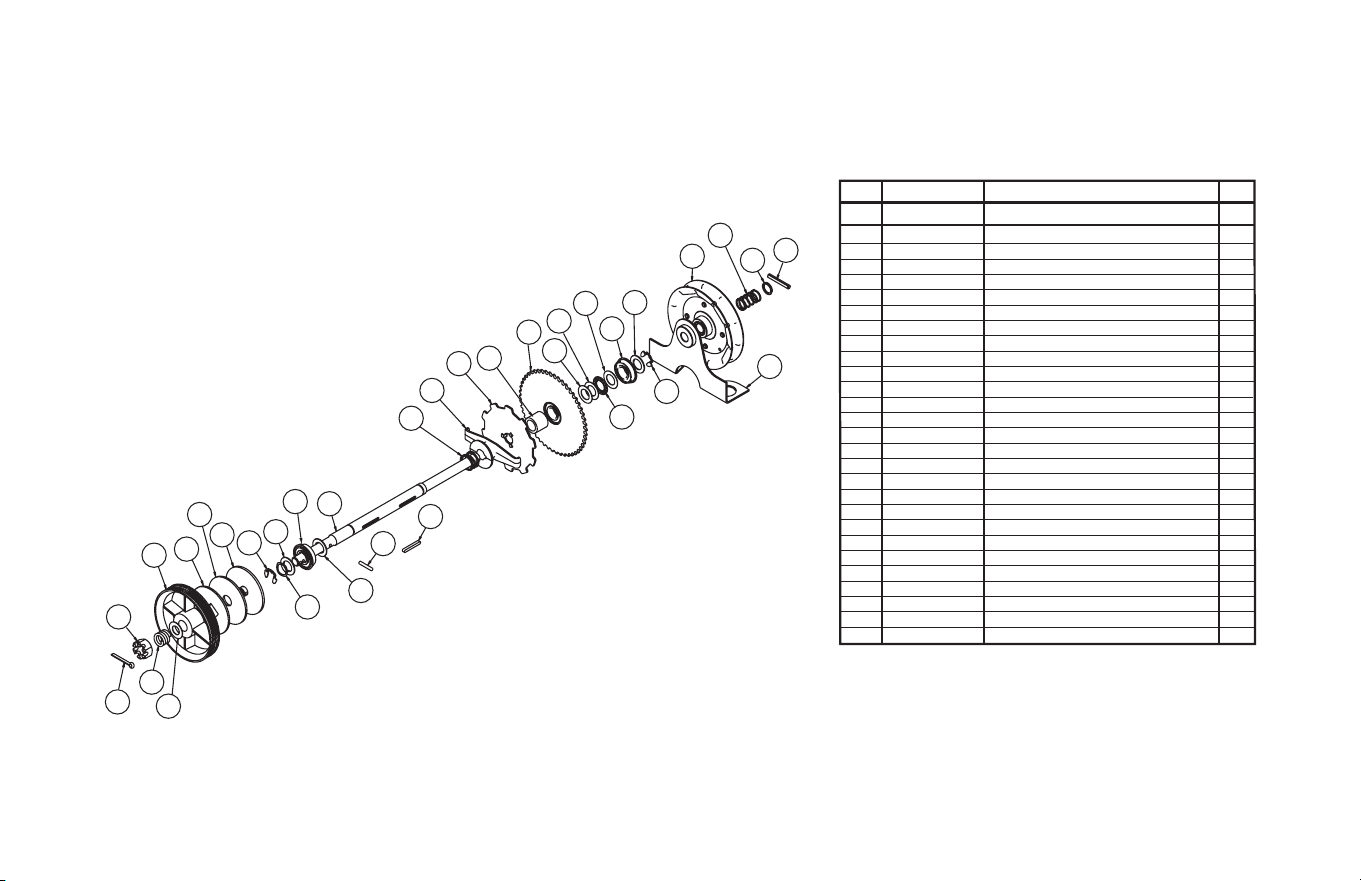
10.7
www.geniecompany.com 01-14
Appendix A (cont’)
Basic Shaft Parts
Hoist/Release Combo
9
8
6
7
5
4
22
3
25
17
18
17
2
1
21
27
26
20
19
16
15
25
24
10
11
23
14
13
12
Item Part Number Description Qty
3
SHAFT, CLUTCH, .75” DIA, HST/JACK111077.0001
1
080401.0624 PIN, COTTER, 3/16” X 1-1/2” L 19
1
10
075197.0000
110472.0001
SPRING, CLUTCH 1
6
NUT, HEX, SLOTTED, 5/8”-11
1
8
086649.0029 WASHER, THRUST, .64
1
7
PIN, DOWEL, .188 X 1.13/1.00110881.0001
LINING, CLUTCH075193.0000
DISC, CLUTCH108015.0001
PULLEY ASSY, CLUTCH111433.0001
CHAIN GUARD ASSY
110411.0001
111388.0001 CLUTCH SHAFT ASSY
1
2
4
5
1
1
1
1
13
HANDWHEEL, STANDARD CHAIN110872.0001
1
111045.0001 SPACER, CLUTCH SHAFT 1
19
1
20
111020.0001
110818.0004
SPROCKET ASSY, 22T-50T 1
16
WASHER, WAVE SPRING, .780” ID
1
18
110819.0003 WASHER, .770” ID
3
17
PIN, SPRING, .250 DIA X 2.00110313.0010
WASHER, PLAIN, .651 ID110819.0001
SPRING, HANDWHEEL112389.0001
BEARING, .750 ID110695.0001
SPROCKET & ENGAGEMENT PLATE
110610.0001
11
12
14
15
1
1
1
2
111402.0001 BEARING, THRUST 1
24
2
25
110816.0001
111403.0001
KEY, ROUND END, .188 X 1.50 1
21
WASHER, THRUST
3
23
111037.0001 DISC, CLUTCH
1
22
RING, RTNG, HIGH GRIP STRENGTH
111382.0001
15
23
17
23
1
26
SLIDER, JACKSHAFT
110387.0002
1
27
SPRING, 1.10 O.D.
111175.0001
CLUTCH SHAFT
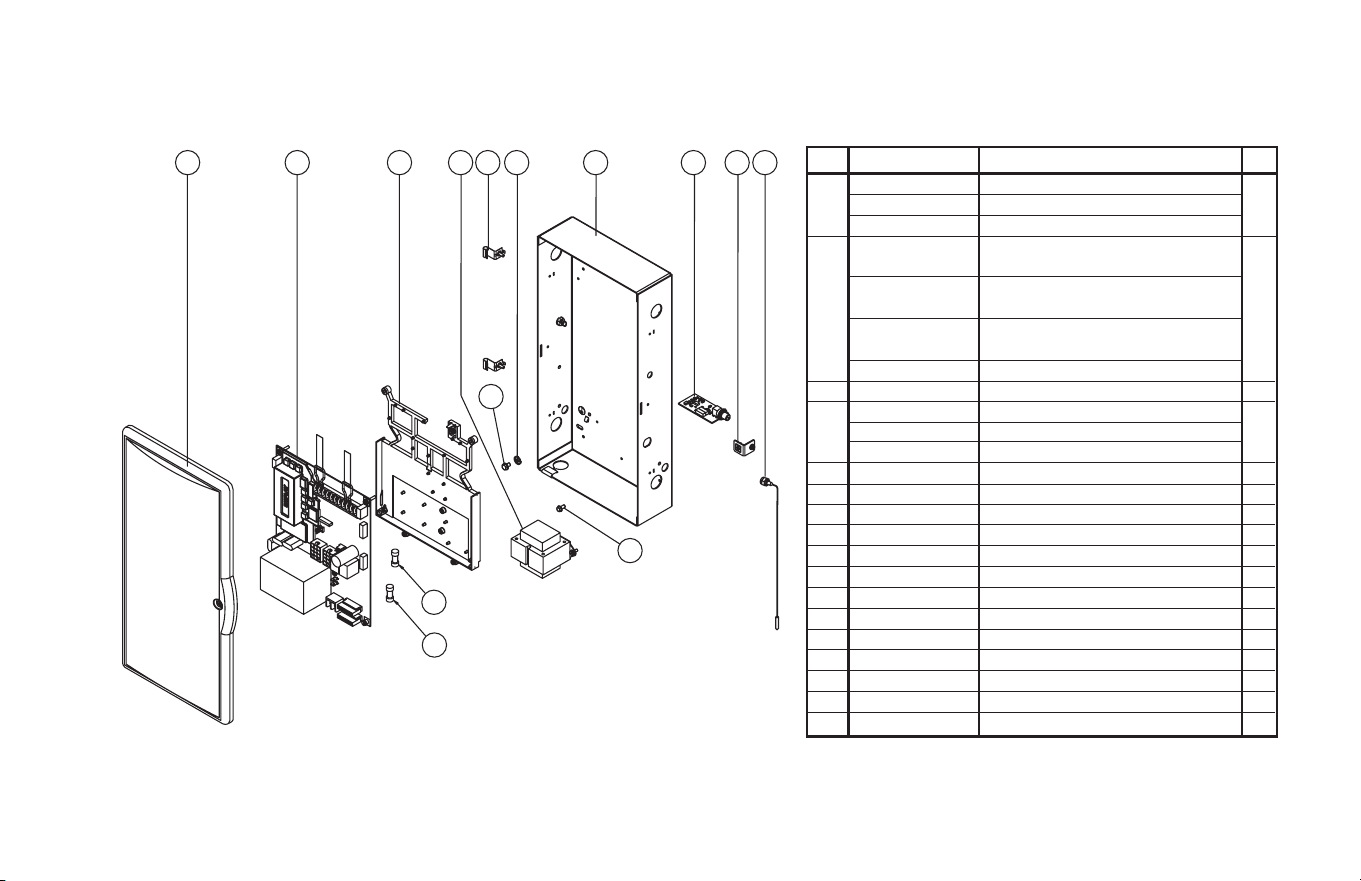
10.8
Appendix A (cont’)
Basic Electric Box Parts
www.geniecompany.com
04-14
13
NS
13
14
Item Part Number Description Qty
1
112363.0001 COVER ASSY, 1 PHASE
112363.0002 COVER ASSY, 3 PHASE 1
112363.0003 COVER ASSY, 575V
2
112357.0001
CIRCUIT BOARD ASSY,
1 PHASE, 3/4-1 HP
1
112357.0002
CIRCUIT BOARD ASSY,
1 PHASE, 1/2 HP
112357.0003
CIRCUIT BOARD ASSY,
3 PHASE
112357.0004 CIRCUIT BOARD ASSY, 575V
3
111401.0001 INSUL
ATOR BOARD ASSY 1
4
111087.0001
XFMR, 115/208/230V, 1 PHASE
111087.0002
XFMR, 208/230/460V, 3 PHASE 1
111087.0003
XFMR, 575V
5
6
7
22634A
WASHER, CUP
1
8
110950.0001
HINGE ASSY
2
9
110630.0001
ELECTRIC BOX
1
10
111397.0001
RECEIVER ASSY
1
111398.0001
LATCH ASSY 1
111352.0001 ANTENNA ASSY
1
NS 111405.0001 SPARE FUSE KIT
1
2 3 4 5 6 7 8 9 10
NS=NOT SHOWN
12
11
11 8706F29
SCREW, GROUND, #10-32 X 3/8
12 8706E29 SCREW, GROUND, #8-32 X 3/8
1
1
14
34004DR250
34004C02R5
FUSE, .250A, SLOW BLOW
FUSE, 2.5A, FAST ACTING
112402.0001 KIT, RELAY, (FOR NO BRAKE ONLY)
111439.0001 PARTS PACK, RADIO PIGTAIL
NS
1
1
.250 AMP (FUSE WITH WHITE MARK)
2.5 AMP (FUSE WITH RED MARK)
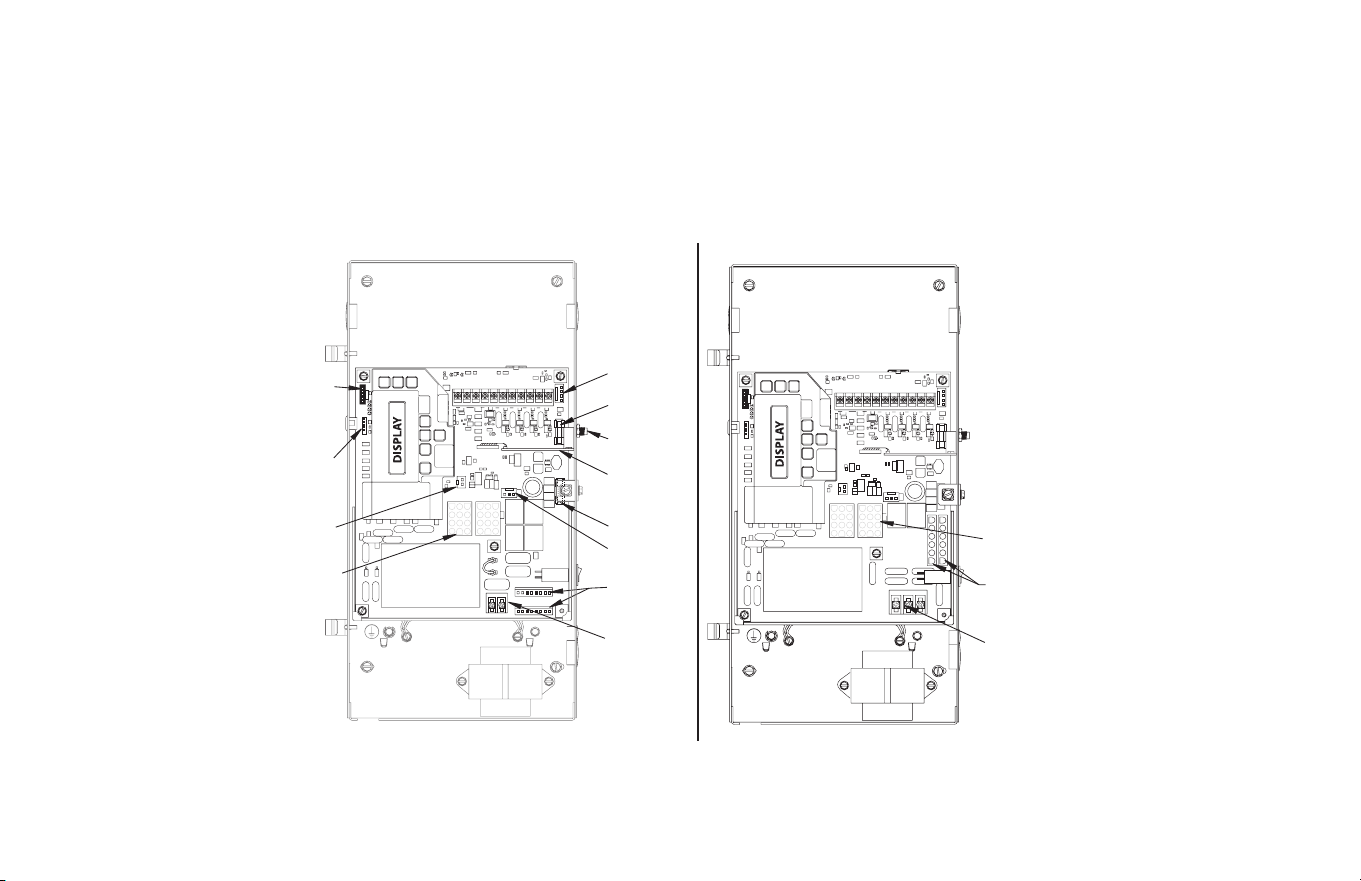
Transformer
Connectors
Input
Power
Connectors
460V
3 PH
208/
230V
3 PH
Transformer
Connectors
115V
1 PH
208/
230V
1 PH
External
Radio
Connector
Internal
Radio
Board
Radio
Fuse
Fuse
Antenna
Input
(Coax)
Brake
Connector
Input
Power
Connectors
Hoist
Interlock
Connector
Motor
Connectors
Motor
Connectors
Expansion
Board
Port
Limit
Sensor
Connector
10.9
Appendix A (cont’)
Electric Box Layout
Three Phase
Single Phase
www.geniecompany.com 01-14
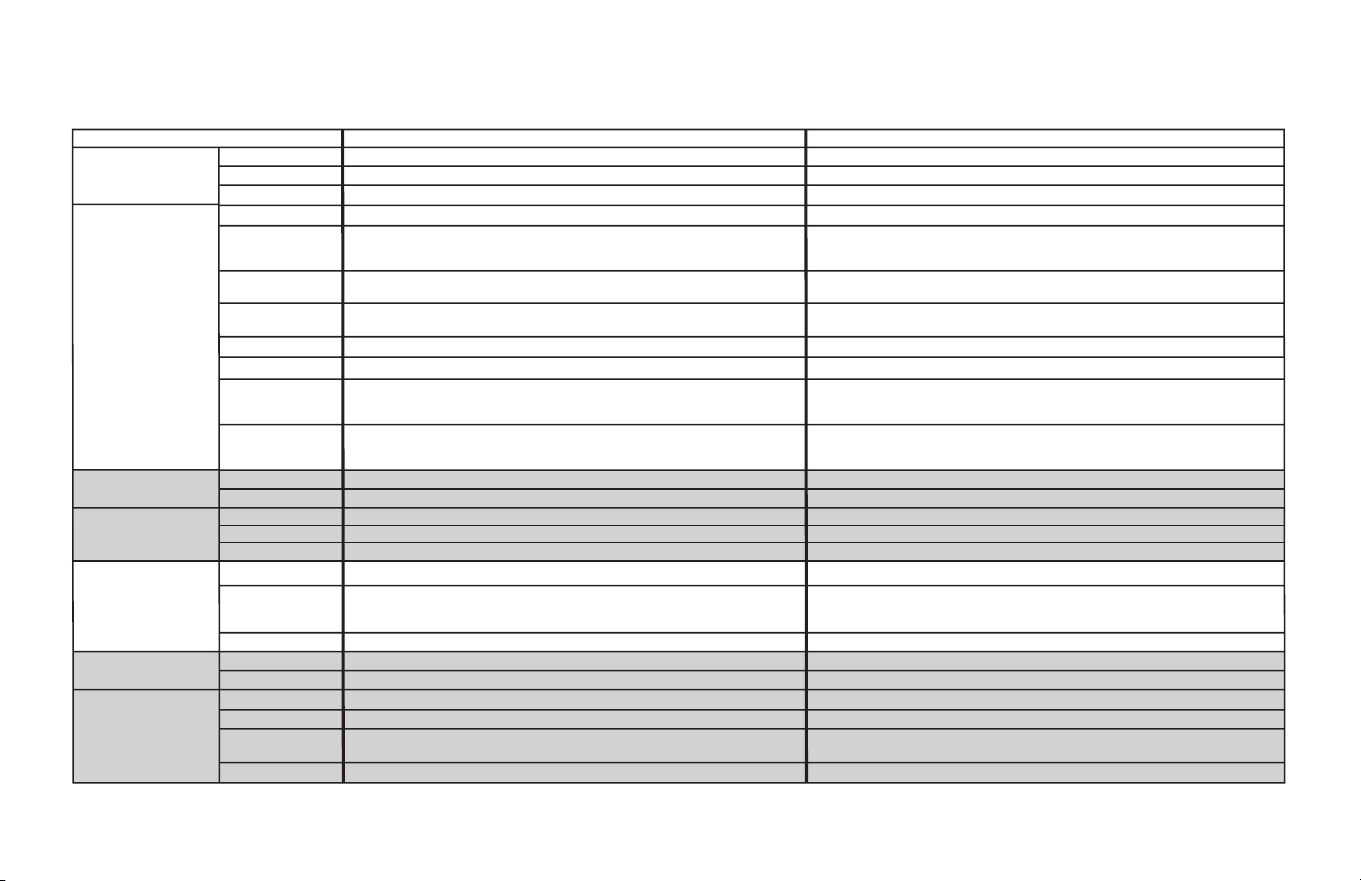
10.10
Section 10: Appendix B
www.geniecompany.com 01-14
Screw Terminal Assignments
FUNCTION CONNECTION TYPE
11-POSITION
TERMINAL BLOCK
INSIDE ELECTRIC BOX
OPEN
Causes door to open if not at Up Limit.
Causes a closing door to reverse.
CLOSE
Causes door to close if not at Down Limit.
Normally-Open Dry Contact to GND.
Normally-Open Dry Contact to GND.
STOP
Causes a moving door to stop.
Prevents the operator from running.
Normally-Closed Dry Contact to GND.
GND
Common ground connection for Open, Close, Stop &
1-Btn Inputs.
1-BTN
Causes door to open if not at Up Limit or Mid-Stop Limit.
Causes door to close if at Up Limit or Mid-Stop Limit.
Causes door to stop if opening.
Causes a closing door to reverse.
Normally-Open Dry Contact to GND.
ODC STB
Reverses a closing door if photocell beam is blocked.
NOTE: STB's must be enabled in Calibration Mode.
ODC Series II Safe-T-Beams® ONLY to
these inputs.
ODC STB
Reverses a closing door if photocell beam is blocked.
NOTE: STB's must be enabled in Calibration Mode.
N-O REVERSE
Causes a closing door to reverse.
NOTE: Will not open a stopped door.
Normally-Open 2-Wire Non-Monitored Edge Sensor.
N-O REVERSE
Causes a closing door to reverse.
NOTE: Will not open a stopped door.
Normally-Open 2-Wire Non-Monitored Edge Sensor.
EXT INTLK
Causes a moving door to stop.
Prevents the operator from running when contact is open.
Operates even if microcontroller is non-functional.
Normally-Closed dry contacts.
(board will energize these contacts at nominal +24VDC).
EXT INTLK
Causes a moving door to stop.
Prevents the operator from running when contact is open.
Operates even if microcontroller is non-function
al.
Normally-Closed dry contacts.
(board will energize these contacts at nominal +24VDC).
2-POS TERMINAL BLOCK
L1 / L1
120VAC: Connect to Line (Hot) / 240VAC: Connect to Line 1.
Power to Operator.
1 PHASE
(INSIDE ELECTRIC BOX)
N / L2
120VAC: Connect to Neutral / 240VAC: Connect to Line 2.
Power to Operator.
PWR
Power for radio & other accessories.
+20 to +40VDC, fused at 250mA (F1).
Connect to radio or other accessory's power input.
RAD
GND
Causes door to open if not at Up Limit or Mid-Stop Limit.
Causes door to close if at Up Limit or Mid-Stop Limit.
Causes a closing door to reverse.
Common ground connection for PWR and RAD terminals. Connect to radio or other accessory's ground input.
EXPANSION PORT
Accessory Module Ribbon Cable.
PLUG CONNECTIONS
INSIDE ELECTRIC BOX
TRANSFORMER
Connects main transformer to control board.
Transformer Plug.
BRAKE
Connects brake solenoid to control board.
Brake Solenoid Plug.
Motor Plug.
HOIST INTLK
Causes moving door to stop. Prevents the operator from running.
Operates even if microcontroller is non-functional.
Limit Sensor Plug.
Hoist Interlock Plug or Jumper.
INPUT
(Radio Input Control)
(not polarity sensitive)
ODC Series II Safe-T-Beams® ONLY to these inputs.
(not polarity sensitive)
(not polarity sensitive)
(not polarity sensitive)
LIMIT SENSOR
Causes door to stop at top and bottom of normal travel.
MOTOR
Connects motor and capacitor to control board.
Connects accessory modules to operator.
RADIO AND
ACCESSORIES
PIGTAIL
L1
L2
L3
Power to Operator.
Power to Operator.
Power to Operator.
3-POS TERMINAL BLOCK
3 PHASE
(INSIDE ELECTRIC BOX)
Connect to radio or other accessory’s signal (output).

Condition
Code
DISPLAY
Condition Code Description
0C IDLE > DOWN LIMIT STANDING BY AT DOWN LIMIT (NOTE: THIS MESSAGE IS DISPLAYED IF BOTH LIMITS ARE ACTIVE)
0D
IDLE
>
UP LIMIT
STANDING BY AT UP LIMIT
0E IDLE
>
MID STOP STANDING BY AT MID-STOP LIMIT
0F
IDLE
>
NO LIMIT
STANDING BY BETWEEN LIMITS
10 OPENING
>
OPEN BTN OPENING FROM OPEN BUTTON
11 OPENING
>
ONE BTN OPENING FROM 1 BUTTON
12 OPENING
>
RADIO OPENING FROM RADIO
13 OPENING
>
AUX OPEN OPENING FROM AUXILIARY OPEN INPUT
14 OPENING
>
OPEN KEY OPENING FROM KEYPAD OPEN KEY
20 CLOSING
>
CLOSE PB CLOSING FROM CLOSE BUTTON
21 CLOSING
>
ONE BTN CLOSING FROM 1 BUTTON
22 CLOSING
>
RADIO CLOSING FROM RADIO
24 CLOSING
>
CLOSE KP CLOSING FROM KEYPAD CLOSE KEY
2A CLOSING
>
TCM CLS CLOSING FROM TIMER CLOSE MODULE
2B CLOSING > FDM CLS CLOSING FROM FORE DOOR MODULE
30 HALT
>
WALL BUTTON GDO STOPPED BECAUSE STOP OR OPEN BUTTON WAS ACTIVATED, POSSIBLY STARTING A REVERSAL
31 HALT
>
ONE BUTTON GDO STOPPED BECAUSE 1 BUTTON WAS ACTIVATED, POSSIBLY STARTING A REVERSAL
32 HALT
>
RADIO GDO STOPPED BECAUSE RADIO INPUT WAS ACTIVATED, STARTING A REVERSAL
33 HALT
>
AUX. OPEN GDO STOPPED BECAUSE AUXILIARY OPEN INPUT WAS ACTIVATED, STARTING A REVERSAL
34 HALT
>
KEYPAD KEY GDO STOPPED BECAUSE KEYPAD STOP OR OPEN KEY WAS ACTIVATED, POSSIBLY STARTING A REVERSAL
35 HALT
>
N-O SAFETY GDO STOPPED BECAUSE N-O REVERSING INPUT WAS ACTIVATED, STARTING A REVERSAL
36 HALT
>
ODC STB GDO STOPPED BECAUSE THE ODC STB WAS BLOCKED, STARTING A REVERSAL
37 HALT
>
N-C SAFETY GDO STOPPED BECAUSE N-C REVERSING INPUT WAS ACTIVATED, STARTING A REVERSAL
38 HALT
>
MON. EDGE GDO STOPPED BECAUSE MONITORED EDGE SENSOR INPUT WAS ACTIVATED, STARTING A REVERSAL
39 HALT
>
DOOR FORCE GDO STOPPED BECAUSE THE FORCE REQUIRED TO OPERATE THE DOOR WAS TOO HIGH, POSSIBLY STARTING A REVERSAL
3A HALT
>
LOSS OF C/C
GDO STOPPED BECAUSE CONSTANT CONTACT ON CONTROL REMOVED BEFORE REACHING A LIMIT, POSSIBLY STARTING A REVERSAL
3B HALT
>
SHUTDOWN GDO STOPPED BECAUSE THE GDO DETECTED A FAULT SUCH AS AN OPEN INTERLOCK, OVERHEATED MOTOR, ETC.
3C HALT
>
DOWN LIMIT GDO STOPPED BECAUSE IT REACHED THE DOWN LIMIT
3D HALT
>
UP LIMIT GDO STOPPED BECAUSE IT REACHED THE UP LIMIT
3E HALT
>
MID STOP GDO STOPPED BECAUSE IT REACHED THE MID-STOP LIMIT
3F HALT
>
MODULE FAIL GDO STOPPED BECAUSE AN EXPANSION MODULE WAS NOT WORKING PROPERLY
40 REV
>
OPEN BUTTON GDO REVERSED BECAUSE THE OPEN BUTTON WAS ACTIVATED
41 REV
>
ONE BUTTON GDO REVERSED BECAUSE THE 1 BUTTON WAS ACTIVATED
42 REV
>
RADIO GDO REVERSED BECAUSE THE RADIO INPUT WAS ACTIVATED
43 REV
>
AUX OPEN GDO REVERSED BECAUSE THE AUXILIARY OPEN INPUT WAS ACTIVATED
44 REV
>
OPEN KEY GDO REVERSED BECAUSE THE KEYPAD OPEN KEY WAS ACTIVATED
45 REV
>
N-O SAFETY GDO REVERSED BECAUSE THE N-O REVERSING INPUT WAS ACTIVATED
10.11
Section 10: Appendix C
Run Code Displays
www.geniecompany.com 01-14

Condition
Code DISPLAY Condition Code Description
46 REV
>
ODC STB GDO REVERSED BECAUSE THE ODC STB WAS BLOCKED
47 REV
>
N-C SAFETY GDO REVERSED BECAUSE THE N-C REVERSING INPUT WAS ACTIVATED
48 REV
>
MON. EDGE GDO REVERSED BECAUSE THE MONITORED EDGE SENSOR WAS ACTIVATED
49 REV
>
DOOR FORCE GDO REVERSED BECAUSE THE FORCE REQUIRED TO CLOSE THE DOOR WAS TOO HIGH
4A REV
>
LOSS OF C/C GDO REVERSED BECAUSE CONSTANT CONTACT ON THE CONTROL WAS REMOVED BEFORE REACHING THE DOWN LIMIT
4B REV
>
MAX RUN TMR GDO REVERSED BECAUSE THE CLUTCH SLIPPED OR SOME OTHER FAULT OCCURRED THAT ALLOWED THE GDO TO RUN TOO LONG
4F REV > EXP MOD FAIL GDO REVERSED BECAUSE AN EXPANSION MODULE WAS NOT WORKING PROPERLY
50 STOP
>
HOT MOTOR GDO STOPPED BECAUSE THE MOTOR WAS OVERHEATED
51 STOP
>
OPEN MRT GDO STOPPED BECAUSE THE CLUTCH SLIPPED OR SOME OTHER FAULT OCCURRED THAT ALLOWED THE GDO TO RUN OPEN TOO LONG
52 STOP
>
CLOSE MRT GDO STOPPED BECAUSE THE CLUTCH SLIPPED OR SOME OTHER FAULT OCCURRED THAT ALLOWED THE GDO TO RUN DOWN TOO LONG
53 STOP > BRAKE FAULT GDO STOPPED BECAUSE OF BRAKE ERRONEOUSLY ENGAGED
57 STOP
>
OPEN INTLK GDO STOPPED BECAUSE THE HOIST INTERLOCK OR EXTERNAL INTERLOCK IS OPEN
58 STOP
>
WRONG GDO GDO STOPPED BECAUSE THE BOARD IS SET FOR JACKSHAFT MODE, BUT INSTALLED IN A TROLLEY OPERATOR
59 STOP
>
DOOR FORCE GDO STOPPED BECAUSE THE FORCE REQUIRED TO OPEN THE DOOR WAS TOO HIGH
5A STOP
>
WRONG LIMIT GDO STOPPED BECAUSE THE UP LIMIT ACTIVATED WHEN CLOSING OR THE DOWN LIMIT ACTIVATED WHEN OPENING
5B STOP > WRONG DIR GDO STOPPED BECAUSE THE DOOR MOVED IN THE WRONG DIRECTION
5C STALL
>
DOWN LIMIT GDO STOPPED BECAUSE IT COULDN'T LEAVE THE DOWN LIMIT DUE TO A SLIPPING CLUTCH OR OTHER PROBLEM
5D STALL
>
UP LIMIT GDO STOPPED BECAUSE IT COULDN'T LEAVE THE UP LIMIT DUE TO A SLIPPING CLUTCH OR OTHER PROBLEM
5E STALL > MID-STOP GDO STOPPED BECAUSE IT COULDN’T LEAVE THE MID-STOP LIMIT DUE TO A SLIPPING CLUTCH OR OTHER PROBLEM
5F STALL > NO LIMIT GDO STOPPED BECAUSE TRAVEL LIMITS HAVE NOT BEEN SET
60 CHECK STOP BTN GDO WON'T RUN BECAUSE THE STOP BUTTON IS ACTIVE
61 TCM DISABLED TIMER CLOSE WON'T WORK BECAUSE NO SAFETIES ARE ENABLED
62 NO RADIO
>>
C/C RADIO INPUT WON'T WORK WITH OPEN OR CLOSE FUNCTION IN CONSTANT CONTACT MODE
63 CHECK AUX OPEN GDO WON'T CLOSE BECAUSE AUXILIARY OPEN INPUT IS ACTIVE
64 CHECK STOP KEY GDO WON'T RUN BECAUSE THE KEYPAD STOP KEY IS ACTIVE
65 CHECK N-O SAFETY GDO WON'T CLOSE BECAUSE THE N-O REVERSING IS ACTIVE
66 CHECK ODC STB GDO WON'T CLOSE BECAUSE ODC STB IS BLOCKED
67 CHECK N-C SAFETY GDO WON'T CLOSE BECAUSE THE N-C REVERSING INPUT IS ACTIVE
68 CHECK MON. EDGE GDO WON'T CLOSE BECAUSE THE MONITORED EDGE SENSOR IS ACTIVE
69 OVERHEATED MO
TOR GDO WON'T RUN BECAUSE THE MOTOR IS OVERHEATED
6A POWER WIRING ERROR GDO WON’T RUN BECAUSE POWER SUPPLY WIRED INCORRECTLY
6B FIRE DOOR SHTDN GDO WON’T RUN BECAUSE OF LOSS OF POWER
6C NO RUN
>
DOWN LIM GDO WON'T CLOSE BECAUSE ITS ALREADY AT THE DOWN LIMIT
6D NO RUN
>
UP LIMIT GDO WON'T OPEN BECAUSE ITS ALREADY AT THE UP LIMIT
6E NO RUN
>
MID STOP
GDO WON'T RUN BECAUSE ITS AT OR ABOVE THE MID-STOP LIMIT & CAN'T RUN UP & A REVERSING INPUT IS PREVENTING IT FROM CLOSING
6F EXP MODULE FAIL GDO WON'T RUN BECAUSE AN EXPANSION MODULE FAILURE IS PREVENTING IT
10.12
Error Code Displays
Section 10: Appendix C
www.geniecompany.com 01-14

Condition
Code
DISPLAY
Condition Code Description
70 BOARD FAILURE 70 CONTROL BOARD FAILURE 70, CONTACT FACTORY TECHNICAL SERVICE DEPT.
71 BOARD FAILURE 71 CONTROL BOARD FAILURE 71, CONTACT FACTORY TECHNICAL SERVICE DEPT.
74 BOARD FAILURE 74 CONTROL BOARD FAILURE 74, CONTACT FACTORY TECHNICAL SERVICE DEPT.
75 BOARD FAILURE 75 CONTROL BOARD FAILURE 75, CONTACT FACTORY TECHNICAL SERVICE DEPT.
76 BOARD FAILURE 76 CONTROL BOARD FAILURE 76, CONTACT FACTORY TECHNICAL SERVICE DEPT.
77 BOARD FAILURE 77 CONTROL BOARD FAILURE 77, CONTACT FACTORY TECHNICAL SERVICE DEPT.
80 BOARD FAILURE 80 CONTROL BOARD FAILURE 80, CONTACT FACTORY TECHNICAL SERVICE DEPT.
81 BOARD FAILURE 81 CONTROL BOARD FAILURE 81, CONTACT FACTORY TECHNICAL SERVICE DEPT.
82 BOARD FAI
LURE 82 CONTROL BOARD FAILURE 82, CONTACT FACTORY TECHNICAL SERVICE DEPT.
83 BOARD FAILURE 83 CONTROL BOARD FAILURE 83, CONTACT FACTORY TECHNICAL SERVICE DEPT.
84 BOARD FAILURE 84 CONTROL BOARD FAILURE 84, CONTACT FACTORY TECHNICAL SERVICE DEPT.
85 EXP PORT PROBLEM EXPANSION PORT IS SHORT CIRCUITED, TRY DISCONNECTING EXPANSION MODULES OR CONTACT FACTORY TECHNICAL SERVICE DEPT.
86 BOARD FAILURE 86 CONTROL BOARD FAILURE 86, DISCONNECT EXPANSION MODULES. IF NO CHANGE, CONTACT FACTORY TECHNICAL SERVICE DEPT.
87 IEM FAILURE RESERVED--NOT CURRENTLY USED
88 TCM FAILURE TIMER CLOSE MODULE (TCM) HAS FAILED
89 FDM FAILURE FIRE DOOR MODULE (FDM) HAS FAILED
8A AOM FAILURE AUXILIARY OUTPUT MODULE (AOM) HAS FAILED
8B SPARE MOD FAILURE RESERVED--NOT CURRENTLY USED
8C LOW SYSTEM VOLTS POWER SUPPLY LINE VOLTAGE LOW
8D HI SYSTEM VOLTS POWER SUPPLY LINE VOLTAGE HIG
H
8E REV INTERRUPTED GDO LOST POWER OR ENCOUNTERED ANOTHER PROBLEM DURING THE REVERSAL PROCESS, REVERSAL IS COMPLETING NOW
8F LIMIT MOD. FAIL GDO WON'T RUN, LIMIT MODULE HAS FAILED
90
DIAGNOSTIC MODE GDO IS IN DIAGNOSTIC MODE, NORMAL FUNCTIONS ARE NOT ALLOWED
A0 OPEN BTN BAD > PU OPEN & CLOSE BUTTONS WON'T WORK, THE OPEN BUTTON WAS ACTIVE WHEN THE GDO WAS POWERED-UP
A1 CLOSE BTN BAD > PU OPEN & CLOSE BUTTONS WON'T WORK, THE CLOSE BUTTON WAS ACTIVE WHEN THE GDO WAS POWERED-UP
A2 ONE BTN BAD > PU 1 BUTTON WON'T WORK, THE 1 BUTTON WAS ACTIVE WHEN THE GDO WAS POWERED-UP
A3 RADIO BAD > PWR UP RADIO INPUT WON'T WORK, THE RADIO INPUT WAS ACTIVE WHEN THE GDO WAS POWERED-UP
A4 AUX OPEN BAD > PU AUXILIARY OPEN INPUT WON'T WORK, THE AUXILIARY OPEN INPUT WAS ACTIVE WHEN THE GDO WAS POWERED-UP
A5 OPEN KEY BAD > PU KEYPAD OPEN & CLOSE KEYS WON'T WORK, THE OPEN KEY WAS ACTIVE WHEN THE GDO WAS POWERED-UP
A6 CLOSE KEY BAD > PU KEYPAD OPEN & CLOSE KEYS WON'T WORK, THE CLOSE KEY WAS ACTIVE WHEN THE GDO WAS POWERED-UP
A7 MULT KEYS BAD > PU 1 OR MORE KEYPAD CALIBRATION KEYS WON'T WORK, 1 OR MORE WERE ACTIVE WHEN THE GDO WAS POWERED-UP
AA TCM BAD > POWER UP RESERVED--NOT CURRENTLY USED
AB FDM BAD > POWER UP RESERVED--NOT CURRENTLY USED
B0 OPENING > XMTR # OPENING FROM TRANSMITTER # __
B1 CLOSING > XMTR # CLOSING FROM TRANSMITTER # __
B2 HALT > XMTR # HALT FROM TRANSMI
TTER # __
B3 NO XMTR > CC
NO CONTROL FROM TRANSMITTER, CONSTANT CONTACT EMPLOYED AT LOCAL CONTROL
10.13
Error Codes Displays (continued)
Section 10: Appendix C
www.geniecompany.com 01-14

11.1
www.geniecompany.com 0• •-12
The Genie Company ("Seller") warrants to the original purchaser of this commercial door operator
(”Product”), subject to all of the terms and conditions hereof, that the Product and all components
thereof will be free from defects in materials and workmanship under normal use for the following
period(s), measured from the date of installation
Two (2) years or When the Operator exceeds 20,000 cycles of operation, as measured by the
integrated cycle counter contained in the Operator.
Seller‘s
g, at its option, any
part which is determined by Seller to be defective during the applicable warranty period. Any labor
charges are excluded and will be the responsibility of the purchaser.
This warranty is made to the original purchaser of the Product only, and is not transferable or assignable.
This warranty does not apply to any unauthorized alteration or repair of the Product, or to any Product or
component which has been damaged or deteriorated due to misuse, neglect, accident, failure to provide
necessary maintenance, normal wear and tear, or acts of God or any other cause beyond the reasonable
control of Seller.
THIS WARRANTY IS EXCLUSIVE AND IN LIEU OF ANY OTHER WARRANTIES, EITHER
EXPRESSED OR IMPLIED, INCLUDING BUT NOT LIMITED TO ANY IMPLIED WARRANTY OF
MERCHANTABILITY OR FITNESS FOR A PARTICULAR PURPOSE.
IN NO EVENT SHALL SELLER BE RESPONSIBLE FOR, OR LIABLE TO ANYONE FOR, SPECIAL,
INDIRECT, COLLATERAL, PUNITIVE, INCIDENTAL OR CONSEQUENTIAL DAMAGES, even if
Seller has been advised of the possibility of such damages. Such excluded damages include, but are
not limited to, loss of goodwill,
s, loss of use, cost of any substitute product, interruption of
business,
Claims under this warranty must be made promptly after discovery, within the applicable warranty period,
and in writing to the Seller or to the authorized distributor or installer whose name and address appear below.
The purchaser must allow Seller a reasonable opportunity to inspect any Product claimed to be defective
prior to removal or any alteration of its condition. Proof of the purchase and/or installation date, and
r, may be required.
ORIGINAL PURCHASER
INSTALLATION ADDRESS
SELLER:
SELLER S ADDRESS:
FACTORY ORDER #:
DATE OF INSTALLATION:
SIGNATURE OF SELLER:
Commercial Operator Limited Warranty

THIS PAGE LEFT BLANK

THIS PAGE LEFT BLANK

1 Door Drive
Mt. Hope, Ohio 44660
www.geniecompany.com
1 1 1 8 4 5 . 5 0 2 3 5 1