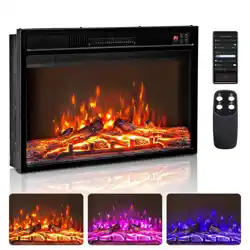
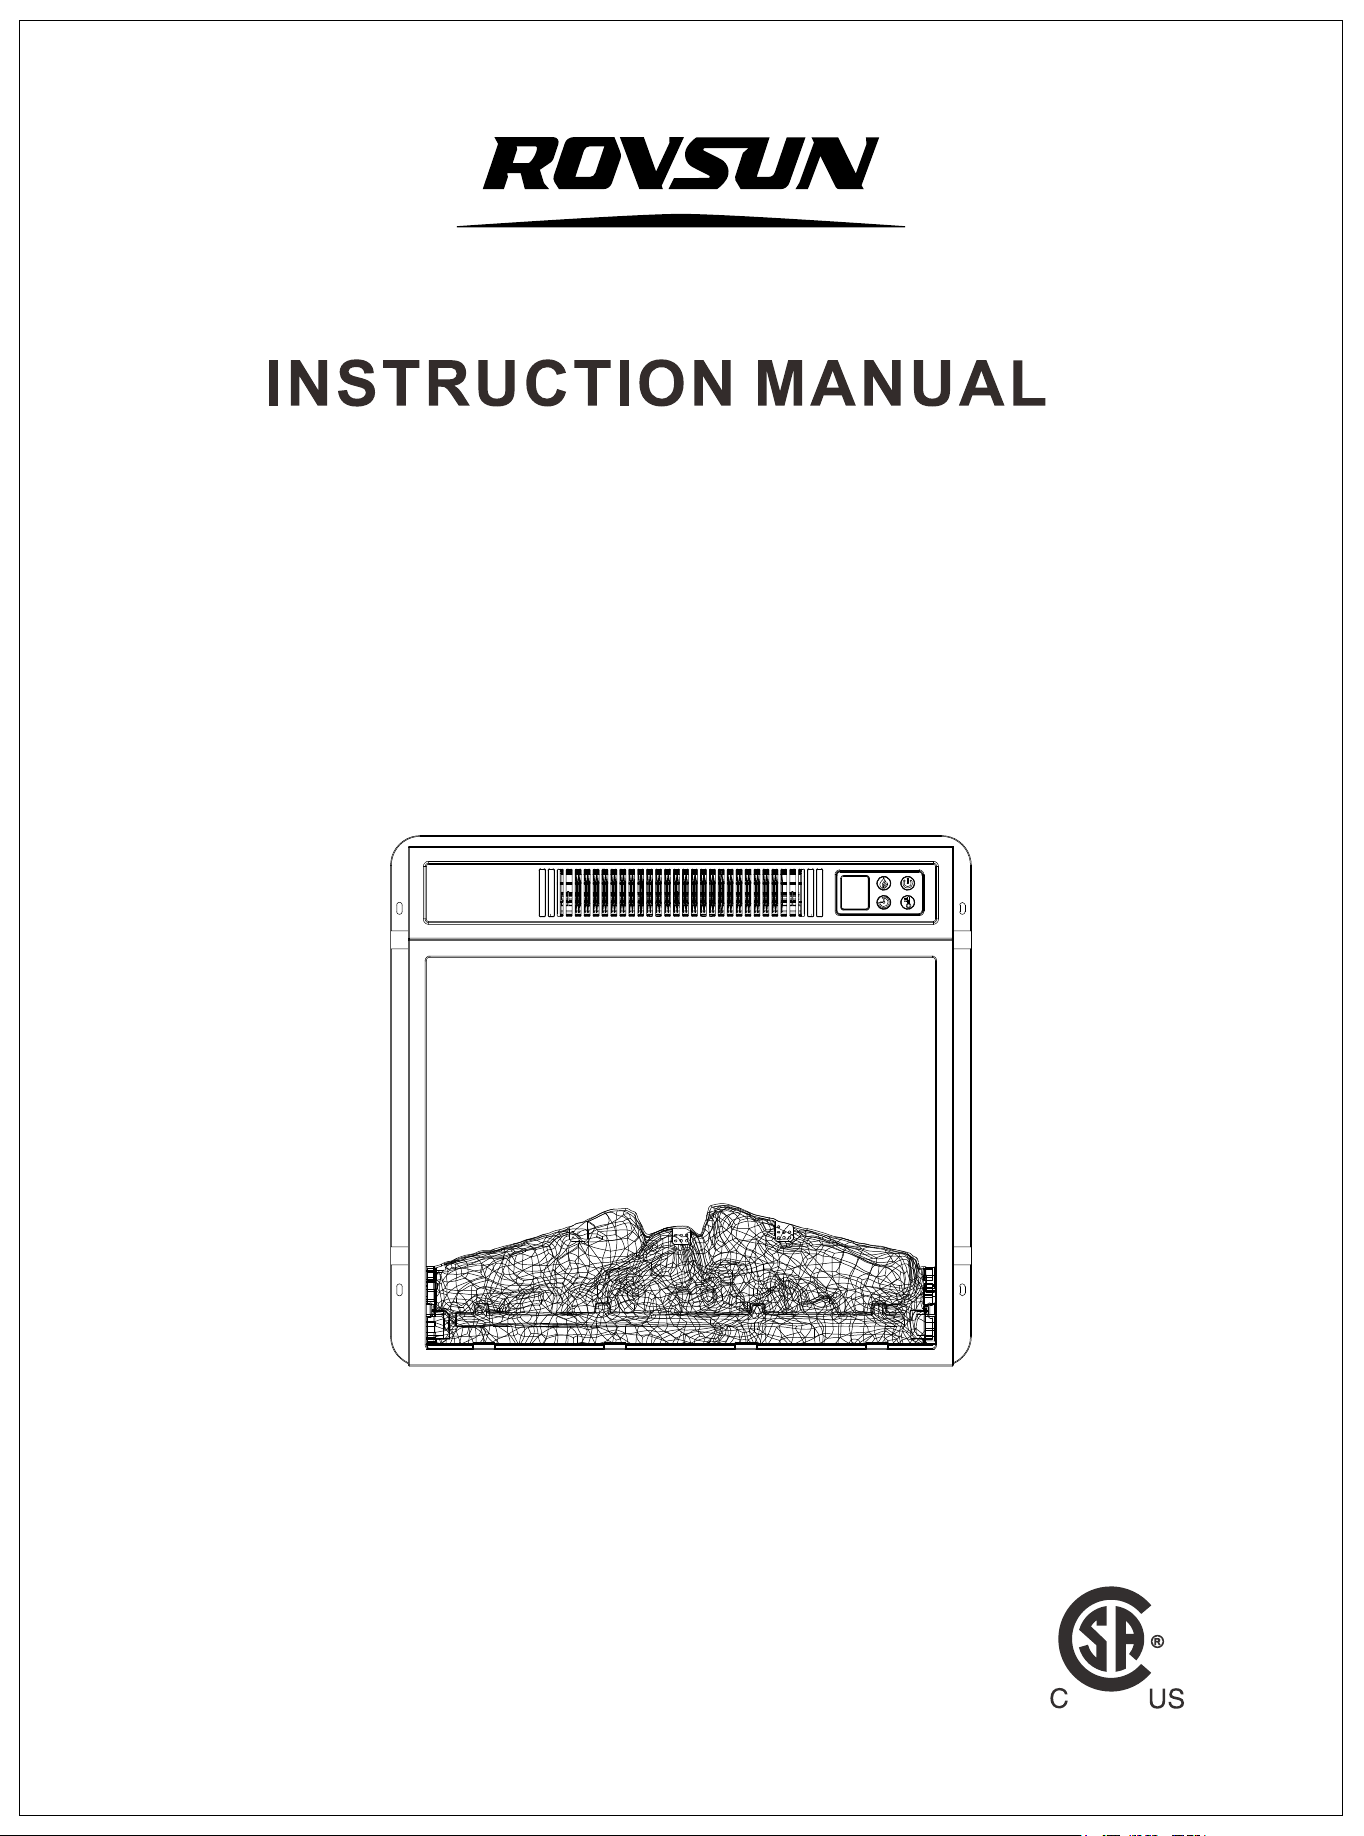
SF105B-18R/SF105B-23R
MADE IN CHINA
ELECTRIC FIREPLACE

2
TableofContents
Safety Information..................................................................................3
Pre-installation.......................................................................................6
Assembly......................................................................................7
Operation.........................................................................................8
Using the Remote Control....................................................................11
Smart Connection Guide.......................................................................12
Using the APP........................................................................................15
Care and Maintenance..........................................................................16
Troubleshooting....................................................................................17

3
SafetyInformation
IMPORTANTSAFETYINFORMATION
PLEASEREADALLOFTHEINFORMATIONINTHISOPERATINGMANUAL,INCLUDING
ALLSAFETY,OPERATING,ANDMAINTENANCEINFORMATION.TOAVOIDTHE
POTENTIALRISKOFFIRE,ELECTRICSHOCK,ORINJURYTOPERSONS,
USERSSHOULDFOLLOWTHEDIRECTIONSANDWARNINGSINTHISMANUAL
1.Readallinstructionsbeforeusingthisheater.
2.Donotusethisheateroutdoors.
3.Thisheaterisnotintendedforuseinbathrooms,laundryareasandsimilarindoorlocations.Neverlocatethe
heaterwhereitmayfallintoabathtuborotherwatercontainer.
4.Donotrunthepowercordundercarpeting.Donotcoverthepowercordwiththrowrugs,runners,orthelike.
Arrangethepowercordawayfromtrafcareasandwhereitwillnotbetrippedover.
5.Todisconnecttheheater,turncontrolstooff,thenremovetheplugfromtheoutlet.
6.Connecttoproperlygroundedoutletsonly.Alwaysplugheatersdirectlyintoawalloutlet/receptacle.Never
usewithanextensioncordorrelocatablepowertap(outlet/powerstrip).
7.Topreventapossiblere,donotblockreboxairintakesortheexhaustinanymanner.Donotoperatethe
reboxonsoftsurfaces,likeabed,whereopeningsmaybecomeblocked.
8.Thereisathermostatlimiterinsidetheheater.Whentheinnertemperatureoverheatsorabnormalheating
occurs,thethermostatprotectivedevicecutsoffthepowersupplytoavoidreplacedamagedorriskofre.
9.Usethisheateronlyasdescribedinthismanual.Anyotherusenotrecommendedbythemanufacturermay
causere,electricalshock,orinjurytopersons.
4
SAVETHESEINSTRUCTIONS
WARNING
!
Therearenouserserviceablepartsinsidethereplace/heater,
Iftheunitappearstomalfunction,
turmtheunitoffandunplugtheunitfromthewallimmediately,andcontactCustomer.
WARNING
!
Thisheaterishotwheninuse.Toavoidburns,donotletbareskintouchhotsurfaces.
Ifprovided,usehandleswhenmovingthisheater,Keepcombustiblematerial,
suchasfurniture,pillows,bedding,papers,clothesandcurtains
atleast3f.t(0.9meters)fromthefrontoftheheaterandkeepthemawayfrom
thesidesandrear.
WARNING
!
Extremecautionisnecessarywhenanyheaterisusedbyornearchildrenorinvalids
andwhenevertheheaterisleftoperatingandunattended.
WARNING
!
Alwaysunplugtheheaterwhennotinuse.
WARNING
!
Donotoperateanyheaterwithadamagedcordorplugor
aftertheheatermalfunctions,hasbeendroppedordamagedinanymanner.
Returntheheatertoanauthorizedservicefacilityforexamination,
electricalormechanicaladjustment,orrepair.
WARNING
!
Donotinsertorallowforeignobjectstoenteranyventilationorexhaustopenings
asthismaycauseanelectricshockorre,ordamagetheheater.
WARNING
!
Aheaterhashotandarchingorsparkingpartsinside.
Donotuseinareaswheregasoline,paint,orammableliquidsareusedorstored.
CAUTION
!
Whiletheheaterisinuse,thetopcenterofthereplacecangethottothetouch,
andmaycauseseriousinjuryorburns.
Alwayssupervisesmallchildrenaroundthereplace/heater.
Donotplaceanyclothordecorationsovertheheateroutletofthereplace,
orotherwiseobstructtheheateroutletofthereplace,
asthismaycauseareandseriousinjurymayresult,
5
SafetyInformation(continued)
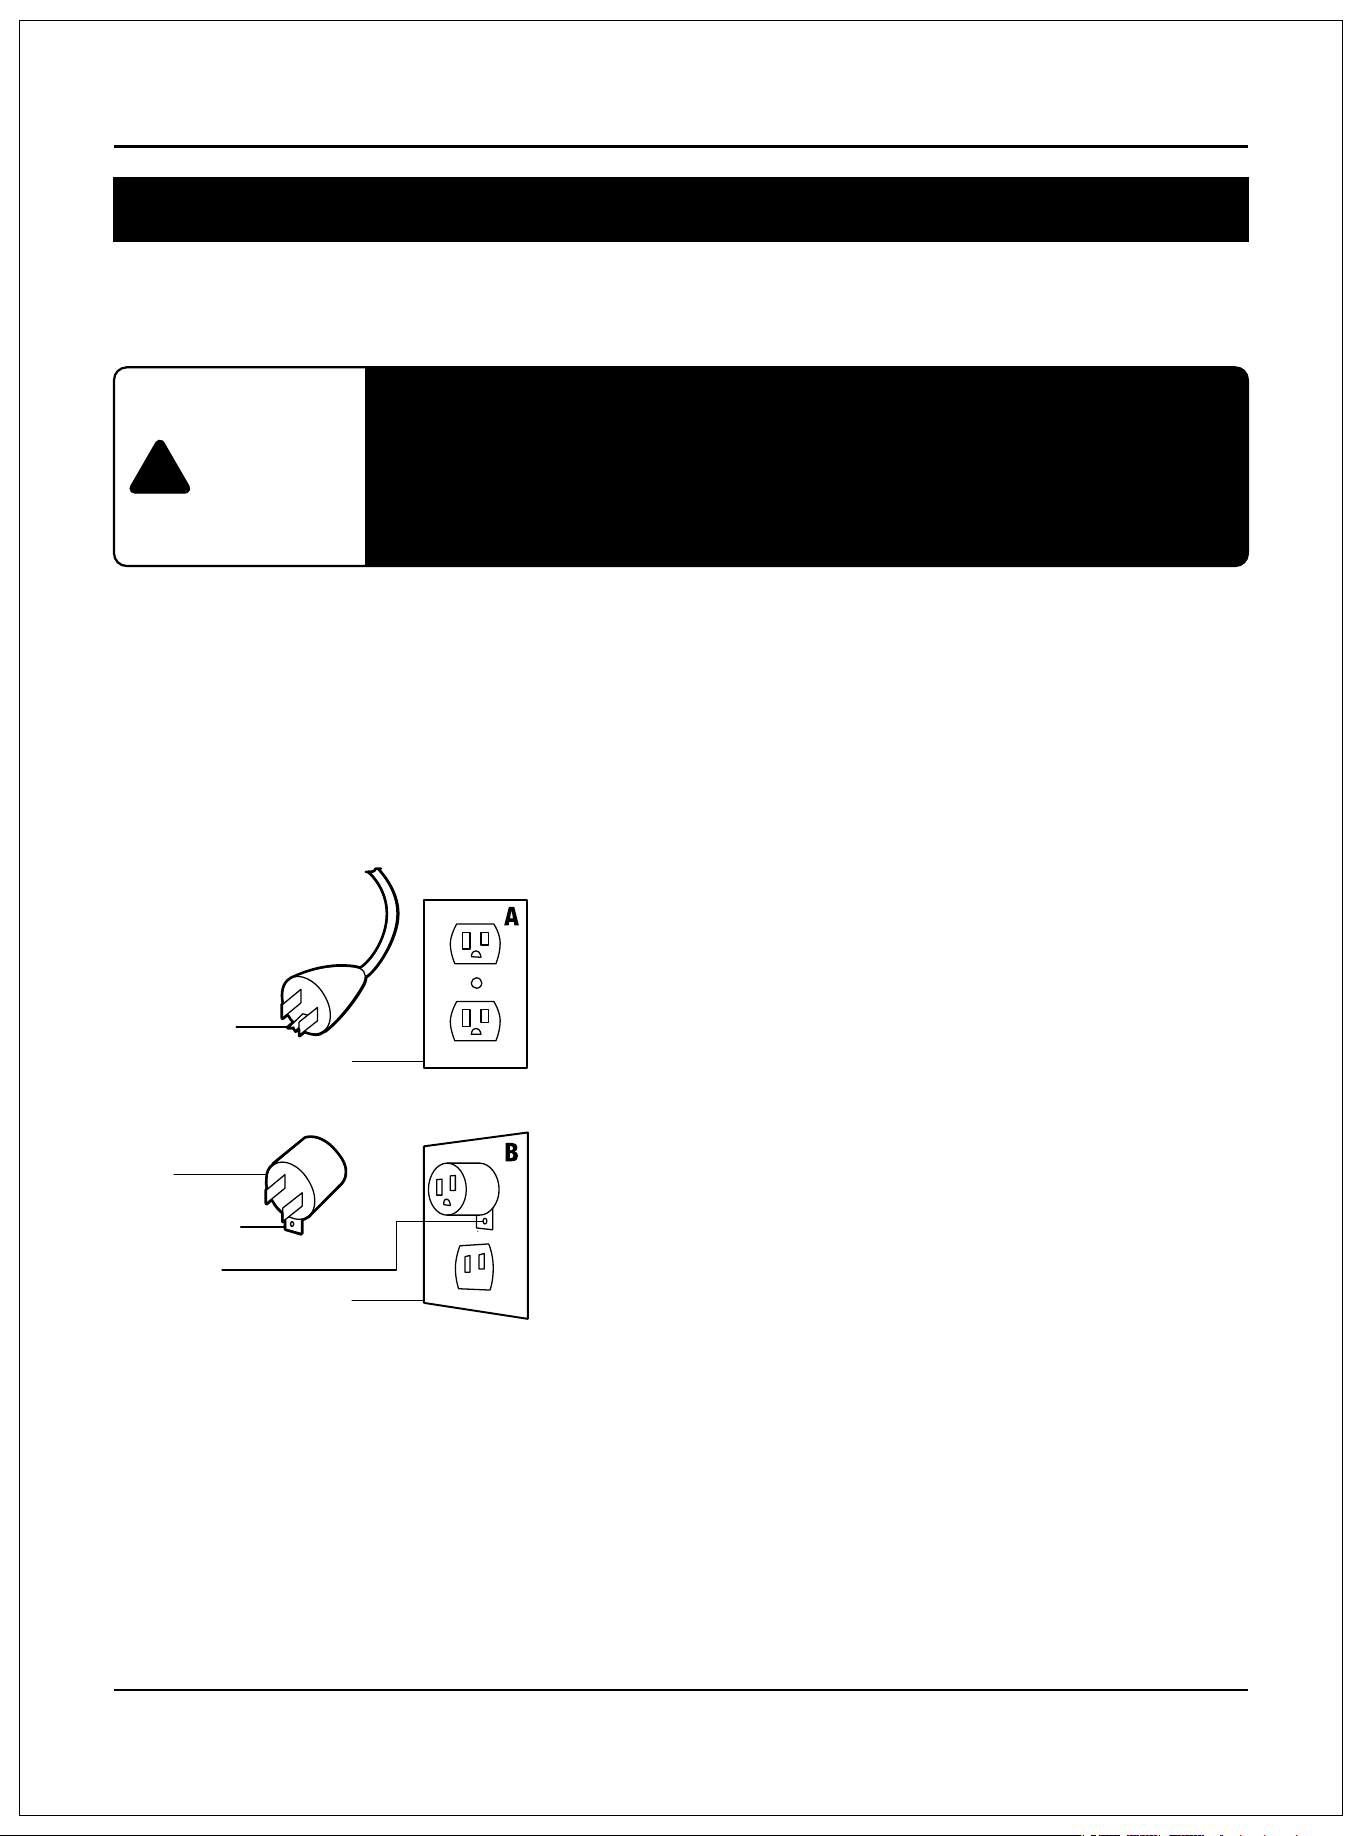
GROUNDINGINSTRUCTIONS
Thisproductmustbegrounded.Ifitshouldmalfunctionorbreakdown,groundingprovidesapathofleast
resistanceforelectriccurrenttoreducetheriskofelectricshock,Thisproductisequippedwithacordhaving
anequipment-groundingconductorandagroundingplug.Theplugmustbepluggedintoanappropriateoutlet
thatisproperlyinstalledandgroundedinaccordancewithalllocalcodesandordinances.
Thisheaterisforuseon120-voltcircuitsandhasagroundedplug.Anadapterisavailablefromyourlocal
electronicsstoreoronlinesupplierforconnectingthree-bladegrounding-typeplugstotwo-slotreceptacles.
Thegreengroundinglugextendingfromtheadaptermustbeconnectedtoapermanentground
suchasaproperlygroundedoutletbox.Theadaptershouldnotbeusedifathree-slotgroundedreceptacle
isavailable.
DANGER
!
Improperconnectionoftheequipment-groundingconductorcanresult
inariskofelectricshock.Checkwithaqualiedelectrician
orservicemanifyouareindoubtastowhethertheproductisproperlygrounded.
Donotmodifytheplugprovidedwiththeproduct.
Ifitwillnotttheoutlet,haveaproperoutletinstalledbyaqualiedelectrician.
Cover of Grounded Outlet Box
Grounding Pin
Adapter
Grounding Lug
Metal Screw
Cover of Grounded Outlet Box
6
Pre-installation
TECHNICAL SPECIFICATION
24x 5.1x 17.5 Inch
Dimensions(WxDxH)/SF105B-23R
Net Weight
Gross Weight
Power Rating
Voltage
Frequency
12.6 Ib
14.8 Ib
1400W
120V
60Hz
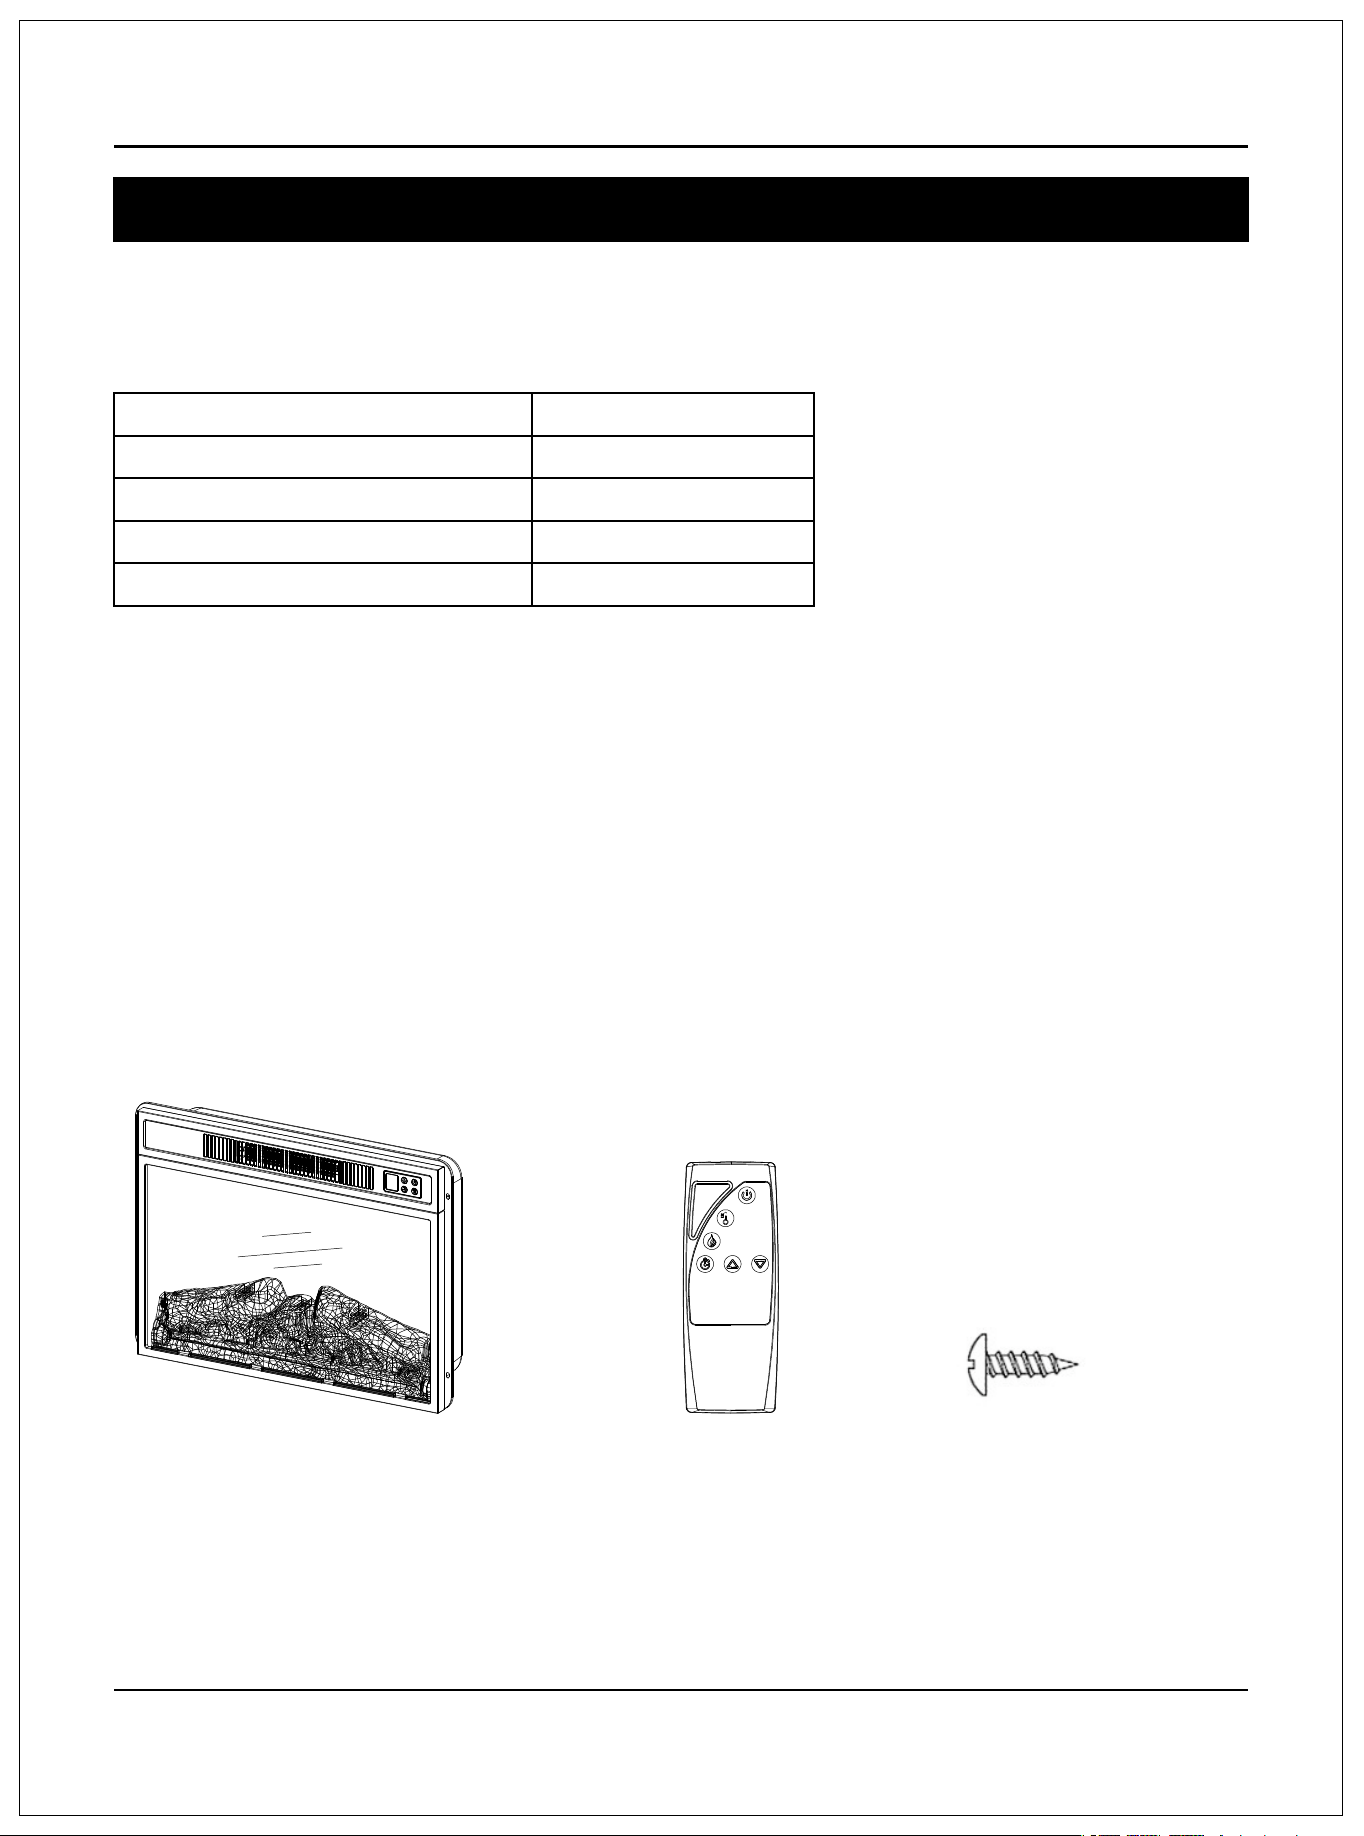
PACKAGE CONTENT
Fireplace Unit Remote Control Screw x5
19x 5.1x 17.5 Inch
Dimensions(WxDxH)/SF105B-18R
7
Assembly
●STEP 1
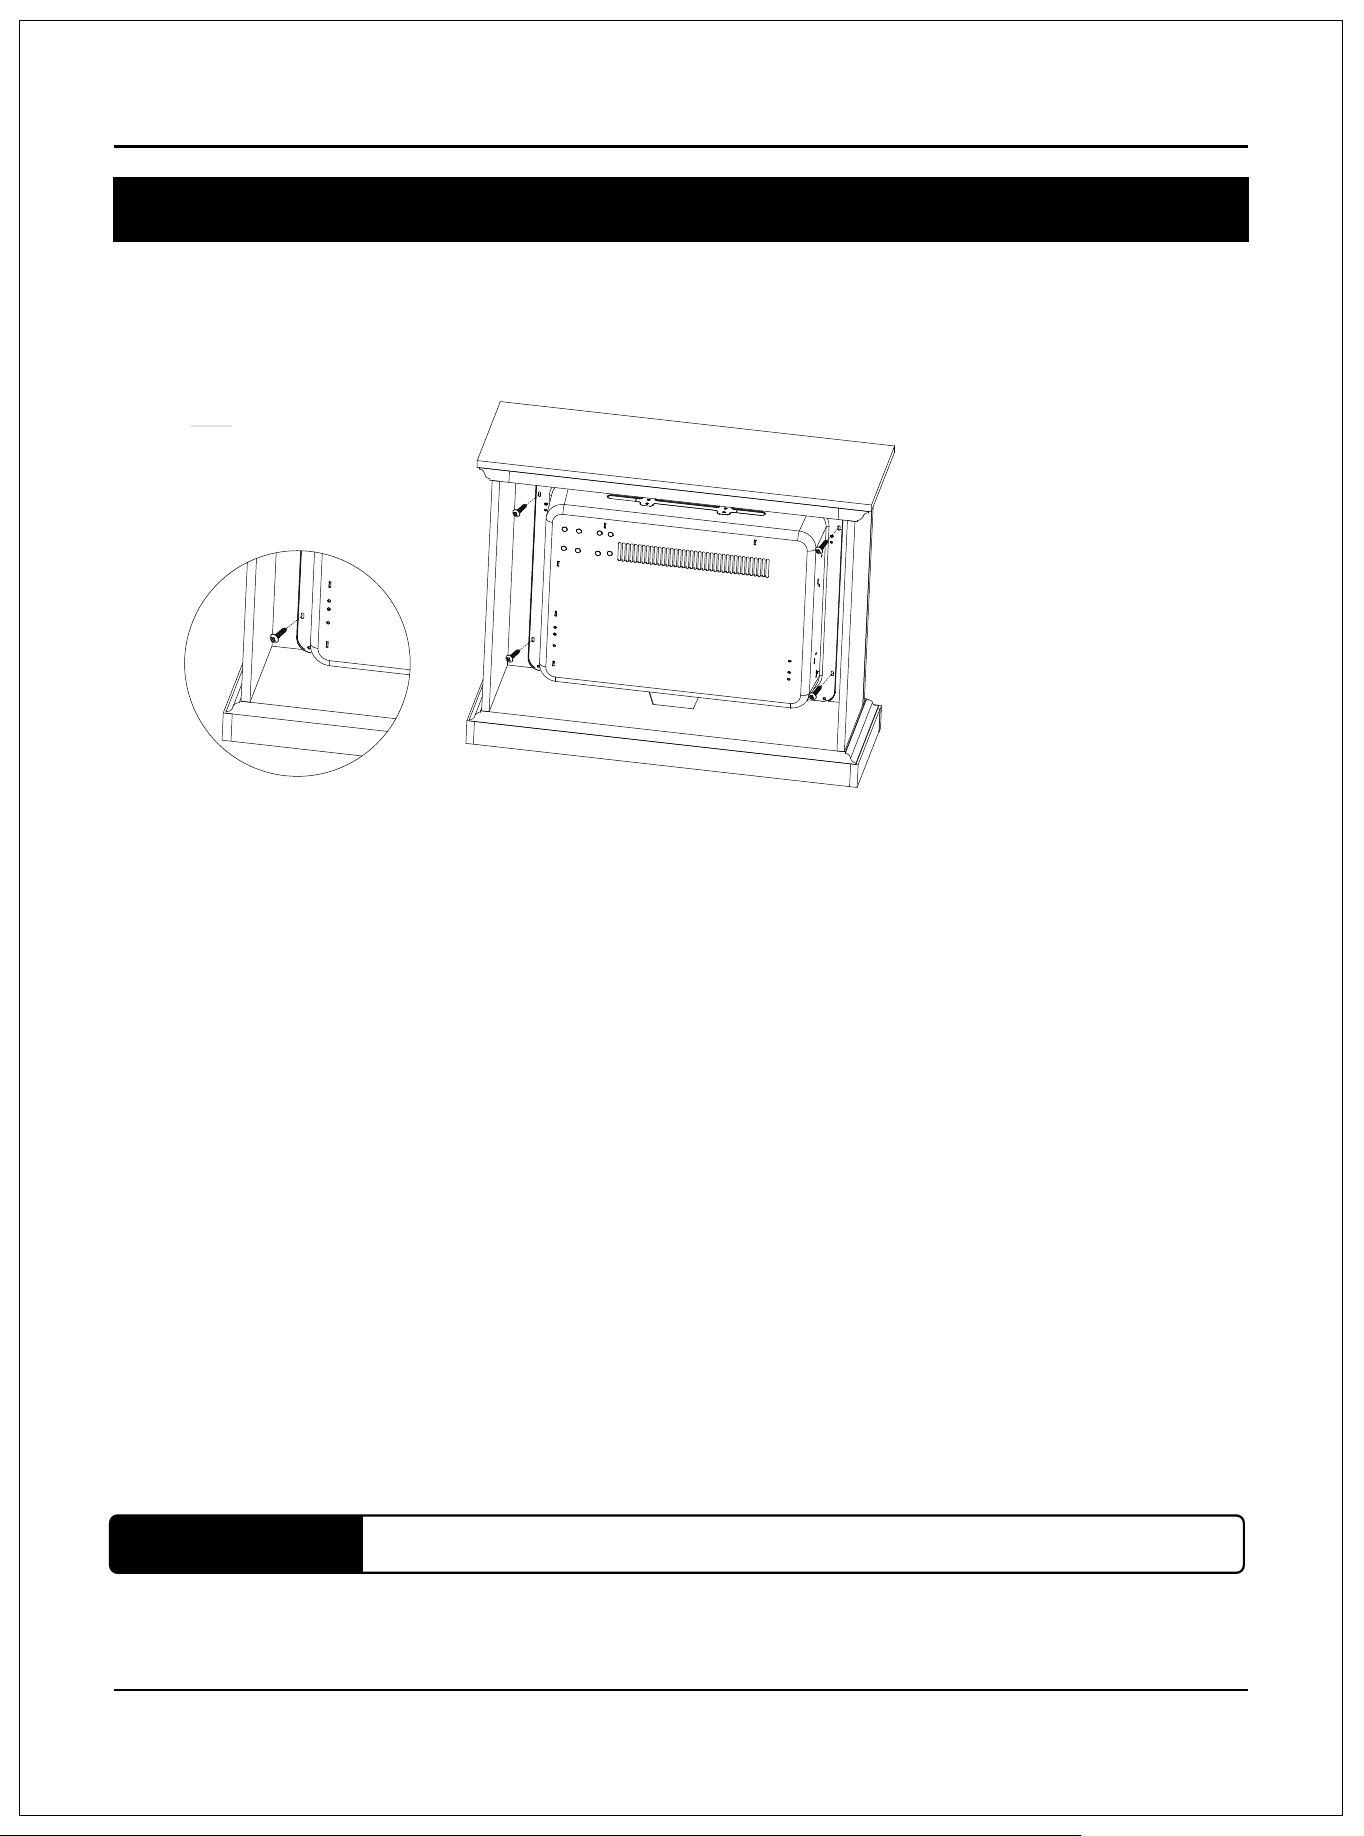
Take out the unit from the box and layout all the spare parts for easy assembly. Make sure all small items
are not left in packaging materials.
NOTE:
Do not attempt to install the unit from the front of the mantel. It will not t.
●STEP 2
Carefully set the unit from the back of the mantel and center it in the opening.
Check the alignment and attach the unit of the mantel by inserting screws through the drilled holes
on the trim of the mantel.
8
Operation
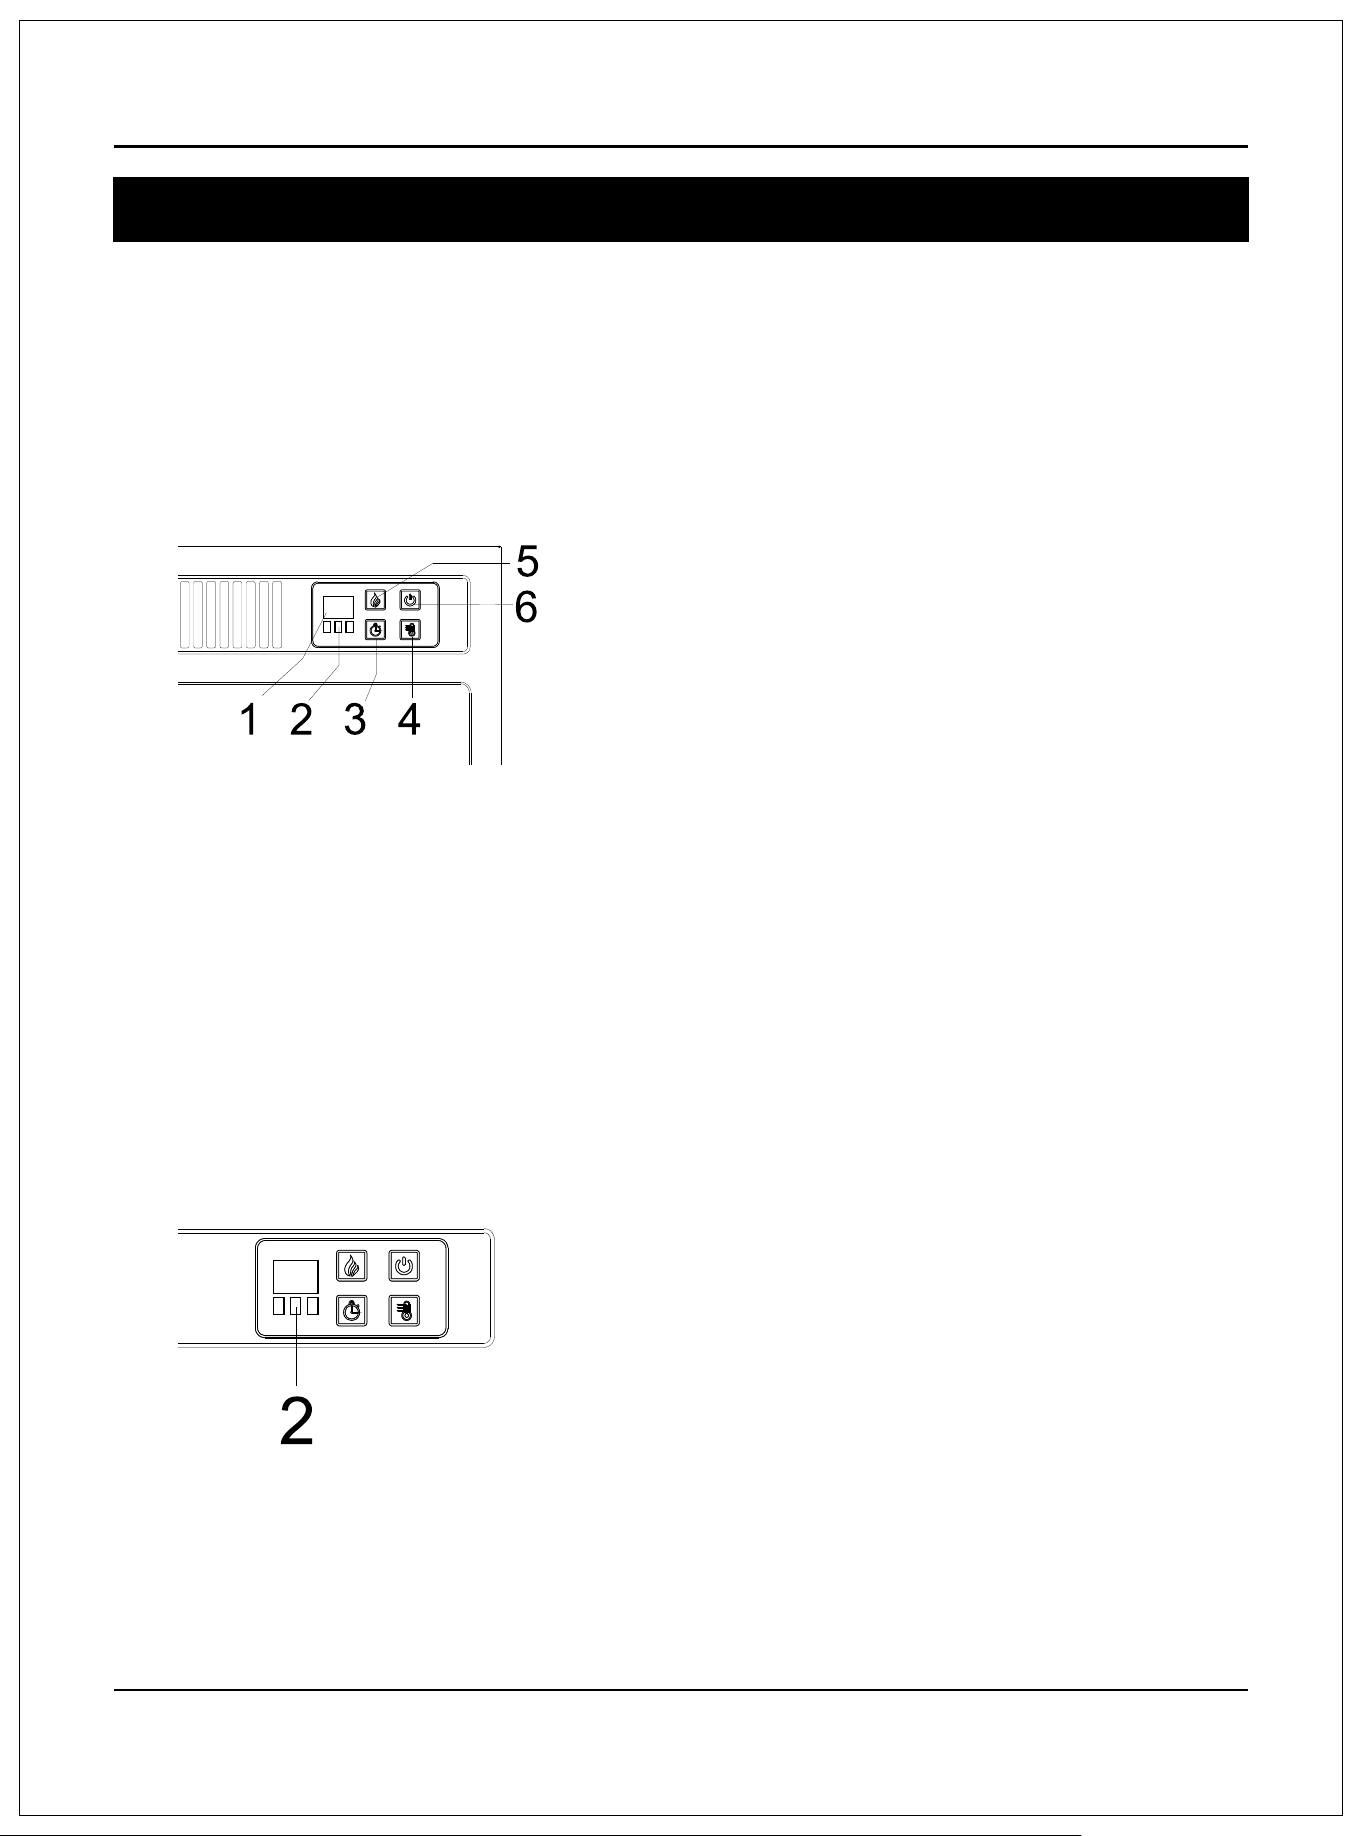
●Identifyingthecontrolpanel
•Thecontrolpanelislocatedonthetoprightcornerofthereplace/heaterunit.
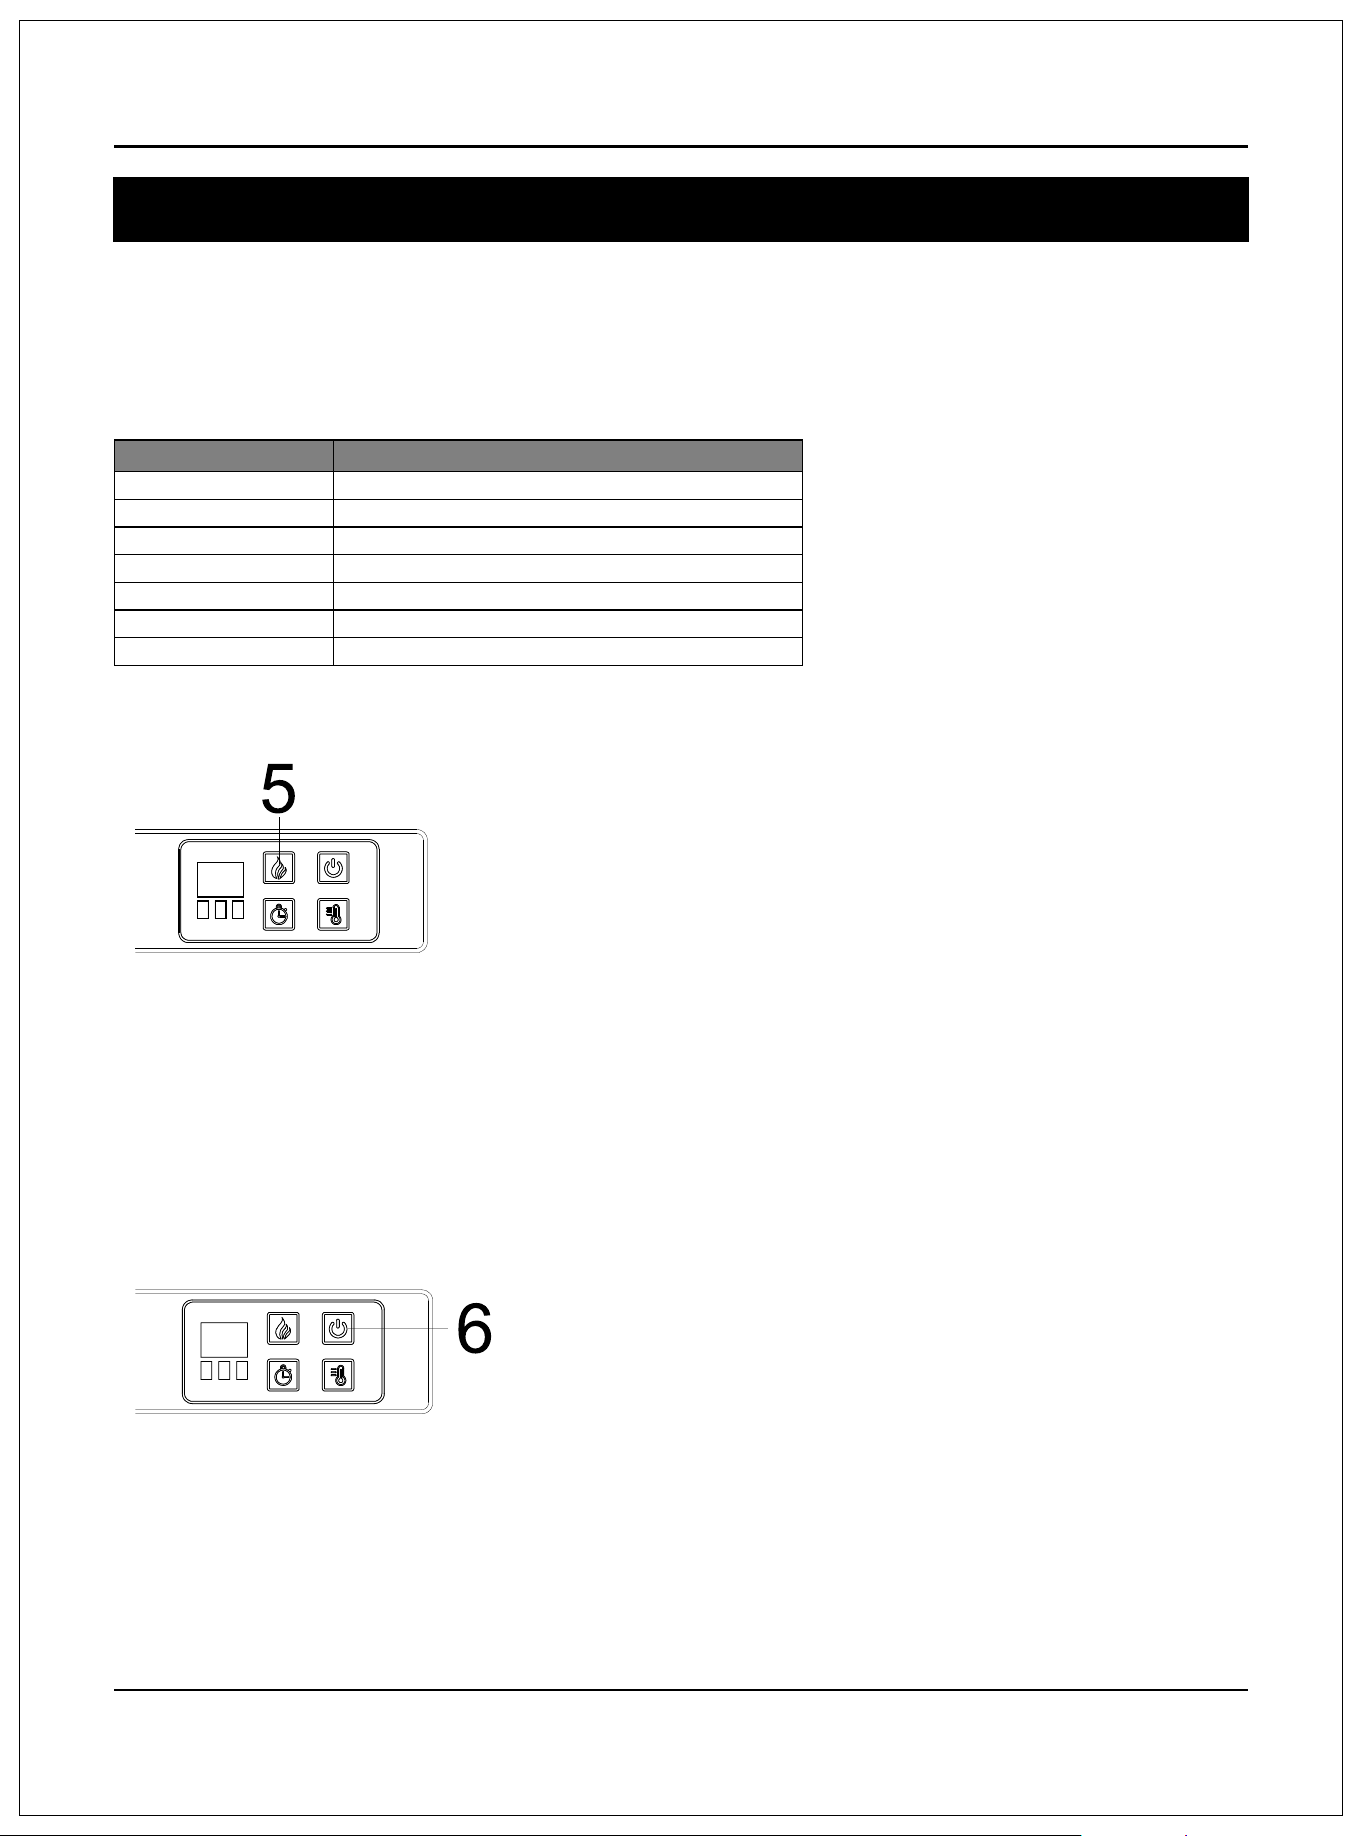
•Thecontrolpanelcontainsthedisplayunit(1),functionindicator(2),timerfunction(3),heatercontrol(4),
amescontrol(5),andmainpower(6).
•Thedisplayunit(1)displaysinformationabouttheamelevel,timer,andcurrenttemperature.
●Understandingthefunctionindicator
•Thefunctionindicator(2)hasthreesquareLEDS-red,green,andblue.TheredLEDindicatesthattheFahrenheit
temperatureheatingfunctionisrunning,thegreenLEDindicatesthattheCelsiustemperatureheatingfunction
isrunning,andtheblueLEDindicatesthatthetimerfunctionisengaged.
•TothebottomofthethreeLEDS,istheinfraredreceivermodulewhichcommunicateswiththeremotecontrol
tocontroltheheater.
9
Operation
●Usingthetimerfunction
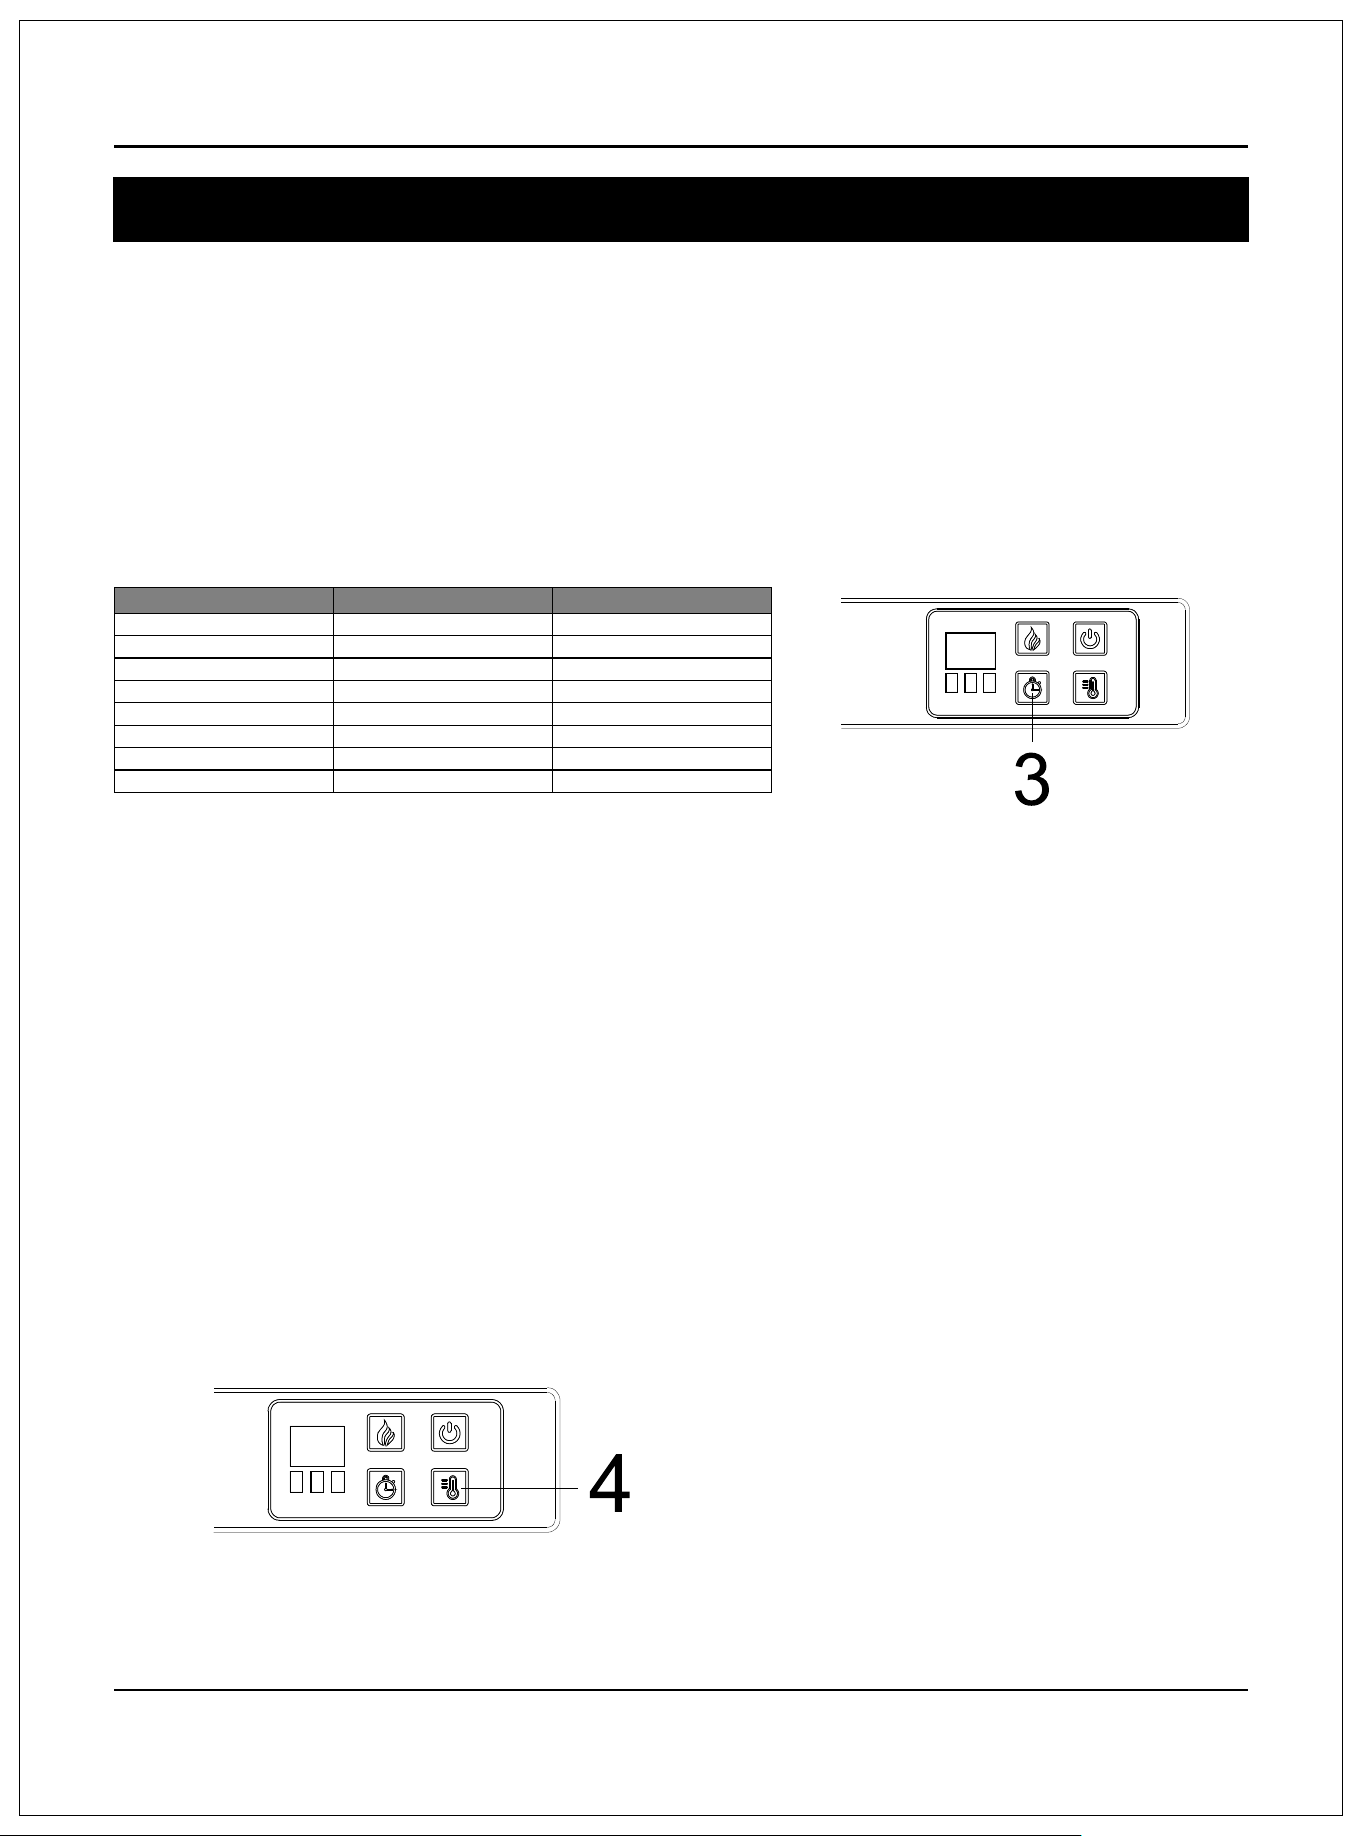
Thetimerbutton(3)allowsyoutosettheamountoftimeyouwantthereplace/heatertorun.Thetimerbutton(3)
operatesboththeamesandtheheaterfunction.iftheheaterisoperatingwhenthetimerisset,thentheheater
isonthetimer.iftheamesareoperating,thenthetimerwillcontroltheames.ifboththeheaterandamesare
operatingwiththetimerset,thenthetimercontrolsboththeamesandtheheater.Pressingthebuttoninsequence
willsetthetimerforasetinterval.Thisintervalperiodisshowninthedisplay(1),inblue.Thesetintervals
aredisplayedinthistable.Thetimerintervalissetfromthetimetheintervalisselected.Thereisnoclockfunction
forturningtheheateroramesonoroffataspecictime.
●Usingtheheatercontrol
•Theheaterbutton(4)turnstheheateronoroff.Thereisnospeedsettingfortheheaterblower.lfyouputthe
heaterinastandbymode(turnoffbythemainpowerbutton6),theunitwillholdthesettingsinthememory.
Whenthepoweristurnedbackon,theheaterwillturnonatthesamesettings.
•Whentheheatingfunctionturnson,pressandholdtheheaterbutton(4)forvesecondstoentertemperature
adjustmentmode.TheLEDindicatorisred.Inadjustmentmode,thedisplayunit(1)ashes(intervalis0.5second).
Thereare22levelstochangeFahrenheittemperature72°F—73°F...82°F—ON—62°F—63°F...71°F.
Afterthisisset,thedisplay(1)willashvetimesandexitfromsettingstatus.
Ifidle,thedisplayturnsoffafter10seconds.
•Withtheheateron,gentlypressandholdthemainpowerbuttonforvesecondstoentertemperature
convertingmode.TheLEDindicatorashesvetimesinredcolorthenchangestogreen.Inthisconvertingmode,
thedisplay(1)ashes(intervalis0.5second).Pressandholdtheheaterbutton(4)forvesecondstoenter
temperatureadjustmentmode.Thereare12levelstochangeCelsiustemperature
22°c—23°c...27°c—ON—17°c—18..21°c.Afteriisset,thedisplay(1)ashesvetimes.Ifidle,thedisplayturnsoff
after10seconds.RepeatthesameprocesstoconvertCelsiustemperatureintoFahrenheittemperature.
ButtonPress
1stpress
2ndpress
3rdpress
4th press
5th press
6th press
7th press
8th press
TimerInterval Display
30Minutes
30
1Hour
2Hours
3Hours
4Hours
5Hours
6Hours
OFF
1h
2h
3h
4h
5h
6h
None
10
Operation
●Usingthef amecontrol
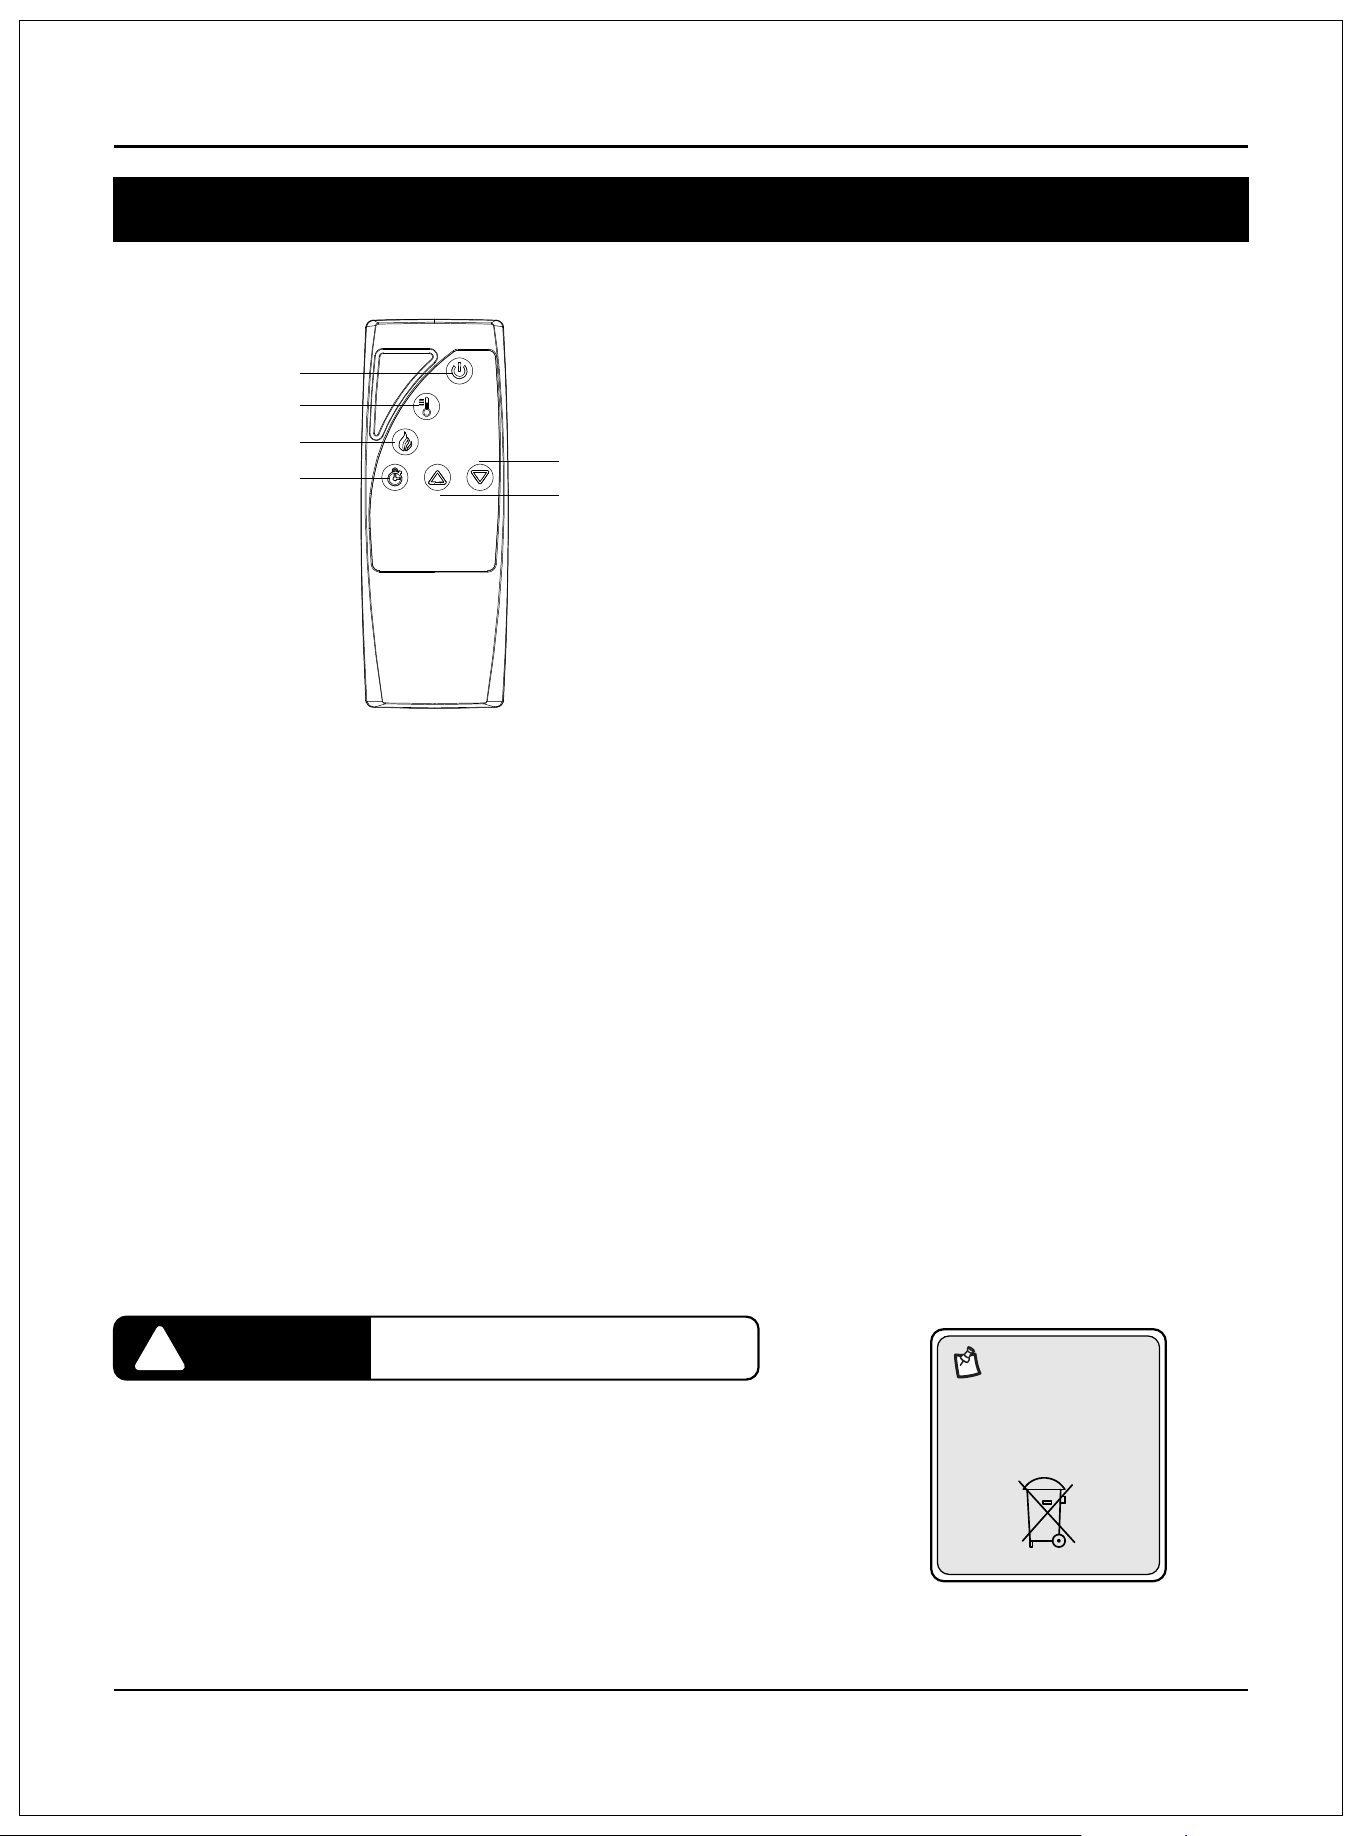
•Press the ame control button manually set ame color. The ame color settings are as follows:
Display
L1
L2
L3
L4
Color Name
Orange
Red
Orange Red
Blue Red
●Usingthemainpowerbutton
•Pressthepowerbutton(6)toturnthereplace/heaterunitonandoft.
Pressthepowerbutton(6)oncetoturntheuniton.Pressagaintoturntheunitoff.
l
L5
L6
AU
Blue Orange
Blue Orange Red
Automatically cycle through all ame colors
11
UsingtheRemoteControl
1.Non-rechargeablebatteriesarenottoberecharged.
2.Batteriesaretobeinsertedwiththecorrectpolarity.
3.Exhaustedbatteriesaretoberemovedfromtheproduct.
4.Alwayspurchasethecorrectsizeandgradeofbatterymostsuitable
fortheintendeduse.
5.Replaceallbatteriesofasetatthesametime..
6.Cleanthebatterycontactsandalsothoseofthedevicepriortobatteryinstallation.
7.Removebatteriesfromequipmentwhennotusedforanextendedperiodoftime.
WARNING
!
Donotingestbatteries.
NOTE:
Batterydisposal
Pleasealwaysdispose
ofbatteries atasuitable
recyclingpoint.
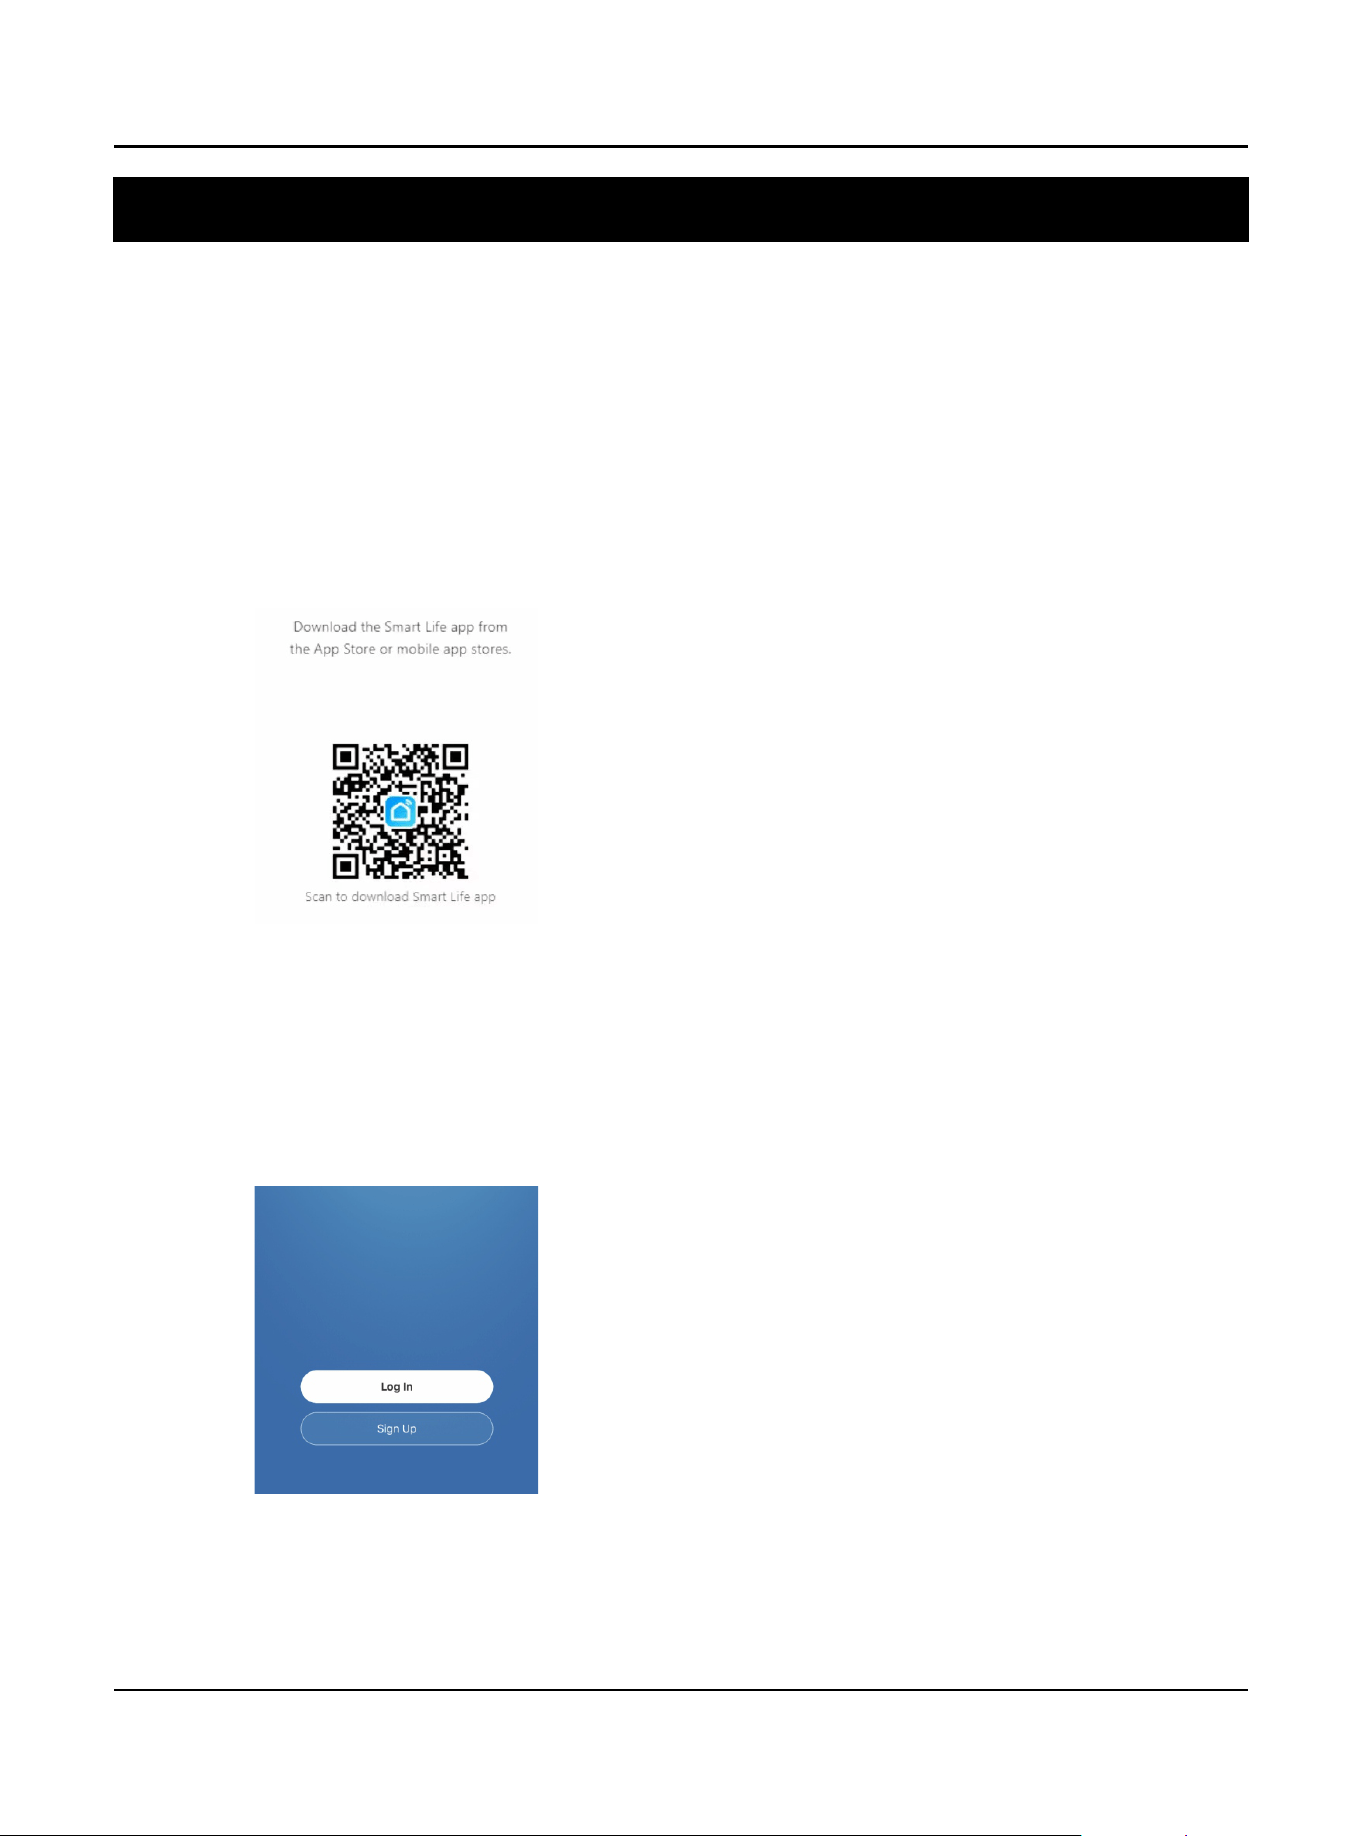
Flame Control
Heater Control
●Using the Remote control
The operation of the remote control buttons work the same as button on the control panel.
●Install the battery
For replacement batteries, use AAA batteries.
Press down and slide back cover off the battery compartment.
Insert two provided AAA batteries into the battery compartment making sure that the ends of the batteries
with the negative(-) symbols are against the springs in the battery compartment.
Replace the battery compartment cover, making sure it snaps into position.
Main Power
Time Control
Heater Down
Heater Up
12
Smart Connection Guide
●SYSTEM REQUIREMENTS
•Supported wireless routers must have a 2.4 GHz operating frequency
•Standard: 802.11b/g/n bans
•Supported smartphone systems: Android 6.0 or later iOS 11 or later
Step 1
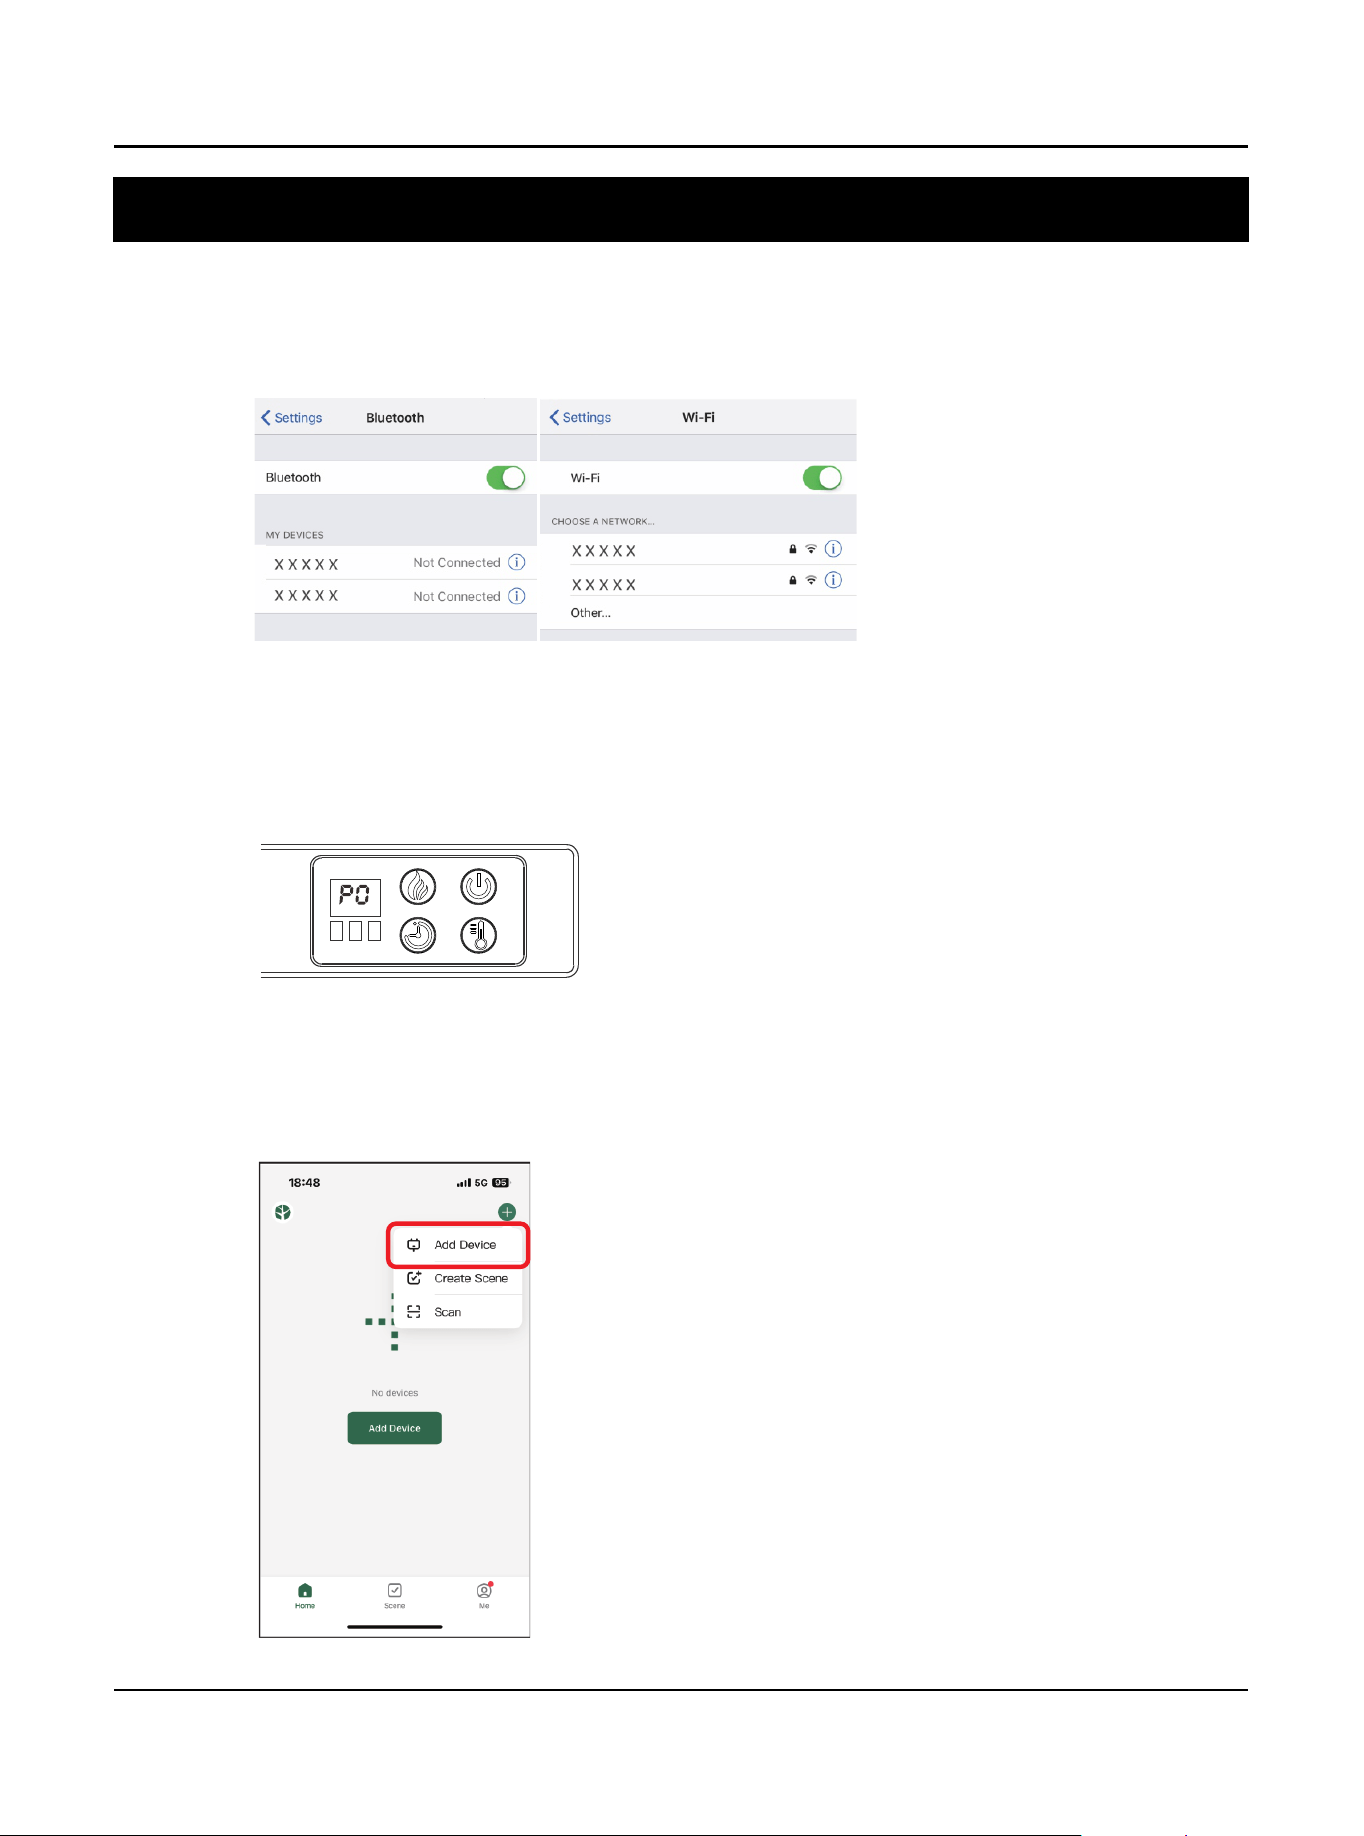
To download the app, scan the QR code. You can download the iOS or Android version, then install on your mobile
device.
Step 2
Open the app, turn on Bluetooth,then sign up for a free account, Log in with your account name and password.
13
Smart Connection Guide
Step 3
Select your network and enter the password. The network must be 2.4 Ghz.
Step 4
When the replace is plugged in, you can search for replace’s name.
To activate Wi-Fi pairing mode in replace standby mode, press and hold the Timer Button for 5 seconds. The
display screen will ash “PO” continuously.The mode will automatically turn off after 90 seconds of inactivity.
Step 5
Open the app, then select the ADD DEVICE button. The app will search for the replace automatically. Press the
green ADD DEVICE button to add your device.
14
Smart Connection Guide
Step 6
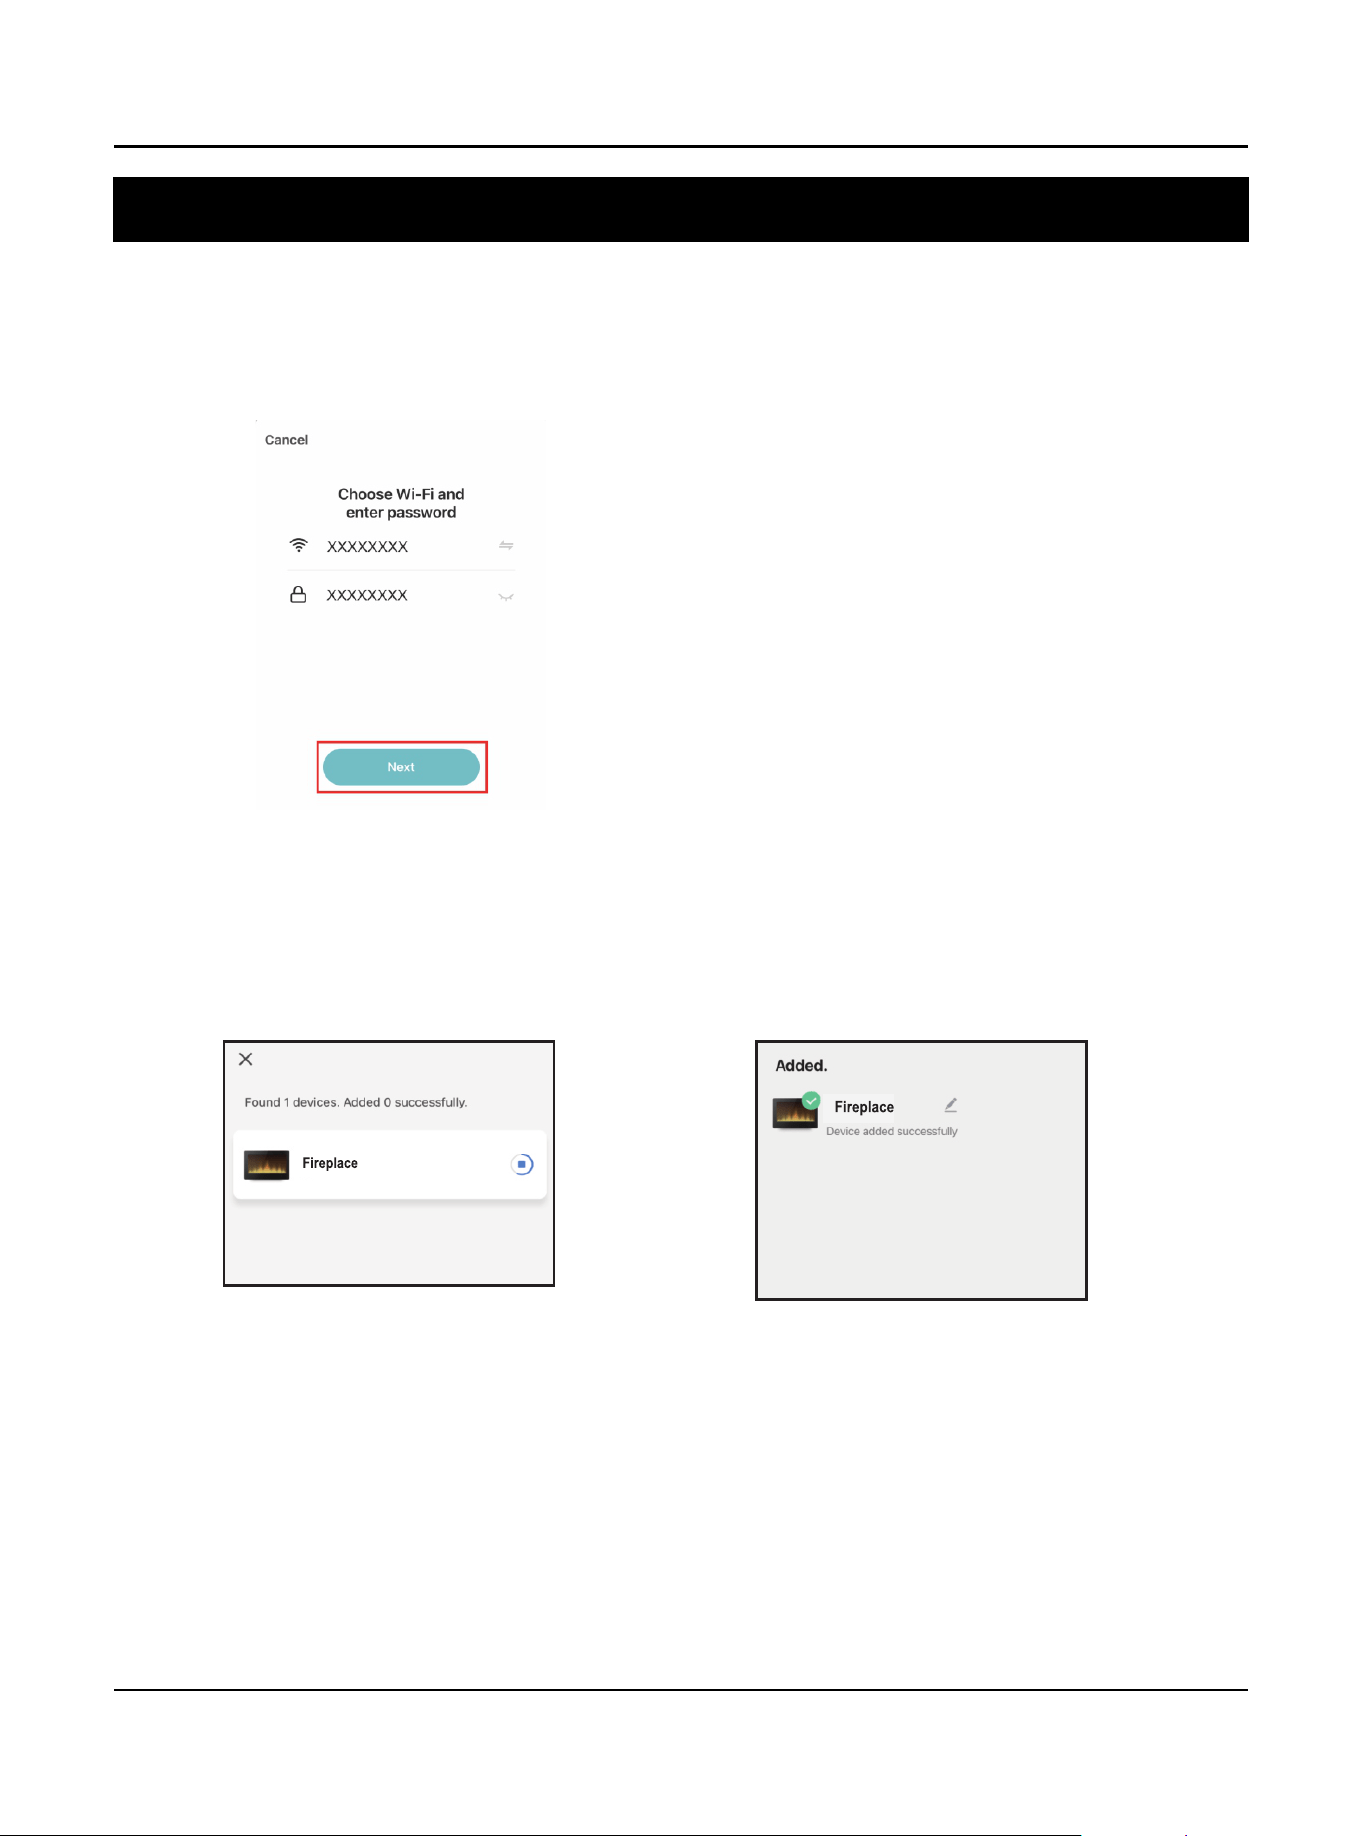
Choose your Wi-Fi name (the one your phone is connected to) and enter the password, Press the “Next” button
to continue.
Tip: If the WI-FI password is displayed, please press Next.
Step 7
The app starts connect to your replace. It may take some time, but please wait patiently to set up the connection.
15
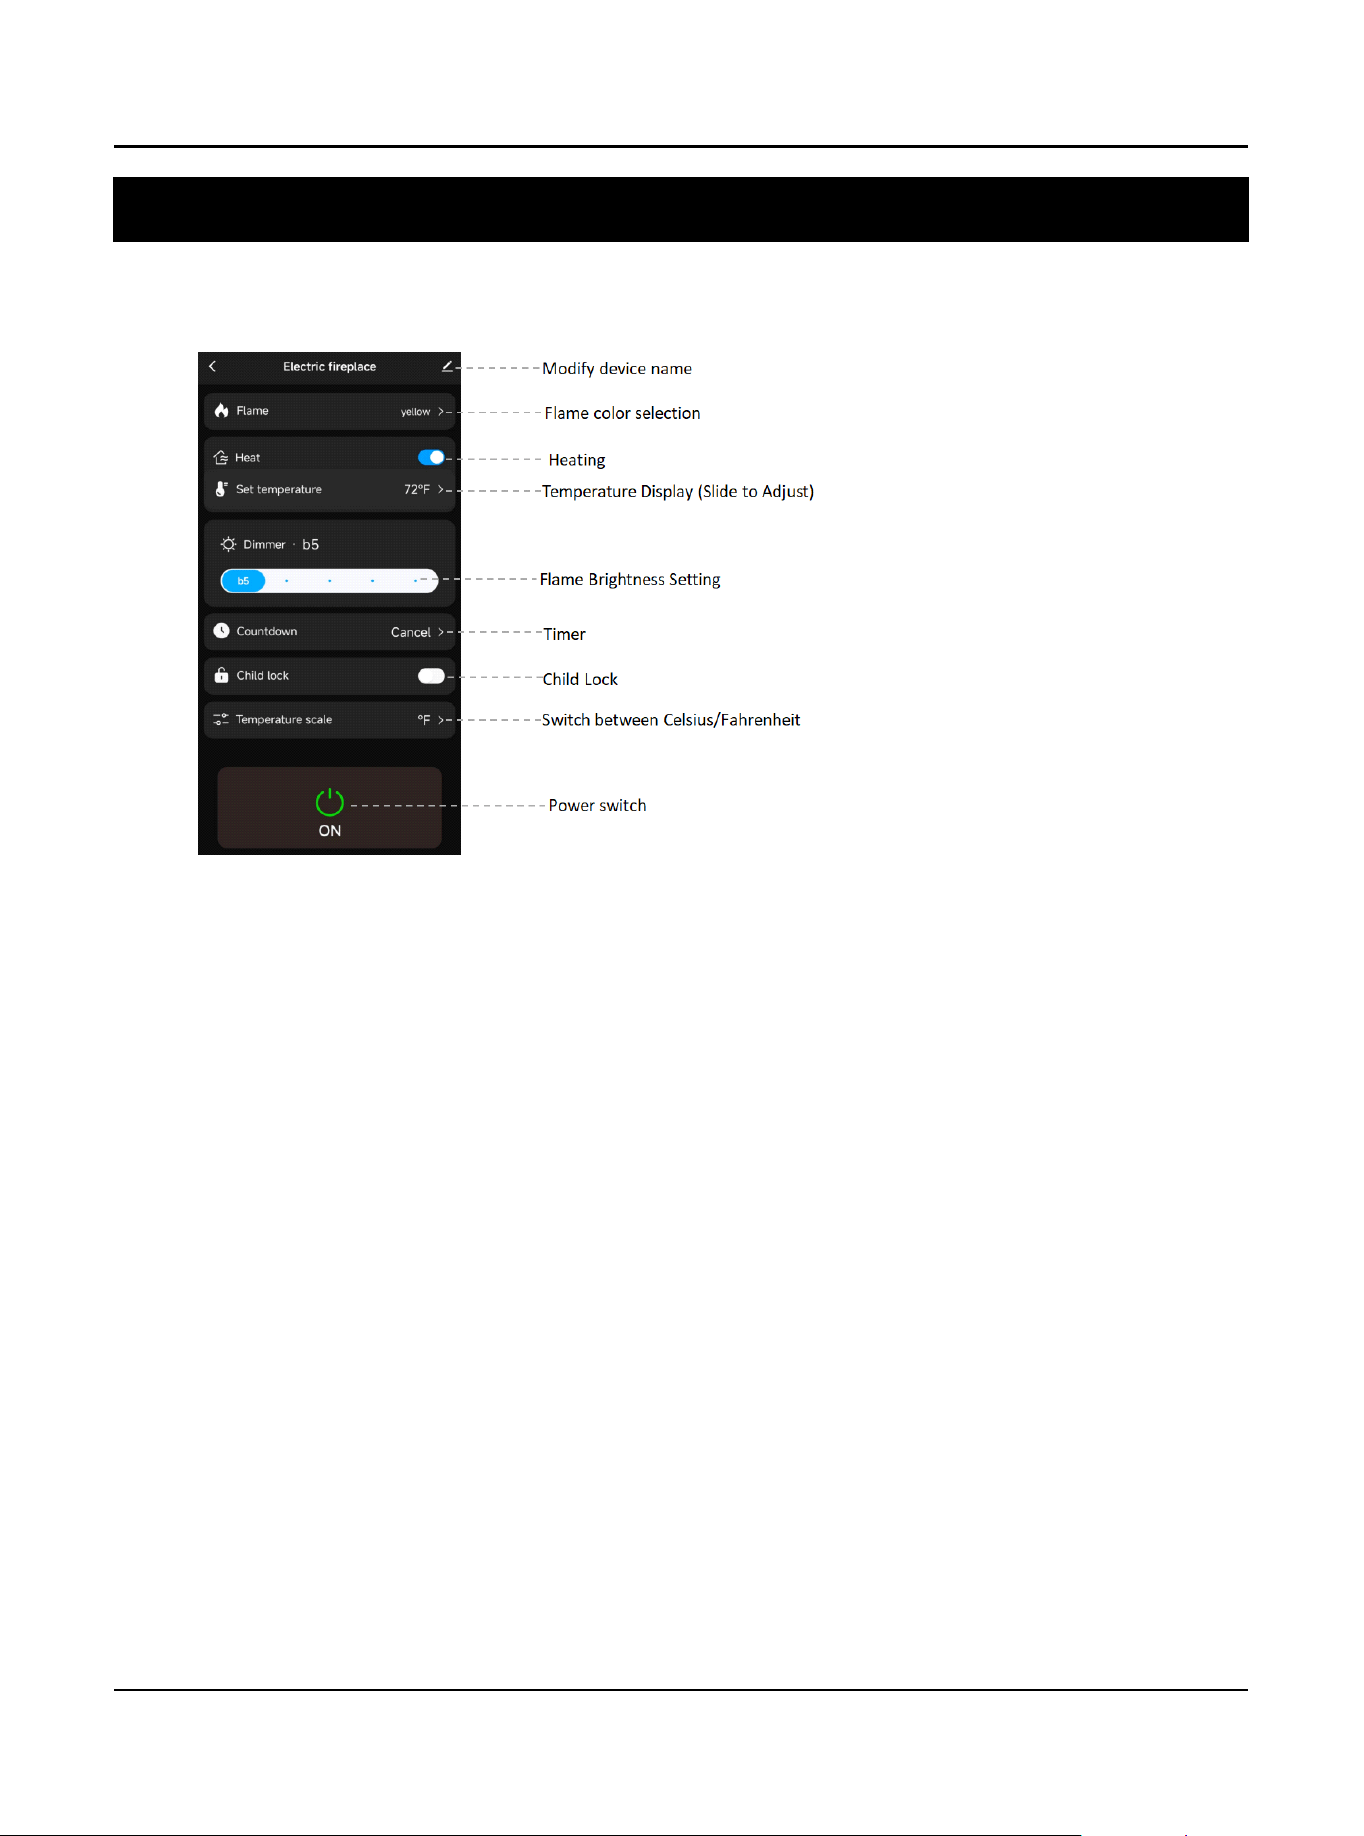
USING THE APP
RF Exposure Warning Statements:
This equipment complies with FCC radiation exposure limits set forth for an uncontrolled
environment. This equipment shall be installed and operated with minimum distance 20cm
between the radiator & body.
16
Care and Maintenance
WARNING
!
Alwaysdisconnectfromthepowersupplybeforecleaningtheheater.
Firstturnoffthemain power.
Thenremovetheelectricalplugfromthewall outlet.
WARNING
!
Donotusethisreplaceinsertifanypartof ithasbeenunderwater.
Immediatelycallaqualied servicetechniciantoinspectthereboxand
replace anypartoftheelectricalsystemwhichhasbeenunderwater.
Theblowermotorandamemotorarepre-lubricatedforadurableusingtimeandneednofurtherlubrication
ormaintenance.Toremoveanyaccumulationofdustordebris,thesoftbrushattachmentofavacuumcleaner
shouldoccasionallybeusedtocleantheoutletgrilleofthefanheater.
● Useasoft,cleancloththatwillnotscratchthesurfacewhendusting.
● Useacleansoftclothdampenedwithwarmwatertocleanthereplacesurface.
D0NOTusehouseholdorabrasive cleaners,astheseproductsmaydamagethesurface.
● Whencleaningtheglassviewingscreenuseanon-abrasivedampclothwithliquidcleanerorsoftsoap
ifnecessary;Don NOTusecleaningpowdersoranyothersubstancewithabrasives
sincethesesubstanceswillscratchglass.
● Undernocircumstancesshouldthisproductbeoperatedwithabrokenorchippedglasspanel.
● Donotstrikeorslamtheglass.
● Intheeventthatyourapplianceisstainedorotherwisedamagedduringuse,werecommendthatyoucall
aprofessionaltoit.
● Whennotinusepleaseunplugthecordfromtheoutlettopreventanydamageoraccidents.
17
Troubleshooting
Problem
Solution
Checkthattheunitisfullypluggedinto
astandard120Voutlet.
Pressthepowerbuttononthecontrolpanel.
Theunitdoesnotturnon.
Theunitison,butthereisnoameeffect. Openthebackpanelstocheckiftheame
spindlehas fallenofffromthespindlemotor.
Thereisavisibleameeffect,buttheheater
doesnot continuetoblowwarmairafterrepeatedly
turningontheheater.
Turnon/offtheheaterbuttonseveraltimesto
makesure itisinthe“ON”position.
Theheaterdoesnotwork,butthepower
andheaterswitchesareinthe“ON”position.
Turnallswitchestothe“OFF”positionandunplug
the unitfromthewalloutletfor5minutes.
After5minutesplugtheunitbackintothewalloutlet,
andoperateas normal.
Makesurethatnoobjectsareblockingtheair
ventsonthetopandonthefrontofyourreplace.
Changetheremotebattery.
Operateremotetransmitterataslowmeasuredpace.
Presstheremotecontrolbuttonswithanevenmotion
andgentlepressure.
Repeatedlypressingbuttonsinrapidsuccessionmay
causethetransmittertomalfunction.
Standclosertoyourreplace.
Removeobjectsthatmayblockyourremotecontrol's
abilitytocommunicatewithyourreplace.
Remotecontrolisnotworking.