OWNER'S MANUAL
(FOR MODELS MANUFACTURED SINCE 11/18)
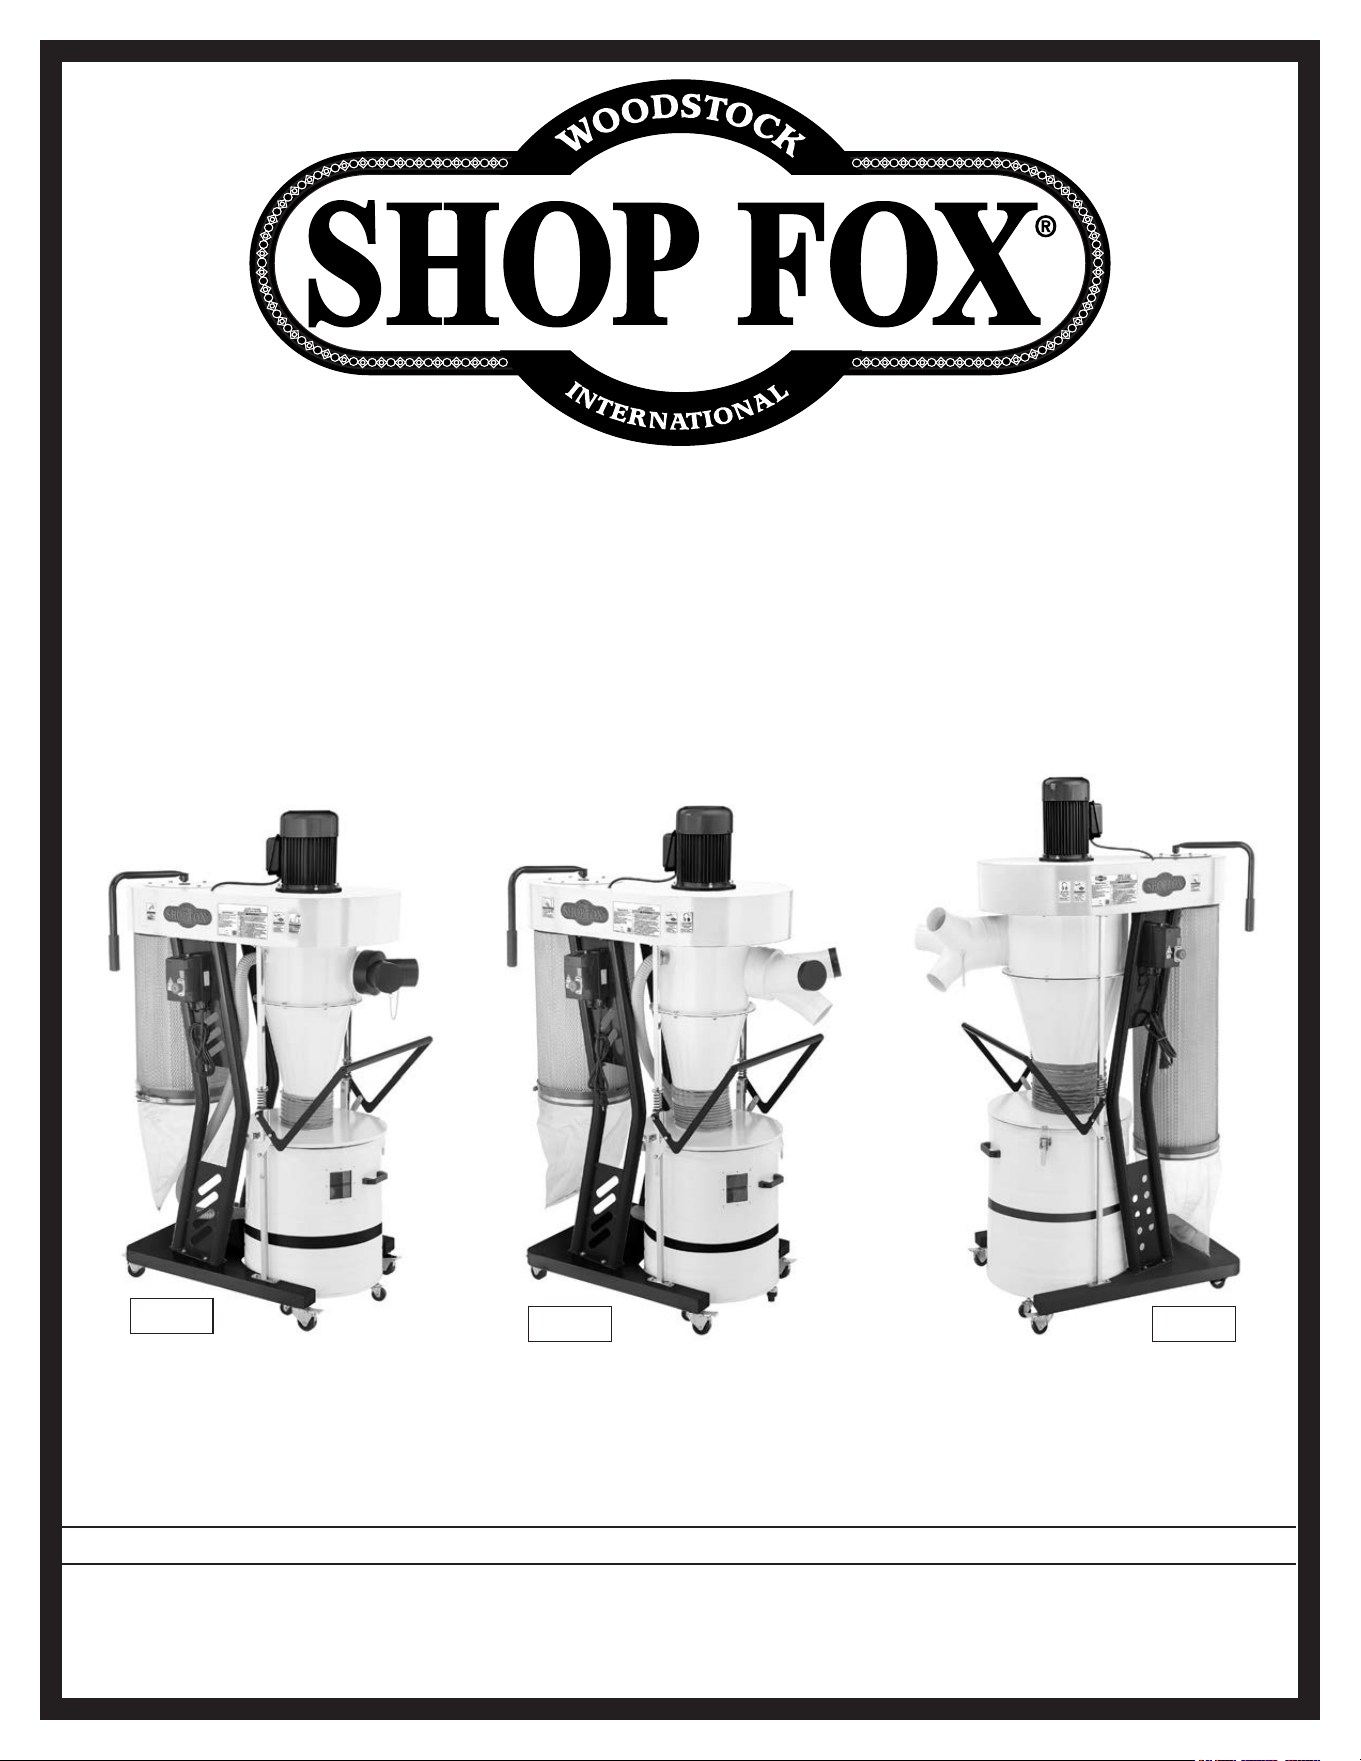
MODEL W1867/W1868/W1869
CYCLONE
DUST COLLECTORS
Phone: (360) 734-3482 • Online Technical Support: [email protected]
COPYRIGHT © JANUARY, 2019 BY WOODSTOCK INTERNATIONAL, INC.
WARNING: NO PORTION OF THIS MANUAL MAY BE REPRODUCED IN ANY SHAPE OR FORM WITHOUT
THE WRITTEN APPROVAL OF WOODSTOCK INTERNATIONAL, INC.
#20207KBES Printed in Taiwan
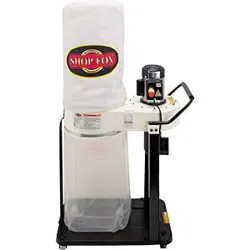
W1867
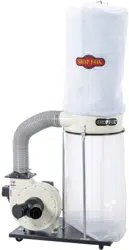
W1868 W1869
This manual provides critical safety instructions on the proper setup,
operation, maintenance, and service of this machine/tool. Save this
document, refer to it often, and use it to instruct other operators.
Failure to read, understand and follow the instructions in this manual
may result in fire or serious personal injury—including amputation,
electrocution, or death.
The owner of this machine/tool is solely responsible for its safe use.
This responsibility includes but is not limited to proper installation in
a safe environment, personnel training and usage authorization,
proper inspection and maintenance, manual availability and compre-
hension, application of safety devices, cutting/sanding/grinding tool
integrity, and the usage of personal protective equipment.
The manufacturer will not be held liable for injury or property
damage from negligence, improper training, machine modifications or
misuse.
Some dust created by power sanding, sawing, grinding, drilling, and
other construction activities contains chemicals known to the State of
California to cause cancer, birth defects or other reproductive harm.
Some examples of these chemicals are:
• Lead from lead-based paints.
• Crystalline silica from bricks, cement and other masonry products.
• Arsenic and chromium from chemically-treated lumber.
Your risk from these exposures varies, depending on how often you
do this type of work. To reduce your exposure to these chemicals:
Work in a well ventilated area, and work with approved safety equip-
ment, such as those dust masks that are specially designed to filter
out microscopic particles.

SETUPELECTRICAL MAINTENANCE
SERVICE PARTS
OPERATIONS
SAFETYINTRODUCTION
USE THE QUICK GUIDE PAGE LABELS TO SEARCH OUT INFORMATION FAST!
INTRODUCTION......................................2
Woodstock Technical Support .................. 2
Machine Differences ............................. 2
Machine Specifications .......................... 3
Identification ..................................... 5
Controls & Components ......................... 6
SAFETY................................................7
Standard Machinery Safety Instructions ...... 7
Additional Safety for Dust Collectors ......... 9
ELECTRICAL........................................ 10
W1867 110V Circuit Requirements .......... 10
Grounding Requirements ...................... 11
Extension Cords ................................ 11
W1868/W1869 220V Circuit Requirements . 12
Grounding Requirements ...................... 13
Extension Cords ................................ 13
SETUP............................................... 14
Unpacking ....................................... 14
Items Needed for Setup ....................... 14
Inventory ........................................ 15
Machine Placement ............................ 17
Assembly ......................................... 18
Test Run .......................................... 26
DESIGNING.THE.SYSTEM......................... 27
General .......................................... 27
Duct Material ................................... 27
System Design .................................. 29
System Grounding .............................. 35
OPERATIONS....................................... 36
General .......................................... 36
Operation Overview ........................... 36
ACCESSORIES....................................... 37
Cyclone Dust Collector Accessories ......... 37
MAINTENANCE..................................... 39
General .......................................... 39
Emptying/Replacing Collection Drum Bag .. 39
Cleaning Canister Filter ....................... 40
SERVICE............................................. 41
General .......................................... 41
Removing/Replacing Canister Filter & Bag . 41
Troubleshooting ................................. 43
Electrical Safety Instructions ................. 45
Electrical Components ........................ 46
W1867 Wiring Diagram ........................ 47
W1868/W1869 Wiring Diagram ............... 48
PARTS............................................... 49
W1867/W1868/W1869 Parts .................. 49
W1867 Parts List ................................ 50
W1868 Parts List ................................ 51
W1869 Parts List ................................ 52
W1867/W1868 Labels & Cosmetics .......... 53
W1869 Labels & Cosmetics ................... 54
WARRANTY......................................... 57
Contents
-2-
Model W1867/W1868/W1869 (For Machines Mfd. Since 11/18)
INTRODUCTION
INTRODUCTION
Model.W1867:
• 1.5 HP 110V Single-Phase Motor
• 6" Dust Port Inlet with 2 x 4" Adapter
• 868 CFM @ 1.8" SP
• 1-Micron Canister Filter
• 20-Gallon Collection Drum
Model.W1868:
• 2 HP 220V Single-Phase Motor
• 7" Dust Port Inlet with 3 x 4" Adapter
• 1023 CFM @ 1.2" SP
• 1-Micron Canister Filter
• 20-Gallon Collection Drum
Model.W1869:
• 3 HP 220V Single-Phase Motor
• 8" Dust Port with 3 x 4" Adapter
• 1941 CFM @ 2.9" SP
• 1-Micron Canister Filter
• 35-Gallon Collection Drum
Machine .Differences
Woodstock.Technical.Support
This machine has been specially designed to provide many years of trouble-free service. Close attention
to detail, ruggedly built parts and a rigid quality control program assure safe and reliable operation.
Woodstock International, Inc. is committed to customer satisfaction. Our intent with this manual is to
include the basic information for safety, setup, operation, maintenance, and service of this product.
We stand behind our machines! In the event that questions arise about your machine, please contact
Woodstock International Technical Support at (360) 734-3482 Ext. 2 or send e-mail to: techsupp ort@
woodstockint.com. Our knowledgeable staff will help you troubleshoot problems and process warranty
claims.
If you need the latest edition of this manual, you can download it from http://ww w.woodstockint.com/
manuals.
If you have comments about this manual, please contact us at:
Woodstock.International,.Inc.
Attn:.Technical.Documentation.Manager
P.O..Box.2309
Bellingham,.WA.98227
Email:.manuals@woodstockint.com
-3-
Model W1867/W1868/W1869 (For Machines Mfd. Since 11/18)
INTRODUCTION
M achine.Specifications
Model W1867 Machine Specifications, Page 1 of 3
MODEL W1867
1.5 HP PORTABLE CYCLONE DUST COLLECTOR
Product Dimensions
Weight.......................................................................................................... 265 lbs.
Width (side‐to‐side) x Depth (front‐to‐back) x Height................................... 27‐1/2 x 44 x 70 in.
Footprint (Length x Width)......................................................................... 32‐1/2 x 24 in.
Shipping Dimensions
Carton #1
Type............................................................................................. Cardboard Box
Content............................................................................................... Main Body
Weight................................................................................................... 199 lbs.
Length x Width x Height..................................................................... 43 x 29 x 23 in.
Must Ship Upright........................................................................................... Yes
Carton #2
Type............................................................................................. Cardboard Box
Content................................................................................ Stand & Support Arms
Weight.................................................................................................... 39 lbs.
Length x Width x Height...................................................................... 50 x 18 x 8 in.
Must Ship Upright............................................................................................ No
Carton #3
Type............................................................................................. Cardboard Box
Content.................................................................. Canister Filter & Collection Drum
Weight.................................................................................................... 40 lbs.
Length x Width x Height..................................................................... 22 x 22 x 28 in.
Must Ship Upright............................................................................................ No
Electrical
Power Requirement.................................................................... 110V, Single‐Phase, 60 Hz
Full‐Load Current Rating......................................................................................... 15A
Minimum Circuit Size............................................................................................. 20A
Connection Type......................................................................................... Cord & Plug
Power Cord Included.............................................................................................. Yes
Power Cord Length............................................................................................... 6 ft.
Power Cord Gauge............................................................................................ 14 AWG
Plug Included....................................................................................................... Yes
Included Plug Type............................................................................................... 5‐15
Switch Type........................................ Remote‐Control Magnetic Switch w/Overload Protection
W1867/W1868/W1869 CYCLONE DUST COLLECTORS
Model.Number W1867 W1868 W1869
Product Dimensions
Weight 265 lbs. 285 lbs. 348 lbs.
Width (side-to-side) x Depth
(front-to-back) x Height
27
1
⁄2" x 44" x 70" 28
1
⁄2" x 52" x 70" 31" x 54" x 82"
Footprint (Length x Width) 32
1
⁄2" x 24" 36" x 26" 40" x 31"
Shipping Dimensions
Type Cardboard Box 1, Main Body
Weight 199 lbs. 213 lbs. 820 lbs.
Width x Depth x Height 43" x 29" x 23" 43" x 29" x 23" 38" x 30" x 46"
Type Cardboard Box 2, Stand & Support Arms
Weight 39 lbs. 42 lbs.
Width x Depth x Height 50" x 18" x 8" 59" x 19" x 8"
Type Cardboard Box 3, Canister Filter & Collection Drum
Weight 40 lbs. 42 lbs. 52 lbs.
Width x Depth x Height 22" x 22" x 28" 27" x 27" x 45"
Electrical
Power Requirement 110V, Single-Phase, 60 Hz 220V, Single-Phase, 60 Hz
Full-Load Current Rating 15A 9A 15A
Minimum Circuit Size 20A 15A 20A
Connection Type Cord & Plug
Power Cord Included Yes
Power Cord Length 6'
Power Cord Gauge 14 AWG 12 AWG
Plug Included Yes
Included Plug Type 5-15 6-15 6-20
Switch Type Remote Control Magnetic Switch w/Overload Protection
Motor
Type TEFC Capacitor-Start Induction
Horsepower 1.5 HP 2 HP 3 HP
Phase Single-Phase
Amps 15A 9A 15A
Speed 3450 RPM
Power Transfer Direct Drive
Bearings Shielded & Permanently Lubricated
Centrifugal Switch/Contacts Type External
-4-
Model W1867/W1868/W1869 (For Machines Mfd. Since 11/18)
INTRODUCTION
Model.Number W1867 W1868 W1869
Operation
Dust Collector Type Two-Stage (Cyclone)
Approved Dust Types Wood
Filter Type Pleated Cartridge, Spun-Bond Polyester
Air Flow Performance 868 CFM @ 1.8" SP 1023 CFM @ 1.2" SP 1941 CFM @ 2.9" SP
Max. Static Pressure (at 0 CFM) 9.7" 10.9" 11.0"
Main Inlet Size 6" 7" 8"
Inlet Adapter Included Yes
Number of Adapter Inlets 2 3
Adapter Inlet Size 4" 4"
Machine Collection Capacity 2 Machines 3 Machines
Max. Material Collection Capacity 20 Gallons 38 Gallons
Bag.Information
Number of Filter Bags 1
Number of Collection Drum Bags 1
Filter Bag Diameter 20"
Filter Bag Length 23"
Collection Drum Bag Diameter 30" 39"
Collection Drum Bag Length 41" 56"
Canister.Filter.Information
Number of Canister Filters 1
Filtration Rating 1 Micron
Canister Filter Diameter 14
1
⁄2"
Canister Filter Length 24" 39
3
⁄8"
Filter Surface Area 28.1 sq. ft. 45.2 sq. ft.
Impeller.Information
Impeller Type Radial Fin
Impeller Size 12
3
⁄4" 13" 15"
Impeller Blade Thickness
1
⁄4"
1
⁄8"
Construction
Dust Collection Bags Clear Plastic
Base Steel
Frame Steel
Impeller Cast Aluminum Steel
Impeller Housing Steel
Body Steel
Collection Drum Steel
Paint Type/Finish Powder Coated
Manufacturer.Specifications
Country of Origin
Taiwan
Warranty
2 Years
Approx. Assembly & Setup Time
1 Hour
Serial Number Location
ID Label on Impeller Housing
Sound Rating
78 dB 79 dB
ISO 9001 Factory
Yes
-5-
Model W1867/W1868/W1869 (For Machines Mfd. Since 11/18)
INTRODUCTION
I dentificati on
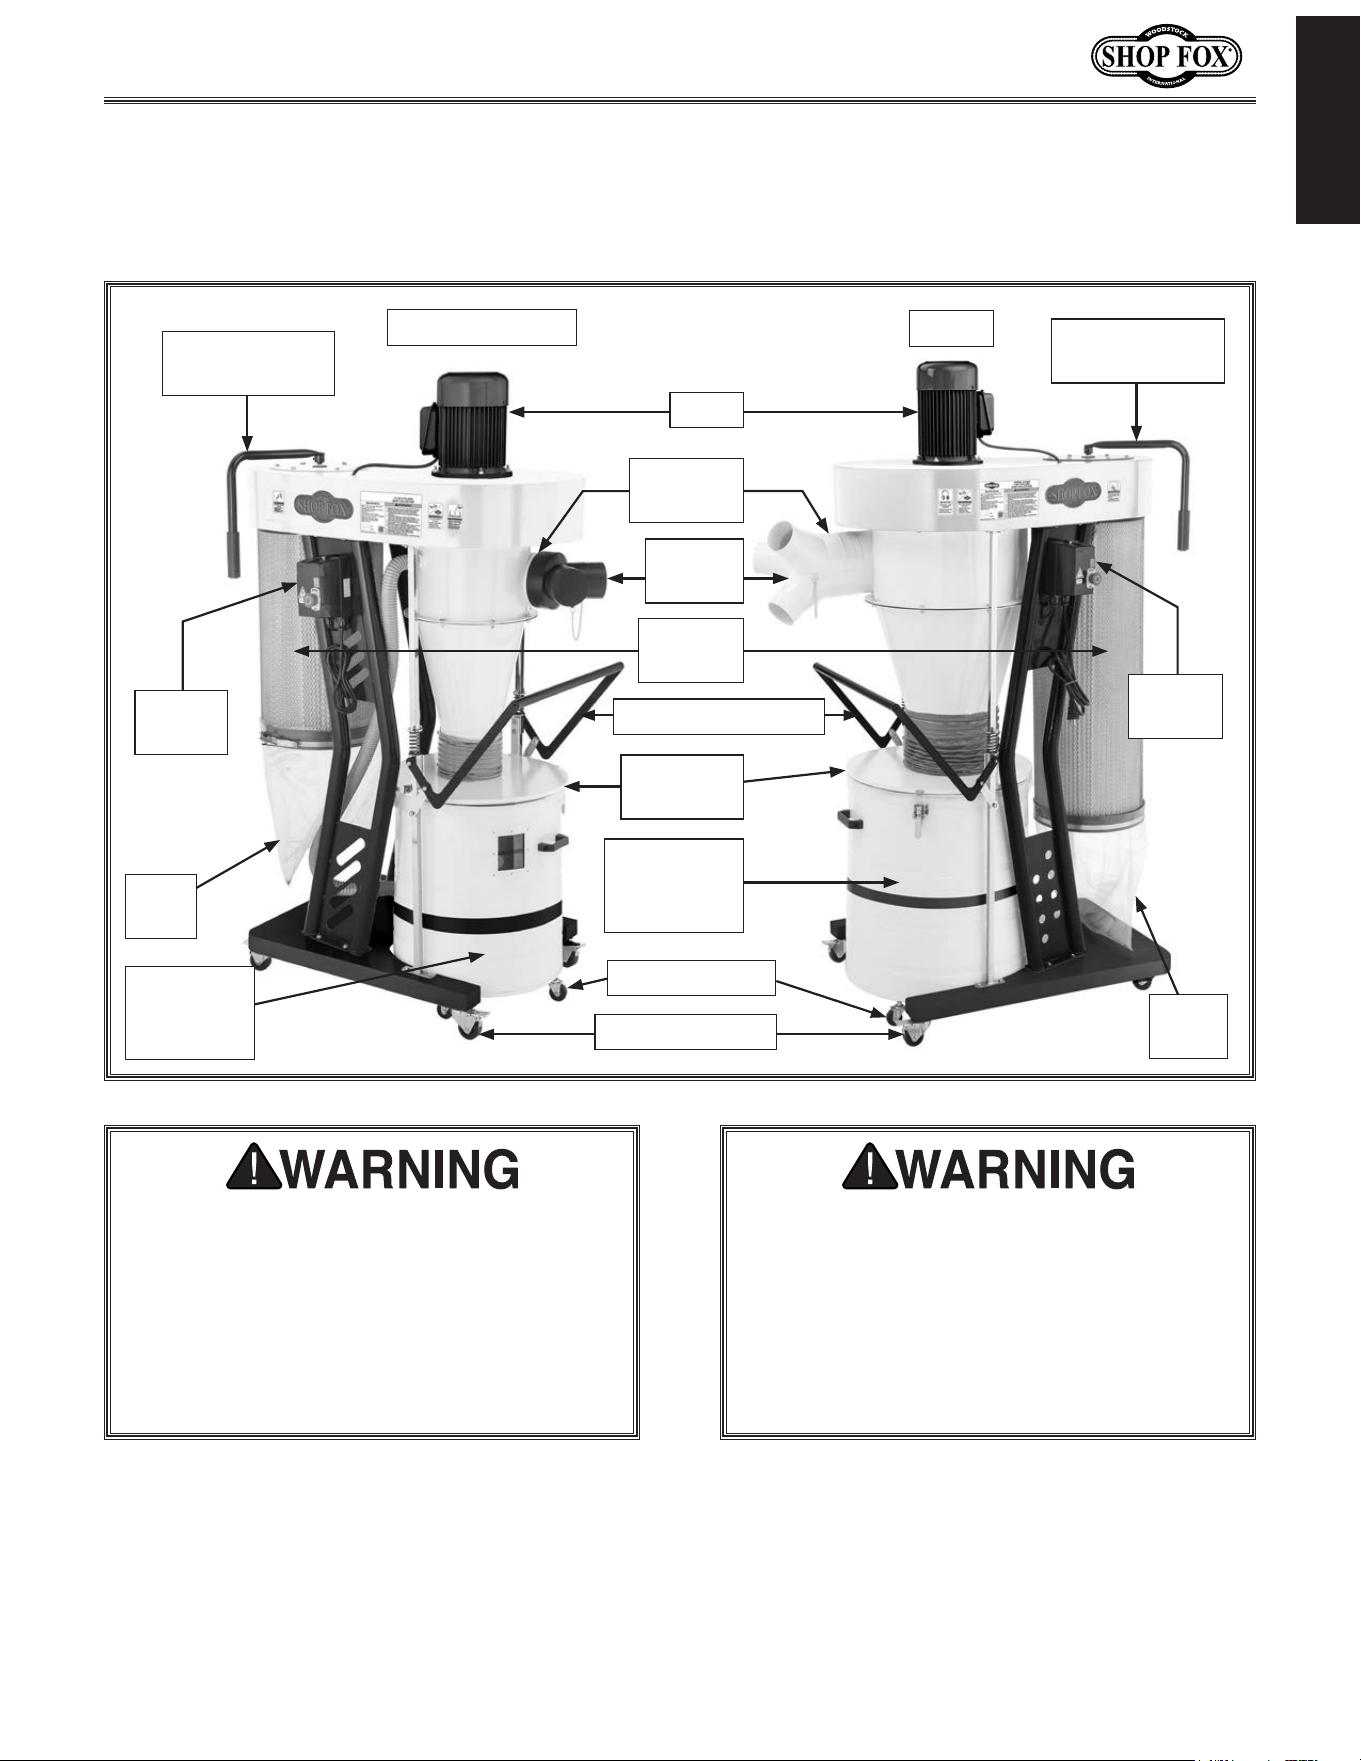
Become familiar with the names and locations of the controls and features shown below to better
understand the instructions in this manual.
W1869
W1867 & W1868
35-Gallon
Collection
Drum
20-Gallon
Collection
Drum
Inlet
Adapter
Control
Box
Control
Box
Filter Cleaning
Handle
Filter Cleaning
Handle
Motor
Dust Port
Inlet
Canister
Filter
Drum Lock Handle
Collection
Drum Bag
Filter
Bag
Filter
Bag
Swivel Casters
Locking Casters
Like.all.machinery.there.is.potential.danger.
when.operating.this.machine..Accidents.are.
frequently. caused. by. lack. of. familiarity. or.
failure. to. pay. attention.. Use. this. machine.
with. respect. and. caution. to. decrease. the.
risk. of. operator. injury.. If. normal. safety.
precautions. are. overlooked. or. ignored,.
serious.personal.injury. may.occur.
No.list.of.safety.guidelines.can.be.complete..
Every.shop.environment.is.different..Always.
consider. safety. first,. as. it. applies. to. your.
individual.working.conditions..Use.this.and.
other.machinery.with.caution.and.respect..
Failure. to. do. so. could. result. in. serious.
personal. injury, . damage. to. equipment,. or.
poor.work.results.
-6-
Model W1867/W1868/W1869 (For Machines Mfd. Since 11/18)
INTRODUCTION
Controls.&.Components
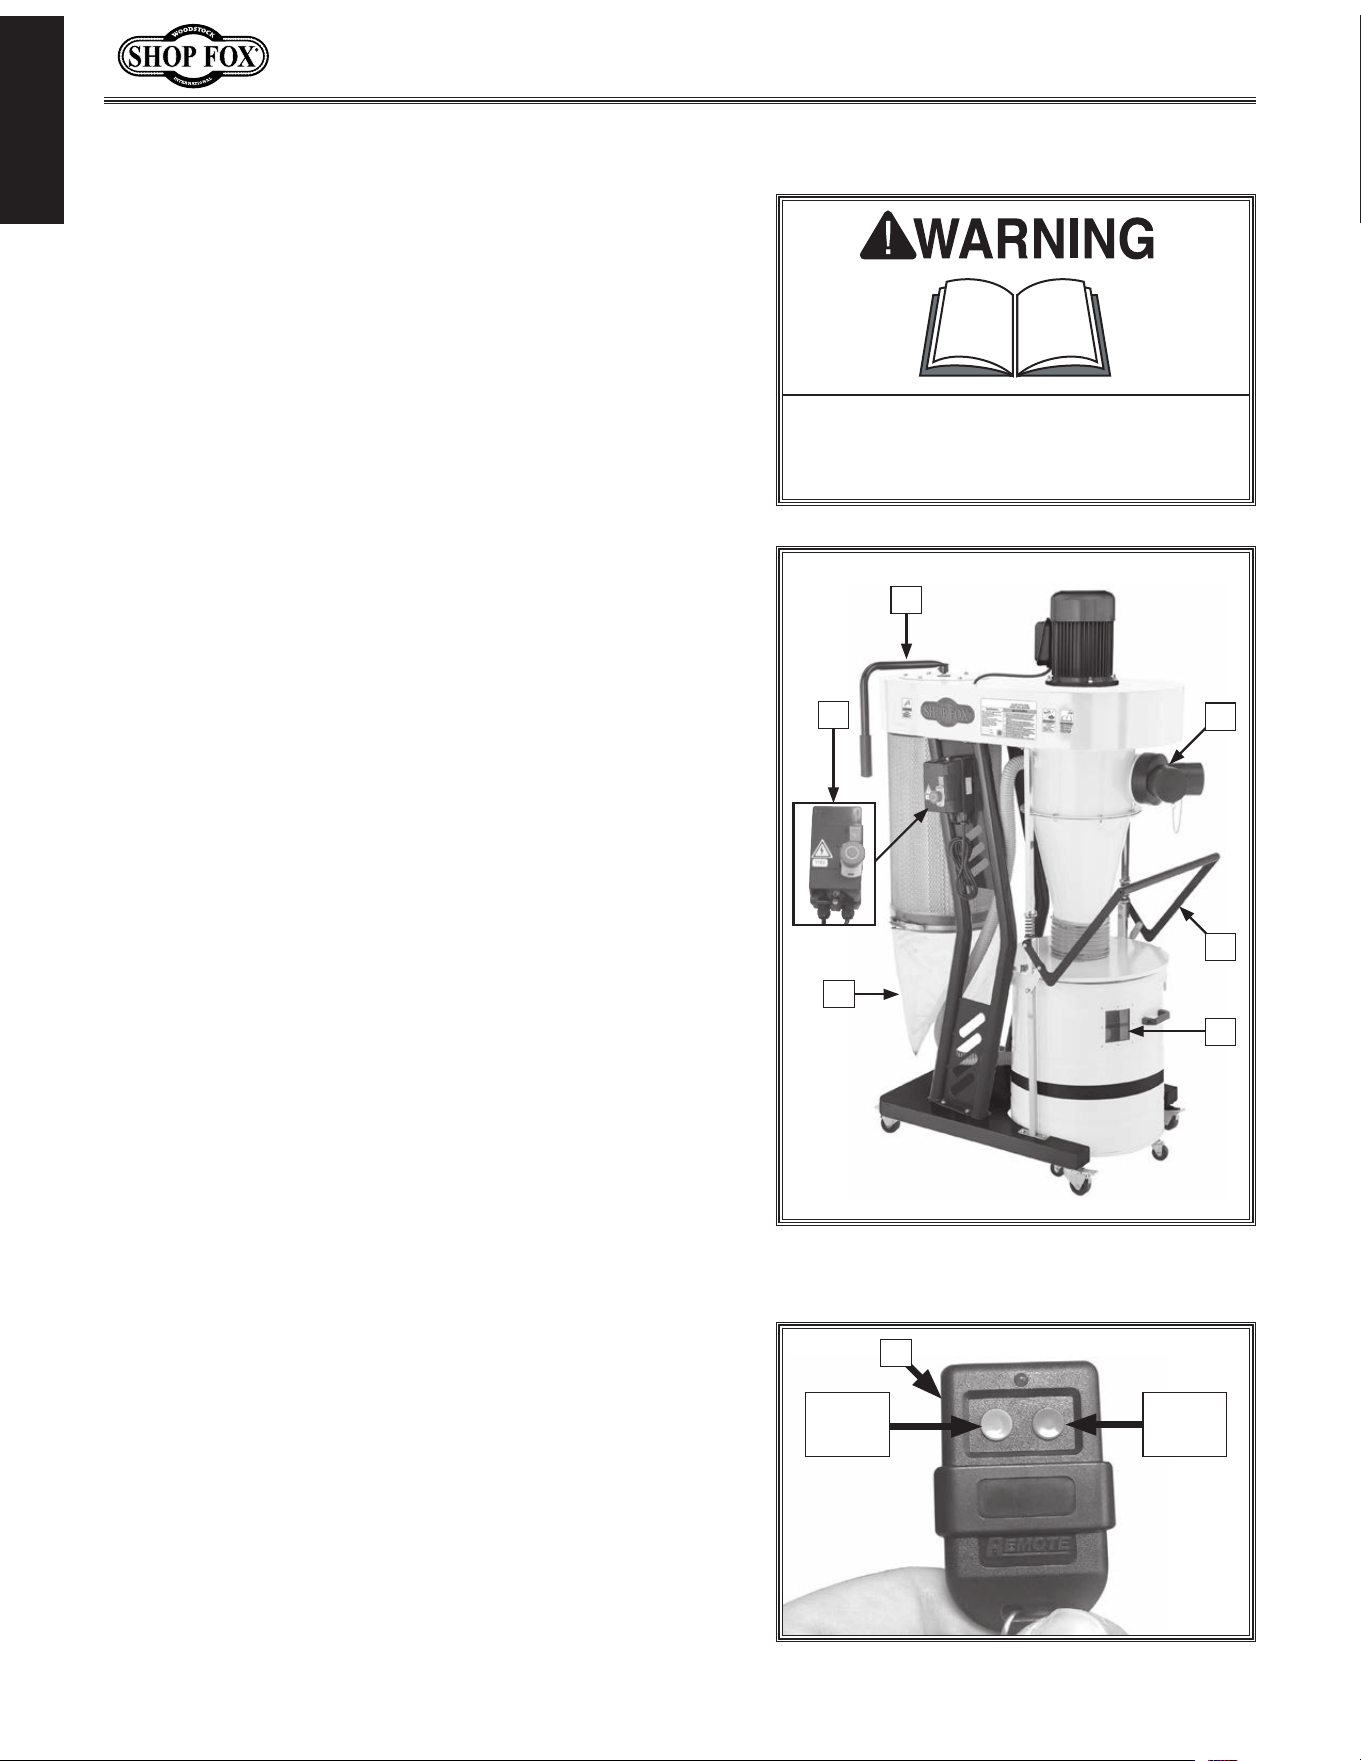
Refer to Figures.2–3 and the following descriptions to
become familiar with the basic controls and components
of this machine. Understanding these items and how they
work will help you understand the rest of the manual and
stay safe when operating this machine.
Figure.2. W1867-69 controls &
components.
A.. Filter.Cleaning.Handle: Turns paddles inside canister
filter to knock dust cake off filter pleats, cleaning
filter and helping maintain good air flow.
B.. Control.Box: Controls motor operation with a
thermally protected magnetic switch. Houses an RF
receiver for operation via remote control.
C.. Removable.Filter.Bag: Collects fine dust from filter
area.
D.. Inlet.Adapter: Allows connection of two 4" ducts
(Model W1867) or three 4" ducts (Models W1868 &
W1869) to main dust port inlet.
E.. Collection.Drum.Lock.Handle: Secures dust
collection drum to lid when pressed down. Releases
collection drum from lid when pulled up.
F.. Collection.Drum.Inspection.Window: Allows
operator to see when collection drum needs to be
emptied.
To. reduce. your. risk.of. serious. injury.
or. damage. to. the. machine,. read. this.
entire.manual.BEFORE.using.machine.
B
A
C
D
E
F
Figure.3. Remote control.
G
OFF
Button
ON
Button
G.. Remote.Control: Green button turns motor ON. Red
button turns motor OFF. Requires a 12V, type A27
battery.
Note: The remote operates on radio frequency and
has a 75-foot range. It does not need to be aimed at
the control box to operate.
Remote Control
-7-
Model W1867/W1868/W1869 (For Machines Mfd. Since 11/18)
SAFETY
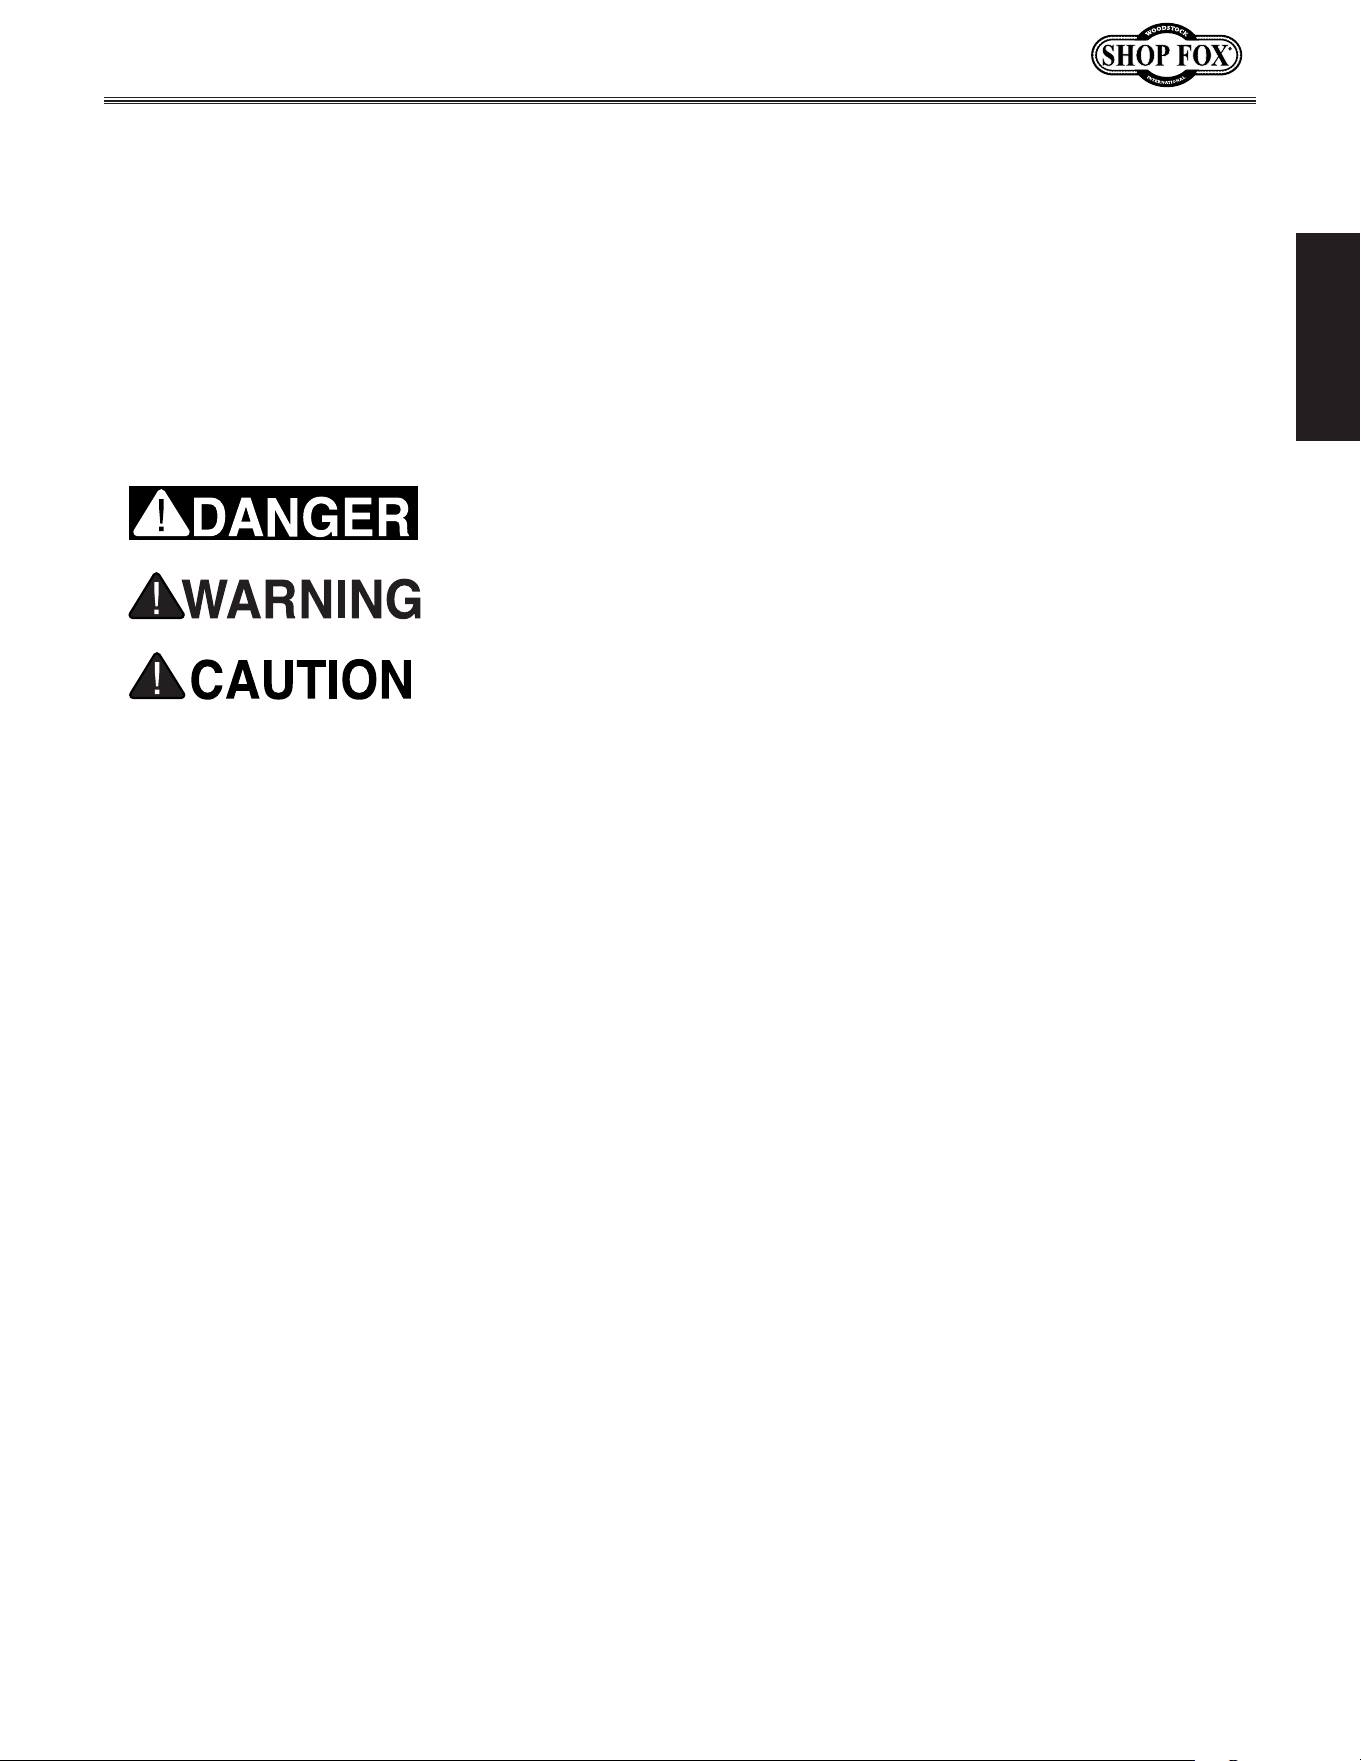
Indicates.a.potentially.hazardous.situation.which,.if.not.avoided,.
MAY.result.in.minor.or.moderate.injury.
Indicates.an.imminently.hazardous.situation.which,.if.not.avoided,.
WILL.result.in.death.or.serious.injury.
Indicates.a.potentially.hazardous.situation.which,.if.not.avoided,.
COULD.result.in.death.or.serious.injury.
This.symbol.is.used.to.alert.the.user.to.useful.information.about.
proper.operation.of.the.equipment.or.a.situation.that.may.cause.
damage.to.the.machinery.
NOTICE
SAFETY
OWNER’S.MANUAL..
Read and understand this
owner’s manual BEFORE using machine.
TRAINED.OPERATORS.ONLY..
Untrained operators
have a higher risk of being hurt or killed. Only
allow trained/supervised people to use this
machine. When machine is not being used,
disconnect power, remove switch keys, or
lock-out machine to prevent unauthorized
use—especially around children. Make
workshop kid proof!
DANGEROUS.ENVIRONMENTS..
Do not use
machinery in areas that are wet, cluttered,
or have poor lighting. Operating machinery
in these areas greatly increases the risk of
accidents and injury.
MENTAL.ALERTNESS.REQUIRED..
Full mental
alertness is required for safe operation of
machinery. Never operate under the influence
of drugs or alcohol, when tired, or when
distracted.
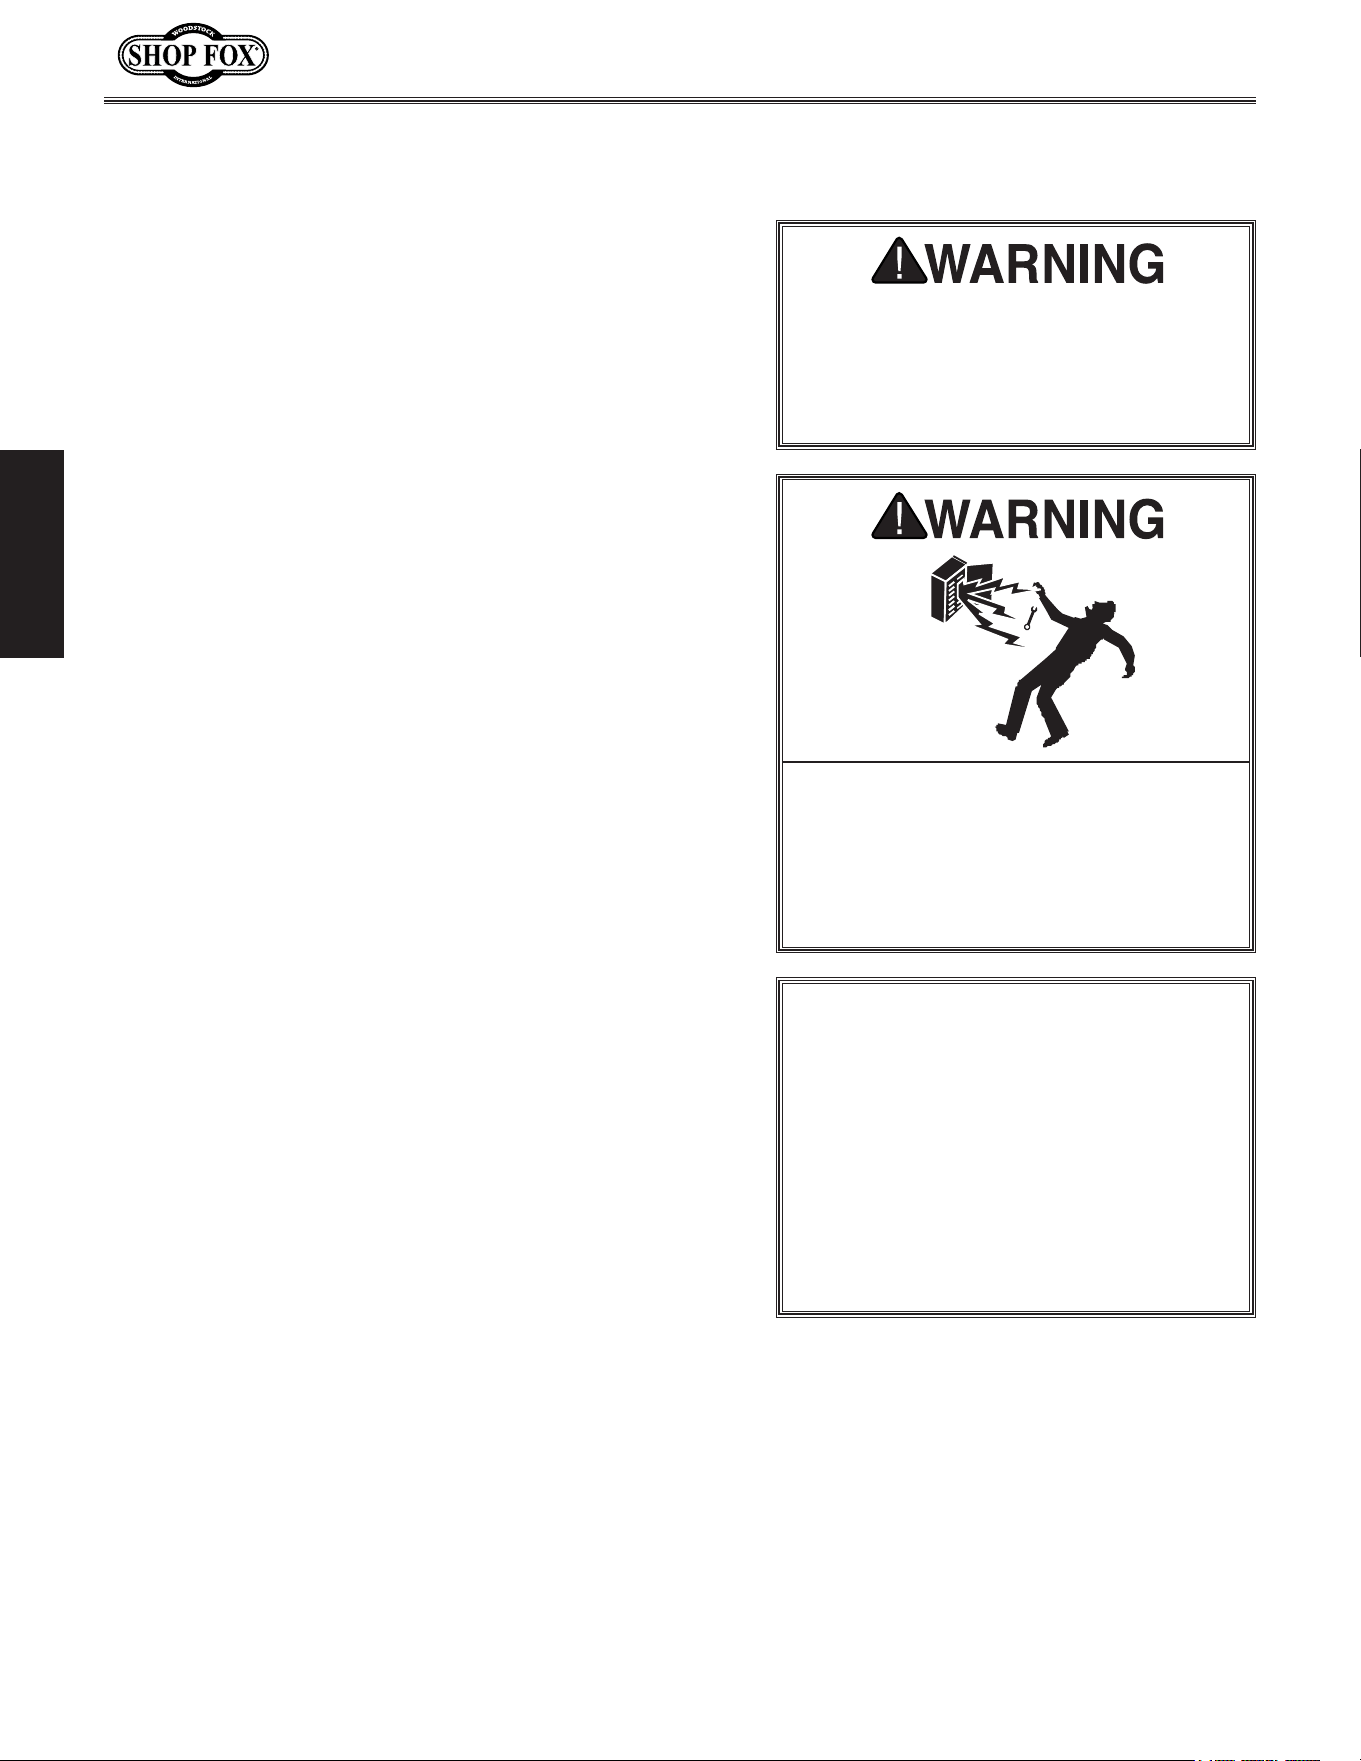
ELECTRICAL.EQUIPMENT.INJURY.RISKS..You can
be shocked, burned, or killed by touching live
electrical components or improperly grounded
machinery. To reduce this risk, only allow an
electrician or qualified service personnel to
do electrical installation or repair work, and
always disconnect power before accessing or
exposing electrical equipment.
DISCONNECT.POWER.FIRST..Always disconnect
machine from power supply BEFORE making
adjustments, changing tooling, or servicing
machine. This eliminates the risk of injury
from unintended startup or contact with live
electrical components.
EYE.PROTECTION..Always wear ANSI-approved
safety glasses or a face shield when operating
or observing machinery to reduce the risk of
eye injury or blindness from flying particles.
Everyday eyeglasses are not approved safety
glasses.
St and ard.Machinery.Safety.Instructions
For.Your.Own.Safet y,
Read.Ma n ual.Before.Operat ing.Ma chine
The. purpose. of. safety. symbols. is. to. attract. your. attention. to. possible. hazardous. conditions.. This.
manual.uses.a.series.of.symbols.and.signal.words.intended.to.convey.the.level.of.importance.of.the.
safety.messages..The.progression.of.symbols.is.described.below..Remember.that.safety.messages.by.
themselves.do.not.eliminate. danger.and.are. not.a.substitute.for.proper.acc ident.prevention.mea-
sures—this.responsibility.is.ultimately.up.to.the.operator!
SAFETY
St and ard.Machinery.Safety.Instructio ns

-8-
Model W1867/W1868/W1869 (For Machines Mfd. Since 11/18)
SAFETY
WEARING.PROPER.APPAREL..Do not wear
clothing, apparel, or jewelry that can become
entangled in moving parts. Always tie back
or cover long hair. Wear non-slip footwear to
avoid accidental slips, which could cause loss
of workpiece control.
HAZARDOUS
.DUST..Dust created while using
machinery may cause cancer, birth defects,
or long-term respiratory damage. Be aware of
dust hazards associated with each workpiece
material, and always wear a NIOSH-approved
respirator to reduce your risk.
HEARING.PROTECTION..
Always wear hearing
protection when operating or observing
loud machinery. Extended exposure to this
noise without hearing protection can cause
permanent hearing loss.
REMOVE.ADJUSTING.TOOLS..
Tools left on
machinery can become dangerous projectiles
upon startup. Never leave chuck keys,
wrenches, or any other tools on machine.
Always verify removal before starting!
INTENDED.USAGE..
Only use machine for its
intended purpose—never make modifications
without prior approval from Woodstock
International. Modifying machine or using
it differently than intended will void the
warranty and may result in malfunction or
mechanical failure that leads to serious
personal injury or death!
AWKWARD.POSITIONS..
Keep proper footing and
balance at all times when operating machine.
Do not overreach! Avoid awkward hand
positions that make workpiece control difficult
or increase the risk of accidental injury.
CHILDREN.&.BYSTANDERS..
Keep children and
bystanders at a safe distance from the work
area. Stop using machine if they become a
distraction.
GUARDS.&.COVERS..
Guards and covers reduce
accidental contact with moving parts or flying
debris—make sure they are properly installed,
undamaged, and working correctly.
FORCING.MACHINERY..Do not force machine. It
will do the job safer and better at the rate for
which it was designed.
NEVER.STAND.ON.MACHINE..Serious injury may
occur if machine is tipped or if the cutting
tool is unintentionally contacted.
STABLE.MACHINE..Unexpected movement during
operation greatly increases risk of injury or
loss of control. Before starting, verify machine
is stable and mobile base (if used) is locked.
USE.RECOMMENDED.ACCESSORIES..Consult
this owner’s manual or the manufacturer for
recommended accessories. Using improper
accessories will increase risk of serious injury.
UNATTENDED.OPERATION..To reduce the risk
of accidental injury, turn machine OFF and
ensure all moving parts completely stop
before walking away. Never leave machine
running while unattended.
MAINTAIN.WITH.CARE..Follow all maintenance
instructions and lubrication schedules to
keep machine in good working condition. A
machine that is improperly maintained could
malfunction, leading to serious personal injury
or death.
CHECK.DAMAGED.PARTS..Regularly inspect
machine for any condition that may affect
safe operation. Immediately repair or replace
damaged or mis-adjusted parts before
operating machine.
MAINTAIN.POWER.CORDS..When disconnecting
cord-connected machines from power, grab
and pull the plug—NOT the cord. Pulling the
cord may damage the wires inside, resulting
in a short. Do not handle cord/plug with wet
hands. Avoid cord damage by keeping it away
from heated surfaces, high traffic areas, harsh
chemicals, and wet/damp locations.
EXPERIENCING.DIFFICULTIES..If at any time
you experience difficulties performing the
intended operation, stop using the machine!
Contact Technical Support at (360) 734-3482.

-9-
Model W1867/W1868/W1869 (For Machines Mfd. Since 11/18)
SAFETY
Additional.Safety.for.D ust.Collectors
Long-term.respiratory.damage.can.occur.from.using.dust.collectors.without.proper.use.of.a.
respirator..Fire.or.explosions.can.result.in.smoke.inhalation,.serious.burns,.or.death—if.machine.
is.used.to.collect.incorrect.materials,.is.operated.near.potential.explosion.sources,.or.ducting.is.
improperly.g rounded..Entanglement,.amputation,.or.death.can.occur.if.hair,.clothing,.or.fingers.
are.pulled.into.the.inlet..To.reduce.the.risk.of.these.hazards,.operator.and.bystanders.MUST.
completely.heed.the.hazards.and.warnings.below.
POWER.DISCONNECT. Turn machine OFF,
disconnect from power supply, and allow
impeller to completely stop before
leaving machine unattended, or doing any
maintenance or service.
REGULAR.CLEANING. To reduce risk of starting
a fire, regularly check/empty collection
bags or drum to avoid buildup of fine dust,
which can increase risk of fire. Regularly
clean surrounding area where machine
is operated—excessive dust buildup on
overhead lights, heaters, electrical panels,
or other heat sources will increase risk of fire.
SUSPENDED.DUST.PARTICLES. To reduce risk
of death or injury caused by explosions
or fires, DO NOT operate in areas where
these risks are high, including spaces near
pilot lights, open flames, or other ignition
sources.
AVOIDING.SPARKS. To reduce risk of fire, avoid
collecting any metal objects or stones.
These can possibly produce sparks when
they strike impeller, which can smolder
in wood dust for a long time before a fire
is detected. If you accidentally cut into
wood containing metal, immediately turn
OFF dust collector, disconnect from power,
and wait for impeller to stop. Then empty
bag or drum into approved airtight metal
container.
FIRE.SUPPRESSION.. Only operate dust collector
in locations that contain fire suppression
system or have fire extinguisher nearby.
STATIC.ELECTRICITY. To reduce risk of fire
or explosions caused by sparks from
static electricity, ground all ducting using
grounding wire.
DUST.ALLERGIES. Dust from certain woods will
cause an allergic reaction. Make sure you
know what type of wood dust you will be
exposed to in case of an allergic reaction.
INTENDED.USE. Collecting the wrong materials
can result in serious inhalation hazards,
fire, explosions, or machine damage.
This machine is ONLY designed to collect
wood dust and chips from woodworking
machines. DO NOT use it to collect silica,
polyurethane, toxic fumes, metal dust or
shavings, lead paint, drywall, asbestos,
biohazards, explosive dusts, flammable or
combustible liquids or fumes, nor burning
or smoking material.
WEAR.A.RESPIRATOR. Fine dust that is too
small to be caught in filter will be blown
into ambient air. Always wear a NIOSH-
approved respirator during operation and
for a short time after to reduce your risk
of permanent respiratory damage. Never
collect dust from any hazardous material.
IMPELLER.HAZARDS. To reduce risk of
entanglement or contact with impeller, DO
NOT place hands, hair, clothing, or tools in
or near open dust collection inlet during
operation, and keep small animals and
children away. The powerful suction could
easily pull them into impeller.
HAZARDOUS.DUST. Dust exposure created while
using machinery may cause cancer, birth
defects, or long-term respiratory damage.
Be aware of dust hazards associated with
each workpiece material, and always wear
a NIOSH-approved respirator.
EMPTYING.DUST. When emptying bag or drum,
wear respirator and safety glasses. Empty
dust away from ignition sources and into
approved container.
OPERATING.LOCATION. To reduce respiratory
exposure to fine dust, locate permanently
installed dust collectors away from working
area or in another room. DO NOT place
dust collector where it can be exposed to
rain or moisture, which creates a shock
hazard and will reduce life of machine.
-10-
Model W1867/W1868/W1869 (For Machines Mfd. Since 11/18)
ELECTRICAL
ELECTRICAL
W1867.110V.Circuit.
Re quirements
This machine must be connected to the correct size and
type of power supply circuit, or fire or electrical damage
may occur. Read through this section to determine if an
adequate power supply circuit is available. If a correct
circuit is not available, a qualified electrician MUST install
one before you can connect the machine to power.
A power supply circuit includes all electrical equipment
between the breaker box or fuse panel in the building
and the machine. The power supply circuit used for
this machine must be sized to safely handle the full-
load current drawn from the machine for an extended
period of time. (If this machine is connected to a circuit
protected by fuses, use a time delay fuse marked D.)
Circuit.Requirements
This machine is prewired to operate on a power supply
circuit that has a verified ground and meets the following
requirements:
Circuit.Type .................... 110V,.60.Hz,.Single-Phase
Circuit.Size ............................................ 20.Amps
Plug/Receptacle ................................... NEMA.5-15
Full-Load.Current.Rating
The full-load current rating is the amperage a machine
draws at 100% of the rated output power. On machines
with multiple motors, this is the amperage drawn by the
largest motor or sum of all motors and electrical devices
that might operate at one time during normal operations.
Full-Load.Current.Rating.(W1867)................ 15.Amps
The machine must be properly set up
before it is safe to operate. DO NOT
connect this machine to the power
source until instrtucted to do so later
in this manual.
Incorrectly. wiring. or. grounding. this.
machine.can.cause.electrocution,.fire,.
or.machine.damage..To.reduce.this.risk,.
only.an.electrician.or.qualified.service.
personnel. should. do. any. required.
electrical.work.on.this.machine.
NOTICE
The.circuit. requirements.listed.in.this.
manual. apply. to
.a.dedicated.circuit—
where.only.one.machine.will.be.running.
at. a. time.. If. this. machine. will. be.
connected. to. a. shared. circuit. where.
multiple.machines.will.be.running.at.the.
same.time,.consult.with.an.electrician.
to. ensure. that. the. circuit. is. properly.
sized.for.safe.operation.
Electrical
-11-
Model W1867/W1868/W1869 (For Machines Mfd. Since 11/18)
ELECTRICAL
Grounding.Requirements
This machine MUST be grounded. In the event of certain
types of
malfunctions or breakdowns, grounding provides
a path of least resistance for electric current
to travel—in
order
to reduce the risk of electric shock.
Improper connection of the equipment-grounding
wire
will
increase
the risk of electric shock. The wire with green
insulation
(with/without yellow stripes) is the equipment-
grounding
wire. If repair or replacement of the power
cord or plug is necessary, do not connect the equipment-
grounding
wire to a live (current carrying) terminal.
Check with a qualified electrician or service personnel
if
you do not understand these grounding requirements,
or if
you are in doubt about whether the tool is
properly grounded.
If you ever notice that a cord or
plug is damaged or worn, disconnect it from power, and
immediately replace it with a new one.
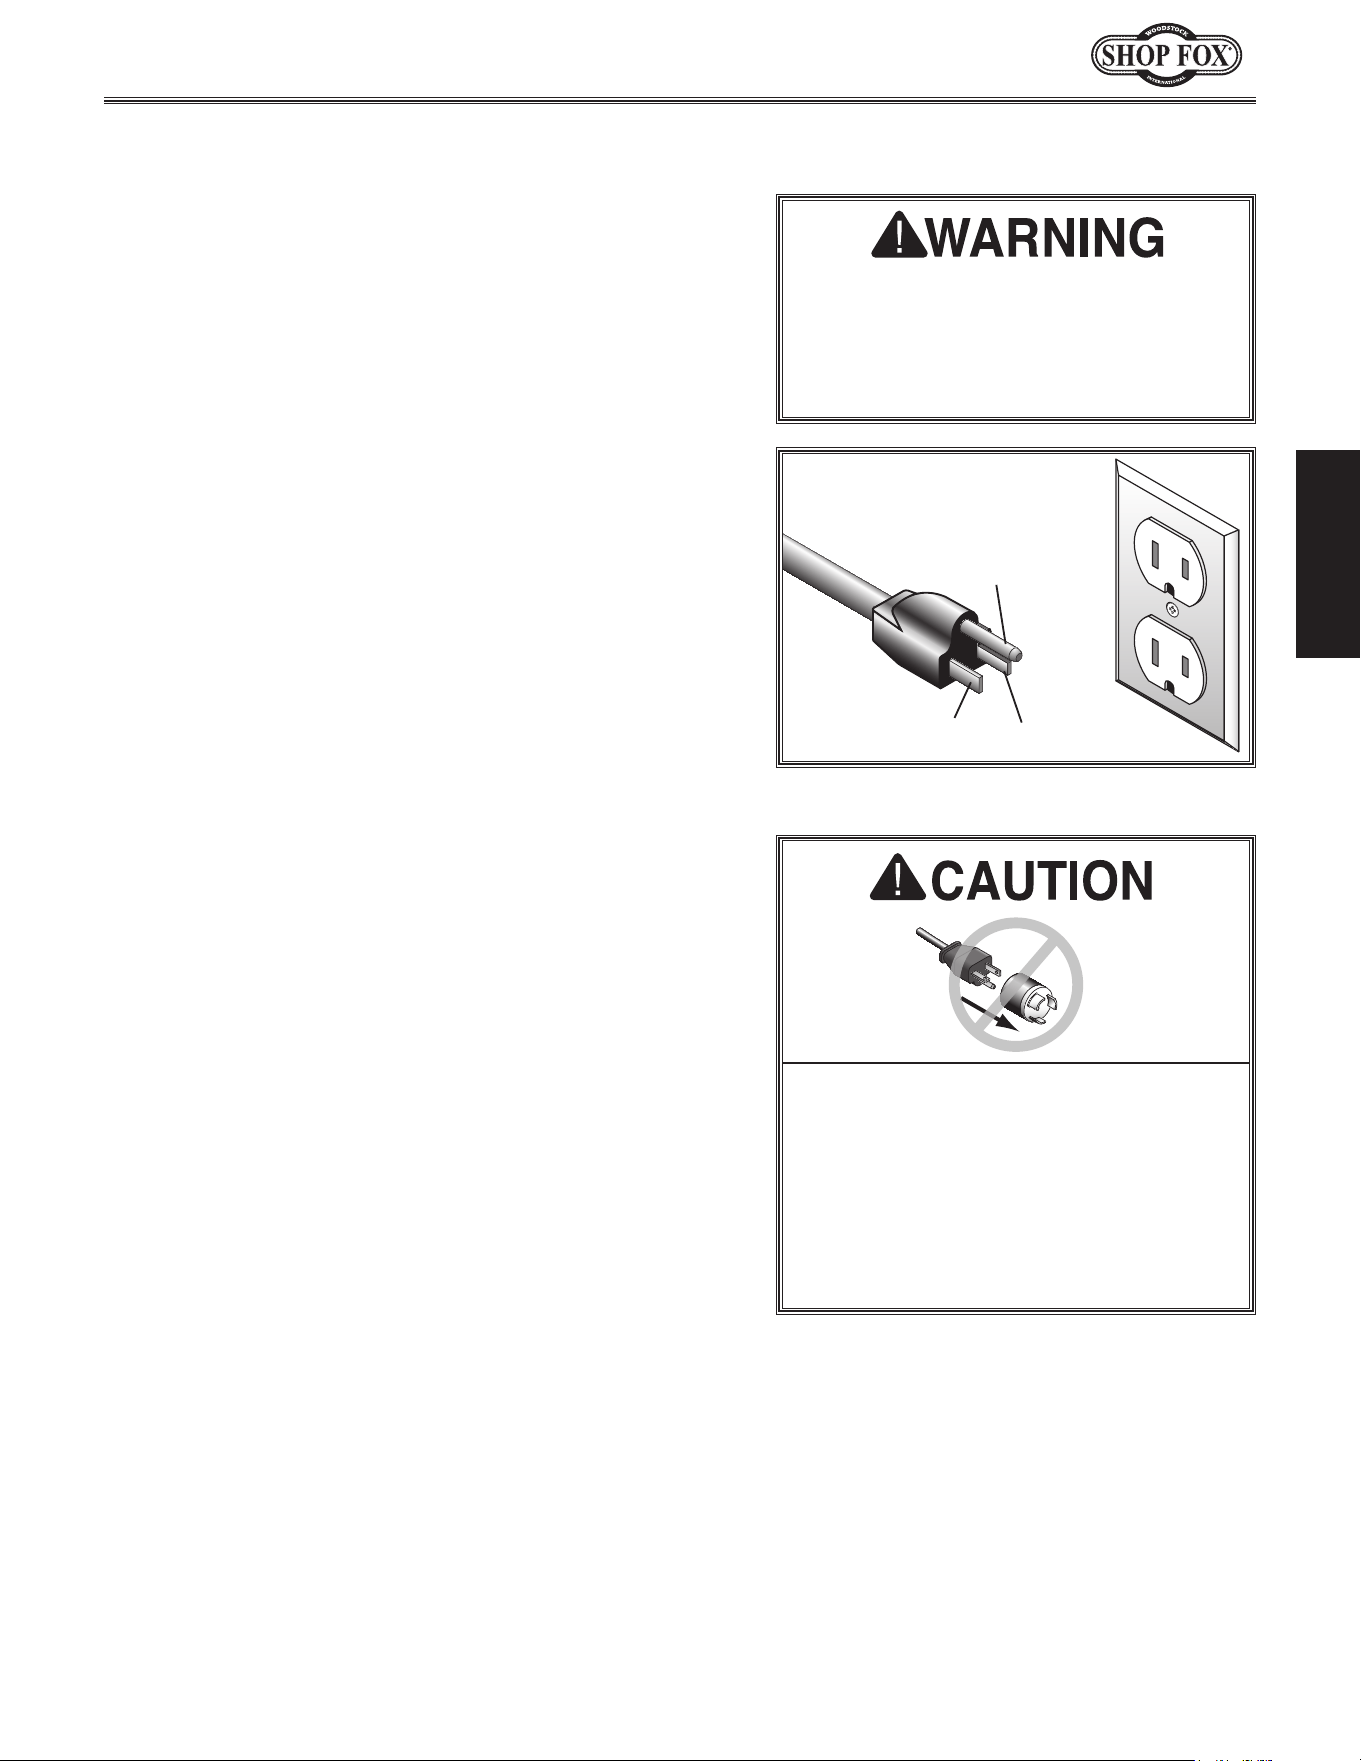
This machine is equipped with a power cord with an
equipment-grounding
wire and NE M A 5-15 grounding
plug
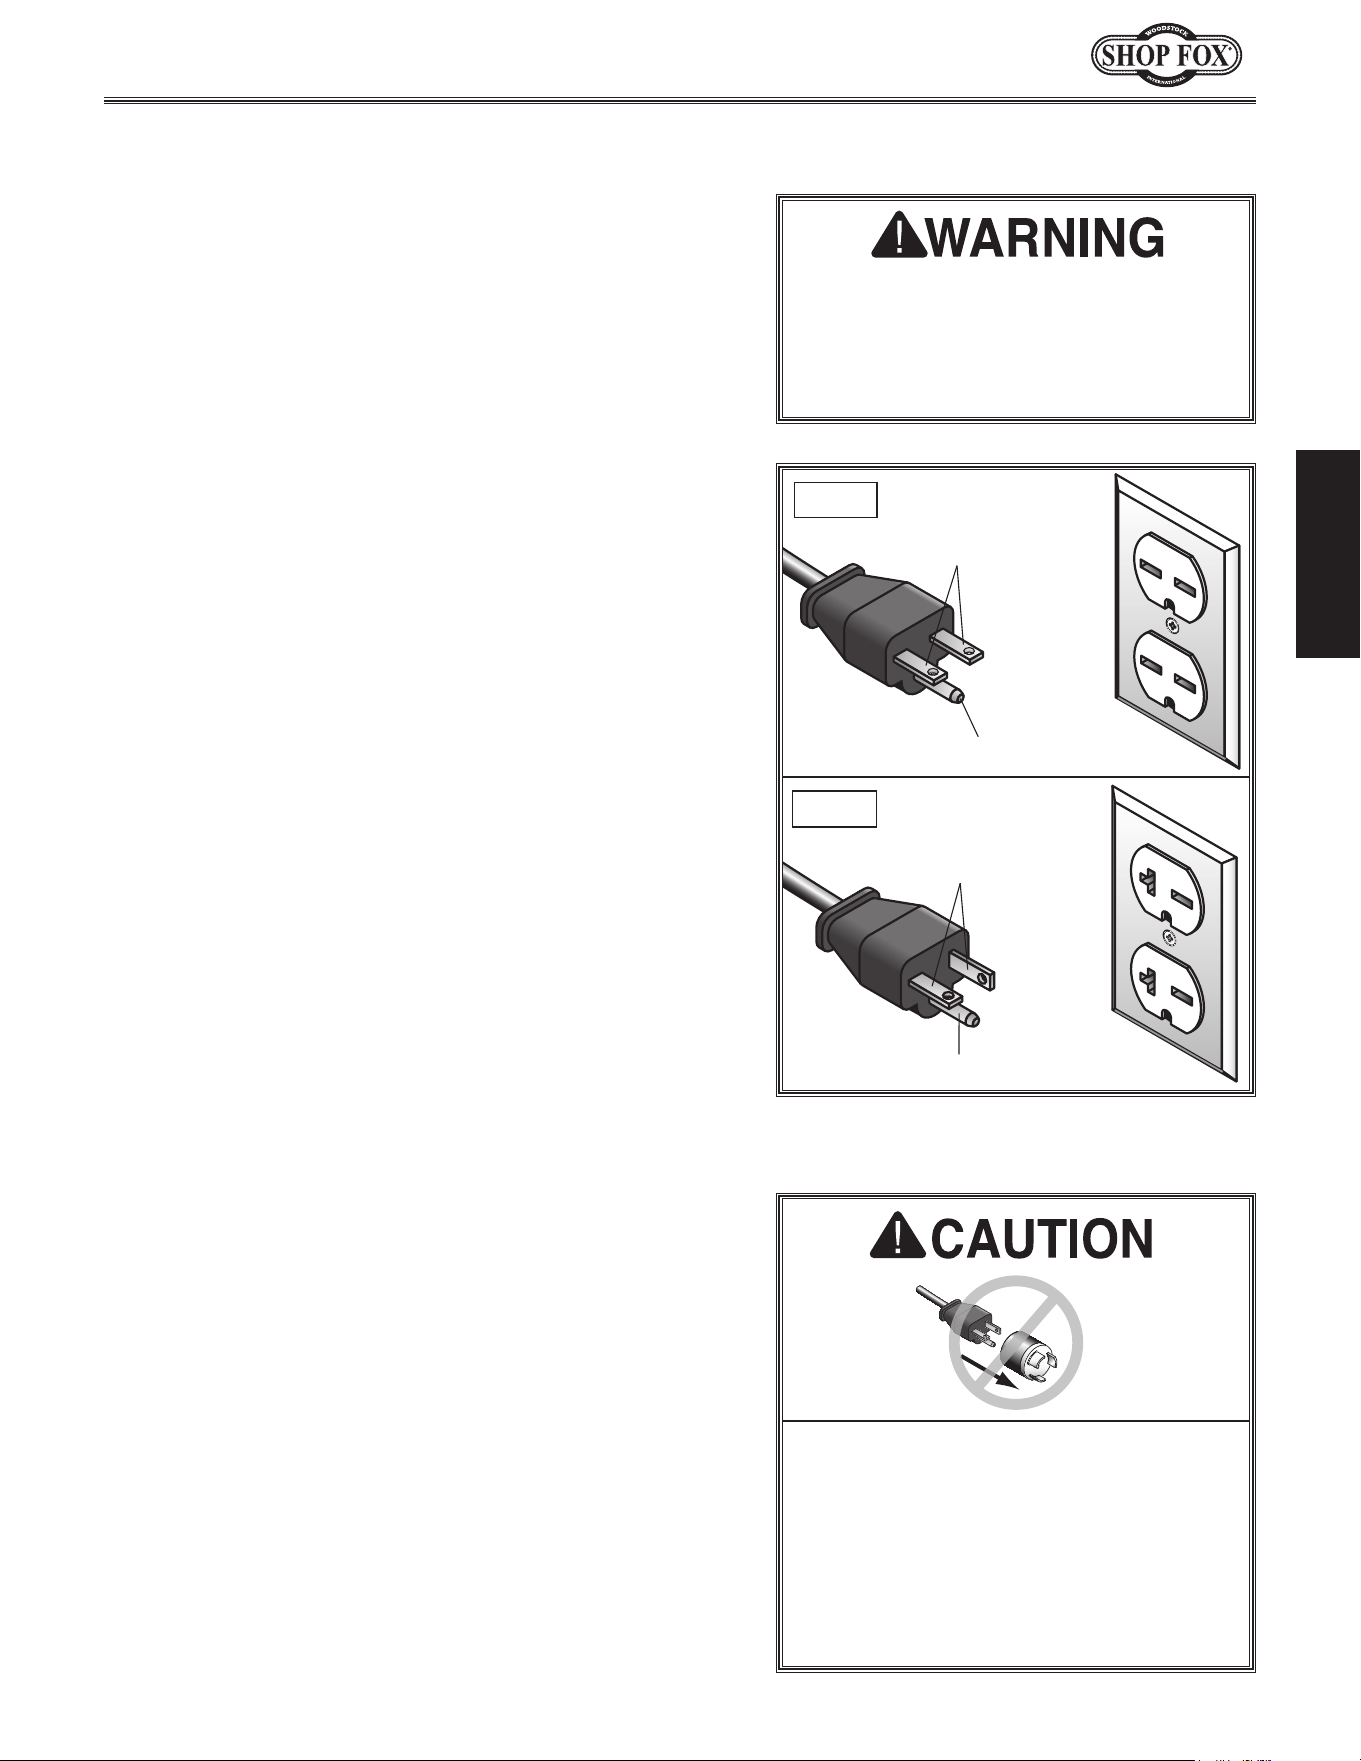
(see figure). The plug must only be inserted into
a matching
receptacle that is properly installed and
grounded in accordance with local codes and ordinances.
For.110V.Connection
The machine must be properly set up
before it is safe to operate. DO NOT
connect this machine to the power
source until instrtucted to do so later
in this manual.
Extension.Cords
We do not recommend using an extension cord with
this machine. Extension cords cause voltage drop, which
may damage electrical components and shorten motor
life. Voltage drop increases with longer extension cords
and smaller gauge sizes (higher gauge numbers indicate
smaller sizes).
Any extension cord used with this machine must contain a
ground wire, match the required
plug and receptacle, and
meet the following requirements:
Minimum.Gauge.Size.................................. 12.AWG
Maximum.Length.(Shorter.is.Better).................50.ft.
Grounding Pin
Neutral Hot
5-15 PLUG
GROUNDED
5-15 RECEPTACLE
110V
Figure.4. Typical 110V plug & receptacle.
No. adapter. should. be. used. with. the.
required.plug..If. the.plug.does. not. fit.
the.available.receptacle.or.the.machine.
must. be. reconne cted. to. a. different.
type.of.circuit,.the.reconnection.must.
be.made.by.an.electrician.or.qualified.
service. personnel. and. it. must. comply.
with.all.local.codes.and.ordinances.
-12-
Model W1867/W1868/W1869 (For Machines Mfd. Since 11/18)
ELECTRICAL
W1868/W1869.220V.
Circuit.Requirements
This machine must be connected to the correct size and
type of power supply circuit, or fire or electrical damage
may occur. Read through this section to determine if an
adequate power supply circuit is available. If a correct
circuit is not available, a qualified electrician MUST install
one before you can connect the machine to power.
A power supply circuit includes all electrical equipment
between the breaker box or fuse panel in the building
and the machine. The power supply circuit used for
this machine must be sized to safely handle the full-
load current drawn from the machine for an extended
period of time. (If this machine is connected to a circuit
protected by fuses, use a time delay fuse marked D.)
Circuit.Requirements
This machine is prewired to operate on a power supply
circuit that has a verified ground and meets the following
requirements:
Circuit.Type .................... 220V,.60.Hz,.Single-Phase
Circuit.Size.(W1868) ................................ 15.Amps
Circuit.Size.(W1869) ................................ 20.Amps
Plug/Receptacle.(W1868) ....................... NEMA.6-15
Plug/Receptacle.(W1869) ....................... NEMA.6-20
Full-Load.Current.Rating
The full-load current rating is the amperage a machine
draws at 100% of the rated output power. On machines
with multiple motors, this is the amperage drawn by the
largest motor or sum of all motors and electrical devices
that might operate at one time during normal operations.
Full-Load.Current.Rating.(W1868)..................9.Amps
Full-Load.Current.Rating.(W1869)................ 15.Amps
The machine must be properly set up
before it is safe to operate. DO NOT
connect this machine to the power
source until instrtucted to do so later
in this manual.
Incorrectly. wiring. or. grounding. this.
machine.can.cause.electrocution,.fire,.
or.machine.damage..To.reduce.this.risk,.
only.an.electrician.or.qualified.service.
personnel. should. do. any. required.
electrical.work.on.this.machine.
NOTICE
The.circuit. requirements.listed.in.this.
manual. apply. to
.a.dedicated.circuit—
where.only.one.machine.will.be.running.
at. a. time.. If. this. machine. will. be.
connected. to. a. shared. circuit. where.
multiple.machines.will.be.running.at.the.
same.time,.consult.with.an.electrician.
to. ensure. that. the. circuit. is. properly.
sized.for.safe.operation.
-13-
Model W1867/W1868/W1869 (For Machines Mfd. Since 11/18)
ELECTRICAL
Grounding.Requirements
This machine MUST be grounded. In the event of certain
types of
malfunctions or breakdowns, grounding provides
a path of least resistance for electric current
to travel—in
order
to reduce the risk of electric shock.
Improper connection of the equipment-grounding
wire
will
increase
the risk of electric shock. The wire with green
insulation
(with/without yellow stripes) is the equipment-
grounding
wire. If repair or replacement of the power
cord or plug is necessary, do not connect the equipment-
grounding
wire to a live (current carrying) terminal.
Check with a qualified electrician or service personnel
if
you do not understand these grounding requirements,
or if
you are in doubt about whether the tool is
properly grounded.
If you ever notice that a cord or
plug is damaged or worn, disconnect it from power, and
immediately replace it with a new one.
For.220V.Connection
The machine must be properly set up
before it is safe to operate. DO NOT
connect this machine to the power
source until instrtucted to do so later
in this manual.
Extension.Cords
We do not recommend using an extension cord with
this machine. Extension cords cause voltage drop, which
may damage electrical components and shorten motor
life. Voltage drop increases with longer extension cords
and smaller gauge sizes (higher gauge numbers indicate
smaller sizes).
Any extension cord used with this machine must contain a
ground wire, match the required
plug and receptacle, and
meet the following requirements:
Minimum.Gauge.Size.(W1868)...................... 14.AWG
Minimum.Gauge.Size.(W1869)...................... 12.AWG
Maximum.Length.(Shorter.is.Better).................50.ft.
No. adapter. should. be. used. with. the.
required.plug..If. the.plug.does. not. fit.
the.available.receptacle.or.the.machine.
must. be. reconne cted. to. a. different.
type.of.circuit,.the.reconnection.must.
be.made.by.an.electrician.or.qualified.
service. personnel. and. it. must. comply.
with.all.local.codes.and.ordinances.
Figure.5. Typical 220V plugs &
receptacles.
Grounding Pin
Current Carrying Prongs
6-15 PLUG
GROUNDED
6-15 RECEPTACLE
Grounding Pin
Current Carrying Prongs
6-20 PLUG
GROUNDED
6-20 RECEPTACLE
This machine is equipped with a power cord that has
an equipment-grounding wire and NEMA 6-15 or 6-20
grounding plug. The plug must only be inserted into
a matching receptacle (see Figure) that is properly
installed and grounded in accordance with local codes and
ordinances.
W1869
W1868
-14-
Model W1867/W1868/W1869 (For Machines Mfd. Since 11/18)
SETUP
SET UP
Unpacking
This machine has been carefully packaged for safe
transportation. If you notice the machine has been
damaged during shipping, please contact your authorized
Shop Fox dealer immediately.
Description. Qty
• Additional People ..........................................1
• Safety Glasses ......................................... 1 ea.
• Wrench or Socket 10mm .................................1
• Wrench or Socket 12mm .................................1
• Wrench or Socket
5
⁄16" ....................................1
• Wrench or Socket
3
⁄8" .....................................1
• Wrench or Socket
1
⁄2" .....................................1
• Hex Wrench 5mm ..........................................1
• Phillips Screwdriver #2 ...................................1
Items.Needed.for.Setup
The following items are needed, but not included, to set
up your machine.
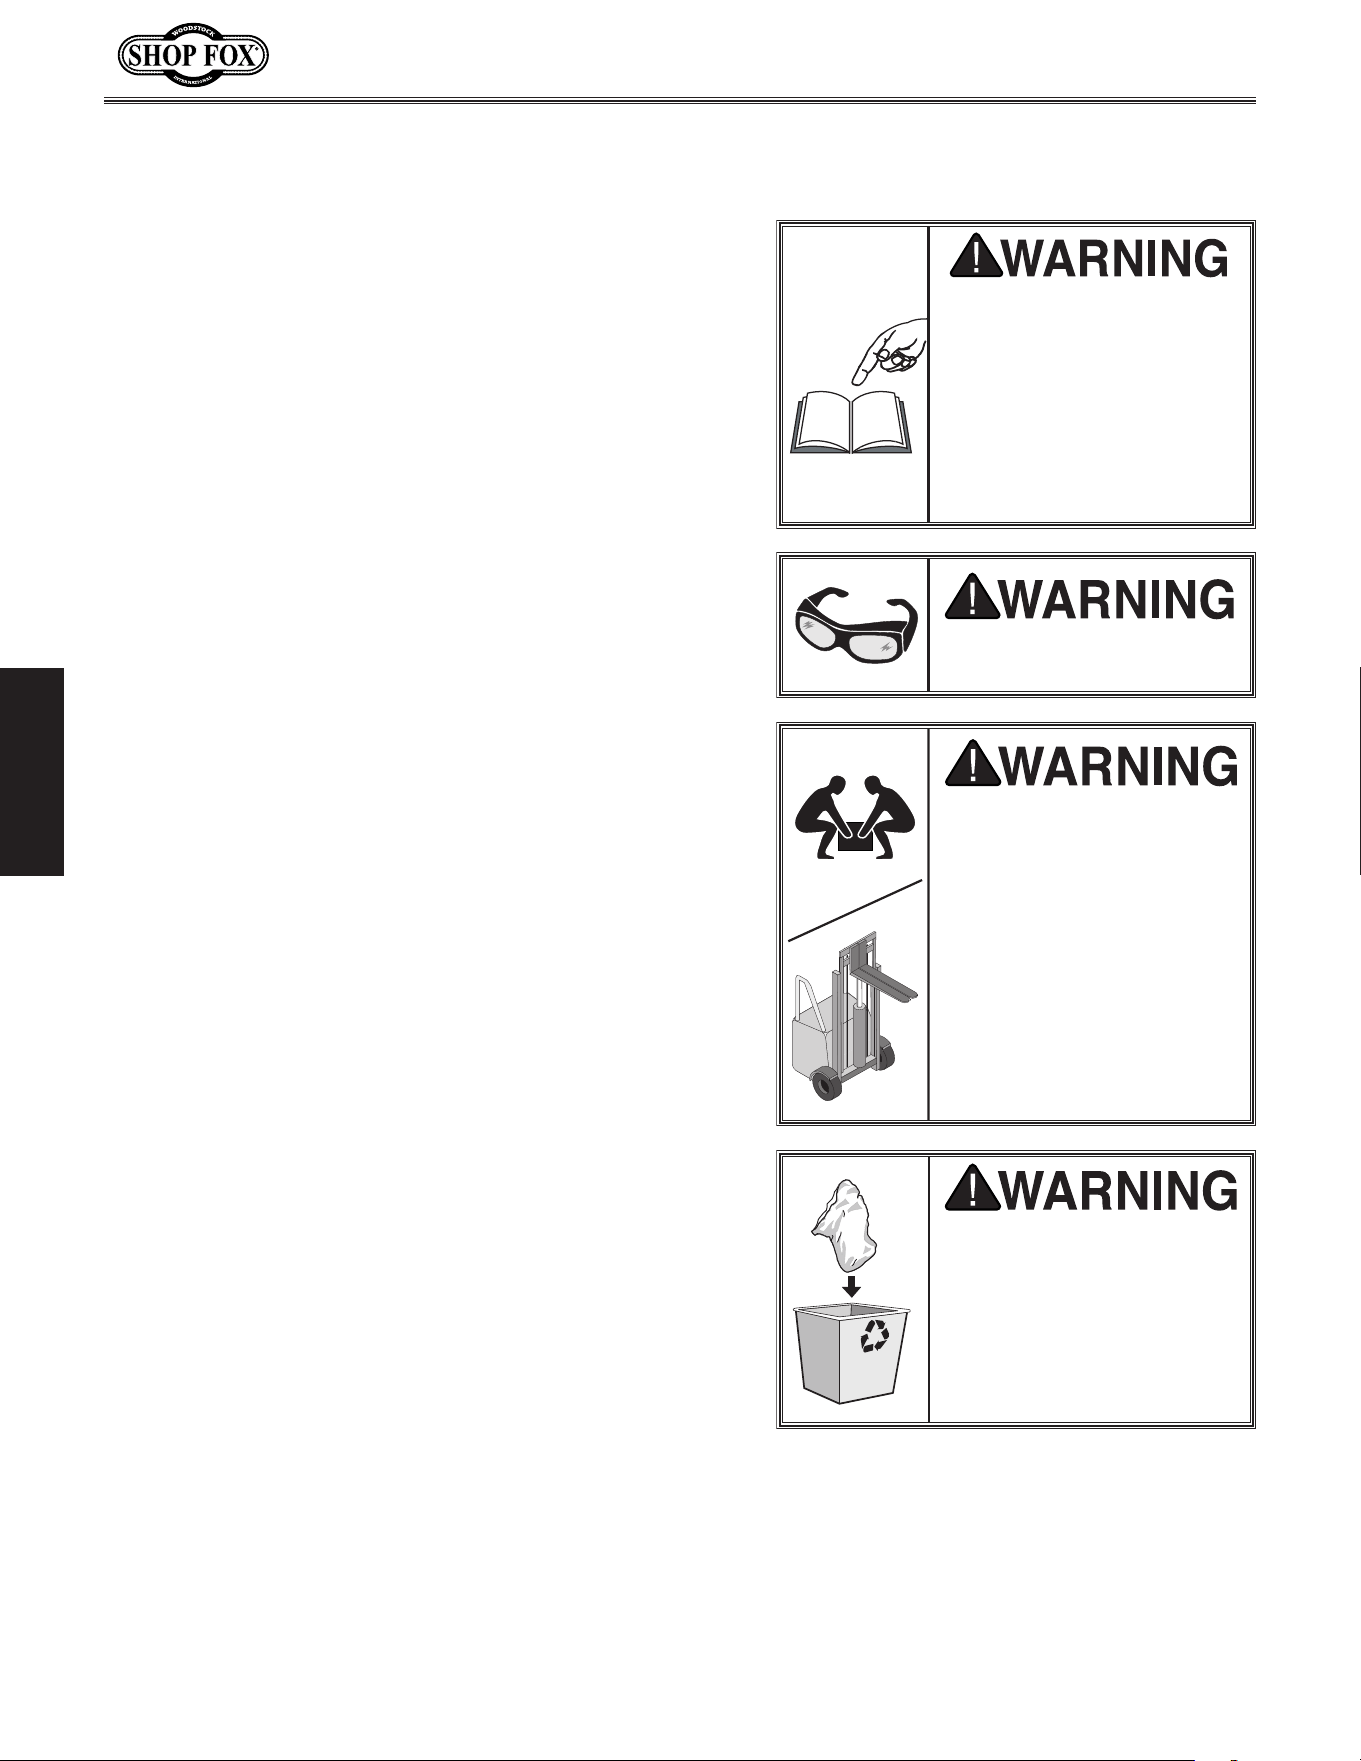
SUFFOCATION HAZARD!
Immediately discard all
plastic bags and packing
materials to eliminate
choking/suffocation
hazards for children and
animals.
Wear safety glasses during
entire setup process!
This machine presents
serious injury hazards
to untrained users. Read
through this entire manual
to become familiar with
the controls and opera-
tions before starting the
machine!
HEAVY LIFT!
Straining or crushing
injury may occur from
improperly lifting the
machine or some of its
parts. To reduce this
risk, get help from other
people and use a forklift
(or other lifting equip-
ment) rated for weight of
machine.
-15-
Model W1867/W1868/W1869 (For Machines Mfd. Since 11/18)
SETUP
Inventory
Figure.6. Boxed parts inventory.
A
B
H
I
J
K
C
D E
F
G
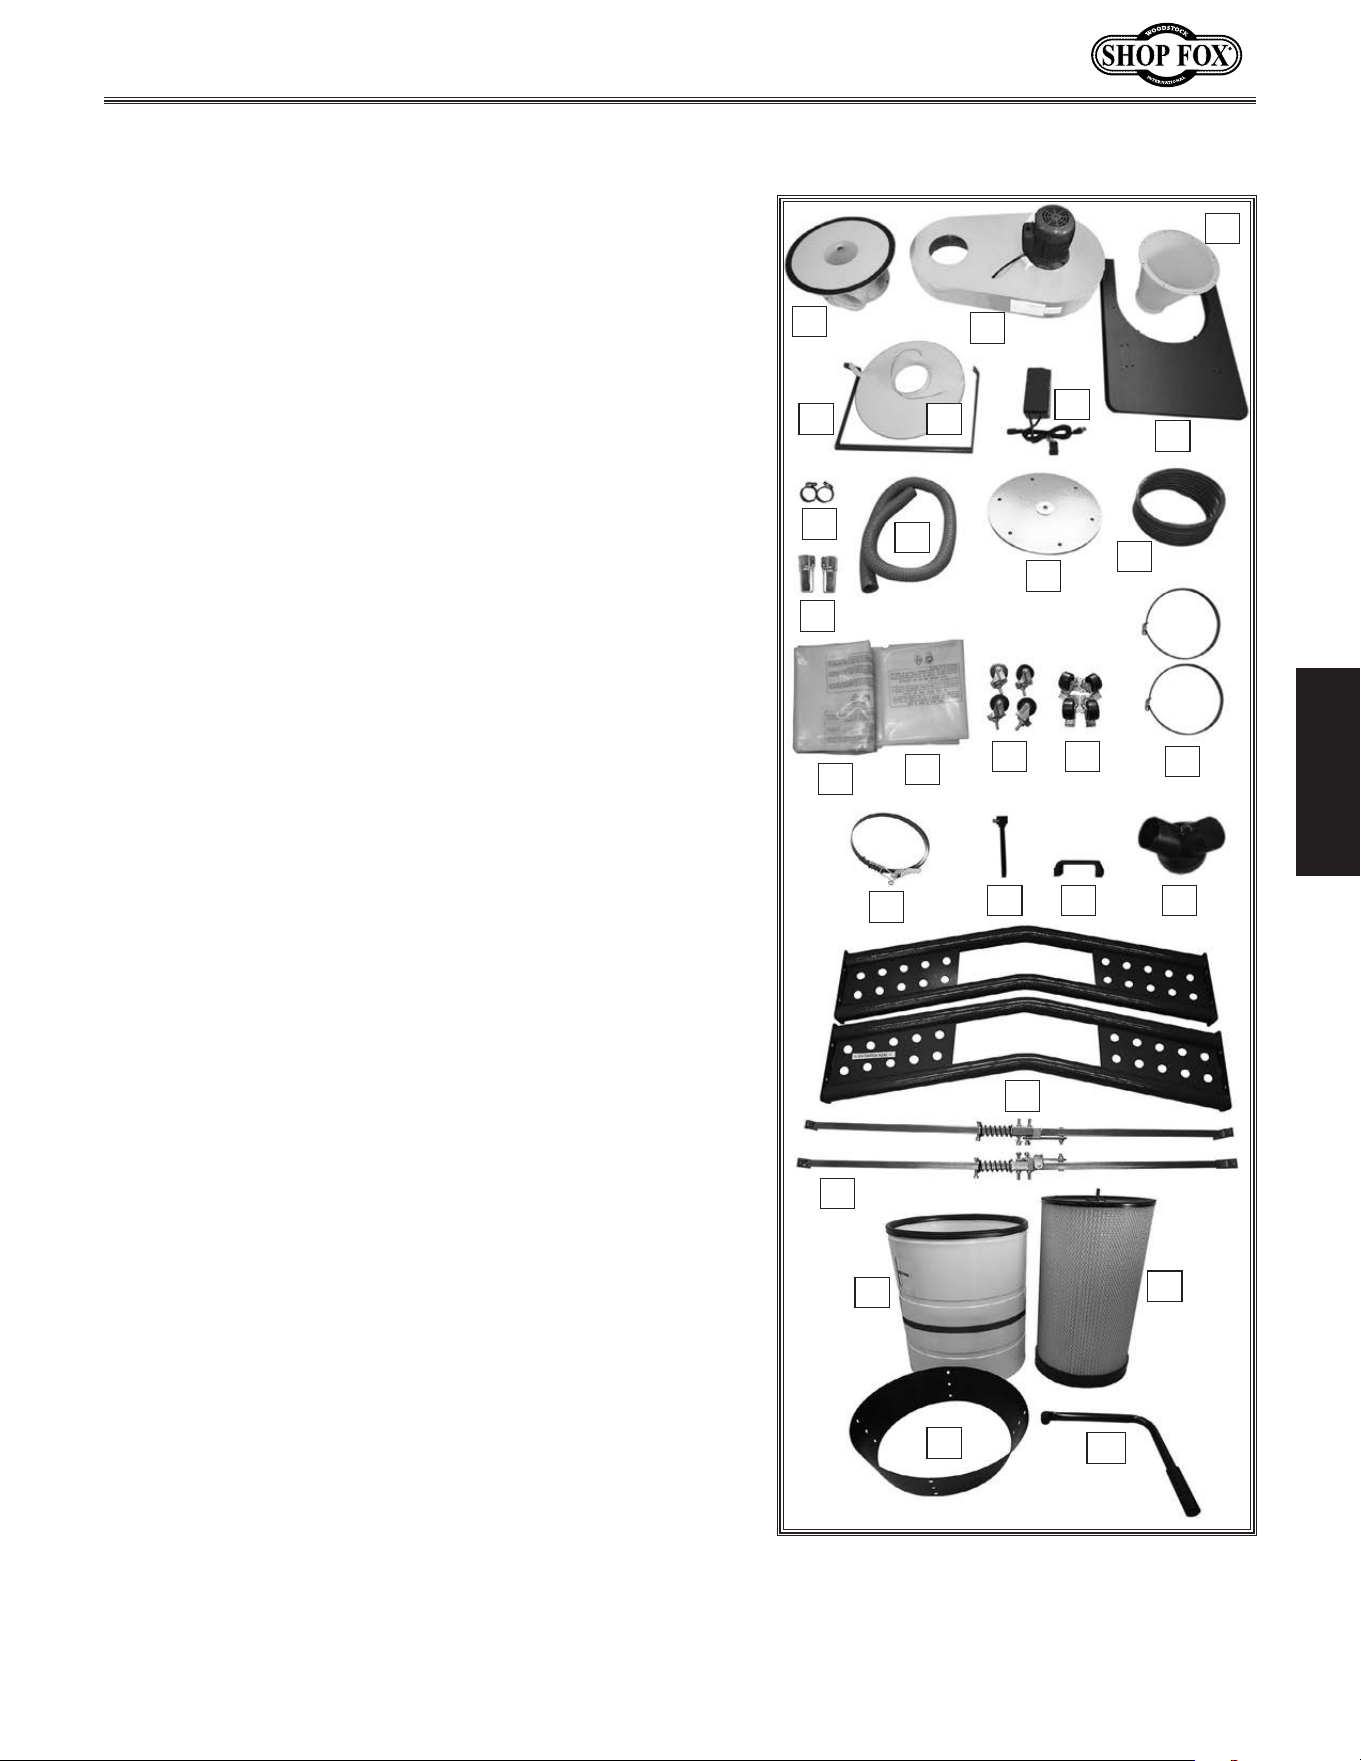
The following is a list of items shipped with your machine.
Before beginning setup, lay these items out and inventory
them.
Note:
If you cannot find an item on this list, carefully
check around/inside the machine and packaging materials.
Often, these items get lost in packaging materials while
unpacking or they are pre-installed at the factory.
Boxed.Inventory.(Figure.6). Qty
A. Intake Barrel ...............................................1
B. Impeller Housing ...........................................1
C. Cyclone Funnel .............................................1
D. Drum Lock Handle .........................................1
E. Collection Drum Lid w/Ground Wire ...................1
F. Control Box w/RF Receiver Unit & Remote Control .1
G. Base ..........................................................1
H. Hose Clamps 1
3
⁄4" .........................................2
I. Collection Drum Latches .................................2
J. Vacuum Hose 1
1
⁄2" x 60" ..................................1
K. Filter Paddle Cover ........................................1
L. Collection Drum Hose .....................................1
M. Collection Drum Dust Bag ................................1
N. Filter Dust Bag .............................................1
O. Swivel Casters 2" ..........................................4
P. Locking Swivel Casters 2
1
⁄2" .............................4
Q. Flex Hose Clamps ..........................................2
R. Filter Dust Bag Clamp.....................................1
S. Filter Handle Spindle .....................................1
T. Collection Drum Handle ..................................1
U. Inlet Adapter (W1867 Adapter Shown) .................1
V. Support Legs................................................2
W. Lock Handle Guides .......................................2
X. Dust Collection Drum .....................................1
Y. Canister Filter ..............................................1
Z. Vacuum Ring ................................................1
AA. Filter Cleaning Handle ....................................1
TS
R
Q
PO
N
L
M
Y
X
W
V
U
Z
AA
-16-
Model W1867/W1868/W1869 (For Machines Mfd. Since 11/18)
SETUP
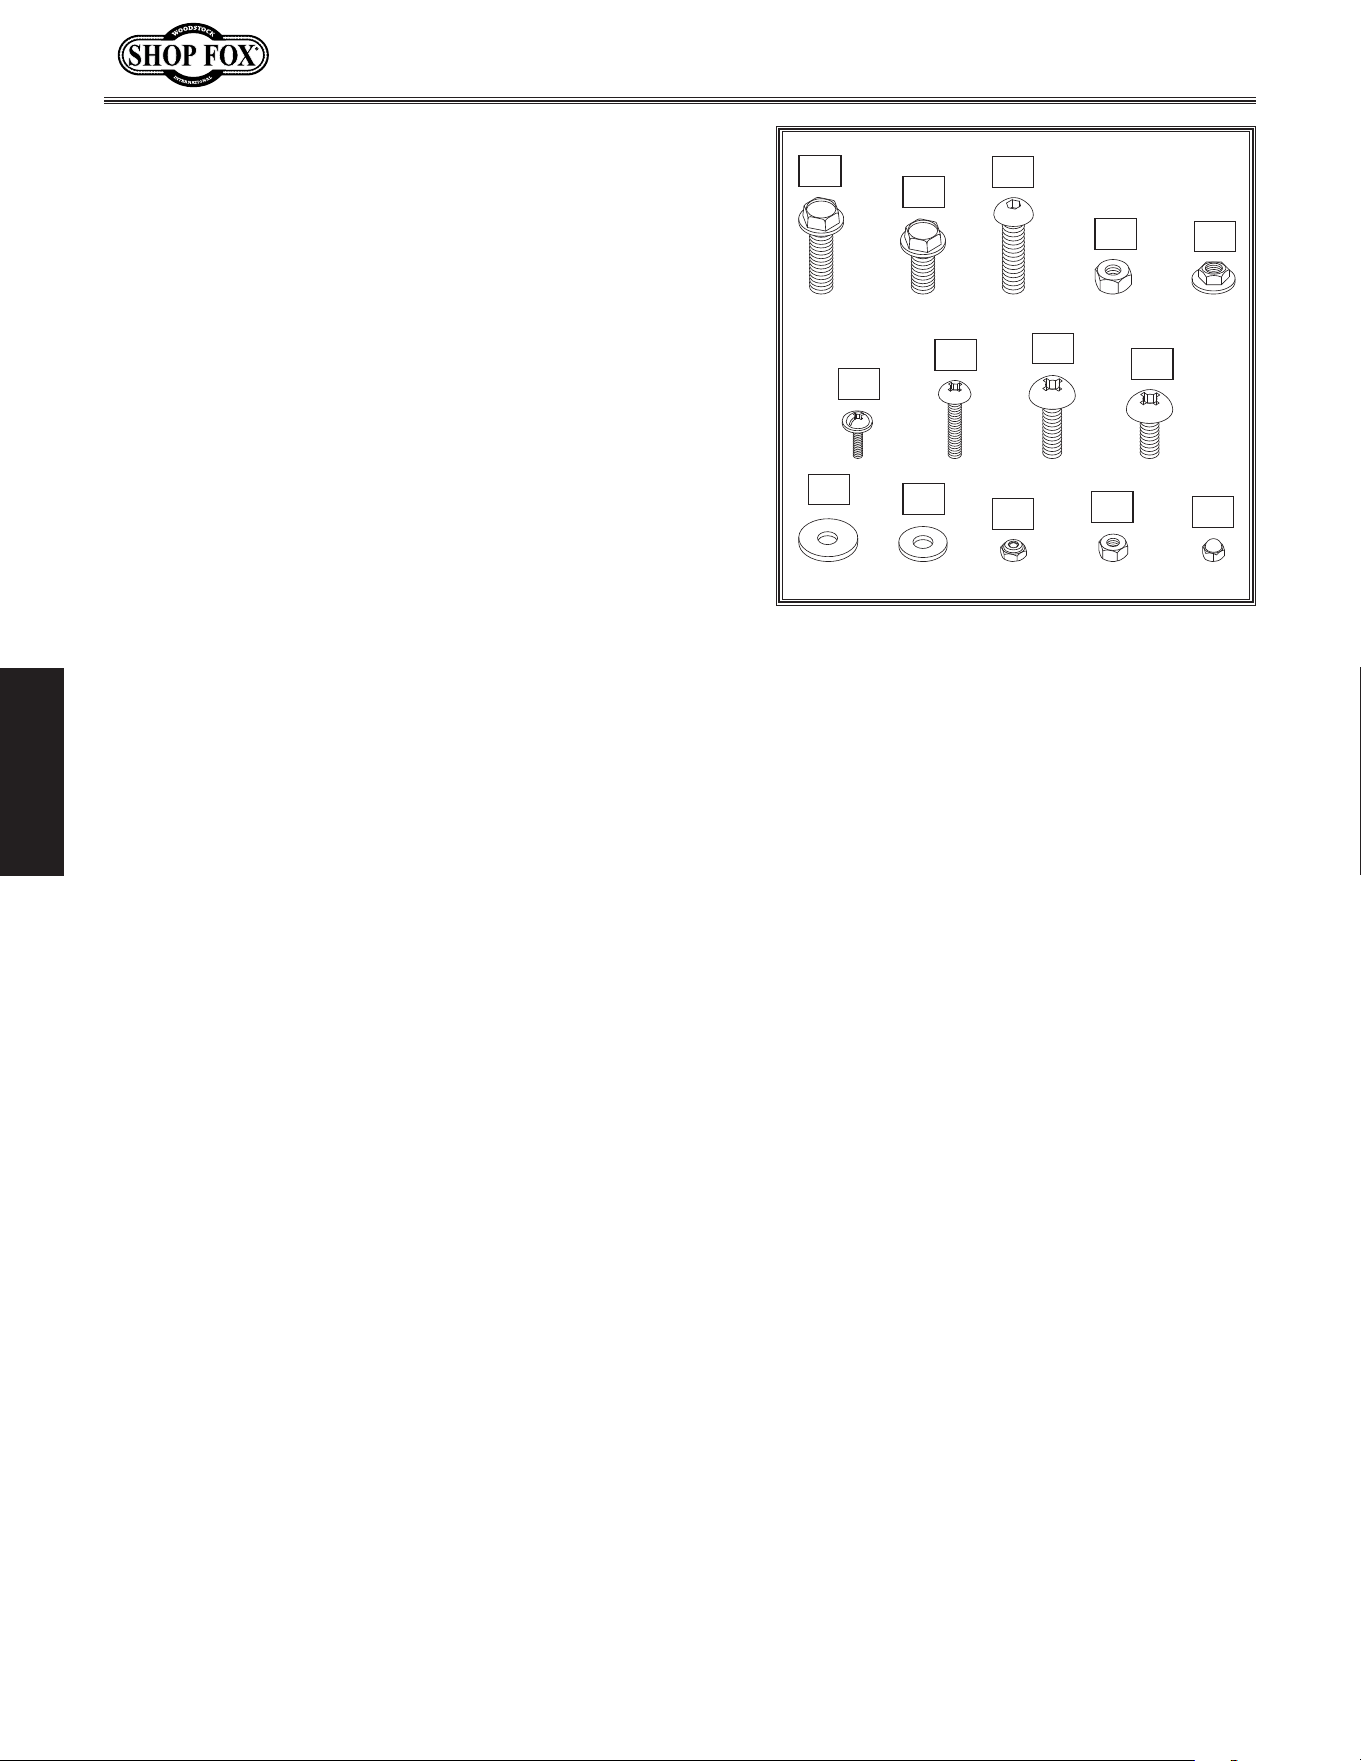
Figure.7. Hardware/fasteners.
Hardware/Fasteners.(Figure.7). Qty
AB. Flange Bolts
5
⁄16"-18 x
3
⁄4" .............................. 28
AC. Flange Bolts
5
⁄16"-18 x
1
⁄2" .............................. 24
AD. Button Head Cap Screws
5
⁄16"-18 x
3
⁄4" .............. 16
AE. Hex Nuts
5
⁄16"-18 ...........................................4
AF. Flange Nuts
5
⁄16"-18 ..................................... 12
AG. Flange Screw 10-24 x
3
⁄8" ................................1
AH. Phillips Head Screws 10-24 x
3
⁄4" .......................2
AI. Phillips Head Screws
1
⁄4"-20 x
5
⁄8" ......................2
AJ. Phillips Head Screws M4-.7 x 8 ..........................8
AK. Fender Washers
5
⁄16" .................................... 16
AL. Flat Washers
5
⁄16" ..........................................4
AM. Lock Nuts M4-.7 ................................ ............8
AN. Hex Nuts 10-24 .............................................2
AO. Acorn Nuts
1
⁄4"-20 .........................................2
AB
AC
AO
AN
AM
AL
AK
AJ
AI
AH
AG
AF
AE
AD
-17-
Model W1867/W1868/W1869 (For Machines Mfd. Since 11/18)
SETUP
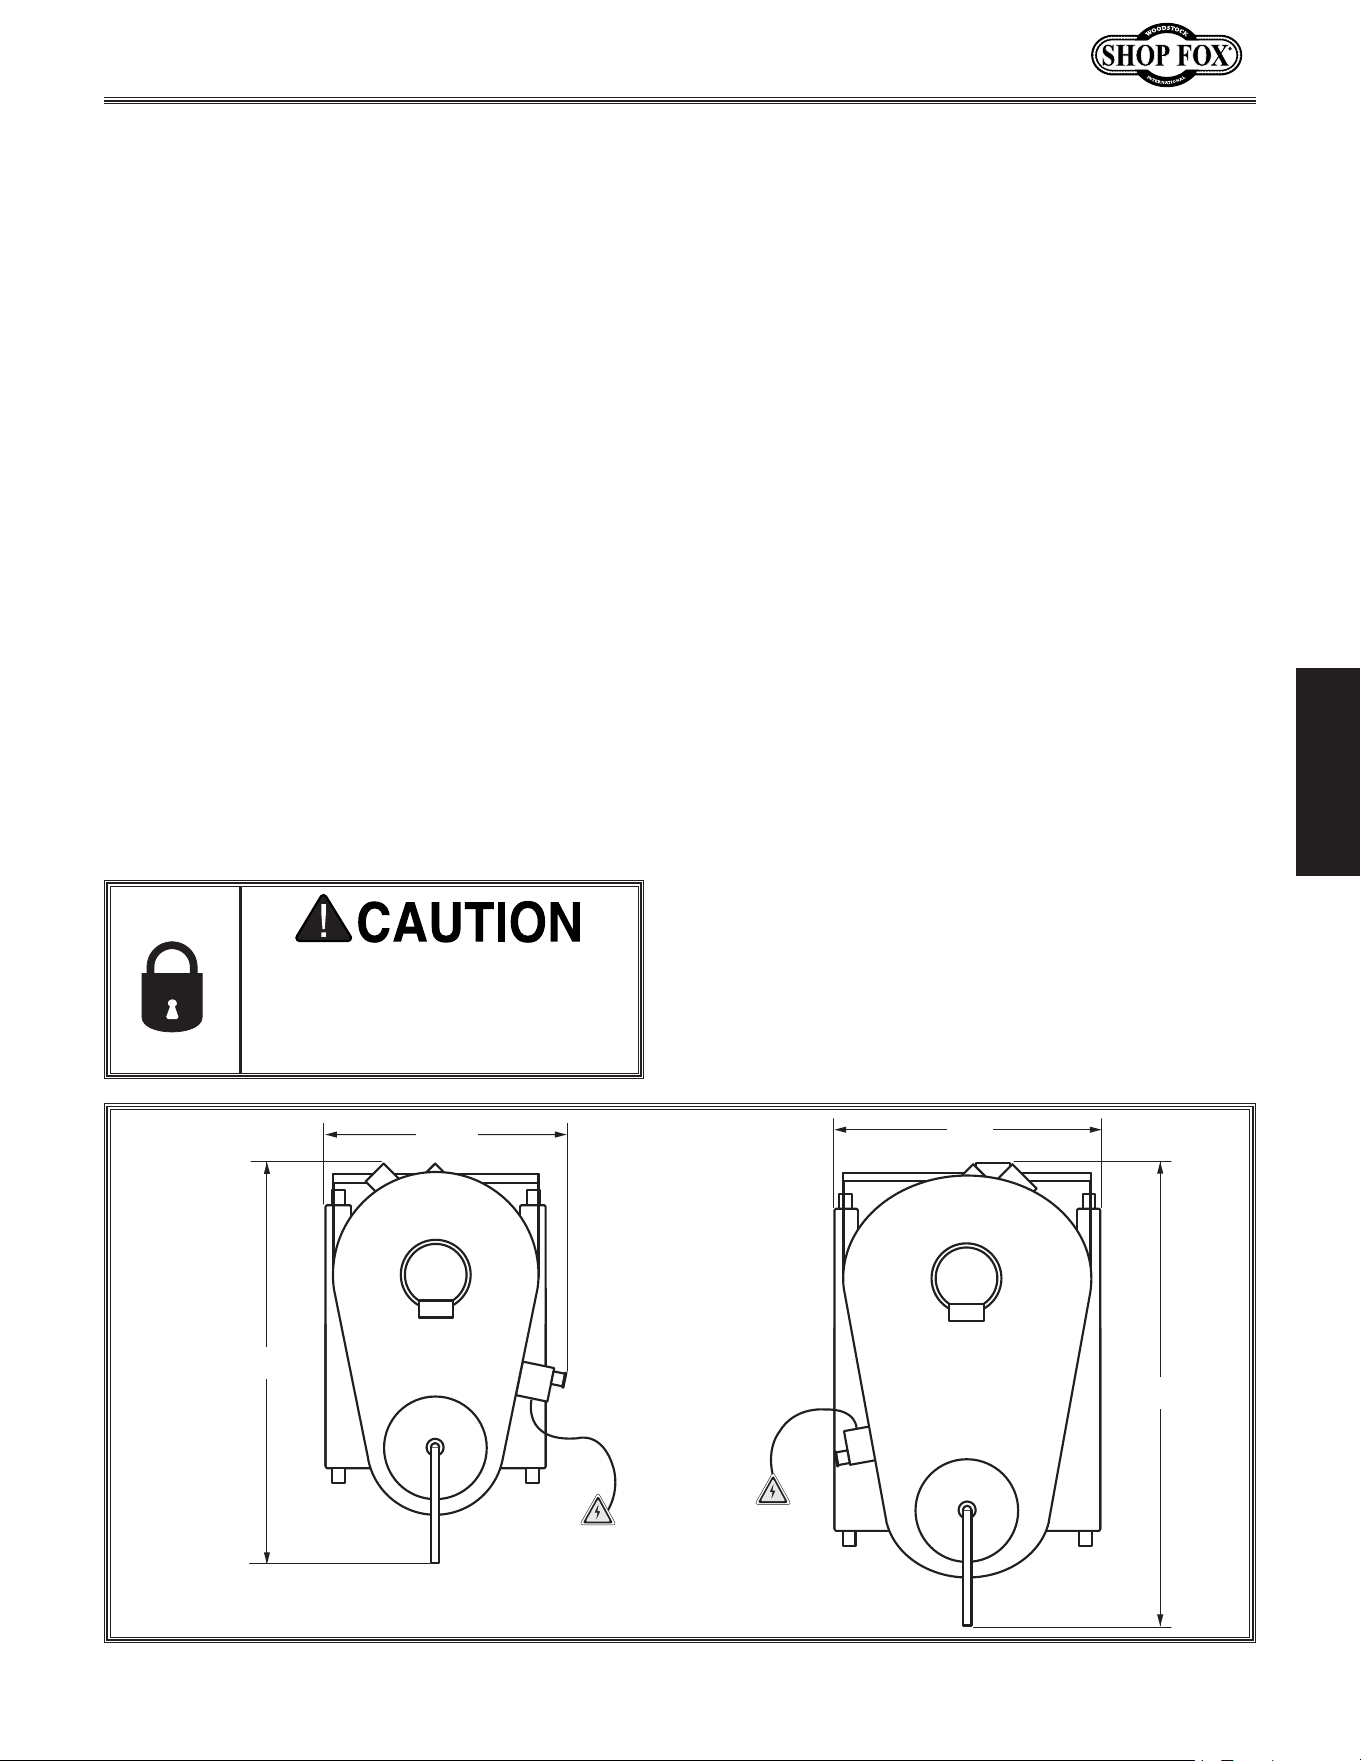
Figure.8. Working clearances.
Machine.Placement
31"
54"
27½"
44"
W1867
W1868
W1869
Weight.Load
Refer to the
Machine.Specific at ions for the
weight of your machine. Make sure that the
surface upon which the machine is placed will
bear the weight of the machine, additional
equipment that may be installed on the
machine, and the heaviest workpiece that will
be used. Additionally, consider the weight of
the operator and any dynamic loading that may
occur when operating the machine.
Space.Allocation
Consider the largest size of workpiece that
will be processed through this machine and
provide enough space around the machine
for adequate operator material handling or
the installation of auxiliary equipment. With
permanent installations, leave enough space
around the machine to open or remove doors/
covers as required by the maintenance and
service described in this manual.
See.below.for.
required.space.allocation.
Physical.Environment
The physical environment where your machine is
operated is important for safe operation and the
longevity of its components. For best results,
operate this machine in a dry environment
that is free from excessive moisture, hazardous
chemicals, airborne abrasives, or extreme
conditions. Extreme conditions for this type
of machinery are generally those where the
ambient temperature range exceeds 41°–104°F;
the relative humidity range exceeds 20–95%
(non-condensing); or the environment is subject
to vibration, shocks, or bumps.
Electrical.Installation
Place this machine near an existing power
source. Make sure all power cords are protected
from traffic, material handling, moisture,
chemicals, or other hazards. Make sure to leave
access to a means of disconnecting the power
source or engaging a lockout/tagout device.
Lighting
Lighting around the machine must be adequate
enough that operations can be performed
safely. Shadows, glare, or strobe effects that
may distract or impede the operator must be
eliminated.
Children. or. untrained. people.
may. be.seriously. injured.by.this.
machine..Only.install.in.an.access.
restric t ed.location.
-18-
Model W1867/W1868/W1869 (For Machines Mfd. Since 11/18)
SETUP
Assembly
Before beginning the assembly process, refer to Items.
Needed.for.Setup
and gather everything you need.
Ensure all parts have been properly cleaned of any
heavy-duty rust-preventative applied at the factory (if
applicable). Be sure to complete all steps in the assembly
procedure prior to performing the Test.Run.
HEAVY LIFT!
Straining or crushing
injury may occur from
improperly lifting the
machine or some of its
parts. To reduce this
risk, get help from other
people and use a forklift
(or other lifting equip-
ment) rated for weight of
machine.
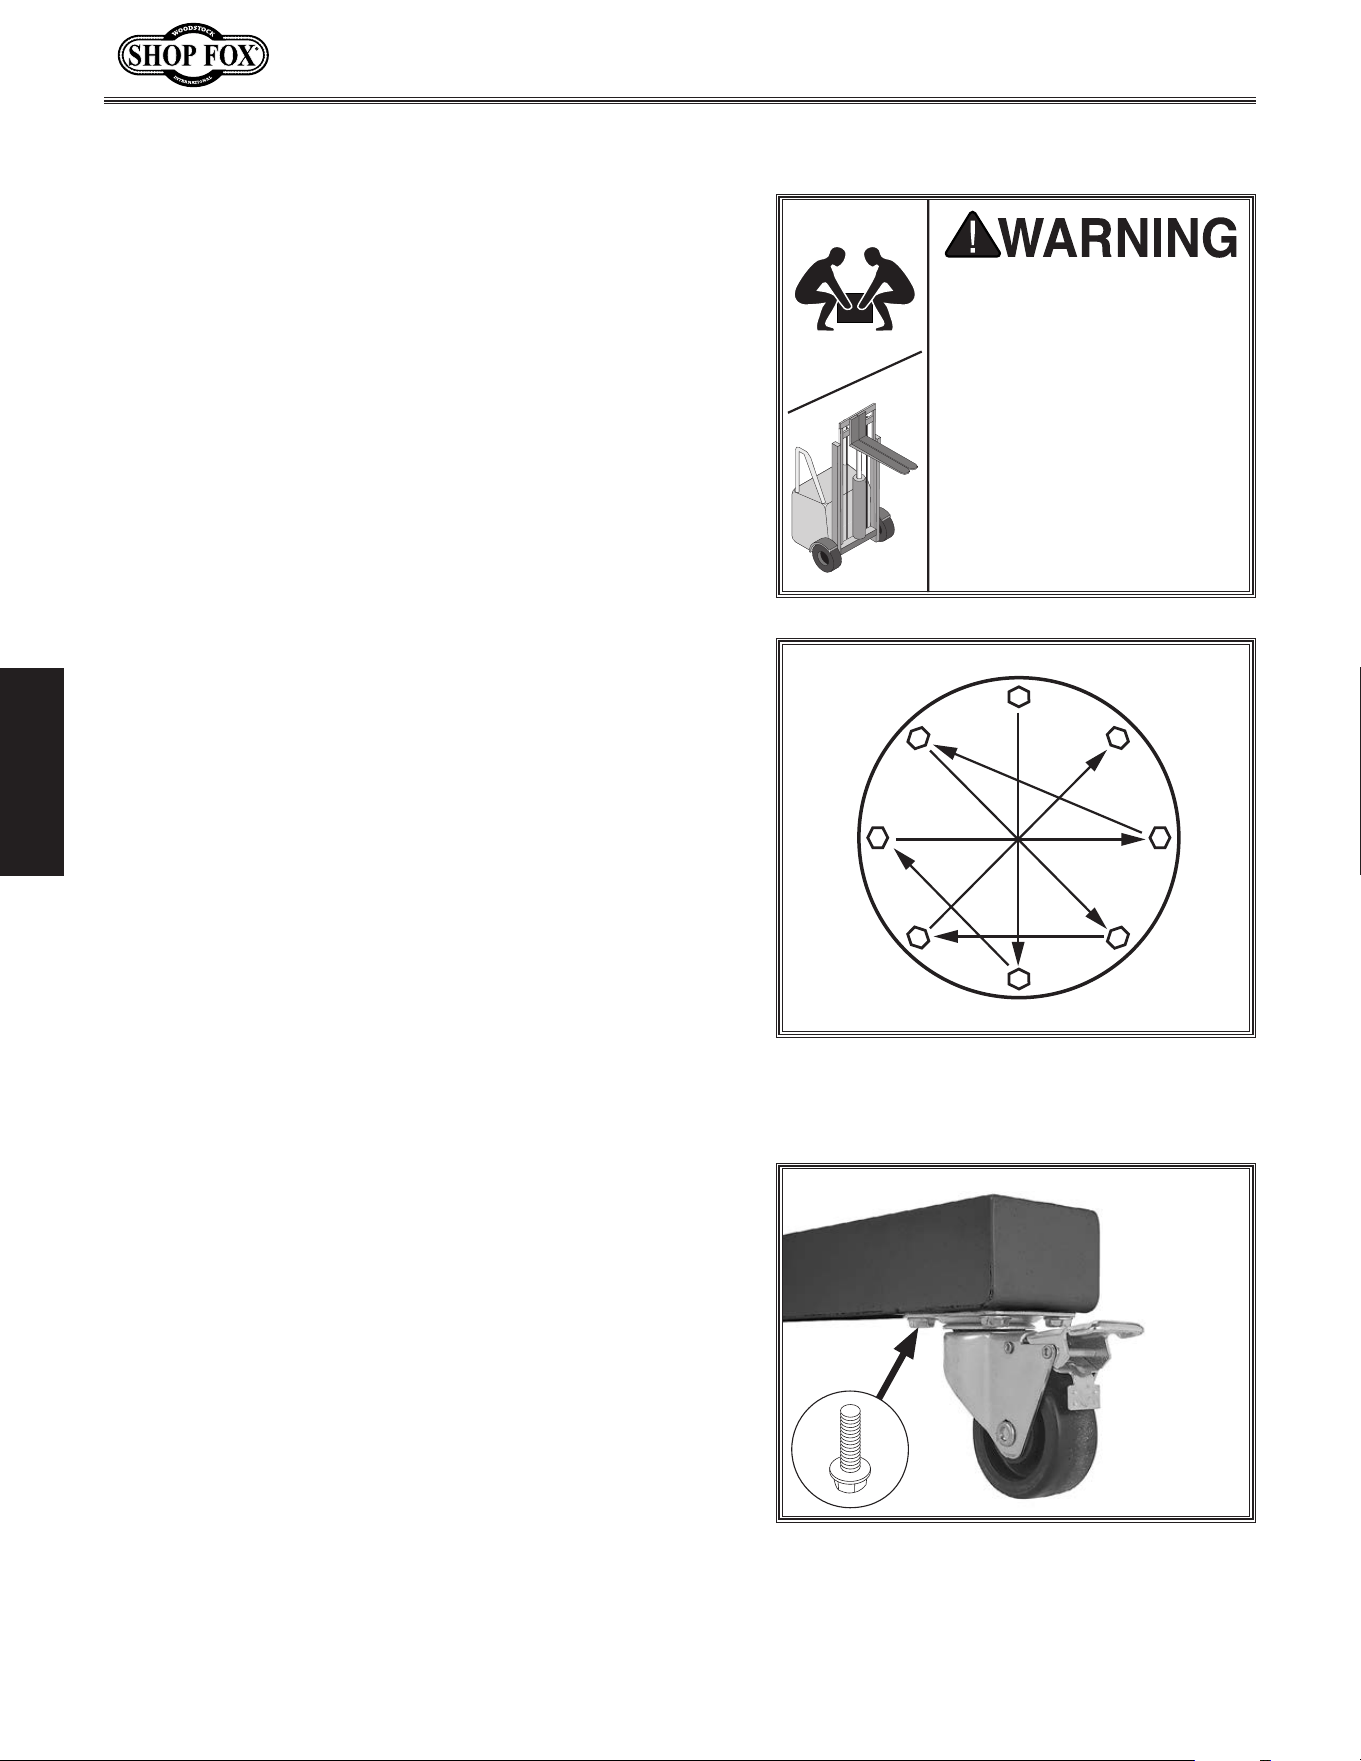
IMP O RTA N T: When assembling any components with a
gasket, tighten fasteners in an alternating star pattern to
ensure an even seal and reduce the risk of air leaks (see
Figure.9).
1
2
3 4
5
6
7
8
Figure.9. Alternating star pattern for
tightening fasteners of components
assembled with a gasket.
Figure.10. Locking swivel caster (1 of 4)
attached to base.
x 4
To.assemble.d ust.collector,.do.these.steps:
1. Attach (4) 2
1
⁄2" locking swivel casters to bottom of
base, and secure each caster with (4)
5
⁄16"-18 x
1
⁄2"
flange bolts (see Figure.10).
-19-
Model W1867/W1868/W1869 (For Machines Mfd. Since 11/18)
SETUP
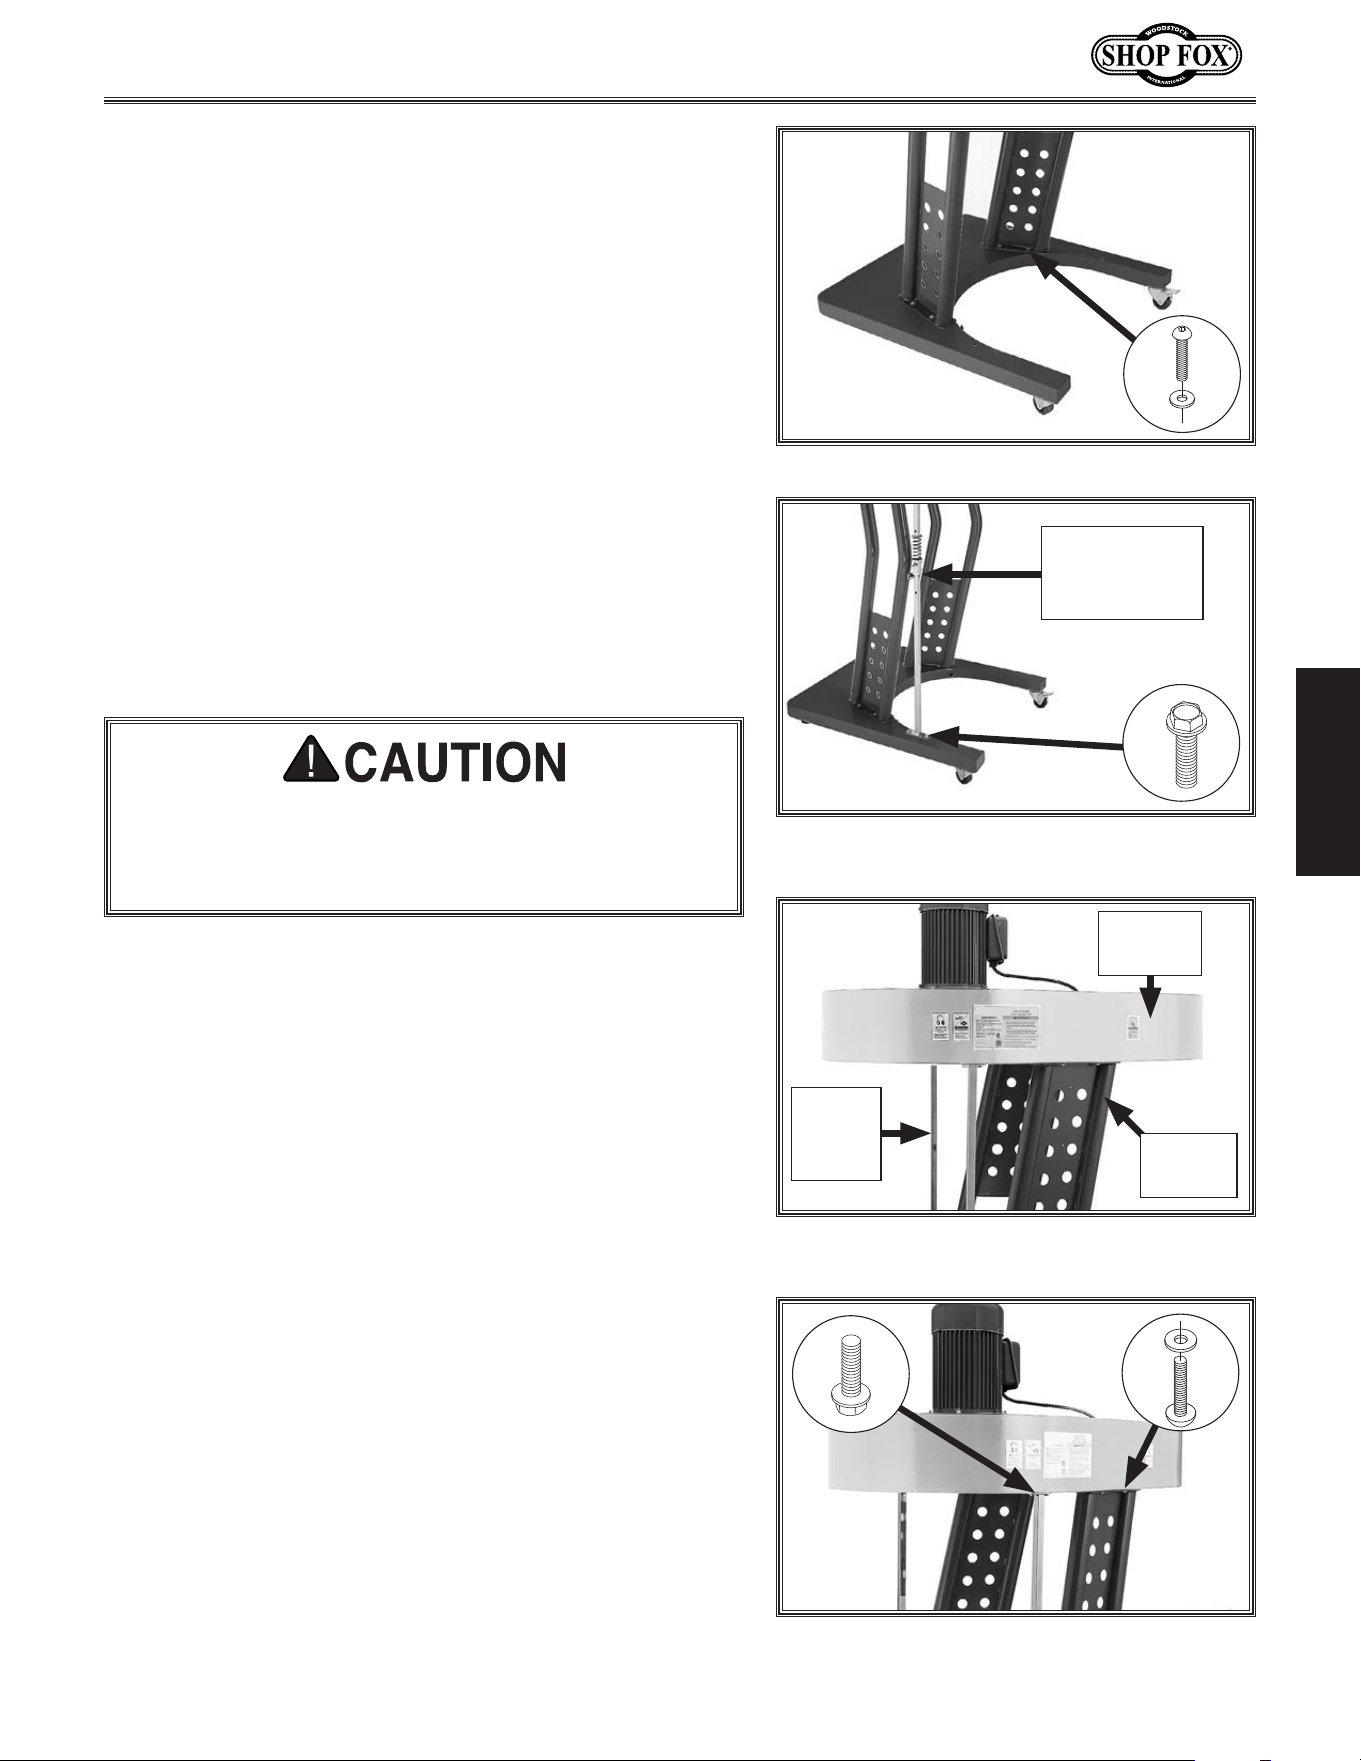
2. Attach each support leg to base, as shown in
Figure.11, and finger-tighten with (8)
5
⁄16"-18 x
3
⁄4"
button head cap screws and (8)
5
⁄16" fender washers.
Note: For Models W1867 and W1868, install support
leg with FIX SWITCH HERE sticker on left side of
base. For Model W1869, install support leg with FIX
SWITCH HERE sticker on right side of base.
Figure.11. Support legs attached to base.
x 8
3. Attach lock handle guide with stop plate to left side
of base stand, and finger-tighten with (2)
5
⁄16"-18 x
1
⁄2" flange bolts (see Figure.12).
4. Repeat Step.3 to attach second lock handle guide to
right side of base.
Once. installed,. the. impeller. housing. makes. the.
machine. top. heavy.. Assistants. must. securely. hold.
the. impeller. housing. in. place. until. Steps. 5–7. are.
completed.
5. With help of two assistants, lift impeller housing
and onto support legs and lock handle guides (see
Figure.13).
Figure.13. Impeller housing positioned on
support legs and lock handle guides.
Impeller
Housing
Lock
Handle
Guides
Support
Legs
6. Secure impeller housing to support legs with (8)
5
⁄16"-
18 x
3
⁄4" button head cap screws and (8)
5
⁄16" fender
washers (see Figure.14).
7. Secure impeller housing to lock handle guides with
(4)
5
⁄16"-18 x
1
⁄2" flange bolts (see Figure.14).
8. Fully tighten all fasteners installed in Steps. 2–4 (see
Figures.11–12).
Figure.14. Impeller housing attached to
support legs and lock handle guides.
x 8
x 4
Figure.12. Lock handle guide with stop
plate attached to base.
Lock Handle
Guide w/Stop
Plate
x 2
-20-
Model W1867/W1868/W1869 (For Machines Mfd. Since 11/18)
SETUP
8. Fully tighten all fasteners installed in Steps. 2–4 (see
Figures.11–12).
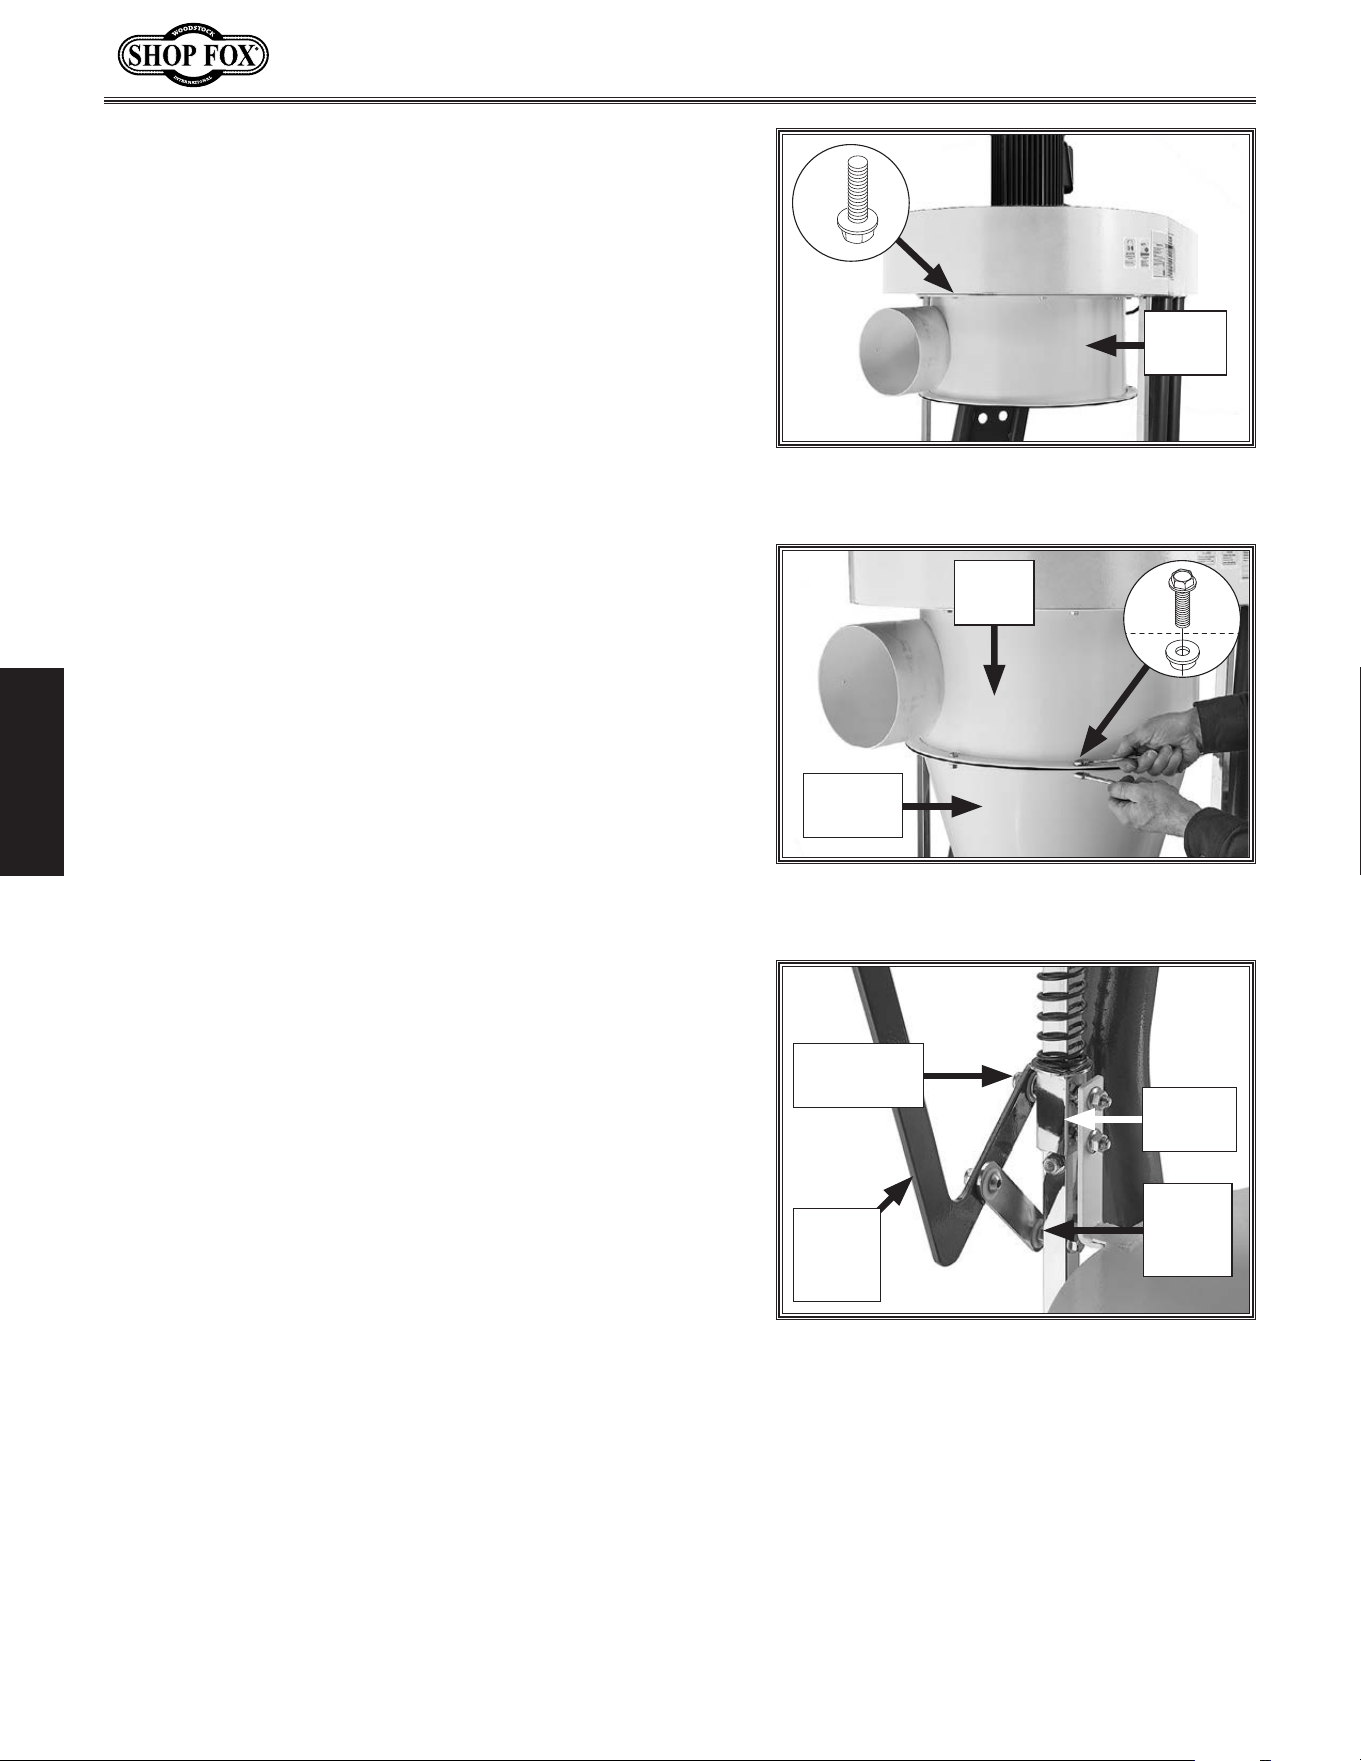
9. Have an assistant align intake barrel so dust port
points straight out from impeller housing (see
Figure.15), then attach to impeller housing with (8)
5
⁄16"-18 x
1
⁄2" flange bolts.
Note: For W1867 and W1868, align dust port on
right. For W1869, align dust port on left.
Figure.15. Intake barrel attached to
impeller housing.
10. Attach cyclone funnel to intake barrel, as shown in
Figure.16, using (8)
5
⁄16"-18 x
3
⁄4" flange bolts and
(8)
5
⁄16"-18 hex nuts.
x 8
Intake
Barrel
Figure.16. Attaching cyclone funnel to
intake barrel.
x 8
Intake
Barrel
Cyclone
Funnel
11. Using fasteners attached to spring bracket, place
upper end of drum lock handle over outer stud on
spring bracket, then attach lock handle link to lower
hole on lock handle (see Figure.17).
Figure.17. Lock handle attached to spring
bracket and lock handle link.
Outer Stud
(1 of 2)
Spring
Bracket
Lock
Handle
Link
Drum
Lock
Handle
-21-
Model W1867/W1868/W1869 (For Machines Mfd. Since 11/18)
SETUP
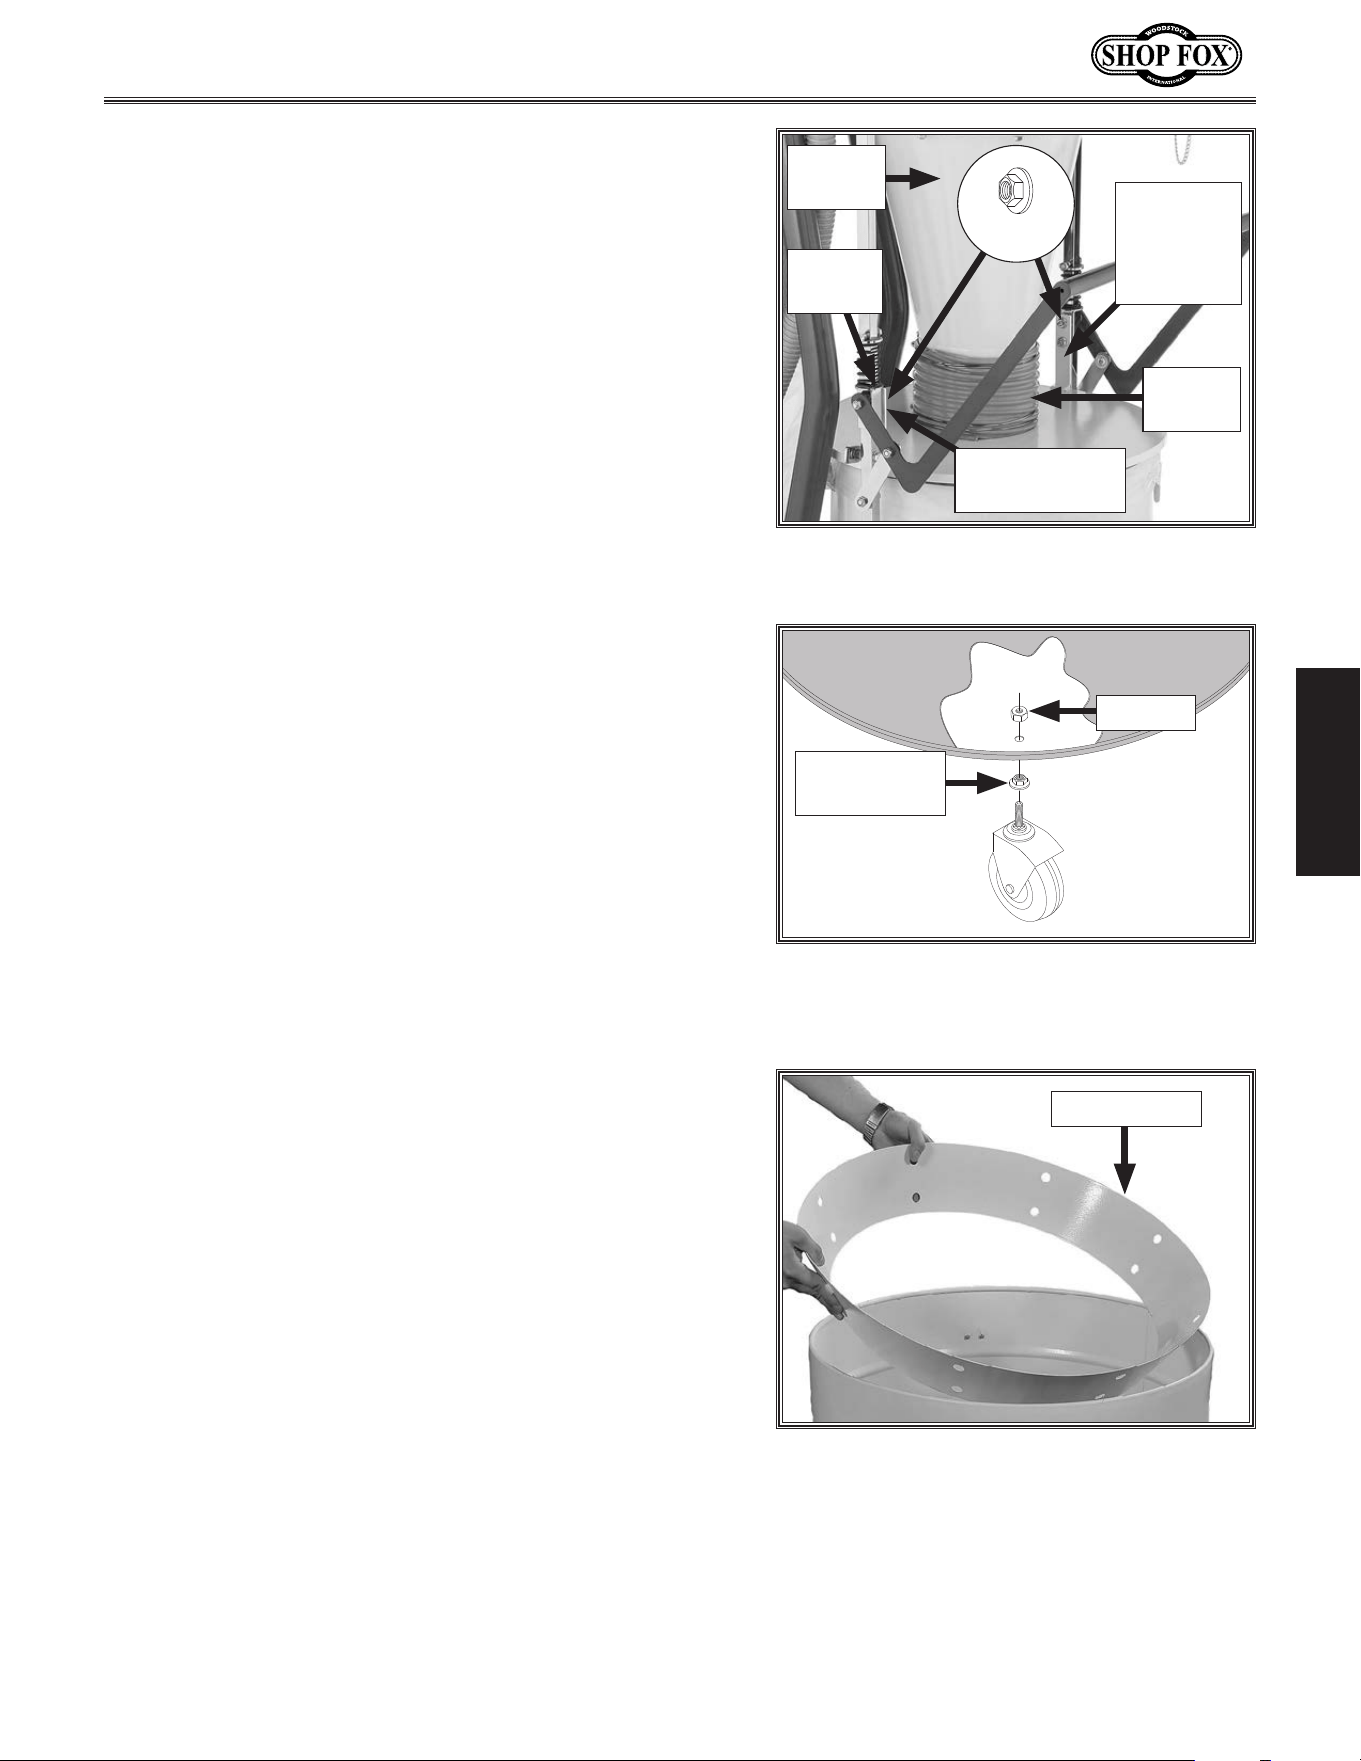
12. Place (2) hose clamps around flexible hose, then
slide hose over port on collection drum lid and
tighten clamp (see Figure.18).
13. With collection drum lid mounting brackets facing
up, orient lid so dust port, flexible hose, and spring
brackets align (see Figure.18).
14. Attach flexible hose to cyclone funnel and secure
with (1) hose clamp (see Figure.18).
15. Connect ground wire to spring bracket stud, then
secure lid and ground wire using (4)
5
⁄16"-18 flange
nuts (see Figure.18).
16. Attach 2" swivel casters to collection drum, as shown
in Figure.19, using (1)
5
⁄16"-18 hex nut on each.
17. Adjust pre-installed flange nut and hex nut (see
Figure.19) until drum rolls evenly without rocking or
wobbling, then tighten both nuts to secure caster in
place.
Figure.18. Collection drum lid and related
components installed.
Spring
Bracket
Attach Ground
Wire Here
x 4
Cyclone
Funnel
Flexible
Hose
Collection
Drum Lid
Mounting
Bracket
Figure.19. Cut-away illustration of 2"
swivel caster attachment to collection
drum.
Hex Nut
Pre-Installed
Flange Nut
18. Place vacuum ring inside collection drum with
smaller side of ring facing down, as shown in
Figure.20.
Note: During operation, this ring and the vacuum
connection to the cyclone funnel will prevent the
collection bag from collapsing or being pulled up
into the cyclone.
Figure.20. Inserting vacuum ring into
collection drum.
Vacuum Ring
-22-
Model W1867/W1868/W1869 (For Machines Mfd. Since 11/18)
SETUP
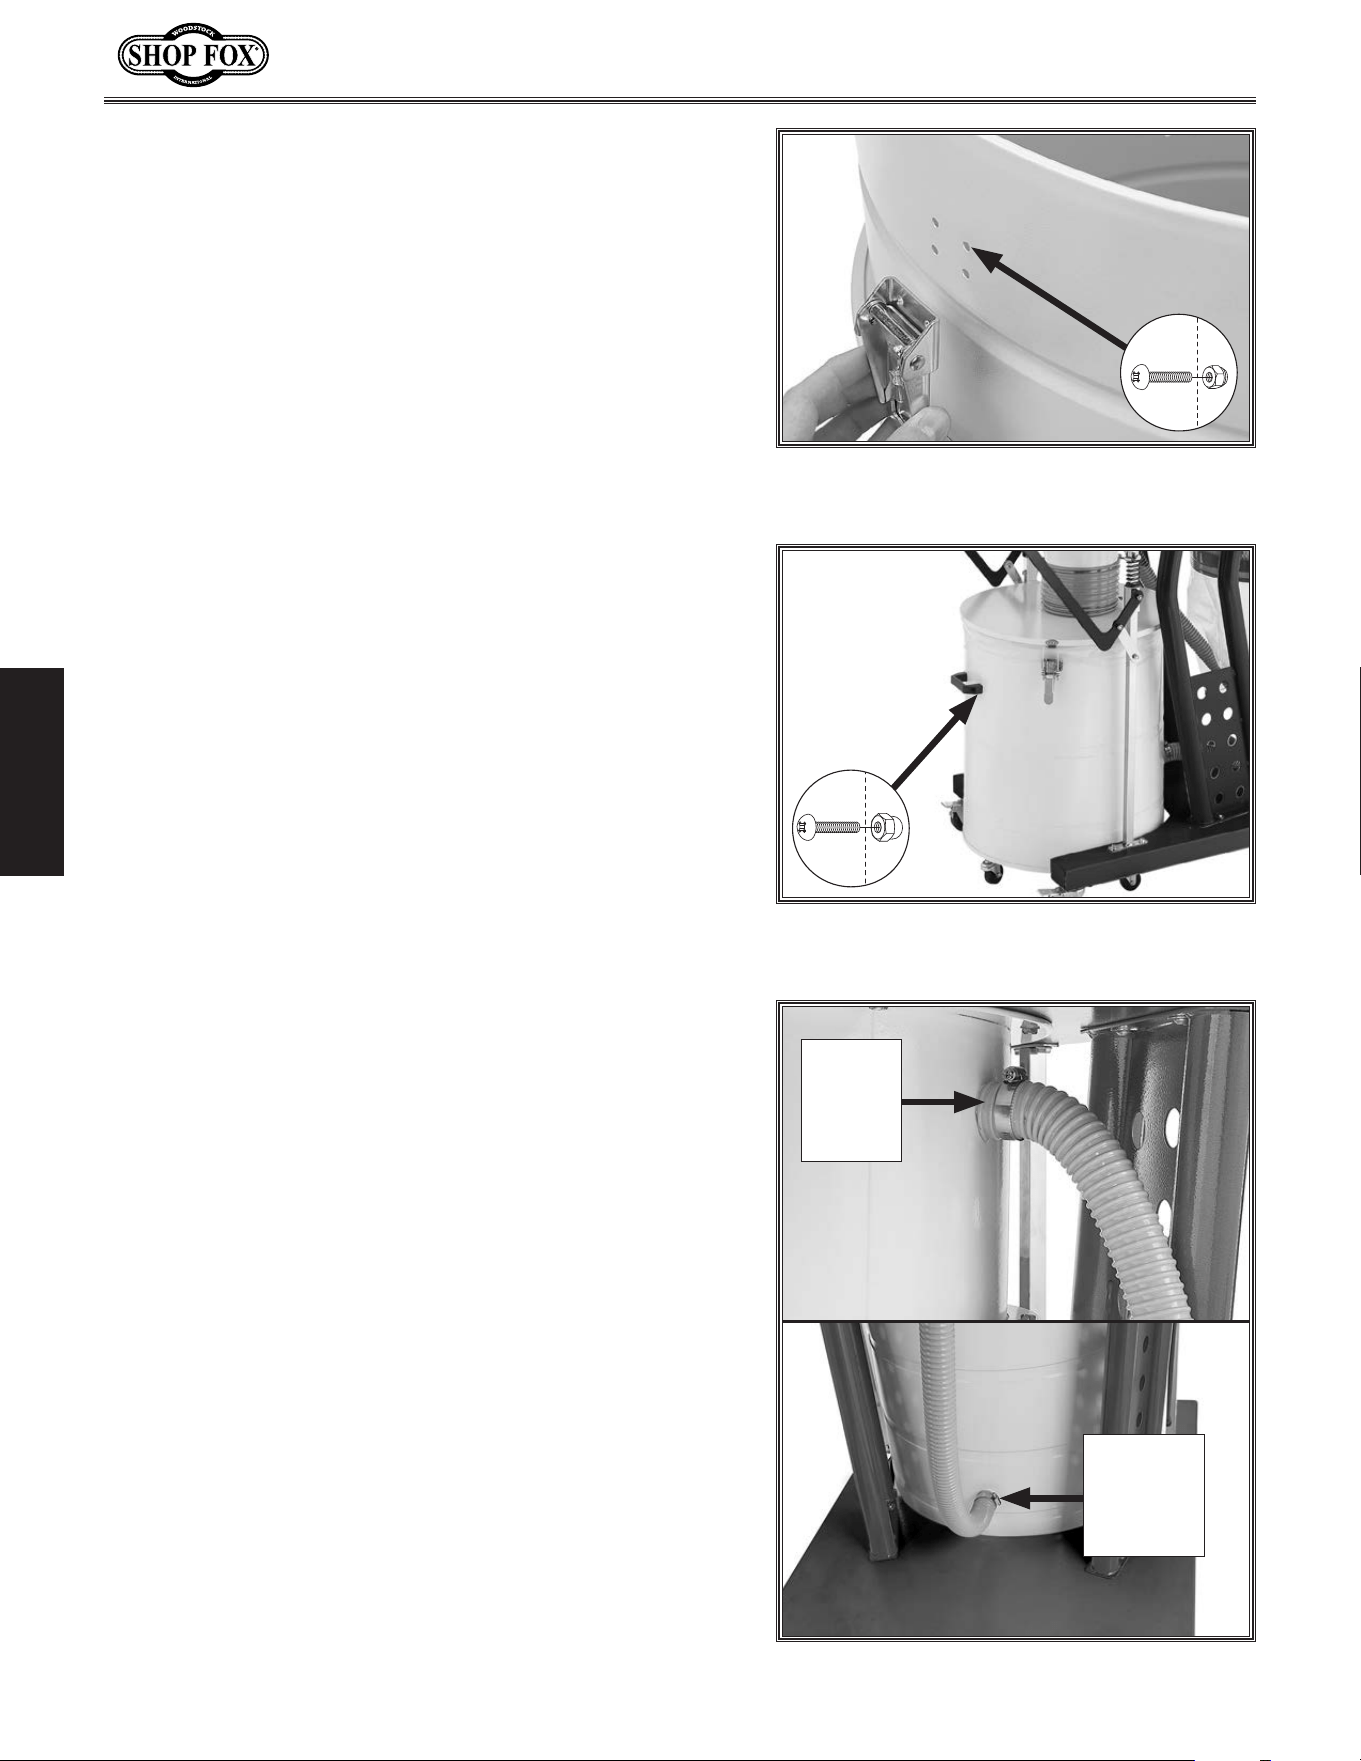
19. Attach both drum latches using (4) M4-.7 x 8 Phillips
head screws and (4) M4-.7 lock nuts per latch (see
Figure.21).
Figure.21. Attaching latch to collector
drum.
x 4
20. Attach handle to collection drum using (2)
1
⁄4"-20 x
5
⁄8" Phillips head screws and (2)
1
⁄4"-20 acorn nuts
(see Figure.22).
21. Insert large plastic dust bag inside collection drum,
and fold excess length of bag over top of collection
drum.
22. Move collection drum under lid, connect latches to
lid hooks, then secure latches.
23. Press drum lock handle down to lift collection drum
off floor.
Figure.22. Collection drum handle
attached.
x 2
24. Place 1
3
⁄4" hose clamps on each end of 1
1
⁄2" x 60"
vacuum hose, then connect hose to ports on cyclone
funnel and collection drum (see Figure.23).
Figure.23. Vacuum hose connections.
Collection
Drum
Vacuum
Port
Cyclone
Funnel
Vacuum
Port
-23-
Model W1867/W1868/W1869 (For Machines Mfd. Since 11/18)
SETUP
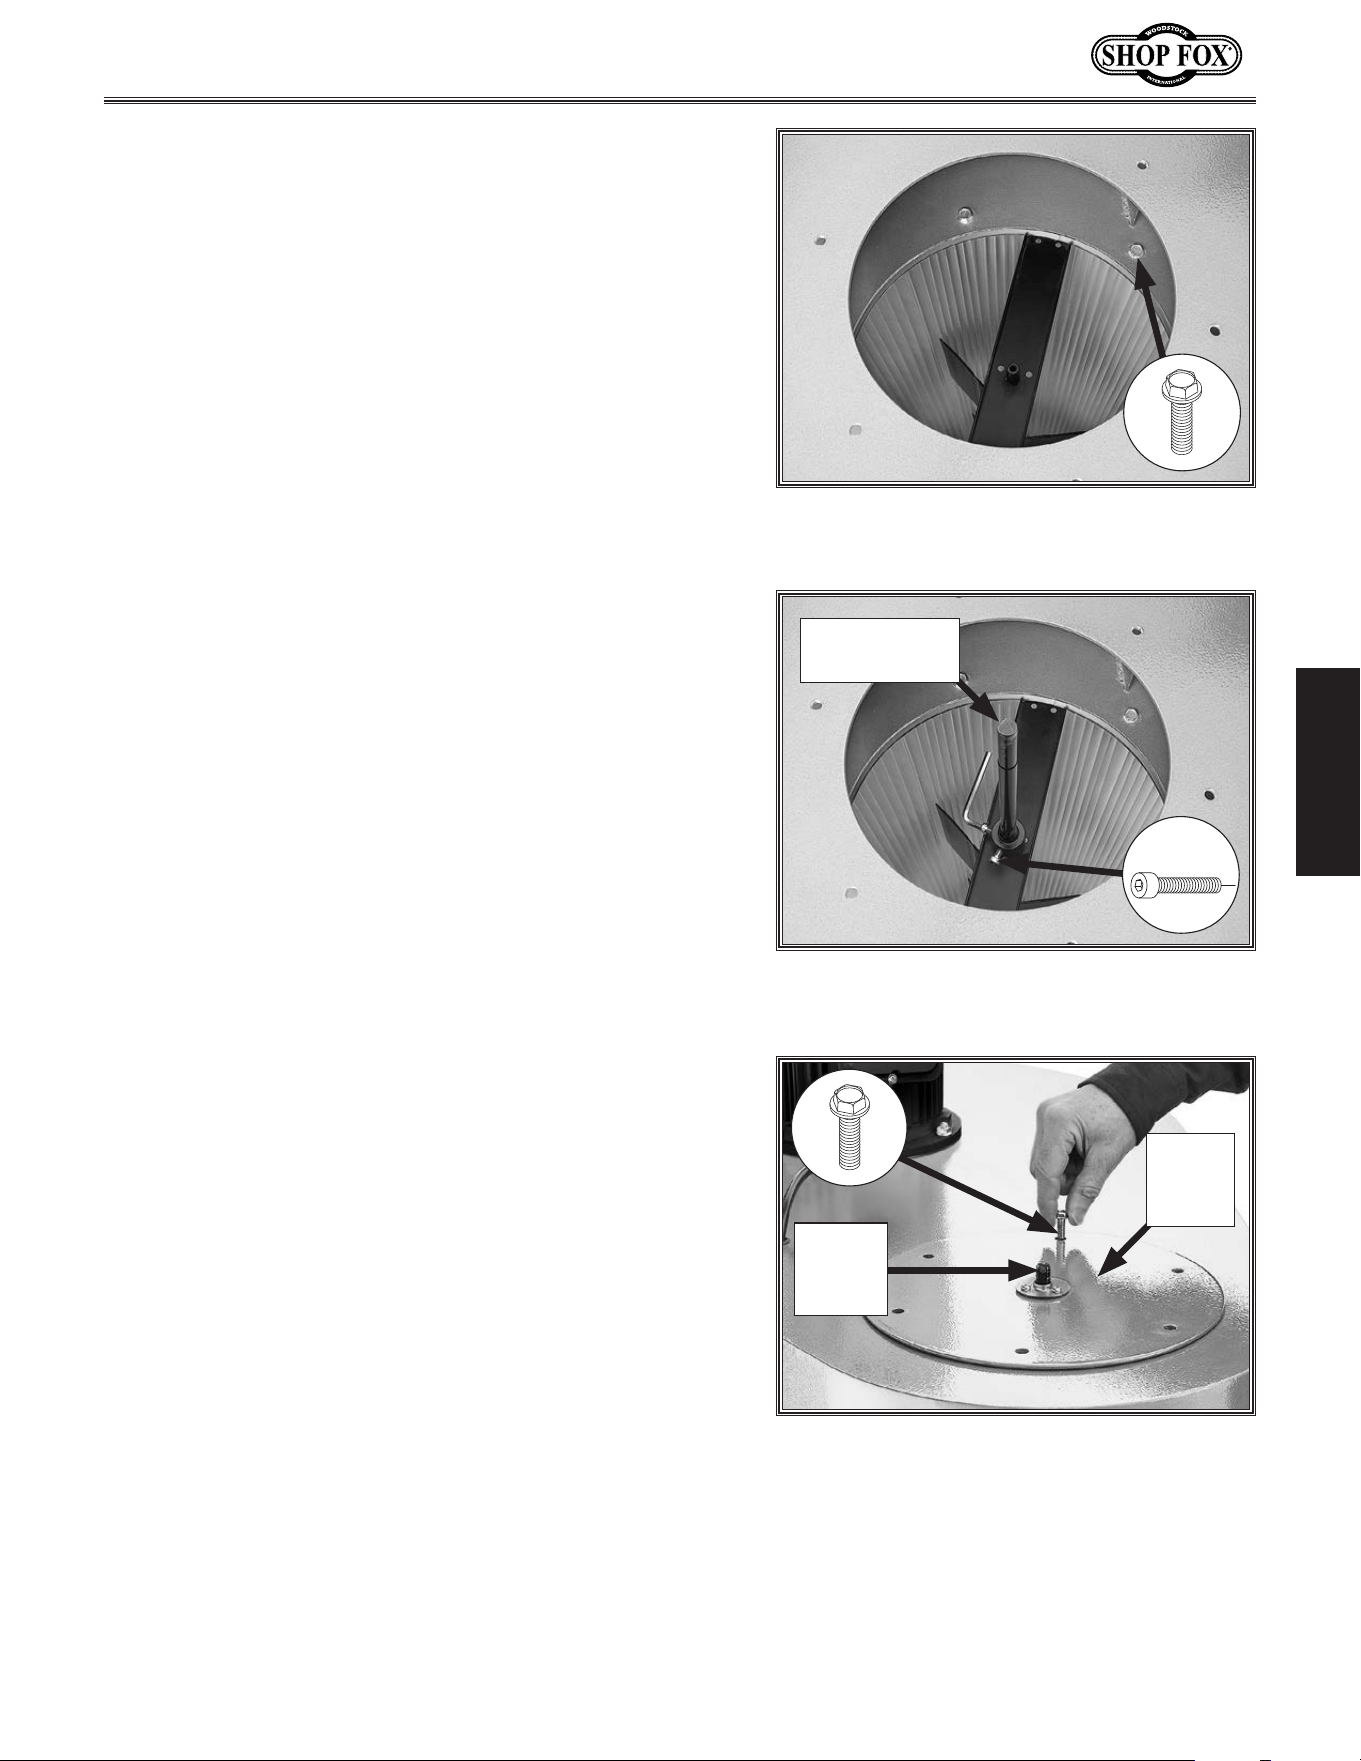
25. While assistant holds canister filter under impeller
housing, reach into impeller housing and attach
canister filter to impeller housing with (6)
5
⁄16"-18 x
1
⁄2" flange bolts (see Figure.24).
Figure.24. Canister filter attached to
impeller housing.
x 6
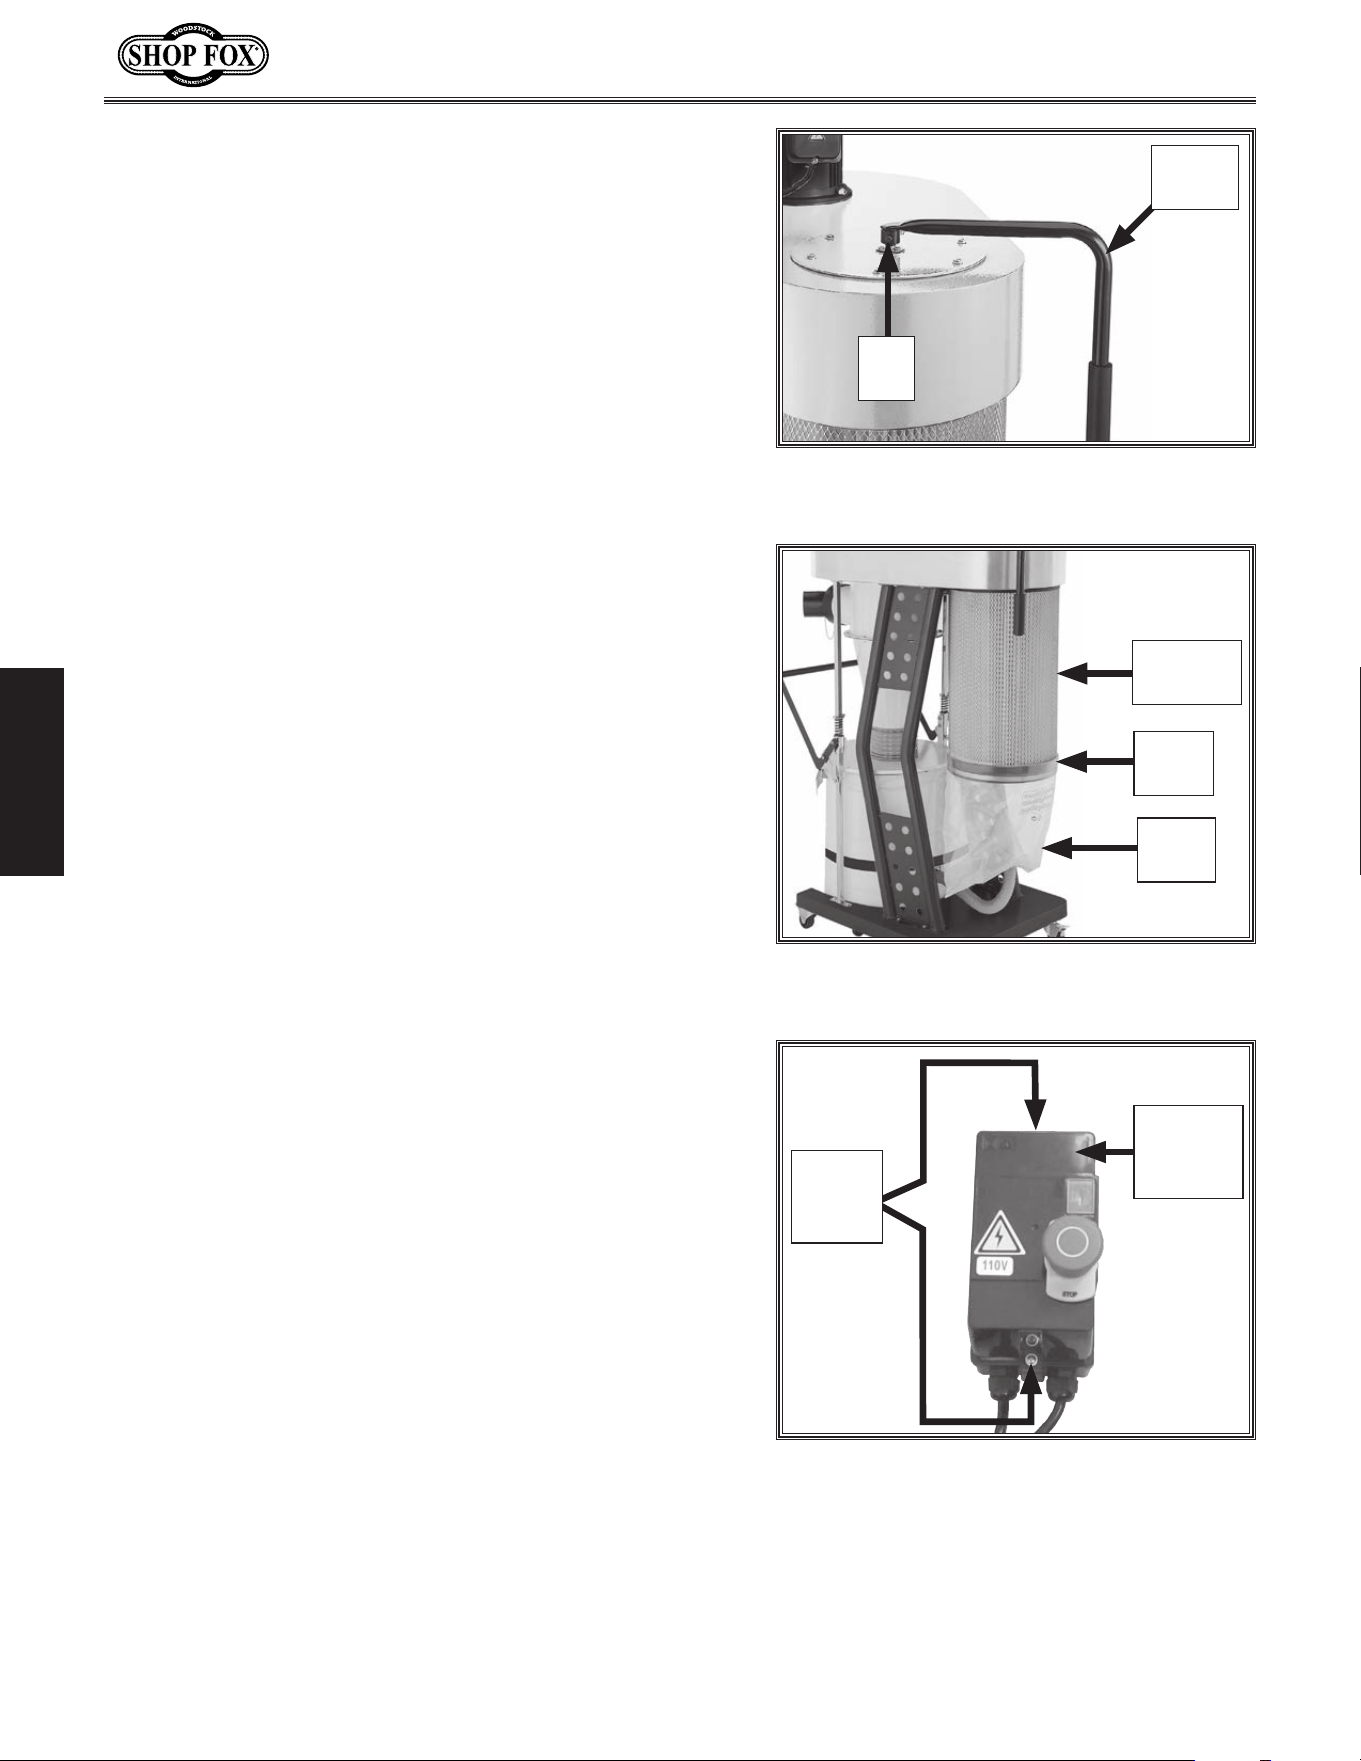
26. Insert filter handle spindle so one of two M6-1 x
16 cap screw tips aligns with flat on side of filter
paddle spindle, then tighten both cap screws to
secure spindle (see Figure.25).
27. Slide filter paddle cover over filter handle spindle,
then secure with (6)
5
⁄16"-18 x
3
⁄4" flange bolts (see
Figure.26).
Figure.26. Installing filter paddle cover.
x 6
Filter
Handle
Spindle
Filter
Paddle
Cover
Figure.25. Filter handle spindle attached
to canister filter assembly.
Filter Handle
Spindle
x 2
-24-
Model W1867/W1868/W1869 (For Machines Mfd. Since 11/18)
SETUP
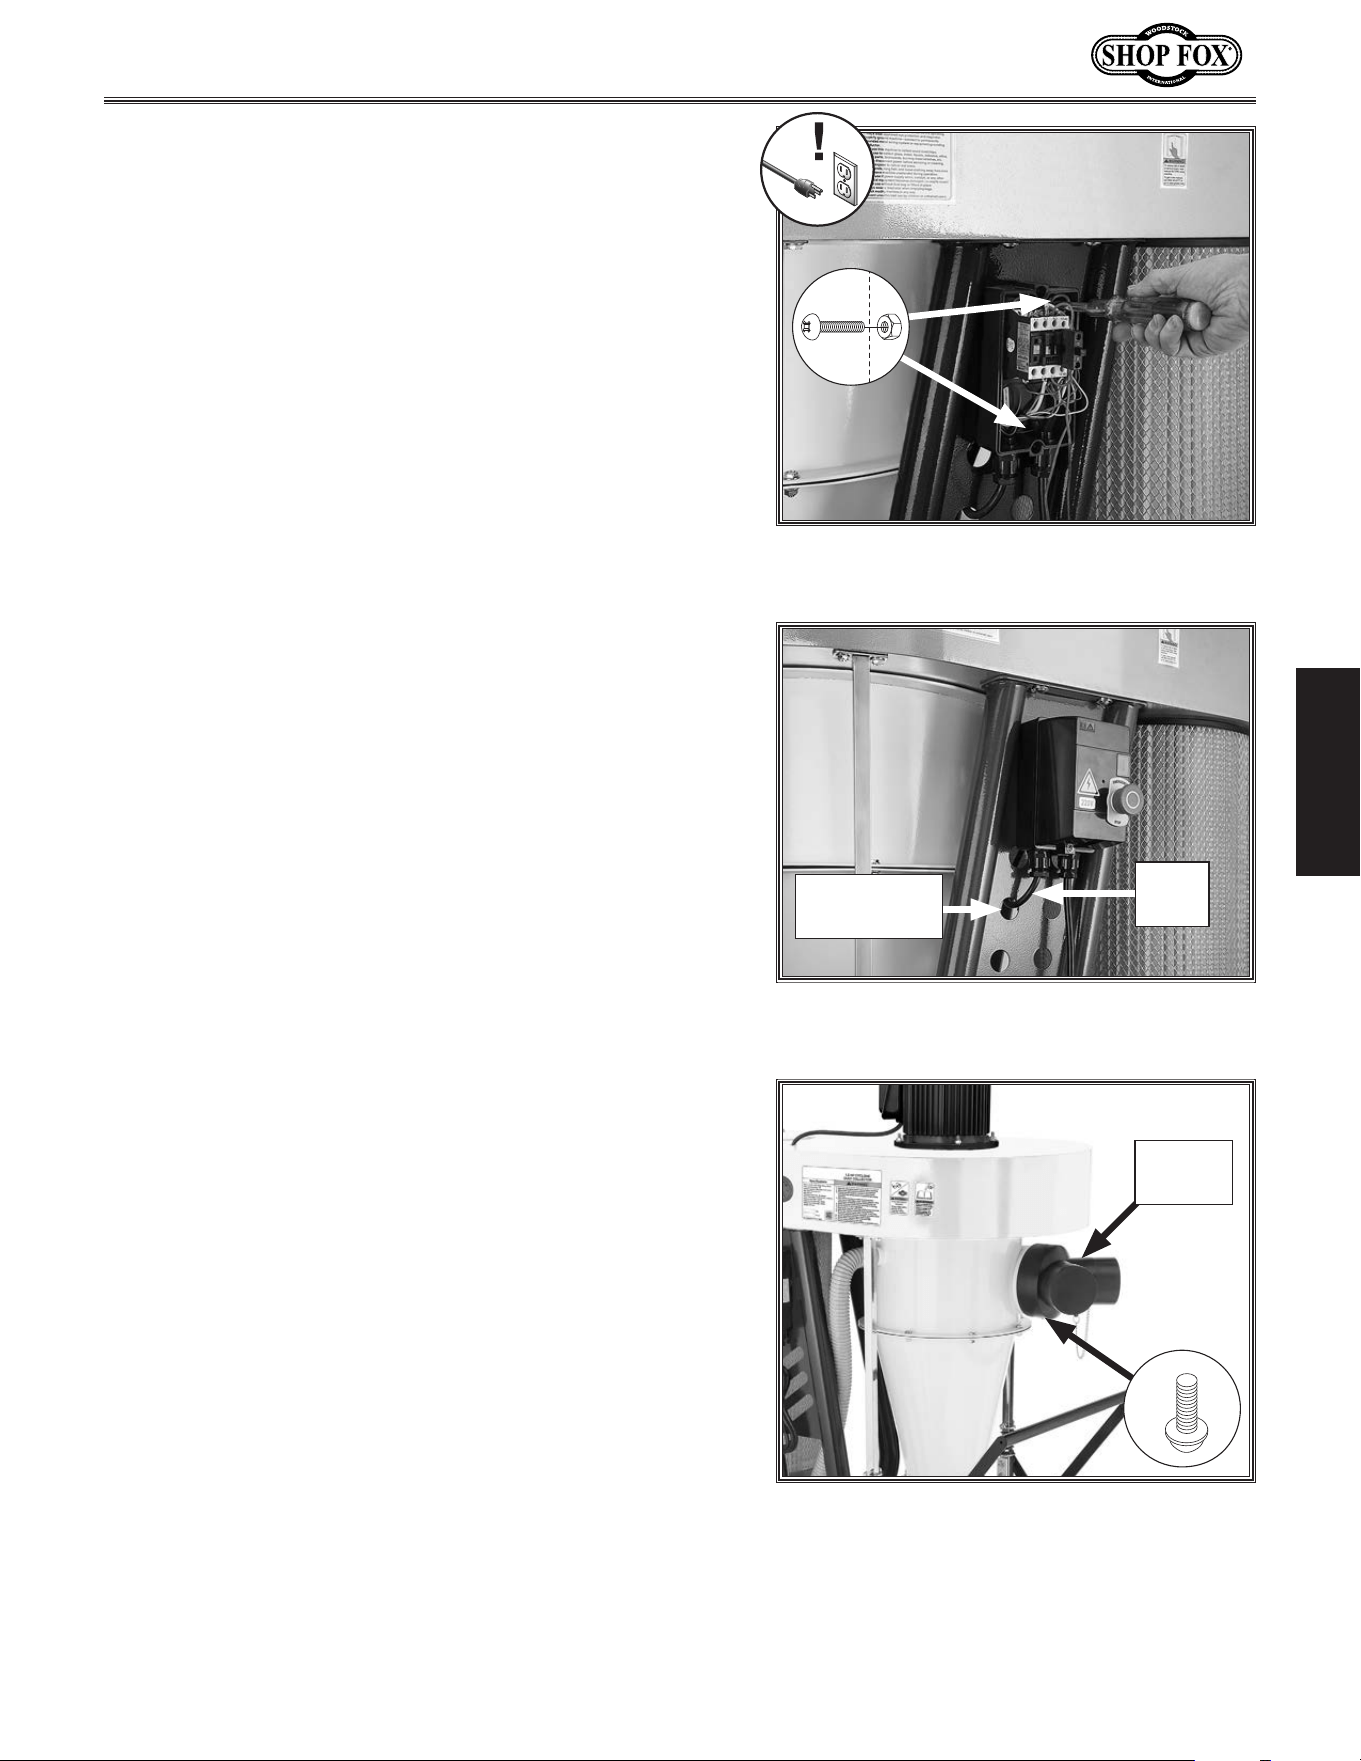
29. Attach plastic filter bag to canister filter and secure
with bag clamp (see Figure.28).
30. Loosen (2) Phillips head screws and remove magnetic
switch cover (see Figure.29).
Figure.28. Filter bag attached to canister
filter.
Filter
Bag
Canister
Filter
Bag
Clamp
Figure.29. Magnetic switch cover.
Phillips
Head
Screws
Magnetic
Switch
Cover
28. Install filter cleaning handle on spindle so that
M6-1 x 16 hex bolt tip aligns with spindle flat, then
tighten hex bolt (see Figure.27).
Figure.27. Filter handle installed on
spindle.
Hex
Bolt
Filter
Handle
-25-
Model W1867/W1868/W1869 (For Machines Mfd. Since 11/18)
SETUP
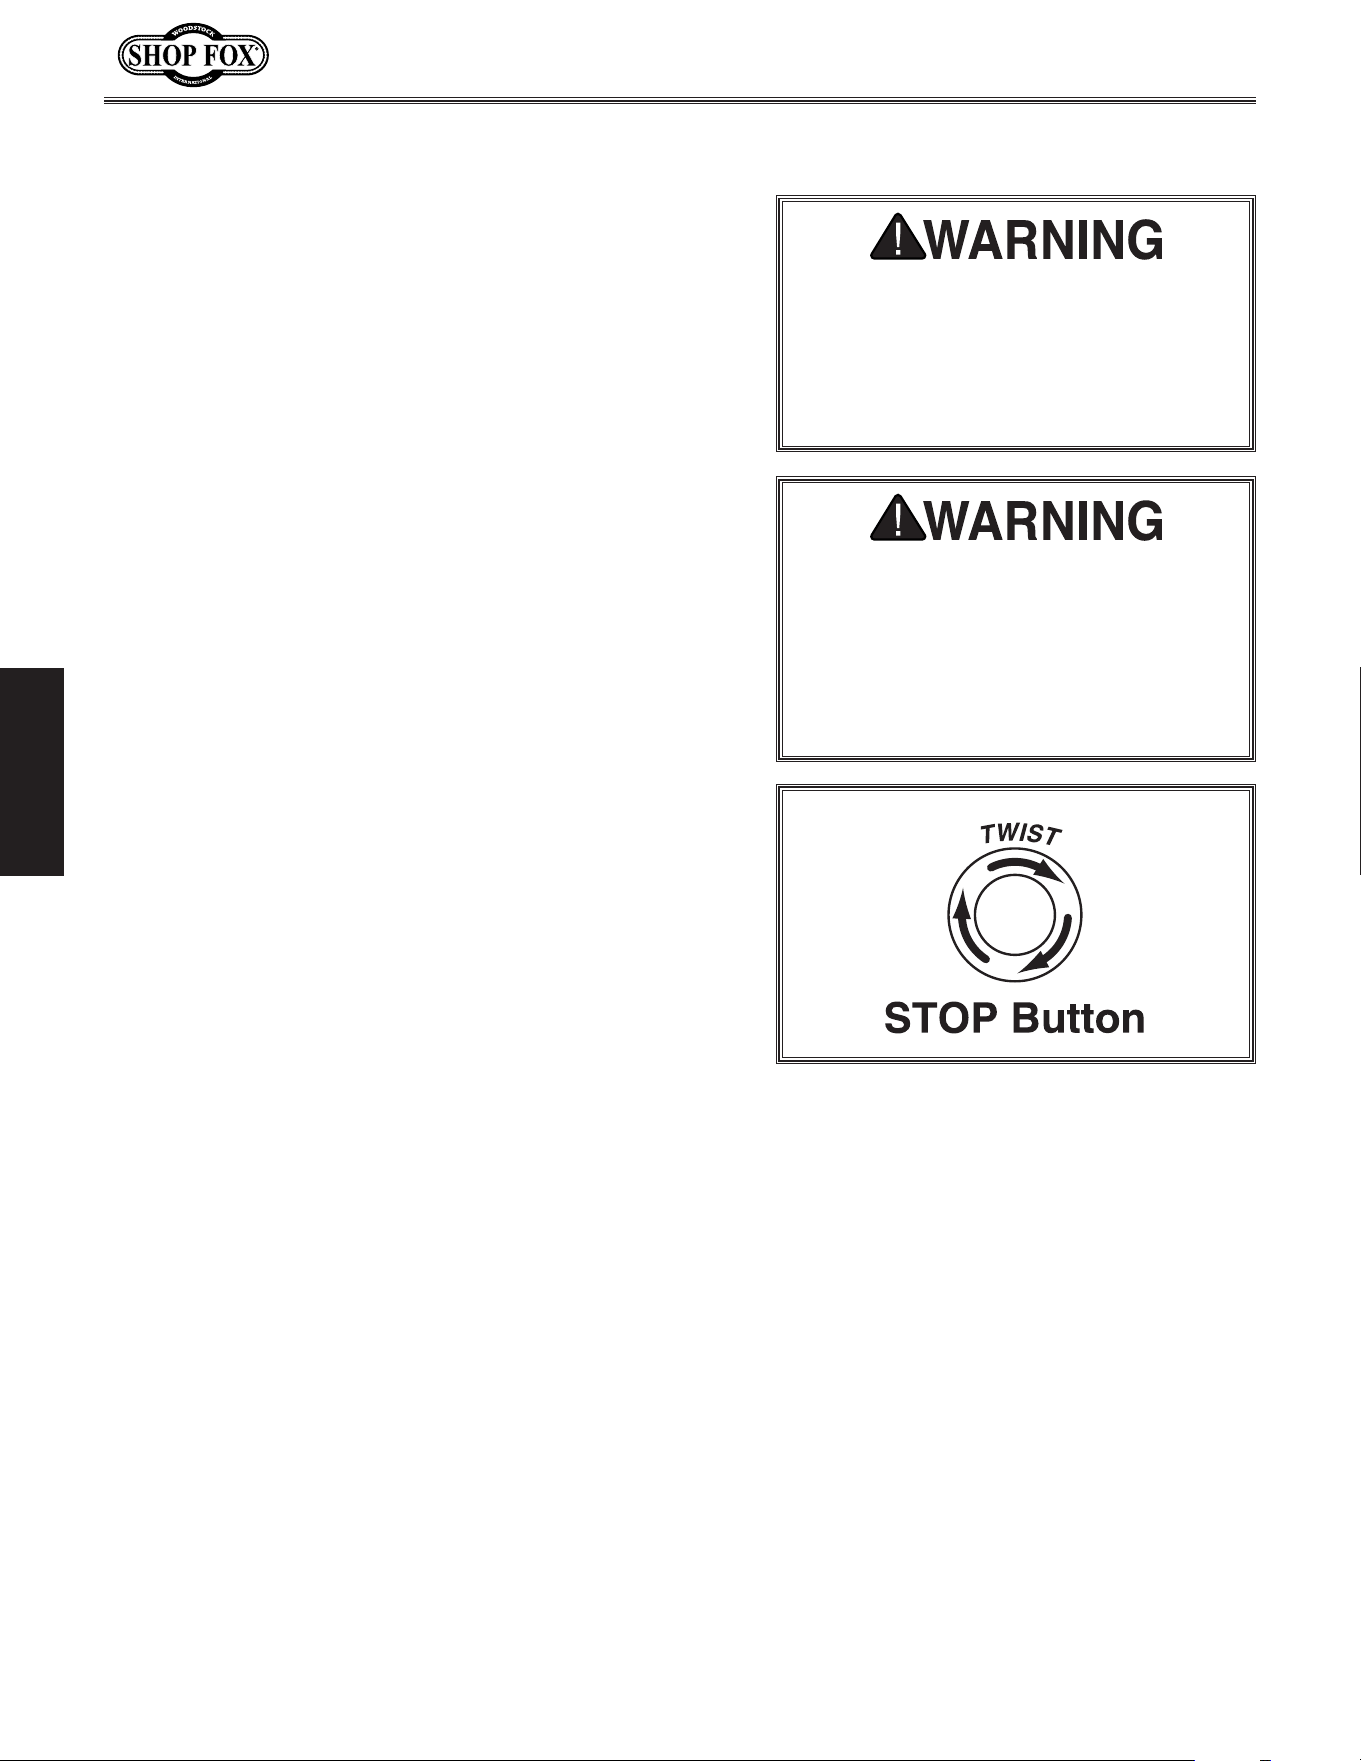
31. Install magnetic switch over FIX SWITCH HERE label
(left support arm for Models W1867 and W1868, right
support arm for Model W1869), then secure with (2)
10-24 x
3
⁄4" Phillips head screws and (2) 10-24 hex
nuts (see Figure.30).
Figure.30. Installing magnetic switch on
support arm.
x 2
32. Tuck loose wires into magnetic switch cover so none
can be crimped when cover is re-attached, and
then replace magnetic switch cover and tighten (2)
Phillips head screws loosened in Step.30 to secure.
33. Thread motor cord through support arm opening and
connect to matching plug from motor under impeller
housing (see Figure.31).
34. Install inlet adapter on dust port and secure with
10-24 x
3
⁄8" flange screw (see Figure.32).
Figure.31. Magnetic switch attached to
support arm.
Motor
Cord
Support Arm
Opening
x 1
Inlet
Adapter
Figure.32. Inlet adapter installed on dust
port.
-26-
Model W1867/W1868/W1869 (For Machines Mfd. Since 11/18)
SETUP
Test.Run
Serious. injury. or. death. can. result.
from. using. this. machine. BEFORE.
understanding. its. controls. and. related.
safety.information..DO.NOT.operate,.or.
allow.others.to.operate,.machine.until.
the.information.is.understood..
DO. NOT. start. machine. until. all.
preceding.setup.instructions.have.been.
performed..Operating.an.improperly.set.
up. machine. may.result.in. malfunction.
or. unexpected. results. that. can. lead.
to. serious. injury,. death,. or. machine/
property.damage.
Once assembly is complete, test run the machine to
ensure it is properly connected to power and safety
components are functioning properly.
If you find an unusual problem during the test run,
immediately stop the machine, disconnect it from power,
and fix the problem BEFORE operating the machine again.
The
Troubleshooting table in the SERVICE
section of this
manual can help.
To.test.run.machine,.do.these.steps:
1. Clear all setup tools away from machine.
2. Lock all swivel casters on base stand.
3. Connect machine to dust-collection system or place
covers over inlet adapter ports.
IMPORTANT: DO NOT operate dust collector without
first connecting it to a dust-collection system or
covering an inlet adapter port. Otherwise the lack
of airflow resistance will cause the motor to operate
at full amperage load, which could trip your circuit
breaker or blow a fuse.
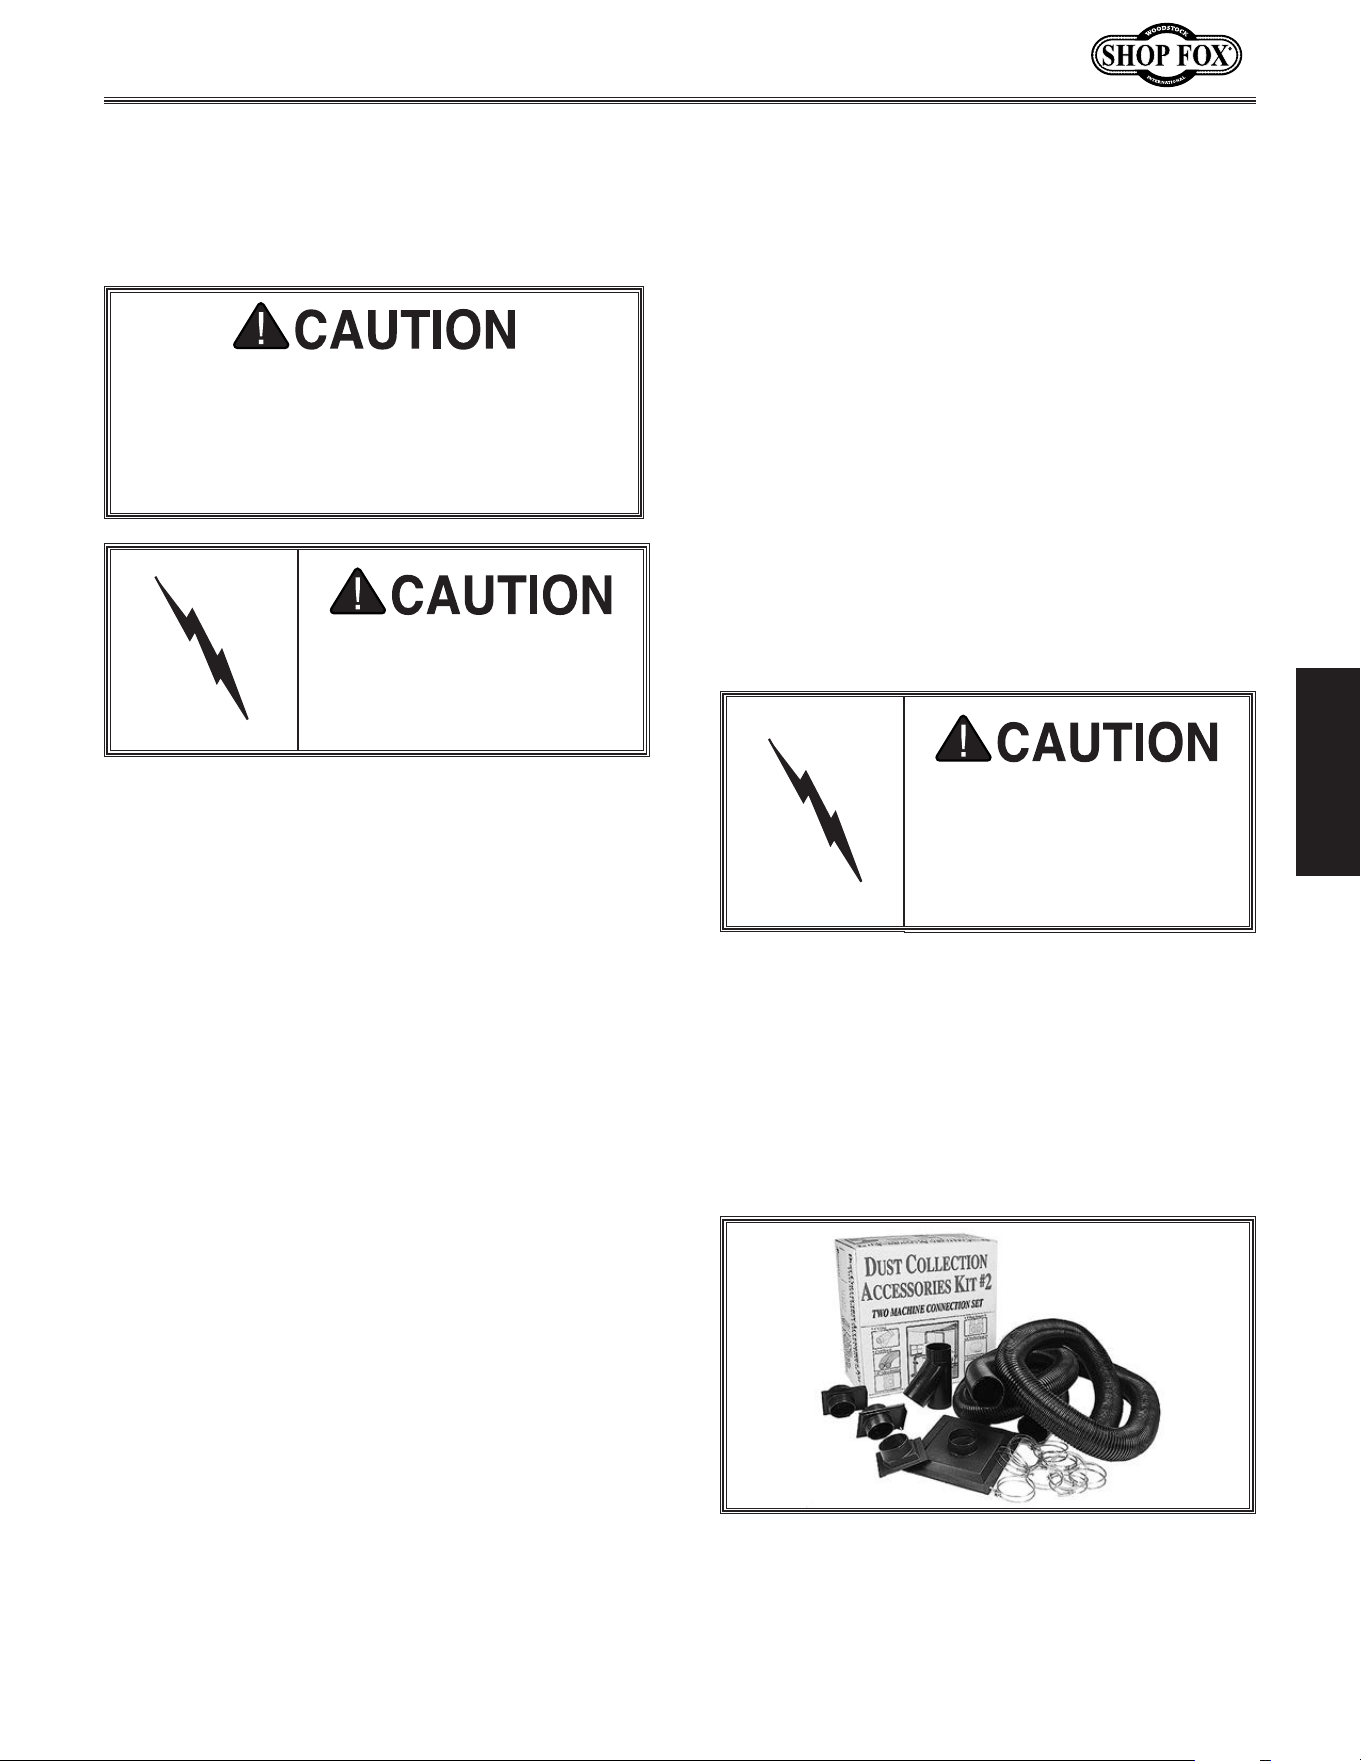
4. Press Emergency Stop button in, and connect
machine to power.
5. Twist Emergency Stop button clockwise until it
springs out (see Figure.33). This resets switch so
machine can start.
6. Standing away from intake port, press green "I"
button to turn machine ON. Verify motor starts up
and runs smoothly without any problems or unusual
noises.
7. Press Emergency Stop button to turn machine OFF.
8. WITHOUT resetting Emergency Stop button, try
to start machine by pressing the "I" button. The
machine should NOT start.
— If machine does not start, the Emergency Stop
button is working correctly.
— If machine does start, immediately turn it OFF
and disconnect power. The Emergency Stop button
is NOT working properly and must be corrected
before further using the machine.
9. To test remote control operation,
press green remote button to turn
motor ON. The motor should run
smoothly with little or no vibration or
rubbing noises.
10. Press red remote button to turn motor
OFF.
— If the machine does not shut off
with the remote control, press
the Emergency Stop button to
turn machine OFF. Refer to
Troubleshooting on Page.43 to
correct any problems with the
remote control unit before further
using it again with the machine.
Figure.33. Resetting Emergency Stop
button.
-27-
Model W1867/W1868/W1869 (For Machines Mfd. Since 11/18)
SETUP
DESIGNING.THE.SYSTE M
General
Duct.Material
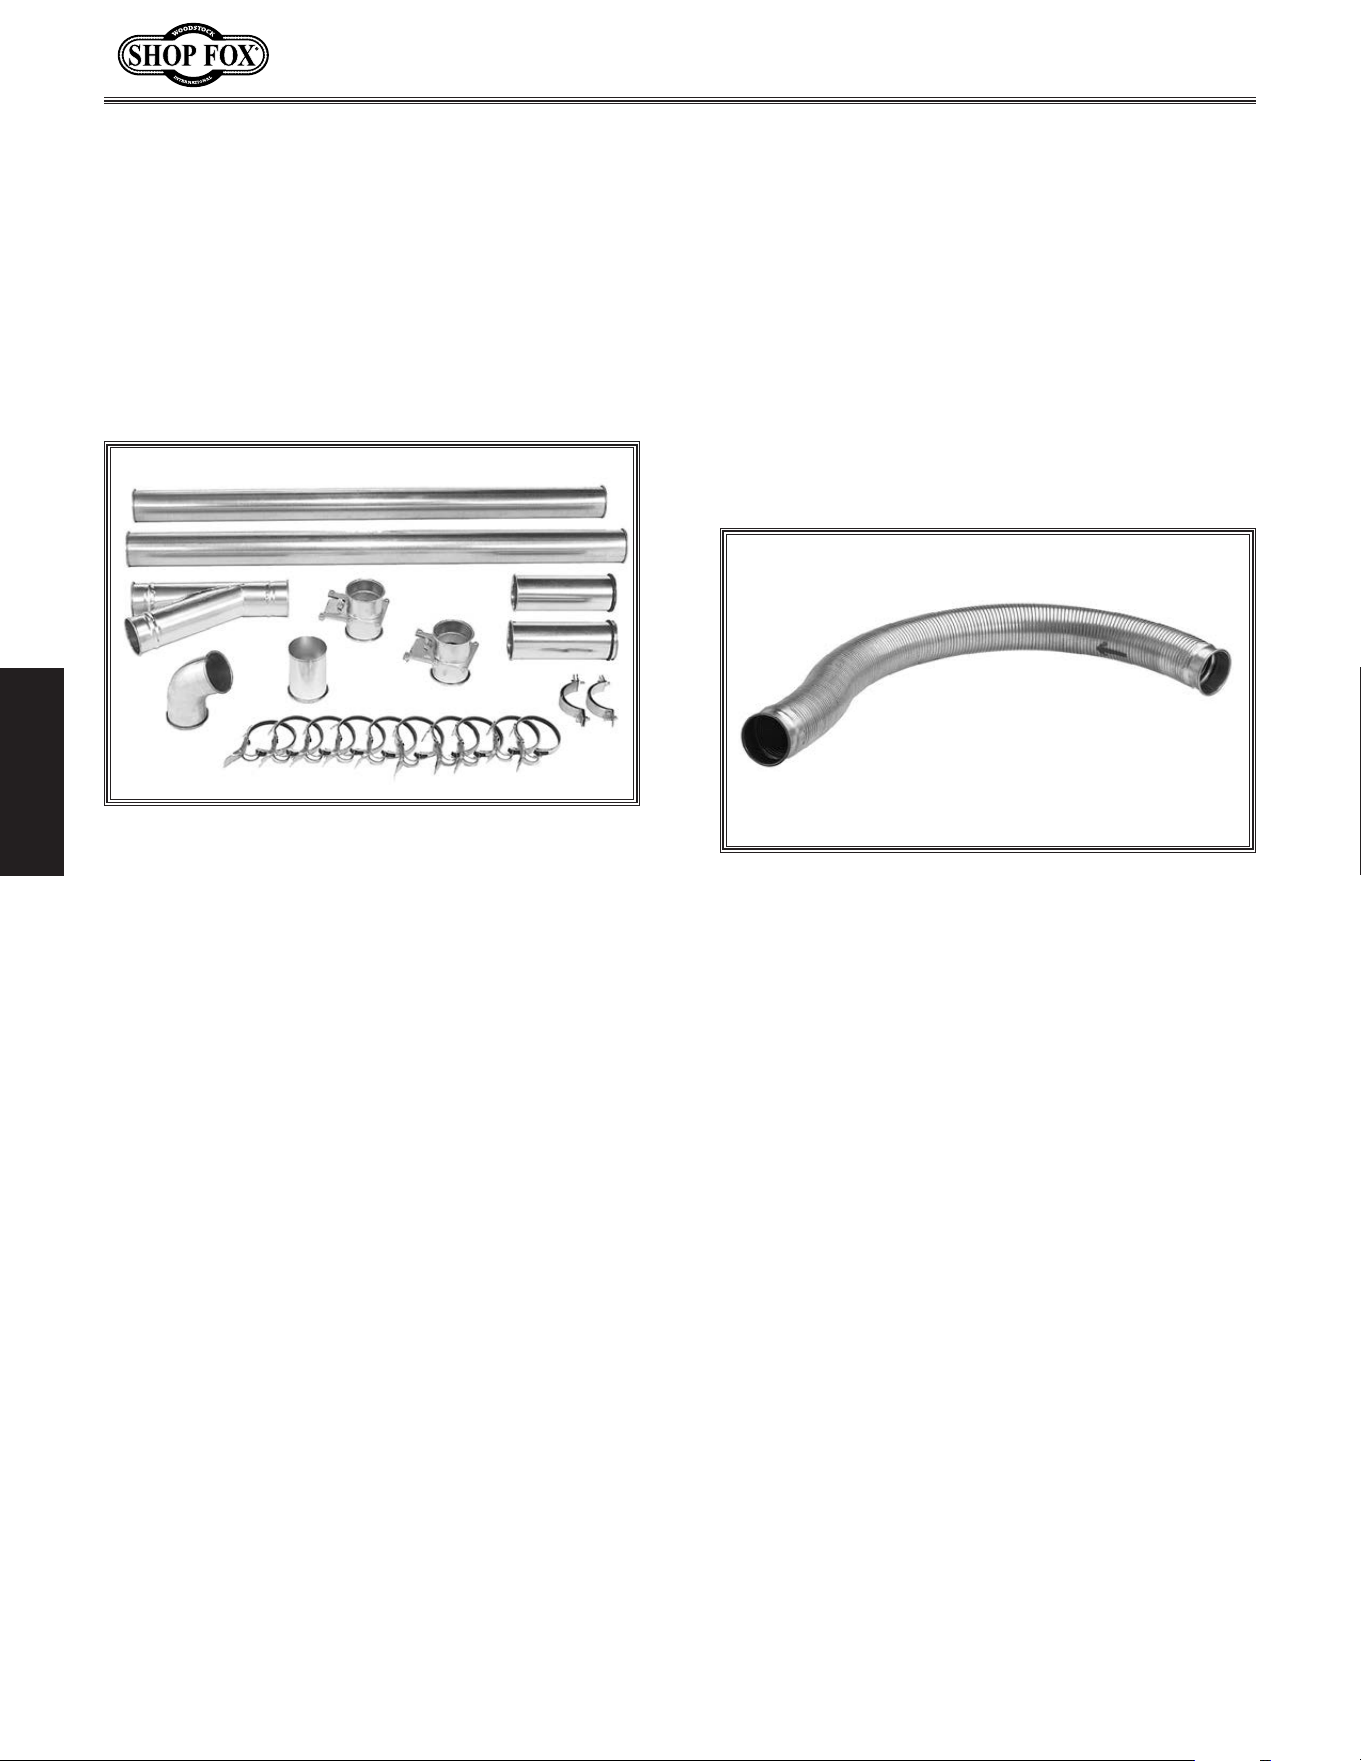
Plastic.Duct
Figure.34. Examples of plastic ducting
components.
The Model W1867/W1868/W1869 works quite
well as a point-of-use dust collector, or for
collecting dust from up to two machines (Model
W1867) or up to three machines (Models W1868
and W1869) simultaneously. The locking swivel
casters make it easy to move around the shop
near the machine being used.
• Avoid using more than 10' of flexible hose
on any ducting line. The ridges inside
flexible house greatly increase pressure
loss, which reduces suction performance.
• Keep ducts between the dust collector and
machines as short as possible.
• Keep ducting directional changes to a
minimum. The more curved fittings you
use, the greater the loss of suction at the
dust-producing machine.
• Gradual directional changes are more
efficient than sudden directional changes
(i.e. use 45° elbows in place of 90° elbows
whenever possible).
• The simpler the system, the more efficient
and less costly it will be.
Tips.for.Optimum.Performance
You have many choices regarding main line and
branch line duct material. For best results, use
smooth metal duct for the main line and branch
lines, then use short lengths of flexible hose to
connect each machine to the branch lines.
Plastic duct is also a popular material for home
shops. However, be aware that there is a fire or
explosion hazard if plastic duct material is not
properly grounded to prevent static electrical
build-up. (Refer to System.Grounding later in
this section.) Another problem with using plastic
is that it is less efficient per foot than metal.
The popularity of plastic duct is due to the fact
that it is an economical and readily available
product. It is also simple to assemble and easily
sealed against air loss. The primary disadvantage
of plastic duct for dust collection is the inherent
danger of static electrical build-up.
Always. guard. against.
static. electrical. build.
up. by. grounding. all. dust.
collect ion.lines.
Plastic. duct. generates.
static. electrical. buildup.
that. can. cause. fire. or.
shock.. Properly. ground. it.
to. reduce.this.risk.
Always.make.sure.there.are.no.open.flames.
or.pilot.lights.in.the.s ame.room. as.the.dust.
collector..There.is.a.risk.of.explosion.if.too.
much.fine.dust.is.dispersed.into.the.air .with.
an. open.f lame.present.
-28-
Model W1867/W1868/W1869 (For Machines Mfd. Since 11/18)
SETUP
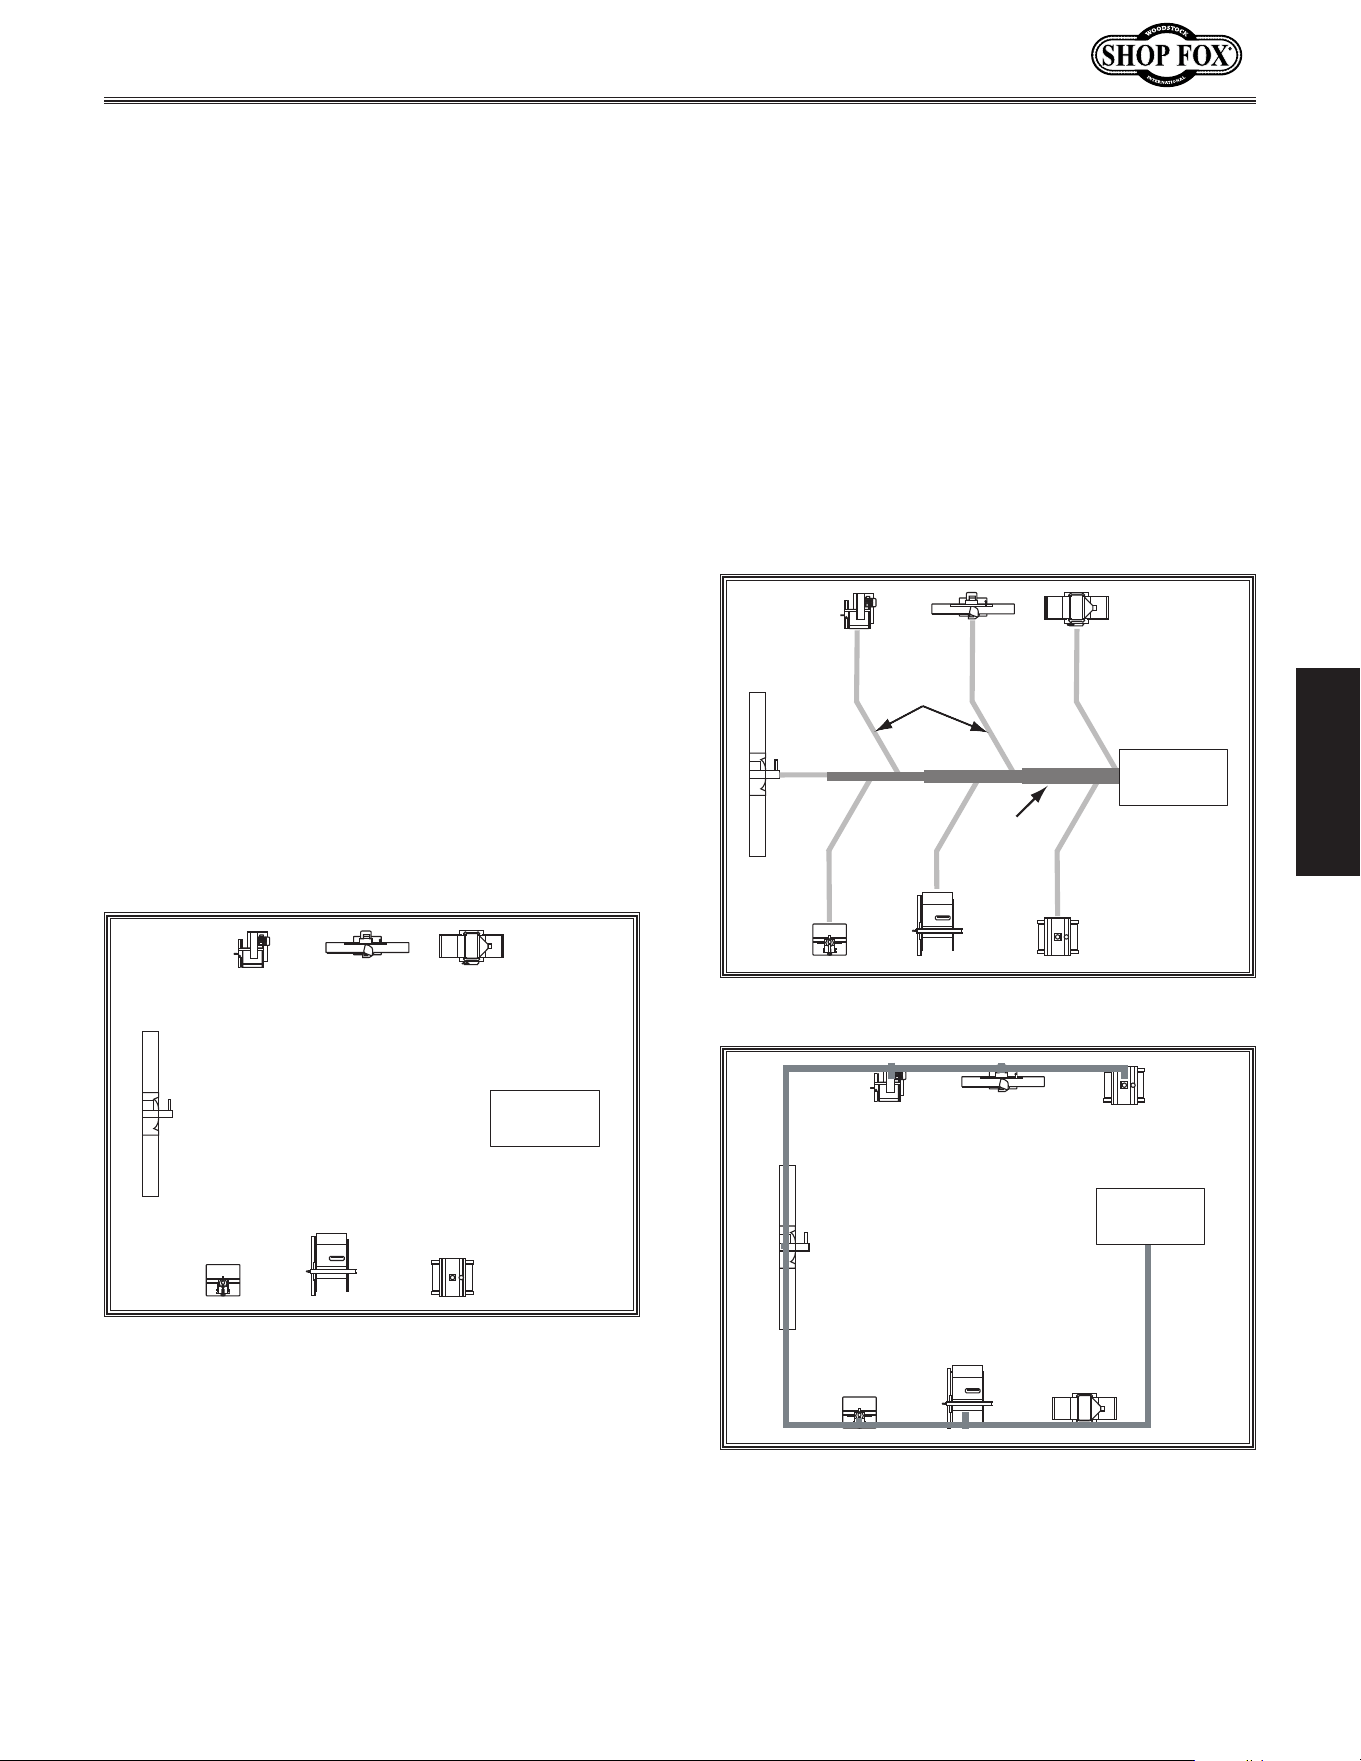
Figure 36. Example of flexible metal duct.
Flexible.DuctMetal.Duct
Figure 35. Examples of smooth metal duct and
components.
Advantages of smooth metal duct is its
conductivity, efficiency, and that it does not
contribute to static electrical charge build-up.
However, static charges are still produced when
dust particles strike other dust particles as they
move through the duct. Since metal duct is a
conductor, it can be grounded quite easily to
dissipate any static electrical charges.
There are a number of options when it comes
to metal duct, but metal duct that is specially
manufactured for dust collection is the best
choice. When selecting your metal duct, choose
high quality metal duct with smooth welded
internal seams that will minimize airflow
resistance. This type of duct usually connects to
other ducts or elbows with a simple, self-sealing
clamp, is very quick and easy to assemble,
and can be readily dismantled and re-installed
in a different configuration. This is especially
important if you ever need to change things
around in your shop or add more tools.
Avoid inferior metal duct that requires you to
cut it to length and snap it together. This type
of duct is time consuming to install because it
requires you to seal all the seams with silicone
and screw the components on the ends with
sheet metal screws. Another disadvantage is
the rough internal seams and crimped ends that
unavoidably increase static pressure loss.
Flexible hose is generally used for short runs,
small shops and at rigid duct-to-tool connections.
There are many different types of flex hose on
the market today. These are manufactured from
materials such as polyethylene, PVC, cloth hose
dipped in rubber and even metal, including steel
and aluminum.
The superior choice here is metal flex hose that
is designed to be flexible, yet be as smooth as
possible inside to reduce static pressure loss.
There are also many kinds of pure plastic
flexible hose, such as non-perforated drainage
type hose and dryer vent hose. Drainage type
hose, while being economical, does not quite
have the flexibility required for dust collection.
The inside of the duct is also deeply corrugated
and can increase the static pressure loss by
as much as 50% over smooth wall duct. Dryer
vent hose, while being completely flexible, is
non-resistant to abrasion and has a tendency to
collapse in a negative pressure system. We DO
NOT recommend using dryer vent hose in your
dust collection system.
If using flex-hose, you should choose one of the
many types that are designed specifically for the
movement of solid particles, i.e. dust, grains,
and plastics. However, the cost of specifically
designed flexible duct can vary greatly. Grizzly
offers polyethylene hose, which is well suited
for the removal of particulate matter, especially
sawdust, since it is durable and completely
flexible. Polyethylene is also very economical
and available in a wide variety of diameters and
lengths for most applications.
-29-
Model W1867/W1868/W1869 (For Machines Mfd. Since 11/18)
SETUP
System.Design
Decide.Who.Will.Design
Dust
Collector
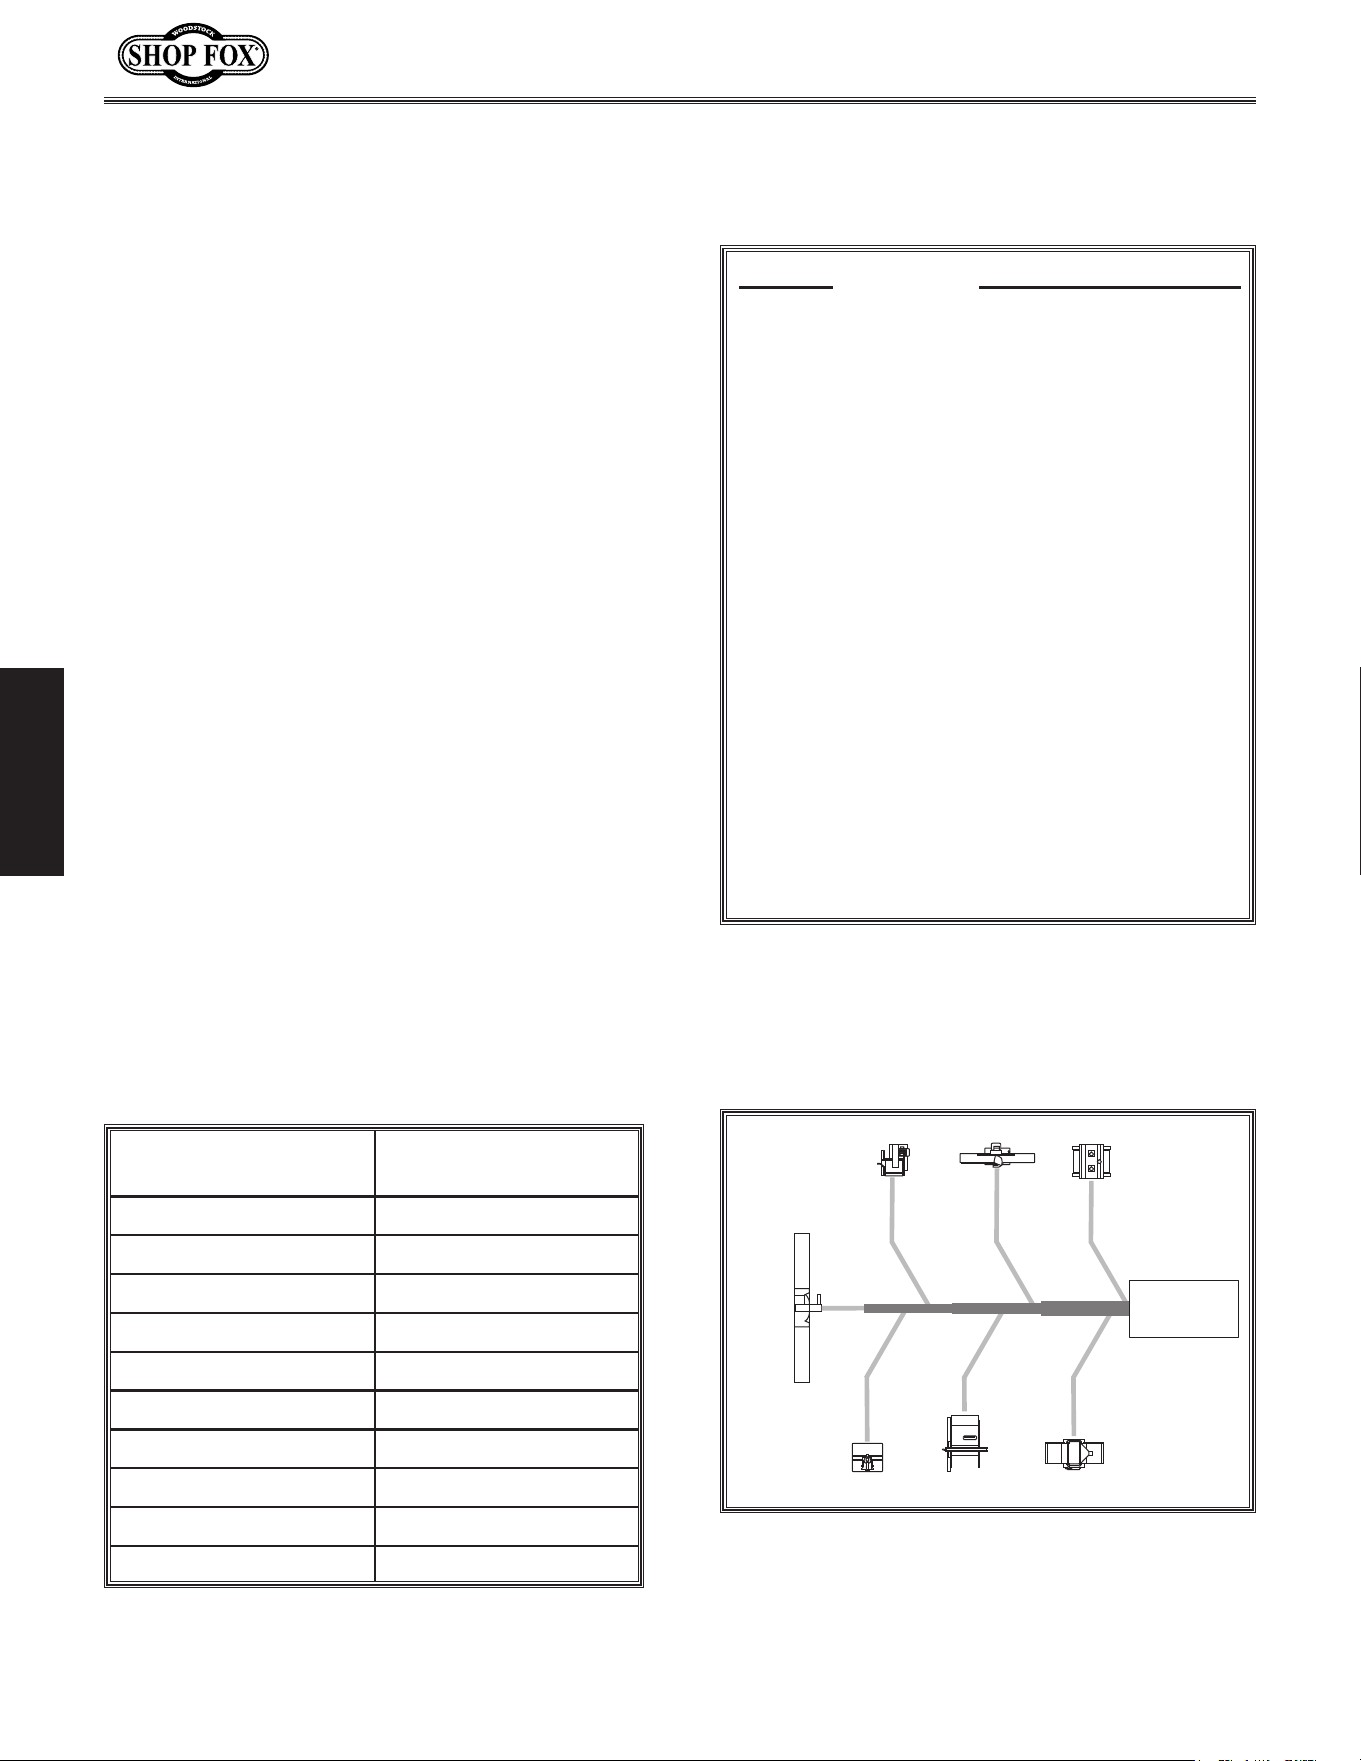
Figure 37. Basic sketch of shop layout.
Sketch.Your.Shop.Layout
Figure.39. Inefficient duct layout.
BAD
Dust
Collector
Figure 38. Efficient duct layout.
Main
Line Duct
Branch
Line
Ducts
GOOD
Dust
Collector
Sketch.a.Basic.Duct.Layout
For most small-to-medium sized shops, you can
design and build the dust collection system
yourself without hiring engineers or consultants.
We have included some basic information here
to get you started on a basic design.
If you have a large shop or plan to design a
complicated system, we recommend doing
additional research beyond this manual or
seeking the help of an expert.
When designing a successful dust collection
system, planning is the most important step.
In this step, sketch a basic layout of your shop,
including space requirements of different
machines.
Your sketch only needs the basic details of
the shop layout, similar to the figure below,
including all your current/planned machines and
your planned placement of the dust collector.
For the next step, sketch how you will connect
your machines to the dust collector. Consider
these general guidelines for an efficient system:
1. Machines that produce the most saw dust
should be placed nearest to the dust
collector (i.e. planers and sanders).
2. Ideally, you should design the duct system
to have the shortest possible main line
and secondary branch ducts. See the
figures below for ideas of efficient versus
inefficient duct layouts.
-30-
Model W1867/W1868/W1869 (For Machines Mfd. Since 11/18)
SETUP
Determine.Required.CFMs
Figure.42. CFM requirements labeled for each
machine.
400
400
600
850400
250
100
Table Saw
Planer/
Moulder
Miter
Saw
Jointer
Sander
PlanerShaper
Dust
Collector
3. Directional changes should be kept to a
minimum. The more directional change
fittings you use directly increases the
overall resistance to airflow.
4. Gradual directional changes are more
efficient than sudden directional changes
(i.e. use the largest corner radius possible
when changing hose or pipe direction).
5. Each individual branch line should have a
blast gate immediately after the branch
to control suction from one machine to
another.
6. The simpler the system, the more efficient
and less costly it will be.
Since each machine produces a different amount
of sawdust, the requirements for the minimum
amount of CFM to move that sawdust is unique
to the machine (for example, a planer produces
more sawdust than a table saw). Knowing this
required CFM is important to gauging which size
of duct to use.
Refer to the figure below for a close estimation
of the airflow each machine requires. Keep in
mind that machines that generate the most
sawdust should be placed closest to the dust
collector. If the machine has multiple dust ports,
the total CFM required is the sum of all ports.
If the machine does not have a built-in dust port,
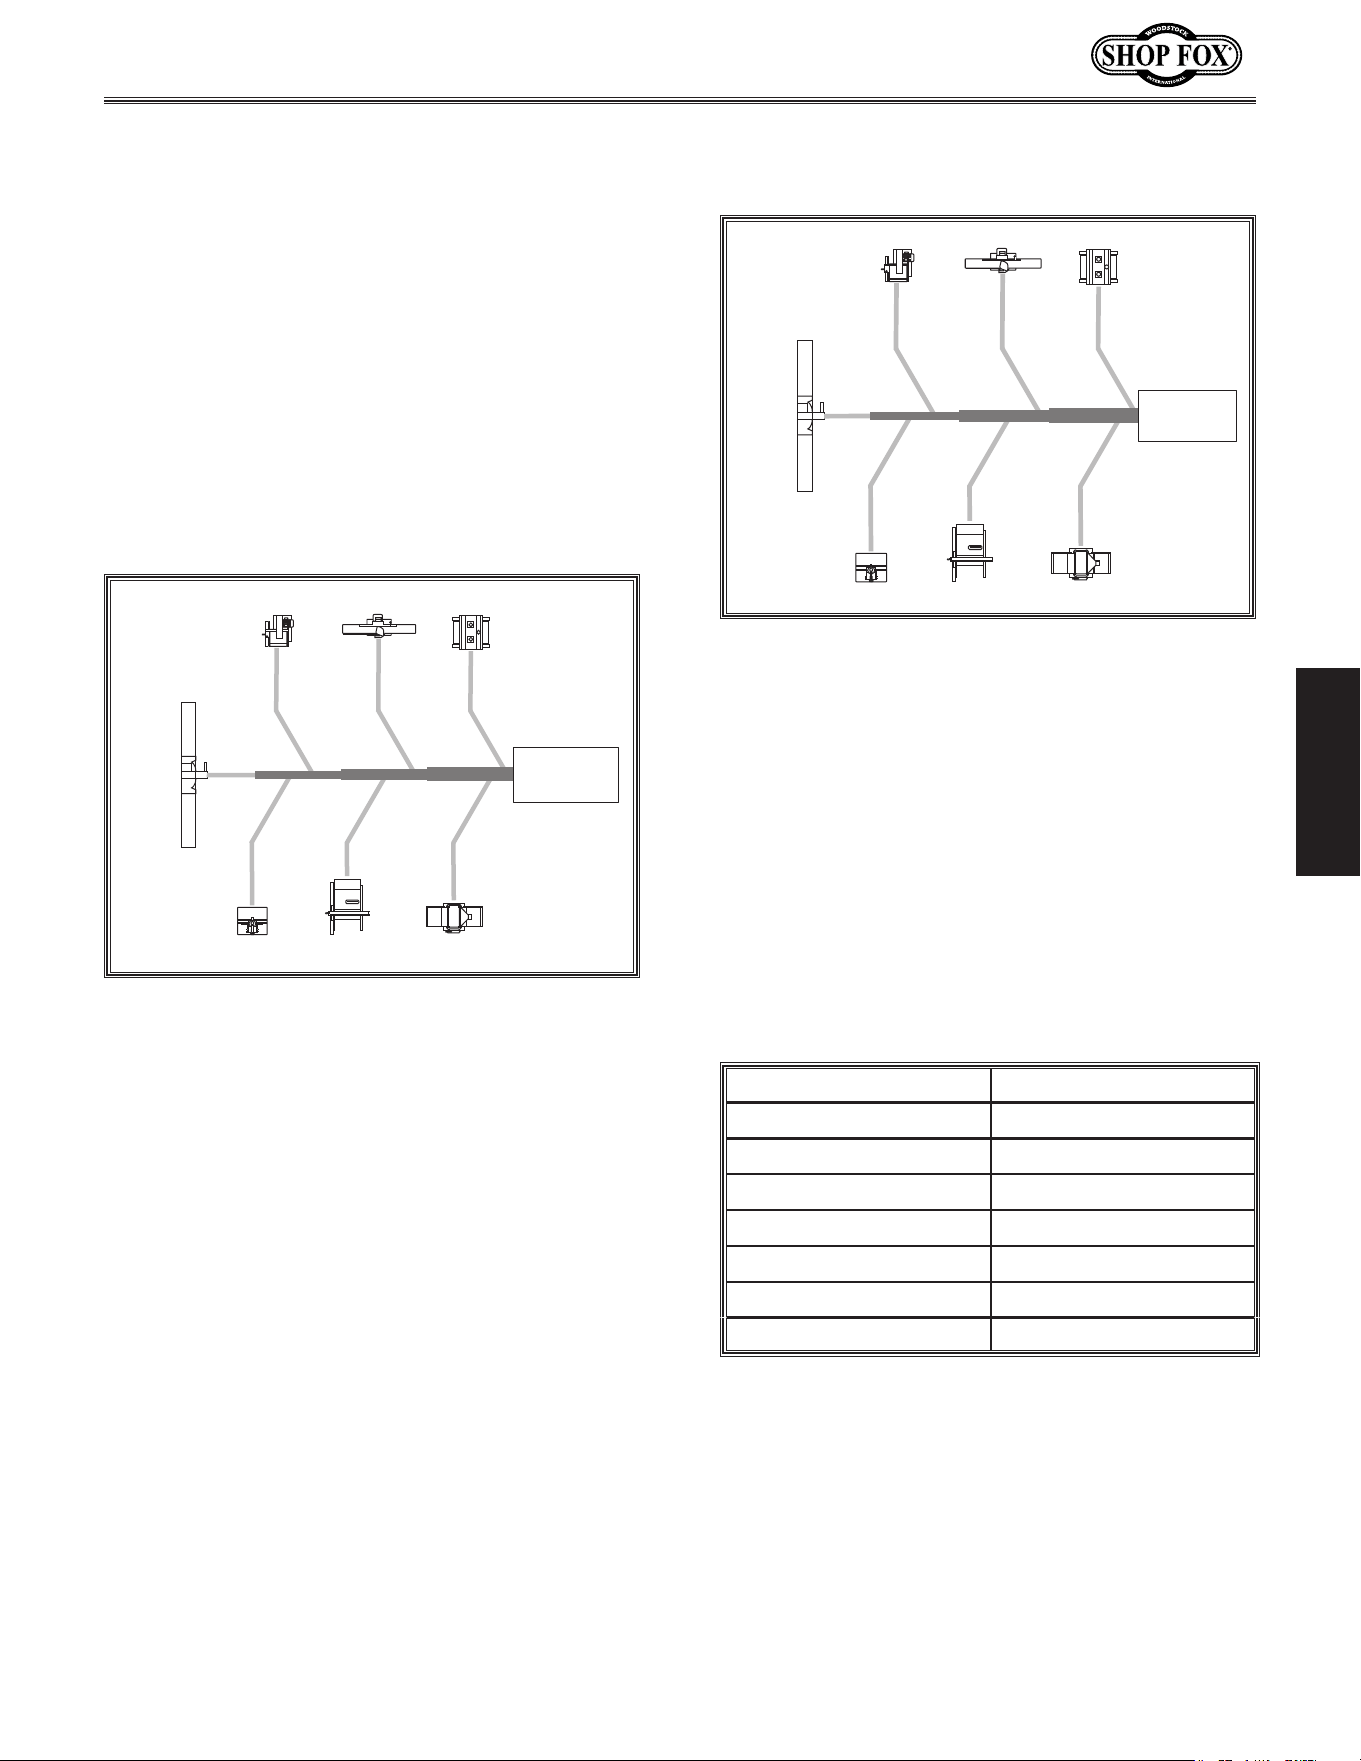
use the following table to determine which size
of dust port to install.
Figure.41..Dust port size and quantity per
average machine.
Machine..................Average.Dust.Port.Size
Table Saw ........................................ 4"
Miter/Radial-Arm Saw .......................... 2"
Jointer (6" and smaller) ....................... 4"
Jointer (8"-12") .................................. 5"
Thickness Planer (13" and smaller) .......... 4"
Thickness Planer (14"-20") ..................... 6"
Shaper ............................................ 4"
Router (mounted to table) .................... 2"
Bandsaw .......................................... 4"
Lathe .............................................. 4"
Disc Sander (12" and smaller) ................. 2"
Disc Sander (13-18") ............................ 4"
Belt Sander (6" and smaller) .................. 2"
Belt Sander (7"-9") .............................. 3"
Edge Sander (6" x 80" and smaller) .......... 4"
Edge Sander (6" x 80" and larger) ............ 5"
Drum Sander (24" and smaller) ...........2 x 4"
Drum Sander (24" and larger) .............4 x 4"
Widebelt Sander (18" and smaller) ........... 5"
Widebelt Sander (24"-37" single head) ..2 x 6"
Widebelt Sander (24"-51" double head) .5 x 4"
Write the required CFM for each machine on
your sketch, as shown in the Figure below.
Machine.
Dust.Port.Size
Approximate.
Required.CFM
2" 100
2.5" 150
3" 250
4" 400
5" 600
6" 850
7" 1200
8" 1600
9" 2000
10" 2500
Figure.40..Approximate required air flow for
machines, based on dust port size.
-31-
Model W1867/W1868/W1869 (For Machines Mfd. Since 11/18)
SETUP
Figure.43. Main line size labeled on sketch.
400
400
600
850400
250
100
5" 6" 7"
Table Saw
Planer/
Moulder
Miter
Saw
Jointer Sander
PlanerShaper
Dust
Collector
Determining.Main.Line.Duct.Size
Determining.Branch.Line.Duct.Size
The general rule of thumb for a main line duct
is that the velocity of the airflow must not fall
below 3500 FPM.
For small/medium sized shops, using the inlet
size of the dust collector as the main line duct
size will usually keep the air velocity above 3500
FPM and, depending on your system, will allow
you to keep multiple branches open at one time.
Mark your drawing, as shown in the figure
below, but using the inlet size for your dust
collector as the main line.
The general rule of thumb for a branch line duct
is that the velocity of the airflow must not fall
below 4000 FPM.
For small/medium sized shops, using the dust
port size from the machine as the branch line
duct size will achieve the correct velocity in
most applications. However, if the dust port on
the machine is smaller than 4", make the branch
line 4" and neck the line down right before the
dust port.
Note:.Systems with powerful dust collectors
work better if multiple blast gates are left open.
This also allows you to run two machines at
once. Experiment with different combinations of
blast gates open/closed to find the best results
for your system.
Figure.44. Branch line duct sizes labeled.
400
400
600
850
400
250
100
4"
4"
4" 6"
4" 4" 5"
5" 6" 7"
Table Saw
Miter
Saw
Jointer Sander
PlanerShaper
Planer/
Moulder
Dust
Collector
Figure.45. Sizing chart for multiple machines
on the same branch line.
If two machines will connect to the same branch
line and both will operate at the same time,
then add the required CFM for each machine
together and find the closest total CFM in the
table below to determine the correct branch
size.
If both machines will never run at the same
time, reference the machine with the biggest
dust port in the table.below and add blast gates
after the Y-branch to open/close the line to each
machine.
Total. CFM Branch.Line.Size
400 4"
500 4"
600 5"
700 5"
800 6"
900 6"
1000 6"
Write your determined branch line sizes on your
drawing, as shown in the following figure.
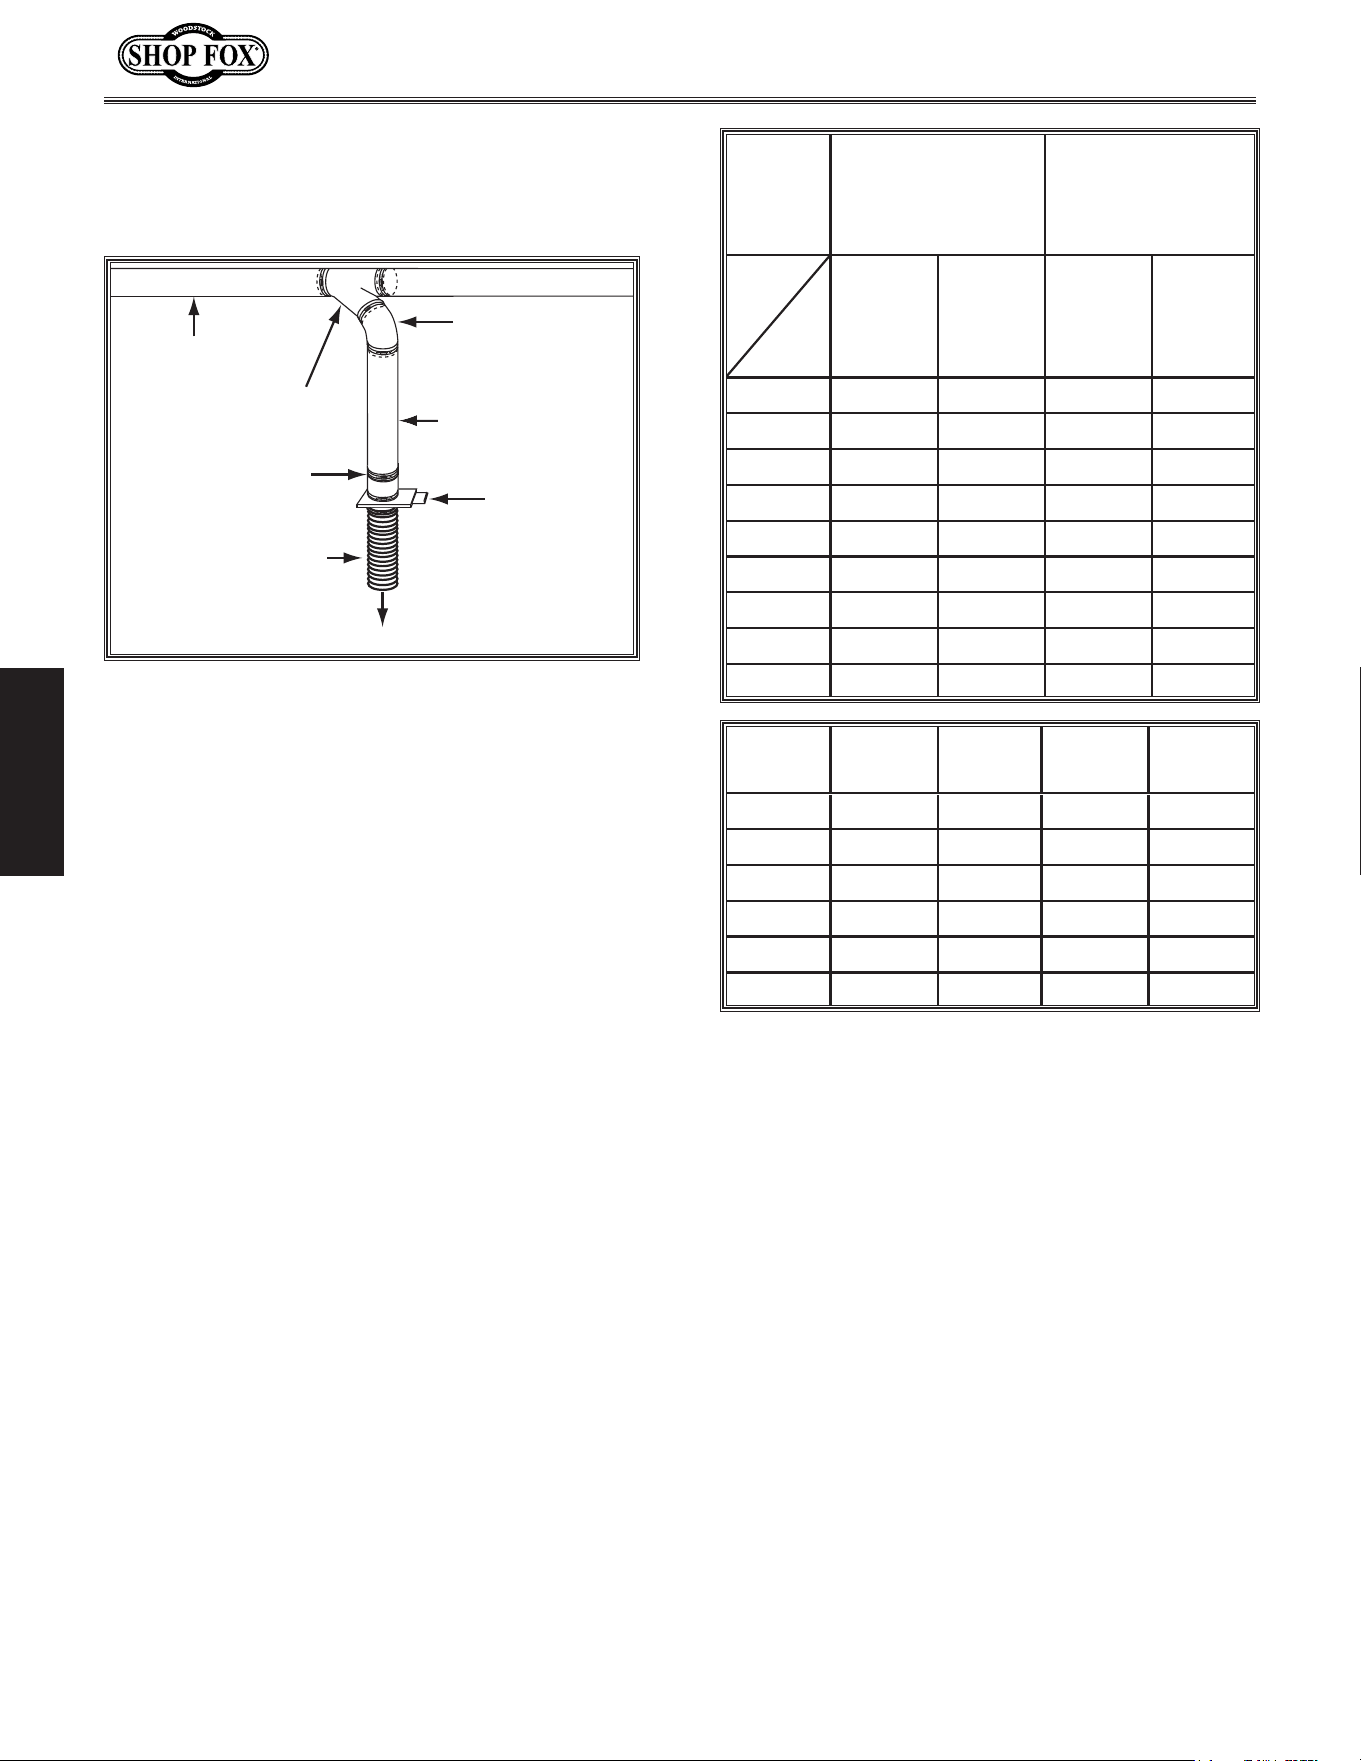
-32-
Model W1867/W1868/W1869 (For Machines Mfd. Since 11/18)
SETUP
Calculating.Duct.Resistance
To Planer
Blast Gate
Flex Duct
Rigid Duct
Rigid Duct
(Main Line)
Elbow
Clamp
Y Branch
Figure.46. Drop down setup.
Planning.Drop.Downs
Plan the drop downs for each machine, using
blast gates wherever possible to control airflow.
Adding duct work, elbows, branches and any
other components to a duct line increases
airflow resistance (static pressure loss). This
resistance can be minimized by using rigid
(smooth) duct and gradual curves, as opposed to
flexible duct and 90˚ elbows.
To help you think about this resistance, imagine
riding a bicycle in a tunnel that is an exact
replica of your duct work. If the inside of the
tunnel is very bumpy (flexible duct) and has a
lot of sharp turns (90˚ elbows), it will take a lot
more effort to travel from one end to the other.
The purpose of calculating the resistance is to
determine if it is low enough from the machine
to the dust collector to meet the given CFM
requirement for the machine. Use the following
tables to calculate the resistance of duct work.
Figure.47..Static pressure loss charts.
Duct.
Dia.
Approximate.
Static.Pressure.
Loss.Per.Foot.of.
Rigid.Duc t
Approximate.
Static.Pressure.
Loss.Per.Foot.of.
Flex.Duct
Main
Lines
at 3500
FPM
Branch
Lines
at 4000
FPM
Main
Lines
at 3500
FPM
Branch
Lines
at 4000
FPM
2" 0.091 0.122 0.35 0.453
2.5" 0.08 0.10 7 0.306 0.397
3" 0.071 0.094 0.271 0.352
4" 0.057 0.075 0.215 0.28
5" 0.046 0.059 0.17 2 0.225
6" 0.037 0.047 0.13 6 0.18
7" 0.029 0.036 0.10 6 0.141
8" 0.023 0.027 0.08 0.10 8
9" 0.017 0.019 0.057 0.079
Fittin g.
Dia.
90˚.
Elbow
45˚.
Elbow
45˚. .
Wye(Y)
90˚.
Wye(Y)
3" 0.47 0.235 0.282 0.18 8
4" 0.45 0.225 0.375 0.225
5" 0.531 0.266 0.354 0.236
6" 0.564 0.282 0.329 0.235
7" 0.468 0.234 0.324 0.216
8" 0.405 0.203 0.297 0.189
In most small/medium shops it is only necessary
to calculate the line with the longest duct
length or the most fittings (operating under
the assumption that if the line with the highest
resistance works, the others will be fine).
To.calculate.the.static.pressure.of.any.given.
line.in.the.system,.follow.these.steps:
1. Make a list of each size duct in the line,
including the length, and multiply those
numbers by the static pressure value given
in the previous table.
2. List each type of elbow or branch and
multiply the quantity (if more than one)
by the static pressure loss given in the
previous table.
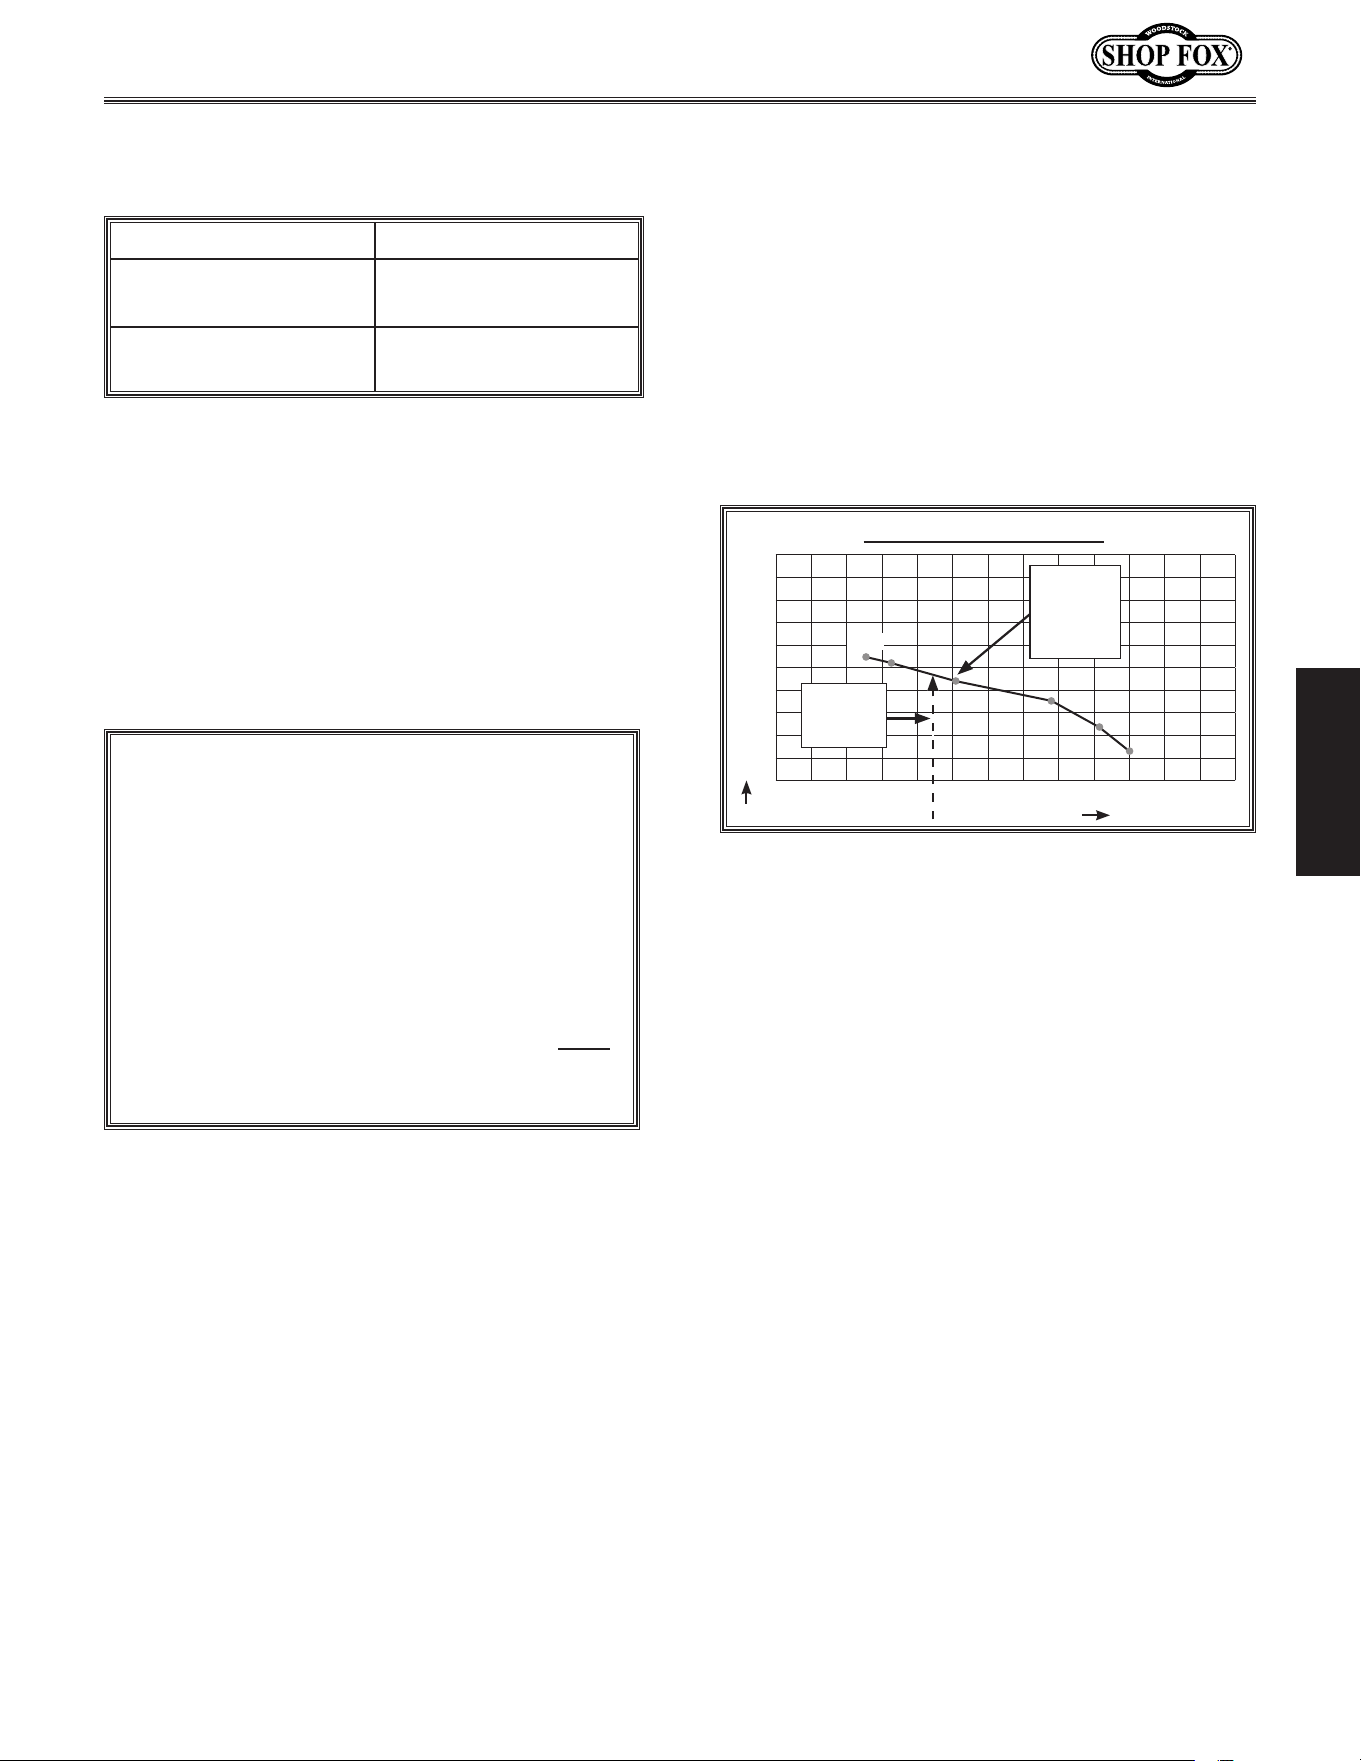
-33-
Model W1867/W1868/W1869 (For Machines Mfd. Since 11/18)
SETUP
Figure.49. Totaling static pressure numbers.
Main Line
6" Rigid Duct (0.037) at 20' ........ 0.740
Branch Line
4" Rigid Duct (0.075) at 10' ........ 0.750
4" Flex Duct (0.28) at 5' ................ 1.400
Elbows/Branches
6" 45˚ Y-Branch ........................ 0.329
4" 45˚ Elbow................................ 0.225
Additional Factors
Seasoned Filter ........................ 1.000
Total Static Pressure Loss ................ 4.444
Figure.48. Additional factors affecting static
pressure.
Example: A typical Data.Sheet.
Performance.Curve is illustrated in
Figure.50. Find 4.4 on the Static Pressure
axis (the amount of total static pressure
loss calculated in Figures.49–50), then
refer to the closest value on the CFM axis—
approximately 1120 CFM.
The 1120 CFM for the static pressure loss
of the line connected to the router is well
above the 220 CFM requirement of that
machine.
— If the CFM for your static pressure loss is
above the requirement of the machine
connected to the end of that branch line,
then dust collection will most likely be
successful. Congratulations! You've just
designed your own dust system. Refer to
the Accessories section on Page.37 to
start buying the components necessary to
make your system a reality.
— If the CFM for your static pressure loss is
below the requirement of the machine,
then that line will not effectively collect
the dust. You must then modify some
of the factors in that line to reduce the
static pressure loss. Some of the ways to
do this include 1) installing larger duct,
2) reducing amount of flexible duct used,
3) increasing machine dust port size, 4)
moving machine closer to dust collector
to eliminate duct length, and 5) reducing
90˚ elbows or replacing them with 45˚
elbows.
3. Add the additional factors from the
following table to your list.
Additional.Factors Static.Pressure
Seasoned (well used)
Dust Collection Filter
1"
Entry Loss at Large
Machine Hood
2"
4. Total your list as shown in the example
below to come up with your overall static
pressure loss number for that line.
Note: Always account for a seasoned filter,
so you don't end up with a system that only
works right when the filter is clean.
Note: When calculating static pressure loss
to determine if multiple lines can be left
open at the same time, only include the
main line numbers once.
5. Compare the total static pressure loss
for that line to the closest CFM given in
Figure.50 for your dust collector.
Figure.50. CFM for static pressure loss of line
connected to a dust collector & router.
Performance Curve
2500
2250
2000
1750
1500
1250
1000
750
500
250
0
0.0 1.0 2.0 3.0 4.0 5.0 6.0 7.0 8.0 9.0 10.0 11.0 12.0 13.0
1354
CFM
STATIC PRESSURE (Inch/H2O)
Closest
CFM
(1120)
4.4 SP
Loss
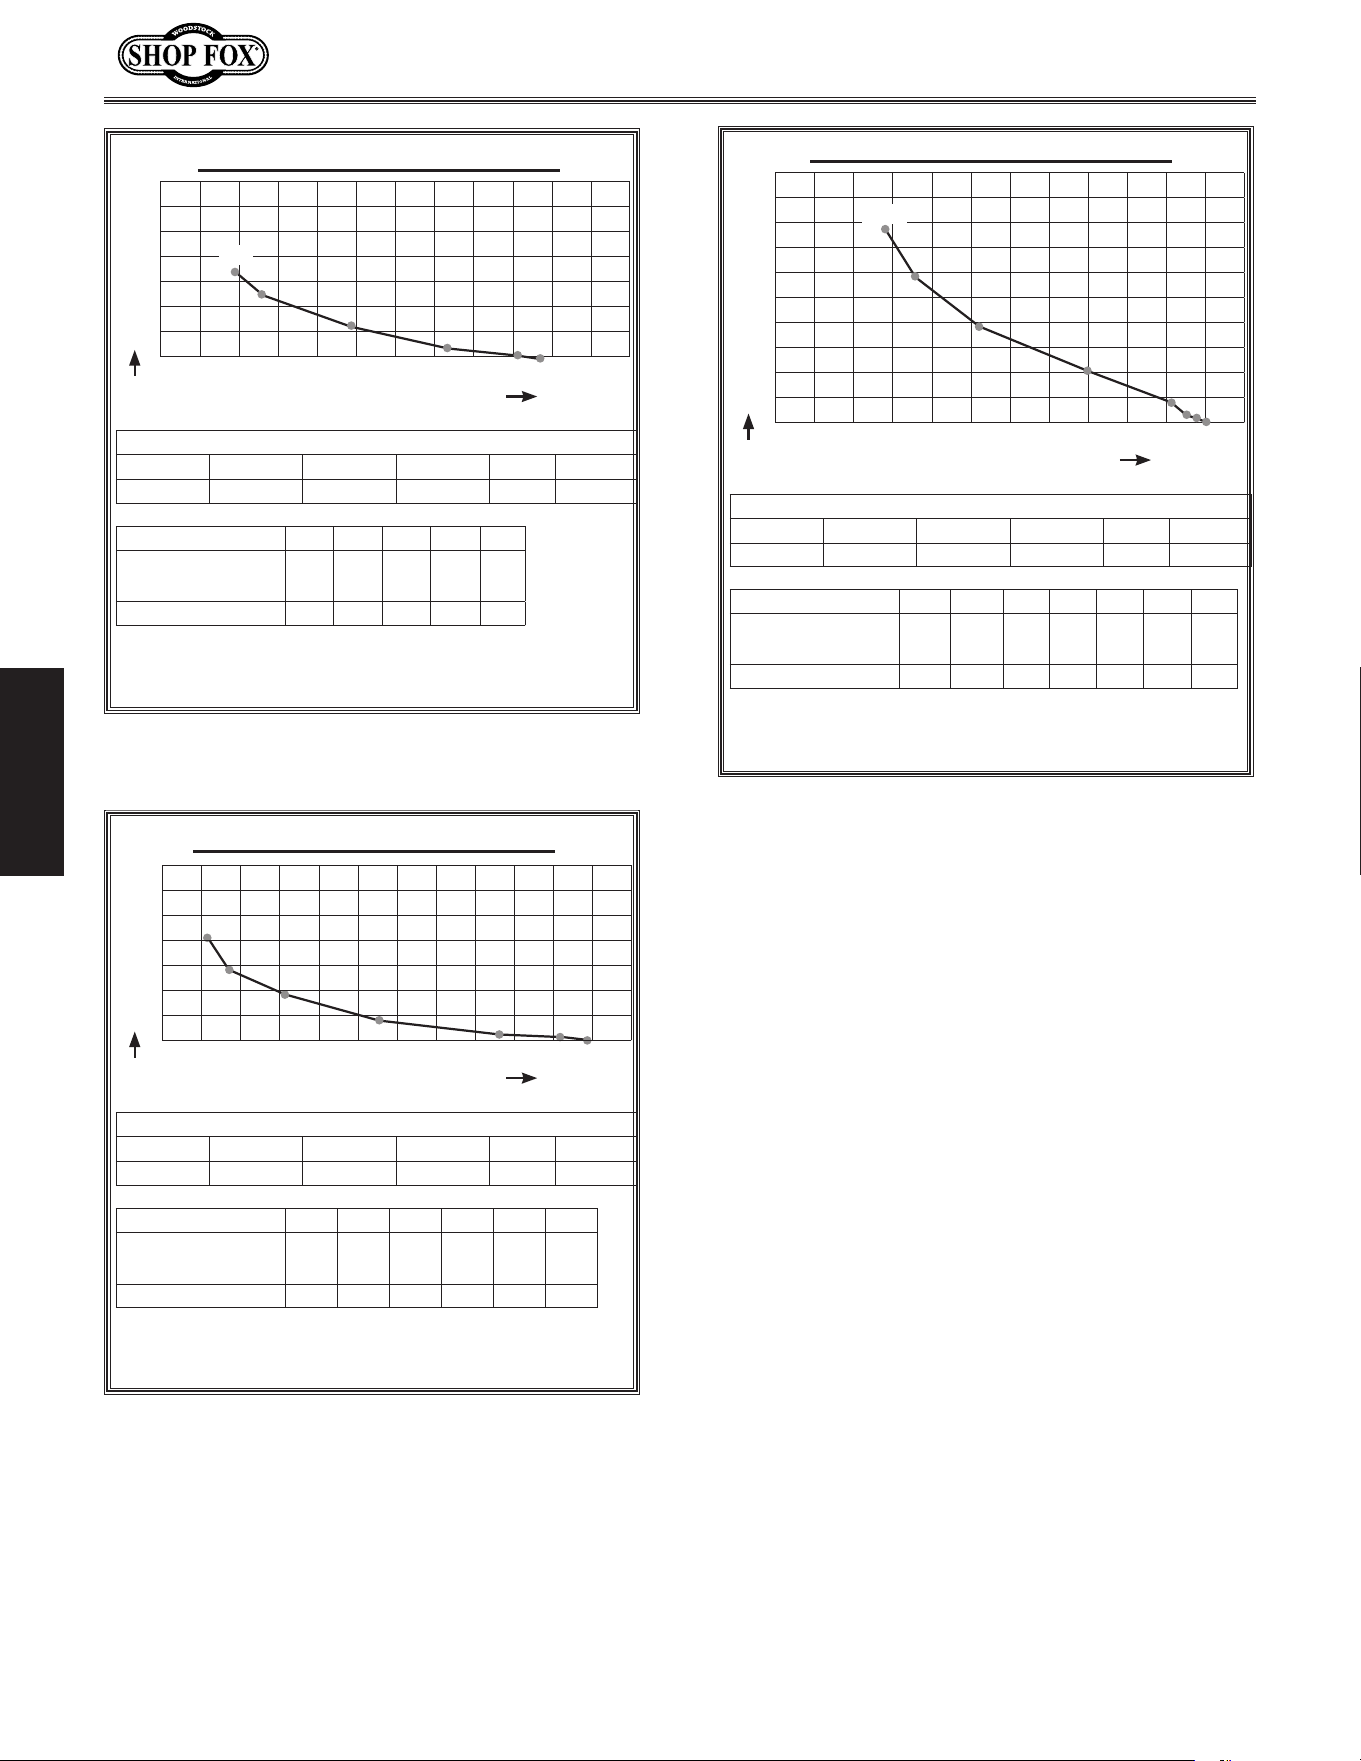
-34-
Model W1867/W1868/W1869 (For Machines Mfd. Since 11/18)
SETUP
The air ow test probe is located 1.5x duct diameter upstream
from the air inlet. Test pipe length is a minimum of 10x duct
diameter.
W1867 Performance Curve
1750
1500
1250
1000
750
500
250
0
1.0 2.0 3.0 4.0 5.0 6.0 7.0 8.0 9.0 10.0 11.0
868
CFM
STATIC PRESSURE (Inch/H2O)
1.5 HP DUST COLLECTOR PERFORMANCE RESULTS
Max CFM Max SP HP Volts Inlet Impeller
868 9.7 1
1
⁄2 HP 110V 6" 12
3
⁄4"
Restrictor Plate Dia. 6"
5" 4" 3" 2"
Static Pressure
(Inch/H2O)
1.8 2.5 4.8 7.3 9.1
CFM 868 575 300 100 35
Figure.51. W1867 performance curve table and
data.
The air ow test probe is located 1.5x duct diameter upstream
from the air inlet. Test pipe length is a minimum of 10x duct
diameter.
W1869 Performance Curve
2500
2250
2000
1750
1500
1250
1000
750
500
250
0
1.0 2.0 3.0 4.0 5.0 6.0 7.0 8.0 9.0 10.0 11.0
1941
CFM
STATIC PRESSURE (Inch/H2O)
3 HP DUST COLLECTOR PERFORMANCE RESULTS
Max CFM Max SP HP Volts Inlet Impeller
1941 11 3 HP 220V 8" 15"
Restrictor Plate Dia. 8"
7" 6" 5" 4" 3" 2"
Static Pressure
(Inch/H2O)
2.9 3.6 5.2 7.9 10.2 10.6 10.7
CFM 1941 1400 900 505 225 100 35
Figure.53. W1869 performance curve table and
data.
Restrictor Plate Dia. 7" 6"
5" 4" 3" 2"
Static Pressure
(Inch/H2O)
1.2 1.8 3.1 5.6 8.7 10.2
CFM 1023 710 430 225 100 35
W1868 Performance Curve
1750
1500
1250
1000
750
500
250
0
1.0 2.0 3.0 4.0 5.0 6.0 7.0 8.0 9.0 10.0
11.0
1023
CFM
STATIC PRESSURE (Inch/H2O)
2 HP DUST COLLECTOR PERFORMANCE RESULTS
Max CFM Max SP HP Volts Inlet Impeller
1023 10.9 2 HP 220V 7" 13"
Figure.52. W1868 performance curve table and
data.
The air ow test probe is located 1.5x duct diameter upstream
from the air inlet. Test pipe length is a minimum of 10x duct
diameter.
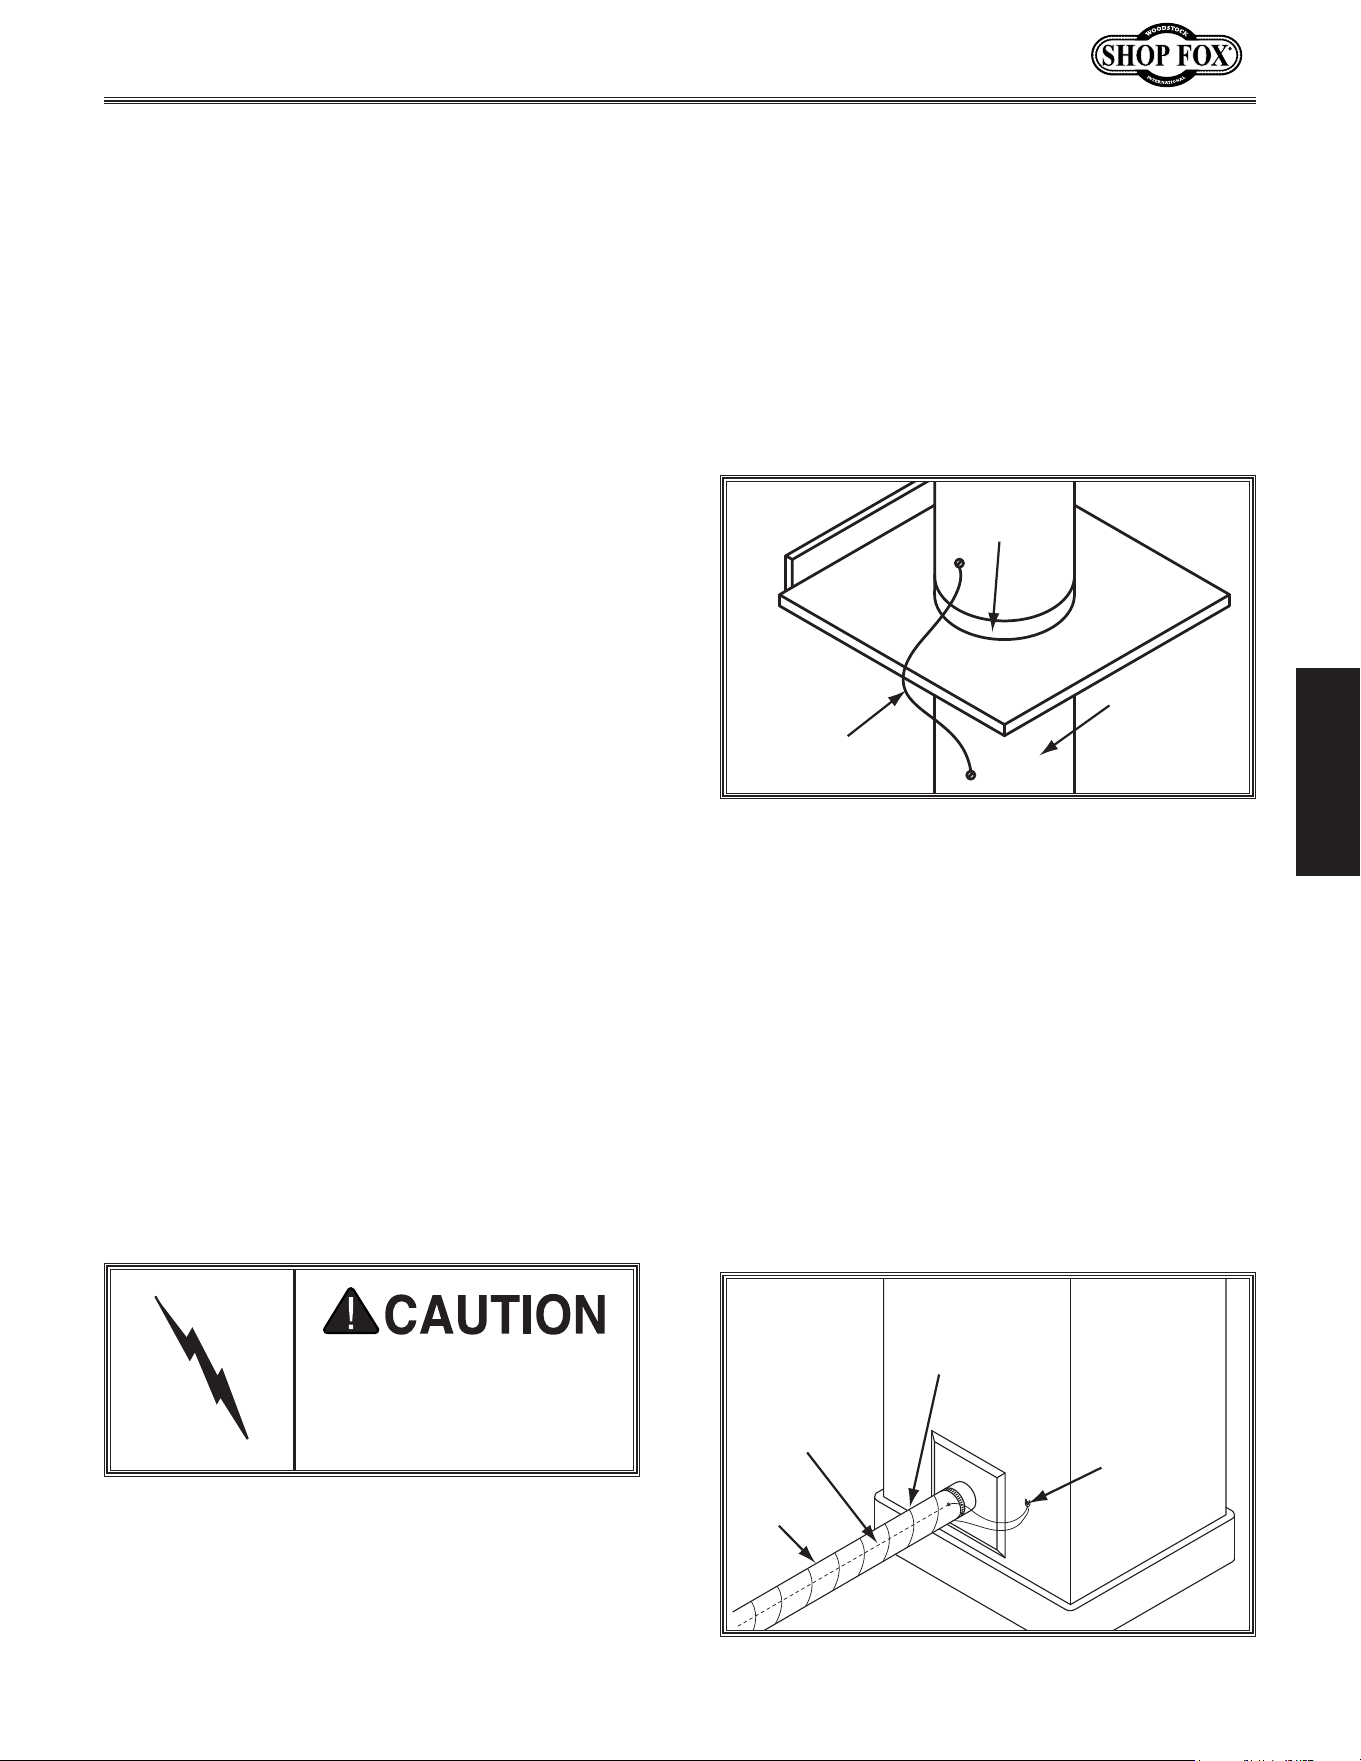
-35-
Model W1867/W1868/W1869 (For Machines Mfd. Since 11/18)
SETUP
System .Grounding
External
Ground Wire
Internal
Ground Wire
Flex-Hose
Ground
Screw
Figure.55. Flex-hose grounded to machine.
Plastic Blast
Gate
Copper
Ground Wire
Metal Duct
Figure.54. Ground jumper wire when using
plastic blast gates and metal duct.
Always. guard. against.
static. electrical. build.
up. by. grounding. all. dust.
collect ion.lines.
Since plastic hose is abundant, relatively
inexpensive, easily assembled and air tight, it is
a very popular material for conveying dust from
woodworking machines to the dust collector.
We recommend only using short lengths
of flexible hose (flex-hose) to connect the
woodworking machine to the dust collector.
However, plastic flex-hose and plastic duct are
an insulator, and dust particles moving against
the walls of the plastic duct create a static
electrical build up. This charge will build until it
discharges to a ground.
If a grounding medium is not available to
prevent static electrical build up, the electrical
charge will arc to the nearest grounded source.
This electrical discharge may cause an explosion
and subsequent fire inside the system.
To protect against static electrical build up
inside a non-conducting duct, a bare copper
wire should be placed inside the duct along
its length and grounded to the dust collector.
You must also confirm that the dust collector
is continuously grounded through the electrical
circuit to the electric service panel.
If you connect the dust collector to more
than one machine by way of a non-conducting
branching duct system and blast gates, the
system must still be grounded as mentioned
above. We recommend inserting a continuous
bare copper ground wire inside the entire duct
system and attaching the wire to each grounded
woodworking machine and dust collector.
Be sure that you extend the bare copper wire
down all branches of the system. Do not forget
to connect the wires to each other with wire
nuts when two branches meet at a "Y" or "T"
connection.
Ensure that the entire system is grounded.
If using plastic blast gates to direct air flow,
the grounding wire must be jumped (see the
figure below) around the blast gate without
interruption to the grounding system.
We also recommend wrapping the outside
of all plastic ducts with bare copper wire to
ground the outside of the system against static
electrical build up. Wire connections at Y's and
T's should be made with wire nuts.
Attach the bare ground wire to each stationary
woodworking machine and attach to the dust
collector frame with a ground screw as shown
in the figure below. Ensure that each machine is
continuously grounded to the grounding terminal
in your electric service panel.
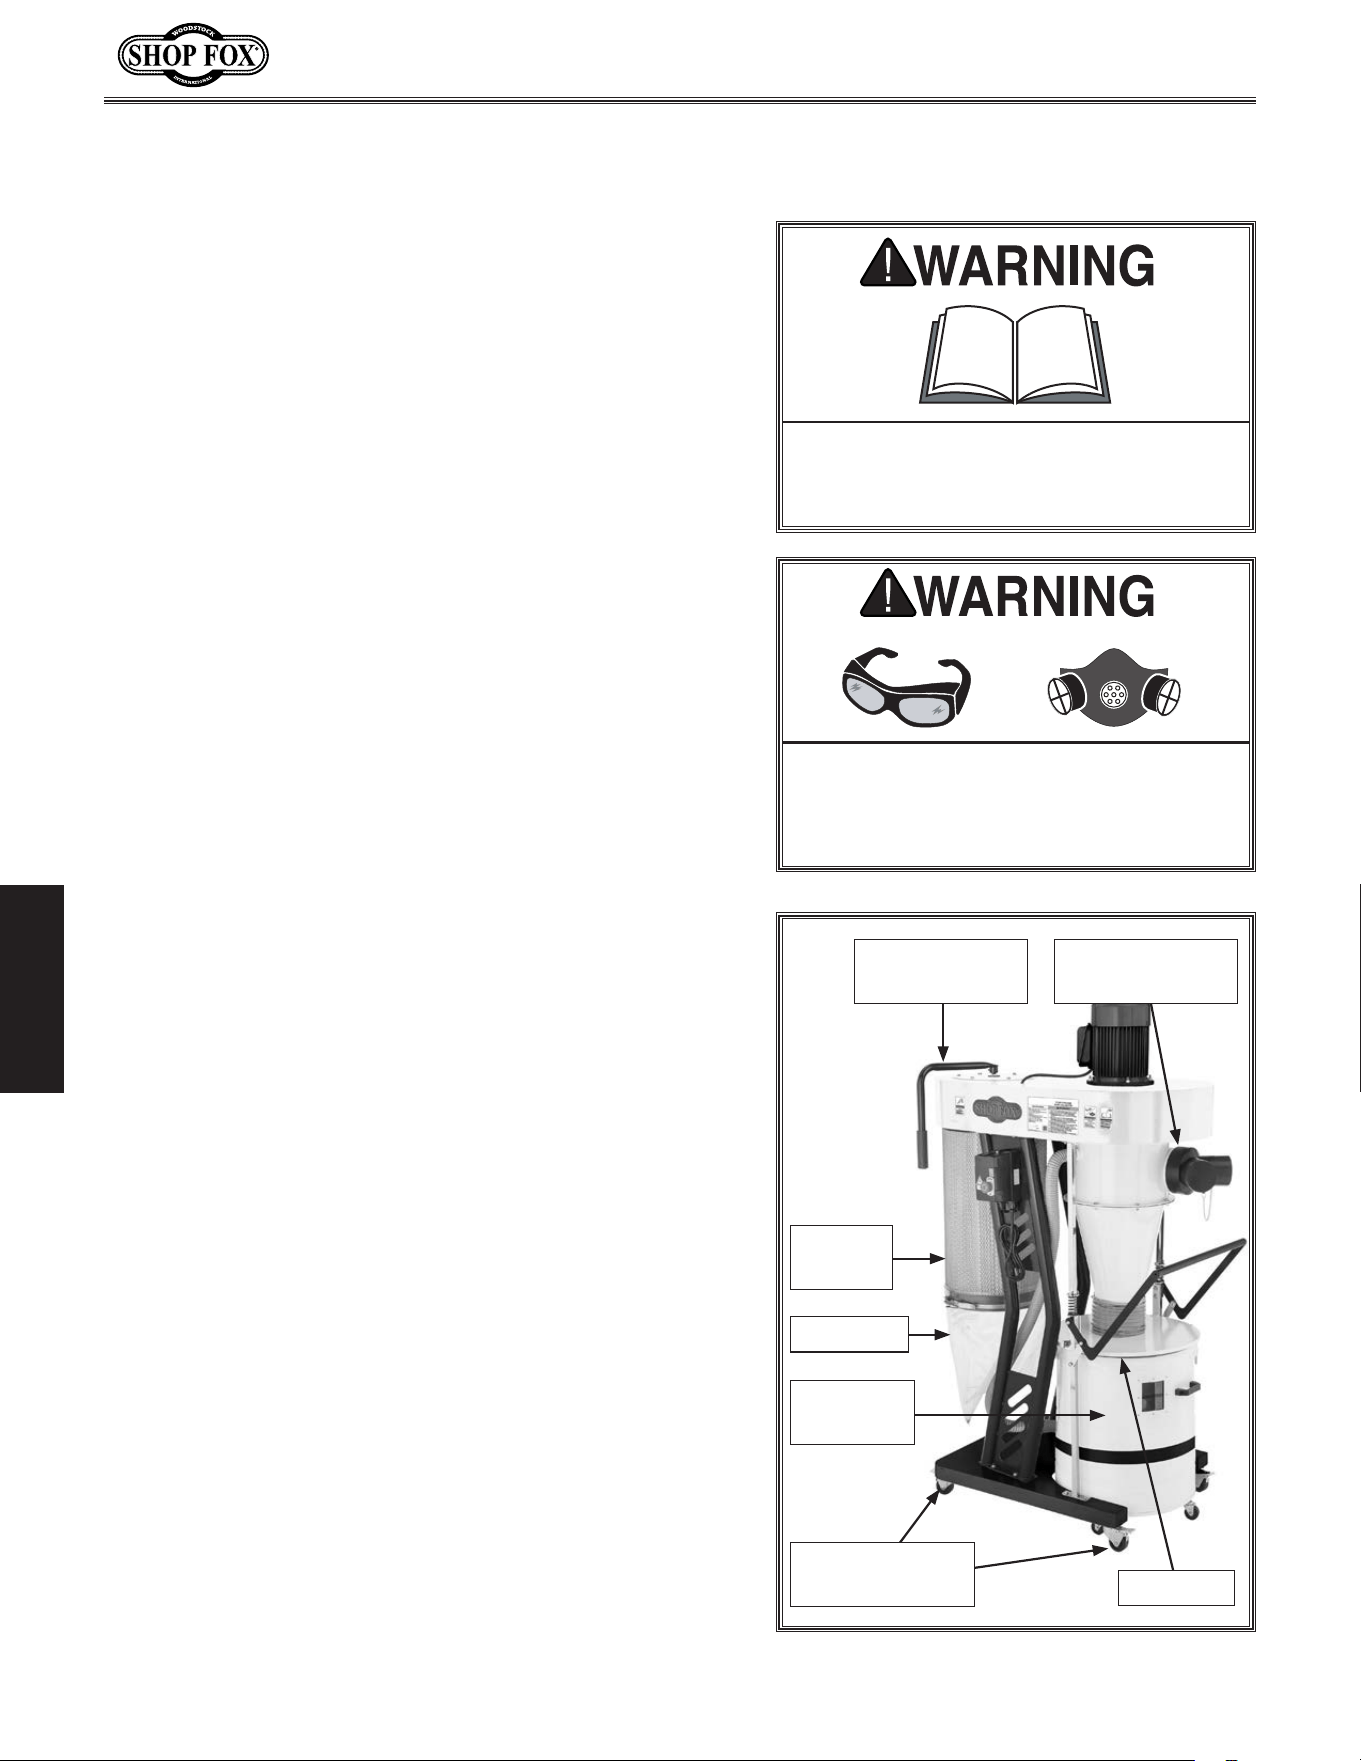
-36-
Model W1867/W1868/W1869 (For Machines Mfd. Since 11/18)
OPERATIONS
OPERATIONS
To. reduce. your. risk. of. serious. injury.
or. damage. to. the. machine,. read. this.
entire.manual.BEFORE.using.machine.
To. reduce. the. risk. of. eye. injury. and.
long-term. respiratory. damage,. always.
wear. s afety. glasses. and. a. respirator.
while.operating.this.machine.
General
The purpose of this overview is to provide the novice
machine operator with a basic understanding of how
the machine is used during operation, so the machine
controls/components discussed later in this manual are
easier to understand.
Due to the generic nature of this overview, it is not
intended to be an instructional guide. To learn more
about specific operations, read this entire manual, seek
additional training from experienced machine operators,
and do additional research outside of this manual by
reading "how-to" books, trade magazines, or websites.
Operation.Overview
This cyclone dust collector creates a vortex of incoming
air that extracts heavy wood chips and large dust
particles, and then drops them into the steel drum below,
which is lined with a plastic bag.
The remaining fine dust travels past the impeller and
is then caught by a canister filter and deposited in the
plastic collection bag below. The spun-bond polyester
filters catch 99.9 percent of particles to 1 micron in size,
and are pleated to provide maximum surface area for
efficient air flow.
To maintain CFM during heavy dust-collection operations,
turn the filter cleaning handle back and forth to knock
caked-on dust into the plastic collection bag.
Always lock all four swivel casters before operation.
Figure.56..Dust collector operation.
Incoming Wood
Chips and Dust
Locking Swivel
Casters (2 of 4)
Filter Cleaning
Handle
Canister
Filter
Filter Bag
Collection
Drum
Drum Bag
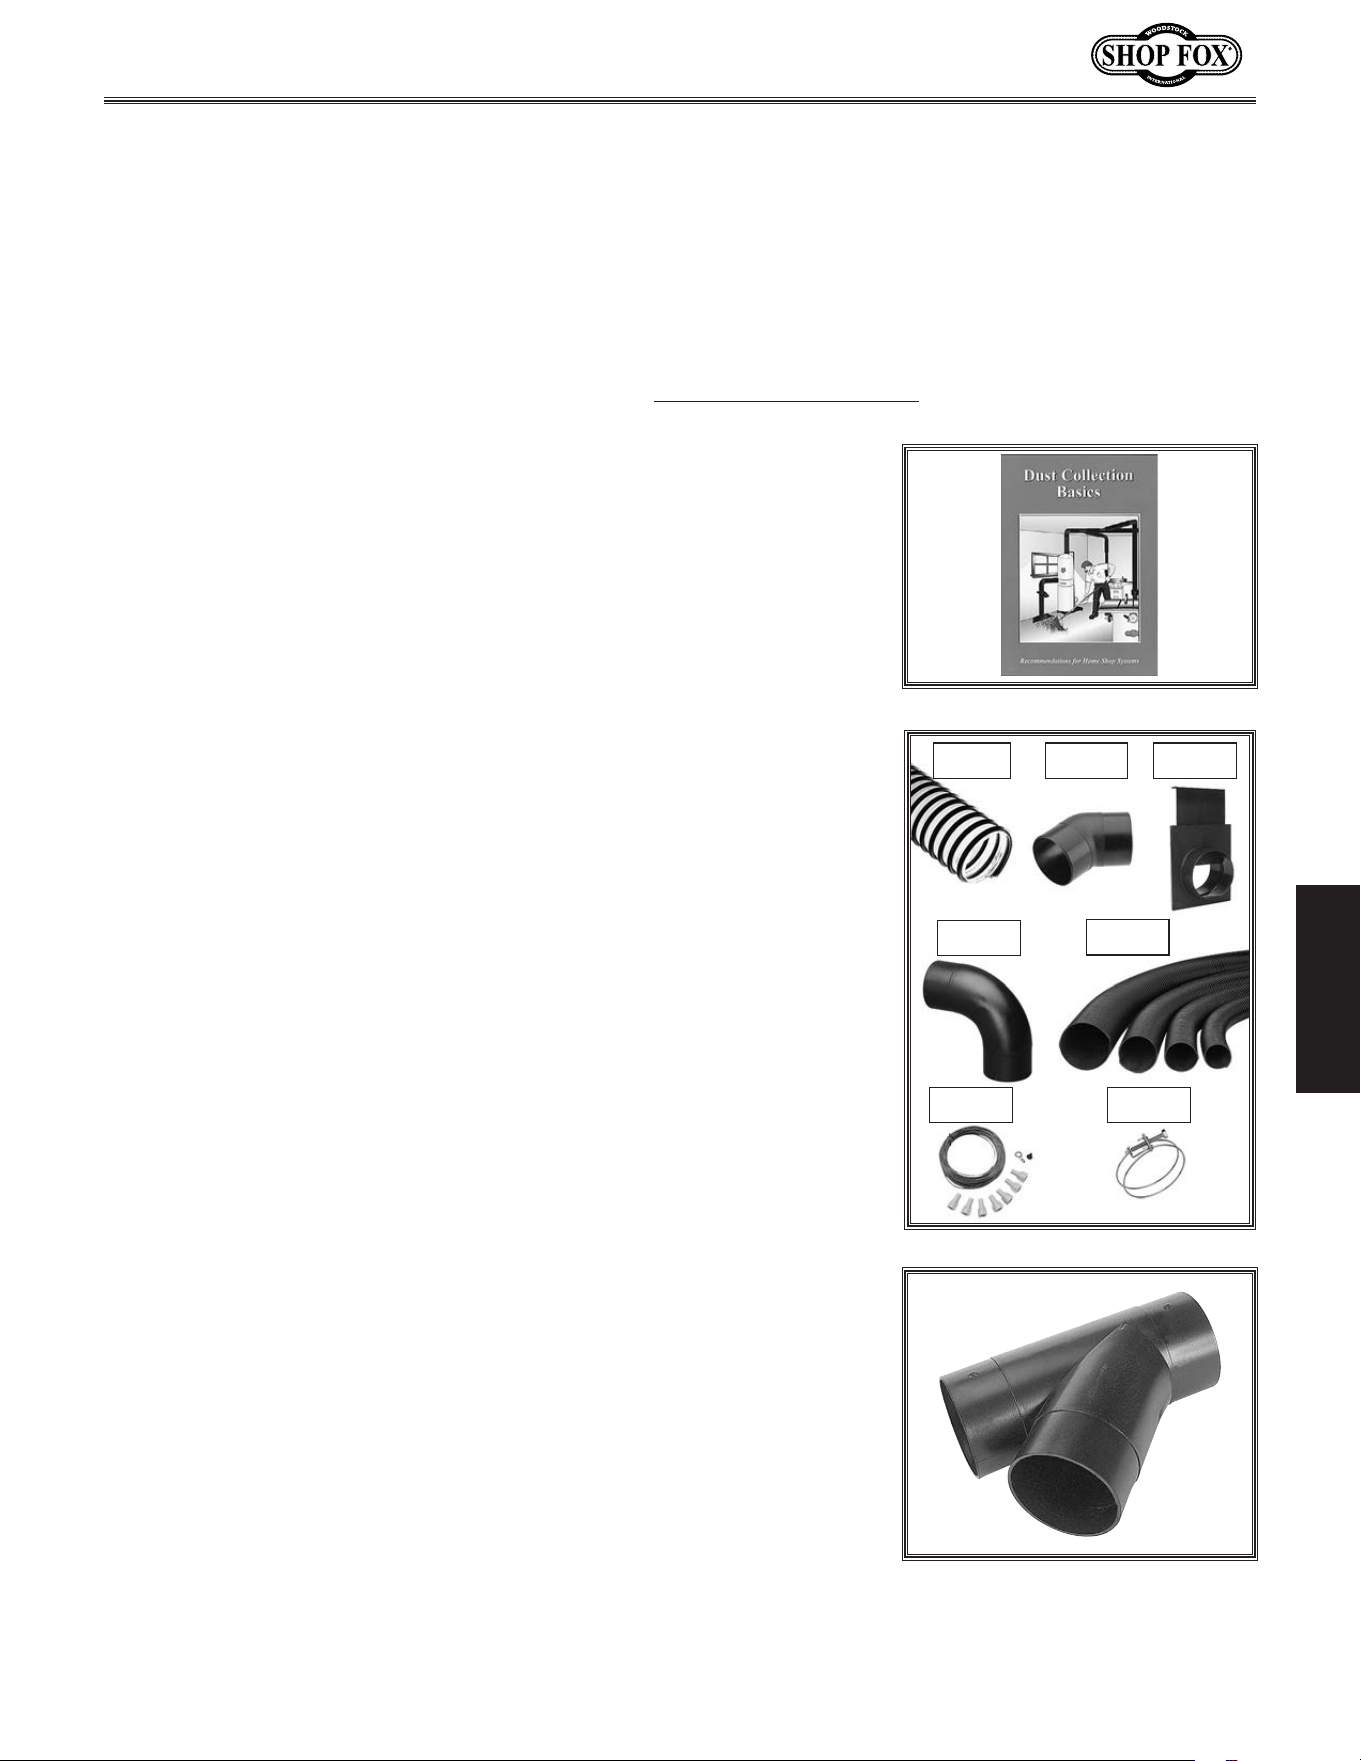
-37-
Model W1867/W1868/W1869 (For Machines Mfd. Since 11/18)
OPERATIONS
ACCESSORIES
Cyclone.Dust.Collec tor.Accessories
The following cyclone dust collector accessories may be available through your local Woodstock
International Inc. Dealer. If you do not have a dealer in your area, these products are also available
through online dealers. Please call or e-mail Woodstock International Inc. Customer Service to get a
current listing of dealers at: 1-800-840-8420 or at sales@woodstockint.com.
W1050—Dust.Collection.Basics.Book
This incisive book skillfully guides the woodworker through all the
steps necessary in the design and construction of an efficient central
dust-collection system and tells you what you need to know for easy
installation. 64 pages.
D4206—Clear.Flexible.Hose.4".x.10'
D4256—45°.Elbow.4"
W1007—Plastic .Blast.Gate.4"
W1017—90°.Elbow.4"
D4216—Black.Flexible.Hose.4".x.10'
W1053—Anti-Static.Grounding.Kit
W1317—Wire.Hose.Clamp.4 "
We've handpicked a selection of commonly used dust-collection
components for machines with 4" dust ports.
D4026
W1317
D4256
W1007
D4216
W1053
W1017
W1014—3".Outer.Diameter.Y-Fittings
W1015—4".Outer.Diameter.Y-Fittings
Used to attach branch lines to service more than one machine. This
design provides increased lateral air flow and efficiency over other
types of fittings.
Accessories
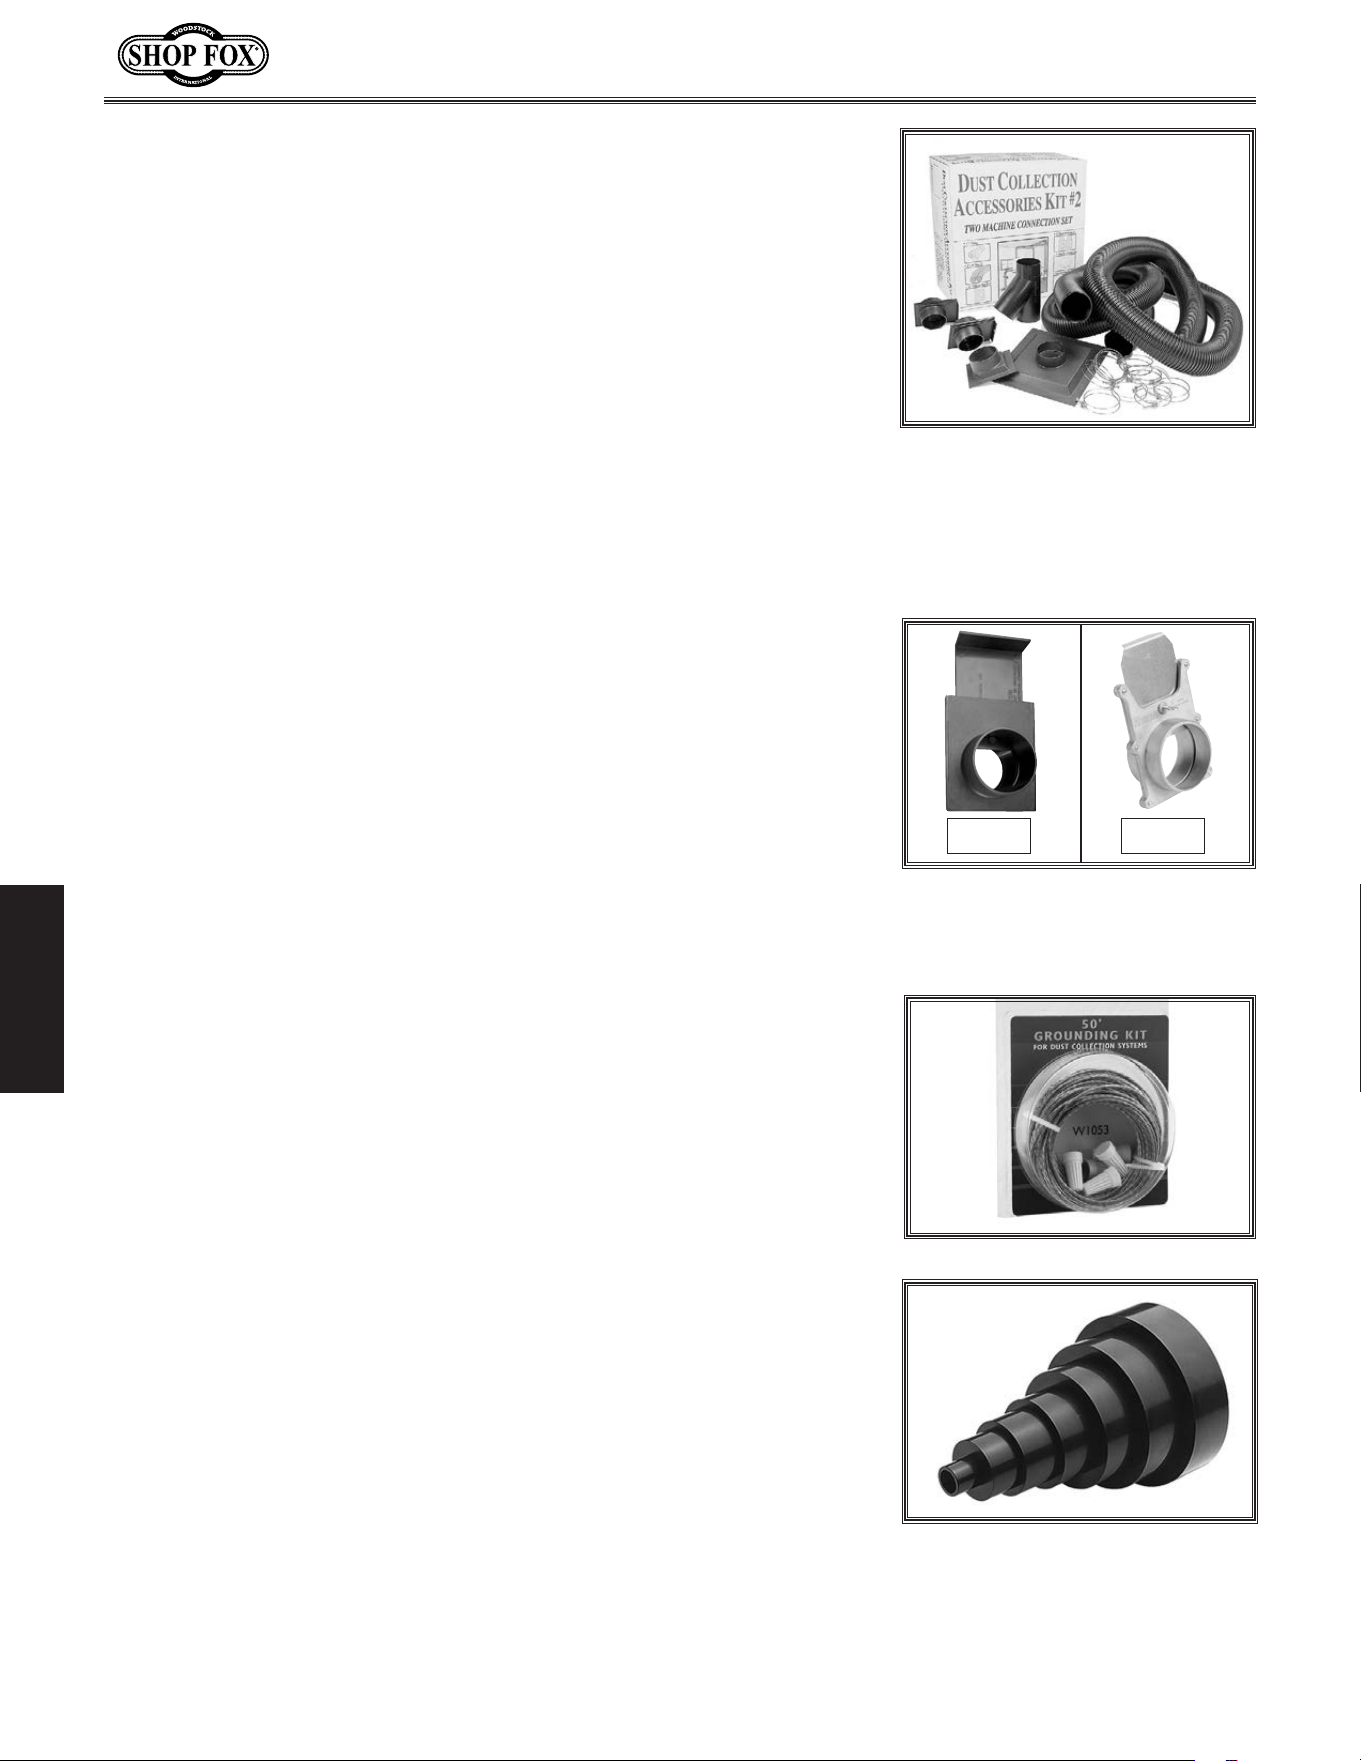
-38-
Model W1867/W1868/W1869 (For Machines Mfd. Since 11/18)
OPERATIONS
W1053—Grounding. Kit
Provides everything you need to ground a dust collection system,
including directions for installation. A large system may need more
than one kit, so keep plenty of these on hand. This safety accessory is
essential to any complete dust collection assortment.
W1055— Dust.Collection.Accessories.Kit.#2
Provides the necessary hoses, clamps, hoods and fittings to connect
two woodworking machines to a dust collector. Air flow to each
machine is controlled by a blast gate. Kit comes complete with
comprehensive instructions and can be expanded even further using
our other dust collection accessories (list enclosed in each box).
Kit includes:
• (2) 4" Blast gates (W1007)
• (2) 4" x 10' Hose (W1031)
• (1) Table saw dust hood (W1004)
• (1) Universal dust hood (W1010)
• (1) 4" Y-fitting (W1015)
• (10) 4" Wire hose clamps (W1317)
• Shipping weight: 15 lbs. 14 oz.
• Package size: 24" x 24" x 12"
Blast.Gates
Available in both black ABS plastic and aluminum. Plastic blast gates
are economically priced, have a textured surface and an easy sliding
gate action. For those customers who prefer metal, our top quality
aluminum blast gates feature a cast aluminum body with steel gate
and locking knob. The following types and models are available:
Black ABS plastic blast gates:
W1006 3" Outer Diameter
W1007 4" Outer Diameter
W1008 5" Outer Diameter
W1009 6" Outer Diameter
Aluminum blast gates:
W1141 3" Outer Diameter
W1142 4" Outer Diameter
W1141W1006
W1039—Universal.Adapter
This adapter provides a multitude of reducing options. Simply cut off
unneeded steps. Outside diameter sizes include 1", 2", 2.5", 3", 4", 5",
and 6". Wall thickness is
1
⁄8".
-39-
Model W1867/W1868/W1869 (For Machines Mfd. Since 11/18)
MAINTENANCE
MAINTENANCE
For optimum performance from this machine, this
maintenance schedule must be strictly followed.
Ongoing
To maintain a low risk of injury and proper machine
operation, if you ever observe any of the items below,
shut down the machine immediately and fix the problem
before continuing operations:
• Loose mounting bolts.
• Damaged filter canister, cleaning paddle
components, or collection bags.
• Worn or damaged wires.
• Suction leaks.
• Any other unsafe condition.
Monthly.Check
• Clean/vacuum dust buildup off machine body and
motor.
General
IMP O RTA N T: To contain wood dust and minimize risk of
exposure, firmly tie bag closed.
If the bag gets overfilled, the dust will be sucked into the
intake barrel and passed through to the canister filter and
filter bag. Avoid allowing this to happen, as it may reduce
filter life.
Check the drum window regularly to prevent excessive
dust buildup in the collection drum.
Emptying/Replacing.
Collection.D rum.Bag
Dispose of the collection drum bag when dust fills it
3
⁄4
full. Replace the bag if it develops a leak or becomes
damaged.
Dust. exposure. created. while. using.
machinery. may. cause. cancer,. birth.
defects,. or. long-term. respiratory.
damage.. Always. wear. goggles. and. a.
NIOSH-approved. respirator. when.
working. with. the. dust. collection. bags.
or.canisters.
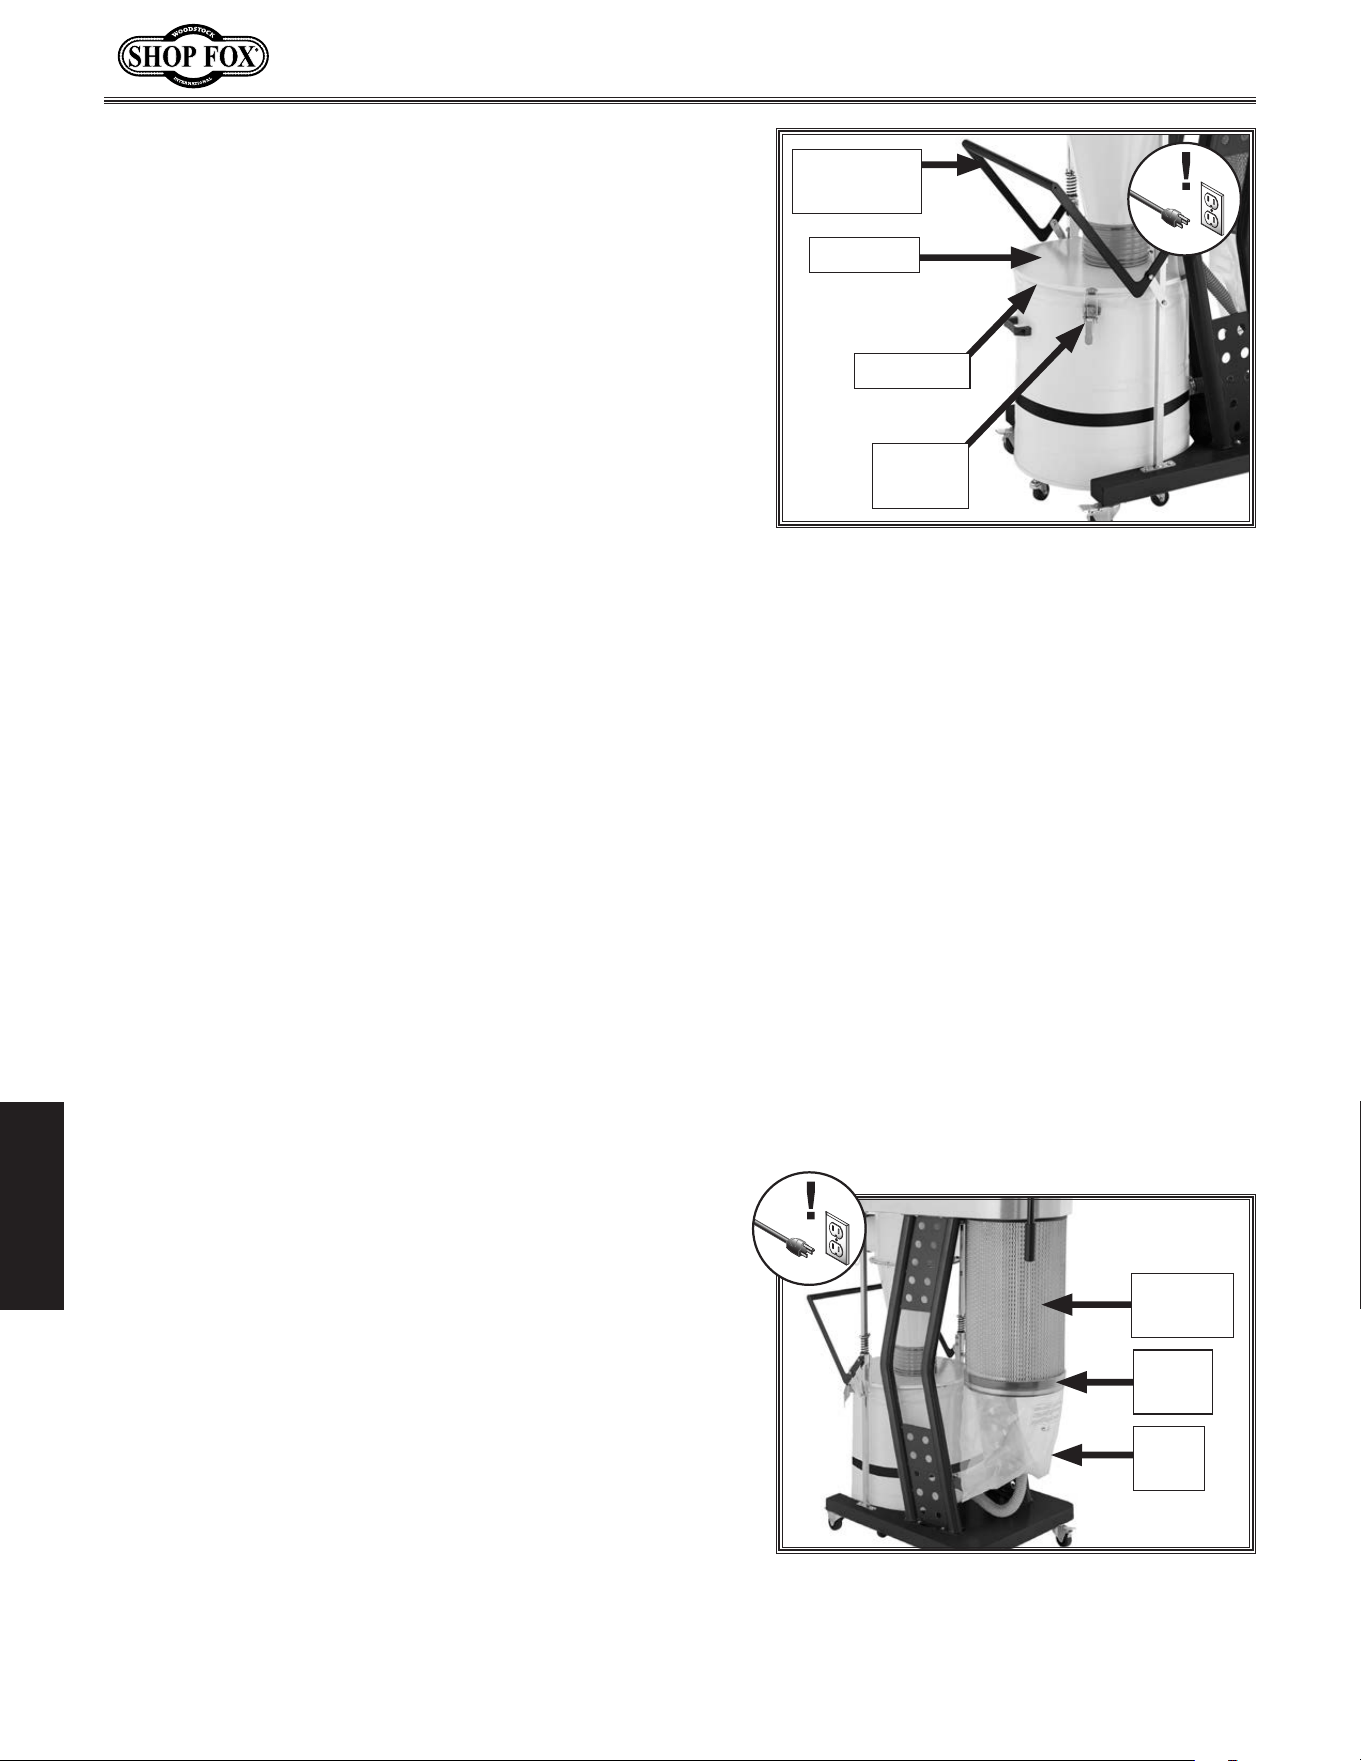
-40-
Model W1867/W1868/W1869 (For Machines Mfd. Since 11/18)
MAINTENANCE
Cleaning.Canister.Filter
This dust collector uses a handle and internal paddles
to remove excess dust and debris from the filter pleats.
Move the handle back and forth through its range of
motion to knock dust into the filter bag. Dispose of the
bag when dust fills it about
1
⁄2 full.
After extended use, the filter should be replaced, or
thoroughly cleaned by hand.
To.clean.canister.filter.by.hand,.do.these.steps:
1. DISCONNECT MACHINE FROM POWER!
2. Remove bag clamp, filter bag, and canister filter (see
Figure.58).
3. Rinse filter with water in an appropriate outdoor
location.
IMPORTANT:.DO NOT use compressed air to clean or
dry the filter, as this can spread fine dust into the
air and damage filter fibers.
Item(s).Needed. Qty
Drum Bag D4894 (Models W1867, W1868) ..................1
Drum Bag D4896 (Model W1869) .............................1
To.remove.and.replace.collection.drum.bag,.do.these.
steps:
1. DISCONNECT MACHINE FROM POWER!
2. Lift drum lock handle to lower collection drum onto
casters (see Figure.57).
3. Release both latches on sides of drum, then roll
drum clear of drum lid (see Figure.57).
4. Lift bag out of drum and dispose of contents.
IMP O RTA N T: To contain wood dust and minimize risk
of exposure, tie bag closed before disposal.
5. Place new dust bag inside collection drum, and fold
excess bag length over top of drum.
6. Move collection drum under lid and latch it closed.
7. Press drum lock handle down to lift collection drum
off casters for operation.
Figure.57. Collection drum bag
components.
Drum Lid
Drum Lock
Handle
Drum Bag
Latch
(1 of 2)
Figure.58. Filter bag components.
Canister
Filter
Bag
Clamp
Filter
Bag
4. Allow filter to air dry only. DO NOT
use heat.
-41-
Model W1867/W1868/W1869 (For Machines Mfd. Since 11/18)
SERVICE
SERVICE
General
This section covers the most common service adjustments
or procedures that may need to be made during the life
of your machine.
If you require additional machine service not included
in this section, please contact Woodstock International
Technical Support at (360) 734-3482 or send e-mail to:
techsupport@woodstockint.com.
Removin g/Re placing.
C anister.Filter.&.Bag
Item(s).Needed. Qty
An Assistant ......................................................1
Wrench or Socket, 12mm ......................................1
Wrench or Socket, 10mm ......................................1
Hex Wrench, 5mm ..............................................1
Shop Vac ..........................................................1
Canister Filter D4892 (Models W1867, W1868) .............1
Canister Filter D4895 (Model W1869) ........................1
Filter Bag D4893 ................................................1
To.remove.and.replace.filter.bag.and.canister.filt er,.do.
these.steps:
1. DISCONNECT MACHINE FROM POWER!
2. Release bag clamp, then remove filter bag (see
Figure.59). Tie bag closed.
If the canister filter is clogged or dirty and cleaning
it does not improve dust-collection performance, the
canister filter must be replaced.
Figure.59. Filter bag components.
Canister
Filter
Bag
Clamp
Filter
Bag
Dust. exposure. created. while. using.
machinery. may. cause. cancer,. birth.
defects,. or. long-term. respiratory.
damage.. Always. wear. goggles. and. a.
NIOSH-approved. respirator. when.
working. with. the. dust. collection. bags.
or.canisters.
Figure.60. Filter cleaning handle hex bolt.
Filter
Cleaning
Handle
Hex Bolt
3. Loosen M6-1 x 16 hex bolt on filter cleaning handle,
then remove handle (see Figure.60).
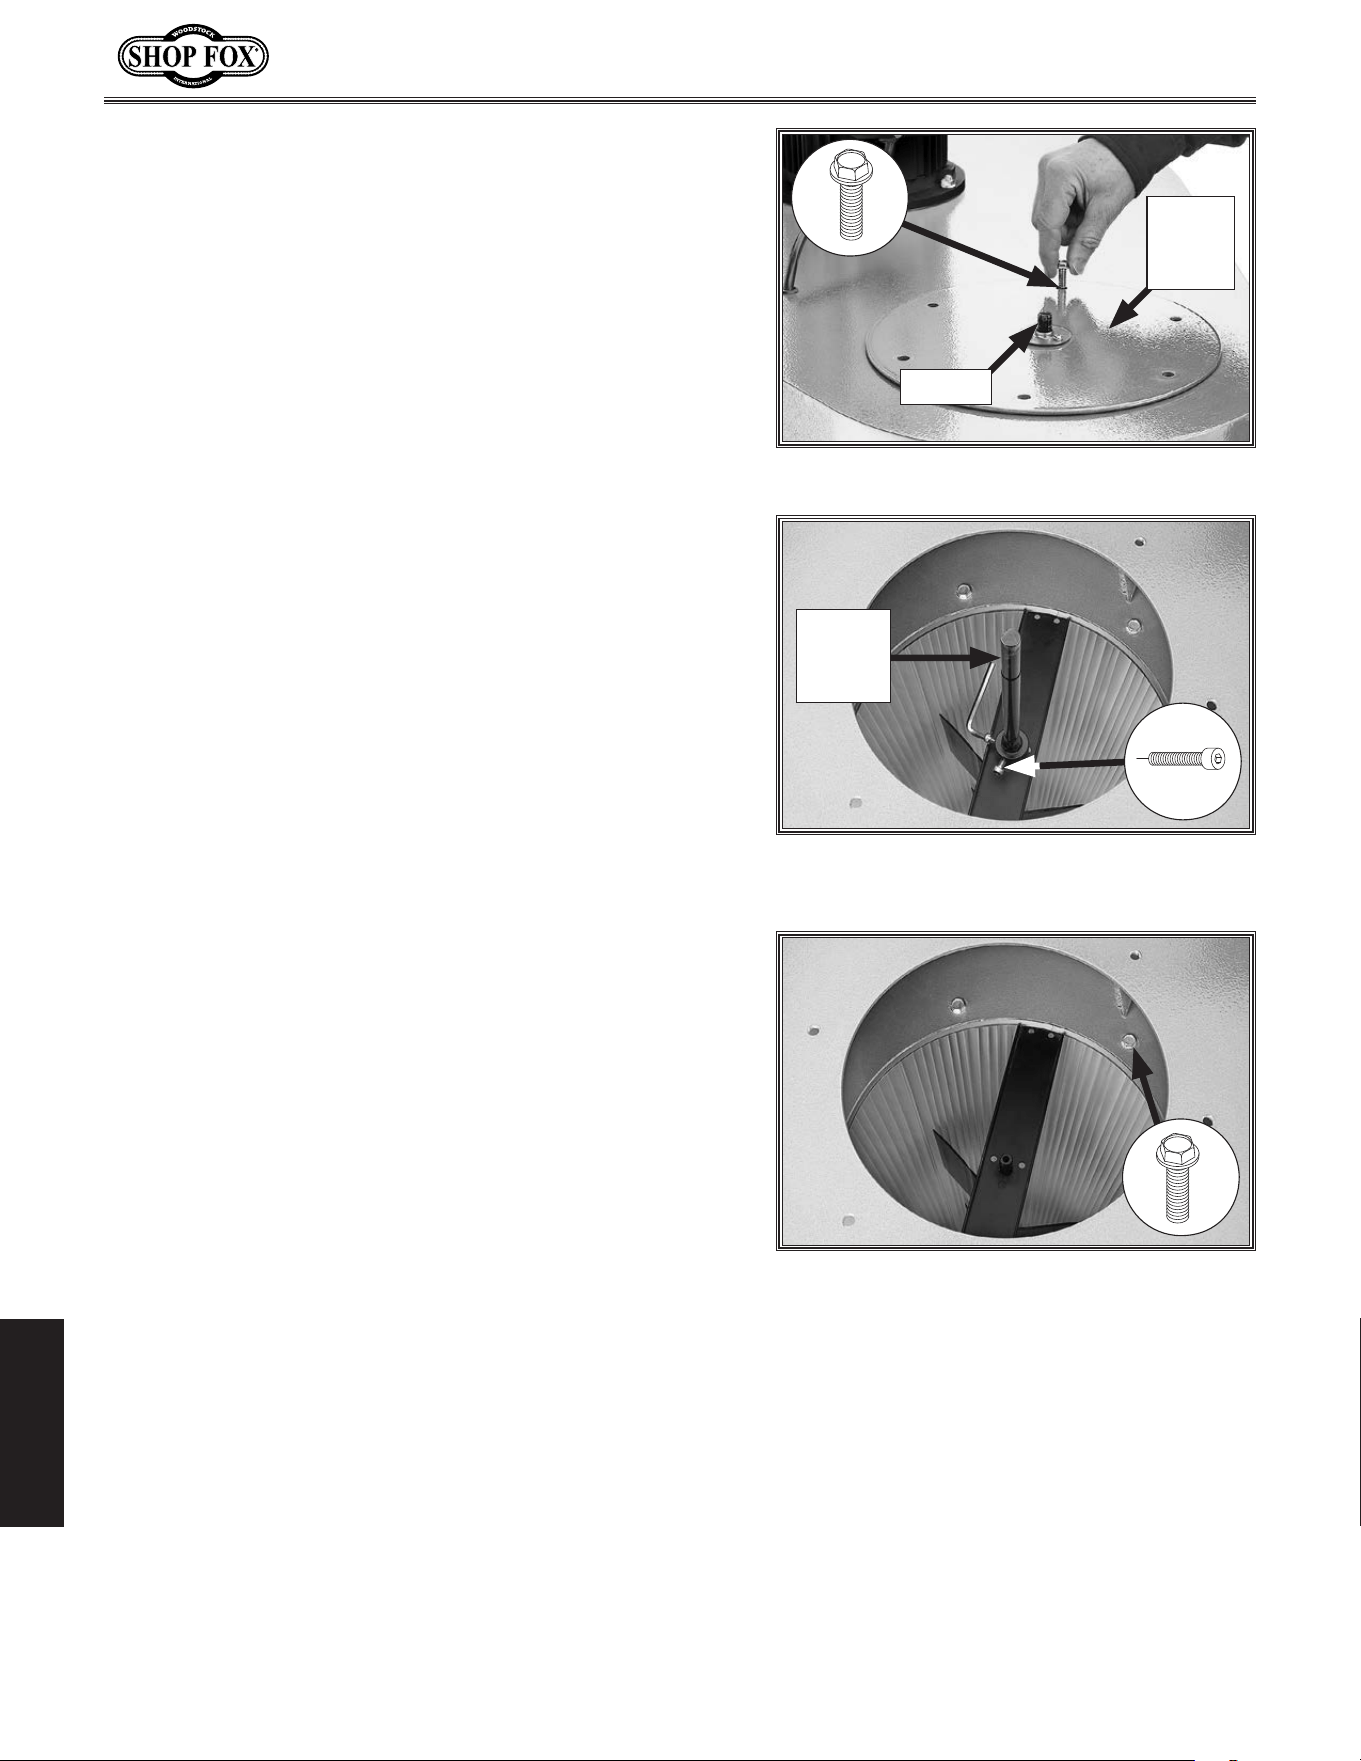
-42-
Model W1867/W1868/W1869 (For Machines Mfd. Since 11/18)
SERVICE
5. Loosen (2) M6-1 x 16 cap screws on paddle handle
spindle to remove (see Figure.62).
4. Remove (6)
5
⁄16"-18 x
3
⁄4" flange bolts securing filter
paddle cover to impeller housing, then lift cover
over spindle (see Figure.61).
Figure.62. Separating paddle handle
spindle from filter paddle spindle.
6. With assistant holding canister filter from below,
loosen and remove (6)
5
⁄16"-18 x
3
⁄4" flange bolts
securing canister filter assembly to impeller housing
(see Figure.63).
7. Vacuum loose dust inside impeller housing and on
machine.
8. Reverse Steps.2–6 to re-assemble.
Figure.63. Remove flange bolts to remove
canister filter assembly from impeller
housing.
x 6
Figure.61. Removing filter paddle cover.
x 6
Spindle
Filter
Paddle
Cover
Paddle
Handle
Spindle
x 2
-43-
Model W1867/W1868/W1869 (For Machines Mfd. Since 11/18)
SERVICE
Troubleshooting
Motor.&.Electrical
The following troubleshooting tables cover common problems that may occur with this machine. If you
need replacement parts or additional troubleshooting help, contact our Technical Support.
Note:
Before contacting Tech Support, find the machine serial number and manufacture date, and if
available, your original purchase receipt. This information is required to properly assist you.
PROBLEM POSSIBLE.CAUSE CORRECTIVE.ACTION
Machine does not
start or a breaker
trips immediately
after startup.
1. Dust collector not properly connected to
ducting.
2. E-Stop Button depressed/at fault.
3. Incorrect power supply voltage or circuit
size.
4. Power supply circuit breaker tripped or
fuse blown.
5. Motor overheated.
6. Machine circuit breaker has tripped.
7. Remote control not working.
8. Wiring open/has high resistance.
9. Centrifugal switch/contact points at fault.
10. Power switch/circuit breaker at fault.
11. Start capacitor at fault.
12. Remote receiver at fault.
13. Motor at fault.
1. Connect dust collector properly (Page.27).
2. Rotate E-Stop Button to reset. Replace if at fault.
3. Ensure correct power supply voltage and circuit
size.
4. Ensure circuit is sized correctly and free of shorts.
Reset circuit breaker or replace fuse.
5. Allow motor to cool, reset overload if necessary.
6. Reset circuit breaker on switch.
7. Replace battery; stay in signal range (Page.6).
8. Check/fix broken, disconnected, or corroded wires.
9. Adjust/replace centrifugal switch/contact points.
10. Test/replace.
11. Test/replace.
12. Replace.
13. Test/repair/replace.
Machine seems
underpowered.
1. Motor overheated.
2. Dust-collection ducting problem.
3. Canister filter clogged/at fault.
4. Dust collector to far from machine or
undersized for dust-collection system.
5. Run capacitor at fault.
6. Centrifugal switch/contact points at fault.
7. Motor bearings at fault.
1. Allow motor to cool, reset overload if necessary.
2. Clear blockages, seal leaks, use smooth-wall duct,
eliminate bends, close other branches (Page.27).
3. Clean canister filter (Page. 40); replace canister
filter (Page.41).
4. Move closer to machine/redesign ducting layout/
upgrade dust collector.
5. Test/repair/replace.
6. Adjust/replace centrifugal switch/contact points if
available.
7. Test by rotating shaft; rotational grinding/loose
shaft requires bearing replacement.
Machine has vibra-
tion or noisy
operation.
1. Motor or component loose.
2. Motor fan rubbing on fan cover.
3. Motor mount loose/broken.
4. Centrifugal switch is at fault.
5. Impeller damaged or unbalanced.
6. Motor bearings at fault.
7. Motor shaft bent.
1. Inspect/replace damaged bolts/nuts, and retighten
with thread-locking fluid.
2. Fix/replace fan cover; replace loose/damaged fan.
3. Tighten/replace.
4. Adjust/replace centrifugal switch if available.
5. Replace.
6. Test by rotating shaft; rotational grinding/loose
shaft requires bearing replacement.
7. Test with dial indicator. Replace motor if damaged.
Loud, repetitious
noise, or excessive
vibration coming
from dust collec-
tor (non-motor
related).
1. Dust collector not on a flat surface and
wobbles.
2. Impeller damaged, unbalanced, or loose.
3. Impeller loose on the motor shaft.
1. Stabilize dust collector; lock casters.
2. Disconnect dust collector from power. Inspect
impeller for dents, bends, or loose fins. Replace
impeller if damaged.
3. Secure impeller; replace motor and impeller as a
set if motor shaft and impeller hub are damaged.

-44-
Model W1867/W1868/W1869 (For Machines Mfd. Since 11/18)
SERVICE
Machine.Operation
PROBLEM POSSIBLE.CAUSE CORRECTIVE.ACTION
Dust collector does
not adequately col-
lect dust or chips;
poor performance.
1. Collection bag full.
2. Canister filter clogged/at fault.
3. Ducting blocked/restricted.
4. Dust collector too far away from point of
suction; duct clamps not properly secured;
too many sharp bends in ducting.
5. Lumber is wet and dust is not flowing
smoothly through ducting.
6. Ducting has one or more leaks, or too many
open ports.
7. Not enough open branch lines at one time,
causing velocity drop in main line.
8. Ducting and ports are incorrectly sized.
9. The machine dust-collection design
inadequate.
10. Dust collector undersized.
1. Empty collection bag.
2. Clean canister filter (Page. 40); replace canister
filter (Page.41).
3. Remove ducting from dust collector inlet and
unblock restriction. A plumbing snake may be nec-
essary.
4. Relocate dust collector closer to point of suction;
re-secure ducts; remove sharp bends. Refer to
Designing.the.System in manual.
5. Only process lumber with less than 20% moisture
content.
6. Seal/eliminate all ducting leaks; close dust ports
for lines not being used. Refer to Designing. the.
System in manual.
7. Open 1 or 2 more blast gates to different branch
lines to increase main line velocity.
8. Install correctly sized ducts and fittings (Page.27)
Refer to Designing.the.System in manual.
9. Use dust-collection hood on stand.
10. Install larger dust collector.
Dust collector blows
sawdust into the
air.
1. Duct clamps or filter bag(s) are not prop-
erly clamped and secured; ducting loose/
damaged.
2. Cylinder or funnel seals are loose or
damaged.
1. Re-secure ducts and filter bag, making sure duct
and bag clamp are tight; tighten/replace ducting.
2. Retighten all mounting and sealing points; replace
damaged seals/gaskets.
Remote control
does not operate
dust collector.
1. Emergency Stop button is pressed in.
2. Machine is disconnected from power.
3. Remote control battery is weak or dead.
4. A wall or barrier disrupts the radio fre-
quency, or controller is too far away.
1. Rotate E-Stop button to reset.
2. Verify machine is connected to power source.
3. Replace battery.
4. Move machine away from barrier; use remote
within 75' of machine.
-45-
Model W1867/W1868/W1869 (For Machines Mfd. Since 11/18)
SERVICE
Electrical.Safety.Instructions
SHOCK.HAZARD. Working on wiring that is
connected to a power source is extremely
dangerous. Touching electrified parts will
result in personal injury including but not
limited to severe burns, electrocution,
or death. Disconnect the power from
the machine before servicing electrical
components!
QUALIFIED.ELECTRICIAN. Due to the inherent
hazards of electricity, only a qualified
electrician should perform wiring tasks on
this machine. If you are not a qualified
electrician, get help from one before
attempting any kind of wiring job.
WIRE.CONNECTIONS. All connections must
be tight to prevent wires from loosening
during machine operation. Double-check all
wires disconnected or connected during any
wiring task to ensure tight connections.
WIRE/COMPONENT.DAMAGE..Damaged wires
or components increase the risk of serious
personal injury, fire, or machine damage. If
you notice that any wires or components are
damaged while performing a wiring task,
replace those wires or components before
completing the task.
MODIFICATIONS. Using aftermarket parts or
modifying the wiring beyond what is shown
in the diagram may lead to unpredictable
results, including serious injury or fire.
MOTOR.WIRING. The motor wiring shown
in these diagrams is current at the time
of printing, but it may not match your
machine. Always use the wiring diagram
inside the motor junction box.
CAPACITORS/INVERTERS. Some capacitors
and power inverters store an electrical
charge for up to 10 minutes after being
disconnected from the power source.
To reduce the risk of being shocked,
wait at least this long before working on
capacitors.
CIRCUIT.REQUIREMENTS. You MUST follow
the requirements at the beginning of this
manual when connecting your machine to a
power source.
EXPERIENCING.DIFFICULTIES. If you are
experiencing difficulties understanding
the information included in this section,
contact our Technical Support at
(360) 734-3482.
The photos and diagrams
included in this section are
best viewed in color. You
can view these pages in
color at www.shopfox.biz.
BLACK
WHITE
GREEN
RED
BLUE
BROWN
GRAY
ORANGE
YELLOW
YELLOW
GREEN
PURPLE
PINK
LIGHT
BLUE
BLUE
WHITE
TUR-
QUOISE
WIRING DIAGRAM COLOR KEY
These pages are current at the time of printing. However, in the spirit of improvement, we may make
changes to the electrical systems of future machines. Compare the manufacture date of your machine to
the one stated in this manual, and study this section carefully.
If there are differences between your machine and what is shown in this section, call Technical Support
at (360) 734-3482
for assistance BEFORE making any changes to the wiring on your machine. An updated
wiring diagram may be available. Note: Please gather the serial number and manufacture date of your
machine before calling. This information can be found on the main machine label.
electrical.warning.page
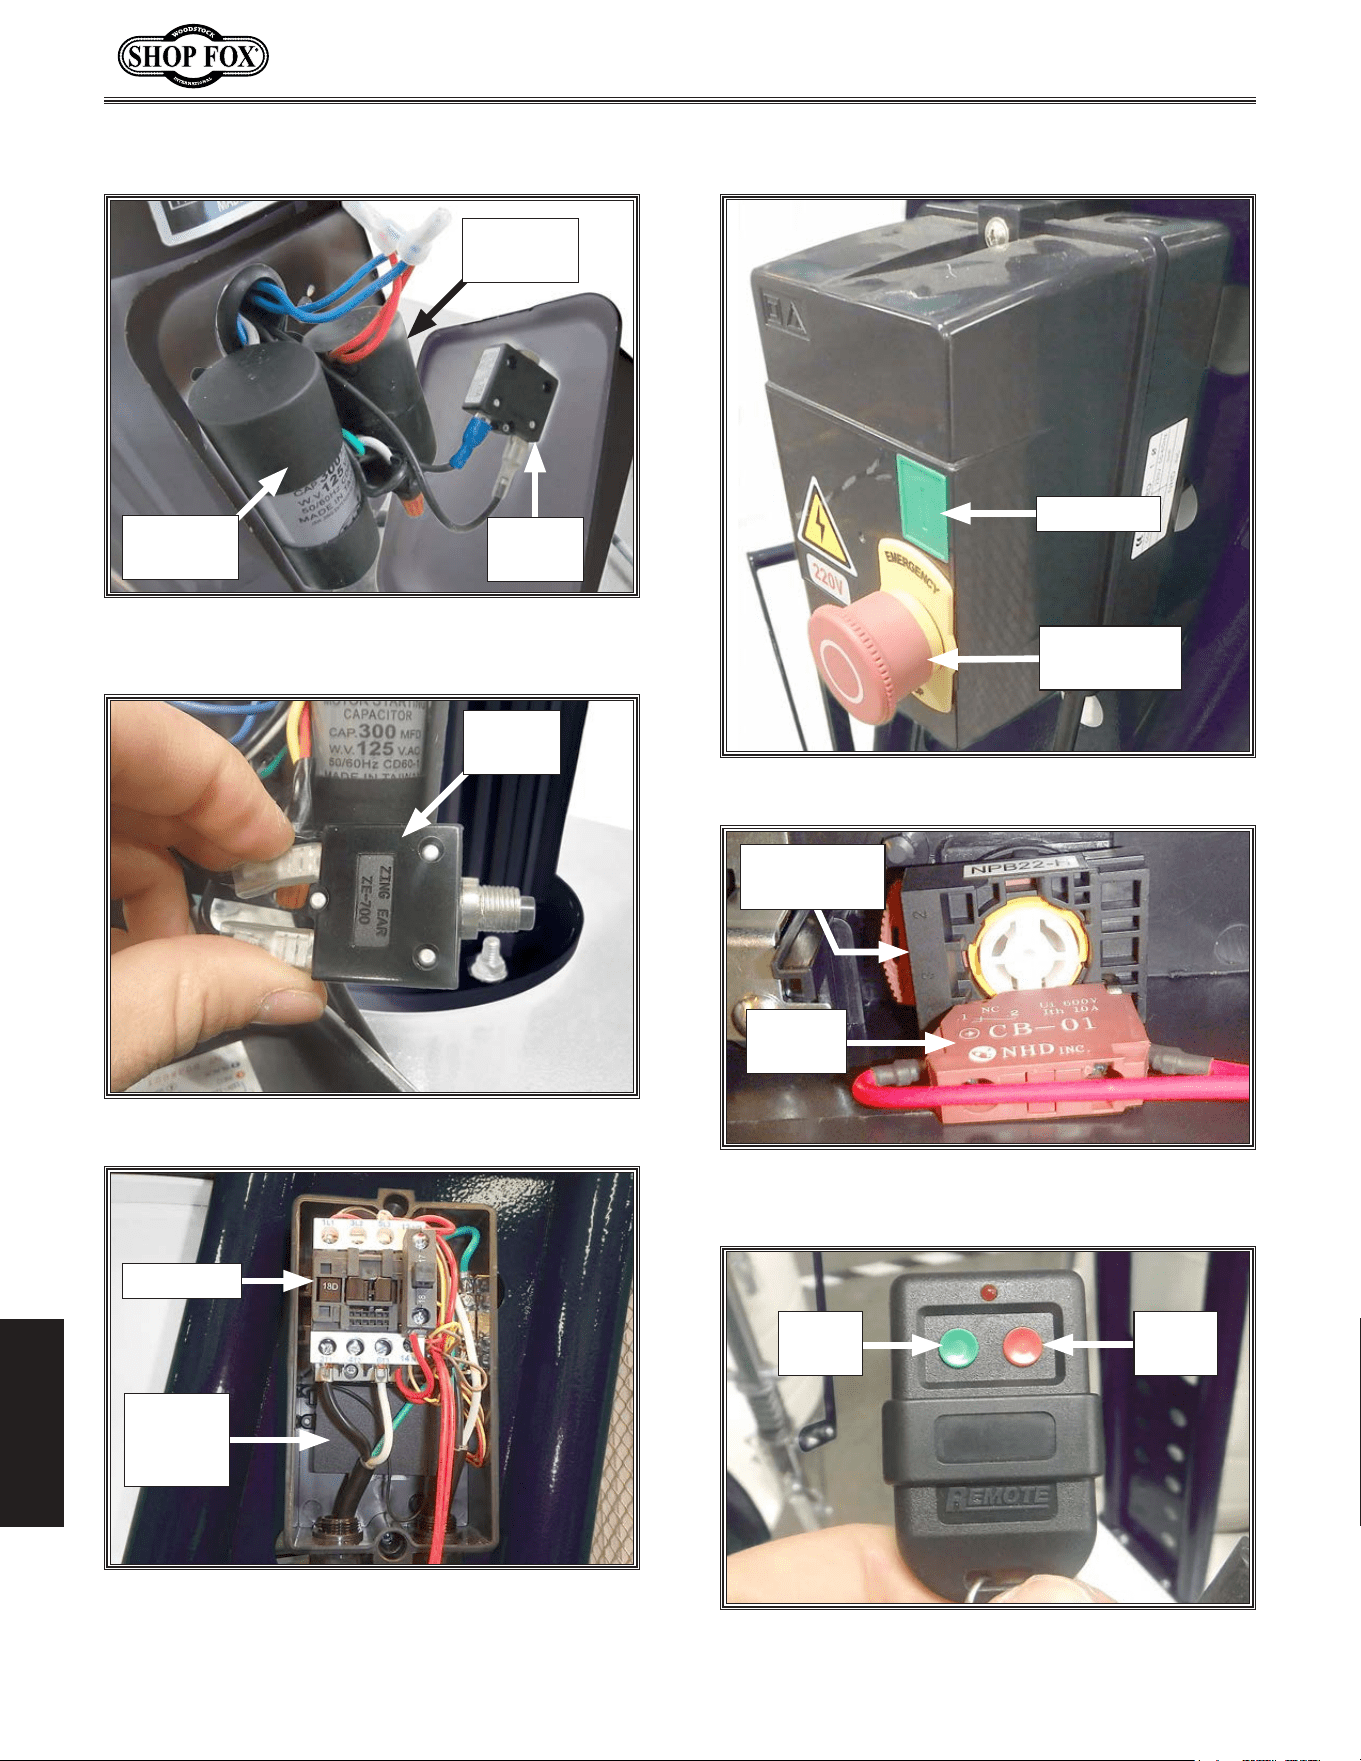
-46-
Model W1867/W1868/W1869 (For Machines Mfd. Since 11/18)
SERVICE
Elec trical.Components
Figure.67. Magnetic switch.
Figure.66. Contactor and remote control
receiver location (W1869 shown).
Figure.69. Remote control unit.
Figure.68. Emergency-stop switch and contact
block.
Figure.65. Circuit breaker.
Emergency
Stop Switch
Contact
Block
ON
Button
OFF
Button
Emergency
Stop Button
ON Button
Figure.64. Junction box components
(W1867 shown).
Start
Capacitor
Run
Capacitor
Circuit
Breaker
Circuit
Breaker
Contactor
Remote
Control
Receiver
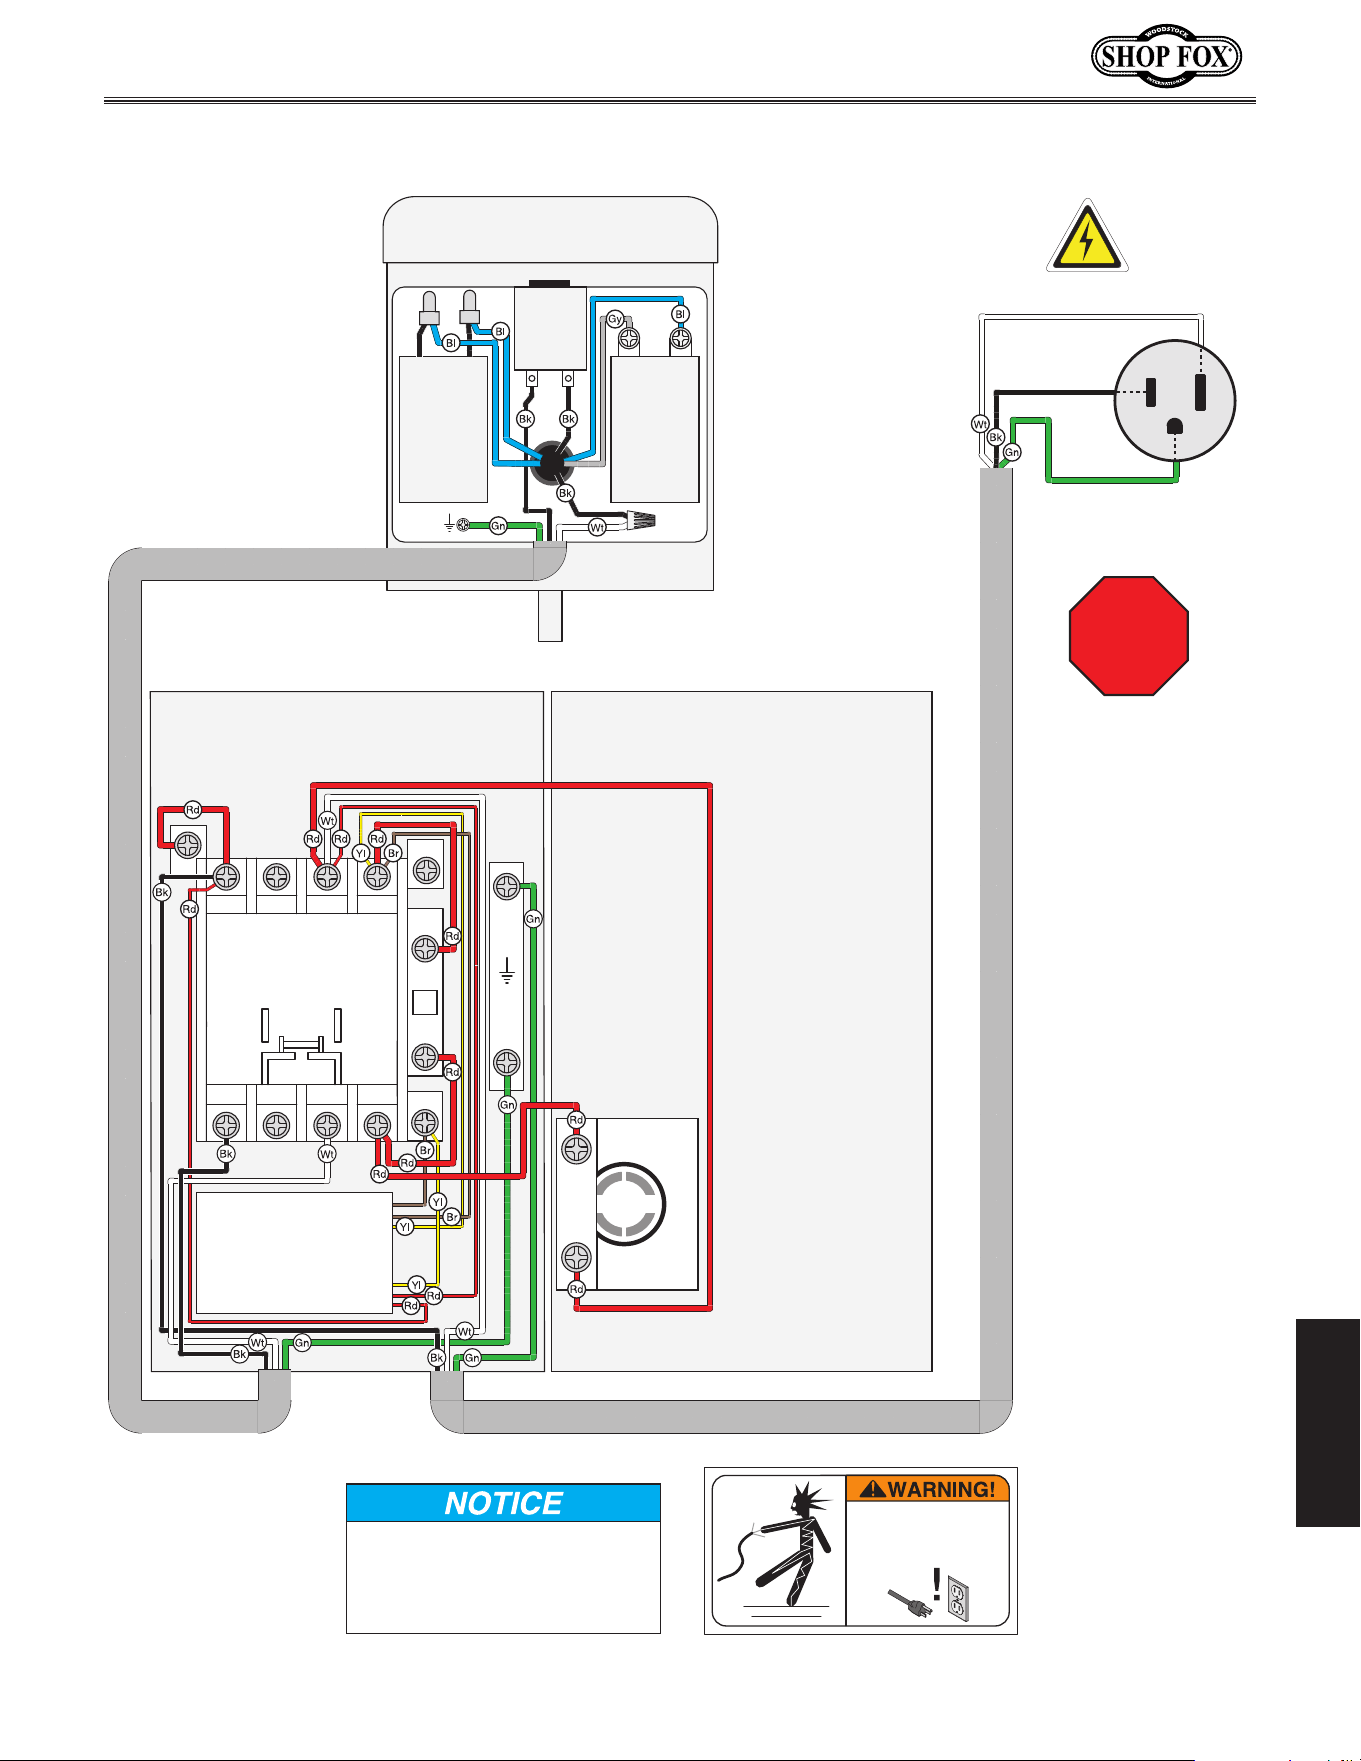
-47-
Model W1867/W1868/W1869 (For Machines Mfd. Since 11/18)
SERVICE
STOP
Read
Page 45
Before
Wiring
W1867.Wiring.Diagram
Neutral
Hot
Ground
110 VAC
5-15 Plug
A1
A2
REMOTE RECEIVER
(110V W1867)
GND
A2
2T1 6T3
14NO
4T2
1L1 5L3
13NO
3L2
CONTACTOR
NHD C-12D10 110V
EMERGENCY
STOP SWITCH
& CONTACT
BLOCK
17
18
Ground
Run
Capacitor
50 uF-U
250VAC
W1867 MOTOR 1.5 HP 110V
Circuit
Breaker
Zing Ear
ZE700-25
Start
Capacitor
300MFD
125VAC
MAGNETIC SWITCH
NHD MS1-12D 110V
MAGNETIC SWITCH COVER
NHD
CB-01
NHD NPB22-H
The motor wiring shown here is
current at the time of printing, but
it may not match your machine.
Always use the wiring diagram inside
the motor junction box.
SHOCK HAZARD!
Disconnect power
before working on
wiring.
wiring
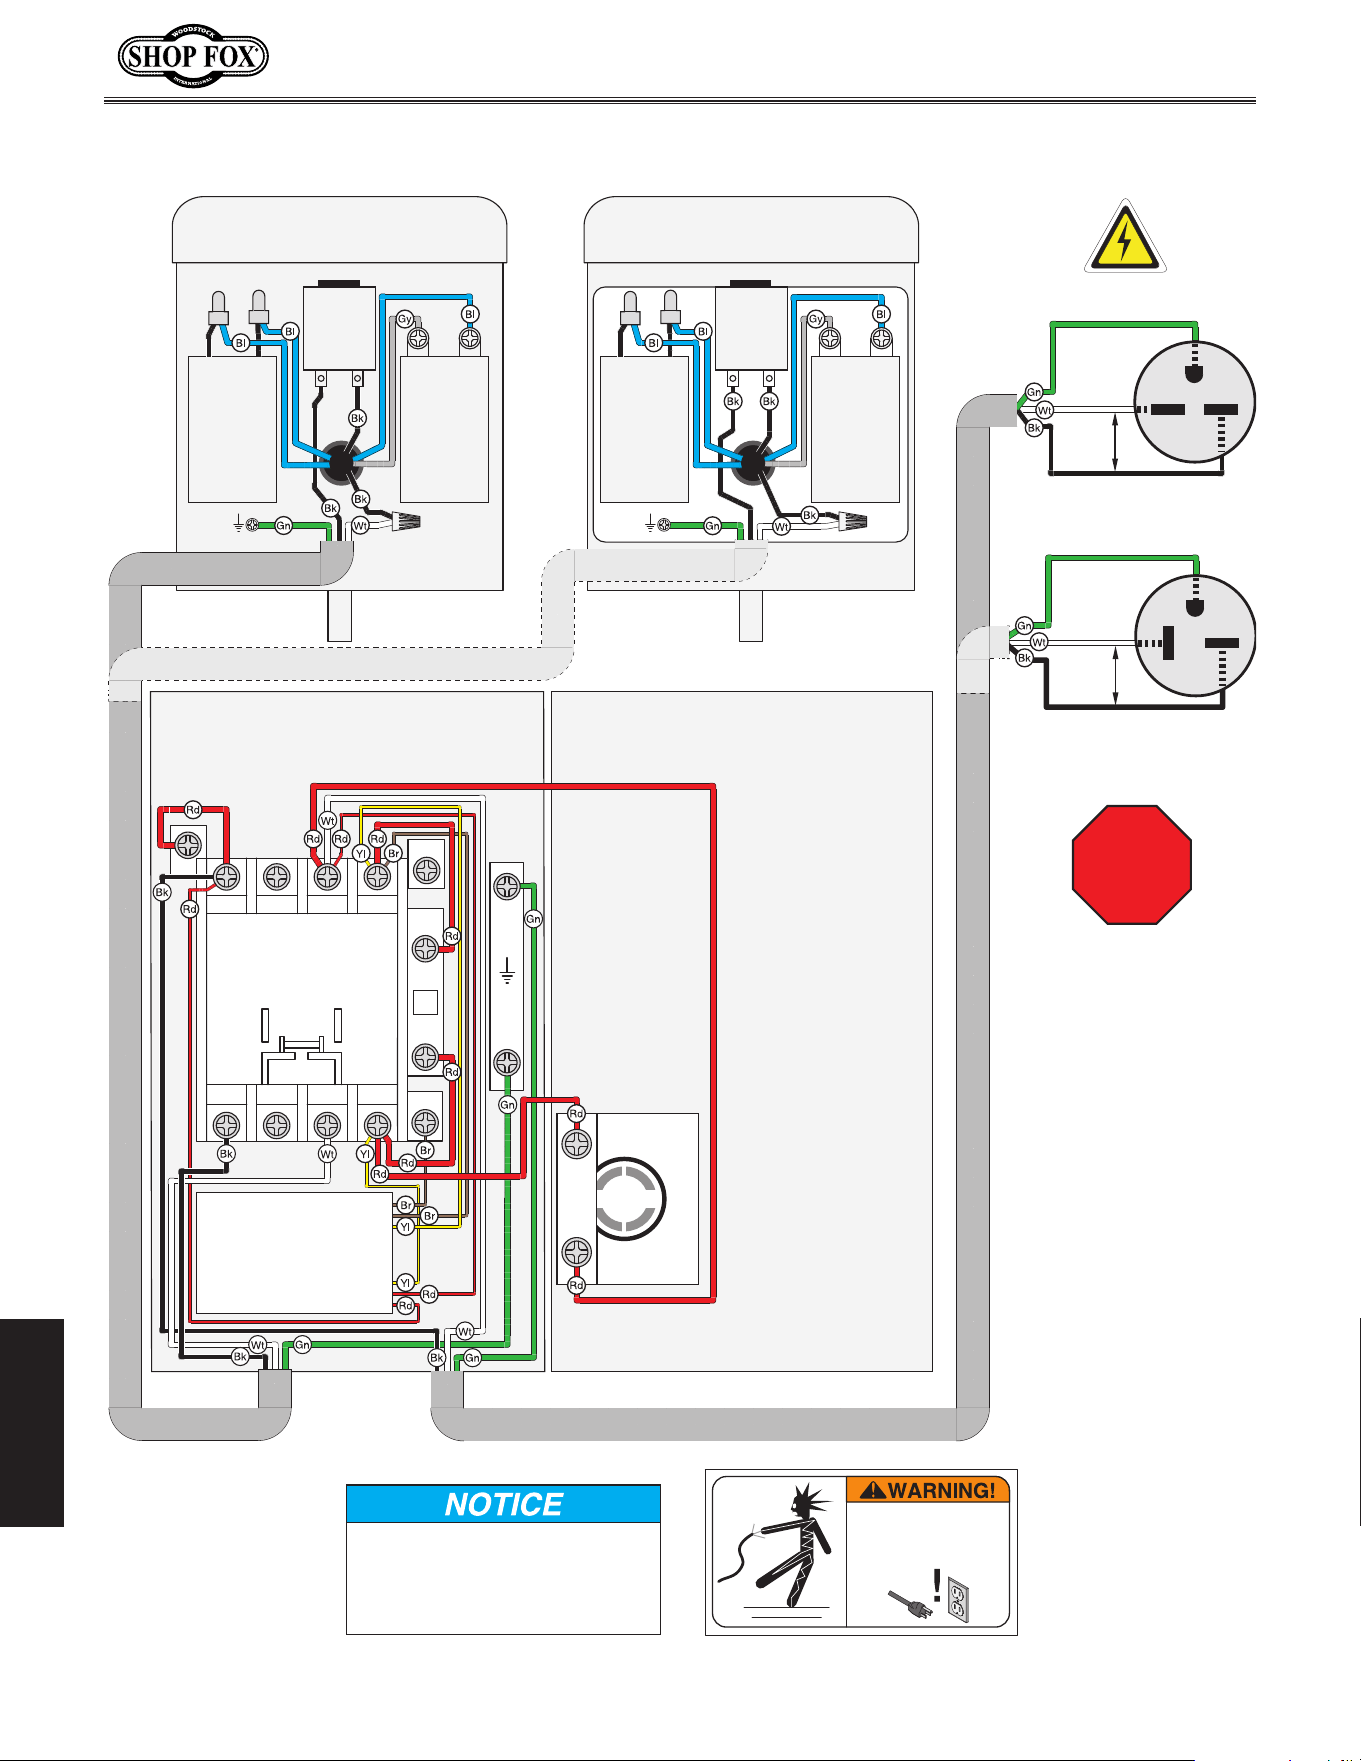
-48-
Model W1867/W1868/W1869 (For Machines Mfd. Since 11/18)
SERVICE
STOP
Read
Page 45
Before
Wiring
W1868/W1869.W iring.Diagram
Hot
Hot
Ground
6-15 Plug (W1868)
220
VACt
G
Hot
Hot
Ground
6-20 Plug (W1869)
220
VAC
G
220 VAC
A1
A2
REMOTE RECEIVER
(220V W1868 W1869)
GND
A2
2T1 6T3
14NO
4T2
1L1 5L3
13NO
3L2
CONTACTOR
NHD C-12D10 220V (W1868)
NHD C-18D10 220V (W1869)
EMERGENCY
STOP SWITCH
& CONTACT
BLOCK
17
18
Ground
Run
Capacitor
30 uF-U
250VAC
W1868 MOTOR 2 HP 220V
Circuit
Breaker
Zing Ear
ZE700-15
Start
Capacitor
300MFD
125VAC
Ground
Run
Capacitor
50 uF-U
250VAC
W1869 MOTOR 3 HP 220V
Circuit
Breaker
Zing Ear
ZE700-50
Start
Capacitor
400MFD
125VAC
MAGNETIC SWITCH
NHD MS1-12D 220V (W1868)
NHD MS1-18D 220V (W1869)
MAGNETIC SWITCH COVER
NHD
CB-01
NHD NPB22-H
The motor wiring shown here is
current at the time of printing, but
it may not match your machine.
Always use the wiring diagram inside
the motor junction box.
SHOCK HAZARD!
Disconnect power
before working on
wiring.
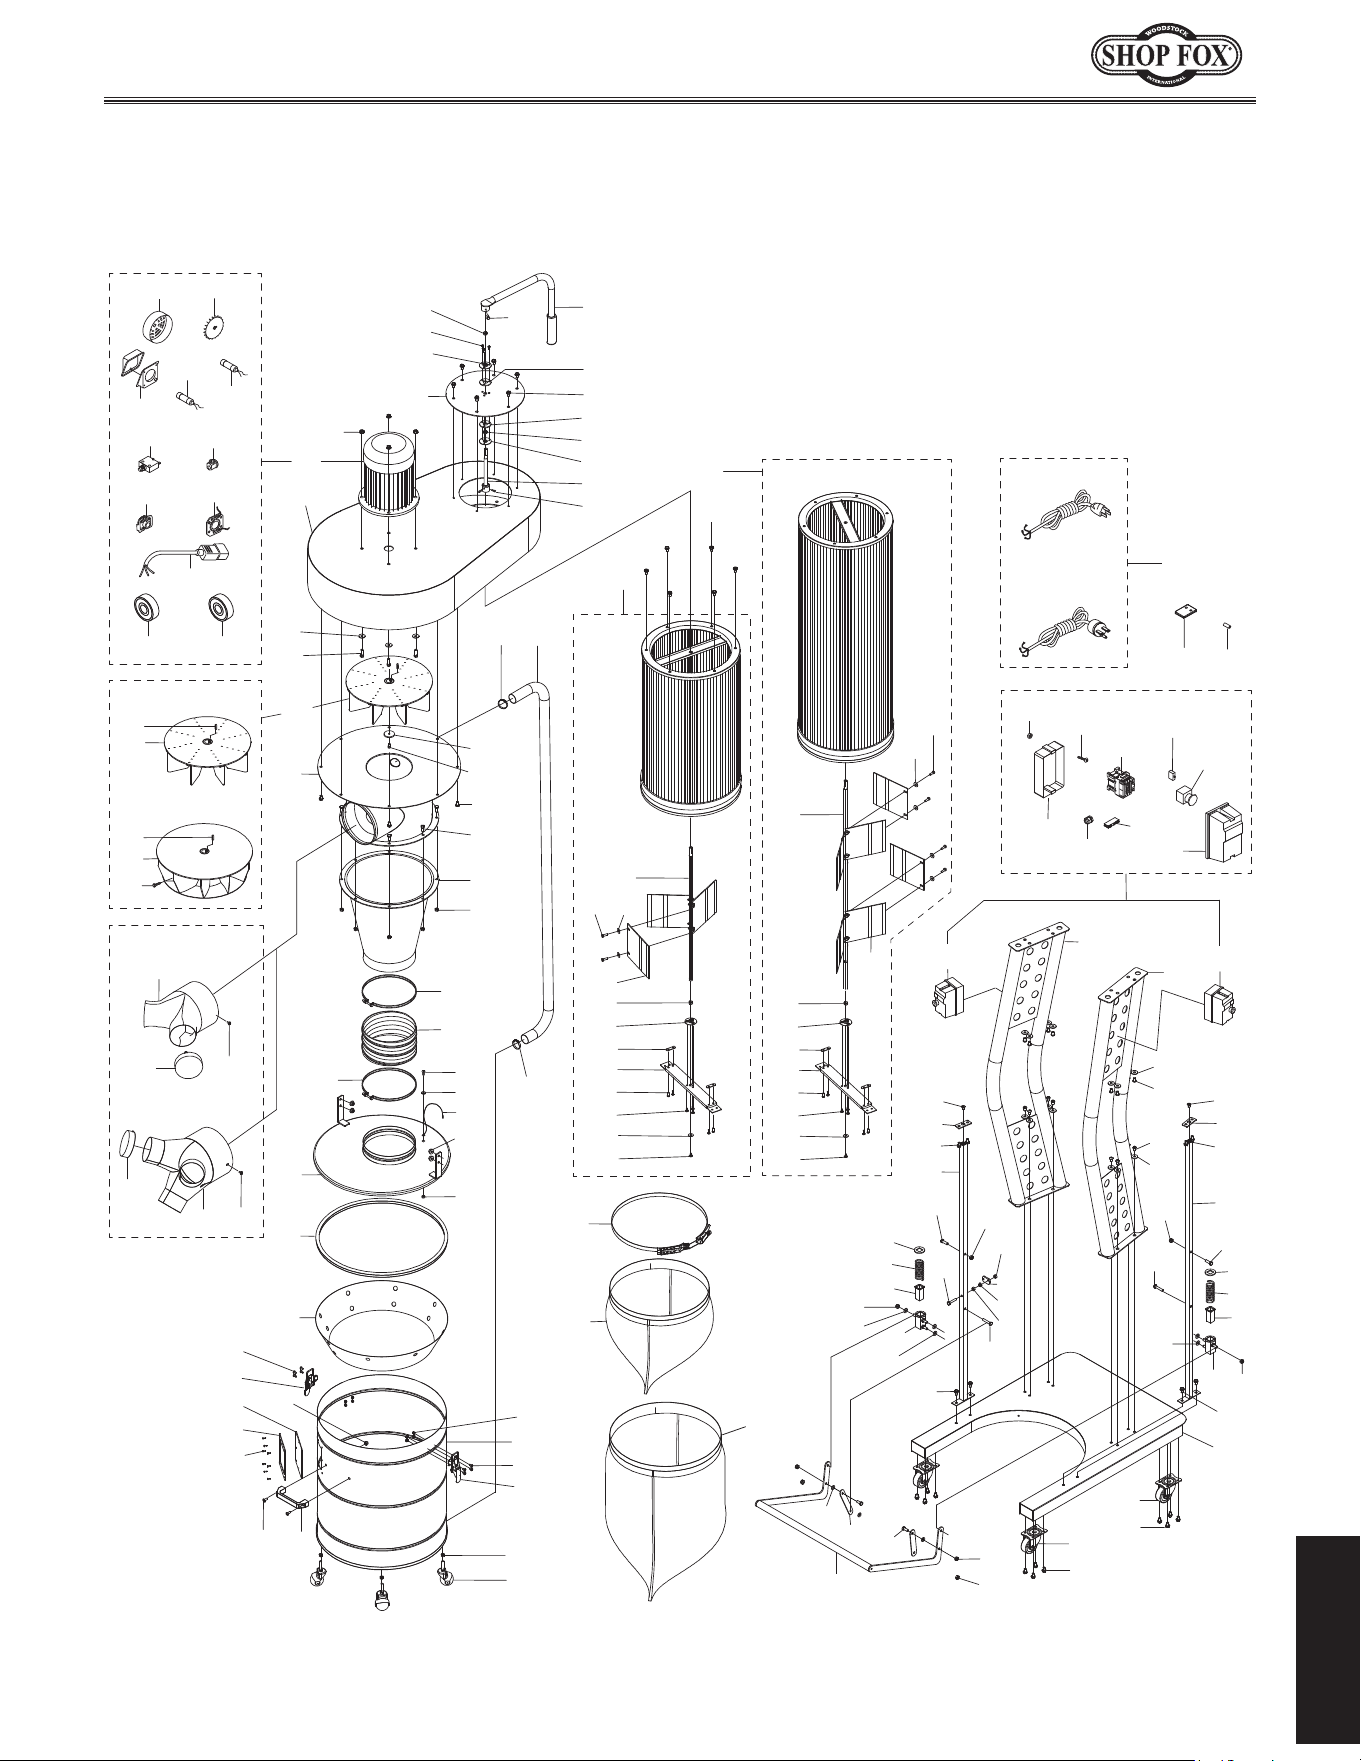
-49-
Model W1867/W1868/W1869 (For Machines Mfd. Since 11/18)
PARTS
PARTS
W1867/W1868/W1869.Parts
67
77
36
40
35
34
33
32
54
7
32
35
38
39
83
29
3
31
19
49
49
2
31
56
2
55
15
14
20
19
27
28
37
22
21
17
16
1
12
37
75
74
68
57
11
4
10
65 64
63
61
62
68
57
66
69
73
9
76
58
76
11
28
84
37
14
6
20
19
15
37
55
37
22
21
17
16
70
5
71
72
74
54
54
20
25
28
11
11
83
37
12
31
56
86
78
81
80
87
82
29-2
29-3
29-1
29-4
29-5
29-6
29-7
29-8
29-9
29-10
49-1
49-8
49-4
49-5
54
41
59
4360
35
38
46
42
47
45
43
44
51
50
35
38
46
42
47
45
43
44
20
20
20
23
25
24
26
83
27
W1867
W1869
W1869
W1869
W1867
W1868
W1867
W1868
W1867 W1868
W1868 W1869
W1867
W1868
W1869
52
52
13
13
53
53
70
85
49-7
49-3
49-2
49-6
49-9
67-1
29-11 29-12
60
43
59
41
70
85
88
8
8
79
-50-
Model W1867/W1868/W1869 (For Machines Mfd. Since 11/18)
PARTS
W1867.Parts.List
REF PART # DESCRIPTION REF PART # DESCRIPTION
1 X1867001 BASE 44 X1867044 PHLP HD SCR M6-1 X 10
2 X1867002 SUPPORT LEG 45 X1867045 PHLP HD SCR M5-.8 X 8
3 X1867003 IMPELLER HOUSING 46 X1867046 PADDLE SPINDLE BRACKET RETAINER
4 X1867004 COLLECTION DRUM, 20 GALLON 47 X1867047 PHLP HD SCR M5-.8 X 15
5 X1867005 INTAKE BARREL 49 X1867049 MAG SWITCH NHD MS1-12D 110V
6 X1867006 CYCLONE FUNNEL 49-1 X1867049-1 CONTACTOR NHD C-12D10 110V
7 X1867007 FILTER COVER PLATE 49-2 X1867049-2 E-STOP SWITCH NHD NPB22-H
8 X1867008 CANISTER FILTER ASSY 14-1/2" X 24" 49-3 X1867049-3 CONTACT BLOCK NHD CB-01
9 X1867009 COLLECTION DRUM LID 49-4 X1867049-4 REMOTE CONTROL RECEIVER
10 X1867010 CASTER 2", SWIVEL 49-5 X1867049-5 STRAIN RELIEF TYPE-3 M20-1.5
11 X1867011 HEX NUT 5/16-18 49-6 X1867049-6 MAG SWITCH BASE
12 X1867012 CASTER 2-1/2", LOCKING SWIVEL 49-7 X1867049-7 MAG SWITCH COVER
13 X1867013 INLET ADAPTER 6" X 4" X 2 49-8 X1867049-8 PHLP HD SCR 10-24 X 3/4
14 X1867014 LOCK HANDLE GUIDE 49-9 X1867049-9 HEX NUT 10-24
15 X1867015 MOUNTING PLATE 50 X1867050 FILTER BAG 20" X 23"
16 X1867016 SPRING BRACKET 51 X1867051 BAG CLAMP 15"
17 X1867017 COPPER PLATE 52 X1867052 INLET ADAPTER CAP 4"
19 X1867019 HEX BOLT 5/16-18 X 1 53 X1867053 PHLP HD SCR 10-24 X 3/8
20 X1867020 LOCK NUT 5/16-18 54 X1867054 FLANGE BOLT 5/16-18 X 3/4
21 X1867021 COMPRESSION SPRING 3 X 33 X 70 55 X1867055 FLAT HD SCR 5/16-18 X 1-1/4
22 X1867022 SPRING RETAINER 56 X1867056 BUTTON HD CAP SCR 5/16-18 X 1/2
23 X1867023 DRUM LOCK HANDLE 57 X1867057 COLLECTION DRUM LID LATCH
24 X1867024 LOCK HANDLE LINK 58 X1867058 FLEX HOSE 7" X 5"
25 X1867025 FLAT WASHER 3/8 PLASTIC 59 X1867059 FILTER PADDLE
26 X1867026 BUTTON HD CAP SCR 5/16-18 X 3/4 60 X1867060 HEX BOLT M6-1 X 12
27 X1867027 FLAT WASHER 5/16 61 X1867061 FOAM GASKET, 120 X 140MM
28 X1867028 HEX BOLT 5/16-18 X 1-3/4 62 X1867062 DRUM WINDOW, 120 X 140MM ACRYLIC
29 X1867029 MOTOR 1.5HP 110V 1-PH 63 X1867063 RIVET 2 X 4MM
29-1 X1867029-1 MOTOR FAN COVER 64 X1867064 COLLECTION DRUM HANDLE
29-2 X1867029-2 MOTOR FAN 65 X1867065 PHLP HD SCR 1/4-20 X 5/8
29-3 X1867029-3 MOTOR JUNCTION BOX 66 X1867066 ACORN NUT 1/4-20
29-4 X1867029-4 R CAPACITOR 50M 250V 1-1/2 X 2-3/8 67 X1867067 REMOTE CONTROL
29-5 X1867029-5 S CAPACITOR 300M 125V 1-3/8 X 2-5/8 67-1 X1867067-1 REMOTE BATTERY TYPE A27 12V
29-6 X1867029-6 CIRCUIT BREAKER ZING EAR ZE-700 25A 68 X1867068 PHLP HD SCR M4-.7 X 8
29-7 X1867029-7 STRAIN RELIEF TYPE-2 15MM 69 X1867069 LOCK NUT M4-.7
29-8 X1867029-8 CENTRIFUGAL SWITCH 70 X1867070 IMPELLER 12-3/4"
29-9 X1867029-9 CONTACT PLATE 71 X1867071 IMPELLER WASHER 6 X 38 X 4MM
29-10 X1867029-10 MOTOR CORD W/PLUG 14G 3W 30" 72 X1867072 CAP SCREW M6-1 X 30
29-11 X1867029-11 BALL BEARING 6203-2RS 73 X1867073 COLLECTION DRUM GASKET
29-12 X1867029-12 BALL BEARING 6205-2RS 74 X1867074 HOSE CLAMP 1-3/4"
31 X1867031 FENDER WASHER 5/16 75 X1867075 VACUUM HOSE 1-1/2" X 60"
32 X1867032 RUBBER GASKET 43MM 76 X1867076 HOSE CLAMP 8-1/2"
33 X1867033 BEARING RETAINER, UPPER 77 X1867077 POWER CORD 14G 3W 72" 5-15P
34 X1867034 PHLP HD SCR M5-.8 X 8 78 X1867078 VACUUM RING
35 X1867035 SLEEVE BEARING 12 X 14 X 6MM 79 X1867079 COLLECTION DRUM BAG 30" X 41"
36 X1867036 FILTER PADDLE HANDLE 80 X1867080 GROUND WIRE 18G 17-1/2"
37 X1867037 FLANGE BOLT 5/16-18 X 1/2 81 X1867081 PHLP HD SCR 10-24 X 3/8
38 X1867038 BEARING RETAINER, LOWER 82 X1867082 HEX NUT 10-24
39 X1867039 PADDLE HANDLE SPINDLE 83 X1867083 FLANGE NUT 5/16-18
40 X1867040 HEX BOLT M6-1 X 16 84 X1867084 LOCK HANDLE STOP
41 X1867041 FILTER PADDLE SPINDLE 85 X1867085 KEY 7 X 7 X 29
42 X1867042 PADDLE SPINDLE BRACKET 86 X1867086 CAP SCREW M6-1 X 16
43 X1867043 FLAT WASHER 1/4 87 X1867087 EXT TOOTH WASHER #10
-51-
Model W1867/W1868/W1869 (For Machines Mfd. Since 11/18)
PARTS
W1868.Parts.List
REF PART # DESCRIPTION REF PART # DESCRIPTION
1 X1868001 BASE 44 X1868044 PHLP HD SCR M6-1 X 10
2 X1868002 SUPPORT LEG 45 X1868045 PHLP HD SCR M5-.8 X 8
3 X1868003 IMPELLER HOUSING 46 X1868046 PADDLE SPINDLE BRACKET RETAINER
4 X1868004 COLLECTION DRUM, 20 GALLON 47 X1868047 PHLP HD SCR M5-.8 X 15
5 X1868005 INTAKE BARREL 49 X1868049 MAG SWITCH NHD MS1-12D 220V
6 X1868006 CYCLONE FUNNEL 49-1 X1868049-1 CONTACTOR NHD C-12D10 220V
7 X1868007 FILTER COVER PLATE 49-2 X1868049-2 E-STOP SWITCH NHD NPB22-H
8 X1868008 CANISTER FILTER ASSY 14-1/2" X 24" 49-3 X1868049-3 CONTACT BLOCK NHD CB-01
9 X1868009 COLLECTION DRUM LID 49-4 X1868049-4 REMOTE CONTROL RECEIVER
10 X1868010 CASTER 2", SWIVEL 49-5 X1868049-5 STRAIN RELIEF TYPE-3 M20-1.5
11 X1868011 HEX NUT 5/16-18 49-6 X1868049-6 MAG SWITCH BASE
12 X1868012 CASTER 2-1/2", LOCKING SWIVEL 49-7 X1868049-7 MAG SWITCH COVER
13 X1868013 INLET ADAPTER 7" X 4" X 3 49-8 X1868049-8 PHLP HD SCR 10-24 X 3/4
14 X1868014 LOCK HANDLE GUIDE 49-9 X1868049-9 HEX NUT 10-24
15 X1868015 MOUNTING PLATE 50 X1868050 FILTER BAG 20" X 23"
16 X1868016 SPRING BRACKET 51 X1868051 BAG CLAMP 15"
17 X1868017 COPPER PLATE 52 X1868052 INLET ADAPTER CAP 4"
19 X1868019 HEX BOLT 5/16-18 X 1 53 X1868053 PHLP HD SCR 10-24 X 3/8
20 X1868020 LOCK NUT 5/16-18 54 X1868054 FLANGE BOLT 5/16-18 X 3/4
21 X1868021 COMPRESSION SPRING 3 X 33 X 70 55 X1868055 FLAT HD SCR 5/16-18 X 1-1/4
22 X1868022 SPRING RETAINER 56 X1868056 BUTTON HD CAP SCR 5/16-18 X 1/2
23 X1868023 DRUM LOCK HANDLE 57 X1868057 COLLECTION DRUM LID LATCH
24 X1868024 LOCK HANDLE LINK 58 X1868058 FLEX HOSE 8" X 7"
25 X1868025 FLAT WASHER 3/8 PLASTIC 59 X1868059 FILTER PADDLE
26 X1868026 BUTTON HD CAP SCR 5/16-18 X 3/4 60 X1868060 HEX BOLT M6-1 X 12
27 X1868027 FLAT WASHER 5/16 61 X1868061 FOAM GASKET 120 X 140MM
28 X1868028 HEX BOLT 5/16-18 X 1-3/4 62 X1868062 DRUM WINDOW, 120 X 140MM ACRYLIC
29 X1868029 MOTOR 2HP 220V 1-PH 63 X1868063 RIVET 2 X 4MM
29-1 X1868029-1 MOTOR FAN COVER 64 X1868064 COLLECTION DRUM HANDLE
29-2 X1868029-2 MOTOR FAN 65 X1868065 PHLP HD SCR 1/4-20 X 5/8
29-3 X1868029-3 MOTOR JUNCTION BOX 66 X1868066 ACORN NUT 1/4-20
29-4 X1868029-4 R CAPACITOR 30M 250V 1-1/2 X 2-3/8 67 X1868067 REMOTE CONTROL
29-5 X1868029-5 S CAPACITOR 300M 125V 1-3/8 X 2-5/8 67-1 X1868067-1 REMOTE BATTERY TYPE A27 12V
29-6 X1868029-6 CIRCUIT BREAKER ZING EAR ZE-700 15A 68 X1868068 PHLP HD SCR M4-.7 X 8
29-7 X1868029-7 STRAIN RELIEF TYPE-2 15MM 69 X1868069 LOCK NUT M4-.7
29-8 X1868029-8 CENTRIFUGAL SWITCH 70 X1868070 IMPELLER 13"
29-9 X1868029-9 CONTACT PLATE 71 X1868071 IMPELLER WASHER 6 X 38 X 4MM
29-10 X1868029-10 MOTOR CORD W/PLUG 14G 3W 30" 72 X1868072 CAP SCREW M6-1 X 30
29-11 X1868029-11 BALL BEARING 6203-2RS 73 X1868073 COLLECTION DRUM GASKET
29-12 X1868029-12 BALL BEARING 6205-2RS 74 X1868074 HOSE CLAMP 1-3/4"
31 X1868031 FENDER WASHER 5/16 75 X1868075 VACUUM HOSE 1-1/2" X 60"
32 X1868032 RUBBER GASKET 43MM 76 X1868076 HOSE CLAMP 8-1/2"
33 X1868033 BEARING RETAINER, UPPER 77 X1868077 POWER CORD 14G 3W 72" 6-15P
34 X1868034 PHLP HD SCR M5-.8 X 8 78 X1868078 VACUUM RING
35 X1868035 SLEEVE BEARING 12 X 14 X 6MM 79 X1868079 COLLECTION DRUM BAG 30" X 41"
36 X1868036 FILTER PADDLE HANDLE 80 X1868080 GROUND WIRE 18G 17-1/2"
37 X1868037 FLANGE BOLT 5/16-18 X 1/2 81 X1868081 PHLP HD SCR 10-24 X 3/8
38 X1868038 BEARING RETAINER, LOWER 82 X1868082 HEX NUT 10-24
39 X1868039 PADDLE HANDLE SPINDLE 83 X1868083 FLANGE NUT 5/16-18
40 X1868040 HEX BOLT M6-1 X 16 84 X1868084 LOCK HANDLE STOP
41 X1868041 FILTER PADDLE SPINDLE 85 X1868085 KEY 7 X 7 X 29
42 X1868042 PADDLE SPINDLE BRACKET 86 X1868086 CAP SCREW M6-1 X 16
43 X1868043 FLAT WASHER 1/4 87 X1868087 EXT TOOTH WASHER #10
-52-
Model W1867/W1868/W1869 (For Machines Mfd. Since 11/18)
PARTS
W1869.Parts.List
REF PART # DESCRIPTION REF PART # DESCRIPTION
1 X1869001 BASE 45 X1869045 PHLP HD SCR M5-.8 X 8
2 X1869002 SUPPORT LEG 46 X1869046 PADDLE SPINDLE BRACKET RETAINER
3 X1869003 IMPELLER HOUSING 47 X1869047 PHLP HD SCR M5-.8 X 15
4 X1869004 COLLECTION DRUM, 38 GALLON 49 X1869049 MAG SWITCH NHD MS1-18D 220V
5 X1869005 INTAKE BARREL 49-1 X1869049-1 CONTACTOR NHD C-18D10 220V
6 X1869006 CYCLONE FUNNEL 49-2 X1869049-2 E-STOP SWITCH NHD NPB22-H
7 X1869007 FILTER COVER PLATE 49-3 X1869049-3 CONTACT BLOCK NHD CB-01
8 X1869008 CANISTER FILTER ASSY 14-1/2" X 39-3/8" 49-4 X1869049-4 REMOTE CONTROL RECEIVER
9 X1869009 COLLECTION DRUM LID 49-5 X1869049-5 STRAIN RELIEF TYPE-3 M20-1.5
10 X1869010 CASTER 2", SWIVEL 49-6 X1869049-6 MAG SWITCH BASE
11 X1869011 HEX NUT 5/16-18 49-7 X1869049-7 MAG SWITCH COVER
12 X1869012 CASTER 2-1/2", LOCKING SWIVEL 49-8 X1869049-8 PHLP HD SCR 10-24 X 3/4
13 X1869013 INLET ADAPTER 8" X 4" X 3 49-9 X1869049-9 HEX NUT 10-24
14 X1869014 LOCK HANDLE GUIDE 50 X1869050 FILTER BAG 20" X 23"
15 X1869015 MOUNTING PLATE 51 X1869051 BAG CLAMP 15"
16 X1869016 SPRING BRACKET 52 X1869052 INLET ADAPTER CAP 4"
17 X1869017 COPPER PLATE 53 X1869053 PHLP HD SCR 10-24 X 3/8
19 X1869019 HEX BOLT 5/16-18 X 1 54 X1869054 FLANGE BOLT 5/16-18 X 3/4
20 X1869020 LOCK NUT 5/16-18 55 X1869055 FLAT HD SCR 5/16-18 X 1-1/4
21 X1869021 COMPRESSION SPRING 3 X 33 X 70 56 X1869056 BUTTON HD CAP SCR 5/16-18 X 1/2
22 X1869022 SPRING RETAINER 57 X1869057 COLLECTION DRUM LID LATCH
23 X1869023 DRUM LOCK HANDLE 58 X1869058 FLEX HOSE 12" X 9-1/2"
24 X1869024 LOCK HANDLE LINK 59 X1869059 FILTER PADDLE
25 X1869025 FLAT WASHER 3/8 PLASTIC 60 X1869060 HEX BOLT M6-1 X 16
26 X1869026 BUTTON HD CAP SCR 5/16-18 X 3/4 61 X1869061 FOAM GASKET, 120 X 140MM
27 X1869027 FLAT WASHER 5/16 62 X1869062 DRUM WINDOW, 120 X 140MM ACRYLIC
28 X1869028 HEX BOLT 5/16-18 X 1-3/4 63 X1869063 RIVET 2 X 4MM
29 X1869029 MOTOR 3HP 220V 1-PH 64 X1869064 COLLECTION DRUM HANDLE
29-1 X1869029-1 MOTOR FAN COVER 65 X1869065 PHLP HD SCR 1/4-20 X 5/8
29-2 X1869029-2 MOTOR FAN 66 X1869066 ACORN NUT 1/4-20
29-3 X1869029-3 MOTOR JUNCTION BOX 67 X1869067 REMOTE CONTROL
29-4 X1869029-4 R CAPACITOR 50M 250V 1-1/2 X 2-3/8 67-1 X1869067-1 REMOTE BATTERY TYPE A27 12V
29-5 X1869029-5 S CAPACITOR 400M 125V 1-3/8 X 2-3/4 68 X1869068 PHLP HD SCR M4-.7 X 8
29-6 X1869029-6 CIRCUIT BREAKER ZING EAR ZE-700 50A 69 X1869069 LOCK NUT M4-.7
29-7 X1869029-7 STRAIN RELIEF TYPE-2 15MM 70 X1869070 IMPELLER 15"
29-8 X1869029-8 CENTRIFUGAL SWITCH 71 X1869071 IMPELLER WASHER 6 X 38 X 4MM
29-9 X1869029-9 CONTACT PLATE 72 X1869072 CAP SCREW M6-1 X 30
29-10 X1869029-10 MOTOR CORD W/PLUG 12G 3W 30" 73 X1869073 COLLECTION DRUM GASKET
29-11 X1869029-11 BALL BEARING 6205-2RS 74 X1869074 HOSE CLAMP 1-3/4"
29-12 X1869029-12 BALL BEARING 6206-2RS 75 X1869075 VACUUM HOSE 1-1/2" X 60"
31 X1869031 FENDER WASHER 5/16 76 X1869076 HOSE CLAMP 8-1/2"
32 X1869032 RUBBER GASKET 43MM 77 X1869077 POWER CORD 12G 3W 72" 6-20P
33 X1869033 BEARING RETAINER, UPPER 78 X1869078 VACUUM RING
34 X1869034 PHLP HD SCR M5-.8 X 8 79 X1869079 COLLECTION DRUM BAG 39" X 56"
35 X1869035 SLEEVE BEARING 12 X 14 X 6MM 80 X1869080 GROUND WIRE 18G 17-1/2"
36 X1869036 FILTER PADDLE HANDLE 81 X1869081 PHLP HD SCR 10-24 X 3/8
37 X1869037 FLANGE BOLT 5/16-18 X 1/2 82 X1869082 HEX NUT 10-24
38 X1869038 BEARING RETAINER, LOWER 83 X1869083 FLANGE NUT 5/16-18
39 X1869039 PADDLE HANDLE SPINDLE 84 X1869084 LOCK HANDLE STOP
40 X1869040 HEX BOLT M6-1 X 16 85 X1869085 KEY 7 X 7 X 30
41 X1869041 FILTER PADDLE SPINDLE 86 X1869086 CAP SCREW M6-1 X 16
42 X1869042 PADDLE SPINDLE BRACKET 87 X1869087 EXT TOOTH WASHER #10
43 X1869043 FLAT WASHER 1/4 88 X1869088 HEX BOLT 3/8-16 X 1/2
44 X1869044 PHLP HD SCR M6-1 X 10
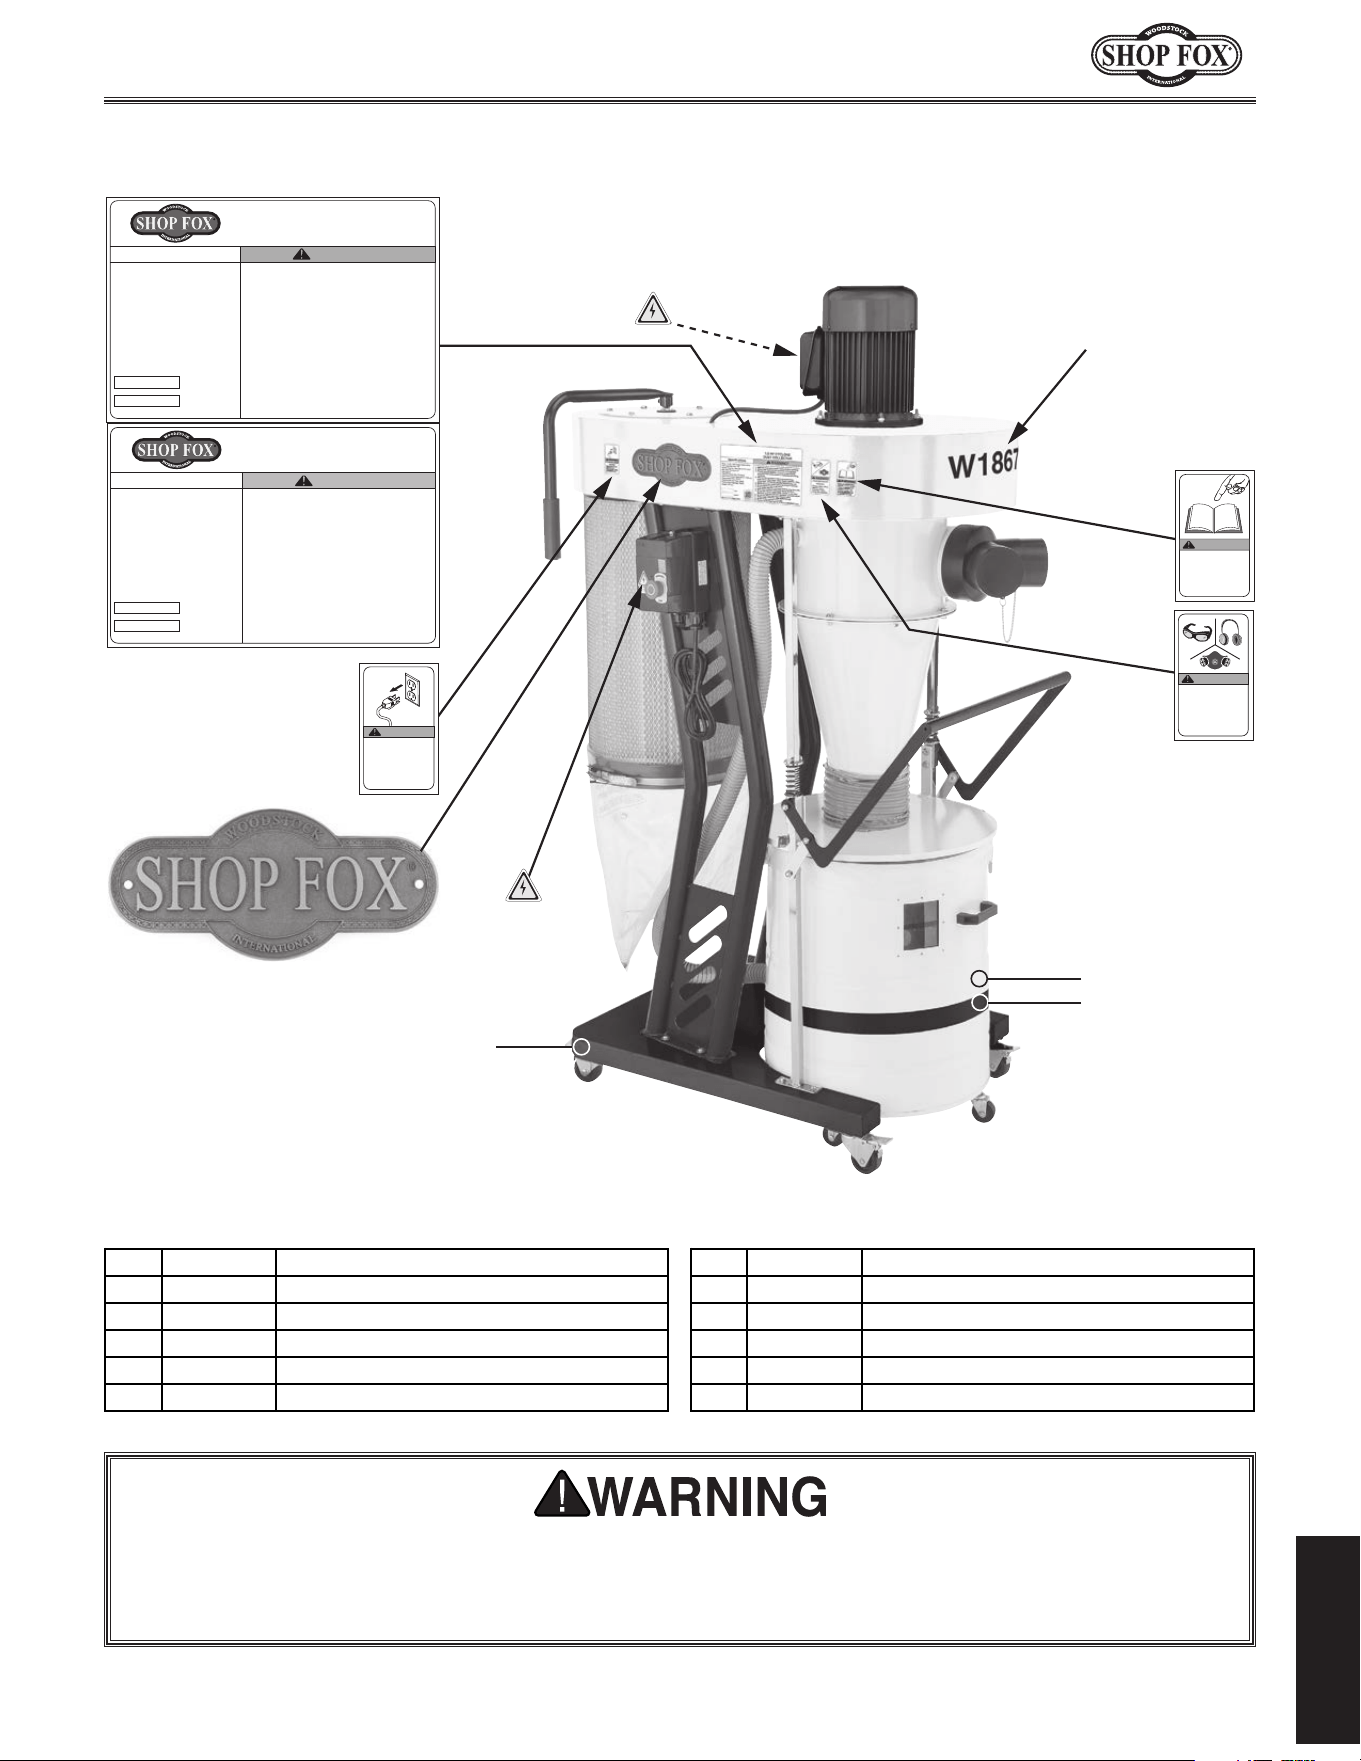
-53-
Model W1867/W1868/W1869 (For Machines Mfd. Since 11/18)
PARTS
Safety.labels.warn.about.machine.hazards.and.how.to.prevent.serious.personal.injury..The.owner.
of.this.machine.MUST.maintain.the.original.location.and.readability.of.all.labels.on.this. machine..
If.any.label.is.removed.or.becomes.unreadable,.REPLACE.that.label.before.allowing.machine.to.
be.operated.again..Contact.us.at.(360).734-3482.or.www.woodstockint.com.to.order.new.labels..
W1867/W1868.Labels.&.Cosmetics
W1867
WARNING
ACCIDENTAL INJURY
HAZARD!
Disconnect power
supply before
adjustments, setup
or maintenance!
MODEL W1867
1.5 HP CYCLONE
DUST COLLECTOR
WARNING!
To reduce the risk of serious injury when using this machine:
1. Read and understand owner’s manual before operating.
2. Always wear approved eye protection and respirator.
3. Only plug power cord into a grounded outlet.
4. Only use this machine to collect wood dust/chips;
never use to collect glass, metal, liquids, asbestos, silica,
animal parts, biohazards, burning material/ashes, etc.
5. Always disconnect power before servicing or cleaning.
6. Do not expose to rain or wet areas.
7. Keep hands, long hair, and loose clothing away from inlet.
8. Never leave machine unattended during operation.
9. Do not use if cord, plug, or any other electrical equipment
becomes damaged—promptly repair!
10. Do not use without dust bag or filters in place.
11. Do not connect cord to power supply with wet hands.
12. Grasp and pull the plug, not the cord, when unplugging.
13. Always wear a respirator when emptying bags.
14. Do not modify machine in any way.
15. Prevent unauthorized use by children or untrained users;
restrict access or disable machine when unattended.
Motor: 1.5 HP, 110V, Single-Phase, 60 Hz
Full-Load Current Rating: 15A
Airflow Performance: 868 CFM @ 1.8" SP
Max. Static Pressure: 9.7"
Inlet Size: 6"
Collection Drum Size: 20 Gallons
Filter Rating: 99.9% at 0.2 – 1 Micron
Cartridge Filter: 14-1/2" x 24"
Replacement Filter: D4892
Replacement Filter Bag: D4893
Replacement Drum Bag: D4894
Weight: 265 lbs.
Mfd. for Woodstock in Taiwan
Date
S/N
Specifications
READ and UNDERSTAND
MANUAL to avoid serious
injury! If a manual is not
available, DO NOT use
machine! Instead, go to
www.woodstockint.com
or call
(
360
)
734-3482.
WARNING!
WARNING!
INJURY HAZARD!
To reduce risk of short
and long-term injury,
wear safety glasses,
hearing protection, and
a respirator when using
this machine.
W1868
101
102
103
104
105
106
107
102
108
109
MODEL W1868
2 HP CYCLONE
DUST COLLECTOR
WARNING!
To reduce the risk of serious injury when using this machine:
1. Read and understand owner’s manual before operating.
2. Always wear approved eye protection and respirator.
3. Only plug power cord into a grounded outlet.
4. Only use this machine to collect wood dust/chips;
never use to collect glass, metal, liquids, asbestos, silica,
animal parts, biohazards, burning material/ashes, etc.
5. Always disconnect power before servicing or cleaning.
6. Do not expose to rain or wet areas.
7. Keep hands, long hair, and loose clothing away from inlet.
8. Never leave machine unattended during operation.
9. Do not use if cord, plug, or any other electrical equipment
becomes damaged—promptly repair!
10. Do not use without dust bag or filters in place.
11. Do not connect cord to power supply with wet hands.
12. Grasp and pull the plug, not the cord, when unplugging.
13. Always wear a respirator when emptying bags.
14. Do not modify machine in any way.
15. Prevent unauthorized use by children or untrained users;
restrict access or disable machine when unattended.
Motor: 2 HP, 220V, Single-Phase, 60 Hz
Full-Load Current Rating: 9A
Airflow Performance: 1023 CFM @ 1.2" SP
Max. Static Pressure: 10.9"
Inlet Size: 7"
Collection Drum Size: 20 Gallons
Filter Rating: 99.9% at 1 Micron
Cartridge Filter: 14-1/2" x 24"
Replacement Filter: D4892
Replacement Filter Bag: D4893
Replacement Drum Bag: D4894
Weight: 285 lbs.
Mfd. for Woodstock in Taiwan
Date
S/N
Specifications
110
REF PART # DESCRIPTION REF PART # DESCRIPTION
101 X1867101 MACHINE ID LABEL (W1867) 105 X1867105 EYE/EAR/LUNG WARNING LABEL
101 X1868101 MACHINE ID LABEL (W1868) 106 X1867106 TOUCH-UP PAINT, SHOP FOX WHITE
102 X1867102 ELECTRICITY WARNING LABEL 107 X1867107 BLACK TRIM TAPE
103 X1867103 MODEL NO. LABEL (W1867) 108 X1867108 TOUCH-UP PAINT, SHOP FOX BLACK
103 X1868103 MODEL NO. LABEL (W1868) 109 X1867109 SHOP FOX NAMEPLATE-MEDIUM
104 X1867104 READ MANUAL LABEL 110 X1867110 DISCONNECT POWER LABEL
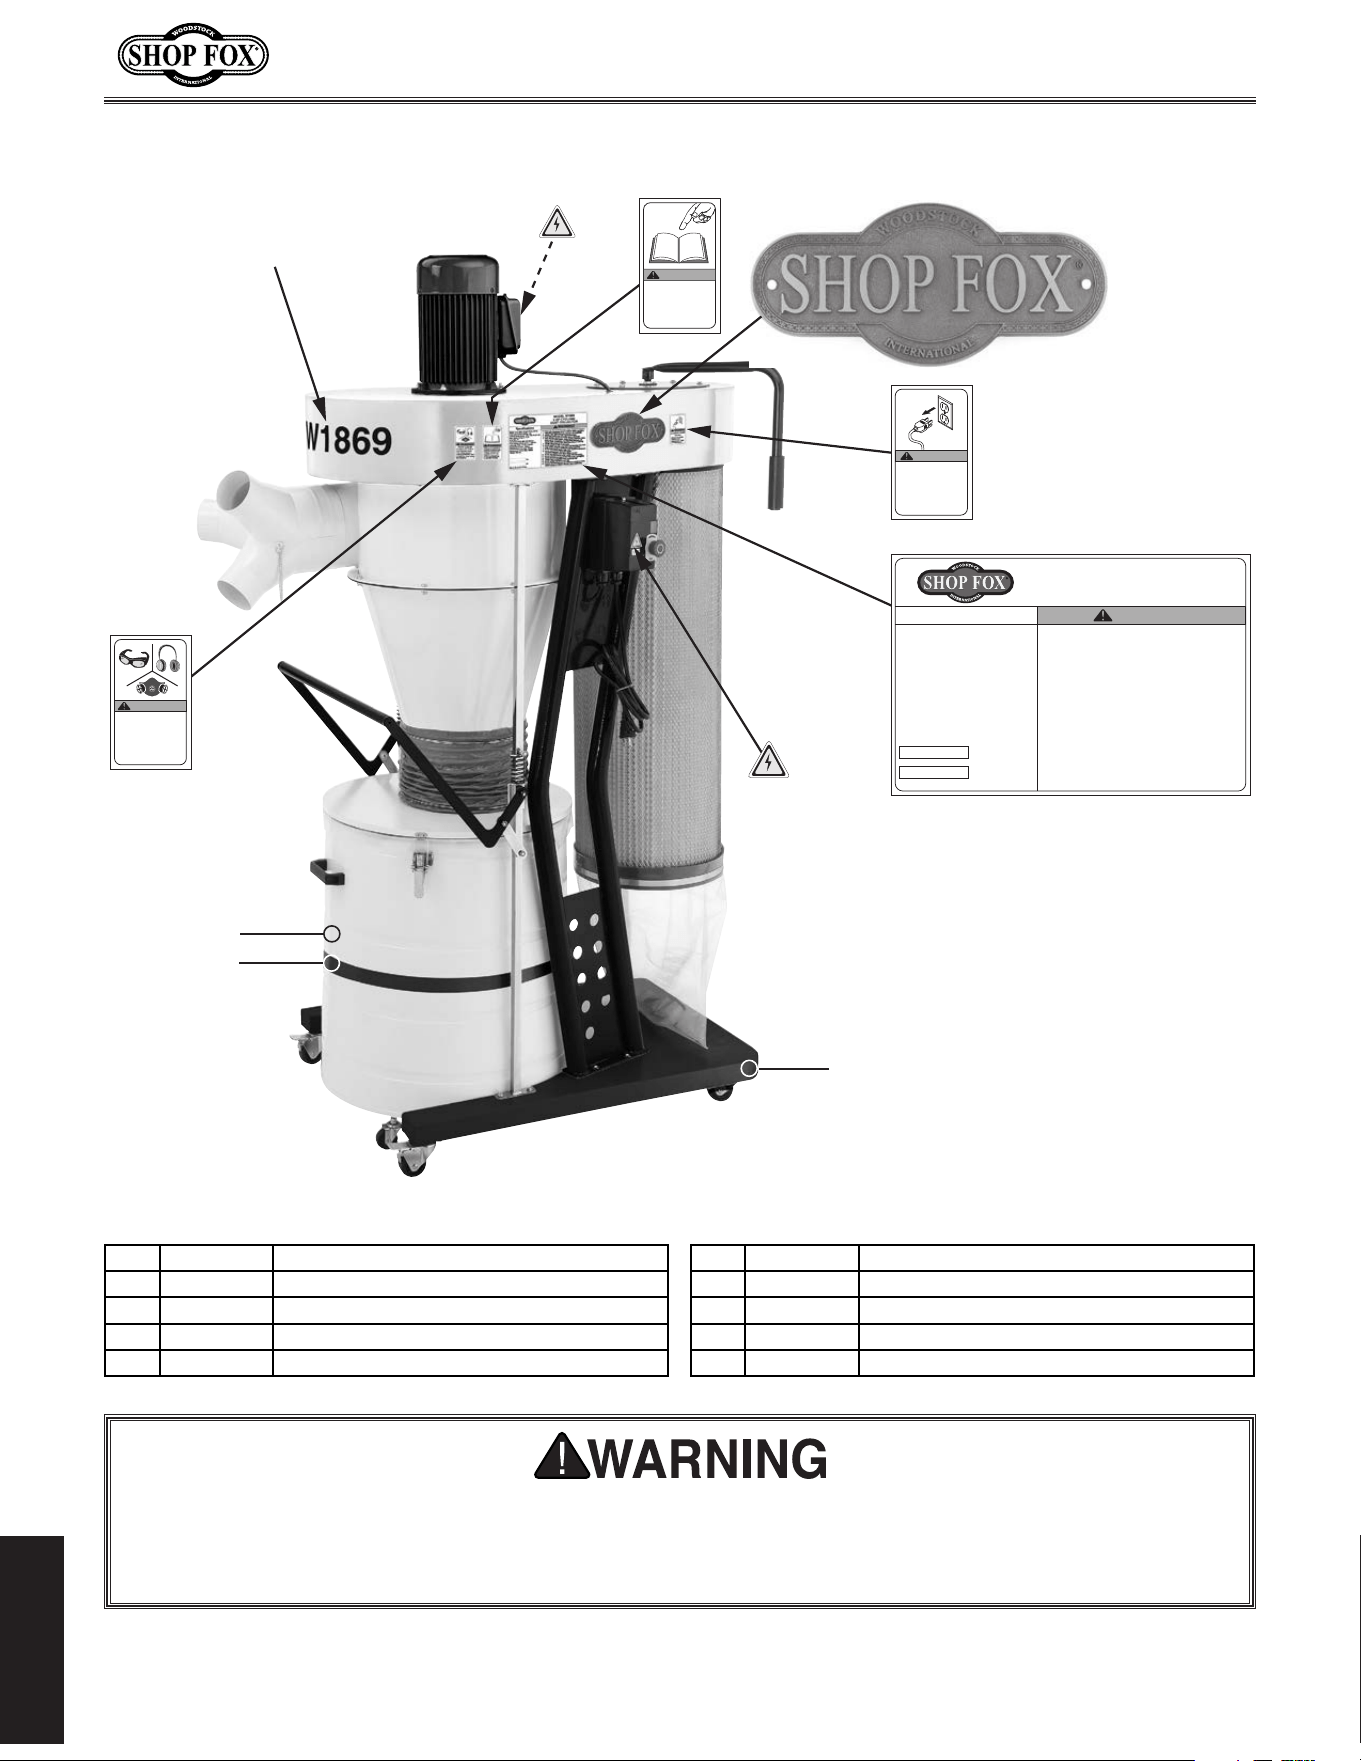
-54-
Model W1867/W1868/W1869 (For Machines Mfd. Since 11/18)
PARTS
W1869.Labels.&.Cosmetics
Safety.labels.warn.about.machine.hazards.and.how.to.prevent.serious.personal.injury..The.owner.
of.this.machine.MUST.maintain.the.original.location.and.readability.of.all.labels.on.this. machine..
If.any.label.is.removed.or.becomes.unreadable,.REPLACE.that.label.before.allowing.machine.to.
be.operated.again..Contact.us.at.(360).734-3482.or.www.woodstockint.com.to.order.new.labels..
W1869
WARNING!
INJURY HAZARD!
To reduce risk of short
and long-term injury,
wear safety glasses,
hearing protection, and
a respirator when using
this machine.
WARNING
ACCIDENTAL INJURY
HAZARD!
Disconnect power
supply before
adjustments, setup
or maintenance!
MODEL W1869
3 HP CYCLONE
DUST COLLECTOR
WARNING!
To reduce the risk of serious injury when using this machine:
1. Read and understand owner’s manual before operating.
2. Always wear approved eye protection and respirator.
3. Only plug power cord into a grounded outlet.
4. Only use this machine to collect wood dust/chips;
never use to collect glass, metal, liquids, asbestos, silica,
animal parts, biohazards, burning material/ashes, etc.
5. Always disconnect power before servicing or cleaning.
6. Do not expose to rain or wet areas.
7. Keep hands, long hair, and loose clothing away from inlet.
8. Never leave machine unattended during operation.
9. Do not use if cord, plug, or any other electrical equipment
becomes damaged—promptly repair!
10. Do not use without dust bag or filters in place.
11. Do not connect cord to power supply with wet hands.
12. Grasp and pull the plug, not the cord, when unplugging.
13. Always wear a respirator when emptying bags.
14. Do not modify machine in any way.
15. Prevent unauthorized use by children or untrained users;
restrict access or disable machine when unattended.
Motor: 3 HP, 220V, Single-Phase, 60 Hz
Full-Load Current Rating: 15A
Airflow Performance: 1941 CFM @ 2.9" SP
Max. Static Pressure: 11"
Inlet Size: 8"
Collection Drum Size: 55 Gallons
Filter Rating: 99.9% at 0.2 – 1 Micron
Cartridge Filter: 14-1/2" x 39-3/8"
Replacement Filter: D4895
Replacement Filter Bag: D4893
Replacement Drum Bag: D4896
Weight: 348 lbs.
Mfd. for Woodstock in Taiwan
Date
S/N
Specifications
READ and UNDERSTAND
MANUAL to avoid serious
injury! If a manual is not
available, DO NOT use
machine! Instead, go to
www.woodstockint.com
or call
(
360
)
734-3482.
WARNING!
102
101
102
110
103
109
104
105
106
108
107
REF PART # DESCRIPTION REF PART # DESCRIPTION
101 W1869101 MACHINE ID LABEL 106 W1869106 TOUCH-UP PAINT, SHOP FOX WHITE
102 W1869102 ELECTRICITY WARNING LABEL 107 W1869107 BLACK TRIM TAPE
103 W1869103 MODEL NO. LABEL 108 W1869108 TOUCH-UP PAINT, SHOP FOX BLACK
104 W1869104 READ MANUAL LABEL 109 W1869109 SHOP FOX NAMEPLATE-MEDIUM
105 W1869105 EYE/EAR/LUNG WARNING LABEL 110 W1869110 DISCONNECT POWER LABEL
Model W1867/W1868/W1869 (For Machines Mfd. Since 11/18)

tape along edges--please do not staple
Fold along dotted lIne
Fold along dotted lIne
Woodstock international inc.
p.o. box 2309
bellingham, Wa 98227-2309
place
stamp
Here

WARRANTY
Woodstock International, Inc. warrants all Shop Fox machinery to be free of defects from workmanship
and materials for a period of two years from the date of original purchase by the original owner.
This warranty does not apply to defects due directly or indirectly to misuse, abuse, negligence or
accidents, lack of maintenance, or reimbursement of third party expenses incurred.
Woodstock International, Inc. will repair, replace, or arrange for a dealer refund, at its expense and
option, the Shop Fox machine or machine part proven to be defective for its designed and intended
use, provided that the original owner returns the product prepaid to an authorized warranty or repair
facility as designated by our Bellingham, Washington office with proof of their purchase of the product
within two years, and provides Woodstock International, Inc. reasonable opportunity to verify the
alleged defect through inspection. If it is determined there is no defect, or that the defect resulted
from causes not within the scope of Woodstock International Inc.'s warranty, then the original owner
must bear the cost of storing and returning the product.
This is Woodstock International, Inc.’s sole written warranty and any and all warranties that may be
implied by law, including any merchantability or fitness, for any particular purpose, are hereby limited
to the duration of this written warranty. We do not warrant that Shop Fox machinery complies with
the provisions of any law, acts or electrical codes. We do not reimburse for third party repairs. In no
event shall Woodstock International, Inc.’s liability under this limited warranty exceed the purchase
price paid for the product, and any legal actions brought against Woodstock International, Inc. shall be
tried in the State of Washington, County of Whatcom. We shall in no event be liable for death, injuries
to persons or property or for incidental, contingent, special or consequential damages arising from the
use of our products.
Every effort has been made to ensure that all Shop Fox machinery meets high quality and durability
standards. We are commited to continuously improving the quality of our products, and
reserve the
right to change specifications at any time
.
WARRANTY