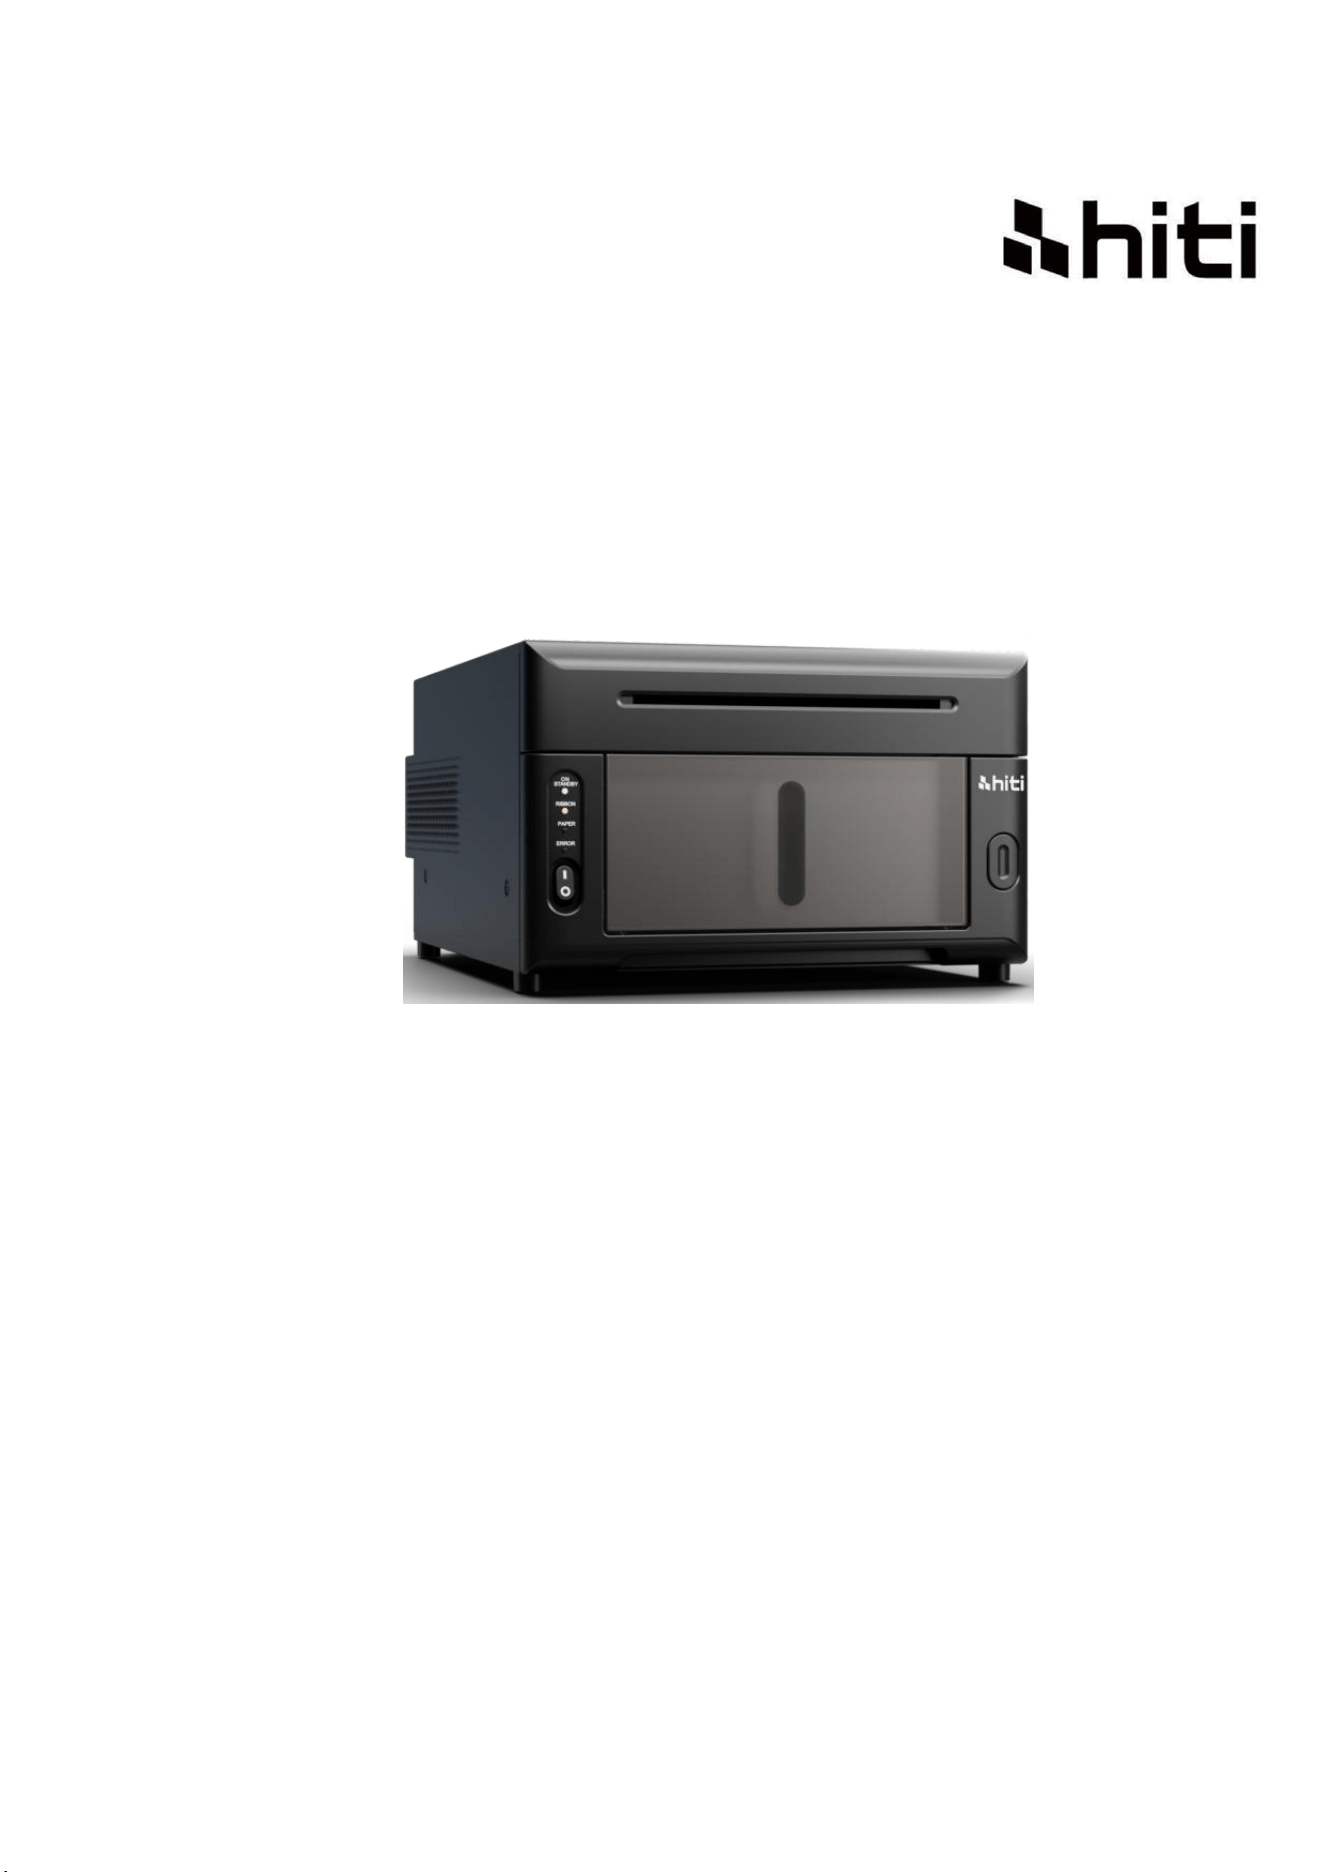
HiTi Photo Printer
P630 Series User Manual
© 2026 HiTi Digital, Inc. All Rights Reserved.

2
Contents
Regulatory compliance statements ....................................................................................................................... 3
Chapter 1. Important safety instruction ................................................................................................................ 5
◎ Safety Instruction ........................................................................................................................................ 5
◎ Environments .............................................................................................................................................. 5
◎ Handling Instruction.................................................................................................................................... 6
◎ Handling Instruction for Print Kit and Printed Outputs ............................................................................... 8
Chapter 2. Accessory items ................................................................................................................................. 12
◎ Accessory Item .......................................................................................................................................... 12
Chapter 3. Basic functions introduction .............................................................................................................. 13
◎ Appearance ............................................................................................................................................... 13
Chapter 4. Installing and operation ..................................................................................................................... 14
◎ Installing .................................................................................................................................................... 14
◎ Operation Process ..................................................................................................................................... 15
◎ Ribbon/Paper Installing............................................................................................................................. 16
◎ Printer Transportation .............................................................................................................................. 18
Chapter 5. Indicator Lights and Printer Status .................................................................................................... 19
◎ Indicator Lights ......................................................................................................................................... 19
◎ Viewing Printer Status via Driver .............................................................................................................. 20
Chapter 6. Routine Maintenance ........................................................................................................................ 21
◎ Cleaning of Thermal Printing Head and Roller .......................................................................................... 21
◎ Cleaning of Outer Cabinet cleaning .......................................................................................................... 22
◎ Cleaning of Filter ....................................................................................................................................... 22
Chapter 7. Error Status Handling ......................................................................................................................... 23
◎ Indicator Lights Correspond to Error Status and Corrective Actions .......................................................... 23
◎ Failure Symptoms ...................................................................................................................................... 23
◎ Paper Jam resolution ................................................................................................................................ 24
◎ Power Supply Interrupted During Printing ................................................................................................ 26
Chapter 8. Specification ...................................................................................................................................... 27
8.1 P630 / P630A Specification ........................................................................................................................ 27
8.2 P63C Specification ..................................................................................................................................... 28

3
Regulatory compliance statements
American Users FCC Part 15
For a Class A digital device or peripheral, the instructions furnished the user shall include the
following or similar statement, placed in a prominent location in the text of the manual.
This equipment has been tested and found to comply with the limits of a Class A digital device,
pursuant to Part 15 of the FCC Rules. These limits are designed to provide reasonable
protection against harmful interference when the equipment is operated in a commercial
environment. This equipment generates, uses, and can radiate radio frequency energy and, if
not installed and used in accordance with the instruction manual, may cause harmful
interference to radio communica ons. Operation of the equipment in a residential area is likely
to cause harmful interference in which case the user will be required to correct the
interference at his (or her own) expense.
FCC ID : W5388D303500AT
Federal Communications commission (FCC) Statement
You are cautioned that changes or modifications not expressly approved by the part
responsible for compliance could void the user’s authority to operate the equipment.
This device complies with Part 15 of the FCC Rules. Operation is subject to the following two
conditions:
(1) This device may not cause harmful interference and
(2) This device must accept any interference received, including interference that may cause
undesired operation of the device.
Cet appareil respoecte la section 15 des directives FCC. Son fonctionnement est soumis aux
deux conditions suivantes :
(1) Cet appareil ne doit pas causer d'interférences nuisibles et
(2) Cet appareil doit accepter toute interférence reçue, y compris des interférences suscetibles
d’occasionner un fonctionnement non souhaité.

4
Europe Users
Class A ITE is a category of all other ITE which satisfies the class A ITE limits but not the class B
ITE limits. Such equipment should not be restricted in its sale but the following warning shall
be included in the instructions for use.
Warning
This is a class A product. In a domestic environment this product may cause radio
interference in which case the user may be required to take adequate measurement.
Products sold in Korea do not have Wi-Fi function.
5
Chapter 1. Important safety instruction / Instructions de sécurité importantes
◎ Safety Instruction
This manual provides detail instructions for the safety use of the printer.
Please read this manual carefully before operating the printer to ensure having proper use.
◆ In this manual, there are notes that require special attention. For your safety operation,
Safety Notices are separated as follows:
: Inappropriate handing can cause the death or serious wounds.
: Inappropriate handling can cause wounds and/or physical damage to the users.
* Attention: Explanation about the cause of the trouble and the environmental condition.
◆ It is difficult to forecast all the danger in setting and use of the printer.
Therefore, warnings in this Operation Manual, in the other documents on the printer
cannot cover all the cases. In case of performing the operation or maintenance which is
not described in this manual, all the concern for the safety have to be taken care at the
customer side.
◆ Operation and the notification for the maintenance described in this manual and other
documents are for the proper use of the printer.
In case of using the printer for the other purpose, all the concern for the safety has to be
taken care at the customer side.
◆ Do Not perform the operation which is prohibited in this manual and other
document.
◎ Environments
To use the printer safety, please pay attention to followings:
: Do not let kids to touch the printer or the cables. It can cause accidents or
electric shock.
6
: Do not place the printer under a humid or dusty place. It can cause a fire,
electric shock or printer problem. Do not place the printer with dust, sand and high humidity
such as bathing place, bathroom, hot spring or the street.
: Do not place the printer on rickety place and/or inclined place. Printer may fall
down or tumble and it can cause serious injury.
* Attention: Keep the printer out of direct sunlight
* Do not put metallic objects or case/cup with any liquid on top of the printer. Water spilt
on metallic items fall into the printer may cause the fire and electric shock. In case the
water spilt or metallic items fall into the printer, please turn off the printer power
immediately.
: Do not block the openings of the printer. In case, the opening blocked, the heat
will remain inside and it can cause the fire.
: Do not insert or fall the metallic or flammable items into the printer through
the openings of the printer; it can cause the fire or electric shock.
◎ Handling Instruction
When handling the printer, please pay attention to the followings:
: Lift the printer from its box and put it onto a flat and firm table or desk.
: The printer alone (without paper and ribbon installed) is weighted around
10.5Kgs. Please handle the printer carefully to prevent personal injury and damage of
the printer.
7
: When moving the printer, hold the bottom edge of the printer. It is strongly
recommended to handle the printer by one to two persons during the transportation.
: Please take caution when transporting the printer on the slippery floor.
: Please Ensure the power is off and the power cord is removed from the printer
before transportation.
: In the cause of dropping the printer during transportation, contact HiTi dealers
or service center for inspection of the printer. Using the printer with possible damage
without proper inspection may cause fire or electric shock.
* Do not dismantle or remodel the printer. Some sections of the printer contain a high
voltage or become very hot. Ignoring this warning may cause electric shock, fire, or
burns.
: Secure the power cable firmly while using.
: The thermal head reached high temperature during operation but it is normal.
Do not touch the thermal head by any case. Touch the thermal head may cause person
injury or damage of the printer.
* Attention: Touching the surface of the thermal head directly may cause damage to the
thermal heat. Hard objects getting into the printer may cause the damage of printer or
result in malfunction. In such case, please do not uses the printer while any obstacle
inside the printer.
: Do not attempt to service the printer beyond the instruction specified in this
document. In case of irrecoverable problem, please contact HiTi dealers or service center.

8
: This product must be grounded at all time during operation, and always used
with the specified power cable only or the power cable accompanying this product. If the
product is used without grounding, and current leakage occurs, fire or electrical shock may
occur, and may also cause interference to radio, TV, and other similar electric appliances
signal receiving. If the proper ground is not available, please contact HiTi dealers or service
center.
◎ Handling Instruction for Print Kit and Printed Outputs
In handling the ink ribbon, paper and printed outputs, please pay attention to the
followings:
* Attention: Paper handling
Use only the paper specified by HiTi
Store the paper flat
Store the paper in a dry and dark place to avoid the direct sunlight (Temperatures
less than 30°c; Humidity less than 60%)
* Attention: Ink ribbon handling
Use only the ribbon specified by HiTi
Store the ink ribbon in cool place to avoid direct sunlight (Temperatures less than
30°C; Humidity less than 60%)
* Attention: Printed output handling
Store the printed outputs in a cool place to avoid direct sunlight
Store the printed outputs away from the organic solvent/fluid such as benzene,
thinner or alcohol which may change or deteriorate the colors
*Attention: Do not print 5-inch photos (5” × 7”) or 6-inch photos (4” × 6” or 6” × 8”) on the
same printer. Frequent changes between different paper roll widths may affect
print quality.
◎ Instruction de sécurité
Ce manuel fournit des instructions détaillées pour une utilisation sécurisée de l’imprimante.
Veuillez lire attentivement ce manuel avant de mettre l’imprimante en marche afin d’assurer une
utilisation correcte.
◆ Dans ce manuel, certaines notes nécessitent une attention particulière. Pour votre sécurité, les avis
sont séparés comme suit :
: Une manipulation inappropriée peut entraîner la mort ou des blessures graves.
9
: Une manipulation inappropriée peut entraîner des blessures et/ou des dommages matériels.
* Attention : Explication sur la cause du problème et les conditions environnementales.
◆ Il est difficile de prévoir tous les dangers liés à l’installation et à l’utilisation de l’imprimante. Les
avertissements contenus dans ce manuel et dans les autres documents relatifs à l’imprimante ne couvrent
pas tous les cas. En cas d’opération ou de maintenance non décrite dans ce manuel, la responsabilité de la
sécurité incombe au client.
◆ Les opérations et notifications de maintenance décrites dans ce manuel et dans d’autres documents
concernent uniquement l’utilisation correcte de l’imprimante. En cas d’utilisation de l’imprimante à
d’autres fins, la responsabilité de la sécurité incombe au client.
◆ Ne pas effectuer d’opérations interdites dans ce manuel ou dans d’autres documents.
◎ Environnements
Pour utiliser l’imprimante en toute sécurité, veuillez respecter les consignes suivantes :
: Ne laissez pas les enfants toucher l’imprimante ou les câbles. Cela peut provoquer des
accidents ou une électrocution.
: Ne placez pas l’imprimante dans un endroit humide ou poussiéreux. Cela peut provoquer un
incendie, une électrocution ou un dysfonctionnement. Évitez les lieux tels que salle de bain, sources
thermales ou extérieur poussiéreux.
: Ne placez pas l’imprimante sur un support instable ou incliné. Elle pourrait tomber et causer
des blessures graves.
* Attention : Gardez l’imprimante à l’abri de la lumière directe du soleil.
* Ne placez pas d’objets métalliques ou de récipients contenant des liquides sur l’imprimante. En cas de
renversement, cela peut provoquer un incendie ou une électrocution. Éteignez immédiatement
l’imprimante si cela se produit.
: Ne bloquez pas les ouvertures de ventilation de l’imprimante. La chaleur accumulée peut
provoquer un incendie.
10
: Ne laissez pas tomber ou n’insérez pas d’objets métalliques ou inflammables dans les
ouvertures de l’imprimante. Cela peut provoquer un incendie ou une électrocution.
◎ Instructions de manipulation
Lors de la manipulation de l’imprimante, veuillez respecter les consignes suivantes :
: Sortez l’imprimante de sa boîte et placez-la sur une table ou un bureau plat et solide.
: L’imprimante seule (sans papier ni ruban) pèse environ 10,5 kg. Manipulez-la avec
précaution pour éviter les blessures et les dommages.
: Lors du déplacement, tenez l’imprimante par la base. Il est fortement recommandé de la
transporter à une ou deux personnes.
: Faites attention lors du transport sur un sol glissant.
: Assurez-vous que l’imprimante est éteinte et que le cordon d’alimentation est retiré avant
tout transport.
: En cas de chute pendant le transport, contactez un revendeur ou un centre de service HiTi
pour inspection. Utiliser l’imprimante endommagée sans inspection peut provoquer un incendie ou une
électrocution.
* Ne démontez ni ne modifiez l’imprimante. Certaines parties contiennent une haute tension ou
deviennent très chaudes. Ignorer cet avertissement peut provoquer une électrocution, un incendie ou
des brûlures.
: Fixez fermement le câble d’alimentation lors de l’utilisation.
11
: La tête thermique atteint une température élevée pendant le fonctionnement, ce qui est
normal. Ne la touchez jamais, cela peut provoquer des blessures ou endommager l’imprimante.
* Attention : Toucher directement la surface de la tête thermique peut l’endommager. Les objets durs
introduits dans l’imprimante peuvent causer des dommages ou des dysfonctionnements. Dans ce cas,
n’utilisez pas l’imprimante tant que l’obstacle n’est pas retiré.
: Ne tentez pas de réparer l’imprimante au-delà des instructions spécifiées dans ce document.
En cas de problème irréversible, contactez un revendeur ou un centre de service HiTi.
: Ce produit doit être mis à la terre en permanence pendant son utilisation et doit toujours
être utilisé avec le câble d’alimentation spécifié ou fourni. L’absence de mise à la terre peut provoquer
une électrocution, un incendie ou des interférences avec les signaux radio/TV. Si une mise à la terre
correcte n’est pas disponible, contactez un revendeur ou un centre de service HiTi.
◎ Instructions de manipulation du kit d’impression et des tirages
Lors de la manipulation du ruban d’encre, du papier et des tirages, veuillez respecter les consignes
suivantes :
* Attention : Manipulation du papier
Utilisez uniquement le papier spécifié par HiTi
Stockez le papier à plat
Conservez le papier dans un endroit sec et sombre, à l’abri du soleil (température < 30°C ; humidité <
60%)
* Attention : Manipulation du ruban d’encre
Utilisez uniquement le ruban spécifié par HiTi
Conservez le ruban dans un endroit frais, à l’abri du soleil (température < 30°C ; humidité < 60%)
* Attention : Manipulation des tirages
Conservez les tirages dans un endroit frais, à l’abri du soleil
Évitez tout contact avec des solvants organiques tels que benzène, diluant ou alcool, qui peuvent
altérer les couleurs
* Attention : Ne pas imprimer de photos 5 pouces (5” × 7”) ou 6 pouces (4” × 6” ou 6” × 8”) sur la même
imprimante. Les changements fréquents entre différentes largeurs de rouleaux de papier
peuvent affecter la qualité d’impression.
12
Chapter 2. Accessory items
Before using the printer, please ensure the Chapter 1. Important Safety Instruction is
fully-acknowledged carefully.
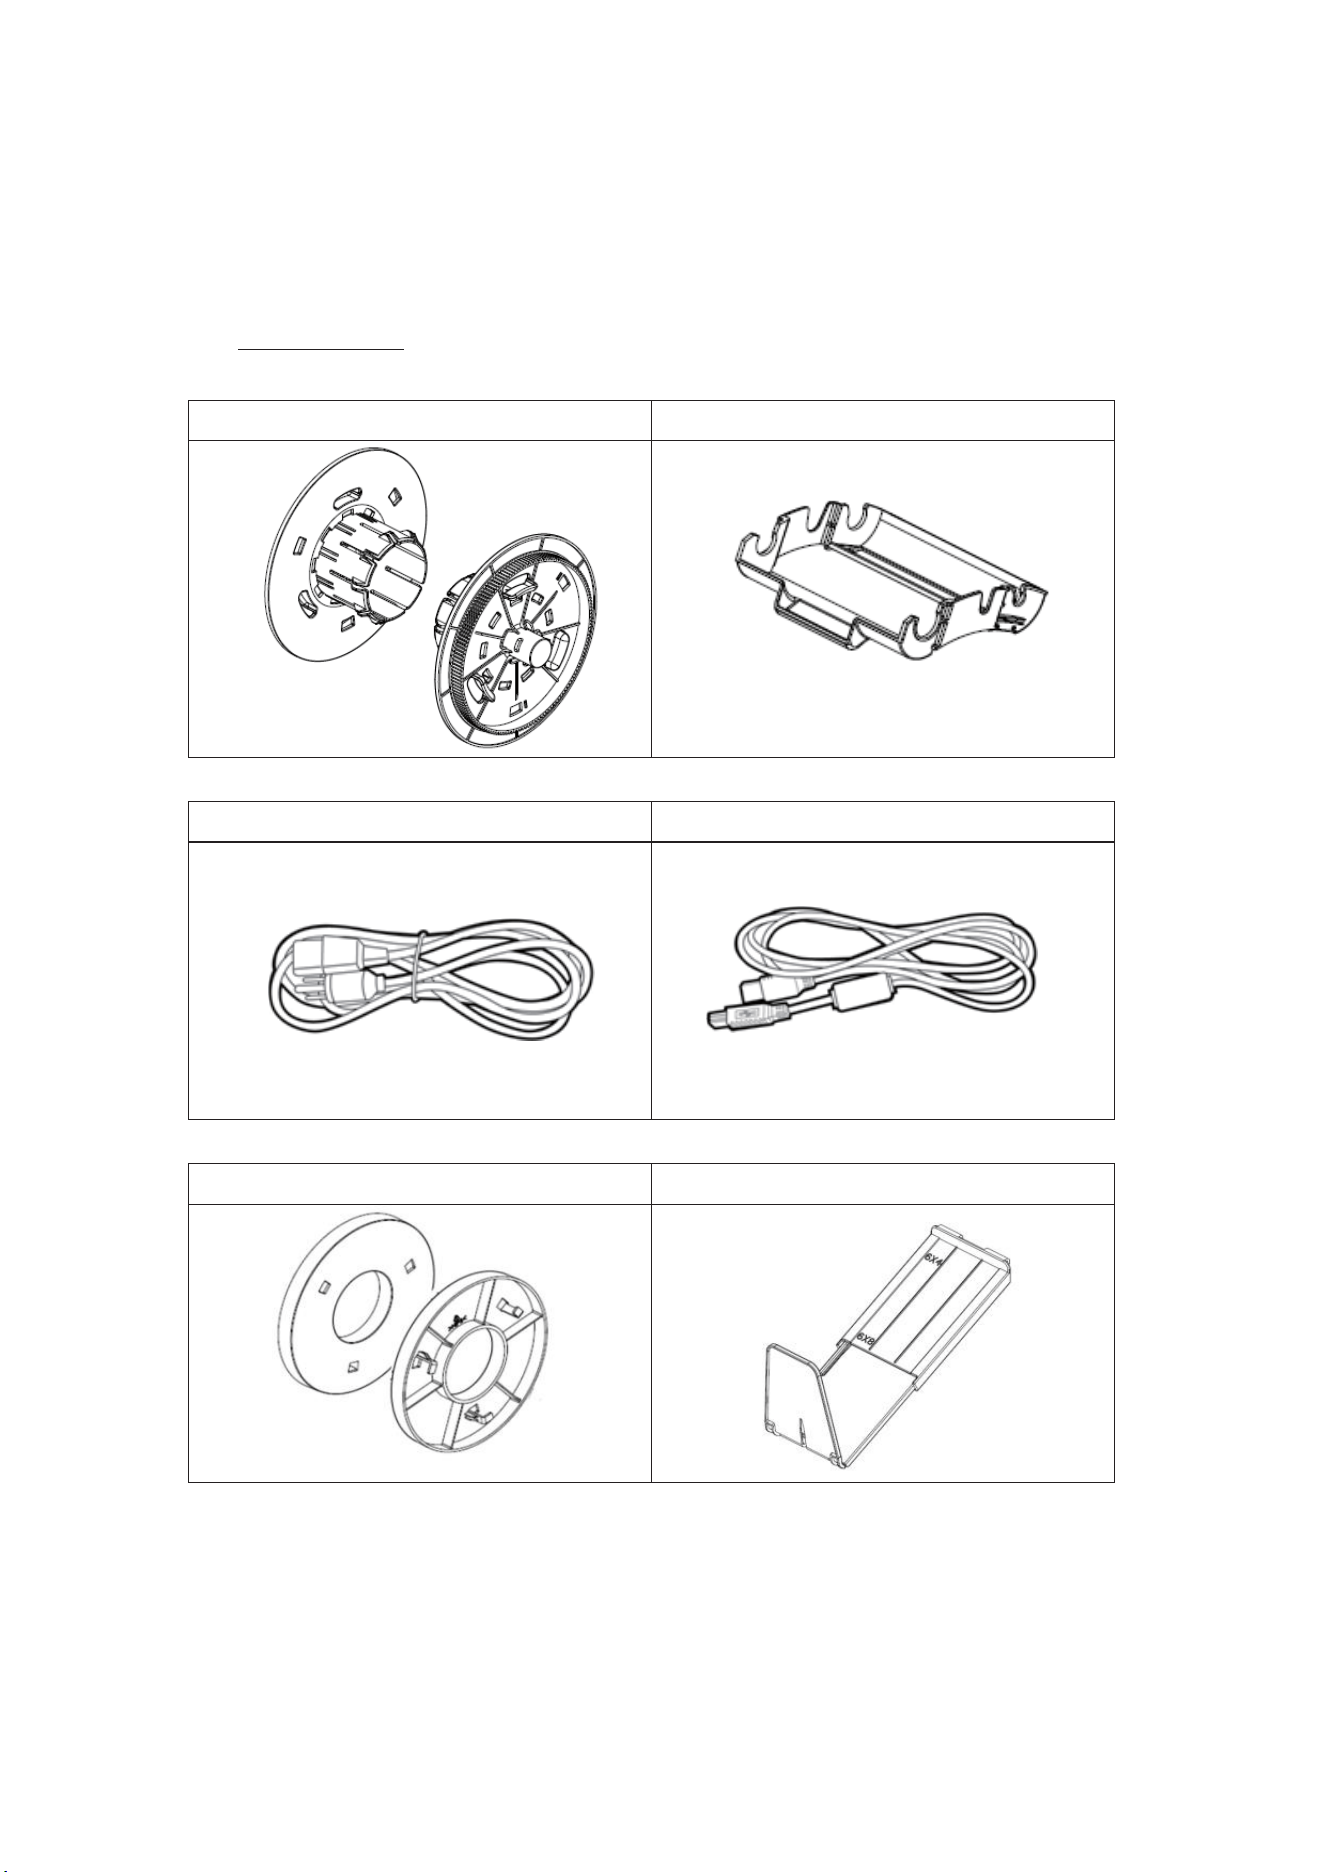
◎ Accessory Item
[In the Machine]
Paper Flange
Ribbon Cassette
[In the Package]
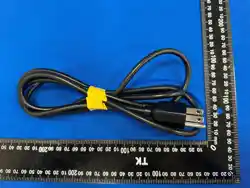
Power Cord
USB CABLE
[Optional Accessories (Sold Separately)]
5 inch Paper adapters
Foldable Paper Tray
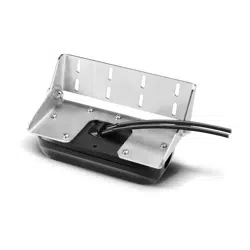
Note: If you require this accessory, please contact your dealer for purchase.
13
Chapter 3. Basic functions introduction
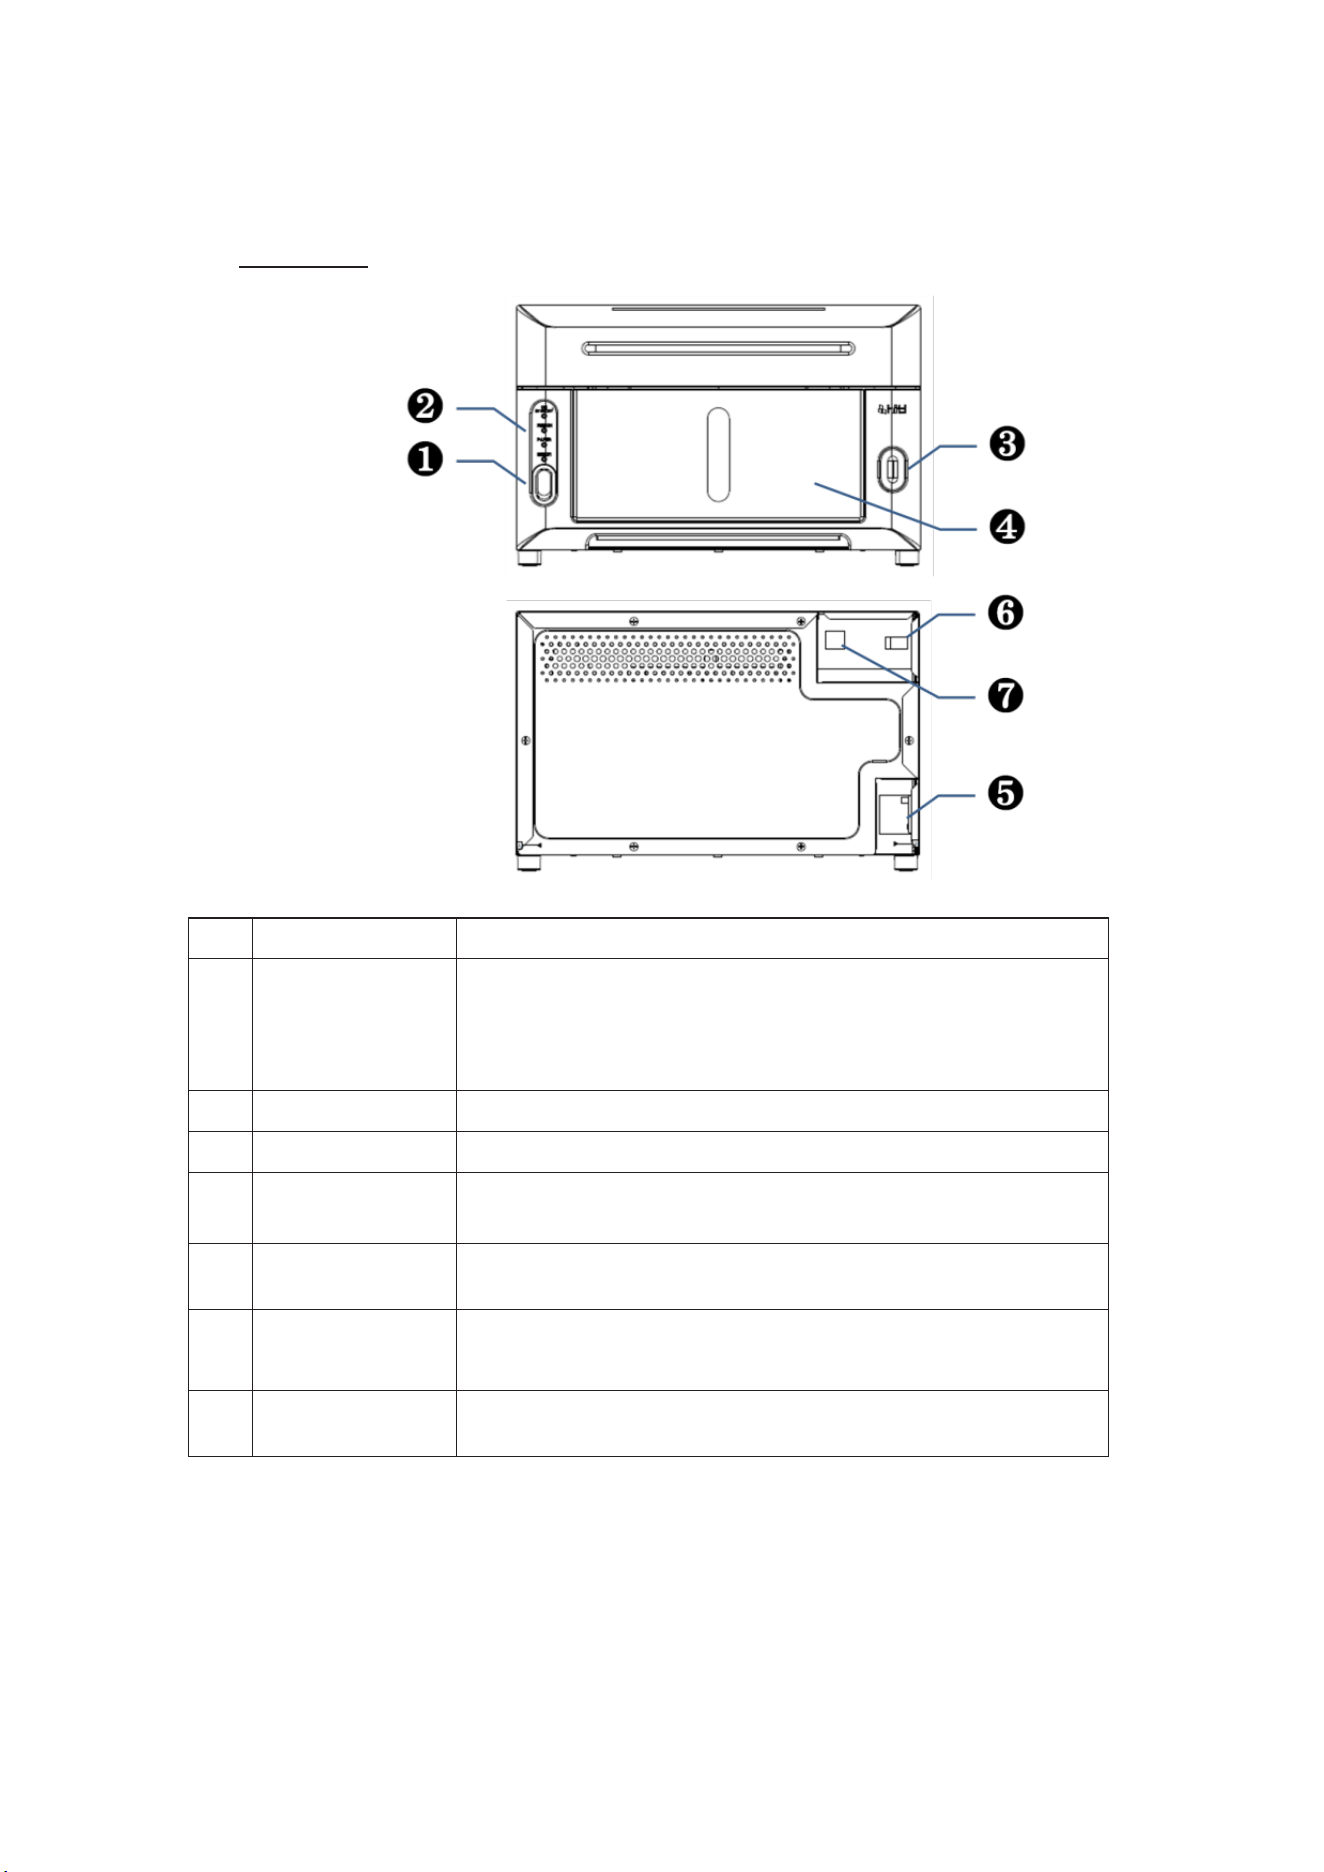
◎ Appearance
No.
Name
Function
❶
Power Switch
Switch “O” to power on and start operation and switch “I”
when finishing using the printer.
*Do not switch off while the printer is operating.
❷
Indicators
Four indicators to monitor the condition of the printer.
❸
Door button
Press the button to open the front door.
❹
Scrap receptacle
Store paper scraps cut during the photo printing process.
*Clean it up periodically before full of scraps in the receptacle.
❺
Power slot
To be connected with AC power (110V~240V) using the power
cord included in the packaging.
❻
USB slot (Type A)
Connect with designated device of HiTi products.
*Do not charge with hand-held devices.
❼
USB Slot (Type B)
To be connected with PC/NB for transferring data using the USB
cable included in the packaging.
14
Chapter 4. Installing and operation
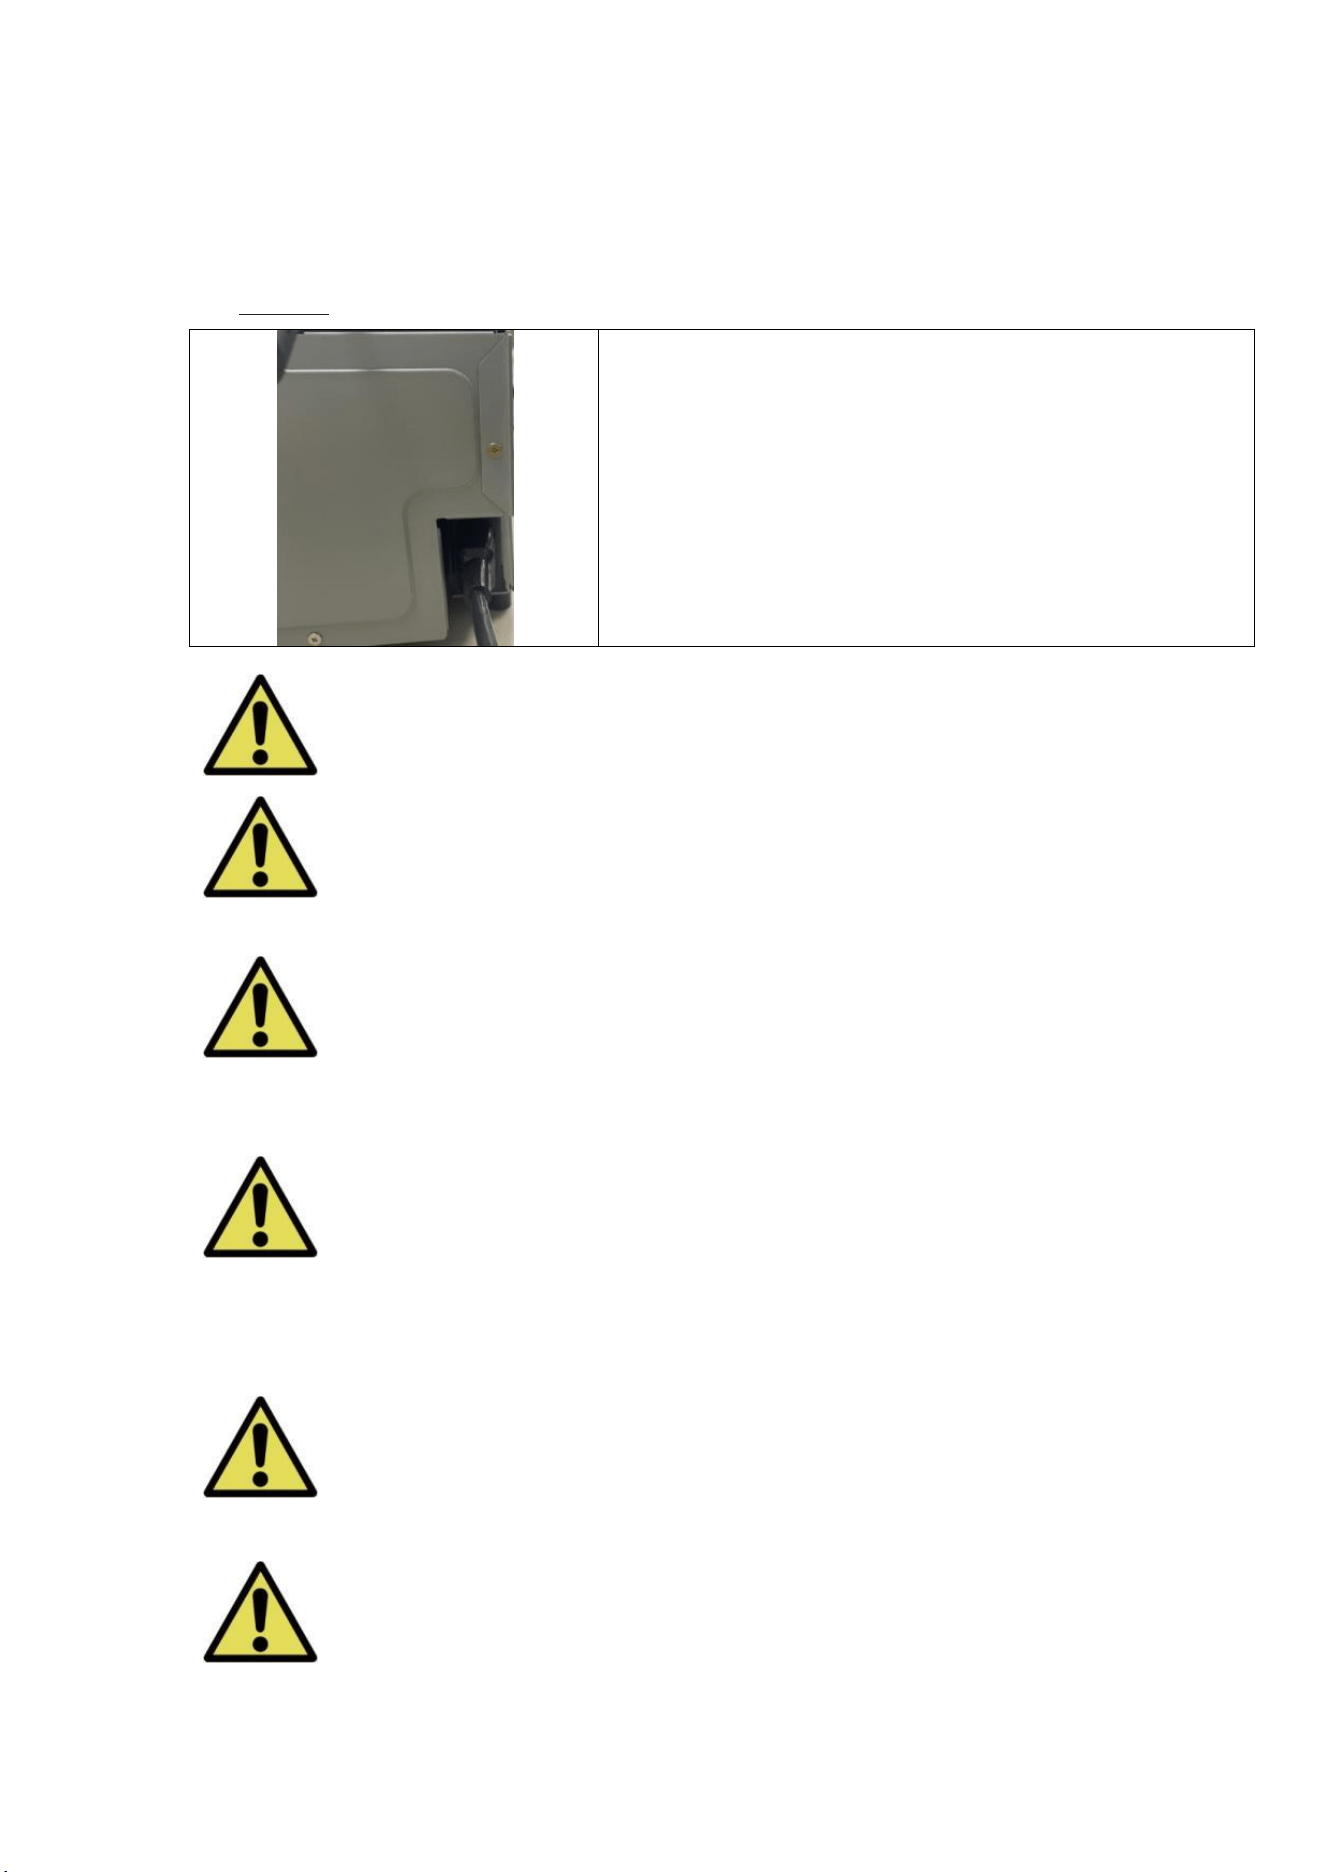
Connect the power cord which is conformed to safety regulations below.
◎ Installing
4.1 Connect the printer power cord to the AC IN slot.
: Ensure to switch off the power of the printer before connecting to AC power.
: Do not insert or remove the power cord with wet hands. It may cause the
electric leakage.
: Do not damage or make any modification to the power cord. Misusing, such as
putting the heavy items on the power cord, giving a strong pull to the power cord and twist
the power cord may cause the fire and electric shock.
: When moving the printer, Ensure to switch off the power of the printer,
remove the power cord in order to have no connection with other devices. Otherwise, the
power cord might be damages and it can cause the fire and electric shock. Also, it is very
likely to fall down caught by the cord.
: For the safety consideration, please remove the power cord from the printer
and AC power if the printer is not to be used for a long time.
: Please avoid piling up which may cause the fire and electric shock.
15
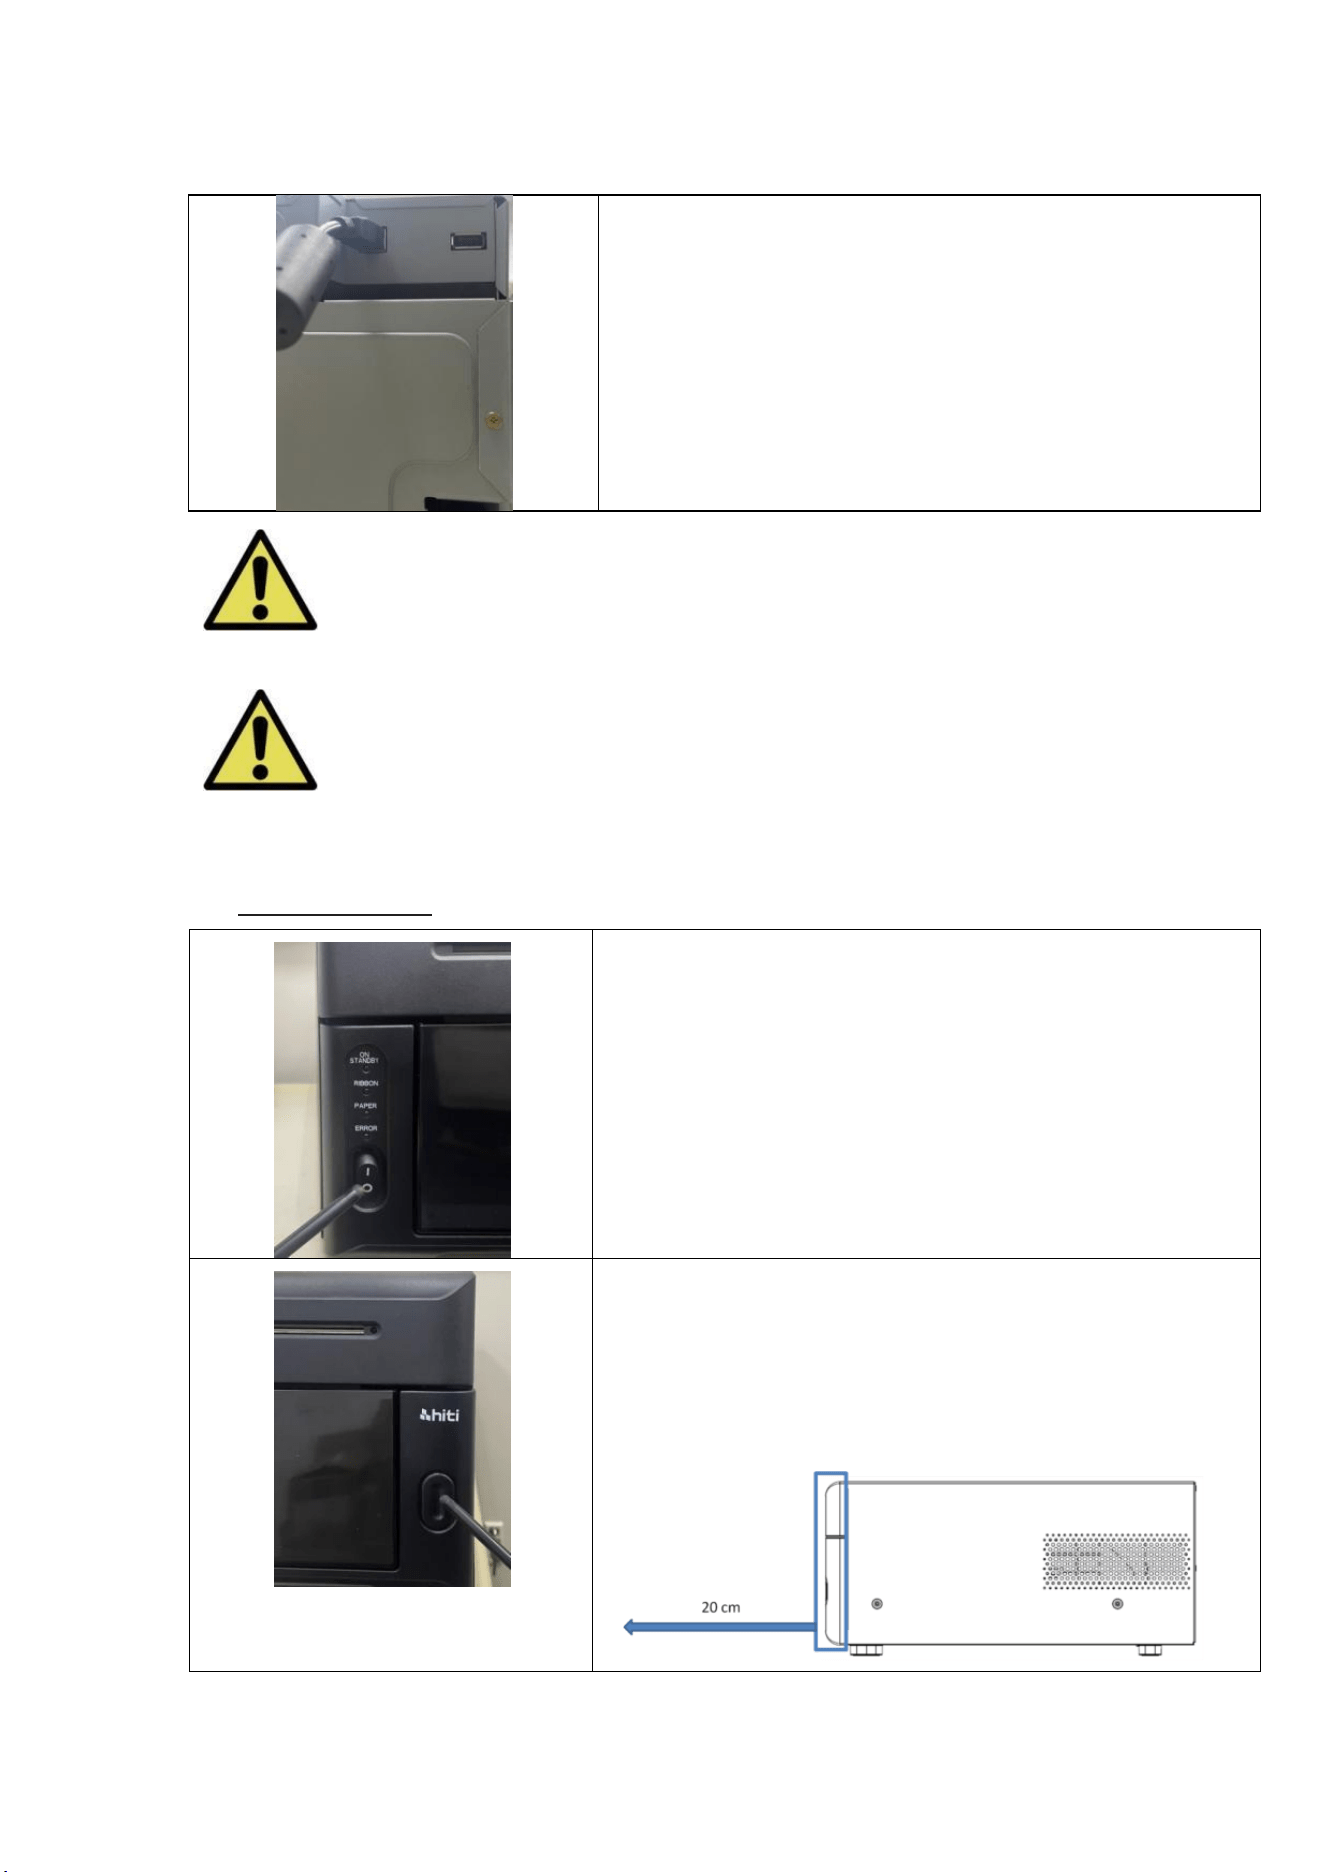
Connect the USB cable with printer and PC/NB for further operation.
4.2 Use USB cable to connect printer and PC/NB.
: Before removing the USB cable, please Ensure the printer is finished its internal
operations.
: Removing the USB cable while data transferring printer may not be able to
print data correctly and it may cause waste.
◎ Operation Process
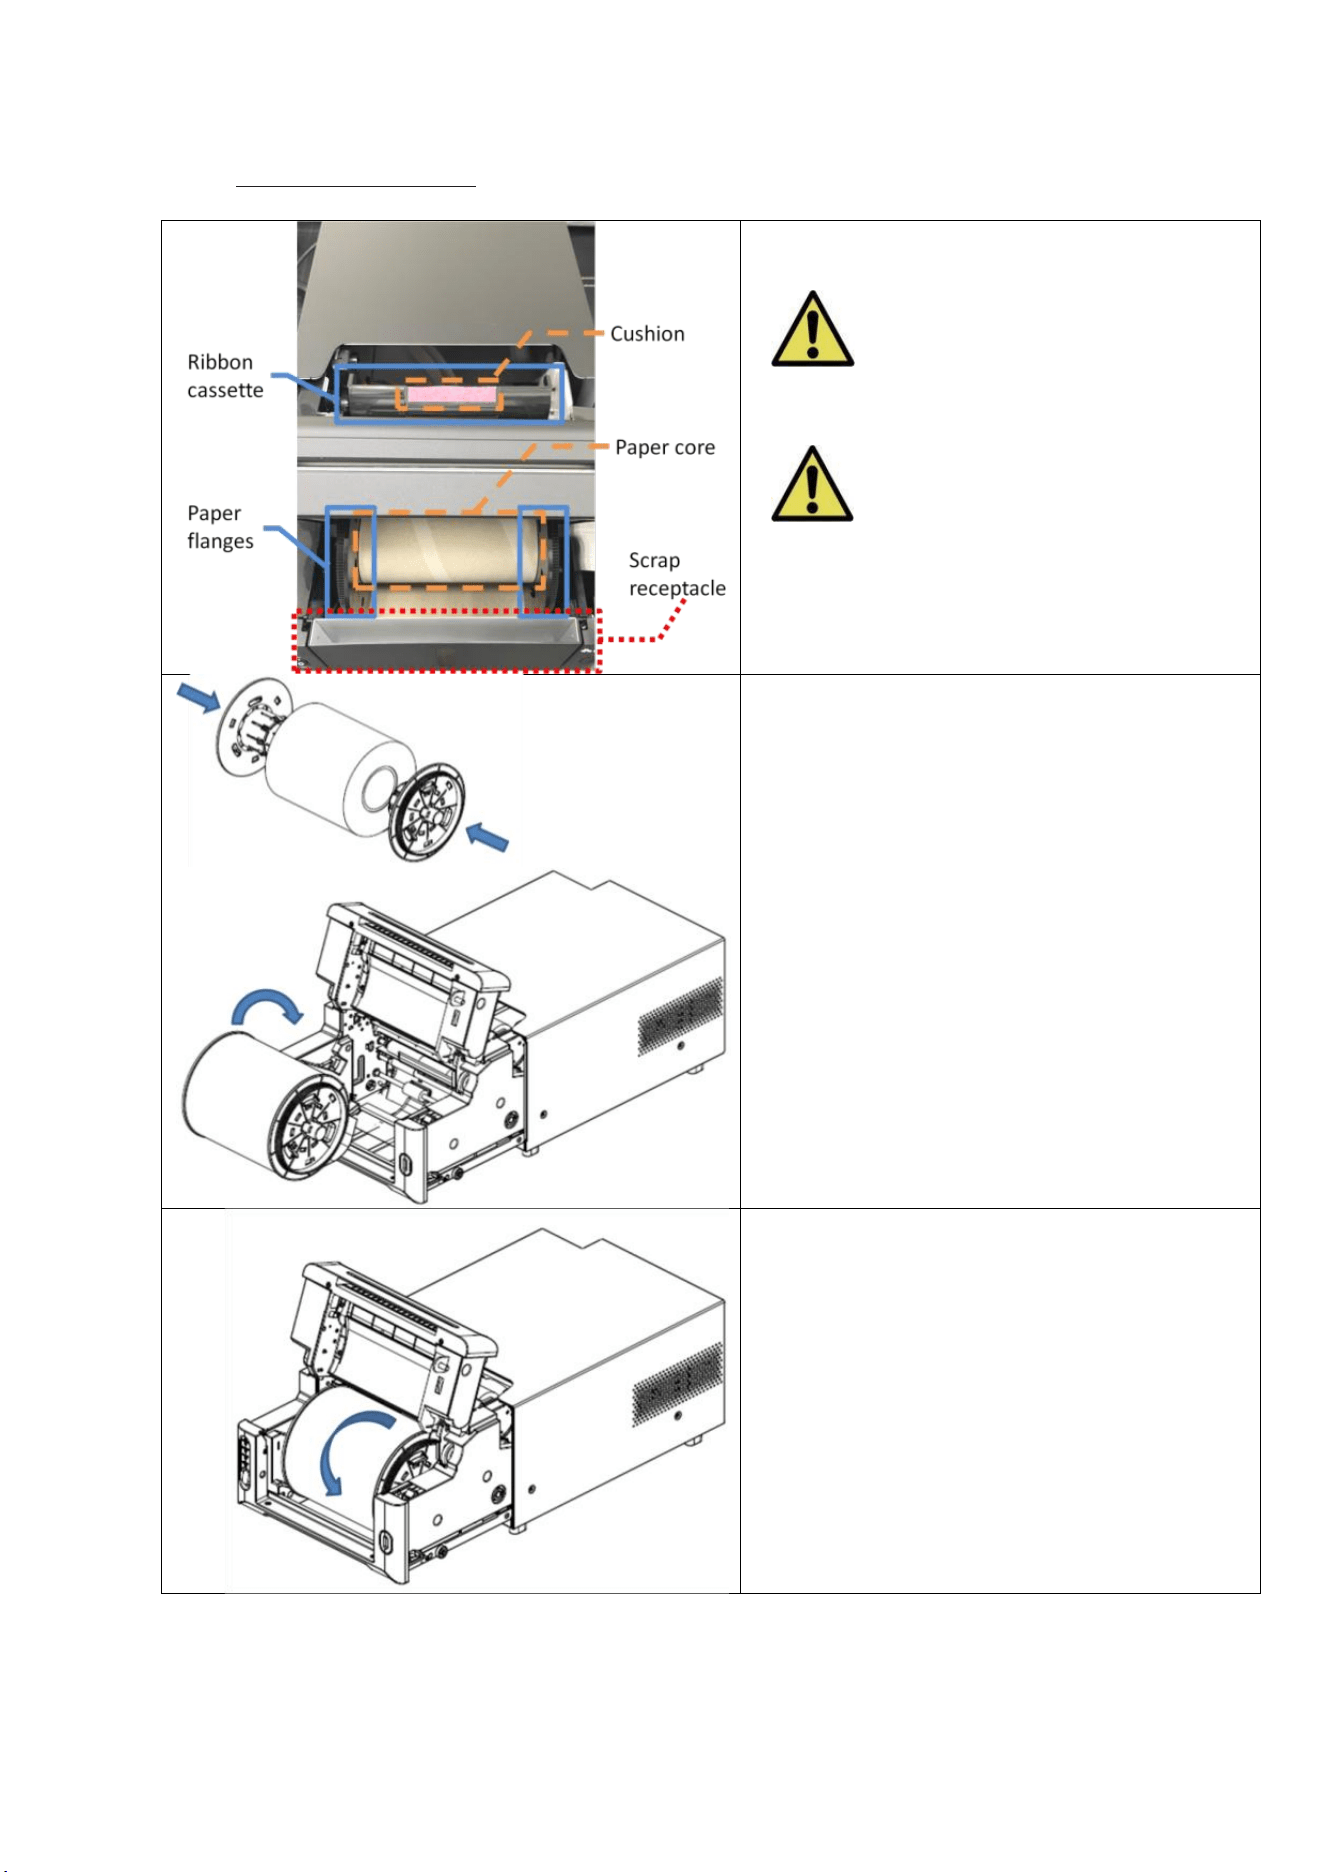
4.3 Switch “O” to power on and start operation.
*Do not switch off while the printer is operating.
4.4 Opening the front cover to install ribbon and paper.
*Please reserve approximately 20 cm of space for the
front cover opening.
16
◎ Ribbon/Paper Installing
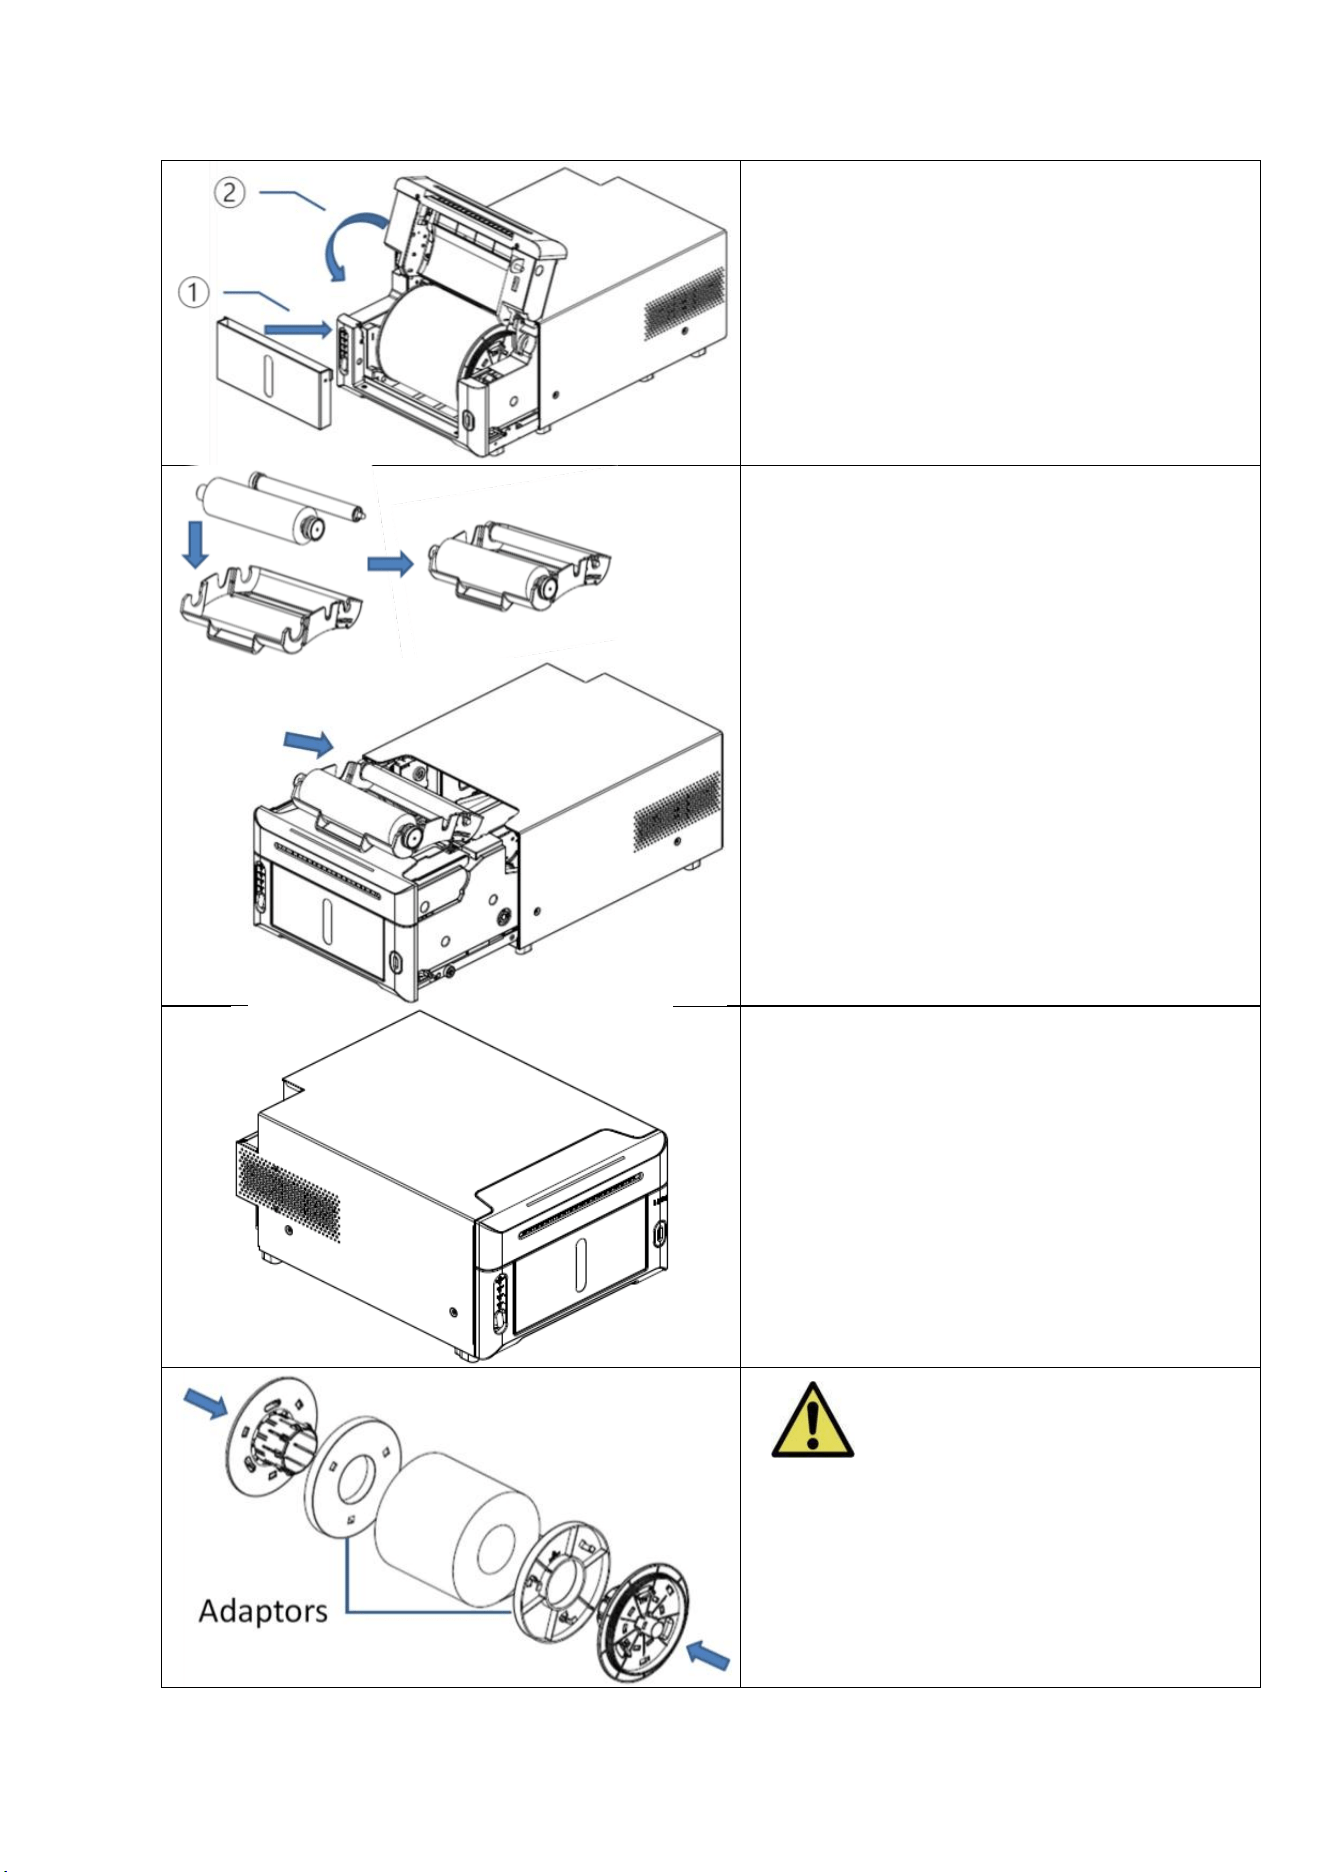
Before installing print kit, please take
out the ribbon cassette, paper flanges and scrap
receptacle.
Remove the protective cushion and
paper core from the support bracket before
use. Reinstall them when transporting the
printer to prevent damage.
4.5.1 Install paper instructions
Install the paper flanges securely at both ends
of the paper roll and place it into the printer.
*For reference, illustrations for print kit
installation are provided on the paper cover
inside the printer.
4.5.2 Rotate the paper roll until the paper
sensor emits “beep” twice, indicating that the
paper has been correctly loaded.
*To ensure the paper is correctly placed, ensure
the leading edge of the paper is inserted at an
angle.
*Do not force the paper in, as this may damage.
17
4.5.3 Put the scrap receptacle back in and close
the paper cover.
*Clean it up periodically before full of scraps.
4.6 Loading ribbon instructions
Place the ribbon into the ribbon cassette. Then
insert the cassette into the ribbon slot of the
printer.
4.7 Closing front cover and 4 sheets of paper
will be cut without printing automatically to
ensure the paper quality.
When using 5-inch paper rolls, install
the paper adapters onto the paper flanges first.
Rotate them until they lock securely in place.
*5-inch paper adapters are optional accessories
and must be purchased separately.

18
◎ Printer Transportation
The following cautions are necessary in transportation of the printer. Since an incorrect
transportation method causes a printer fault, please follow the correct method.
1. Remove the ribbon and paper from the printer before transporting the printer. If the
ribbon or paper cannot be removed due to a fault, consult with the HiTi dealers or
service center.
2. Do not switch off the power while the front cover is open. Close the front cover
with the power on, and then switch off the power only when the ribbon and paper
indicator lights are on (indicating “ribbon and paper are missing”).
19
Chapter 5. Indicator Lights and Printer Status
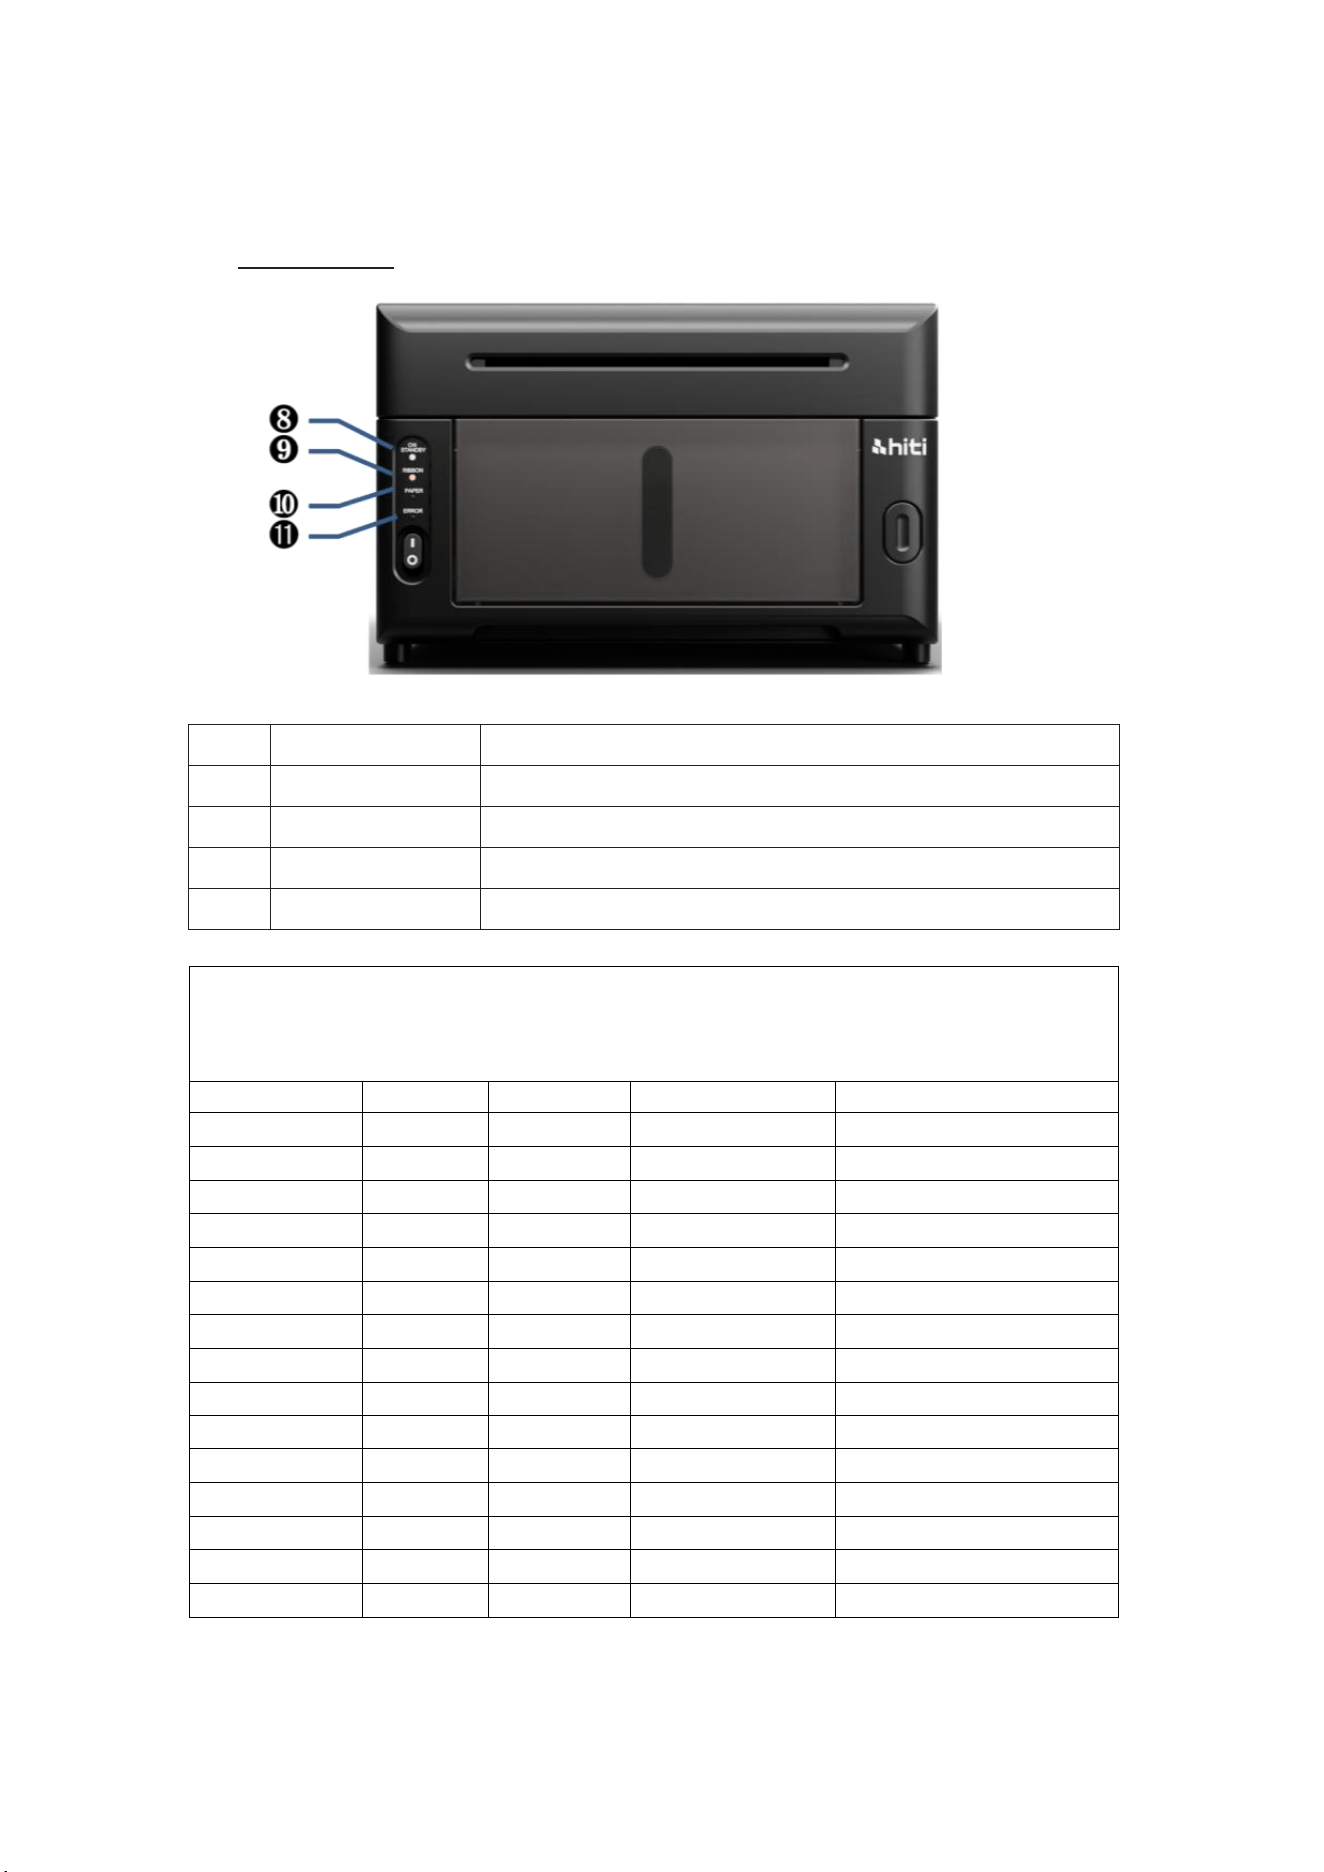
◎ Indicator Lights
No.
Name
Function
❽
ON / STANDBY
Shows the printer’s power status.
❾
RIBBON
Indicates ribbon installation and usage status.
❿
PAPER
Indicates paper installation and usage status.
⓫
ERROR
Signals printer malfunctions.
Indicator Definitions
●Indicates lit
◎Indicates blinking, pauses for one second, then repeats the cycle
ON / STANDBY
RIBBON
PAPER
ERROR
Printer Status
●
Ready
●
●
Ribbon Misinstallation
●
●
Paper Misinstallation
●
◎ blinks 1 time
Door Error
●
●
◎ blinks 2 times
Ribbon Error
●
●
◎ blinks 3 times
Ribbon Out
●
●
◎ blinks 4 times
Paper Out
●
●
◎ blinks 5 times
Paper Error
●
●
●
◎ blinks 6 times
Paper / Ribbon Mismatch
●
◎ blinks 7 times
Cam Error
●
◎ blinks 9 times
NVRAM Error
●
◎ blinks 10 times
RFID Tag Error
●
◎ blinks 12 times
ADC Error
●
◎ blinks 13 times
FW Check Error
●
◎ blinks 15 times
Cutter Error

20
◎ Viewing Printer Status via Driver
The following functions can be monitored on a PC/NB via the driver:
View current printer status
Total prints
Available prints
Printer firmware version
21
Chapter 6. Routine Maintenance
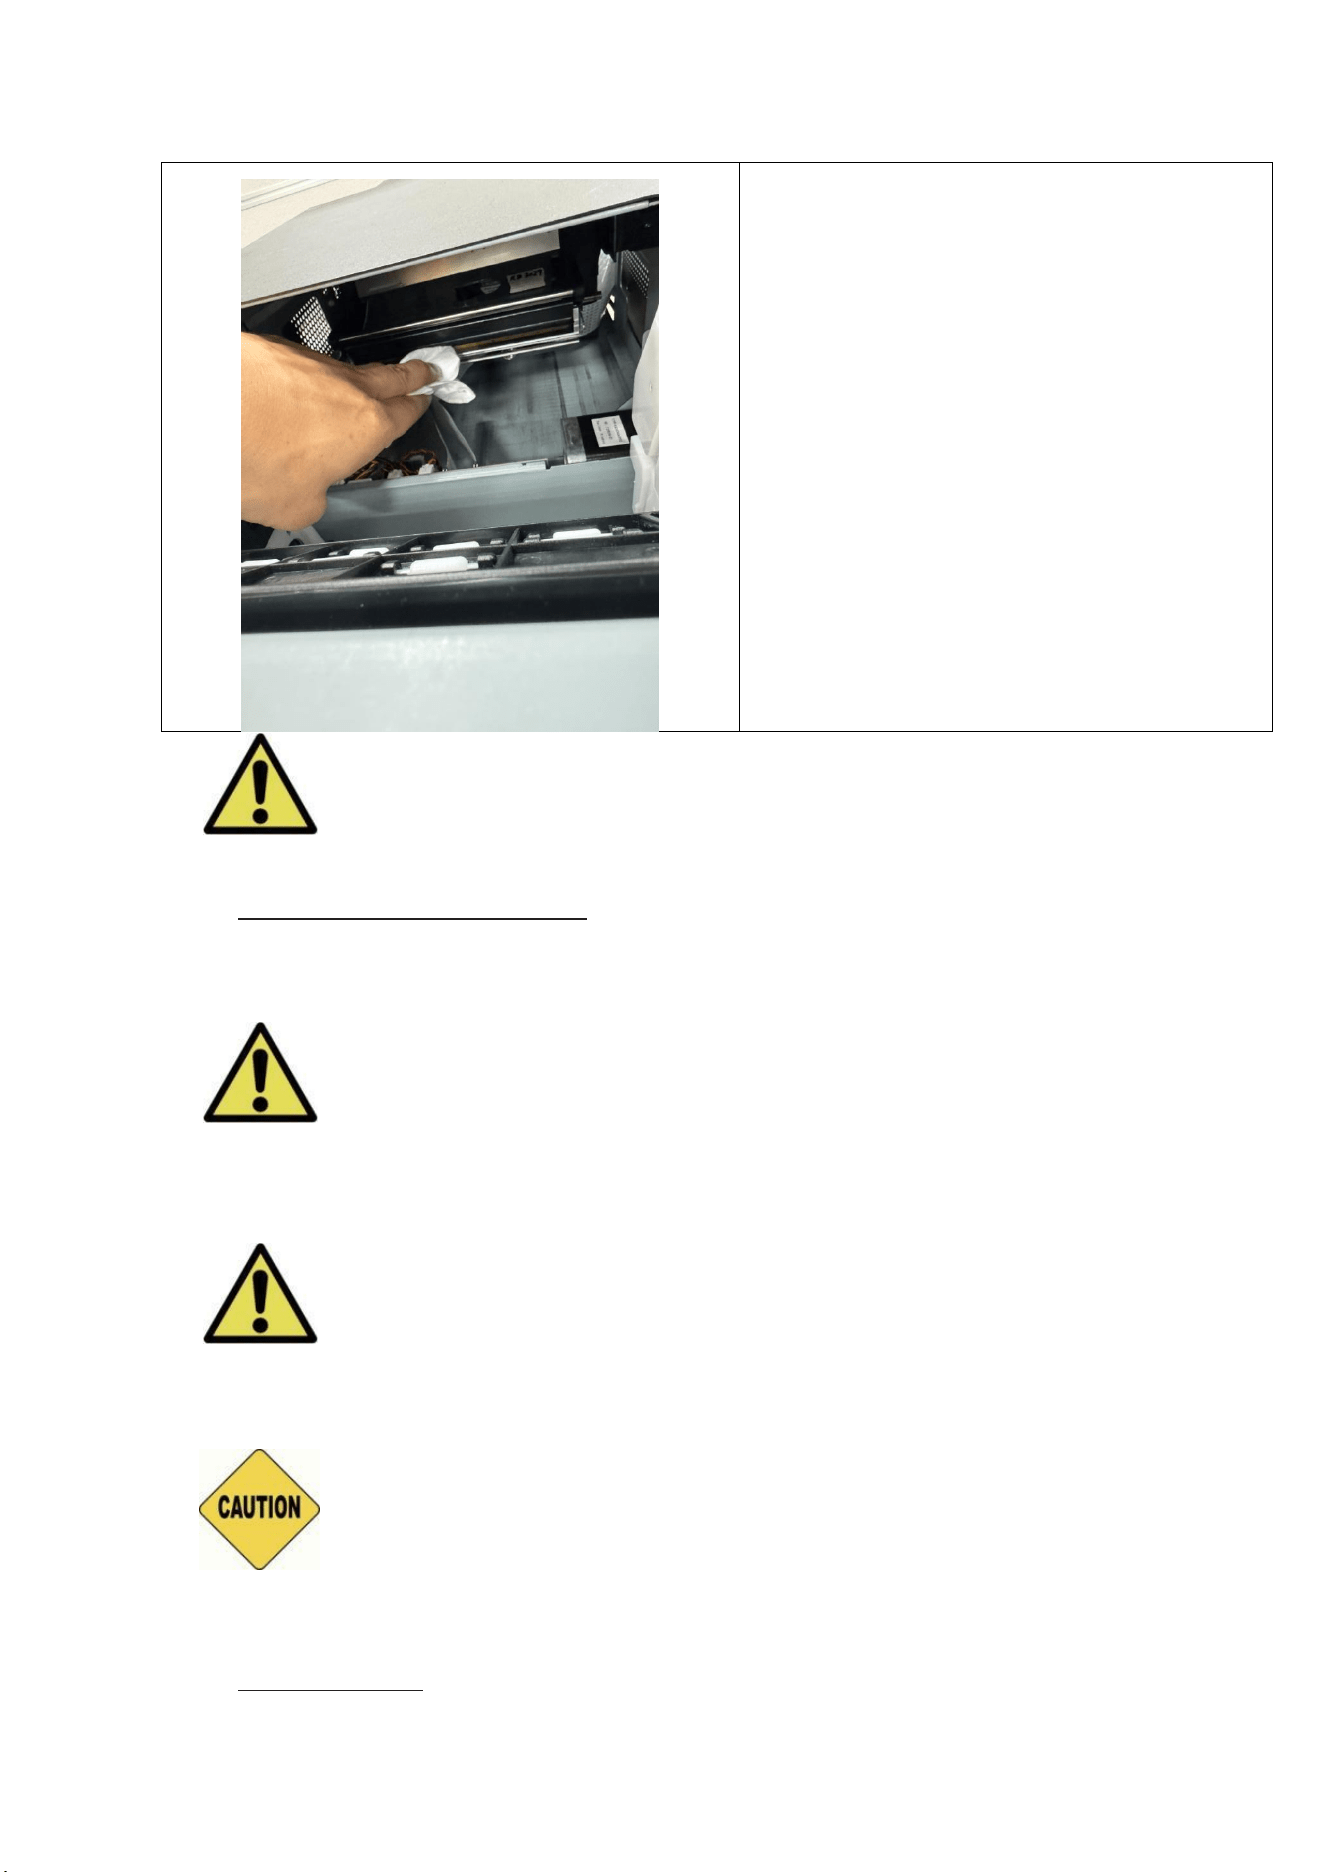
◎ Cleaning of Thermal Printing Head and Roller
By using thermal transfer technology, daily maintenance is not necessary if the printer
has been using properly. However, in order to keep the best print quality, it is highly
recommended to clean Thermal Printing Head and Roller once a month.
: Ensure that the power is switched off before cleaning. Thermal Printing Head
reaches high temperature right after printing. Do not touch by hands directly. Make
sure the Thermal Printing Head has been sufficiently cooled down before start cleaning.
When fingerprint stick to the heating element, it can damage the Thermal Printing Head. Be
careful not to be hurt by the projections of the printer.
6.1 Use Gauze: Clean the heating element (glass
bar) of the Thermal Printing Head with ethyl
alcohol
22
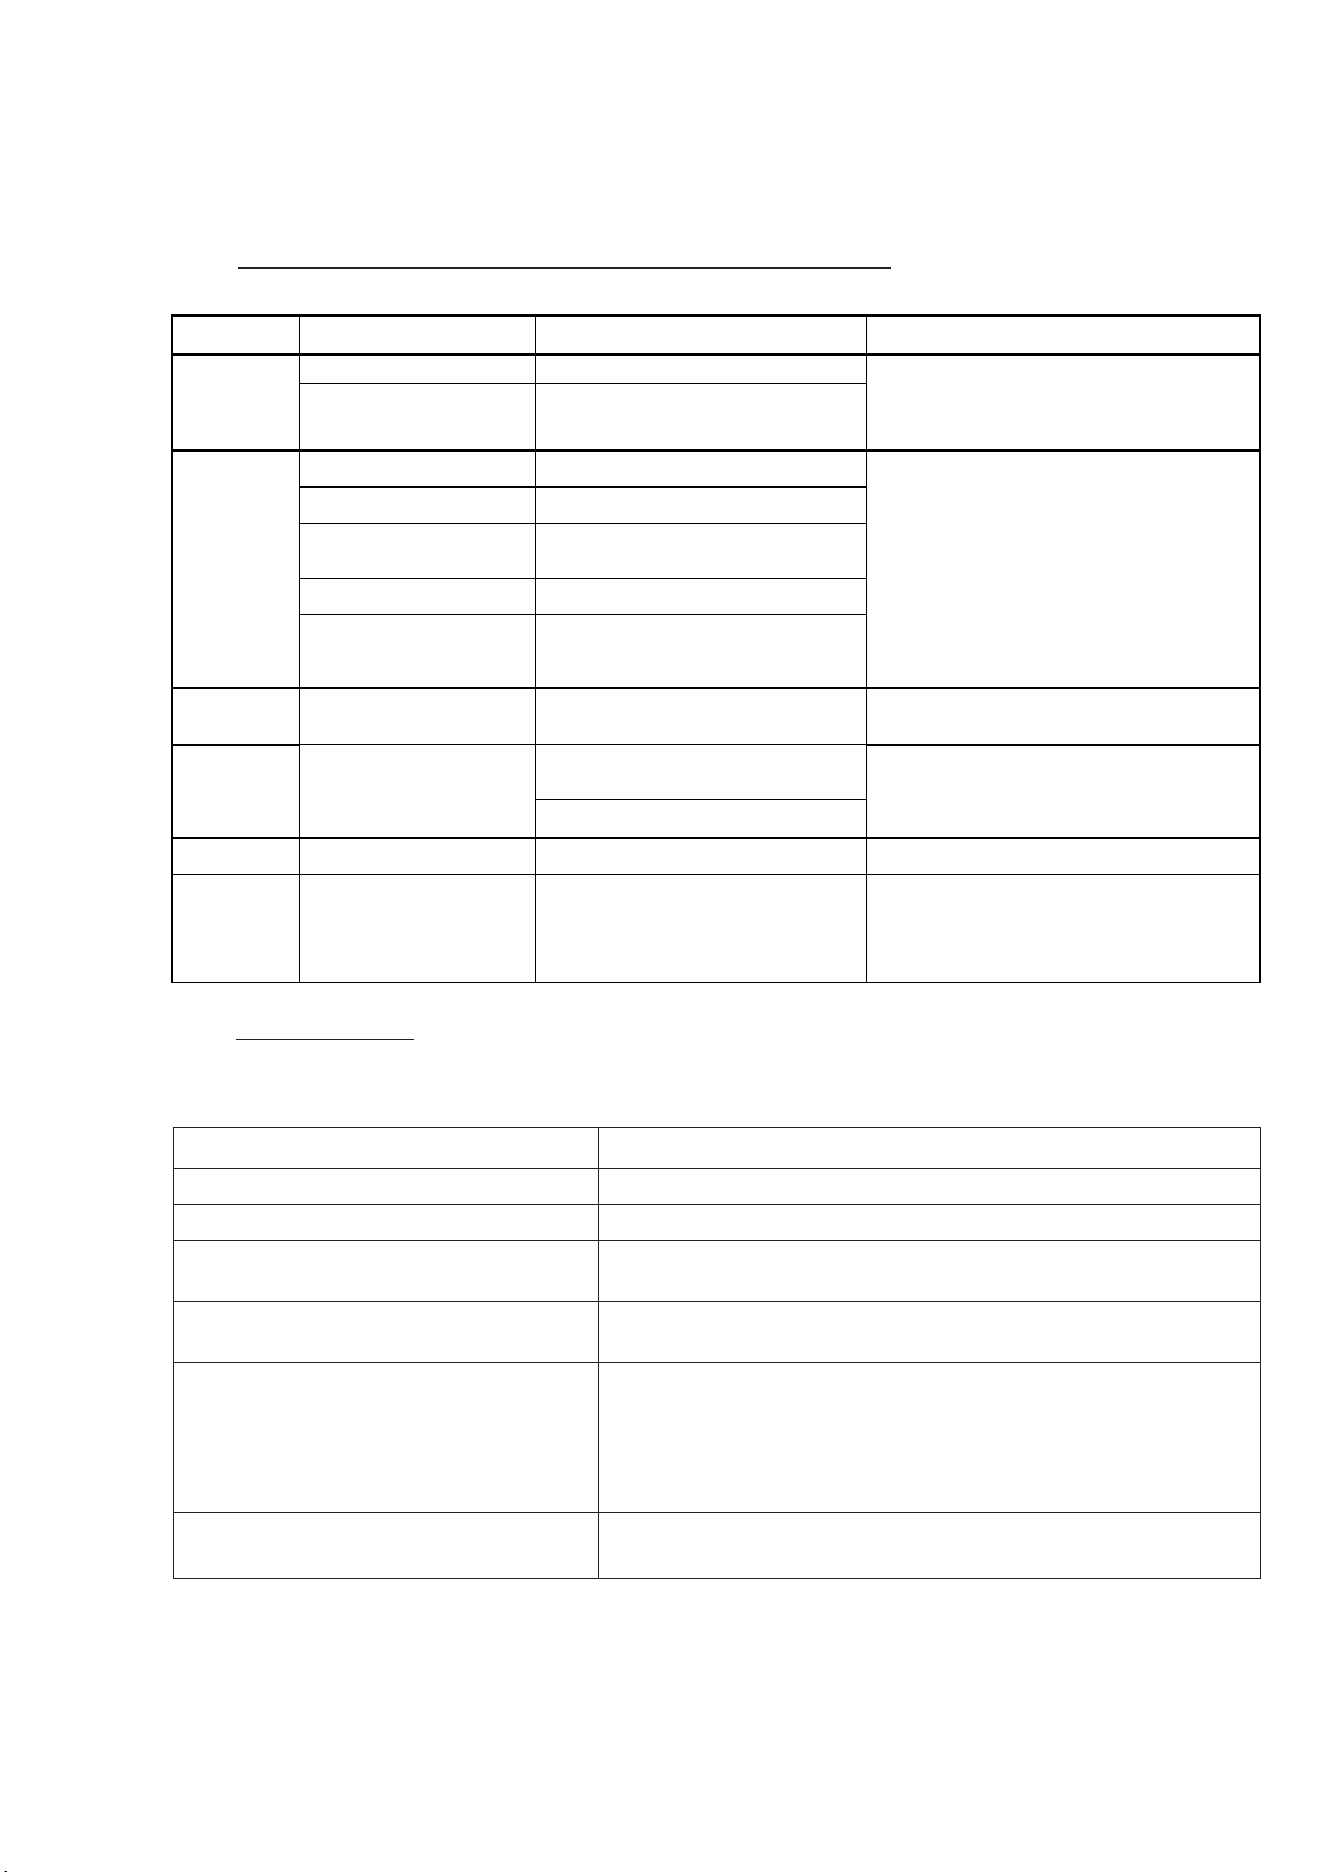
6.2 Use Gauze: Clean the roller (black parts)
with ethyl alcohol.
:Please wait 5 minutes until the gauze dried up completely
◎ Cleaning of Outer Cabinet cleaning
Wipe the printer with a soft cloth. If the strains are not removed, wet the cloth and
apply weakened neutral Detergent to it.
: In case of foreign substance get into the printer, please switch off the printer,
remove the power cord and contact with dealers or service center for further help.
Continuous use of the printer under such condition can cause the fire and electric shock.
: Continuous use under the abnormal condition such as high temperature,
smoke and strange smell can cause the fire and electric shock. Please switch off the printer,
remove the power cord and contact with dealers or service center for further help.
: Do not use volatile solvents or spray insecticide on the printer outer cabinet.
Otherwise, discoloration or crack may result.
◎ Cleaning of Filter
If the dust collects on the openings, please clean it with vacuum cleaner.
23
Chapter 7. Error Status Handling
◎ Indicator Lights Correspond to Error Status and Corrective Actions
Indicator
Driver information
Status
Corrective Action
Door Error
0100 Cover open
The front cover is opened
Ensure the door is closed.
Switch ❶again to reset.
Change door sensor if needed.
0101 Cover open fail
The front cover is not opened
Ribbon Error
0200 RFID Tag Missing
No RFID tag
Put ribbon cassette into printer.
Ensure the RFID tag attached on the
cover of ribbon spool.
Check the ribbon type.
Replace to the correct ribbon
0201 Ribbon Missing
No ribbon detected
0202 Ribbon mismatch
01
Installed ribbon does not match
RFID tag ID (5"/6")
0203 Security Check Fail
Unsupported ribbon type
0205 Ribbon mismatch
03
Installed ribbon does not match
RFID tag ID (6x4/ 6x8)
Ribbon Out
03XX Ribbon Out
The remaining count recorded on
the RFID tag is zero.
Replace the ribbon cassette if empty.
Paper Out
04XX Paper Out
Paper roll is installed incorrectly
Replace the paper roll if empty.
Ensure paper is loaded in right
direction and at correct position.
Ending mark of paper is detected
Paper Error
05XX Paper Jam
Paper jammed while printing
Remove jammed paper.
Paper
Mismatch
0600 Paper mismatch
Loaded paper roll size is not
match to ribbon
Replace the correct size of paper roll.
◎ Failure Symptoms
When detecting a failure symptom, check the printer regarding the following table.
Symptom
Action
Power is not switch on
Please check if the power cable is firmly connected
The PC/NB does not recognize the printer
Check if the USB cable is connected to the PC/NB or printer
The printer does not ready
Check if the front cover is properly closed
Check if paper is jammed in the printer
The front cover does not open
Check if the printer is installed in a flat surface
Please check if there is hindrance for opening the front door
A straight stripe area is not printed
The Thermal Printing Head may be dirty, clean it up as Chapter
6. “Routine Maintenance” instructs
If the blank area remains after cleaning Thermal Printing Head,
it may be caused by loosing of Thermal Printing Head. Please
consult HiTi dealers or service center
Dotted areas are not printed
The roller may be dirty. Clean the roller as Chapter 6. “Routine
Maintenance” instructs
24
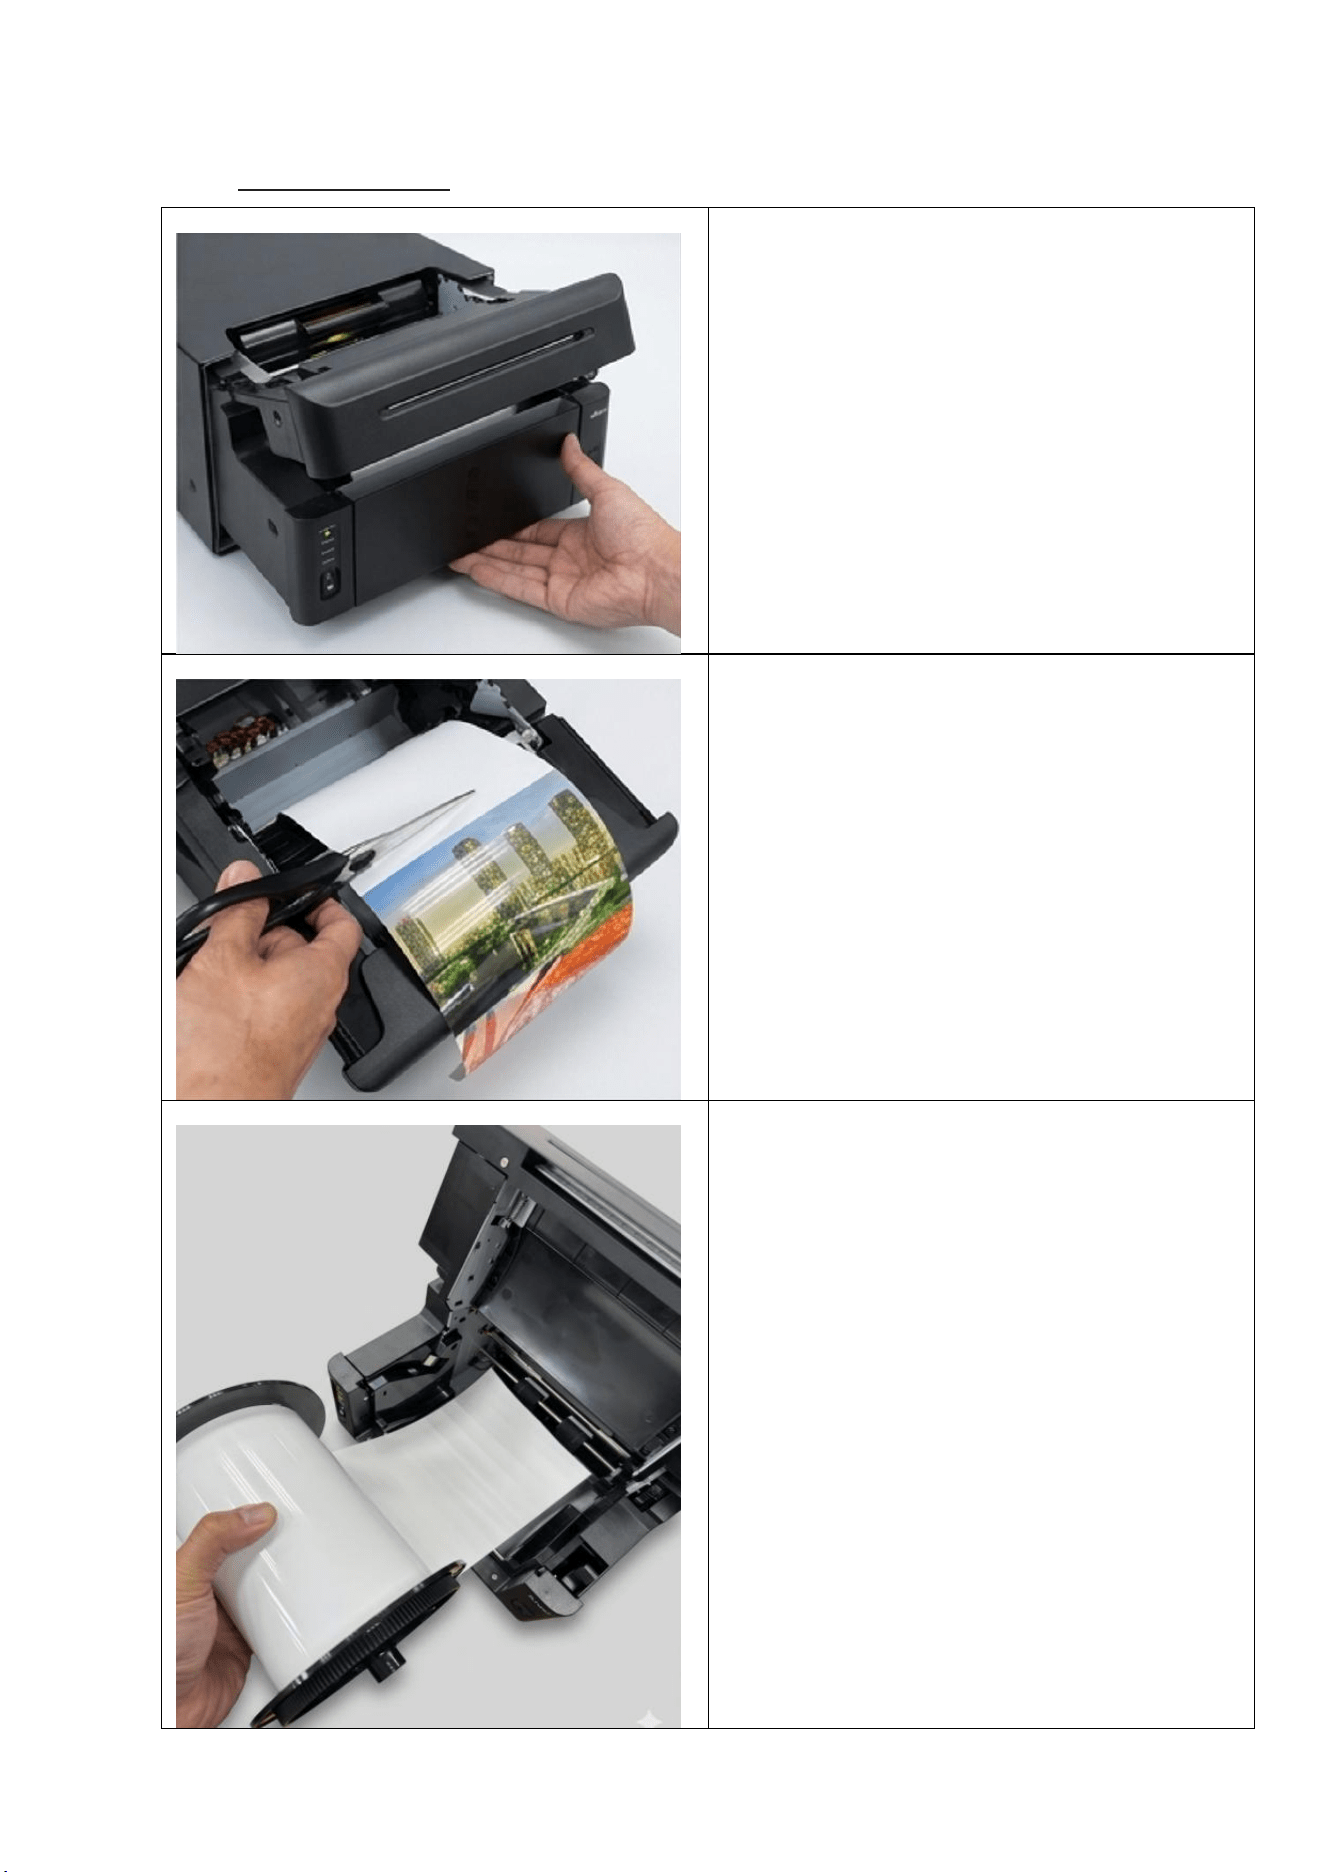
◎ Paper Jam resolution
7.1
Open the front cover
7.2
Cut off the folded paper or printed section by
scissors. When the paper is folded inside of the
printer, pull it out gently and slowly.
7.3
Pull out the paper.

25
* Attention: If the paper is used without cutting off the folded or printer section, pa per
jam occurs every time or the ribbon may snap during printing. Always cut off the creased
or printed section of the paper.
* Attention: Cut off the paper straight and at right angles to the roll paper direction
* Attention: If paper jam occurs frequently, a defect in the mechanical section is assumed.
Consult with HiTi dealers or service center.
26
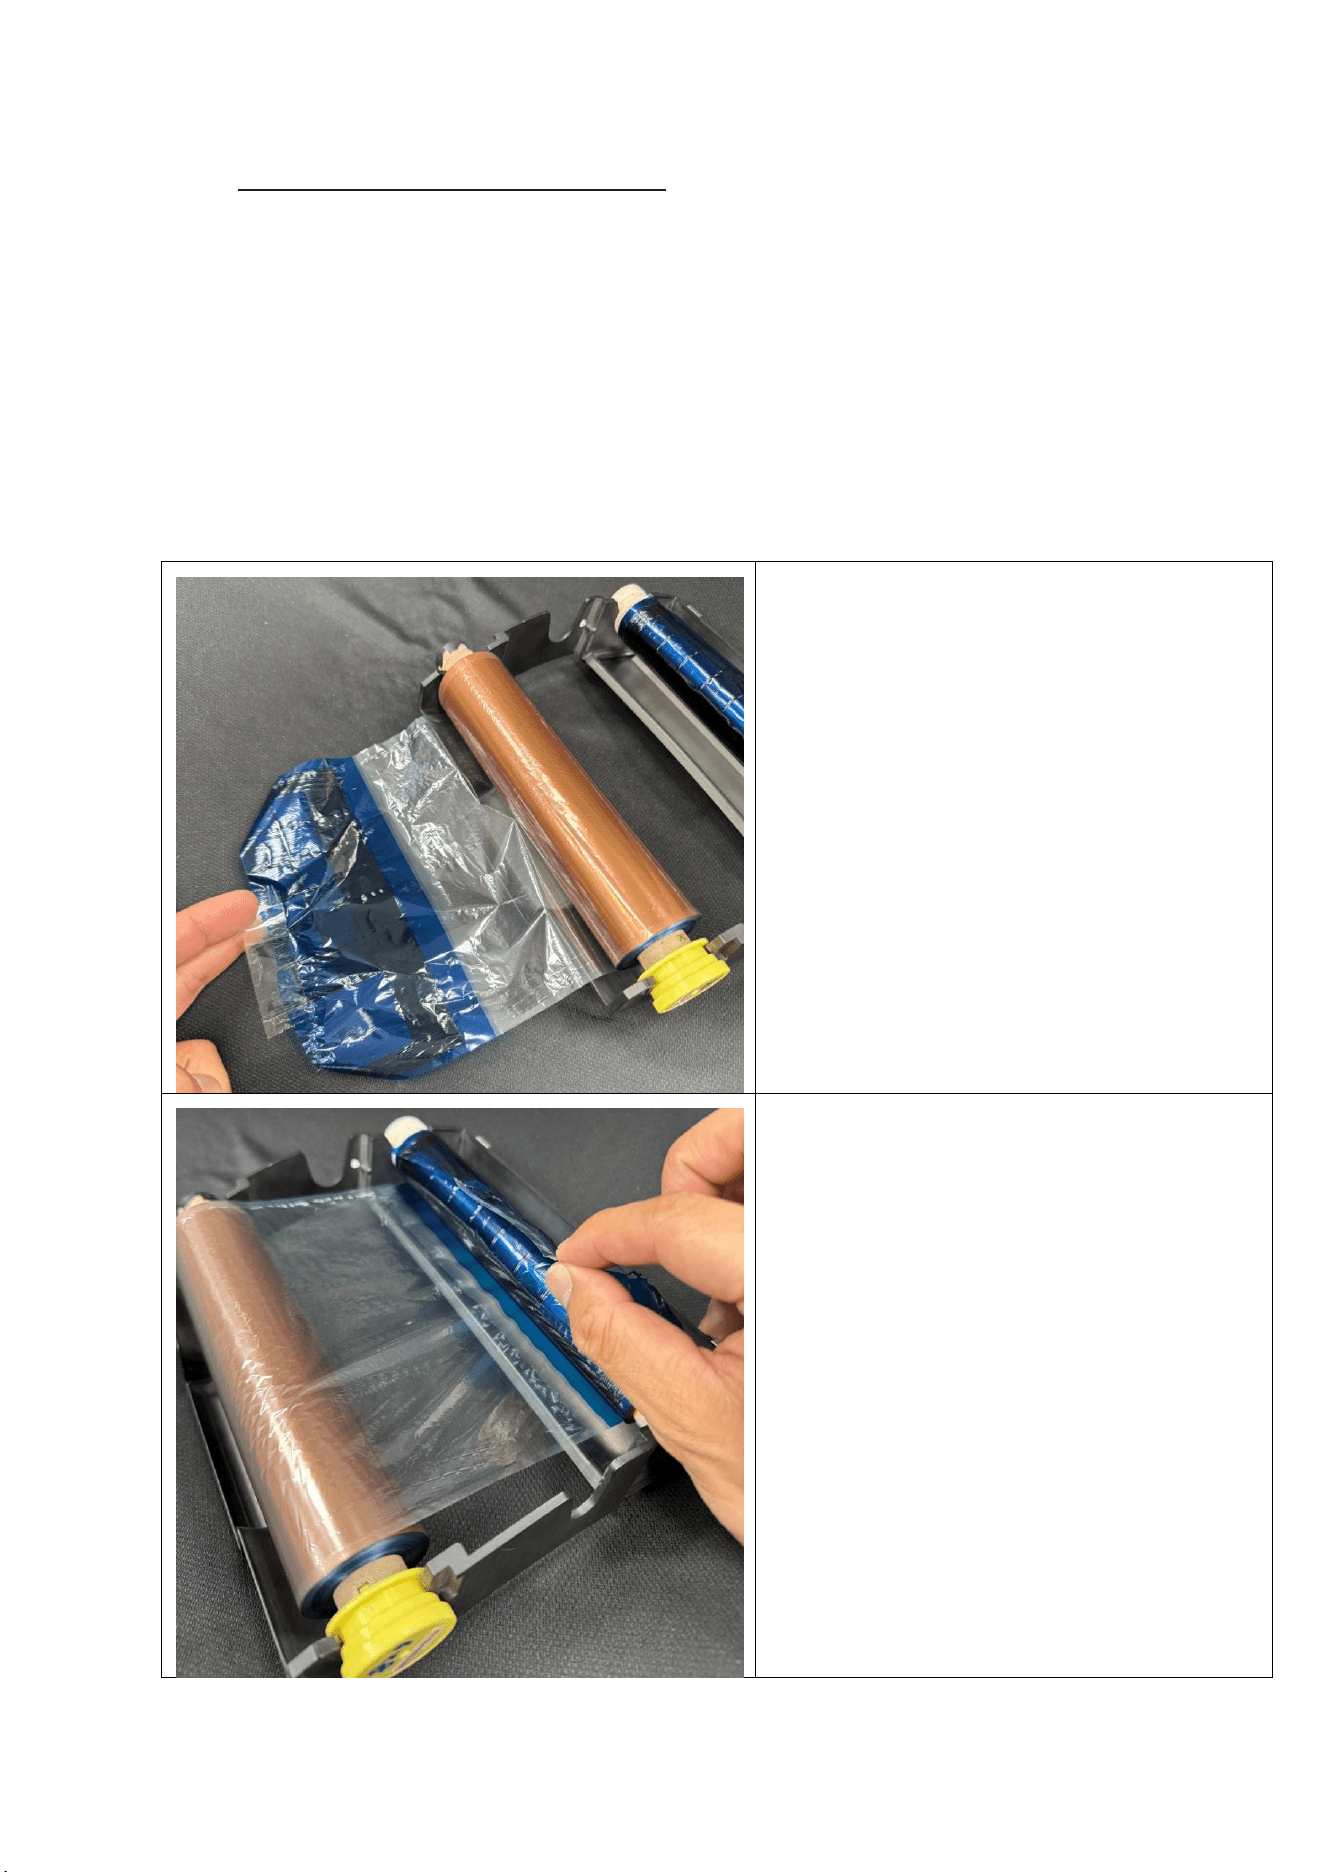
◎ Power Supply Interrupted During Printing
In the course of printing, in case of unexpected power interruption, please must always
repower on the printer to reset. Leaving this situation for a long time, the shape of
Platen can be warped. In order to avoid this situation, please follow the instruction
below.
1. Switch off the power of the printer
2. Always await 3 or more seconds for power on and off.
3. The status corresponding to the indicator is "Paper Jam", open the front cover and
take the necessary measures according to the instructions for the "Paper Jam"
topic.
7.4
Stick the broken part of ribbon with a tape.
7.5
Turn the ribbon on the rewinding side and
rewind the tapped section completely and
tightly.

27
Chapter 8. Specification
8.1 P630 / P630A Specification
Model Name HiTi P630 / P630A
*Inside the U.S., please use P630A.
Printing Method Dye Sublimation
Resolution 300dpi
Printable Size &
Corresponding Print Kit
2x6" (51x152 mm)
4x6" (102x152 mm)
4x6" (102x152 mm) Print Kit
3.5x5" (89x127 mm)
5x5" (127x127 mm)
5x7" (127x178 mm)
5x7" (127x178 mm) Print Kit
4x6" (102x152 mm)
5x6" (127x152 mm)
6x6" (152x152 mm)
6x8" (152x203 mm)
6x8" (152x203 mm) Print Kit
2x3" (51x76 mm)
3x4" (76x102 mm)
4x6" (102x152 mm)
Perforated Print Kit
3x4" (76x102 mm)
3x5" (76x127 mm)
3x6" (76x152 mm)
3x8" (76x203 mm)
6x8" (152x203 mm)
Perforated Print Kit
Prints Per Roll
4x6" (102x152 mm): 430 prints (2 rolls/ctn)
5x7" (127x177 mm): 215 prints (2 rolls/ctn)
6x8" (152x203 mm): 215 prints (2 rolls/ctn)
Printing speed
4x6" approximately: 8.9 seconds
5x7" approximately: 15.6 seconds
6x8" approximately
:
16.9 seconds
Operation System Windows 7 (32/64bit) or above, Mac OS X v10.6 or above
PC Connection
USB 2.0 High Speed
Power Requirement
AC 100V ~ 240V , 50/60 Hz
Operation Environment
10°C ~ 35°C (50°F ~ 95°F) ; 20~90% non-condensing
Dimension 280 x 170 x 385 mm (W x H x D)
Weight 10.5 kg (print kit and packing materials excluded)
Note: Specification is subject to change without prior notice

28
8.2 P63C Specification
Model Name HiTi P630C
* Not for resale/use in the U.S. Inside the U.S., please use P630A.
* Only compatible with P630C Print kit.
Printing Method Dye Sublimation
Resolution 300dpi
Printable Size &
Corresponding Print Kit
2x6" (51x152 mm)
4x6" (102x152 mm)
4x6" (102x152 mm) Print Kit
3.5x5" (89x127 mm)
5x5" (127x127 mm)
5x7" (127x178 mm)
5x7" (127x178 mm) Print Kit
4x6" (102x152 mm)
5x6" (127x152 mm)
6x6" (152x152 mm)
6x8" (152x203 mm)
6x8" (152x203 mm) Print Kit
2x3" (51x76 mm)
3x4" (76x102 mm)
4x6" (102x152 mm)
Perforated Print Kit
3x4" (76x102 mm)
3x5" (76x127 mm)
3x6" (76x152 mm)
3x8" (76x203 mm)
6x8" (152x203 mm)
Perforated Print Kit
Prints Per Roll
5x7" (127x177 mm): 200 prints (2 rolls/ctn)
6x8" (152x203 mm): 200 prints (2 rolls/ctn)
Printing speed
5x7" approximately: 15.6 seconds
6x8" approximately
:
16.9 seconds
Operation System Windows 7 (32/64bit) or above, Mac OS X v10.6 or above
PC Connection
USB 2.0 High Speed
Power Requirement
AC 100V ~ 240V , 50/60 Hz
Operation Environment
10°C ~ 35°C (50°F ~ 95°F) ; 20~90% non-condensing
Dimension 280 x 170 x 385 mm (W x H x D)
Weight 10.5 kg (print kit and packing materials excluded)
Note: Specification is subject to change without prior notice