Rechargeable Long-distance
Remote Control
REMOTE 1500FT
USER’S GUIDE

2
Introduction
The REMOTE 1500FT remote allows you to control
multimedia functions of audio and video equipment
over long distances, both for automotive and residential
use. Its 8-function control makes it practical for quick
management of your music.
Using radio frequency (RF) technology, you can control
the equipment from up to 1500 feet in open areas free
of interference.
With the implementation of ULTRACAP technology, the
remote is equipped with an energy storage capacitor that
powers the remote, eliminating the need for disposable
batteries. Its ultra-fast charging allows a full charge in
less than 10 minutes, which lasts for weeks without
needing a recharge.
CONTROL YOUR MUSIC FROM FAR AWAY!
USER MANUAL
Features
▪ Remote with 8 functions;
▪ Stores various device models in memory, plus the
“LEARN” function, which allows copying commands from
other remotes on the market;
▪ Integrated battery with ultra-fast charging, eliminating
the need for disposable batteries;
▪ USB-Cconnectorforcharging,oeringversatilityand
compatibility with a wide range of power sources, such
as radios, power banks, and smartphone chargers.
▪ Low battery indicator on the remote.
▪ Easy synchronization of new remotes;
▪ Syncs with up to 8 remotes, allowing multiple users to
control the same device.
RADIO REMOTE CONTROL
WITH 1500 Feet* RANGE

3
LRN
IR IN
SYNC
RESET
ANTIR OUT
PWR
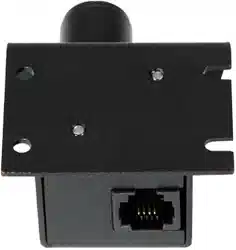
Control
Central
(Rear view)
Central
(Front view)
Product Presentation
TRANSMISSION / LOW BATTERY INDICATOR
POWER/SOURCE
FORWARD & REVERSE
FOLDER CHANGE
VOLUME CONTROLS
PLAY/PAUSE
6
5
2
1
3
4
13
14
12
IR RECEIVER
SYNC/RESET BUTTON
LEARN BUTTON (LRN)
WHITE
BLACK
7
8
9
10
11
PROGRAMMING PIN
ANTENNA
IR TRANSMITTER
LED INDICATOR
POWER CABLES
1
2
3 5
64
7
98
10
12 13 14
11
4
LRN
IR IN
SYNC
RESET
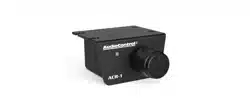
Central Installation
The central unit can be installed in a discreet location or in a
visible spot for monitoring the LED INDICATOR.
▪ Install the unit in a way that the antenna is not blocked
by the vehicle’s body or metal parts, as they act as barriers
for radio frequency transmissions. Position the antenna
near the edge of a window or inside the dashboard and
compartments.
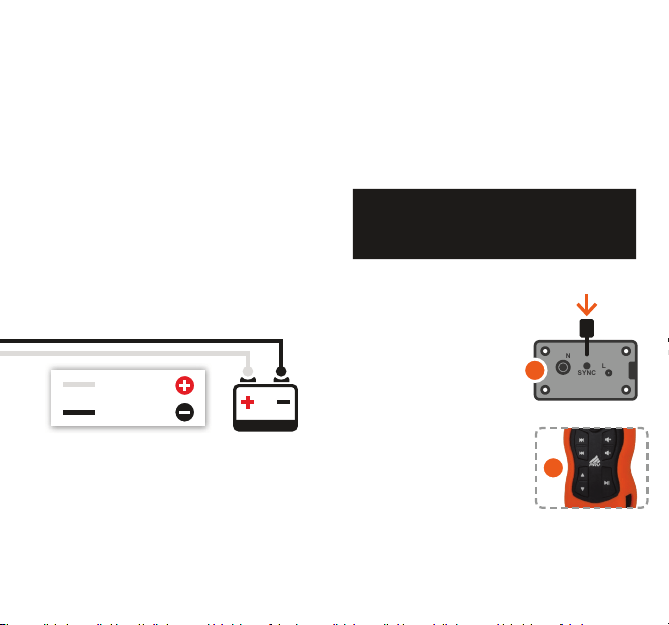
▪ The POWER CABLES are polarized. Connect the
WHITE WIRE (+12V) to the positive terminal of the
battery and the BLACK WIRE (GND) to the negative
terminal.
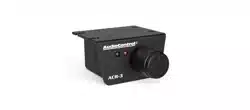
▪ The IR TRANSMITTER should be mounted so that it
faces the radio/player you wish to control. Ensure there
are no obstacles between them.
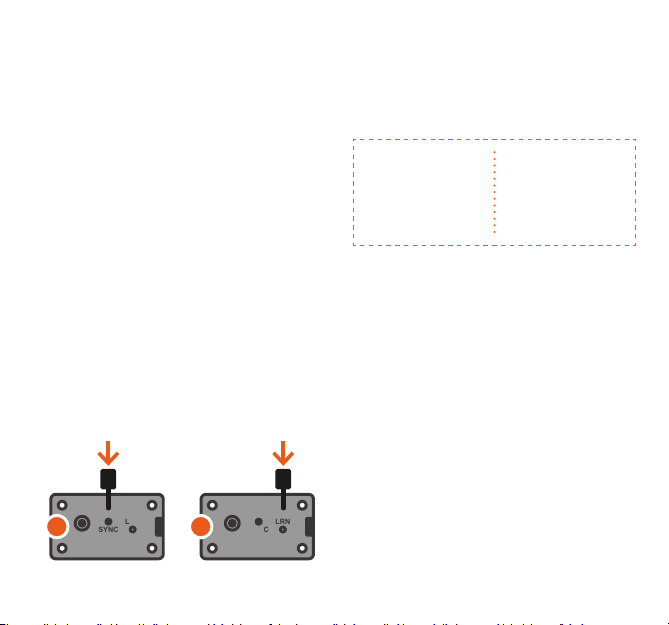
Remote Synchronization
The remote that comes with the product is already pre-
registered at the factory. It is possible to register new
remotes or re-sync with previously registered remotes
in case of communication issues. A single Central unit
allows registration of up to 8 remotes.
Before performing the synchronization, make sure there are
no other remotes within range of the central unit that you do
not want to register, as they may interfere with the process.
1. Press the SYNC button
on the central unit. The LED
INDICATOR on the central
unit will begin to blink.
2. Press any button on the
remote (except the POWER
button).
If the synchronization is successful, the LED
INDICATORonthecentralunitwillturno.
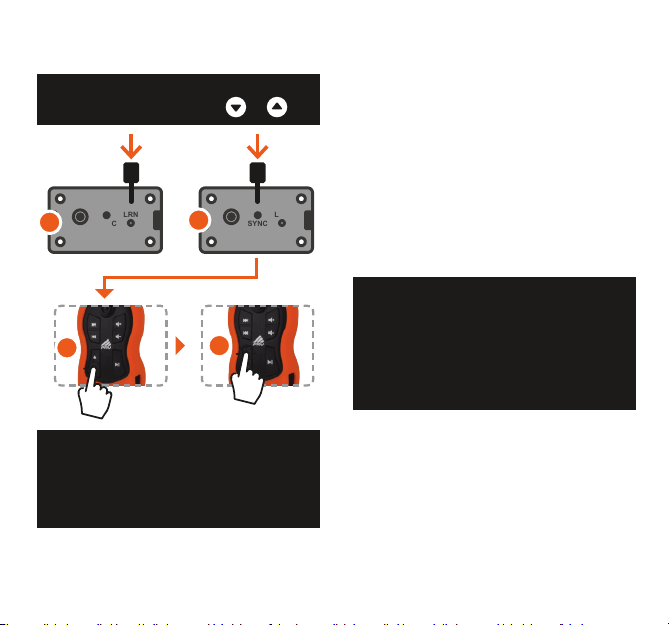
Synchronizing new remotes:
1
2
WHITE WIRE
BLACK WIRE
5
LRN
IR IN
SYNC
RESET
LRN
IR IN
SYNC
RESET
1 2
Remote programming
For the remote to work properly with your radio/player, you must
selectacongurationcompatiblewithyourdevicemodel.
This can be done in two ways:
Removing synchronized remotes:
1. Press the SYNC button on the central unit. The LED
INDICATOR on the central unit will begin to blink.
2. Press the POWER button on the remote you wish to remove.
3. The remote will be deleted, and the LED INDICATOR will turn
o.
Removing all synchronized remotes:
1. Press the SYNC button on the central unit. The LED
INDICATOR on the central unit will begin to blink.
2. Then press the LRN button on the central unit. The LED
INDICATOR will start blinking faster.
3. All remote registrations will be deleted, and the LED
INDICATORwillturno.
To synchronize more remotes (up to a maximum of 8), repeat
the previous steps. If the number of synchronizations exceeds 8
remotes,thenewremotewilloverwritetherstonesynchronized,
canceling its synchronization, and so on. It is also possible to
unsynchronize each remote individually or all at once.
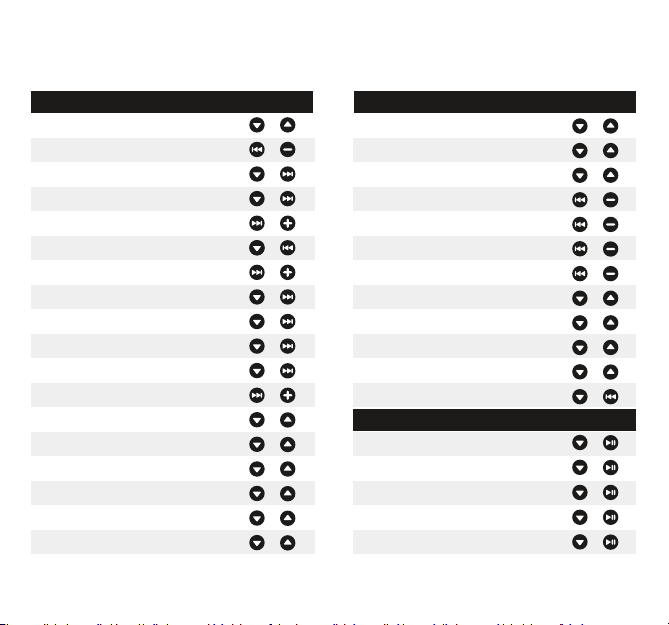
DIRECT MODE:
1. Check the code for your device in the CODE TABLE (at the
end of this manual).
2. Press the LRN button on the central unit.
The LED INDICATOR on the central unit will begin to blink.
3. Press the SYNC button on the central unit. The LED
INDICATOR will blink faster.
4. Onthe remote, press therst button listed in the table for
the desired device. The LED INDICATOR on the central unit will
brieyturno,thenresumeblinkingrapidly.
5. Press the second button listed in the table. The LED
INDICATOR willturno.
THE CENTRAL UNIT IS NOW PROGRAMMED FOR THE
SELECTED DEVICE MODEL.
DIRECT MODE
Allows you to select a
preset conguration stored
in memory, compatible
with various devices.
LEARN MODE
Allows you to manually
copy the commands
from the device’s
original remote.
6
Conguration example
Programming for PIONEER DEH-
8380 SD PLAYER
Key sequence:
and
Choose a not bright or lit environment, preferably away from
uorescent lighting or inside the vehicle, as external light
may interfere with the central unit’s IR RECEIVER. Plasma
screens are also strong sources of interference.
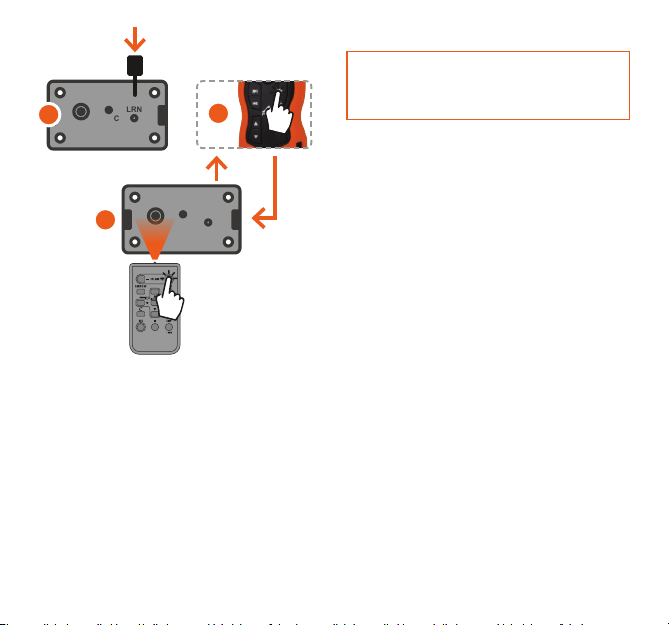
LEARN MODE:
1. Press the LRN button on the central unit. The LED INDICATOR
will begin to blink.
2. On the remote, pressthebutton you want to congure.The
remote’s INDICATOR willbrieyturnoandthenstartblinking
again.
3. Point the original remote of the device at the IR RECEIVER
on the central unit and press the button you want to copy. If the
command is successfully recorded, the LED INDICATOR will
brieyturnoandthenresumeblinking.
At this stage, external light interference may occur. If this
happens, the central unit will detect the failure and the
LED INDICATOR will blink rapidly instead of turning o. It
will then briey turn o and return to step 2 with the LED
INDICATOR blinking.
4. Repeat steps 2 and 3 for all the buttons you want to program.
If any button is programmed incorrectly, repeat steps 2 and 3 as
many times as needed.
To exit LEARN MODE, press the LRN button on the central unit.
LRN
IR IN
SYNC
RESET
3
LRN
IR IN
SYNC
RESET
2
4
5
7
LRN
IR IN
SYNC
RESET
LRN
IR IN
SYNC
RESET
The central unit allows you to merge functions from DIRECT
MODE with LEARN MODE. In other words, it is possible to load
apreset conguration from memory and change some buttons
withoutaectingtheothers.Theprocessisquitesimple:
1. Follow the steps in DIRECT MODE to load the desired device
from the table into memory.
2. Follow the steps in LEARN MODE to program the desired
buttons/functions.
Whenever LEARN MODE is used, the buttons that are not
reprogrammed will continue performing the functions they
were previously programmed to execute.
1
3
2
Restore factory settings
Press and hold the RESET button on the central unit for 5
seconds. The LED INDICATOR will blink, and the factory
settings will be restored. The synchronization will be retained.
Multi-use of the Central Unit
It is possible to use a single remote to control multiple devices
simultaneously. To use this feature, the remote must be
synchronized with the central units of each device. To do so, follow
the instructions in “Remote synchronization.” Each central
unitmustbeconguredaccordingtoitsdevice;todothis,follow
the instructions in “Remote programming.”
8
The remote features a safety system that turns
it o if any button is pressed for more than 10
seconds, preventing unnecessary battery drain.
Once the button is released, the system will return to
normal operation.
In charging state
Diagnostics
Invalid transmission pattern:
If any information is incorrectly saved during LEARN MODE due
to interference, the central unit will not transmit the command
to the device, and the LED INDICATOR on the central unit
will remain on for 2 seconds. To resolve this, redo the remote
congurationinLEARN MODE for the buttons with issues.
The remote does not control my device:
Even with the LEARN FUNCTION, the REMOTE 1500FT may
not recognize some brands and models of original remotes.
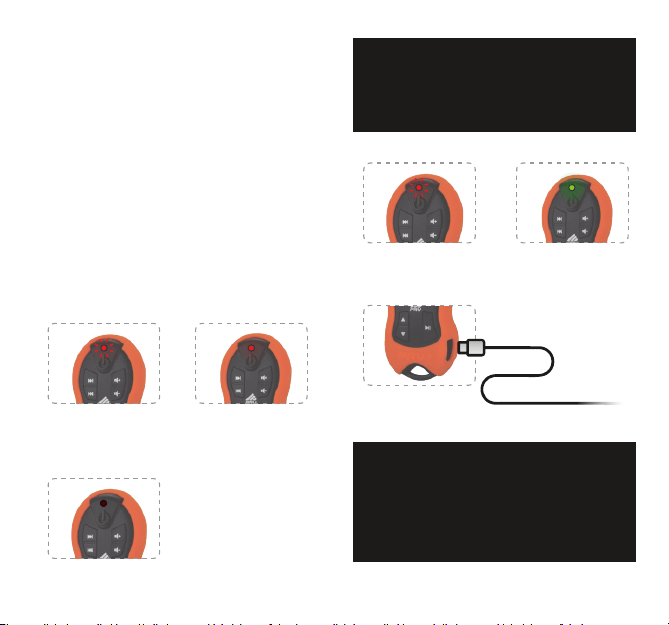
LED indicator guide:
RED LED BLINKING:
Indicates the transmission of
a command.
RedLEDBlinking:
Charging in progress
RED LED ON:
Indicates low battery and a
reminder that it needs to be
recharged.
GreenLEDOn:
Battery fully charged.
LED OFF:
Indicates a discharged battery.
A full charge takes only 10 minutes on automotive
players and can be done through other USB ports with
a minimum current of 300mA. It features an indicator
that signals when the charge is complete (Green LED On).
Connect USB-C
Side for charging.
9
CONFIG.
Code table
PIONEER PIONEER
CONFIGURATION CONFIGURATION
DEFAULT CD
DEFAULT CD CXC57177
DEFAULT DVD CXE2833
DEFAULT DVD CXE3877
DEFAULT DVD CXE5116
DEFAULT DVD CXE5125
AVH-1480DVD AVH-2480BT
AVH-2380DVD AVH-5480DVD
AVH-P3280BT AVH-P3380BT
AVH-P4280DVD AVH-P4380DVD
AVH-P5280BT AVH-P6380BT
AVH-X1580DVD AVH-X2580BT
DEH-1480UB DEH-1580UB
DEH-2280UB DEH-3180UB
DEH-3480UB DEH-4280SD
DEH-4380UB DEH-5280SD
DEH-6280BT DEH-6380SD
DEH-6480BT DEH-7380BT
DEH-8380SD DEH-P4080UB
DEH-P4180SD DEH-P5080UB
DEH-P5180UB
DEH-6980IB DEH-8980BT
DEH-P6080UB DEH-P7180UB
DEH-P7880MP DEH-P7980UB
DEH-P9880BT
DEH-X3580UI DEH-X6580BT
DEH-X8580BT MVH-1480UB
MVH-158UI MVH-358BT
MVH-8280BT MVH-8380BT
DVH-7580AV DVH-8480AVBT
CDX-GT217X CDX-GT227X
CDX-GT267X CDX-GT317X
CDX-GT40UX CDX-GT417UX
CDX-GT427UX CDX-GT437UX
CDX-GT617UX CDX-GT627UX
SONY
CONFIGURATION
10
Code table
KENWOOD CONFIGURATION
DEFAUT KDC-BT6052U
KDC-MP1045 KDC-MP1048
KDC-MP152U KDC-MP2045U
KDC-MP2048U KDC-MP2052U
KDC-X494 KDC-X496
KDC-X595 KDC-X996
ALPINE
CONFIGURATION
CDE-133BT IVE-W530
CONTROLLER
Operating voltage
Maximum consumption
Dimensions
Weight
Charging connector
Operating frequency
Maximum power
Modulation
Maximum consumption
Dimensions
Weight
6V ~ 16V DC
23 mA
2.26 x 1.30 x 0.47 inches
1.48 Ibs
USB-C
433,92 MHz
10 mW
OOK
20 mA
3.28 x 1.68 x 0.98 inches
1.34 Ibs
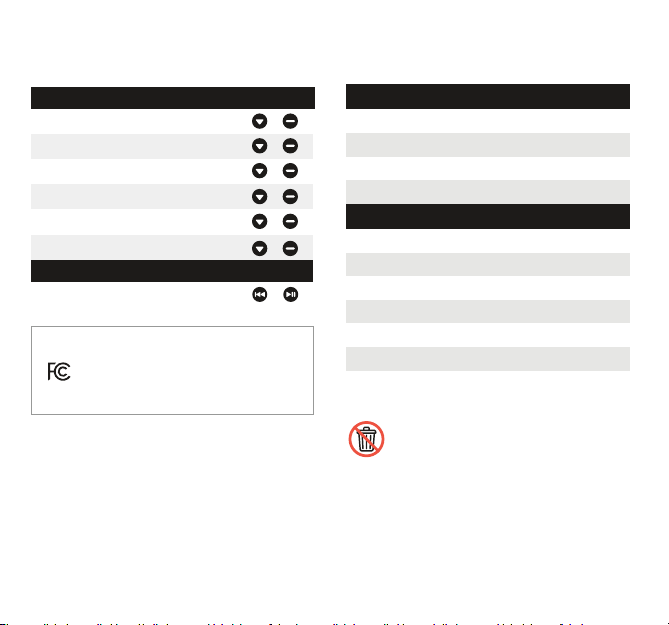
Technical specications
All parts of this product, including electrical and electronic components,
must be recycled (or reused) and should not be discarded as regular waste.
Pleasendacollectionpoint forthesematerialsanddo your part to help
the environment.
CENTRAL UNIT
FCC ID: 2BBF7 - PRVREMOTE1500
FCC Compliance Notice
Thisdevicecomplieswithpart15oftheFCCRules.Operationissubjecttothefollowingtwoconditions:
(1) This device may not cause harmful interference, and (2) this device must accept any interference received,
including interference that may cause undesired operation.
Note: This equipment has been tested and found to comply with the limits for a Class B digital device, pursuant to
part 15 of the FCC Rules. These limits are designed to provide reasonable protection against harmful interference in
a residential installation. This equipment generates, uses and can radiate radio frequency energy and, if not installed
and used in accordance with the instructions, may cause harmful interference to radio communications. However,
there is no guarantee that interference will not occur in a particular installation.
If this equipment does cause harmful interference to radio or television reception, which can be determined by
turningtheequipmentoandon,theuserisencouragedtotrytocorrecttheinterferencebyoneormoreofthe
followingmeasures:
—Reorient or relocate the receiving antenna.
—Increase the separation between the equipment and receiver.
—Connecttheequipmentintoanoutletonacircuitdierentfromthattowhichthereceiverisconnected.
—Consult the dealer or an experienced radio/TV technician for help.
Note: The Grantee is not responsible for any changes or modications not expressly approved by the party
responsibleforcompliance.suchmodicationscouldvoidtheuser’sauthoritytooperatetheequipment.
The device has been evaluated to meet general RF exposure requirement. The device can be
used in portable exposure condition without restriction.
11
FCC ID: 2BBF7 - PRVREMOTE1500