EN
www.gorenje.comwww.gorenje.com
INSTRUCTION MANUAL
FOR FREEZER

2
We thank you for the confidence you have shown by purchasing
our appliance which is designed to simplify your life. To make the use of the
product easier, we have supplied detailed instructions for use, and installation
instructions supplied on a separate sheet. The instructions should allow you to
learn about your new appliance as quickly as possible.
We wish you find a lot of pleasure in its use.
The appliance is intended solely for household use.
The freezer is intended for freezing fresh food and for long-term storage of
frozen food (up to one year, depending on the type of food).
Please visit our website where you can enter your appliance model number,
indicated on the rating plate or the warranty sheet, to find detailed description
of your appliance, tips on use, troubleshooting, service information, instructions
for use etc.
http://www.gorenje.com
Important safety warning
!
3
CONTENTS
INTRODUCTION
APPLIANCE
DESCRIPTION
DEFROSTING
AND CLEANING
THE APPLIANCE
4 IMPORTANT NOTES AND PRECAUTIONS
4 SAFETY AND WARNING INFORMATION
11 INSTALLING YOUR NEW APPLIANCE
13 APPLIANCE DESCRIPTION
14 CHANGING THE DOOR OPENING DIRECTION
19 OPERATING THE APPLIANCE
21 USING YOUR APPLIANCE
24 HELPFUL HINTS AND TIPS
25 CLEANING AND CARE
27 TROUBLESHOOTING
29 DISPOSAL OF THE APPLIANCE
MISCELLANEOUS

4
IMPORTANT NOTES AND
PRECAUTIONS
For your safety and correct usage, before installing and
first using the appliance, read this user manual carefully,
including its hints and warnings. To avoid unnecessary
mistakes and accidents, it is important to make sure that all
people using the appliance are thoroughly familiar with its
operation and safety features. Save these instructions and
be sure that they remain with the appliance if it is moved
or sold, so that anyone using it throughout its life, will be
properly informed on its usage and safety notices.
For the safety of life and property, keep the precautions of
these user's instructions as the manufacturer is not
responsible for damages caused by omission.
Safety for children and others who are vulnerable people
According to EN standard
This appliance can be used by children aged from 8 years
and above and persons with reduced physical, sensory or
mental capabilities or lack of experience and knowledge if
they have been given supervision or instruction concerning
use of the appliance in a safe way and understand the
hazards involved. Children shall not play with the appliance.
Cleaning and user maintenance shall not be made by
children without supervision.
Children aged from 3 to 8 years are allowed to load and
unload refrigerating appliances.
SAFETY AND WARNING
INFORMATION
!
5
According to IEC standard
This appliance is not intended for use by persons (including
children) with reduced physical, sensory or mental
capabilities, or lack of experience and knowledge, unless
they have been given supervision or instruction concerning
use of the appliance by a person responsible for their safety.
• Keep all packaging away from children as there is risk of
suffocation.
• If you are discarding the appliance, pull the plug out of
the socket, cut the connection cable (as close to the
appliance as you can) and remove the door to prevent
children playing from suffering an electric shock or from
closing themselves inside it. I
• f this appliance, featuring a magnetic door seals, is to
replace an older appliance having a spring lock (latch) on
the door or lid, be sure to make the spring lock unusable
before you discard the old appliance. This will prevent it
from becoming a death trap for a child.
General safety
• WARNING —This appliance is intended to be used in
household and similar applications such as
-staff kitchen areas in shops, offices and other working
environments;
-farm houses and by clients in hotels, motels and other
residential type environments;
-bed and breakfast type environments;
-catering and similar non-retail applications.
!

6
• WARNING — Do not store explosive substances such
as aerosol cans with a flammable propellant in this
appliance.
• WARNING — If the supply cord is damaged, it must
be replaced by the manufacturer, its service agent or
similarly qualified persons in order to avoid a hazard.
• WARNING — Keep ventilation openings, in the appliance
enclosure or in the built-in structure, clear of obstruction.
• WARNING — Do not use mechanical devices or other
means to accelerate the defrosting process, other than
those recommended by the manufacturer.
• WARNING — Do not damage the refrigerant circuit.
• WARNING — Do not use electrical appliances inside the
food storage compartments of the appliance, unless they
are of the type recommended by the manufacturer.
• WARNING — The refrigerant and insulation blowing
gas are flammable. When disposing of the appliance,
do so only at an authorized waste disposal centre. Do
not expose to flame. WARNING —When positioning
the appliance, ensure the supply cord is not trapped or
damaged.
• WARNING —Do not locate multiple portable socket-
outlets or portable power supplies at the rear of the
appliance.
Refrigerant
The refrigerant isobutene (R600a) is contained within the
refrigerant circuit of the appliance, a natural gas with a high
level of environmental compatibility, which is nevertheless
flammable. During transportation and installation of the
appliance, ensure that none of the components of the
refrigerant circuit becomes damaged.
The refrigerant (R600a) is flammable.
7
• WARNING — Refrigerators contain refrigerant andgases
in the insulation. Refrigerant and gases must be disposed
of professionally as they may cause eye injuries or
ignition. Ensure that tubing of the refrigerant circuit is
not damage prior to proper disposal.
WARNING! Risk of fire/flammable materials.
If the refrigerant circuit should be damaged:
• Avoid opening flames and sources of ignition.
• Thoroughly ventilate the room in which the appliance is
situated.
It is dangerous to alter the specifications or modify this
product in any way.
Any damage to the cord may cause a short circuit, fire, and/
or electric shock.
!
Electrical safety
• The power cord must not be lengthened.
• Make sure that the power plug is not crushed or
damaged. A crushed or damaged power plug may
overheat and cause a fire.
• Make sure that you can access the main plug of the
appliance.
• Do not pull the main cable.
• If the power plug socket is loose, do not insert the power
plug. There is a risk of electric shock or fire.
• You must not operate the appliance without the interior
lighting lamp cover.

8
• The fridge is only applied with power supply of single
phase alternating current of 220~240V/50Hz. If
fluctuation of voltage in the district of user is so large
that the voltage exceeds the above scope, for safety
sake, be sure to apply A.C. Automatic voltage regulator
of more than 350W to the fridge. The fridge must
employ a special power socket instead of common one
with other electric appliances. Its plug must match the
socket with ground wire.
Daily use
• Do not store flammable gass or liquids in the appliance,
There is a risk of an explosion.
• Do not operate any electrical appliances in the appliance
(e.g.electric ice cream makers,mixers etc.).
• When unplugging always pull the plug from the mains
socket,do not pull on the cable.
• Do not place hot items near the plastic components of
this appliance.
• Do not place food products directly against the air outlet
on the rear wall.
• Store pre-packed frozen food in accordance with the
frozen food manufacture’s instructions.
• The appliances manufactures storage recommendations
should be strictly adhered to.Refer to relrelevant
instructions for storage.
• Do not place carbonated or fizzy drinks in the
freeze compartment as it creates pressure on the
container,which may cause it to explode,resulting in
damage to the appliance.
• Frozen food can cause frost burns if consumed straight
from the freezer compartment.
• Do not place the appliance in direct sunlight.

9
• Keep buring candles,lamps and other items with naked
flames away from the appliance so that do not set the
appliance on fire.
• The appliance is intended for keeping food stuff and/
or beverages in normal household as explained in this
instruction booklet The appliance is heavy.Care should
be taken when moving it.
• Do not remove nor touch items from the freezer
compartment if your hands are damp/wet,as this could
cause skin abrasions or frost/freezer burns.
• Never use the base,drawers, doors etc. to stand on or as
supports.
• Frozen food must not be refrozen once it has been
thawed out.
• Do not consume ice popsicles or ice cubes straight from
the freezer as this can cause freezer burn to the mouth
and lips.
• To avoid items falling and causing injury or damage to
the appliance, do not overload the door racks or put too
much food in the crisper drawers.
• WARNING - Food needs to be packed into bags before
it is put into the refrigerator. Liquids need to be stored in
bottles or capped containers in order to avoid a spill, as
the design structure of the product is not easy to clean.
caution!
Care and cleaning
• Before maintenance, switch off the appliance and
disconnect the mains plug from the mains socket.
• Do not clean the appliance with metal objects, steam
cleaner, ethereal oils, organic solvents or abrasive
cleansers.
• Do not use sharp objects to remove frost from the
appliance. Use a plastic scraper.

10
Installation Important!
• For electrical connection carefully, follow the instructions
given in this manual.
• Unpack the appliance and check if there are damages on
it. Do not connect the appliance if it is damaged. Report
possible damages immediately to the place you bought
it. In this case retain packing.
• It is advisable to wait at least four hours before
connecting the appliance to allow the oil to flow back in
the compressor.
• Adequate air circulation should be around the appliance,
lacking this leads to overheating. To achieve sufficient
ventilation, follow the instructions relevant to installation.
Wherever possible the back of the product should not be
too close to a wall to avoid touching or catching warm
parts (compressor, condenser) to prevent the risk of a
fire, follow the instructions relevant to installation.
• The appliance must not be locate close to radiators or
cookers.
• Make sure that the mains plug is accessible after the
installation of the appliance
Service
• Any electrical work required to do the servicing of the
appliance should be carried out by qualified electrician or
competent person.
• This product must be serviced by an authorized Service
Center, and only genuine spare parts must be used.
1) If the appliance is Frost Free.
2) If the appliance contains freezer compartment.
11
INSTALLING YOUR NEW
APPLIANCE
• Before using the appliance for the first time, you should review the following tips.
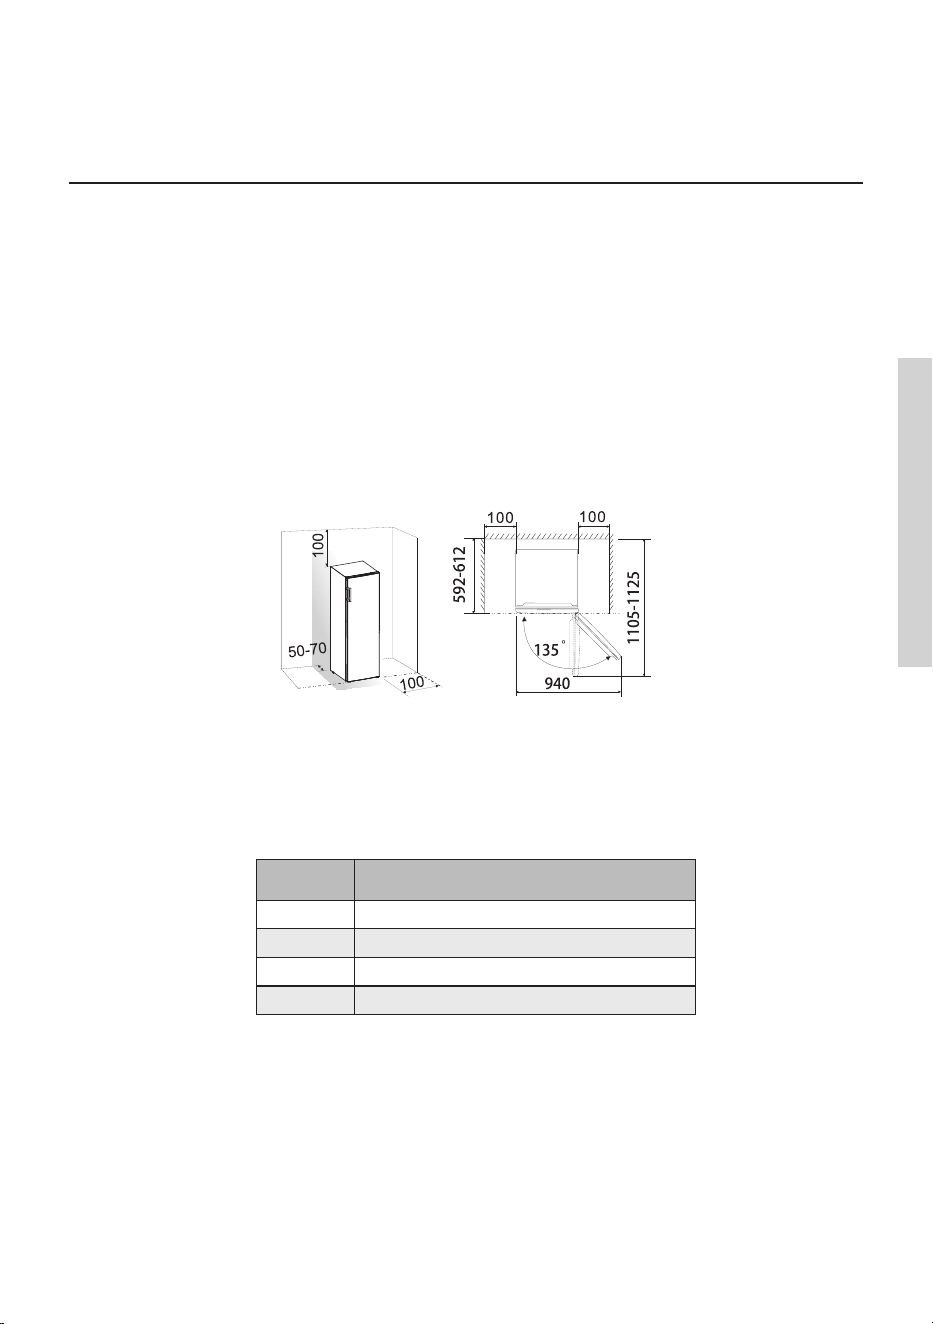
Ventilation of appliance
In order to improve eciency of the cooling system and save energy, it is
necessary to maintain good ventilation around the appliance for the dissipation
of heat. For this reason, sucient clear space should be available around the
refrigerator.
Suggest: It is advisable for there to be 50-70 mm of space form the back to the
wall, at least 100 mm form its top, at least 100 mm form its side to the
wall and a clear space upfront to allow the doors to open 135 °.
Please see the following diagrams
Note:
• This appliance performs well in the climate class from N to T. It may not work
properly if being left at a temperature above or below the indicated range for
a long period.
Class Temperature
SN from +10 °C to +32 °C
N from +16 °C to +32 °C
ST from +16 °C to +38 °C
T from +16 °C to +43 °C
• Stand you appliance in a dry place to avoid damage moisure.
• Keep the appliance out of direct sunlight, rain or frost. Stand the appliance
away from heat sources such as stoves, fires or heaters.
12
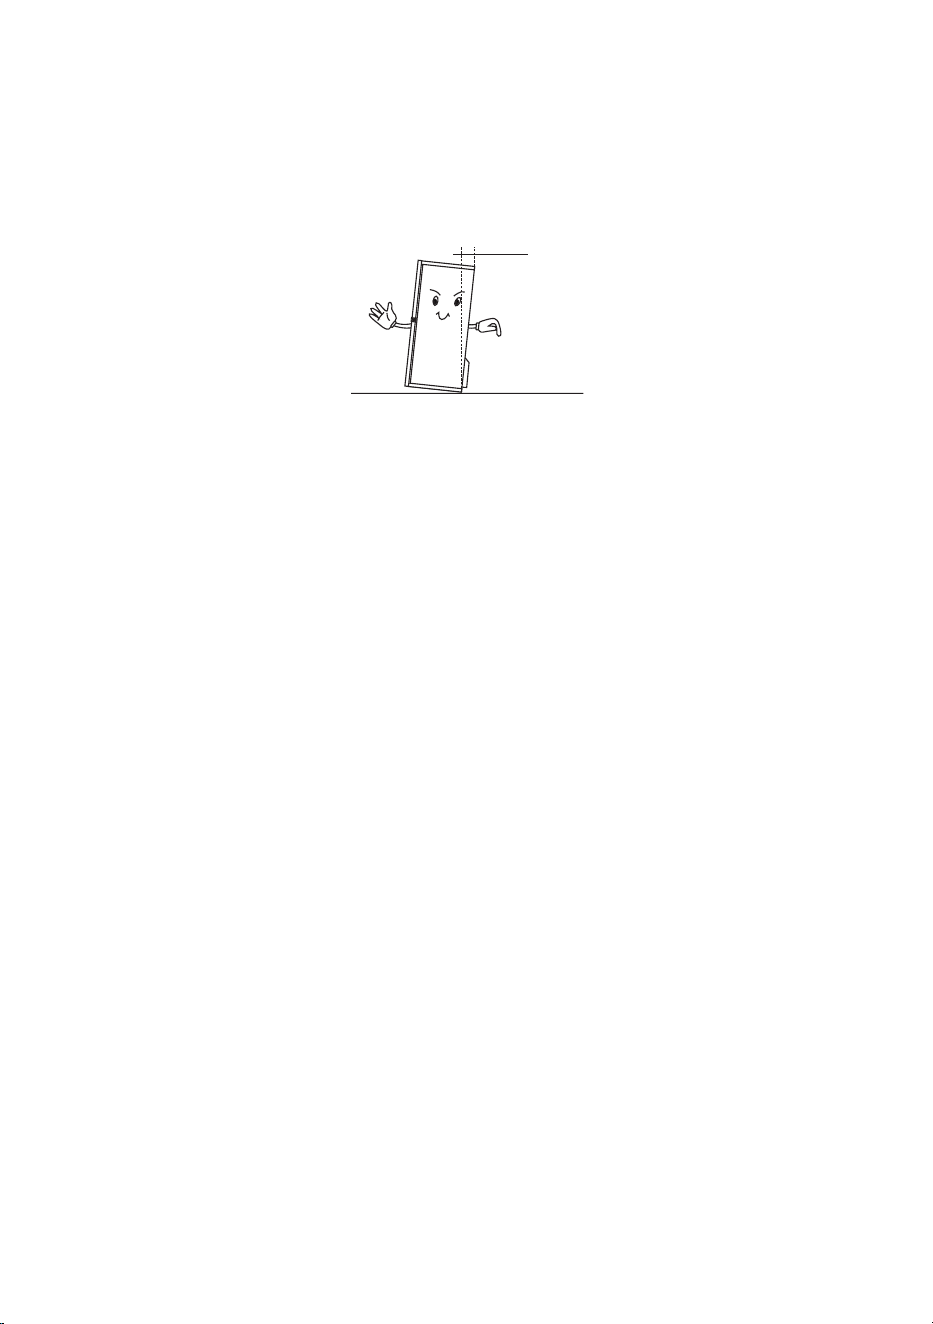
Leveling of appliance
• For sucient leveling and air circulating in the lower rear section of the
appliance, the bottom feet may need to be adjusted, you can adjust them by
your fingers or a suitable spanner.
• To allow the doors to self-close, tilt back the top backwards for about 10 mm.
İ
İ
1
1
0
0
m
m
m
m
13
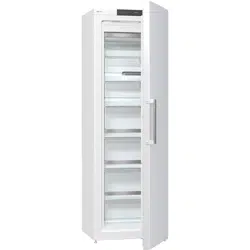
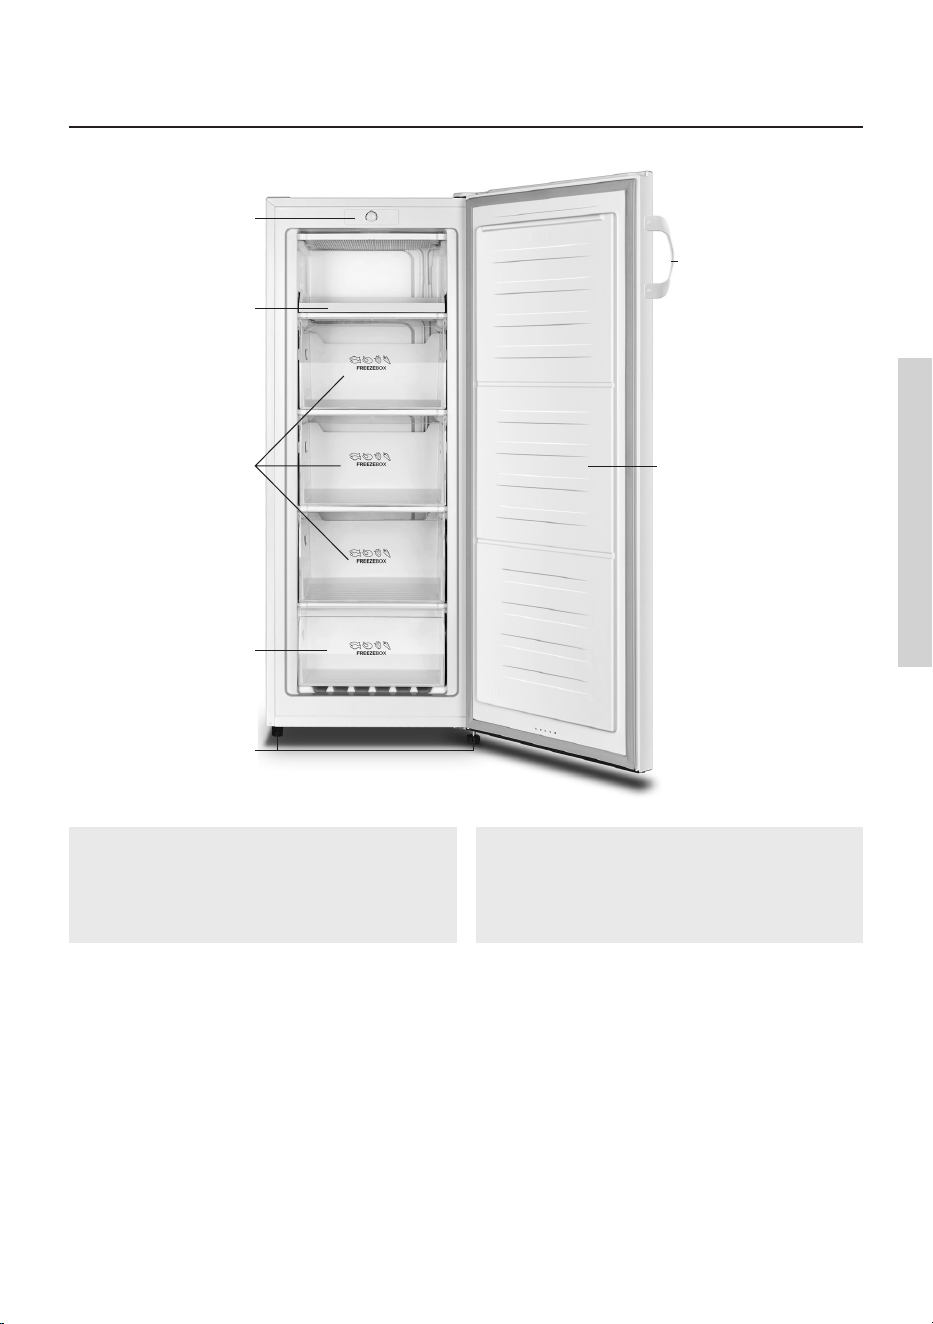
APPLIANCE DESCRIPTION
1
2
3
4
5
6
7
1. Control panel
2. Serving tray
3. Middle drawer
4. Lower drawer
5. Adjustable bottom feet
6. Handle
7. Freezer door
Note: Due to unceasing modification of our products, your refrigerator may
be slightly dierent from this instruction manual, but its functions and using
methods remain the same.

14
CHANGING THE DOOR OPENING
DIRECTION
The side at which the door opens can be changed, from the right side (as
supplied) to the left side, if the installation site requires.
Warning! When reversing the door, the appliance must not be connected to the
mains. Ensure that the plug is removed from the mains socket
Tools you will need.
Note: If required you may lay the refrigerator on its back in order to gain access
to the base, you should rest it on soft foam packaging or similar material to
avoid damaging the backboard of the refrigerator. To reverse the door, the
following steps are generally recommended.
8mm socket wrench
Thin-blade
screwdriver
Putty knife
Cross-shaped
screwdriver
Monkey
wrench
8mm wrench
Additional parts (in the plastic bag)
Left hinge cover
15
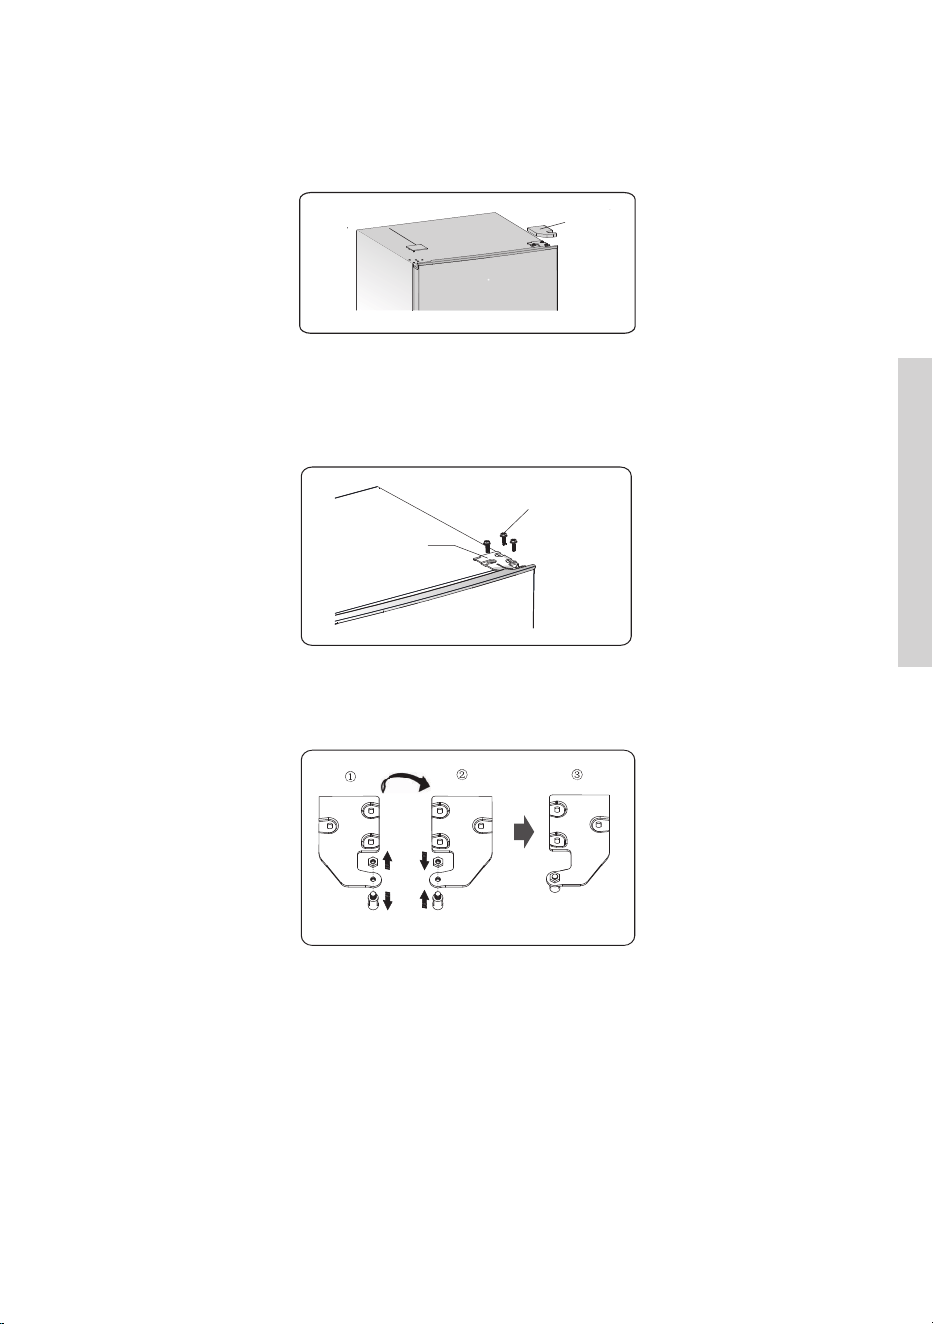
1. Use a putty knife or thin-blade screwdriver to prize the screw hole cover which
is at the top left corner of the refrigerator, and the upper hinge cover which is
at the top right corner of the refrigerator.
2. Unscrew the special flange self-tapping screws which are used for fixing the
right upper hinge part by a 8 mm socket driver or a spanner (please support
the upper door with your hand when doing it.
3. Remove the upper hinge axis, transfer it to reversed side and tighten securely,
then put it in a safe place.
screw hole cover
upper hinge
cover (right)
right upper
hinge part
special flange
selftapping screws
16
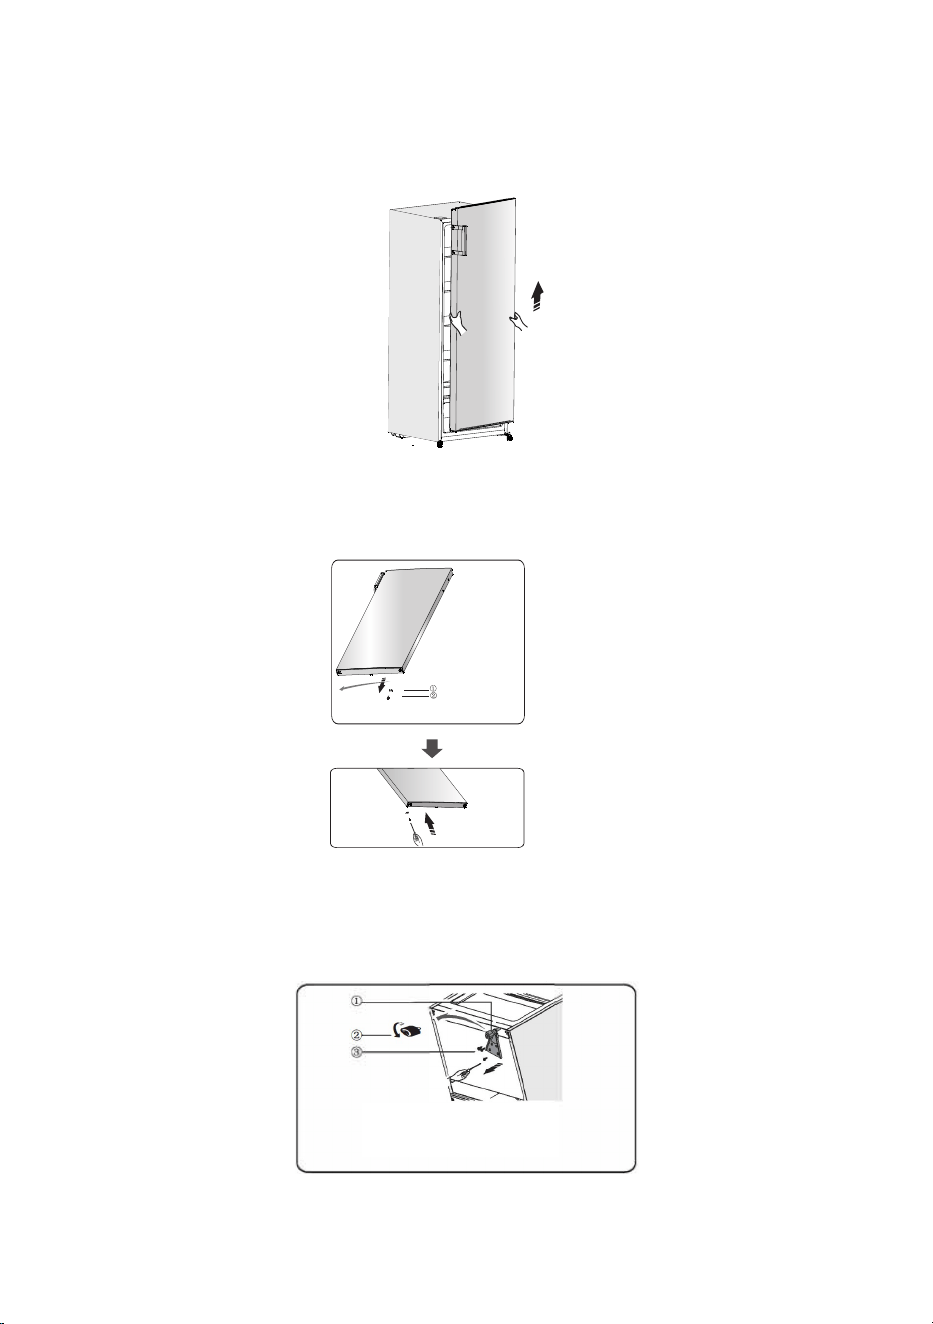
4. Remove the door from the lower hinge.
NOTE: When removing the door watch for washer(s) between the center
hinge and the bottom of the upper door that may stick to the door. Do not
lose.
5. Place the upper door on a smooth surface with its panel upwards. Loose screw
(2) and part (1), then install them to the left side and tighten securely.
6. Lay the refrigerator on soft foam packaging or similar material. Remove both
adjustable bottom feet parts, and the lower hinge part by unscrewing the
special flange self-tapping screws.
1 Stop block
2 Self tapping
screw
1 Lower hinge part (right)
2 Adjustable bottom feet part
3 Self tapping screws
17
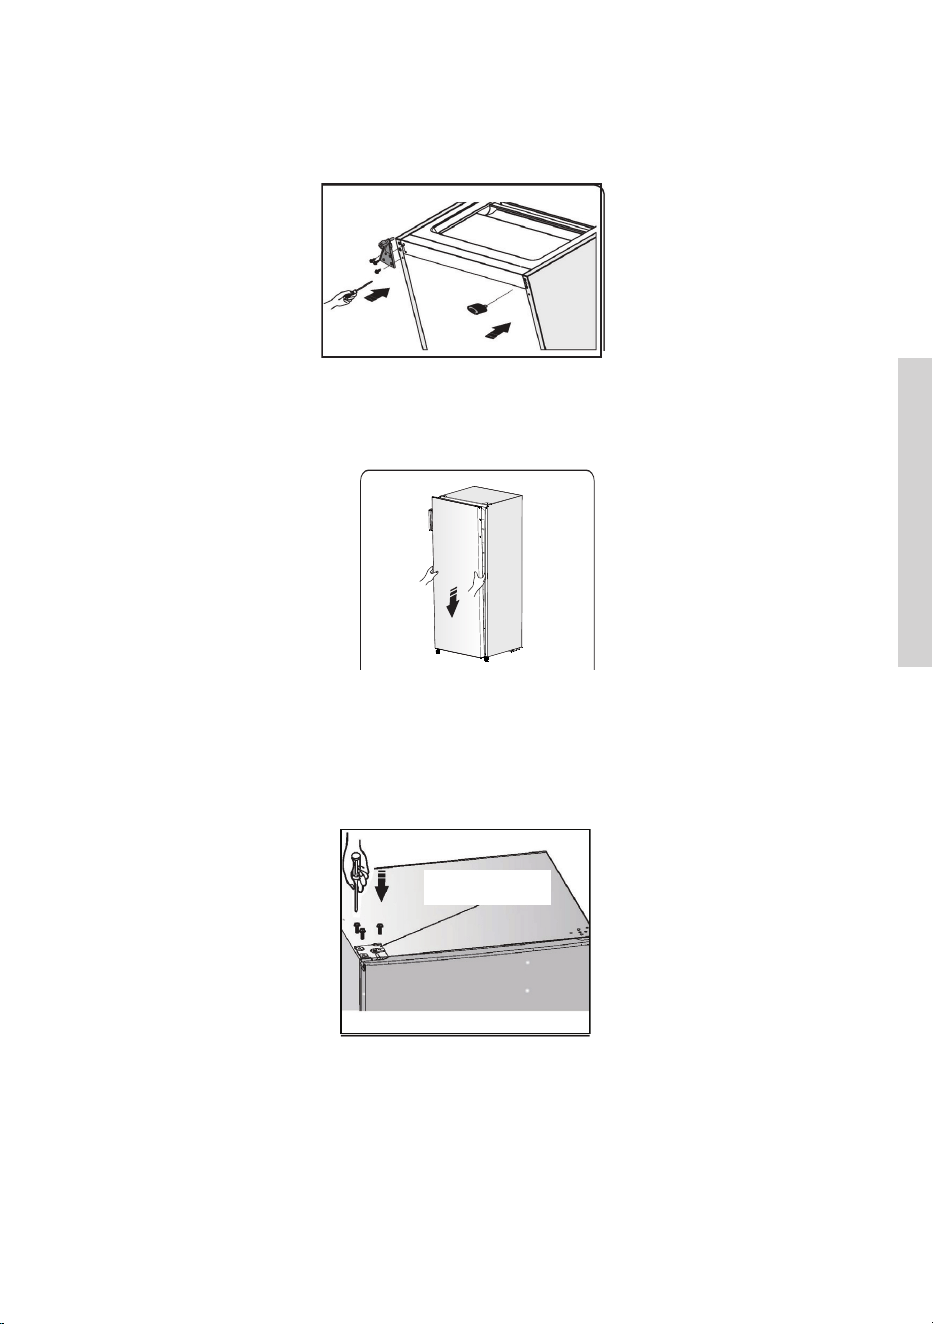
7. Replace the lower hinge part to the left side and fixing it with the special
flange self-tapping screws. Replace the adjustable bottom feet parts to
another side and fixing it.
8. Transfer the door to the property position, adjust the lower hinge part, make
the hinge axis into the lower hole of the door.
9 .Transfer the upper hinge part and make the upper hinge axis into the upper
hole of the upper door, and adjust the position of the upper door (please
support the upper door with your hand when doing it), fixing the upper hinge
part with the special flange self-tapping screws.
upper hinge part
18
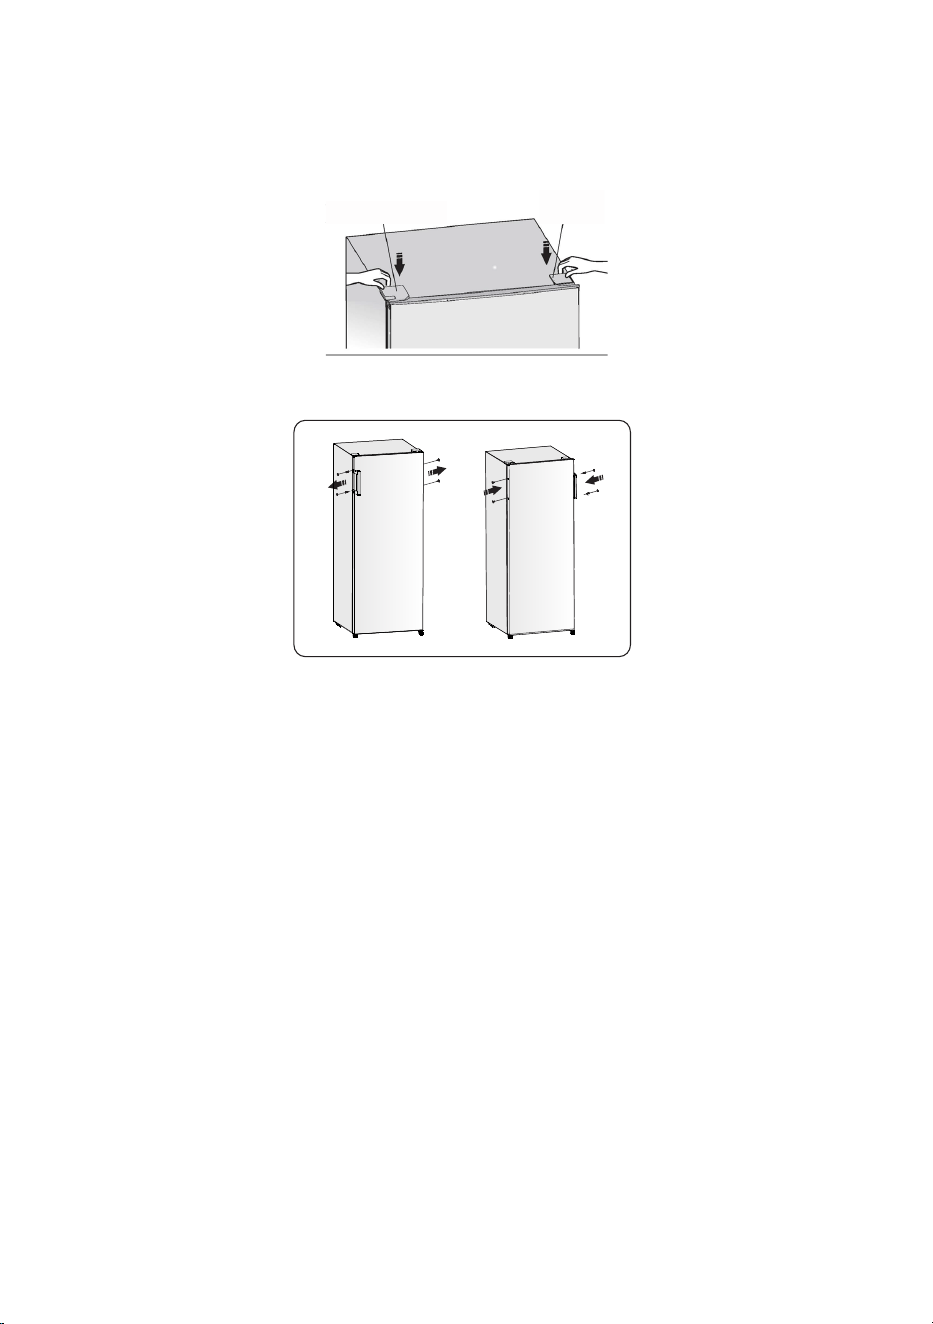
10.Install the screw hole cover on the top right corner of the refrigerator. Install
the upper hinge cover (which is in the plastic bag) on the left corner. Put the
other upper hinge cover into the plastic bag.
11. Move the handle from the left side of door to the right side.
Warning! When changing the side at which the door opens, the appliance must
not be connected to the mains. Remove plug from the mains beforehand.
upper hinge cover
(left)
screw hole cover
19
OPERATING THE APPLIANCE
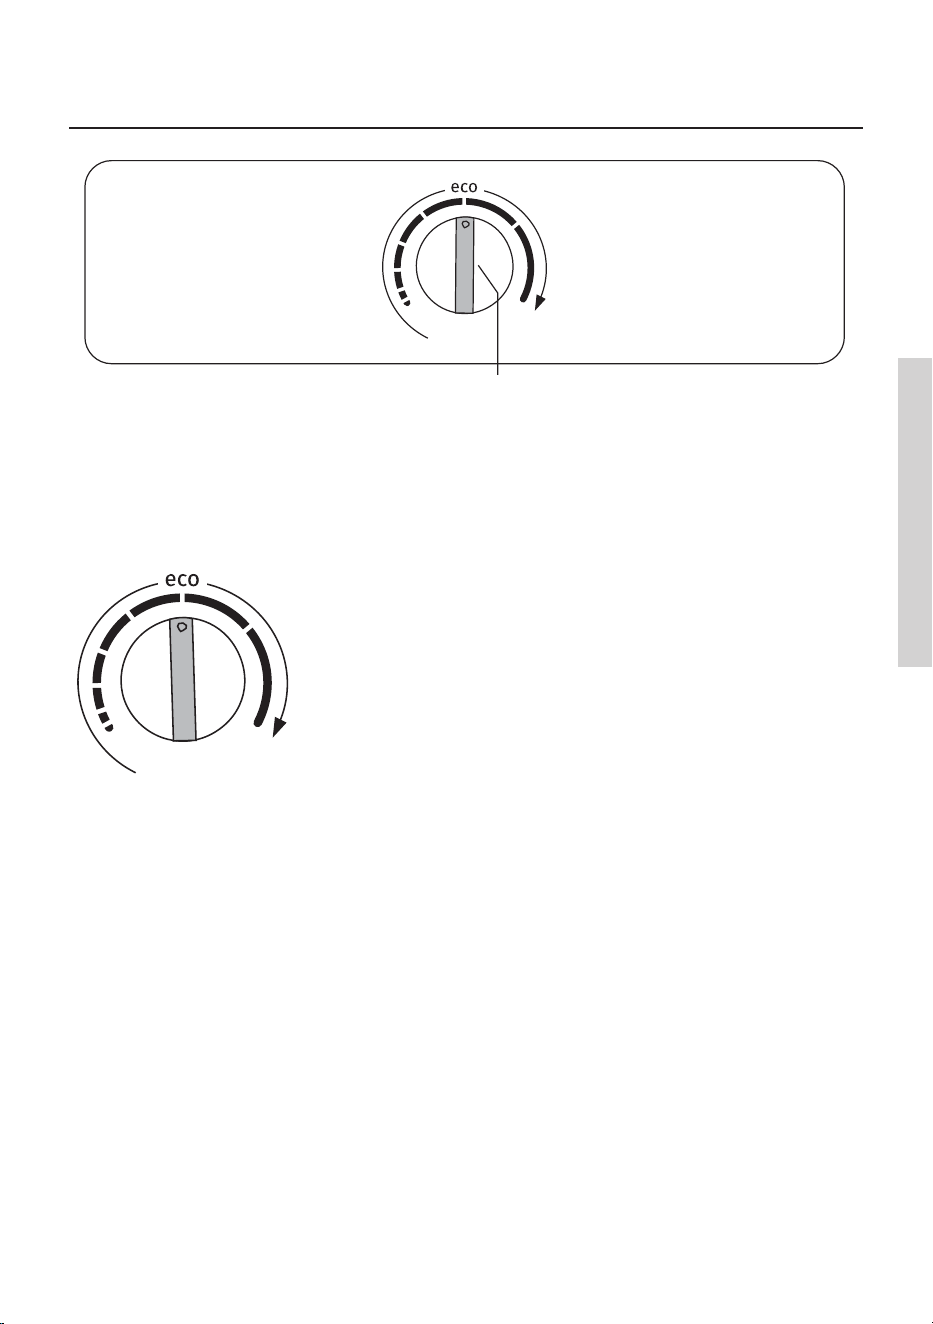
SWITCHING THE APPLIANCE ON
To switch on: rotate the A dial clockwise.
A Temperature setting knob
A
20
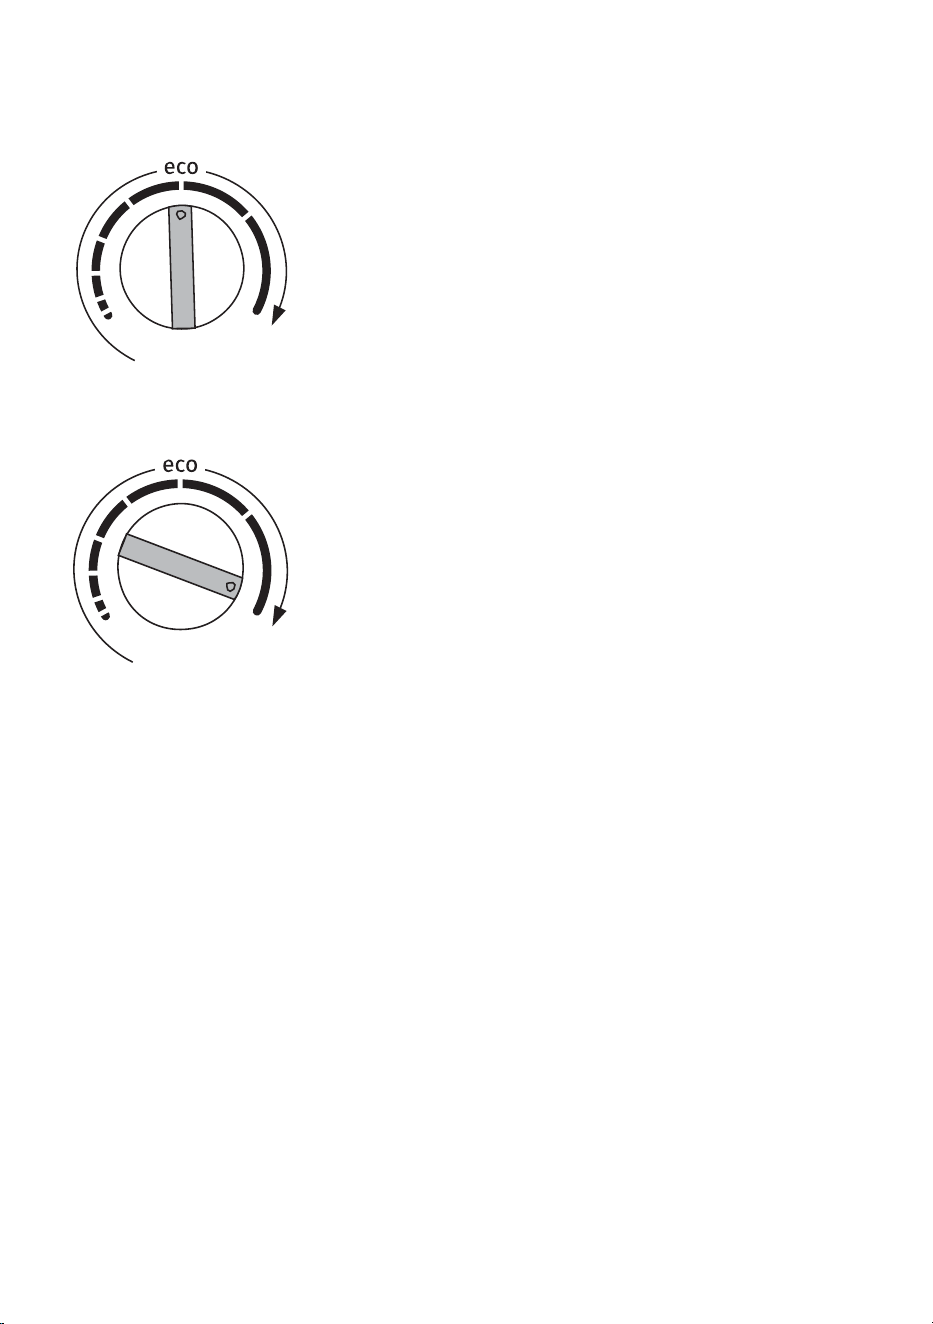
ADJUSTING THE TEMPERATURE
• To set the desired temperature, rotate the A dial in
clockwise direction, i.e. to the right.
• A change in the environment temperature will
aect the temperature in the appliance. Adjust
the setting with the A dial accordingly. Positions
towards the longer lines mean a lower temperature
in the appliance (cooler). Settings towards the
shorter lines mean a higher temperature (warmer).
• Recommended setting of the A dial is on the eco
position (see figure).
• If the temperature of the room where the appliance
is installed is below 16°C, we recommend setting
the A dial temperature to the longest line..

21
USING YOUR APPLIANCE
The freezer compartment
The symbol means that your freezer will store frozen food at -18°C(-0.4F)
or colder allowing for long term frozen-food storage and freezing of fresh
food. The freezer temperature is controlled automatically by the thermostat
situated in the control panel. Due to the different installations, methods of
usage and weather conditions, adjustments to the temperature settings may
be required. These are best assessed against a temperature reading on a
thermometer buried in the frozen food. The reading must be taken quickly as
the thermometer temperature will rise rapidly after removal. Place the fresh
food in the top freezer drawer. Food may need rearranging to achieve this.
During the freezing process the temperature of fresh food should be reduced
quickly so that ice crystals are kept as small as possible to avoid damaging the
structure of food. If freezing takes place slowly large ice crystals form and these
will affect the quality of food once it has defrosted. Existing frozen food should
be rearranged to leave space in the top two drawers for freezing. The packets
to be frozen should be placed in the drawer in contact with the drawer surface
as far as possible and spaced apart to allow cold air to circulate between them.
They should not touch existing packets. If there is enough room, transfer the
food you have frozen to the baskets or drawers to allow you to freeze a further
load in the top drawer. Exceptionally large items can be stored by removing
the drawer. Frozen food should not be refrozen once it has thawed out. Do not
remove items from the freezer if your hands are damp/wet, as this could cause
skin abrasions or “frost/freezer burns”. For safety reasons, the freezer drawer
are fitted with stops but are readily removed by pulling them forward to the
stop, then lifting the front and pulling all the way out. Refit by reversing this
procedure.
Frozen food storage
Pre-packed commercially frozen food should be stored in accordance with the
manufacturer's instructions for a 4-star frozen food compartment and should
be put in the freezer as soon as possible after purchase. Your freezer provides
for long term storage which generally means up to 3 months, but the length of
the time can vary and i it is important to follow the recommended times shown
on packets of commercially frozen food. Do not place sealed containers or
carbonated liquids such as fizzy drinks into the freezer as it creates pressure on
the container which may cause it to explode leading to damage to the freezer.

22
To avoid contamination of food, please respect the following instructions
• Opening the door for long periods can cause a significant increase of the
temperature in the compartments of the appliance.
• Clean regularly surfaces that can come in contact with food and accessible
drainage systems.
• Store raw meat and fish in suitable containers in the refrigerator, so that it is
not in contact with or drip onto other food.
• Two-star frozen-food compartments are suitable for storing pre-frozen food,
storing or making ice cream and making ice cubes.
• One-, two- and three-star compartments are not suitable for the freezing of
fresh food.
Order Compartments
TYPE
Target storage
temp.[°C]
Appropriate food
1 Fridge +2 ≤ +8 Eggs, cooked food, packaged
food, fruits and vegetables, dairy
products, cakes, Drinks and other
foods which are not suitable for
freezing.
2 (***)* –
Freezer
≤ –18 Seafood (fish, shrimp, shellfish),
freshwater aquatic products and
meat products (recommended
time is 3 months – nutrition values
and taste decrease with time),
suitable for frozen fresh food.
3 *** –
Freezer
≤ –18 Seafood (fish, shrimp, shellfish),
freshwater aquatic products and
meat products (recommended
time is 3 months – nutrition values
and taste decrease with time). Not
suitable for freeing fresh food.
4 ** –
Freezer
≤ –12 Seafood (fish, shrimp, shellfish),
freshwater aquatic products and
meat products (recommended
time is 2 months – nutrition values
and taste decrease with time). Not
suitable for freeing fresh food.
23
5 * –
Freezer
≤ –6 Seafood (fish, shrimp, shellfish),
freshwater aquatic products and
meat products (recommended
time is 1 month – nutrition values
and taste decrease with time). Not
suitable for freeing fresh food.
6 0 star –6 ≤ 0 Fresh pork, beef, fish, chicken,
some packaged processed foods,
etc. (Recommended to eat within
the same day, preferably not later
than 3 days) .
Partially packed/wrapped up
encapsulated processed foods
(non-freezable foods)
7 Chill –2 ≤ +3 Fresh/frozen pork, beef, chicken,
freshwater aquatic products, etc.
(7 days below 0 °C and above 0 °C
is recommended for consumption
within that day, preferably no more
than 2 days). Seafood (less than 0
for 15 days, it is not recommended
to store above 0 °C)
8 Fresh Food 0 ≤ +4 Fresh pork, beef, fish, chicken,
cooked food, etc. (Recommended
to eat within the same day,
preferably no more than 3 days)
9 Wine +5 ≤ +20 Red wine,white wine,sparkling
wine etc.
Note: please store different foods according to the compartments or target
storage temperature of your purchased products.
• If the refrigerating appliance is left empty for long periods, switch o, defrost,
clean, dry, and leave the door open to prevent mould developing within the
appliance.

24
HELPFUL HINTS AND TIPS
Energy saving tips
We recommend that you follow the tips below to save energy.
• Try to avoid keeping the door open for long periods.
• Ensure the appliance is away from any sources of heat (Direct sunlight, electric
oven or cooker etc.)
• Don`t set the temperature colder than necessary.
• Don`t store warm food or evaporating liguid in the appliance.
• Place the appliance in a well ventilated, humidity free room. Please refer to
Instaling your new appliance chapter
• If the diagram shows the correct combination for the drawers, crisper and
shelves, do not adjust the combination as this designed to be the most energy
ecient configuration.
Hints for freezing
• When first staring-up or after a period out of use. Before putting the food in
the compartment, let the appliance run at least 2 hours on the higher settings.
• Prepare food in small portions to enable it to rapidly and completely frozen
and to make it possible to subsequently thaw only the quantity required.
• ‘Wrap up the food in aluminum foil or polyethylene (plastic) and make sure
that the packages are airtight.
• Do not allow fresh, unfrozen food to touch food that is already frozen, thus
avoiding a rise in the temperature of latter.
• Iced products, if consumed immediately after removal from the freezer
compartment can possibly cause skin to become freezer burnt.
• It is recommended to label and date each frozen package in order to keep
track of the storage time.
Hints for the storage of frozen food
• Make sure that commercially frozen food was stored by the retailer.
• Once defrosted, foods deteriorate rapidly and can not be re-frozen.
• Do not exceed the storage period indicated by the food manufacturer.
Note: If the appliance contains related accessories and functions.

25
CLEANING AND CARE
For hygienic reasons, the appliance interior, including interior accessories, should
be cleaned regularly. The appliance should be cleaned and maintained at least
every two months.
Warning!
The appliance should not be connected to the main power supply during
cleaning. Before cleaning, switch the appliance o and remove the plug from the
main power supply, switch o, or shut o the circuit breaker of fuse.
Notice!
• Remove the food from the appliance before cleaning. Store them in a cool
place and keep well covered.
• Never clean the appliance with a steam cleaner. Moisture could accumulate in
electrical components.
• Hot vapors can lead to the damage of plastic parts.
• Ethereal oils and organic solvents can attack plastic parts, e.g. lemon juice or
the juice from an orange peel, butyric acid, or cleansers that contain acetic
acid.
• Do not use any abrasive cleansers.
• Clean the appliance and the interior accessories with a cloth and lukewarm
water. Commercially available dish washing detergents may also be used.
• After cleaning, wipe with fresh water and a clean dish cloth.
• Accumulation of dust at the condenser increases energy consumption; clean
the condenser at the back of the appliance once a year with a soft brush or a
vacuum cleaner.(Only for the outside-condenser product)
• Check the water drain hole on the rear wall of the refrigerator compartment.
• Clear a blocked drain hole with the aid of something like soft green peg, an be
careful not to create any damage to the cabinet by sharp objects.
After everything is dry, the appliance back into service.

26
Defrosting in the frozen food storage compartment
• Defrosting in the freezer chamber is operated manually. Before defrosting, take
the foot out.
• Take the ice tray and drawers out or put them into the fresh food
compartment temporarily.
• Leave the door of the freezer open until ice and frost dissolve thoroughly and
accumulate at the bottom of the freezer chamber. Wipe out the water with soft
cloth.
• In order to speed up the process of defrosting, you may put a bowl of warm
water (about 50°C) into the freezer chamber and scrape away the ice and
frost with a defrosting spatula. After doing so, be sure to set the knob of the
temperature regulator to the original position.
• It is not advisable to heat the freezer chamber directly with hot water or hair
dryer while defrosting to avoid deformation of the inner case.
• It is also not advisable to scrape o ice and frost or separate foods from the
containers which have been congealed together with the food with sharp tools
or wooden bars, so as not to damage the inner casing or the surface of the
evaporator.
Notice! The appliance should be defrosted at least once a month. During its
usage, if the door has been used in extreme humidity, we advise the user to
defrost every two weeks.
Taking the appliance out of service
• Empty the appliance.
• Pull out the power plug.
• Clean thoroughly (see section: Cleaning and Care).
• Leave the door open to prevent odors.

27
TROUBLESHOOTING
Warning! Before troubleshooting, disconnect the power supply. Only qualified
electrician or other personnel must carry out the troubleshooting that is not in
the manual.
Important! Repairs to the appliance may only be performed by competent
service engineers. Improper repairs can give rise to significant hazards for the
user. If your appliance needs repairing, please contact your specialist dealer or
your local Customer Service Center.
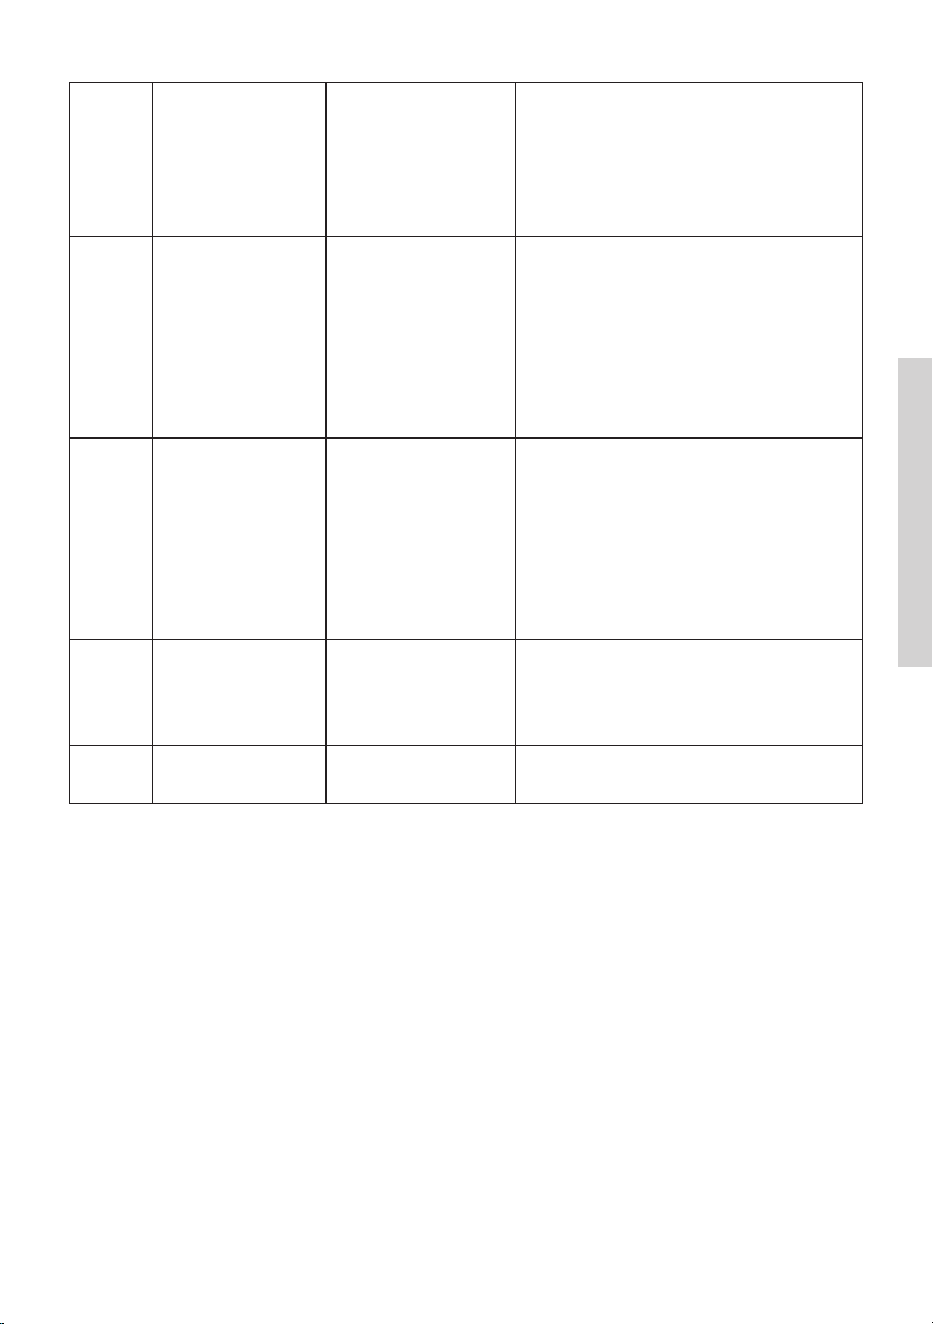
Problem: Possible cause Solution
Appliance does
not work
• Appliance is not switched on.. • Switch on the appliance.
• Mains plug is not plugged in
or is loose.
• Plug the appliance into
the electrical socket.
• Fuse has blown or is
defective.
• Check fuse, replace if
necessary.
• Outlet is defective..
• Defective parts need
to be repaired by an
electrician.
Appliance cools
too much.
• Temperature is set too cold.
• Turn the temperature
regulator to a warmer
setting temporarily.
The food is too
warm.
• Temperature is not properly
adjusted.
• Please look in the initial
Temperature Setting
section.
• Door was open for an
extended period.
• Open the door only as
long as necessary.
• A large quantity of warm
food was placed in the
appliance within the last 24
hours.
• Turn the temperature
regulation to a colder
setting temporarily.
• The appliance is near a heat
source.
• Please look in the
installation location
section.

28
Problem: Possible cause Solution
Heavy build-up
of frost, possibly
also on the door
seal.
• Door seal is not air-tight
(possibly after reversing the
door) .
• Carefully warm the
leaking sections of the
door seal with a hair
dryer (on a cool setting).
At the same time, shape
the warmed door seal
by hand so that it sits
correctly.
Unusual noises.
• Appliance is not level. • Readjust the feet.
• The appliance is touching the
wall or other objects.
• Move the appliance
slightly.
• A component, e.g. a pipe, on
the rear of the appliance is
touching another part of the
appliance or the wall.
• If necessary, carefully
bend the component out
of the way.
The compressor
dose not start
immediately
after changing
the temperature
setting.
• This is normal, no error has
occurred.
• The compressor starts
after a period of time.
Water on the
floor or storage
shelves.
• Water drain hole is blocked.
• Refer the “Cleaning and
Care” section.
DISPOSAL OF THE APPLIANCE
It is prohibited to dispose of this appliance as household waste.
Packaging materials
Packaging materials with the recycle symbol are recyclable. Dispose of the
packaging into a suitable waste collection container to recycle it.
Before disposal of the appliance
1. Pull out the mains plug from the mains socket.
2. Cut off the power cord and discard with the mains plug
Warning! Refrigerators contain refrigerant and gases in the insulation.
Refrigerant and gases must be disposed of professionally as they may cause
eye injuries or ignition. Ensure that tubing of the refrigerant circuit is not
damage prior to proper disposal.
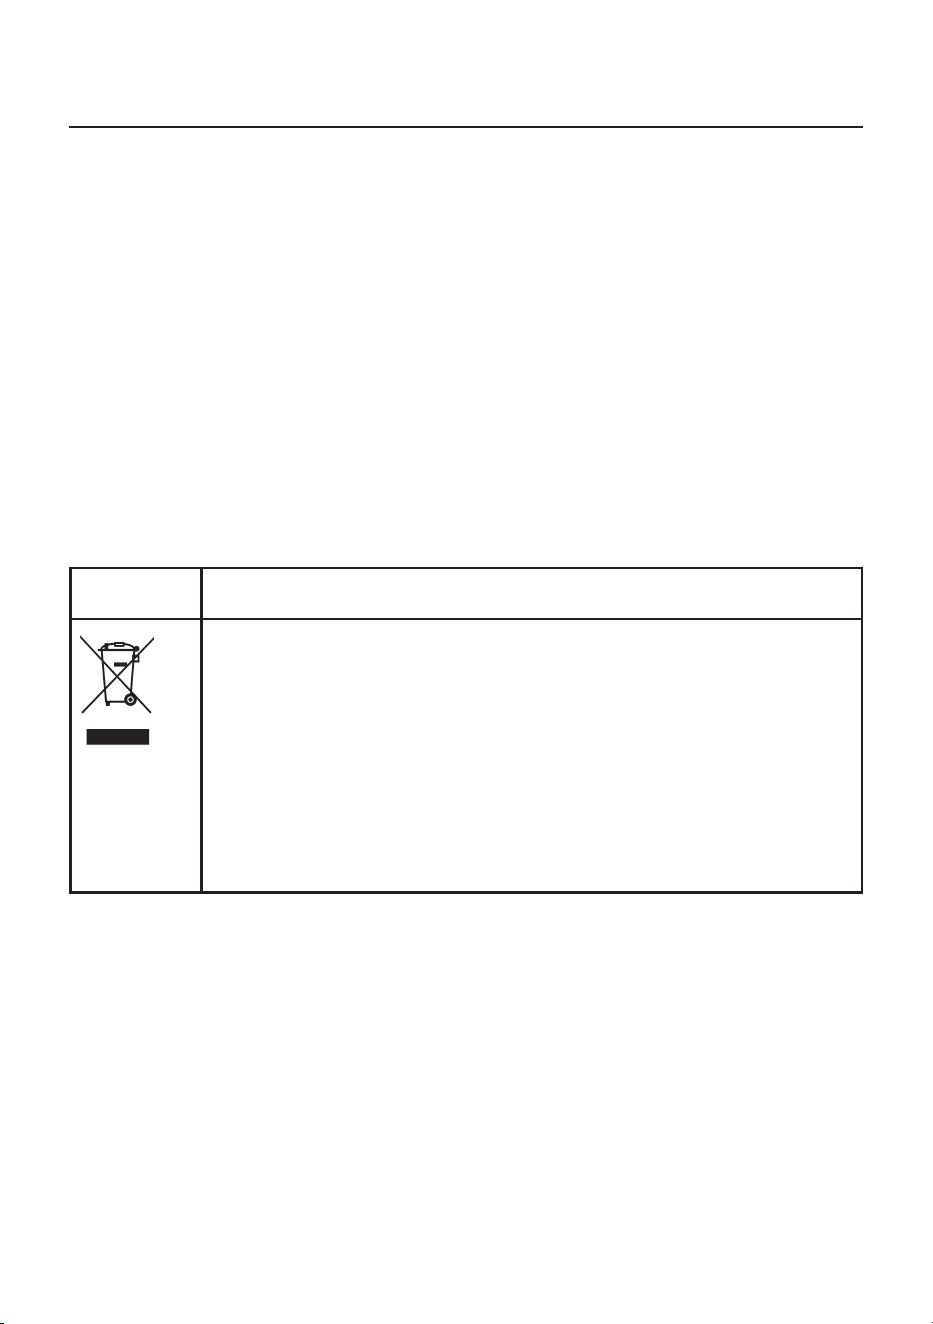
CORRECT DISPOSAL OF THIS PRODUCT
The symbol on the product or its packaging indicates that the
product should not be treated as normal household waste. The
product should be taken to an authorized collection centre for
waste electric and electronic equipment processing. Correct
disposal of the product will help prevent any negative effects
on the environment and health of people which could occur
in case of incorrect product removal. For detailed information
on removal and processing of the product, please contact the
relevant municipal body in charge of waste management, your
waste disposal service, or the store where you bought the
product.
Gorenje, d.o.o.
Partizanska 12
SI - 3320 Velenje, Slovenija
info@gorenje.com
www.gorenje.com