
Mini PC
Air12 Series
User Manual
Applicable Model: Mini Air12

Revision History
Revised Version
Revision History
Date
1.0
Initial release of the GEEKOM Mini PC Mini Air12 Series User Manual
September 2024
Copyright Notice
©GEEKOM Network Co., Ltd. All rights reserved.
This user manual, including but not limited to all information contained within it, is protected by
copyright law. Without the permission of GEEKOM Network Co., Ltd. (hereinafter referred to as
"GEEKOM"), reproduction, copying, extraction, translation, or any other unauthorized use is strictly
prohibited.
Disclaimer
This user manual is provided "as is" and "under the currently stated conditions." To the extent permitted
by law, GEEKOM makes no express or implied warranties or guarantees regarding this user manual,
including but not limited to warranties of merchantability, fitness for a particular purpose,
non-infringement of third-party rights, or guarantees regarding the usability or accuracy of any
information obtained from this manual.
The user assumes all risks associated with using this user manual. The user explicitly acknowledges and
agrees that GEEKOM, its licensors, and their respective officers, directors, employees, agents, or
affiliates are not liable for any incidental, consequential, direct, indirect, special, punitive, or other
damages (including but not limited to loss of profits, business interruption, data loss, or other monetary
damages) arising from or related to this user manual or its use, even if GEEKOM has been advised of the
possibility of such damages.
Some countries or regions may not allow the full exclusion or limitation of liability for damages. As a
result, the above limitations or exclusions may not apply to you.
The user acknowledges that GEEKOM reserves the right to modify this user manual at any time. If
product specifications or drivers are updated, this user manual will be updated accordingly.
For details about updates to this user manual, please visit GEEKOM’s customer service website at
https://service.geekompc.com/
or contact GEEKOM Information Products Technical Support via email at
including junk mail folders, trash, etc.)
The ownership and intellectual property rights of the third-party product names or contents mentioned in
this user manual are owned by their respective product or content owners and protected by current laws
and regulations related to intellectual property rights and international treaties. GEEKOM’s warranty and
service will no longer apply to this product under the following two circumstances:
(1) The product has been repaired, modified, had parts replaced, or undergone other actions not
authorized by GEEKOM.
(2) The product's serial number is unclear or missing.

3
Contents
About This User Manual................................................................................................ 5
Prompt Description...................................................................................................6
Package Box Contents ..............................................................................................7
Chapter 1: Getting to Know Your Mini PC
Appearance Overview.................................................................................................. 10
Front View.............................................................................................................. 10
Left View................................................................................................................ 12
Right View.............................................................................................................. 12
Back view ............................................................................................................... 13
Chapter 2: Using Your Mini PC
Before You Start........................................................................................................... 17
Connecting the Power Adapter to Your Mini PC ...................................................17
Connecting a Screen to Your Mini PC................................................................... 19
Connecting a USB Keyboard or Mouse.................................................................22
Attached VESA Installation................................................................................... 23
Powering On................................................................................................................24
Turning off Your Mini PC ...................................................................................... 24
Putting Your Mini PC into Sleep Mode ................................................................. 24
Entering the BIOS Settings.................................................................................... 25
Loading Default BIOS Settings ..............................................................................25
Chapter 3: Upgrading Your Mini PC
Removing the Bottom Cover ..................................................................................28

4
Restoring the Bottom Cover ...................................................................................32
Installing Memory Modules................................................................................... 34
Installing M.2 SSDs ................................................................................................35
Chapter 4: TPM
About TPM ............................................................................................................. 36
Appendix
Security Notes ...............................................................................................................39
Operational Precautions......................................................................................... 39
Usage Precautions .................................................................................................. 39
Service and Support ......................................................................................................41

5
About This User Manual
This user manual provides an overview of the hardware settings and
software features of the Mini PC. It is organized into the following
chapters:
Chapter 1: Getting to Know Your Mini PC
This chapter introduces the hardware components of the Mini PC.
Chapter 2: Using Your Mini PC
This chapter covers the basic operations of the Mini PC.
Chapter 3: Upgrading Your Mini PC
This chapter provides information on upgrading the memory module,
wireless module, and hard drive/solid-state drive of your Mini PC
Chapter 4: TPM
This chapter explains the relevant information about TPM.
Appendix
This chapter includes the statements and safety instructions of the Mini
PC.

6
Prompt Description
The instructions for use of specific icons and information in the
manual are as follows:
Important! This information contains important information
that must be followed to complete the task.
Note: This information contains additional tips and helpful
information to assist in completing the task.
Warning! This information contains vital information that must
be followed to ensure user safety and avoid damage to the Mini
PC’s data or components.
7
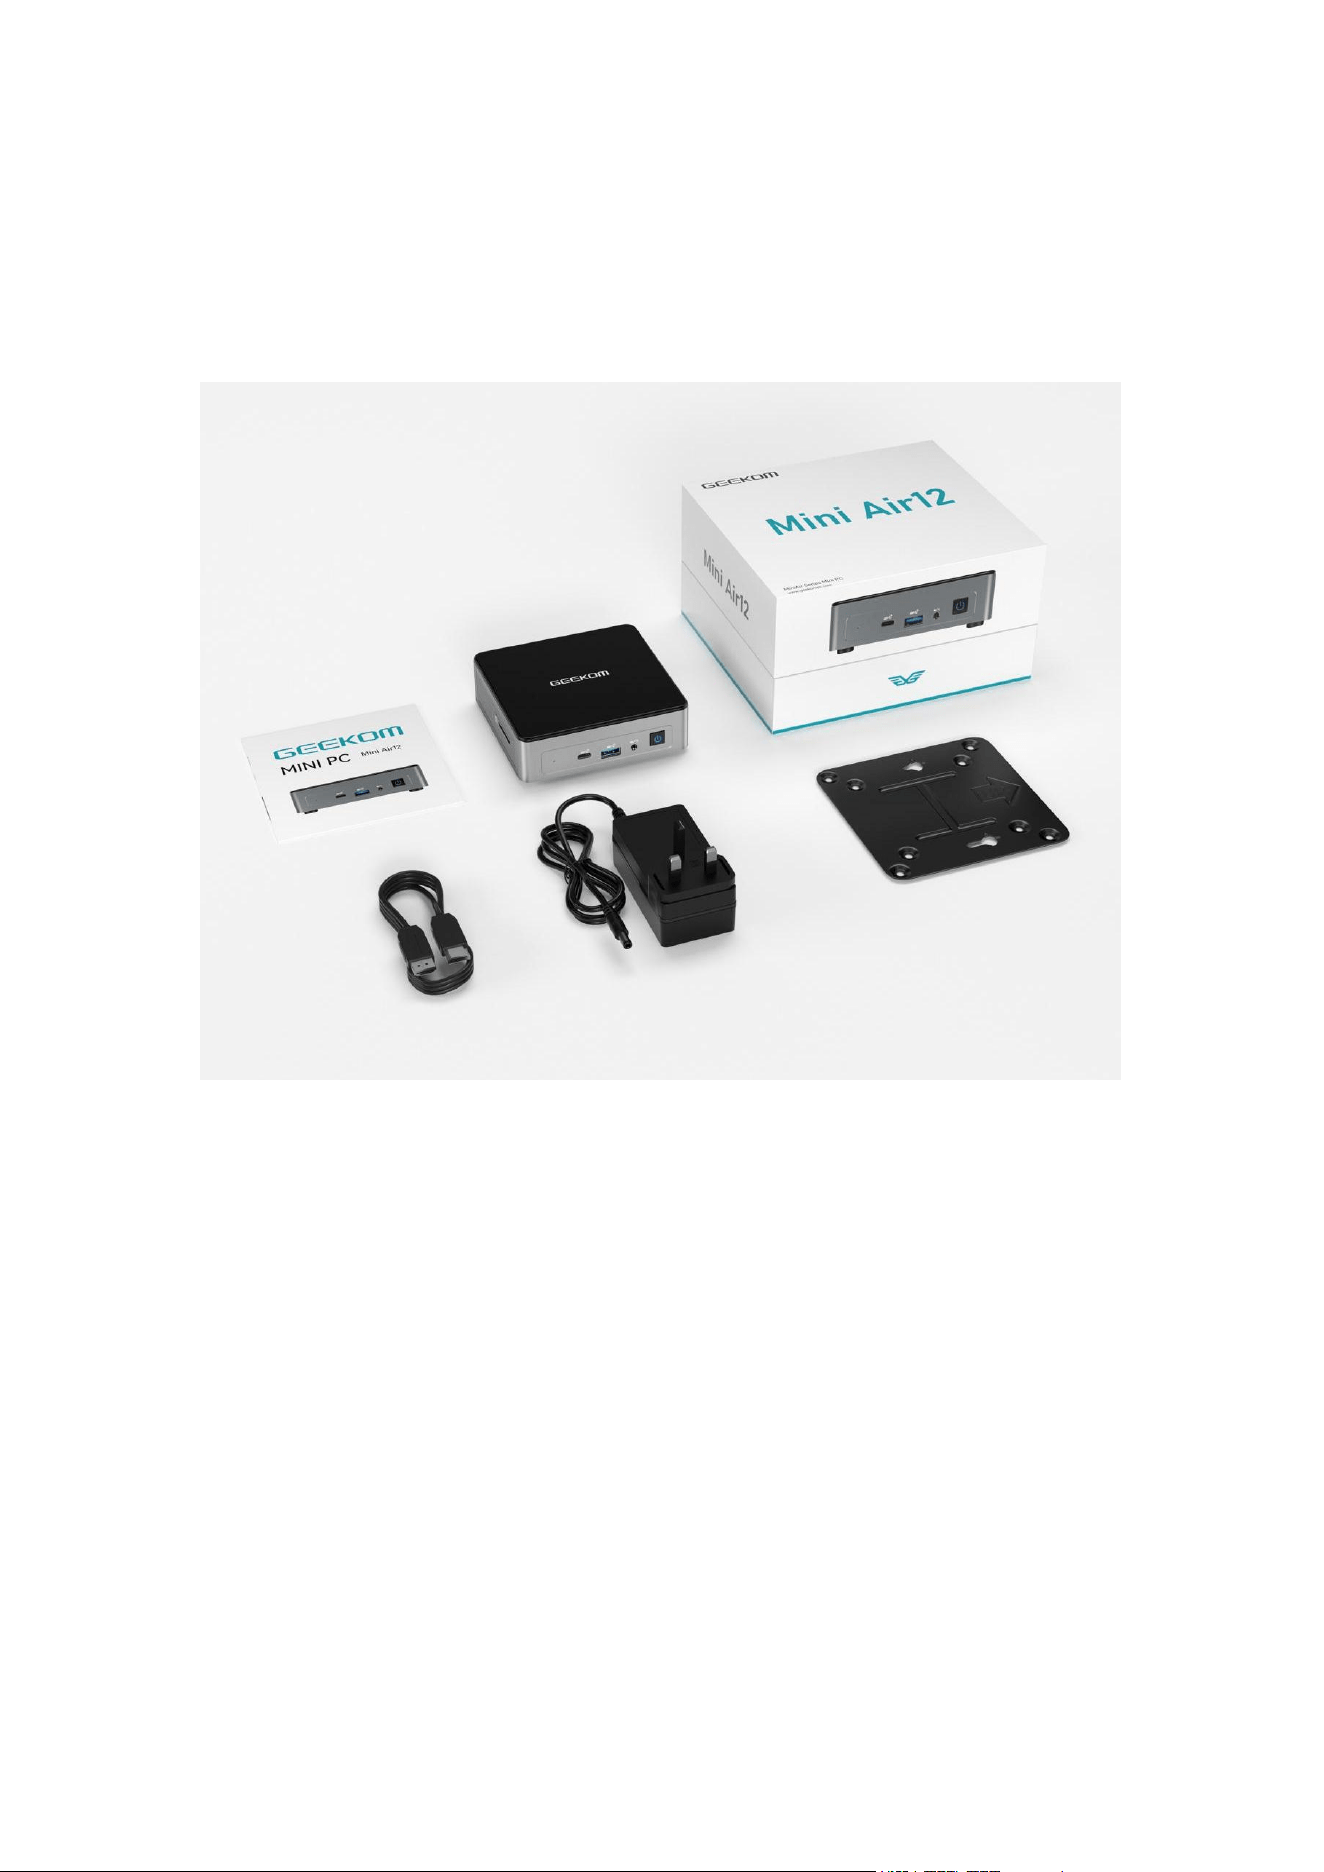
Package Box Contents
Your Mini PC package box should include the following
items:
Product Specification
HDMI cable*
VESA bracket
Power adapter*
GEEKOM Mini PC
Air 12 Series Products
Product packaging box

8
Notes:
Please visit https://www.geekompc.com to download
the latest and most accurate product specifications.
Images are for reference only. The actual product may
vary by region.Please refer to the product you
purchased.
*The included power adapter may vary depending on
the model and region.
Accessories included with your Mini PC may differ
based on the model. For detailed accessory
information, please refer to the user manual of the
specific model.
During the warranty period, if the product or its
accessories experience any fault under normal usage
conditions, please contact a GEEKOM-authorized
service center with your warranty card and the faulty
product.

9
Getting to Know Your
Mini PC
1
10
Appearance Overview
Front View
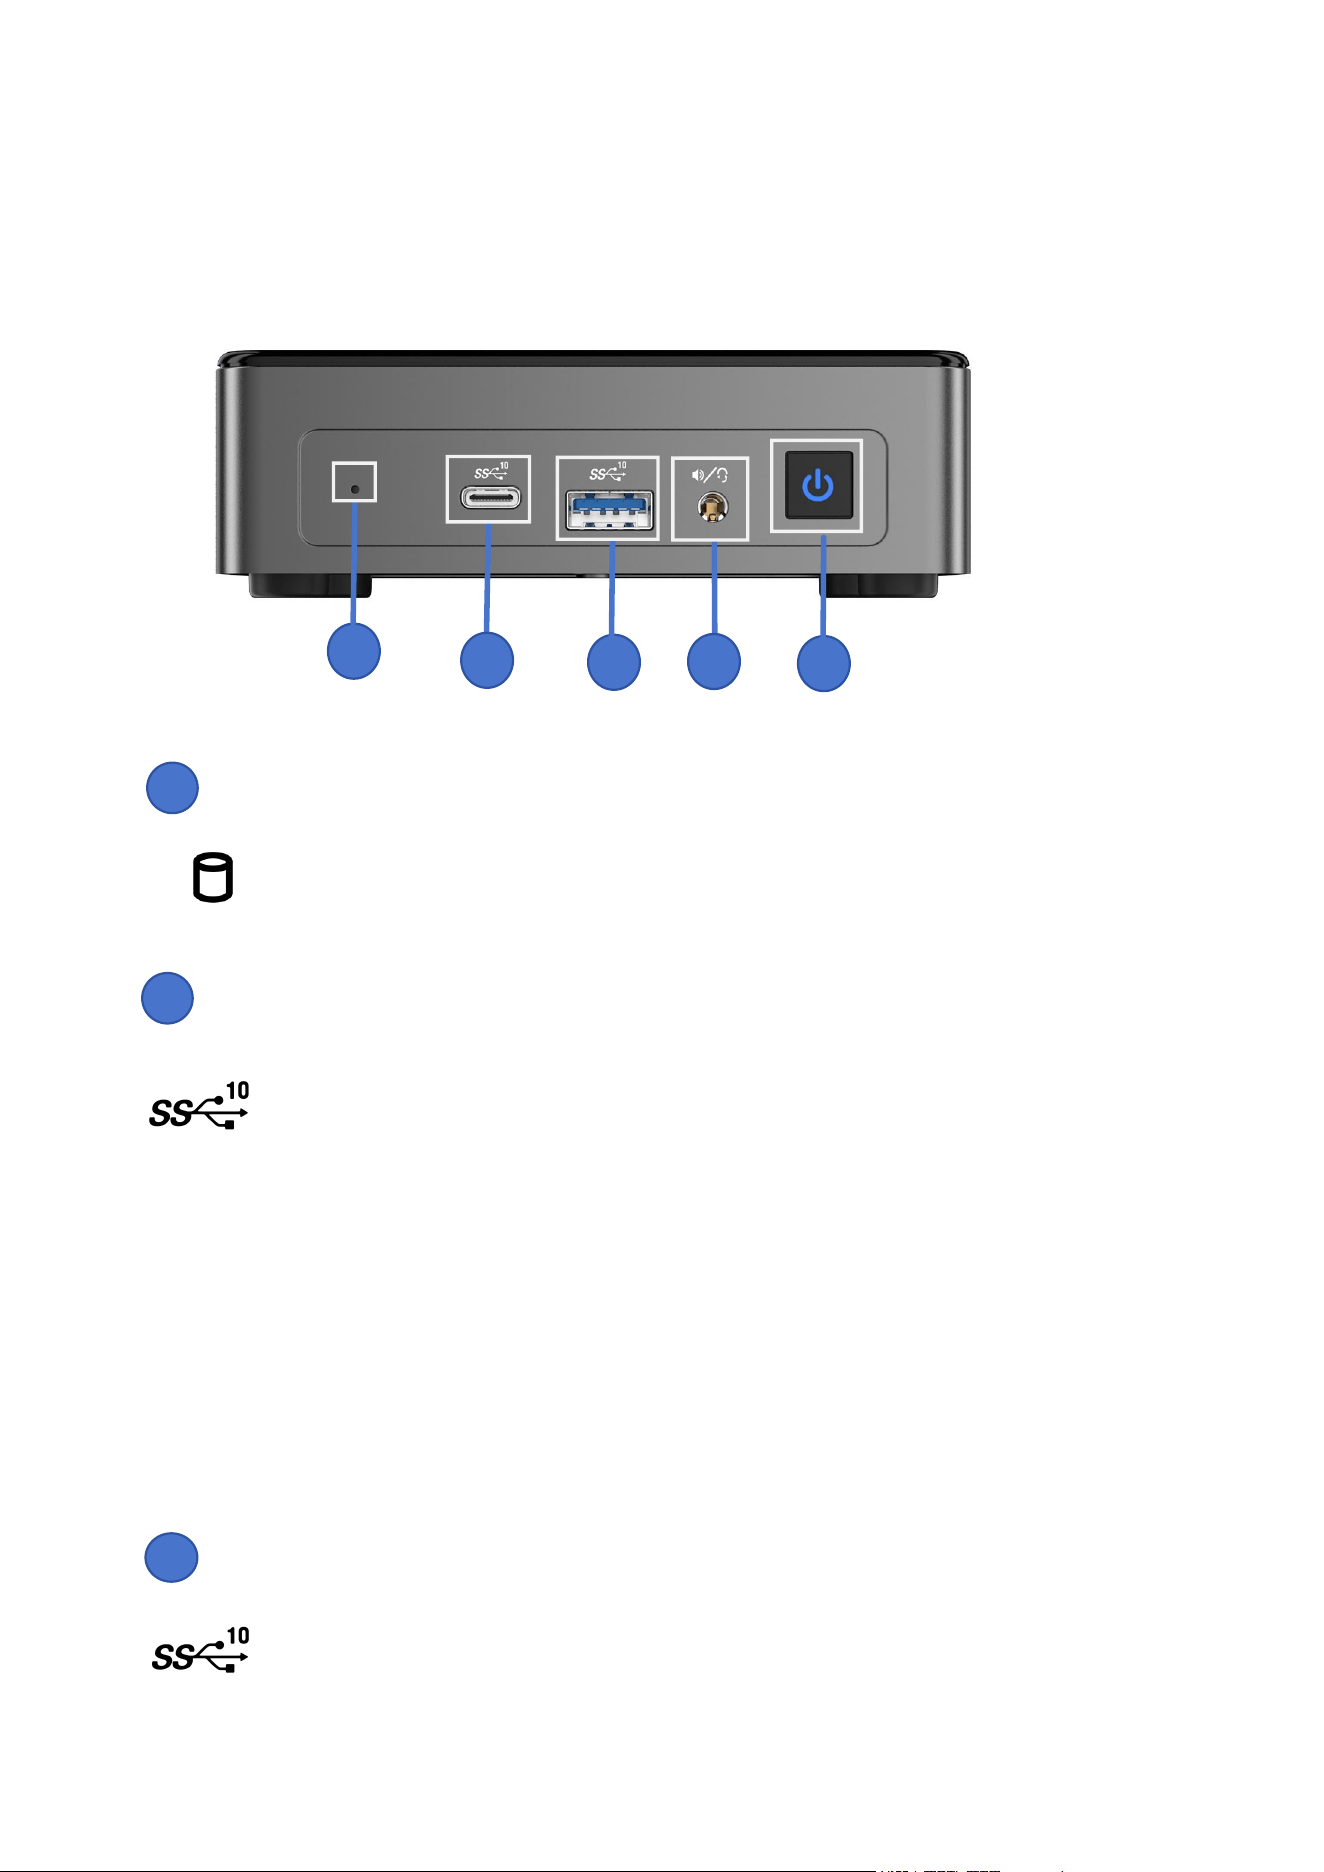
Power-on Status Indicator
This indicator provides a visual indication of your MiniPc's boot
progress and helps diagnose boot problems.
USB 3.2 Gen2 Type-C Port
This USB 3.2 Gen2 Type-C® port provides the following
functions:
• It provides up to 10 Gbit/s transfer rate for USB 3.2 Gen 2
devices.
• Downward compatibility with USB 3.1 and USB 2.0.
• USB power transmission provides a maximum current output of
5V/3A.
USB 3.2 Gen2 TYPE-A Port
This USB 3.2 Gen2 (Universal Serial Bus) port provides a transfer
speed of up to 10Gbit/s.
1
3
2
3
4
5
1
2

11
Headphone/Headset/Microphone Output Port (Optional)
This port is used to connect audio output devices such as speakers
or headphones. It can also be used to connect external
microphones or other audio output devices.
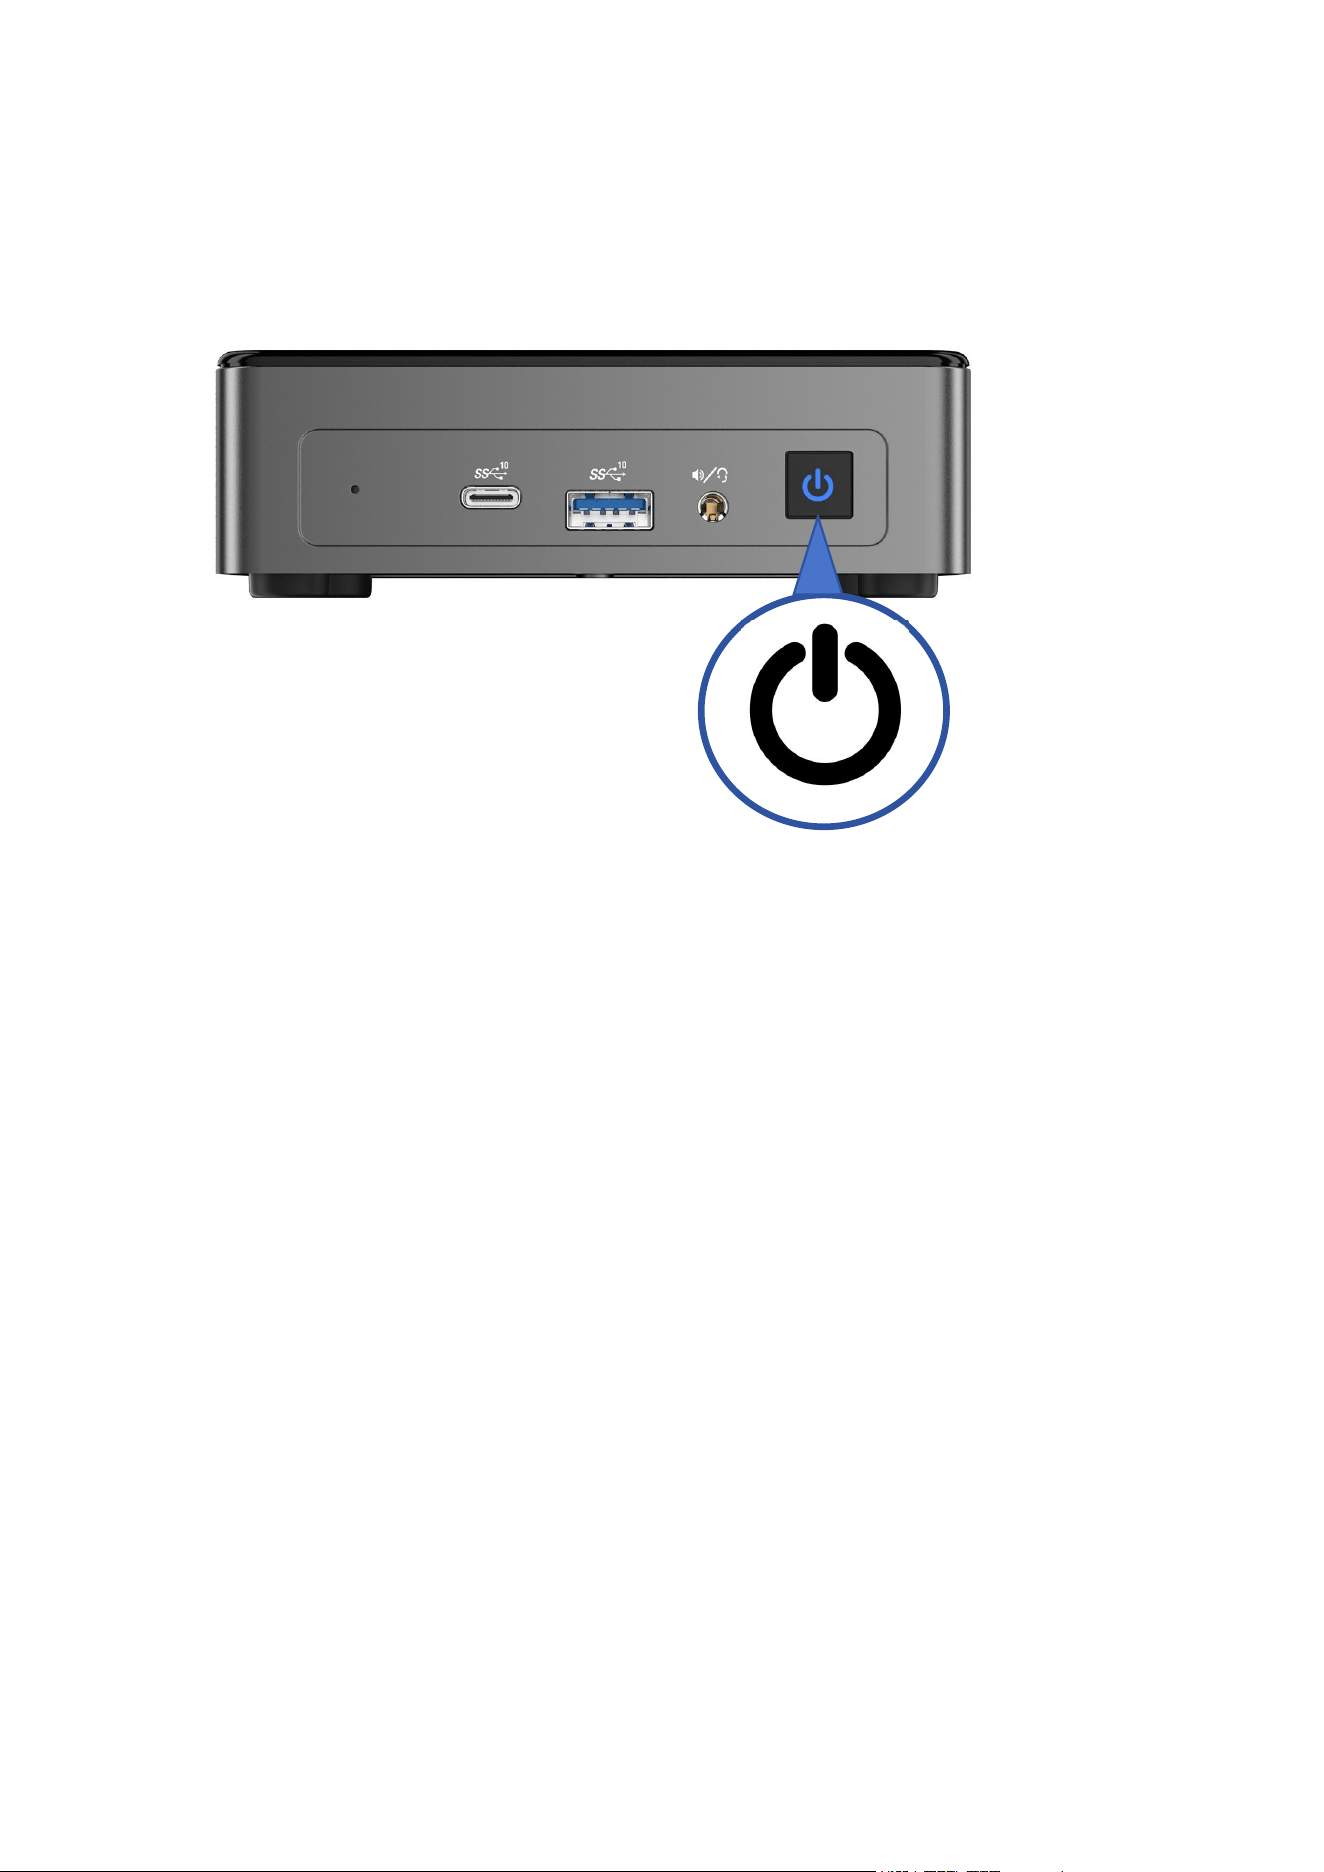
Power Button
This power button is used to turn the Mini PC on or off. You can
also use it to put the Mini PC into sleep mode or press and hold it
for approximately four seconds to force the Mini PC off.
5
4
12
Left View
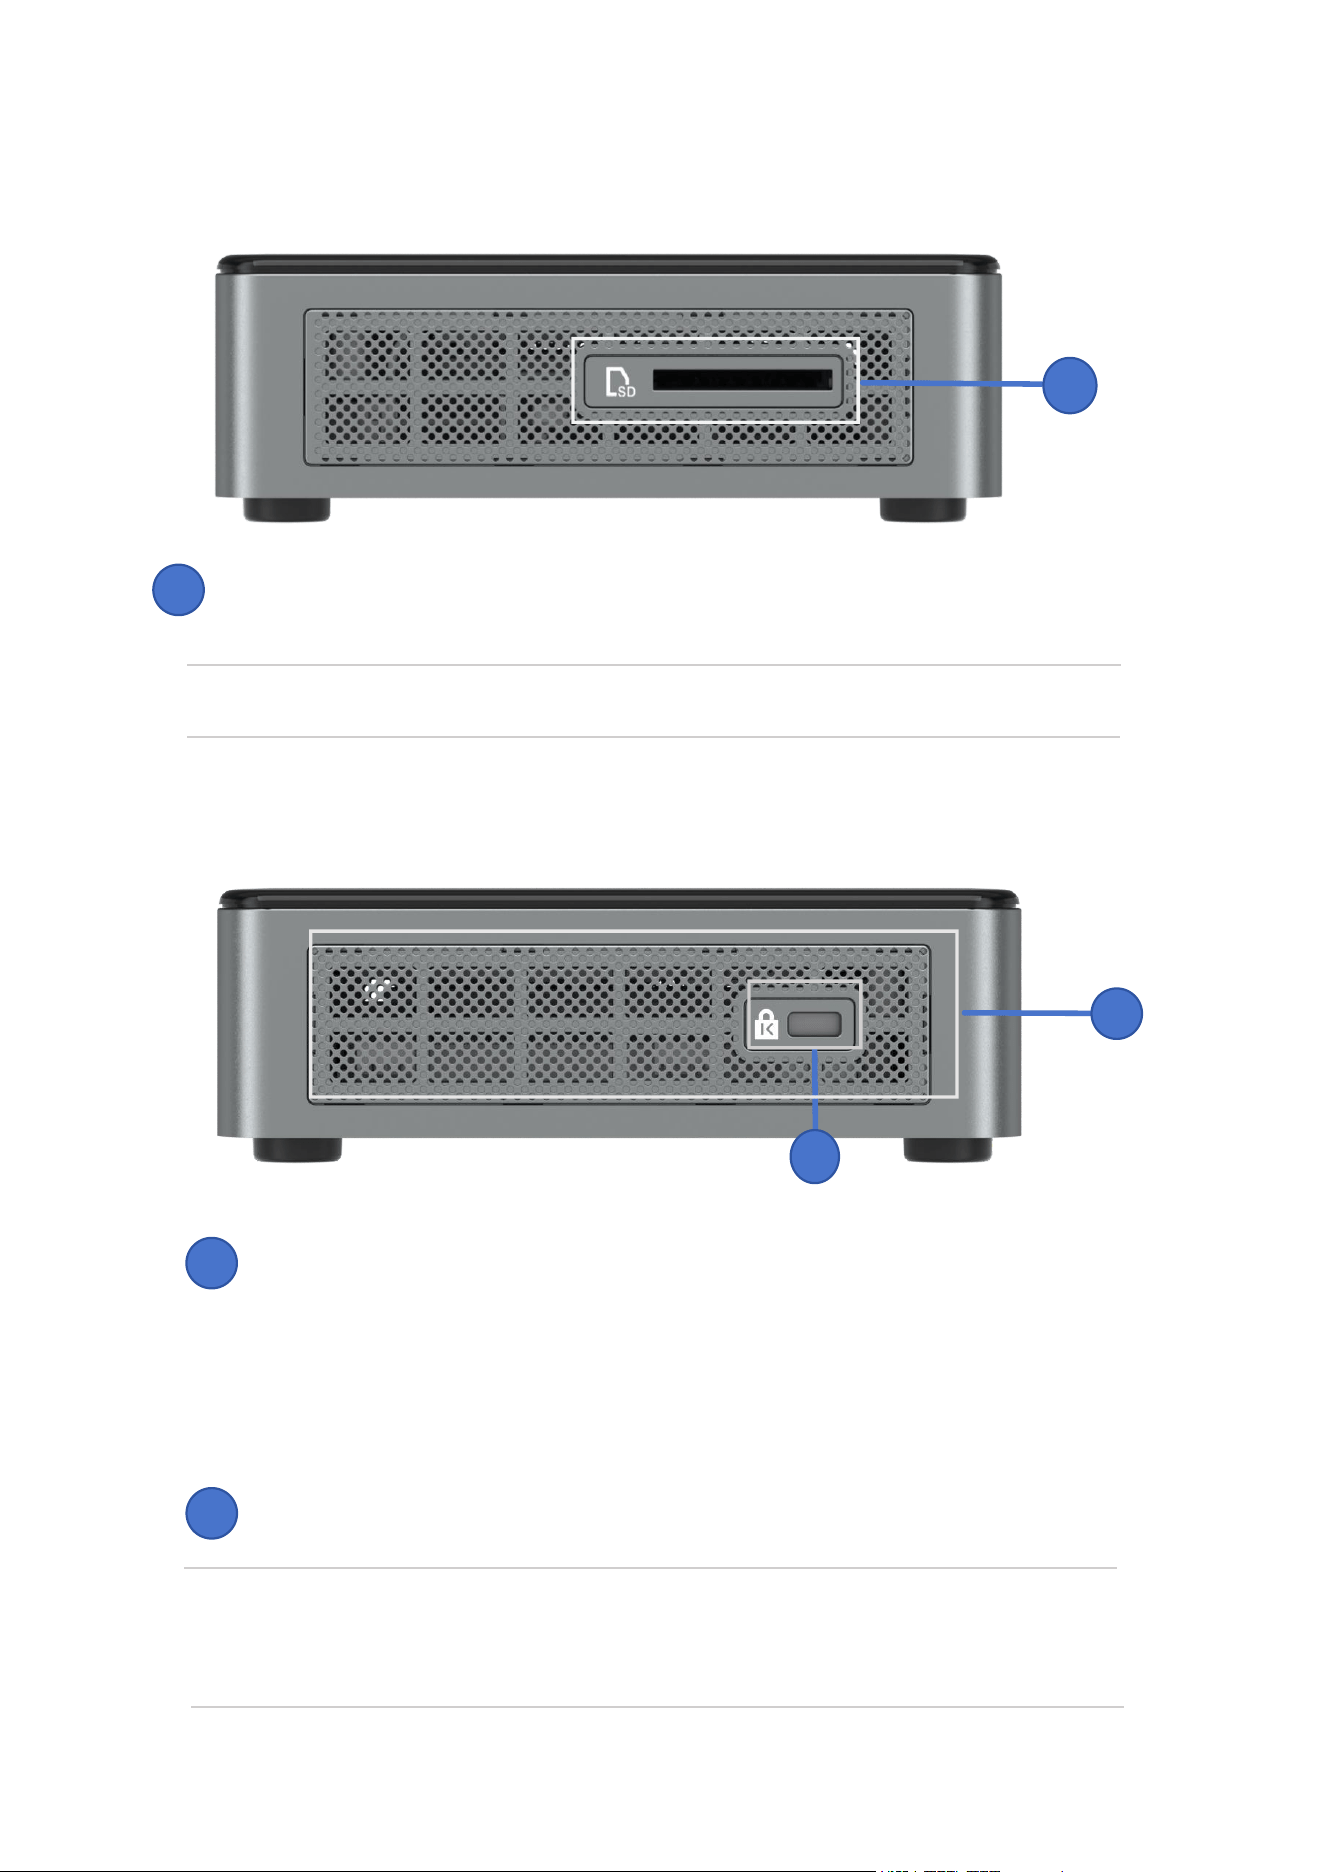
SD Card Slot
This slot is designed to accommodate an SD card.
Note: The SD card is optional and must be purchased separately.
Right View
Kensington Security Slot
The Kensington security slot allows you to secure your Mini PC
with a compatible anti-theft lock.
Ventilation Holes (Air Inlet)
This heat emission hole allows cool air to enter the Mini PC case.
Important! Do not block the ventilation holes with paper, books,
clothing, cables, or any other objects to avoid overheating the
device.
1
1
2
1
1
2
13
Back View
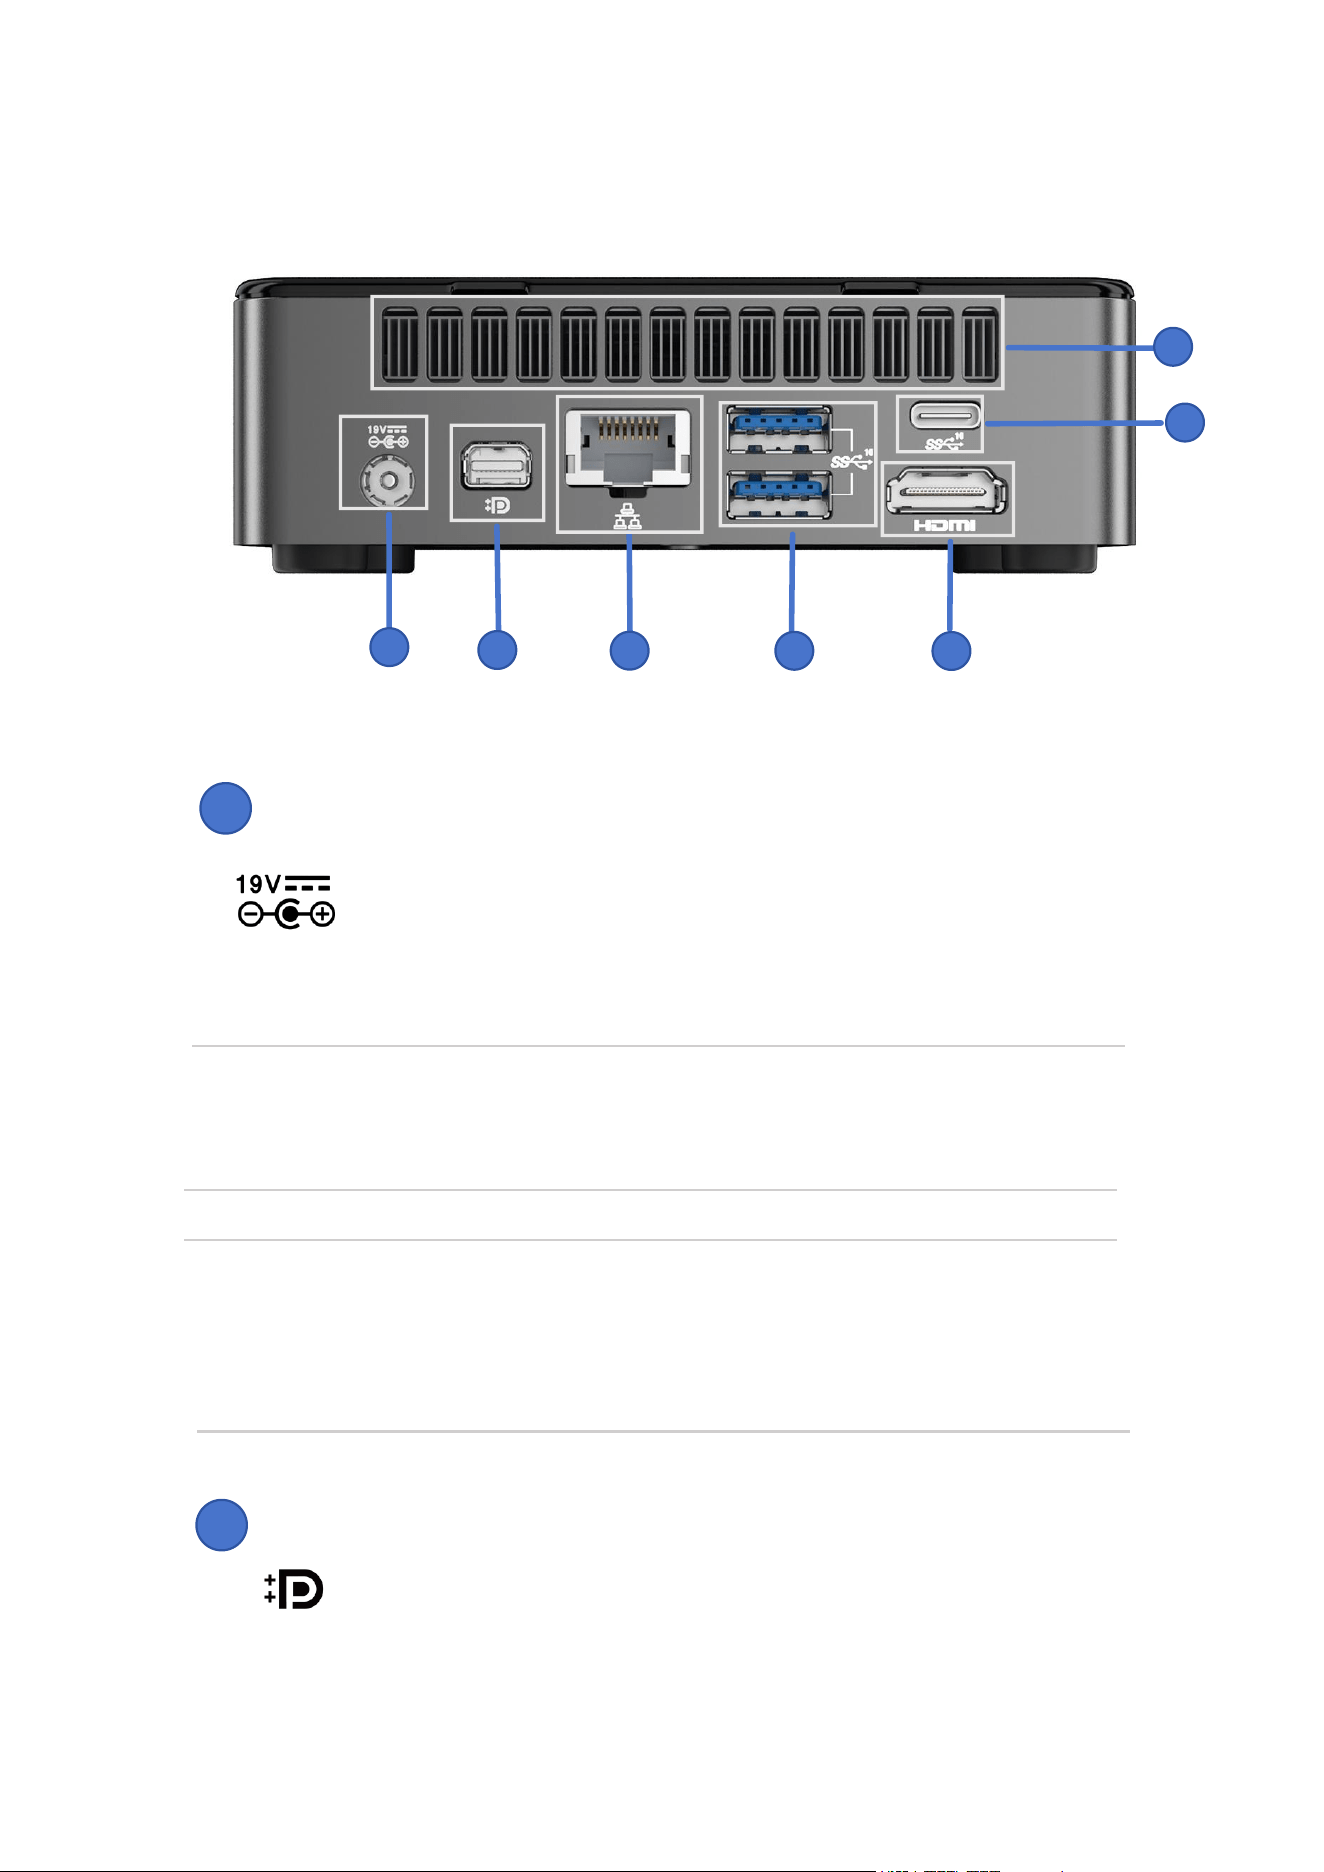
Power Input Port
The power adapter converts AC power to DC power, which
is supplied to your Mini PC via this port. To avoid damaging
your Mini PC, always use the included power adapter.
Important! The power adapter may heat up during operation.
Please ensure it is not covered by any objects and keep it
away from your body.
Note:
The power adapter may vary depending on the model and
region. Refer to the following information for details:
45W power adapter: +19V DC——2.36A,45W
MINI DP1.4
This DP1.4 is mainly used to connect video sources with
devices such as monitors, and also supports carrying audio,
USB and other forms of data.
4
3
5
2
7
1
1
2
6
14
Ethernet Port
This 8-pin network port supports a standard Ethernet cable to
connect to a LAN. It also supports WI-FI 6 (network data
rates of 0-1000 Mbps) and Bluetooth 5.2 pairing.
USB3.2 Gen2 TYPE-A Port
This USB 3.2 Gen2 (Universal Serial Bus) port provides a
transfer speed of up to 10Gbit/s.
HDMI Port
The HDMI (High-Definition Multimedia Interface) port can
connect to Full-HD display devices for an enhanced viewing
experience, such as LCD monitors or screens.
Note: The maximum resolution for this port, when used as a
display output source, supports up to 4096x2304@60 Hz.
Resolution may vary depending on the cable and output
device.
USB 3.2 Gen2 Type-C Port
This USB 3.2 Gen2 Type-C® port provides the following
functions:
• Input and output multipurpose port (resolution
5120x2160@60Hz)
• It provides up to 10 Gbit/s transfer rate for USB 3.2 Gen 2
devices.
• Downward compatibility with USB 3.1 and USB 2.0.
• USB power transmission provides a maximum current
output of 5V/3A.
4
5
6
3

15
Ventilation Holes (Air Outlet)
These ventilation holes allow warm air to exit the Mini PC.
Important! Do not block the ventilation holes with paper, books,
clothing, cables, or any other objects to avoid overheating the
device.
7

16
Using Your Mini PC
2
17
Before You Start
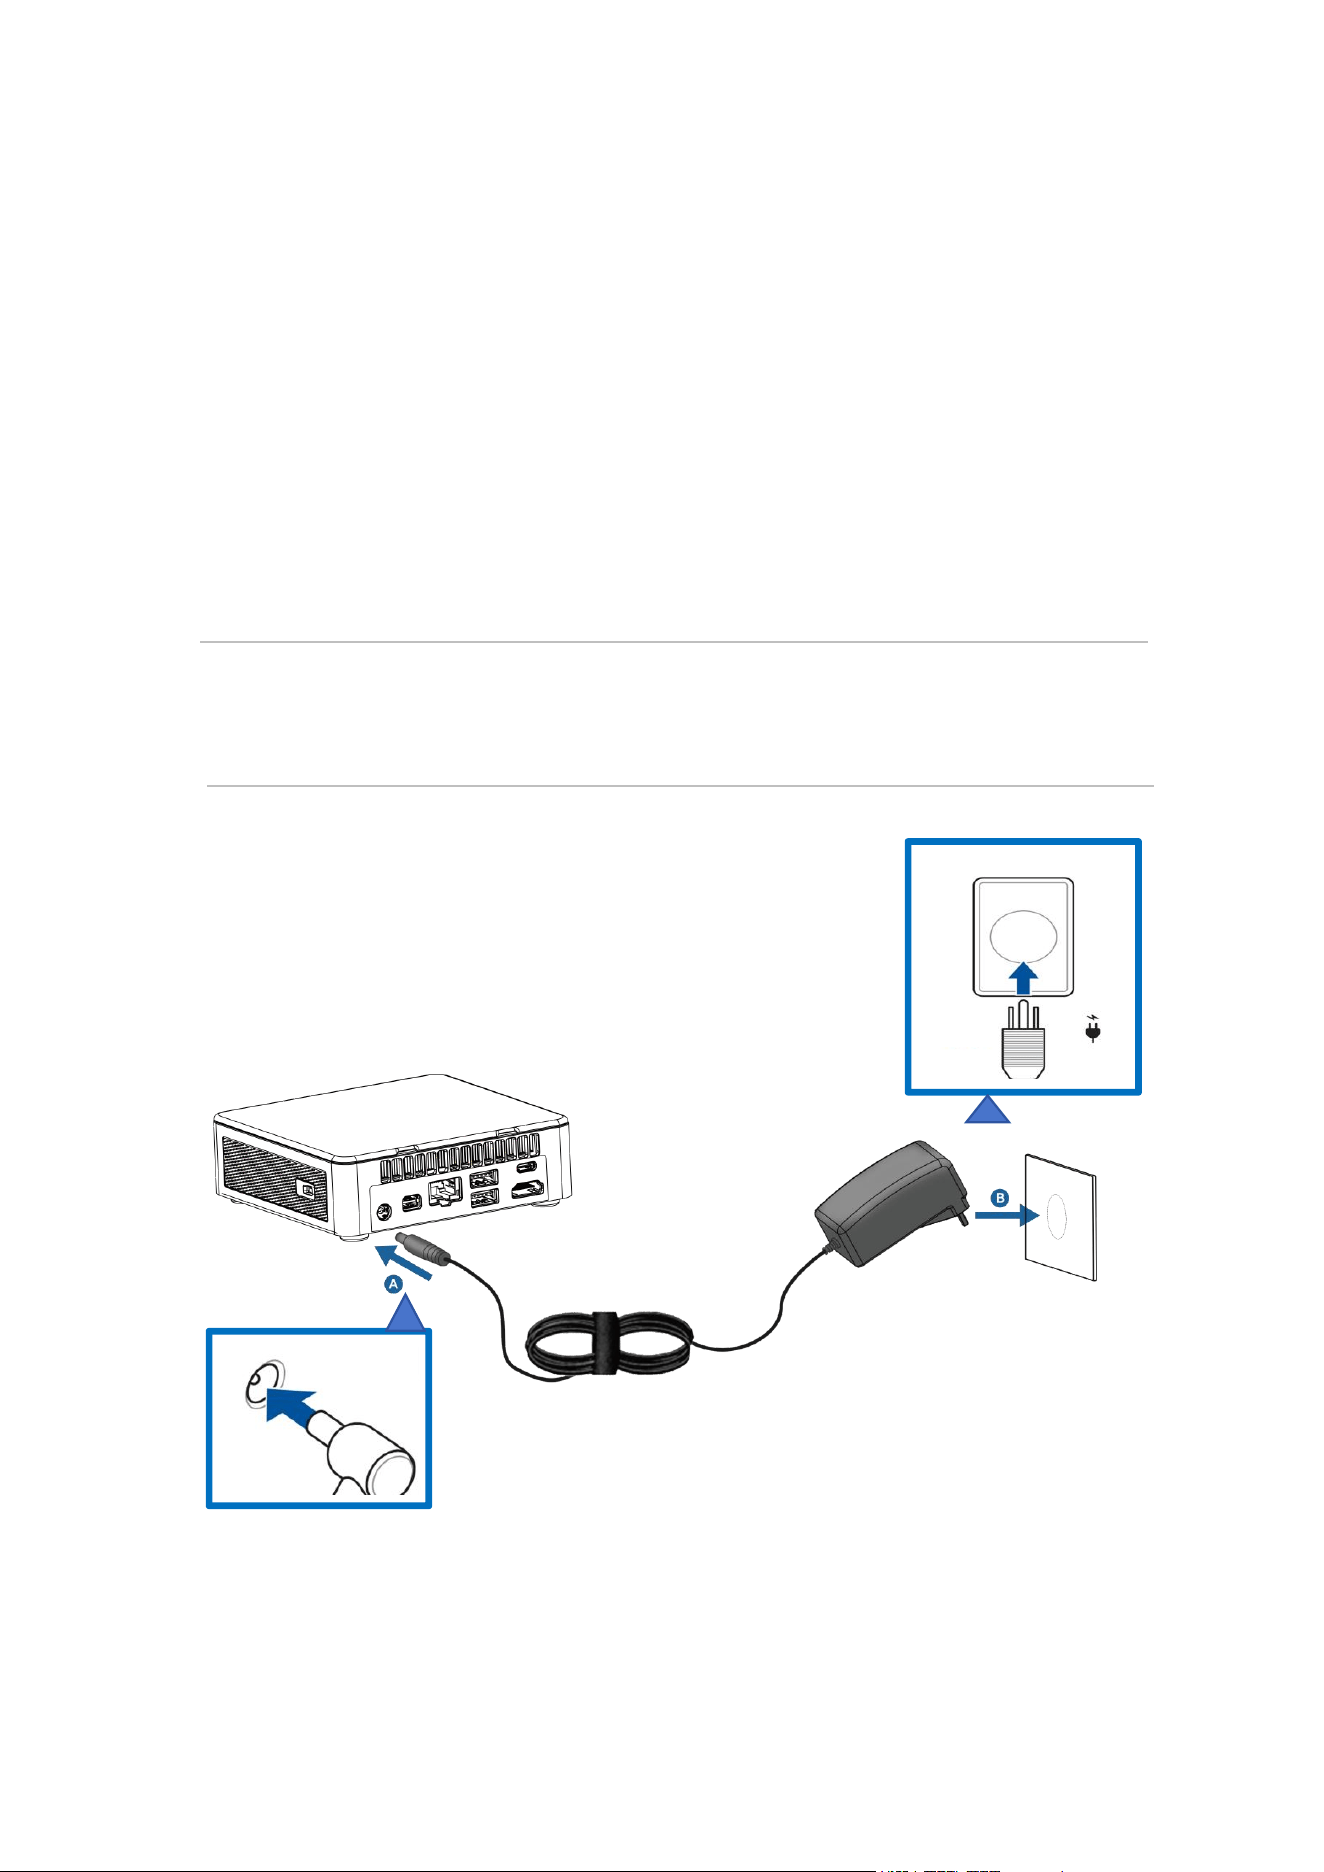
Connecting the Power Adapter to Your Mini PC
Follow the steps below to connect the power adapter to your
Mini PC:
A. Insert the DC power plug into the DC power jack on the
Mini PC.
B. Plug the AC power adapter into a 100V~240V power outlet.
Note: The appearance of the adapter may vary depending on
the model and region.

18
Note:
The power adapter may vary depending on the model and region. Refer to
the following information for details:
45W power adapter
Input voltage: 100-240V AC
Input frequency: 50-60Hz
Output current (power): 2.36A(45W)
Output voltage: 19V

19
Connecting a Screen to Your Mini PC
Your Mini PC features the following ports for connecting screens or
projectors:
1xHDMI port
1xUSB 3.2 TYPE-C input and output multipurpose port
1xMini DP 1.4 input and output multipurpose port
Notes:
Depending on the model and optional configurations, you can connect
and display up to 3 monitors simultaneously*.
When the following ports are used exclusively for display output, the
maximum supported resolutions are as follows:**
- HDMI port
Resolution up to 4096x2304@60Hz°
-USB3.2 TYPE-C input and output multipurpose port
Resolution up to 5120x2160@60Hz°.
-Mini DP1.4 input and output multipurpose port
Resolution up to 2560x1600@60Hz°.
* The product ports may vary by model. Please refer to the chapter
Appearance Overview for port details.
** Maximum resolution may vary depending on the cable and output
device.
20
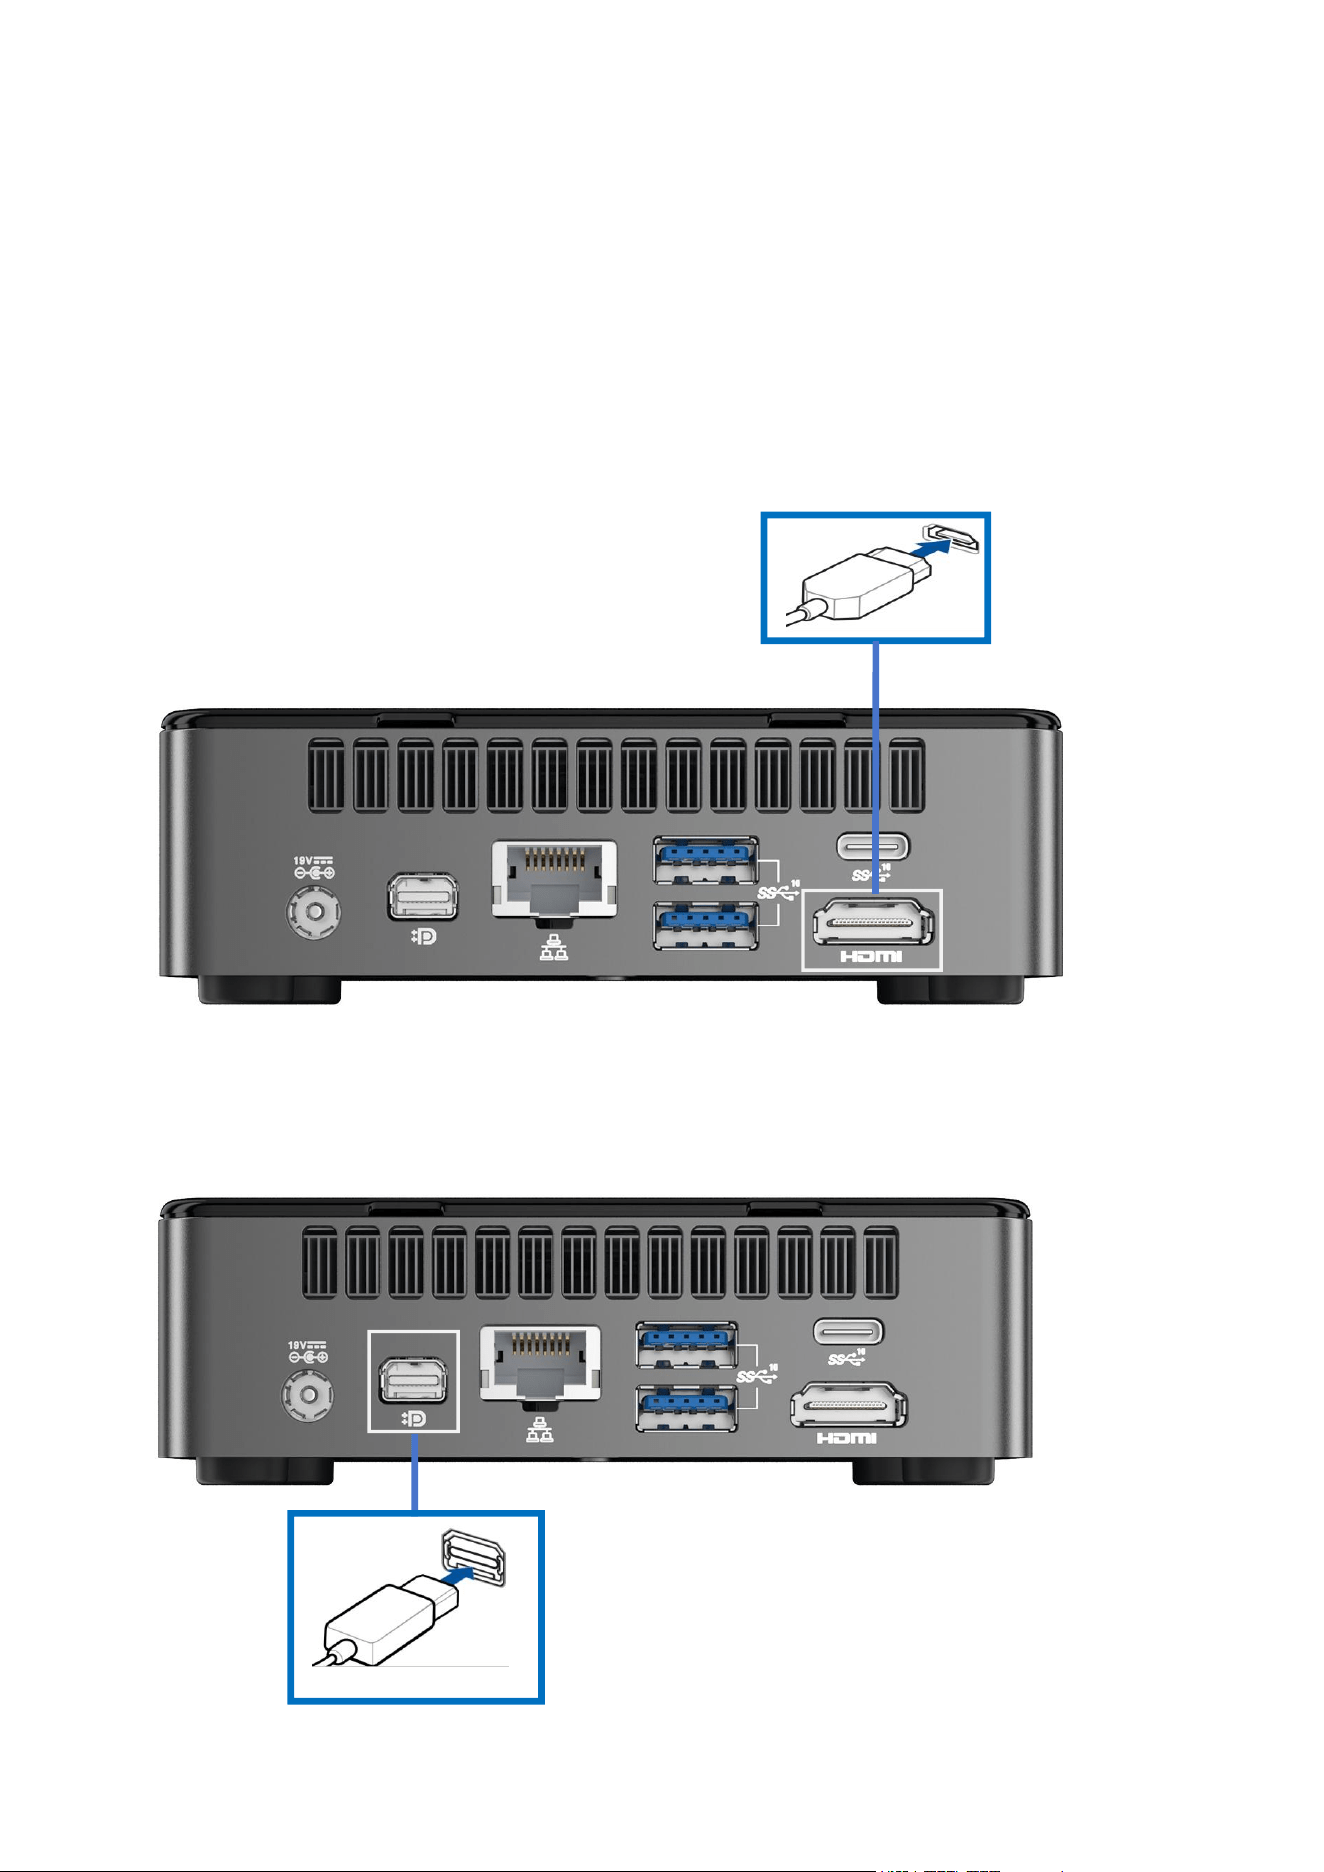
Please follow the instructions below to connect the screen to your Mini
PC:
Connect one end of the HDMI, USB Type-C or Mini DP1.4 port cables to
the display screen and the other end to the corresponding port on your
Mini PC.
Connect a screen via HDMI port
Connect the screen via DP1.4 input and output multipurpose port
21
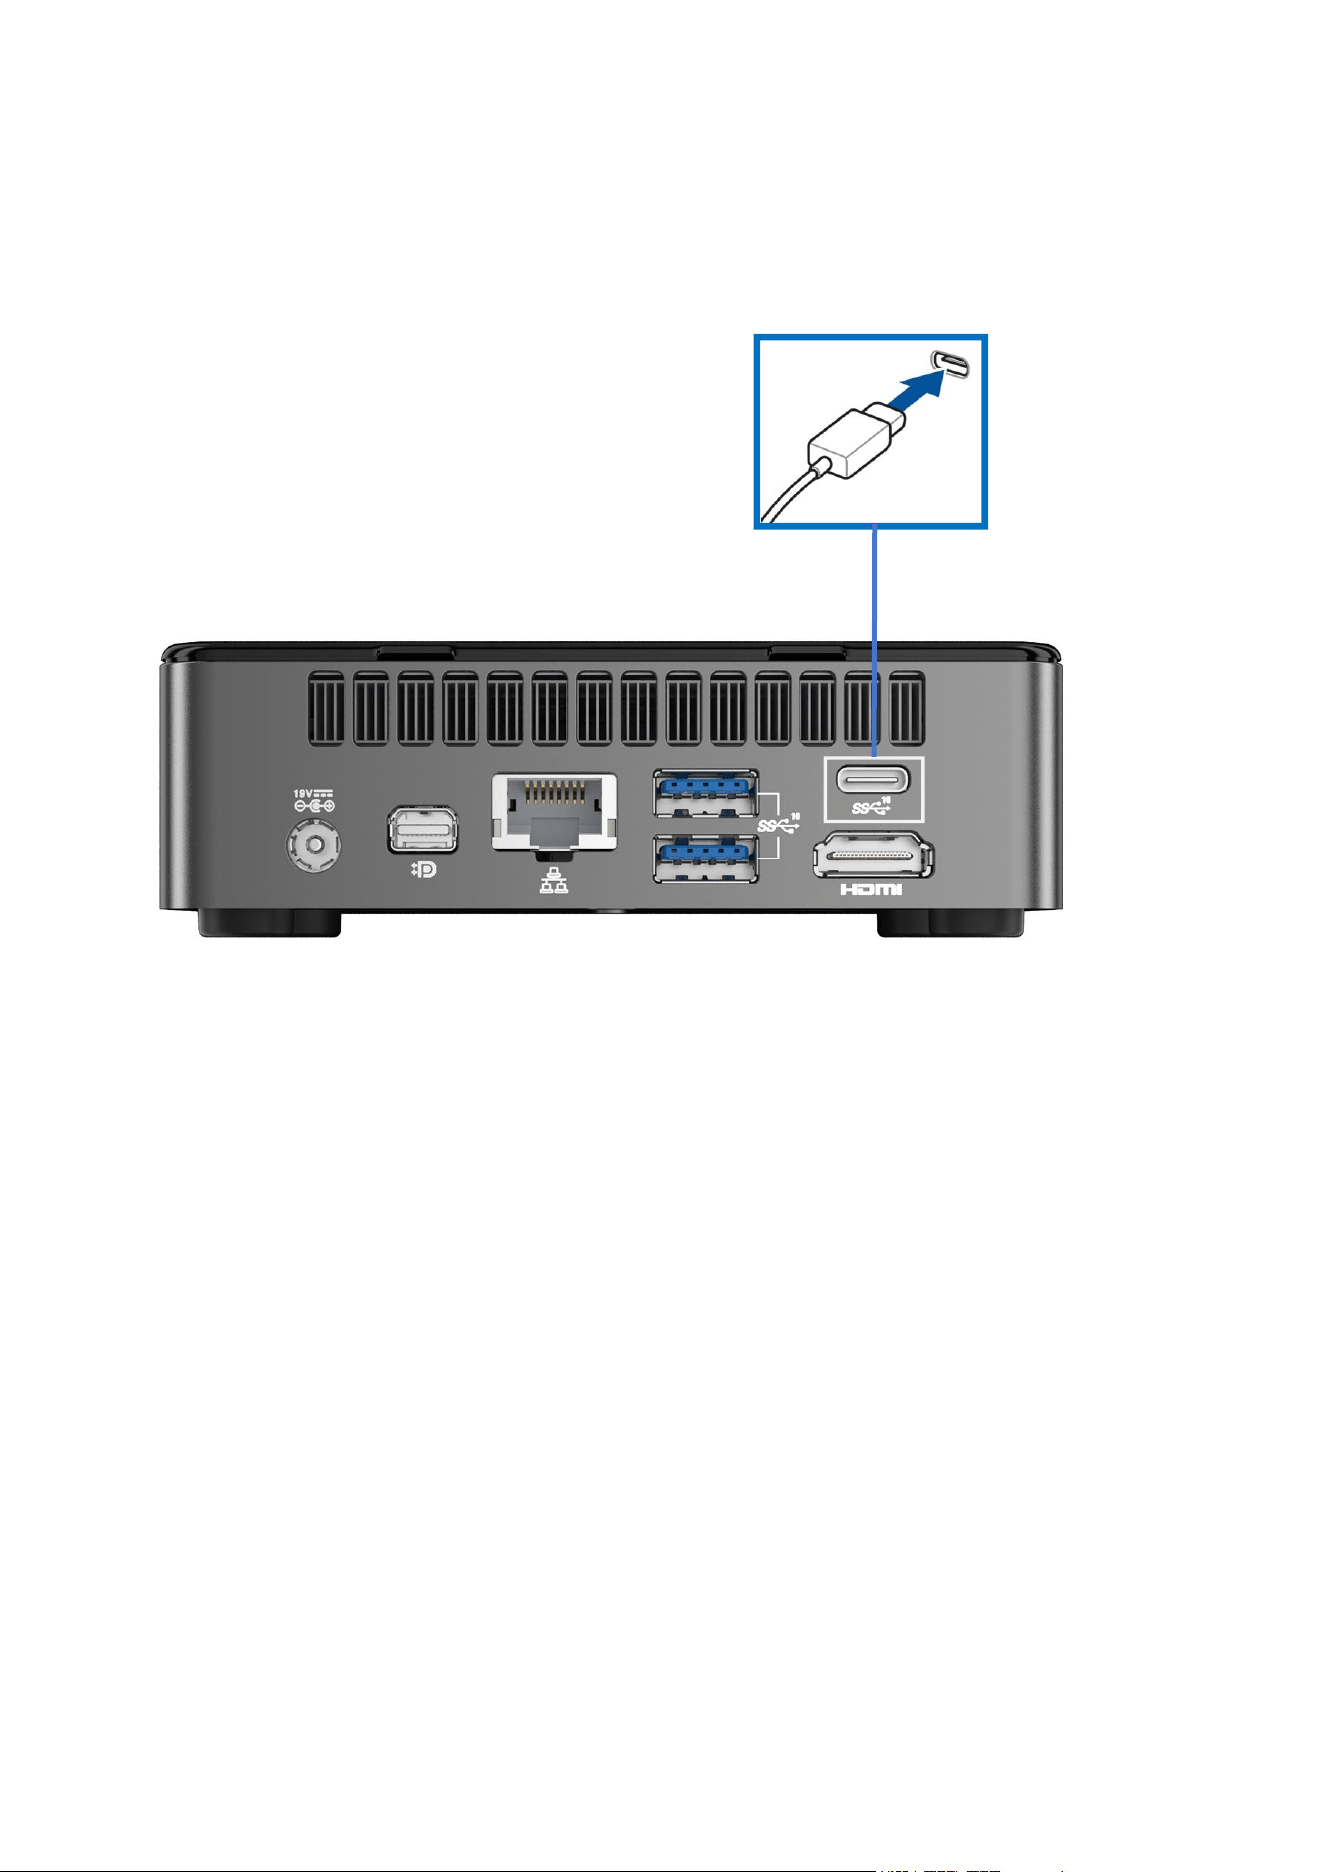
Connect the screen via USB 3.2 TYPE-C (rear) input and output
multipurpose port
22
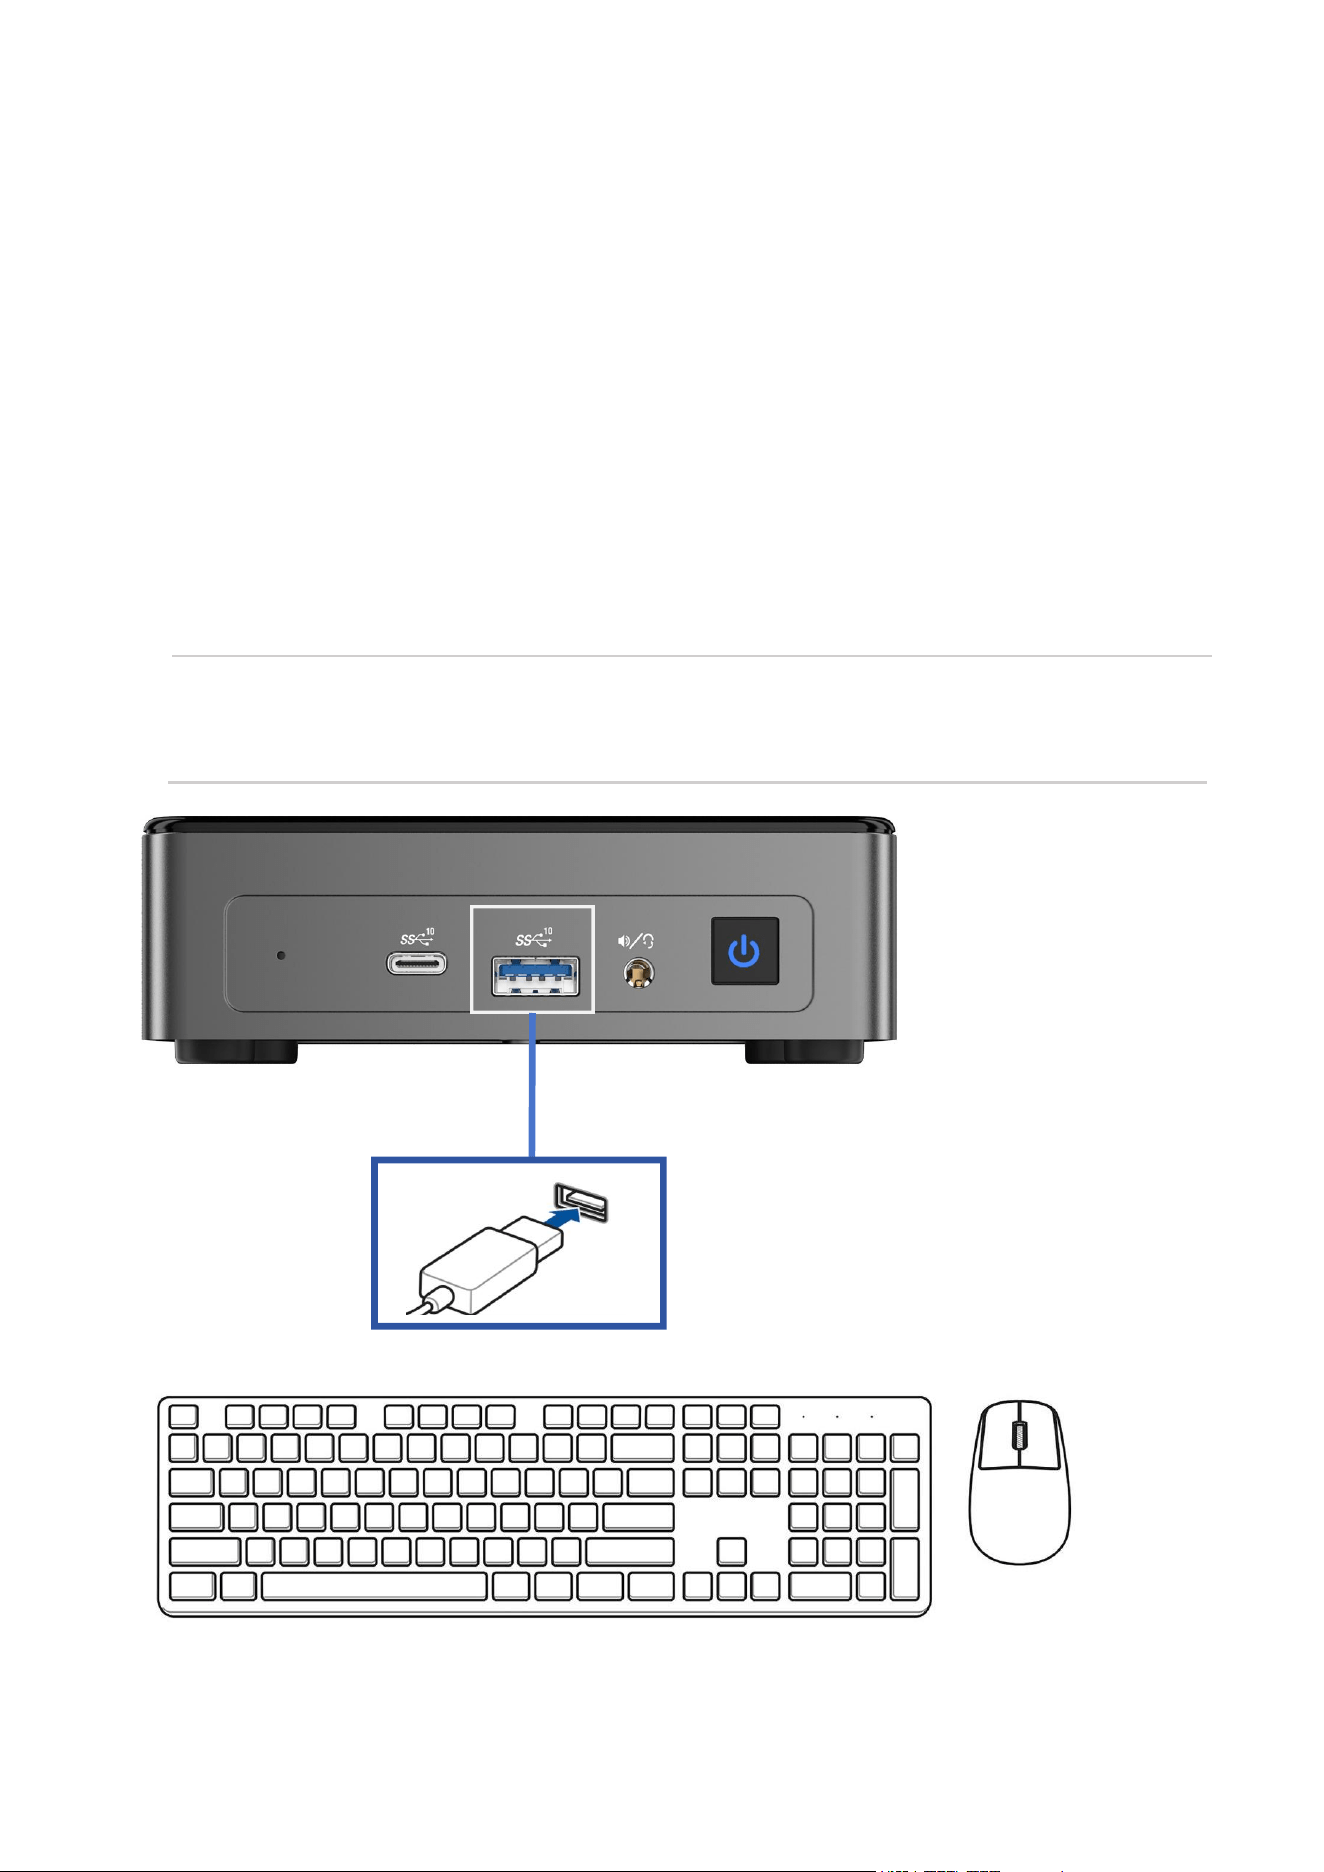
Connecting a USB Keyboard or Mouse
You can connect any USB keyboard or mouse to your Mini PC.
Alternatively, you can connect a USB receiver to a wireless keyboard
and mouse set.
Please follow the instructions below to connect the keyboard and
mouse to your Mini PC:
Connect the USB cable from your keyboard or mouse to any USB port
on your Mini PC.
Note: Keyboard designs may vary depending on the region. Refer to
the product you purchased.
23
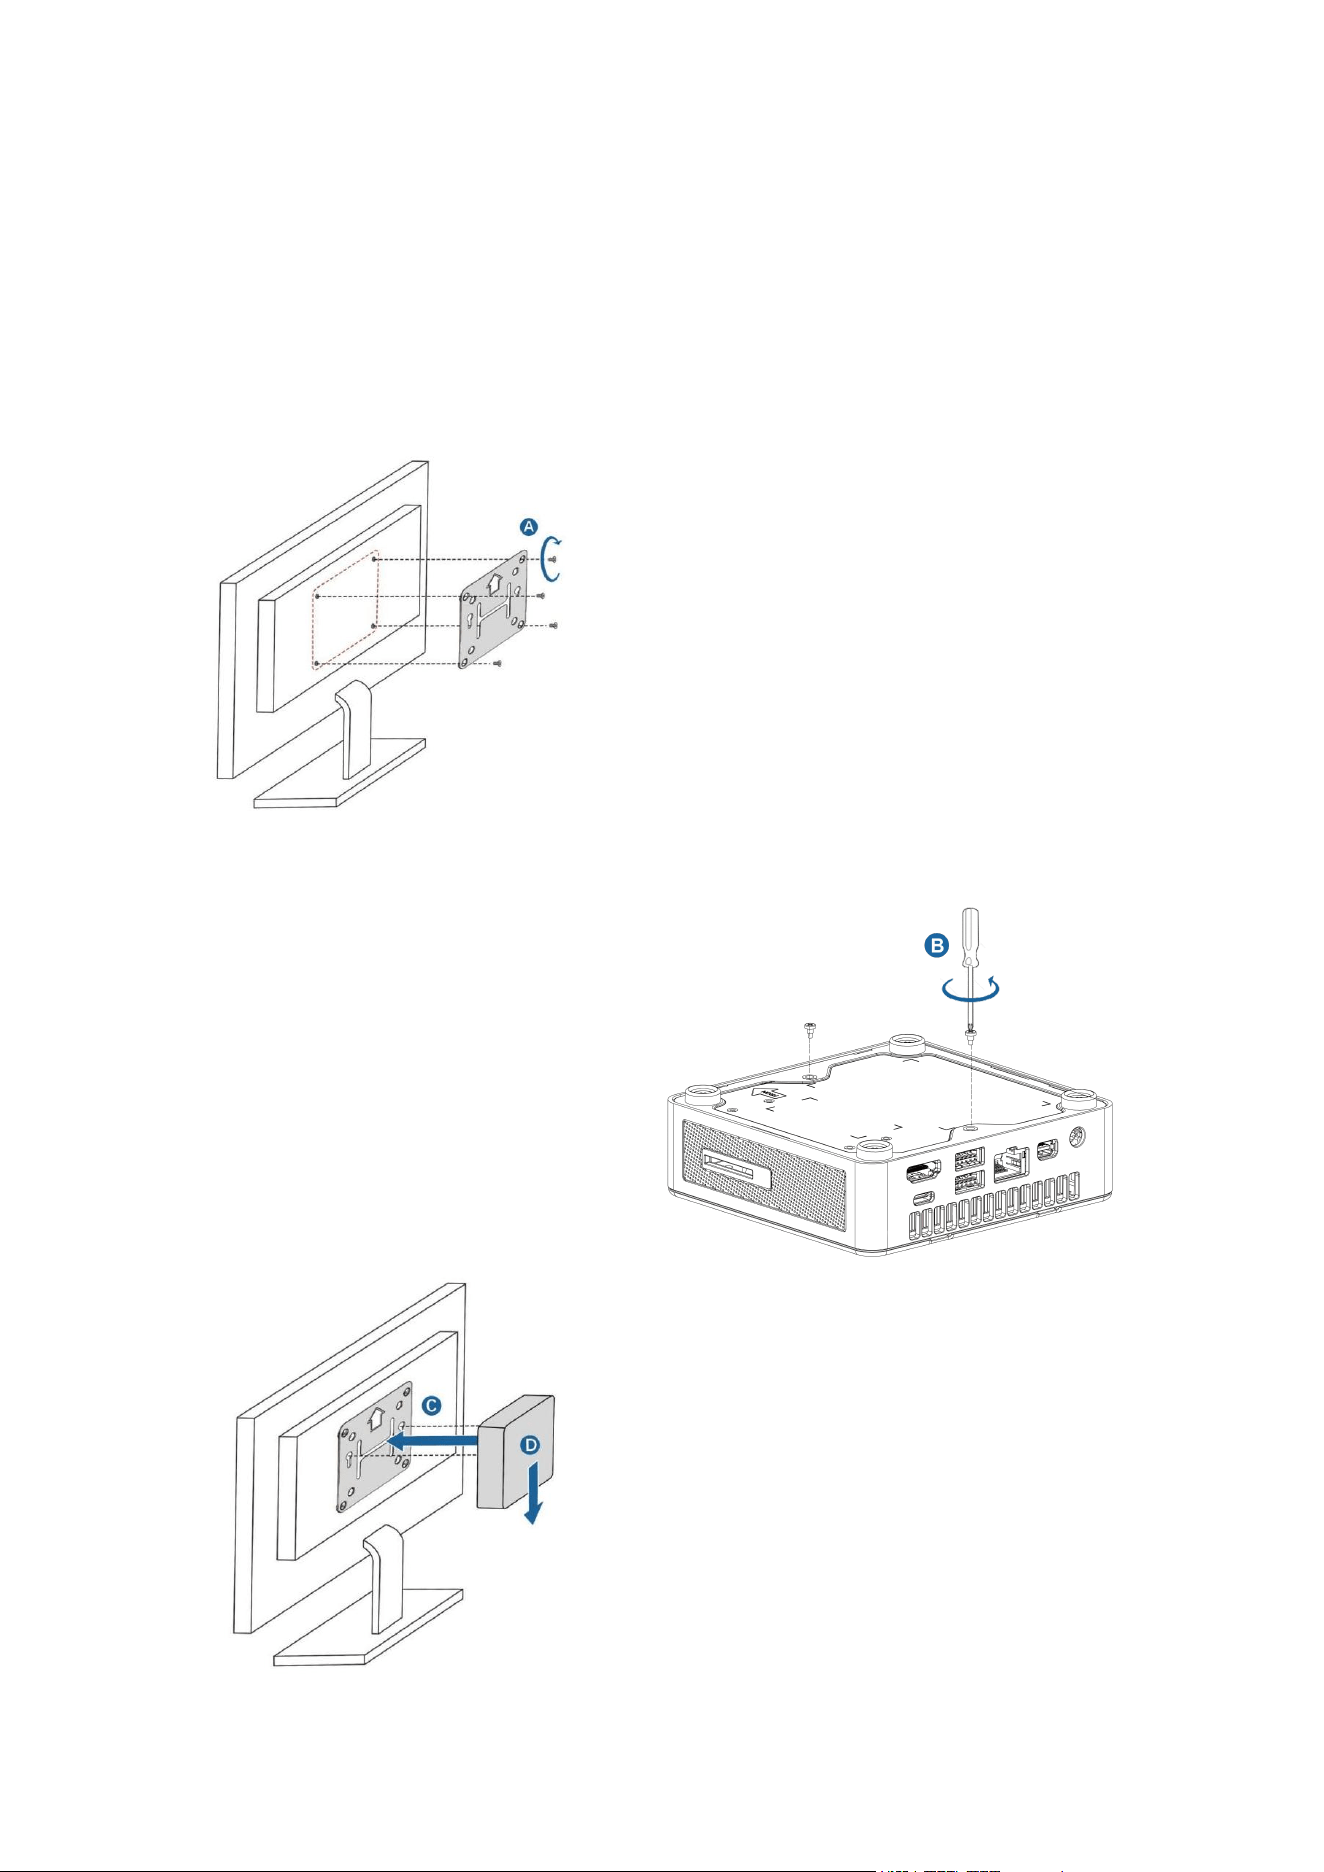
Attached VESA Installation
Attach the VESA bracket (included in the package box) to the
back of a monitor. This allows you to securely hang the Mini PC
on the back of the monitor, keeping your workspace tidy.
A. Install the VESA mount bracket on the back of the
monitor with a VESA hole
B. Screw the attached fixing screws into the
corresponding holes of the bottom cover
C. Hang the product into the cut-out in the middle
of the VESA mount bracket
24
Powering On
Press the power button to start your Mini PC
Turning off Your Mini PC
If your Mini PC becomes unresponsive, press and hold the
power button for at least 4 seconds to force a shutdown.
Putting Your Mini PC into Sleep Mode
Please enter Control Panel in the Windows search bar, then click
Hardware and Sound > Power Options > Choose what the
power button does. Select When I press the power button to
Sleep to set the Mini PC to enter sleep mode with a single press
of the power button.

25
Entering the BIOS Settings
The BIOS (Basic Input/Output System) contains the hardware
configuration settings necessary for starting your Mini PC.
Under normal circumstances, the default BIOS settings are
sufficient to ensure optimal system performance. You should
only modify the BIOS settings in the following scenarios:
An error message appears during startup, prompting you to
access the BIOS settings.
You need to configure or update the BIOS after installing new
system components.
Warning! Improper BIOS settings may result in system
instability or failure to boot. It is strongly recommended to make
changes to BIOS settings only under the guidance of trained
professionals.
Loading Default BIOS Settings
Please follow the instructions below to load the default BIOS
settings;
1. During the startup process, repeatedly press Del or ESC key
on your keyboard to enter the BIOS settings.
2. When options are prompted, select NO option, and navigate
to Exit menu.
3. Select Load Optimized Defaults option or press <F3> on
your keyboard.
4. Select OK to load the default BIOS settings.

26
Upgrading Your Mini PC
3

27
Important!
It is recommended that you install or upgrade memory modules,
wireless network cards, and solid-state drives (SSD) under
professional supervision. Visit a GEEKOM-authorized service center
for further assistance.
Before starting any installation, ensure your hands are dry. Before
installation, wear an anti-static wrist strap or touch a grounded object
or metal surface to prevent static damage to components.
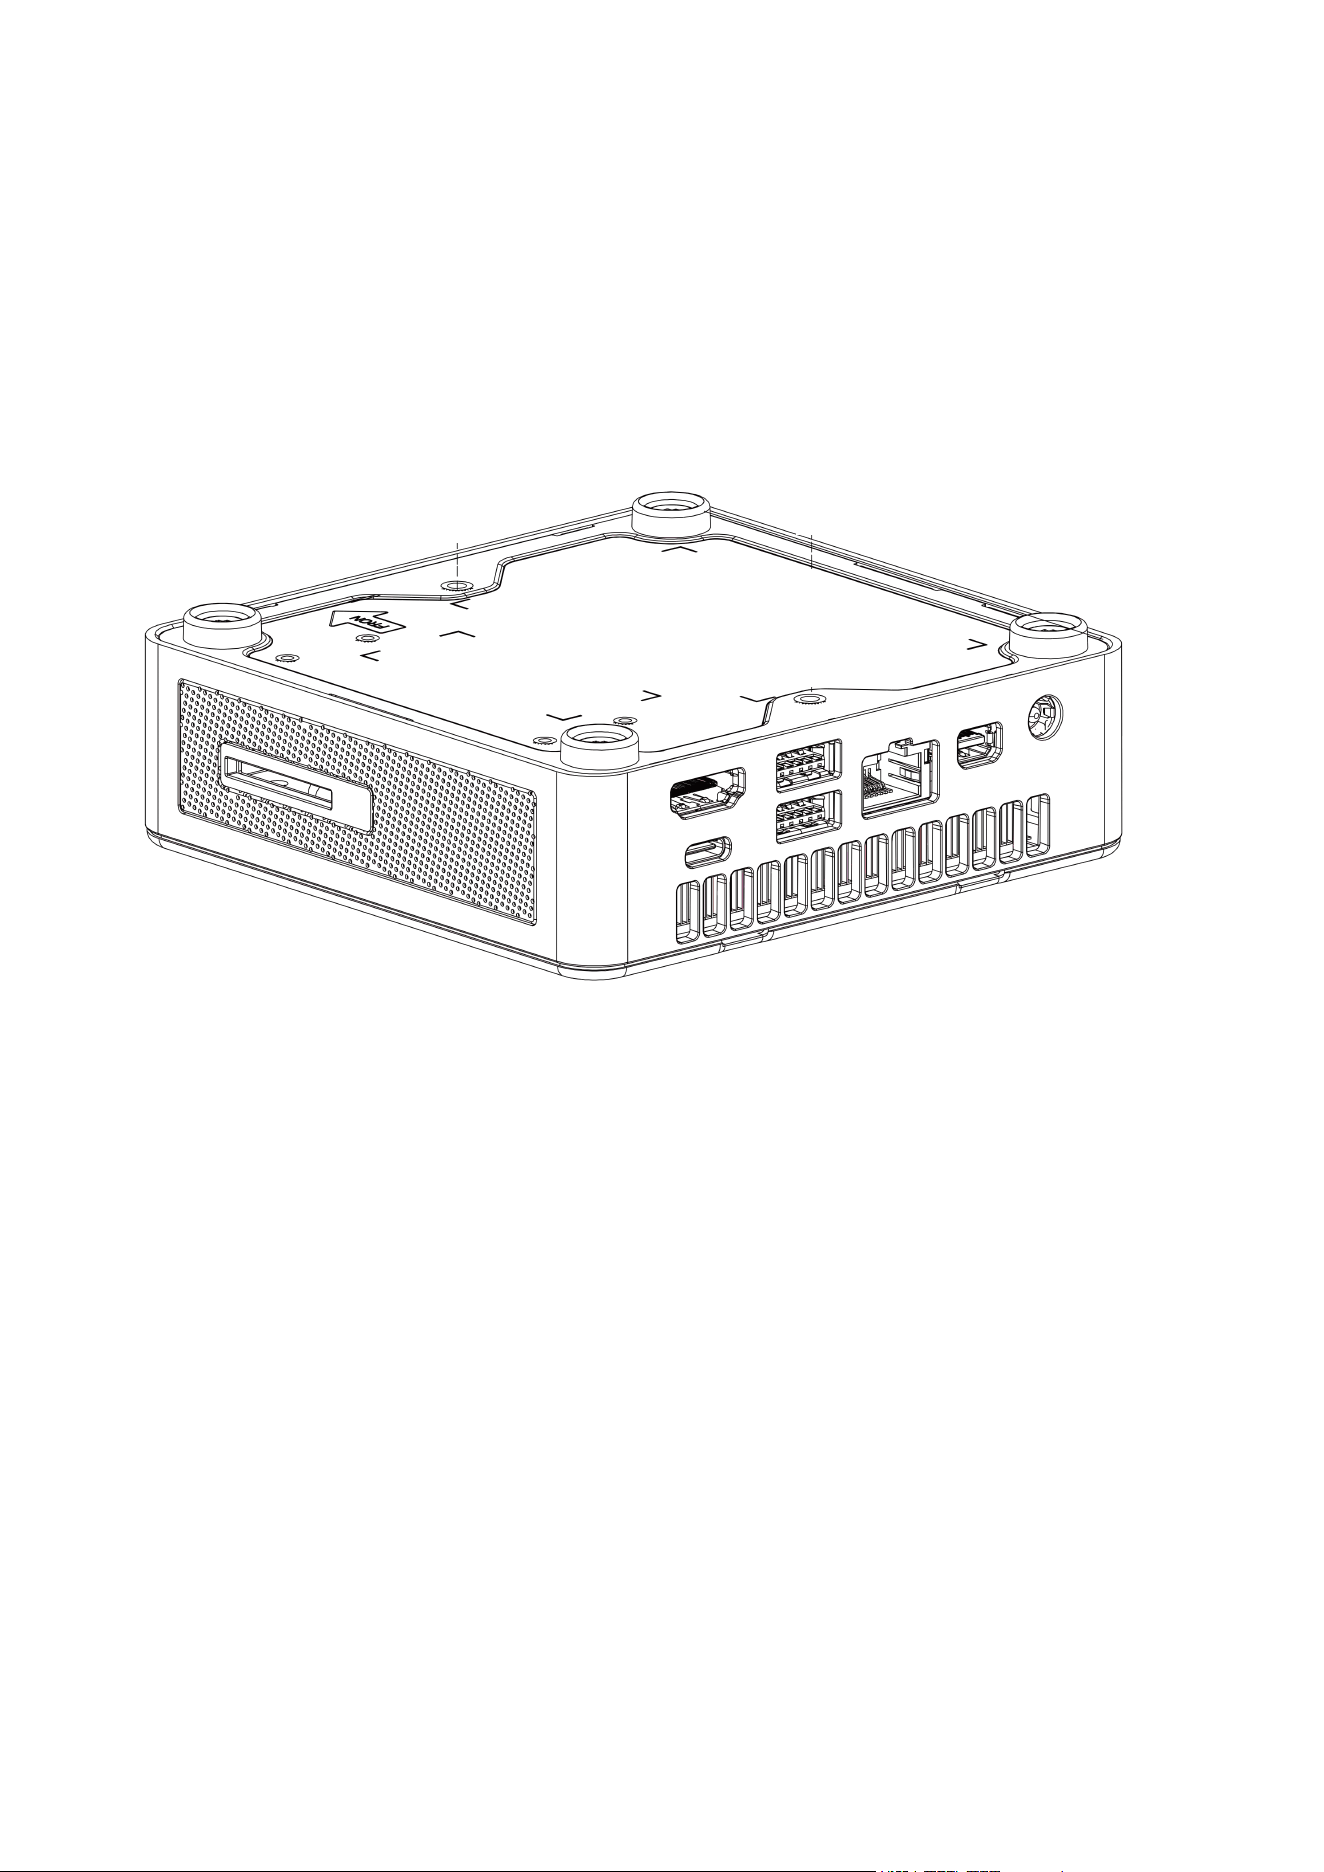
Note: The illustrations in this chapter are for reference only. The
appearance of slots may vary depending on ton the model.
28
Removing the Bottom Cover
1.Turn off your Mini PC and disconnect all cables and devices.
2.Place the Mini PC on a stable, flat surface with the top of the device
facing downward.
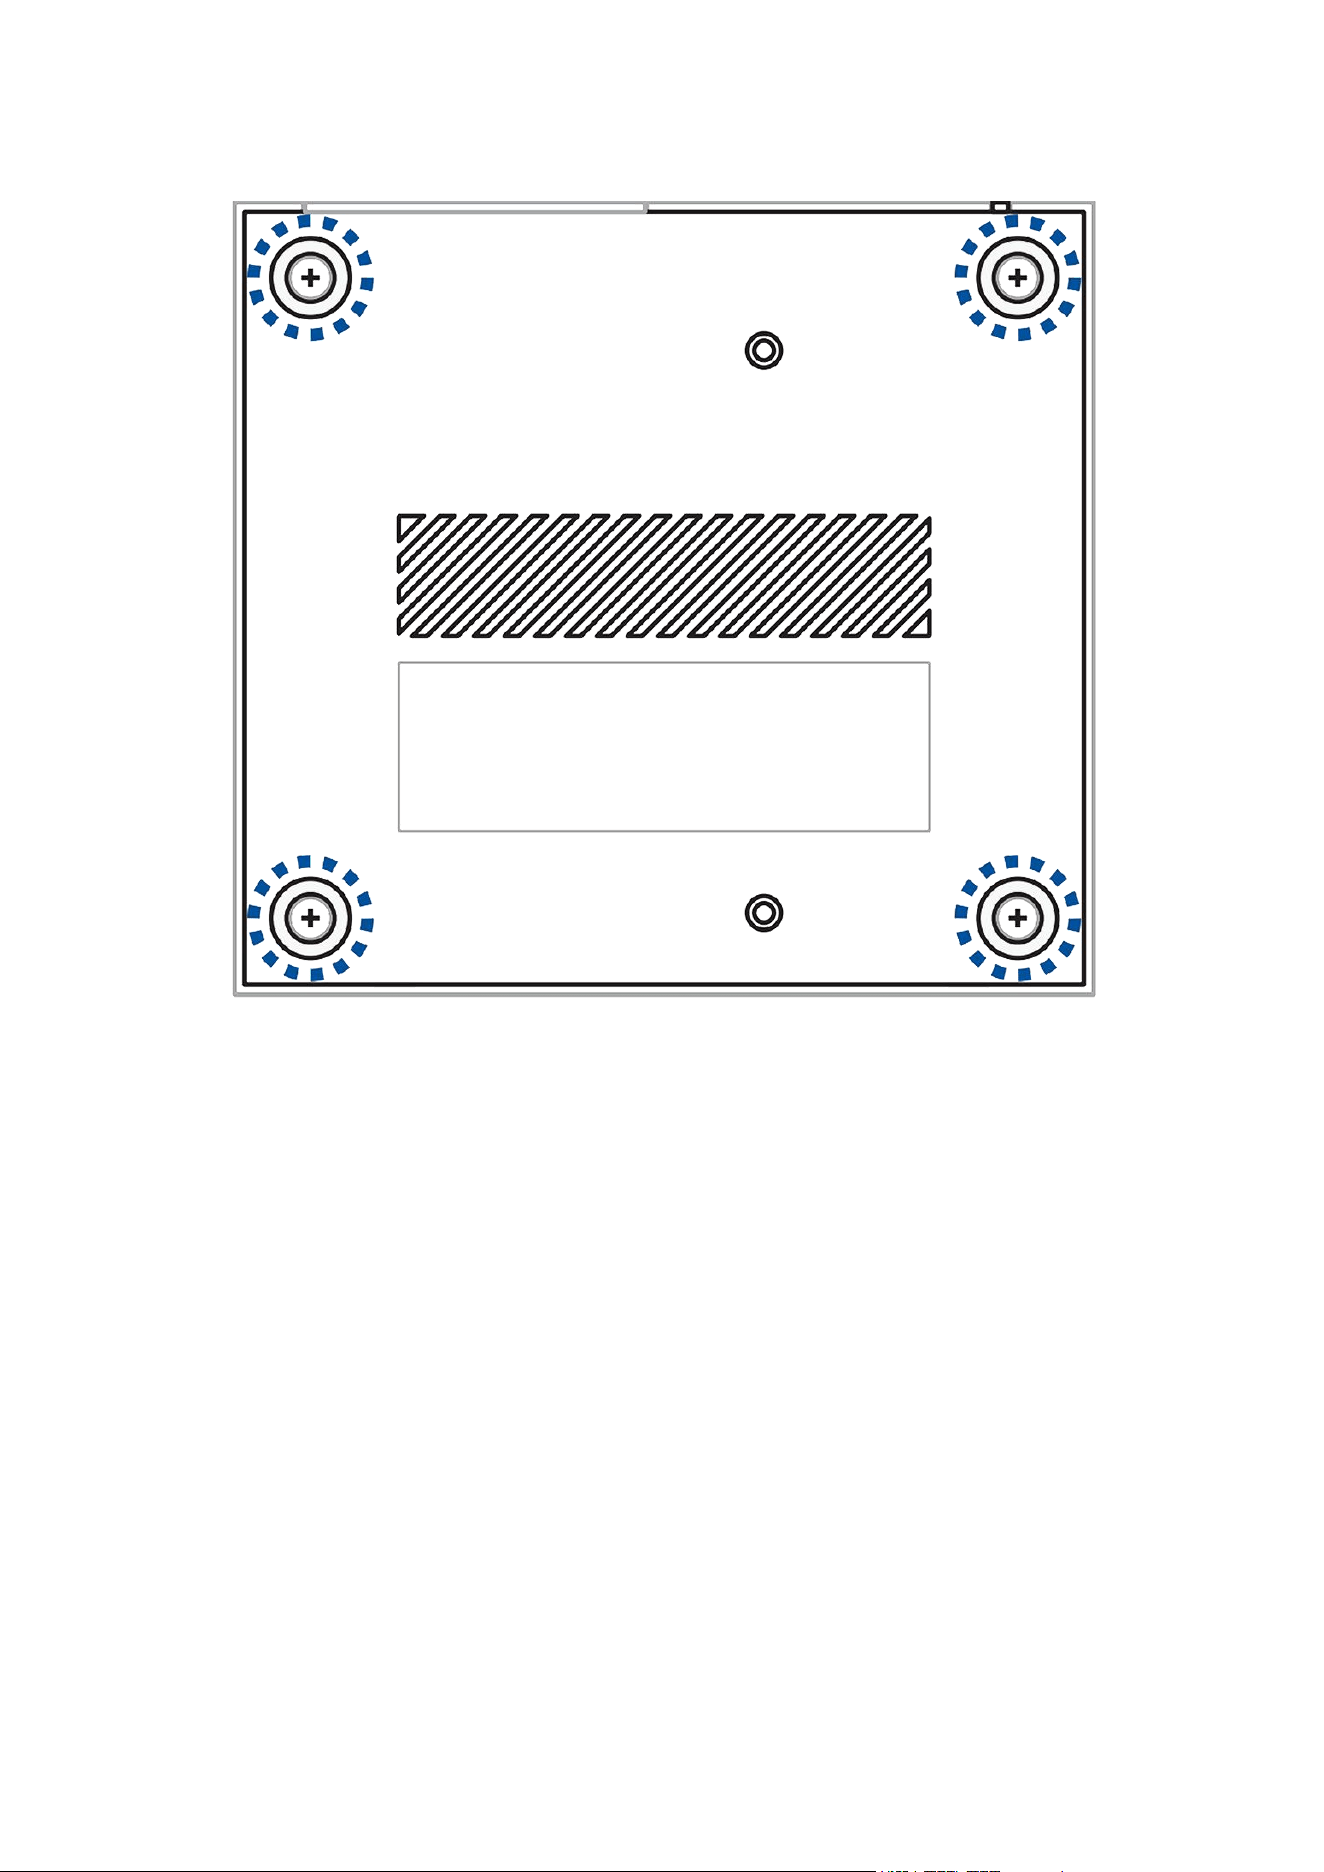
29
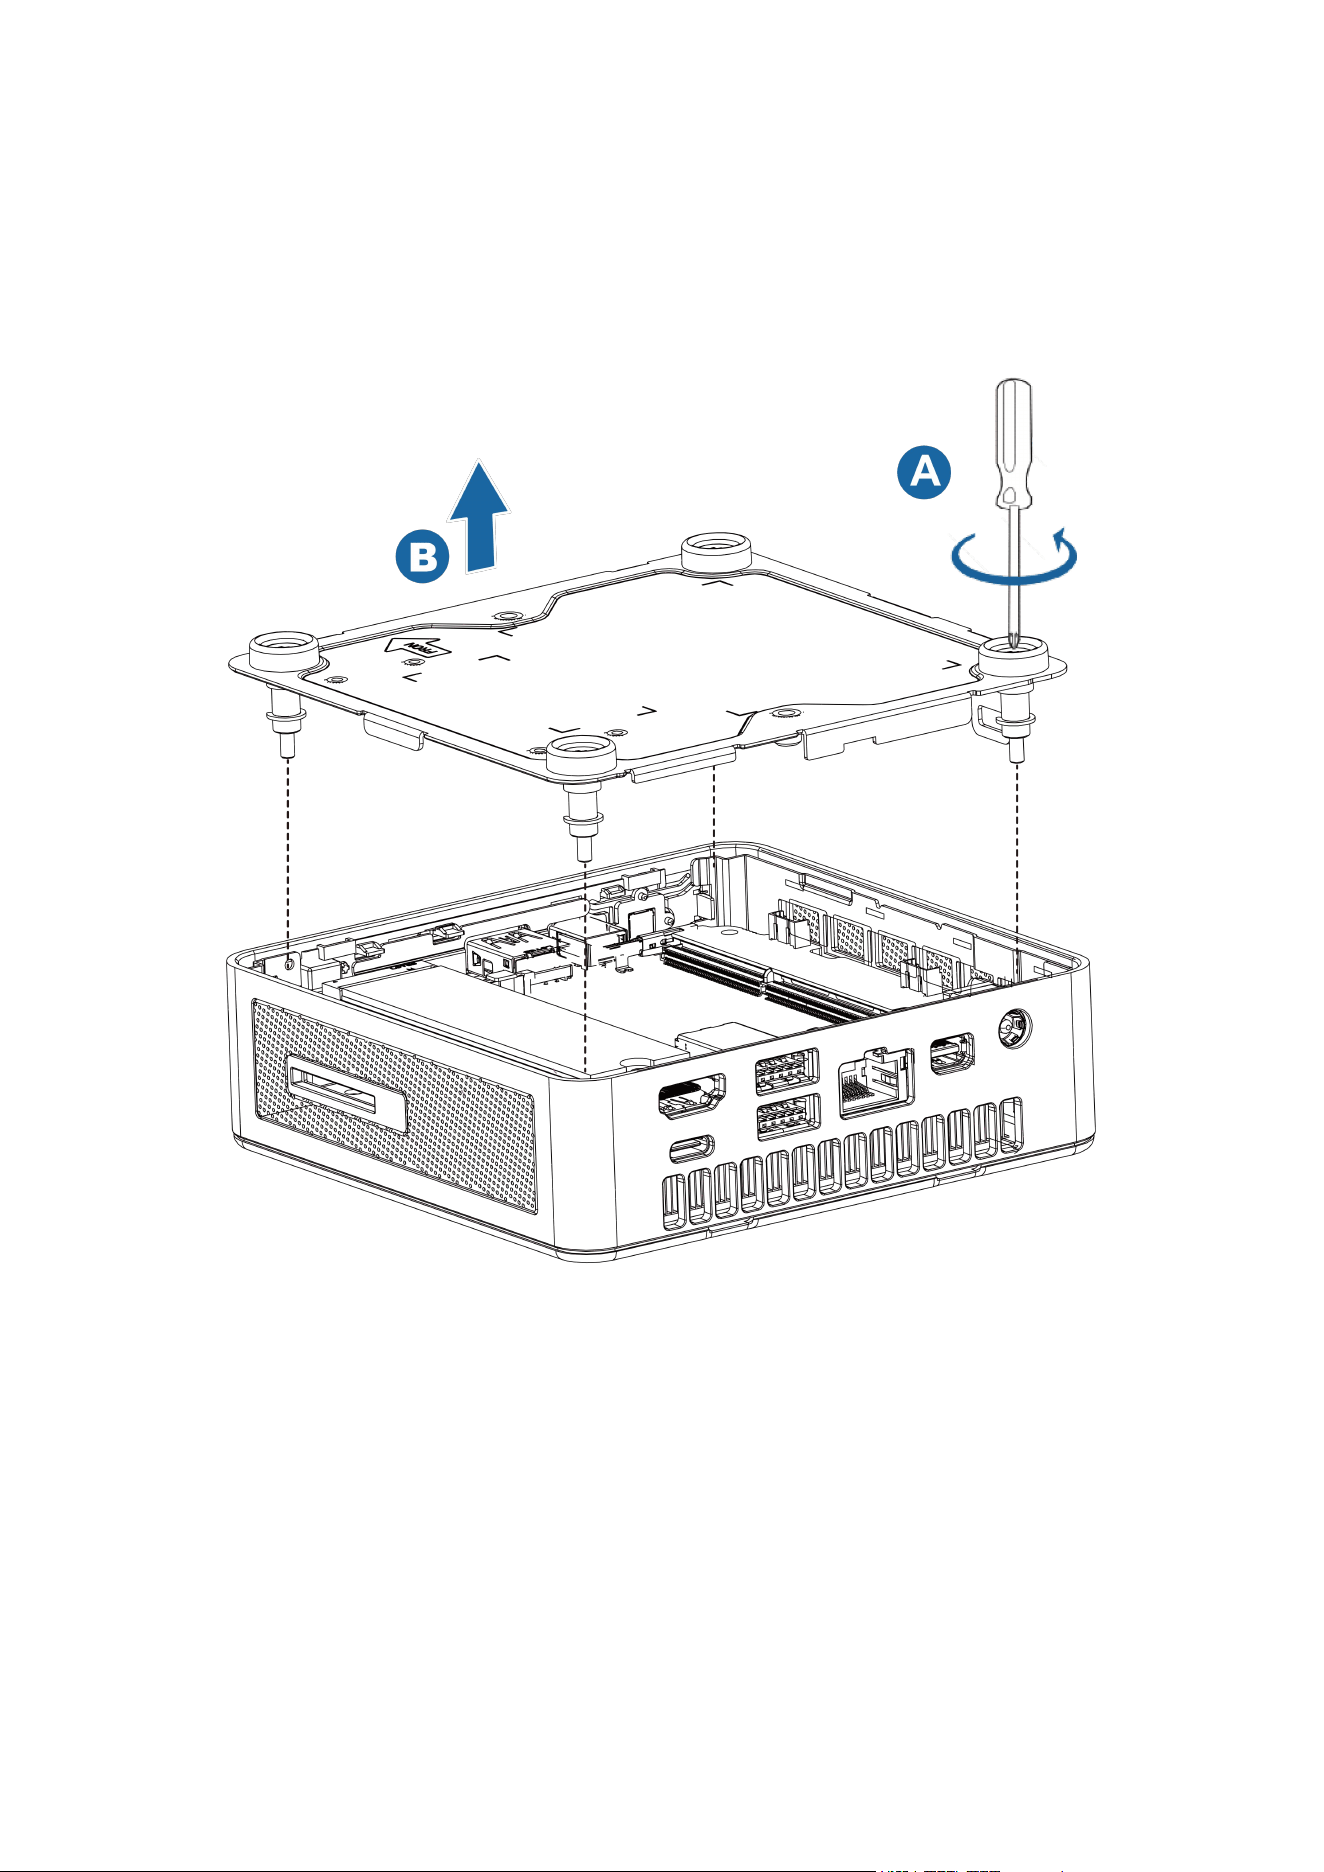
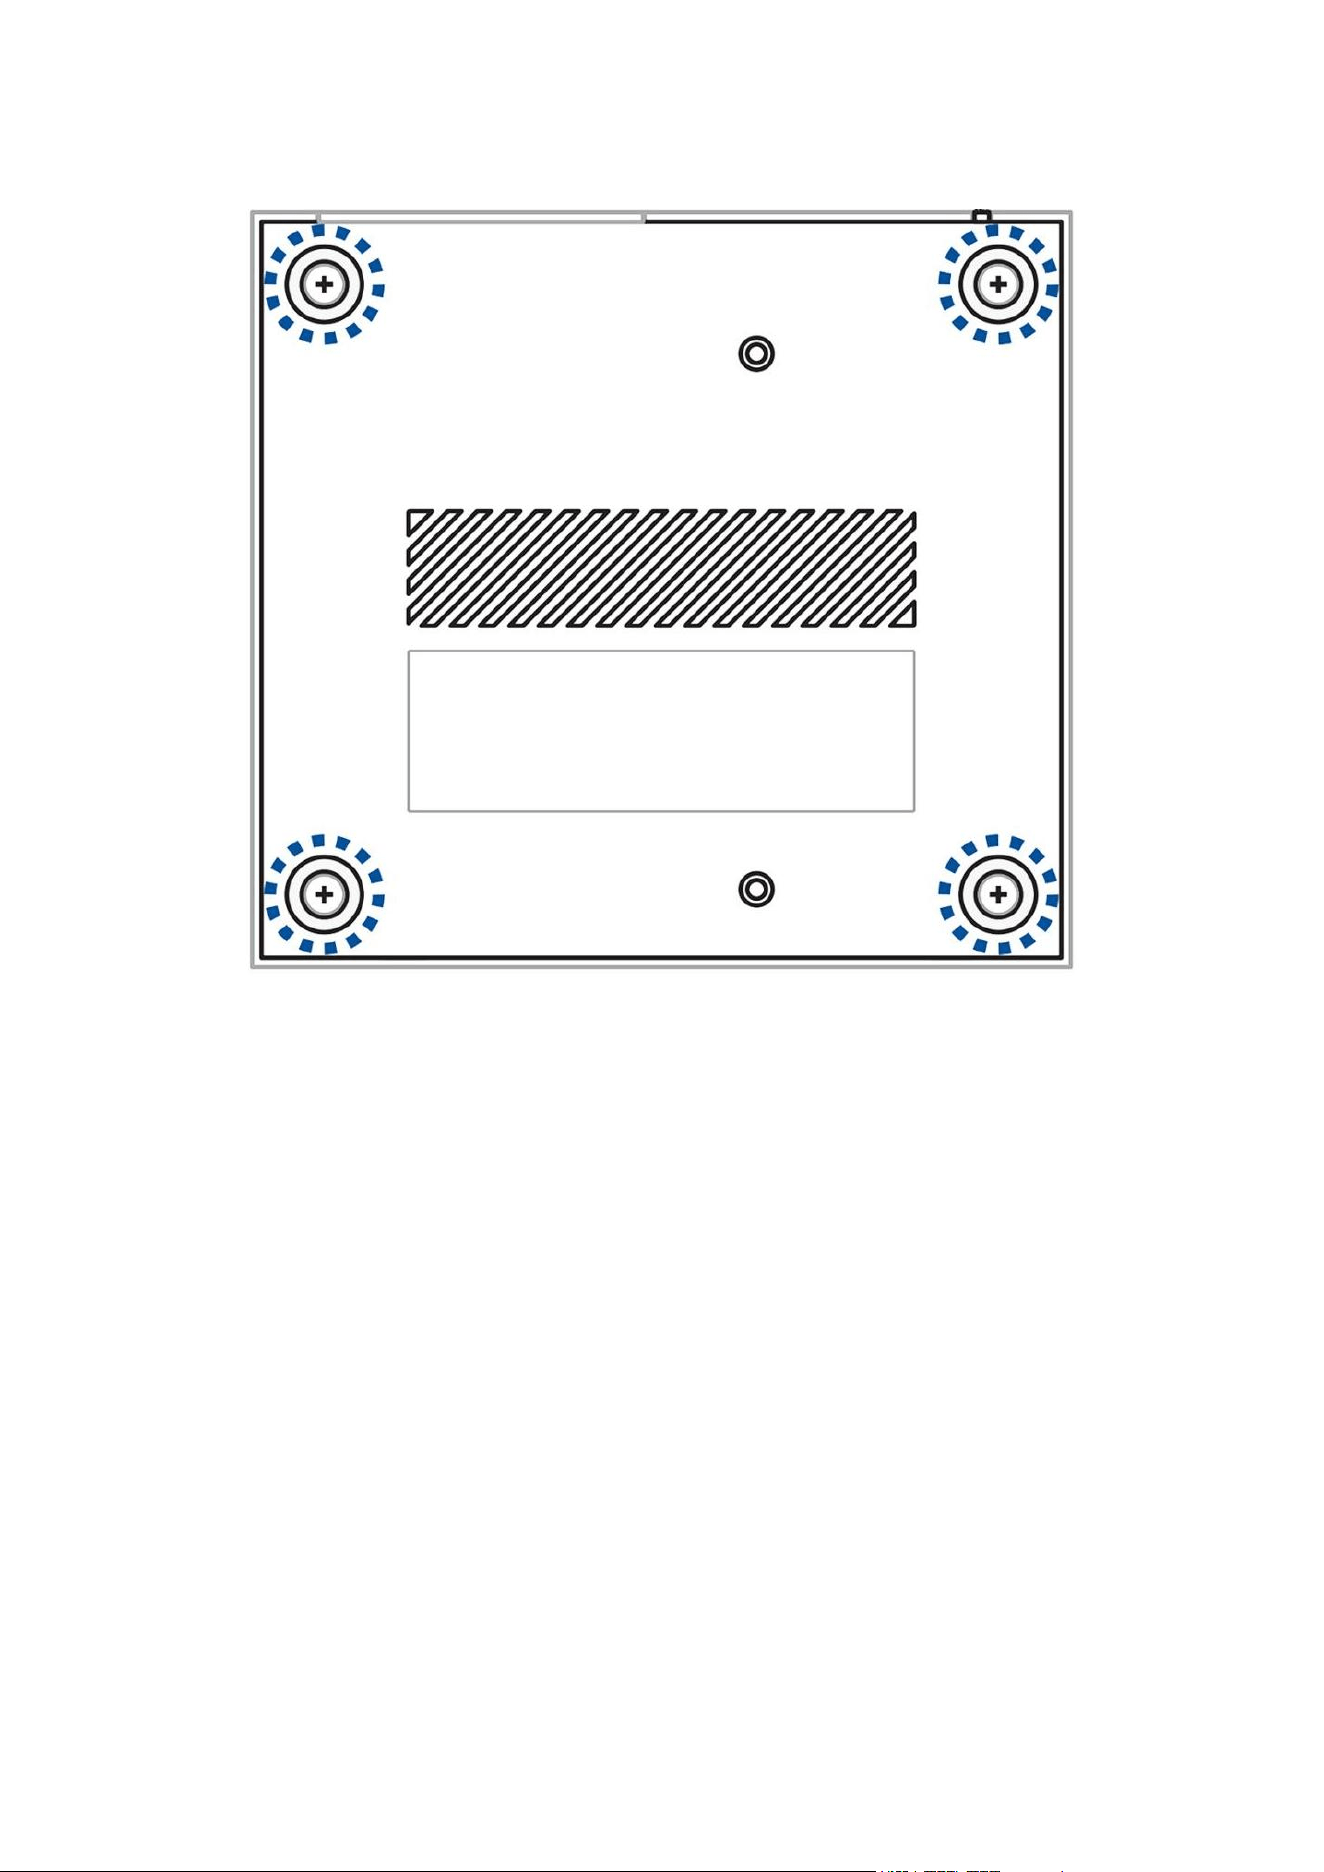
3. Loosen the four screws on the bottom cover.
30
4. Please hold two captive screws on the diagonal and gently lift the
bottom cover upward until it separates from the chassis to remove it.
31
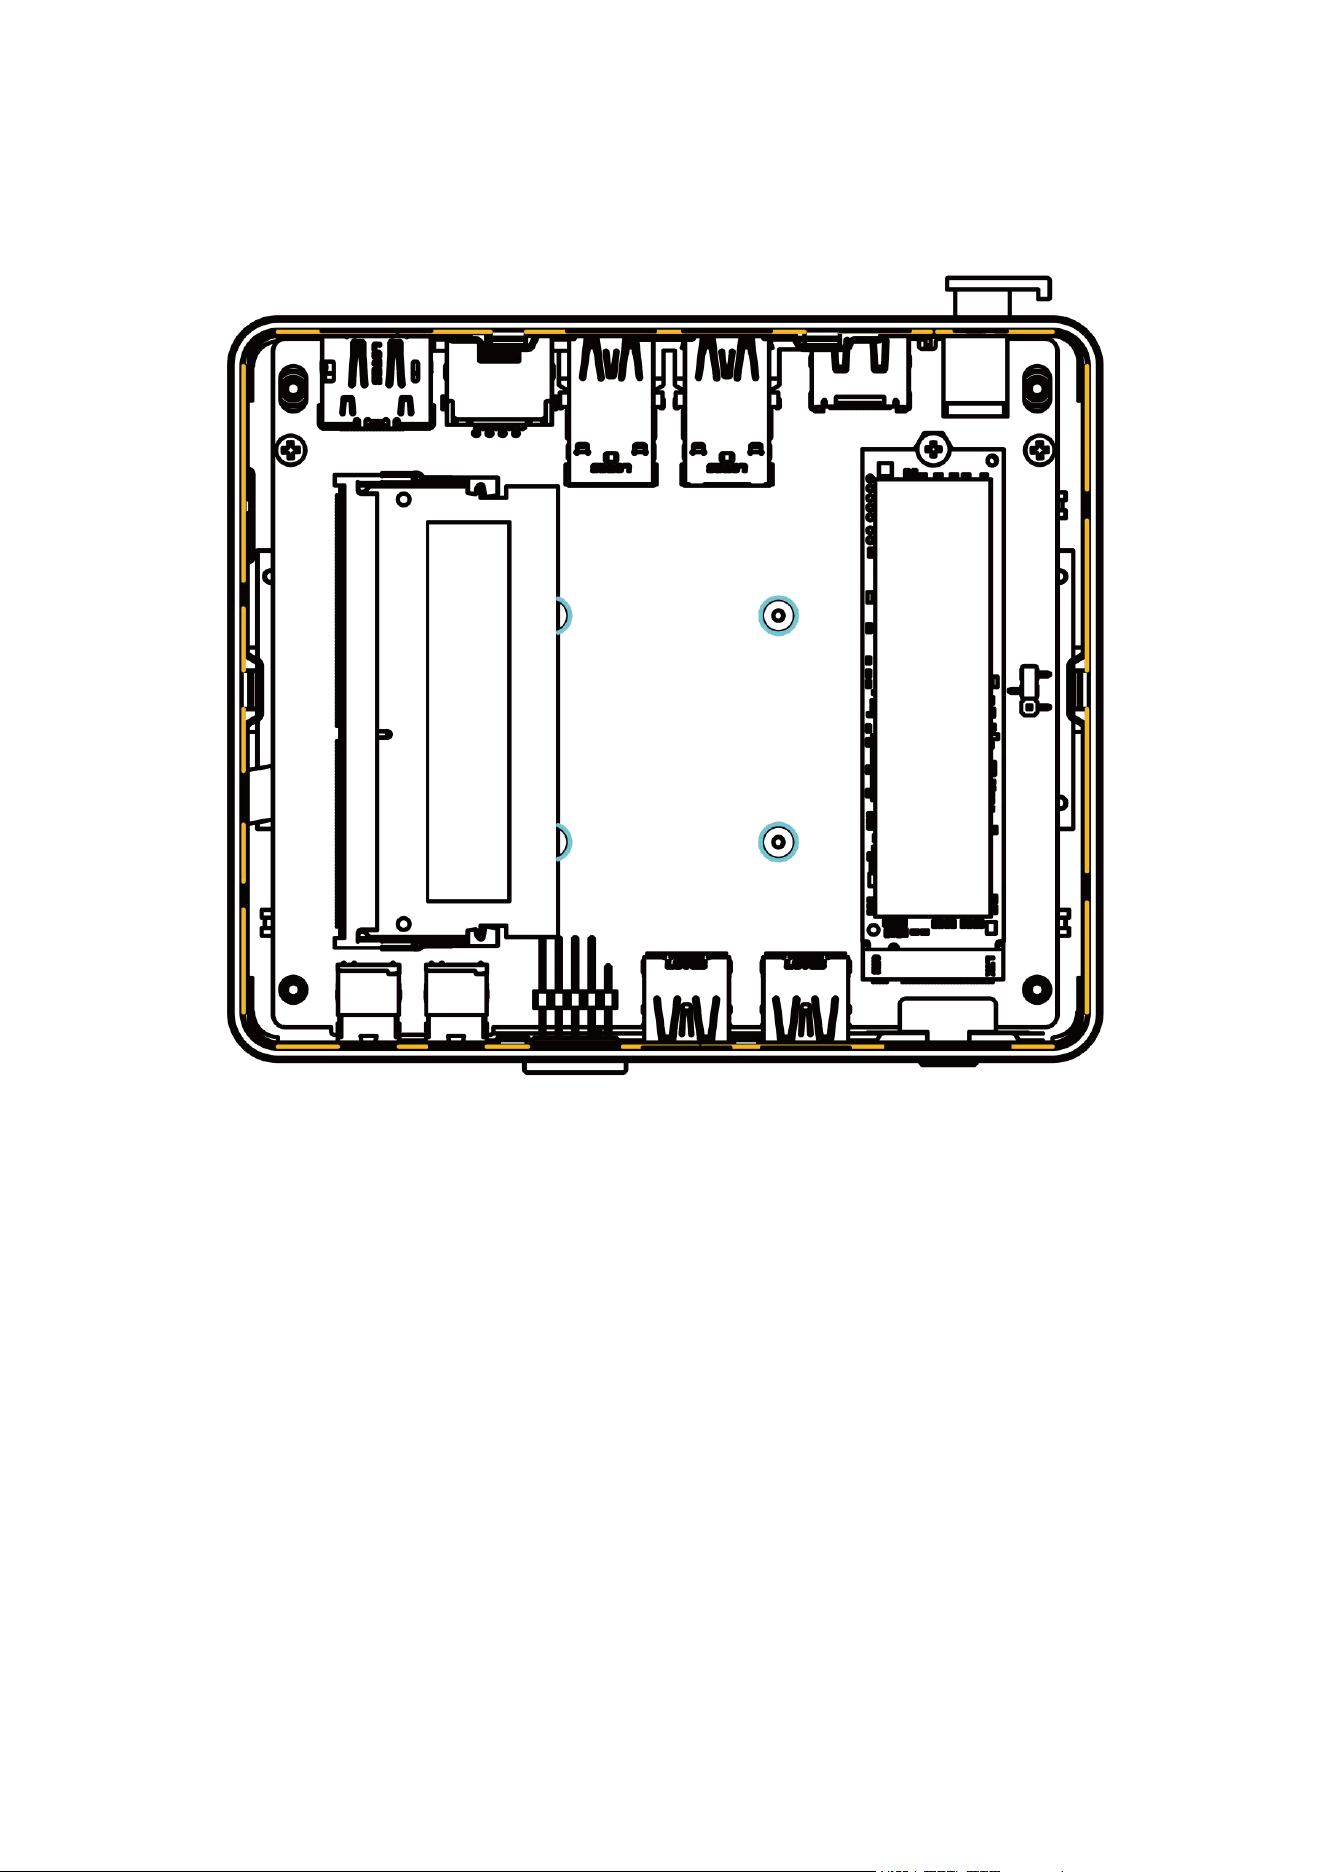
5. Remove the bottom cover, the internal product components are as
shown in the figure below.
32
Restoring the Bottom Cover
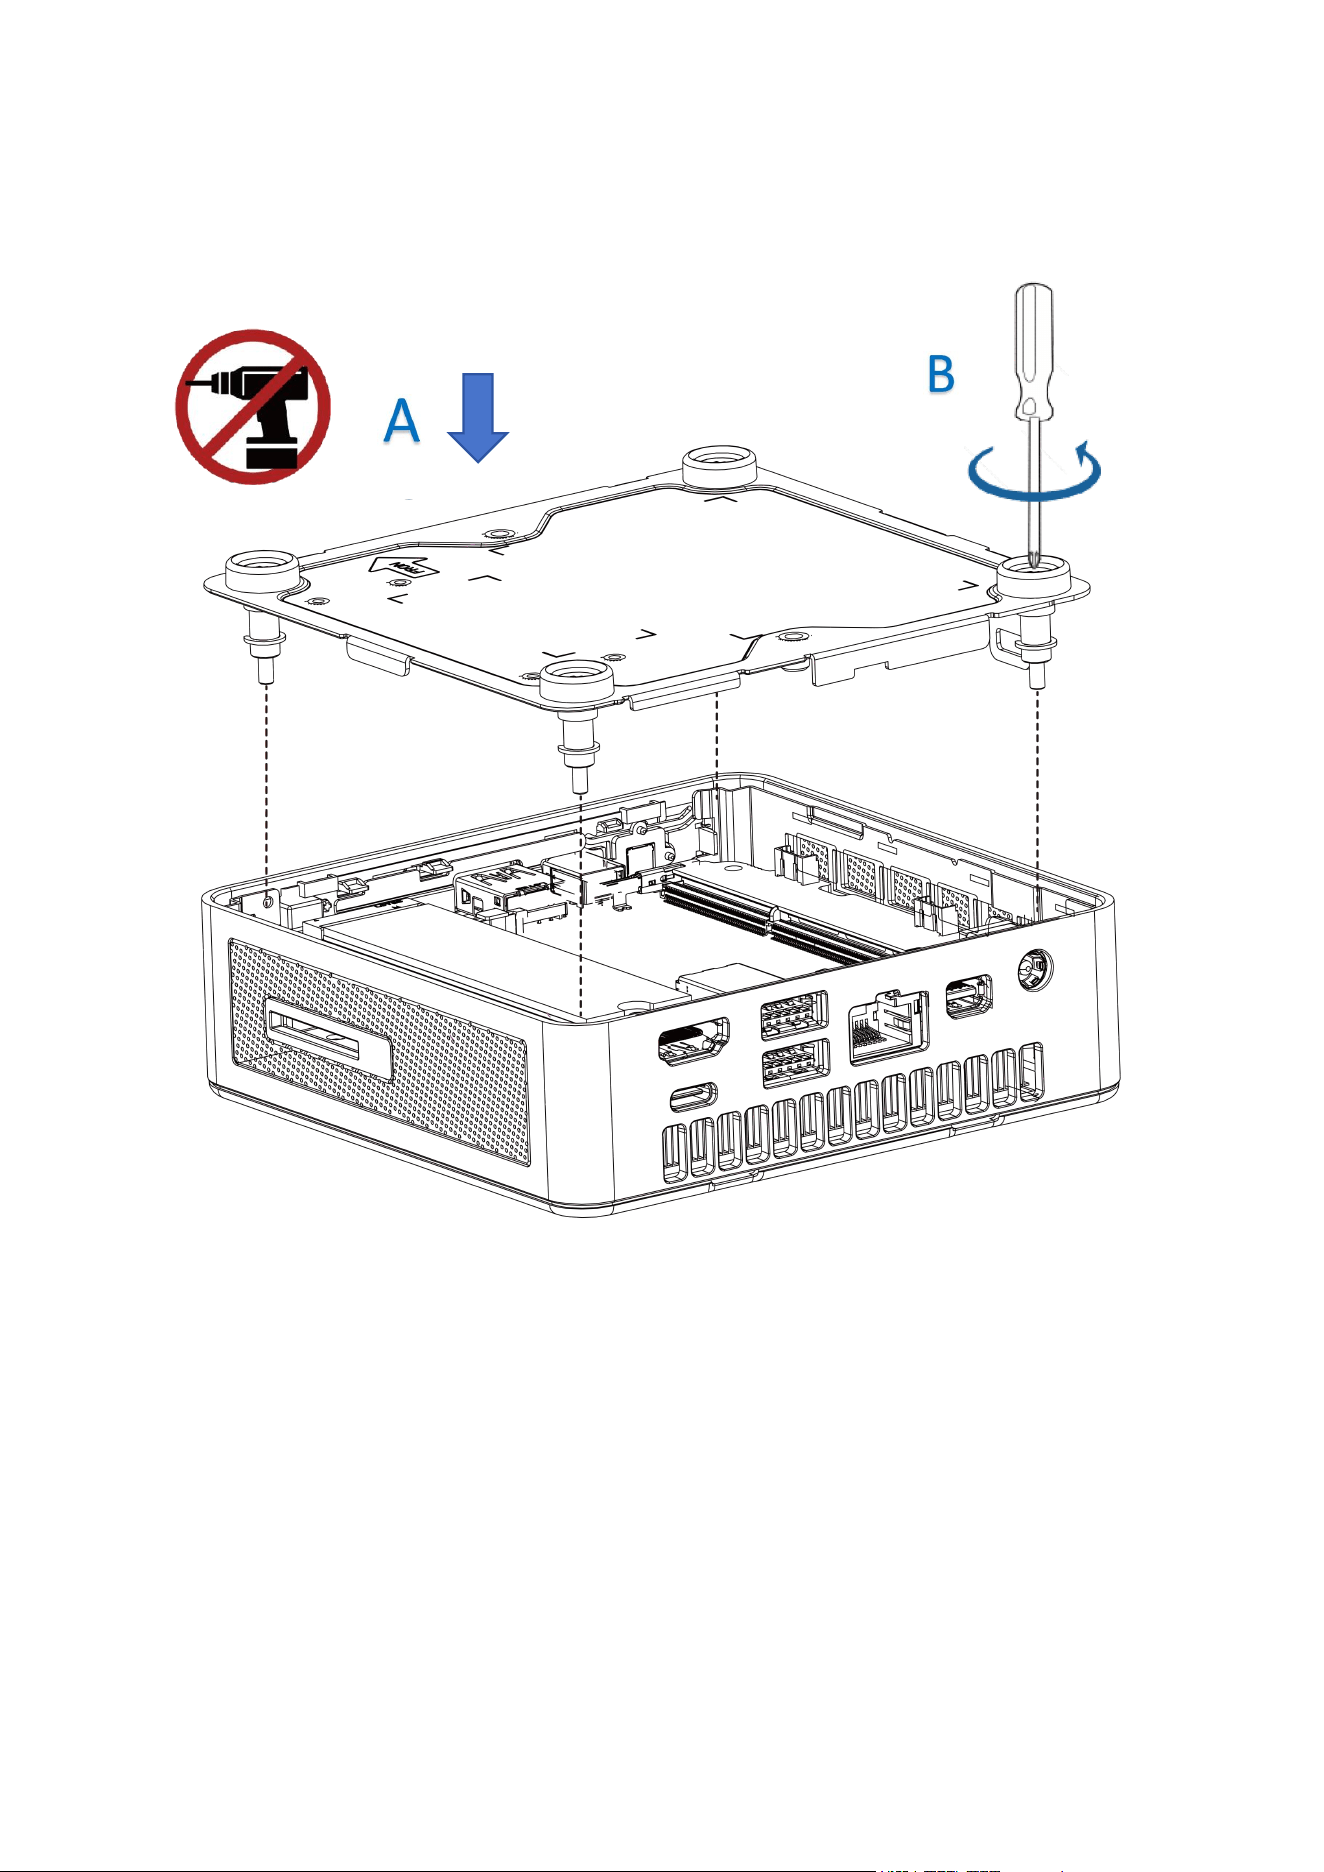
1. Place the bottom cover back on the chassis.
33
2. Tighten the four captive screws to secure the bottom cover in place.
34
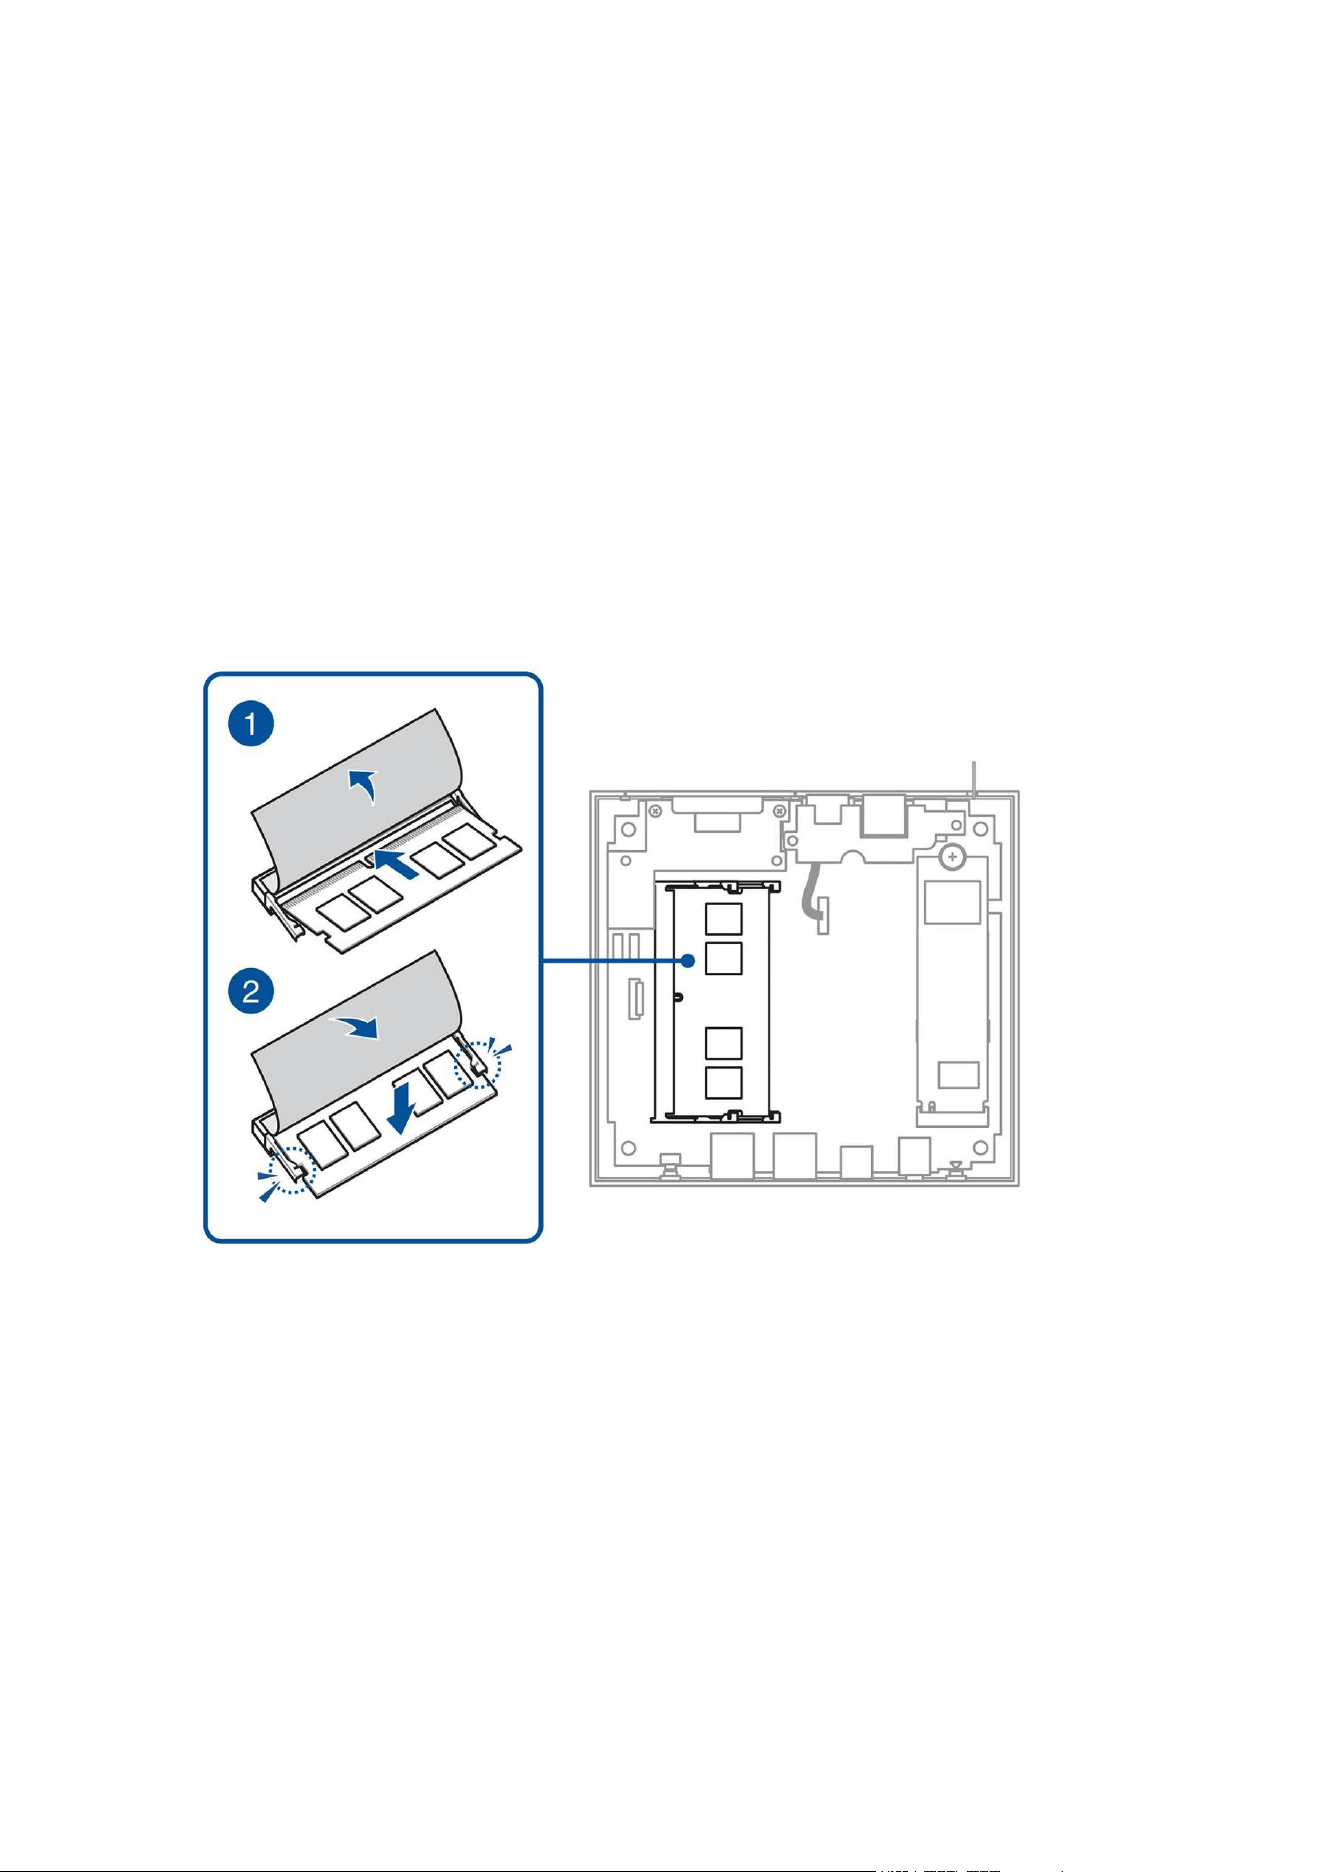
Installing Memory Modules
Your Mini PC is equipped with one SO-DIMM slots, allowing the
installation of up to one DDR5 SO-DIMM memory modules.
1. Peel back the protective film covering the memory slots. Align
the memory module with the slot and insert it.
2. Press the memory module down gently until it clicks into place,
then replace the protective film to its original position.
35
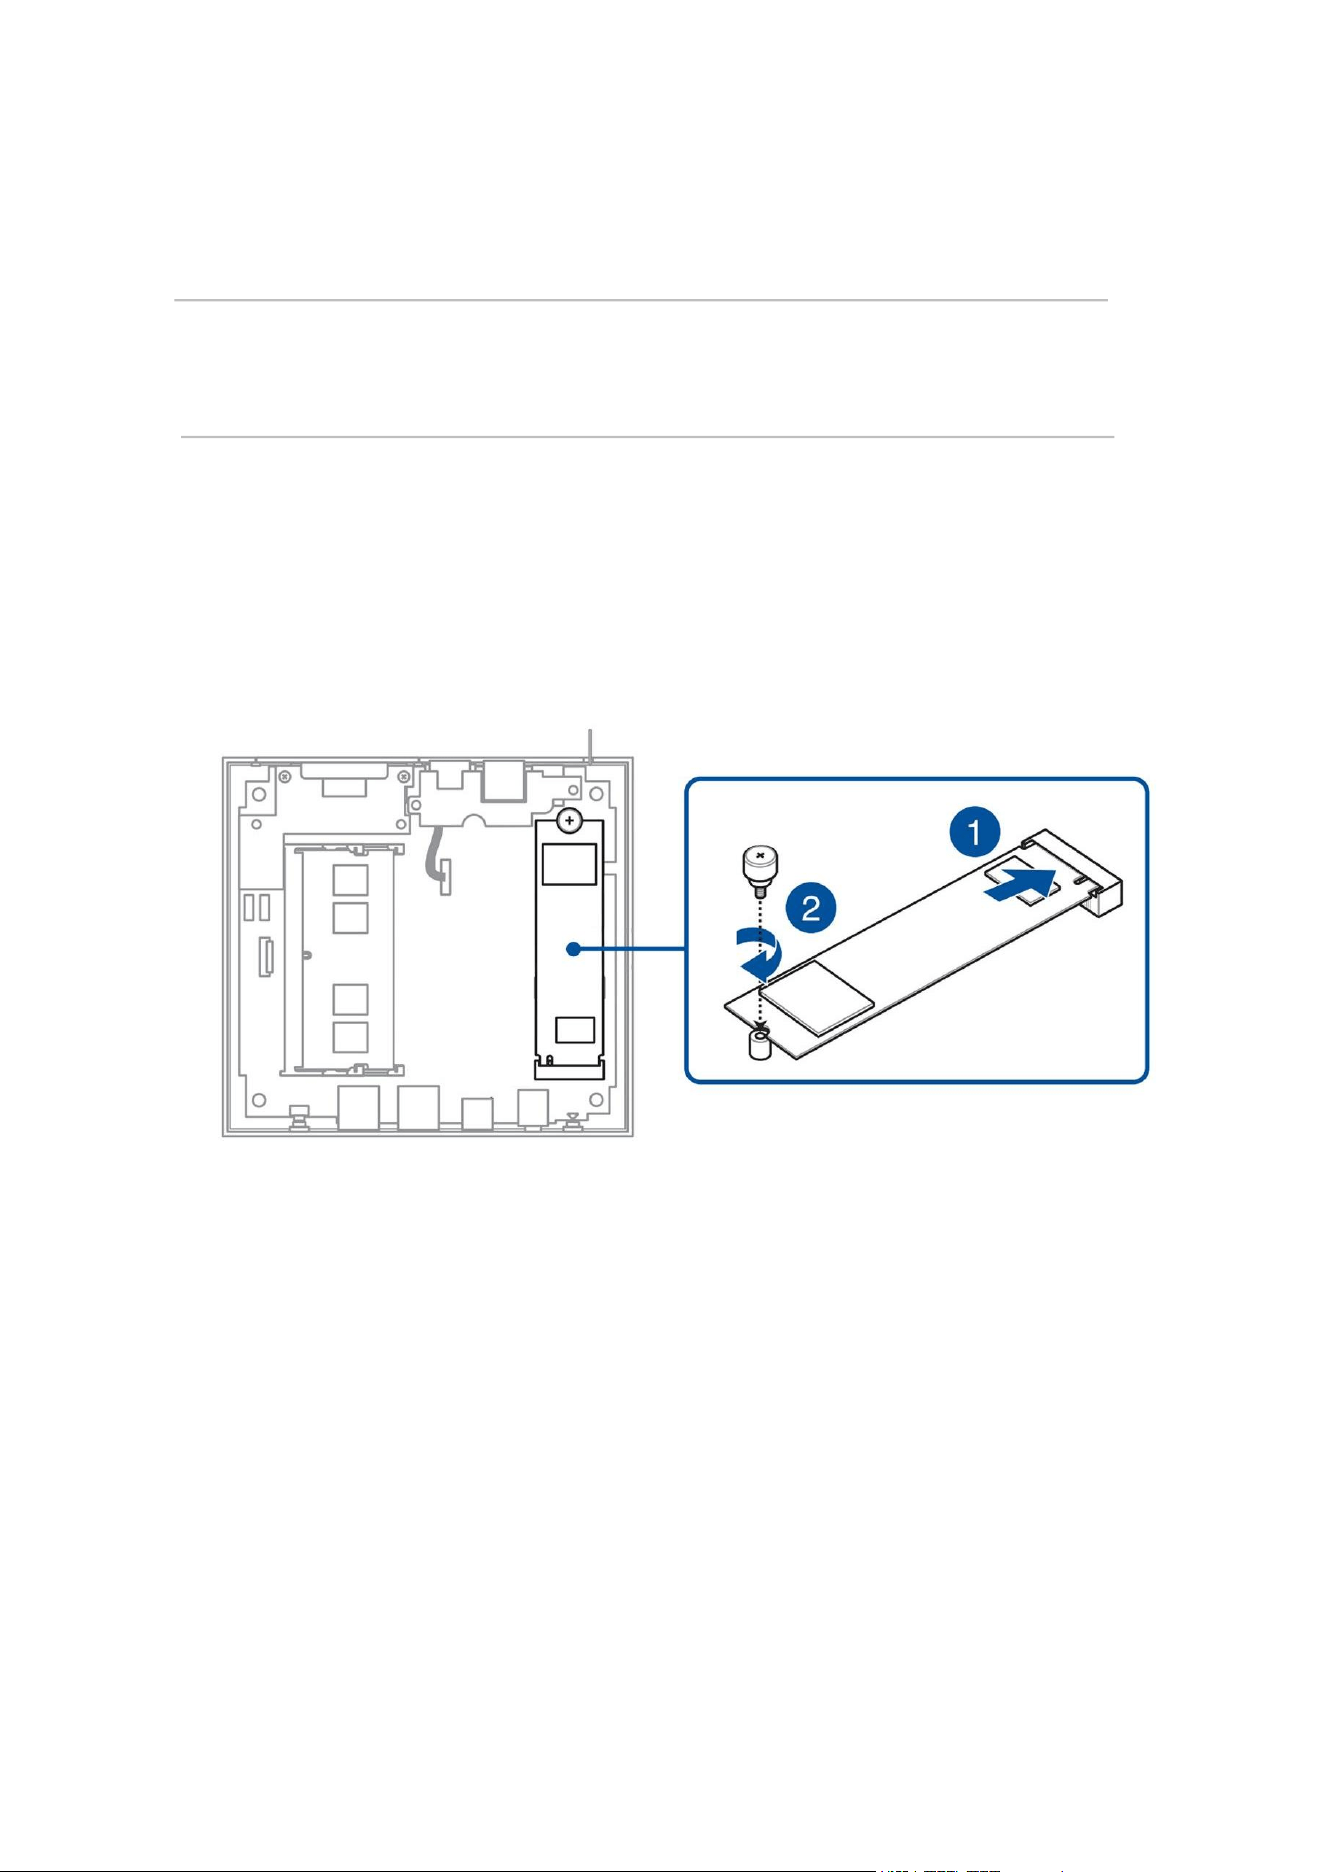
Installing M.2 SSDs
Your Mini PC features one M.2 slots inside the chassis.
Note:M.2 SSD specifications that can be Supported:
1 x M.2 2280 PCIe Gen3*4 SSD
Install the M.2 SSD to the chassis:
1. Align the 2280 M.2 SSD with slots and insert it.
2. Gently push the 2280 M.2 SSD downward onto the standoff,
then use one of the included thumb screws to secure it.

36
TPM
4

37
About TPM
This system defaults to supporting the fTPM option: Firmware
TPM (fTPM).
Notes:
fTPM is supported by default, but it may not be activated.
You can check if your system supports fTPM using the
following methods:
Use Windows Security App:
a. Click Start > Settings > Update & Security > Windows
Security > Device Security.
b. Verify if there is a Security Processor menu on the screen. If
the Security Processor menu is absent, it means the system
does not have TPM or the TPM function is disabled.
Use Microsoft Management Console:
a. Click Start > Run or press Windows Key +R.
b. Enter tpm.msc and click OK.
c. If you see a message indicating that TPM is available, it
means TPM is enabled and functional. If you see the
message Compatible TPM cannot be found, it means the
system does not have TPM or the TPM function is disabled.

38
Appendix

39
Security Notes
Before you start using this product, please thoroughly read the following
operational precautions to avoid potential system damage or personal
injury due to human error.
Operational Precautions
Before using this product, please carefully read the relevant
information provided in this manual.
Dust, moisture, and extreme temperature changes can affect the
lifespan of this product, so avoid placing it in such environments.
Do not place the product on uneven or unstable surfaces. Please use this
product with a special footstand.
When using this product, be sure to maintain adequate clearance around
it for proper ventilation to facilitate heat dissipation. Avoid letting
small items like paper shreds, screws, or wire ends come near the
connectors, slots, or openings, to prevent short circuits or poor
connections. Do not insert any objects into the product's internal
components to avoid short circuits or damage to the circuits.
This product should only be used in environments with temperatures
between 0°C and 35°C.
Please use the correct power adapter according to the product’s power
rating label. Using an incorrect power adapter may damage internal
components.
When installing or operating this product, please maintain a distance of
at least 20cm between the heatsink and your body.
Usage Precautions
Before use, please check that all components are functioning properly
and that the power cable is not damaged or improperly connected.
Keep the product in a dry environment. Rain, moisture, and liquids
containing minerals can corrode the electronic circuits.
To avoid potential electric shock damage, always unplug all power
cables from the power socket before cleaning or moving the product.

40
If you encounter any of the following issues, or any technical problems
while using the product, please contact your authorized distributor.
-Damaged power cable or charger.
-The computer or accessories have been exposed to water.
-The computer does not operate normally despite following the
instructions.
-The computer has been dropped or the chassis is damaged.
-The computer’s performance is abnormal.
Replacing the battery incorrectly could cause an explosion. Please follow
the manufacturer’s instructions and use the same type or model of battery.
Also, dispose of used batteries according to the manufacturer's
instructions.
Do not disassemble or repair the product
yourself. Any unauthorized disassembly will
void the warranty.
WEEE Mark: The crossed-out bin symbol indicates that this
product (electrical/electronic equipment) should not be disposed of
as regular waste. Please dispose of it in accordance with local
regulations for electronic waste disposal.
Do Not Disassemble or
Reassemble Yourself Warning
Lithium Battery Safety Warning