
INSTRUCTION MANUAL
MANUAL DE INSTRUCCIONES
Cordless Vacuum Sweeper
Barredora Aspiradora Inalámbrica
GSV01
CAUTION: Read the instructions before using the machine.
PRECAUCIÓN: Lea las instrucciones antes de usar la máquina.
2 ENGLISH
ENGLISH (Original instructions)
WARNING
• This appliance is not intended for use by persons (including children) with reduced physical, sensory or mental
capabilities, or lack of experience and knowledge.
• Children should be supervised to ensure that they do not play with the appliance.
• CAUTION: Before carrying out any maintenance operation, disconnect the appliance from the power supply.
Perform maintenance on the appliance periodically.
• Rechargeable batteries must be removed from the device before charging.
• Toremoveorinstallthebattery,rstopenthebatterycoverthenslidethecartridgeoutofthetoolwhilepress-
ing the button on the front of the cartridge.
• Exhausted batteries must be removed from the device and disposed of safely. Follow local regulations regard-
ing battery disposal.
• If the device is to be stored unused for a long period, the batteries should be removed.
• The power terminals must not be short-circuited.
INTRODUCTION
Specications
Model: GSV01
Waste container capacity 15.6 L (4.1 gal.)
Cleaning capability *1 Side brush not used 1,920 m
2
/h (20,670 ft
2
/h)
Side brush used 2,600 m
2
/h (28,000 ft
2
/h)
Cleaning width Side brush not used 480mm(18-7/8″)
Side brush used 650mm(25-1/2″)
Rated voltage D.C. 36 V - 40 V max
Dimensions
(L x W x H)
Handle vertical 830mmx677mmx1,146mm(32-3/4″x26-3/4″x45″)
Handle folded 830mmx677mmx467mm(32-3/4″x26-3/4″x18-3/8″)
Allowable overall weight (GVW) max. 44.0 kg (97.0 lbs)
Net weight (transportation weight) (with BL4025 x1) 29.9 kg (65.9 lbs)
Protection degree IPX4: Engineered to provide increased water resistance in harsh
job site conditions
*1 Assuming a walking speed of 4 km/h.
• Duetoourcontinuingprogramofresearchanddevelopment,thespecicationshereinaresubjecttochange
without notice.
• Specicationsandbatterycartridgemaydierfromcountrytocountry.
Applicable battery cartridge and charger
Battery cartridge BL4020 / BL4025 / BL4040 / BL4040F / BL4050F / BL4080F
Charger DC40RA / DC40RB / DC40RC / DC40WA
• Some of the battery cartridges and chargers listed above may not be available depending on your region of
residence.
WARNING: Only use the battery cartridges and chargers listed above. Use of any other battery cartridges
andchargersmaycauseinjuryand/orre.
Recommended cord connected power source
Portable power pack PDC01 / PDC1200 / PDC1500
• The cord connected power source(s) listed above may not be available depending on your region of residence.
• Before using the cord connected power source, read instruction and cautionary markings on them.

3 ENGLISH
Intended use
The appliance is intended for collecting dry debris. The
appliance is suitable for commercial use, for example in
hotels,schools,hospitals,factories,shops,ocesand
rental businesses.
Safety precautions
Cordless vacuum sweeper safety
warnings
1. Operators shall be adequately instructed on
the use of the vacuum sweeper.
2. This vacuum sweeper is for dry use only.
3. When not in use, always store the vacuum
sweeper indoors.
4. Do not use for cleaning purposes on surfaces
having a gradient exceeding that marked on
the appliance.
5. Do not let children play with rechargeable
appliance.
6. When store the appliance, place the appliance
on a at and stable surface. Store the appli-
ance out of the reach of children.
7. Always place the appliance on a at surface
when the appliance will be stood on its end.
8. Keep the work location neat and tidy. Also,
make sure it is well lit and always kept clean.
Failure to do so may cause accidents.
9. Wear appropriate work attire.
10. Do not use battery adapter.
11. Do not touch the battery area with wet hands.
Otherwise, electric shock may result.
12. Do not use the lter in a wet. Motor burnout or a
breakdown may result.
13. Do not use the appliance when it is raining
or when the road surface is wet. Also, do not
pick up refuse containing liquid or foam. Motor
burnout or a breakdown may result.
14. Do not collect string-like refuse such as cord,
string, or wire. These refuse may get entan-
gled in the brushes. Remove the refuse before
cleaning operation. Otherwise a breakdown may
result.
15. Do not disconnect the earthing line.
16. Do not attempt to clean the exterior or interior
with benzine, thinner or cleaning chemicals.
Cracks and discoloration may be caused.
17. Wear appropriate protective equipment such
as goggles and a dust mask when cleaning
dusty location, performing maintenance or
disposing of refuse.
18. Mount lters properly. Using the appliance with
nolterattached,attachedinthewrongposition,
or in a damaged state could cause motor burnout
or a breakdown.
19. Do not disassemble the appliance. Doing so
may cause a breakdown.
20. If you notice anything that seems abnormal,
halt the appliance and remove the batteries
immediately.
21. Before using the appliance, check to make
sure there are no damaged parts and that each
part is operating correctly. If there is a damaged
part, have it replaced or repaired, as appropriate,
byanauthorizeddealerunlessspecicallyindi-
cated otherwise in the instruction manual.
22. There is a risk of being squeezed, caught or
injured by the drive belt, main brushes, side
brush, handle or rear wheel.
23. Do not use the appliance to collect toxic sub-
stances such as asbestos.
24. Do not use the side brush when cleaning con-
taminated or dusty location.
25. Do not use the appliance in a location where
hazardous materials or open ame are pres-
ent. Doingsomaycauseareorexplosion.
26. Do not use the appliance in an explosive and
ammable location.
27.
Do not let familiarity gained from frequent use
of tools allow you to become complacent and
ignore tool safety principles. A careless action can
cause severe injury within a fraction of a second.
28. Never service damaged battery packs. Service
of battery packs should only be performed by the
manufacturer or authorized service providers.
Battery tool use and care
1. Prevent unintentional starting. Ensure the
switch is in the o-position before connecting
to battery pack, picking up or carrying the
appliance.Carryingtheappliancewithyournger
on the switch or energizing appliance that have
the switch on invites accidents.
2. Disconnect the battery pack from the appli-
ance before making any adjustments, chang-
ing accessories, or storing appliance. Such
preventive safety measures reduce the risk of
starting the appliance accidentally.
3. Recharge only with the charger specied by
the manufacturer. A charger that is suitable for
onetypeofbatterypackmaycreateariskofre
when used with another battery pack.
4. Use appliances only with specically desig-
nated battery packs. Use of any other battery
packsmaycreateariskofinjuryandre.
5. When battery pack is not in use, keep it away
from other metal objects, like paper clips,
coins, keys, nails, screws or other small metal
objects, that can make a connection from one
terminal to another. Shorting the battery termi-
nalstogethermaycauseburnsorare.
6. Under abusive conditions, liquid may be
ejected from the battery; avoid contact. If con-
tact accidentally occurs, ush with water. If
liquid contacts eyes, additionally seek medical
help. Liquid ejected from the battery may cause
irritation or burns.
7. Do not use a battery pack or product that is
damaged or has been modied. Doing so may
cause unexpected operation, re, explosion,
or injury.
8. Do not expose a battery pack or appliance to
re or excessive temperature. Exposure to
re or temperature above 130 °C may cause
explosion.
4 ENGLISH
9. Follow all charging instructions and do not
charge the battery pack or appliance outside
of the temperature range specied in the
instructions. Charging improperly or at tempera-
turesoutsideofthespeciedrangemaydamage
thebatteryandincreasetheriskofre.
10. Have servicing performed by a qualied repair
person using only identical replacement parts.
This will ensure that the safety of the product is
maintained.
11. Do not modify or attempt to repair the appli-
ance or the battery pack except as indicated in
the instructions for use and care.
Symbols
The followings show the symbols used for tool.
volts
direct current
IPX4
Engineered to provide increased water
resistance in harsh job site conditions
Important safety instructions for
battery cartridge
1.
Before using battery cartridge, read all instruc-
tions and cautionary markings on (1) battery
charger, (2) battery, and (3) product using battery.
2. Do not disassemble or tamper with the battery
cartridge.Itmayresultinare,excessiveheat,
or explosion.
3. If operating time has become excessively
shorter, stop operating immediately. It may
result in a risk of overheating, possible burns
and even an explosion.
4. If electrolyte gets into your eyes, rinse them
out with clear water and seek medical atten-
tion right away. It may result in loss of your
eyesight.
5. Do not short the battery cartridge:
(1) Do not touch the terminals with any con-
ductive material.
(2) Avoid storing battery cartridge in a con-
tainer with other metal objects such as
nails, coins, etc.
(3) Do not expose battery cartridge to water
or rain.
A battery short can cause a large current
ow, overheating, possible burns and even a
breakdown.
6. Do not store and use the tool and battery car-
tridge in locations where the temperature may
reach or exceed 50 °C (122 °F).
7. Do not incinerate the battery cartridge even if
it is severely damaged or is completely worn
out. The battery cartridge can explode in a re.
8. Do not nail, cut, crush, throw, drop the battery
cartridge, or hit against a hard object to the
battery cartridge. Such conduct may result in a
re,excessiveheat,orexplosion.
9. Do not use a damaged battery.
10.
The contained lithium-ion batteries are subject to
the Dangerous Goods Legislation requirements.
For commercial transports e.g. by third parties,
forwarding agents, special requirement on pack-
aging and labeling must be observed.
For preparation of the item being shipped, consult-
ing an expert for hazardous material is required.
Please also observe possibly more detailed
national regulations.
Tapeormaskoopencontactsandpackupthe
battery in such a manner that it cannot move
around in the packaging.
11. When disposing the battery cartridge, remove
it from the tool and dispose of it in a safe
place. Follow your local regulations relating to
disposal of battery.
12. Use the batteries only with the products
specied by Makita. Installing the batteries to
non-compliantproductsmayresultinare,exces-
sive heat, explosion, or leak of electrolyte.
13. If the tool is not used for a long period of time,
the battery must be removed from the tool.
14. During and after use, the battery cartridge may
take on heat which can cause burns or low
temperature burns. Pay attention to the han-
dling of hot battery cartridges.
15. Do not touch the terminal of the tool imme-
diately after use as it may get hot enough to
cause burns.
16. Do not allow chips, dust, or soil stuck into the
terminals, holes, and grooves of the battery
cartridge.Itmaycauseheating,catchingre,
burst and malfunction of the tool or battery car-
tridge, resulting in burns or personal injury.
17. Unless the tool supports the use near
high-voltage electrical power lines, do not use
the battery cartridge near high-voltage electri-
cal power lines. It may result in a malfunction or
breakdown of the tool or battery cartridge.
18. Keep the battery away from children.
SAVE THESE INSTRUCTIONS.
CAUTION: Only use genuine Makita batteries.
Use of non-genuine Makita batteries, or batteries that
have been altered, may result in the battery bursting
causingres,personalinjuryanddamage.Itwill
also void the Makita warranty for the Makita tool and
charger.
Tips for maintaining maximum
battery life
1. Charge the battery cartridge before completely
discharged. Always stop tool operation and
charge the battery cartridge when you notice
less tool power.
2.
Never recharge a fully charged battery cartridge.
Overcharging shortens the battery service life.
3.
Charge the battery cartridge with room tempera-
ture at 10 °C - 40 °C (50 °F - 104 °F). Let a hot
battery cartridge cool down before charging it.
4. When not using the battery cartridge, remove
it from the tool or the charger.
5. Charge the battery cartridge if you do not use
it for a long period (more than six months).
5 ENGLISH
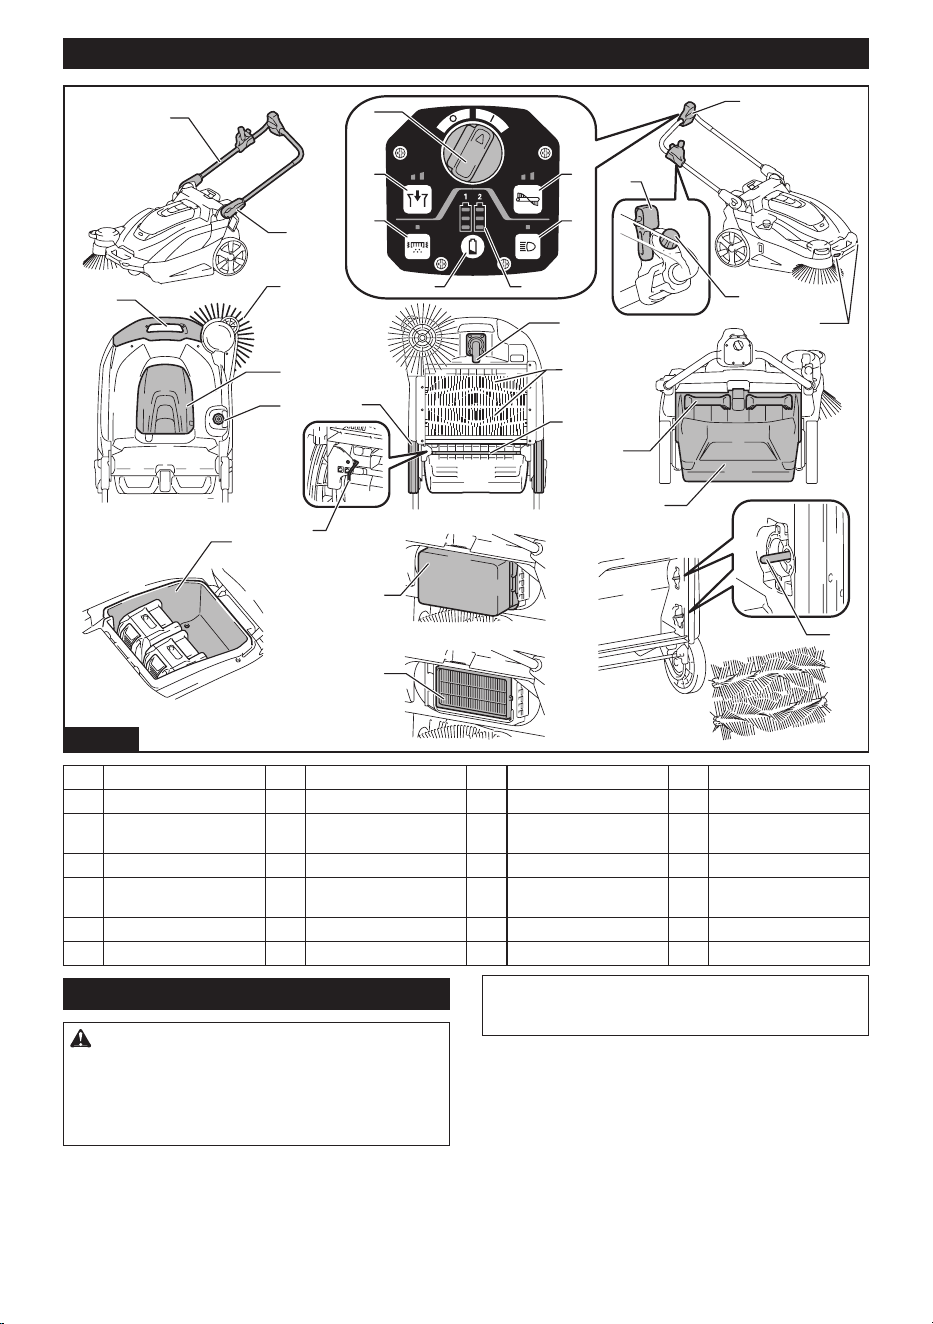
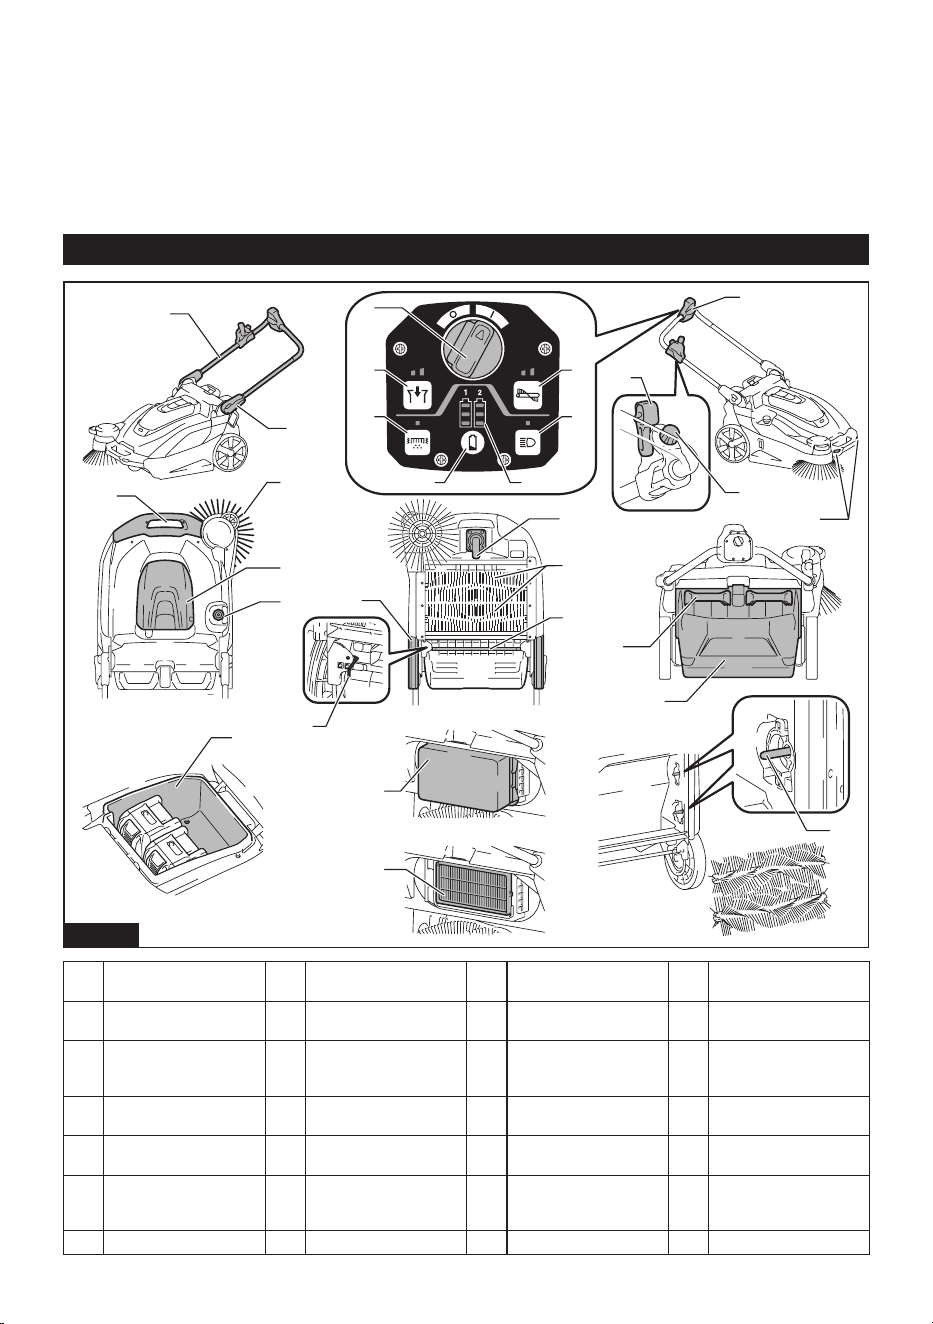
Names of parts
1
3
2
4
5
910
8
7
11
12
13
14
15
16
17
18
21
20
19
22
23
6
24
25
26
27
28
Fig.1
1 Handle 2 Handle lock lever 3 Control panel 4 ON/OFF switch
5 Suction button 6 Filter shake button 7 Main brush button 8 Lamp button
9 Check button 10 Indicator lamps 11 Side brush ON/OFF
lever
12 Side brush height adjust-
ing knob
13 Lamp 14 Grip 15 Side brush 16 Battery box cover
17 Main brush height
adjusting knob
18 Rear wheel 19 Front wheel 20 Main brushes
21 Waste container shaft 22
Grip (waste container part)
23 Waste container 24 Battery box
25 Prelter 26 HEPAlter 27 Brush shaft 28 Earthing line
Introduction of separately sold items
CAUTION: These accessories or attachments
are recommended for use with your Makita tool
specied in this manual. The use of any other
accessories or attachments might present a risk of
injury to persons. Only use accessory or attachment
for its stated purpose.
For details of separately sold items, refer to the catalog
orcontactthedealeroroursalesoce.
• Multifunction adapter
• Dust bag
• Makita genuine battery and charger
NOTE: Some items in the list may be included in the
tool package as standard accessories. They may
dierfromcountrytocountry.
6 ENGLISH
PREPARATIONS
FOR USE
Assembly
CAUTION: Before operating the appliance,
make sure the ON/OFF switch is turned o and
the batteries have been removed.
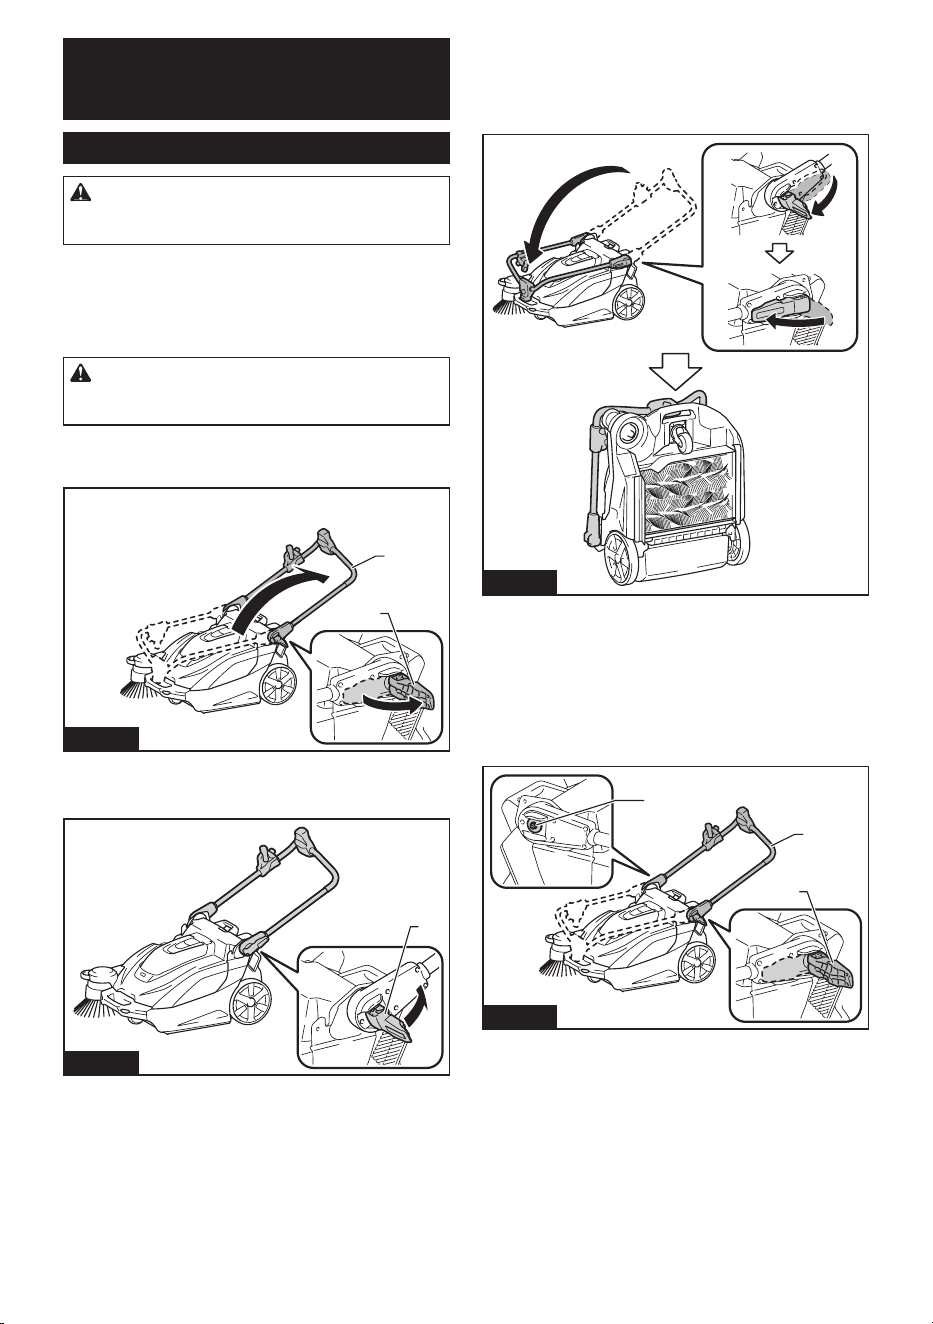
Handle angle adjustment
You can adjust the angle of the handle to make it easier
to operate the appliance. At the factory shipment, the
handle is folded down.
CAUTION: Properly engage the handle lock
lever. If the handle collapses or falls over, there is a
danger of injury.
1. Release the lock of the handle lock lever.
2. Adjust the handle to the desired angle.
1
2
Fig.2
►1. Handle lock lever 2. Handle
3. Engage the handle lock lever.
1
Fig.3
►1. Handle lock lever
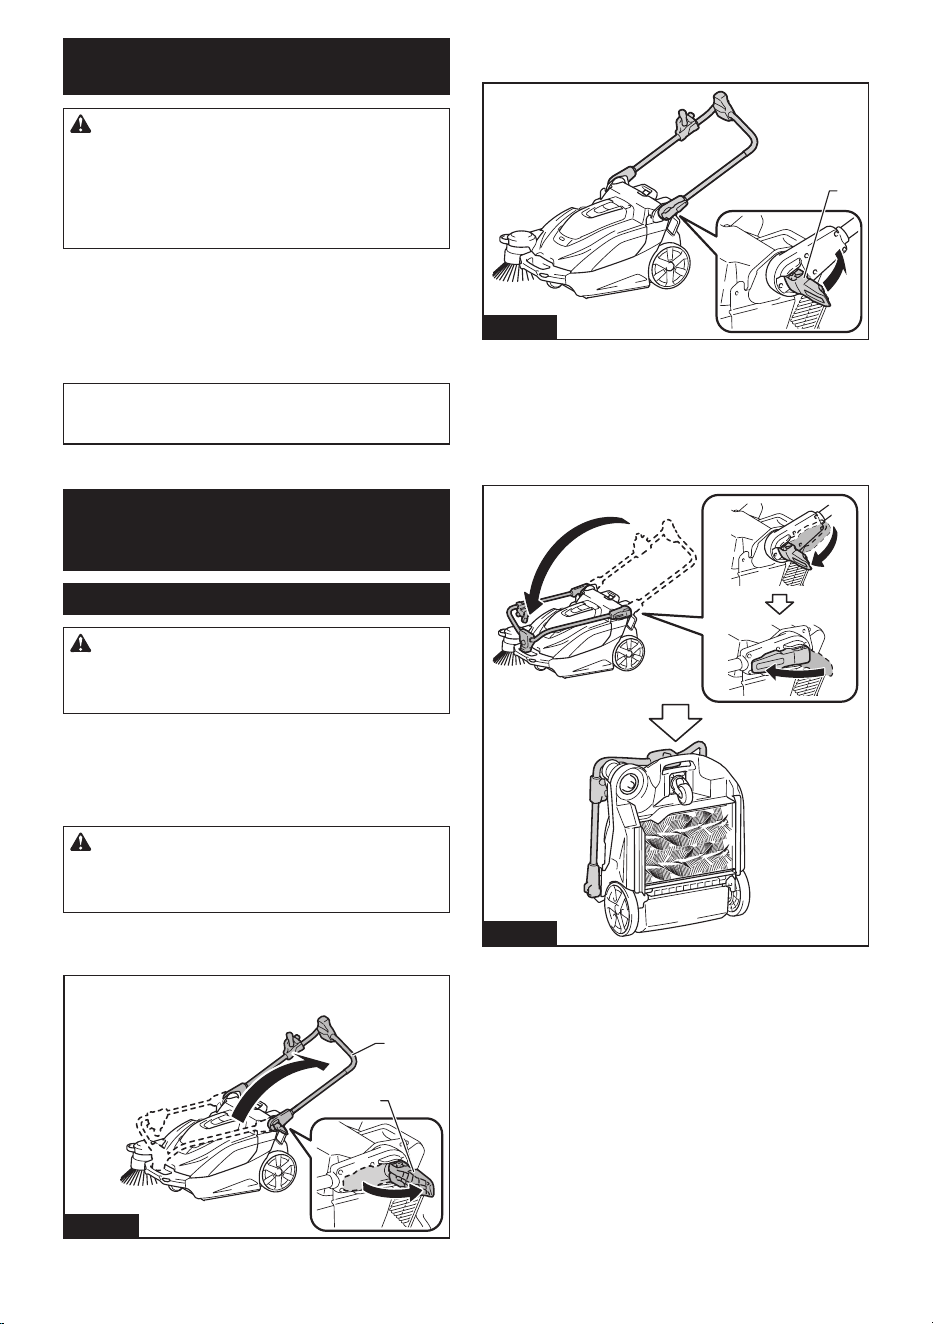
Folding down the handle
When you stand the appliance on its end for storage/
inspection or when you transport the appliance by lifting
the appliance, fold down the handle.
Fig.4
If the handle is loose and rattles
If the handle is loose and rattles even though the handle
lock lever is properly locked, adjust it by tightening the
nut opposite the handle lock lever. If the appliance is
used when the handle is loose and rattles, there is a
danger of collapse or fall over of the handle, possibly
causing injury.
1
2
3
Fig.5
►1. Handle lock lever 2. Handle 3. Tightening nut (for
adjusting looseness)
7 ENGLISH
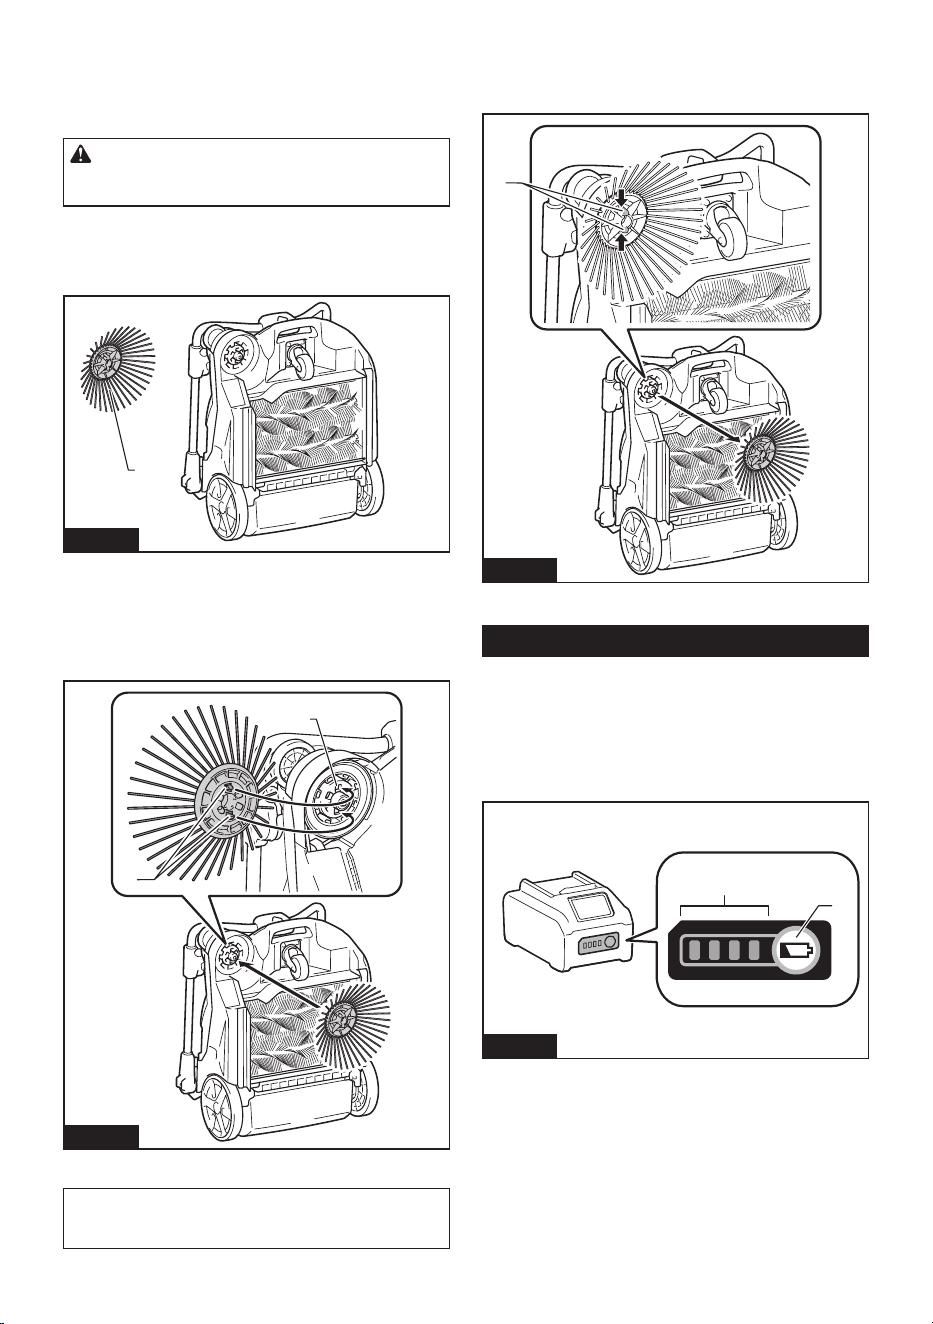
Attaching and removing the side
brush
The side brush can be used to extend the cleaning
width and also used to clean the areas along walls.
CAUTION: Attach the side brush correctly. If
the brush comes loose, it may contact with persons,
possibly causing injury.
Attachment
1. Extend the side brush and stand the appliance on
itsendasshowninthegure.
1
Fig.6
►1. Side brush
2. Align the hooks (2 locations) of the side brush with
the mounting holes and attach the side brush.
The hooks (2 locations) of the side brush can be aligned
with any of the 6 holes.
1
2
Fig.7
►1. Hooks (2 locations) 2. Holes (6 locations)
NOTE: To make it easier to engage the hooks and
holes, rotate the side brush counterclockwise while
the side brush lever is lowered.
Removal
While pinching inward on the grips of the hooks, remove
the side brush.
1
Fig.8
►1. Grips of hooks
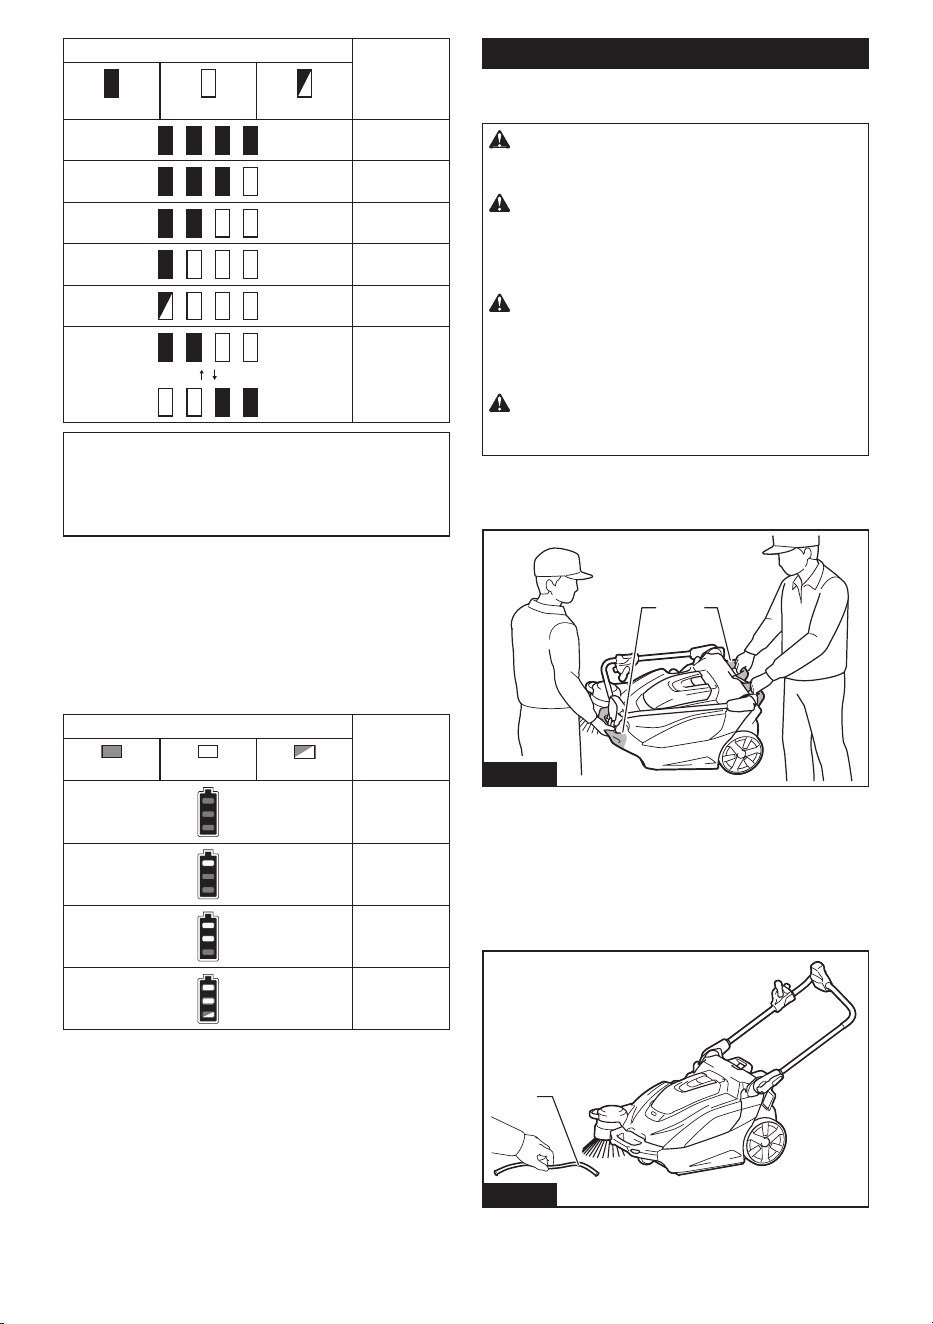
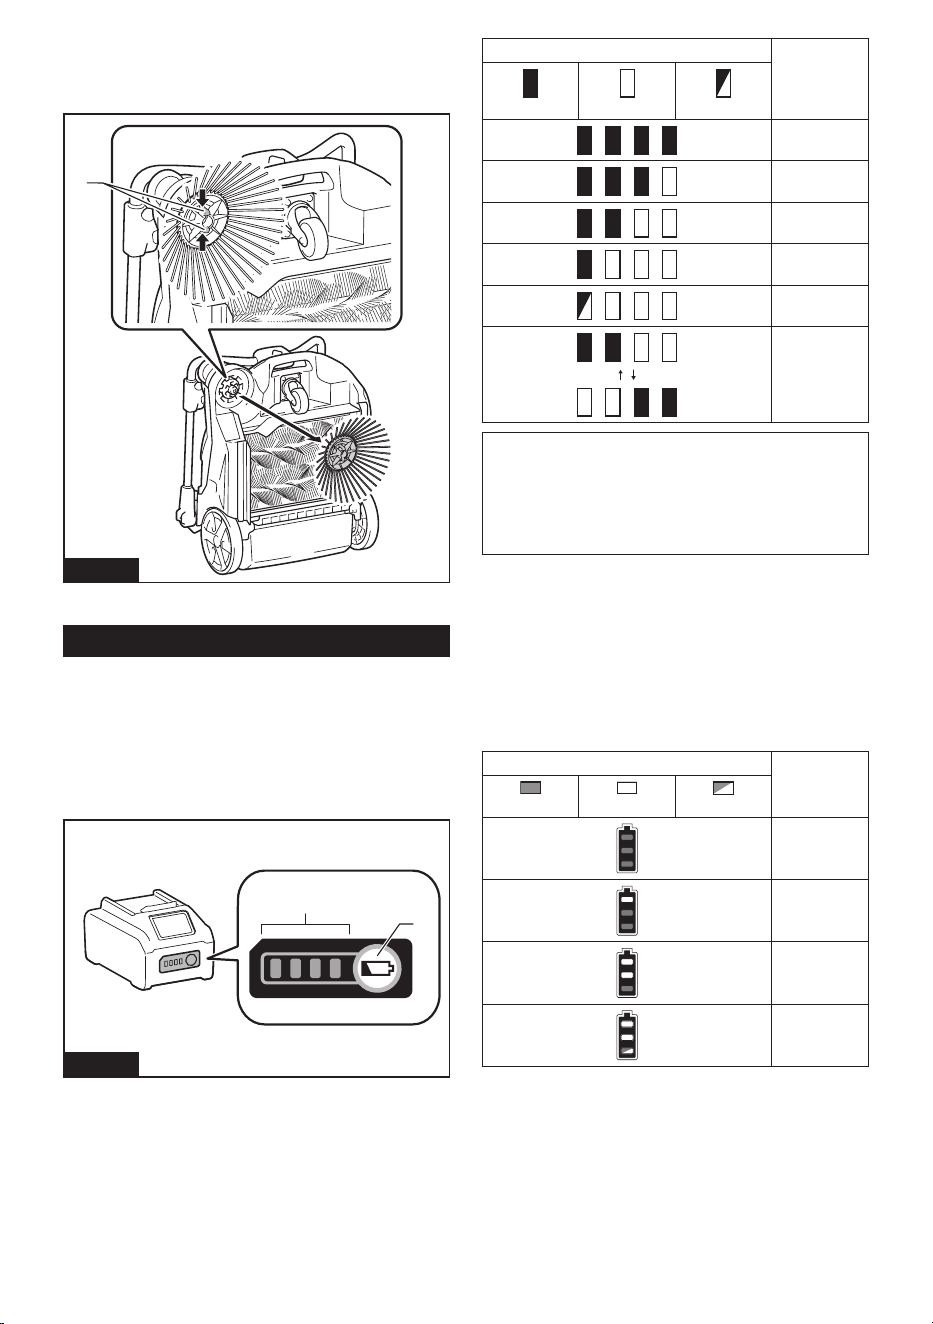
Charging the batteries
Indicating the remaining battery
capacity
Press the check button on the battery cartridge to indi-
cate the remaining battery capacity. The indicator lamps
light up for a few seconds.
1
2
Fig.9
►1. Indicator lamps 2. Check button
8 ENGLISH
Indicator lamps Remaining
capacity
Lighted O Blinking
75% to 100%
50% to 75%
25% to 50%
0% to 25%
Charge the
battery.
The battery
may have
malfunctioned.
NOTE: Depending on the conditions of use and the
ambienttemperature,theindicationmaydierslightly
from the actual capacity.
NOTE:Therst(farleft)indicatorlampwillblinkwhen
the battery protection system works.
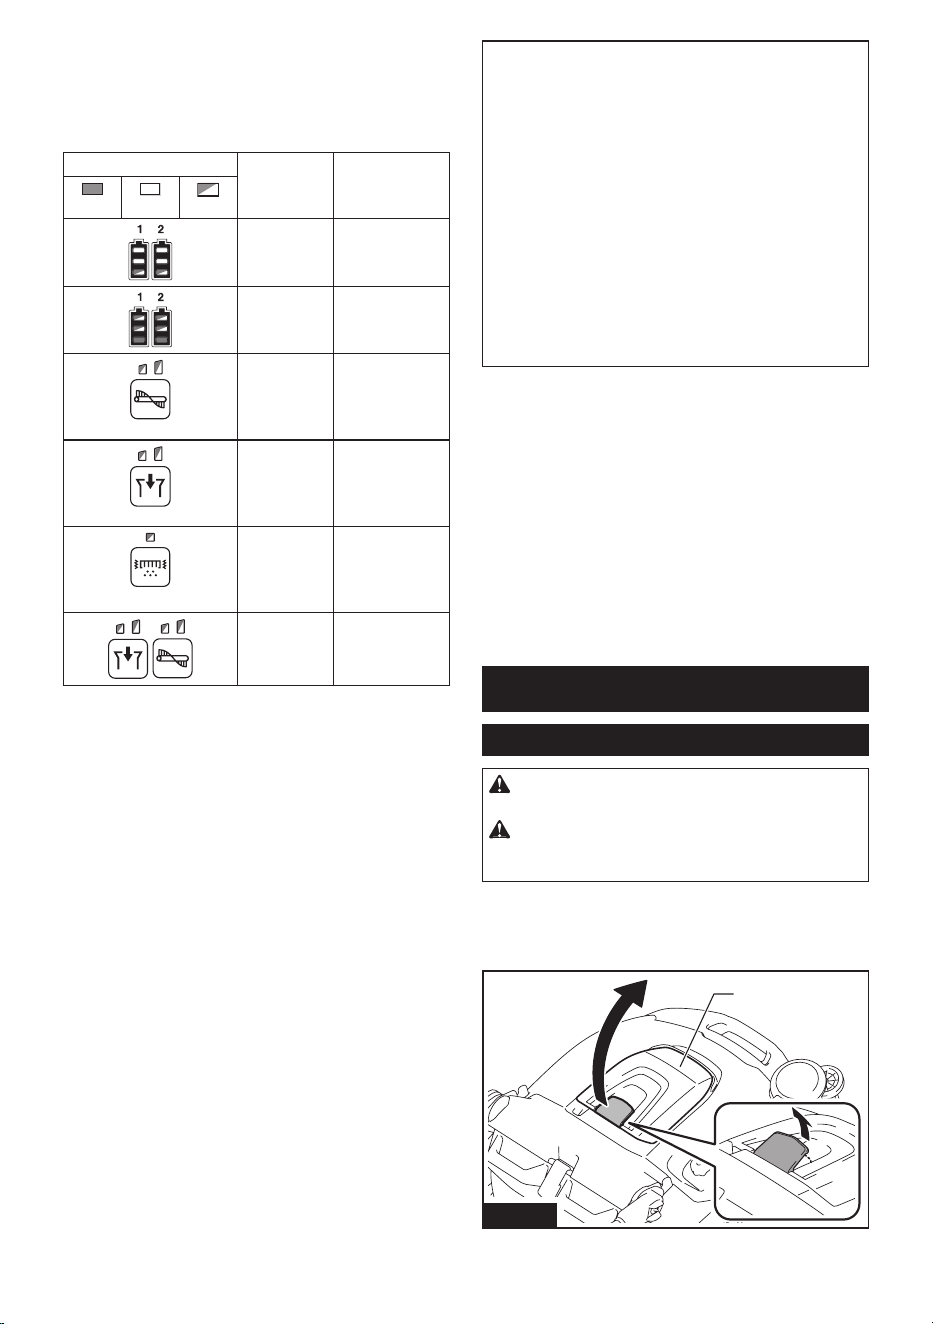
Remaining battery capacity
indication (control panel)
You can also check the remaining battery capacity on
the control panel. The remaining battery capacity is dis-
playedwhentheON/OFFswitchisturnedonoro,or
when the check button is pressed. The battery indicator
lamps light up for 3 seconds.
Indicator lamps Remaining
battery
capacity
On
O
Blinking
50% to 100%
20% to 50%
0% to 20%
Charge the
battery
Things to know before use
Transporting the appliance
CAUTION: Before transporting the appliance,
make sure the ON/OFF switch is turned o and
the batteries have been removed.
CAUTION: Empty the waste container and
make sure that the waste container is properly
locked by the hook before lifting and transporting
the appliance. Failure to lock the hook could result
in injury.
CAUTION: Lifting and transporting the
appliance should always be performed by at
least two persons using a safe carrying posture.
Transporting the appliance in an unsafe manner could
result in injury.
CAUTION: When loading and unloading the
appliance in slope, be careful not to let the wheels
fall o.
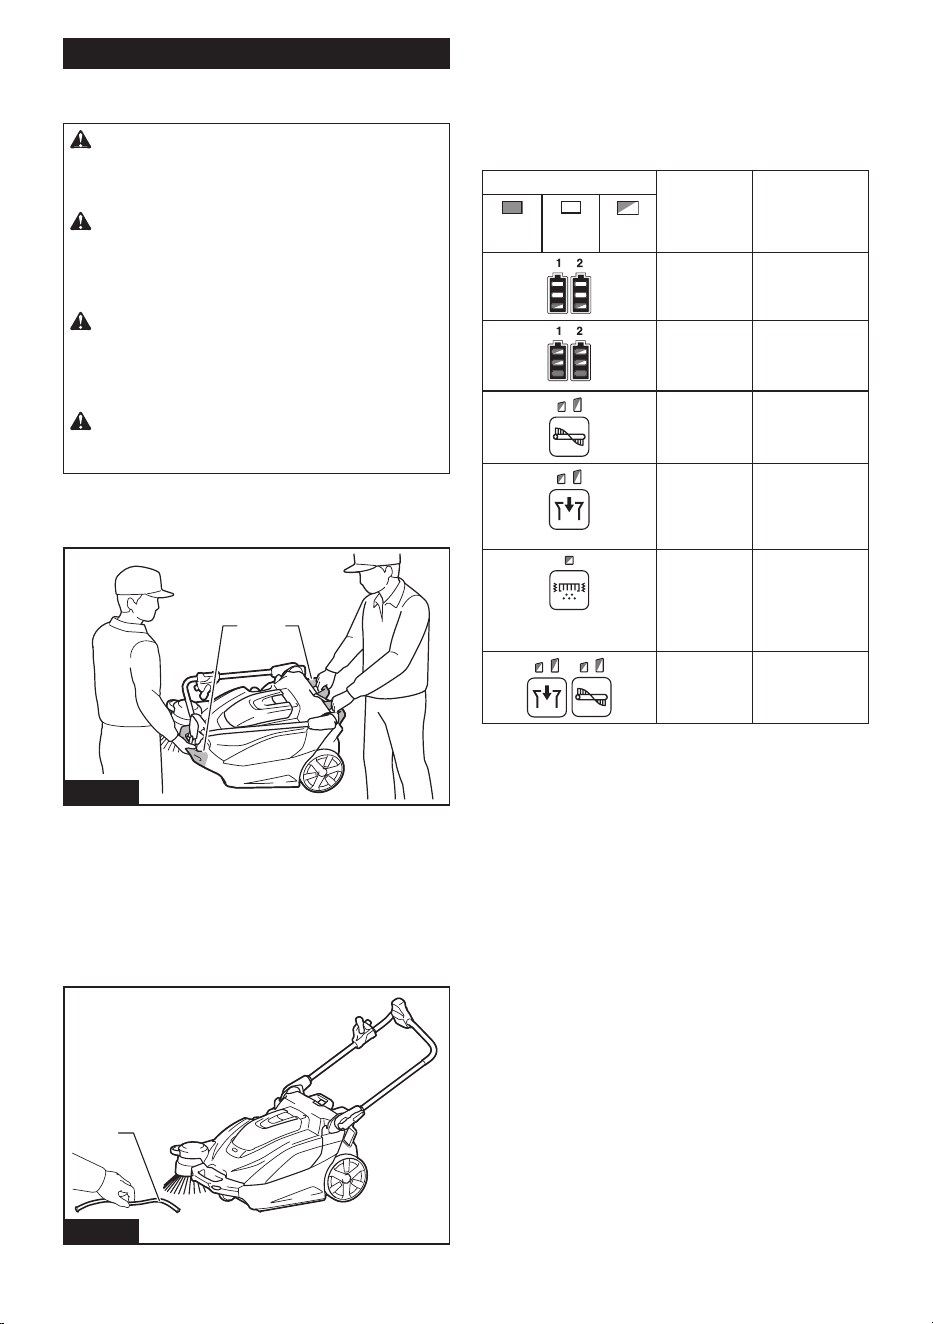
Two persons should transport the appliance, one
holding the grip and the other holding the grip (waste
container part).
1 2
Fig.10
►1. Grip 2. Grip (waste container part)
Work environment
If there is string-like refuse such as cords or wire in the
location to be cleaned, clear it away before proceeding.
The string-like refuse may become tangled in the main
brushes and the side brush.
1
Fig.11
►1. String-like refuse
9 ENGLISH
Protection function
This appliance is equipped with a protection function.
When one of the following conditions occurs, the protec-
tion function automatically stops all motors. The lamps
on the control panel indicates the error state.
Illumination state Error state Action
On
O
Blinking
Battery error Charge the
batteries.
Appliance
temperature
is high
Allow the appli-
ance to cool
down.
Brush
overload
Stop use of
the brush and
remove the
source of the
overload.
Suction
overload
Stop use of the
suction mode
and remove the
source of the
overload.
Filter shake
overload
Stop use of the
ltershakefunc-
tion and remove
the source of the
overload.
Restart
prevention
Switchothe
ON/OFF switch.
Restart prevention
This appliance is equipped with a restart prevention
function. If the batteries are inserted while the ON/OFF
switch is turned on, or if the appliance recovers from
low-power mode* while the ON/OFF switch is turned on,
the restart prevention function prevents an unexpected
restart.WhentheON/OFFswitchisturnedo,theerror
indication disappears. When the ON/OFF switch is
turned on afterwards, the appliance starts.
* Low-power mode: When all of the following condi-
tions apply, the appliance turns low-power mode
to save the battery capacity.
— No motors operate.
— Thefrontlampsareo.
— No button has been pressed for one minute.
Thismodecutsopowertosomeelectroniccircuits.
NOTE: To cancel an error indication other than restart
prevention,turnotheON/OFFswitchandperform
one of the following three actions.
— Turn on the ON/OFF switch.
— Press a button on the control panel.
— Perform no operation for one minute.
NOTE: Regardless of whether or not an error has
occurred,youcanturnonorothelamps.
NOTE:
If no operation is performed for one minute after an
error has occurred while the ON/OFF switch is on, all control
panelindicationsturno,buttheerrorhasnotbeencleared.
— If the lamps are on: Press any button on the
control panel to redisplay the error indication.
— Ifthelampsareo:Theapplianceisinlow-
power mode, so pressing a button on the control
panel triggers the restart prevention.
Protections against other causes
Protection system is also designed for other causes that
could damage the appliance and allows the appliance to
stop automatically. Take all the following steps to clear
the causes, when the appliance has been brought to a
temporary halt or stop in operation.
1.
Turntheapplianceo,andthenturnitonagaintorestart.
2. Charge the battery(ies) or replace it/them with
recharged battery(ies).
3. Let the appliance and battery(ies) cool down.
If no improvement can be found by restoring protection
system, then contact your local Makita Service Center.
USAGE
Mounting/removing the batteries
CAUTION:
Make sure the ON/OFF switch is
turned o before mounting or removing the batteries.
CAUTION: Be careful not to get your ngers
caught when opening and closing the battery box
cover. There is a danger of injury.
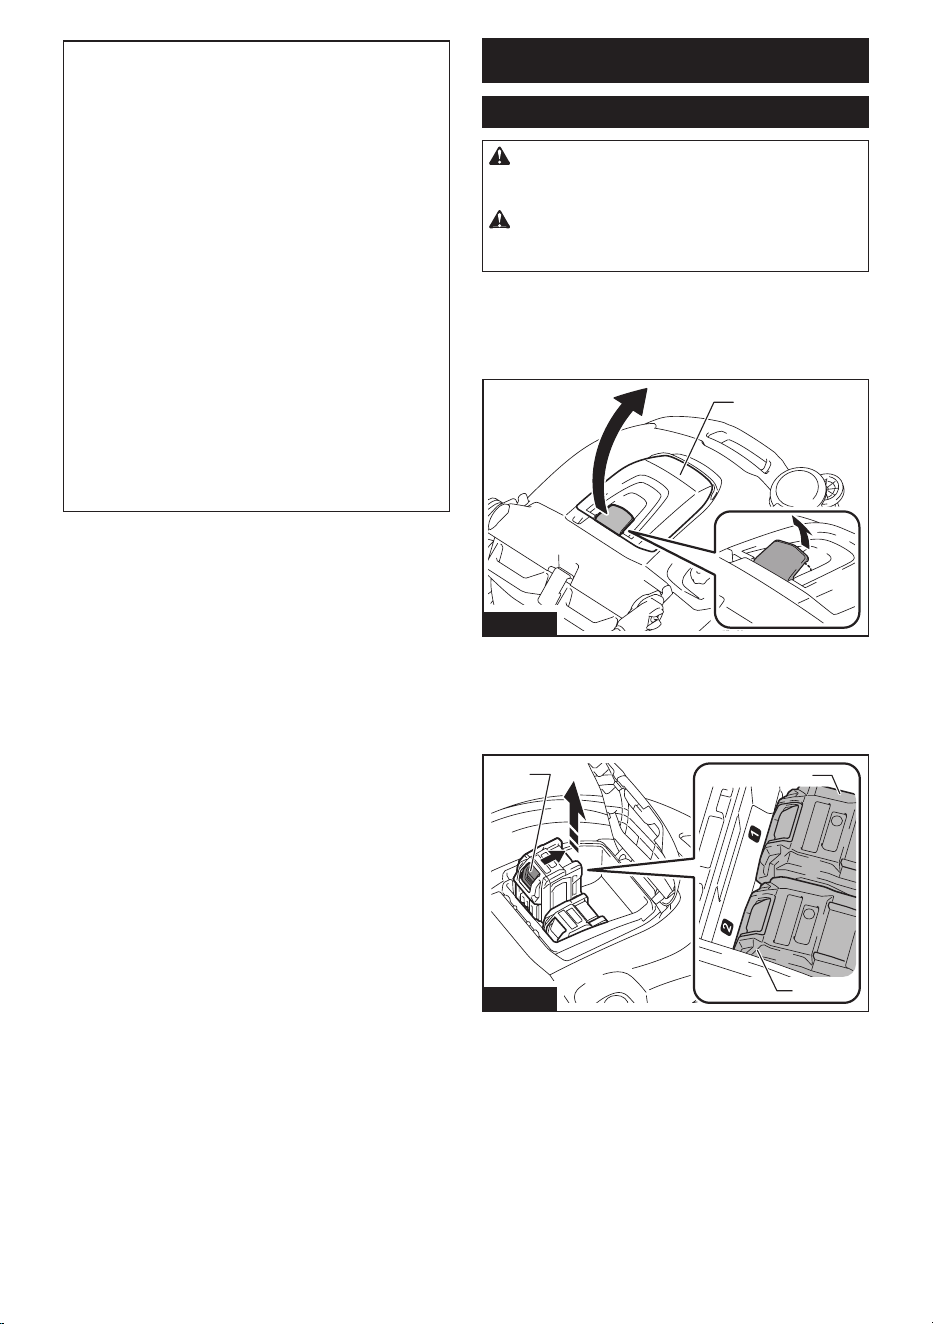
Mounting the batteries
Open the battery box cover. Align the battery with the groove,
and insert it until it clicks into place. Close the battery box cover.
1
Fig.12
►1. Battery box cover
10 ENGLISH
Removing the batteries
While holding down the button on the battery, lift the
battery out of the battery box.
2
3
1
Fig.13
►1. Button 2. Battery “1” 3. Battery “2”
The appliance will operate with either one or two batter-
ies mounted.
• Mounting two batteries
With two batteries mounted side by side, battery
“1”isusedrst.Whenbattery“1”isexhausted,
the appliance automatically switches to battery “2”
without a pause in operation.
NOTE: Even if battery “1” is mounted, when battery
“2” is being used, the appliance does not switch to
battery “1” unless battery “2” is exhausted or the ON/
OFFswitchisturnedo.
• Mounting one battery
The mounted battery is detected automatically.
Operating the appliance
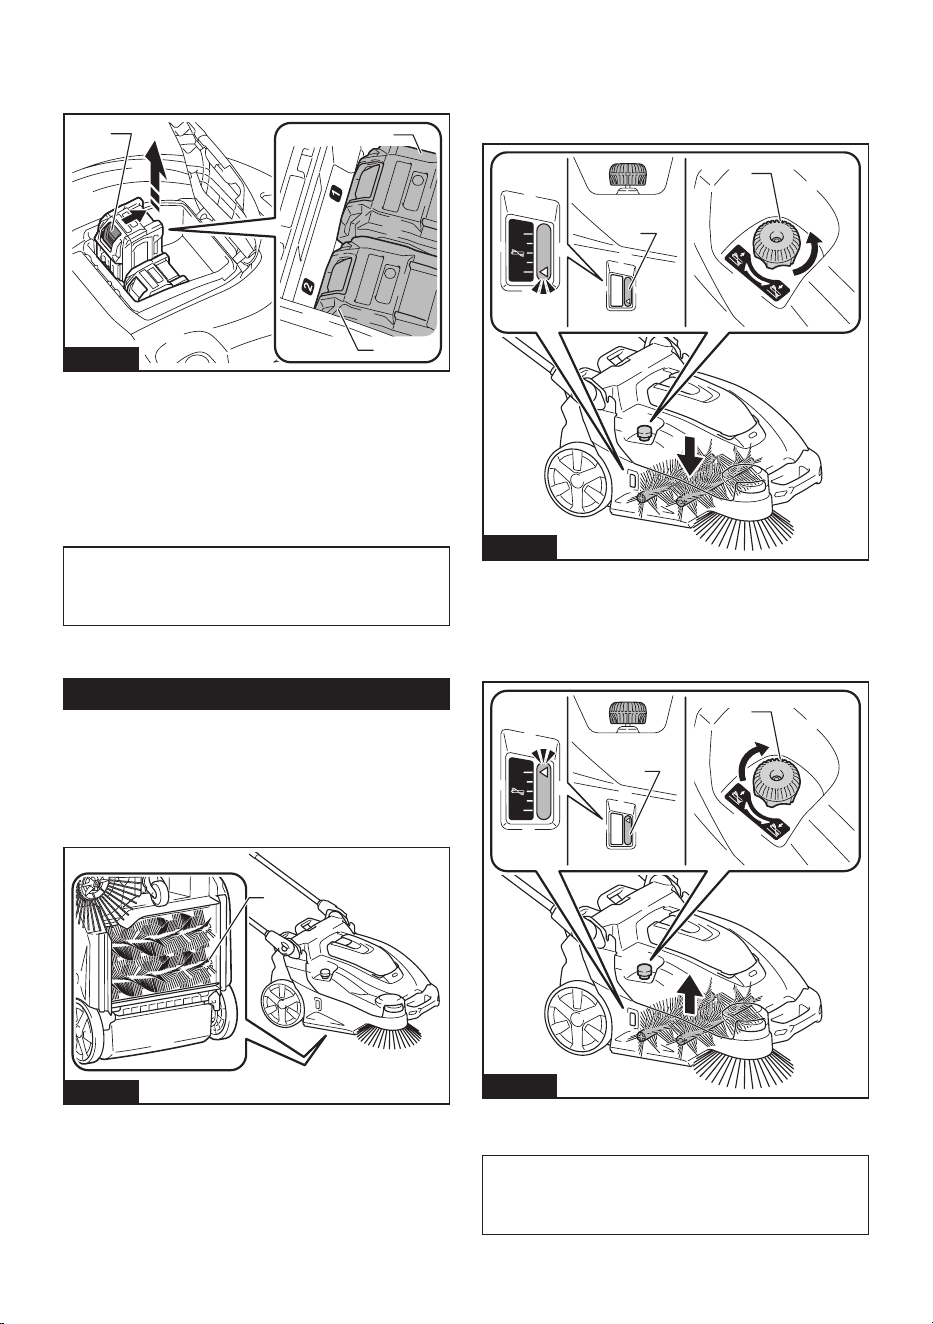
Main brush height adjustment
The height of the main brush (rear side only) at the bot-
tom of the appliance is adjustable. Adjust appropriately
dependingontheconditionoftheoortobecleaned,
the length of the main brush, etc.
1
Fig.14
►1. Main brush (rear side)
Turn the main brush height adjusting knob to adjust the
height of the main brush.
Turn the knob in the direction indicated by the arrow to
reduce the height of the main brush (to adjust towards
morecontactwiththeoor).
1
2
Fig.15
►1. Main brush height adjusting knob 2. Main brush
height
Turn the knob in the direction indicated by the arrow to
increase the height of the main brush (to adjust towards
lesscontactwiththeoor).
1
2
Fig.16
►1. Main brush height adjusting knob 2. Main brush
height
NOTE: The main brushes become worn down. Check
and adjust the height of the main brushes regularly.
Ifitisnotpossibletoadjustthebrushessuciently,
replace them.
11 ENGLISH
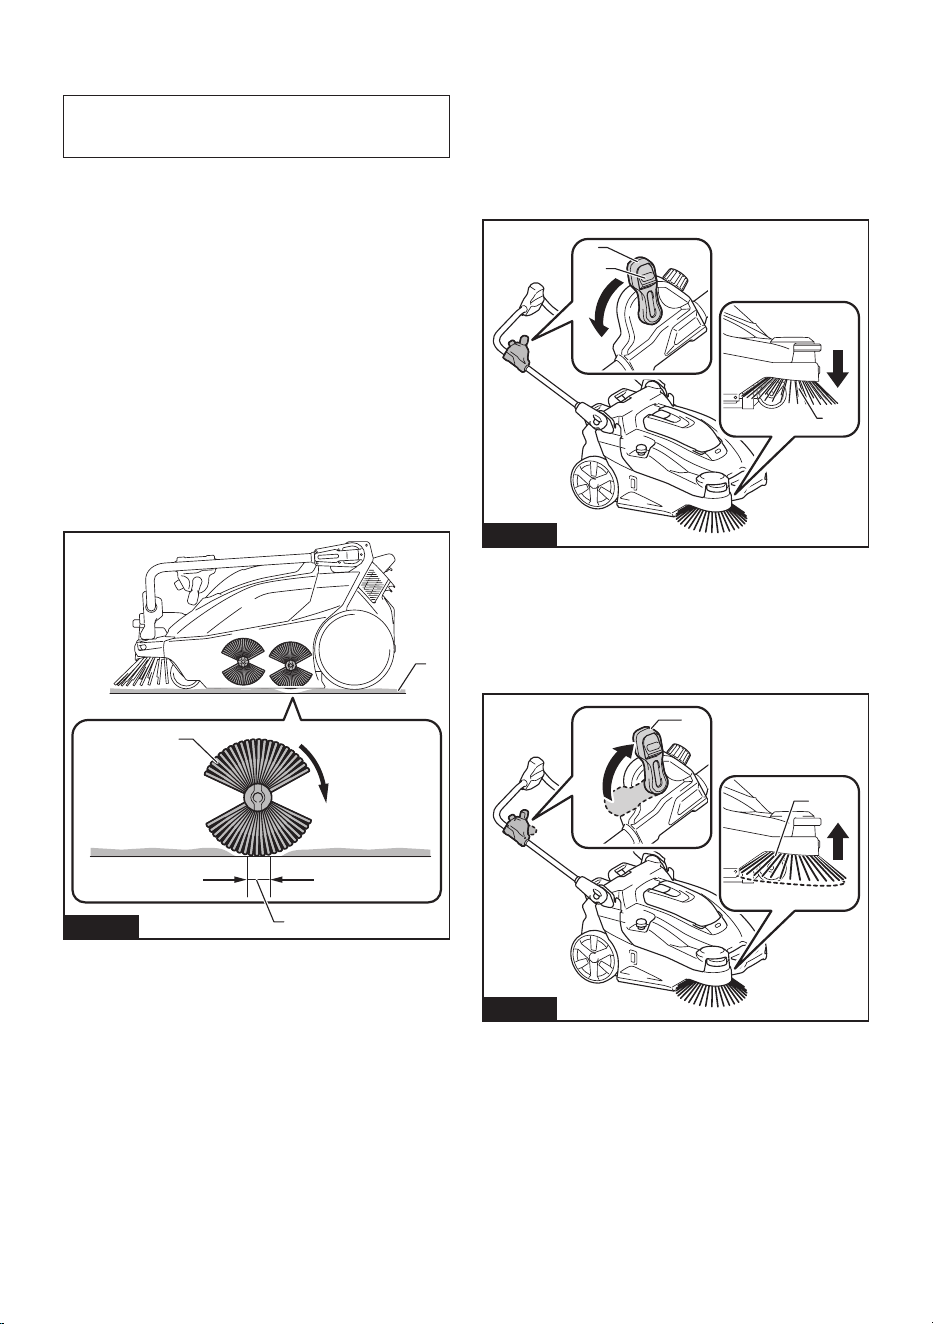
How to check the appropriate main
brush height
NOTICE: Observe the appropriate height. Too
much pressure on the main brush accelerates the
wear of the main brush and shorten run-time.
A main brush track width indicates the appropriate
height of the main brush.
1. Raise up the front of the appliance by holding
thegriporhandle.Movetheappliancetoaatsurface
covered with the following materials, and then gently
lower the appliance onto the surface.
• Layer of dust
• Layer of chalk
2. Turn on the ON/OFF switch and rotate the main
brushes approx. 15 - 30 seconds.
3. TurnotheON/OFFswitch.Raisethefrontofthe
appliance to prevent the main brush from contacting the
surface and move the appliance to another area.
Check that the main brush track is evenly rectangular,
25 - 40 mm (1" - 1-9/16") wide.
Readjust the height by using the main brush height
adjusting knob if the track shape is inappropriate.
1
3
2
Fig.17
►1. Layer of dust or chalk 2. Main brush (rear side)
3. Track
Turning the side brush on or o
The side brush can be used to extend the cleaning
width and also used to clean the areas along walls.
Tousethesidebrush,holddownthelockobuttonand
lower the side brush ON/OFF lever.
Thesidebrushisloweredtotheoorsurface.Whenthe
side brush is on, it rotates in conjunction with the main
brushes.
1
2
3
Fig.18
►1. Side brush 2.Lockobutton3. Side brush ON/
OFF lever
Raise the side brush ON/OFF lever when the side brush
is not in use.
Thesidebrushisraisedfromtheoorsurface.When
thesidebrushiso,itdoesnotrotate.
2
1
Fig.19
►1. Side brush 2. Side brush ON/OFF lever
12 ENGLISH
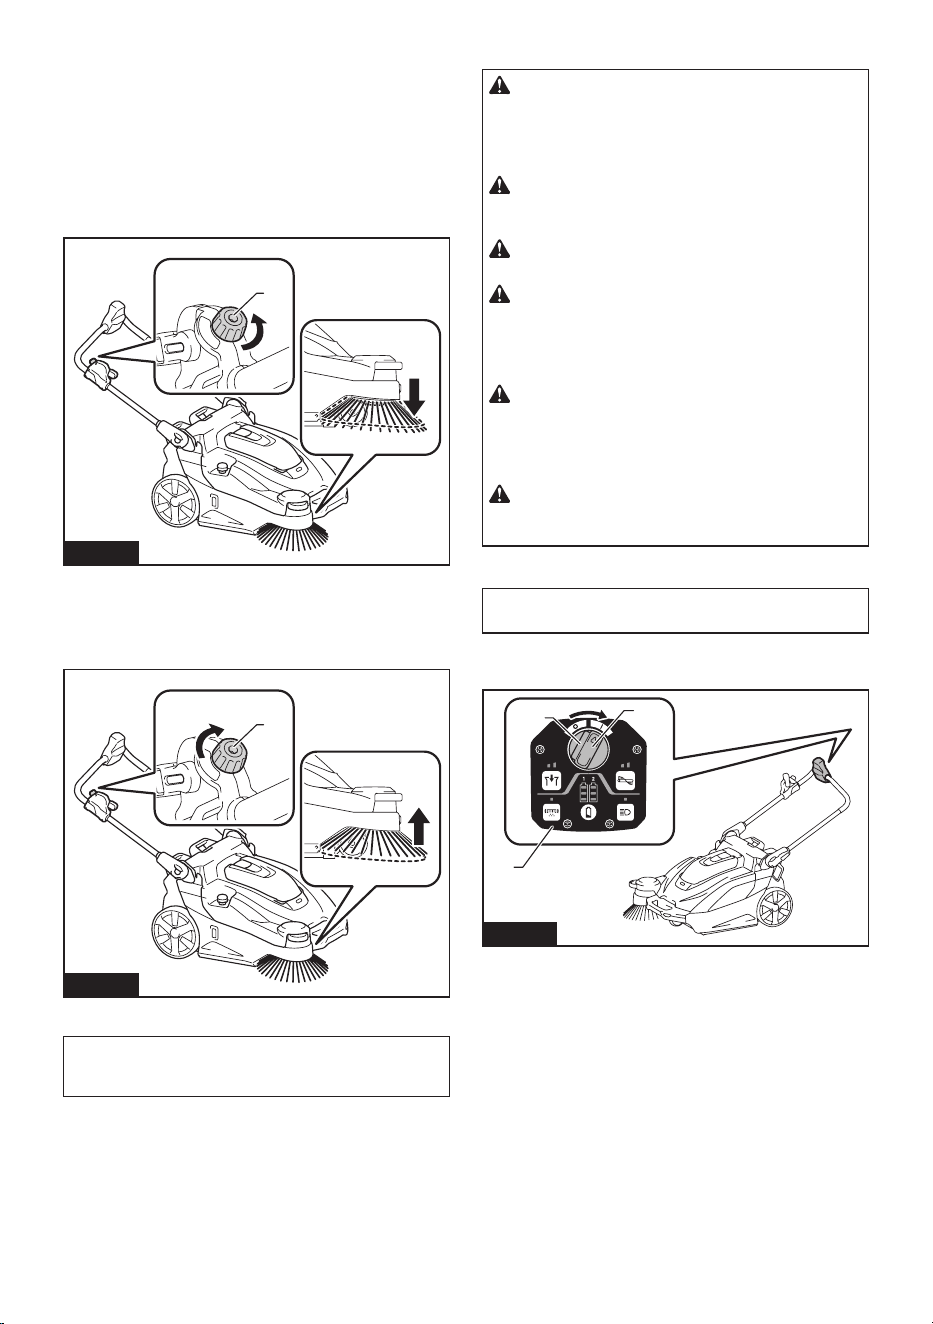
Side brush height adjustment
When the side brush is on, the height is adjustable.
Adjust appropriately depending on the condition of the
oortobecleaned,thelengthofthesidebrush,etc.
Turn the side brush height adjusting knob to adjust the
height of the side brush.
Turn the knob in the direction indicated by the arrow to
reduce the height of the side brush (to adjust towards
morecontactwiththeoor).
1
Fig.20
►1. Side brush height adjusting knob
Turn the knob in the direction indicated by the arrow to
increase the height of the side brush (to adjust towards
lesscontactwiththeoor).
1
Fig.21
►1. Side brush height adjusting knob
NOTE: The side brush becomes worn down. Check
and adjust the height of the side brush regularly. If it is
notpossibletoadjustthebrushsuciently,replaceit.
Starting cleaning
CAUTION: Hold the appliance rmly during
use. Also, do not leave the appliance unattended
regardless of whether the appliance is on a slope
or not. The appliance may move and cause an
accident.
CAUTION: Do not rotate the brushes or start
the lter shake function when the waste container
or dust bag are not attached to the appliance.
CAUTION: Do not touch rotating brushes.
There is a danger of injury.
CAUTION: Do not use the appliance to collect
items that could become tangled in the brushes,
such as cords, string, or wire. Doing so may
cause a breakdown. Clear away string-like refuse
beforehand.
CAUTION: Do not use the appliance in unsta-
ble places such as locations where the oor has
a steep slope or is very slippery. There is a danger
that operation could be unstable or the appliance
could tip over.
CAUTION: Wear protective equipment such
as a mask, glasses and gloves when cleaning in a
dusty environment.
Cleaning
NOTICE: Do not turn the ON/OFF switch forcibly
withoutpressingthelockobutton.
1. TurntheON/OFFswitchwithpressingthelocko
button to the “I” position to turn on power.
1
2
3
Fig.22
►1. ON/OFF switch 2.Lockobutton3. Control
panel
2. If necessary, change settings by pressing the
function switches on the control panel. (Refer to
“Control panel operations.”)

13 ENGLISH
3. Push the handle to start cleaning.
Fig.23
NOTE:Forhowtoturnthesidebrushonoro,refer
to “Turning the side brush on or o.”
4. TurntheON/OFFswitchwithpressingthelocko
buttontothe“O”positiontoturnopower.
1
2
Fig.24
►1. ON/OFF switch 2.Lockobutton
Control panel operations
Changing the main brush rotation speed
When power is turned on, each press of the [main brush
button] switches the brush rotation speed mode.
Button/LED
indication
Mode Function
Standard mode
The brush rotation
speed is standard.
This is optimal for
when there is a lot
of dirt.
Quiet mode
This is optimal for
when you want to
clean quietly or
when you want to
clean for a long
time.
NOTE: The rotation speed of the side brush is linked
to the rotation speed of the main brushes.
NOTE: When power is turned on, operation starts
in the mode being used when power was previously
turnedo.
Changing the suction mode
When power is turned on, each press of the [suction
button] switches the suction power mode.
Button/LED
indication
Mode Function
Standard mode
The suction power
is standard. This
is optimal for
cleaning in a dusty
environment.
Quiet mode
This is optimal
for quiet and long
cleaning.
O
This is optimal for
when suction is not
needed, as well as
quieter and longer
cleaning than quiet
mode.
NOTE: When power is turned on, operation starts
in the mode being used when power was previously
turnedo.
NOTE:Iftheltershakefunctionisturnedonwhile
the suction fan is in use, the suction fan stops tempo-
rarilyandthenrestartswhenltershakestops.
Turns the lter shake function on or o
Pressingthe[ltershakebutton]togglestheltershake
functionbetweenonando.
Button/LED
indication
Mode Function
On
Turnsonthelter
shake function.
Whenthelter
shake function is
operating, dust is
removed from the
lterautomatically
to eliminating the
clogging. It turns
oautomatically
after about 15
seconds.
O
Turnsothelter
shake function.
Turns the lamps on or o
Pressing the [lamp button] toggles the lamps between
onando.
Button/LED
indication
Mode Function
On
Turns the lamps
on.
O
Turns the lamps
o.
14 ENGLISH
1 1
Fig.25
►1. Lamp
Lamp auto-o function
Thelampsturnoautomaticallyifthefollowingtwo
conditions continue for 30 minutes.
• None of the motors (main brushes, suction, and
ltershake)isoperating.
• No button has been pressed.
Showing the remaining battery capacity
Press the [check button] to display the remaining bat-
tery capacity.
Using the waste container
1
Fig.26
►1. Waste container
• The refuse is collecting in the waste container.
• For details of the cleaning procedure, refer to
“Starting cleaning.”
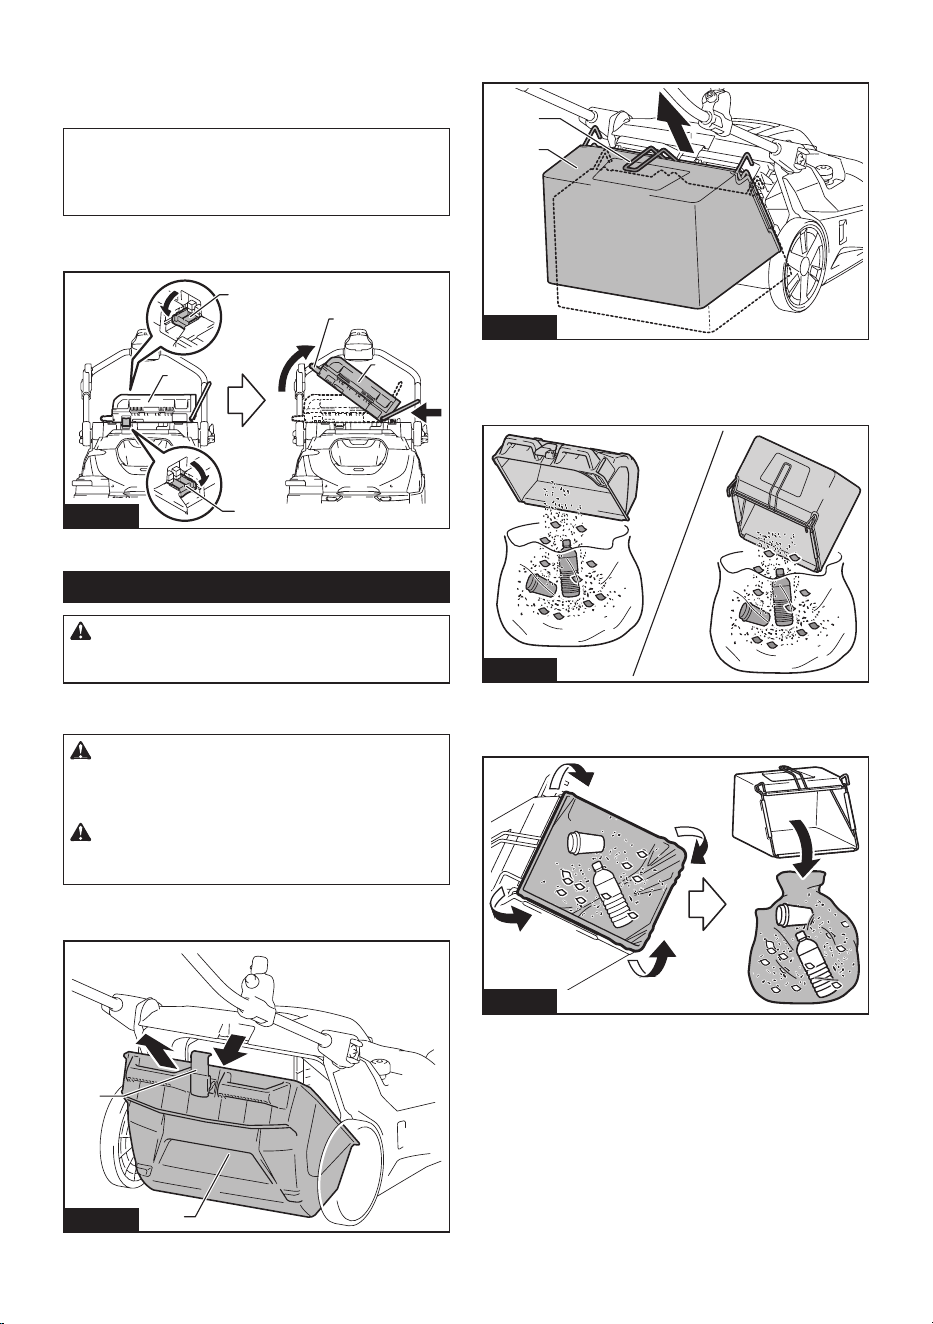
Removal
1. Raise the hook of the waste container.
2. Remove the hook from the appliance.
1
Fig.27
►1. Hook
3. Remove the waste container from the appliance.
1
2
Fig.28
►1. Hook 2. Waste container
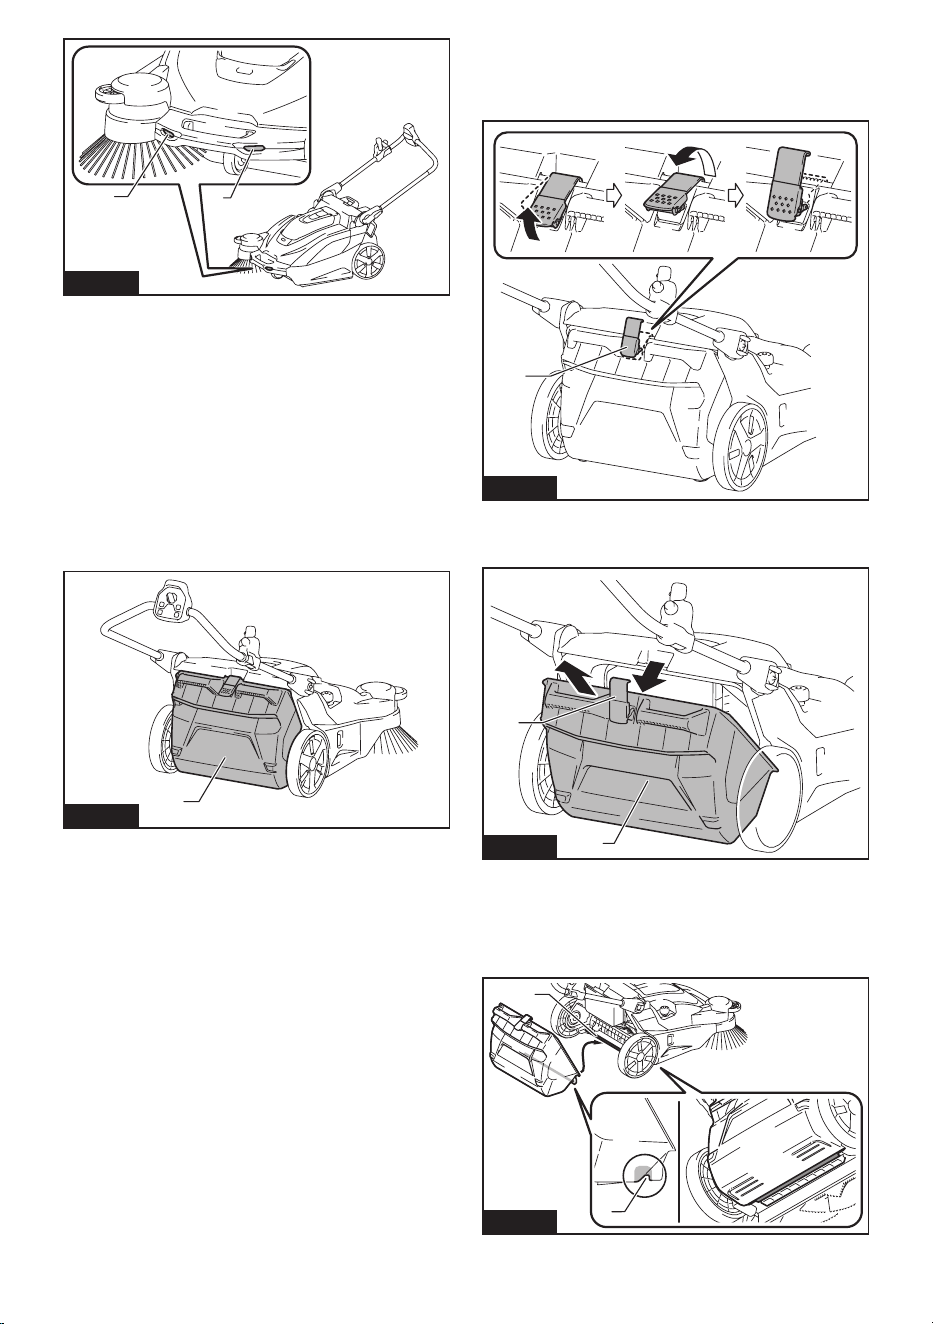
Attachment
1. Attach the groove of the waste container to the
waste container shaft of the appliance.
1
2
Fig.29
►1. Groove 2. Waste container shaft
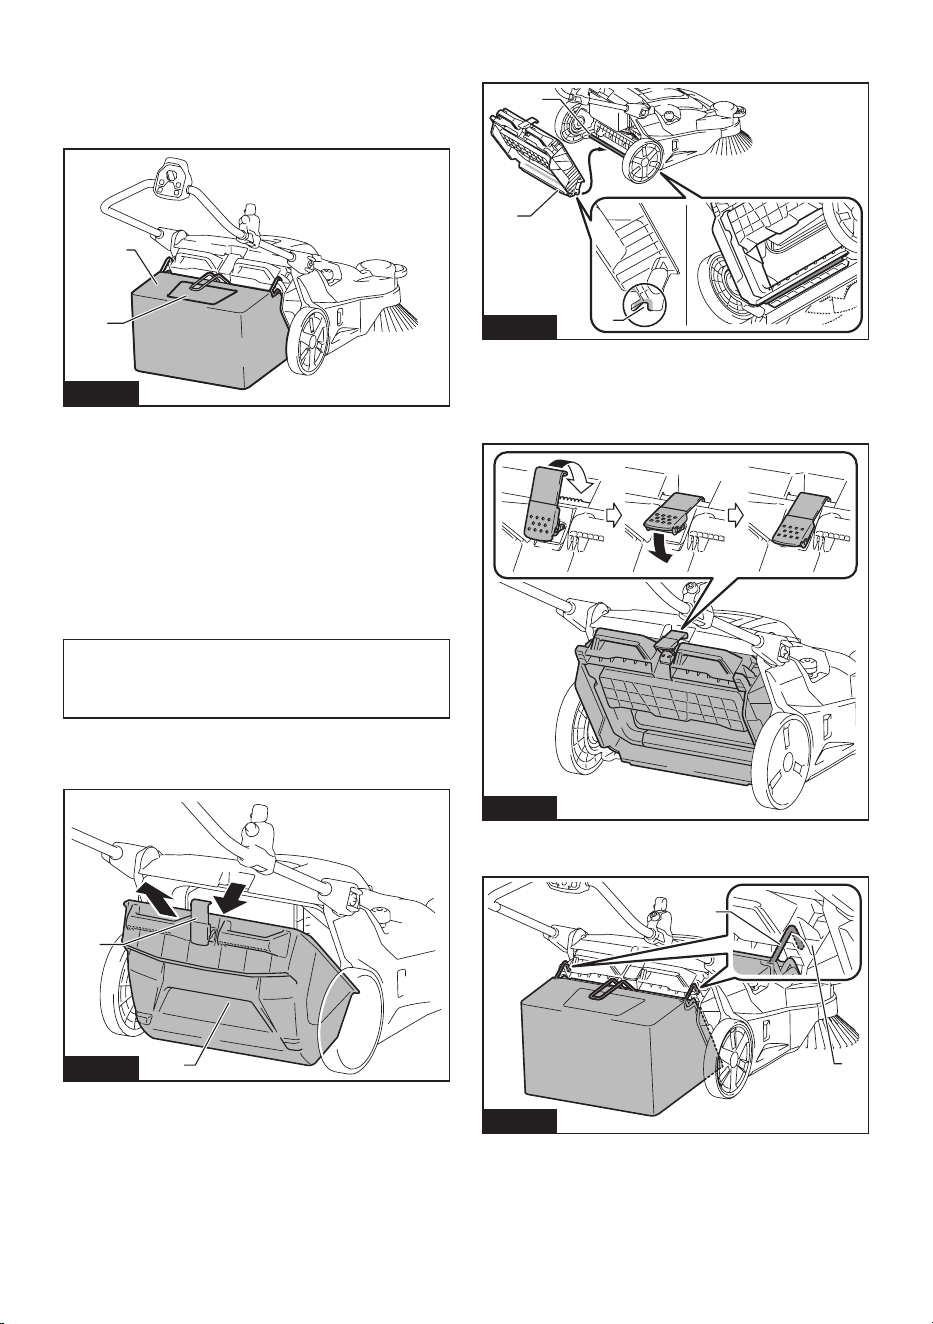
15 ENGLISH
2. Fit the hook onto the appliance and lower the hook
to secure the waste container in place.
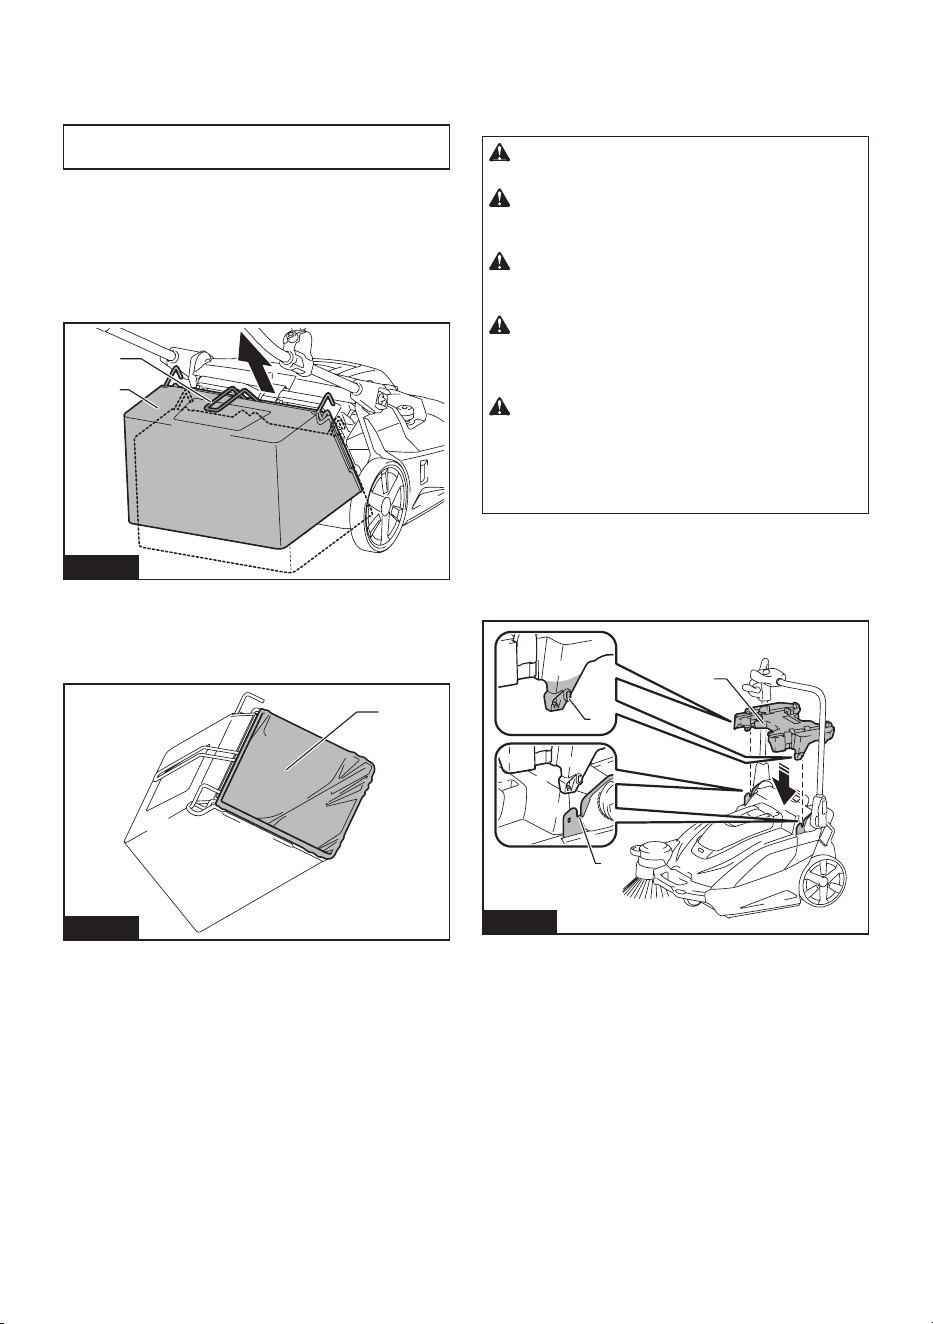
Using the dust bag
Optional accessory
1
2
Fig.30
►1. Dust bag 2. Transparent window
• The dust bag has a large capacity, making it
suitable for collecting bulky refuse such as fallen
leaves.
• You can check how much refuse has been col-
lected by looking through the transparent window
on the top.
• Use the waste container when suction dust. The
dust bag is not as airtight as the waste container.
• For details of the cleaning procedure, refer to
“Starting cleaning.”
NOTE: When collecting light refuse such as fallen
leaves, using suction mode is recommended. Using
suction mode helps to collect more refuse than when
themodeiso.
Attachment
1. Remove the waste container from the appliance.
1
2
Fig.31
►1. Hook 2. Waste container
2. Attach the groove of the dust bag frame to the
waste container shaft of the appliance.
1
3
2
Fig.32
►1. Dust bag frame 2. Groove 3. Waste container
shaft
3. Fit the hook onto the appliance and lower the hook
to secure the dust bag frame in place.
Fig.33
4. Attach the dust bag by hanging the hooks on the
left and right of the dust bag on the attaching grooves.
2
1
Fig.34
►1. Hook 2. Groove
16 ENGLISH
Removal
Reverse the steps of the attachment procedure.
Attaching a polyethylene bag
NOTICE: When attaching a polyethylene bag, it may
bediculttoseeinsideofthedustbag.
Attaching a polyethylene bag to the dust bag gives
you the convenience when it is time to discard refuse,
because discarding work can be completed by simply
removing and throwing away the polyethylene bag with
its contents.
1. Lift up the grip (for the dust bag) and remove the
dust bag.
1
2
Fig.35
►1. Grip (for the dust bag) 2. Dust bag
2. Attach a polyethylene bag (commercial appliance,
bag opening perimeter is over 1,600 mm (63")) to the
dust bag.
1
Fig.36
►1. Polyethylene bag
3. Attach the dust bag by hanging the hooks on the
left and right of the dust bag on the attaching grooves.
Using a multifunction adapter
Optional accessory
Attaching a multifunction adapter makes it possible to
mount a Makpac or portable power pack.
CAUTION: Properly secure the multifunction
adapter in place using the supplied screws.
CAUTION: Properly secure the Makpac or
portable power pack in place by using the latches
or hooks on the multifunction adapter.
CAUTION: Do not place objects weighting
more than 20 kg (44 lbs) or more on the multifunc-
tion adapter.
CAUTION: Do not use the handle of a Makpac
or portable power pack mounted on the multifunc-
tion adapter to transport or operate the appliance.
Doing so may cause accidents.
CAUTION: Do not stand the appliance on its
end when a Makpac or portable power pack is
mounted on the multifunction adapter. Doing so
may damage the locking mechanism of the multifunc-
tion adapter, and the Makpac or portable power pack
mayfallo.
Attaching the multifunction adapter
1. Align the protrusions on the left and right of the
multifunction adapter with the mounting grooves on the
appliance and attach the multifunction adapter.
1
2
3
Fig.37
►1. Protrusion 2. Groove 3. Multifunction adapter
Ifitisdiculttomountthemultifunctionadapter,loosen
the handle lock lever on the appliance. When loosen the
handle lock lever, fold down the handle to prevent the
handle from falling over, and then mount the multifunc-
tion adapter.
17 ENGLISH
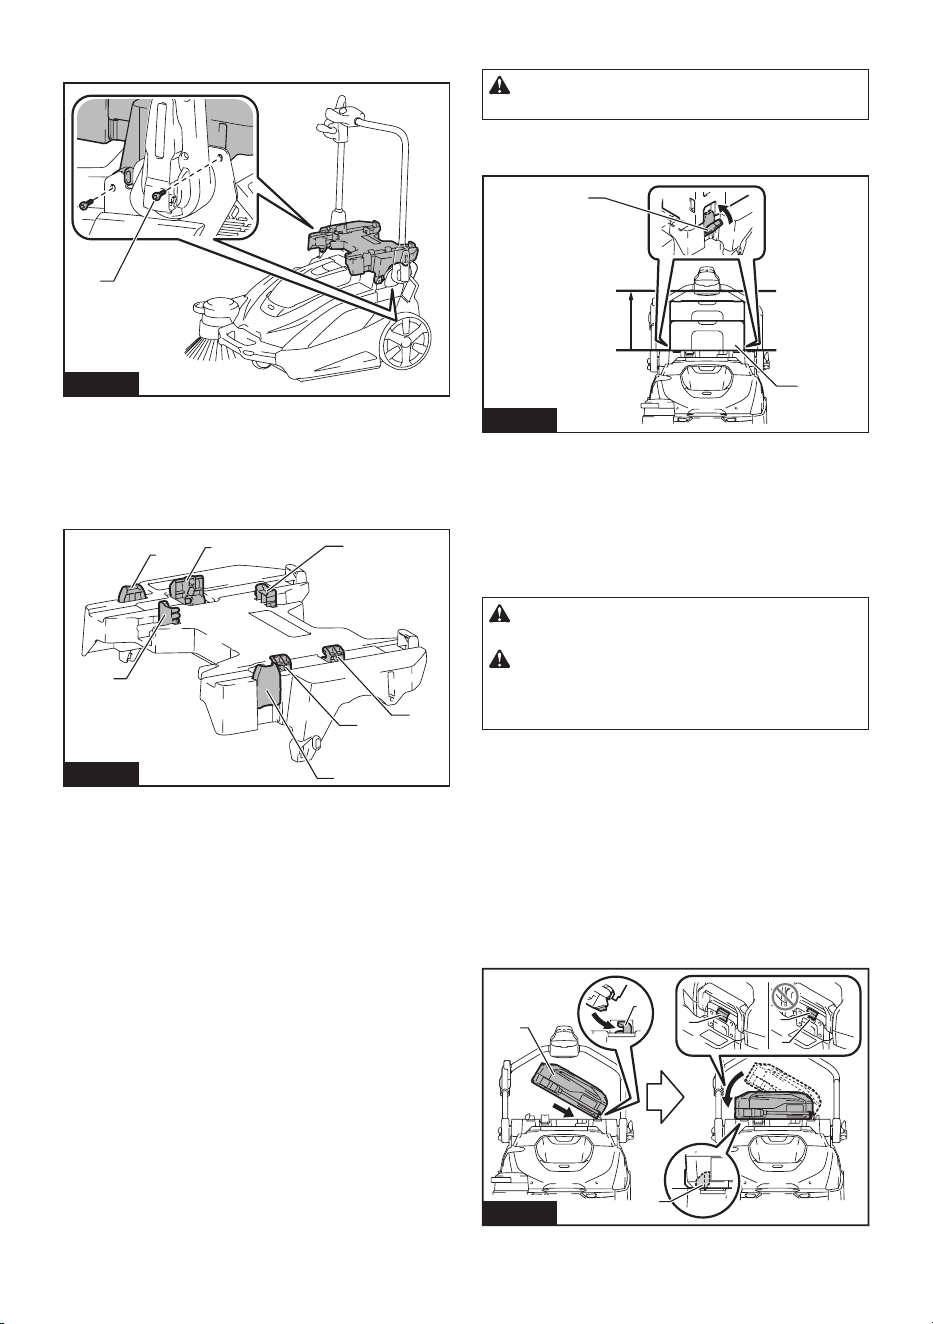
2. Tighten the four screws to secure the multifunction
adapter in place.
1
Fig.38
►1. Screws
Removing the multifunction adapter
Reverse the steps of the attachment procedure.
Names of parts of multifunction adapter
2
2
1
1
3
4
4
Fig.39
►1. Securing latch (for Makpac) 2. Hooks A (for
PDC01 / PDC1200 / PDC1500) 3. Hook B (for
PDC1200 / PDC1500) 4. Hooks C (for PDC01)
Mounting a Makpac
CAUTION: Do not exceed the height 315 mm
(12-3/8") when mounting the Makpac.
Firmlytthetwosecuringlatchesontheleftandrightintothe
mounting notches of the Makpac to secure the Makpac in place.
Max
315 mm
(12-3/8″)
1
2
Fig.40
►1. Makpac 2. Securing latches
Removing a Makpac
Disengage the two securing latches on the left and right
and remove the Makpac.
Mounting a portable power pack
CAUTION: Do not use the appliance with the
portable power pack on your back.
CAUTION:
When mounting a portable power pack on
the multifunction adapter, make sure the cord of the portable
power pack is arranged properly. Otherwise sagging cord may
bescrapedbytheooranddisconnection,smoke,orreresult.
1.
Fit the bottom edge of the portable power pack onto
hooksAandsecureitinplacewithhookBorhookC.Conrm
that the portable power pack does not detach from the appli-
ance by lifting up the handle of the portable power pack lightly.
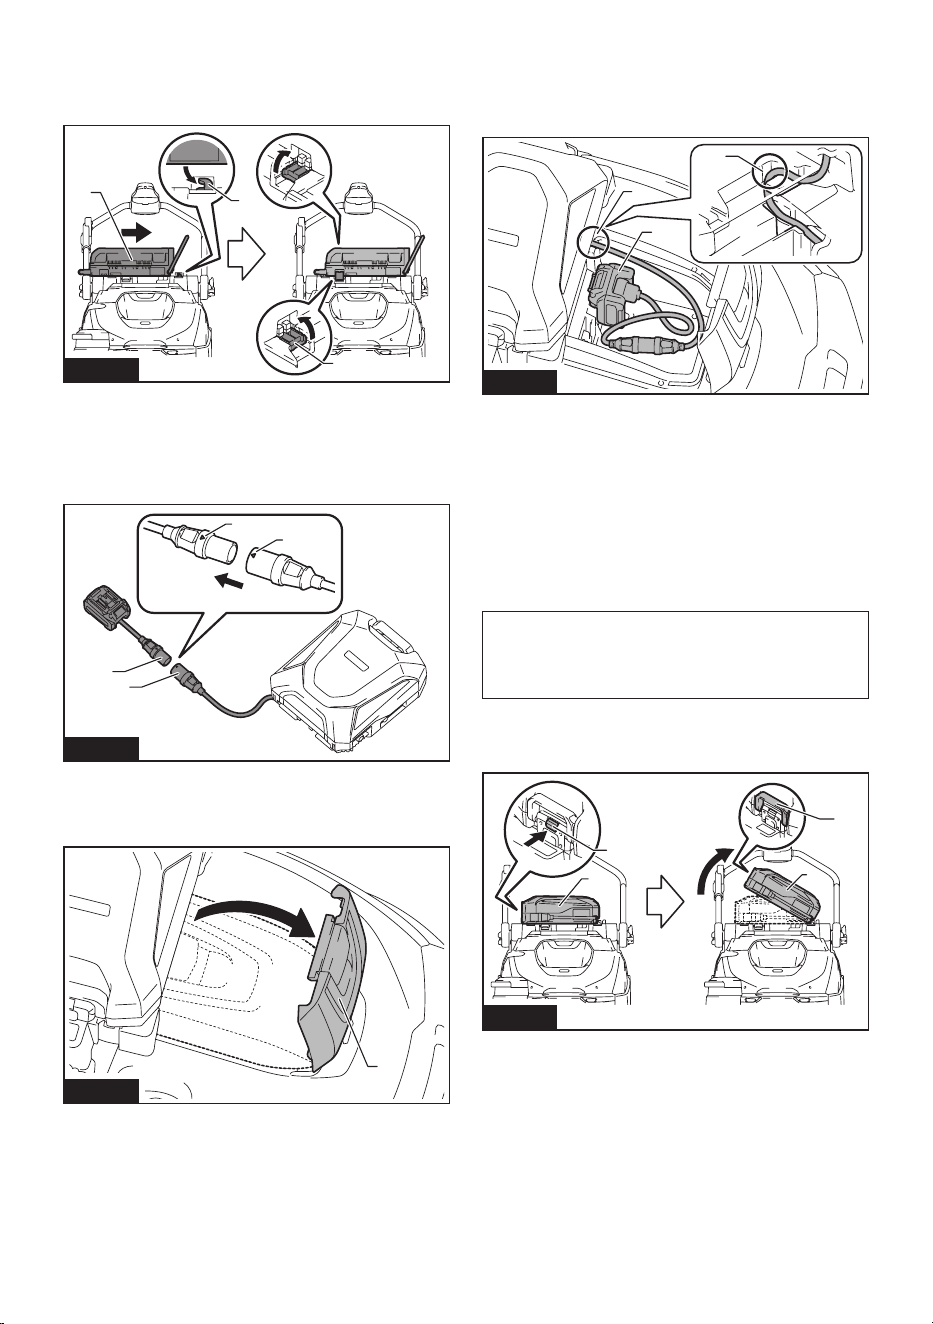
• PDC1200 / PDC1500
Fit the bottom edge of the portable power pack onto hooks
AandsecureitinplacewithhookB.Conrmthatthe
portable power pack does not detach from the appliance
by lifting up the handle of the portable power pack lightly.
If the red indicator of the lock button is visible, the porta-
ble power pack is not completely locked.
4
4
5
1
2
3
Fig.41
►1. Portable power pack 2. Hooks A 3. Hook B
4. Lock button 5. Red indicator
18 ENGLISH
• PDC01
Fit the bottom edge of the portable power pack onto
hooks A and secure it in place with hooks C. Hook B is
not used.
1
2
3
Fig.42
►1. Portable power pack 2. Hooks A 3. Hooks C
2. Align the triangle marks on the socket of the porta-
ble power pack and the plug of the adapter (for the XGT
battery)andtthemtogetherrmlyasfarastheywill
go.
1
2
3
3
Fig.43
►1. Socket of portable power pack 2. Plug of adapter
(for XGT battery) 3. Triangle marks
3. Open the battery box cover.
1
Fig.44
►1. Battery box cover
4. Asshowninthegure,arrangethecordsoit
passes through the groove in the multifunction adapter
and the battery box. Align the adapter (for the XGT
battery) with the groove in the battery insertion opening,
and insert the adapter until it clicks into place.
2
3
1
Fig.45
►1. Groove in multifunction adapter 2. Groove in
battery box 3. Adapter (for XGT battery)
5. Close the battery box cover.
Removing a portable power pack
PDC1200 / PDC1500
1. Remove the plug of the adapter (for the XGT
battery) from the socket of the portable power pack and
remove the cord.
NOTICE: Do not pull the cord when removing
from the plug of adapter. Also, do not carry the
portable power pack by holding only the cord.
The cord may break or otherwise be damaged.
2. While holding down the lock button of the portable
power pack, raise the handle of the portable power
pack.
1
2
3
1
Fig.46
►1. Portable power pack 2. Lock button 3. Handle
19 ENGLISH
PDC01
1. Remove the plug of the adapter (for the XGT
battery) from the socket of the portable power pack and
remove the cord.
NOTICE: Do not pull the cord when removing
from the plug of adapter. Also, do not carry the
portable power pack by holding only the cord.
The cord may break or otherwise be damaged.
2. Disengage hooks C and pull the portable power
pack out and then up.
1
2
2
3
1
Fig.47
►1. Portable power pack 2. Hooks C 3. Handle
Handling after use
CAUTION: If the appliance will not be in use,
make sure the ON/OFF switch is turned o and
the batteries have been removed.
Discarding refuse
CAUTION: Always wear protective equipment
such as a mask and gloves when disposing of
refuse. There is a danger you may touch sharp
objects in the refuse, possibly causing injury.
CAUTION: Discard refuse early, before too
much accumulates. The suction power could be
reduced.
1. Remove the hook and then remove the waste
container from the appliance.
1
2
Fig.48
►1. Waste container 2. Hook
When using the dust bag, raise the grip and lift out the
dust bag.
1
2
Fig.49
►1. Grip (for dust bag) 2. Dust bag
2. Transport the waste container or dust bag to the
refuse collection are and discard the refuse.
Fig.50
When using the dust bag, attaching a polyethylene
bag inside allows you to discard the polyethylene bag
together with the refuse.
Fig.51
3. After discarding refuse, mount the waste container
or dust bag to the appliance. Make sure that the hook is
properly locked.
20 ENGLISH
MAINTENANCE
CAUTION: Always be sure that the appli-
ance is switched o and the battery cartridge is
removed before attempting to perform inspection
or maintenance.
NOTICE: Never use gasoline, benzine, thinner,
alcohol or the like. Discoloration, deformation or
cracks may result.
Maintenance
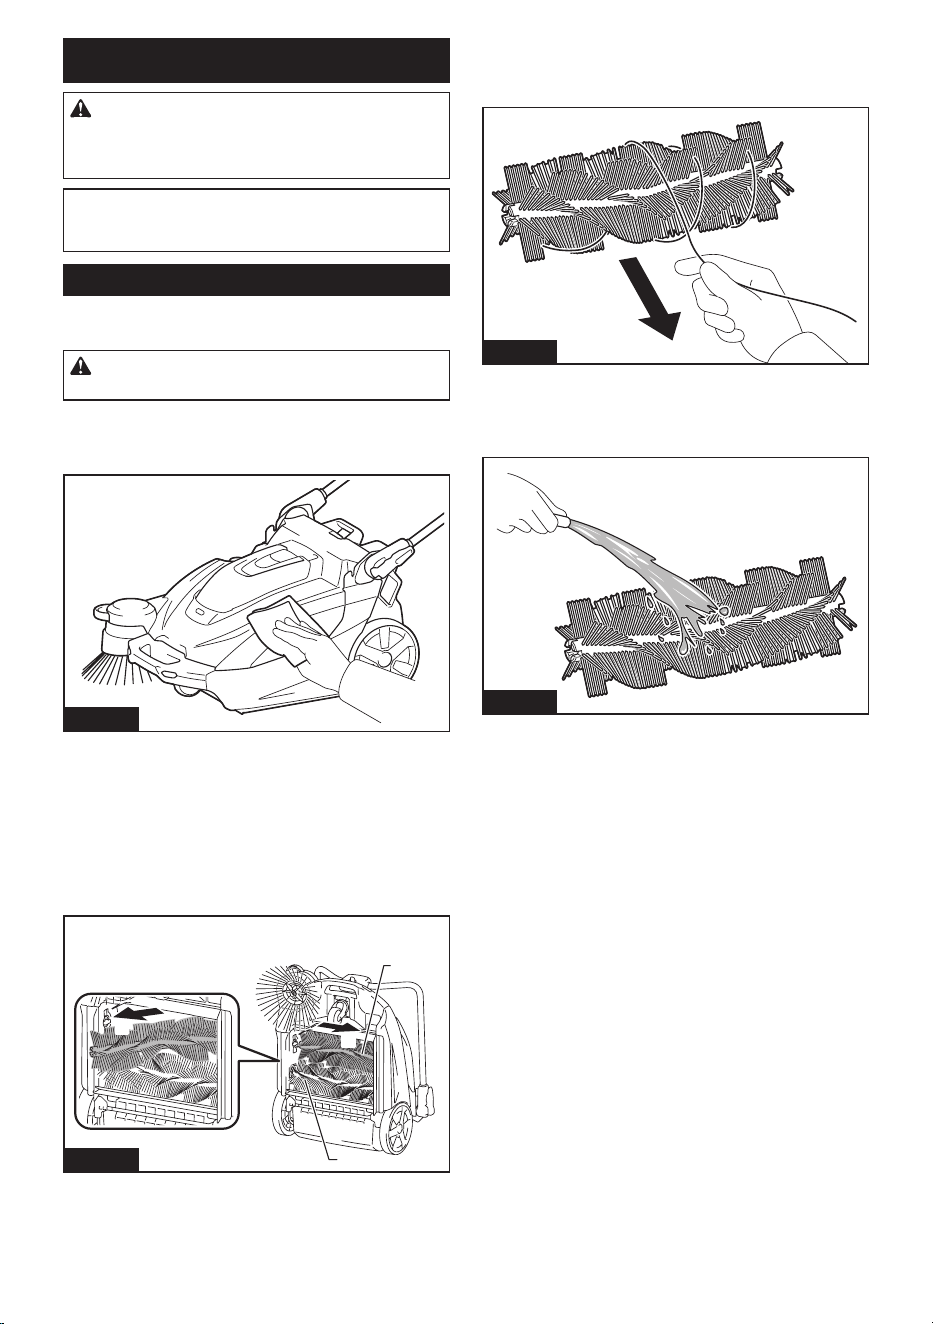
Cleaning the appliance body
CAUTION: Do not wash the appliance body
with water. Doing so may cause a breakdown.
To remove dirt from the appliance body, wipe it using a
cloth that has been moistened with a small amount of
diluted neutral detergent.
Fig.52
Cleaning the main brushes
1. Fold down the handle and stand the appliance on
itsendasshowninthegure.
2. Push in a main brush in the direction indicated by
thearrowAinthegure.
Remove one end of the main brush in the direction
indicatedbythearrowBinthegure.
1
1
A
B
Fig.53
►1. Main brush
3. Remove the other end of the main brush from the
brush shaft.
4. In like manner, remove the other main brush.
5. If there is string-like refuse adhered to the
brushes, remove it by hand.
Fig.54
6. Shakeodust,andwashthebrusheswithwater
if they are very dirty. After washing, leave them to dry
in the shade; do not use them until they are completely
dry.
Fig.55
21 ENGLISH
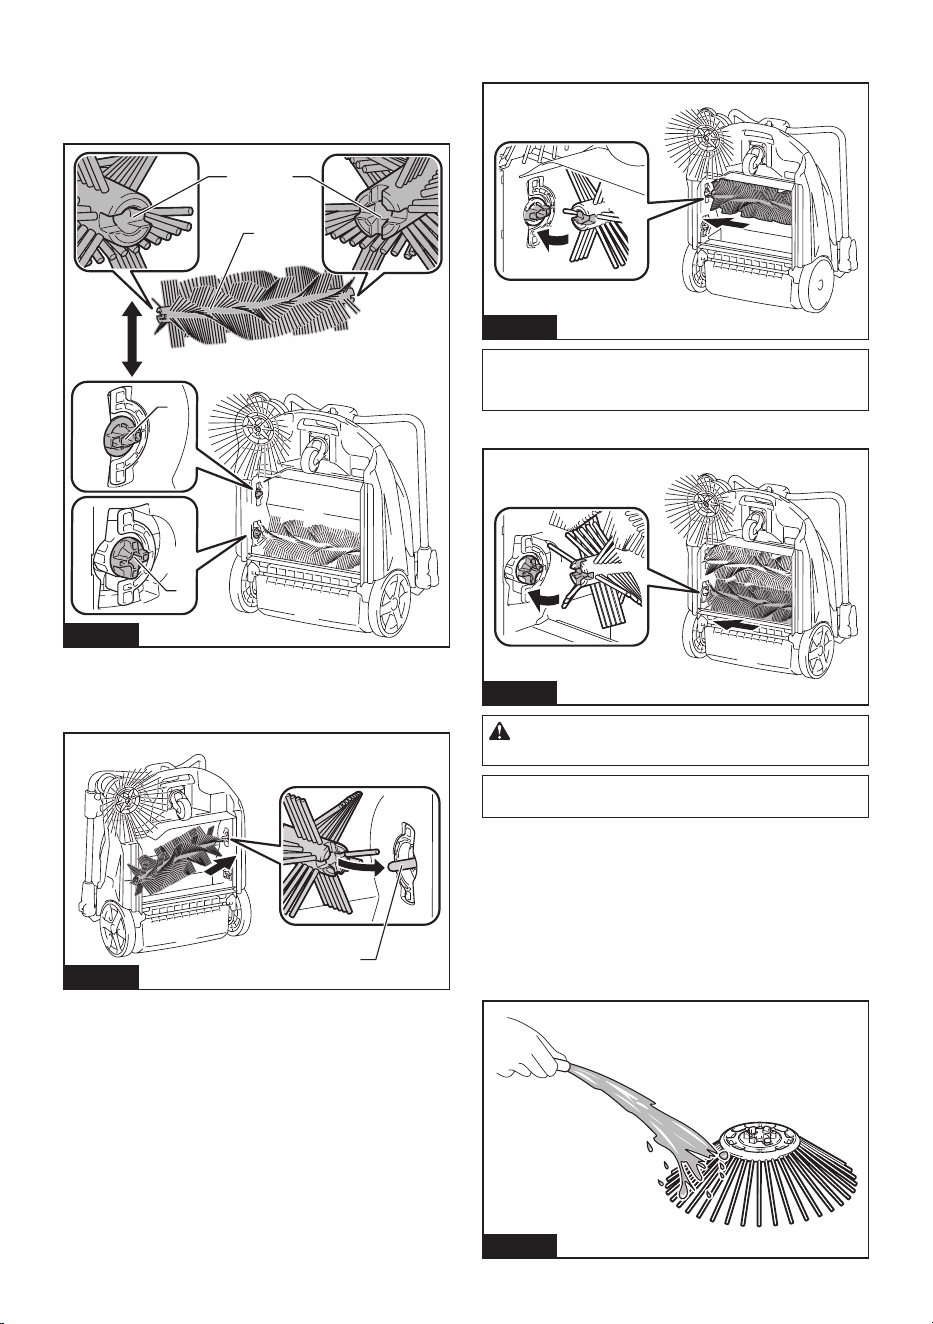
7. Orient each main brush so that the shapes of the
ends match the mounting areas of the appliance, as
showninthegure.
If the shapes of the ends do not match, reverse the left-
right orientation of the main brush so they match.
1
2 3
2
3
Fig.56
►1. Main brush 2. Minus shape 3. Plus shape
8. Fit a main brush onto the brush shaft of the appli-
anceinthedirectionindicatedbythearrowinthegure.
1
Fig.57
►1. Brush shaft
9.
Fit a main brush into mounting area of the appliance, in the
directionindicatedbythearrowinthegure,andsecureitinplace.
Fig.58
NOTE: If the shapes of the ends do not match, you
will not be able to mount the main brush. In this case,
go back to step 7 and redo the process.
10. In like manner, mount the other main brush.
Fig.59
CAUTION: After mounting the main brushes,
check that the shapes are correctly engaged.
NOTE: If the main brushes are worn down to a
shorter length, replace them.
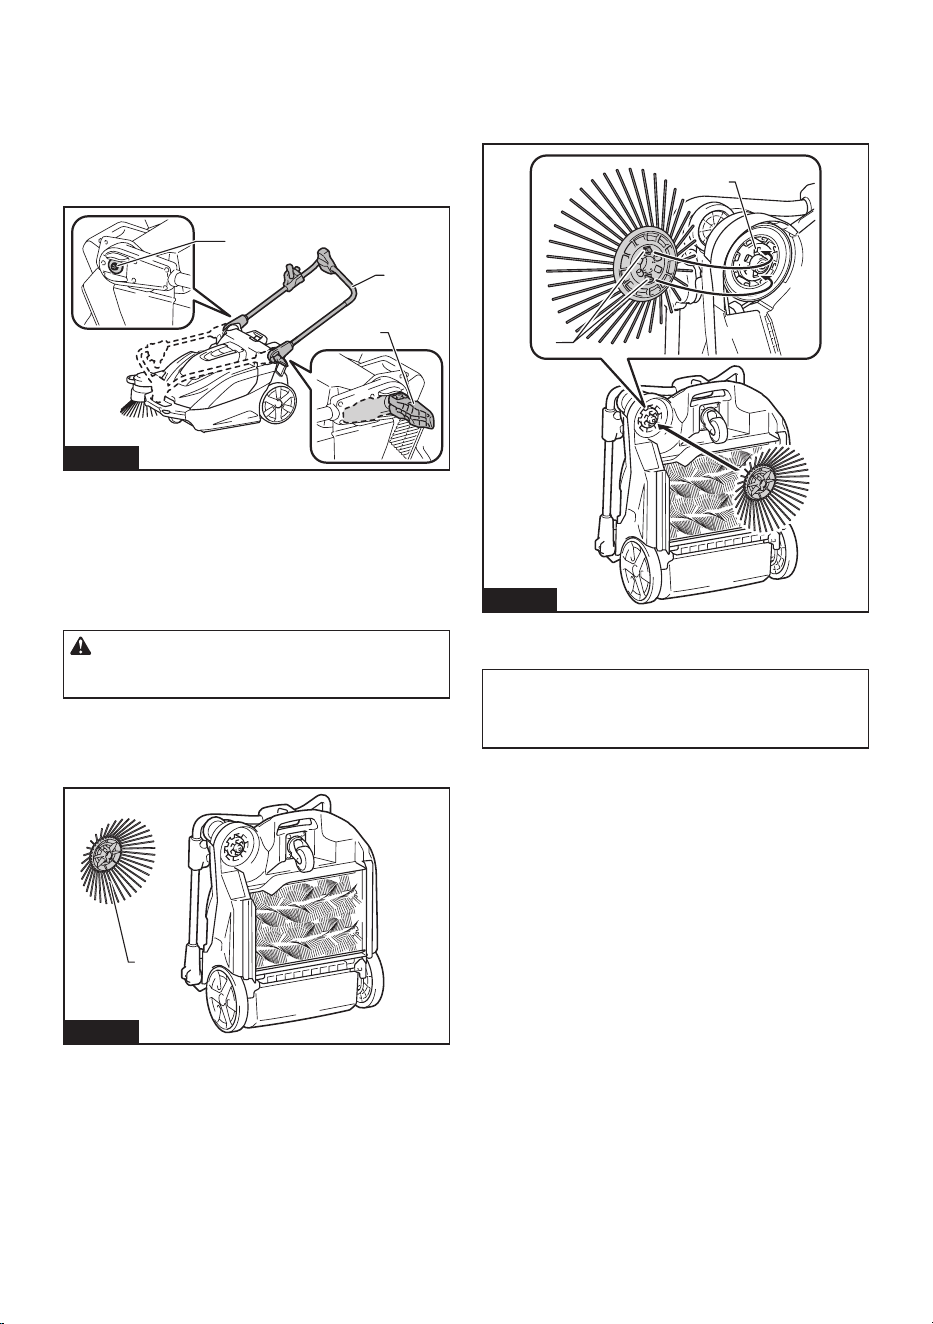
Cleaning the side brush
For the procedure for mounting and removing the side
brush, refer to “Attaching and removing the side brush.”
1. Remove the side brush.
2. Shakeodust,andwashthebrushwithwaterifit
is very dirty. After washing, leave the brush to dry in the
shade; do not use it until it is completely dry.
Fig.60
22 ENGLISH
3. Mount the side brush.
NOTE: If the side brush is worn down to a shorter
length, replace it.
Cleaning the lters
CAUTION: Make sure the lters are mounted
properly, and do not use the appliance when the
lters are not in place. Also, do not use lters that
are damaged or wet. Motor burnout or a breakdown
may result.
NOTICE: The lters can be washed and reused.
To prevent damage to the lters, do not use the
following items when cleaning them.
— Air dusters
— High-pressure washers
— Brushes made of hard materials such as metal
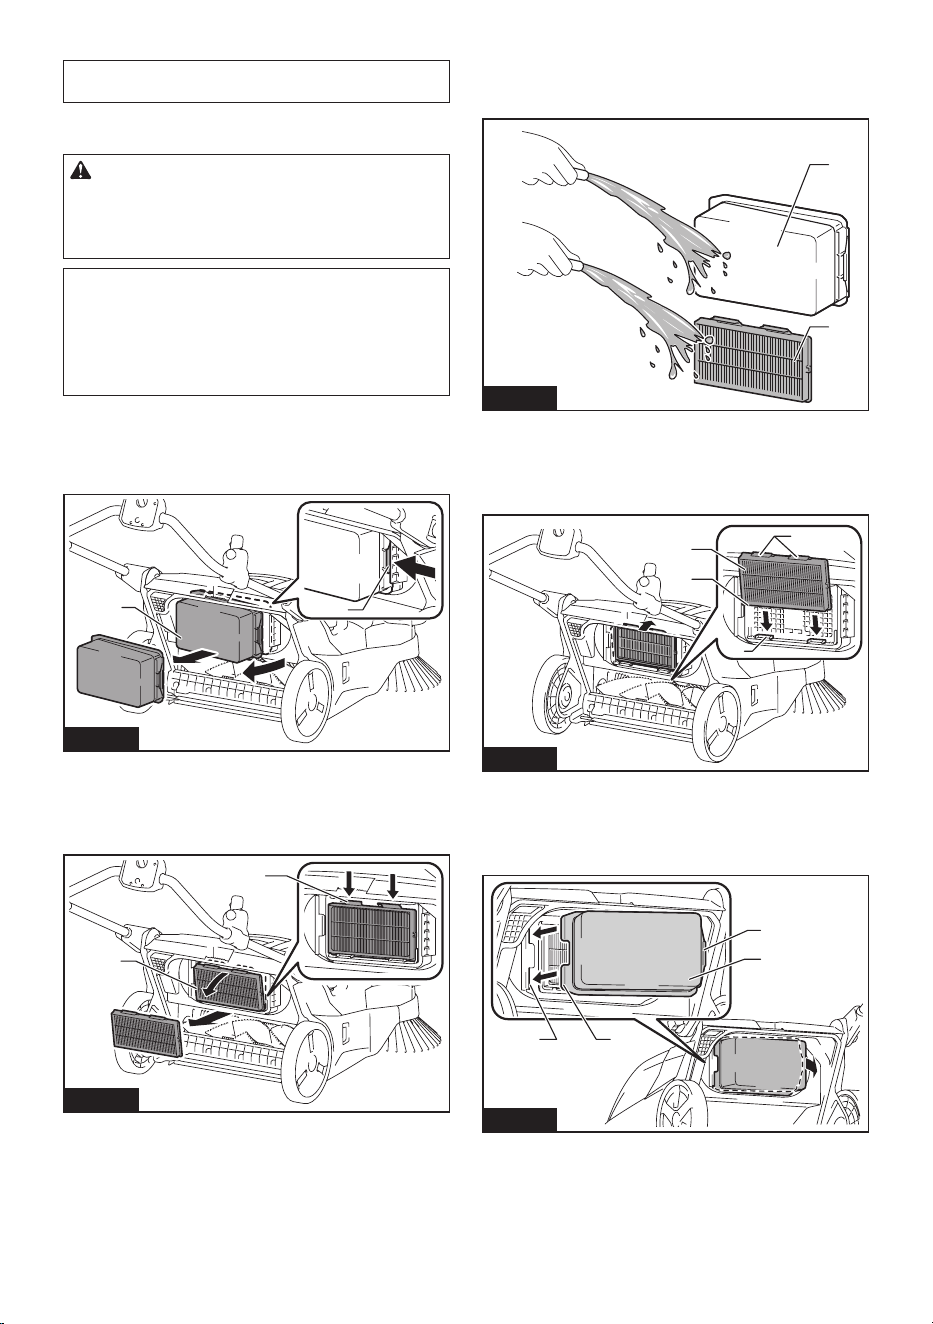
1. Remove the waste container.
2. Whilepushingonthehookoftheprelterinthe
directionindicatedbythearrowinthegure,remove
theprelter.
1
2
Fig.61
►1.Prelter2. Hook
3. WhilepushingonthehooksoftheHEPAlter
inthedirectionindicatedbythearrowsinthegure,
removetheHEPAlter.
1
2
Fig.62
►1.HEPAlter2. Hook
4. Shakeodust,andwashthelterswithwaterif
theyareverydirty.Afterwashing,leavetheprelterand
HEPAltertodryintheshade;donotusethemuntil
they are completely dry.
1
2
Fig.63
►1.Prelter2.HEPAlter
5. TomounttheHEPAlter,ttheedgeoftheHEPA
lterontothegroovesontheappliance,andpushthe
lterintoplace.Checkthatthehooksaresecurelyxed.
1
2
3
4
Fig.64
►1.HEPAlter2. Edge 3. Groove 4. Hook
6. Tomounttheprelter,ttheprotrusionsonthe
prelterintothegroovesontheappliance,andpushthe
lterintoplace.Checkthatthehookissecurelyxed.
1
23
4
Fig.65
►1.Prelter2. Protrusion 3. Groove 4. Hook
23 ENGLISH
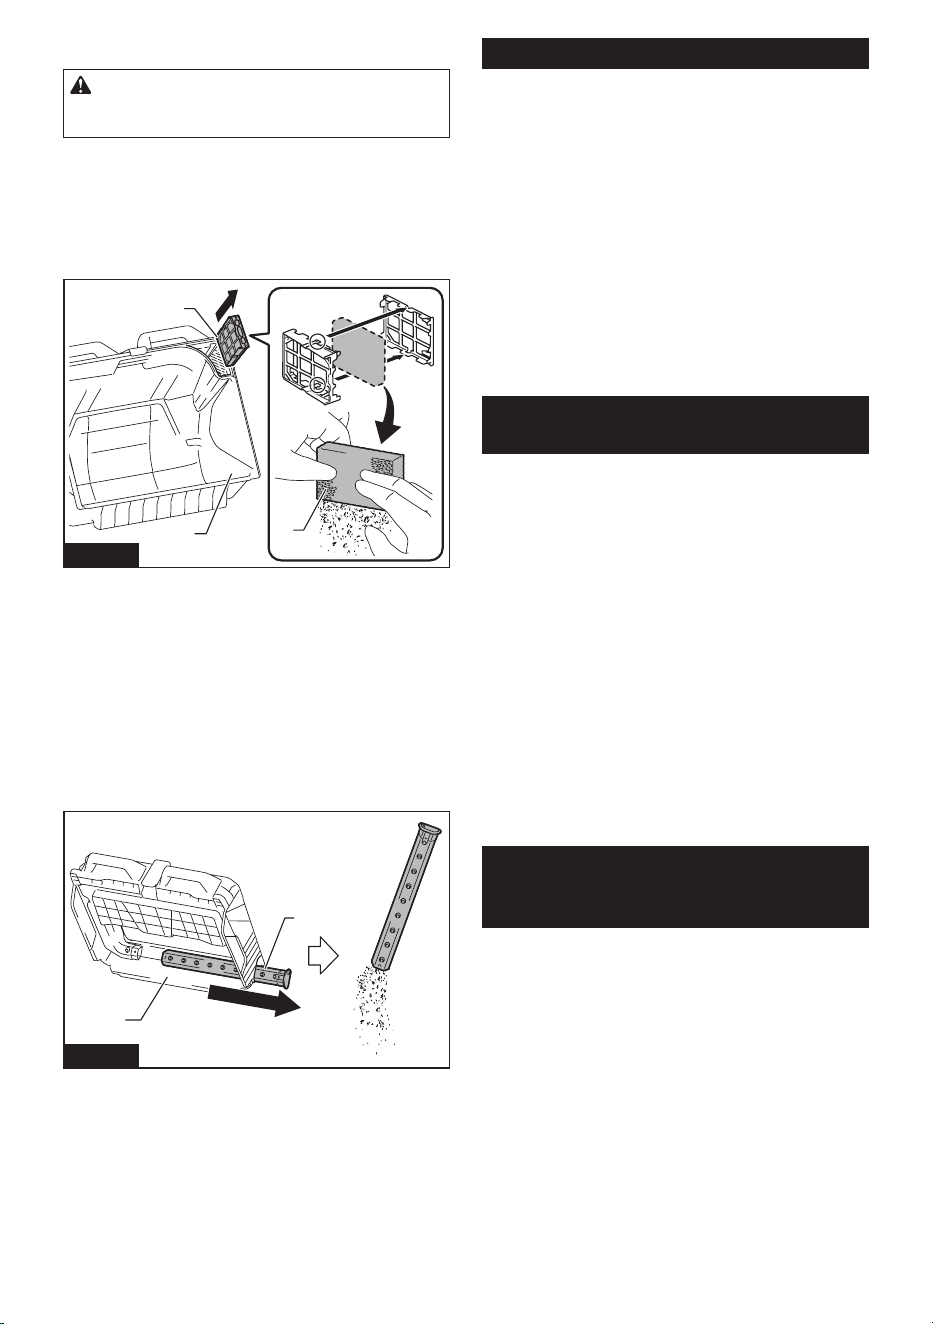
Cleaning the sponge lter
CAUTION: After cleaning the sponge lter, be
sure to install it on the waste container. If washed
in water, dry it up before installing.
Whenthespongelteriscloggedwithdust,removeit
fromthewastecontainerandthenwipeitoorwash
in water.
1. Remove the sponge case from the waste
container.
2. Openthespongecasetoremovethespongelter.
1
2
3
Fig.66
►1. Waste container 2. Sponge case 3.Spongelter
3. Wipeothespongelterorwashinwater.
4. Installthespongelterinitsoriginalposition.
Cleaning the tube
When using the dust bag (optional accessory), the tube
maybecomecloggedwithnerefusesuchassand,
pebbles, and small fallen leaves.
1. Pull the tube from the dust bag frame.
2. Remove the refuse from the tube.
1
2
Fig.67
►1. Dust bag frame 2. Tube
3. Install the tube in its original position.
Periodic inspections
To ensure a long service life for the appliance and
safety usage, perform the inspections listed below
periodically.
Daily inspections
• Waste container: empty the container.
• Filters: if they are dirty, cleaning them.
• Brushes: if string-like refuse get entangled,
remove it.
• Control and movable parts: check that they move
smoothly.
Weekly inspections
• Main brush height: if the height is inappropriate,
readjust it.
• Screws (when using multifunction adapter): if they
are loose, tighten them.
Replacement/replenishment of
consumable items
Brush replacement
If the main brushes and side brush become worn out,
ask your local Makita service center for replacement.
Replacing the main brushes
Replace the main brushes if they cannot be adjusted
appropriately. Refer to "Main brush height adjustment."
For removing and mounting the main brushes, refer to
“Cleaning the main brushes.”
Replacing the side brush
Replacethesidebrushifitdoesnotcontacttheoor
when the side brush height adjusting knob is turned to
the lowest position. Refer to "Side brush height adjust-
ment."
For removing and mounting the side brush, refer to
“Attaching and removing the side brush.”
MAKITA LIMITED
WARRANTY
Please refer to the annexed warranty sheet for the
most current warranty terms applicable to this product.
If annexed warranty sheet is not available, refer to the
warranty details set forth at below website for your
respective country.
United States of America: www.makitatools.com
Canada: www.makita.ca
Other countries: www.makita.com

24 ESPAÑOL
ESPAÑOL (Instrucciones originales)
ADVERTENCIA
• Este aparato no está diseñado para ser utilizada por personas (incluidos niños) con discapacidades físicas,
sensoriales o mentales, o que carezcan de experiencia y conocimientos.
• Hay que asegurarse de que los niños no jueguen con el aparato.
• PRECAUCIÓN: Antes de realizar cualquier operación de mantenimiento, desconecte el aparato de la fuente de
alimentación. Realice periódicamente el mantenimiento del aparato.
• Las baterías recargables deben retirarse del dispositivo antes de cargarlas.
• Para quitar o instalar la batería, primero abra la cubierta de la batería y luego deslice el cartucho fuera de la
herramienta mientras presiona el botón de la parte delantera del cartucho.
• Las baterías agotadas deben retirarse del dispositivo y desecharse de forma segura. Siga las normas locales
con respecto a la eliminación de baterías.
• Si el dispositivo se va a almacenar sin usar durante un período prolongado, se deben quitar las baterías.
• Los terminales de alimentación no deben cortocircuitarse.
INTRODUCCIÓN
Especicaciones
Modelo: GSV01
Capacidad del contenedor de desechos 15,6 l (4,1 gal.)
Capacidad de limpieza *1 Cepillo lateral no utilizado 1 920 m
2
/h (20 670 ft
2
/h)
Cepillo lateral utilizado 2 600 m
2
/h (28 000 ft
2
/h)
Anchura de limpieza Cepillo lateral no utilizado 480mm(18-7/8″)
Cepillo lateral utilizado 650mm(25-1/2″)
Tensión nominal 36 V - 40 V (máx.) c.c.
Dimensiones
(La x An x Al)
Mango en posición vertical 830mmx677mmx1146mm(32-3/4″x26-3/4″x45″)
Mango doblado 830mmx677mmx467mm(32-3/4″x26-3/4″x18-3/8″)
Peso total permitido (GVW) 44,0 kg (97,0 lbs) máx.
Peso neto (peso de transporte) (con BL4025 x1) 29,9 kg (65,9 lbs)
Grado de protección IPX4: Diseñada para proporcionar una mayor resistencia al agua
en condiciones adversas en el lugar de trabajo
*1 Suponiendo una velocidad al caminar de 4 km/h.
• Debidoanuestrocontinuoprogramadeinvestigaciónydesarrollo,lasespecicacionesaquíincluidasestán
sujetas a cambio sin previo aviso.
• Lasespecicacionesyelcartuchodebateríapuedenvariardepaísapaís.
Cartucho de batería y cargador aplicables
Cartucho de batería BL4020 / BL4025 / BL4040 / BL4040F / BL4050F / BL4080F
Cargador DC40RA / DC40RB / DC40RC / DC40WA
•
Algunos de los cartuchos de batería y cargadores enumerados arriba podrían no estar disponibles dependiendo de su área de residencia.
ADVERTENCIA: Use únicamente los cartuchos de batería y los cargadores indicados arriba. El uso de
cualquier otro cartucho de batería y cargador podría ocasionar una lesión y/o un incendio.
Fuente de alimentación conectada por cable recomendada
Unidad portátil de alimentación eléctrica PDC01 / PDC1200 / PDC1500
• La o las fuentes de alimentación conectadas por cable enumeradas arriba podrían no estar disponibles depen-
diendo de su área de residencia.
•
Antes de utilizar la fuente de alimentación conectada por cable, lea las instrucciones e indicaciones de precaución sobre ellas.

25 ESPAÑOL
Uso pretendido
El aparato sirve para recolectar escombros secos. El
aparato es adecuado para uso comercial, por ejemplo
en hoteles, escuelas, hospitales, fábricas, tiendas,
ocinasyempresasdealquiler.
Precauciones de seguridad
Advertencias de seguridad de la
barredora aspiradora inalámbrica
1.
Los operadores deberán recibir las instrucciones
adecuadas sobre el uso de la barredora aspiradora.
2. Esta barredora aspiradora es para uso en seco
solamente.
3. Cuando no esté en uso, guarde siempre la
aspiradora barredora en interiores.
4. No la utilice para nes de limpieza en super-
cies que tengan una pendiente superior a la
marcada en el aparato.
5. No permita que los niños jueguen con apara-
tos recargables.
6. Cuando guarde el aparato, colóquelo sobre
una supercie plana y estable. Almacene el
aparato fuera del alcance de los niños.
7. Coloque siempre el aparato sobre una super-
cie plana cuando vaya a colocarlo boca arriba.
8. Mantenga el lugar de trabajo limpio y orde-
nado. Además, asegúrese de que esté bien
iluminado y siempre limpio. De lo contrario, se
podrían ocasionar accidentes.
9. Use vestimenta de trabajo adecuada.
10. No utilice un adaptador de batería.
11.
No toque el área de la batería con las manos mojadas.
De lo contrario, podría producirse una descarga eléctrica.
12.
No utilice el ltro en un lugar húmedo. Podría produ-
cirse una falla por exceso de calor del motor o una avería.
13. No utilice el aparato cuando esté lloviendo o
cuando la supercie del camino esté mojada.
Tampoco recoja residuos que contengan
líquido o espuma. Podría producirse una falla
por exceso de calor del motor o una avería.
14.
No recoja residuos similares a cuerdas, como sogas,
cordeles o alambres. Estos desechos podrían enredarse
en los cepillos. Retire los residuos antes de la operación
de limpieza. De lo contrario, podría producirse una avería.
15. No desconecte la línea a tierra.
16.
No intente limpiar el exterior o el interior con ben-
cina, disolvente o productos químicos de limpieza.
Podrían crear agrietamientos y decoloración.
17. Utilice equipo de protección adecuado, como
gafas y una máscara antipolvo, cuando limpie
lugares polvorientos, realice tareas de mante-
nimiento o elimine residuos.
18.
Monte los ltros de forma adecuada. El uso del
aparatosinelltrocolocado,conelltropuesto
enlaposiciónincorrectaelltroenestadodañado
podría provocar que el motor se queme o se averíe.
19. No desensamble el aparato. El hacerlo podría
provocar una avería.
20. Si nota algo que parece anormal, detenga el
aparato y retire las baterías inmediatamente.
21.
Antes de utilizar el aparato, verique que no haya
piezas dañadas y que cada pieza esté funcionando
correctamente. Si hay una pieza dañada, haga que
un distribuidor autorizado la reemplace o repare,
segúncorresponda,amenosqueseindiqueespecí-
camente lo contrario en el manual de instrucciones.
22. Existe riesgo de que una parte suya quede
atrapada, aplastada o se lesione por la correa
de transmisión, los cepillos principales, el
cepillo lateral, el mango o la rueda trasera.
23. No utilice el aparato para recoger sustancias
tóxicas como el asbesto.
24. No utilice el cepillo lateral para limpiar lugares
contaminados o polvorientos.
25.
No utilice el aparato en un lugar donde haya
materiales peligrosos o llamas abiertas. Hacerlo
podría provocar un incendio o una explosión.
26.
No utilice el aparato en un lugar explosivo e inamable.
27. No permita que la familiaridad adquirida
debido al uso frecuente de las herramientas
haga que se sienta conado e ignore los prin-
cipios de seguridad de las herramientas. Un
descuido podría ocasionar una lesión grave en
una fracción de segundo.
28.
Nunca dé servicio a baterías que estén dañadas. El
servicio a las baterías solamente deberá ser efectuado
por el fabricante o un agente de servicio autorizado.
Uso y cuidado de la herramienta a batería
1.
Evite un arranque accidental. Asegúrese de que
el interruptor esté en la posición apagada antes
de conectar el paquete de batería, levantar el
aparato o cargarlo. Cargar el aparato con su dedo
en el interruptor o pasar energía al aparato con el
interruptor encendido puede propiciar accidentes.
2.
Desconecte el paquete de baterías del aparato
antes de hacer cualquier ajuste, cambiar acce-
sorios o almacenar el aparato. Tales medidas de
seguridad preventivas reducirán el riesgo de que
el aparato sea puesto en marcha accidentalmente.
3.
Recargue sólo con el cargador especicado por el
fabricante. Un cargador que es adecuado para un solo
tipo de paquete de baterías puede generar riesgo de
incendio al ser utilizado con otro paquete de baterías.
4. Use los aparatos únicamente con los paquetes
de baterías designados especícamente para
ellos. El uso de cualquier otro paquete de batería
puede generar riesgo de lesión e incendio.
5.
Cuando no se esté usando el paquete de batería,
manténgalo alejado de otros objetos metálicos,
como sujetapapeles (clips), monedas, llaves, cla-
vos, tornillos u otros objetos pequeños de metal
que puedan crear una conexión entre una terminal
y otra. Causar un cortocircuito en las terminales de la
batería puede provocar quemaduras o incendio.
6.
En condiciones de mal uso, podría escapar líquido
de la batería; evite el contacto. Si toca el líquido
accidentalmente, enjuague con agua. Si hay con-
tacto del líquido con los ojos, solicite atención
médica adicionalmente. Puede que el líquido expul-
sado de la batería cause irritación o quemaduras.
7.
No utilice un paquete de batería ni un producto si
están dañados o han sido modicados. Hacerlo
podría provocar un funcionamiento inesperado,
un incendio, una explosión o lesiones.

26 ESPAÑOL
8. No exponga un paquete de baterías o aparato
al fuego o a una temperatura excesiva. La
exposición al fuego o a una temperatura supe-
rior a 130 °C podría causar una explosión.
9.
Siga todas las instrucciones relativas a la carga
y no cargue el paquete de baterías o el aparato
fuera del rango de temperatura especicado en
las instrucciones. Cargar de manera inapropiada o
atemperaturasfueradelrangoespecicadopodría
dañar la batería e incrementar el riesgo de incendio.
10.
Pida que el servicio lo realice un técnico en repa-
raciones calicado y que utilice únicamente piezas
de repuesto idénticas a las originales. Esto garanti-
zará que se mantenga la seguridad del producto.
11. No modique ni intente reparar el aparato ni el
paquete de baterías salvo como se indique en
las instrucciones para el uso y cuidado.
Símbolos
A continuación se muestran los símbolos utilizados
para la herramienta.
volts o voltios
corriente directa o continua
IPX4
Diseñada para proporcionar una mayor resistencia al
agua en condiciones adversas en el lugar de trabajo
Instrucciones importantes de
seguridad para el cartucho de batería
1.
Antes de utilizar el cartucho de batería, lea todas
las instrucciones e indicaciones de precaución
en el (1) el cargador de batería, (2) la batería, y
(3) el producto con el que se utiliza la batería.
2.
No desarme ni modique el cartucho de batería. Podría
ocurrir un incendio, calor excesivo o una explosión.
3. Si el tiempo de operación se ha acortado en
exceso, deje de operar de inmediato. Podría
correrse el riesgo de sobrecalentamiento,
posibles quemaduras e incluso explosión.
4.
En caso de que ingresen electrolitos en sus ojos, enjuá-
guelos bien con agua limpia y consulte de inmediato a
un médico. Esto podría ocasionar pérdida de visión.
5. Evite cortocircuitar el cartucho de batería:
(1) No toque las terminales con ningún mate-
rial conductor.
(2) Evite guardar el cartucho de batería en un
cajón junto con otros objetos metálicos,
tales como clavos, monedas, etc.
(3) No exponga el cartucho de batería al
agua o la lluvia.
Un cortocircuito en la batería puede causar un ujo
grande de corriente, sobrecalentamiento, posibles
quemaduras e incluso una descompostura.
6.
No guarde ni utilice la herramienta y el cartucho
de batería en lugares donde la temperatura
pueda alcanzar o exceder los 50 °C (122 °F).
7. Nunca incinere el cartucho de batería incluso
en el caso de que esté dañado seriamente o
ya no sirva en absoluto. El cartucho de batería
puede explotar si se tira al fuego.
8. No clave, corte, aplaste, lance o deje caer el
cartucho de batería, ni golpee un objeto sólido
contra el cartucho de batería. Dicha acción
podría resultar en un incendio, calor excesivo o en
una explosión.
9. No use una batería dañada.
10. Las baterías de ión de litio están sujetas a los
requisitos reglamentarios en materia de bie-
nes peligrosos.
Para el trasporte comercial, por ej., mediante
terceros o agentes de transporte, se deben tomar
en cuenta los requisitos especiales relativos al
empaque y el etiquetado.
Para efectuar los preparativos del artículo que se
va a enviar, se requiere consultar a un experto en
materiales peligrosos. Si es posible, consulte ade-
más otras regulaciones nacionales más detalladas.
Pegue o cubra con cinta adhesiva los contactos
abiertos y empaque la batería de manera que ésta
no pueda moverse dentro del paquete.
11. Para deshacerse del cartucho de batería,
sáquelo de la herramienta y deséchelo en un
lugar seguro. Siga las regulaciones locales
relacionadas al desecho de las baterías.
12.
Utilice las baterías únicamente con los produc-
tos especicados por Makita. Instalar las bate-
rías en productos que no cumplan con los requisi-
tos podría ocasionar un incendio, un calentamiento
excesivo, una explosión o una fuga de electrolito.
13.
Si no se utiliza la herramienta por un período
largo, debe extraerse la batería de la herramienta.
14. El cartucho de batería podría absorber calor
durante y después de su uso, lo que ocasiona-
ría quemaduras o quemaduras a baja tempe-
ratura. Tenga cuidado con la manipulación de
los cartuchos de batería que estén calientes.
15. No toque el terminal de la herramienta inme-
diatamente después de su uso, ya que el
mismo podría estar lo sucientemente caliente
como para provocarle quemaduras.
16. No permita que las rebabas, el polvo o la tierra
queden atrapados en los terminales, oricios
y ranuras del cartucho de batería. Podría pro-
vocar calentamiento, incendio, explosión y mal
funcionamiento de la herramienta o del cartucho
de batería, lo que resultaría en quemaduras o
lesiones personales.
17. No utilice el cartucho de batería cerca de
cables eléctricos de alto voltaje, a menos que
la herramienta sea compatible con el uso cer-
cano a estos cables eléctricos de alto voltaje.
Esto podría ocasionar una avería o descompos-
tura de la herramienta o del cartucho de batería.
18. Mantenga la batería alejada de los niños.
GUARDE ESTAS
INSTRUCCIONES.
PRECAUCIÓN: Utilice únicamente baterías
originales de Makita. El uso de baterías no origina-
les de Makita, o de baterías alteradas, puede ocasio-
nar que las baterías exploten causando un incendio,
lesiones personales y daños. Asimismo, esto inva-
lidará la garantía de Makita para la herramienta y el
cargador Makita.
27 ESPAÑOL
Consejos para alargar al máximo
la vida útil de la batería
1.
Cargue el cartucho de batería antes de que
se descargue completamente. Pare siempre
la operación y cargue el cartucho de batería
cuando note menos potencia en la herramienta.
2. No cargue nunca un cartucho de batería que
esté completamente cargado. La sobrecarga
acortará la vida de servicio de la batería.
3. Cargue el cartucho de batería a una tempera-
tura ambiente de 10 °C - 40 °C (50 °F - 104 °F).
Si un cartucho de batería está caliente, déjelo
enfriar antes de cargarlo.
4. Cuando no utilice el cartucho de batería,
sáquelo de la herramienta o del cargador.
5. Cargue el cartucho de batería si no va a utili-
zarlo durante un período prolongado (más de
seis meses).
Nombre de las piezas
1
3
2
4
5
910
8
7
11
12
13
14
15
16
17
18
21
20
19
22
23
6
24
25
26
27
28
Fig.1
1 Mango 2 Palanca de bloqueo del
mango
3 Panel de control 4
Interruptor de
ENCENDIDO/APAGADO
5 Botón para succión 6 Botón para agitación
delltro
7 Botón del cepillo
principal
8 Botón de la lámpara
9 Botóndevericación 10 Luces indicadoras 11
Palanca de
ENCENDIDO/APAGADO
del cepillo lateral
12 Perilla de ajuste de
altura del cepillo lateral
13 Lámpara 14 Empuñadura 15 Cepillo lateral 16 Tapa de la caja para
baterías
17
Perilla de ajuste de altura
del cepillo principal
18 Rueda trasera 19 Rueda delantera 20 Cepillos principales
21 Varilla del contenedor de
desechos
22 Empuñadura (pieza
del contenedor de
desechos)
23 Contenedor de
desechos
24 Caja para baterías
25 Preltro 26 Filtro HEPA 27 Eje del cepillo 28 Línea a tierra
28 ESPAÑOL
Introducción de artículos vendidos
por separado
PRECAUCIÓN: Estos accesorios o aditamen-
tos están recomendados para utilizarse con su
herramienta Makita especicada en este manual.
El empleo de cualquier otro accesorio o aditamento
puede conllevar el riesgo de lesiones personales.
Utilice los accesorios o aditamentos solamente para
sunestablecido.
Para obtener detalles sobre los artículos que se venden
por separado, consulte el catálogo o comuníquese con
eldistribuidoronuestraocinadeventas.
• Adaptador multifunción
• Bolsa para polvo
• Batería y cargador originales de Makita
NOTA: Algunos de los artículos en la lista pueden
incluirse en el paquete de la herramienta como acce-
sorios estándar. Éstos pueden variar de país a país.
PREPARATIVOS PARA
EL USO
Montaje
PRECAUCIÓN: Antes de operar el aparato,
asegúrese de que el interruptor de ENCENDIDO/
APAGADO esté apagado y que se hayan retirado
las baterías.
Ajuste del ángulo del mango
Puede ajustar el ángulo del mango para facilitar el
funcionamiento del aparato. En el envío de fábrica, el
mango está plegado hacia abajo.
PRECAUCIÓN: Ponga correctamente la
palanca de bloqueo del mango en su lugar. Si
el mango se pliega o se cae, existe el peligro de
lesiones.
1.
Suelte el bloqueo de la palanca de bloqueo del mango.
2. Ajuste el mango al ángulo deseado.
1
2
Fig.2
►1. Palanca de bloqueo del mango 2. Mango
3. Ponga en su lugar la palanca de bloqueo del
mango.
1
Fig.3
►1. Palanca de bloqueo del mango
Plegado hacia abajo del mango
Cuando coloque el aparato sobre su extremo para
guardarlo/inspeccionarlo o cuando lo transporte levan-
tándolo, pliegue el mango hacia abajo.
Fig.4
29 ESPAÑOL
Si el mango está ojo y hace ruido
Si el mango está suelto y hace ruido a pesar de que la
palanca de bloqueo del mango está bloqueada correc-
tamente, ajústela apretando la tuerca opuesta a la
palanca de bloqueo del mango. Si se utiliza el aparato
cuando el mango está suelto y hace ruido, existe el
peligro de que el mango se colapse o se caiga, lo que
podría provocar lesiones.
1
2
3
Fig.5
►1. Palanca de bloqueo del mango 2. Mango
3. Tuerca de apriete (para ajustar la holgura)
Colocar y quitar el cepillo lateral
El cepillo lateral se puede utilizar para ampliar el ancho
de la limpieza, y también para limpiar las áreas a lo
largo de las paredes.
PRECAUCIÓN: Coloque el cepillo lateral
correctamente. Si el cepillo se suelta, podría entrar
en contacto con personas y causar lesiones.
Aditamento
1. Extienda el cepillo lateral y coloque el aparato
sobresuextremocomosemuestraenlagura.
1
Fig.6
►1. Cepillo lateral
2. Alinee los ganchos (2 ubicaciones) del cepillo
lateralconlosoriciosdemontaje,ycoloqueelcepillo
lateral.
Los ganchos (2 ubicaciones) del cepillo lateral se pue-
denalinearconcualquieradelos6oricios.
1
2
Fig.7
►1. Ganchos (2 ubicaciones) 2.Oricios(6
ubicaciones)
NOTA: Para que sea más fácil enganchar los gan-
chosylosoricios,gireelcepillolateralensentido
inverso al de las manecillas del reloj mientras la
palanca del cepillo lateral está bajada.
30 ESPAÑOL
Retiro
Mientras aprieta las empuñaduras de los ganchos hacia
adentro, retire el cepillo lateral.
1
Fig.8
►1. Empuñadura de los ganchos
Carga de las baterías
Indicación de la capacidad restante
de la batería
Oprimaelbotóndevericaciónenelcartuchodela
batería para que indique la capacidad restante de la
batería. Las luces indicadoras se iluminarán por algu-
nos segundos.
1
2
Fig.9
►1. Luces indicadoras 2.Botóndevericación
Luces indicadoras Capacidad
restante
Iluminadas Apagadas Parpadeando
75% a 100%
50% a 75%
25% a 50%
0% a 25%
Cargar la
batería.
La batería
pudo haber
funcionado
mal.
NOTA: Dependiendo de las condiciones de uso y
la temperatura ambiente, la indicación podrá diferir
ligeramente de la capacidad real.
NOTA: La primera luz indicadora (extrema izquierda)
parpadeará cuando el sistema de protección de
batería esté en funcionamiento.
Indicación de la capacidad restante
de la batería (panel de control)
También puede comprobar la capacidad restante de la
batería en el panel de control. La capacidad restante
de la batería se muestra cuando se enciende o apaga
el interruptor de ENCENDIDO/APAGADO, o cuando se
presionaelbotóndevericación.Laslucesindicadoras
de la batería se encienden durante 3 segundos.
Luces indicadoras Capacidad
restante de la
batería
Encendido
Apagado
Parpadeando
50% a 100%
20% a 50%
0% a 20%
Cargar la
batería
31 ESPAÑOL
Cosas que necesita saber antes del uso
Transporte del aparato
PRECAUCIÓN: Antes de transportar el
aparato, asegúrese de que el interruptor de
ENCENDIDO/APAGADO esté apagado y que se
hayan retirado las baterías.
PRECAUCIÓN: Vacíe el contenedor de dese-
chos y asegúrese de que esté correctamente
bloqueado por el gancho antes de levantar y
transportar el aparato. No bloquear el gancho
podría provocar lesiones.
PRECAUCIÓN: El levantado y el transporte
del aparato siempre deben ser realizados por al
menos dos personas utilizando una postura de
transporte segura. Transportar el aparato de forma
insegura podría provocar lesiones.
PRECAUCIÓN: Al cargar y descargar el apa-
rato en una pendiente, tenga cuidado de no dejar
que las ruedas se caigan.
Deben transportar el aparato dos personas, una suje-
tando la empuñadura y la otra sujetando la empuñadura
(pieza del contenedor de desechos).
1 2
Fig.10
►1. Empuñadura 2. Empuñadura (pieza del contene-
dor de desechos)
Entorno de trabajo
Si hay residuos similares a hilos, como cables o alam-
bres en el lugar que se va a limpiar, retírelos antes de
continuar. Los residuos en forma de hilo pueden enre-
darse en los cepillos principales y en el cepillo lateral.
1
Fig.11
►1. Residuo similar a hilos
Función de protección
Este aparato está equipado con una función de protec-
ción. Cuando ocurre una de las siguientes condiciones,
la función de protección detiene automáticamente todos
los motores. Las luces del panel de control indican el
estado de error.
Estado de iluminación Estado de
error
Acción
Encendido
Apagado
Parpa-
deando
Error de la
batería
Cargue las
baterías.
La tempe-
ratura del
aparato es
elevada
Deje que el apa-
rato se enfríe.
Sobrecarga
del cepillo
Deje de usar el
cepillo, y elimine
la fuente de la
sobrecarga.
Sobrecarga
de la succión
Deje de usar el
modo de suc-
ción, y elimine
la fuente de la
sobrecarga.
Sobrecarga
por agitación
delltro
Deje de utilizar
la función de
agitación del
ltro,yelimine
la fuente de la
sobrecarga.
Prevención
de rearranque
Apague el
interruptor de
ENCENDIDO/
APAGADO.
Prevención de rearranque
Este aparato está equipado con una función de pre-
vención de rearranque. Si las baterías se insertan
mientras el interruptor de ENCENDIDO/APAGADO está
encendido, o si el aparato se recupera del modo de
bajo consumo* mientras el interruptor de ENCENDIDO/
APAGADO está encendido, la función de prevención
de rearranque evita un rearranque inesperado. Cuando
se apaga el interruptor de ENCENDIDO/APAGADO, la
indicación de error desaparece. Cuando posteriormente
se enciende el interruptor de ENCENDIDO/APAGADO,
el aparato se pone en marcha.
* Modo de baja potencia: Cuando se aplican todas
las condiciones siguientes, el aparato cambia al
modo de baja potencia para ahorrar capacidad de
la batería.
— Ningún motor funciona.
— Las lámparas delanteras están apagadas.
— No se ha presionado ningún botón durante
un minuto.
Este modo corta la energía a algunos circuitos
electrónicos.
32 ESPAÑOL
NOTA: Para cancelar una indicación de error que no
sea la prevención de rearranque, apague el interrup-
tor de ENCENDIDO/APAGADO, y realice una de las
siguientes tres acciones.
— Encienda el interruptor de ENCENDIDO/
APAGADO.
— Presione un botón del panel de control.
— No realice ninguna operación durante un
minuto.
NOTA: Independientemente de si se ha producido un
error o no, puede encender o apagar las lámparas.
NOTA: Si no se realiza ninguna operación durante un
minuto después de que se haya producido un error
mientras el interruptor de ENCENDIDO/APAGADO
está activado, todas las indicaciones del panel
de control se apagarán, pero el error no se habrá
solucionado.
— Si las lámparas están encendidas: Presione
cualquier botón del panel de control para volver
a mostrar la indicación de error.
— Si las lámparas están apagadas: El aparato
está en modo de baja potencia, por lo que al
presionar un botón del panel de control, se
activa la prevención de rearranque.
Protección contra otras causas
El sistema de protección también está diseñado para
otras causas que podrían dañar el aparato, y permite
que el aparato se detenga automáticamente. Siga
todos los pasos a continuación para eliminar las causas
cuando el aparato se haya detenido temporalmente o
se haya detenido durante el funcionamiento.
1. Apague el aparato, y luego enciéndalo nueva-
mente para reiniciarlo.
2. Cargue la(s) batería(s) o reemplácela(s) con
batería(s) recargada(s).
3. Deje que el aparato y la(s) batería(s) se enfríen.
Si no hay ninguna mejora al restaurar el sistema de
protección, comuníquese con su centro local de servi-
cio Makita.
USO
Montaje/desmontaje de las baterías
PRECAUCIÓN: Asegúrese de que el inte-
rruptor de ENCENDIDO/APAGADO esté apagado
antes de montar o desmontar las baterías.
PRECAUCIÓN: Tenga cuidado de no pellizcar
sus dedos al abrir y cerrar la tapa de la caja para
baterías. Existe el peligro de lesiones.
Montaje de las baterías
Abra la tapa de la caja para baterías. Alinee la batería
con la ranura, e insértela hasta que encaje en su lugar.
Cierre la tapa de la caja para baterías.
1
Fig.12
►1. Tapa de la caja para baterías
Extracción de las baterías
Mientras mantiene presionado el botón de la batería,
levante la batería para sacarla de la caja de la batería.
2
3
1
Fig.13
►1. Botón 2. Batería «1» 3. Batería «2»
El aparato funcionará con una o dos baterías
montadas.
• Montaje de dos baterías
Con dos baterías montadas una al lado de la otra,
la batería “1” se usa primero. Cuando la batería
“1” se agota, el aparato cambia automáticamente
a la batería “2” sin pausa en el funcionamiento.
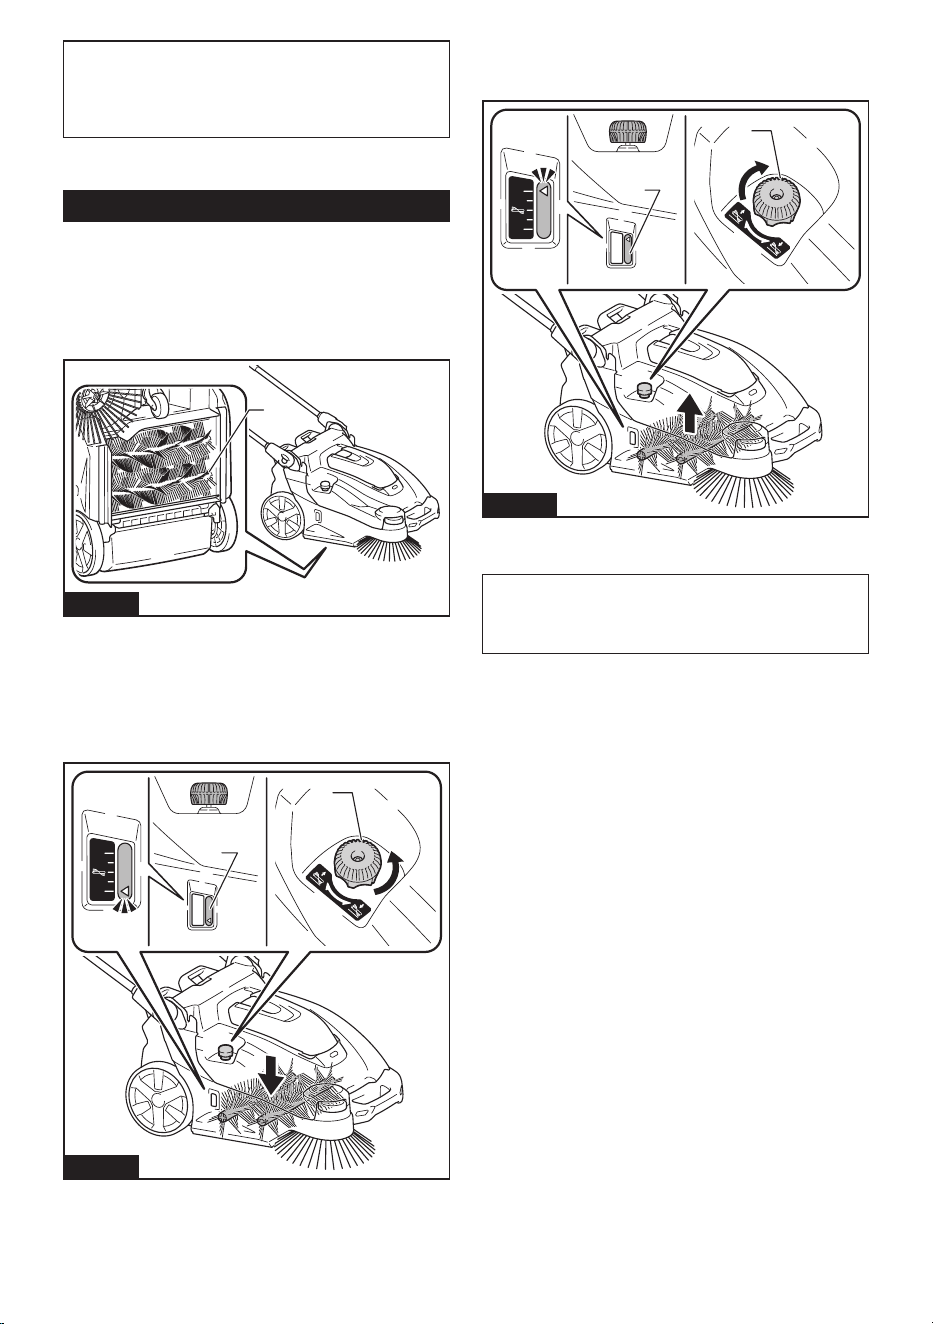
33 ESPAÑOL
NOTA: Incluso si la batería “1” está montada, cuando
se utiliza la batería “2”, el aparato no cambia a la
batería “1” a menos que la batería “2” esté agotada
o el interruptor de ENCENDIDO/APAGADO esté
apagado.
• Montaje de una batería
La batería montada se detecta automáticamente.
Operación del aparato
Ajuste de altura del cepillo principal
La altura del cepillo principal (solo en la parte trasera)
en la parte inferior del aparato es ajustable. Ajuste ade-
cuadamente dependiendo del estado del piso a limpiar,
longitud del cepillo principal, etc.
1
Fig.14
►1. Cepillo principal (lado trasero)
Gire la perilla de ajuste de altura del cepillo principal
para ajustar la altura de los cepillos principales.
Girelaperillaenladirecciónindicadaporlaechapara
reducir la altura de los cepillos principales (para ajustar-
los hacia un mayor contacto con el piso).
1
2
Fig.15
►1. Perilla de ajuste de altura del cepillo principal
2. Altura del cepillo principal
Girelaperillaenladirecciónindicadaporlaecha
para aumentar la altura de los cepillos principales (para
ajustarlos hacia un menor contacto con el piso).
1
2
Fig.16
►1. Perilla de ajuste de altura del cepillo principal
2. Altura del cepillo principal
NOTA: Los cepillos principales se desgastan.
Compruebe y ajuste periódicamente la altura de los
cepillosprincipales.Sinoesposibleajustarsucien-
temente los cepillos, sustitúyalos.
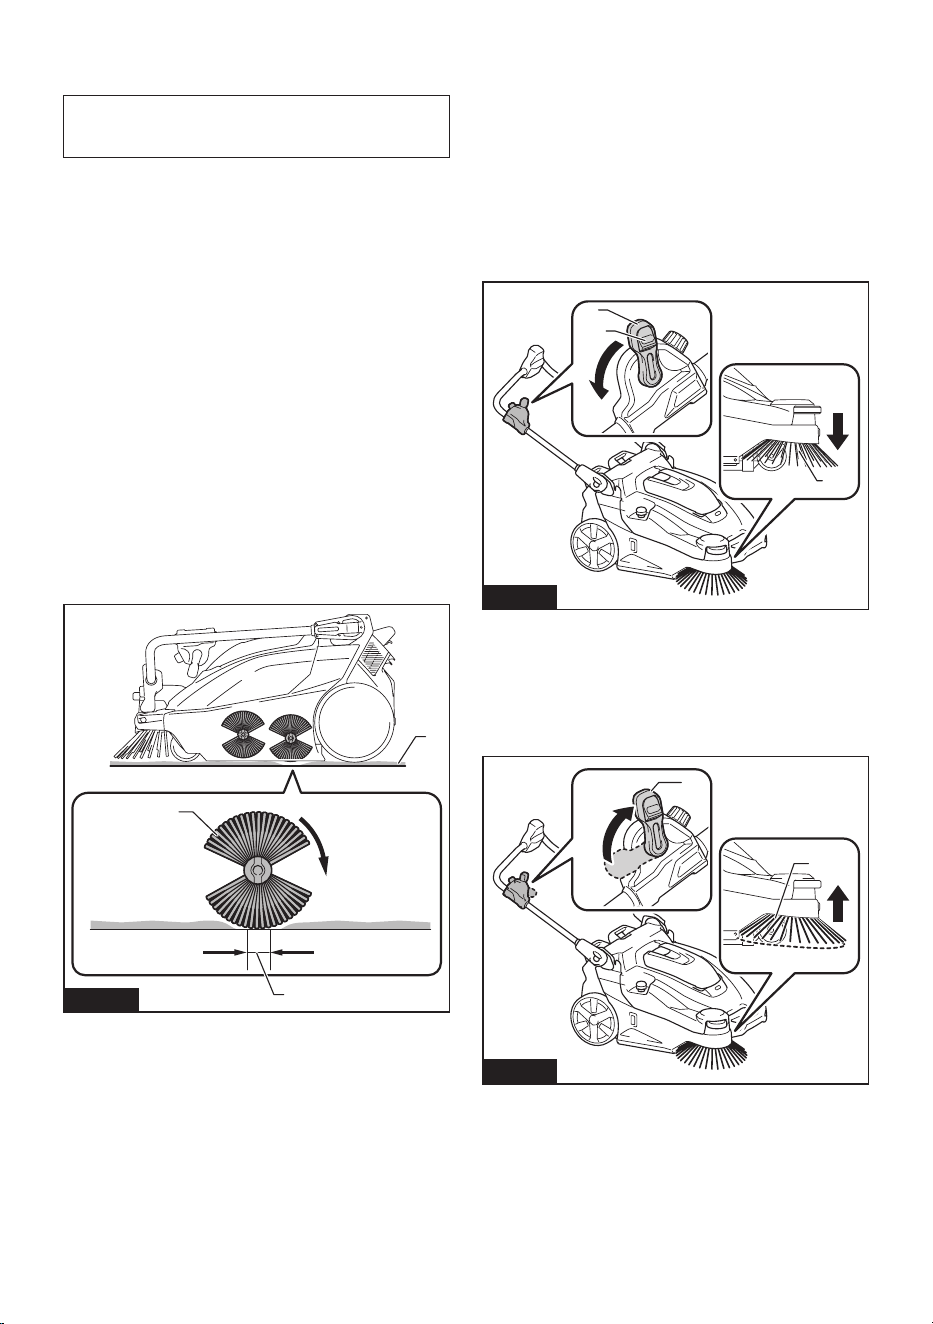
34 ESPAÑOL
Cómo comprobar la altura adecuada
del cepillo principal
AVISO: Observe la altura adecuada. Demasiada
presión sobre el cepillo principal acelera su desgaste
y acorta el tiempo de funcionamiento.
El ancho de pista del cepillo principal indica la altura
apropiada del cepillo principal.
1. Levante la parte delantera del aparato sujetando
la empuñadura o el mango. Mueva el aparato a una
supercieplanacubiertaconlossiguientesmateriales,
yluegobájelosuavementesobrelasupercie.
• Capa de polvo
• Capa de tiza
2. Encienda el interruptor de ENCENDIDO/
APAGADO y gire los cepillos principales aprox. 15 - 30
segundos.
3. Apague el interruptor de ENCENDIDO/
APAGADO. Levante la parte frontal del aparato para
evitar que el cepillo principal entre en contacto con la
supercieymuevaelaparatoaotraárea.
Compruebe que la pista del cepillo principal sea rec-
tangular uniformemente, 25 mm a 40 mm (1" - 1-9/16")
de ancho.
Reajuste la altura utilizando la perilla de ajuste de
altura del cepillo principal si la forma de la pista no es
apropiada.
1
3
2
Fig.17
►1. Capa de polvo y tiza 2. Cepillo principal (lado
trasero) 3. Pista
Encendido o apagado del cepillo
lateral
El cepillo lateral se puede utilizar para ampliar el ancho
de la limpieza, y también para limpiar las áreas a lo
largo de las paredes.
Para usar el cepillo lateral, mantenga presio-
nado el botón de desbloqueo y baje la palanca de
ENCENDIDO/APAGADO del cepillo lateral.
Elcepillolateralsebajahastalasuperciedelpiso.
Cuando el cepillo lateral está encendido, gira junto con
los cepillos principales.
1
2
3
Fig.18
►1. Cepillo lateral 2. Botón de desbloqueo 3. Palanca
de ENCENDIDO/APAGADO del cepillo lateral
Levante la palanca de ENCENDIDO/APAGADO del
cepillo lateral cuando el cepillo lateral no esté en uso.
Elcepillolateralselevantadelasuperciedelpiso.
Cuando el cepillo lateral está apagado, no gira.
2
1
Fig.19
►1. Cepillo lateral 2. Palanca de ENCENDIDO/
APAGADO del cepillo lateral
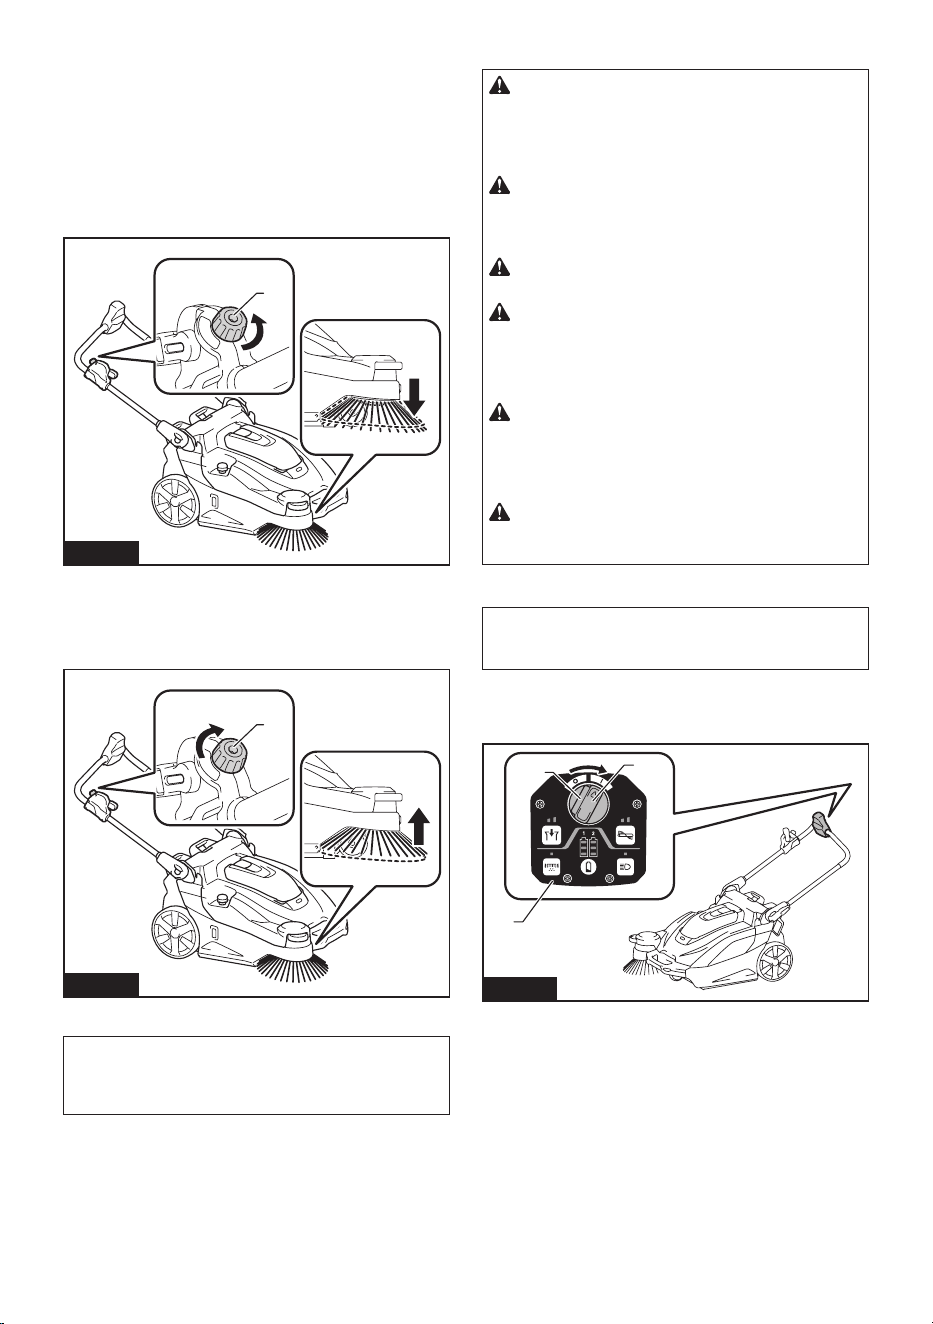
35 ESPAÑOL
Ajuste de altura del cepillo lateral
Cuando el cepillo lateral está encendido, la altura es
ajustable. Ajuste adecuadamente dependiendo del
estado del piso a limpiar, longitud del cepillo lateral, etc.
Gire la perilla de ajuste de altura del cepillo lateral para
ajustar la altura del cepillo lateral.
Girelaperillaenladirecciónindicadaporlaechapara
reducir la altura del cepillo lateral (para ajustarla hacia
un mayor contacto con el piso).
1
Fig.20
►1. Perilla de ajuste de altura del cepillo lateral
Girelaperillaenladirecciónindicadaporlaechapara
aumentar la altura del cepillo lateral (para ajustarla
hacia un menor contacto con el piso).
1
Fig.21
►1. Perilla de ajuste de altura del cepillo lateral
NOTA: El cepillo lateral se desgasta. Compruebe
y ajuste periódicamente la altura del cepillo lateral.
Sinoesposibleajustarsucientementeelcepillo,
sustitúyalo.
Comenzar la limpieza
PRECAUCIÓN: Sujete el aparato rmemente
durante su uso. Además, no deje el aparato des-
atendido, independientemente de si está en una
pendiente o no. El aparato podría moverse y provo-
car un accidente.
PRECAUCIÓN: No gire los cepillos ni inicie
la función de agitación del ltro cuando el conte-
nedor de desechos o la bolsa para polvo no estén
conectados al aparato.
PRECAUCIÓN: No toque los cepillos mien-
tras están girando. Existe el peligro de lesiones.
PRECAUCIÓN: No utilice el aparato para
recoger elementos que podrían enredarse en los
cepillos, como cordones, cordeles o alambre. El
hacerlo podría provocar una avería. Retire previa-
mente los residuos similares a hilo.
PRECAUCIÓN: No utilice el aparato en luga-
res inestables, como lugares donde el suelo tiene
una pendiente pronunciada o es muy resbaladizo.
Existe el peligro de que el funcionamiento sea inesta-
ble o que el aparato se vuelque.
PRECAUCIÓN: Utilice equipo de protección
como mascarilla, gafas y guantes cuando limpie
en un ambiente polvoriento.
Limpieza
AVISO: No encienda el interruptor de ENCENDIDO/
APAGADO forzadamente sin haber oprimido el botón
de desbloqueo.
1. Gire el interruptor de ENCENDIDO/APAGADO
presionando el botón de desbloqueo a la posición «I»
para encender la alimentación.
1
2
3
Fig.22
►1. Interruptor de ENCENDIDO/APAGADO 2. Botón
de desbloqueo 3. Panel de control
2. Siesnecesario,cambielaconguraciónpresio-
nando los interruptores de función del panel de control.
(Consulte “Operaciones del panel de control”).
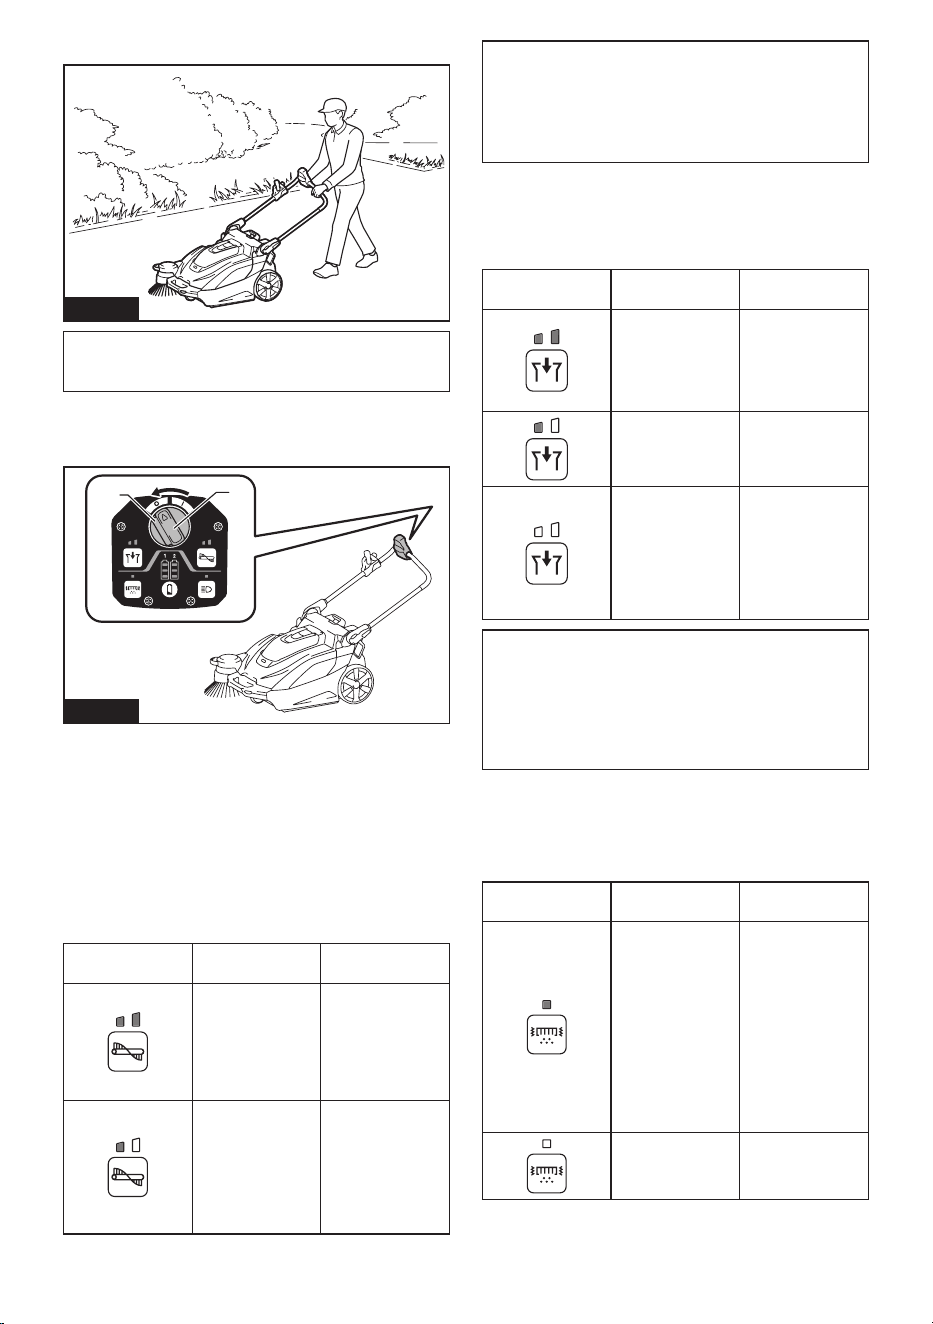
36 ESPAÑOL
3. Empuje el mango para comenzar a limpiar.
Fig.23
NOTA: Para saber cómo encender o apagar el cepillo
lateral, consulte “Encendido o apagado del cepillo
lateral”.
4. Gire el interruptor de ENCENDIDO/APAGADO
presionando el botón de desbloqueo a la posición “O”
para apagar la alimentación.
1
2
Fig.24
►1. Interruptor de ENCENDIDO/APAGADO 2. Botón
de desbloqueo
Operaciones del panel de control
Cambiar la velocidad de rotación del
cepillo principal
Cuando se enciende la alimentación, cada vez que
presiona el [botón del cepillo principal] cambia el modo
de velocidad de rotación del cepillo.
Botón/indicación
de LED
Modo Función
Modo estándar
La velocidad de
rotación del cepi-
llo es estándar.
Esta velocidad
es óptima para
cuando hay mucha
suciedad.
Modo silencioso
Esta velocidad
es óptima para
cuando quiere
limpiar silenciosa-
mente, o cuando
quiere limpiar
durante mucho
tiempo.
NOTA: La velocidad de rotación del cepillo lateral
está vinculada a la velocidad de rotación de los cepi-
llos principales.
NOTA: Cuando se enciende la alimentación, la ope-
ración comienza en el modo que se estaba utilizando
cuando se apagó la alimentación anteriormente.
Cambiar el modo de succión
Cuando se enciende la alimentación, cada pulsación
del [botón de succión] cambia el modo de potencia de
succión.
Botón/indicación
de LED
Modo Función
Modo estándar
La potencia
de succión es
estándar. Esto es
óptimo para limpiar
en un ambiente
polvoriento.
Modo silencioso
Este modo es
óptimo para una
limpieza silenciosa
y prolongada.
Apagado
Esto es óptimo
cuando no se
necesita succión,
así como para
una limpieza más
silenciosa y prolon-
gada que el modo
silencioso.
NOTA: Cuando se enciende la alimentación, la ope-
ración comienza en el modo que se estaba utilizando
cuando se apagó la alimentación anteriormente.
NOTA:Silafuncióndeagitacióndelltroseactiva
mientras el ventilador de succión está en uso, el ven-
tilador de succión se detiene temporalmente y luego
sereiniciacuandosedetienelavibracióndelltro.
Activa o desactiva la función de agitación
del ltro.
Alpresionarel[botónparaagitacióndelltro],seactiva
ydesactivalafuncióndeagitacióndelltro.
Botón/indicación
de LED
Modo Función
Encendido
Activa la función de
agitacióndelltro.
Cuando la función
deagitacióndell-
tro está operativa,
el polvo se elimina
delltroautomá-
ticamente para
eliminar la obs-
trucción. Se apaga
automáticamente
después de unos
15 segundos.
Apagado
Desactiva la fun-
ción de agitación
delltro.
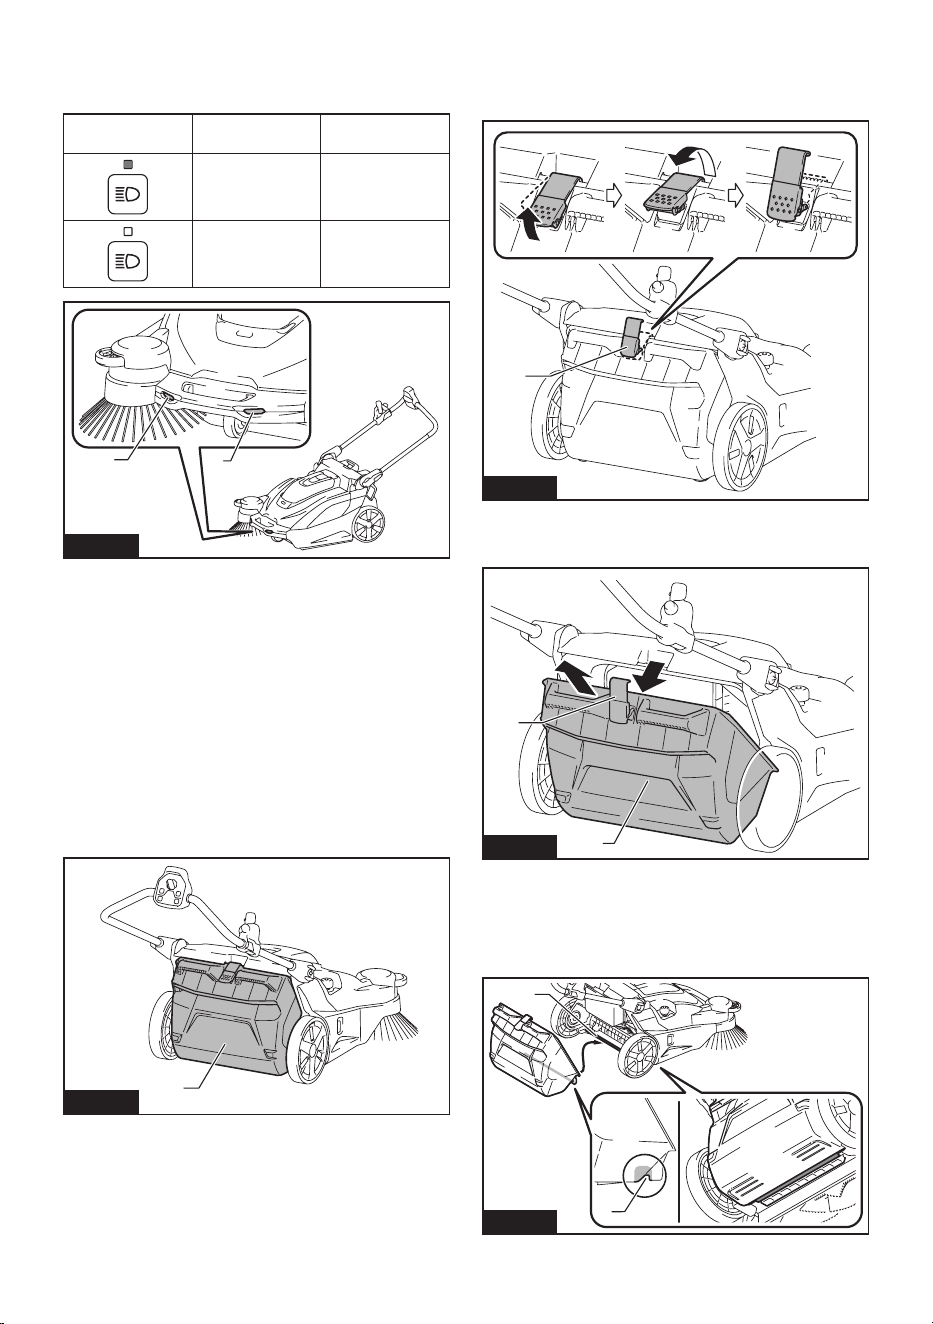
37 ESPAÑOL
Apaga o enciende las lámparas
Al presionar el [botón de lámpara] se alternan las lám-
paras entre encendidas y apagadas.
Botón/indicación
de LED
Modo Función
Encendido
Apaga las
lámparas.
Apagado
Enciende las
lámparas.
1 1
Fig.25
►1. Lámpara
Función de autoapagado de la lámpara
Las lámparas se apagan automáticamente si las dos
condiciones siguientes continúan durante 30 minutos.
• Ninguno de los motores (cepillos principales,
succiónyvibracióndelltro)estáfuncionando.
• No se ha presionado ningún botón.
Mostrar la capacidad restante de la
batería
Oprimael[botóndevericación]paramostrarlacapa-
cidad restante de la batería.
Uso del contenedor de desechos
1
Fig.26
►1. Contenedor de desechos
• Los residuos se recolectan en el contenedor de
desechos.
• Para obtener detalles sobre el procedimiento de
limpieza, consulte “Comenzar la limpieza”.
Retiro
1. Levante el gancho del contenedor de desechos.
2. Retire el gancho del aparato.
1
Fig.27
►1. Gancho
3. Retire el contenedor de desechos del aparato.
1
2
Fig.28
►1. Gancho 2. Contenedor de desechos
Aditamento
1. Coloque la ranura del contenedor de desechos en
la varilla del contenedor de desechos del aparato.
1
2
Fig.29
►1. Ranura 2. Varilla del contenedor de desechos
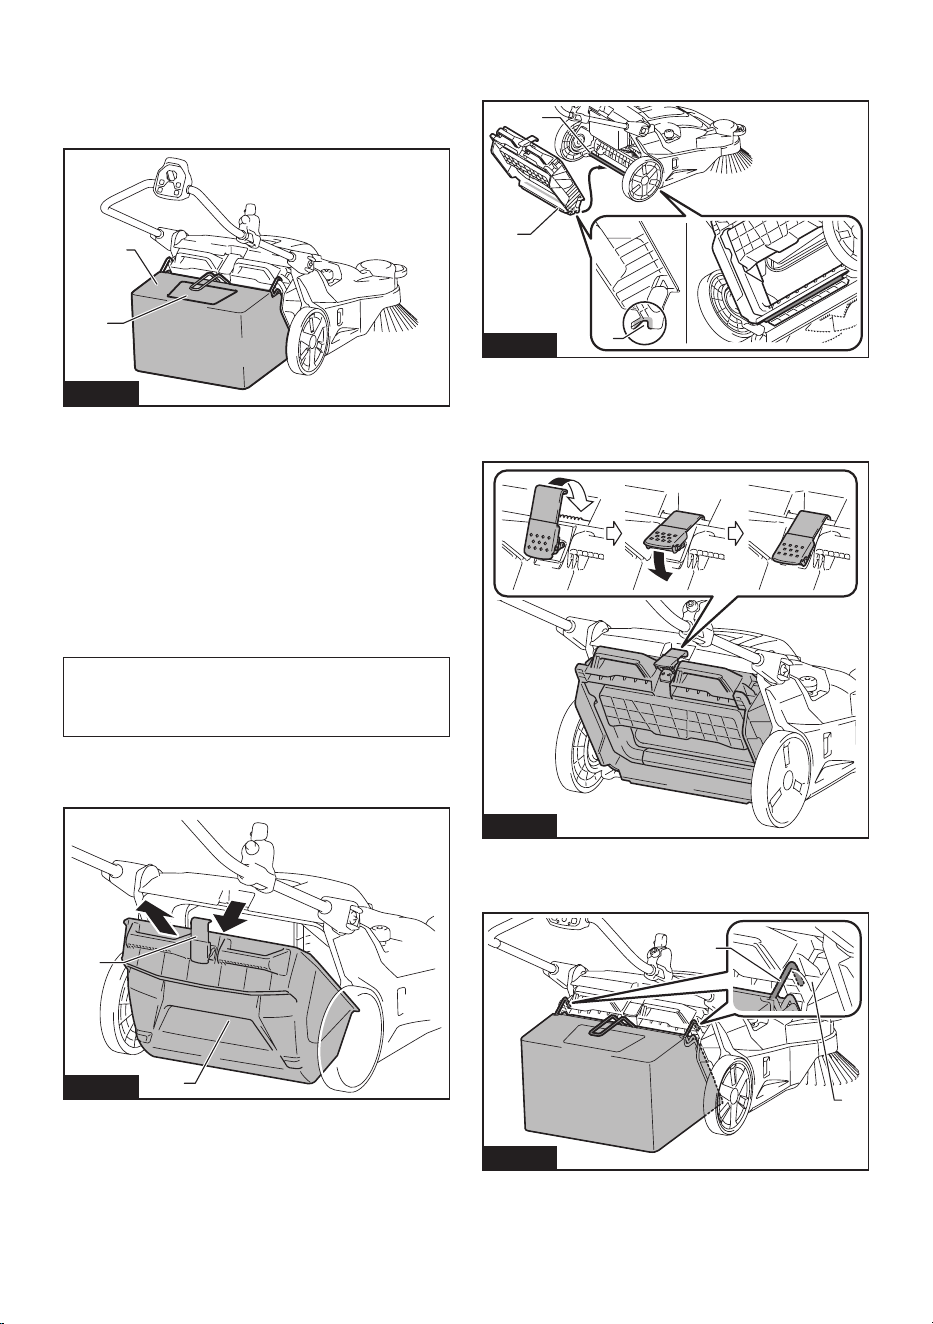
38 ESPAÑOL
2. Coloque el gancho en el aparato, y bájelo para
asegurar el contenedor de desechos en su lugar.
Uso de la bolsa para polvo
Accesorio opcional
1
2
Fig.30
►1. Bolsa para polvo 2. Ventanilla transparente
• La bolsa para polvo tiene una gran capacidad, por
lo que es adecuada para recoger residuos volumi-
nosos como, por ejemplo, hojas caídas.
• Puede comprobar cuánta basura se ha recogido
al ver a través de la ventanilla transparente de la
parte superior.
• Use el contenedor de desechos cuando succione
polvo. La bolsa para polvo no es tan hermética
como el contenedor de desechos.
• Para obtener detalles sobre el procedimiento de
limpieza, consulte “Comenzar la limpieza”.
NOTA: Cuando se recogen residuos ligeros, como
hojas caídas, se recomienda utilizar el modo de
succión. Usar el modo de succión ayuda a recolectar
más basura que cuando el modo está apagado.
Aditamento
1. Retire el contenedor de desechos del aparato.
1
2
Fig.31
►1. Gancho 2. Contenedor de desechos
2. Coloque la ranura del bastidor de la bolsa para
polvo en la varilla del contenedor de desechos del
aparato.
1
3
2
Fig.32
►1. Bastidor de la bolsa para polvo 2. Ranura
3. Varilla del contenedor de desechos
3. Coloque el gancho en el aparato, y bájelo para
asegurar el bastidor de la bolsa para polvo en su lugar.
Fig.33
4. Coloque la bolsa para polvo colgando los ganchos
a la izquierda y a la derecha de la bolsa para polvo en
lasranurasdejación.
2
1
Fig.34
►1. Gancho 2. Ranura
Retiro
Invierta los pasos del procedimiento de colocación.
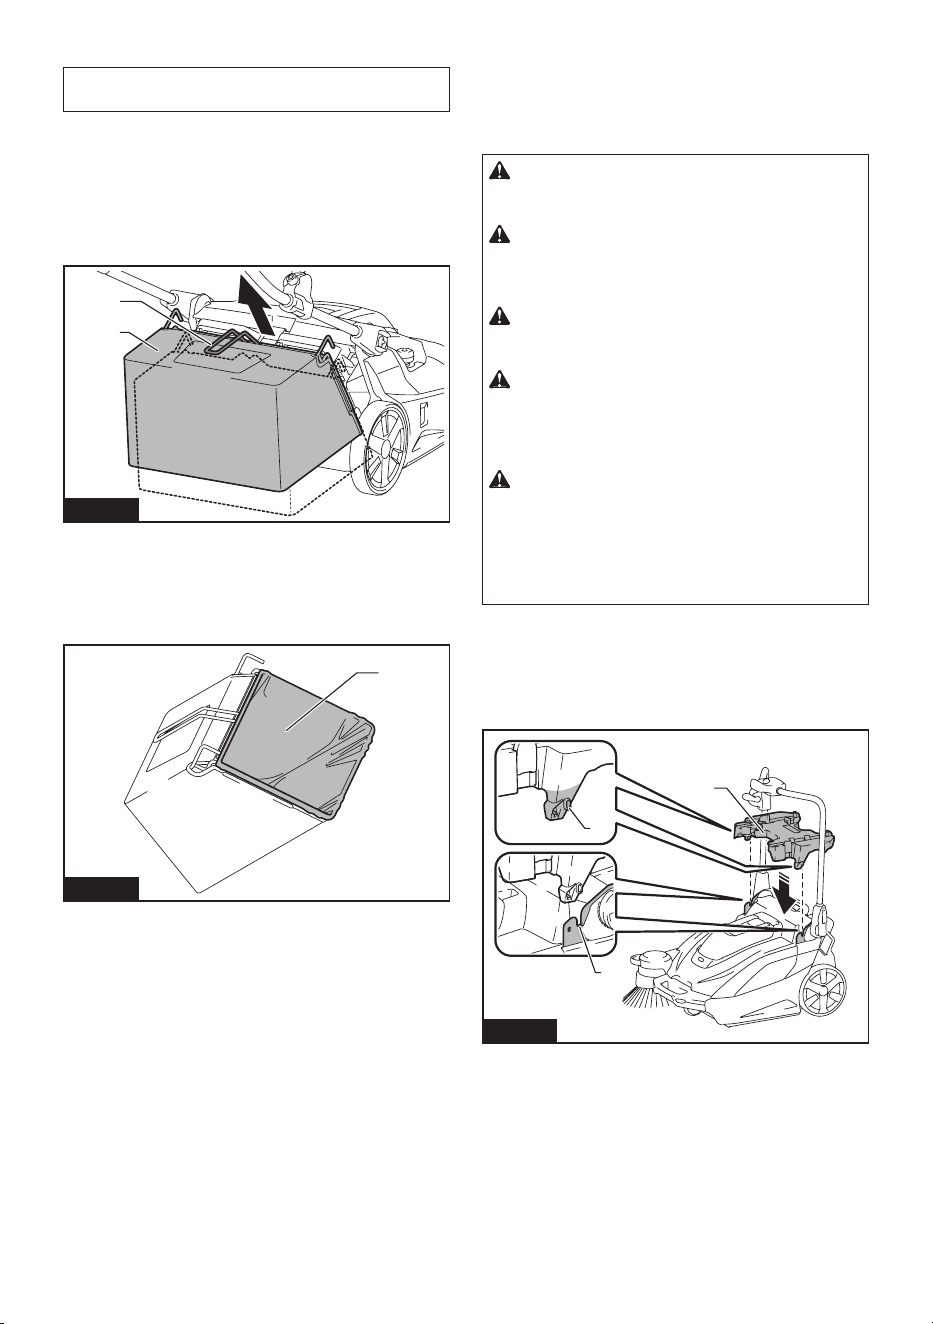
39 ESPAÑOL
Colocar una bolsa de polietileno
AVISO: Al colocar una bolsa de polietileno, puede
resultar difícil ver el interior de la bolsa para polvo.
Colocar una bolsa de polietileno en la bolsa para polvo
le brinda comodidad cuando llega el momento de des-
echar los residuos, porque el trabajo de desecho de los
residuos se puede completar simplemente quitando y
desechando la bolsa de polietileno con su contenido.
1. Levante la empuñadura (de la bolsa para polvo), y
retire la bolsa para polvo.
1
2
Fig.35
►1. Empuñadura (para la bolsa para polvo) 2. Bolsa
para polvo
2. Coloque una bolsa de polietileno (de aplicación
comercial, que el perímetro de apertura de la bolsa sea
superior a 1 600 mm (63")) a la bolsa para polvo.
1
Fig.36
►1. Bolsa de polietileno
3. Coloque la bolsa para polvo colgando los ganchos
a la izquierda y a la derecha de la bolsa para polvo en
lasranurasdejación.
Uso de un adaptador multifunción
Accesorio opcional
Al conectar un adaptador multifunción es posible mon-
tar un Makpac o una unidad portátil de alimentación
eléctrica.
PRECAUCIÓN: Asegure adecuadamente el
adaptador multifunción en su lugar mediante los
tornillos suministrados.
PRECAUCIÓN: Asegure adecuadamente el
Makpac o la unidad portátil de alimentación eléc-
trica en su lugar mediante los pestillos o ganchos
del adaptador multifunción.
PRECAUCIÓN: No coloque objetos que
pesen 20 kg o más (44 lbs) o más en el adaptador
multifunción.
PRECAUCIÓN: No utilice el mango de un
Makpac o una unidad portátil de alimentación
eléctrica montada en el adaptador multifunción
para transportar u operar el aparato. El hacerlo
podría provocar accidentes.
PRECAUCIÓN: No coloque el aparato sobre
su extremo cuando un Makpac o una unidad
portátil de alimentación eléctrica esté montado en
el adaptador multifunción. Hacerlo podría dañar el
mecanismo de bloqueo del adaptador multifunción y
el Makpac o la unidad portátil de alimentación eléc-
trica podrían caerse.
Colocación de un adaptador multifunción
1. Alinee las protuberancias a la izquierda y a la
derecha del adaptador multifunción con las ranu-
ras de montaje del aparato, y coloque el adaptador
multifunción.
1
2
3
Fig.37
►1. Protuberancia 2. Ranura 3. Adaptador
multifunción
Siresultadifícilmontareladaptadormultifunción,aoje
la palanca de bloqueo del mango del aparato. Cuando
aojelapalancadebloqueodelmango,pliegueel
mango hacia abajo para evitar que se caiga, y luego
monte el adaptador multifunción.

40 ESPAÑOL
2. Aprieteloscuatrotornillosparajareladaptador
multifunción en su lugar.
1
Fig.38
►1. Tornillos
Remoción del adaptador multifunción
Invierta los pasos del procedimiento de colocación.
Nombres de las piezas del adaptador
multifunción
2
2
1
1
3
4
4
Fig.39
►1. Pestillo de aseguramiento (para el Makpac)
2. Ganchos A (para el PDC01 / PDC1200 /
PDC1500) 3. Ganchos B (para el PDC1200 /
PDC1500) 4. Ganchos C (para el PDC01)
Montaje de un Makpac
PRECAUCIÓN: No exceda la altura de 315
mm (12-3/8") cuando monte el Makpac.
Coloquermementelosdospestillosdeaseguramiento
a la izquierda y a la derecha en las muescas de mon-
taje del Makpac, para asegurar el Makpac en su lugar.
Max
315 mm
(12-3/8″)
1
2
Fig.40
►1. Makpac 2. Pestillos de aseguramiento
Retiro de un Makpac
Desenganche los dos pestillos de aseguramiento a la
izquierda y a la derecha, y retire el Makpac.
Montaje de una unidad portátil de
alimentación eléctrica
PRECAUCIÓN: No utilice el aparato con la
unidad portátil de alimentación eléctrica en su
espalda.
PRECAUCIÓN: Al montar una unidad portátil
de alimentación eléctrica en el adaptador multi-
función, asegúrese de que el cable de la unidad
portátil de alimentación eléctrica esté dispuesto
correctamente. De lo contrario, el suelo podría
rasparelcableojoyprovocarunadesconexión,
humo o incendio.
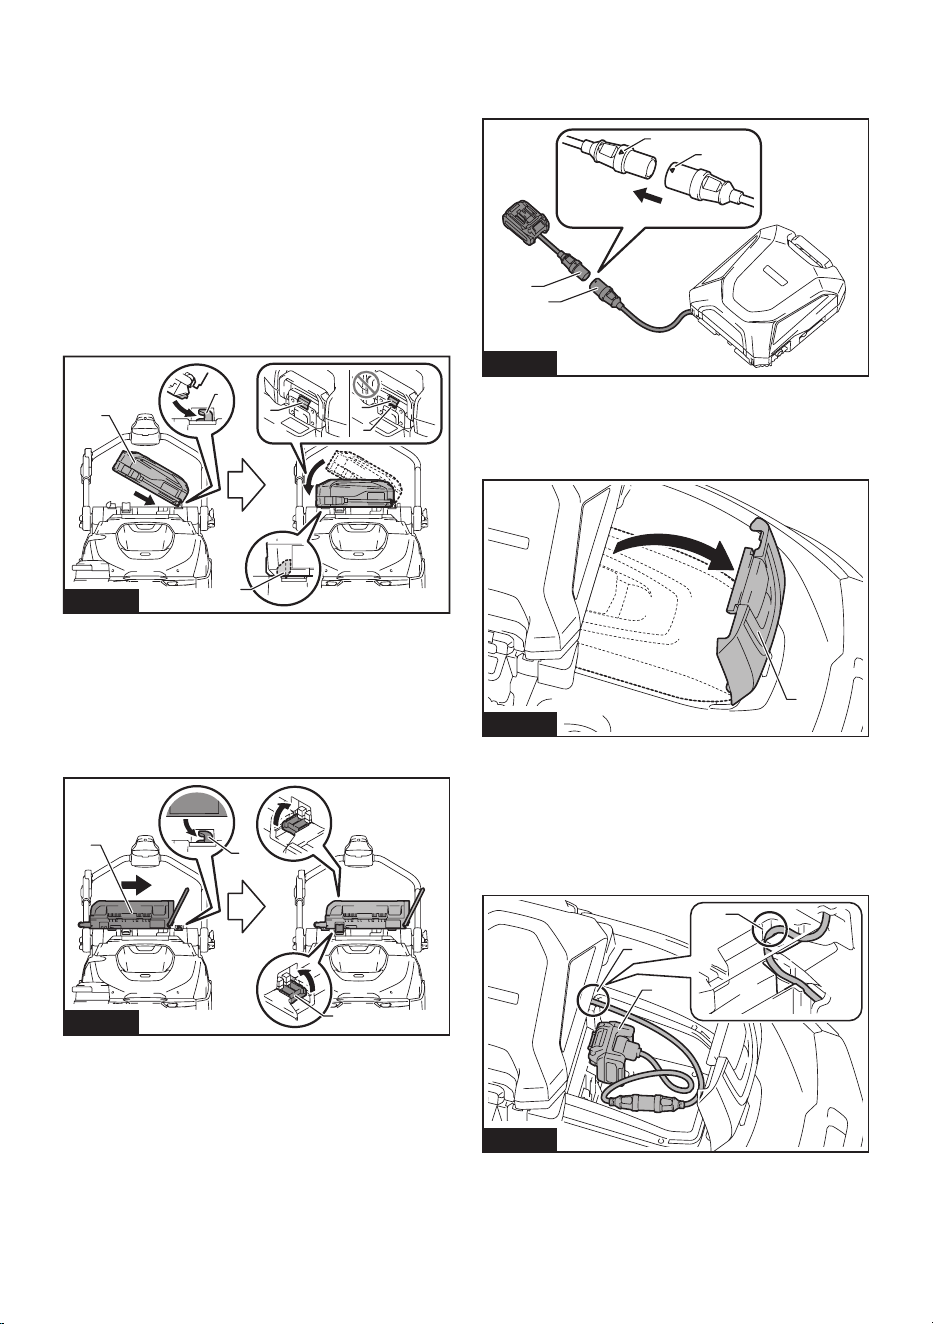
41 ESPAÑOL
1. Coloque el borde inferior de la unidad portátil de
alimentación eléctrica en los ganchos A, y asegúrela en
sulugarconelganchoBoelganchoC.Conrmeque
la unidad portátil de alimentación eléctrica no se separe
del aparato levantando ligeramente el mango de la
unidad portátil de alimentación eléctrica.
• PDC1200 / PDC1500
Coloque el borde inferior de la unidad portátil de ali-
mentación eléctrica en los ganchos A, y asegúrela en
sulugarconelganchoB.Conrmequelaunidadpor-
tátil de alimentación eléctrica no se separe del aparato
levantando ligeramente el mango de la unidad portátil
de alimentación eléctrica.
Si el indicador rojo del botón de bloqueo está visible, la
unidad portátil de alimentación eléctrica no está com-
pletamente bloqueada.
4
4
5
1
2
3
Fig.41
►1. Unidad portátil de alimentación eléctrica
2. Ganchos A 3. Gancho B 4. Botón de bloqueo
5. Indicador rojo
• PDC01
Coloque el borde inferior de la unidad portátil de ali-
mentación eléctrica en los ganchos A, y asegúrela en
su lugar con los ganchos C. No se utiliza el gancho B.
1
2
3
Fig.42
►1. Unidad portátil de alimentación eléctrica
2. Ganchos A 3. Ganchos C
2. Alinee las marcas triangulares del enchufe de la
unidad portátil de alimentación eléctrica y el enchufe
deladaptador(paralabateríaXGT),yencájelosrme-
mente hasta donde topen.
1
2
3
3
Fig.43
►1. Receptáculo de la unidad portátil de alimentación
eléctrica 2. Enchufe del adaptador (para batería
XGT) 3. Marcas de triángulo
3. Abra la tapa de la caja para baterías.
1
Fig.44
►1. Tapa de la caja para baterías
4. Comosemuestraenlagura,coloqueelcablede
manera que pase por la ranura del adaptador multifun-
ción y la caja para baterías. Alinee el adaptador (para la
batería XGT) con la ranura en la abertura de inserción
de la batería, e inserte el adaptador hasta que encaje
en su lugar.
2
3
1
Fig.45
►1. Muesca en el adaptador multifunción 2. Muesca
en la caja para baterías 3. Adaptador (para batería
XGT)
5. Cierre la tapa de la caja para baterías.
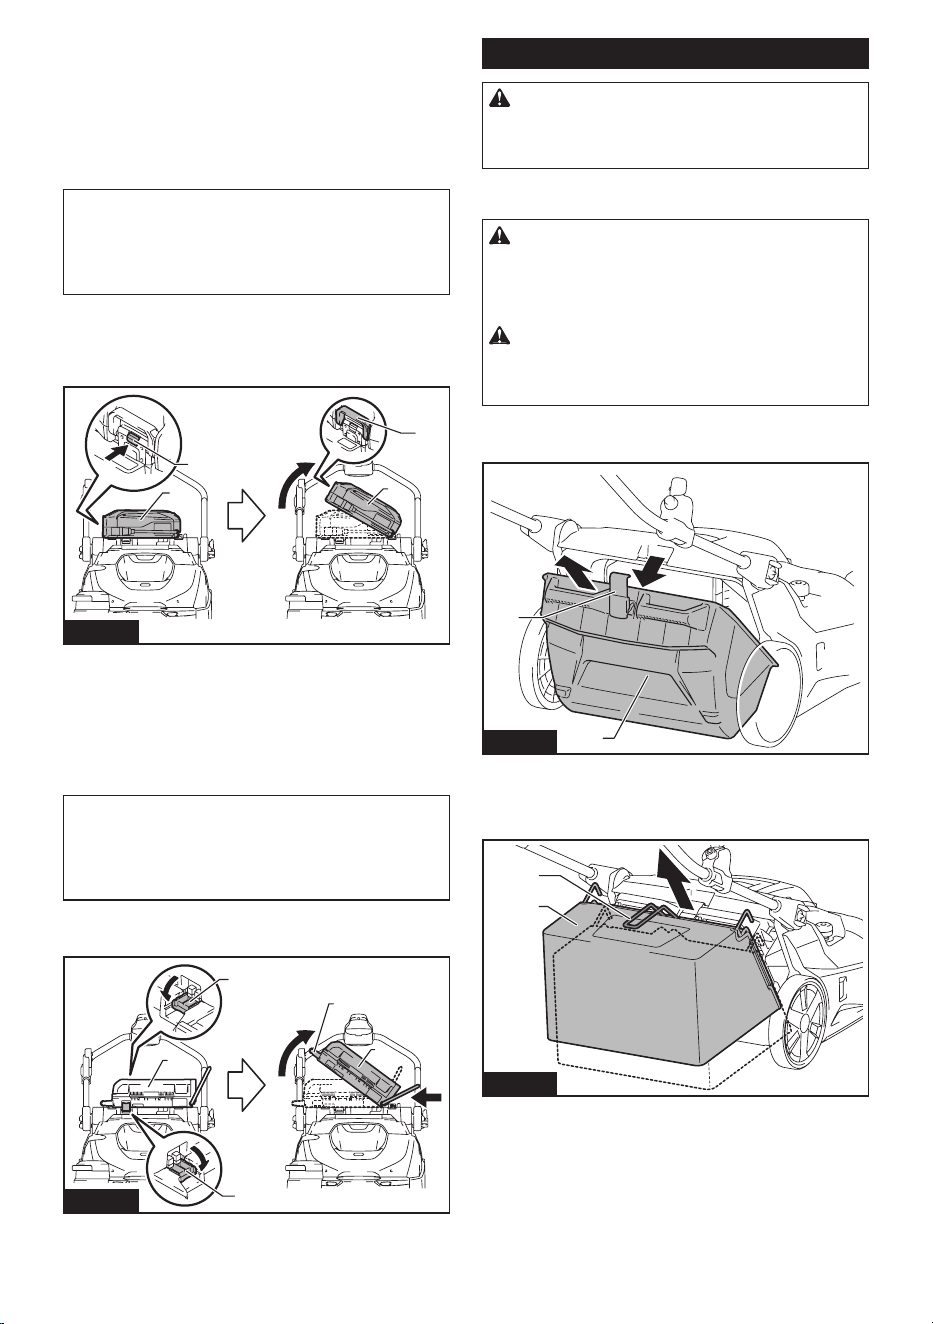
42 ESPAÑOL
Extracción de una unidad portátil de
alimentación eléctrica
PDC1200 / PDC1500
1. Retire el enchufe del adaptador (para batería
XGT) del receptáculo de la unidad portátil de alimenta-
ción eléctrica, y retire el cable.
AVISO: No tire del cable cuando lo retire del
enchufe del adaptador. Además, no transporte la
unidad portátil de alimentación eléctrica sujetán-
dola únicamente por el cable.
El cable podría romperse o dañarse de otro modo.
2. Mientras mantiene presionado el botón de blo-
queo de la unidad portátil de alimentación eléctrica,
levante el mango de la unidad portátil de alimentación
eléctrica.
1
2
3
1
Fig.46
►1. Unidad portátil de alimentación eléctrica 2. Botón
de bloqueo 3. Mango
PDC01
1. Retire el enchufe del adaptador (para batería
XGT) del receptáculo de la unidad portátil de alimenta-
ción eléctrica, y retire el cable.
AVISO: No tire del cable cuando lo retire del
enchufe del adaptador. Además, no transporte la
unidad portátil de alimentación eléctrica sujetán-
dola únicamente por el cable.
El cable podría romperse o dañarse de otro modo.
2. Desenganche los ganchos C y extraiga la unidad
portátil de alimentación eléctrica, y luego levántela.
1
2
2
3
1
Fig.47
►1. Unidad portátil de alimentación eléctrica
2. Ganchos C 3. Mango
Manejo después del uso
PRECAUCIÓN: Si el aparato no se usará,
asegúrese de que el interruptor de ENCENDIDO/
APAGADO esté apagado y que se hayan retirado
las baterías.
Desechado de los residuos
PRECAUCIÓN: Utilice siempre equipo de
protección, como mascarilla y guantes, cuando
elimine los residuos. Existe el peligro de que pueda
tocarobjetosaladosenlosresiduos,loquepodría
provocar lesiones.
PRECAUCIÓN: Deseche los residuos lo más
rápido que pueda, antes de que se acumulen
demasiados. La potencia de succión podría verse
reducida.
1. Retire el gancho y luego retire el contenedor de
desechos del aparato.
1
2
Fig.48
►1. Contenedor de desechos 2. Gancho
Cuando utilice la bolsa para polvo, levante la empuña-
dura y levante la bolsa para polvo para sacarla.
1
2
Fig.49
►1. Empuñadura (para la bolsa para polvo) 2. Bolsa
para polvo
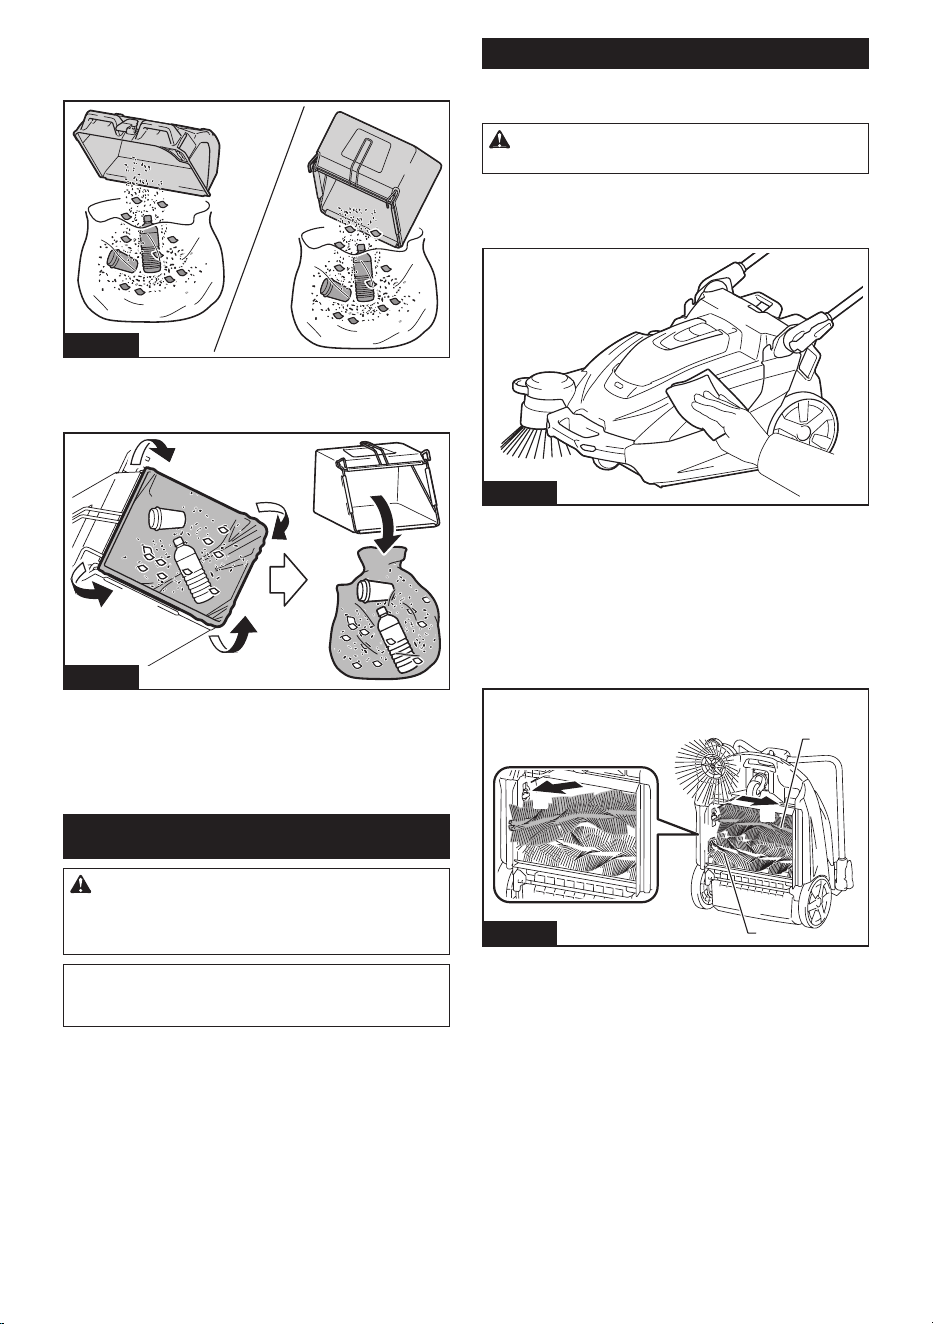
43 ESPAÑOL
2. Transporte el contenedor de desechos o la bolsa
para polvo al lugar de recogida de residuos, y deseche
estos.
Fig.50
Al utilizar la bolsa para polvo, colocar una bolsa de
polietileno en su interior le permitirá desechar la bolsa
de polietileno junto con los residuos.
Fig.51
3. Después de desechar los residuos, monte el con-
tenedor de desechos o la bolsa para polvo en el apa-
rato. Asegúrese de que el gancho esté correctamente
asegurado.
MANTENIMIENTO
PRECAUCIÓN: Asegúrese siempre de que el
aparato haya sido apagado y que el cartucho de
batería haya sido extraído antes de intentar reali-
zar una inspección o tarea de mantenimiento.
AVISO: Nunca use gasolina, bencina, diluyente
(tíner), alcohol o sustancias similares. Puede que
esto ocasione grietas o descoloramiento.
Mantenimiento
Limpieza del cuerpo del aparato
PRECAUCIÓN: No lave el cuerpo del aparato
con agua. El hacerlo podría provocar una avería.
Para eliminar la suciedad del cuerpo del aparato, lím-
pielo con un paño humedecido con una pequeña canti-
dad de detergente neutro diluido.
Fig.52
Limpieza de los cepillos principales
1. Pliegue hacia abajo el mango, y coloque el apa-
ratosobresuextremocomosemuestraenlagura.
2. Empuje un cepillo principal en la dirección indi-
cadaporlaechaAenlagura.
Retire un extremo del cepillo principal en la dirección
indicadaporlaechaBenlagura.
1
1
A
B
Fig.53
►1. Cepillo principal
3. Retire el otro extremo del cepillo principal del eje
del cepillo.
4. De manera similar, retire el otro cepillo principal.
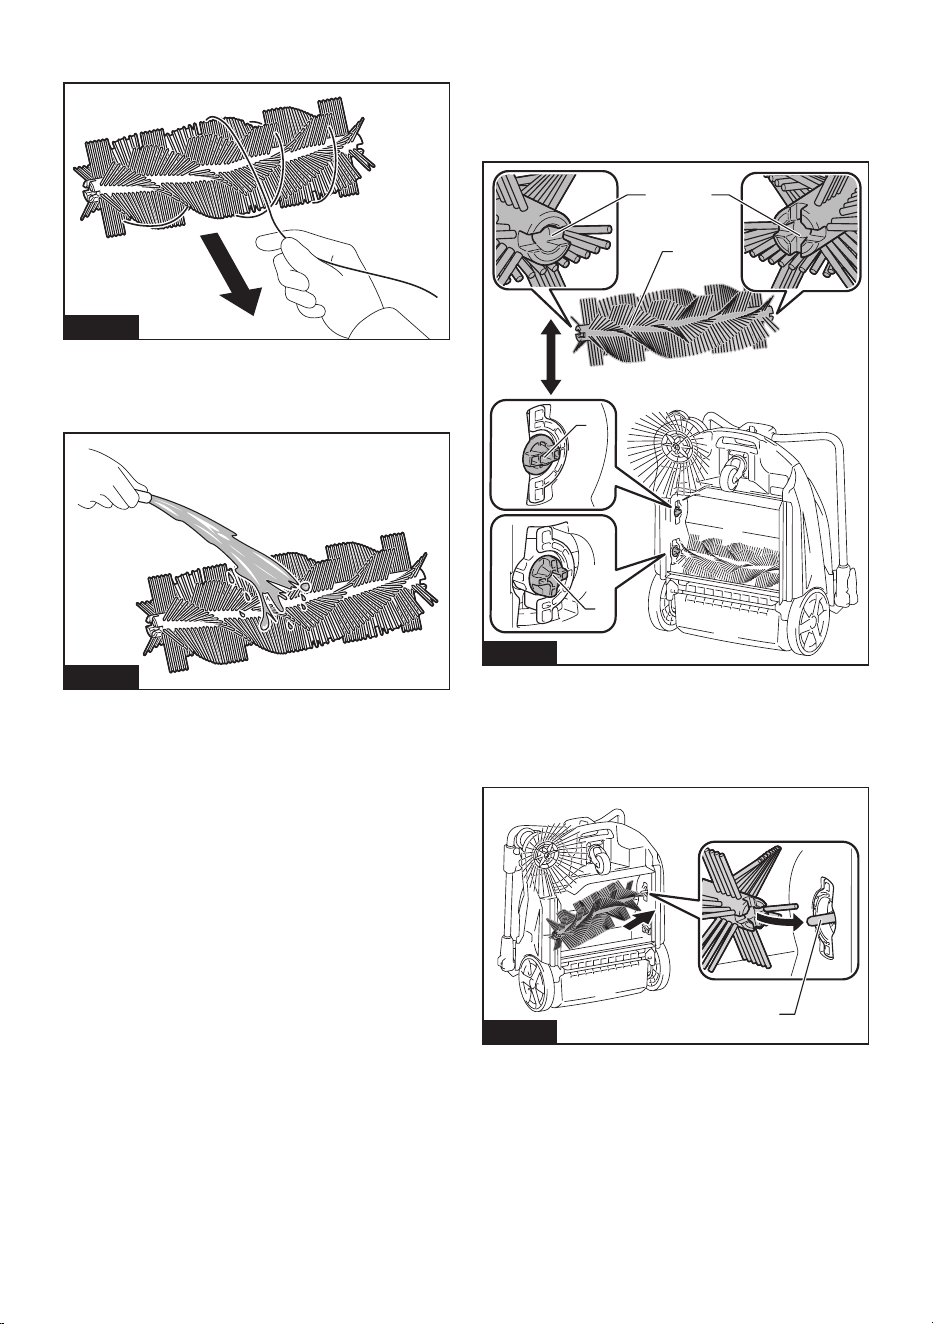
44 ESPAÑOL
5. Si hay residuos en forma de hilo adheridos a los
cepillos, retírelos con la mano.
Fig.54
6. Sacuda el polvo y lave los cepillos con agua si
están muy sucios. Después del lavado, deje secar a la
sombra; no los utilice hasta que estén completamente
secos.
Fig.55
7. Oriente cada cepillo principal de modo que las
formas de los extremos coincidan con las áreas de
montajedelaparato,comosemuestraenlagura.
Si las formas de los extremos no coinciden, invierta la
orientación izquierda-derecha del cepillo principal para
que coincidan.
1
2 3
2
3
Fig.56
►1. Cepillo principal 2. Forma “menos” 3. Forma
“más”
8. Coloque un cepillo principal en el eje del cepillo
delaparatoenladirecciónindicadaporlaechaenla
gura.
1
Fig.57
►1. Eje del cepillo
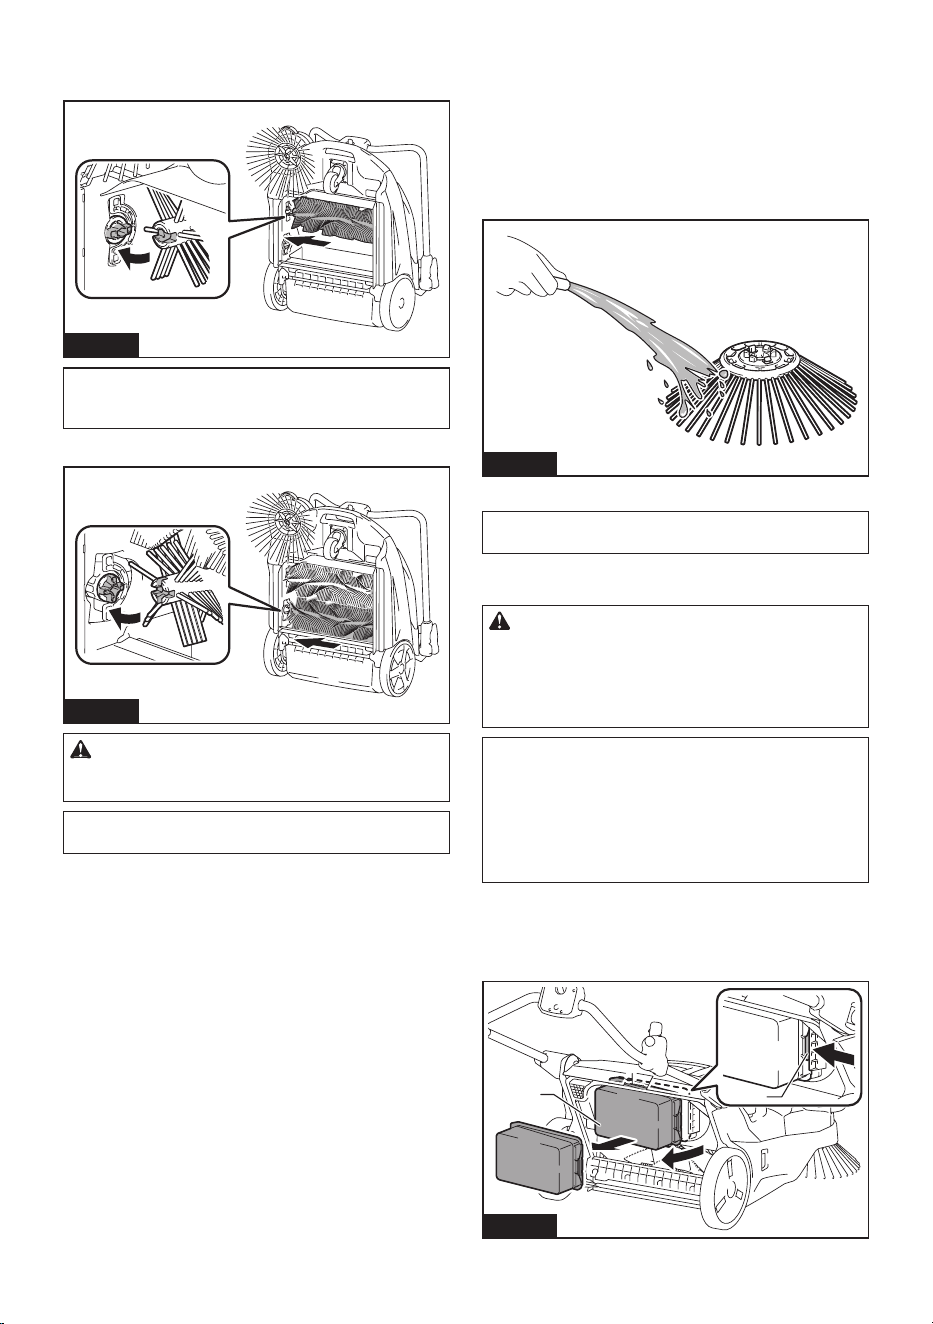
45 ESPAÑOL
9. Coloque un cepillo principal en el área de montaje
delaparato,enladirecciónindicadaporlaechaenla
gura,yasegúreloensulugar.
Fig.58
NOTA: Si las formas de los extremos no coinciden,
no podrá montar el cepillo principal. En este caso,
regrese al paso 7 y reinicie el proceso.
10. De manera similar, monte el otro cepillo principal.
Fig.59
PRECAUCIÓN: Después de montar los cepi-
llos principales, compruebe que las formas estén
correctamente acopladas.
NOTA: Si los cepillos principales están desgastados
y tienen una longitud más corta, reemplácelos.
Limpieza del cepillo lateral
Para conocer el procedimiento de montaje y desmontaje del
cepillo lateral, consulte “Colocar y quitar el cepillo lateral”.
1. Retire el cepillo lateral.
2. Sacuda el polvo y lave los cepillos con agua si
están muy sucios. Después del lavado, deje secar a la
sombra; no los utilice hasta que estén completamente
secos.
Fig.60
3. Monte el cepillo lateral.
NOTA: Si el cepillo lateral está desgastado y tiene
una longitud más corta, reemplácelo.
Limpieza de los ltros
PRECAUCIÓN: Asegúrese de que los ltros
estén montados correctamente, y no utilice el
aparato cuando los ltros no estén en su lugar.
Además, no utilice ltros que estén dañados o
mojados. Podría producirse una falla por exceso de
calor del motor o una avería.
AVISO: Los ltros se pueden lavar y reutilizar.
Para evitar daños a los ltros, no utilice los
siguientes elementos al limpiarlos.
— Sacudidores de aire
— Hidrolavadoras de alta presión
— Cepillos hechos de materiales duros como el
metal
1. Retire el contenedor de desechos.
2. Mientrasempujaelganchodelpreltroenla
direcciónindicadaporlaechaenlagura,retireel
preltro.
1
2
Fig.61
►1.Preltro2. Gancho
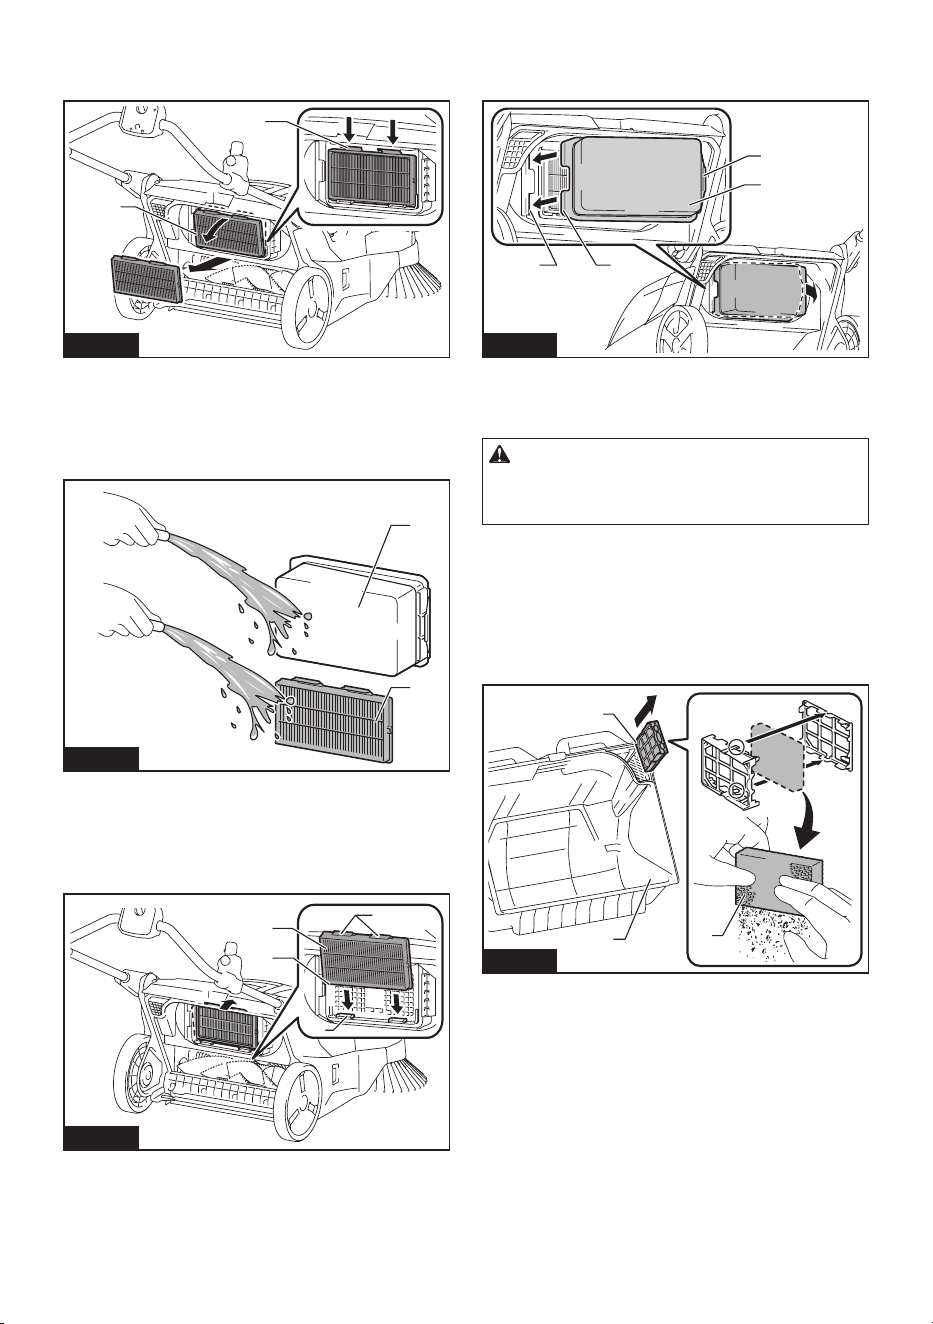
46 ESPAÑOL
3. MientrasempujalosganchosdelltroHEPAenla
direcciónindicadaporlasechasenlagura,retireel
ltroHEPA.
1
2
Fig.62
►1. Filtro HEPA 2. Gancho
4. Sacudaelpolvoylavelosltrosconaguasiestán
muysucios.Despuésdellavado,dejesecarelpreltro
yelltroHEPAalasombra;nolosutilicehastaque
estén completamente secos.
1
2
Fig.63
►1.Preltro2. Filtro HEPA
5. ParamontarelltroHEPA,coloqueelbordedel
ltroHEPAenlasranurasdelaparato,ypresioneel
ltroensulugar.Veriquequelosganchosesténbien
jos.
1
2
3
4
Fig.64
►1. Filtro HEPA 2. Borde 3. Ranura 4. Gancho
6. Paramontarelpreltro,coloquelasprotuberan-
ciasdelpreltroenlasranurasdelaparatoypresioneel
ltroensulugar.Veriquequeelganchoestébienjo.
1
23
4
Fig.65
►1.Preltro2. Protuberancia 3. Ranura 4. Gancho
Limpieza del ltro de esponja
PRECAUCIÓN: Después de limpiar el ltro
de esponja, asegúrese de instalarlo en el conte-
nedor de desechos. Si este fue lavado con agua,
séquelo antes de instalarlo.
Cuandoelltrodeesponjasehayatapadoconpolvo,
retírelo del contenedor de desechos y luego límpielo o
lávelo con agua.
1. Retire la funda de esponja del contenedor de
desechos.
2. Abralacajadelaesponjaparaquitarelltrode
esponja.
1
2
3
Fig.66
►1. Contenedor de desechos 2. Caja de la esponja
3. Filtro de esponja
3. Limpieelltrodeesponjaoláveloconagua.
4. Instaleelltrodeesponjaensuposiciónoriginal.
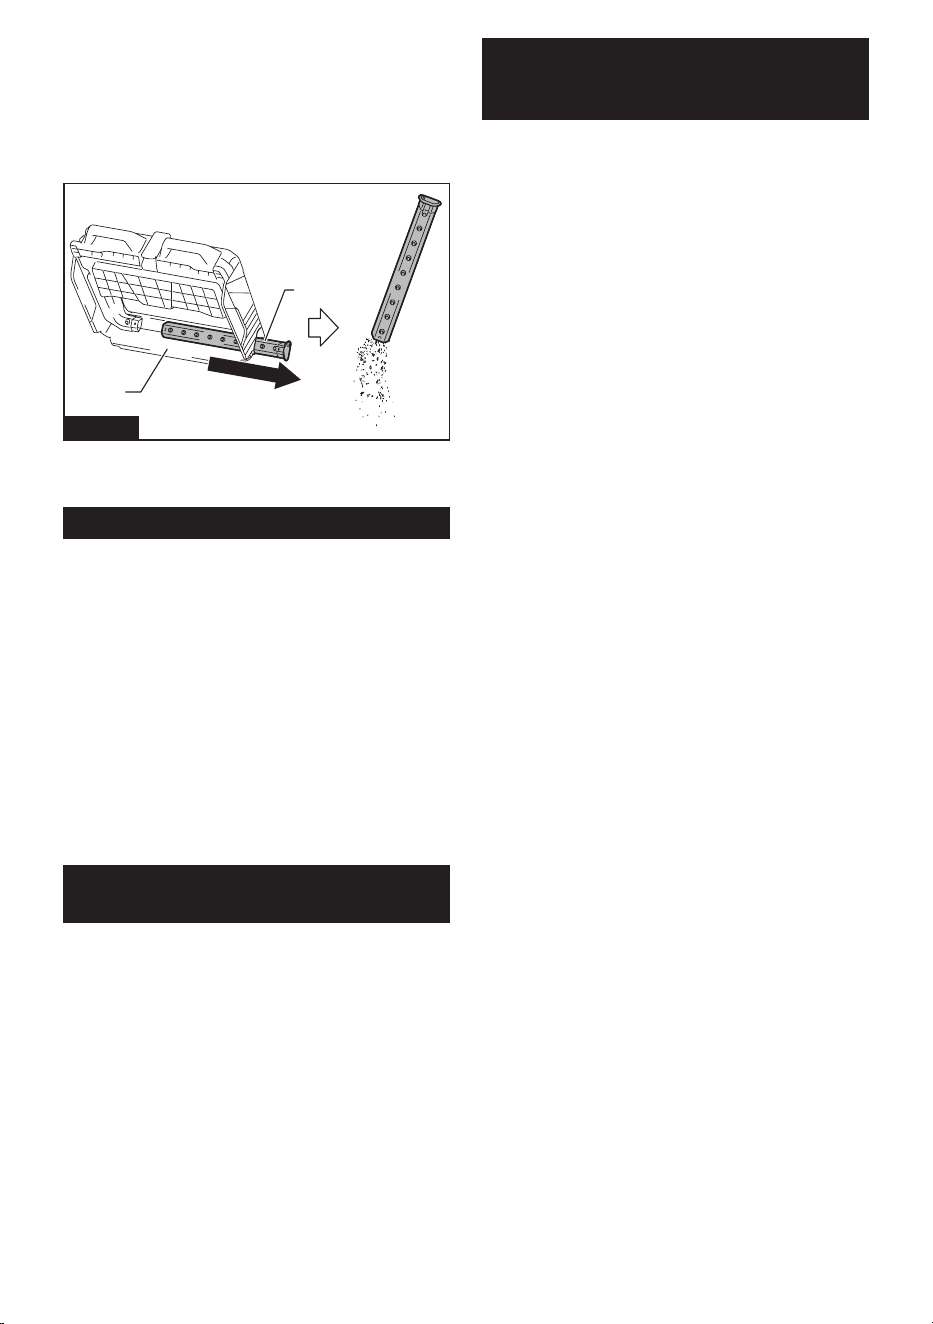
47 ESPAÑOL
Limpieza del tubo
Al utilizar la bolsa para polvo (accesorio opcional), el
tubopodríaobstruirsecondesechosnoscomoarena,
guijarros y pequeñas hojas caídas.
1. Saque el tubo del bastidor de la bolsa para polvo.
2. Retire los residuos del tubo.
1
2
Fig.67
►1. Bastidor de la bolsa para polvo 2. Tubo
3. Instale el tubo de esponja en su posición original.
Inspecciones periódicas
Para garantizar una larga vida útil del aparato y un uso
seguro, realice periódicamente las inspecciones que se
enumeran a continuación.
Inspecciones diarias
• Contenedor de desechos: vacíe el contenedor.
• Filtros: si están sucios, límpielos.
• Cepillos: si se enredan restos similares a hilos,
retírelos.
• Mando y piezas móviles: compruebe que se mue-
ven con suavidad.
Inspecciones semanales
• Altura del cepillo principal: si la altura no es la
adecuada, reajústela.
• Tornillos (cuando se utiliza el adaptador multifun-
ción):siestánojos,apriételos.
Reemplazo/reposición de artículos
consumibles
Reemplazo de cepillos
Si los cepillos principales y el cepillo lateral se desgastan,
solicite reemplazo a su centro de servicio local de Makita.
Reemplazo de los cepillos principales
Reemplace los cepillos principales si no se pueden ajustar ade-
cuadamente. Consulte “Ajuste de altura del cepillo principal”.
Para retirar y montar los cepillos principales, consulte
“Limpieza de los cepillos principales”.
Reemplazo del cepillo lateral
Reemplace el cepillo lateral si no hace contacto con el piso
cuando la perilla de ajuste de altura del cepillo lateral se gira a la
posición más baja. Consulte “Ajuste de altura del cepillo lateral”.
Para retirar y montar el cepillo lateral, consulte “Colocar
y quitar el cepillo lateral”.
GARANTÍA LIMITADA DE
MAKITA
Ésta Garantía no aplica para México
Consulte la hoja de la garantía anexa para ver los
términos más vigentes de la garantía aplicable a este
producto. En caso de no disponer de esta hoja de
garantía anexa, consulte los detalles sobre la garantía
descritos en el sitio web de su país respectivo indicado
a continuación.
Estados Unidos de América: www.makitatools.com
Canadá: www.makita.ca
Otros países: www.makita.com

Some dust created by power sanding, sawing, grinding, drilling, and other
construction activities contains chemicals known to the State of California
to cause cancer, birth defects or other reproductive harm. Some examples
of these chemicals are:
• lead from lead-based paints,
• crystalline silica from bricks and cement and other masonry products, and
• arsenic and chromium from chemically-treated lumber.
Your risk from these exposures varies, depending on how often you do this
type of work. To reduce your exposure to these chemicals: work in a well
ventilated area, and work with approved safety equipment, such as those
dust masks that are specially designed to filter out microscopic particles.
WARNING
< USA only >
ADVERTENCIA
Algunos polvos creados por el lijado, aserrado, esmerilado, taladrado y
otras actividades de la construcción contienen sustancias químicas
reconocidas por el Estado de California como causantes de cáncer, defectos
de nacimiento y otros peligros de reproducción. Algunos ejemplos de estos
productos químicos son:
• plomo de pinturas a base de plomo,
• sílice cristalino de ladrillos y cemento y otros productos de albañilería, y
• arsénico y cromo de maderas tratadas químicamente.
El riesgo al que se expone varía, dependiendo de la frecuencia con la que
realice este tipo de trabajo. Para reducir la exposición a estos productos
químicos: trabaje en un área bien ventilada y póngase el equipo de seguridad
indicado, tal como las máscaras contra polvo que están especialmente
diseñadas para filtrar partículas microscópicas.
< Sólo en los Estados Unidos >
Makita Corporation
3-11-8, Sumiyoshi-cho,
Anjo, Aichi 446-8502 Japan
www.makita.com
885A57A943
GSV01-1
EN, ESMX
20240129
