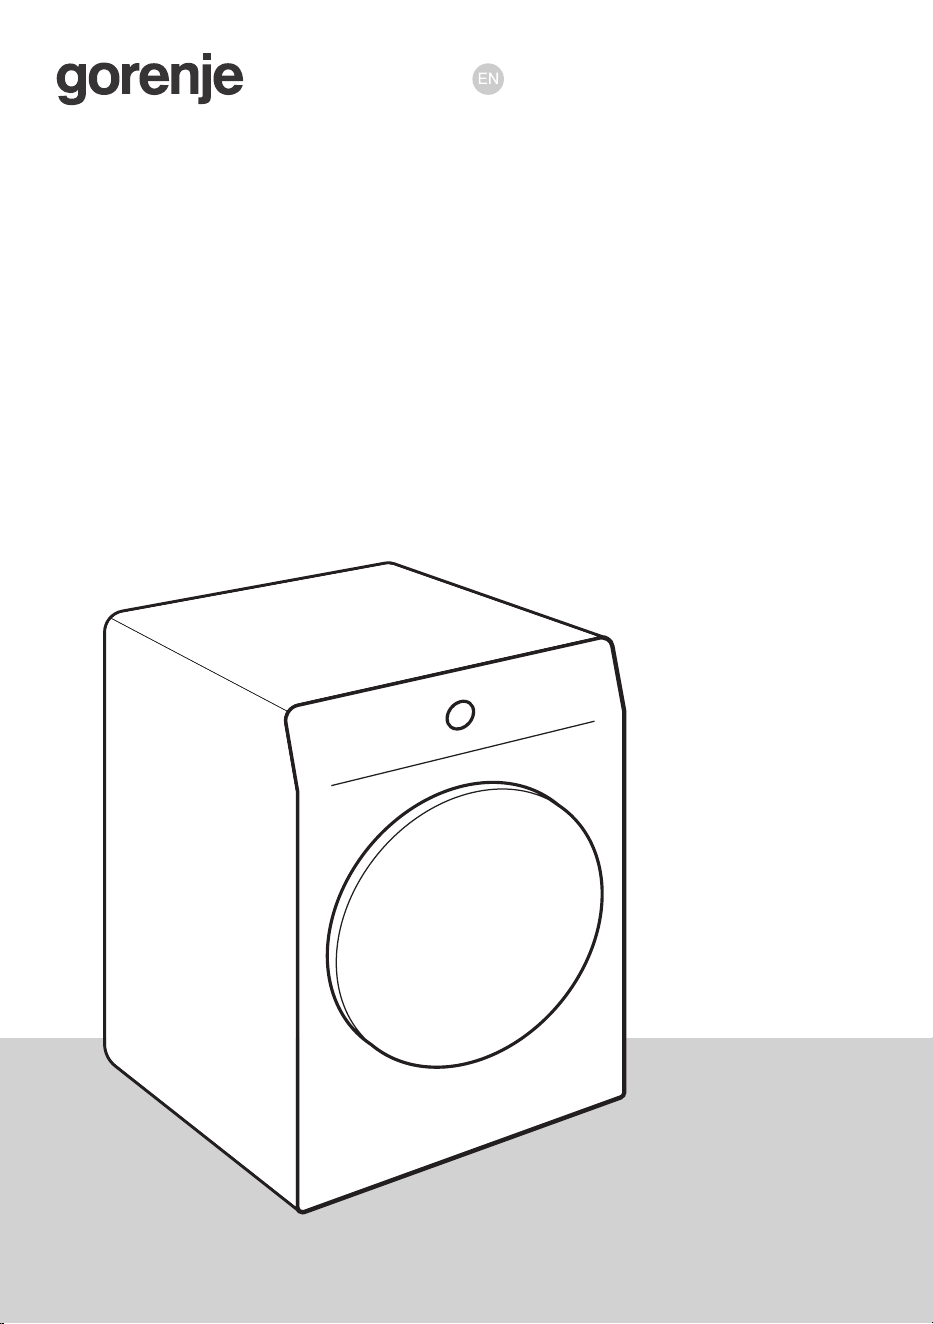
USER MANUAL
TUMBLE DRYER
Life is complicated today. Let's make at least laundry care simple! Your new dryer uses
innovative technology and the latest achievements in laundry care to help you simplify
your daily household chores.
The technology offers the gentlest care for any garment, with minimum creasing.
Moreover, your new dryer is also friendly to the environment as it uses power in the
most economical way possible.
This dryer is intended solely for household use. Please do not use it to dry clothes that
are not suitable for machine drying.
The following symbols are used throughout the manual and they have the following meanings:
INFORMATION!
Information, advice, tip, or recommendation
WARNING!
Warning – general danger
ELECTRIC SHOCK!
Warning – danger of electric shock
HOT SURFACE!
Warning – danger of hot surface
DANGER OF FIRE!
Warning – danger of fire
It is important that you carefully read the instructions.

Contents
51. SAFETY PRECAUTIONS .................................................................................................
61.1 Use in accordance with regulations ................................................................................
61.2 Installation and connection .............................................................................................
81.3 Proper use .......................................................................................................................
101.4 Child safety ......................................................................................................................
111.5 Danger of hot surface ......................................................................................................
132. ENVIRONMENTAL PROTECTION ..................................................................................
132.1 Disposal of packaging .....................................................................................................
132.2 General advice ................................................................................................................
132.3 Disposal of the end-of-life appliance ..............................................................................
143. DESCRIPTION OF THE DRYER ......................................................................................
143.1 Dryer overview .................................................................................................................
153.2 Dimensions of the dryer ..................................................................................................
163.3 Opening the dryer door ...................................................................................................
173.4 Technical data .................................................................................................................
193.5 Control unit ......................................................................................................................
234. INSTALLATION AND CONNECTION ..............................................................................
234.1 Before the first installation and during subsequent transport .........................................
274.2 Dryer placement ..............................................................................................................
324.3 Draining the condensate .................................................................................................
334.4 Connecting the dryer to the electricity supply ................................................................
345. BEFORE USING THE APPLIANCE FOR THE FIRST TIME ............................................
345.1 Before switching on the appliance for the first time ........................................................
365.2 First connection to a Wi-Fi network ................................................................................
396. DRYING PROCESS, STEP BY STEP (1–7) .....................................................................
396.1 Sort the laundry ...............................................................................................................
416.2 Load the laundry into the dryer .......................................................................................
426.3 Switch on the dryer .........................................................................................................
436.4 Choose the drying program ............................................................................................
486.5 Select the additional functions ........................................................................................
546.6 Start the drying programme ............................................................................................
566.7 Complete the drying cycle ..............................................................................................
577. APPLIANCE SETTINGS AND ADJUSTMENTS ..............................................................
577.1 Saving programe and selected functions ........................................................................
587.2 Additional appliance settings ..........................................................................................
607.3 User settings menu .........................................................................................................
618. CLEANING AND MAINTENANCE ...................................................................................
618.1 Cleaning the dryer exterior ..............................................................................................
638.2 Cleaning the lint filter .......................................................................................................
658.3 Cleaning of the heat exchanger ......................................................................................
668.4 Cleaning the steam system .............................................................................................
688.5 Emptying the condensate tank .......................................................................................
699. TROUBLESHOOTING AND SERVICING ........................................................................
699.1 What to do in case of problems? ....................................................................................
719.2 Display Message Table ...................................................................................................
3

729.3 Service .............................................................................................................................
739.4 Warranty ..........................................................................................................................
739.5 Spare parts ......................................................................................................................
7410. TIPS FOR DRYING AND ECONOMIC USE YOUR DRYER ...........................................
7410.1 Tips for optimally dried laundry .......................................................................................
7510.2 Preventing unpleasant odours and maintaining performance ........................................
7510.3 Recommendations for energy-efficient drying ................................................................
7611. CONSUMPTION VALUES ................................................................................................
4

1. SAFETY PRECAUTIONS
Carefully read the instructions for use before using
the dryer.
Please, do not use the dryer without reading and
understanding these instructions for use first.
This appliance is not intended for use by persons (including
children) with reduced physical, sensory or mental
capabilities, or lack of experience and knowledge, unless
they have been given supervision or instruction concerning
use of the appliance by a person responsible for their safety.
These instructions for use of a dryer are supplied with
different types or models of dryers. Therefore, they may
include descriptions of settings or equipment that are not
available in your dryer.
The maximum mass of dry textile material in kilograms to be
used in the appliance.
Failure to observe the instructions for use or inappropriate
use of the dryer may result in damage to the laundry or the
appliance, or injury to the user. Keep the instruction manual
handy, near the dryer.
Instructions for use are available on our website at
www.gorenje.com.
5
1.1 Use in accordance with regulations
Your dryer is intended solely for household use. If the dryer
is used for professional, for-profit purpose or purpose
exceeding normal use in a household, or if the dryer is used by
a person who is not a consumer, the warranty period shall be
equal to the shortest warranty period required by relevant
legislation.
1.2 Installation and connection
Follow the instructions for correct installation of the Gorenje
dryer and connection to the power mains (see chapter
INSTALLATION AND CONNECTION).
All and any repairs or maintenance tasks on the dryer should
only be done by trained experts. Unprofessional repair may
result in an accident or major malfunction.
WARNING!
The dryer may only be used with the factory-installed
power cord.
ELECTRIC SHOCK!
A damaged power cord may only be replaced by the
manufacturer, a service technician, or an authorized person.
After installation, the dryer should stand still for two hours
before it is connected to the power mains.
WARNING!
Do not connect the dryer to power mains using an external
switching device such as a programme timer, or connect it
to power mains that is regularly switched on and off by the
power supply provider.
6

The dryer shall not be connected to the power mains using an
extension cord.
Do not connect the tumble dryer to an electrical outlet intended
for an electric shaver or a hair dryer.
In case of a defect, only use approved spare parts by authorized
manufacturers.
In case of incorrect dryer connection, incorrect use, or servicing
by an unauthorized person, the user shall bear the cost of any
damage as such damage shall not be covered by warranty.
Always use the hoses supplied with the dryer.
Install the dryer in a room with adequate ventilation and a
temperature between 15 °C and 25 °C.
At least two persons are required to install the tumble dryer on
top of a washing machine.
Place the dryer on a level and stable solid (concrete) base.
The appliance must not be installed behind a lockable door, a
sliding door or a door with a hinge on the opposite side to that
of the tumble dryer, in such a way that a full opening of the
tumble dryer door is restricted.
Never block the air exhaust (evacuation opening).
For appliances with ventilation openings in the base, a carpet
must not obstruct the openings.
The air in the room where the dryer is installed may not
contain dust particles.
7

Adequate ventilation has to be provided to avoid the back
flow of gases into the room from appliances burning other fuels,
including open fires.
The lint must not to be allowed to accumulate around the
tumble dryer.
In the appliance enclosure or in the built-in structure, keep
ventilation openings clear of obstruction.
The appliance may not be in contact with a wall or adjacent
furniture.
After installation, wait for 24 hours before using the dryer. If the
dryer has to be laid down on one of the sides during transport
or servicing, place it with its right side, viewing from the
appliance front, downwards.
1.3 Proper use
Do not dry unwashed items of laundry in the tumble dryer.
Items that have been soiled with substances such as cooking
oil, acetone, alcohol, petrol, kerosene, spot removers,
turpentine, waxes and wax removers should be washed in hot
water with an extra amount of detergent before being dried in
the tumble dryer.
Items such as foam rubber (latex foam), shower caps,
waterproof textiles, rubber backed articles and clothes or
pillows fitted with foam rubber pads should not be dried in the
tumble dryer.
Fabric softeners, or similar products, should be used as
specified by the fabric softener instructions.
8

DANGER OF FIRE!
Remove all objects from pockets such as lighters and
matches.
If the condensate tube is blocked or clogged, then tumble dryer
operation is stopped (see chapter Start the drying
programme/Full condensate tank).
Before moving the dryer or before storing it in a non-heated
room during the winter, the condensate tank has to be emptied.
That the lint filter has to be cleaned frequently, if applicable.
Clean the dryer filters after each drying cycle. If you have
removed the filters, replace them before the next drying cycle.
Do not use any solvents or cleaning agents that could
damage the dryer (please observe the recommendations and
warnings provided by the manufacturers of the cleaning agents).
Never add chemicals or fragrances into the condensate
tank (see chapters DESCRIPTION OF THE DRYER; CLEANING
AND MAINTENANCE / Emptying the condensate tank).
Fill steam generator tank only with liquids specified by the
manufacturer.
After the drying process, unplug the dryer power cord from
the power outlet.
The dryer uses a heat pump system to heat the air.
9
The system consists of a compressor and a heat exchanger.
When the dryer is started, compressor operation (the sound of
flowing liquid) or flow of refrigerant may be louder as long as
the compressor operates. This is not a sign of malfunction and
it will not affect useful life of the dryer. In time and with use of
the dryer this noise will become quieter.
The warranty does not cover consumables, minor deviations
in colour, increased noise that results from appliance age and
which does not affect the functionality of the dryer, and
aesthetic defects on components, which do not affect the
dryer's functionality and safety.
1.4 Child safety
WARNING!
Children should be supervised to ensure that they do
not play with the appliance.
Children of less than 3 years should be kept away unless
continuously supervised.
Prevent your children and pets from entering the dryer drum.
Before closing the dryer door and running the programme,
make sure there is nothing except laundry in the drum (e.g. if
a child climbed into the dryer drum and closed the door from
the inside).
Activate the child lock. See chapter APPLIANCE SETTINGS
AND ADJUSTMENTS / Additional appliance settings / Child
lock.
The dryer is made in compliance with all relevant safety
standards.
10
This appliance can be used by children aged from 8 years and
above and persons with reduced physical, sensory or mental
capabilities or lack of experience and knowledge if they have
been given supervision or instruction concerning use of the
appliance in a safe way and understand the hazards involved.
Children shall not play with the appliance.
Cleaning and user maintenance shall not be made by children
without supervision.
1.5 Danger of hot surface
HOT SURFACE!
At higher drying temperatures, the door glass will heat up.
Be careful to avoid burns. Make sure children do not play
near the door glass.
The back of the dryer may get very hot during operation.
Wait for the dryer to cool down completely before touching
its back side.
If you open the dryer door during the drying process, the clothes
may be very hot and there is a risk of burning.
Never stop the drying process before it is completed; if you do
interrupt the cycle for any reason, be careful when removing
the laundry from the drum as it is very hot. Quickly remove the
laundry from the drum and spread it to allow it to cool down
as quickly as possible.
11

DANGER OF FIRE!
Only use the dryer to dry laundry that was washed with
water. Do not dry any laundry that was washed or cleaned
with flammable cleaners or substances (such as gasoline,
trichloroethylene etc.) as this may result in an explosion.
The tumble dryer is not to be used if industrial chemicals have
been used for cleaning.
The dryer is protected with an automatic switch-off system in
case of overheating. This system will switch off the dryer if the
temperature is too high.
If the net filter is clogged, the overheating automatic switch-off
system may be activated. Clean the filter, wait for the dryer to
cool down, and try running it again. If the dryer still fails to start,
call a service technician.
Do not damage the refrigerant circuit.
The refrigerant R290 in this appliance is environmentally friendly
yet combustible and may ignite if it comes into contact with
open flames or ignition sources. Keep naked flames and ignition
sources away from the appliance.
12
2. ENVIRONMENTAL PROTECTION
2.1 Disposal of packaging
Once you have unpacked the appliance, we advise you to recycle all packaging materials. Dispose
of them in the appropriate containers or take them to a local collection center.
2.2 General advice
to ensure your appliance works as efficiently and lasts as long as possible, we recommend that you:
• observe the recommended nominal load for each drying programme (see chapter DRYING
PROCESS, STEP BY STEP (1–7)/Choose the drying program),
• ensure that the laundry is properly spun before drying,
• clean the appliance regularly (see chapter CLEANING AND MAINTENANCE).
This will help protect the environment and save natural resources.
2.3 Disposal of the end-of-life appliance
DISPOSAL
Packaging is made of environmentally friendly materials that can be recycled, disposed
of, or destroyed without any hazard to the environment. To this end, packaging materials
are labelled appropriately.
The symbol on the product or its packaging indicates that the product should not be treated as
normal household waste. Take the product to an authorized collection centre for waste electric and
electronic equipment processing.
When disposing of the appliance at the end of its useful life, remove all power cords, and destroy
the door latch and switch to prevent the door from locking or latching (child safety).
Correct disposal of the product will help prevent any negative effects on the environment and health
of people, which could occur in case of incorrect product removal. For detailed information on
removal and processing of the product, please contact the relevant municipal body in charge of
waste management, your waste disposal service, or the store where you bought the product.
13

3. DESCRIPTION OF THE DRYER
In this chapter, you will get to know your dryer, including:
- its appearance,
- its dimensions,
- how to open the dryer door,
- the location of the technical specifications and other relevant information,
- the layout and functions of the appliance’s control panel.
3.1 Dryer overview
BACKFRONT
Power cord1.Start key Start/Pause1.
Condensate discharge hose2.Touch control unit2.
Adjustable feet3.Button for switching the appliance on and off
On/Off and for programme selection (hereinafter
referred to as the selector)
3.
Condense water tank4.
Rating plate5.
Door6.
Lint filter7.
Air vent8.
Heat exchanger9.
14
3.2 Dimensions of the dryer
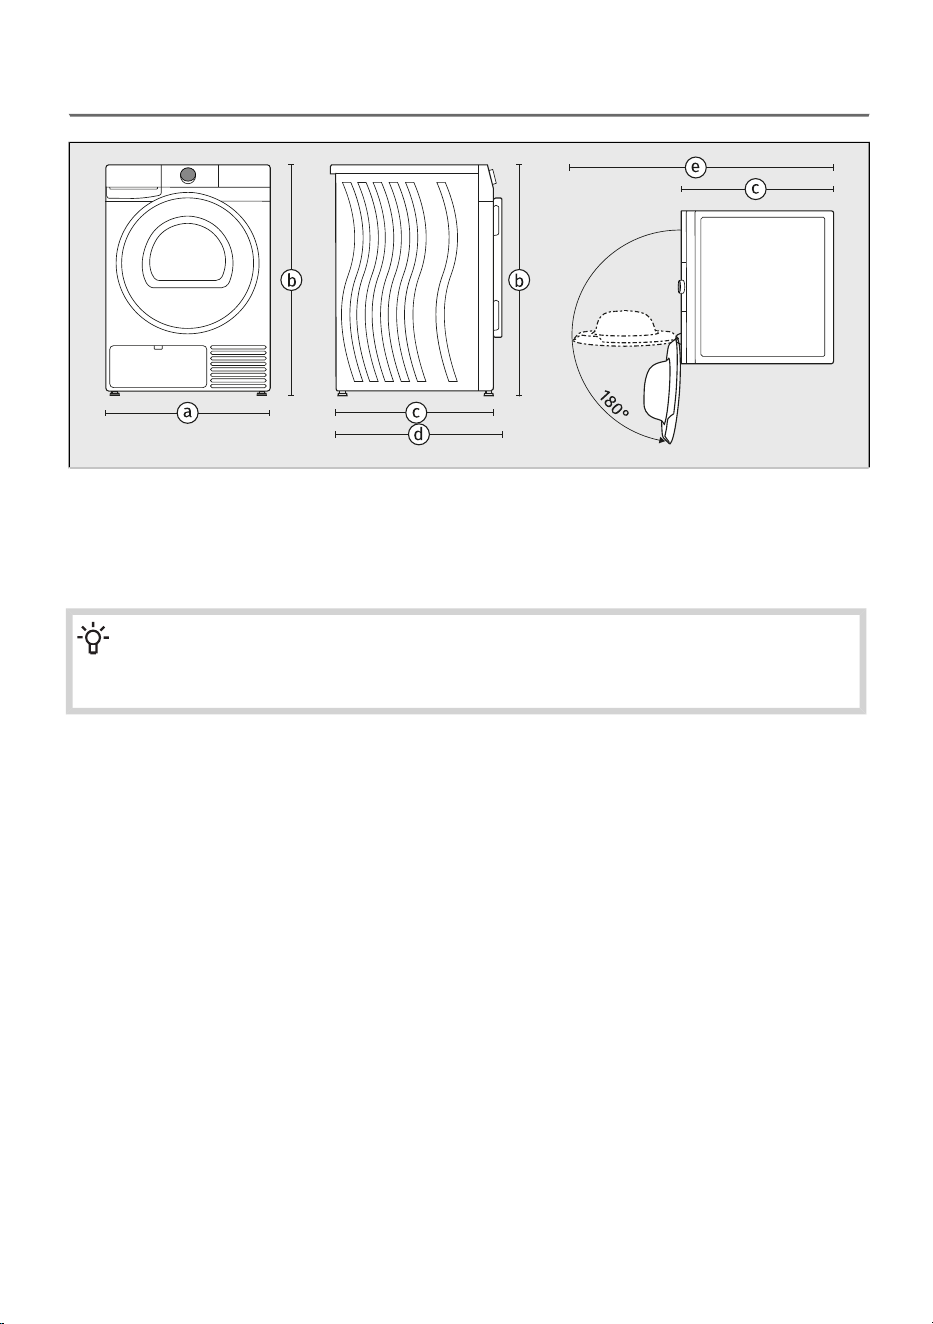
width of the appliance: 600 mm–a
height of the appliance: 850 mm–b
depth of the appliance’s top surface: 625 mm–c
depth with door closed: 655 mm–d
depth with door open: 1110 mm–e
NOTE!
The depth of your dryer Gorenje is an important specification for possible stacking with a
washing machine Gorenje. (See chapter INSTALLATION AND CONNECTION/Dryer placement.)
15
3.3 Opening the dryer door
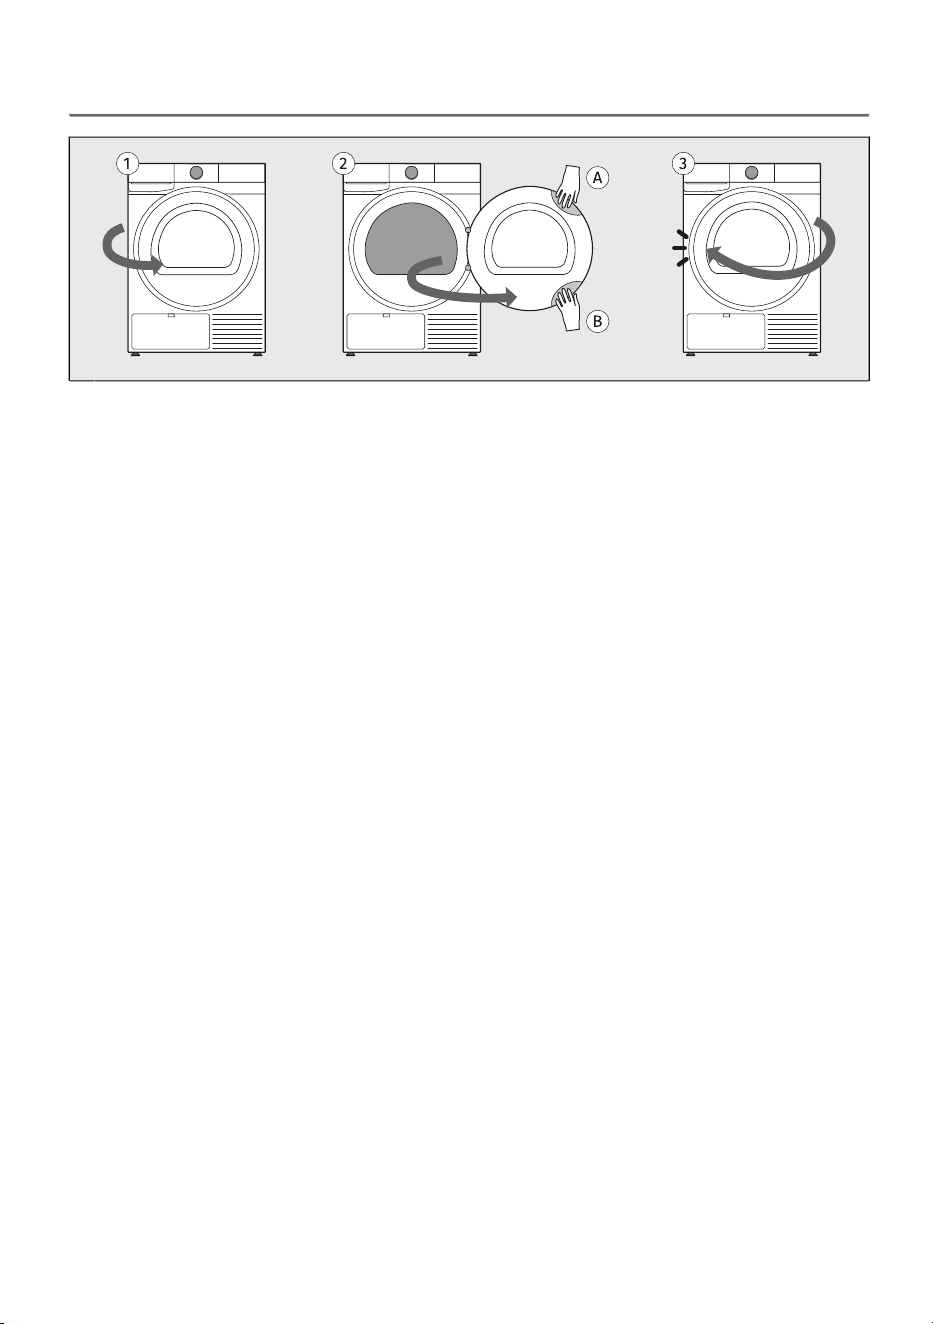
The dryer door is hinged on the right side of the appliance and opens from the left side.1
Place your hand in the recess on the top left side of the door. (The recess is not visible from the
front.)
When the dryer is stacked on top of the washing machine, use the recess on the bottom left side
of the door to open.
Pull the door towards you.
2
Close the door in reverse order until it locks into place.3
16
3.4 Technical data
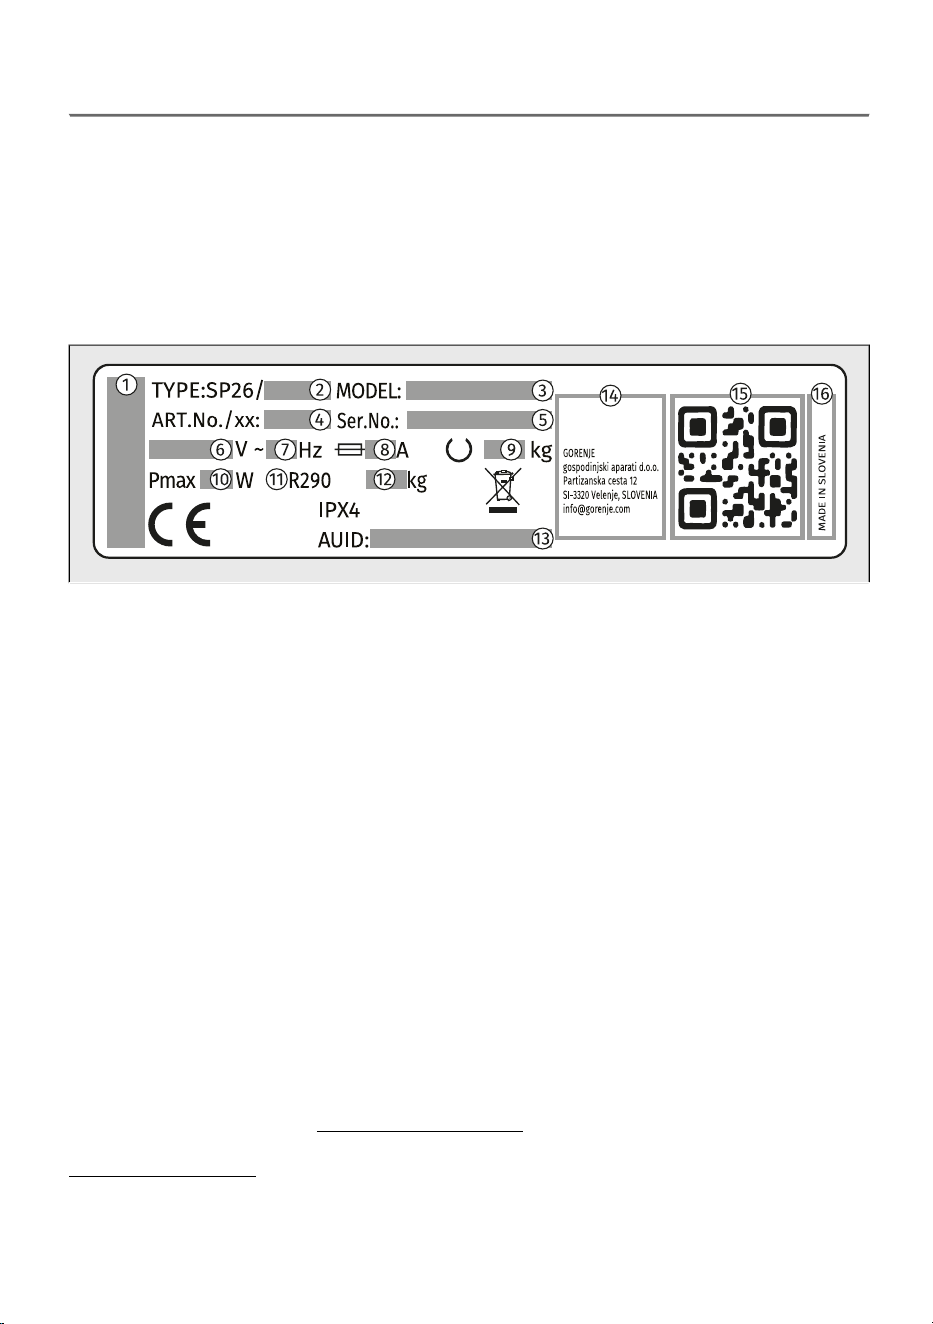
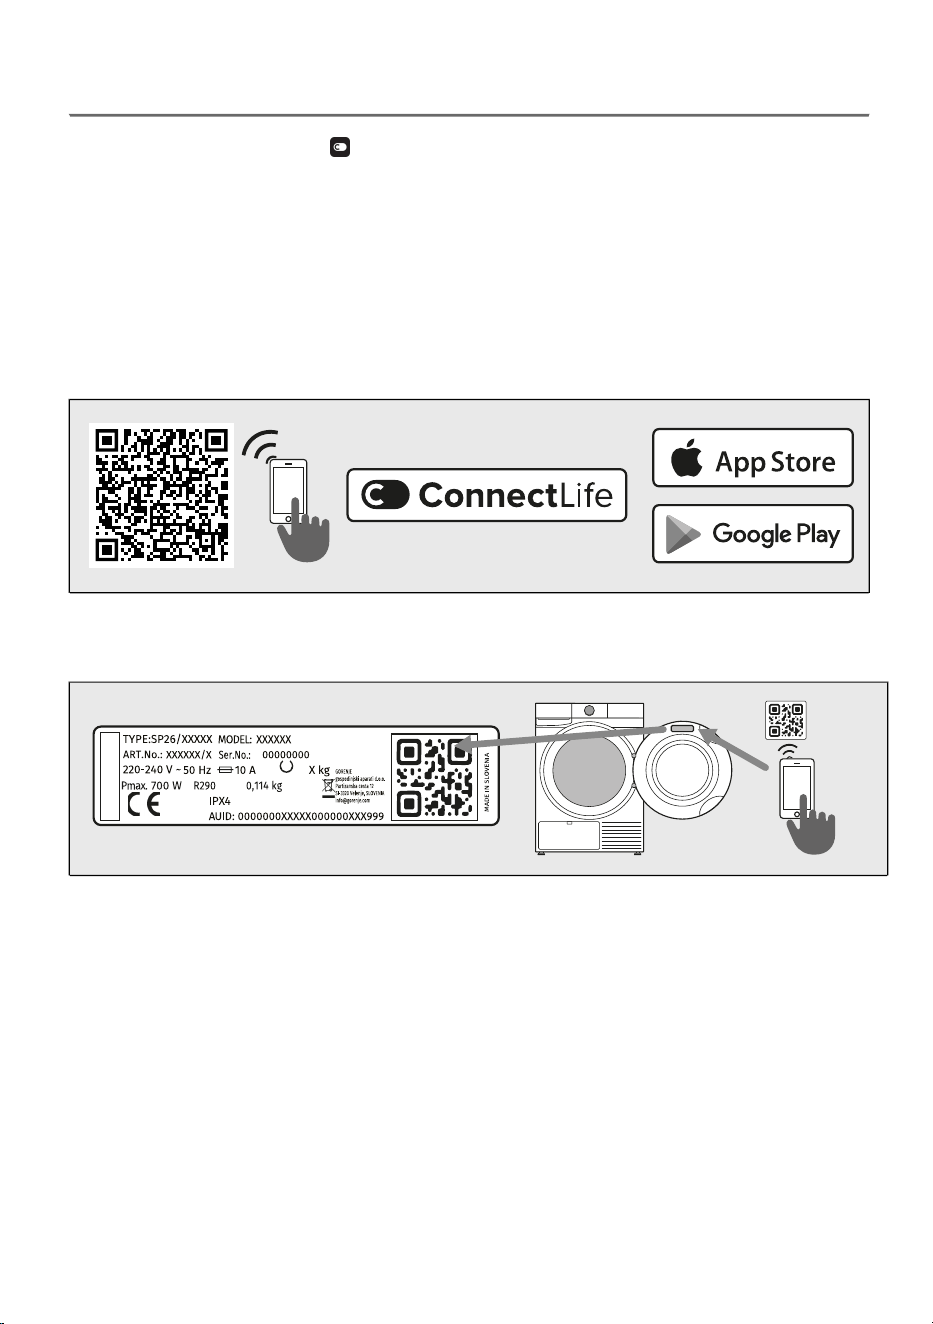
Technical data on the rating plate
Rating plate with basic information about the dryer is located on the inner side of the dryer door (see
the beginning of this chapter).
The rating plate contains various technical details about your appliance. An important element is the
QR koda, which provides access to a website where you can find additional information about your
appliance, as well as all relevant documentation, such as the user manual, declaration of conformity,
product information sheet, consumption data and the energy label, and after-sales support information.
You will also need the QR code to connect the appliance for remote control.
brand of the appliance–1
type designation of the appliance–2
model designation of the appliance–3
the article number/service index (you will need them when contacting customer service)–4
serial number of the appliance (you will need them when contacting customer service)–5
rated voltage (V)–6
frequency (Hz)–7
maximum current consumption (A)–8
maximum rated load (kg)–9
maximum nominal power (W)–10
Refrigerant type–11
Quantity of refrigerant–12
unique AUID number–13
manufacturer's address–14
unique QR code (required when connecting the appliance to a Wi-Fi network)–15
country of origin–16
Link to the EU EPREL database
From 1 March 2021, information on energy labelling and ecodesign requirements is available in the
EU EPREL product database.
The QR code on the energy label supplied with the appliance contains a web link through which you
can find your registered appliance in the EU EPREL database.
Information regarding the performance of the product can also be found in the EU EPREL database,
which is accessible via the link https://eprel.ec.europa.eu where you have to enter the model and
product number; both are indicated on the rating plate on the appliance. On the website
www.theenergylabel.eu you can find more detailed information about the energy label.
Keep the energy label in case it is needed in the future, together with the user manual and other
documents supplied with this appliance.
17
Compliance information
Radio equipment type
HL3215STG(depending on the model)
HLW3215-TG
HLW3215-TG01
Wi-Fi
2.4000 GHz – 2.4835 GHzOperating frequency range
≤10 dBm/MHz (EIRP) (Antenna gain <10 dBi)Maximum output power
Gain: 0 dBiMaximum antenna gain
Bluetooth
2.400 GHz – 2.4835 GHzOperating frequency range
6 dBm (≤ 10 dBm)Carrier output
F1DEmission type
Declaration of conformity
The company declares that the device with the function ConnectLife complies with the essential
requirements and other relevant provisions of Directive 2014/53/EU. The detailed Declaration of
Conformity can be found at the web address https://auid.connectlife.io on the page of your device
among the additional documents.
Low standby mode
If you do not run any program or choose any settings after switching on the dryer, the display unit will
be switched off after 5 minutes and switched to stand-by mode in order to save energy.
The display unit will be reactivated if you rotate the selector or press the On/Off button, or open the
dryer door. If you do not do anything for 5 minutes after the end of a programme, the display unit will
be switched off to save power.
< 0,5P o = weighted power when off [W]
< 0,5P I = weighted power when in standby [W]
5,00T I = standby time [min]
INFORMATION!
Low mains voltage and different drying loads may affect the drying time; the remaining time
displayed is adjusted accordingly during the drying process.
INFORMATION!
Appliance with a wireless connection uses less than 2 W of electric energy in standby mode.
INFORMATION!
When the appliance is in Remote Control mode, the symbol will remain illuminated even after
it enters standby mode.
18
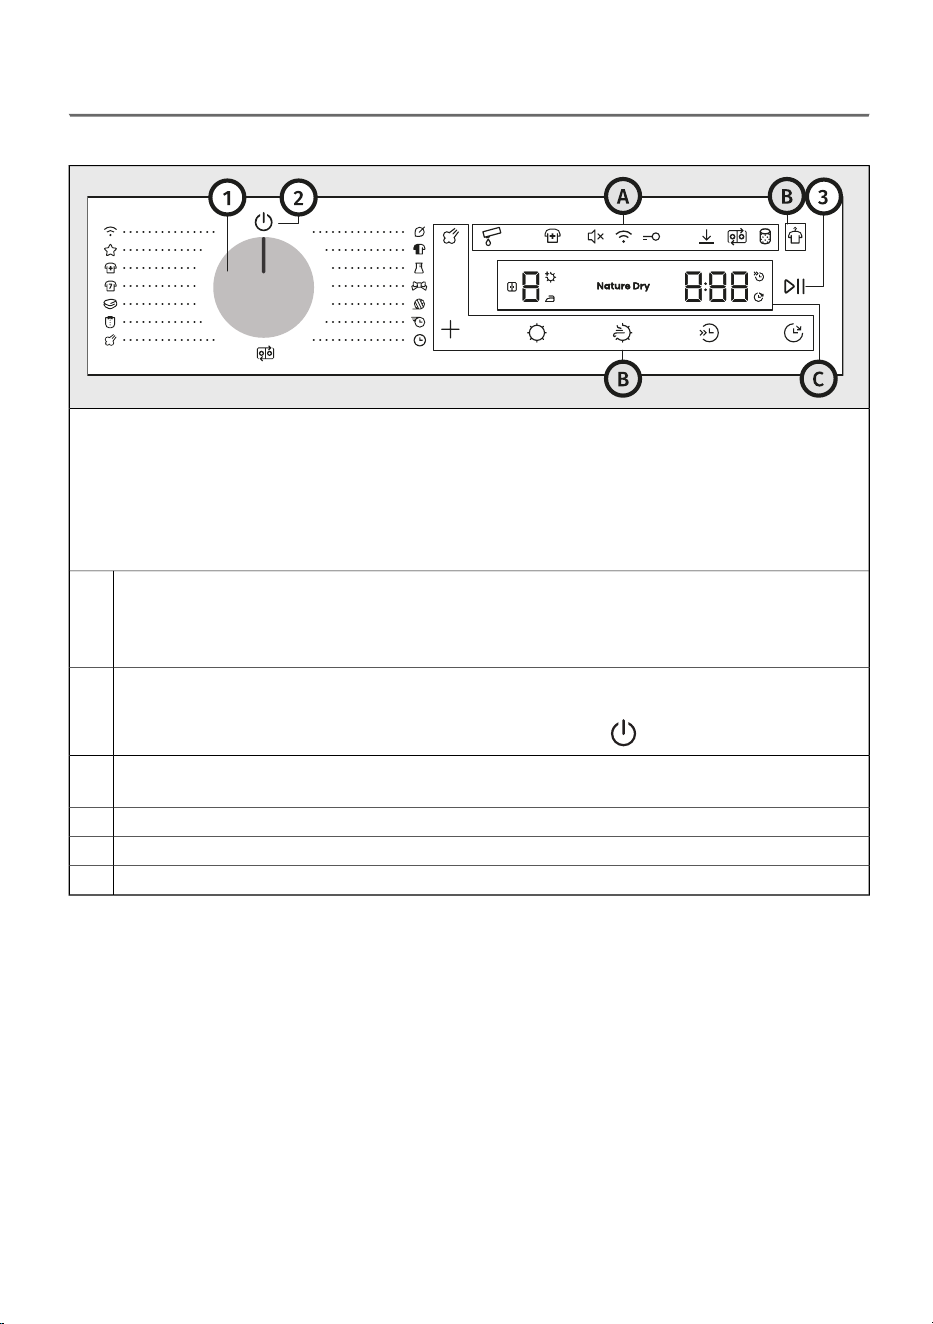
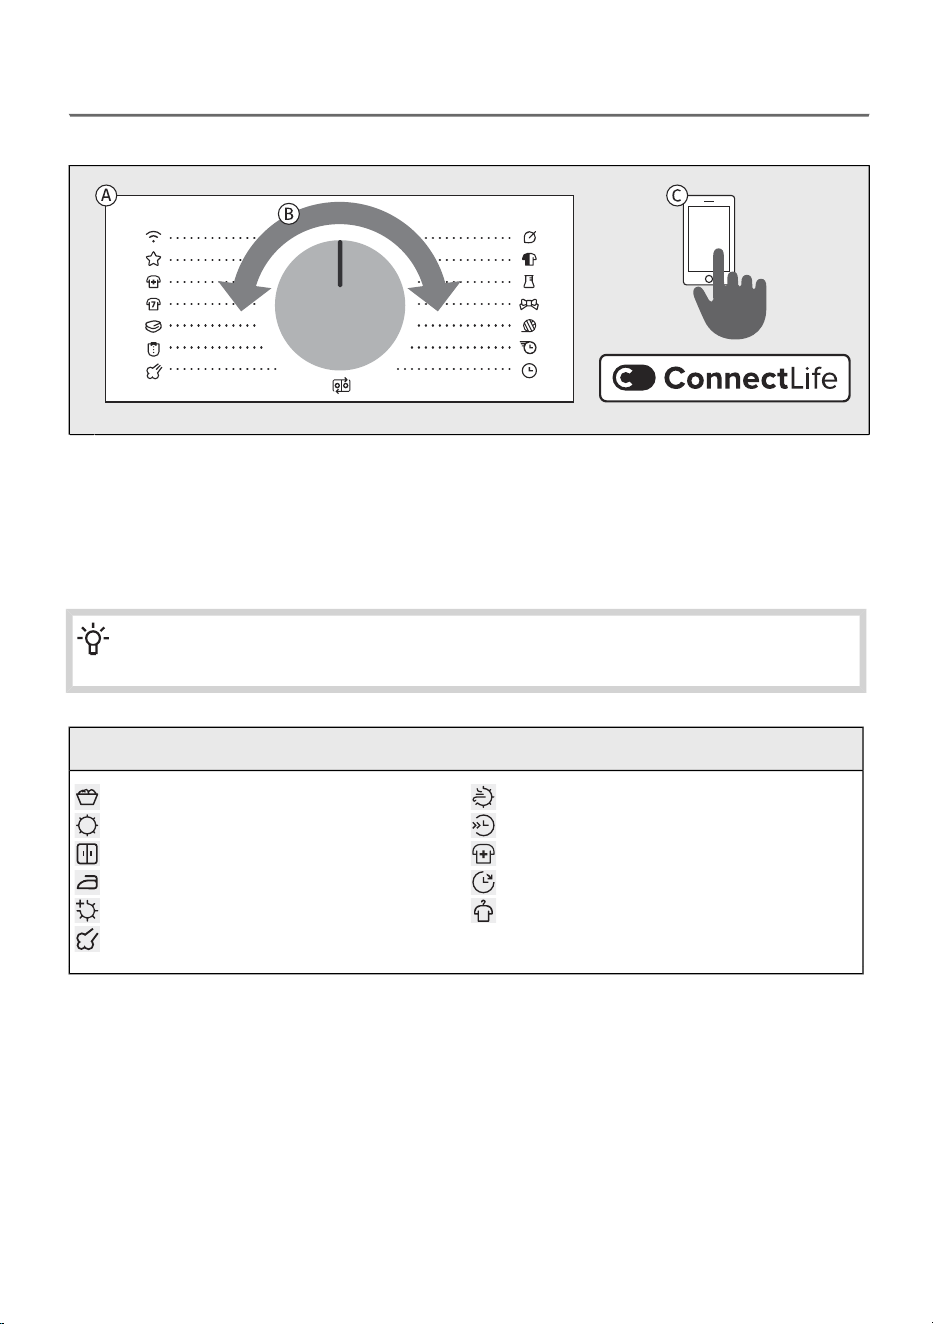
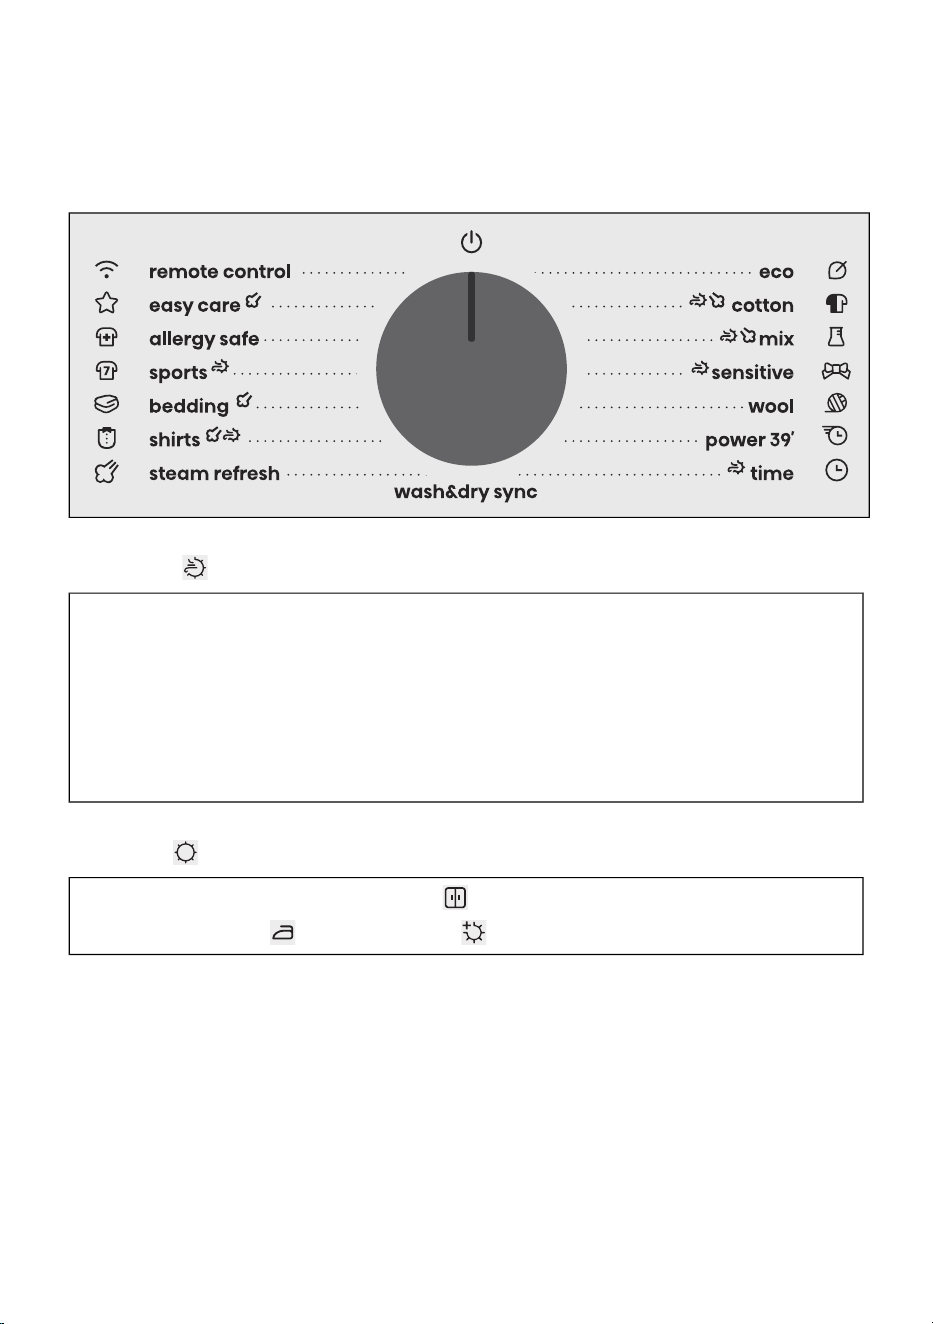
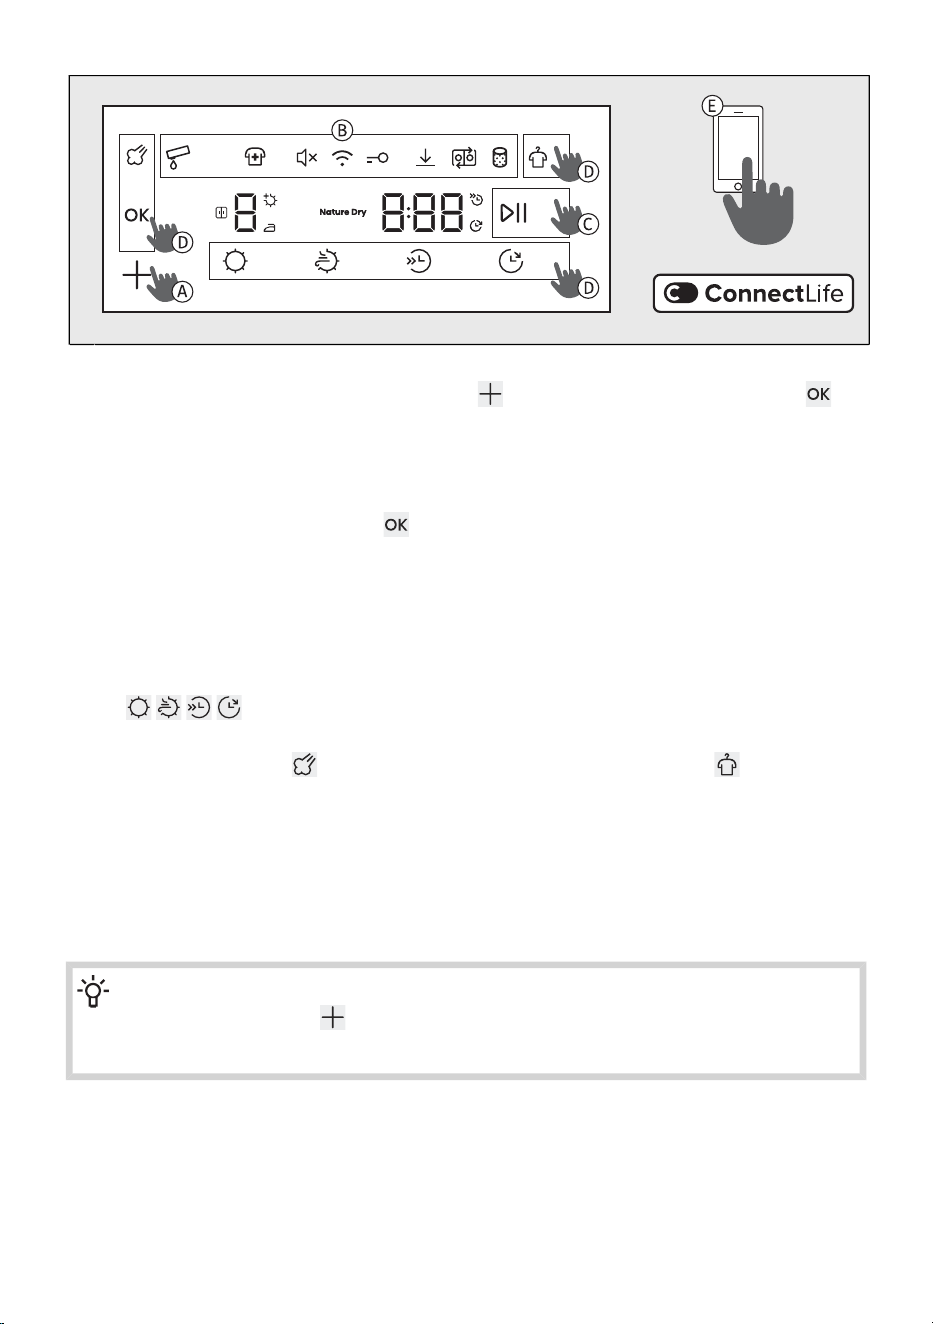
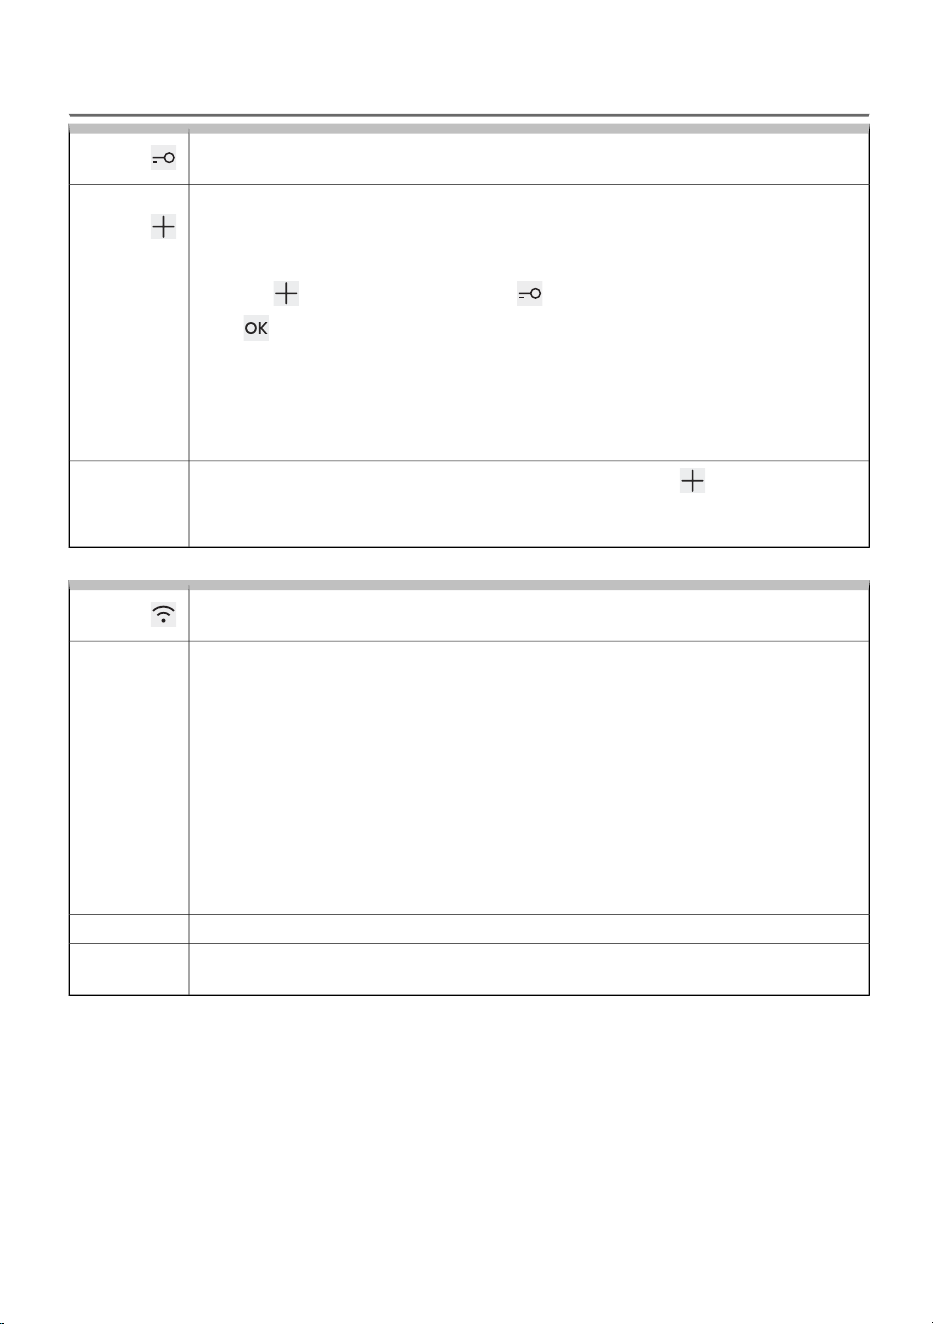
3.5 Control unit
Control panel overview
The control unit is located on the upper right part of the appliance.
With it, you will be able to control the operation of the appliance:
- switch the appliance on or off,
- select the drying programme and additional options,
- adjust additional appliance settings,
- start and stop the washing cycle,
- identify possible malfunctions and errors, and perform basic troubleshooting.
Button for switching the appliance on and off and for programme selection (hereinafter
referred to as the selector)
To select a program, rotate the selector to the desired program. See chapter DRYING PROCESS,
STEP BY STEP (1–7) / Choose the drying program
1
Symbol for switching the appliance on and off
To switch on the appliance, rotate the selector to any position.
To switch off the appliance, rotate the selector to the position .
2
Key Start/Pause (lights up when active)
To start, pause, or resume a program, press key Start/Pause.
3
Additional settings symbolsA
Function keysB
Display unitC
19
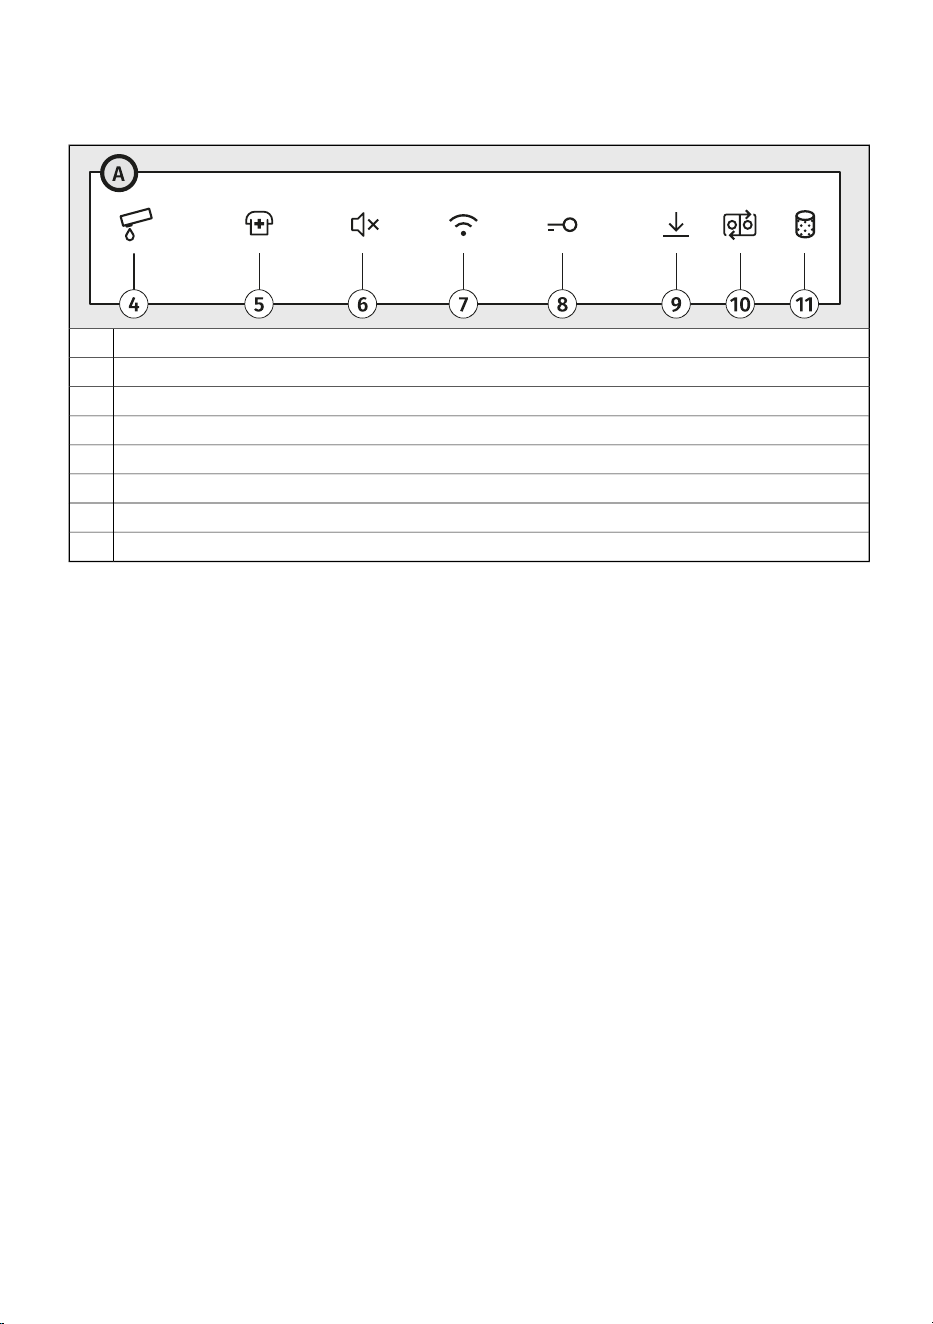
Additional settings symbols (4–11)
The symbols light up when activated. The lighting can be full or partial.
Full condensate tank4
Disinfect5
Sound On/Off6
Remote control7
Child lock8
Settings saved9
Wash & Dry sync (connection between washing and drying)10
Clean the filter11
20
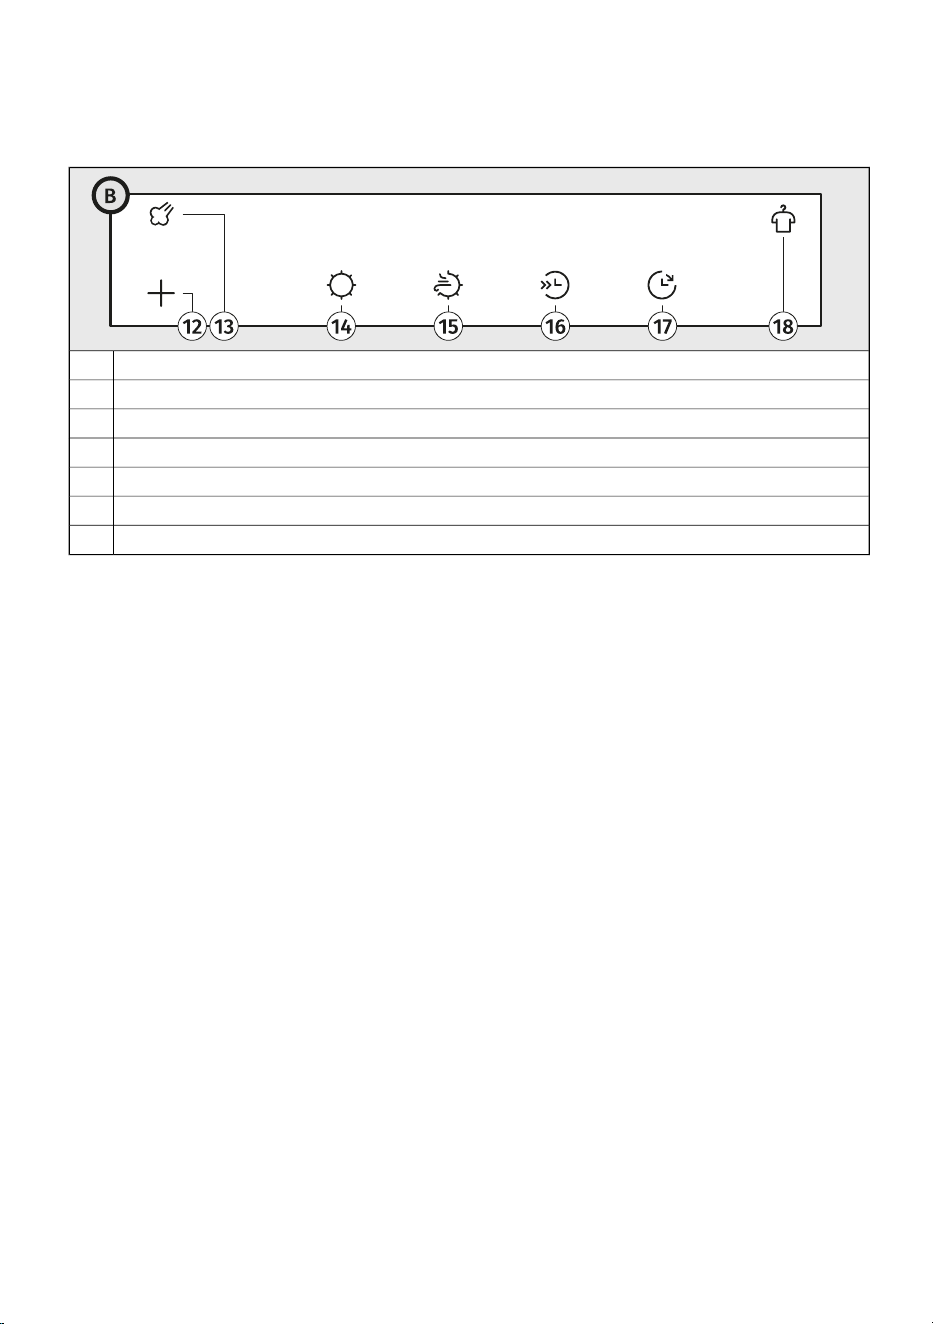
Function keys (12–18)
The function keys are finger-press-activated. Some functions can be selected by pressing two keys
at the same time.
Extras12
Steam13
Dry target14
Nature dry15
Half Load16
Delay end17
Anticrease18
21
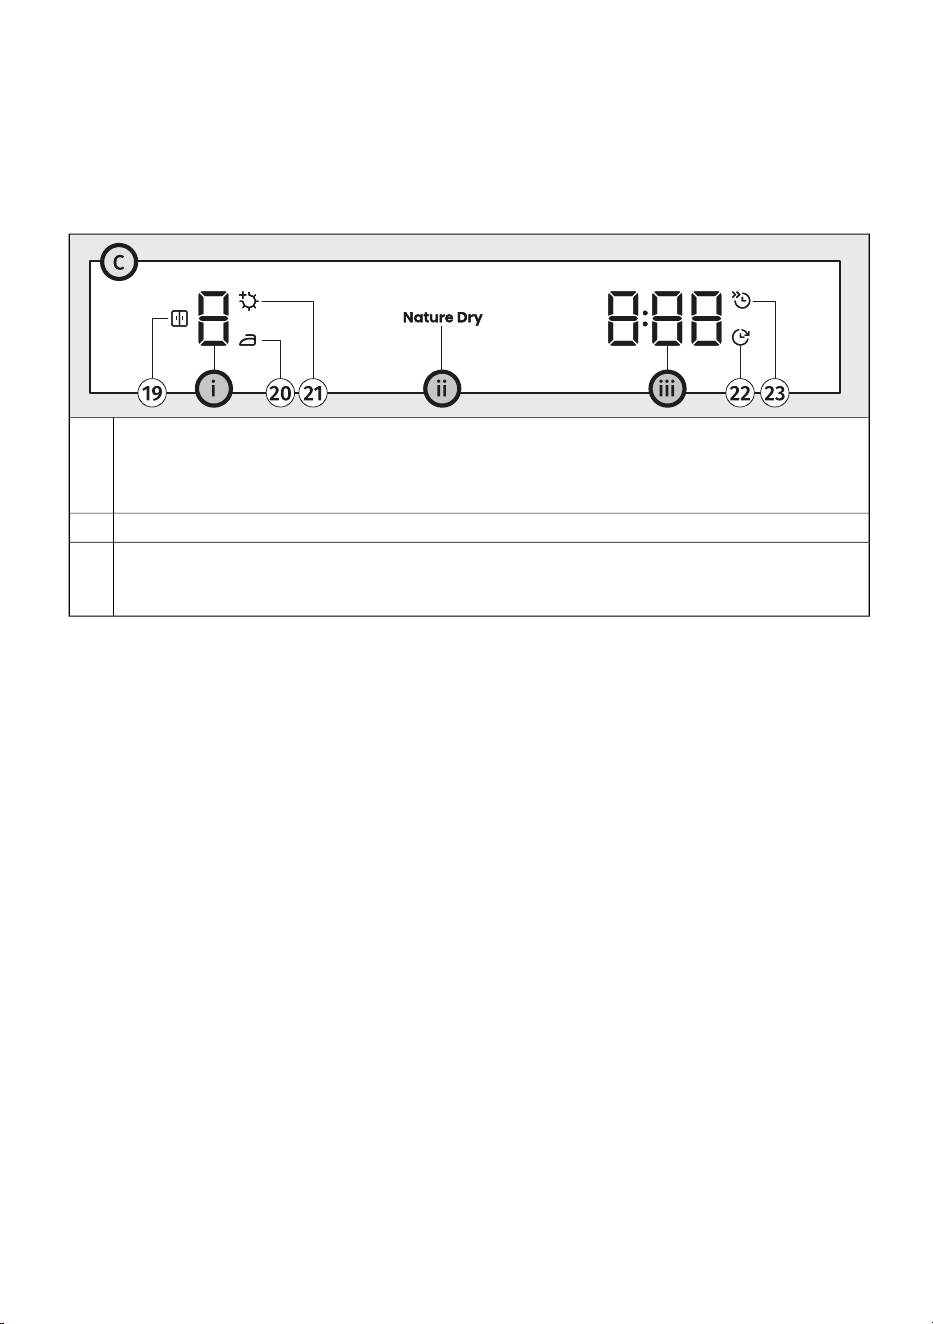
Display unit (19–23)
The display provides the following information:
- various settings and animations, the sound level, etc.,
- the dryness level and drying mode,
- remaining time until the end of the drying cycle,
- information about malfunctions and error messages.
Dryness level indicator
Symbol for Dry target / Storage (lights up when active)
Symbol for Dry target / Iron (lights up when active)
Symbol for Dry target / Extra dry (lights up when active)
i
19
20
21
Display unit Nature dry
ii
Display for total drying time or delay end of drying
Symbol for Delay end (lights up when active)
Symbol for Half Load (lights up when active)
iii
22
23
22
4. INSTALLATION AND CONNECTION
This chapter describes how to:
- handle the dryer before the first installation and during any subsequent transport,
- position the dryer,
- set up the condensate drainage,
- connect the appliance to the electrical network.
INFORMATION!
Remove all packaging. When removing the packaging, make sure not to damage the dryer
with a sharp object.
4.1 Before the first installation and during subsequent
transport
INFORMATION!
Before using the dryer for the first time, it is necessary to remove the transport protection.
Keep the transport protection, as you will need it if the appliance is transported again.
INFORMATION!
After installation, let the appliance rest still for 24 hours before using it.
WARNING!
Before transporting a dryer that has been previously used, you must drain the water
from the steam generator located at the back of the dryer beforehand; otherwise, water
from the tank may spill into the dryer interior! See chapter CLEANING AND
MAINTENANCECleaning the steam system.
23
If the dryer has to be laid down on one of the sides during transport or servicing, place it with its
right side, viewing from the appliance front, downwards.
Never turn the dryer upside down or lay it on its back or front!
24
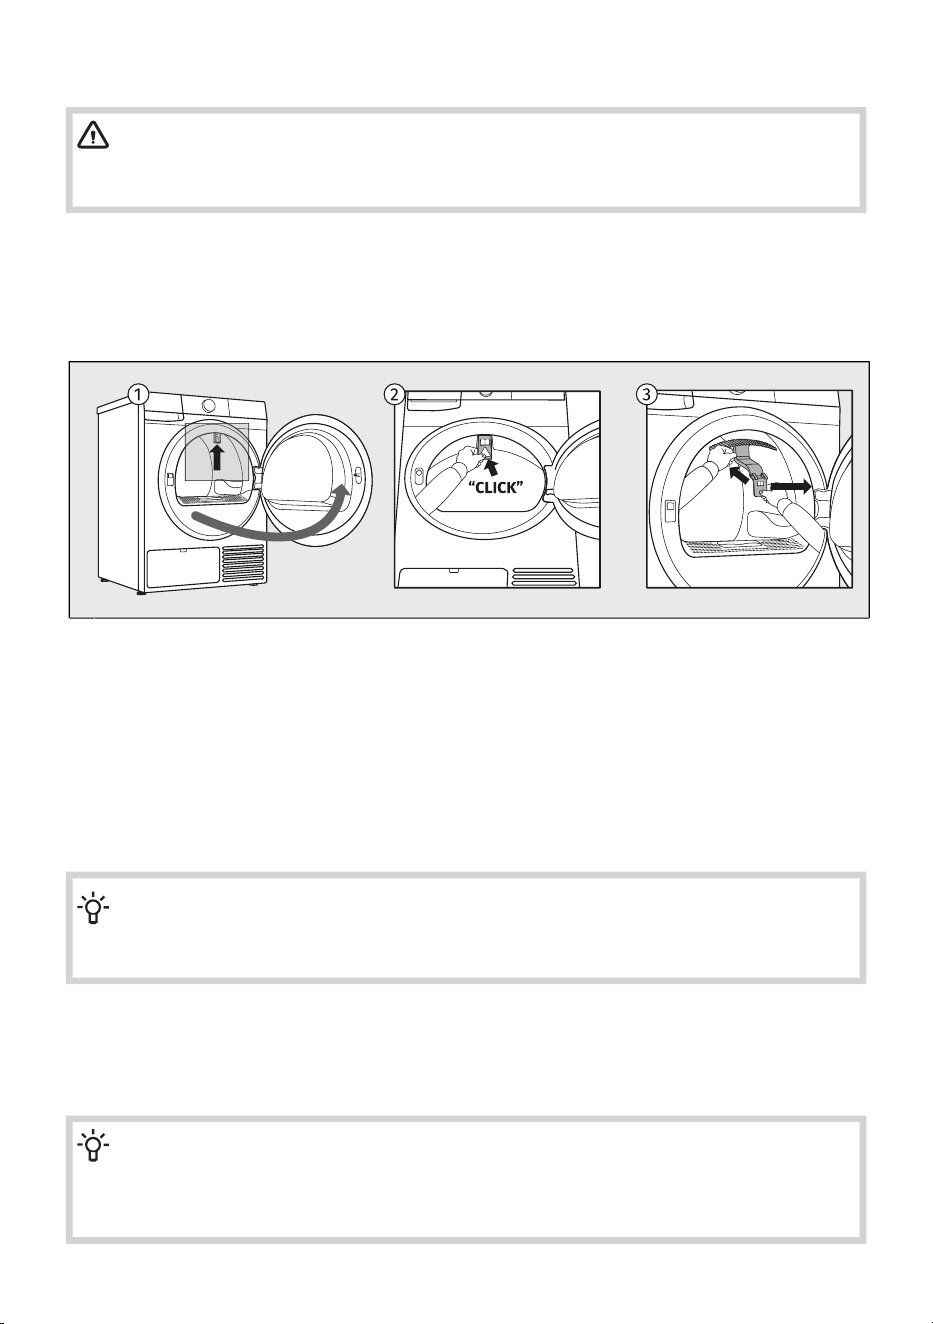
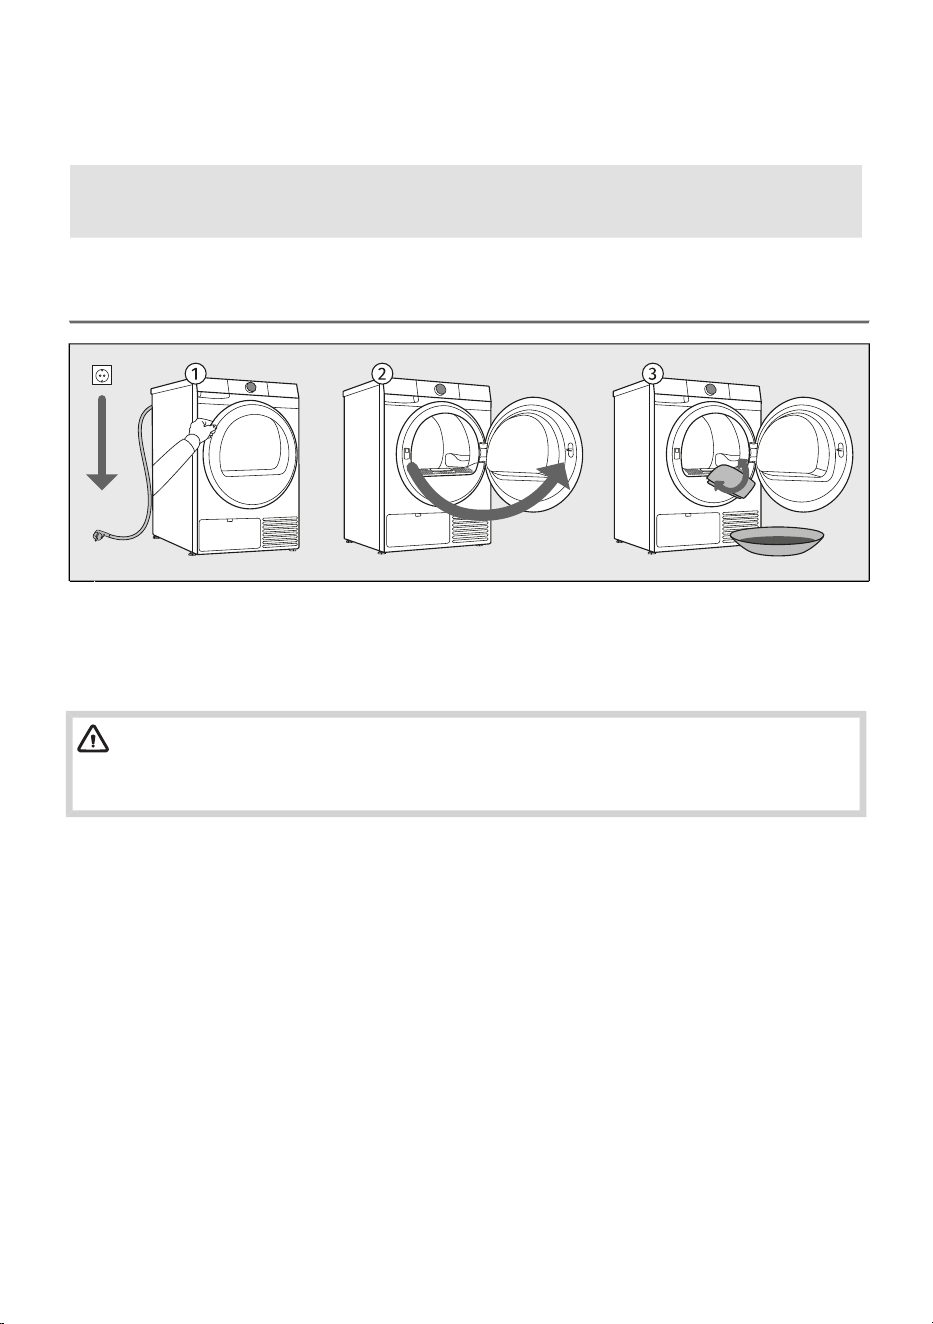
Remove the transport securing device
WARNING!
Before first use, make sure to remove the transport safety device to prevent damage when
switching on the dryer. Warranty shall be void in cases of such damage!
Before using the appliance, remove the transport protection designed to secure the appliance during
transport.
The transport protection is placed inside the drum of the dryer and secured at the top in a protective
bag.
Open the dryer door.1
Press the marked part of the transport protection by hand toward the inside of the appliance to
release it from its position.
2
Then remove the transport protection from the appliance.3
If you need to transport the appliance, reinstall the transport protectionin the door opening rim to
prevent damage caused by shaking during transit. When reinstalling the transport protection, slightly
lift the drum from the inside and press the protection firmly between the drumand the inner edge of
the door opening.
INFORMATION!
If the transport protection is not used, the appliance may be damaged during transport, and
warranty claims will not be accepted.
Moving and transport after installation
After every drying cycle, a small amount of condensed water will remain in the dryer. Switch on the
dryer and choose one of the programmes, then let the appliance operate for approximately half a
minute. This will pump out the remaining water and prevent damage to the dryer during transport.
INFORMATION!
Tilt the dryer to the right side when carrying or transporting it in a horizontal position.
Install the transport safety device in the dryer (see previous chapter). If the transport safety
device has been lost, it can be ordered from the manufacturer.
25
ELECTRIC SHOCK!
After transport, the dryer should be left to stand still for at least two hours before it is
connected to the power mains. The appliance should be installed and connected by a
trained technician.
ELECTRIC SHOCK!
Carefully read the instructions for use before connecting the dryer. Repair or any warranty
claim resulting from incorrect connection or use of the dryer shall not be covered by
the warranty.
INFORMATION!
If the appliance was not transported in compliance with the instructions, the dryer should be
left to stand still at least 24 hours before it is reconnected to the power mains.
Failure to do so may result in a heat pump failure which shall not be covered by the warranty.
Be careful not to damage the cooling system (see the next chapter).
INFORMATION!
When transporting the dryer again (after it has already been used), the steam generator
tank must be emptied. Otherwise, water may spill into the interior of the dryer. See chapter
CLEANING AND MAINTENANCECleaning the steam system.
26
4.2 Dryer placement
Selecting the room
INFORMATION!
Floor on which the dryer is placed must have a concrete base. It should be clean and dry;
otherwise, the dryer may slide. Also clean the adjustable feet.
INFORMATION!
The dryer must stand level and stable on a solid base.
INFORMATION!
If the dryer is placed on an elevated stable base, the dryer has to be additionally secured
against tipping.
The room in which you will install the dryer should be sufficiently ventilated, with a temperature between
15°C and 25°C. Dryer operation at a lower environment temperature may result in condensate
accumulation in the dryer interior. Do not place the dryer into a place where there is danger of freezing.
Frozen water in the condensate tank and pump may damage the dryer.
The dryer emits heat. Therefore, do not place it in a very small room, as the drying process may take
longer due to limited amount of available air.
Lighting in the room should be sufficient to allow reading the information on the display unit on the
control panel.
WARNING!
The appliance must not be installed behind a lockable door, a sliding door or a door with a
hinge on the opposite side to that of the tumble dryer, in such a way that a full opening of the
tumble dryer door is restricted.
WARNING!
For appliances with ventilation openings in the base, a carpet must not obstruct the openings.
27
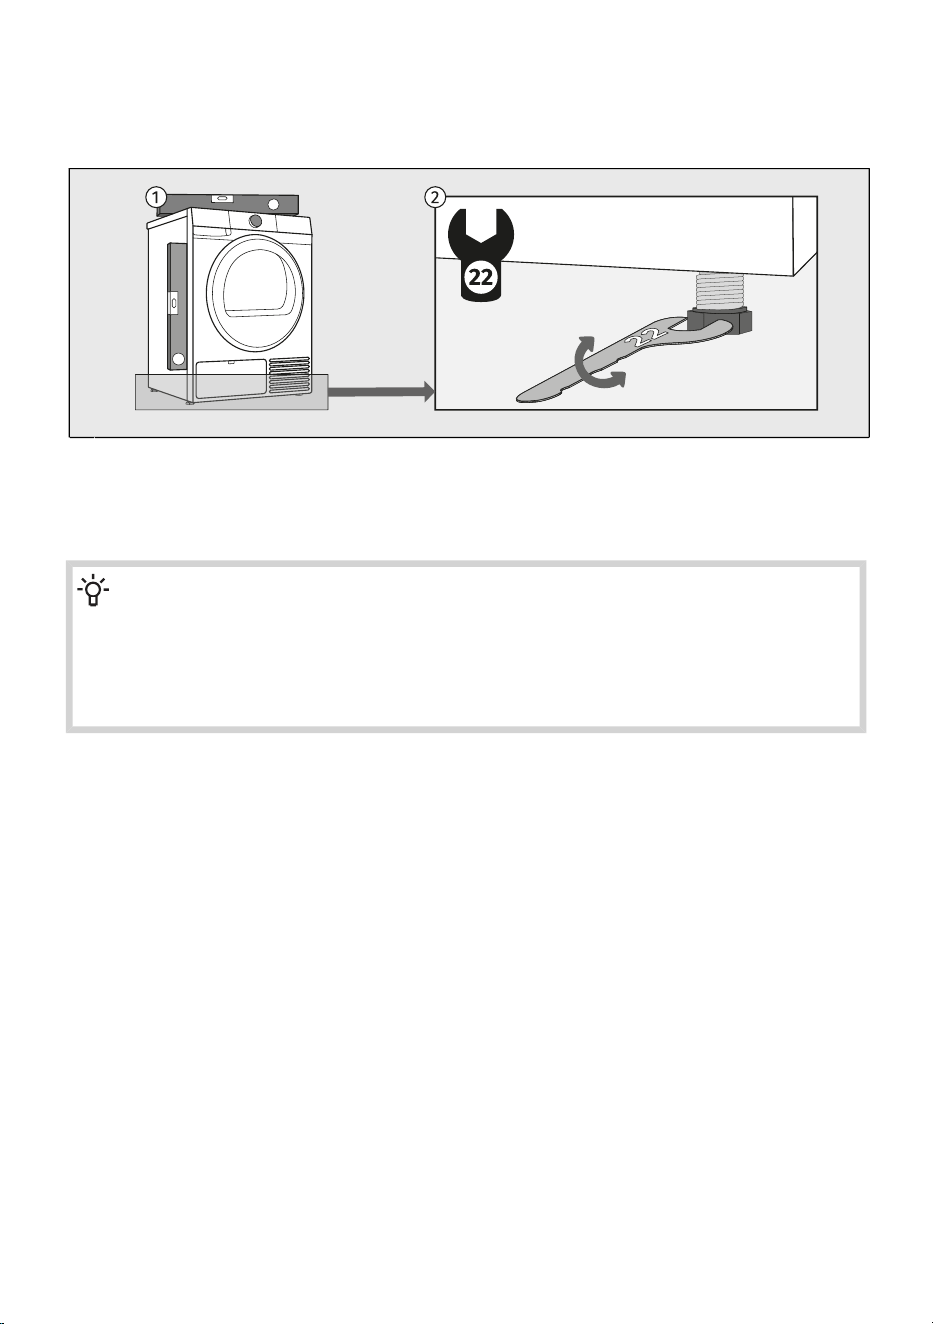
Leveling the appliance
It is important to level your dryer to prevent excessive vibration or noise when the appliance is operating.
This can be achieved by adjusting the dryer's feet.
Use a spirit level and spanner 22. The spanner is not supplied.1
Level the dryer in longitudinal and traverse direction by rotating the adjustable feet, which allow
levelling up to +/- 1 cm.
2
INFORMATION!
Sometimes, unusual or louder noise may appear during appliance operation; these are mostly
the result of improper installation.
Incorrect levelling of the dryer with the adjustable legs may cause vibration, appliance sliding
across the room, and loud operation. Incorrect levelling of the dryer shall not be subject to
warranty.
28
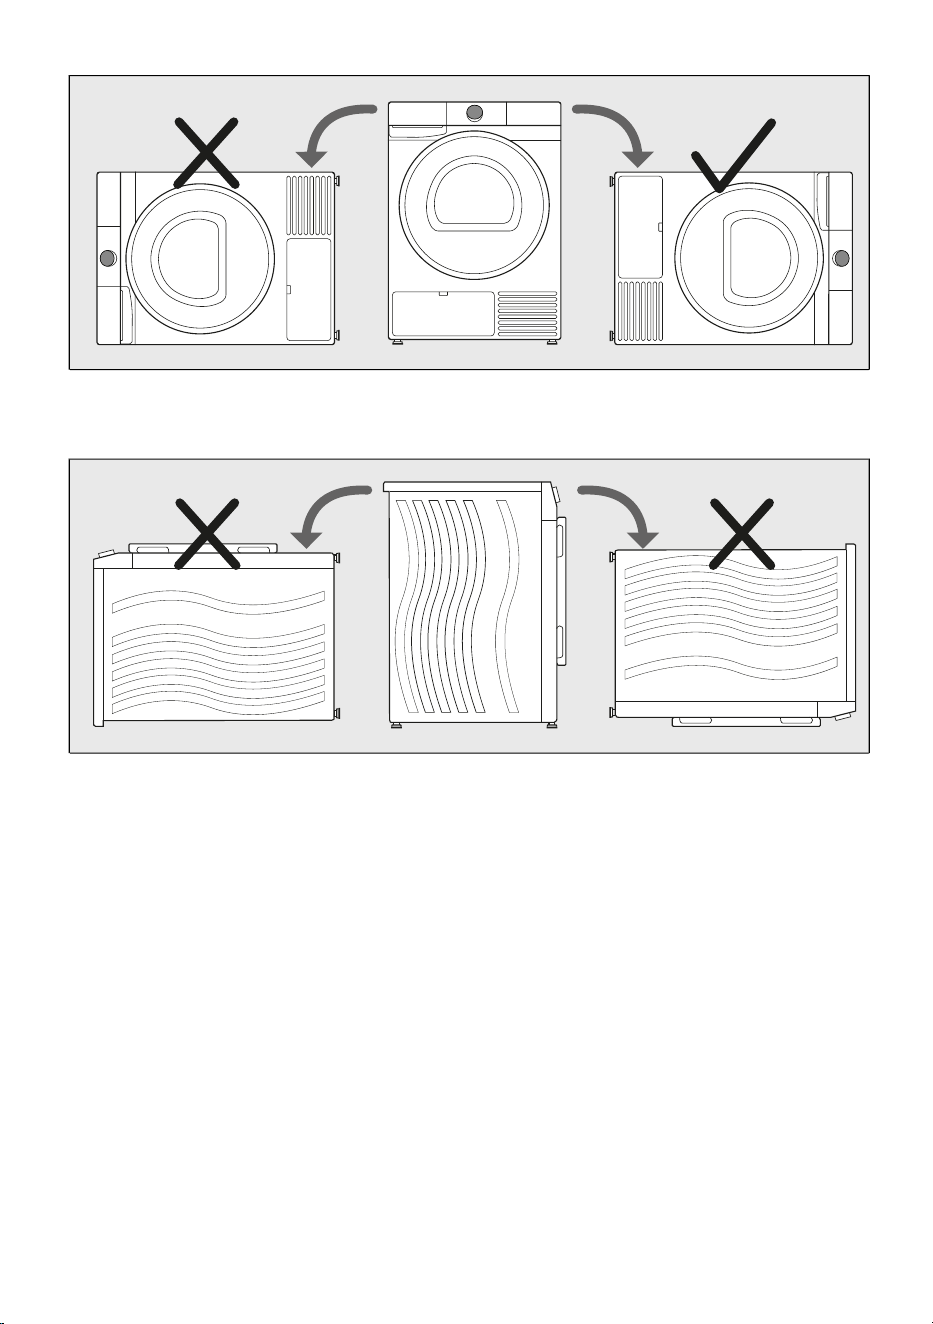
Combination of washing machine and tumble dryer installation
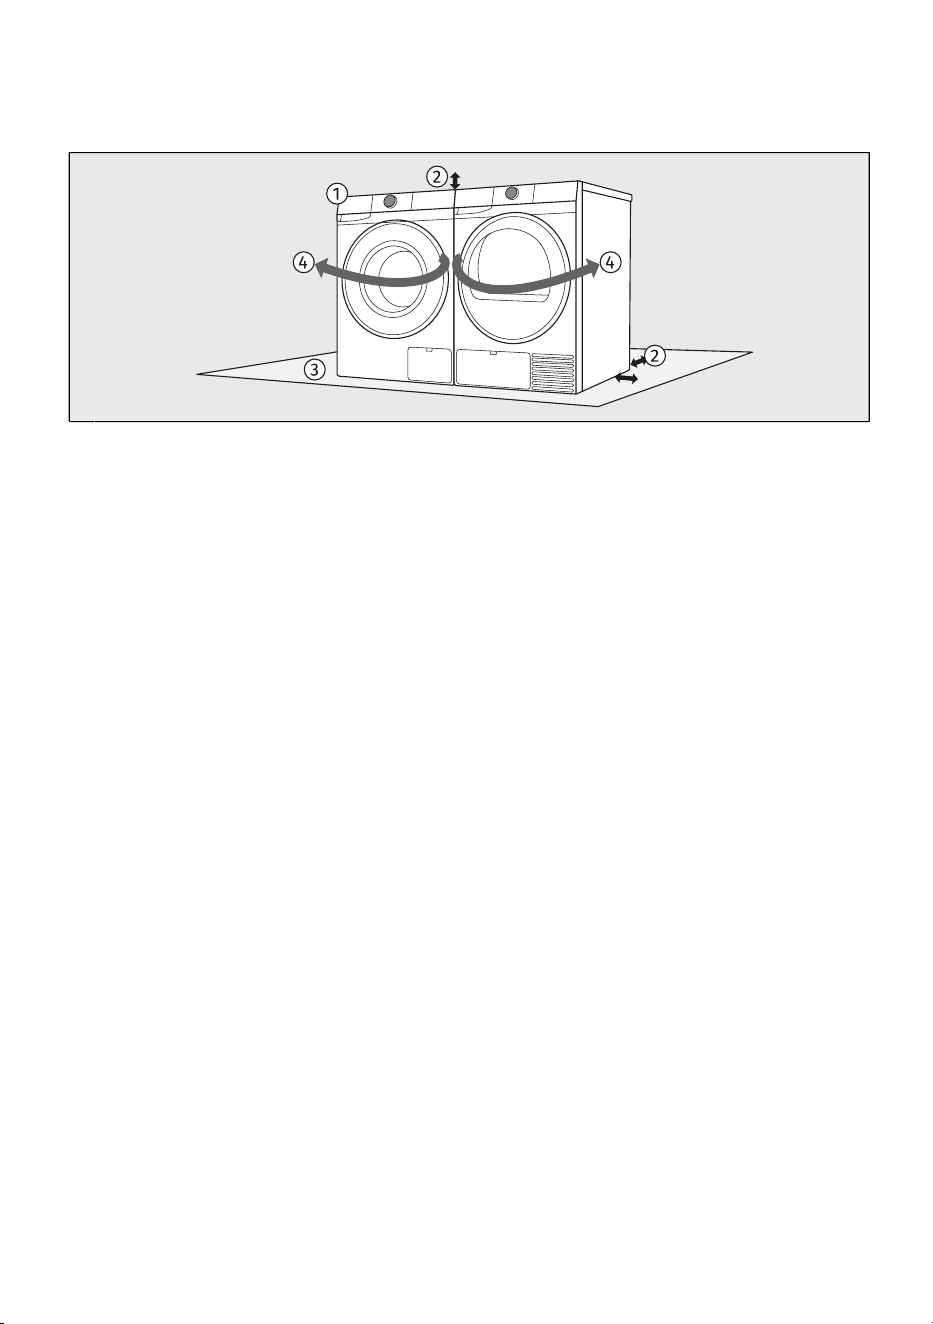
Freestanding installation
The washing machine and the dryer can be placed next to each other.1
When positioning the appliance, observe the required clearances from the top and side surfaces
of the washing machine and tumble dryer. (See chapter Dryer installation clearances when installing
in a room.)
2
The surface on which the washing machine and/or dryer is placed should be clean and level.3
Due to the door opening direction and the handling process of laundry, it is recommended to
place the washing machine on the left and the tumble dryer on the right.
4
29
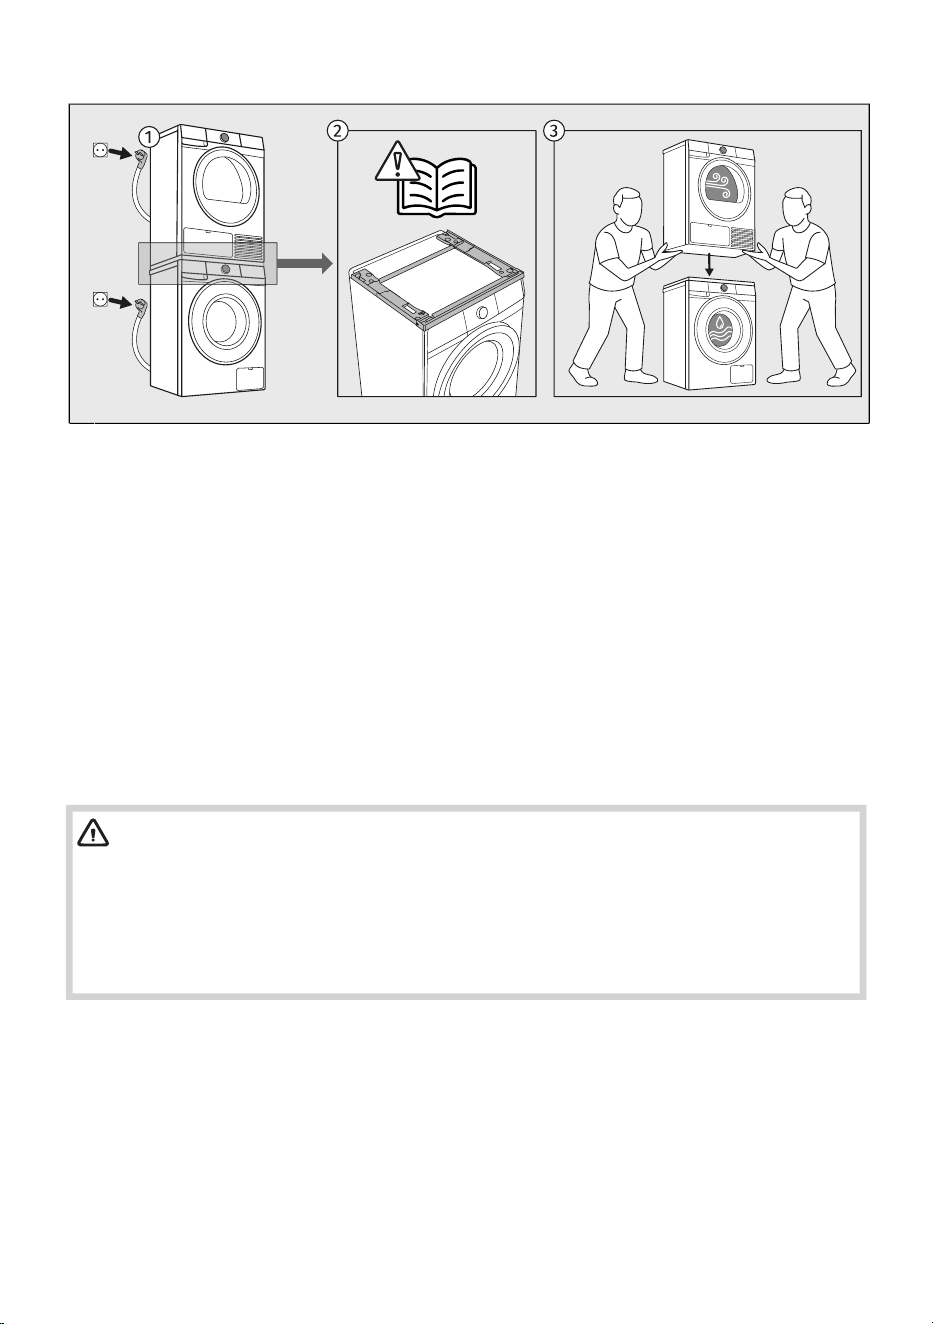
Stacked installation
Certain dryers and washing machines of the Gorenje brand can be installed in a stacked
configuration. In this case, a so-called Stacking Kit (Dryer-to-washer Installation Kit, hereinafter
referred to as the Stacking Kit) must be used.
1
The Stacking Kit can be purchased from an authorised service centre. Detailed installation
instructions are supplied with the Stacking Kit.
It is available in white (product code: 20018019 SKGUP1) or black (product code: 20018049
SKGUP1B).
For information on the compatibility of different types of washing machines and dryers for stacking,
consult your retailer or check the compatibility details in the technical data sheet of the Stacking
Kit.
2
The floor surface on which the washing machine is placed must be clean and level. The surface
of the washing machine on which the Stacking Kit is installed must also be clean.
At least two persons are required to install the tumble dryer on top of a washing machine.
Never place the washing machine on top of the dryer!
3
WARNING!
When installing the washing machine and dryer in a stacked configuration, the installation
instructions for the Stacking Kit must be strictly followed. The stacked appliances must be
secured to the wall using the dedicated brackets supplied with the Stacking Kit to prevent
tipping over and possible injury.
Certain washing machine depths are not suitable for stacking. A washing machine depth of
less than 54 cm does not allow a dryer to be installed on top of the washing machine.
30
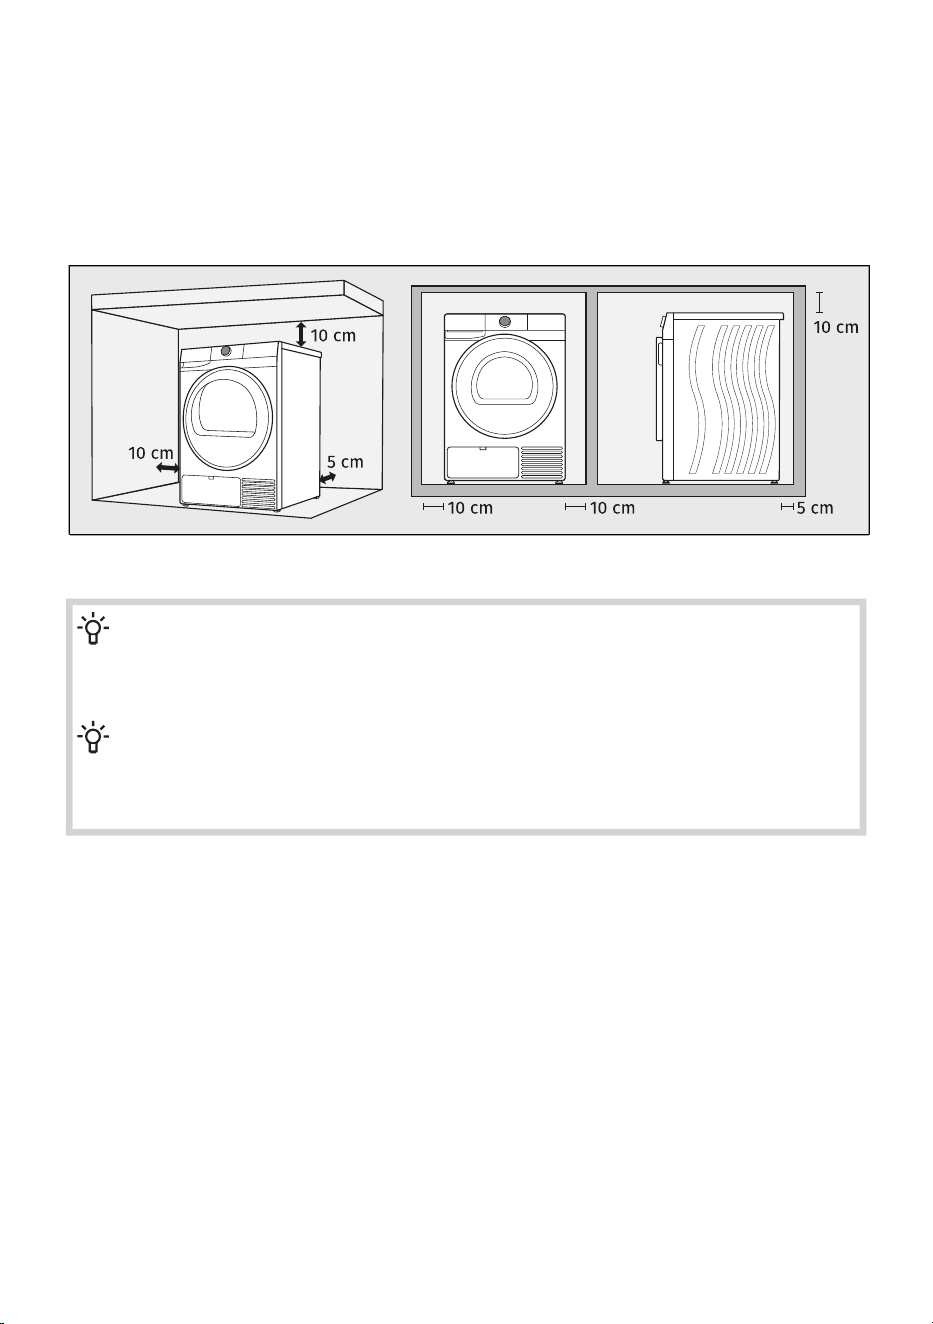
Dryer installation clearances when installing in a room
For safety reasons, the minimum distance between the back of the appliance and the wall must be
at least 5 cm, and the distance between the appliance and any furniture above or beside it must be
at least 10 cm.
When positioning the dryer, also consider other elements in the room, such as doors or windows and
how they open into the space. The dryer must have sufficient clearance for the door to open. See
chapter DESCRIPTION OF THE DRYER/Technical data.
Observe the required minimum clearances as shown in the picture.
INFORMATION!
The dryer may not be in contact with a wall or adjacent furniture. For optimum dryer operation,
we recommend observing the clearance from the walls as indicated in the figure. In case of
failure to heed the required minimum clearance, the dryer may overheat.
INFORMATION!
Vents on the back wall and the air exhaust opening on the front side of the dryer should never
be obstructed.
It is not recommended to install the dryer under a countertop.
31
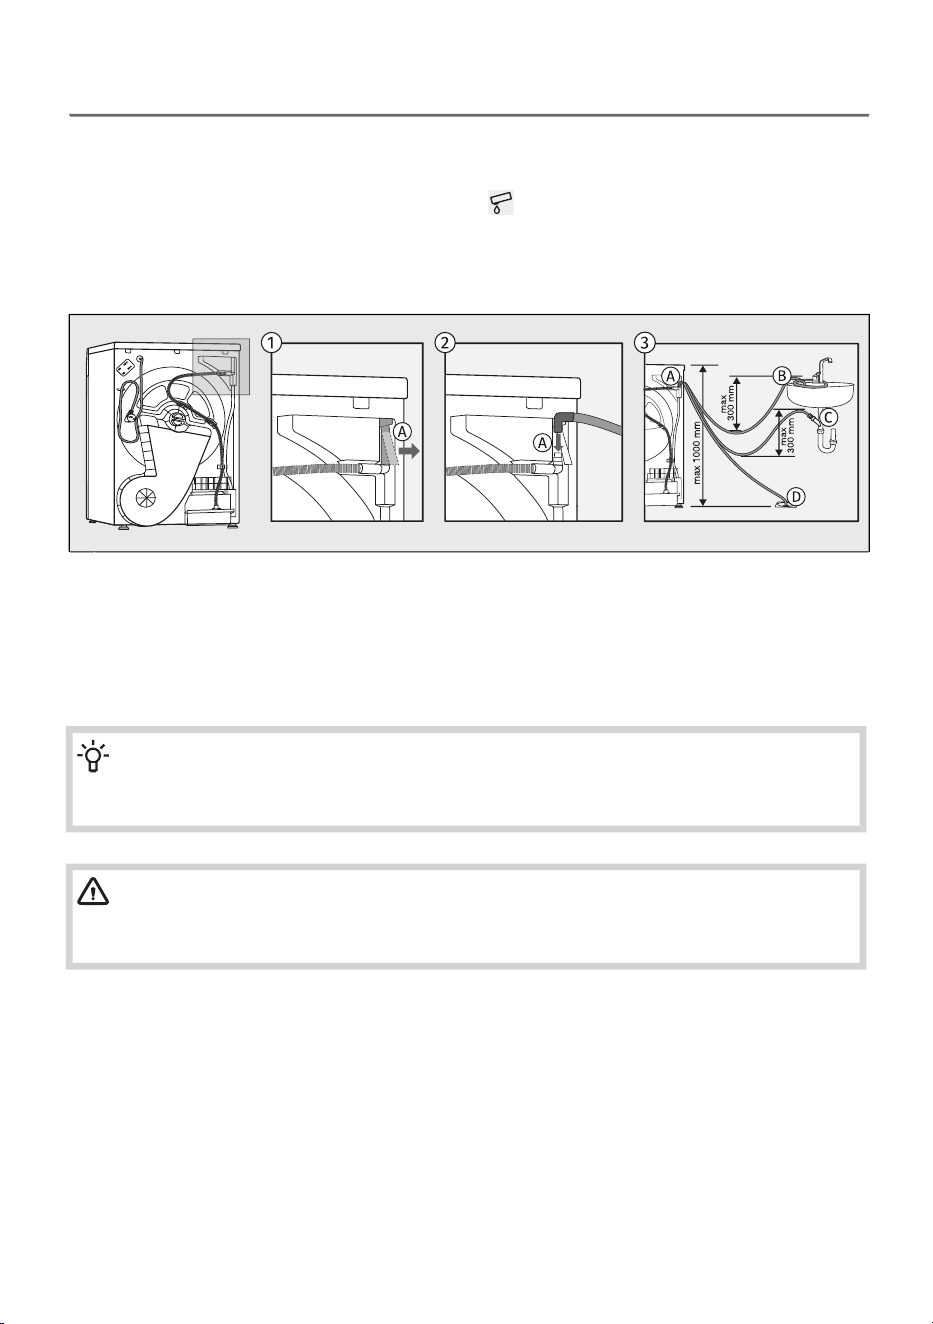
4.3 Draining the condensate
Moisture from the laundry is extracted as humid air passes through the heat exchanger and collects
in the condensate container.
During the drying process, an indicator light (symbol is lit on the display unit) warns when the
condensate tank is full and needs to be emptied.
To avoid emptying the condensate tank, run the condensate discharge hose located at the back of
the appliance directly into a drain.
Remove the rubber hose from the attachment (A).1
Attach the supplied water drain hose to the same fitting (A).2
The supplied drain hose can be routed to a sink drain by attaching it to the tap (B), to the sink
siphon (C), or to a floor drain (D).
3
Then, the water is pumped directly into a washbasin, a siphon, or a floor drain.
INFORMATION!
If you decide to run the condensate drain hose into a drain, make sure the hose is securely
fastened. This will prevent any water spillage which could result in unexpected damage.
WARNING!
Do not pull the drain hose, and make sure it is not under tension, clamped, or bent.
Always use the hoses supplied with the dryer.
32
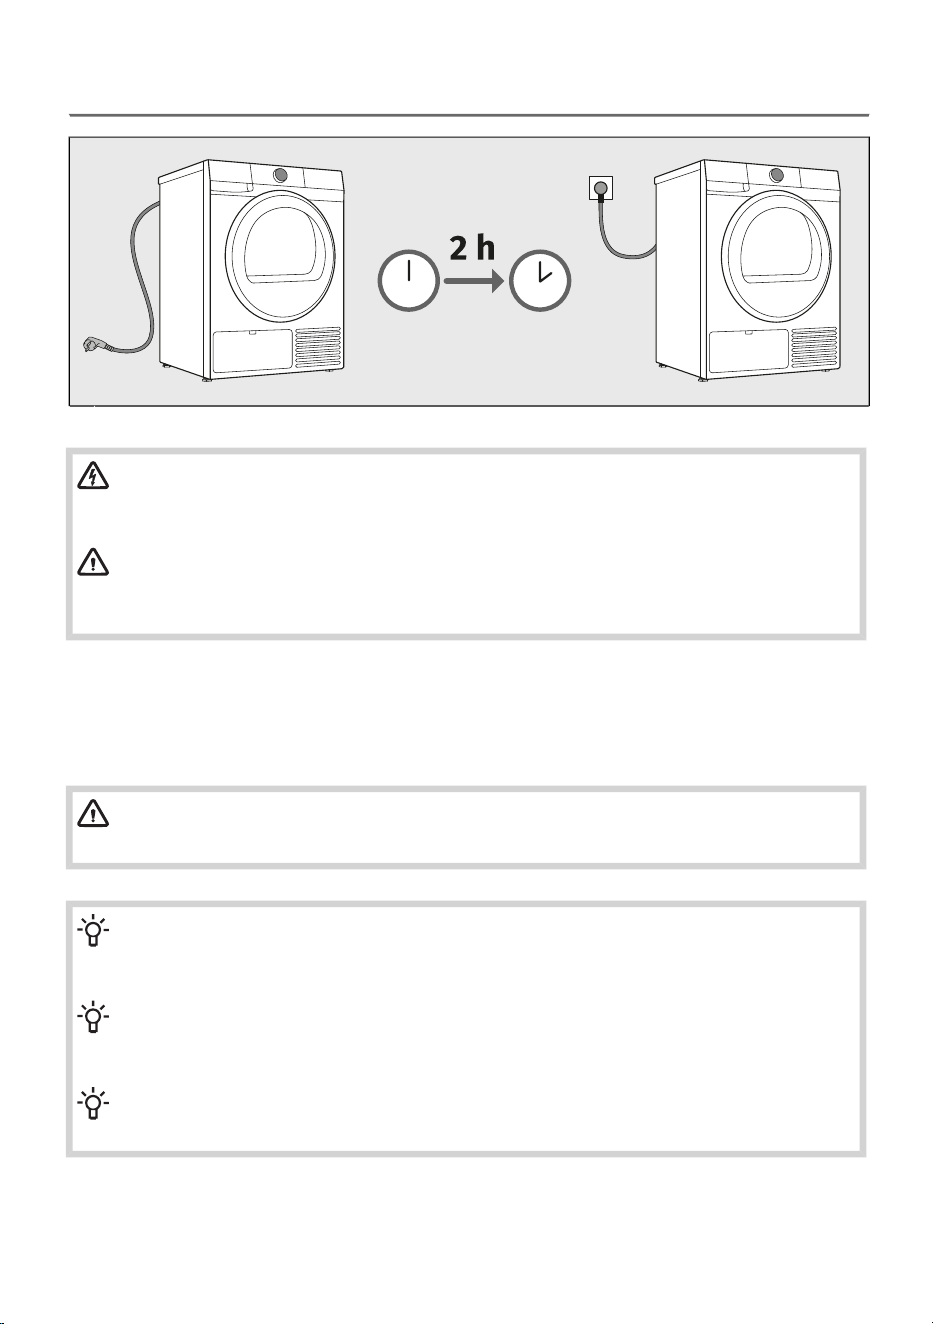
4.4 Connecting the dryer to the electricity supply
ELECTRIC SHOCK!
We recommend using over-voltage protection to protect the appliance in case of a
lightning strike.
WARNING!
After installation, the dryer should stand still for two hours before it is connected to the
power mains; this allows the dryer to stabilize.
Connect the dryer to a grounded power outlet. After installation, the wall outlet should be freely
accessible. The outlet should be fitted with an earth contact (in compliance with the relevant regulations).
Information on your dryer is indicated on the rating plate (see chapter DESCRIPTION OF THE
DRYER/Technical data).
WARNING!
The dryer shall not be connected to the power mains using an extension cord.
INFORMATION!
Do not connect the tumble dryer to an electrical outlet intended for an electric shaver or a
hair dryer.
INFORMATION!
Any repair and maintenance pertaining to safety or performance should be done by trained
experts.
INFORMATION!
A damaged power cord may only be replaced by a person authorized by the manufacturer.
33
5. BEFORE USING THE APPLIANCE FOR THE
FIRST TIME
This chapter describes how to:
- what you need to do before you turn on your appliance for the first time,
- how to connect the appliance to a Wi-Fi network for the first time.
5.1 Before switching on the appliance for the first time
Disconnect the dryer from the power mains.1
Open the door towards yourself.2
Clean the dryer drum with a soft, damp cotton cloth and water.3
WARNING!
Do not use any solvents or cleaning agents that could damage the dryer (please observe the
recommendations and warnings provided by the manufacturers of the cleaning agents).
34
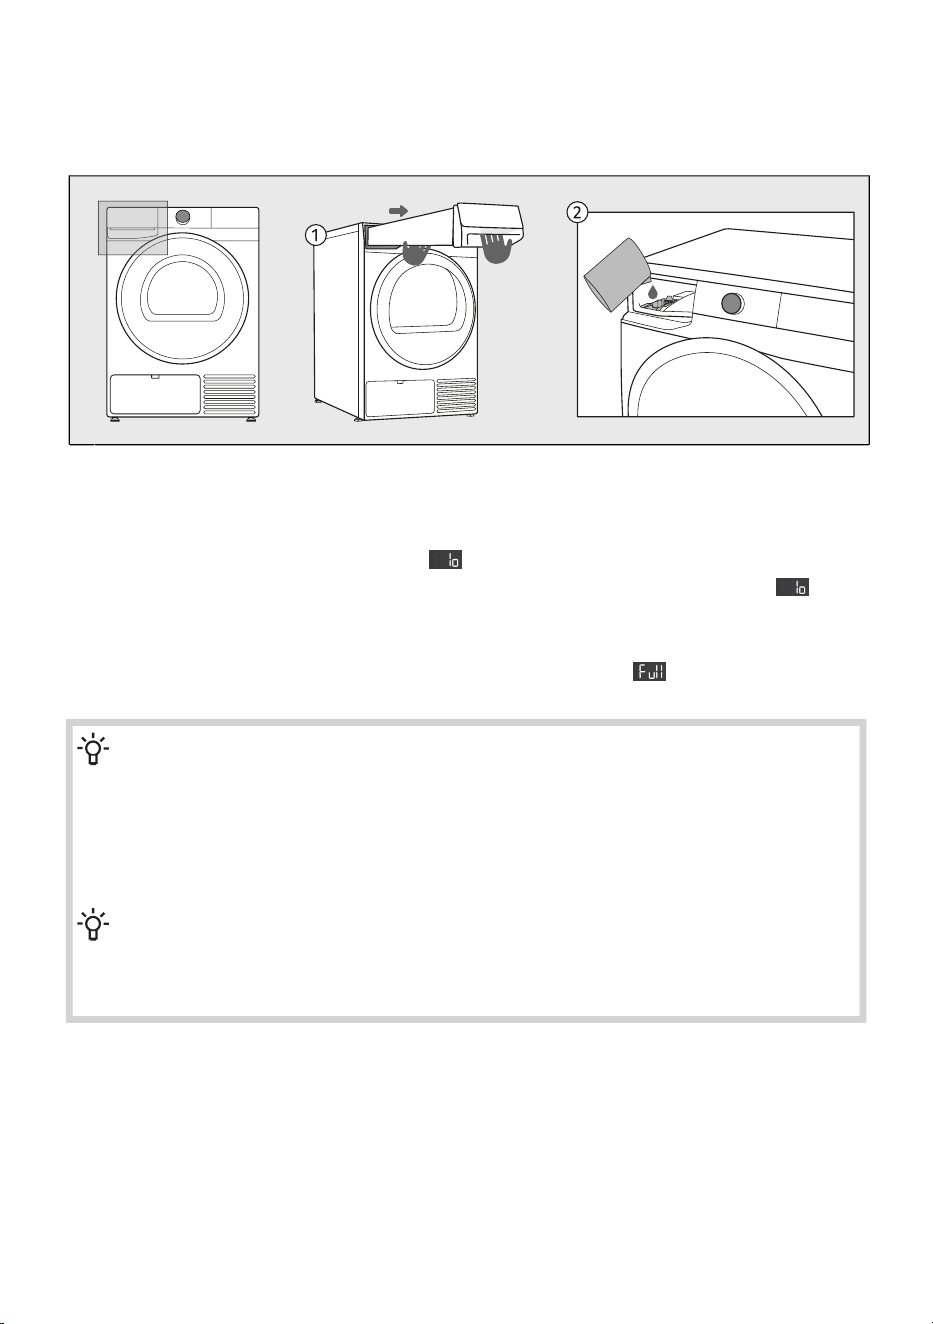
Filling and replenishing the steam generator tank
If you select the steam program Steam refresh (Osvežitev s paro) when using the dryer for the first
time, you must first fill the steam generator tank with distilled water, which the dryer uses to produce
steam.
Pull out the condensate tank (using both hands as shown in the figure).1
Slowly add distilled water to the steam generator tank filter.2
If the steam generator tank is empty, the sign appears and the Steam refresh (Osvežitev s paro)
programme cannot be run. Fill the steam generator tank with distilled water until the sign
disappears. Later on, as you use your dryer, the system will be filled automatically with condensed
water extracted during the drying process.
When the steam generator tank is full, this will be indicated by the sign and an acoustic signal.
This means that both tanks are filled – there is a risk of water spillage.
INFORMATION!
Only the use of distilled water or condensed water from the condensate tank is allowed. The
use of plain water or other additives is prohibited. Due to limescale build-up, the heater may
malfunction, which is not subject to warranty.
Only add distilled water when the dryer is switched on and the steam programme is selected
(but before you start the programme). Otherwise, the level sensor will not operate and water
may overflow to the dryer interior.
INFORMATION!
By pouring the water slowly, you will prevent the water from flowing down the front wall of
the dryer. Steam generator tank is not visible as it is located in the dryer interior; only the
steam generator tank filter is visible.
35
5.2 First connection to a Wi-Fi network
Application ConnectLife
ConnectLife is a smart home platform that connects people, devices and services. The ConnectLife
application includes advanced digital services and carefree solutions that allow users to monitor and
control appliances, receive notifications from a smartphone, and update software (supported features
may vary depending on your appliance and the region/country in which you are located).
Install the app
To connect your smart device, you need a home 2,4 GHz Wi-Fi network and a smartphone equipped
with the application ConnectLife.
You can download the ConnectLife app for free from the Apple App Store® or Google Play™, or scan
the code:
Install the ConnectLife app and create an account or log in to your existing account if you
already have one.
1.
In the ConnectLife app, go to the Add device menu and follow the instructions.2.
Unique QR code can be found on the warranty card or on the rating plate of the appliance.
After a successful connection, the appliance can be operated remotely via the application.3.
36
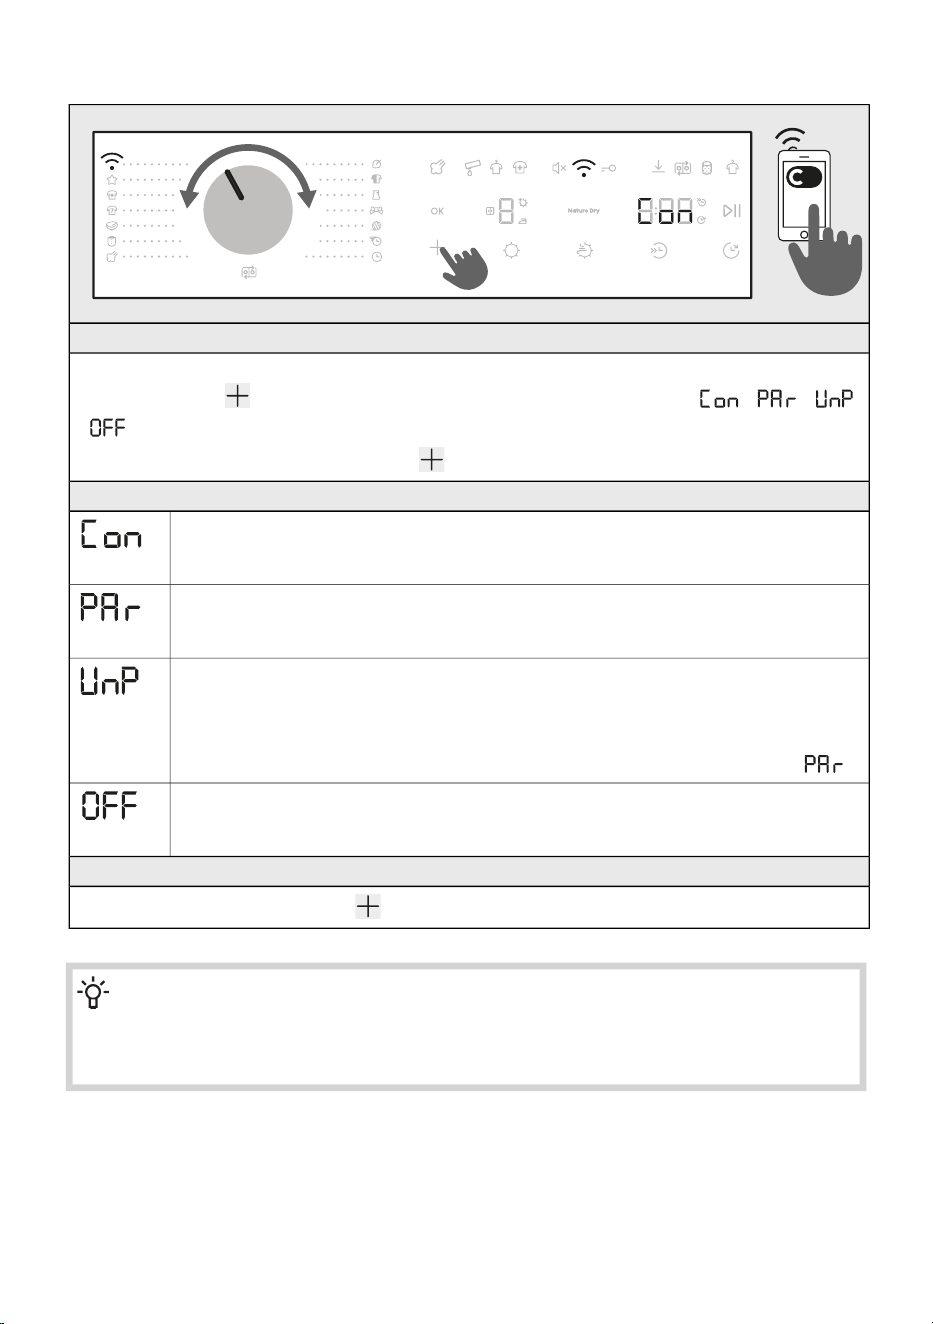
How do I connect my device?
ENTER THE MENU
The appliance must be turned on; turn the selector to position Remote control .
Press and hold the key on the device until the function you want to activate ( / /
/ ) appears on the display.
To activate the desired function, release the button while the function is displayed on the display.
CONNECTION BETWEEN THE APPLIANCE AND THE APPLICATION
CONNECT (Connection setup) (from 3 to 6 sec)
When you release the button, the function is activated, the countdown of 5 minute(s)
begins, continue your activities in the application.
PAIR (Pairing) (from 6 to 9 sec)
When you release the button, the function is activated, the countdown of 3 minute(s)
begins, continue your activities in the application.
UNPAIR (Unpairing) (from 9 to 12 sec)
When you release the button, the function is activated, the countdown of 1 minute
begins.
This step will remove all active users of the appliance. If you want to operate the
appliance remotely again, you will need to repeat the process of adding a user .
OFF (Wi-Fi On/Off ) (from 12 to 15 sec)
When you release the button, the appliance’s Wi-Fi connection is switched off.
All appliance settings remain unchanged.
EXITING MENU
Exit the menu by holding down the button for more than 15 sec.
INFORMATION!
You can also control your appliance from your phone if you are not connected to the same
Wi-Fi network as your appliance (the phone only needs an active internet connection). This
means you can also control your appliance when you are away from home.
37

INFORMATION!
You can operate the appliance with multiple devices. You can also control and monitor the
operation of the appliance with any phone connected to the appliance, regardless of which
user has initiated the washing cycle. The appliance can be connected to/controlled
simultaneously with several ConnectLife user accounts.
INFORMATION!
After you have started the appliance from your phone, a person located next to the appliance
can take over and manually turn off or control the appliance; the app will notify you in such
case. In such case, controlling the appliance remotely from your phone is no longer possible.
If you wish to control the appliance from your phone again, all required steps must be repeated.
Which Wi-Fi router can be used?
Only 2,4 GHz networks are supported. If the ConnectLife app cannot find your local network during
the connection set-up process, check the following:
• your router is operating at the frequency of 2.4 GHz,
• your network is hidden, and
• your signal is strong enough.
Do you have more questions?
Remotely upgrading the software
Check the software update options in the app ConnectLife.
38
6. DRYING PROCESS, STEP BY STEP (1–7)
This chapter describes the step-by-step laundry drying process:
step 1: sort the laundry,
step 2: load the laundry into the dryer,
step 3: switch on the dryer,
step 4: select the drying programme,
step 5: select additional functions,
step 6: start the drying programme,
step 7: complete the drying cycle.
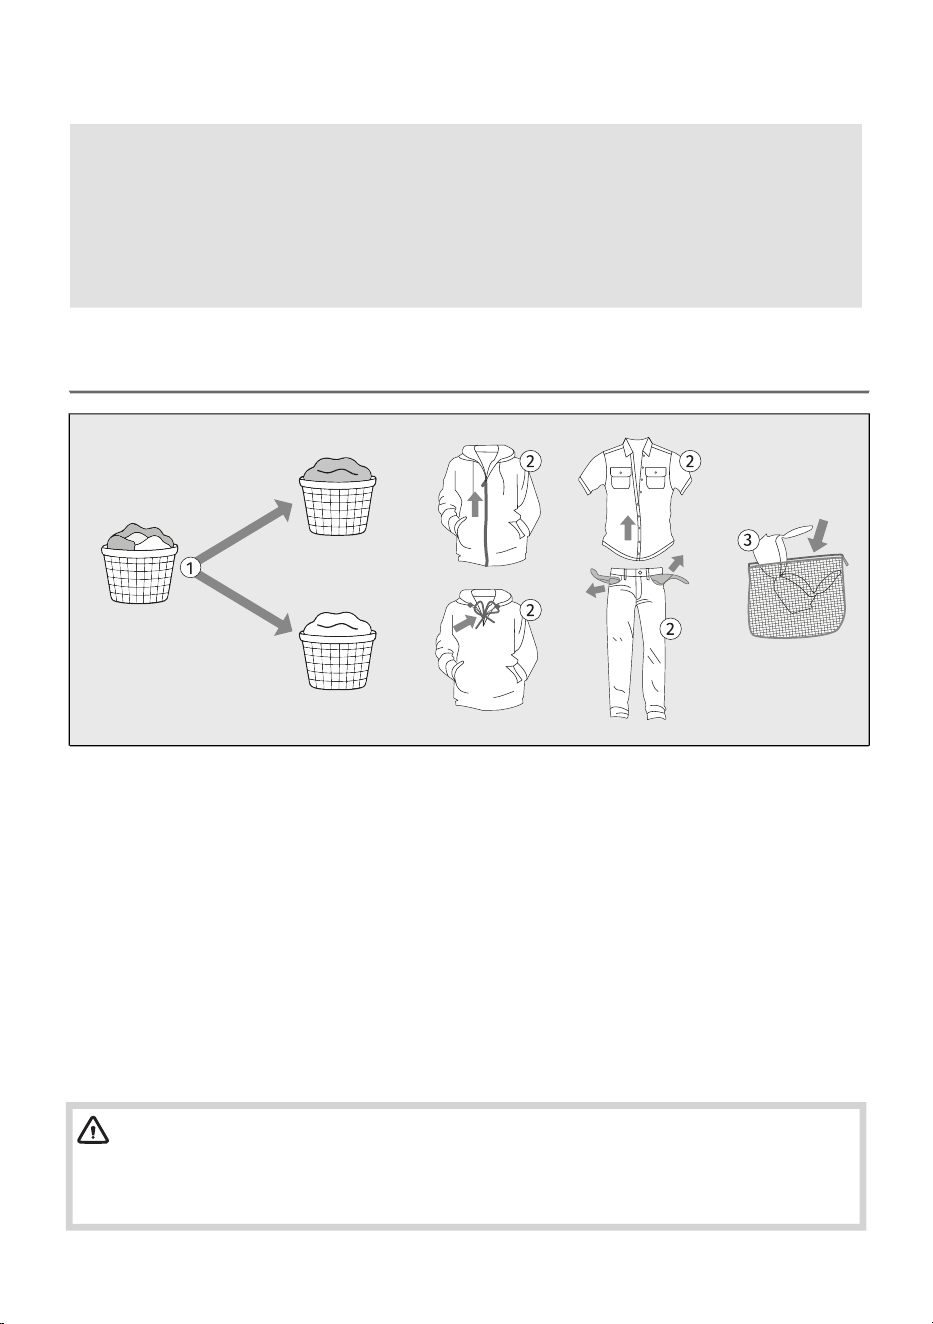
6.1 Sort the laundry
1. Sort the laundry by type and thickness of the fabric (see chapter DRYING PROCESS, STEP BY
STEP (1–7) / Choose the drying program).
2. Close the buttons and zips, tie any ribbons, and turn the pockets inside out.
3. Place very sensitive clothes and small items in a special-purpose laundry washing bag.
(The special-purpose laundry bag is available as an optional accessory.)
Drying laundry made of particularly delicate fabrics that may be deformed is not recommended.
The following types of laundry may not be dried in the dryer as this may cause your garments
to deform:
• leather garments and other leather products,
• garments that are waxed or treated in any other way,
• garments with major wooden, plastic, or metal parts;
• garments with spangles;
• garments with metal parts subject to rusting.
WARNING!
The manufacturer assumes no responsibility for malfunctions resulting from failure to follow
these instructions, which may also affect the validity of the warranty. Service costs for damage
caused by drying fabrics not recommended for tumble drying are likewise not covered.
39
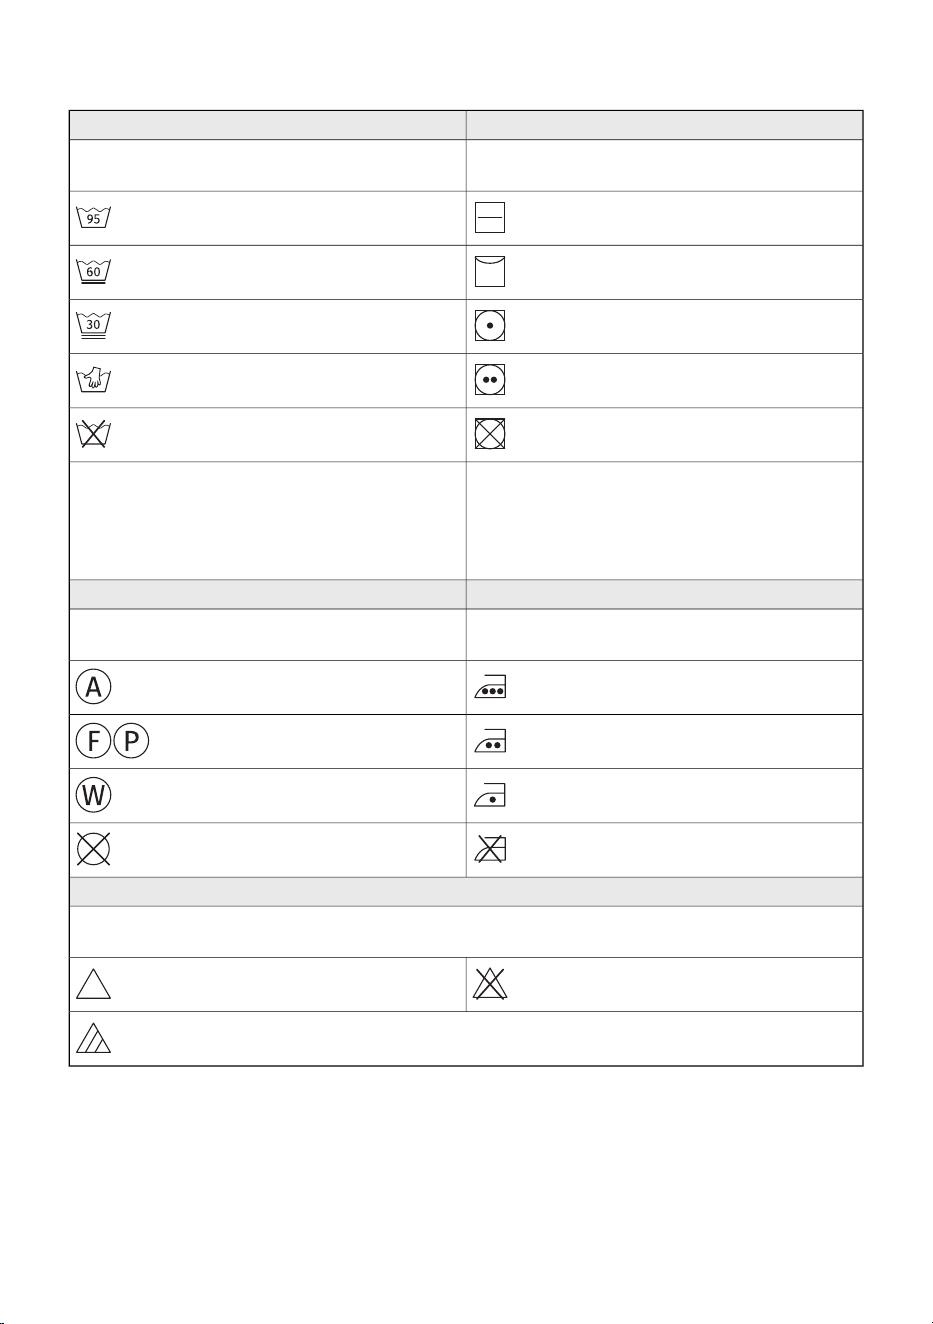
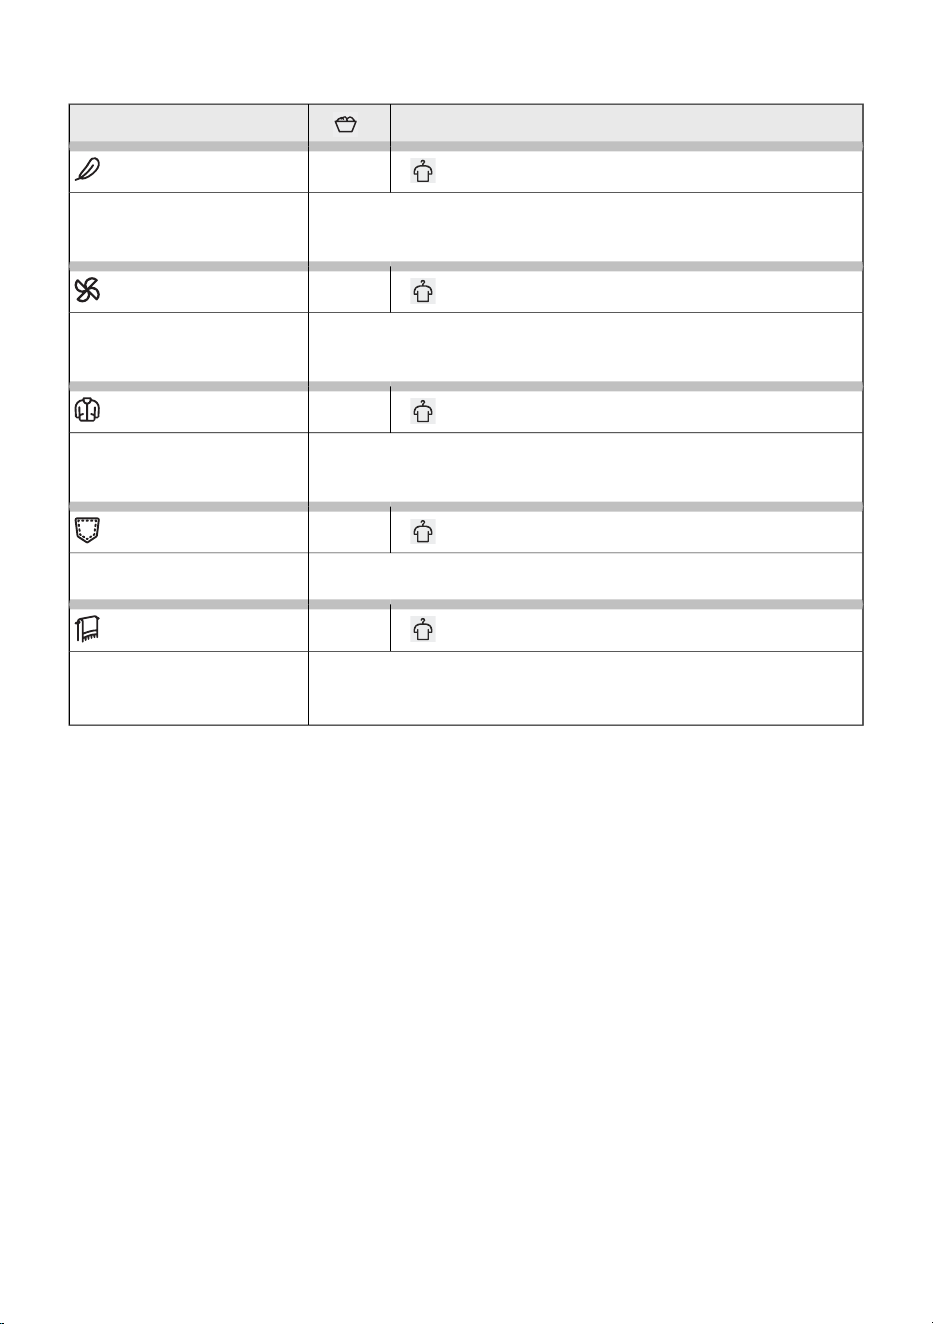
When sorting laundry, see the table below and pay attention to the labels on the laundry.
DryingWashing
The mark in the square means the drying method
for the laundry.
The number in the basket symbol means the
maximum allowed washing temperature in (°C).
Drying on a flat surfaceNormal wash
Line dryDelicate wash
Drying at a low temperatureVery delicate wash
Drying at a high temperatureHand wash only up to max. 40°C
Tumble drying not allowedWashing is not allowed
If the square symbol has slanted lines, this
indicates natural drying in the shade. Slanted
lines can be used in combination with other
symbols in the square.
The line under the basket symbol indicates the
level of treatment intensity: one line indicates
gentle washing (less mechanical effect, lower
spin speed), two lines indicate very gentle
washing (e.g. wool, silk, synthetics).
IroningDry cleaning
Steam ironing can permanently damage textiles.Dry cleaning is intended for textiles that cannot
or should not be machine washed.
Ironing at maximum 200°CDry cleaning with all types of solvents
Ironing at maximum 150°C
Dry cleaning with certain solvents
(depending on the label)
Ironing at maximum 110°CProfessional wet cleaning
Ironing not allowedDry cleaning not allowed
Bleaching
Bleaching is intended for refreshing and removing stains from textiles that are suitable for washing
with bleach in a washing machine. Always follow the manufacturer’s instructions.
Bleaching not allowed
Bleaching with all types of bleaching
agents
Bleaching with oxygen-based bleaching agents
40
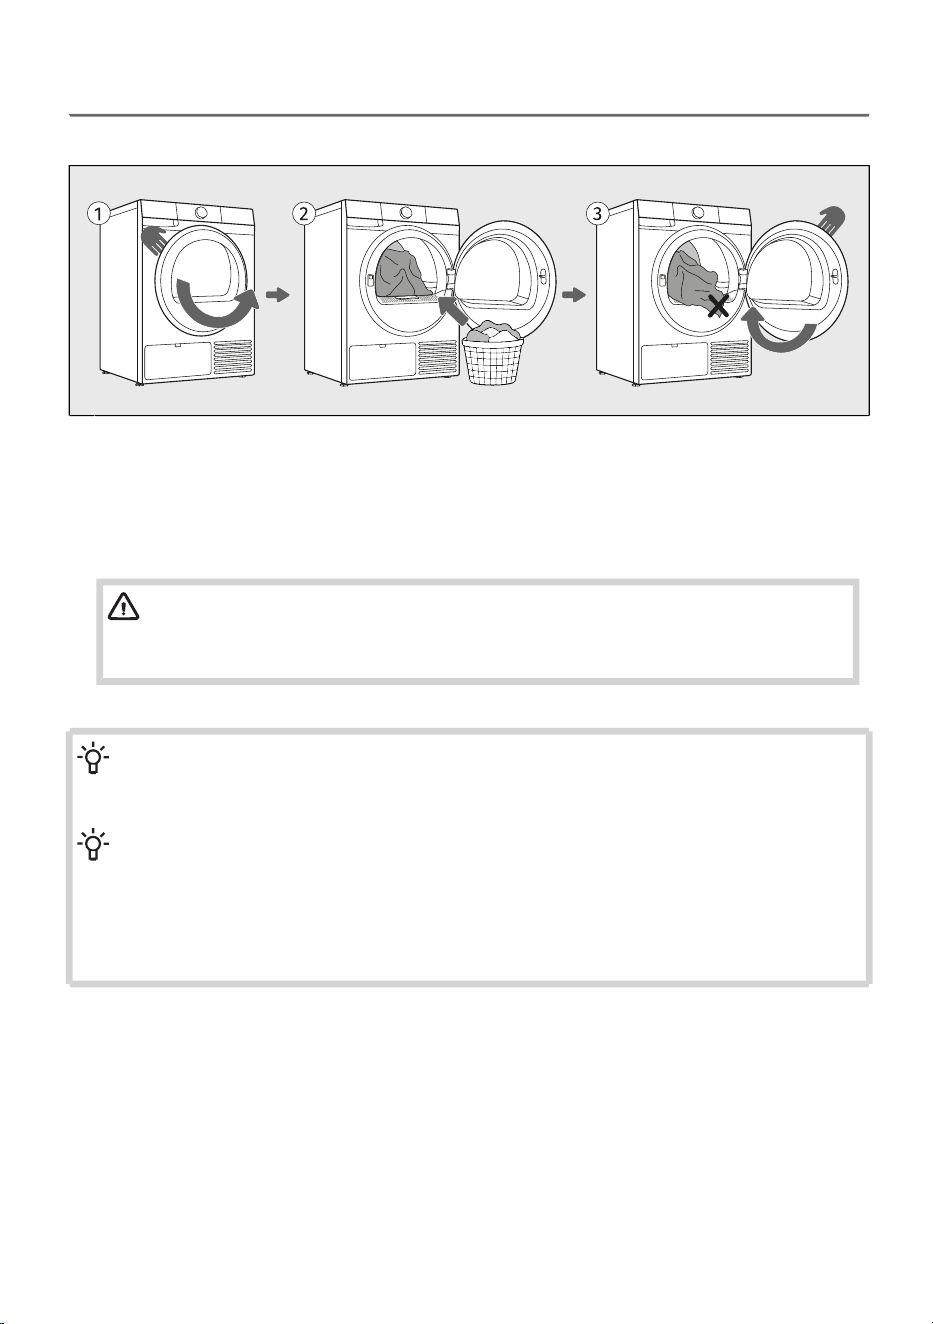
6.2 Load the laundry into the dryer
Loading the dryer
Open the dryer door towards you.1
Place the laundry into the empty dryer drum. Make sure there aren't any other objects among
the laundry, such as a detergent ball. Such objects could melt and cause damage to the dryer
or your laundry.
2
Make sure that no garment is stuck between the door and the dryer housing. Close the dryer
door.
3
WARNING!
The lint filter must always be inserted in its designated slot before loading or removing
fabrics. This prevents any garment or other fabric from falling into the empty opening.
INFORMATION!
Do not insert laundry into the dryer if it has not been wrung or spun (recommended minimum
spinning cycle: 800 rpm).
INFORMATION!
Do not overload the drum! See chapter DRYING PROCESS, STEP BY STEP (1–7) / Choose
the drying program and observe the recommended nominal load for each drying programme.
If the dryer drum is overloaded, the laundry will be more wrinkled and perhaps unevenly dried.
When drying larger items (bedding, towels, tablecloths etc.), loosen them and then insert them
into the dryer drum.
41
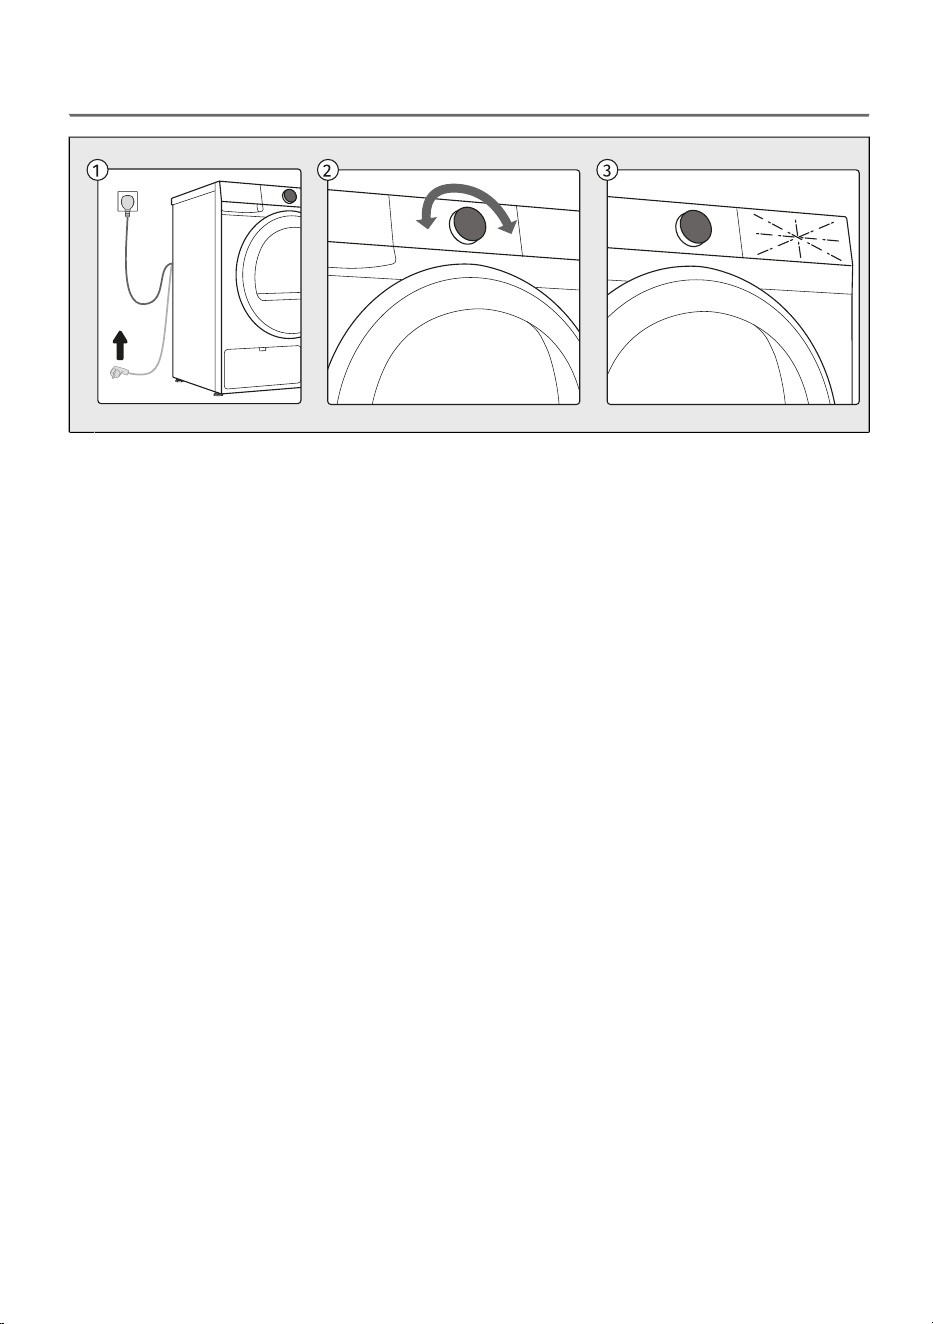
6.3 Switch on the dryer
Connect the dryer to the power mains by plugging in the power cord.1
To switch on the appliance, rotate the selector to any position.2
The icons on the display light up.3
42
6.4 Choose the drying program
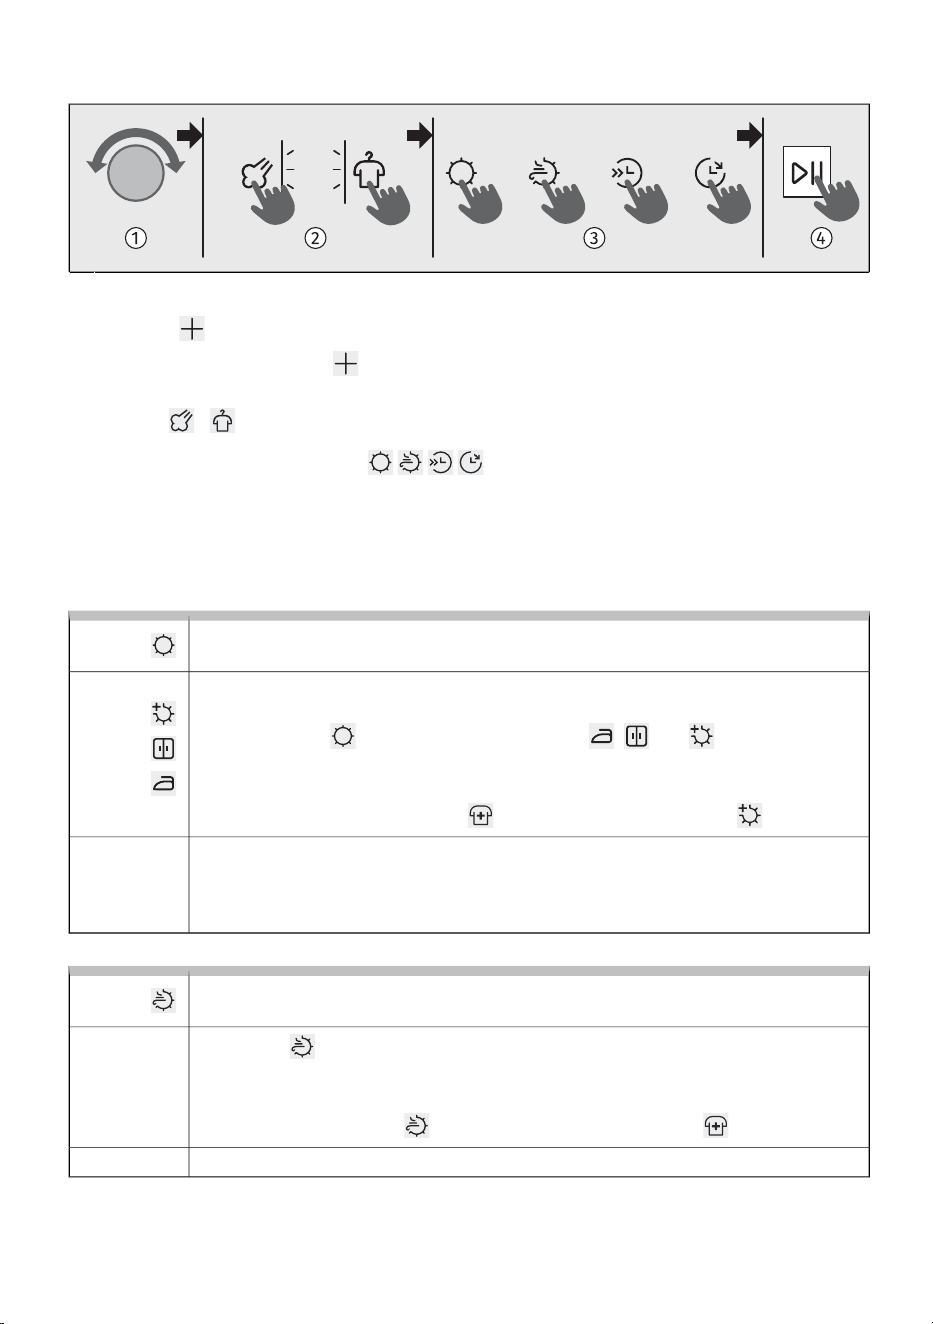
Selecting a program on the control unit
The dryer offers drying programs indicated around the selector knob.A
Choose the drying programme by rotating the selector to the left or to the right (depending on
the type and spin-dry level of the laundry).
B
In addition to the programmes shown on the control panel, further programmes are available
through the ConnectLife app. Follow the instructions provided in the app.
C
INFORMATION!
During operation, the selector will not rotate automatically.
Explanation of symbols used below:
Nature DryMaximum load
Half LoadDry target
DisinfectStorage - preset
Delay endIron
AnticreaseExtra dry
Steam
For detailed descriptions of the functions, see chapters DRYING PROCESS, STEP BY STEP (1–7) /
Select the additional functions.
43
Drying programme selection
All programs listed on the control unit can be started on the appliance or from the app. To start a
programme from the app, turn the selector knob to position Remote control. Close the door, then
press the Start/Pause button. The appliance will then remain ready for app control for 24 hours. See
also the following chapter.
Nature Dry
The gentlest drying for delicate favourites
NatureDry is especially ideal for sensitive garments that need extra care and usually avoid the dryer.
It protects colours, maintains softness, and preserves the natural feel of fabrics. By drying at just
33,8 °C (around 37 %* lower than standard drying temperatures) it gently mimics the effect of
air-drying outdoors, but in half the time. Enjoy worry-free drying for your most delicate pieces.
Based on testing results from SGS laboratories. Comparison between heat pump tumble dryer on
Mix program with and without NatureDry function. Measured average temperature inside laundry
without NatureDry function: 53,8 °C. Measured average temperature inside laundry with NatureDry
function: 33,8 °C. Individual results may vary.
Dry target
The default dryness level is medium - Storage (level 2).
You can also select Iron (level 1) or Extra dry (level 3).
44
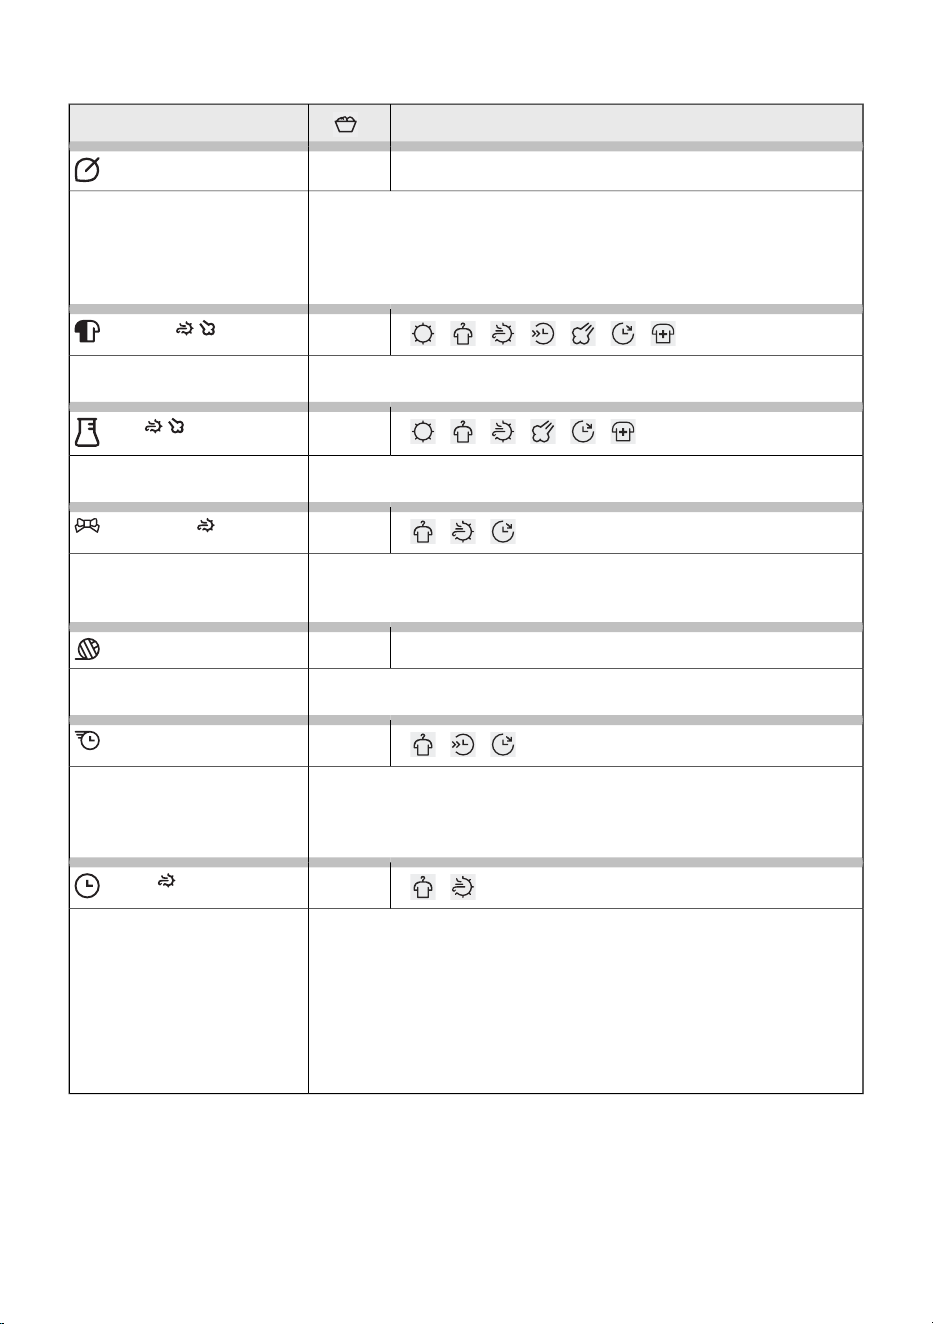
Programs on the front panel
Option of selecting additional functionsProgram
9 kg
Eco*
The Eco programme is suitable to dry wet cotton laundry, and is the
most efficient programme in terms of energy consumption for drying
wet cotton laundry.
The Eco programme is used to assess compliance with EU legislation
on eco-design.
*
9 kg
Cotton
This programme is intended for drying non-delicate wet white and
coloured cotton laundry.
4 kg
Mix
The program is used for drying cotton and synthetic laundry at the
same time.
1 kg
Sensitive
Use this programme to dry highly delicate laundry made of synthetic
fibres, which may be slightly moist after the drying process. We
recommend using a special-purpose laundry bag.
2 kg
Wool
This programme is used to dry wool and clothing according to the
manufacturer's instructions specified on the label.
2 kg
Power 39'
The programme is suitable for small amounts of lightweight laundry
that you want to dry quickly and efficiently. The programme duration
may vary depending on the load, fabric type, and spin speed after
washing.
4 kg
Time
Use this programme for non-sensitive laundry that is still slightly moist
and has to be thoroughly dried. In the time programme, remaining
moisture is not detected automatically. If the laundry is still damp
after the programme is complete, repeat the programme; if it is too
dry and therefore creased and rough to touch, the drying time you
selected was too long.
You can choose the duration of the washing from 30 minut to 4h in
steps of 15 minut.
45
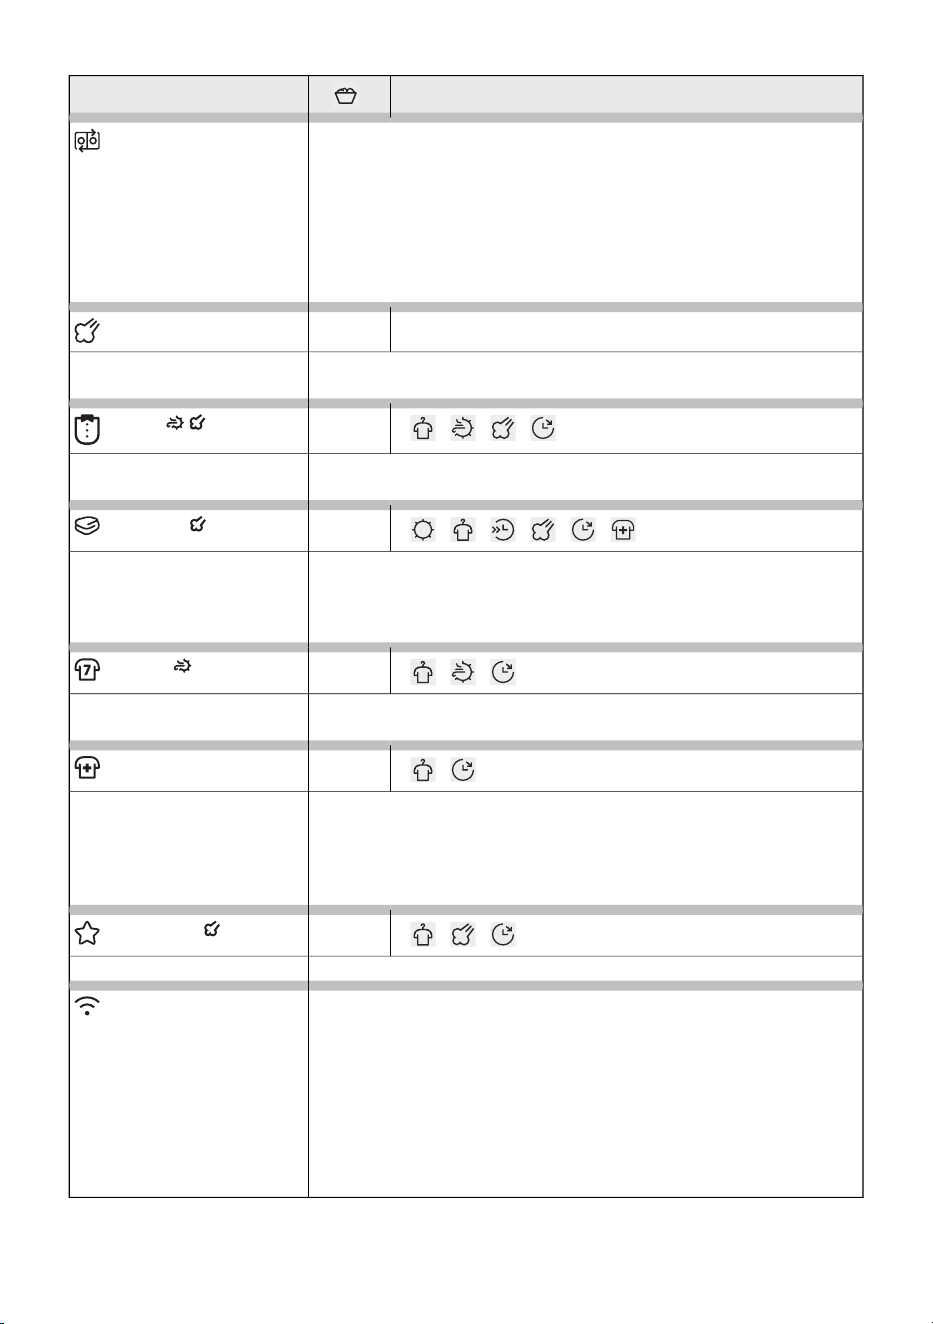
Option of selecting additional functionsProgram
When this function is activated, the washing machine and dryer can
operate in a coordinated way if both appliances are connected to the
Wi-Fi network. Set up the connection between the appliances in the
ConnectLife app. On the dryer, set the selector to Wash&Dry sync.
After the wash cycle is completed, the dryer will automatically set the
appropriate drying programme based on the selected wash
programme. All you need to do is transfer the laundry from the
washing machine to the dryer and press the Start/Pause button.
Wash&Dry sync
2 kg
Steam refresh
Use this program to refresh the laundry with steam (for laundry that
does not yet need washing, only refreshing).
2 kg
Shirts
Use this program to dry shirts and blouses. Adjusted drum rotation
prevents the laundry from creasing.
5 kg
Bedding
This programme is intended for drying larger textile items. At the end
of the programme, the laundry will be dry and ready for storage.
We recommend drying fitted sheets separately from other laundry
items or together with similar pieces.
3 kg
Sports
Use this programme for clothing with a membrane, for sportswear
made of mixed materials, and breathable fabrics.
4 kg
Allergy safe
Longer drying programme duration and overheating of the fabric
results in higher drying temperature, which reduces the number of
microbes and allergens on the garments. This drying programme is
not suitable for delicate items and items that should not be dried in
the dryer.
4 kg
Easy care
The program is used for drying synthetic and blended textiles.
Use the Remote control programme to remotely control your appliance
(using your phone).
It is possible to select all programs and functions that are available
for a specific program of your appliance (see sections BEFORE USING
THE APPLIANCE FOR THE FIRST TIME / First connection to a Wi-Fi
network and APPLIANCE SETTINGS AND ADJUSTMENTS / Remote
control).
In the application, you can also select additional programmes and
some additional settings.
Remote control
46
The following washing programmes can be selected in the ConnectLife app:
Option of selecting additional functionsProgram
2 kg
Pillow
Use this program to dry textiles stuffed or padded with down (pillows,
duvets, jackets etc.). Dry large items separately and use the extra dry
function or the time program if necessary.
2 kg
Air refresh
This program does not use a heater. Use it to refresh your clothes.
Program duration can be adjusted from 15 minutes to 4 hours (in
15-minute steps).
2 kg
Jackets / Coats
This programme is intended for drying jackets and coats that are
suitable for tumble drying according to the garment manufacturer’s
instructions.
4 kg
Jeans
This programme is suitable for drying jeans and clothes with extremely
thick seams.
5 kg
Towels
This programme is used for larger, thicker items that will be completely
dried and ready for storage after the cycle.
This programme is available only in the app.
47

6.5 Select the additional functions
Choosing extra functions
Once you have selected a drying programme, you can also choose and set additional functions for
certain programmes.
This is done in two or three steps:
- selecting the function (hereinafter referred to as Selection),
- setting the function level, if the function allows it (hereinafter referred to as Level / Description /
Display),
- activating the function (hereinafter referred to as Activation / Deactivation / Exit).
If you do not want to select additional functions, press the Start/Pause button.
The individual functions are described below.
48
Select additional functions by pressing the corresponding function button (see description at
point D). Select the Disinfect function using the button and confirm it by pressing the
button.
A
The symbol of the selected function at the top of the display will light up partially or fully. When
the function is not enabled, the symbol does not light up. The function currently being selected
flashes and is partially lit.
Confirm the setting by pressing the button.
The symbol of the selected function lights up fully but keeps flashing. When you move to the next
available function, the previously selected function stays permanently illuminated and stops
flashing.
To select or set an additional function, repeat the procedure described above.
B
To start the drying cycle, press the Start/Pause button to activate the function.C
When selecting functions directly using the buttons at the bottom of the display, additional options
for will appear on the screen above the symbol. Press the corresponding button
and choose the appropriate function setting.
You can also select the function in the upper left part of the display or the function in the
upper right part by pressing the corresponding button; the indicator – a dash I – lights up next
to the selected function
If the function button does not allow the selected function to be set for a specific programme,
the symbol flashes briefly and an acoustic signal sounds.
D
You can also select additional programs in the app ConnectLife. Follow the instructions in the
app.
E
INFORMATION!
If you press and hold the button for more than three seconds, you will enter the Wi-Fi
settings (applies when Remote control has been selected using the selector knob.
49
Set of additional drying functions
Use the selector knob to select the desired programme.1
Press the button repeatedly until the symbol of the desired function lights up and starts
flashing. (Briefly pressing the button allows you to scroll through the available functions.)
Press any of the function buttons on the upper left or right to activate this function (when the
function / is activated, the indicator next to it lights up).
2
Press any of the function buttons to activate this function (when activated, the
symbol lights up).
3
Press the (Start/Pause) button to start drying.4
Additional function options vary depending on the programme.
Dry target
Function for increased laundry dryness.
You can choose between different levels of dryness of the laundry and drying time.
You can select it before starting the drying process.
Press the button . Three options are available: , and , which allow
selecting a higher laundry dryness level and extend the drying time. The activated
dryness level is highlighted.
If the function is selected Disinfect , only the highest dryness level is available.
Selection:
To start drying, press Start/Pause.
At the end of the program, the function is not saved, unless the same program with
the same settings has been used three times in a row (then the AdaptTech function
is activated).
Activation:
Nature Dry
Gentle drying of laundry at a lower temperature.
By pressing , it is possible to select drying at a lower, laundry-friendly temperature.
When this function is selected, the indicator Nature Dry lights up.
This function is intended for delicate garments that can be dried in the dryer.
If the function Nature Dry is selected, the function Disinfect is not available.
Selection:
To start drying, press Start/Pause.Activation:
50
Half Load
Function for shorter drying time for a smaller load of laundry.
By pressing , you can select between normal and half load, which affects the
displayed drying time.
When you select a drying program, the function is only available if is highlighted.
If you activate the function, the drying time shown on the display is shortened.
Selection:
To start drying, press Start/Pause.Activation:
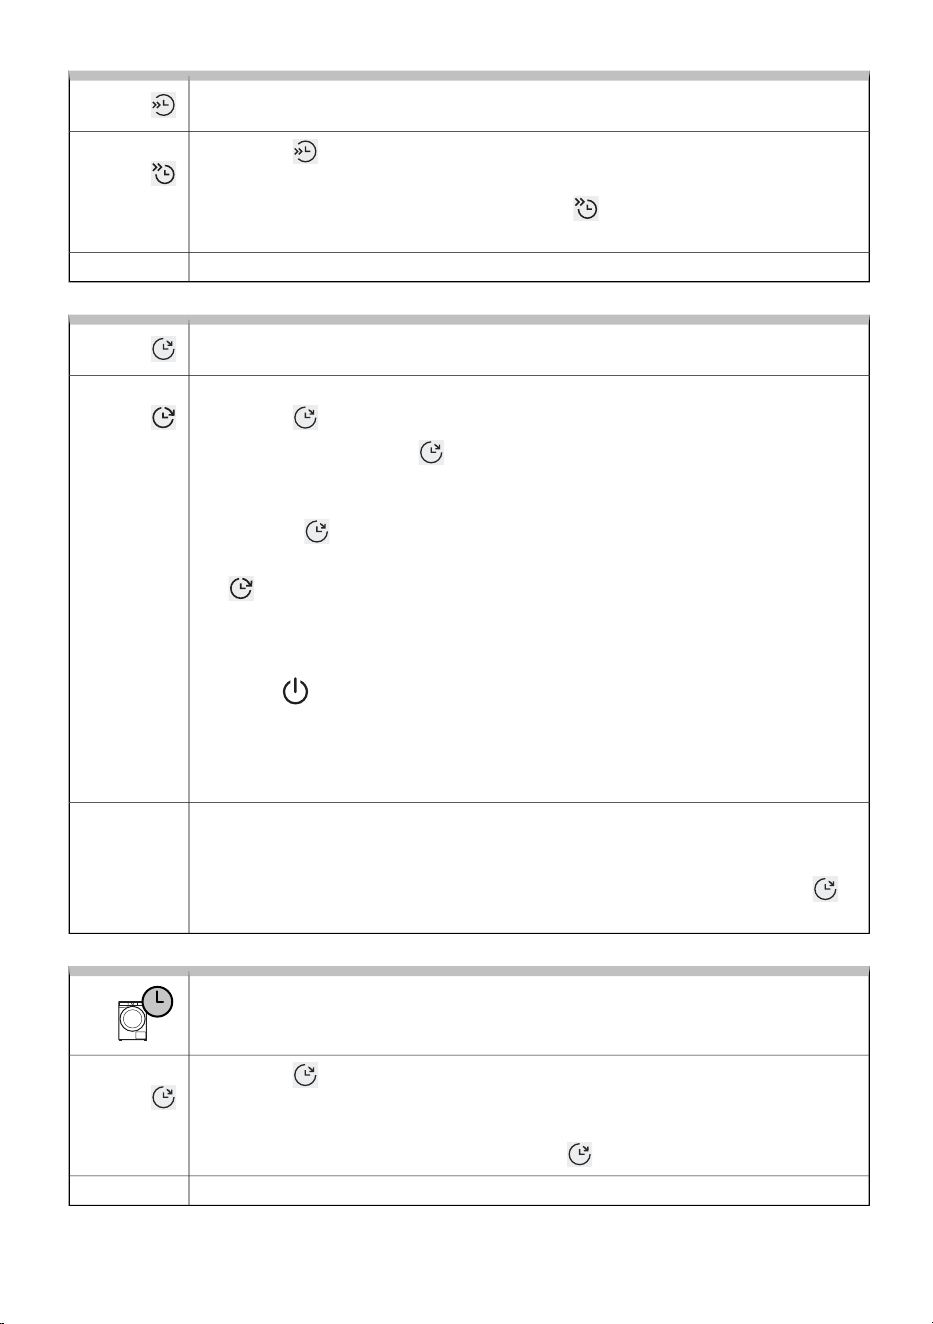
Delay end
Function for delaying the end of drying cycle
Select the desired programme and extra functions. Close the dryer door.
By pressing , it is possible to set the end of drying up to 24 hours.
If you press any key (except and Start/Pause) while setting the function, then the
function will be reset. Therefore, before setting this function all other desired functions
have to be set first.
Press or hold to set the desired drying end delay period. It can be selected in
30-minute increments up to 6 hours, and then in 1 hour increments up to 24 hours.
The indicator lights up on the display. The end of drying time is displayed.
The countdown begins. When the countdown reaches the drying program time (e.g.
2:30), the drying program starts automatically.
To stop or change the drying end delay, rotate the drying programme selector knob
to position for at least 1 second.
You can set a new end of drying delay time the next time you switch on the dryer.
Example of function setting:
If you wish the drying programme end at 6:00 in the morning and it is now 21:00,
then set the delaying the end of the drying program to 9 hours.
Selection:
Press Start/Pause to activate the function.
The dryer starts counting down the time. When the countdown reaches the drying
programme duration (e.g. 2:30), the drying programme starts automatically.
If the function is active, it can be interrupted by holding down the 3 button for
seconds. The drying cycle starts immediately after the interruption of the function.
Activation:
Time (timed drying)
To set the drying time on the program
By pressing it is possible to set the drying time. The set drying time is shown on
the display. The start time is 0:30, at each press the time increases by 15 min. The
maximum drying time is 4:00 h.
To reset (cancel) the set time, hold position for 3 seconds.
Selection:
To start drying, press Start/Pause.Activation:
51
Disinfect
For reducing microbes and allergens on clothes
Using the function allows you to reduce microbes and allergens on laundry, as it uses
a higher drying temperature. The function must be selected before starting the drying
process.
Press to select the function. A dash lights up next to the symbol.
If the function Disinfect is selected, the function Nature Dry is not available.
Selection:
To start drying, press Start/Pause.Activation:
Anticrease
A function to loosen and reduce creasing of laundry.
This function prevents laundry from creasing after drying. It is enabled by default for
all programmes and operates for 3 hours. It does not affect the total drying time.
Press to select the function. A dash lights up next to the symbol.
By pressing again, you can deactivate the function.
When you open the dryer door after the drying cycle is finished, the function is
automatically cancelled. The function is also cancelled if you press the button
Start/Pause after the program has finished.
Selection:
To start drying, press Start/Pause.Activation:
Steam
Softening and refreshing clothes with steam at the end of drying
Drying programmes in which the clothes are softened at the end of the programme
by addition of steam are intended for clothes that would otherwise require ironing.
Steam smooths and refreshes the clothes. We recommend using the steam
programmes for clothes that you wish to immediately use or store in the cupboard
or closet – without ironing. At the end of a steam programme, hang the clothes like
shirts, blouses etc. on a clothes hanger to let them dry completely and to allow the
fibres to straighten.
Press to select the function. A dash lights up next to the symbol.
The laundry will be moistened with steam before the end of the program, so ironing
is usually not necessary when using this function.
In order to achieve the steam drying effect at the end of the programme, it is
recommended to take the laundry out of the appliance drum immediately after
the end of the programme and hang it on a drying rack/hanger to straighten the
fibres.
Selection:
To start drying, press Start/Pause.Activation:
52

Optimizing drying time
Using advanced technology, the dryer detects the load size and moisture level
and continuously adjusts the drying time during the programme.
The time shown on the display at the start of the programme is for information only
and may change during drying. The laundry will be properly dried at the end of the
programme even if the load is smaller than the recommended amount.
AutomaticSelection:
AutomaticActivation:
53

6.6 Start the drying programme
Starting the programme
Close the dryer door and start the drying programme by pressing the Start/Pause button on the right
side of the display.
If the TIME REMAINING indicator flashes three times and an audible signal sounds, this means that
the dryer door is open or not properly closed. Close the dryer door and press the Start/Pause-button
again to resume the drying programme.
Pausing, stopping and changing the program
Temporarily pause the drying programme by briefly pressing the (Start/Pause) button. The remaining
drying time flashes on the display. Press the (Start/Pause) button again briefly to resume the programme.
Stop the drying programme by pressing and holding the (Start/Pause) button for 3 seconds, or turn
the selector to position . The dryer will start cooling. Cooling time depends on the selected
programme. To switch the appliance back on, turn the selector to the desired programme, set the
functions, and start drying by pressing the (Start/Pause) button.
Opening the Door
The dryer door can be opened at any time, the drying cycle will be interrupted.
When the door is closed and the Start/Pause button is pressed, the drying will resume from the point
at which it was interrupted.
HOT SURFACE!
The dryer door will heat up during the drying process. When opening the door during a
drying programme, the laundry and the door surface may be very hot! Make sure you
do not burn yourself when opening the dryer door.
Adding/removing laundry during the operating of the appliance
In order to add or remove laundry from the dryer during programme operation, proceed as follows:
1. Press the Start/Pause button or open the dryer door.
2. If you have not already done so, open the door. Add or remove laundry from the drum.
3. Close the dryer door!
4. Press the button Start/Pause.
The drying program will resume.
HOT SURFACE!
When loading the laundry, make sure you do not burn yourself when you open the dryer
door.
INFORMATION!
Drying time will resume from the point at which the drying programme was interrupted.
54
INFORMATION!
If you increase the amount of laundry during drying, the laundry may be less efficient and
unevenly dried. This may also cause friction and increased creasing.
Consequently, drying time may be longer.
Power supply failure
In case of an error or fault, the drying programme will be interrupted.
In the event of a power failure, the drying programme is interrupted. The display shows . After
power is restored, press the Start/Pause button to continue drying.
The drying programme continues at the stage where it was interrupted.
Full condensate tank
When the condensate tank is full, the drying programme will pause (the sign will be lit).
Empty the condensate tank (see chapter CLEANING AND MAINTENANCE / Emptying the condensate
tank).
Press the Start/Pause button to resume the drying programme from the point at which it was interrupted.
55
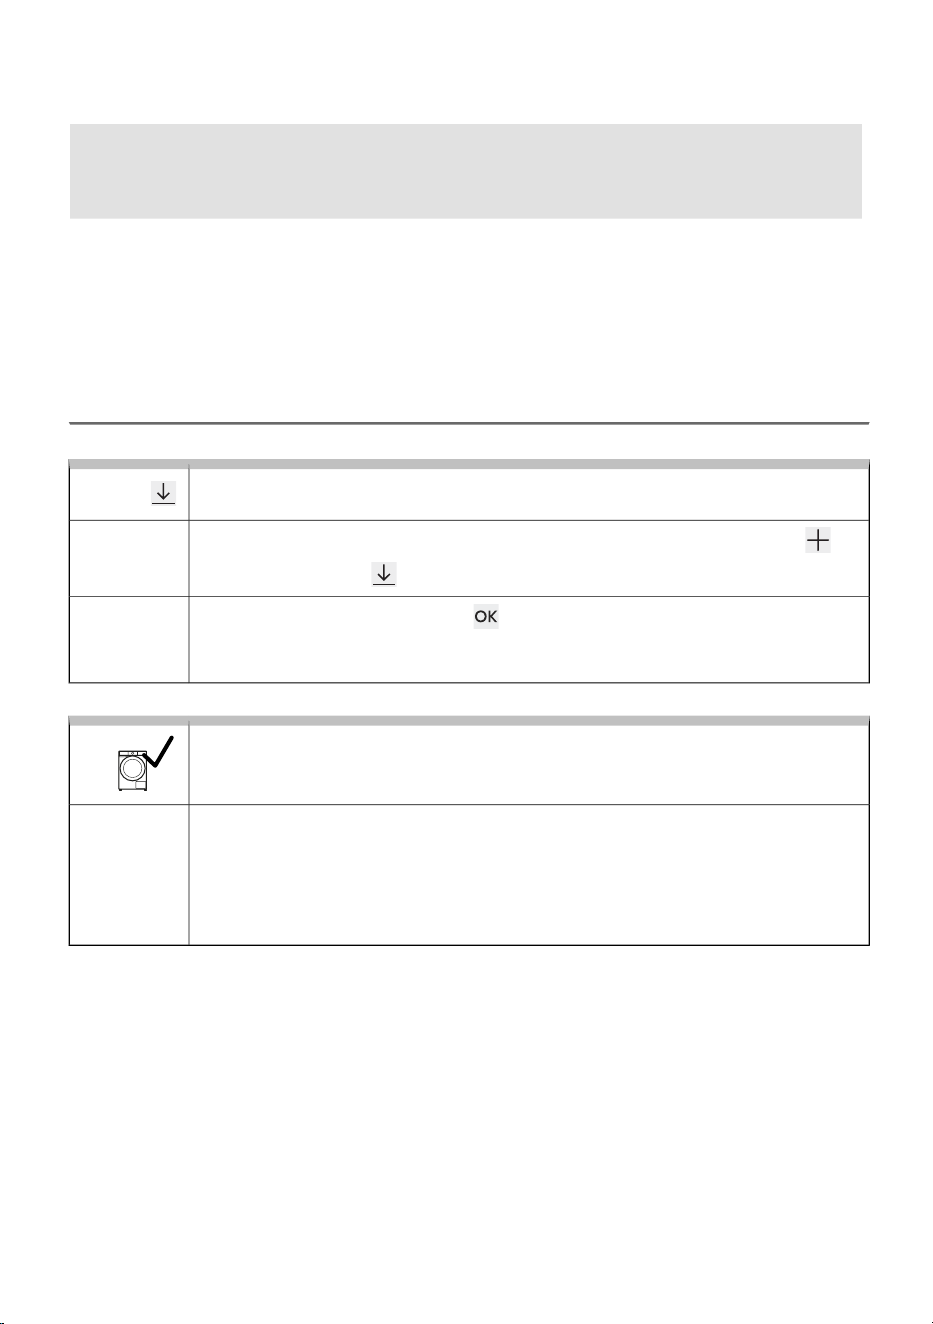
6.7 Complete the drying cycle
The dryer will indicate the end of the drying programme with an acoustic signal and (End) will
appear on the display until the dryer switches into low standby mode or switches off. After 5 minutes,
the (End) sign will no longer be displayed.
Open the dryer door. Take the laundry from the drum.1
Pull out the filter from the front of the appliance housing, clean it, and reinsert it. See chapter
CLEANING AND MAINTENANCE / Cleaning the lint filter.
2
Empty the condensate tank. See chapter CLEANING AND MAINTENANCE / Emptying the
condensate tank.
Close the door.
3
Switch off the dryer (turn the selector to position ).
4
Empty the condensate tank and unplug the power cord from the outlet.5
INFORMATION!
After the end of the drying programme, immediately remove the laundry from the dryer to
prevent it from creasing again.
WARNING!
The final drying cycle includes a cooling down stage without heater operation. It makes sure
the laundry is of suitable temperature at the end of the program and that it can be taken from
the dryer without risk of touch hot clothes.
56
7. APPLIANCE SETTINGS AND ADJUSTMENTS
This chapter describes:
- how to save personal settings,
- how to customise your appliance using additional settings,
- how to enter the User Settings Menu.
There are a few additional settings that can be set on the appliance. This will allow you to further
customize the device to your personal use and needs.
The basic principle for selecting additional settings is similar to selecting functions. See chapter
DRYING PROCESS, STEP BY STEP (1–7)/Select the additional functions.
7.1 Saving programe and selected functions
You can change the initial settings of each washing programme; some are saved automatically.
Settings saved
Function to save your settings for selected programs and functions.
After selecting the drying program and additional functions, press the button
several times until the symbol lights up.
Selection:
Settings are saved by pressing the button.
The programme is saved until you change it again using the same procedure or if
you reset the personal settings to the factory settings (see the chapter below).
Activation:
AdaptTech
Automatic function for storing frequently used programmes and settings.
When a drying programme setting is used three times in a row, this setting is stored
as default and will always be suggested when you select that drying programme. If
you manually save the settings on a drying program, AdaptTech on that program is
cancelled.
The programme is saved until you reset the personal settings to the factory settings
(see the chapter below).
Activation:
57
7.2 Additional appliance settings
Child lock (child safety)
A safety feature.
As long as the child lock is activated, programme, settings, or additional
functions cannot be changed.
By using this setting, you lock the display so that children cannot accidentally start
or change the cycle.
Press the button repeatedly until the symbol starts flashing.
Press to confirm selection.
The function can also be activated during the programme using the procedure
described above.
If the child lock is activated, programme or additional functions cannot be changed.
It remains active even after the appliance is switched off, so you must switch it off
before selecting a new programme.
Activation:
To switch off (deactivate) the child lock, press button 3 sec for second. Animation
3-2-1 will start. At the end of the animation, the function turns off (is deactivated).
It is possible to switch off Child lock in the same way during the drying programme.
Deactivation:
Remote control
Function for remote control.
To use this function, the appliance must be connected to the network, see chapter
BEFORE USING THE APPLIANCE FOR THE FIRST TIME / First connection to a Wi-Fi
network.
Remote control is available for the next 24 hours, even when the appliance enters
standby mode. Remote control can be cancelled by pressing the Start/Pause button.
Continue operating the appliance in the ConnectLife app, where you can choose
from several options (selection, launch, and monitoring and stopping of the
programme, amongst other additional settings, ...)
Dryer operation can be paused or stopped from the app by selecting Start/Pause,
Add clothes ...
Some options can be implemented remotely in full, and some require your physical
presence, such as adding laundry during the drying cycle (Add clothes).
Description:
Turn the selector to Remote control.Selection:
After you have loaded the laundry, close the dryer door.
Continue activities in the app (select a program, additional functions and start drying).
Activation:
58

Wash&Dry sync (connection between washing and drying)
Optimal selection of the drying program based on the washing program used.
Turn the selector on the dryer to programme Wash&Dry sync. The lights up.
In the ConnectLife, connect the appliances. When the dryer and the washing machine
are connected, the dryer proposes an appropriate drying programme according to
the programme that is carried out in the washing machine.
During sending, flashes on the dryer. The suggested additional functions light up.
Load the washed laundry into the dryer drum and close the door.
Selection:
To start drying, press Start/Pause.Activation:
59

7.3 User settings menu
To enter the User Settings menu, press and simultaneously and hold until the 3-2-1 animation
completes (at least 3 seconds).
Press to move between the two user settings (Sound / Factory reset).
Sound On/Off
Option to switch off or adjust the sound volume.
The sound volume is preset to level 2.
Press the button to select the sound level or to switch the sound off. If the sound
is switched off, there will be no audible signal at the end of the drying programme.
Available settings:
= silent sound setting
= medium sound setting
= loud sound setting
= sound off
Press the button to save and exit.
Display:
Factory reset
Delete all settings and return to the factory settings.
The display shows . Briefly press to restore all settings to factory defaults
(your own settings and all stored programmes will be deleted).
The symbol flashes twice, and the start screen appears automatically.
Display:
If you do not want to restore to Factory reset, press to exit.
Exit:
60
8. CLEANING AND MAINTENANCE
In this chapter, you will learn everything about cleaning your appliance:
- how to clean the exterior of the dryer,
- how to clean the filter system,
- how to empty and clean the condensate container.
ELECTRIC SHOCK!
Before cleaning, make sure to switch off the dryer and disconnect it from the power
mains (unplug the power cord from the outlet).
INFORMATION!
The dryer may never be operated without the filters in place or with damaged filters, as
excessive amount of accumulated fibres from the fabric could cause malfunction or failure of
the dryer.
8.1 Cleaning the dryer exterior
ELECTRIC SHOCK!
Danger of electric shock.
Even when the dryer is switched off, it remains under voltage for some time. Always unplug
the power cord before cleaning or performing maintenance.
WARNING!
Do not use any solvents or cleaning agents that could damage the dryer (please observe the
recommendations and warnings provided by the manufacturers of the cleaning agents).
WARNING!
Damage that can be caused by water.
Do not clean the dryer with a jet of water, as water could enter the dryer and damage its
components.
Wipe all parts of the dryer with a soft cloth until dry.
61
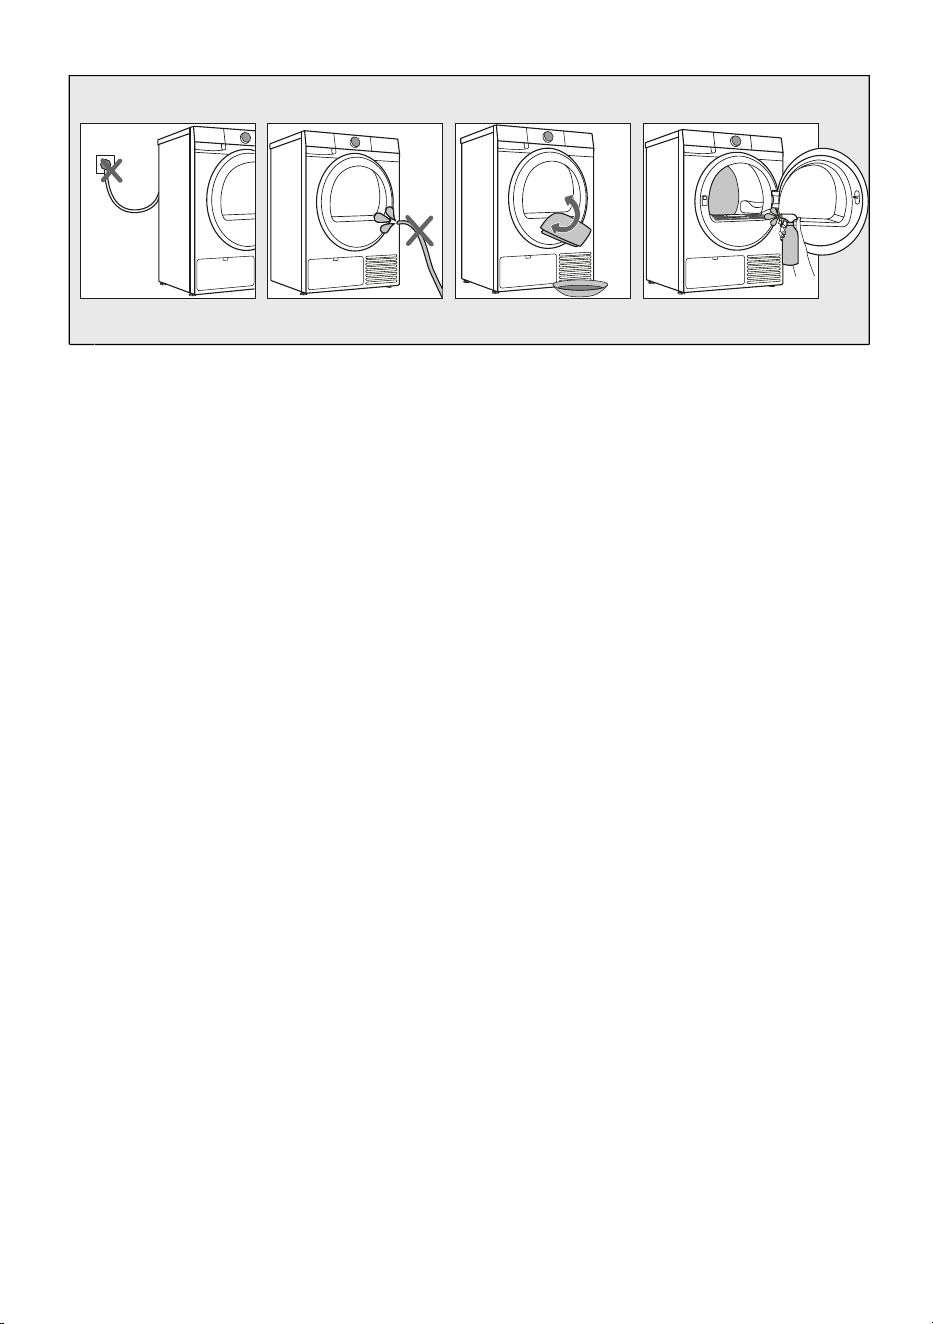
Before cleaning, unplug the dryer from the power mains.1
Do not clean the dryer with a jet of water!2
Clean the dryer exterior and display unit using a soft damp cotton cloth and water.
Wipe all parts of the dryer with a soft cloth until dry.
3
Clean the drum using a soft cotton cloth and a suitable cleaning agent.4
62

8.2 Cleaning the lint filter
INFORMATION!
Clean the lint filter after each drying cycle.
The dryer is fitted with a filtering system consisting of two filters (a and b), which prevent any impurities
from entering the heat exchanger system.
Pull out the lint filter (a).1
Pull apart the lint filter with both hands (a).
Carefully remove fibers and threads from the lint filter (a) using your hand or a vacuum cleaner.
Clean the lint filter (a) after each drying cycle.
2
From the same opening of the dryer, pull out the lint filter (b). If necessary, wipe the area where
it is located.
3
Pull apart the lint filter with both hands (b).
Carefully remove the layer of fibers and threads from the lint filter (b) using your hand, a cloth or
a vacuum cleaner.
Clean the lint filter (b) after each drying cycle.
4
Insert back the lint filter (b) into the opening.
Make sure there are no lint residues in the opening. If necessary, vacuum them up with a vacuum
cleaner.
5
Insert back the lint filter (a) that you pulled out first.
If necessary, clean the filter housing and door gasket as well.
6
63
INFORMATION!
Do not rinse the filter under water to avoid micro-plastic effluent into the groundwater!
INFORMATION!
Make sure the lint filter is correctly inserted.
INFORMATION!
Make sure you do not pinch your fingers with the filter cover.
WARNING!
Never operate the dryer without a lint filter or if the lint filter is damaged.
WARNING!
Insufficient cleaning of the filters in the dryer can lead to reduced drying efficiency, increased
energy consumption, overheating of the appliance, and a higher risk of fire and mechanical
damage. Regular cleaning of the filters will ensure optimal appliance performance, shorter
drying times, and minimal energy consumption.
WARNING!
Do not shake the filter or hit it to remove dust and lint, because you can damage it!
64
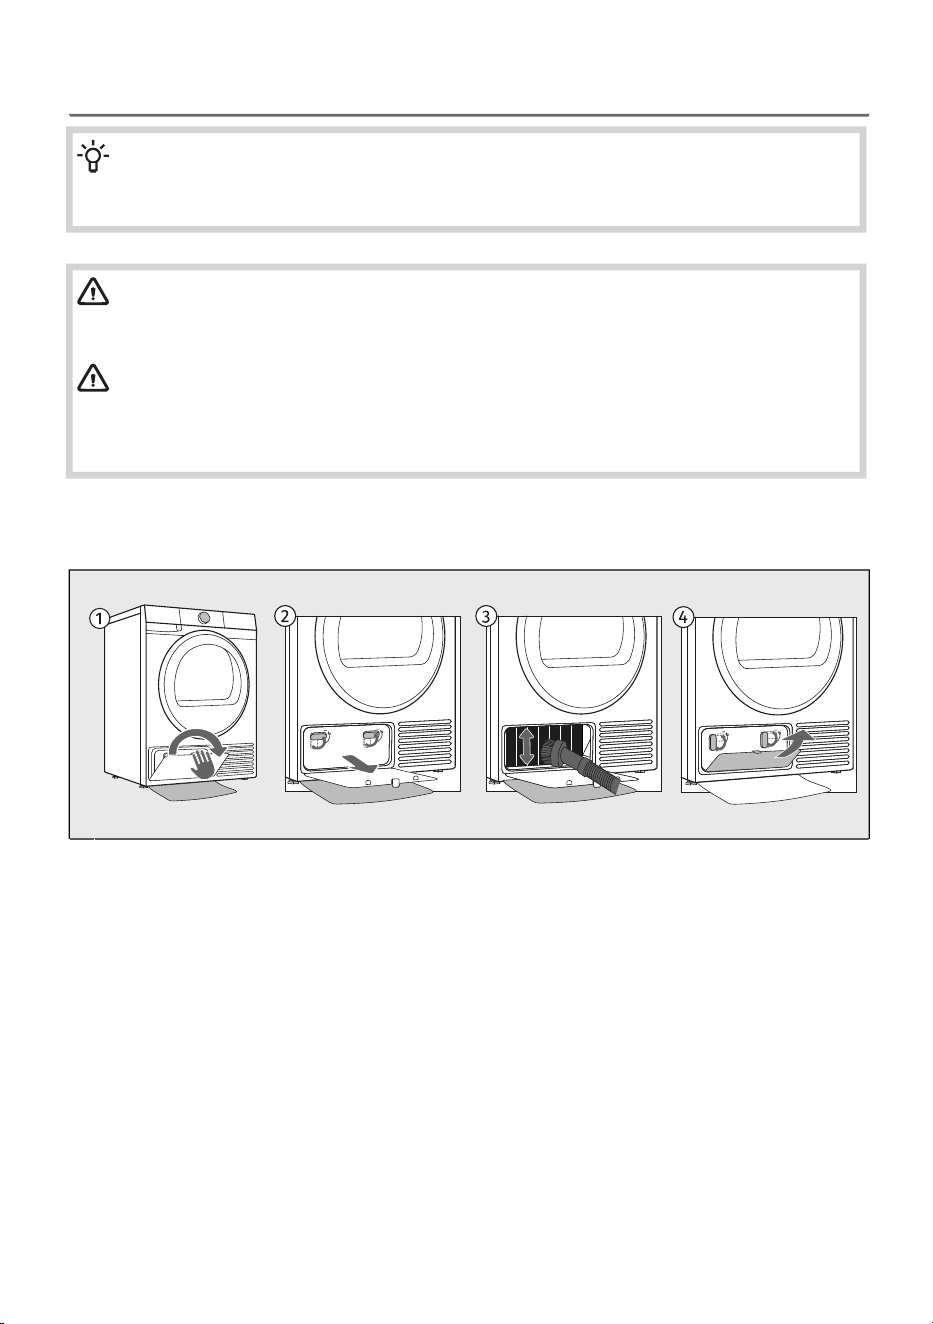
8.3 Cleaning of the heat exchanger
INFORMATION!
We recommend you clean the heat exchanger at least every 3 months or more frequently in
case of intensive use.
WARNING!
Do not touch the inner metal parts of the heat exchanger with bare hands. Danger of injury
on sharp parts. Use appropriate protection gloves when cleaning the heat exchanger.
WARNING!
Incorrect cleaning of the metal fins of the heat exchanger can permanently damage the tumble
dryer. Do not press on the metal fins with hard objects like for example the plastic tube of a
vacuum cleaner.
During cleaning, some water may be spilled. It is therefore recommended to place an absorbent cloth
on the floor.
Open the heat exchanger’s outer cover.1
Hold the levers on the inside cover and rotate them upwards. Remove the inside cover.2
The dust and dirt in the metal fins of the heat exchanger can be cleaned with a vacuum cleaner
and a soft brush attachment.
Without pressing, gently move the brush attachment only in the direction of the metal fins from
top to bottom. Too much pressure can damage or bend the metal fins of the heat exchanger.
3
Reinstall the inside cover and rotate the levers clockwise to the vertical position.
Close the outer cover.
4
65

8.4 Cleaning the steam system
Cleaning the steam generator inlet filter
Each time you empty the condensate container, also clean the steam generator inlet filter.
The filter is located in the dryer housing (visible when the condensate tank is removed).
Pull out the condensate tank (using both hands as shown in the figure).1
Remove the filter from the slot in the condensate tank housing.2
INFORMATION!
Before cleaning the steam generator filter, first, manually remove all solid particles (dust)
from it.
Clean the filter thoroughly under running water. If necessary, clean the filter slot as well.3
INFORMATION!
Replace the filter correctly into the slot (otherwise, the filter will not perform its function,
which may result in clogging of the system).
66
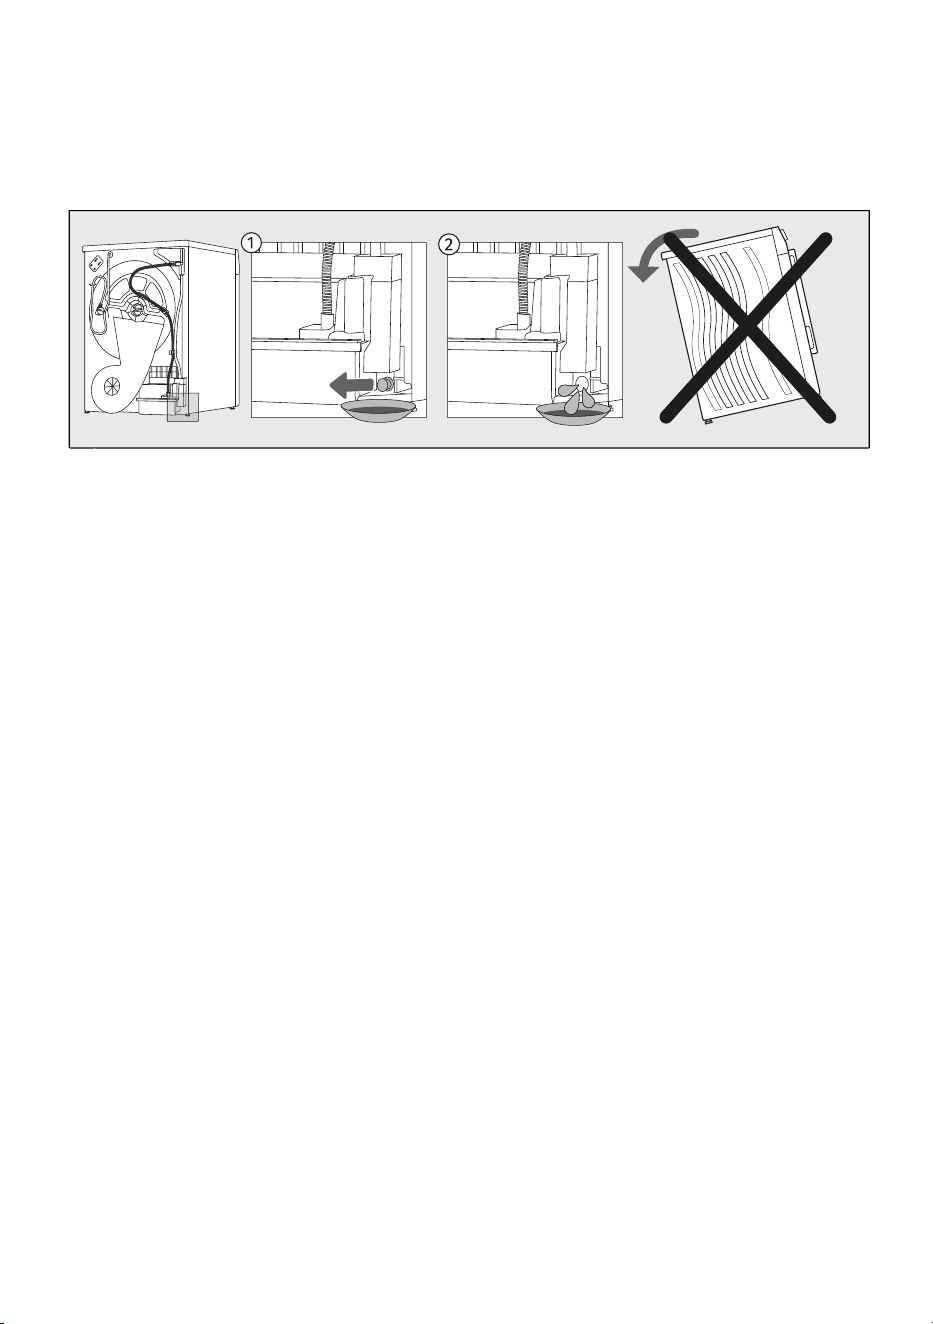
Emptying the steam generator tank
Before transporting a dryer that has been previously used, the steam generator tank must be
emptied. Otherwise, water from the tank may spill into the dryer interior.
The steam generator tank emptying plug is located in the opening on the back wall of the dryer (see
figure).
Remove the plug from the water outlet opening and place an empty container (approximately 2
litres) underneath.
1
When the water runs out, close the opening with the plug (if the opening is not closed, water will
leak from the dryer during operation).
2
The appliance does not need to be tilted; the water drains by itself.
67
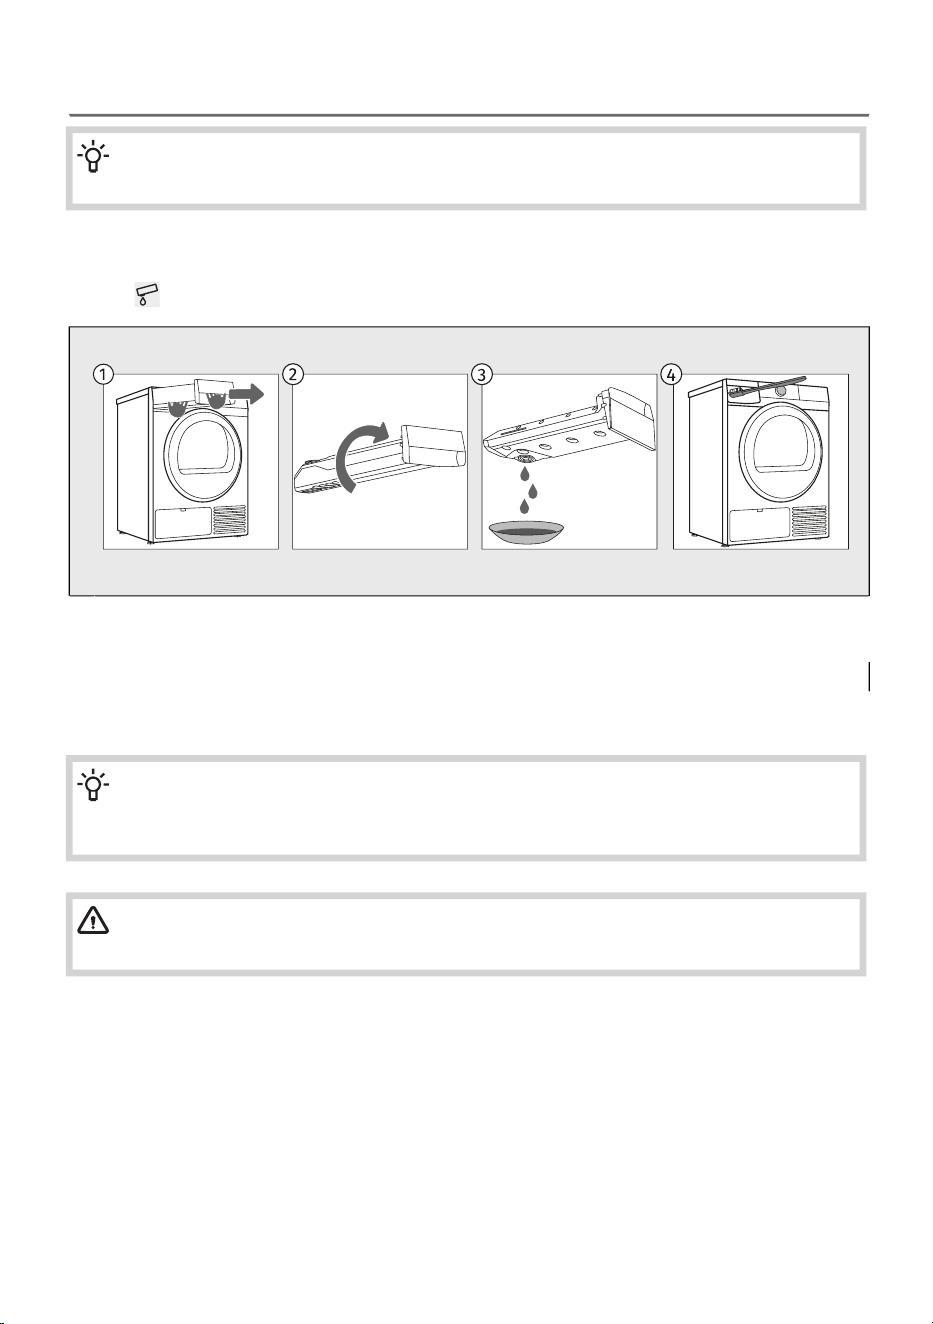
8.5 Emptying the condensate tank
INFORMATION!
Empty the condensate tank after each drying cycle.
If the condensate tank is full, the drying programme will be paused automatically.
Symbol will light up on the display unit, indicating that the condensate tank should be emptied.
Pull out the condensate tank from the dryer (using both hands as shown in the figure).1
Turn it upside down over a washbasin or sink.2
Pour the water out of the condensate tank.3
Also clean the dryer opening and reinsert the condensate tank.4
INFORMATION!
Water from the condensate tank is not drinkable. If thoroughly filtered, it can be used for
ironing.
WARNING!
Never add chemicals or fragrances into the condensate tank.
It is not necessary to empty the condensate tank if the drain hose is connected directly to a drain (see
chapter /Draining the condensate).
68
9. TROUBLESHOOTING AND SERVICING
In this chapter, you will learn:
- how to access information about the number of completed cycles,
- how to act in case of malfunctions or problems during drying,
- descriptions of warnings, alerts, and error messages displayed on the screen,
- when and how to contact the service centre,
- what to do in case of a warranty claim and what the warranty covers,
- where to order spare parts.
9.1 What to do in case of problems?
Disturbances from the environment (e.g. the power grid) may result in various error reports (see the
tables below). In such case:
• Switch off the dryer and wait at least one minute.
• Switch on the dryer and repeat the drying programme.
• Most errors during operation can be resolved by the user (see the comming tables).
• If the error occurs again, call an authorized service unit.
• Repairs may only be carried out by an adequately trained person.
• Repair or any warranty claim resulting from incorrect connection or use of the dryer shall not be
covered by the warranty. In such cases, the costs of repair shall be charged to the user.
GENERAL MALFUNCTIONS
The main switch is not switched on.
Check whether the main switch is on.
There is no voltage in the power outlet.
Check the fuse.
Check if the power cord plug is correctly inserted into the power outlet.
The machine will not start.
Open door.
Check if the door is closed properly.
The condensate tank is full.
Empty the condensate tank (see chapter CLEANING AND
MAINTENANCE/Emptying the condensate tank).
Perhaps the Delay end function was set.
To cancel the start delay, press the position Delay end and hold for 3
seconds.
Program was not started in accordance with the instructions.
Re-read the instructions for use again.
There is voltage in the
outlet, but the drum does
not spin and the appliance
does not work.
The net filter may be clogged. As a result, the temperature in the
dryer rises, which in turn causes overheating, and therefore heating
is switched off.
Clean the lint filter (see chapter CLEANING AND
MAINTENANCE/Cleaning the lint filter).
Wait for the appliance to cool down, and try running it again. If the
dryer still fails to start, call a service technician.
The appliance stops
heating completely during
a programme.
69

If the dryer is out of use for a long period of time, the support
elements are under stress at the same point.
The noise will subside without any intervention.
A slight hitting noise
appears.
Excessive load on the door (too much laundry in the drum).
Reduce the amount of laundry.
The door opens during
drying.
Laundry of varying types and thickness, or excessive amount of
laundry.
Make sure you have sorted the laundry by type and thickness, whether
you have added a suitable amount of laundry to the drum, and whether
you have selected a suitable programme (see chapter DRYING
PROCESS, STEP BY STEP (1–7) / Choose the drying program).
Unevenly dried laundry.
Filters are not clean.
Clean the filters (see chapter CLEANING AND MAINTENANCE/Cleaning
the lint filter).
Dryer is placed in a closed room; room that is too cold; or room
that is too small and the air overheats as a result.
Make sure there is adequate supply of fresh air to the dryer; for
example, open the door and/or window.
Check if the temperature in the room where the dryer is installed is too
high or too low.
Laundry was not sufficiently wrung or spun.
If the load is still wet after completed drying cycle, an appropriate drying
program should be run again (after cleaning filters).
Amount of laundry dried in the appliance is too large or insufficient.
Use a suitable program or extra functions.
Laundry (such as bedding) gets tangled into large balls.
Close the buttons or zippers on the laundry before drying. Select a
suitable programme (e.g. the program Bedding).
After the drying process, loosen the laundry and select an additional
drying programme (e.g. Time).
Laundry not dried or
drying takes too long
Humming sound: compressor noise; the noise level depends on the
program and the drying stage.
Buzzing sound: the compressor is occasionally ventilated.
Pumping or liquid flowing sound: the pump is pumping the
condensate into the condensate tank.
Clicking sound: start of automatic cleaning of the heat exchanger
(compressor).
Rumbling or rattling noise: during drying when the laundry also
includes hard parts (such as buttons, zippers etc.)
Sounds
INFORMATION!
In the initial drying stage or during drying, the compressor and the heat pump cause noise;
this, however, does not affect the tumble dryer operation.
70
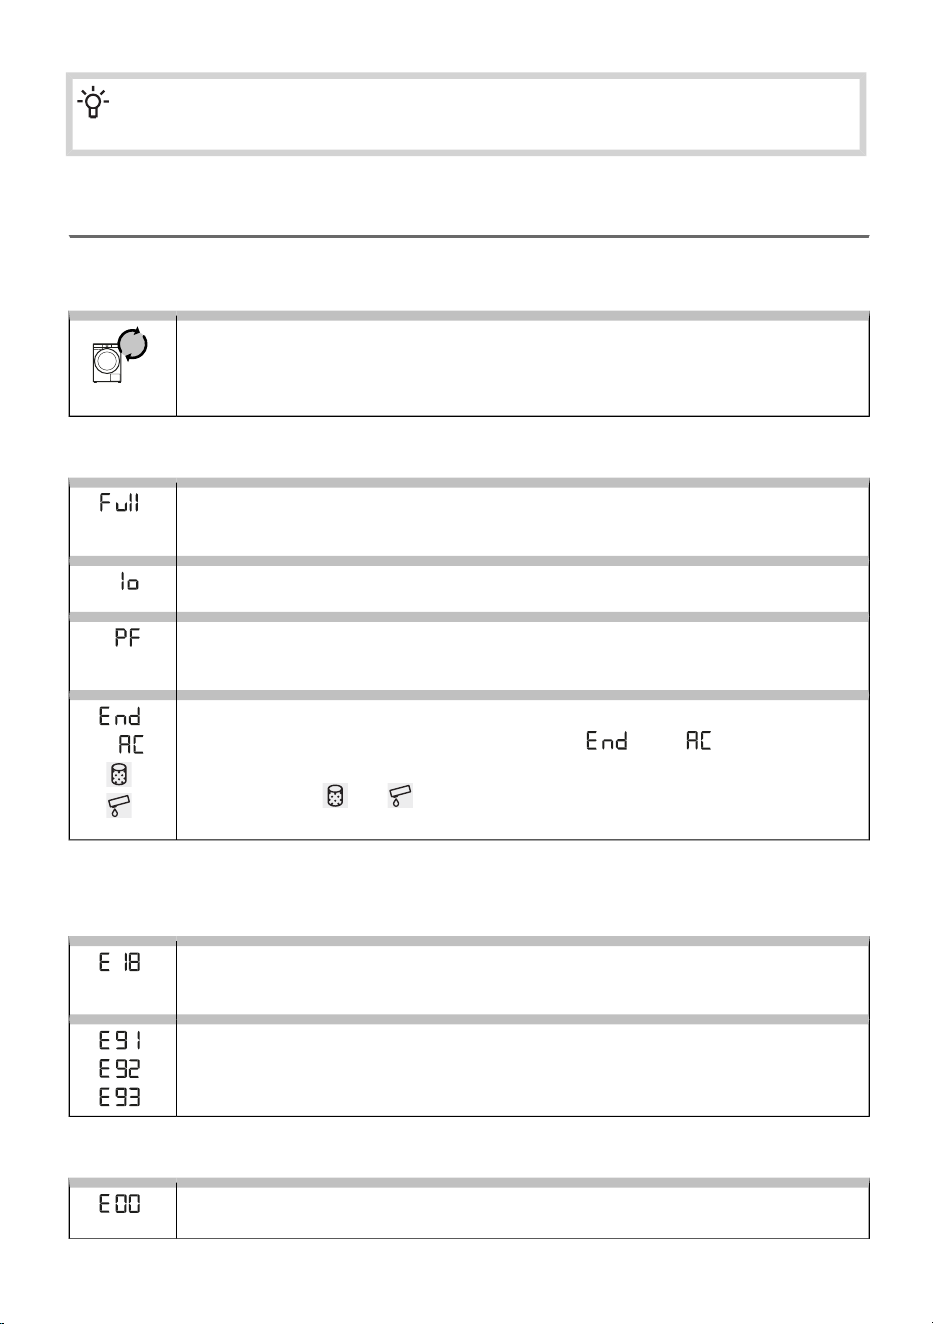
INFORMATION!
Noise and vibration – check if the feet are properly leveled.
9.2 Display Message Table
Warnings/information for the user, which can be indicated on the display unit, may include the following:
INFORMATION
Overview of the number of drying cycles performed
The number of drying cycles performed will appear on the display for 3 seconds if you
unplug the power cord, wait 10 seconds and then plug the power cord back in. After
3 seconds, the appliance enters standby mode.
WARNINGS
Full condensation water tank warning
Empty the condensate tank before resuming the programme (see chapter CLEANING
AND MAINTENANCE/Emptying the condensate tank).
Steam generator tank empty warning
Add distilled water or condensed water from the condensate tank.
Power supply failure warning
Drying interrupted due to power supply failure.
Press the Start/Pause button to restart or resume the drying programme.
Drying cycle completed warning
After the drying programme is complete, the signs and will alternate on
the display unit.
Two red symbols and will light up.
Clean the filters and empty the condensate tank.
/
The following lists all the errors that the user can see on the user interface.
HEATING SYSTEM FAULT
Steam system overheating
The temperature is higher than 290 °C.
Call service centre.
Temperature sensor failure
Call service centre.
ELECTRONICS MALFUNCTION
Control unit failure
Call service centre.
71
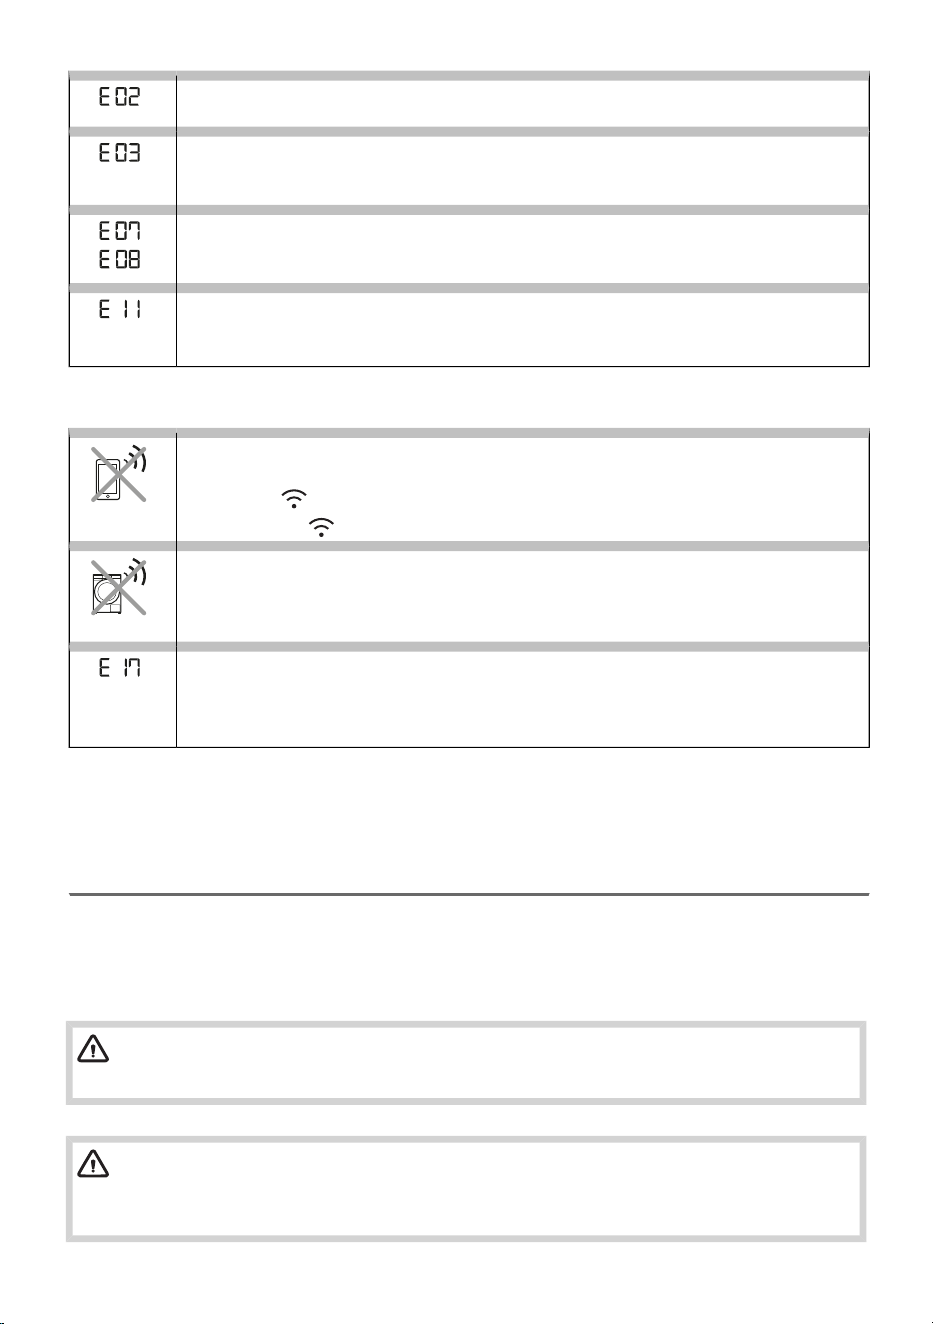
Communication error
Call service centre.
Pump error
Failure on the pump for pumping the condensate into the condensate tank
Call service centre.
Control unit failure
Disconnect the tumble dryer from the power supply.
Call service centre.
Error in BLDC motor communication
No connection between the motor and the control unit.
Call service centre.
CONNECTIVITY MALFUNCTIONS
The appliance cannot be controlled remotely
Appliance remote control is not activated or enabled.
Check if the Wi-Fi symbol on the appliance is lit, and turn the selector to position
Remote control .
The appliance will not connect to the Wi-Fi network
The appliance cannot find your Wi-Fi network.
Check whether 2.4 GHz network is activated on your router and whether the Wi-Fi
signal at the appliance is strong enough.
The appliance will not connect to the Wi-Fi network
The error only affects the option to remotely control your drying programme (remote
control). It does not affect the drying process on other programmes.
Call a service technician.
Write down the error code (e.g. E0, E1), switch off the dryer, and call the nearest authorized service
(call centre).
9.3 Service
When you contact a service centre, please state your dryer's type, code/ID, model number, and serial
number.
Dryer type, code, model, and serial number can be found on the rating (type) plate on the inner side
of the dryer door. See chapter DESCRIPTION OF THE DRYER/Technical data on the rating plate.
WARNING!
In case of a failure, only use approved spare parts by authorized manufacturers.
WARNING!
Repair or any warranty claim resulting from incorrect connection or use of the dryer shall not
be covered by the warranty. In such cases, the costs of repair shall be charged to the user.
72
9.4 Warranty
INFORMATION!
The warranty does not cover consumables, minor deviations in colour, increased noise that
results from appliance age and which does not affect the functionality of the dryer, and
aesthetic defects on components, which do not affect the dryer's functionality and safety.
The warranty does not cover the errors or failures resulting from disturbances from the
environment (lightning strike, power grid failures, natural disasters etc.).
INFORMATION!
Report any malfunction to your local call centre or web address; all information can be found
in the enclosed warranty statement. Contact details of your authorised service centre are
available in the warranty statement supplied with the appliance and on the website by scanning
the QR code on the rating plate.
INFORMATION!
Some simple faults described in the chapter TROUBLESHOOTING AND SERVICING can be
fixed by the user himself by taking into account the instructions without risk to their own safety
and without affecting the warranty conditions.
9.5 Spare parts
INFORMATION!
Functional spare parts for the dryer you purchased will be available for 10 years. During this
time, original spare parts will be available to ensure the correct operation of your appliance.
A list of spare parts and repair tips in accordance with the current Ecodesign Directive can
be found by scanning the QR code located on the inside of the door of the dryer. Or on the
following link: https://auid.connectlife.io.
INFORMATION!
The belt may only be replaced by a service technician authorized by the manufacturer, who
can supply the original spare part with the code 907722 BELT POLY-V 7PH 1971
HUTCHINSON; 883648 BELT POLY-V 7PH 1879 HUTCHINSON (depending on the model).
73
10. TIPS FOR DRYING AND ECONOMIC USE
YOUR DRYER
In this chapter, you will learn about:
– achieving optimally dried laundry and correct loading of the dryer,
– preventing unpleasant odours and extending the lifespan of your dryer,
– using drying programmes effectively,
– reducing energy consumption.
INFORMATION!
The most economical way of drying is to dry the recommended amount of laundry in each
batch (see chapter DRYING PROCESS, STEP BY STEP (1–7) / Choose the drying program).
10.1 Tips for optimally dried laundry
INFORMATION!
Before drying, the laundry must be properly spun. A higher spin speed in the washing machine
results in shorter drying times and lower energy consumption.
Do not dry unspun laundry!
Very damp or unevenly distributed laundry will prolong the drying process. Before loading the dryer,
shake out the items to allow better air circulation in the drum.
Fabric softener is not necessary during washing, as laundry becomes soft and supple after tumble
drying.
Sort the laundry according to fabric type and desired dryness level. Thicker items (e.g. towels) take
longer to dry than thinner ones (e.g. T-shirts). For best results, avoid mixing items with very different
properties.
Drying laundry made of particularly delicate fabrics that may be deformed is not recommended.
Laundry suitable for tumble drying is marked with the symbol . If the symbol is not shown, the fabric
may not be heat-resistant. When the symbol is indicated on the label, tumble drying is not permitted.
For delicate fabrics (e.g. wool, sensitive synthetics), select suitable programmes with lower temperatures
or dry the items in the air.
To reduce creasing, avoid overdrying. For garments that will be ironed, select a lower dryness level.
INFORMATION!
Loading the dryer according to the capacity specified for each programme ensures better
energy efficiency. Overloading may lead to uneven drying and longer programme duration.
When drying a small load or individual items, the sensor may not detect the actual moisture level in
the laundry. In this case, we recommend using the (Time) programme to achieve sufficient dryness.
74
10.2 Preventing unpleasant odours and maintaining
performance
INFORMATION!
After each drying cycle, remove lint from the filter. A clogged filter significantly increases
energy consumption and prolongs drying time.
If the dryer is not connected directly to a drain, empty the condensate tank after each drying cycle.
Clean the heat exchanger regularly (see chapter CLEANING AND MAINTENANCE / Cleaning of the
heat exchanger). Dust and lint reduce airflow and operating efficiency.
INFORMATION!
For a quick refresh of dry laundry, you can use a short-duration program or a steam program
(e.g. Steam refresh), such as the non-heated Air refresh program, which removes unpleasant
odours from lightly worn garments.
10.3 Recommendations for energy-efficient drying
Remove as much moisture as possible in the washing machine. Drying laundry that has been spun
at high speeds is significantly more energy-efficient.
Use automatic drying programmes whenever possible, as they adjust the duration to the load and
detected moisture level, helping reduce energy consumption.
INFORMATION!
Regular maintenance (cleaning filters, emptying the condensate container) is essential to
prevent extended drying times.
Avoid drying quick-drying fabrics (such as synthetics) together with heavy cotton items.
75
11. CONSUMPTION VALUES
The table lists the values for drying time and power consumption for drying of a test batch of laundry
with various spinning rpm in the washing machine.
Explanation of symbols used below:
Programme duration (h:min)Rated capacity (kg)
Energy consumption (kWh per cycle)Final moisture content (%)
Energy efficiency class: C (9 kg)
Program
1,823:46
0 ± 3
9
Eco*
0,851:474,5
1,733:44
-3
9
Cotton
Extra dry
1,192:196,3
0,911:594,5
1,443:06
-1
9
Cotton
Storage
0,952:006,3
0,721:344,5
1,181:54
12 ± 4
9
Cotton
Iron
0,651:244,5
0,491:042 ± 34
Easy care
0,300:4001
Sensitive
0,901:56-2
4
Mix
Extra dry
0,711:310
Mix
Storage
0,641:232
Mix
Iron
Acoustic airborne noise emission, during the drying cycle amount to 61 dB.*
The Eco programme is suitable for drying wet cotton laundry and is used to assess compliance with
EU legislation on eco-design 2023/2533.
*
The Eco programme is the most efficient programme in terms of energy consumption for drying wet
cotton laundry.
All values in the table are provided per drying cycle.
The values provided for all programmes, except for the Eco programme, are for information only.
INFORMATION!
You can save energy by filling up the household tumble dryer to the maximum capacity
specified for each programme.
76

INFORMATION!
Due to deviations in terms of type and amount of laundry, power supply oscillation, and
environment temperature and humidity, the values measured at the end user may differ from
the one stated in the table.
77
We reserve the right to any changes and errors in the instructions for use.
SP26/4694C GOR en964250
GORENJE gospodinjski aparati, d.o.o. Address: Partizanska 12, 3320 Velenje, Slovenia
Phone: +386 (0)3 899 10 00 Fax: +386 (0)3 899 28 00 www.gorenje.com
964250-a2