INSTRUCTION MANUAL
Please read all the instructions
completely before use and save
this manual for future reference.
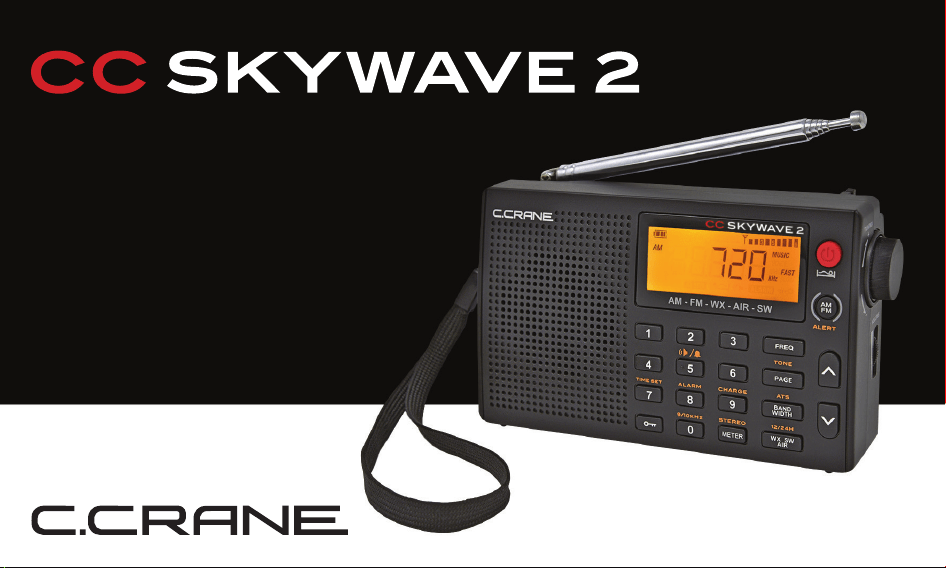
CC Skywave 2
2
Introduction
The CC Skywave 2 radio uses the latest in digital chip technology along with our own
ideas developed at C. Crane. This radio is a travel essential for several reasons:
1. Experiencing local music and social customs is enlightening.
2. If there is a problem at the airport or with your plane you can usually nd out the
reason and make adjustments.
3. The cost of using data on your smart phone overseas can be prohibitive.
The AM/FM, Weather, Shortwave and Aviation bands give you information and insight
into a country that is available by no other means. Small and lightweight but with high
quality reception and features. Easy button navigation makes it a superior companion for
night time listening at home or abroad. The new micro-USB connector works well from
any USB Port along with improved in-circuit battery charging. Other changes are a better
speaker with slightly more amplication, circuit noise reduction, and long feet for better
stability. If you have any question about your radio, please give us a call or check out
www.ccrane.com.
CC Skywave 2
3
Owners Record
FOR YOUR FUTURE REFERENCE:
Serial No. (Found inside battery compartment):
Date of purchase/Name & address of dealer:
UNPACKING
The box should contain the CC Skywave 2, CC Buds Earphones, carry case, warranty
card and this manual. If anything is missing or damaged, please contact your dealer
immediately. We recommend that you keep the packaging in the unlikely event that your
radio needs servicing.
CC Skywave 2
4
Safety Instructions
CAUTION
• Before turning the unit on, set your volume control to a low setting.
• Slowly increase the sound until you can hear it comfortably and clearly
without distortion.
• Long-term exposure to loud sounds may cause hearing damage. It is best to avoid high
volume levels when using headphones/earbuds, especially for extended periods.
SAFETY INSTRUCTIONS - READ BEFORE OPERATING EQUIPMENT
SAVE THESE INSTRUCTIONS
1. Read and understand all safety and operating instructions before the radio is operated
2. Heat: Never put the radio in direct sunlight in an unventilated area or behind glass like
a car’s interior. The appliance should be away from heat sources such as radiators,
heat registers, stoves, or other appliances that produce heat.
3. If the radio is left unattended and unused for long periods of time, remove the batteries.
The batteries may leak and damage furniture or your radio.
CC Skywave 2
5
Safety Instructions
4. The user should not attempt to service the appliance beyond that described in the
operating instructions.
5. All other servicing should be referred to qualied service personnel.
WARNING: DO NOT CHARGE ALKALINE BATTERIES. Use only the recommended
AC charging adapter that we offer for recharging NiMH batteries.
CC Skywave 2
6
Table of Contents
Introduction
Owners Record
Safety Instructions
Getting Started
Installing the Batteries
Display Screen Identication
Radio Operation
Power Button/Sleep Timer
Up and Down Tuning Buttons
Memory Preset Buttons 0-9
Changing AM/FM Bands
Setting Weather Alert
Frequency Button
Page Button/Changing Tone
02
03
04
09
11
13
13
14
14
14
15
16
CC Skywave 2
7
Automatic Tuning System (ATS) Button
Setting Bandwidth Filters
Meter/Stereo Button
Lock Button
Speaker
WX/SW/AIR Button
About the Weather Band
About the Shortwave Band
About the Air Band
Changing Time Format
Charge Button/Battery Charging
Time Set Button
Activate 9 or 10 kHz AM Tuning Button
Expanding the FM Band
Table of Contents
16
16
17
18
18
19
19
20
20
21
21
21
22
22
CC Skywave 2
8
Alarm Button/Setting The Alarm
Positioning the Whip Antenna
Tuning Knob
Squelch Mode
Volume Control
Antenna Jack
Earphone Jack
USB Power/Charging Jack
Charging NiMH Batteries
Reset Hole
Hidden Settings
Troubleshooting Guide
Specications
Accessories
Table of Contents
22
23
24
24
25
25
25
25
26
27
28
30
34
37
CC Skywave 2
9
Getting Started
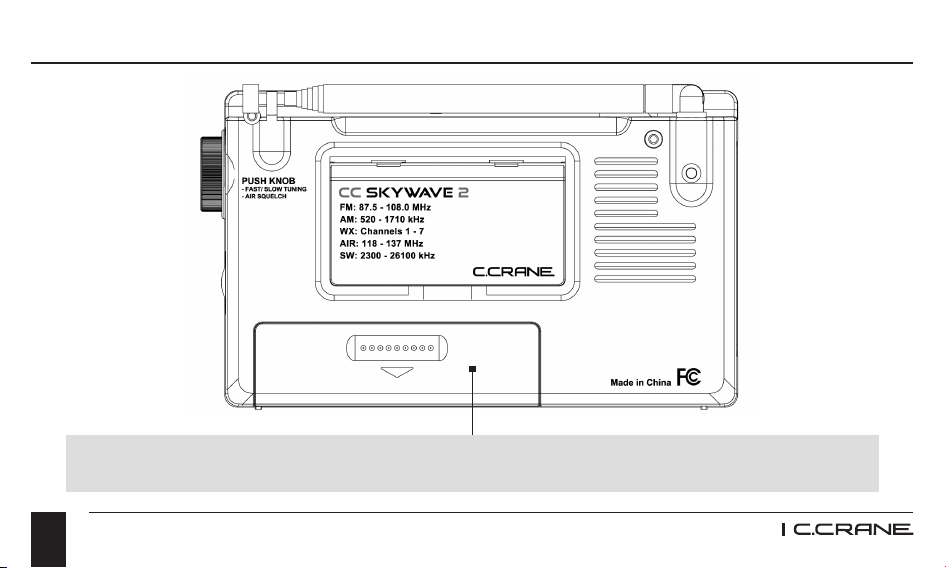
INSTALLING THE BATTERIES - DO NOT USE LITHIUM BATTERIES.
1. Position the radio face down on a soft surface to protect it.
2. Remove the battery cover by applying pressure and sliding downwards towards the
bottom of the radio.
3. Insert the two (2) “AA” alkaline or NiMH cell batteries into the compartment as
indicated. Be sure the negative (-) end of each battery is against the spring.
4. Replace the battery cover. You are now ready to operate your radio.
NOTE: You will have 30 seconds after batteries are removed before the clock and alarm
settings are lost. We recommend having your new batteries ready to insert quickly after
removing the old ones.
In our test, (going slowly) it took us about 15 seconds to add the new batteries after
removing the old ones. The memory presets and other settings are stored in permanent
memory so they will not be lost if the radio is unpowered for a duration of time.
CC Skywave 2
10
Two (2) “AA” Alkaline or NiMH batteries. DO NOT USE LITHIUM BATTERIES.
Getting Started
CC Skywave 2
11
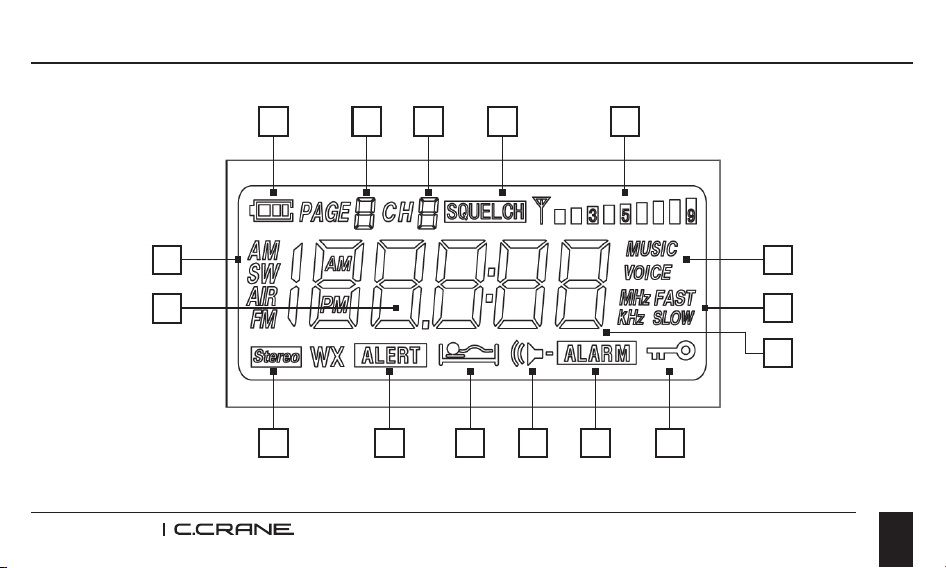
Display Screen Identication
K
A B C D E
G
F N
O
P
I L H J M
CC Skywave 2
12
A. Battery Icon/Charge Indicator
B. Page Number (for station memories)
C. Station memories 0-9
D. Squelch
E. Reception Signal Strength
F. Band Indicators
(AM, SW, AIR, FM, WX)
G. Frequency
H. Alarm Set for Radio Station
I. Alert is Activated
J. Alarm is Activated
K. Stereo FM Reception
L. Sleep Timer is Activated
M. Radio is Locked
N. Audio Filter for Voice or Music
O. Tuning Speed with Knob
P. Tuning Increments
Display Screen Identication
CC Skywave 2
13
Radio Operation
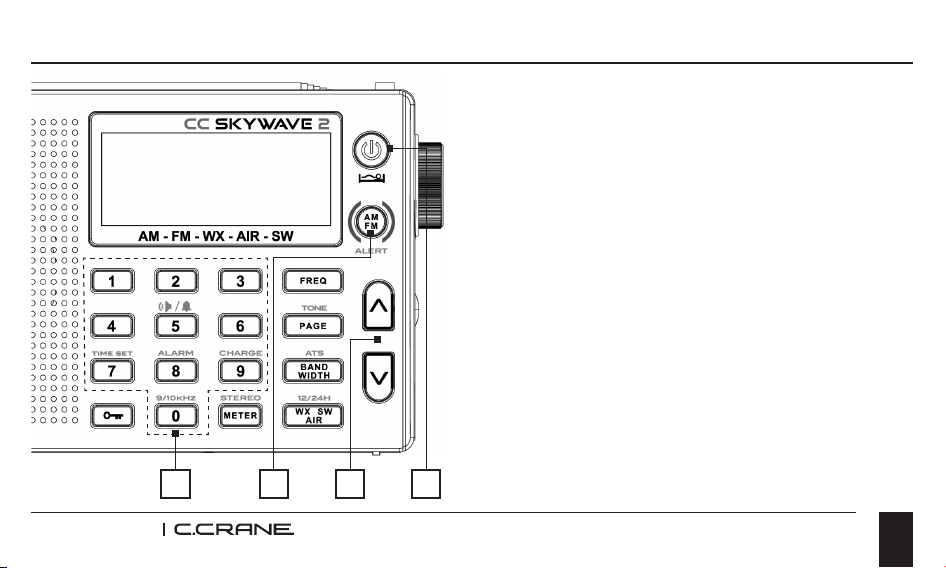
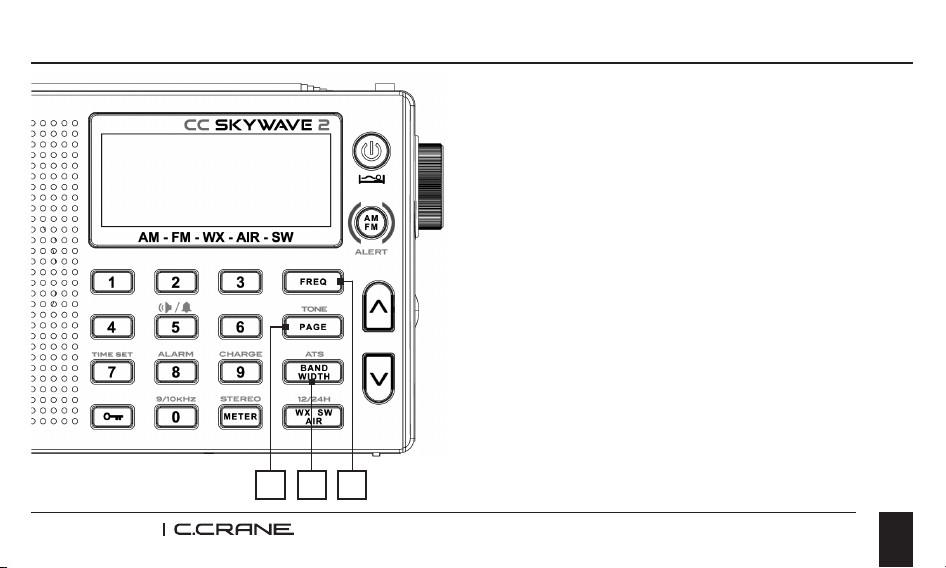
1. POWER BUTTON - SLEEP TIMER
To turn the radio “ON” just press the red
power button. To set the Sleep Timer, press
and hold the red power button.
SETTING THE SLEEP TIMER
The Sleep Timer will automatically shut off the
radio after the set amount of time expires.The
display will cycle through minutes 120, 90, 60,
45, 30, 15, and OFF.
Release the power button to activate the
sleep setting you desire. The radio will
remember your last Sleep Timer setting for
the next time you activate it.
2. UP AND DOWN TUNING BUTTONS
Press once quickly to tune to the next
3 4 2 1
CC Skywave 2
14
Radio Operation
frequency increment.
Press and hold for 2 seconds to automatically tune to the next strong station. Hold
continuously to cycle through the whole band.
3. MEMORY PRESET BUTTONS 0-9
To save your favorite stations to memory buttons press and hold any memory button for 2
seconds while the station is playing. To play a saved station, press the same button once
quickly. NOTE: The CC Skywave 2 is a “smart” radio and will remember current settings
when a station is preset into memory. The current settings that will be saved with your
station are:
• Stereo or Mono selection on FM
• Bandwidth selection on AM, Shortwave, or Air bands.
• Audio tone selection. On or Off.
4. CHANGING AM/FM BANDS - SETTING WEATHER ALERT
Press the AM/ FM button once quickly to switch between AM and FM bands.
For NOAA Weather Alert: Press and hold this button to activate the weather alert for 4, 8,
or 16 hours.
CC Skywave 2
15
Radio Operation
Release button to make selection. To
disable alert, press and hold this button for 2
seconds. NOTE: When alert is set and radio
is OFF, light will ash indicating alert is on
and working. Turning off when not needed will
help conserve batteries (See page 30).
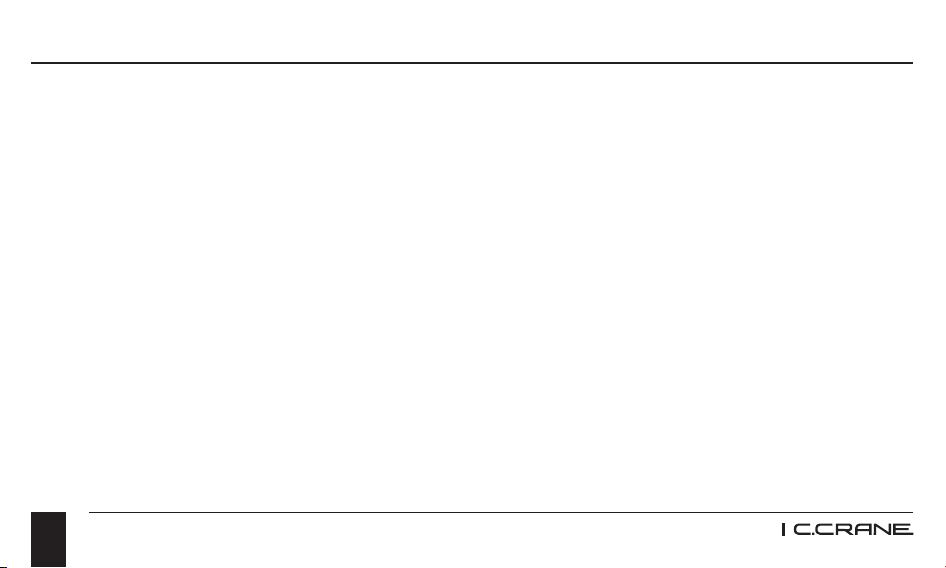
5. FREQUENCY BUTTON
When you are in your selected band, this
button lets you directly enter the frequency
number of your desired station using the
number buttons. For example, to play 1480
kHz in the AM band, quickly press the FREQ
button and then enter 1, 4, 8, 0 using the
number buttons. NOTE: When manually
entering SW frequencies 2300 to 2610, you
must press the FREQ button after entry.
6 7 5
CC Skywave 2
16
Radio Operation
6. PAGE BUTTON/CHANGING TONE
Each memory page allows you to save 10 additional stations per band. To change to a
different page, press the PAGE button once quickly, then press any memory button 0-9
to select the Page that you desire. To change between Music and Voice tones, press and
hold this button for two seconds. Display will switch between “Music” and ‘’Voice”.
7. AUTOMATIC TUNING SYSTEM (ATS) BUTTON
Automatic Tuning System (ATS). This feature programs all receivable stations in the AM,
FM and Shortwave bands to memory buttons. To use ATS, select your desired band: AM,
FM or Shortwave, and press and hold the ATS button for two seconds. The CC Skywave
2 will scan the entire band and automatically set all available stations in sequence 1-10. If
more than 10 stations are available then the remaining stations will be preset to the next
memory page, and so on.
SETTING BANDWIDTH FILTERS (FOR AM, SW, AND AIRBAND ONLY)
The AM and SW bands have ve bandwidth settings that can be used to lter out
unwanted noise or adjacent overlapping stations. The Airband has three lters for this.
CC Skywave 2
17
Quickly press the BANDWIDTH button to view the current selection. Press it again to
choose the setting that sounds best to you. A narrow bandwidth of 1 kHz may work best
when receiving a weak or noisy signal. For strong local signals 6 kHz is usually best,
especially for music.
If the station is changed then the radio will return to the default bandwidth setting. By
default, the CC Skywave 2 is set to 3 kHz bandwidth for good audio, noise ltering, and
voice quality. The default bandwidth can be changed by holding down the bandwidth
button for more than ve seconds with the power OFF. Release the button to choose the
displayed selection.
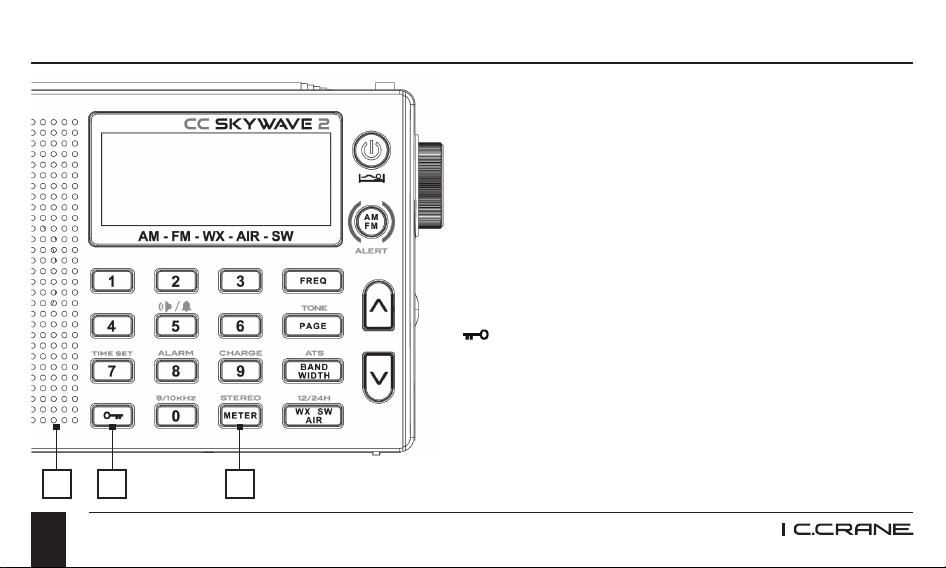
8. METER/STEREO - CHANGING METER BANDS
In the Shortwave band the METER/STEREO button will change between frequencies
according to popular meter bands.
STEREO OR MONO RECEPTION
In the FM band the METER/STEREO button will cycle between stereo and mono FM
reception. Typically, FM Mono will have better reception than FM Stereo. NOTE: If a
Radio Operation
CC Skywave 2
18
Radio Operation
station does not broadcast in stereo, or the
radio cannot lock on to the stereo signal
the radio will only receive FM mono and the
stereo symbol will not be displayed.
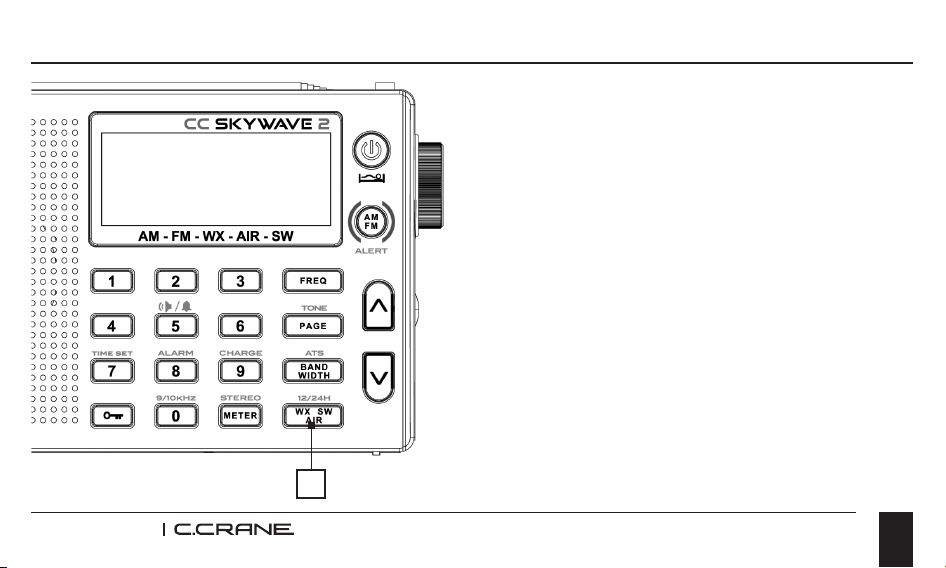
9. LOCK BUTTON
The lock button will disable all buttons and
controls, except the volume control. A Key
icon will display on the screen when the radio
is locked. To enable lock press the lock button
for two seconds. To disable press and
hold again for two seconds.
10. SPEAKER
The speaker will be disabled when headphones
are plugged into the headphone jack.
10 9 8
CC Skywave 2
19
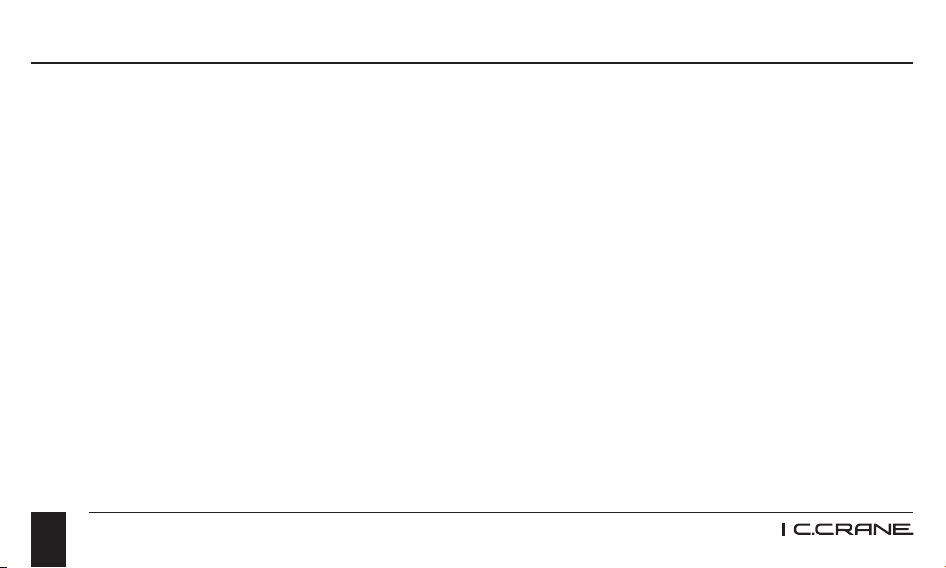
11. WX/SW/AIR - WEATHER,
SHORTWAVE AND AIR BANDS
Quickly press the “WX/SW/AIR” button to
cycle between Weather, Shortwave, and
AIR bands.
ABOUT THE WEATHER BAND
The CC Skywave 2 can receive all 7 NOAA
weather band channels. NOAA is short
for National Oceanic and Atmospheric
Administration. It is a network of stations
across the USA and territories that
continuously broadcasts local weather
forecasts and Emergency Alerts are issued
for serious weather conditions and public
safety information. Enable the ALERT
Radio Operation
11
CC Skywave 2
20
Radio Operation
feature to be notied when a warning is issued in your area (See page 14). Fully extend
the whip antenna for best reception.
ABOUT THE SHORTWAVE BAND
With shortwave you can listen to radio signals from around the world. Signals are usually
received best at night and early morning when the earth’s ionosphere does not cause
interference with the bouncing signals. The CC Skywave 2 has several bandwidth lters
to reduce interference. Select which one sounds best by pressing the “BAND WIDTH”
button after a station is tuned in.
ABOUT THE AIR BAND
With air band you can listen to communications between pilots and control towers. Basic
instructions for moving the plane and updates for weather and possible delays can also
be heard. Many airports broadcast a continuous feed that updates frequently for this
information. To nd station frequencies that are used for your airport, we recommend
searching the internet. One good site is www.radioreference.com. See Page 24 for
setting Squelch.
CC Skywave 2
21
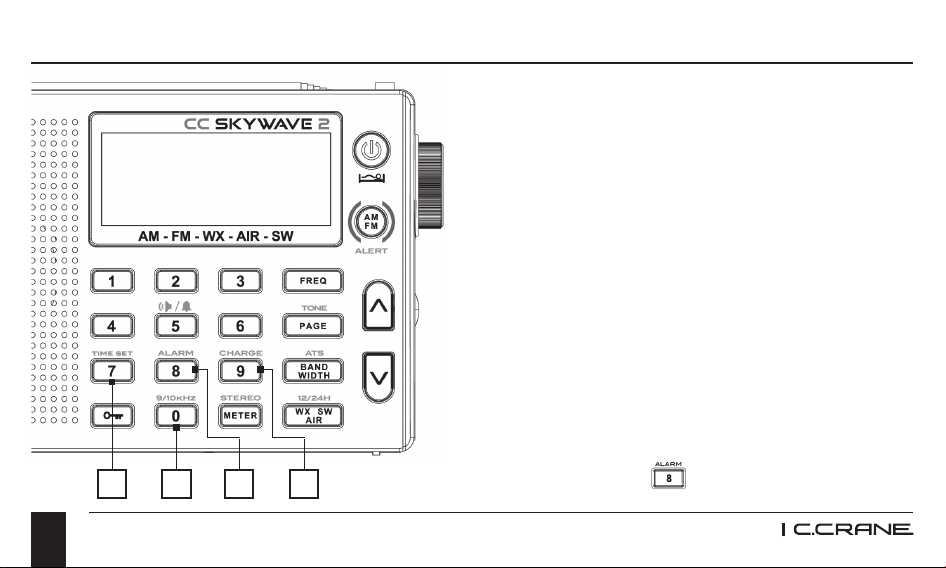
CHANGING TIME FORMAT
12 or 24 Hour Time Switch between 12 hour and 24 hour time. With the radio OFF, press
and hold the12/24H button for two seconds to change this setting.
12. CHARGE BUTTON - BATTERY CHARGING
Use the CC Skywave 2 to recharge your NiMH type batteries. Supply power to the CC
Skywave 2 from AC charging adapter (not included). With the radio powered OFF, press
and hold the CHARGE button for two seconds. The battery icon on the display will
begin to cycle indicating that the batteries are charging. Charging will continue for 10
hours or until the batteries are full. Do not charge alkaline batteries.
13. TIME SET BUTTON - SETTING THE TIME
With the radio OFF, press and hold the TIME SET button for two seconds. While the hour
is ashing, press the or tuning buttons (or rotate knob) until the hour and AM/PM
time is correct. Press the TIME SET button again to adjust the minutes. When nished,
press the TIME SET button again.
Radio Operation
CC Skywave 2
22
Radio Operation
14. ACTIVATE 9 OR 10 KHZ TUNING
BUTTON - EXPAND FM BAND
Many parts of the world, including Europe,
use 9 kHz tuning steps for the AM band. 10
kHz tuning steps for AM are used in the USA
and other regions. Switch tuning steps by
holding the 9/10 kHz button for two seconds
with the radio turned OFF. When tuning steps
are set to 9 kHz the FM Band will also be
expanded to cover 76-108 MHz (FM band
in Japan).
15. ALARM BUTTON - SETTING
THE ALARM
With the radio powered off, press and hold
the ALARM button for two seconds.
151413 12
CC Skywave 2
23
While the hour is ashing, press the or tuning buttons (or rotate knob) until the hour
and AM/PM time is correct. Press the ALARM button again to adjust the minutes. When
nished, press the ALARM button again to conrm. To disable alarm, press the ALARM
button for three seconds. By default, the alarm will wake you with a beep. To wake to a
radio station, press the #5 button during alarm setup. A speaker icon displays
on the screen indicating that the alarm will wake to the previous radio station played.
It is best to check the station frequency and adjust the volume level to your wake up
preference before going to sleep to insure that is just how you want it. When the alarm
sounds, press the power button to turn the alarm off, or press any other button to sleep
for 10 more minutes.
16. POSITIONING THE WHIP ANTENNA - FM/WX/AIR/SW
Flip up and fully extend the whip antenna. For most stations, reception is best when
antenna is positioned vertically. Other stations may have better reception with the
antenna positioned differently.
Radio Operation
CC Skywave 2
24
Radio Operation
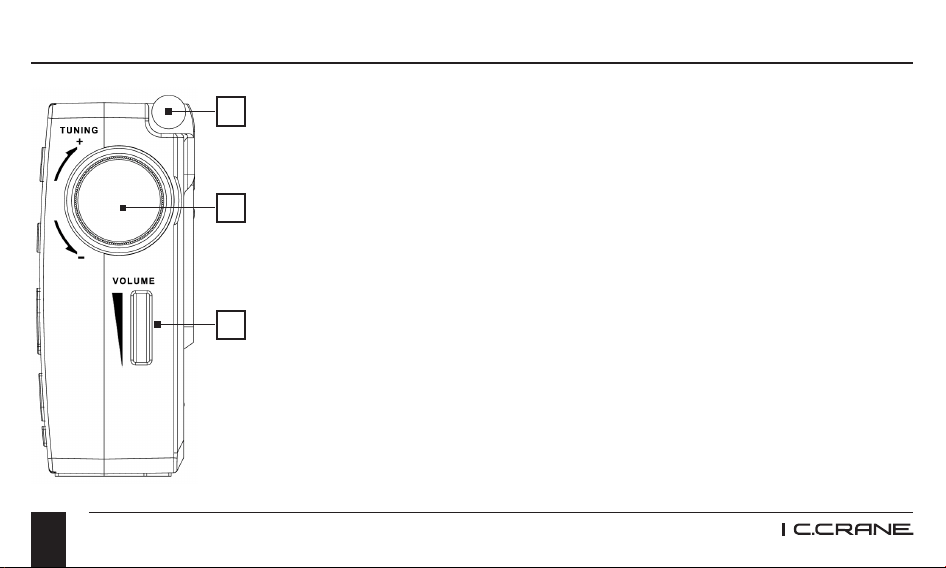
17. TUNING KNOB
Rotate knob to tune to the next frequency increment. Press
the knob “IN” towards the body of the radio (once quickly) to
change between “FAST” and “SLOW” tuning increments when
rotating the knob. “FAST” tuning will use larger incremental
steps between frequencies. “SLOW” tuning can improve AM
stations that are slightly frequency on poor signals. Try tuning 1
kHz higher or lower than the actual station frequency to see if
reception improves.
SQUELCH MODE
Squelch Mode only works on the Air band. Press and hold the
tuning knob “IN” towards the body of the radio (for 2 seconds)
to activate. “OFF” will appear on the display screen. Rotate the
knob to adjust the level of squelch desired. The optimal level is
usually the lowest number that does not have background noise.
16
17
18
CC Skywave 2
25
With squelch turned “OFF”, you may be able to receive some very weak signals that do
not register when the squelch is enabled. Press the tuning knob “IN” towards the body of
the radio one time to save the current squelch setting.
18. VOLUME CONTROL
Rotate the small wheel up for more volume and down for less volume.
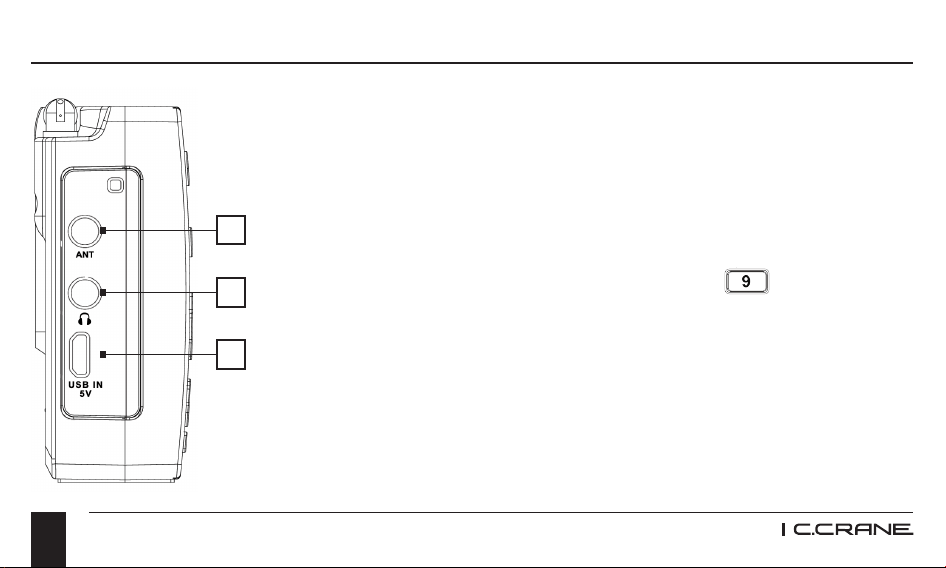
19. ANTENNA JACK
This jack can be used for connecting an external shortwave antenna for improved
reception.
20. EARPHONE JACK
For private listening, use headphones or earbuds. This jack can also be used as an audio
output to another device.
21. USB POWER / CHARGING JACK
You can power your radio or charge NiMH type batteries with the USB jack connected to
a computer or USB AC charging adapter (not included).
Radio Operation
CC Skywave 2
26
Radio Operation
POWERING THE CC SKYWAVE 2
For best reception we recommend using “AA” batteries. Using the
(optional) AC charging adapter or a Micro USB to USB charging
cable (not included) may generate too much interference on the
AM, SW and VHF AIR bands. The FM and WX bands should not
have as much interference when connected.
CHARGING NIMH BATTERIES
To begin battery charging press the CHARGE button for two
seconds with the power OFF. Charging will continue for 10 hours
or until the batteries are full.
WARNING: DO NOT CHARGE ALKALINE BATTERIES
OR OTHER BATTERY CHEMISTRIES. USE ONLY THE
RECOMMENDED AC CHARGING ADAPTER THAT WE
OFFER FOR RECHARGING NiMH BATTERIES.
19
20
21
CC Skywave 2
27
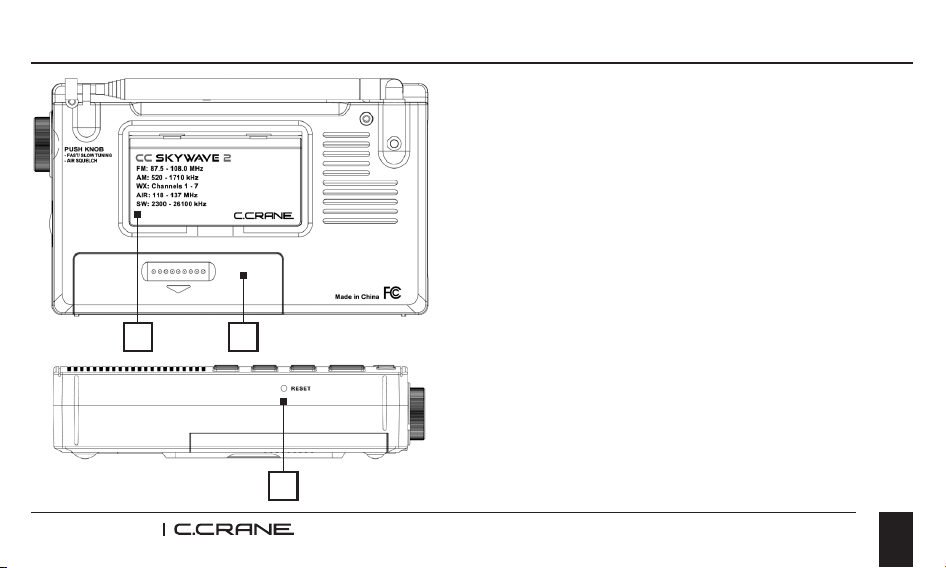
22. BACK STAND
Flip this panel out to prop up your radio for
easy use of the controls, best audio and for
viewing positioning.
23. BATTERY COMPARTMENT
Requires two “AA” alkaline or NiMH
batteries. DO NOT USE LITHIUM
BATTERIES.
24. RESET HOLE - RESETTING
THE RADIO
Quickly press into the reset hole on
the bottom of the radio to reset the
microprocessor. It is recommended to use
a toothpick or other soft device to reset the
radio. Do not press too hard as you might
Radio Operation
22 23
24
CC Skywave 2
28
Radio Operation / Hidden Settings
DISABLE BEEP SOUND
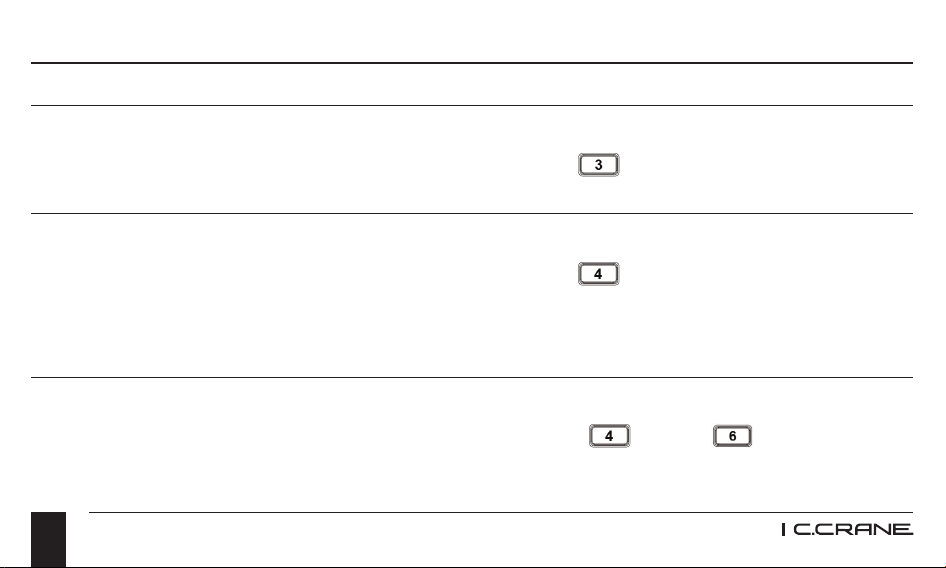
With the power OFF, press and hold memory button #3 for two seconds. All beeps
are disabled except ALARM and WX ALERT. Repeat sequence to enable beep again.
DESIGNATE FREQUENCY OR CLOCK WHILE LISTENING TO THE RADIO
With the power OFF, press and hold memory button #4 for two seconds. A “C” will
appear on the screen indicating that the clock will show while listening to radio. Repeat
sequence to display frequency instead. “F” will appear on the screen to indicate that the
frequency will show when listening to the radio.
RESET ALL SETTINGS
With the power OFF, press and hold memory buttons #4 and #6 for ve
seconds. The radio will beep four times, a long pause and three more beeps indicating
that all settings have been restored back to the factory defaults.
damage the radio. See paragraph below for resetting to all factory settings.
CC Skywave 2
29
Hidden Settings
NOTE ON THE DISPLAY BACKLIGHT:
When using the AC charging adapter (sold separately) the following applies:
• Default setting = Light is ON for 15 seconds when any button is pressed.
• If radio is OFF, the display light is OFF.
• If any button is pressed while radio is OFF, the display light will turn ON for 15 seconds
• If LOCK button is tapped while the radio is ON = Light is ON all the time.
• If LOCK button is tapped again while radio is ON= Lights return to default setting of 15
seconds.
CC Skywave 2
30
Troubleshooting Guide
WHAT ARE THE STEPS FOR SETTING AND ACTIVATING THE WEATHER ALERT?
1. Turn the radio on by pressing and releasing the red power button (on the front
of the radio).
2. Press and release the “WX SW AIR” button (on front bottom right of the radio) until WX
shows on the display.
3. Change the channel with the Tuning dial or the Up or Down tuning buttons until you
hear your local NOAA Weather Broadcast.
4. Press and hold the “AM FM Alert” button until the desired hours of monitoring (4hr, 8hr
or 16hr) are selected.
NOTE: While the weather alert is activated, the display light will ash once every few
seconds to remind you that the NOAA Weather Alert is "ON".
5. When NOAA issues a weather alert, the radio will continuously beep for two minutes.
6. Press and release the red Power Button to listen to the weather broadcast.
7. To de-activate the Weather Alert, press and hold the “AM FM Alert” button for 3
seconds or until “OFF” is displayed.
CC Skywave 2
31
THE CC SKYWAVE 2 WILL NOT TURN ON AND NONE OF THE BUTTONS WORK:
The Lock button: that is located on the front of the radio may be activated. When
activated, a key icon will show on the display screen. Push lock button for 2 seconds to
resume normal operation of the radio.
See “Lock Button” on Page 18.
MY RADIO SHUTS OFF AFTER JUST A FEW SECONDS:
Low batteries can cause this situation. Replace them with a new set of batteries.
STATIONS WON’T HOLD IN MEMORY:
The memory button settings are being overwritten. When recalling a station from memory,
if you hold the memory button down too long it will program the current station over your
previously stored station. To recall a station that has been stored in memory, always press
and release the button quickly. To program a new station into memory, tune to the desired
station and then press and hold the memory button for two seconds until you hear a beep.
Troubleshooting Guide
CC Skywave 2
32
POOR RECEPTION ON AM BAND:
Rotate the radio until the reception is best. Many buildings that use brick, metal, or stucco
can absorb or reect the AM signal. Computers and other electronic equipment, including
uorescent lights, can cause noise that interferes with your AM reception. Move the radio
to a different place to see if that helps. Additional noise may affect a weak signal. There
are several bandwidth lters which can help to reduce interference. Select which one
sounds best by pressing the “BANDWIDTH” button. For better reception, use an external
AM antenna like our Terk Indoor AM antenna available at www.ccrane.com.
POOR RECEPTION ON FM, WEATHER AND AIR BAND:
Fully extend the whip antenna and adjust its orientation to obtain the strongest signal. You
may be able to get an even better signal by switching to FM mono. Press the STEREO
button to change between FM Stereo and FM Mono. For even better reception use an
external FM antenna available at www.ccrane.com.
Troubleshooting Guide
CC Skywave 2
33
Troubleshooting Guide
POOR RECEPTION ON SHORTWAVE BAND:
Fully extend the whip antenna and adjust its orientation to obtain the strongest signal.
There are several bandwidth lters which can help to reduce interference. Select which
one sounds best by pressing the “BANDWIDTH” button. For much better reception, use
an external SW antenna available at www.ccrane.com, or use the CC Wire Terminal
Antenna Adapter (sold separately) to attach an (60’-100’ recommended) insulated wire.
BATTERY POWER LEVEL INDICATOR DOESN’T SHOW FULL CHARGE WHEN
USING RECHARGEABLE BATTERIES:
Rechargeable batteries will not show a full charge on your radio display. The CC
Skywave 2 is calibrated to read the charge of your alkaline batteries, which is 1.5 volts at
full charge. Rechargeable batteries, however, are fully charged at just 1.25 volts, so your
radio will show a partial charge even if the rechargeable batteries have been
fully charged.
CC Skywave 2
34
Specications
FM BAND:
87.5 - 108 MHz (Regular Mode) / 76 - 108 MHz (Expanded Mode - See page 22)
AM BAND:
520 - 1710 kHz (10 kHz)
522 - 1620 kHz (9 kHz)
SHORTWAVE BAND:
2300 - 26100 kHz
AIR BAND:
118 - 137 MHz
WEATHER BAND:
Channel 1: 162.400 MHz / Channel 2: 162.425 MHz / Channel 3: 162.450 MHz /
Channel 4: 162.475 MHz / Channel 5: 162.500 MHz / Channel 6: 162.525 MHz /
Channel 7: 162.550 MHz
CC Skywave 2
35
Specications
POWER SOURCE:
Batteries: (2) “AA” size
POWER CONSUMPTION:
30 - 100 mA DC (depending on headphone or speaker usage)
AUDIO:
Speaker: 1.5”, 8 Ohm, 0.5 watt
Stereo headphone jack
ANTENNA:
FM, Weather, Shortwave and Air Band: 19” whip antenna
AM Band: Built-in Ferrite bar
DIMENSIONS:
3” H x 4. 75” W x 1.1” D
CC Skywave 2
36
Specications / Common Shortwave Broadcast Bands
WEIGHT:
Approximately 5.5 ounces without batteries
WARRANTY:
1-Year Limited Warranty.
NOTE: Specications are subject to change without notice.
COMMON SHORTWAVE BROADCAST BANDS
2300 - 2495
3200 - 3495
3900 - 4000
4750 - 5060
5730 - 6200
7100 - 7450
9250 - 9900
120 Meters
90 Meters
75 Meters
60 Meters
49 Meters
41 Meters
31 Meters
25 Meters
22 Meters
19 Meters
16 Meters
15 Meters
13 Meters
11 Meters
11500 - 12100
13570 - 13870
15030 - 15800
17480 -17900
18900 - 19020
21450 - 21850
25670 - 26100
CC Skywave 2
37
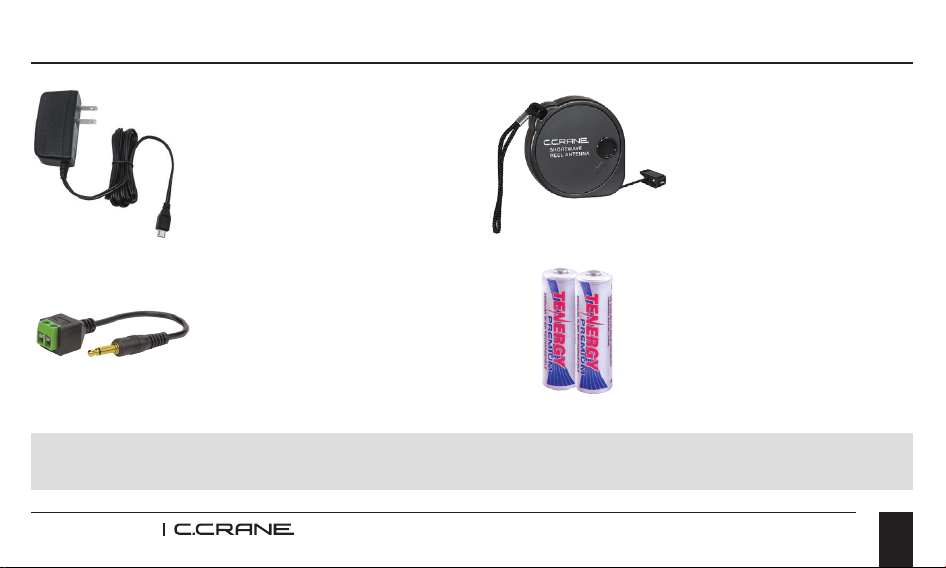
Accessories for your CC Skywave 2
Available at ccrane.com or call: 1-800-522-8863
CC Wire Terminal
Antenna Adapter
(Item # CCSWT)
CC SW Reel Antenna
(Item # CCSWA)
AC Charging Adapter
(Item # SKWV2P)
Rechargeable NiMH
“AA” Batteries
(Item # NHA)

This page left blank intentionally.

This page left blank intentionally.

MODEL: CC SKYWAVE 2
THIS DEVICE COMPLIES WITH PART 15 OF THE FCC RULES.
OPERATION IS SUBJECT TO THE FOLLOWING TWO CONDITIONS:
1. THIS DEVICE MAY NOT CAUSE HARMFUL INTERFERENCE, AND
2. THIS DEVICE MUST ACCEPT ANY INTERFERENCE RECEIVED,
INCLUDING INTERFERENCE THAT MAY CAUSE UNDESIRED OPERATION.
NOTICE: Any changes or modications not expressly approved by the party responsible
for compliance could void the users authority to operate the equipment.
172 Main Street
Fortuna, CA 95540-1816
Phone: 1-800-522-8863 | Web: ccrane.com
Copyright © 2024 by C. Crane. All rights reserved. No part of this booklet may be
reproduced, in any form or means whatsoever, without permission in writing from
C. Crane. (Ver 3)