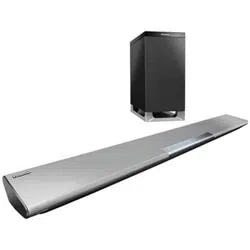
Operating Instructions
Home Theater Audio System
Model No. SC-HTB100
Thank you for purchasing this product.
For optimum performance and safety, please read these instructions carefully. Please keep this
manual for future reference.
Included Installation Instructions
Installation work should be completed by a qualified installation specialist. ( 4 to 6)
Before commencing work, carefully read these installation instructions and the operating
instructions to ensure that installation is performed correctly.
(Please keep these instructions. You may need them when maintaining or moving this system.)
Ver. 1.0.3
REGISTER NOW
UPDATES
TIPS
NEWS
OFFERS
www.panasonic.eu/register

2
Contents
Safety precautions .............................................................................................. 2
Features .............................................................................................................. 4
Placement ........................................................................................................... 4
Wall-mounting .................................................................................................... 5
Panel ................................................................................................................... 6
Connections ........................................................................................................ 7
Remote control ................................................................................................... 9
Basic Playback ................................................................................................... 11
Troubleshooting ................................................................................................ 12
Specifications .................................................................................................... 12
References ........................................................................................................ 13
License .............................................................................................................. 13
Product conformity information for customers in the EU................................ 14
Safety precautions
WARNING
Unit
To reduce the risk of fire, electric shock or product damage,
– Do not expose this unit to rain, moisture, dripping or splashing.
– Do not place objects filled with liquids, such as vases, on this unit.
– Use the recommended accessories.
– Do not remove covers.
– Do not repair this unit by yourself. Refer servicing to qualified service personnel.
AC mains lead
To reduce the risk of fire, electric shock or product damage,
– Ensure that the power supply voltage corresponds to the voltage printed on this unit.
– Insert the mains plug fully into the socket outlet.
– Do not pull, bend, or place heavy items on the lead.
– Do not handle the plug with wet hands.
– Hold onto the mains plug body when disconnecting the plug.
– Do not use a damaged mains plug or socket outlet.
Small objects
Keep the wall mount plug & wall mount screw out of reach of children to prevent swallowing.
3
CAUTION
Unit
To reduce the risk of fire, electric shock or product damage,
– Do not install or place this unit in a bookcase, built-in cabinet or in another confined space.
Ensure this unit is well ventilated.
– Do not obstruct this unit's ventilation openings with newspapers, tablecloths, curtains, and
similar items.
– Do not place sources of naked flames, such as lighted candles, on this unit.
This unit is intended for use in moderate climates.
This unit may receive radio interference caused by mobile telephones during use. If such
interference occurs, please increase separation between this unit and the mobile telephone.
Setup the unit on an even surface away from direct sunlight, high temperatures, high humidity, and
excessive vibration.
This system might get warm after prolonged usage. This is normal. Do not be alarmed.
AC mains lead
The mains plug is the disconnecting device. Install this unit so that the mains plug can be unplugged
from the socket outlet immediately.
Battery
Danger of explosion if battery is incorrectly replaced. Replace only with the type recommended by
the manufacturer.
When disposing of the batteries, please contact your local authorities or dealer and ask for the
correct method of disposal.
Do not heat or expose to flame.
Do not leave the battery(ies) in a car exposed to direct sunlight for a long period of time with doors
and windows closed.
Insert with poles aligned.
Remove the battery if you do not use the remote control for a long period of time. Keep in a cool,
dark area.
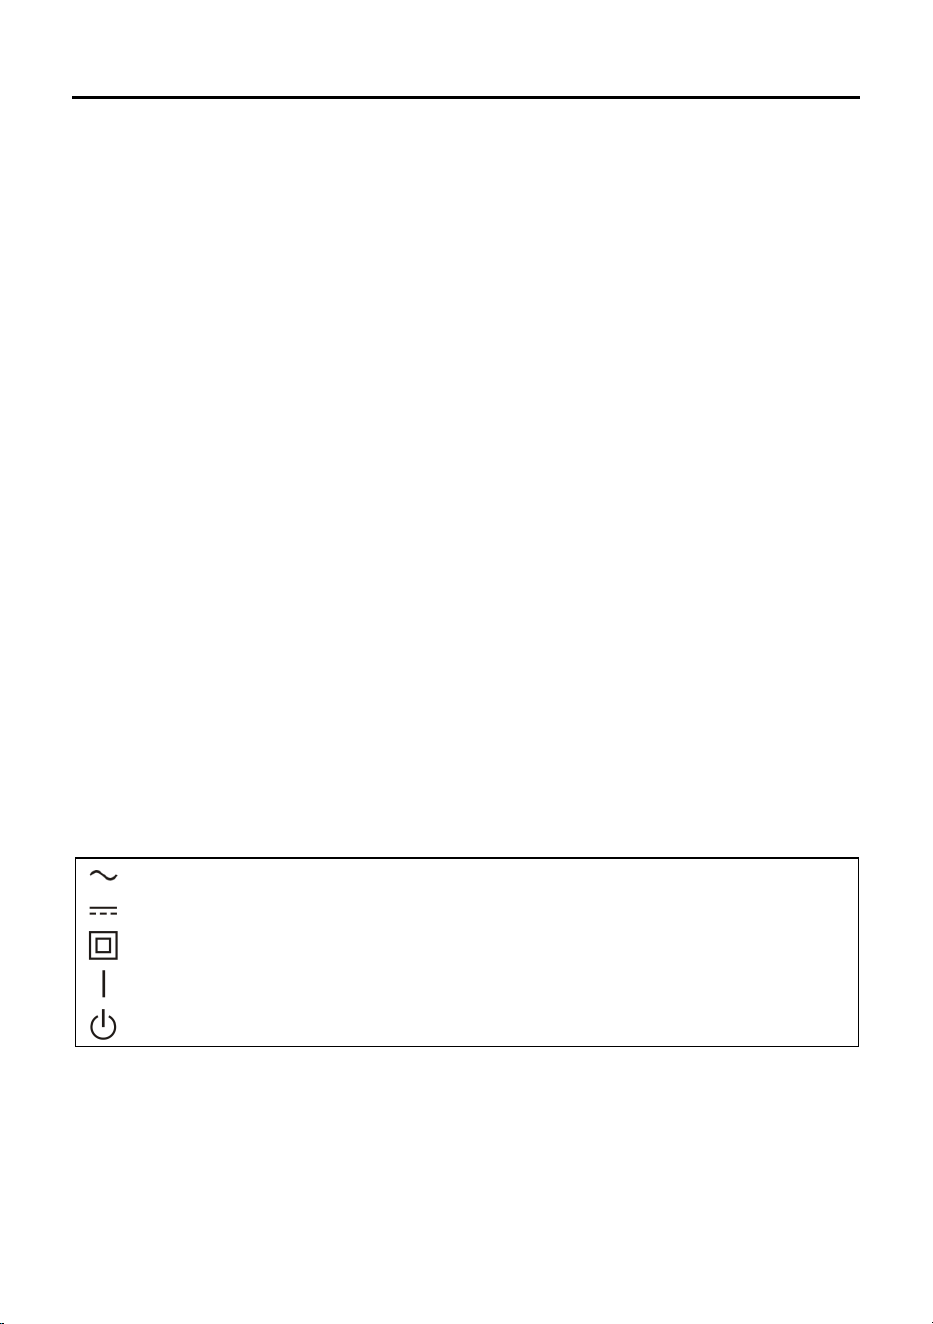
The symbols on this product (including the accessories) represent the following:
o
AC
o
DC
o
Class II equipment (The construction of the product is double-insulated.)
o
ON
o
Standby
4
Features
Thanks for your purchase of our product. Please read through this manual before making connections
and operating this product. Retain this manual for future reference.
LINE input
Optical input
USB slot
ARC function
Bluetooth playback
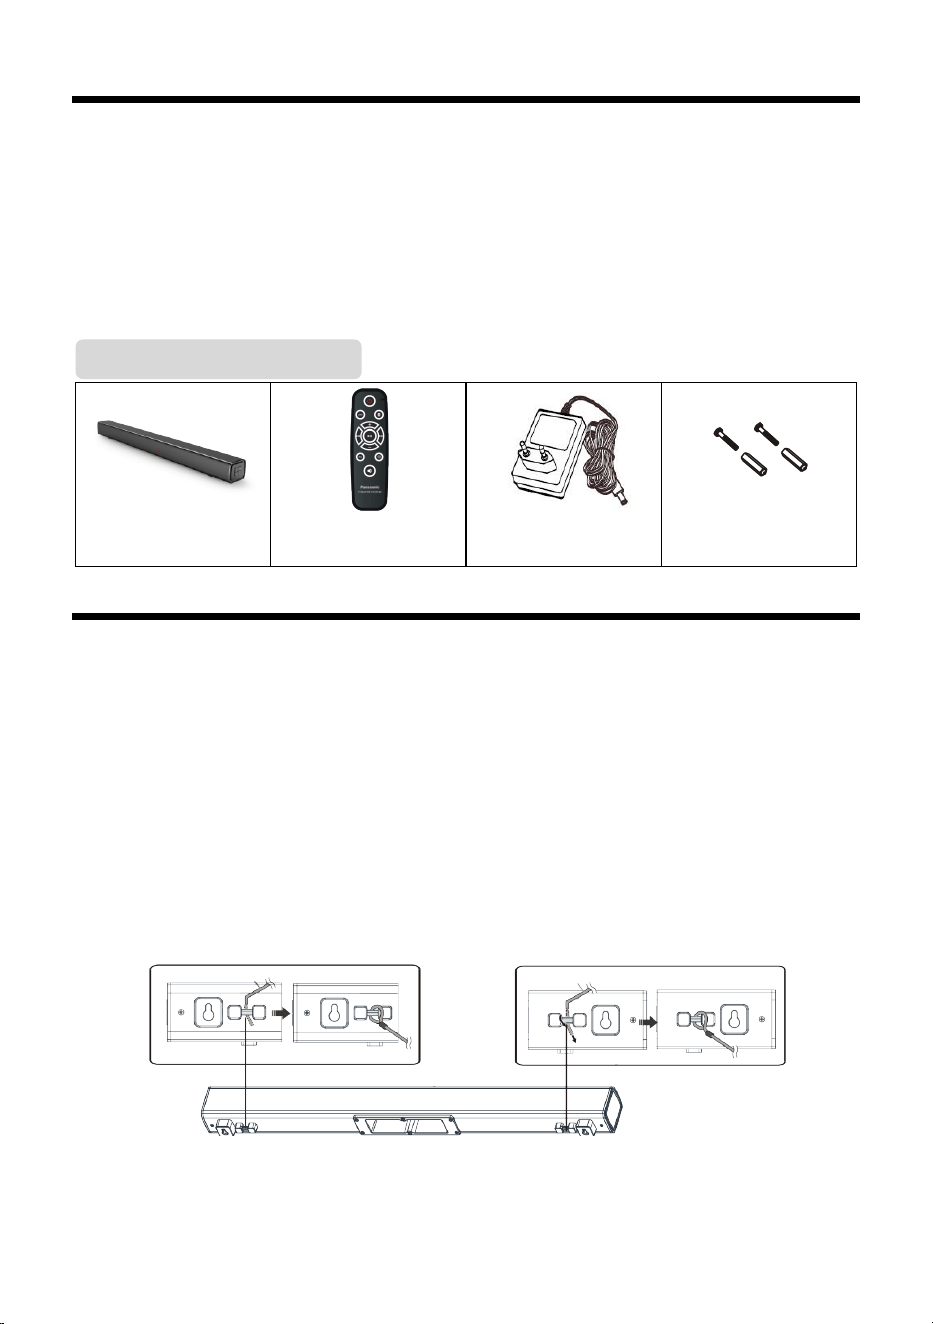
Main unit
Remote control
AC adaptor
Wall plug (2x) and
screw (2x)
Placement
Placing the main unit in a rack, on a table or on the wall
In order to prevent injuries, the sound bar device must be securely fasten to the wall in accordance
with the below installation instructions.
Additionally required accessories (Commercially available)
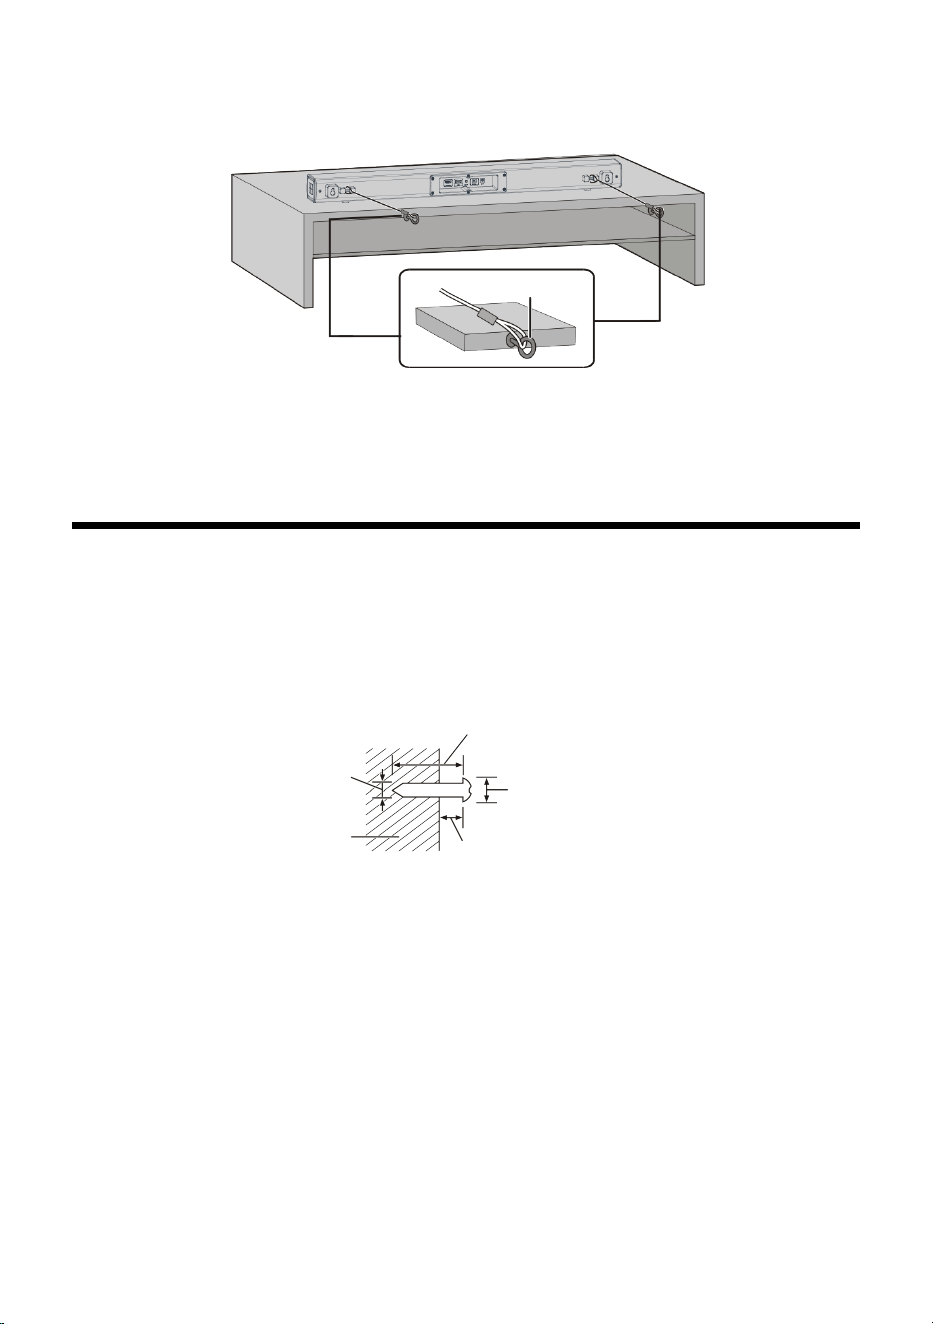
Fall prevention cord (x2)
Screw eyes (to attach the fall prevention cord) (x2)
Note:
Use commercially available screws that are capable of supporting over 30 kg.
Use a cord that is capable of supporting over 30 kg (with a diameter of about 1.5 mm).
1 Attach the cord to the main unit.
Package Contents
Cord
Cord
5
2 Place the main unit in the desired position and attach each cord onto the
rack or table.
Make sure that the slack of the cord is minimal.
Do not lean the main unit against the TV or wall.
Attach the screw eye at a position capable of supporting over 30 kg.
Depending on the placement of the main unit, the screwing position of the screw eye may differ.
Wall-mounting
Mounting sound bar on a wall
In order to prevent injuries, the sound bar device must be securely fastened to the wall in accordance
with the below installation instructions.
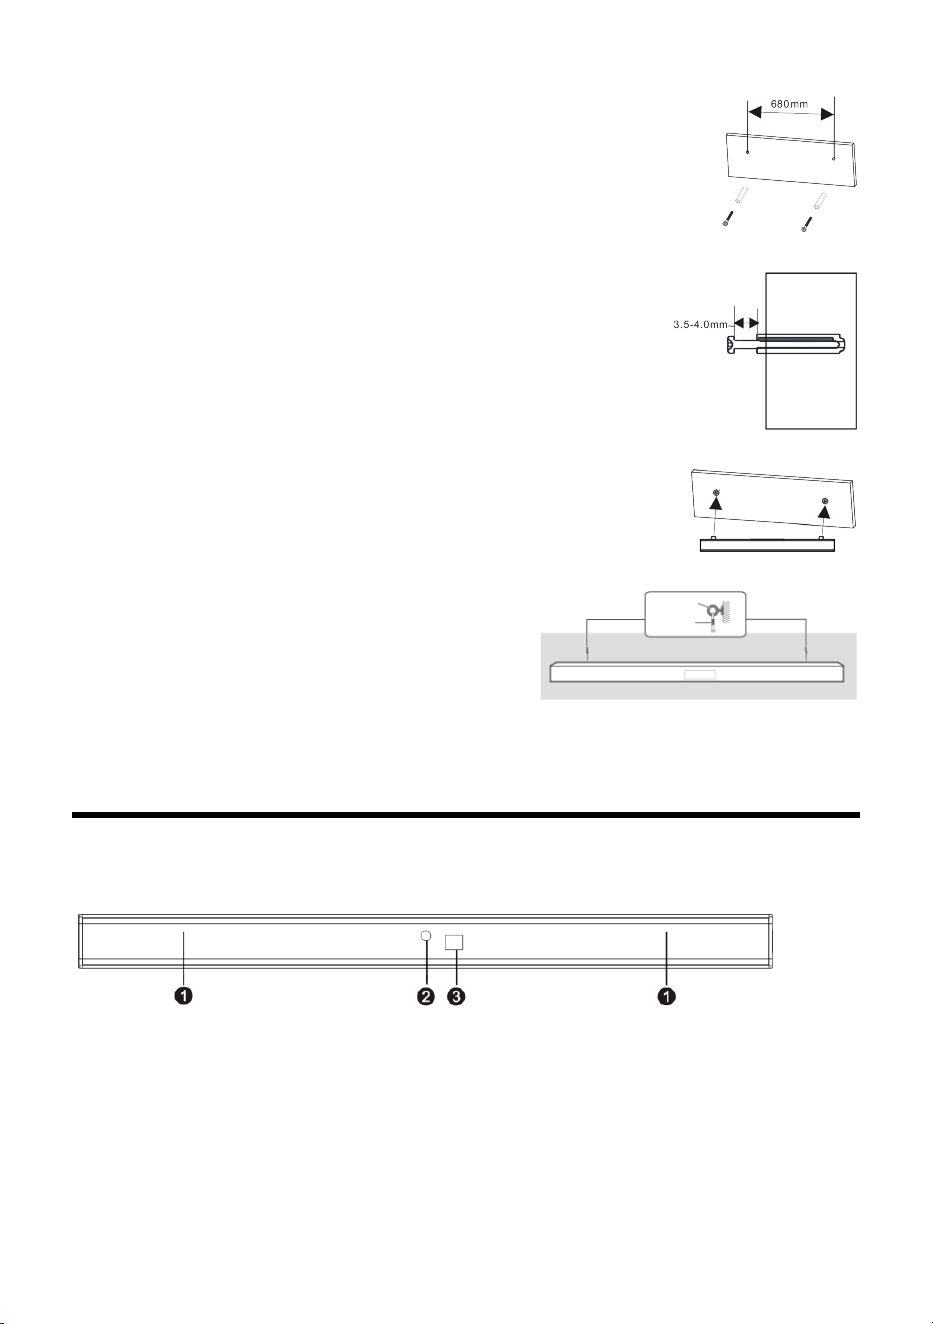
Drive the screws into the wall:
Use the measurements indicated below to identify the screwing positions on the wall.
Leave at least 100 mm of space above the main unit to allow enough space for fitting the main
Unit.
Be sure to use a level to ensure that both mounting holes are level with each other.
Note: If you are installing screws into drywall or concrete, use the wall anchors (provided) designed
for that type of surface, these are not required when fixing to wood.
Safety requirement for wall mount fixing:
Wall-mounted equipment must be positioned to ensure that metal parts of the equipment such as
mounting screws are not grounded through metallic members in the wall such as metal laths, wire
laths and metal plates, in order to prevent smoke emission, ignition and fire hazards.
When mounting you must ensure that any metal parts of the equipment (such as the mounting
screws) do not contact any metallic parts in the wall as stated above.
Caution: Keep the mounting screws and plastic screw dowels out of reach of children to prevent
swallowing.
Screw eye
>25 mm
Ø7.0 mm - Ø9.4 mm
3.5 mm - 4.0 mm
Wall or pillar
Ø3.6 mm
6
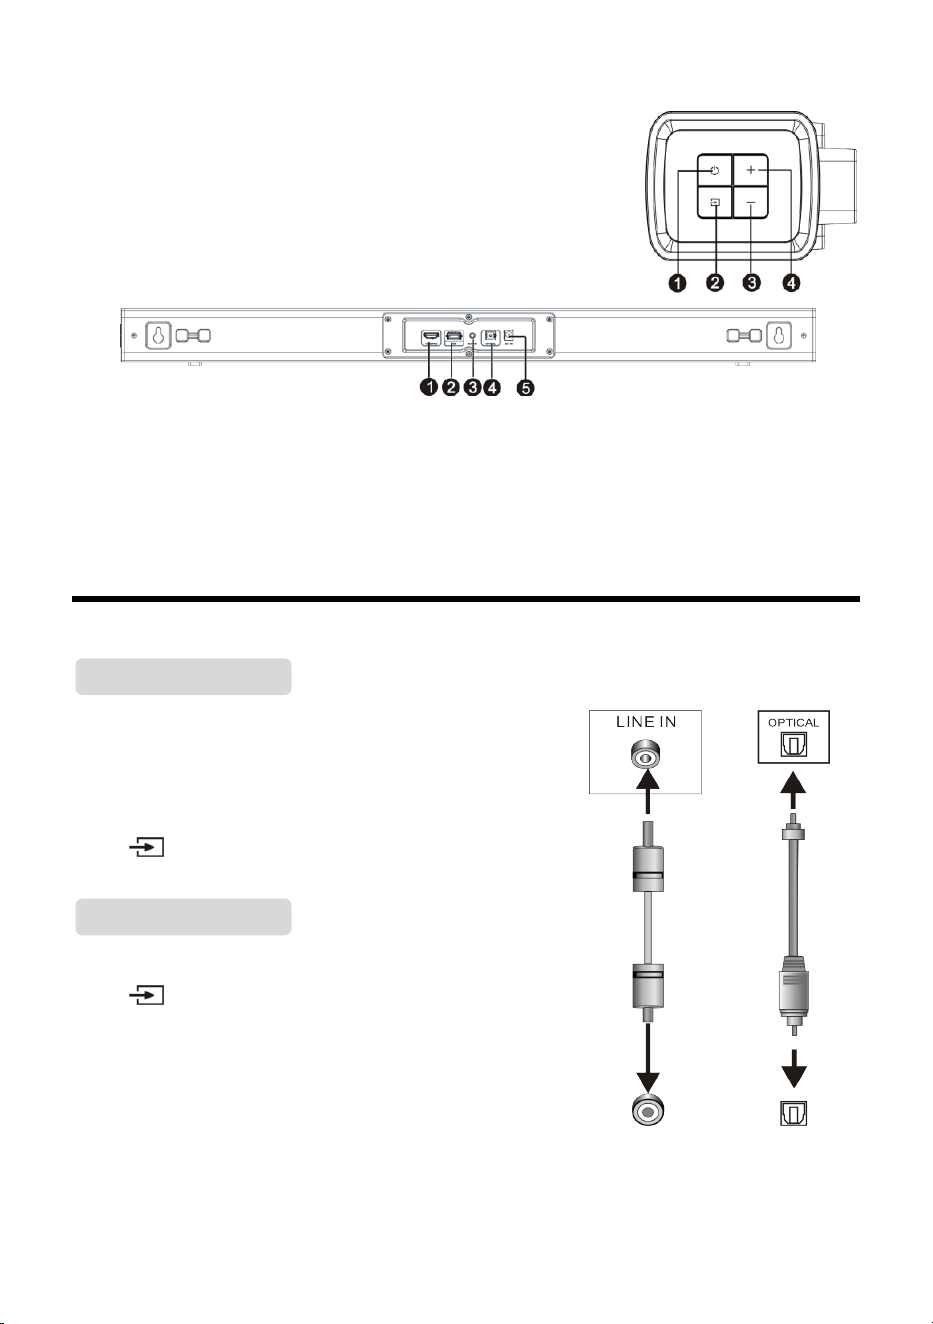
1. Drill the two holes (about 6mm diameter) in the wall keeping
680 mm distance between the drill holes, as shown in the
picture on the right. Insert the two plugs supplied into the
drilled holes and then insert two screws (supplied) into the
holes and tighten. As shown in the picture on the right (diagram
1).
Diagram 1
2. Take care to leave 4 mm between the screw heads and the wall.
As shown in the picture on the right (diagram 2).
Diagram 2
3. Hang the assembled sound bar on the screw set in the wall. As
shown in the picture on the right (diagram 3).
Diagram 3
4. Attach the fall prevention cord (not supplied) to the
screw eyes, secure the cord to the wall, making sure
that the slack of the cord is minimal. As shown in the
lower picture (diagram 4).
Diagram 4
Note: Use a cord that is capable of supporting over 30kg (with a diameter of about 1.5mm).
Panel
FRONT PANEL:
❶ SPEAKER: Amplifier of the unit.
❷ INDICATOR LIGHT: Show the units current mode status.
❸ REMOTE SENSOR: Point the remote control at the remote
control sensor, away from obstacles and within the operation
range.
Indicator light
Red: In STANDBY mode.
Blue: In Bluetooth mode.
Green: In LINE IN mode.
Yellow: In Optical mode.
Purple: In HDMI ARC mode.
Cyan: In USB mode.
Screw eyei
Cord
7
SIDE PANEL:
❶ STANDBY: Switch the unit between ON and STANDBY mode.
❷ SOURCE: Switch to the different source mode among in,
BLUETOOTH, LINE IN, USB, OPTICAL IN and ARC mode.
❸ VOLUME-: Press to decrease the volume level.
❹ VOLUME+: Press to increase the volume level.
REAR PANEL:
❶ ARC SLOT: HDMI TV (ARC) terminal (ARC compatible).
❷ USB SLOT: Play the MP3 files in the connected USB drive.
❸ LINE IN: Connect to a 3.5mm headphone socket of the external audio device.
❹ OPTICAL DIGITAL AUDIO INPUT: Connect to an optical output socket of the external audio
device.
❺ DC IN (DC18V/2.0A): DC power input terminal.
Connections
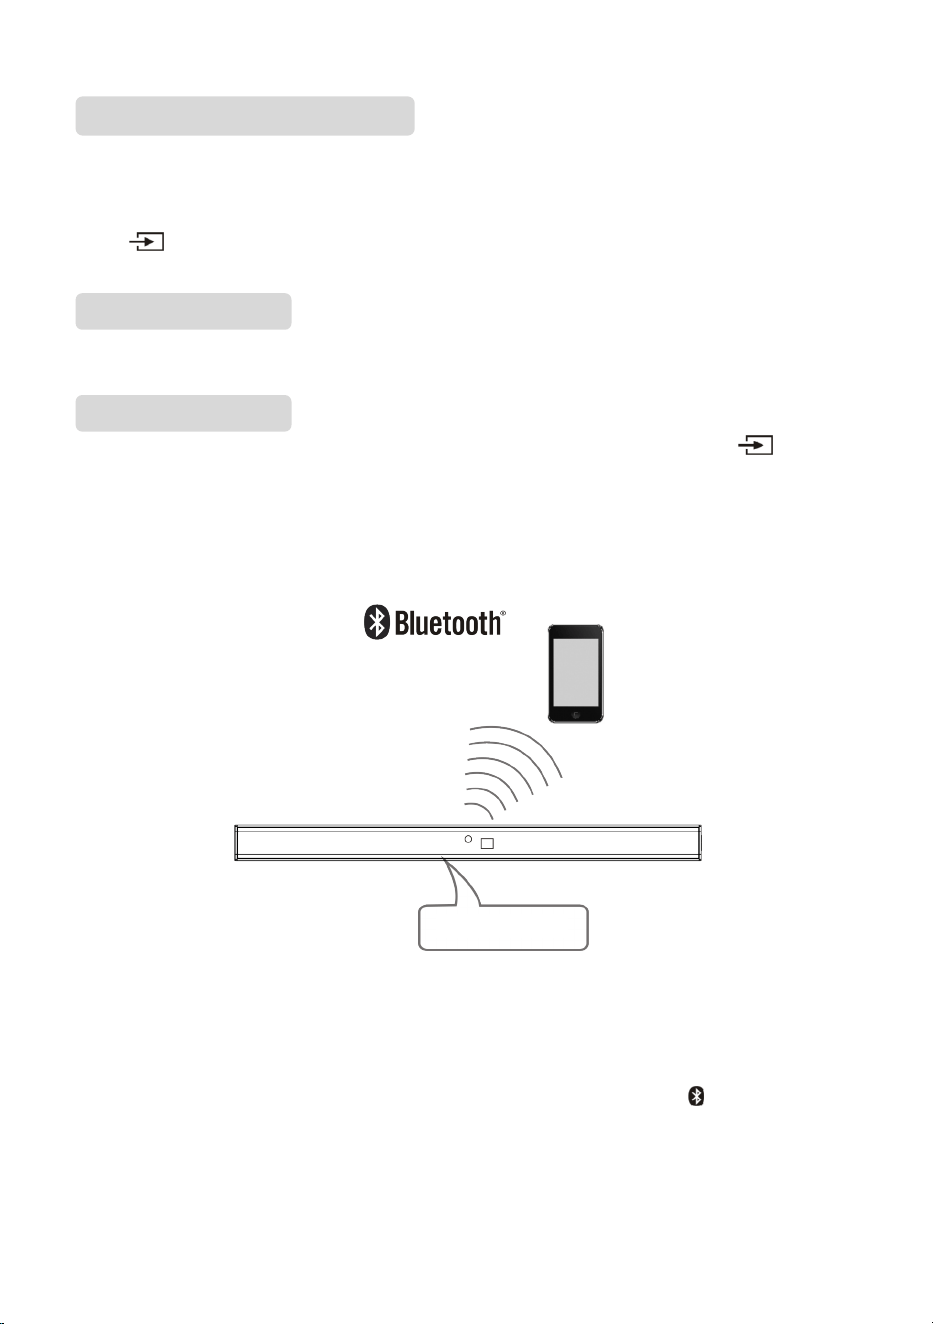
This sound bar has an extra group of audio input terminals.
You can input analogue stereo audio signals from extra
devices such as VCD, CD, VCR, DVD player, etc.
Use the audio cable to connect the stereo audio output
terminals of a VCD, CD, VCR, DVD player to the stereo input
LINE IN terminal of this sound bar.
Press [ ] button on the remote control to select LINE IN -
shown as a solid green indicator light.
Use the optical cable to connect the optical input of this sound
bar to the optical output of a VCD, CD, VCR, DVD player.
Press [ ] button on the remote control to select Optical
mode - the indicator will show as a solid yellow light on the
sound bar.
AUDIO INPUT
LINE Input
LINE Output
Optical Input
Optical Output
AUDIO OUTPUT
Optical Input
LINE IN
8
ARC is audio return channel function, used in digital audio output of liquid-crystal display televisions
in order to get the optimal synchronous sound quality .
Use the HDMI cable to connect the HDMI-ARC input port of this sound bar to the ARC output port of
the liquid-crystal display television.
Press [ ] button to switch to HDMI ARC mode on the remote control and the indicator will show
as solid purple on the sound bar.
This sound bar automatically switches to standby after 15 minutes of button inactivity and no audio
play from a connected device.
Press STANDBY button on the remote control to power on the sound bar, then press [ ] button
on the remote control to switch to Bluetooth mode, the indicator will blink blue quickly, showing that
the sound bar is in searching Bluetooth signal status. Use your Bluetooth device to search for the
Bluetooth signal of the sound bar, select SC-HTB100 on your list, input the password 0000 if the
password prompt is shown, the sound bar will synchronize to play songs on your mobile phone and
the indicator light will show as a solid blue light meaning connection was successful.
Disconnect the Bluetooth on the Bluetooth devices to switch off the Bluetooth connection.
Note:
Bluetooth connection range is 10 meters.
The model SC-HTB100 in your device was not deleted.
In Bluetooth mode, [PLAY/PAUSE], [NEXT], [PREVIOUS], [VOLUME+/-] etc. are also active.
Pairing a device
If this sound bar is already connected to a Bluetooth device, press and hold the button on the
remote control to disconnect it, the indicator blinks blue quickly, activate your device's Bluetooth
function to search for the Bluetooth signal, the Bluetooth pairing name SC-HTB100 will be shown on
the device list.
Note: You can pair up to 8 devices with this system, if a 9th device is paired, the device that has not
been used for longest time will be replaced.
BLUETOOTH
Auto Standby
ARC (AUDIO RETURN CHANNEL)
Model: SC-HTB100
9
Connecting a paired device
If this sound bar is already connected to a Bluetooth device, press and hold button on the remote
control to disconnect it, the indicator will blink blue quickly, activate your device's Bluetooth function
to search for the Bluetooth signal, select SC-HTB100 on the device list and tap it, when your device
and sound bar is connected the indicator on the sound bar will show a solid blue light.
Disconnecting a device
If this sound bar is connected to a Bluetooth device, press and hold button on the remote control
to disconnect it.
Note: This sound bar can only connect to one device at a time; when the sound bar switches to
Bluetooth mode, it will automatically try to connect to the last connected device; when the sound bar
switches to another source, the previous Bluetooth device will be disconnected.
Remote control
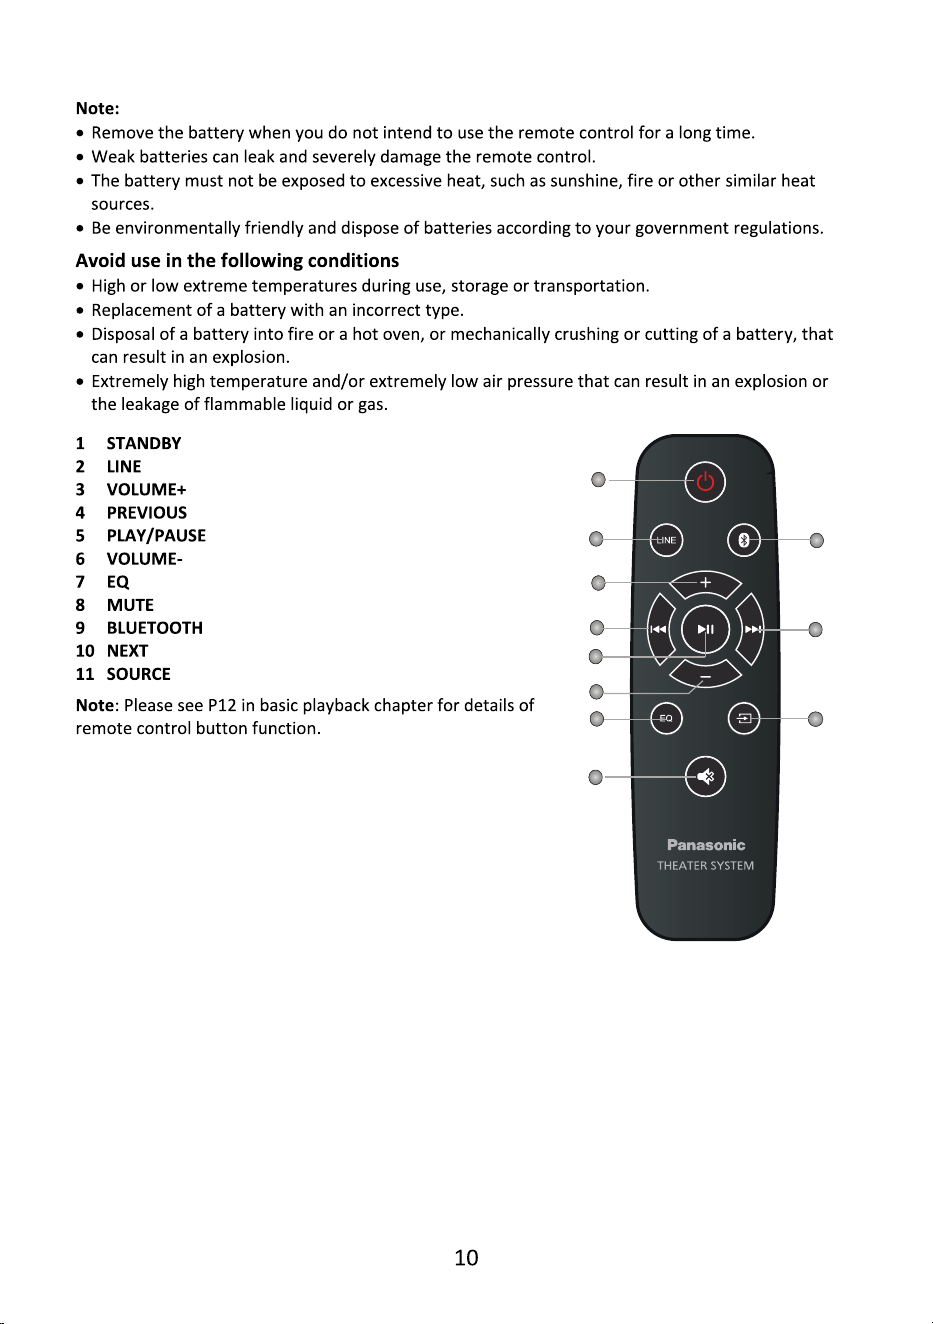
Insert the battery into the remote control. Point the remote control at the remote sensor on the
front panel. The remote control works within a distance of about 8 metres from the sensor and
within an angle of about 30 degrees from the left and right side.
❶
Remove the battery compartment cover on the back of the remote
control.
❷
Load one AAA/1.5V batteries into the battery compartment making
sure that the batteries have been inserted with the correct polarities
matching the symbols +, - as indicated inside the battery
compartment.
❸
Replace the cover.
Battery Installation
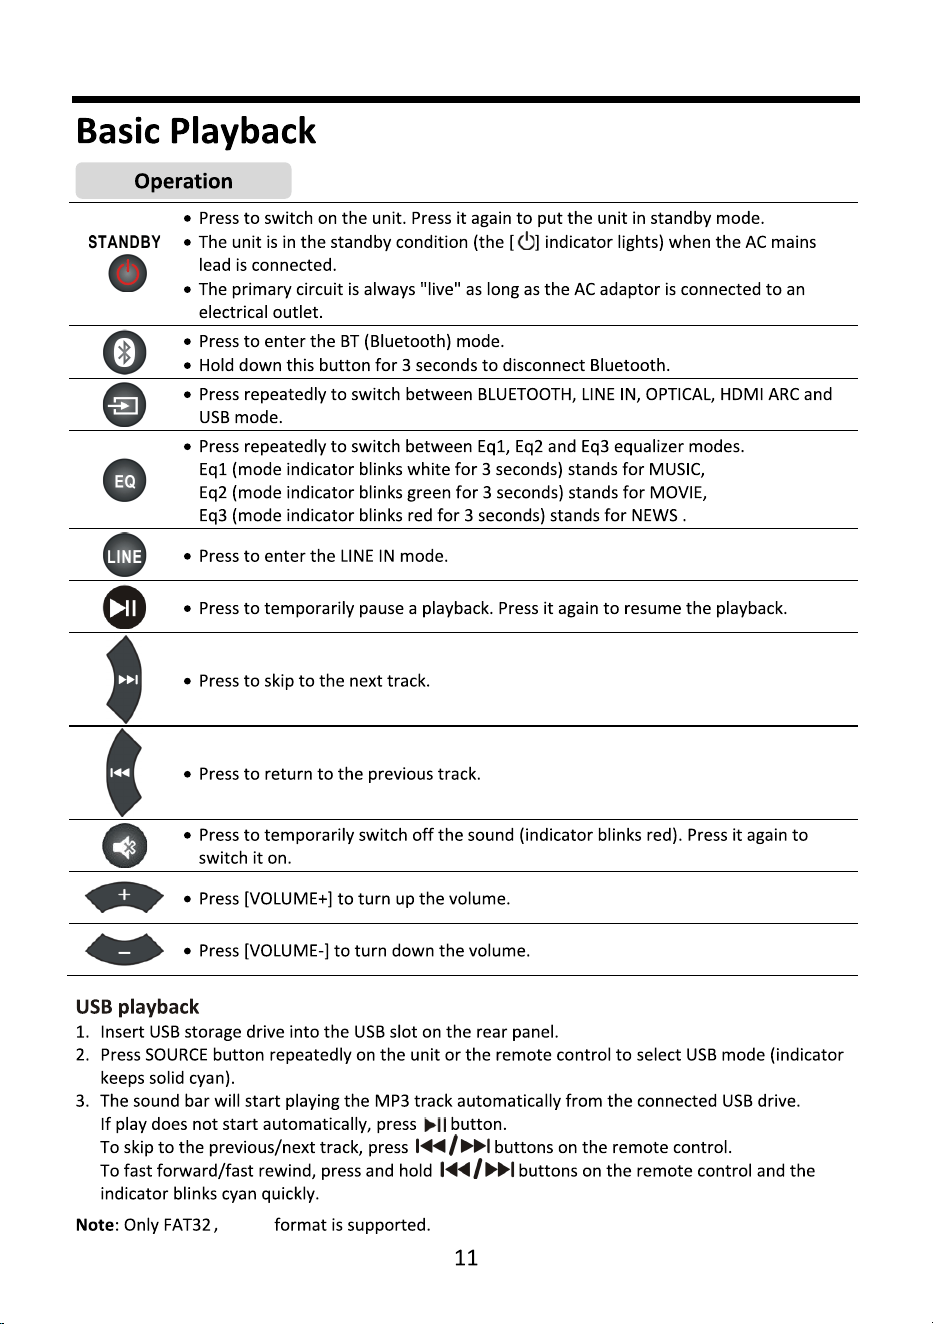
Remote Control Operation
2
7
6
1
3
4
5
8
9
11
1 0
exFAT

13
References
Panasonic bears no responsibility for data and/or information that is compromised during a wireless
transmission.
Frequency band
This system uses the 2.4 GHz frequency band.
Certification
This system conforms to the frequency restrictions and has received certification based on
frequency laws. Thus, a wireless permit is not necessary.
The actions below are punishable by law in some countries:
– Taking apart or modifying the unit.
– Removing specification indications.
Restrictions of use
Wireless transmission and/or usage with all Bluetooth equipped devices is not guaranteed.
All devices must conform to standards set by the Bluetooth SIG, Inc.
Depending on the specifications and settings of a device, it can fail to connect or some operations
can be different.
This system supports Bluetooth security features. But depending on the operating environment
and/or settings, this security is possibly not sufficient. Transmit data wirelessly to this system with
caution.
This system cannot transmit data to a Bluetooth device.
Range of use
Use this device at a maximum range of 10 m.
The range can decrease depending on the environment, obstacles or interference.
Interference from other devices
This system may not function properly and troubles such as noise and sound jumps may arise due
to radio wave interference if this unit is located too close to other Bluetooth devices or the devices
that use the 2.4 GHz band.
This system may not function properly if radio waves from a nearby broadcasting station, etc. is too
strong.
Intended usage
This system is for normal, general use only.
Do not use this system near an equipment or in an environment that is sensitive to radio frequency
interference (example: airports, hospitals, laboratories, etc.).
License
The Bluetooth word mark and logos are registered trademarks owned by Bluetooth SIG, Inc. and any
use of such marks by Panasonic Corporation is under license. Other trademarks and trade names are
those of their respective Owners.
The terms HDMI and HDMI High-Definition Multimedia Interface, and the HDMI Logo are trademarks
or registered trademarks of HDMI Licensing Administrator, Inc.
14
Product conformity information for customers in the EU
English
Declaration of Conformity (DoC)
Hereby, "Panasonic Corporation" declares that this product is in
compliance with the essential requirements and other relevant
provisions of Directive 2014/53/EU.
Customers can download a copy of the original DoC to our RE
products from our DoC Server: http://www.ptc.panasonic.eu
Contact to Authorised Representative:
Panasonic Marketing Europe GmbH, Panasonic Testing Centre,
Winsbergring 15, 22525 Hamburg, Germany
Type of wireless
Frequency band
Maximum power
(dBm E.I.R.P.)
Bluetooth®
2402 - 2480 MHz
7.5 dBm
(5.62 mW)
Portugués
Declaraçâo de Conformidade (DoC)
Com o presente documento, a "Panasonic Corporation" declara que
este produto se encontra em conformidade com os requisitos
específicos e demais especificaçôes referentes à Diretiva
2014/53/UE.
Os clientes podem baixar uma copia da declaraçâo de conformidade
(DoC) para nossos produtos RE do Server DoC:
http://www.ptc.panasonic.eu
Contacto com um Representante Autorizado:
Panasonic Marketing Europe GmbH, Panasonic Testing Centre,
Winsbergring 15, 22525 Hamburg, Alemanha
Tipo de ligaçâo sem
fios
Banda de
frequência
Potência máxima
(dBm e.i.r.p.)
Bluetooth®
2402-2480 MHz
7.5 dBm
(5.62 mW)
Ελληνικά
Δήλωση συμμόρφωσης (DoC)
Η "Panasonic Corporation" δηλώνει ότι το προϊόν αυτό είναι
ςυμμορφωμζνο προσ τισ βαςικζσ απαιτήςεισ και άλλεσ ςχετικζσ
διατάξεισ τησ Οδηγίασ 2014/53/ΕΕ.
Οι πελάτεσ μποροφν να κατεβάςουν ζνα αντίγραφο του
πρωτοτφπου DoC για τα RE προϊόντα μασ από τον DoC server μασ:
http://www.ptc.panasonic.eu
Επικοινωνήςτε με τον Εξουςιοδοτημζνο Αντιπροςωπό μασ:
Panasonic Marketing Europe GmbH, Panasonic Testing Centre,
Winsbergring 15, 22525 Hamburg, Γερμανία
Τφπο αςφρματησ
Ζώνη ςυχνοτήτων
Μζγιςτη ιςχφσ
(dBm e.i.r.p.)
Bluetooth®
2402-2480 Μ Hz
7.5 dBm
(5.62 mW)
Lietuviškai
Atitikties deklaracija (AD)
Bendrovė "Panasonic Corporation" patvirtina, kad šis gaminys
atitinka direktyvos 2014/53/ES esminius reikalavimus ir kitas
taikytinas nuostatas.
Mūsų RE gaminių originalios atitikties deklaracijos kopiją klientai gali
atsisiųsti iš mūsų AD serverio: http://www.ptc.panasonic.eu
Įgaliotojo atstovo adresas:
Panasonic Marketing Europe GmbH, Panasonic Testing Centre,
Winsbergring 15, 22525 Hamburg, Vokietija
Bevielio ryšio tinklas
Dažnių diapazonas
Maksimali siuntimo
galia (dBm e.i.r.p.)
Bluetooth®
2402-2480 M Hz
7.5 dBm
(5.62 mW)
Eesti keel
Vastavusdeklaratsioon (DoC)
Käesolevaga kinnitab "Panasonic Corporation", et see toode vastab
direktiivi 2014/53/EL olulistele nõuetele ja teistele asjakohastele
sätetele.
Kliendid saavad koopia meie RE toodetele kehtiva
originaalvastavusdeklaratsiooni koopia alla laadida meie DoC-
serverist: http://www.ptc.panasonic.eu
Võtke ühendust volitatud esindajaga:
Panasonic Marketing Europe GmbH, Panasonic Testing Centre,
Winsbergring 15, 22525 Hamburg, Saksamaa
Juhtmevaba seadme
tüüp
Sagedusriba
Maksimaalne
võimsus (dBm EIRP)
Bluetooth®
2402 - 2480 MHz
7.5 dBm
(5.62 mW)
Norsk
Samsvarserklæring (DoC)
"Panasonic Corporation" erklærer herved at dette produktet
samsvarer med de grunnleggende kravene og andre relevante
bestemmelser i direktivet 2014/53/EU.
Kundene kan laste ned en kopi av den originale
samsvarserklæringen (DoC) for vårt RE utstyr fra vår DoC server:
http://www.ptc.panasonic.eu
Kontaktinformasjon autorisert representant:
Panasonic Marketing Europe GmbH, Panasonic Testing Centre,
Winsbergring 15, 22525 Hamburg, Tyskland
Type trådløs
Frekvensbånd
Maks. effekt
(dBm e.i.r.p.)
Bluetooth®
2402 - 2480 MHz
7.5 dBm
(5.62 mW)
Български
Декларация за съответствие (йоС)
С настоящото "Panasonic Corporation" декларира, че този
продукт е в съответствие с основните изисквания и други
съответни разпоредби на Директива 2014/53/ЕС.
Потребителите могат да свалят копие от оригиналните
DoC към нашите продуктите от типа RE от сървъра, на който се
съхраняват DoC: http://www.ptc.panasonic.eu
Свържете се с нашия упълномощен представител:
Panasonic Marketing Europe GmbH, Panasonic Testing Centre,
Winsbergring 15, 22525 Hamburg, Германия
Вид безжична
връзка
Честотна лента
Максимална
мощност (dBm e.i.r.p)
Bluetooth®
2402- 2480 МHz
7.5 dBm (5.62 mW)
Latviski
Atbilstības deklarācija (DoC)
Ar šo "Panasonic Corporation" paziņo, ka šis izstrādājums atbilst
pamatprasībām un pārējiem Direktīvas 2014/53/ES noteikumiem.
Pircēji var lejupielādēt oriģinālo DoC kopiju mūsu RE izstrādājumos
no mūsu DoC servera: http://www.ptc.panasonic.eu
Lūdzam sazināties ar pilnvaroto pārstāvi:
Panasonic Marketing Europe GmbH, Panasonic Testing Centre,
Winsbergring 15, 22525 Hamburg, Vācijā
Bezvadu tips
Frekvenču josla
Maksimālā jauda
(dBm EIRP)
Bluetooth®
2402-2480 MHz
7.5 dBm
(5.62 mW)