contents
READ AND SAVE THESE INSTRUCTIONS
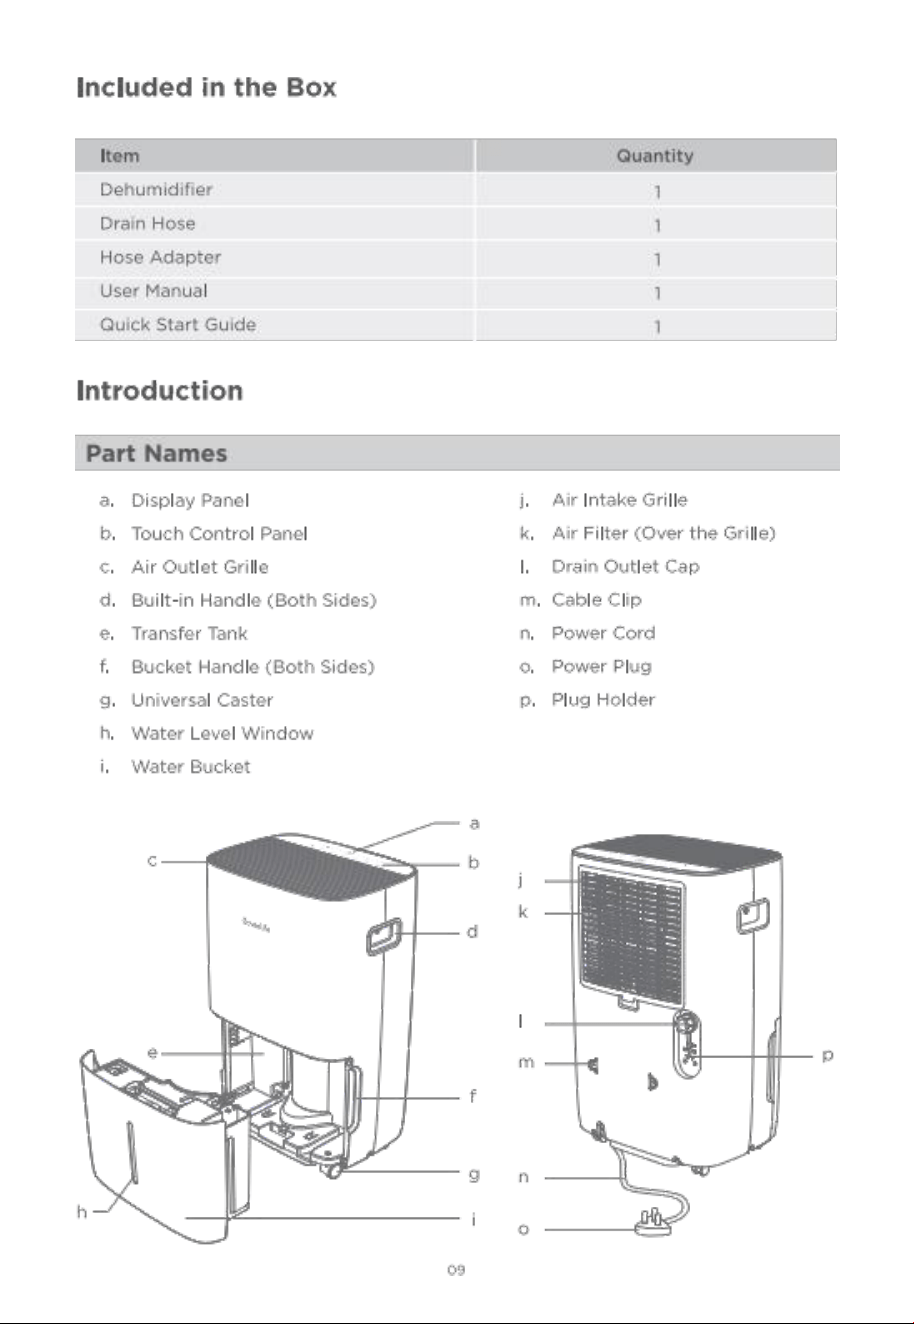
Included in the Box
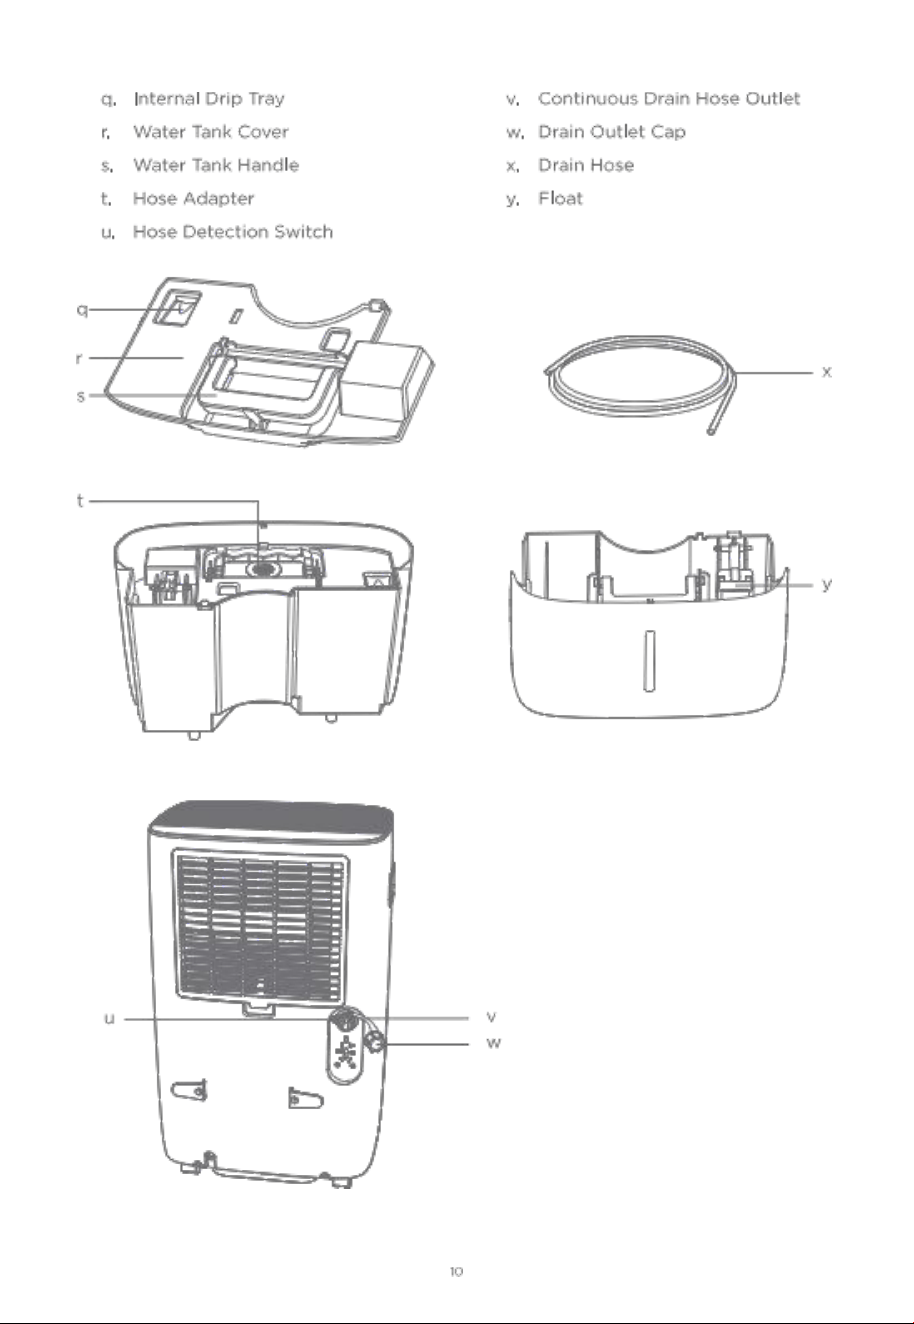
Introduction
14
15
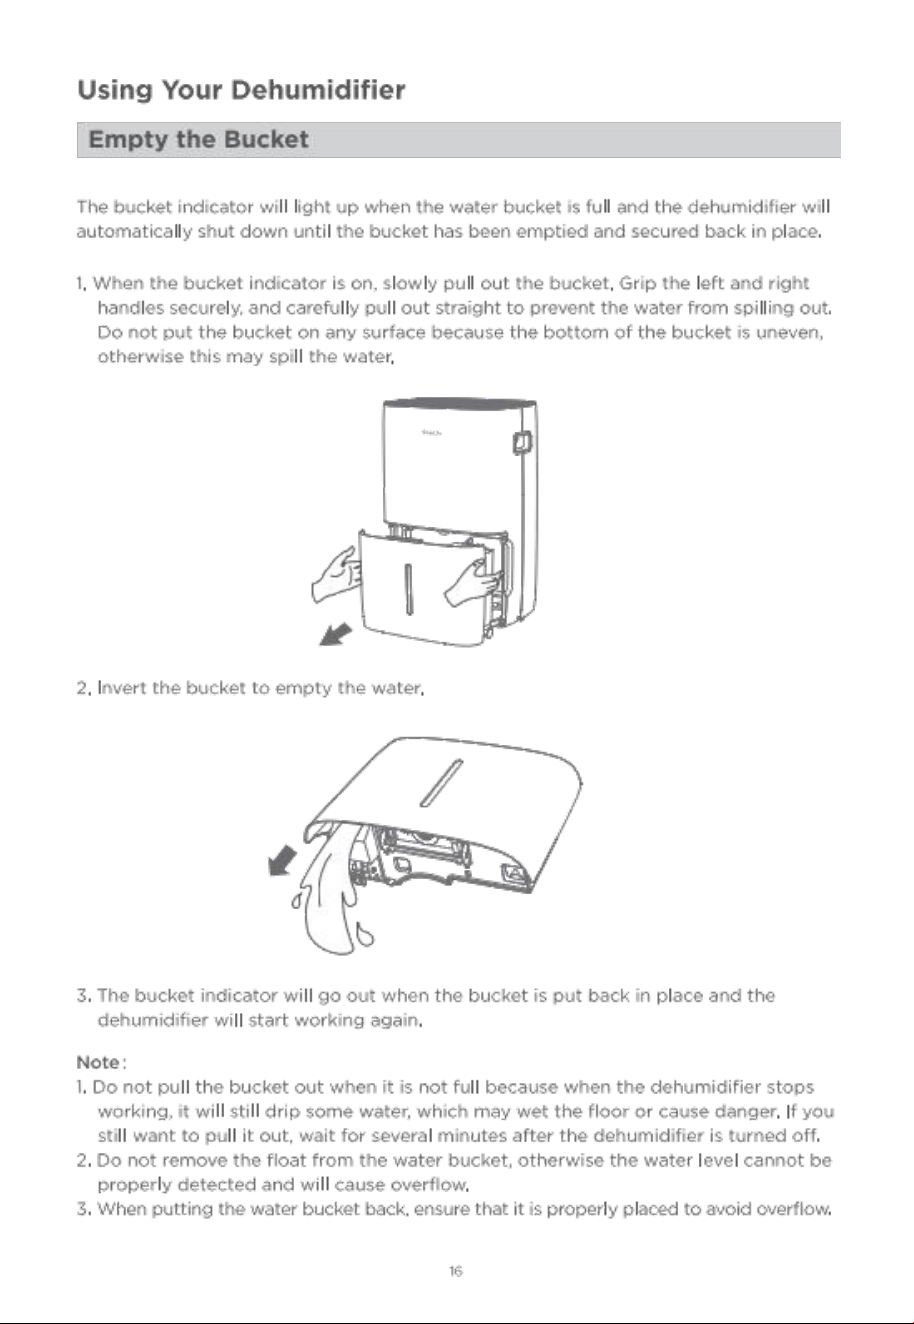
using your Dehumi difie r
care & Maintenance
Tro ub leshooting
App e n d i x
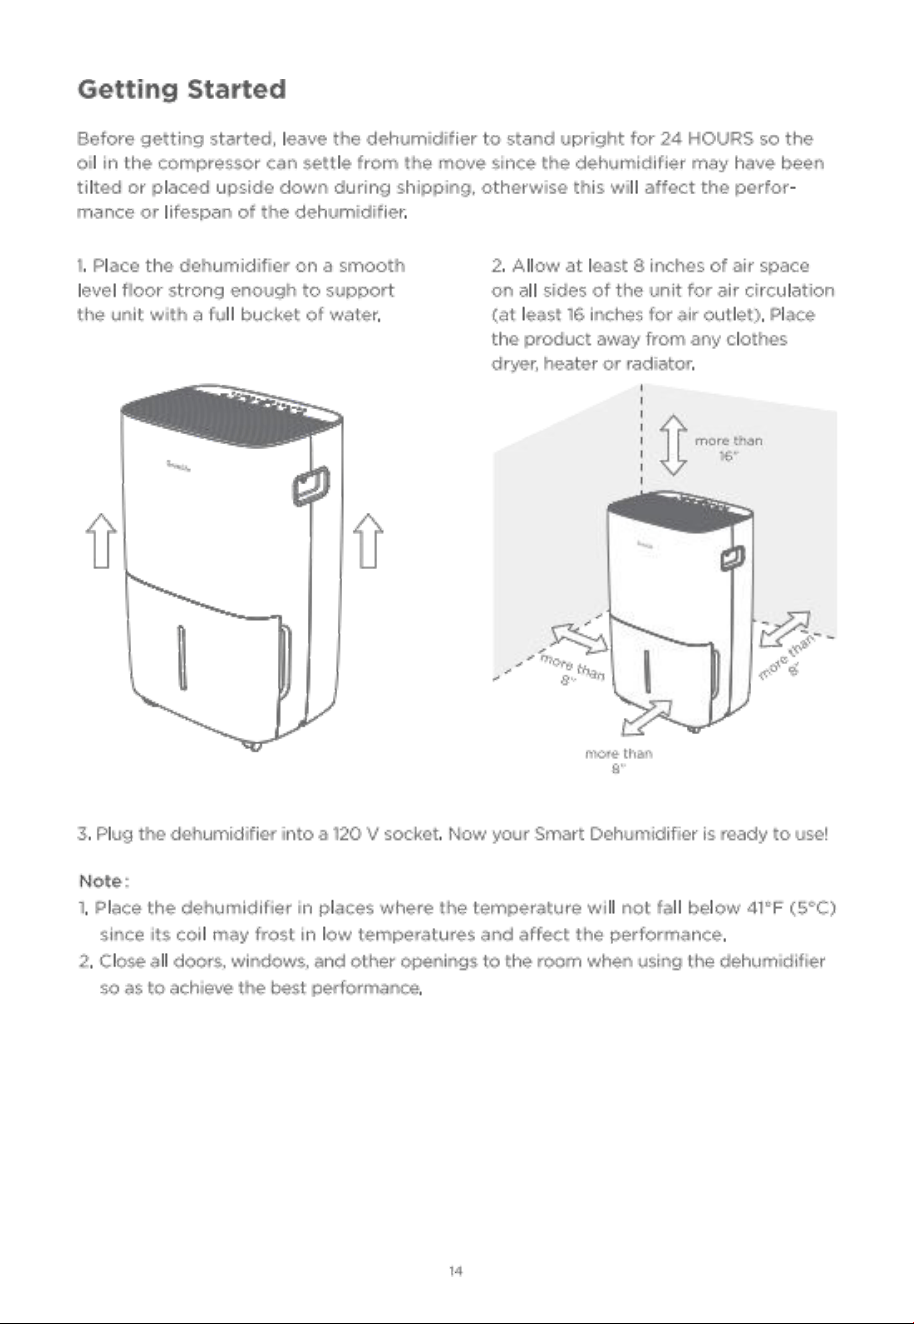
Gett in g star ted
Govee Home APP
22
2

GoveeLife Dehumidifier user Manual
READ AND SAVE THESE INSTRUCTIONS
SAFETY WARNINGS
whe n using th e unit, please read the following safety instructions:
● Follow local grid inter connection rules while installing the dehumidifier and
ensure that it is properly grounded. If you have any auestion on electrical
installation , follow the instructions of the manufacturer and if necessary, ask a
professional electrician to install it.
●
place the machine in a flat and dry place and keep a distance of above 5ocm
betwe en the mac hine an d the surro unding objects or walls.
● when drainage pipes are installed , ensure that the drainage pipes are properly
connected , and are not distorted or bended .
●
keep the air inlet and outle t free from ob structions.
● That the applia nce shall be installed in accordance with national wiring regulations.
After the dehumidifier is installed , ensure that the power plug is intact and firmly
plugged into the power outlet and place the po wer cord orde rl y to prevent
someone from being trip ped or pu lling out the plug.
●
Do not put any object into the air inlet an d ou tlet of the dehumidifier.
● Maintenance and repair reauring the assistance of other skilled personnel shall be carried out
under the supervision of the pe rson competent in the use of lammable ref rigerants.
All working procedure that affects safety means shall only be carried by competent persons.
● The dehumidifier is only suitable for indoor use, and is not suitable for other applications.
● when moving the machine, make sure that it is in an upright position.
● The machine should stay away from gasoline, flammable gas, stoves and other heat sources.
●
Don't disassemble, overhaul and modify the machine arbitrarily, otherwise it will cause a
machine malfunction or even bring harm to persons and properties. To avoid danger, if a
machine failure occurs ask the manufacturer or professionals to repair it.
●
Do not pull th e plug to turn off the machin e.
●
Do not place Cups or ot her objects on the body to prevent water or other liquids
from spilling into th e dehumidifier.
●
Do not use insecticide sprays or other flammable substances near the dehumidifier .
●
Do not wipe or wash the dehumidifier with chemical solvents such as gasoline and alcohol.
when you need to clean the dehumidifier, you must disconnect the power supply, and clean
it with a half-wet softcloth. If the machine is really dirty, scrub with a mild detergent.
● children should be supervised to ensure that they do not play with the app l iance.
clean ing and maintenance shall not be ma de by children without supervision.

o If the supply cord is damaged , it must be replaced by the manufacturer, its service
agent or similarly qualified persons in order to avoid a hazard.
●
The appliance shall be stored so as to prevent mechanical damage from occurring.
● plug into a grounded 3 prong outlet.
● Do not use an extension cord .
● Do not remove ground prong .
● Do not use an electrical adapter.
●
unplug the dehum idifier before servicing.
● The dimen sions of the spa ce necessary for correct installation of the appliance
including the min im u m pe rmis sible distanc es to adjacent structures.
A Wiring diagram with a clear indica tion of the connections and wiring to external
control devices and SUPPLY CORD.
● This appliance is not intended for use by persons (including children) with reduced
physical , sensory or mental capabilities, or lack of experience and knowledge, unless
they have been given supervision or instruction concerning use of the appliance
by a perso n responsible for their safety.
●
This unit is equipped with electrically powered safety measures. To be effective, the unit
must be electrically powered at all times after insta llation , other than when servicing.
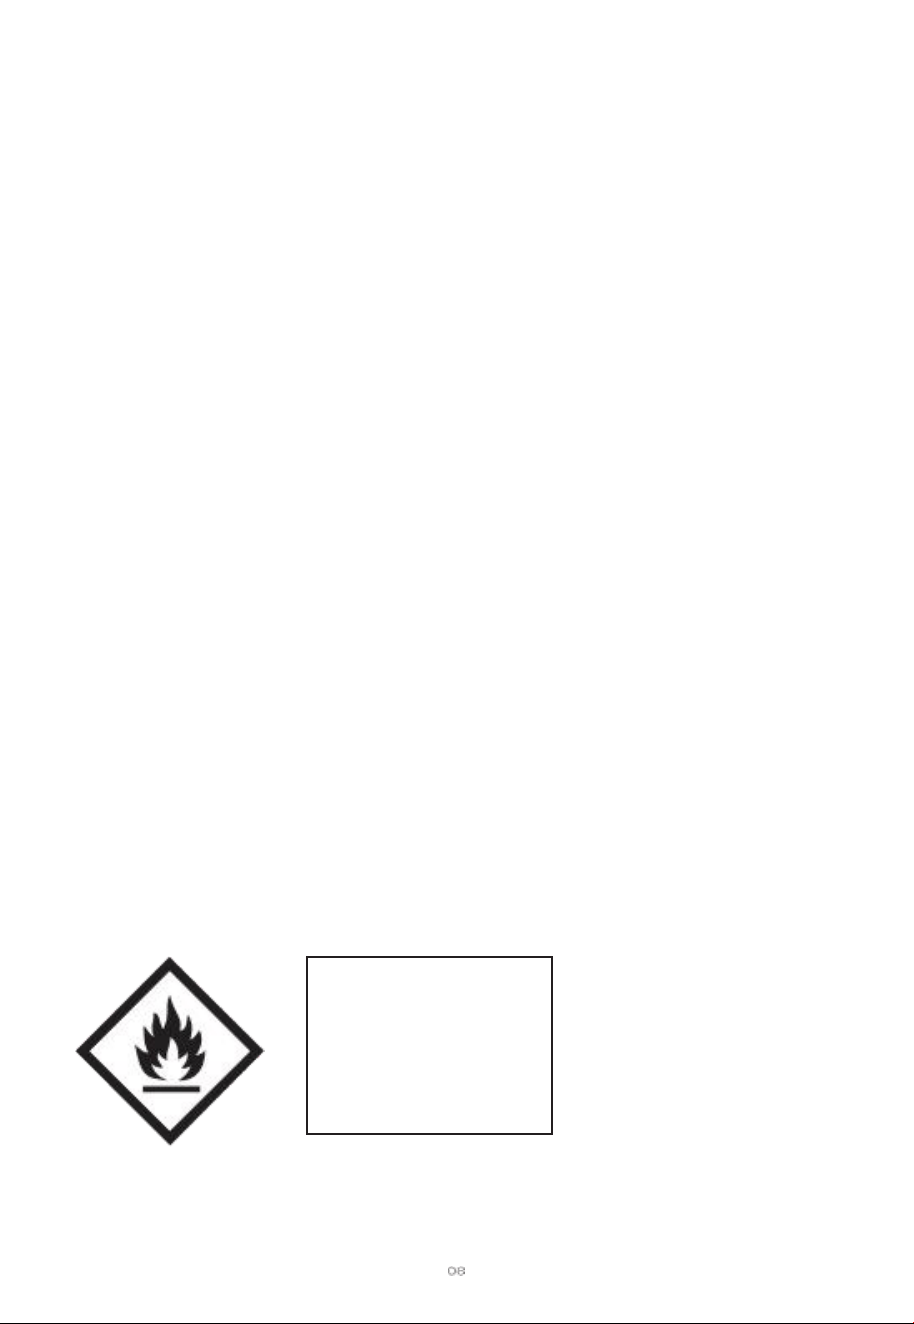
WARNING for using R32 Refrig erant:
Trans p orta t ion, ma rk i ng and stor age fo r unit s tha t em p lo y fam m able re f ri g e ran ts
1 . General
● The following information is provided for units that employ FLAMMABLEREFRIGERANTS.
2 . Transpo rt of equi p me n t conta in i ng fla mmable refriger an ts
Attention is drawn to the fact that additio n al transportation regulation s may ex ist
wi th re s pect to eauip m e n t co nt aini n g fla m ma ble
as . The ma xim um num ber of
pi ece s of equ ipm e nt or the co nf ig u r ation of the eq uip me n t pe rm i tte d to be
tra nsp or t e d to g et he r will be determi ned by the appli cable transport regu l ations.
3 . Ma rking of equipme nt us ing signs
o signs for similar appliances used in a work area are generally addressed by local
regulations and give the minimum req rements for the provision of safety and/or
health signs for a work location.
All reauired signs are to be maintained and employers should ensure that employees receive
suitable and suffi ci ent in stru ction an d training on the mea ning of appropriate safety
signs and the act ions that need to be taken in connection with th ese signs.
● The effectiveness of signs should not be diminished by too many signs being placed together·
Any pictograms used should be as simple as possible and contain only essential details.
O2

O3
4 . Disp o s al of eq ui p me nt using flammable refrigerants
o see national regulations.
5 . storage of equipment/appliances
●
The storage of the appliance should be in accordance with the applicable regulations
or instruc tions ,whichever is more stringent.
6 . st o r age of pack ed (unsold ) equ ipm ent
o sto rage package protection should be cons tructed such that mechanical damage to
the equipment inside the package will not cause a leak of the refrigerant charge.
● The max imum number of pieces of eauipment permitted to be stored together will
be determined by local regulations.
7. Important instrat ion
7.1 Qualification of workers
●
The manual shall co ntain specific information about the re uired qua lification of the
working personnel for mainte nance, se rvice and rep air operatio ns. Every working
proced ure th at affects safety means shall only be carried out by competent persons.
●
Examples for such working proce dures are:
- breaking into the refrigerating circuit;
- opening of sealed compo nen ts;
- opening of ventilated enclosures.
Information on servicing:
1 . General
● The manual shall contain specifi c information for service personnel according.
2 . checks to the area
● prior to beginning work on systems containing FLAMMABLE REFRIGERANTS ,
safety checks are necessary to ensure that the risk of ignition is minim ised . For
repair to the REFR GERATING SYSTEM.
3 . work pr oced ur e
● work s hall be undertaken under a controlled procedure so as to minimise the risk of
a flamm ab le
as or vapo ur bein g pre sent whil e th e work is being pe rfomed.
4 . General work area
All maintenance staff and others working in the local area shall be instructed on the
nature of work bein g ca ried out. work in confned spaces shall be avoided.
5 . checki ng for pr ese nc e of ref r i gerant

O4
●
The area shall be checked with an appropriate re frigerant detector prior to and
duringwork, to en sure the technician is awar e of potentially toxic or fammable
atmosphere s. Ensure that the leak de tection eauipm ent being used is suitable for
use with all applicable refrigerants , i . e. non -sparking , adeauately seal ed or
intrinsically safe.
6 . presence of fire exting uishe r
o If any hot work is to be conducted on the refrigerating equipment or any associated
parts , appropriate fire extinguishing eauipment shall be available to hand. Have a
drypowder or Co2, fire ex tinguisher adjacent to the charging area .
7. No ignition sources
●
No person carrying out work in relation to a REFRIGERATING SYSTEM Which
involves exposing any pipe work shall use any sources of ignition in such a manner
that it may lead to the risk of fire or explosion. All possible ignition sources ,
indudingc igare tte smo king , should be kept su fficiently far away from the site of
installation , repair ing , removing and disposal , during which refrigerant can possibly
be released to the sur rou nding spa ce. prior to work taking pla ce, the area around
the eauipm ent is to be survey ed to mak e sure that there are no fammable hazards
or ignition risks. " No smoking " signs shall be displayed.
8 . ventilated area
● Ensure that the area is in the open or that it is adeauately ventilated before
breaking into the system or conducting any hot work. A degree of ventilation shall
contin ue during the period that th e work is carried ou t. The ventilation should safely
disperse any released refrigerant and preferably expel it externally intothe atmosphere.
9 . che c ks to th e re f rig e r ating eq ui p me n t
●
where electrical compone nts are being changed , they shall be fit for the purpose
and to the correct spec if icatio n. At all time s the manufacturer's maintenance and
service guidelines shall be followed. If in doubt, consult the manufacturer's t echnical
department for assistance.
●
The following checks shall be applied to installations using fla mmable refrigerants.
- the actual REFRIGERANT CHARGE is in accordance with the room size within
which. the refrigerant containing parts are insta lled;
- the ventilation machinery and outlets are operating adequately and are not obstructed;
- if an indirect refrigerating circuit is being used , the secondary circuit shall be
checke d for the pres ence of refrgerant;
- marking to the eauipment continues to be visible and legible. Markings and signs
that are illegible shall be corrected;
- refrigeratin g pip e or components are installed in a position where they are unlikely

O5
to be exposed to any substance which may corode refrigerant containing components,
unless the components are co nstructed of materials which are inherently re sistant
to being cor o ded or are suitably protected ag a inst being so coroded.
10 . checks to electrical devices
●
Repair and maintenance to electrical compone nts sh all include initial safety checks
and componen t inspecti on procedures. If a fau lt exists that couldc omprom ise
safety, then no electrical su pply shall be connected to the circuituntil it is
satisfactorily dealt with. If the fault cannot be corected imm ediately but it is
necess ary to cont inue operatio n , an adequate temporary solution shall be used.
This shall be reported to the owner of the equipment so all par ties are advised.
o Initial safety checks shall include :
- that capacitors are discharged: this shall be done in a safe manner to avoid
possibility of sparkin g;
- th at no live electrical components and wiring are exposed while charging ,
recoverin g or purging th e system;
- th at there is co ntinuity of earth bonding.
11 . Repairs to sealed components
o sealed electrical compo nen ts shall be repl aced.
12 . Repair to intrinsically safe component
o Intrinsically safe co mponents must be replaced.
13 . cabling
● check that cabling will not be subject to wear, corrosion , excessive pressure,
vibration , sharp edge s or any other adverse environmental effects. The ch eck shall
also take into ac coun t the effects of aging or continual vibration from sources such
as compressors or fans.
14 . Detection of flam ma b le refrigerants
●
under no circumstances sh all potential sources of ignition be used in the searching
for or de t e ction of re frigerant leaks. A halide torch (o r an y other de tector using
an a ke d fa m e ) sh a ll not be us ed .
● The following leak detection methods are deemed acc eptable for all refrigerant systems.
●
Electronic leak detectors may be used to detect refrigerant leaks but, in the case of
FLAMMAB LE REFRIGERANTS , the sensitivity may not be adeauate, or may need
re-calibration. (Detectio n equipment sh all be calibrated in a refrigerant-free area . )
Ensure that the detector is no t a po tential so urce of ign ition and is suitable for the
refrigerant used. Leak detection eau ipment shall be set at a percentage of the LFL
of th e refrigerant and shall be calibra ted to the refrigerant employed , and the

appropriate per c e ntage of ga s(25 % maximum) is confirmed.
o Leak detection fuids are also suitable for use with most refrige ran ts but the use of
detergents containing chlorine shall be avoided as the ch lorin e may re act with the
re fr ig er a nt and cor ro de the c opper pipe-work.
● NOTE Examples of leak detectio n fluids are:
- bubble method.
- fuorescent method agents.
o If a leak is suspected , all naked flames shall be removed/extinguished.
o If a
le ak a e of ref r i g erant is fo un d wh i c h re q uir e s braz ing , all of the re f rig erant
shallbe recovered from the system , or isolated (by means of shut off valves) in a
part ofthe system rem ote from the leak.
15 . Removal and evacuation
o conventional procedures shall be used. However, for fammable refrigerants it is
important th at best practic e be followed , since flammability is a cons ideration.
●
The following procedure shall be adhered to:
- safely remove refrigerant following local and national reg u lations;
- evacuate;
- purge the cir cu it wit h iner t ga s(opt ional for A2L) ,
- evacuate(optiona l for A2L);
- continuously fush or purge with in ert gas when using fa me to open circu it ;an d
- open the circuit.
●
The refrigerant charge sh all be recovered into th e correct recovery cylinders if
ventin g is not allowed by local and national codes. For appliances containing
fammable refrigerants , the syst em sh all be purged with oxygen -free nitrogen to
render the appliance safe for fammable refrige rants . This process might need to be
repeatedseveral time s. compress ed air or oxygen sha ll not be used for purging
refrigerant systems.
●
For appliances co ntaining flammable refrigerants , refrigerants purg ing sha ll be
ach ieved by breaking the vacuum in th e system with oxyg en-free nitrogen and
contin uing to fill until the working pressure is achieved , th en venting to
atmos phere , and finally pull ing down to a vacuum (optional for A2L) . This process
shall be repeated until no refrig er ant is within the system (optional for A2L) . when
the final oxygen-free nitrogen charge is used , the system sh all be vented down to
atmos pheric pres sure to enab le wor k to take place.
● The outlet for the vacuum pump shall not be dose to an y potential ignition
sources . and ventilation shall be available.
16 . chargin g procedures
o In addition to conventional charging procedures , the following req uirements shall
be followed.

O7
- Ensure tha t contamination of different refrigerants does no t occur when using
charging equipment. Hoses or lines shall be as short as possible to minimise the
amou nt of refrigerant contained in them .
- cylinder s shall be kept in an app ropria te position according to the instructions.
- Ensure that the REFRIGERATING SYSTEM is earthed prio r to charging the system
with refrigerant.
- Label the system when cha rging is complete (if not already) .
- Extreme care shall be taken not to overfil the REFRIGERATING SYSTEM .
● prior to recharging the system , it shall be pressure-tested with th e appropria te
purging gas. The system s hall be leak-tested on completion of charging but prior
tocomm issioning. A follow Up leak test shall be carried out prior to leaving the site.
17. Decommissioning
●
Before carying out this procedure, it is essential that the technician is completely
familiar with the eauipment and all its detail . it is recommended good practice that
all refrigerants are recovered safely. prior to th e task being caried out, an oil and
refrigerant sample shall be taken in case analysis is reauired prior to re- use of
recovered refrigerant. It is essential that electrical power is available before the task
is commenced .
a) Be come familiar with th e eau ipme n t and its opera tion.
b) Isolate system electrically.
C) Before attempting the procedure, ensure that:
- mechanical handlling eauipment is available, if reauired, for handlling refrigerant cylinders;
- all personal protective equipment is available and bein g used correctly;
- the recovery process is superv ised at all times by a competent person;
- rec overy eauipment and cy linders confom m to the approprate standa rds.
d) pump down refrigerant system , if possible.
e) If a vacuum is not poss ible, make a manifold so that refrigerant can beremoved
from va rious parts of the system.
f) Make sure that cylinder is situated on the scales before recovery takes place.
g) start the recovery machine and ope rate in accordance with instructio ns.
h) Do not overfill cylinders (no more than 8o % vo lum e liauid charge) .
1) Do not exceed the maximu m working pressure of the cylinder, even temporarily.
j)when the cy linders ha v e been fil led corectly an d the process completed make sure
that the cy linders and the eauip ment are re m ov ed fr om site prompt ly and all
isolation valves on the equipme nt are dosed off.
k) Recovered refrigerant shall not be charged into another REFRIGERATINGSYSTEM
unless it has been cleaned and checked.
18 . Labelling
●
Equipment shall be labelled stating that it has been de-commissioned and emptied
of refrigerant. The label shall be dated and signed. For appliances containing
FLAMMABLE REFRIGERANTS , ensure that there are labels on the eauipment stating
the eauipment contains FLAMMABLE REFRIGERANT.
19 . Recovery
● when removing refrigerant from a system , either for servicing or decommissioning , it
is recommended good practice that all refrigerants are removed safely.
● when transfering refrigerant into cylinders , ensure that only appropriate refrgera nt
recovery cylinders are emp loyed. Ensure that the corect number of cylinders
forholding the total system charge is available. All cylinders to be used are
designated forthe recovered refrigerant and labelled for that refrigerant (i. e. special
cylinders for therecovery of refrige ran t) . cylinders shall be complete with
pressure-relief valve andassociated shut-off valves in good working order. Empty
recovery cylinders areevacuated and , if possible, cooled before recovery occurs .
●
The recovery equipment shall be in good working order with a set of instructions
conceming the equipment that is at hand and shall be suitable for the recovery of the
fammable refrigerant. If in doubt, the manufacturer should be consulted. In addition ,
a set of calibrated weighing scales shall be available and in good working order.
Hosesshall be complete with leak-free disconnect couplings and in good condition.
● The recovered refrigerant shall be processed according to local legislation in the
corect recovery cylinder, and the relevant waste transfer note aranged. Do not mix
refrigerants in recovery units and especially not in cylinders.
WAR NING
● Do not use means to accelerate the defrosting process or to clean , other than those
recommended by the manufacturer.
●
The appliance shall be st ored in a room without continuously operating ignition
sources (for example. open flames , an operating gas appliance or an operating
el e ct ri c hea t e r)
●
Do not pierce or burn.
●
Be aware that refrigerants may not contain an odour.
Refrigerant safety
Group
A2L
Appliance filled
with f l amma ble mag
as R32 .
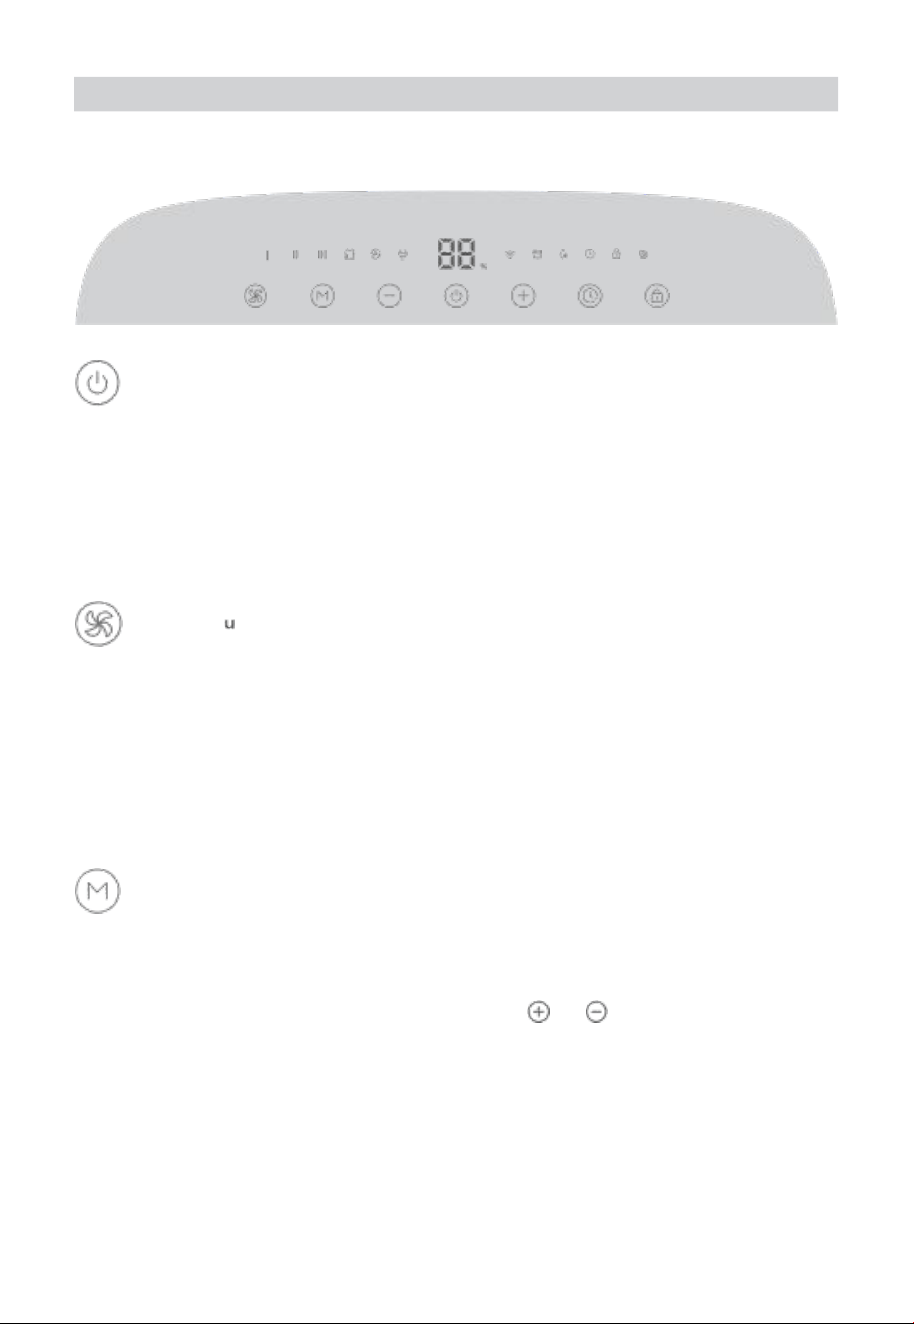
controls & Functions
You can access additional features using Govee Home APP.
H
power Butt on
Touch to turn the dehumidifier on or off.
Note :
● when powering the dehumidif i er on or off, the com pres sor will respond with a
short vibration .
●
Follow the in-app instructions to press the power button wh en pairing with the app.
speed B tt。n
Touch to cycle through Low (I) , Medium (II) , High (111) speed. At high speed , the
deh umi d if ie r redu c es moi sture and dampness to a max im u m extent. when th e
humidity has been lowered , switch to low speed to let the dehumidifier run auietly.
Note: In sp eed Mode , the dehumidifier continuously redu ces the moisture . If you
wish to st op dehum idifying when your room humidity rea ch es the target va l ue,
touch the Mode Button to turn on Auto Mode.
Mode Button
Touch to switch between Auto Mode and La undry Drying Mode.
Aut o Mode: The deh um idifier auto matically turns on or off and adjusts its speed
based on the current humidity. In this mode, touch
or to increase or
decrease the cu r rent ambie n t humidity value displayed on the pan el to set your
targe t humidity by 5% within the range betw een 30% to 80% . After you finis h
adjusting the target value, wait for 5 seconds for th e sett ing to take ef fect.
Note:
1 . The setting of targ et humidity only works in Auto Mode.
2 . The fans will continue working for 3 more minutes when the target humidity is
reached to dry the condensed water inside and prolong the lifespan of the dehumidifier.
11
Laundry Drying Mode: The deh u m idifier conti nuously ope rates at hi gh sp ee d with
lower running costs compared to a conve ntional tumble dryer.
Note: In Auto Mode and Laundry Drying Mode, the speed cannot be manually adjusted.
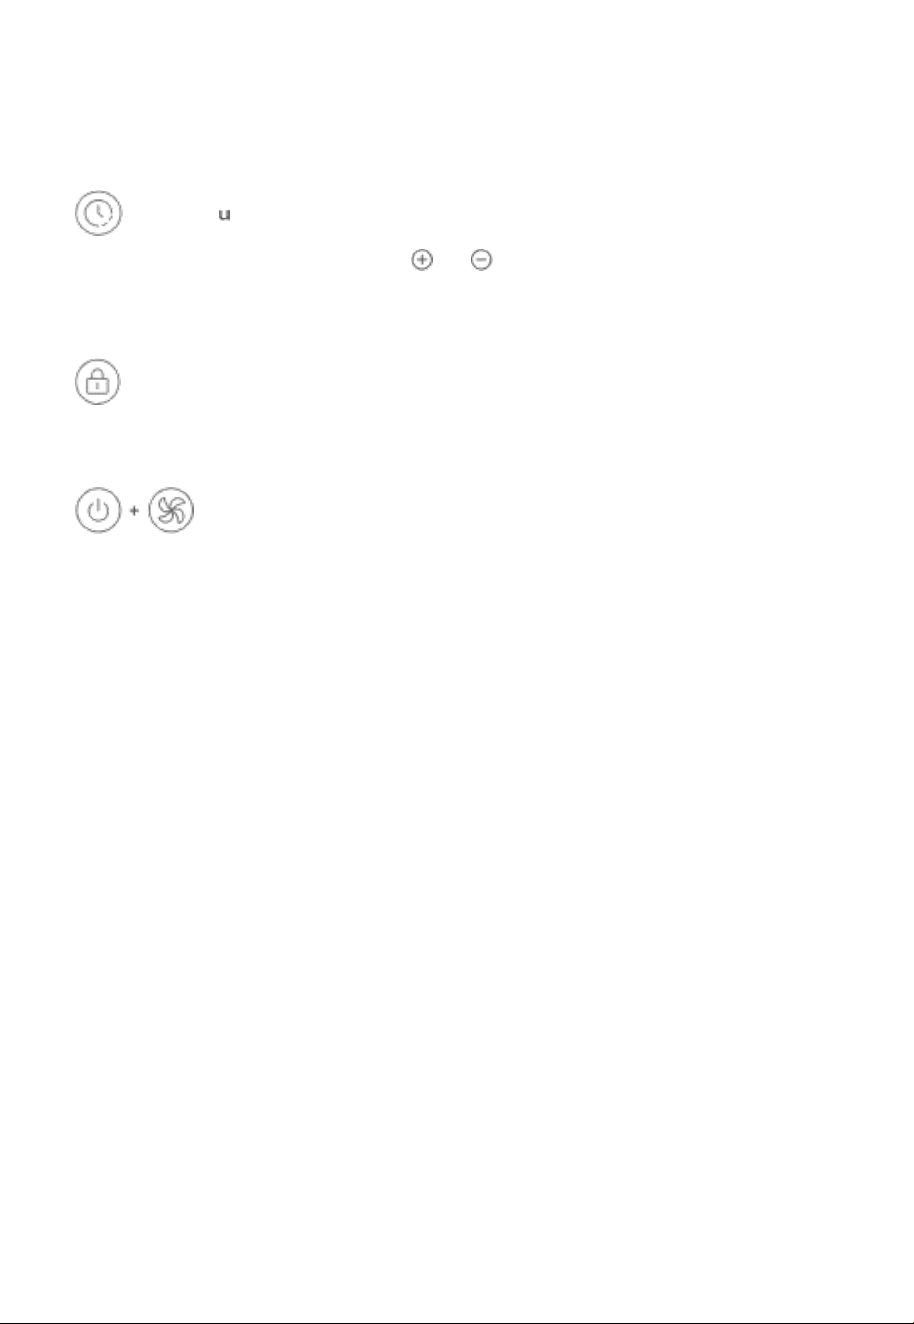
Timer B tt。n
Timer: Touch to set a timer and touch or to increase or decrease the time by 1
hour. After you finis h setting the time , wait for 5 se con ds for the tim er to wor k. Read
the countdown by hour on the display panel and check any remaining time on the app.
Touch LoCK
LoCK: Long press for 3 seconds to turn th e touch lock on or off.
Re co ve ry Bu tt on
Long press for 5 seconds until all indicators flash once, then th e de humidifier will be
restored to factory se t tings , disconnect from wi-F i and Blu etoot h , and automa tically
reboot. This bu tton is for restoring all pre set functions if the deh umidif ier cannot
function pro perly.
Note: After restoring the dehumidifier to factory settings, go to the " Device" page on
the app to delete this dehumidifi er first, otherwise it cannot be added to the app again.
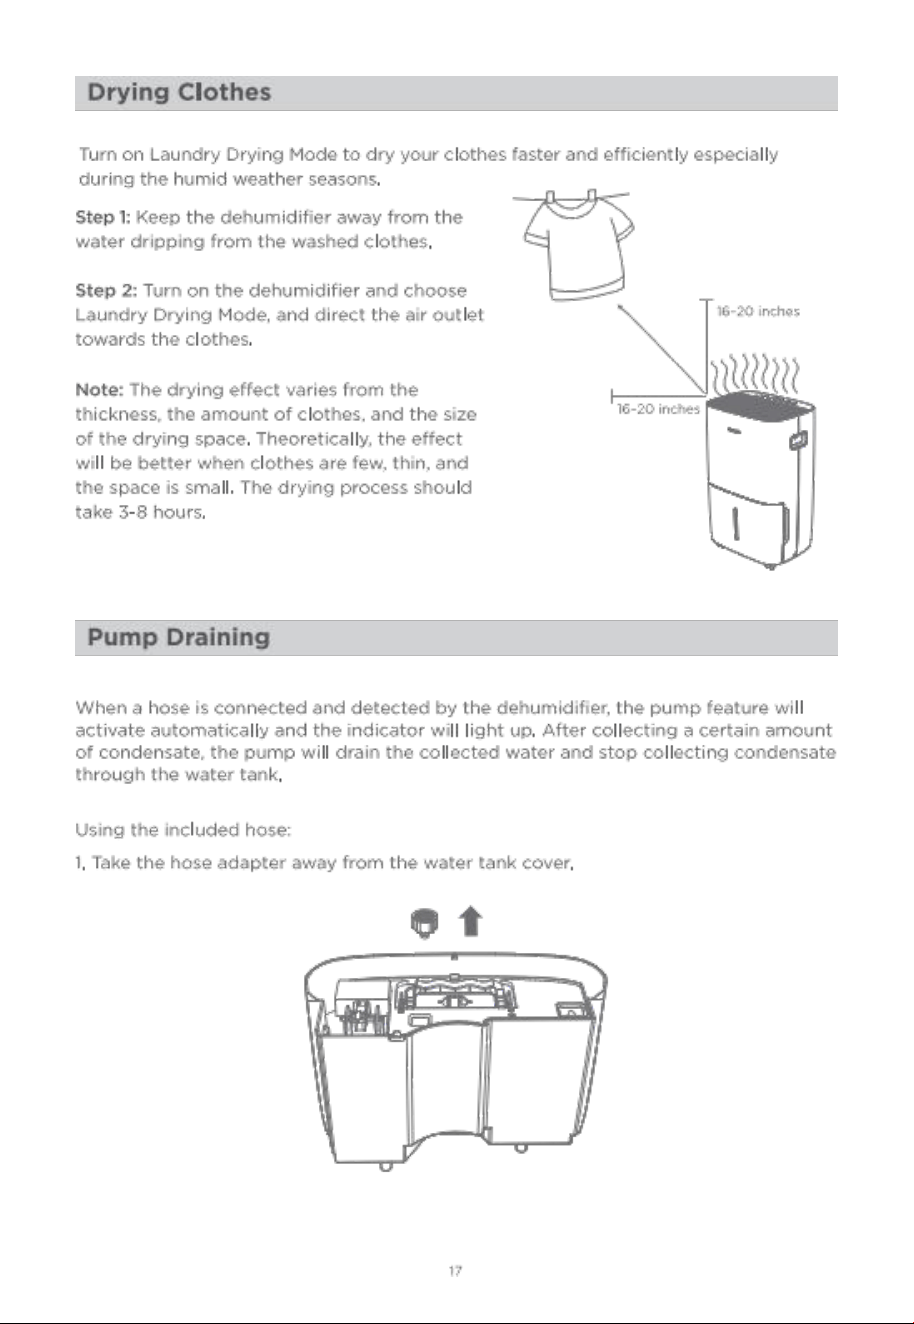
pu mp Draining Function
wh en a hose is conne c t e d and de tec ted by the de hu mi difier (refer to "using your
Dehumidifier - pump Dr ai n ing " for more in f orm at ion) , the pump fea tu re will activate
automatically and the indic ator will li g h t up . After collecting a certain amo unt of
co n de ns ate , th e pump wi l ld r ai n th e collecte d wa te r and stop collecti ng condensate
through the water tank.
Mem ory Function
The dehumid ifier will save its previous settin g s when powere d off(such as its speed ,
mod e, and wi -Fi connection) . when it is powered back on , the se ttings will resume.
comp re ssor protec tio n fo r 3 Mi nutes Bef ore st art -Up
After the deh u mi difier has stopp e d , it cannot be restarted to dehu midify in th e first 3
minutes in order to protect its compressor and expand its lifespan. It will automatically
restart after 3 minutes.
com pr es so r pro tect io n for 8 Hours of contin uou s ope rat ion
After 8 ho u rs of continuous de hum idifi cation , the compressor will automatically stop
running for 8 minutes with out notice . Nothing needs to be done to release this action.
After the fans have worked for 8 minutes , th e compressor will restart.
12
13
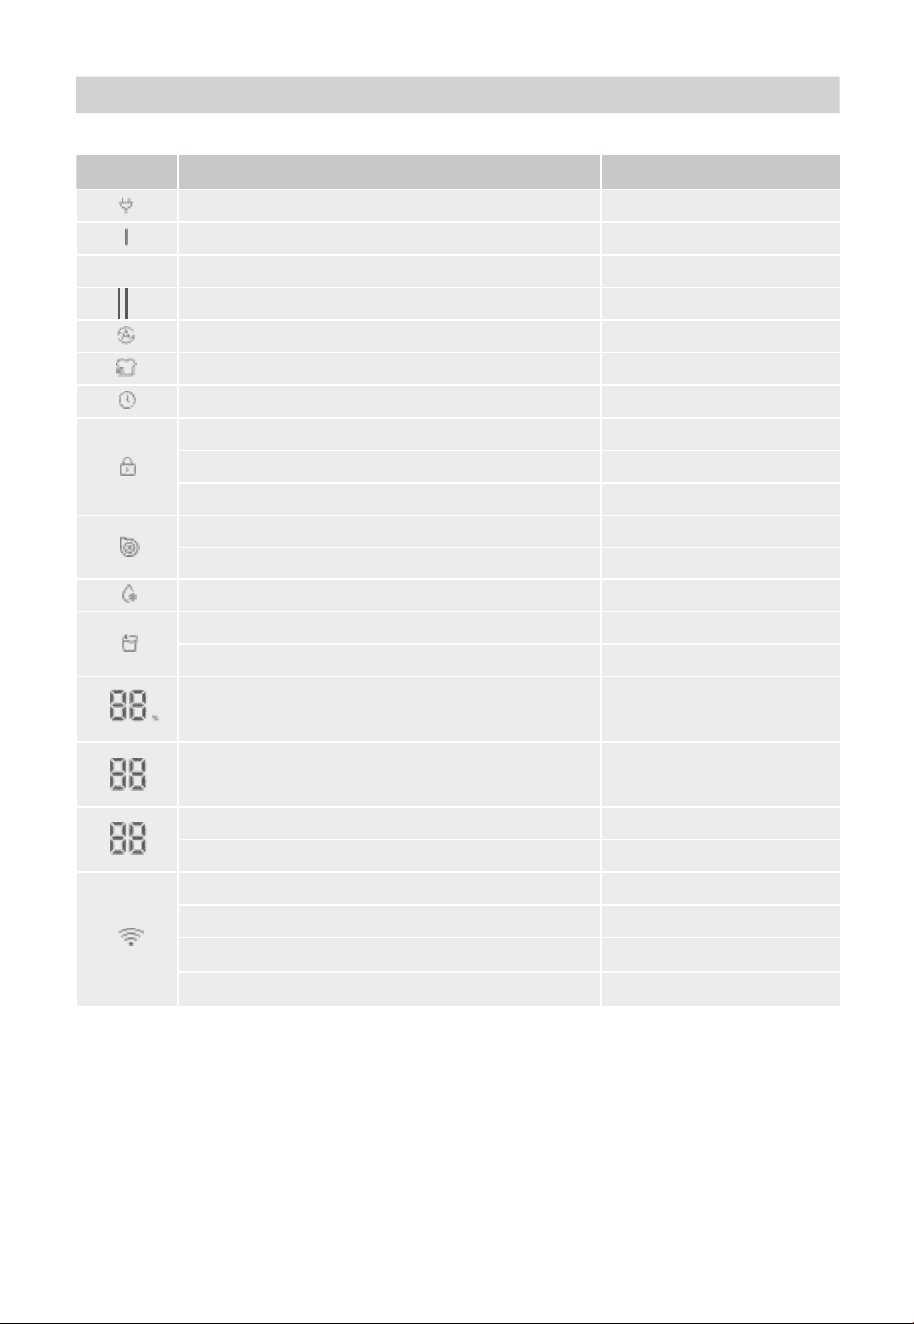
Indicator status
Indicator
work i n g st a tu s
Lig h t status
powered on
solid white
continuous Dehumidifi cation at Low speed
solid white
Il
continuous Dehumidifi cat ion at Medium speed
solid white
continuous Dehumidification at High speed
solid white
Auto Mode
solid white
Laund ry Drying Mode
solid white
Timer
solid white
Locked
solid white
unlocked
Dim
LocK Reminder
Triple Flashes
pump Enabled
solid white
pump Malf u nc t ion
slow Flash
Auto Defrost
solid Red
water Bucket is Full
solid Red
Full Reminder
Triple Flashes
Hu mid i ty value
solid white
H
Hour
solid white
current value
solid white
Las t stage setting
slowly Flashes
Re ad y for connectin g
slowly Flashes white
con n ec t ing
Quickly Flashes white
connected
solid white
Not connected
Dim
Note :
1 . The bucket indicator will also light up when the bucket is pulled out. You can go to
" Device settings " page to turn on " Full Bucket Ale rt " , then yo u will get notifications
from the app when the bucket is full of water or is being pulled out.
2 . If the dehumidifier detects internal frost ing , it will automatically trigger Auto Defrost
until there is no frost . In Auto Defrost mode, the dehumidifier will stop dehumidifying.
15
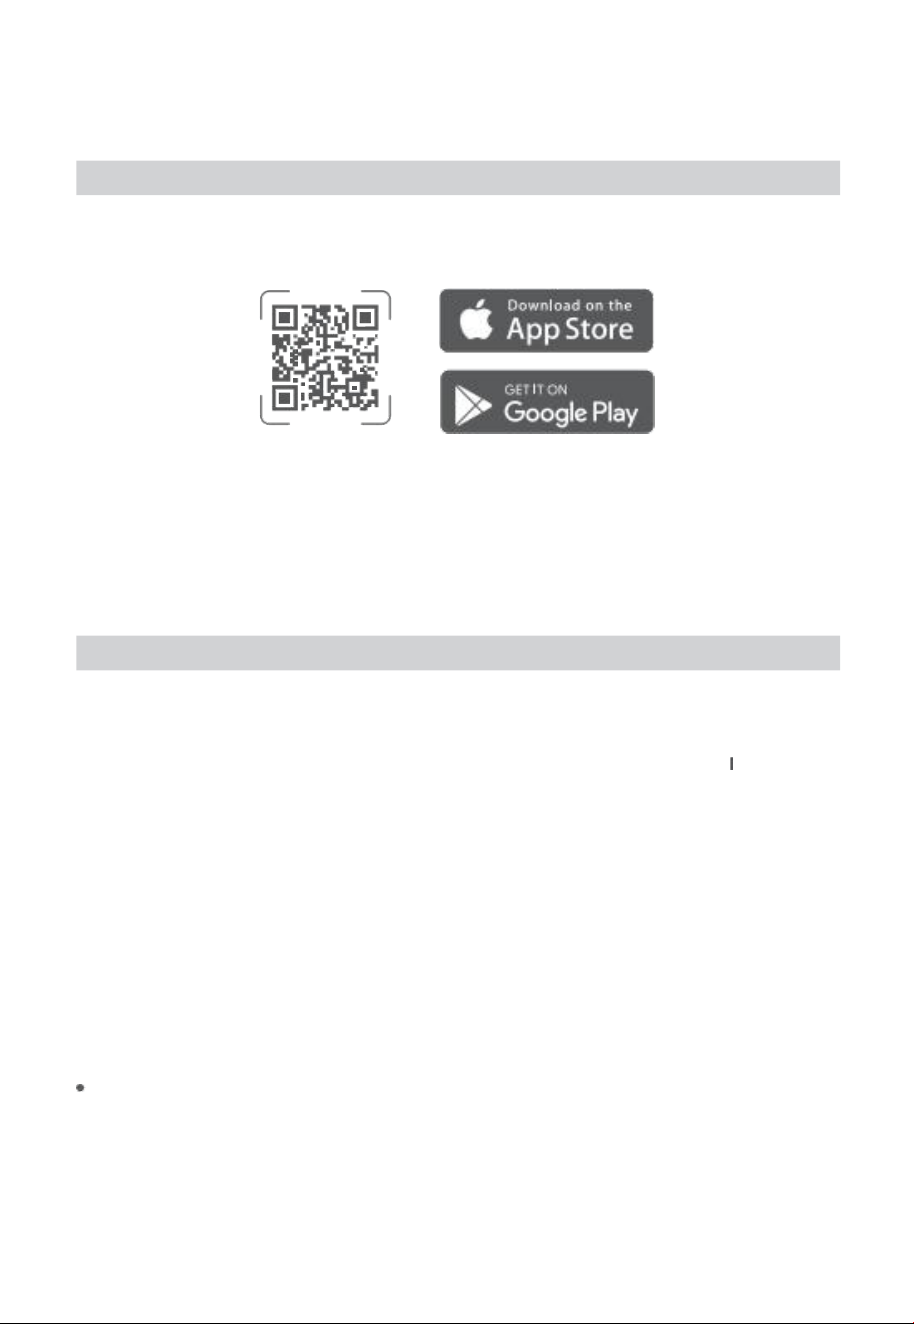
Govee Home APP
You can access more features using Govee Home APP.
Dow n l o a d i n g G o v e e Ho m e AP P
To download Govee Home APP, scan the QR Code or search for "Govee" in the APP
stor ee (i os ) or Goo gle play store (A n dro id) .
Govee Home APP
Note :
●
choose "A llow" to th e permissions reauested when opening Govee Home APP for
the firs t time. These permissions allow the app's features to functio n normally and
are not used to record personal or private information.
● Due to ongo ing upda tes , Go vee Home APP may be slightly different than shown
in this manual . In case of any differ ences , always follow the in-app instructions.
pairing w i t h G o v e e Ho m e AP P
1 . Turn on your smartphone's Bluetooth. connect to your wi-Fi router's 2 . 4GHz network.
5GHz is not supported.
2 . Android users turn on Location services; ios users choose Location - >A
Ways on in
the pop- up win dow wh il e add in g devi ce s.
Note :
●
For ios users , if you chose Location- >Never, it might result in notifications/alert
exceptions. It is recommende d to follow settings - >Govee Home - >Location - >Always
on to obta in the bes t experience.
●
Govee Home WILL NOT Collect, use, or share your location in any way.
3 . open Govee Home APP, tap the"+" icon in the top right corner and search for " H7152.
4 . Tap the device icon and follow the in-app instru ction s to complete the Bluetooth
and wi - Fi connection.
Note :
Meth od to turn off Blue too th an d wi - Fi conne ct io n: press and hol d the pow er Butto n
and speed Bu tton for 5s to re store the device to factory settings , then go to the
" Device" pag e on the app to delete this dehumid ifier first, other wise it cannot be
added to the app again.
● You can use Go vee Home APP to connect your dehumidifier to Amazon Alexa or
Google Assistant. Follow the in-app instructions to connect to each vo ice assistant.
● Govee Home APP is being continually updated and its features expanded.


Troubleshooting
The troubleshooting section below is for solving freauently asked Questions. If your
prob lem persist s , please contact cu stomer support.
For Dehumidifier
po ssi ble solu tio n & Re aso n
check if the power plug is firmly co nnected into th e wall outlet.
check the house fuse/circuit breaker box.
Th e dehumidifier has r each e d ta r get temperature in Auto
Mo de or th e wa t e r buck et i s al r ea dy fu l l .
do e s no t w o rk.
The float in the tank is stuck and is not pro perly positioned.
push the float down to the lowest po sitio n.
water bucket is not in the proper position , put it back in place.
The drain hose is not connected correctly or the other end of the
drain hose is blocked, so the water cannot be appropriately discharged.
Ensure that both ends of the drain hose are un imped ed after
connecting the water pipe to the drain outlet. keepi ng the drain
hose in an inclined state is more conducive to gravity drainage.
The time is not enough to remove the moisture.
The ambient humidit y is too low, affecting the performance of
dehu midifying.
Make sure there are no curtains , blinds or furniture blocking the
top or back of the dehumidifier.
The dehumidifie r is in Auto Mode and its target humidity is
higher than the amb ient humidity.
check if all doors, windows, and other openings are securely closed.
Room temperature is too low, below 41 0 F (5。c) . Heat up the room .
There is a water vapor source in the room such as a humidifier.
The air filter is dirty. clean the air filter.
The air filter may be dirty. Follow the previous instruction to clean it.
The dehumidifier is tilted. put it upright.
The fl oor surface is not level .
check if the filte r is properly positioned.
2O
The drain hose is
leaking water when
the dehumidifier is
con tinuously
draining.
The dehumidifier
makes a loud
noise when
running.
The dehumidifier
does not dry the
air as it should .
The dehumidifier
pro b le m

21
check that the hose adapter is properly screwed in. Take it out, and
screw it in again. Make sure the hose detection switch is in contact
with the water hose adapter.
check for bends in the hose and smooth it out.
This is a normal phenomenon when the dehumidifier is running at
low ambient temperatur e.
Frost appears
Th e dehu m i d i fi e r wi l l au t om at i ca l ly st ar t defros t i ng , an d the whole
pr o c ess ma y take 15 to 20 minute s . when the dehumidifi er
completes defrosting , it will automatically restart dehumidifying.
The hose port may be loose.
ntended to use th e bucket to col lect water , but the back drain
outlet cover is not in place.
The refrige rant may not be stable yet. keep the device working
for an hour and ob serve whether the strange noise has
disappeared.
turned on .
ple as e cont ac t custom er se rv ic e for ass ista nce.
" E1 " or " E2 . "
Displays " - - " ,
instead of the
curre nt humidity
level .
Fo r APP & con nect ivit y
1 . cannot connect to Govee Home APP.
● Make sure your smartphone is powered on and is not connected with other Bluetooth devices.
●
Enable the smartphone's Location services.
Try con necting with another smartphone.
● Make sure your app is updated to the latest version.
● Make su re you connect to your wi-Fi router's 2 . 4GHz network and that the network
is working correctly.
● Make sure the wi -Fi password you entered is correct.
o shorten the distanc e between the dehumidifie r, wi - Fi router, an d the smartphone.
●
Make sure your dehumidifier an d the wi- Fi router are located away from appliances
that produce electromagnetic radiation (e. 9 . microwave ovens , refrigerators , etc. )
o If you are using a VPN , try turning it off and the n connecting the dehumidifier.
● Disable portal authentication for your wi-Fi network. If portal authentication is enabled,
this dehumid ifier will no t be able to ac c ess your wi -Fi network and setu p will fail .
pu mp indic a to r
doesn't light up
after connecting
the hose.
pu mp indi c a tor
flashes.
The dehumidifier
produces a strange
noise when it is
Displays error code
water on fl oor.
on the coils ·
22
port a l authentication means that you need to sign in to your wi-Fi network through
a web page before you can use the Internet.
2 . cannot find the device on Blu etoot h De vice Nearby page of the app.
● The dehum idifier may be conn e cted wit h another smartphone. Disconnect it from
the other sm artphone fi rst.
3 . The dehumidifier is offline.
● Make sure the dehumidifier is plugged in and powered on , then refresh " Device" in
Govee Home APP by swiping down on the screen .
●
Make sure yo ur rout er is conne cted to the intern et and you r smartphon e's network
connection is working.
o If the wi-Fi password has been changed , the dehumidifier will automatically go offl ine.
Try connecting it to the network again.
● Delete the offl ine dehumidifier from Govee Home APP, then add and recon figure the
dehumidifier again in the app.
App e n di x
customer service
warranty: 12 -Month Limited warranty
support: Lifetime Technical support
Email: support@ vee. com
official website: Www. govee, com
@GOVEE 团 OGoveelife.official
@GoveeLife @Goveelife @GoveeLife
sp e cifi cati ons
po we r source
115V AC 6OHz
Rated power
86OW
Rated current
7.5A
ope ra tin g co n di t ion s
Temperature: 41 。F - 86 。F (5。c - 30 ec)
Humidity: <80%RH
Noise Level
≤ 53 dB(A )
Moisture Removal (65。 F, 60%R H)
49 . 72 pints/Day
Moisture Remov a l (8o 。F, 60%RH )
66 pints/Day
Moisture Removal (86 。F, 80 %R H)
10 9 pints/ Day
Inp ut pow er (65 。 F, 60%RH)
51OW

23
Input cu rrent (65 。 F, 60% RH )
4 . 63A
IEF (65。 F, 60%RH)
1 . 90 liters/kwh
Motor FLA
O. 58A
Motor comp r essor
RLA: 4 . 3A LRA: 24 . 9A
Refrig erant
R32/150g (5 .3ozs)
Ma xim um AI lowa b le pre ssu re
3 . 72M p a
Maxim um op erating pressure High
3 . 72M p a
Maximum operating pressure L ow
2 . O7 Mp a
unit Dimensions
15x11 . 3x24 . 4 inches/38 .1 x28 . 7x62 cm
u n i t w e ig h t
40 Ib / 18 . 2 kg
co m p l i a n c e Inform a t ion
FCC Statement
This device complies with part 15 of the FCC Rules.
operation is subject to the followin g two conditions: (1) this device ma y not cause
harmful interference, and (2) this device must accept any interference received , including
nterference that may cause undesired operation.
wa rni n g: Any cha ng es or mo dif ications not expressly approved by the part y
responsible for compliance cou ld void the user's au thority to oper ate the eauipment.
Note: This eauipment has been tested and found to comply wit h the limits for a class B
digitaldevice, pursuant to part 15 of the FCC Rules. These limits are designed to provide
reasonable protection against harmful interference in a residential installation.
This eauipment generates uses and can radiate radio frequency energy and , if not
nstalled and used in accordance with the instructions , may cause harmful interference
to radio communications. However, there is no guarantee that interference will not
occur in a particular installation. If this equipment does cause harmful interference to
radio or television reception , which can be determined by turning the eauipmen t off
and on , the user is encouraged to try to correct the interference by one or more of the
following measures:
(1)Reorient or relocate the receiving antenna.
(2)In crease the separation betwee n the eauipme nt and re ceiver.
(3 )co n ne ct the ea ui p me n t into an outlet on a circu it diffe re n t from that to whi c h t he
receiver is connected .
(4)consult the dealer or an experienced radio/TV technician for help.
FCC Radio
Fre uency Exposure statement
The device has been evaluated to meet general RF exposure reauirements. The device
can be used in fixed/mobile exposure condition. The min separation distance is 20cm ·

24
The fo llowing importer is the responsible pa rty
Name : G O V EE MO M E NTS (U S ) TR A DING LI MI T E D
Address: 2501 chatham Rd su ite R Springfield IL 62704
Email: support@govee. com
contact information: https://www. govee. com/support
RF ex pos ure stat eme nt
This equipment mee ts the exemption from the routine evaluation limits in section 2 . 5
of RSS -102 . It should be installed and operated with a minimum distance of 20cm
betwe en the ra diato r and any part of your body.
c e t u i p e me n t e s t c o n f o r m e
’
e x e m p t i o n de s l i m i t e s d ’ v a l u a t i o n h a b i tu e l l e de la
section 2 . 5 de la norme RSS-1 02 . Il doit tre insta et util is une distance minimale
de 20 cm entre le ra diate ur et toute par tie de votre corps.
FOR INDOOR USE ONLY
The Blue t ooth word mark and logo s are registered trademarks owned by Bluetoot h
s
G , Inc. and any use of such marks by shenzhen Qianyan Technology LTD is under
license.
The trademark GoveeLife has been authorised to shenzhen Qianyan Technology LTD.
copyright 2021 shenzhen Qianyan Technology LTD. AlI Rights Reserved.


Govee Home APP
For FAQs and more information ,
please visit: Www. 9ovee. com