
Contents
1.About this guide .................................................................................................................................................................. 1
2.Instruction ...........................................................................................................................................................................2
3.Appearance......................................................................................................................................................................... 3
4. How to register an account ................................................................................................................................................ 4
5.APP basic settings ................................................................................................................................................................6
5.1 How to do network configuration ............................................................................................................................... 6
5.2 How to turn on message notifications........................................................................................................................ 9
5.3 How to manage user’s account .................................................................................................................................11
5.4 How to switch different language ............................................................................................................................. 13
6.Main Function ................................................................................................................................................................... 15
6.1 How to set up alarm ................................................................................................................................................. 15
6.2 How to set up reminder ............................................................................................................................................19
6.3 How to view playback ............................................................................................................................................... 21
6.4 Patrol........................................................................................................................................................................ 23
6.4.1 How to set up panorama patrol ....................................................................................................................... 23

6.4.2 Location patrol.................................................................................................................................................24
6.5 Local Area Network (LAN) Settings ........................................................................................................................... 25
6.5.1 How to set up LAN ........................................................................................................................................... 25
6.5.2 How to connect camera to NVR by LAN ........................................................................................................... 27
6.6 How to set up image .................................................................................................................................................28
6.7 How to set TF card recording .................................................................................................................................... 35
6.8 How to set up intelligent tracking ............................................................................................................................. 39
6.9 How to configure region and time ............................................................................................................................ 40
6.10 How to share your cameras.................................................................................................................................... 42
6.10.1 Add friends .................................................................................................................................................... 42
6.10.2 Share your cameras ........................................................................................................................................44
6.10.3 Cancel friends authorization .......................................................................................................................... 46
6.11 How to reset/unbind camera.................................................................................................................................. 48
6.12 How to configure the timing function ..................................................................................................................... 49
6.13 How to adjust the volume level .............................................................................................................................. 50
1
1.About this guide
We are dedicated to providing you with high-quality and reliable imaging equipment to meet your needs in various scenarios, such as home
security, business surveillance, video conferencing, and more. To ensure you fully understand and correctly use this product, we have
meticulously prepared this user manual, aiming to provide you with detailed operating instructions, usage tips, and maintenance advice.Before
using this product, please read this manual carefully to ensure safe and efficient operation and to fully utilize its features. We recommend
keeping this manual for future reference. Additionally, you can visit our official website or contact our customer service hotline for further
technical support and assistance.
Conventions
Conventions
Description
Blue Title:
The main information themes will be highlighted in blue, including introduction, appearance,
main function, etc.
Note:
The steps and precautions in the manual have been professionally tested and verified to help
you avoid unnecessary malfunctions or damage.
Contact us:
For more details, please visit our official website: https://xpaihome.com/
Note :The functions of different products may vary. This document uses the Indoor PT camera as an example for reference only. Please refer to the product manual for accurate details.

2
2.Instruction
With the xpai app connected to your home network, you can get the full picture of any space in your apartment, dorm or
home. With a 360°horizontal view , the Pan Tilt has everything covered. With Human tracking and Patrol Mode, track
activity from beginning to end and set multiple distinct viewpoints for your camera to monitor at set intervals.
• Pan and Tilt - Swipe up, down, left and right on your phone to rotate and adjust the camera’s viewing angle.
• Human Tracking - When a Human is detected, smart camera tracks and follows the person to keep them within the camera’s field of
view.
• Cloud Storage - Users can store videos on remote servers via the internet and access them for playback anytime through the app.
• Patrol Mode - The camera automatically rotates to user-preset positions at scheduled times or performs timed rotation.
• Night Vision - The camera features night vision, including infrared night vision for black-and-white images and full-color night vision for
colored images.
• Activity Alerts - There is no need to check your xpai APP throughout the day. Get automatic alerts when it detects motion. Take quick
action when you see your pet on the couch, a roommate walking through your room, or an intruder entering your front door.
• Two-Way Audio - Use two-way audio to communicate with nosy roommates, family members or even mischievous pets.
• 24/7 Recording - Supports continuous video recording with an SD card inserted into your camera.
3
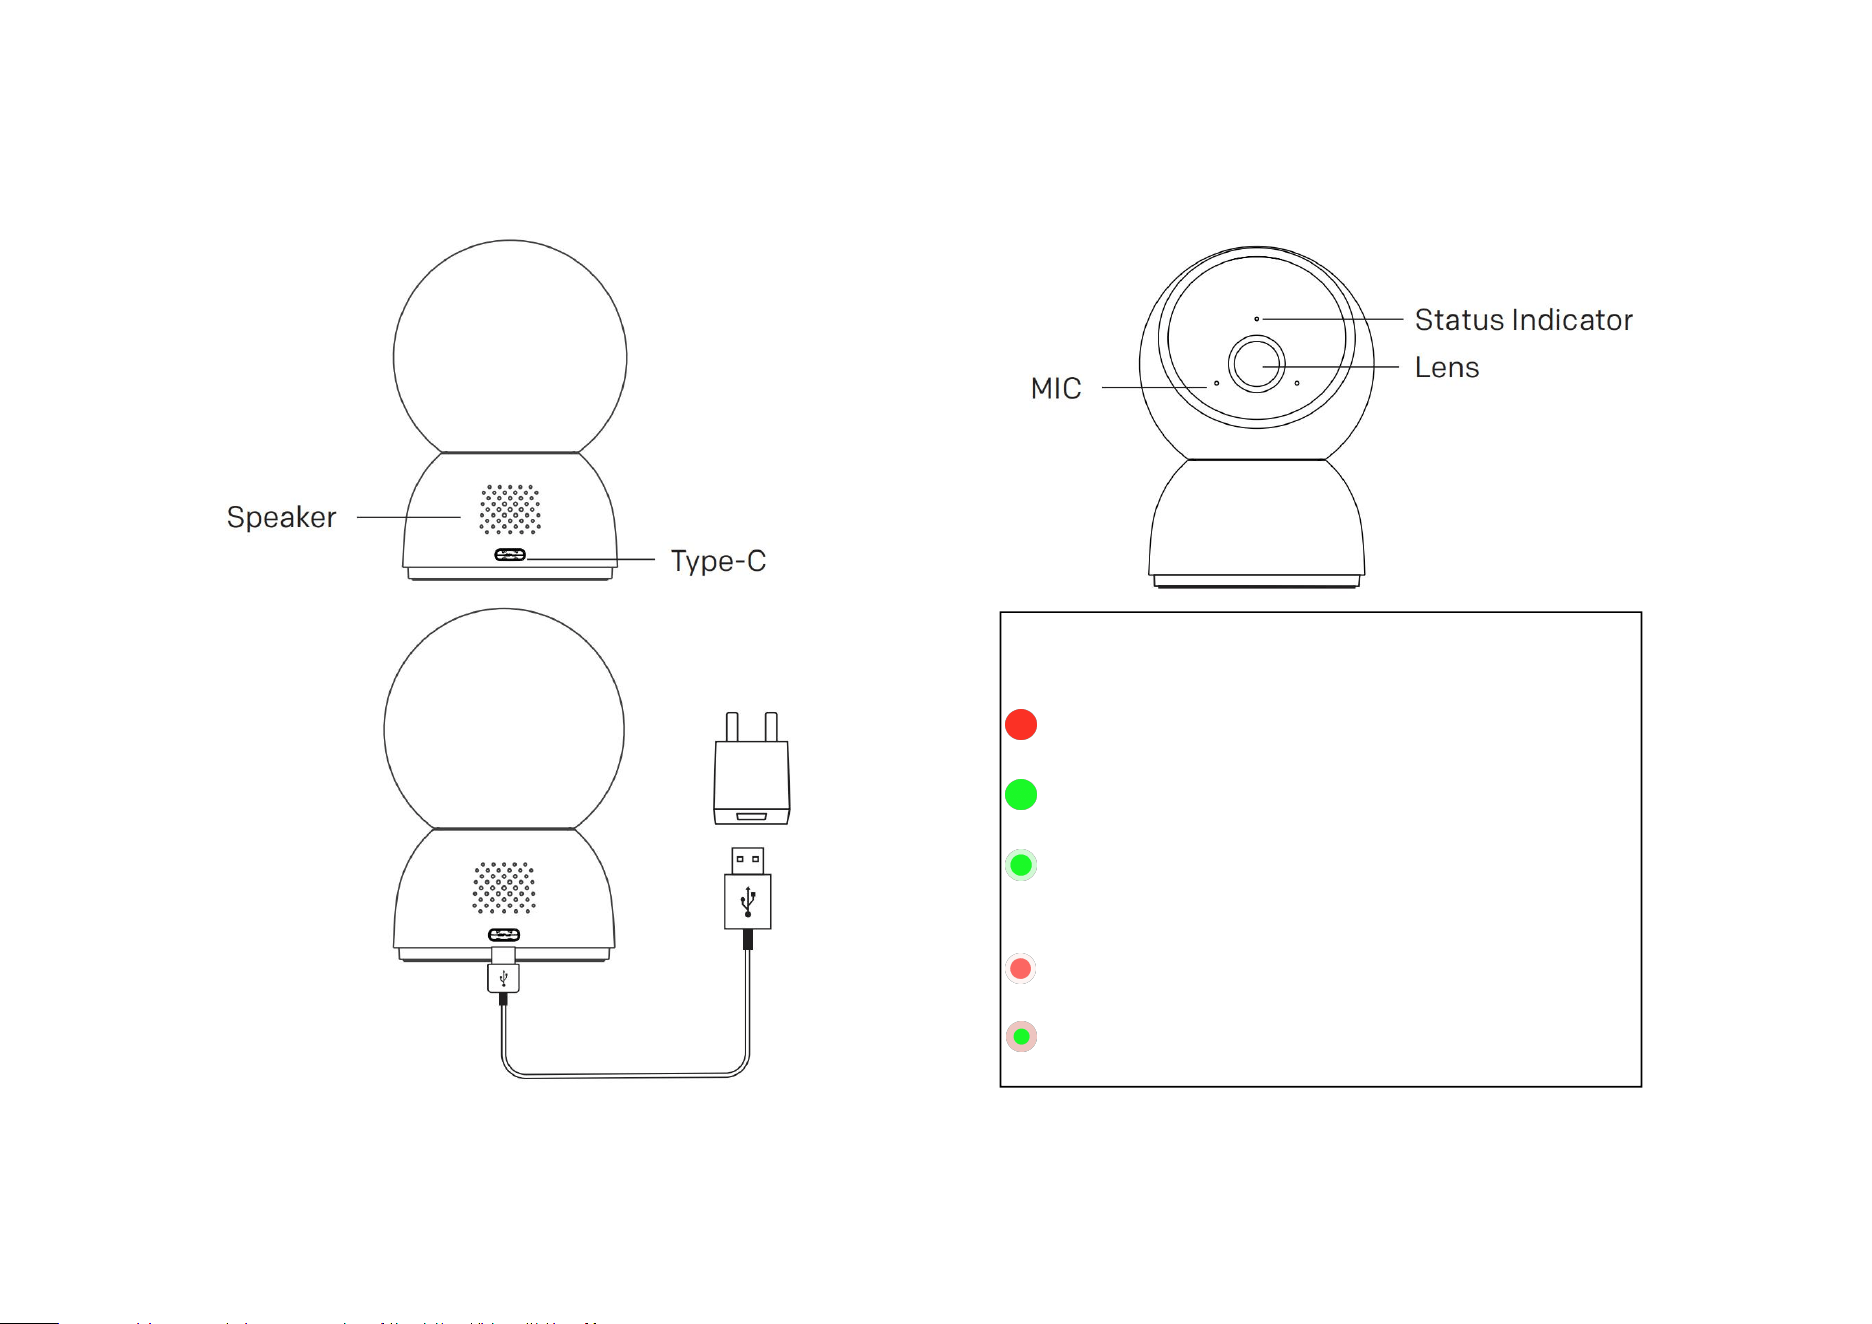
3.Appearance
Note
:The position of indicator lights may vary for different products. Please refer to the actual product for accurate information.
Indicator status
Red light keeps on: the camera starts.
Green light keeps on: the camera is online
Green light slow flashing: waiting for network
distribution, WiFi disconnection.
Red light slow flashing: the device is offline.
Alternating red and green: connecting to WiFi.
4
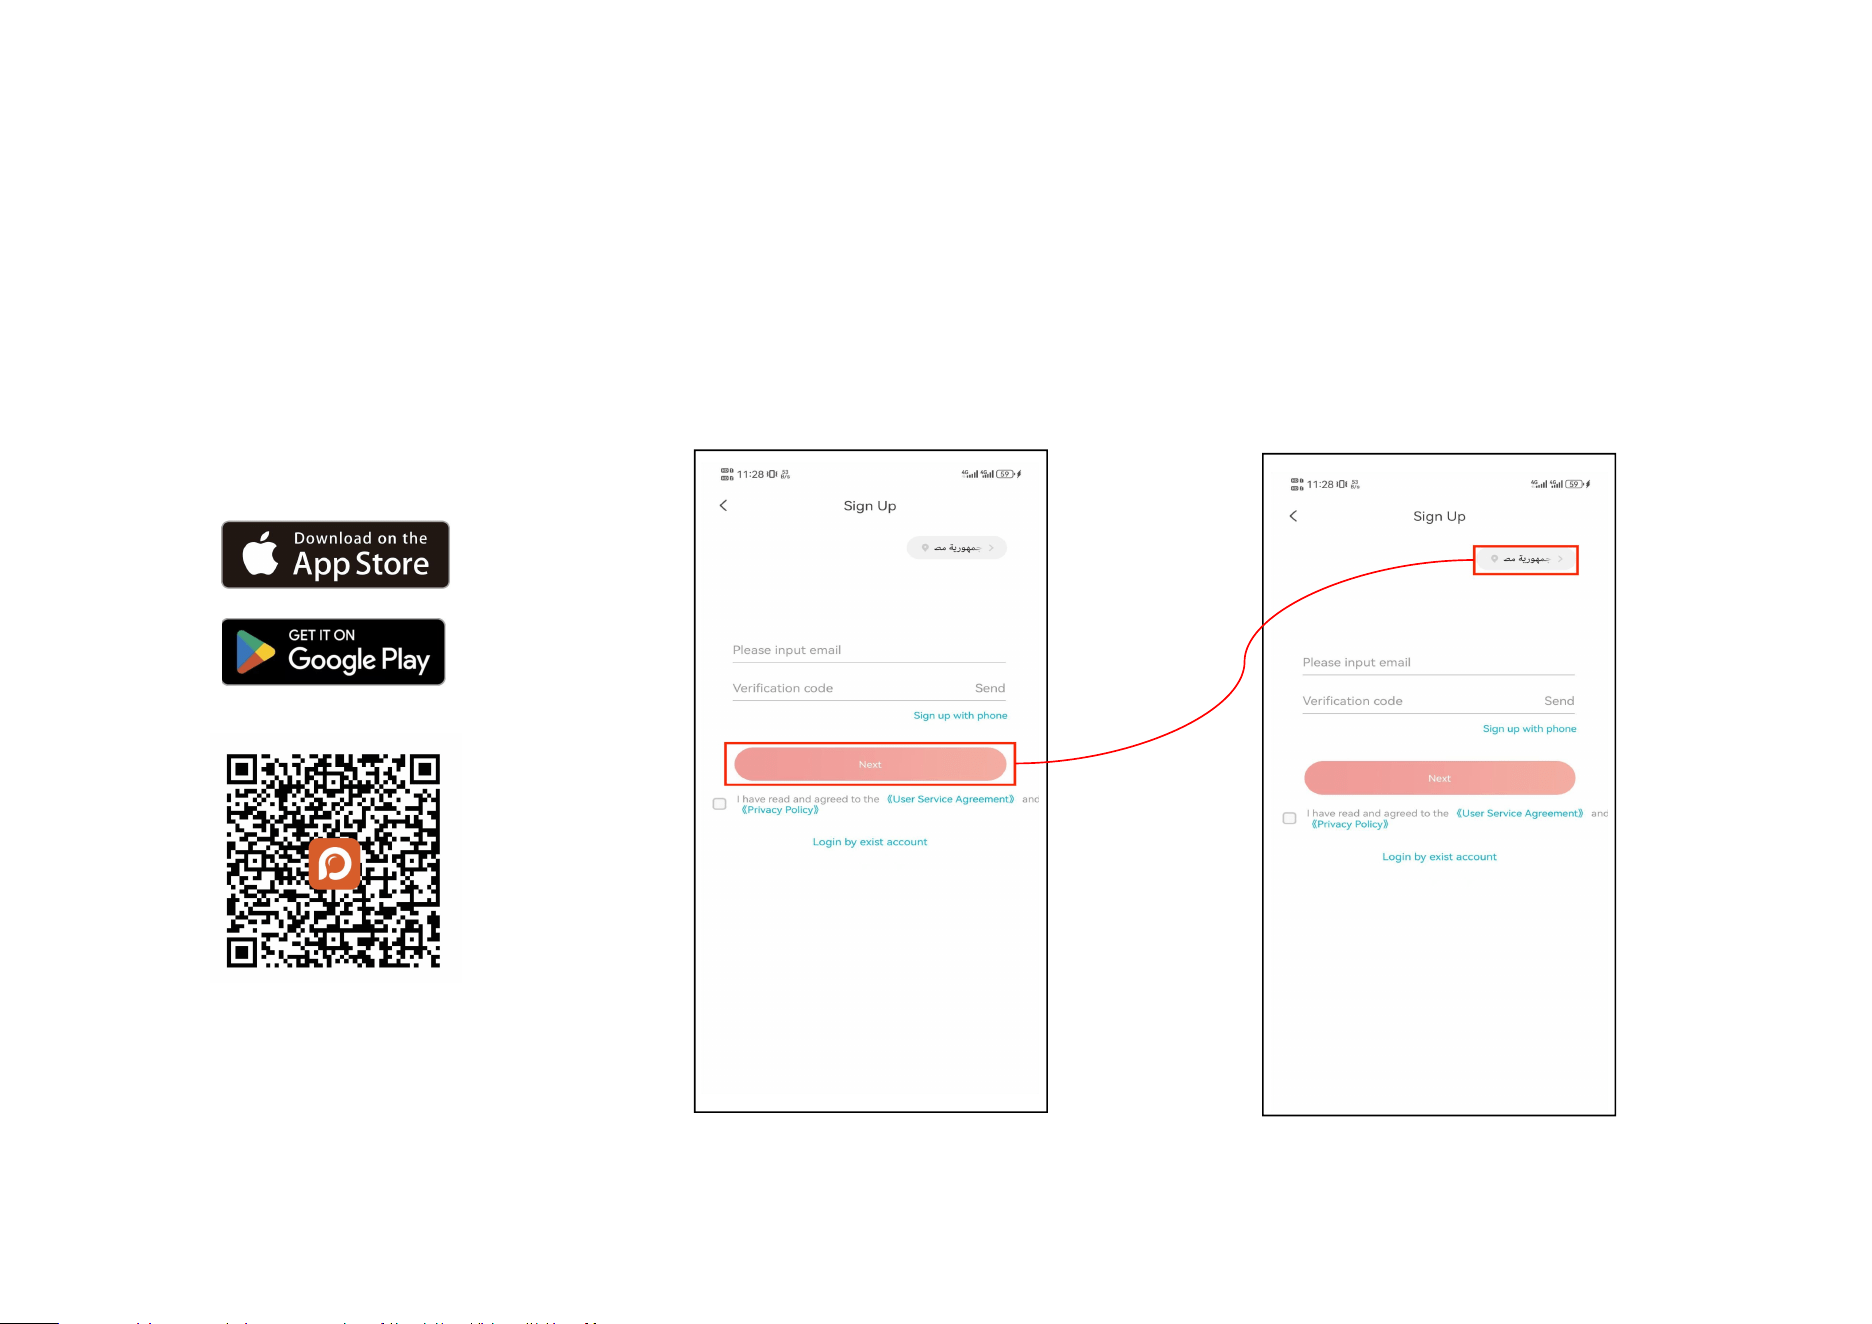
4. How to register an account
When a user uses the app for the first time, they need to follow the steps below to register.
Step 1:Download APP Step 2:Tap ‘’sign up’’ Step 3:Select region
Get the app from the App Store or
Play, or by scanning the QR code below
5
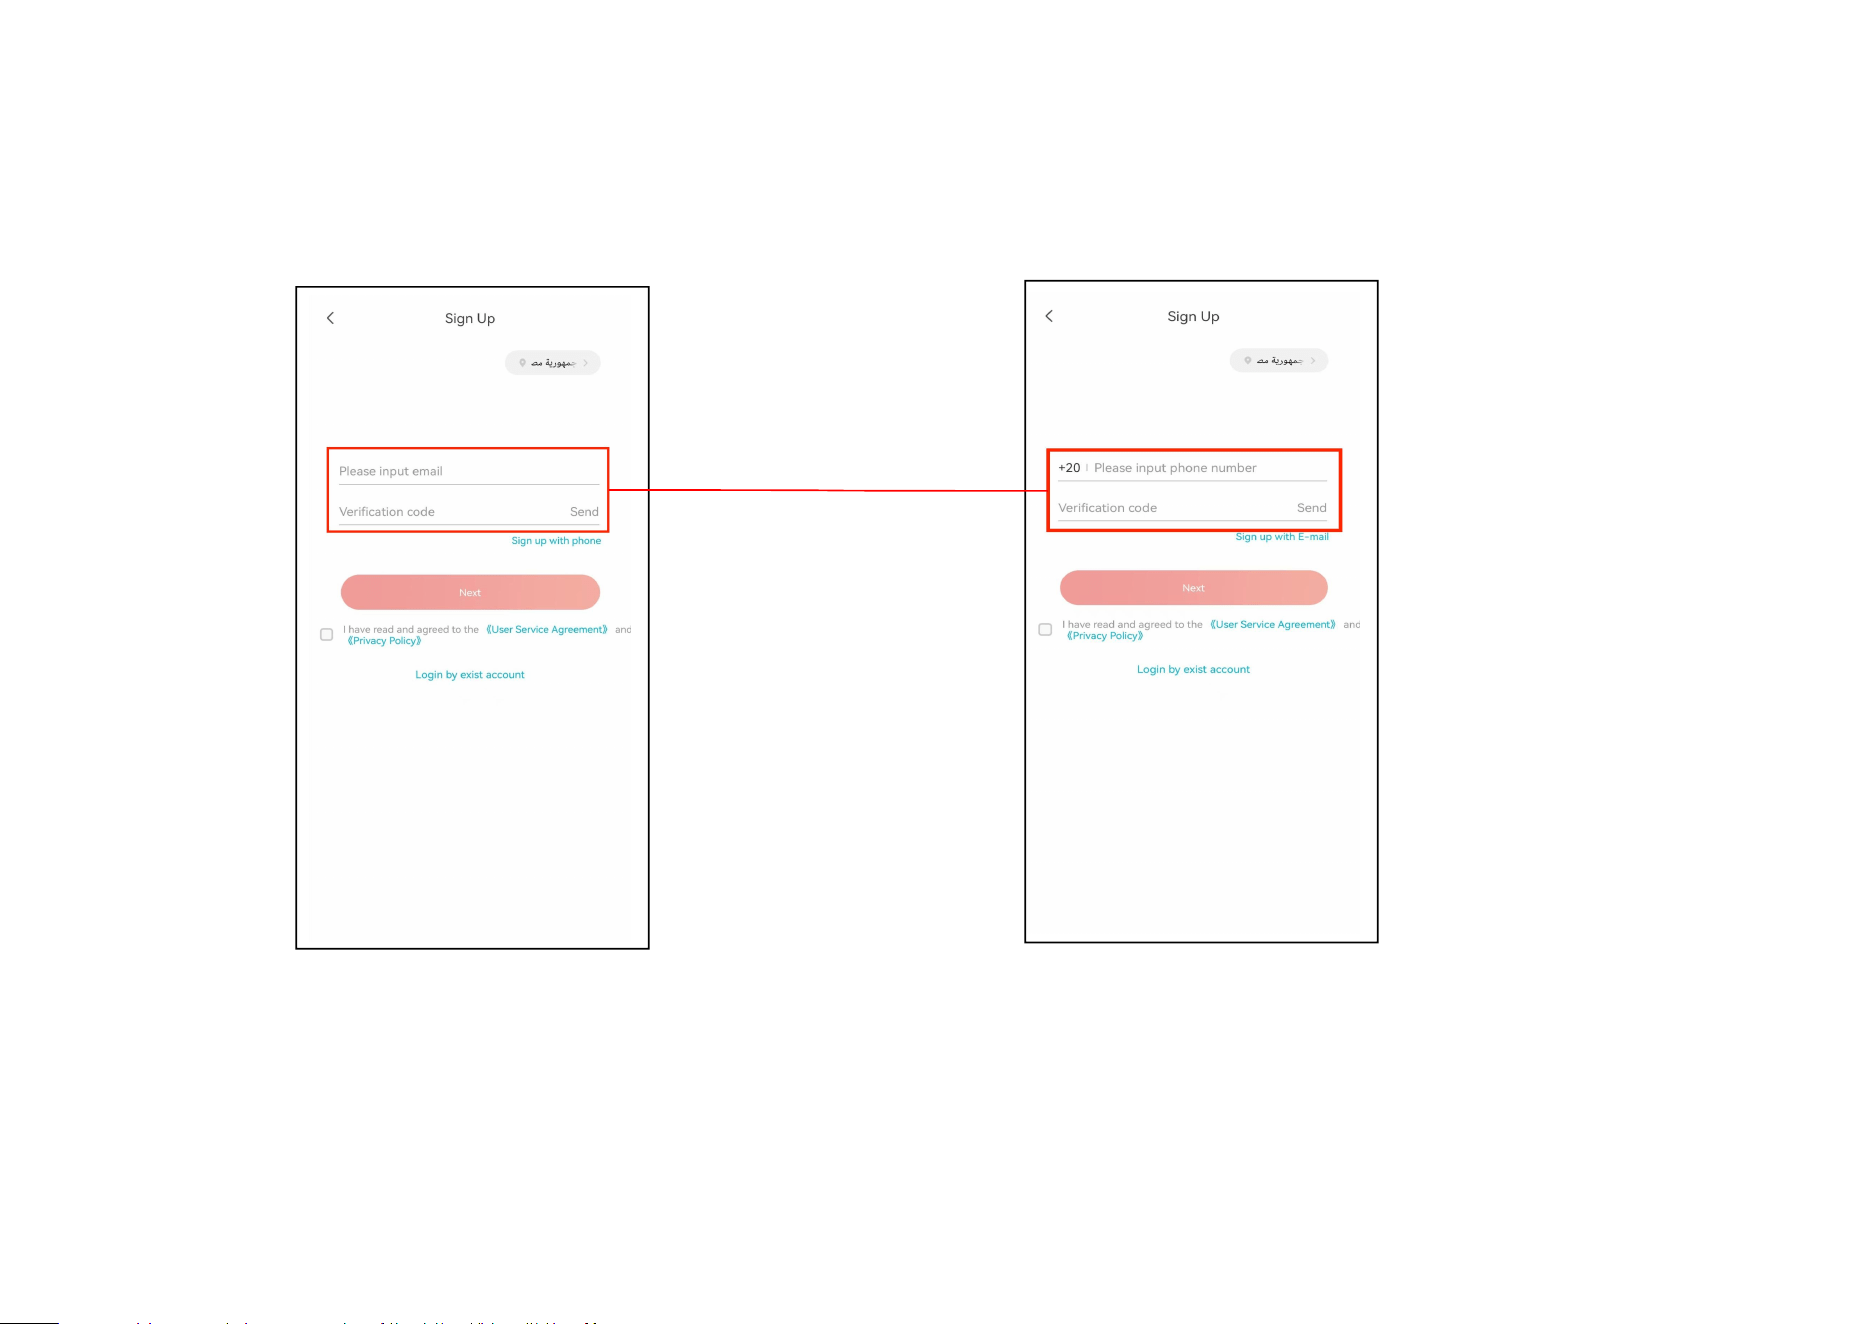
Step 4-1:Users can choose to register using their Step 4-2:Users can choose to register
email address using their phone number
6
5.APP basic settings
5.1 How to do network configuration
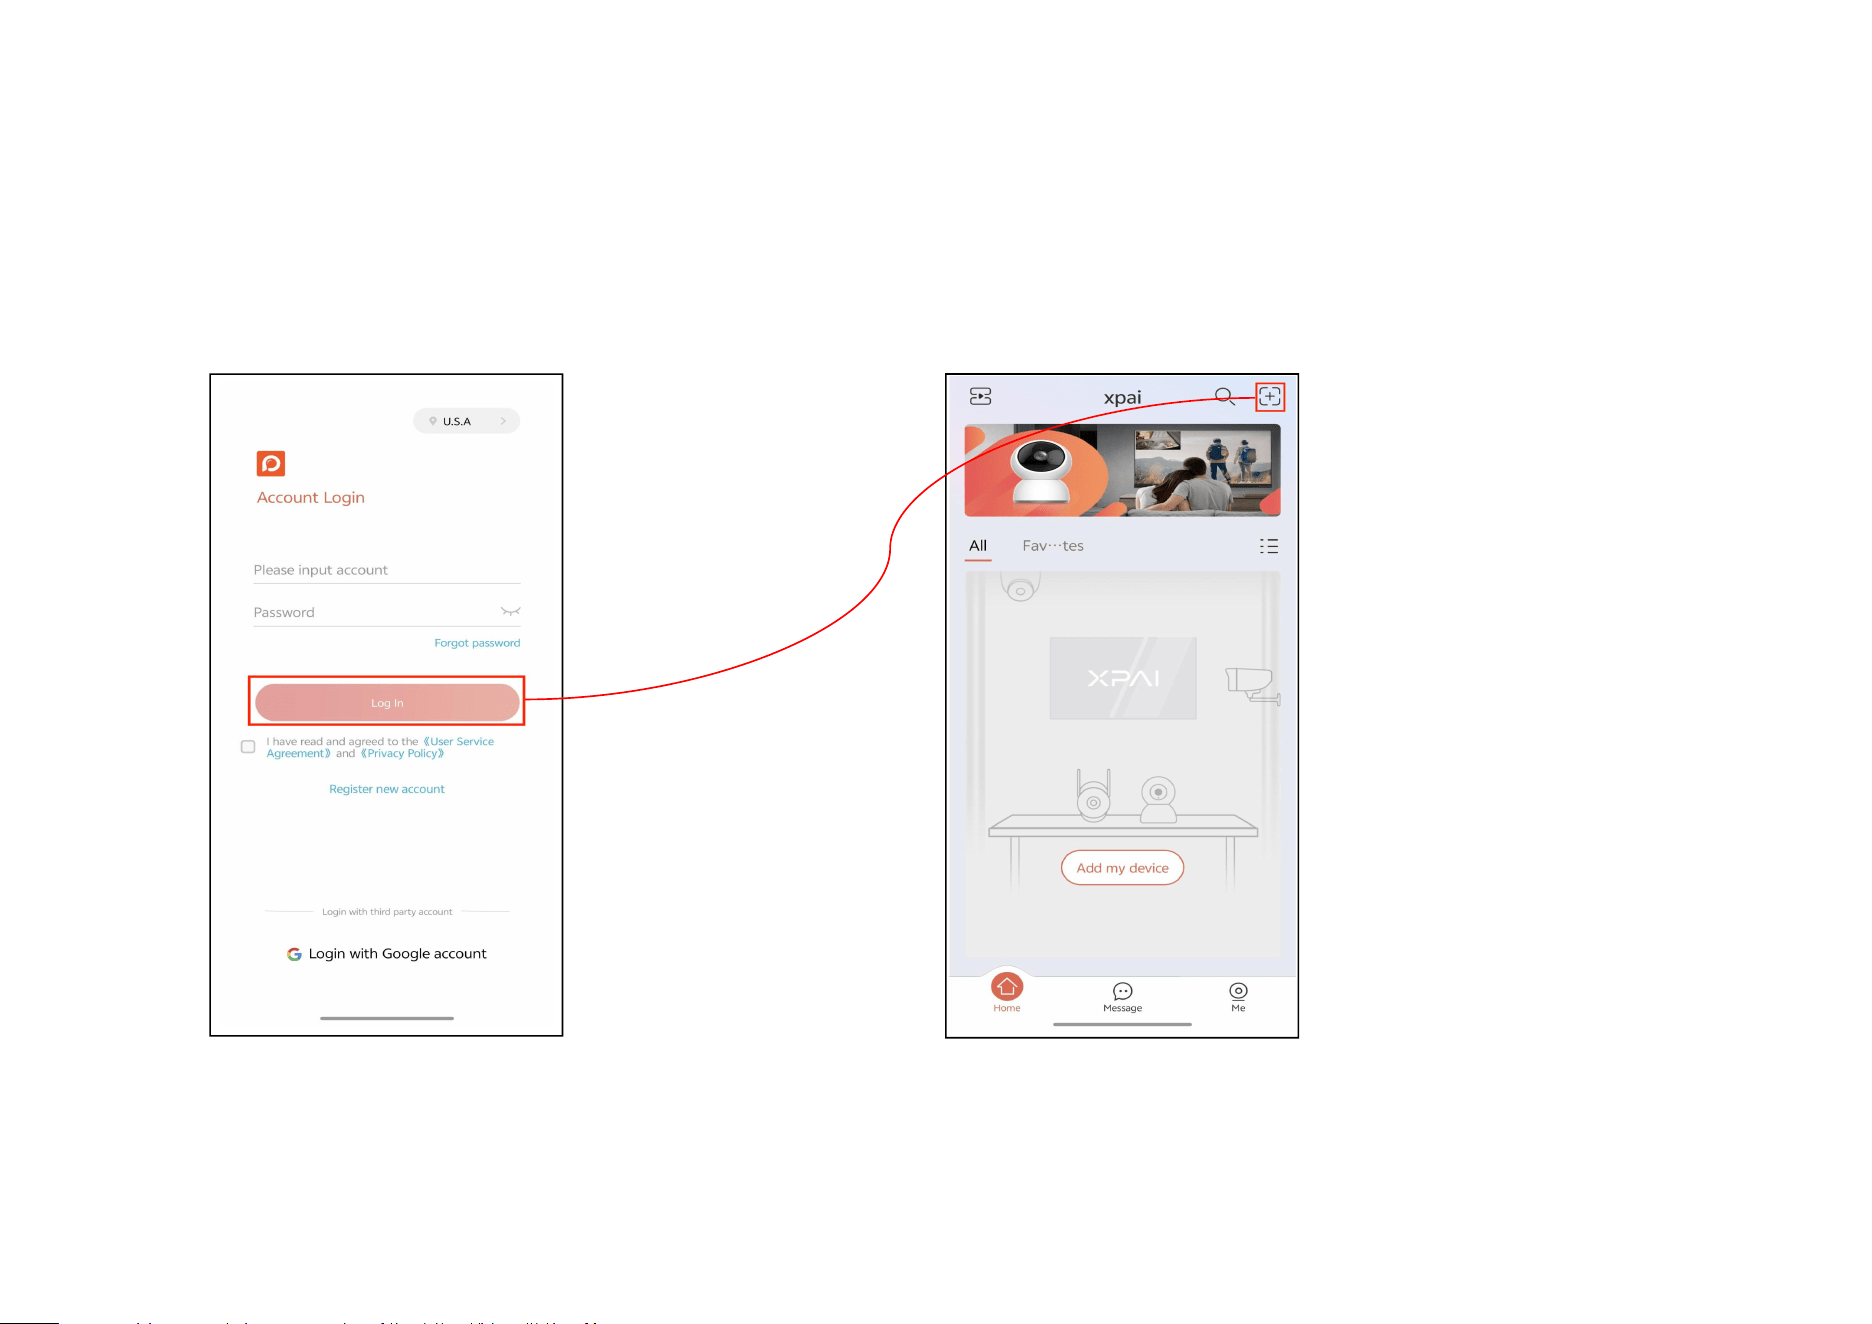
Step 1:Enter your username and password to log in Step 2:Tap button to add
7
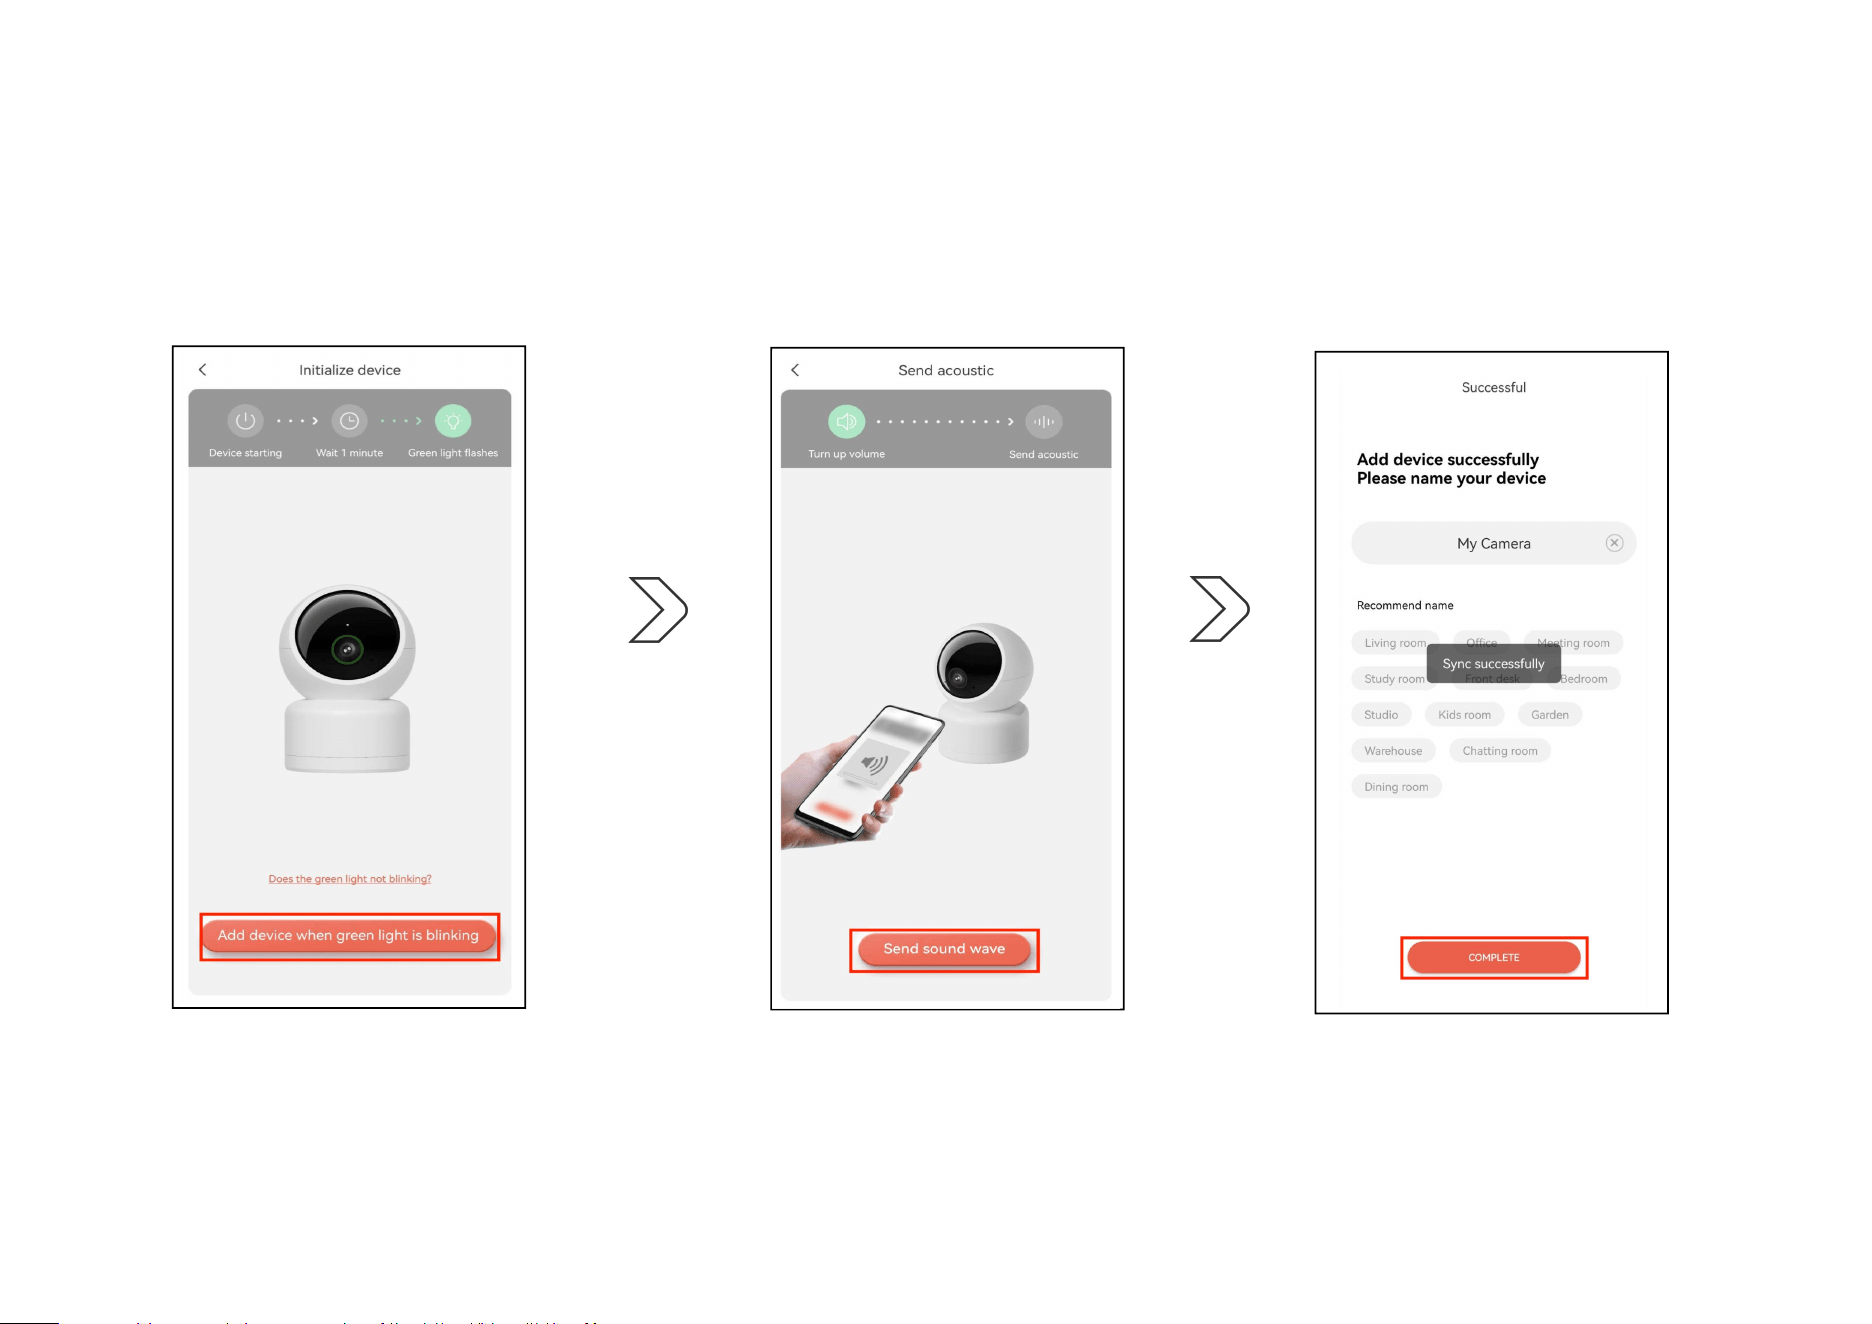
Step 3:Configure camera
The user follows the step-by-step instructions provided by
the app to configure the network until the device successfully
connects.
8
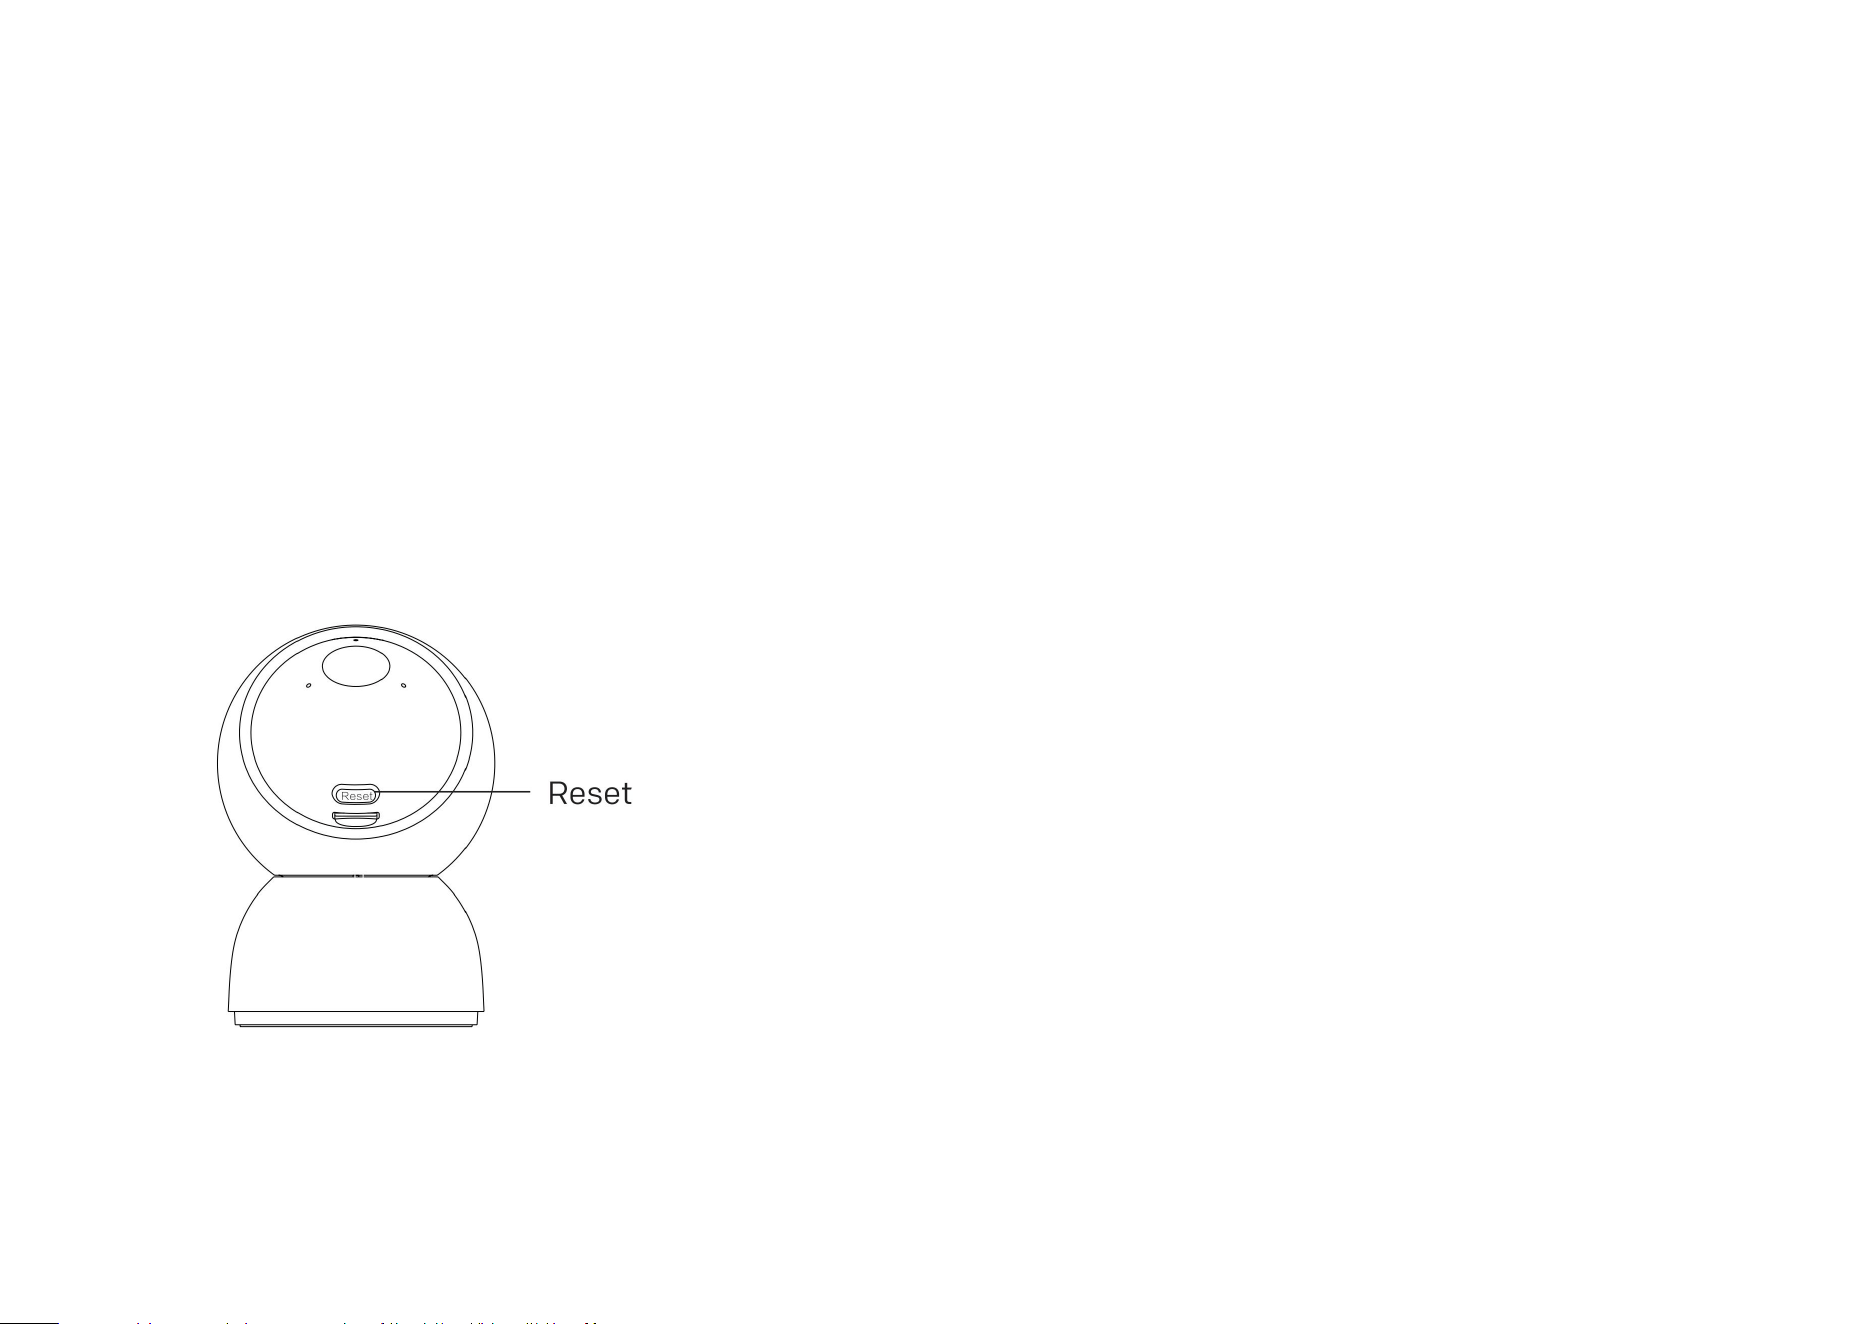
Note:If the user fails during the network configuration process, they can follow the steps below to troubleshoot:
1. Please verify whether the device supports both 2.4GHz and 5GHz Wi-Fi. If it doesn’t support, kindly switch the Wi-Fi
connection to the 2.4GHz band.
2.If using sound wave for network configuration, please increase the volume of your phone and bring it close to the
camera.
3.Check if the camera is in the network configuration mode (green light blinking). If not, please reset the device and then
proceed with the network configuration operation.
9
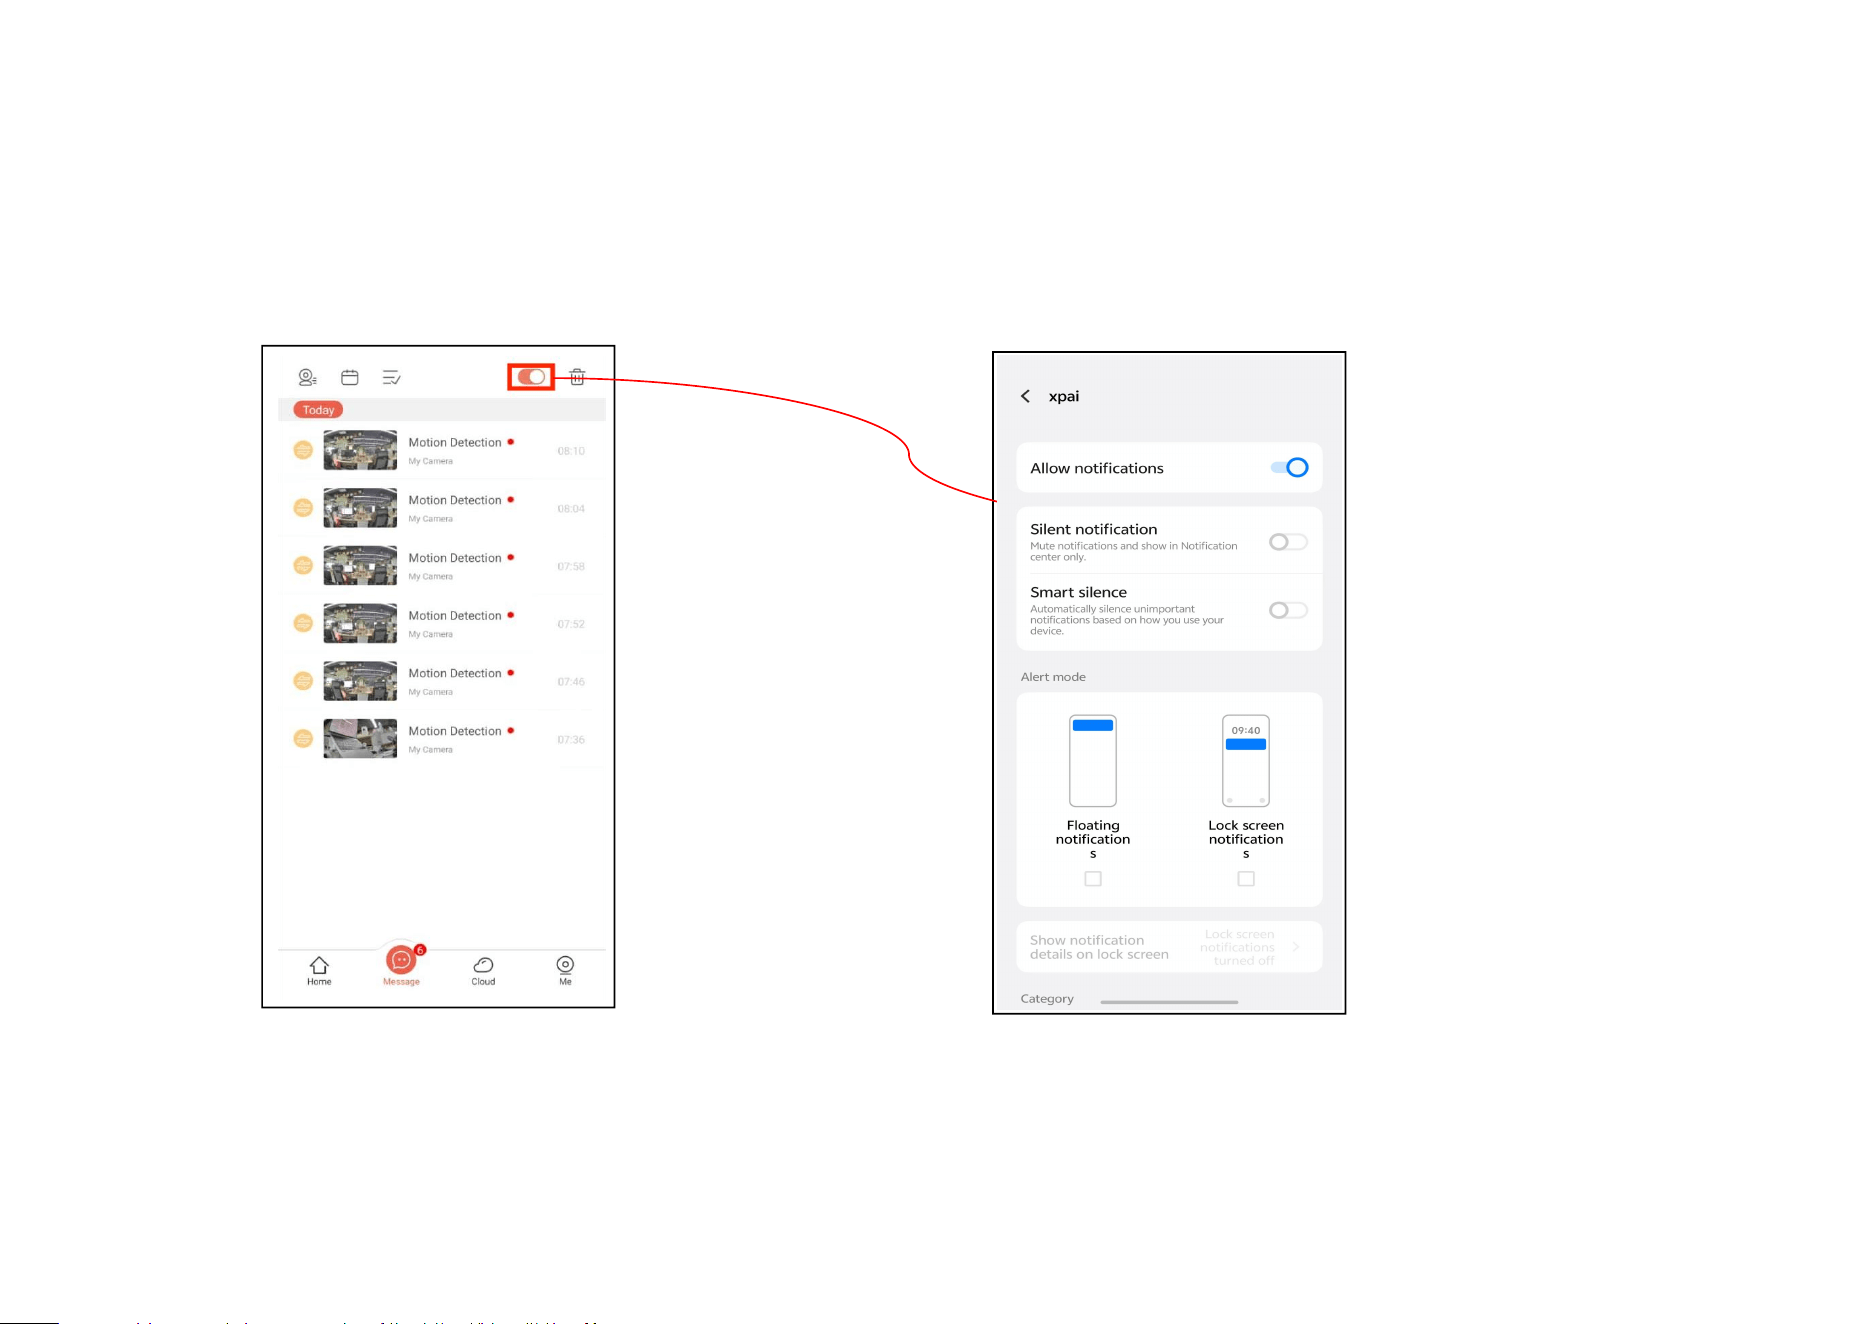
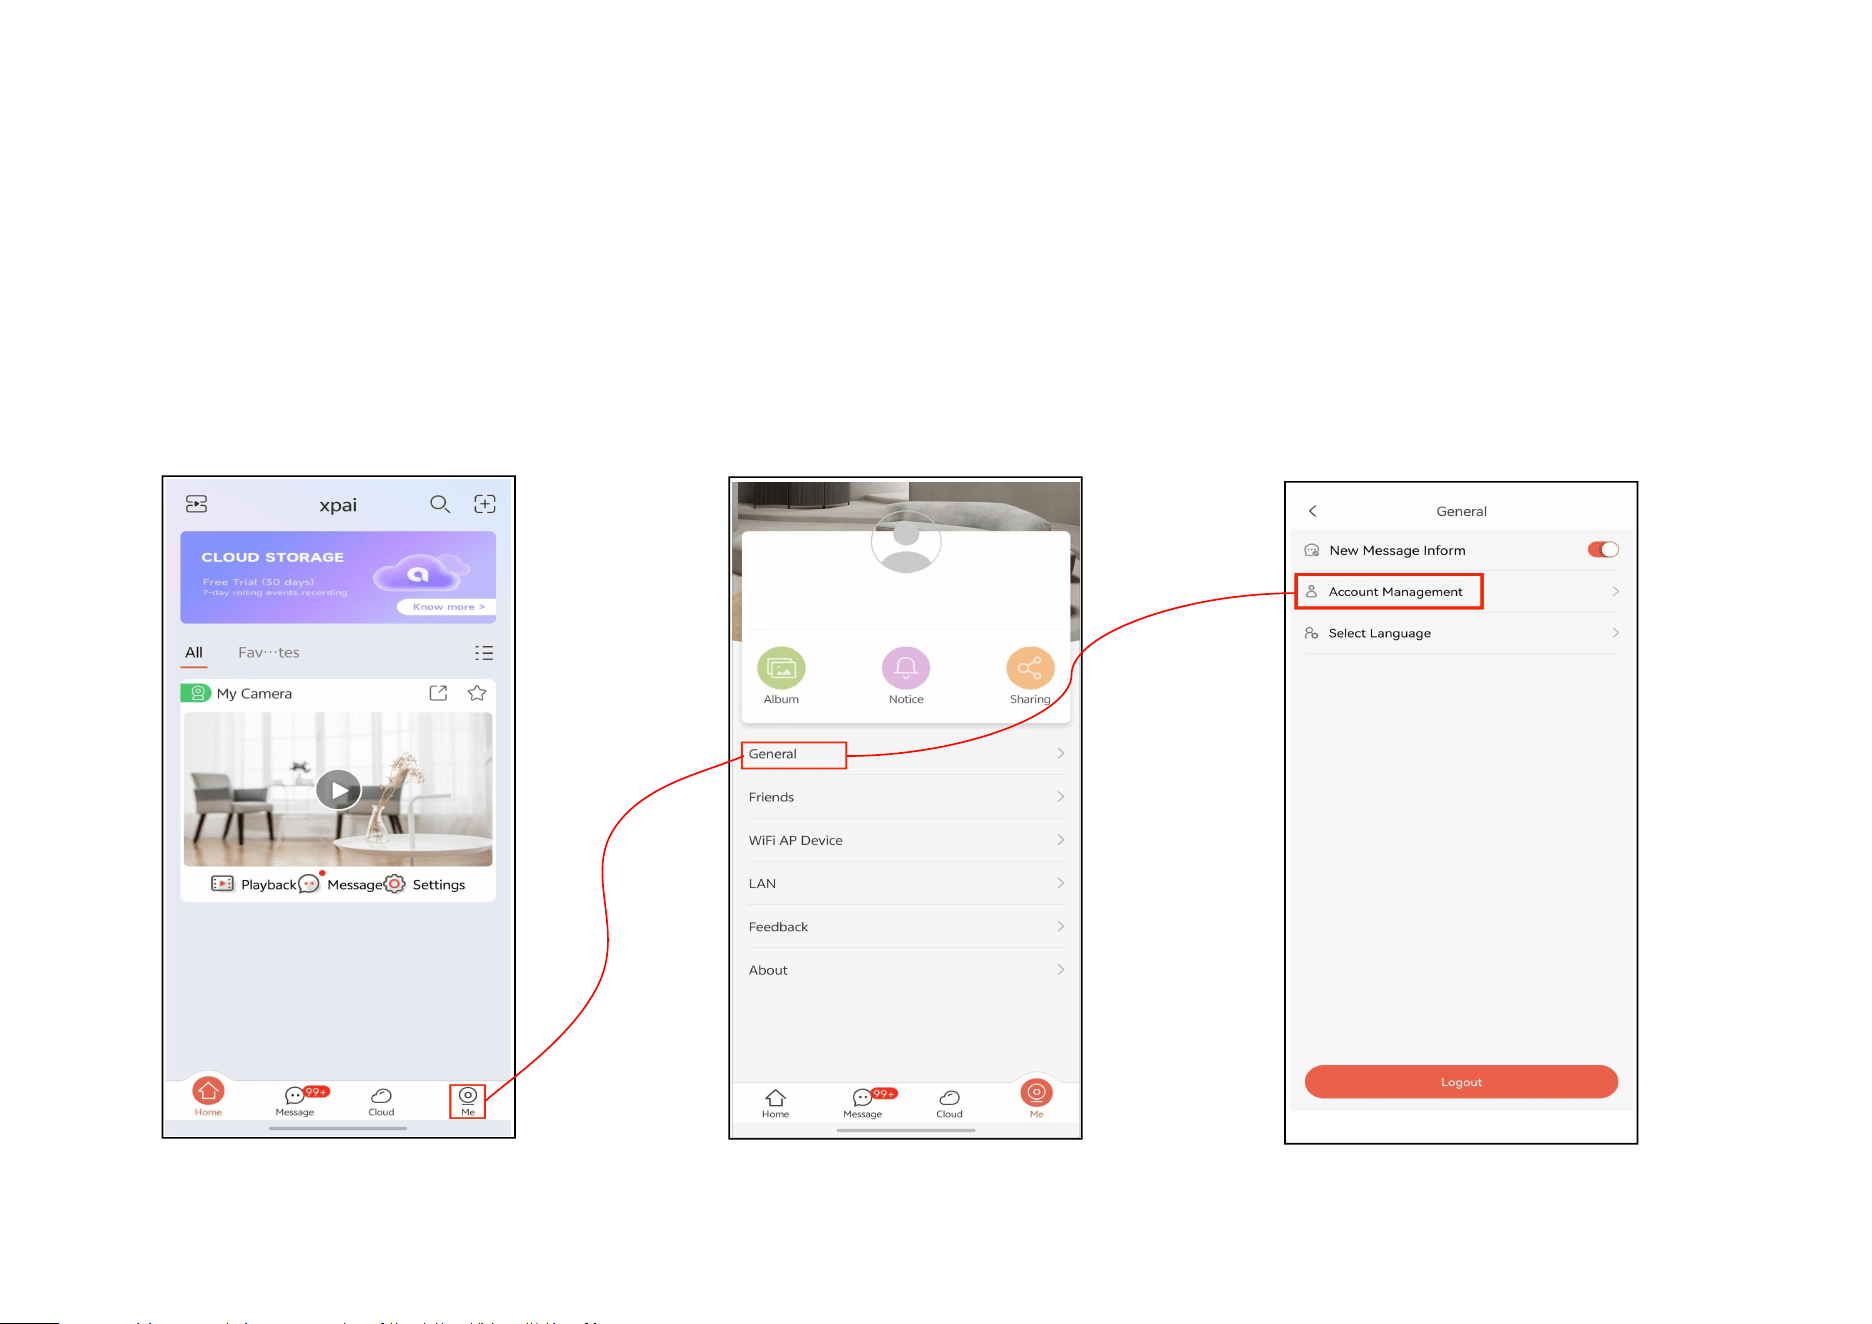
5.2 How to turn on message notifications
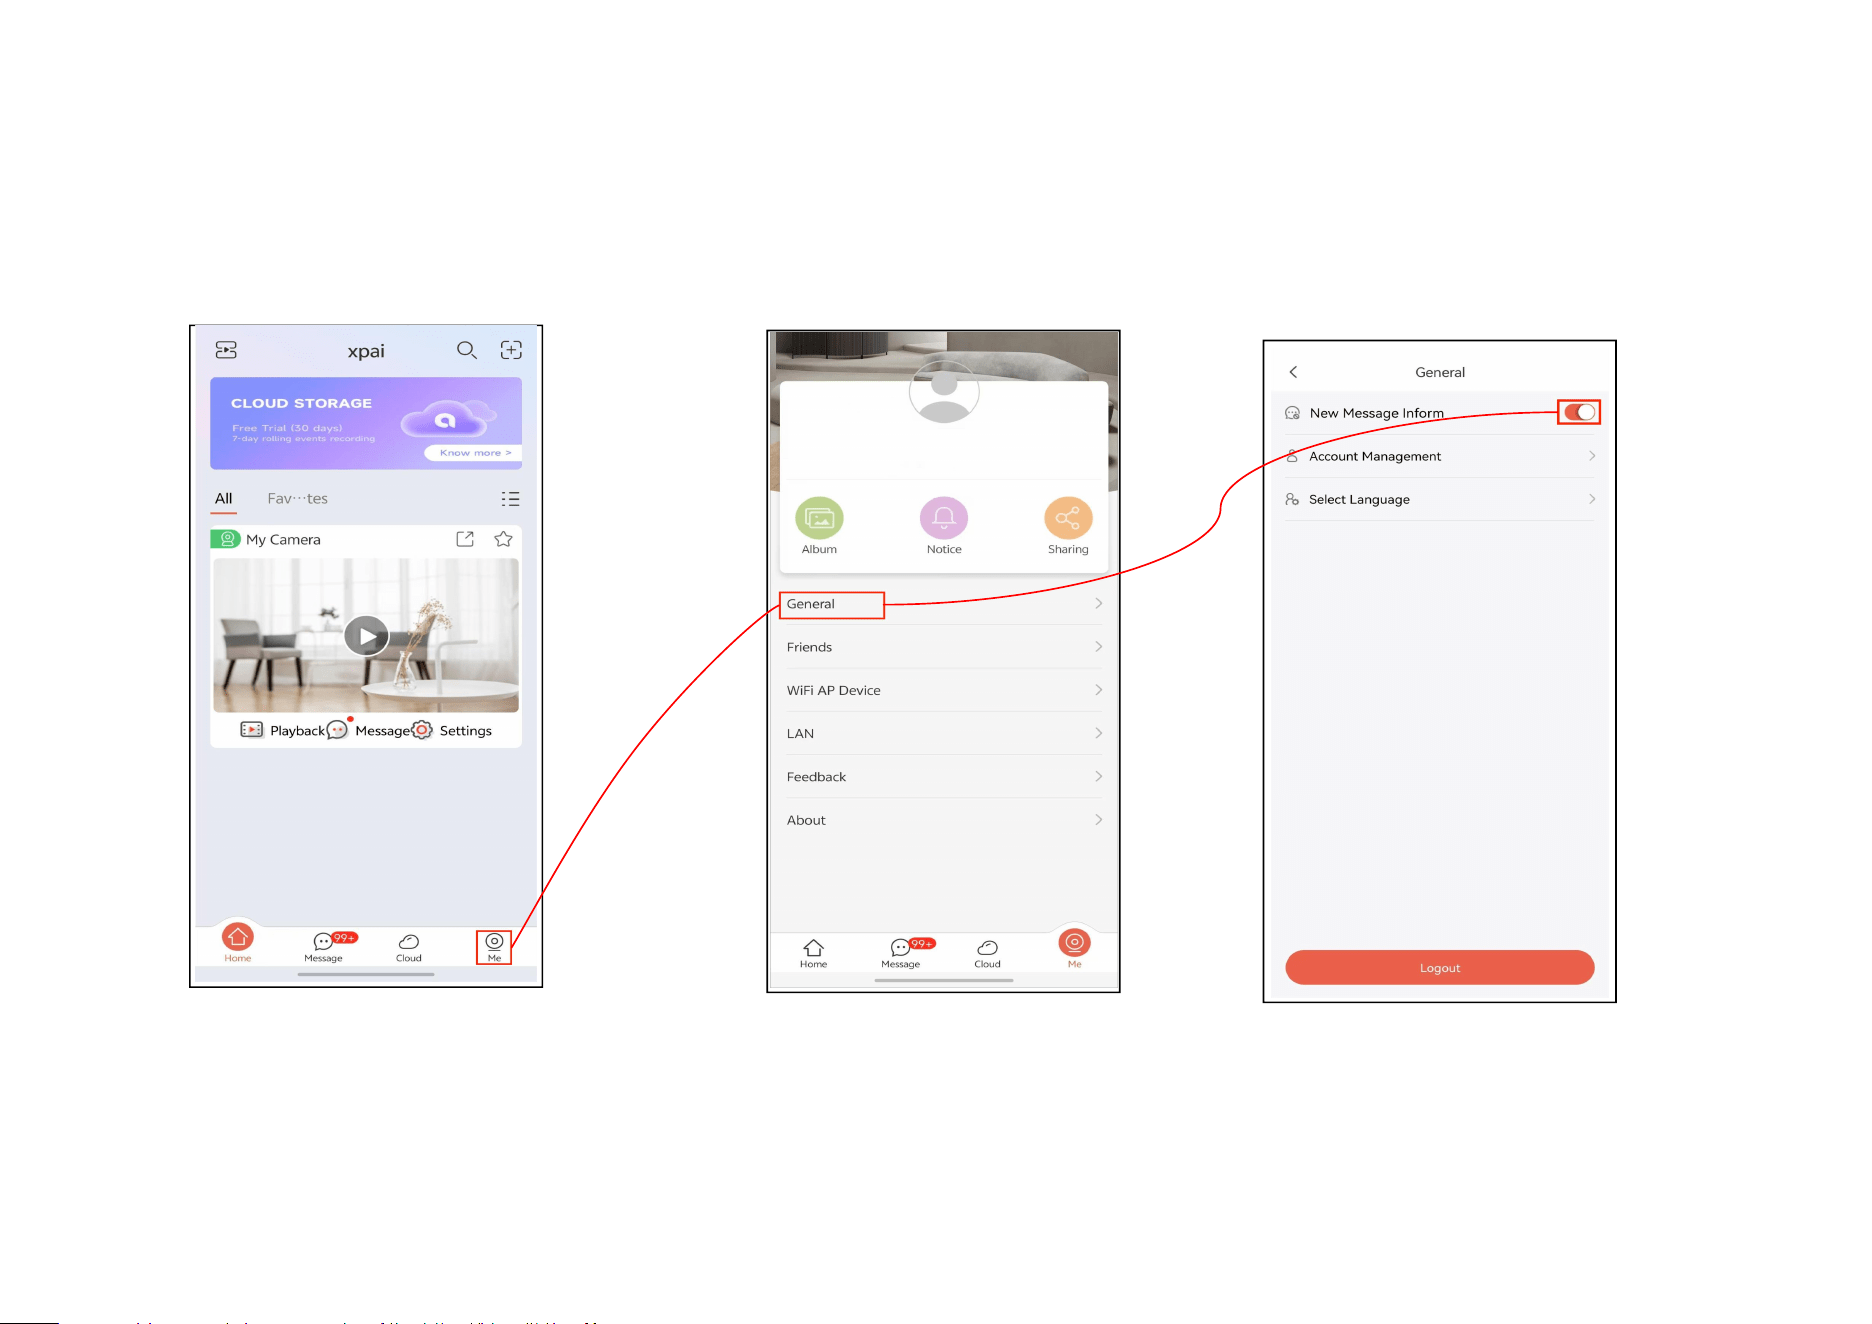
Step 1:Tap ‘’Me’’ Step 2:Tap ‘’General’’ Step 3:Turn on this message inform button
10
Or Step 1:Users can view relevant alert messages Step 2:User can also turn on message notifications by clicking
in the message section and can turn them this button
on or off using buttons
11
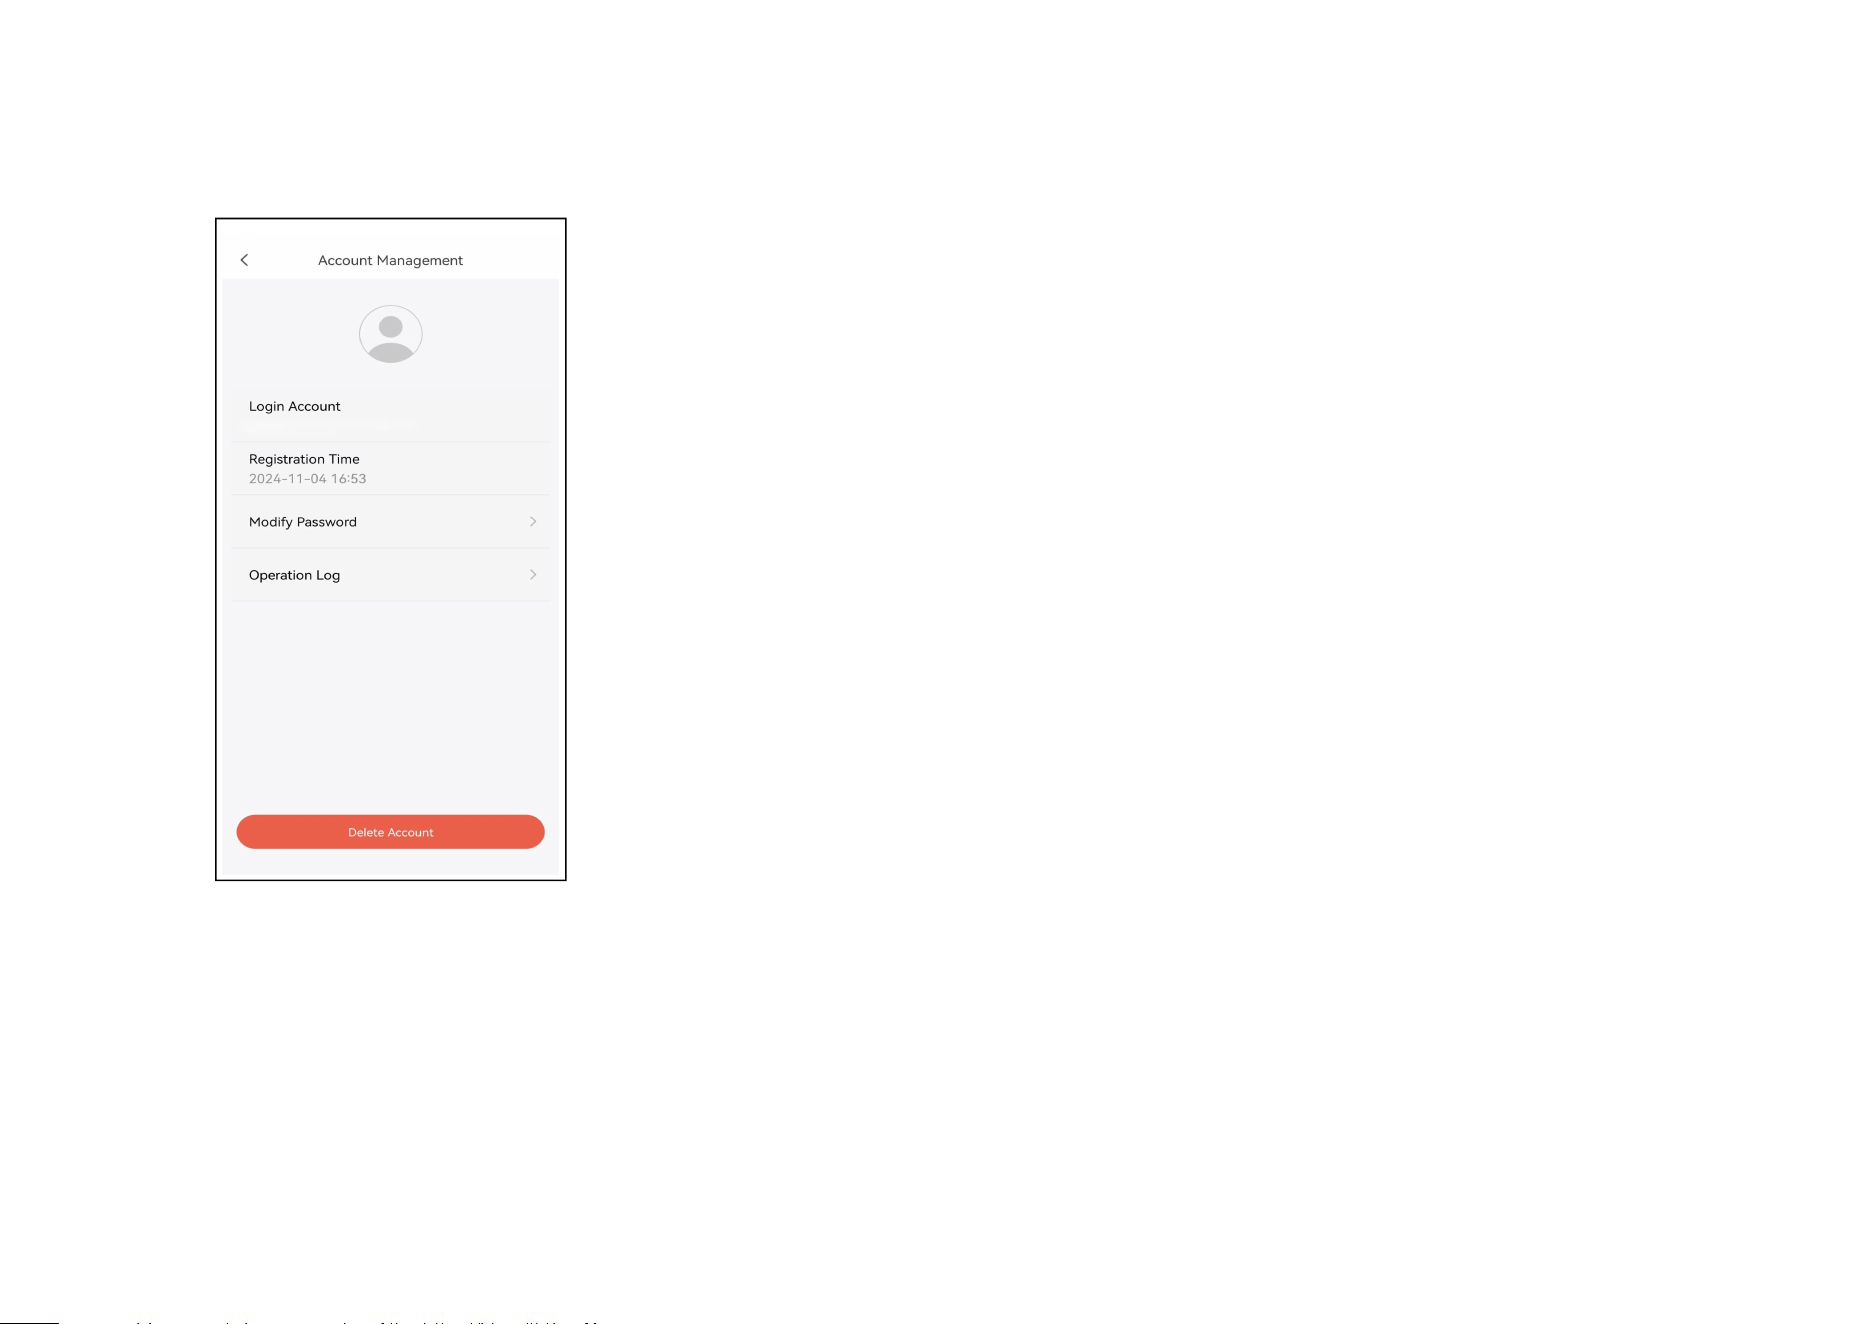
5.3 How to manage user’s account
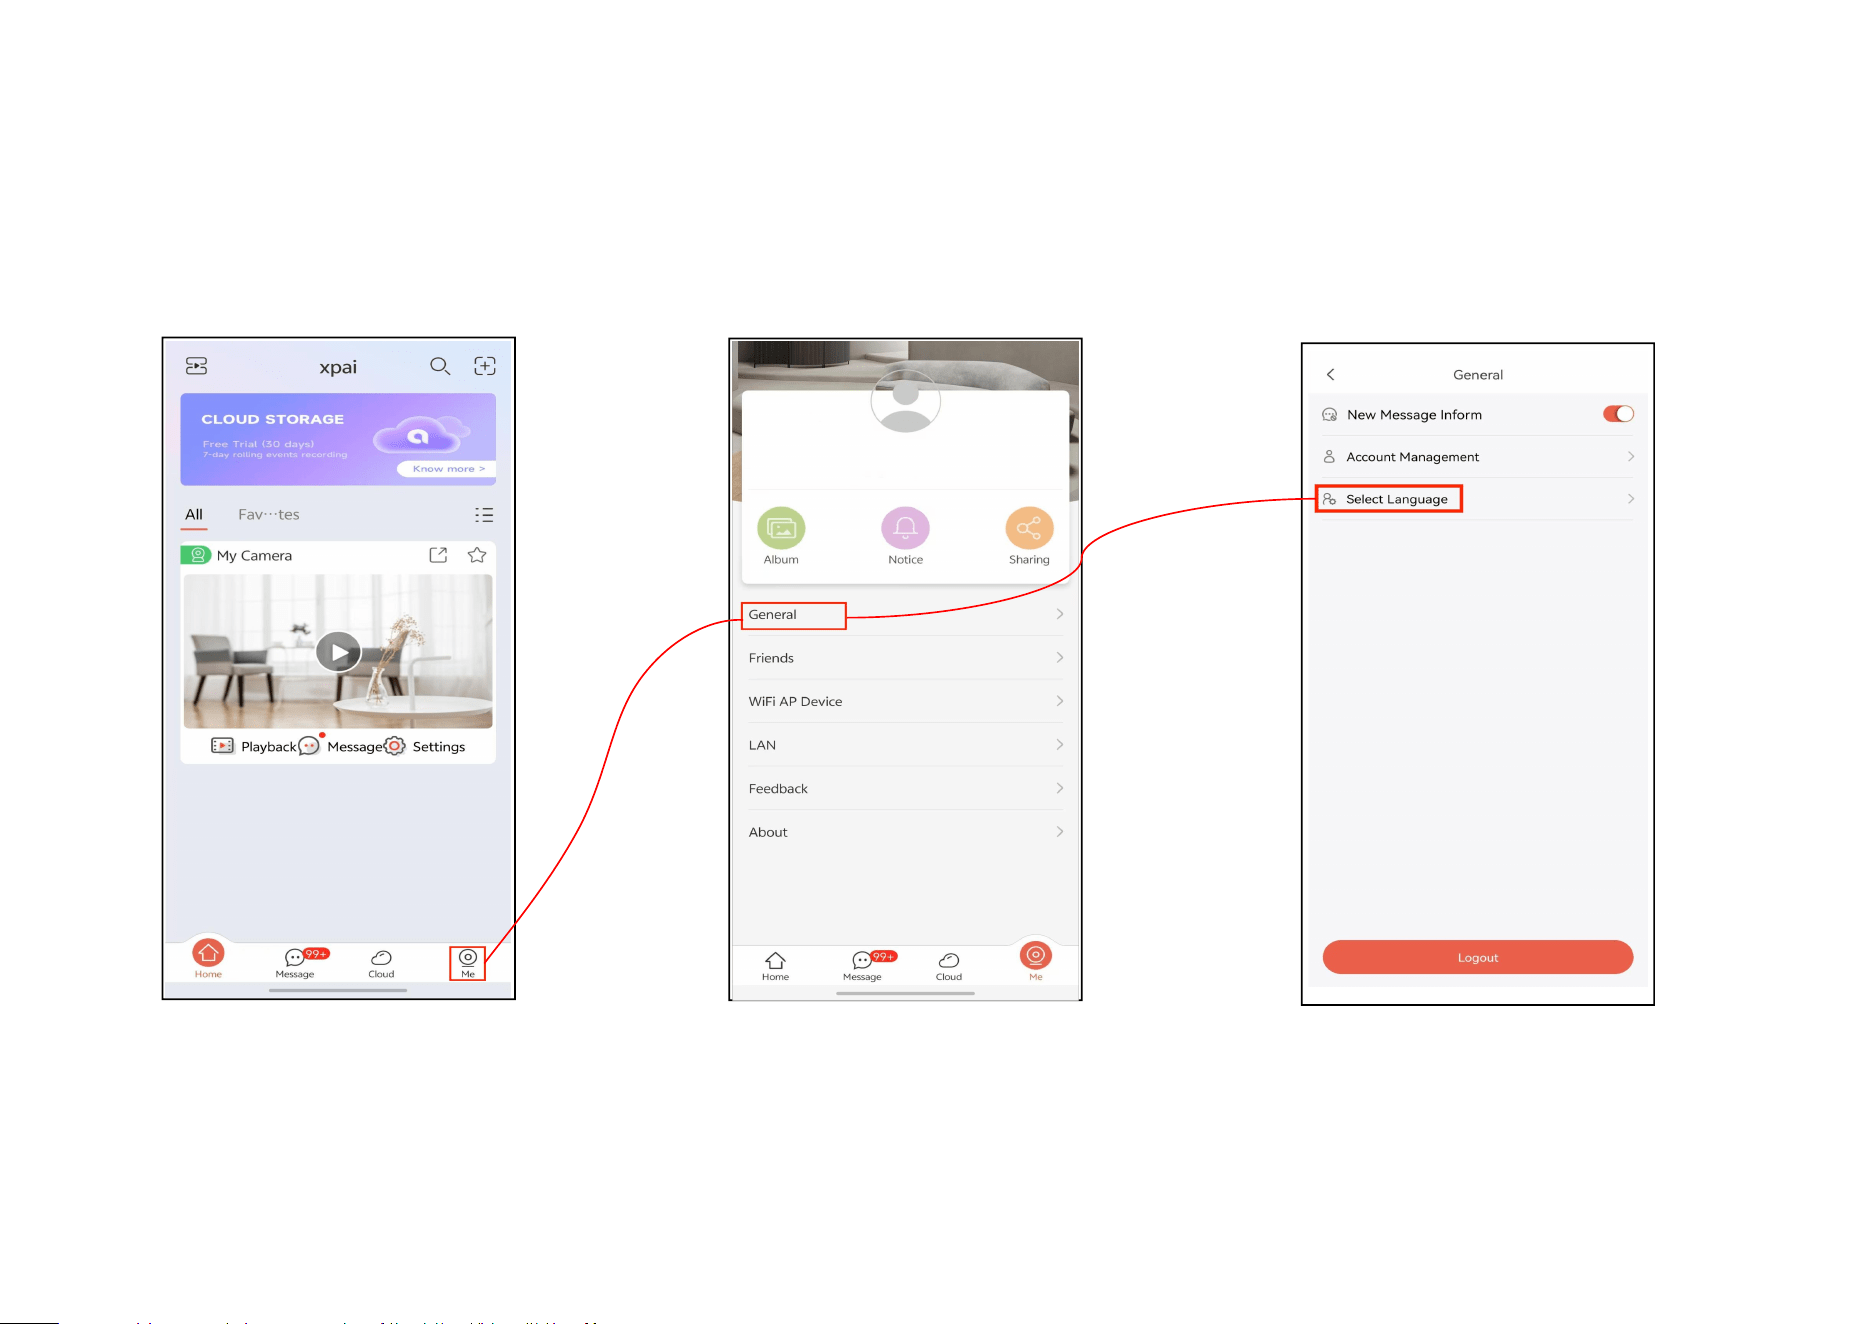
Users can manage their accounts through the basic settings in the APP, such as changing passwords, viewing logs, deleting
accounts, and more.
Step 1:Tap ‘’Me’’ Step 2:Tap ‘’General’’ Step 3:Tap account management
12
Step 4:In account management, you can view account information, change your password, check logs, and deactivate your account.
13
5.4 How to switch different languages
Step 1:Tap ‘’Me’’ Step 2:Tap ‘’General’’ Step 3:Tap select language
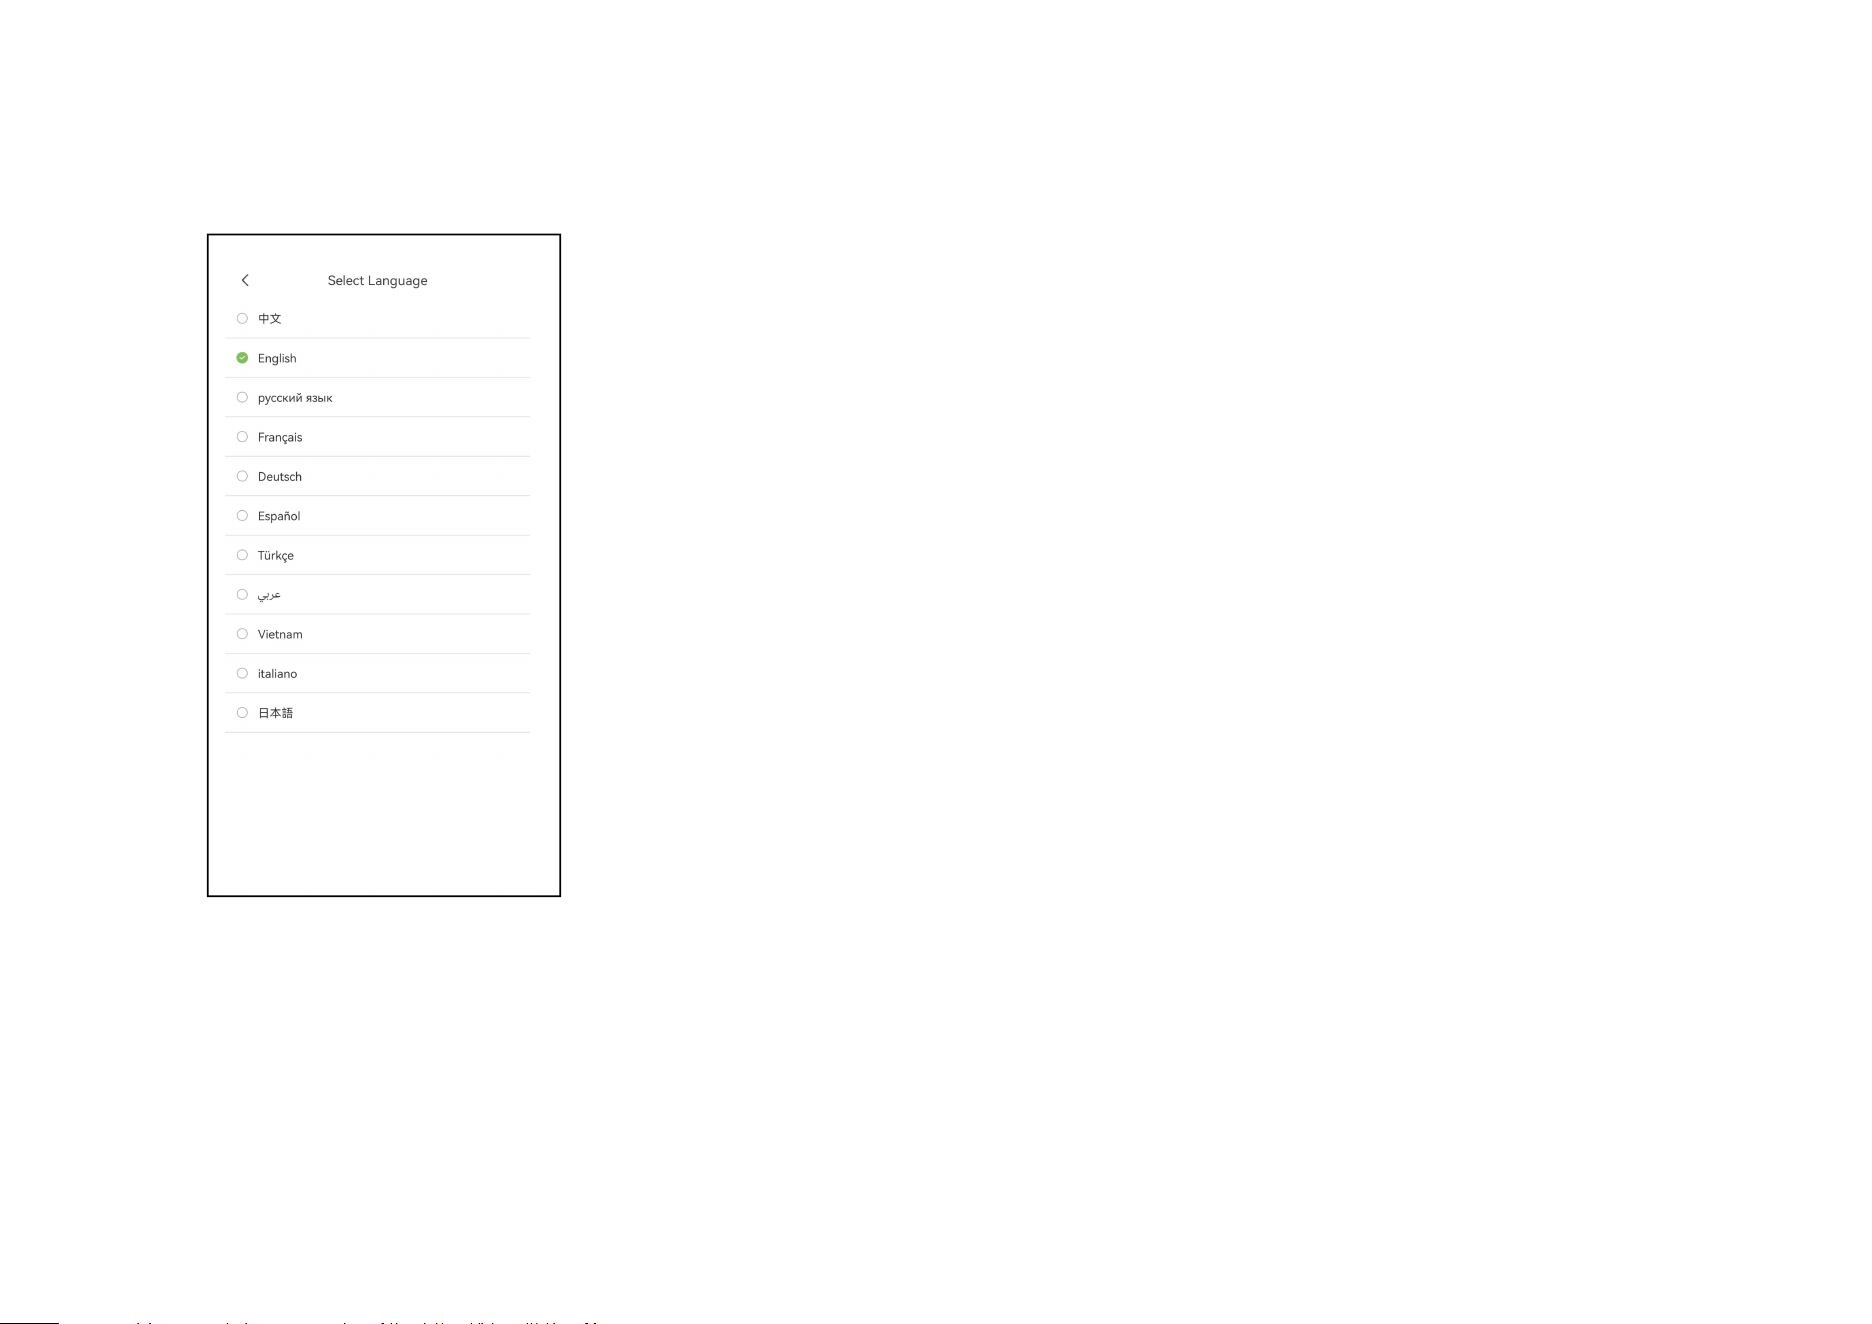
14
Step 4:Our app supports multiple languages, allowing users to select the one that best suits their needs.
15
6.Main Function
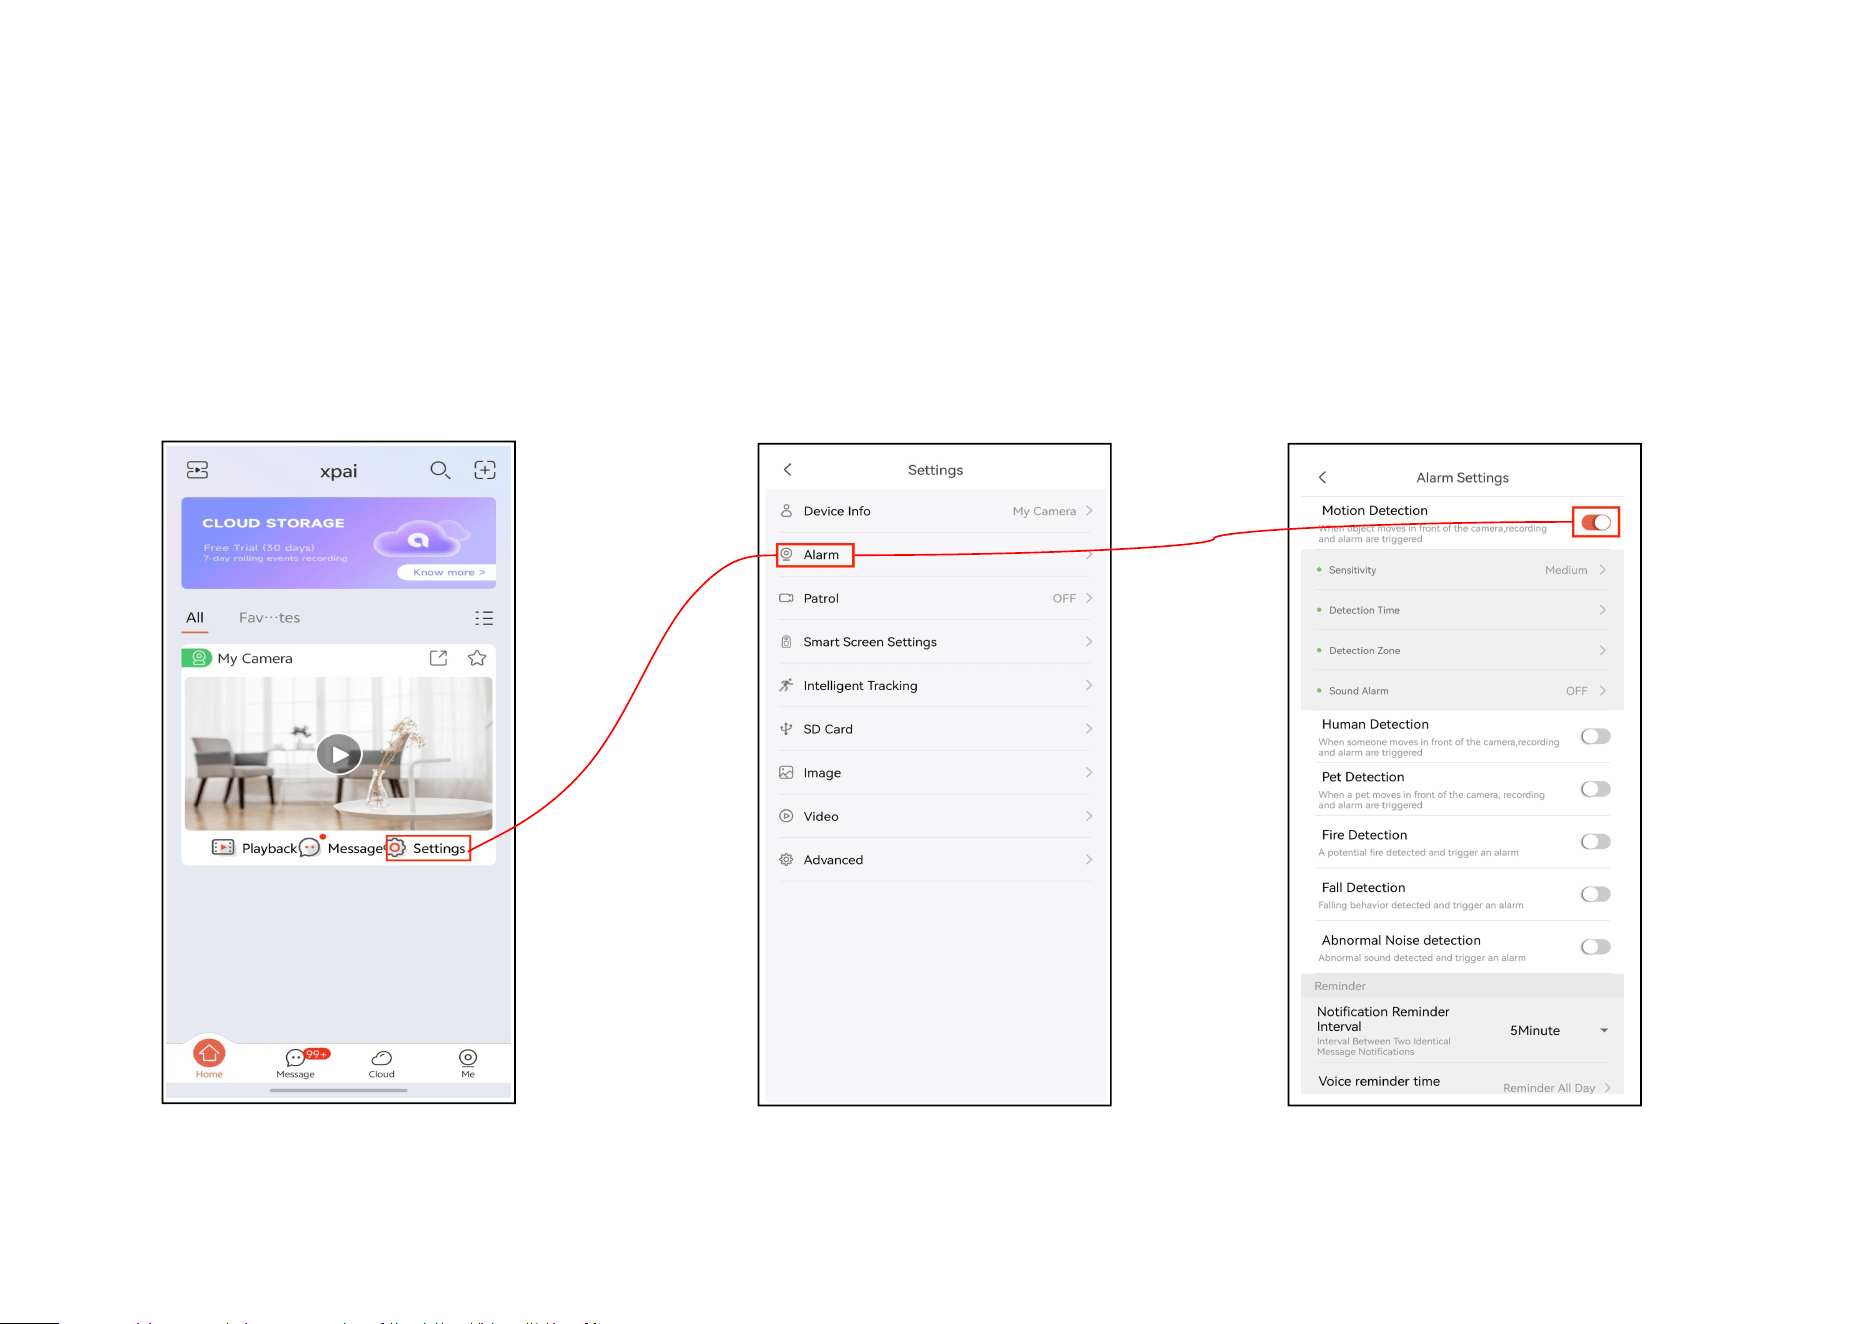
6.1 How to set up alarm
Step 1:Tap ‘Settings’ Step 2:Tap ‘Alarm’ Step 3:Turn on the detection function
16
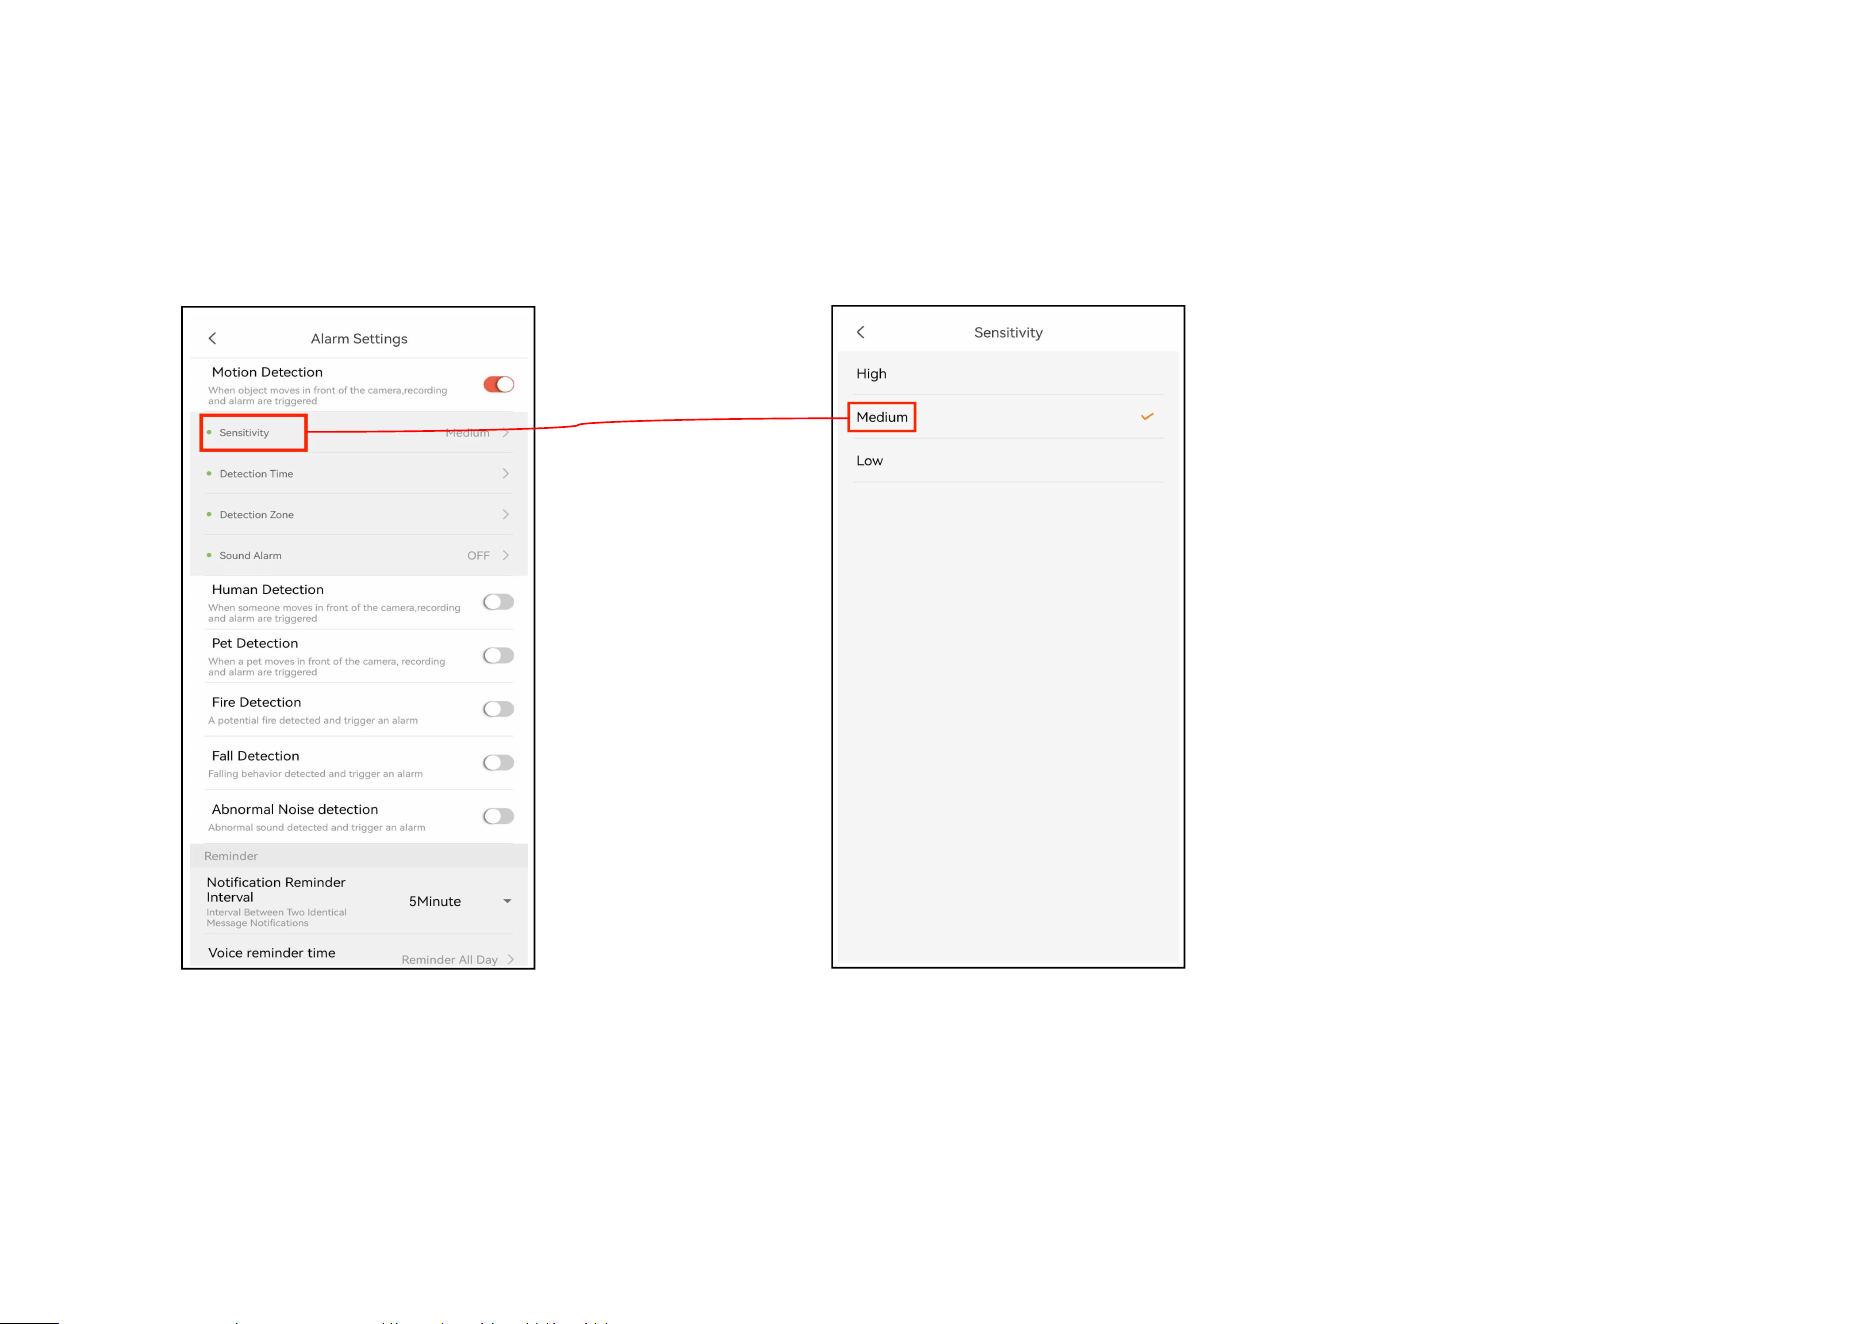
Sensitivity:
Step 1:Tap ’sensitivity’ Step 2:User can select the sensitivity
Note: We implement the alarm function through software algorithms, so different sensitivity levels affect the accuracy of the alarm.
Therefore, if false alarms occur, the sensitivity can be adjusted to low.
17
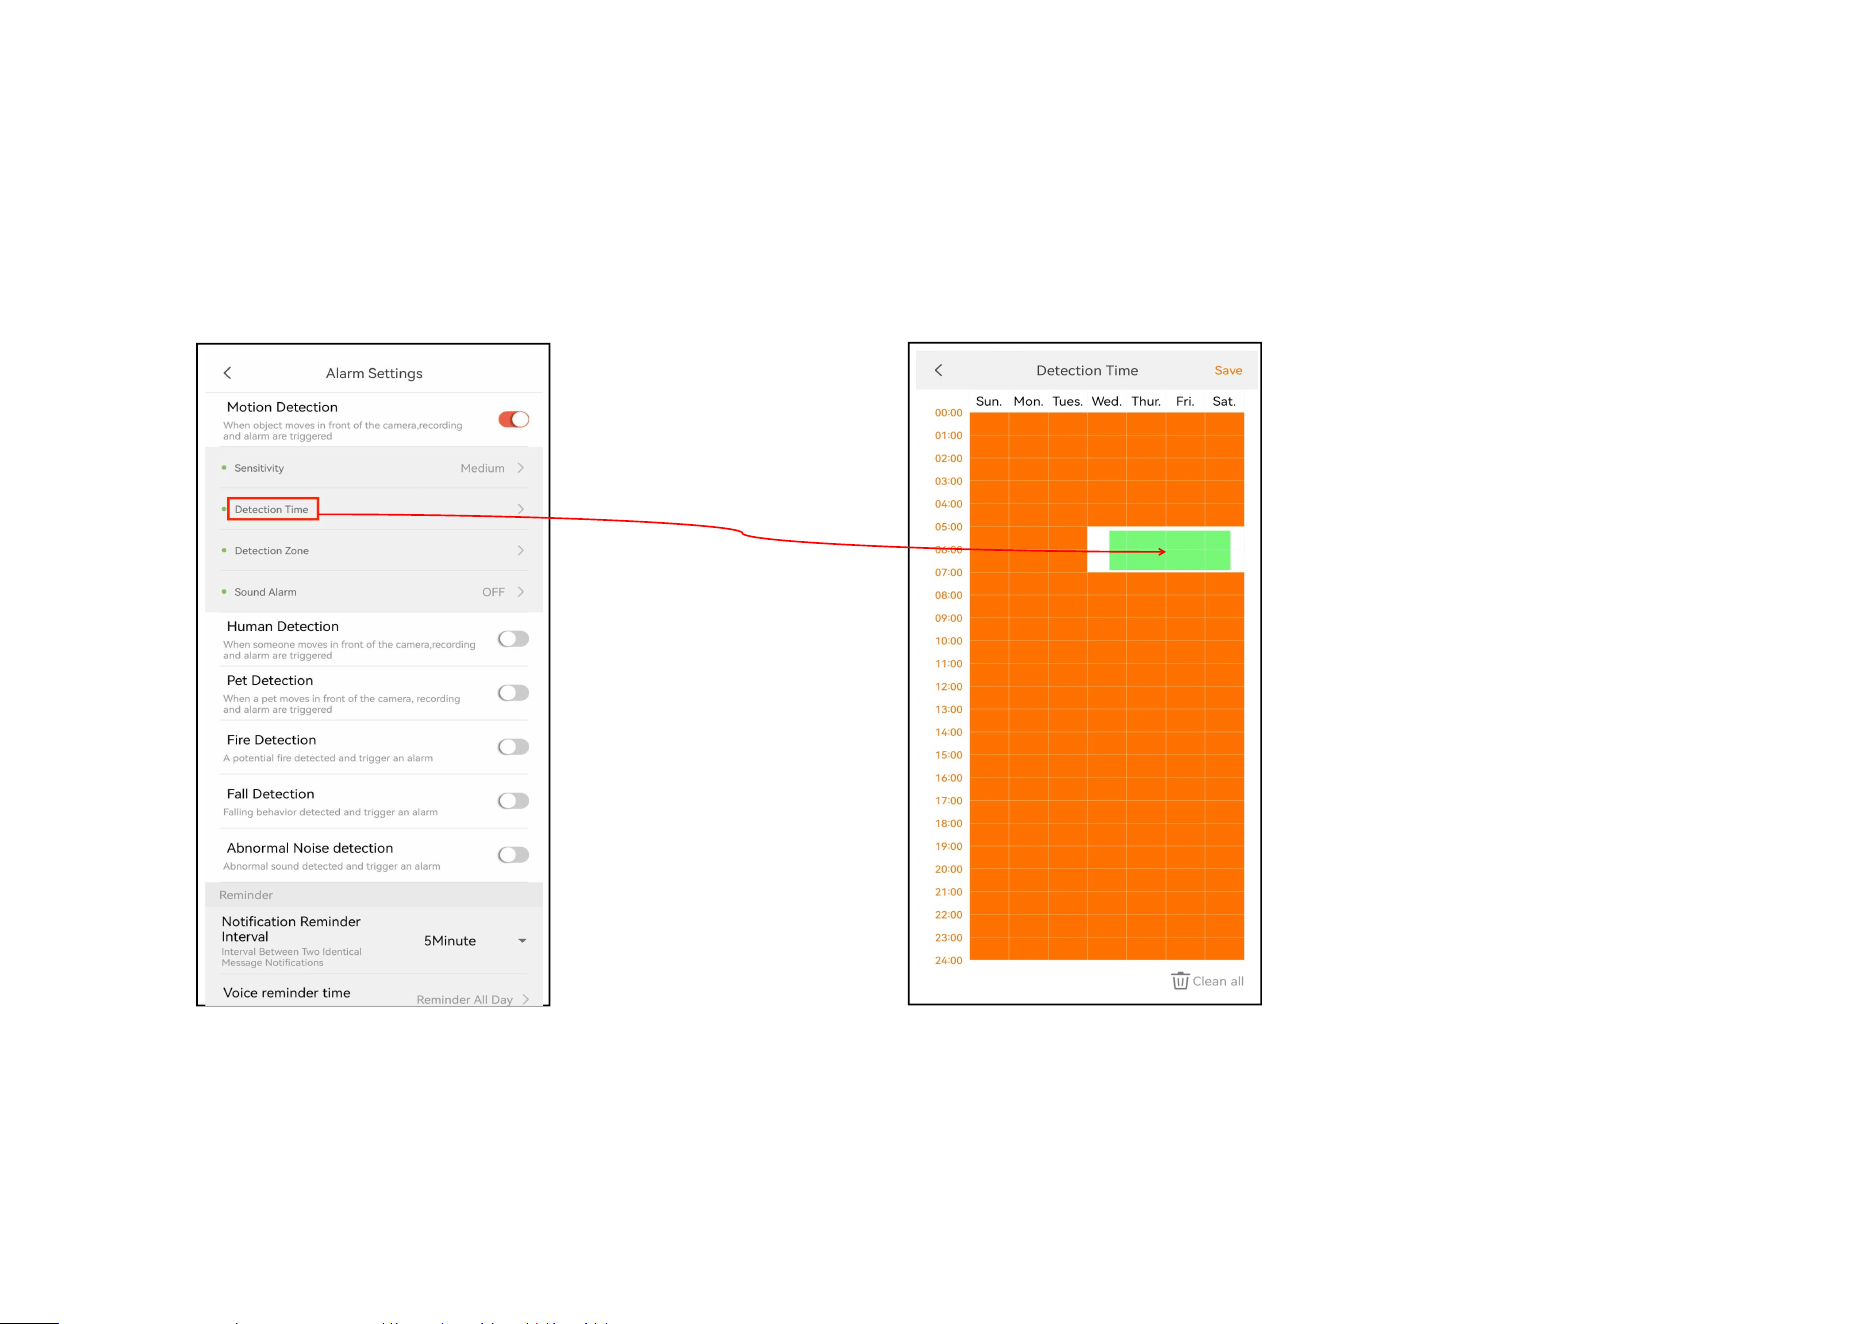
Detection time
Step 1:Set up detection time Step 2:Users can set different detection times
by selecting different time periods.
18
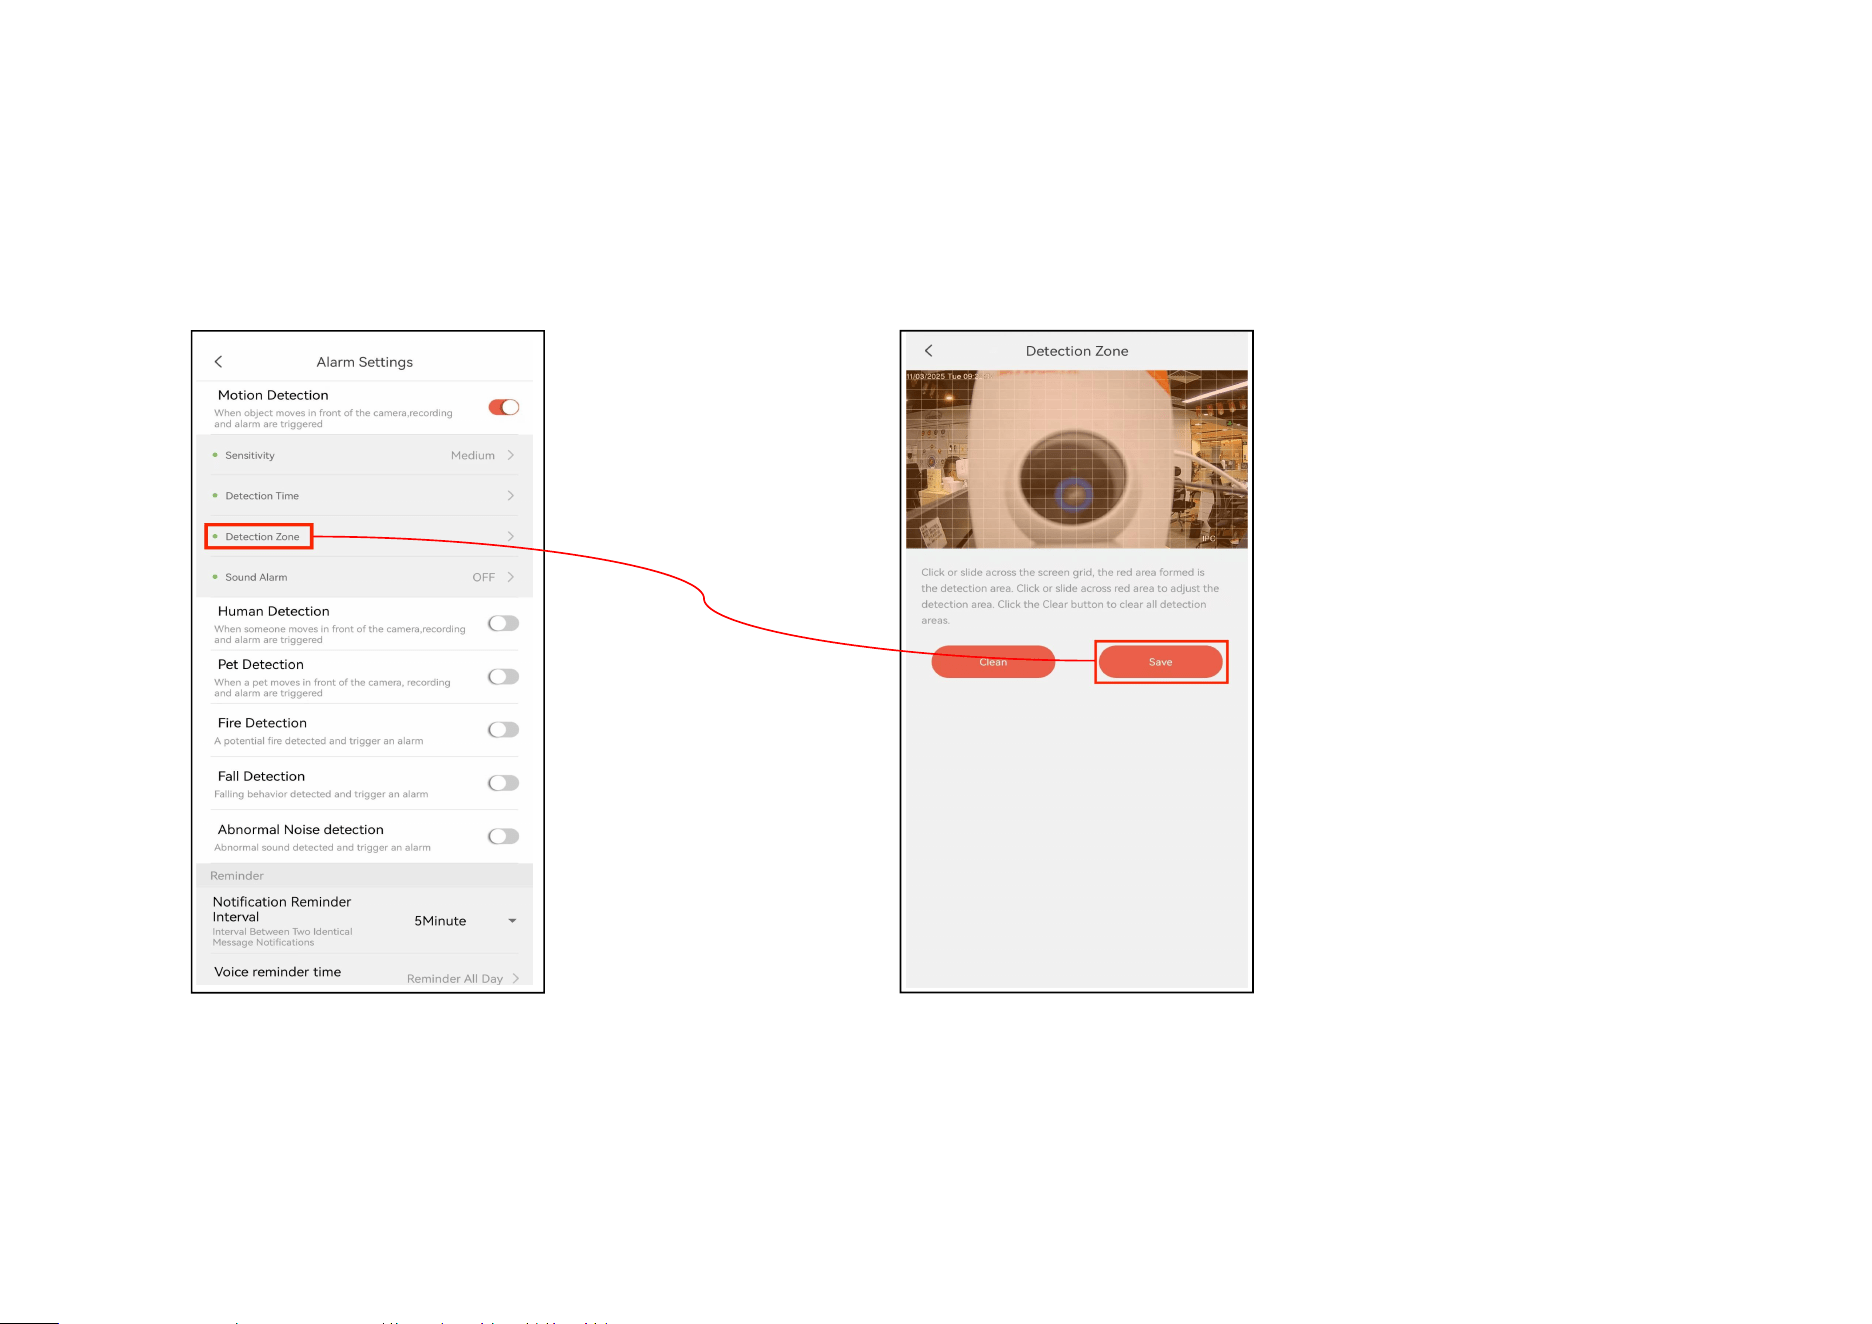
Set up detection zone
Step 1:Tap ‘detection zone’ Step 2:Users can select the detection area by dragging
and dropping.
19
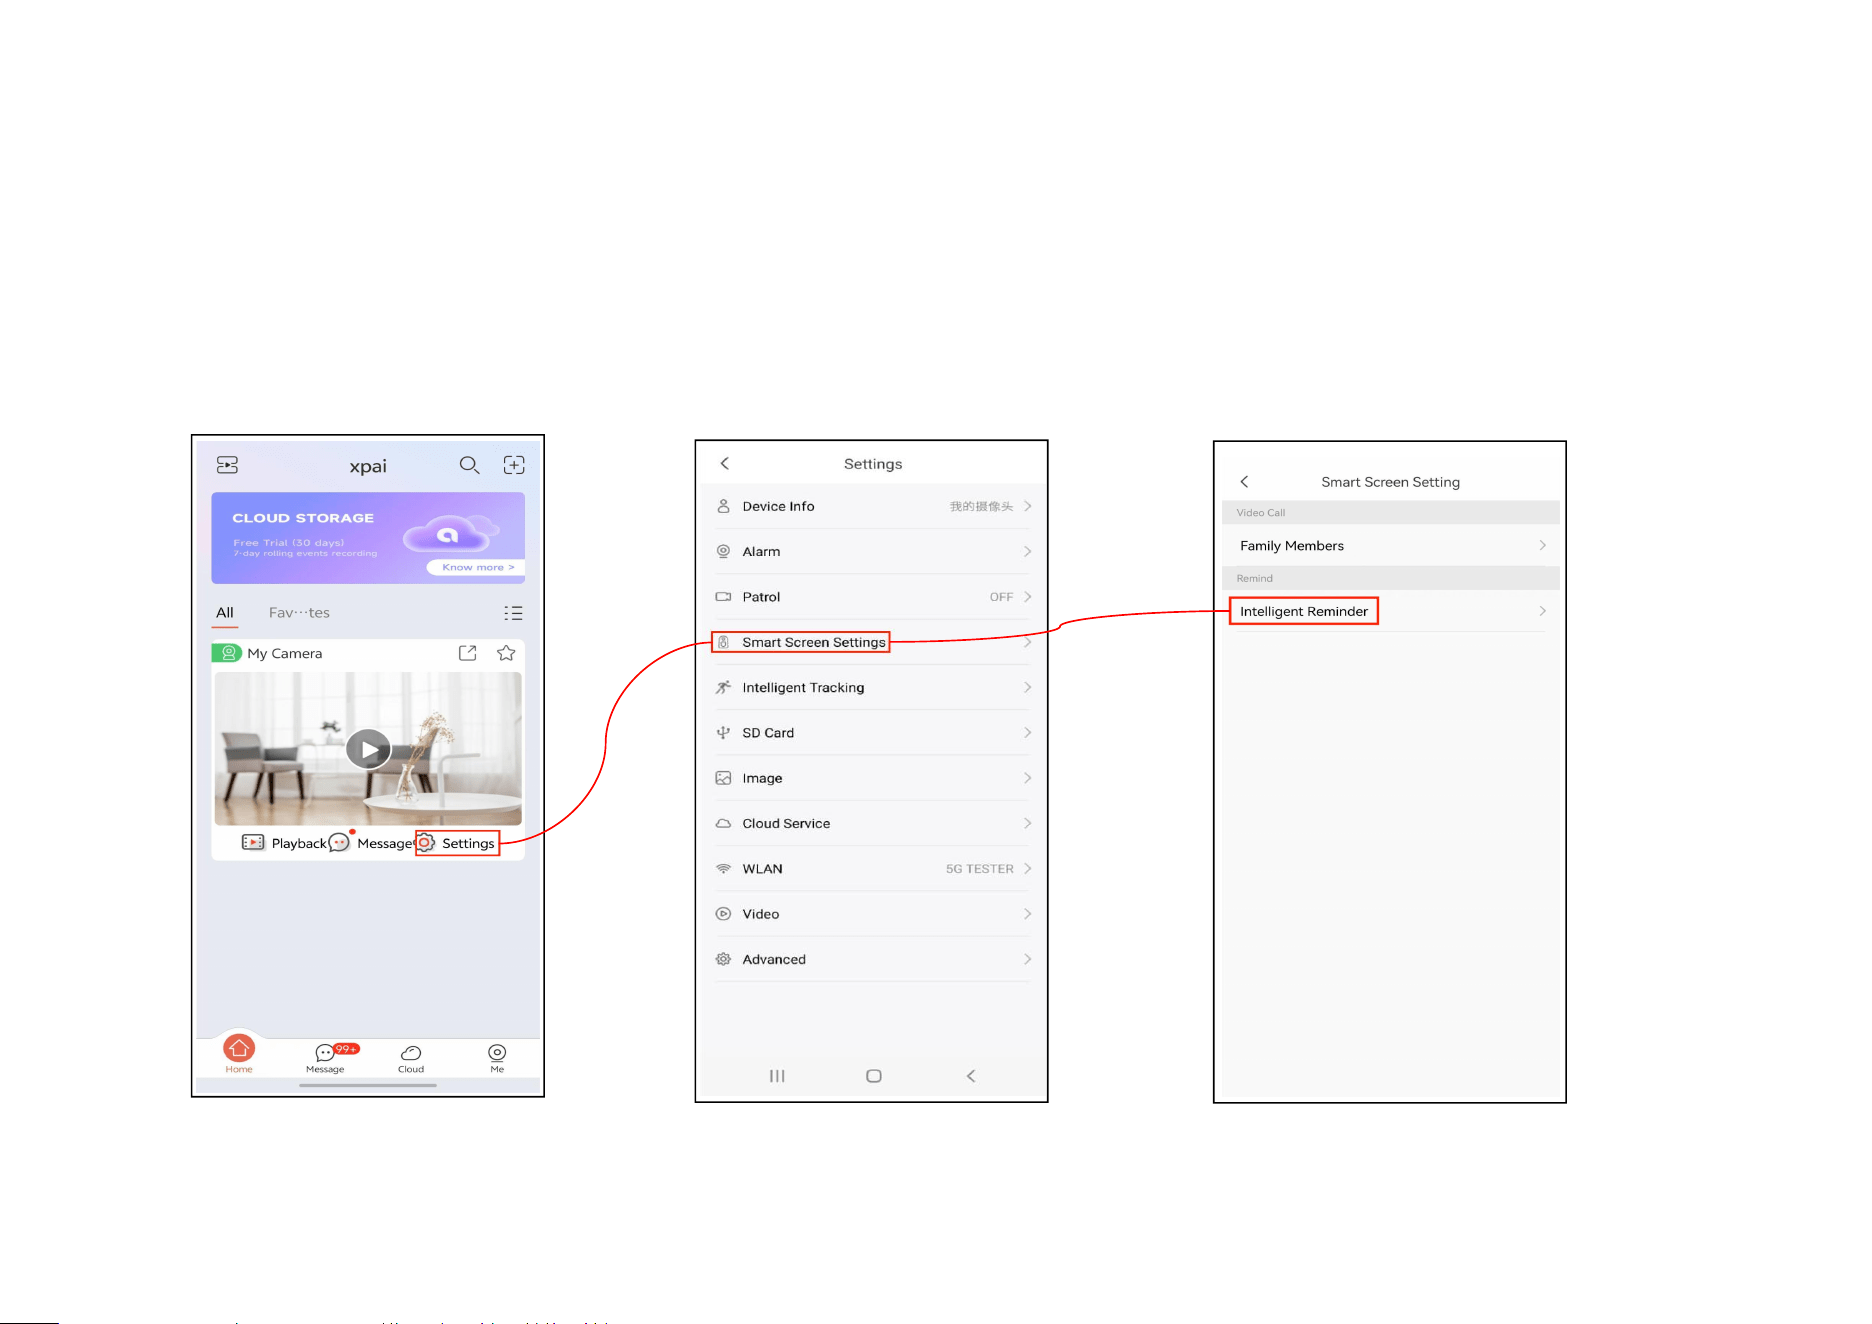
6.2 How to set up reminder
Users can set reminders to ensure they don't forget certain tasks or events, and they can choose either a default ringtone
or record their own sound.This function is only applicable to A50.
Step 1:Tap ‘Settings’ Step 2:Tap ‘Smart Screen Settings’ Step 3:Tap ‘Intelligent Reminder’
20
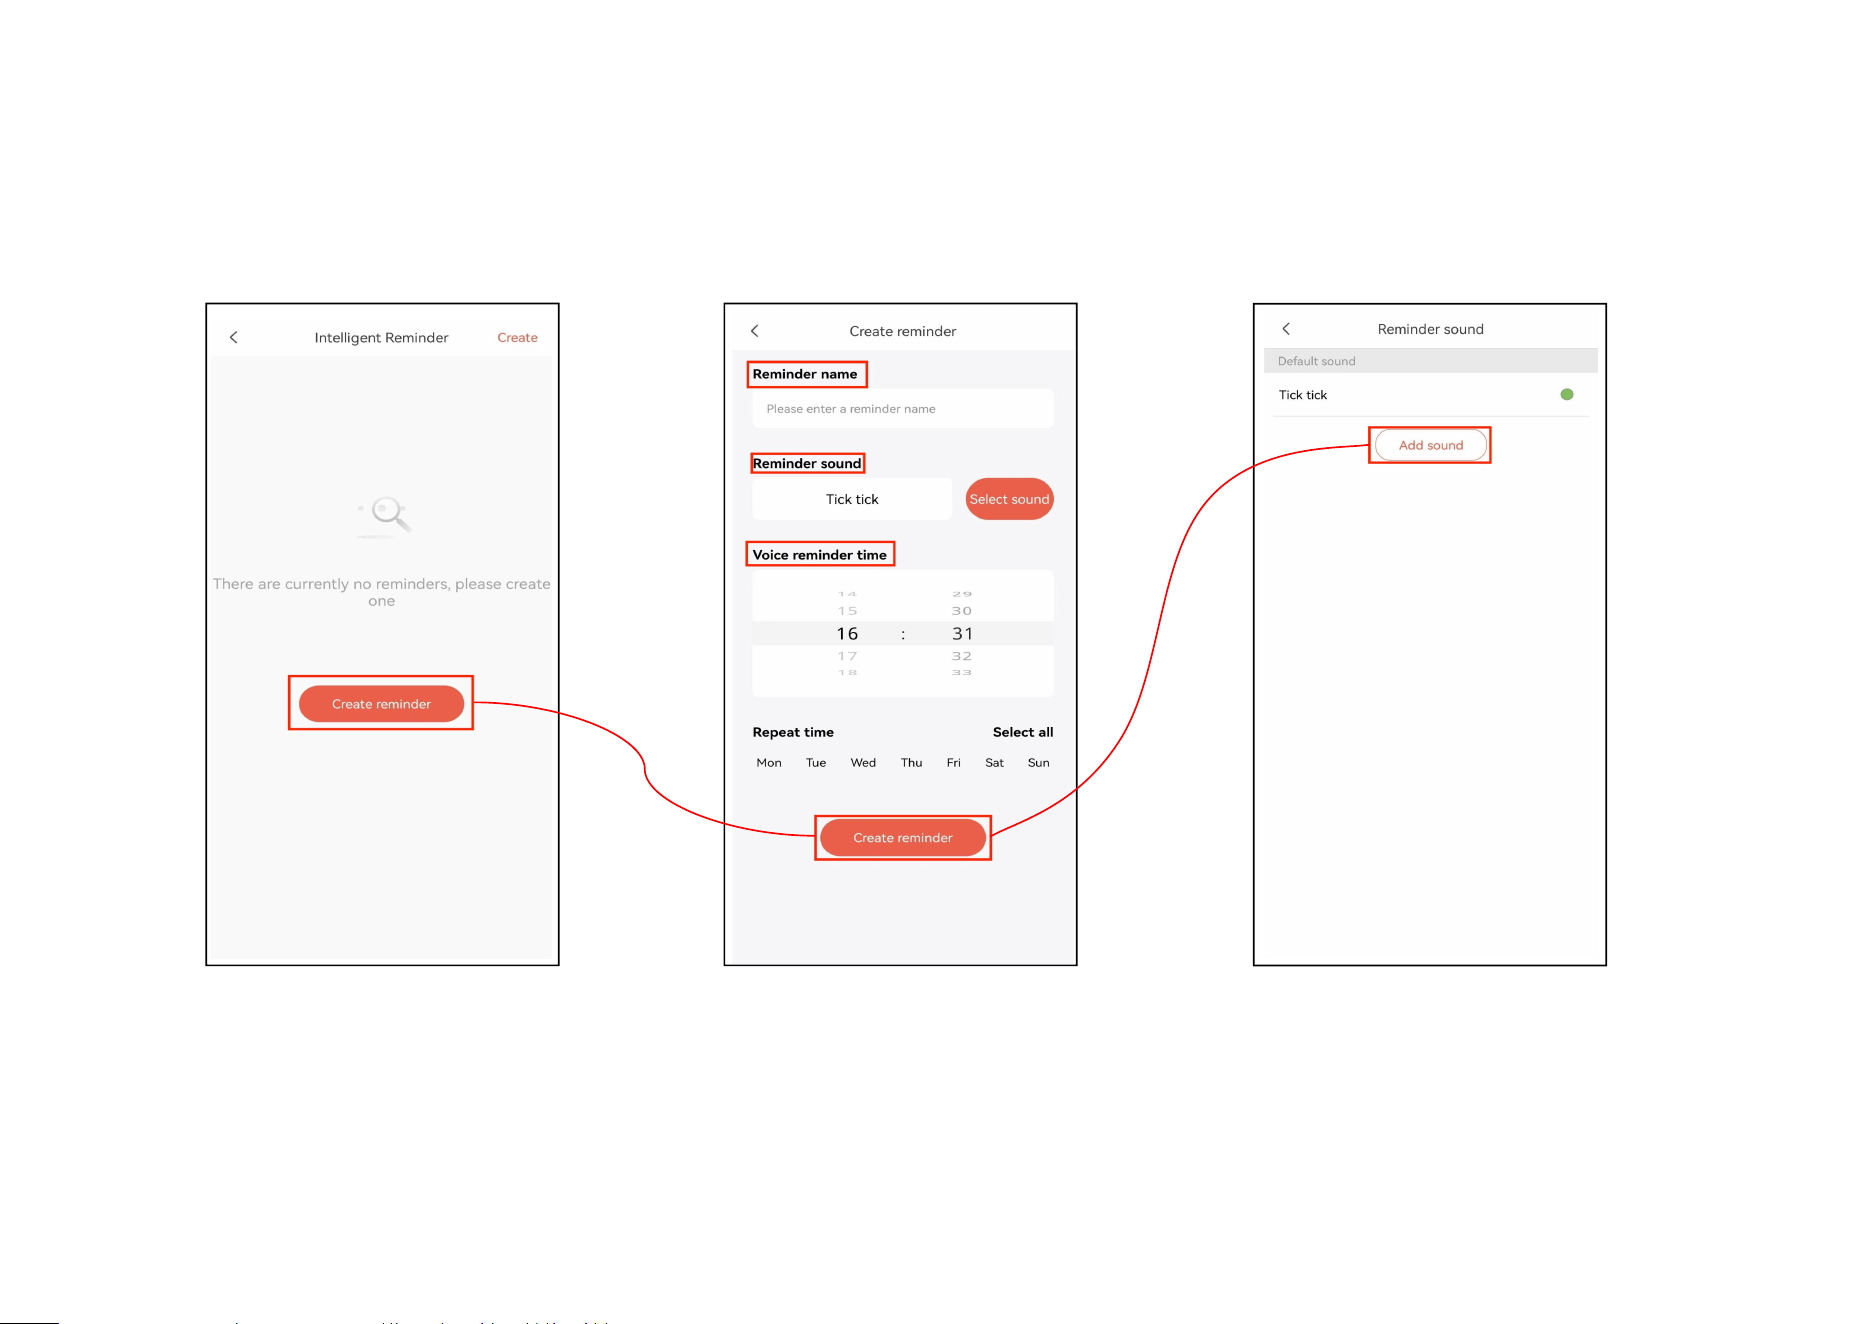
Step 4:Tap ‘Settings’ Step 5:Customers can choose their own Step 6:Tap ‘Add sound’,
ringtones,time, and date, or customize the Users can customize the voice
voice
21
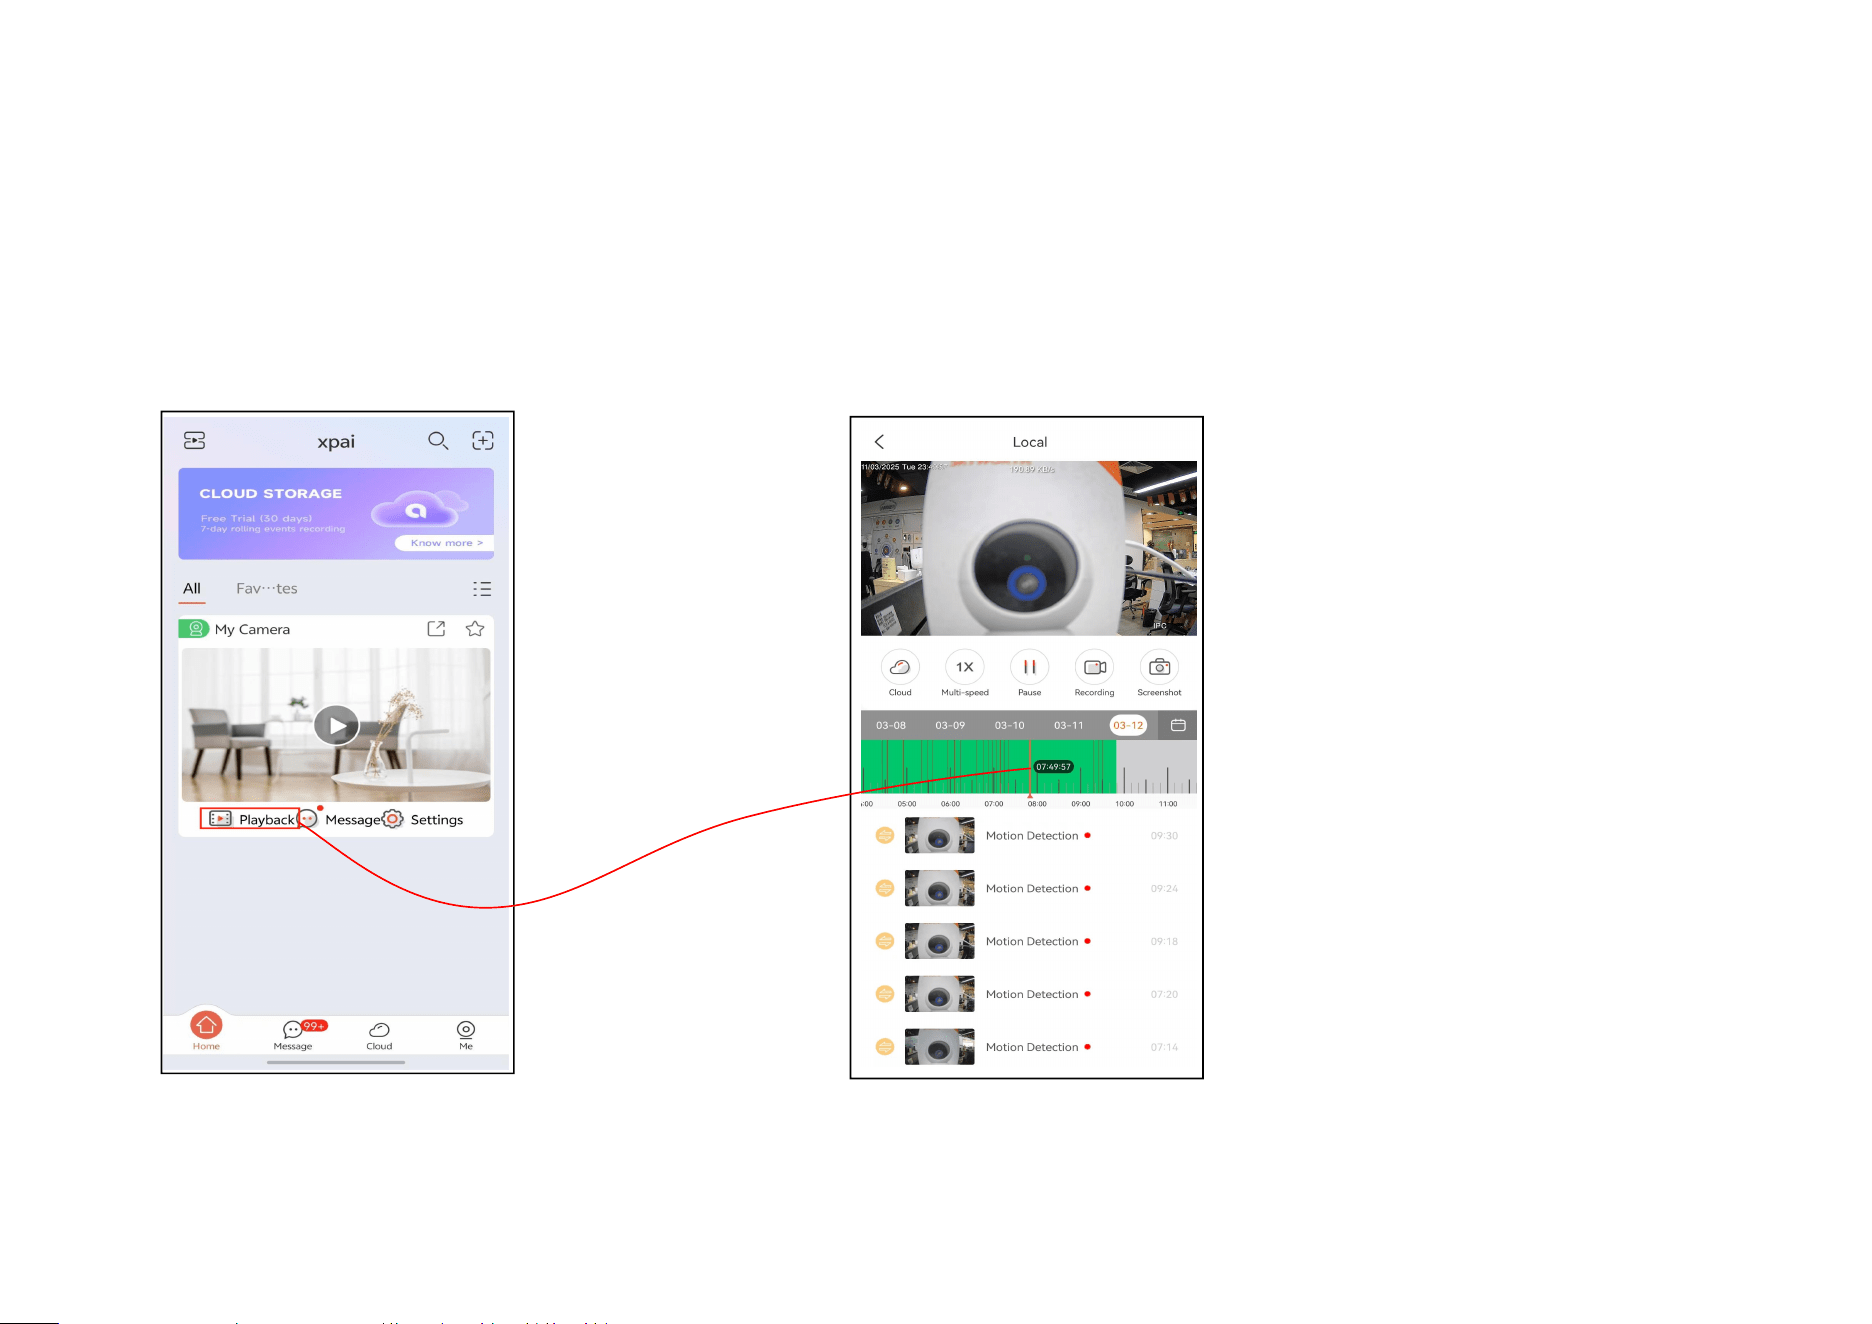
6.3 How to view playback
Local playback
Step 1:Tap ‘playback’ Step 2:Users can click on alarm events or drag
the progress bar to watch the playback.
22
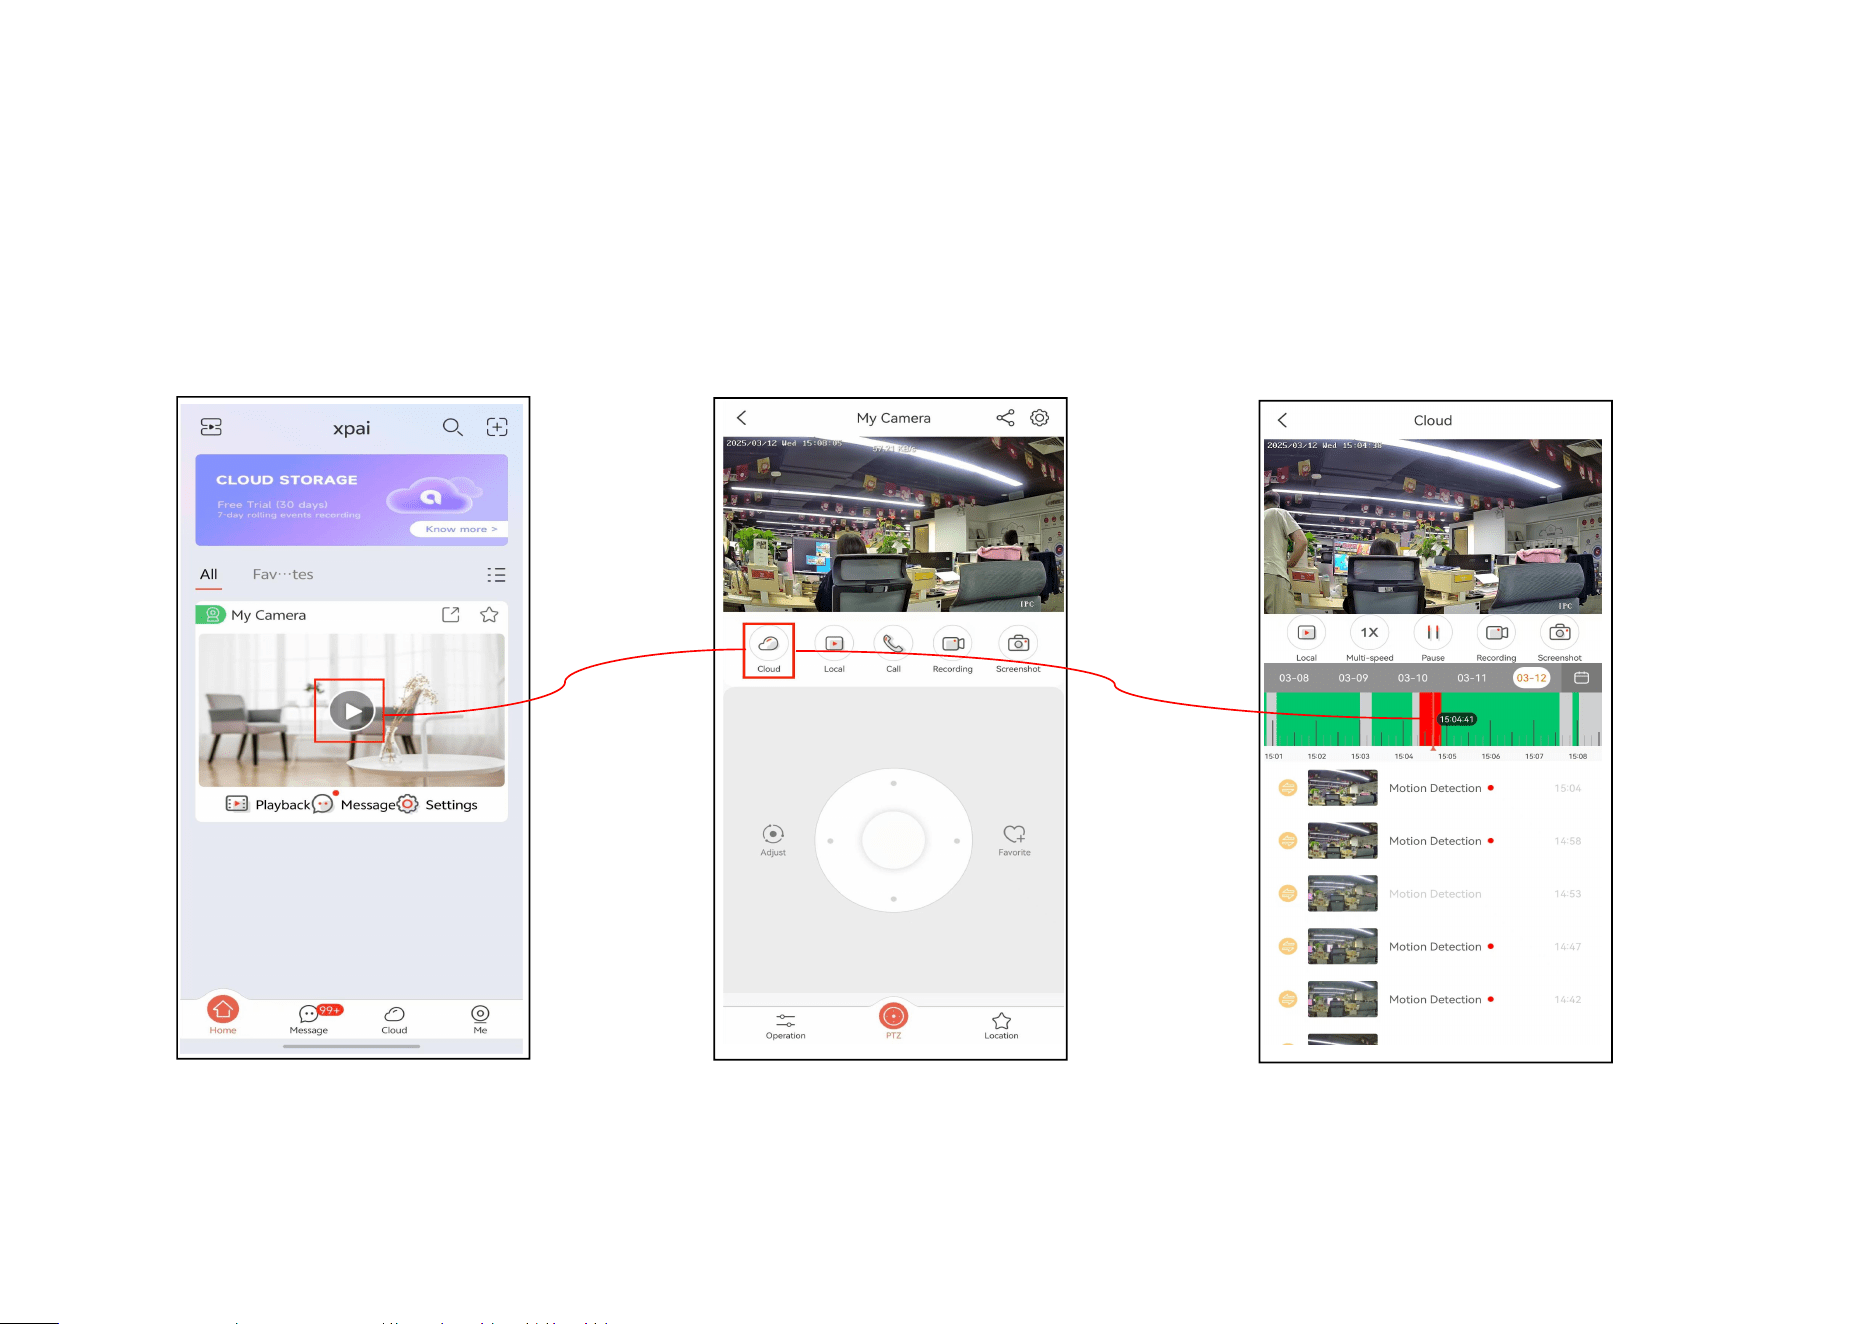
Cloud playback
After purchasing cloud storage, users can watch playback videos directly on the app without the need for a TF card.
Step 1:Tap ‘playback’ Step 2:Tap ‘Cloud’ Step 3:Users can select a time period to view
different playback footage
23
6.4 Patrol
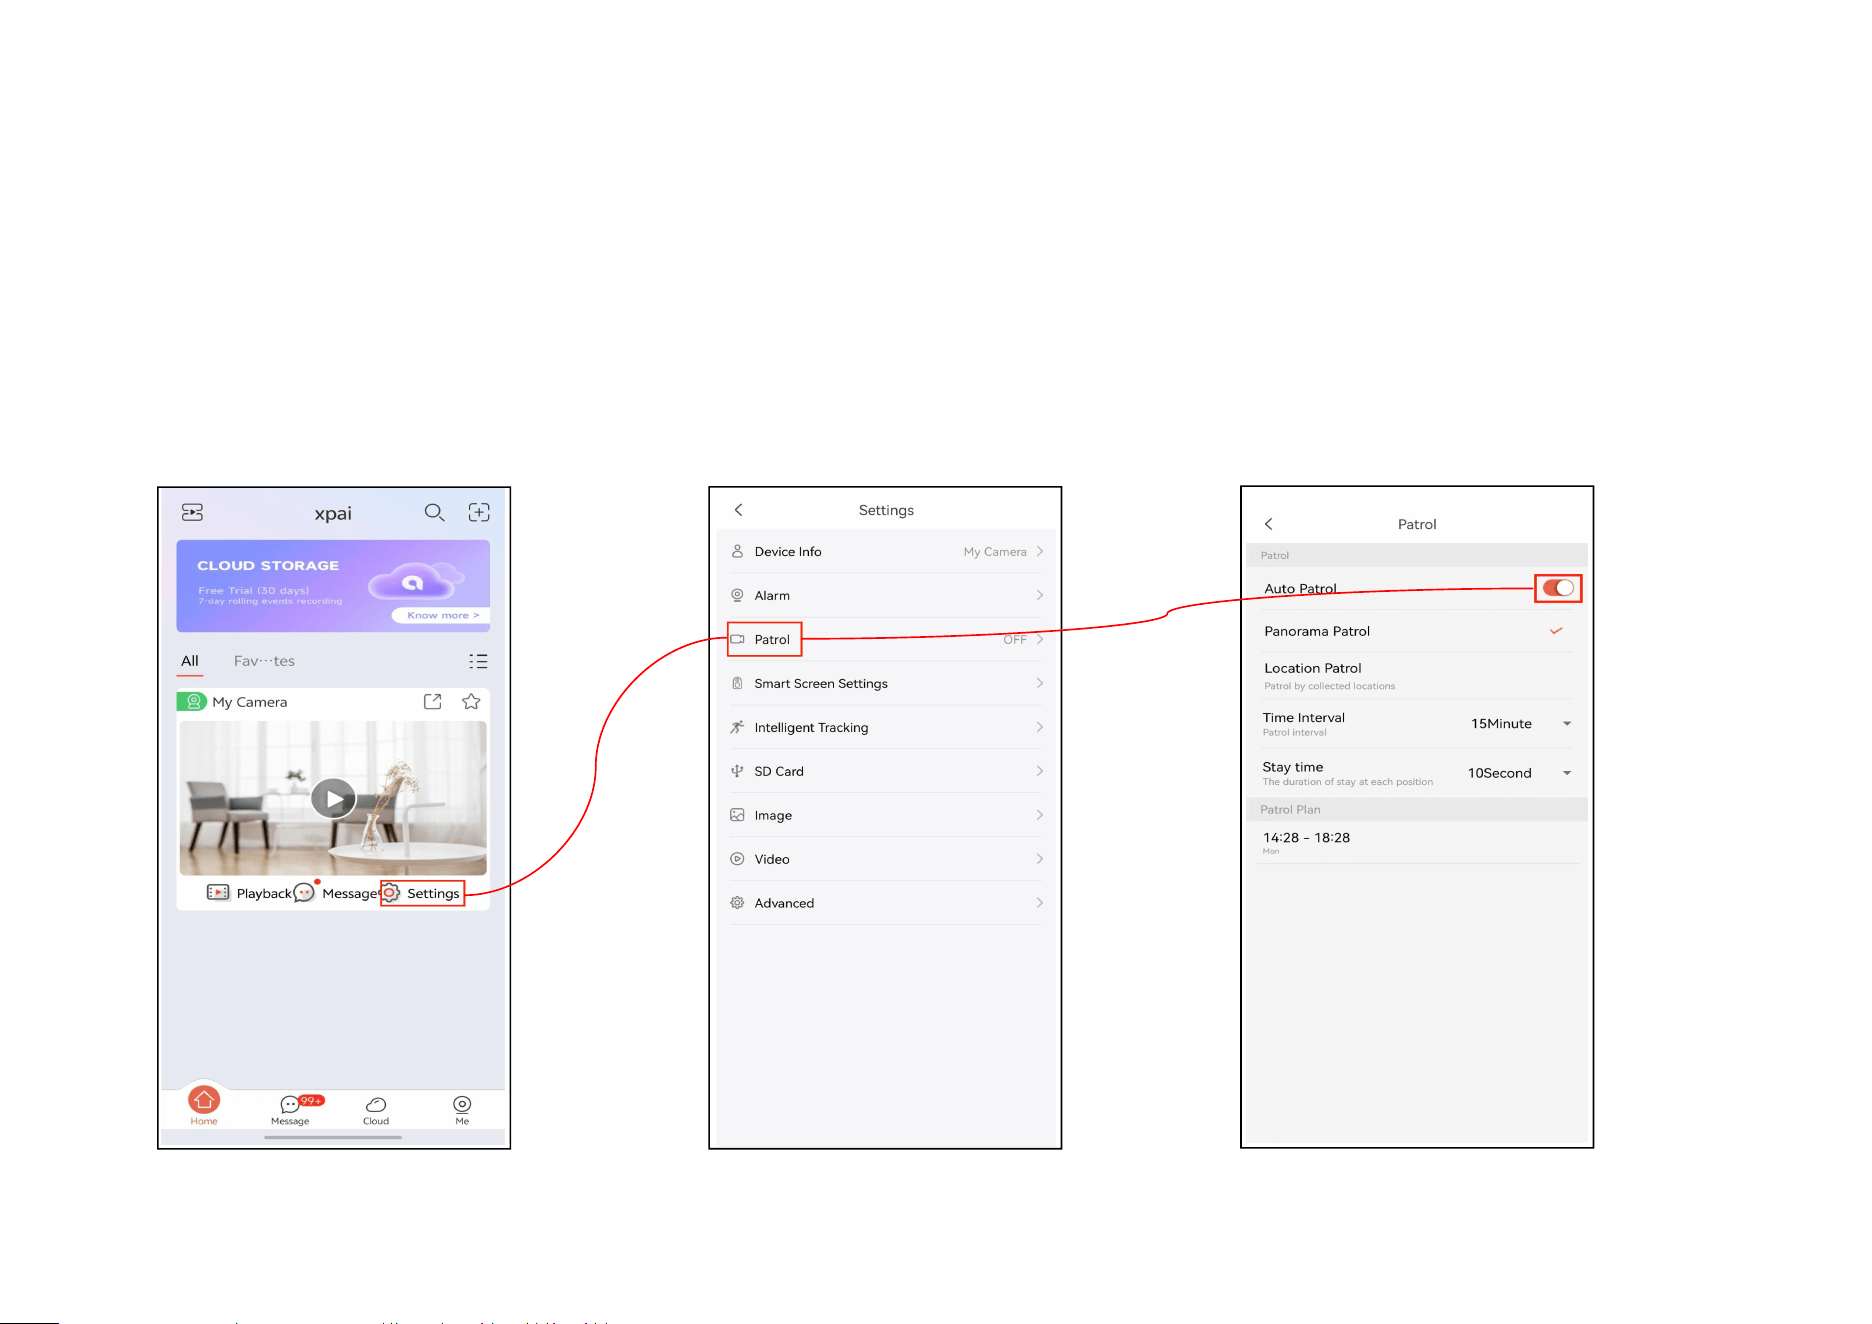
6.4.1 How to set up panorama patrol
Panorama Patrol is a feature typically found in advanced surveillance cameras, designed to enhance monitoring capabilities
by offering a comprehensive view of the surroundings
Step 1:Tap ‘Settings’ Step 2: Tap ‘Patrol’ Step 3: Turn on the ‘Patrol’
24
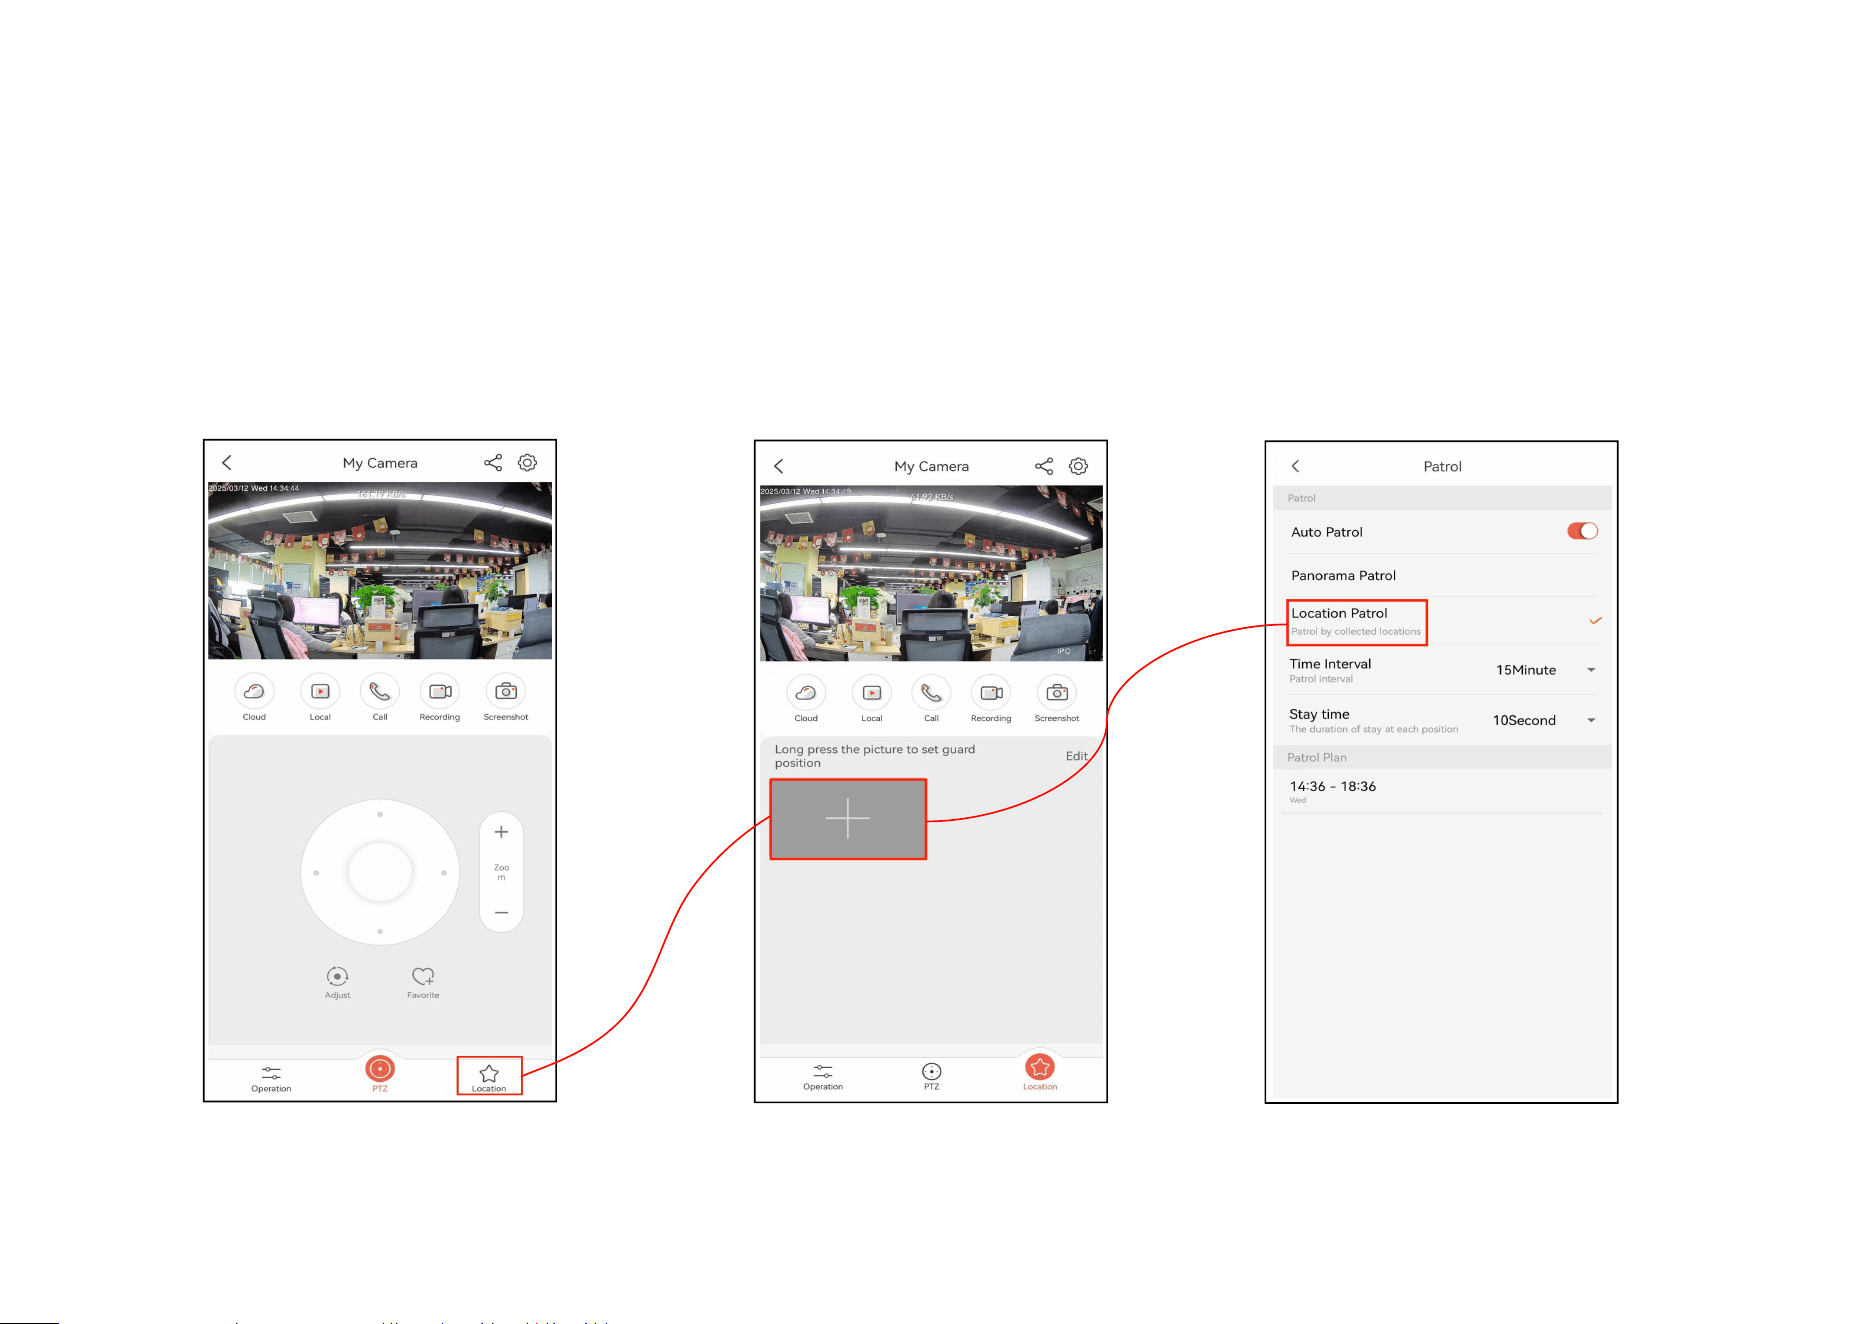
6.4.2 location patrol
Users can configure different locations for surveillance based on their monitoring needs.
Step 1:Click on Location in the Step 2:Save at least two Step 3:Choose ‘Location Patrol’ and
live stream interface different locations. you can set the patrol schedule
25
6.5 Local Area Network (LAN) Settings
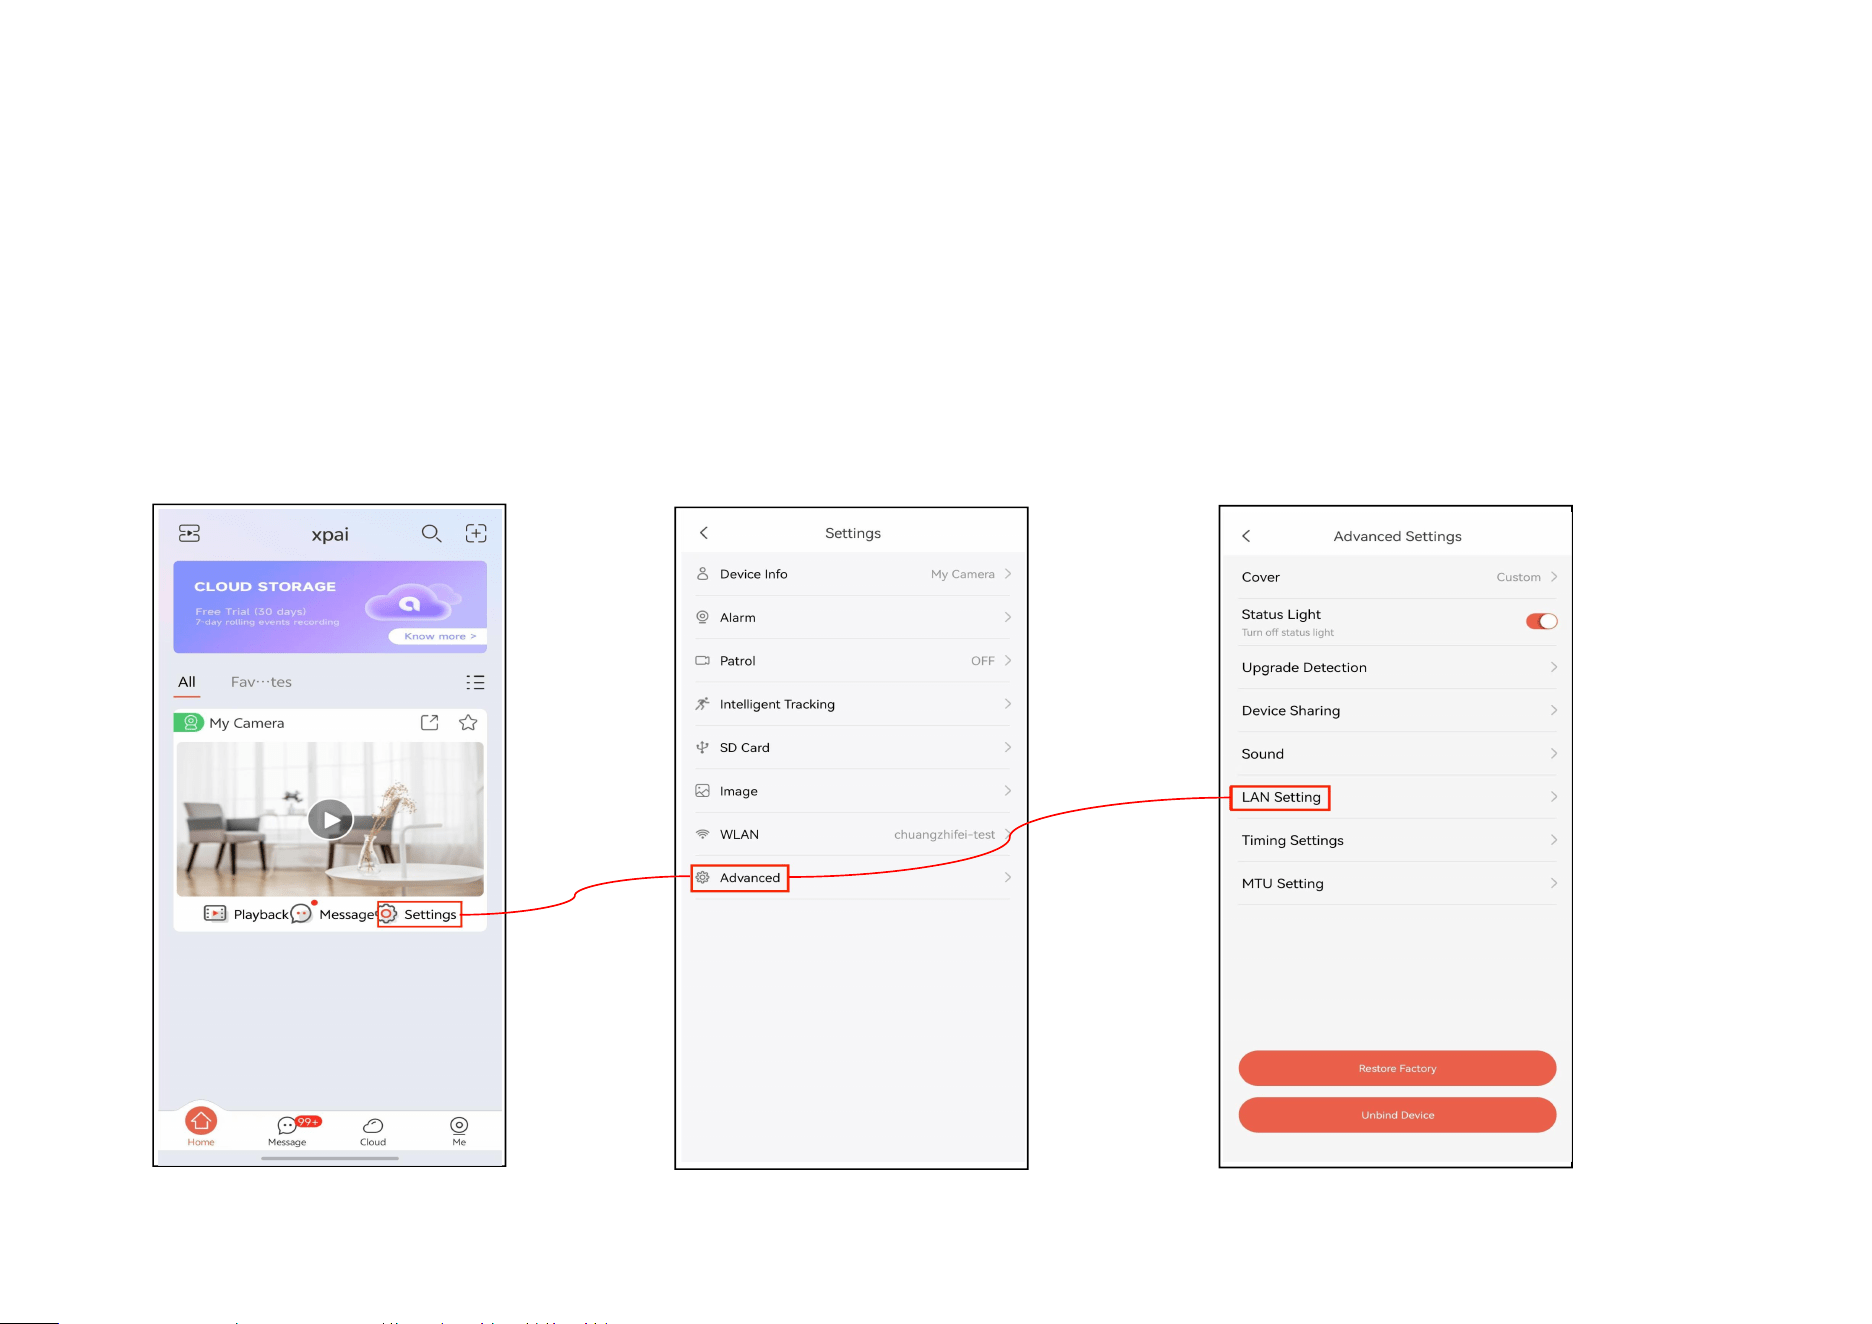
6.5.1 How to set up LAN
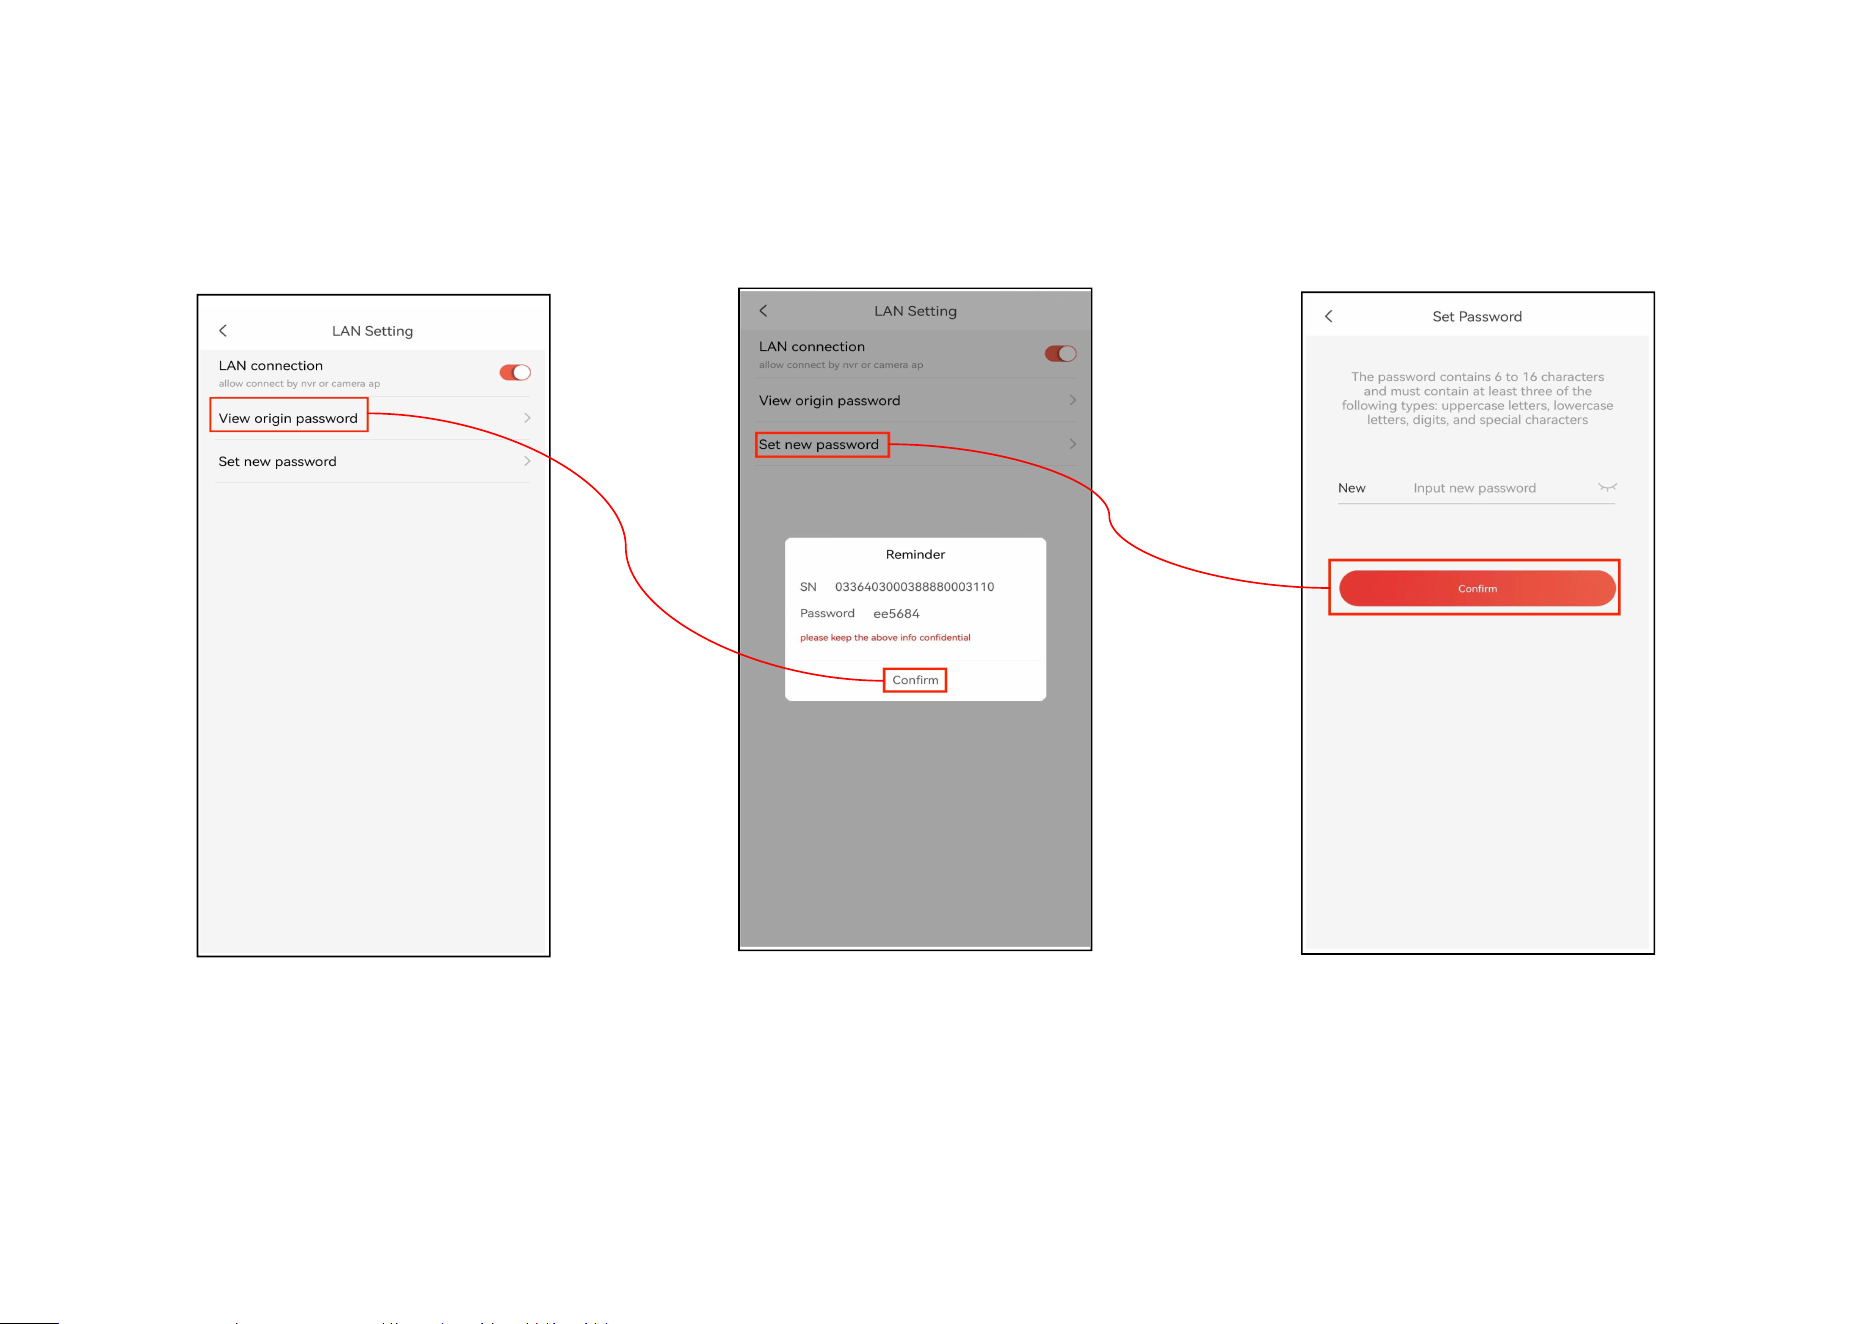
This feature is enabled by default, allowing users to connect the camera to the NVR and the app. Within this feature, users
can view the initial password and modify it.
Step 1:Tap ‘Settings’ Step 2:Tap ‘Advanced’ Step 3:Tap ‘LAN Settings’
26
Step 4:Users can toggle this feature Step 5:View password Step 6:Users can modify the
on or off, View the initial password, LAN password of the device themselves
and modify the password
27
6.5.2 How to connect camera to NVR by LAN
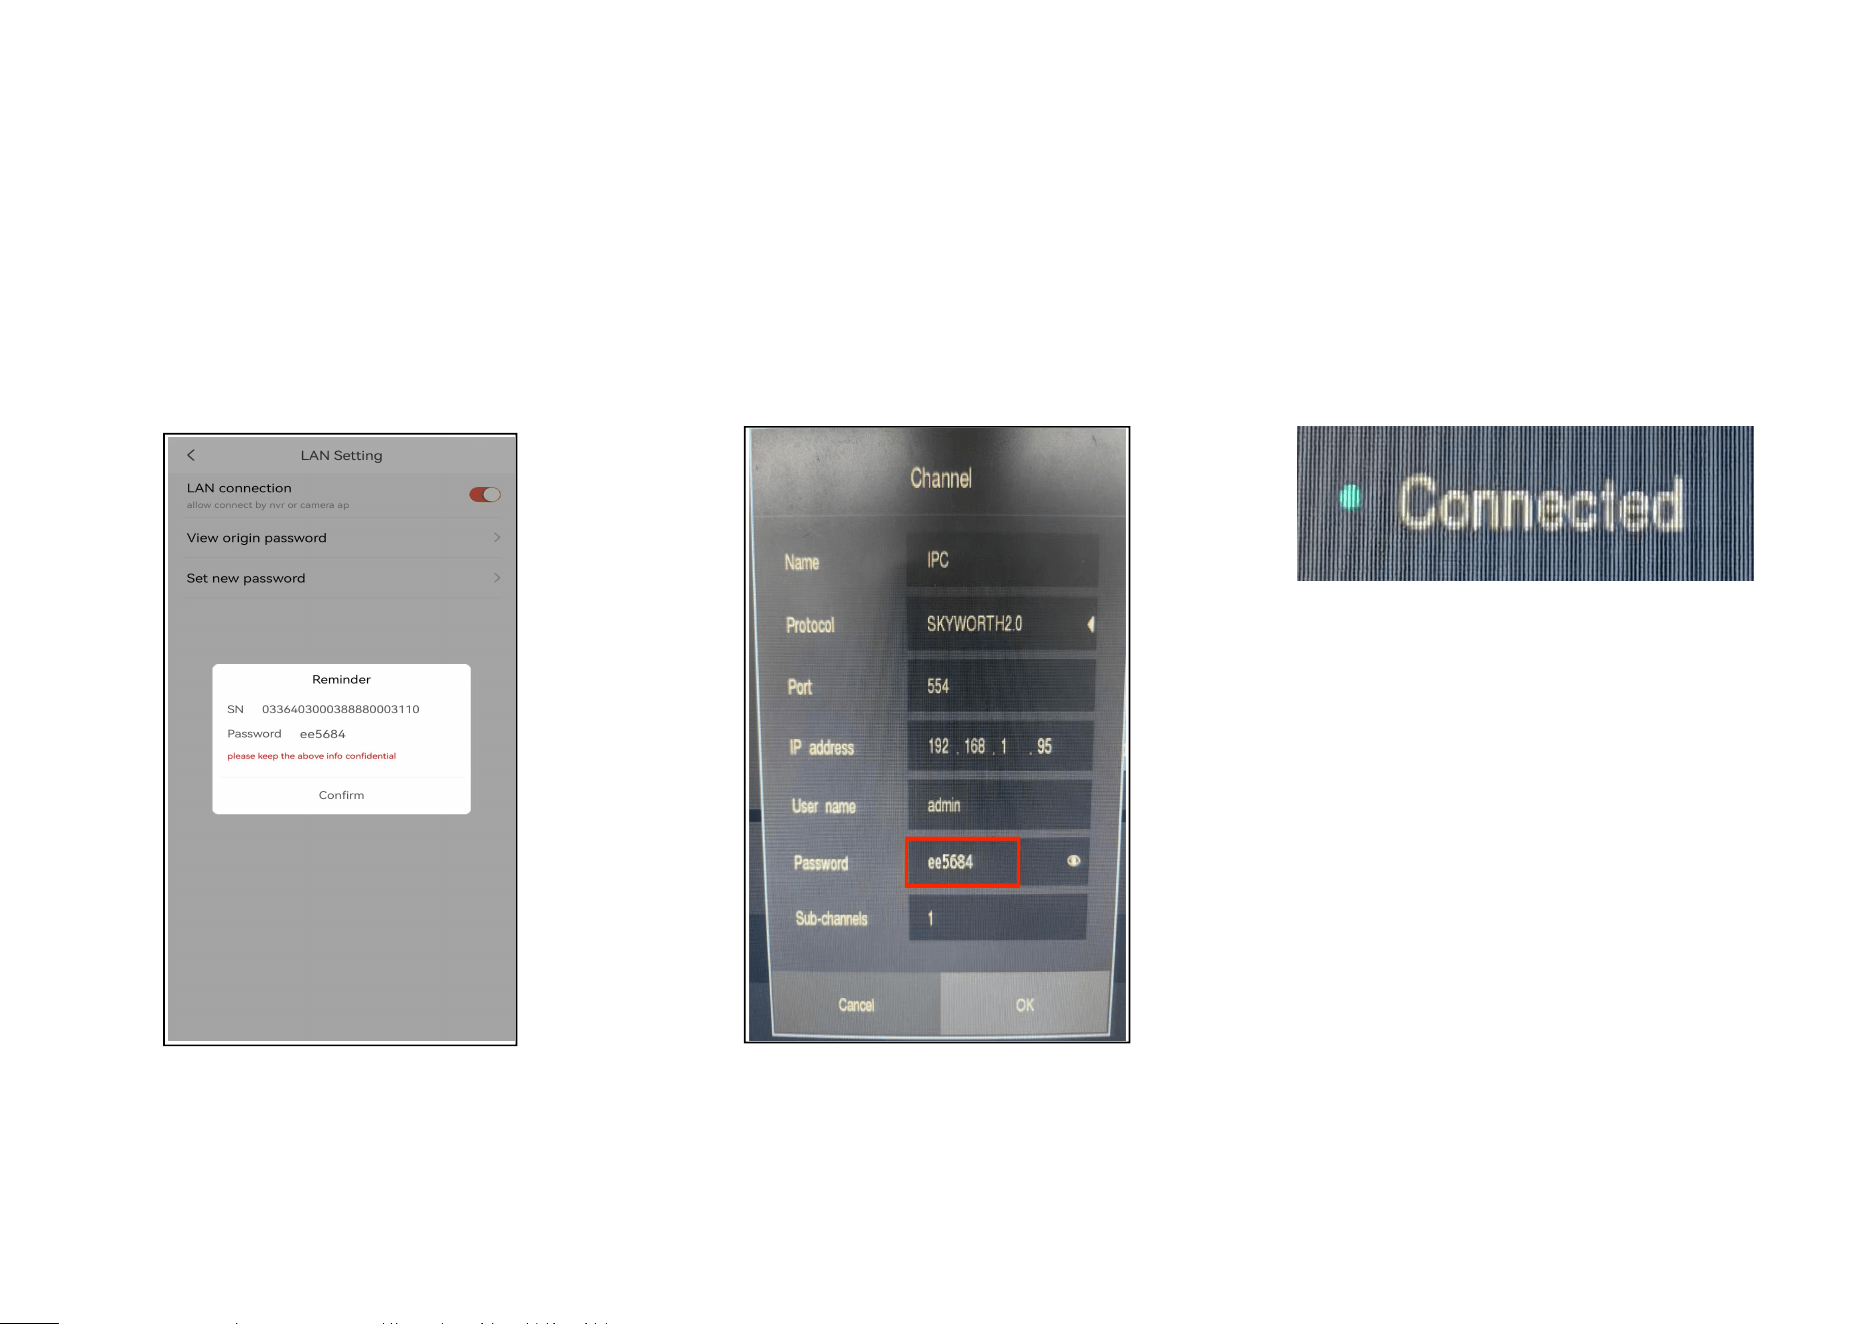
Through LAN settings, we can connect our Wi-Fi camera to the NVR.
Step 1:Confirm the device password to Step 2:Search camera and Step 3:Enter the password to successfully
ensure that the camera and the NVR input password on NVR connect
are on the same local area network.
Note: Only devices with LAN (Local Area Network) functionality can be added to the NVR
28
6.6 How to set up image
6.6.1 How to set up Vertical flip
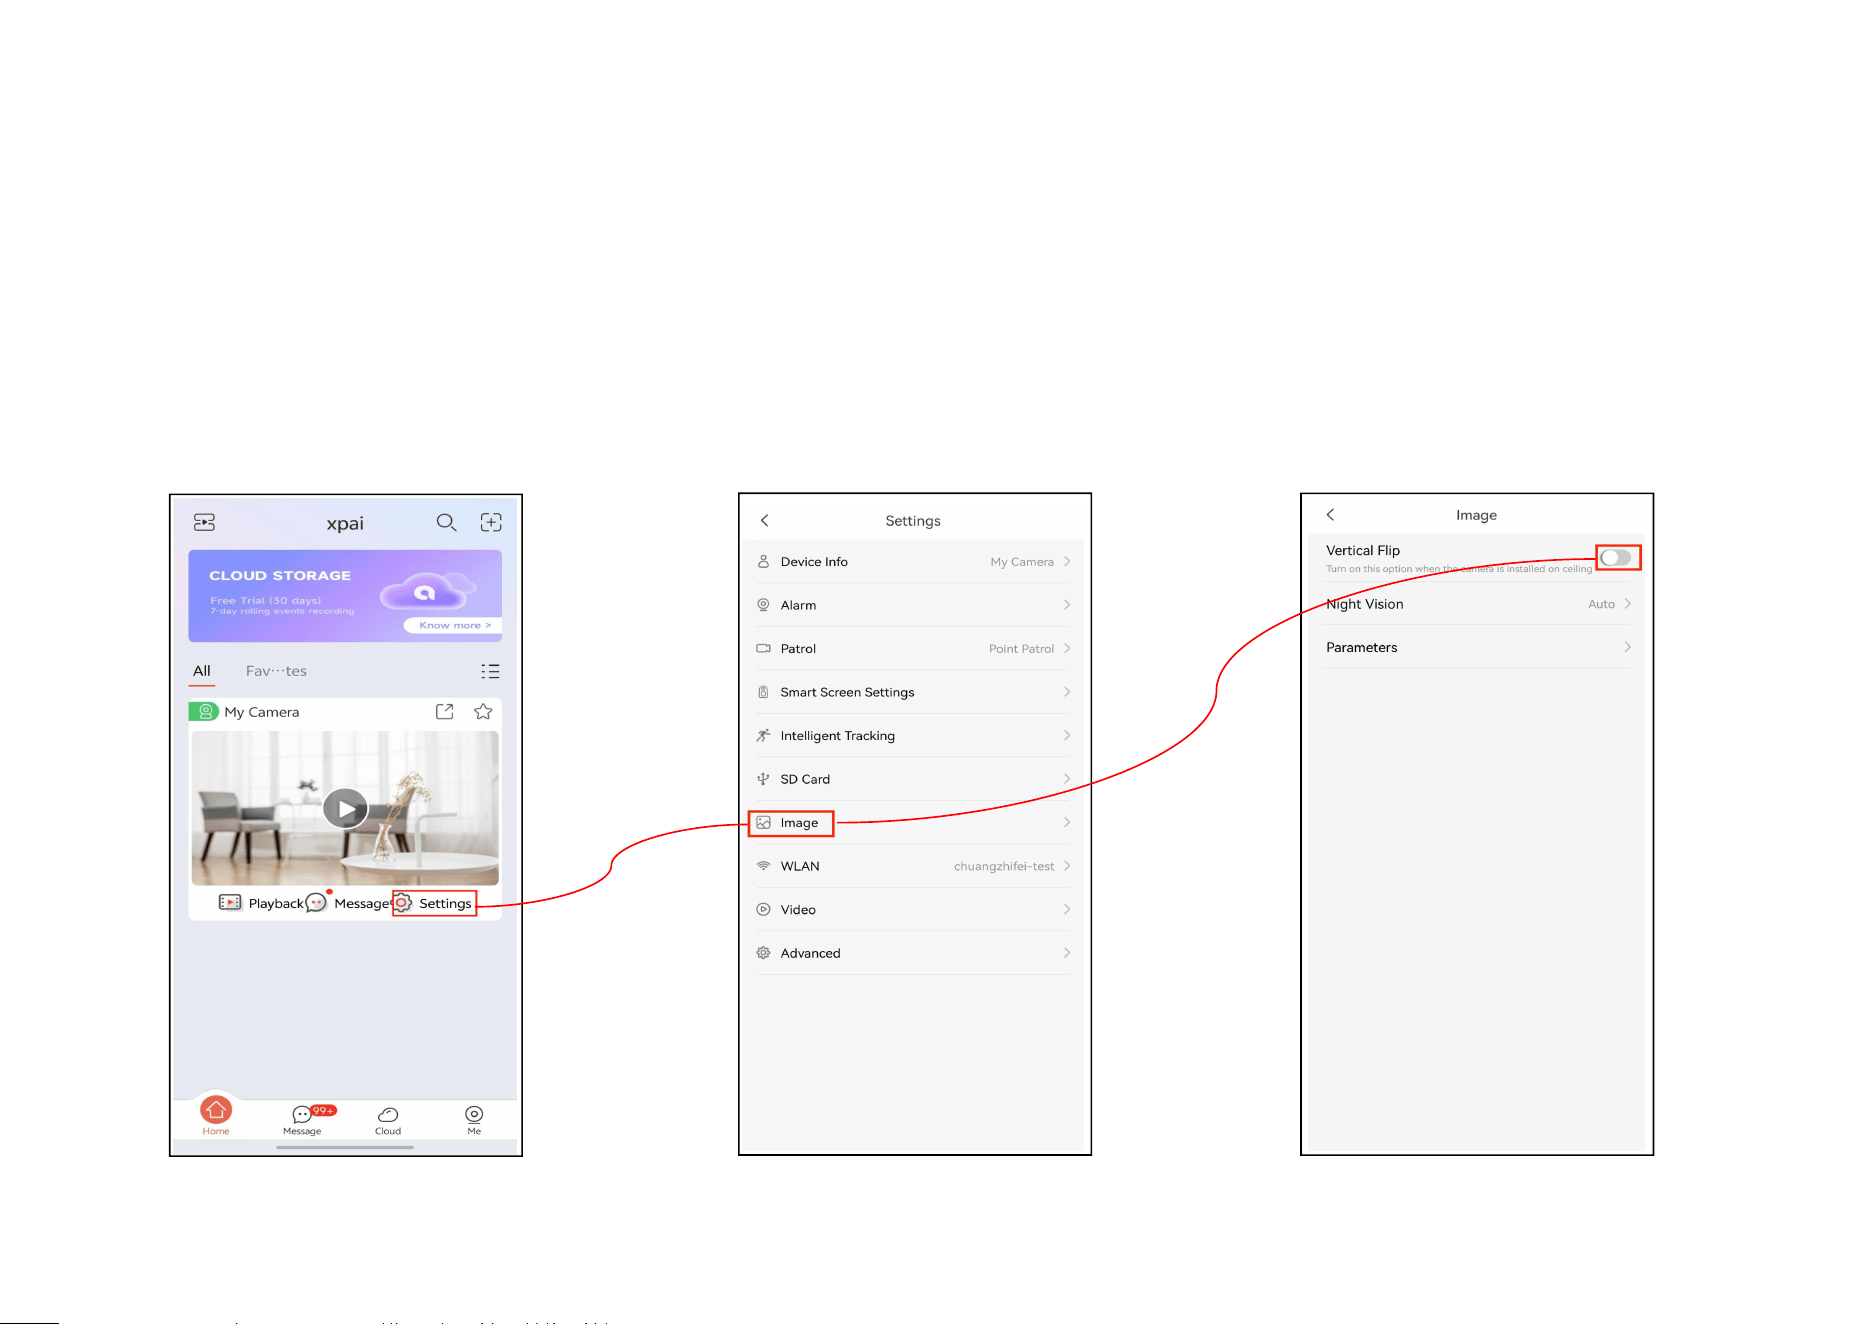
When the user mounts the camera upside down, this feature allows the camera's image to be flipped.
Step 1:Tap ‘Settings’ Step 2:Tap ‘Image’ Step 3:User can turn on the vertical
flip switch.
29
6.6.2 How to set up Night Vision
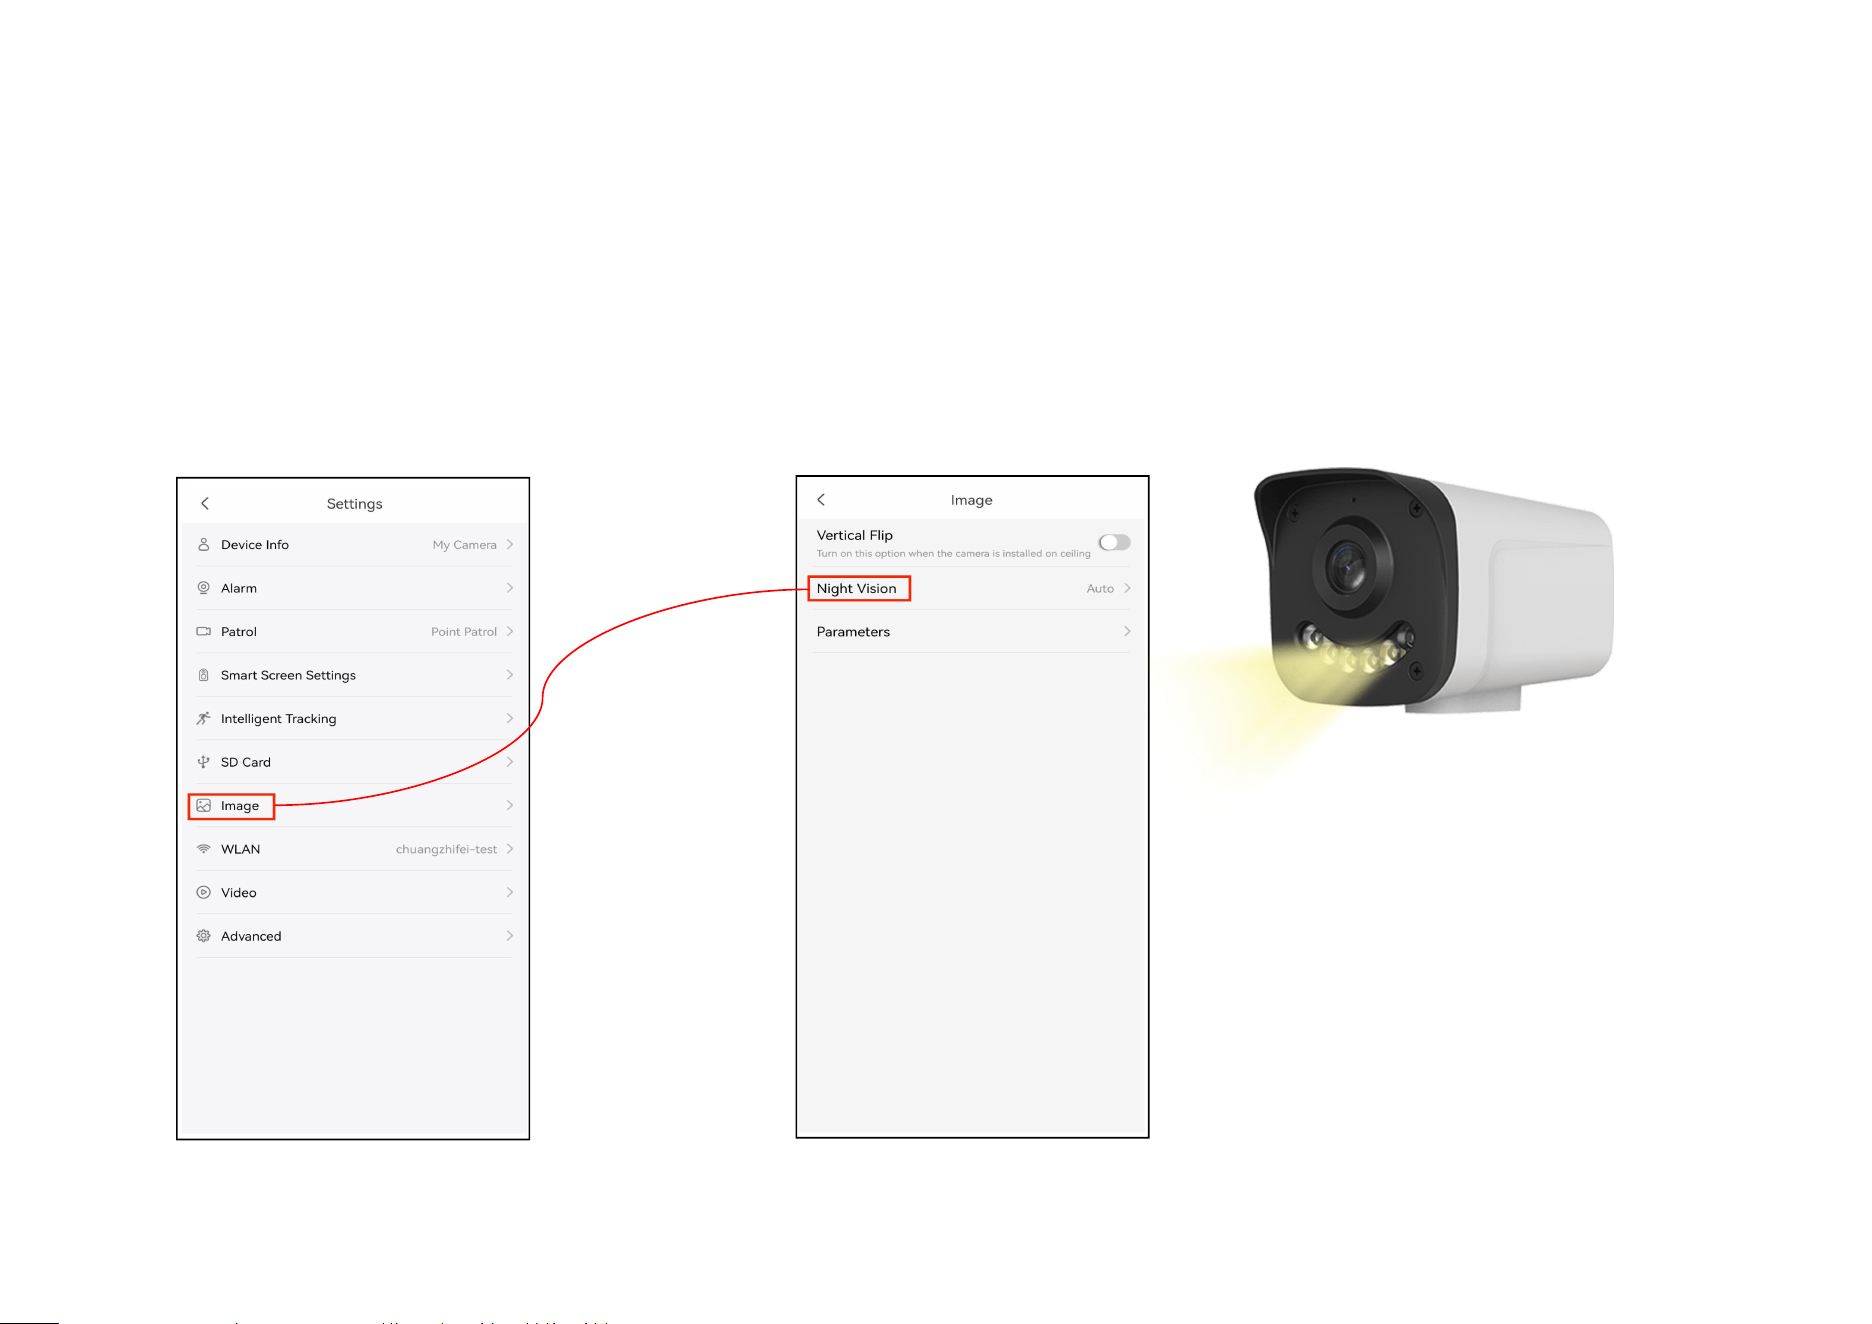
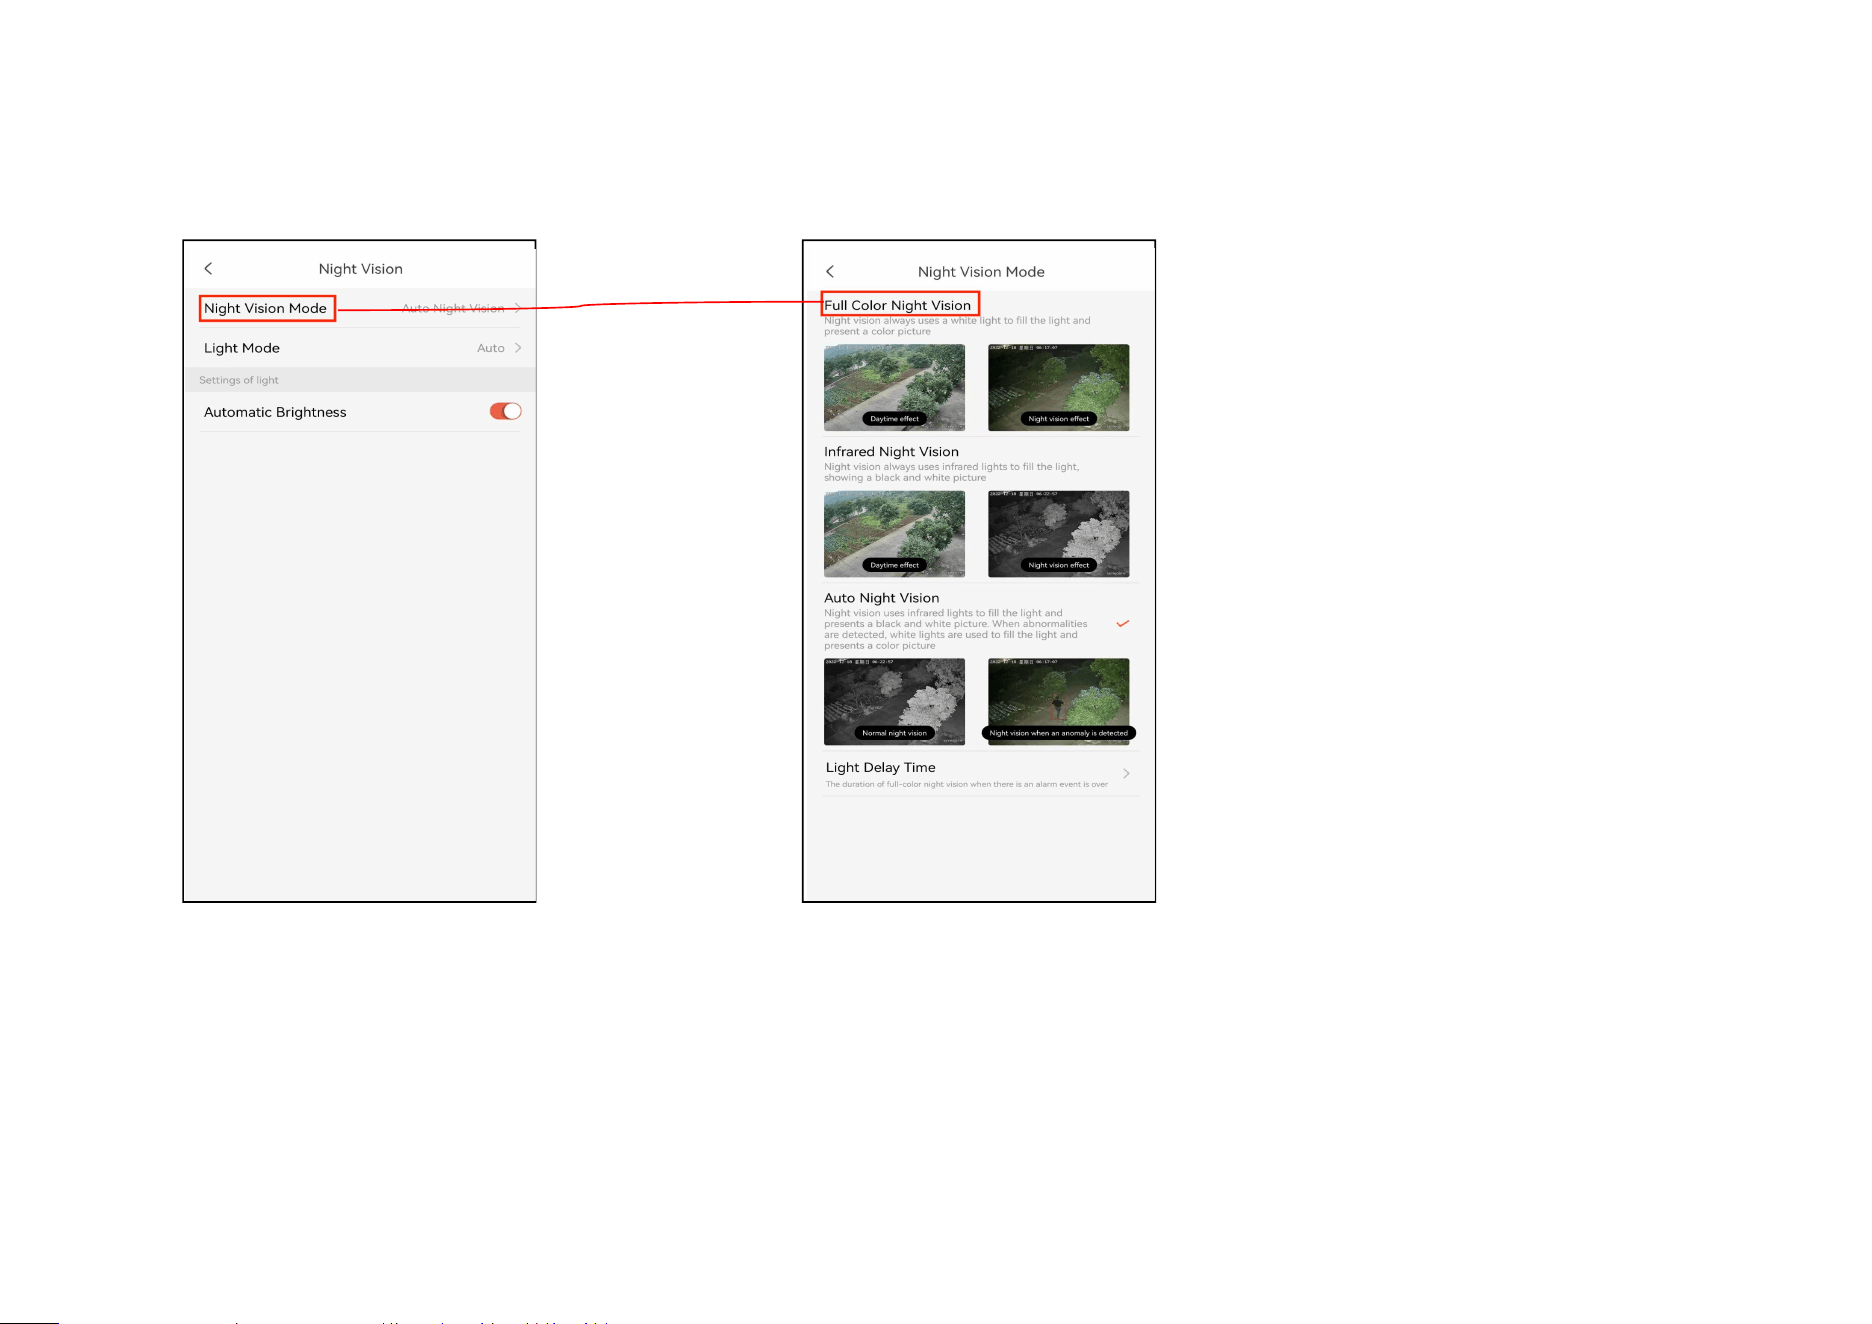
1. Full Color Night Vision
In a completely dark environment, the camera provides an additional light source, delivering color images that are closer
to human vision, thereby enhancing recognition capabilities and user experience.
IR Night Vision
Step 1:Tap ‘Image’
Step 2:Tap ‘Night Vision’
30
Step 3:Tap ‘Night Vision’ Mode
Step 4 : Tap ‘Full Color Night
Vision’
31
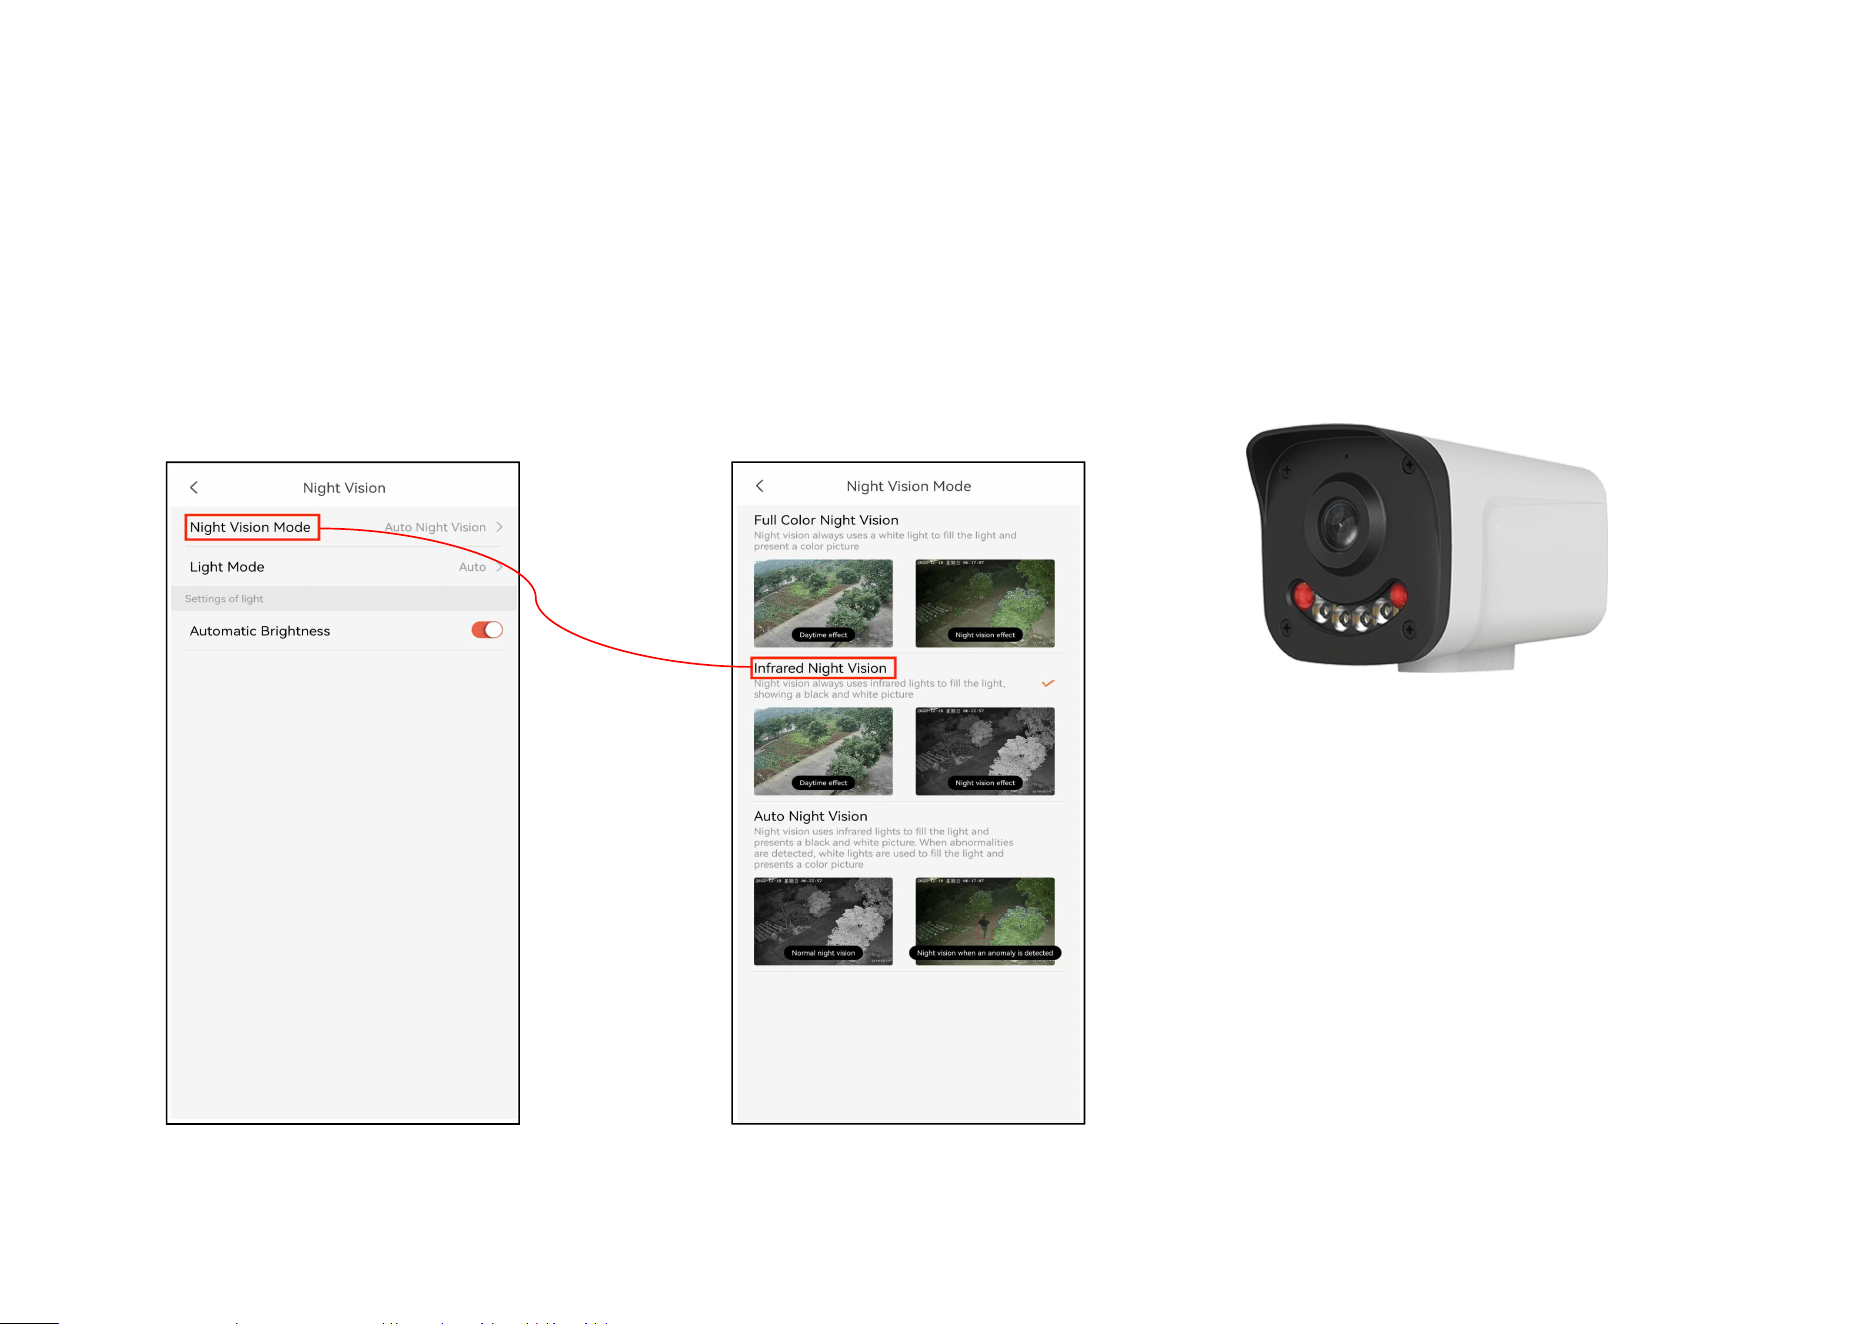
2. Infrared Night Vision
If the user is using a dual-light camera, they can choose from three modes: full color, infrared, and smart night vision.
For example, when the user only needs to use the infrared fill light, they can simply select "Infrared Night Vision," as
shown in the figure below.
IR Night Vision
32
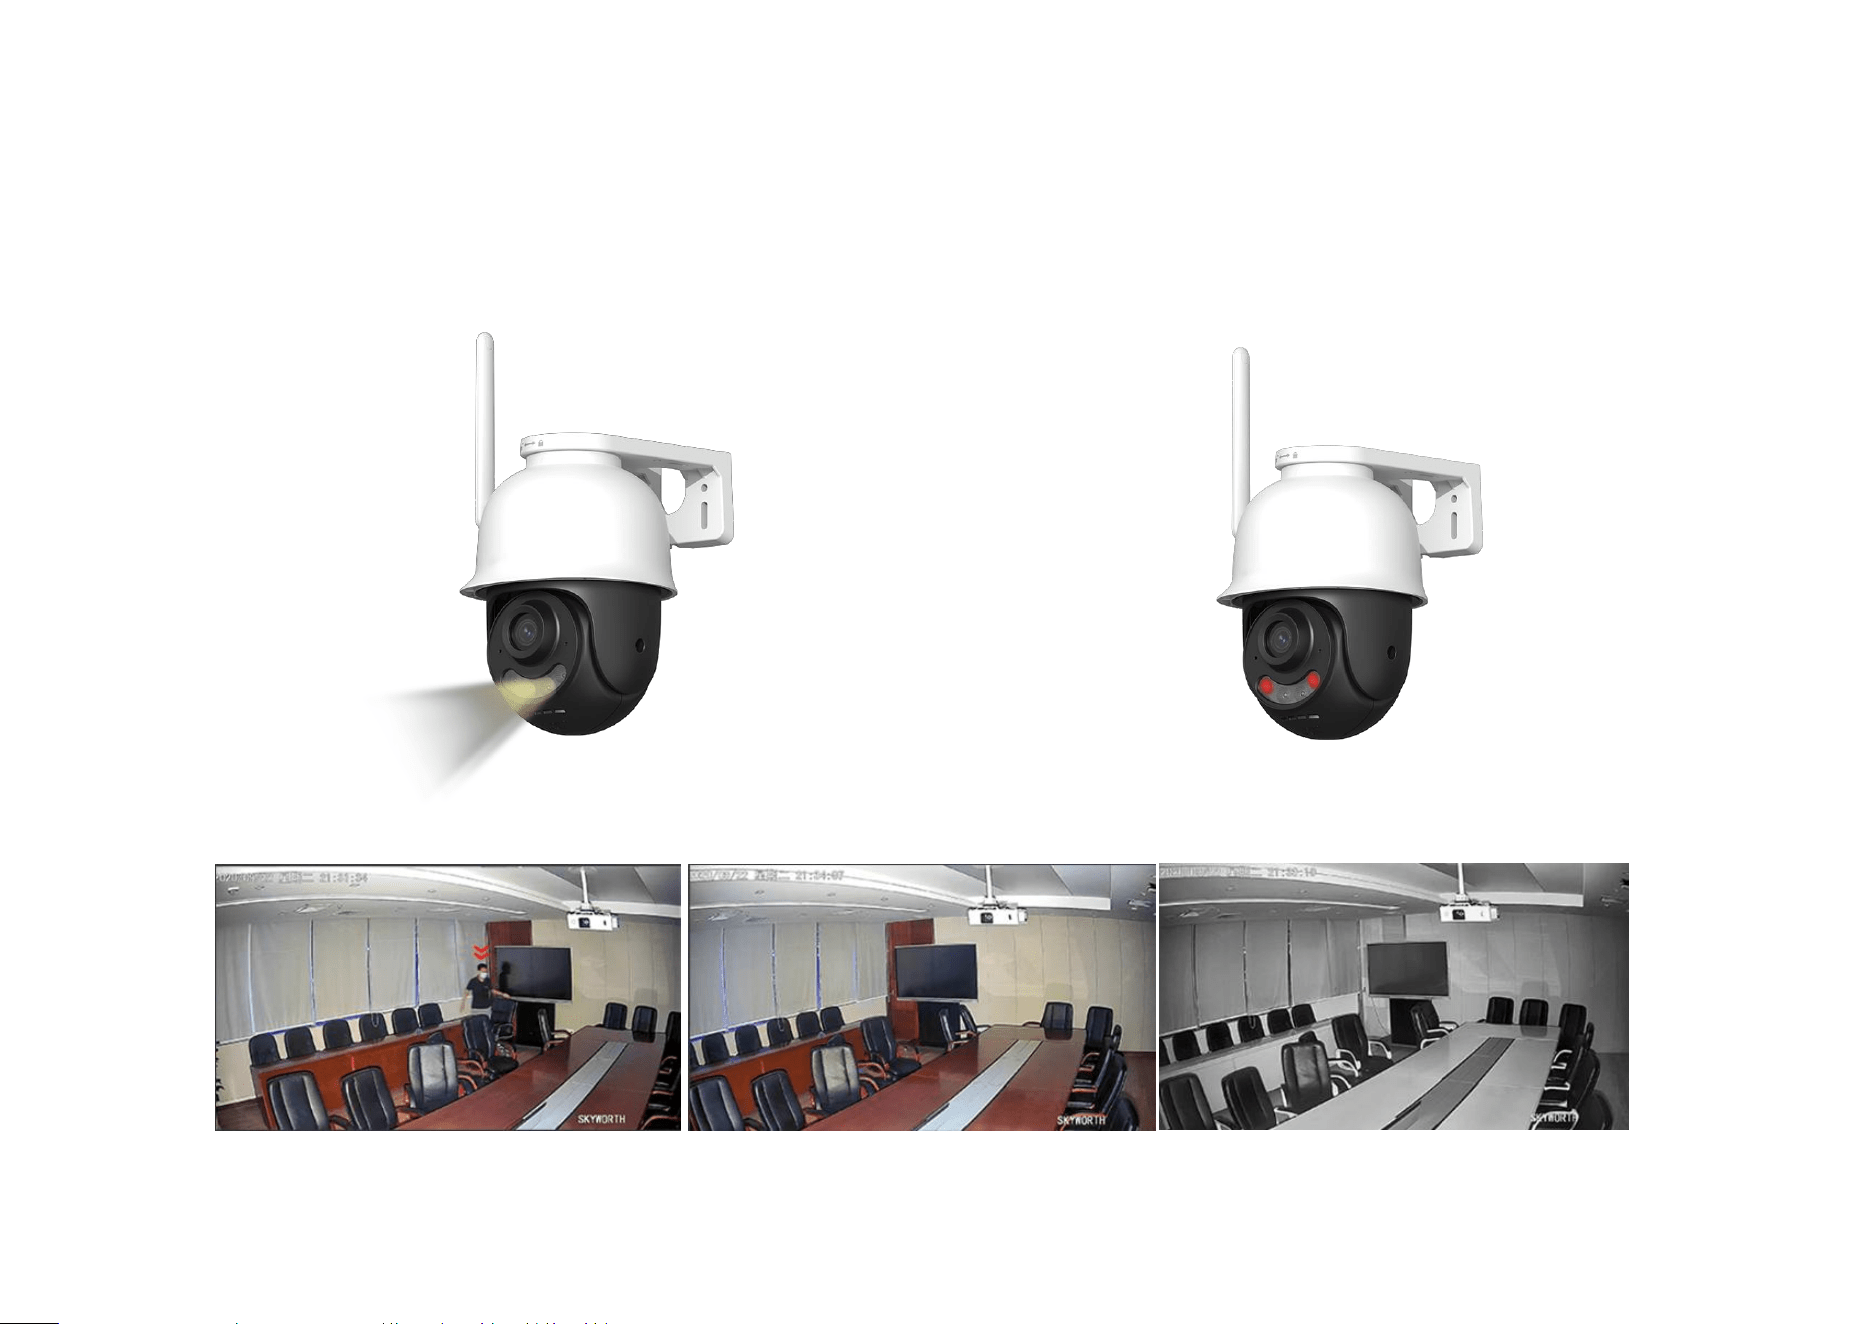
3.Auto Night Vision
At night, when the user enables the smart dual-light feature, if an alarm is triggered at that moment, the camera will
automatically turn on the white light. If there is no alarm, the camera will remain in infrared light mode.
33
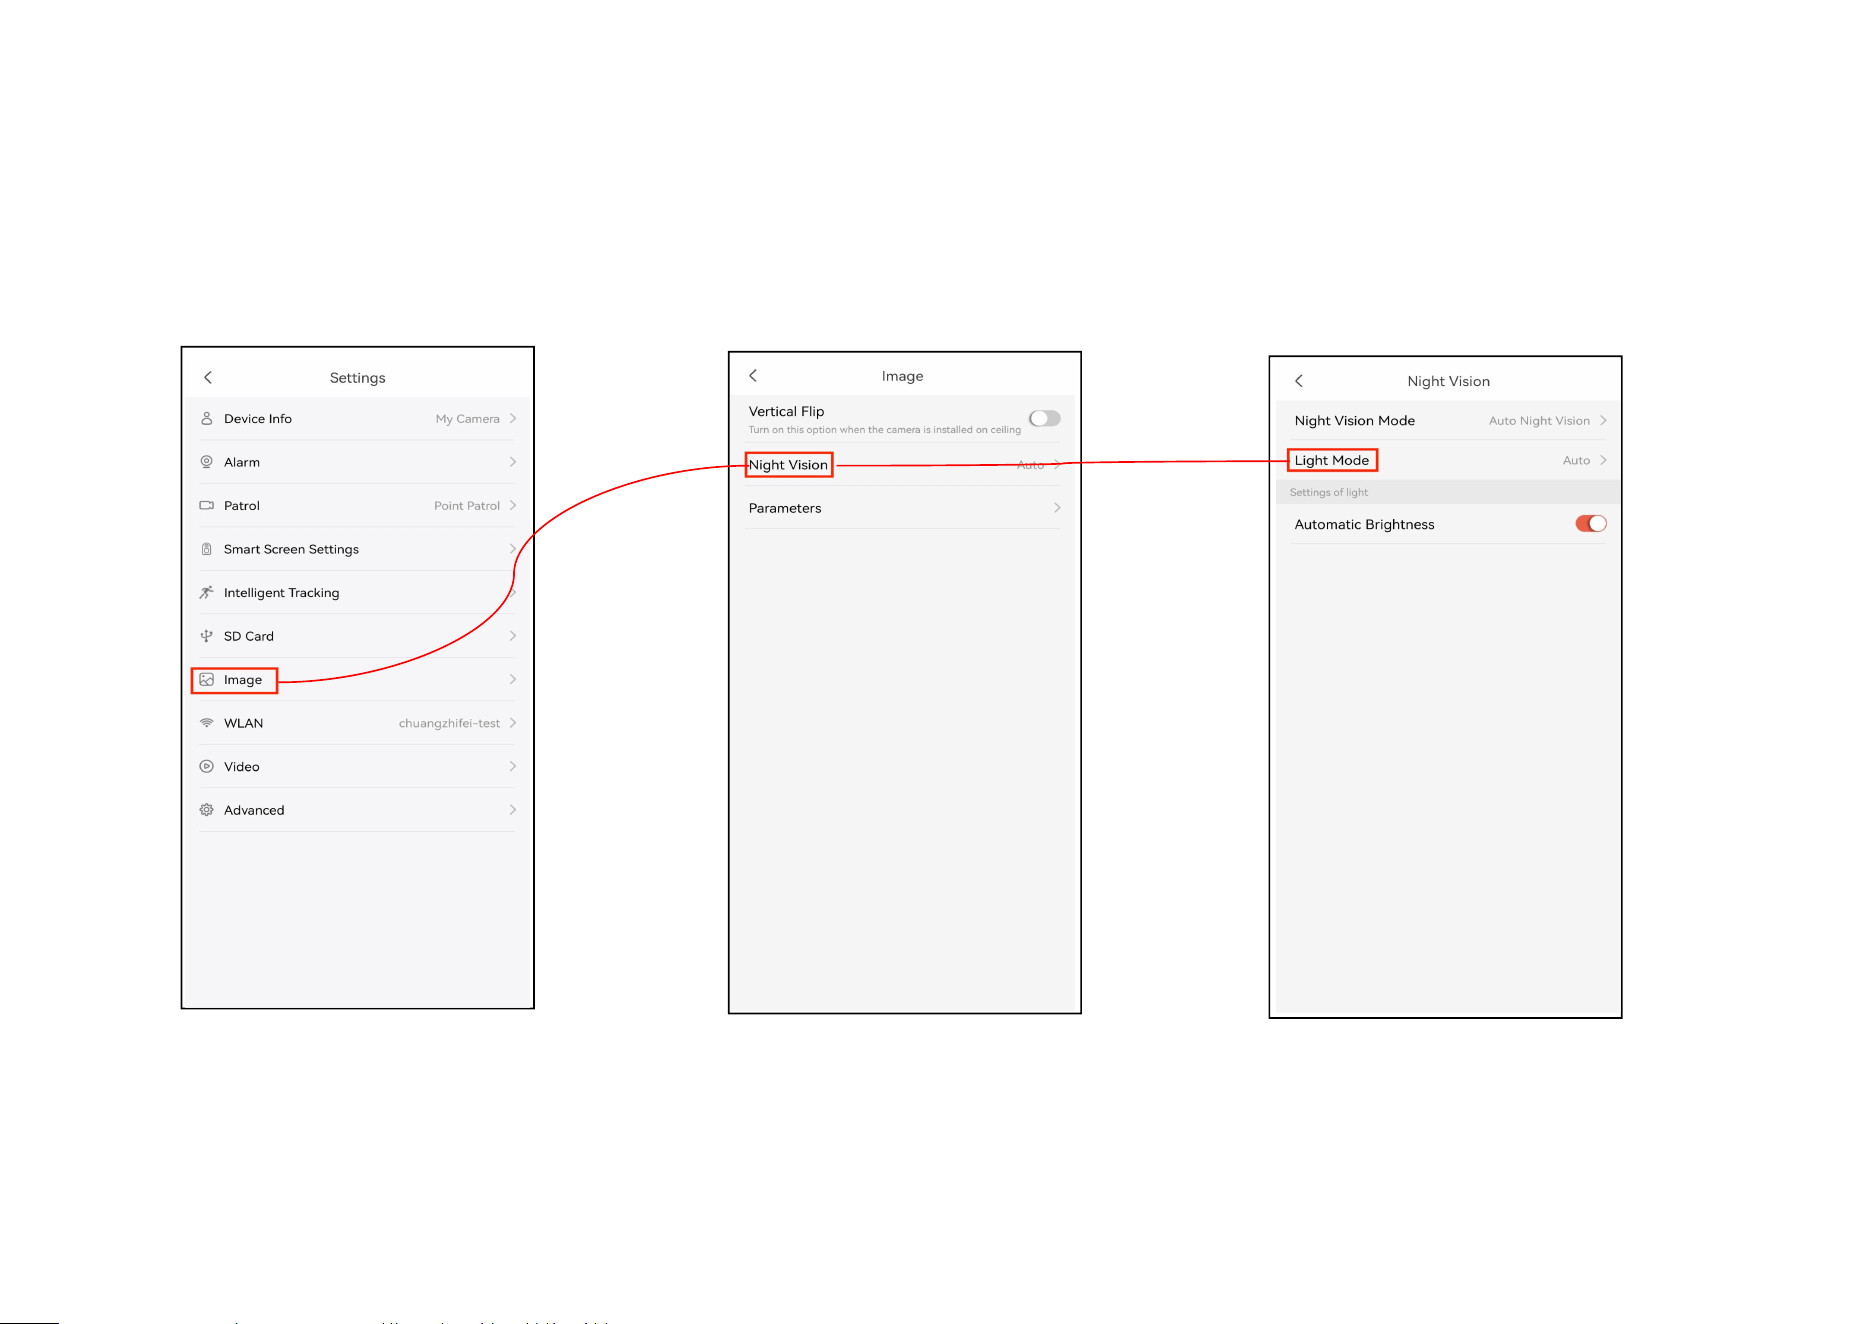
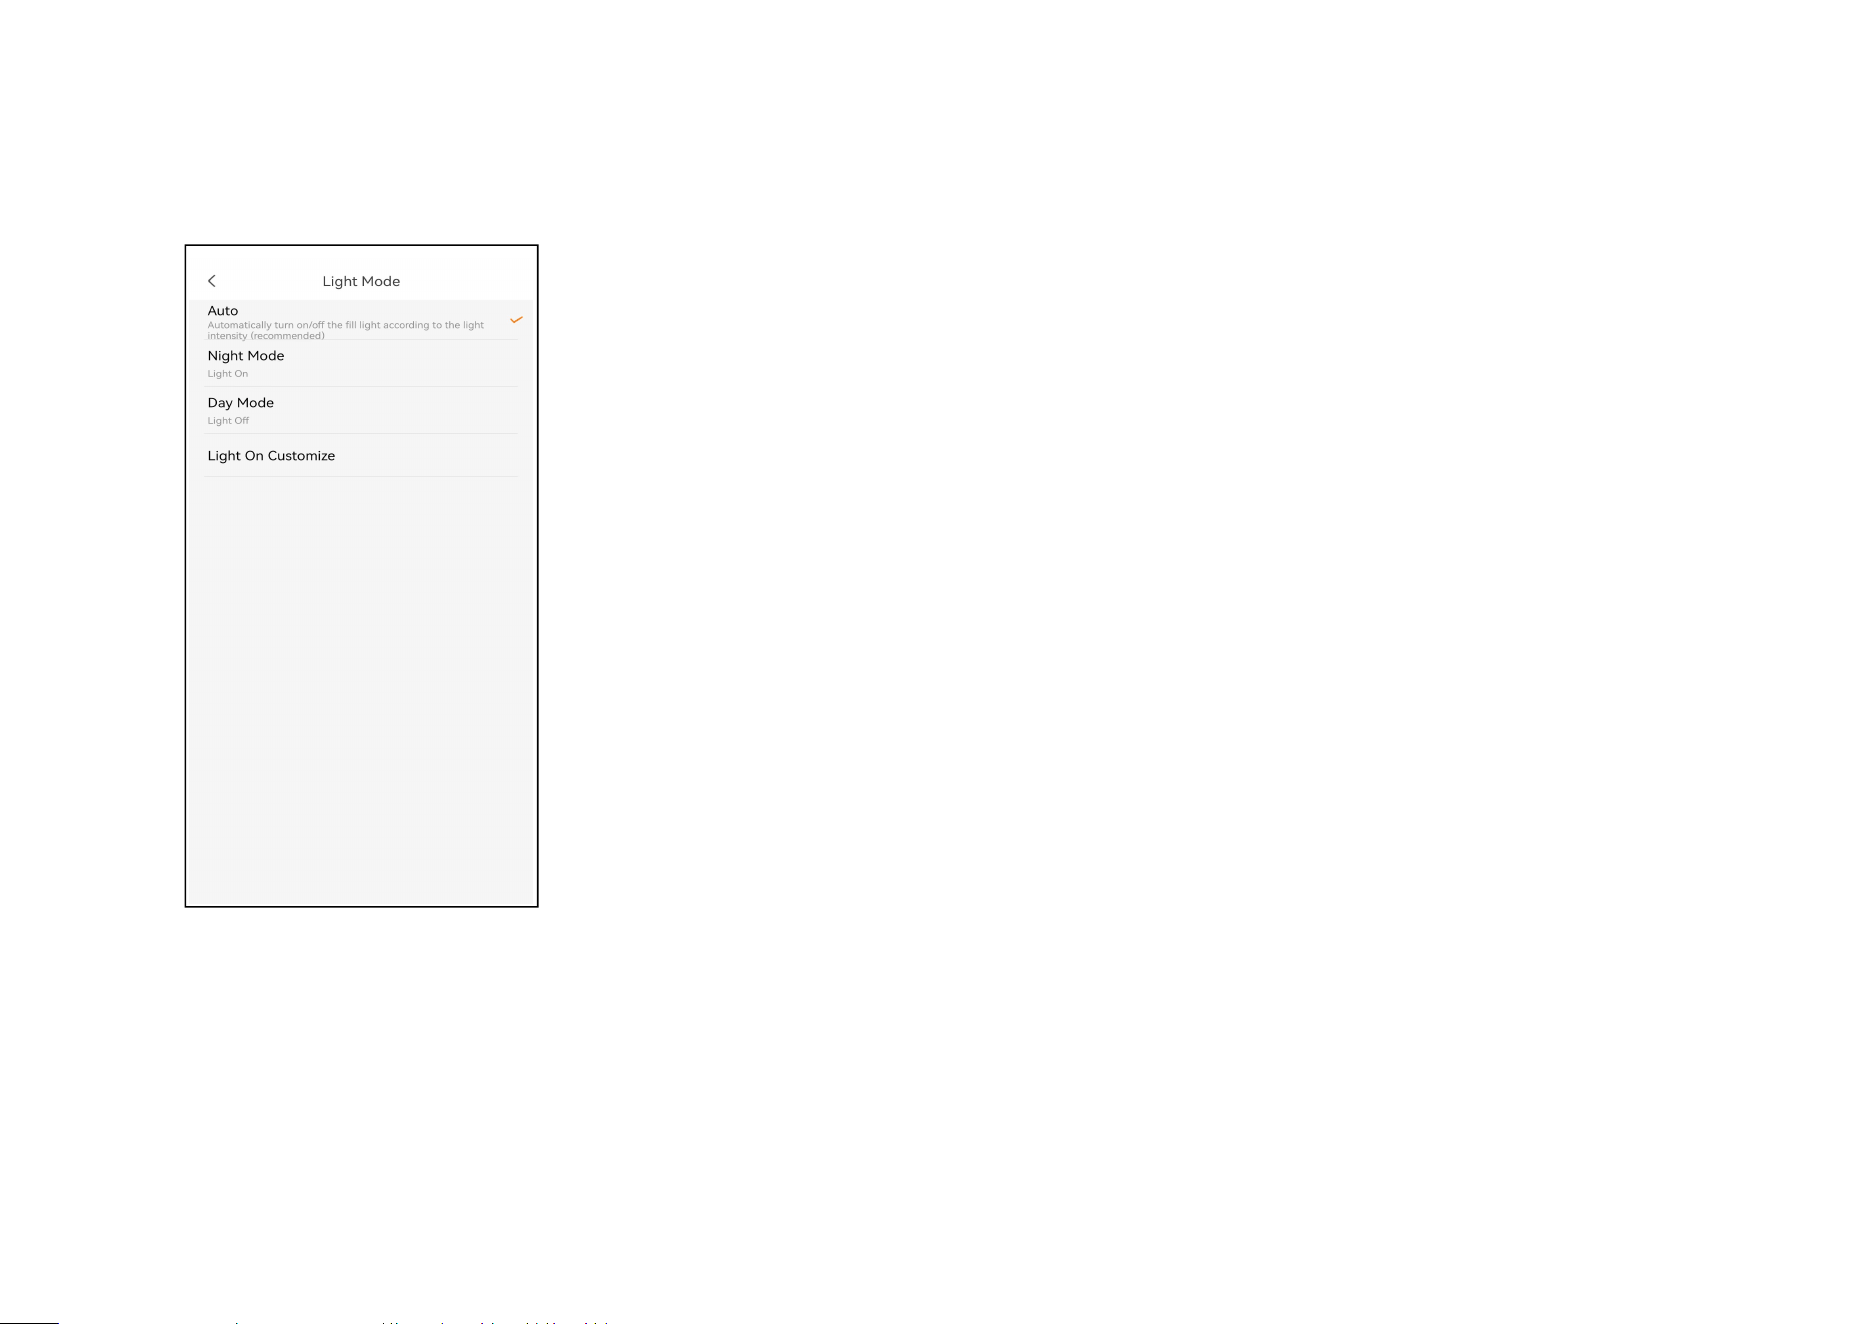
4.Set Light Mode
Users can customize different night vision modes according to their needs, including Auto, Day Mode, and Night Mode.
Step 1:Tap ‘Image’ Step 2:Tap ‘Night Vision’ Step 3:Tap ’Light Mode’
34
Step 4: Users can choose the night mode and customize it.
Auto: The camera automatically activates or deactivates
the fill light based on whether it is night or day.
Night Mode: It will directly turn on the fill light and
keep it in the active state.
Day Mode: It will directly turn off the fill light and
maintain it in the off state.
Light On Customize: Users can set the daily turn-on
and turn-off times for the supplemental lighting according
to their needs
35
6.7 How to set TF card recording
6.7.1 Insert TF card
By inserting a TF card, users can save videos locally. Moreover, the videos can be viewed through the app or backed up by
the users themselves.
*Mainstream TF cards available on the market are all compatible.
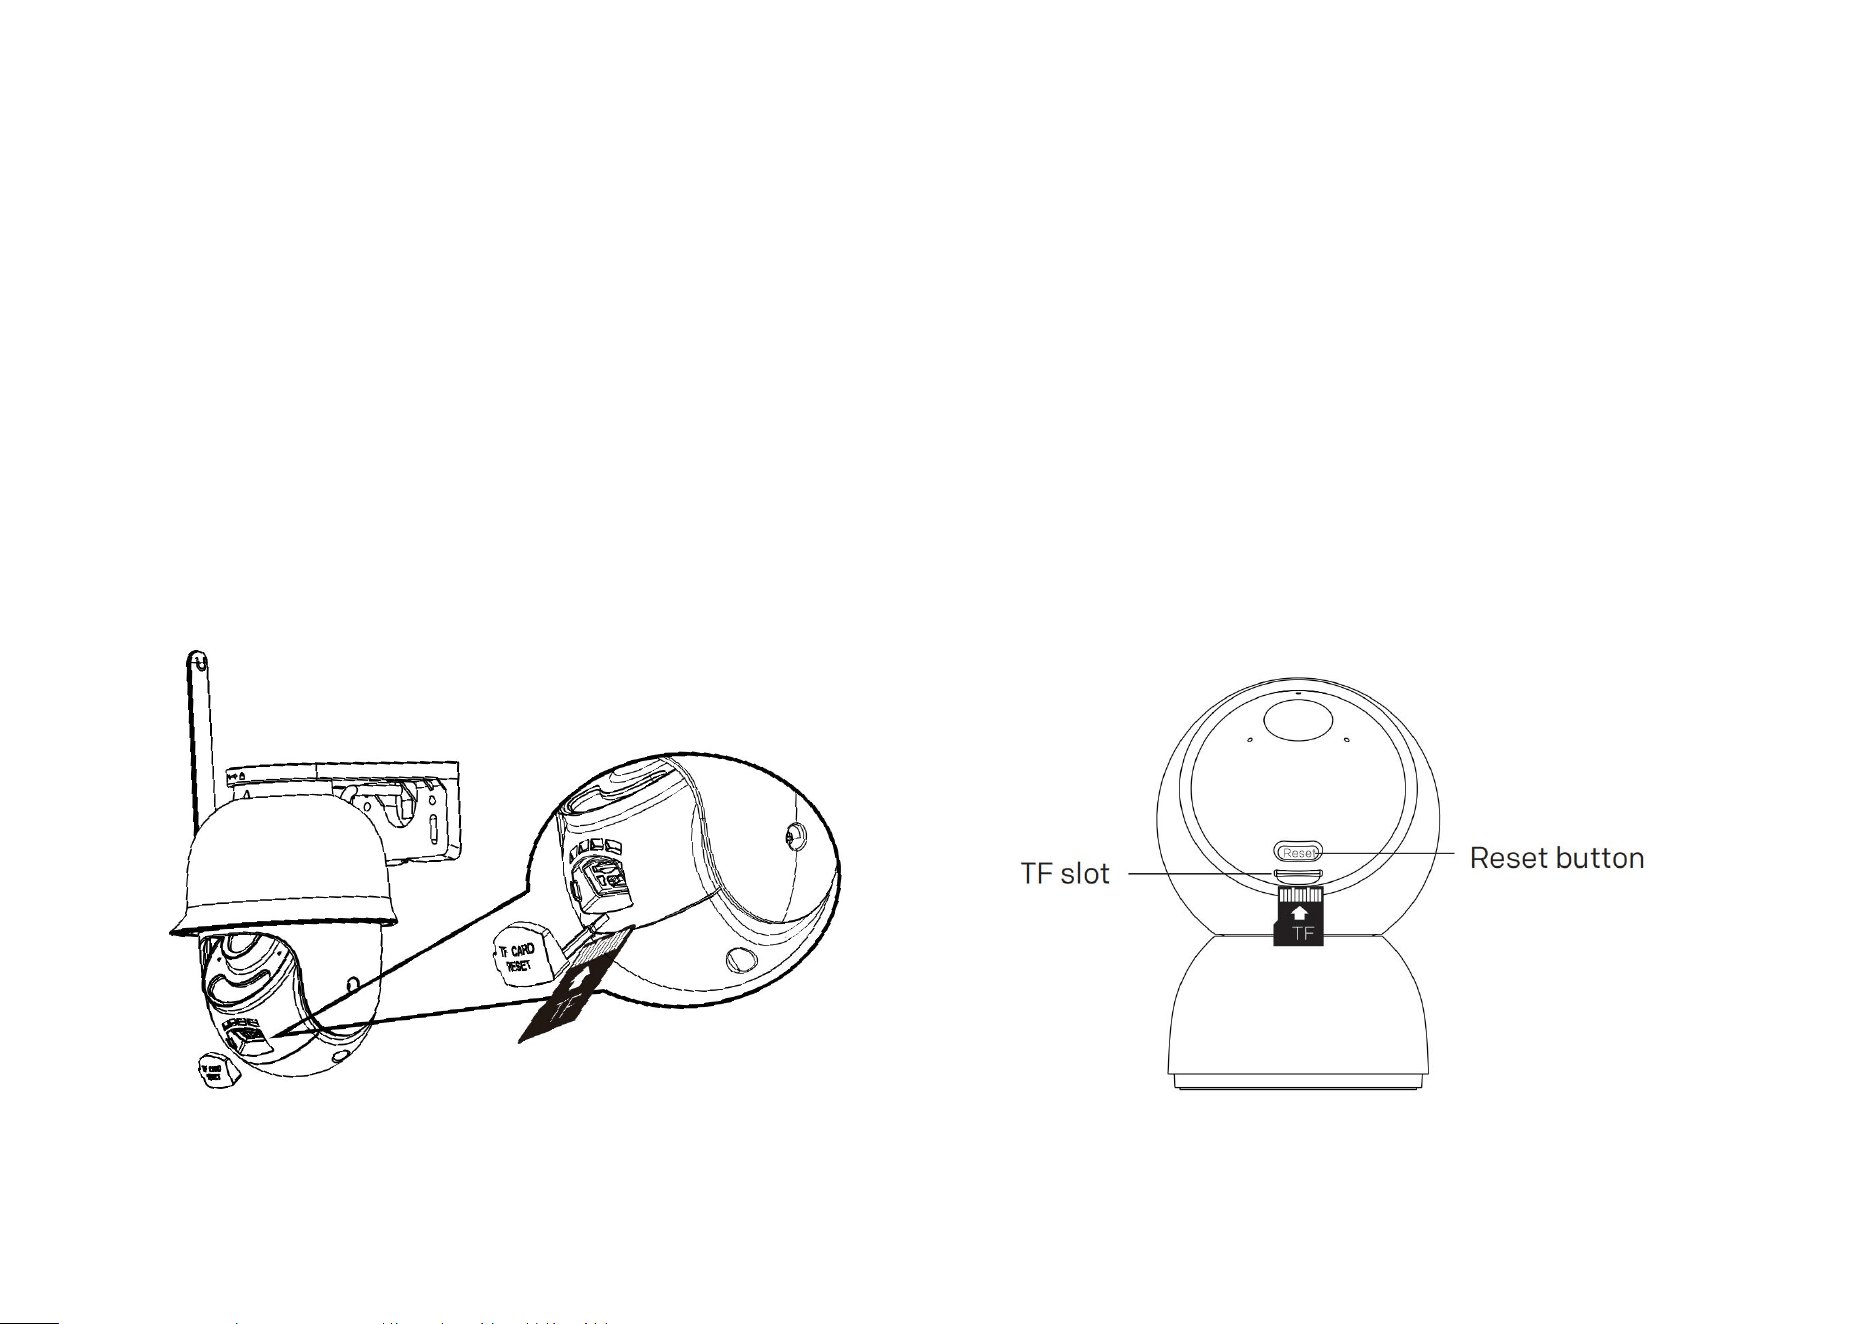
1.Rotate the lens part of the camera upwards,the TF card slot becomes visible.
2.According to the diagram, simply insert the TF card into the slot.
Note: The specific location of the TF card slot is subject to the actual product.
36
6.7.2 Initialize TF card
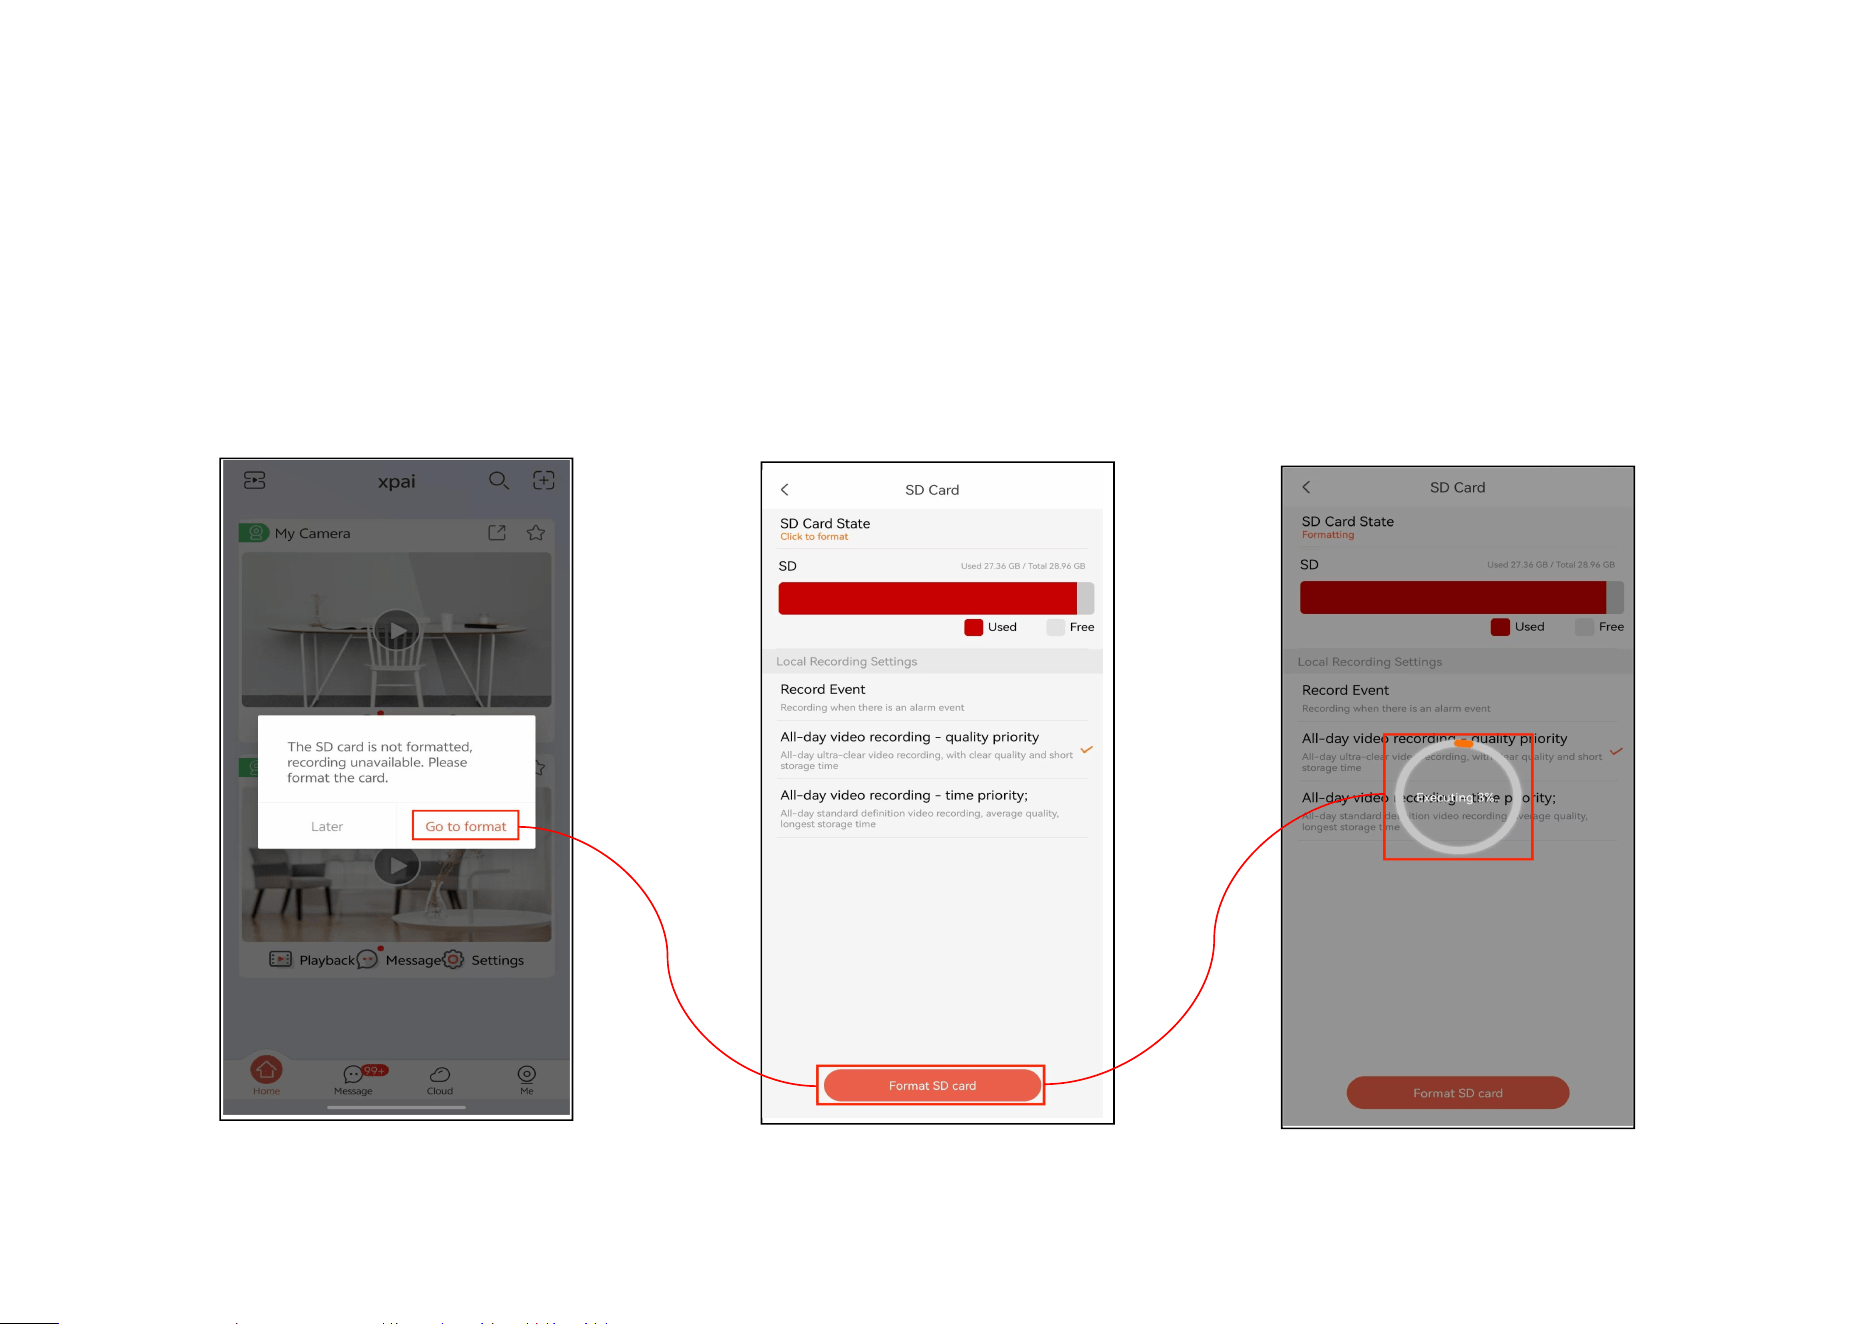
When a user inserts a TF card for the first time, it needs to be initialized before it can be used for storage.Clear old data to
make the recording more stable.
Step 1: After clicking ‘Playback’, Step 2: Click to format TF card Step 3: Initializing
the TF card needs to be initialized.
37
6.7.3 Set up local recording
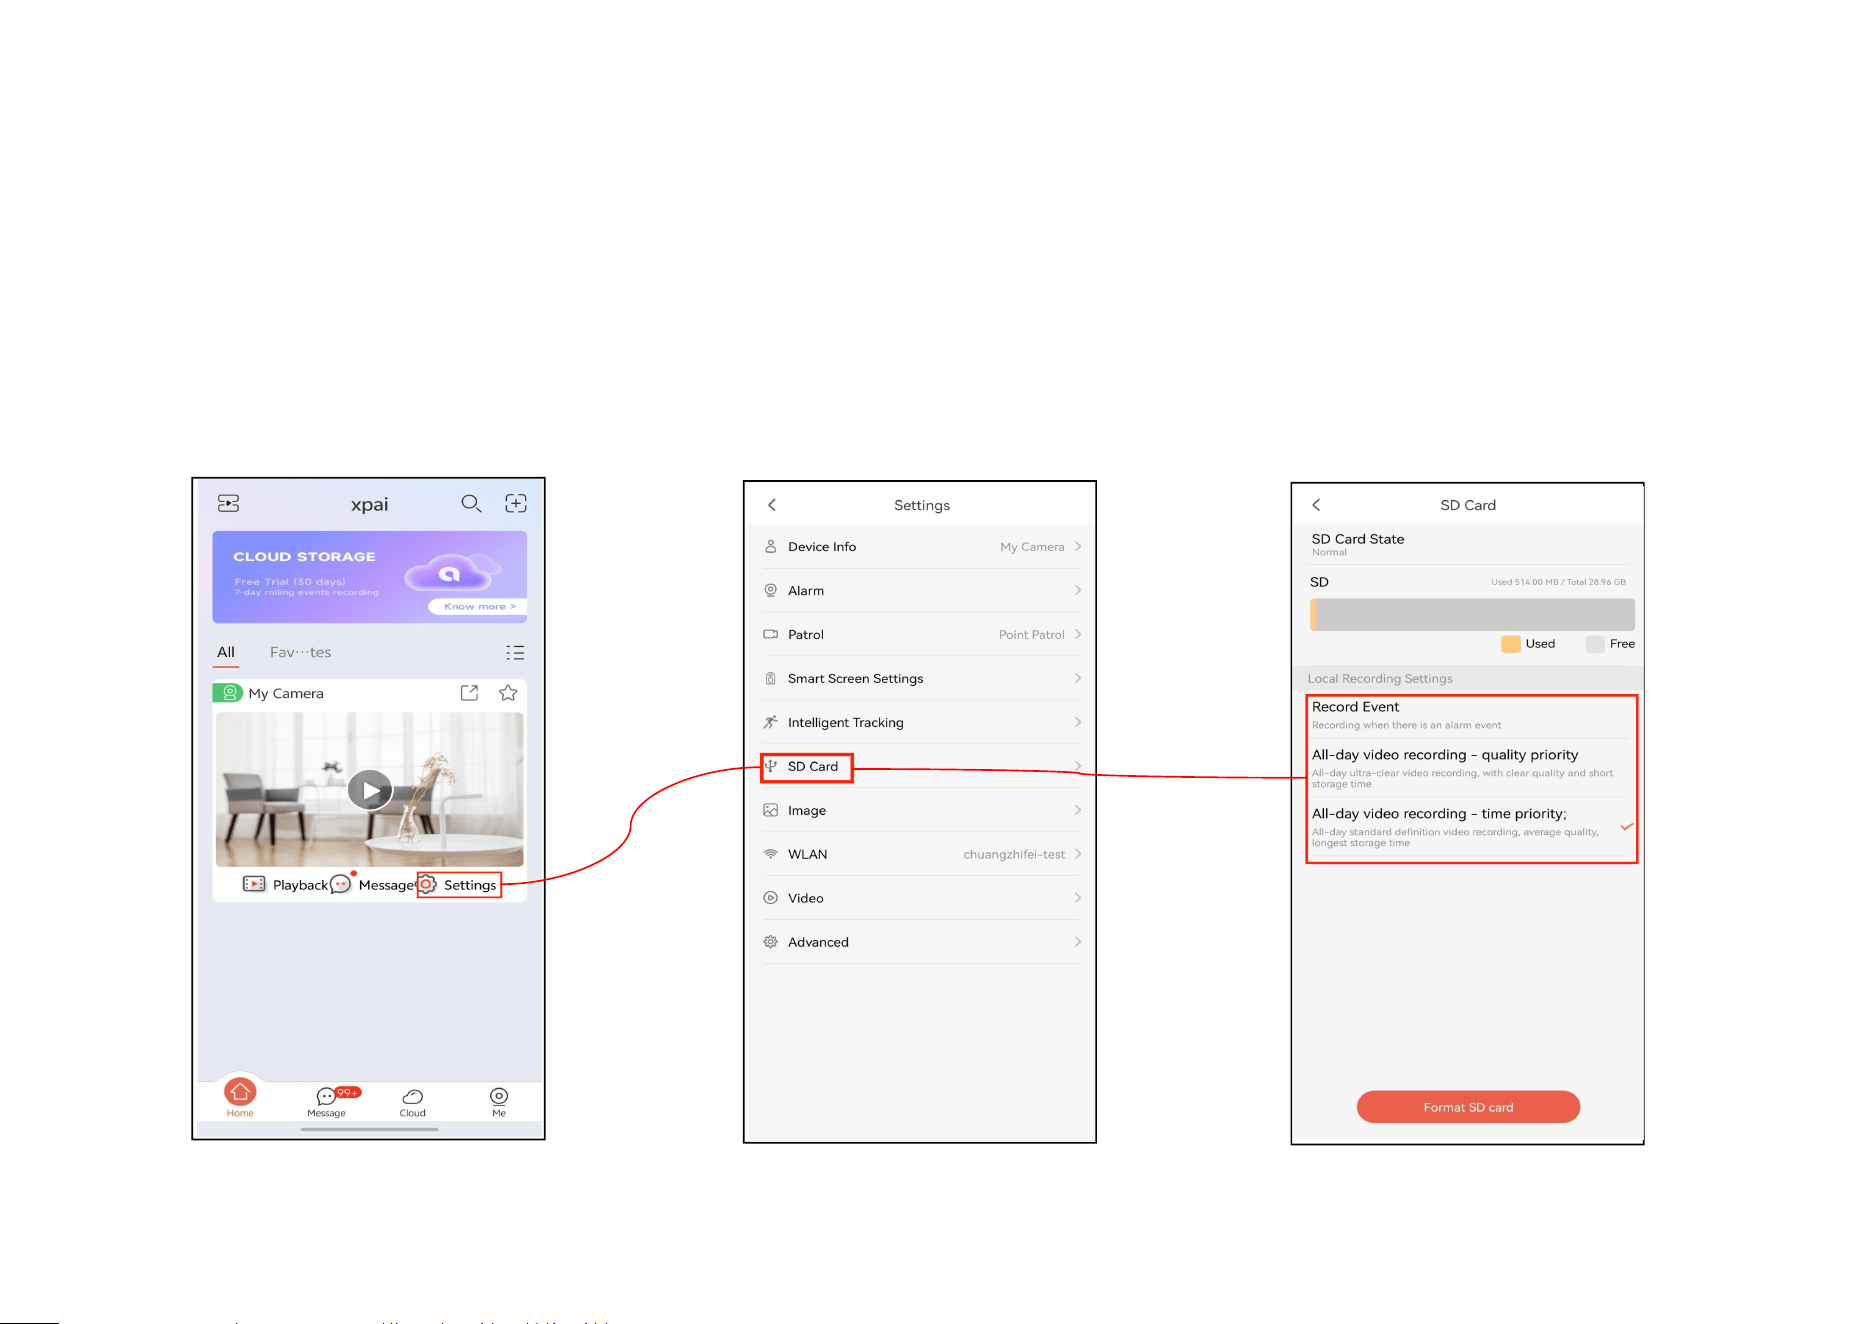
The local recording of the camera stores videos directly on the SD card without the need for external transmission over the
network. This method ensures immediate accessibility and security of the recordings.
Step 1: Tap ‘Settings’ Step 2: Tap ‘SD Card’ Step 3: Users can select from three different
recording methods.
38
Record Event: When the time-based alarm is triggered, the camera will automatically save the video footage from five
seconds before and after the event, which will significantly reduce storage space usage.
All-day video recording-quality priority: The video will be recorded and stored in high definition, which means it will
occupy a relatively larger amount of storage space.
All-day video recording-time priority: The video will be recorded and stored in high definition, which means it will occupy
a relatively larger amount of storage space.
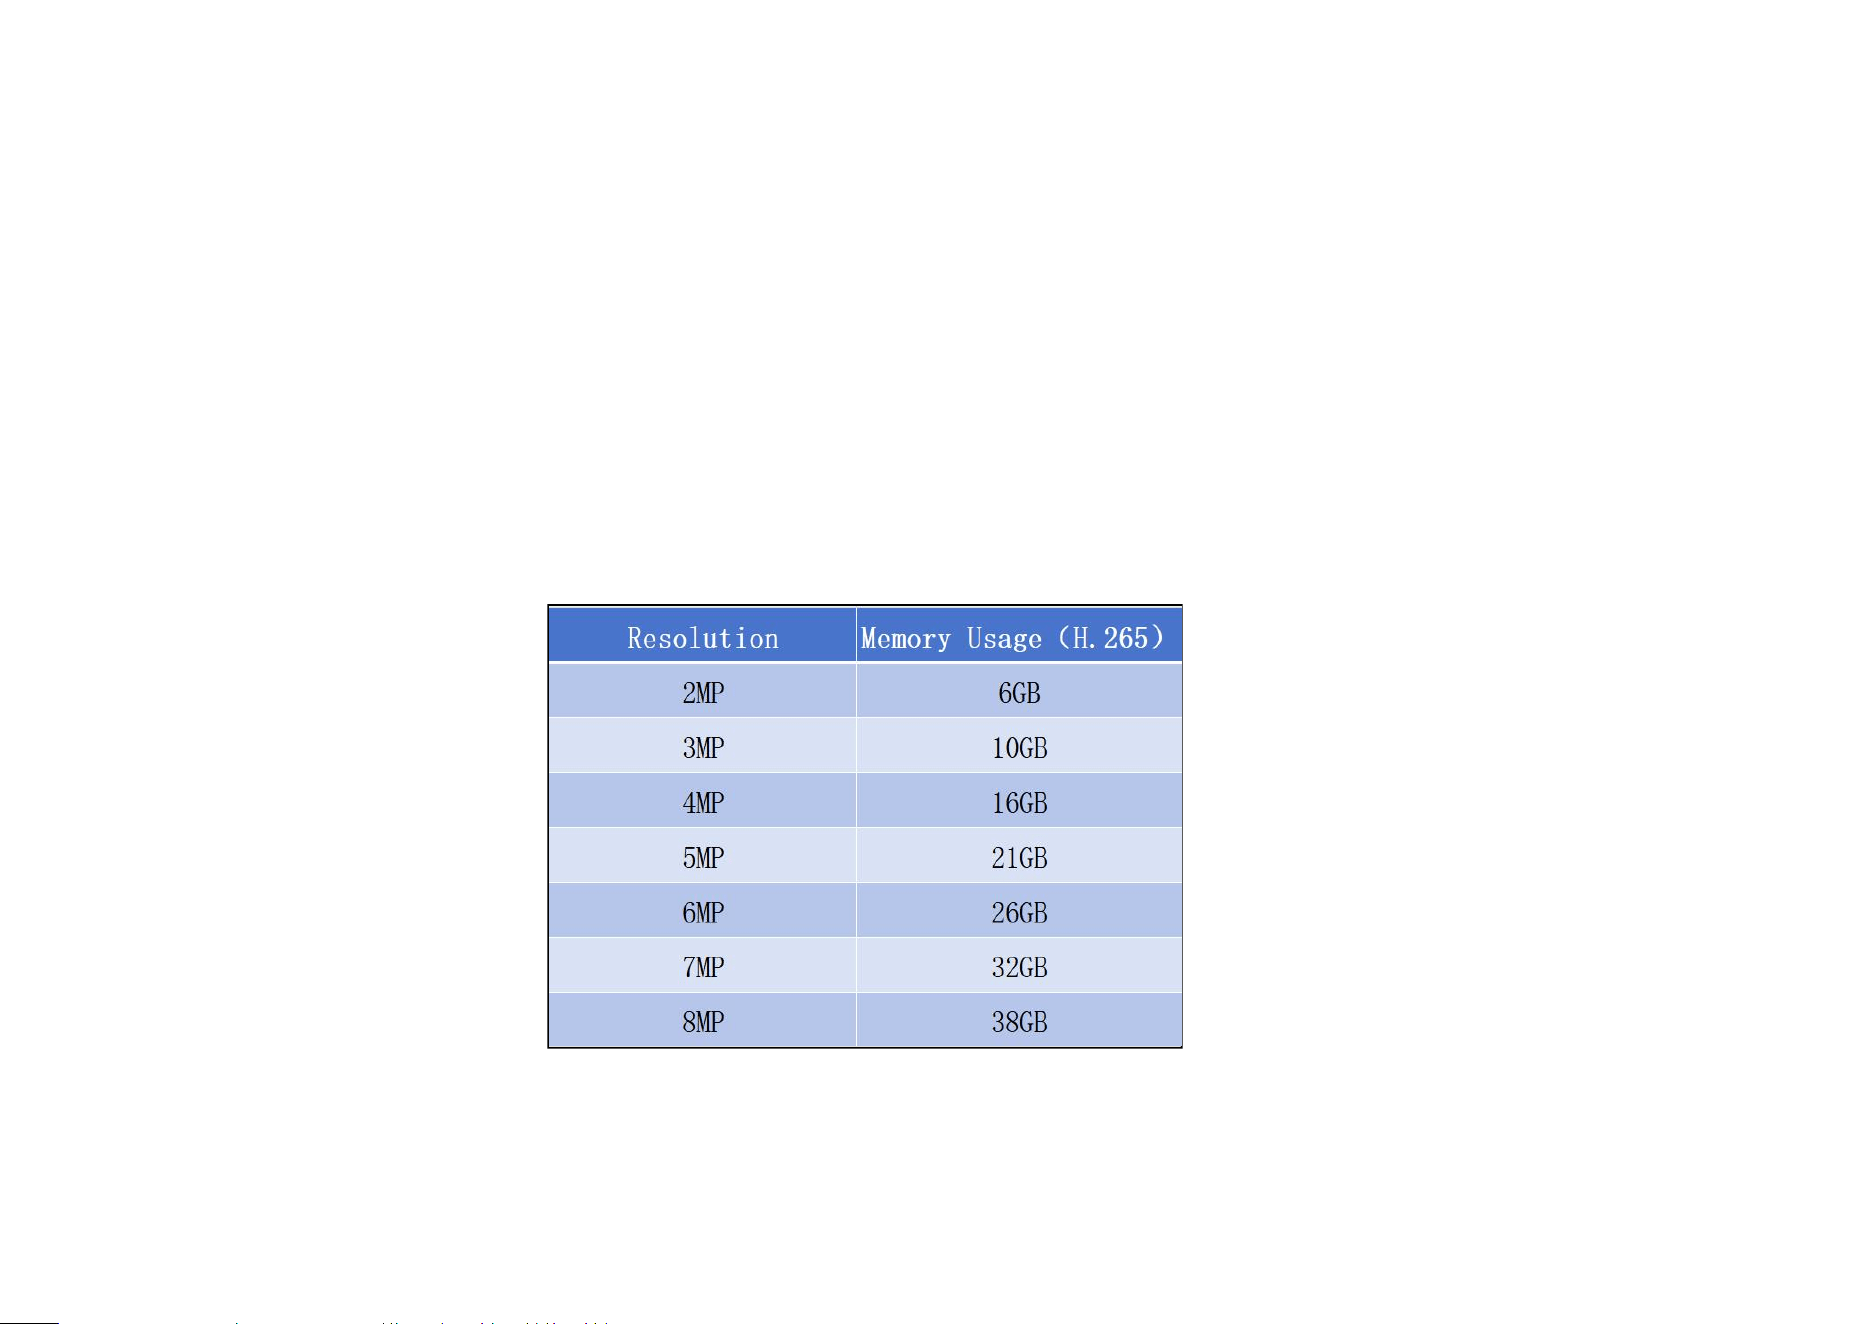
The daily memory usage at different resolutions:
Note: The specific memory usage may vary depending on the environment, and this data is for reference only.
39
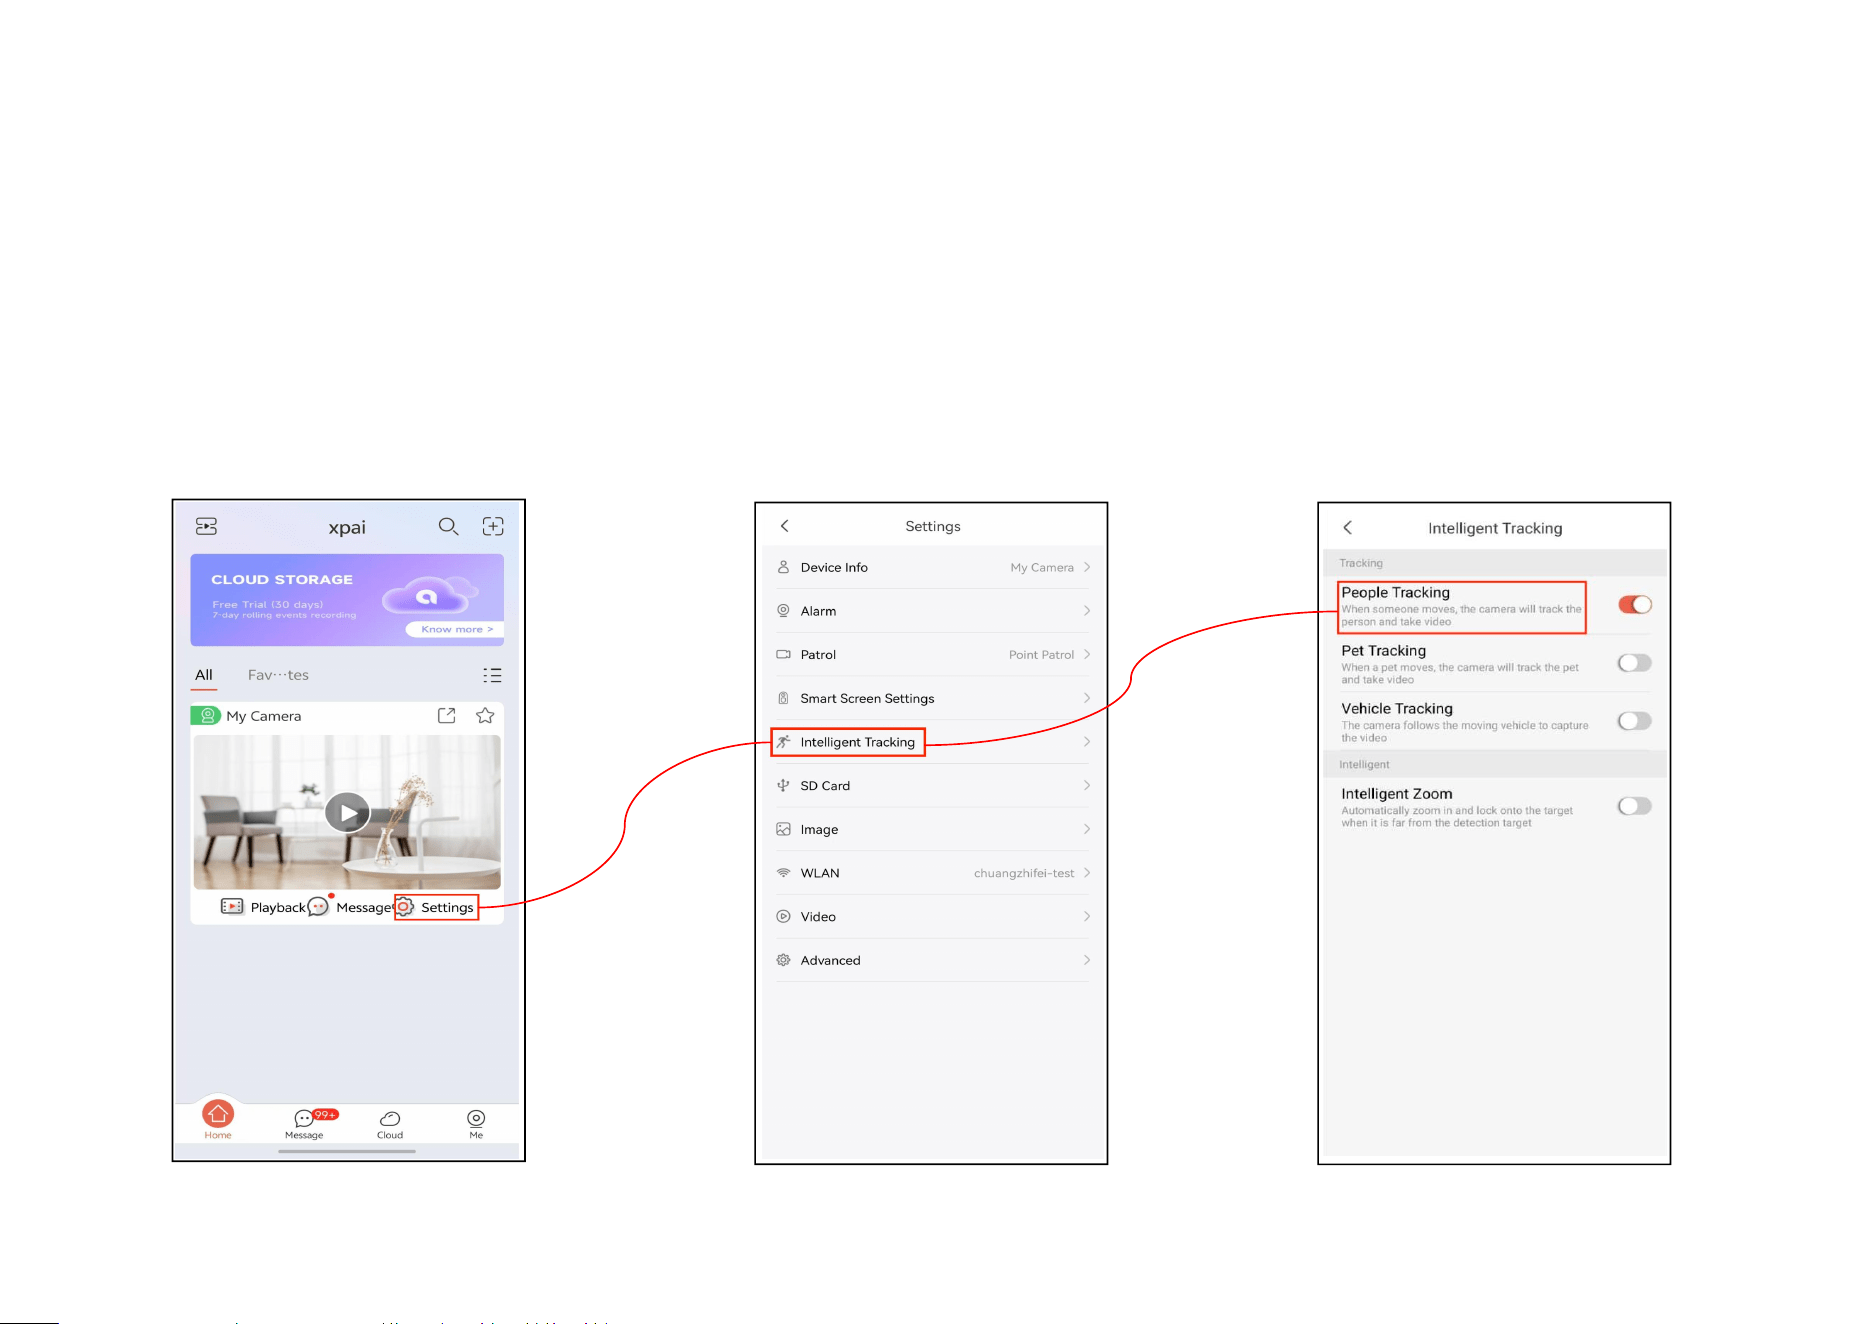
6.8 How to set up intelligent tracking
The intelligent human tracking feature of the camera is capable of real-time detection and recognition of human
silhouettes within the frame, automatically locking onto the target and providing smooth tracking. This ensures a more
precise and efficient visual experience.
Step 1: Tap ‘Settings’ Step 2: Tap ‘Intelligent Tracking’ Step 3: Enable the people tracking
40
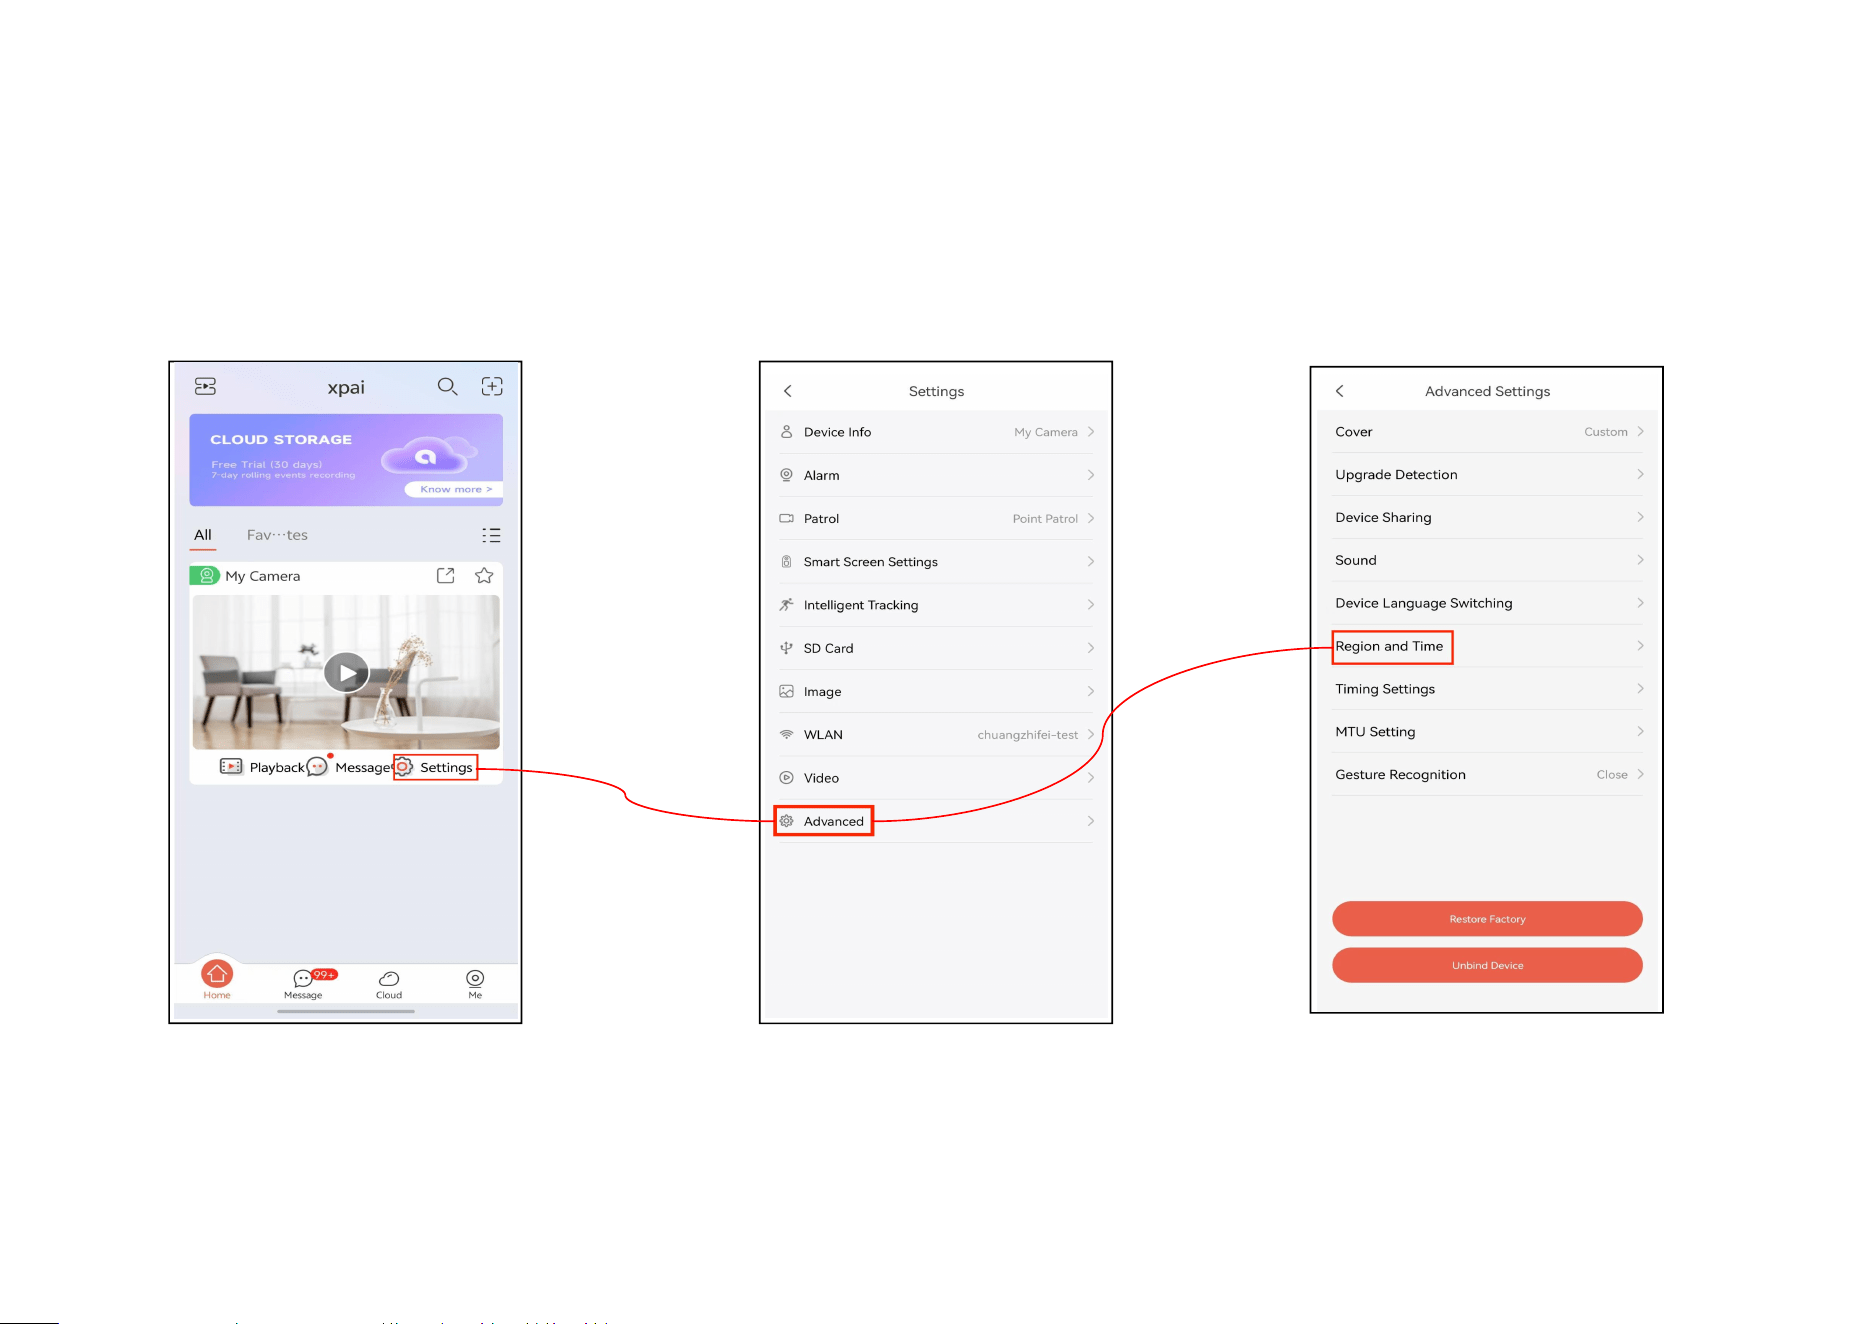
6.9 How to configure region and time
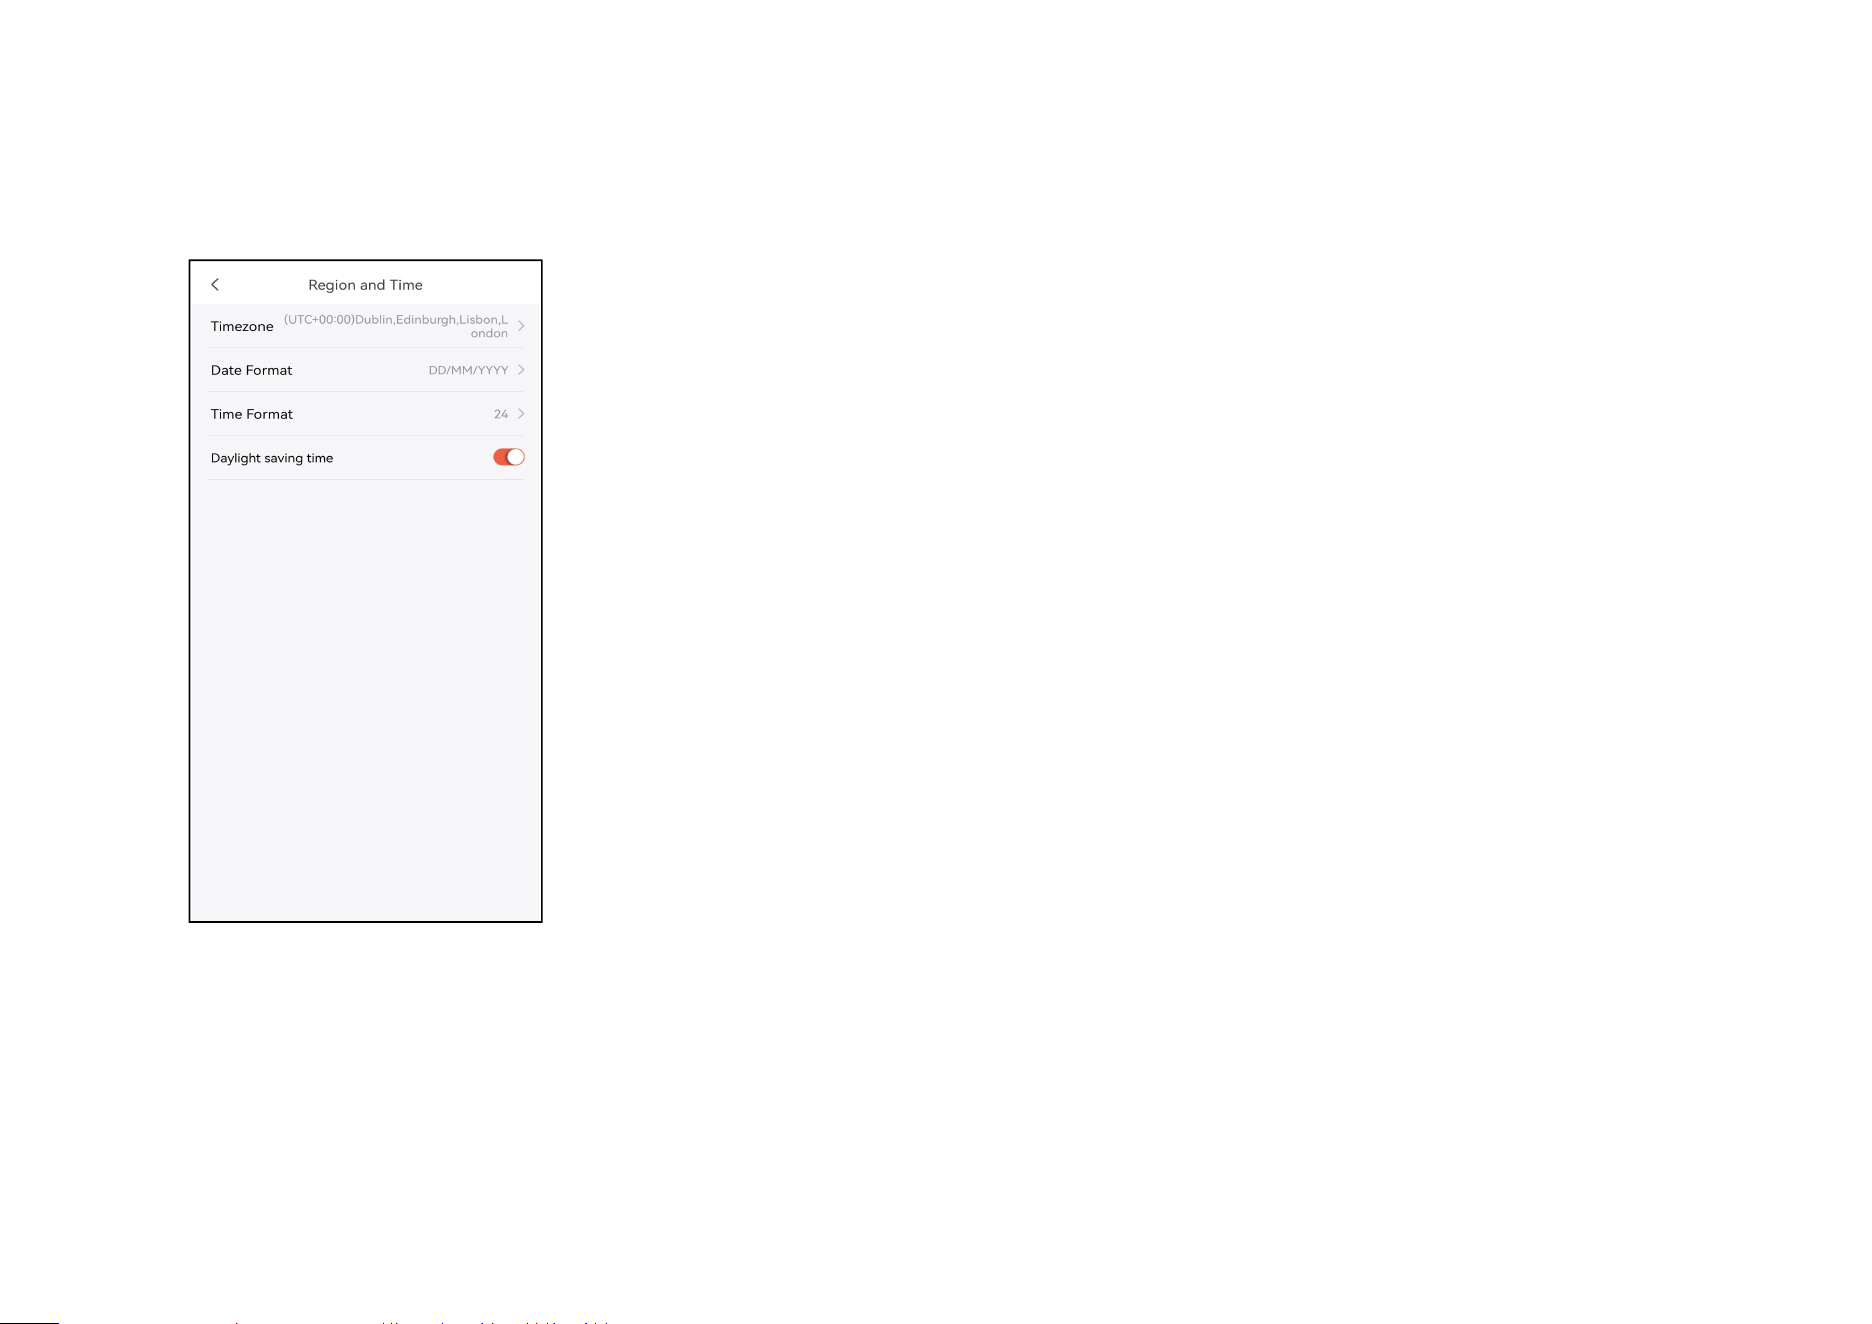
Users can set different time zones for the camera, and they can also configure the time format and daylight saving time.
Step 1: Tap ‘Settings’ Step 2: Tap ‘Settings’ Step 3: Tap ‘Region and Time’
41
Step 4: Users can select different time zones, choose their preferred time display format, and the system supports daylight saving time.
42
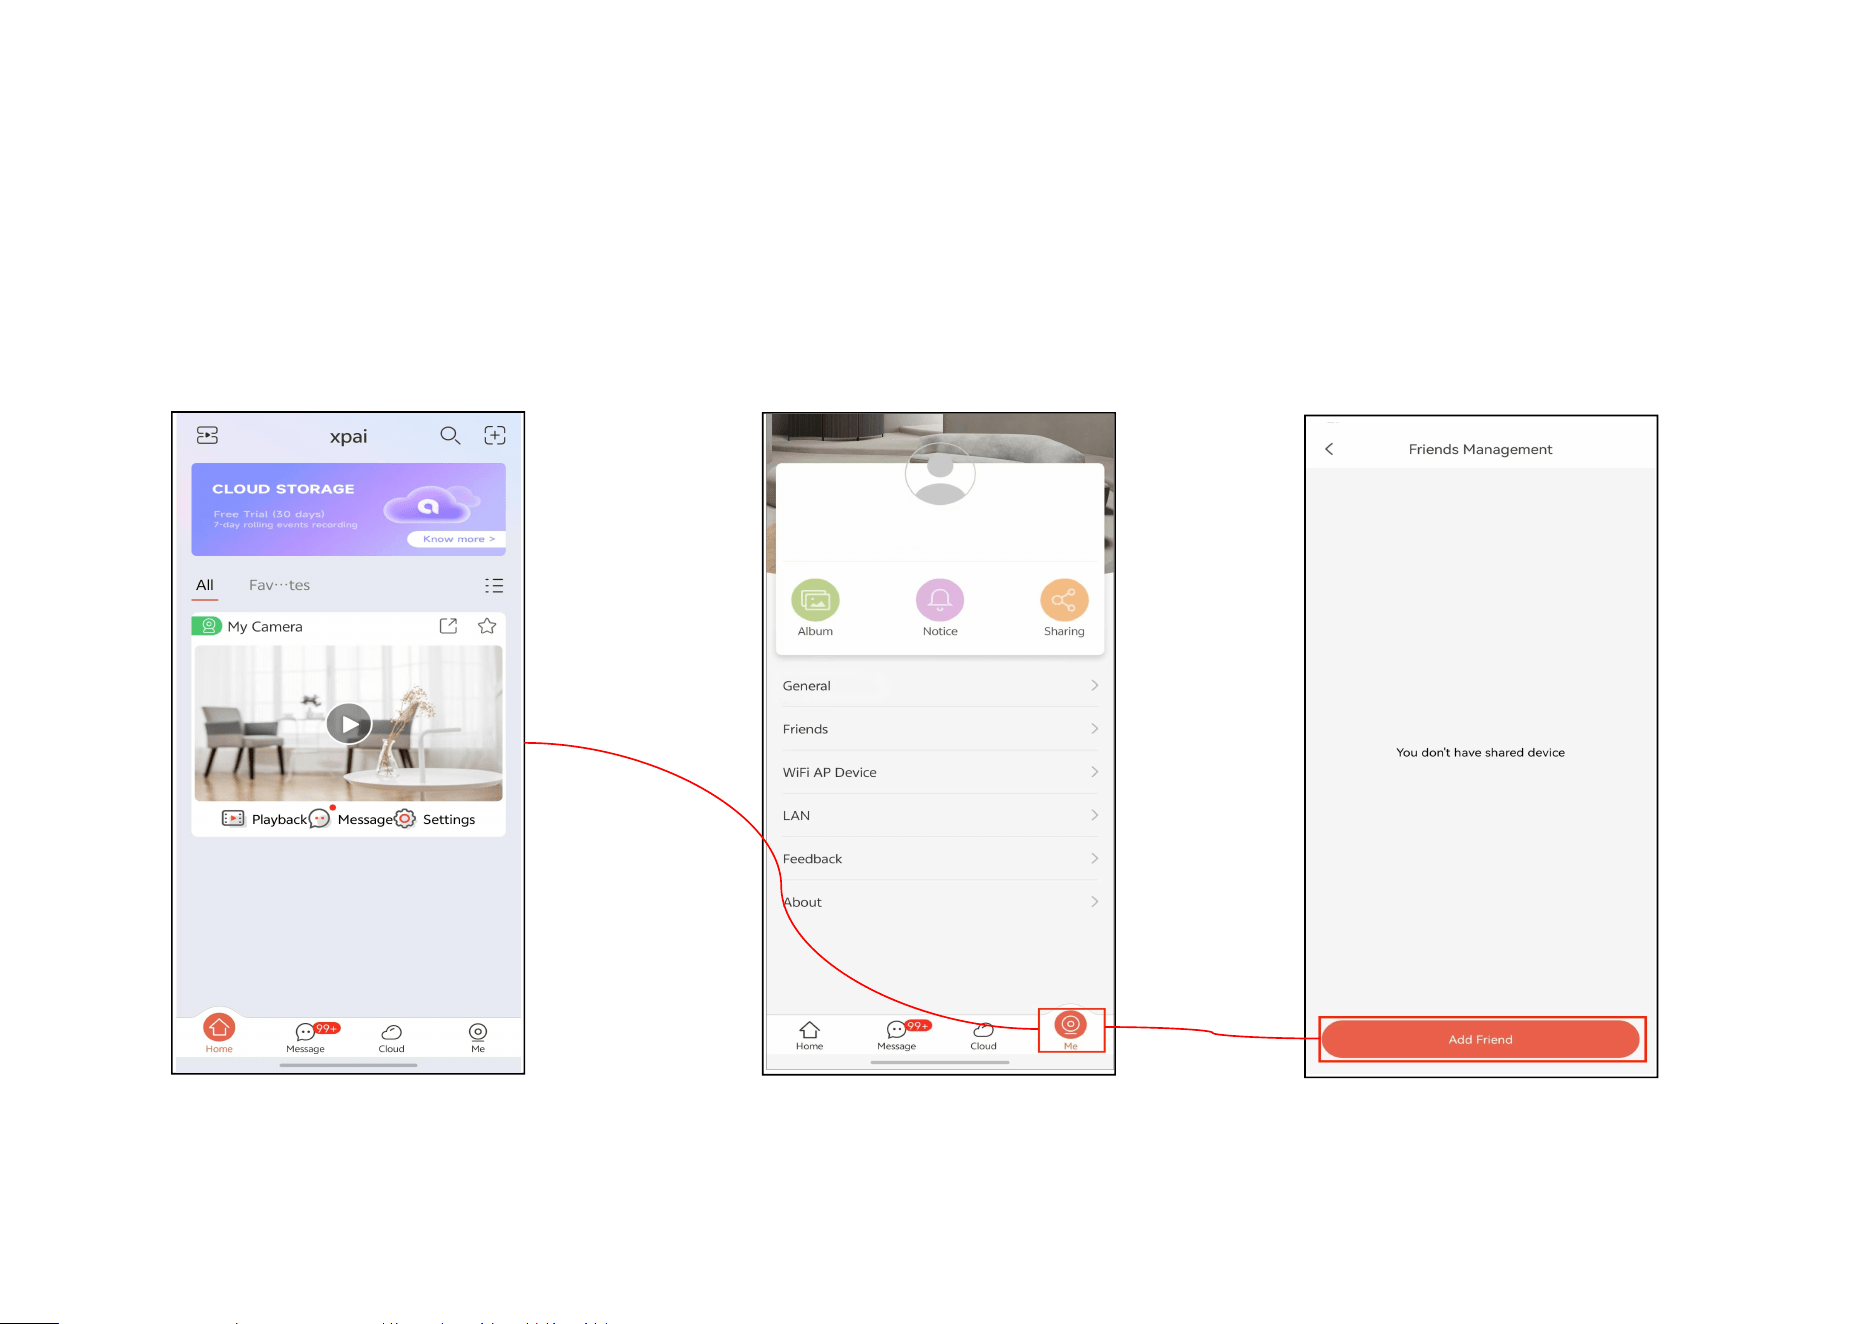
6.10 How to share your cameras
6.10.1 Add friends
Step 1: Tap ‘Me’ Step 2: Tap ‘Me’ Step 3: Tap ‘Add Friend’
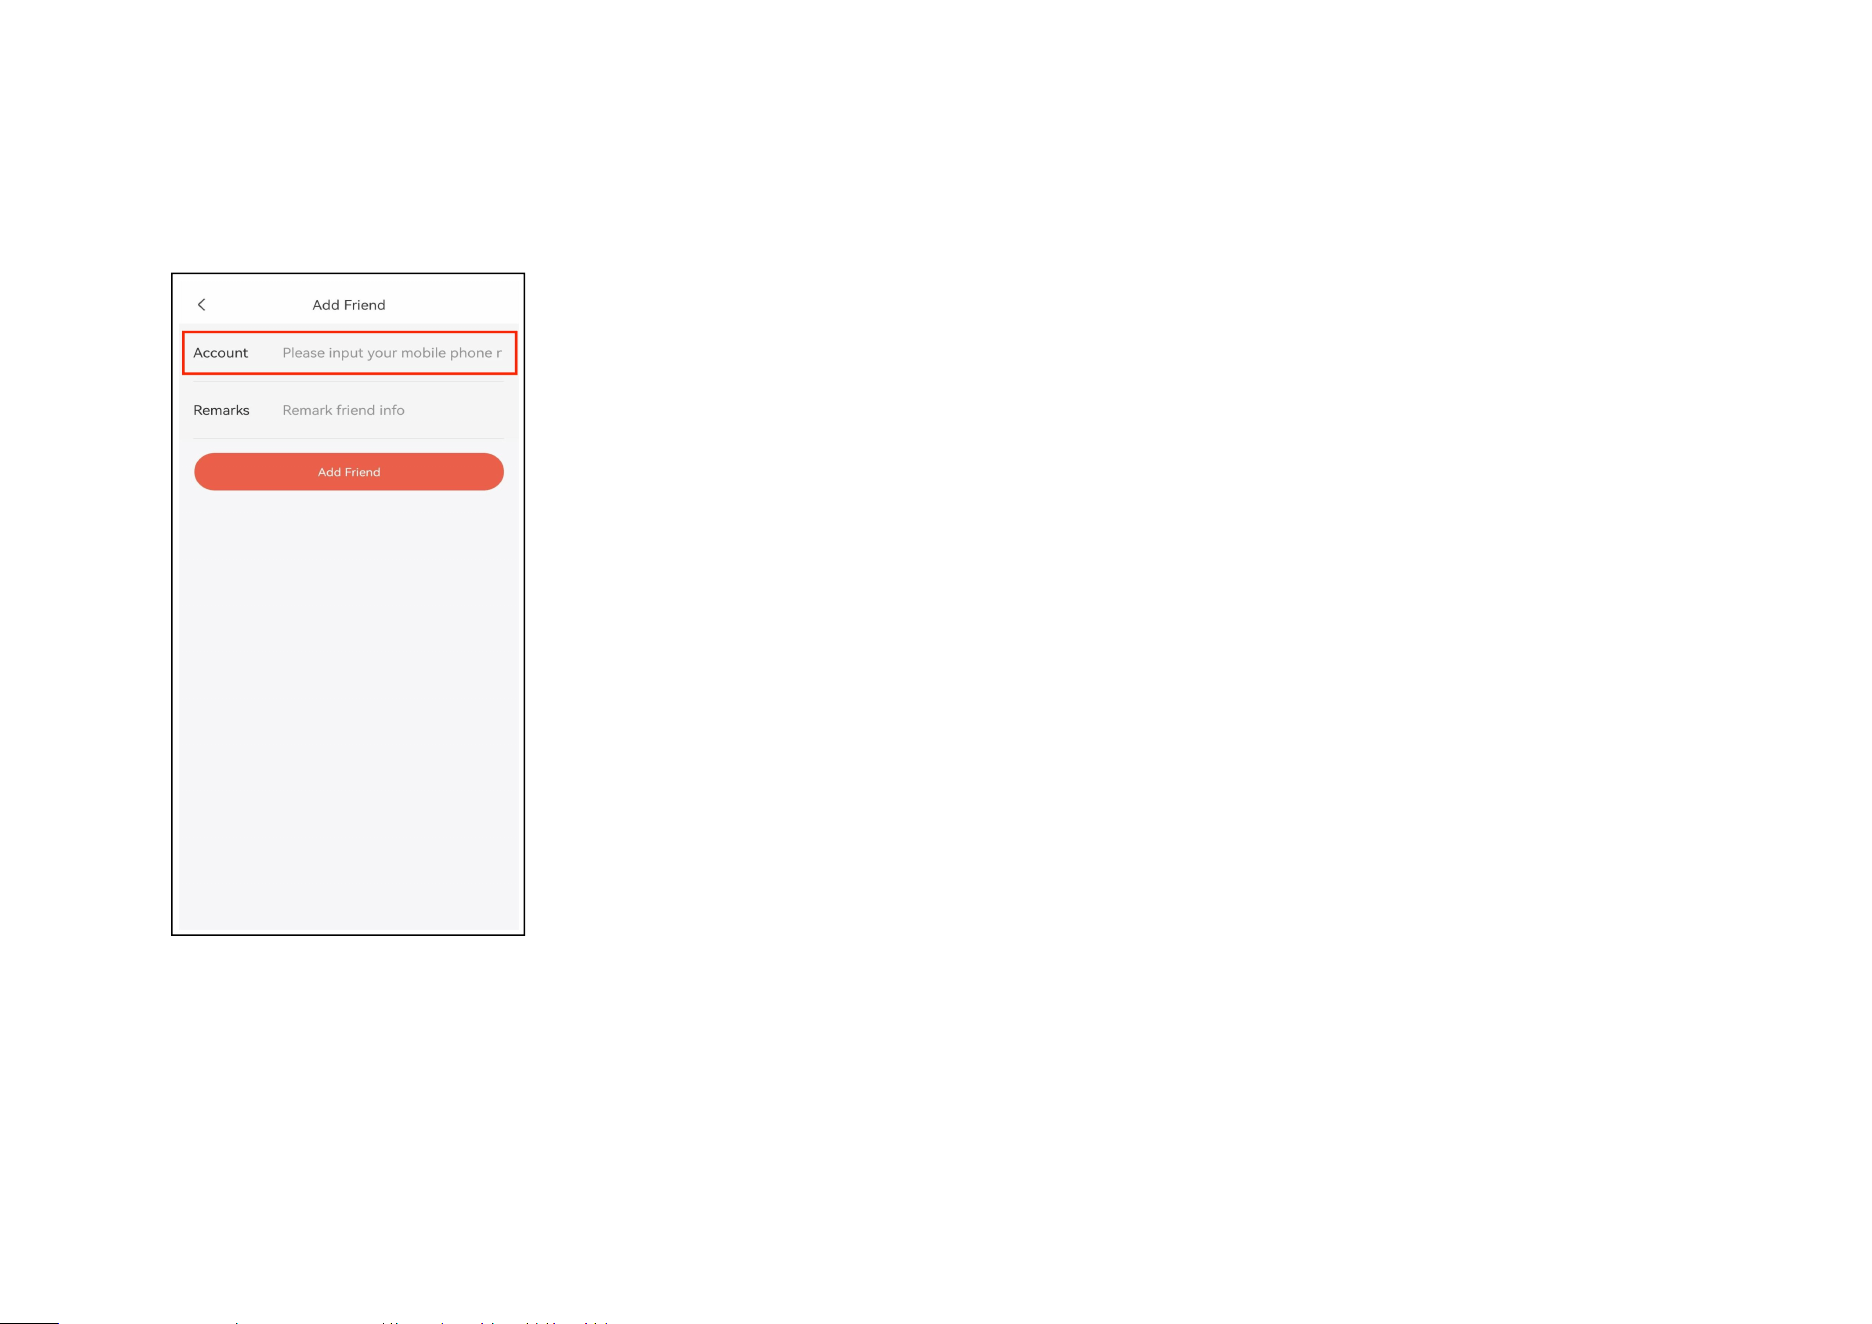
43
Step 4: Users only need to enter their friend's account to add them (ensuring both accounts are in the same region).
44
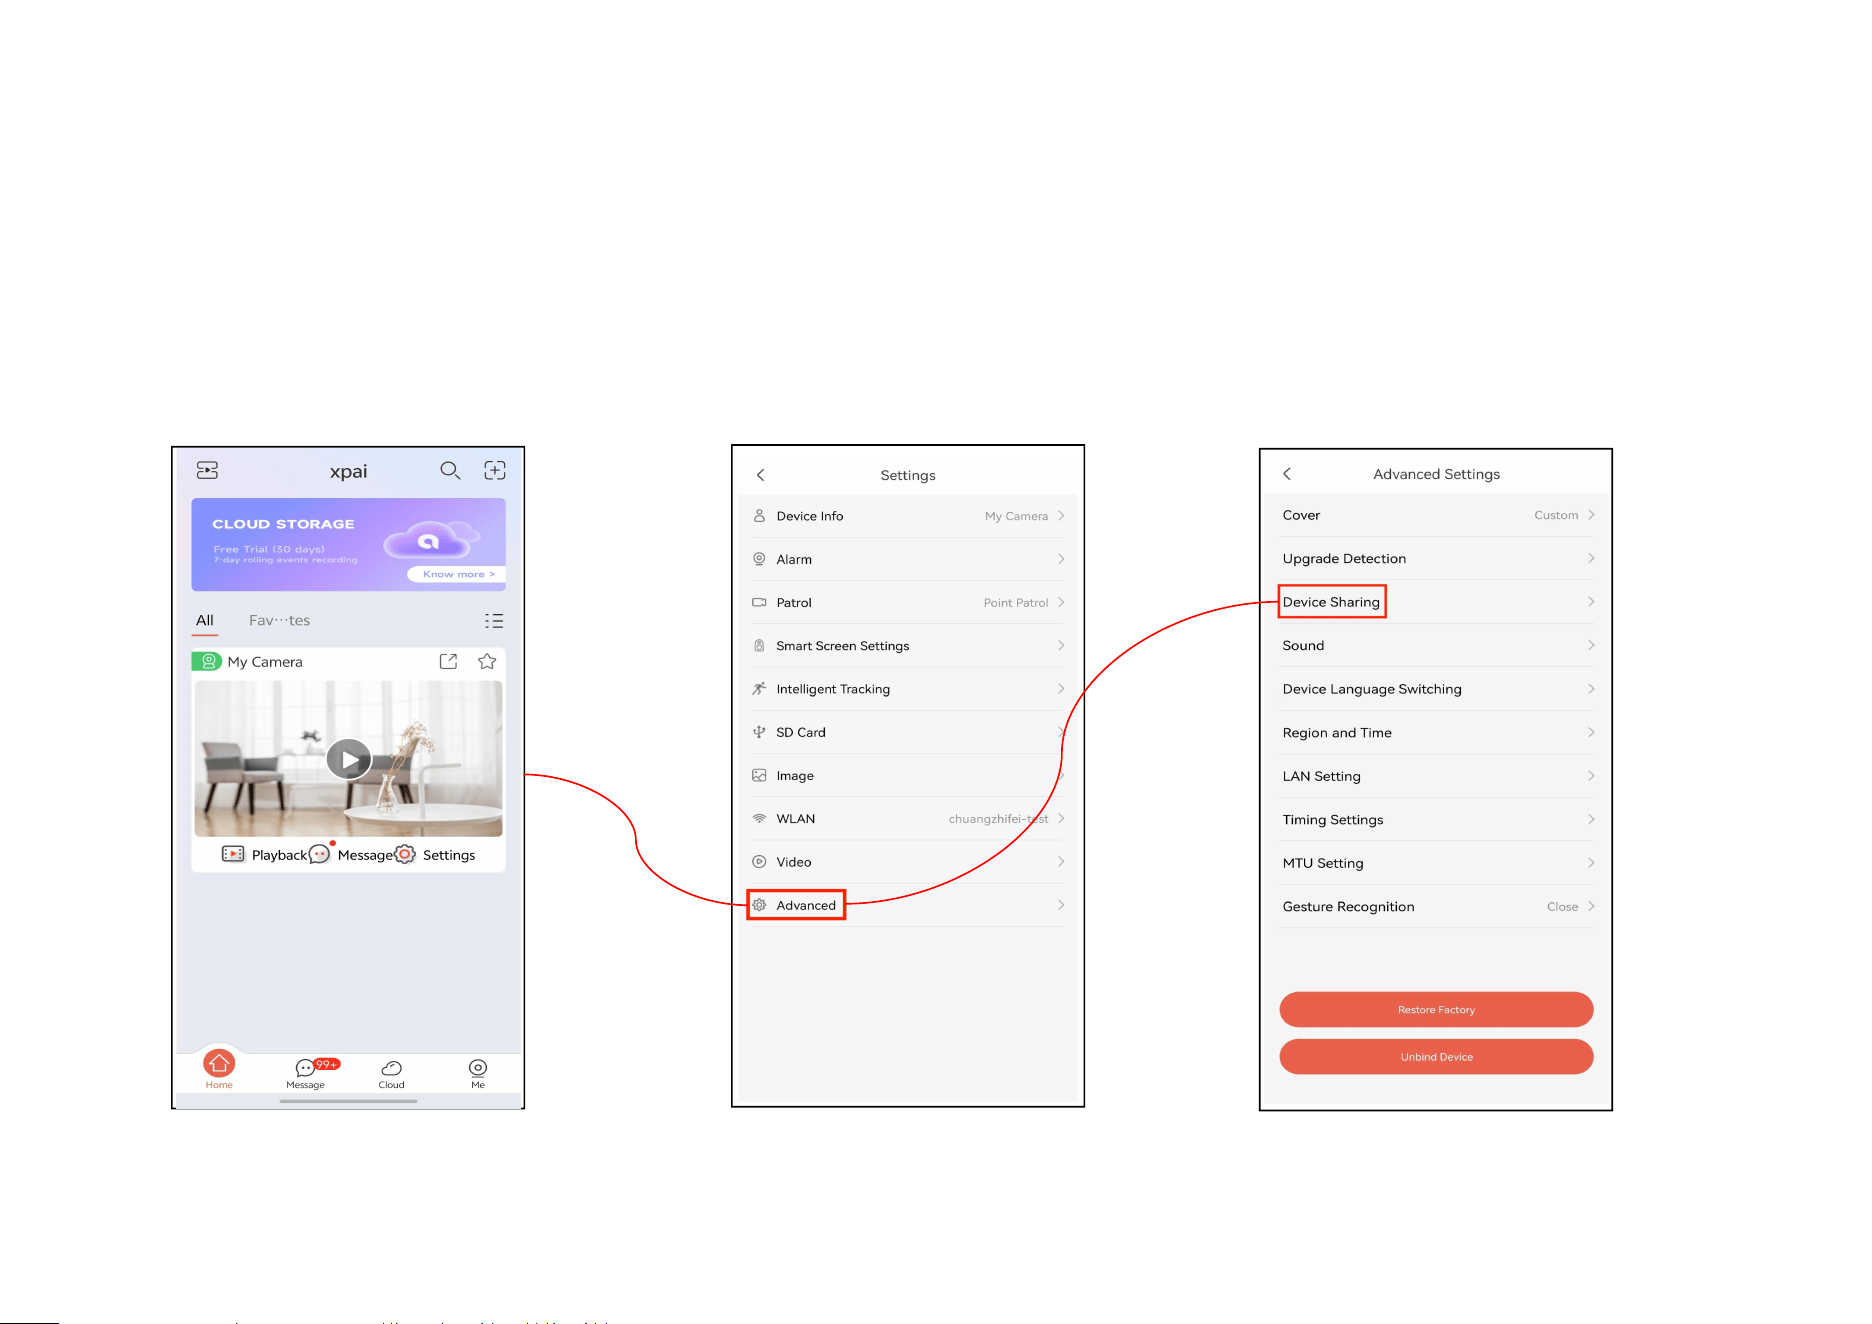
6.10.2 share your cameras
Through the sharing feature, it ensures that even if the device owner is not present, others can promptly respond to
abnormal situations. This enhances the practicality and flexibility of the device, meeting diverse monitoring needs.
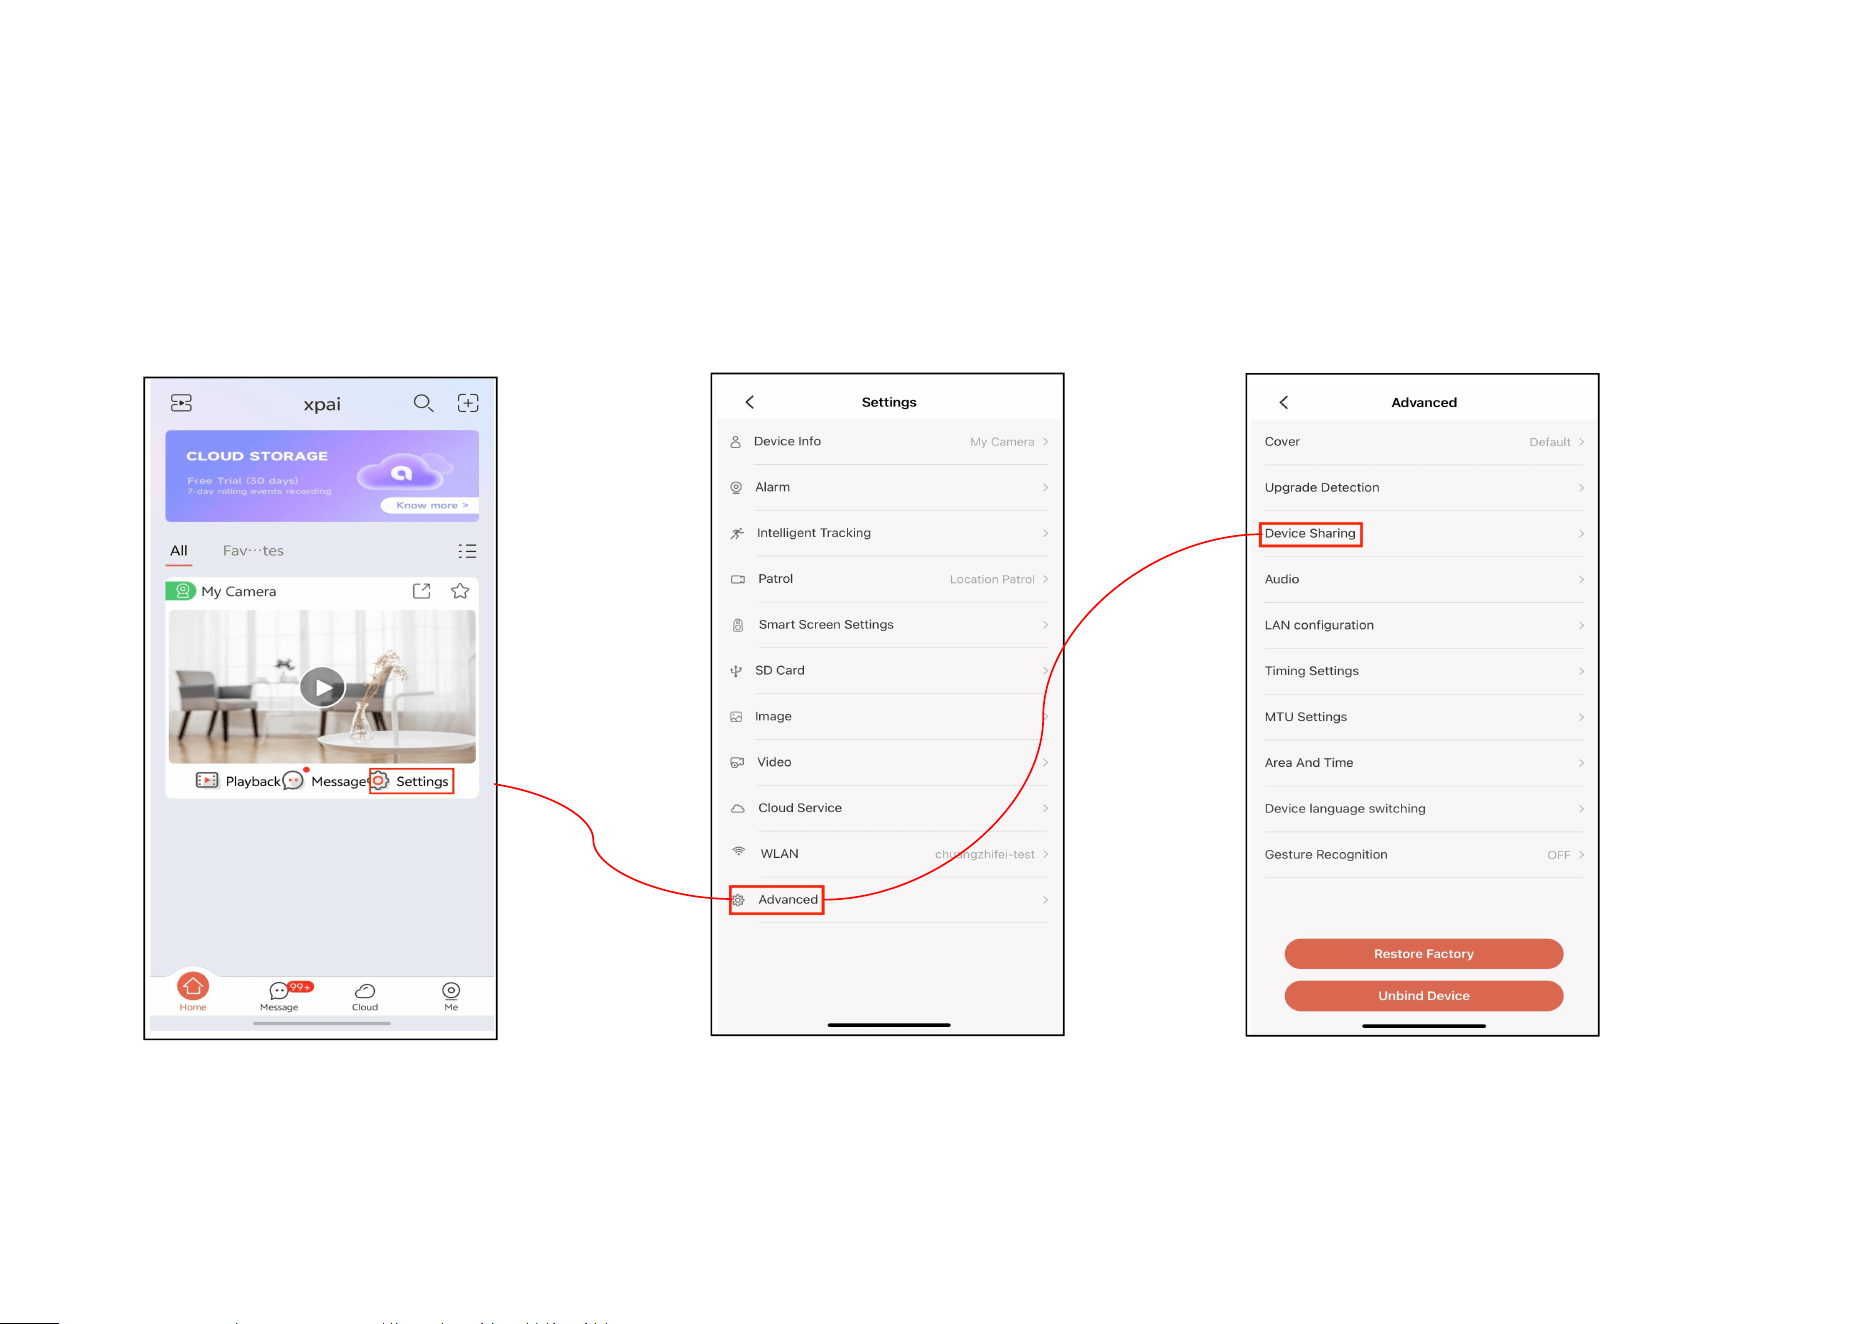
Step 1: Tap ‘Settings’ Step 2: Tap ‘Advanced’ Step 3: Tap ‘Device Sharing’
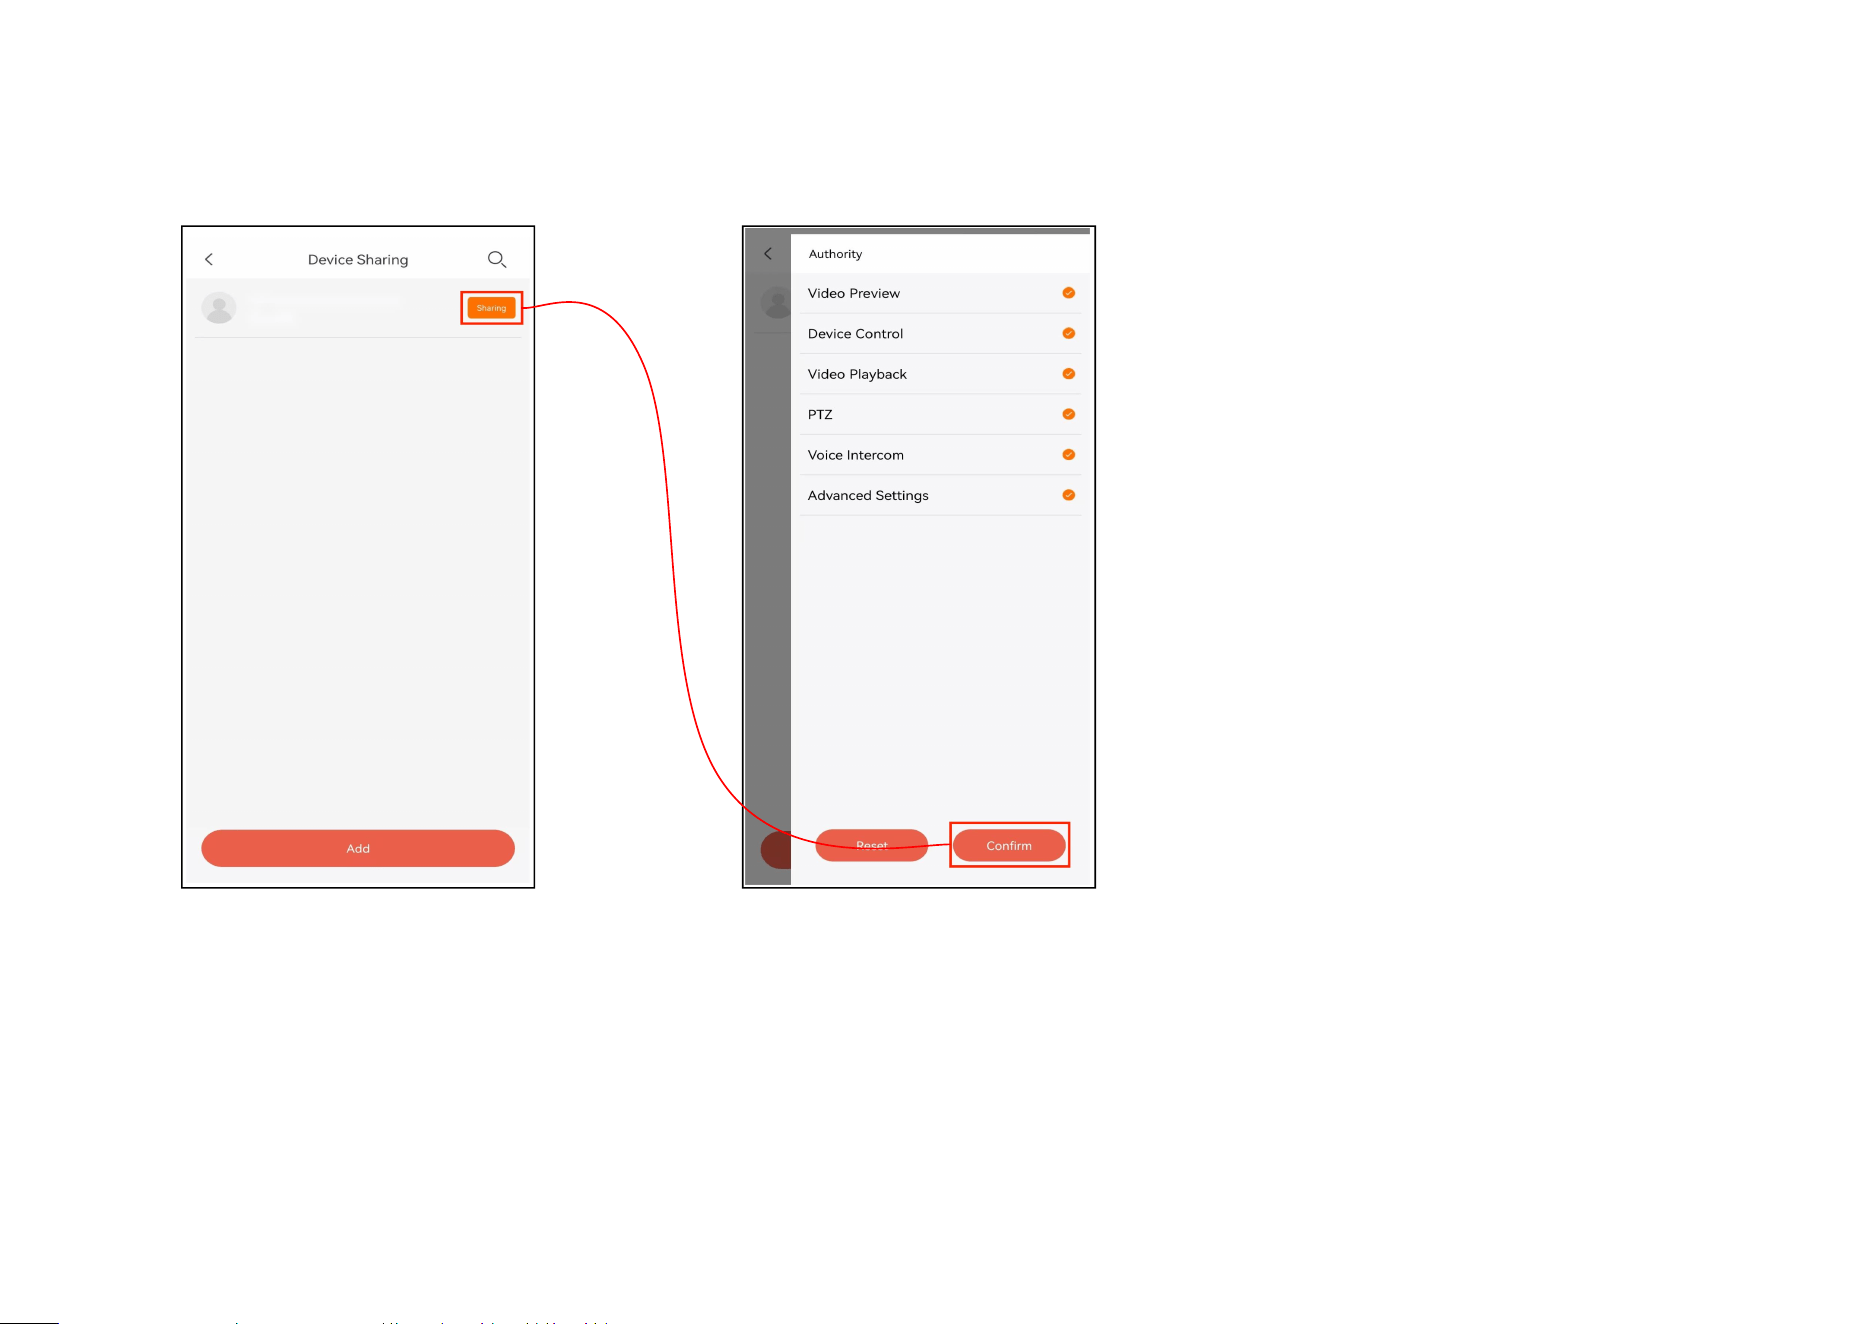
45
Step 4: Tap ‘Sharing’ Step 5: The corresponding permissions can be granted to the shared user.
46
6.10.3 Cancel friends authorization
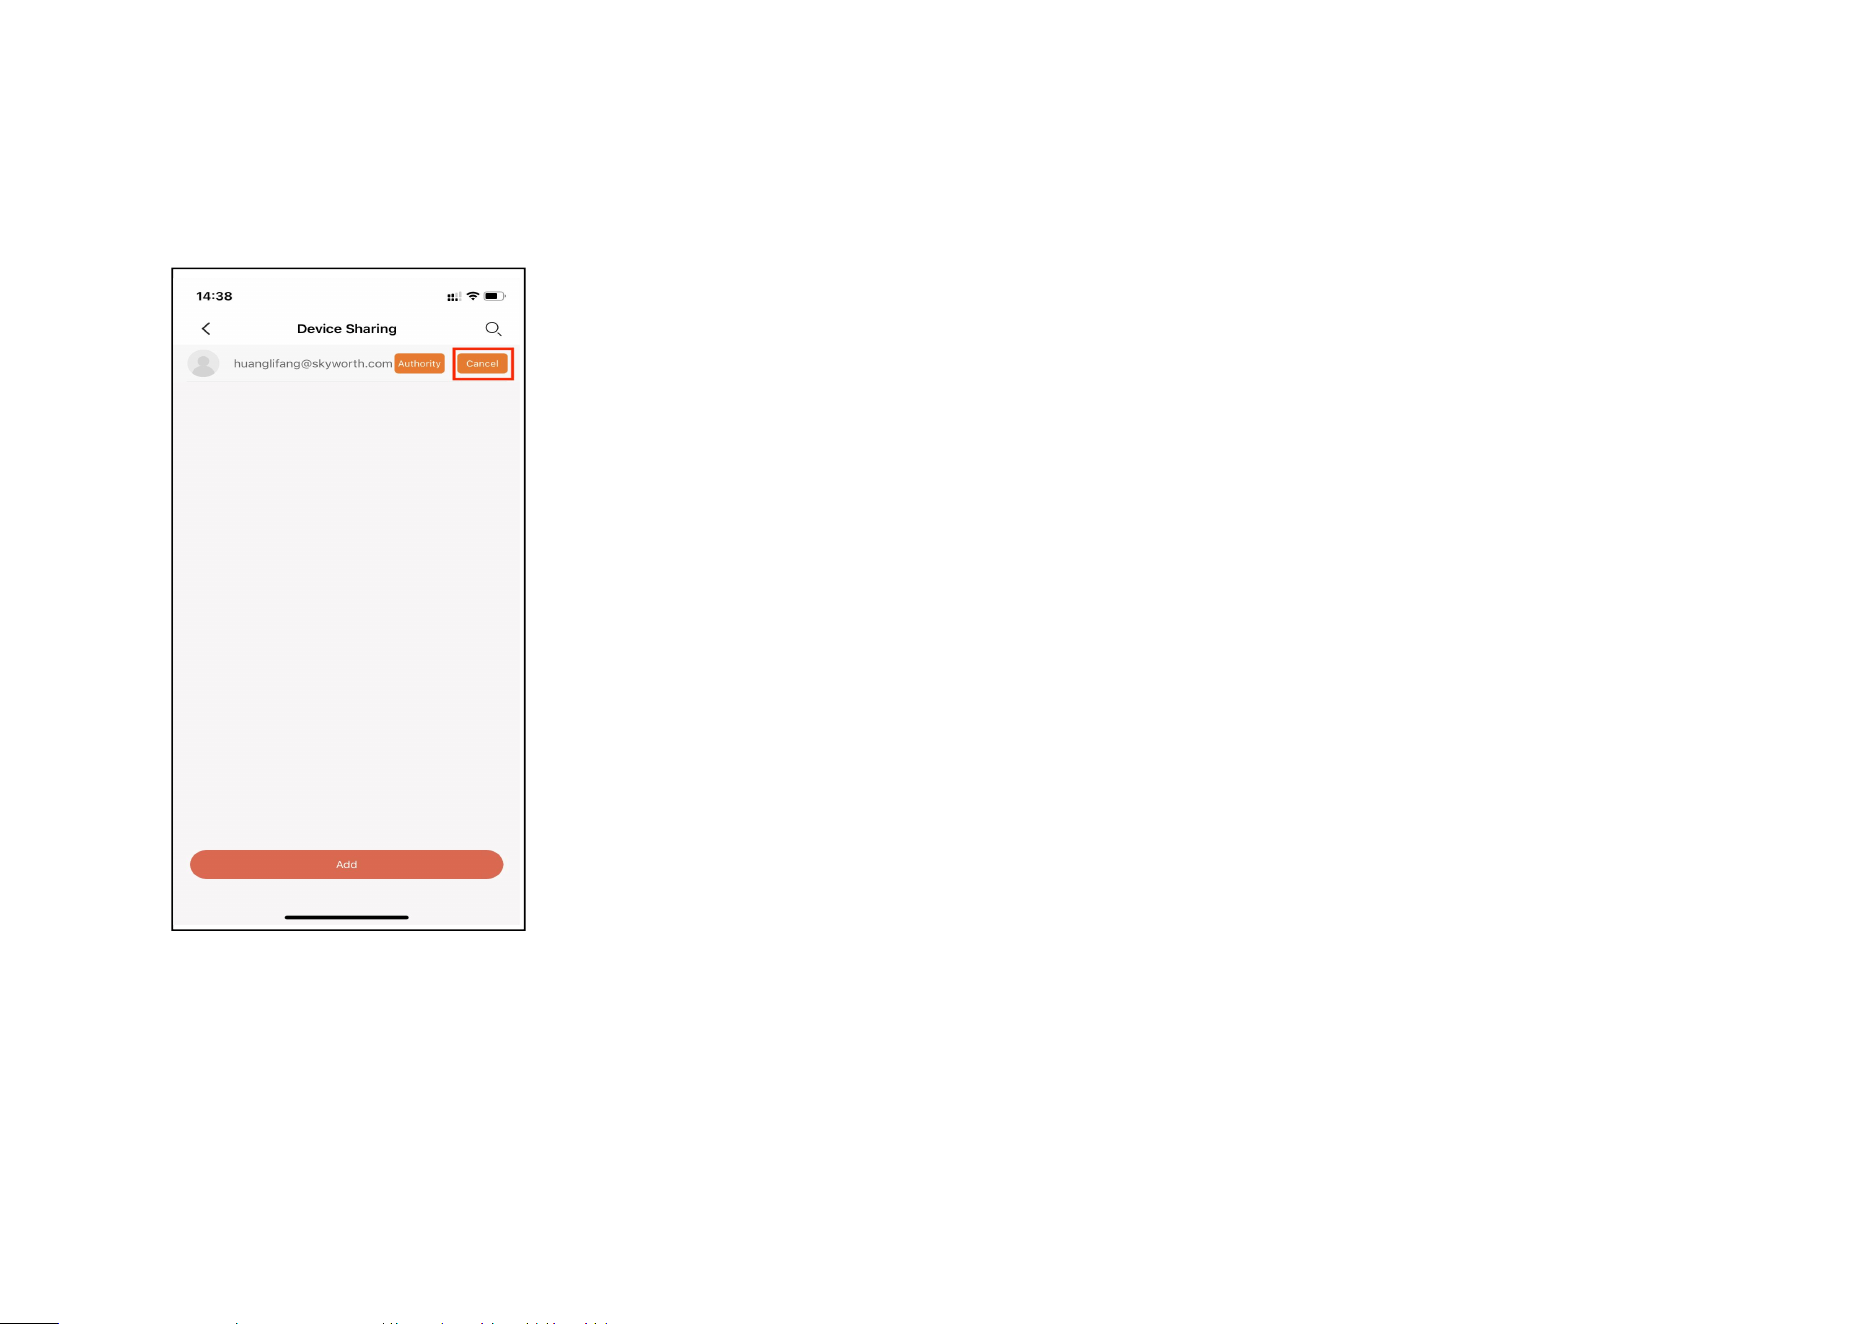
After you have shared permissions with a friend, you can revoke the authorization by following these steps.
Step 1: Tap ‘Settings’ Step 2: Tap ‘Advanced’ Step 3: Tap ‘Device Sharing’
47
Step 4: Tap ‘Cancel’,Authorization can be canceled immediately
48
6.11 How to reset/unbind camera
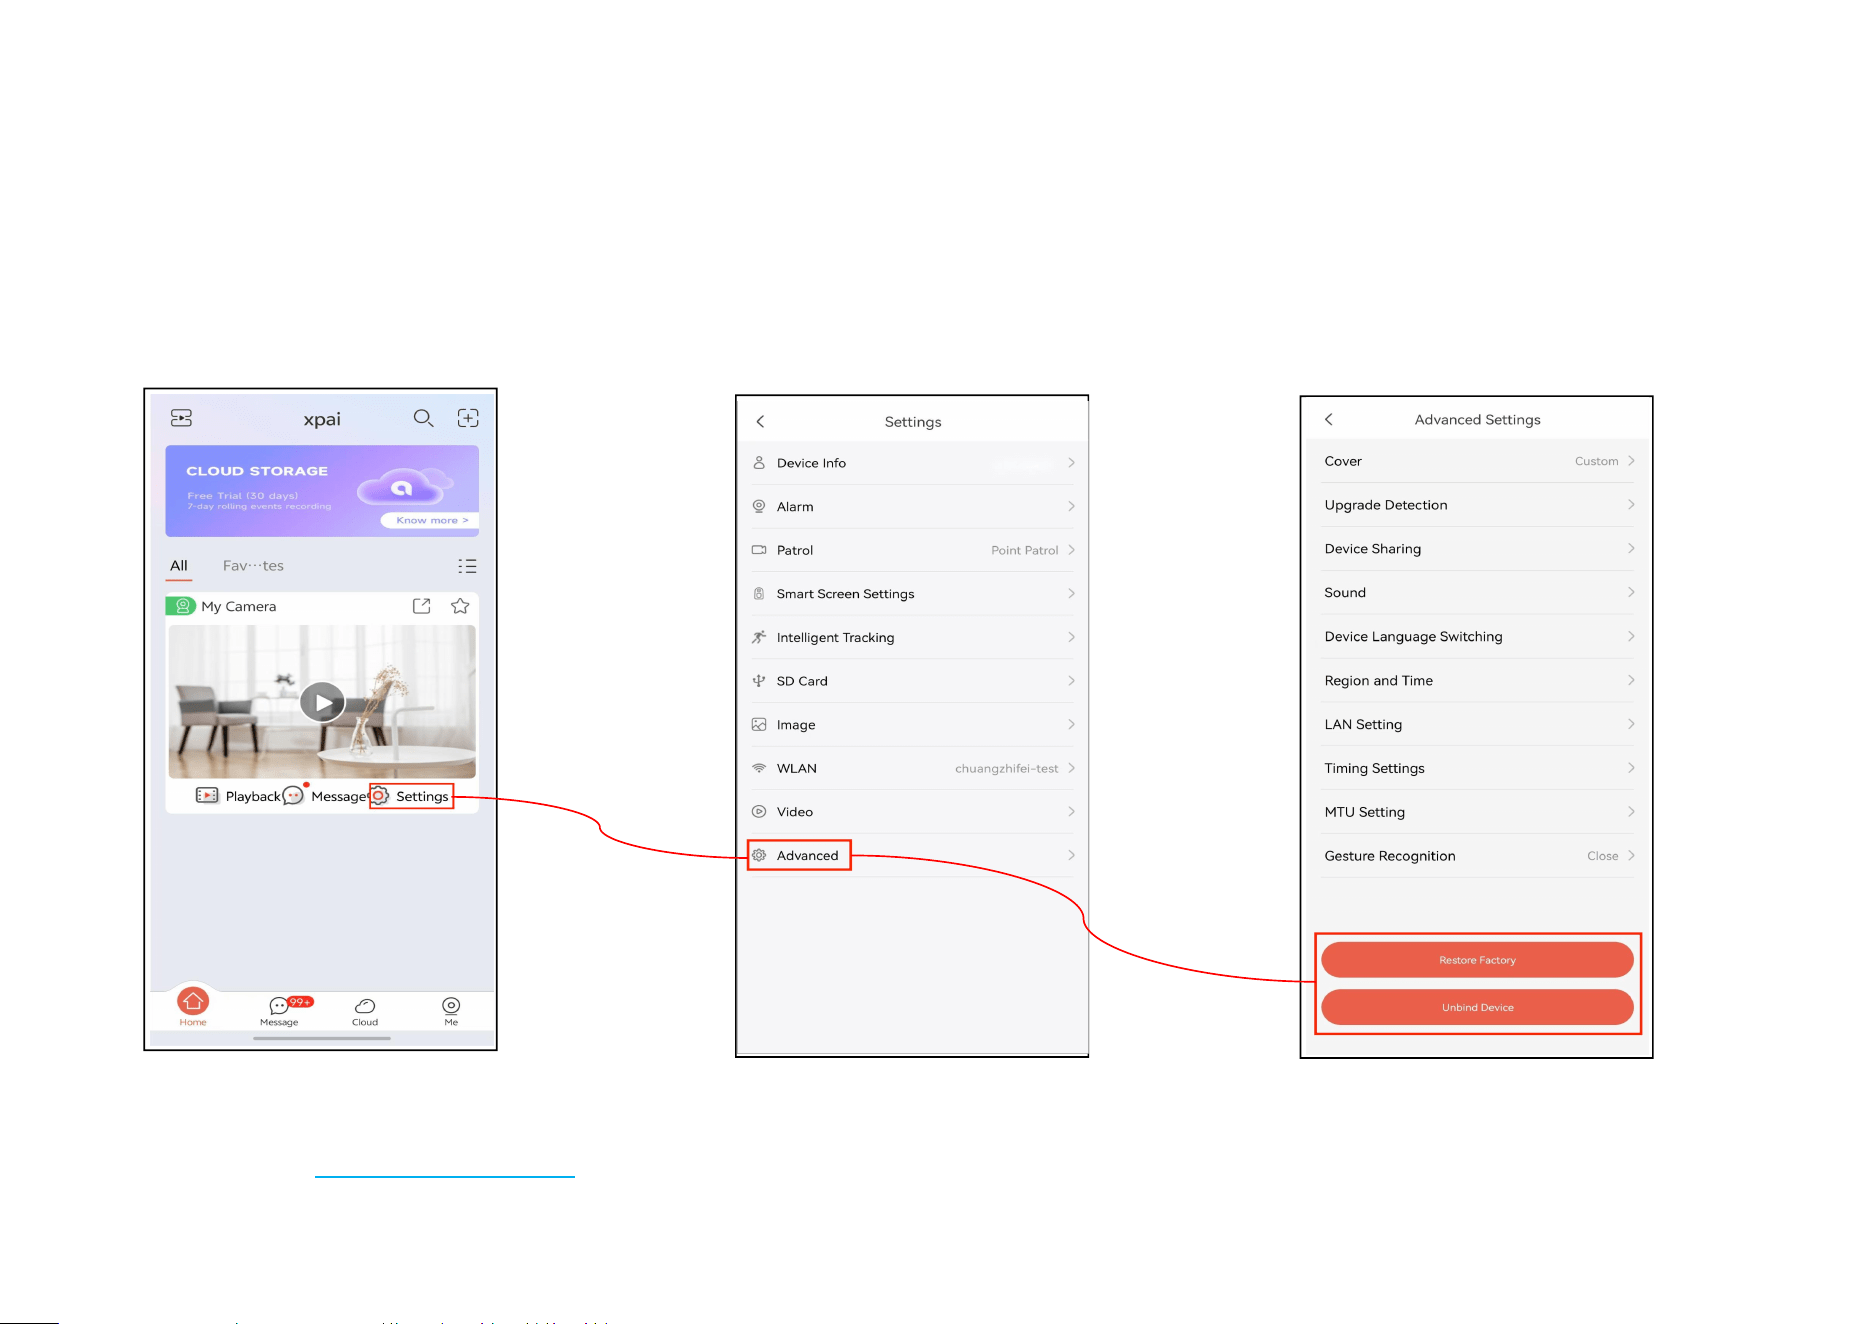
Step 1: Tap ‘Settings’ Step 2: Tap ‘Advanced’ Step 3: Users can restore the device to
factory settings and
unbind device
Note: If users are unable to unbind the device by themselves, they can send the corresponding account and camera serial number to the
email address service@xpaihome.com for assistance.
49
6.12 How to configure the timing function
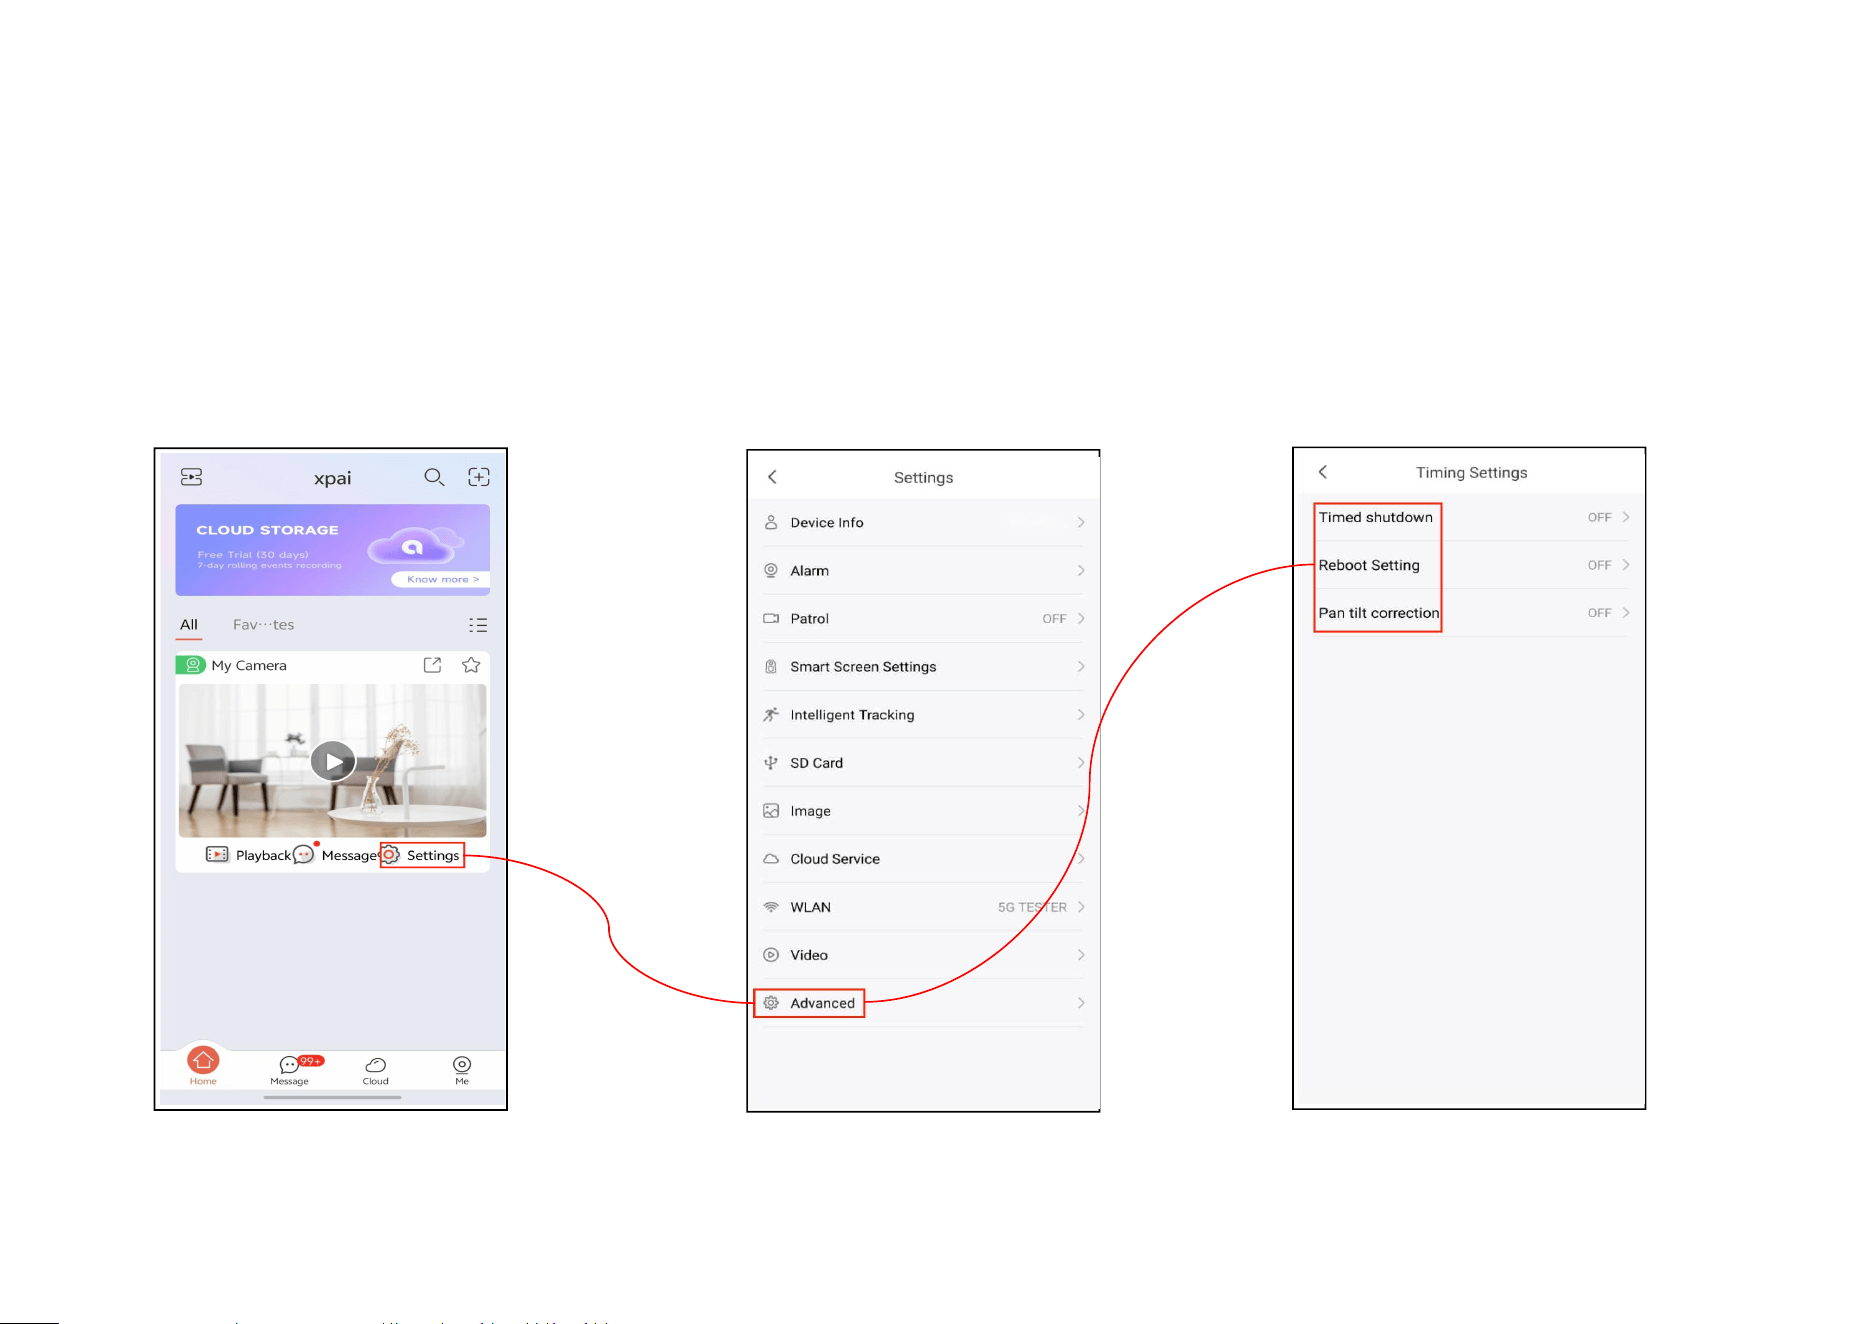
The timing features of the app include scheduled power on/off, scheduled restart, and scheduled location
calibration.
Step 1: Tap ‘Settings’ Step 2: Tap ‘Advanced’ Step 3:Select the functions.
50
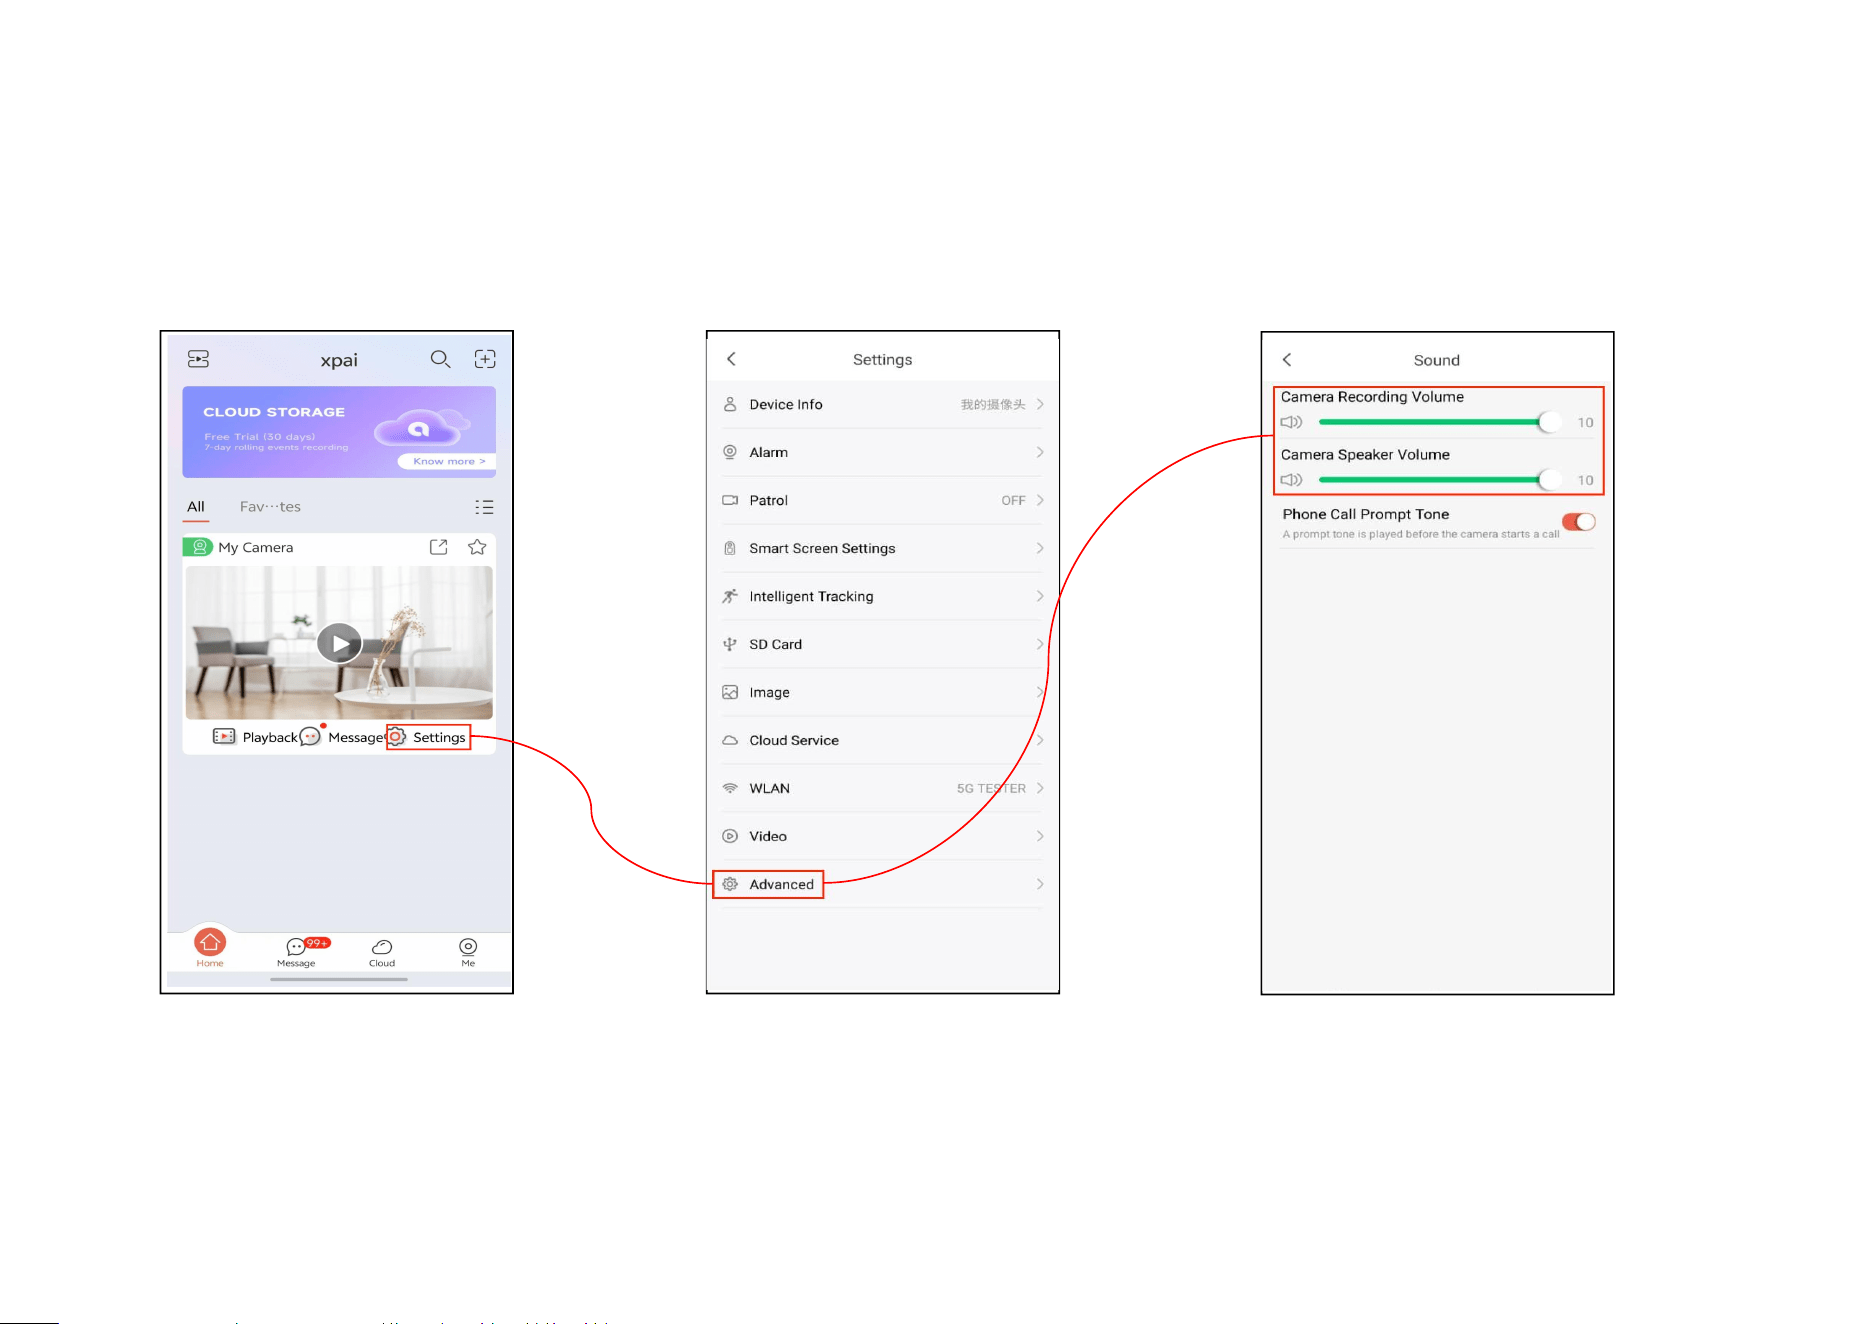
6.13 How to adjust the volume level
Step 1: Tap ‘Settings’ Step 2: Tap ‘Advanced’ Step 3:User can adjust the volume
51