V06
User Manual
www.wolox.com
The information in this manual is subject to change without notice.

Ⅱ
Preface
Thank you for purchasing WOLFBOX products. Our equipment is manufactured to high standards and will provide
3 years of trouble-free peormance if used in accordance with these instructions and properly maintained.
IMPORTANT
• Before operating or maintaining this equipment, please read this manual carefully and follow the instructions
for installation and operation, paying special attention to safety warnings and precautions. Improper use of
this product may result in product damage and personal inju and void the product warranty.
• Under no circumstances does compliance with the information in the instructions relieve the user of the
responsibility to comply with all applicable codes and safety standards. This document describes the install
process. If you are unable to peorm the steps described below, please contact us. We are not responsible for
any damages resulting from custom installations or procedures not described in this document or from failure
to comply with the recommendations.

Ⅲ
WARNING
• This equipment should be installed by a licensed electrician only in accordance with all local codes and
ordinances.
• This equipment must be grounded through the permanent wiring system or equipment grounding
conductor,otherwise it may result in the risk of electric shock or re.
• Children should be supeised when using this equipment.
• Do not inse ngers or foreign objects into the EV connector.
• Do not install or use this equipment near ammable materials, explosive, irritating or combustible substances,
chemicals or vapors.
• Do not use this product if the exible power cord or EV cable is frayed, has broken insulation, or any other
signs of damage.
• Do not use this product if the enclosure or the EV connector is broken, cracked, open, or shows any other
indication of damage.
• Use only 90° copper wire conductors.
• Do not operate this equipment outside operating temperature range of -30℃~50℃(-22℉~122℉).
• Please install this equipment correctly. Improper installation and testing of the equipment may result in
propey damage, personal inju.
• Handle the equipment carefully during transpoation. Do not use force, shock or pull, twist, wrap, drag or step
on the equipment to avoid damage to the equipment or equipment pas.
• For NEMA plug-in versions, use only NEMA outlets (NEMA 14-50). For your own safety, do not
unplug the charger during charging.
• THE SUITABILITY OF THE USE OF FLEXIBLE CORD IN ACCORDANCE WITH CE CODE, PART I.
For use with electric vehicles.
Ventilation Not Required.
CAUTION
To avoid the risk of re or electric shock, do not use this equipment is used with extension cord.
Safety Instructions
The safety messages herein cover situations WOLFBOX is aware of. WOLFBOX cannot know, evaluate or advise
you as to all of the possible hazards. You must be ceain that any condition or seice procedure encountered
does not jeopardize your personal safety.

CONTENTS
PREFACE . . . . . . . . . . . . . . . . . . . . . . . . . . . . . . . . . . . . . . . . . . . . . . . . . . . . . . . . Ⅱ
SAFETY INSTRUCTIONS . . . . . . . . . . . . . . . . . . . . . . . . . . . . . . . . . . . . . . . . . . . . . . . . Ⅲ
GENERAL INTRODUCTION . . . . . . . . . . . . . . . . . . . . . . . . . . . . . . . . . . . . . . . . . . . 1
Packing List . . . . . . . . . . . . . . . . . . . . . . . . . . . . . . . . . . . . . . . . . . . . . . . . . . . . . . 1
Product Oveiew . . . . . . . . . . . . . . . . . . . . . . . . . . . . . . . . . . . . . . . . . . . . . . . . . . 2
Indicator Light Description . . . . . . . . . . . . . . . . . . . . . . . . . . . . . . . . . . . . . . . . . . . . . 3
Overall Drawing . . . . . . . . . . . . . . . . . . . . . . . . . . . . . . . . . . . . . . . . . . . . . . . . . . . 3
INSTALLATION GUIDE(REFERENCE) . . . . . . . . . . . . . . . . . . . . . . . . . . . . . . . . . . . . . . 3
Location . . . . . . . . . . . . . . . . . . . . . . . . . . . . . . . . . . . . . . . . . . . . . . . . . . . . . . . . 3
Positioning . . . . . . . . . . . . . . . . . . . . . . . . . . . . . . . . . . . . . . . . . . . . . . . . . . . . . . 4
Current Line Description . . . . . . . . . . . . . . . . . . . . . . . . . . . . . . . . . . . . . . . . . . . . . . 5
Hardwired Installation . . . . . . . . . . . . . . . . . . . . . . . . . . . . . . . . . . . . . . . . . . . . . . . . 6
NEMA Plug-in Installation . . . . . . . . . . . . . . . . . . . . . . . . . . . . . . . . . . . . . . . . . . . . . . 6
INSTRUCTIONS FOR USE . . . . . . . . . . . . . . . . . . . . . . . . . . . . . . . . . . . . . . . . . . . . 8
Charging Steps . . . . . . . . . . . . . . . . . . . . . . . . . . . . . . . . . . . . . . . . . . . . . . . . . . . . 8
About Management Card . . . . . . . . . . . . . . . . . . . . . . . . . . . . . . . . . . . . . . . . . . . . . . 8
Fault Description . . . . . . . . . . . . . . . . . . . . . . . . . . . . . . . . . . . . . . . . . . . . . . . . . . . 9
WOLFBOX EV APP . . . . . . . . . . . . . . . . . . . . . . . . . . . . . . . . . . . . . . . . . . . . . . . 10
App Download . . . . . . . . . . . . . . . . . . . . . . . . . . . . . . . . . . . . . . . . . . . . . . . . . . . 10
Sign Up and Log In . . . . . . . . . . . . . . . . . . . . . . . . . . . . . . . . . . . . . . . . . . . . . . . . . 10
App Connection . . . . . . . . . . . . . . . . . . . . . . . . . . . . . . . . . . . . . . . . . . . . . . . . . . 11
App Function . . . . . . . . . . . . . . . . . . . . . . . . . . . . . . . . . . . . . . . . . . . . . . . . . . . . 14
AFTER-SALES INFORMATION . . . . . . . . . . . . . . . . . . . . . . . . . . . . . . . . . . . . . . . . 19
Out of Scope Warranty . . . . . . . . . . . . . . . . . . . . . . . . . . . . . . . . . . . . . . . . . . . . . . 19
Promise . . . . . . . . . . . . . . . . . . . . . . . . . . . . . . . . . . . . . . . . . . . . . . . . . . . . . . . 19
Brand Contact Details . . . . . . . . . . . . . . . . . . . . . . . . . . . . . . . . . . . . . . . . . . . . . . . 19
1
1.1
1.2
1.3
1.4
2
2.1
2.2
2.3
2.4
2.5
3
3.1
3.2
3.3
4
4.1
4.2
4.3
4.4
5
5.1
5.2
5.3
1
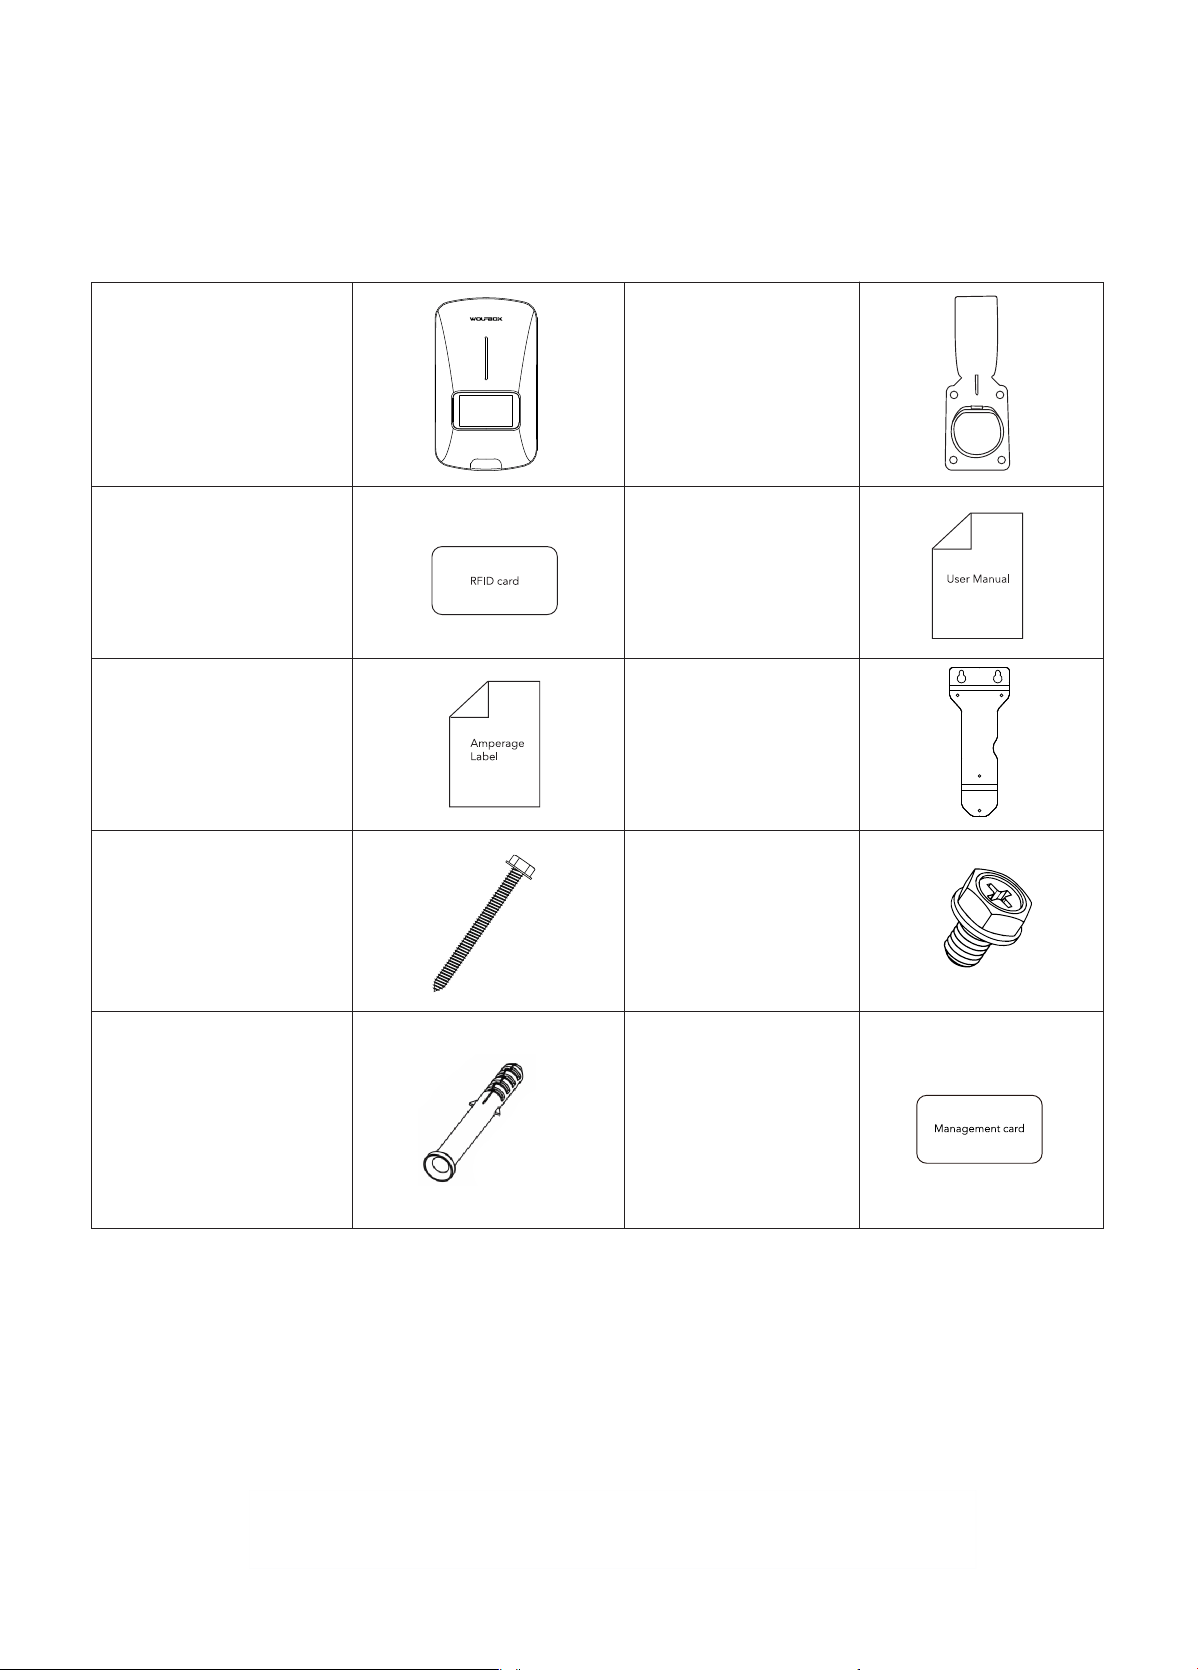
1.1 Packing List
Electric Vehicle
Supply Equipment
RFID Blocking Card
(2 PCS)
Amperage Label
Self-tapping Screw
M6*50mm(2PCS)
M4*40mm(5PCS)
Plastic Expansion Bolts
M10(2PCS) for M6 screws
M6(5PCS) for M4 screws
Wall Mount Bracket
Machine screw
M4*6mm(3 PCS)
Management card
User Manual
Connector Holder
Other tools you may use and need to prepare for yourself :
1: Socket of NEMA 14-50 or power supply for installing Hardwired circuit
2: Drill
3: Pen
4: Hammer
5: Screwdriver
1 GENERAL INTRODUCTION
2
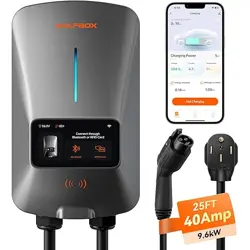
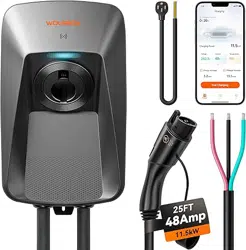
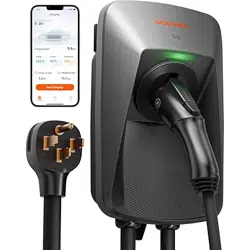
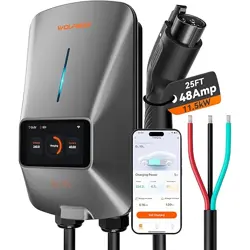
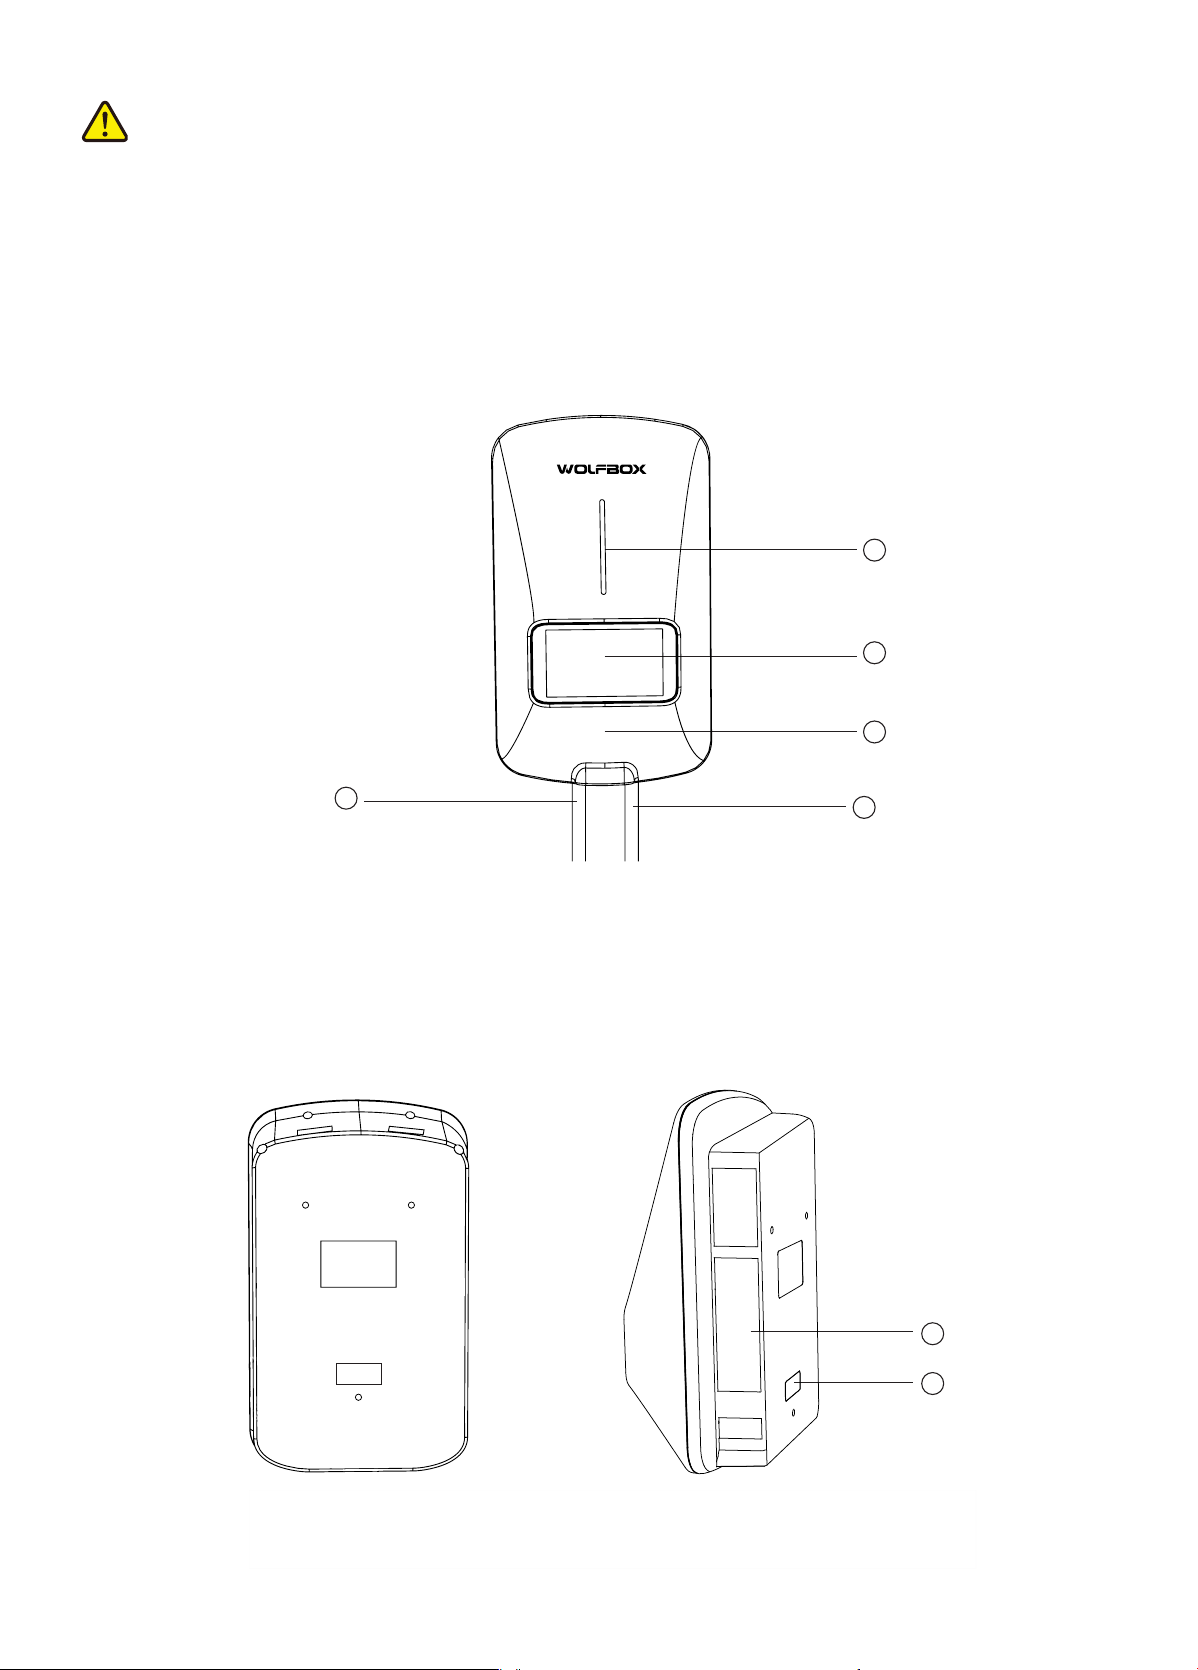
1.2 Product Oveiew
1. Indicator Light
2. Display Screen
3. RFID Reader
4. Current Inlet Cable
5. Charging Cable
1
4
2
3
5
6. Product Labels
7. Amperage Labels
6
7
CAUTION
• Connector holder and installation accessories only apply to the product model provided with this product.
• The list above does not necessarily include all tools required for installation. We recommend that you read
through the installation process and gather the tools you need before installing
3
IMPORTANT
Please follow all applicable codes and regulations and obtain permits to complete electrical work as required.
1. Mount the unit on a veical suace that will suppo its weight (e.g., a nished wall). The maximum weight of
this product is approx 10.5kg .
2. Keep this equipment installed in allowing wire bending tolerance within the scope of the position.
3. Place the charger in a position that is not easily damaged.
Connected to a mobile device
Standby Mode
Charging Interruption
Charging Mode
Solid orange
Connected to a mobile device Solid blue
An EV is connected Solid blue
Charging in progress Flowing blue
Working status Indicator status
Charging complete
Error occurs
Solid green
Solid red
1.4 Overall Drawing
1.3 Indicator light Description
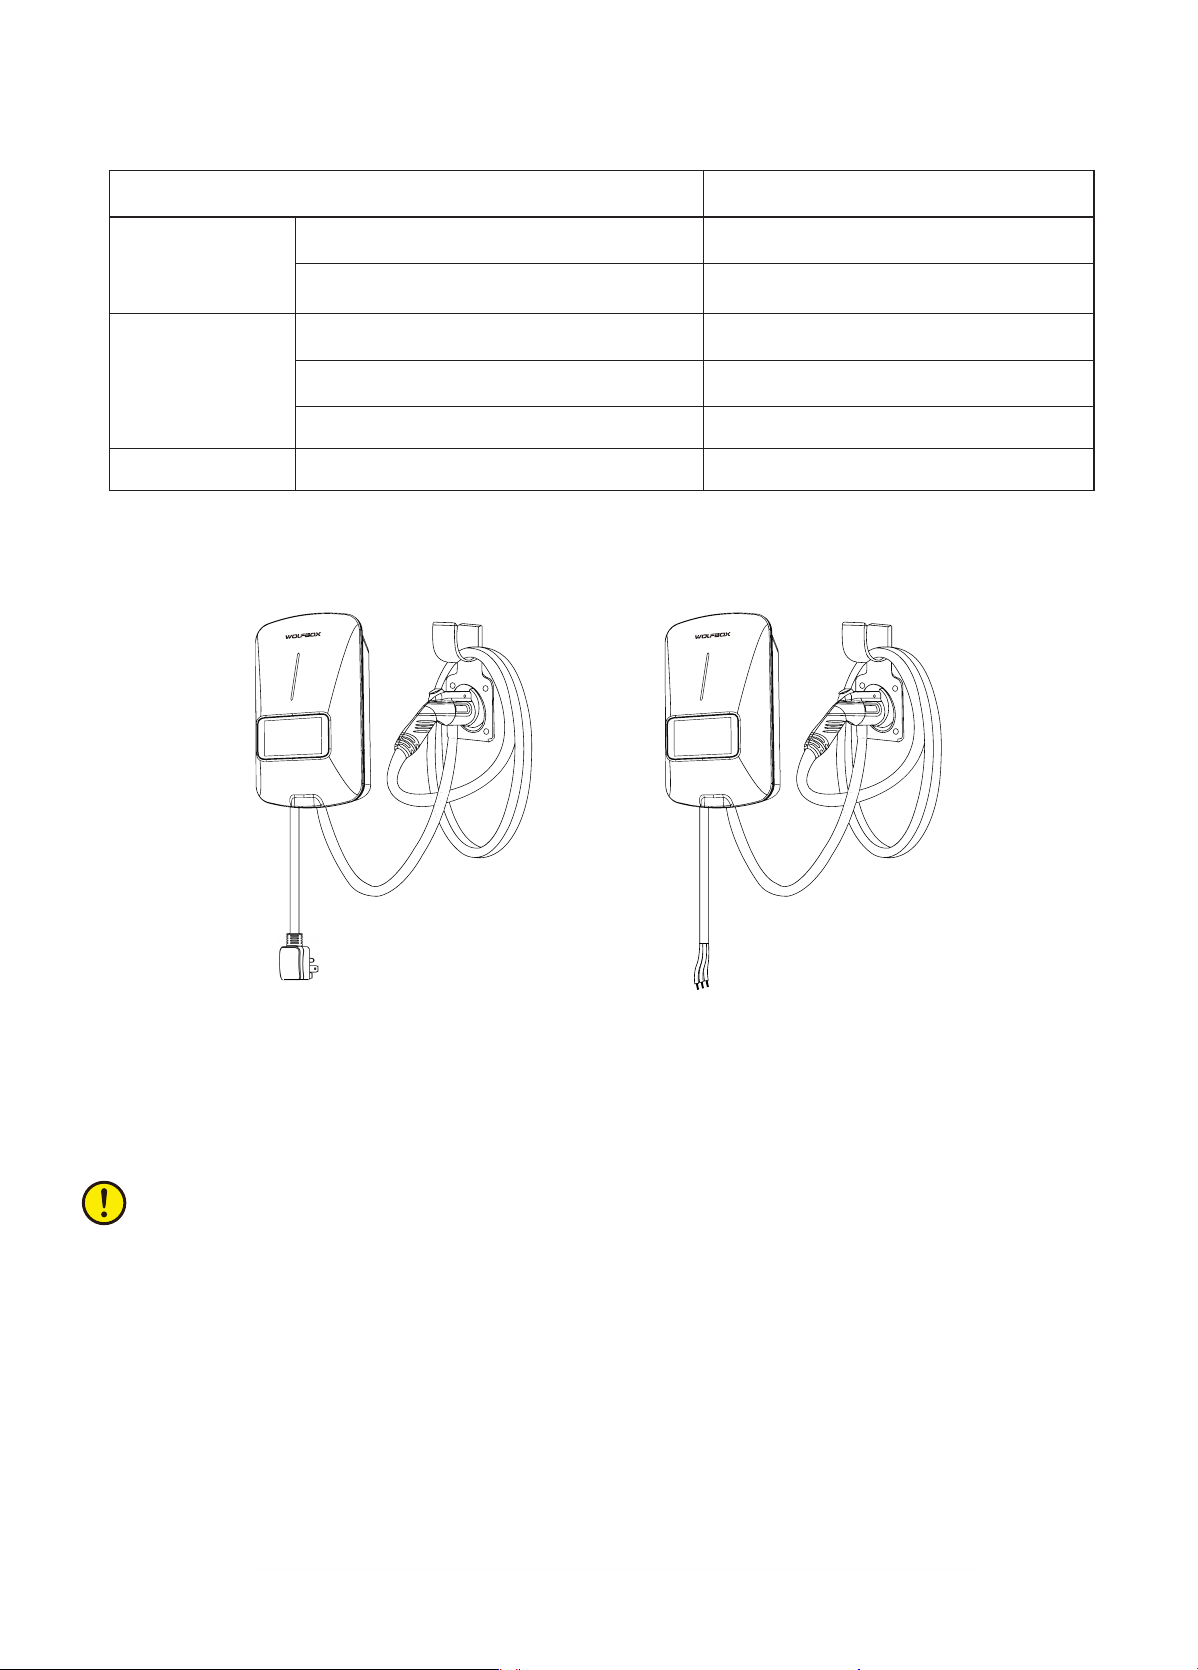
2.1 Location
NEMA Plug-in Version Hardwired Version
2 INSTALLATION GUIDE(REFERENCE)
4
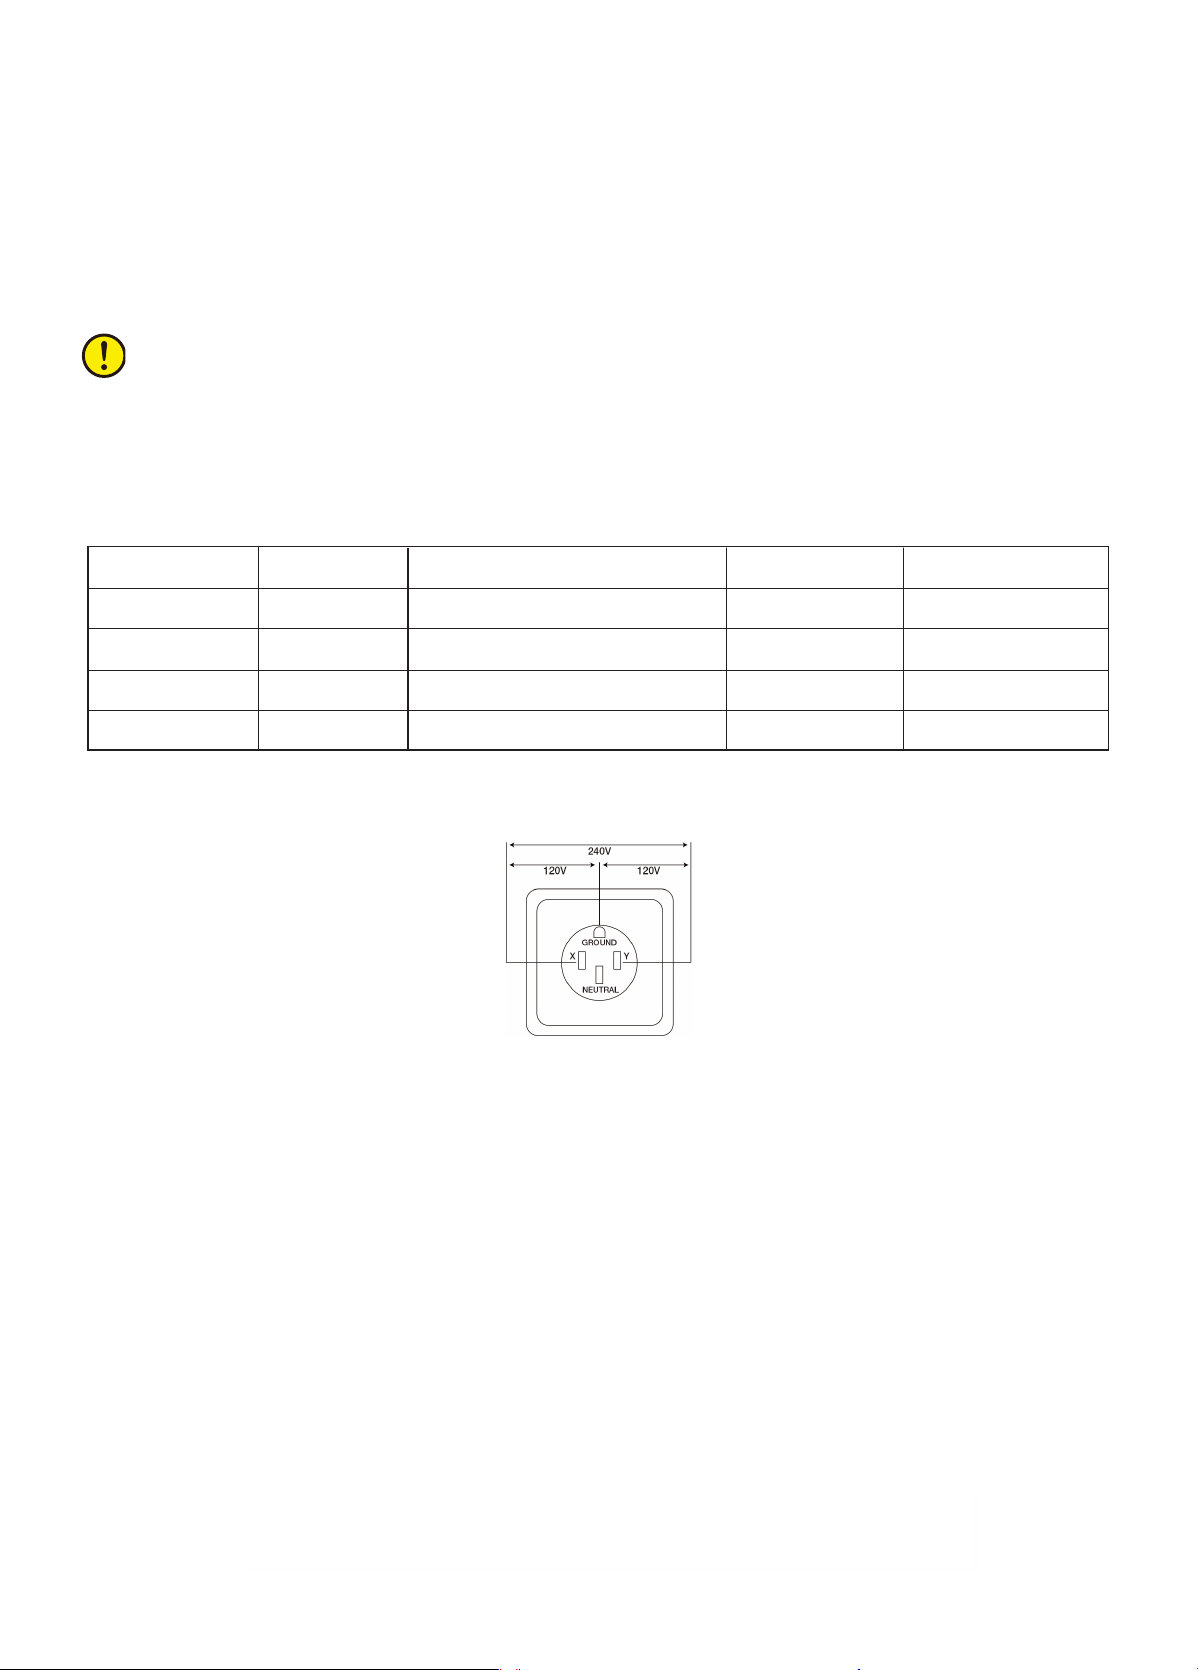
Circuit Rating Max Load Plug-In HardwireEstimated Range per Hour
IMPORTANT
In Canada, a NEMA plug-in installation is only allowed with a 50 amp circuit.
Higher amperage connections are also available for this product. See all applicable codes for circuit breaker and
wire sizing requirements.Field terminals are rated to 105°C and accept up to 6 AWG (16 mm²) wire.
80 A 50 A no45miles/72km yes
70 A
60 A
50A
50 A
48 A
40A
no
no
yes
45miles/72km
44miles/70km
37miles/60km
yes
yes
no
2. For NEMA plug-in installations, determine the type of plug purchased, NEMA 14-50 plug.
3. Ensure that the electrical panel suppos 240V dedicated circuits and new dedicated non-GFCI bipolar
disconnects in accordance with local regulations.
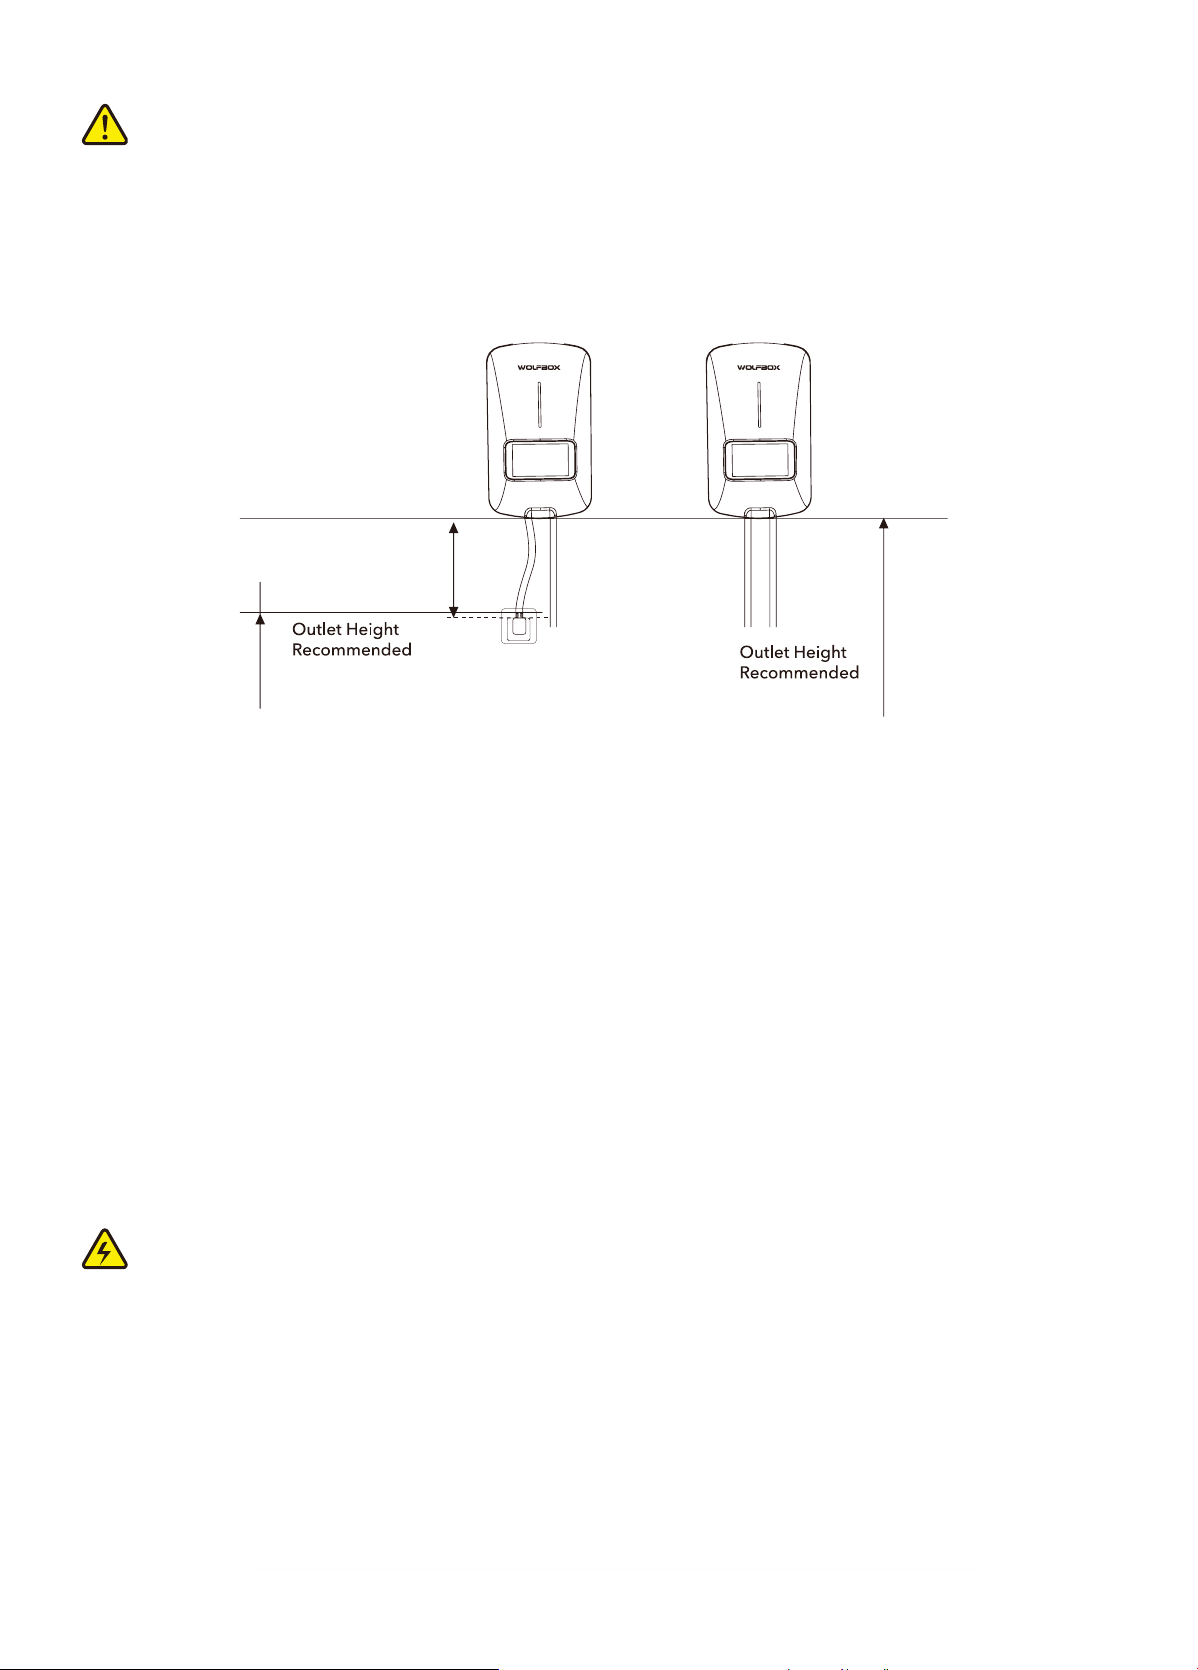
4. The recommended installation height is between 1100mm(43inch) and 1500mm(59inch). For NEMA plug-in
installations, the NEMA should be at least 460mm (18inch) o the ground adjacent to the charger mounting location,
but make sure both are positioned within the adjustable range of the wire. Within the adjustable range of the cord.
14-50
2.2 Positioning
A 50A or higher current fuse is recommended for installation circuits of the E40 model.
A 60A or higher current fuse is recommended for installation circuits of the E50(48A)
model.
A 70A or higher current fuse is recommended for installation circuits of the E50 model.
5
2.3 Current Line Description
Ground Requirements
• The charger must be connected to the eahing metal permanent wiring system. Equipment grounding
conductor must be run with circuit conductor, and connect to the equipment grounding terminal or lead on
the charger.
• The grounding conductor shall be grounded to eah at the seice equipment or, when supplied by a
separately derived system, at the supply transformer.
• Ensure that a grounding conductor that complies with all applicable codes is properly grounded to eah at
the seice equipment, when supplied by a separate system, at the supply transformer.
• Neutral is not used to power the charger but must be properly connected to ground, at the panel transformer,
to provide necessa voltage reference relative to ground.
CAUTION
• The suitability of the use of exible cord in accordance with CE code, pa I, rule 4-012, is to be determined by
the local inspection authority having jurisdiction.
• The input power cable length is 300mm (12 inches) (According to the National Electric Vehicle Charger Electrical Code).
DANGER: RISK OF SHOCK.
Disconnect the 240V power vac. Do not turn on the power until you are sure the installation is complete. Failure
to following this instruction may result in electric shock or electrocution.
800-1200mm
(31-47inch)
1100-1500mm
(43-59inch)
300mm
(12inch)
Cable Length
6
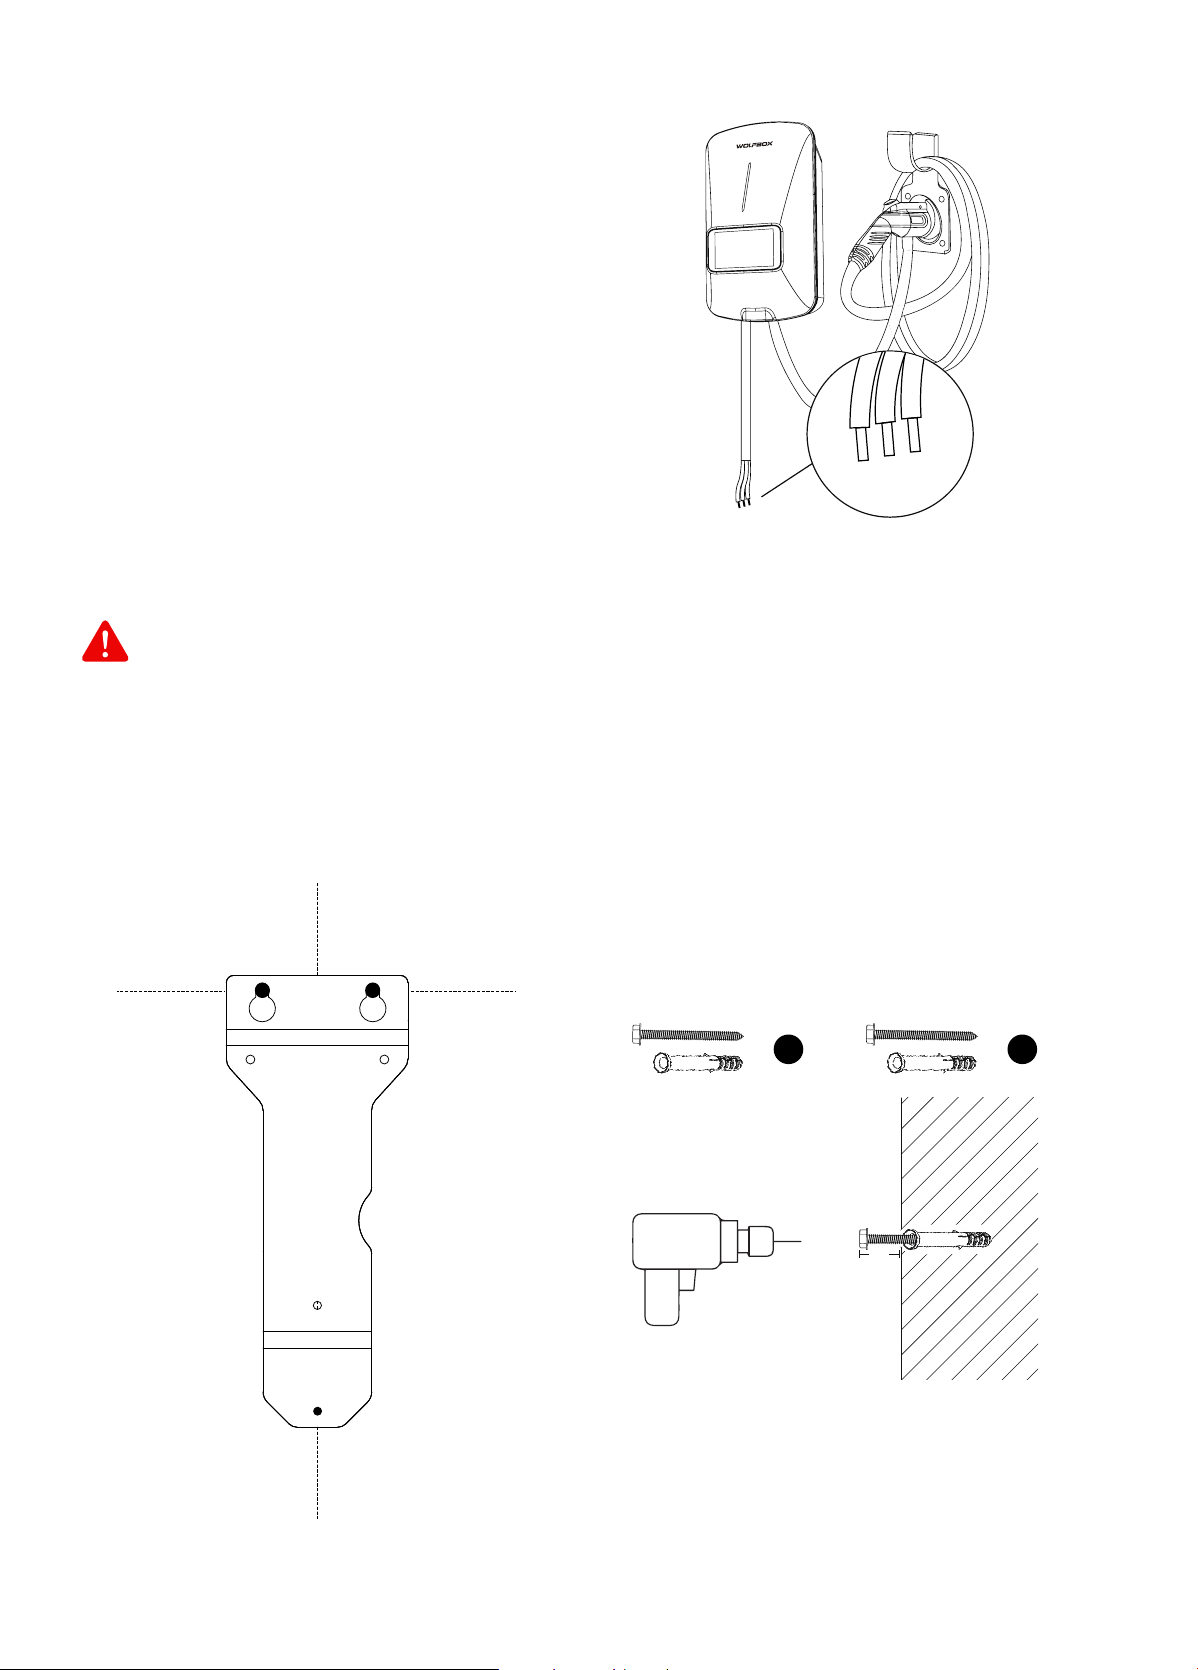
2. To use the wall mount bracket, rst conrm
the top two holes on the wall, corresponding to
points A and B. Then drill holes in points A and B,
and place M10 expansion bolts and M6*50mm
screws.
Note: About 5mm length of M6 screws should be
reseed for placing the device.
A
5mm
B
WARNING
To avoid the risk of re or electric shock, do not use this product with an extension cord.
C
A
B
1. Find the ideal installation location for the device.
Note: The installation position should ensure that
the NEMA cable is properly bent and cannot be
over-stretched.
For this version installation,please follow all applicable
codes and regulations and obtain permits to complete
electrical work as required.
2.4 Hardwired Installation
2.5 NEMA Plug-in Installation
L1
L2/N
PE
7
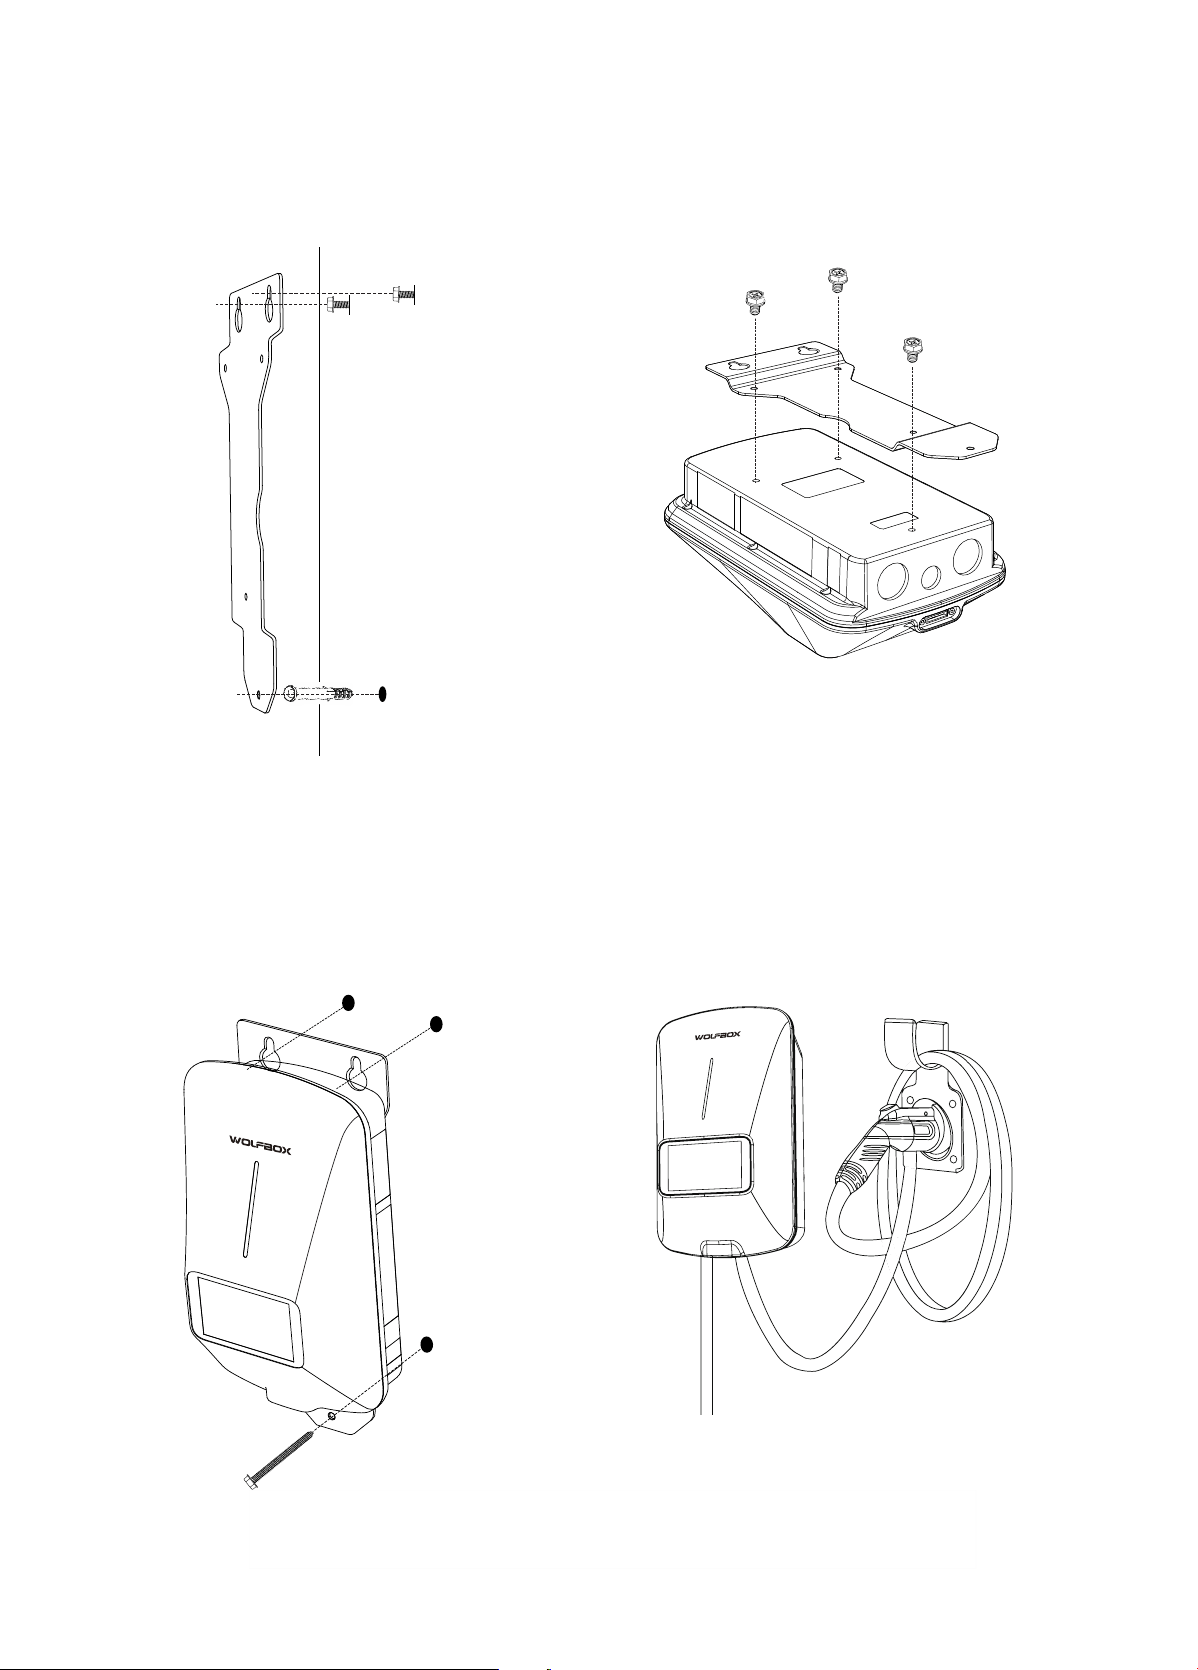
4. Use M4*6mm screws to x the bracket on the
back of the Electric Vehicle Supply Equipment.
5. When the EVSE and bracket are combined, place
them on screws A and B. And use M4*40mm screw
through point C to x the device on the wall.
6. Install the EV connector bracket in place using M6
expansion bolts and M4*40mm screws.
Note: The connector Holder should be located
within the exible range of the cable.
B
A
C
B
A
C
3. Place the bracket on the screws at points A and B
to conrm and mark the position of point C.
Then drill a hole at point C and put in the
expansion bolt.
8
3.2 About Management Card
When the EV charger cannot connect to the App, you're going to need this card.
Usage Method:
Swipe the management card in the RFID reader area and the EV charger will prompt "Reset action in
progress";After 10 seconds, EV charger will prompt "Conrm reset".At this point, swipe the management card
again. When the EV charger prompts "reset complete", it means that the Wi-Fi function of the EV charger has
been reset.
NOTE: If the fault persists, please contact us.
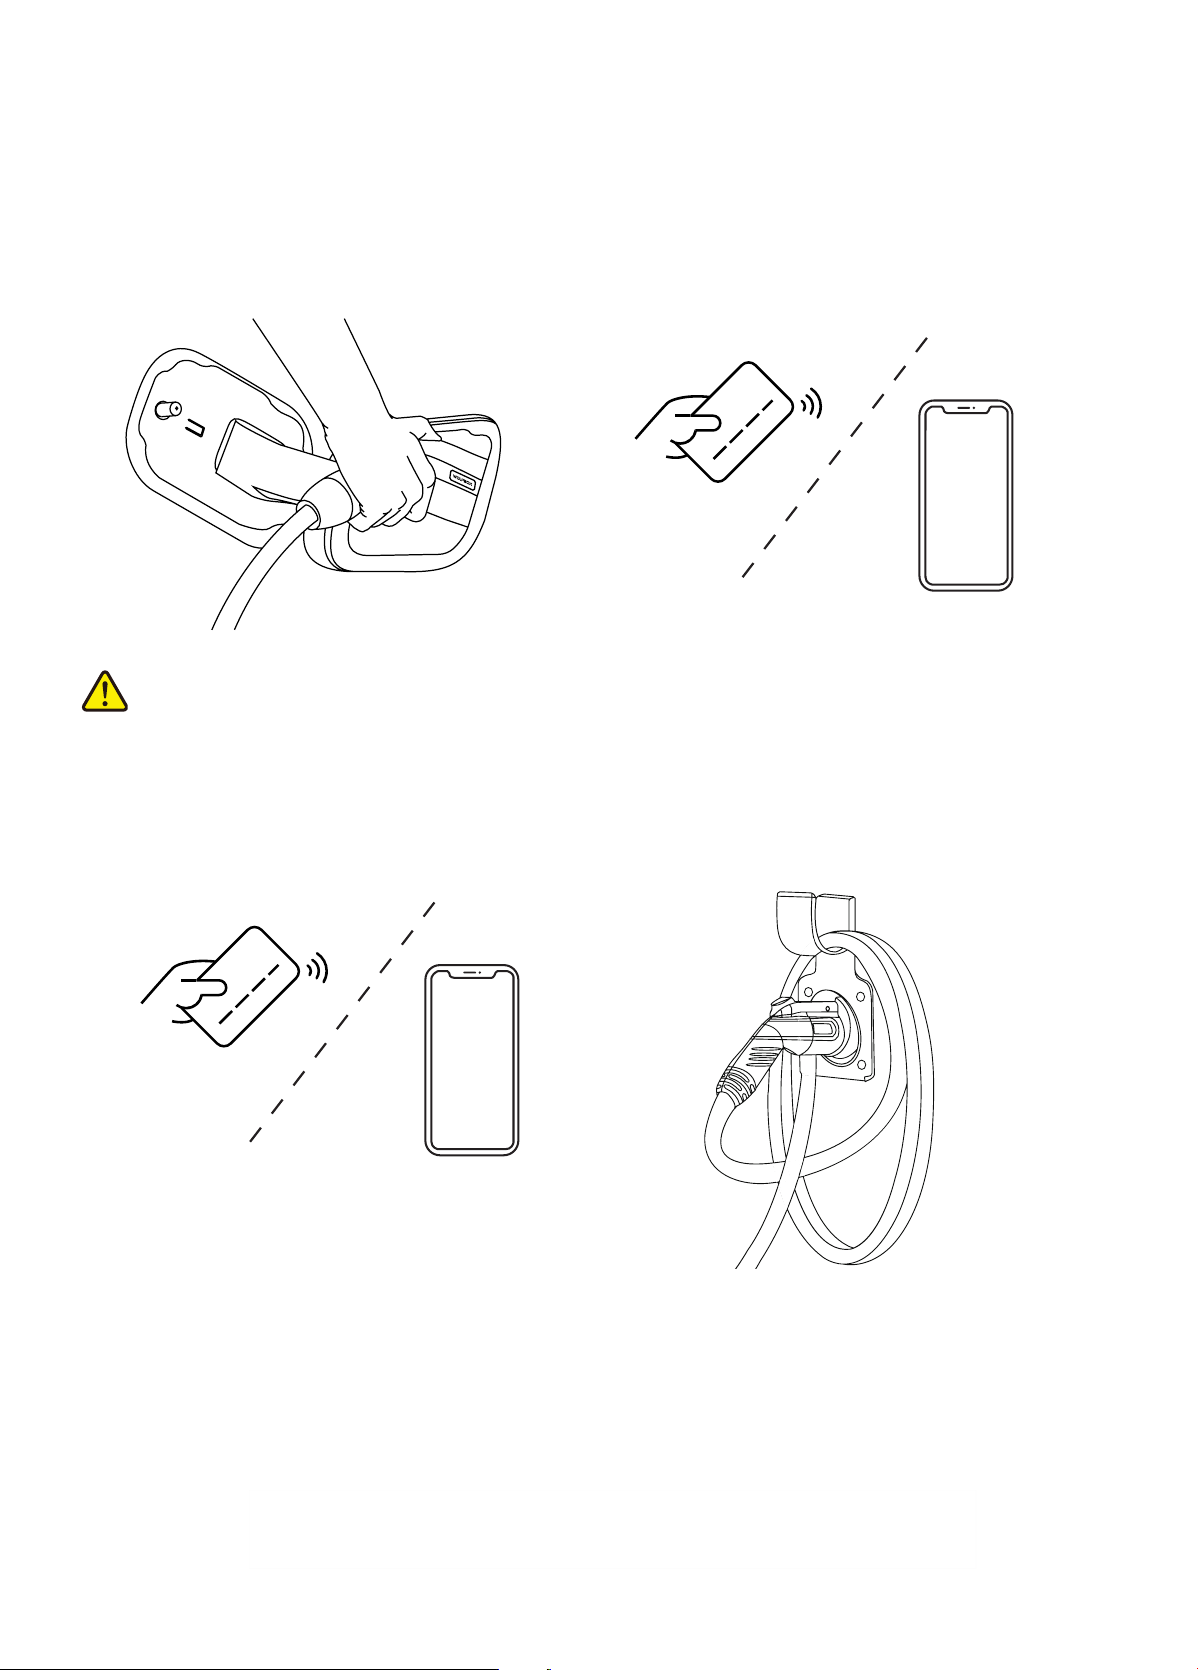
1. Inse the connector into the vehicle power po. 2. Sta charging by swipe RFID card or use the App.
3. End of charging by swipe RFID card or use the App.
CAUTION
Do not disconnect the connector during charging. Otherwise, there is a risk of damage to the connector or
Electric Vehicle Supply Equipment.
4. Unplug the connector and put it back in place.
Note: Ensure that the equipment is properly connected to the power supply.
3 INSTRUCTIONS FOR USE
3.1 Charging Steps

9
E1 Metering communication error
E2
Over-voltage alarm
Under-voltage alarm
E3
Ground faultE4
Over current protection
Contact the after-sales seice team for this fault
1. Immediately disconnect the power distribution box
2. Check whether the equipment input/output line grounding is normal,
and whether the input L/N is connected in the normal order
3. Exclude the above problems, re-energize
1. Immediately disconnect the power distribution box
1. Immediately disconnect the power distribution box
2. Check whether there is low impedance or sho circuit
between the two lines of the output line of the device
2. Check whether there is low impedance or sho circuit
between the two lines of the output line of the device
Consult your local electric seice to conrm that the voltage in this area
is stable. If it is below 175V, this error will Appear
1. If the voltage exceeds 265Vac for a sho time, wait for the grid to
return to the normal voltage range by itself
2. Consult your local electric seice to conrm that the voltage in this
area is stable. If it is higher than 265V, this error will Appear
Fault code Failure Cause Exclusion suggestion
E5
Permanent overcurrent
protection
3. Exclude the above problems, re-energize
3. Exclude the above problems, re-energize
Contact the after-sales seice team for this fault
Contact the after-sales seice team for this fault
Contact the after-sales seice team for this fault
2. Check if the device output line is broken or has low impedance
or sho circuit to ground
2. The charging settings of the EV and the EV Charger do not match. You
need to change the charging settings on the vehicle side
3. Exclude the above problems, re-energize
3. The EV fails to receive the current from the charging post in time. You
need to plug and unplug the EV Connector again.
1. Immediately disconnect the power distribution box
1. Conrm that the batte of the electric vehicle is fully charged
E6
Leakage protection
Check the environment in which the equipment is installed,
verify that there is no other heat generating equipment next to it,
and ensure that the ambient temperature is below 45°C (113°F)
E7
Over temperature
protection
E8
E9
E10
E11
E12
RFID failure
Relay failure
Memo failure
Clock exception
3.3 Fault Description
Note: When the red light ashes, it indicates a malfunction.
* If you have any questions, please contact the after-sales team.
10
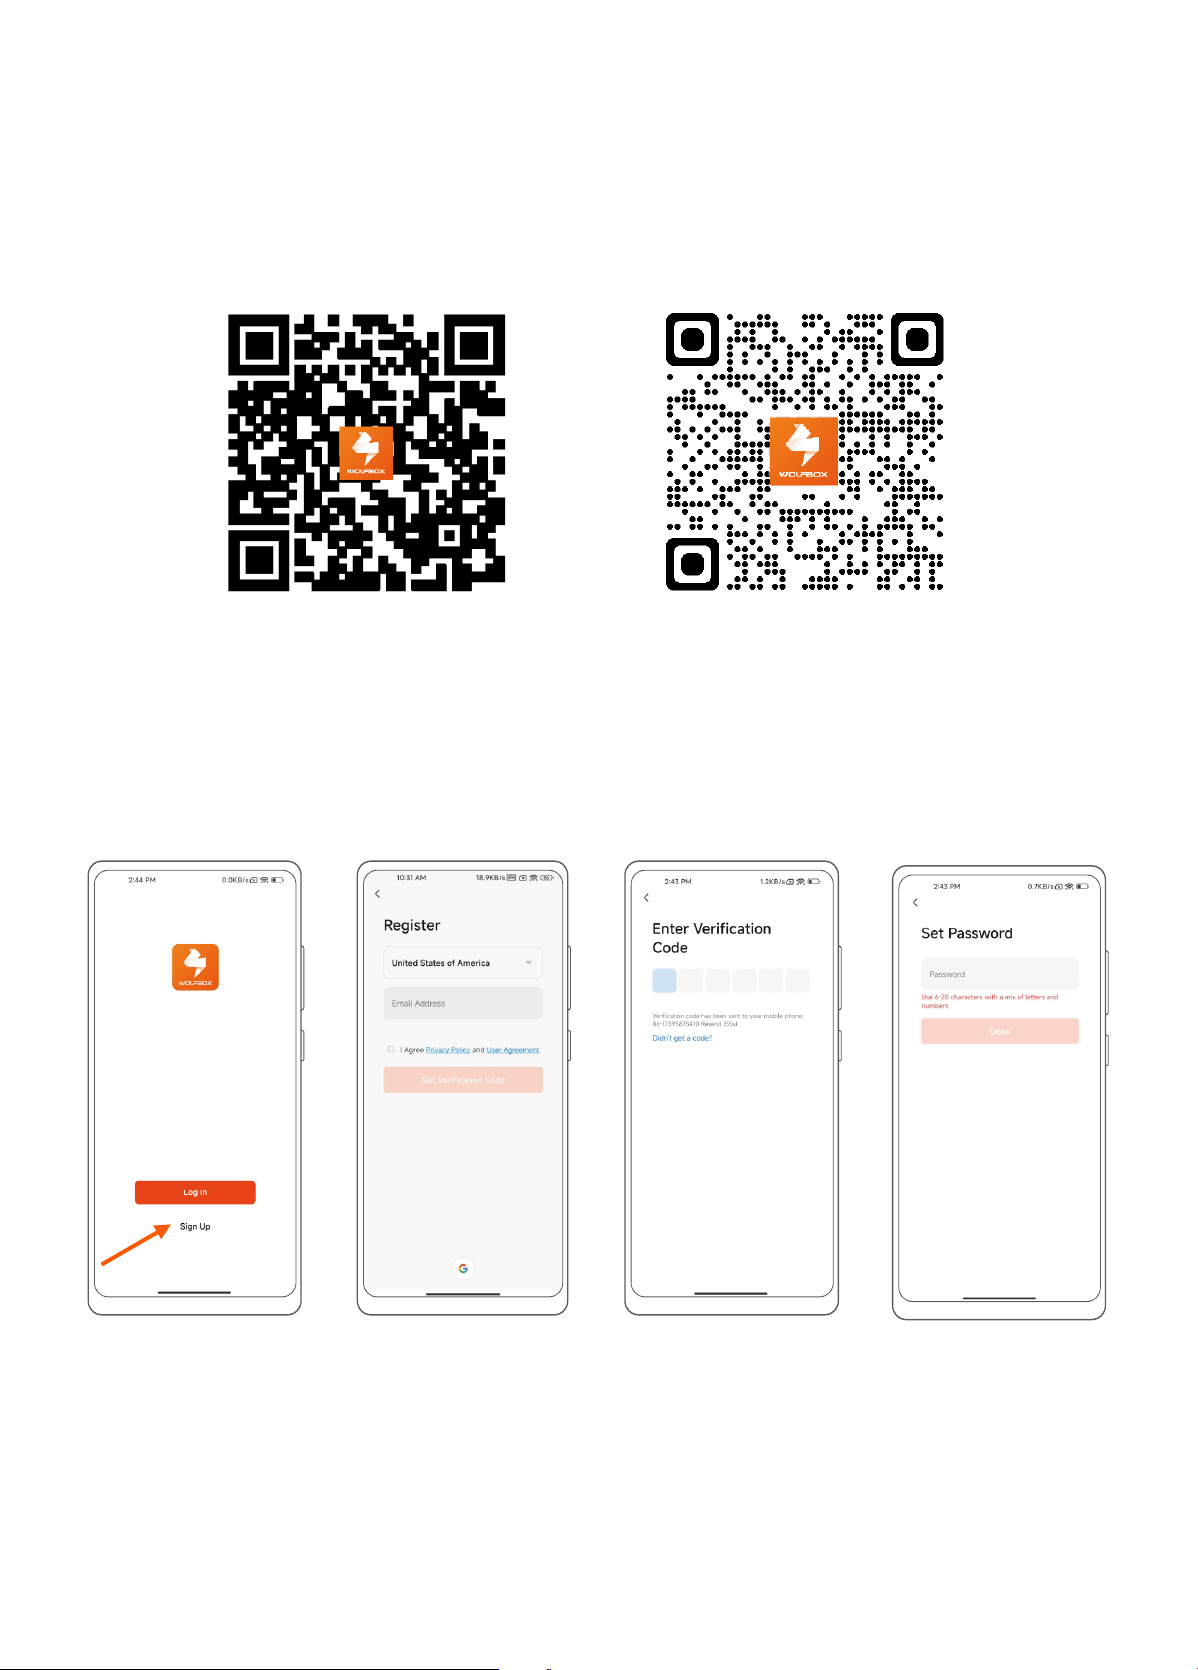
1.Scan the QR code below to download the “WOLFBOX EV” App to your mobile device. For IOS users, you will be
redirected to the App Store; For Android users, you will be redirected to the Google Play.
2. After downloading, open the “WOLFBOX EV” and register.
4.2 Sign Up and Log In
1. Sign Up:
Step 3Step 1 Step 4Step 2
Step 1: Open the “WOLFBOX EV” App and select "Sign Up".
Step 2: Enter your cell phone number or email to get the verication code.
Step 3: Conrm you receive a verication code from “WOLFBOX EV” and ll it out.
Step 4: Set up your login password.
App Download App Use
4 WOLFBOX EV APP
4.1 App Download
11
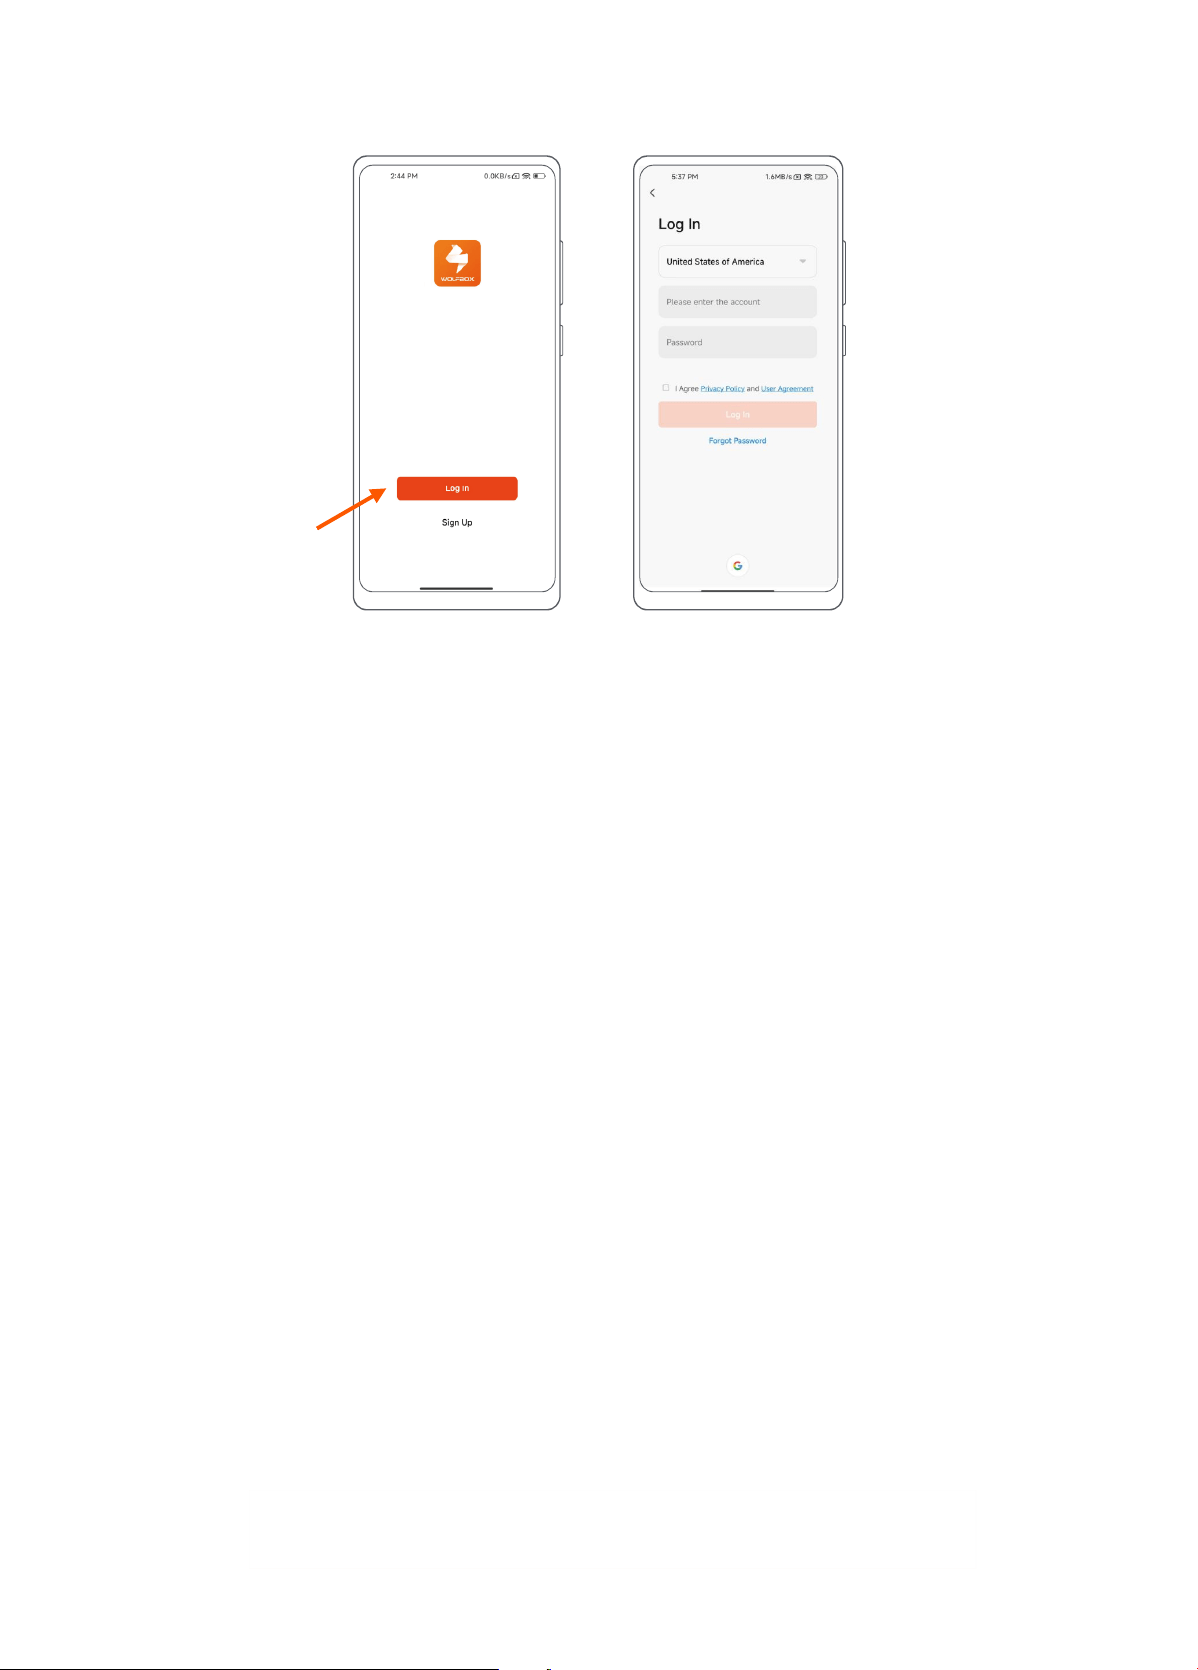
2. Log In:
Step 1: Open the "WOLFBOX EV" App and select "Log In".
Step 2: Read and check the relevant agreements, then enter your account number and password to log in.
4.3 App Connection
Note: If App can't connect the EV charger. Please use the management card.
Use of management card: Swipe the management card in the RFID reader area and the EV charger will prompt
"Reset action in progress";After 10 seconds, EV charger will prompt "Conrm reset".
At this point, swipe the management card again. When the EV charger prompts "reset
complete", it means that the Wi-Fi function of the EV charger has been reset.
Step 1 Step 2
1. Preparation Before Connection
Preparations For EV charger:
1.1 Ensure that the Wi-Fi signal in the environment is 2.4GHz.
1.2 Make sure the Bluetooth module is not in a dormant state (if no connection is made within 3 minutes after
the EV Charger is powered on, the Bluetooth module will go into a low power mode and will need to be re-
powered to wake up the Bluetooth module).
Tips:
For environments with poor or no network:
1. If the environment of the network is poor, you can t to open a hot spot, with a hot spot connected to
the app can be realized to control the charging station, but some of the functions may not be able to
enjoy.
2. If the App has been connected, you can realize the app control pile through Bluetooth. But the charging
record and some functions can't be enjoyed.
3. If there is no network in the environment, there is no way to connect the app, you can only swipe the
charging card to realize.
12
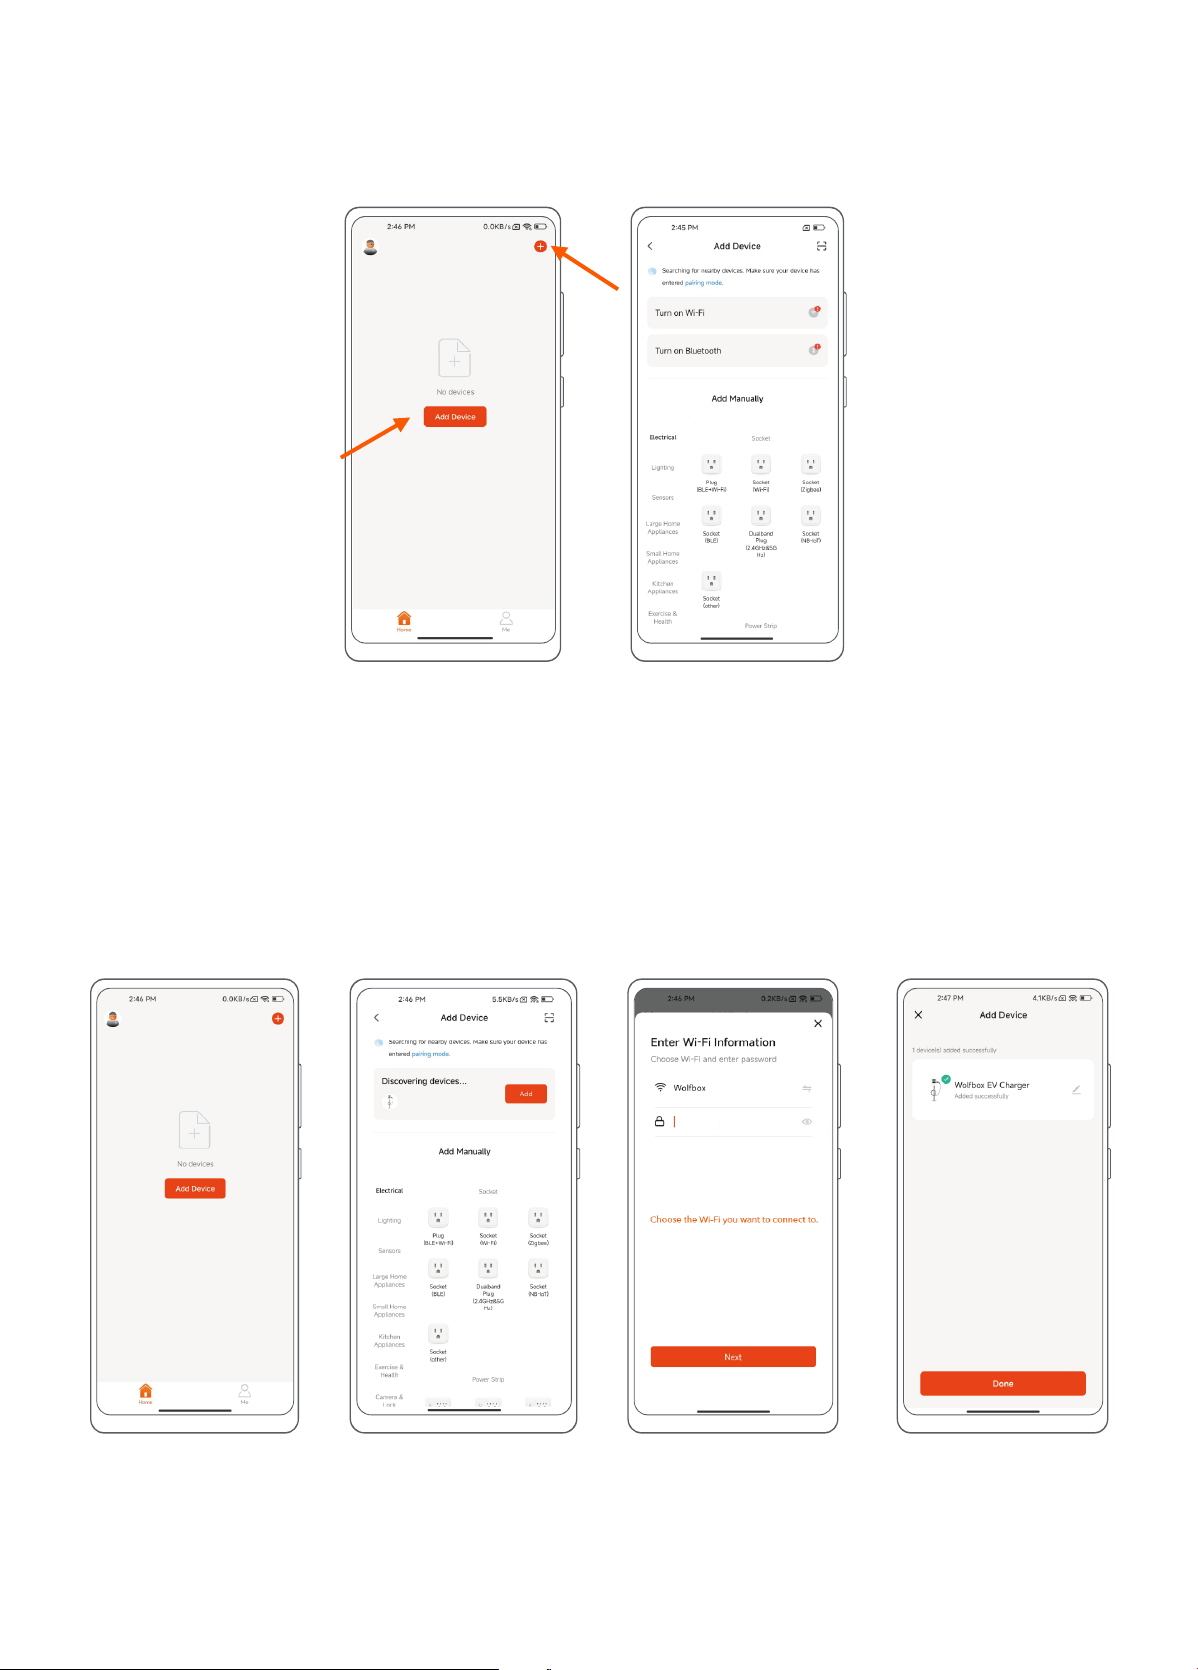
Step 1: Click "Add Device" on the main page or "+" in the upper right corner to add a device.
Step 2: On the "Add Device" page, follow the prompts to conrm that "Wi-Fi" and "Bluetooth" are turned on.
Including Application permissions and cell phone system Bluetooth.
Preparations For Mobile Device:
1.3 Ensure that the mobile device is in a network-connected environment.
Step 1 Step 2
2. Add Devices
2.1 Automatically Add Device
Step 3Step 1 Step 4Step 2

13
Step 1: Click "Add Device" on the "Home" page or "+" in the upper right corner and then jump to the page of “Add
Devices”.
Step 2: Click "Add" and select the device "WOLFBOX EV charger".
Step 3: Conrm the Wi-Fi information and connect.
Step 4: After successfully connecting, click "Done" and jump to "Charge" page.
2.1 Add the Device Manually
Step 1: In the "Add Device" inteace, pull down and nd "Energy", select "EV charger (BLE)".
Step 2: Ensure that the EV charger is in a network-connected environment. (When the charging equipment is
connected to the internet, a light in pale blue color will remain illuminated.)
Step 3: Conrm the Wi-Fi information and connect.
Step 4: After successfully connecting, click "Done" and jump to "Charge" page.
Step 3Step 1 Step 4Step 2
14
4.4 App Function
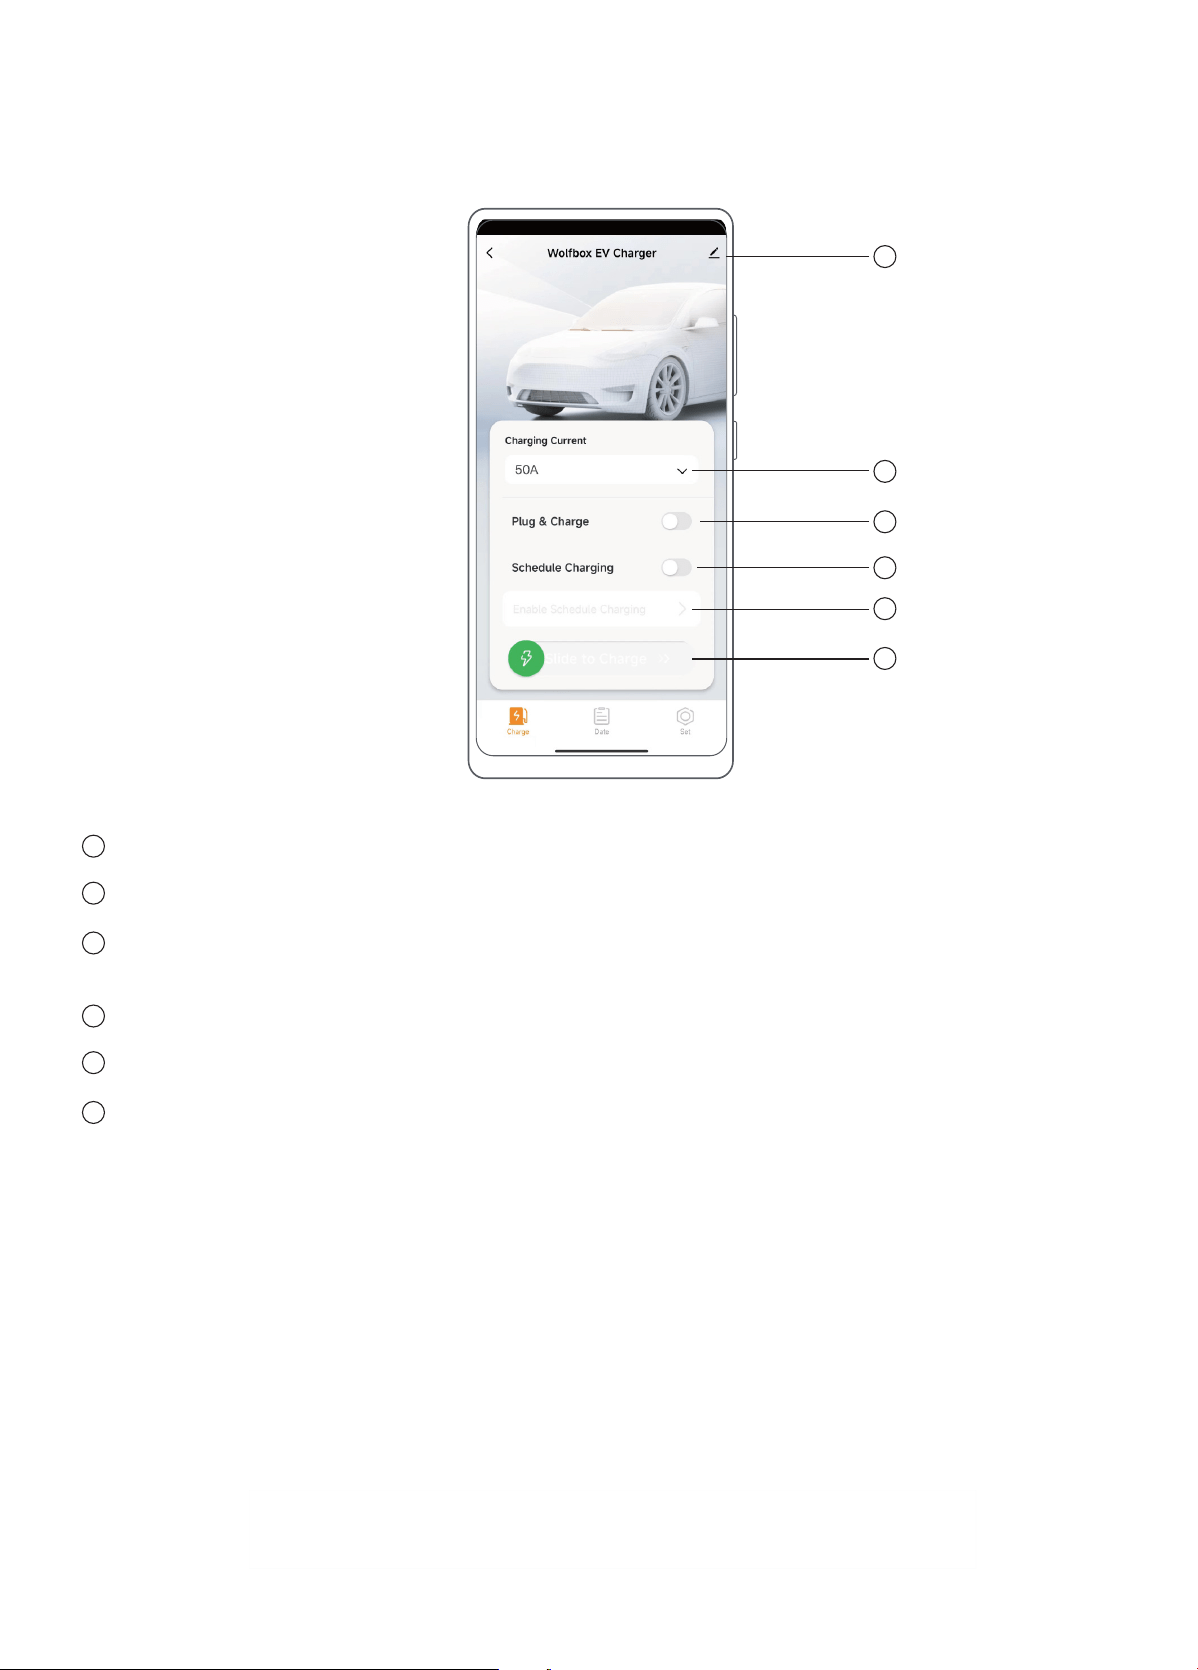
1. Charge Page (Idle State)
Information: Device information, share device, FAQ and feedback, remove device, etc.
Charging Current: Select the output current level of EV charger.
Plug and Charge Mode: After enabling this mode, the EV charger can directly charge the vehicle without
requiring an unlock, which may pose ceain security risks to your product. Please conrm.
Scheduled Charging: Set the sta and end times for scheduled charging.
Reminder of booking charging mode and Set the sta time and end time for scheduled charging.
Connector prompt, Sliding charge indicator, Charge mode indication.
Impoant Note:
You cannot activate both the 'Plug & Charge' mode and the 'Scheduled Charging' mode simultaneously. You
can select the charging mode that best suits your needs.
1
2
3
4
1
2
3
4
5
5
6
6
15
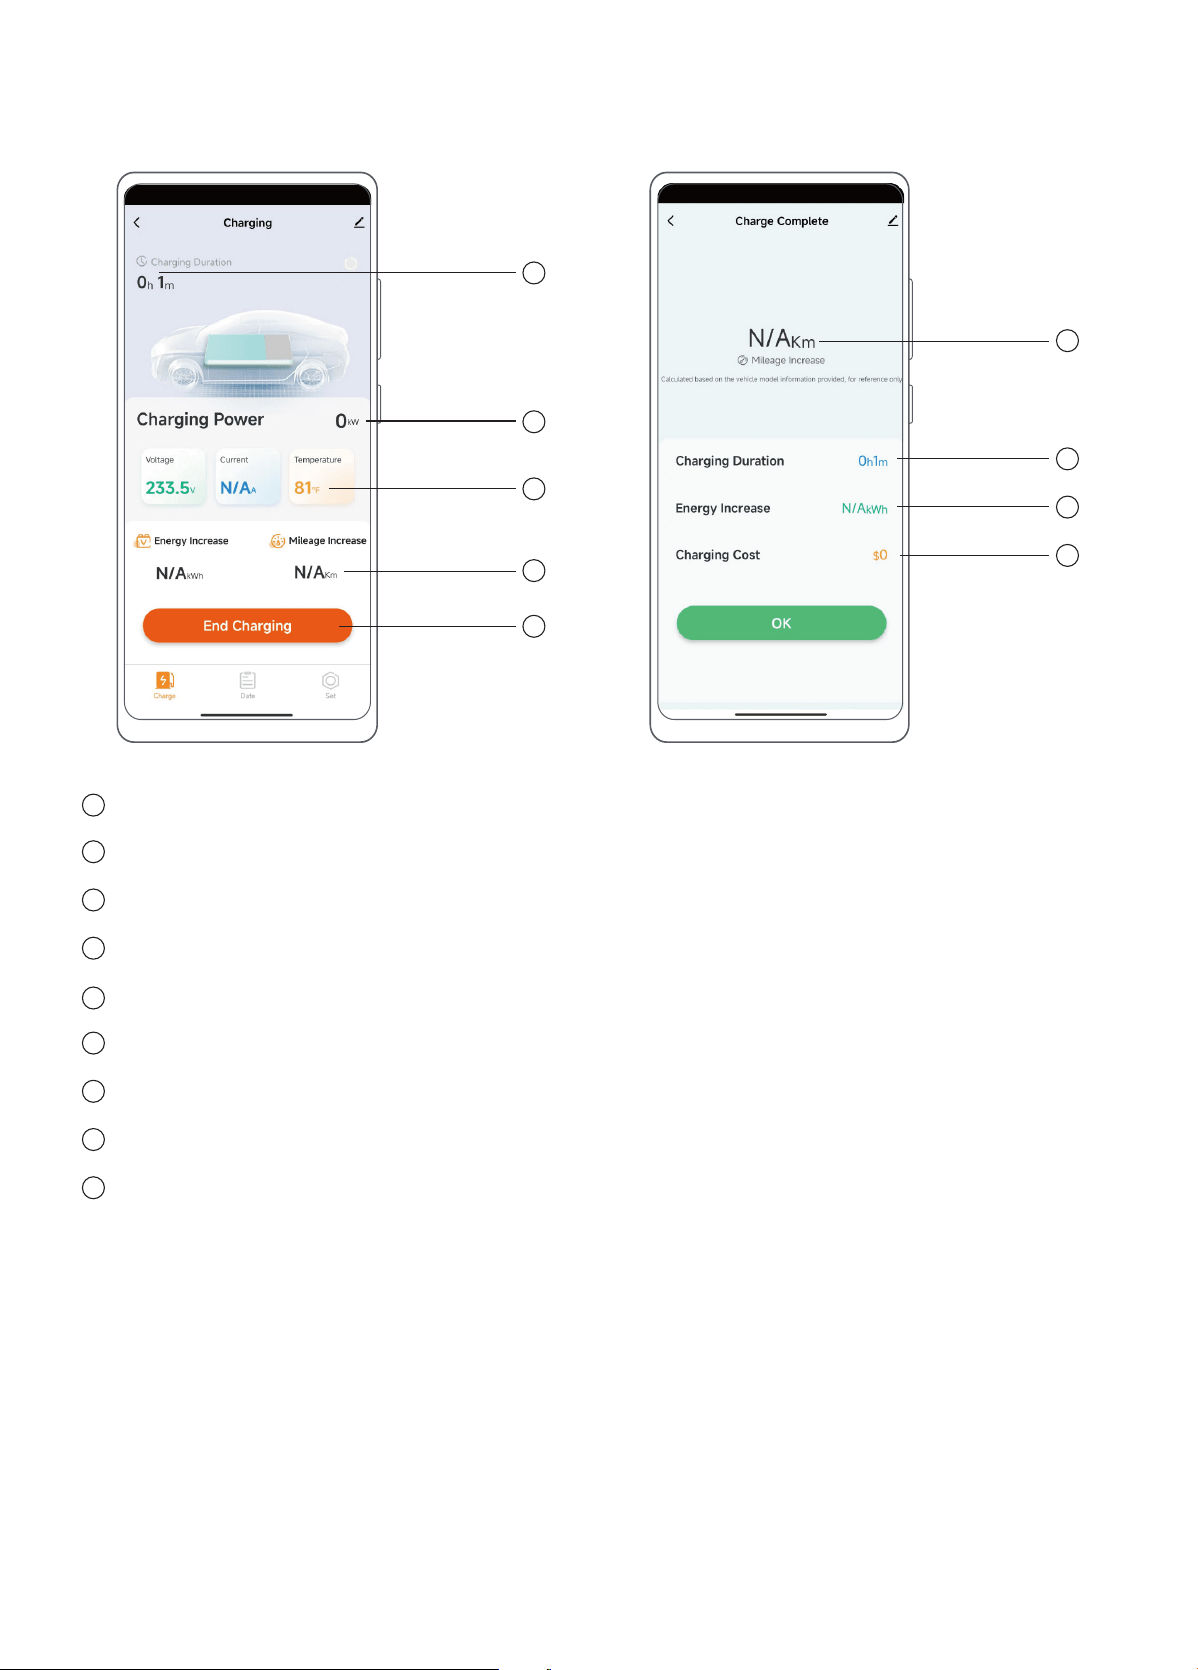
2. Charge Page (Charging Status) & Charge Settlement
Current Charging Duration.
Current charging power.
Current Charging Data: Voltage, Current, and Temperature of the EV charger.
Increased data: power and mileage (for reference only).
End charging.
The mileage increased of this charge (for reference only).
The duration of this charge.
The increased power of this charge (for reference only).
The electricity charge used for this charging (for reference only).
1
2
3
4
5
6
7
8
1
2
3
4
5
6
7
8
9
9
16
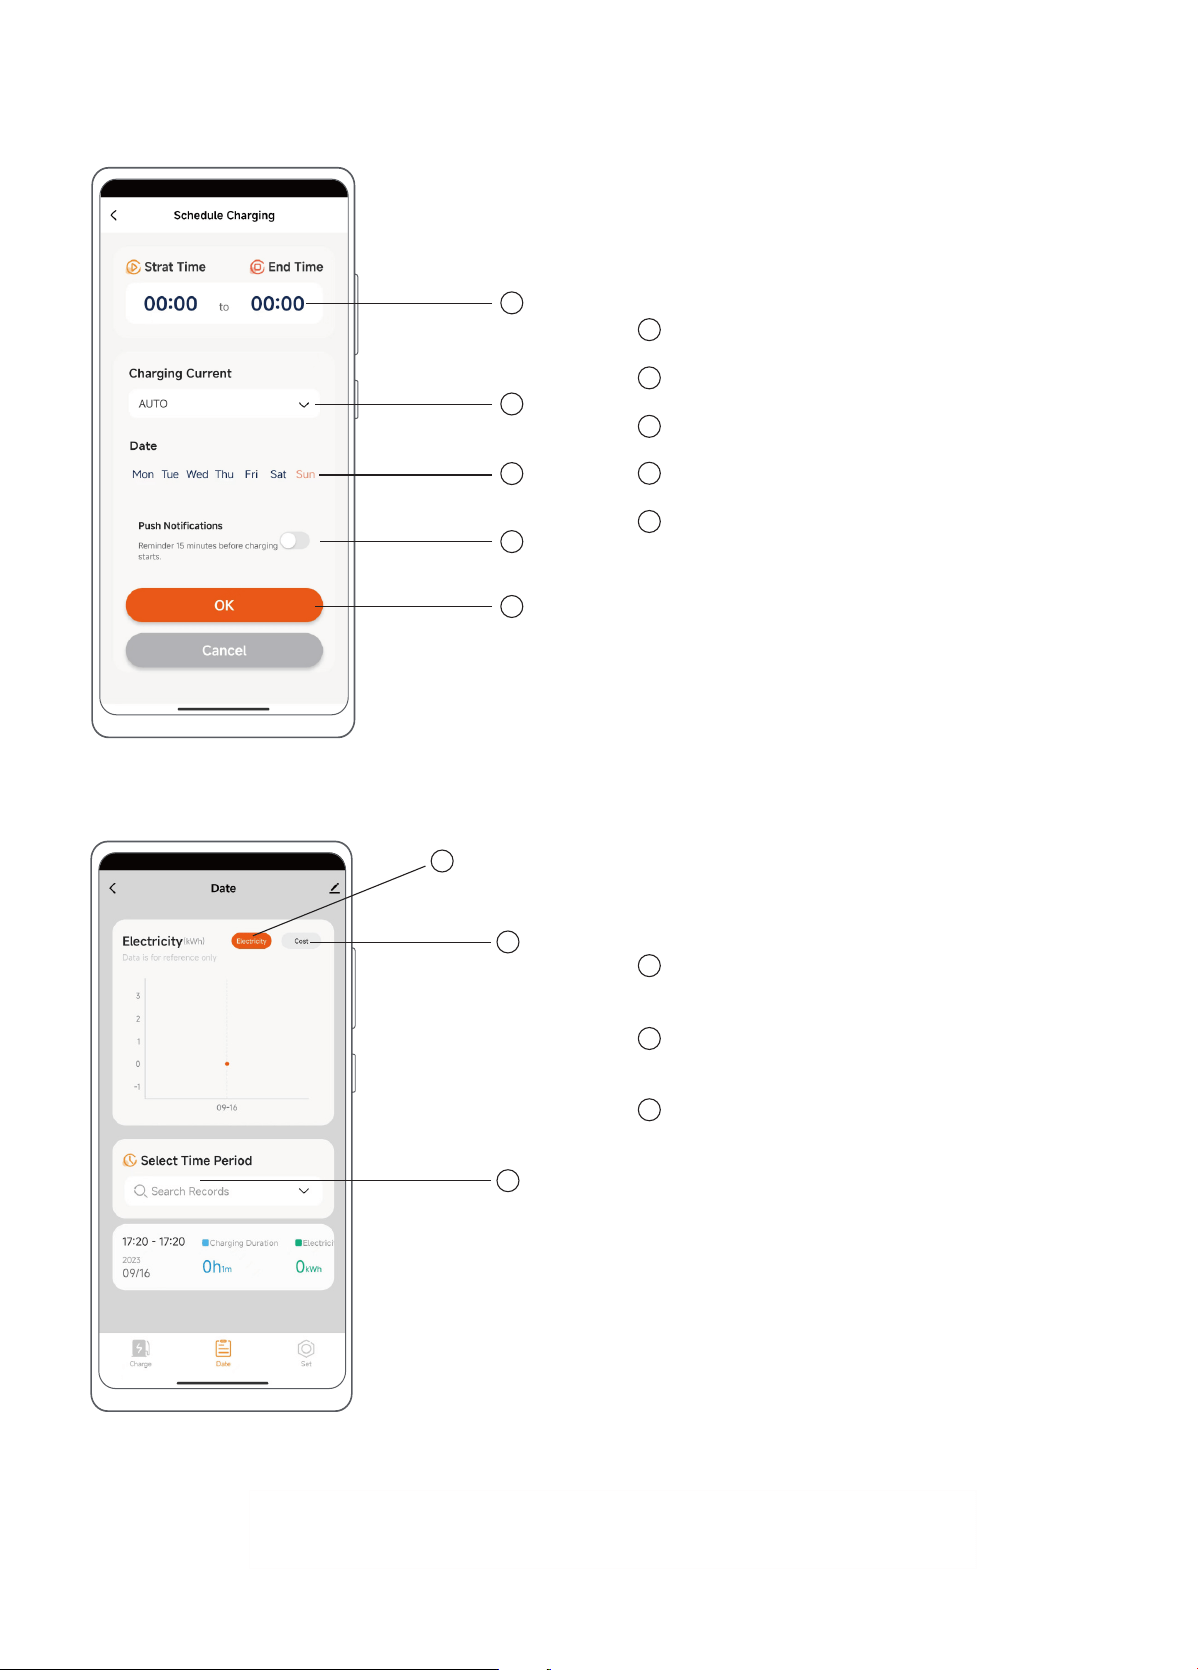
Schedule charging sta and end time.
Set charging current size (Defaults to AUTO).
Set charging date (Monday to Sunday).
Enable Push Notication Before Charging Stas.
Save or cancel the relevant settings for
scheduled charging.
3. Schedule Charging
1
2
3
4
5
1
2
3
4
5
4. Data
1
2
3
Electric: Select to view the amount of power
consumed by charging (for reference only).
Cost: Select to view the amount of money
consumed by charging (for reference only).
Select Time: Select the sta time and end time
to check the data within the time period.
1
2
3
17
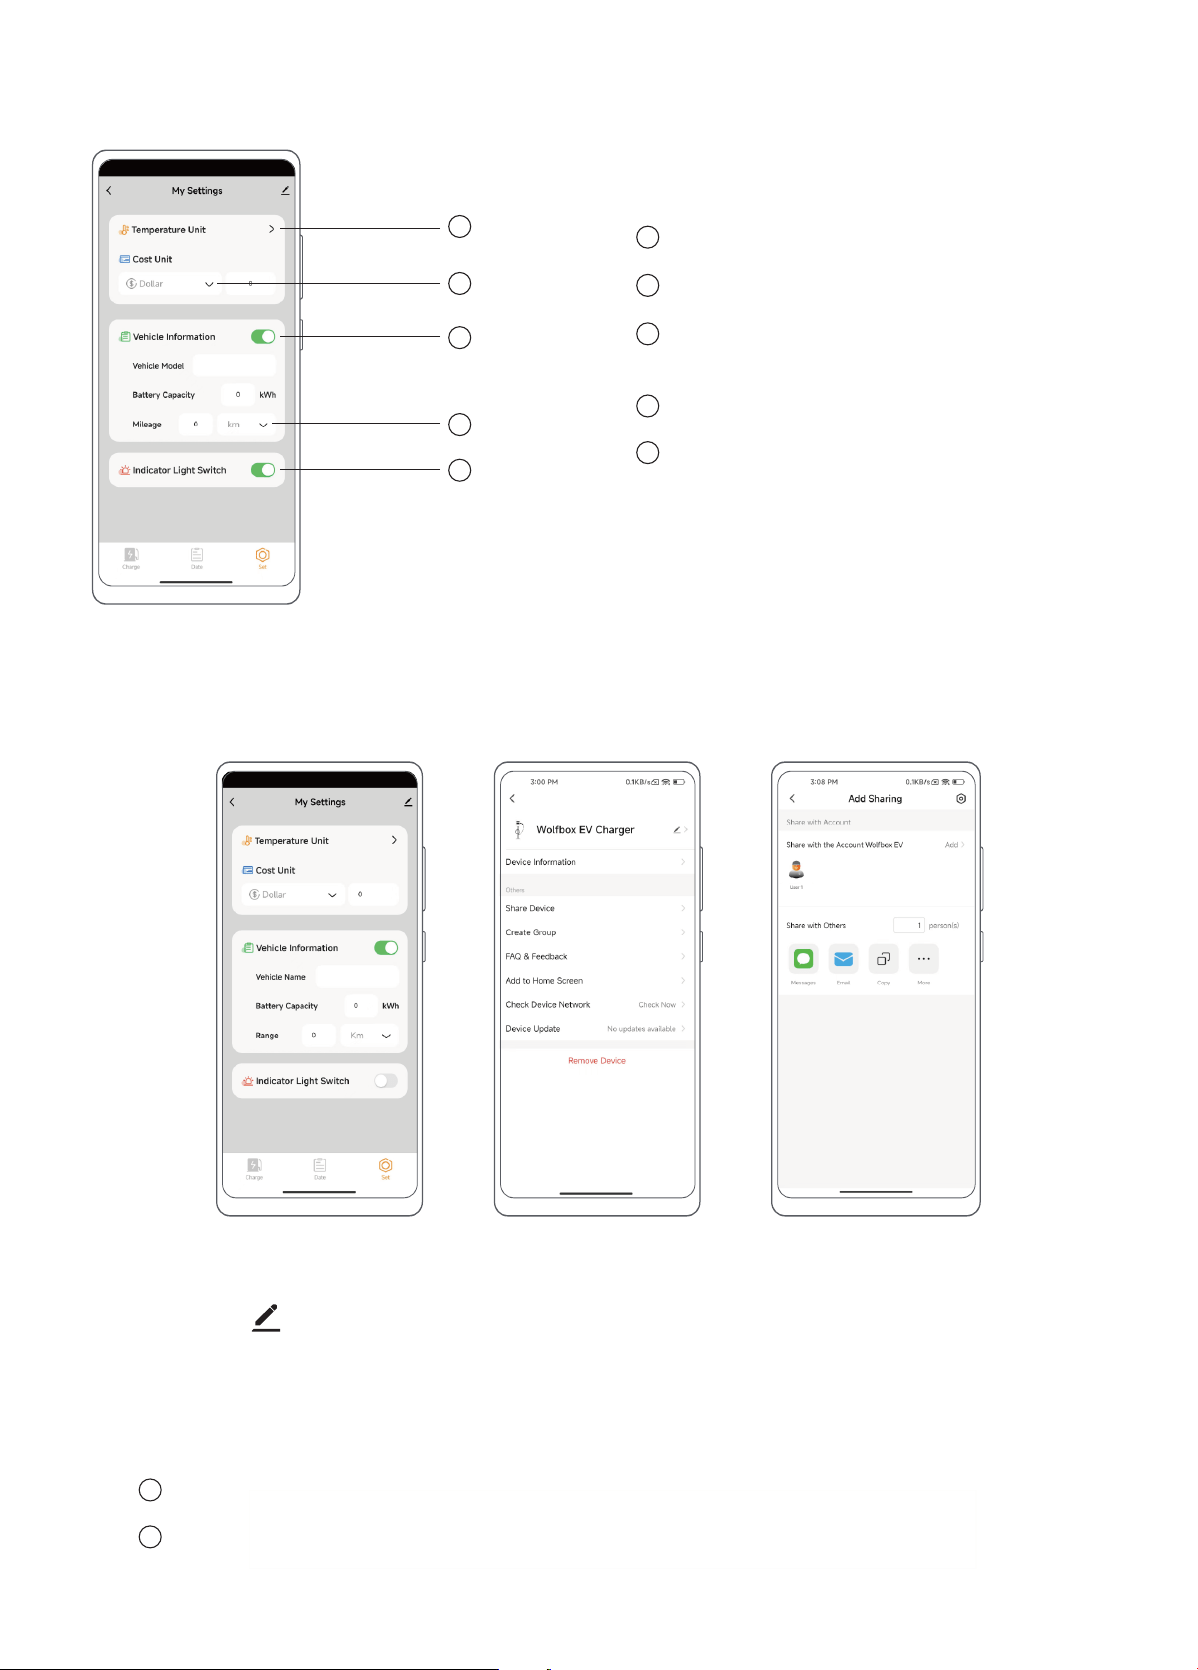
Temperature Unit: Select units in ℃ or ℉
Cost Unit: Currency type setting
Vehicle Information: Whether to display vehicle
information
Range unit setting: Select units in km or Miles
Indicator Light Switch: Turn on or turn o the EV
charger lights
5. Set
1
2
3
4
5
1
2
3
4
5
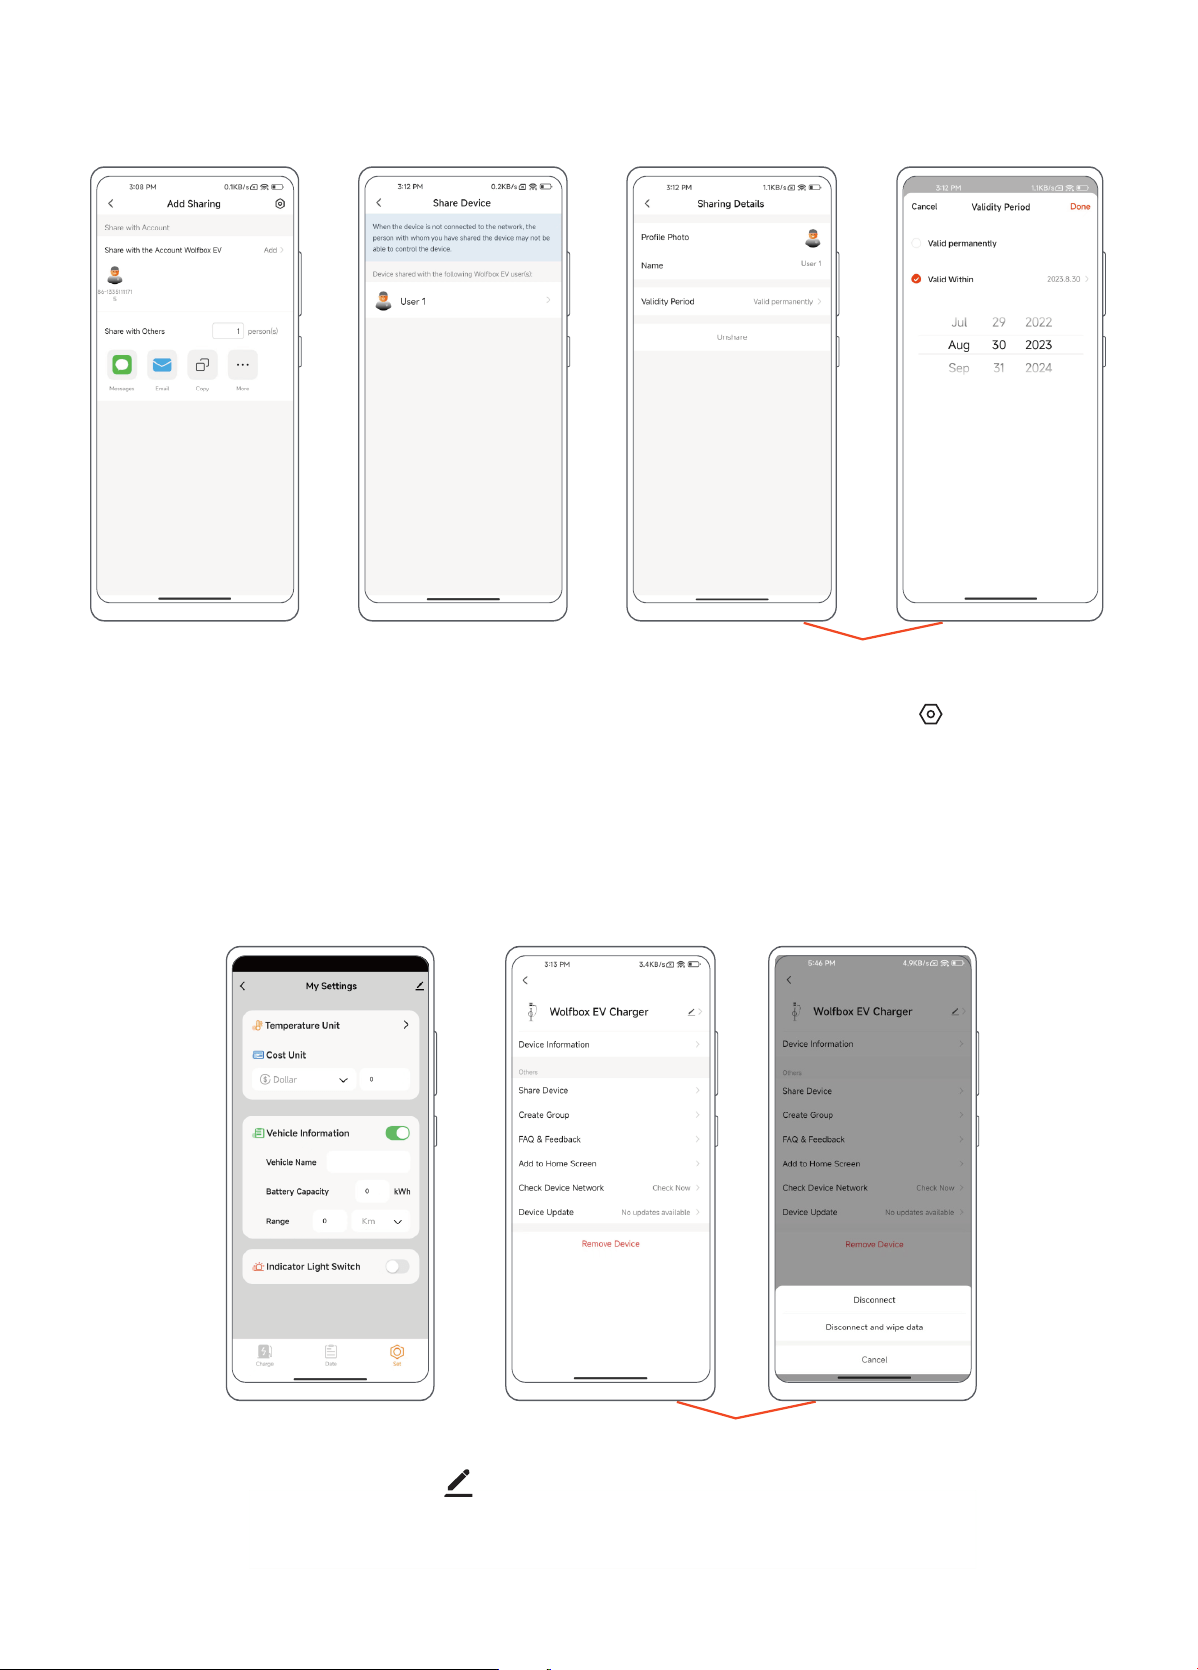
Other Setting
1. Share Device
Step 3Step 1 Step 2
Step 1: Click the " " in the upper right corner of the “Set” page.
Step 2: Click "Share Device" to enter "Add Sharing" page.
Step 3: Click "Add" to share the device by entering the other user’s WOLFBOX EV account or by other means (SMS,
email, copy link, etc.).
Note: The maximum number of user shares is 19.
Shared users also need to download "WOLFBOX EV".
1
2
18
2. Setting Shared User Privileges (Remove Sharing & Privilege Duration)
Step 1: Follow the steps in "Sharing Device" to enter the "Add Sharing" page and click the " " in the upper
right corner.
Step 2: Enter to view the users who have been shared.
Step 3: Select the user you want to change the privilege to cancel the sharing and the privilege duration.
Step 3Step 1 Step 2
3. Remove the Device
Step 1: Enter the “Set” page and click " " in the upper right corner.
Step2: Disconnect:Disconnect from EV charger.
Disconnect and wipe data: The device will be restored to facto Settings and removed from the device list.
Step 1
Step 2

19
IMPORTANT:
You are responsible for the proper installation and maintenance of the Electric Vehicle Supply Equipment.
1. Improper site preparation or maintenance, improper installation, cosmetic damage such as scratches
and dents, or normal deterioration.
2. Abuse, vandalism, damage or other problems caused by accident, misuse or negligence (including,
but not limited to, physical damage caused by vehicle impact), or use of the Electric Vehicle Supply
Equipment in a manner other than that specied in the Applicable WOLFBOX documentation.
3. Damage to the Electric Vehicle Supply Equipment caused by software, inteaces, components,
supplies or any other products not supplied by WOLFBOX.
4. Damage caused by failure to install, alter, disassemble, modify or relocate Electric Vehicle Supply
Equipment in accordance with the installation guidelines.
5. Damage caused by extreme electrical surges, extreme electromagnetic elds, or other causes beyond
control.
In addition: The Electric Vehicle Supply Equipment warranty will not Apply ifs the original identication markings of
your Electric Vehicle Supply Equipment (e.g., serial number and logo) are damaged, altered or removed.
WOLFBOX shall not be liable for any direct, indirect, incidental, special, punitive or consequential damages,
including, arising out of or in connection with your purchase or use of a Electric Vehicle Supply Equipment or
inability to use Electric Vehicle Supply Equipment, under any theo of liability, whether in an action in contract,
strict liability, to (including negligence including negligence) or other legal or equitable theo, even if WOLFBOX
knew or should have known of the possibility of such damages. in no event will WOLFBOX's cumulative liability for
all claims relating to the Electric Vehicle Supply Equipment exceed the price you paid for the Electric Vehicle Supply
Equipment. The limitations set foh herein are intended to limit WOLFBOX's liability and shall Apply to any failure of
the essential purpose of the limited remedy.
We are committed to giving customers the best product experience and after-sale seice.
WOLFBOX warrants your Electric Vehicle Supply Equipment to be free from defects in material or workmanship
when used under normal operating conditions for a period of three (3) years from the date of original purchase
(warranty period).
If, during the warranty period, your Electric Vehicle Supply Equipment becomes defective due to a breach of
warranty, WOLFBOX will repair or replace the Electric Vehicle Supply Equipment at its option during the warranty
period.
NOTE: If you encounter a problem that cannot be handled, you can contact our after-seice personnel or
customer seice sta for help.
WOLFBOX
Tel: +1 833 369 1616
Email: EV@wolox.com
Business time: 6AM-12AM,1PM-8PM EST(GMT-4)
The nal interpretation right belongs to WOLFBOX
5 AFTER-SALES INFORMATION
5.1 Out of Scope Warranty
5.2 Promise
5.3 Brand Contact Details

Check us out here!
We have professional customer seice!
E-mail: EV@wolox.com
Phone: +1 833 369 1616
303379