

• 4
• 5
• 6
• 7
• 8
• 9
• 10
• 11
• 12
• 13
• 15
• 16
• 17
• 18
• 19
• 20
• 21
• 22
• 23
• 24
• 26
• 27
• 28
• 29
• 30
• 31
• 32
• 33
• 34
• 35
• 37
• 38
• 39
• 40
• 41
• 42
• 43
• 44
• 45
• 46
• 48
• 49
• 50
• 51
• 52
• 53
• 54
• 55
• 56
• 57
• 59
• 60
• 61
• 62
• 63
• 64
• 65
• 66
• 67
• 68
Table of Contents
ENGLISH (EN)
DEUTSCH (DE)
ESPANOL (ES)
FRENCH (FR)
ITALIAN (IT)
SWEDISH (SV)
• Items Included . . . . . . . . . . . . .
• Fitting . . . . . . . . . . . . . . . . . . . . .
• Power On/Off . . . . . . . . . . . . . .
• Bluetooth Pairing . . . . . . . . . . .
• Dual Connect . . . . . . . . . . . . . .
• User Controls . . . . . . . . . . . . . .
• Charging . . . . . . . . . . . . . . . . . .
• Factory Reset . . . . . . . . . . . . . .
• Cleaning & Maintenance . . . .
• Need Support? . . . . . . . . . . . . .
• Im Lieferumfang enthalten . .
• Aufsetzen . . . . . . . . . . . . . . . . .
• Ein-/Ausschalten . . . . . . . . . . .
• Bluetooth-Kopplung . . . . . . . .
• Dual Connect . . . . . . . . . . . . . .
• Bedienelemente . . . . . . . . . . .
• Laden . . . . . . . . . . . . . . . . . . . . .
• Factory-Reset . . . . . . . . . . . . . .
• Reinigung und Wartung . . . . .
• Brauchen Sie Unterstützung?
• Artículos incluidos . . . . . . . . . . . . .
• Colocación . . . . . . . . . . . . . . . . . . . .
• Encendido/Apagado . . . . . . . . . . .
• Emparejamiento Bluetooth . . . . .
• Dual Connect . . . . . . . . . . . . . . . . .
• Controles . . . . . . . . . . . . . . . . . . . . .
• Carga . . . . . . . . . . . . . . . . . . . . . . . .
• Restablecimiento de Fábrica . . . .
• Limpieza y mantenimiento . . . . . .
• ¿Necesita ayuda? . . . . . . . . . . . . . .
• Articles Inclus . . . . . . . . . . . . . . . . .
• Ajustement . . . . . . . . . . . . . . . . . . .
• Mise Sous/Hors Tension . . . . . . . .
• Couplage Bluetooth . . . . . . . . . . . .
• Fonction de Double Connexion . .
• Commandes . . . . . . . . . . . . . . . . . .
• Charger . . . . . . . . . . . . . . . . . . . . . .
• Réinitialisation . . . . . . . . . . . . . . . .
• Nettoyage et entretien . . . . . . . . .
• Besoin d'assistance? . . . . . . . . . . .
• Articoli inclusi . . . . . . . . . . . . . .
• Montaggio . . . . . . . . . . . . . . . . .
• Accensione/Spegnimento . . . .
• Associazione Bluetooth . . . . . .
• Dual Connect . . . . . . . . . . . . . . .
• Controlli . . . . . . . . . . . . . . . . . . .
• Caricare . . . . . . . . . . . . . . . . . . .
• Ripristino di Fabbrica . . . . . . . .
• Pulizia e manutenzione . . . . . .
• Hai bisogno di supporto? . . . . .
• Ingående föremål . . . . . . . . . .
• Passform . . . . . . . . . . . . . . . . . .
• Ström På/Av . . . . . . . . . . . . . . .
• Parkoppling Bluetooth . . . . . .
• Dual Connect . . . . . . . . . . . . . .
• Användarkontroller . . . . . . . . .
• Laddning . . . . . . . . . . . . . . . . . .
• Fabriksåterställning . . . . . . . . .
• Rengöring och underhåll . . . .
• Behöver du support? . . . . . . .

English (EN)
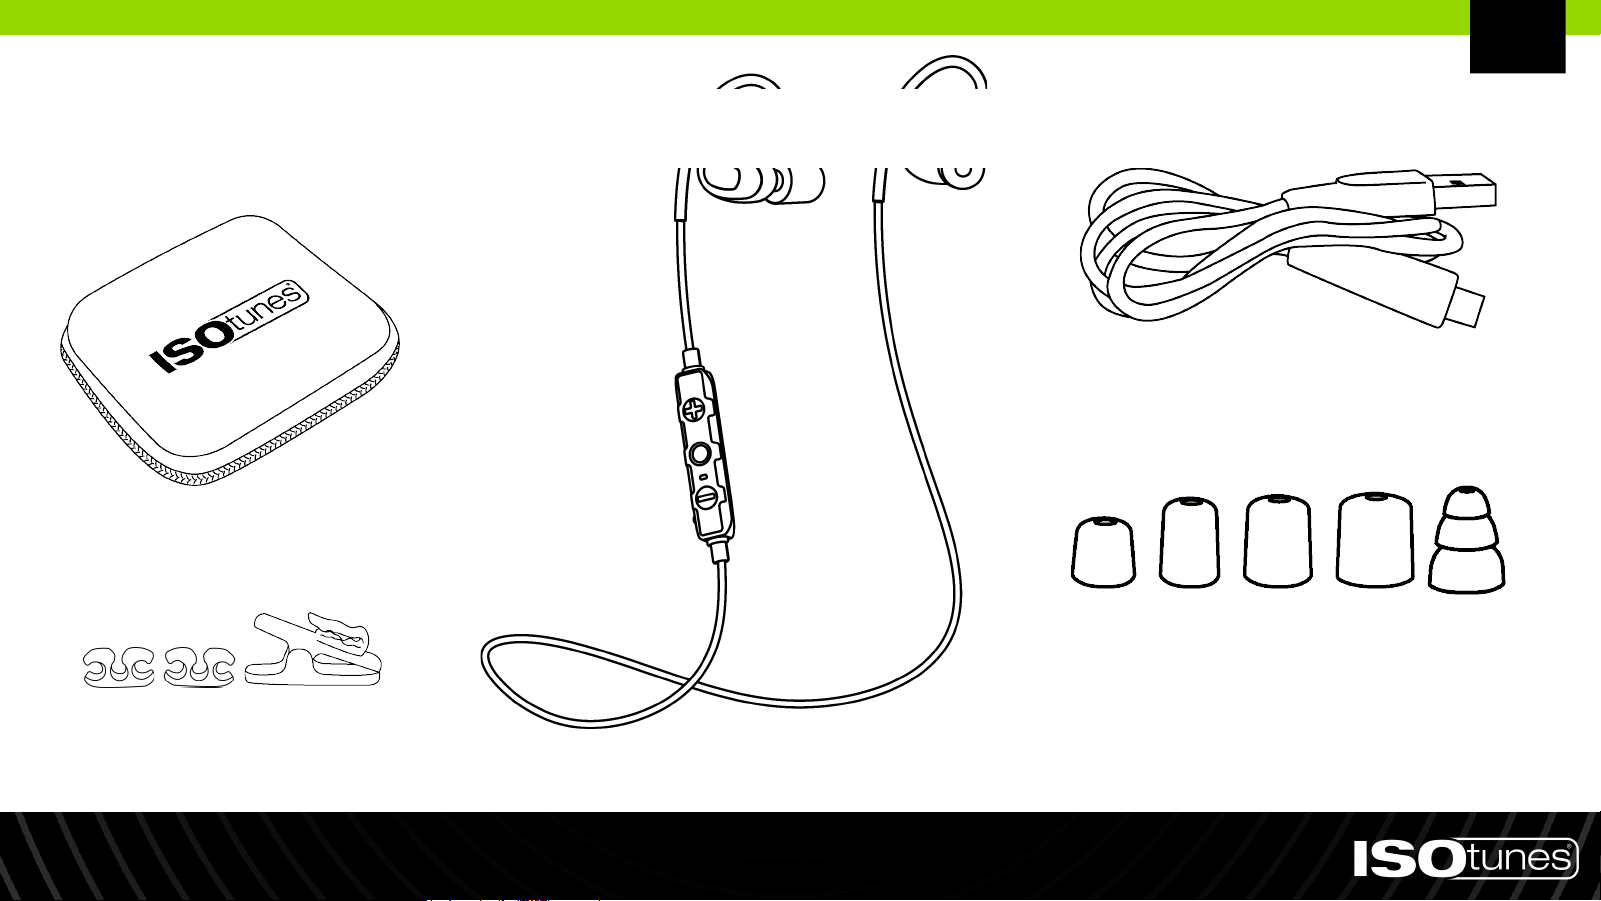
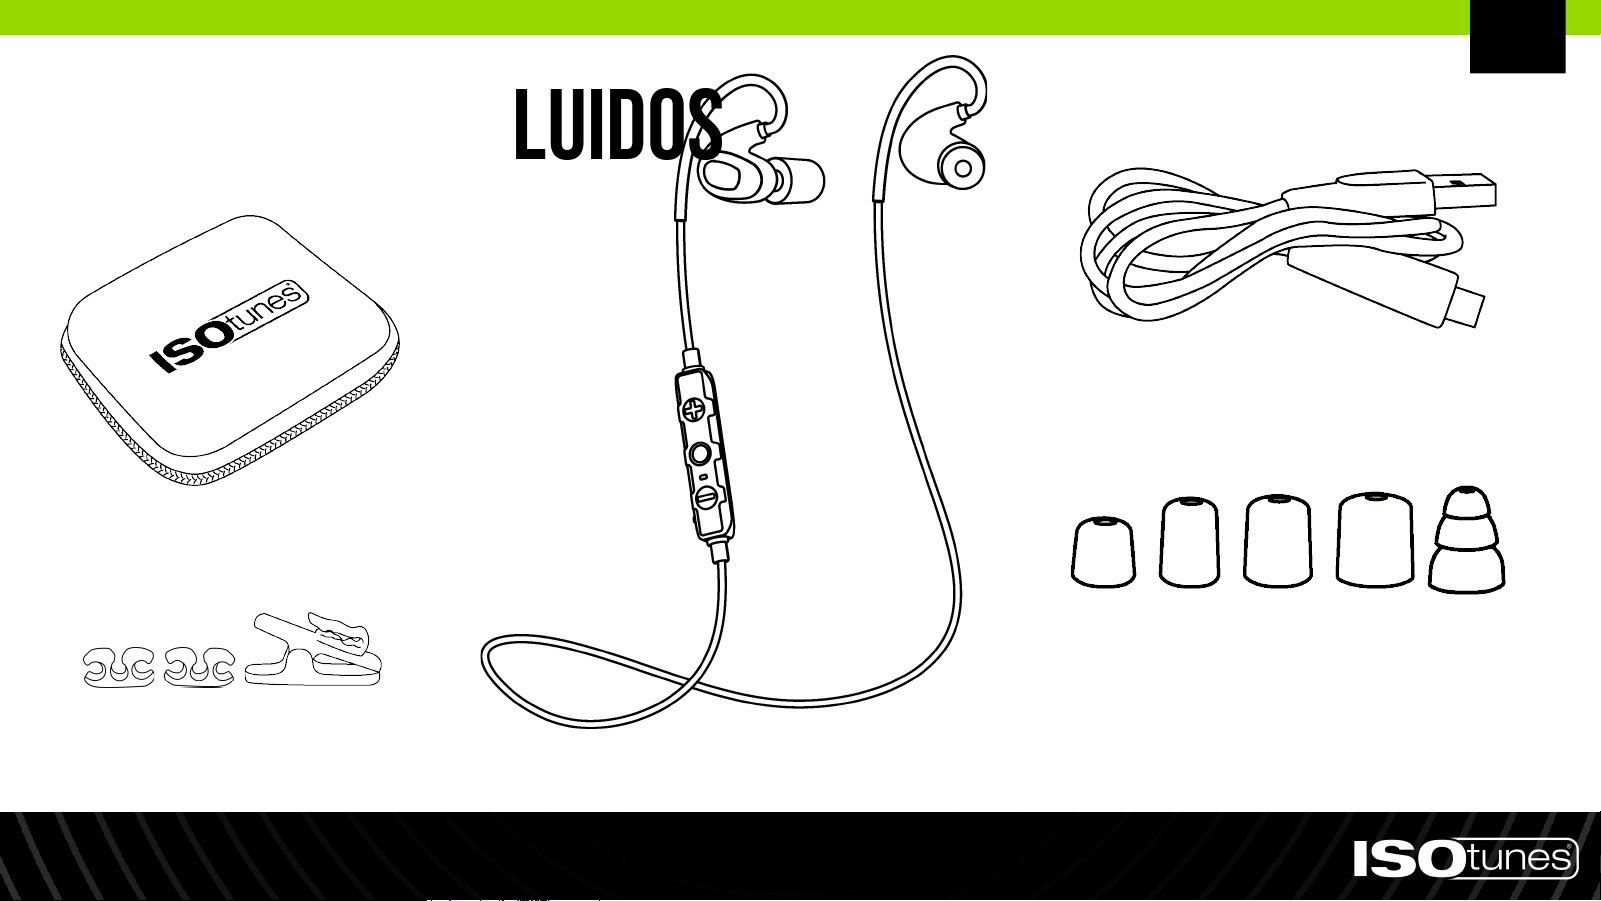
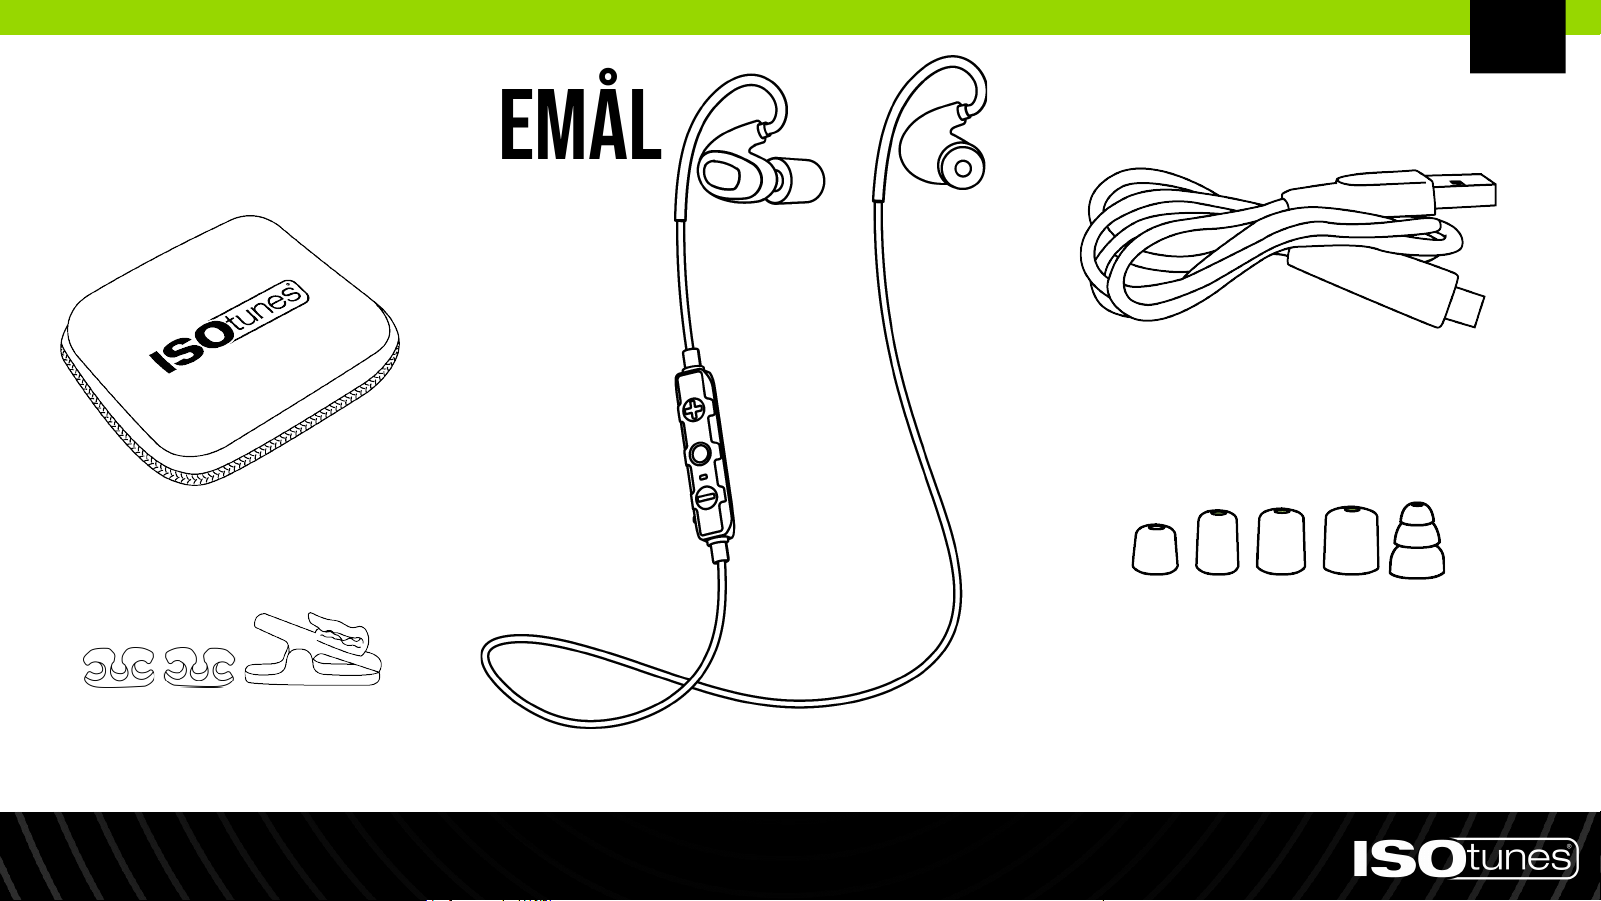
Items Included
1 Pair Triple Flange
Silicone Eartips
Charging Cable
Earbuds
Cord Clips & Alligator Clip
Rigid Storage Case
EN
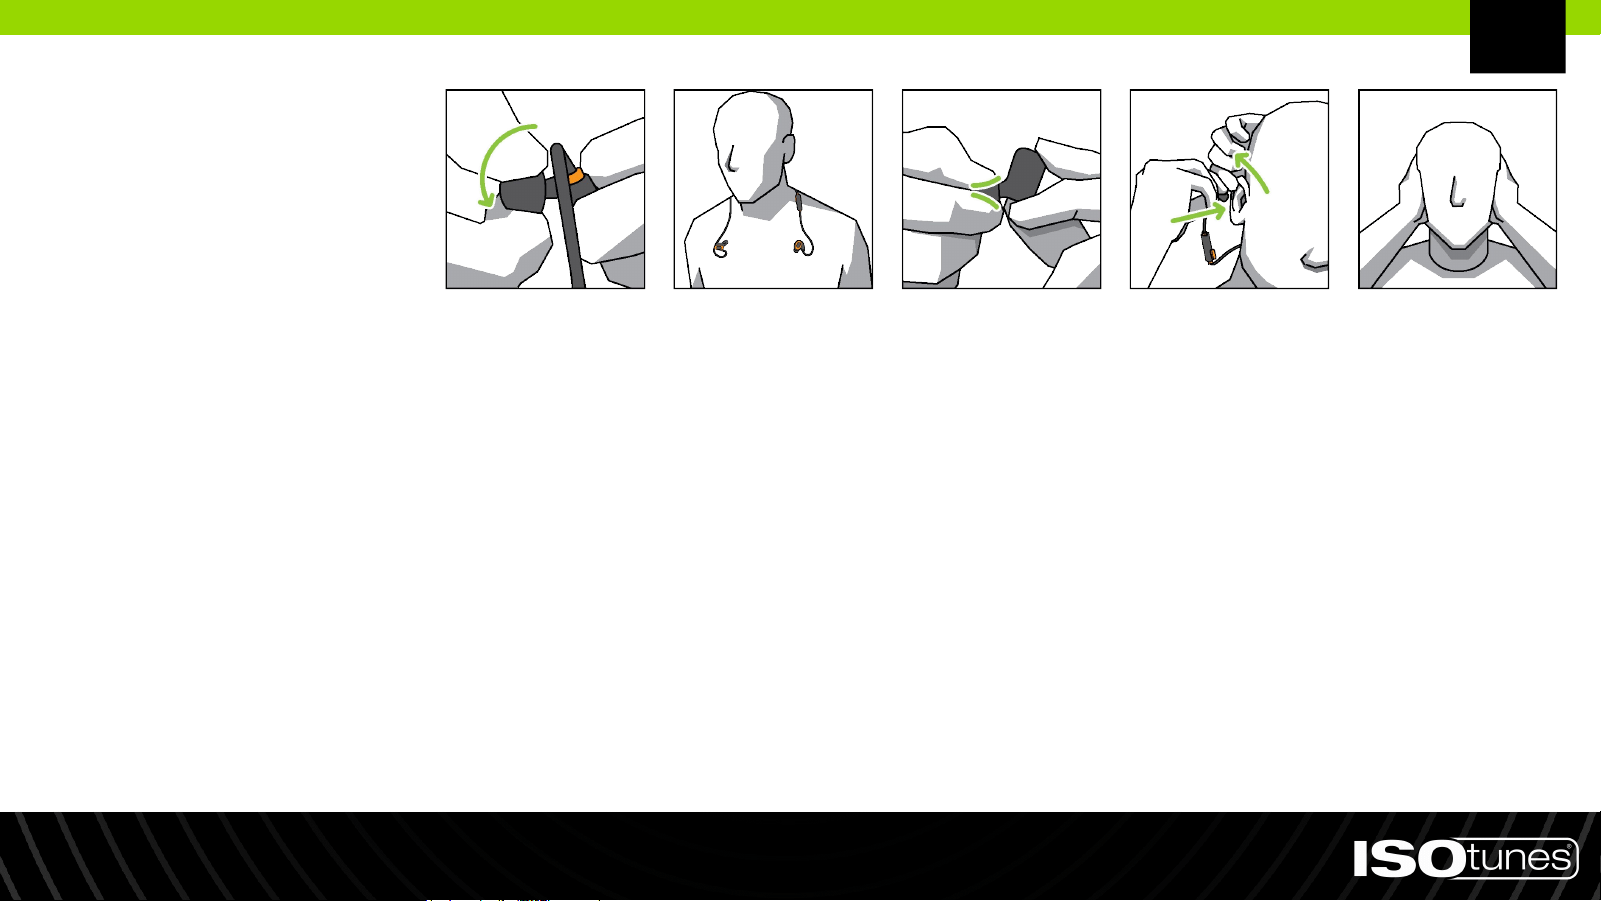
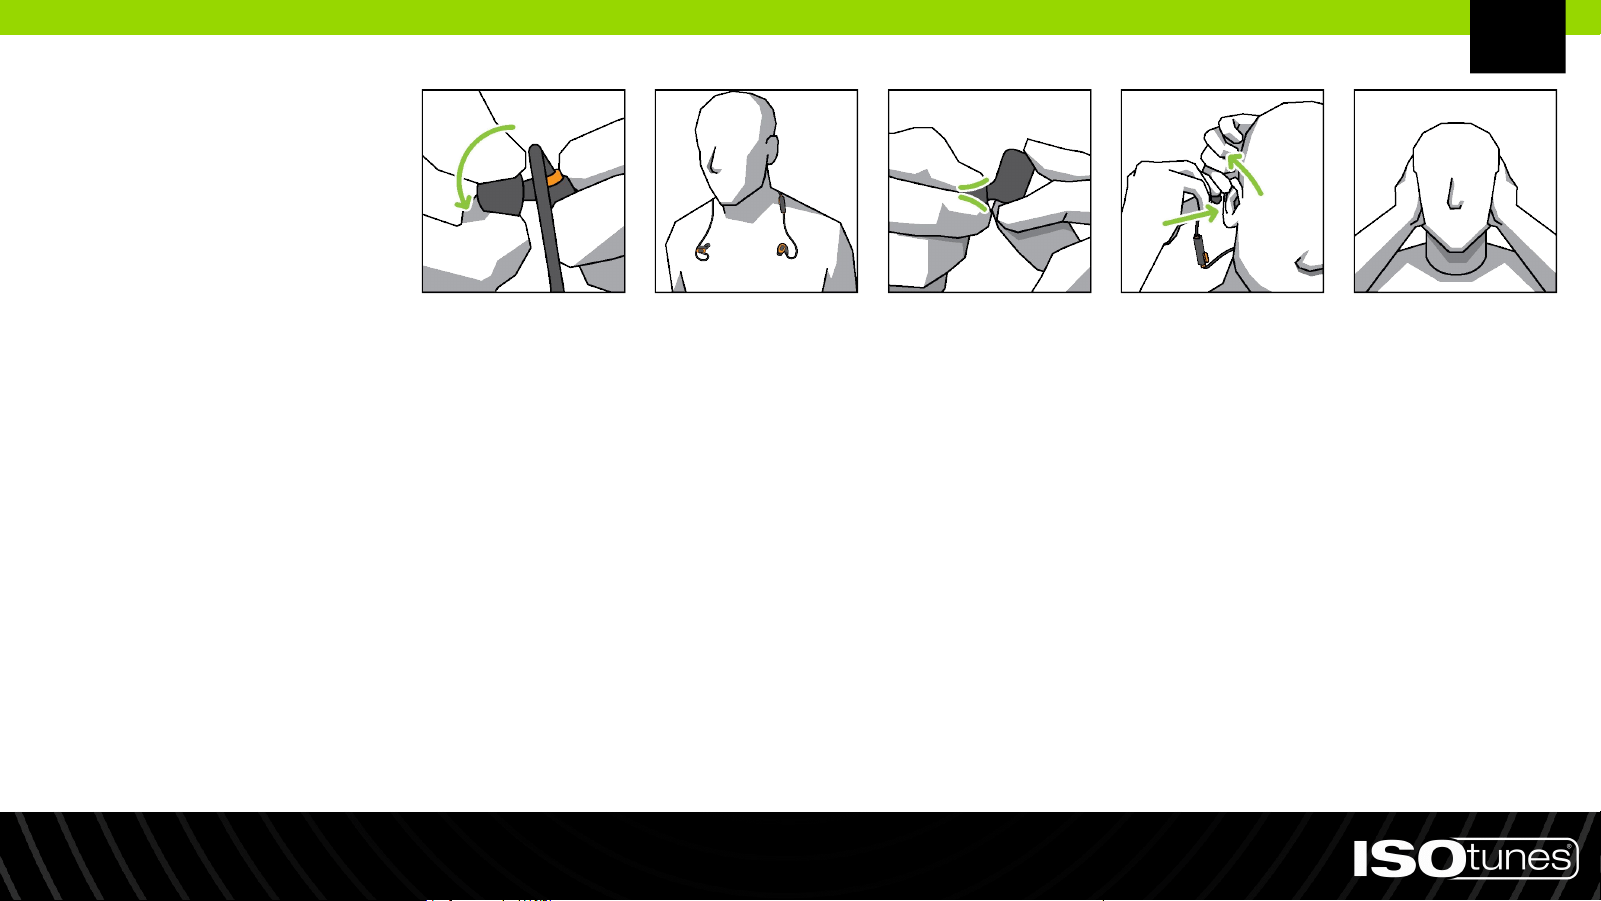
Fitting
1. There are multiple sizes of eartips. For the best hearing protection, use the largest eartip that fits your ear.
The eartip should be snug, but not too large that it falls out.
2. The eartip core is threaded, please screw eartips on or off the posts (Figure 1). Do not push or pull.
3. Place the neckband around your neck so that each earbud is resting on your chest (Figure 2).
4. Carefully roll and compress the foam tip between your fingers (Figure 3). Do not squeeze.
5. When ready to insert into the ear, reach over your head with your opposite hand and gently pull the top of
your ear back and away from your head to open your ear canal (Figure 4).
6. While holding your ear open, insert the eartip into your ear and push the rolled eartip into your ear as deeply as
comfortable. Hold the product in place for about 10 seconds, allowing the foam to expand and seal the ear.
7. Secure the earhook around the back of the ear. Repeat with the other earbud and ear.
8. Properly fitted and secured eartips will significantly reduce outside noise. To test, cup your hands over ears - if
there is a noticeable change in sound, the product is not properly fitted. We have included multiple eartip sizes
to ensure you get the air-tight fit needed for the best and safest noise reduction (Figure 5).
Figure 1 Figure 2 Figure 3 Figure 4 Figure 5
EN

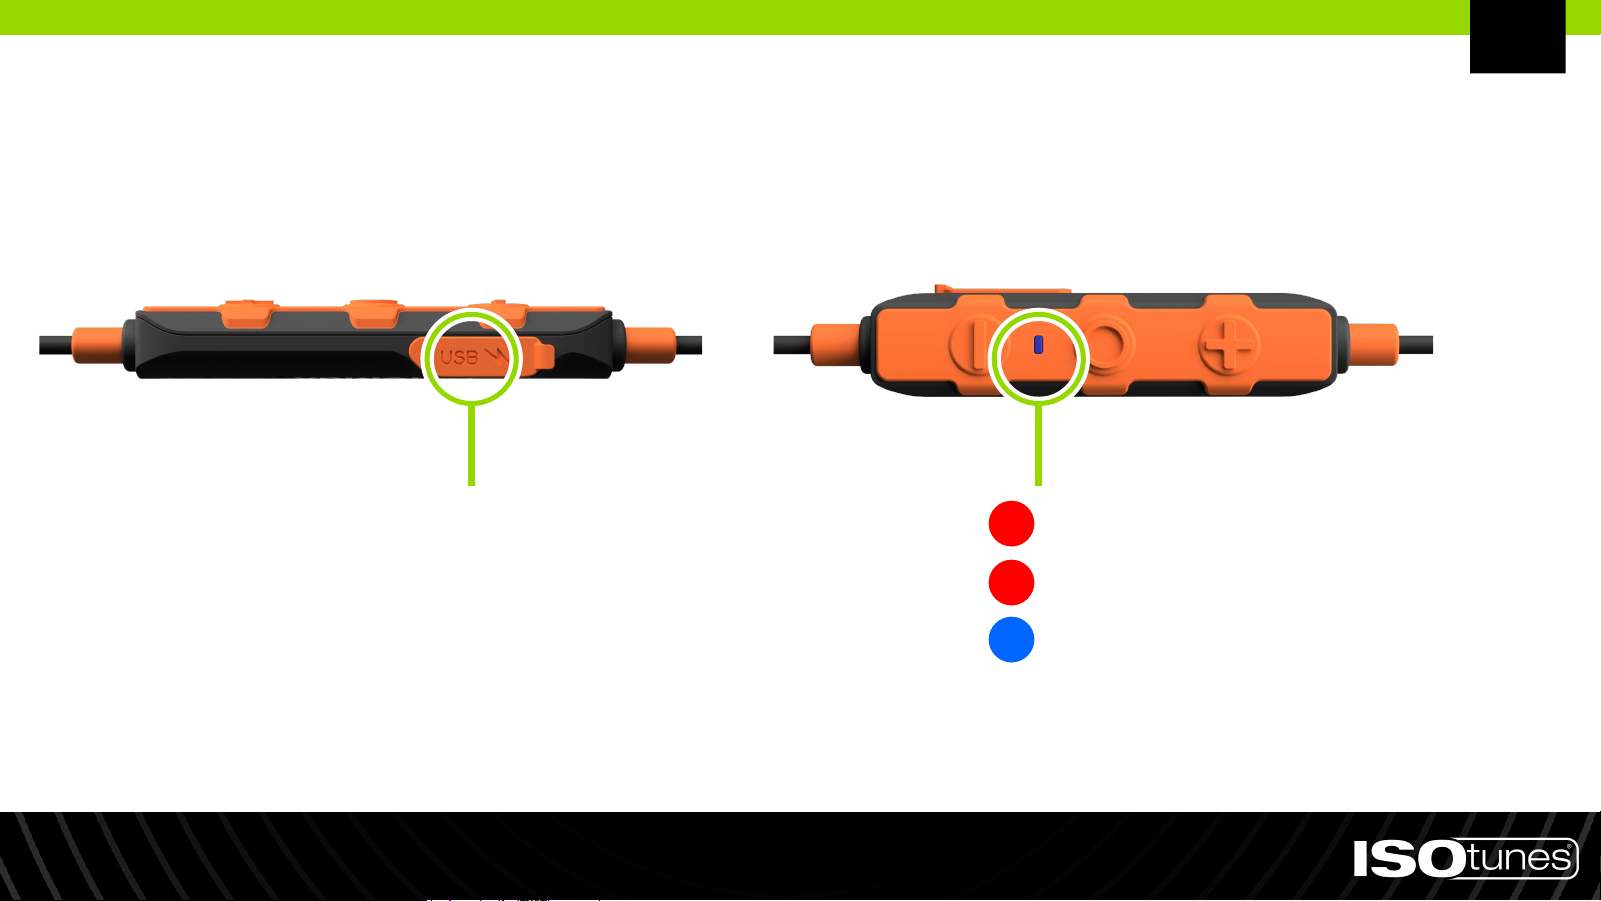
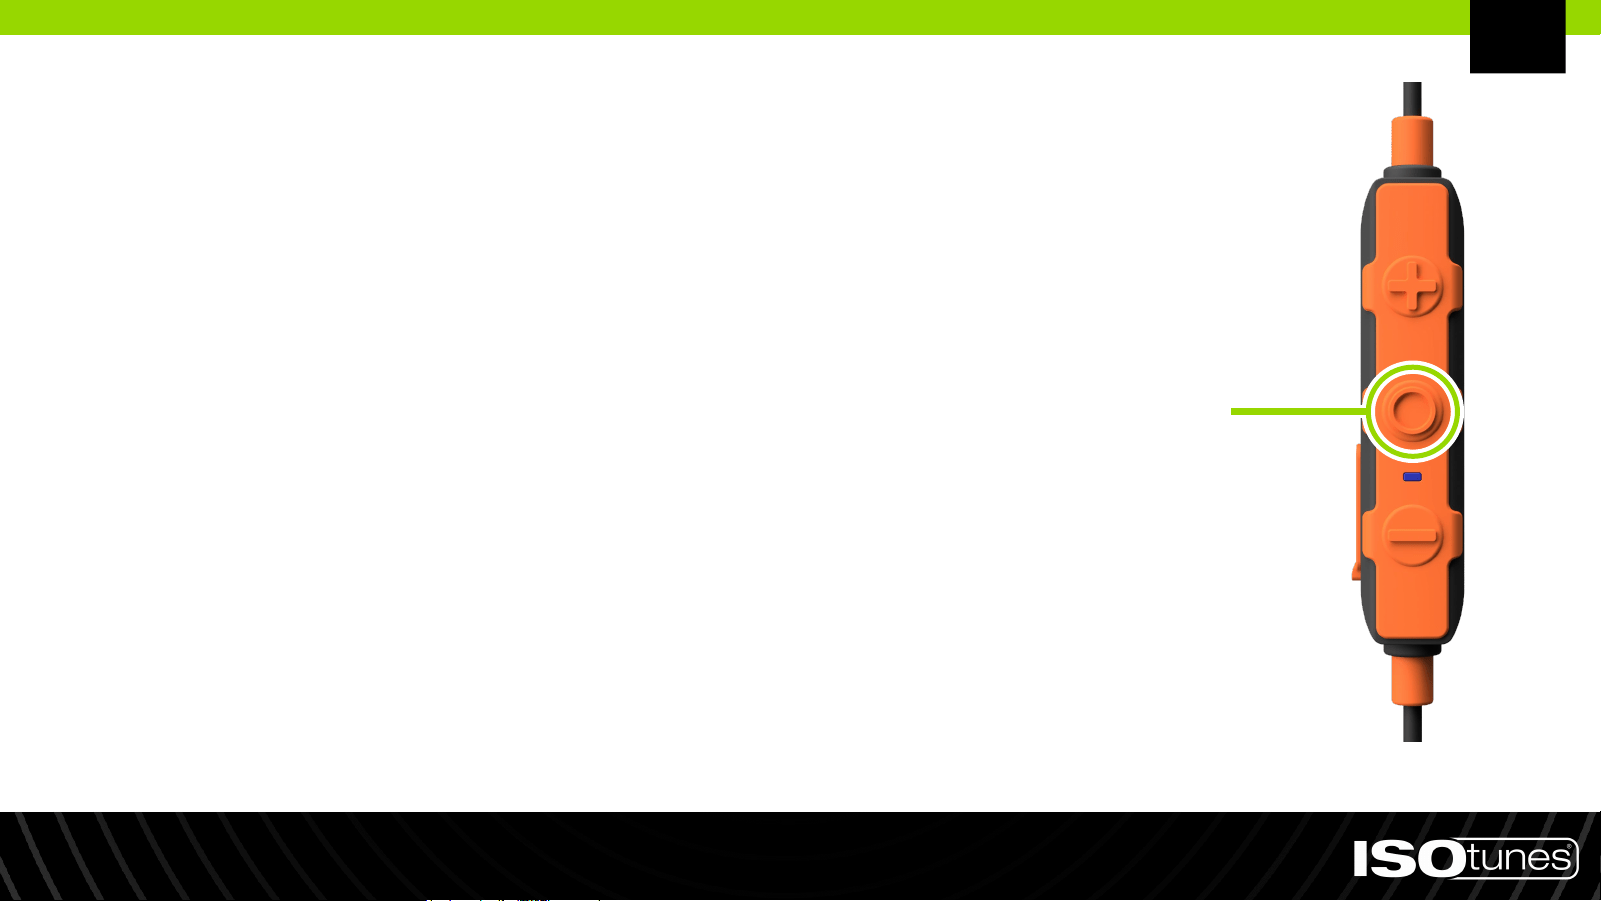
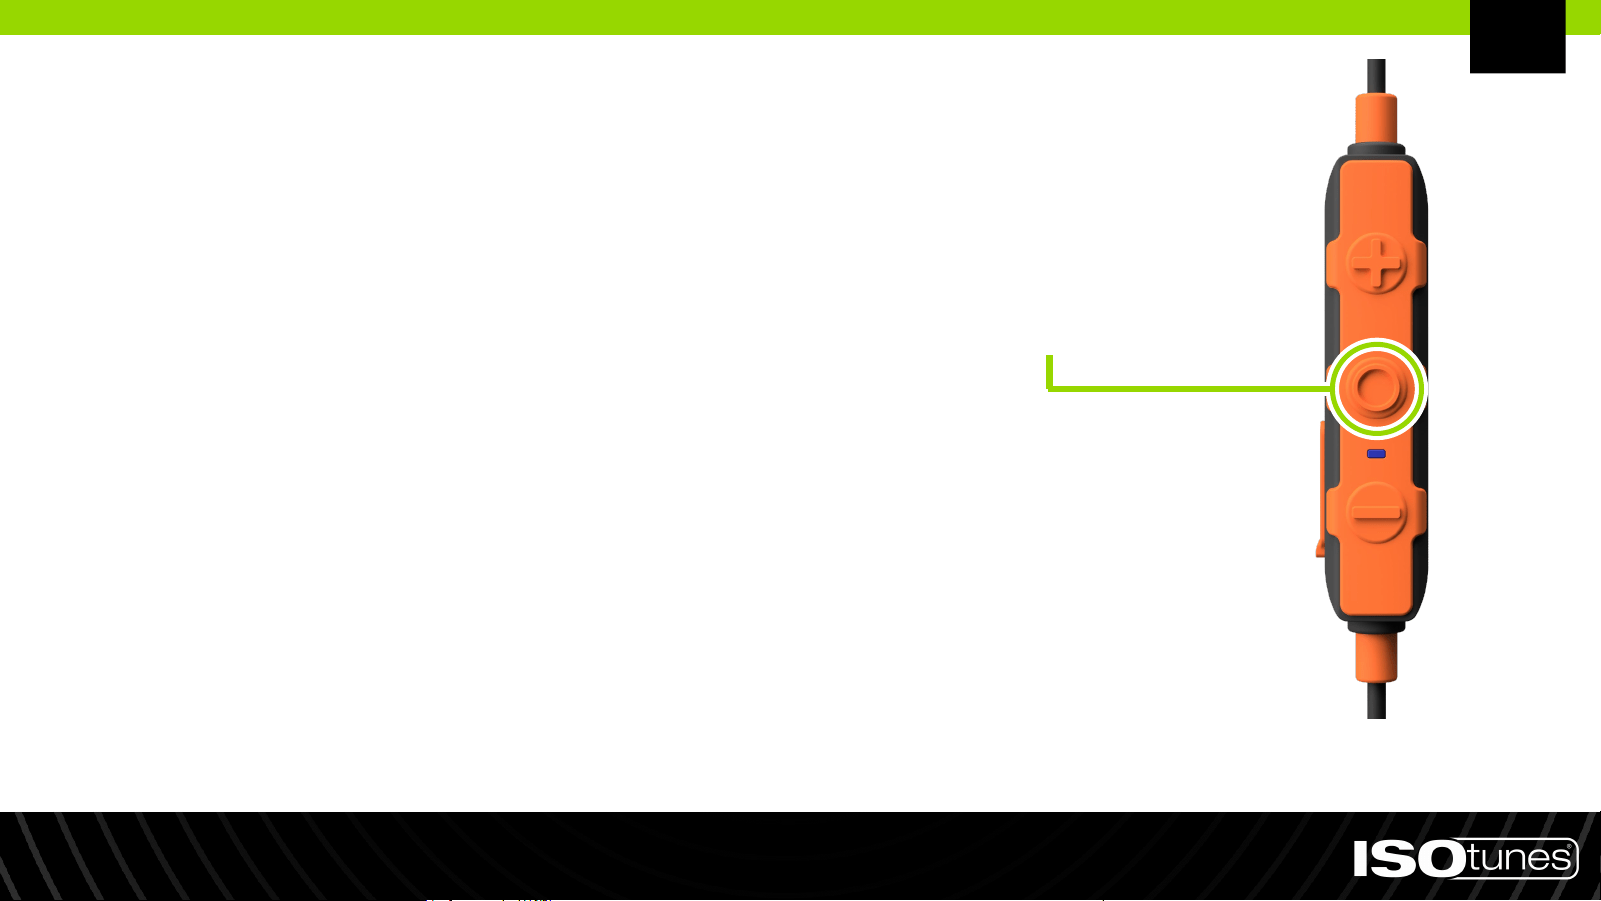
Power On: Press and hold multi-function
button (MFB) for 1 second
Power Off: Press and hold multi-function
button (MFB) for 3 seconds
Power On/Off
Multi-Function
Button (MFB)
EN
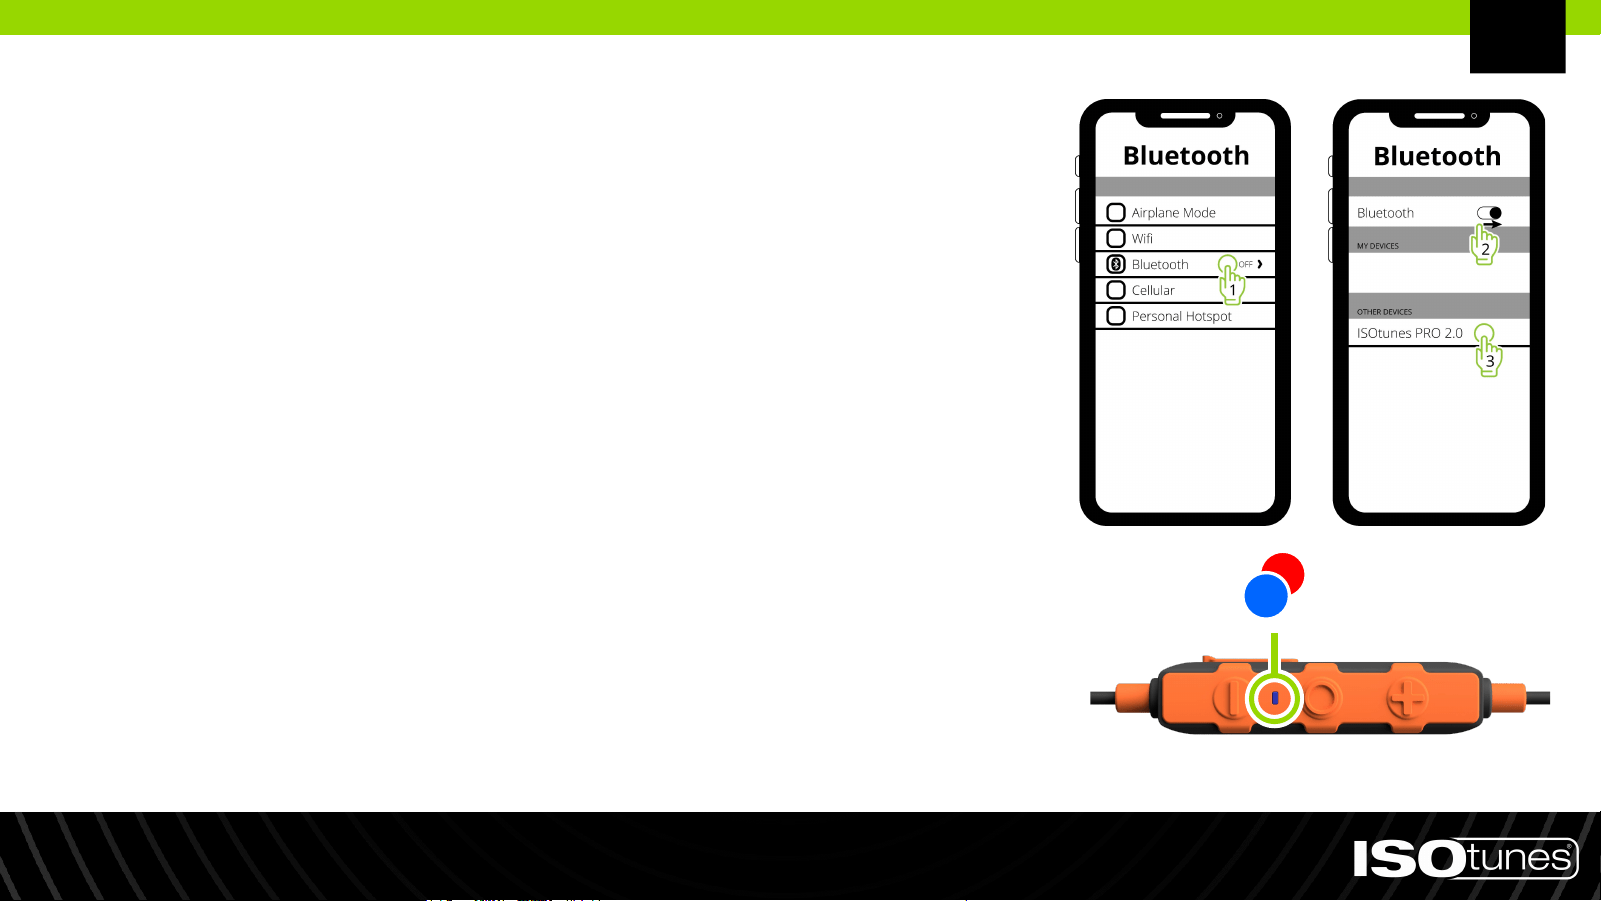
1. Pairing mode is automatically entered if PRO 2.0
has yet to be paired to a device or if all previously
connected devices are out of range.
2. To manually enter pairing mode, press and hold
the MFB for 5 seconds. The device will quickly flash
red and blue indicator lights. You may hear “Power
On” or “Power Off” during this time, but continue
holding the button for a full 5 seconds.
3. Open the Bluetooth settings on your device.
Search for “ISOtunes PRO 2.0.” Pair and connect.
4. You will hear “Bluetooth Connected” once connected.
Bluetooth Pairing
EN

1. Pair with Device A.
2. Press and hold the MFB for 5 seconds to enter pairing
mode for Device B, this will disconnect from Device A. You
may hear “Power On” or “Power Off” during this time, but
continue holding the button for a full 5 seconds.
3. Pair with Device B.
4. Within 1 minute of pairing Device B, reconnect Device A
to ISOtunes PRO 2.0 via Device A’s Bluetooth menu.
If you experience any issues, please reference the
Bluetooth user information for Device A or B.
Dual Connect
EN

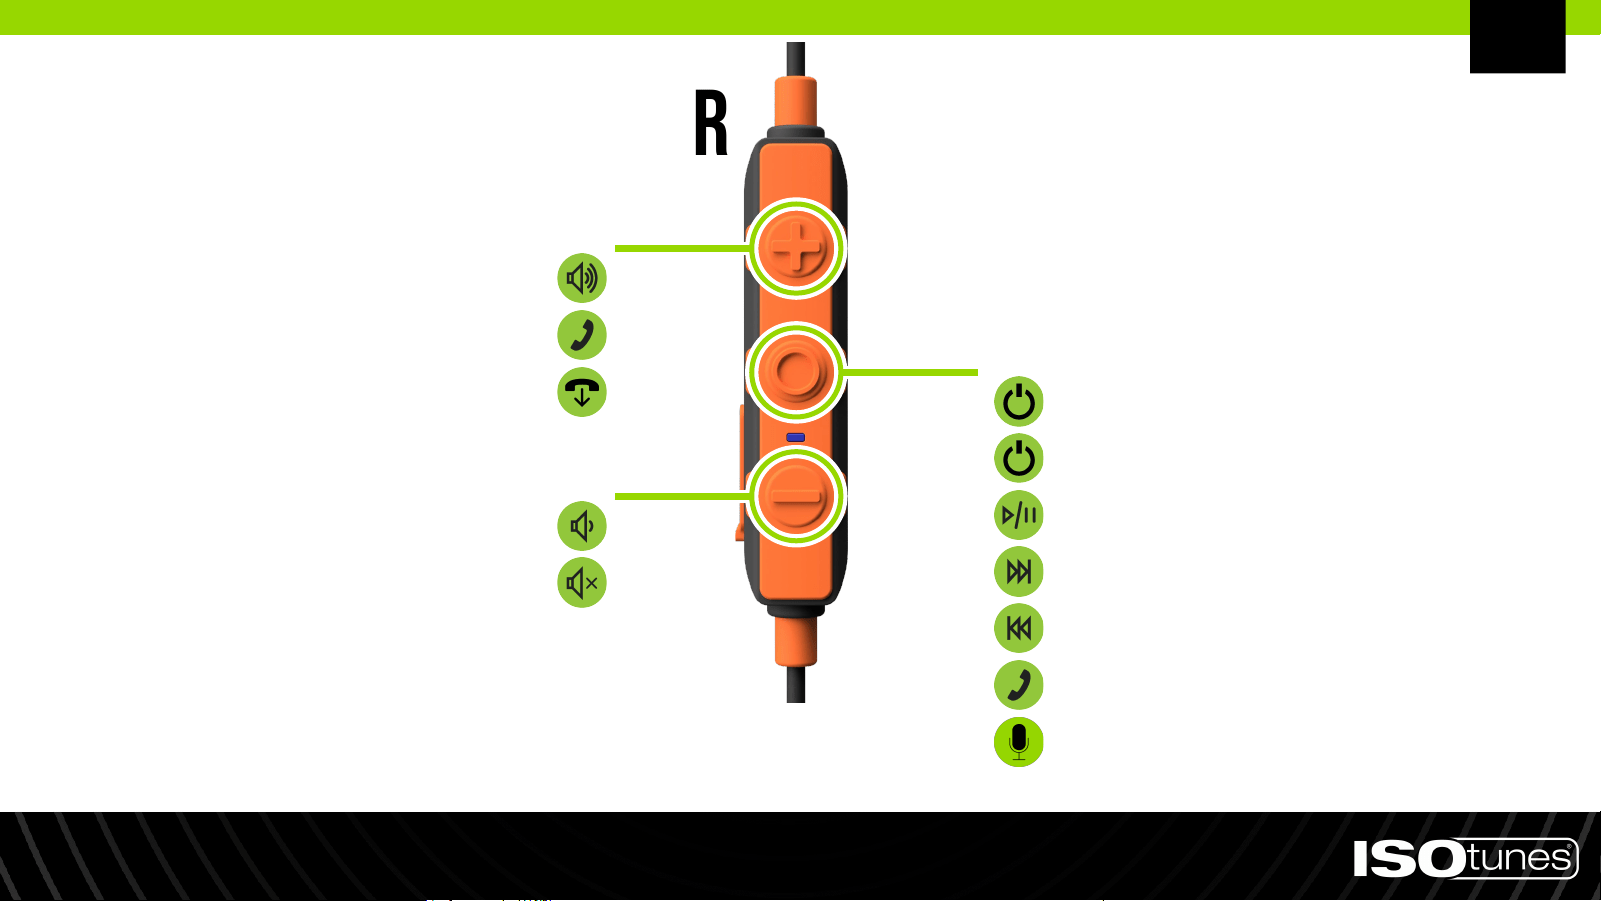
User Controls
MULTI-FUNCTION BUTTON (MFB)
*Volume Up: Press 1x
Redial (Standby Mode): Press 2x
Decline Call: Press, hold 2 secs
Volume Down: Press 1x
Mute/Unmute Call: Press, hold 2 secs
Power On: Press, hold 1 sec
Power Off: Press, hold 3 secs
Play/Pause: Press 1x
Next Track: Press 2x
Previous Track: Press 3x
Answer Call: Press 1x
Voice Assistant: Press, hold 1 sec
PLUS BUTTON (+)
MINUS BUTTON (-)
*Beep indicates maximum volume met.
EN

Charging
Charging voltage should not exceed 5 v.
CHARGING PORT
Low Battery: Flash once per second
Charging: No flashing
Fully Charged: No flashing
EN
Factory Reset
1. Press and hold both plus
button (+) and minus button (-)
for 5 seconds.
2. Product LED indicator light will
flash pink/purple once factory
reset is complete.
3. Using the Bluetooth pairing steps,
re-pair your device.
EN
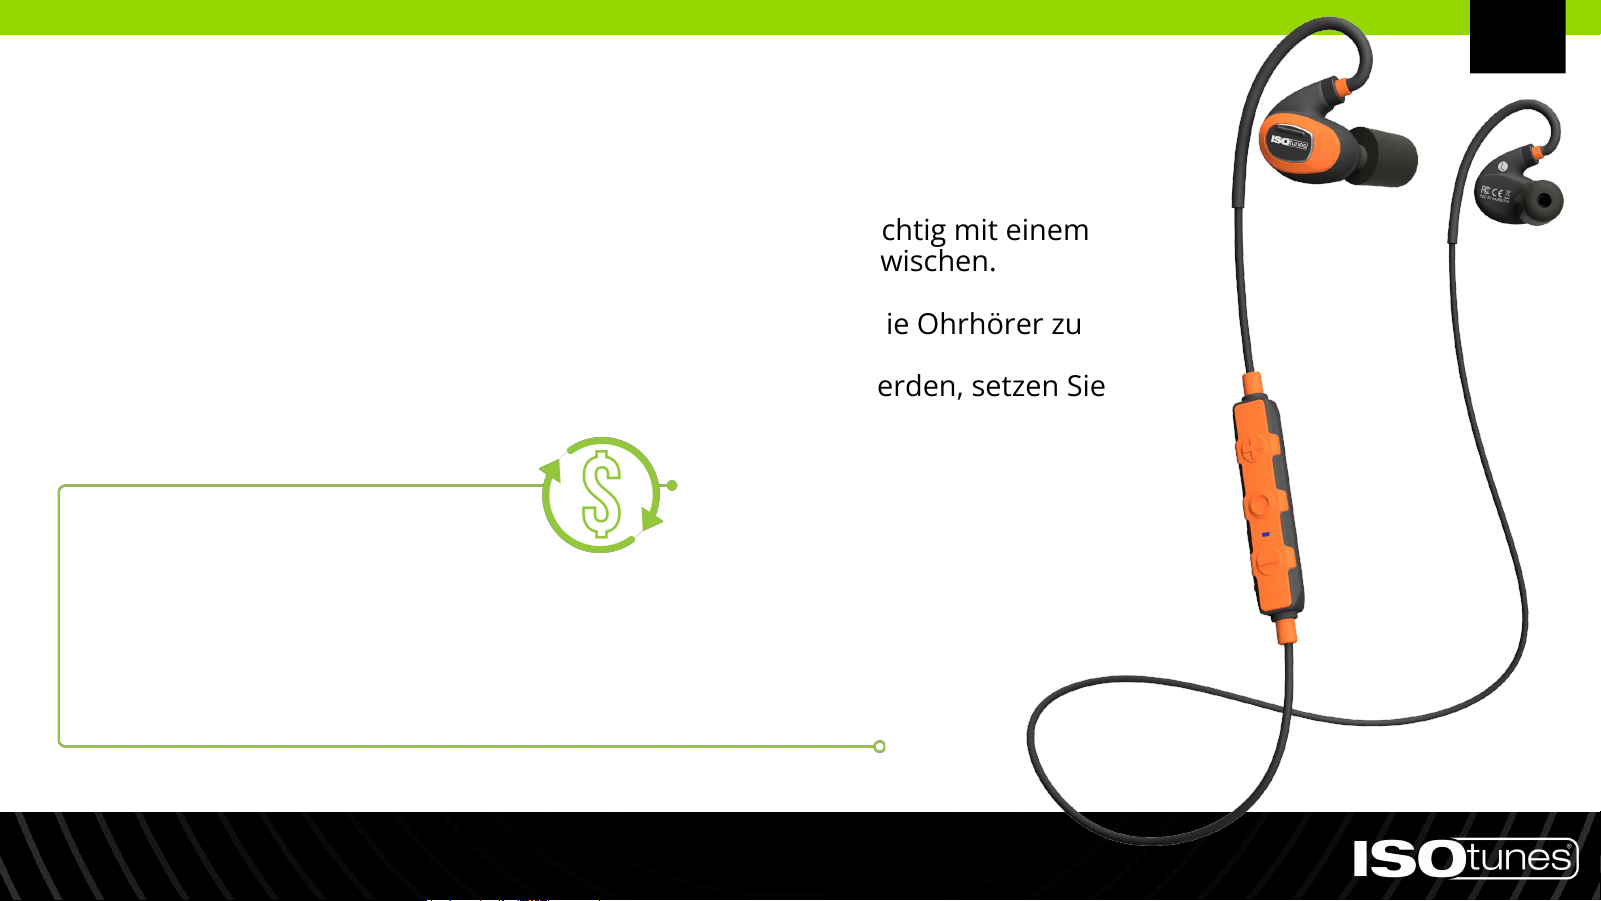
● Clean your ISOtunes PRO 2.0 by gently wiping them with a
clean, damp cloth with mild soap.
● Do not immerse the earbuds in water.
● Do not use abrasive cleaning solvents to clean the earbuds.
● If the earbuds get wet from sweat or rain, please discontinue
use and allow them to dry.
Cleaning & Maintenance
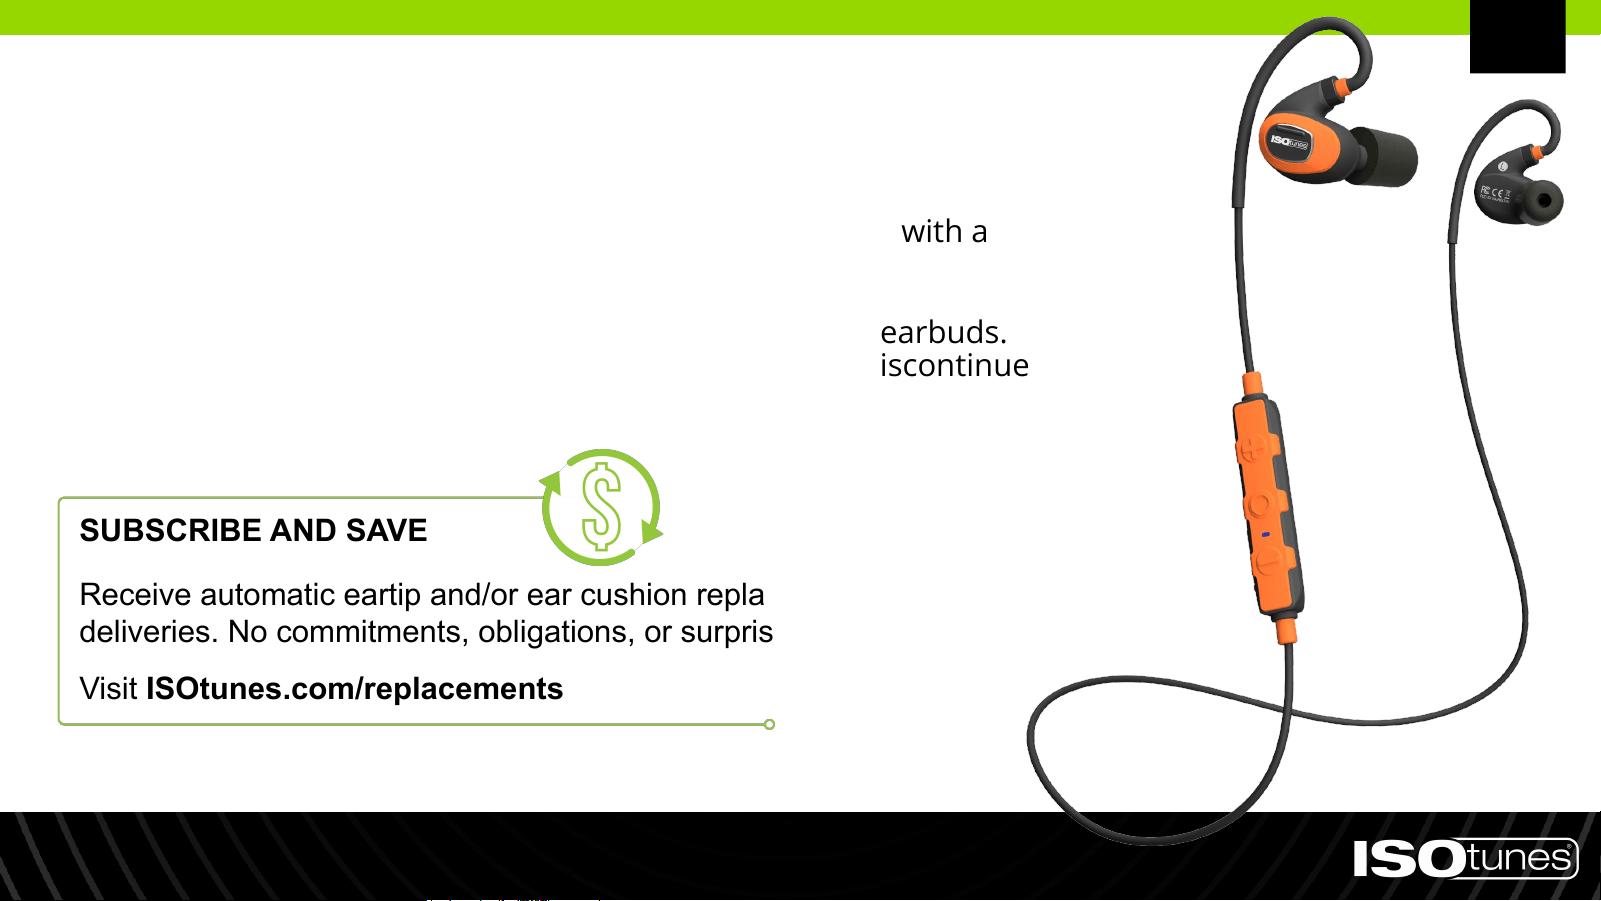
SUBSCRIBE AND SAVE
Receive automatic eartip and/or ear cushion replacement
deliveries. No commitments, obligations, or surprise fees.
Visit ISOtunes.com/replacements
EN
Exclusive to the United States.

CONTACT CUSTOMER SERVICE
USA & Canada
+1 (317) 740-0419
Mon-Fri 9:00 AM-5:00 PM EST
UK & Europe
Need Support?
EN

DEutsch (DE)
4 Paar Schaumstoff-Ohrstöpsel
(XS, S, M, L)
1 Paar dreiflanschige
Silikon-Ohrstöpsel
Ladekabel
Ohrhörer
Kabelclips und
Alligator-Klammer
Robustes
Aufbewahrungsetui
DE
Im Lieferumfang enthalten
Aufsetzen
1. Es gibt verschiedene Größen von Ohrstöpseln. Für den besten Gehörschutz verwenden Sie den größten Ohrstöpsel, der in Ihr
Ohr passt. Der Ohrstöpsel sollte fest sitzen, aber nicht so groß sein, dass er herausfällt.
2. Der Kern des Ohrstöpsels ist gewindeartig. Schrauben Sie bitte die Ohrstöpsel auf oder ab von den Befestigungspunkten
(Abbildung 1). Drücken Sie nicht oder ziehen Sie daran.
3. Legen Sie den Nackenbügel um Ihren Hals, sodass jeder Ohrhörer auf Ihrer Brust aufliegt (Abbildung 2).
4. Rollen Sie den Schaumstoff-Ohrstöpsel vorsichtig zwischen Ihren Fingern zusammen und komprimieren Sie ihn (Abbildung 3).
Drücken Sie ihn nicht zusammen.
5. Wenn Sie bereit sind, den Ohrstöpsel einzuführen, greifen Sie mit der gegenüberliegenden Hand über Ihren Kopf und ziehen
Sie sanft die Oberseite Ihres Ohrs nach hinten und weg von Ihrem Kopf, um Ihren Gehörgang zu öffnen (Abbildung 4).
6. Halten Sie Ihr Ohr geöffnet, während Sie den Ohrstöpsel einführen, und schieben Sie den zusammengerollten Ohrstöpsel so
tief wie möglich in Ihr Ohr, bis es angenehm ist. Halten Sie das Produkt etwa 10 Sekunden lang an Ort und Stelle, um den
Schaumstoff auszudehnen und das Ohr abzudichten.
7. Befestigen Sie den Ohrbügel hinter dem Ohr. Wiederholen Sie dies mit dem anderen Ohrhörer und Ohr.
8. Richtig angepasste und befestigte Ohrstöpsel reduzieren Außengeräusche signifikant. Um dies zu überprüfen, legen Sie Ihre
Hände über Ihre Ohren - wenn Sie eine merkliche Veränderung im Klang bemerken, sitzt das Produkt nicht richtig. Wir haben
verschiedene Ohrstöpselgrößen beigefügt, um sicherzustellen, dass Sie die luftdichte Passform erhalten, die für den besten
und sichersten Lärmschutz erforderlich ist (Abbildung 5).
Abbildung 1 Abbildung 2 Abbildung 3 Abbildung 4 Abbildung 5
DE

Einschalten: Drücken und halten Sie die
Multifunktionstaste (MFB) 1 Sekunde lang
gedrückt.
Ausschalten: Drücken und halten Sie die
Multifunktionstaste (MFB) 3 Sekunden
lang gedrückt.
Ein-/Ausschalten
Multifunktionstaste
(MFB)
DE

1. Der Pairing-Modus wird automatisch aktiviert, wenn der
PRO 2.0 noch nicht mit einem Gerät gekoppelt wurde
oder alle zuvor verbundenen Geräte außer Reichweite
sind.
2. Um den Pairing-Modus manuell zu aktivieren, drücken
und halten Sie die MFB-Taste 5 Sekunden lang gedrückt.
Das Gerät blinkt schnell mit roten und blauen
Anzeigeleuchten. Während dieser Zeit können Sie "Power
On" oder "Power Off" hören, halten Sie jedoch die Taste
für volle 5 Sekunden gedrückt.
3. Öffnen Sie die Bluetooth-Einstellungen auf Ihrem Gerät.
Suchen Sie nach "ISOtunes PRO 2.0". Koppeln und
verbinden Sie das Gerät.
4. Sobald die Verbindung hergestellt ist, hören Sie
"Bluetooth Connected".
Bluetooth-Kopplung
DE

1. Gerät A koppeln.
2. Press and hold the MFB for 5 seconds to enter pairing
mode for Device B, this will disconnect from Device A. You
may hear “Power On” or “Power Off” during this time, but
continue holding the button for a full 5 seconds.
3. Gerät B koppeln.
4. Halten sie die MFT 5 sekunden lang defrückt, um den
Kopplungsmodus für Gerät B einsuschalten, dann wired
Gerät A getrennt.
Wenn Sie Probleme haben, lesen Sie bitte die
Bluetooth-Benutzerinformationen für Gerät A oder B.
Dual Connect
DE

Bedienelemente
MULTIFUNKTIONSTASTE (MFT)
*Volumen Oben: Drücken 1x
Wiederwahl (in standby-modus): Drücken 2x
Ablehnen: Gedrückt halten 2 sekunden
Volumen Nieder: Drücken 1x
Stummschalten/Stummschaltung
adheben: Gedrückt halten 2 sekunden
Einschalten: Gedrückt halten 1 sekunden
Ausschalten: Gedrückt halten 3 sekunden
Abspielen/Pause: Drücken 1x
Nächstes Lied: Drücken 2x
Vorheriges Lied: Drücken 3x
Antwort/Ende: Drücken 1x
Sprachbefehle: Gedrückt halten 1 sekunden
PLUS-TASTE (+)
MINUS-TASTE (-)
*Piepton = maximale Lautstärke erreicht.
DE
Laden
Die Ladespannung sollte 5 V nicht überschreiten.
Aufladestation
Batteriestand schwach: Einmal pro sekunde
Audladen: Kien blinken
Ladevorgang abgeschlossen:
Kien blinken
DE

Factory-Reset
1. Halten Sie sowohl die Plus-Taste
(+) als auch die Minus-Taste (-) 5
Sekunden lang gedrückt.
2. Die LED-Anzeige des Produkts
blinkt rosa/lila, sobald das
Zurücksetzen auf
Werkseinstellungen
abgeschlossen ist.
3. Verwenden Sie die
Bluetooth-Kopplungsschritte, um
Ihr Gerät erneut zu koppeln.
DE
● Reinigen Sie Ihre ISOtunes PRO 2.0, indem Sie sie vorsichtig mit einem
sauberen, feuchten Tuch und mildem Seifenwasser abwischen.
● Tauchen Sie die Ohrhörer nicht ins Wasser.
● Verwenden Sie keine abrasiven Reinigungsmittel, um die Ohrhörer zu
reinigen.
● Wenn die Ohrhörer durch Schweiß oder Regen nass werden, setzen Sie
bitte die Verwendung aus und lassen Sie sie trocknen.
Reinigung und Wartung
ABONNIEREN UND SPAREN
Erhalten Sie automatische Lieferungen von Ersatz-Ohrstöpseln und/oder
Ohrpolstern. Keine Verpflichtungen, keine Verpflichtungen oder überraschenden
Gebühren.
Besuchen Sie ISOtunes.com/replacements.
DE
Exklusiv für die Vereinigten Staaten.

KONTAKTIEREN SIE DEN KUNDENDIENST
USA & Kanada
+1 (317) 740-0419
Montag bis Freitag 9:00 bis 17:00 Uhr (EST)
Vereinigtes Königreich und Europa
Brauchen Sie Unterstützung?
DE

español (ES)
Artículos incluidos
4 pares de Almohadillas de
Espuma (XS, S, M, L)
1 par de Almohadillas de Silicona
de Triple Brida
Cable de Carga
Auriculares
Clips para el Cable y Clip
de Cocodrilo
Estuche de
Almacenamiento Rígido
ES

Colocación
1. Existen varios tamaños de almohadillas para los oídos. Para una mejor protección auditiva, utiliza la almohadilla
más grande que se ajuste a tu oído. La almohadilla debe ajustarse bien, pero no ser tan grande que se caiga.
2. El núcleo de la almohadilla para el oído tiene rosca, por favor, enrosca o desenrosca las almohadillas en los postes
(Figura 1). No las empujes ni las jales.
3. Coloca la diadema alrededor de tu cuello de manera que cada auricular descanse sobre tu pecho (Figura 2).
4. Gire cuidadosamente la funda de gomaespuma sobre el puerto de sonido (Fig. 3).
5. Cuando estés listo para insertarlos en el oído, pasa la mano contraria por encima de tu cabeza y tira suavemente
de la parte superior de tu oreja hacia atrás y alejándola de la cabeza para abrir el canal auditivo (Figura 4).
6. Mientras mantienes la oreja abierta, introduce la almohadilla para el oído en el oído y empuja la almohadilla
enrollada hacia el interior del oído hasta una profundidad cómoda. Sujeta el producto en su lugar durante
aproximadamente 10 segundos, permitiendo que la espuma se expanda y selle el oído.
7. Asegura el gancho para la oreja en la parte posterior de la oreja. Repite el proceso con el otro auricular y oreja.
8. Las almohadillas para el oído correctamente ajustadas y aseguradas reducirán significativamente el ruido exterior.
Para probarlo, coloca las manos sobre los oídos: si hay un cambio notable en el sonido, el producto no está
correctamente ajustado. Hemos incluido varios tamaños de almohadillas para asegurarnos de que obtengas un
ajuste hermético necesario para una reducción de ruido óptima y segura (Figura 5).
Figura 1 Figura 2 Figura 3 Figura 4 Figura 5
ES
Encendido: Presiona y mantén pulsado el
botón multifunción (MFB) durante 1 segundo
Apagado: Presiona y mantén pulsado el botón
multifunción (MFB) durante 3 segundos
Encendido/Apagado
Botón
Multifunción
(MFB)
ES

1. El modo de emparejamiento se activa automáticamente
si el PRO 2.0 aún no ha sido emparejado con un
dispositivo o si todos los dispositivos previamente
conectados están fuera del alcance.
2. Para ingresar manualmente al modo de emparejamiento,
presiona y mantén pulsado el botón MFB durante 5
segundos. El dispositivo parpadeará rápidamente con
luces indicadoras rojas y azules. Es posible que escuches
"Encendido" o "Apagado" durante este tiempo, pero
continúa presionando el botón durante los 5 segundos
completos.
3. Abre la configuración de Bluetooth en tu dispositivo.
Busca "ISOtunes PRO 2.0". Empareja y conecta.
4. Una vez conectado, escucharás "Bluetooth Conectado".
Emparejamiento Bluetooth
ES

1. Empareja con el Dispositivo A.
2. Presiona y mantén pulsado el botón MFB durante 5
segundos para entrar en el modo de emparejamiento para
el Dispositivo B. Esto desconectará del Dispositivo A. Es
posible que escuches "Encendido" o "Apagado" durante
este tiempo, pero continúa manteniendo pulsado el botón
durante los 5 segundos completos.
3. Empareja con el Dispositivo B.
4. En el plazo de 1 minuto después de emparejar el Dispositivo
B, vuelve a conectar el Dispositivo A a ISOtunes PRO 2.0 a
través del menú Bluetooth del Dispositivo A.
Dual Connect
ES
Si experimentas algún problema, por favor consulta la
información del usuario de Bluetooth para el Dispositivo A o B.
Controles
BOTÓN MULTIFUNCIÓN (MFB)
*Volumen Subir: Pulsación 1x
Rediscado (en espera): Pulsación 2x
Rechazar: Presionar, mantener 2 segundos
Volumen Bajar: Pulsación 1x
Silenciar.Anular el Modo de Silencio:
Pulsación larga 2 segundos
Encendido: Press, hold 1 segundos
Apagado: Presionar, mantener 3 segundos
Reproducir/Pausar: Pulsación 1x
Siguiente Canción: Pulsación 2x
Canción Anterior: Pulsación 3x
Responder/Finalizar: Pulsación 1x
Comandos de Voz: Presionar,
mantener 1 segundo
BOTÓN DE SUMA (+)
BOTÓN DE RESTA (-)
* El pitido el volumen máximo mejorado.
ES

Carga
El voltaje de carga no debe superar los 5 V.
PUERTO DE CARGA
Batería Baja: Une por segundo
Cargando: Sin destello
Carga Completa: Sin destello
ES

Restablecimiento de Fábrica
1. Press and hold both plus
button (+) and minus button (-)
for 5 seconds.
2. Product LED indicator light will
flash pink/purple once factory
reset is complete.
3. Using the Bluetooth pairing steps,
re-pair your device.
ES
● Limpie sus ISOtunes PRO 2.0 frotándolos suavemente con
un paño limpio y húmedo con un jabón suave.
● No sumerja los auriculares en agua.
● No utilice solventes de limpieza abrasivos para limpiar los
auriculares.
● Si los auriculares se mojan por el sudor o la lluvia, deje de
usarlos y permítalos que se sequen.
Limpieza y mantenimiento
SUSCRÍBETE Y AHORRA
Recibe entregas automáticas de repuestos de almohadillas y/o tapones
para los oídos. Sin compromisos, obligaciones o tarifas sorpresa.
Visita ISOtunes.com/replacements.
ES
Exclusivo para Estados Unidos

CONTACT CUSTOMER SERVICE
Estados Unidos & Canadá
+1 (317) 740-0419
Lun-Vie 9:00 AM-5:00 PM EST’
Reino Unido y Europa
¿Necesita ayuda?
ES

française (FR)

ARTICLES INCLUS
4 paires d'embouts en
mousse (XS, S, M, L)
1 paire d'embouts en silicone
à triple bride
Câble de charge
Écouteurs
Cord Clips & Pinces pour
câble et pince crocodile
Étui de rangement
rigide
FR
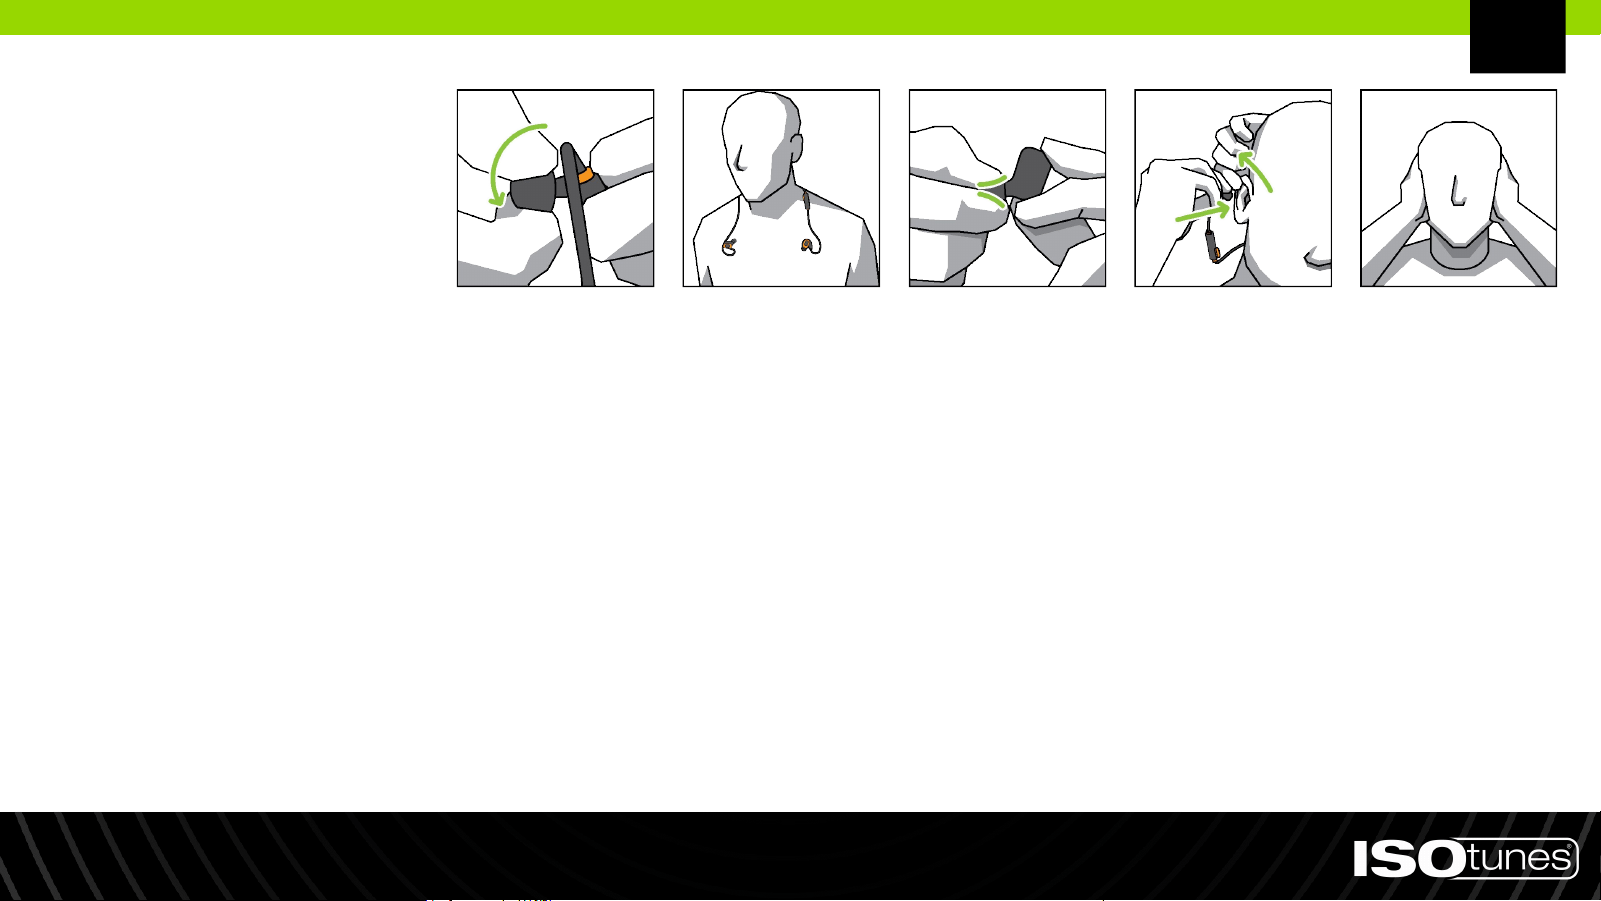
Ajustement
1. Il existe plusieurs tailles d'embouts auriculaires. Pour une meilleure protection auditive, utilisez l'embout auriculaire le
plus grand qui convient à votre oreille. L'embout doit être ajusté, mais pas trop grand au point de tomber.
2. Le noyau de l'embout auriculaire est fileté, veuillez donc visser les embouts sur ou hors des supports (Figure 1). Ne
poussez pas ou ne tirez pas.
3. Placez le tour de cou autour de votre cou de manière à ce que chaque écouteur repose sur votre poitrine (Figure 2).
4. Roulez et compressez délicatement l'embout en mousse entre vos doigts (Figure 3). Ne serrez pas.
5. Lorsque vous êtes prêt à insérer l'embout dans l'oreille, passez la main opposée par-dessus votre tête et tirez doucement
le haut de votre oreille vers l'arrière et loin de votre tête pour ouvrir votre conduit auditif (Figure 4).
6. Tout en maintenant votre oreille ouverte, insérez l'embout auriculaire dans votre oreille et poussez l'embout enroulé
aussi profondément que possible et confortablement. Maintenez le produit en place pendant environ 10 secondes,
permettant à la mousse de se dilater et de sceller l'oreille.
7. Attachez le crochet auriculaire à l'arrière de l'oreille. Répétez avec l'autre écouteur et oreille.
8. Les embouts auriculaires correctement adaptés et fixés réduiront considérablement les bruits extérieurs. Pour tester,
couvrez vos oreilles avec vos mains - s'il y a un changement notable dans le son, le produit n'est pas correctement
adapté. Nous avons inclus plusieurs tailles d'embouts auriculaires pour vous assurer un ajustement hermétique
nécessaire à une réduction du bruit optimale et sécurisée (Figure 5).
Figure 1 Figure 2 Figure 3 Figure 4 Figure 5
FR

Allumer: Appuyez et maintenez le bouton
multifonction (MFB) pendant 1 seconde.
Éteindre: Appuyez et maintenez le bouton
multifonction (MFB) pendant 3 secondes.
Mise Sous/Hors Tension
Bouton
Multifonction
(MFB)
FR

1. Le mode de jumelage s'active automatiquement si le
PRO 2.0 n'a pas encore été appairé avec un appareil ou
si tous les appareils précédemment connectés sont
hors de portée.
2. Pour entrer manuellement en mode de jumelage,
appuyez et maintenez le bouton MFB pendant 5
secondes. L'appareil clignotera rapidement avec des
voyants rouges et bleus. Vous pourrez entendre "Mise
sous tension" ou "Mise hors tension" pendant cette
période, mais continuez à maintenir le bouton enfoncé
pendant 5 secondes complètes.
3. Ouvrez les paramètres Bluetooth de votre appareil.
Recherchez "ISOtunes PRO 2.0". Appairez et connectez.
4. Une fois connecté, vous entendrez "Bluetooth connecté".
Couplage Bluetooth
FR

1. Couple avec l’appereil A.
2. Appuyez et maintenez le bouton MFB pendant 5 secondes
pour entrer en mode de jumelage pour l'appareil B. Cela
se déconnectera de l'appareil A. Vous pourriez entendre
"Mise sous tension" ou "Mise hors tension" pendant ce
temps, mais continuez à maintenir le bouton enfoncé
pendant une durée complète de 5 secondes.
3. Couple avec l’appereil B.
4. Dans l'intervalle d'une minute après avoir jumelé
l'appareil B, reconnectez l'appareil A à ISOtunes
PRO 2.0 via le menu Bluetooth de l'appareil A.
Si vous rencontrez des problèmes, veuillez vous référer au
guide d'utilisation Bluetooth de l'appareil A ou B.
Fonction de Double Connexion
FR

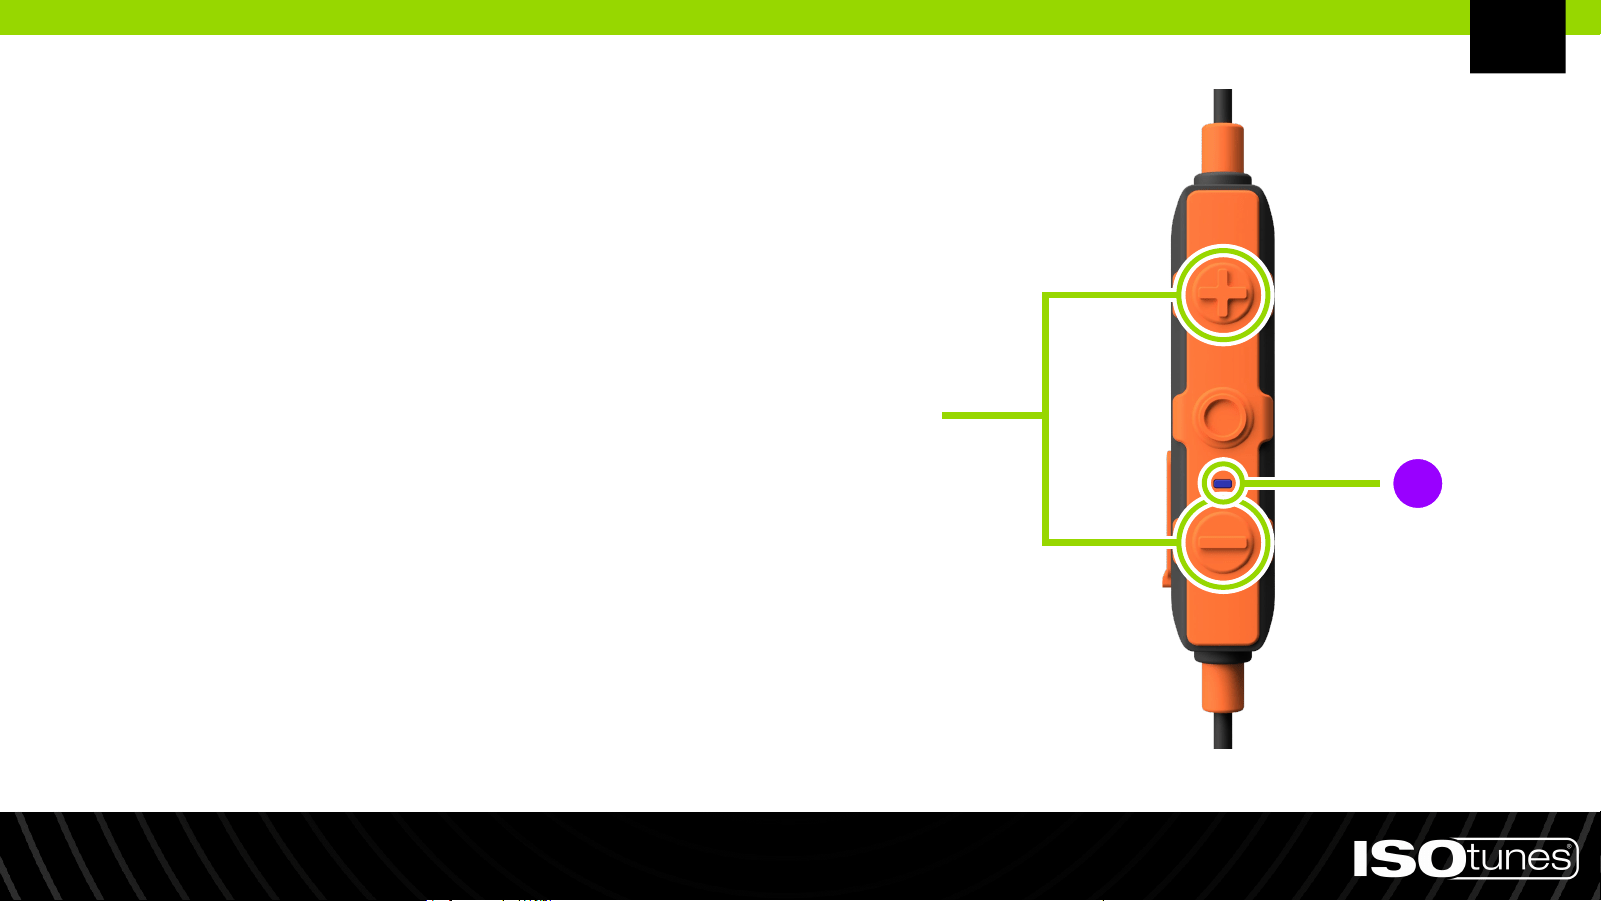
Commandes
MULTI-FUNCTION BUTTON (MFB)
*Volume Haut: Appui 1x
Rappel (en mode veille): Appui 2x
Refuser: Appui, maintenir 2 secs
Volume Bas: Appui 1x
Muet/Son Activé: Appui, maintenir 2 secs
Allumer: Press, maintenir 1 sec
Éteindre Press, maintenir 3 secs
Jouer/Pause: Appui 1x
Piste Suivante: Appui 2x
Piste Précédente: Appui 3x
Répondre: Appui 1x
Commandes Vocales: Press, maintenir 1 sec
PLUS BUTTON (+)
MINUS BUTTON (-)
*Bip indique le volume maximum atteint.
FR

Charger
La tension de charge ne doit pas dépasser 5 V.
PORT DE CHARGEMENT
Batterie Faible: Une fois par seconde
Charge: Pas de clignotant
Chargement Terminé: Pas de
clignotant
FR

Réinitialisation
1. Appuyez et maintenez les boutons
plus (+) et moins (-) en même temps
pendant 5 secondes.
2. Le témoin lumineux LED du produit
clignotera en rose/violet une fois la
réinitialisation d'usine terminée.
3. Suivez les étapes de jumelage Bluetooth
pour réappairer votre appareil.
FR
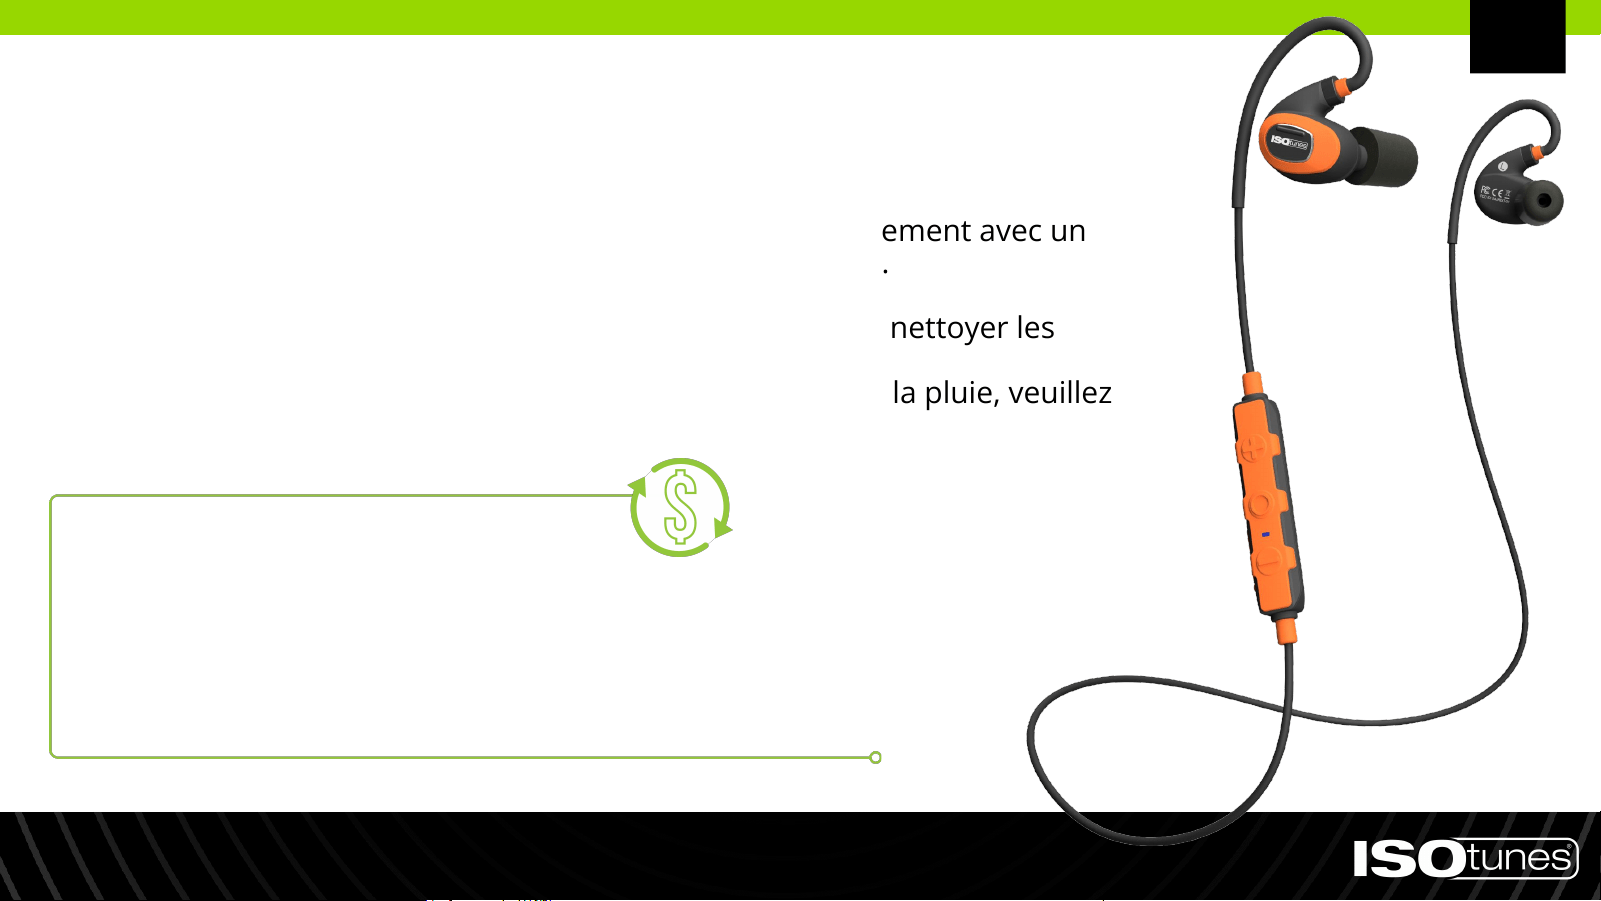
● Nettoyez vos ISOtunes PRO 2.0 en les essuyant doucement avec un
chiffon propre et humide imprégné d'un savon doux.
● Ne plongez pas les écouteurs dans l'eau.
● N'utilisez pas de solvants de nettoyage abrasifs pour nettoyer les
écouteurs.
● Si les écouteurs sont mouillés par la transpiration ou la pluie, veuillez
cesser de les utiliser et les laisser sécher.
Nettoyage et entretien
ABONNEZ-VOUS ET ÉCONOMISEZ
Recevez automatiquement des livraisons de remplacement d'embouts
auriculaires et/ou de coussinets pour les oreilles. Aucun engagement,
aucune obligation, ni frais surprises.
Rendez-vous sur ISOtunes.com/replacements.
FR
Uniquement aux États-Unis.

CONTACTEZ LE SERVICE CLIENT
États-Unis et Canada
+1 (317) 740-0419
Lundi au Vendredi de 9h00 à 17h00, heure de l'Est (EST)
Royaume-Uni et Europe
Besoin d'assistance ?
FR

Italian (IT)

Articoli inclus
1 paio di tappi auricolari in
silicone a triplice flangia
4 paia di tappi auricolari in
schiuma (XS, S, M, L)
Cavo di ricarica
Auricolari
Clip per cavi e clip a
forma di alligatore
Custodia rigida per
il trasporto
IT
Montaggio
1. Ci sono diverse dimensioni di tappi auricolari. Per la migliore protezione uditiva, utilizza il tappo auricolare più grande
che si adatta al tuo orecchio. Il tappo auricolare dovrebbe essere aderente, ma non troppo grande da cadere.
2. Il nucleo del tappo auricolare è filettato, quindi avvita o svita i tappi auricolari dai supporti (Figura 1). Non spingere o
tirare.
3. Posiziona il collare intorno al collo in modo che ogni auricolare riposi sul petto (Figura 2).
4. Arrotola e comprimi delicatamente la punta in schiuma tra le dita (Figura 3). Non schiacciare.
5. Quando sei pronto per inserirlo nell'orecchio, con la mano opposta raggiungi sopra la testa e tira delicatamente la parte
superiore dell'orecchio all'indietro e lontano dalla testa per aprire il condotto uditivo (Figura 4).
6. Mentre tieni l'orecchio aperto, inserisci il tappo auricolare nell'orecchio e spingi il tappo arrotolato all'interno
dell'orecchio il più profondamente possibile in modo confortevole. Tieni il prodotto in posizione per circa 10 secondi,
consentendo alla schiuma di espandersi e sigillare l'orecchio.
7. Fissa il gancio per l'orecchio nella parte posteriore dell'orecchio. Ripeti con l'altro auricolare e orecchio.
8. I tappi auricolari correttamente adattati e fissati ridurranno significativamente il rumore esterno. Per testare, copri le
orecchie con le mani: se c'è un cambiamento percettibile nel suono, il prodotto non è correttamente adattato. Abbiamo
incluso diverse dimensioni di tappi auricolari per garantire una perfetta aderenza ermetica necessaria per la migliore e
più sicura riduzione del rumore (Figura 5).
Figura 1 Figura 2 Figura 3 Figura 4 Figura 5
IT

Accensione: Premi e mantieni premuto il
pulsante multifunzione (MFB) per 1 secondo
Spegnimento: Premi e mantieni premuto il
pulsante multifunzione (MFB) per 3 secondi
Accensione/Spegnimento
Pulsante
Multifunzione
(MFB)
IT

1. La modalità di accoppiamento viene attivata
automaticamente se il PRO 2.0 non è ancora stato
abbinato a un dispositivo o se tutti i dispositivi
precedentemente collegati sono fuori portata.
2. Per entrare manualmente in modalità di
accoppiamento, premi e mantieni premuto il pulsante
MFB per 5 secondi. Il dispositivo lampeggerà
rapidamente con luci indicatrici rosse e blu. Potresti
sentire "Accensione" o "Spegnimento" durante questo
periodo, ma continua a tenere premuto il pulsante
per 5 secondi completi.
3. Apri le impostazioni Bluetooth sul tuo dispositivo.
Cerca "ISOtunes PRO 2.0". Accoppia e connetti.
4. Una volta connesso, sentirai "Bluetooth connesso".
Associazione Bluetooth
IT

1. Effettua l'accoppiamento con il Dispositivo A.
2. Premi e mantieni premuto il pulsante MFB per 5 secondi
per entrare in modalità di accoppiamento per il
Dispositivo B. Ciò si disconnetterà dal Dispositivo A.
Potresti sentire "Accensione" o "Spegnimento" durante
questo periodo, ma continua a tenere premuto il pulsante
per 5 secondi completi.
3. Effettua l'accoppiamento con il Dispositivo B.
4. Entro 1 minuto dall'accoppiamento del Dispositivo B,
ricollega il Dispositivo A a ISOtunes PRO 2.0 tramite il
menu Bluetooth del Dispositivo A.
Se riscontri problemi, consulta le informazioni sull'utente
Bluetooth per il Dispositivo A o B.
Dual Connect
IT

Controlli
MULTI-FUNCTION BUTTON (MFB)
*Alzare Volume: Pressione 1x
Riselezione (modalità standby): Pressione 2x
Rifiutare: Tenere premuto 2 secondos
Basso Volume: Pressione 1x
Dissativa/Attiva Microfono:
Tenere premuto 2 secondos
Accensione: Tenere premuto 1 secondo
Spegnimento: Tenere premuto 3 secondos
Attivazione/Pausa: Pressione 1x
Brano Successivo: Pressione 2x
Brano Precedente: Pressione 3x
Risposta/Fine: Pressione 1x
Comandi Vocali: Tenere premuto 1 secondo
PLUS BUTTON (+)
MINUS BUTTON (-)
*Il bip indica il volume massimo raggiunto.
IT

Caricare
La tensione di ricarica non deve superare i 5 V.
PORTA DI RICARICA
Batteria Scarica: Una volta per secondo
Ricarica: Non lampeggiante
Ricarica Completata:
Non lampeggiante
IT
Ripristino di Fabbrica
1. Premere e tenere premuti
contemporaneamente il pulsante più
(+) e il pulsante meno (-) per 5 secondi.
2. Una volta completato il ripristino alle
impostazioni di fabbrica, la luce
indicatrice LED del prodotto
lampeggerà di colore rosa/viola.
3. Seguendo i passaggi di accoppiamento
Bluetooth, riaccoppia il tuo dispositivo.
IT
● Pulisci i tuoi ISOtunes PRO 2.0 delicatamente strofinandoli
con un panno pulito e umido con sapone delicato.
● Non immergere gli auricolari nell'acqua.
● Non utilizzare solventi abrasivi per pulire gli auricolari.
● Se gli auricolari si bagnano di sudore o pioggia, interrompi
l'uso e lasciali asciugare.
Pulizia e manutenzione
ISCRIVITI E RISPARMIA
Ricevi consegne automatiche di ricambi per le puntine auricolari e/o i cuscinetti
per le orecchie. Nessun impegno, nessun obbligo o costi sorpresa.
Visita ISOtunes.com/replacements.
IT
Esclusivo per gli Stati Uniti.

CONTATTA IL SERVIZIO CLIENTI
USA e Canada
+1 (317) 740-0419
Lun-Ven 9:00-17:00 EST
Regno Unito e Europa
Hai bisogno di supporto?
IT

Svenka (SV)
Ingående föremål
1 par tredubbla
silikonpluggar med fläns
4 par skumpluggar
(XS, S, M, L)
Laddningskabel
Hörlurar
Kabelfästen och
krokodilklämma
Stelt förvaringsfodral
SV
Passform
1. Det finns flera storlekar på öronproppar. För bästa hörselskydd, använd den största öronproppen som passar ditt
öra. Öronproppen bör sitta tätt, men inte vara för stor så att den faller ut.
2. Öronproppens kärna är gängad, skruva därför på eller av öronpropparna från stolparna (Figur 1). Tryck inte eller
dra i dem.
3. Placera nackbandet runt nacken så att varje öronsnäcka vilar på bröstet (Figur 2).
4. Rulla och komprimera försiktigt skumspetsen mellan fingrarna (Figur 3). Kläm inte åt.
5. När du är redo att sätta in dem i örat, sträck med motsatt hand över huvudet och dra försiktigt upp toppen av örat
och bort från huvudet för att öppna hörselgången (Figur 4).
6. Håll örat öppet och sätt in öronproppen i örat och tryck in den rullade öronproppen så djupt som det känns
bekvämt. Håll produkten på plats i cirka 10 sekunder, så att skummet kan expandera och tätas i örat.
7. Säkra öronkroken bakom örat. Upprepa med den andra öronsnäckan och örat.
8. Korrekt anpassade och säkrade öronproppar kommer att minska ljudet från omgivningen avsevärt. För att testa,
koppla händerna över öronen - om det är en märkbar förändring i ljudet, är produkten inte korrekt anpassad. Vi
har inkluderat flera storlekar på öronproppar för att säkerställa en lufttät passform som behövs för bästa och
säkraste ljudreducering (Figur 5).
Figur 1 Figur 2 Figur 3 Figur 4 Figur 5
SV
Slå på: Håll ned multifunktionsknappen
(MFB) i 1 sekund.
Stäng av: Håll ned multifunktionsknappen
(MFB) i 3 sekunder.
Ström På/Av
Multifunktionsknappen
(MFB)
SV

1. Parningsläget aktiveras automatiskt om PRO 2.0
ännu inte har blivit pareat med en enhet eller om
alla tidigare anslutna enheter är utanför räckvidd.
2. För att manuellt aktivera parningsläget, tryck och
håll ned MFB-knappen i 5 sekunder. Enheten
kommer snabbt att blinka med röda och blå
indikatorlampor. Du kan höra "Power On" eller
"Power Off" under denna tid, men fortsätt hålla
ned knappen i hela 5 sekunder.
3. Öppna Bluetooth-inställningarna på din enhet. Sök
efter "ISOtunes PRO 2.0". Parea och anslut.
4. Du kommer höra "Bluetooth ansluten" när
anslutningen har upprättats.
Parkoppling Bluetooth
SV

1. Parea med enhet A.
2. Håll ned MFB-knappen i 5 sekunder för att aktivera
parningsläget för enhet B. Detta kommer att bryta
anslutningen till enhet A. Du kan höra "Power On" eller
"Power Off" under denna tid, men fortsätt hålla ned
knappen i hela 5 sekunder.
3. Parea med enhet B.
4. Inom 1 minut efter att ha paret enhet B, återanslut enhet
A till ISOtunes PRO 2.0 via enhet A:s Bluetooth-menyn.
Om du upplever några problem, vänligen hänvisa till
Bluetooth-användarinformationen för enhet A eller B.
Dual Connect
SV
Användarkontroller
MULTI-FUNCTION BUTTON (MFB)
*Volym Höj: Kort tryck
Återuppringing (i vänteläge): Dubbeltryck
Avvisa: Långt tryck 2 sekunder
Volum Sänk: Kort tryck
Ljud Av/På: Långt tryck 2 sekunder
Ström På: Långt tryck 1 sekunder
Ström Av: Långt tryck 3 sekunder
Spela/Pausa: Kort tryck
Nästa Spår: Dubbeltryck
Föregående Spår: Trippeltryck
Svara/Avsluta: Kort tryck
Röstkommandon: Lång tryck 1 sekunder
PLUS BUTTON (+)
MINUS BUTTON (-)
*Pipet indikerar maximal volym uppnådd.
SV
Laddning
Laddningsspänningen får inte överstiga 5 V.
LADDNINGSPORT
Låg Batterinivå: En gång per sekund
Laddning: Inget blinkande
Laddning Färdig: Inget blinkande
SV
Fabriksåterställning
1. Håll ned både plusknappen (+) och
minusknappen (-) i 5 sekunder.
2. Produktens LED-indikator kommer
att blinka rosa/lila när
fabriksåterställningen är klar.
3. Använd Bluetooth-kopplingsstegen
för att para om din enhet.
SV
● Rengör dina ISOtunes PRO 2.0 genom att försiktigt torka dem
med en ren, fuktig trasa och milt tvåljummet vatten.
● Doppa inte hörlurarna i vatten.
● Använd inte starka rengöringsmedel eller lösningsmedel för att
rengöra hörlurarna.
● Om hörlurarna blir blöta av svett eller regn, sluta använda dem
och låt dem torka.
Rengöring och underhåll
PRENUMERERA OCH SPARA
Få automatiska leveranser av ersättningsöronproppar och/eller
öronkuddar. Inga åtaganden, skyldigheter eller oväntade avgifter.
Besök ISOtunes.com/replacements
SV
Endast tillgängligt i USA.

KONTAKTA KUNDTJÄNSTEN
USA & Kanada
+1 (317) 740-0419
Mån-fre 9:00-17:00 EST
Storbritannien & Europa
Behöver du support?
SV