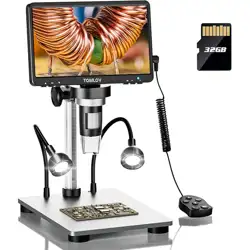
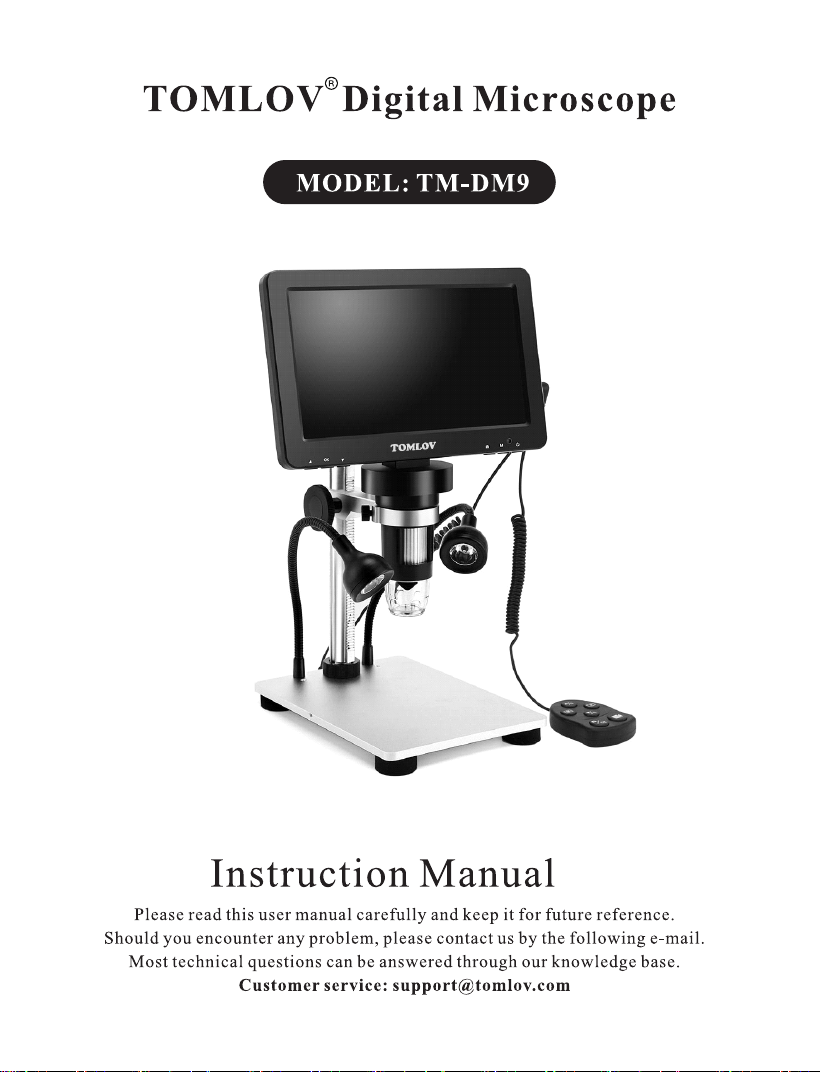
TOMLOVR Digital Microscope
MODEL: TM-DM9
TOMLOV
Instruction Manual
Please read this user manual carefully and keep it for future reference.
Should you encounter any problem, please contact us by the following e-mail.
Most technical questions can be answered through our knowledge base.

Contents
1
Read Me First -
Installation -
2
Button Description -
3
Light Barrier -
5
Quick Start
5
Adjust The Magnification And Focus -
6
6
Save Images/ Videos With Micro SD Card--
Switch Different Modes
6
Capture Pictures 7
Record Videos
7
8
Menu Under Photo Mode -
Menu Under Video Mode -
8
Set Up
8
Works With Windows -
9
Works With Mac/iMac----------------------------------------------------------• 9
Specifications 10
FAQ
11

Read Me First
1. TOMLOV TM-DM9 Digital Microscope utilizes 18650 rechargeable lithium
battery. It takes 1-2 hours to charge with 5V 2A adapter. Battery on the back
of the monitor is replaceable.
2. The product contains tiny parts and is inedible, please avoid accidental
ingestion by children. Also, this product is not intended for cell and
medical use.
3. The images and videos will be saved on the micro SD card by default. With the
microscope connected to a P C, the files will be saved on the computer hard
drive.
4. The wired remote and buttons on the microscope are unavailable under
PC-Microscope mode, you can save pictures and videos by your PC.
5. TOMLOV offers one year manufacture warranty and life-long technical
support for TM-DM9 digital microscope. Please feel free to get in touch with
us if you need any help about the unit. It is recommended to attach microscope
photos or videos showing the problems in the e-mail/message for quick
solutions. TOMLOV customer service usually responds in 12 hours on
working days.
Facebook: @Tomlov Microscope
WhatsApp: +86 18123716479
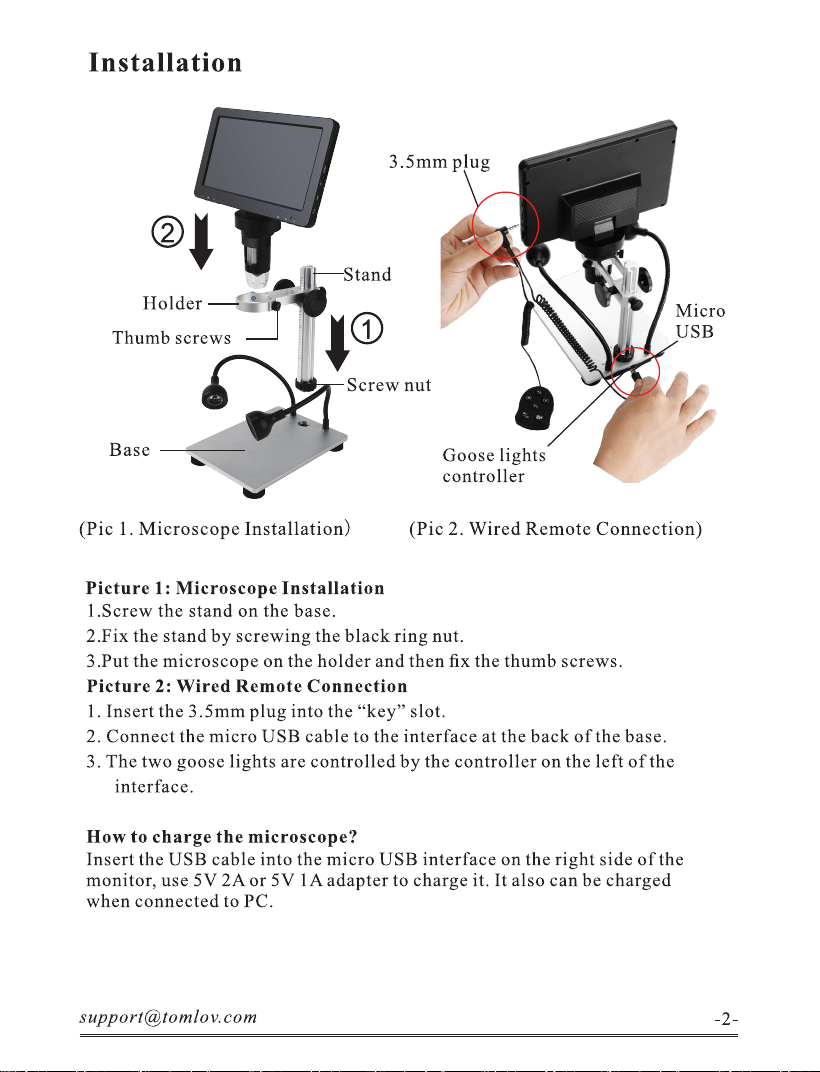
Installation
Holder I
Thumb screws
Base
3.5mm plug
[lit—stand
Screw nut
Goose lights
controller
Micro
USB
(Pic l. Microscope Installation)
(Pic 2. Wired Remote Connection)
Picture 1: Microscope Installation
I.Screw the stand on the base.
2.Fix the stand by screwing the black ring nut.
3 .Put the microscope on the holder and then fix the thumb screws.
Picture 2: Wired Remote Connection
1. Insert the 3.5mm plug into the "key" slot.
2. Connect the micro USB cable to the interface at the back of the base.
3. The two goose lights are controlled by the controller on the left of the
interface.
How to charge the microscope?
Insert the USB cable into the micro USB interface on the right side of the
monitor, use 5V 2A or 5V IA adapter to charge it. It also can be charged
when connected to PC.
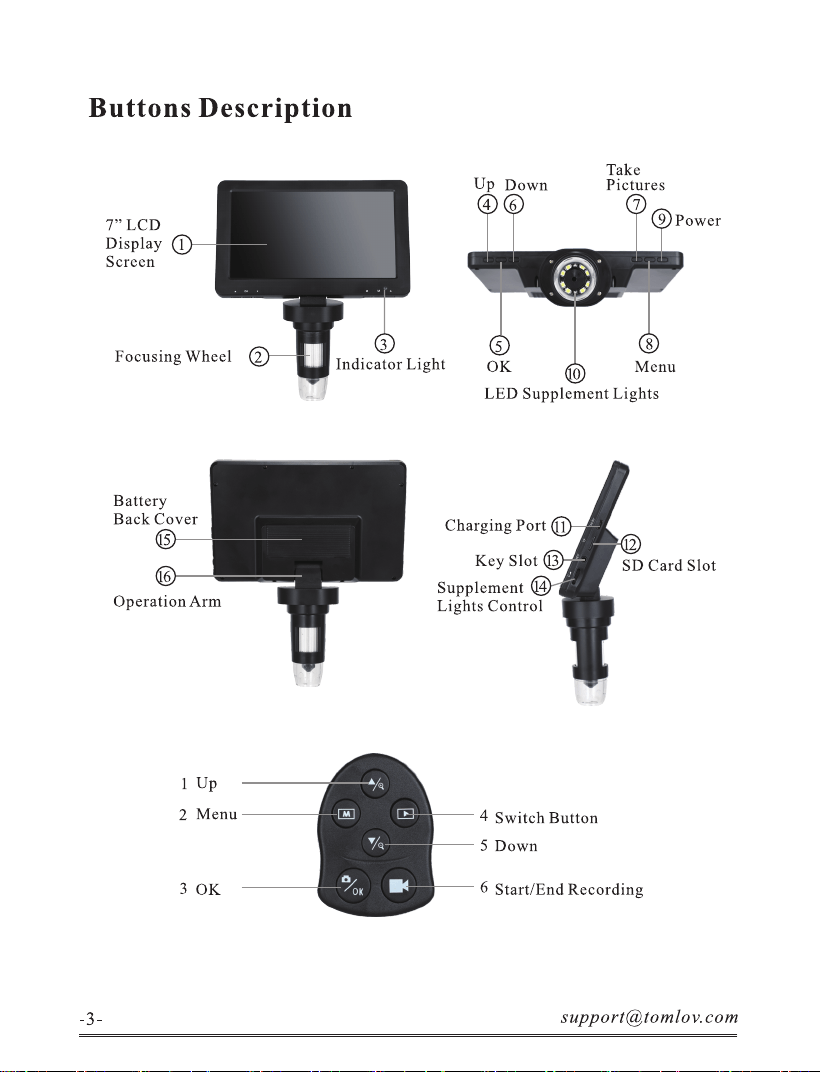
Buttons Description
Up
4
Down
6
7" LCD
Display (T)
Screen
Focusing Wheel
Battery
Back Cover
6
Operation Arm
1 Up
2 Menu
3 0K
3
Indicator Light
0K
Take
Pictures
7
9 Power
8
Menu
0
LED Supplement Lights
ChargingPortO—
KeySlotO-
Supplement
Lights Control
SD Card Slot
4 Switch Button
5 Down
6 Start/ End Recording
Microscope Buttons
0 7 Inch LCD Display
@ Focusing Wheel: Rotate the wheel to zoom in and out and focus.
@ Indicator Light: Charging(Red) Full Charged(Green) Device Working
(Blue Light Flashing)
@ Up: Move your selection.
0 0K Button: Confirm the selection.
@ Down: Move your selection.
O Take Pictures
@ Menu: Enter/Exit the menu. Press "Menu" for 3 seconds to switch modes
between photo taking, recording and replay.
@ Power: Press it for 3 seconds to turn on/offthe device.
@ LED Supplement Lights
O Micro USB port: Charge the scope with 5V 2A adapter. Connect it to computer
for PC view.
@ SD Card Slot: Supports 8GB - 32GB memory 0).
@ Key Slot: Insert the 3.5mm plug to use wired remote.
@ Supplement Lights Control: Rotate to adjust the LED supplement lights.
Battery Cover: Can be opened to replace the battery or restart the microscope.
Wired Remote Buttons
l. Up: Move your selection.
2. Menu: Enter/Exit the menu. Press "Menu" for 3 seconds to switch
modes between photo taking, recording and replay.
3. 0K Button: Confirm the selection. Take pictures.
4. Switch Button: Switch the modes between photo taking and video recording.
5. Down: Move your selection.
6. Start/ End recording video: Videos will be automatically saved.

Light Barrier
The main function of this light barrier is to reduce the reflection light when
doing micro soldering.
Take off the transparent lens protector and screw the light barrier on the
lens.
Quick Start
1. Install the microscope.(See Pic 1.)
2. Press the power button till the display lights up.
3. Raise or lower the holder, put the object on the base then rotate the focusing
wheel till the display shows clear view.
4. Press "0K" button to take pictures under photo mode or record videos
under video mode. Photos and videos will be saved on the micro SD card.
5. Hook up the microscope to your PC via the USB cable for larger view.
Run "Windows Camera" on Windows computer or "Photo Booth" on
iMac/MacBook. Images and videos will be save on your computer hard drive.
6. Connect the wired remote(See Pic 2.) to take pictures and control the menu
without touching the microscope panel.
7. The two extra goose lights can be adjusted by the wheel on the back of the base
after the wired remote connected to the scope.
Adjust The Magnification And Focus
ORotate the knobs on the holder to raise or lower the microscope to a desired
height. The lower the height, the greater the magnification will be. But be careful
not to let the the lens bottom contact the object.
@Gently rotate the focus controller to obtain a clear view of the object.
ORaise the holder to the top. Scroll the focus wheel till you see the most clear
view on the screen. The view you see now is close to 50X magnification. Lower
the holder to the middle of the stand. Scroll the focus wheel till you see the most
clear view on the screen. The view you see now is close to 1200X magnification.
Save Images/ Videos With Micro SD Card
By using a Micro SD card, you can save images and videos to review later. Insert
the Micro SD card into the SD card slot on the right side of the screen. (Be careful
with the direction. The side which has metal exposed should face down.) Push it
in till you hear a "click". (If you don't push it in far enough, it will be ejected.)
Switch Different Modes
The Menu button(number @ from the picture "Buttons", marked with letter"M")
can be used to cycle between three modes: Photo mode( ), video standby and
P).
playback (
In photo mode, the display shows 'time' on the lower left corner & '8M'
(white color font)on the top right corner. The 'time' can be reset.
In video standby mode, the display shows 'time' on the lower left corner & '720P'
(white color font)on the top right corner. The '720P' means the current video
resolution is 720P in this mode.
In playback mode, you can check the images and videos saved on the SD card.
This function is unavailable with no SD card inserted in the microscope.
TOMLOV
TOMLOV
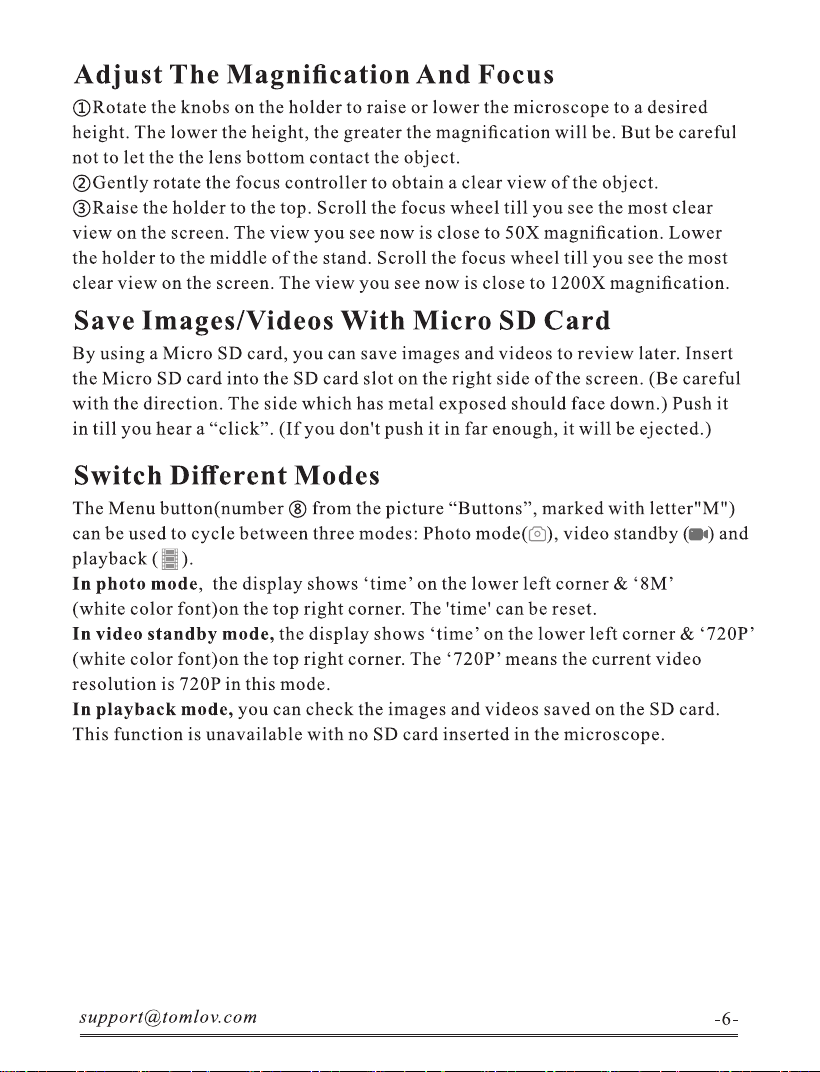
Capture Pictures
Under photo mode( ),Press the
"0K" button to snap image.
Images will be saved in the SD
card and you can check it under
playback mode.
Record Videos
Press the "M" button to switch
the mode. Under the video mode
), press "0K" button to start
recording. To stop recording,
briefly press "0K" again.
Videos will be saved in the SD
card and you can check it under
playback mode.

Menu Under Photo Mode
Long press "M" button to switch into photo mode, brief press
"M" button to enter the menu.
Resolution: Image quality. 3MB, 5MB, 8MB, IOMB and 12MB are available
Burst Shooting: Press "0K" to turn on/off the burst shooting.
Image Quality: High quality, standard and economic quality are available.
Better quality image will take more storage space.
Sharpness: Press "0K" to choose intensive, standard or soft mode.
ISO: Press "0K" to choose auto, 100 or 200.
Exposure Compensation: Press "0K" to choose.
Data Tag: Press "0K" to turn on/off the time watermark.
Menu Under Video Mode
Long press "M" button to switch into video mode, brief press
"M" button to enter the menu.
Resolution: Press "0K" to choose the video quality, 1080FHD,
1080P or 720P.
Exposure Compensation: Press "0K" to choose then exit.
Data Tag: Press "0K" to turn on/off the time watermark.
Set Up
Press "M" button to enter the menu, press again to enter "set up"
Date/ Time: Set a date or time.
Auto Off: Select the time to automatically turn off the device.
Screen Protection: Select the time to protect the screen in spare time.
Language Settings: Select different languages for display.
Light Source Frequency: 50Hz or 60Hz available to choose.
Line-assist: Display and hide the "cross" line in the photo and video.
Format: Format the memory.
Default Setting: All settings will be changed to default ones.
Version: View the current software version.
Works With Windows
Run "Windows Camera"
@ Installation Steps(Take Windows 10 for example)
Make sure your PC installed "Windows Camera". If doesn't, get it in
Windows/Microsoft Store or search it on Google.
@ Connect the digital microscope to the PC with the USB cable.
@ The microscope shows "Mass Storage", "PC Camera" and Charging
mode", choose "PC Camera" and confirm.
@ Start "Windows Camera" and your PC detects the microscope and s
hows the real time display. If doesn't, an error occurs. Unplug and plug
the USB cable again.
Works With Mac/iMac
Run "Photo Booth"
@ Make sure your MacBook has "Photo Booth". If doesn 't, please install
it from App Store.
@Connect the digital microscope to the computer with the USB cable
(You may need an USB hub).
OThe microscope shows "Mass Storage", "PC Camera" and Charging
mode", choose "PC Camera" and confirm.
@Start "Photo Booth"(Finder > Application > Photo Booth) and choose
"GENERAL - UVC on the menu bar.
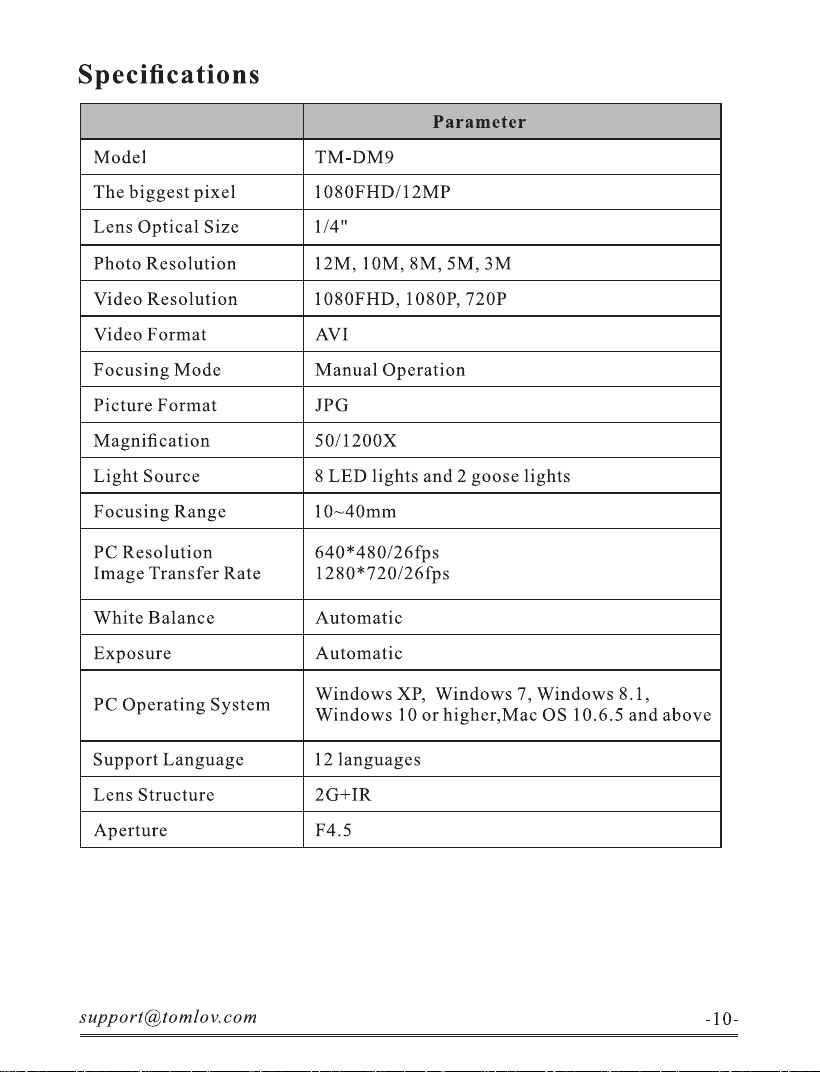
Specifications
Model
The biggest pixel
Lens Optical Size
Photo Resolution
Video Resolution
Video Format
Focusing Mode
Picture Format
Magnification
Light Source
Focusing Range
PC Resolution
Image Transfer Rate
White Balance
Exposure
PC Operating System
Support Language
Lens Structure
Aperture
Parameter
TM-DM9
1080FHD/12MP
1/4"
12M, 10M, 8M, 5M, 3M
1080FHD, 1080P, 720P
AVI
Manual Operation
JPG
50/1200X
8 LED lights and 2 goose lights
10—40mm
640 * 4 8 s
1280*720/26fps
Automatic
Automatic
Windows XP, Windows 7, Windows 8.1,
Windows 10 or higher,Mac OS 10.6.5 and above
12 languages
2G+1R
F4.5
-10-
FAQ
1. Why can't I get clear pictures?
Make sure that the LED lights work properly. Adjust the light to illuminate the
object, adjust the object distance by using the knob on the holder, and then rotate
the focus controller. If you still cannot obtain a clear image, gently wipe the lens
with a clean, dry cotton cloth or paper towel to ensure that the lens is clean.
2. What is the USB slot on the base of the unit?
The slot is to hold the USB drive.
3. Does other micro USB charger work with the microscope?
Yes, other micro USB cable works with the scope, too. However, if you need to
connect it with computer, it must be micro USB 3.0 cable.
4. Does it support and SD card larger than 32GB?
No, it supports 32GB at most.
5. Can you run this microscope off USB power if the battery is dead?
Yes, this microscope works normally without battery if plugged. And all batteries
have certain life. This microscope uses replaceable 18650 lithium battery, which
has more than 4 years life.
This user's manual has been subjected to thorough reviews and verification to
ensure accuracy of its content and contains information that's pertinent to the
model and series it describes at the time of publication. However, content of
this manual and/or product specifications are sub-ject to change without prior
notice and with no direct or indirect liability on TOMLOV Electronics ' part
concerning such change. Copyright and registered trademark TOMLOV,
Tomlov are registered trademarks.
www.tomlov.com
@Tomlov Microscope
WhatsApp: +86 18123716479
Monday Friday
9:00AM CST - 6:00PM CST
