Copyright @ 2025-2026 Micro Computer (HK) Tech Limited.
English / 简体中文 / 繁体中文 / Deutsch / 日本語 / español /
Italiano / Français / Język polski / Nederlands

1
Note:--- This message contains additional instructions for this item.
说明:--- 本信息包含对此项目的额外说明。
說明:--- 本資訊包含對此項目的額外說明。
Hinweise:--- Dies gibt weitere Information zu diesem Punkt.
説明:--- この情報には、このプロジェクトに関する追加の説明が含まれています。
Nota: --- Esta información contiene instrucciones adicionales para este producto.
Nota: --- Queste informazioni contengono istruzioni aggiuntive per questo articolo.
Description : --- Ces informations contiennent des notes supplémentaires sur cet élément.
Opis: --- Ta informacja zawiera dodatkowe wyjaśnienia dotyczące tego projektu.
Opmerking: --- Deze informatie bevat aanvullende beschrijving over dit item.
Important!--- This information contains information instructions that must be followed.
重要!--- 本信息包含必须遵守的信息说明。
重要!--- 本資訊包含必須遵守的資訊說明。
Wichtig! --- Diese enthält Hinweise, die unbedingt zu beachten sind.
重要!この情報には、遵守するべき情報の説明が含まれています。
¡Importante! --- Este mensaje contiene información vital que deberá seguir para completar
una tarea.
Importante! --- Queste informazioni contengono note informative che devono essere seguite.
Important! --- Ces informations contiennent des notes d’information qui doivent être suivies.
Ważne! --- Ta informacja zawiera informacje, które należy przestrzegać.
Belangrijk! --- Deze informatie bevat noodzakelijke nalevingsbeschrijving.
Warning!--- This message contains information about user safety and product safety.
警告!--- 本信息包含维护使用者安全以及产品安全相关信息说明。
警告!--- 本資訊包含維護使用者安全以及產品安全相關資訊說明。
Warnung! --- Diese enthält Informationen und Anweisungen zur Aufrechterhaltung der
Benutzersicherheit sowie zur Produktsicherheit.
警告!--- この情報には、ユーザーの安全の維持および製品の安全に関する情報の説明が含まれ
ています。
¡Advertencia! --- Este mensaje contiene información importante que deberá seguir para su
seguridad mientras realiza ciertas tareas, y para evitar daños a los datos y componentes de su
equipo portátil.
Attenzione! --- Queste informazioni contengono istruzioni per garantire la sicurezza
dell'utente e del prodotto.
Avertissement! --- Ces informations contiennent des instructions pour maintenir la sécurité des
utilisateurs et des produits.
Ostrzeżenie! --- Ta informacja zawiera informacje związane z bezpieczeństwem użytkownika i
produktu.
Waarschuwing! --- Deze informatie bevat veiligheidsbeschrijving voor de gebruiker en het
product.
Conventions Used In This Manual / 指示说明
1

Aufpassn:
* Das Netzteil und anderes im Lieferumfang enthaltenes Zubehör variieren je nach Modell-
parameter oder Kaufregion.
Descrizione:
* L'adattatore di alimentazione incluso e altri accessori variano a seconda dei parametri del
modello e della regione di acquisto.
REMARQUE:
* Les adaptateurs et autres accessoires inclus dans la boîte peuvent varier selon le modèle
ou la région d'achat.
Uwaga:
* Zasilacz i inne akcesoria dostarczone w opakowaniu mogą się różnić w zależności od
modelu lub regionu zakupu.
Let op:
* De meegeleverde netadapter en andere accessoires kunnen variëren afhankelijk van het
model of het aankoopgebied.
NOTE:
* The power adapter and other accessories included in the box will vary depending on the
model parameter or area purchased. Here you need to change it to this.
注意:
* 包裝盒內隨附的變壓器及其他配件會因型號參數或購買地區而異。
注意:
* 包装盒内随附的电源适配器及其他配件会因型号参数或购买地区而异。
知らせ:
* 同梱されている電源アダプターやその他の付属品は、モデルのパラメーターや購入地域によ
って異なります。
Aviso:
* El adaptador de corriente incluido y otros accesorios variarán según los parámetros del
modelo y la región de compra.
2
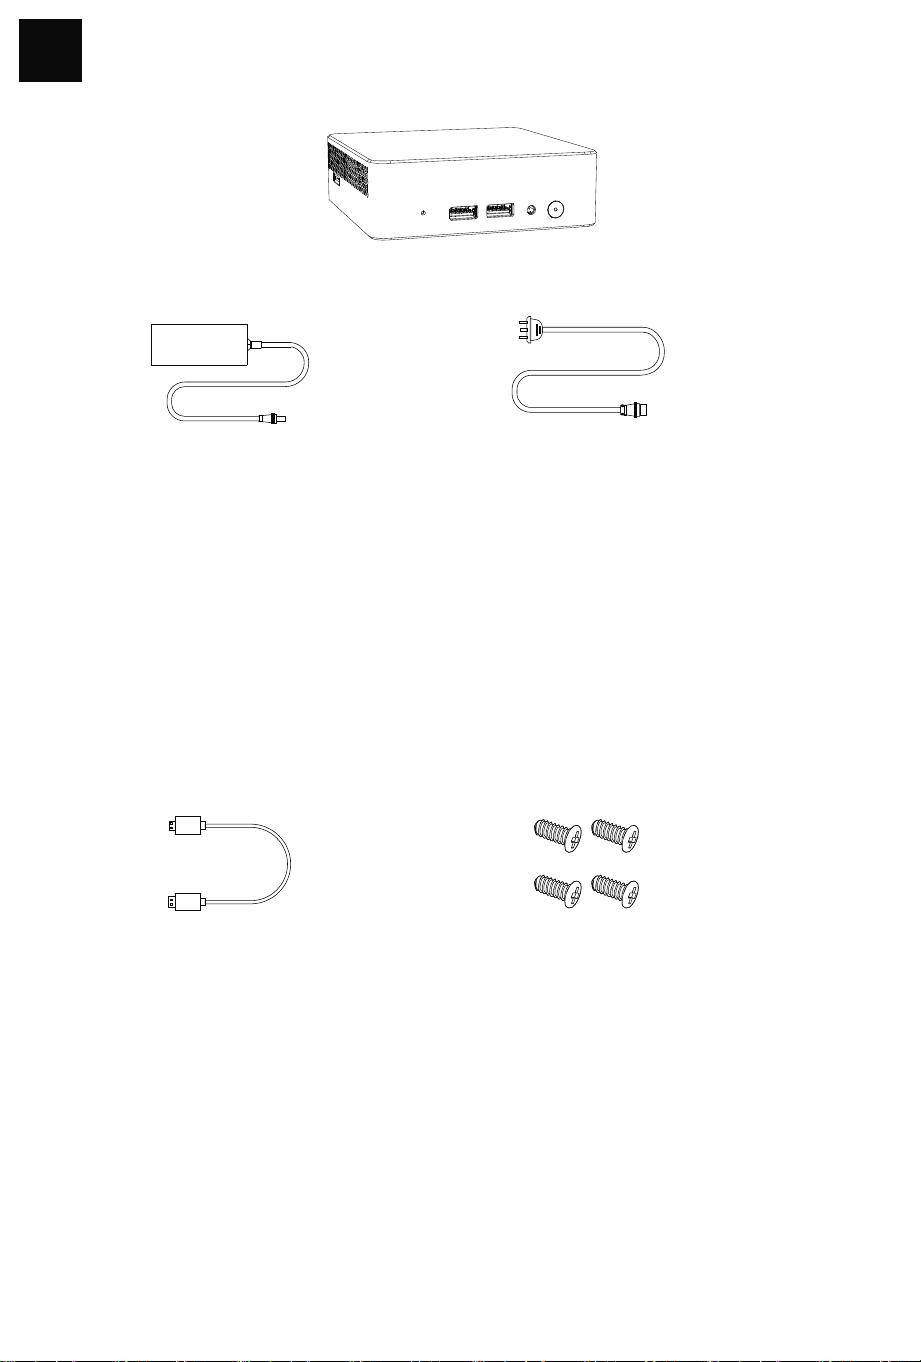
Package Contents / 包装内容
2
Mini PC
3
Power Cord*/
电源线*/
電源線*/
Stromkabel*/
電源コード*/
Cable De Alimentación*/
Cavo Di Alimentazione*/
Cordon D’alimentation*/
Kabel zasilający*/
Netsnoer*/
Ac Power Adapter*/
电源适配器*/
Netzadapter*/
變壓器*/
電源アダプタ*/
Adaptador De Alimentación*/
Adattatore Di Alimentazione*/
Adaptateur Secteur*/
Zasilacz*/
Netadapter */
HDMI® Cable*/
HDMI® 线*/
HDMI®-Kabel*/
HDMI®ケーブル*/
Cable HDMI®*/
Cavo HDMI®*/
Câble HDMI®*/
HDMI® 線*/
HDMI® kabel*/
HDMI®-kabel*/
Mounting Screw Set*/
安装螺丝组*/
安裝螺絲組*/
Befestigungsschraubensatz*/
Juego de tornillos de montaje*/
Set di viti di montaggio*/
Jeu de vis de montage*/
zestaw montażowych*/
het opzetten van schroevenreeks*/
取付ねじセット*/

4
Mini PC Suspension Stand*/
Mini PC 挂架*/
Mini PC 掛架*/
Mini-PC-Aufhängeständer*/
ミニPCサスペンションスタンド*/
Soporte de suspensión para
Mini PC*/
Supporto di sospensione per
Mini PC*/
Support de suspension Mini PC*/
Support de suspension Mini PC*/
Stojak do zawieszania Mini PC*/
Mini PC-ophangstandaard*/
User Manual*/
用户手册*/
使用者手冊*/
Manual De Usuario*/
Die Bedienungsanleitung*/
取扱説明書*/
Manuale D'uso*/
Manuel Utilisateur*/
Instrukcja obsługi*/
Gebruikershandleiding*/
5
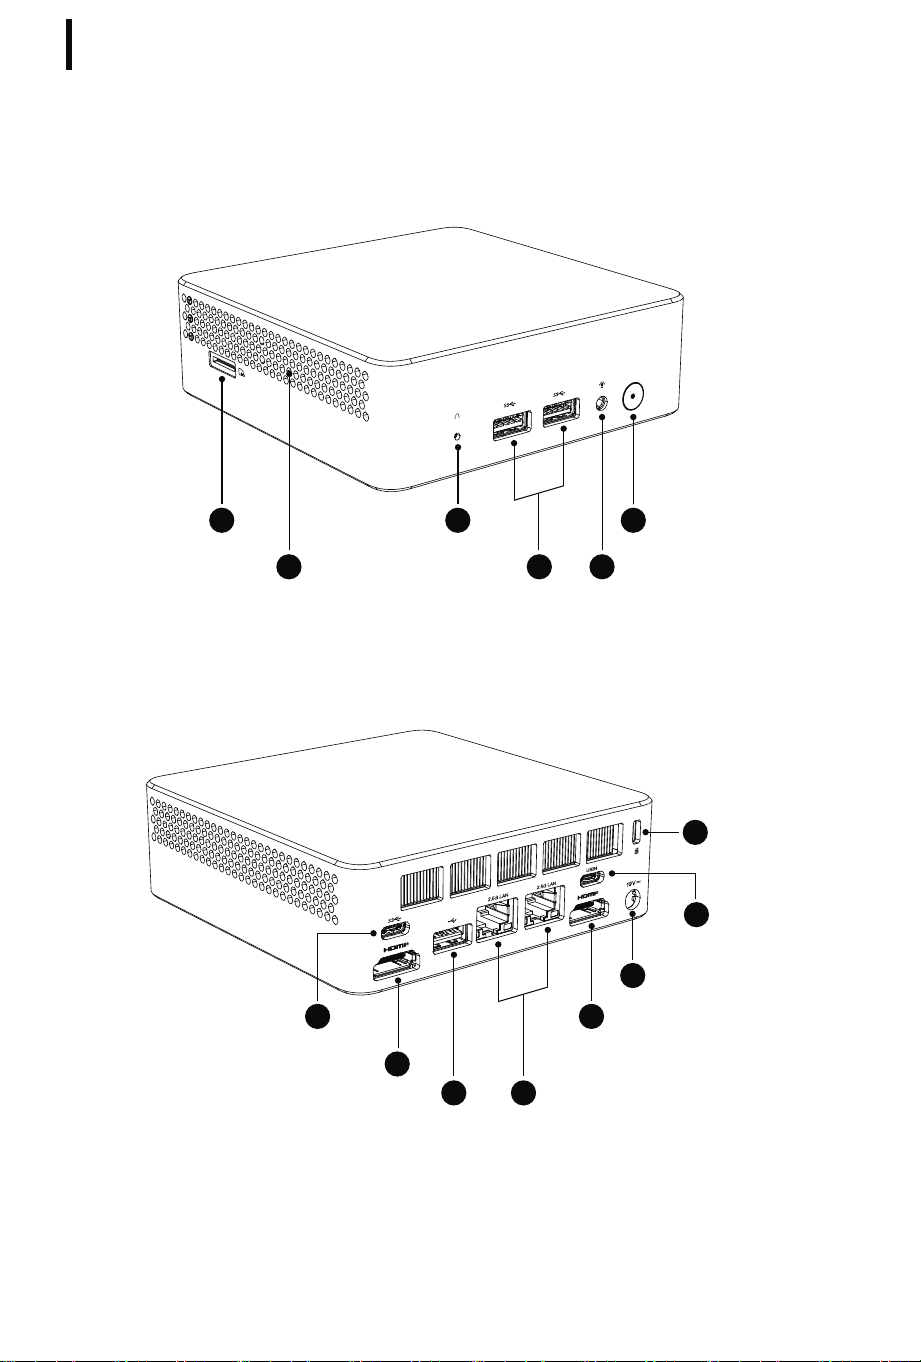
Getting To Know Your Mini PC/了解您的迷你电脑
03
USB3.2 Gen2 Port
02
3.5mm Combo Jack
04Reset Hole
01
Power Button06SD Card Slot
07
TYPE-C Interface
RJ-45 LAN Port
HDMI® Port
08
HDMI® Port
08
Power Input11
05
Air Vent
12
USB4 Port
13
Kensington Lock
09
USB2.0 Port
10

3.5mm Combo Jack
This connector is used to connect audio output signals to a power amplifier or headphones. You can
also use it to connect an external microphone or output signals from audio equipment.
3.5mm 耳机/耳麦复合接口
这个接头用来连接音频输出信号至功率放大器或耳机。
您也可以用来连接外接麦克风或从音频设备输出信号。
3.5mm 耳機/咪複合接口
這個接頭用來連接音頻輸出訊號至功率放大器或耳機。
您也可以用來連接外接咪或從音頻裝置輸出訊號。
3,5-mm-Kombibuchse
Diese Schnittstelle dient zum Anschluss von Audio-Ausgangssignalen an einen Leistungsverstärker
oder Kopfhörer. Sie können ihn auch zum Anschluss eines externen Mikrofons oder von Ausgangssig-
nalen von anderen Audiogeräten verwenden.
02
6
01
Interfaces/接口介绍
The power button allows you to turn the Mini PC on /off. You can press the power button to put your
Mini PC to sleep mode or press it for 10 seconds to force shutdown your Mini PC.
Power Button
按下此开关以开启/关闭Mini PC;在开启Mini PC的状态下,按下此开关以进入省电模式,长按10秒可强制关
闭Mini PC。
电源开关
按下此開關以開啟 / 關閉 Mini PC ; 在開啟 Mini PC 的狀態下, 按下此開關以進入省電模式, 長按 10 秒可強
制關閉 Mini PC。
電源開關
Durch Drücken dieses Schalters wird der Mini-PC ein- bzw. ausgeschaltet. Bei eingeschaltetem Mini-PC
wird durch Drücken dieses Schalters der Stromspar-Modus aktiviert und durch 10 Sekunden langes
Drücken wird der Mini-PC zwangsweise ausgeschaltet.
Netzschalter
このスイッチを押すと、Mini PCのオン/オフを切り替え、Mini PCをオンにした状態でこのスイッチを
押すと省電力モードになり、10秒間長押しすると強制的にMini PCがオフになります。
電源スイッチ
El botón de alimentación permite encender o apagar su Mini PC; con el Mini PC encendido, puede
utilizar el botón de alimentación para activar el modo ahorro de energía o presionarlo durante diez
segundos para forzar el apagado de su Mini PC.
Botón De Alimentación
Premere questo interruttore per accendere/spegnere il Mini PC; con il Mini PC acceso, premere questo
interruttore per entrare in modalità di risparmio energetico e tenere premuto per 10 secondi per forzare
lo spegnimento del Mini PC.
Interruttore Di Alimentazione
Appuyez sur ce bouton pour allumer / éteindre le Mini PC; Lorsque le Mini PC est allumé, appuyez sur ce
interrupteur pour passer en mode d’économie d’énergie, puis maintenez enfoncé pendant 10
secondes pour forcer le Mini PC à s’éteindre.
Interrupteur D’alimentation
Przycisk zasilania umożliwia włączenie/wyłączenie Mini PC. Możesz nacisnąć przycisk zasilania, aby
przełączyć Mini PC w tryb uśpienia, lub nacisnąć go na 10 sekund, aby wymusić wyłączenie Mini PC.
Przycisk zasilania
Met de aan/uit-knop kunt u de Mini-PC aan-/uitzetten. U kunt op de aan/uit-knop drukken om uw
Mini-PC in de slaapstand te zetten of deze 10 seconden ingedrukt houden om het afsluiten van uw
Mini-PC geforceerd uit te voeren.
Aanknop

3.5mmコンボジャック
オーディオ出力信号をパワーアンプまたはヘッドフォンに接続するために使用されます。
また、外部マイクを接続したり、オーディオ機器からの信号を出力するために使用することもできます。
Este conector se utiliza para conectar señales de salida de audio a un amplificador de potencia o
auriculares. También puede usarlo para conectar un micrófono externo o producir señales de equipos
de audio.
Conector combinado de 3,5 mm
Questo connettore viene usato per collegare il segnale di uscita audio a un amplificatore di potenza o agli
auricolari.Puoi usarlo per collegare un microfono esterno o trasmettere segnali da apparecchiature audio.
Jack combinato da 3,5 mm
Ce port peut émettre du son en connectant un casque ou un amplificateur de puissance. Vous pouvez
également l'utiliser pour connecter un microphone externe ou un équipement audio pour émettre des
signaux.
Prise combinée 3,5mm
To gniazdo służy do podłączania sygnału wyjściowego audio do wzmacniacza mocy lub słuchawek.
Można również podłączyć zewnętrzny mikrofon lub wyjść sygnał audio z urządzenia audio.
Złącze słuchawkowe/mikrofonowe 3,5mm
Deze poort wordt gebruikt om audiouitvoersignalen naar een versterker of hoofdtelefoon te sturen. U
kunt ook een externe microfoon aansluiten of audiosignalen van een audiodevice uitvoeren.
Gecombineerde poort van 3,5 mm voor koptelefoon/microfoon
7
USB3.2 Gen2 インターフェイス
USB3.2 Gen2(Universal Serial Bus)インターフェイスで最大10.0 Gbpsの転送が可能キーボード、
ポインティングデバイス、ビデオカメラ、ハードディスク、プリンタ、スキャナーなどが接続可能などで
す。
Puerto USB3.2 Gen 2
Este puerto USB3.2 Gen2 (Universal Serial Bus) ofrece una velocidad de transferencia de hasta 10.0
Gbps y puede utilizarse para conectar teclados, dispositivos apuntadores, cámaras, discos duros,
impresoras y escáneres.
Interfaccia USB3.2 Gen2
L'interfaccia USB3.2 Gen2 (Universal Serial Bus) è in grado di trasferire velocità fino a 10,0 Gbps e può
essere collegata a tastiere, dispositivi di puntamento, fotocamere, dischi rigidi, stampanti e scanner, ecc.
Interface USB3.2 Gen2
USB3.2 Gen2 (Universal Serial Bus) vitesse de transfert jusqu’à 10,0 Gbps peut être connecté à des
claviers, des périphériques de pointage, des appareils photo, des disques durs, des imprimantes, des
scanners, etc.
03
USB3.2 Gen2 Port
USB3.2 Gen2 (Universal Serial Bus) port provides a transfer rate of up to 10 Gbit/s.It can be connected
to keyboards, pointing devices, cameras, hard disks, printers and scanners.
USB3.2 Gen2 接口
USB3.2 Gen2 (Universal Serial Bus) 接口传输速度最高可达 10.0 Gbps 可连接键盘﹑指向设备﹑摄像机﹑硬盘﹑
打印机以及扫描机等。
USB3.2 Gen2 接口
USB3.2 Gen2 (Universal Serial Bus) 接口傳輸速度最高可達 10.0 Gbps 可連接鍵盤﹑指向裝置﹑攝像機﹑硬碟﹑
打印機以及掃描機等。
USB3.2 Gen2 Schnittstelle
USB3.2 Gen2-Schnittstelle (Universal Serial Bus) mit einer Übertragungsgeschwindigkeit von bis zu 10,0
Gbit/s ist für den Anschluss von Tastaturen, Zeigegeräten, Kameras, Festplatten, Druckern und
Scannern geeignet.

04
Reset Hole
Please remove the power, press and hold the reset hole for ten seconds, the BIOS will restore to the
factory defaults.
Important! If you encounter some problems during use, you can first try to solve it by pressing the reset
hole.
复位孔
请移除电源,按住复位孔十秒钟,BIOS将恢复为出厂默认值。
重要!若使用过程中遇到某些问题,可以先尝试通过按住复位孔解决。
複位孔
請移除電源,按住複位孔十秒鐘,BIOS將恢復為出廠預設值。
重要!若使用過程中遇到某些問題,可以先嘗試透過按住複位孔解決。
Loch zurücksetzen
Bitte trennen Sie die Stromversorgung, halten Sie das Reset-Loch zehn Sekunden lang gedrückt, das
BIOS wird auf die Werkseinstellungen zurückgesetzt.
Wichtig! Wenn Sie während des Gebrauchs auf einige Probleme stoßen,können Sie zunächst
versuchen,diese durch Drücken der Resettaste zu lösen.
リセット穴
電源を切り、リセット穴を10秒間押し続けると、BIOSが工場出荷時のデフォルトにリセットされます。
重要!使用中に何か不具合がございましたら、リセットしてみてください。
Orificio de reinicio
Apague la alimentación y mantenga presionado el orificio de reinicio durante 10 segundos para
restablecer el BIOS a los valores predeterminados de fábrica.
¡Importante! Si encuentra algunos problemas durante el uso, puede intentar resolverlos presionando
el orificio de reinicio primero.
Otwór resetowania
Odłącz zasilanie, przytrzymaj otwór resetowania przez dziesięć sekund, BIOS zostanie przywrócony do
wartości domyślnych fabrycznych.
Ważne! Jeśli napotkasz problemy podczas użytkowania, najpierw spróbuj je rozwiązać, przytrzymaj
otwór resetowania.
Resetgat
Verwijder de voeding, houd het resetgat 10s ingedrukt, en het BIOS wordt teruggezet naar de fabriek-
sinstellingen.
Belangrijk! Als u tijdens het gebruik problemen ondervindt, kunt u proberen deze op te lossen door het
resetgat ingedrukt te houden.
Foro di ripristino
Spegnere l'alimentazione e tenere premuto il foro di ripristino per 10 secondi per ripristinare le
impostazioni di fabbrica del BIOS.
Importante! Se riscontri dei problemi durante l'uso, puoi prima provare a risolverli tenendo premuto il
foro di ripristino.
Trou de réinitialisation
Veuillez couper l'alimentation, appuyez et maintenez le trou de réinitialisation pendant dix secondes,
le BIOS restaurera les paramètres d'usine par défaut.
REMARQUE: si vous rencontrez des problèmes pendant l'utilisation, vous pouvez d'abord essayer de
les résoudre en appuyant sur le trou de réinitialisation.
8
Port USB3.2 Gen2
Port USB3.2 Gen2 (Universal Serial Bus) osiąga prędkość przesyłania danych do 10,0 Gbps. Można
podłączyć klawiaturę, urządzenie wskazujące, kamerę, dysk twardy, drukarkę oraz skaner itp.
USB3,2 Gen2-poort
De USB3,2 Gen2 (Universele seriële bus) poort biedt een overdrachtssnelheid tot 10,0 Gbps. Het kan
worden aangesloten op toetsenborden, aanwijsapparaten, camera's, harde schijven, printers,
scanners en meer.

ルーバー
これらのルーバーにより、Mini PCシャーシから熱い空気が排出されます。
大事なこと!用紙、本、衣類、配線、その他のものでルーバーをカバしないでください、そうしないと
本体が加熱する恐れがあります。
Air Vent
The air vents allow your Mini PC chassis to expel hot air out.
Important! For optimum heat dissipation and air ventilation, ensure that the air vents are free from
obstructions (such as Paper, books, clothes, transmission lines ).
散热孔
这些散热孔可以将热空气排出Mini PC机箱外。
重要!请勿让纸张、书本、衣物、传输线或任何其他物品挡住散热孔,否则可能会造成机器过热。
Kühlkörperlöcher
Diese Kühlkörperlöcher ermöglichen das Entweichen der heißen Luft aus dem Mini-PC-Gehäuse.
Wichtig! Es ist zu beachten, dass die Kühlöffnungen nicht durch Papier, Bücher, Kleidung, Übertra-
gungskabel oder andere Gegenstände blockiert werden, da dies zu einer Überhitzung des Geräts
führen kann!
散熱孔
這些散熱孔可以將熱空氣排出Mini PC機箱外。
重要!請勿讓紙張、書本、衣物、傳輸線或任何其他物品擋住散熱孔,否則可能會造成機器過熱。
05
9
06
SD Card Slot
This built-in SD card reader allows your Mini PC to read and write SD card data.
SD卡插槽
这个内置存储卡读卡器可让您的Mini PC读取与写入SD卡数据。
SD記憶卡插槽
這個內建記憶卡讀卡器可讓您的Mini PC讀取與寫入SD記憶卡數據。
Aperturas De Ventilación
Las aperturas de ventilación permiten al chasis Mini PC expulsar el aire caliente.
¡Importante! Para que el equipo disipe la temperatura correctamente, por favor, asegúrese de que las
aperturas de ventilación no se obstaculizan por cualquier objeto como el papel, los libros, la ropa, los
cables, etc.
Fori Per Il Dissipatore Di Calore
Questi dissipatori di calore consentono all'aria calda di uscire dal case del Mini PC.
Importante! Non lasciare che carta, libri, indumenti, cavi di trasmissione o altri oggetti ostruiscano i fori
di raffreddamento,perché potrebbero causare il surriscaldamento della macchina!
Trou De Dissipation De Chaleur
Ces évents de chaleur peuvent expulser l’air chaud du boîtier du Mini PC.
Important! Ne laissez pas le papier, les livres, les vêtements, les câbles de transmission ou tout autre
article obstruer les évents de chaleur, car cela pourrait provoquer une surchauffe de la machine.
Otwory wentylacyjne
Te otwory wentylacyjne pozwalają na odprowadzanie gorącego powietrza z obudowy Mini PC.
Ważne! Nie zasłaniaj otworów wentylacyjnych papierem, książkami, ubraniami, kablami lub innymi
przedmiotami, ponieważ może to spowodować przegrzanie urządzenia.
Warmteafvoeropeningen
Deze warmteafvoeropeningen voeren warme lucht uit de behuizing van de Mini PC af.
Belangrijk! Zorg ervoor dat papier, boeken, kleding, kabels of andere voorwerpen de warmteafvoero-
peningen niet blokkeren, anders kan het apparaat oververhit raken.

10
SD-Kartensteckplatz
Mit diesem integrierten SD-Kartenleser kann Ihr Mini-PC SD-Kartendaten lesen und schreiben.
SDカードスロット
この内蔵 SD カード リーダーにより、ミニ PC で SD カード データの読み取りと書き込みが可能になり
ます。
Ranura para tarjetas SD
Este lector de tarjetas SD incorporado permite que su Mini PC lea y escriba datos de tarjetas SD.
Slot per scheda SD
Questo lettore di schede SD integrato consente al tuo Mini PC di leggere e scrivere i dati della scheda
SD.
Emplacement pour carte SD
Ce lecteur de carte SD intégré permet à votre Mini PC de lire et d'écrire les données de la carte SD.
Gniazdo kart SD
Ten wbudowany czytnik kart pamięci umożliwia Mini PC odczytywanie i zapisywanie danych na kart�
ach SD.
SD-kaartsleuf
Deze ingebouwde kaartlezer stelt uw Mini PC in staat om gegevens van en naar SD-kaarten te lezen en
te schrijven.
07
TYPE-C- Anschluss
Diese Schnittstelle unterstützt Datenübertragungen mit einer maximalen Geschwindigkeit von USB 3.2
Gen 2 (10 Gbit/s). Sie unterstützt Alt Mode DisplayPort (DP) für Audio- und Videoausgabe sowie eine
externe Stromversorgung von 5V/3A mit bis zu 15W.
このインターフェースは、最大10GbpsのUSB 3.2 Gen 2のデータ転送速度に対応しています。Alt
Mode DisplayPort(DP)による音声・映像出力に対応しており、5V/3A、最大15Wの外部への電源
供給もサポートしています。
TYPE-C ポート
此接口传输数据时最大支持USB3.2 Gen2 10Gbps速率。支持Alt DP音视频输出,支持5V/3A 15W对外供电。
TYPE-C 接口
此接口傳輸數據時最大支援USB3.2 Gen2 10Gbps速率。 支援Alt DP音視頻輸出,支援5V/3A 15W對外供電。
TYPE-C 接口
This interface supports data transmission at a maximum rate of 10 Gbps via USB 3.2 Gen 2. It also
supports Alt Mode DisplayPort (DP) for audio and video output and provides up to 15W (5V/3A) power
to external devices.
TYPE-C Interface
Puerto TYPE-C
Esta interfaz admite la transmisión de datos a una velocidad máxima de USB 3.2 Gen 2, 10Gbps. Admite
DisplayPort (DP) en modo Alt para salida de audio y vídeo y proporciona alimentación externa de 5 V/3
A, hasta 15 W.
Questa interfaccia supporta una velocità massima di trasmissione dati pari a 10Gbps conforme allo
standard USB 3.2 Gen 2. Supporta l’uscita audio e video tramite Alt Mode DisplayPort (DP) e fornisce
un’alimentazione esterna di 5V/3A fino a un massimo di 15W.
Interfaccia TYPE-C
Cette interface prend en charge un débit de transfert maximal de 10Gbps, conforme à la norme USB 3.2
Gen 2. Elle permet la sortie audio et vidéo via le mode alternatif DisplayPort (DP) et offre une alimenta-
tion externe de 5V/3A, jusqu’à 15W.
Interface TYPE-C

08
HDMI® Port
The HDMI® port (High-Definition Multimedia interface) is uncompressed, fully digital audio/video
interface that provides a common data connection channel for compatible devices, It can be used to
connect external display devices and televisions.
HDMI® 接口
HDMI®接口是个未压缩的全数字化音频/视频接口,为兼容设备提供通用的数据连接渠道,连接外部显示设备
和电视。
HDMI® 接口
HDMI®接口是個未壓縮的全數字化音頻/視頻接口,為相容裝置提供通用的數據連接管道,連接外部顯示裝置
和電視。
HDMI®-Schnittstelle
Die HDMI®-Schnittstelle ist eine unkomprimierte, volldigitale Audio-/Videoschnittstelle, die einen
universellen Datenverbindungskanal für kompatible Geräte zum Anschluss externer Anzeigegeräte und
Fernsehgeräte bereitstellt.
HDMI® ポート
HDMI® ポートは、非圧縮の完全デジタルオーディオ/ビデオインターフェイスです。互換性のあるデバ
イスに共通のデータ接続チャネルを提供します。外部ディスプレイ デバイスとテレビの接続に使用され
ます。
Puerto HDMI®
El puerto HDMI® es una interfaz de audio/vídeo totalmente digital y sin compresión que proporciona un
canal de conexión de datos común para dispositivos compatibles, conectando dispositivos de
visualización externos y televisores.
Porta HDMI®
L'interfaccia HDMI® è un'interfaccia audio/video completamente digitale e non compressa che fornisce
un canale di connessione dati universale per dispositivi compatibili, display esterni e TV.
Interface HDMI®
Le port HDMI® est une interface audio/vidéo numérique non compressée qui fournit un canal de
connexion de données commun pour les appareils compatibles. Il peut être utilisé pour connecter des
appareils d'affichage externes et des téléviseurs.
Port HDMI®
Port HDMI® to nieskompresowany cyfrowy interfejs audio/wideo, który zapewnia uniwersalny kanał
danych dla kompatybilnych urządzeń, podłącza zewnętrzne urządzenia wyświetlające i telewizory.
HDMI®-poort
De HDMI®-poort is een ongecomprimeerde volledig digitale audio/video-poort die een gemeenschap-
pelijk gegevenskanaal biedt voor compatibele apparaten om externe beeldschermen en televisies aan
te sluiten.
11
To złącze obsługuje transmisję danych z maksymalną prędkością 10Gb/s zgodnie ze standardem USB
3,2 Gen 2. Obsługuje wyjście audio i wideo za pomocą trybu alternatywnego DisplayPort (DP) oraz
zapewnia zasilanie zewnętrzne 5V/3A, do maksymalnie 15W.
Złącze TYPE-C
Deze interface ondersteunt gegevensoverdracht van de USB3.2 Gen2 met een maximale snelheid van
10 Gbps. Het ondersteunt Alt DP audio- en video-uitvoer, en ondersteunt de uitvoer van voeding van
5V/3A 15W.
TYPE-C interface

10
网络接口
这个RJ-45网络接口支持标准的以太网线,可以连接局域网等。(传输速度2.5Gbps)
網絡接口
這個RJ-45網絡接口支援標準的以太網線,可以連接局域網等。(傳輸速度2.5Gbps)
Netzwerkschnittstelle
Diese RJ-45-Netzwerkschnittstelle unterstützt Standard-Ethernet-Kabel und kann an ein lokales
Netzwerk angeschlossen werden.(übertragungsgeschwindigkeit 2.5Gbps)
RJ-45 LAN Port
This RJ-45 network interface supports standard Ethernet cables and can be connected to a local area
network. (Transmission speed 2.5Gbps)
LANポート
RJ-45 LANポートは標準のイーサネットケーブルをサポートし、ローカルエリアネットワーク (LAN)な
どと連結することができます。(伝送速度2.5Gbps)
09
USB2.0 Port
The USB (Universal Serial Bus) port is compatible with USB2.0 or USB1.1 devices such as keyboards, and
printers.
USB2.0 接口
这个USB(Universal Serial Bus)2.0接口兼容于采用USB2.0或USB1.1规范的设备,像是键盘、打印机等。
USB2.0 接口
這個 USB (Universal Serial Bus) 2.0 接口相容於採用USB2.0 或 USB1.1 規範的裝置, 如鍵盤、打印機等。
USB2.0 インターフェイス
USB (UniversaISerialBus) 2.0 インターフェースは、キーボードやプリンターなど、USB2.0または
USB1.1仕様を採用するデバイスと互換性があります。
USB2.0 -AnschlussDieser USB2.0-Anschluss (Universal Serial Bus) ist mit Geräten kompatibel , die
USB2.0-oder USB1.1-Anschlüsse verwenden , wie z.B.Tastaturen , Drucker usw.
USB2.0 -Anschluss
Puerto USB2.0
El puerto USB (Universal Serial Bus) es compatible con dispositivos de USB2.0 o USB1.1, como teclados
e impresoras.
Interfaccia USB2.0
Questa interfaccia USB (Universal Serial Bus) 2.0 è compatibile con i dispositivi che usano le specifiche
USB2.0 o USB1.1, come tastiere, stampanti, ecc.
Port USB2.0
Ce port USB2.0 (Universal Serial Bus) est compatible avec les appareils standard qui utilisent USB2.0 ou
USB1.1, tels que les claviers, imprimantes, etc.
Port USB2.0
Ten port USB (Universal Serial Bus) 2.0 jest kompatybilny z urządzeniami zgodnymi z normami USB2.0
lub USB1.1, takimi jak klawiatury, drukarki itp.
USB2,0-poort
Deze USB (Universele seriële bus) 2,0-poort is compatibel met apparaten die de USB2,0- of
USB1,1-standaard gebruiken, zoals toetsenborden, printers, enz.
12

11
Stromeingangsschnittstelle
Der mitgelieferte Netzadapter kann die Wechselstromversorgung in eine Gleichstromversorgung
umwandeln und das Mini PC über diese Buchse mit Strom versorgen. Um Schäden an Ihrem Mini PC zu
vermeiden, verwenden Sie bitte das mitgelieferte Netzteil.
Warnung! Wenn das Netzteil verwendet wird, kann die Temperatur des Netzadapters steigen und heiß
werden. Decken Sie den Netzadapter nicht ab und halten Sie es von Ihrem Körper fern.
Netzadapter: DC 19V
Power Input
The supplied power adapter can convent AC power to DC power for use, and supply power through this
jack to the Mini PC. To prevent damage to your Mini PC, please use the supplied power adapter.
Warning! When the power supply is in use, the tetmperature of the power adapter may rise and
become hot. Do not cover the power adapter or get close to you.
Power adapter: DC 19V
电源输入接口
电源适配器可以将交流电源转换为直流电源,转换的电源通过电源输入接口提供电力给您的Mini PC,为了避
免损害您的Mini PC,请使用产品随附的电源适配器。
警告!当电源正在使用中,电源适配器的温度可能会上升变热,请勿将电源适配器靠近您的身体 。
电源适配器: DC 19V
電源輸入接口
變壓器可以將交流電源轉換為直流電源,轉換的電源通過電源輸入接口提供電力給您的Mini PC,為了避免損
害您的Mini PC,請使用產品隨附的變壓器。
警告!當電源正在使用中,變壓器的溫度可能會上升變熱,請勿將變壓器靠近您的身體。
變壓器: DC 19V
パワーインプット
付属の電源アダプターは、AC電源をDC電源に転換し、パワーインプットジャックからお使いのMini
PCにパワーを供給できます。Mini PCを壊さないため、付属の電源アダプターを使用してください。
警告!使用中に、電源アダプタの温度が上がることがあります。電源アダプターを素手で触ったり布等
で覆ったりは絶対にしないでください。
電源アダプター:DC 19V
13
Esta interfaz de red RJ-45 admite cables Ethernet estándar y se puede conectar a red de área local.
(Velocidad de transmisión de 2.5 Gbps)
Puerto LAN
Questa interfaccia di rete RJ-45 supporta un cavo Ethernet standard, che può essere collegato a una
rete locale e così via.(Velocità di trasmissione 2.5 Gbps)
Interfaccia di rete
Ce port réseau RJ-45 prend en charge un câble Ethernet standard, qui peut être connecté à un réseau
local, etc. (Vitesse de transmission 2.5 Gbps)
Port LAN
Ten port sieciowy RJ-45 obsługuje standardowy kabel Ethernet, można go podłączyć do sieci lokalnej
itp. (Prędkość przesyłania 2.5 Gbps)
Port sieciowy
Deze RJ-45-netwerkpoort ondersteunt standaard Ethernet-kabels en kan worden aangesloten op een
lokaal netwerk, enz. (Overdrachtsnelheid 2.5 Gbps)
Netwerkpoort

Port d'alimentation
L'adaptateur d'alimentation peut convertir l'alimentation AC en alimentation DC et l'alimentation
convertie alimente votre Mini PC via ce port. Pour éviter d'endommager votre Mini PC, veuillez utiliser
l'adaptateur fourni avec le produit.
ATTENTION: Lorsque l'adaptateur est en cours d'utilisation, sa température peut augmenter et devenir
chaude. Veuillez ne pas rapprocher l'adaptateur de votre corps.
Adaptateur d'alimentation: DC 19V
Entrada de alimentación
El adaptador de corriente suministrado puede convertir la alimentación de CA en CC. La fuente de
alimentación transformada proporciona energía a su Mini PC a través de la interfaz de entrada de
energía. Para evitar daños en su Mini PC, utilice el adaptador de corriente suministrado.
¡Advertencia! Cuando la fuente de alimentación está en uso, la temperatura del adaptador de corrien-
te puede subir y calentarse. No cubra el adaptador de corriente ni se acerque.
Adapdator de corriente: CC 19V
Interfaccia di ingresso alimentazione
L'adattatore di alimentazione può convertire l'alimentazione CA in CC. L'alimentazione convertita
alimenta il tuo Mini PC tramite l'interfaccia di ingresso dell'alimentazione. Per evitare di danneggiare il
tuo Mini PC, per favore usa l'adattatore di alimentazione fornito con il prodotto.
Avvertimento! Quando l'alimentazione è in uso, la temperatura dell'adattatore di alimentazione
potrebbe aumentare e diventare calda. Per favore non portare l'adattatore di alimentazione vicino al
tuo corpo.
Adattatore di alimentazione:DC 19V
Port wejściowy zasilania
Zasilacz może konwertować zasilanie AC na zasilanie DC, przekształcone zasilanie jest dostarczane do
Mini PC za pośrednictwem portu zasilania. Aby uniknąć uszkodzenia Mini PC, używaj dołączonego
zasilacza.
Uwaga! Gdy zasilacz jest w użyciu, jego temperatura może wzrosnąć, nie umieszczaj zasilacza w
pobliżu ciała.
Zasilacz: DC 19V
Voedingsingangspoort
De netadapter zet AC-voeding om in DC-voeding, en de omgezette voeding wordt via de voedingsin-
gangspoort naar uw Mini PC geleid. Gebruik de meegeleverde netadapter om schade aan uw Mini PC
te voorkomen.
Waarschuwing! Tijdens gebruik van de voeding kan de netadapter warm worden. Houd de netadapter
uit de buurt van uw lichaam.
Netadapter: DC 19 V
12
USB4 Anschluss
Diese Schnittstelle unterstützt das USB4-Übertragungsprotokoll mit einer maximalen Datenübertra-
gungsrate von 40 Gbps, Alt DP-Audio- und Videoausgang, 5V/3A-Laden für Peripheriegeräte mit einer
maximalen Ladeleistung von 15W sowie PCIe-Datenübertragung.
这个接口支持USB4传输协议,数据最大传输速率40Gbps。支持Alt DP音视频输出,支持5V/3A对外设充电,
最大充电功率15W,支持PCIe数据传输。
USB4 接口
此接口支援USB4傳輸協定。最大資料傳輸速率為40Gbps,支援Alt DP音視訊輸出、5V/3A週邊充電、最大
15W功率充電、PCIe資料傳輸。
USB4 接口
This interface supports the USB4 transmission protocol. The maximum data transmission rate is 40Gbps.
It supports Alt DP audio and video output, 5V/3A peripheral charging, maximum 15W power charging,
and PCIe data transmission.
USB4 Port
14

このインターフェイスは USB4 伝送プロトコルをサポートし、最大データ伝送速度は 40Gbps です。
Alt DP オーディオおよびビデオ出力をサポートし、5V/3A 周辺機器充電をサポートし、最大充電電力
15W をサポートし、PCIe データ伝送をサポートします。
USB4 ポート
Puerto USB4
Esta interfaz es compatible con el protocolo de transmisión USB4 y la velocidad máxima de transmisión
de datos es de 40 Gbps.Admite salida de audio y video Alt DP, admite carga periférica de 5 V/3 A,
potencia de carga máxima de 15 W, transmisión de datos PCIe.
Questa interfaccia supporta il protocollo di trasmissione USB4 e la velocità massima di trasmissione dei
dati è di 40 Gbps.Supporta l'uscita audio e video Alt DP, supporta la ricarica delle periferiche 5V/3A, la
massima potenza di ricarica 15W, supporta la trasmissione dati PCIe.
Interfaccia USB4
Cette interface PC prend en charge le protocole de transfert USB4 et offre un taux de transfert de
données maximal de 40 Gbps.Il prend non seulement en charge la sortie audio et vidéo Alt DP, mais
aussi la charge 5V/3A pour les périphériques (la puissance de charge maximale est de 15W) et le
transfert de données PCIe.
Port USB4
Ten interfejs obsługuje protokół transmisji USB4. Maksymalna prędkość transmisji danych wynosi 40
Gb/s. Obsługuje wyjście audio i wideo Alt DP, ładowanie urządzeń peryferyjnych 5 V/3 A, ładowanie o
maksymalnej mocy 15 W i transmisję danych PCIe.
Interfejs USB4
Deze interface ondersteunt het USB4-transmissieprotocol. De maximale gegevensoverdrachtsnelheid
is 40Gbps. Het ondersteunt Alt DP audio- en video-uitvoer, 5V/3A randapparatuur opladen, maximaal
15W stroom opladen en PCIe-gegevensoverdracht.
USB4-aansluiting
15
13
Sicherheitsschlitz
Der Sicherheitsschlitz kann an eine Diebstahlsicherung angeschlossen werden, um zu verhindern, dass
andere Ihren Mini-PC stehlen.
La ranura de seguridad se puede conectar a un dispositivo antirrobo para evitar que otros roben su
Mini PC.
Ranura de seguridad
La fessura del blocco antifurto può essere collegato a un blocco antifurto per impedire ad altri di rubare
il tuo Mini PC.
Blocco antifurto
Le port de verrouillage antivol peut être connectée à un verrou antivol pour empêcher d'autres
personnes de voler votre Mini PC.
Port de verrou antivol
盗難防止ロック
盗難防止ロックスロットを盗難防止ロックに接続して、他人がMini PCを盗むのを防ぐことができます。
肯辛通鎖
肯辛通鎖可連接防盜鎖以防止他人竊取您的Mini PC。
防盗锁
防盗锁槽可连接防盗锁以防止他人窃取您的Mini PC。
Kensington Lock
The Kensington Lock can be connected to a locker to prevent others from stealing your Mini PC.

Kensington-slot
Kensington Lock wordt aangesloten op een antidiefstalslot om te voorkomen dat anderen uw mini-pc
stelen.
Zamek Kensingtona
Blokada Kensington łączy się z blokadą przeciwkradzieżową, aby uniemożliwić innym kradzież
Twojego Mini PC.
16
3
Getting Started With Your Mini PC/开始使用前
Using Your Mini PC/使用您的迷你电脑
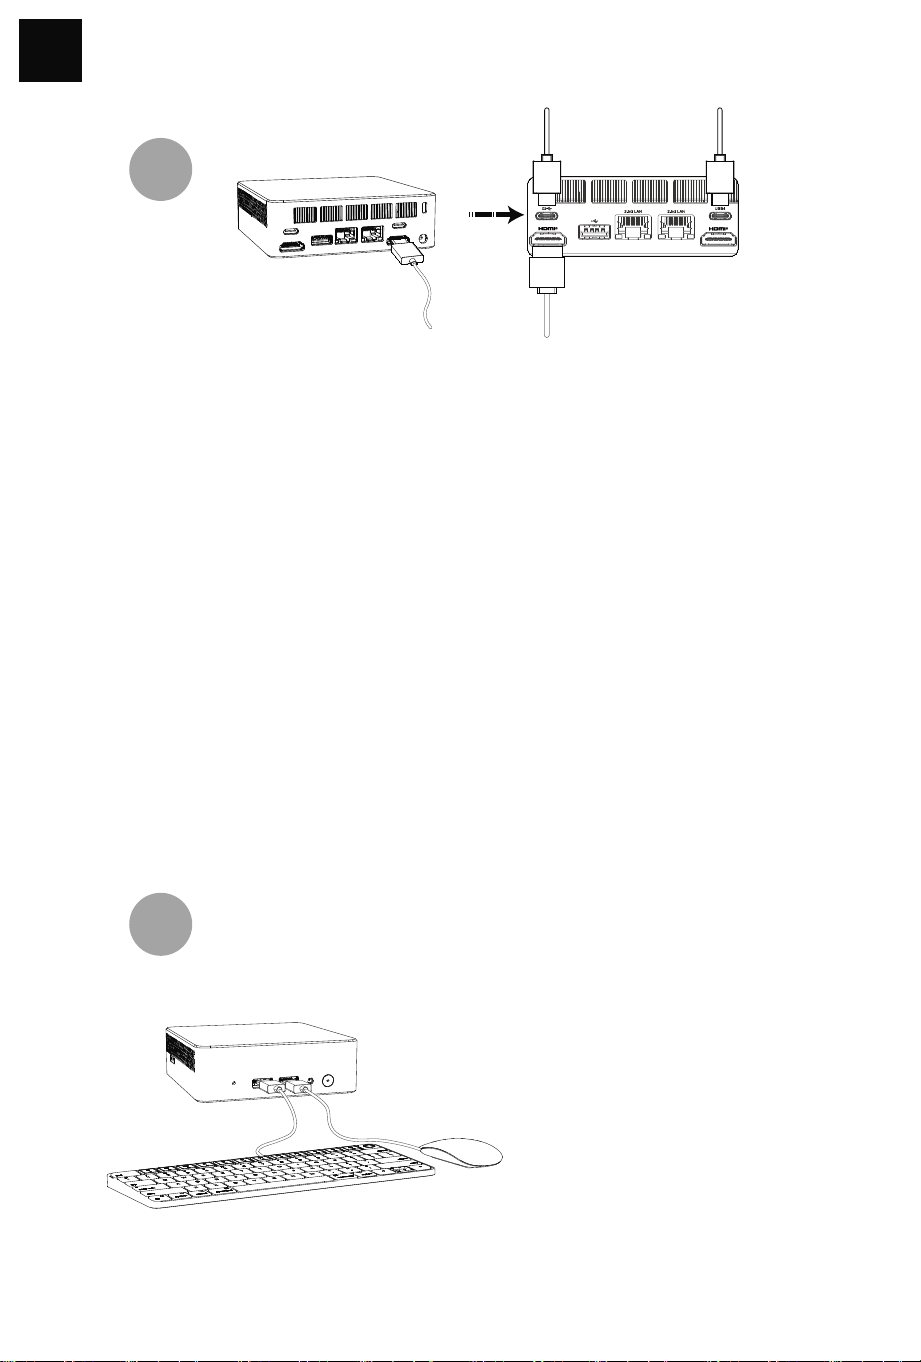
Connect a display panel to your Mini PC by connecting a display cable either to the HDMI® port 、
TYPE-C interface or the USB4 port.
将显示屏幕通过电缆线连接至 Mini PC的HDMI®接口、TYPE-C 接口或USB4接口。
將熒幕透過電纜線連接至 Mini PC的HDMI®接口、TYPE-C 接口或USB4接口。
Schließen Sie einen Bildschirm an Ihren Mini PC an, indem Sie das Anzeigekabel an den HDMI®- oder
TYPE-C- Anschluss、USB4-Anschluss verbinden.
ケーブルでモニターを Mini PCのHDMI®ポート、TYPE-C ポートやUSB-4ポートに接続します。
Conecte una pantalla a su Mini PC por un cable de pantalla al puerto HDMI®, puerto TYPE-C o puerto
USB4.
Collega lo schermo di visualizzazione all'interfaccia HDMI®, all' interfaccia TYPE-C o all'interfaccia
USB4 del Mini PC tramite un cavo.
Connectez l'écran d'affichage au port HDMI®, au interface TYPE-C ou au port USB4 du Mini PC via les
câbles.
Podłącz ekran do portu HDMI®, złącze TYPE-C lub USB4 Mini PC za pomocą kabla.
Sluit het beeldscherm aan op de HDMI®-poort, TYPE-C interface of USB4-poort van de Mini PC met
een kabel.
Connect the keyboard and mouse.
连接键盘与鼠标。
連接鍵盤與滑鼠。
Die Tastatur und die Maus anschließen.
キーボードとマウスの接続します。
Conectar el teclado o ratón.
Collegare la tastiera e il mouse.
Connectez le clavier et la souris.
Podłącz klawiaturę i mysz.
Sluit het toetsenbord en de muis aan.
1
2
17
3
4
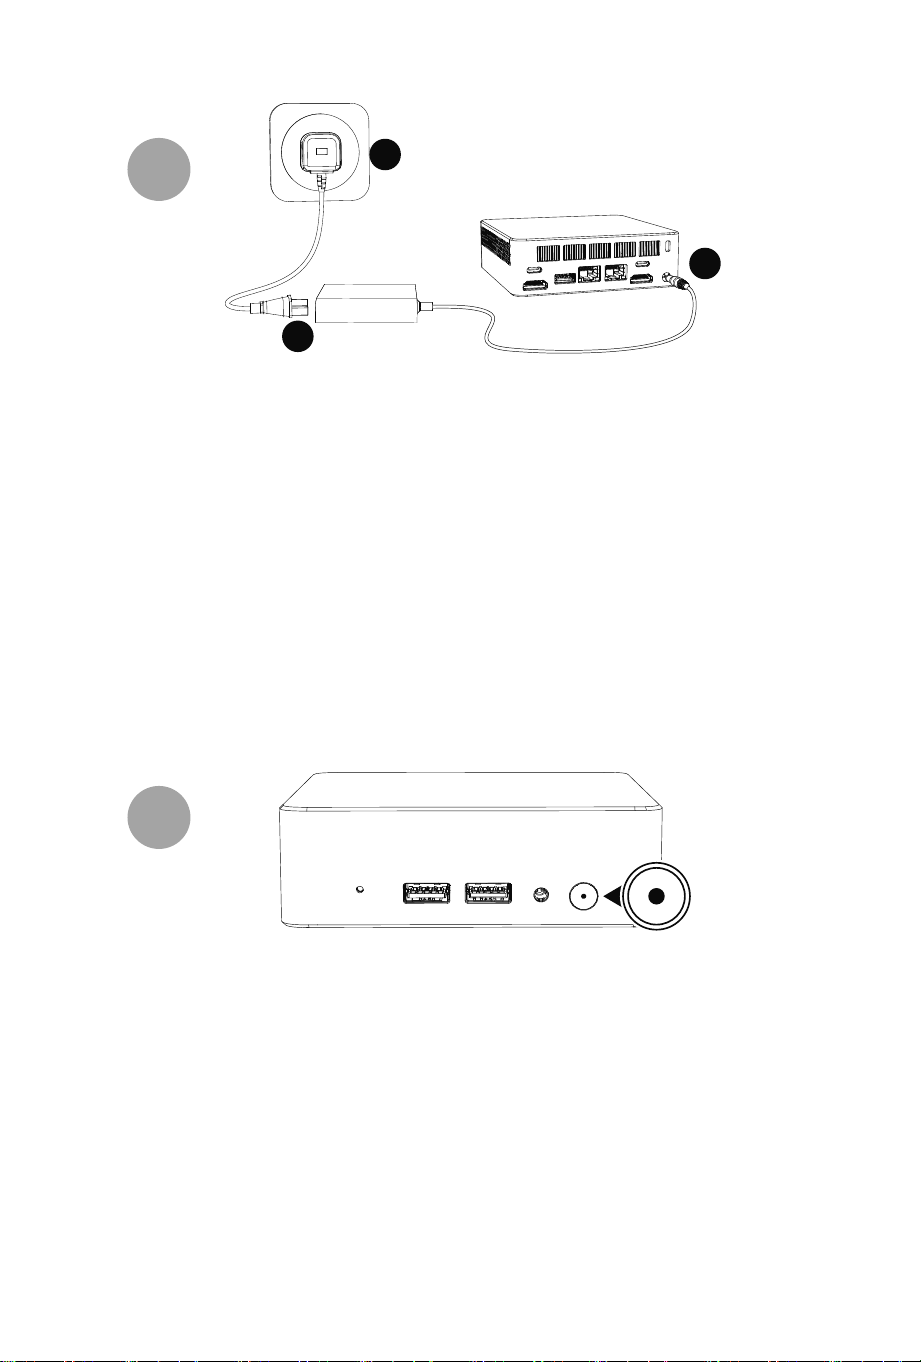
Connect the provided power adapter to your Mini PC.
連接Mini PC的變壓器。
连接Mini PC的电源适配器。
Den Netzadapter des Mini-PCs anschließen.
Mini PCに接続された電源アダプタです。
Conectar el adaptador de alimentación de la Mini PC.
Collegare l'adattatore di alimentazione del Mini PC.
Connectez l’adaptateur secteur du Mini PC.
Podłącz zasilacz Mini PC.
Sluit de netadapter van de Mini PC aan.
Turn on the power and start the Mini PC.
打開電源,啟動Mini PC。
打开电源,启动Mini PC。
Die Stromversorgung herstellen und den Mini-PC starten.
電源を入れてMini PCを起動します。
Pulsar el botón de encendido y encender su Mini PC.
Accendere il Mini PC e avviarlo.
Allumez l’alimentation et démarrez le Mini PC.
Włącz zasilanie, uruchom Mini PC.
Zet de Mini PC aan door de voeding in te schakelen.
A
B
C
18

If the Mini PC is frozen or slow to respond, press and hold the power button at least for 10 seconds
to force it shutdown.
Falls Ihr Mini-PC längere Zeit nicht reagiert, dann halten Sie den Netzschalter mindestens 10
Sekunden lang gedrückt, bis sich Ihr Mini-PC automatisch ausschaltet.
Mini PCが長時間応答しない場合は、Mini PCの電源が切れるまで、電源ボタンを10秒間以上押し続
けると。
Si su Mini PC deja de responder, presione sin soltar el botón de encendido durante al menos diez
segundos hasta que se apague.
Se il tuo Mini PC rimane a lungo senza risposta, tenere premuto il pulsante di accensione per
almeno 10 secondi fino allo spegnimento del Mini PC.
Si votre Mini PC ne répond pas pendant une longue période, veuillez maintenir enfoncé le bouton
d’alimentation pendant au moins 10 secondes jusqu’à ce que votre Mini PC s’éteigne .
Jeśli Mini PC nie reaguje przez dłuższy czas, przytrzymaj przycisk zasilania przez co najmniej 10
sekund, aż Mini PC się wyłączy.
Als uw Mini PC lange tijd niet reageert, houd dan de aan/uit-knop minimaal 10s ingedrukt totdat uw
Mini PC uitschakelt.
如果您的Mini PC长时间没有响应,请长按电源键至少10秒钟直到您的Mini PC关闭。
如果您的Mini PC長時間沒有回應,請按住電源鍵至少10秒鐘直到您的Mini PC關閉。
To put your Mini PC on Sleep mode, press the Power button once.
若要让您的Mini PC进入睡眠状态,请按下电源键一次。
若要讓您的Mini PC進入睡眠狀態,請按下電源鍵一次。
Drücken Sie die Einschalttaste einmal, um Ihren Mini-PC in den Ruhezustand zu versetzen.
Mini PCをスリープ状態にするには、電源ボタンを1回押します。
Para activar el modo de suspensión de su Mini PC, presione el botón de alimentación una vez.
Per mettere il Mini PC in modalità di sospensione, premere una volta il pulsante di accensione.
Pour mettre votre Mini PC en veille, appuyez une fois sur le bouton d’alimentation.
Aby przełączyć Mini PC w tryb uśpienia, naciśnij raz przycisk zasilania.
Om uw Mini PC in de slaapstand te zetten, drukt u één keer op de aan/uit-knop.
Turn Off Your Mini PC/关闭您的迷你电脑
Putting You Mini PC To Sleep/让您的迷你电脑进入睡眠模式
19
20
1
A B
4
Installation Operation/安装指南
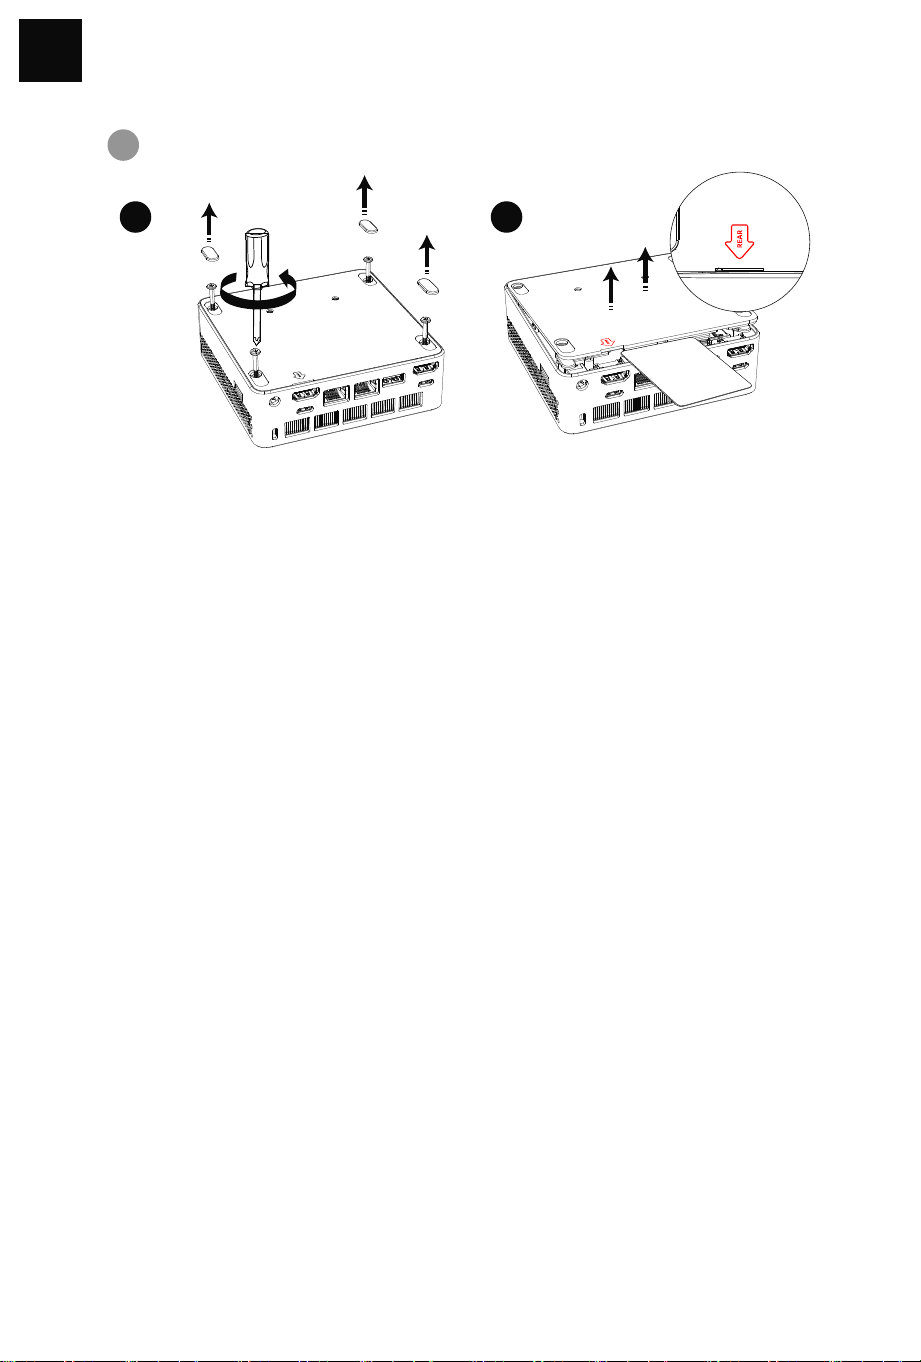
Remove the foot mats, use a tool to unscrew the bottom shell screws, and then use a tool to open
the bottom shell from the "REAR" side.
取下脚垫,用工具拧开底壳螺丝,并用工具从底壳“REAR”方向打开底壳。
Entfernen Sie die Fußmatten, lösen Sie mit einem Werkzeug die Schrauben der Unterschale und
öffnen Sie dann mit einem Werkzeug die Unterschale von der „RÜCKSEITE“-Seite.
拆下腳墊,用工具旋下底殼螺絲,然後用工具從「REAR」側打開底殼。
フットマットを取り外し、工具を使用してボトムシェルのネジを外し、工具を使用してボトムシェル
を「REAR」側から開きます。
Retire las alfombrillas, use una herramienta para destornillar los tornillos de la cubierta inferior y
luego use una herramienta para abrir la cubierta inferior desde el lado "TRASERO".
Rimuovere i tappetini, utilizzare uno strumento per svitare le viti della scocca inferiore, quindi
utilizzare uno strumento per aprire la scocca inferiore dal lato "POSTERIORE".
Retirez les tapis de sol, utilisez un outil pour dévisser les vis de la coque inférieure, puis utilisez un
outil pour ouvrir la coque inférieure du côté « ARRIÈRE ».
Verwijder de voetmatten, draai de schroeven van de onderste schaal los met behulp van gereed-
schap en open vervolgens de onderste schaal vanaf de "ACHTERKANT".
Zdejmij dywaniki, odkręć śruby dolnej obudowy za pomocą narzędzia, a następnie otwórz dolną
obudowę od strony „TYŁU” za pomocą narzędzia.
2
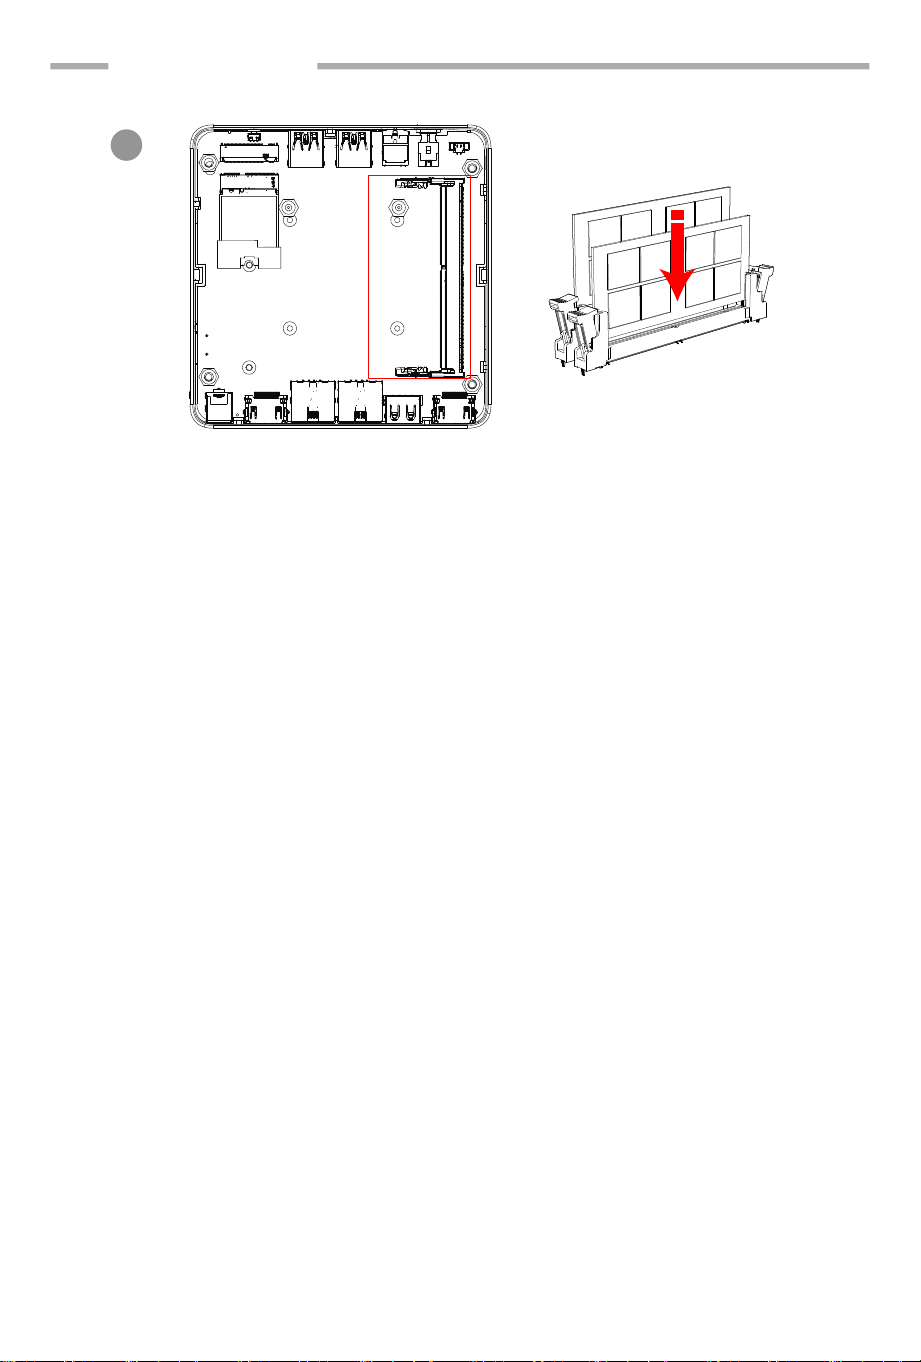
Insert the memory into the memory slot according to the diagram.
将内存按照图示插入内存插槽。
将内存按照图示插入内存插槽。
Setzen Sie den Speicher entsprechend der Abbildung in den Speichersteckplatz ein.
図に従ってメモリをメモリ スロットに挿入します。
Inserte la memoria en la ranura de memoria de acuerdo con el diagrama.
Inserire la memoria nello slot di memoria secondo lo schema.
Insérez la mémoire dans la fente de mémoire selon le schéma.
Inserire la memoria nello slot di memoria secondo lo schema.
Insérez la mémoire dans la fente de mémoire selon le schéma.
DIY DDR/安装 DDR
DDR5
21
3
DIY SSD/安装 SSD
M.2 2280 SSD
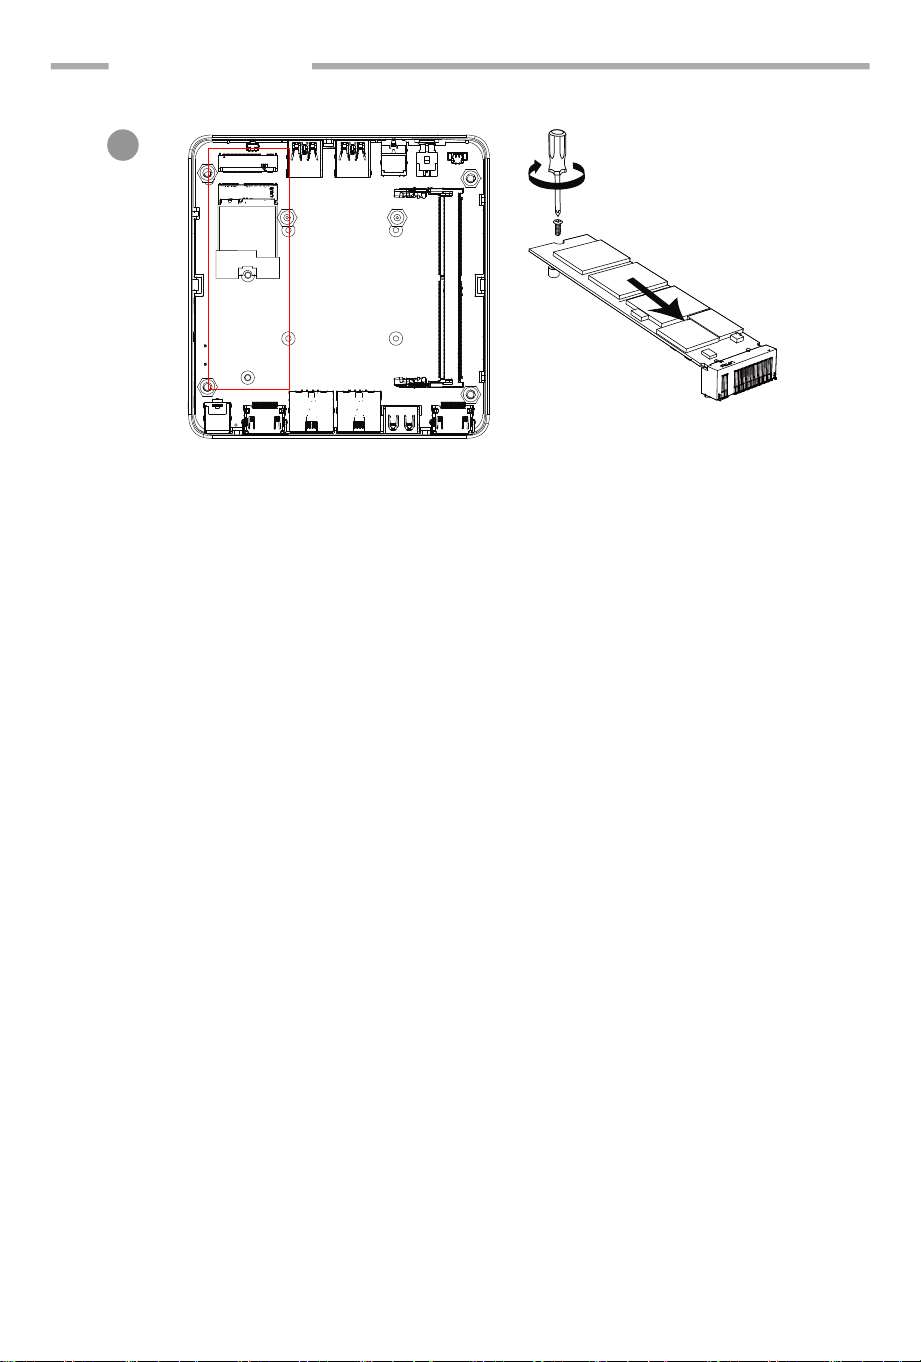
将SSD卡对准卡槽缺口倾斜插入, 使用螺丝固定住。
將SSD記憶卡對準卡槽缺口傾斜插入, 使用螺絲固定住。
Install the SSD into its slot by inserting it slantly and fix it with screws.
Setzen Sie die Ssd-karte schrag gegen die Kerbe des Kartenschlitzes ein und halten Sie sie mit
Schrauben fest.
Instale la tarjeta SSD en su ranura, insertándola inclinada y fíjela con tornillos.
Allinea la scheda SSD con la tacca della fessura per scheda, inseriscila obliquamente e fissala con le viti.
Alignez la carte SSD avec l'encoche du logement de carte et insérez-la obliquement, puis fixez-la
avec des vis.
Włóż kartę SSD pod kątem do gniazda i zabezpiecz ją śrubą.
Lijn de SSD-kaart uit met de inkeping in de kaartsleuf, steek deze diagonaal naar beneden, en
bevestig deze met een schroef.
SSDカードを斜めに挿入してスロツトに取り付け、ネジで固定します。
22
4
23
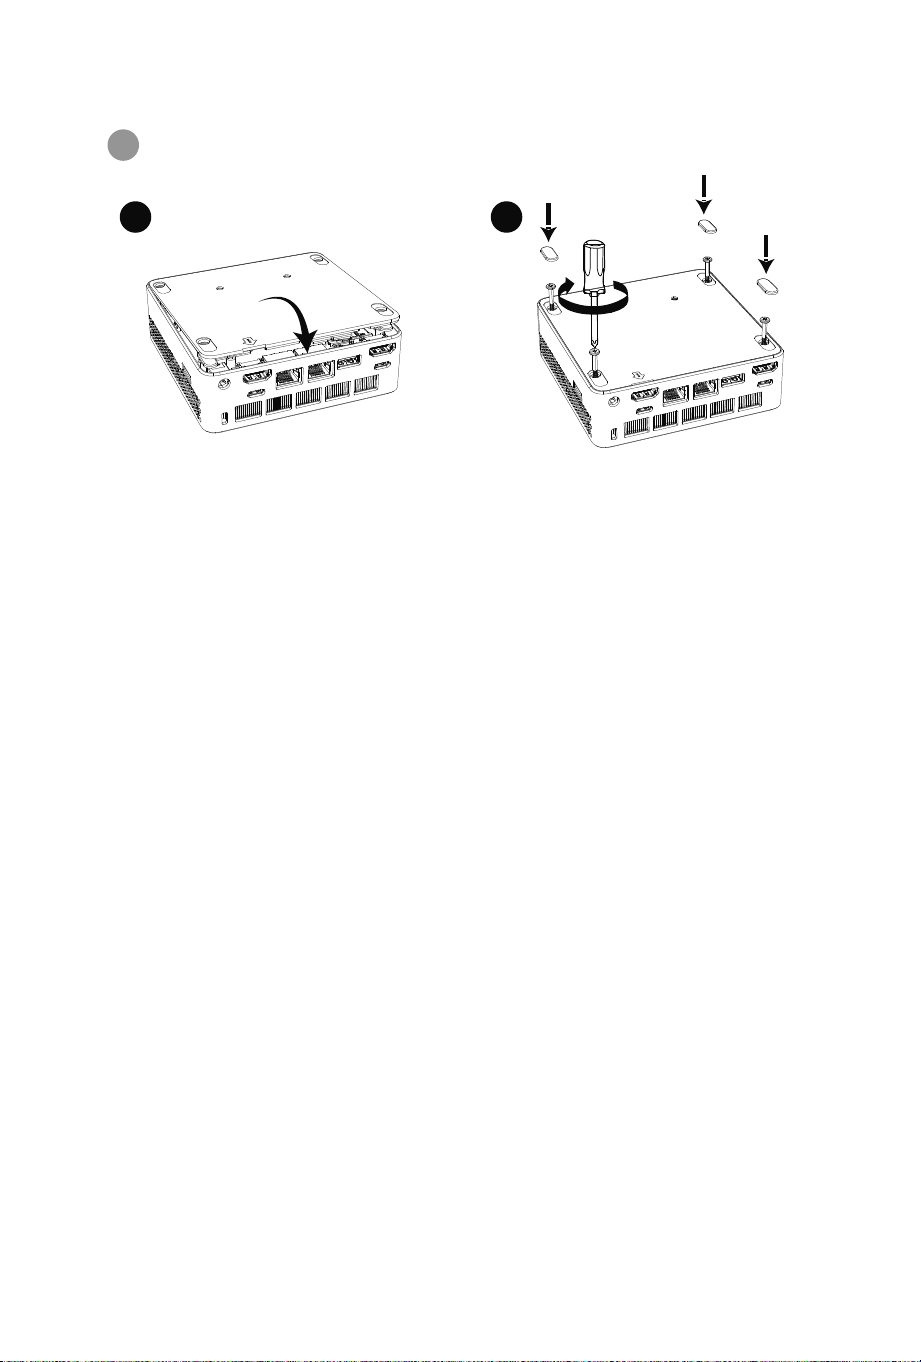
合上底盖并锁上螺丝,然后重新贴好脚垫。
合上底蓋並擰緊螺絲,然後重新裝上腳墊。
Schließen Sie die untere Abdeckung und ziehen Sie die Schrauben fest. Bringen Sie dann die
Fußpolster wieder an.
底部カバーを閉じてネジを締めて、フットパッドを再度取り付けます。
Cierre la cubierta inferior y apriete los tornillos, luego vuelva a colocar las almohadillas para
los pies.
Chiudere il coperchio inferiore e serrare le viti, quindi rimontare i piedini.
Fermez le capot inférieur et serrez les vis, puis remettez les repose-pieds en place.
Zamknij dolną pokrywę i dokręć śruby, a następnie ponownie zamontuj podkładki pod stopy.
Sluit de onderkant en draai de schroeven vast. Bevestig vervolgens de voetjes weer.
Close the bottom cover and tighten the screws, then reattach the foot pads.
A B
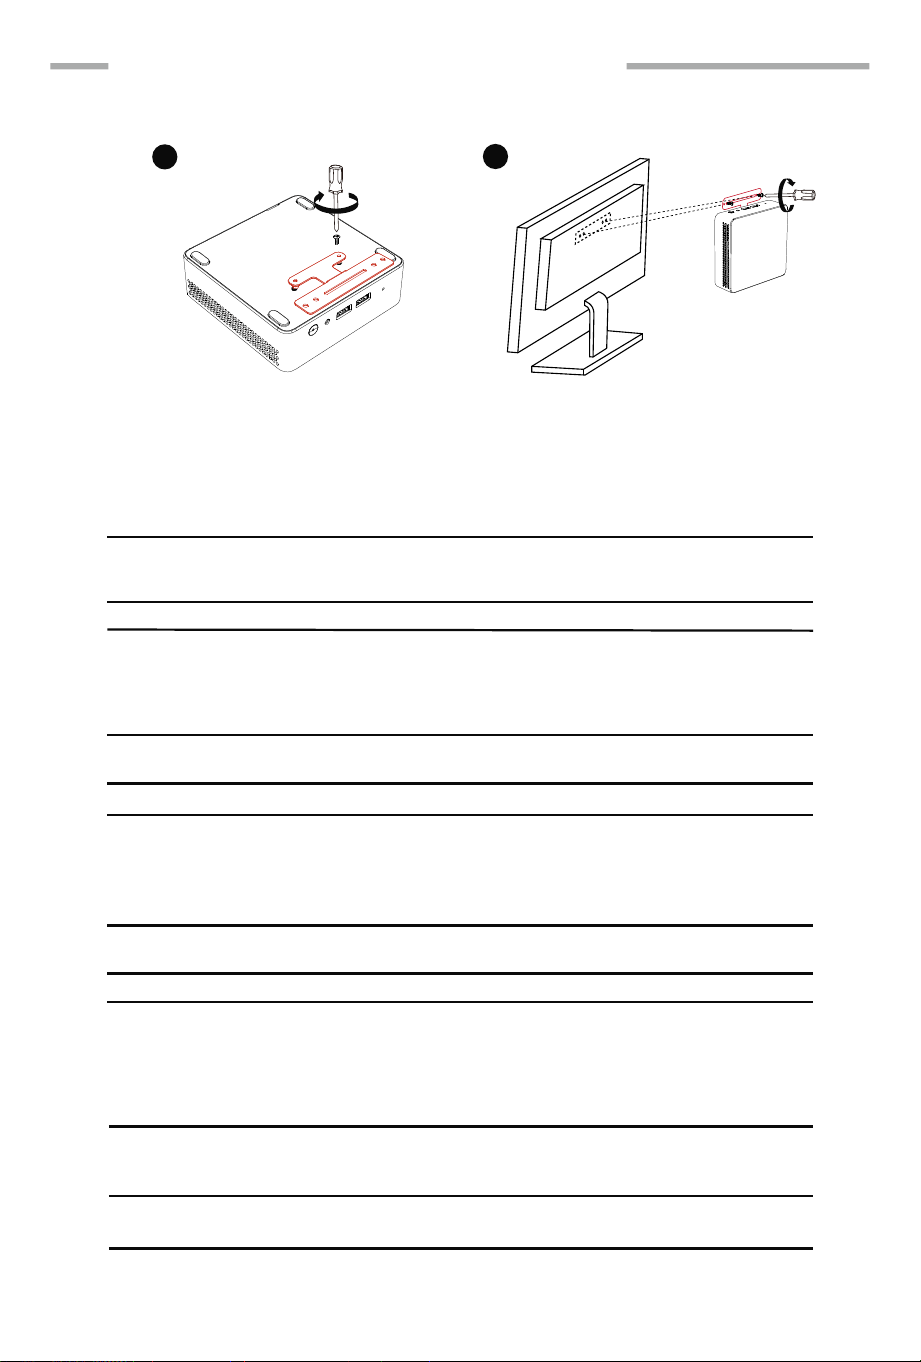
DIY Mini PC Suspension Stand/安装Mini PC 挂架
A
B
24
Install your Mini PC to a compatible Universal Screen Mount device
Please follow the steps below to install your Mini PC to a compatible Universal Screen Mount device:
1.Place your Mini PC upside down on a flat and stable surface.
2.Use the included screws to mount the Mini PC Mount into the screw holes on the bottom of the Mini
PC. (A)
Warning! Do not over tighten the screws as it may damage to your Mini PC.
3.Use the included screws to secure the installed Mini PC to the back of the device. (B)
将您的Mini PC安装到通用型屏幕挂架兼容设备
请依照以下步骤将Mini PC安装到兼容通用型屏幕挂架兼容设备:
2.使用附带的螺丝将迷你主机挂架安装至Mini PC底部的螺丝孔中。 (A)
警告! 请勿过度拧紧螺丝,因为可能会造成您的Mini PC损坏。
1.将您的Mini PC底部朝上并倒置于平坦的地方。
3.使用附带的螺丝将已安装完成的Mini PC固定至设备背后。(B)
將您的Mini PC安裝到通用型螢幕掛架相容設備
請依照以下步驟將Mini PC安裝到相容通用型螢幕掛架相容設備:
2.使用附帶的螺絲安裝至Mini PC底部的螺絲孔中。 (A)
警告! 請勿過度擰緊螺絲,因爲可能會造成您的Mini PC損壞。
1.將您的Mini PC底部朝上並倒置於平坦的地方。
3.使用隨附的螺絲將已安裝完成的Mini PC固定至裝置背後。(B)
Installieren Sie Ihren Mini-PC auf einem kompatiblen Gerät mit universeller Bildschirmhalterung
Befolgen Sie die nachstehenden Schritte, um Ihren Mini-PC auf einem kompatiblen Gerät mit
universeller Bildschirmhalterung zu installieren:
1. Stellen Sie Ihr Mini PC auf den Kopf nach, das legen ihn auf eine flache und stabile Oberfläche.
2. Befestigen Sie die Mini-PC-Halterung mit den mitgelieferten Schrauben in den Schraubenlöchern
an der Unterseite des Mini-PCs. (A)
Warnung! Ziehen Sie die Schrauben nicht zu fest an, da dies Ihr Mini PC beschädigen könnte.
3. Verwenden Sie die mitgelieferten Schrauben, um das installierte Mini PC an der Rückseite des
Gerätes zu befestigen. (B)

25
互換性のあるユニバーサル スクリーン マウント デバイスにミニ PC をインストールします
互換性のあるユニバーサル スクリーン マウント デバイスにミニ PC をインストールするには、以下
の手順に従ってください:
1. Mini PCを上下逆にして平らで安定した場所に置きます。
2. 付属のネジを使用して、Mini PC マウントを Mini PC の底面にあるネジ穴に取り付けます。(A)
警告!ネジを締めすぎないでください。Mini PCを損傷する可能性があります。
3. 付属のネジを使用して、取り付けられたMini PCをVESA互換性のある設備の背面に固定します。(B)
Instale su Mini PC en un dispositivo de montaje de pantalla universal compatible
Siga los pasos a continuación para instalar su Mini PC en un dispositivo de montaje de pantalla
universal compatible:
1. Coloque la Mini PC boca abajo sobre una superficie plana y estable.
2. Utilice los tornillos incluidos para montar el soporte para mini PC en los orificios para tornillos en
la parte inferior de la Mini PC. (A)
¡Advertencia! No apriete demasiado los tornillos, ya que podría dañar su Mini PC.
3. Use los tornillos incluidos para fijar la Mini PC instalada a la parte posterior del dispositivo. (B)
Installa il tuo Mini PC su un dispositivo compatibile con Universal Screen Mount
Segui i passaggi sottostanti per installare il tuo Mini PC su un dispositivo compatibile con Universal
Screen Mount:
1. Posiziona la parte inferiore del tuo Mini PC verso l'alto, capovolgilo e posizionalo su un luogo
piatto.
2. Utilizzare le viti incluse per montare il supporto per Mini PC nei fori per le viti presenti nella parte
inferiore del Mini PC. (A)
Avvertimento! Per favore non stringere eccessivamente le viti, poiché potresti danneggiare il tuo
Mini PC.
3. Usa le viti in dotazione per fissare il Mini PC installato sul retro del dispositivo.(B)
Installez votre Mini PC sur un dispositif de montage d'écran universel compatible
Veuillez suivre les étapes ci-dessous pour installer votre Mini PC sur un dispositif de montage
d'écran universel compatible :
1. Placez le bas de Mini PC à l'envers sur un endroit plat.
2. Utilisez les vis fournies pour monter le support du mini PC dans les trous de vis situés sous le Mini
PC. (A)
Attention ! Ne serrez pas trop les vis car cela pourrait endommager votre Mini PC.
3. Utilisez les vis fournies pour fixer le Mini PC installé à l'arrière de l'appareil compatible. (B)
Zainstaluj swój Mini PC na kompatybilnym urządzeniu Universal Screen Mount
Aby zainstalować swój Mini PC na kompatybilnym urządzeniu Universal Screen Mount, wykonaj
poniższe czynności:
1. Połóż swój Mini PC do góry nogami na płaskiej i stabilnej powierzchni.
2. Za pomocą dołączonych śrub zamontuj uchwyt Mini PC w otworach na śruby znajdujących się na
spodzie Mini PC. (A)
Ostrzeżenie! Nie dokręcaj śrub zbyt mocno, ponieważ może to uszkodzić Mini PC.
3. Za pomocą dołączonych śrub przymocuj zainstalowany Mini PC do tylnej części urządzenia.(B)

26
Installeer uw Mini-pc op een compatibel Universal Screen Mount-apparaat
Volg de onderstaande stappen om uw Mini-pc op een compatibel Universal Screen Mount-appa-
raat te installeren:
1. Połóż swój Mini PC do góry nogami na płaskiej i stabilnej powierzchni.
2. Gebruik de meegeleverde schroeven om de Mini PC Mount in de schroefgaten aan de onderkant
van de Mini PC te monteren. (A)
Waarschuwing! Draai de schroeven niet te vast, want dit kan uw Mini PC beschadigen.
3. Gebruik de meegeleverde schroeven om de geïnstalleerde Mini PC aan de achterkant van het
apparaat te bevestigen. (B)

27
FCC STATEMENT
This device complies with Part 15 of the FCC Rules. Operation is subject to the following
two conditions:
(1) This device may not cause harmful interference, and
(2) This device must accept any interference received, including interference that may
cause undesired operation.
This equipment has been tested and found to comply with the limits for a Class B digital
device, pursuant to part 15 of the FCC Rules. These limits are designed to provide reason-
able protection against harmful interference in a residential installation. This equipment
generates, uses and can radiate radio frequency energy and, if not installed and used in
accordance with the instructions, may cause harmful interference to radio communica-
tions. However, there is no guarantee that interference will not occur in a particular
installation. If this equipment does cause harmful interference to radio or television
reception, which can be determined by turning the equipment off and on, the user is
encouraged to try to correct the interference by one or more of the following measures:
—Reorient or relocate the receiving antenna.
—Increase the separation between the equipment and receiver.
—Connect the equipment into an outlet on a circuit different from that to which the receiv-
er is connected.
—Consult the dealer or an experienced radio/ TV technician for help.
Operation of transmitters in the 5.925-7.125 GHz band is prohibited for control of or
communications with unmanned aircraft systems
Operational restrictions for 6 GHz U–NII devices.
FCC regulations restrict operation of this device to indoor use only. The operation of this
device is prohibited on oil platforms, cars, trains, boats, and aircraft, except that opera-
tion of this device is permitted in large aircraft while flying above 10,000 feet.
FCC Radiation Exposure Statement:
This equipment complies with FCC radiation exposure limits set forth for an uncontrolled
environment. In order to avoid the possibility of exceeding the FCC radio frequency
exposure limits, Human proximity to the antenna shall not be less than 20cm(8
inches)during normal operation.
Any Changes or modifications not expressly approved by the party responsible
for compliance could void the user's authority to operate the equipment.

Address :
Manufacturer :
TEL : 852-23860910
Unit 1908, 19/F, Tower 2, Grand Central Plaza, 138
Shatin Rural Committee Road, Shatin, N.T., H.K
Website : https://www.miniscloud.com
Micro Computer (HK) Tech Limited
Online Technical Support
Email :
Website : https://www.minisforum.com/new/support
Contact information
地址 :
生产商 :
电话 :
0755-84659450
深圳市龙岗区平湖街道禾花社区富康路6号宝能智创谷B栋
201-203、205-210、218-2、219-222
网址 : https://www.miniscloud.com
深圳美高创新科技股份有限公司
售后技术支持
电话 : 400-090-9901
网址 : https://www.minisforum.com/new/support
联系信息