WX159053A
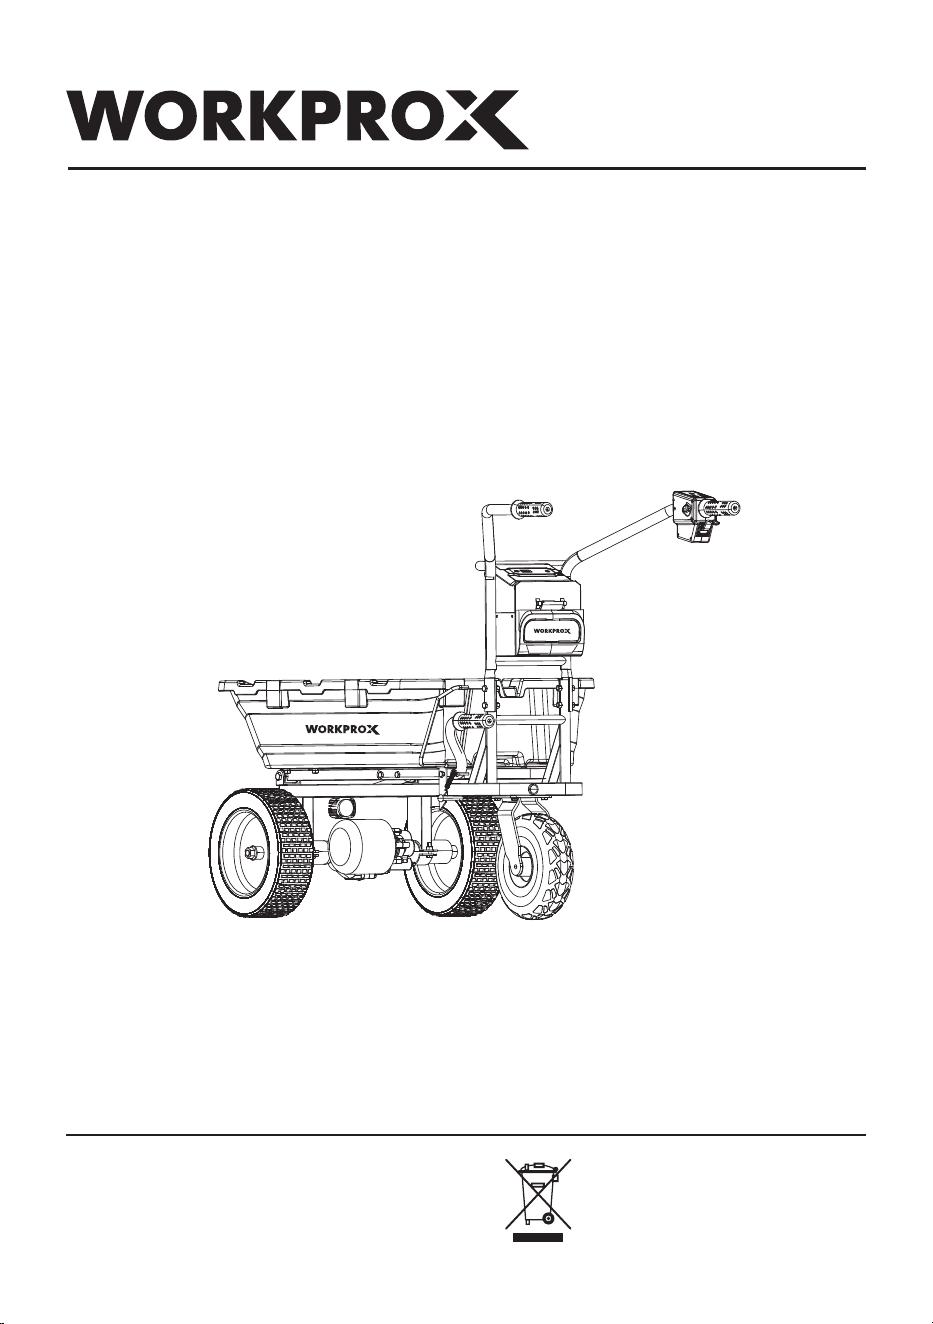
ORIGINAL OPERATING INSTRUCTIONS
40V BRUSHLESS ELECTRIC
POWERED WHEELBARROW
Distributed by
Hangzhou GreatStar Industrial Co., Ltd.
No.35 Jiuhuan Road, Shangcheng District
Hangzhou 310019, China
www.greatstartools.com
Made in China
Model#: GJ7303
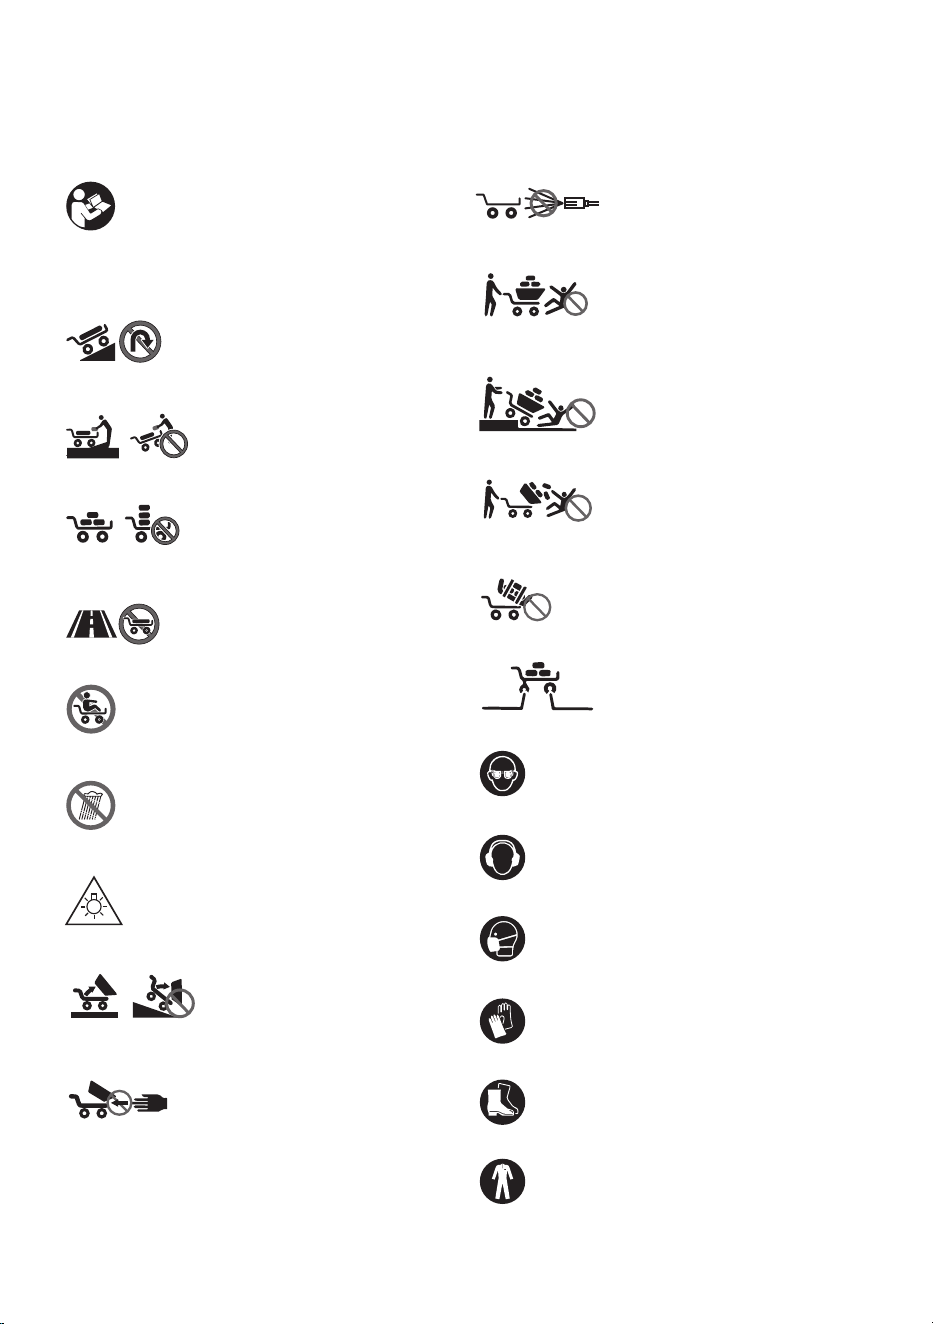
DESCRIPTION OF SYMBOLS
The rating plate on your tool may show symbols. These represent important information about the
product or instructions on its use.
DANGER!
- Read the operating instructions to reduce the
risk of inquiry.
Do not change the direction on steep slopes.
Load and unload objects on at ground.
Load objects on the carrier or bucket evenly.
This machine cannot be used on the public road.
Pressure: 33 psi for front tires and 33 psi for rear tires.
Remove the ropes before dumping the cargo.
Do not operate the machine around uneven surfaces.
Keep bystanders away from the machine during
operation.
Do not operate the machine until the bucket is fully
retracted.
Do not use a high-pressure washer to clean the
machine.
Do not use for transporting persons.
Do not expose to rain.
Do not look directly at the light.
Do not dump items on slopes. After dumping,
lock the dumping device.
Wear safety goggles.
Wear ear defenders.
Wear a breathing mask.
Wear protective gloves.
Wear safety shoes.
Wear close-tting work clothes.
Risk of pinning and crushing. Keep your hands
at a safe distance during operation. Do not
place your hands or body parts into the
transport components.
2
33 psi 33 psi

3
3) Personal safety
Stay alert, watch what you are doing and use
common sense when operating a power tool.
Do not use a power tool while you are tired or
under the inuence of drugs, alcohol or medication.
A moment of inattention while operating power
tools may result in serious personal injury.
Use personal protective equipment. Always
wear eye protection. Protective equipment such
as a dust mask, non-skid safety shoes, hard hat or
hearing protection used for appropriate conditions
will reduce personal injuries.
Prevent unintentional starting. Ensure the
switch is in the off-position before connecting
to power source and/or battery pack, picking up
or carrying the tool. Carrying power tools with
your nger on the switch or energising power tools
that have the switch on invites accidents.
Remove any adjusting key or wrench before
turning the power tool on. A wrench or a key left
attached to a rotating part of the power tool may
result in personal injury.
Do not overreach. Keep proper footing and balance
at all times. This enables better control of the
power tool in unexpected situations.
Dress properly. Do not wear loose clothing or
jewellery. Keep your hair and clothing away from
moving parts. Loose clothes, jewellery or long hair
can be caught in moving parts.
If devices are provided for the connection of
dust extraction and collection facilities, ensure
these are connected and properly used. Use of
dust collection can reduce dust-related hazards.
Do not let familiarity gained from frequent use
of tools allow you to become complacent and
ignore tool safety principles. A careless action
can cause severe injury within a fraction of a
second.
4) Power tool use and care
Do not force the power tool. Use the correct
power tool for your application. The correct power
tool will do the job better and safer at the rate for
which it was designed.
Do not use the power tool if the switch does not
turn it on and off. Any power tool that cannot be
controlled with the switch is dangerous and must
be repaired.
Disconnect the plug from the power source
and/or remove the battery pack, if detachable,
from the power tool before making any
adjustments, changing accessories, or storing
power tools. Such preventive safety measures
reduce the risk of starting the power tool accidentall
y.
Store idle power tools out of the reach of
children and do not allow persons unfamiliar with
the power tool or these instructions to operate
the power tool. Power tools are dangerous in the
hands of untrained users.
Maintain power tools and accessories. Check
for misalignment or binding of moving parts,
breakage of parts and any other condition that
DANGER!
When using the equipment, a few safety precautions
must be observed to avoid injuries and damage. Please
read the complete operating instructions and safety
regulations with due care. Keep this manual in a safe
place, so that the information is available at all times. If
you give the equipment to any other person, hand over
these operating instructions and safety regulations as
well. We cannot accept any liability for damage or
accidents which arise due to a failure to follow these
instructions and the safety instructions.
1. GENERAL POWER TOOL SAFETY WARNING
Save all warnings and instructions for future
reference.
The term "power tool" in the warnings refers to your
mains-operated (corded) power tool or battery-operated
(cordless) power tool.
1) Work area safety
Keep work area clean and well lit. Cluttered or
dark areas invite accidents.
Do not operate power tools in explosive
atmospheres, such as in the presence of
flammable liquids, gases or dust. Power tools
create sparks which may ignite the dust or fumes.
Keep children and bystanders away while
operating a power tool. Distractions can cause
you to lose control.
2) Electrical safety
Power tool plugs must match the outlet. Never
modify the plug in any way. Do not use any
adapter plugs with earthed (grounded) power tools.
Unmodied plugs and matching outlets will reduce
risk of electric shock.
Avoid body contact with earthed or grounded
surfaces, such as pipes, radiators, ranges and
refrigerators. There is an increased risk of electric
shock if your body is earthed or grounded.
Do not expose power tools to rain or wet
conditions. Water entering a power tool will
increase the risk of electric shock.
Do not abuse the cord. Never use the cord for
carrying, pulling or unplugging the power tool.
Keep cord away from heat, oil, sharp edges or
moving parts. Damaged or entangled cords
increase the risk of electric shock.
When operating a power tool outdoors, use an
extension cord suitable for outdoor use. Use of a
cord suitable for outdoor use reduces the risk of
electric shock.
If operating a power tool in a damp location is
unavoidable, use a residual current device (RCD)
protected supply. Use of an RCD reduces the risk
of electric shock.
WARNING!
Read and understand all instructions. Failure to
follow the warnings and instructions may result in
electric shock, re and/or serious injury.

4
may affect the power tool’s operation. If damaged,
have the power tool repaired before use. Many
accidents are caused by poorly maintained power tools.
Keep cutting tools sharp and clean. Properly
maintained cutting tools with sharp cutting edges
are less likely to bind and are easier to control.
Use the power tool, accessories and tool bits etc.
in accordance with these instructions, taking into
account the working conditions and the work to be
performed. Use of the power tool for operations
different from those intended could result in a
hazardous situation.
Keep handles and grasping surfaces dry, clean
and free from oil and grease. Slippery handles and
grasping surfaces do not allow for safe handling and
control of the tool in unexpected situations.
5) Service
Have your power tool serviced by a qualied repair
person using only identical replacement parts. This will
ensure that the safety of the power tool is maintained.
6) Battery tool use and care
a. Ensure the switch is in the off position before
inserting battery pack. Inserting the battery pack into
power tools that have the switch on invites accidents.
b. Use power tools only with specically designated
battery packs. Use of any other battery packs may
create a risk of injury and re.
c. When battery pack is not in use, keep it away from
other metal objects like paper clips, coins, keys, nails,
screws, or other small metal objects that can make a
connection from one terminal to another.
Shorting the battery terminals together may cause
burns or a re.
d.Under abusive conditions, liquid may be ejected from
the battery; avoid contact. If contact accidentally
occurs, ush with water. If liquid contacts eyes,
additionally seek medical help. Liquid ejected from
the battery may cause irritation or burns.
ADDITIONAL SAFETY INSTRUCTIONS RELATED TO
THE BATTERY PACK AND BATTERY SAFETY
Use only the WORKPROX batteries supplied with the
WORKPROX Tool or WORKPROX-approved replacements.
Do not use the battery to power any device other than
the WORKPROX tool it was sold with.
Do not charge the battery in a place where static
electricity is generated nor let the battery touch
something that is statically charged.
The battery can be stored at temperatures between
40°F(4°C) and 104°F(40°C).
Never store or leave your lithium ion battery in
temperatures over that recommended otherwise re
may occur.
DO NOT store the Lithium Ion battery anywhere that the
temperature can easily reach higher temperatures than
recommended -this includes garden type sheds, and
vehicles where the inside temperature can climb to
dangerous levels in the direct sunlight and on high
temperature days. THINK BEFORE LEAVING YOUR
LITHIUM ION BATTERY PACK IN STORAGE.
The battery can be charged or operated at temperatures
between 40°F(4°C) and 104°F(40°C). NEVER CHARGE
YOU LITHIUM ION BATTERY BELOW OR ABOVE
TEMPERATURES RECOMMENDED OTHERWISE
FIRE OR SERIOUS DAMAGE TO THE BATTERY
PACK MAY OCCUR.
The most suitable temperatures to charge the battery
pack are between 68°F(20°C) -77°F(25°C).
Always allow the battery pack to cool down after
charging, do not place it in a hot environment such as a
metal shed or open trailer left in the sun.
Take care where the tool is stored. Do not store in areas
of corrosive fumes, or salt air or similar conditions. Try
and store the tool in the packaging supplied with the tool.
Do not dispose of the battery in a re or put the battery
into a microwave oven, conventional oven, dryer, or
high-pressure container. Under these conditions, the
battery may explode.
Never attempt to open the battery pack, puncture the
battery or subject the battery to strong physical shock.
If the plastic housing of the battery pack breaks open or
cracks, immediately discontinue its use and do not
recharge it. Ensure the battery pack clip is in good
condition and will not allow the pack to fall free from the
tool. If the clip is damaged or for any reason is not
locking the pack in place, Do Not continue to use.
Stop using the battery if it exhibits abnormal heat, odour,
colour, deformation, or is in an abnormal condition.
If you detect leakage or a foul odour, it is especially
important to keep the battery away from re. If battery
liquid leaks onto your skin or clothes, wash well with
clean water immediately. If liquid leaking from the
battery gets into your eyes, do not rub your eyes. Rinse
your eyes well (for at least 10 minutes) with clean water,
and consult a doctor immediately.
Do not use a leaking battery.
Handle batteries with care to avoid shorting the battery
with conducting materials, such as nails, screws, metal
watch bands, rings, bracelets, and keys. The battery
may overheat and could burn you.
After the battery has reached the end of its useful life,
we recommend recycling the materials at your local
municipal council recycling centre. DO NOT attempt to
replace the battery cells in the battery pack, repair or
modify any part of the battery pack assembly.
When recycling, make it nonconductive by applying
insulating tape to the terminals located on the battery.
WHEN TO CHARGE THE BATTERY
New batteries are shipped in a low charged condition
and should be fully charged before Use. The battery
pack can be recharged at any time during use, provided
the pack is not overheated.
If the battery pack starts to cut out due to low voltage,
or previous tasks undertaken can no longer be
performed, it is suggested to stop using the tool and
recharge the battery.
For storage, it is suggested to recharge the battery
between 50% and 75% charge.Charge the device at
least once in 3-6 months to preserve battery life
span.

5
7) Brushless Electric Powered Wheelbarrow safety
warnings
Always wear slip-resistant protective footwear during
machine operation. Anti-slip and toe-closure safety
boots/shoes can reduce the risk of injury.
Check the path before loading items or materials.
Familiarize yourself with the path and ensure it is
wide enough for the machine to pass safely under
load. This helps reduce the risk of the machine losing
control.
Exercise extreme caution on slippery, loose, and
unstable terrain. Slippery surfaces (e.g., wet grass,
snow, and ice) as well as loose and uneven ground
(e.g., sand or gravel) may cause the machine to lose
traction and adversely affect steering, control, and
stability.
Do not operate the machine on steep slopes. This
reduces the risk of the machine losing control,
slipping, or falling. If the slope exceeds the
recommended maximum gradient, it increases the
risk of unstable driving and adversely affects safe
parking capability.
When working on slopes, ensure a stable stance and
stand across the slope surface. Avoid jolting up and
down, and exercise extreme caution when changing
direction. This reduces the risk of machine loss of
control, slipping, and falling.
When parking, loading, and unloading, park the
vehicle on a at area whenever possible. Never leave
the machine on a slope without supervision.
Compared to at surfaces, parking the machine on a
slope is more unstable.
When leaving the machine, park it in a safe area and
engage the parking brake. The parking brake
prevents the front wheels from moving unexpectedly
and enhances stability.
Ensure ramps are barrier-free, solid, and safe. To
minimize the risk of damage or injury, all loose rocks
on the ramps must be cleared, and the pavement
must be sufciently sturdy to withstand the
anticipated load from vehicles. The subgrade and
both sides of the road surface must be robust
enough to prevent machinery from tilting or swaying
under heavy loads. The width of the ramps must
provide adequate space for workers to stand and
maintain balance when transporting heavy items.
Before use, ensure all locking screws are securely
tightened. The locking screws on the rear wheel and
the front and side panels of the open bracket must
be rmly secured to prevent accidental movement of
these adjustable components on the machine.
Do not operate the machine under overload
conditions. Ensure the machine is loaded with the
appropriate load of items or materials to be
transported. Overloading may result in difculty in
operating and stopping the machine, increased
braking time and distance, and heightened risks of
instability.
Do not operate the machine when materials are
stacked too high. If the stack exceeds the hopper
depth or extends beyond the hopper sides, the
machine may lose balance and control, becoming
unmanageable.
Secure the load using containers and fastening
devices. Loose and/or unfastened loads may shift,
resulting in loss of stability and control.
Always keep the handle rmly in your grip. Loss of
control increases the risk of personal injury.
Remove both battery packs when not in use.
Removing the battery packs prevents accidental
power supply, such as in the event of operation by
children or untrained/unauthorized personnel.
Without the battery packs, there is no power.
This machine is not intended for use on public roads.
Using a handcart on public roads is illegal and may
result in personal injury or local judicial penalties.
When loading or unloading the machine for
transportation or moving it across different levels,
use a sturdy board with anti-slip and anti-dislodging
features. Ensure the board's tilt angle does not
exceed 12° and handle the machine slowly and
carefully. If the operation is too fast or unstable, it
may cause the machine to tip over or overturn.
Do not disassemble, repair, or modify this device.
PREPARE
Before operating the machine, make sure there is no
one around the machine.
Perform the inspection as specied in the mainte-
nance section before operating the machine.
OPERATE
When operating the machine, stand behind the
machine and rmly hold the handle with both hands.
Never ride on the machine to operate it.
Never allow others to ride on the machine.
When operating the machine to move backward or
backward, keep your eyes on the rear and watch
your step to avoid slipping or tripping.
Do not use the machine when visibility is poor,
otherwise you may hit an obstacle.
Slow down and be careful when operating the
machine on uneven road or crossing the difference of
road elevation.
Avoid driving on soft ground to prevent shoulder
collapse and rollover.
Do not operate the machine on slopes steeper than
15°.
If an abnormality is detected, park the machine on a
at surface. Before inspecting the machine, lock the
brake handle and then turn off the power.
Before operating the machine, ensure the handle of
the tipping device is fully pulled down to the bottom
and securely locked. If not fully locked, the chute or
tipping bucket may tilt during downhill movement,
causing the load to fall and posing a risk of accidents
or personal injury.
When operating the machine near the wall, be careful
to avoid your hand getting caught between the
handle and the wall.
Do not use the machine in bad weather, especially
when there is a possibility of lightning. This can
reduce the risk of being struck by lightning.

6
Do not touch metal parts during or after use, as they
may become hot due to sunlight exposure and cause
burns.
Be careful not to let the cable wrap around the items
or obstacles it carries.
When crossing the wooden bridge, ensure that the
total weight of the product, load capacity, and
operator does not exceed the bridge's weight limit,
and cross the bridge carefully at a constant speed.
Wear gloves when operating the machine in
low-temperature environments. Touching metal parts
with bare hands may cause your hands to stick.
If there are people or obstacles in the direction of
movement, avoid them in advance.
Do not scoop items directly with a tray or bucket.
This may damage the machine and cause accidents.
When using the machine on muddy ground, wet
slopes or slippery surfaces, be sure to stand rmly.
Do not immerse the machine in water.
If you leave the machine while working, make sure
the tipping device is fully retracted to its original
position, then lock the brake handle and remove the
lock key.
Do not leave the machine unattended when the
trolley or hopper is loaded.
OPERATIONS ON A SLOPE
Do not cross the slope.
Stop before going downhill and slow down carefully
If the speed is too high while going downhill, a
buzzer will sound. In this case, use the brakes to
slow down.
Be careful when starting and stopping the machine
on the slope.
As the stability of items on the slope will be reduced,
use ropes to securely fasten the items.
The machine's stability depends on its load. Reduce
the load to the minimum. The machine's stability
depends on its load. Reduce the load to the
minimum.
Due to blocked visibility on the slope, minimize the
stacking height of the items carried.
Do not park the machine on a slope. Park it on a at
surface, lock the brake handle, and then turn off the
power. Do not park the machine on a slope. Park it
on a at surface, lock the brake handle, and then turn
off the power.
Do not change direction or speed pattern on a steep
slope.
Never release the trigger while climbing uphill. The
machine may reverse, causing accidents.
Ensure your battery has enough power before
working on the slope. If the battery is low, charge it
or replace it with a fully charged one.
When starting the machine on a slope, do not place
your foot behind the rear wheel, as the machine will
move back a few centimeters.
LOADING ITEMS
Do not overload. When loading items, strictly follow
the instructions in the manual and do not exceed the
load limit.
The higher the load capacity, the more difcult it is to
operate the machine. Therefore, the load capacity
should be maintained within a range that does not
affect operation.
Secure the load with ropes.
Place items into the pallet or dump. If the loaded
items protrude beyond the pallet or dump, there is a
risk of accidents due to falling items or contact with
obstacles such as walls.
Ensure the items do not exceed the line of sight
height. Stacking items too high obstructs visibility,
posing serious risks. There is also a risk of rollovers
and personal injury as the stacked items may lose
balance.
Load items evenly into the pallet or dump truck. If the
items are not evenly loaded, there is a risk of
overturning and injury due to unbalanced cargo.
Before loading items or operating the machine,
ensure the handle of the tipping device is fully pulled
down to the bottom and fully locked.
Make sure to load heavier items rst to maintain
balance.
Never extend the front or side rails on steep slopes.
The side rail may be extended when carrying lighter
loads.
When extending the front and side rails, do not
exceed the extension limits. When extending the side
rail, ensure both sides are at the same height and
evenly loaded.
Load or unload items on a at surface. Do not load or
unload items on a slope.
When lifting and tilting the support or dump, hold the
handle rmly in a stable position.
MACHINE TRANSPORTATION
Use ladder rails with a height at least four times the
length of the truck bed, equipped with xed devices
suitable for the bed, featuring anti-slip surfaces and
sufcient width to support the weight of machinery
and operators. Please read the user manual of the
ladder rails carefully before use.
Before loading the machine, unload all items from the
machine and remove dirt and debris from the tires.
Install the ladder rail on a level surface.
Before loading or unloading the machine, ensure no
one is around the machine or the ladder rail. Load or
unload the machine slowly, taking precautions to
prevent the machine from falling off the ladder rail
and avoiding head contact with the truck's ceiling.
Extra caution is required when loading or unloading
the machine in reverse.
When transporting the machine, lock the brake
handle, turn off the power, remove the battery and
lock the key, and secure the machine rmly.
7
14
4
5
3
2
1
1919
15
11
18
17
10
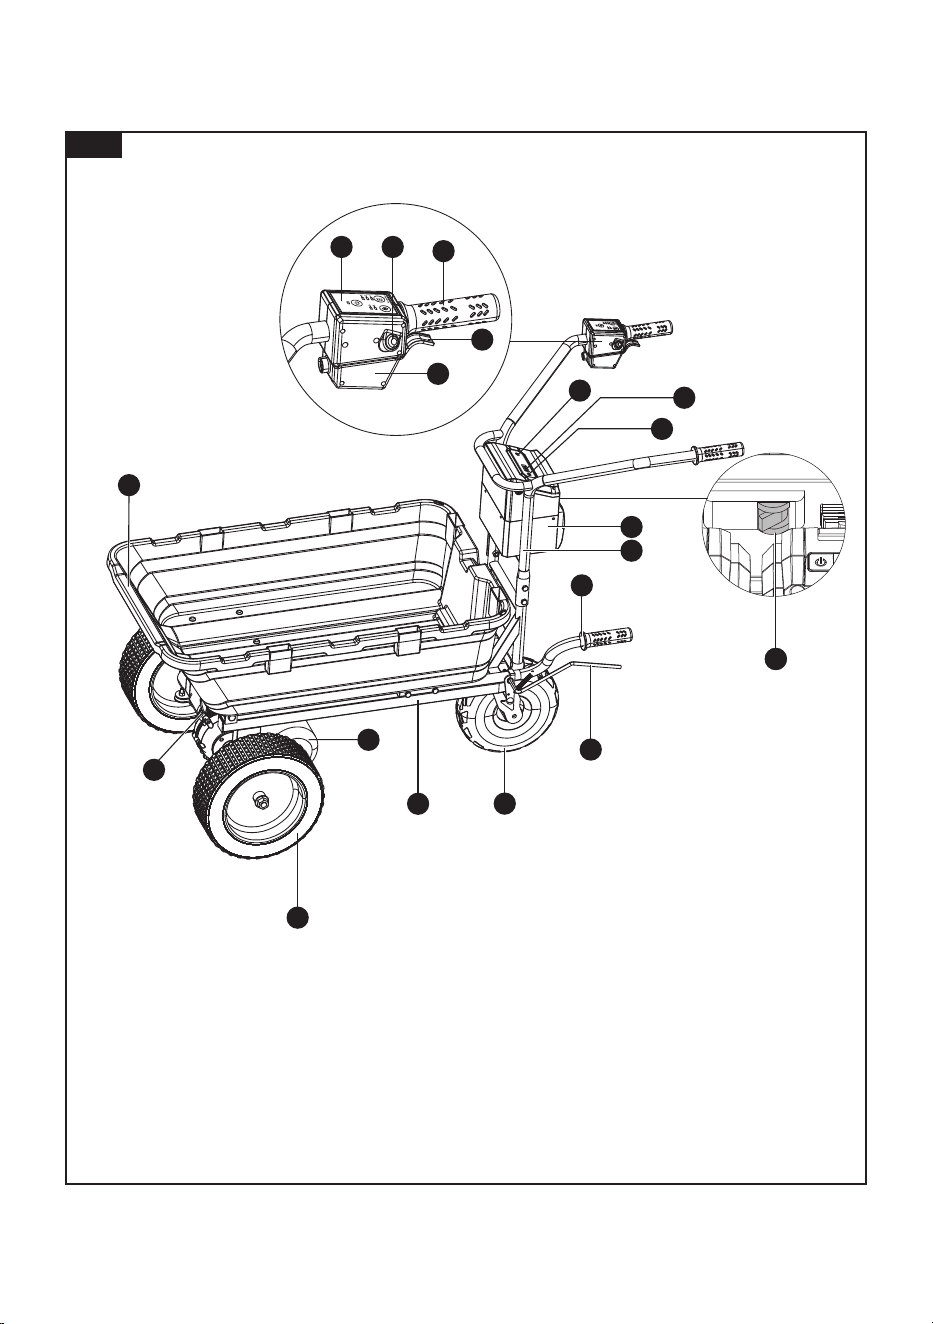
2. LAYOUT AND UNPACKING
Fig. 1
2.1 Layout (Fig.1)
1. Control Panel
2. Horn Button
3. Handlebar
4. Drive/Reverse Switch
5. Control Box
6. Headlight Switch
7. Battery Level Indicator (LED)
8. Battery Level Display Button
9. Battery Compartment
10. Dump Handle
11. Caster wheel
12. Gear Motor
13. Drive Wheel
14. Headlight
15. Bucket
16. Handle Assembly
17. Main Frame
18. Release Lever
19. Main Power Switch/Over
Current Protection Switch
6
12
8
7
13
9
16
8
Gear Motor Type
Rated Gear Motor Power
Gear Motor Speed
Optimal Operating
Load Capacity
Maximum Load Capacity
Maximum Climbing Ability
Bucket Capacity
Light Brightness
Horn Sound Level
2.2 Items supplied
NOTE: Please check that the article is complete as
please contact our online service center.
Open the packaging and take out the equipment with
care.
Remove the packaging material and any packaging
and/or transportation braces (if available).
Check to see if all items are supplied.
Inspect the equipment and accessories for transport
damage.
If possible, please keep the packaging until the end
of the guarantee period.
DANGER!
The equipment and packaging material are not toys.
Do not let children play with plastic bags, foils or
small parts. There is a danger of swallowing or
suffocating!
3. PROPER USE
Speed (No Load):
Machine Weight
Drive:
Gear 1/2/3 = 1.5 / 3.0 / 4.5 km/h
Reverse: 1.5 km/h
80.5 lb(36.5 kg)
4. TECHNICAL DATA
Model No.
Capacity
Voltage
USB-C
Battery
GS-ET24075
4000mAh
Maximum 20V, Nominal 18V
Max. 45W, 5V/3A, 9V/3A,
12V/3A, 15V/3A, 20V/2.25A
USB-A
Output Max. 15W, 5V/3A
Input/
Output
This appliance is a brushless electric powered
wheelbarrow for transporting loose materials such as
soil, sand, gravel, bricks, mulch, and garden tools in
private gardens, yards, construction sites, and farms,
within the maximum load capacity.
Brushless Gear Motor
300 W
1600RPM
100 kg
200 kg
15°
75L
400 lm
80 dB
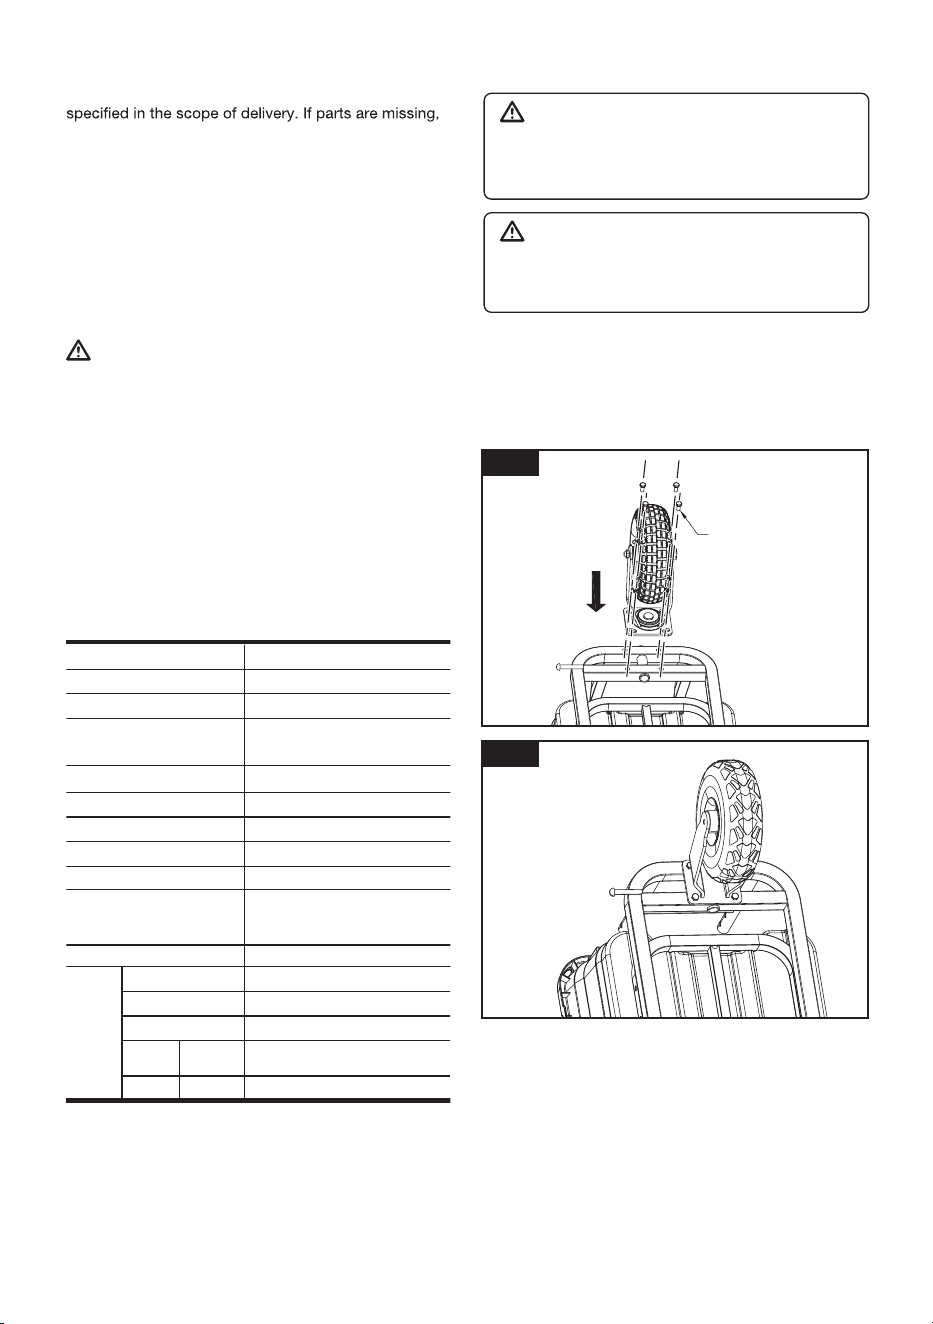
5.1 Installing the Caster Wheel (Fig.2-3)
Place the caster wheel (11) onto the main frame (17).
Align the mounting holes.
Secure the wheel using four M8 hex bolts.
Tighten all bolts securely with a wrench.
5.2 Installing the Drive Wheel (Fig.4-5)
Install the two drive wheels (13) onto both sides of the
drive shaft.
Align the keyway of each wheel with the keyway on
the shaft.
Insert the parallel key fully into the aligned keyway.
Secure the wheels with the M14 lock nuts.
Tighten all lock nuts securely with a wrench.
5. ASSEMBLY
Fig. 2
Fig. 3
WARNING!
Do not insert the battery until assembly is complete.
Failure to comply could result in accidental starting
and serious personal injury.
WARNING!
The product must be fully assembled before
operation. Do not use a product that is only partially
assembled or assembled with damaged parts.
M8*20 Hex Bolt
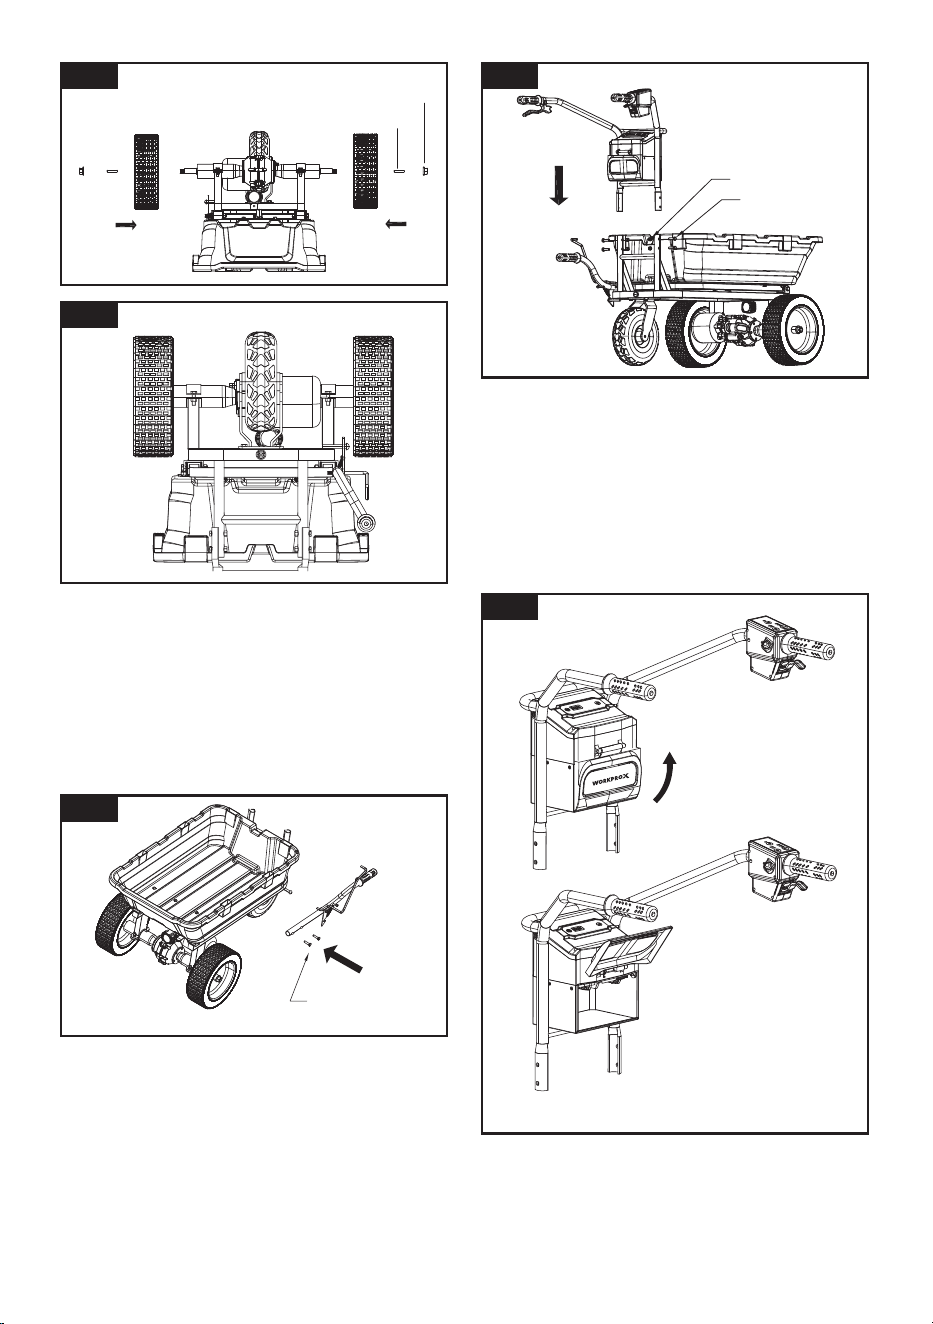
Fig. 4
9
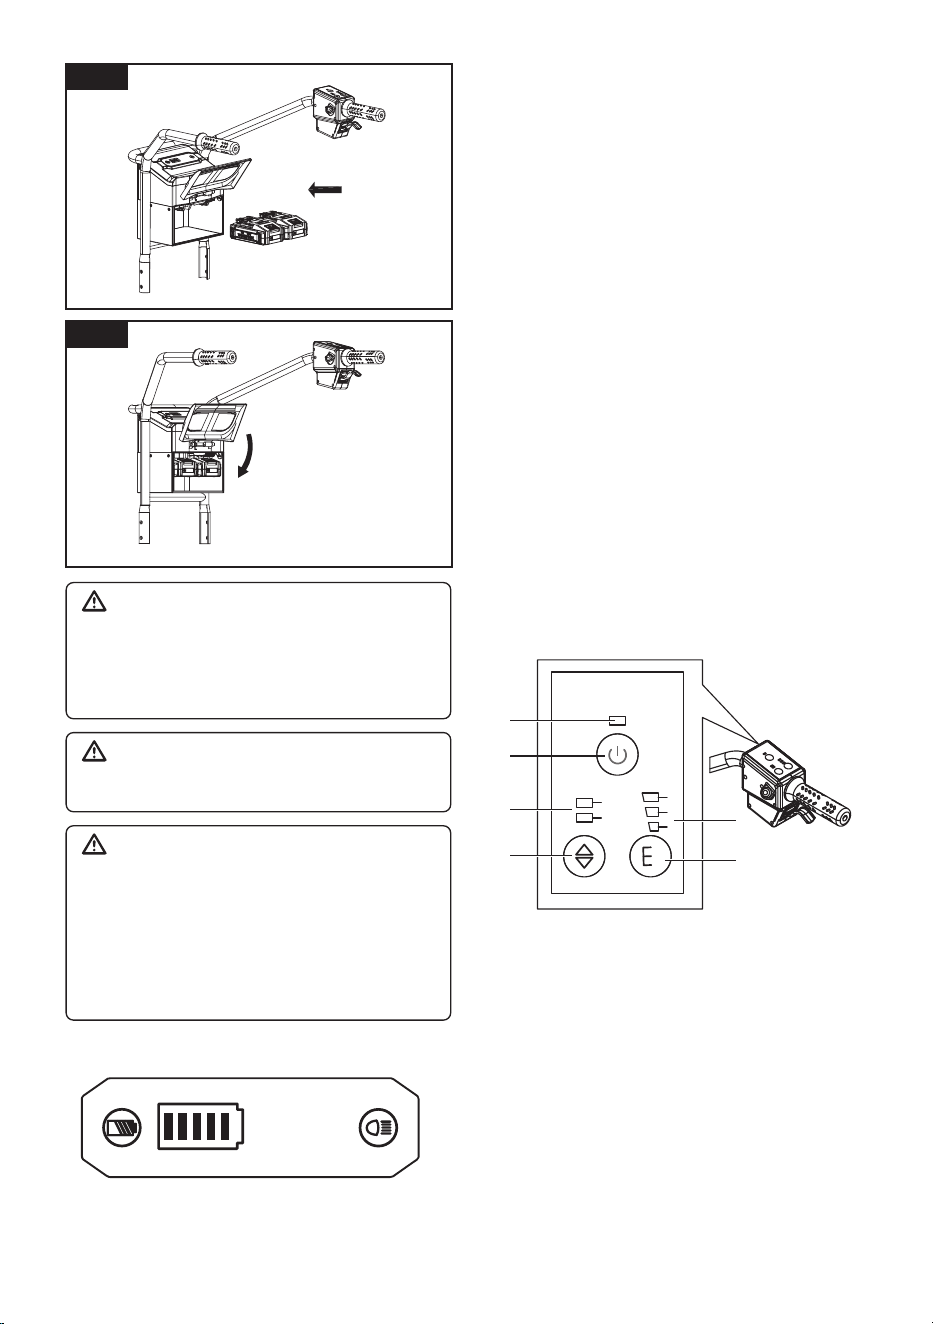
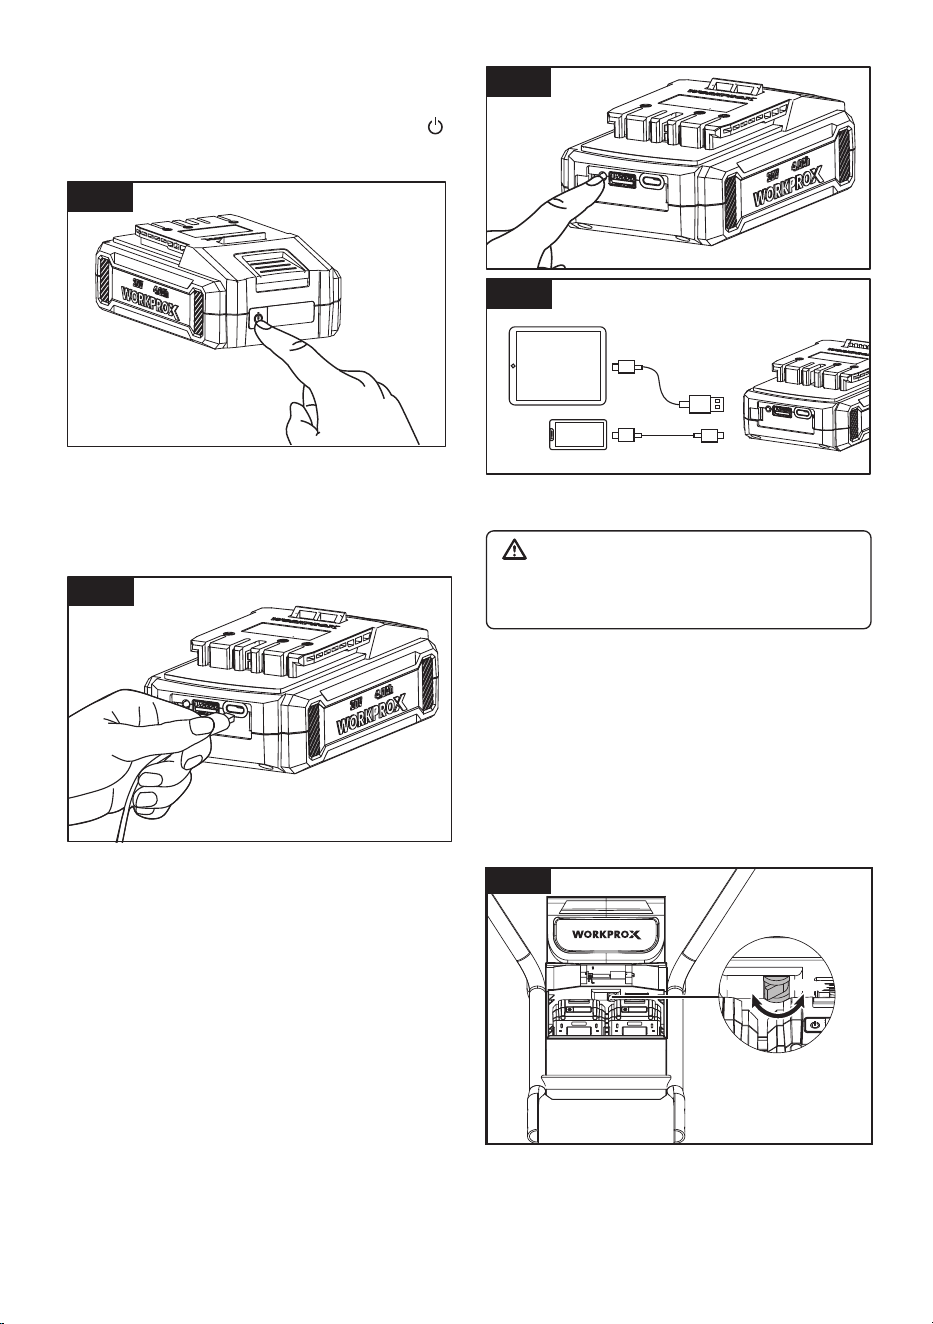
5.5 Inserting/Removing the battery pack (Fig.8-10)
To install the battery, open the battery compartment
cover, slide the battery pack into the body of the tool,
and ensure it clicks and locks securely into place.
To remove the battery, push in the release buttons and
pull the battery pack away from the tool.
Close the battery compartment cover.
NOTE: Be careful not to pinch your ngers when
opening or closing the battery compartment cover.
5.3 Installing the Dump Handle (Fig.6)
Install the dump handle (10) onto the main frame (17).
Align the holes of the handle with the holes on the
brackets.
Secure the handle using the M8 hex bolts.
Tighten all bolts securely with a wrench.
Check that the handle moves smoothly and is securely
attached.
5.4 Install the Handle Assembly (Fig. 7)
Align the ends of the handle assembly (16) with the
corresponding holes on the main frame (17).
Insert the M8 hex bolts into the aligned holes.
Fasten the hex bolts using M8 lock nuts.
Tighten all lock nuts securely with a wrench.
Check that the bracket is securely installed and operates
properly.
Fig. 5
Fig. 6
Fig. 7
Fig. 8
M8*40 Hex Bolt
M8 Lock Nut
M8*40 Hex Bolt
M14 Lock Nut
Parallel Key
10
(D/R)
D
R
1
2
3
(Gear switching)
1
2
3
5.7 Control panel
1. Main Power Indicator:
Shows whether the device is on (green) or off.
2. Power Button:
Press and hold 3–4 seconds to turn the device on or off.
3. Drive/Reverse Indicator:
Lights green to show the current direction.
4. Drive/Reverse Button:
Press the Drive/Reverse Button to switch direction.
5. Speed Control Button:
Switches between Low (1st), Medium (2nd), and High
(3rd) speeds. Disabled in Reverse.
6. Speed Indicator:
Shows the current speed setting.
2. Battery Level Indicator (LED)
Function: Displays the battery charge level.
Operation:
Press the battery level display button on the battery
compartment cover to check the remaining battery level.
Battery Level Display (Green LEDs):
5 LEDs lit: 81-100%
4 LEDs lit: 61-80%
3 LEDs lit: 41-60%
2 LEDs lit: 21-40%
1 LED lit: 0-20%
NOTE: Always check the battery level before use to
ensure sufcient power.
1. Battery Level Display Button
Function: Checks the current battery charge level.
Operation:
Press the battery level button on the battery
compartment cover.
3. Headlight Switch
Function: Turns the vehicle lights on or off.
Operation:
Press the switch once to turn on the lights.
Press again to turn off the lights.
Fig. 9
Fig. 10
5.6 Battery Compartment Button & LED Indicator
WARNING!
This machine will only operate when two batteries
are installed. You must use the two identical
WORKPROX battery packs provided, or other
WORKPROX 20V series battery packs you already
own, and charge them at the same time. lf two
battery packs with different amp-hour capacities
are used, the machine will operate according to the
lower-capacity battery.
WARNING!
Hold the tool and the battery pack rmly when
installing or removing the battery pack. Failure to
hold the tool and the battery pack rmly may cause
them to slip off your hands and result in damage to
the tool and battery pack and personal injury.
WARNING!
When installing the battery packs, make sure your
hand is not on the switch to prevent accidental starting.
1 2 3
1
2
3
6
5
4
11
Fig. 15
Main Power Switch/Over
Current Protection Switch
OpenOpen CloseClose
NOTES:
Never remove the battery while the machine is running.
For extended periods of inactivity, press the
shut-down button.
Only use the electric gear motor when the battery has
sufcient charge.
7.1 Main Power Switch (Fig.15)
Controls the machine’s main power supply. Turn it on
before operation and switch it off after use.
Fig. 12
6.3 Charge portable device (Fig.13-14)
Press the button as shown in, the indicator will light
up green to indicate that the battery pack is active
and that the USB ports are ready to be used. (See
Fig.13)
Plug the USB cable into the correct port, and the
other end of the cable into your device to begin
charging the device. (See Fig.14)
After charging, disconnect the USB cables, press
the button to turn the indicator off.
NOTE: The green light remains on during output.After
pressing the button, if no USB cable is connected for
an extended period, the green light will automatically
turn off after 5 minutes.
6. BATTERY PACK
6.1 Battery capacity indicator (Fig.11)
The battery pack has an LED screen, and press the
can display real-time power level. The screen will
automatically turn off in three seconds.
6.2 Recharge the battery pack (Fig.12)
To charge your battery pack, connect one end of the
USB cable with a USB-C port to the corresponding
USB-C port on the battery pack, and connect the other
end to a USB-C or USB-A interface charger.
Fig. 11
7. OPERATION
WARNING!
Before performing any assembly or maintenance
on the machine, make sure the power is turned
off and the battery pack is removed.
Fig.13
Fig. 14
12
Fig. 17
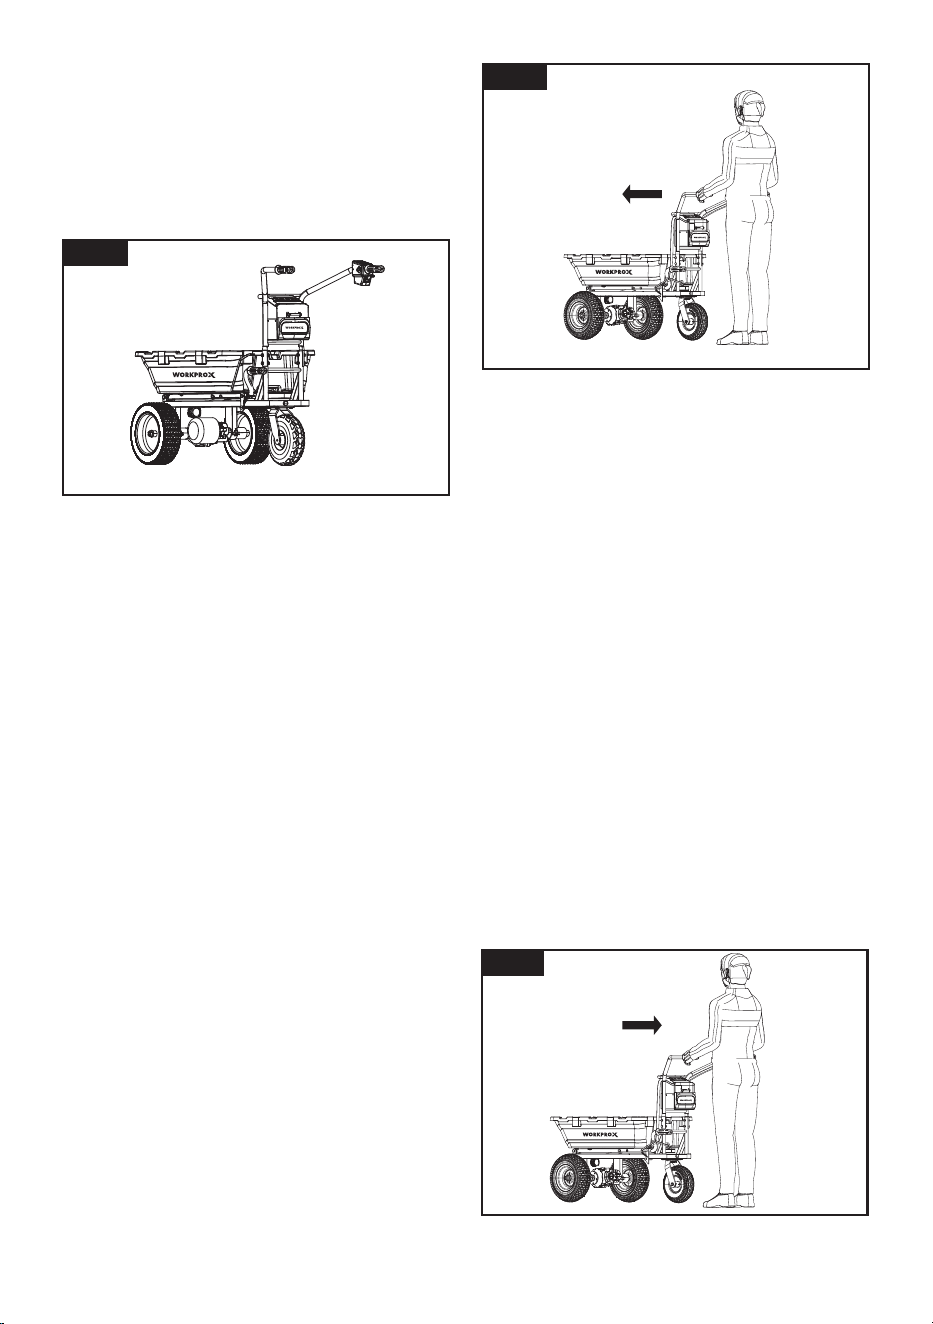
7.2 Power On / Off (Fig. 16)
Press and hold the Power Button for 3–4 seconds to
turn on the device. The main power indicator will light
up green.
To turn off the device, press and hold the Power Button
again for 3–4 seconds until the indicator turns off.
NOTE: The device will automatically turn off after 30
minutes of inactivity.
7.3 Drive / Reverse Operating Steps (Fig. 17-18)
NOTE: Ensure the battery is sufciently charged before
operation.
Drive Operation (Fig. 17)
1. Grip the Handlebar
Hold the handlebar rmly with both hands.
2. Select Drive Gear
Press the drive/reverse switch button to select drive.
Speed Levels: The vehicle has 3 drive speed levels.
Choose the appropriate speed according to terrain
and load:
Level 1: Low speed – suitable for tight spaces or heavy
loads.
Level 2: Medium speed – suitable for normal operation.
Level 3: High speed – suitable for open areas on at terrain.
3. Start Moving Drive
Gradually increase the throttle until the vehicle starts
moving.
4. Stop
Release the drive control to slow down and stop.
NOTES:
Always start at a lower speed when carrying heavy
loads or driving on slopes.
When powered on, the vehicle defaults to drive mode
and low speed.
Avoid changing speed levels abruptly while the
vehicle is in motion.
Do not exceed the maximum recommended speed.
The drive/reverse direction cannot be switched while
the vehicle is in motion. Release the drive/reverse
switch before changing direction. During reverse
operation, the speed is limited to a xed low level and
cannot be adjusted.
Keep both hands on the handlebar at all times during
operation.
Reverse Operation (Fig. 18)
1. Grip the Handlebar
Hold the handlebar rmly with both hands.
2. Select Reverse Gear
Press the drive/reverse switch button to select
reverse.
Speed Level: The vehicle has 1 reverse speed –
suitable for precise maneuvers and safe operation in
tight spaces.
3. Start Moving Backward
Gradually increase the throttle until the vehicle starts
moving backward.
4. Stop
Release the reverse control to slow down and stop.
NOTES:
Avoid changing direction abruptly while the vehicle is
in motion.
Always keep both hands on the handlebar during
operation.
Always start at a lower speed when carrying heavy
loads or driving on slopes.
Do not exceed the maximum recommended speed.
Always ensure the vehicle has fully stopped before
switching between drive and reverse.
Fig. 16
Fig. 18
13
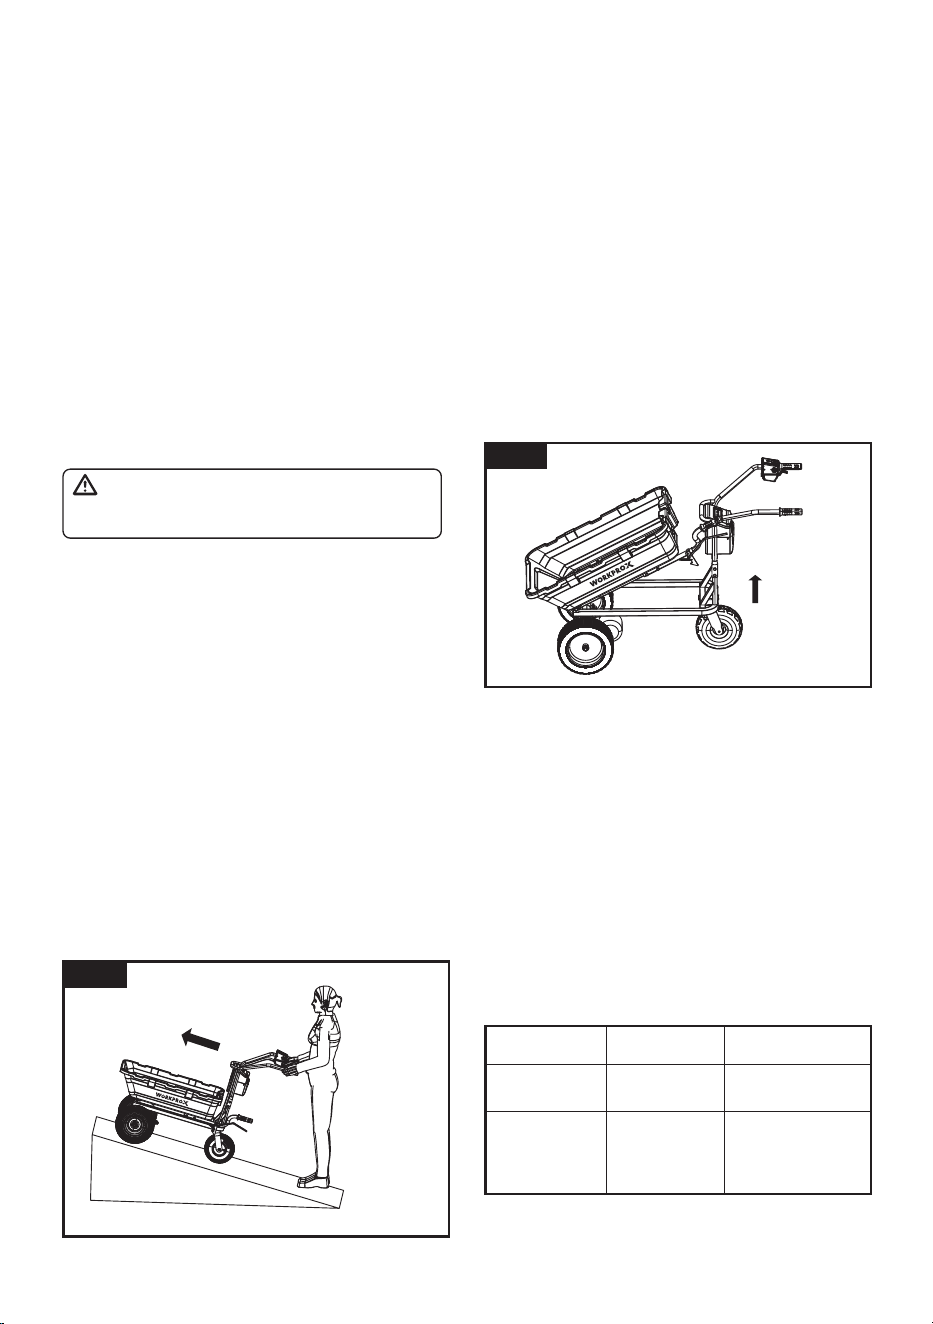
7.4 Climbing Operation (Fig.19)
NOTE: Ensure the battery is sufciently charged before
operation. Check that the path is clear and free of obstacles.
1. Grip the Handlebar
Hold the handlebar rmly with both hands throughout
the climb.
2. Select Drive Gear
Press the
drive
/reverse switch button to select
drive
.
Speed Levels: For climbing, it is recommended to use
Level 1 (low speed) to maintain control and prevent
slipping. Higher speeds are not recommended on
inclines.
3. Start Climbing
Gradually increase the throttle until the vehicle begins
moving uphill.
Maintain a steady speed and avoid sudden
acceleration or braking.
7.5 Operating the Release Lever (Fig. 20)
The release lever (18) on the dump handle controls the
locking and unlocking of the bucket.
To Unlock the Bucket:
Pull the release lever (18) toward yourself.
To Tilt the Bucket:
Hold the dump handle (10) and lift or tilt the bucket
as needed.
To Lock the Bucket:
First, release the release lever (18), then press the
dump handle (10) to engage the locking mechanism.
4. Parking on a Slope
Release the drive control lever to slow down the
machine.
Always hold the handlebar rmly and maintain full
control of the machine. Never let go of the handlebar.
Avoid stopping on a slope whenever possible.
If stopping is unavoidable, move the machine to a at
and stable surface as soon as it is safe to do so.
PRECAUTIONS:
Always travel straight when going uphill. Avoid sharp
turns on slopes.
Do not exceed the maximum recommended load
when operating on an incline.
Always keep both hands on the handlebar.
Operate at low speed to maintain stability and
prevent battery overload.
Ensure the slope is within the machine’s rated climbing
capability. Refer to the technical specications for
details.
7.6 Overload Protection (Fig. 15)
When the machine is operated under conditions that
cause abnormally high current (such as excessive load
or steep inclines), the overload protection system will
be activated. The machine will automatically stop, and
the main power indicator will ash green.
If this occurs, turn off the machine immediately and
remove the cause of the overload, such as reducing the
load or operating under less demanding conditions.
Then turn the machine on again to resume operation.
NOTE: Frequent activation of overload protection may
indicate that the machine is being operated beyond its
intended capacity.
WARNING:
Before moving the machine, always ensure that the
bucket is securely locked.
Keep hands and ngers away from pinch points
when operating the release lever.
WARNING: The vehicle may roll downhill when
stopped on a slope, as it is not equipped with an
automatic hill-hold function.
Fig. 20
Fig. 19
Problem / Fault
Machine will
not run
Gear motor
overheats
Possible Cause
Battery is
discharged
Vent may be
blocked by
dust
Solution / Action
Recharge the
battery pack
Clean vent. Do not
cover vent with
hands during
operation
8. TROUBLESHOOTING
14
ENVIRONMENTAL PROTECTION
This product has been marked with a symbol relating to removing electric and electronic waste. This
means that this product shall not be discarded with household waste but that it shall be returned to a
collection system.
It will then be recycled or dismantled in order to reduce the impact on the environment. Electric and
electronic equipment can be hazardous for the environment and for human health since they contain
hazardous substances.
DISPOSAL OF AN EXHAUSTED
BATTERY PACK
To preserve natural resources, please recycle or dispose of the battery pack properly. This battery pack
contains Li-ion batteries. Consult your local waste authority for information regarding available recycling
and/or disposal options. Discharge your battery pack by operating your tool, then remove the battery
pack from the tool housing and cover the battery pack connections with heavy-duty adhesive tape to
prevent short circuit and energy discharge. Do not attempt to open or remove any of the components.
11. DISPOSAL AND RECYCLING
The unit is supplied in packaging to prevent its being damaged in transit. This packaging is raw
material and can therefore be reused or can be returned to the raw material system.
9. CLEANING & MAINTENANCE
WARNING!
Before inspecting, cleaning, or performing any other maintenance, always switch off the Electric Powered
Wheelbarrow, remove the battery.
9.1 Cleaning
Wear protective gloves when cleaning or performing maintenance.
Use a damp cloth or soft brush to wipe the exterior, wheels, and frame. Avoid spraying water directly on the gear
motor, control box, battery compartment, or air spring components.
Keep water away from bearings, gears, and other critical mechanical parts.
Do not use strong acids, alkalis, or solvents for cleaning.
After cleaning, ensure the machine is completely dry before reinstalling the battery and powering on.
9.2 Maintenance
Always perform a visual inspection before and after use.
Check for loose bolts, damaged or worn parts, and any unusual noises.
Ensure all mechanical components are in proper working condition.
The tipping mechanism contains an air spring rod device. Do not modify the device, as this may cause malfunction
or accidents.
10. STORAGE
Store the machine indoors in a dry, shaded location, avoiding direct sunlight, rain, high temperatures, or damp
conditions.
Park the machine on a at surface to prevent rolling or slipping.
Turn off the power and remove the battery pack.
Do not leave the machine unattended outdoors.
Ensure all mechanical components are in neutral or safe positions before storage.
Manufacturer:
JINHUA GAOJIU ELECTRIC EQUIPMENT CO.LTD.
Add: No.12 Baijiale Road, Xialixi Industry Area,Shizhu Town,Yongkang City,Zhejiang,China. 321300