

Platinum Gas
Rangetop
User Manual
Part # 200031— rev. 0 © Prizer-Painter Stove Works, Blandon, PA 19510

2 (800) 449-8691

bluestarcooking.com 3
Thank You and Welcome
Thank you for your purchase and welcome to the BlueStar family!
BlueStar appliances are designed for discerning home chefs who demand restaurant-quality results in their own
kitchens. As the owner of a new BlueStar appliance, you can look forward to years of precise and even cooking in
your home kitchen.
Here are a few tips to get started:
1. Review this User Manual, which includes instructions and tips for getting the most out of your new appliance.
2. Register your appliance online at www.bluestarcooking.com/support/product-registration to stay in touch and
allow us to send you valuable product news and updates.
3. Review our products and help us spread the word at https://www.bluestarcooking.com/inspiration/reviews.
Thank you again for choosing BlueStar.
4 (800) 449-8691
Safety Information ............................................................ 5
Site Preparation .............................................................. 10
Installation Instructions .................................................. 19
Before Your First Use ..................................................... 24
Operation ........................................................................ 31
Cooking Guide and Tips ................................................ 34
Common Baking Problems and Solutions ................... 42
Care and Cleaning ......................................................... 43
Troubleshooting ............................................................. 45
Warranty .......................................................................... 47
Contents
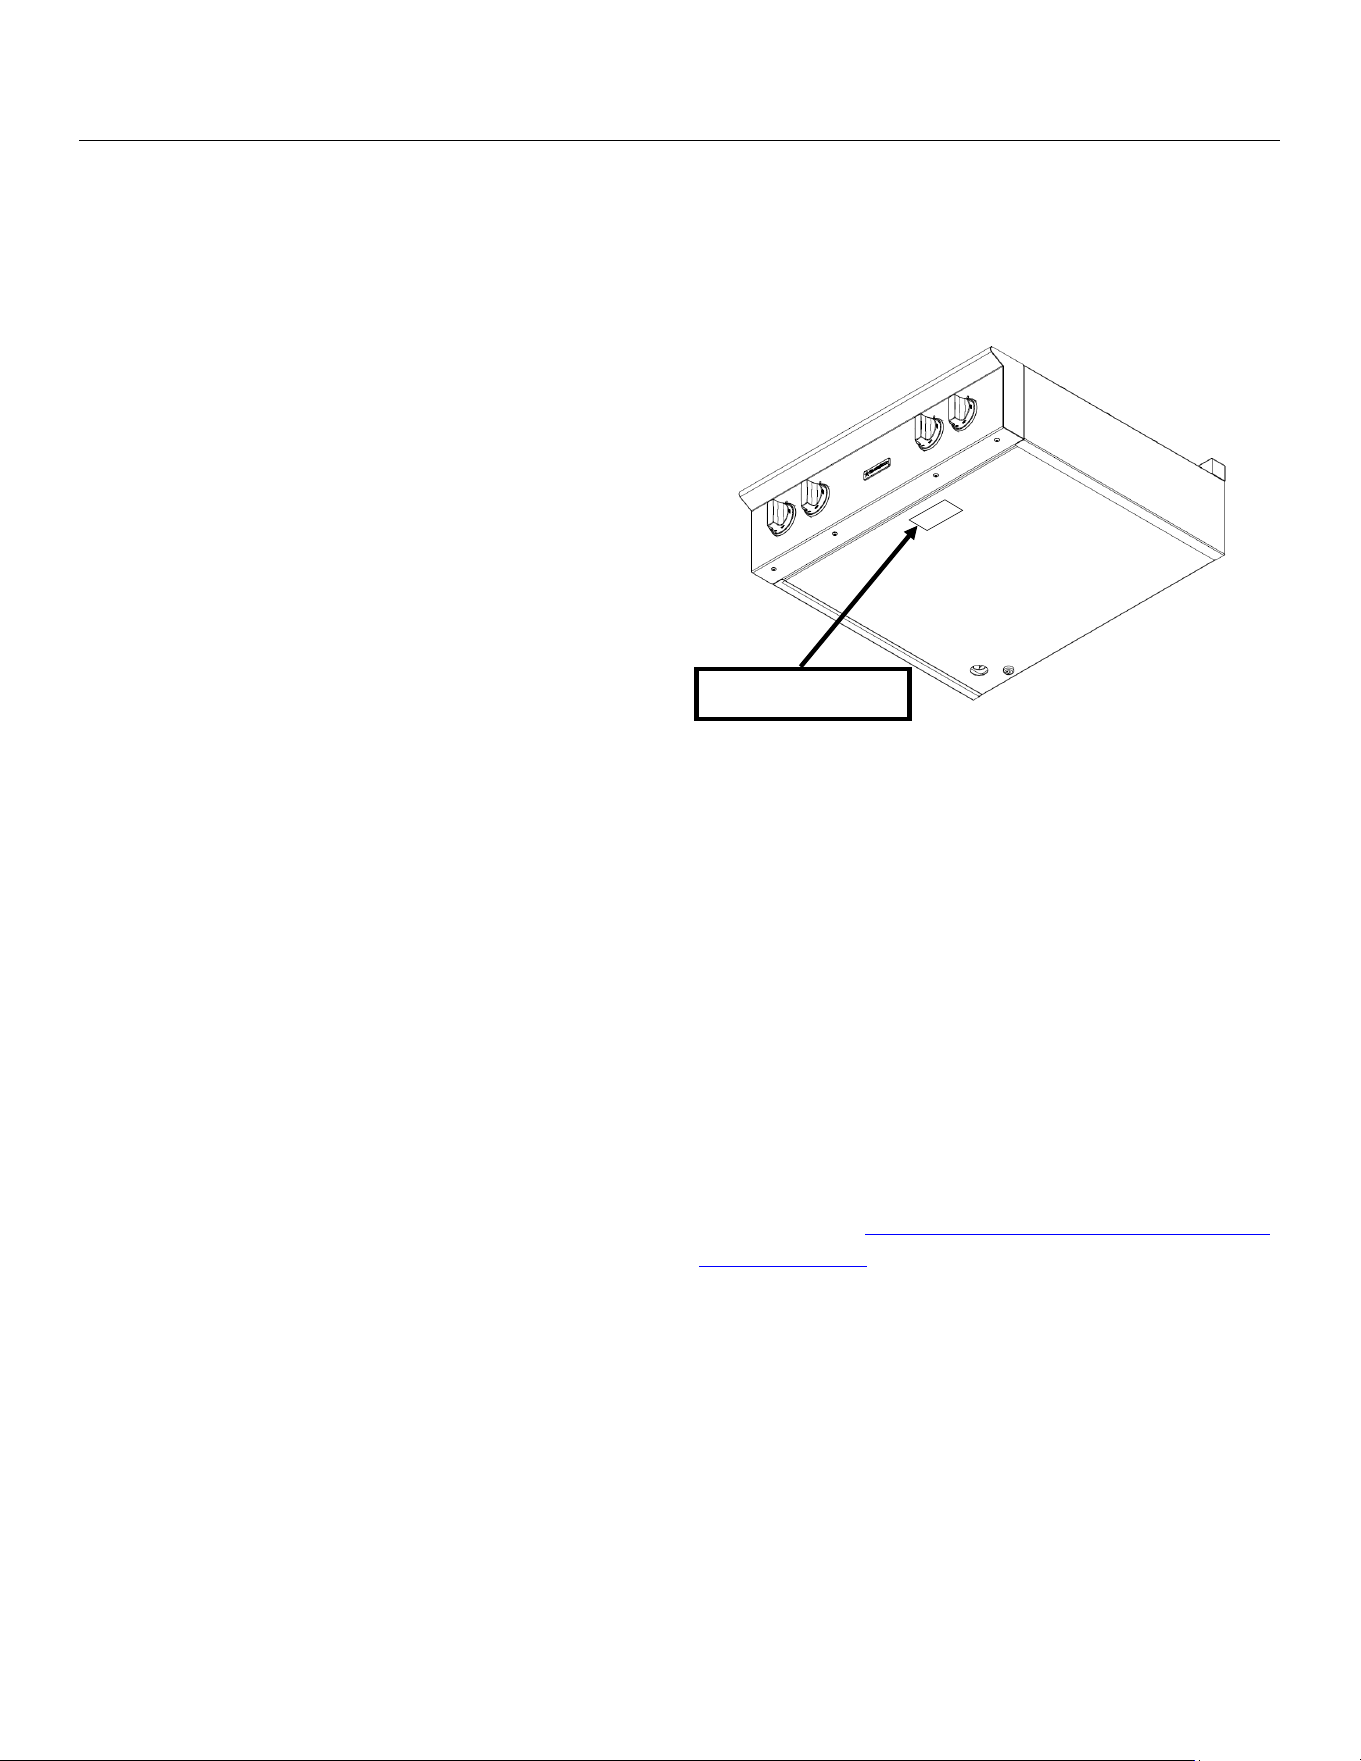
Important product information, including the model and
serial numbers, can be found on the serial plate, which is
located on the bottom of the rangetop behind the
stainless steel control panel.
Please complete the information below for warranty
purposes and future reference:
Model Number ____________________________________
Serial Number _____________________________________
Installation Date ___________________________________
Dealer’s Name _____________________________________
Dealer’s Phone Number ____________________________
If service is required under warranty, it must be
performed by an authorized BlueStar service company.
To locate an authorized BlueStar service company in
your area, go to www.bluestarcooking.com/support/nd
-a-service-center.
Product Information
Serial number location
bluestarcooking.com 5
Safety Information
Please read and comply with the following safety
messages to ensure your cooking product is installed
and operated as safely as possible.
DANGER states a hazard that will cause serious injury or
death if precautions are not followed.
WARNING states a hazard that can cause serious injury
or death if precautions are not followed.
CAUTION states a hazard that can cause minor injury or
product damage if instructions are not followed.
NOTICE highlights important information that is not
related to physical injury.
This appliance is designed for easy installation and
operation, however we recommend that you read all
sections of this manual before installation and rst use.
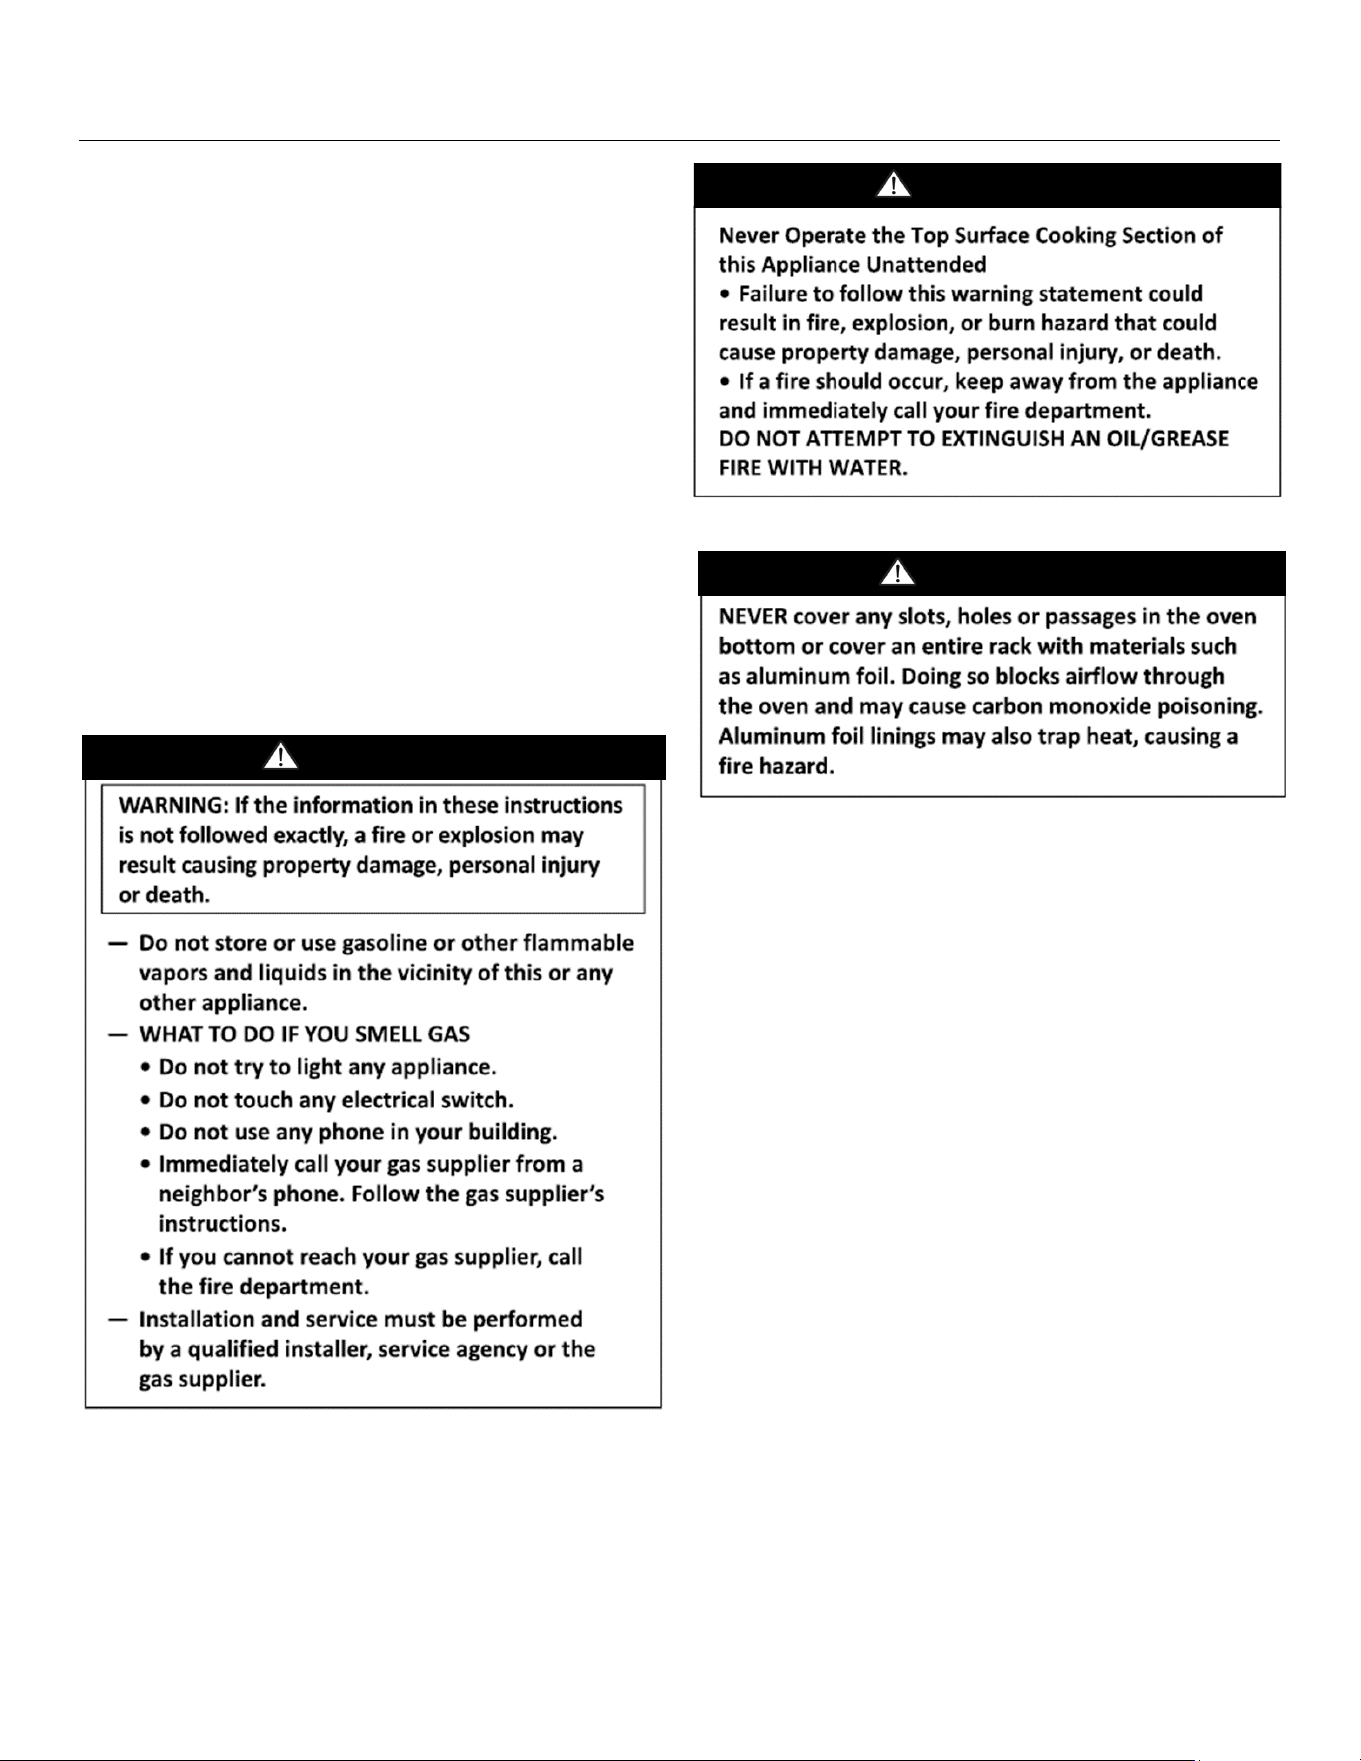
WARNING
WARNING
WARNING
6 (800) 449-8691
Safety Information (continued)
Electrical Requirements and Grounding Instructions
Installation and service must be performed by a qualied
installer, service agency, or utility company. The appliance
must be electrically grounded in accordance with local codes
or, in the absence of local codes, with the National Electrical
Code, NFPA 70, or the Canadian Electric Code, CSA C22.1-02.
Installation must conform with local codes or, in the absence of
local codes, to the National Fuel Gas Code, ANSI Z223.1/NFPA
54, or, in Canada, the National Gas and Propane Installation
Code, CSA 8149.1.
The installation of appliances designed for manufactured
(mobile) home installation must conform to the Manufactured
Home Construction and Safety Standard, Title 24 CFR, Part
3280 (formerly the Federal Standard for Mobile Home
Construction and Safety, Title 24 HUD (Part 280), or with local
codes where applicable.
The installation of appliances designed for Recreation Park
Trailers must conform with state and local codes, or, in the
absence of such codes, to the standard for Recreational Park
Trailers ANSI A119.5.
To reduce the risk of re, electric shock, serious injury, or
death when using your appliance, follow basic safety
precautions, including the following:
• Read the provided user manual before operating this
appliance.
• This product is to be used only for cooking tasks
expected of a home appliance. This product is not
intended for commercial use.
• If your product is found to be damaged upon receipt,
contact your dealer or builder immediately. Do not install
or use a damaged appliance or if the conduit is damaged.
• Do not install, repair, or replace any part of the appliance
yourself unless specically recommended in the literature
accompanying it. All other service must be performed by
a qualied service technician.
• Electric power to the appliance must be turned off at the
circuit breaker or fuse box prior to performing any type of
service or installation.
• This appliance must be properly installed and grounded
by a qualied installer according to these installation
instructions prior to use. The installer must show the
customer the location of the circuit breaker panel or fuse
box so that they know where and how to turn off electric
power to the appliance. BlueStar is not responsible for
service required to correct a faulty installation. The owner
is responsible to make sure this appliance is properly
installed.
• To avoid electric shock hazard, do not install this
appliance outside or near water. Do not install or use this
appliance if it has been exposed to water.
• Do not obstruct any venting areas or slots. The appliance
must be installed in a manner which will keep the area
below the door unobstructed to allow free air ow.
• Do not tamper with the controls. Do not adjust or alter
any part of the appliance unless specically instructed to
do so by this manual.
• Secure the appliance to the cabinet following the
direction in the installation instructions to prevent injury
due to the unit tipping forward.
• This appliance must be installed by a qualied gas
technician. Have the technician show you the exact
location of the gas shutoff valve on the incoming gas line
so you know how to turn off the gas if necessary.
WARNING
• A manual gas shutoff valve is to be installed in an
accessible location in the gas line, external to the
appliance to allow gas to be turned on and off to the
appliance.
• Any openings in the wall directly behind the appliance
and in the oor below the appliance must be sealed prior
to installation and use of the appliance.
• Units with a char-broil burner must have non-combustible
material used in the construction of the underside of the
cabinet above the unit or a ventilation hood must be
installed above the unit or in accordance with local codes,
or in the absence of local codes, with the National Fuel
Gas Code, ANSI Z223.1/NFPA 54 or, in Canada, the
Natural Gas and Propane Installation Codes CSA B149.1.
• Leak testing of the appliance must be conducted
according to the manufacturer’s instructions.
• In the event of a power failure, do not attempt to operate
the appliance or light any of the burners. This is a gas
red appliance that uses electrical components as ignition
and safety devices.
• Before any maintenance or repair, disconnect the
appliance from the electric supply.
WARNING
WARNING

bluestarcooking.com 7
To reduce the risk of re, electric shock, serious injury, or
death when using your appliance, follow basic safety
precautions, including the following:
• To prevent damage, do not use the knobs or bezels
as lift points or for moving the appliance
• Do not climb or sit on any part of the appliance.
• Keep packaging materials away from children.
Plastic sheets and bags can cause suffocation.
• Do not leave children or pets alone or unattended in
the area around the appliance. Do not allow children
to play with the controls, pull on the handle, or touch
other parts of the appliance
• Do not store items of interest to children above the
appliance. Children can be burned or injured while
climbing on the appliance.
• Install a smoke detector near the kitchen.
• Do not use water on grease res. Smother any
ames with a lid, cookie sheet, or at tray. Use
baking soda or a foam re extinguisher to extinguish
aming grease. If a re occurs, keep the oven door
closed.
• Keep ammable items, such as paper, cardboard,
plastic, and cloth away from hot surfaces. Do not put
such items in the oven. Do not allow potholders to
touch hot surfaces.
• Only use dry potholders to prevent steam burns
when moving items on or off of the appliance. Do
not use a towel or other bulky cloth in place of
potholders.
• Wear proper attire. Do not wear loose or hanging
apparel while using the appliance. Do not allow
clothing to come into contact with or within close
proximity of any element or the interior of the oven
and the surrounding areas during and immediately
after use. Some synthetic materials are highly
ammable and should not be worn while cooking.
• Do not store combustible, ammable, or explosive
materials in adjacent cabinets.
• Never use the appliance for warming or heating the
room.
• Use caution when adding liquids to food or
containers. Steam can cause serious burns or
scalding.
• Do not heat unopened food containers. Build up of
pressure may cause the container to burst and result
in injury.
• Grease is ammable. Let hot grease cool before
attempting to handle it. Avoid letting grease
accumulate anywhere on the appliance.
• Be sure all appliance controls are turned off and the
appliance is cool before using any type of aerosol
cleaner on or around the appliance. A chemical that
produces the spraying action could, in the presence
of heat, ignite or cause metal parts to corrode.
• Clean parts only as listed in the user manual.
• Do not install or use any ventilation system which
uses a downward airow with this appliance.
Safety Information (continued)
WARNING

8 (800) 449-8691
Information sur la sécurité
Veuillez lire et respecter les messages de sécurité
suivants pour vous assurer que votre appareil de cuisson
est installé et utilisé de la manière la plus sûre possible.:
DANGER indique un danger qui entraînera des
blessures graves ou la mort si les précautions ne sont
pas respectées.
AVERTISSEMENT indique un danger qui peut entraîner
des blessures graves ou la mort si les précautions ne
sont pas respectées.
ATTENTION signale un danger pouvant entraîner des
blessures mineures ou endommager le produit si les
instructions ne sont pas suivies.
NOTE met en èvidence des informations importantes
qui pas lieès à des blessures physiques.
Cet appareil est conçu pour une installation et un
fonctionnement faciles, cependant nous vous
recommandons de lire toutes les sections de ce manuel
avant l'installation et la première utilisation.
Exigences électriques et instructions de mise à la
terre
L'installation et l'entretien doivent être effectués par un
installateur qualié, une agence de service ou une
entreprise de services publics.
AVERTISSEMENT: L'installation doit être conforme aux
codes locaux ou, en l'absence de codes locaux, au
National Fuel Gas Code, ANSI Z223.1/NFPS54 et au
National Electrical Code NFPA70.
L'installation d'appareils conçus pour une installation
dans une maison préfabriquée (mobile) doit être
conforme à la norme de sécurité et de construction de
maisons préfabriquées, titre 24 CFR, partie 3280, ou,
lorsque cette norme ne s'applique pas, se référer à :
ANSI/NCSBCS A225.1 ou avec codes locaux, le cas
échéant.
L'installation d'appareils conçus pour les remorques de
parc de loisirs doit être conforme aux codes nationaux
et locaux ou, en l'absence de tels codes, à la norme
pour les remorques de parc de loisirs ANSI A119.5.
Pour réduire les risques d'incendie, d'électrocution, de
blessures graves ou de mort lors de l'utilisation de votre
appareil, suivez les précautions de sécurité de base,
notamment les suivantes:
• Lisez le manuel d'utilisation fourni avant d'utiliser
cet appareil.
• Ce produit doit être utilisé uniquement pour les
tâches de cuisson attendues d'un appareil
électroménager. Ce produit n'est pas destiné à un
usage commercial.
• Si votre produit s'avère endommagé à la réception,
contactez immédiatement votre revendeur ou le
constructeur. Ne pas installer ou utiliser un appareil
endommagé ou dont le conduit est endommagé.
• N'installez, ne réparez ou ne remplacez aucune
pièce de l'appareil vous-même, sauf si cela est
spéciquement recommandé dans la
documentation qui l'accompagne. Tout autre
service doit être effectué par un technicien de
service qualié.
• L'alimentation électrique de l'appareil doit être
coupée au niveau du disjoncteur ou de la boîte à
fusibles avant d'effectuer tout type d'entretien ou
d'installation.
• Cet appareil doit être correctement installé et mis à
la terre par un installateur qualié conformément à
ces instructions d'installation avant utilisation.
L'installateur doit montrer au client l'emplacement
du panneau de disjoncteurs ou de la boîte à fusibles
an qu'il sache où et comment couper
l'alimentation électrique de l'appareil. BlueStar n'est
pas responsable du service requis pour corriger une
installation défectueuse. Le propriétaire est
responsable de s'assurer que cet appareil est
correctement installé.
• Pour éviter tout risque d'électrocution, n'installez
pas cet appareil à l'extérieur ou à proximité de
l'eau. Ne pas installer ou utiliser cet appareil s'il a
été exposé à l'eau.
• Ne pas obstruer les zones ou les fentes de
ventilation. L'appareil doit être installé de manière à
garder la zone sous la porte dégagée pour
permettre la libre circulation de l'air.
• Ne modiez pas les commandes. N'ajustez ou ne
modiez aucune pièce de l'appareil à moins d'y être
spéciquement invité par ce manuel.
AVERTISSEMENT

bluestarcooking.com 9
• Lorsque vous utilisez le four, ne touchez pas les
éléments chauffants ou les surfaces intérieures du
four ou la zone extérieure entourant immédiatement
la porte. Les éléments chauffants peuvent être
chauds même s'ils sont de couleur foncée. Les
surfaces intérieures du four peuvent devenir
sufsamment chaudes pour causer des brûlures.
• Portez une tenue correcte. Ne portez pas de
vêtements amples ou suspendus lors de l'utilisation
de l'appareil. Ne laissez pas les vêtements entrer en
contact avec ou à proximité de tout élément ou de
l'intérieur du four et des zones environnantes
pendant et immédiatement après l'utilisation.
Certains matériaux synthétiques sont hautement
inammables et ne doivent pas être portés pendant
la cuisson.
• N'utilisez pas le four pour le stockage.
• Ne stockez pas de matériaux combustibles,
inammables ou explosifs dans le four ou dans des
armoires adjacentes.
• N'utilisez jamais l'appareil pour réchauffer ou
chauffer la pièce.
• Ne recouvrez pas le four de papier d'aluminium ou
d'autres matériaux pendant la cuisson ou le
nettoyage.
• Ne laissez pas d'objets métalliques, tels que du
papier d'aluminium, la sonde à viande, des plaques
à biscuits, etc. sur le fond du four. Les objets laissés
au fond du four pourraient endommager le four et
l'objet.
• Soyez prudent lorsque vous ouvrez la porte du four.
Laissez l'air chaud ou la vapeur s'échapper avant de
retirer ou de replacer les aliments dans le four.
• Soyez prudent lorsque vous ajoutez des liquides à
des aliments ou des récipients dans un four chaud.
La vapeur peut causer de graves brûlures ou
échaudures.
• Ne chauffez pas les récipients alimentaires non
ouverts. L'accumulation de pression peut faire
éclater le récipient et entraîner des blessures.
• La graisse est inammable. Laissez refroidir la
graisse chaude avant d'essayer de la manipuler.
Évitez de laisser les dépôts de graisse s'accumuler.
Nettoyer après chaque utilisation.
• Les lentilles d'éclairage doivent toujours être en
place lorsque le four est utilisé pour protéger les
ampoules contre la casse.
Pour réduire les risques d'incendie, d'électrocution, de
blessures graves ou de mort lors de l'utilisation de votre
appareil, suivez les précautions de sécurité de base,
notamment les suivantes:
• Fixez l'appareil à l'armoire en suivant les instructions
des instructions d'installation pour éviter les
blessures dues au basculement de l'appareil vers
l'avant.
• Pour éviter tout dommage, n'utilisez pas les
poignées du four comme points de levage ou pour
déplacer l'appareil
• Ne grimpez pas et ne vous asseyez sur aucune partie
de l'appareil.
• N'utilisez jamais la porte du four pour marcher, vous
appuyer ou vous asseoir. Des dommages à
l'appareil et/ou des blessures corporelles peuvent
survenir.
• Gardez les matériaux d'emballage hors de portée
des enfants. Les feuilles et les sacs en plastique
peuvent provoquer une suffocation.
• Ne laissez pas les enfants ou les animaux
domestiques seuls ou sans surveillance dans la zone
autour de l'appareil. Ne laissez pas les enfants jouer
avec les commandes, tirer sur la poignée ou toucher
d'autres parties de l'appareil
• Attention : ne rangez pas d'objets intéressants pour
les enfants au-dessus de l'appareil. Les enfants
peuvent se brûler ou se blesser en grimpant sur
l'appareil.
• Installez un détecteur de fumée près de la cuisine.
• Ne pas utiliser d'eau sur les feux de graisse. Étouffez
les ammes avec un couvercle, une plaque à biscuits
ou un plateau plat. Utilisez du bicarbonate de soude
ou un extincteur à mousse pour éteindre la graisse
enammée. En cas d'incendie, gardez la porte du
four fermée.
• Gardez les articles inammables, tels que le papier,
le carton, le plastique et les tissus, à l'écart des
surfaces chaudes. Ne mettez pas de tels articles
dans le four. Ne laissez pas les maniques toucher les
surfaces chaudes.
• Utilisez uniquement des maniques sèches pour
éviter les brûlures de vapeur lorsque vous déplacez
des articles dans ou hors de l'appareil. N'utilisez pas
de serviette ou d'autre chiffon volumineux à la place
des maniques.
Informations de sécurité (suite)
AVERTISSEMENT

10 (800) 449-8691
Pour réduire les risques d'incendie, d'électrocution, de
blessures graves ou de mort lors de l'utilisation de votre
appareil, suivez les précautions de sécurité de base,
notamment les suivantes:
• Les grilles du four doivent être positionnées lorsque
le four est froid pour éviter les brûlures. Si une grille
doit être déplacée alors que le four est chaud, ne
laissez pas la manique entrer en contact avec les
éléments chauffants chauds du four.
• Assurez-vous que toutes les commandes de
l'appareil sont éteintes et que l'appareil est froid
avant d'utiliser tout type de nettoyant en aérosol sur
ou autour de l'appareil. Le produit chimique qui
produit l'action de pulvérisation pourrait, en
présence de chaleur, s'enammer ou provoquer la
corrosion des pièces métalliques.
• Nettoyez les pièces uniquement comme indiqué
dans le manuel d'utilisation.
• Ne nettoyez pas les joints de la porte du four. Les
joints de porte sont indispensables pour une bonne
étanchéité du four. Des précautions doivent être
prises lors du nettoyage pour éviter de frotter,
d'endommager ou de déplacer le joint de sa
position d'installation.
Informations de sécurité (suite)
AVERTISSEMENT

bluestarcooking.com 11
Site Preparation — Electrical Requirements and Clearances
Electrical Requirements
This appliance requires a grounded dedicated circuit
with the following requirements:
•BSPGRT30 — 120 VAC, 60Hz, 1 amp
•BSPGRT36 — 120 VAC, 60Hz, 1 amp
•BSPGRT48 — 120 VAC, 60Hz, 1 amp
•BSPGRT60 — 120 VAC, 60Hz, 1 amp
The installation of this appliance must conform with all
applicable local codes. The installed appliance must be
electrically grounded in accordance with local codes or,
In the absence of such codes, with the National
Electrical Code, NFPA 70, or Canadian Electric Code,
CSA C22-1.02.
Clearances
When the appliance is installed in an island, the island
trim itself should be kept at least 6” (152.4 mm) in a
vertical plane below the top horizontal plane of the
appliance and 6” (152.4 mm) above the top horizontal
plane of the appliance from combustible materials at the
rear.
When the appliance is installed in a zero clearance
condition or is installed with any other backguard in a
zero clearance condition. Use non-combustible/heat
resistant materials in a vertical plane for at least 6” (152.4
mm) below the top horizontal plane of the appliance
and 6” (152.4 mm) above the top horizontal plane of the
appliance where the appliance meets the back wall.
The non-combustible material need not extend
horizontally past the initial barrier thickness. The initial
barrier should consist of materials such as ceramic tile,
cement backer board, .032” (0.8 mm) thick stainless
steel (with an air gap of 1/4” min.), or other non-
combustible material. Non-combustible materials are
dened as in the form in which the material is used and
under the conditions anticipated, the material will not
aid combustion or add appreciable heat to an ambient
re or materials that are in compliance with ASTM E 136.
Refer to the local building code for additional
information.
Unpacking
1. Check the package for damage. If any damage is
visible the Bill of Lading it must be noted that
Concealed Damage may be present, prior to
signing. If visible damage is present, contact the
Dealer from which the appliance was purchased.
2. Ensure the package is upright. If the package is not
upright there is a possibility of major damage to the
appliance. If damage is discovered, do not refuse
delivery. Contact the dealer and le appropriate
freight claims. Save all packaging materials. Do not
contact the manufacturer. Your appliance was
shipped from the dealer from which it was
purchased. Shipping damage claims are to be
resolved between the customer, the shipping
carrier, and the dealer. The manufacturer may assist
in resolving any such claims but such assistance
does not relieve you of your responsibility.
3. Move the container as close to its installation
location as possible. This will reduce moving and
handling of the appliance once it is out of the
shipping packaging.
4. Cut the straps and remove fasteners holding the
carton to the pallet. Carefully lift the box directly up
and off the appliance. Do not use a hammer. Do not
cut the carton with a razor, utility knife, box cutting
knife or other blade.
5. Thoroughly inspect the appliance for damage. If
damage is discovered do not refuse delivery.
Contact the dealer and le appropriate freight
claims.
6. Remove and unpack any accessories shipped with
your appliance. Make sure no hardware,
accessories, or parts remain in the packaging and
are unintentionally discarded.
12 (800) 449-8691
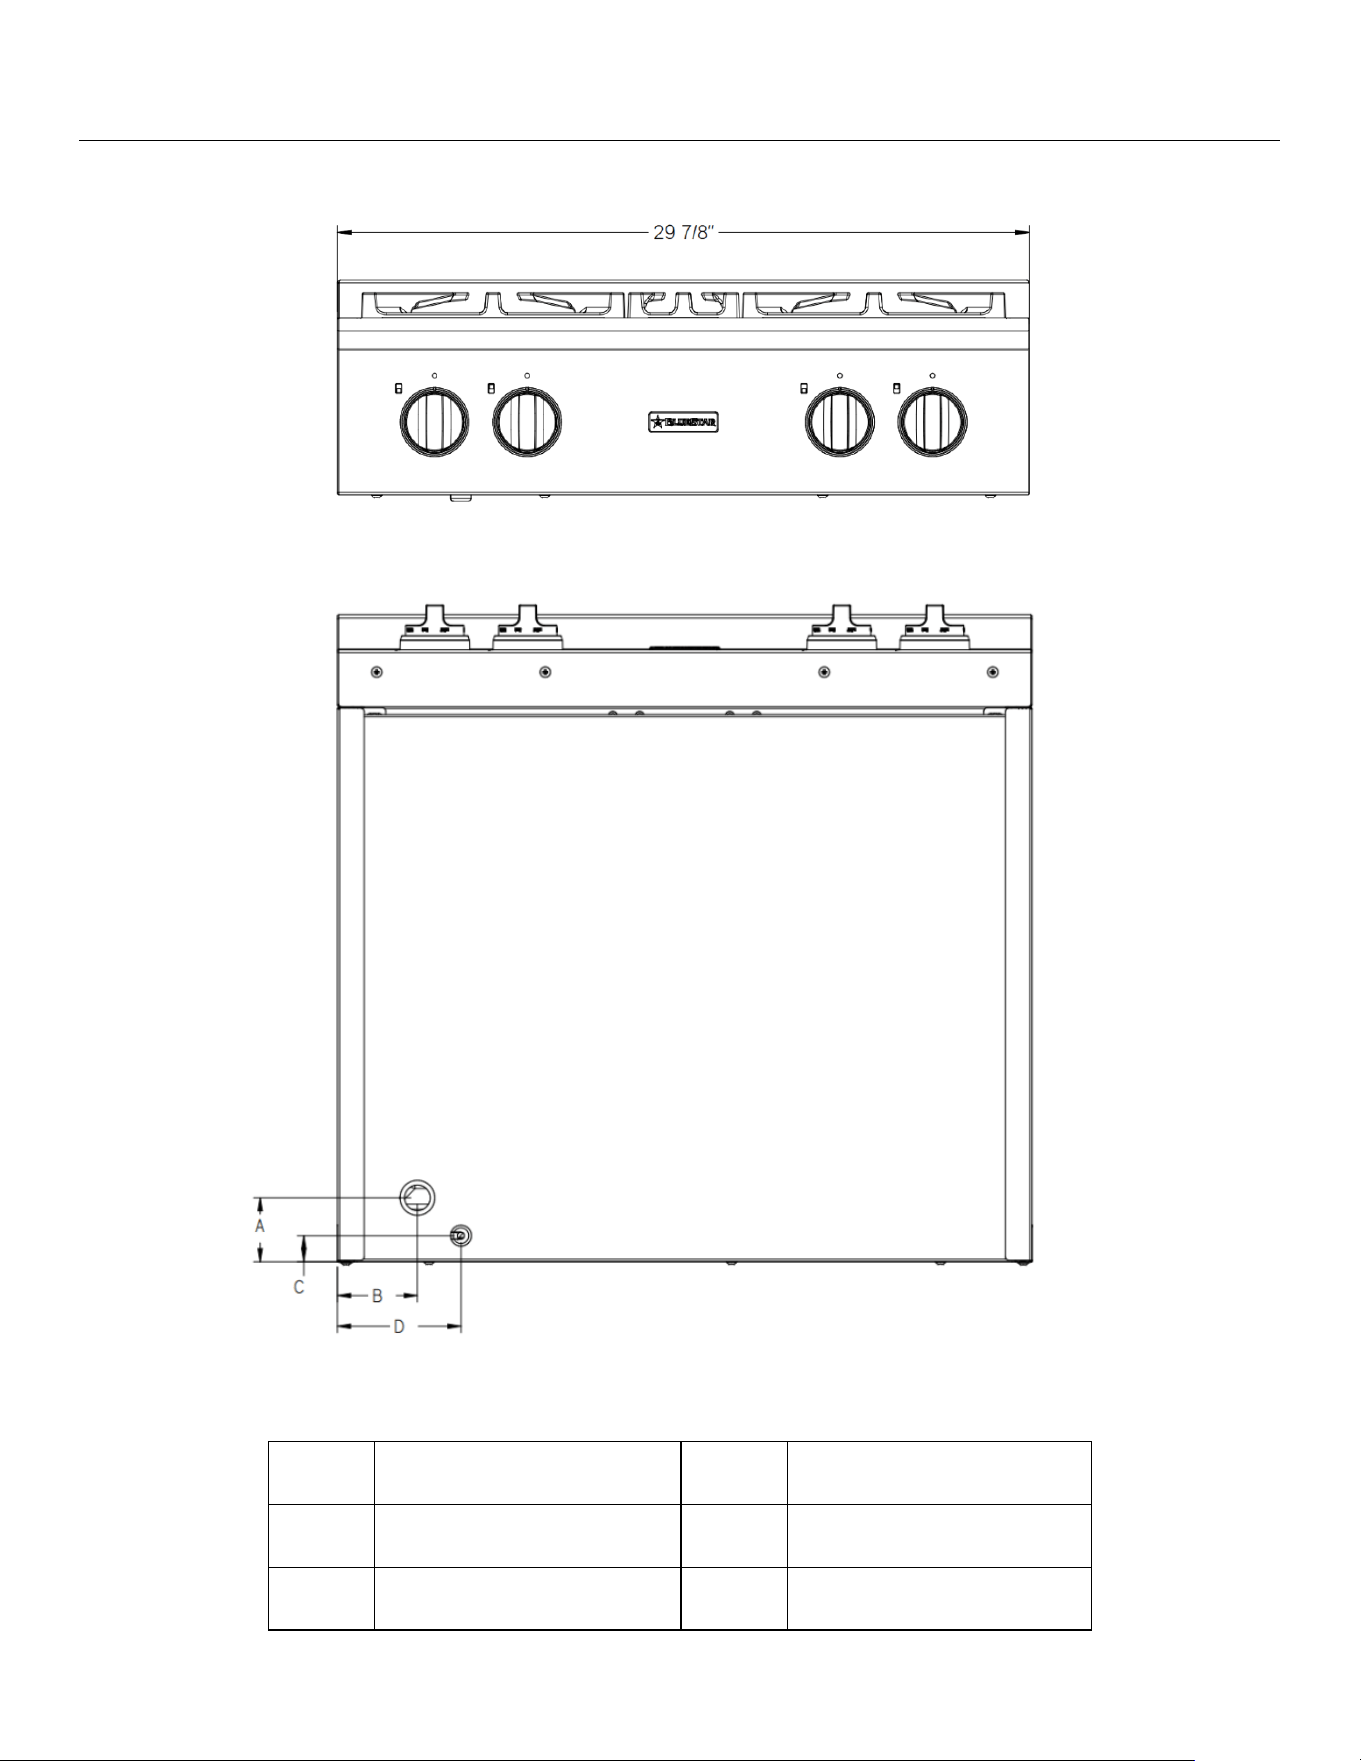
Site Preparation — Product Dimensions (BSPGRT30)
FRONT VIEW
BOTTOM VIEW
GAS INLET LOCATION
ELECTRIC CORD LOCATION
A
2-3/4" (69.9 mm)
B
3-7/16" (87.4 mm)
C
1-1/8" (28.5 mm)
D
5-5/16" (134.9 mm)
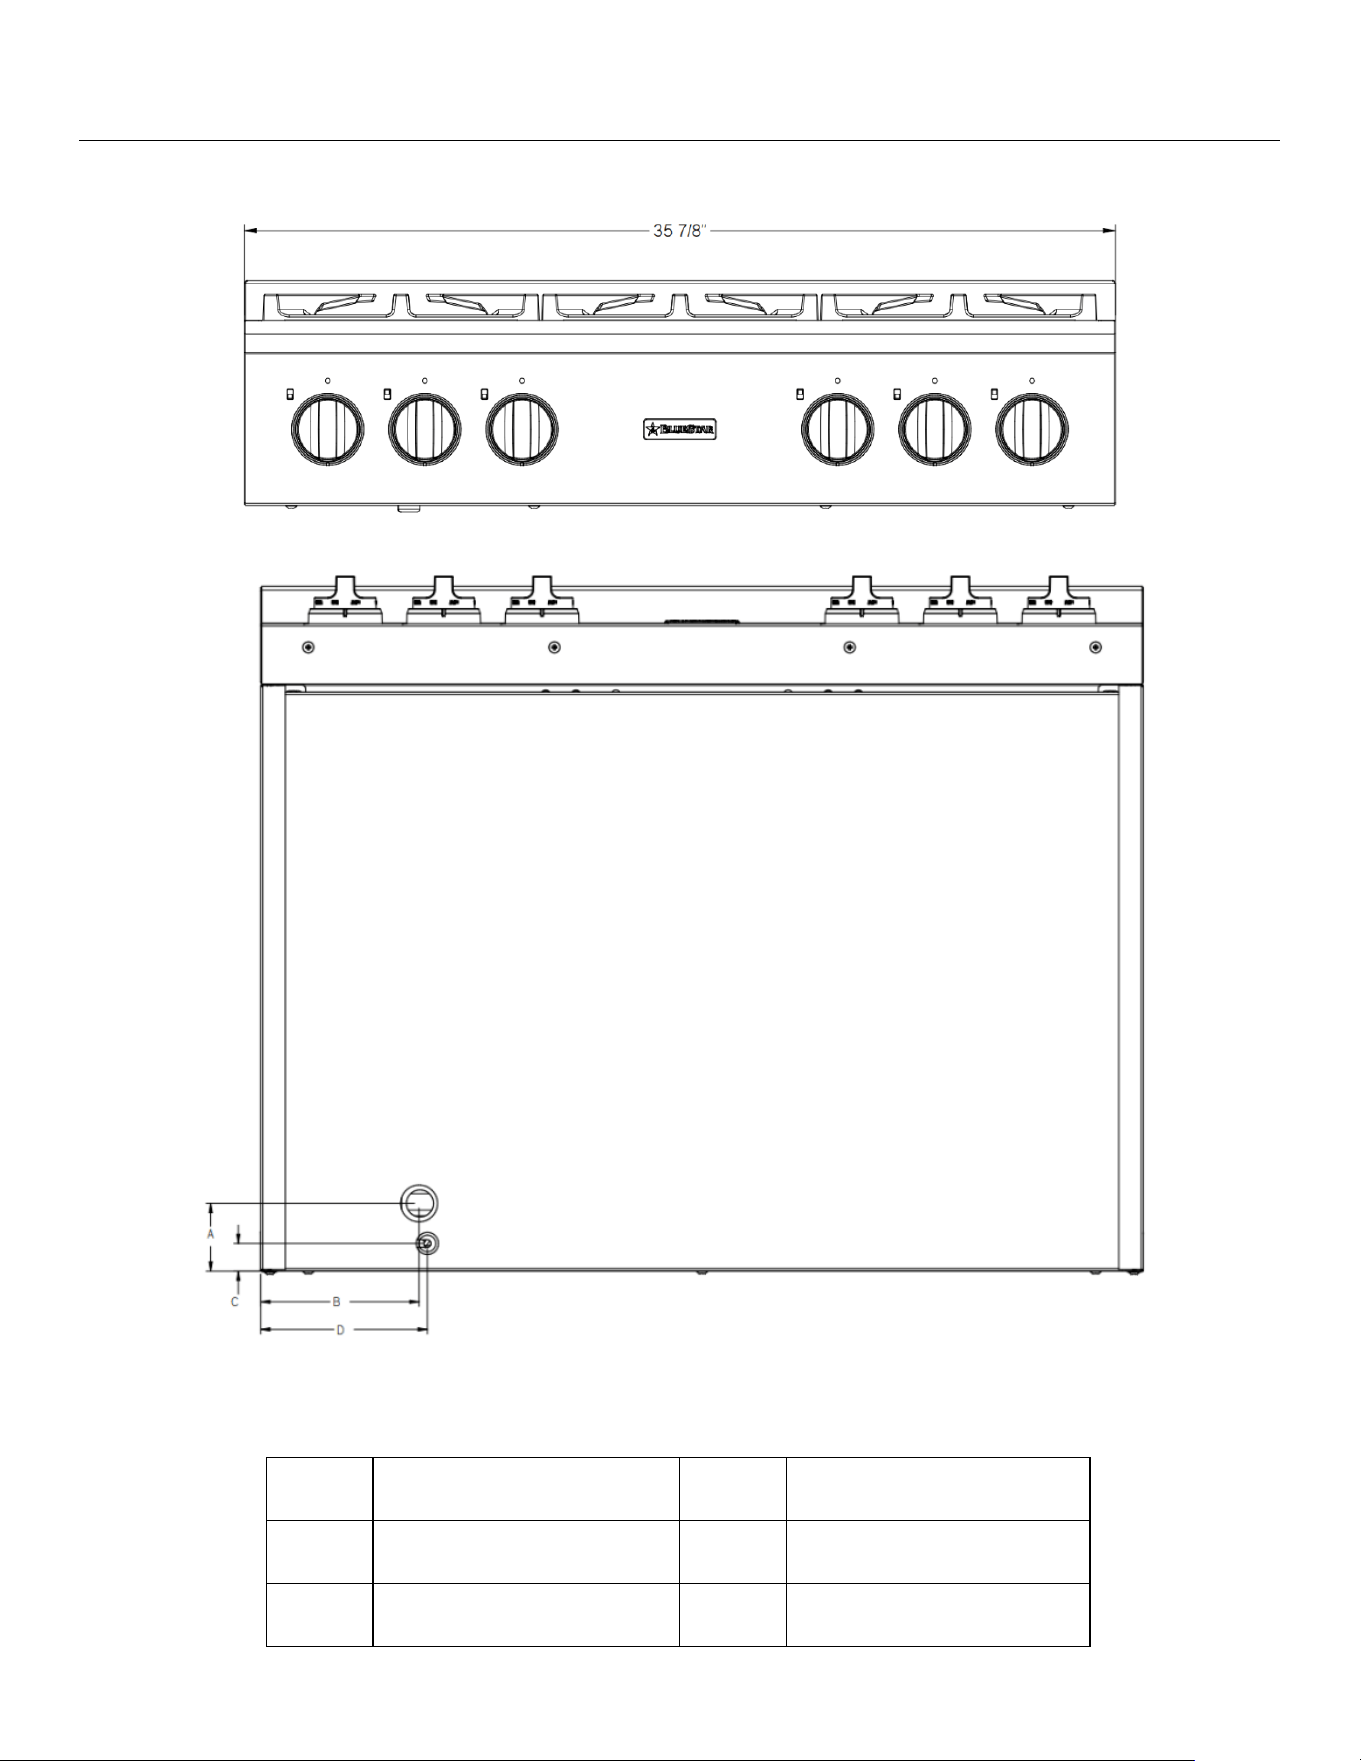
bluestarcooking.com 13
Site Preparation — Product Dimensions (BSPGRT36)
GAS INLET LOCATION
ELECTRIC CORD LOCATION
A
2-3/4" (69.9 mm)
B
6-7/16" (163.5 mm)
C
1-1/8" (28.5 mm)
D
6-3/4" (172.1 mm)
FRONT VIEW
BOTTOM VIEW
14 (800) 449-8691
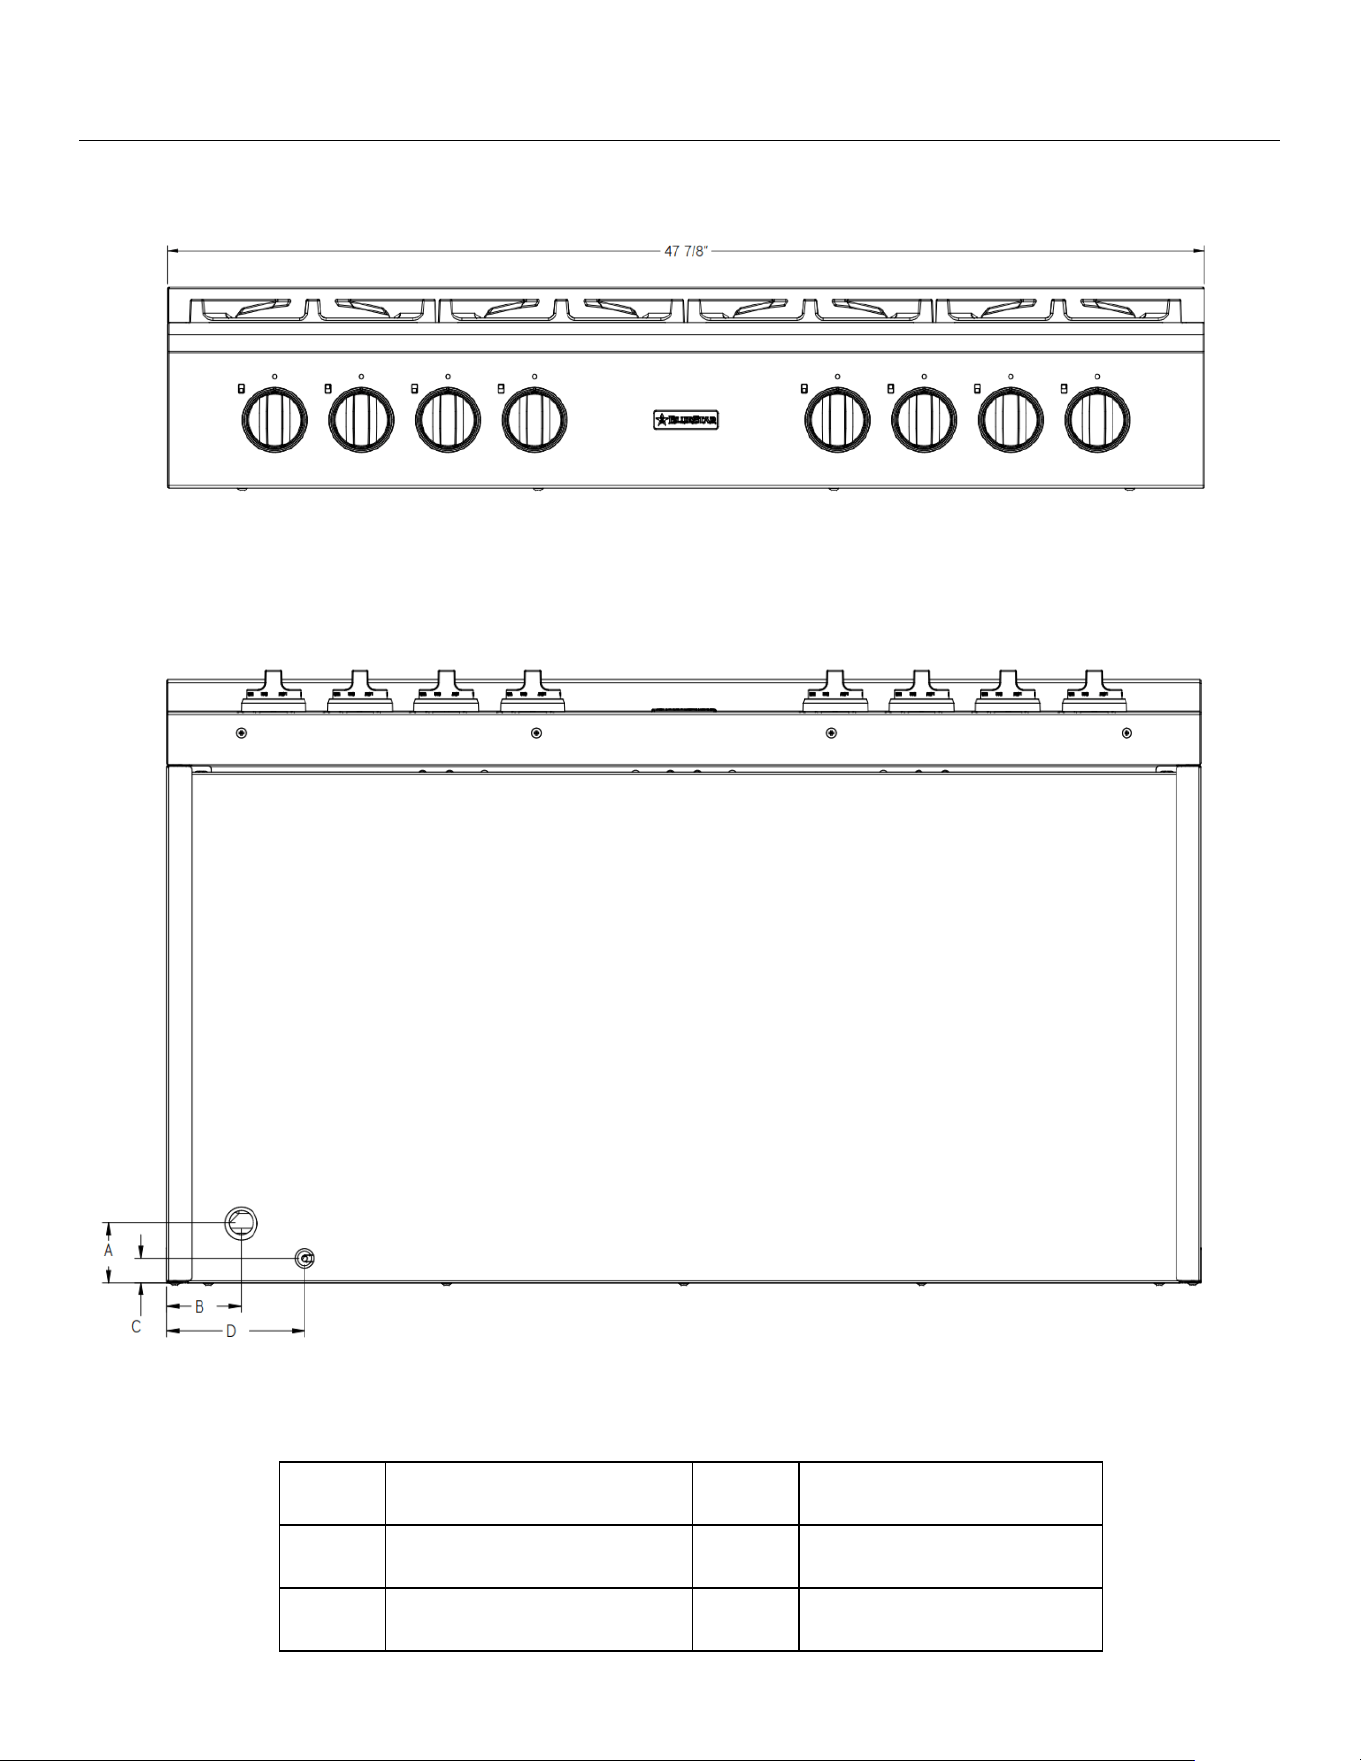
Site Preparation — Product Dimensions (BSPGRT48)
GAS INLET LOCATION
ELECTRIC CORD LOCATION
A
2-3/4" (69.9 mm)
B
3-7/16" (87.4 mm)
C
1-1/8" (28.5 mm)
D
6-3/8" (161.9 mm)
FRONT VIEW
BOTTOM VIEW
bluestarcooking.com 15
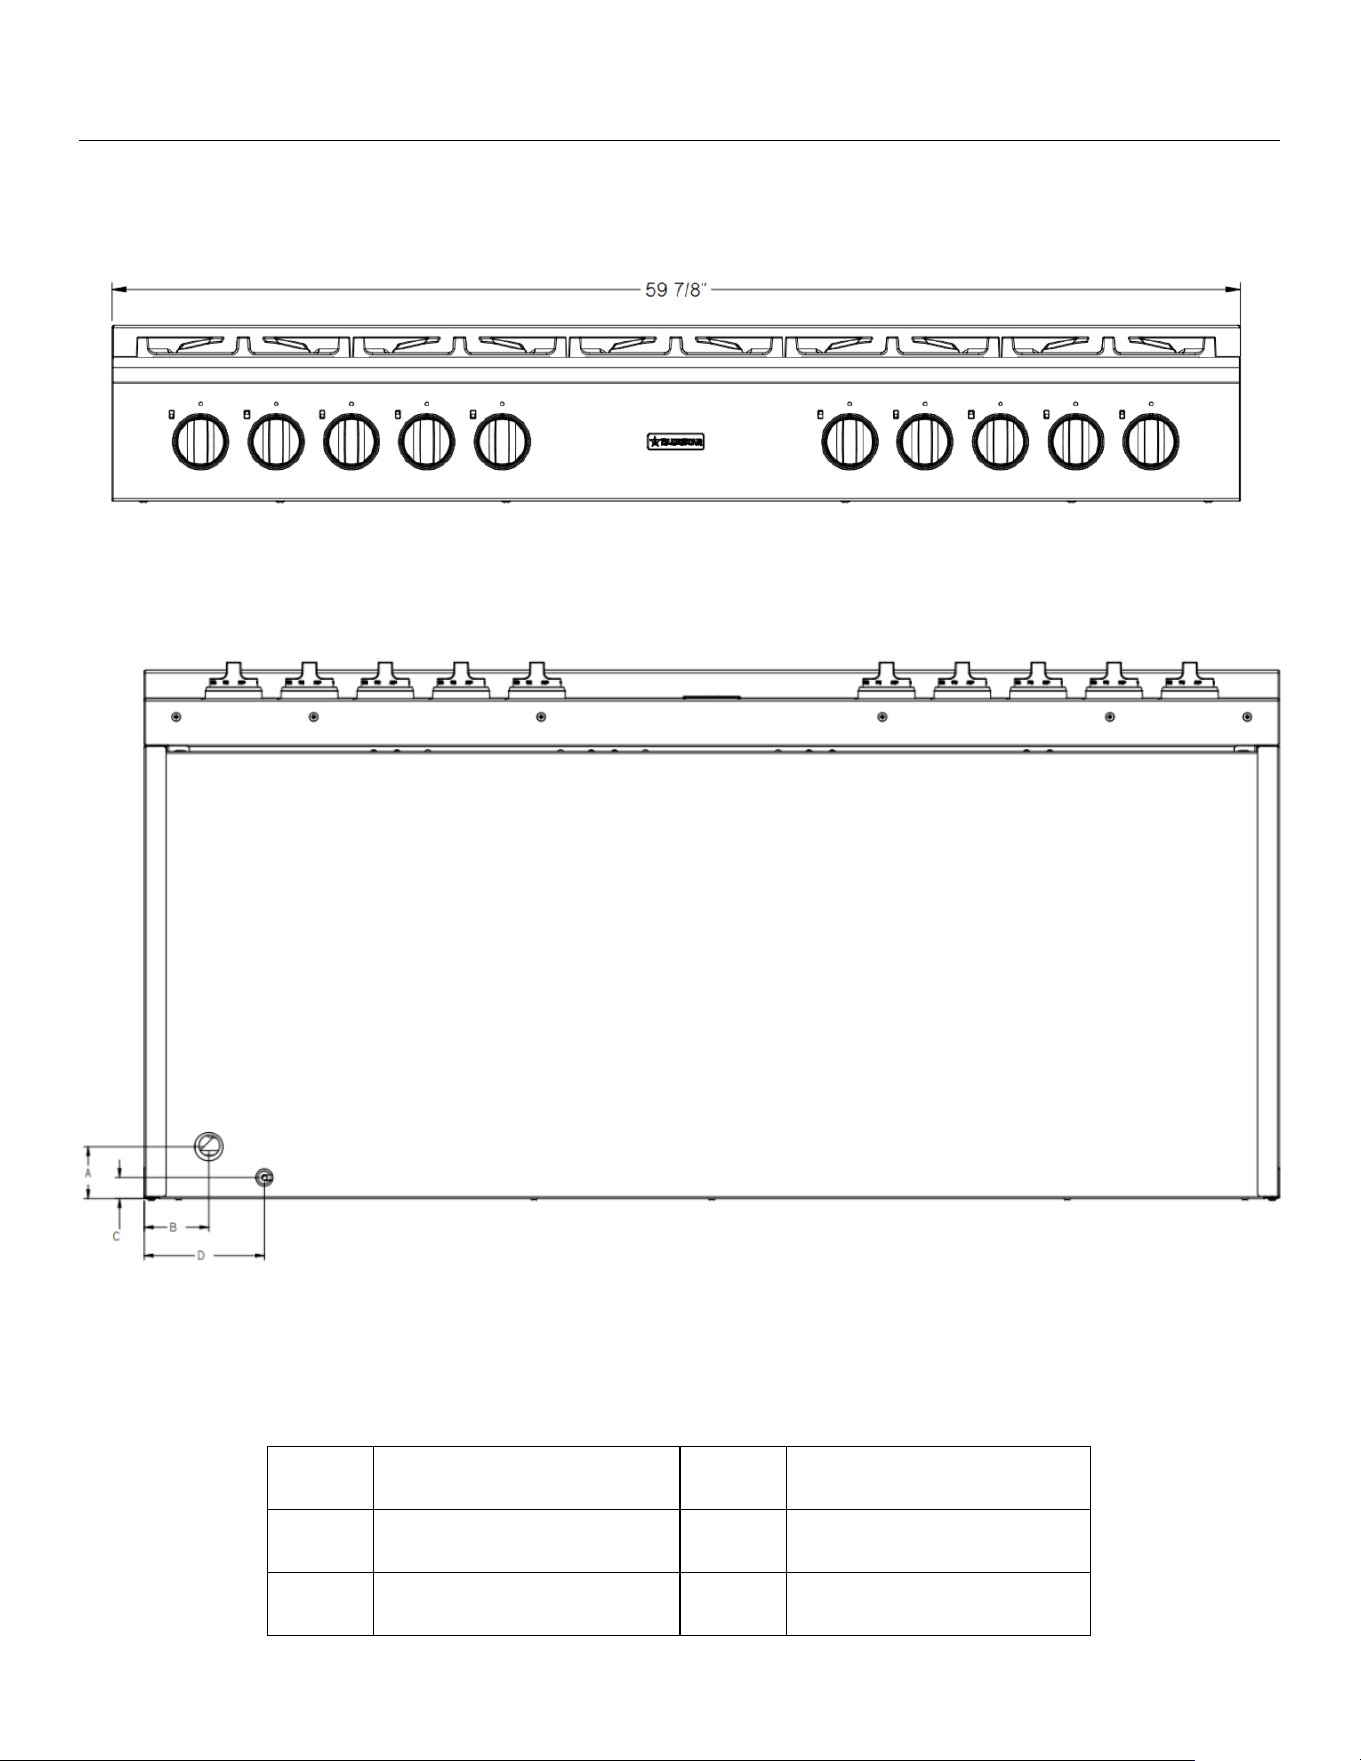
Site Preparation — Product Dimensions (BSPGRT60)
FRONT VIEW
BOTTOM VIEW
GAS INLET LOCATION
ELECTRIC CORD LOCATION
A
2-3/4" (69.9 mm)
B
3-3/8" (86.5 mm)
C
1-1/8" (28.5 mm)
D
6-5/16" (160.9 mm)
16 (800) 449-8691
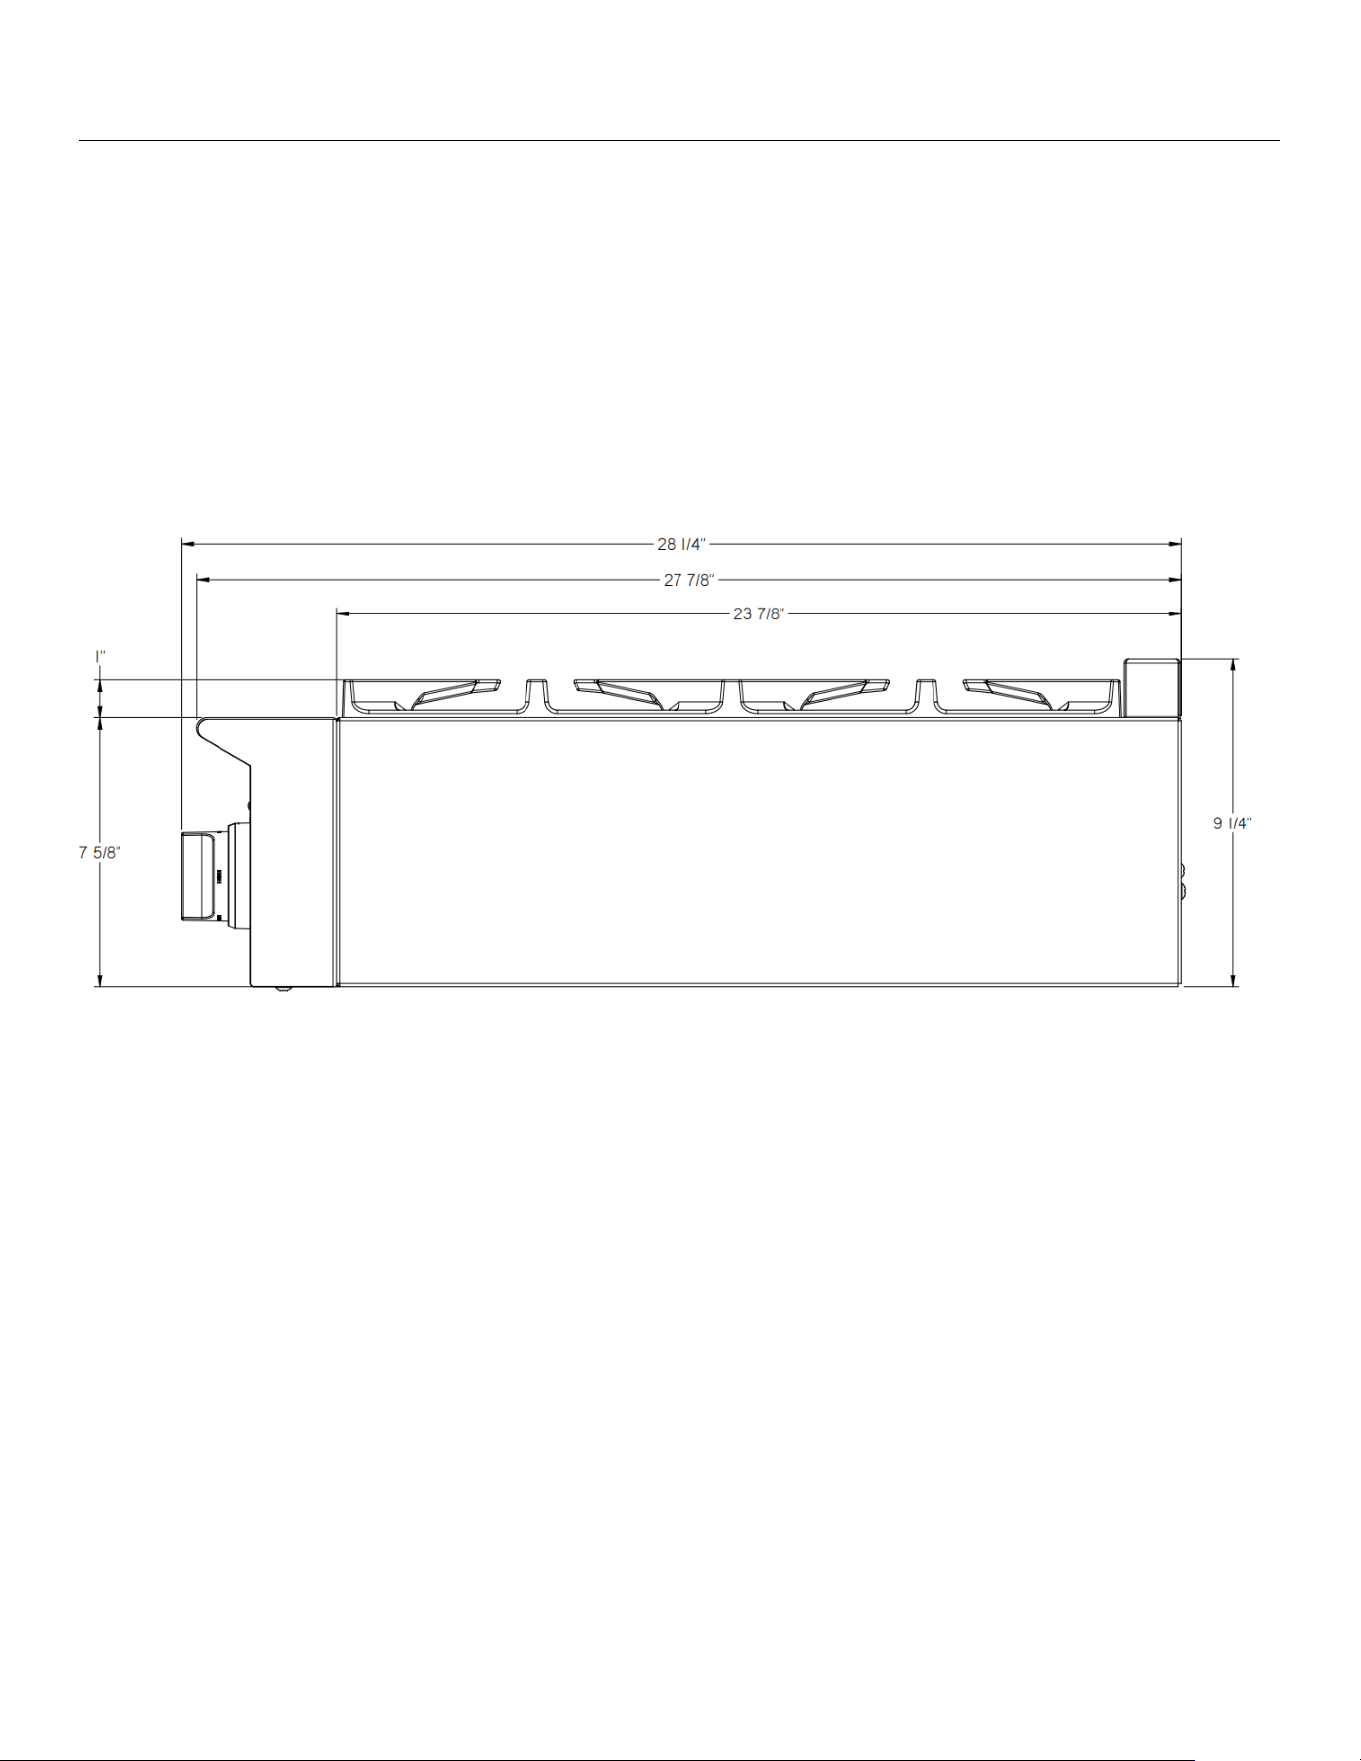
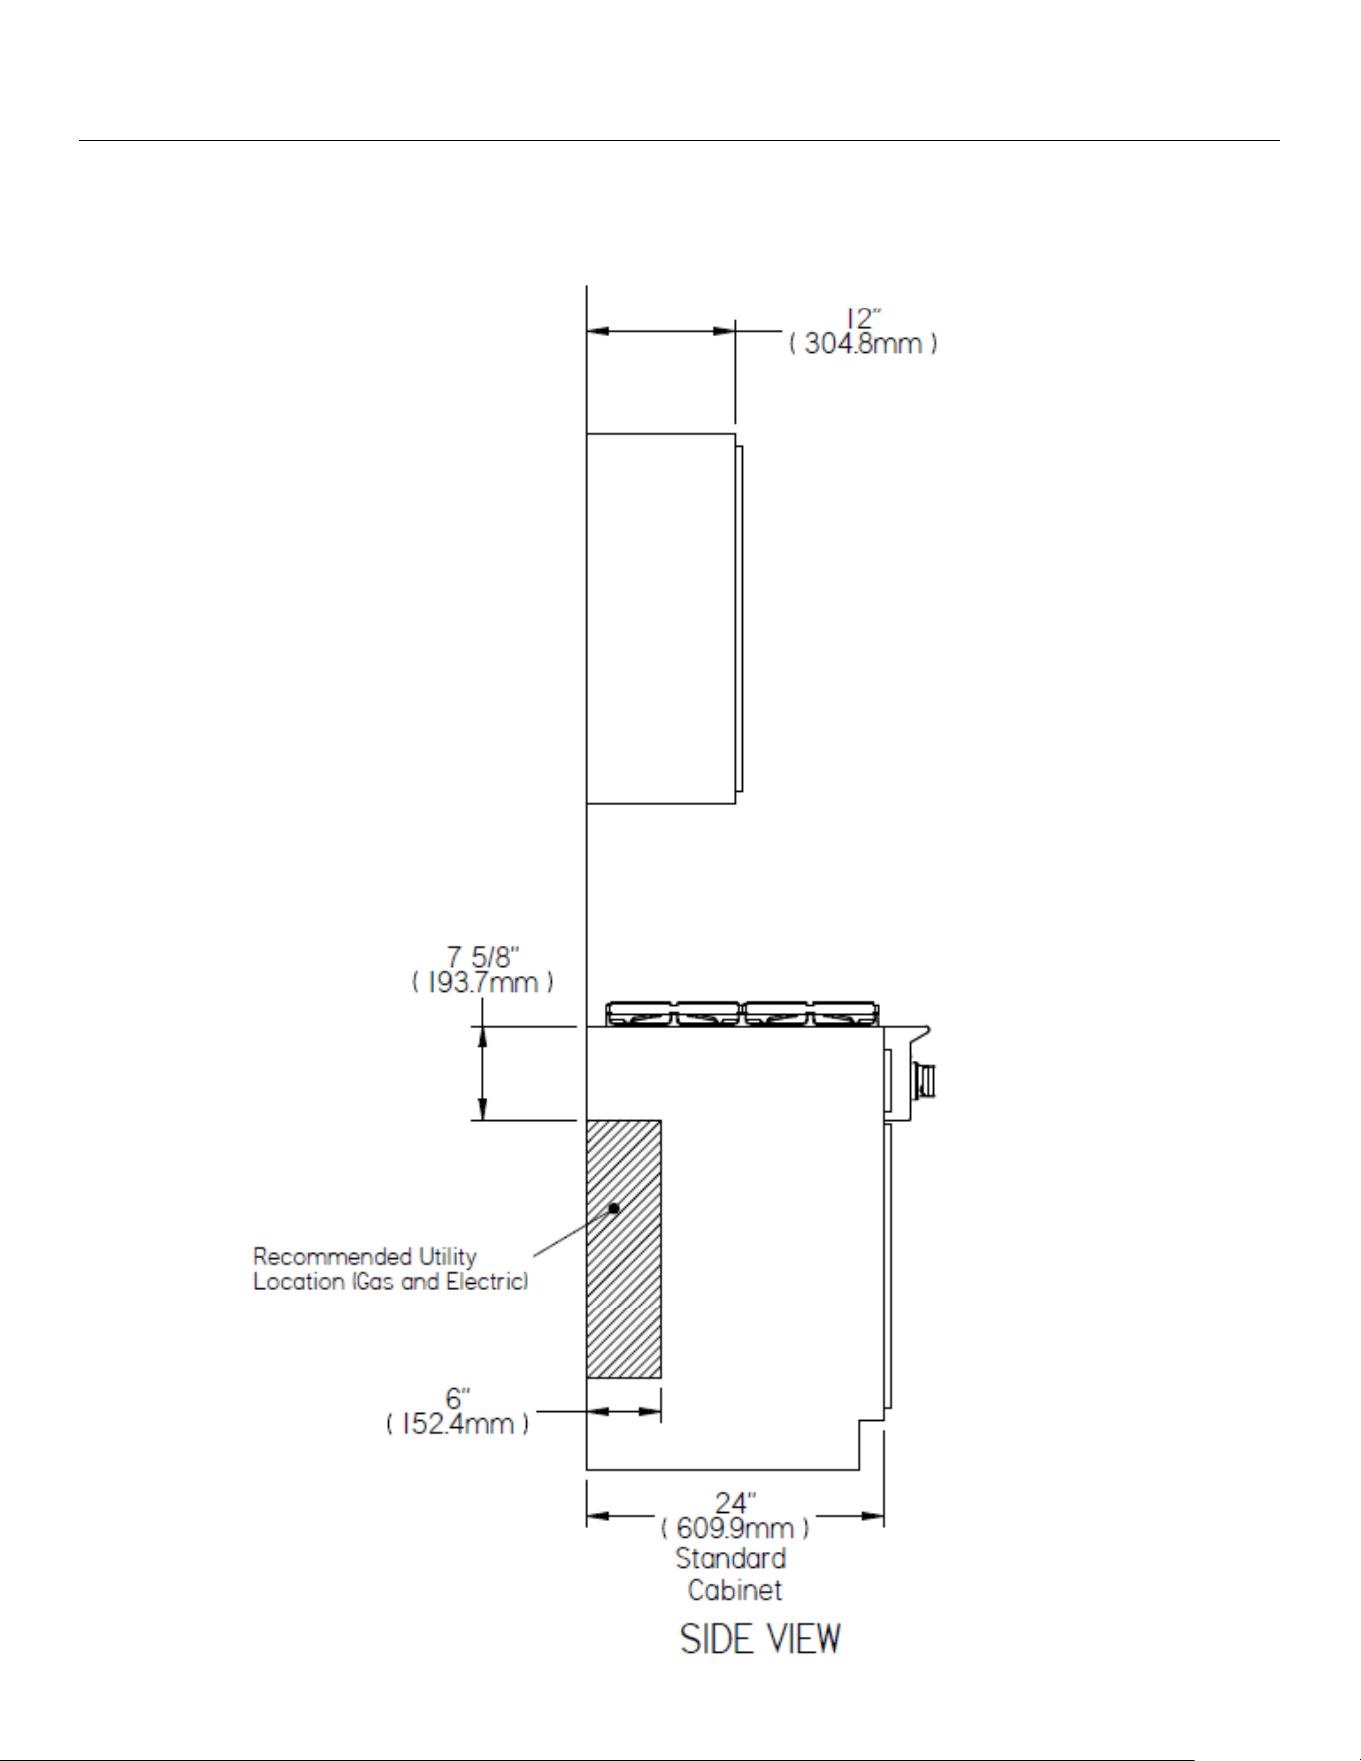
Site Preparation — Product Dimensions Side View
SIDE VIEW (ALL SIZES)
bluestarcooking.com 17
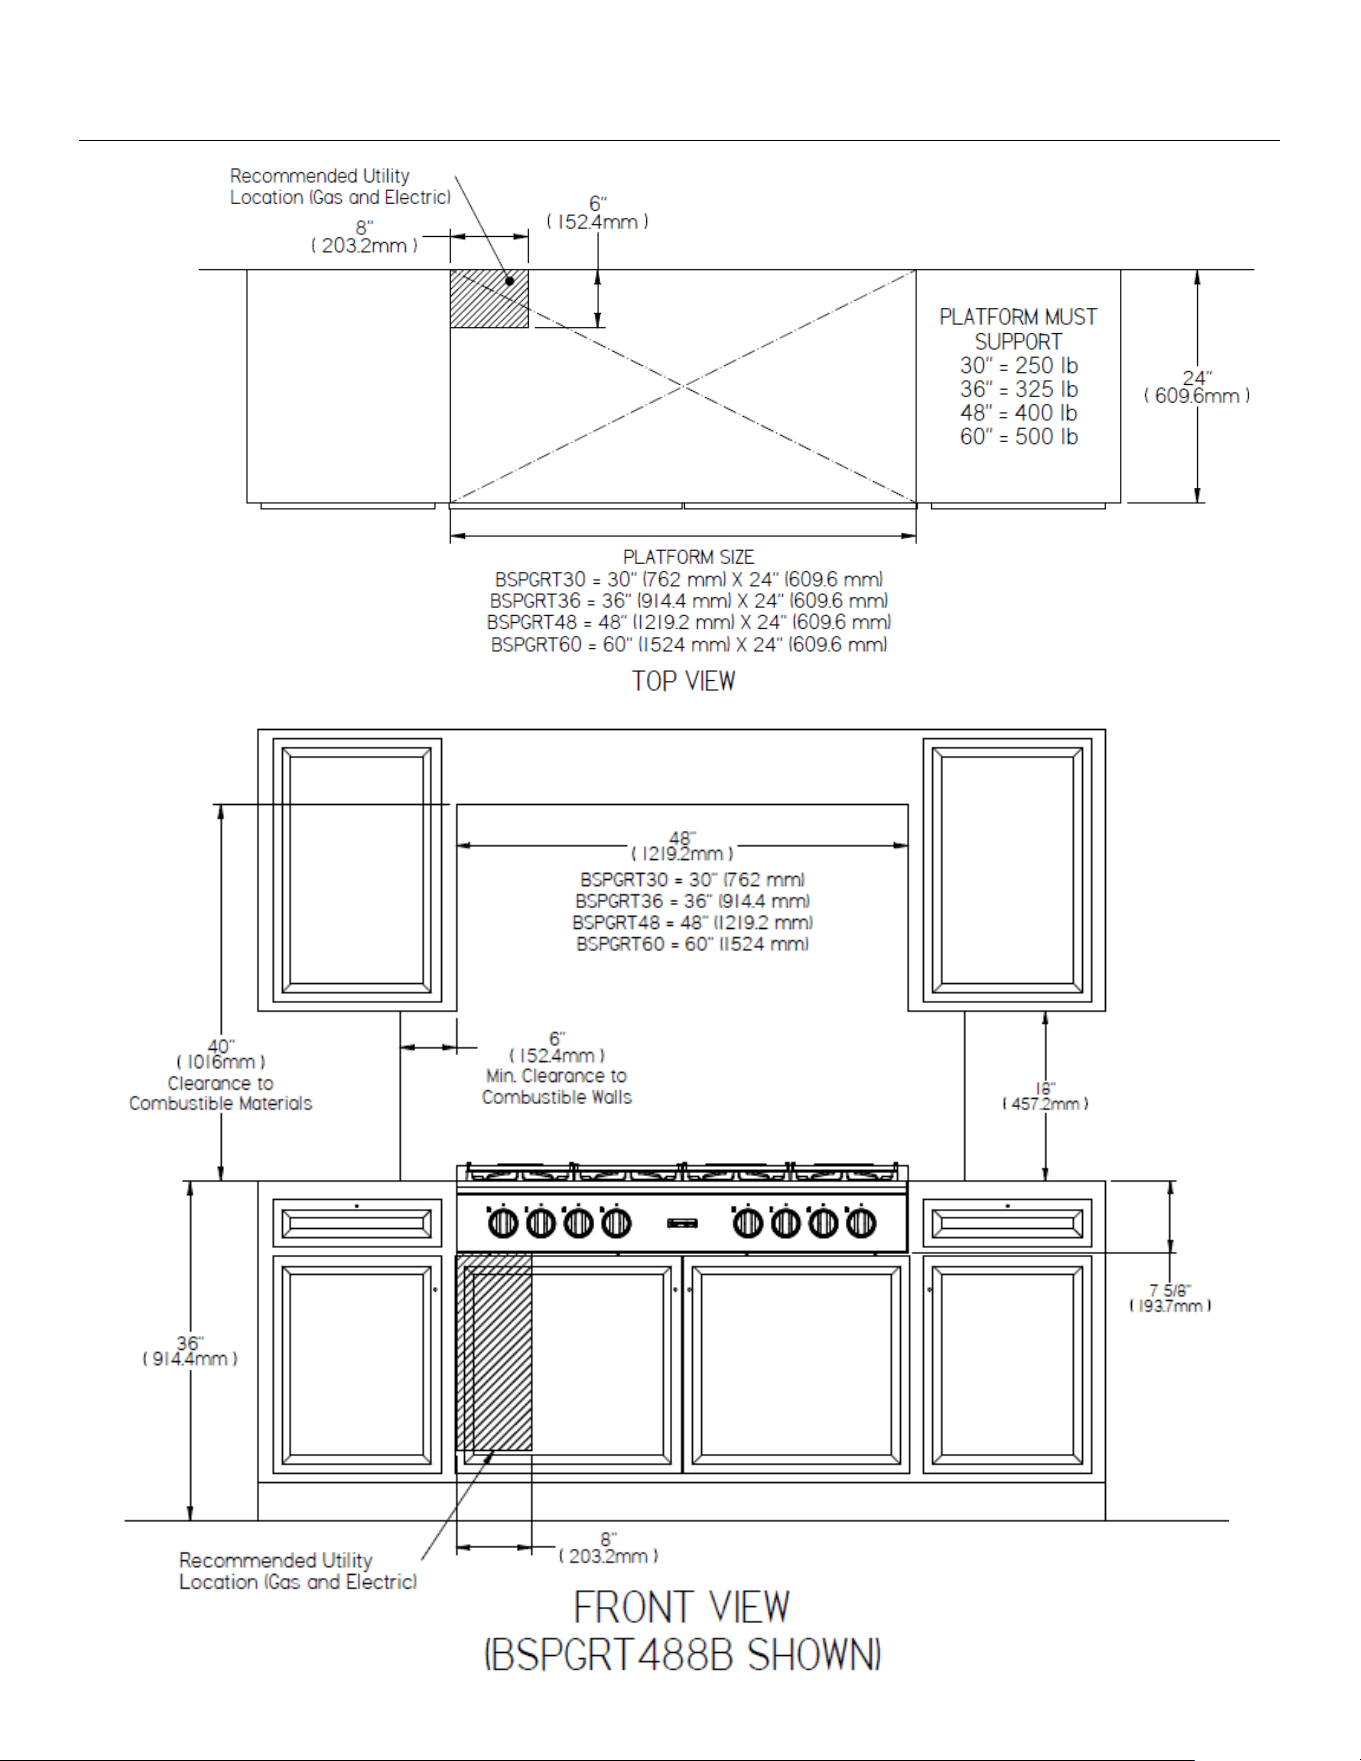
Site Preparation — Cabinet Dimensions, Preparation, & Utility Location
18 (800) 449-8691
Site Preparation — Cabinet Dimensions & Utility Location (continued)
Cabinet Side View All Sizes
bluestarcooking.com 19
Tools and Materials
• Philips Screw Driver
• Level
• Gloves and safety glasses
Step 1 — Uncrate and Inspect the Rangetop
Uncrate and inspect the rangetop. Remove the packing
materials but do not discard the user manual, grates,
any accessories packed with the units, etc.
Step 2 — Plan the Installation
The electric power cord and gas inlet are located on the
left rear corner of the appliance on the bottom surface.
Take caution when sliding the appliance onto the
platform to prevent damage to the electrical cord and
internal gas plumbing. Verify that the area below the
platform allows sufcient clearance for the electrical
cord and gas line as well as for the installation of the
required gas regulator and a gas shutoff valve.
Step 3 — Move the Rangetop into Position
Remove the hold down brackets securing the product
to the pallet using a Philips screwdriver and discard the
shipping screws and brackets. Use an appliance cart to
move the rangetop near the front of the enclosure.
Carefully lift the appliance using sufcient manpower or
proper tools. Cautiously slide the rangetop into position.
Verify the power cord is not pinched or compromised
during the move.
Level the product (front to back / left to right).
Installation Instructions
Cet appareil est lourd et bascule facilement lorsqu'il
n'est pas complètement installé. Utilisez deux
personnes ou plus pour déplacer et installer la
cuisinière. Le non-respect de ces instructions peut
entraîner la mort ou des blessures graves.
This appliance is heavy and tips easily when not
completely installed. Use two or more people to move
and install the rangetop. Failure to follow these
instructions can result in death or serious injury.
Step 4 — Connect Gas Supply
• The installation of this appliance must conform with
all applicable local codes. In the absence of local
codes, the installation must conform to the latest
level of the National Fuel Gas Code, ANSI Z223.1/
NFPA 54.
• In Canada, the installation must be in accordance
with the current CAN/CGA B149.1 and B149.2.
• You must have an individual manual shut-off valve
installed in the gas supply line ahead of the
appliance. This must be easily accessible in case of
emergency.
• The included gas regulator must be installed into
the gas pipe system.
• When pressure testing the piping systems the
appliance and its individual shut-off valve must be
disconnected from the gas supply piping during any
pressure testing in excess of 1/2 psi (3.5 kPa).
• For tests equal to or less than 1/2 psi (3.5 kPa) the
appliance must be isolated from the gas supply
piping system by closing its manual shut-off valve.
• Incoming line pressure upstream of the appliance
should be 1.0” WC greater than the operating
manifold pressure. Service pressure may uctuate
for a variety of reasons. Under no circumstances
should the factory-installed regulator be removed or
bypassed.
• Maximum gas pressure must not exceed 14” water
column (WC) or 1/2 psi.
• You can use either natural gas or liquid propane
with this appliance. Verify whether the appliance and
the incoming gas supply are compatible. Check the
serial plate.
• The gas supply line must be the same size or larger
than the gas inlet on the appliance. The appliance
has either a 1/2” NPT or 3/4” NPT gas inlet
connection. Make sure the supply line is 1/4” NPT
larger than the appliance gas inlet.
AVERTISSEMENT
WARNING
20 (800) 449-8691
• The sealant used on the pipe joints must be resistant
to LP gas.
• All gas cooking equipment must have a pressure
regulator on the incoming service line for safe and
efcient operation. This appliance is equipped with
such a gas pressure regulator. Check the incoming
gas pressure using a manometer. The correct
manifold pressure for natural gas is 5.0” WC and for
LP is 10” WC.
• The factory provided pressure regulator will
withstand a maximum input pressure of 1/2 PSI (14”
WC). If the incoming pressure exceeds the maximum
rating, a step-down regulator is required.
• The appliance and its individual shut-off valve must
be disconnected from the gas supply line during any
pressure testing in excess of 1/2 PSI (3.5 kPa).
• Check to see that all installer-supplied pipes and
ttings are clear of direct, threading chips or other
foreign particles before connecting the appliance to
the supply line. Such particles will clog orices and/
or valves when pressure is applied.
• The incoming gas supply is brought from the inlet
pipe. This is the only connection required via the
installer-supplied shut-off valve.
• If installing the appliance with exible couplings
and/or a “quick disconnect,” use a commercially-
approved AGA Design certied exible connector at
least 1/2” NPT that complies with ANSI Z21.41. In
Canada, the connector must comply with
CAN 16.10-88 and the “quick disconnect” device
must comply with CAN 16.19M-79 and installed with
a strain relief device.
• Before putting the appliance into service, test all gas
connections for leaks. When pressure testing
systems, do not exceed 1/2 PSI or damage will occur
to the regulator. Use a soapy solution. Do not use an
open ame to check for leaks. Such a procedure is
dangerous and it may not detect all the small leaks
that a soapy solution will.
Installation Instructions (continued)
Step 5 — Connect Electrical Supply
Observe all local and other codes regarding electrical
connections.
Installation and service must be performed by a
qualied installer, service agency, or utility company.
Installation must comply with all applicable electrical
codes.
1. The appliance is equipped with a standard three-
prong polarized , NEMA 5-15P line cord to be
plugged into a 120 volt, 15 amp outlet. The outlet
must be connected to a dedicated breaker rated for
15 amps with a good connection to ground.
2. Removal of the grounding prong from the plug will
void the manufacturer’s warranty and can cause
injury or death.
3. A dedicated ground is recommended for optimal
performance. A poor ground will cause problems
with burner ignition and operation.
4. The power cord is located at the left rear of the
appliance (viewed from the front).
5. Turn power off at the breaker when connecting the
power cord to the outlet.
6. Turn power on at the breaker after connecting the
power cord. A small click may be heard when power
is turned on to the unit. This is normal.
lmportant: All electrical wiring should be free
and clear. Wires or cables should not be pinched
or otherwise obstructed.
This appliance must be grounded. Do not cut, remove,
or disregard the grounding wire in this appliance. If the
appliance is not grounded, severe shock hazards can
exist and performance of the product can be negatively
affected.
WARNING
Cet appareil doit être mis à la terre. Ne coupez pas, ne
retirez pas et ne négligez pas le l de mise à la terre de
cet appareil. Si l'appareil n'est pas mis à la terre, de
graves risques d'électrocution peuvent exister.
AVERTISSEMENT
bluestarcooking.com 21
Installation Instructions (continued)
IMPORTANT: If connecting the appliance to a GFCI or
AFCI outlet or breaker, the manufacturers
recommended use, care, and maintenance schedule for
the GFCI/AFCI must be followed.
Improper maintenance can cause the GFCI/AFCI to trip.
This will result in the appliance becoming non-
operational.
BlueStar will not be responsible for any service
related to improperly maintained GFCI or AFCI
circuits.
Power supply: Grounded, 120VAC, 60Hz
Circuit protection: 15 amp dedicated circuit
IMPORTANT: Save these instructions for the local
electrical inspector’s use.
Backguard
• All ranges and range tops require a backguard to be
installed prior to operation.
• Most models have the option of using: island trim
(standard); 6 inch, or 24 inch with high shelf.
• All backguards follow the same basic method of
installation.
• The unit must be pulled out of the cabinet to
install a backguard
• Remove grates and existing backguard if
present
• Slide backguard onto the rear of the unit.
• Align holes and use supplied hardware to
fasten the backguard to the unit.
• A minimum of six sheet metal screws (more
depending on the width of the unit) are to
be installed, three on each end and more
along the bottom edge.
• Replace removed grates.
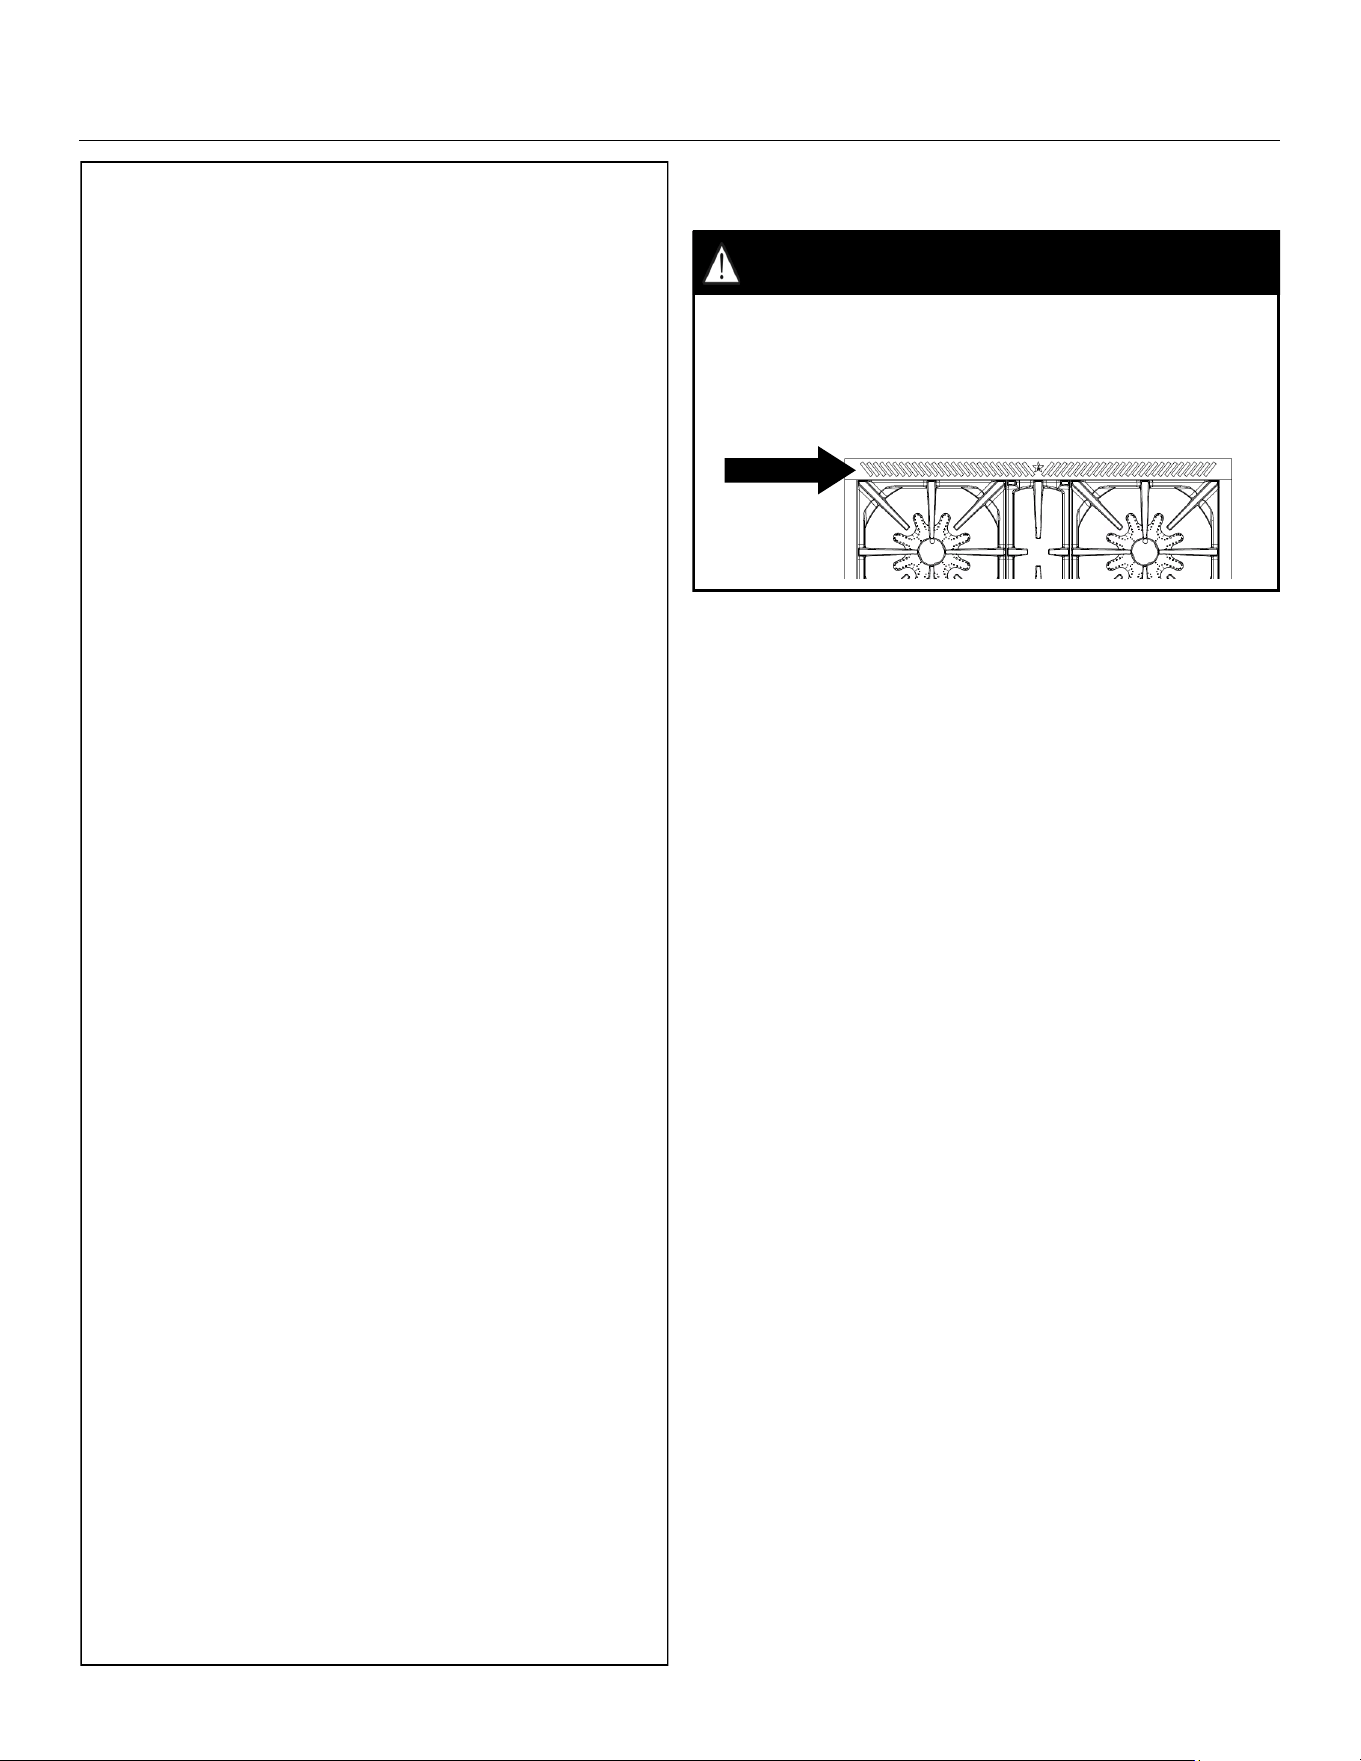
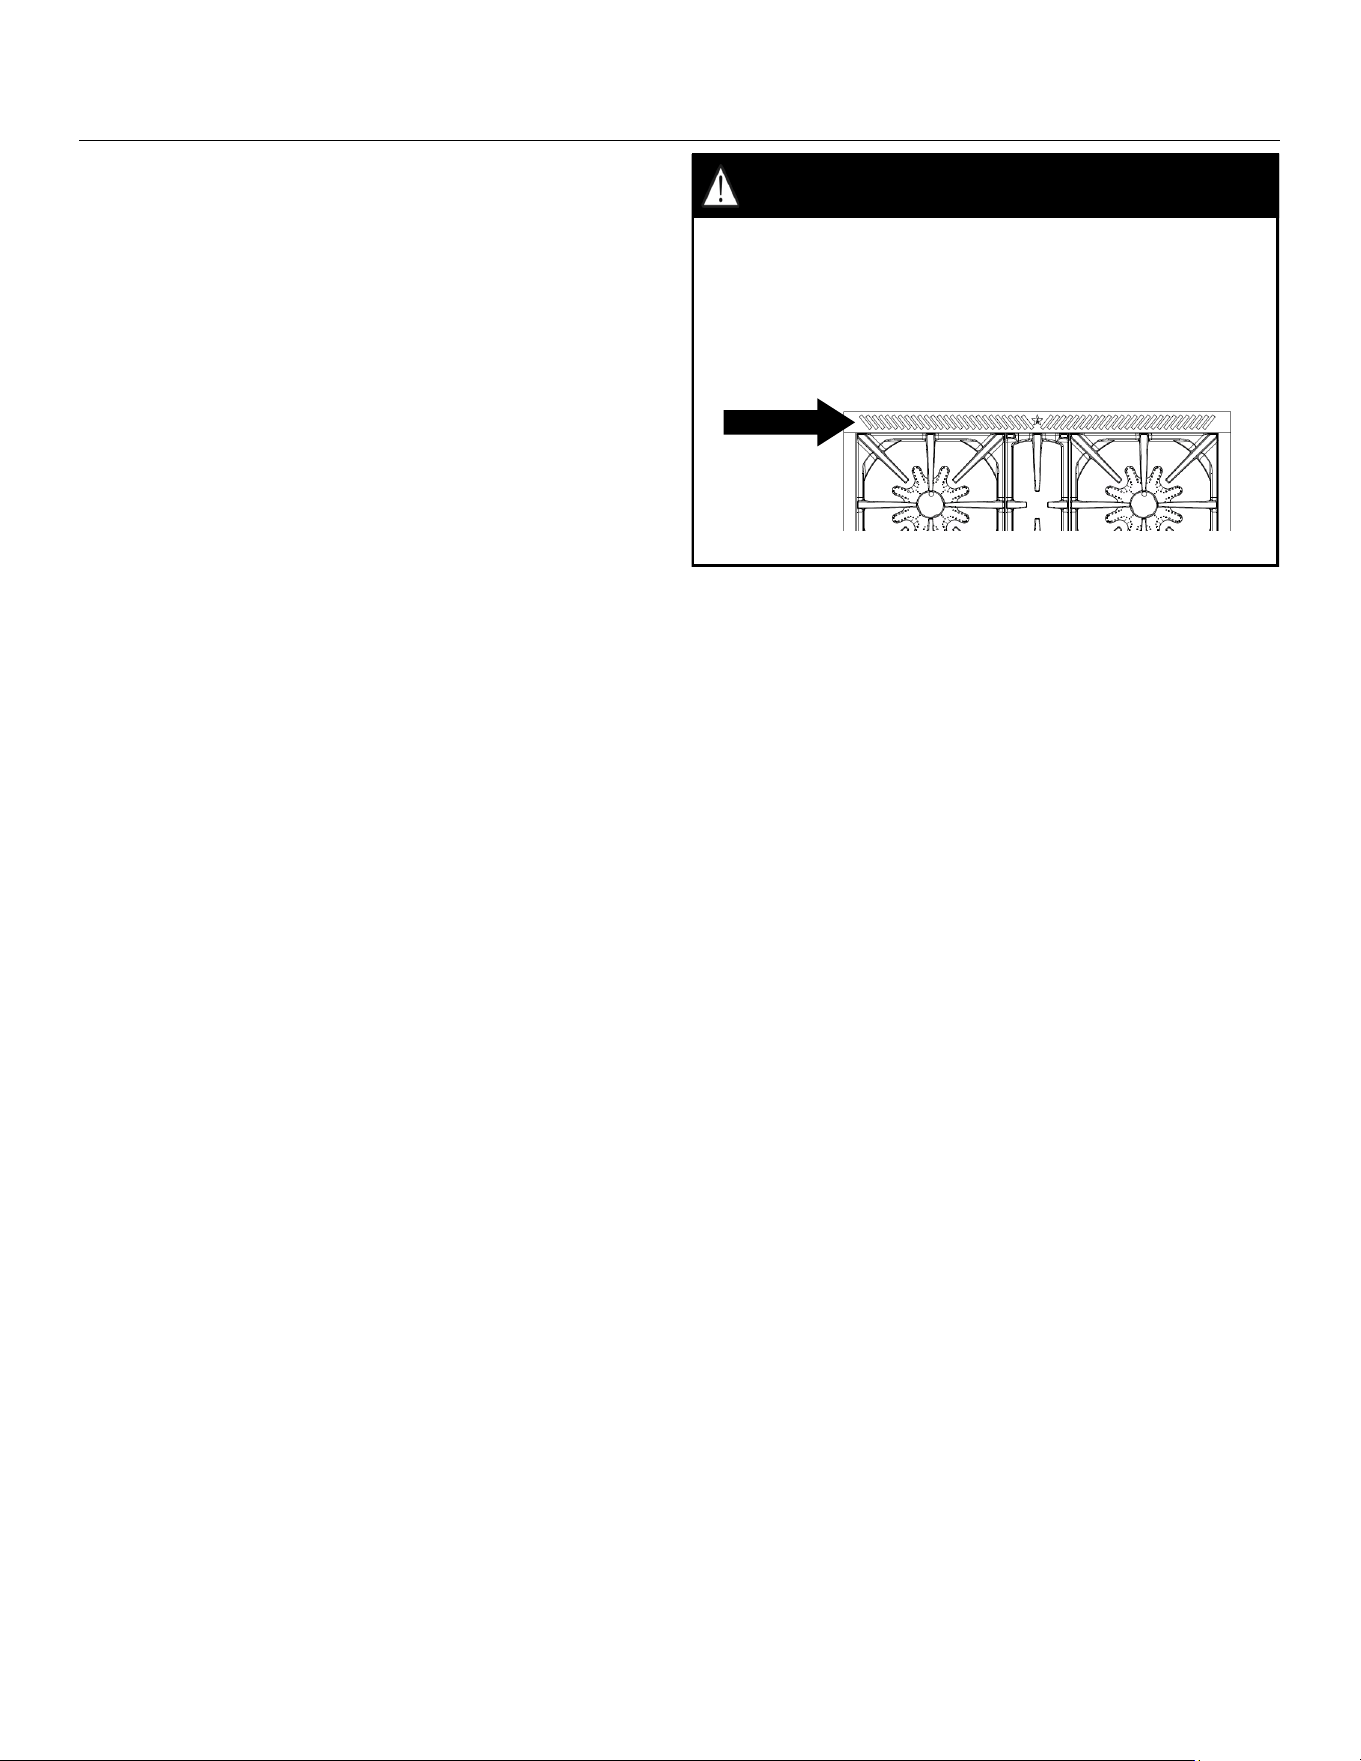
Never obstruct, place anything on top of, or touch the
openings in the backguard. This can result in damage to
property and objects; re; serious injury; or death if
these precautions are not followed.
WARNING
22 (800) 449-8691
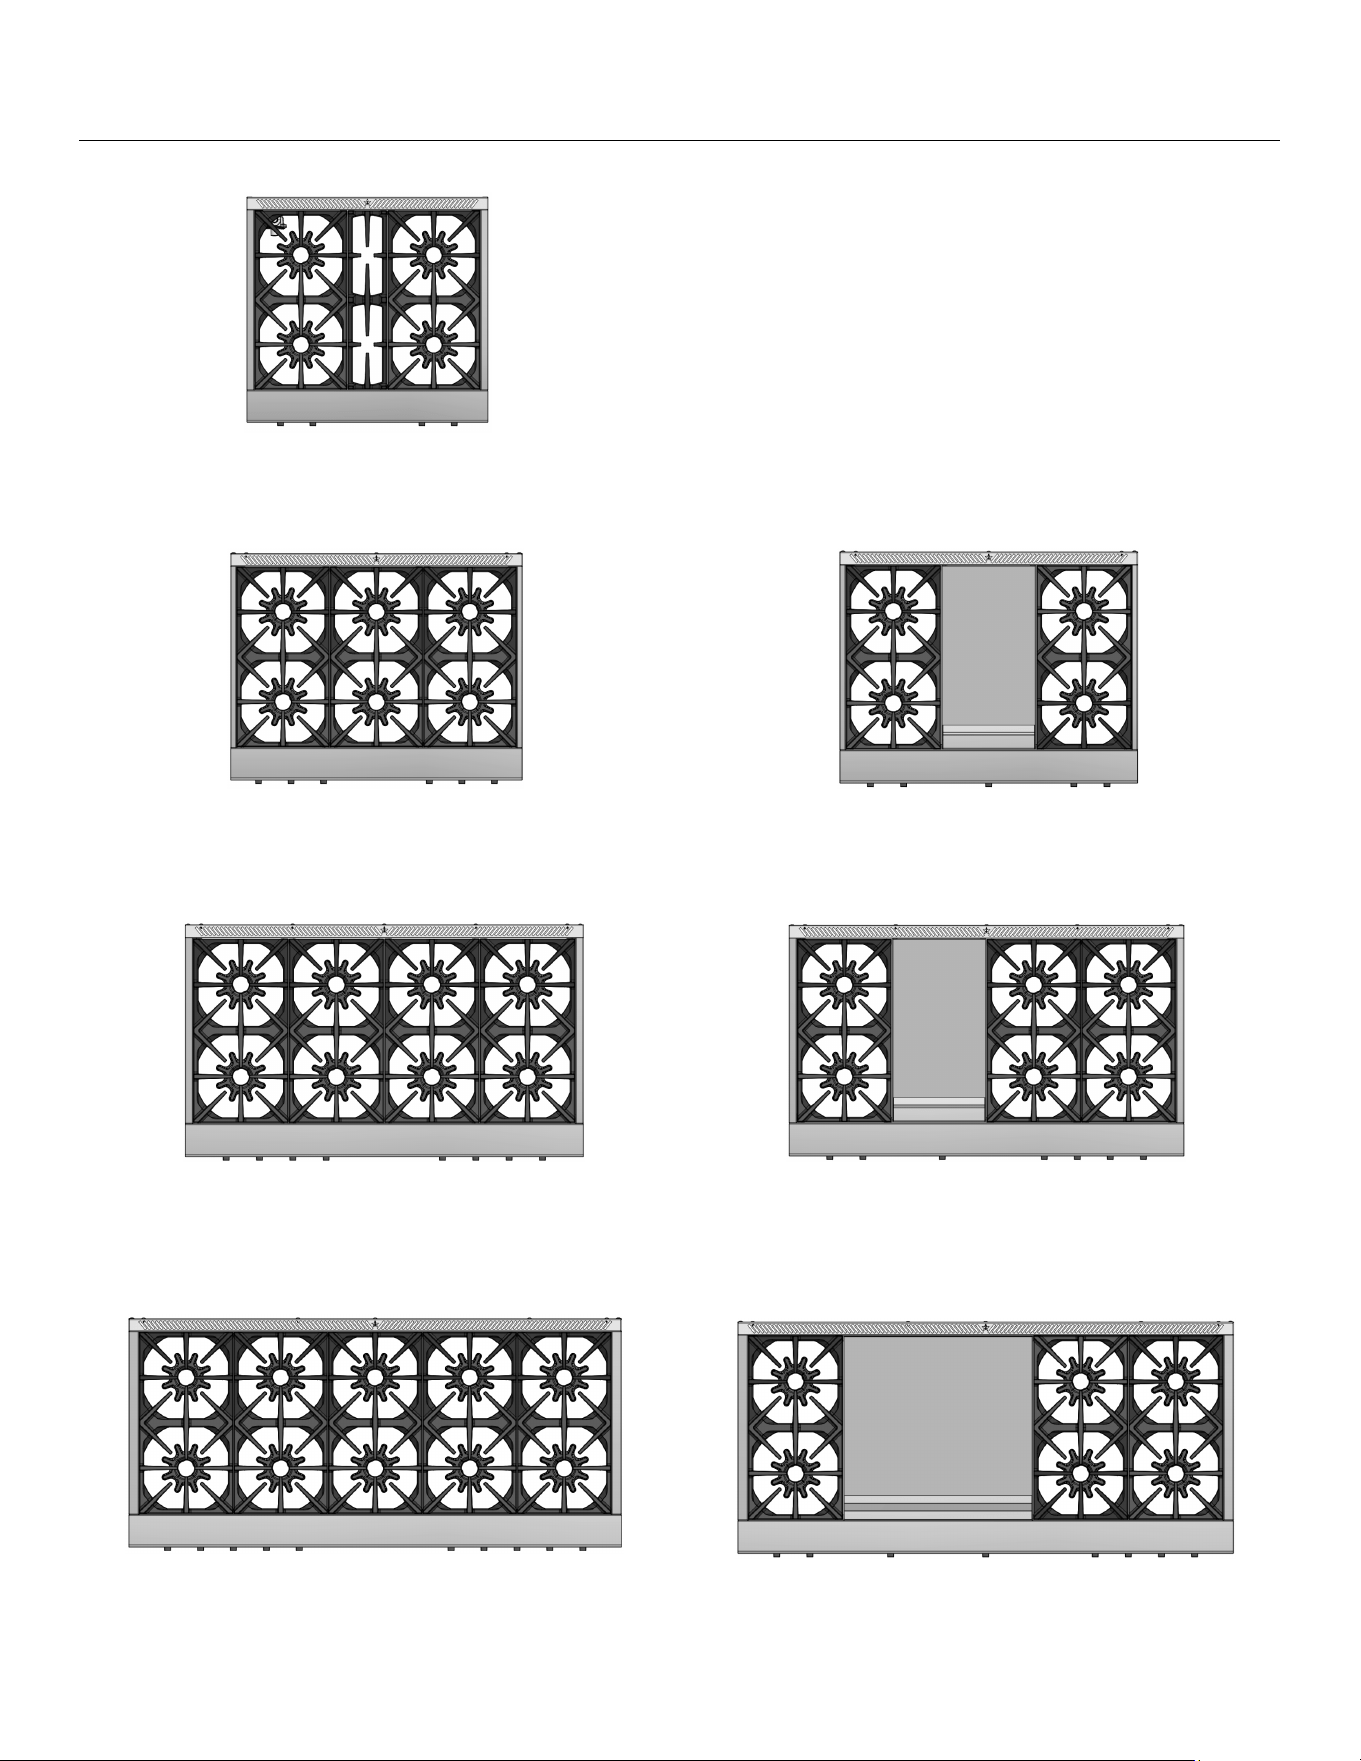
Model Conguration Top Views with Burner Rates
18K BTU 18K BTU 18K BTU 18K BTU 18K BTU
25K BTU 25K BTU 25K BTU 25K BTU 25K BTU
25K BTU 15K BTU 15K BTU 25K BTU 25K BTU
18K BTU 18K BTU 18K BTU 18K BTU
25K BTU 25K BTU 25K BTU 25K BTU
18K BTU 18K BTU 18K BTU
25K BTU 15K BTU 25K BTU 25K BTU
18K BTU 18K BTU 18K BTU
25K BTU 15K BTU 25K BTU
18K BTU 18K BTU 18K BTU 18K BTU 18K BTU
25K BTU 25K BTU 25K BTU
18K BTU 18K BTU
25K BTU 25K BTU
BSPGRT304B
BSPGRT366B
BSPGRT488B
BSPGRT364G
BSPGRT488B
BSPGRT606G
BSPGRT606G
bluestarcooking.com 23
Surface Burners
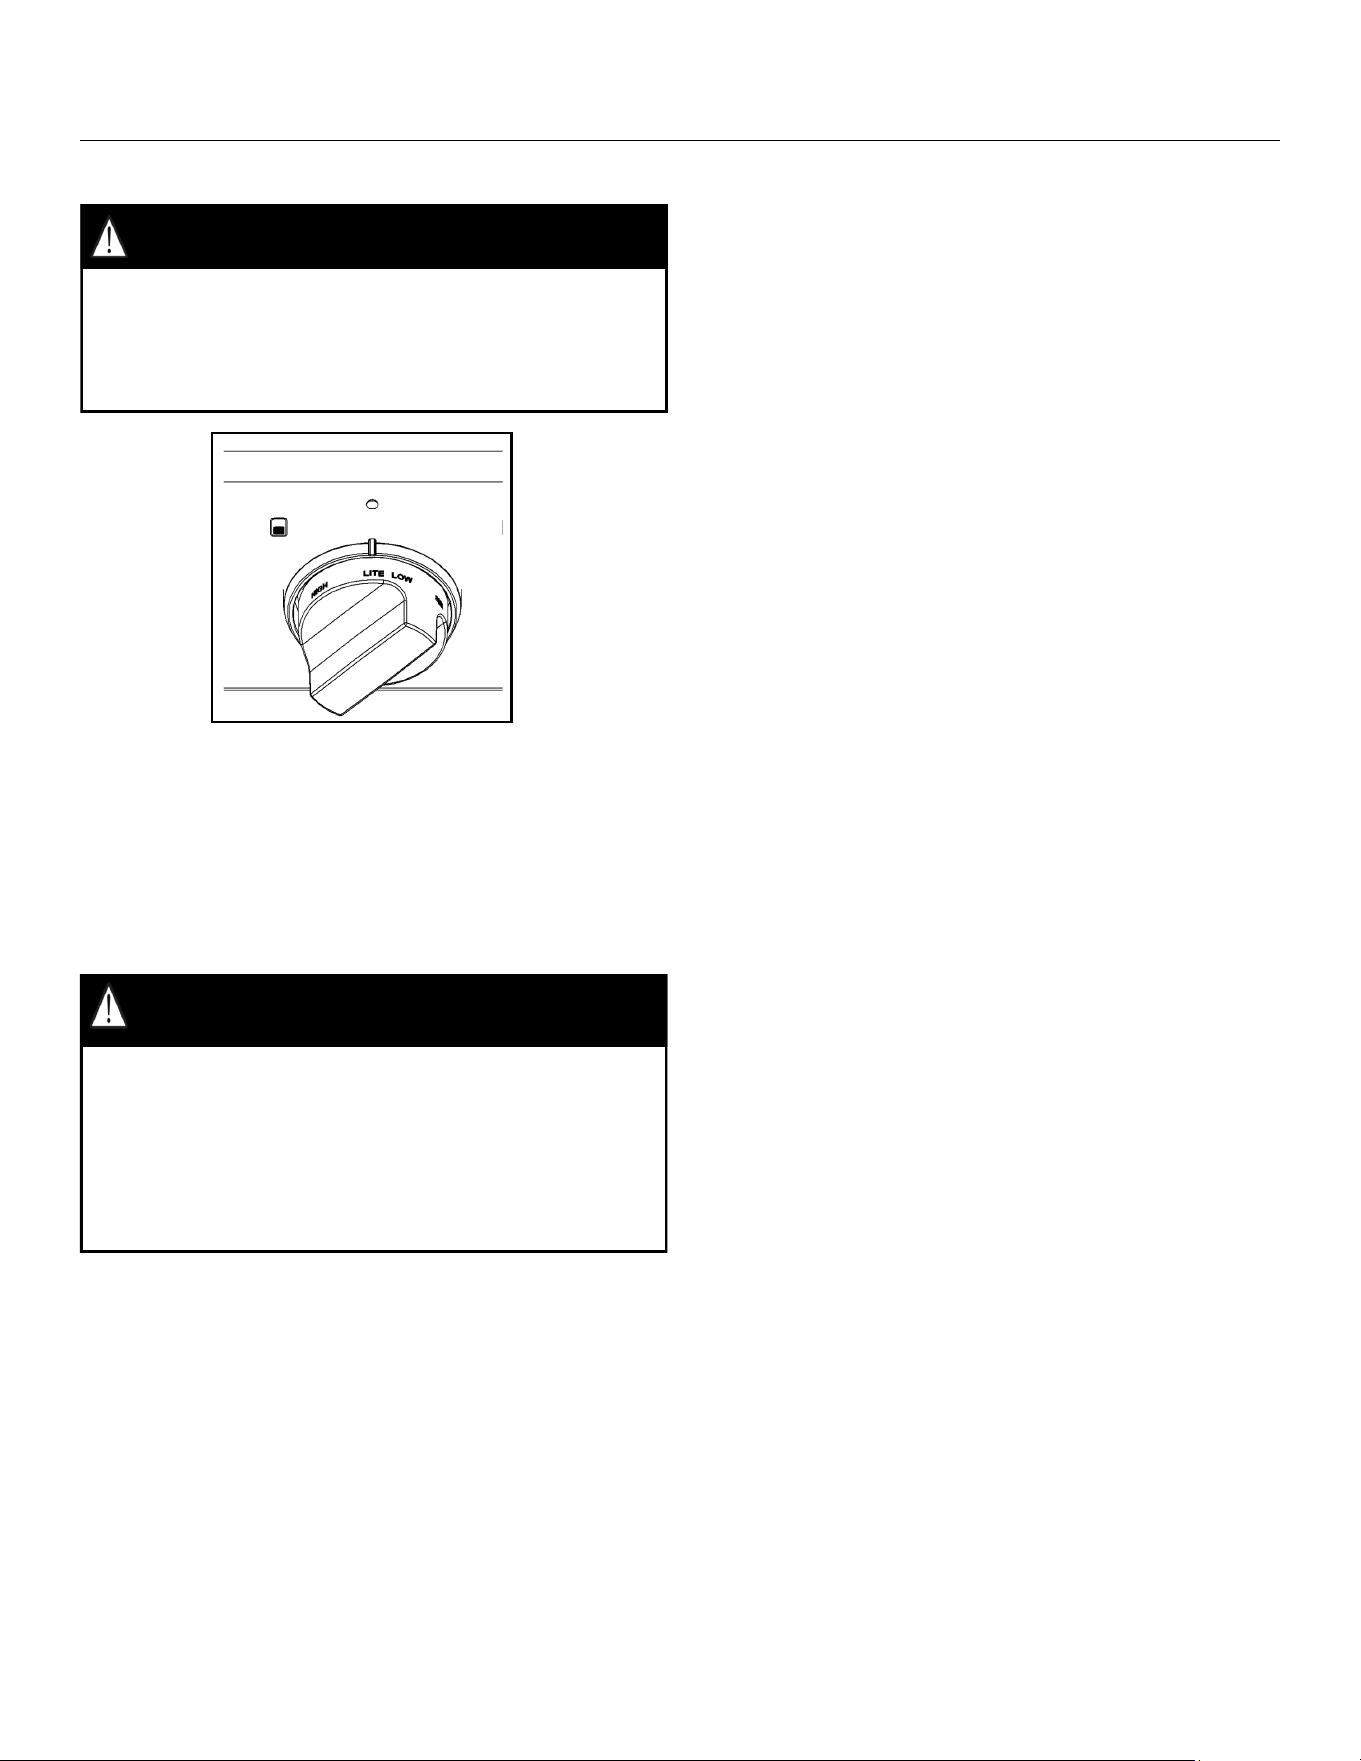
• When turning a burner ON: Push in and turn the
burner knob counterclockwise past HIGH to the LITE
position to start the ignition process. The ignitor will
spark and make a clicking sound which will stop
after the burner ignites. After ignition, it may take a
few seconds for the gas to reach all the ports.
Surface Burners
• After the burner is lit, turn the knob to adjust the
ame to your desired setting.
• A white indicator light above each knob indicates
the burner is in the ON position.
• Turn the knob to OFF to extinguish the burner. The
ame may linger for a few seconds until all the gas
in the tube is burned off. Propane units may have an
audible popping sounds when the ame
extinguishes. This is normal and is caused by the
heavier than air property of propane.
Operation
Surface Burners (cont’d)
• Burners have a reignite feature in case the ame is
extinguished, however, it may take several seconds
for the burner to reignite.
• If a spillover occurs and the ame is extinguished
turn the burner OFF, allow the burner to cool and
clean the spill and the burner before reusing the
burner
Important: Never operate the burner with knob set
between the HIGH and OFF positions. The ame will not
reignite in this position and a gas leak could occur.
Burner Adjustment
1. After ignition, turn the knob to your desired
setting.
2. Each burner has ve (5) marked positions:
HIGH Maximum heat
25,000 BTU front burner
18,000 BTU rear burners
LOW Flames will be on all ports at their lowest
position.
SIM Inner ring of ame only at its highest
adjustment.
WARM Inner ring of ame only at its lowest
adjustment.
3. Turn the knob to OFF to extinguish the burner.
The ame may linger for several seconds until all
the gas in the burner is burned off.
4. If the burner does not ignite, see the Before
Calling for Service section for possible causes and
solutions.
CAUTION: Never operate the burner with the knob
set between the HIGH and OFF position.
The ame will NOT re-ignite in this
position and a gas leak can occur.
When turning the burner on ALWAYS turn the knob to
the LITE position. If the burner is lit in the HIGH position
a large ame can result due to the high BTU rate of the
burners and varying conditions in the kitchen. Lighting
the burner at the LITE position will result in quicker
WARNING
Lighting the burner in the HIGH position can result in a
slight delay of ignition and can produce a large ame.
This is normal but not recommended.
WARNING

24 (800) 449-8691
Cooking Guide and Tips
Burner Settings
1. Burners can be set to any setting between WARM
and HIGH.
2. Flames should be adjusted to contact the bottom
of the pot and should not extend beyond the edge
of any pot or pan.
3. The center ring of ame can be adjusted from
WARM to SIM. The difference in the ame is
almost not visible despite nearly 1000 BTU
difference from lowest to highest adjustment of
the ring.
IMPORTANT: When set to HIGH, ames should appear
as a dened cone with a dark blue center and light blue
outside. Some yellow/orange ame may be seen
depending on the type of gas and the supply line.
Simmer Flame
The center ring WARM ame gives you the ability to
hold very low settings that can be used to gently melt
chocolate and hold delicate sauces and foods at low
temperatures.
1. All burners on your range top can turn down to
WARM.
2. The LOW setting turns all the ports on the burner
to their lowest setting. This setting has been
adjusted to hold nearly all foods to a temperature
just below boiling. From this setting the ame can
be adjusted up all the way to HIGH.
IMPORTANT: If a spillover occurs and the center ring
ame is extinguished but does not relight it will cause
the burner to continuously click and the reignition
feature will not function. It is important that the burner
be turned off, allowed to cool, then cleaned, taking care
to remove any residual food and moisture from the
center ring slot.
Surface Burners
• To avoid oil spillover and re, use a minimum
amount of oil when shallow pan-frying and avoid
cooking frozen foods with excessive amounts of ice.
• Never leave the appliance unattended during use.
Boil-overs may occur, causing spills which may
ignite.
• If you are aming liquor or other spirits and your
appliance is installed under a vent hood, turn off the
fan. The draft created could cause the ames to
spread out of control.
• Do not use cookie sheets or aluminum foil to cover
the grates or line any part of the rangetop. Doing so
may result in carbon monoxide build-up and
poisoning, over heating the rangetop surfaces, or a
potential re hazard.
• Never leave surface burners unattended. Foods,
especially oily foods, may ignite resulting in re that
could spread to surrounding cabinets. Use a deep
fry thermometer whenever possible to monitor oil
temperature and operate within safe limits.
• To avoid oil spillover and re, use a minimum
amount of oil when shallow pan-frying and avoid
cooking frozen foods with excessive amounts of ice.
• If you are aming liquor or other spirits, turn off the
fan on the hood. The draft could cause the ames to
spread.
• Do not use cookie sheets or aluminum foil to cover
the grates or line any part of the rangetop. Doing so
may result in carbon monoxide build-up and
poisoning, over heating the rangetop surfaces, or a
potential re hazard.
• Use a deep fry thermometer whenever possible to
monitor oil temperature and operate with safe limits.
Top Grates
When placing the top grate back on the range top,
position the silicon feet over the bolt heads securing the
porcelain bowl.
Attention: Darkening of grates and burners with
usage over time is normal.
bluestarcooking.com 25
Before Your First Use (continued)
Griddle Seasoning Procedure (select models)
IMPORTANT: You must season your griddle before
your rst use. The seasoning process prevents food from
sticking and the surface from rusting. This procedure will
take about an hour and a half and you will need to stay
and monitor the griddle during this time as the griddle
will get very hot!
1. Wipe off any factory oils and residue with a soft
cloth.
2. Use a dry cotton towel to apply a light coat of high
smoke point oil to the griddle’s cooking surface. The
smoke point of the oil must be over 450°F (232°C).
3. Use a different dry cotton towel to wipe away excess
oil.
4. Push in and turn the griddle burner control knob left
to 300°F (149°C) setting and wait 30 minutes.
CAUTION: The griddle must be turned on to
perform the next steps. Use caution to prevent injury.
5. After 30 minutes, use a dry cotton towel to remove
the excess oil from the griddle’s surface.
6. Use another clean, dry cotton towel to apply another
coat of oil to the griddle’s surface.
7. Turn the griddle knob to 325°F (163°C), then wait 15
minutes.
8. Turn the griddle knob to 350°F (177°C), then wait 15
minutes.
9. Turn the griddle knob to 375°F (191°C), then wait 15
minutes.
10. Turn the griddle burner knob back to OFF and
taking extreme care, use a clean, dry cotton towel to
remove any excess oil while the griddle is hot.
Your griddle is now ready for use. After seasoning, with
time and use, your griddle will darken and develop a
normal, rich blue/black patina color.
IMPORTANT: If food begins to stick to the griddle with
use, repeat the seasoning process.
Griddle (select models)
• Push in and turn the griddle burner knob left to the
temperature you want.
• For optimal performance, allow the griddle to
preheat for approximately 20-40 minutes before
cooking.
• Always leave the grease tray in place while cooking
to make cleanup easy.
IMPORTANT: To clean your griddle do not scrub the
griddle plate with harsh chemicals, or heavy abrasives.
This will remove the seasoned nish, which can allow the
griddle plate to rust.
To clean the griddle:
• CAUTION: Allow the griddle to cool prior cleaning
to prevent injury.
• Always leave the grease tray installed when washing
your griddle.
• Scrape off as much food residue as possible off the
griddle plate using a spatula, scraper, wooden
spoon, or a natural bristle brush.
• Use warm soapy water and a soft cloth or sponge to
gently wash the griddle plate.
• Use clean water and a soft cloth or sponge to rinse
the griddle plate.
• Dry thoroughly using a lint free cloth or paper towel.
• Apply a small amount of vegetable or other neutral
cooking oil to the surface of the griddle and wipe
across the entire surface to preserve seasoning.
Important: Turn off the griddle when you are not using
it. Do not bang the griddle with metal utensils as this will
damage it.
Never obstruct, place anything on top of, or touch the
openings in the backguard. This can result in damage to
property and objects; re; serious injury; or death if
these precautions are not followed.
WARNING

26 (800) 449-8691
Cooking Guide and Tips
Food Safety Tips
Safe steps in food handling, cooking, and storage are essential in preventing food-borne illness. You can't see, smell,
or taste harmful bacteria that may cause illness. In every step of food preparation, follow these four guidelines to
keep food safe:
• Clean — Wash hands and surfaces often.
• Separate — Keep raw meat apart from other foods.
• Cook — Cook to the right temperature.
• Chill — Refrigerate food promptly.
Cook all food to the minimum (see the following page for recommendations from United States Food Safety and
Inspection Service) internal temperatures as measured with the temperature probe before removing food from the
oven. You may choose to cook food to higher temperatures. A holding temperature of 140°F (60°C) or higher is
recommended for food safety.
High Altitudes
For helpful information on cooking in high altitudes, visit: https://www.fsis.usda.gov/food-safety/safe-food-handling-
and-preparation/food-safety-basics/high-altitude-cooking.
bluestarcooking.com 27
Cooking Guide and Tips
Food Safety Tips
Use the table below as a guideline for internal temperature to safely cook raw meat, poultry, seafood, and other
foods. Temperatures should always be checked with a food thermometer to ensure minimum safe internal
temperatures have been reached to prevent food poisoning by killing harmful germs.
Resting times are listed for certain foods to allow the innermost parts and juices to fully reach safe temperatures.
Source: FoodSafety.gov, United States Food Safety and Inspection Service, as of November 21, 2024.
Food Type Internal Temperature (°F/°C)
Beef, bison, veal, goat, and
lamb
Steaks, roasts, chops
145°F (63°C)
Rest time: 3 minutes
Ground meat and sausage 160°F (71°C)
Casseroles Meat and meatless 165°F (74°C)
Chicken, turkey, and other
poultry
All: whole bird, breasts, legs, thighs, wings, ground poultry,
giblets, sausage, and stuing inside poultry.
165°F (74°C)
See USDA's Turkey Thawing Calculator and Turkey
Cooking Calculator.
Eggs
Raw eggs Cook until yolk and white are firm
Egg dishes (such as frittata, quiche) 160°F (71°C)
Casseroles (containing meat and poultry) 165°F (74°C)
Ham
Raw ham
145°F (63°C)
Rest time: 3 minutes
Precooked ham (to reheat)
165°F (74°C)
Note: Reheat cooked hams packaged in
USDA-inspected plants to 140°F (60°C)
Leftovers Any type 165°F (74°C)
Pork
Steaks, roasts, chops
145°F (63°C)
Rest time: 3 minutes
Ground meat and sausage 160°F (71°C)
Rabbit and venison Wild or farm-raised 160°F (71°C)
Seafood
Fish (whole or filet), such as salmon, tuna, tilapia,
pollock, bass, cod, catfish, trout, etc.
145°F (63°C) or cook until flesh is no longer
translucent and separates easily with a fork
Shrimp, lobster, crab, and scallops
Cook until flesh is pearly or white, and
opaque
Clams, oysters, mussels Cook until shells open during cooking

28 (800) 449-8691
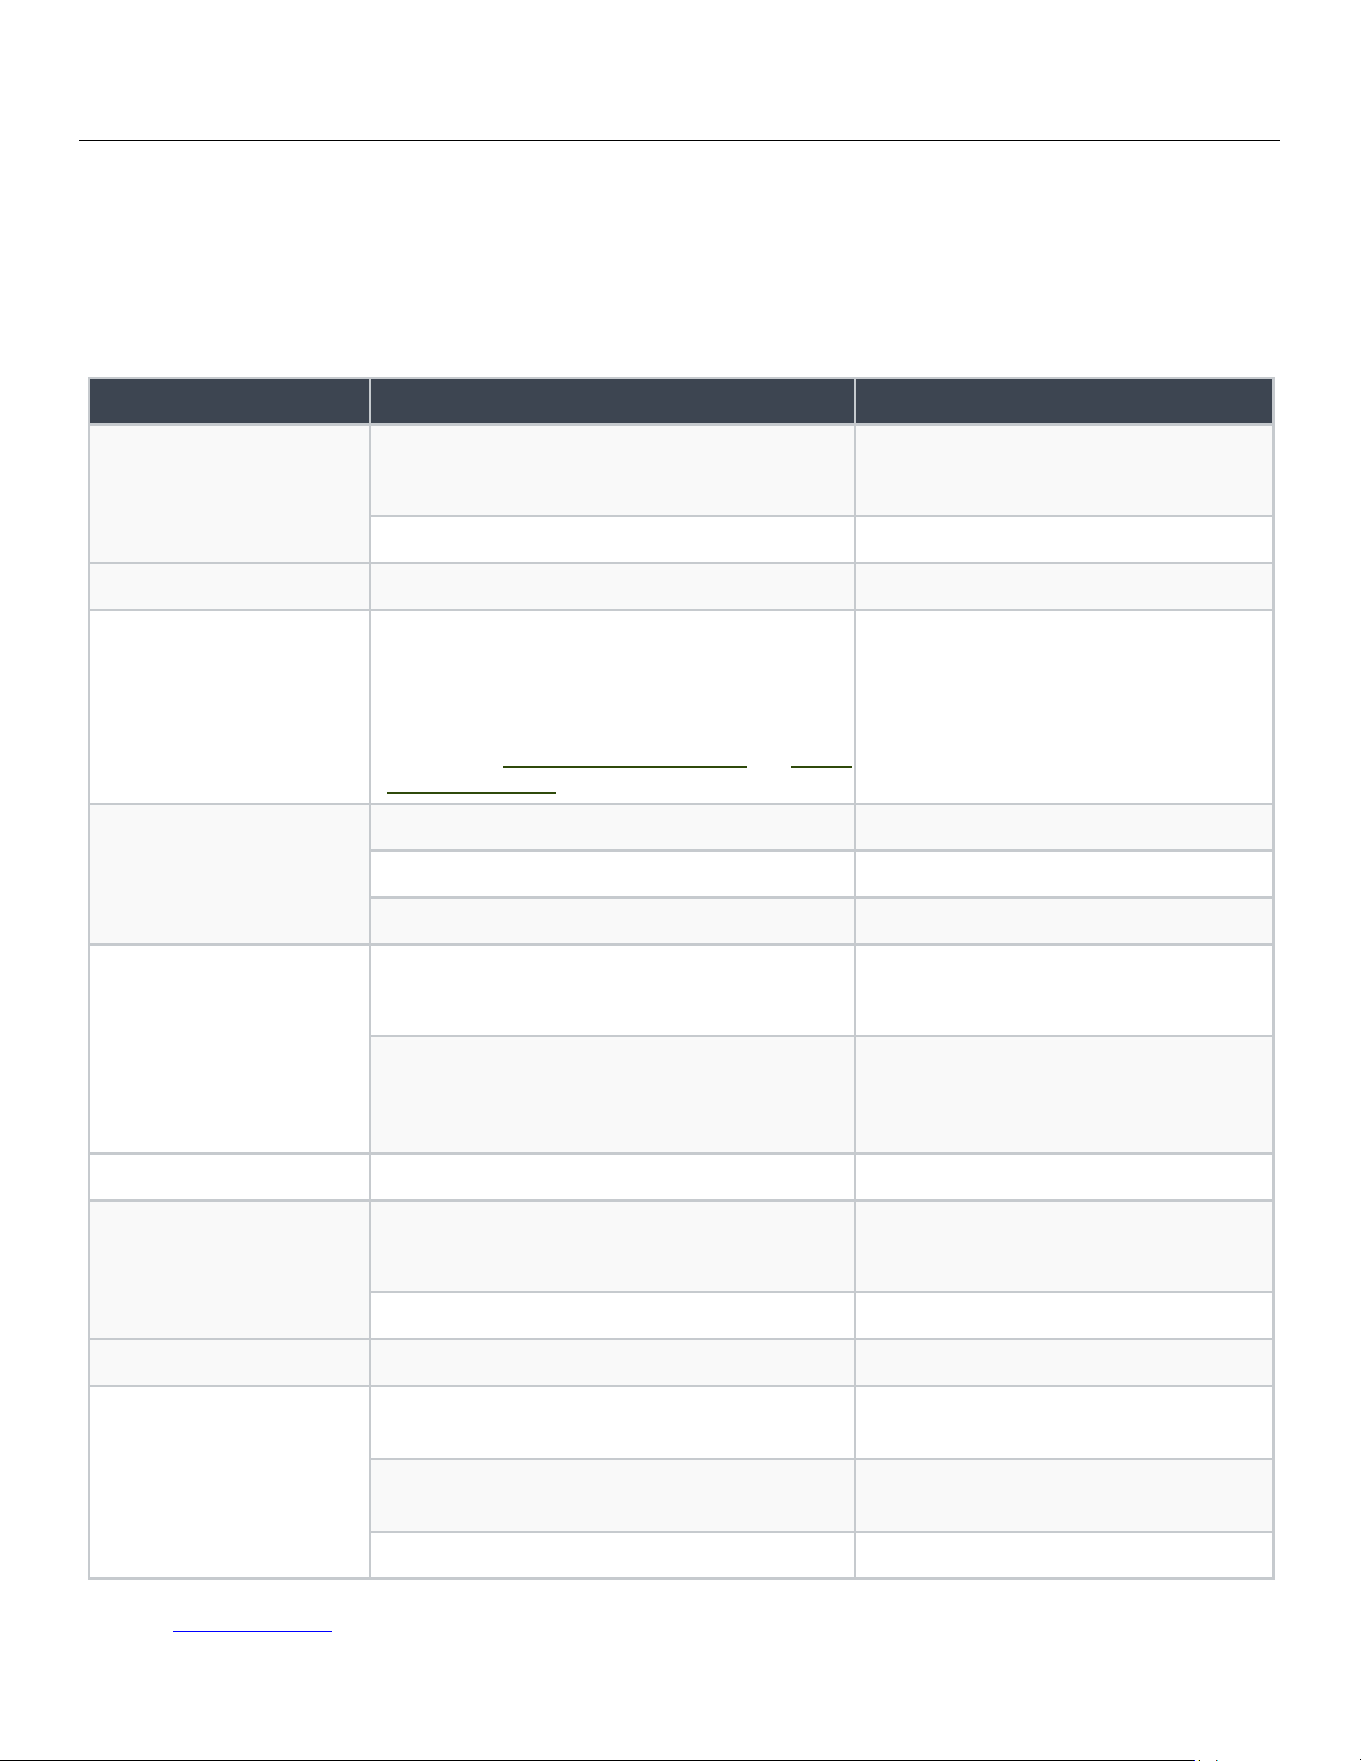
Care and Cleaning
Important: Make sure the appliance is cool before you clean.
Material Cleaning Need to Know
Cast Iron
• Wash in hot, soapy water, rinse well and dry
thoroughly. For heavy soiling, use a commercially
available oven cleaner. Be sure to follow the
cleaner manufacturer’s instructions.
• Do not allow a commercial oven cleaner to touch
painted or stainless steel surfaces.
• Do not use a wooden or plastic toothpick or any
other material that can break to clean burner ports.
Griddle
• Wait for it to cool to room temperature and
scrape off any excess food with a spatula and
wipe off any used cooking oil.
• For heavy soiling, use a nylon pad coated with a
thin layer of cooking oil.
• For stubborn stains, use a commercially-available,
food-safe griddle cleaner. Be sure to follow the
cleaner manufacturer’s instructions.
• After every use, apply a light coat of high smoke
point oil (like corn oil) to the griddle, then use a
clean, dry cotton towel to wipe off the excess.
• Do not use soap directly on the griddle surface,
residue may remain on the surface of the griddle
which can affect the avor of your food.
• Never ood a hot griddle plate with cold water.
• Do not allow your griddle to stand without a fresh
coat of oil.
Porcelain-Coated
Burner Bowl
• Wash with hot, soapy water, rinse well and dry
thoroughly.
• Do not use steel wool or metal pads as they may
damage or scratch the enamel coating.
• Do not permit citrus or tomato juices to sit and dry
on these surfaces as citric acid will discolor the
surface. Wipe such spills immediately.
Stainless Steel
• Clean with stainless steel cleaner and follow the
cleaner manufacturer’s instructions.
• Do not use steel wool, metal pads, or abrasive
cleaners.
• Do not use a metal knife, spatula, or any metal tool
to scrape these surfaces.
• Do not permit citrus or tomato juices to sit and dry
on these surfaces as citric acid will discolor the
surface. Wipe such spills immediately.
• Do not polish across the grain or in circles.
• Discoloration may occur with heavy use.
Painted Metal
• Use a soft cloth and a quality glass cleaner or
warm soapy water.
• Do not use steel wool, metal pads, or abrasive
cleaners.
• Do not use a metal knife, spatula, or any metal tool
to scrape these surfaces.
• Do not permit citrus or tomato juices to sit and dry
on these surfaces as citric acid will discolor the
surface. Wipe such spills immediately.
• Do not use paper towels or other coarse cloths.
Top Burners
• Use a soft cloth or sponge and warm soapy water
• Clear any blocked ports with a thin toothpick or
skewer
• Do not use chlorine or other harsh chemical
cleansers
• Do not use steel wool, metal pads, or abrasive
cleansers
• Do not use a metal knife, spatula, or any metal tool
to scrape these surfaces

bluestarcooking.com 29
Material Cleaning Need to Know
Plated Finishes
(Brass, Copper,
Chrome, Oil-Rubbed
Bronze, Pewter)
• The parts were treated with a protective clear coat
to prevent aging or discoloration. This clear coat
will last the life of the appliance unless the coating
is removed.
• Clean with a microber cloth using Endust,
Pledge, or something similar.
• Do not use a metal knife, spatula, or something
similar or any metal tool to scrape these
surfaces.
• Do not permit citrus or tomato juices to sit and
dry on these surfaces as citric acid will discolor
the surface. Wipe such spills immediately.
• Do not use harsh cleaners (such as Brite Boy) as
these will remove the coating and cause the
metals to discolor.
Care and Cleaning (continued)

30 (800) 449-8691
Troubleshooting
Check these helpful tips for any problems with your oven. If additional help or service is needed, please call
customer service at (800) 449-8691. You will need to have the model and serial numbers for your appliance ready
before you contact them. See Product Information on page 4 for information on nding these numbers.
Problem Possible Cause Solution
Burner will not ignite and there is no
“clicking” sound
• No electrical power to the appliance.
• Poor ground connection
• Electric polarity is reversed
• Plug into a properly grounded three-
prong electrical outlet.
• Check and reset the circuit breaker for
the appliance.
Burner will not ignite and there is a
“clicking” sound, but no spark
• Gas is not turned on.
• Clogged burner ports.
• Dirty electrode
• Turn on the gas supply.
• Use a push pin or safety pin to clear the
ports.
Burner will not ignite and there is a
“clicking” sound and a spark
• Gas is not turned on.
• The center ame ring slot is clogged.
• Turn on the gas supply.
• Clean the burner and clear any food or
moisture trapped in the center ame
ring slot.
Burner ignites but the “clicking” sound
does not stop
• Burners are wet.
• Electric plug is not in grounded outlet.
• Let burners dry and try again.
• Check the outlet polarity.
• Plug the appliance into a grounded
three-prong electrical outlet.
Burner does not fully ignite
• Partial gas supply.
• Clogged burner ports.
• Make sure the gas supply is fully on.
• Use a push pin or safety pin to clear the
ports.
Burner ame oats
• For LP users—the propane supply is low.
• Burner is dirty and ports are clogged.
• Fill the propane tank.
• Clean burners and burner ports.

bluestarcooking.com 31
Warranty
Prizer-Painter Stove Works, Inc. (“Prizer-Painter”)
warrants your BlueStar appliance (“product”) purchased
in the U.S. and Canada and installed in residential
properties for normal residential use.
What Is Covered
Subject to the specic conditions and limitations below,
this warranty covers parts and/or labor necessary to
repair or replace any part of the product that contains
defects in materials and workmanship.
Two Year Warranty. For two (2) years from the date of
installation, this warranty covers all parts and labor
necessary to repair or replace any part on the product
except for the Cosmetic Component Warranty below.
Cosmetic Component Warranty. For thirty (30) days
from the date of installation, this warranty covers
scratches and dents, paint and porcelain blemishes,
visible chips, etc.
Limitations of Coverage
• Floor Models. For one (1) year from the date of
installation, this warranty covers all parts and labor
necessary to repair or replace any part on the
product except for cosmetic parts for which there is
no warranty.
• The replacement of a part under this warranty does
not extend the warranty period.
• Warranty service outside normal business hours and
in areas beyond 50 miles one way from an
authorized BlueStar retailer or service provider. The
owner will be responsible for any and all costs
associated with additional mileage, non-standard
service or overtime, and special equipment required
to remove the product so service may be performed.
This warranty is void:
• If the product is removed from where it was
originally installed.
• If the original factory installed serial number is
altered or removed from the product.
• If gas cooking products are converted by someone
other than a BlueStar authorized service company.
What Is Not Covered
This warranty does not cover, and specically excludes:
• Product installed or used in any commercial or other
non-residential property such as, but not limited to,
day care facilities, re stations, hotels, nursing
homes, etc.
• Installation related issues including or installation
inconsistent with the product specications/
installation instructions.
• Damage or repairs caused by alterations or
modications, abuse, misuse, neglect, or improper
installation, mounting, handling, operation,
maintenance, or storage.
• Normal adjustments after installation and setup.
• Normal wear, care, and maintenance of the product
as described in this manual.
• Service calls to educate the customer on the proper
use and care of the product.
• Consumable parts.
• Damage or repairs caused by unauthorized service
or repairs, including unauthorized adjustments or
calibrations performed on the product.
• Accidental or intentional damage.
• Damage or repairs as a result of natural disasters,
res, oods, earthquakes, winds, lightning, corrosive
atmosphere, loss of electrical power to the product
for any reason, or other conditions beyond Prizer-
Painter’s control.
• Damage or repairs caused by alteration for outdoor
use.
• Damage or repairs caused by the use of harsh
chemicals or cleaning products improperly applied.
• Damage to surrounding property including
cabinetry, oors, ceilings, etc.
• Consequential or incidental damage, including but
not limited to food or medicine loss, time away from
work, restaurant meals, etc.
The terms of this warranty provide for repair of the
product only. If the product cannot be repaired, Prizer-
Painter, at its sole discretion, will determine whether to
exchange the product.
Please see the Arbitration Clause and Related
Provisions, which affect your legal rights. The Arbitration
Clause is available at www.bluestarcooking.com.

32 (800) 449-8691