Instruction Manual
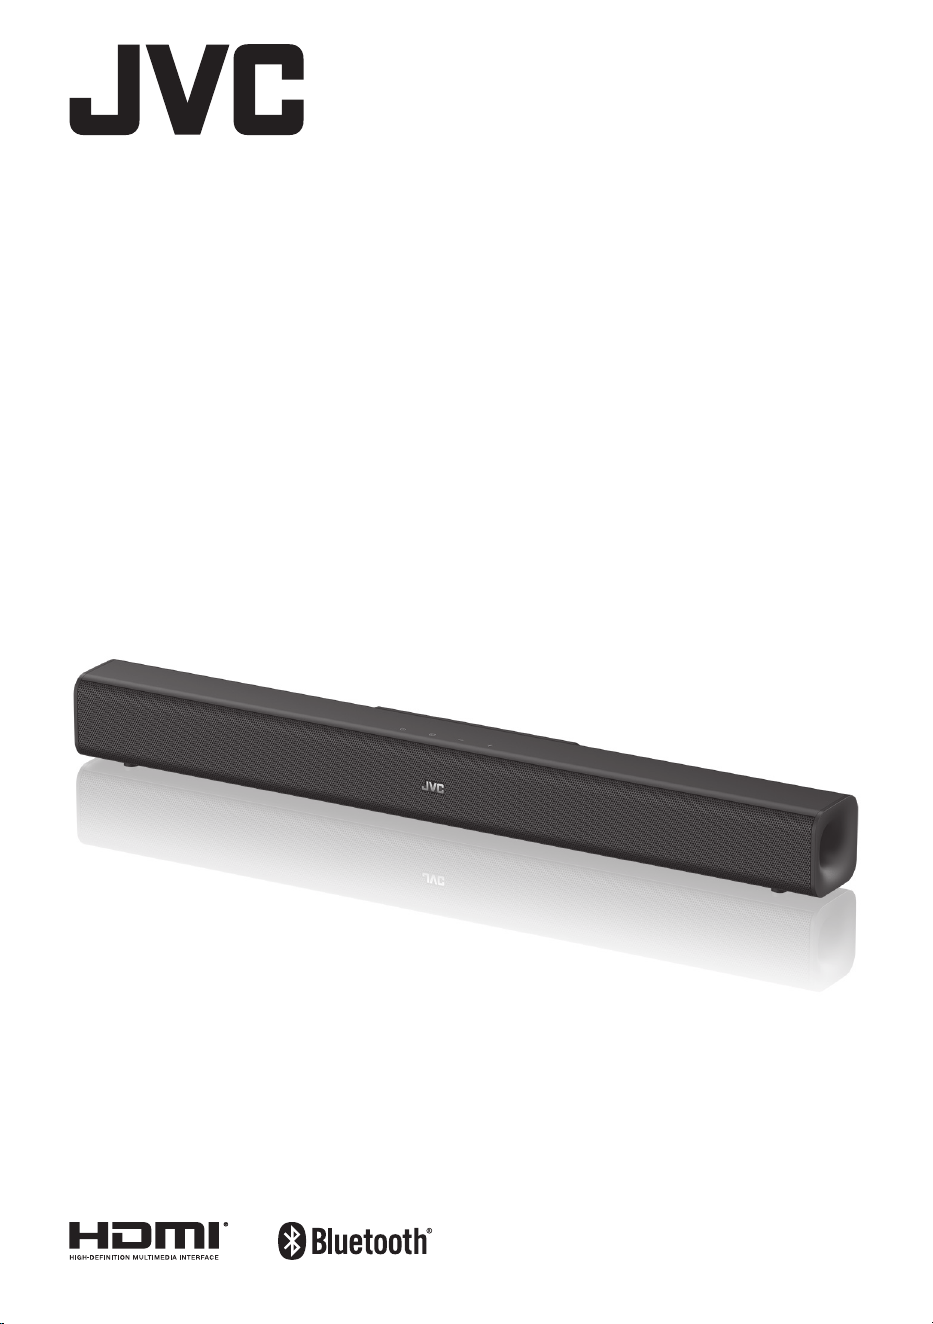
Compact Soundbar
TH-D625B

Safety Warnings - Soundbar
Ventilation
• To prevent the risk of electric shock or
re hazard due to overheating, ensure
that curtains and other materials do not
obstruct the ventilation vents.
• A minimum distance of 5 cm around the
unit should be maintained to allow for
sucient ventilation.
• Do not install or place this unit in a
bookcase, built-in cabinet or in another
conned space. Ensure the unit is well
ventilated.
Safety
• Always disconnect the unit from the mains
supply before connecting / disconnecting
other devices or moving the unit.
• Unplug the unit from the mains socket
during a lightning storm.
• In the interests of safety and to avoid
unnecessary energy consumption,
never leave the unit switched on while
unattended for long periods of time, e.g.
overnight, while on holiday or while out of
the house. Switch it o and disconnect the
mains plug from the mains socket.
Mains Cable
• Make sure the unit or unit stand is not
resting on top of the mains cable, as the
weight of the unit may damage the mains
cable and create a safety hazard.
• If the mains cable is damaged it must be
replaced by the manufacturer, its service
agent, or similarly qualied persons in
order to avoid a hazard.
Use only power supplies listed in the
user instruction.
The mains plug is used as disconnect
device, the disconnect device shall
remain readily operable.
Interference
• Do not place the unit on or near appliances
which may cause electromagnetic
interference. If you do, it may adversely
aect the operating performance of the
unit, and cause a distorted picture or
sound.
Batteries
• Batteries used in the remote control for this
unit are easily swallowed by young children
and this is dangerous.
• Read all the instructions carefully before
using the unit and keep them for future
reference.
• Retain the manual. If you pass the unit
onto a third party make sure to include this
manual.
• Check that the voltage marked on the
rating label matches your mains voltage.
Damage
• Please inspect the unit for damage after
unpacking.
• Do not continue to operate the unit if you
are in any doubt about it working normally,
or if it is damaged in any way - switch o,
withdraw the mains plug and consult your
dealer.
Location of Unit
• The unit must be placed on a at stable
surface and should not be subjected to
vibrations.
• Do not place the unit on sloped or unstable
surfaces as the unit may fall o or tip over.
• The mains socket must be located near the
unit and should be easily accessible.
• This unit is designed for indoor, domestic
use only.
Temperature
• Avoid extreme degrees of temperature,
either hot or cold. Place the unit well away
from heat sources such as radiators or gas /
electric res.
• Avoid exposure to direct sunlight and other
sources of heat.
• Attention should be drawn to the use of
apparatus in moderate climates.
Naked Flames
• Never place any type of candle or naked
ame on the top of or near the unit.
Moisture
• To reduce the risk of re, electric shock or
product damage, do not expose this unit
to rain, moisture, dripping or splashing.
No objects lled with liquids, such as
vases, should be placed on the unit. Do
not operate the unit with wet hands, near
water or other liquid.
• If you spill any liquid into the unit, it can
cause serious damage. Switch it o at the
mains immediately. Withdraw the mains
plug and consult your dealer.
• Keep loose batteries away from young
children and make sure that the battery
holder tray is secure in the remote control.
Seek medical advice if you believe a cell
has been swallowed.
• Please dispose of batteries correctly by
following the guidance in this manual.
• Do not expose the battery to direct
sunlight or sources of excessive heat.
• Attention should be drawn to the
environmental aspects of battery disposal.
• Do not ingest the battery. Chemical Burn
Hazard.
• Keep new and used battery away from
children.
• If the battery compartment does not close
securely, stop using the product and keep
it away from children.
• If you think batteries might have been
swallowed or placed inside any part of the
body, seek immediate medical attention.
Supervision
• Children should be supervised to ensure
that they do not play with the unit and the
remote control.
• Never let anyone especially children push
anything into the holes, slots or any other
openings in the case - this could result in a
fatal electric shock.
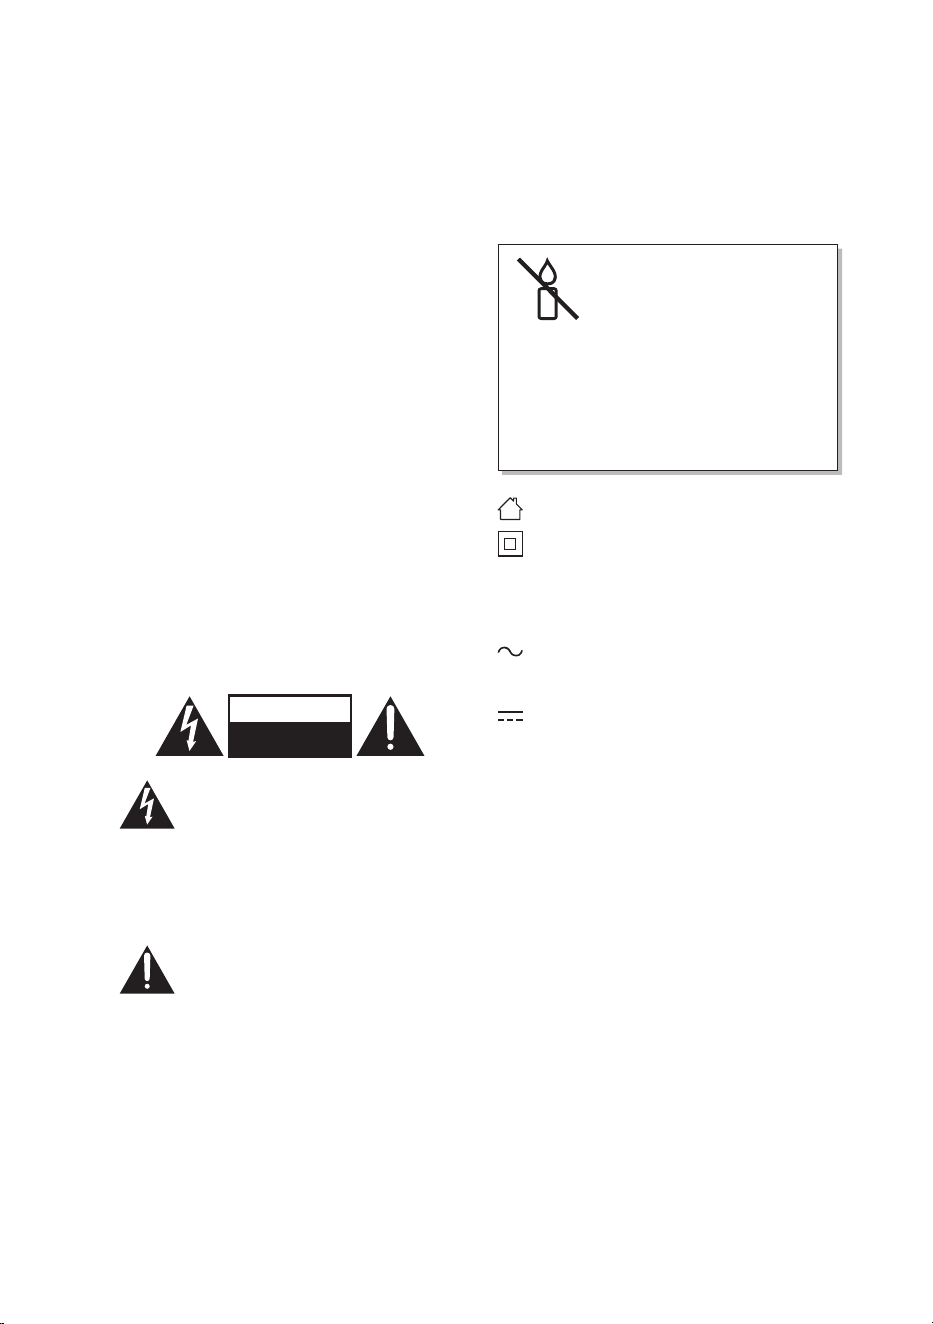
CAUTION
RISK OF ELECTRIC SHOCK
DO NOT OPEN
The lightning ash with arrowhead
symbol, within an equilateral
triangle, is intended to alert the
user to the presence of uninsulated
“dangerous voltage” within the
unit’s enclosure that may be of
sucient magnitude to constitute a
risk of electric shock.
The exclamation point within an
equilateral triangle is intended to
alert the user to the presence of
important operating and
maintenance (servicing)
instructions in the manual
accompanying the unit.
Service
• To reduce the risk of electric shock, do not
remove screws. The unit does not contain
any user-serviceable parts. Please leave all
maintenance work to qualied personnel.
• Do not open any xed covers as this may
expose dangerous voltages.
Maintenance
• Ensure to unplug the unit from the mains
socket before cleaning.
• Do not use any type of abrasive pad or
abrasive cleaning solutions as these may
damage the unit’s surface.
• Do not use liquids to clean the unit.
To prevent the
spread of re, keep
candles or other
open ames away
from this product
at all times.
This unit is designed for indoor use only.
This equipment is a Class II or double
insulated electrical appliance. It has been
designed in such a way that it does not
require a safety connection to electrical
earth.
AC voltage: This symbol indicates that the
rated voltage marked with the symbol is
AC voltage.
DC voltage: This symbol indicates that
the rated voltage marked with the
symbol is DC voltage.
The symbol on the product or its packaging indicates that this product
must not be disposed of with your other household waste. Instead, it is
your responsibility to dispose of your waste equipment by handing it over
to a designated collection point for the recycling of waste electrical and
electronic equipment. The separate collection and recycling of your waste
equipment at the time of disposal will help conserve natural resources and
ensure that it is recycled in a manner that protects human health and the
environment.
For more information about where you can drop o your waste for
recycling, please contact your local authority, or where you purchased your
product.
Notes for battery disposal
The batteries used with this product contain chemicals that are harmful to
the environment. To preserve our environment, dispose of used batteries
according to your local laws or regulations. Do not dispose of batteries with
normal household waste.
For more information, please contact the local authority or your retailer
where you purchased the product.
Useful Information and Licences
Visit Partmaster.co.uk today for the easiest way to buy electrical
spares and accessories. With over 1 million spares and accessories
available we can deliver direct to your door the very next day. Visit www.partmaster.co.uk or
call 0344 800 3456 (UK customers only). Calls charged at National Rate.
The terms HDMI, HDMI High-Denition Multimedia Interface, HDMI Trade dress and the
HDMI Logos are trademarks or registered trademarks of HDMI Licensing Administrator, Inc.
The Bluetooth® word mark and logos are registered trademarks owned by Bluetooth SIG,
Inc. and any use of such marks by Currys Group Limited is under license. Other trademarks
and trade names are those of their respective owners.
All trademarks are the property of their respective owners and all rights are acknowledged.

(TH-D625B-Safety Warnings-260526V2)
UK Representative
Currys Group Limited (No. 504877)
Currys Newark Campus, Long Hollow Way, Newark, NG24 2NH, UK
https://www.currys.co.uk
EU Representative
Currys Ireland Limited (No. 259460)
3rd Floor Oce Suite, Omni Park SC, Santry, Dublin 9, Republic of Ireland
https://www.currys.ie
UK & EU Contact details: business.standar[email protected]
This product is distributed and warranted exclusively by Currys Group Limited.
“JVC” is the trademark of JVCKENWOOD Corporation,
used by Currys Group Limited under license.

Contents
Unpacking .............................................................................................................................4
Product Overview ................................................................................................................5
Main Unit ......................................................................................................................................................... 5
Remote Control ............................................................................................................................................7
Preparation ...........................................................................................................................8
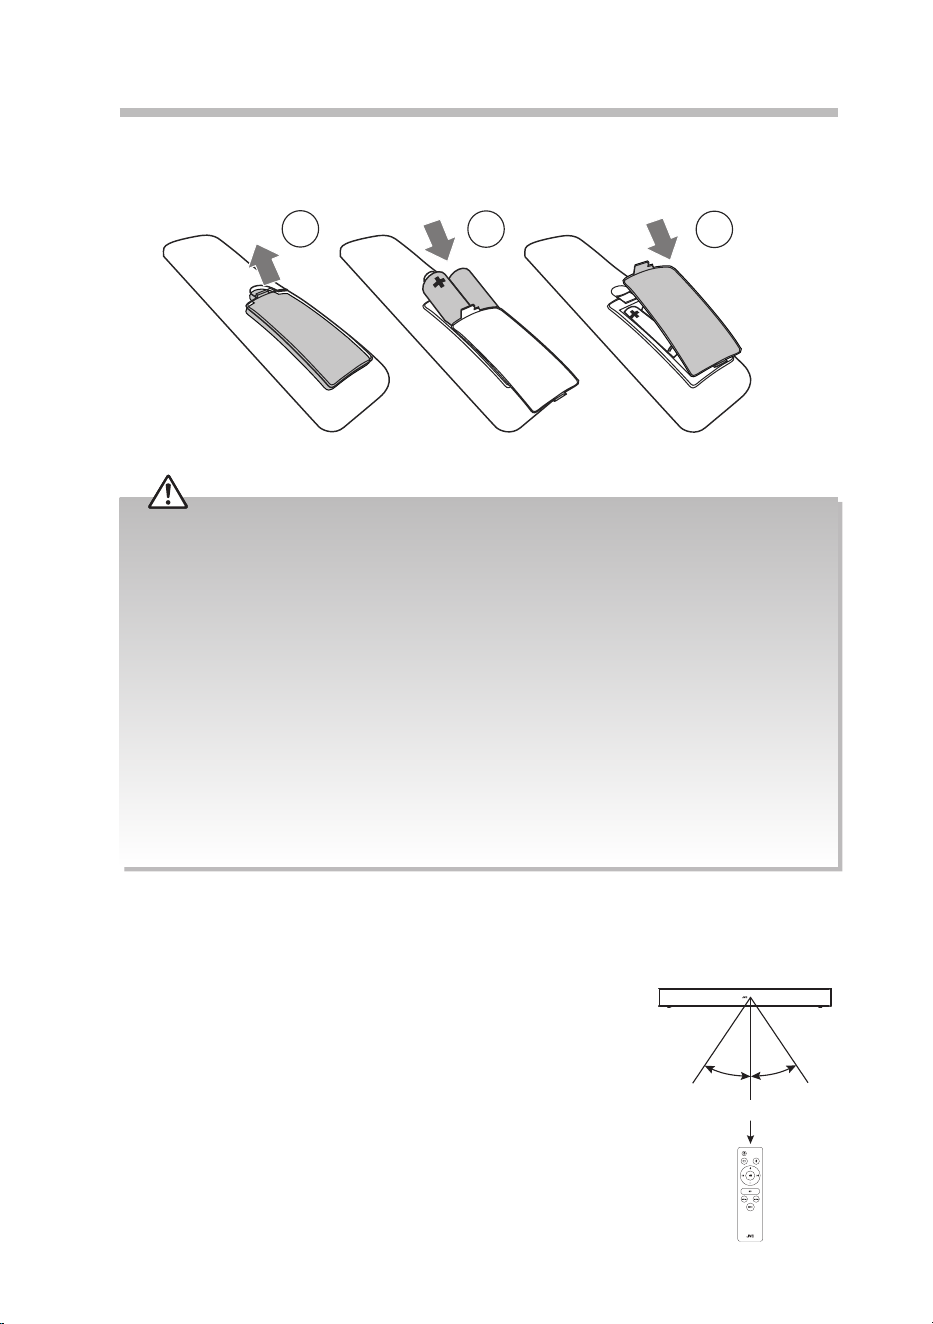
Battery Replacement for the Remote Control ..................................................................................8
Remote Control Operation Range .........................................................................................................8
Wall Mounting ............................................................................................................................................... 9
Speaker Placement ....................................................................................................................................11
Connections ........................................................................................................................12
Method 1: HDMI Hub Connection .......................................................................................................12
Method 2: Optical Connection .............................................................................................................14
Method 3: AUX Connection ...................................................................................................................15
Connecting to the Mains Supply ........................................................................................................ 16
General Operation .............................................................................................................17
Standby / ON ...............................................................................................................................................17
Auto Wake Function .................................................................................................................................17
Automatic Power O Function .............................................................................................................17
Selecting Modes .........................................................................................................................................17
Adjusting the Speaker Level Settings and Eects .........................................................................17
OPTICAL / AUX / HDMI Operation .....................................................................................18
USB Operation ....................................................................................................................18
Bluetooth® Operation ........................................................................................................19
Maintenance .......................................................................................................................19
Hints and Tips .................................................................................................................... 20
Product Fiche and Specifications .................................................................................... 22

4
Unpacking
Remove all items from the packaging. Retain the packaging. If you dispose of it please do so
according to local regulations.
The following items are included:
• Main Unit
• Remote Control (Batteries included)
• Mains Cable
• Wall Mount Bracket × 2
• Screw × 2
• Dowel × 2
• Optical Cable
• Instruction Manual & Safety Warnings
• Quick Start Guide
Thank you for purchasing your new product.
We recommend that you spend some time reading this instruction manual
in order that you fully understand all the operational features it oers. You
will also nd some hints and tips to help you resolve any issues.
Read all the safety instructions carefully before use and keep this
instruction manual for future reference.
• To get the most from this product, you may need to buy an HDMI and 3.5 mm to 3.5 mm stereo audio
cable.
• If items are missing, or damaged please contact Partmaster (UK only). Tel: 0344 800 3456 for assistance.
• If you require additional assistance:
For UK, please call our UK Call Centre on 0344 561 1234.
For Ireland, please call our Ireland Call Centre on 0818 810575.
5
Product Overview
Main Unit
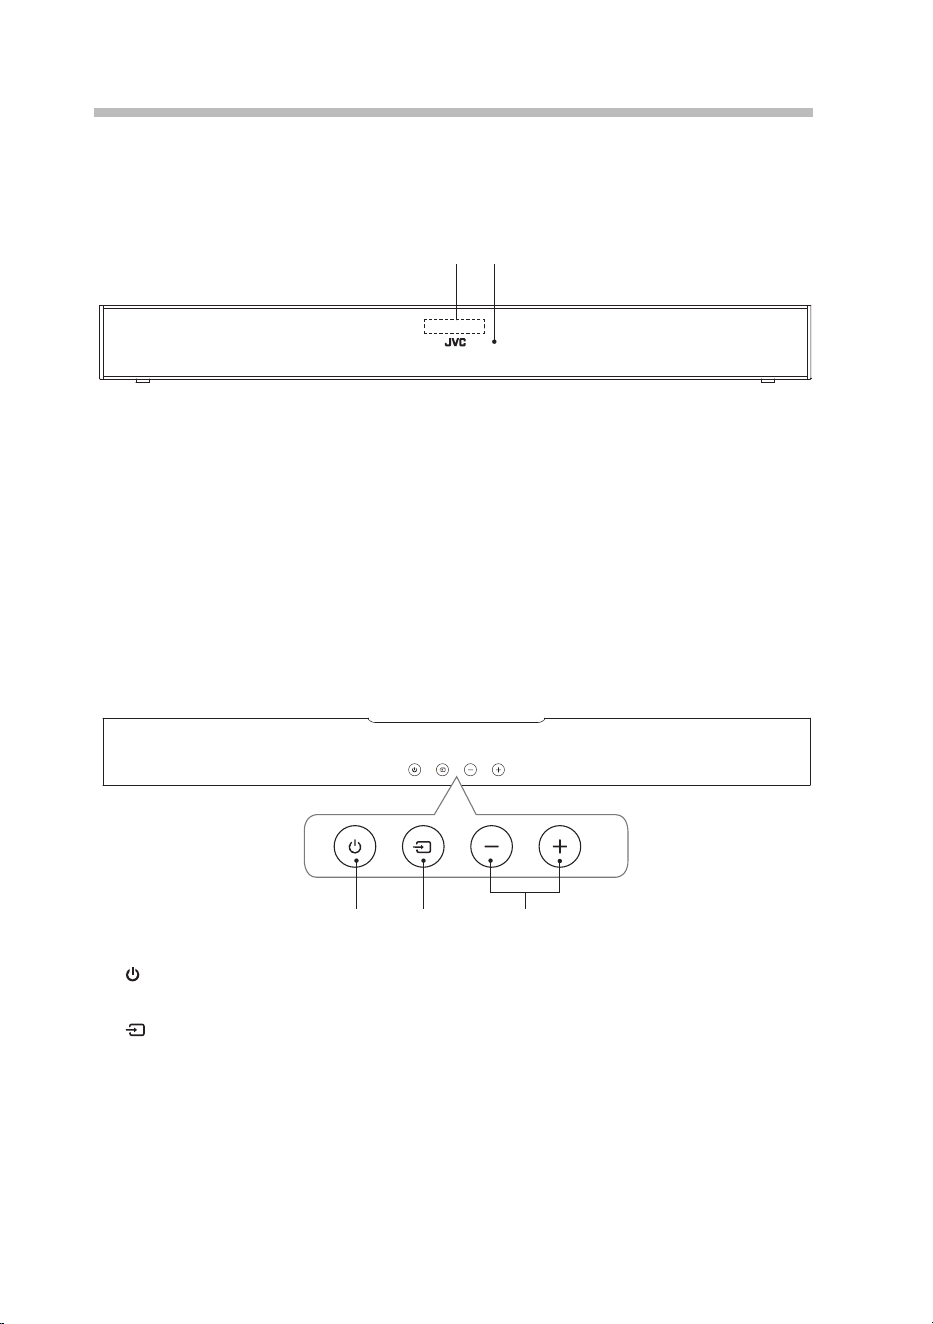
Front View
1. Button
Switch the unit between On and STANDBY mode.
2.
SOURCE Button
• Press to select the input source.
3. +/– Volume Button
Adjust the volume.
1. Remote Control Sensor
2. LED Indicators
Red: Standby mode
Green: Aux In mode
Flash in Green: USB mode
Blue: Bluetooth mode
White: HDMI ARC mode
Orange: Optical mode
1 2
31 2
Top View
6
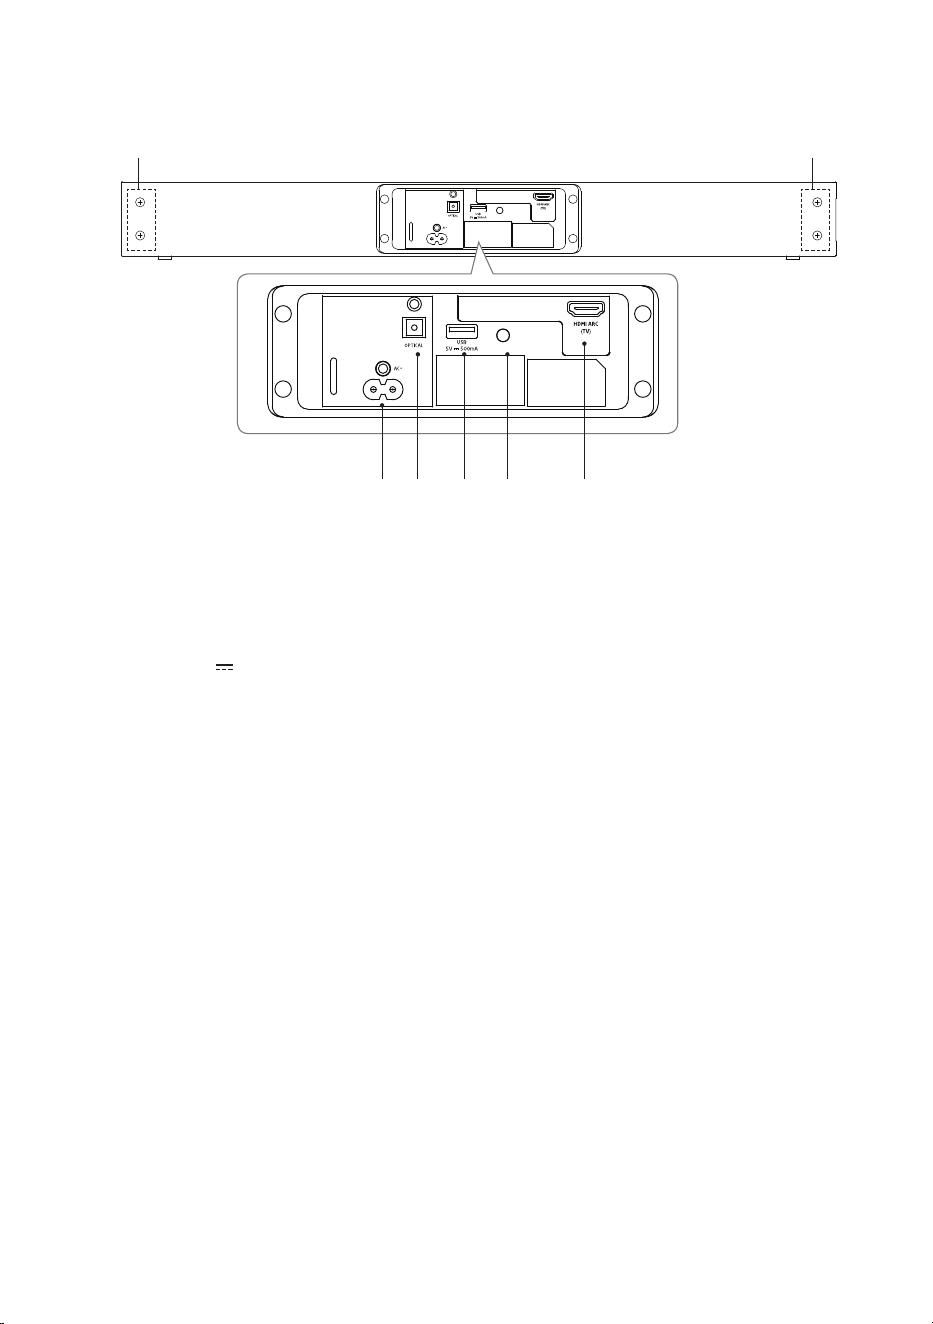
1. AC~ Socket
2. OPTICAL Socket
3. USB 5V
500 mA Socket
4. AUX 1 Socket
5. HDMI ARC (TV) Socket
6. Wall Bracket Screws
Rear View
AUX 1
AUX 1
1 2 3 4 5
6
6
7
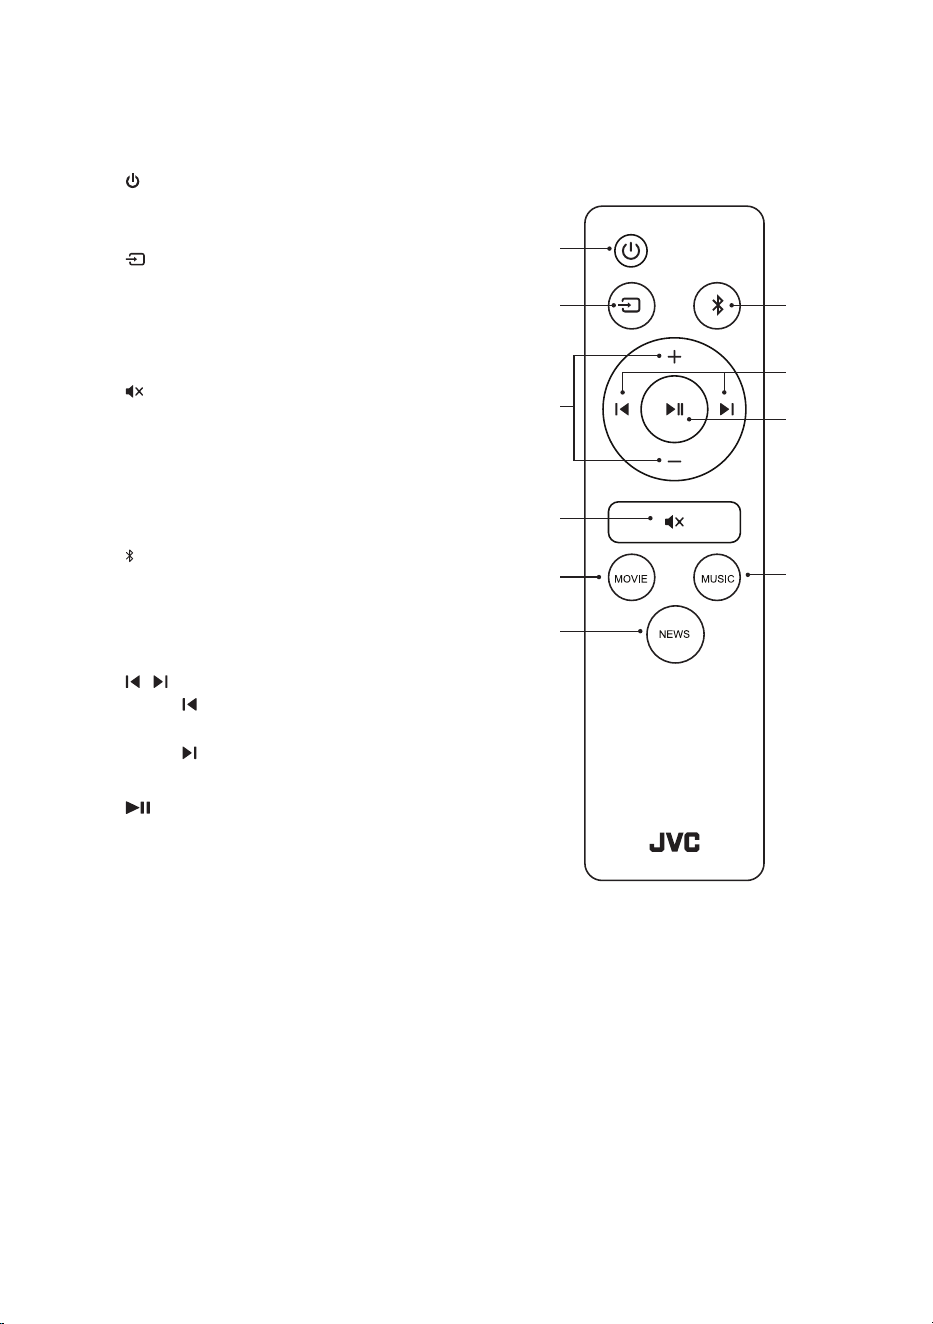
1. Button
Switch the unit between On and STANDBY
mode.
2.
SOURCE Button
Press to select between HDMI ARC, Optical,
Aux In, USB and Bluetooth mode.
3. +/– Volume Button
Press to increase/decrease the volume.
4.
Mute Button
Press to mute/un-mute the unit.
5. MOVIE Button
Press to switch into MOVIE EQ mode.
6. NEWS Button
Press to switch into NEWS EQ mode.
7.
Button
• Press to enter Bluetooth mode.
• Press and hold to activate the pairing
function or disconnect the existing paired
Bluetooth device in Bluetooth mode.
8.
/ Button
• Press button to skip to the previous track
(PREV) in Bluetooth® mode.
• Press
button to skip forwards to the next
track (NEXT) in Bluetooth® mode.
9.
Button
• Play/pause/resume playback in Bluetooth®
mode.
10. MUSIC MODE Button
Press to switch into MUSIC EQ mode.
Remote Control
1
2
3
4
5
6
7
8
9
10
8
Remote Control Operation Range
• The remote control sensor on the front unit is sensitive to the
remote control’s commands up to a maximum of 6 metres away
and within a maximum of a 60° arc.
• Please note that the operating distance may
vary depending on the brightness of the room.
Handling the Battery
• Improper or incorrect use of batteries may cause corrosion or battery leakage, which could cause re,
personal injury or damage to property.
• Only use the battery type indicated in this manual.
• Do not install new batteries with used ones and do not mix dierent types of batteries.
• Do not dispose of used batteries as domestic waste. Dispose of them in accordance with local
regulations.
Handling the Remote Control
• Do not drop the remote control.
• Do not allow anything to impact the remote control.
• Do not spill water or any liquid on the remote control.
• Do not place the remote control on a wet object.
• Do not place the remote control under direct sunlight or near sources of excessive heat.
• Remove the battery from the remote control when not in use for a long period of time, as corrosion or
battery leakage may occur and result in physical injury, and / or property damage, and / or re.
• When the battery is exhausted, the remote control will not function.
Preparation
Battery Replacement for the Remote Control
30° 30°
Max. 6 m
1
2
3
9
Wall Mounting
• Installation must be carried out by qualied personnel only. Incorrect assembly can result in severe
personal injury and property damage (if you intend to install this product yourself, you must check
for installations such as electrical wiring and plumbing that may be buried inside the wall). It is the
installer’s responsibility to verify that the wall will safely support the total load of the soundbar.
• Additional tools (not included) are required for the installation.
• Do not overtighten screws.
• Keep this instruction manual for future reference.
• Use an electronic stud nder to check the wall type before drilling and mounting.
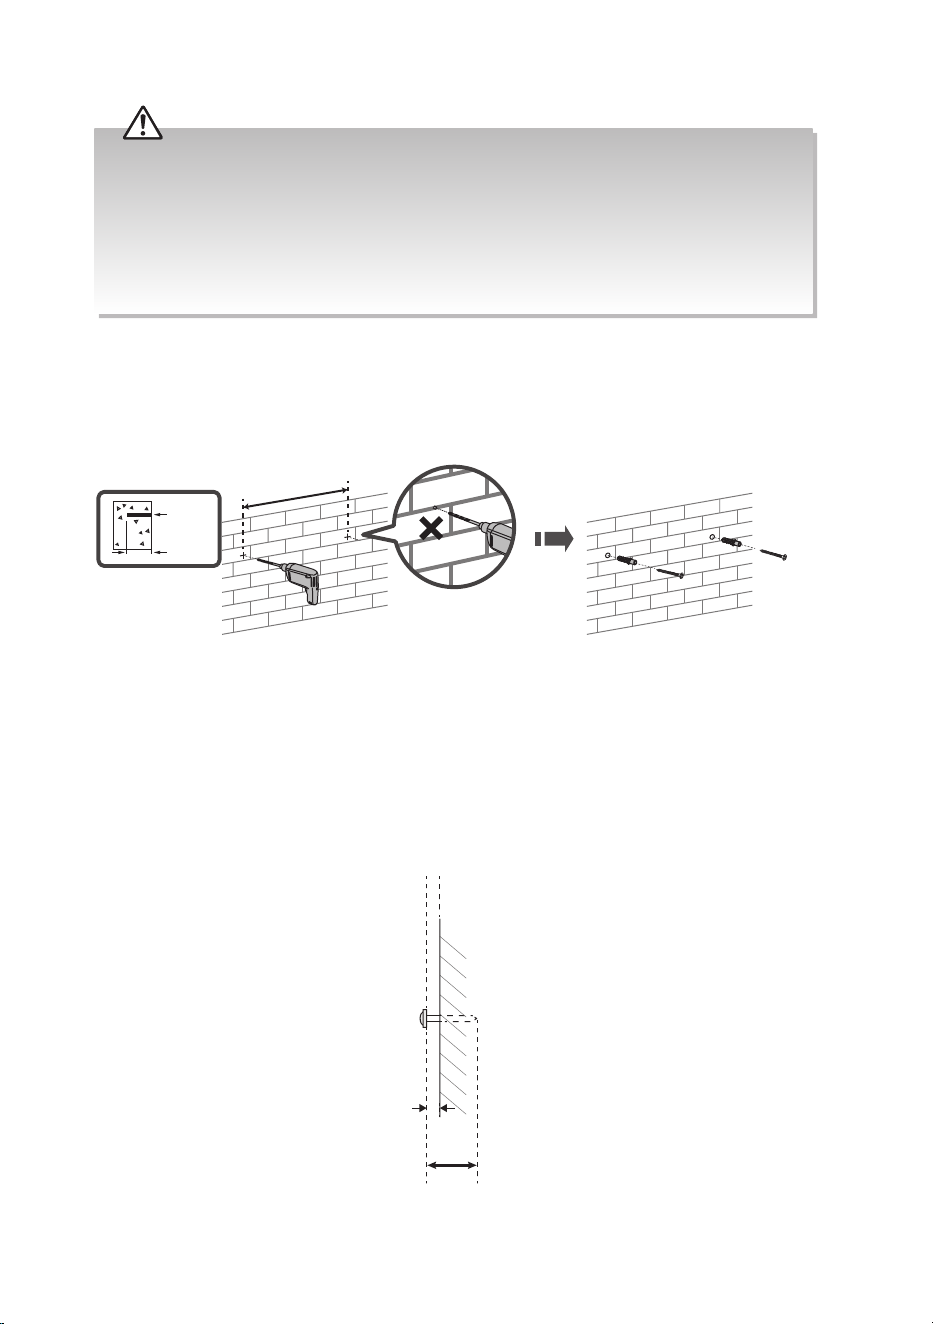
1. Drill 2 parallel holes (Ø 3-8 mm each according to wall type) in the wall. The distance
between the holes should be 550 mm. Firmly x 1 dowel (included) into each hole in
the wall if necessary. Fix two screws (included) onto the wall.
550 mm
~ø5 mm
25-30 mm
2. Leave approximately 5 mm between the wall and the screw’s head.
~5 mm
25-30 mm
10
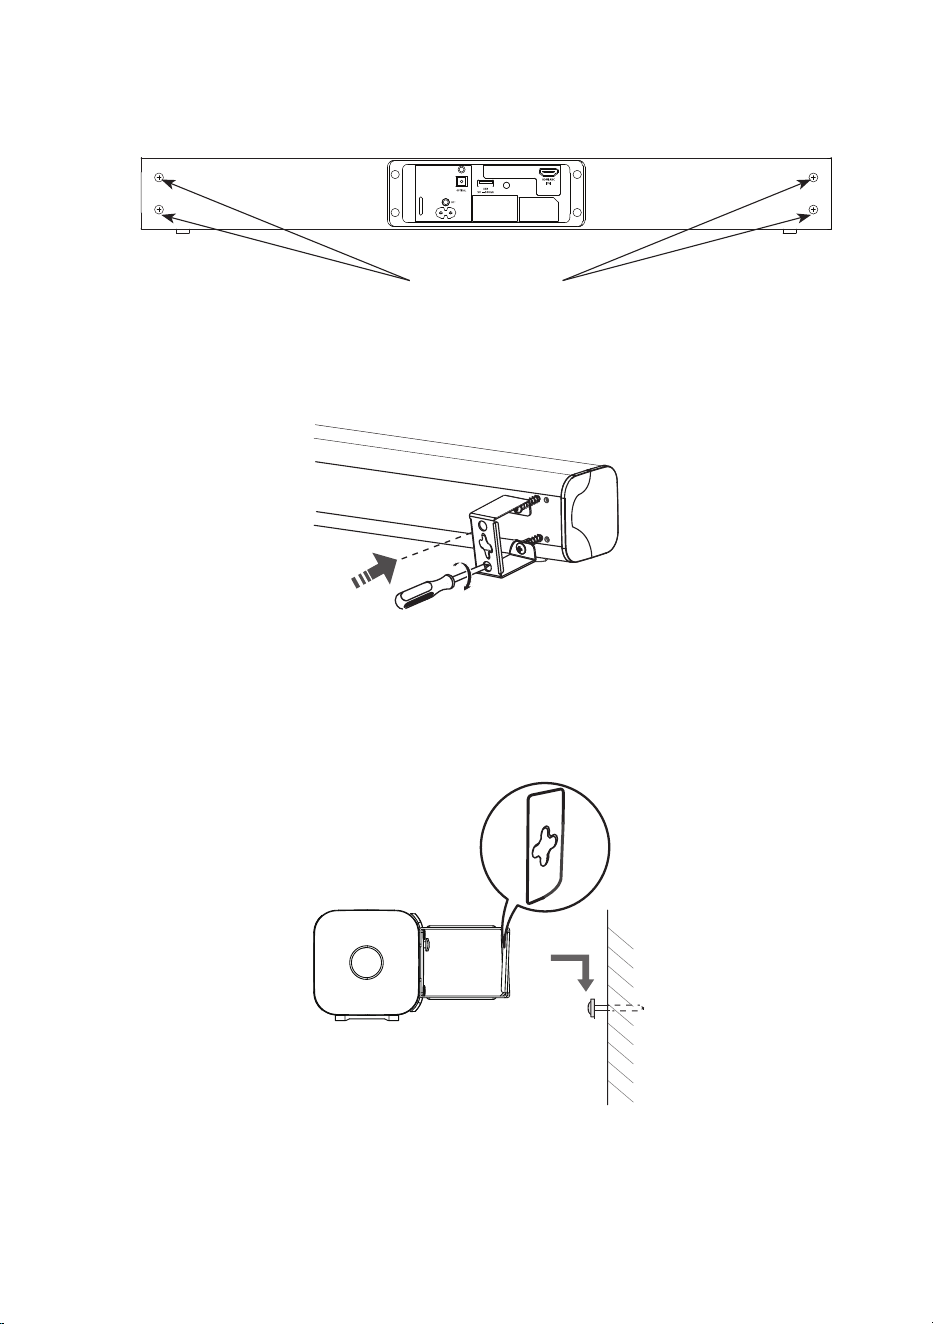
3. Loosen the 4 screws at the back of the unit.
Loosen the screws
AUX 1
4. Install the wall mounting brackets with the 4 loosened screws into the back of the unit.
5. Lift the unit with the attached wall mounting brackets over the heads of the screws and
slot into place.
11
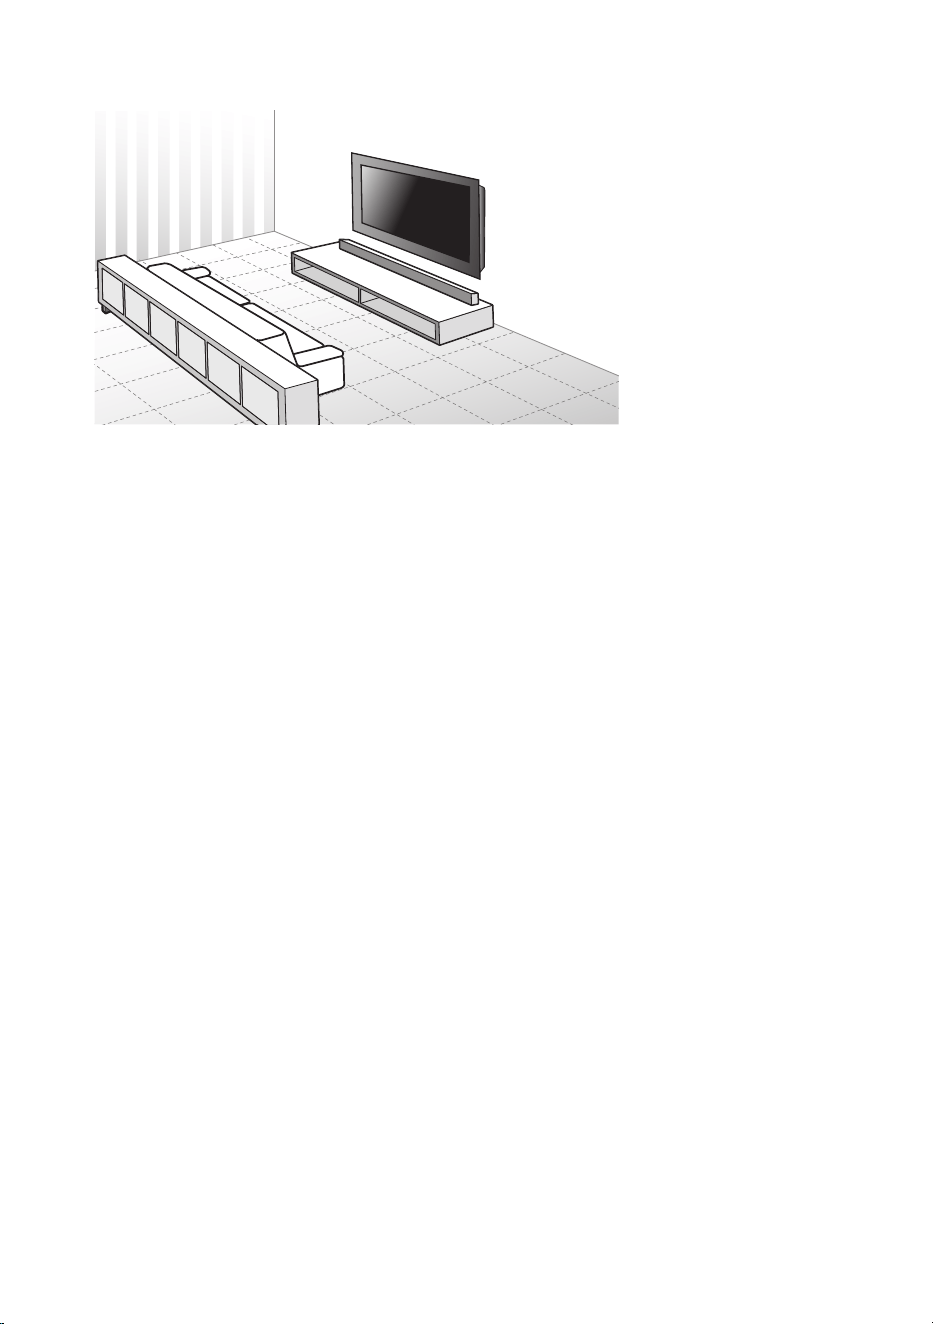
Speaker Placement
SOUNDBARSOUNDBAR
Soundbar
Soundbar carries most of the dialogue as well as music and eects.
• If your TV is placed on a table, you can place the soundbar on the table directly in front
of the TV stand, centred with the TV screen.
• If your TV is attached to a wall, you can mount the soundbar on the wall directly below
the TV screen.

12
Connections
Method 1: HDMI Hub Connection
Some 4K HDR TVs require the HDMI input or picture settings to be set for HDR content reception. For
further setup details on HDR display, please refer to the instruction manual of your TV.
Using your TV as a hub
• Ensure to use an HDMI cable that can support the ARC function.
• HDMI-CEC will be called dierent names by dierent manufacturers – please refer to your owner’s
manual for details on setting up HDMI-CEC and ARC.
• While using an HDMI cable for ARC function, CEC (Consumer Electronics Control) provides
interoperability between the unit and various devices (e.g. TV). However, this unit is not guaranteed to
fully operate with all HDMI-CEC enabled devices. This is NOT a defect.
The ARC (Audio Return Channel) function allows sound to travel to and from your ARC-
compliant TV to your soundbar through a single HDMI connection. To enjoy the ARC
function, please ensure that your TV is both HDMI-CEC and ARC compliant and set up
accordingly. When correctly set up, the CEC feature allows you to adjust the volume output
(+/– and ) of the soundbar with the TV remote control.
When you switch your TV on/o with your remote control, you soundbar will also be
switched on/o.
Be patient that it might take a few seconds for your TV to tell your Soundbar to switch on or
o.
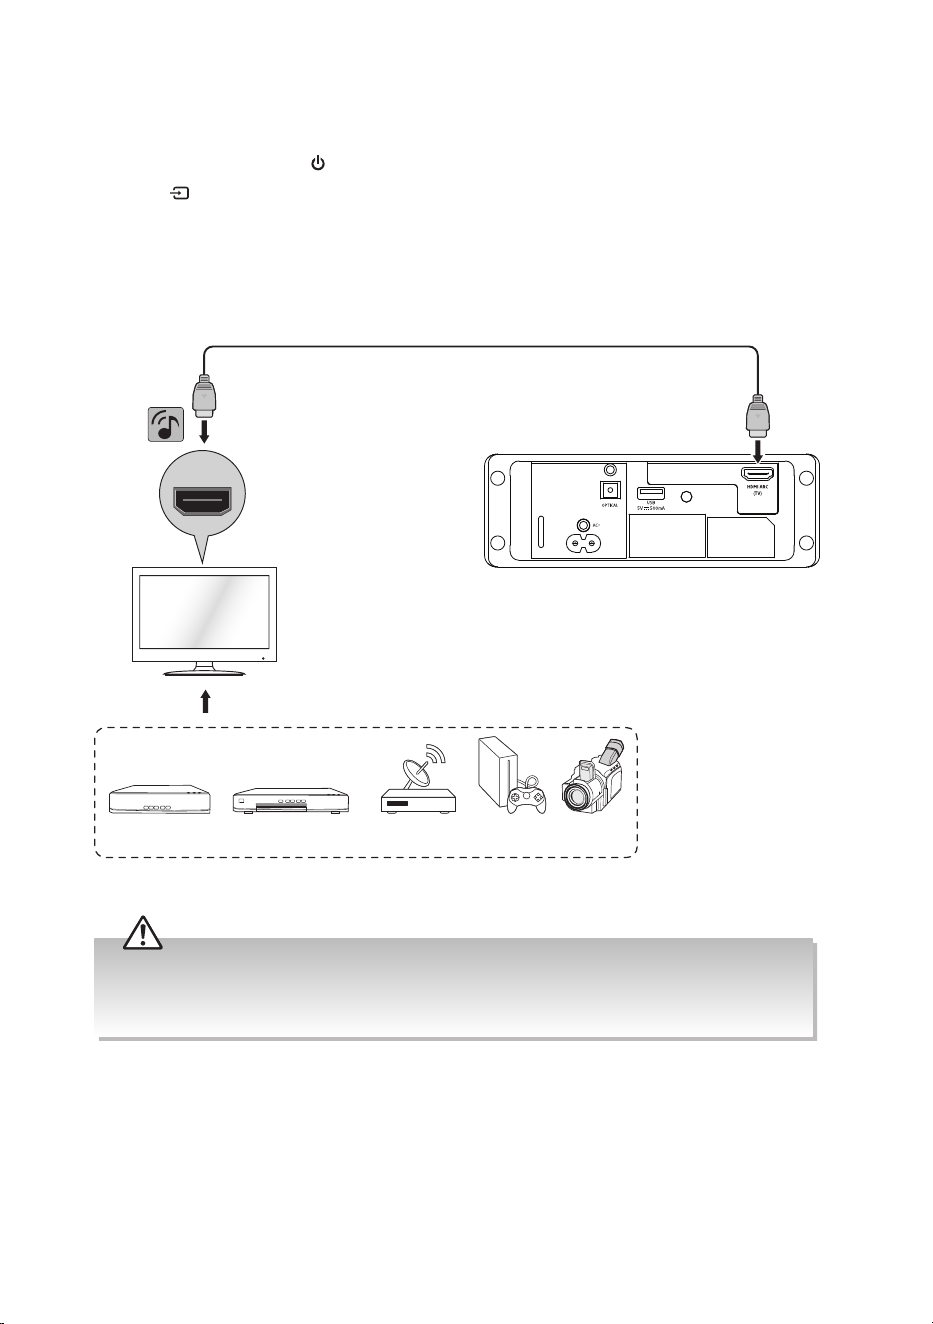
13
AUX 1
HDMI ARC
Rear view of the unit
TV
Set-top Box
Blu-ray Player
DVD Player
Satellite
Receiver
Game
Console
Video
Camera
HDMI cable (not included)
The unit may not be able to decode all digital audio formats from the input source. In this case, the unit
will mute. This is NOT a defect. Ensure the audio setting of the input source (e.g. TV, game console, DVD
player, etc.) is set to PCM (Refer to the user manual of the input source device for its audio setting details)
with HDMI output.
Use this method to connect all your devices into your TV.
1. Connect an HDMI cable (not included) from your soundbar’s HDMI ARC (TV) socket to
the HDMI ARC socket on your ARC-compliant TV.
2. After connection, press
button on the unit or remote control to switch the unit on.
3. Press
SOURCE button repeatedly on the unit or remote control to select HDMI
mode to play audio from your input device.
14
The unit may not be able to decode all digital audio formats from the input source. In this case, the unit
will mute. This is NOT a defect. Ensure that the audio setting of the input source (e.g. TV, game console,
DVD player, etc.) is set to PCM (Refer to the user manual of the input source device for its audio setting
details) with Optical input.
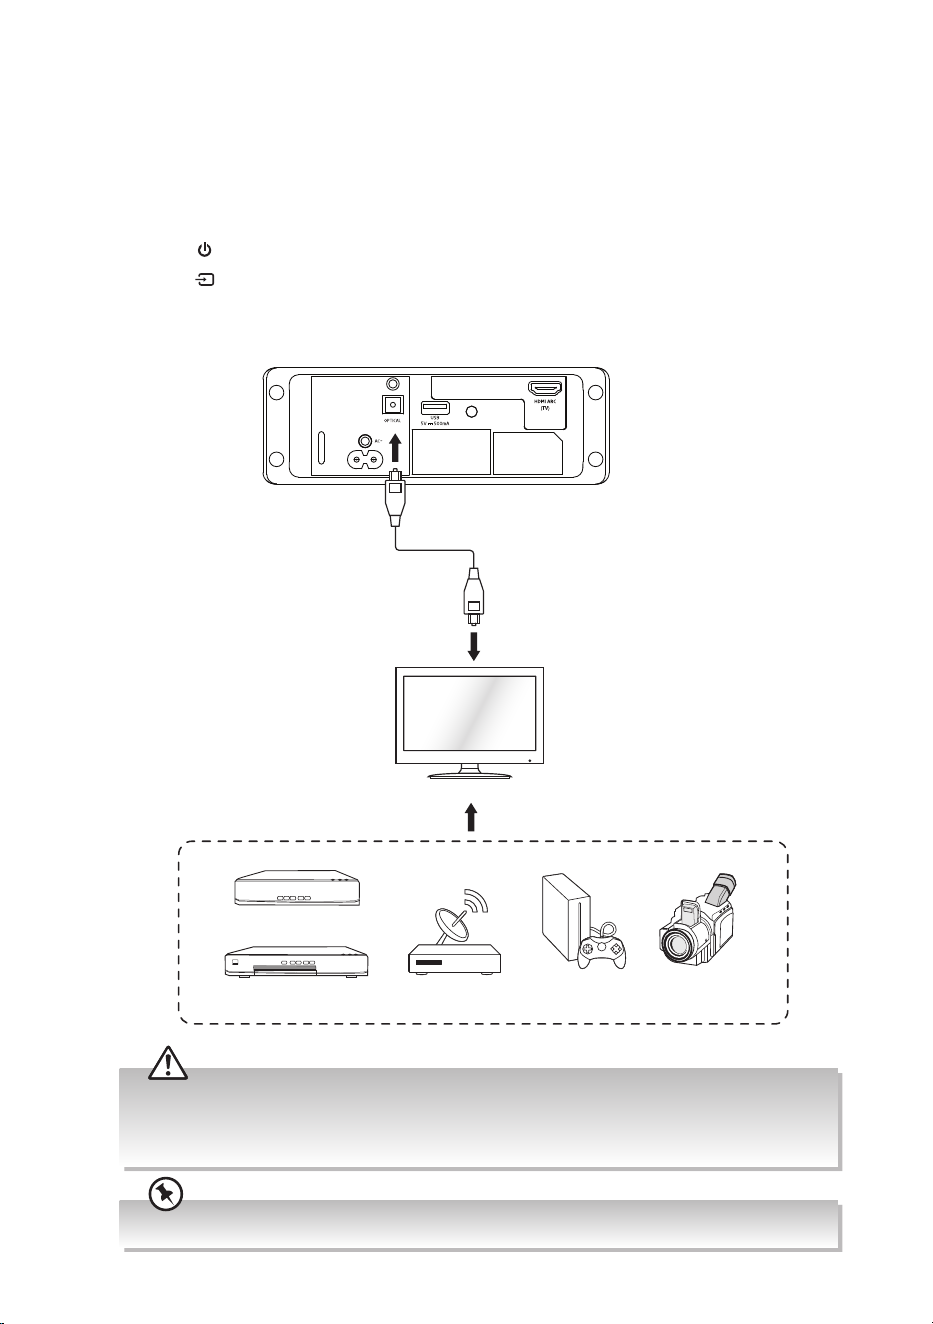
AUX 1
TV
Rear view of the unit
Blu-ray Player / DVD Player
/ Recorder
Set-top Box
Satellite
Receiver
Game
Console
Video
Camera
Optical cable
DO NOT connect the soundbar to the TV through its Yellow/Red/White sockets.
Method 2: Optical Connection
Use an optical cable to connect the soundbar’s OPTICAL socket to the OPTICAL OUT
socket of the external device. The simplest option is to connect your soundbar directly to
your TV. If you connect the soundbar to another external device (e.g. Blu-Ray player), you
will hear the sound from that device through the soundbar.
After the connection is completed,
1. Press on the unit or remote control to switch on the unit.
2. Press
SOURCE button repeatedly on the unit or remote control to select OPTICAL
mode.
15
• Ensure the colours on the cable plugs match with the colours on the input and output sockets.
• DO NOT connect the soundbar and TV by using the AUX 1 socket.
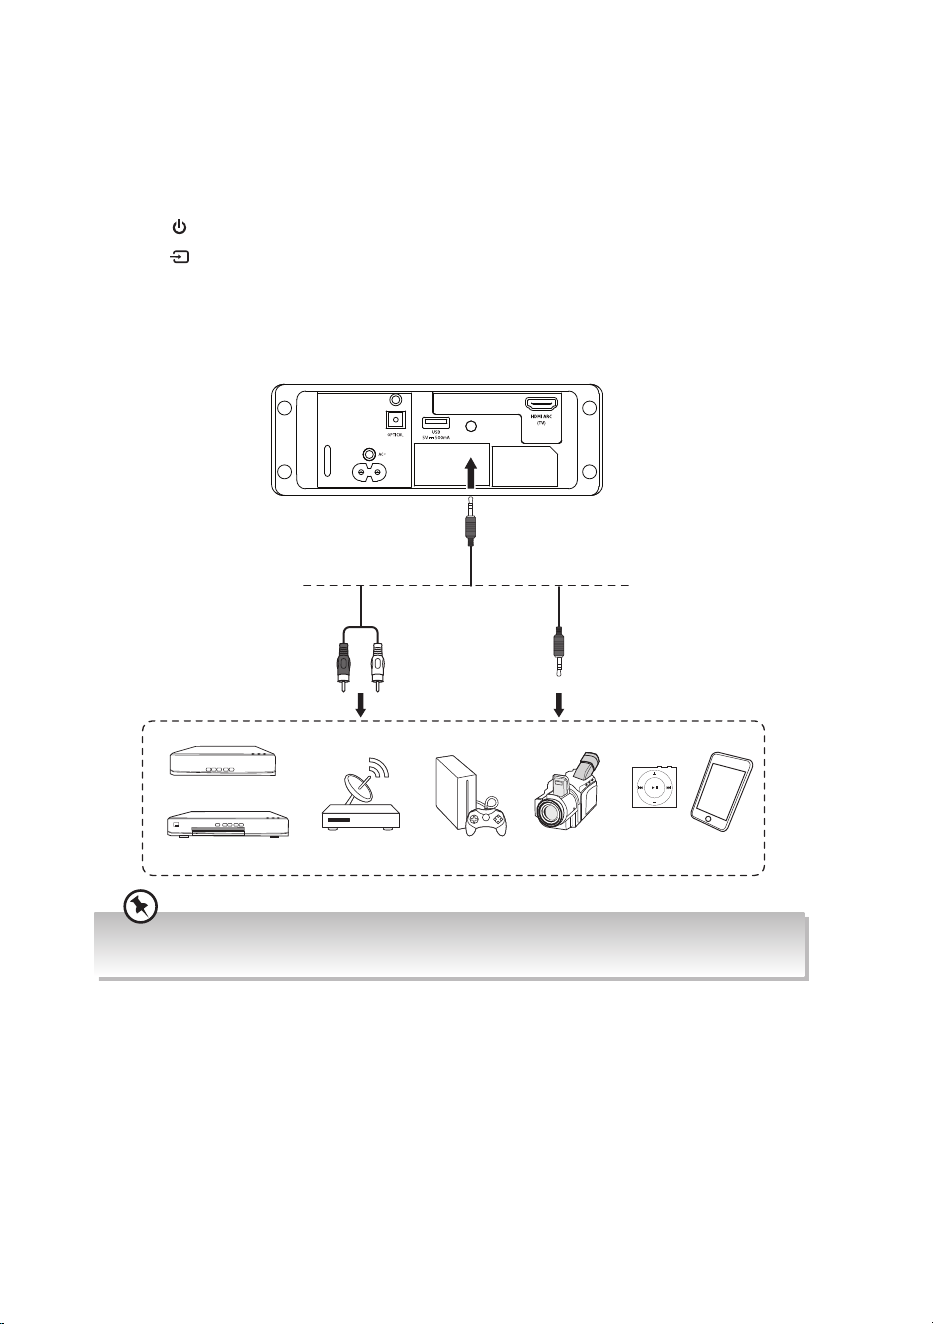
Method 3: AUX Connection
Use a 3.5 mm to RCA stereo audio cable (not included) or a 3.5 mm to 3.5 mm stereo
audio cable (not included) to connect the soundbar’s AUX 1 socket to the AUDIO OUT/
HEADPHONES sockets of the external device.
After the connection is completed,
1. Press on the unit or remote control to switch on the unit.
2. Press
SOURCE button repeatedly on the unit or remote control to select Aux In
mode.
AUX 1
Rear view of the unit
Blu-ray Player / DVD
Player / Recorder
Set-top Box
Satellite
Receiver
Game
Console
Video
Camera
MP3 Player or
Mobile Device
OR
3.5mm to 3.5mm Stereo
Audio Cable (not included)
3.5 mm to RCA Stereo
Audio Cable (not included)
16
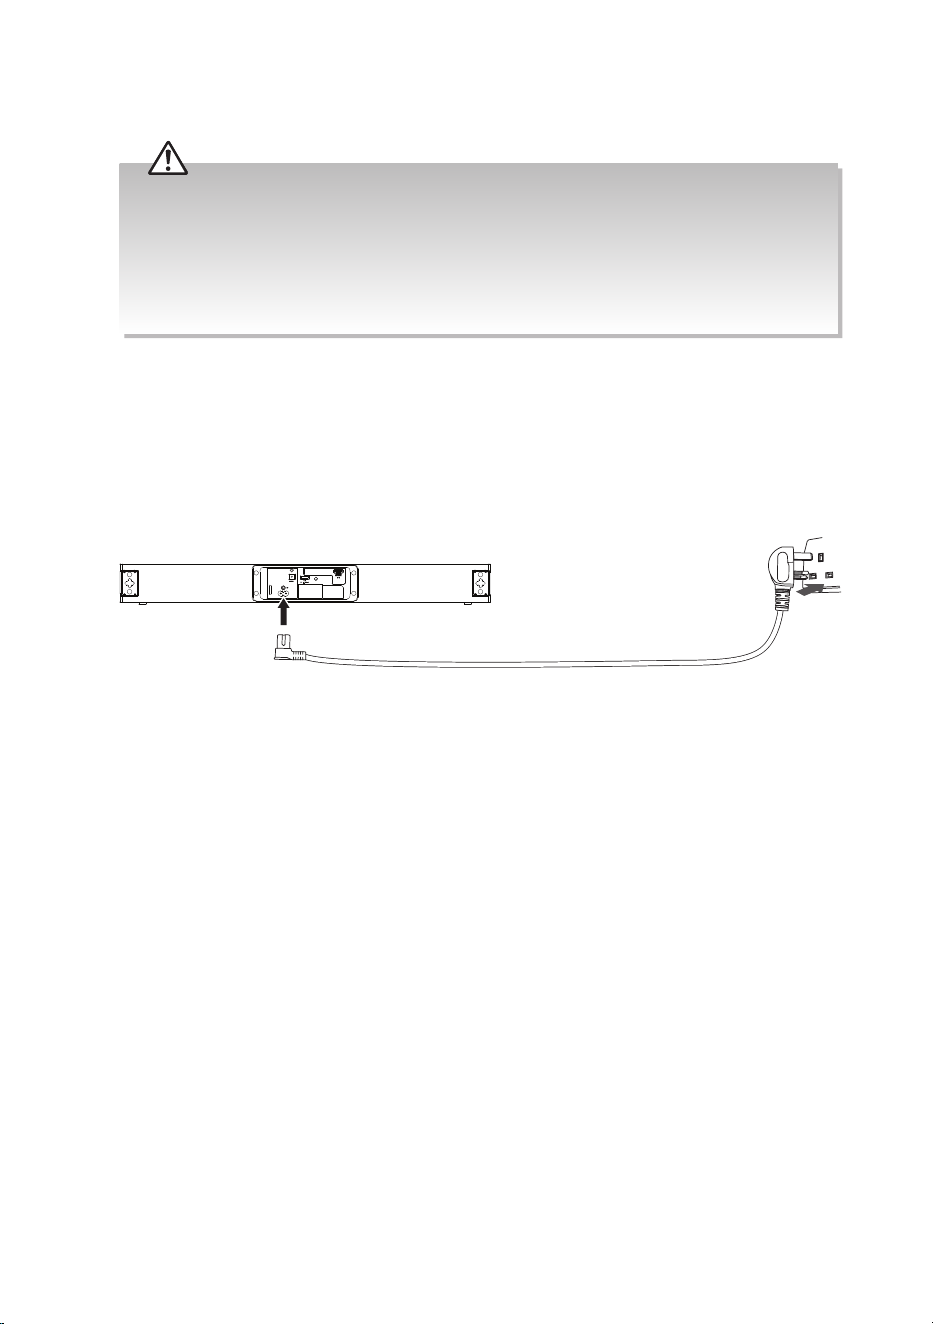
AUX 1
To the mains
socket
Rear View of the Soundbar
Connecting to the Mains Supply
The soundbar is designed to operate with the supplied mains cable.
• Connecting the unit to any other power source may damage the unit.
• Ensure all audio connections of the unit are connected before connecting to the mains power socket.
• Make sure the mains plug is rmly inserted into the mains socket.
• To switch the unit o completely, remove the mains plug from the mains socket.
• Please turn the unit o completely to save energy when not in use.
• The mains cable is designed for this JVC soundbar only. DO NOT use the mains cable for other
purposes.
Soundbar
Unwind the mains cable to its full length. Connect the end of the cable to the AC~ IN socket
at the rear of the unit and then connect the mains plug to the mains socket. Make sure the
mains plug is fully inserted into the mains socket.

17
General Operation
Standby / ON
When you rst connect the unit to the mains socket, the unit will be in STANDBY mode.
The POWER indicator will light up red
• Press
on the unit or remote control to switch the unit on.
• Press
on the unit or remote control again to switch the unit back to STANDBY mode.
Auto Wake Function
If the unit is connected with a TV or an external audio device via HDMI ARC / AUX
connection, the unit will automatically be switched on when the TV or the external audio
device is switched on.
Automatic Power O Function
The unit automatically turns to STANDBY mode after about 15 minutes if the TV or the
external unit is disconnected, switched o or the volume is too close to mute.
• To switch the unit o completely, remove the mains plug from the mains socket.
• Please turn the unit o completely to save energy when not in use.
Selecting Modes
Press SOURCE button repeatedly on the unit or remote control to select between HDMI
ARC, Optical, Aux In, USB and Bluetooth mode.
Adjusting the Speaker Level Settings and Eects
Adjusting the Volume
• Press +/– to adjust the volume.
• If you wish to turn the sound o, press
button on the remote control. Press button
again, or press +/– on the unit or remote control to resume normal listening.
Select Equaliser (EQ) Eect
Press the SOUND MODE button on the remote control to select the preset equaliser eects.
• MOVIE: Create a surround listening experience. Ideal for watching movies.
• MUSIC: Create two-channel or multi-channel stereo sound. Ideal for listening to music.
• NEWS: Recommended for listening to news.
18
OPTICAL / AUX / HDMI Operation
1. Before connecting to the mains socket, ensure all the connections are completed.
2. While in the On mode, press
SOURCE button repeatedly on the unit or remote
control to select between Aux In, HDMI ARC and OPTICAL, mode.
3. Operate your audio device directly for playback features.
The unit may not be able to decode all digital audio formats from the input source. In this case, the unit
will mute. This is NOT a defect. Ensure that the audio setting of the input source (e.g. TV, game console,
DVD player, etc.) is set to PCM (Refer to the user manual of the input source device for its audio setting
details) with Optical / AUX / HDMI input.
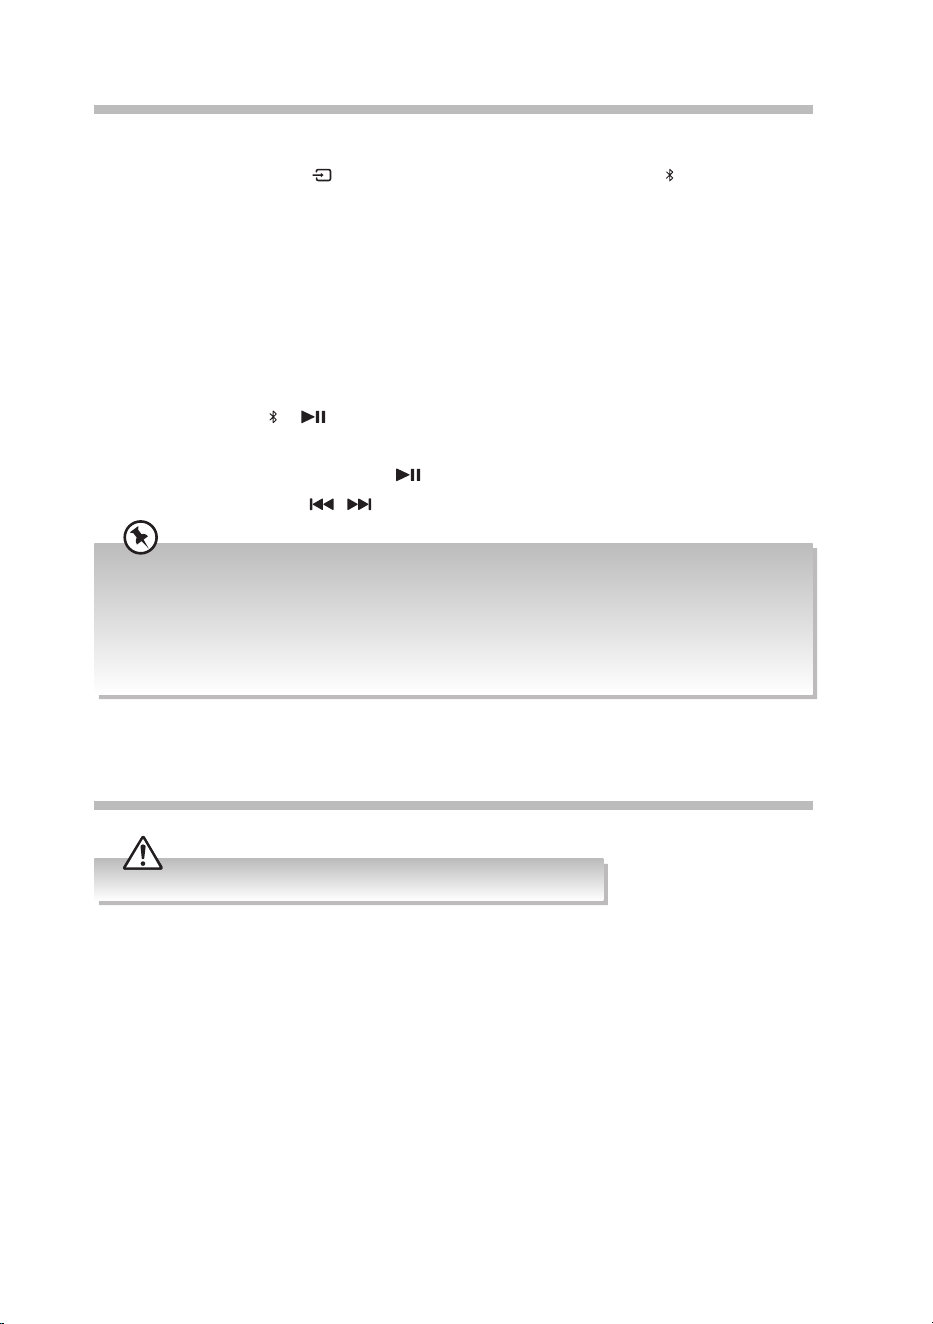
USB Operation
By connecting a USB mass storage device (e.g. USB
ash memory, USB ash players [not included]) to
this unit, you can enjoy the device’s stored music
through the unit.
4. Press
SOURCE button repeatedly on the
unit or remote control to select USB mode.
The unit will start playback automatically.
5. Press
button to pause / resume playback.
6. Press
/ button to skip backward /
forward a track.
• The player supports the USB music le format of MP3 only.
• The unit can support USB devices with up to 32 GB of memory.
• The unit may not be compatible with all USB devices, this is not an indication of a problem with the
unit.
AUX 1
Rear Sockets of the Unit
USB ash drive (not included)
19
Maintenance
Ensure the unit is fully unplugged from the mains socket before cleaning.
• To clean the units, wipe the case with a slightly moist, lint-free cloth.
• Do not use any cleaning uids containing alcohol, ammonia or abrasives.
• Do not spray aerosol at or near the unit.
Bluetooth® Operation
First time pairing
1. During On mode, press
SOURCE button on the unit repeatedly or button on the
remote control to select Bluetooth® mode. The indicator will ash slowly in Blue.
2. Activate your Bluetooth
® device and select the search mode. “TH-D625B” will appear
on your Bluetooth® device list.
3. Select “TH-D625B” enter “0000” for the password if necessary. The unit will prompt a
tone, and the indicator light up in Blue.
To disconnect the Bluetooth® function, you can:
• Switch to another function on the unit;
• Disable the function from your Bluetooth® device.
• Press and hold
or button on the remote control.
If your Bluetooth
® device supports AVRCP, use the supplied remote control to control play.
• To pause / resume playback, press
on the remote control.
• To skip to a track, press
/ .
• The operational range between the unit and the device is approximately 8 metres.
• Before connecting a Bluetooth® device to the unit, ensure you know the device’s capabilities.
• Compatibility with all Bluetooth® devices is not guaranteed.
• Any obstacle between the device and the unit can reduce operational range.
• Keep this player away from other electronic devices that may cause interference.
• The player will also be disconnected when your device is moved beyond the operational range.
20
Hints and Tips
If a problem does occur, it may often be due to something very minor. The following table
contains various tips. If you require additional assistance
• For UK, please call our UK Call Centre on 0344 561 1234.
• For Ireland, please call our Ireland Call Centre on 0818 810575.
Problem Solution
No power. • Ensure the mains plug is connected.
• Make sure that you select the On mode.
The remote control does
not function.
• Use the remote control near the unit.
• Point the remote control at the remote sensor on the unit.
• Replace the battery in the remote control with a new one.
• Remove any obstacles between the remote control and
the unit.
Loud hum or noise is
heard.
• The plugs and sockets are dirty. Wipe them with a cloth
slightly moistened with alcohol.
No sound from the
soundbar.
Please try either one of the solutions below:
• Make sure that the unit is not muted. Press
button or
+/– button to resume normal listening.
• Press on the unit or on the remote control to switch the
soundbar to STANDBY mode. Then press the button again
to switch the soundbar on.
• Unplug the soundbar from the mains socket, then plug it
in again. Switch on the soundbar.
• Ensure the audio setting of the input source (e.g. TV, game
console, DVD player, etc.) is set to PCM mode while using
digital (e.g. HDMI/OPTICAL) connection.
• The unit may not be able to decode all digital audio
formats from the input source. In this case, the unit will
mute. This is NOT a defect.
TV has display problem
while viewing HDR
content from HDMI
source.
• Some 4K HDR TVs require the HDMI input or picture
settings to be set for HDR content reception. For further
setup details on HDR display, please refer to the instruction
manual of your TV.
I can’t nd the Bluetooth
name of this unit on my
Bluetooth device for
Bluetooth pairing
• Ensure the Bluetooth function is activated on your
Bluetooth device.
• Re-pair the Soundbar with your Bluetooth device.
• The Soundbar has a Bluetooth® function that can receive
a signal within 8 metres. Keep a distance within 8 metres
between the Soundbar and your Bluetooth® device.
The unit does not
respond when pressing
any buttons.
• The unit may freeze up during use. Switch the unit o and
then on again at the mains socket to reset the unit.

21
Problem Solution
I cannot nd “TH-
D625B” on my
Bluetooth device
• Ensure that the unit is switched on.
• Ensure that the Bluetooth® function is activated on your
Bluetooth® device.
• The unit has a Bluetooth® function that can receive a signal
within 8 metres. Keep a distance within 8 metres between
the unit and your Bluetooth® device.
If any anomaly is encountered, unplug the mains cable from the mains socket and reconnect it again.
22
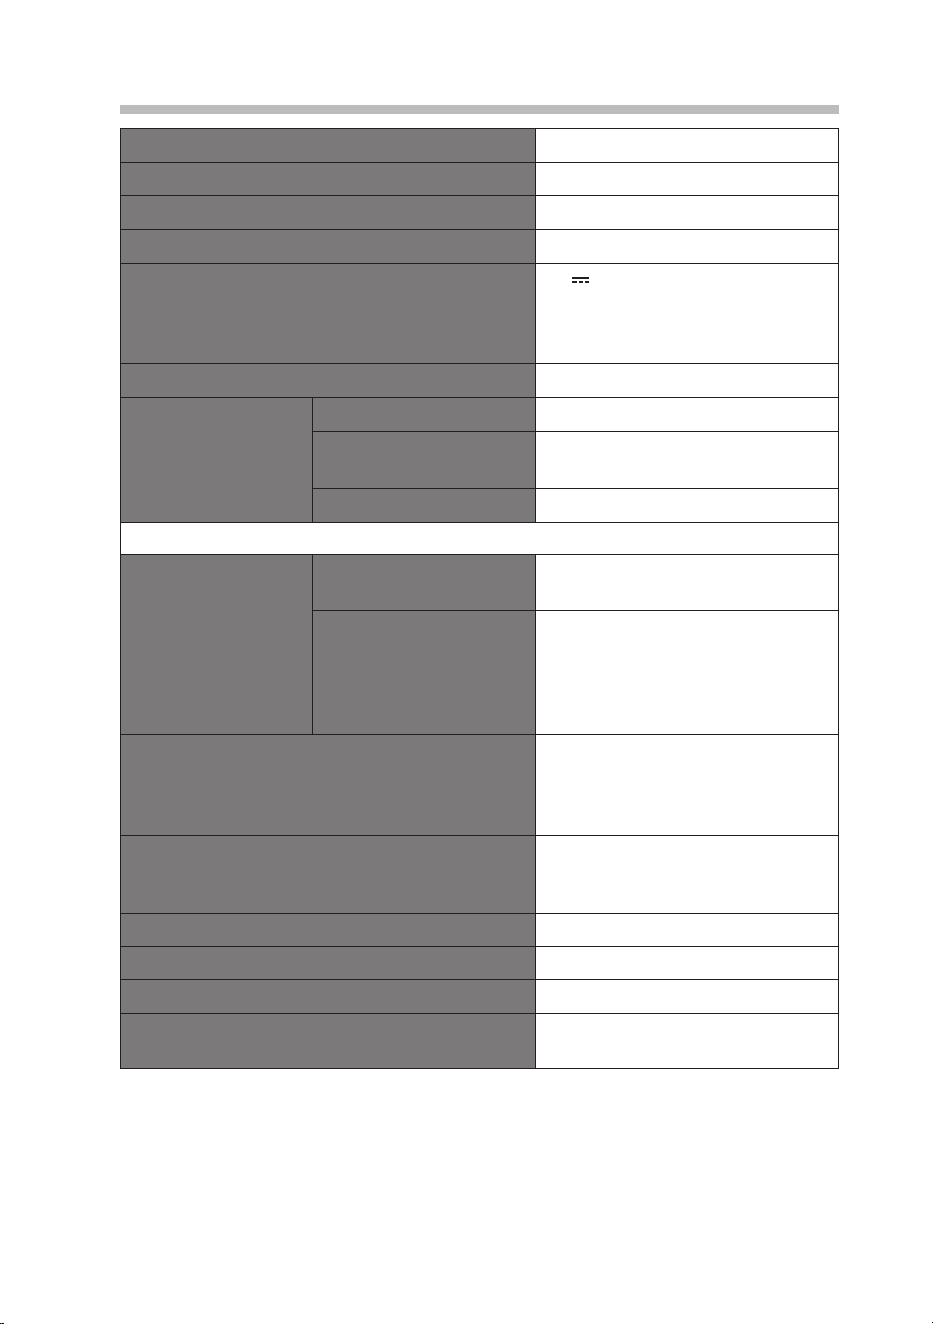
Product Fiche and Specifications
Brand
JVC
Model
TH-D625B
Main Unit Input
AC 100-240V~ 50/60 Hz
Main Unit Power Consumption
18 W
USB Output (For playback only, charging
is not recommended and may not be
compatible)
5 V 500 mA max.
Hi-Speed USB (2.0) / FAT32 / FAT16,
32G (max)
MP3 format compatible only
Speaker Output Power
20 W rms × 2
Bluetooth®
Version
V5.3
Maximum Transmitted
Power
8 dBm
Frequency bands
2402 MHz - 2480 MHz
Ecodesign Information
Information on
Power Consumption
Standby mode Power
consumption
0.4 W
Network Standby Power
Consumption (when the
unit is operating under
HDMI (ARC) mode and
audio signal stopped)
0.6 W
Time interval for Power management function
switches the unit automatically into standby /
network standby mode
The unit should switch to
standby / network standby mode
automatically when the unit is not
playing audio signal for 15 minutes.
Power consumption in network standby if all
wired network ports are connected and all
wireless network ports are activated
0.6 W
How to activate wireless network port N/A. No wireless network ports
How to deactivate wireless network port N/A. No wireless network ports
Net Weight
1.17 kg
Dimension
580 mm (W) × 60 mm (H) × 60 mm
(D)
Features and specications are subject to change without prior notice.
For the latest version of the Safety and Instruction Manual, please visit the ocial website
below (other websites may not contain the full and most updated version):
https://www.currys.co.uk/services/repairs-maintenance/product-service-manuals.html

(IB-TH-D625B-250520V1)
Declaration of Conformity (RED)
Hereby, Currys Group Limited declares that the radio
equipment type [TH-D625B] is in compliance with
Directive 2014/53/EU.
The full text of the EU declaration of conformity is
available at the following internet address:
https://www.currys.co.uk/
Declaration of Conformity (RER)
Hereby, Currys Group Limited declares that the radio
equipment type [TH-D625B] is in compliance with Radio
Equipment Regulations 2017 (S.I. 2017/1206).
The full text of the UK declaration of conformity is
available at the following internet address:
https://www.currys.co.uk/
For Help and Support Call
UK: 0344 561 1234
Ireland: 0818 810575
This product is distributed and warranted exclusively by Currys Group Limited
“JVC” is the trademark of JVCKENWOOD Corporation,
used by Currys Group Limited under license.