
1
MEET YOUR
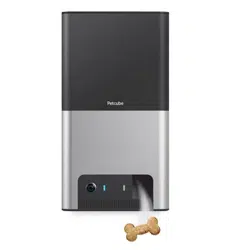
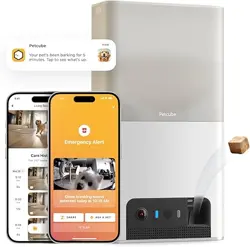
Petcube
Bites 2 Lite

2
PETCUBE BITES 2 LITE SPECS
AND SYSTEM REQUIREMENTS
Petcube Bites 2 Lite features:
• 160º wide angle view;
• 1080p HD video;
• Treat dispenser;
• 2-way audio;
• Night vision;
• 8x digital zoom;
• Sound and motion alerts.
Petcube Bites 2 Lite requires:
• Wi-Fi 802.11b/g/n, 2.4 Ghz, password protected;
• iOS 14 and higher or Android 7.1.2 and higher;
• Min 2 Mbps Upload speed on the Petcube (4 Mbps recommended);
• Min 2 Mbps Download speed on the mobile device (4 Mbps recommended).
1

3
SAFETY
AND HANDLING
2
To avoid injuries or causing harm, read all safety information and operating instructions
prior to using Petcube.
• Don’t drop, hit, shake, or tumble your Petcube camera;
• Don’t stain, scratch, or otherwise damage the front panel;
• Treats dispensed by Petcube Bites should not replace your pet’s normal meals;
• Petcube Bites should not be used to dispense medication to your pet;
• Keep in mind treats expiration dates and ensure you are only providing your pets
with fresh treats;
• To prevent mechanical problems, use only crunchy treats;
• Be aware that using treats with your pet exposes them to choking hazards.
Ensure your pet is familiar with the treats you are using and that you monitor
the consumption. You are not required to use any specific treats with Petcube Bites,
as long as they are crunchy and are 0.3 to 1 inch in size to avoid mechanical issues
with treat dispenser;
• Petcube should not be used by minors without supervision from an adult;
• Don’t expose to liquid, moisture, dust, excessive heat, or naked flame;
• To avoid overheating, don’t leave Petcube in direct sunlight;
• Protect the power cord from being walked on, pinched or chewed on by pets.

4
HOW TO ACCLIMATE YOUR
PET TO PETCUBE BITES
3
Some pets may need an adjustment period to get used to Petcube Bites.
Follow these simple steps to successfully introduce Bites to your pet:
• Take time to positively introduce Bites to your pet. Let them smell and inspect
the device before you start operating it;
• Introduce them to the idea that treats will come out and give your pet a positive
association with the device. Toss treats to your pet as though they’re coming from
the device. Put a treat into the dispensing hole and let them smell and see it;
• Disable the sound in settings to avoid your pet being alarmed by the speaker;
• Stay in the room with your pet the first time you launch treats to provide
encouragement and comfort;
• Make sure your pet is not directly in front of the launcher. It is recommended
to setup the device on a counter, or a shelf or wall mount it.

5
GETTING
STARTED
4
1. Setting up your Petcube Bites 2 Lite on iOS device
Fig. 4.1.1
Fig. 4.1.3 Fig. 4.1.4
Step 1. To set up your Petcube,
download Petcube application (fig 4.1.1)
to your iOS device. The Petcube app
requires iOS 14 or greater and can
be downloaded in the App Store
or at the link below:
www.petcu.be/ios-app-download
Step 2. Connect your Petcube
to a power source and wait
up to a minute until the LED light
starts blinking yellow or blue (fig 4.1.2).
Step 3. Open the Petcube app on your
iOS device, and log in or sign up for
a Petcube account (fig 4.1.3).
Step 4. Tap the plus icon in the right
upper corner of the screen, and choose
‘Add a new device’ option. (fig 4.1.4)
and pick Petcube Bites 2 Lite from
the list of options (fig 4.1.5).
During the setup, Petcube camera will
automatically detect the Wi-Fi network
your phone is currently connected to,
so it’s a good idea to make sure you’re
connected to the same network you
want to hook up the camera to, and
have the Wi-Fi password handy
as you’ll be asked to enter it shortly.
Make sure it is a 2.4 ghz WI-FI network.
Fig. 4.1.2

6
Step 5. As long as the LED light
is flashing on your camera, you’re
ready to enable the setup mode.
To do that, press the setup button
above the usb port on the camera until
you hear a short jingle and a message
saying «Ready to Connect», and tap
‘I heard «Ready to connect»
on the screen.’ (fig 4.1.6).
Step 6. At the top, you’ll see
the network that you’ll be connecting
the camera to, so tap ‘Next’
to continue the setup and enter your
Wi-Fi password or ‘Change network’
if you wish to connect it to a different
network (fig 4.1.7).
Keep in mind that only 2.4 Ghz Wi-Fi
networks are supported by Petcube
Bites 2 Lite. Please make sure you are
connecting to 2.4 Ghz Wi-Fi network.
Step 7. A QR code will be generated
on your phone screen. Hold your
camera at the 5-inch distance with
the lens facing the QR code until you
hear a message saying «QR code
scanned», check the box, tap ‘Next’
(fig 4.1.8 & 4.1.9).
Step 8. Your Petcube device
is almost set! Please wait until
it connects (figs 4.1.10 & 4.1.11) and
the light on the front panel turns blue.
Fig. 4.1.7 Fig. 4.1.8
Fig. 4.1.5 Fig. 4.1.6

7
Step 9. Once the LED light on your
Petcube changes to solid blue
(fig 4.1.12), you are ready to play
with your Petcube (fig 4.1.13).
Reminder: It is likely that your Petcube
will need a firmware update right after
it is connected. The firmware update
will be downloaded to your camera
within 24 hours.
Fig. 4.1.10
Fig. 4.1.12
Fig. 4.1.11 Fig. 4.1.13
Fig. 4.1.9

8
2. Setting up your Petcube camera on Android device
Step 1. To set up your Petcube,
download the Petcube app to your
Android device (fig 4.2.1). The Petcube
app requires Android 7.1.2 or greater
and can be downloaded in the Google
Play Store or at the link below:
www.petcu.be/android-app-download
Step 2. Connect your Petcube
to a power source and wait up
to a minute until the LED light starts
pulsing yellow or blue (fig 4.2.2).
Step 3. Open Petcube app on your
Android device, and log in or sign up
for a Petcube account (fig 4.2.3).
Step 4. Tap the plus icon in the right
upper corner of the screen, and choose
‘Add a new device’ option. (fig 4.2.4)
and pick Petcube Bites 2 Lite from
the list of options (fig 4.2.5). During
the setup, Petcube Bites 2 Lite will
automatically detect the Wi-Fi network
your phone is currently connected to,
so it’s a good idea to make sure you’re
connected to the same network you
want to hook up the camera to,
and have the Wi-Fi password handy
as you’ll be asked to enter it shortly.
Step 5. As long as the LED light
is flashing on your camera, you’re ready
to enable the setup mode. To do that,
Fig. 4.2.1
Fig. 4.2.3
Fig. 4.2.4
Fig. 4.2.2

9
press the start button at the bottom
of the camera until you hear a short
jingle and a message saying «Ready
to Connect», and tap ‘I heard «Ready
to Connect» on the screen.’ (fig 4.2.6).
Step 6. Choose Wi-Fi network
to connect your Petcube to and enter
Wi-Fi password. Keep in mind that only
2.4 Ghz Wi-Fi networks are supported
by Petcube Bites 2 Lite. Please make
sure you are connecting to 2.4 Ghz
Wi-Fi network (figs 4.2.7 & 4.2.8).
Step 7. A QR code will be generated
on your phone screen. Hold your
camera at the 5-inch distance with
the lens facing the QR code until you
hear a message saying «QR code
scanned», check the box, tap ‘Next’
(figs 4.2.9 & 4.2.10).
Step 8. Your Petcube device is almost
set! Please wait until it connects and
the light on the front panel turns blue
(figs 4.2.11 & 4.2.12).
Step 9. Once the LED light on your
Petcube changes to solid blue, you
are ready to play with your Petcube
(figs 4.2.13 & 4.2.14).
Fig. 4.2.6Fig. 4.2.5
Fig. 4.2.7 Fig. 4.2.8

10
Fig. 4.2.10
Fig. 4.2.12
Fig. 4.2.9
Fig. 4.2.11
Reminder: It is likely that your Petcube
will need a firmware update right after
it is connected. The firmware update
will be downloaded to your camera
within 24 hours.
Fig. 4.2.14
Fig. 4.2.13

11
3. Select the correct treat size insert
Your Petcube Bites 2 Lite camera comes with three different inserts
to accommodate different treat sizes: Small, Medium and Large.
• Use Small insert with treats under 12mm or 0.47in of size;
• Use Medium insert with treats between 12-16mm or 0.47-0.63in of size;
• Use Large insert with treats above 16mm or 0.63in of size.
Keep in mind that if the treats you’re using have an unnatural form (a star or a bone),
for the best experience it is recommended to use the insert 1 size bigger.
4. Playing with your Petcube
When you successfully registered your
Petcube and the LED light on the back
glows blue, tap on the camera profile
on the homescreen to access camera
page (fig 4.4.1).
Petcube Bites 2 Lite Live Stream
Controls (fig 4.4.2):
1 — Game Settings Menu;
2 — Start video to be saved
on your device;
3 — Take a photo to be saved
on your device;
4 — Dispense treats to your pet;
5 — Tap to talk to your pet;
6 — Tap to hear your pet;
7 — Switch to portrait mode (iOS only).
Fig. 4.4.2
Fig. 4.4.1

12
Fig. 4.4.3
To fling treats, use the bone icon
(#4 on fig 4.4.2) in the bottom left corner
of the app while in play mode, then hold
down the bone icon in the middle
of the screen and swipe up to select
how far you want to fling the treats:
you can select close, medium and
long shots (fig 4.4.3).
To access advanced Video & Audio
control, select the ‘Settings’ icon
in the top right corner of the screen
(fig 4.4.4 - 4.4.6).
To exit the live stream, first exit
the landscape mode by pressing
the 2 arrows icon in the upper left
corner. To return back to the Petcube
homescreen, tap the camera video while
in portrait mode and press the ‘back’ icon
in the upper left corner (fig 4.4.7).
Fig. 4.4.7
Fig. 4.4.4
1
2
Fig. 4.4.6Fig. 4.4.5
13
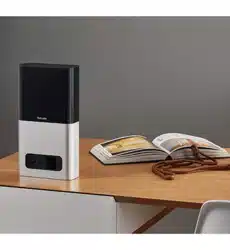
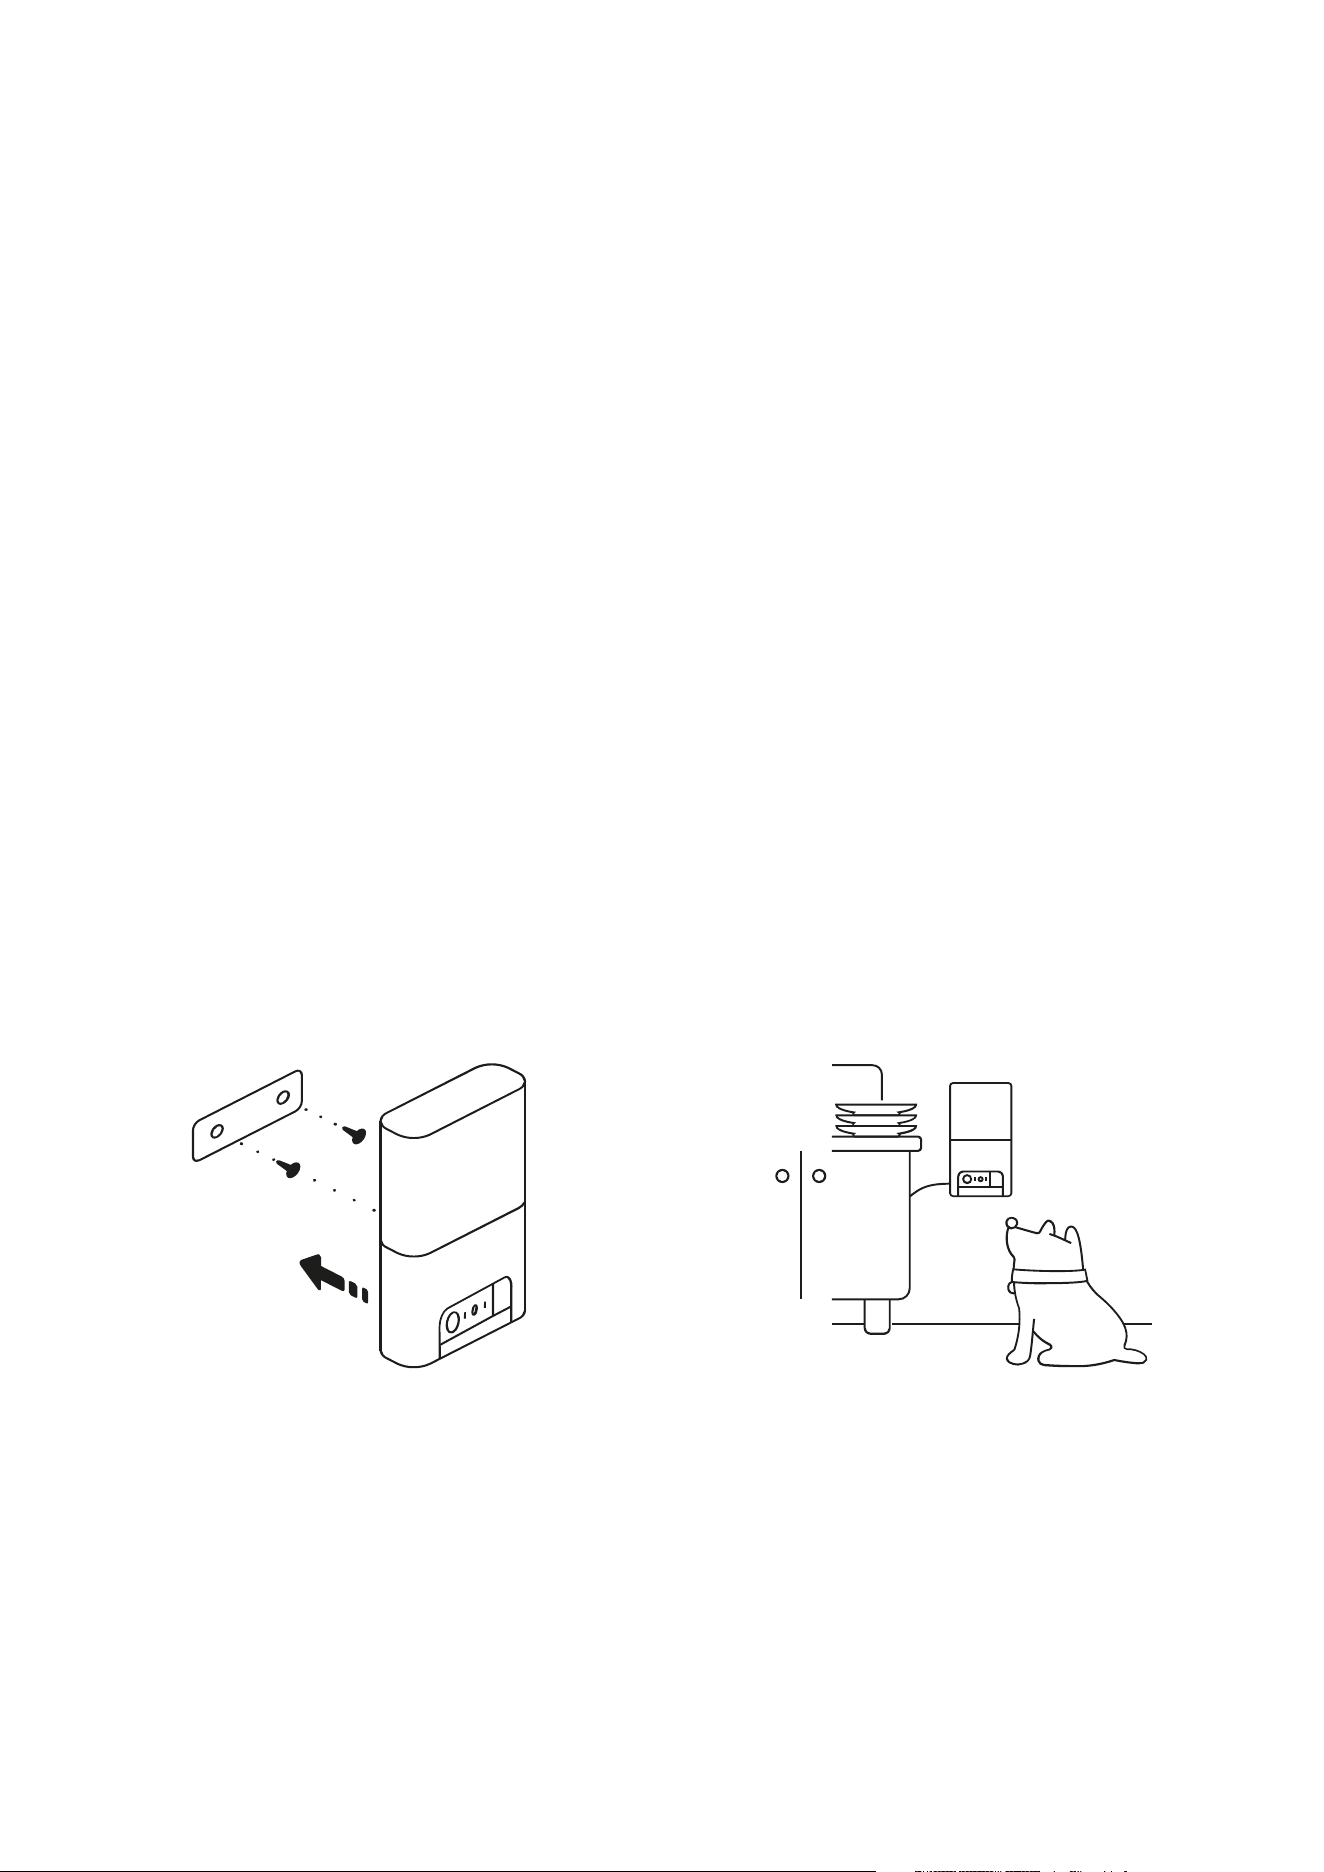
5. Where to place your Petcube Bites
Consider placing Petcube Bites in a location that allows for maximum coverage through
the camera’s 160° wide angle lens. It’s always a good idea to point the Petcube Bites
in the direction where your pets tend to spend most of their time.
If you want to place Petcube Bites on a table or shelf, we recommend you set it up
at least 3 feet above the floor. Petcube Bites has a non-slip rubber bottom, which
provides a secure grip on flat surfaces. The camera should be placed closer
to the edge of the surface for better viewing angle.
If you want to hang camera on drywall, anchor screws are included in the packaging
for an easy and secure setup (fig 4.5.1).
Wall mounted position gives extra protection from eager pets and allows for the best
room coverage (fig 4.5.2).
Fig. 4.5.1 Fig. 4.5.2

14
6. Treat recommendations
• Treats should be uniform in size (ideally spherical), no smaller than 0.3 inches and
no larger than 1 inch in length. The treat hopper can fit up to 2 lbs of treats;
• Treats must be dry and hard;
• Treats should not be greasy, soft, sticky or crumbly;
• Use treats that are all the same size and shape;
• Choose the correct orange insert that came with your Petcube Bites 2 Lite
depending on the size of your treats to have better control of the amount of treats
dispensed at once. Available sizes: Small, Medium and Large with Medium insert
being pre-installed;
• You can opt from using an insert if you feel like that works best with your treats.
Close the container lid for an airtight seal to keep treats fresh and so no odors get out.
7. Cleaning made simple
The detachable treat container is dishwasher safe on lower temperature/delicate
cleaning settings (up to 130’F), or you can wash it by hand.
Do not use abrasive cleaners on the container, only liquid detergents and soft sponges.
To detach the treat container, push the back release button to the right and pull up and
away from the base.

15
8. Taking screenshots and recording video
In order to take a snapshot of the live stream from your Petcube, you need to tap
the Photo Camera icon on the bottom left while in play mode (fig 4.8.1). To start
recording a live stream, tap the Video Camera icon at the bottom right while
in play mode. To stop recording, tap the ‘Stop’ icon and the video will automatically
be saved to your phone’s storage.
Fig. 4.8.1
9. Using Zoom feature
Petcube app now comes with
the 8x digital zoom feature. Just
connect to your Petcube in the app,
pinch-to-zoom in the image during
the game, and pan around to see
the whole scene.
10. Using Night Vision
Petcube comes with the infrared sensor
capable of streaming clear black and
white video in pitch dark. When
the sensor detects a low level
of ambient light, your Petcube
camera will automatically activate
the Night Vision mode.
By default Night Vision is set to Auto
mode, but you can default it to always
On or Off going to Camera Settings ->
Audio & Video (fig 4.10.1 & fig 4.10.2).
Fig. 4.10.1 Fig. 4.10.2

16
11. Using Two-way Audio or Push-To-Talk
Petcube comes with 2 ways of audio
interaction: default simultaneous
2-way audio and optional ‘push-to-talk’
feature that works much like
a walkie-talkie.
To start talking and listening, first,
make sure the sound is activated
in Settings at the top right, then simply
tap the mic icon in the bottom left
corner (fig 4.11.1).
To switch to push-to-talk audio:
1. Open the Petcube app;
2. Go to the camera profile, tap
the ‘Settings’ wheel in the upper
right corner if you use Android
or tap the ‘Play’ icon if you use iOS;
3. Tap the ‘Settings’ wheel
in the upper right corner;
4. Select ‘Video & Audio’ and disable
the ‘Simultaneous 2-way audio’
(fig 4.11.2).
‘Let me hear my pet’ and ‘Let my pet
hear me’ being in the Off position
defaults live stream connection audio
to be Off (fig 4.11.3).
You can enable sound and mic manually
using live stream controls if you decide
you want to hear what’s going
on in your home, or talk to your pet
(fig 4.11.4).
Fig. 4.11.2 Fig. 4.11.3
Fig. 4.11.1

17
12. Volume control
To change the volume level
on your Petcube:
1. Open the Petcube app;
2. Go to the camera profile (fig 4.12.1);
3. Tap the ‘Settings’ wheel in the upper
right corner;
4. Go to Video & Audio settings menu
(fig 4.12.3);
5. Adjust the volume level under
‘Camera speaker volume’ (fig 4.12.4).
Keep in mind that in order to be able
to change the settings on your Petcube,
it needs to be in online standby mode
(steady Blue light).
Fig. 4.12.1 Fig. 4.12.2
Fig. 4.11.4

18
To attract your pet’s attention and
be aware of when someone connects
to your Petcube in accordance with
your sharing settings, at the start
of every call your Petcube will play
a sound alert.
To disable the sound alert:
1. Open the Petcube app;
2. Go to the camera profile, tap
the ‘Settings’ wheel in the upper
right corner if you use Android
or tap the ‘Play’ icon if you use iOS;
3. Tap the ‘Settings’ wheel
in the upper right corner;
4. Go to Video & Audio settings;
5. Switch the ‘Let camera play
a sound’ to Off (fig 4.13.1).
Fig. 4.13.1
13. Sound alert at the start of a call
Fig. 4.12.3 Fig. 4.12.4

19
14. Sharing access to your Petcube Bites
By default, only you can access your
Petcube video stream, but you can
share access to your Petcube with your
family, friends and anyone who installs
the Petcube app on their smartphone.
Family sharing (fig 4.14.5) will have
almost full control of your camera,
being able to connect to your Petcube
anytime, change camera and sharing
settings and access recorded videos
on Petcube Care timeline.
Friend sharing (fig 4.14.6) allows you
to set friend sharing access
at specifically scheduled times and
days as well as set a permission access
for the treats and 2-way audio controls.
To share access to family members
or friends:
1. Open the Petcube app;
2. Go to the camera profile (fig 4.14.1);
3. Tap the ‘Settings’ wheel in the upper
right corner (fig 4.14.2);
4. Tap ‘Sharing’, select the preferable
sharing option and add the new user
to either ‘Family’ or ‘Friend’ list
(fig 4.14.4) (fig 4.14.5) (fig 4.14.6).
Fig. 4.14.1
Fig. 4.14.3
Fig. 4.14.4
Fig. 4.14.2

20
To delete a user from your ‘Family’
or ‘Friends’ list:
1. Go to ‘Sharing’ settings again;
2. Find their username and swipe it left
to ‘Delete’ or ‘Unfriend’ (fig 4.14.7
and 4.14.8).
Fig. 4.14.6
Fig. 4.14.7
Fig. 4.14.5
Fig. 4.14.8

21
15. Using motion and sound detection
If are using Petcube Care cloud-based
video storage, the Petcube app can
send push notifications to your
smartphone whenever motion or
sound is detected on your Petcube.
To enable push notifications:
1. Open the Petcube app;
2. Go to the camera profile, tap
the ‘Settings’ wheel in the upper
right corner;
3. Select ‘Notifications’ (fig 4.15.3);
4. Turn ‘Motion Detection’ and ‘Sound
Detection’ options On (fig 4.15.4).
You can also adjust the sensitivity
of the motion and sound detection
sensors by moving the ‘Motion
sensitivity’ slider (fig 4.15.5).
Keep in mind that in order to be able
to change the settings on your
Petcube, it needs to be in online
standby mode (steady Blue light).
If you are using Petcube Care cloud
history service, the Petcube app
will record videos triggered by motion
and sound and you can configure push
notifications to be sent as soon as new
video recordings are available, enabling
Care Video Recording setting
(fig 4.15.6).
Fig. 4.15.3 Fig. 4.15.4
Fig. 4.15.1 Fig. 4.15.2

22
16. Using Auto Treat Scheduling
With Petcube Bites users not only can
give their pet a treat on demand during
the live stream but also set up an auto
treats schedule to cheer up their pet
even if they are not there.
You can set up the treat scheduling
by following these few easy steps:
1. Open the Petcube app;
2. Go to the camera profile, tap
the ‘Settings’ wheel in the upper
right corner;
3. Select ‘Treat Dispensing’ (fig 4.16.3);
4. Set time, treat flinging power and
serving count and when the time
comes, your pet will be getting that
extra treat (fig 4.16.4).
17. Setting up multiple Petcube
cameras on one account
To register multiple cameras
in a single account:
1. Launch the Petcube app;
2. Click Plus icon in the right top
corner (fig 4.17.1);
3. Select your Petcube in the list
and follow the instructions.
Repeat this process to register
additional devices.
Fig. 4.15.6
Fig. 4.15.5
Fig. 4.16.1 Fig. 4.16.2

23
Fig. 4.16.3 Fig. 4.16.4 Fig. 4.17.1
18. Registering Petcube to a different account
Be aware that a Petcube can only be registered to one user. You cannot register
it under multiple accounts, but you can share access to it with other users using
various sharing options.
If you need to register a Petcube to a different account, simply delete the camera
from the account it is currently registered to:
1. Open the Petcube app;
2. Go to the camera profile, tap the ‘Settings’ wheel in the upper right corner;
3. Find ‘Disconnect camera’;
4. Now login to a different Petcube account and add Petcube Cam to this account.

24
19. Deleting the Petcube device
To delete the Petcube from your
account:
1. Open the Petcube app;
2. Go to the camera profile, tap
the ‘Settings’ wheel in the upper
right corner;
3. Find ‘Disconnect camera’ (fig 4.19.1);
4. Confirm by choosing ‘Delete’.
20. Resetting user account password
If you forgot your password:
1. Open the Petcube app
on your mobile device;
2. Tap ‘Log In’ at the bottom
of the screen (fig 4.20.1);
3. Tap ‘Forgot password’ (fig 4.20.2);
4. Enter your Petcube account
email address;
5. Hit ‘Restore password’ button
(fig 4.20.3);
6. Check your email and follow
the instructions to reset
your password.
Fig. 4.19.1
Fig. 4.20.2
Fig. 4.20.1
Fig. 4.20.3

25
21. Changing your account name, username, password or camera name
To change your account details such
as your name, username or password:
1. Open the Petcube app;
2. Go to the user profile by tapping
your user icon (fig 4.21.1);
3. Tap the ‘Settings’ wheel in the upper
right corner (fig 4.21.2);
4. Hit ‘Edit profile’ (fig 4.21.3) and tap
the values you want to change.
To change your Petcube camera name
or change the camera background:
1. Open camera profile (fig 4.21.4);
2. Tap the ‘Settings’ wheel in the upper
right corner (fig 4.21.5);
3. Hit the arrow next to your Petcube
name (fig 4.21.6) and status and
change the necessary values.
Fig. 4.21.3
Fig. 4.21.5
Fig. 4.21.2
Fig. 4.21.4
Fig. 4.21.6
Fig. 4.21.1

26
22. Moving your Petcube to a different location or changing Wi-Fi settings
As long as the Petcube is within range
of your wireless network, you can
reposition it according to your needs.
However, if you’re trying to use
it in a different Wi-Fi environment
or want to connect the camera
to a different wireless network,
you need to change the Wi-Fi
settings in the Petcube app.
To do that:
1. Open the Petcube app;
2. Go to the camera profile (fig 4.22.1);
3. Tap the ‘Settings’ wheel in the upper
right corner (fig 4.22.2);
4. Tap ‘Change Wi-Fi’ (fig 4.22.3) ;
5. Power up your Petcube, wait
1 minute until it starts up;
6. Find the small hole above the USB
port on the left side of the device,
push it one with a pointy object and
follow the on-screen instructions.
Fig. 4.22.1
Fig. 4.22.3
Fig. 4.22.2

27
Petcube Alexa skill can be associated with your Petcube Bites 2 Lite giving you ability
to ask alexa enabled device to, for instance, treat your pet with Petcube Bites 2 Lite.
AMAZON ALEXA SKILL
5
1. Setting up Amazon Alexa to work with Petcube
1. Sign into your Amazon Alexa account using Alexa app on your phone (fig 5.1.1);
2. Search for and download the Petcube Skill for Alexa (fig 5.1.2 and 5.1.3);
3. Link your Petcube account using your Petcube username through your
Alexa App or Amazon account (fig 5.1.4 and 5.1.5);
4. Start using Alexa to give voice commands to Petcube cameras.
Setting up the Petcube Skill for Amazon Alexa is a one-time process. No changes
are necessary from within the Petcube app or your Petcube account.
2. Amazon Alexa voice commands on Petcube
After you’ve downloaded and installed the skill, use the following voice commands
with Alexa-enabled device to give commands to your Petcube Bites 2 Lite camera:
• Alexa, ask Petcube to treat [your pet’s name];
• Alexa, ask Petcube to treat my pet;
• Alexa, ask Petube to fling treats.
Amazon, Kindle, Echo, Alexa, Dash, Fire and all related logos are trademarks
of Amazon.com, Inc. or its affiliates.

28
Fig. 5.1.3Fig. 5.1.1 Fig. 5.1.4
Fig. 5.1.5
Fig. 5.1.2

29
3. Walking & Feeding
Just say «Alexa, ask Petcube has Rocky (your pet’s name) been fed?» or «Alexa, ask
Petcube has Rocky been for a walk?» to get the last time when your pet was fed
or walked.
When feeding the pet, say «Alexa, tell Petcube I fed Rocky» or «Alexa, tell Petcube
Rocky has been fed».
When returning from or going for a walk, say «Alexa, tell Petcube I walked Rocky»
or «Alexa, tell Petcube Rocky has been walked».
4. Toggling Petcube Care video recording On/Off
All Petcube camera owners can pair their devices and switch Petcube Care On and Off,
to enable or disable the motion detection alerts and automated video recording.
For instance, if you have a Petcube camera named «Living Room» you may say: «Alexa,
turn Petcube Care off on Living Room» when returning home. When leaving, you may
say «Alexa, turn video recording on Living Room».
Moreover, Petcube skill lets families and individuals easily keep tabs on when
the pet was fed or walked last time. You can also toggle Petcube Care video
recording On and Off.

30
1. What is Petcube Care
PETCUBE CARE™
6
Petcube Care is an optional subscription service that adds features to a Petcube
camera and gives owners additional peace of mind when it comes to their pets
and their property.
Depending on the subscription plan, Petcube Care provides Petcube users with access
to cloud-based video history for 3 or 90 days, 30-second video clips, 10 or unlimited
video downloads, smart alerts.
2. How much does Petcube Care cost
Petcube Care offers two different subscription plans, Optimal and Premium,
to fit the needs of pet owners of all stripes. Choose a monthly or annual rate.
For more information on the plans, check out the Petcube Care subscription options
on petcube.com/care/
3. How does Petcube Care work
Petcube Care watches after your pets and home when everyone is away, capturing
action videos, triggered by sound or motion. 30-second clips are saved securely
in the cloud and are accessible in the interactive timeline in the Petcube app to review
and download for 3 or 90 days (depending on the subscription plan). The 3-second
look back lets you see what event set Off the recording.
Using powerful AI technology, Care understands what pets are doing, registering
important events like cat, dog or human movements, barks or meows, and sends
you real-time smart alerts.
Without Care, Petcube users only have access to the live video streaming.

31
4. How to activate Petcube Care
To start using Petcube Care, you need to have a Petcube camera and
a Petcube Care subscription.
To subscribe:
1. Go to petcube.com;
2. Sign in with your Petcube account or go to the Petcube Care product page
and select the most suitable subscription option for you. You will also
be able to subscribe from the ‘Home’ page in the Petcube app on both
iOS and Android devices.
If you are not a Petcube camera owner yet but wish to buy one, you will also
be able to subscribe to Petcube Care when you make your purchase.
5. How to Turn Off Petcube Care Video History
Petcube Care’s video history feature is turned On by default.
To deactivate it:
1. Open Petcube app;
2. Go to the camera profile in Home menu;
3. Move the slider to ‘Sleep’ mode in the lower right corner
of the Petcube camera controls.
In Sleep mode, Petcube Care is disabled. It will not detect and record events. Nothing
will be added to your video history timeline. You will still have access to recorded videos
if any were taken when Care was active and your subscription plan allows.
Use Awake mode, when you are not around and want Petcube Care to be active. You
will get noise & motion notifications. These moments will be stored on your timeline.

32
6. How to view your video history in Petcube Care
It’s very easy to access your video history with Petcube Care! Launch the Petcube app
on your phone. Most recent videos will populate below.
Tap on ‘Show Older Videos’ to move back or forward in time.
Tap on the ‘...’ next to each video to get options to Delete, Share, or Save the video.
You can also access your video history if you log into your Petcube account on
petcube.com in the upper right corner.
The website doesn’t offer live streaming or alerts, but you can scroll through, filter,
and play back the recorded Care videos.
Remember, Petcube Care records videos to the timeline automatically by default. If you
would like to deactivate this feature, review these instructions in the article «How to
Turn Off Petcube Care Video History».
If your Petcube Care is currently set to Sleep mode, you will need to change it to Awake
mode in order for videos to be recorded to your timeline. To do this:
1. Open Petcube app;
2. Go to the camera profile in Home menu;
3. Move the slider to ‘Awake’ mode.
7. How to save a video recording to your phone’s internal storage
While you will be able to view video history for the past 3 or 90 days, depending
on your subscription plan from the cloud via Petcube Care, you will always be able
to store video recordings to your phone’s internal storage. Just pick the necessary video
clip, press the three dots ‘…’ located on the left hand side of the video and select ‘Save’.

33
8. Video recording length
Currently, video recording length can be no longer than 30 secs. So, for instance,
if there’s a motion that lasts for 2 minutes 15 seconds, the app will cut it into 5 scenes.
However, in the free 4-hour history plan, video recording length is limited to 10 seconds.
9. How can I use Petcube Care on multiple Petcube devices
At the moment, Optimal Care plan covers one camera per subscription, while Premium,
both monthly and annual plans, are applied on the account level and cover an unlimited
amount of cameras on the account.
10. How to add or update your payment information for Petcube Care
If you need to add or update your payment information for Petcube Care service:
1. Log into your Petcube account at petcube.com by clicking on the Home icon
in the upper right corner;
2. Once logged in, go to ‘Billing’ tab to update your information.
11. How do I cancel Petcube Care subscription
In order to cancel your Petcube Care subscription:
1. Open Petcube app;
2. Go to camera profile on which you wish to cancel the subscription;
3. Tap the ‘Settings’ wheel in the upper right corner;
4. Select Care Settings;
5. Click on the current subscription at the top;
6. Hit Cancel subscription at the very bottom of the page.

34
1. What are Smart Alerts & How do they work?
PETCUBE SMART ALERTS
7
Smart alerts bring AI-powered recognition technology to the pet space. Your Petcube
camera will be able to give you better intel on what’s happening at home when you’re
away, with audio detection of dog barks and cat meows, and visual detection of cats,
dogs and people. Get push notifications on your phone when something is detected and
setup automatic video recording so you can later replay what happened.
2. How well does it work?
Smart alerts improve the accuracy of your notifications, giving you less false positives.
The feature is powered by artificial intelligence algorithms that learn and improve over
time - this means that it will actually get smarter and smarter.
3. Can I use smart alerts?
Petcube launched smart alerts in November 2018 for subscribers to select Petcube Care
tiers. To find out if smart alerts are available for your subscription plan or to start a new
subscription, please visit petcube.com/care.
4. Can I choose which smart alerts I receive?
Yes! Smart alerts are triggered by four new types of events that your Petcube camera
can recognize:
• Dogs barking;
• Cats meowing;
• Pets in view of the camera;
• People in view of the camera.
You’re in full control of which notifications you get - choose one or get them all —
it’s up to you.

35
5. How can I get smart alerts for my pets?
If you don’t have a Petcube camera yet:
1. Get a Petcube pet camera! :)
2. Download the Petcube App for your phone or tablet from the App Store
or Google Play Store;
3. Sign up for history subscription to Petcube Care;
4. Enable Smart Alerts in the Petcube App under Camera Notifications.
If you already have a Petcube camera, but don’t have Petcube Care:
1. Sign up for a video history subscription to Petcube Care;
2. Enable Smart Alerts in the Petcube App under Camera Notifications.
If you have a Petcube camera and Petcube Care:
Easy! Enable Smart Alerts in the Petcube App under Camera Notifications.

36
1. LED light doesn’t light up
2. Petcube blinks blue/yellow and doesn’t turn blinking blue
TROUBLESHOOTING
8
If the LED light on your Petcube camera is Off while the camera is plugged into
the power source, try unplugging it and plugging it back in. Make sure that you
are using the original power adapter that came with your Petcube and that the power
cord is undamaged. If you no longer have the original power adapter, make sure
to only use the ones that provide 5V/2A power.
It might be that Petcube
camera is located out of reach
of Wi-Fi assigned, or Wi-Fi is not being
broadcasted, or there is not internet
available. Make sure it is in Wi-Fi range
and internet is available.
When you plug in your Petcube before
starting the registration process,
it should glow solid yellow for a minute.
Wait up to 1 minute until it starts
blinking blue/yellow.
1. Find setup button above the USB
port of your Petcube Bites 2 Lite,
hold it down with a pin for 1 second
until you hear «Ready to connect»
(Fig. 8.2.1);
2. Open Petcube app, go to the ‘Home’
tab, tap Plus icon in the top right
cornet of the screen’, pick your
Petcube from the list of options and
follow the steps on the screen.
Fig. 8.2.1

37
3. Incorrect Wi-Fi password
If Petcube app is showing
the «Incorrect Wi-Fi password» error
message after the setup, here are a few
possible reasons behind that:
1. Case sensitivity: check the entered
password for uppercase
or lowercase characters.
Keep in mind that «Password» and
«password» would be two different
passwords because the «P»
is uppercase in the first example and
lowercase in the second example;
2. Password length: check the entered
password length and keep in mind
that normally the password length
is 8+ characters long;
3. Keyboard language: check
the onscreen keyboard language
and make sure you enter password
in the correct keyboard layout.
To reset the Wi-Fi password:
1. Open the Petcube app;
2. Go to the camera profile, tap
the ‘Settings’ wheel in the upper
right corner (fig 8.3.1);
5. Tap ‘Change Wi-Fi’ (fig 8.3.4);
6. Power up your Petcube, wait
1 minute until it starts up;
Fig. 8.3.1
Fig. 8.3.3
Fig. 8.3.2

38
4. Petcube can’t register on your Wi-Fi network
You may see this message when there Petcube cannot receive the IP address
automatically using DHCP. Normally, the router should assign the IP address to your
Petcube automatically but if this didn’t happen, you can enter your router settings and
assign the IP address to your Petcube manually. You can also contact your ISP
or Petcube Customer Care team for help.
5. Petcube can’t establish the cloud connection / No Internet connection
If you get this error message, firstly, make sure you have Internet access on your
Wi-Fi by trying to open a few websites on a few devices. If you have Internet access but
Petcube still can’t be connected, try to reset the device by following these easy steps:
1. First, if you have previously set up your Petcube, open the Petcube app, go to ‘Home’
tab, then select ‘Settings’ and choose ‘Disconnect Camera’;
Fig. 8.3.5
7. Find setup button right above
the USB port of your Petcube
Bites 2 Lite (fig 8.3.5), hold it down
with a pin for 1 second until you hear
“Ready to connect”;
8. Open Petcube app, go to the ‘Home’
tab, select ‘connect your device’,
pick your Petcube from the list
of options and follow the steps
on the screen.
In case none of the above tips help,
contact Petcube Customer Care Team
at petcube.com/support/.

39
2. Power up your Petcube, wait 1
minute until it starts up;
3. Find setup button right above
the USB port of your Petcube Bites
2 Lite (fig 8.6.1), hold it down with
a pin for 1 seconds until you hear
«Ready to connect»;
4. Open Petcube app, go to the ‘Home’
tab, select ‘connect your device’,
pick your Petcube from the list
of options and follow the steps
on the screen.
If you want to have the firewall on, you
need to open the following ports:
a) TCP port 3335; 34.194.225.22
b) TCP port 443; 35.212.7.2135.207.1.22
(You may not need the UDP ports
because they’re rarely blocked, but
UDP range should be from 7000 to
7100) WPS pin code should be disabled
(please note that not all the routers
have it).
MAC filtering should be disabled. If
enabled, a MAC address can be found
at the back of the cube.
Fig. 8.6.1

40
6. Oh bummer setup error
If during the setup you’re getting an «Oh Bummer» error message, turn your Petcube
Off and back On, wait up to 1 minute until it boots up and starts blinking and start
the setup process over again.
7. Poor video quality or poor network conditions
Like with most video streaming services and products, video quality is affected
by router performance and/or your Internet connection. This can be improved if you
place Petcube closer to your home Wi-Fi router or by arranging it in a way so there
aren’t any obstacles between it and your router (i.e. walls, floors, radio interference etc.).
Petcube also requires at least 2 Mbps Internet connection upload and download speed
(4 Mbps is recommended). If your Internet connection speed is less than 2 Mbps, we
recommend upgrading for the best experience and highest video quality. To check your
Internet speed, we recommend performing online speed test. If you are not getting the
full speed you subscribed for, contact your Internet Service Provider.
8. I can’t connect to my Petcube / Petcube is offline in the app
If you cannot connect to your Petcube from your mobile phone, try the following:
- Make sure that the LED light on the front of your Petcube is steady blue. If the
LED light on the front of your Petcube isn’t steady blue, see section 9 «LED light
notifications» to determine the issue. In most cases rebooting the Petcube
by unplugging and plugging it back in should help but if you’re facing this issue
too often, below are a few ideas why it could be happening:
1. Your Petcube needs a firmware update. To get the most recent firmware update,
contact our support team at support@petcube.com;
2. Sometimes the issue may be caused by restrictions of the Wi-Fi network your phone
is connected to, especially if it’s a public or office Wi-Fi. Try to temporarily disable
Wi-Fi on your phone and connect to your Petcube while using mobile data or or try
connecting to other Public Petcube cameras in the feed to make sure it’s not
a network restriction issue;
41
3. This issue may occur if you’re using a non-original or a less powerful A/C adapter.
Please make sure to use only 5V / 2A power adapters;
4. You are using a mesh network or your 5Ghz and 2.4Ghz channels have the same
SSID. It has been observed on multiple occasions that sometimes Petcube cannot
maintain a reliable connection on a mesh/merged network or different network
channels (5Ghz and 2.4Ghz) with the same network name (SSID). It is recommended
to change any of the two channels names to avoid connection issues.
Petcube Bites 2 Lite will only work with 2.4 Ghz Wi-Fi channels;
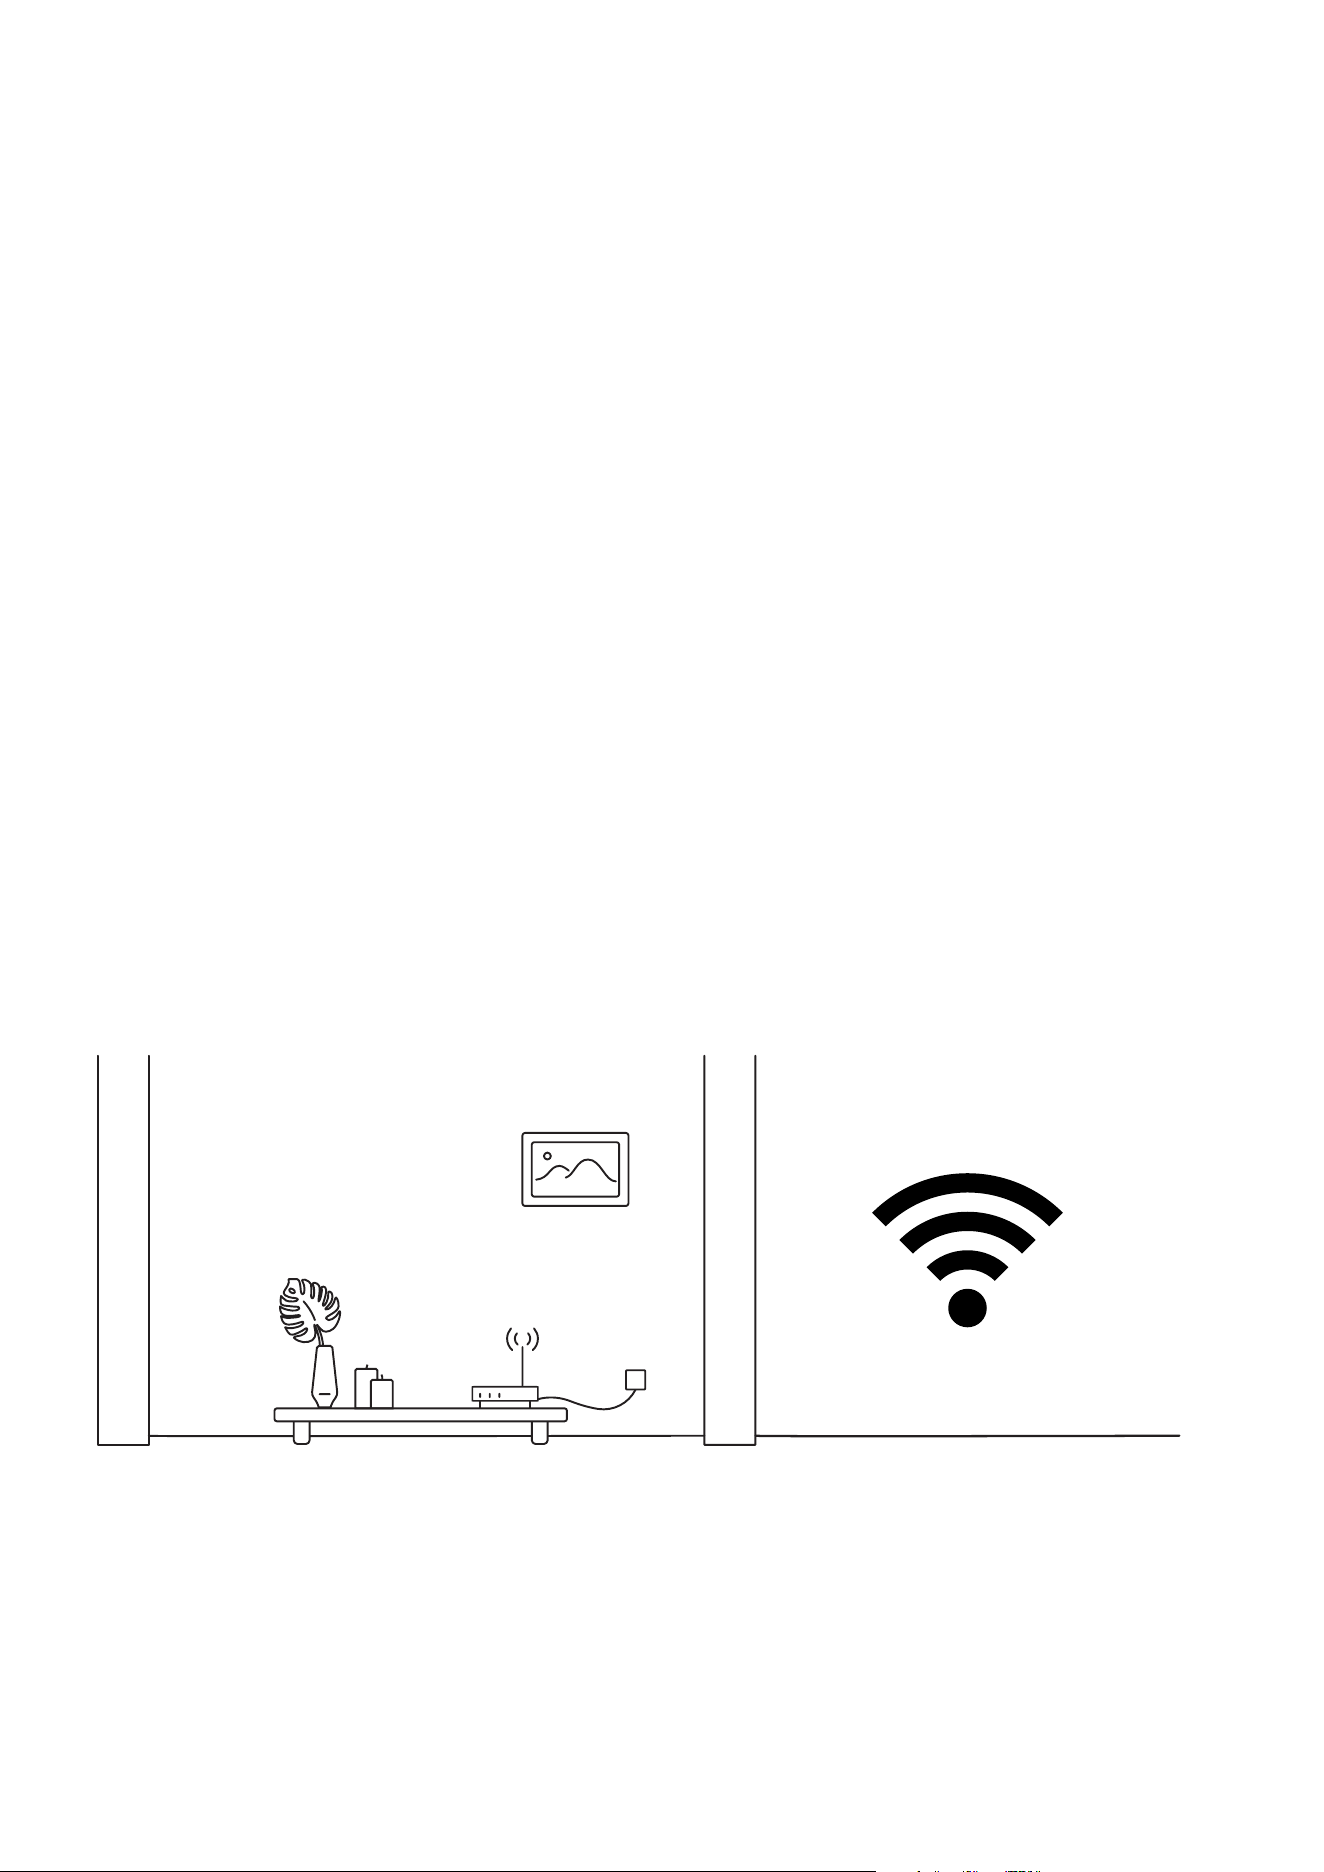
5. It’s possible that Petcube doesn’t have strong Wi-Fi connection. Keep in mind that
some connection issues may be caused by poor Wi-Fi signal, which can depend
on the router range, distance to the router and obstacles between Petcube and
router, such as walls or radio frequency interferences. Here are a few examples how
electronic appliances or bearing walls can impact your Wi-Fi signal.
Example 1 (fig 8.10.1) shows no electronic or radio devices and no bearing walls between
two rooms so the signal in the other room is very good.
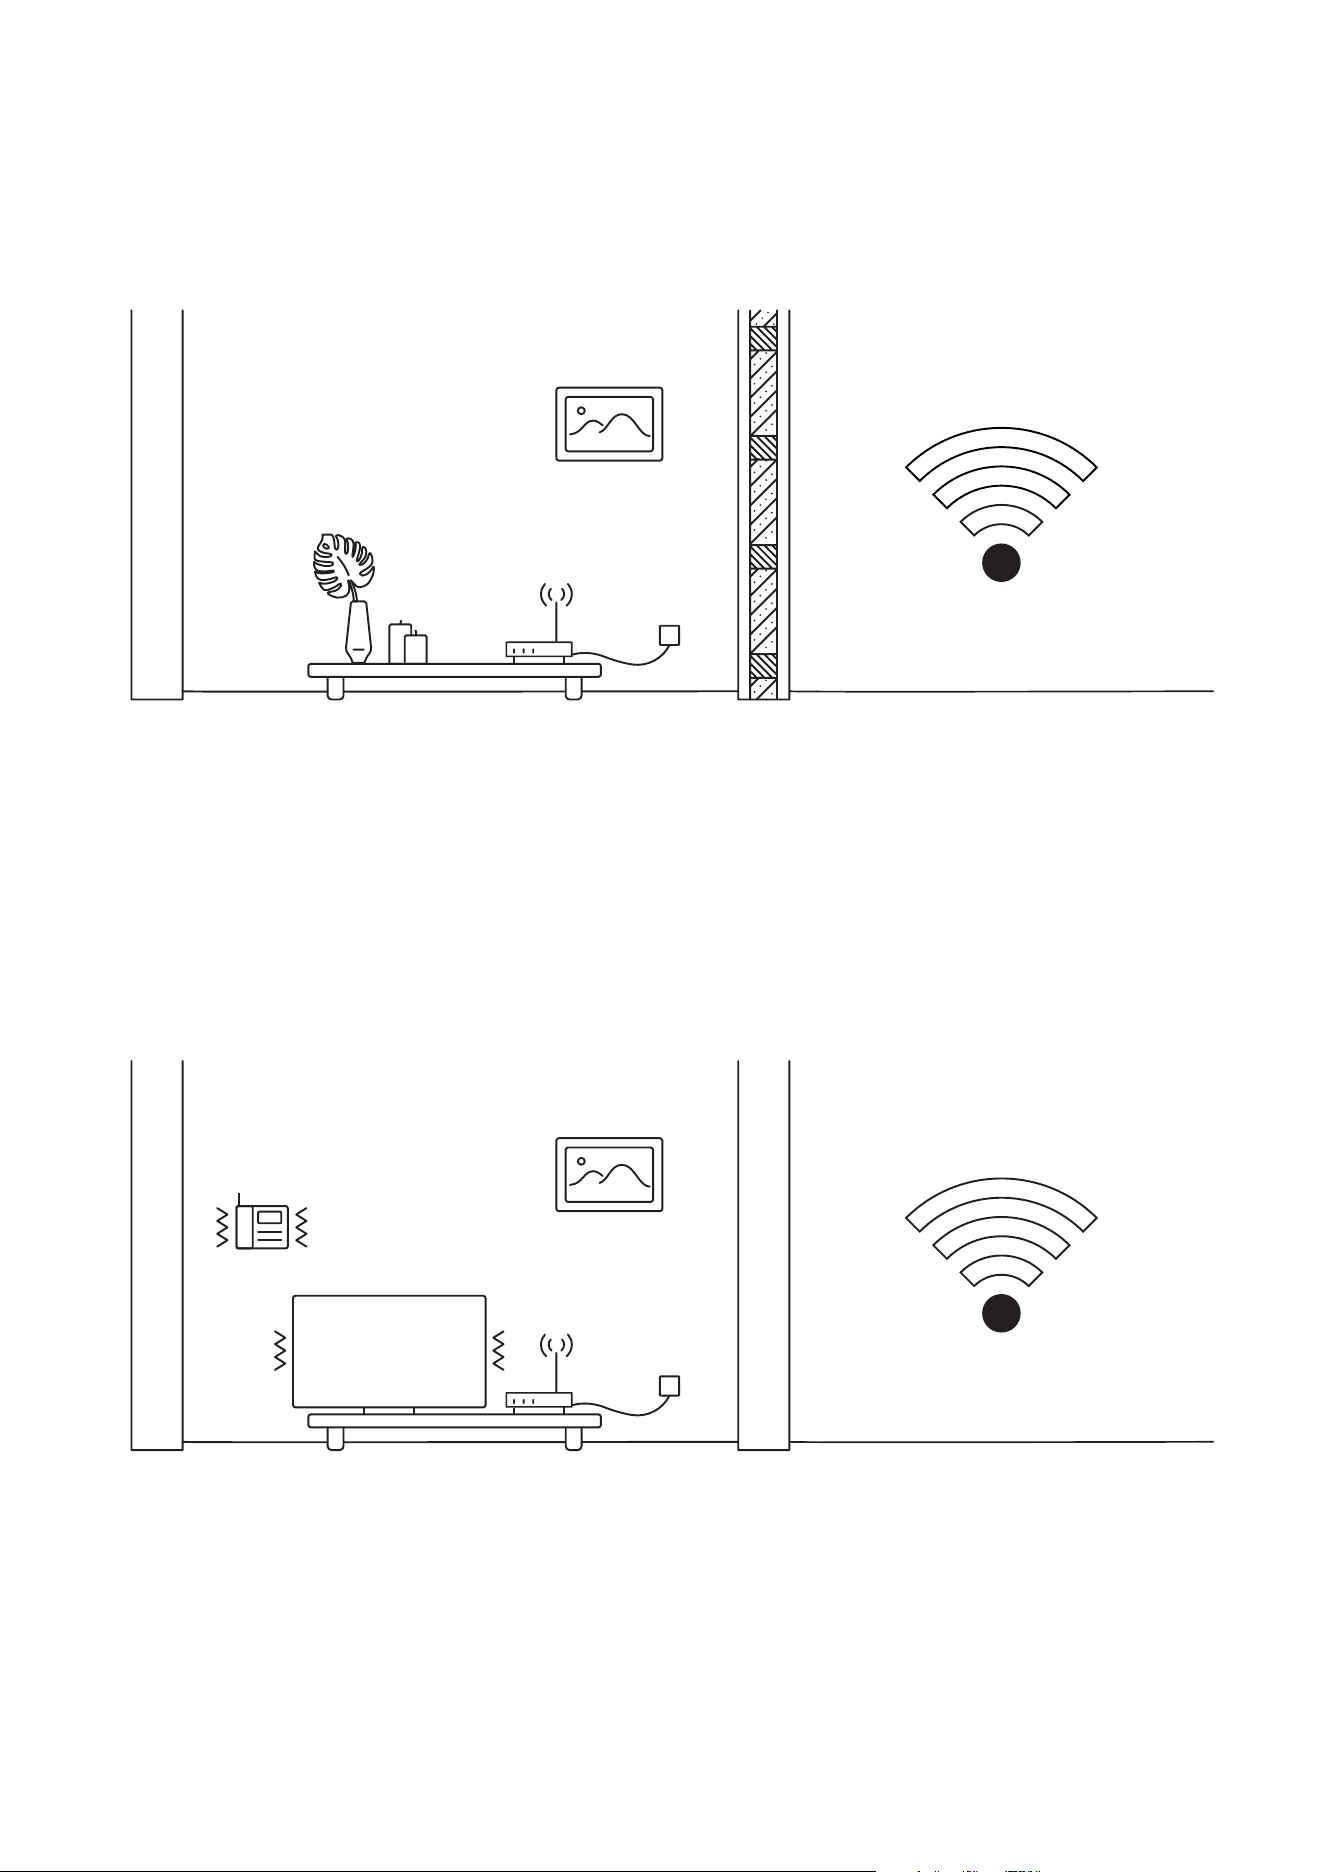
Example 2 (fig 8.10.2) shows a bearing wall between two rooms which causes poor
Wi-Fi signal in the other room.
Fig. 8.10.1
42
Example 3 (fig 8.10.3) shows interference caused by radio (phone) or electronic
appliances (TV). Poor Wi-Fi signal can be also impacted by microwaves, refrigerators,
cordless phones, baby monitors etc.
Fig. 8.10.2
Fig. 8.10.3

43
9. Petcube is Disconnected in the app
If your Petcube camera status shows as «Disconnected» in the Petcube app, it usually
means that your phone is not connected to the Internet at the moment or the network
you are connected to has certain restrictions. Try to switch to any other Wi-Fi network
or connect to your camera using cellular data (LTE, 3G).
10. Petcube goes offline / turns off
This issue may occur if you’re using a non-original or a less powerful A/C adapter.
Please make sure to use only 5V / 2A power adapters.
If you’re using the original adapter, but the problem persists, contact
Petcube Customer Care Team to determine the problem.
11. How to find Petcube’s MAC address
Petcube Cam’s MAC address is specified on the back of the device.
12. Petcube app shows «no treats» message
In case the Petcube app is showing an error message that says your Petcube Bites has
no treats despite the container being filled with treats, simply ignore this error message
and try to still fling a treat from your phone using the Petcube app.
In case it doesn’t work, reboot your Petcube by unplugging it from the power source
and plugging it back in.
13. Treat got stuck in the camera
If a treat gets jammed in the container, you’ll get a notification via the Petcube app.
You can dislodge the treat by removing it or shaking the container to empty it.
If a treat gets stuck in the flinging mechanism, use the door on the bottom
of the device to remove it. Do not unjam the device with sharp instruments
or apply too much pressure, both of which can damage the device.

44
14. Petcube Bites 2 Lite factory reset instructions
If you have a problem with your Petcube and need to reset it, follow these easy steps:
First, if you have previously set up your Petcube:
1. Open the Petcube app;
2. Go to ‘Home’ tab;
3. Tap the ‘Settings’ wheel in the upper right corner;
4. Choose ‘Disconnect Camera’;
5. Power up your Petcube, wait 1 minute until it starts up;
6. Find a small button above the USB port on the left side of the Petcube Bites,
insert the reset pin into it, until you hear: «Ready for setup»;
7. Wait until the LED on the camera starts blinking;
8. Open Petcube app again;
9. Go to the ‘Home’ tab and select ‘Connect your device’;
10. Pick your Petcube from the list of options and follow the steps on the screen.

45
LED LIGHT NOTIFICATIONS
9
Steady Yellow
If you just powered your Petcube up,
it will show this color while it boots up
for up to 30 seconds.
Steady Blue
Online, standby mode.
Fast Pulsing Yellow
Setup mode.
Pulsed Blue Once
Petcube Care™ is active, saving video
to your timeline.
Fig. 9.1
Fig. 9.3
Fig. 9.2
Fig. 9.4
The LED light on the back of your Petcube tells you about its status.

46
Slowly Pulsing Blue
Play mode. Be aware, mind your
privacy! Petcube is streaming live
video at the moment.
Pulsing Yellow/Blue
Your Petcube cannot connect to your
Wi-Fi network because of an incorrect
password, no wifi in range,
or no internet connection.
Pulsing Purple
Your Petcube is downloading the most
current software update, which usually
takes about 5 minutes.
Fig. 9.5 Fig. 9.6
Fig. 9.7