OPERATING MANUAL
PLEASE READ ALL INSTRUCTIONS, QUICK START GUIDE & WORK OUT GUIDE
CAREFULLY BEFORE USING THE UNIT AND PAY ATTENTION TO THE IMPORTANT
SAFETY PRECAUTIONS.
PLEASE SAVE THESE INSTRUCTIONS FOR FUTURE REFERENCE.
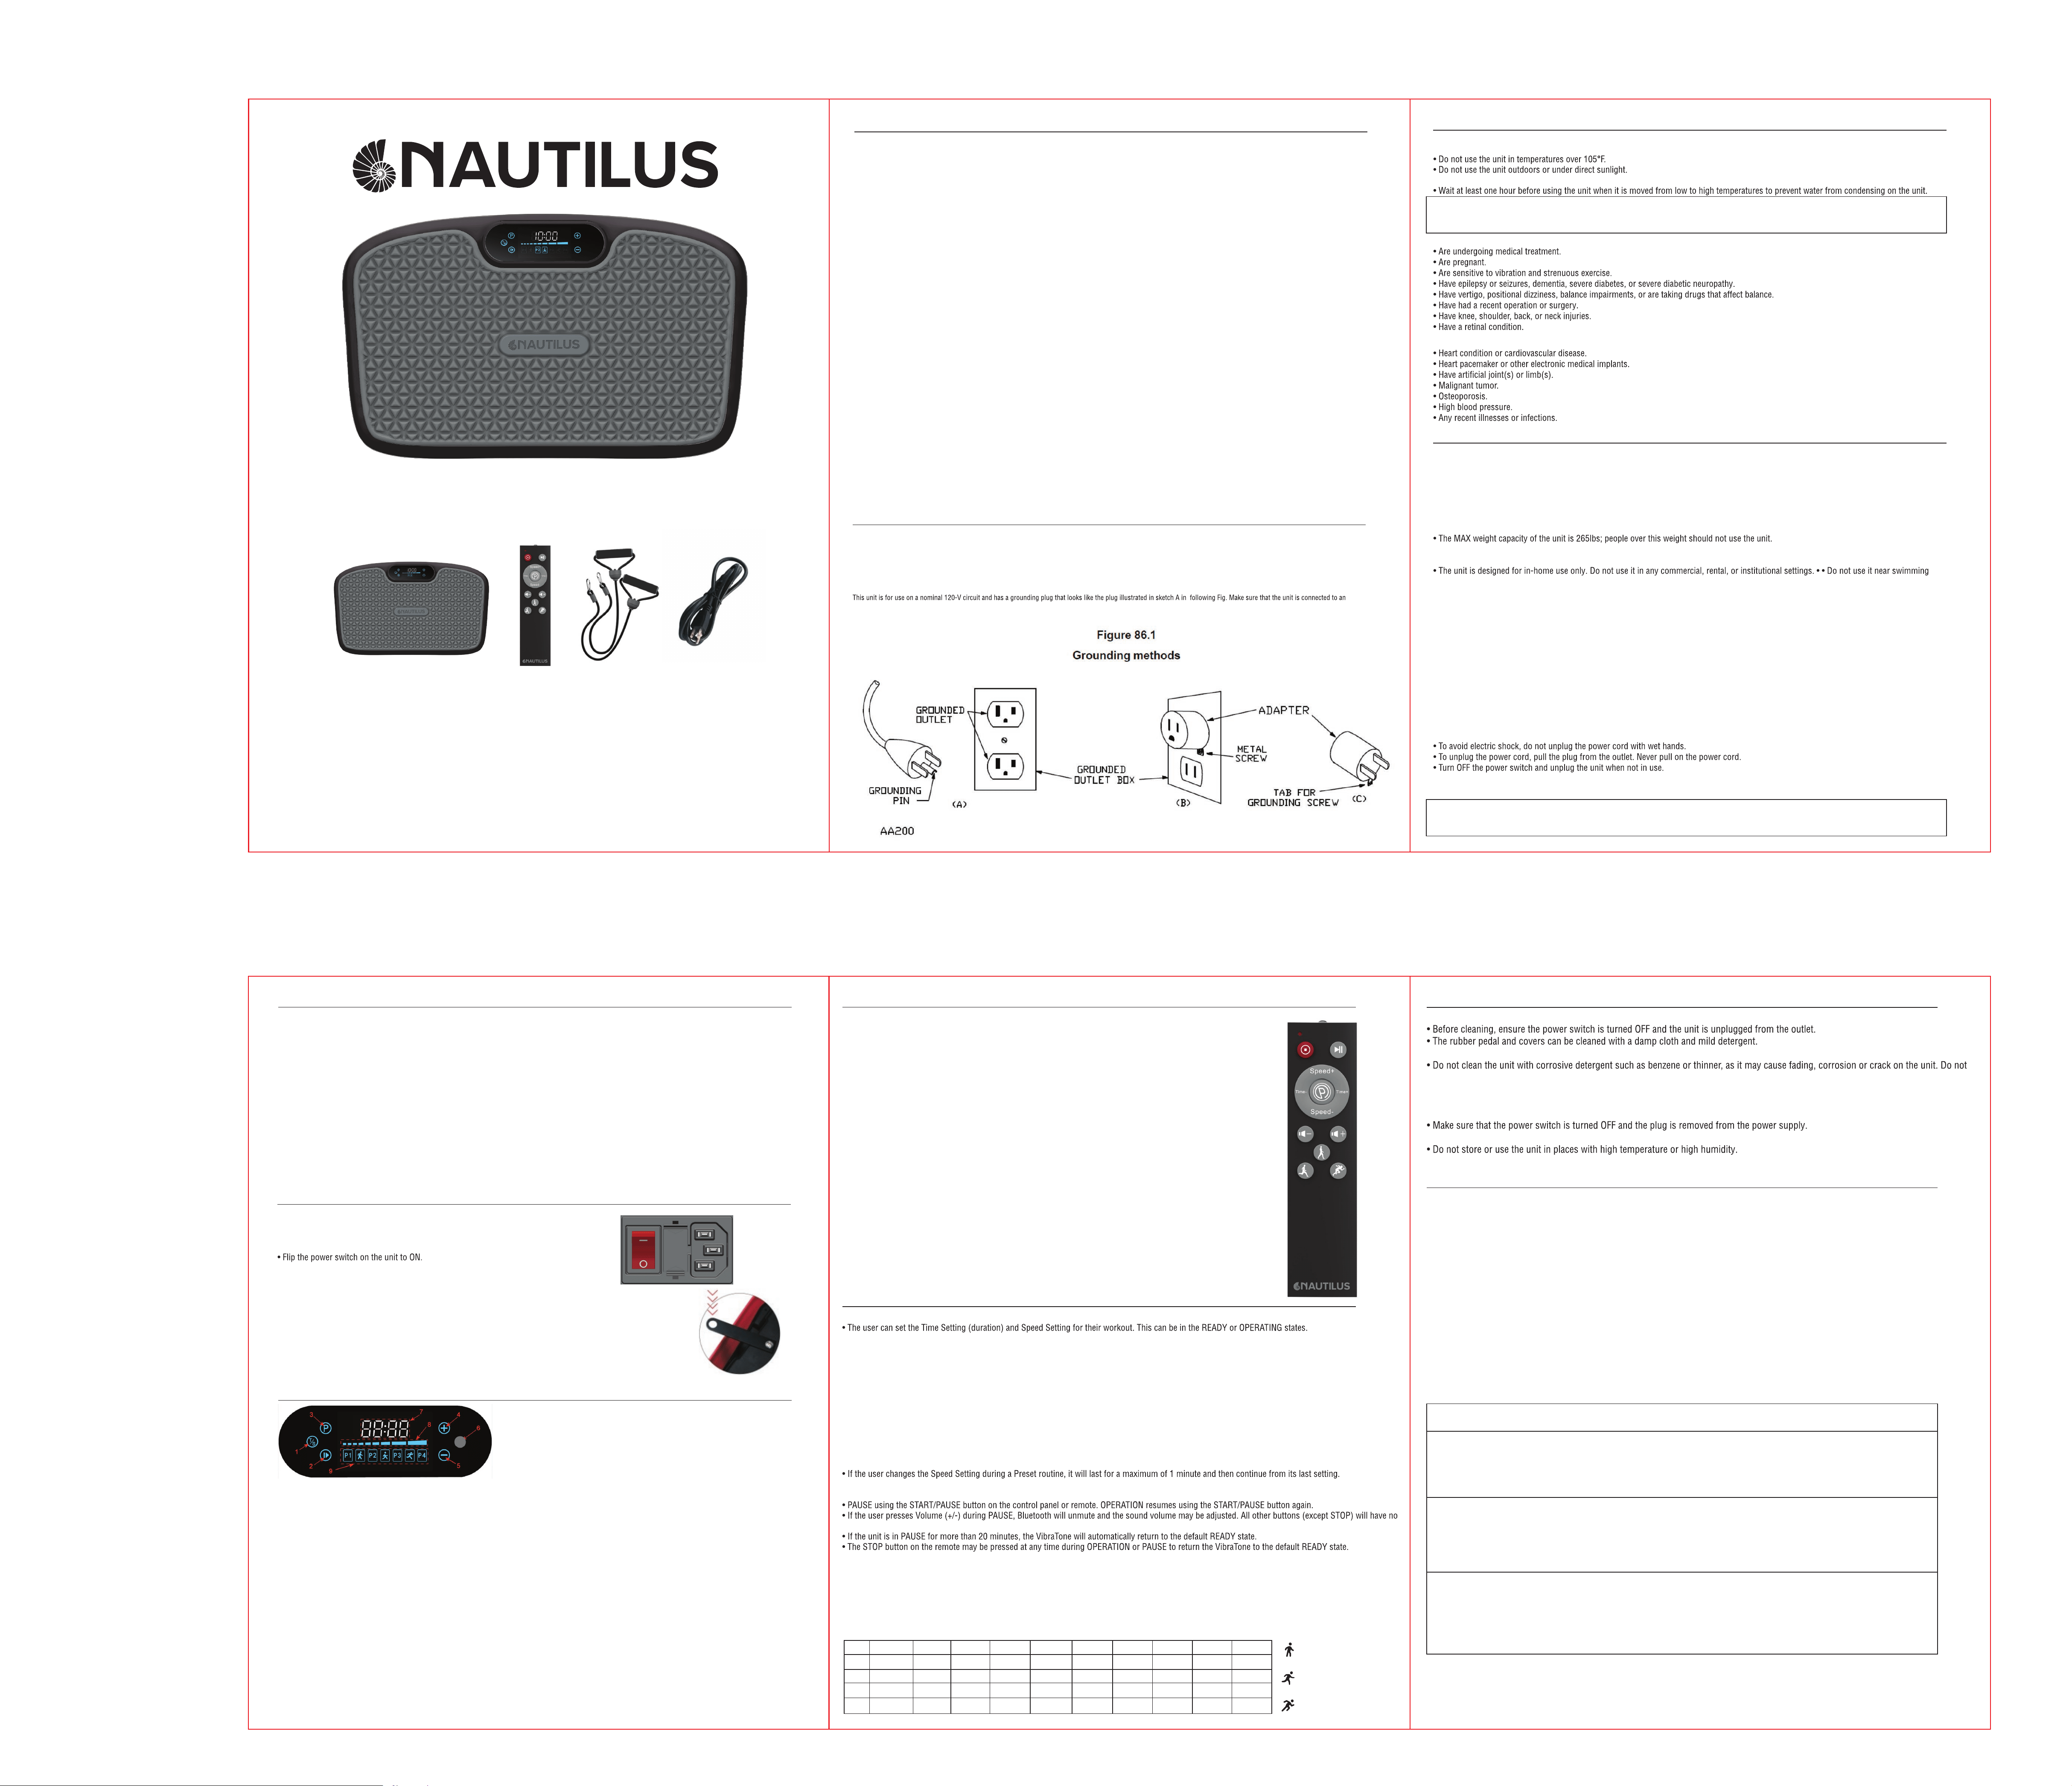
REMOTE CONTROL
(BATTERIES INCLUDED)
VIBRATION BOARD RESISTANCE BANDS POWER CORD
© 2024 Ideavillage Products Corp.
Wayne, NJ 07470
NAT091025
®
IMPORTANT SAFETY INSTRUCTIONS
When using an electrical unit, basic precautions should always be followed, including the following:
Read all instructions before using (this unit).
DANGER: To reduce the risk of electric shock:
1) Always unplug this unit from the electrical outlet immediately after using and before cleaning.
WARNING: To reduce the risk of burns, fire, electric shock, or injury to persons:
1) This unit should never be left unattended when plugged in. Unplug from outlet when not in use, and before putting on or taking off parts.
2) Do not operate under blanket or pillow. Excessive heating can occur and cause fire, electric shock, or injury to persons.
3) Close supervision is necessary when this unit is used by, on, or near children, invalids, or disabled persons.
4) Use this unit only for its intended use as described in this manual. Do not use attachments not recommended by the manufacturer.
5) Never operate this unit if it has a damaged cord or plug, if it is not working properly, if it has been dropped or damaged, or dropped into
water. Return the unit to a service center for examination and repair.
6) Do not carry this unit by supply cord or use cord as a handle.
7) Keep the cord away from heated surfaces.
8) Never operate the unit with the air openings blocked. Keep the air openings free of lint, hair, and the like.
9) Never drop or insert any object into any opening.
10) Do not use outdoors.
11) Do not operate where aerosol (spray) products are being used or where oxygen is being administered.
12) To disconnect, turn all controls to the off position, then remove plug from outlet.
13) Connect this unit to a properly grounded outlet only. See Grounding Instructions.
SAVE THESE INSTRUCTIONS
Unit is intended for household use
GROUNDING INSTRUCTIONS
This unit must be grounded. If it should malfunction or breakdown, grounding provides a path of least resistance for electric current to reduce the risk of electric shock. This unit is
equipped with a cord having an equipment-grounding conductor and a grounding plug. The plug must be plugged into an appropriate outlet that is properly installed and grounded in
accordance with all local codes and ordinances.
DANGER: Improper connection of the equipment-grounding conductor can result in a risk of electric shock. Check with a qualified electrician or serviceman if you are in
doubt as to whether the unit is properly grounded. Do not modify the plug provided with the unit – if it will not fit the outlet, have a proper outlet installed by a qualified electrician.
outlet having the same configuration as the plug. No adapter should be used with this unit.
SAFETY & WARNINGS
Environmental Safety Precautions:
• Do not use the unit in humid or dusty environments to avoid electric shock or breakdown of the mechanical parts.
• The unit must be used on a stable, level surface. To protect the floor or carpet from damage, place an exercise mat beneath the unit.
WARNING: Before starting any exercise program, consult your physician. This is especially important for people with pre-existing health
problems. The seller assumes no responsibility for personal injury or property damage sustained by or through the use of this unit. This
unit should not be used to treat a medical condition.
DO NOT use the unit without your doctor's consent if you:
It is strongly advised to consult your doctor before use if you have any of the following conditions:
NOTICES DURING OPERATION
• Before use, remove any jewelry, valuable objects and sharp objects (i.e., keys) to avoid damage or body injury.
• Always wear appropriate athletic clothing and shoes. Clothes that are too loose could be unsafe.
• Avoid any accessories that could interfere with your movement or get caught in the unit.
• Do not smoke while using the unit.
• Do not use the unit immediately after a meal or drink.
• During use, keep children or pets away from the unit.
• Do not put fingers or other foreign bodies into the gap between the middle cover and base cover.
• Not intended for use by children. This is not a toy.
• The unit should be used by one person at a time.
• Do not jump on the unit.
pools or other bodies of water.
• Never leave the unit unattended while it is running. Always keep children and pets away.
• After use, turn the power OFF and unplug the power cord.
WARNING:
• The unit contains no user-serviceable parts. It is strongly recommended that the user not try to resolve electrical issues regarding the power
source to the unit. Otherwise, serious and permanent personal injury or property damage may result. Please contact the manufacturer or local
dealer immediately if there is any service needed.
Immediately stop using the unit and unplug from the power outlet if:
• Water or other liquid is splashed onto the unit or controller.
• Any accessory is found damaged, or an internal component is exposed.
• You feel abnormal or severe pain, tired, dizzy, nauseous, irregular heartbeat, or shortness of breath.
• Power failure.
For the plug and power cord:
• Check if the voltage complies with the one specified for the unit.
• Only power the unit using the included power cord.
CAUTION:
Any changes, modifications, or unauthorized maintenance performed to or on the unit could void the unit warranty.
WARNING: CHOKING HAZARD: Children under 3 years old can choke or suffocate on small parts.
WARNING: BATTERY INGESTION HAZARD: Battery ingestion is extremely dangerous and can cause severe injury and even death. Never allow
children to play with batteries and always keep batteries out of reach. If a battery is ingested, seek immediate medical attention.
SETUP INSTRUCTIONS
VIBRATION BOARD:
• Unbox and locate a flat, stable, and open area to place the unit.
NOTE: Place an exercise mat under the board to protect the floor or carpet.
• Plug the power cord into the receptacle. Plug the cord into a standard electrical outlet.
BLUETOOTH:
• Turn on your Bluetooth source device, search and select “Nautilus”.
REMOTE CONTROL:
• Remove the back panel of the remote control, insert 2 AAA batteries according to the polarity
markings (+/-) inside the battery compartment, and slide the back panel until it clicks into place.
RESISTANCE BANDS:
• Locate the two short metal bars extending from underneath either side of the unit.
Attach the metal clip(s) on the end of the resistance band(s) to the metal bar(s).
PRODUCT STATES
POWER OFF: The power switch on the rear of the VibraTone is in the O (off) position and the switch is not lit up. All indicators on the user
interface panel are off. Bluetooth is OFF. None of the user interface or remote controls will work. The motor is OFF.
READY: The power switch on the rear of the VibraTone is in the | (on) position and the switch is lit up. The buttons on the user interface panel
are illuminated and the display shows the default time setting, such as “10:00”. The bar graph on the display is fully illuminated. Bluetooth
Audio is unmuted and able to play audio from a connected device. The Speed Setting is reset to 001. The motor is OFF.
OPERATING: The power switch on the rear of the VibraTone is in the | (on) position and the switch is lit up. The buttons on the user interface
panel are illuminated and the display alternates between showing time remaining in a workout, such as “09:30” and a speed setting, such as
“005”. The bar graph segments illuminate left to right, with the speed of illumination depending on the vibration Speed Setting. The motor is
ON and the VibraTone is working. The display may show other icons for program setting (P1 – P4) and/or Walk, Jog, Run icons. Bluetooth
Audio is unmuted and able to play audio from a connected device.
PAUSED: The power switch on the rear of the VibraTone is in the | (on) position and the switch is lit up. The buttons on the user interface panel
are illuminated and the display flashes Remaining Time, such as “09:30”. The full bar graph on the display flashes at same rate as Remaining
Time to indicate the VibraTone is PAUSED. Bluetooth Audio is initially muted, but may be unmuted by pressing Volume + or Volume – (on
remote). The motor is OFF.
CONTROL PANEL
1. TIME/SPEED: This button toggles between Time and Speed setting, letting the user set the Time or Speed for a workout. When first powered
on, the VibraTone is ready for the user to set the workout Time Setting. The display shows the default time of "10:00". Press the
TIME/SPEED button to change the Speed Setting. The display shows a value between “001” and “120” depending on the Speed Setting.
Time and Speed are adjusted using the + and – buttons described below (or remote control buttons).
2. START/PAUSE: Press this button in the READY state to start the machine OPERATING. While the VibraTone is OPERATING, pressing this
button will PAUSE operation. Pressing again will resume OPERATION.
3. PRESET/MANUAL: Press this button to select one of the four Preset exercise routines P1, P2, P3 or P4 or Manual operation. The Preset
routines will be described in more detail below. In Manual operation, the user adjusts the Time Setting and Speed Setting manually before or
during a workout.
4.
+ In the READY state, press this button to increase the Time Setting of the workout or the vibration Speed Setting (see TIME/SPEED button
above). While OPERATING, this button increases the Speed Setting of the vibrations.
5.
– In the READY state, press this button to decrease the Time Setting of the workout or the vibration Speed Setting (see TIME/SPEED button
above). While OPERATING, this button decreases the Speed Setting of the vibrations.
6. REMOTE CONTROL SIGNAL RECEIVER WINDOW: Aim the remote control at this window when using the remote to operate the VibraTone.
7. NUMERIC DISPLAY: Shows Time or Speed. Alternates between Speed and Remaining Time in the OPERATING state.
Flashes in the PAUSED state.
8. BAR GRAPH: All segments on solid in READY State. Segments fill left to right in OPERATING state, at a rate depending on the motor speed.
Flashes all segments on/off in PAUSED state.
9. ICONS: Icons to indicate Walk, Jog, Run and Preset exercise routines P1-P4.
Control Panel:
1. Time/Speed
2. Start/Pause
3. Preset/Manual
4. Increase: Time/Speed
5. Decrease: Time/Speed
6. Remote Signal Window
7. Numeric Display
8. Bar Graph
9. Icons
REMOTE CONTROL
1. STOP: Press this button when the VibraTone is OPERATING to stop the vibrations and return to the
default READY state. All settings and modes are reset to Default Settings.
2. START/PAUSE: Press this button in the READY state to start the VibraTone OPERATING. Press while the
VibraTone is OPERATING to PAUSE the operation. The motor will slow down until it stops. Bluetooth will
mute. Press the button again to resume the VibraTone.
3. Speed + : Press the button to increase Speed Setting. (Hold the button to quickly increase the Speed)
4. Speed - : Press the button to decrease Speed Setting. (Hold the button to quickly decrease the Speed)
5. Time + : Press the button to increase workout Time. (Hold the button to quickly increase the Time)
This button does not work with Preset workouts P1-P4 since the time is preset. If pressed during a Preset
workout, the unit will beep 3 times to alert the user that this is not a valid option.
6. Time - : Press the button to decrease workout time. (Hold the button to quickly decrease the Time)
This button does not work with preset workouts P1-P4 since the time is preset. If pressed during a Preset
workout, the unit will beep 3 times to alert the user that this is not a valid option.
7. PRESET: Press the button to scroll though preset exercise routines P1, P2, P3, P4 or Manual operation.
The Presets are fixed at 10 minutes total, with the Speed changing every 1 minute to a new Speed.
8. Volume - : Press this button to decrease the volume of Bluetooth Audio.
9. Volume + : Press the button to increase the volume of Bluetooth Audio.
10. Walk: Press the button to automatically set Speed to 20.
11. Jog: Press the button to automatically set Speed to 60.
12. Run: Press the button to automatically set Speed to 100.
PRESET ROUTINES:
“Walk” 1-40
“Jog” 41- 80
“Run” 81-120
10 min 9 min 8 min 7 min 6 min 5 min 4 min 3 min 2 min 1 min
P1 1 15 1 30 15 40 15 1 20 1
P2 20 40 60 40 20 40 60 50 40 20
P3 30 40 50 60 80 90 100 110 120 40
P4 60 85 100 85 120 85 100 85 60 40
OPERATION
MANUAL:
• Before a routine, the user may change Time Setting or Speed Setting using the Time (+/-) or Speed (+/-) buttons on the remote.
• Time and Speed may also be changed on the User Interface Panel using the T/S button to toggle between Time Setting and Speed Setting,then using
the + and – buttons to adjust either Time Setting or Speed Setting, depending on which is displayed in the Numeric Display.
Time may be set in the range from 1 minute to 15 minutes. Speed may be set in the range of 1 to 120.
• PRESET:
• The Preset exercise routines P1, P2, P3, and P4 each last 10 minutes and automatically change to a new speed every 1 minute.
• Time cannot be changed for any Presets. The Time (+/-) buttons on the remote or Time Setting on the Control Panel, will not work.
• If a user presses any of these buttons, the unit will beep 3 times to indicate the button is not allowed.
DURING OPERATION:
• The user may cycle between Manual and Preset exercise routines using the “P” button on the user interface panel or the remote.
• The VibraTone will ramp to the starting Speed Setting of the selected Preset or to the last user setting if cycling from Preset P4 to Manual.
• The timer will continue to countdown from the existing point.
• The user may change the Speed Setting using the Speed (+/-) buttons on the remote or the + and - buttons on the Control panel.
• The user may use the Walk, Jog, and Run buttons on the remote to change the speed to Walk = 020, Jog = 060, or Run = 100.
• The VibraTone will automatically switch to Manual mode and the timer will continue to count down from the Remaining Time.
function and will beep 3 times if pressed.
Example 1: If the user goes from Manual to P1 with 08:25 remaining, the VibraTone will ramp to a Speed Setting of “001” and begin P1. P1 will not finish
before the timer runs out. When the timer runs out, OPERATION will stop and the unit will return to the default READY state.
Example 2: If the user goes from Manual to P3 with 12:35 remaining, the VibraTone will ramp to a Speed Setting of “030” and begin P3. After P3 completes,
the VibraTone will automatically return to Manual OPERATION with a Speed Setting of 020 for the rest of Remaining Time.
Example 3: At 08:50 in P1, the speed will have automatically been set to “015”. If the user then changes the speed to “040”, the VibraTone will operate at
“040” until Remaining Time is 08:00, at which point it will automatically change to “001” (the next speed in the P1 routine).
DEFAULT SETTINGS:
Time Setting = 10:00
Speed Setting = 001 = 400 vibrations/minute
READY State – Time shown on display
Bluetooth unmuted
Manual mode
PREDEFINED SETTINGS:
Maximum Time Setting (Manual) = 15 minutes
Maximum Speed = 120 = 900 vibrations/minute
PAUSED timeout = 20 minutes (maximum PAUSED time before automatically going back to READY)
WALK Speed Setting = 020, range = 001 to 040
JOG Speed Setting = 060, range = 041 to 080
RUN Speed Setting = 100, range = 080 to 120
All Presets (P1-P4) Time Setting = 10 minutes
P1 starting Speed Setting = 001 (P1 simulates a walking exercise routine)
P2 starting Speed Setting = 020 (P2 simulates a walking/jogging exercise routine)
P3 starting Speed Setting = 030 (P3 simulates a jogging/running exercise routine)
P4 starting Speed Setting = 060 (P4 simulates a running exercise routine)
CLEANING, STORAGE, TROUBLESHOOTING
Surface Cleaning:
Notice:
splash water onto the unit to avoid short circuit.
Controller:
• Use a dry cloth to clean the controller to prevent any malfunction caused by liquid.
Storage and maintenance:
• Clean off any dust and dirt on the unit before use.
PRODUCT SPECIFICATIONS
Size: 21.9" L x 13.6" W × 4.7” H
Net Weight: 14.3 lbs.
Rated current: 1.6A
Voltage: 120V, 60HZ
Maximum User Weight: 265 lbs.
Speed Levels: 1-120
Automatic Mode Programs: P1 - P4
Operating Temperature: 32°F to 105°F
Storage Temperature: 0°F to 120°F
Auto Shutoff Time: 10 minutes
Batteries Required: 2 AAA Batteries (included)
Made in China
ISSUE POSSIBLE REASON HOW TO RESOLVE
THE UNIT
IS NOT WORKING.
THE UNIT
STOPPED WORKING
SUDDENLY.
THE REMOTE
CONTROL DOES
NOT WORK.
Unit is not turned ON.
Flip the power switch on the front side of
the unit to ON.
The unit automatically enters READY state
after the set working time.
When the unit has been working for a long
time, the motor shuts OFF for overheating
protection.
Press START/PAUSE button again to
begin a new workout program.
Allow the unit to cool for at least 30
minutes before using again.
The remote control is too far away from the
infrared sensor on the control panel.
Point the remote control directly at the infrared sensor
when in use. The effective distance is approximately 5 feet.
Battery is installed incorrectly.
Battery is dead.
Check to see if the battery is installed per the polarity
markings (+/-) on the inside of the battery compartment.
Replace dead batteries with 2 new batteries (AAA).
216mm
280mm

FCC Caution
This device complies with part 15 of the FCC Rules. Operation is subject to the following two conditions:
(1) This device may not cause harmful interference, and
(2) this device must accept any interference received, including interference that may cause undesired operation.
Any Changes or modifications not expressly approved by the party responsible for compliance could void the user's authority to operate the equipment.
Note: This equipment has been tested and found to comply with the limits for a Class B digital device, pursuant to part 15 of the FCC Rules. These limits are designed to provide
reasonable protection against harmful interference in a residential installation. This equipment generates uses and can radiate radio frequency energy and, if not installed and used in
accordance with the instructions, may cause harmful interference to radio communications. However, there is no guarantee that interference will not occur in a particular installation. If
this equipment does cause harmful interference to radio or television reception, which can be determined by turning the equipment off and on, the user is encouraged to try to correct
the interference by one or more of the following measures:
-Reorient or relocate the receiving antenna.
-Increase the separation between the equipment and receiver.
-Connect the equipment into an outlet on a circuit different from that to which the receiver is connected.
-Consult the dealer or an experienced radio/TV technician for help.
The device has been evaluated to meet general RF exposure requirement. The device can be used in portable exposure condition without restriction.