Quick Start Guide
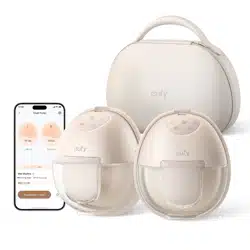
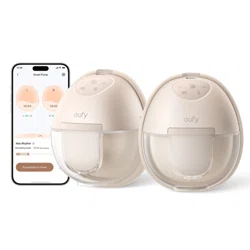
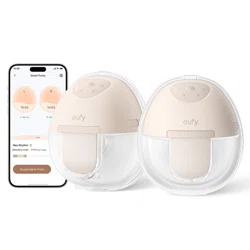
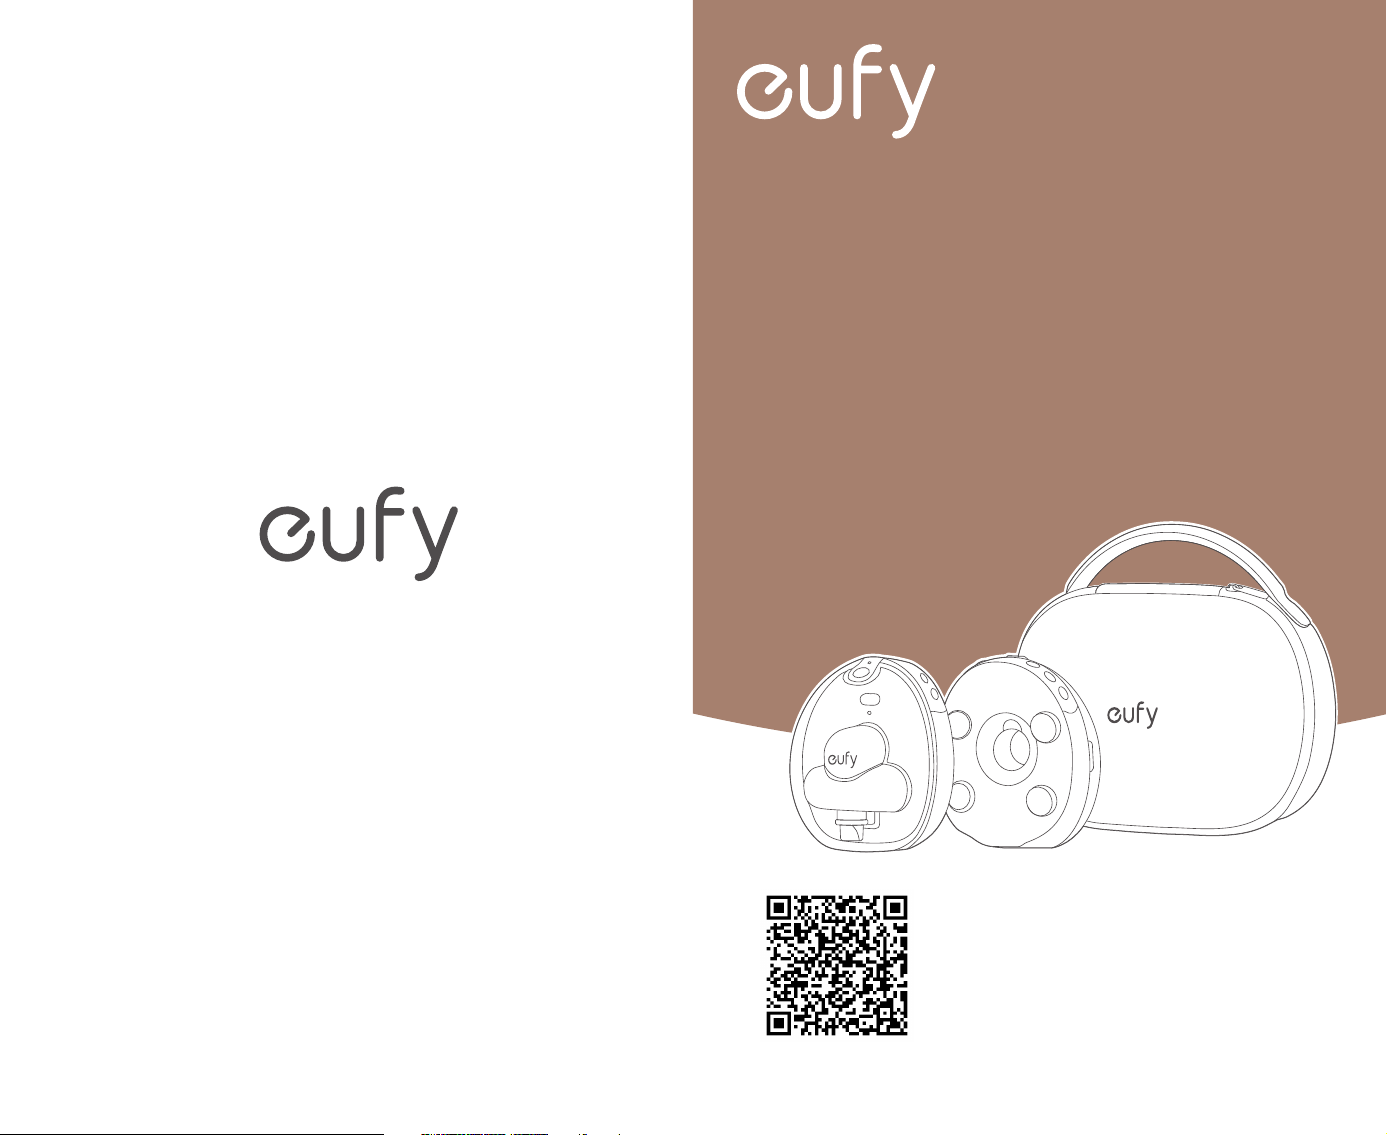
Wearable Breast Pump S2 Pro
User Manual/Video/Support
Model: T60A1/T600P
51005006230_V2
Anker Innovations Limited. All rights reserved, registered in the United States and other
countries.
Anker Innovations Limited
Unit 56, 8th Floor, Tower 2, Admiralty Centre, 18 Harcourt Road, Hong Kong

Contents
Breast Pump Overview
1 Charging
2 Disassembling
3 Cleaning
4 Assembling
5 Wearing
6 Using
7 Transferring Milk
8 The App
9 Replacing and Purchasing Washable Parts
10 Top 10 Troubleshooting Tips
Customer Service
IMPORTANT SAFEGUARDS
01
02
03
05
07
11
12
14
16
16
17
20
21
01 02
Breast Pump Overview
❶
❸
❹
❺
❻
❼
❽
❾
❷
❿
⓫
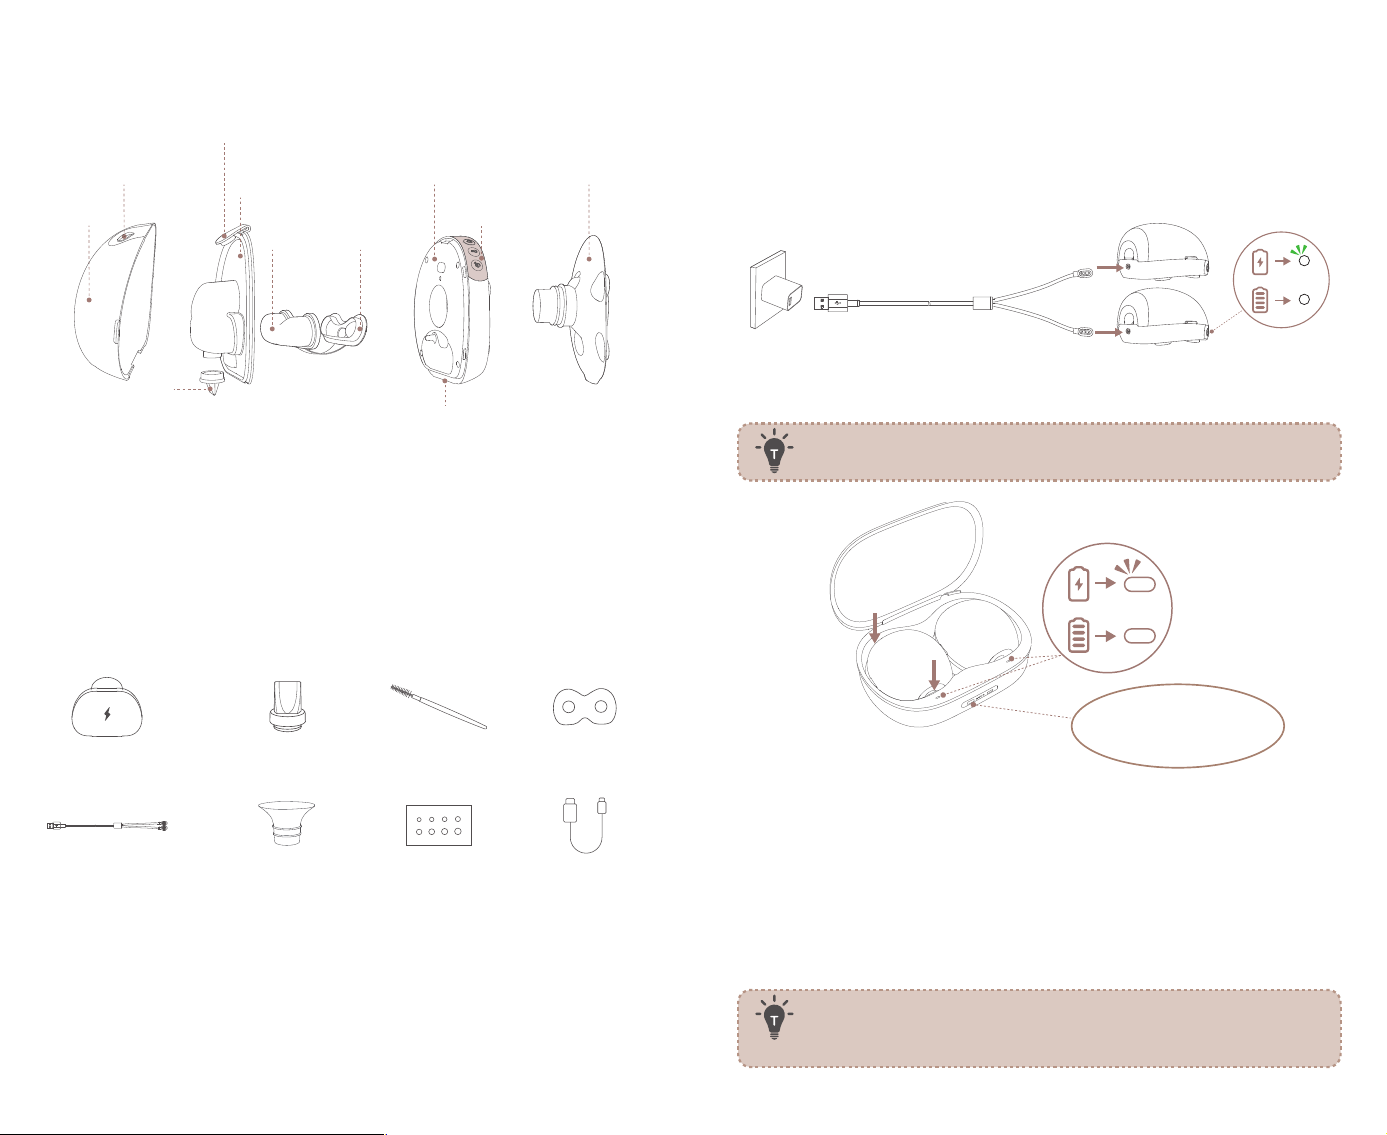
❶ Milk Container
❷ Pouring Spout
❸ Container Lid
❹ Container Back
❺ Duckbill Valve
❻Diaphragm
Accessories:
❶ ❸ ❹
❺ ❻ ❼ ❽
❷
❶ Charging Case
❷ Extra Duckbill Valves
❸ Duckbill Valve Cleaning Brush
❹ Stain-proof Mat
1
Charging
Fully charge the pump hub before initial use; it won’t operate while
charging.
• Option 1: 2-in-1 Magnetic Charging Cable
5V/2A
• Option 2: Charging Case
Before first use, remove the protective sticker from the
charging pins on the breast pump.
❶
❷
❸
❶
Align the pump hub's charging pins with the port inside the
case until you hear them click.
❷
Let go of the pumps to allow the entire pump to be placed in
the slot.
❸
Ensure the charging case indicator flashes white,
indicating
the
pumps are charging properly. The charging case
automatically
stops charging once the breast pumps are fully charged. The
charging case LED will remain on when plugged in.
The charging case is not washable. The removable silicon
stain-proof mat inside the charging case is washable and
helps prevent the milk from spilling into the case.
❼ Diaphragm Lid
❽ Control Panel
❾ Pump Hub
❿ Charging Pins
⓫ Flange (24 mm)
❺Magnetic Charging Cable
❻ Sizing Inserts (15/17/19/21 mm)
❼ Nipple Measurement Card
❽ USB-C Charging Cable
Press to display the
charging case power level
03 04
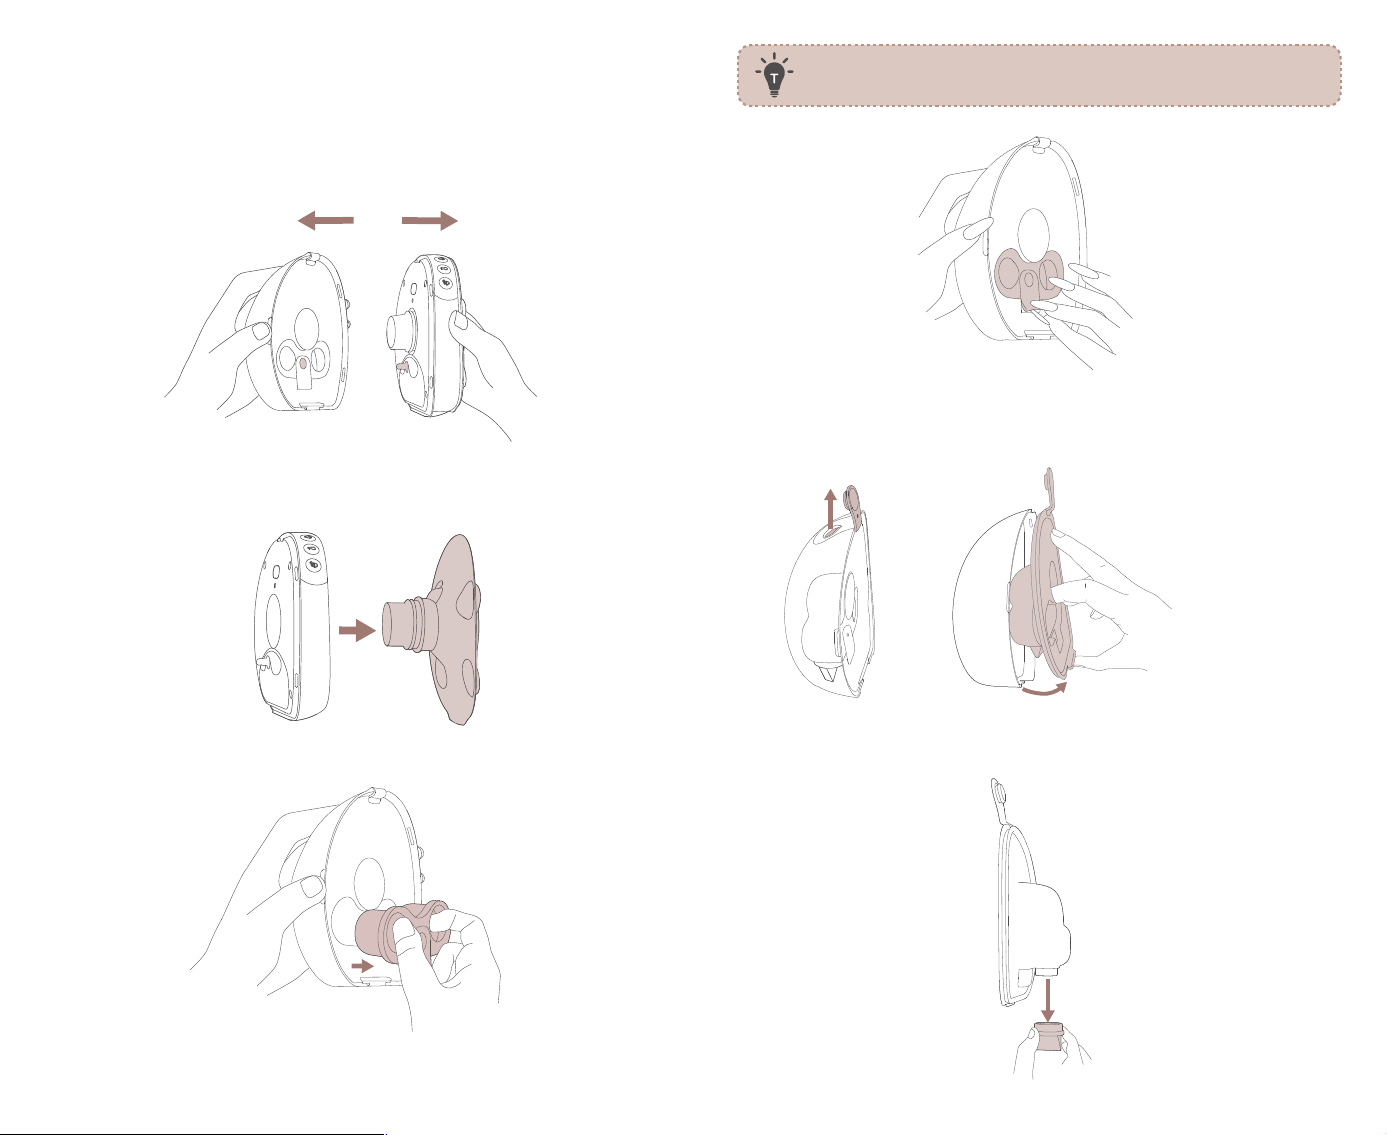
2
Disassembling
1. Pull the side grip of the milk container to detach it from the pump
hub.
2. Press to release the flange from the pump hub.
3. Pull out the diaphragm.
For moms with long nails — li here to pull out the
diaphragm.
4. Open the container lid, and pull from the bottom to remove the
container back.
5. Remove the duckbill valve.
05 06
3
Cleaning
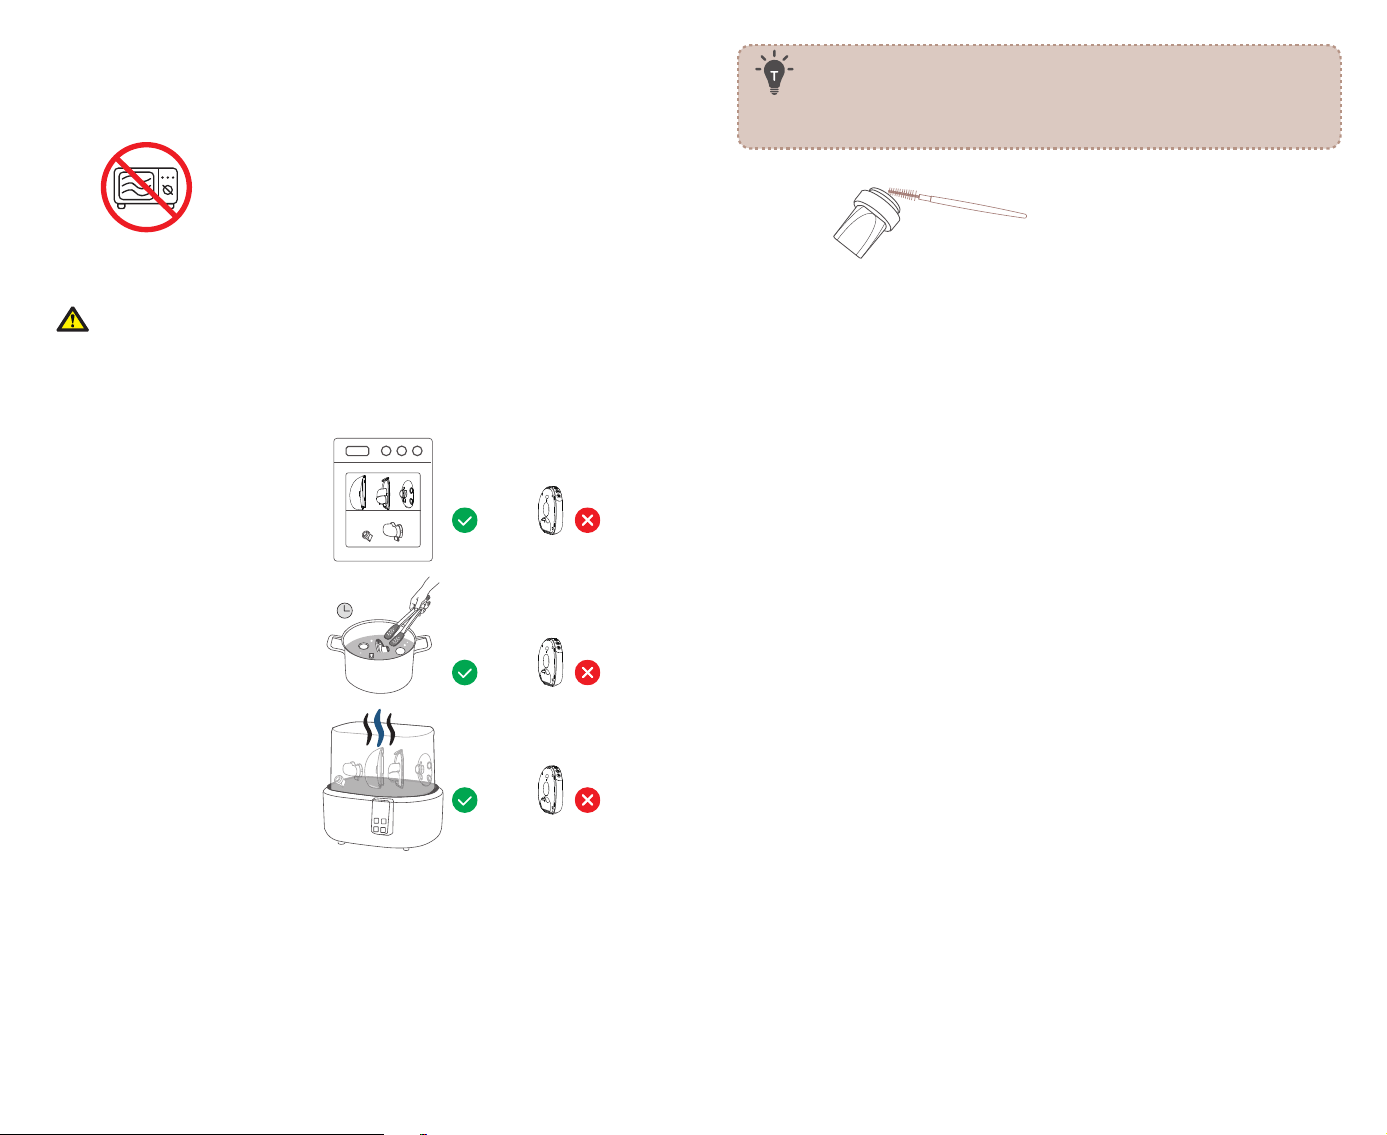
• Do not use a microwave to sterilize.
• All parts except the pump hub and the charging case can be
washed and sterilized as follows.
The pump hub is NOT washable. Always keep the pump
hub dry and clean aer each pumping session. If milk is
spilled on the pump hub, wipe it clean with a dry cloth to
ensure proper charging.
5 min
Before First Use: Sterilize all washable parts by boiling for up to 5
minutes, stirring constantly to prevent the parts from sticking to the
container and melting. You can also steam-sterilize them.
Daily Cleaning: Rinse all washable parts with warm, soapy water,
then air dry. Sterilize if needed, using the same methods as the
initial cleaning.
• To avoid damage, use only the provided duckbill valve
cleaning brush to clean the valve.
• To prevent scratches, clean the rest of the washable
parts with a silicon or sponge brush.
Dishwasher
Cooking Pot
Baby Bottle Sterilizer
Keep stirring to prevent deformation.
07 08
4
Assembling
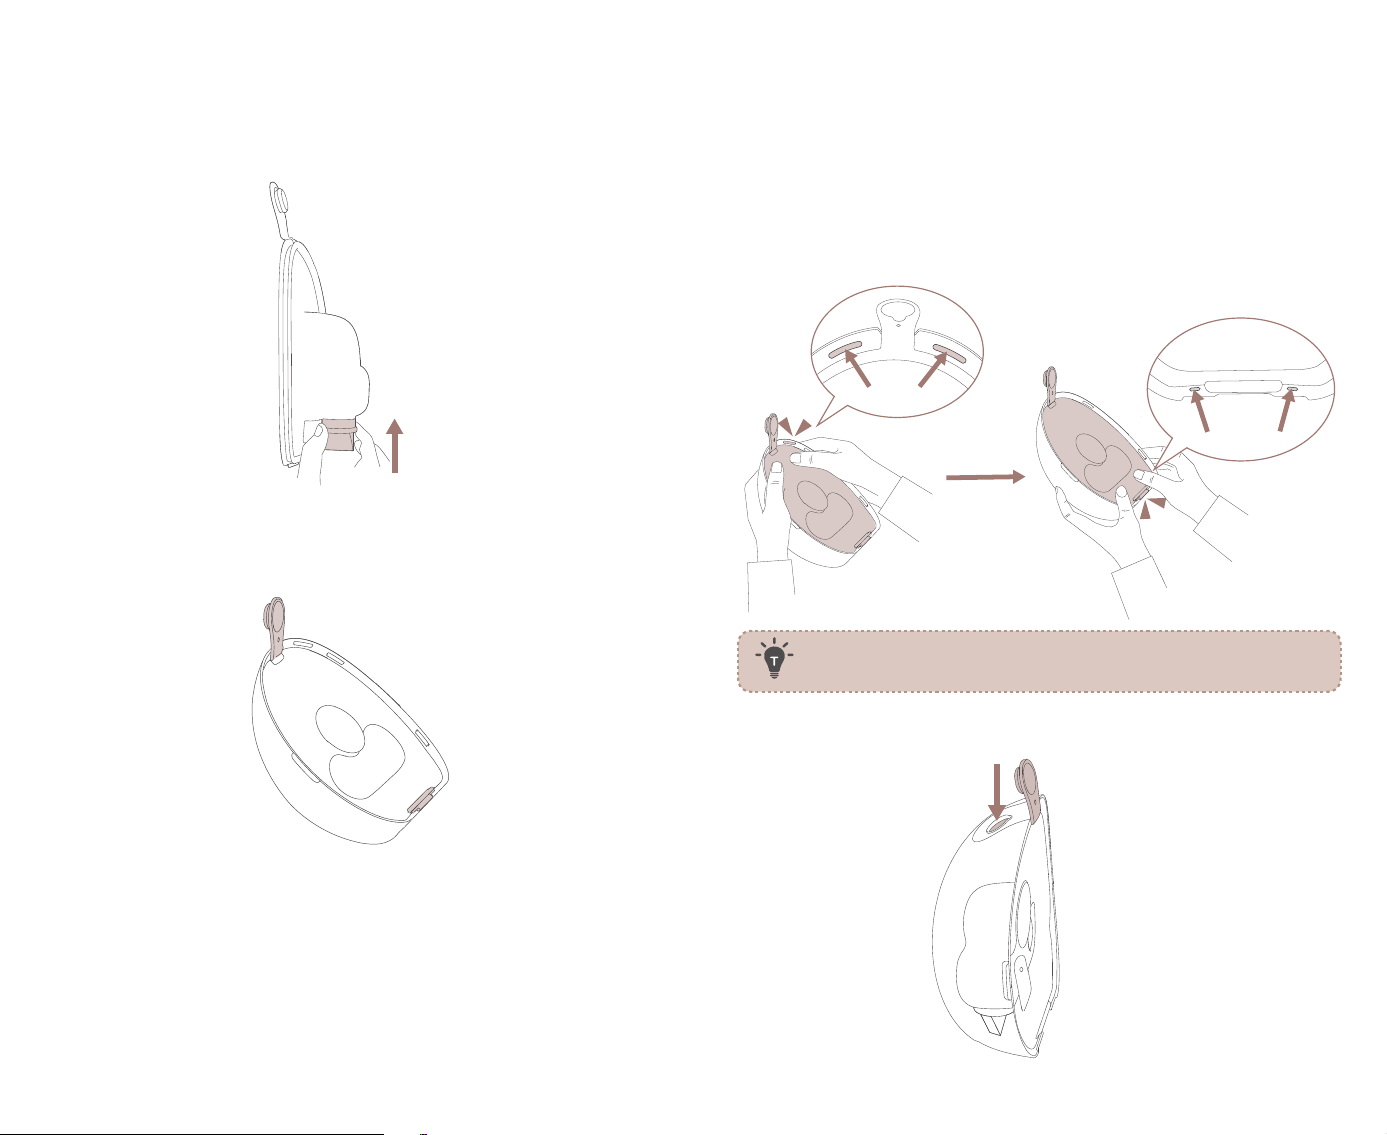
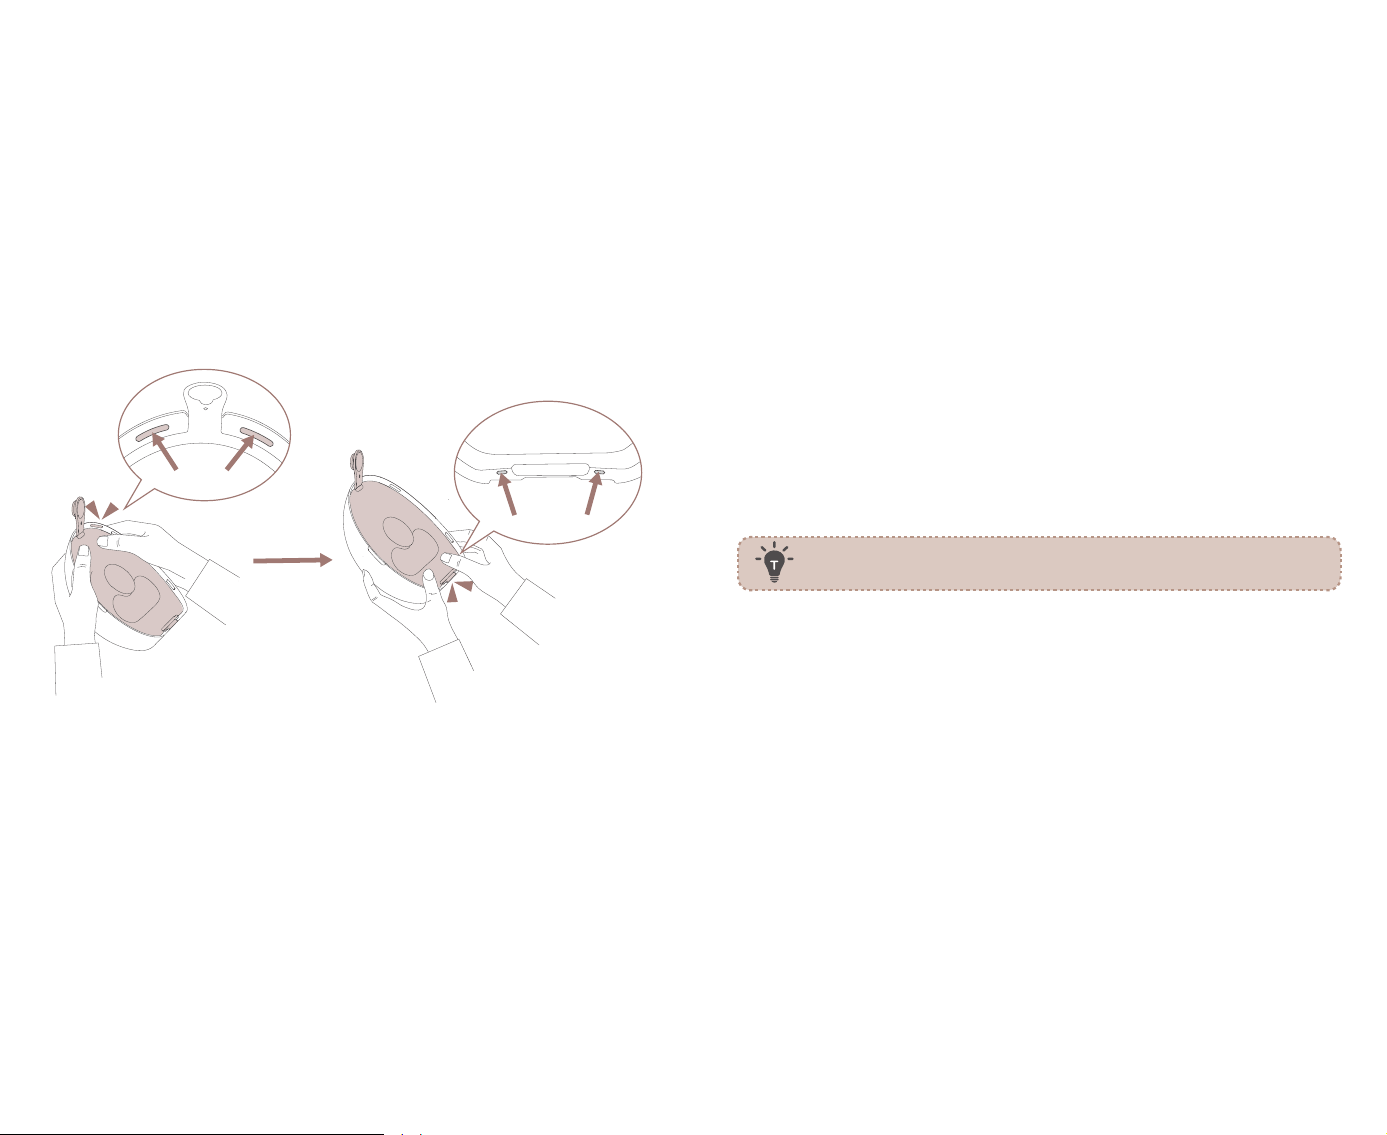
1. Firmly push the duckbill valve to the small hole on the container
back. Flick it to ensure it does not fall out.
2. Reassemble the container back.
❶
Align the lid with the top slot and fit the bottom tab into the
container slot.
❷
Press firmly the upper part of the container back with both
hands first, then the lower part until you hear a click. Ensure all
4 alignment marks are positioned above the container back to
prevent low suction and leaking.
Don't worry! The milk container is made of durable PPSU
plastic. It won't break when pressed.
❸
Press the container lid firmly into the spout.
You can see the 4
alignment marks above
the container back if
securely assembled.
Click
Click
09 10
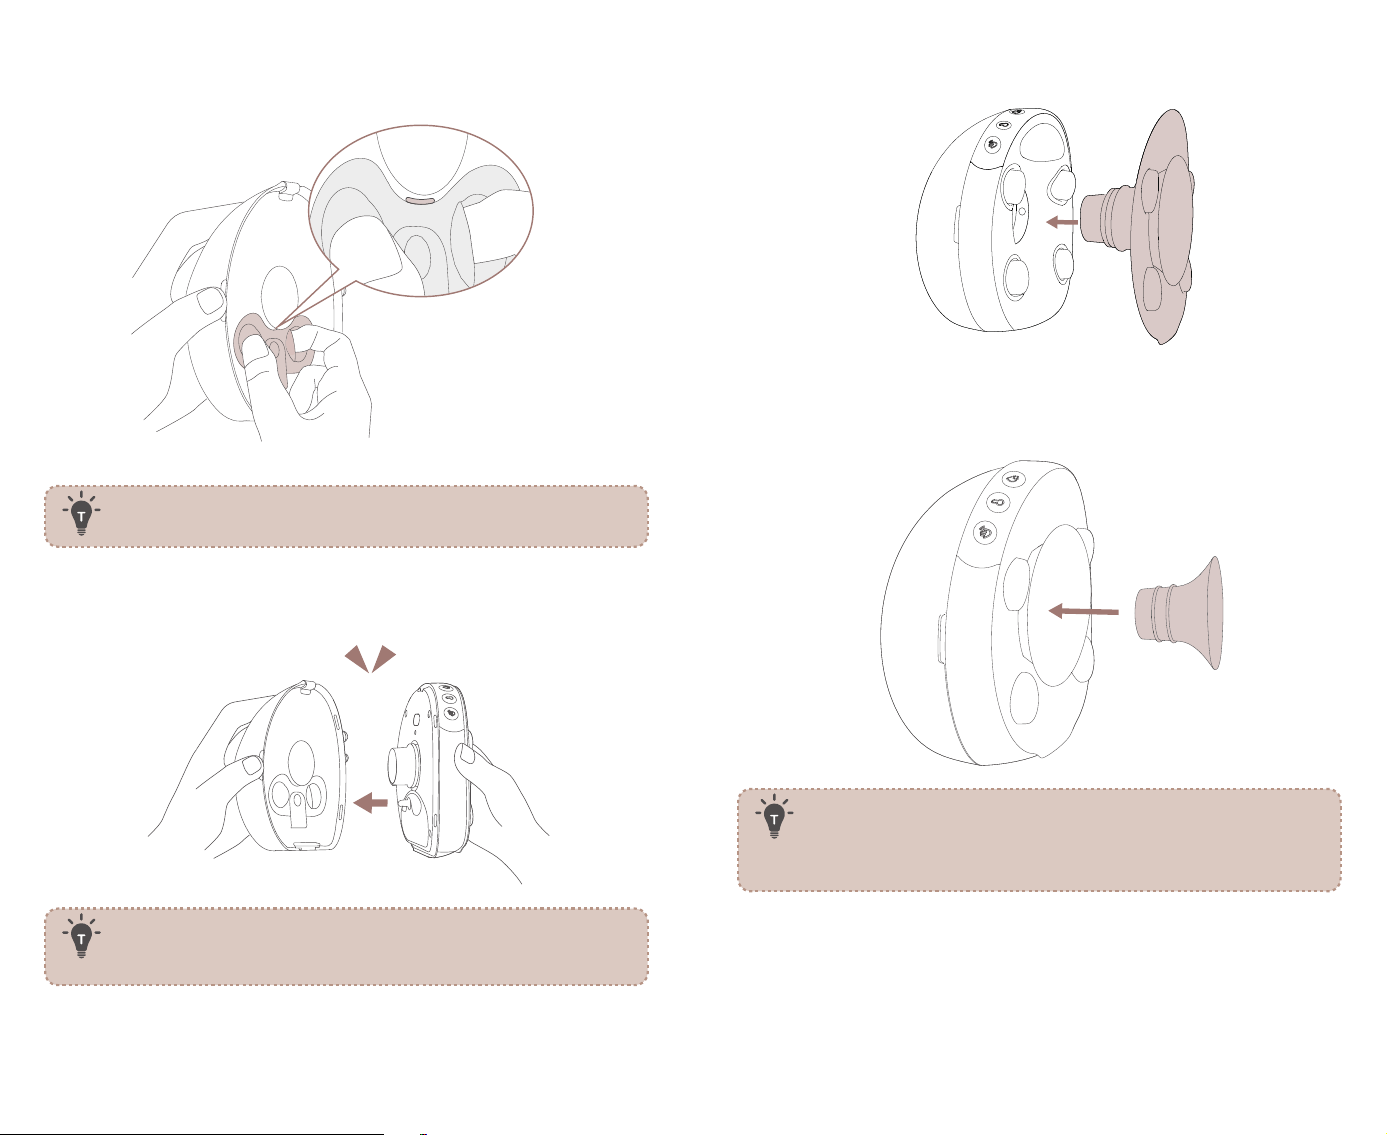
3. Fit the diaphragm into the contoured recess at the back of the
container. Ensure the diaphragm rim is fully seated along the
groove edge, especially the upper curve.
Ensure the diaphragm is completely dry before assembly.
Moisture may cause damage to the pump hub.
4. Align the peg on the pump hub with the hole in the diaphragm,
and press the assembled container onto the hub until it clicks.
Important: Aer clicking the container onto the hub, gently
tug it to confirm it is securely attached. If not, follow the
steps above to reassemble them.
5. Press the flange onto the pump.
6. Use the Nipple Measurement Card to select an appropriate
sizing insert, and place it in the flange tunnel.
Very Important: Choosing the correct flange size is critical
for both comfort and output. Use the included Nipple
Measurement Card before first use. If you experience low
output or discomfort, try a dierent sizing insert.
Click
Press the diaphragm lid
firmly to create a secure
seal, and ensure it sits
below the alignment
mark in the groove.
11 12
5
Wearing
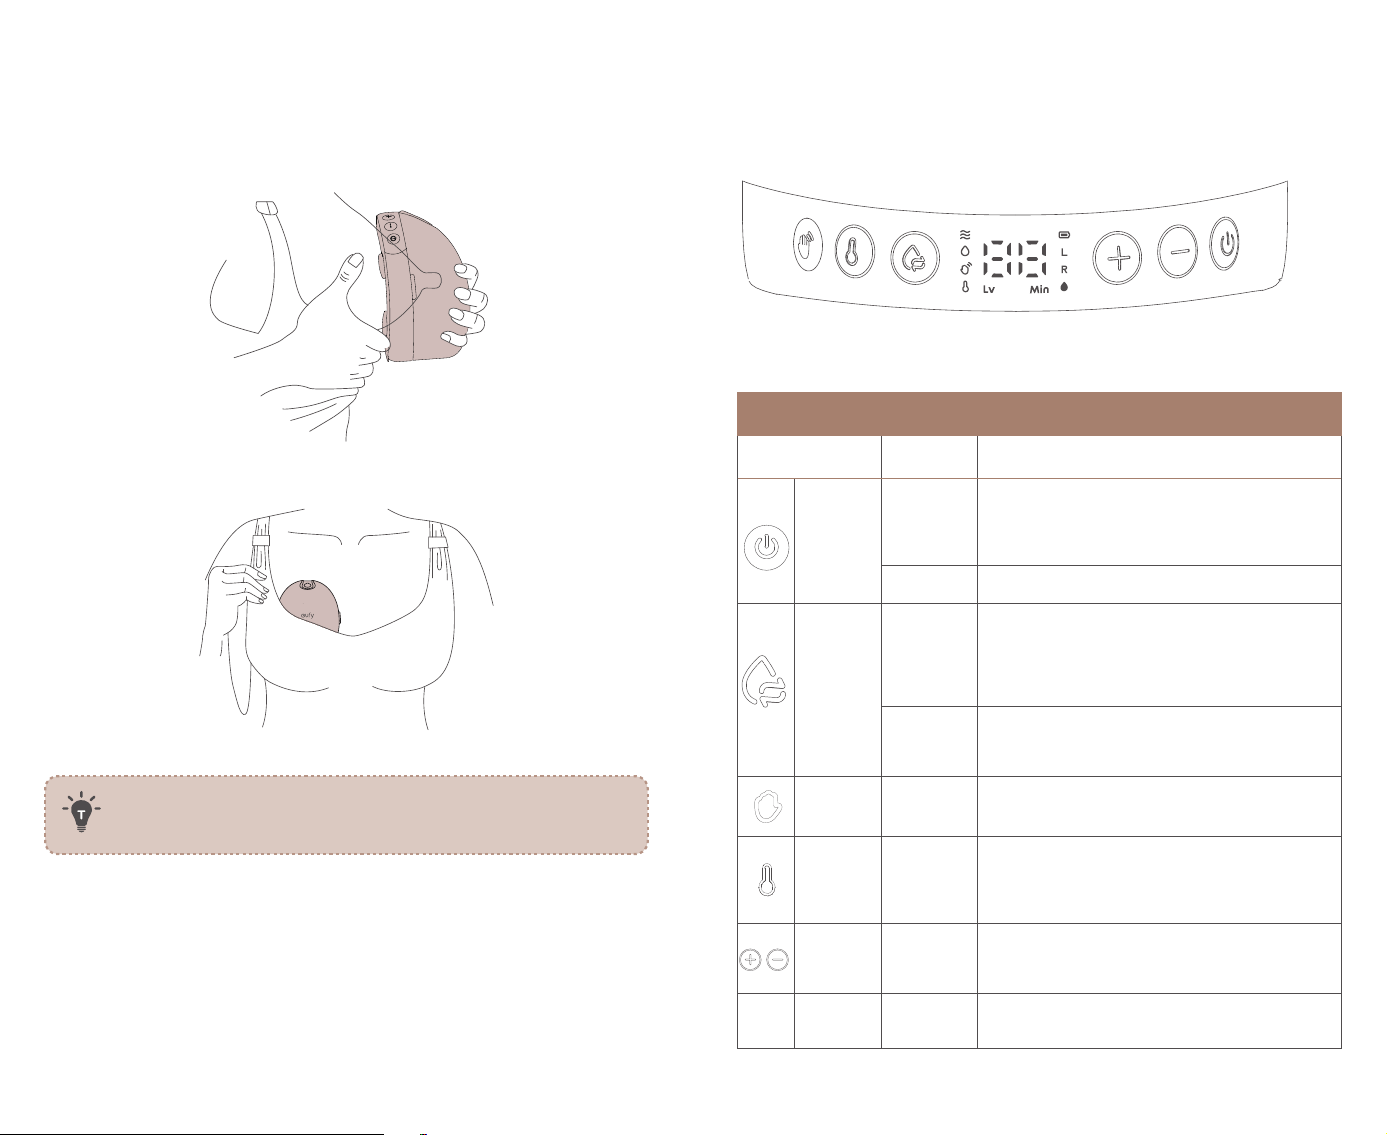
1. Slightly lean forward to make sure your nipple is centered in
the flange tunnel. The breast pump should be firmly against your
breast.
2. Use a full-coverage nursing bra with a flap to create a tight seal
between your breasts and the flange.
The massage heads may cause temporary marks on the
skin. This is a normal response to gentle stimulation and
will disappear shortly aer use.
3. Check if the breast pump is positioned correctly:
• Whether you feel a noticeable suction that can pull out milk;
• Whether it is comfortable to wear.
If the wearing position doesn't meet either of these criteria, you
need to adjust the position of the pump or change to a more
supportive nursing bra.
6
Using
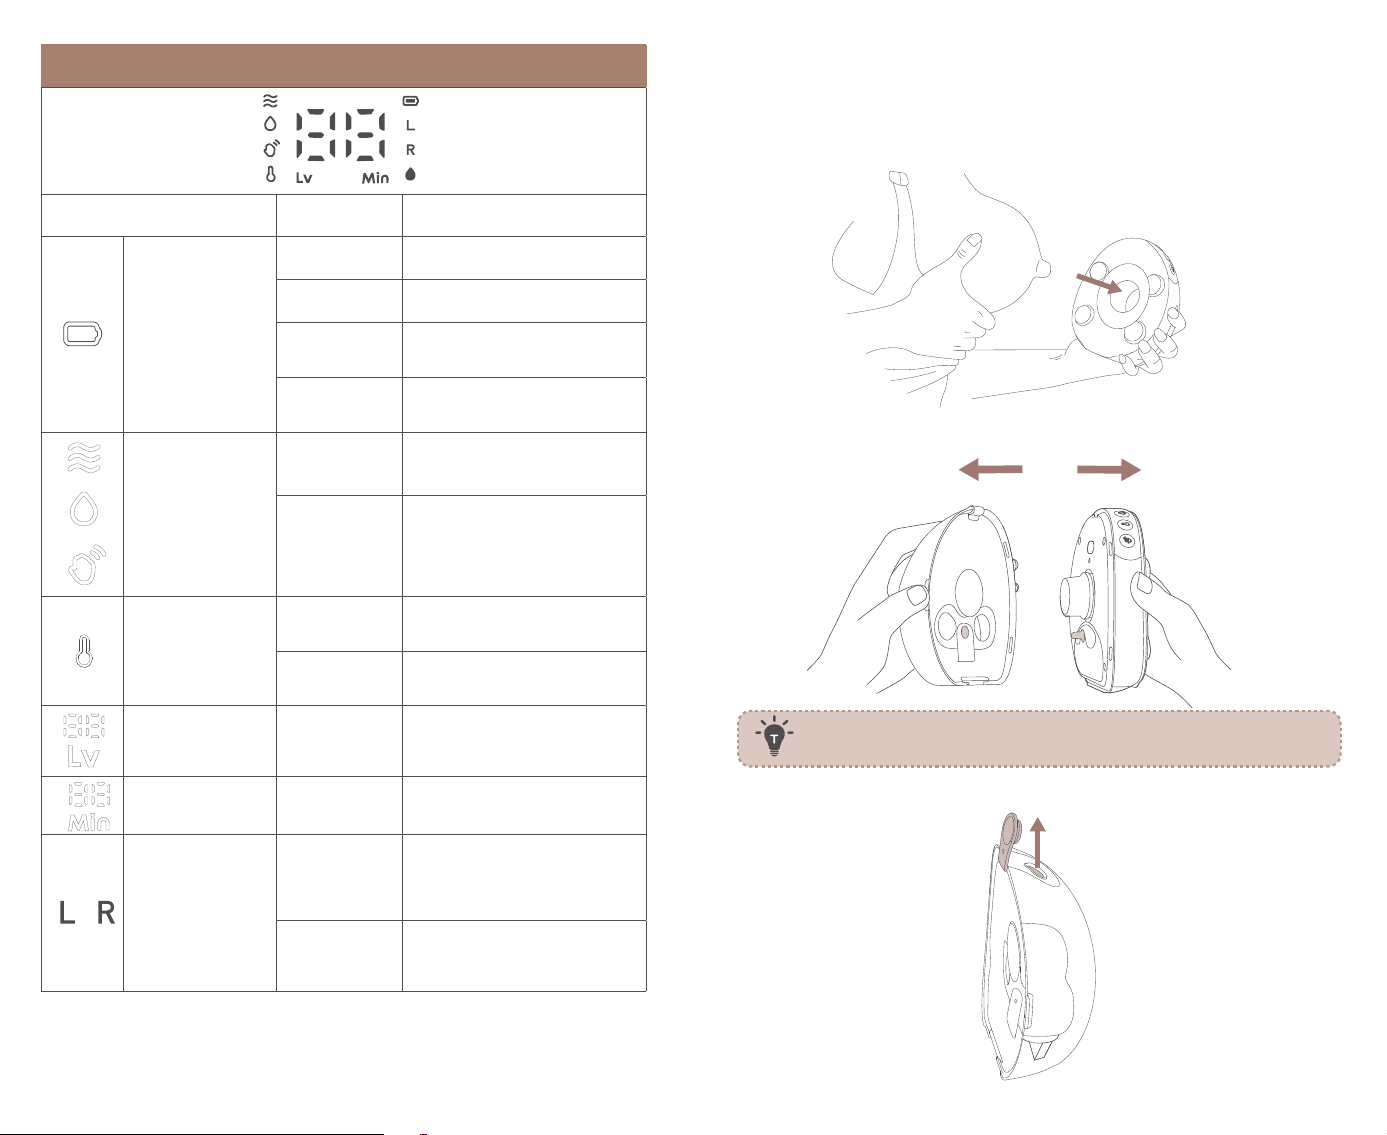
Button Controls
Icon Action Function
Power
Button
Press and
hold for 2
seconds
Turn Breast Pump On / O
• The breast pump will turn o automatically
aer pumping for 30 minutes or pausing for 10
minutes.
Press Pause / Continue
Mode
Button
Press
Press to select the current mode.
Press again to switch between Stimulation Mode
and Expression Mode
• There are 7 levels in the stimulation mode and 10
levels in the expression mode.
Quick
press
twice
Turn Nipple Tunnel Light On / O
Massage
Button
Press
Turn Massage mode On / O. There are 3 levels in
massage mode.
Heating
Button
Press
Turn Heating On / O
• Automatically stops aer 10 minutes of heating.
• You can change the heating duration in the
app.
Level Up
/ Down
Buttons
Press
• Increase / Decrease the Suction/Heating/
Massage Level
Any
Button
Press Check the remaining battery level.
13 14
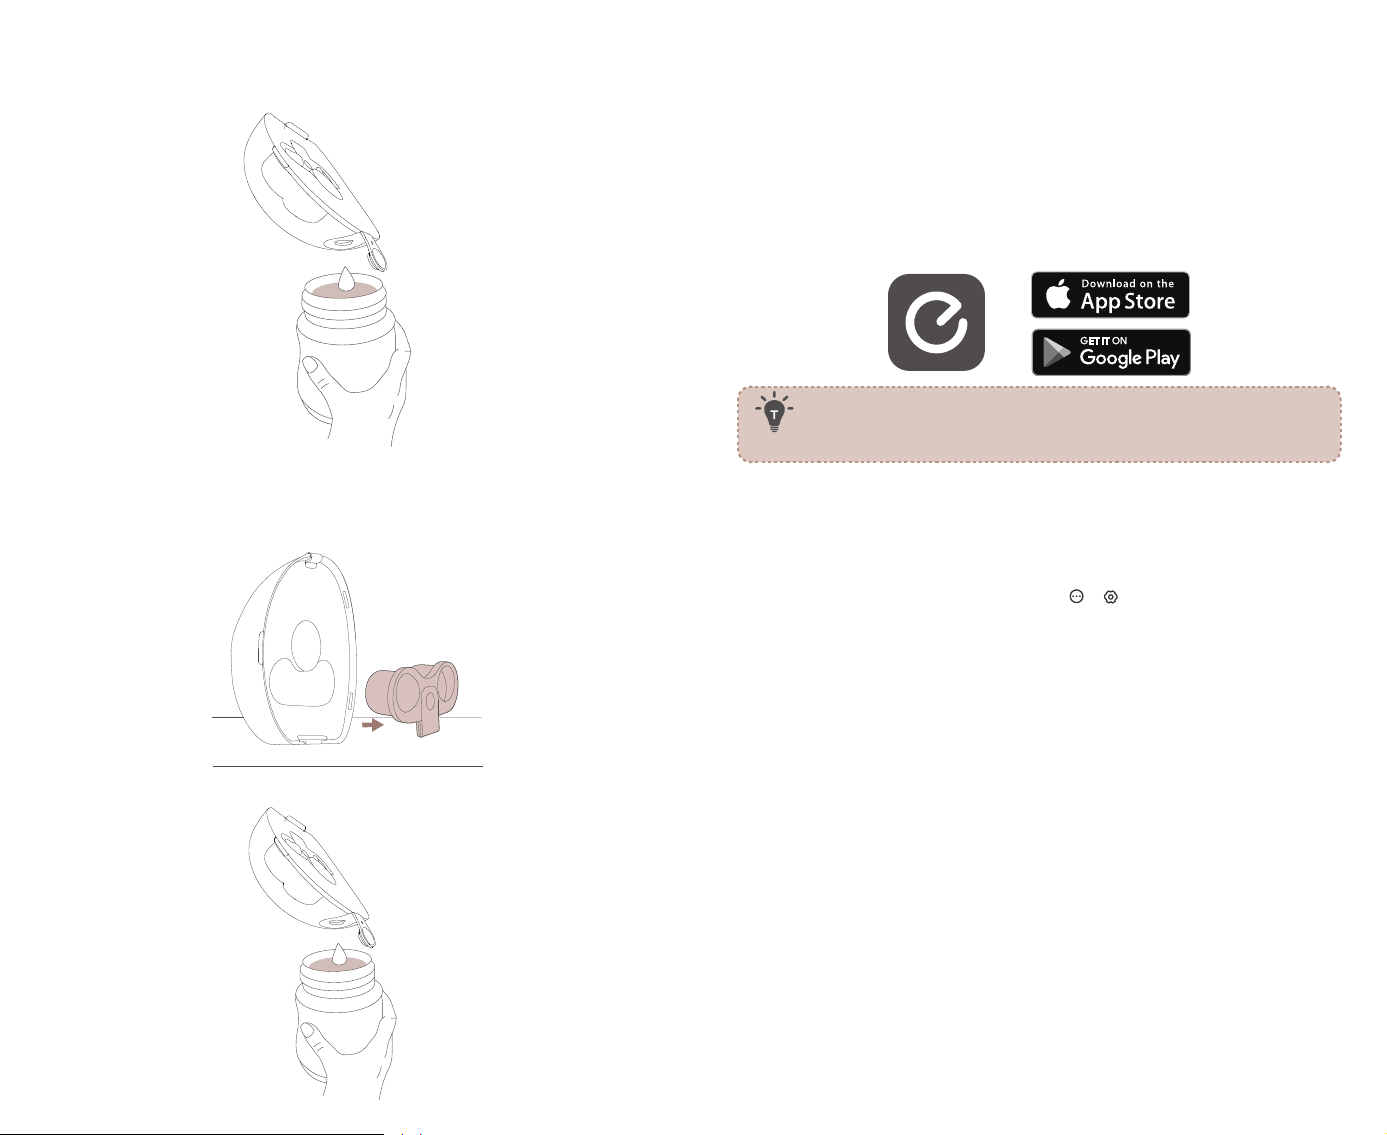
Light & Display Guide
Light Description Status
Battery
Flashing White Charging in Process
Steady White Fully Charged
Steady
Orange
Battery Level <20%
Flashing
Orange
Battery Level <10%
Stimulation Mode
Expression Mode
Massage Mode
Steady White
In Stimulation / Expression /
Massage Mode
Flashing White
The corresponding function is
selected to adjust stimulation /
expression / massage levels.
Heating
Steady
Orange
In Heating Mode
Flashing
Orange
The function is selected to
adjust heating levels.
Level Steady White
Indicates the current level of
the selected mode (the one that
flashes white).
Running Time Steady White Pumping time
Pair Mode
Le / Right
Indicator
Flashing
Alternately
Le / Right Side Pairing in the
App
Le / Right
Indicator
White
Le / Right Side Paired in the
App
7
Transferring Milk
1. Pause or turn o the breast pump. Lean forward when taking out
the pump to prevent leakage.
2. Remove the container from the pump hub.
Do not remove any parts from the container before
pouring out the milk to avoid leakage.
3. Open the container lid.
15 16
4. Pour out the milk.
❶
Tilt the container with the flange tunnel facing up and the
pouring spout down.
❷
A small amount of milk may remain in the diaphragm chamber
aer pouring. To collect all milk, remove the diaphragm, and
place the container upright on the table for 10 seconds to allow
any trapped milk to flow back into it.
❸
Pour out the collected milk.
8
The App
Use your pump with the eufy app for a fully personalized pumping
experience. Customize pumping settings, track and log your data,
and manage sessions with ease.
1. Visit the App Store or Google Play to get the latest version of the
eufy app (not eufy Baby)
,
and create an account.
If you are currently using the eufy Baby app, please switch
to the eufy app to continue using all existing devices and
access new devices and features.
2. Tap Add Device > Care > Breast Pump > Wearable Breast Pump S2
Pro, and follow in-app instructions to pair the device.
3. Check the firmware updates to ensure you have the latest
version of the soware
:
❶
On the Home screen, tap Care > > to enter the Setting
page.
❷
Select a breast pump, and tap About Device > Check for
Firmware Updates.
❸
Aer you complete the update of one breast pump, select
another breast pump, and repeat Step
❷
.
9
Replacing and Purchasing
Washable Parts
The estimated life of the washable parts is 1-3 months, and actual
life will vary with use and sterilization frequency.
Replace them if you notice a decrease in suction and peormance
(particularly the duckbill valve), or if you have stored them too long
when planning to pump for your next child.
Need extra washable parts for your breast pump? Visit eufy.com to
find and order what you need.
17 18
10
Top 10 Troubleshooting Tips
1.
Container won't click tightly onto the hub?
Step 1: reassemble the container back.
Press firmly the upper part of the container back with both
hands first, then the lower part. Ensure all 4 alignment marks are
positioned above the container back to prevent low suction and
leaking. There are 4 alignment marks in total: 2 on the le and right
sides of the pouring spout, and 2 at the bottom.
Step 2: reassemble the diaphragm.
Fit the diaphragm into the contoured recess at the back of the
container. Ensure the diaphragm rim is fully seated along the
groove edge, especially the upper curve. Press the diaphragm
lid firmly to create a secure seal, and confirm it sits below the
alignment mark in the groove.
Step 3: reattach the container to the hub.
Align the peg on the pump hub with the hole in the diaphragm,
then press the assembled container firmly onto the hub until you
hear and feel a click.
2.
No suction, or very little output?
• Inspect the duckbill valve and diaphragm for any damage —
cracks, chips, holes, or tears. If damage is found, stop using
immediately and replace the aected part.
• Check if the 4 main components (duckbill valve, diaphragm,
container, and flange tunnel) are correctly assembled and fully
sealed. Possible causes of improper assembly:
• The duckbill is not fully pushed in place.
• The container back is not fully seated under all 4 alignment
marks.
• The diaphragm rim is not fully seated along the groove edge.
• The diaphragm lid is not firmly pressed and does not sit below
the alignment mark in the groove.
• The container is not fully clicked onto the hub.
• The flange is not fully pushed in and securely clicked.
• Adjust the fit: ensure your nipple is centered in the flange tunnel
and the pump is sealed snugly against your breast.
• Try a dierent insert size for a better fit.
It takes time for your body to respond to a new pump —
don't be discouraged if output is low at first.
3.
Milk le behind aer pouring?
• Milk trapped in the diaphragm: remove the diaphragm, and
place the container upright on the table for 10 seconds to allow
any trapped milk to flow back into it, then pour.
• Milk remaining in the container: give the container a few quick
flicks toward the bottle to help any remaining milk flow down.
4.
How to prevent leak?
• Ensure the container back is firmly pushed in and fully seated
under all 4 alignment marks—two on the le and right sides of the
pouring spout, and two at the bottom.
• Wear a full-coverage nursing bra to create a tight seal between
the breasts and the flange.
• Do not lean back or bend forward excessively while pumping.
• Do not disassemble the container before transferring the milk.
• Keep the flange tunnel facing upward when transferring the milk.
19 20
5.
Feel painful?
• Ensure you have selected the correct flange size for your nipple.
Refer to the provided nipple measurement card and sizing guide.
If needed, try sizing up or down to find the most comfortable and
eective fit.
• Adjust the wearing position so the nipple is centered within the
flange tunnel.
• Gradually increase the suction until it feels strong yet comfortable.
• Use the heating and massage features to enhance comfort and
relaxation.
• Try pumping spray.
6.
How to do the fridge hack with the S2?
Detach the container from the pump hub. Insert the flange tunnel
into the container tunnel to form a single integrated unit, then store
in the fridge.
Do not put the pump hub in the fridge.
7.
The breast pump hub won't charge or turn on?
• Press and hold the power button on the pump hub for 12 seconds
to reset it.
• If using the charging case, adjust the breast pumps to ensure
proper contact with the charging pins.
• Press and hold the power display button on the charging case for
2 seconds to reset it
• Use a 5V/2A or higher power adapter.
• Charge directly using the included magnetic charging cable.
8.
The charging case cannot be charged or charge
the breast pumps?
• Press and hold the power display button on the charging case for
2 seconds to reset it.
9.
The app can't find or can't add the device?
Step 1: update to the latest version of the eufy app from your app
store.
Step 2: press + and − simultaneously for 2 seconds until the L and R
indicator lights flash alternately, indicating the device is in pairing
mode.
Step 3: follow the in-app instructions to complete the pairing.
Only one pump connects to the app?
• Close and reopen the eufy app. Make sure the unconnected
pump is in pairing mode, then redo the pairing process for that
unit.
10.
How do I update the firmware?
Step 1: on the Home screen, tap Care > > to enter the Setting
screen.
Step 2: select a breast pump, and tap About Device > Check for
Firmware Updates.
Step 3: aer you complete the update of one breast pump, select
another breast pump, and repeat Step 2.
Customer Service
12-month limited warranty on pump hub
3-month limited warranty on washable parts
(US/CA) +1 855-952-0878
(AU/NZ) +61 1800 920 330
babysupport@eufy.com
Australian and New Zealand customers, please
scan the QR code for the warranty information.
@EufyOfficial@EufyOfficial
@EufyOfficial

21 22
IMPORTANT SAFEGUARDS
When using electrical products, especially when children are
present, basic safety precautions should always be followed,
including the following:
READ ALL INSTRUCTIONS BEFORE
USING
WARNING: Read all safety warnings and instructions. Failure to
follow the warnings and instructions may result in fire and/or
serious injury.
• Recharge only with the charger specified by the manufacturer. A
charger that is suitable for one type of battery pack may create a
risk of fire when used with another battery pack.
• Under abusive conditions, liquid may be ejected from the battery;
avoid contact. If contact accidentally occurs, flush with water.
If liquid contacts eyes, additionally seek medical help. Liquid
ejected from the battery may cause irritation or burns.
• Do not expose a battery pack or appliance to fire or excessive
temperature. Exposure to fire or temperature above 130°C (265°F)
may cause explosion.
• Follow all charging instructions and do not charge the battery
pack or appliance outside of the temperature range specified in
the instructions. Charging improperly or at temperatures outside
of the specified range may damage the battery and increase the
risk of fire.
• Have servicing peormed by a qualified repair person using only
identical replacement parts. This will ensure that the safety of the
product is maintained.
• Do not modify or attempt to repair the appliance or the battery
pack.
• Use only with Listed/Certified Information Technology (Computer)
Equipment or ITE Power Supply or Class 2 Power Unit.
DANGER – To reduce the risk of electrocution:
• Do not use while bathing.
• Do not place or store product where it can fall or be pulled into a
tub or sink.
• Do not place in or drop into water or other liquid.
• Do not reach for a product that has fallen into water. Unplug
immediately.
• Always disconnect from the charger before using it.
WARNING – To reduce the risk of injury, user must read instruction
manual.
WARNING – To reduce the risk of burns, electrocution, fire, or injury
to persons.
• Use this product only for its intended use as described in this
manual. Do not use attachments not recommended by the
manufacturer.
• Never operate this product if it has a damaged adapter, if it is not
working properly, if it has been dropped or damaged, or dropped
into water. Return the product to a service center for examination
and repair.
• Keep the cord away from heated suaces.
• Never use while sleeping or drowsy.
• Never drop or insert any object into any opening or hose.
• Do not use outdoors or operate where aerosol (spray) products
are being used or where oxygen is being administered.
• For household use only.
• Do not use an appliance that is damaged or modified. Damaged
or modified batteries may exhibit unpredictable behavior
resulting in fire, explosion or risk of injury.
• Use only with Listed/Certified ITE Power Supply or Listed Class 2
Power Unit.
• When using two breast pumps simultaneously, be sure to use an
adapter with an output of 2.4A or higher.
• This is a personal care product for a single user and should not be
shared between users.
• If irritation or discomfort occurs, use your finger to break the seal
between the flange and the breast tissue, discontinue use and
see a healthcare provider.
• Do not modify the product.
• This is not a toy, keep it out of the reach of children.
• Do not wear and use the product for over 30 minutes. Consult your
healthcare practitioner to understand how long you should pump
in a pumping session.
• Do not wash or sanitize the pump hub. Wipe with clean, damp
cloth only.
• Do not place the breast pump in refrigerator or freezer. Do not use
a microwave oven.
• Do not boil the milk container and all the silicon parts for more
than 5 minutes every time.
• Do not use the product in an environment that is too hot or too
cold, never expose the product to strong sunlight or a humid
environment.
• The suitable temperature for this product and accessories is 0°C
to 40°C (32°F to 104°F).
• It is recommended to charge the device in an environment with a
temperature that ranges from 5°C to 25°C (41°F to 77°F).
• The expected service life of the washable parts is 1-3 months. It
is recommended to replace the washable parts aer long-term
23 24
storage or before pumping for your next child.
• Keep out of reach of children. Do not allow children to play with
this appliance.
• This appliance can be used by persons with reduced physical,
sensory or mental capabilities or lack of experience and
knowledge if they have been given supervision or instruction
concerning use of the appliance in a safe way and understand
the hazards involved.
• Cleaning and user maintenance shall not be made by children
without supervision.
• It is intended to be rechargeable by an approved power supply
with output 5 V, 2.4 A.
• This appliance contains batteries that are non-replaceable.
SAVE THESE INSTRUCTIONS
Notice
Notice (United States Of America)
FCC Statement
This device complies with Part 15 of the FCC Rules. Operation is
subject to the following two conditions: (1) this device may not
cause harmful inteerence, and (2) this device must accept any
inteerence received, including inteerence that may cause
undesired operation.
Warning: Changes or modifications not expressly approved by the
party responsible for compliance could void the user's authority to
operate the equipment.
Note: This equipment has been tested and found to comply with
the limits for a Class B digital device, pursuant to Part 15 of the FCC
Rules. These limits are designed to provide reasonable protection
against harmful inteerence in a residential installation.
This equipment generates, uses and can radiate radio
frequency energy and, if not installed and used in accordance
with the instructions, may cause harmful inteerence to radio
communications. However, there is no guarantee that inteerence
will not occur in a particular installation. If this equipment does
cause harmful inteerence to radio or television reception, which
can be determined by turning the equipment o and on, the user is
encouraged to try to correct the inteerence by one or more of the
following measures: (1) Reorient or relocate the receiving antenna.
(2) Increase the separation between the equipment and receiver.
(3) Connect the equipment into an outlet on a circuit dierent from
that to which the receiver is connected. (4) Consult the dealer or an
experienced radio/ TV technician for help.
FCC Radio Frequency Exposure Statement
The device has been evaluated to meet general RF exposure
requirement. The device can be used in portable exposure
conditions without restriction.
The following importer is the responsible party:
Company Name: POWER MOBILE LIFE, LLC
Address: 10800 NE 8TH ST #900, BELLEVUE, WA, 98004, UNITED STATES
Telephone: 1-800-988-7973
Warning:
• Replacing a battery with an incorrect type may bypass
safeguards and create danger;
• Disposal of a battery in a fire or other source of significant heat,
or by crushing, or cutting, may result in an explosion as well as
leakage of flammable liquids and gases;
• Leaving a battery in an extremely hot environment may result in
an explosion as well as leakage of flammable liquids and gases;
• A battery subjected to extremely low air pressure may result in an
explosion as well as leakage of flammable liquids and gases.
CAUTION!
THERE IS A RISK OF EXPLOSION IF AN INCORRECT BATTERY
TYPE IS USED.
DISPOSE OF USED BATTERIES ACCORDING TO THEIR
INSTRUCTIONS.