
About the Product
What's in the Box
Product Overview
At a Glance
Button Controls
Light Guide
Charging
Disassembling
Cleaning and Sterilizing
Before Initial Use
For Daily Use
Assembling
Wearing
Measurement
Use a Sizing Insert (Optional)
Wear
Using without an App
Pumping
Stimulation Mode and Expression Mode
Using with eufy Baby App
Transferring Milk
Storing Milk
Storing Breast Milk
Feeding Stored Milk
Maintenance
FAQ
Specifications
About the Product
The eufy Wearable Breast Pump Series is designed for lactating women to express and collect breast milk from
their breasts. The breast pump can be used with or without the eufy Baby app to help you express and collect
breast milk safely, eciently, and comfortably for your baby.
• This product is intended for a single user.
DANGER – To reduce the risk of electrocution:
• Do not use while bathing.
• Do not place or store product where it can fall or be pulled into a tub or sink.
• Do not place in or drop into water or other liquid.
• Do not reach for a product that has fallen into water. Unplug immediately.
• Always disconnect from the charger before using it.
WARNING – To reduce the risk of burns, electrocution, fire, or personal injury.
• Use this product only for its intended use as described in this manual. Do not use attachments not recommended
by the manufacturer.
• Never operate this product if it has a damaged cord or plug, if it is not working properly, if it has been dropped or
damaged, or dropped into water. Return the product to a service center for examination and repair.
• Keep the cord away from heated surfaces.
• Never use while sleeping or drowsy.
• Never drop or insert any object into any opening or hose.
• Do not use outdoors or operate where aerosol (spray) products are being used or where oxygen is being
administered.
• Do not modify the product.
• This is not a toy, keep it out of the reach of children.
• This is a personal care product for a single user and should not be shared between users.
• If irritation or discomfort occurs, use your finger to break the seal between the flange and the breast tissue,
discontinue use and see a healthcare provider.
• Do not wear and use the product for over 35 minutes. Consult your healthcare practitioner to understand how
long you should pump in a pumping session.
• Do not wash or sanitize the pump hub. Wipe with clean, damp cloth only.
• Do not place the breast pump in refrigerator or freezer. Do not use a microwave oven.
• Do not boil the milk container and all the silicone parts for more than 5 minutes every time.
• Do not use the product in an environment that is too hot or too cold, never expose the product to strong sunlight
or a humid environment.
• The suitable temperature for this product and accessories is 0°C-40°C.
• It is recommended to charge the device in an environment with a temperature that ranges from 5°C-25°C.
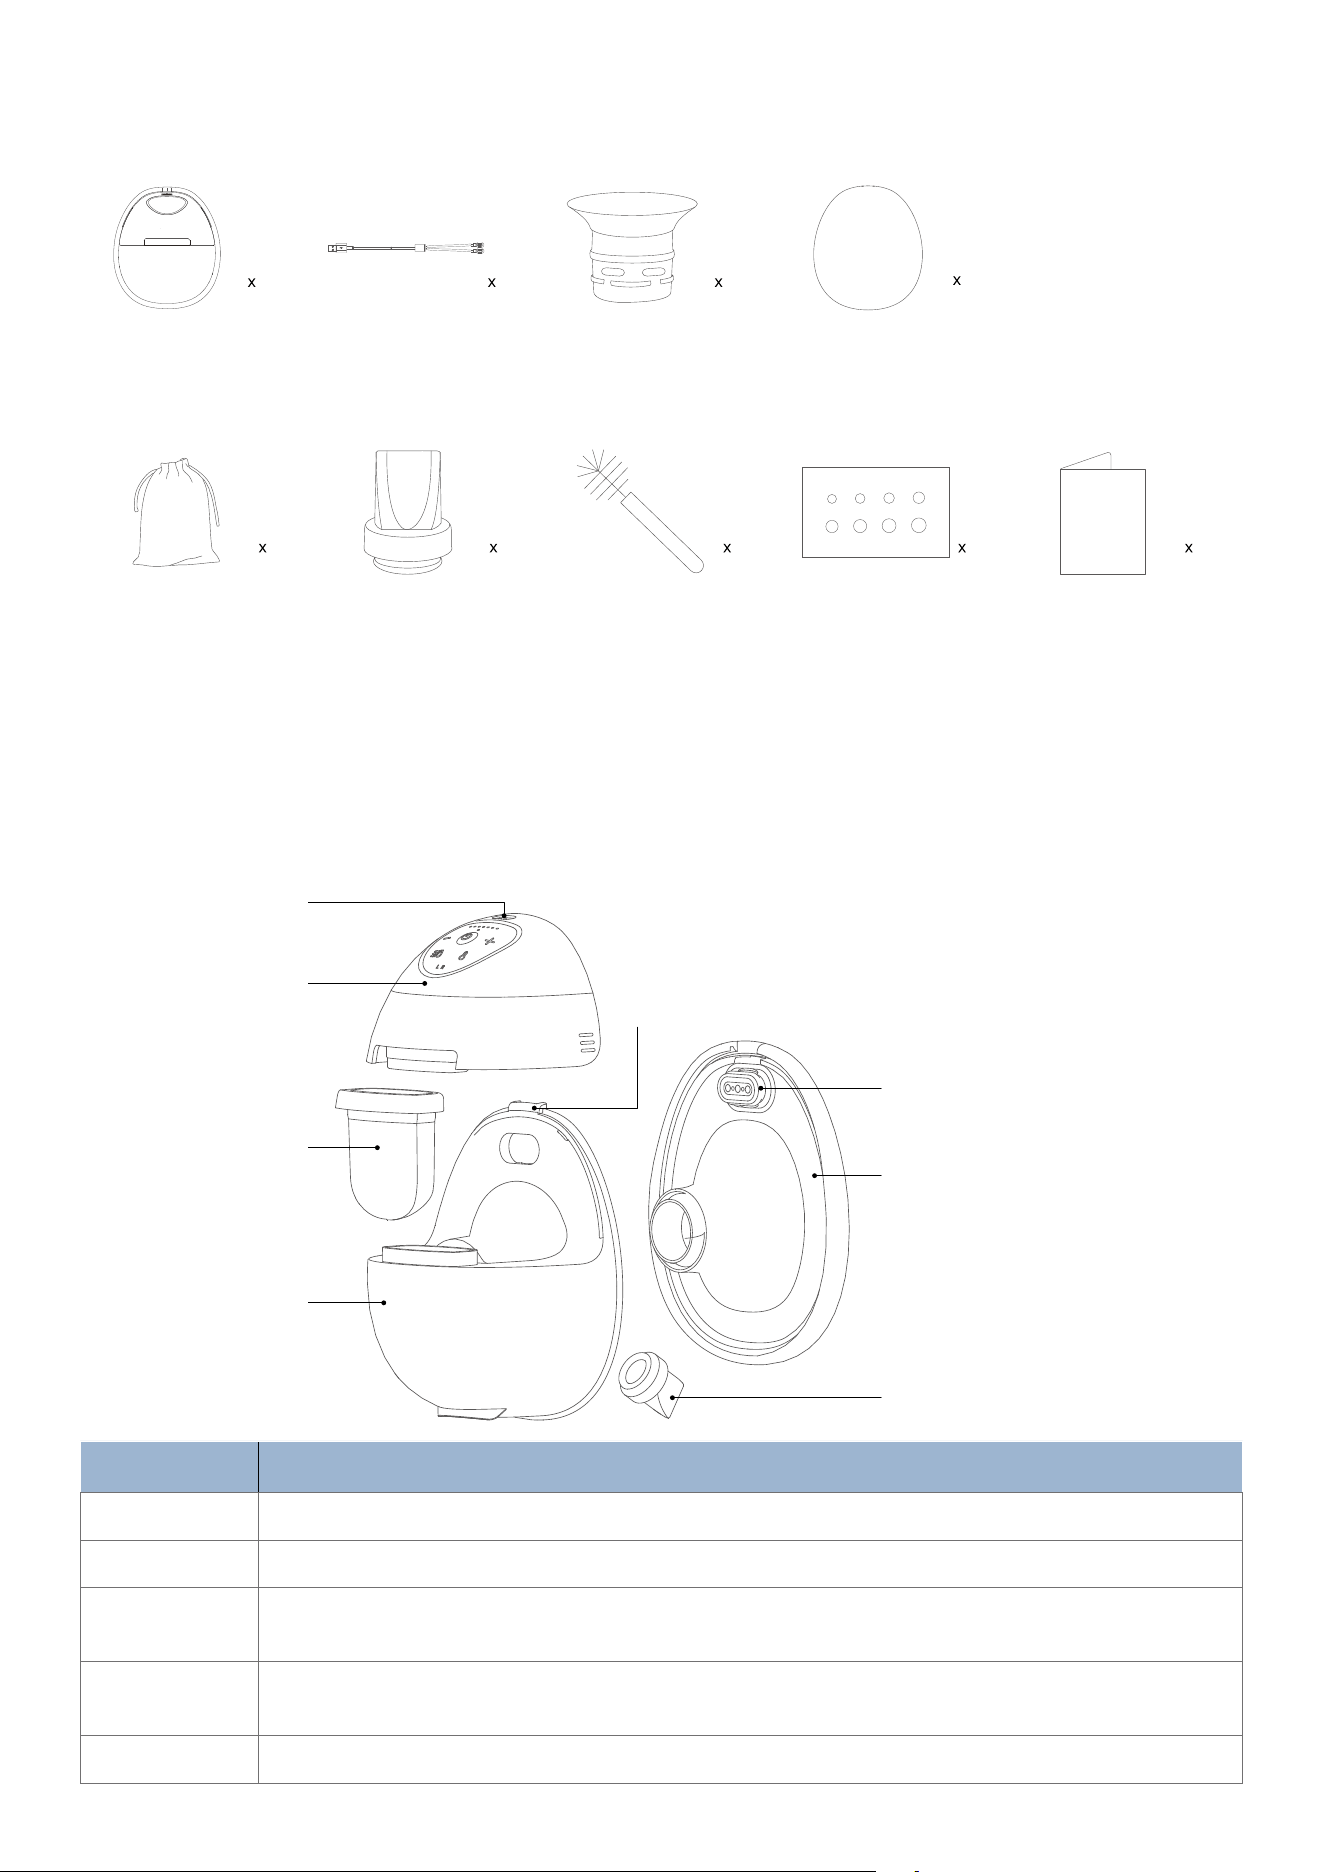
What's in the Box
Breast Pumps
(24 mm Flanges)
Dust Covers
2
2
QSG
Extra
Duckbill Valves
Cleaning Brush
Nipple
Measurement Card
Quick Start
Guide
2 1 1 1
Storage Bag
1
Magnetic
Charging Cable
Sizing Inserts
(17/19/21 mm)
1
6
Product Overview
At a Glance
Flange (24 mm)
Pump Hub
Duckbill Valve
Diaphragm
Milk Container
Pouring Spout
Charging Pins
Heating Pins
Part Function
Charging Pins In contact with the magnetic charging cable to charge the breast pump.
Pump Hub The motor of a breast pump. It has a control panel on which you can control the settings.
Diaphragm
A membrane that creates suction through deformation, separates breast milk and the pump
hub, and ensures that your milk supply is sanitary.
Milk Container
A collector of breast milk. After each pumping session, transfer breast milk from the container
through the pouring spout.
Heating Pins In contact with the hub of the breast pump for the heating function.
Flange
A silicone piece that fits directly over your nipple to form a vacuum seal. Please refer to the
Nipple Measurement Card included in the package or the “Measurement” section in this user
guide to find the right flange or insert size for yourself.
Duckbill Valve
A valve that promotes suction as well as releases breast milk into the container.
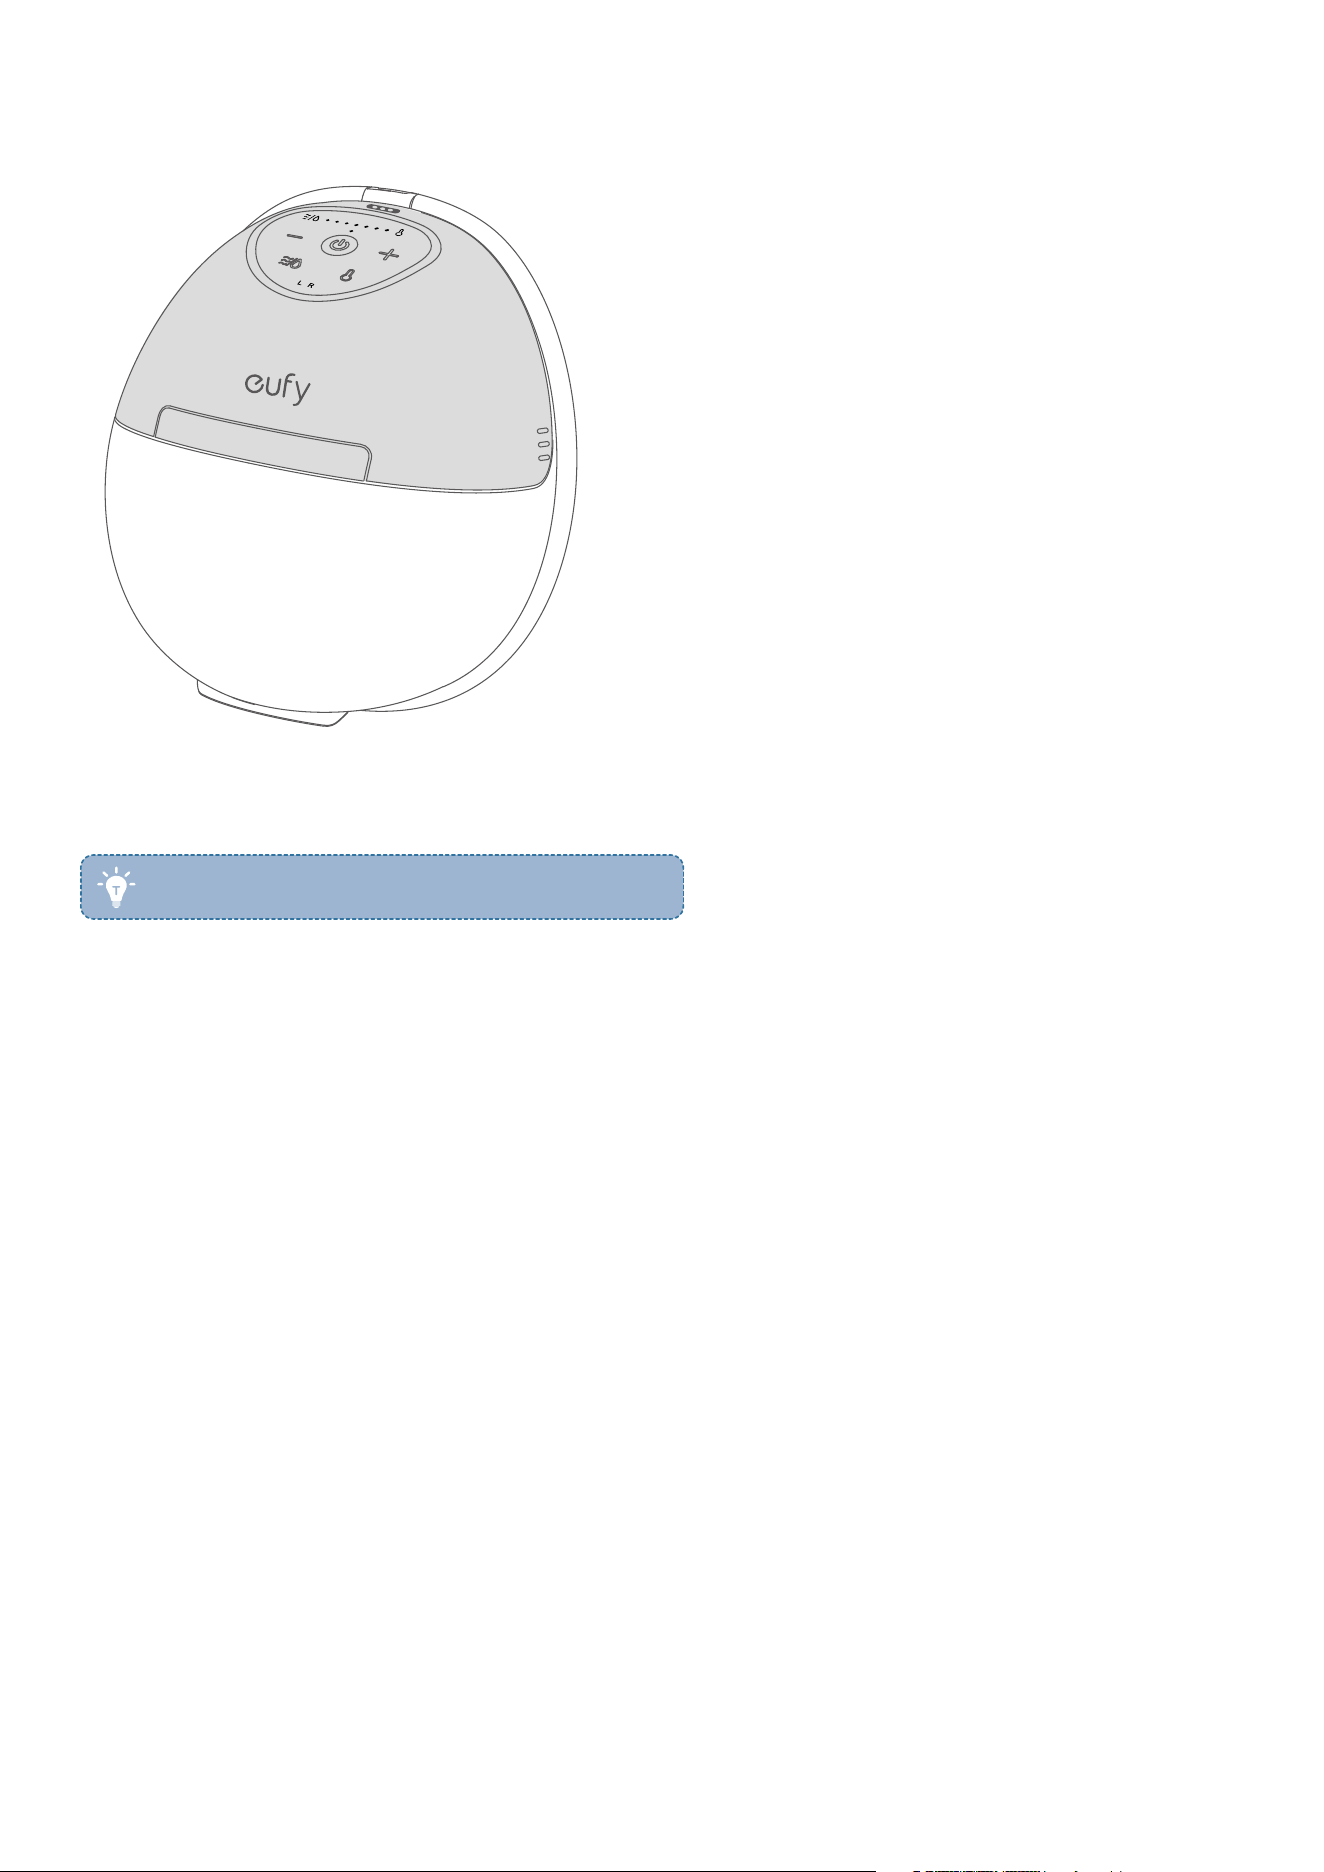
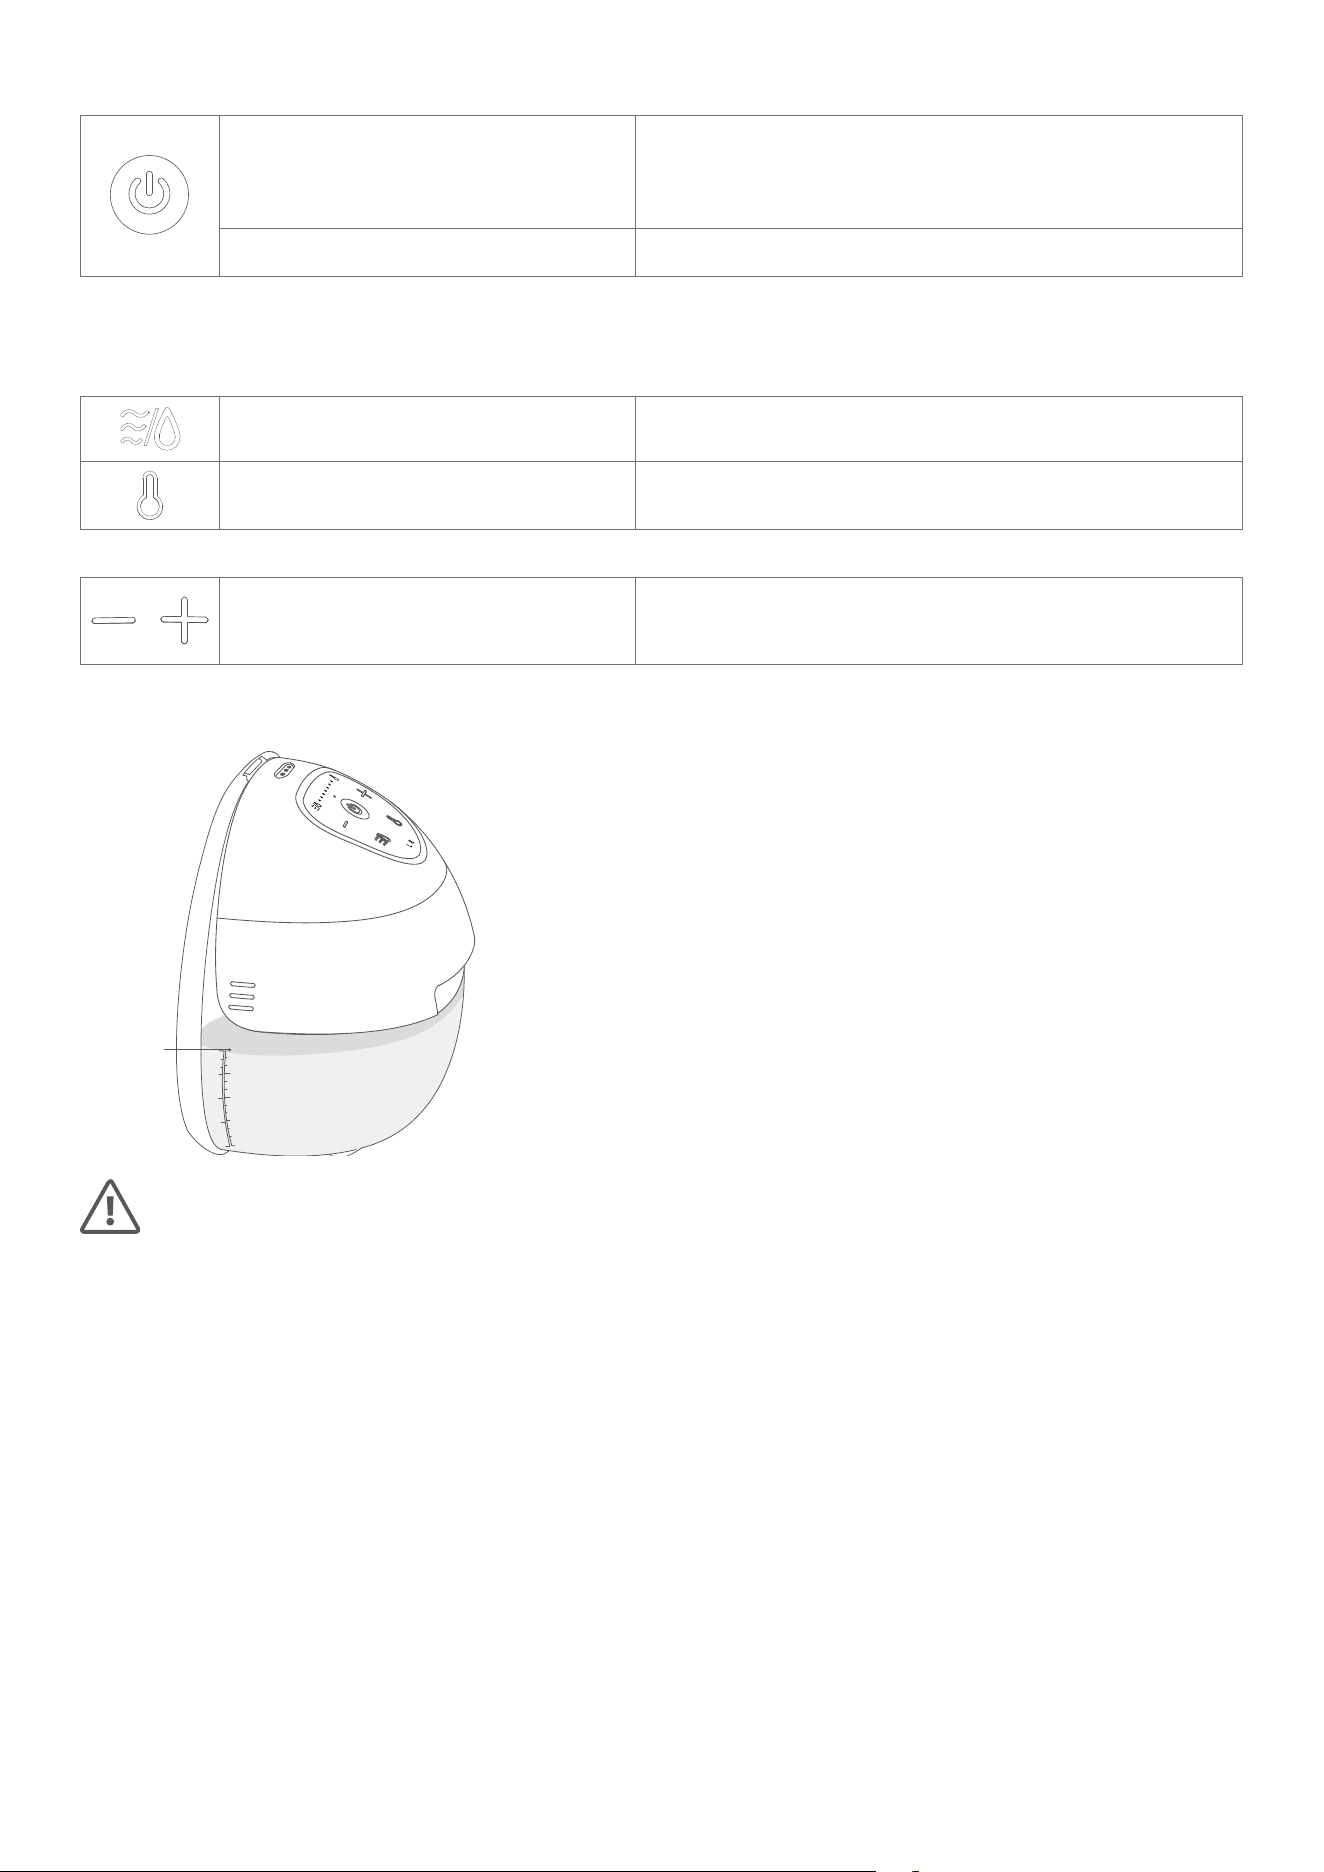
Button Controls
Press and Hold for 2 Seconds Turn Breast Pump On / O
(The breast pump will turn o automatically after
pumping for 30 minutes or pausing for 10 mintues.)
Press Pause / Continue
Press Switch between Stimulation Mode and Expression
Mode
Stimulation Mode: In this mode, the breast pump
begins with a quick and short sucking pattern to get
your milk to start flowing.
Expression Mode: In this mode, the breast pump begins
with a slow sucking pattern for milk expression, sucking
more deeply and more slowly.
Press Turn Heating On / O
Press Increase / Decrease the Suction / Heat Level
(To adjust the heat level, press the heating button first.)
Press and Hold Simultaneously for 2
Seconds
L/R Pairing in the App
(You need to set up your breast pumps in the eufy Baby
app first.)
Light Guide
Flashing Green Charging in Progress
Steady Green Charging Complete
Steady Red Battery Level <20%
Flashing Red Battery Level <10%
White In Stimulation / Expression Mode
Steady Orange In Heating Mode
Flashing Orange Heating Exception
(Reassemble the flange and pump hub to ensure the
heating pins are properly seated.)
1 to 7 Indicators Steady White Suction / Heat Level: 1 to 7
Flashing White In Pause Mode
(The breast pump goes into pause mode after it is
turned on. Confirm the left or right side and adjust
the suction level before pressing the power button to
continue.)
L / R Indicator Flashing Alternately Left / Right Side Pairing in the App
L / R Indicator White Left / Right Side Paired in the App
• By default, the indicator lights turn o after 10 seconds of inactivity. This time can be changed in the
eufy Baby app.
• When the indicator lights are on, pressing the buttons will perform the corresponding actions
immediately. When the indicators are o, press any button to wake up and then press the buttons for the
corresponding actions.
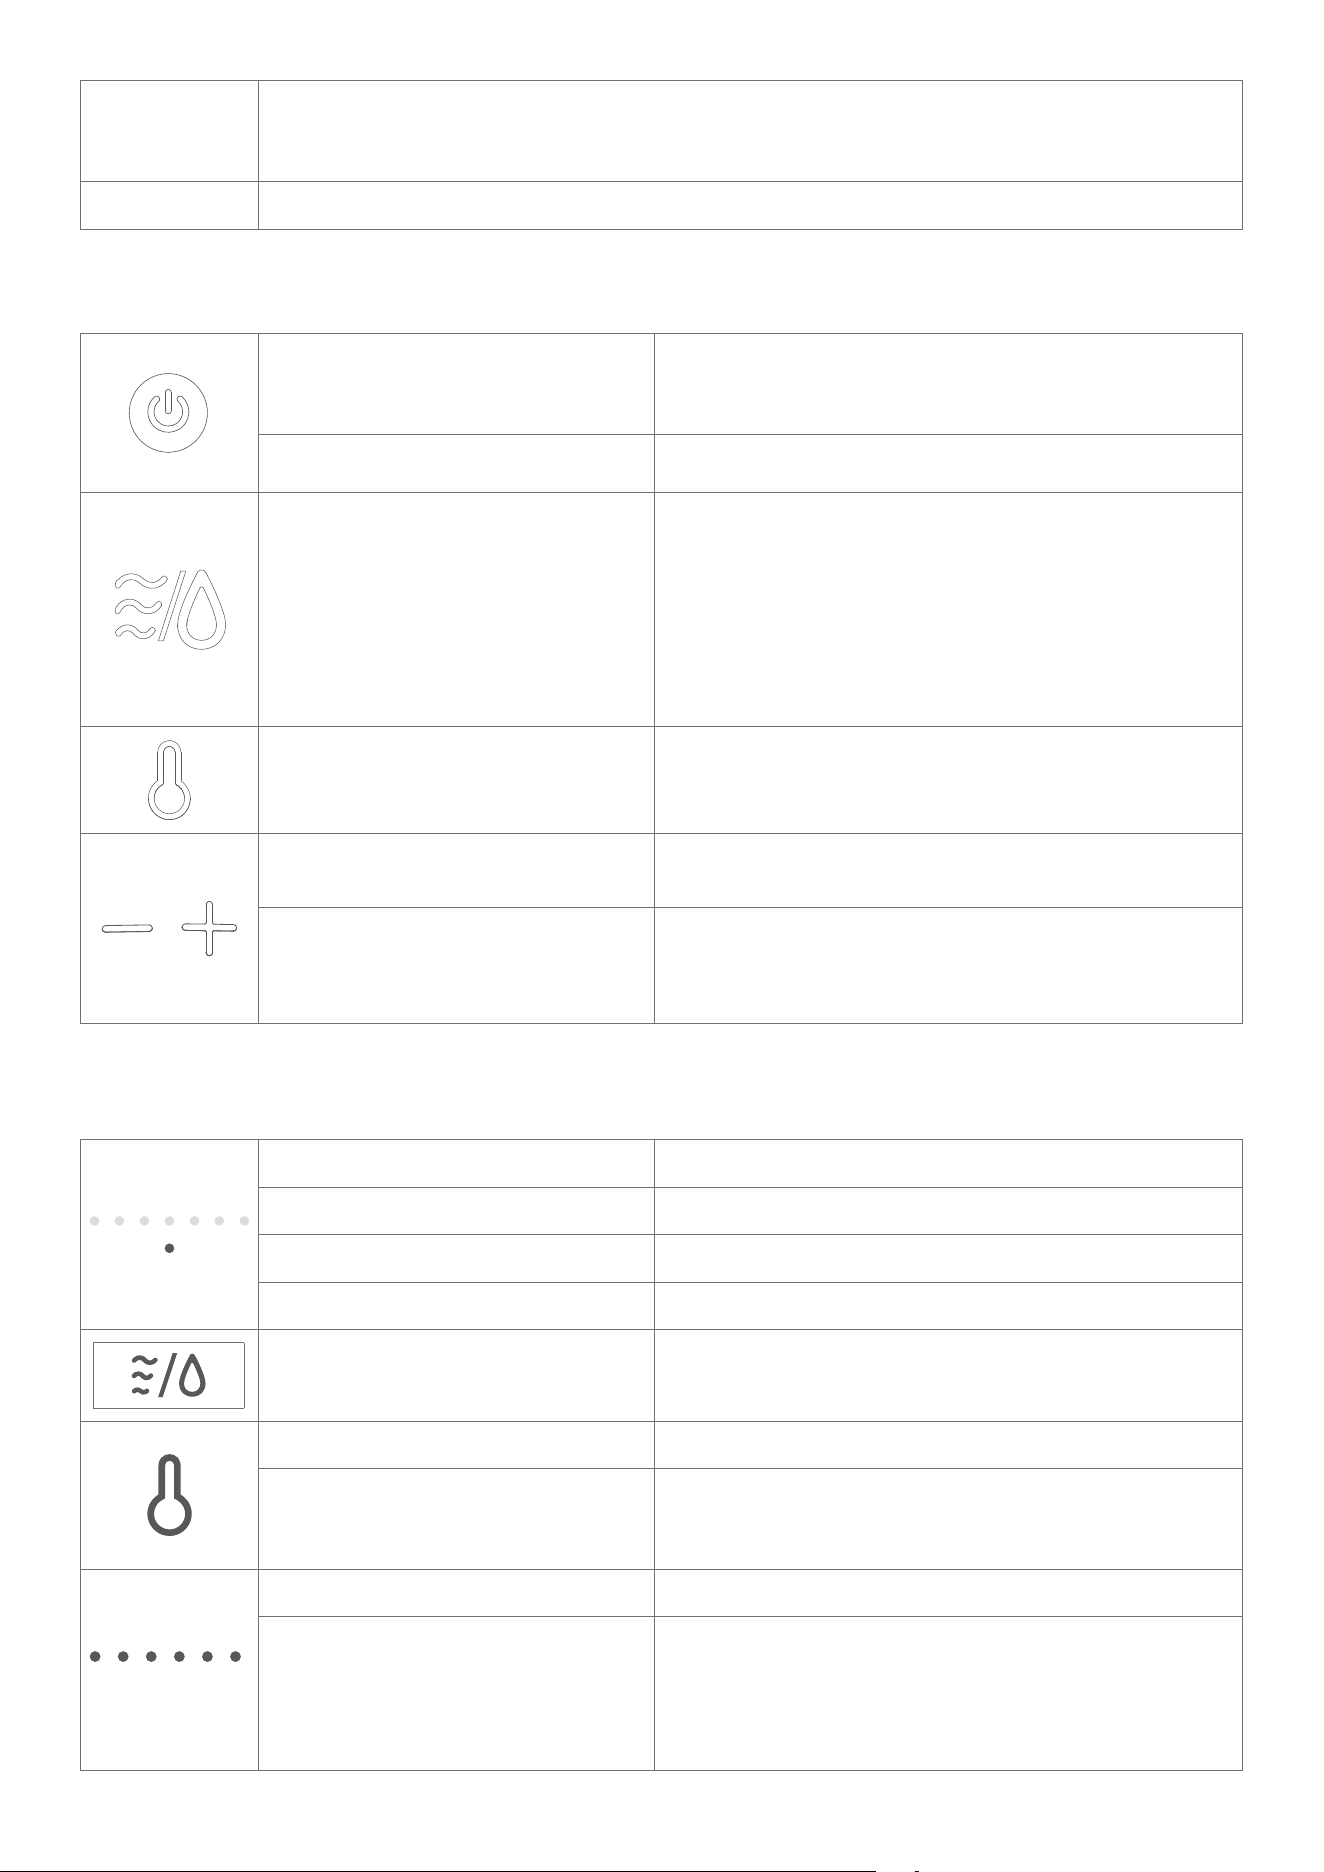
Charging
https://youtu.be/7KIDNBc3wKM
Before initial use, fully charge your breast pumps, which can last up to 4 to 6 pumping sessions.
Your breast pump does not work when charging with a charger. Do not wear the breast pumps during
charging.
Use a magnetic charging cable (included) and a 5V/1A or higher adapter (not included) to charge your breast
pumps.
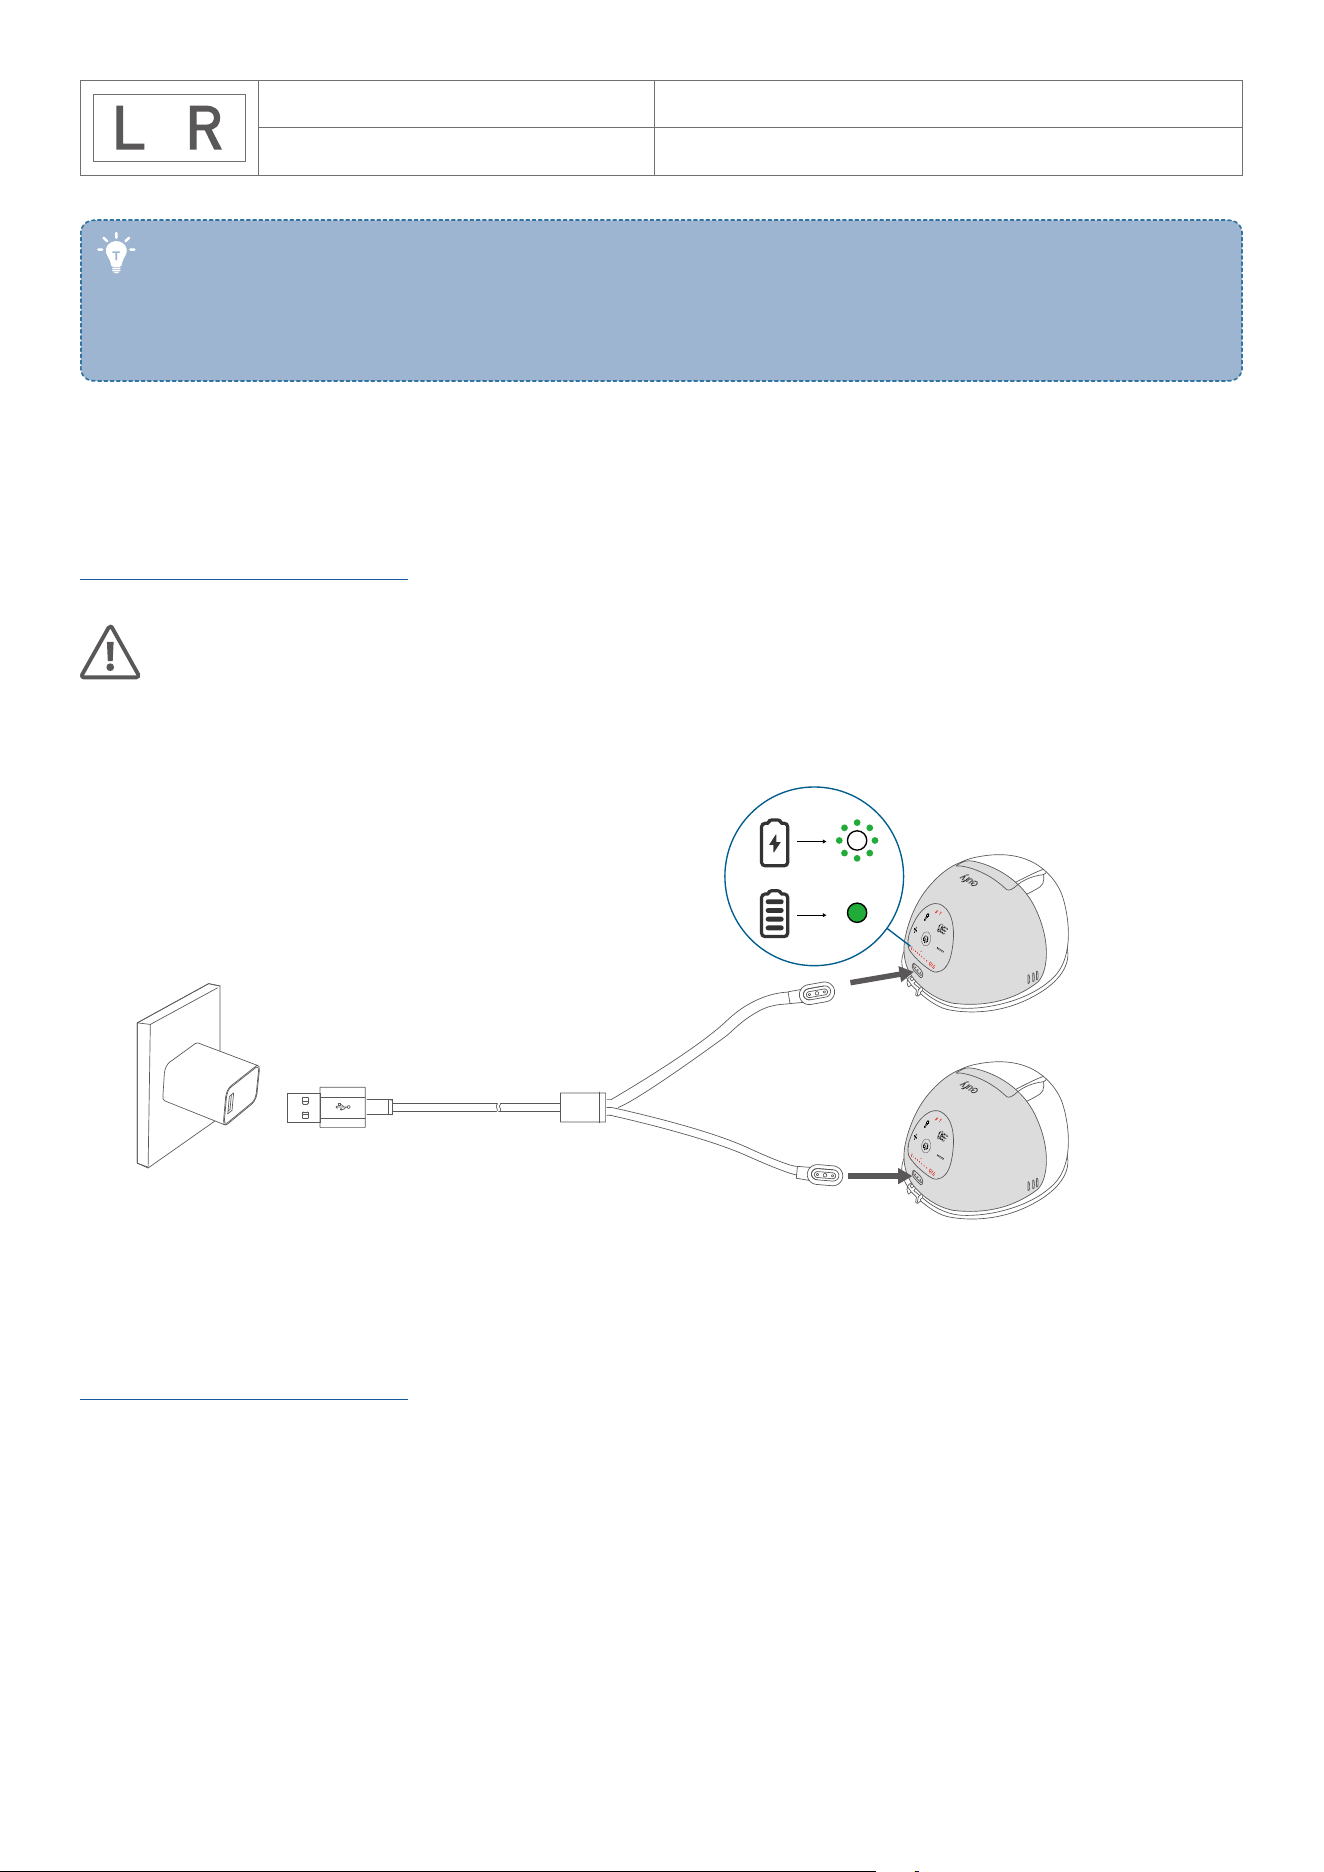
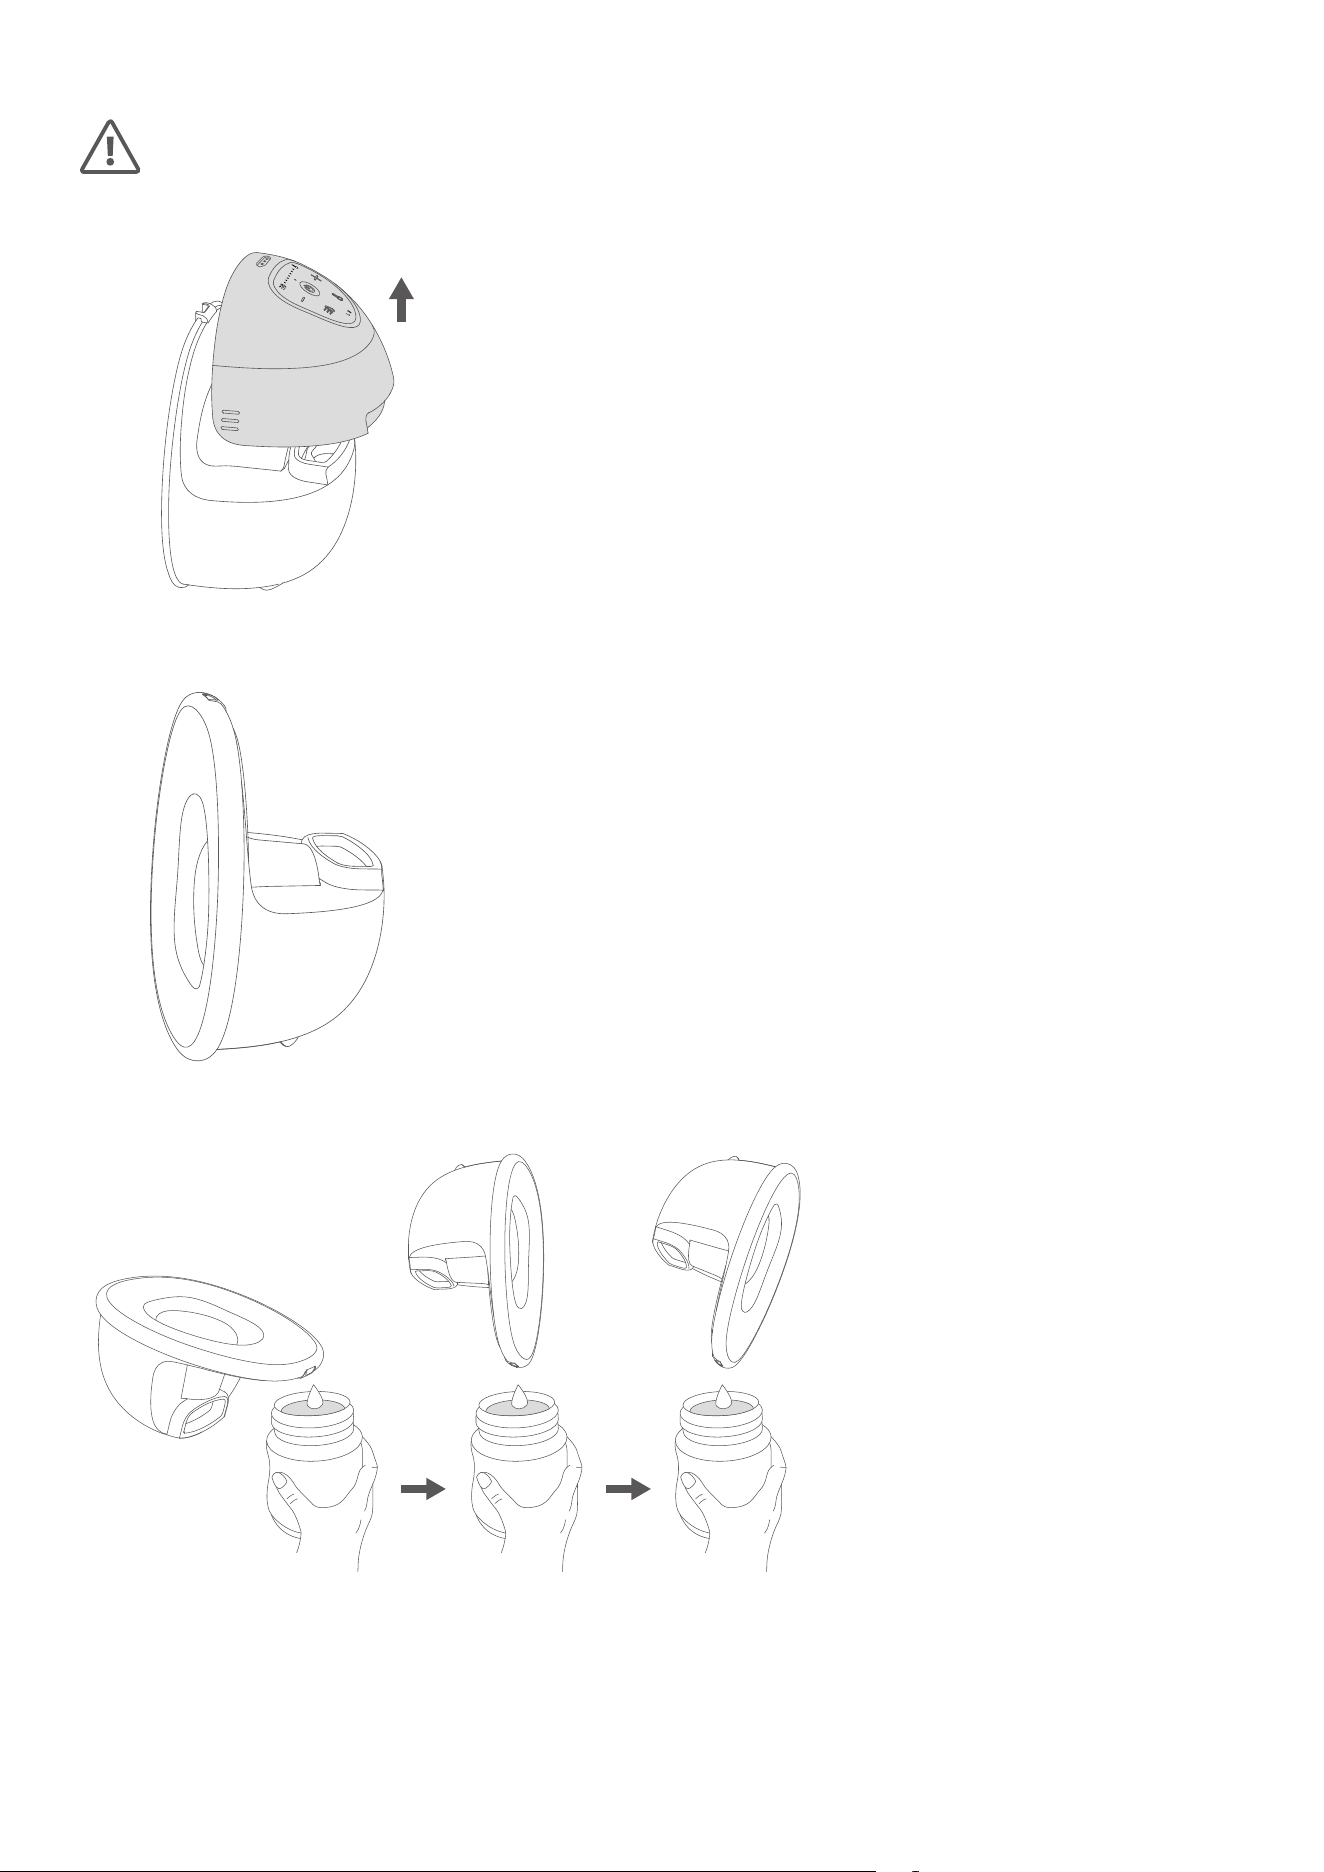
Disassembling
https://youtu.be/88AqHUD2nhY
For initial use, or after each use, disassemble the pumps into parts that can be cleaned or sterilized separately.
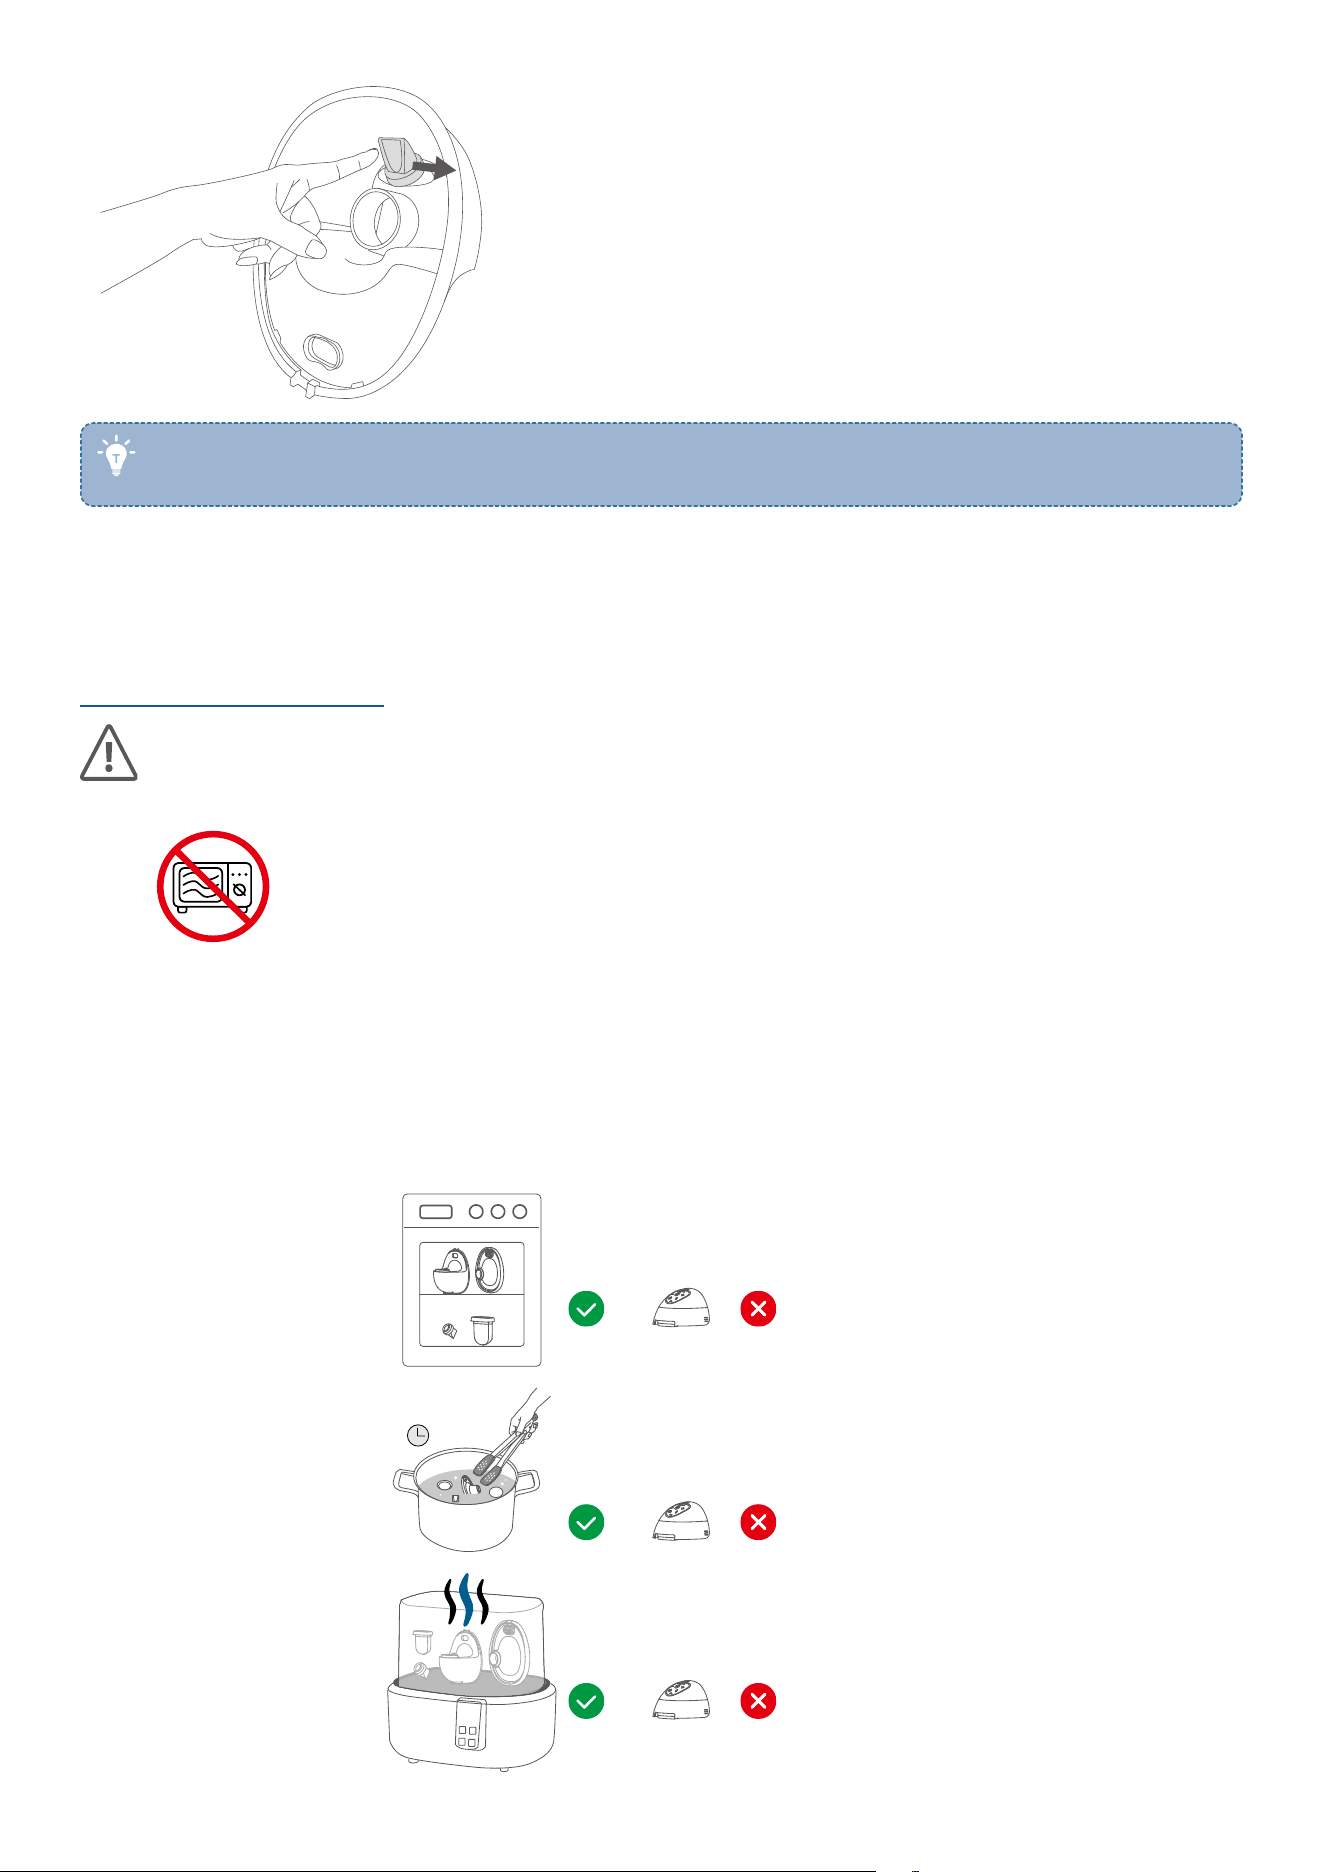
1. Step 1: Hold the pump hub with one hand and use the thumb of the other hand to pull the container edge near
the spout outward to release the pump hub from the spout. (Avoid pulling the flange.) Step 2: Lift the hub.
Step 2
Step 1
• The locking mechanism between the pump hub and the pouring spout ensures reliable suction and heating.
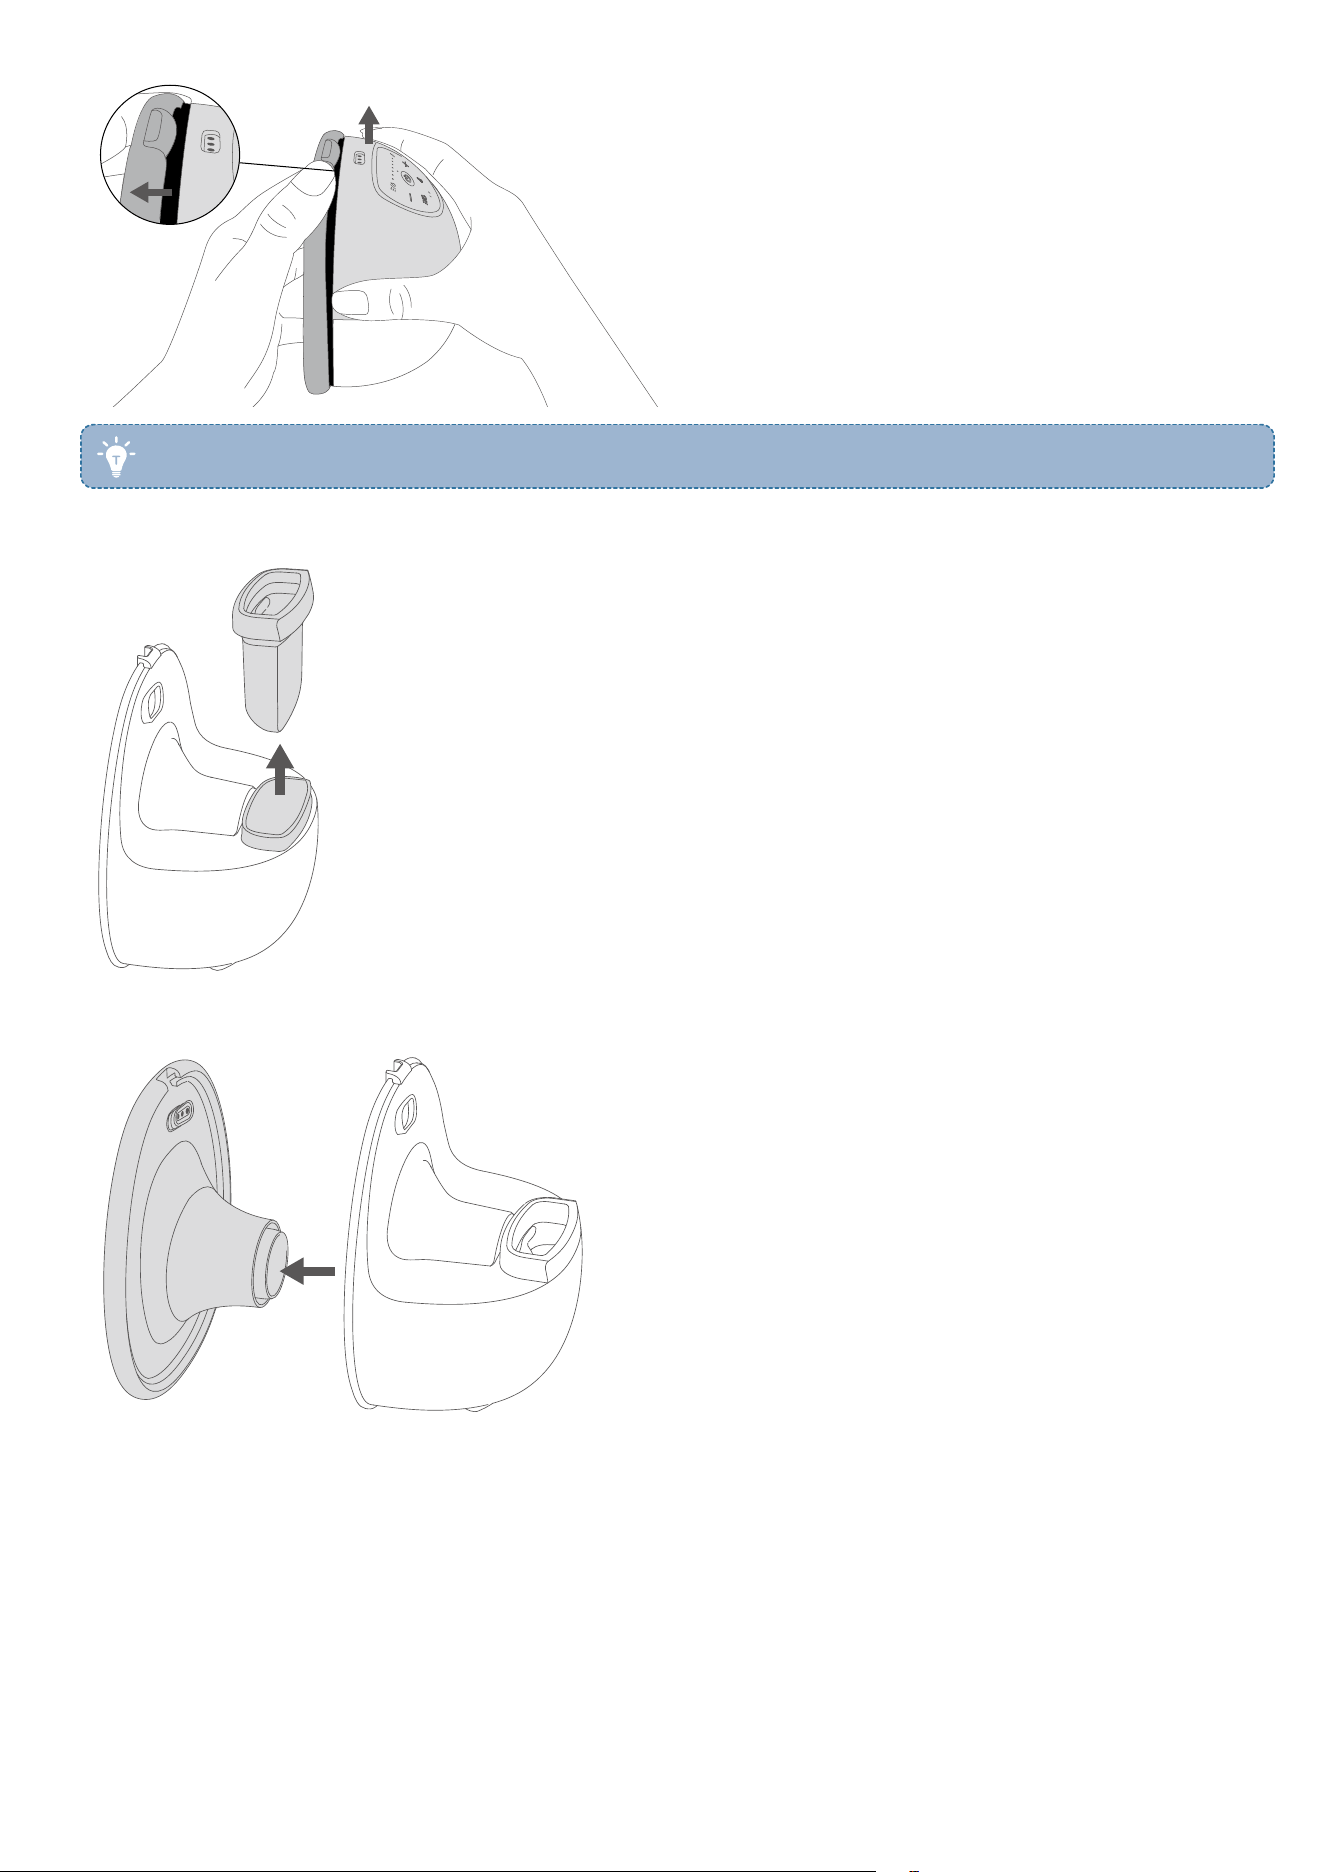
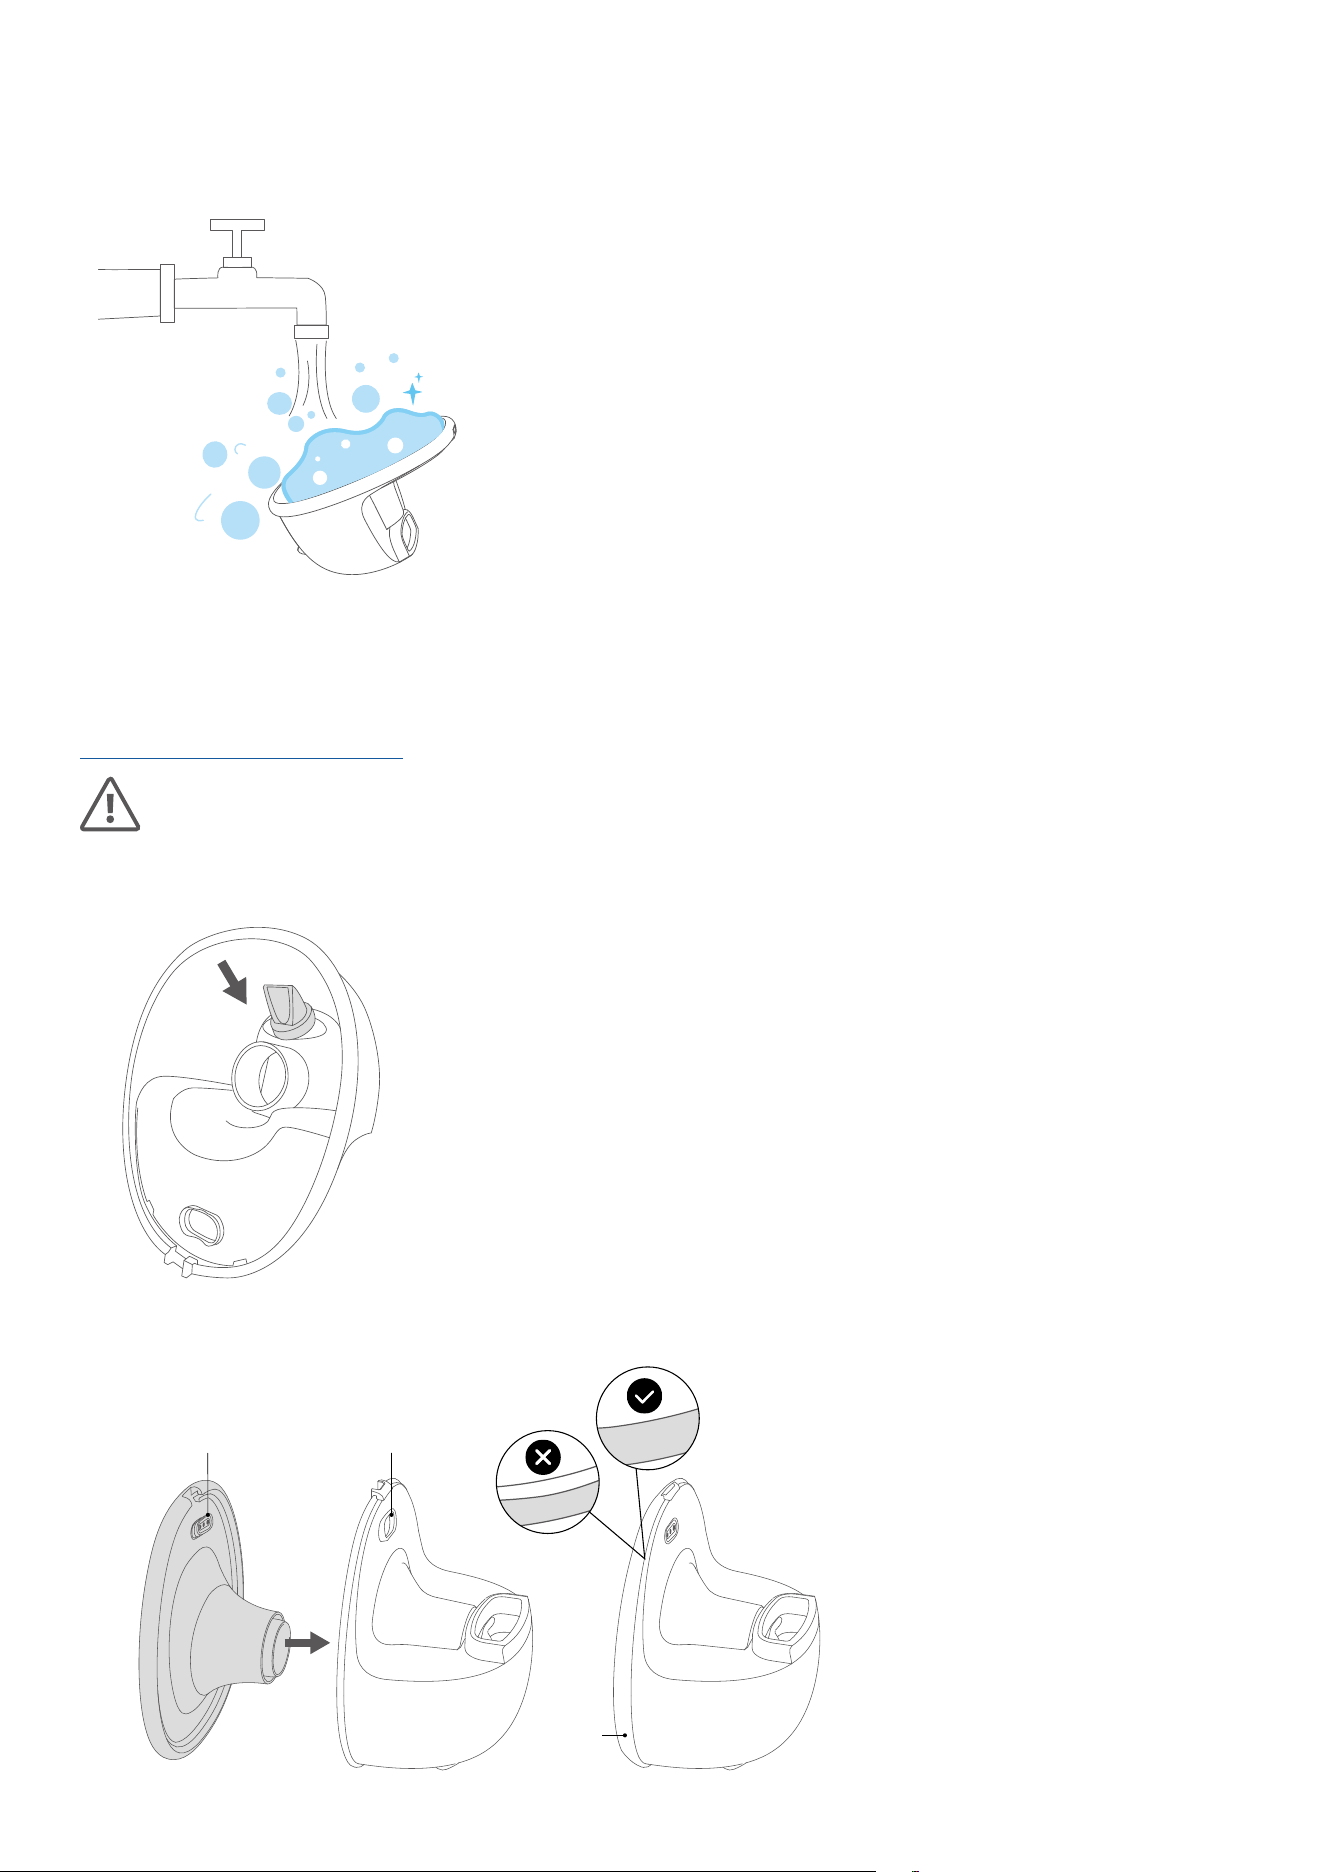
2. Remove the diaphragm from the groove.
3. Unwrap the outer ring of the flange, pull the heating pins out of the oval notch, and then pull the entire flange
out.
4. Flick the duckbill valve with your finger to remove it.
• The duckbill valve may be slippery after you use it for pumping. Flicking the duckbill valve helps you
move it more easily.
Cleaning and Sterilizing
https://youtu.be/lkIQ_H89qrA
• All components except the pump hub are washable. Clean the pump hub with disinfectant wipes.
• Scrub infant feeding items using the provided clean brush.
• Do not use a microwave to sterilize. High temperatures will shorten the lifespan and cause safety
hazards.
• Air-dry all parts thoroughly after cleaning and sterilizing.
Before Initial Use
Sterilize all washable parts by boiling for up to 5 minutes, stirring constantly to avoid the parts sticking to the
container and melting. Alternatively, steam-sterilize for a maximum of 5 minutes. Then remove them using clean
tongs.
5 min
Dishwasher
Cooking Pot
Baby Bottle Sterilizer
For Daily Use
Rinse all washable parts with warm, soapy water, then air dry. Sterilize if needed, using the same methods as the
initial cleaning.
Assembling
https://youtu.be/UchwqZQrDlU
Before assebmling, make sure to wash your hands well with soap and water.
1. Hold the bottom of the container up, insert the duckbill valve into the small hole inside the container with your
thumb and index finger and flick it to ensure it does not fall out.
2. Push the flange tunnel onto the container, making sure the heating pins are firmly pushed into the oval notch.
Wrap the outer ring to ensure it is properly assembled to prevent milk leakage.
Heating pins Oval notch
Outer ring
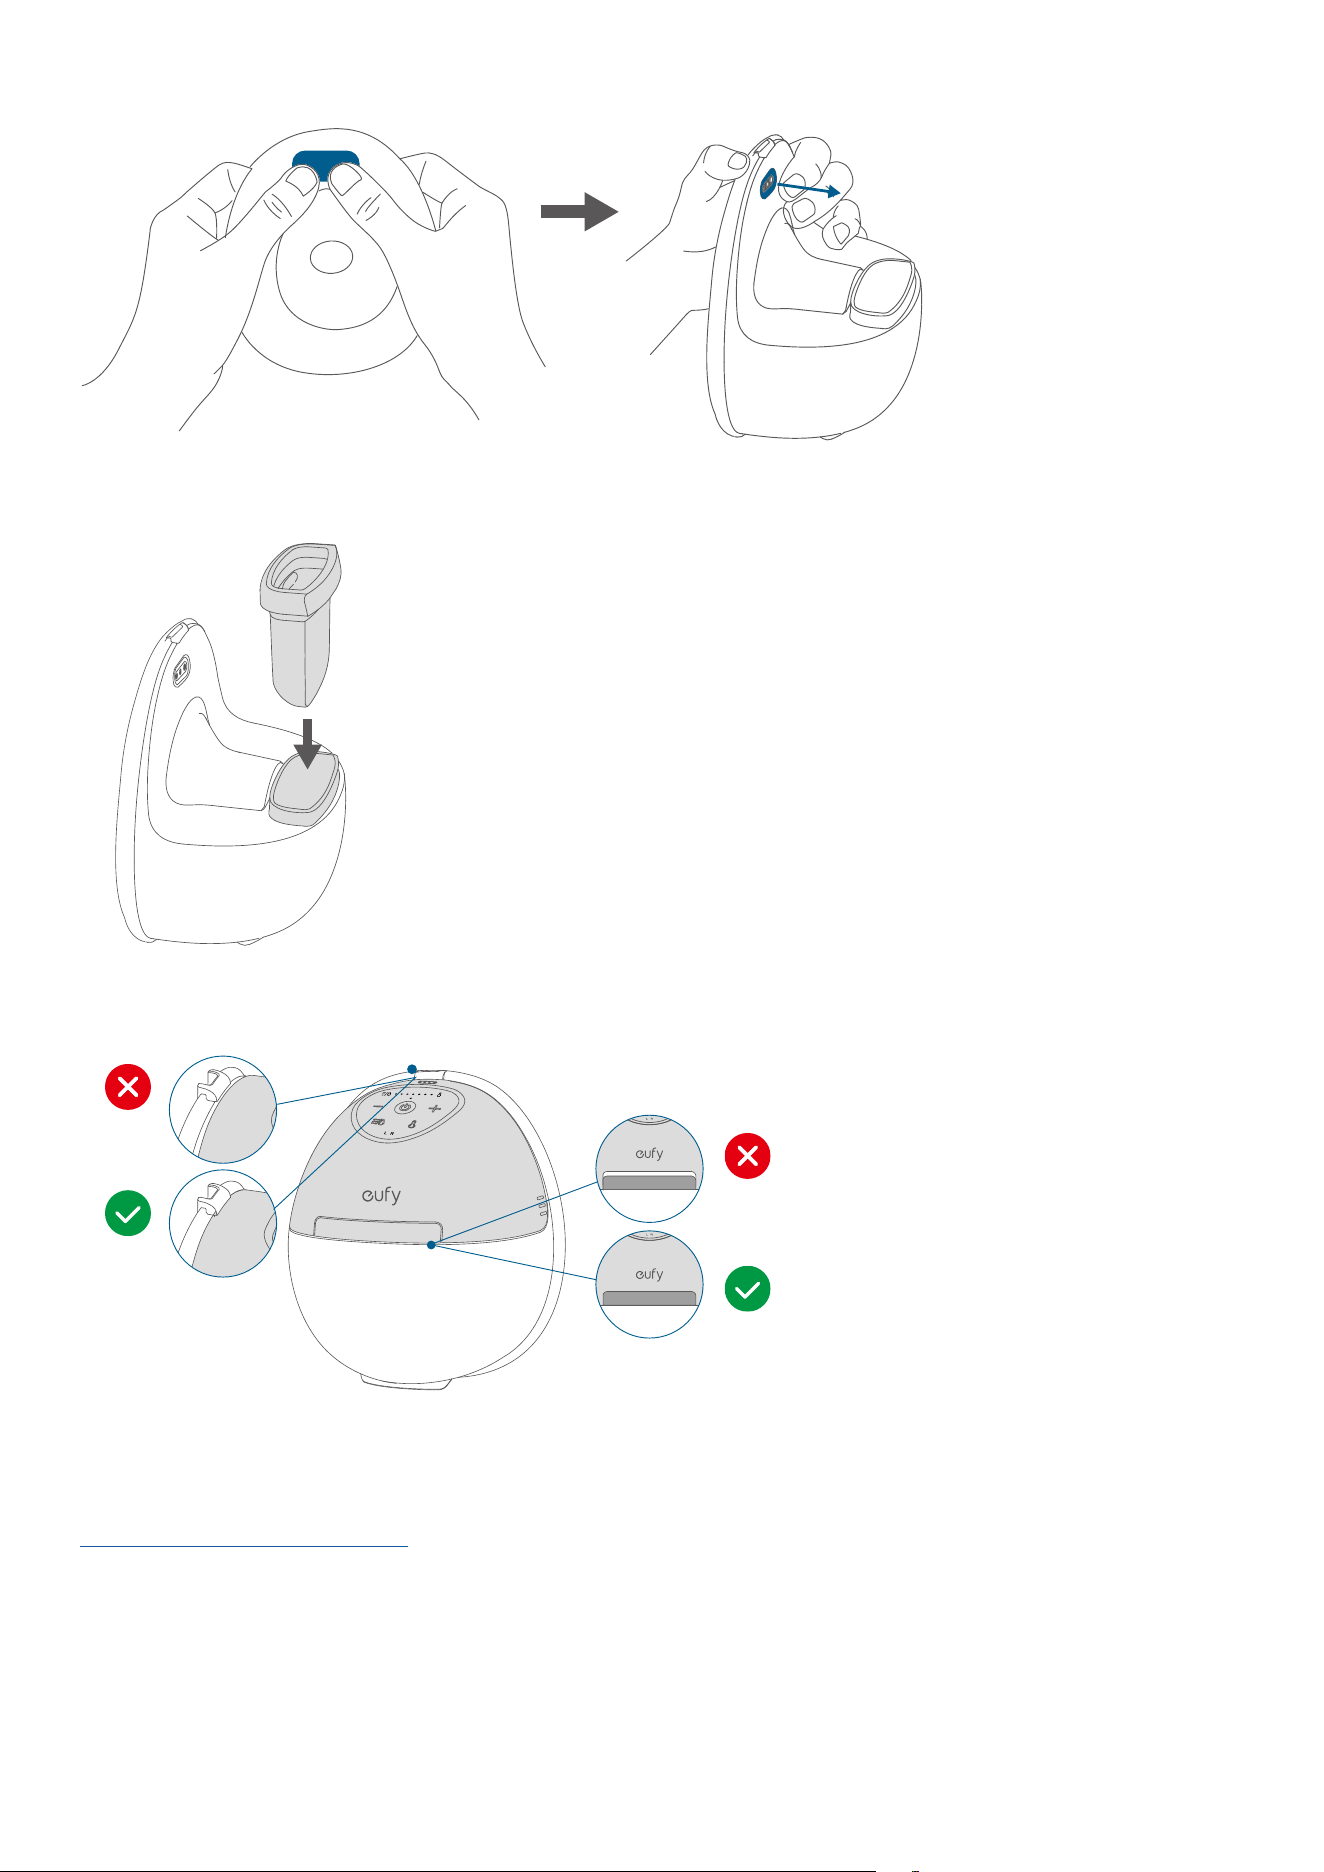
3. Press firmly behind the heating pins for full extension. Heating may fail if not fully extended.
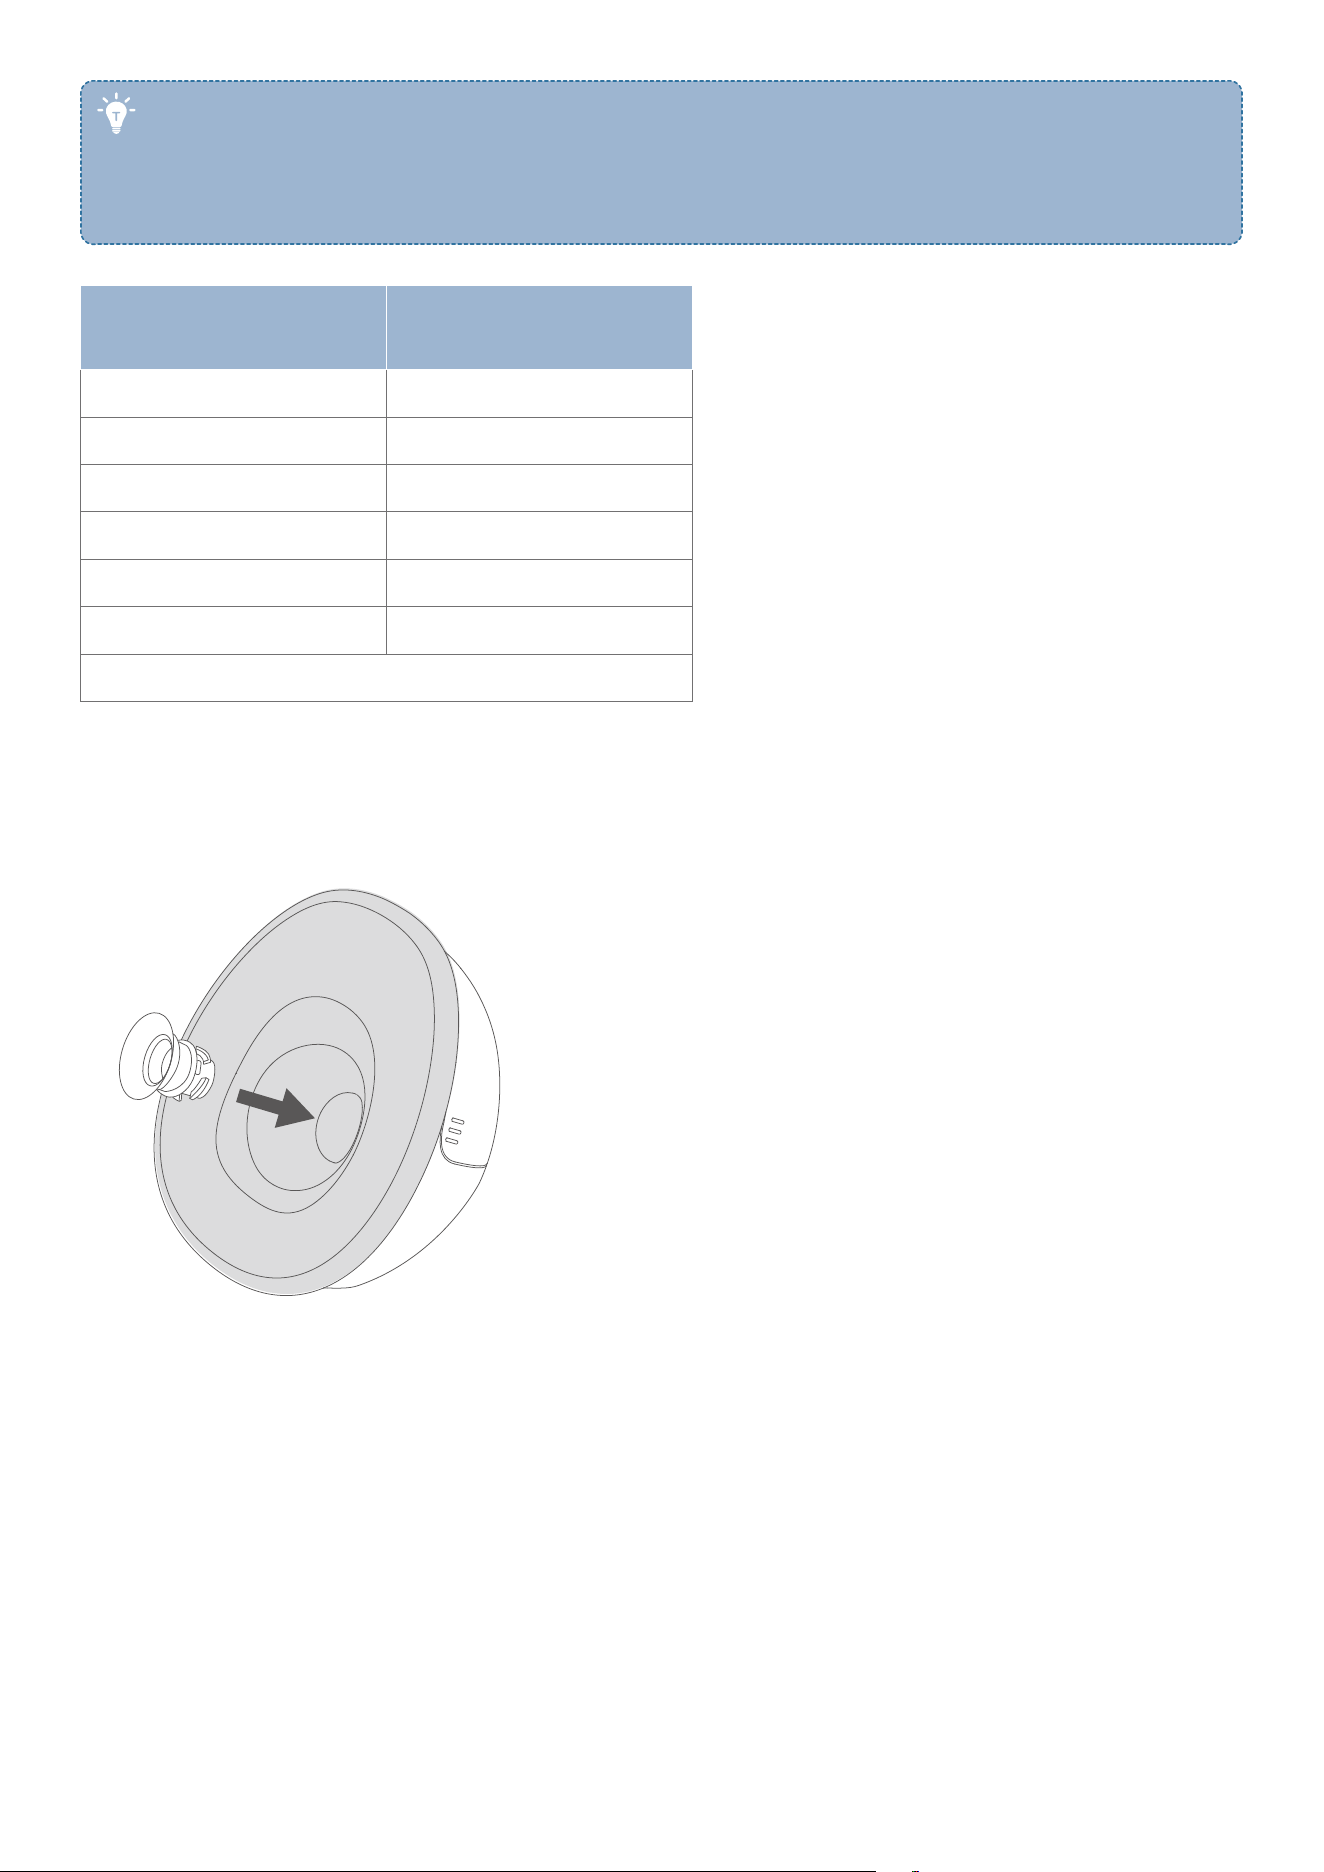
4. Insert the diaphragm into the groove of the container, with the concave side of the diaphragm facing the flange
side
.
5. Install the pump hub on the top of the container, pressing firmly to seal the gap between the pump hub and the
diaphragm.
Wearing
https://youtu.be/MZpAd5EKH9k
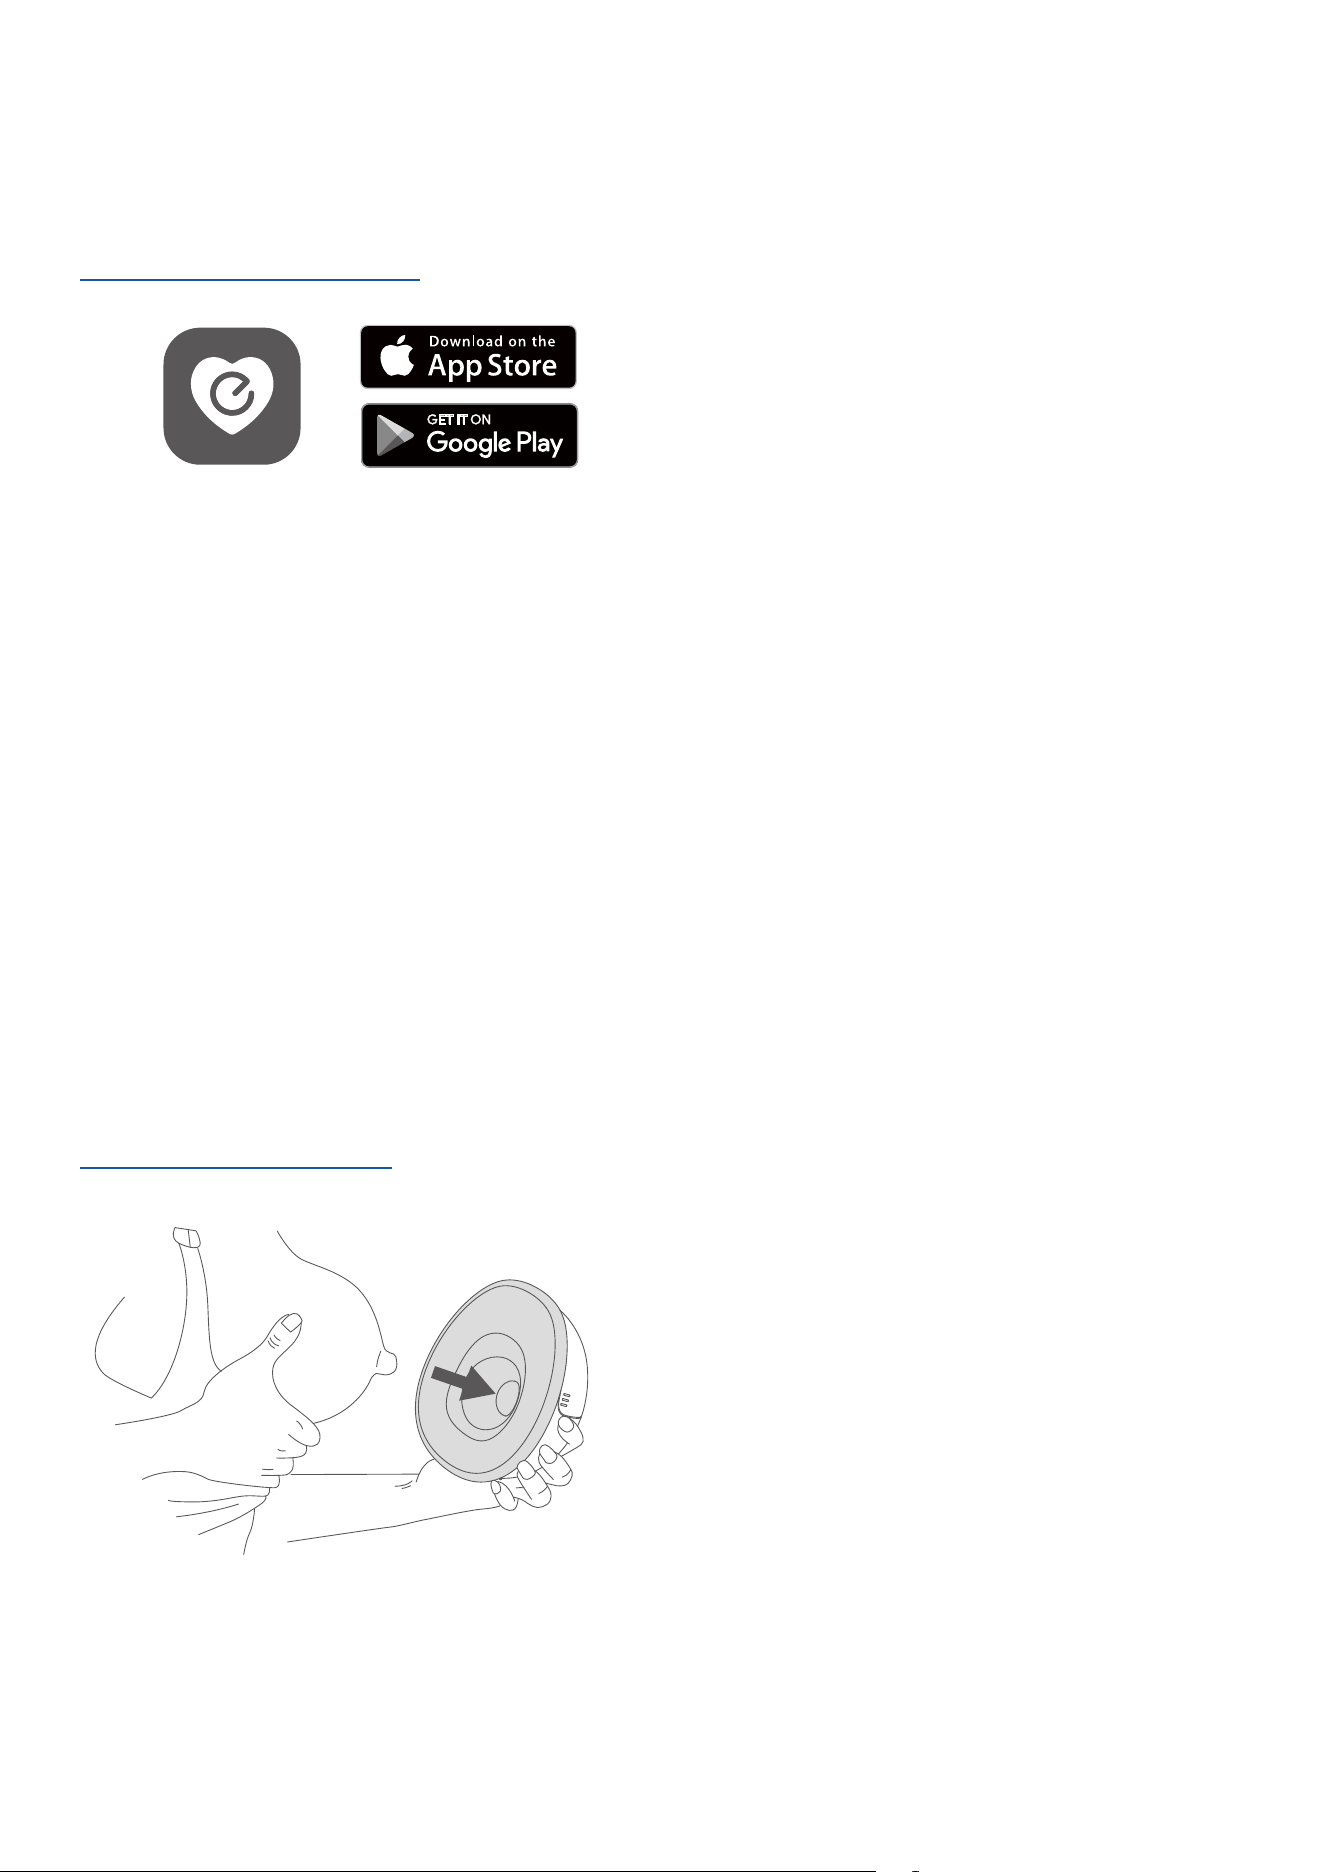
Measurement
Use the nipple measurement card to determine your flange or insert size:
1. Stimulate your nipple until it is erect.
2. Slide the hole over each nipple. Select a hole with a nipple diameter that fits snugly around the base.
3. Get your measurement based on the sizing chart.
• Nipple elasticity can aect sizing. You may need to size down if you have elastic nipples, or size up if
you have less elastic nipples. If you experience discomfort or notice a consistent decrease in output,
you may need to experiment with dierent sizes.
• 15 mm, 17 mm, 19 mm, and 21 mm sizing inserts must be used with 24 mm flanges. 24 mm and 27 mm
flanges are available for your choice.
Nipple Diameter
Recommended
Flange or Insert Size
11-13mm 15mm *
13-15mm 17mm *
15-17mm 19mm *
17-20mm 21mm *
20-23mm 24mm
23-26mm 27mm
* Sizing inserts must be used with 24mm flange.
Use a Sizing Insert (Optional)
To ensure a proper fit, use the Nipple Measurement Card to select an appropriate sizing insert and place the sizing
insert in the flange tunnel.
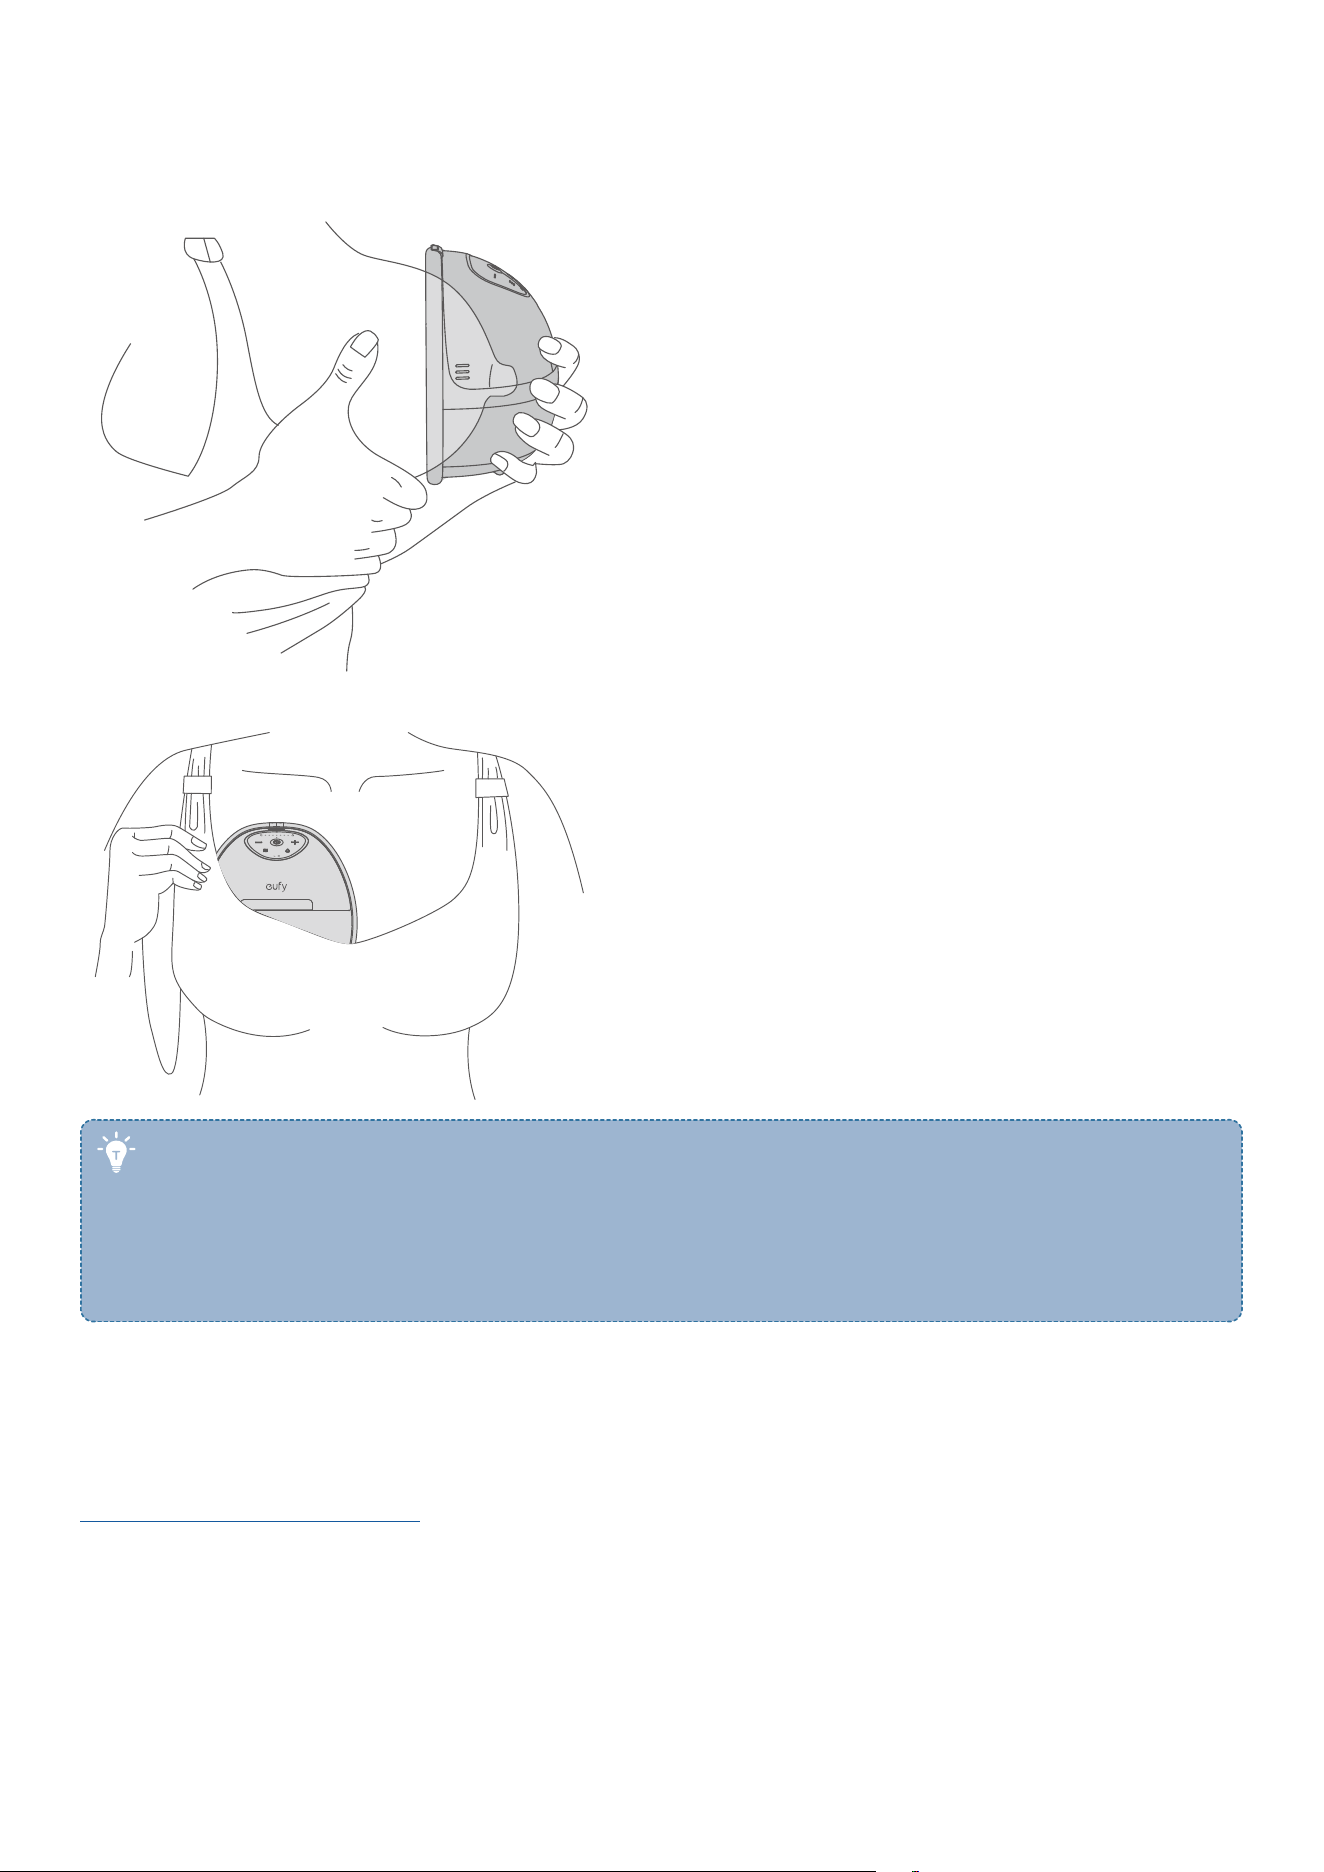
Wear
1. Slightly lean forward to make sure your nipple is centered in the flange tunnel. The breast pump should be firmly
against your breast.
2. Use a full-coverage nursing bra with a flap to create a tight seal between your breasts and the flange.
Two criteria will help you determine if the breast pump is positioned correctly:
• Whether you feel a noticeable suction that can pull out milk;
• Whether it is comfortable to wear.
If the wearing position doesn't meet either of these criteria, you need to adjust the position of the pump.
It takes a bit of time for your body to adapt to a new pump, so don't be discouraged if the results aren't
good at the very beginning.
Using without an App
https://youtu.be/9W_xgZgCSCQ
Pumping
1. Press and hold the power button for 2 seconds to turn the breast pump on.
2. Press the power button to start pumping. Press again to pause.
Press and Hold for 2 Seconds Turn Breast Pump On / O
(The breast pump will turn o automatically after
pumping for 30 minutes or pausing for 10 mintues.)
Press Pause / Continue
· The stimulation mode will last 2 minutes, then it will automatically switch to expression mode.
· If breast milk comes out early, switch to expression mode.
· Press the heating button to turn heating on or o.
Press Switch between Stimulation Mode and Expression Mode
Press Turn Heating On / O
· Adjust the suction or heat level to the most comfortable level.
Press Increase / Decrease the Suction / Heat Level
(To adjust the heat level, press the heating button first.)
· Check the milk level from time to time while pumping to avoid overfilling. Stop pumping if it is more than 6 oz (150
ml).
150
150ml 5
oz
3
2
1
4
120
ml
90
60
30
• Do not continue pumping for more than 5 minutes at a time if you do not succeed in expressing any milk.
Try again at another time during the day.
• If the process becomes very uncomfortable or painful, stop using the pump and consult your healthcare
professional.
• Do not wear and use the product for over 35 minutes. Consult your healthcare practitioner to
understand how long you should pump in a pumping session.
Stimulation Mode and Expression Mode
• Stimulation mode (also known as Massage mode):
Designed to mimic the initial rapid sucking that a baby does to stimulate the milk ejection reflex, also known as
letdown. This mode typically uses a faster and lighter suction pattern to encourage the breasts to start releasing
milk. The goal is to signal the body to begin milk flow. This mode is usually shorter in duration, lasting for a few
minutes, and is the first phase of the pumping process.
• Expression mode:
After the milk ejection reflex has been triggered, switch to expression mode. This mode imitates the slower, deeper
suck of a baby when it is actually feeding and drawing milk from the breast. Expression mode uses slower but
stronger suction to extract milk eciently. This phase can last as long as the mother needs to pump to empty the
breasts suciently, which can be about 10-20 minutes per session.
Using with eufy Baby App
https://youtu.be/9W_xgZgCSCQ
Your phone is your pumping partner. Enhance your experience with the eufy Baby app.
• Manage devices: Rename the breast pumps, select sides, and adjust LED light.
• Remote control: Start or stop pumping, adjust suction or heat level, switch between stimulation and expression
modes.
• Set schedule and session: Remind yourself not to forget to pump. Set a duration or capacity for each session.
• Optimize Milk Output with OptiRhythm Technology: Choose from 4 pre-set rhythms and customize your pump by
adjusting suction intensity, speed, and duration to best suit your baby.
1. Max Rhythm (by default): For moms who want the max output. Switch between stimulation and expression
modes multiple times.
2. Natural Rhythm: For moms who appreciate the natural suction rhythm of a baby. Switch between stimulation
and expression modes with a mix of long and short pulls.
3. Standard Rhythm: For moms who prefer a traditional electric pumping suction pattern. Single switch from
stimulation to expression mode after 2 minutes.
4. Gentle Rhythm: For moms who have sensitive nipples. Each suction is carefully calibrated to operate at a slower
pace and with a softer touch.
• Tutorial and FAQ: Refer to more detailed instructions or troubleshooting.
• Track data: Review your pumping history.
• Upgrade firmware: Upgrade firmware when available for improved performance or new features.
Transferring Milk
https://youtu.be/v_HzT9psxSY
1. Pause or turn o the breast pump. Lean forward when taking out the pump to prevent leakage.
2. Remove the pump hub from the container. (Refer to “Disassembling” step 1.)
Avoid disassembling any parts (including the diaphragm) other than the pump hub before transferring milk
to prevent leakage.
3. Leave the container on the table ready for transfer.
4. Tilt the container with the flange up to pour milk. When the pouring spout faces down, tilt further to empty
completely. Lastly, remove the diaphragm if needed to collect any trapped milk under it.

Storing Milk
Storing Breast Milk
Store breast milk in a clean and sterilized milk storage bag or a milk bottle with a sealing cushion, and immediately
place in the refrigerator to chill or freeze.
• Do not freeze breast milk repeatedly.
• Do not mix fresh breast milk with frozen breast milk.
Feeding Stored Milk
Place the frozen breast milk in the refrigerator for one night to thaw. Alternatively, you can use a bowl of hot water
to thaw in an emergency. Once thawed, it must be consumed within 24 hours.
• Make sure to check the temperature of breast milk before feeding your baby.
• Do not immerse the milk storage bottle in boiling water for heating to prevent it from rupturing or
cracking.
• Do not use a microwave oven to heat breast milk.
• Discard the breast milk left after feeding.
Maintenance
1. Pump Hub
Modifications of any kind are prohibited. Opening or tampering with the pump hub will void the warranty. If repair is
required, return the pump hub to the retailer or directly to the manufacturer.
2. Washable Parts
The expected service life of the washable parts is 1-3 months. It is recommended to replace the washable parts
after long-term storage or before pumping for your next child.
More wearable breast pumps and spare parts are available for purchase at
https://www.eufy.com/breast-pump
3. Built-in Battery
If your breast pump is not used for a long period of time, the built-in battery will discharge slowly. To prevent
damage to the battery from low voltage over a long period of time, charge your breast pumps every 3 months.
FAQ
Frequently asked questions and solutions can be found in the FAQ by clicking on the link below:
https://www.eufy.com/products/t8d02181?variant=43660278366394
Specifications
Input 100-240V ~, 50/60Hz
Output 5V
⎓
2A
Battery Capacity 1400mAh / 3.7VDC
Rated Power 5W
Battery Charging Time 1.5 Hours
Battery Usage Time 2 Hours
Noise Level <46dB
Operating Temperature 0
°C
- 40
°C
Transportation & Storage Temperature -20
°C
- 70
°C
Transportation & Storage Humidity 15% - 90%