

en-us
2
Further information and explanations are available online:
Table of contents
1 IMPORTANT SAFETY INSTRUCTIONS.................... 4
1.1 Safety definitions....................................................... 4
1.2 General information................................................... 4
1.3 Safe use.................................................................... 4
1.4 Child safety ............................................................... 6
1.5 Safe use of the meat probe ....................................... 6
1.6 Cleaning function ...................................................... 6
1.7 Proper installation and maintenance ......................... 7
1.8 Remote operation ..................................................... 7
1.9 State of California Proposition 65 Warnings .............. 7
2 Preventing material damage .................................... 8
2.1 General information................................................... 8
2.2 Core temperature probe............................................ 8
2.3 Rotisserie spit ........................................................... 9
3 Environmental protection and energy-saving ........ 9
3.1 Disposal of packaging ............................................... 9
3.2 Saving energy ........................................................... 9
4 Familiarizing yourself with your appliance ............. 9
4.1 Appliance .................................................................. 9
4.2 Oven cavity ............................................................. 10
4.3 Interior lighting ........................................................ 10
4.4 Control elements..................................................... 10
4.5 Types of heating ..................................................... 14
4.6 Low power mode display......................................... 16
4.7 Additional information.............................................. 17
4.8 Pop-up notifications................................................. 17
4.9 Quick guides ........................................................... 17
4.10 Cooling fan............................................................ 17
4.11 Automatic switch-off .............................................. 17
4.12 Wipe protection ..................................................... 17
4.13 Proximity sensor ................................................... 17
4.14 Door lock............................................................... 18
4.15 Catalyzer heating .................................................. 18
5 Functions in the HomeConnect® app .................. 18
6 Accessories............................................................. 19
6.1 Other accessories ................................................... 19
6.2 Sliding accessories into the oven cavity .................. 20
7 Before using for the first time ................................ 21
7.1 Initial use................................................................. 21
8 Basic Operation ...................................................... 21
8.1 Switching on the appliance...................................... 21
8.2 Opening the appliance door .................................... 21
8.3 Changing the type of heating.................................... 22
8.4 Changing the temperature........................................ 22
8.5 Displaying the current interior oven temperature ...... 22
8.6 Switching on the broiler and changing the broil
setting ...................................................................... 22
8.7 Add broiler................................................................ 22
8.8 Opening the appliance door automatically after
the cooking process ................................................. 23
8.9 Deactivating automatic appliance door opening ....... 23
8.10 Interrupting and continuing an operation ................ 23
8.11 Opening and closing the control center .................. 23
8.12 Switching the interior lighting on or off .................... 23
8.13 Switching off the appliance..................................... 23
8.14 Switching on the appliance after automatic shut-
off........................................................................... 23
8.15 Displaying information ............................................ 23
8.16 Displaying appliance information ............................ 24
8.17 Using the quick guides ........................................... 24
9 Timer functions ........................................................ 24
9.1 Overview of the timer functions ................................ 24
9.2 Call up the timer menu ............................................. 24
9.3 Exiting the timer menu.............................................. 24
9.4 Cooking time ............................................................ 24
9.5 Cooking time end ..................................................... 25
9.6 Count-up cooking timer ............................................ 25
10 Sabbath mode
1
....................................................... 26
10.1 Selecting a time period for the Sabbath mode
function .................................................................. 26
10.2 Opening the Sabbath mode function ...................... 26
10.3 Selecting the settings for the interior lighting
while the Sabbath mode function is active.............. 26
10.4 Setting heating cycles ............................................ 26
10.5 Changing the time period for the Sabbath mode
function .................................................................. 27
10.6 Changing settings for the interior lighting................ 27
10.7 Changing the heating cycle .................................... 27
10.8 Deleting a heating cycle ......................................... 27
10.9 Starting the Sabbath mode function ....................... 27
10.10 Switching off the Sabbath mode function.............. 27
11 Child lock................................................................ 27
11.1 Activating the childproof lock .................................. 27
11.2 Deactivating the childproof lock .............................. 27
12 Rotisserie spit ........................................................ 28
12.1 Preparing the rotisserie spit.................................... 28
1
Available depending on the software version.

en-us
3
12.2 Switching on the rotisserie spit.............................. 30
12.3 Switching off and removing the rotisserie spit........ 30
12.4 Inserting the handle............................................... 30
12.5 Removing the food from the rotisserie spit ............ 30
12.6 Removing the handle ............................................ 31
12.7 Storing the rotisserie spit....................................... 31
13 Searing function.................................................... 31
13.1 Starting the searing function.................................. 31
13.2 Ending the searing function early .......................... 31
14 Favorites................................................................ 32
14.1 Creating the first favorites ..................................... 32
14.2 Selecting a favorite................................................ 32
14.3 Renaming a favorite .............................................. 32
14.4 Starting a favorite.................................................. 32
14.5 Changing a favorite............................................... 32
14.6 Deleting a favorite ................................................. 32
15 Programs ............................................................... 32
15.1 Automatic programs .............................................. 32
15.2 Recommended settings ........................................ 33
16 Core temperature sensor ..................................... 34
16.1 Inserting the core temperature probe into the
food....................................................................... 35
16.2 Turning the food.................................................... 36
16.3 Setting the core temperature probe....................... 36
16.4 Deleting the set core temperature ......................... 37
16.5 Changing the set core temperature ....................... 37
16.6 Core temperature guideline values........................ 37
16.7 Estimated cooking time ......................................... 38
17 HomeConnect® ................................................... 38
17.1 Setting upHomeConnect®................................... 38
17.2 HomeConnect® settings ...................................... 38
17.3 Starting functions with the HomeConnect® app
via manual Remote start ....................................... 39
17.4 Starting functions with the HomeConnect® app
via permanently activated Remote start ................ 39
17.5 Using the HomeConnect® app to change
settings ................................................................. 39
17.6 Switching the Wi-Fi on or off ................................. 39
17.7 Software update.................................................... 39
17.8 Data Protection ..................................................... 40
18 Basic settings........................................................ 41
18.1 Overview of the basic settings............................... 41
18.2 Changing the basic settings .................................. 47
19 Cleaning and maintenance................................... 47
19.1 Cleaning agents .................................................... 47
19.2 Microfiber cloth...................................................... 48
19.3 Removing the shelf supports................................. 48
19.4 Fitting the shelf supports ....................................... 49
19.5 Cleaning the fully extendable telescopic pull-out
rack ........................................................................ 49
19.6 Cleaning the rotisserie spit ..................................... 49
20 Pyrolytic self-cleaning ........................................... 49
20.1 Preparing pyrolytic self-cleaning............................. 50
20.2 Preparing the cleaning of accessories with the
pyrolytic self-cleaning function................................ 50
20.3 Starting the pyrolytic self-cleaning function............. 50
20.4 Stopping the pyrolytic self-clean ............................. 51
21 Troubleshooting..................................................... 52
21.1 Power failure .......................................................... 53
21.2 Demo mode............................................................ 53
22 Disposal .................................................................. 53
22.1 Disposal of your old appliance................................ 53
23 How it works ........................................................... 53
23.1 General cooking tips............................................... 53
24 Customer Service................................................... 55
24.1 Model number (E-Nr.), production number (FD)
and consecutive numbering (Z-Nr.) ........................ 56
24.2 Rating plate location............................................... 56
25 Information regarding Free and Open Source
Software.................................................................. 56
26 STATEMENT OF LIMITED PRODUCT
WARRANTY ............................................................ 56
26.1 What this warranty covers & Who it applies to........ 56
26.2 How long the warranty lasts ................................... 56
26.3 Repair/replace as your exclusive remedy ............... 57
26.4 Out of warranty product.......................................... 57
26.5 Warranty exclusions ............................................... 57
26.6 Obtaining warranty service ..................................... 58
26.7 Product information ................................................ 58

en-us
4
Read all of the instructions carefully before using the
appliance. In order to reduce the risk of fire, electric
shocks and personal injuries when using the appliance,
follow the basic safety precautions, including the following
safety instructions.
1.1 Safety definitions
Here you can find explanations of the safety signal words
used in this manual.
WARNING
This indicates that death or serious injuries may occur as
a result of non-observance of this warning.
CAUTION
This indicates that minor or moderate injuries may occur
as a result of non-observance of this warning.
NOTICE:
This indicates that damage to the appliance or property
may occur as a result of non-compliance with this
advisory.
Note:This alerts you to important information and/or tips.
1.2 General information
Here you can find general information about this manual.
¡ Please read this manual carefully.
¡ Observe the safety instructions and warnings.
¡ Keep the manual and the product information in a safe
place for future reference or for the next owner.
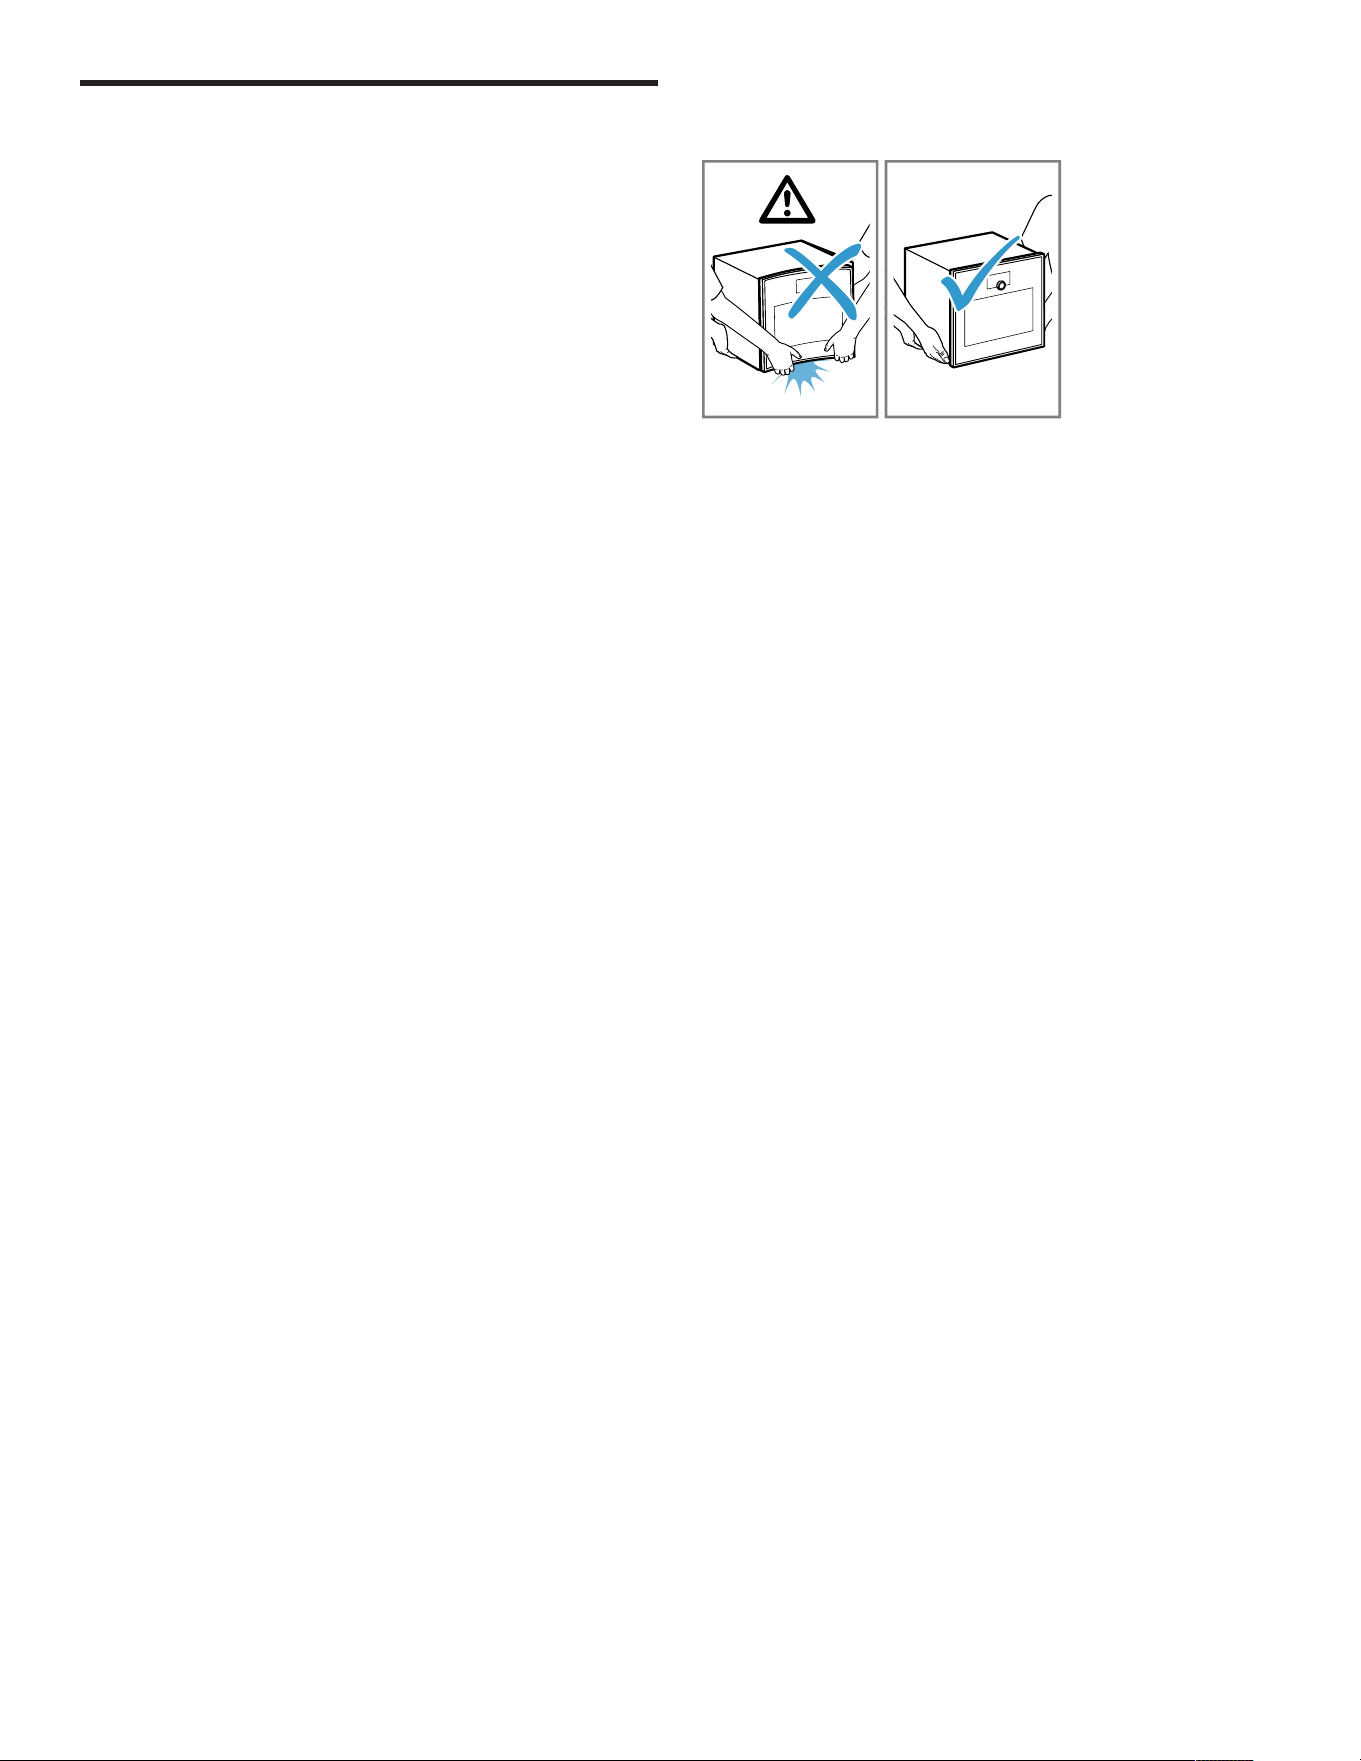
¡ Check the appliance for damage after unpacking it. Do
not connect the appliance if it has been damaged in
transit.
This appliance is intended for use up to a maximum height
of 13,100feet (4000meters) above sea level.
1.3 Safe use
WARNING
When properly cared for, your new appliance has been
designed to be safe and reliable.
▶
Read all instructions carefully before use. These
precautions will reduce the risk of burns, electric shock,
fire, and injury to persons.
▶
When using kitchen appliances, basic safety
precautions must be followed, including those in the
following pages.
WARNING
While cooking food items, small amounts of certain by-
products, such as particulate matter / soot, can be
released. To minimize exposure to these substances:
▶
Always ensure proper ventilation by using an
appropriate ventilation fan or hood vented to the
outside and/or an open window.
▶
Always operate the unit according to the instructions in
this manual.
WARNING
Overheated materials can cause fire or burns and may
produce potentially harmful smoke or fumes.
▶
To prevent overheating, turn ventilation hood ON when
heating grease, fats or frying using medium to high heat
settings.
▶
Avoid heating empty pots and pans.
▶
Do not allow pans to boil dry.
▶
Do not allow aluminum foil, plastic, paper, or cloth to
come in contact with a hot surface element, burner, or
grate.
WARNING
If materials inside an oven or warming drawer should
ignite, keep door closed.
▶
Turn off the appliance and disconnect the circuit at the
circuit breaker box.
A fire could occur during cooking.
▶
Always have a working smoke detector near the
kitchen.
▶
Have an appropriate fire extinguisher available, nearby,
highly visible and easily accessible near the appliance.
NEVER cover any slots, holes or passages in the oven
bottom or cover an entire rack with materials such as
aluminum foil.
▶
Doing so blocks air flow through the oven.
▶
Aluminum foil linings may also trap heat, causing a fire
hazard.
Cooking fires can spread if extinguished incorrectly.
▶
Never use water on cooking fires.
Wear Proper Apparel. Loose-fitting or hanging garments,
such as ties, scarves, jewelry, or dangling sleeves, should
never be worn while using the appliance.
▶
Tie long hair so that it does not hang loose.
▶
Secure all loose garments, etc. before beginning.
In the event that personal clothing or hair catches fire,
drop and roll immediately to extinguish flames.
IMPORTANT SAFETY INSTRUCTIONS
READ AND SAVE THESE INSTRUCTIONS

en-us
5
Do Not Use Water on Grease Fires.
▶
Smother fire or flame or use dry chemical or foam-type
extinguisher.
CAUTION
The oven vents are important for air circulation. Covering
the oven vents will cause the oven to overheat. Refer to
the appliance overview for the location of the oven vents.
▶
Do not obstruct oven vents.
WARNING
Use Only Dry Potholders - Moist or damp potholders on
hot surfaces may result in burns from steam.
▶
Do not let potholders touch hot heating elements.
▶
Do not use a towel or other bulky cloth.
DO NOT TOUCH HEATING ELEMENTS OR INTERIOR
SURFACES OF OVEN - Heating elements may be hot
even though they are dark in color. Interior surfaces of an
oven become hot enough to cause burns.
▶
During and after use, do not touch, or let clothing,
potholders, or other flammable materials contact
heating elements or interior surfaces of oven until they
have had sufficient time to cool. Other surfaces of the
appliance may become hot enough to cause burns.
Among these surfaces are oven vent openings,
surfaces near these openings and oven doors.
Use Care When Opening Door - Let hot air or steam
escape before removing or replacing food.
▶
Standing to the side, open the door (or drawer) slowly
and slightly to let hot air and/or steam escape.
▶
Keep your face clear of the opening and make sure
there are no children or pets near the appliance.
▶
After the release of hot air and/or steam, proceed with
your cooking.
▶
Keep doors shut unless necessary for cooking or
cleaning purposes.
▶
Do not leave open doors unattended.
Do not clean the appliance while it is still hot. Some
cleaners produce noxious fumes when applied to a hot
surface. Wet clothes and sponges can cause burns from
steam.
CAUTION
Use caution when cooking foods with high alcohol content
(e.g. rum, brandy, bourbon) in the oven. Alcohol
evaporates at high temperatures. There is a risk of
burning as the alcohol vapors may catch fire in the oven.
▶
Use only small quantities of alcohol in foods, and open
the oven door carefully.
Placement of Oven Racks - Always place oven racks in
desired location while oven is cool. If the rack must be
moved while the oven is hot, do not let potholders contact
the hot heating elements in the oven. Use caution when
removing oven racks from the lowest rack position to
avoid contact with the hot oven door.
WARNING
Storage in or on Appliance - The use of corrosive
chemicals in heating or cleaning will damage the
appliance and could result in injury.
▶
Flammable materials, corrosive chemicals, vapors or
non-food products should not be stored or used in an
oven or on or near surface units.
▶
The appliance is specifically designed for use when
heating or cooking food.
This appliance is intended for normal family household
use only. It is not approved for outdoor use. See the
Statement of Limited Product Warranty. If you have any
questions, contact the manufacturer.
WARNING
Using this appliance other than for its intended use can
cause fire or injury to persons.
▶
Use this appliance only for its intended use as
described in this manual.
▶
NEVER use your appliances as a space heater for
warming or heating the room. Doing so may result in
overheating the appliance.
▶
Never use the appliance for storage.
Do not heat or warm unopened food containers. Build-up
of pressure may cause the container to burst and cause
injury.
Failure to operate knobs properly may result in personal
injury and damage to the appliance.
Cooking or roasting bags might explode.
▶
Follow the manufacturer’s directions when using
cooking or roasting bags.
CAUTION
To avoid possible injury or damage to the appliance,
ensure oven rack is installed exactly per installation
instructions and not backwards or upside down.
Do not place anything on the oven cavity bottom. Do not
cover it with aluminum foil. A build-up of heat could
damage the appliance or cause injury.
WARNING
Moisture intrusion may cause an electric shock.
▶
Do not use any steam cleaners or high-pressure
cleaners to clean the appliance.
IMPORTANT SAFETY INSTRUCTIONS
READ AND SAVE THESE INSTRUCTIONS

en-us
6
To avoid risk of injury from a damaged appliance or power
cord, observe the following.
▶
Do not turn the power on if the appliance or the power
cord is damaged. Doing so may cause injury.
▶
Never operate a damaged appliance.
▶
If the appliance or the power cord is damaged,
immediately switch off the breaker in the circuit breaker
box.
▶
Call Customer Service. →
Page55
▶
Repairs to the appliance should only be performed by
an authorized service provider.
WARNING
Scratched glass in the appliance door may develop into a
crack.
▶
Do not use any harsh or abrasive cleaners or sharp
metal scrapers to clean the glass on the oven door, as
they may scratch the surface.
1.4 Child safety
This appliance is not intended for use by persons
(including children) with reduced physical, sensory or
mental capabilities, or lack of experience and knowledge,
unless they have been given supervision or instruction
concerning use of the appliance by a person responsible
for their safety.
When children become old enough to use the appliance, it
is the responsibility of the parents or legal guardians to
ensure that they are instructed in safe practices by
qualified persons.
WARNING
Do not allow children to use this appliance unless closely
supervised by an adult.
▶
Children and pets should not be left alone or
unattended in the area where the appliance is in use.
They should never be allowed to play in its vicinity,
whether or not the appliance is in use.
Do not allow anyone to climb, stand, lean, sit, or hang on
any part of an appliance, especially a door, warming
drawer, or storage drawer.
▶
This can damage the appliance, and the unit may tip
over, potentially causing severe injury.
Do not let children play with the appliance.
CAUTION
Do not store items of interest to children in an appliance,
in cabinets above an appliance or on the backguard of an
appliance. Children climbing on the appliance to reach
items could be seriously injured.
Do Not Leave Children Alone.
▶
Children should not be left alone or unattended in the
area where the appliance is in use.
▶
They should never be allowed to sit or stand on any
part of the appliance.
▶
Always check inside the oven before turning it on.
WARNING
To avoid the risk of suffocation:
▶
Do not allow children to play with packaging material.
▶
Store small parts safely as they can be a choke hazard.
1.5 Safe use of the meat probe
WARNING
The oven interior and the meat probe become very hot.
▶
Use oven mitts to plug and unplug the meat probe.
WARNING
Use of a wrong meat probe can damage the insulation.
Use only the meat probe intended for this appliance.
1.6 Cleaning function
Follow these safety instructions when using the cleaning
function.
WARNING
Do not block the oven vent(s) during the self-cleaning
cycle. Always operate the unit according to the
instructions in this manual.
WARNING
During the elimination of soil during self-cleaning, small
amounts of carbon monoxide can be created and the
fiberglass insulation could give off very small amounts of
formaldehyde during the first several cleaning cycles.
▶
To minimize exposure to these substances, provide
good ventilation with an open window, or use a
ventilation fan or hood.
The oven heats up to a very high temperature during self
cleaning. Opening the door can result in injury.
▶
When self-cleaning, confirm that the door locks and will
not open.
▶
If the door does not lock, do not run Self Clean. Contact
Customer Service.
IMPORTANT SAFETY INSTRUCTIONS
READ AND SAVE THESE INSTRUCTIONS

en-us
7
WARNING
The outside of the appliance gets very hot when the
cleaning function is in progress.
▶
Never touch the appliance door.
▶
Allow the appliance to cool down.
▶
Keep children at a safe distance.
WARNING
Do not leave food or cooking utensils, etc., in an oven
during the pyrolytic self-cleaning mode of operation.
CAUTION
Remove broiler pans, pots, and other utensils and excess
spillage before self-cleaning.
CAUTION
Birds have very sensitive respiratory systems.
▶
Keep pet birds out of the kitchen or other rooms where
kitchen fumes could reach them.
▶
During self clean, fumes are released that may be
harmful to birds.
▶
Other kitchen fumes such as overheating margarines
and cooking oils may also be harmful.
WARNING
Do not clean the door gasket – The door gasket is
essential for a good seal. Care should be taken not to rub,
damage, or move the gasket.
WARNING
Do not use a protective coating to line the oven and do not
use commercial oven cleaner.
Clean only parts listed in this manual.
Please note that some pets or humans can be sensitive to
the odors created during the self-cleaning process
whether it is a manufacturing residue burn off or food. It is
recommended that those potentially affected be removed
from the kitchen area during the self-clean process.
1.7 Proper installation and maintenance
WARNING
In the event of a malfunction, it might become necessary
to turn off the power supply.
▶
Have the installer show you the circuit breaker or fuse.
Mark it for easy reference.
To avoid electrical shock hazard, before servicing the
appliance, turn power off at the service panel and lock the
panel to prevent the power from being switched on
accidentally.
Proper Installation - Improper installation or grounding can
cause electric shock.
▶
This appliance must be properly installed and grounded
by a qualified technician.
▶
Connect only to properly grounded outlet.
▶
Refer to installation instructions for details.
User Servicing - Do not repair or replace any part of the
appliance unless specifically recommended in this
manual.
▶
All other servicing should be referred to an authorized
service provider.
WARNING
Grease and fat can ignite when heated.
▶
Keep the oven free from grease build up.
CAUTION
In the event of an error the display flashes and beeps
continuously.
▶
Disconnect appliance from the power supply and call
an authorized service provider.
WARNING
Malfunctions can cause injuries.
▶
Do not operate this appliance if it is not working
properly, or if it has been damaged. Contact an
authorized service provider.
1.8 Remote operation
CAUTION
This appliance may be configurable to allow remote
operation at any time.
▶
Do not store any flammable materials or temperature
sensitive items inside, on top or near surface units of
the appliance.
1.9 State of California Proposition 65
Warnings
This product may contain a chemical known to the State
of California, which can cause cancer or reproductive
harm. Therefore, the packaging of your product may bear
the following label as required by California:
IMPORTANT SAFETY INSTRUCTIONS
READ AND SAVE THESE INSTRUCTIONS
en-us Preventing material damage
8
Preventing material damage
2 Preventing material damage
Preventing material damage
2.1 General information
NOTICE:
Objects on the oven cavity floor will cause heat to build up.
The baking and roasting times will no longer be correct
and the enamel will be damaged.
▶
Do not place anything directly on the oven cavity floor.
▶
Do not cover the oven cavity floor with any sort of foil or
baking parchment.
When the oven cavity is hot, any water inside it will create
steam. The change in temperature that occurs as a result
may cause damage.
▶
Never pour water into the oven cavity when it is still hot.
▶
Never place cookware containing water on the oven
cavity floor.
The prolonged presence of moisture in the oven cavity
leads to corrosion.
▶
Do not keep moist food in the closed oven cavity for
extended periods of time.
▶
Do not store food in the oven cavity.
Fruit juice dripping from the baking tray leaves stains that
cannot be removed.
▶
When baking very juicy fruit flans, do not pack too much
on the baking tray.
▶
If possible, use the deeper universal pan.
If aluminum foil comes into contact with the door pane, it
could cause permanent discoloration.
▶
Do not allow aluminum foil in the oven cavity to come
into contact with the door pane.
Leaving the appliance to cool down with the door open will
damage the front of adjacent units over time.
▶
Always allow the oven cavity to cool down with the door
closed after cooking at high temperatures.
▶
Do not trap anything in the appliance door.
▶
Only leave the oven cavity to dry with the door open if a
lot of moisture was produced during operation.
If the seal is very dirty, the appliance door will no longer
close properly during operation. The fronts of adjacent
units could be damaged.
▶
Always keep the seal clean.
▶
Never operate the appliance if the seal is damaged or
missing.
Sitting or placing objects on the appliance door may
damage it.
▶
Do not place, hang or support objects on the appliance
door.
▶
Do not place any cookware or accessories on the
appliance door.
With certain models, accessories may scratch the door
panel when closing the appliance door.
▶
Always slide accessories into the oven cavity as far as
they will go.
Carrying the appliance by the appliance frame may cause
it to bend. The appliance frame cannot support the weight
of the appliance.
▶
Do not lift the appliance using the appliance frame.
▶
Always lift the appliance at the casing.
The heat during the pyrolytic self-cleaning may damage
certain accessories.
▶
Do not clean the wire rack, rotisserie spit, cast iron
roaster, baking stone, core temperature probe or other
accessories using the pyrolytic self-cleaning function.
▶
Only clean GAGGENAU baking trays and grill trays with
the pyrolytic self-cleaning function.
Using cleaning agents before the pyrolytic self-cleaning
cycle may damage the cooking compartment and the
glass on the appliance door.
▶
Before the pyrolytic self-cleaning cycle, do not use any
cleaning agents in the cooking compartment or on the
inside of the appliance door.
The oven's wire rack is not suitable for the combi-steam
oven. Corrosion may form on the oven's wire rack.
▶
Do not use the oven's wire rack in the combi-steam
oven.
2.2 Core temperature probe
WARNING
An incorrect core temperature probe may damage the
insulation.
▶
Only use the core temperature probe that is suitable for
this appliance.
NOTICE:
Temperatures above 480°F (250°C) damage the core
temperature probe.
▶
Only use the core temperature probe in your appliance
at a maximum temperature of 480°F (250°C).
▶
Do not use the core temperature probe with any broil
heating mode.
▶
Before using a broil heating mode, remove the core
temperature probe from the oven cavity.
You may damage the cable of the core temperature probe
with the appliance door.
▶
Do not trap the cable of the core temperature probe in
the appliance door.
Environmental protection and energy-saving en-us
9
The heat of the grilling surface may damage the core
temperature probe.
▶
Ensure that the distance between the glass grilling
surface and the core temperature probe and the cable
of the core temperature probe is a few centimeters. In
doing so, ensure that the meat can expand during the
cooking process.
Aggressive cleaning agents may damage the core
temperature probe.
▶
Do not clean the core temperature probe in the
dishwasher.
2.3 Rotisserie spit
To prevent material damage to your accessory, observe
the following information.
NOTICE:
The heat in the oven causes damage to the handle of the
rotisserie spit.
▶
Do not place the handle of the rotisserie spit in the
oven.
Cleaning the rotisserie spit drive in the dishwasher can
damage it.
▶
Do not clean the rotisserie spit drive in the dishwasher.
Temperatures above 480°F (250°C) damage the
rotisserie spit.
▶
Only use the rotisserie spit in your appliance at a
maximum temperature of 480°F (250°C).
Environmental protection and energy-saving
3 Environmental protection and
energy-saving
Environmental protection and energy-saving
3.1 Disposal of packaging
The packaging materials are environmentally compatible
and can be recycled.
▶
Sort the individual components by type and dispose of
them separately.
3.2 Saving energy
If you follow these instructions, your appliance will use
less power.
When cooking multiple dishes, do so in succession or in
parallel.
a
The oven cavity is heated after cooking the first dish.
This reduces the heating-up time for the following
dishes.
If the cooking time is relatively long, you can switch the
appliance off 10minutes before the cooking time ends.
a
There will be enough residual heat to finish cooking the
dish.
When operating with the "Bake with humidity",
"Convection plus" and "Economy convection" type of
heating, you can bake on several levels at the same time.
a
This will save energy.
Use dark-colored or black-coated baking tins.
a
These types of baking tin absorb the heat particularly
well.
Open the appliance door as little as possible during
operation.
a
This maintains the temperature in the oven cavity and
eliminates the need for the appliance to reheat.
Familiarizing yourself with your appliance
4 Familiarizing yourself with your
appliance
Familiarizing yourself with your appliance
This Use and Care Manual covers several models. Your
model may have some but not all of the features listed.
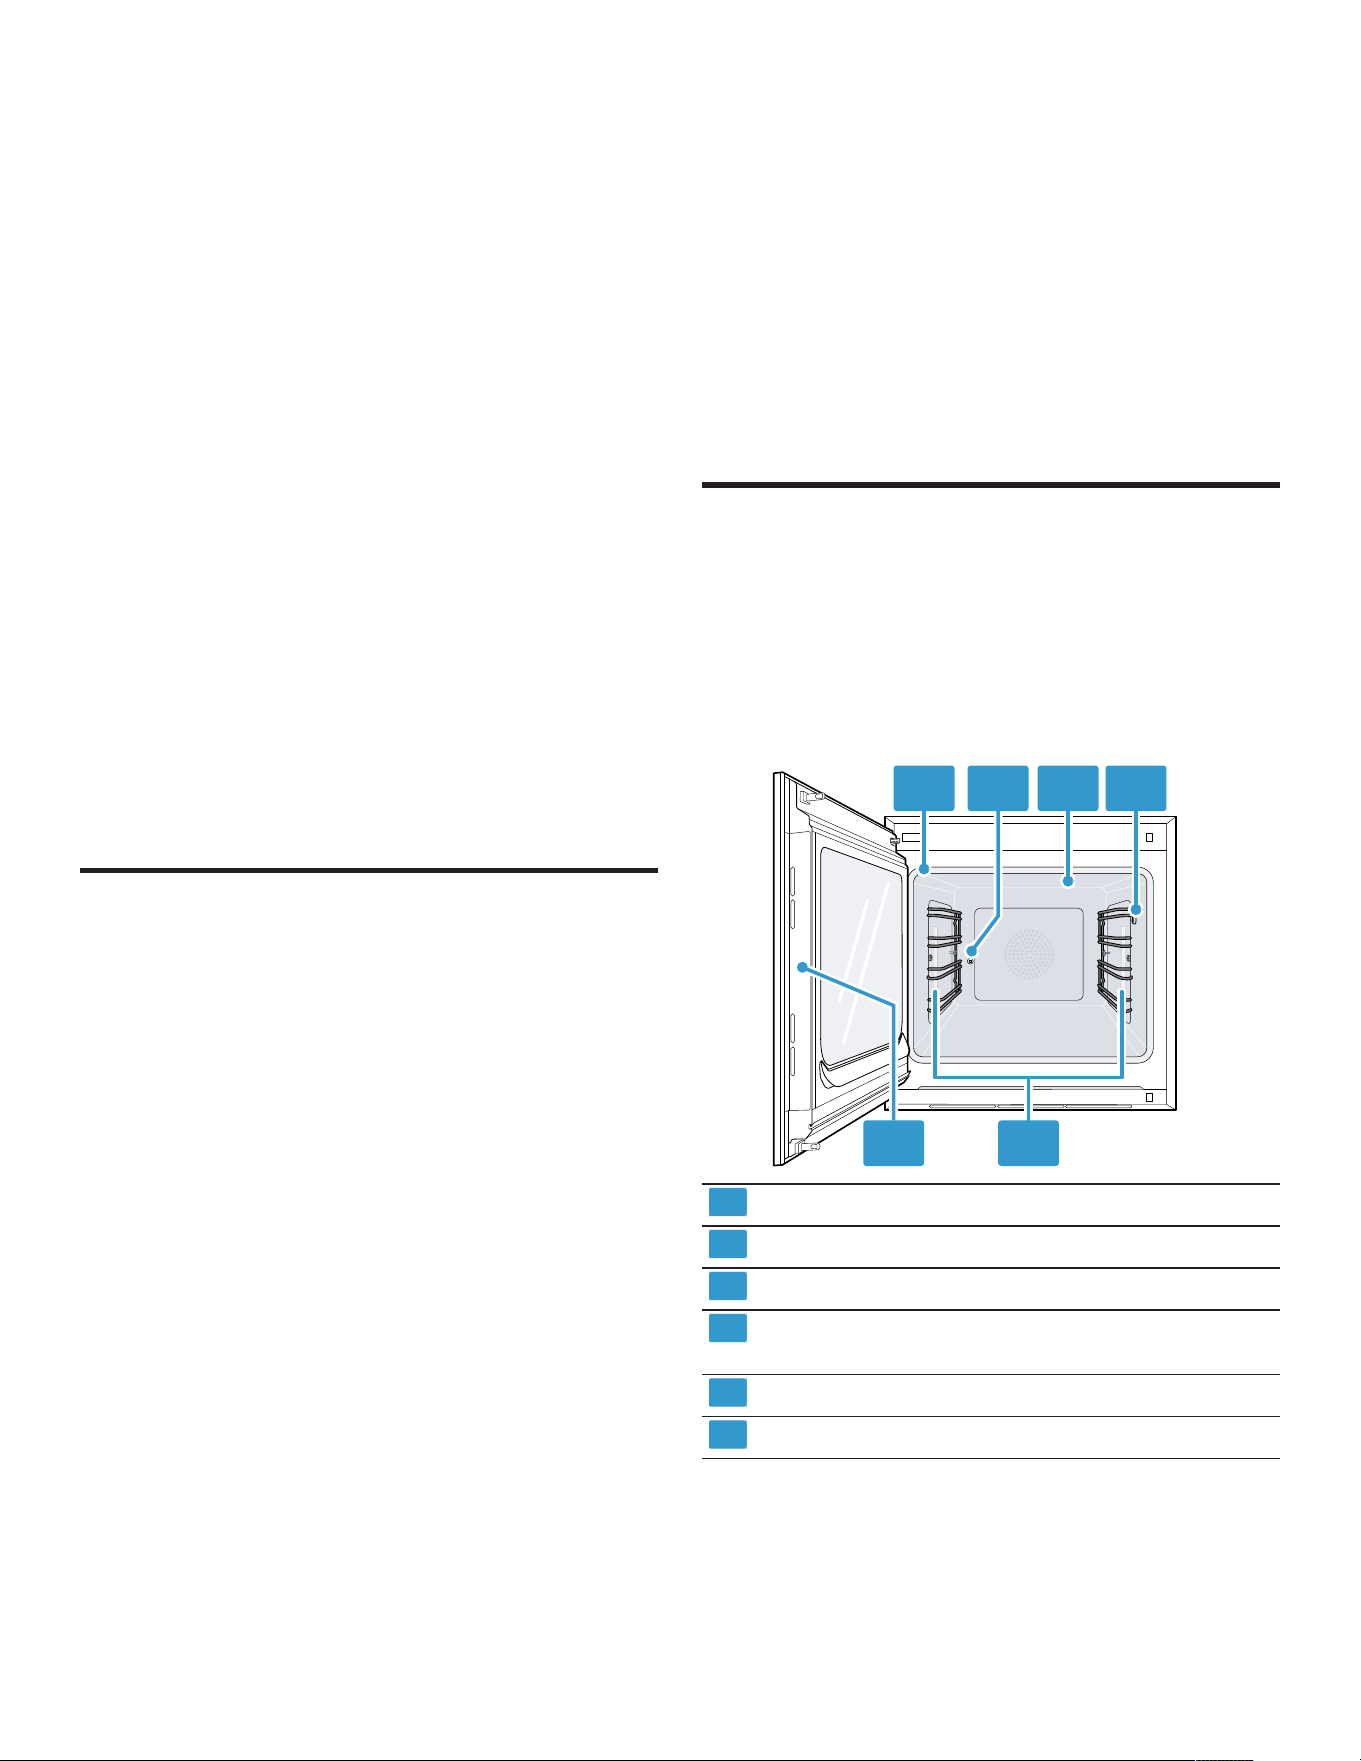
4.1 Appliance
Here you can find an overview of the parts of your
appliance.
1 2 3 4
56
1
Door seal
2
Rotisserie spit socket
3
Broiling area
4
Connection socket for core temperature probe
→
Page34
5
Interior lighting
6
Intended area for opening the door
en-us Familiarizing yourself with your appliance
10
4.2 Oven cavity
The oven cavity has 4 shelf levels. Count the shelf levels
from the bottom up.
WARNING
The inside of the appliance door becomes very hot during
operation.
▶
During or after operation of the appliance, only touch
the appliance door at the surface intended for this on
the side.
▶
Always open the appliance door as far as it will go.
NOTICE:
Objects on the oven cavity floor will cause heat to build up.
The baking and roasting times will no longer be correct
and the enamel will be damaged.
▶
Do not place anything directly on the oven cavity floor.
▶
Do not cover the oven cavity floor with any sort of foil or
baking parchment.
The accessories may tip.
▶
Do not push the accessories between the shelf
positions.
Shelf level 4 is not suitable for cooking.
4.3 Interior lighting
When you open the appliance door, the interior lighting
switches on. If the appliance door remains open for longer
than around 3minutes, the interior lighting switches off.
WARNING
The light emitted by LED lights is very dazzling, and can
damage the eyes (risk group 1).
▶
Do not look directly into the switched on LED lights for
longer than 100seconds.
You can also switch on the interior lighting when the
appliance is in low power mode.
After approximately 20minutes, the appliance switches
the interior lighting off.
When you switch on the appliance, the appliance switches
the interior lighting on.
→
"Switching the interior lighting on or off", Page23
In most operating modes, the appliance keeps the interior
lighting switched on.
You can specify whether the appliance will switch the
interior lighting on during operation in the basic settings
→
Page41
. If you select the "Manual" setting in the basic
settings, the appliance does not switch on the interior
lighting automatically but you can switch on the interior
lighting when required. After approximately 20seconds,
the appliance switches the interior lighting off.
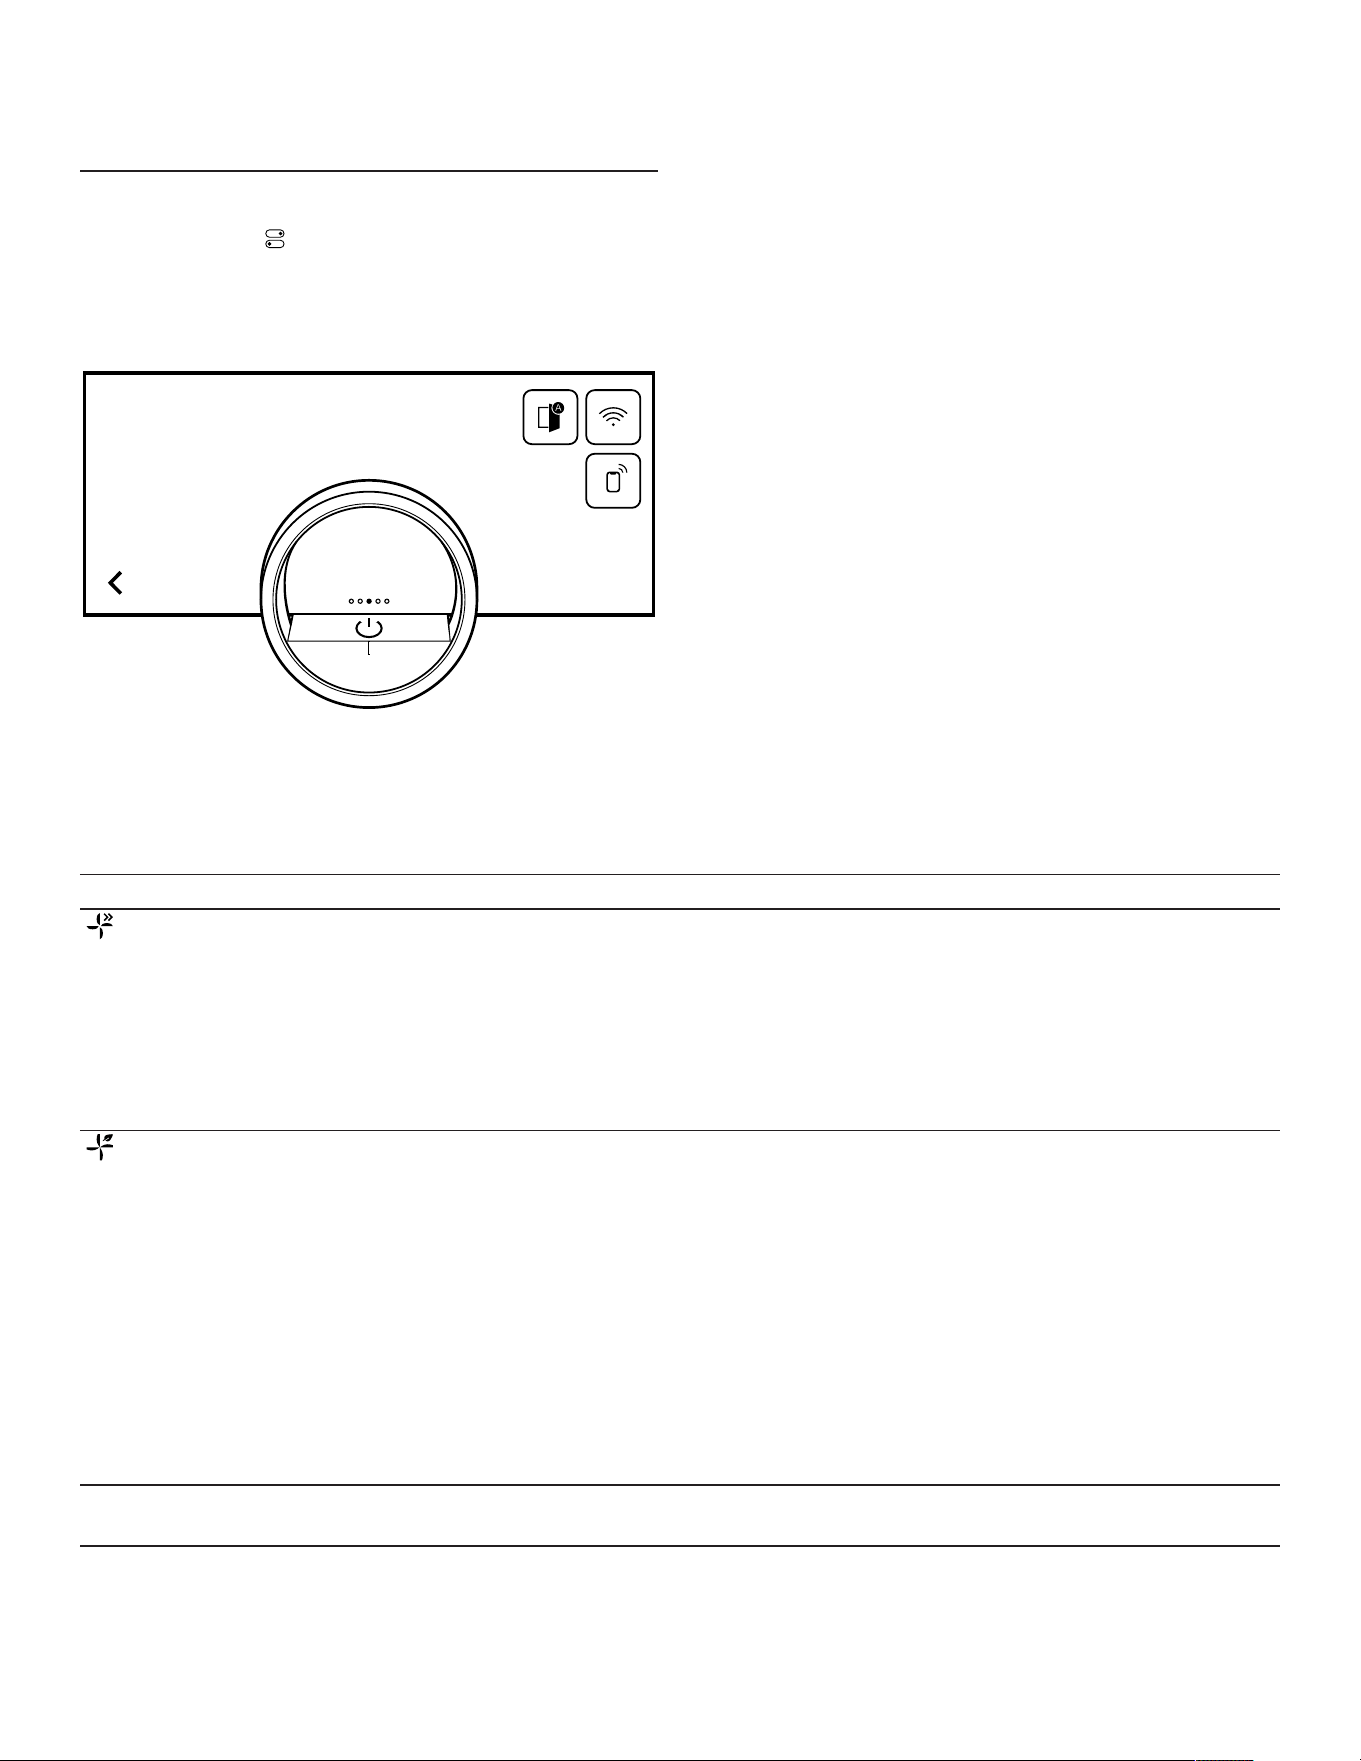
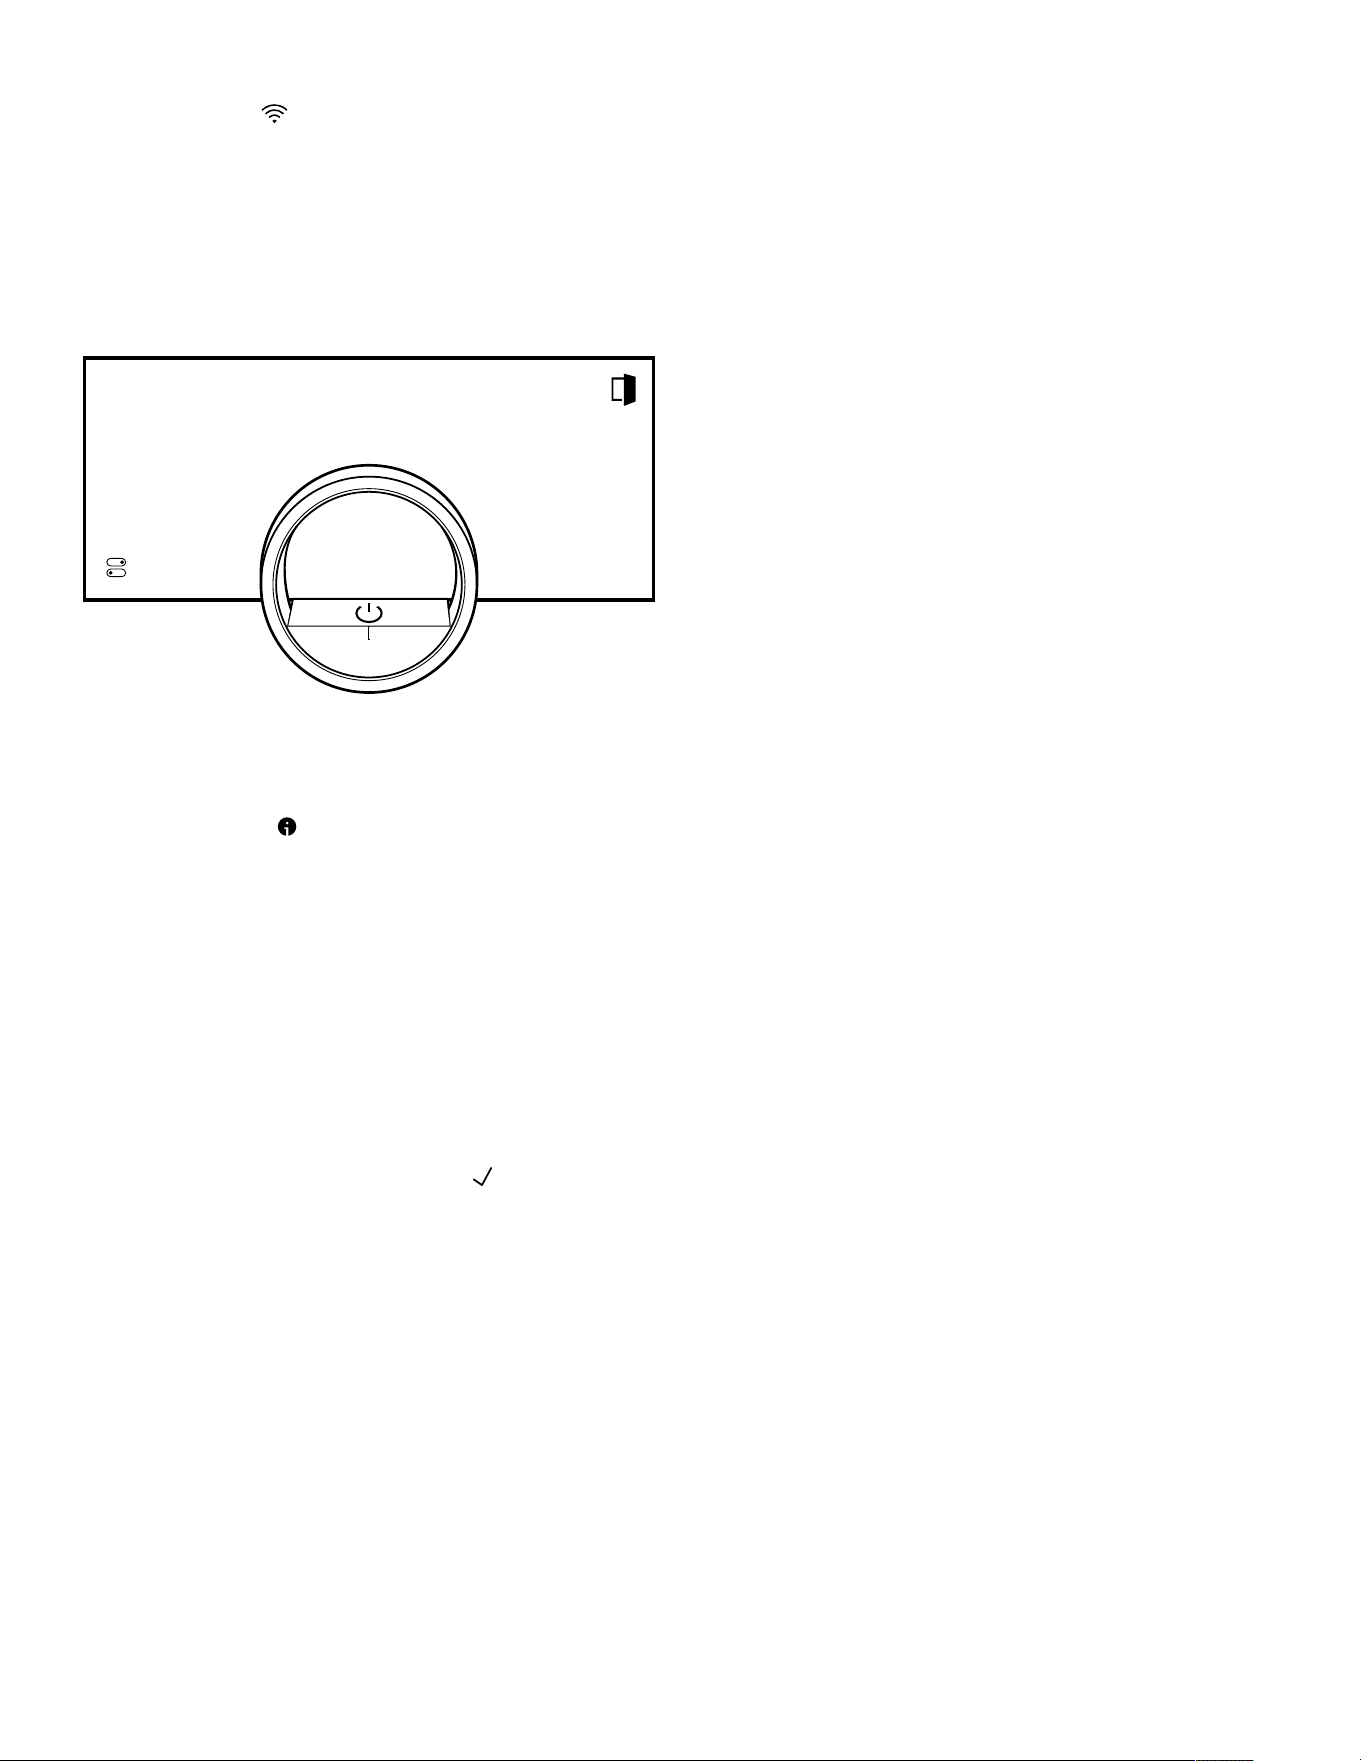
4.4 Control elements
You can use the control panel to configure all functions of
your appliance and to obtain information about the
operating status.
On certain models, specific details may differ from those
pictured.
1 2 3 4
56
1
Symbols Show settings, and start or end
functions.
2
Control ring Use the control ring to change the
selection.
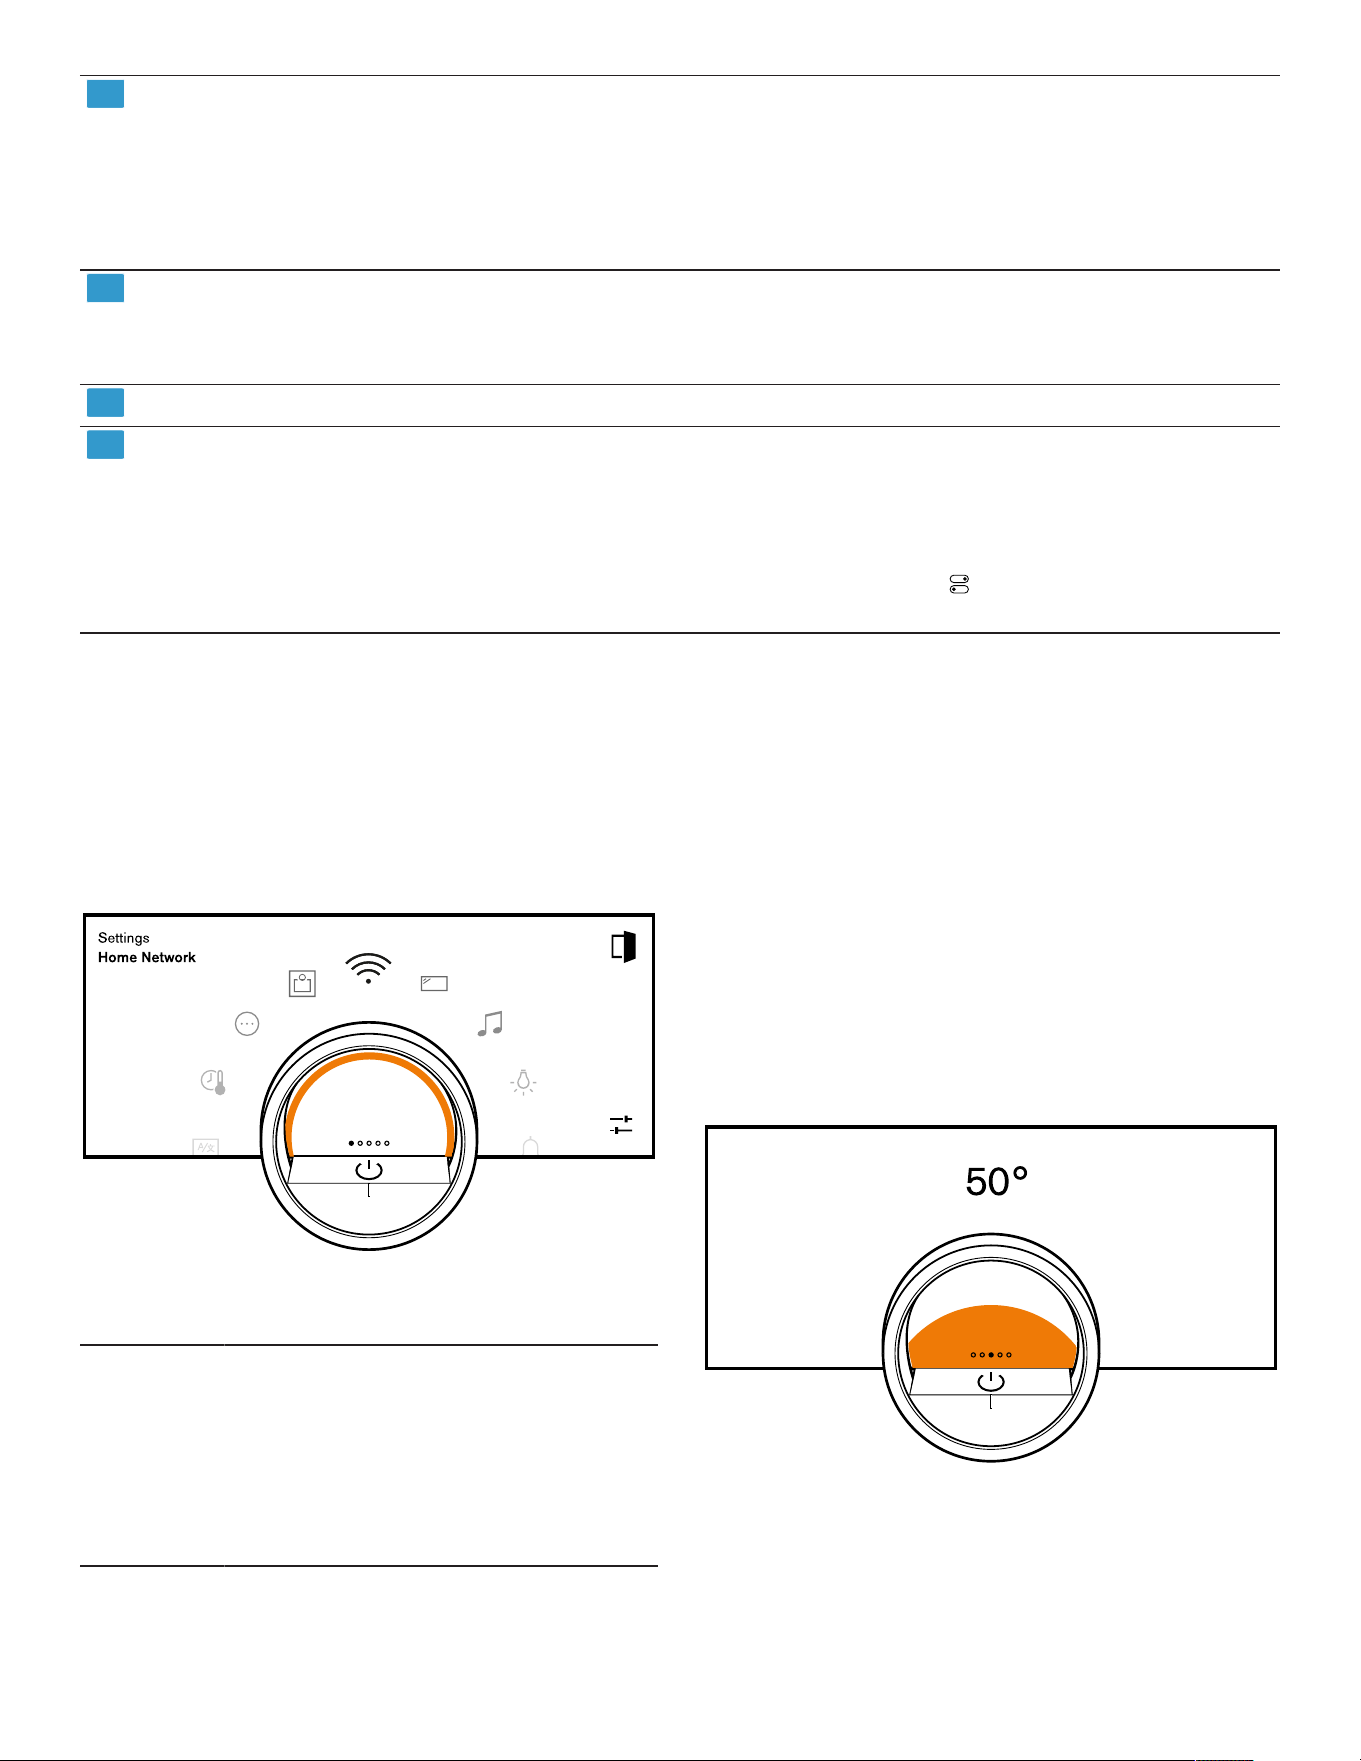
Familiarizing yourself with your appliance en-us
11
3
12 o'clock position The 12 o'clock position shows the
value that is currently selected for a
function, which you can change using
the control ring. If required, press on
another function, e.g. on the
temperature or cooking time, to
position this at the 12 o'clock position.
4
Position indicator The filled point on the display in the
middle of the control ring shows the
current horizontal navigation position
between the appliance displays.
5
On/off button Switch the appliance on and off.
6
Status line The status line shows the current
status of functions or appliance
components, e.g.:
¡ HomeConnect® connection status
¡ Child lock
Press to open the control center
→
Page14
.
Control ring
Operation using the control ring is only possible when the
appliance is switched on. You can use the control ring to
navigate through the ring menus or the list menus and
select settings.
When you touch the control ring, the display shows a ring
in orange behind the control ring.
While operating the appliance, you can only use the
control ring if you first select a function on the display.
Turn Navigate in ring menus and list menus:
¡ Turn the control ring to the right to
increase the values.
¡ Turn the control ring to the left to
decrease the values.
¡ Turn the control ring to the right or left
quickly to change the values in larger
increments.
You can set how the control ring behaves in the basic
settings →
Page41
. In the "Standard" setting, press on
the required function on the display and use the control
ring to change the value of the function.
In the "Quick selection" setting, use the control ring, which
is at the 12 o'clock position, to directly change the values
for the function.
Process visualization
For process visualization, the appliance shows a section
of a circle in orange behind the control ring.
The appliance shows the section of a circle in orange
behind the control ring under the following conditions:
¡ A cooking time is set.
¡ A core temperature is set for the core temperature
probe.
The section of the circle in orange becomes larger the
longer the timer runs or the closer the core temperature of
the food approaches the set core temperature.
If no cooking time and no core temperature are set, the
section of the circle pulsates in orange.
en-us Familiarizing yourself with your appliance
12
Display
The display shows the selected settings and setting
options, as well as messages about the appliance's
operating status.
Press Selects or confirms the
procedure or function
Press and hold Displays additional
information
Swipe horizontally Navigates between
appliance displays
For example, in the
"Manual" appliance display,
swipe to the left or right
Note:You can only use the
function if you are in an
appliance display
→
Page13
and no
program is running.
Note:If no display language is available in your national
language, select a display language that is available, e.g.
English.
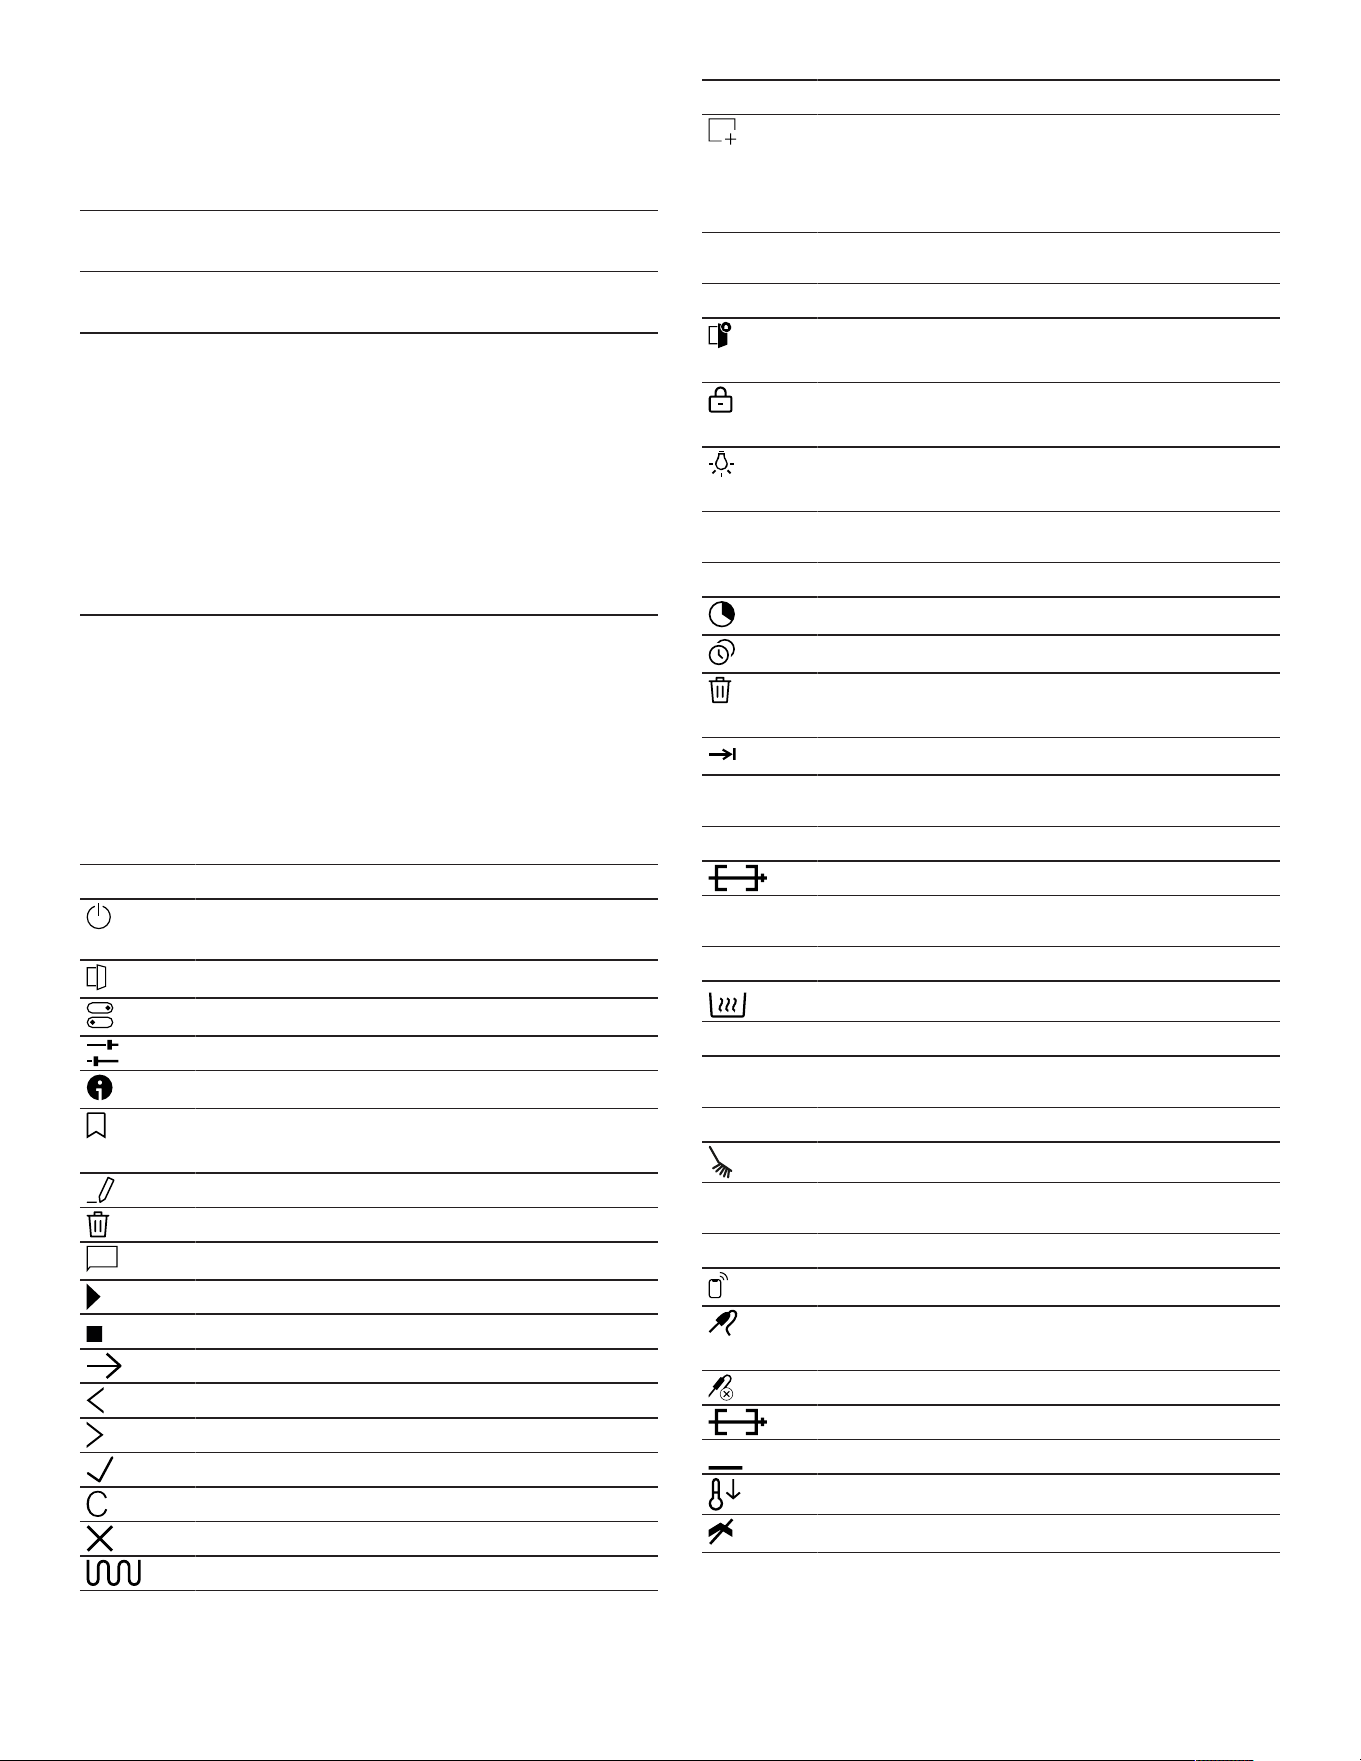
Symbols
Use the symbols to start or stop functions, or to navigate
in the appliance menu.
Operation
Symbol Function
Switch the appliance on or off at the control
ring
Opening the appliance door →
Page21
Open the control center →
Page23
Edit settings
Call up additional information →
Page23
Save a favorite
→
"Favorites", Page32
Edit a favorite
Deleting a favorite
Tip for calling up programs →
Page32
Start
Stop
Switch to the next step
Back or accept settings
Next
Confirm
Delete
Cancel
Turning on the broiler
Symbol Function
Switching between the display for the
preferred types of heating and the display of
all available types of heating
→
"Basic settings", Page41
Symbols in the control center
Symbol Function
Opening the appliance door automatically
after the cooking process →
Page23
Activate or deactivate the child lock
→
Page27
Switch the interior lighting on or off
→
Page23
Timer functions
Symbol Function
Call up the timer menu →
Page24
Call up "Sabbath mode" →
Page26
Deleting the heating cycle from "Sabbath
mode" →
Page27
Delaying the cooking time end →
Page25
Rotisserie spit
Symbol Function
Start and stop the rotisserie spit.
Searing function
Symbol Function
Searing function
1
1
This function is currently unavailable.
Cleaning and maintenance
Symbol Function
Pyrolytic self-cleaning
Status
Symbol Function
Remote start →
Page39
Core temperature probe is inserted
→
"Core temperature sensor", Page34
Core temperature probe is missing
Rotisserie spit is inserted
Status display for the heating process
Display of a cooling process
Appliance is in demo mode →
Page53
Familiarizing yourself with your appliance en-us
13
Status in the control center
Symbol Function
Connection to the router:
Strong→
"HomeConnect® ", Page38
Connection to the router:
OK→
"HomeConnect® ", Page38
Connection to the router:
Weak→
"HomeConnect® ", Page38
Symbol Function
No connection to the
router.→
"HomeConnect® ", Page38
Appliance connected to the router. No
connection to the Home Connect
server.→
"HomeConnect® ", Page38
Software update status
Appliance displays
You can find an overview of the appliance displays here.
Appliance displays Usage Navigation symbol
Settings ¡ Adjusting the basic settings
→
Page41
¡ Adjusting the HomeConnect®
settings →
Page38
Modes & Service ¡ Starting the pyrolytic self-cleaning
function
¡ Starting the quick guide →
Page24
Manual operation Setting the temperature, type of
heating and timer function
Favorites
Calling up favorites →
Page32
Programs Calling up automatic programs and
recommended settings →
Page32
Tip:In the basic settings →
Page41
, you can set which
appliance menu your appliance starts in.
Colors
The different colors are used to guide the user in the
relevant setting situations.
Red ¡ Error messages for which you may
need the help of customer service.
Orange ¡ Information that you must observe so
that you can continue to use your
appliance
¡ Symbols for starting and stopping
White ¡ Information
¡ Additional information
Appearance
Depending on the situation, the appearance of symbols,
values or the entire display changes.
Zooming in ring menus and
list menus
When you use the control
ring to select a list entry in a
list menu, the display
enlarges this list entry and
displays it as underlined.
When you use the control
ring to select a value in a
ring menu, the display
shows this value enlarged
in the 12 o'clock position.
Zoom at end of cooking or
core temperature probe
A few minutes before the
cooking process ends, the
appliance shows the
remaining cooking time
enlarged in the center of
the display.
As soon as the current core
temperature is just a few
degrees below the set
value, the display shows
the current core
temperature enlarged.
All other displays are
hidden.
Pared-down display If the appliance does not
detect a user in the
immediate vicinity, the
appliance reduces the
amount of information
shown on the display and
only the most important
information remains. This
en-us Familiarizing yourself with your appliance
14
function is preset. You can
change the setting in the
basic settings →
Page41
.
Control center
The control center provides you with access to functions
that are only visible in the status bar via symbols. You can
activate or deactivate functions in the control center.
On the left-hand side, the display shows the symbols and
texts with information on the current status of the
appliance. On the right-hand side, the display shows the
touch fields of the control center.
4.5 Types of heating
This is where you will find an overview of the types of heating. You will find recommendations for using the types of
heating.
Symbols Function/type of heating Temperature/setting Use
Convection plus 122-570°F
(50-300°C)
The heat that arises from the back
wall of the oven is combined with
top and bottom heat and is
distributed quickly and optimally by
the fan. For baking and cooking on
one or more levels. For moist
cakes, cookies, bakes, gratins, and
meat.
Economy convection 122-480°F
(50-250°C)
Energy-saving mode in which the
heat arises from the back wall of
the oven cavity and is distributed
quickly and evenly by the fan.
Convenience functions such as
interior lighting remain switched off
and the temperature is only
displayed during the heating
phase. For baking on one level.
For cakes, meat, bakes. No
preheating is required. The interior
lighting can be switched on for a
few seconds in the control center.
1
This function is currently unavailable.
2
Do not preheat the appliance.

Familiarizing yourself with your appliance en-us
15
Symbols Function/type of heating Temperature/setting Use
Bake with humidity 122-480°F
(50-250°C)
The heat is distributed gently and
the inherent moisture of the food is
retained in the oven cavity to
prevent it from drying out. The
interior lighting remains switched
off and can be switched on for a
few seconds in the control center.
For baking on one or more levels.
For dry cakes, cookies, and
gratins.
Top + bottom heat 122-570°F
(50-300°C)
Constant heat from above and
below creates an ideal baking area
and preserves the moisture in the
food. Only suitable for baking on
one level. For cakes, tarts,
quiches.
Top heat + 1/3 bottom heat 122-570°F
(50-300°C)
Constant heat from above,
combined with low heat from
below. For additional baking time.
For bakes, covered cakes.
Top heat 122-570°F
(50-300°C)
Constant heat, targeted from
above. For meringues on fruit
cakes.
Bottom heat + 1/3 top heat 122-570°F
(50-300°C)
Constant heat from below,
combined with low heat from
above. For lightly browned quiches
and tarts, cheesecake, bread in
loaf tins, dishes in a bain marie
and braising without a lid.
Bottom heat 122-570°F
(50-300°C)
Constant heat, targeted from
below. For cooking in a bain marie,
boiling down or as additional
baking time for moist fruit bases
and quiches.
Hot air + bottom heat 122-570°F
(50-300°C)
The heat arises from the back wall
of the oven and is distributed
quickly and evenly by the fan. Heat
is also added from below. For
moist cakes, fruit bases,
cheesecakes.
Convection + 1/3 bottom heat 122-570°F
(50-300°C)
The heat arises from the back wall
of the oven and is distributed
quickly and evenly by the fan. Low
heat is also added from below. For
small cakes and tarts.
Broil + circulated air 122-570°F
(50-300°C)
Extremely intensive heat from
above, which is distributed quickly
and evenly by the fan. Guarantees
that a crust is formed with
simultaneous all-round heating.
For meat, poultry, fish, vegetable
skewers. No preheating is
required.
1
This function is currently unavailable.
2
Do not preheat the appliance.
en-us Familiarizing yourself with your appliance
16
Symbols Function/type of heating Temperature/setting Use
Broiler low, medium, high
Default setting: 2, medium
Extremely intensive heat from
above. Ideal for broiling and
gratinating. For chicken legs (broil
setting1), vegetables (broil
setting2), strips of bacon and toast
(broil setting3).
Baking stone function 122-570°F
(50-300°C)
Optimal heating of the baking
stone with extra-strong, targeted
bottom heat. For crispy baked
pizza, tarte flambée, bread and
bread rolls. It can only be used in
conjunction with the GAGGENAU
baking stone (special accessory).
Roaster operation 122-430°F
(50-220°C)
Optimal heating of the roaster with
bottom heat. For roasting, stews
and casseroles. It can only be
used for the Gaggenau cast iron
roaster and in conjunction with the
pull-out system
1
(special
accessory).
Air frying 122-570°F
(50-300°C)
Extra-fast heat circulation in which
the moisture is actively extracted
from the cooking compartment. For
extremely crispy results with little
additional fat. For potatoes,
poultry, meat, vegetables. Only in
conjunction with the Gaggenau
baking tray for hot-air frying
(optional accessory).
Drying
2
85-175°F
(30-80°C)
For drying thin slices of fruit or
vegetables or herbs. When heat is
circulating, moisture is actively
extracted from the oven cavity.
Dough proofing
2
85-120°F
(30-50°C)
Optimal temperature range for
proving dough batches and pieces
of dough. For yeast dough and
sourdough.
Keeping warm
2
120-195°F
(50-90°C)
Optimal temperature range for
keeping food warm and preheating
cookware.
Defrosting
2
104-140°F (40-60°C) Optimal temperature range for
gently defrosting frozen food. For
vegetables, fruit, cakes.
1
This function is currently unavailable.
2
Do not preheat the appliance.
4.6 Low power mode display
The appliance has different displays in low power mode.
The displays depend on whether or not the appliance
detects a user.
On the display without user detection, the appliance is
switched off and the display is black. The appliance
switches to low power mode without user detection if,
when the appliance is switched on, you do not implement
any settings for approx. 20minutes or approx. 20minutes
after the appliance has completed a heating process.
If the proximity sensor detects a user or if you touch the
control ring or press on the display, the appliance switches
to low power mode with user detection.
In low power mode with user detection, the display shows
the door opening symbol and the status bar. In the basic
settings →
Page41
, you can select whether the display
also shows the GAGGENAU logo.
Familiarizing yourself with your appliance en-us
17
If the appliance is connected to the HomeConnect® app,
the display shows .
→
"HomeConnect® ", Page38
The user detection distance depends on the selected
basic settings.
In low power mode with user detection, the display
brightness is reduced. The brightness of the display
depends on the viewing angle.
4.7 Additional information
If required, you can display additional information.
When you press on , the display shows additional
information about the current function.
When you press and hold certain symbols or values, the
display shows additional information about the current
function. Additional information is available for all symbols
that are arranged around the control ring, e.g. information
about the set type of heating or current interior oven
temperature.
In the basic settings →
Page41
, you can activate or
deactivate the "Info-i" function.
The appliance also occasionally displays important
information about safety and the operating status
automatically. These messages disappear automatically
after a few seconds, or when you press to confirm the
message.
For messages about HomeConnect®, the appliance also
displays the HomeConnect® status.
→
"HomeConnect® ", Page38
4.8 Pop-up notifications
Pop-up notifications contain explanations about current
functions.
In the basic settings →
Page41
, you can activate or
deactivate the "Pop-up hints" function.
4.9 Quick guides
Your appliance comes with a quick guide to help you with
various topics.
4.10 Cooling fan
The cooling fan switches on when the appliance is in
operation. The hot air escapes beneath the door.
After removing your food from the appliance, keep the
door closed until the appliance has cooled down. The
appliance door should not be left half open as this may
damage adjacent kitchen units. The cooling fan continues
running for a certain period of time after the appliance has
stopped heating and then it switches itself off
automatically.
Do not cover the ventilation slots. Otherwise, the
appliance may overheat.
4.11 Automatic switch-off
For your protection, the appliance is equipped with an
automatic shut-off function. The appliance switches off the
heating process after 12hours if you do not operate the
appliance or program a cooking time during this time. The
display shows a message.
If you set a cooking time, you can use the appliance for
longer.
If you set a cooking time, you can operate the appliance in
the "Drying" type of heating for a maximum of 72hours,
and in all other types of heating for a maximum of
24hours.
When programming with the "Sabbath mode" function, the
appliance switches off after up to 74hours.
4.12 Wipe protection
Your appliance detects if you would like to clean the
display or navigate between the appliance displays. The
appliance locks the operation via the display and the
control ring for a short time.
Press the display to return to the operation.
4.13 Proximity sensor
Your appliance detects whether you are in front of the
appliance or moving towards it. Your appliance disregards
if you are passing in front of it.
If you do not remain in the detection zone for the
appliance when it is switched on, the appliance reduces
the display to what is essential.
Note:You can set the distance at which the appliance can
detect you in the basic settings. To ensure that the
proximity sensor optimally detects the user, set the
installation height of the appliance's upper edge in the
basic settings →
Page41
.

en-us Functions in the HomeConnect® app
18
4.14 Door lock
The "Door lock" function prevents the appliance door from
being opened accidentally. This is particularly useful when
installing the appliance under the countertop.
In the basic settings →
Page41
, you can activate or
deactivate the "Door lock" function. When you activate the
function and press , the display shows a slide control
instead of the symbol.
→
"Opening the appliance door", Page21
4.15 Catalyzer heating
The catalyzer heating supports more effective elimination
of odors.
In the basic settings →
Page41
, you can switch the
catalyzer heating on or off.
When you switch on the catalyzer heating, this reduces
odor development.
To save energy, switch the catalyzer heating off.
Functions in the HomeConnect® app
5 Functions in the HomeConnect®
app
Functions in the HomeConnect® app
The HomeConnect® app offers a range of functions and
benefits.
¡ Monitor the cooking process, e.g. the remaining cooking
time or the current core temperature.
¡ Start or stop a type of heating or program, or change
the settings.
¡ Find the optimum settings or the optimum program for
your recipe with the Oven Assistant function.
¡ View the estimated remaining cooking time when using
the core temperature probe.
¡ Change the basic settings.
¡ Run important updates to the appliance software.
¡ Find the appliance information and instructions.
¡ Find new recipes.
Accessories en-us
19
Accessories
6 Accessories
Accessories
Only use genuine accessories. These are designed
especially for your appliance.
Note:Accessories may become deformed if they get hot.
Deformation has no effect on function. As the accessory
cools down, it will regain its original shape.
The accessories supplied may differ depending on the
appliance model.
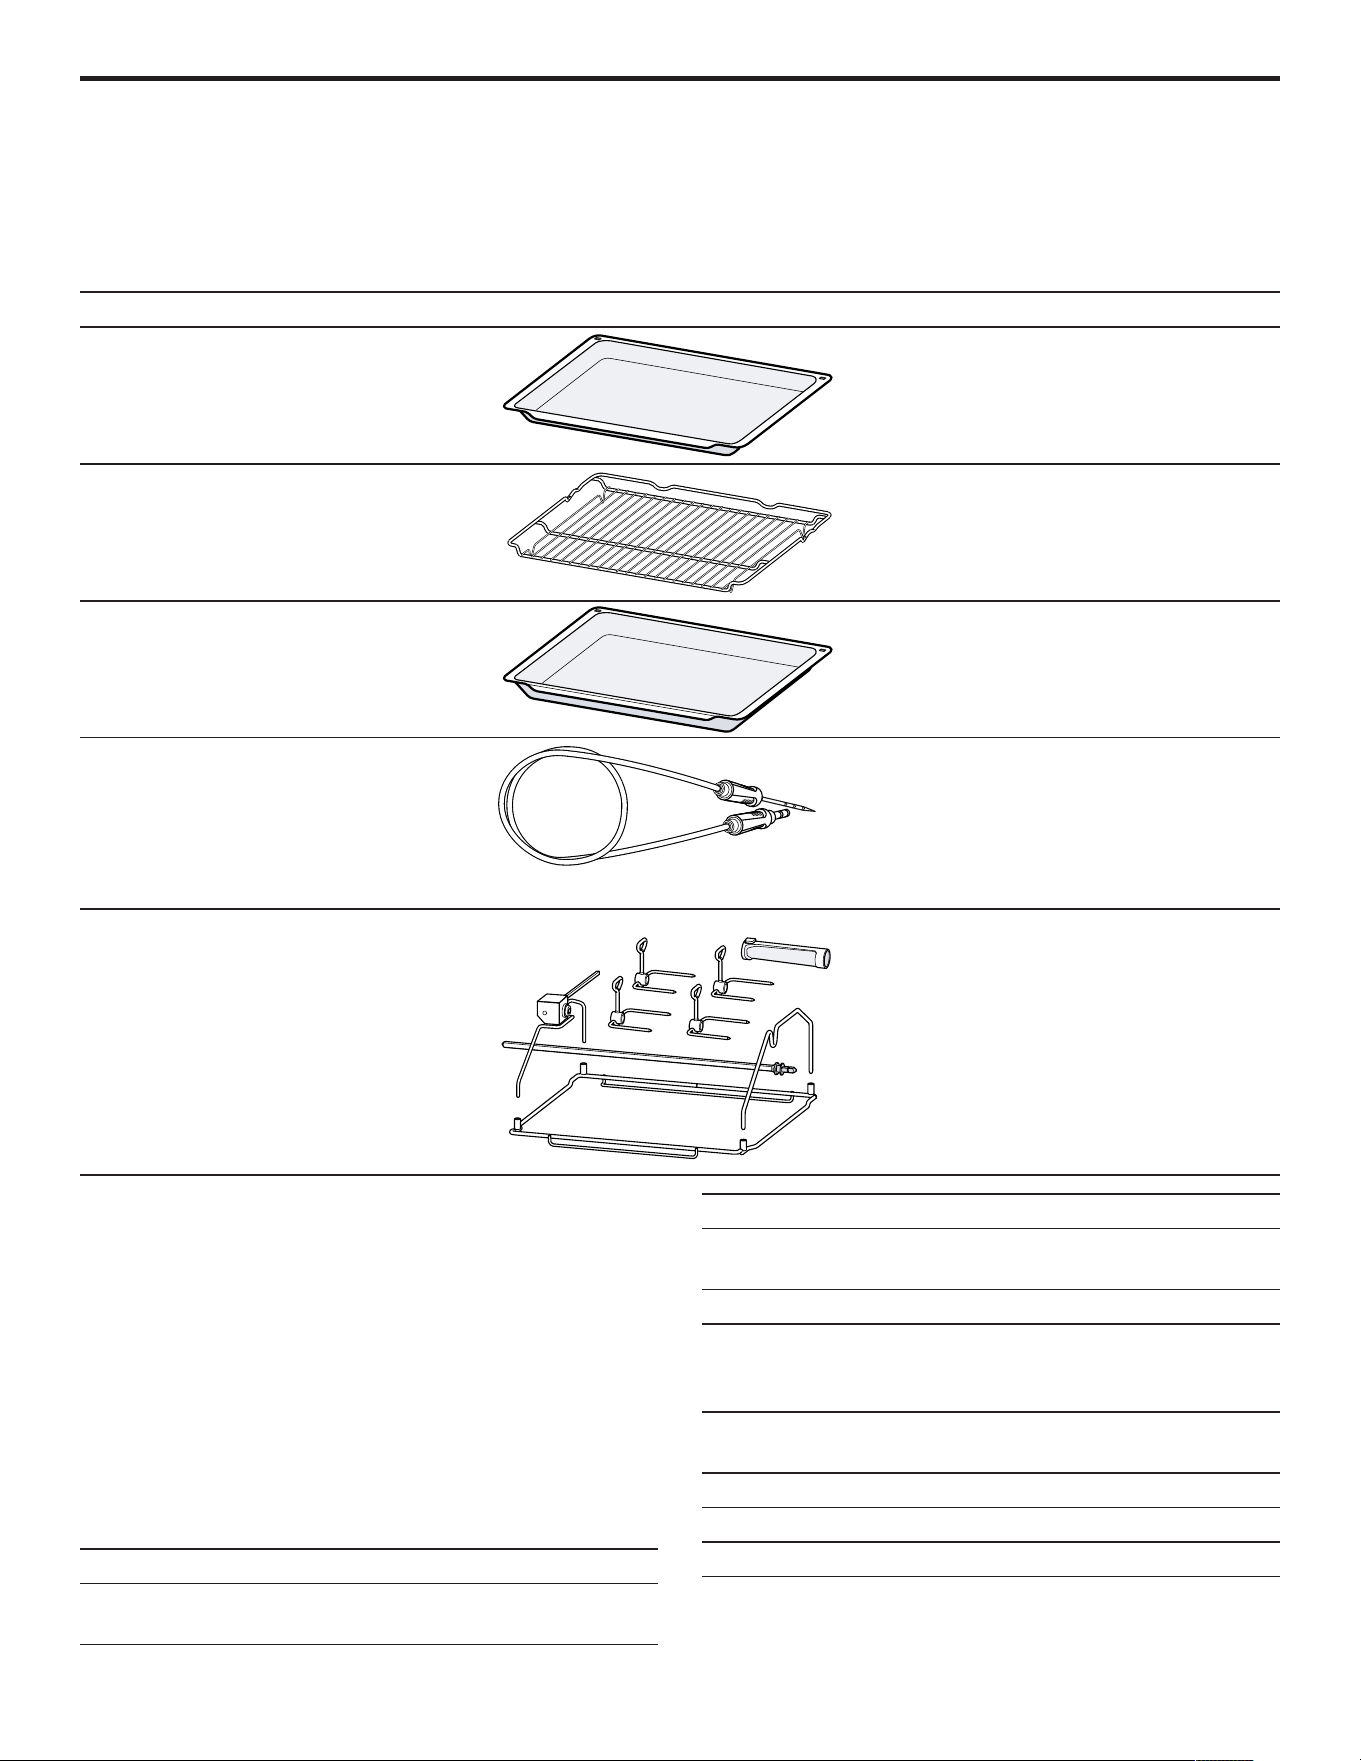
Accessories Use
Baking tray, enameled ¡ Tray bakes
¡ Small baked items
Wire rack ¡ Cookware
¡ Cake tins
¡ Ovenproof dishes
¡ Roaster
Broiling tray, enameled ¡ Tray bakes
¡ Roaster
Core temperature sensor
Core temperature probe →
Page34
for the highly precise cooking of:
¡ Meat
¡ Fish
¡ Poultry
¡ Bread
Rotisserie spit Rotisserie spit for evenly cooking:
¡ Poultry
¡ Roaster
6.1 Other accessories
You can purchase other accessories from our Customer
Service, specialist retailers or online.
You will find a comprehensive range of products for your
appliance in our brochures and online:
www.gaggenau.com
Accessories are appliance-specific. When purchasing,
always check for compatibility with your appliance model
number (E-Nr).
You can find out which accessories are available for your
appliance in our online shop or from our Customer
Service.
Other accessories Order number
Baking tray, enameled, 1⅛"
(30mm) deep
BA026116
Other accessories Order number
Broiling tray, enameled,
1½" (38mm) deep
BA026117
Wire rack BA036166
Baking tray for hot-air
frying, perforated,
enameled
BA020110
Baking stone, baking stone
supports, and pizza paddle
BA056134
Pizza paddle BS020003
Core temperature sensor BA010050
Manual door opening aid BA010050
en-us Accessories
20
6.2 Sliding accessories into the oven cavity
The accessories feature a rack stop function. The rack
stop function prevents tilting of accessories when pulling
them out. You must insert accessories in the oven cavity
correctly so that tilt protection will work.
NOTICE:
The accessories may tip.
▶
Do not push the accessories between the shelf
positions.
1. Tilt the rack to guide the rack stop in between the rails
of the rack holders . Lower the rack and slide it into
the oven cavity, so that the rack stop can engage .
2. Make sure the rack’s safety rail is at the rear and top.
Sliding the baking tray and wire rack together into
the oven cavity
1. Correctly position the wire rack on the baking tray.
2. Slide the baking tray and wire rack together into the
cooking compartment.
The wire rack slides over the current rack.
Sliding the broiling tray and wire rack together into
the oven cavity
1. Correctly position the wire rack on the broiling tray.

Before using for the first time en-us
21
2. Slide the broiling tray and wire rack together into the
cooking compartment.
Before using for the first time
7 Before using for the first time
Before using for the first time
Apply the initial configuration settings. Clean the appliance
and the accessories.
7.1 Initial use
Implement the settings for initial use before using your
appliance.
First read the information under Safety.
The appliance must be installed and connected.
After connecting to the power supply, the appliance shows
the "Initialization" display.
The appliance shows the "Initialization" display when it is
first switched on after being connected to the power
supply, if the initial start-up has not been completed
successfully or the appliance has been restored to the
factory settings.
Implement the following settings:
¡ Setting the language
¡ Activating HomeConnect®
¡ Set the temperature unit
¡ Set the weight unit
¡ Setting the time format
¡ Set the time
You can retroactively change all of the settings in the
basic settings →
Page41
.
Follow the instructions in the display. The display guides
you through the initial settings.
Setting the language and implementing the
remaining settings
1. Press .
a The display shows the preset language.
2. Use the control ring to select the required display
language.
3. Press to confirm.
4. Press .
5. Implement the remaining settings.
a The display shows the appliance display that is selected
in the basic settings →
Page41
as the start screen.
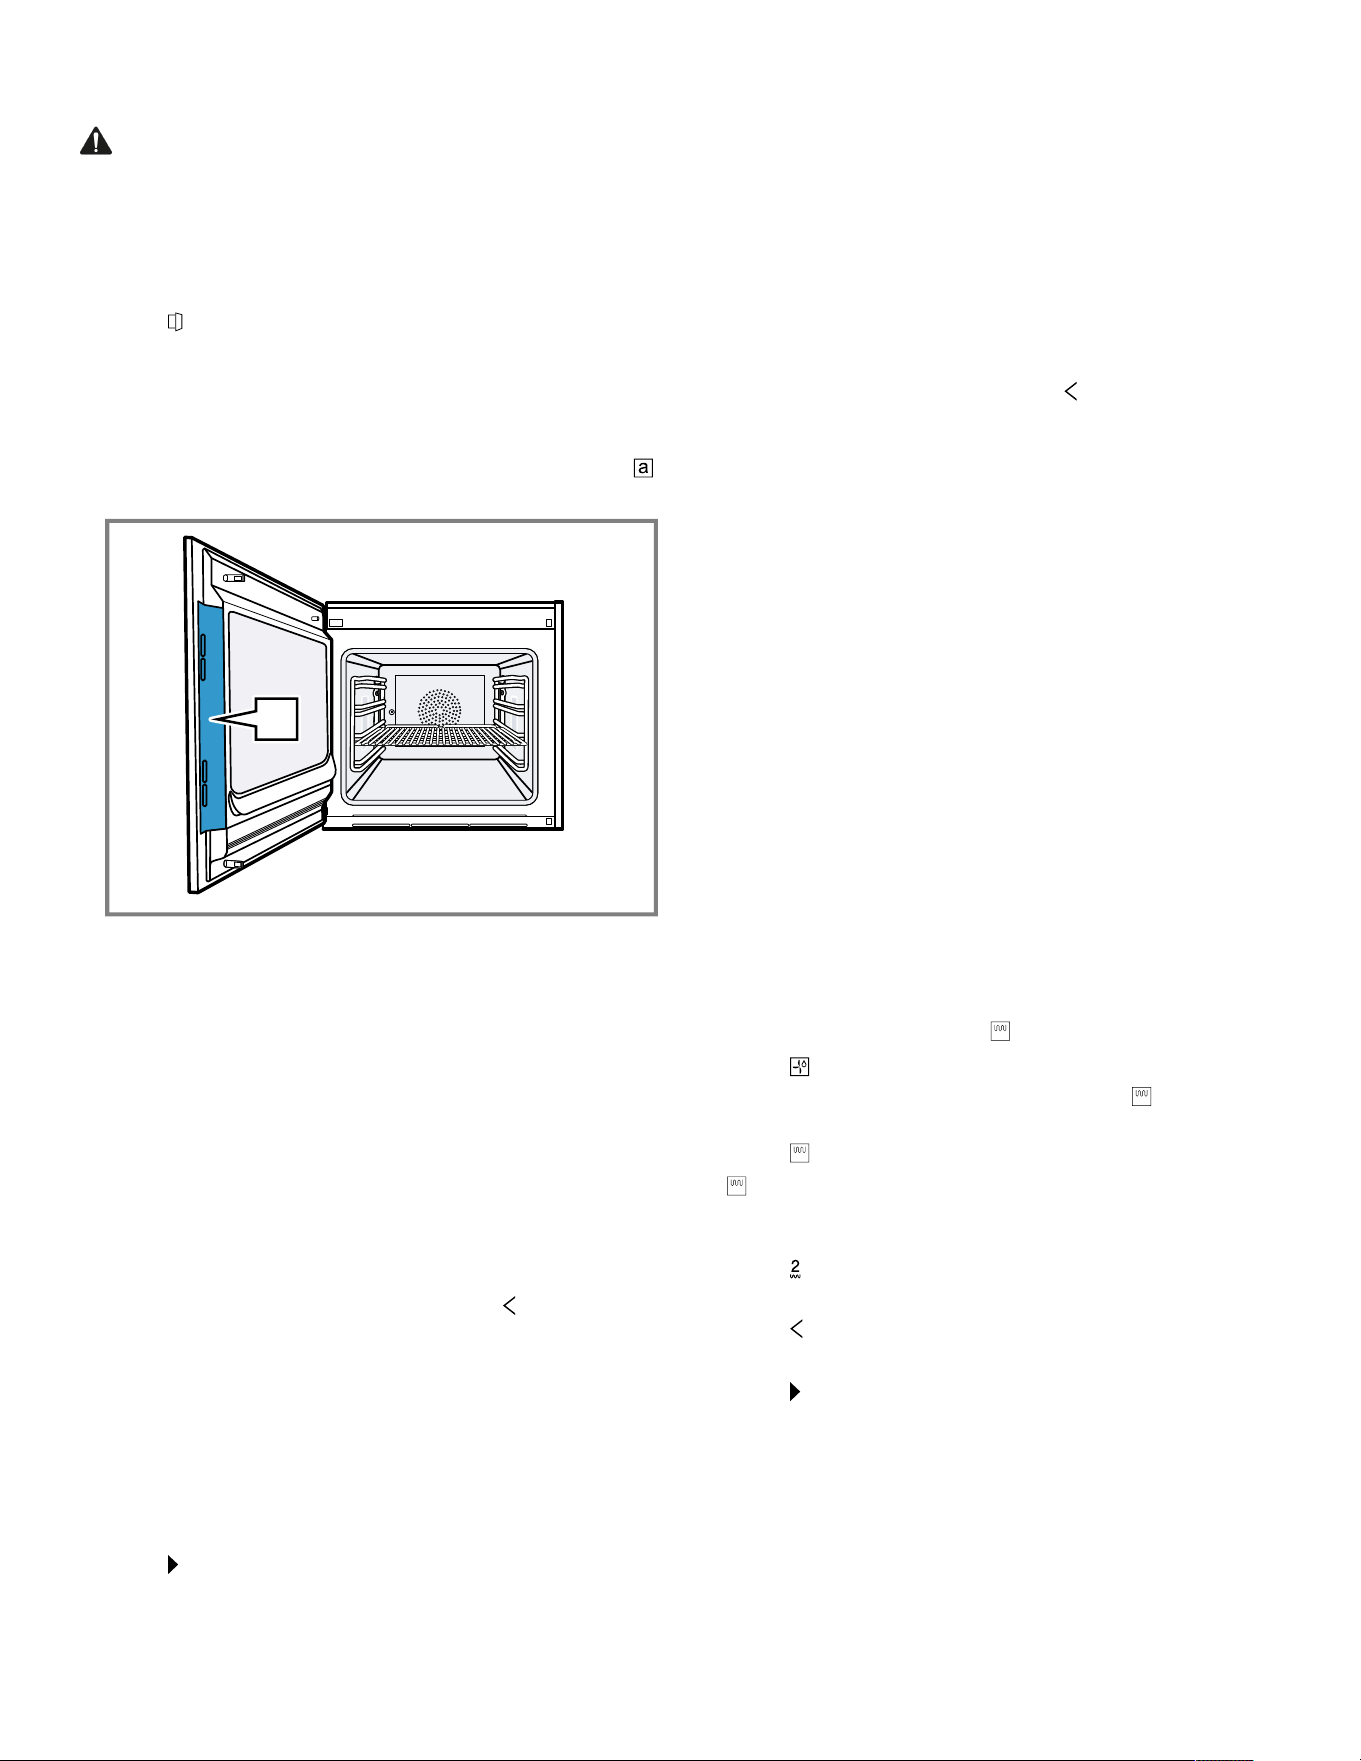
Cleaning the door pane
Note:To ensure tightness, the door seal is lubricated at
the factory. Residue may remain on the door pane.
▶
Before using for the first time, clean the door pane with
glass cleaner and a window cloth or a microfiber cloth.
Do not use a glass scraper.
Cleaning theaccessories
▶
Before first use, clean the accessories thoroughly using
hot soapy water and a soft cloth.
Heating up the appliance
1. Ensure that there is no leftover packaging in the oven
cavity.
2. Remove any accessories from the oven cavity.
3. To eliminate the new-appliance smell, heat up the
empty appliance with the door closed.
The ideal setting for heating is 390°F (200°C) in the
"Convection plus" type of heating for one hour.
4. Clean the appliance interior.
Basic Operation
8 Basic Operation
Basic Operation
8.1 Switching on the appliance
1.
To exit low power mode →
Page16
, press on the
appliance's control ring or in the HomeConnect®app.
a The display shows a temperature, a symbol for the type
of heating, and a symbol for the timer.
a The appliance switches the interior lighting on.
a lights up orange.
2. Set the temperature, type of heating and cooking time
that you require.
Tip:In the basic settings →
Page41
, you can specify
which appliance display appears on the display after the
appliance is switched on and whether you want the interior
lighting to switch on.
Note:If you do not implement any settings for an
extended period, the display shows the appliance display
that is selected in the basic settings →
Page41
as the
start screen, and then the low power mode display.
8.2 Opening the appliance door
WARNING
The inside of the appliance door becomes very hot during
operation.
▶
During or after operation of the appliance, only touch
the appliance door at the surface intended for this on
the side.
en-us Basic Operation
22
▶
Always open the appliance door as far as it will go.
WARNING
Hot steam may escape when you open the appliance
door. Steam may not be visible, depending on the
temperature.
▶
Open the appliance door carefully.
▶
Keep children away from the appliance.
1. Press .
‒ If the "Door lock" function is activated in the basic
settings →
Page41
, move the slide control to the
other end.
a The appliance door opens automatically.
2. Only touch the appliance door at the designated area
and open it fully.
a
Tip:In the control center, you can set that the appliance
door opens automatically after the current cooking
process.
→
"Opening the appliance door automatically after the
cooking process", Page23
8.3 Changing the type of heating
Note:You can change the type of heating during
operation.
1. Press the current symbol for the type of heating.
2. Use the control ring to select the required type of
heating.
3. Press on the selected type of heating or , or wait a few
seconds.
a The display shows the selected type of heating and the
suggested temperature.
a If you have previously used the type of heating, the
display shows the last temperature that you used.
4.
If required, change the temperature. →
Page22
5. If the display shows a notification window, follow the
instructions in the notification window.
6. Press to start the operation.
8.4 Changing the temperature
Note:You can change the temperature during operation.
Requirement:The type of heating is selected.
→
"Changing the type of heating", Page22
1. Press the temperature displayed.
2. Use the control ring to select the desired temperature.
a The display shows the temperatures that are available
for the selected type of heating.
3. To change the previously stored appliance display,
press the required temperature or .
If you do not use the appliance for an extended period,
the display returns to the previously stored appliance
display.
a The display shows the selected temperature.
Note:Once the operation has started, the display shows a
progress bar below the selected temperature if the
changed temperature is more than 20°C higher than the
previous temperature.
8.5 Displaying the current interior oven
temperature
▶
Press and hold the set temperature.
a The display shows the current interior oven
temperature.
Note:During continuous operation after heating up, slight
temperature fluctuations are normal.
8.6 Switching on the broiler and changing
the broil setting
Note:The core temperature probe cannot be used in
combination with the "Broiler" type of heating.
1. Press .
2. Use the control ring to select the "Broiler" type of
heating.
3. Press .
a lights up.
a The display shows the symbol for the broil setting
instead of the temperature.
4. Press .
5. Turn the control ring to select the broil setting.
6. Press .
7.
If required, set the cooking time →
Page24
.
8. Press to start the operation.
a The display shows the type of heating, the broil setting
and the cooking time or cooking time end.
8.7 Add broiler
You can brown or gratinate your food using the broiler.
The "Add broiler" function is available for most types of
heating, except for "Broiler", "Broil + circulated air",
"Roaster operation", "Drying", "Dough proofing", "Keeping
warm" and "Defrosting".

Basic Operation en-us
23
The "Add broiler" function is not available until a
temperature of 150°C is reached.
After around 5minutes, the appliance switches the broiler
off. If required, you can switch the broiler on again.
Turning on the broiler
NOTICE:
Temperatures above 480°F (250°C) damage the core
temperature probe.
▶
If you use the core temperature probe, never place the
food on the top shelf level.
1. Use the control ring to select the required type of
heating and start the operation.
The "Add broiler" function is not available for all types of
heating.
2. Press .
a lights up.
a The appliance switches the grill off for approx. 3
minutes.
Deactivating the broiler
Requirement: lights up orange.
▶
Press .
a lights up white.
a The broiler is deactivated.
8.8 Opening the appliance door
automatically after the cooking process
The "automatic door opening" function at the end of the
cooking process is only valid for the current cooking
process.
WARNING
The appliance and its parts that can be touched become
hot during use.
▶
Young children under 8 years of age must be kept away
from the appliance.
▶
Ensure that young children are not in the vicinity of the
appliance when the appliance door opens automatically.
Note:Use the "automatic door opening" function at the
end of the cooking process only if required to prevent the
food from being overcooked or burning.
In order to reduce the amount of moisture deposited on
the unit fronts, open the appliance door fully after the
cooking time has elapsed if possible.
1. Press .
2. Press .
a The display shows .
a The appliance opens the appliance door automatically
after the current cooking process with a set cooking
time end or set core temperature.
Notes
¡ The appliance door also opens when the child lock
→
Page27
is activated or the door lock →
Page18
is
activated.
¡ Automatic appliance door opening is not available in
combination with the rotisserie spit.
8.9 Deactivating automatic appliance door
opening
1. Press .
2. Press .
a The display shows .
a Automatic appliance door opening after the cooking
process is deactivated.
8.10 Interrupting and continuing an
operation
1. To interrupt the operation, press .
2. To continue the operation, press .
8.11 Opening and closing the control center
1. Press to open the control center.
a The appliance shows a description above the functions
currently active.
2. To activate or deactivate a function as required, press
the symbol for the function.
3. Press to close the control center.
a A pop-up message →
Page17
tells you if a function has
been activated.
8.12 Switching the interior lighting on or off
1. Press .
2. Press .
8.13 Switching off the appliance
▶
Press on the control ring.
a The appliance switches to low power mode.
8.14 Switching on the appliance after
automatic shut-off
Requirement:After prolonged operation, the automatic
shut-off →
Page17
switches off the appliance.
▶
Press on the control ring.
8.15 Displaying information
▶
Press .
a The appliance displays information about the selected
function.
→
"Additional information", Page17
en-us Timer functions
24
8.16 Displaying appliance information
1. Swipe repeatedly from left to right until the display
shows "Modes & Service".
a The display shows the available functions in a list menu.
2. Use the control ring to select the "Appliance
information" function.
3. Press "Appliance information".
a The display shows the appliance information, e.g. the E-
number and the serial number.
4. Press to exit the display.
8.17 Using the quick guides
1. Select the "Modes & Service" appliance display.
→
"Appliance displays", Page13
2. Use the control ring to select "Quick guide", then
release the control ring.
3. Select the required quick guide and view it.
Timer functions
9 Timer functions
Timer functions
Your appliance has different timer functions, with which
you can control its operation.
9.1 Overview of the timer functions
Use to select the different timer functions.
Timer function Usage
Cooking time
Cooking time end
A cooking time or cooking time end can only be set in
combination with a type of heating.
The "Cooking time" and "Core temperature probe"
functions are not available at the same time.
9.2 Call up the timer menu
▶
Press .
a The display shows "h" and "min" for hours and minutes.
a The display shows the display for the minutes enlarged
in the 12 o'clock position.
9.3 Exiting the timer menu
▶
Press or press on the selected cooking time to switch
to the previously stored appliance display.
a The timer menu is closed.
9.4 Cooking time
When you set the cooking time for your food, the
appliance automatically switches off after this time. The
maximum possible cooking time depends on the set type
of heating.
For most types of heating, you can set a cooking time of
1minute up to 24hours.
For the "Drying" type of heating, the maximum cooking
time is 72hours.
You can change the type of heating and temperature while
the cooking time counts down.
Setting the cooking time
Requirement:No core temperature is set. You cannot
use the "Cooking time" and "Core temperature probe"
functions at the same time.
1. Place the food in the oven cavity.
2. Press .
a The display shows h : min for hours and minutes.
3. Press the required value and use the control ring to
change the value.
‒ Turn the control ring slowly to change the value in
smaller increments.
‒ Turn the control ring quickly to change the value in
greater increments.
The maximum possible cooking time depends on the
type of heating.
a The appliance automatically calculates the time for the
cooking time end.
4. Press or press on the selected cooking time to switch
to the previously stored appliance display.
If you do not use the appliance for an extended period,
the appliance saves the settings and the display returns
to the previously stored appliance display.
a If the appliance is in operation, the appliance shows the
temperature, the operating mode, and the remaining
cooking time.
a 3minutes before the end of the cooking time, the
display zooms in on the remaining cooking time.
a After the cooking time has elapsed, the display shows
00:00 and a signal tone sounds.
5. Turn the control ring or open the appliance door.
The appliance door opens automatically if you have
activated this function.
→
"Opening the appliance door automatically after the
cooking process", Page23
a The signal tone stops.
Note:If there is no further operation following the signal
tone, the display shows the "Downtime timer" function with
the + symbol. The display shows how much time has
elapsed since the cooking time ended. After approx.
20minutes without any further operation, the appliance
switches to low power mode.
Changing the cooking time
Requirement:You have set a type of heating and a
temperature.
1. Press .
a The display shows h : min for hours and minutes.
2. Press the required value and use to delete the value,
or use the control ring to change the value.
‒ Turn the control ring slowly to change the value in
smaller increments.

Timer functions en-us
25
‒ Turn the control ring quickly to change the value in
greater increments.
The maximum possible cooking time depends on the
type of heating.
a The appliance automatically calculates the time for the
cooking time end.
3. Press or press on the selected cooking time to switch
to the previously stored appliance display.
If you do not use the appliance for an extended period,
the display returns to the previously stored appliance
display.
a The display shows the temperature, the type of heating,
the remaining cooking time, and the cooking time end.
Deleting the cooking time
Tip:In the "Manual" appliance display, double-click on the
cooking time in order to delete the cooking time without
switching to the timer settings.
1. Press .
a The display shows h : min for hours and minutes.
2. Press the required value and use to delete the value.
a The display shows --:--.
3. Press or press on the selected cooking time to switch
to the previously stored appliance display.
If you do not use the appliance for an extended period,
the display returns to the previously stored appliance
display.
a The display does not show a cooking time.
9.5 Cooking time end
As soon as you set a cooking time, the display shows the
cooking time end. You can delay the cooking time end by
a maximum of 12 hours.
For example, if you set a cooking time of 90minutes at 10
a.m., you can delay the end of the cooking time so that the
cooking process ends at 11.30 p.m. at the latest.
For most types of heating, the maximum cooking time is
24hours.
For the "Drying" type of heating, the maximum cooking
time is 72hours.
Bear in mind that food which spoils easily should not be
left in the appliance for too long.
Delaying the cooking time end
Requirement:No core temperature is set. You cannot
use the "Cooking time" and "Core temperature probe"
functions at the same time.
1. Place the food in the oven cavity.
2. Press .
a The display shows h : min for hours and minutes.
3.
Set the cooking time. →
Page24
a The appliance automatically calculates the time for the
cooking time end.
4. Press or press on the selected cooking time to switch
to the previously stored appliance display.
If you do not use the appliance for an extended period,
the display returns to the previously stored appliance
display.
5. Press on the cooking time end.
6. Use the control ring to set the required cooking time
end.
7. Press .
a The appliance switches to standby.
a The display shows the temperature, the type of heating,
and the cooking time end.
a If the end of cooking time is one or more days in the
future, the display shows "+1d".
a The appliance starts at the calculated time and
automatically switches off once the cooking time has
elapsed.
a After the cooking time has elapsed, the display shows
00:00 and a signal tone sounds.
8. Turn the control ring or open the appliance door.
The appliance door opens automatically if you have
activated this function.
→
"Opening the appliance door automatically after the
cooking process", Page23
a The signal tone stops.
Note:If there is no further operation following the signal
tone, the display shows the "Downtime timer" function with
the + symbol. The display shows how much time has
elapsed since the cooking time ended. After approx.
20minutes without any further operation, the appliance
switches to low power mode.
Resetting the delay of the cooking time end
Note:In the "Manual" appliance display, double-click on
the cooking time end in order to reset the delay of the
cooking time end without switching to the timer settings.
Requirement:You have used the control ring to manually
set the cooking time end.
1. Press .
2. To reset the delay of the cooking time, press .
a The appliance calculates the cooking time end based
on the cooking time.
a The display shows the cooking time end.
3. Press or press on the cooking time end to switch to
the previously stored appliance display.
If you do not use the appliance for an extended period,
the display returns to the previously stored appliance
display.
9.6 Count-up cooking timer
If no cooking time is set, the display shows the time that
has elapsed since the start of the process.
In the basic settings, you can switch the "Count-up
cooking timer" function on or off.
Reset Count-up cooking timer
1. Press and hold .

en-us Sabbath mode
26
2. Press .
a The "Count-up cooking timer" function is reset.
Sabbath mode
10 Sabbath mode
1
Sabbath mode
You can use this function to keep food warm and cook
food for up to 74hours without having to switch the
appliance on or off. You can select the "Convection" and
"Top + bottom heat" types of heating, the temperature,
and the required cooking time.
Bear in mind that food which spoils easily should not be
left in the appliance for too long.
You can use the "Sabbath mode" function to program 9
different heating cycles with a total cooking time of
74hours. Set a start time and an end time. The display
shows which settings have been selected.
You can define whether the interior lighting is switched on
or switched off during the selected cooking time.
At the end of the selected cooking time, the appliance
automatically deactivates the function. If required, you can
deactivate the "Sabbath mode" function at any time using
the on/off button .
If the "Sabbath mode" function is active, the display screen
does not change when you approach the appliance.
If the "Sabbath mode" function is active, you cannot
operate the appliance via the display and the control ring.
If the "Sabbath mode" function is active, the "Automatic
door opening at the end of the cooking process" function is
not available.
10.1 Selecting a time period for the Sabbath
mode function
Requirement:The "Sabbath mode" function is set to "On"
in the basic settings →
Page41
.
1. Press the start time.
2. Use the control ring to change the start time.
3. Press .
a The appliance automatically calculates the time for the
end time.
a The display shows the start time and the end time.
4. Press the end time.
5. Use the control ring to change the end time.
a The display shows the start time and the end time.
6. Press to confirm.
a The display shows .
10.2 Opening the Sabbath mode function
Requirement:The "Sabbath mode" function is set to "On"
in the basic settings →
Page41
.
1. Swipe repeatedly from left to right until the display
shows "Modes & Service".
2. Use the control ring to select the "Sabbath mode"
function.
3. Set the switch to the right of the "Sabbath mode" list
entry to "On".
a The display shows the start time and the end time.
10.3 Selecting the settings for the interior
lighting while the Sabbath mode
function is active
Requirement:A start time and an end time are selected.
→
"Selecting a time period for the Sabbath mode function",
Page26
1. Press .
2. To switch the interior lighting on at the lowest lighting
level for the entire cooking time while the "Sabbath
mode" function is active, set the switch for the interior
lighting to "On".
3. To switch the interior lighting off for the entire cooking
time while the "Sabbath mode" function is active, set the
switch for the interior lighting to "Off".
a The display shows the start time and the end time.
4. To program the first heating cycle, if needed, press +.
→
"Setting heating cycles", Page26
10.4 Setting heating cycles
1. Press .
a The display shows the settings that have been selected
for the "Sabbath mode" function.
2. Press "Summary".
3. Press .
4. Press +.
5. Press the temperature to set it.
‒ Use the control ring to select the required
temperature and press .
6. Press the current symbol for the type of heating to set
the type of heating.
‒ Use the control ring to select the required type of
heating and press .
7. To change the start time, press the start time.
‒ Use the control ring to change the start time and
press .
8. To change the end time, press the end time.
‒ Use the control ring to change the end time and
press .
a The display shows the settings for the first heating
cycle.
9. Press to confirm.
10.To program a further heating cycle, if needed, press +.
‒ Program the settings for the further heating cycle.
You can program up to 9 heating cycles.
a The display shows the settings for the programmed
heating cycles.
a The display shows the start time and the end time for
the "Sabbath mode" function.
1
Available depending on the software version.

Child lock en-us
27
11.Touch the control ring.
a The display shows the settings for the programmed
heating cycles.
12.Navigate though the list of programmed heating cycles
in the menu with the control ring.
10.5 Changing the time period for the
Sabbath mode function
1. Press .
a The display shows the settings that have been selected
for the "Sabbath mode" function.
2. Press "Summary".
3. Press .
4. Press .
a The display shows the start time and the end time.
5. Press the start time and use the control ring to change
the start time.
10.6 Changing settings for the interior
lighting
1. Press .
a The display shows the settings that have been selected
for the "Sabbath mode" function.
2. Press "Summary".
3. Press .
4. To switch the interior lighting on at the lowest lighting
level for the entire cooking time while the "Sabbath
mode" function is active, set the switch for the interior
lighting to "On".
5. To switch the interior lighting off for the entire cooking
time while the "Sabbath mode" function is active, set the
switch for the interior lighting to "Off".
10.7 Changing the heating cycle
1. Press .
a The display shows the settings that have been selected
for the "Sabbath mode" function.
2. Press "Summary".
3. Press .
4. Navigate though the list of programmed heating cycles
in the menu with the control ring and press the required
heating cycle.
5. To change the settings for the heating cycle, press the
corresponding settings.
6. To save the changed setting, press .
10.8 Deleting a heating cycle
1. Press .
a The display shows the settings that have been selected
for the "Sabbath mode" function.
2. Press "Summary".
3. Press .
4. Navigate though the list of programmed heating cycles
in the menu with the control ring and select the required
heating cycle.
5. Press .
10.9 Starting the Sabbath mode function
▶
Press to start.
a The "Sabbath mode" function starts.
a At the end of the "Sabbath mode" function, the
appliance switches off.
10.10 Switching off the Sabbath mode
function
1. Swipe repeatedly from left to right until the display
shows "Modes & Service".
2. Use the control ring to select the "Sabbath mode"
function.
3. Set the switch to the right of the "Sabbath mode" list
entry to "Off".
Child lock
11 Child lock
Child lock
Activate the "Child lock" function so that children cannot
accidentally switch the appliance on or change the
settings.
If the child lock is activated, operation via the display and
the control ring is not possible.
If the child lock is activated and the power fails, the child
lock can be deactivated when the power comes back on.
You can activate the child lock even during operation.
11.1 Activating the childproof lock
Requirement:In the basic settings →
Page41
, the
option "On" is set for the "Display child lock" function.
1. Press .
2. Press .
a The display shows .
a The "Child lock" function is activated.
11.2 Deactivating the childproof lock
1. Press and hold for approximately 2seconds.
a The "Child lock" function is deactivated.
2. Set the appliance as normal.
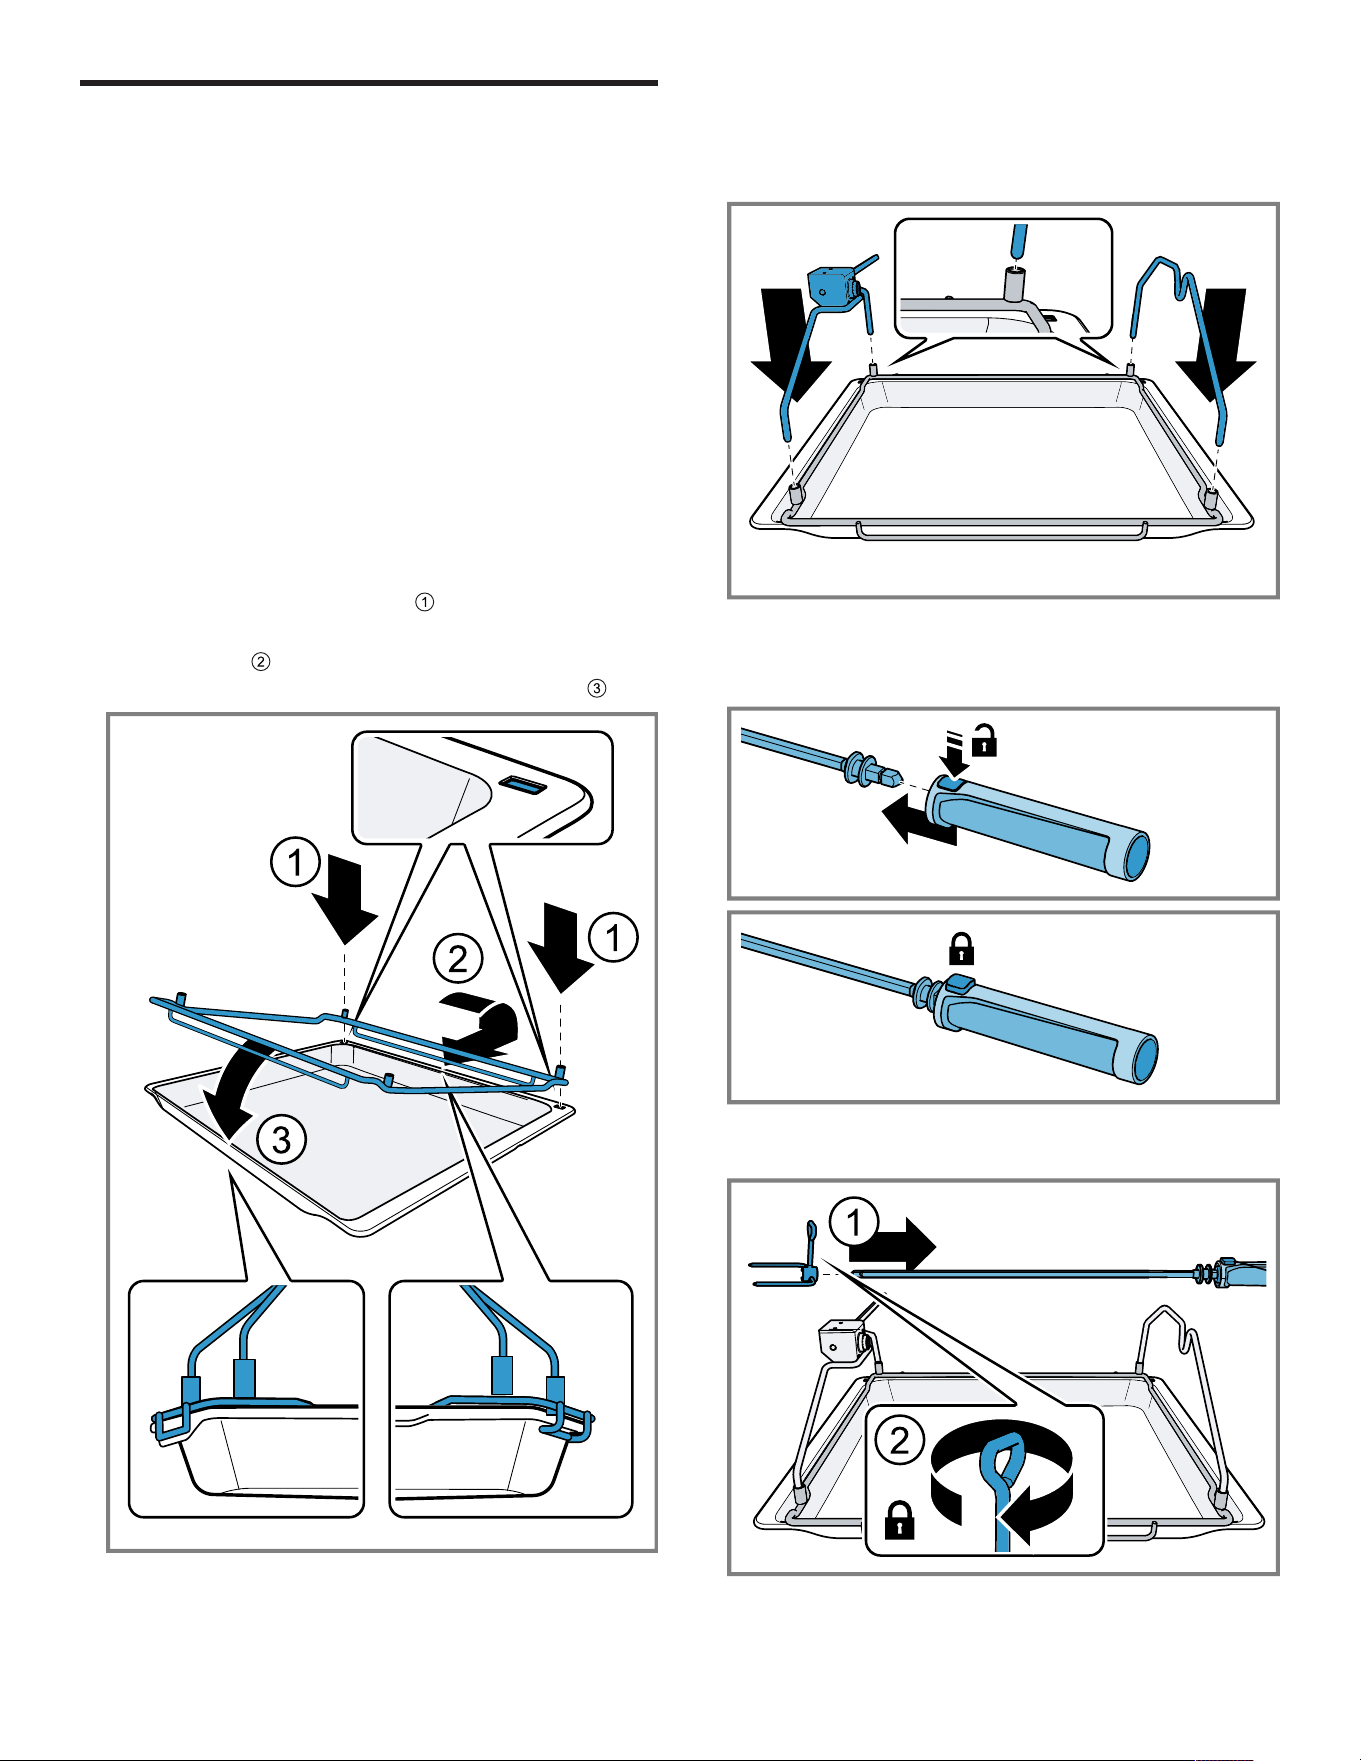
en-us Rotisserie spit
28
Rotisserie spit
12 Rotisserie spit
Rotisserie spit
The rotisserie spit is particularly good for cooking large
roasts, such as rolled roasting joints or poultry. The meat
becomes crispy and brown.
NOTICE:
Temperatures above 480°F (250°C) damage the
rotisserie spit.
▶
Only use the rotisserie spit in your appliance at a
maximum temperature of 480°F (250°C).
You can use the rotisserie spit with all operating modes.
For best results, use the ""Broiler"" or ""Top heat"" types of
heating.
12.1 Preparing the rotisserie spit
1. Position the frame above the broiling tray so that the
openings in the broiling tray and the curved frame
elements are vertically stacked .
‒ Push the frame at an angle from the rear onto the
broiling tray .
‒ Place the frame on the front of the broiling tray .
2. Push the two supporting frames into the sockets in the
frame.
‒ Position the supporting frames with the drive on the
left-hand side.
3. Press and hold the button on the handle.
‒ Slide the handle onto the rotisserie spit.
‒ Release the button.
4. Fit the right-hand retaining prongs to the rotisserie spit
and screw them in with a fixation screw.
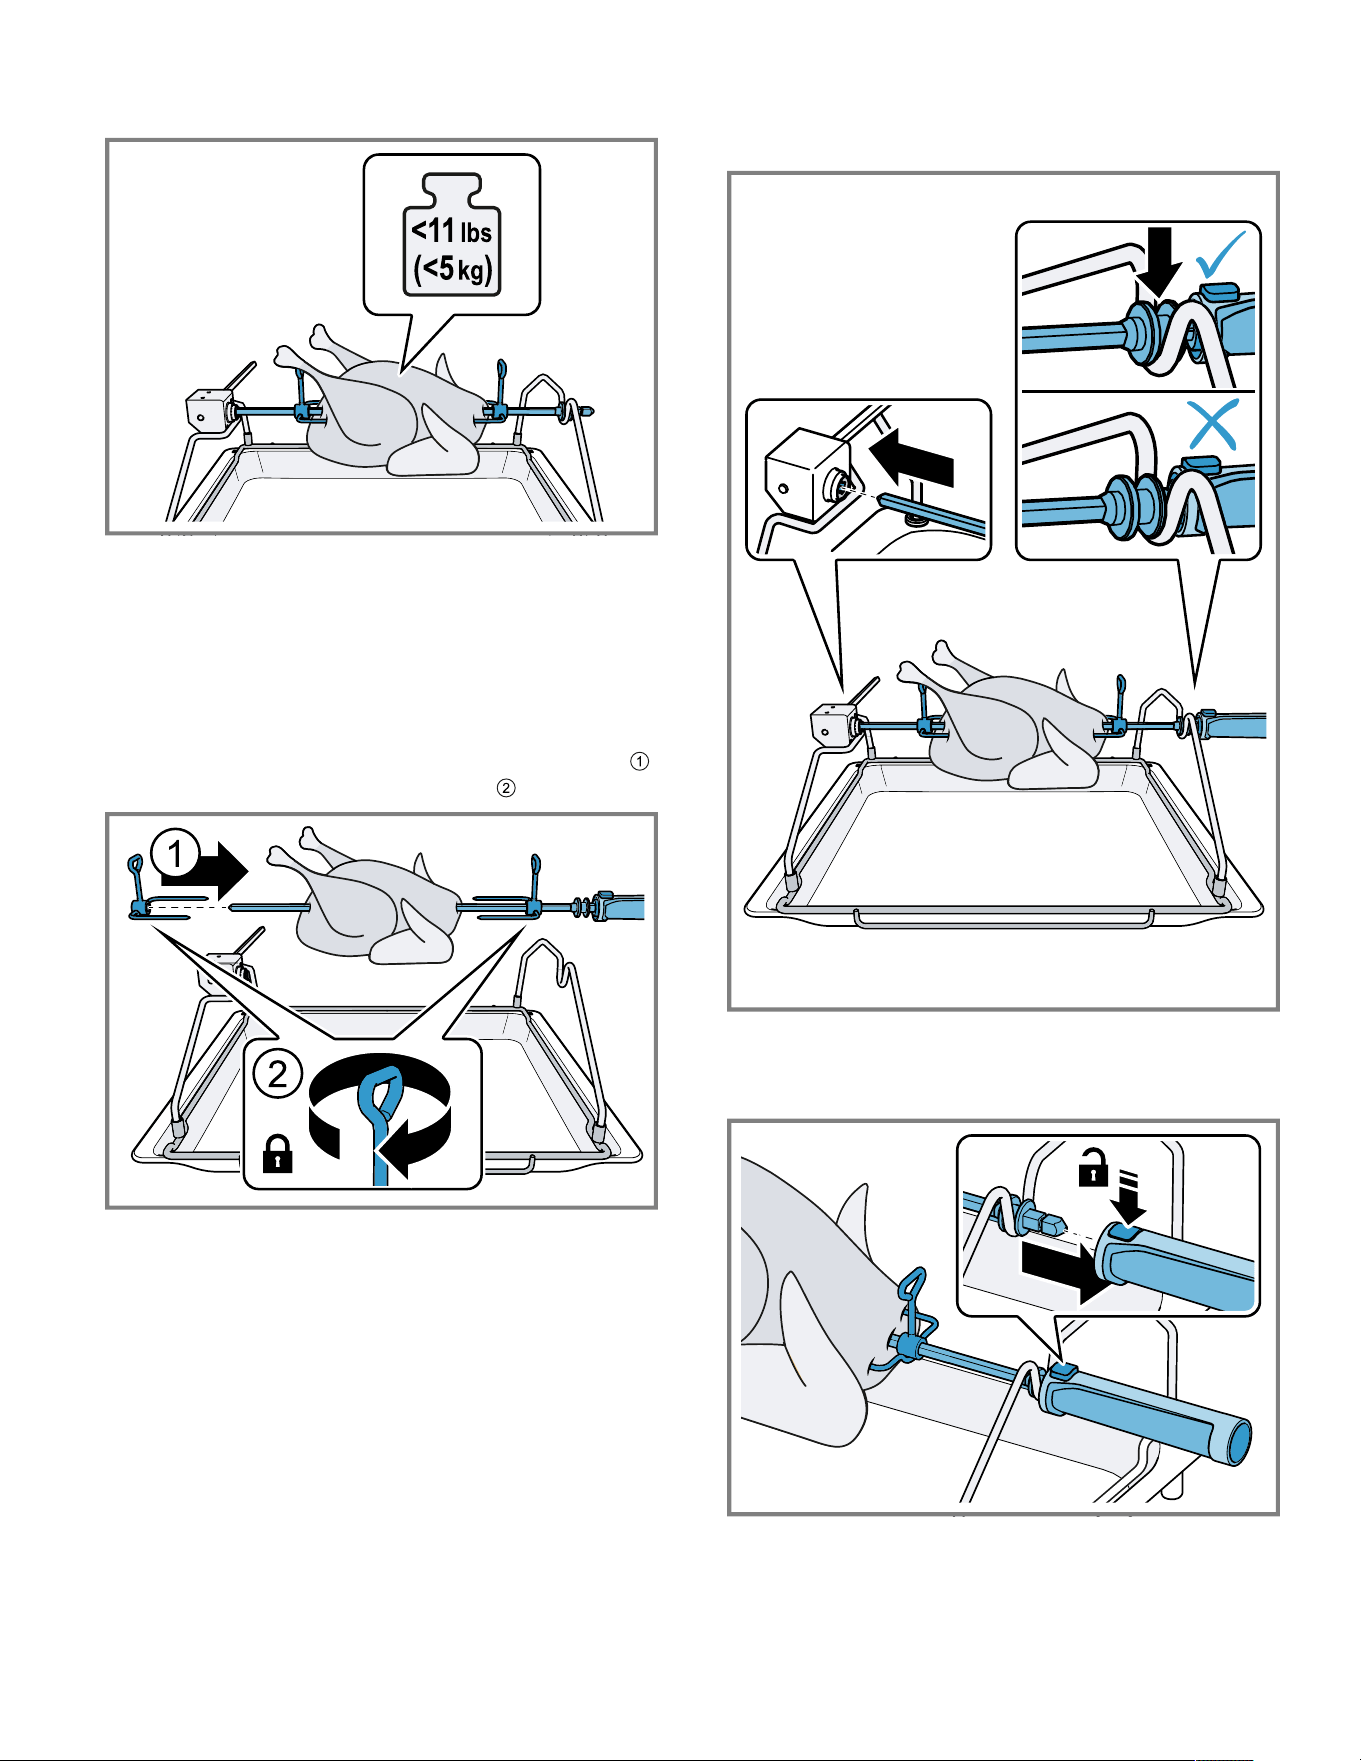
Rotisserie spit en-us
29
5. Do not exceed the maximum permissible weight for the
rotisserie spit of 11lbs (5kg).
6. Skewer the food and move it to the middle of the
rotisserie spit.
7. Secure two smaller chickens using two retaining prongs
each.
8. Secure any protruding parts, e.g. chicken wings.
a The protruding parts must not touch the broiling
element.
9. Fit the left-hand retaining prongs to the rotisserie spit
and screw them in with a fixation screw .
10.Set the rotisserie spit down onto the supporting frames.
‒ Push the rod of the rotisserie spit into the drive so
that it engages with its square profile.
11.Press and hold the button on the handle.
‒ Remove the handle.
‒ Release the button.
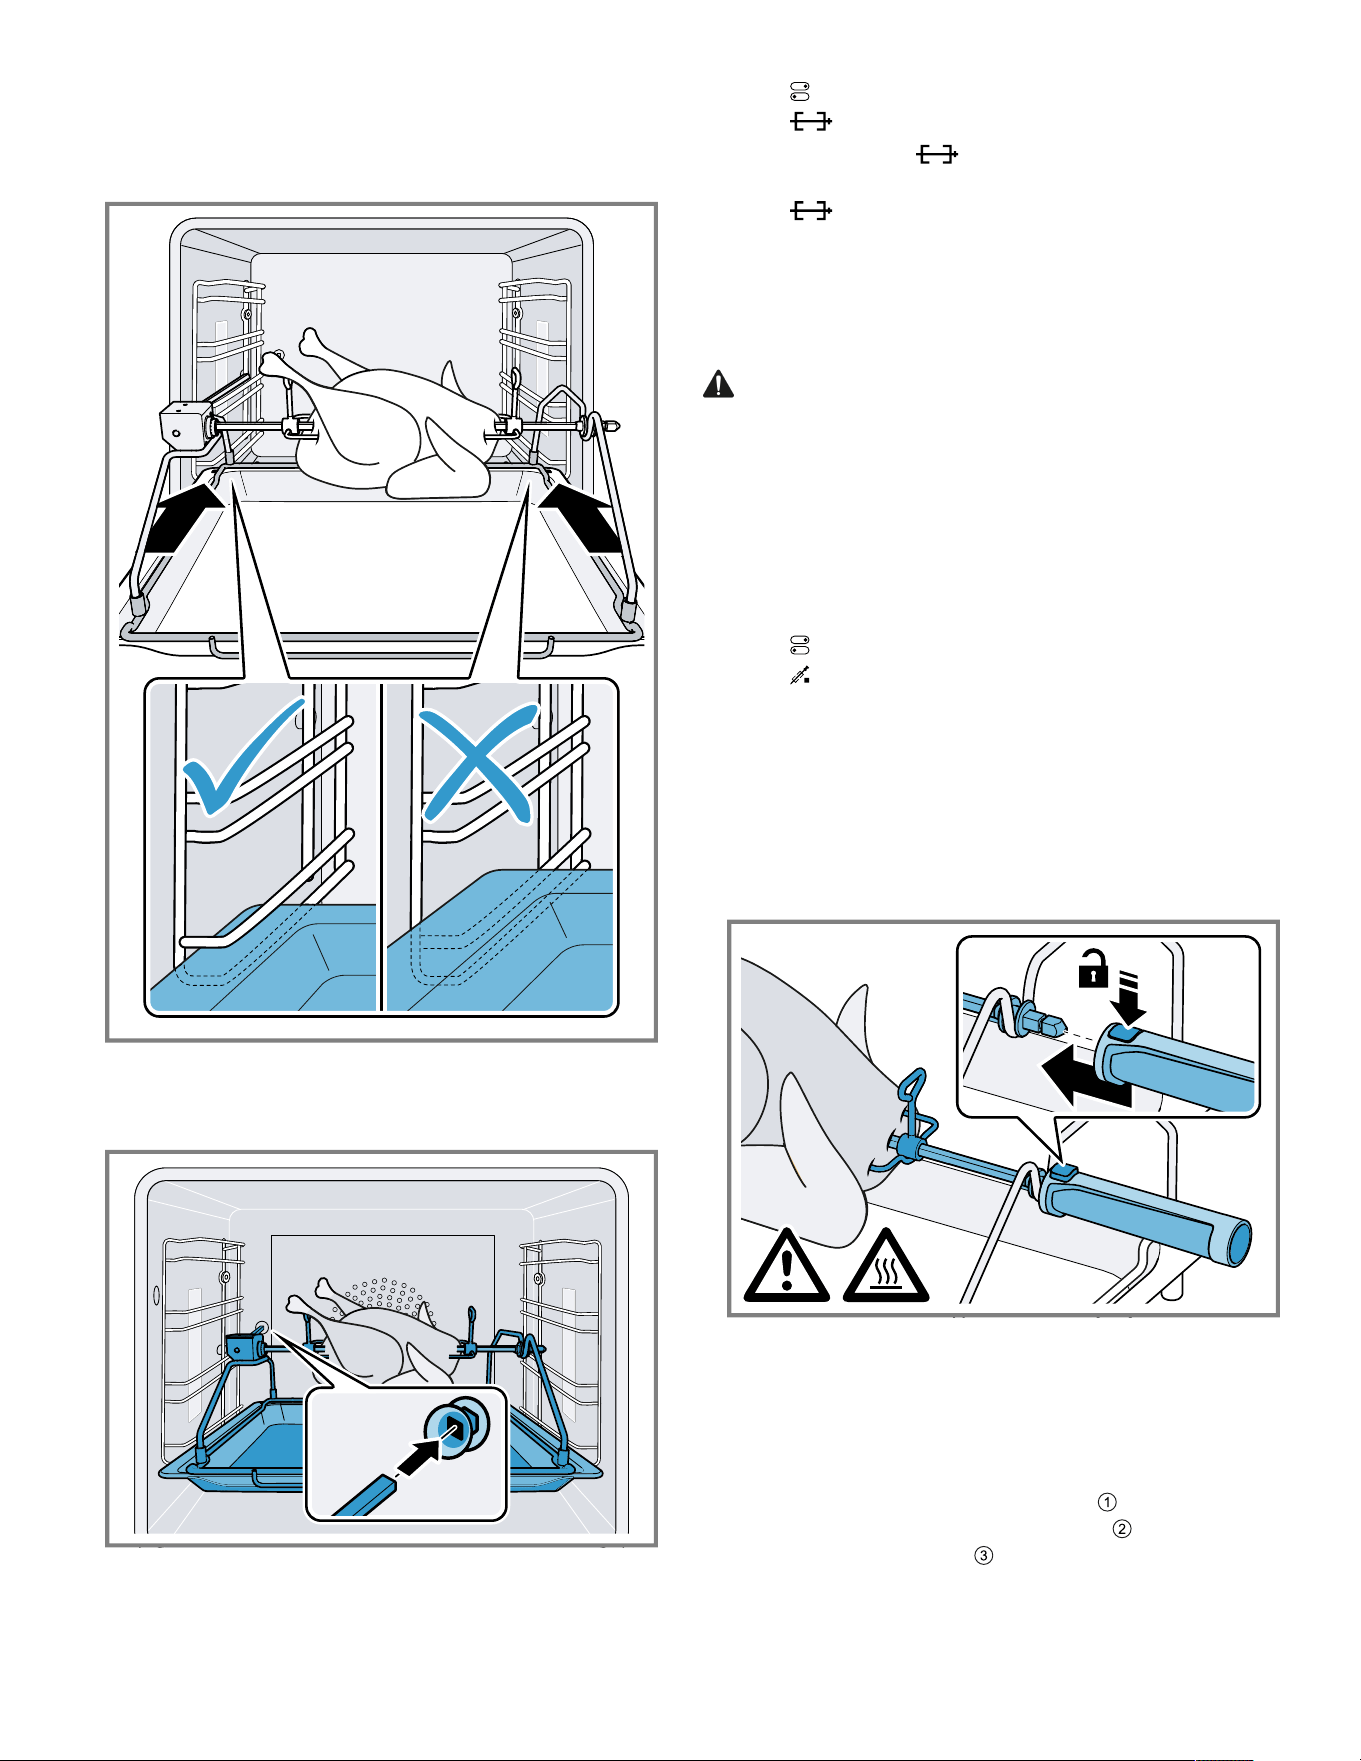
en-us Rotisserie spit
30
12.Insert the broiling tray along with the rotisserie spit at
the bottom shelf level.
‒ Do not push the broiling tray between the shelf
positions.
13.The drive shaft must engage in the opening in the rear
panel of the appliance.
‒ If necessary, turn the rotisserie spit slightly.
12.2 Switching on the rotisserie spit
1. Set the temperature and type of heating you require.
2. Press .
3. Press .
a The display shows in the "Manual" appliance
display.
4. Press .
a The appliance switches on the rotisserie spit drive.
12.3 Switching off and removing the
rotisserie spit
WARNING
The rotisserie spit and associated retaining frame are hot.
▶
Wear gloves to take them out.
▶
Place the rotisserie spit and the associated retaining
frame on a stable and heat-resistant surface.
Press the knob on the handle to release it from the
rotisserie spit.
▶
When lifting the rotisserie spit, do not press the knob on
the handle.
1. Press .
2. Press .
a The rotisserie spit drive stops.
3. Switch off the appliance.
4. Remove the broiling tray with the rotisserie spit and
place it on a stable, heat-resistant surface.
12.4 Inserting the handle
1. Press and hold the button on the handle.
2. Slide the handle onto the rotisserie spit.
3. Release the button.
12.5 Removing the food from the rotisserie
spit
▶
Pull the rotisserie spit out of the drive , loosen the
fixation screws on the retaining prongs , loosen the
left-hand retaining prong and remove the food from
the rotisserie spit.
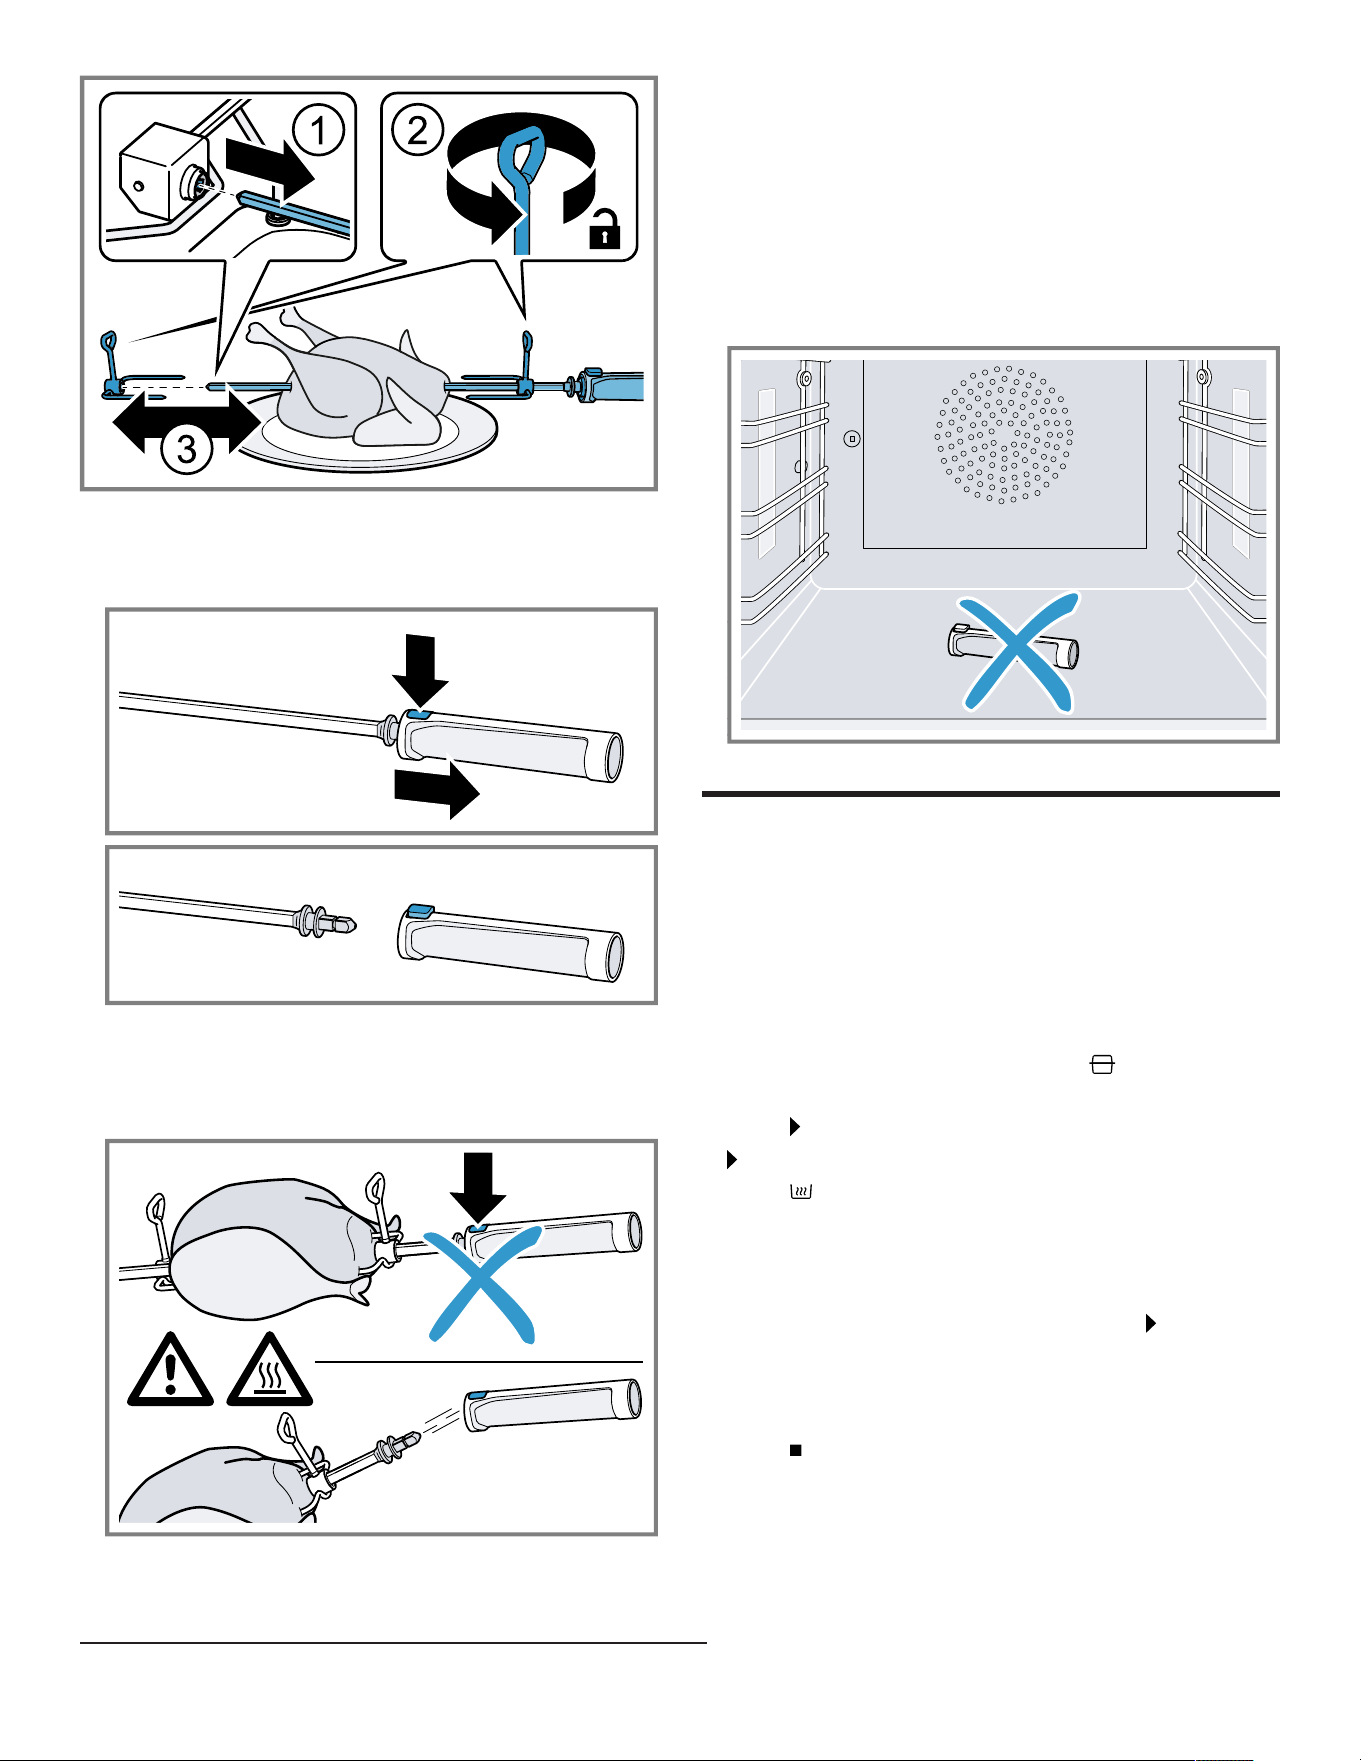
Searing function en-us
31
12.6 Removing the handle
1. Press and hold the button on the handle.
2. Pull the handle off the rotisserie spit.
3. Release the button.
4. Only press down on the button on the handle of the
rotisserie spit if there is no food on the spit.
The food may fall down.
12.7 Storing the rotisserie spit
NOTICE:
The heat in the oven causes damage to the handle of the
rotisserie spit.
▶
Do not place the handle of the rotisserie spit in the
oven.
▶
After cleaning, store the rotisserie spit handle with the
rotisserie spit.
Searing function
13 Searing function
Searing function
With the searing function, the appliance heats up at full
capacity for approximately 3minutes. You can use this to
sear steaks, for example.
To use the searing function, you need a cast iron roaster
and pull-out system
1
– these are special accessories.
13.1 Starting the searing function
Requirement:The "Roaster operation" type of heating
is set.
1. Press .
a lights up orange.
2. Press .
a The searing function starts.
Tip:You can also set the searing function to start several
times consecutively.
Note:When the searing function has ended, lights up
white.
13.2 Ending the searing function early
▶
Press .
1
This function is currently unavailable.

en-us Favorites
32
Favorites
14 Favorites
Favorites
In the "Favorites" appliance display, you can save
preferred automatic programs, recommended settings or
combinations of type of heating, temperature, core
temperature or cooking time. The appliance adopts the
selected settings, such as temperature, cooking time,
weight or level of browning for the favorites.
You can individually select the names for the favorites.
You can use the HomeConnect® app to change the
saved settings for the favorite or the order of the favorites.
After starting the favorite, you can change the settings.
→
"Changing a favorite", Page32
14.1 Creating the first favorites
Note:You can save a food as a favorite at the beginning
or end of an automatic program or a setting
recommendation.
Requirement:The settings for the favorites are selected
or a heating process ends.
1. Press .
a The display shows the "Favorites" appliance display.
2. Press .
3. Use the keyboard to enter a name.
4. Press .
14.2 Selecting a favorite
1. Swipe repeatedly from right to left until the display
shows "Favorites".
→
"Appliance displays", Page13
2. Use the control ring to select the desired favorite.
3. Press the favorite.
14.3 Renaming a favorite
Requirement:The favorite has been selected.
→
"Selecting a favorite", Page32
1. Press .
2. Enter the name for the favorite.
3. Press to confirm.
14.4 Starting a favorite
Requirement:The favorite has been selected.
→
"Selecting a favorite", Page32
▶
Press to start.
14.5 Changing a favorite
Requirements
¡ The favorite has been selected.
→
"Selecting a favorite", Page32
¡ The favorite is stopped.
1. Change the selected settings, e.g. the temperature, the
type of heating, or the cooking time.
The "Add broiler" function is unavailable.
The "Automatic door opening at end of process"
function and the rotisserie spit are available.
2. Press .
3. Press to start.
a The operation starts with the changed settings.
Note:The appliance does not save the changed settings
in the selected favorite. If you select the favorite again, the
settings match the settings when the favorite was created.
You can use the HomeConnect® app to change the
settings for the favorites.
14.6 Deleting a favorite
Requirement:The favorite has been selected.
→
"Selecting a favorite", Page32
1. Press .
2. Press to confirm.
Programs
15 Programs
Programs
The "Programs" appliance display includes the automatic
programs and recommended settings.
15.1 Automatic programs
You can use the "Automatic programs" function to cook a
wide variety of food. The appliance will choose the optimal
setting for you.
In automatic programs, the appliance defines the optimal
settings after you enter the weight and required cooking
result, for example. The automatic programs are labeled
with a checkmark in the overview list.
The cooking time only begins once the appliance has
preheated. You can find information about the accessories
or shelf levels in the tip for the respective program.
Note:In the basic settings →
Page41
, you can filter
automatic programs, e.g. with the following filters
"Vegetarian" or "No meat & poultry".
Information about the settings for the automatic
programs
Observe the instructions for the settings of the automatic
programs.
¡ The cooking result depends on the quality of the food
and the size and type of cookware. For an optimal
cooking result, only use food that is in good condition
and meat that is chilled to refrigerator temperature. For
frozen food, use food straight out of the freezer only.
¡ The food is divided into categories. One or more dishes
are listed for each category. The display shows the last
selected meal.
¡ For some dishes, the appliance asks you to enter, for
example, the weight, the desired level of browning, the
thickness of the food or the cooking level of the food.

Programs en-us
33
¡ For some food, preheat the empty cooking
compartment for an optimal cooking result. Place the
food in the cooking compartment once the preheating is
complete and a message appears in the display.
¡ The appliance displays the selected settings next time
as a suggestion.
¡ For some programs, you need the core temperature
probe. Use the core temperature probe →
Page34
for
these programs.
¡ To achieve good results, the cooking compartment must
not be too hot for the type of food you have selected. If
the cooking compartment is too hot, the display shows a
corresponding notification. Allow the appliance to cool
and then try again.
Selecting an automatic program
1. Swipe repeatedly from right to left until the display
shows "Programs".
a The display shows the first program in the "Vegetables"
category or the last set automatic program.
a The display shows the preselected values for the
program or the last set values.
a The display shows a tip and symbols for the Favorites
→
Page32
category and for the program start.
2. Use the control ring to select the required meal, and
press on the required meal.
a The display shows the name of the selected dish and
the corresponding values.
Changing category
1. Press the symbol for the category.
a The display shows the available categories in the ring
menu.
2. Select the required category with the control ring.
3. Press or press the category in order to confirm the
selection.
a The display shows the first dish in the selected category
and the corresponding values.
Changing the program
1. Press on the name of a dish or navigate through the list
of dishes in the menu with the control ring.
2. Press the required dish.
a The display shows the name of the selected dish and
the corresponding settings.
3. Press the setting.
4. Use the control ring to change the setting and press on
the required setting.
Not all settings can be changed.
You cannot change the type of heating.
5. Press .
a The display shows the name of the selected dish and
the corresponding settings.
6. Press .
a The display shows information about the accessories
and preparation.
7. Follow the information on the display.
Starting the automatic program
▶
Press .
a Once the cooking time has elapsed, a signal tone
sounds.
a The appliance stops heating.
Note:If you open the appliance door during an automatic
program, this affects the cooking result. Do not open the
appliance door, or only open it briefly. The appliance
interrupts the automatic program and continues to run
when you close the appliance door.
Extending the cooking time
If you are still not satisfied with the cooking result, you can
increase the cooking time again.
1. Press 00.00.
2. Select the required cooking time.
3. Press to confirm.
Canceling the automatic program
Note:Once you have started the automatic program, you
can no longer change the settings.
▶
Press .
a The appliance ends the automatic program.
Saving a program as a favorite
You can save a program as a favorite at the start or end of
an automatic program.
1. Press .
a The display shows the "Favorites" appliance display.
2. Press .
3. Use the keyboard to enter a name.
4. Press .
You can only change the settings for a saved favorite
via the HomeConnect® app.
15.2 Recommended settings
With recommended settings, the appliance specifies the
optimal type of heating.
The recommended settings are not labeled with a
checkmark in the overview list.
If a weight is specified in the tip, the recommended
temperature and the cooking time relate to this weight
specification. You can adapt the temperature and cooking
time within the available ranges.
The cooking time only begins once the appliance has
preheated. You can find information about the accessories
or shelf levels in the tip for the respective program.
Information on the recommended settings
Observe the information on the recommended settings.

en-us Core temperature sensor
34
¡ The cooking result depends on the quality of the food
and the size and type of cookware. For an optimal
cooking result, only use food that is in good condition
and meat that is chilled to refrigerator temperature. For
frozen food, use food straight out of the freezer only.
¡ The food is divided into categories. One or more dishes
are listed for each category. The display shows the last
selected meal.
¡ With the recommended settings, the appliance specifies
the type of heating.
¡ You can change the temperature and the cooking time
in the specified areas.
¡ For some food, preheat the empty cooking
compartment for an optimal cooking result. Place the
food in the cooking compartment once the preheating is
complete and a message appears in the display.
¡ The appliance displays the selected settings next time
as a suggestion.
¡ To achieve good results, the cooking compartment must
not be too hot for the type of food you have selected. If
the cooking compartment is too hot, the display shows a
corresponding notification. Allow the appliance to cool
and then try again.
Selecting a recommended setting
1. Swipe repeatedly from right to left until the display
shows "Programs".
a The display shows the first program in the "Vegetables"
category or the last set automatic program.
a The display shows the preselected values for the
program or the last set values.
a The display shows a tip and symbols for the Favorites
→
Page32
category and for the program start.
2. Use the control ring to select the required meal, and
press on the required meal.
a The display shows the name of the selected dish and
the corresponding values.
Changing category
1. Press the symbol for the category.
a The display shows the available categories in the ring
menu.
2. Select the required category with the control ring.
3. Press or press the category in order to confirm the
selection.
a The display shows the first dish in the selected category
and the corresponding values.
Changing the program
1. Press on the name of a dish or navigate through the list
of dishes in the menu with the control ring.
2. Press the required dish.
a The display shows the name of the selected dish and
the corresponding settings.
3. Press the setting.
4. Use the control ring to change the setting and press on
the required setting.
Not all settings can be changed.
You cannot change the type of heating.
5. Press .
a The display shows the name of the selected dish and
the corresponding settings.
6. Press .
a The display shows information about the accessories
and preparation.
7. Follow the information on the display.
Starting a recommended setting
▶
Press .
a Once the cooking time has elapsed, a signal tone
sounds.
a The appliance stops heating.
Note:If you open the appliance door when a
recommended setting is running, this affects the cooking
result. Do not open the appliance door, or only open it
briefly. The appliance interrupts the recommended setting
and continues to run when you close the appliance door.
Extending the cooking time
If you are still not satisfied with the cooking result, you can
increase the cooking time again.
1. Press 00.00.
2. Select the required cooking time.
3. Press to confirm.
Changing a recommended setting
Note:Once you have started the recommended setting,
you can change the settings.
1. Press on the recommended setting.
2. Change the desired settings.
Saving a program as a favorite
You can save a program as a favorite at the start or end of
a recommended setting.
Requirements
¡ The temperature and type of heating are set.
¡ The cooking time or core temperature is set.
1. Press .
a The display shows the "Favorites" appliance display.
2. Press .
3. Use the keyboard to enter a name.
4. Press .
You can only change the settings for a saved
"Favorites" via the HomeConnect® app.
Core temperature sensor
16 Core temperature sensor
Core temperature sensor
The core temperature probe makes it possible to cook with
exact precision. The core temperature probe measures
the temperature at 3 measuring points inside the food.
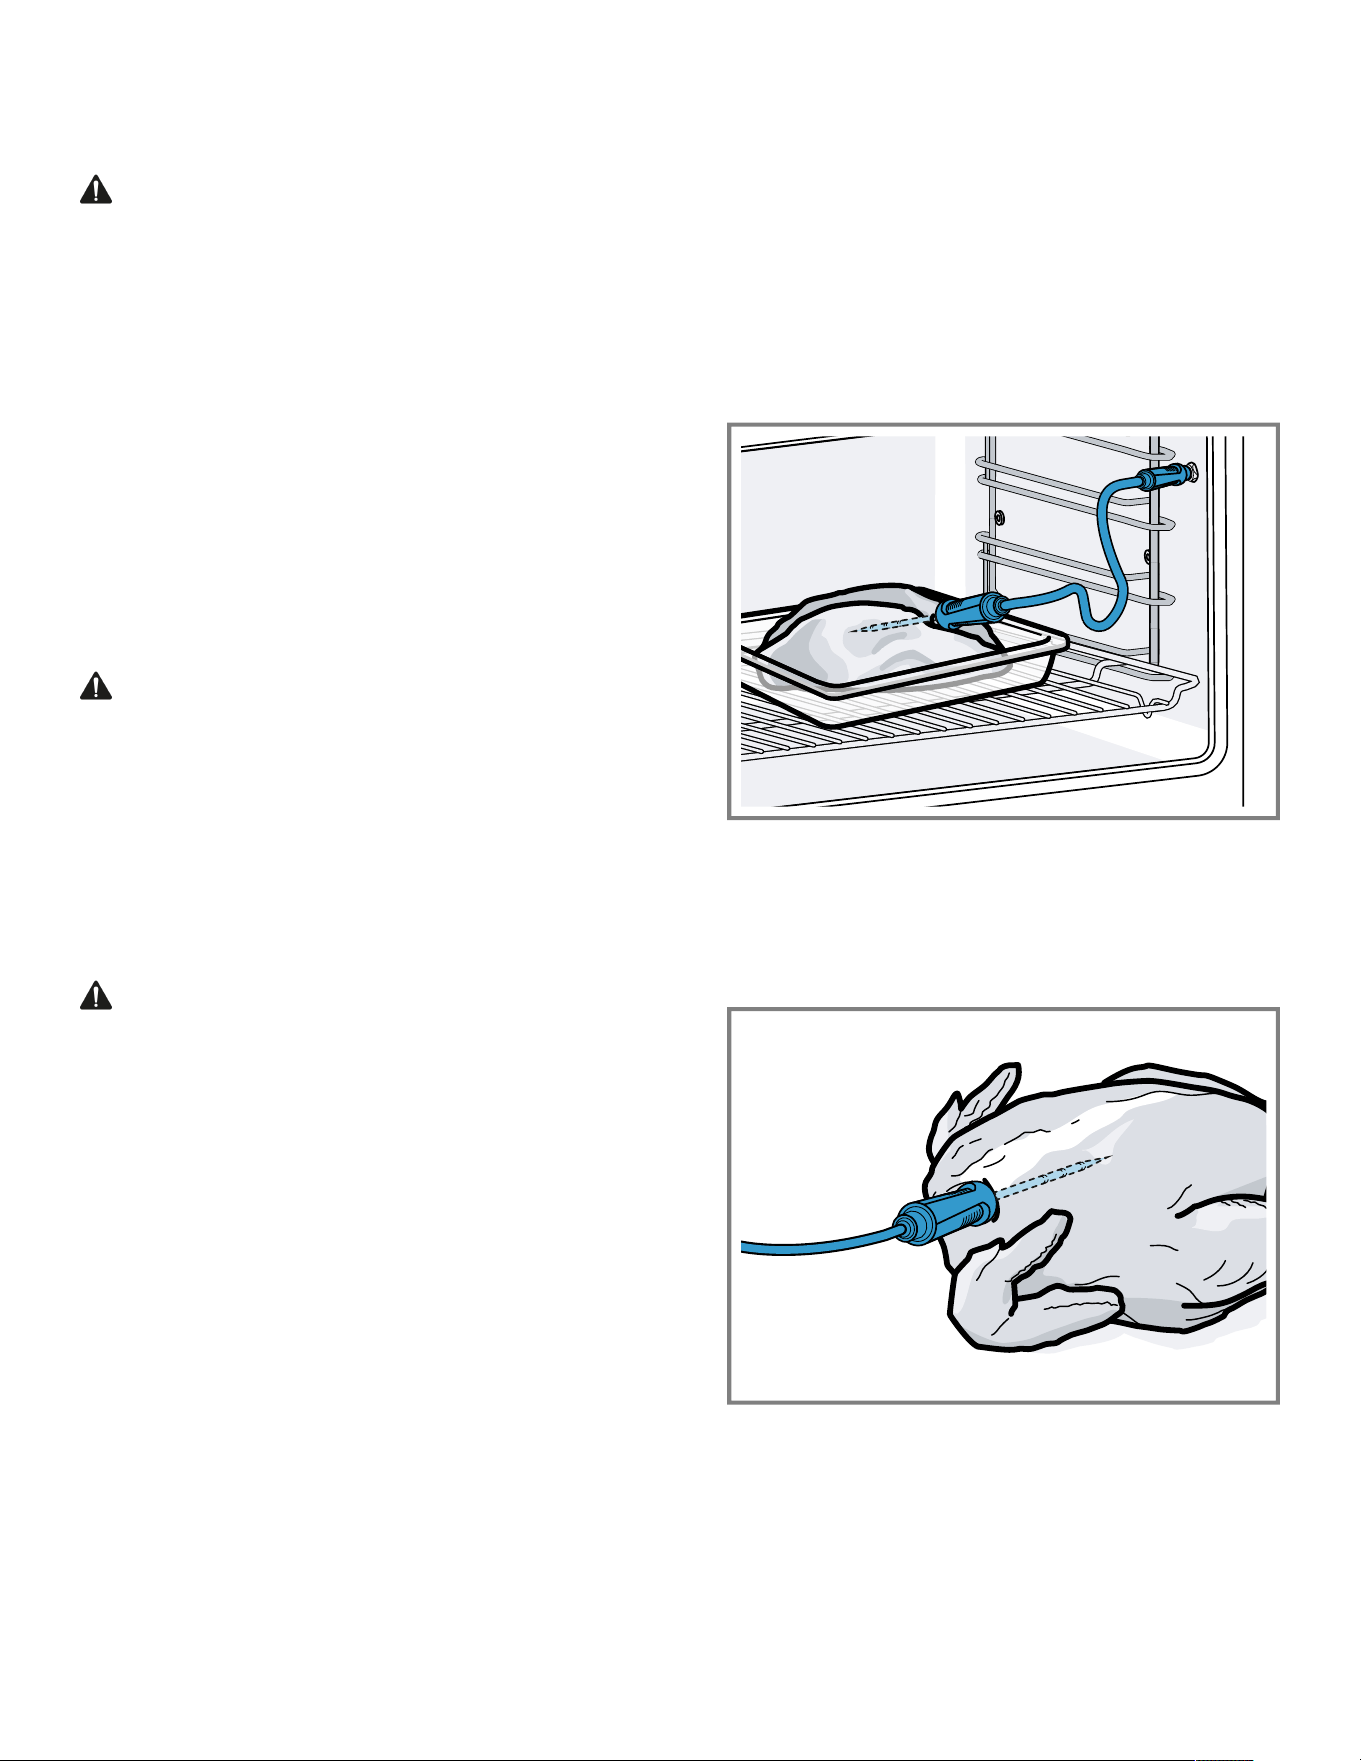
Core temperature sensor en-us
35
When the required core temperature is reached, the
appliance automatically switches off, ensuring that all food
is cooked perfectly.
WARNING
The oven cavity and the core temperature probe become
very hot.
▶
Use oven gloves when inserting and removing the core
temperature probe.
NOTICE:
Temperatures above 480°F (250°C) damage the core
temperature probe.
▶
Only use the core temperature probe in your appliance
at a maximum temperature of 480°F (250°C).
▶
Do not use the core temperature probe with the "Broil"
type of heating.
▶
Before using the "Broil" type of heating, remove the
core temperature probe from the cooking compartment.
▶
When using the core temperature probe with
the"Broil+circulated air" type of heating, set the
temperature to a maximum of 480°F (250°C).
WARNING
An incorrect core temperature probe may damage the
insulation.
▶
Only use the core temperature probe that is suitable for
this appliance.
NOTICE:
Aggressive cleaning agents may damage the core
temperature probe.
▶
Do not clean the core temperature probe in the
dishwasher.
WARNING
The core temperature probe is sharp.
▶
Handle the core temperature probe with care.
Only use the core temperature probe supplied. The core
temperature probe →
Page19
is available as a spare part
from customer service or the online shop.
If you use the core temperature probe, never place the
food on the top shelf level.
After use, always remove the core temperature probe from
the cooking compartment. Never store the core
temperature probe in the cooking compartment.
After each use, clean the core temperature probe with a
damp cloth.
The measurable range is 60-212°F (15°C to 100°C).
Outside of the measurable range, the display shows
"<60F (15°C)" or ">212F (100°C)" for the current core
temperature.
If you leave food in the cooking compartment for some
time after cooking, the core temperature will continue to
rise somewhat due to the residual heat in the cooking
compartment.
16.1 Inserting the core temperature probe
into the food
1. Insert the core temperature probe fully into the food.
2. Do not insert the core temperature probe into the fat.
3. Ensure that the core temperature probe is not touching
any cookware or any bones.
4. Place the food in the oven cavity.
Inserting the core temperature probe into meat
1. Insert the core temperature probe at the thickest point
on the side as far as it will go into the meat.
2. If there is more than one piece of meat, insert the core
temperature probe into the middle of the thickest piece.
Inserting the core temperature probe into poultry
1. Insert the core temperature probe as far as it will go into
the thickest point in the breast.
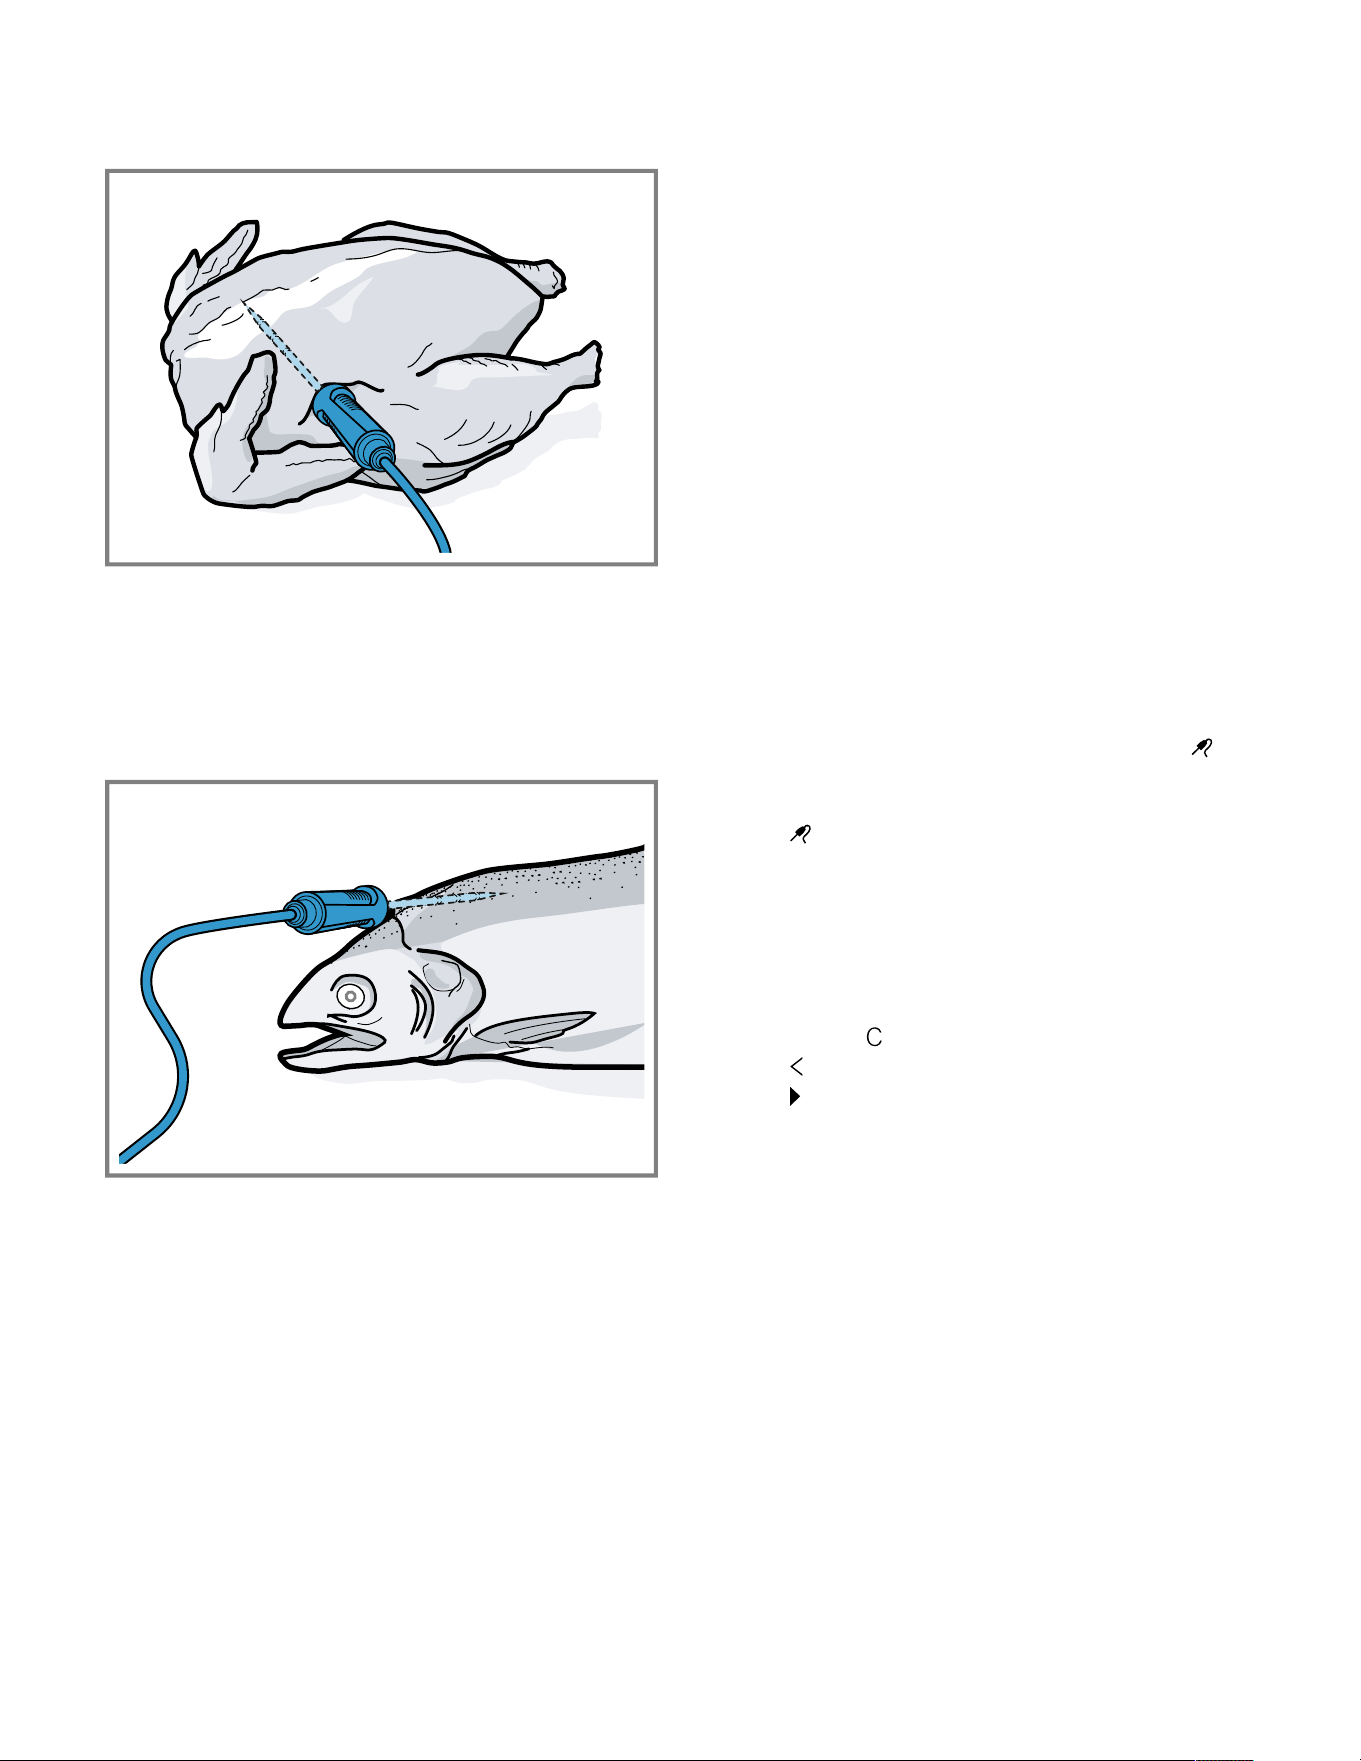
en-us Core temperature sensor
36
2. Depending on its composition, insert the core
temperature probe into the poultry crossways or
lengthways.
3. With poultry, ensure that the tip of the core temperature
probe does not protrude into the cavity in the middle of
the bird.
Inserting the core temperature probe into fish
1. Insert the core temperature probe behind the head as
far as it will go towards the spine.
2. Place the whole fish onto the wire rack and prop it up in
the swimming position using half a potato.
16.2 Turning the food
1. Do not pull out the core temperature probe when turning
the food.
If you pull out the core temperature probe during
operation, the appliance resets all settings. You must
then reset the settings.
2. Turn the food.
3. Once you have turned the food, check that the core
temperature probe is correctly positioned in the food.
16.3 Setting the core temperature probe
NOTICE:
The heat of the grilling surface may damage the core
temperature probe.
▶
Ensure that the distance between the glass grilling
surface and the core temperature probe and the cable
of the core temperature probe is a few centimeters. In
doing so, ensure that the meat can expand during the
cooking process.
You may damage the cable of the core temperature probe
with the appliance door.
▶
Do not trap the cable of the core temperature probe in
the appliance door.
Requirement:A cooking time end is not set. The cooking
time end and core temperature probe functions are not
available at the same time.
1. Slide the food into the oven cavity with the core
temperature probe inserted.
2. Insert the core temperature probe into the socket in the
oven cavity.
3. Close the appliance door.
a The display shows the current interior oven temperature
and the symbol for the core temperature probe .
4. Select the required type of heating and interior oven
temperature using the control ring.
5. Press .
6. Use the control ring to select the required core
temperature →
Page37
.
‒ Ensure that the set core temperature is higher than
the current core temperature.
You can change the set core temperature at any time.
7. The set core temperature can be cleared and reset as
needed using or the control ring.
8. Press or press the set core temperature.
9. Press .
a The appliance heats up using the set type of heating.
a Once you have set the core temperature, the display
shows the type of heating and the current core
temperature.
a Once you have set the core temperature, the display
shows the type of heating and switches between
displaying the estimated time →
Page38
until the core
temperature is reached and the current and set core
temperature.
a If the current core temperature is 9°F (5°C) below the
set core temperature, the display shows the current and
set core temperature as enlarged.
a Once the core temperature for the food has been
reached, the display shows the required core
temperature alongside the set core temperature and a
signal sounds.
a The appliance ends the cooking process automatically.

Core temperature sensor en-us
37
Note:If you do not continue to operate the appliance after
the signal tone, the display shows how much time has
elapsed since the food reached the core temperature.
Once you start operating the appliance again, the
appliance clears the time display. After around 20minutes
without any further operation, the appliance switches to
low power mode.
16.4 Deleting the set core temperature
▶
In the "Manual" appliance display, double-click on the
temperature.
→
"Appliance displays", Page13
a The display shows the current core temperature.
16.5 Changing the set core temperature
1. Press .
2. Change the set core temperature using the control ring.
Once the display shows the set core temperature
enlarged in the 12 o'clock position, you can change the
set core temperature directly using the control ring.
16.6 Core temperature guideline values
The following overview provides you with guideline values
for the core temperature. The guideline values depend on
the quality and composition of the food.
Only use fresh food that has not been frozen. For hygiene
reasons, ensure that critical foods such as fish and game
reach a core temperature of at least 140-160°F
(62-70°C) and poultry and minced meat 180-195°F
(80-90°C).
Food Core temperature
guideline value in °F (°C)
Beef
Sirloin, fillet of beef,
entrecôte, roast beef, rare
116-131 (47-55)
Sirloin, fillet of beef,
entrecôte, roast beef,
medium rare
133-145 (56-63)
Sirloin, fillet of beef,
entrecôte, roast beef,
medium
147-158 (64-70)
Sirloin, fillet of beef,
entrecôte, roast beef, well
done
160-167 (71-75)
Pork
Joint of pork 167-176 (75-80)
Loin of pork, medium rare 149-158 (65-70)
Loin of pork, medium 160-167 (71-75)
Pork loin, well done 169-176 (76-80)
Meatloaf 185 (85)
Fillet of pork, medium rare 149-158 (65-70)
Fillet of pork, medium 160-167 (71-75)
Food Core temperature
guideline value in °F (°C)
Veal
Joint of veal, well done 167-176 (75-80)
Breast of veal, stuffed, well
done
167-176 (75-80)
Saddle of veal, medium 147-158 (64-70)
Saddle of veal, well done 160-167 (71-75)
Fillet of veal, rare 120-131 (50-55)
Fillet of veal, medium rare 133-145 (56-63)
Fillet of veal, medium 147-158 (64-70)
Fillet of veal, well done 160-167 (71-75)
Game
Saddle of venison 140-158 (60-70)
Leg of venison 158-167 (70-75)
Venison loin steaks 149-158 (65-70)
Saddle of hare, saddle of
rabbit
149-158 (65-70)
Poultry
Chicken 194 (90)
Guinea fowl 176-185 (80-85)
Goose, turkey, duck 185-194 (85-90)
Duck breast, medium rare 131-140 (55-60)
Duck breast, medium 141-158 (61-70)
Duck breast, well done 160-176 (71-80)
Ostrich steak 140-149 (60-65)
Lamb
Leg of lamb, medium 149-156 (65-69)
Leg of lamb, well done 158-176 (70-80)
Saddle of lamb, medium
rare
131-140 (55-60)
Saddle of lamb, medium 141-147 (61-64)
Saddle of lamb, well done 149-167 (65-75)
Mutton
Leg of mutton, medium rare 158-176 (70-75)
Leg of mutton, medium 169-176 (76-80)
Leg of mutton, well done 178-185 (81-85)
Saddle of mutton, medium 158-176 (70-75)
Saddle of mutton, well done 169-176 (76-80)
Fish
Fillet, whole, medium 136-147 (58-64)
Fillet, whole, well done 149-154 (65-68)
Terrine 144-149 (62-65)
Other
Bread 205 (96)
Pâté 162-167 (72-75)
Terrine 158-176 (70-75)

en-us HomeConnect®
38
Food Core temperature
guideline value in °F (°C)
Foie gras 113-140 (45-60)
Reheating food 167 (75)
16.7 Estimated cooking time
After preheating, if the appliance has a temperature
setting above 250°F (120°C) and the core temperature
probe is inserted, the display shows an estimated cooking
time a few minutes into the cooking time. The appliance
continuously updates the estimated cooking time.
The estimated cooking time is only available if you
connect your appliance to the HomeConnect® app.
The longer the cooking process lasts, the more precise the
estimated cooking time becomes. Do not open the
appliance door; this distorts the estimated cooking time.
The display shows the estimated cooking time in manual
operation and in the automatic program.
To display the current core temperature, press on the set
core temperature.
HomeConnect®
17 HomeConnect®
HomeConnect®
This appliance is network-capable. Connecting your
appliance to a mobile device lets you control its functions
via the HomeConnect® app, adjust its basic settings and
monitor its operating status.
The HomeConnect® services are not available in every
country. The availability of the HomeConnect® function
depends on the availability of the HomeConnect®
services in your country. You can find information on this
at: www.home-connect.com.
The HomeConnect® app guides you through the entire
registration process. Follow the instructions, noting the
information in the HomeConnect® app.
Notes
¡ Note the safety information in this instruction manual
and ensure that it is also observed when operating the
appliance using the HomeConnect® app.
¡ Operating the appliance on the appliance itself always
takes priority. It is not possible to operate the appliance
using the HomeConnect® app during this time.
¡ In networked standby mode, the appliance requires a
maximum of 2watts.
17.1 Setting upHomeConnect®
Requirements
¡ The appliance is connected to the power supply and is
switched on.
¡ You have a mobile device with a current version of the
iOS or Android operating system, e.g. a smartphone.
¡ The appliance receives signals from the WLAN home
network (Wi-Fi) at its installation location.
¡ The mobile device and the appliance are within range of
your home network's Wi-Fi signal.
1. Scan the following QR code.
You can install the HomeConnect® app and connect
your appliance via the QR code.
2. Follow the instructions in the HomeConnect® app.
17.2 HomeConnect® settings
You can adjust the home network settings in your
appliance's basic settings.
Which settings the display shows will depend on whether
HomeConnect® has been set up and whether the
appliance is connected to your home network.
You can switch the network connection on or off as
required. The network information is retained after the
appliance is switched off. After switching on the appliance,
wait for a few seconds until it reconnects to the home
network.
The display uses different symbols to show the connection
strength to the router.
Note:In networked standby mode, the appliance requires
a maximum of 2W.
You can use the HomeConnect® app to access the
appliance's functions. If you select the "Off (monitoring
only)" setting in the basic settings →
Page41
for "Remote
start", the HomeConnect® app only shows the
appliance's operating status and you can configure the
settings.
If you select the "Permanent" setting in the basic settings
→
Page41
for "Remote start", you can start and operate
your appliance at any time without any prior approval on
the appliance.
If you select the "Manual" setting in the basic settings
→
Page41
for "Remote start", the appliance requires
approval in the control center in order to start a function.
In the basic settings →
Page41
, you can use "Network
information" to display the network information.
In the basic settings →
Page41
, you can use "Network
credentials reset" to delete all network access data from
the appliance at any time.

HomeConnect® en-us
39
17.3 Starting functions with the
HomeConnect® app via manual
Remote start
You can use the HomeConnect® app to set the appliance
remotely via the "Remote start" function. If you select the
"Manual" setting in the basic settings for "Remote start",
the appliance requires approval in the control center in
order to start a function.
WARNING
Combustible objects that are left in the cooking
compartment may catch fire.
▶
Never store combustible objects in the cooking
compartment.
▶
If smoke is emitted, the appliance must be switched off
or the fuse must be switched off and the door must be
held closed in order to stifle any flames.
Requirements
¡ The appliance is connected to the home network and to
the HomeConnect®app.
¡ To start a function, the "Manual" setting is selected in
the basic settings for "Remote start".
1. To activate manual remote start, press and then .
2. Configure a setting in the HomeConnect®app and
send it to the appliance.
3. Start a function.
Note:If you open the appliance door more than
15minutes after activating remote start or after the
operation ends, the appliance deactivates the manual
remote start.
24hours after activating remote start, the appliance
deactivates the manual remote start.
17.4 Starting functions with the
HomeConnect® app via permanently
activated Remote start
You can use the HomeConnect® app to set and start the
appliance remotely via the "Remote start" function. If you
select the "Permanent" setting in the basic settings for
"Remote start", the appliance does not require approval in
the control center in order to start a function.
WARNING
Combustible objects that are left in the cooking
compartment may catch fire.
▶
Never store combustible objects in the cooking
compartment.
▶
If smoke is emitted, the appliance must be switched off
or the fuse must be switched off and the door must be
held closed in order to stifle any flames.
Requirements
¡ The appliance is connected to the home network and to
the HomeConnect®app.
¡ To start a function, the "Permanent" setting is selected
in the basic settings for "Remote start".
1. Configure a setting in the HomeConnect®app and
send it to the appliance.
2. Start a function.
17.5 Using the HomeConnect® app to
change settings
You can use the HomeConnect® app to set the appliance
remotely.
WARNING
Combustible objects that are left in the cooking
compartment may catch fire.
▶
Never store combustible objects in the cooking
compartment.
▶
If smoke is emitted, the appliance must be switched off
or the fuse must be switched off and the door must be
held closed in order to stifle any flames.
Requirement:The appliance is connected to the home
network and to the HomeConnect®app.
▶
Configure a setting in the HomeConnect®app and
send it to the appliance.
17.6 Switching the Wi-Fi on or off
Requirement:The "On" and "Off" settings are only
available if a connection to the HomeConnect® server
has been established.
1. Press in the status line.
2. Press in the control center.
3. Press the desired setting.
4. If required, use to switch to "Settings".
17.7 Software update
Your appliance's software can be updated using the
software update function, e.g. for the purposes of
optimization, troubleshooting or security updates.
To do this, you must be a registered
HomeConnect®user, have installed the app on your
mobile device and be connected to the
HomeConnect®server.
As soon as a software update is available, you will be
informed via the HomeConnect®app and will be able to
start the software update via the app. Once the update
has been successfully downloaded, you can start installing
it via the HomeConnect®app if you are in your home
network (Wi-Fi). The HomeConnect®app informs you
once the installation is successful.
Notes
¡
The software update consists of two steps.
– The first step is the download.
– The second step is the installation on your appliance.
¡ You can continue to use your appliance as normal while
updates are downloading. Depending on your personal
settings in the app, software updates can also be set to
download automatically.

en-us HomeConnect®
40
¡ Installation takes a few minutes. You cannot use your
appliance during installation.
¡ We recommend that you install security updates as
soon as possible.
17.8 Data Protection
Please read this information on data protection.
The first time your appliance is registered on a home
network connected to the Internet, your appliance
transmits the following types of data to the
HomeConnect® server (initial registration):
¡ Unique appliance identification (consisting of appliance
codes as well as the MAC address of the installed Wi-Fi
communication module).
¡ Security certificate of the Wi-Fi communication module
(to ensure a secure data connection).
¡ The current software and hardware version of your
home appliance.
¡ Status of any previous reset to factory settings.
This initial registration prepares the HomeConnect®
functions for use and is only required when you want to
use the HomeConnect® functions for the first time.
Note:Please note that the HomeConnect® functions can
only be used in conjunction with the HomeConnect® app.
Information on data protection can be retrieved in the
HomeConnect® app.

Basic settings en-us
41
Basic settings
18 Basic settings
Basic settings
You can configure the basic settings for your appliance to meet your needs.
18.1 Overview of the basic settings
Here you can find an overview of the basic settings and factory settings. The basic settings depend on the features of
your appliance.
Symbol Basic setting Setting Selection Use
Wi-Fi Wi-Fi ¡ On
¡ Off
1
Switching the Wi-Fi on
or off
Note:The On and Off
settings are only
available if a
connection to the
HomeConnect®
server has been
established.
All settings are
retained after the
appliance is switched
off.
Switch on the Wi-Fi in
order to allow the
appliance to be
controlled via the app
and to use additional
appliance functions.
HomeConnect®
assistant
¡ During the initial
connection to the
HomeConnect®
app: "Start"
¡ If you have already
connected
successfully to the
HomeConnect®
app: "Connect now"
Setting
upHomeConnect®
→
Page38
Remote start ¡ Off (monitoring only)
¡ Manual
1
¡ Permanent
Note:The settings are
only available if you
have selected the "On"
setting for Wi-Fi.
Setting "Remote start"
→
"Starting functions
with the
HomeConnect® app
via manual Remote
start", Page39
Network information ¡ MAC address
¡ Wi-Fi SSID
¡ IPv4 address
¡ IPv6 address
Note:The settings are
only available if you
have selected the "On"
setting for Wi-Fi.
Displaying "Network
information"
1
Factory setting (may vary according to model)

en-us Basic settings
42
Symbol Basic setting Setting Selection Use
Network credentials
reset
¡ Confirm
The connections are
reset. The appliance
deletes saved network
access data.
Note:The settings are
only available if you
have selected the "On"
setting for Wi-Fi.
Reset the network
access data
Display Brightness ¡ 1
¡ 2
¡ 3
¡ 4
1
¡ 5
¡ 6
Sets the brightness in
increments
Distant view ¡ "On"
1
: The display
shows less content
if you are at a
greater distance.
¡ "Off": The display
always shows the
same content.
Switch the remote
view on or off
Screen in off-mode ¡ GAGGENAU
logo"displayed on
approach"
1
¡ None
Sets the low power
mode display
→
Page16
Ring behavior ¡ "Standard": Press
the required
function and use the
control ring to
change the function
¡ "Quick selection"
1
:
Use the control ring
to change the
function located
above the control
ring
Set the control ring
behavior
Display child lock ¡ "On"
1
: The symbol
for the "Display
child lock" function
is only visible in the
status line if the
"Display child lock"
function is active.
Control ring and
touch fields are
locked.
¡ "Off": The "Display
child lock" function
cannot be activated.
Displays or hides the
symbol for the child
lock →
Page27
in the
control center
1
Factory setting (may vary according to model)

Basic settings en-us
43
Symbol Basic setting Setting Selection Use
Door lock ¡ Activated
¡ Off
1
Activates or
deactivates the door
lock
Note:The door lock
→
Page18
prevents
the appliance door
from being opened
accidentally. This is
particularly useful
when installing the
appliance under the
countertop.
Display alignment ¡ Vertical
1
¡ Horizontal
Aligns the display
horizontally or
vertically depending
on the appliance's
installation position or
the user's body size
Sounds Switch-on/switch-off
sounds
¡ Quiet
¡ Standard
1
¡ Loud
Set the volume of the
on/off tones
Notification sounds ¡ Off
¡ Quiet
¡ Standard
1
¡ Loud
Set the volume of the
notification tones
Note:The notification
tones for the warnings
and error messages
always remain
switched on.
Process sounds Volume
¡ Off
¡ Quiet
¡ Standard
1
¡ Loud
"Repetitions":
¡ 1x
¡ "10 s": The
appliance emits the
signal tone
repeatedly for
10seconds.
¡ "30 s"
1
: The
appliance emits the
signal tone
repeatedly for
30seconds.
¡ "3 min": The
appliance emits the
signal tone
repeatedly for
3minutes.
"Preheating signal":
¡ "On"
1
¡ Off
¡ Set the volume of
the process tones
¡ Sets the desired
maximum duration
of the process tones
¡ Activates or
deactivates the
process tone
following preheating
1
Factory setting (may vary according to model)
en-us Basic settings
44
Symbol Basic setting Setting Selection Use
Visual feedback ¡ On
¡ Off
1
Switches the pulsating
light for program end,
notifications or error
messages on or off
Volume reduction ¡ "On": Lowers the
volume for all tones
to a certain volume
level in a defined
period
¡ "Reduced": Lowers
the volume for all
tones to the "Quiet"
volume level in a
defined period and
switches off the
tones for cleaning
¡ "Off"
1
: Switches off
all tones in a
defined period
Start time
¡ "22h"
1
End time
¡ "7h"
1
Sets the lowering of
the volume
Note:The signal
tones for warnings,
error messages, and
switching on and
switching off always
remain switched on.
Interior lighting Brightness ¡ Dark
¡ Standard
1
¡ Bright
Sets the brightness of
the interior lighting
Activation ¡ Automatic
1
¡ Manual
Switches the interior
lighting on
automatically or
manually
Light interaction ¡ On
1
¡ Off
Sets the light
interaction
Note:If you are
outside of the range
that the appliance
recognizes, the
appliance reduces the
interior lighting to what
is essential.
Notifications Info-i ¡ On
1
¡ Off
Display or hide
additional information
Tip:If you press ,
the display shows
additional information
→
Page17
. If you
switch off the function,
the display does not
show any symbol or
any additional
information.
Pop-up hints ¡ On
1
¡ Off
Displays or hides pop-
up notifications
→
Page17
1
Factory setting (may vary according to model)
Basic settings en-us
45
Symbol Basic setting Setting Selection Use
Language - ¡ German
¡ French
¡ [...]
¡ English
1
Setting the language
Time and units Time ¡ Time
1
¡ "Automatic": Select
the "Automatic"
option if your
appliance is
connected to
HomeConnect®.
Set the time
Time format ¡ 12
¡ 24
1
Set the time format
Temperature unit ¡ °C
1
¡ °F
Set the temperature
unit
Weight unit ¡ "Metric": "g/kg"
¡ "Imperial": "oz/lb"
Set the weight unit
Advanced Display Sabbath mode ¡ On
¡ Off
1
Displays or hides the
"Sabbath mode"
function
Demo mode ¡ On
¡ Off
1
Activates or
deactivates demo
mode
Note:The setting is
only available in the
first 3minutes after
connecting to the
power supply.
Factory settings ¡ Restore Resets the appliance
to the factory settings
Note:The appliance
starts the initialization.
The display asks you
to specify settings that
the appliance installer
has implemented.
Appliance Start screen ¡ Manual
1
¡ Favorites
¡ Programs
Select a display that
shows the display after
switching on
Preselection of types
of heating
Overview of the
available types of
heating →
Page14
.
Selects the preferred
types of heating
1
Factory setting (may vary according to model)

en-us Basic settings
46
Symbol Basic setting Setting Selection Use
¡ On
¡ Off
¡ Selects the
preferred type of
heating that is
available after the
appliance is
switched on
¡ If required, displays
or hides additional
types of heating at a
later point
Note:The sequence
of the types of heating
is defined.
Food preference ¡ Off
1
¡ Vegetarian
¡ No meat & poultry
¡ No fish & seafood
¡ No pork
¡ Kosher
Selects the preferred
food for automatic
programs and
recommended settings
Count-up cooking
timer
¡ On
1
¡ Off
Sets the total cooking
time timer
Note:The running
cooking time is
automatically counted
up if no cooking time
has been stored.
User detection "Behavior":
¡ Automatic
¡ "Below 3' 11'' (1.2
m)"- "Below 4'' (0.1
m)"
"Installation height":
¡ Under 91.4 cm/36"
¡ Between 91.4 cm/
36" and 150 cm/59"
1
¡ Over 150 cm/59''
¡ Sets the distance
from which the
proximity sensor
detects the user
¡ Set the appliance's
installation height
Note:To ensure that
the proximity sensor
optimally detects the
user, store the
installation height of
the appliance's upper
edge.
Quick heat ¡ On
1
¡ Off
Switches fast pre-heat
on or off
Catalyzer heating ¡ On
1
¡ Off
Switches the catalyzer
heating →
Page18
on
or off
Introduction to the
appliance
Start Start the appliance
introduction
Note:The appliance
introduction contains a
short description of the
basic functions.
1
Factory setting (may vary according to model)
Cleaning and maintenance en-us
47
18.2 Changing the basic settings
1. Swipe repeatedly from left to right until the display
shows Basic settings →
Page41
.
a The display shows the symbols for the available
settings in a ring menu.
2. Use the control ring to select the required basic setting.
3. Press the required basic setting.
a The display shows the settings for the selected basic
setting.
4. Depending on the selected basic setting, use the control
ring to select the setting, or press the required setting.
‒ With a list menu, ensure that the required setting is
above the horizontal line.
5. Use to activate the setting or use the control ring to
select the setting option, and press the setting.
6. If required, use to switch to the previous view.
Cleaning and maintenance
19 Cleaning and maintenance
Cleaning and maintenance
19.1 Cleaning agents
To avoid damaging the various surfaces on the appliance,
do not use any unsuitable cleaning agents.
WARNING
Moisture intrusion may cause an electric shock.
▶
Do not use any steam cleaners or high-pressure
cleaners to clean the appliance.
WARNING
The appliance and its parts that can be touched become
hot during use.
▶
Caution should be exercised here in order to avoid
touching heating elements.
▶
Young children under 8 years of age must be kept away
from the appliance.
WARNING
Scratched glass in the appliance door may develop into a
crack.
▶
Do not use any harsh or abrasive cleaners or sharp
metal scrapers to clean the glass on the appliance door,
as they may scratch the surface.
NOTICE:
Unsuitable cleaning agents damage the surfaces of the
appliance.
▶
Do not use harsh or abrasive cleaning agents.
▶
Do not use cleaning agents with a high alcohol content.
▶
Do not use hard scouring pads or cleaning sponges.
▶
Do not use any special cleaners for cleaning the
appliance while it is hot.
Salt contained in new sponge cloths may damage
surfaces.
▶
Wash new sponge cloths thoroughly before use.
Using oven cleaner in a hot oven cavity damages the
stainless steel surfaces.
▶
Never use oven cleaner in the oven cavity when it is still
warm.
▶
Remove all food remnants from the oven cavity and the
appliance door before you next heat up the appliance.
WARNING
Loose food resides, fat, and meat juices may catch fire.
▶
Remove coarse dirt from the oven cavity and from the
accessories.
Suitable cleaning agents
Only use cleaning agents that are suitable for the different surfaces on your appliance.
Appliance door
Area Suitable cleaning agents Information
Door pane ¡ Glass cleaner Do not use a glass scraper.
Clean it using a soft cloth or a microfiber cloth.
Door seal ¡ Hot soapy water Clean with a dish cloth.
Do not remove or scrub.
Do not use metal scrapers or glass scrapers for cleaning.
Control ring ¡ Soapy water Clean with a slightly damp soft cloth.
Do not spray with any cleaning agent.
Cooking compartment
Area Suitable cleaning agents Information
Cooking
compartment
¡ Hot soapy water Clean with a dishcloth and dry with a soft cloth.
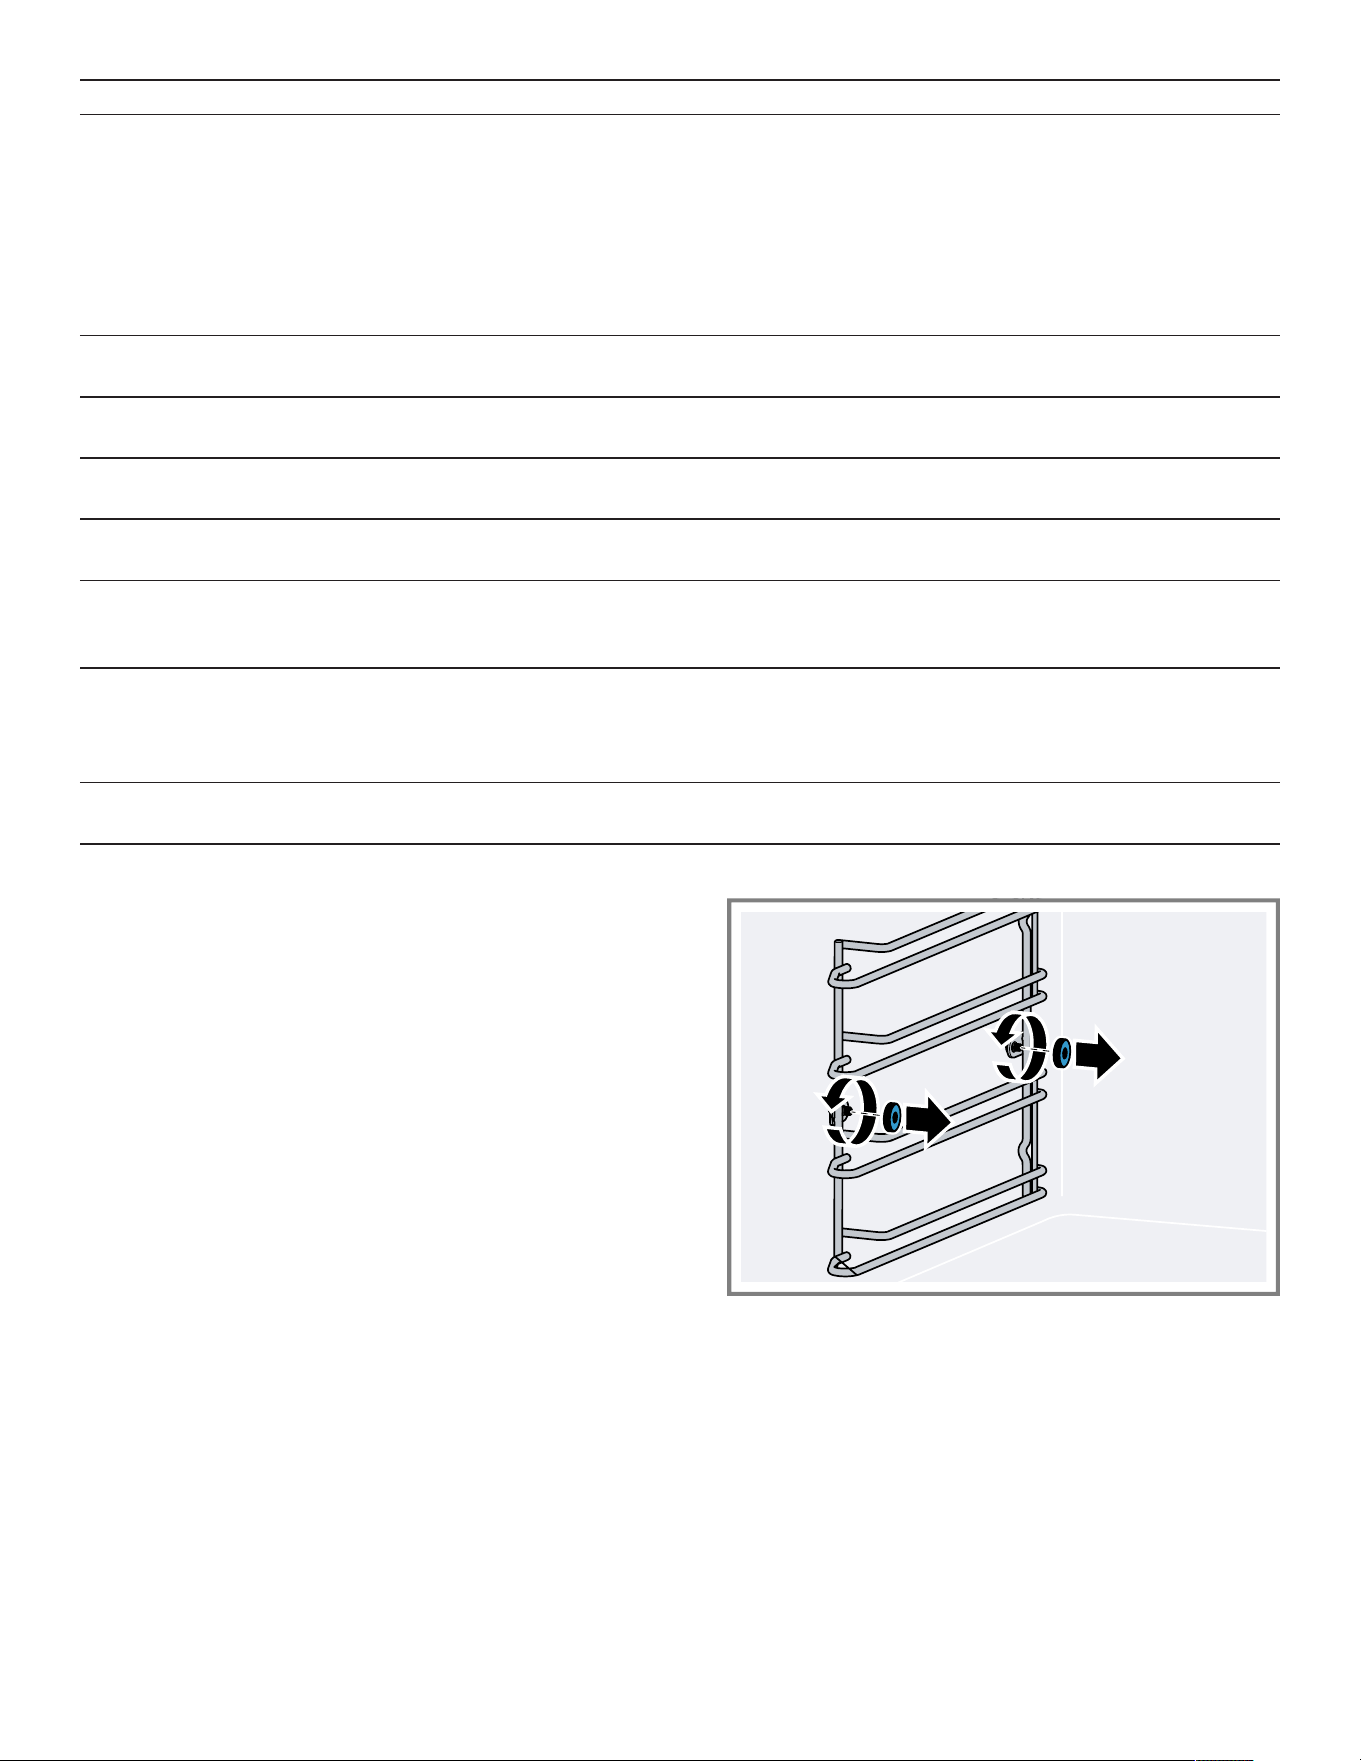
en-us Cleaning and maintenance
48
Area Suitable cleaning agents Information
Very dirty oven
cavity
¡ Cleaning gel spray for
ovens
The cleaning gel spray for ovens can be obtained from customer
service or from the online shop.
Observe the following information about the cleaning gel spray:
¡ The cleaning gel spray must not get into the door opening.
¡ Leave this to work for no more than 12hours.
¡ Do not use it on hot surfaces.
¡ Rinse off thoroughly with water.
¡ Follow the manufacturer's instructions.
Glass cover for the
oven cavity light
¡ Hot soapy water Clean with a dish cloth.
Wire rack ¡ Hot soapy water In the event of heavy soiling, leave to soak and use a brush.
Do not clean in the dishwasher.
Accessories ¡ Dishwasher
¡ Hot soapy water
Soak burned-on residues and remove with a brush.
Rinse thoroughly with clean water.
Core temperature
probe
¡ Hot soapy water Wipe with a damp cloth
Do not clean in the dishwasher.
Rotisserie spit ¡ Hot soapy water Do not clean the rotisserie spit in the dishwasher.
Clean the rotisserie spit with hot soapy water and a soft cloth. After
cleaning, dry the rotisserie spit with a soft cloth.
Fully extendable
telescopic pull-out
rack (special
accessory)
¡ Hot soapy water Clean with a dishcloth or scrubbing brush, and dry with a soft cloth.
Roaster (special
accessory)
¡ Hot soapy water Soak and then clean with a dishcloth or scrubbing brush.
Do not clean the roaster in the dishwasher.
19.2 Microfiber cloth
The honeycomb microfiber cloth is especially suitable for
cleaning easily damaged surfaces, such as glass, glass
ceramic, stainless steel or aluminum. The microfiber cloth
removes liquid and greasy deposits in one go.
The microfiber cloth can be obtained from customer
service or from the online shop.
19.3 Removing the shelf supports
The shelf supports can be removed for cleaning. You can
also leave the shelf supports fitted in the appliance and
clean them with the pyrolytic self-cleaning program.
1. Place a dish towel in the oven cavity to protect the
enamel from scratches.
2. Undo the knurled nuts.
Pyrolytic self-cleaning en-us
49
3. Lift the shelf supports slightly sideways away from the
screw and pull them out towards the front .
4. Clean the shelf supports with hot soapy water and a soft
dish cloth.
19.4 Fitting the shelf supports
1. Fit the shelf supports on the correct side of the cooking
compartment.
The shelf supports for the left and right side of the
cooking compartment are different.
2. Position the shelf support such that the indentation is
located at the rear.
3. Tighten the knurled nuts.
19.5 Cleaning the fully extendable telescopic
pull-out rack
NOTICE:
Aggressive cleaners cause damage to the fully extendable
telescopic pull-out rack.
▶
Do not clean the fully extendable telescopic pull-out
rack in the dishwasher.
▶
Do not place the fully extendable telescopic pull-out
rack in rinsing water.
The cleaning program causes damage to the fully
extendable telescopic pull-out rack.
▶
Do not clean the fully extendable telescopic pull-out
rack using the appliance's cleaning program.
1. Remove the fully extendable telescopic pull-out rack.
2. Undo the knurled nut.
3. Use a damp cloth to clean the pull-out rail.
‒ Do not remove the lubricant on the pull-out rail.
It is best to clean the pull-out rail while it is pushed in.
19.6 Cleaning the rotisserie spit
1. Do not clean the rotisserie spit, the rotisserie spit drive,
the holding clamps and the handle in the dishwasher,
but use hot soapy water and a soft cloth for cleaning.
2. After cleaning, dry all parts of the rotisserie spit with a
soft cloth.
Pyrolytic self-cleaning
20 Pyrolytic self-cleaning
Pyrolytic self-cleaning
Follow these safety instructions when using the pyrolytic
cleaning function.
WARNING
The appliance gets very hot when the cleaning function is
in progress. The non-stick coating on baking trays and tins
is destroyed and noxious gases are released.
▶
Never clean non-stick baking trays or baking tins using
the cleaning function.
▶
Only clean enameled accessories at the same time.
WARNING
The oven cavity gets very hot when the cleaning function
is in progress.
▶
Never open the appliance door.
▶
Allow the appliance to cool down.
▶
Keep children away from the appliance.
The outside of the appliance gets very hot when the
cleaning function is in progress.
▶
Never touch the appliance door.
▶
Allow the appliance to cool down.
▶
Keep children away from the appliance.

en-us Pyrolytic self-cleaning
50
WARNING
The cleaning function heats up the oven cavity to a very
high temperature so that food left over from roasting,
grilling and baking is incinerated. This process releases
vapors, which can irritate mucous membranes.
▶
Keep the kitchen well ventilated while the cleaning
function is running.
▶
Do not remain in the room for long periods.
▶
Keep children and pets away.
WARNING
The oven heats up to a very high temperature during self
cleaning. Opening the door can result in injury.
▶
When self-cleaning, confirm that the door locks and will
not open.
▶
If the door does not lock, do not run Self Clean. Contact
Customer Service.
CAUTION
Remove broiler pans, pots, and other utensils and excess
spillage before self-cleaning.
When the pyrolytic self-cleaning function is running, the
appliance heats up to 905°F (485°C). Residues from
roasting, broiling or baking are incinerated. All you have to
do is wipe the ash out of the oven cavity.
The total duration of the pyrolytic self-cleaning function
comprises the cleaning time and cooling period. Pyrolytic
self-cleaning takes around 3hours. The cooling time is
approximately 1hour. If required, you can delay the
pyrolytic self-cleaning switch-off time, e.g. if you want the
pyrolytic self-cleaning function to run overnight.
20.1 Preparing pyrolytic self-cleaning
WARNING
Loose food resides, fat, and meat juices may catch fire.
▶
Before using the cleaning function, always remove the
worst of the food residues and remnants from the oven
cavity and accessories.
NOTICE:
Using cleaning agents before the pyrolytic self-cleaning
cycle may damage the cooking compartment and the
glass on the appliance door.
▶
Before the pyrolytic self-cleaning cycle, do not use any
cleaning agents in the cooking compartment or on the
inside of the appliance door.
1. Wipe the oven cavity with a damp cloth.
2. Wipe the door seal and the insides of the doors.
3. Completely remove all traces of cleaning agents.
4. Remove all loose objects from the oven cavity.
The shelf supports are pyrolysis-safe.
→
"Preparing the cleaning of accessories with the
pyrolytic self-cleaning function", Page50
20.2 Preparing the cleaning of accessories
with the pyrolytic self-cleaning function
GAGGENAU Baking trays and broiling trays are coated
with a pyrolysis-safe enamel. Only clean GAGGENAU
baking trays and broiling trays with the pyrolytic self-
cleaning function.
WARNING
Loose food resides, fat, and meat juices may catch fire.
▶
Before using the cleaning function, always remove the
worst of the food residues and remnants from the oven
cavity and accessories.
NOTICE:
The heat during the pyrolytic self-cleaning may damage
certain accessories.
▶
Do not clean the wire rack, rotisserie spit, cast iron
roaster, baking stone, core temperature probe or other
accessories using the pyrolytic self-cleaning function.
▶
Only clean GAGGENAU baking trays and grill trays with
the pyrolytic self-cleaning function.
Note:If the oven cavity is extremely dirty, clean the baking
tray or grill tray separately.
1. In each case, only slide one baking tray or broiling tray
onto the lowest shelf.
2. Slide the baking tray or broiling tray in all the way.
20.3 Starting the pyrolytic self-cleaning
function
1. Remove all loose objects from the oven cavity and
remove coarse dirt.
2. Completely remove any cleaning agent residue.
3. Swipe repeatedly from left to right until the display
shows "Modes & Service".
a The display shows the available functions in a list menu.
4. Use the control ring to select the "Pyrolytic self-clean"
function.
5. Press "Pyrolytic self-clean".
6. Press "Start".
7. If required, delay the end time.
‒ Press the end time.
‒ Use the control ring to set the end time.
‒ Press .
8. Follow the instructions on the display.
9. Press .
10.Press to start.
‒ If required, press to delay the end time.
The total duration of the pyrolytic self-cleaning function
comprises the cleaning time and cooling period. The
time for the relevant section of the pyrolytic self-
cleaning function counts down on the display.
a For your safety, the appliance locks the appliance door.
During cooling, the appliance unlocks the door
mechanism as soon as the temperature has fallen
below 390°F (200°C).

Pyrolytic self-cleaning en-us
51
a The cleaning time counts down on the display.
a If you have delayed the end time, the time until the
pyrolytic self-cleaning function starts will count down on
the display.
a The light in the cooking compartment remains switched
off.
a A signal tone sounds once the pyrolytic self-cleaning
function has ended.
a The display shows a message.
11.Once the appliance has cooled down, wipe out the ash
that has been left behind in the oven cavity with a damp
cloth.
Depending on the type and degree of soiling, white
deposits may remain on the enamel surfaces. These
deposits are harmless. They do not affect the function
or service life of your appliance.
12.Press to confirm.
20.4 Stopping the pyrolytic self-clean
▶
Press on the control ring.
a For your safety, the appliance locks the appliance door.
During cooling, the appliance unlocks the door
mechanism as soon as the temperature has fallen
below 390°F (200°C).

en-us Troubleshooting
52
Troubleshooting
21 Troubleshooting
Troubleshooting
You can eliminate minor issues on your appliance
yourself. Please read the information on eliminating issues
before contacting Customer Service. This may avoid
unnecessary repair visits.
WARNING
To avoid risk of injury from improper repairs, observe the
following.
▶
Only qualified technicians or authorized service
providers should perform repairs.
▶
If the power cord of this appliance becomes damaged, it
must be replaced by the manufacturer, the
manufacturer's Customer Service, or an authorized
service provider in order to prevent injury.
▶
Only genuine spare parts may be used to repair the
appliance.
▶
If the appliance has an issue, call Customer Service.
Issue Cause and troubleshooting
The appliance is not working. The circuit breaker in the circuit breaker panel has tripped.
▶
Check the breaker panel.
There has been a power failure.
▶
Check whether the lighting in your kitchen or other appliances in the room are
working.
Operating error.
▶
Switch off the circuit breaker for the appliance in the fuse box and switch it back
on after approximately 60seconds.
The appliance does not start. The appliance door is not fully closed.
▶
Close the appliance door.
The appliance cannot be started
via the HomeConnect® app.
The appliance is not connected to the HomeConnect® app.
▶
Start the connection between the appliance and the HomeConnect® app.
→
"Setting upHomeConnect®", Page38
The appliance is connected to the HomeConnect® app but the remote control
function is not activated.
▶
Activate the remote control function in the Home Connect settings →
Page38
.
The appliance is not working. The
display does not respond. The
display shows the symbol for the
childproof lock .
Childproof lock is activated.
▶
Deactivate the childproof lock. →
Page27
The appliance automatically
switches off.
Safety switch-off function: No operation for more than 12hours.
1. Press to confirm the message.
2. Switch off the appliance.
The appliance does not heat up;
the display shows the symbol for
the demo mode .
The appliance is in demo mode.
▶
Deactivate the demo mode in the basic settings →
Page41
.
The lighting does not work. The lighting is defective.
▶
Call
→
"Customer Service", Page55
.
Issue Cause and troubleshooting
The display shows the error
message "Exx".
An error occurred.
1. If the display shows an error message, press .
a If the display no longer shows the error message, it was a one-off problem.
2. If the display continues to show or repeatedly shows the error message, contact
customer service →
Page55
and provide them with the error code.
Display shows "Initialization". The initial start-up was not completed successfully.
▶
Carry out initial start-up.
→
"Initial use", Page21

Disposal en-us
53
Issue Cause and troubleshooting
Display shows "Initialization". The appliance's factory settings were restored.
▶
Carry out initial start-up.
→
"Initial use", Page21
Demo mode was activated during initial start-up and has now been deactivated.
▶
Carry out initial start-up.
→
"Initial use", Page21
21.1 Power failure
Your appliance can bridge a power failure of a few
seconds. The operation continues.
If the power failure lasts longer and the appliance was
operating, the display shows a message. The operation is
interrupted.
Switch the appliance back on again after a power failure
1. Press . 2. Switch theappliance back on again as usual.
21.2 Demo mode
If the display shows , demo mode is activated. The
appliance does not heat up.
Deactivating demo mode
1. To briefly disconnect the appliance from the mains,
switch off the household fuse or the circuit breaker in
the fuse box.
2. Deactivate demo mode within 3minutes in the basic
settings →
Page41
.
Disposal
22 Disposal
Disposal
22.1 Disposal of your old appliance
Environmentally compatible disposal allows valuable raw
materials to be recycled.
▶
Dispose of the appliance in an environmentally
responsible manner.
Information about current disposal methods can be
obtained from your specialist dealer or local authority.
How it works
23 How it works
How it works
Here, you can find the ideal settings for various types of
food as well as the best accessories and cookware. We
have perfectly tailored these recommendations to your
appliance.
You can find recommended settings →
Page33
for some
meals in the display under Programs →
Page32
or in the
HomeConnect®app.
The following overview only contains standard dishes for
test purposes.
23.1 General cooking tips
Take note of the following information when cooking all
types of food.
¡ Always preheat the appliance. This will produce the
best cooking results. The cooking times specified refer
to a preheated appliance.
¡ The cooking times specified are intended as a guide.
The actual cooking time depends on the quality and
temperature of the food before cooking, as well as its
weight and thickness.
¡ If you have not made a particular dish before, start with
the shortest specified time. If required, you can continue
to cook the food.
¡ A lower temperature results in more even browning. If
necessary, set a higher temperature.
¡ The values given refer to average quantities for 4
people. If you want to prepare a larger amount, expect a
longer cooking time.
¡ Use the cookware specified. If you use other cookware,
cooking times may be longer or shorter.
¡ You can use any heat-resistant cookware. Place the
ovenware in the center of the wire rack. For large
roasts, you can also use the broiling tray or glass tray.
¡ To ensure optimal heat circulation, do not position the
wire racks and baking trays too closely.
¡ To prepare bulky food items, you can remove the shelf
supports at both sides.

en-us How it works
54
¡ Place the rack directly onto the bottom of the cooking
compartment and place the food or roaster onto the
rack. Do not place the food or roaster directly onto the
bottom of the oven cavity. If required, remove the shelf
supports. →
Page48
¡ Open the oven cavity door on the preheated oven for a
short time only and quickly place your food inside the
appliance.
¡ Always use plates, baking tins or ovenproof dishes with
the wire rack.
¡ "Economy convection" type of heating:
Energy-saving hot air mode for cakes, meat, bakes, and
gratins. Optimal use is made of the residual heat.
Convenience functions remain switched off (e.g. the
interior lighting). The interior oven temperature can only
be displayed while the appliance is heating up. Do not
preheat the oven. Make sure that the oven cavity is cold
and that there is nothing already in there when you
place the food inside. Then start the specified cooking
time. Always keep the appliance door closed when
cooking. This prevents heat loss.
¡ "Broiler" and "Broil + circulated air":
With these operating modes, there may be a
temperature difference between the temperature you
have set and the actual temperature inside the oven.
This is because broiling and browning are fast cooking
processes that require high temperatures.
Consequently, for browning and roasting, a higher
temperature than is actually needed on the surface of
the food is selected.
Vegetables
Take note of the recommended settings for vegetables.
¡ Oven-roasted or oven-baked vegetables are a good
alternative to pan-fried vegetables. The different flavors
become more concentrated and, because the
vegetables are roasted, they have a very distinctive
taste. In addition, very little fat is required to prepare the
vegetables.
¡ Clean and prepare the vegetables, and mix them with a
little oil in a bowl. Place them in a heat-resistant dish or
in the glass tray or broiling tray and spread them out
evenly.
¡ Mix them thoroughly at least once during the cooking
process. Once they are cooked, season them, and
sprinkle them with fresh herbs to taste.
¡ Vegetables are good as a hot or cold appetizer, or
vegetarian main course, or as an accompaniment to
meat and fish.
¡ For small portions (for 2-3 people), use a heat-resistant
dish and place it on the wire rack. If you use the glass
tray or broiling tray, the food will start to burn or dry out.
¡ A follow the manufacturer's instructions for pre-cooked
and frozen products, too.
Fish
Take note of the recommended settings for fish.
¡ For food hygiene reasons, ensure that fish has a core
temperature of at least 62-70°C after cooking. This is
also the ideal cooking temperature.
¡ Do not season the fish with salt until it is fully cooked.
This ensures that the natural flavor is maintained and
that less water is drawn out of the fish.
¡ Use a small amount of oil to grease the wire rack or
baking tray so that the fish does not stick to it.
¡ For fillets with skin: Place the fish on the rack or tray
with the skin side up – this helps to hold the fish
together and maintain its flavor.
¡ Shorten the wooden skewers or, before skewering the
ingredients, leave the skewers to soak in water
overnight to prevent them from charring.
¡ A follow the manufacturer's instructions for pre-cooked
and frozen products, too.
Poultry
Take note of the recommended settings for poultry.
¡ The cooking times listed are intended as a guide only
and depend heavily on the temperature of the meat at
the start of cooking. For better results, use the core
temperature probe. Insert the core temperature probe
between the belly and the thigh, rather than in the
middle or in a cavity. Further information and
instructions, as well as optimal target temperatures, can
be found in the section entitled Core temperature probe
→
Page34
.
¡ Poultry will turn out particularly crispy and brown if you
baste it towards the end of the roasting time with butter,
salted water, drained fat, or orange juice.
¡ When cooking duck or goose, pierce the skin
underneath the wings to allow the fat to run out.
¡ Use a roaster or another heat-resistant baking dish or
tin for dishes that involve adding a lot of liquid to the
roast. The same applies if a lot of fat is likely to drain
from the food, e.g. roast goose.
Meat
Take note of the recommended settings for meat.
¡ The cooking times listed are intended as a guide only
and depend heavily on the temperature of the meat at
the start of cooking and on how long the meat was
seared for. For better results, use the core temperature
probe. Information and instructions, as well as optimal
target temperatures, can be found in the section entitled
Core temperature probe →
Page34
.
¡ Time to rest: Allow the meat to rest for 5-15minutes on
a wire rack after cooking. This gives the meat a chance
to "relax". The circulation of the meat juice slows and,
when the meat is cut, less juice is lost. Large pieces of
meat, such as roasts, can rest in the oven. Smaller
ones, e.g. steaks, should rest outside the oven wrapped
in aluminum foil.
¡ For small portions (2-3 people), use a heat-resistant
pan so that the food does not burn or dry out.
¡ Use the broiling tray or roaster for a large joint of meat,
and for preparation methods that involve adding a lot of
liquid to the joint.

Customer Service en-us
55
¡ For best results, leave meat to marinate overnight and
remove it before roasting or grilling, e.g. using the back
of a knife or a spoon. Otherwise, the spices and herbs
will burn.
¡ If the joint of meat has become too dark in color and the
skin is burned in places, reduce the set temperature the
next time you cook a joint, and check the rack level.
¡ If the joint is cooked but the sauce is slightly burnt, use
a smaller roaster the next time you cook a joint, and add
more liquid. If the sauce is too watery, use a larger
roaster and add less liquid.
Side dishes and meals
Take note of the recommended settings for side dishes
and meals.
¡ The best known oven-cooked side dishes are potato-
based, such as potato gratin. However, you can also
obtain excellent results when oven-cooking side dishes
that are normally pan-fried, e.g. potato pancakes or
fried potatoes. The advantages of this preparation
method: You can prepare relatively large quantities of
food at the same time, the cooking smells do not spread
so far in the room, and the food can be prepared using
less fat.
¡ Another highly versatile oven-cooked side dish is
cheese. It is a very good addition to vegetarian dishes
in particular; depending on the preparation method, you
can also serve cheese as an appetizer or finger food.
¡ Grilled dishes such as bakes and gratins are particularly
well suited to being prepared in the oven. Dishes with a
dough or pastry base, e.g. pizza and savoury flan, and
egg dishes with a filling, e.g. tortillas, are also suitable.
¡ For small portions (for 2-3 people), use a heat-resistant
dish and place it on the wire rack. If you use the glass
tray or broiling tray, the food will start to burn or dry out.
¡ A follow the manufacturer's instructions for pre-cooked
and frozen products, too.
Baked goods
Note the recommended settings for baked items.
¡ We recommend using dark-colored metal baking tins as
these absorb heat more effectively. Place the baking tin
in the center of the wire rack.
¡ If you are baking tray bakes without baking parchment,
lightly grease the baking tray beforehand.
¡ Small baked items, e.g. cream puffs, cookies and puff
pastry parcels, can be baked on 2 levels, 1+3.
¡ If you are baking on more than one level, it is normal for
food on baking trays placed in the oven at the same
time to be ready at different times. Leave the food on
the baking trays lower down in the oven to cook for a
little longer, or place them in the appliance earlier next
time.
¡ Before cutting the baked items, leave them to cool on a
wire rack.
¡ If the baked items are too dark on the bottom, place
them a level up and select a lower temperature.
If the baked items are too dark on the top, place them a
level down, select a lower temperature, and extend the
baking time a little.
¡ If the cake is too dry, set the temperature a little higher.
If the cake remains uncooked in the middle, set a lower
temperature.
Baking times cannot be reduced by setting a higher
temperature; it is better to set the temperature a little
lower.
¡ If the cake collapses, use less liquid or set the
temperature 10°C lower. Do not open the oven door
too soon.
¡ If the cake only rises in the middle, grease the sides of
the baking tin.
¡ Do not remove the cookies from the baking tray; place
the baking tray back into the hot oven for a short period
and remove the cookies whilst they are still hot.
¡ If the cake does not come away from the tin when you
are trying to turn it out, carefully slide a knife around the
sides to loosen it. Turn the cake tin upside down again
and cover it several times with a cold, wet cloth. Next
time, grease the tin well and sprinkle some bread
crumbs into it.
¡ A follow the manufacturer's instructions for pre-cooked
and frozen products, too.
Desserts
Note the recommended settings for desserts.
¡ Oven-cooked desserts are very easy to prepare – all
that remains is to put them in the oven. This preparation
method is useful for relatively large quantities, for
example if you have guests.
¡ Oven-cooked desserts are generally eaten hot, and are
very enjoyable particularly during the colder months.
Customer Service
24 Customer Service
Customer Service
With any warranty repair, we will make sure your
appliance is repaired by an authorized service provider
using genuine replacement parts. We use only genuine
replacement parts for all repairs.
Detailed information on the warranty period and terms of
warranty can be found in the Statement of Limited Product
Warranty, from your retailer, or on our website.
If you contact Customer Service, you will need the model
number (E-Nr.), the production number (FD) and the
consecutive numbering (Z-Nr.) of your appliance.
The LED light sources are available as a spare part and
should only be replaced by an authorized service provider.
USA:
1-877-442-4436
www.gaggenau.com
www.gaggenau.com/us/appliances/eshop
CA:
1-877-442-4436
www.gaggenau.com
www.gaggenau.ca
For assistance with connecting to HomeConnect®, you
can also view instructions here:
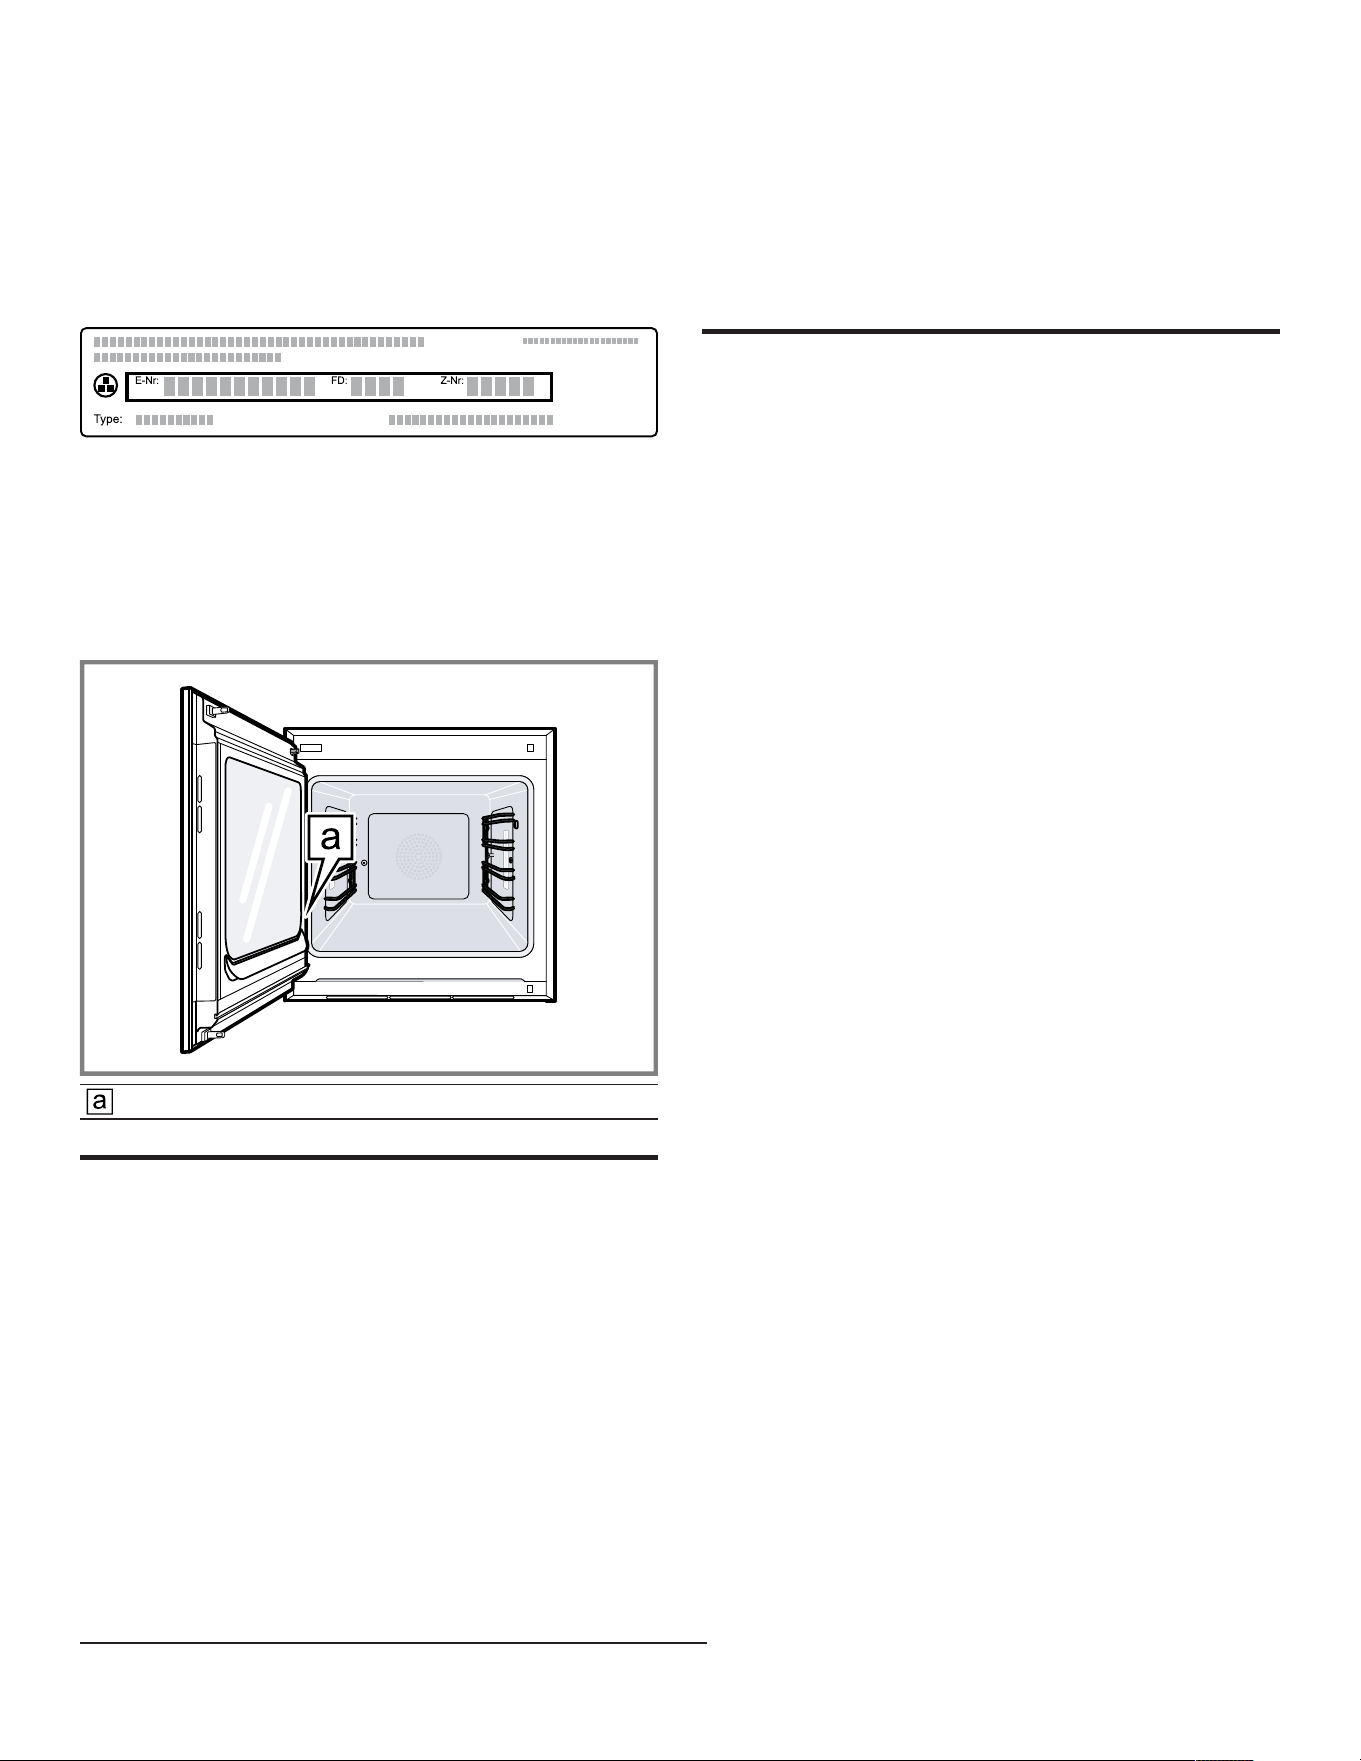
en-us Information regarding Free and Open Source Software
56
www.home-connect.com/us/en/help-support/set-up
24.1 Model number (E-Nr.), production
number (FD) and consecutive
numbering (Z-Nr.)
You can find the model number (E-Nr.), the production
number (FD) and the consecutive numbering (Z-Nr.) on
the appliance's rating plate.
Making a note of your appliance's details and the
Customer Service telephone number will enable you to
find them again quickly.
24.2 Rating plate location
The rating plate is located at the door frame close to the
lower door hinge.
Rating plate
Information regarding Free and Open Source Software
25 Information regarding Free and
Open Source Software
Information regarding Free and Open Source Software
This product includes software components that are
licensed by the copyright holders as free or open source
software.
The applicable license information is stored on your home
appliance. You can also access the applicable license
information via your HomeConnect® app: "Profile ->
Legal information -> License Information".
1
You can
download the license information on the brand product
website. (Please search on the product website for your
appliance model and additional documents). Alternatively,
you can request the relevant information from
[email protected] or BSH Hausgeräte GmbH, Carl-
Wery-Str. 34, 81739 Munich, Germany.
The source code will be made available to you on request.
Please send your request to [email protected] or
BSH Hausgeräte GmbH, Carl-Wery-Str.34, 81739 Munich,
Germany.
Subject: „OSSREQUEST“
The cost of performing your request will be charged to
you. This offer is valid for three years from the date of
purchase or at least as long as we offer support and spare
parts for the relevant appliance.
STATEMENT OF LIMITED PRODUCT WARRANTY
26 STATEMENT OF LIMITED
PRODUCT WARRANTY
STATEMENT OF LIMITED PRODUCT WARRANTY
26.1 What this warranty covers & Who it
applies to
The limited warranty provided by BSH Home Appliances
(“Gaggenau“) in this Statement of Limited Product
Warranty applies only to the Gaggenau appliance sold to
you (“Product“), provided that the Product was purchased:
¡ For your normal, household (non-commercial) use, and
has in fact at all times only been used for normal
household purposes.
¡ New at retail from a BSH authorized dealer or directly
from BSH (not a display, "as is", or previously returned
model), and not for resale, or commercial use.
¡ Within the United States or Canada, and has at all times
remained within the country of original purchase.
The warranties stated herein apply to the original
purchaser of the product warranted herein and to each
succeeding owner of the product purchased for ordinary
home use during the term of the warranty.
Please make sure to register your Product; while not
necessary to effectuate warranty coverage, it is the best
way for Gaggenau to notify you in the unlikely event of a
safety notice or product recall.
26.2 How long the warranty lasts
Gaggenau warrants that the Product is free from defects in
materials and workmanship for a period of seven hundred
and thirty (730) days from the date of the original delivery.
The foregoing timeline begins to run upon the date of
original delivery, and shall not be stalled, tolled, extended,
or suspended, for any reason whatsoever. This Product is
also warranted to be free from cosmetic defects in
material and workmanship (such as scratches of stainless
steel, paint/porcelain blemishes, chips, dents, or other
damage to the finish) of the Product, for a period of sixty
(60) days from the date of delivery or closing date for new
construction. This cosmetic warranty excludes slight color
variations due to inherent differences in painted and
porcelain parts, as well as differences caused by kitchen
1
Depending on the appliance specifications

STATEMENT OF LIMITED PRODUCT WARRANTY en-us
57
lighting, product location, or other similar factors. This
cosmetic warranty specifically excludes any display, floor,
“As Is”, or “B” stock appliances.
26.3 Repair/replace as your exclusive
remedy
During this warranty period, Gaggenau or one of its
authorized service providers will repair your Product
without charge to you (subject to certain limitations stated
herein) if your Product proves to have been manufactured
with a defect in materials or workmanship. If reasonable
attempts to repair the Product have been made without
success, then Gaggenau will replace your Product
(upgraded models may be available to you, in Gaggenau's
sole discretion, for an additional charge). Nothing in this
warranty requires damaged or defective parts to be
replaced with parts of a different type or design than the
original parts. All removed parts and components shall
become the property of Gaggenau at its sole option. All
replaced and/or repaired parts shall assume the identity of
the original part for purposes of this warranty and this
warranty shall not be extended with respect to such parts.
Gaggenau's sole liability and responsibility hereunder is to
repair manufacturer-defective Product only, using a
Gaggenau authorized service provider during normal
business hours. For safety and property damage
concerns, Gaggenau highly recommends that you do not
attempt to repair the Product yourself, or use a non-
authorized service provider; Gaggenau will have no
responsibility or liability for damage resulting from repairs
or work performed by a non-authorized service provider.
Authorized service providers are those persons or
companies that have been specially trained on Gaggenau
products, and who possess, in Gaggenau's opinion, a
superior reputation for customer service and technical
ability (note that they are independent entities and are not
agents, partners, affiliates or representatives of
Gaggenau). Nevertheless, taking your product to be
serviced by a repair shop that is not affiliated with or an
authorized dealer of Gaggenau will not void this warranty.
Also, using third-party parts will not void this warranty.
Notwithstanding the foregoing, Gaggenau will not incur
any liability, or have responsibility, for the Product if it is
located in a remote area (more than 100 miles from an
authorized service provider) or is reasonably inaccessible,
hazardous, threatening, or treacherous locale,
surroundings, or environment; in any such event, if you
request, Gaggenau would still pay for labor and parts and
ship the parts to the nearest authorized service provider,
but you would still be fully liable and responsible for any
travel time or other special charges by the service
company, assuming they agree to make the service call.
Further, to the extent you have installed the Product in a
difficult-to-access location or have otherwise installed
temporary or permanent fixtures that create barriers to
accessing or removing the Product, Gaggenau will not
incur any liability for, or have responsibility, for work or
costs associated with moving the Product or otherwise
creating access to the Product in order to repair or replace
it. All such costs shall be your sole responsibility.
26.4 Out of warranty product
Gaggenau is under no obligation, at law or otherwise, to
provide you with any concessions, including repairs,
prorates, or Product replacement, once this warranty has
expired.
26.5 Warranty exclusions
The warranty coverage described herein excludes all
defects or damage that are not the direct fault of
Gaggenau, including without limitation, one or more of the
following:
¡ Use of the Product in anything other than its normal,
customary and intended manner (including without
limitation, any form of commercial use, use or storage of
an indoor product outdoors, use of the Product in
conjunction with air or water-going vessels).
¡ Any party's willful misconduct, negligence, misuse,
abuse, accidents, neglect, improper operation, failure to
maintain, improper or negligent installation, tampering,
failure to follow operating instructions, mishandling,
unauthorized service (including selfperformed "fixing" or
exploration of the appliance's internal workings).
¡ Adjustment, alteration or modification of any kind.
¡ A failure to comply with any applicable state, local, city,
or county electrical, plumbing and/or building codes,
regulations, or laws, including failure to install the
product in strict conformity with local fire and building
codes and regulations.
¡ Ordinary wear and tear, spills of food, liquid, grease
accumulations, or other substances that accumulate on,
in, or around the Product.
¡ Any external, elemental and/or environmental forces
and factors, including without limitation, rain, wind,
sand, floods, fires, mud slides, freezing temperatures,
excessive moisture or extended exposure to humidity,
lightning, power surges, structural failures surrounding
the appliance, and acts of God.
¡ Service calls to correct the installation of your Product,
to instruct you how to use your Product, to replace
house fuses or correct house wiring or plumbing.
¡ Removal and replacement of trim or decorative panels
that interfere with servicing the Product.
¡ Damage or defects caused by labor or parts installed by
any non-authorized service provider, unless approved
by Gaggenau before service is performed.
In no event shall Gaggenau have any liability or
responsibility whatsoever for damage to surrounding
property, including cabinetry, floors, ceilings, and other
structures or objects around the Product. Also excluded
from this warranty are Products, on which the serial
numbers have been altered, defaced, or removed; service
visits to teach you how to use the Product, or visits where
there is nothing wrong with the Product; correction of
installation problems (you are solely responsible for any

en-us STATEMENT OF LIMITED PRODUCT WARRANTY
58
structure and setting for the Product, including all
electrical, plumbing or other connecting facilities, for
proper foundation/flooring, and for any alterations
including without limitation cabinetry, walls, floors,
shelving, etc.); and resetting of breakers or fuses.
TO THE EXTENT ALLOWED BY LAW, THIS WARRANTY
SETS OUT YOUR EXCLUSIVE REMEDIES WITH
RESPECT TO PRODUCT, WHETHER THE CLAIM
ARISES IN CONTRACT OR TORT (INCLUDING STRICT
LIABILITY, OR NEGLIGENCE) OR OTHERWISE. THIS
WARRANTY IS IN LIEU OF ALL OTHER WARRANTIES,
WHETHER EXPRESS OR IMPLIED. ANY WARRANTY
IMPLIED BY LAW, WHETHER FOR MERCHANTABILITY
OR FITNESS FOR A PARTICULAR PURPOSE, OR
OTHERWISE, SHALL BE EFFECTIVE ONLY FOR THE
PERIOD THAT THIS EXPRESS LIMITED WARRANTY IS
EFFECTIVE. IN NO EVENT WILL THE MANUFACTURER
BE LIABLE FOR CONSEQUENTIAL, SPECIAL,
INCIDENTAL, INDIRECT, "BUSINESS LOSS", AND/OR
PUNITIVE DAMAGES, LOSSES, OR EXPENSES,
INCLUDING WITHOUT LIMITATION TIME AWAY FROM
WORK, HOTELS AND/OR RESTAURANT MEALS,
REMODELLING EXPENSES IN EXCESS OF DIRECT
DAMAGES WHICH ARE DEFINITIVELY CAUSED
EXCLUSIVELY BY GAGGENAU, OR OTHERWISE.
SOME STATES DO NOT ALLOW THE EXCLUSION OR
LIMITATION OF INCIDENTAL OR CONSEQUENTIAL
DAMAGES, AND SOME STATES DO NOT ALLOW
LIMITATIONS ON HOW LONG AN IMPLIED WARRANTY
LASTS, SO THE ABOVE EXCLUSIONS OR
LIMITATIONS MAY NOT APPLY TO YOU. THIS
WARRANTY GIVES YOU SPECIFIC LEGAL RIGHTS,
AND YOU MAY ALSO HAVE OTHER RIGHTS WHICH
VARY FROM STATE TO STATE.
No attempt to alter, modify or amend this warranty shall be
effective unless authorized in writing by an officer of BSH.
26.6 Obtaining warranty service
To obtain warranty service for your product, you should
contact Gaggenau Customer Support at 1-877-442-4436
to schedule a repair.
26.7 Product information
For handy reference, copy the information below from the
rating plate. Keep your invoice and/or delivery documents
for warranty validation.
Model number (E-Nr.)
Production number
(FD)
Date of delivery


BSH Home Appliances Corporation
1901 Main Street, Suite 600
Irvine, CA 92614
USA
www.gaggenau.com
1-877-442-4436
© 2025 BSH Home Appliances Corporation
*9001954219*
9001954219 en-us (050814)
