OWNER'S MANUAL
AIR CONDITIONER
In order to use the product safely and conveniently, please read
the owner’s manual before using the product.
ENGLISH
K*SAL**1A
MFL71982461
Rev.04_071725
www.lg.com
Copyright © 2017-2025 LG Electronics. All Rights Reserved
Scan to see the online manual.
TYPE: WALL MOUNTED

TABLE OF CONTENTS
2
3 IMPORTANT SAFETY
INSTRUCTIONS
3 READ ALL INSTRUCTIONS BEFORE USE
9 WARNING INSTRUCTIONS
12 CAUTION INSTRUCTIONS
16 OPERATION
16 Before Use
17 Product Overviews
18 Preparation before Operation
19 Wireless Remote Control Overview
22 Using Operating Modes
26 Using Special Functions
36 SMART FUNCTIONS
36 LG ThinQ Application
39 Smart Diagnosis
TM
41 MAINTENANCE
41 Cleaning
47 TROUBLESHOOTING
47 Before Calling for Service
51 LIMITED WARRANTY
51 USA
53 CANADA
3IMPORTANT SAFETY INSTRUCTIONS
ENGLISH
IMPORTANT SAFETY INSTRUCTIONS
READ ALL INSTRUCTIONS BEFORE USE
The following safety guidelines are intended to prevent unforeseen risks or damage from unsafe or
incorrect operation of the appliance.
The guidelines are separated into ‘WARNING’ and ‘CAUTION’ as described below.
Safety Messages
Your safety and the safety of others are very important.
We have provided many important safety messages in this manual and on your appliance. Always read and
follow all safety messages.
All safety messages will tell you what the potential hazard is, tell you how to reduce the chance of injury,
and tell you what may happen if the instructions are not followed.
This is the safety alert symbol.
This symbol alerts you to potential hazards that can kill or injure you and others. All safety
messages will follow the safety alert symbol and either the word WARNING or CAUTION.
These words mean:
WARNING
You may be killed or seriously injured if you do not follow instructions.
CAUTION
You may be injured or cause damage to the product if you do not follow instructions.
4 IMPORTANT SAFETY INSTRUCTIONS
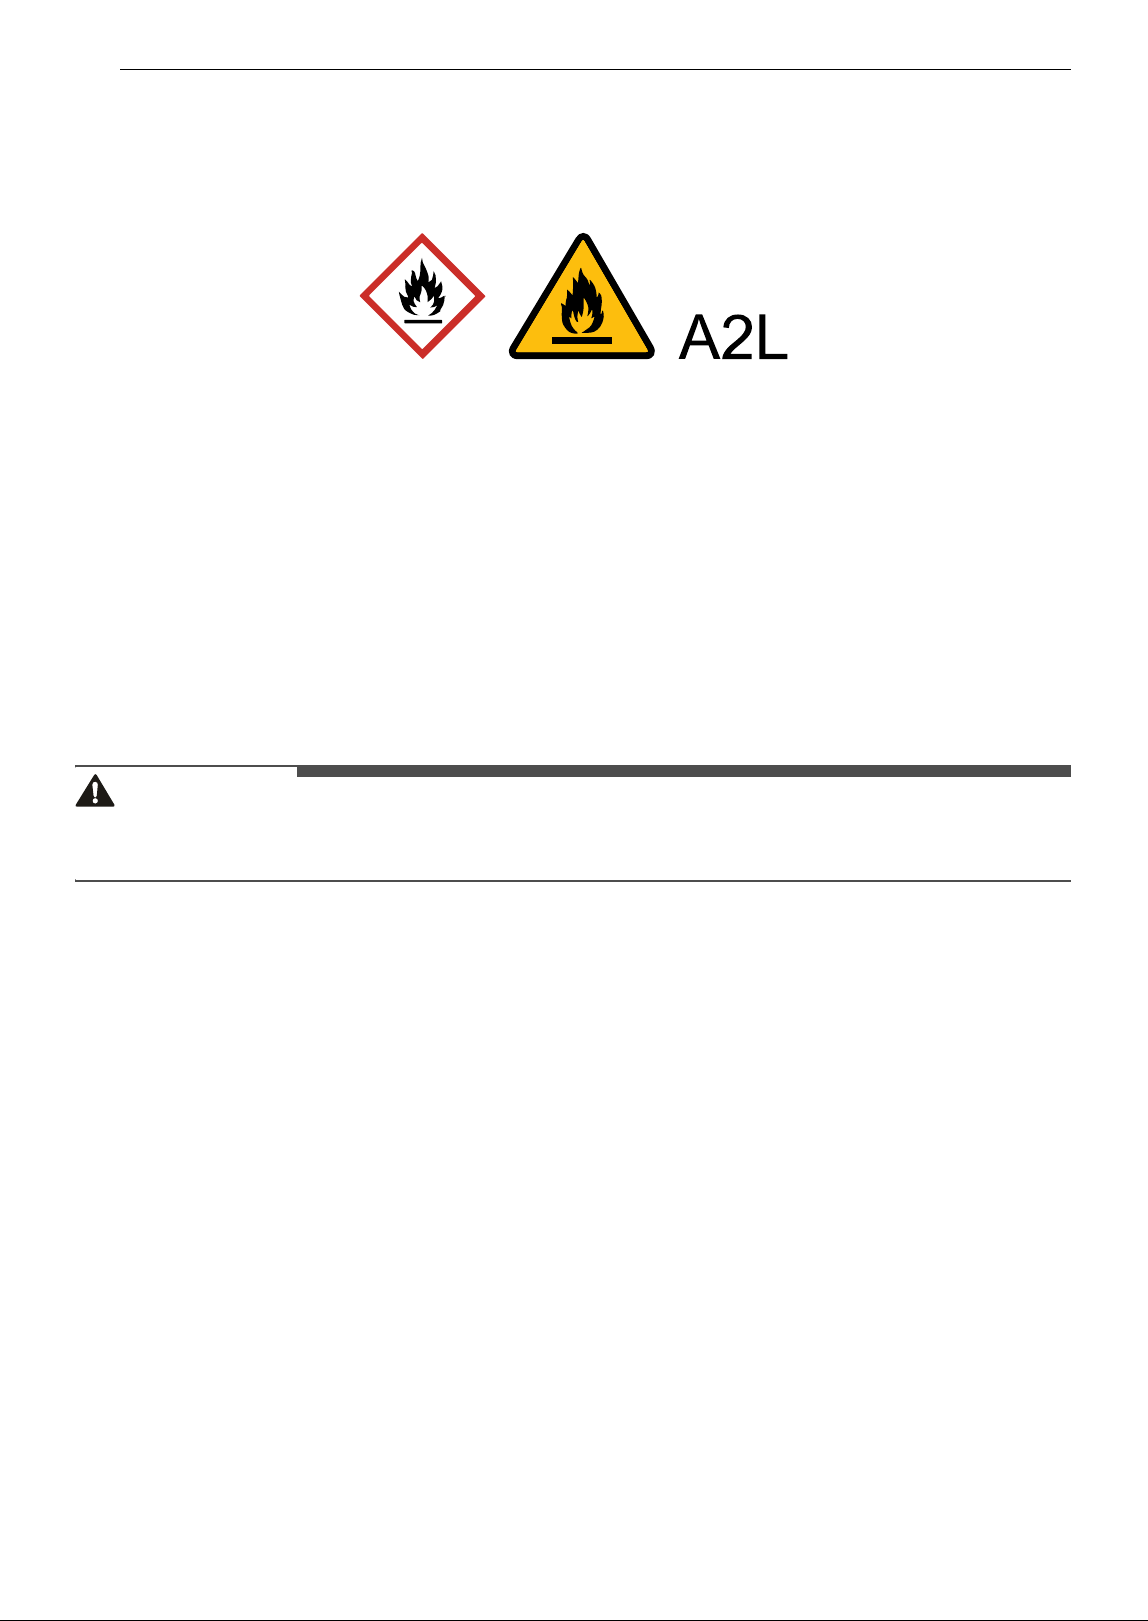
Notes for Flammable Refrigerant
The following symbols are displayed on units.
Notes for Safety Guide
• This appliance is not accessible to the general public.
• This appliance uses a flammable refrigerant. If the refrigerant is leaked and exposed to an external
ignition source, there is a risk of fire.
• This appliance includes a ground connection that can be used for functional purposes only.
• Refer space of installation guide.
• Refer to refrigerant charge in the installation manual for additional refrigerant charge.
• Outdoor unit can be installed and used outside.
• Means for disconnection must be incorporated in the fixed wiring in accordance with the wiring rules.
• If the supply cord is damaged, it must be replaced by the manufacturer, its service agent or similarly
qualified persons in order to avoid a hazard.
WARNING
• Do not use means to accelerate the defrosting process or to clean, other than those recommended by
the manufacturer.
• The appliance shall be stored in a room without continuously operating ignition sources (for example:
open flames, an operating gas appliance or an operating electric heater.)
• Do not pierce or burn.
• Be aware that refrigerants may not contain an odour.
• The manufacturer may provide other suitable examples or may provide additional information about the
refrigerant odour.
• Pipe-work including piping material, pipe routing, and installation shall include protection from physical
damage in operation and service, and be in compliance with national and local codes and standards,
such as ASHRAE 15, ASHRAE 15.2, IAPMO Uniform Mechanical Code, ICC International Mechanical Code,
or CSA B52. All field joints shall be accessible for inspection prior to being covered or enclosed.
• To ensure no leaking, field-made refrigerant joints indoors shall be tightness tested. The test method
shall have a sensitivity of 5 grams (0.176 oz) per year of refrigerant or better under a pressure of at least
0.25 times the maximum allowable pressure. No leak shall be detected.
• Technical Safety
- This appliance can be used by children aged from 8 years and above and persons with reduced
physical, sensory or mental capabilities or lack of experience and knowledge if they have been given
supervision or instruction concerning use of the appliance in a safe way and understand the hazards
involved. Children shall not play with the appliance. Cleaning and user maintenance shall not be made
by children without supervision.
This symbol indicates that this appliance uses a flammable refrigerant. If the refrigerant is
leaked and exposed to an external ignition source, there is a risk of fire.
This symbol indicates that the Owner's Manual should be read carefully.
This symbol indicates that service personnel should be handling this equipment with reference
to the Installation Manual.
This symbol indicates that information is available in the Owner's Manual or Installation Manual.

5IMPORTANT SAFETY INSTRUCTIONS
ENGLISH
• Installation
- Contact an authorized service center when installing or relocating the air conditioner.
- Do not install the air conditioner on an unstable surface or in a place where there is danger of it falling.
• Operation
- Do not modify or extend the power cable. Scratches or peeling insulation on the power cables may
result in fire or electric shock, and should be replaced.
- Make sure that the power cable is neither dirty, loose, nor broken.
• The refrigerant and insulation blowing gas used in the appliance require special disposal procedures.
• Consult a service agent or a similarly qualified person before disposing of them.
• This appliance is not intended for the purposes of cooling INFORMATION TECHNOLOGY EQUIPMENT.
• Qualification of workers
The manual shall contain specific information about the required qualification of the working personnel
for maintenance, service and repair operations. Every working procedure that affects safety means shall
only be carried out by qualified person by manufacturer. Examples of such work procedures are as
follows:
- breaking into the refrigerating circuit;
- opening of sealed components;
- opening of ventilated enclosures.
• Ventilated area
Ensure that the area is open and adequately ventilated before accessing the system or performing high-
temperature work.
A certain level of ventilation must be maintained for the duration of the work.
Ventilation should be such that any refrigerant emitted is safely dispersed and preferably moistened into
the outside atmosphere.
• Cabling
Check that the cable is not subject to wear, corrosion, excessive pressure, vibration, sharp edges, or
other adverse environmental influences. When checking, you should also take into account the effects of
aging or continuous vibration of ignition sources such as compressors or fans.
• Detection of flammable refrigerants
Under no circumstances should potential ignition sources be used to detect or detect refrigerant leaks.
Do not use halide lamps (or other detectors that use fine salts).
• Leak detection methods
The following leak detection methods are deemed acceptable for all refrigerant systems.
Electronic leak detectors may be used to detect refrigerant leaks but, in the case of FLAMMABLE
REFRIGERANTS, the sensitivity may not be adequate, or may need re-calibration. (Detection equipment
shall be calibrated in a refrigerant-free area.) Ensure that the detector is not a potential source of
ignition and is suitable for the refrigerant used. Leak detection equipment shall be set at a percentage of
the LFL of the refrigerant and shall be calibrated to the refrigerant employed, and the appropriate
percentage of gas (25 % maximum) is confirmed.Leak detection fluids are also suitable for use with most
refrigerants but the use of detergents containing chlorine shall be avoided as the chlorine may react
with the refrigerant and corrode the copper pipe-work.
Examples of leak detection fluids are:
- bubble method
- fluorescent method agents
If a leak is suspected, all naked flames shall be removed/extinguished.
If a leakage of refrigerant is found which requires brazing, all of the refrigerant shall be recovered from
the system, or isolated (by means of shutoff valves) in a part of the system remote from the leak.Removal
of refrigerant shall be according to removal and evacuation procedure.
• Removal and evacuation

6 IMPORTANT SAFETY INSTRUCTIONS
When breaking into the refrigerant circuit to make repairs – or for any other purpose – conventional
procedures shall be used. However, for flammable refrigerants it is important that best practice be
followed, since flammability is a consideration. The following procedure shall be adhered to:
- safely remove refrigerant following local and national regulations;
- evacuate;
- purge the circuit with inert gas (optional for A2L);
- evacuate (optional for A2L);
- continuously flush or purge with inert gas when using flame to open circuit; and
- open the circuit.
The refrigerant charge shall be recovered into the correct recovery cylinders if venting is not allowed by
local and national codes. For appliances containing flammable refrigerants, the system shall be purged
with oxygen-free nitrogen to render the appliance safe for flammable refrigerants. This process might
need to be repeated several times.Compressed air or oxygen shall not be used for purging refrigerant
systems.
For appliances containing flammable refrigerants, refrigerants purging shall be achieved by breaking
the vacuum in the system with oxygen-free nitrogen and continuing to fill until the working pressure is
achieved, then venting to atmosphere, and finally pulling down to a vacuum (optional for A2L). This
process shall be repeated until no refrigerant is within the system (optional for A2L). When the final
oxygen-free nitrogen charge is used, the system shall be vented down to atmospheric pressure to
enable work to take place.
The outlet for the vacuum pump shall not be close to any potential ignition sources, and ventilation shall
be available.
• Charging procedures
In addition to the existing filling procedure, the following requirements must be observed: When using
the charging device,make sure that it is not contaminated with other refrigerants. The hose or pipe
should be as short as possible to minimize the amount of refrigerant in it.The cylinder should be stored
in the proper location according to the instructions.Make sure the refrigeration system is grounded
before filling the system with refrigerant.When charging is complete, label the system (if it is not already
there).Be careful not to overfill there frigerant. Before recharging the system, a pressure test should be
performed with an appropriate purge gas. After charging is complete and before Dry Run, the system
must be inspected for leaks. Follow-up should be carried out before leaving the site.
• Recovery
When removing refrigerant from a system, either for servicing or decommissioning, it is recommended
good practice that all refrigerants are removed safely.
When transferring refrigerant into cylinders, ensure that only appropriate refrigerant recovery cylinders
are employed. Ensure that the correct number of cylinders for holding the total system charge is
available. All cylinders to be used are designated for there covered refrigerant and labelled for that
refrigerant (i.e. special cylinders for the recovery of refrigerant). Cylinders shall be complete with
pressure-relief valve and associated shut-off valves in good working order. Empty recovery cylinders are
evacuated and, if possible, cooled before recovery occurs.
The recovery equipment shall be in good working order with a set of instructions concerning the
equipment that is at hand and shall be suitable for the recovery of the flammable refrigerant. If in doubt,
the manufacturer should be consulted. In addition, a set of calibrated weighing scales shall be available
and in good working order. Hoses shall be complete with leak-free disconnect couplings and in good
condition.
The recovered refrigerant shall be processed according to local legislation in the correct recovery
cylinder, and the relevant waste transfer note arranged. Do not mix refrigerants in recovery units and
especially not in cylinders.
If compressors or compressor oils are to be removed, ensure that they have been evacuated to an
acceptable level to make certain that flammable refrigerant does not remain within the lubricant. The
compressor body shall not be heated by an open flame or other ignition sources to accelerate this
process. When oil is drained from a system,it shall be carried out safely.
• Checks to the area

7IMPORTANT SAFETY INSTRUCTIONS
ENGLISH
Prior to beginning work on systems containing flammable refrigerants, safety checks are necessary to
ensure that the risk of ignition is minimized. For repair to the refrigerating system, the following
precautions shall be complied with prior to conducting work on the system.
• Work procedure
Work shall be undertaken under a controlled procedure so as to minimize the risk of a flammable gas or
vapour being present while the work is being performed.
• General work area
All maintenance staff and others working in the local area shall be instructed on the nature of work
being carried out. Work in confined spaces shall be avoided.
• Checking for presence of refrigerant
The area shall be checked with an appropriate refrigerant detector prior to and during work, to ensure
the technician is aware of potentially flammable atmospheres. Ensure that the leak detection equipment
being used is suitable for use with flammable refrigerants,i.e. non-sparking, adequately sealed or
intrinsically safe.
• Presence of fire extinguisher
If any hot work is to be conducted on the refrigerating equipment or any associated parts, appropriate
fire extinguishing equipment shall be available to hand. Have a dry powder or CO2 fire extinguisher
adjacent to the charging area.
• No ignition sources
No person carrying out work in relation to a refrigerating system which involves exposing any pipe work
shall use any sources of ignition in such a manner that it may lead to the risk of fire or explosion.
All possible ignition sources,including cigarette smoking, should be kept sufficiently far away from the
site of installation, repairing, removing and disposal, during which refrigerant can possibly be released
to the surrounding space.
Prior to work taking place, the area around the equipment is to be surveyed to make sure that there are
no flammable hazards or ignition risks. “No Smoking” signs shall be displayed.
• Checks to the refrigerating equipment
Where electrical components are being changed, they shall be fit for the purpose and to the correct
specification.
At all times the manufacturer’s maintenance and service guidelines shall be followed. If in doubt consult
the manufacturer’s technical department for assistance.
The following checks shall be applied to installations using flammable refrigerants:
- The actual refrigerant charge is in accordance with the room size within which the refrigerant
containing parts are installed.
- The ventilation machinery and outlets are operating adequately and are not obstructed.
- If an indirect refrigerating circuit is being used, the secondary circuit shall be checked for the presence
of refrigerant.
- Marking to the equipment continues to be visible and legible. Markings and signs that are illegible
shall be corrected.
- Refrigerating pipe or components are installed in a position where they are unlikely to be exposed to
any substance which may corrode refrigerant containing components, unless the components are
constructed of materials which are inherently resistant to being corroded or are suitably protected
against being so corroded.
• Checks to electrical devices
Repair and maintenance to electrical components shall include initial safety checks and component
inspection procedures. If a fault exists that could compromise safety, then no electrical supply shall be
connected to the circuit until it is satisfactorily dealt with. If the fault cannot be corrected immediately
but it is necessary to continue operation, an adequate temporary solution shall be used. This shall be
reported to the owner of the equipment so all parties are advised.
Initial safety checks shall include:
- Capacitors are discharged: this shall be done in a safe manner to avoid possibility of sparking.

8 IMPORTANT SAFETY INSTRUCTIONS
- No live electrical components and wiring are exposed while charging, recovering or purging the
system.
- Continuity of earth bonding.
• Repair to sealed components
"Sealed electrical components shall be replaced."
• Repair to intrinsically safe components
"Intrinsically safe components must be replaced."
• Decommissioning
Before carrying out this procedure,it is essential that the technician is completely familiar with the
equipment and all its detail.
It is recommended good practice that all refrigerants are recovered safely. Prior to the task being carried
out, an oil and refrigerant sample shall be taken in case analysis is required prior to re-use of recovered
refrigerant. It is essential that electrical power is available before the task is commenced.
a) Become familiar with the equipment and its operation.
b) Isolate system electrically.
c) Before attempting the procedure ensure that:
- mechanical handling equipment is available, if required, for handling refrigerant cylinders
- all personal protective equipment is available and being used correctly
- the recovery process is supervised at all times by a competent person
- recovery equipment and cylinders conform to the appropriate standards.
d) Pump down refrigerant system, if possible.
e) If a vacuum is not possible,make a manifold so that refrigerant can be removed from various parts of
the system.
f) Make sure that cylinder is situated on the scales before recovery takes place.
g) Start the recovery machine and operate in accordance with instructions.
h) Do not overfill cylinders. (No more than 80 % volume liquid charge).
i) Do not exceed the maximum working pressure of the cylinder, even temporarily.
j) When the cylinders have been filled correctly and the process completed, make sure that the cylinders
and the equipment are removed from site promptly and all isolation valves on the equipment are closed
off.
k) Recovered refrigerant shall not be charged into another refrigerating system unless it has been
cleaned and checked.
• Labelling
Equipment shall be labelled stating that it has been de-commissioned and emptied of refrigerant.
The label shall be dated and signed.
Ensure that there are labels on the equipment stating the equipment contains flammable refrigerant.
• Mechanical connections (mechanical connectors or flared joints) shall be accessible for maintenance
purposes.
• When mechanical connectors are reused indoors, sealing parts shall be renewed.
• When flared joints are reused indoors, the flare part shall be re-fabricated.
• This appliance incorporates an earth connection for functional purposes only.
• Flexible pipe elements shall be protected against mechanical damage, excessive stress by torsion, or
other forces. They should be checked for mechanical damage annually.
• Protection devices, piping and fittings shall be protected as far as possible against adverse
environmental effects, for example, the danger of water collecting and freezing in relief pipes or the
accumulation of dirt and debris.
• Precautions shall be taken to avoid excessive vibration or pulsation to refrigerating piping.
9IMPORTANT SAFETY INSTRUCTIONS
ENGLISH
• Piping in refrigerating systems shall be so designed and installed to minimize the likelihood hydraulic
shock damaging the system.
• Provision shall be made for expansion and contraction of long runs of piping.
• Use a supply cord shall be between 1.5~3 m(4.9~9.8 ft) long and shall be either and extra hard usage or a
hard usage cord.
• Ampacities of supply cords and attachment plugs shall not be less than the current rating of the
appliance and shall be suitable for the application in accordance with national electrical installation
requirements.
• An unventilated area where the appliance using flammable refrigerants is installed shall be so
constructed that should any refrigerant leak, it will not stagnate so as to create a fire or explosion
hazard.
• Non-duct connected appliances containing A2L refrigerants with the supply and return air openings in
the conditioned space may have the body of the appliance may be installed in open areas such as false
ceilings not being used as return air plenums, as long as the conditioned air does not directly
communicate with the air of the false ceiling.
• For appliances with REFRIGERANT DETECTION SYSTEMS(Optional), the instructions shall include
the following:
For REFRIGERANT DETECTION SYSTEMS, the function and operation and required servicing measures.
For LIMITED LIFE REFRIGERANT SENSORS used in REFRIGERANT DETECTION SYSTEMS, the specified end
of life and instructions for replacement.
REFRIGERANT SENSORS for REFRIGERANT DETECTION SYSTEMS shall only be replaced with sensors
specified by the appliance manufacture.
LEAK DETECTION SYSTEM installed. Unit must be powered except for service.
This unit is equipped with a refrigerant leak detector for safety. To be effective, the unit must be
electrically powered at all times after installation, other than when servicing.
WARNING INSTRUCTIONS
WARNING
• To reduce the risk of explosion, fire, death, electric shock, injury or scalding to persons when using this
product, follow basic precautions, including the following:
Technical Safety
• This appliance is not intended for use by persons (including children) with reduced physical, sensory or
mental capabilities, or lack of experience and knowledge, unless they have been given supervision or
instruction concerning use of the appliance by a person responsible for their safety. Children should be
supervised to ensure that they do not play with the appliance.
• Installation or repairs made by unauthorized persons can pose hazards to you and others.
• The information contained in the manual is intended for use by a qualified service technician who is
familiar with the safety procedures and equipped with the proper tools and test instruments.
• Failure to read and follow all instructions in this manual can result in equipment malfunction, property
damage, personal injury and/or death.
• When the power cord is to be replaced, the replacement work shall be performed by authorized
personnel using only genuine replacement parts.
• If the supply cord is damaged, it must be replaced by the manufacturer, its service agent or similarly
qualified person in order to avoid a hazard.
• Installation MUST conform to the local building codes or, in the absence of local codes, the National
Electrical Code NFPA 70/ANSI C1-1003 or current edition and Canadian Electrical Code Part1 CSA C.22. 1.

10 IMPORTANT SAFETY INSTRUCTIONS
• After completion of field piping for split systems, the field pipework shall be pressure tested with an inert
gas and then vacuum tested prior to refrigerant charging, according to the following requirements:
- The minimum test pressure for the low side of the system shall be the low side design pressure and
the minimum test pressure for the high side of the system shall be the high side design pressure,
unless the high side of the system, cannot be isolated from the low side of the system in which case
the entire system shall be pressure tested to the low side design pressure.
- The test pressure after removal of pressure source shall be maintained for at least 1 h with no
decrease of pressure indicated by the test gauge, with test gauge resolution not exceeding 5% of the
test pressure.
- During the evacuation test, after achieving a vacuum level specified in the manual or less, the
refrigeration system shall be isolated from the vacuum pump and the pressure shall not rise above
1500 microns within 10 min. The vacuum pressure level shall be specified in the manual, and shall be
the lessor of 500 microns or the value equired for compliance with national and local codes and
standards, which may vary between residential, commercial, and industrial buildings.
• Steel pipes and components shall be protected against corrosion with a rustproof coating before
applying any insulation.
• If appliances with A2L refrigerants connected via an air duct system to one or more rooms are installed
in a room with an area less than A min as determined in Clause GG.2, that room shall be without
continuously operating open flames (for example an operating gas appliance) or other potential ignition
sources (for example an operating electric heater, hot surfaces). A flame-producing device may be
installed in the same space if the device is provided with an effective flame arrest;
• Auxiliary devices which can be potential ignition source shall not be installed in connecting ductwork.
Examples of potential ignition sources are UV lights, electric heaters with a temperature exceeding 700
7, pilot flames, brushed motors and similar devices.
• Servicing shall be performed only as recommended by the manufacturer.
Installation
• Contact an authorized service center when installing or relocating the air conditioner.
• Do not install the air conditioner on an unstable surface or in a place where there is danger of it falling.
• Do not install the unit in potentially explosive atmospheres.
• Do not install the air conditioner in a place where flammable liquids or gases such as gasoline, propane,
paint thinner, etc., are stored.
• Install the panel and the cover of the control box safely.
• Install a dedicated electric outlet and circuit breaker before using the air conditioner.
• Use standard circuit breaker and fuse that conform to the rating of the air conditioner.
• Make sure that the pipe and the power cable connecting the indoor and outdoor units are not pulled too
tight when installing the air conditioner.
• The indoor/outdoor wiring connections must be secured tightly, and the cable should be routed properly
so that there is no force pulling the cable from the connection terminals. Improper or loose connections
can generate heat or cause a fire.
• Do not connect the ground wire to a gas pipe, a lightning rod, or a telephone ground wire.
• Use non-flammable gas (nitrogen) to check for leaks and to purge air; using compressed air or
flammable gas may cause fire or explosion.
• The indoor unit got power from outdoor unit. Details of fuses or circuit breakers are indicated in
installation manual of outdoor unit.
Operation
• Do not modify or extend the power cable. Scratches or peeling insulation on the power cables may result
in fire or electric shock, and should be replaced.

11IMPORTANT SAFETY INSTRUCTIONS
ENGLISH
• Make sure that the power cable is neither dirty, loose, nor broken.
• Do not place any objects on the power cable.
• Do not place a heater or other heating appliances near the power cable.
• Take care to ensure that the power cable could not be pulled out or damaged during operation.
• Never touch, operate, or repair the air conditioner with wet hands.
• Do not insert hands or other objects through the air inlet or outlet while the air conditioner is operating.
• Make sure that children do not climb on or hit the outdoor unit.
• Be sure to use only those parts listed in the service parts list. Never attempt to modify the equipment.
• Do not touch the refrigerant pipe, water pipe or any internal parts while the unit is operating or
immediately after operation.
• Do not leave flammable substances such as gasoline, benzene, or thinner near the air conditioner.
• Do not use the air conditioner for an extended period of time in a small place without proper ventilation.
• Be sure to ventilate sufficiently when the air conditioner and a heating appliance such as a heater are
used simultaneously.
• Do not block the inlet or outlet of airflow.
• Cut off the power supply if there is any noise, smell, or smoke coming from the air conditioner.
• Contact an authorized service center when the air conditioner is submerged by flood waters.
• In the event of a gas leak (such as Freon, propane gas, LP gas, etc.) ventilate sufficiently before using the
air conditioner again.
• Cut off the power supply immediately in the event of a blackout or a thunderstorm.
Remote Control
• Remove the batteries if the remote control is not to be used for an extended period of time.
• Never mix different types of batteries, or old and new batteries for the remote control.
• Do not recharge or disassemble the batteries.
• Stop using the remote control if there is a fluid leak in the battery. If your clothes or skin is exposed to
the leaking battery fluid, wash off with clean water.
• If the leaking battery fluid has been swallowed, rinse the inside of the mouth thoroughly and consult a
doctor.
• Dispose of the batteries in a place where there is no danger of fire.
Maintenance
• Before cleaning or performing maintenance, disconnect the power supply and wait until the fan stops.
• Do not clean the appliance by spraying water directly onto the product.
Refrigerant
General
• Follow the standards of the corresponding region or country for handling the refrigerant and the air
conditioner and for disassembling the air conditioner.
• Use only the refrigerant specified on the air conditioner label.
• Do not use uncertified refrigerants.
• Do not input air or gas into the system except the specified refrigerant.
• Do not touch the leaking refrigerant during installation or repair.
12 IMPORTANT SAFETY INSTRUCTIONS
• Be sure to check for refrigerant leaks after installing or repairing the air conditioner.
• The appliance shall be stored so as to prevent mechanical damage from occurring.
R32 Only
• Any person who is involved with working on or breaking into a refrigerant circuit should hold a current
valid certificate from an industry-accredited assessment authority, which authorizes their competence to
handle refrigerants safely in accordance with an industry recognized assessment specification.
• Servicing shall only be performed as recommended by the equipment manufacturer. Maintenance and
repair requiring the assistance of other skilled personnel shall be carried out under the supervision of
the person competent in the use of flammable refrigerants.
• The appliance shall be stored in a well-ventilated area where the room size corresponds to the room
area as specified for operation.
• Keep any required ventilation openings clear of obstruction.
• The appliance shall be stored in a room without continuously operating open flames (for example an
operating gas appliance) and ignition sources (for example an operating electric heater).
CAUTION INSTRUCTIONS
CAUTION
• To reduce the risk of minor injury to persons, malfunction, or damage to the product or property when
using this product, follow basic precautions, including the following:
Installation
• Transport the air conditioner with two or more people or use a forklift.
• Install the outdoor unit such that it is protected from direct sunlight. Do not place the indoor unit in a
place where it is directly exposed to sunlight via the windows.
• Do not install the air conditioner in an area where it is directly exposed to sea wind (salt spray).
• Install the drain hose properly for the smooth drainage of water condensation.
• Install the air conditioner in a place where the noise from the outdoor unit or the exhaust fumes will not
inconvenience the neighbors. Failure to do so may result in conflict with the neighbors.
• Safely dispose of packing materials such as screws, nails, plastic bags or batteries using proper
packaging after installation or repair.
• Exercise caution when unpacking or installing the air conditioner.
Operation
• Make sure that the filter is installed before operating the air conditioner.
• Do not drink the water drained from the air conditioner.
• Do not place any object on the air conditioner.
• Do not let the air conditioner run for a long time when humidity is very high or when a door or a window
has been left open.

13IMPORTANT SAFETY INSTRUCTIONS
ENGLISH
• Do not expose people, animals, or plants to the cold or hot wind from the air conditioner for extended
periods of time.
• Do not use the product for special purposes, such as preserving foods, works of art, etc. the air
conditioner is designed for consumer purposes, and is not a precision refrigeration system. There is risk
of damage or loss of property.
Maintenance
• Use a sturdy stool or ladder when cleaning, maintaining, or repairing the air conditioner at a height.
• Never use strong cleaning agents or solvents or spray water when cleaning the air conditioner. Use a
soft cloth.
• Never touch the metal parts of the air conditioner when removing the air filter.
• To clean the interior, contact an authorized service center or dealer. Using harsh detergents may cause
corrosion or damage to the unit.
Installation Guide
• The appliance shall be installed in accordance with national wiring regulations.
• Compliance with national gas regulations shall be observed.
• Appliance shall be disconnected from its power source during service and when replacing parts.
• Check that appliance’s voltage level is 90 % ~ 110 % of the rated voltage. (To check it, refer to the label
attached to the side of the appliance.)
• Do not install the appliance on an unstable surface or in a place where there is danger of it falling.
• This appliance must be grounded. In the event of malfunction or breakdown, grounding will reduce the
risk of electric shock by providing a path of least resistance for electric current.
• Improper connection of the equipment-grounding conductor can result in risk of electric shock. Check
with a qualified electrician or service personnel if you are in doubt as to whether the appliance is
properly grounded.
• If the power supply cable is damaged or the cable connection is loose, do not use the power supply cable
and contact an authorized service center.
• Do not share the power supply for this unit with other appliances or devices, it must be a dedicated
power source for this appliance.
• Ensure the power cable is secure so that it does not come out while the appliance is operating.
• Do not touch the power plug or the appliance controls with wet hands.
• Cut the power during a severe thunderstorm or lightening or when not in use for a long period of time.
• Do not grab the power cable when removing the plug, but rather hold the power plugtightly.
• Do not bend the power cable excessively or place a heavy object on it.
• Do not turn on the circuit breaker or power when covers are removed or opened.
• Make sure that the pipe and the power cable connecting the indoor and outdoor units are not pulled too
tight when installing the appliance.
• Install dedicated electric outlet and circuit breaker for the appliance.
• Make sure to close the cover of the control box after connecting the wiring to the appliance.
• Loose connections may cause electrical sparks, injury, and death.
• Do not install the appliance in a place where flammable liquids or gases such as gasoline, propane, paint
thinner, etc., are stored.
• Only use the refrigerant designated on the label, do not put any foreign substances into the appliance.
• Inert gas (oxygen free nitrogen) should be used when you checking for leaks, cleaning or repairs of pipes
etc. If you are using combustible gases including oxygen, appliance may have the risk of fires and
explosions.

14 IMPORTANT SAFETY INSTRUCTIONS
• If the air conditioner is installed in a small room, measures must be taken to prevent the refrigerant
concentration from exceeding the safety limit when the refrigerant leaks.
- Consult the dealer regarding the appropriate measures to prevent the safety limit from being
exceeded. Should the refrigerant leak and cause the safety limit to be exceeded, hazards due to lack of
oxygen in the room could result.
• Do not use copper pipes which are deformed. Otherwise, the expansion valve or capillary tube may
become blocked with contaminants.
• Ducts connected to an appliance shall not contain an ignition source.
• When installing or relocating the appliance, consult with a qualified technician to set up the appliance.
The appliance should not be installed by someone without proper qualifications.
• After pump down, power must be turned off before removing the pipe. It may causeexplosion or injury.
• Operating the appliance while it is disconnected to the pipe could result in explosion and damage. Use
the appliance after connecting it to the pipe once the appliance has been relocated and the refrigerant
circuit repaired.
• Do not step on and climb on the outdoor unit. It may cause electric shock, fire or damage to the unit.
• Close the extra installation hole.
• Install at places where it can endure the weight and vibration/noise of the outdoor unit.
• Install the appliance in a place where the noise from the outdoor unit or the exhaust air will not
inconvenience the neighbors. Failure to do so may result in conflict with the neighbors.
• Do not install the outdoor unit near the septic tank, drain or toilet exhaust duct. It results in a corrosion
of a heat exchanger or pipe.
• Ensure the appliance is installed level. Otherwise, it may cause vibration or water leakage.
• Do not insert a drain hose in drain or soil pipe. Bad smells can occur and it results in a corrosion of a heat
exchanger or pipe.
• Do not discharge the refrigerant into the atmosphere.
• If refrigerant leaks, ventilate the room.
• Always check for gas (refrigerant) leakage after installation or repair of appliance.
• Be cautious not to get injured by the sharp edges while installing the appliance or taking it out of its
packaging.
• Ensure that you carry by the chassis when you lift the unit.
• This appliance should only be transported by two or more people holding the appliance securely.
• During working on heights fasten safety belt to put for personal safety.
• To avoid nitrogen entering the refrigerant system in a liquid state, the top of the cylinder must be higher
than its bottom when you pressurize the system.
• The tubing shall be protected to the extent that it will not be handled or used for carrying during moving
of the appliance.
• Ventilation system have to be installed in the space when appliance with R32 is using for cooling of
electric equipment.
• Do not use the appliance for special purposes, such as preserving foods, works of art, and etc. It is an
appliance for consumer purposes, not a precision refrigerant system. There is risk of damage or loss of
property.
• This product has been designed and manufactured to meet ENERGY STAR criteria for energy efficiency
when matched with appropriate coil components. However, proper refrigerant charge and proper air
flow are critical to achieve rated capacity and efficiency. Installation of this product should follow the
manufacturer’s refrigerant charging and air flow instructions. Failure to confirm proper charge and
airflow may reduce energy efficiency and shorten equipment life.
• Refrigerant tubing shall be protected or enclosed to avoid damage.
• Flexible refrigerant connectors (such as connecting lines between the indoor and outdoor unit) that may
be displaced during normal operations shall be protected against mechanical damage.

15IMPORTANT SAFETY INSTRUCTIONS
ENGLISH
SAVE THESE INSTRUCTIONS
• The installation of pipe-work shall be kept to a minimum.
• A brazed, welded, or mechanical connection shall be made before opening the valves to permit
refrigerant to flow between the refrigerating system parts.

16 OPERATION
OPERATION
Before Use
Notes for Operation
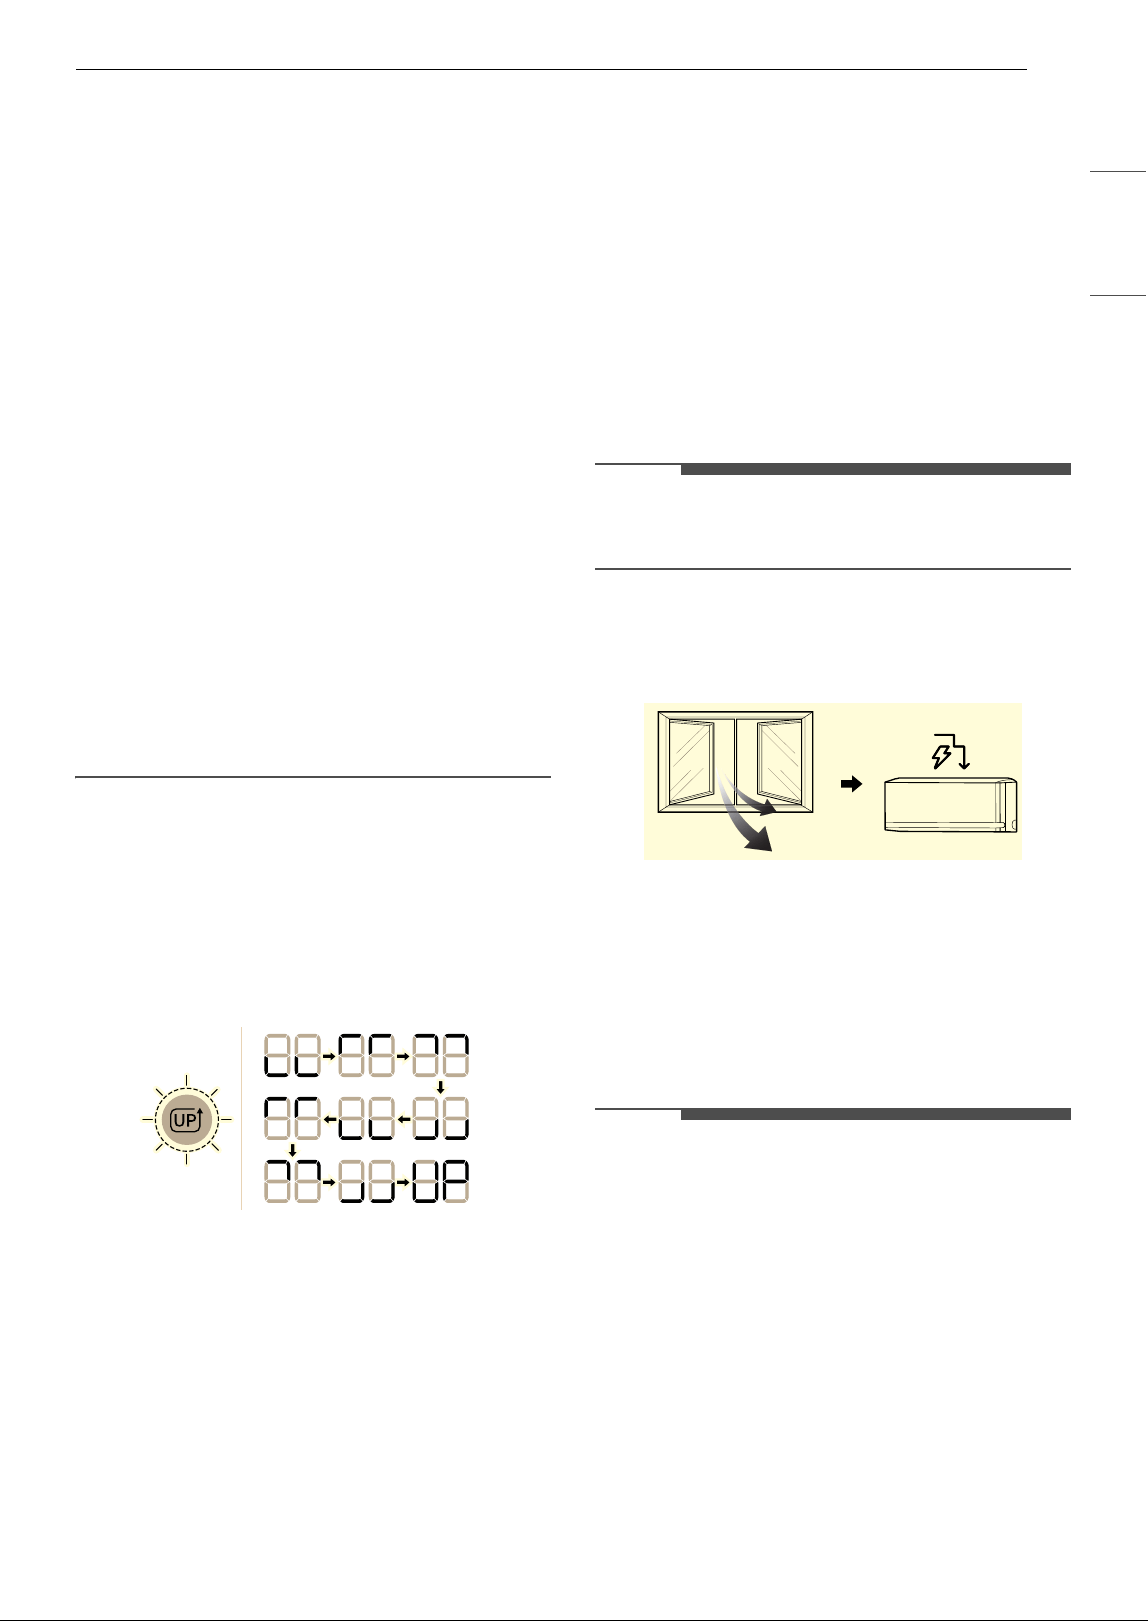
• Adjust the direction of the airflow vertically or horizontally to circulate indoor air.
• Speed up the fan to cool or warm indoor air quickly, within a short period of time.
• Turn off the appliance and periodically open windows for ventilation. The indoor air quality may
deteriorate if the appliance is used for long durations.
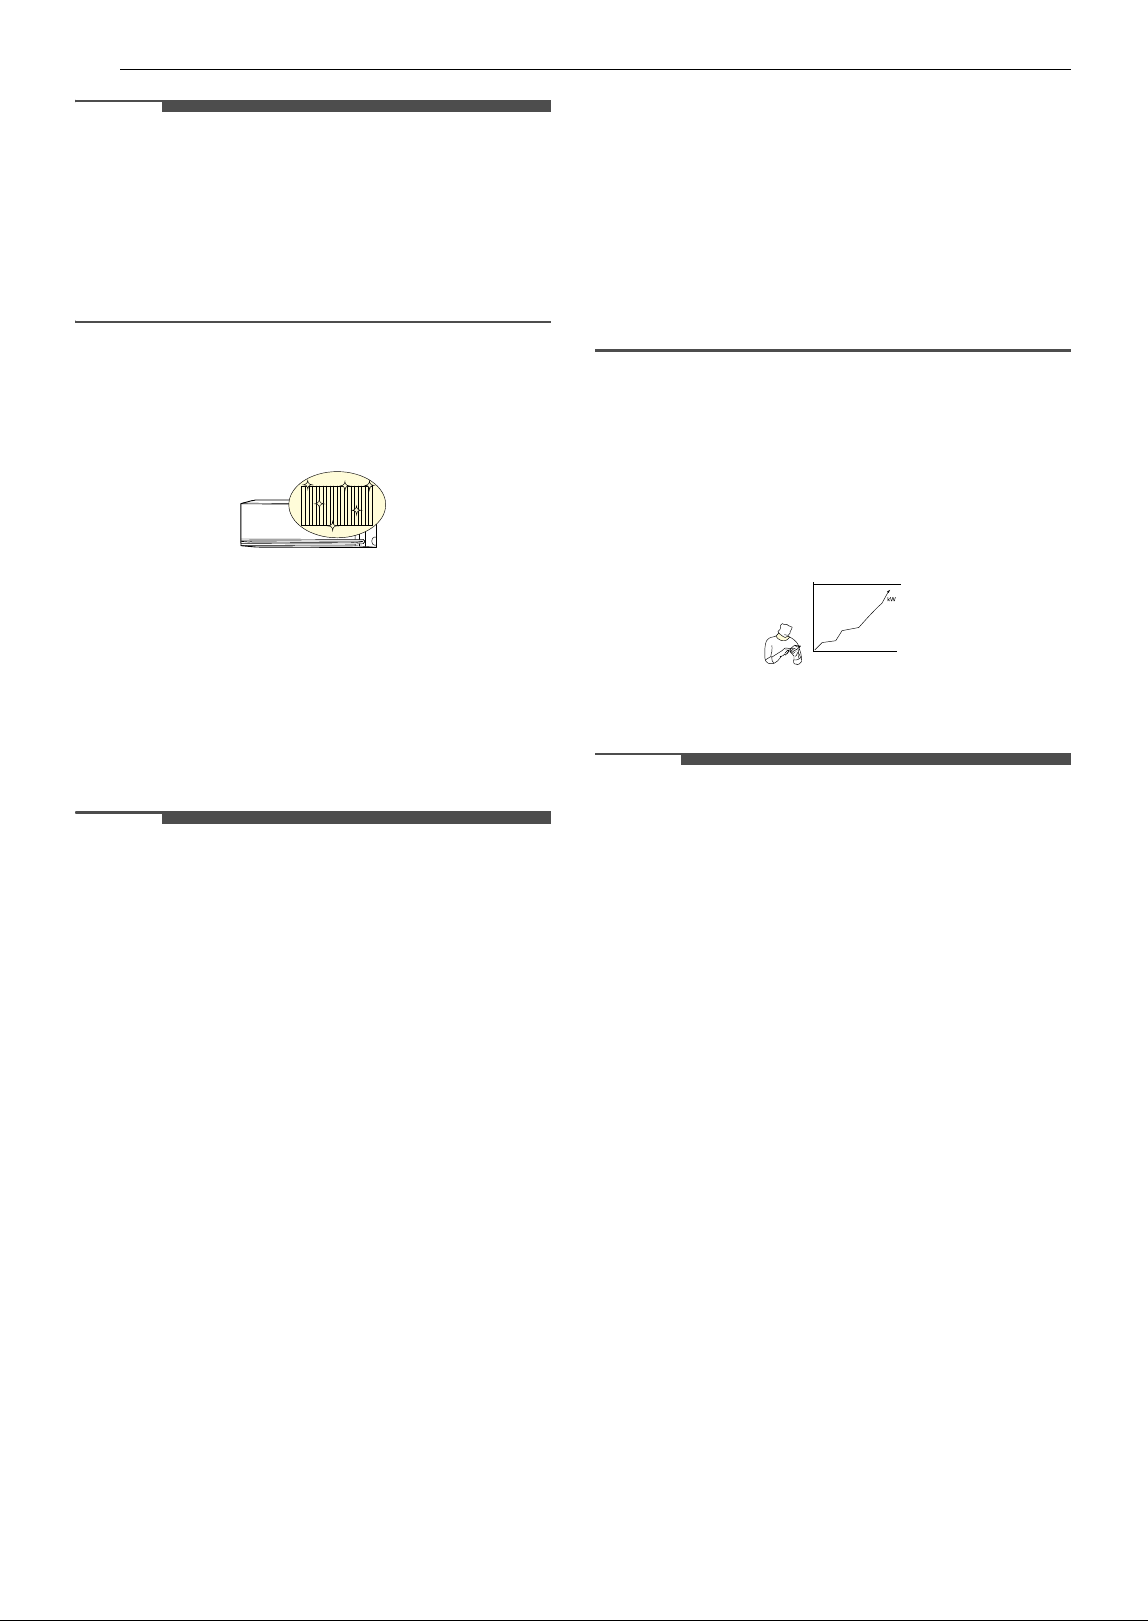
• Clean the air filter once every 2 weeks. Dust and impurities collected in the air filter may block the airflow
or reduce the appliance performance.
Suggestions for Energy Saving
• Do not over-cool the space. This may be harmful for your health and may consume more electricity.
• Block sunlight with blinds or curtains while you are operating the appliance.
• Keep doors or windows closed tightly while you are operating the appliance.
17OPERATION
ENGLISH
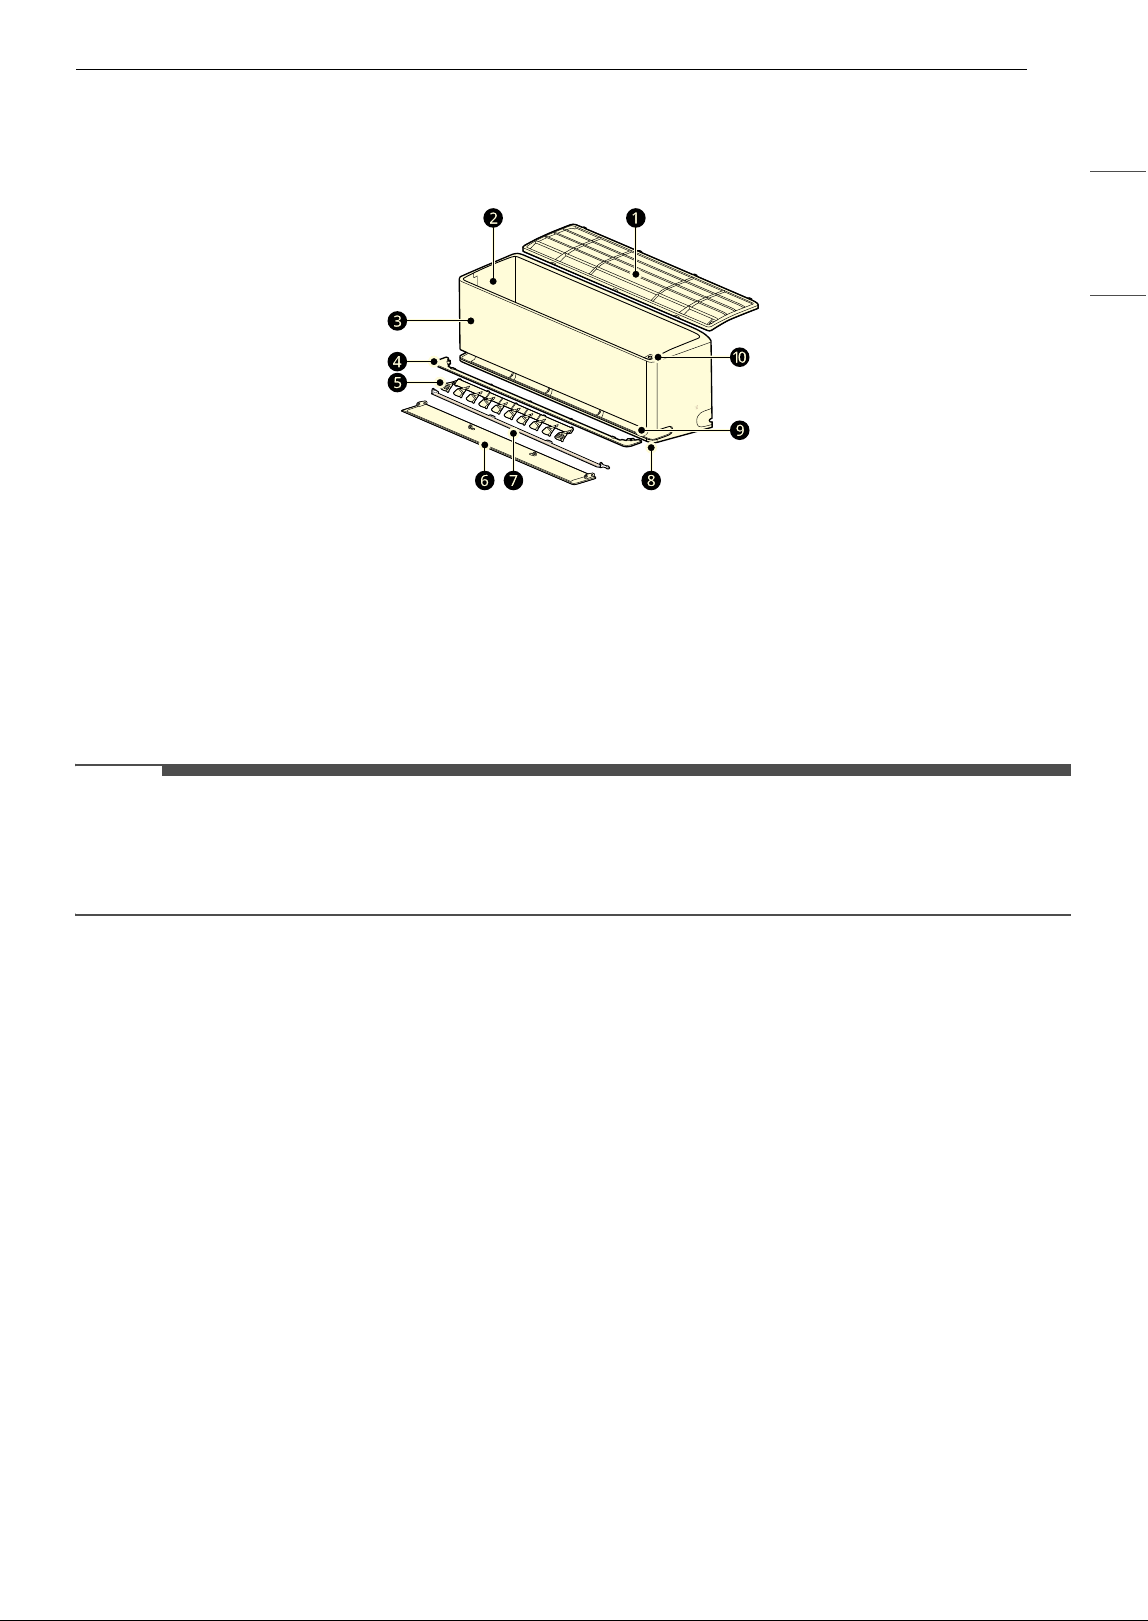
Product Overviews
Wall-Mounted
NOTE
• Dual Vane: f + g
• The number and location of parts may vary depending on the model of the appliance.
• Features may change depending on the model type.
a
Air Filter
f
Air Deflector (Up-Down Vane)
b
Air Intake Vents
g
Air Deflector (Inner Vane)
c
Front Cover
h
Main Air Outlet Vents
d
Air Guide
i
Soft Air Outlet Vents
e
Air Deflector (Left-Right Louver)
j
Power Button
18 OPERATION
Preparation before
Operation
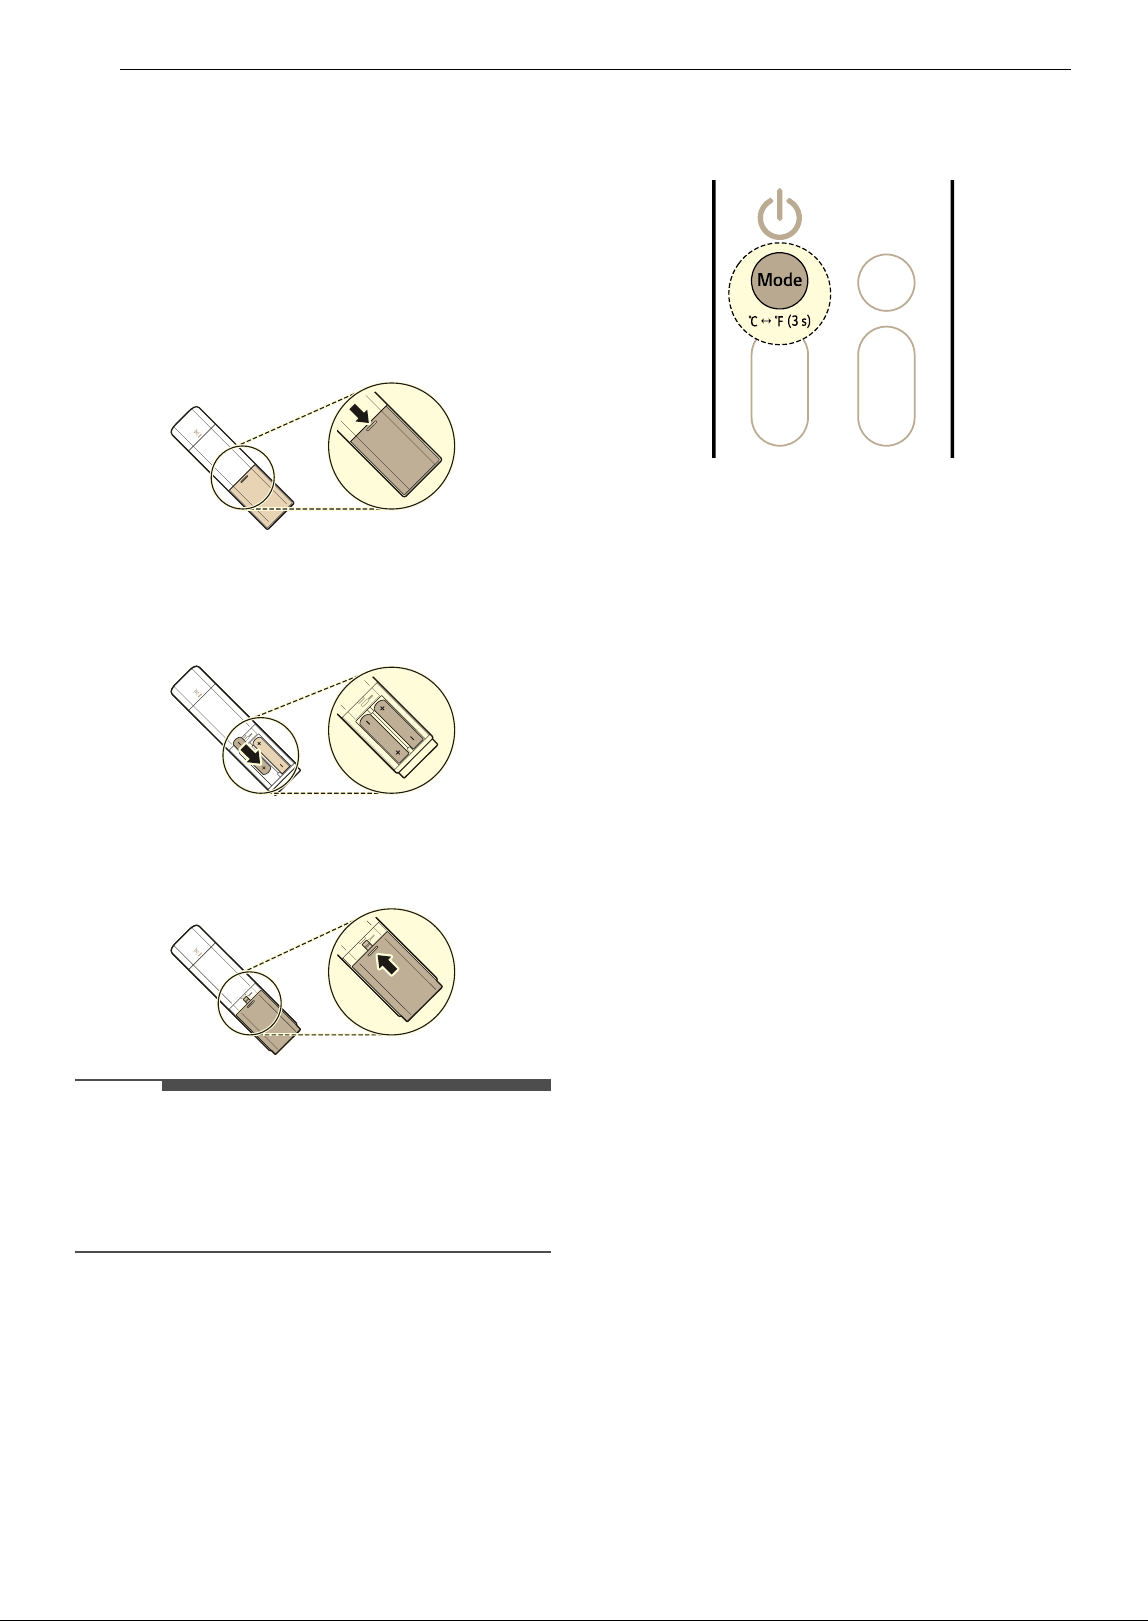
Inserting the Batteries into the
Wireless Remote Control
Insert AAA (1.5 V) batteries into the wireless
remote control.
1 Remove the battery cover.
2 Insert the new batteries and make sure that
the + and – terminals of the batteries are
installed correctly.
3 Reattached the cover by sliding it back into
position.
NOTE
• When the wireless remote control display begins
to fade, replace AAA (1.5 V) batteries.
• Do not use old and new batteries together.
• Do not use batteries other than alkaline.
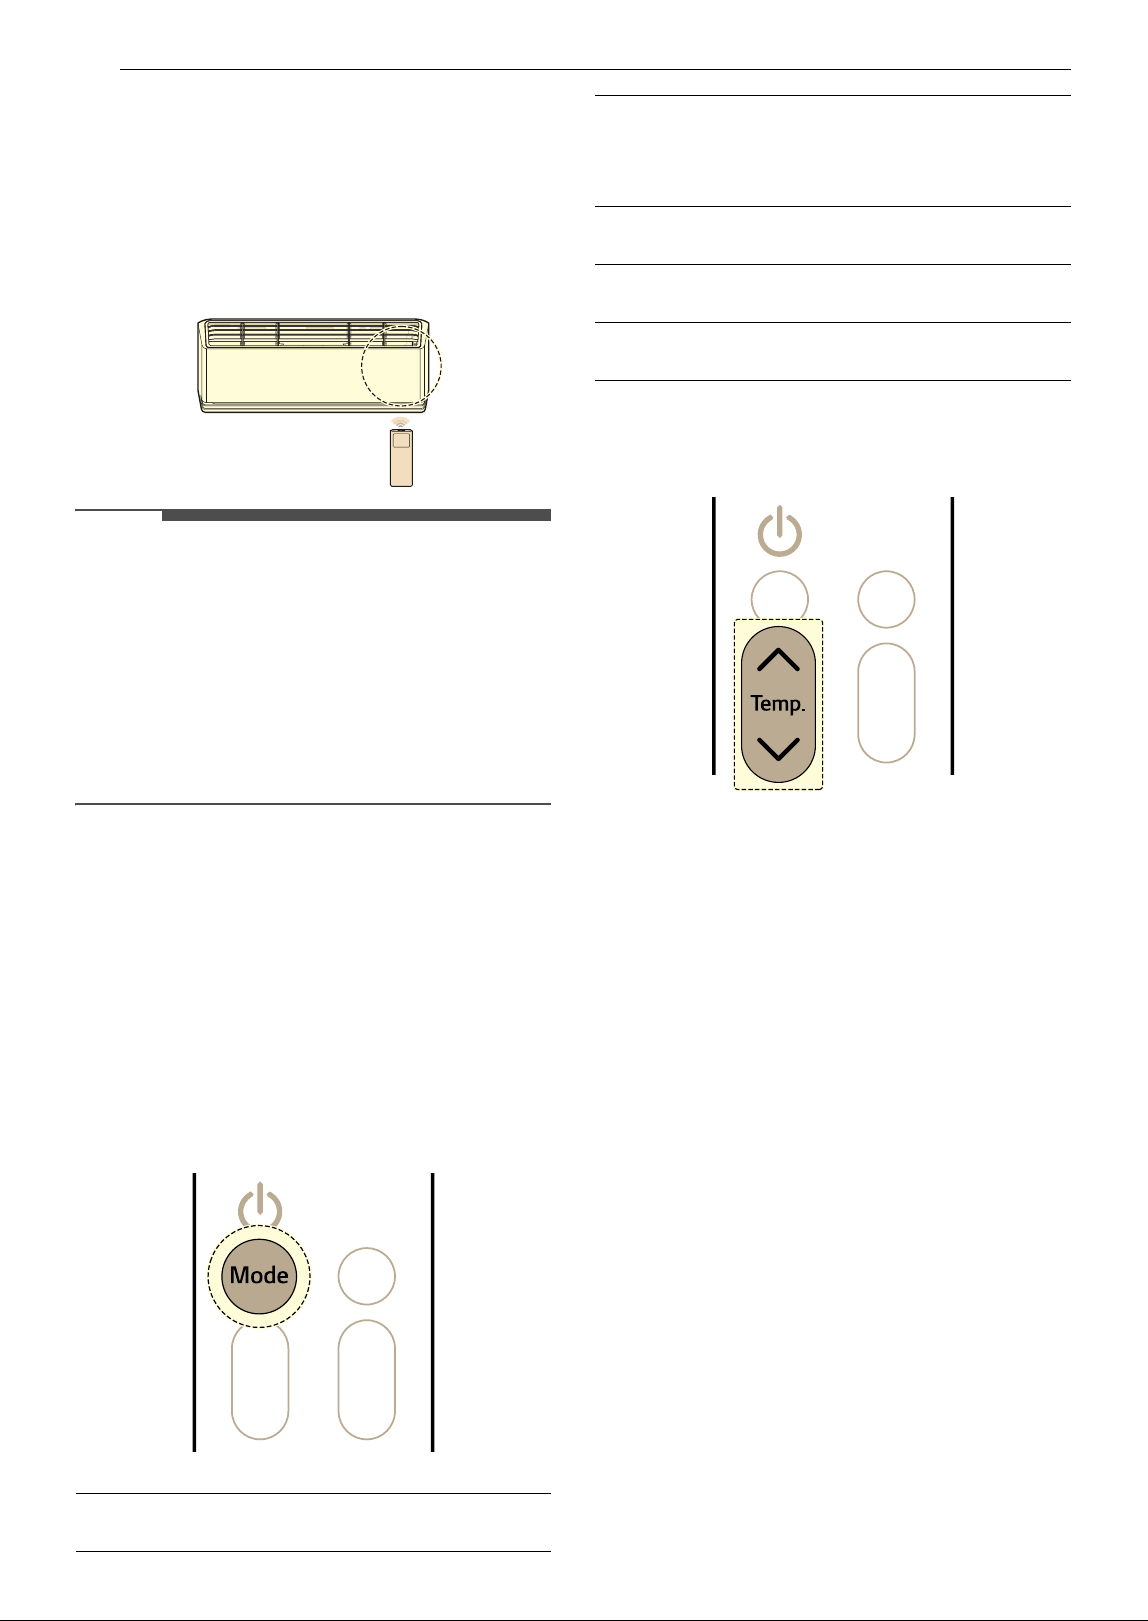
Selecting Fahrenheit or Celsius
Set the temperature display to show either
Fahrenheit (
8) or Celsius (7) units.
1 Turn the appliance on.
2 Press and hold the Mode button for about 3
seconds, to change units between
7 and 8
19OPERATION
ENGLISH
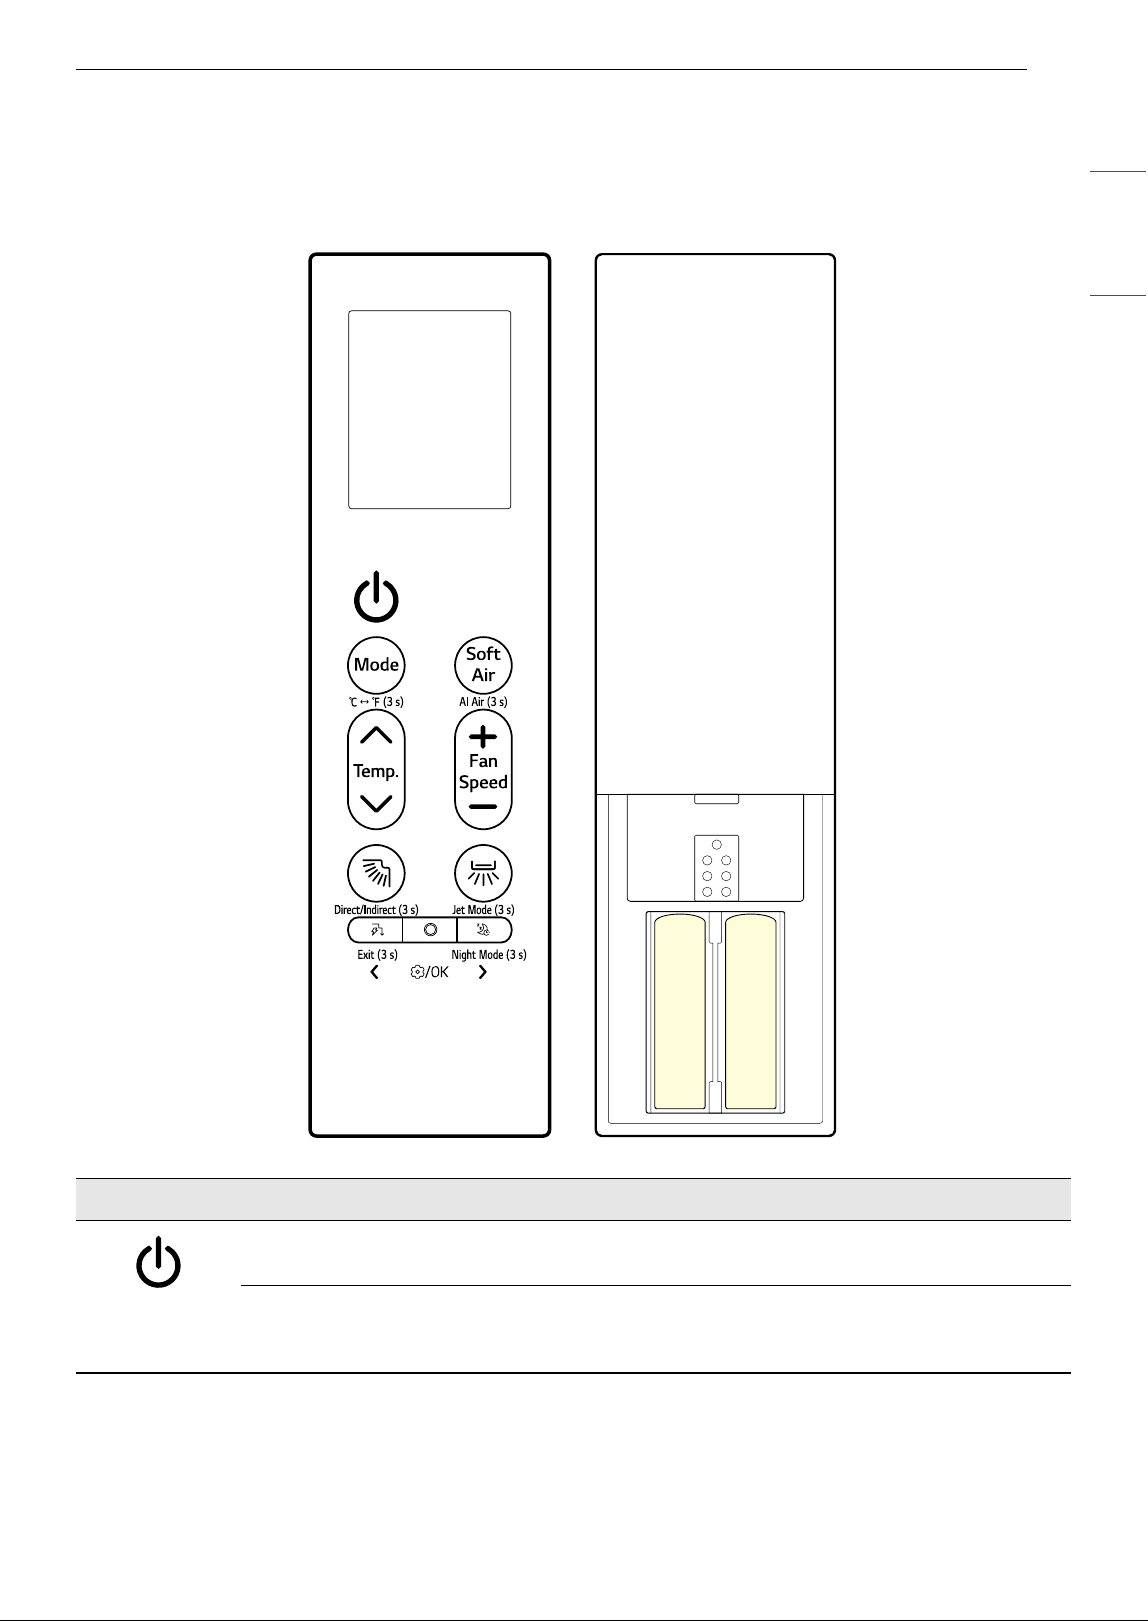
Wireless Remote Control Overview
Wireless Remote Control
You can operate the appliance more conveniently with the wireless remote control.
Image Description
Power
Turns the appliance on or off.
Connecting to LG ThinQ
Press and hold the Power button for about 3 seconds to prepare the statue for connecting
appliance and Wi-Fi.
20 OPERATION
Mode
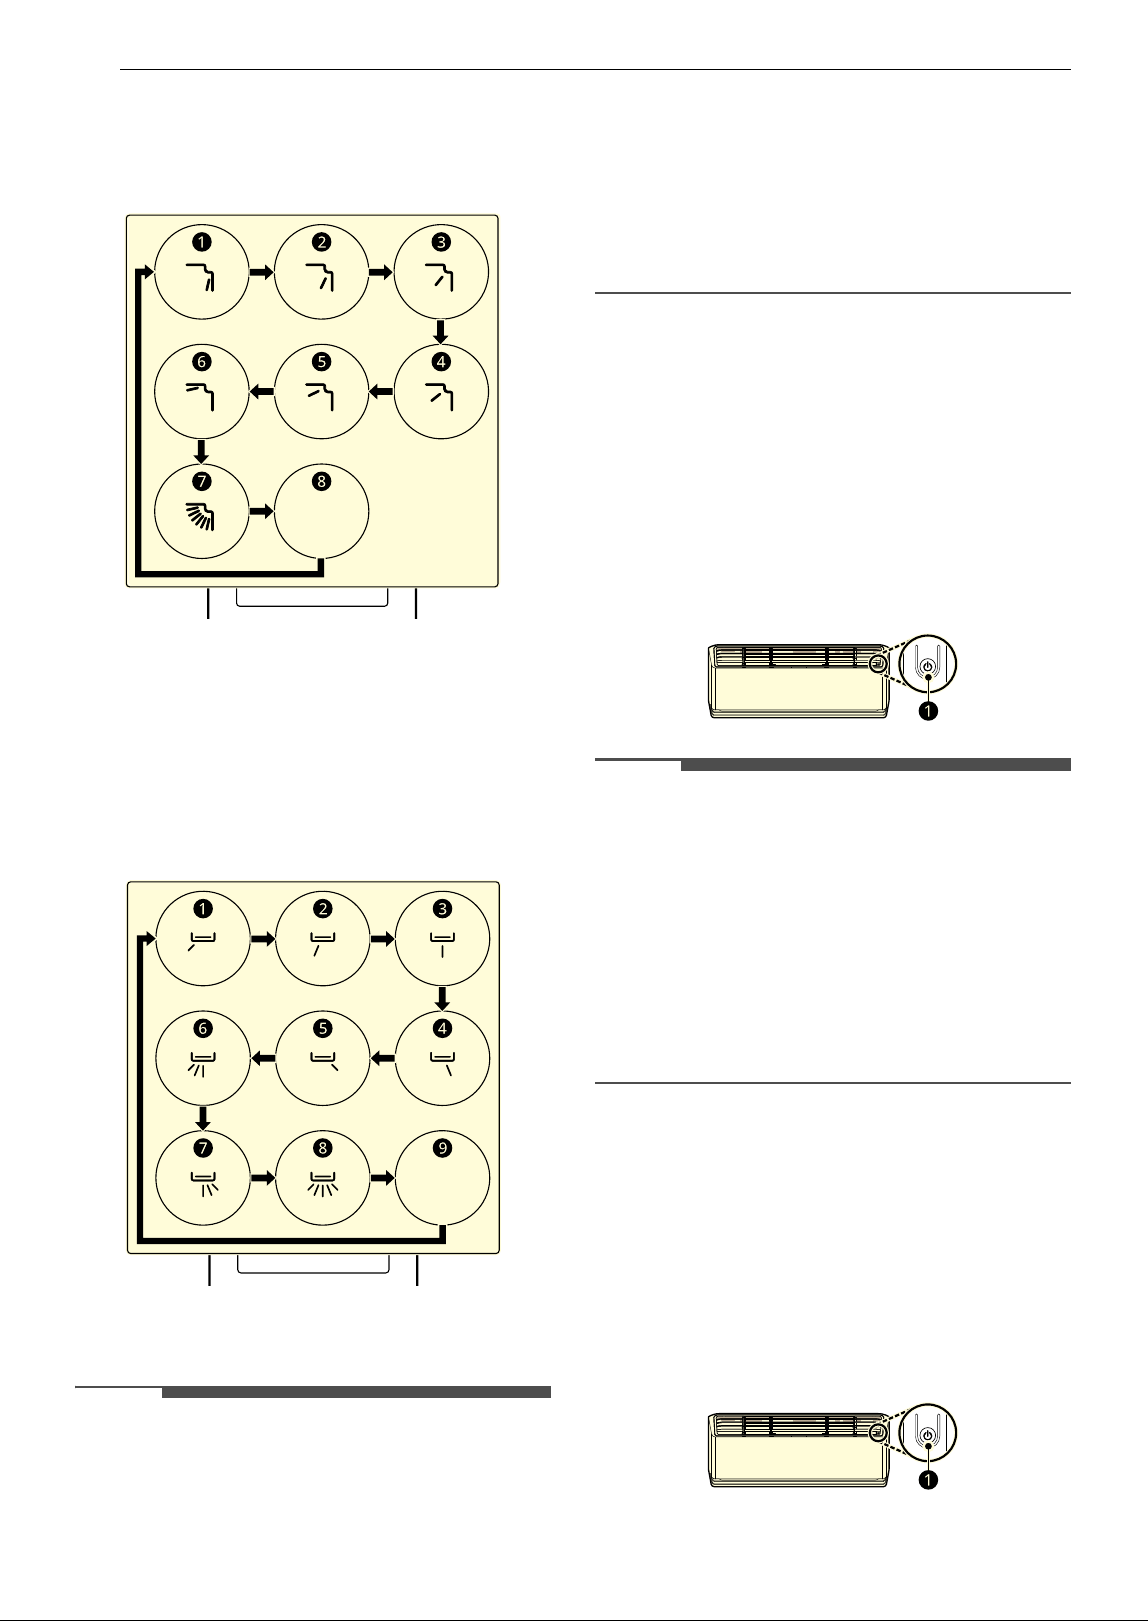
Selects the desired operation mode.
• Each press changes the modes in this order: Cooling ~ Auto ~ Dehumidification
~ Heating ~ Fan
7 & 8 (3 s)
Press and hold the Mode button for about 3 seconds to change units between
7 and 8
Soft Air
Keep you cool without feeling a draft.
AI Air (3 s)
Press and hold the Soft Air button for about 3 seconds to operate automatically by
detecting the surrounding environment and user characteristics.
Temp.
J, K
Adjusts the desired room temperature.
Fan Speed
~, !
Adjust the fan speed.
à (Up-Down Swing)
Adjusts the airflow direction up and down.
Direct/Indirect (3 s)
Press and hold the
à button for about 3 seconds to set either a direct or indirect airflow
based on your preferences.
Cleaning Mode
While the remote control and appliance are turned off, press and hold the
à button for
about 5 seconds to fix the vane for cleaning the vane easily.
Ä (Left-Right Swing)
Adjusts the airflow direction left and right.
Jet Mode (3 s)
Press and hold the
Ä button for about 3 seconds to change the room temperature quickly.
Ñ (Energy Control)
Decrease the power input. You can control energy consumption.
Exit (3 s)
When entering the settings, press and hold the
Ñ button for about 3 seconds to return the
previous setting.
Function
Selects the desired function.
Image Description

21OPERATION
ENGLISH
Ç (Sleep)
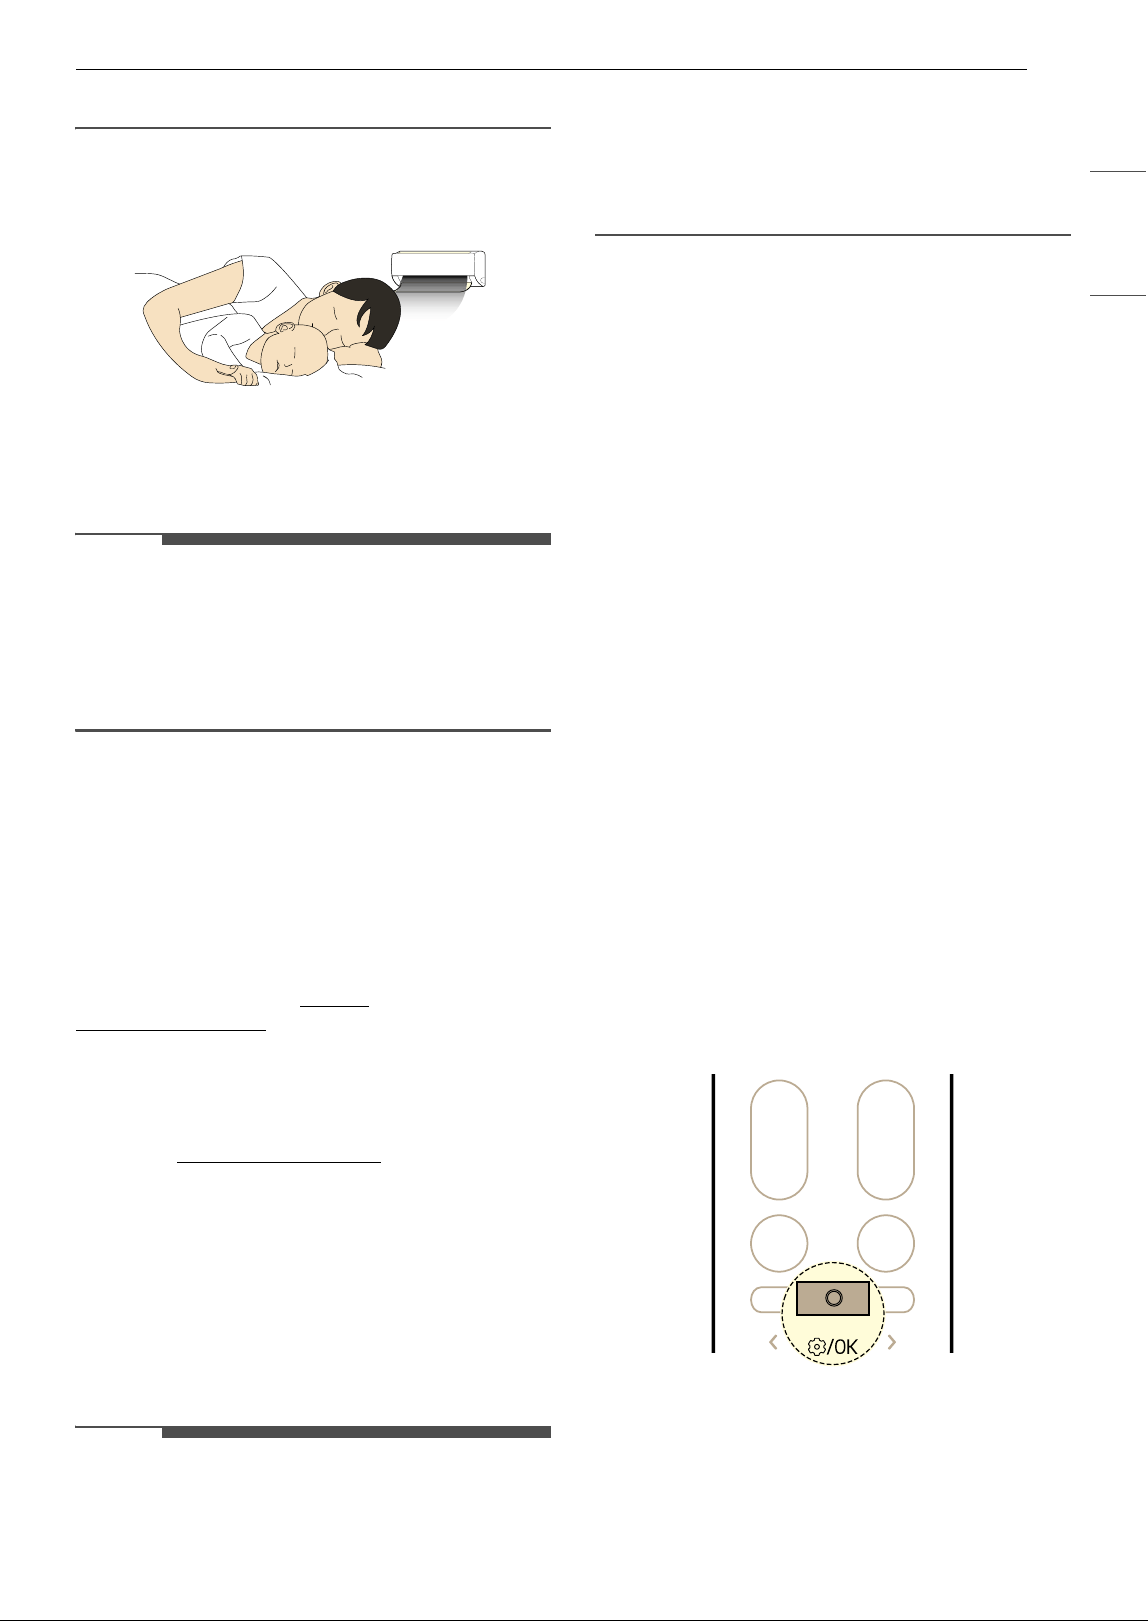
Automatically turns the appliance off at a desired time. Use it before sleeping.
Night Mode (3 s)
Press and hold the
Ç button for about 3 seconds to turn off the display and the beep
sound.
Image Description
22 OPERATION
Using Operating Modes
Operating with the Wireless
Remote Control
Point the wireless remote control towards the
signal receiver at the right side of the appliance to
operate it.
NOTE
• The wireless remote control may operate other
electronic devices if it is directed towards them.
Make sure to point the wireless remote control
towards the appliance signal receiver.
• For proper operation, use a soft cloth to clean
the signal transmitter and receiver.
• If a function included on the remote is not
supported on the appliance, the appliance may
not indicate this by buzzing.
Cooling, Auto, Dehumidification,
Heating, Fan Mode
You can change the operating mode when the
appliance is turned on.
1 Turn the appliance on.
2 Press the Mode button repeatedly to change
the operating mode.
3 Press the J or K button to set the desired
temperature.
Notes for Each Operation Mode
Dehumidification Mode
•In the Dehumidification mode, compressor and
indoor fan may not operate, to prevent excessive
cooling.
Fan Mode
• ON or t is displayed on the indoor unit.
• You cannot adjust the temperature.
Jet Mode
You can change the room temperature quickly.
•The Jet mode is available with the Cooling and
Heating modes.
1 Turn the appliance on.
2 Press the Mode button repeatedly to select
the desired mode.
w
Cooling mode
N
†
Auto Operation mode / Auto
changerover mode
† It automates the process of choosing
the right settings for your space.
q
Dehumidification mode
v
Heating mode
G
Fan mode

23OPERATION
ENGLISH
3 Press and hold the Ä button for about 3
seconds.
NOTE
•The Jet Heating mode is not available on some
models.
• Jet mode may operate differently from the
wireless remote control display.
Adjusting the Fan Speed
You can adjust the fan speed by pressing the ~ or
! button repeatedly.
NOTE
• The fan speed of Natural Wind is available with
the Fan mode. The fan speed adjusts
automatically.
• The fan speed of Auto is available with the
Cooling and Heating modes. The fan speed
adjusts automatically according to the
temperature difference. The fan may turn off
when the set temperature is reached.
• The indoor unit icons are displayed on some
indoor units.
• The indoor unit display shows the fan speed
icons for only 5 seconds and returns to the set
temperature.
Adjusting the Airflow Direction
You can adjust the direction of the airflow vertically
or horizontally.
Speed
Wireless
Remote
Control Icon
Indoor Unit
Icon
Natural Wind
Auto
AU
High
Fs
Medium - High
F4
Medium
F3
Medium - Low
Fz
Low
F1
24 OPERATION
Adjusting the Up-Down Direction
• Press the à button repeatedly to adjust airflow
direction.
- Select
à to adjust the up-down direction of
the airflow automatically.
Adjusting the Left-Right Direction (On
Some Models)
• Press the Ä button repeatedly to adjust airflow
direction.
- Select
Ä to adjust the left-right direction of
the airflow automatically.
NOTE
• Adjusting the air deflector arbitrarily may cause
appliance failure.
• When restarted, the appliance uses the last set
airflow direction. The position of the air deflector
may not match the icon displayed on the
wireless remote control. When this occurs,
adjust the direction of the airflow again.
• This function may operate differently from the
wireless remote control display.
• Adjusting the Left-Right Direction may not be
supported, depending on the model.
Manual Operation
If your wireless remote control is unavailable, you
can turn the appliance on and off by pressing the
POWER button
a on the indoor unit.
1 Open the up-down vane.
2 Press the POWER button a.
NOTE
• The stepping motor may be broken, if the up-
down vane opens rapidly.
• The fan speed is set to high by default.
• Features may change depending on the model
type.
• The temperature cannot be altered when using
the POWER button
a.
• The temperature is set between 72
8 (22 7) and
76 8 (24 7) by default.
Restoring the Previous Settings
When the air conditioner is turned on again after a
power failure, Auto Restart function restores the
previous settings.
When using the appliance for the first time, Auto
Restart function is set. You can cancel and set this
function by pressing the POWER button a on the
indoor unit.

25OPERATION
ENGLISH
Canceling Auto Restart
1 Open the up-down vane.
2 Press and hold the POWER button a for 6
seconds.
3 When the appliance beeps twice, release the
POWER button a. The lamp will flash twice.
This repeats 4 times.
Setting Auto Restart
1 Open the up-down vane.
2 Press and hold the POWER button a for 6
seconds.
3 When the appliance beeps twice, release the
POWER button
a. The lamp will flash. This
repeats 4 times.
NOTE
• The feature may change depending on the
model type.
• If you press and hold the POWER button
a for 3
– 5 seconds, instead of 6 seconds, the appliance
will switch to the test operation. In the test
operation, the appliance blows out strong
cooling air for 18 minutes and then returns to
factory default settings.
26 OPERATION
Using Special Functions
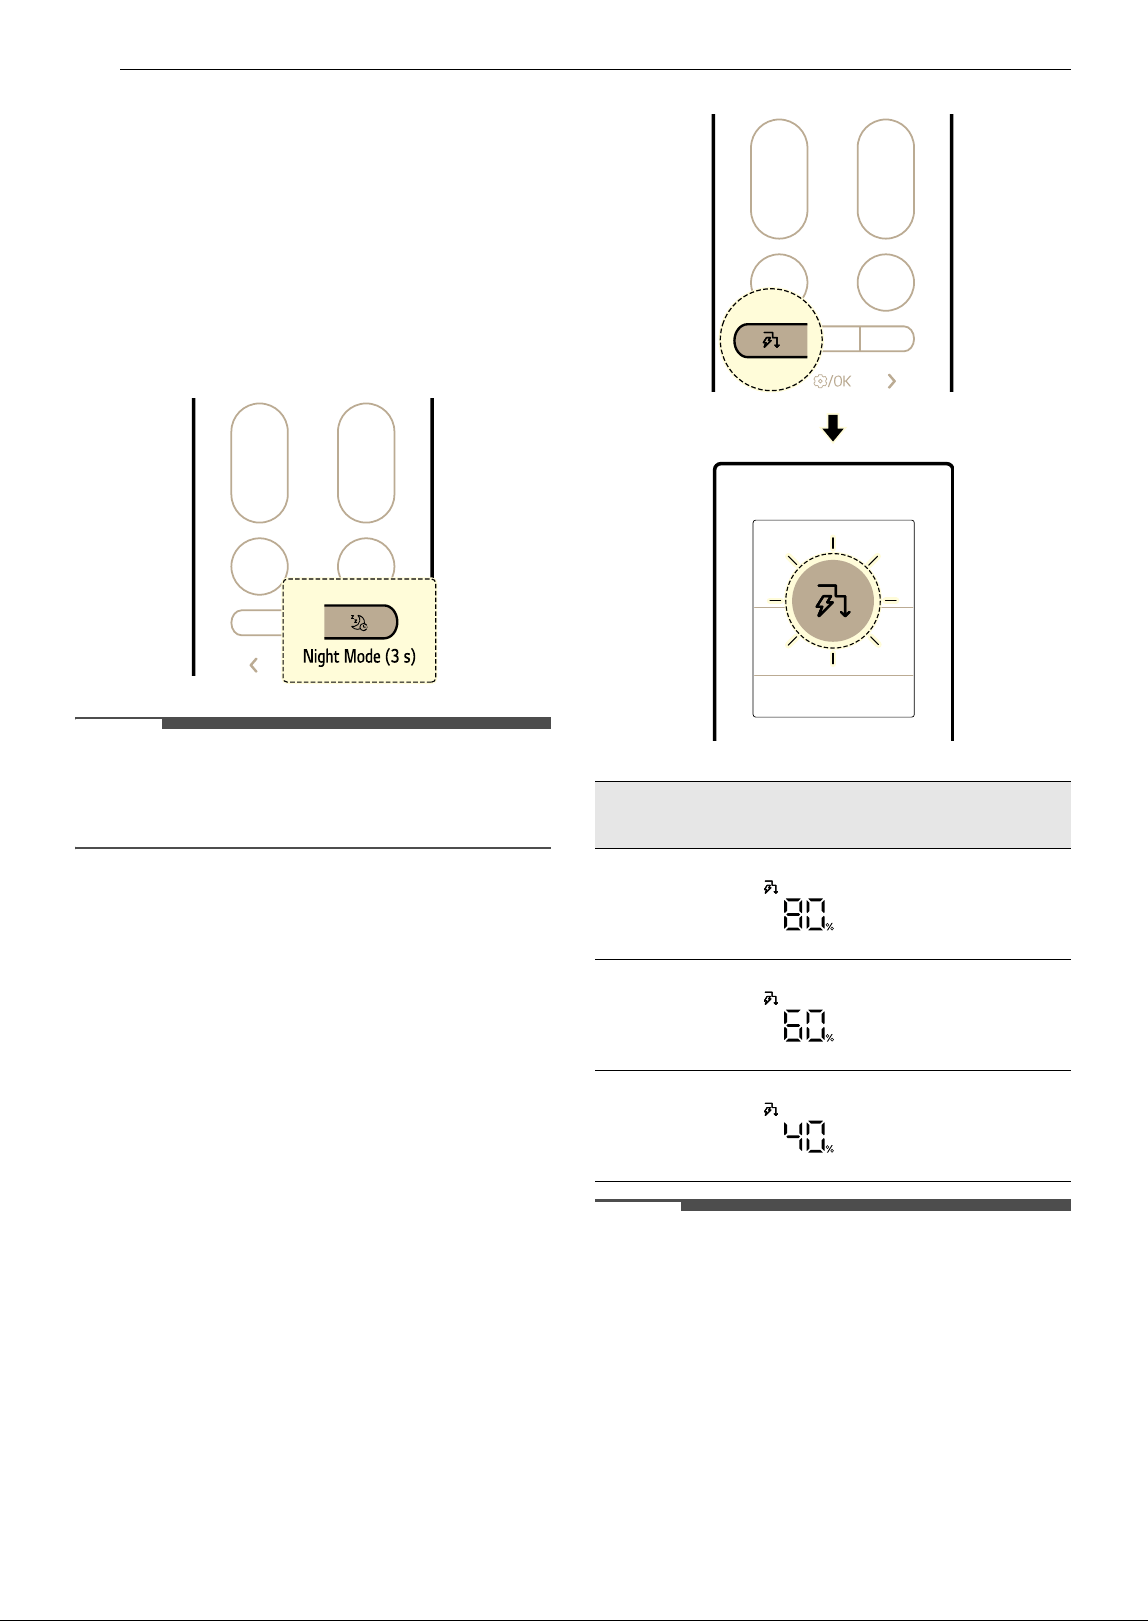
Night Mode (On Some Models)
You can easily turn off the light and mute the
buzzer simultaneously.
• Press and hold the
Ç button for about 3
seconds to set night mode.
- Each time button pressed, the function
changes in this order: ON
& OFF
NOTE
• When the Night Mode is on, pressing any
buttons on the wireless remote control
automatically turns the display on for a while.
Active Energy Control Function (On
Some Models)
You can decrease the power input.
1 Turn the appliance on.
2 Press the Ñ button repeatedly to select the
desired step.
NOTE
• 8O, 6O, 4O or L (step 1), LL (step 2) is displayed on
some indoor units.
• This function is available with Cooling mode.
• Capacity may decrease when the Active Energy
Control function is selected.
• The desired temperature is displayed for about 5
seconds if you press the
J or K button.
• The fan speed is displayed for about 5 seconds if
you press the
~ or ! button.
Step
Display
Screen
Description
1
The power Input is
decreased by 20%
compared to rated
power input.
2
The power Input is
decreased by 40%
compared to rated
power input.
3
(on some
models)
The power Input is
decreased by 60%
compared to rated
power input.
27OPERATION
ENGLISH
• When connected to the Multi Outdoor unit, this
functions may not be supported.
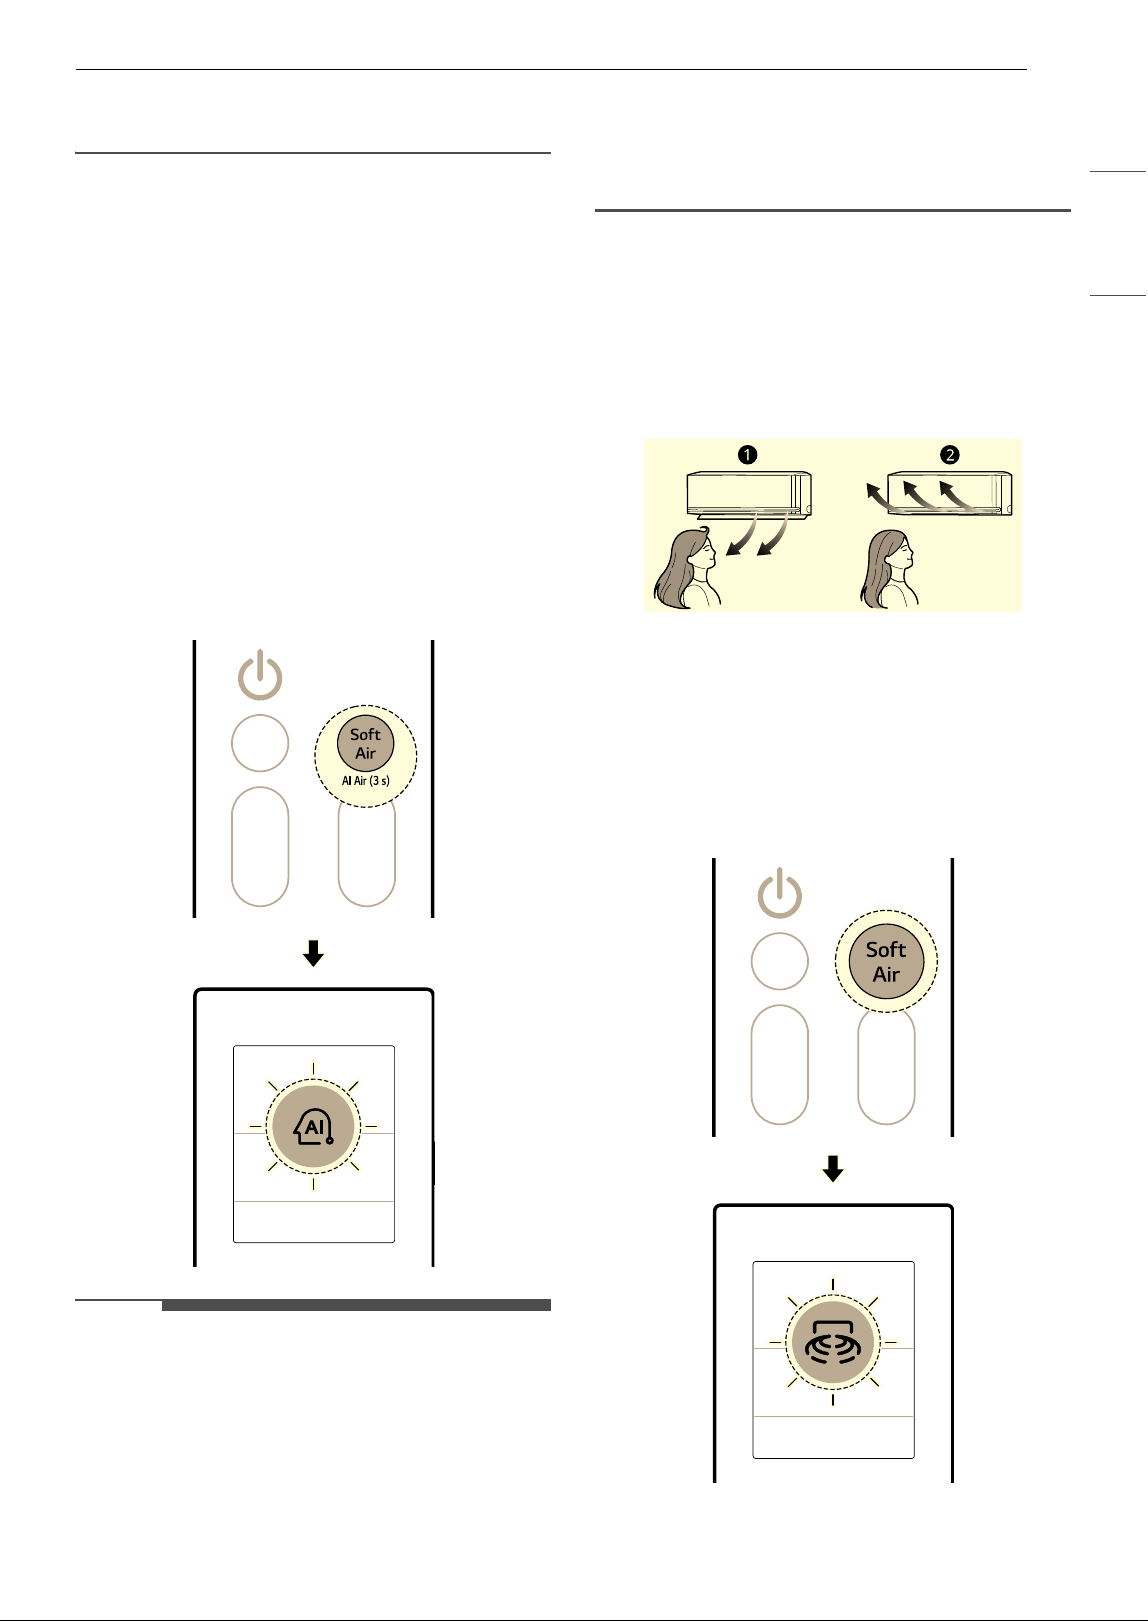
AI Air Mode
The fan speed and airflow direction change
automatically based on learned usage patterns
and ambient temperature changes.
If you select the AI Air mode, the air conditioner
analyzes the surrounding environment to reach
the desired temperature quickly. The airflow
direction and fan speed are automatically adjusted
to achieve the comfort settings.
1 Turn the appliance on.
2 Press and hold the Soft Air button for about 3
seconds.
NOTE
• This function is available with the Cooling and
Heating modes.
• AI is displayed on the display screen.
• To change the desired temperature, press the
Temperature J or K button on the remote
control.
• Pressing the Mode or Jet Mode buttons while in
the AI Air mode operates the selected function.
• This function may operate differently depending
on the model.
Soft Air
This feature directs a soft airflow upwards to keep
you cool without feeling a draft.
With the LG ThinQ application, you can fine-tune
the temperature and strength of the airflow.
a Normal
b Soft Air
1 Turn the appliance on.
2 Press the Soft Air button.
28 OPERATION
NOTE
• When the Soft Air function is activated, the
temperature of the air coming out of the
appliance is changed and the airflow is directed
upward.
• Soft Air function can be used with the Cooling
and Fan modes.
•
so is displayed on the display screen.
• To change the target temperature, press the
Temperature
J or K button on the remote
control.
- The temperature adjustment range may be
limited while using the Soft Air function.
• Press the ~ or ! button to adjust the fan
speed.
• The airflow temperature may not increase or
decrease depending on the indoor and outdoor
temperatures.
• When connected to the Multi Outdoor unit, you
cannot adjust the airflow temperature.
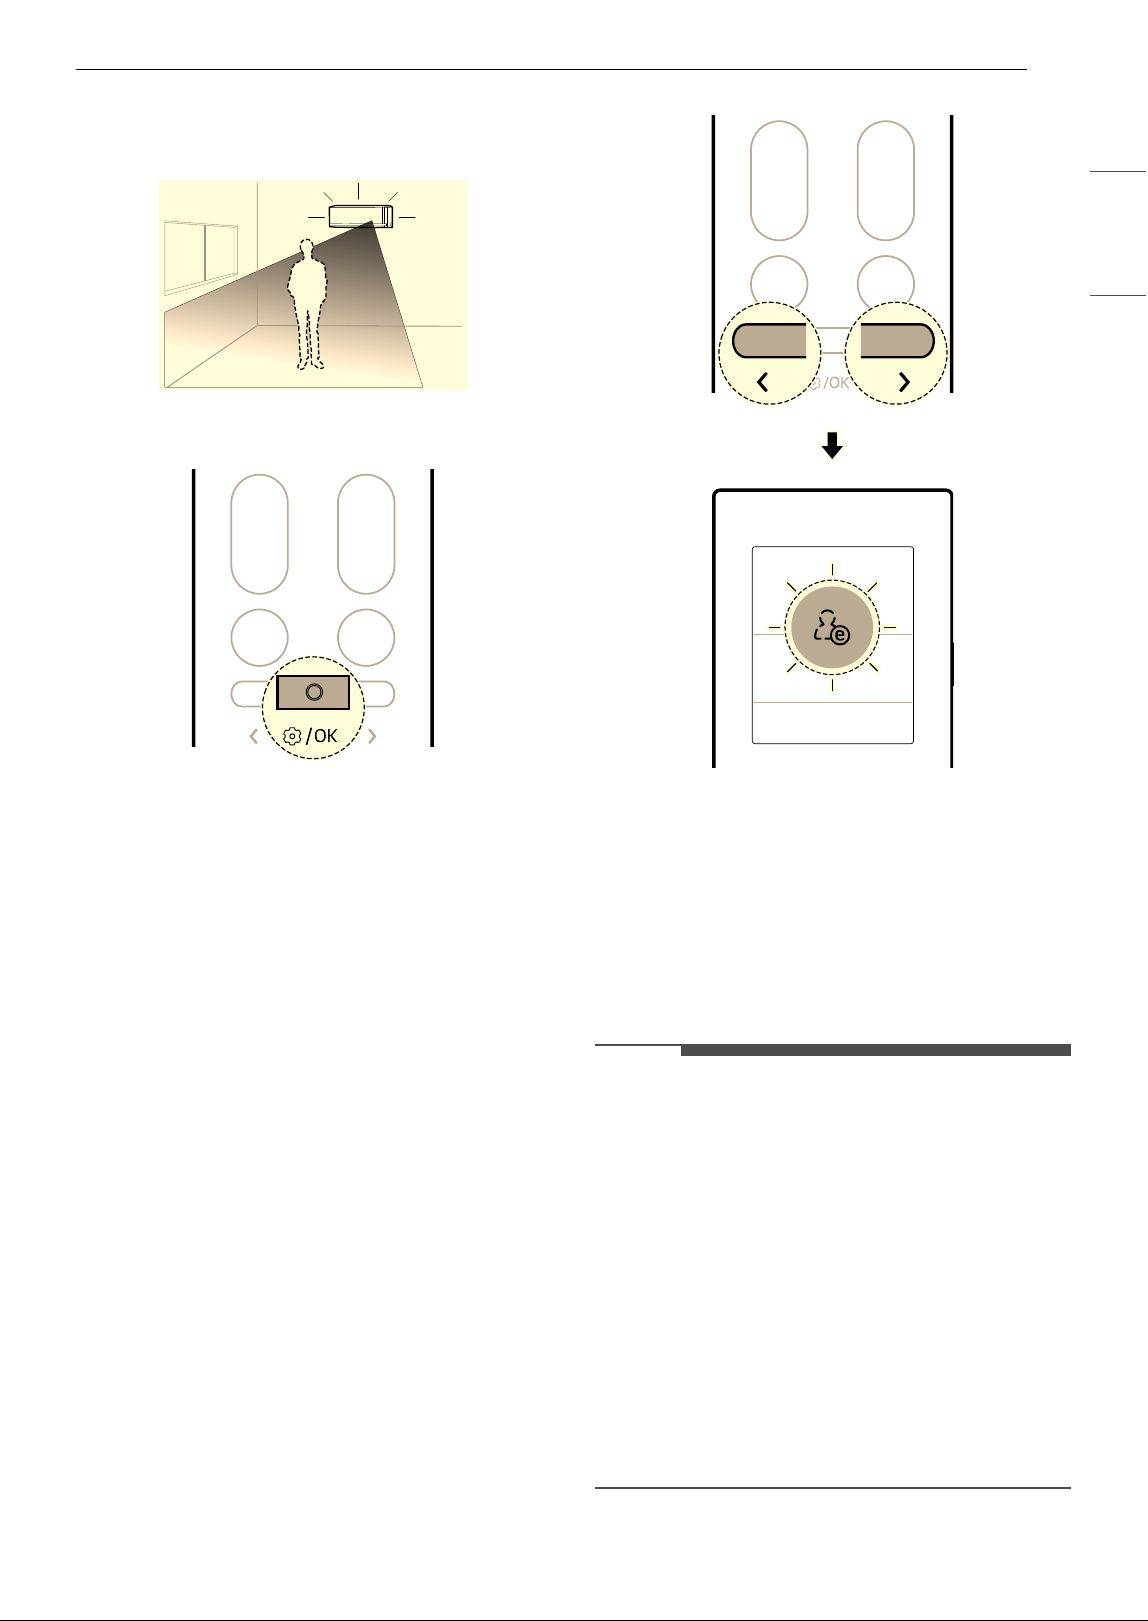
Human Detecting Sensor (On Some
Models)
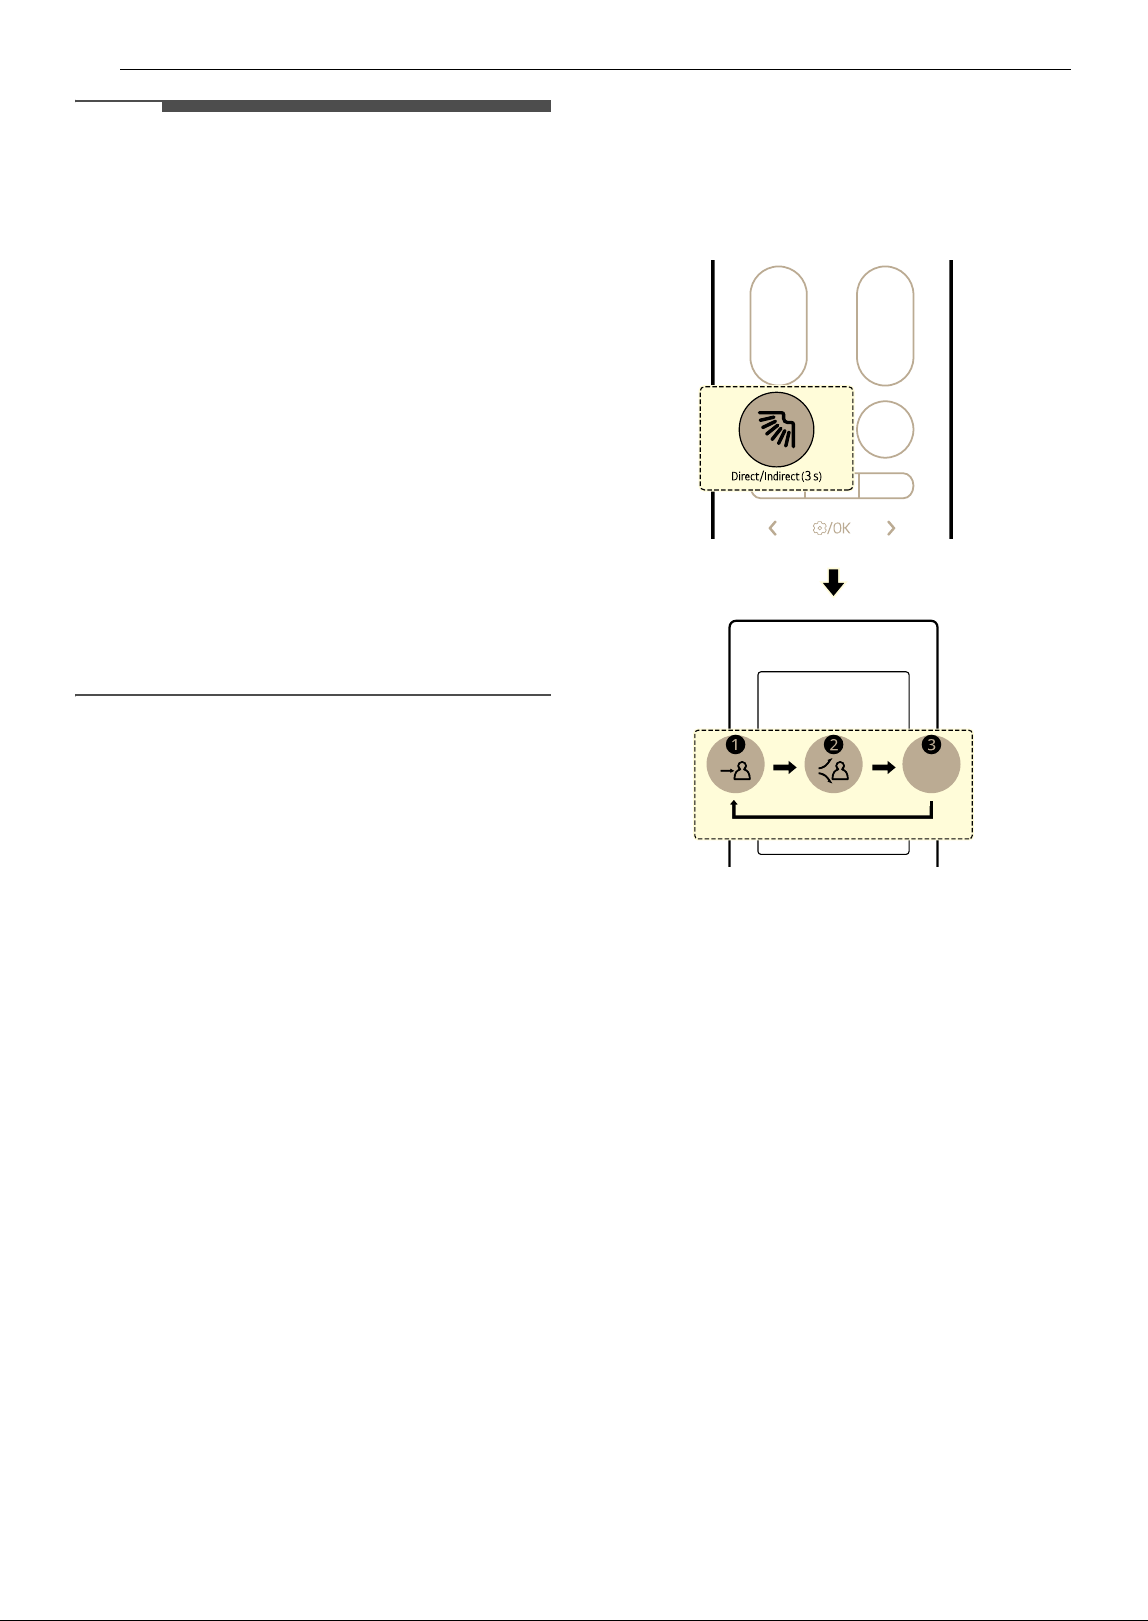
Direct and Indirect Airflow
This feature detects people and sets either a
Direct or Indirect airflow based on your
preferences.
• Direct Airflow
After detecting an occupied area, it directs the
airflow to the occupied area.
• Indirect Airflow
After detecting an occupied area, it directs the
airflow to the unoccupied area.
• Press and hold the
à button for about 3
seconds to set direct and indirect function.
- Each time button pressed, the function
changes in this order: Direct
~ Indirect ~
Off
a Direct
b Indirect
c Off
Absence Detection
It automatically changes to energy saving
operation when no one is present.
• If you leave the appliance turned on while you
are out, the appliance automatically performs
energy saving cooling operation or turns off the
power when the absence detection time elapses,
saving on electricity bills.
29OPERATION
ENGLISH
• Connect the appliance to the LG ThinQ
application to set the absence detection time
and absence detecting mode.
1 Press the Function button.
2 Press L or M button to set the below icon
flashes at the bottom of the display screen.
Then press the Function button.
3 Press the L or M button to set absence
detection function.
• Each time button pressed, the function
changes in this order: ON
& OFF
4 Then press the Function button.
NOTE
•The Direct and Indirect Airflow operation are
available with Cooling, Heating mode.
• The sensitivity of the radar sensor may vary
depending on the indoor environment and
conditions, including:
- If there is little movement, such as while
watching TV or sleeping
- If you are sitting on the floor close to the
appliance
- If you are in a location far from the appliance
approximately 5 m (16 ft) or more
• Moving objects such as fans, robot vacuum
cleaners, or companion animals may be
mistaken for people.
30 OPERATION
Sleep Timer
You can set the appliance to turn off automatically
after a set time. The appliance will automatically
change the temperature, fan speed and airflow
direction. There are two ways to set the sleep
timer.
This function can be set when the appliance is
turned on.
Method 1
1 Turn the appliance on.
2 Press the Function button.
3 Press the L or M button until the below icon
flashes at the bottom of the display screen.
Then press the Function button.
4 Press the L or M button to set the desired
time. Then press the Function button.
• Starting from 30 minutes, the Sleep Timer
can be set in hourly increments up to 12
hours.
Method 2
1 Turn the appliance on.
2 Press the Ç button.
31OPERATION
ENGLISH
3 Press the L or M button to set the desired
time. Then press the Function button.
• Starting from 30 minutes, the Sleep Timer
can be set in hourly increments up to 12
hours.
NOTE
• Indoor unit display shows the set time from 1 Hr
to 12 Hr for only 5 seconds then disappears on
some models.
•In the Cooling and Dehumidification mode, the
temperature increases by 1 8 (1 7) after 30
minutes and an additional 1 8 (1 7) after
another 30 minutes for a more comfortable
sleep. The temperature increases up to 2
8 (2
7) from the preset temperature and up to 86 8
(30
7).
• Although the remark for fan speed on the
display screen may be changed, the fan speed is
adjusted automatically.
•In the Heating mode, the temperature
decreases by 1
8 (1 7) after 1 hours and an
additional 1
8 (1 7) after another 1 hours for a
more comfortable sleep. The temperature
decreases up to 2
8 (2 7) from the preset
temperature.
- When connected to the Multi Outdoor unit, the
temperature may not changed automatically.
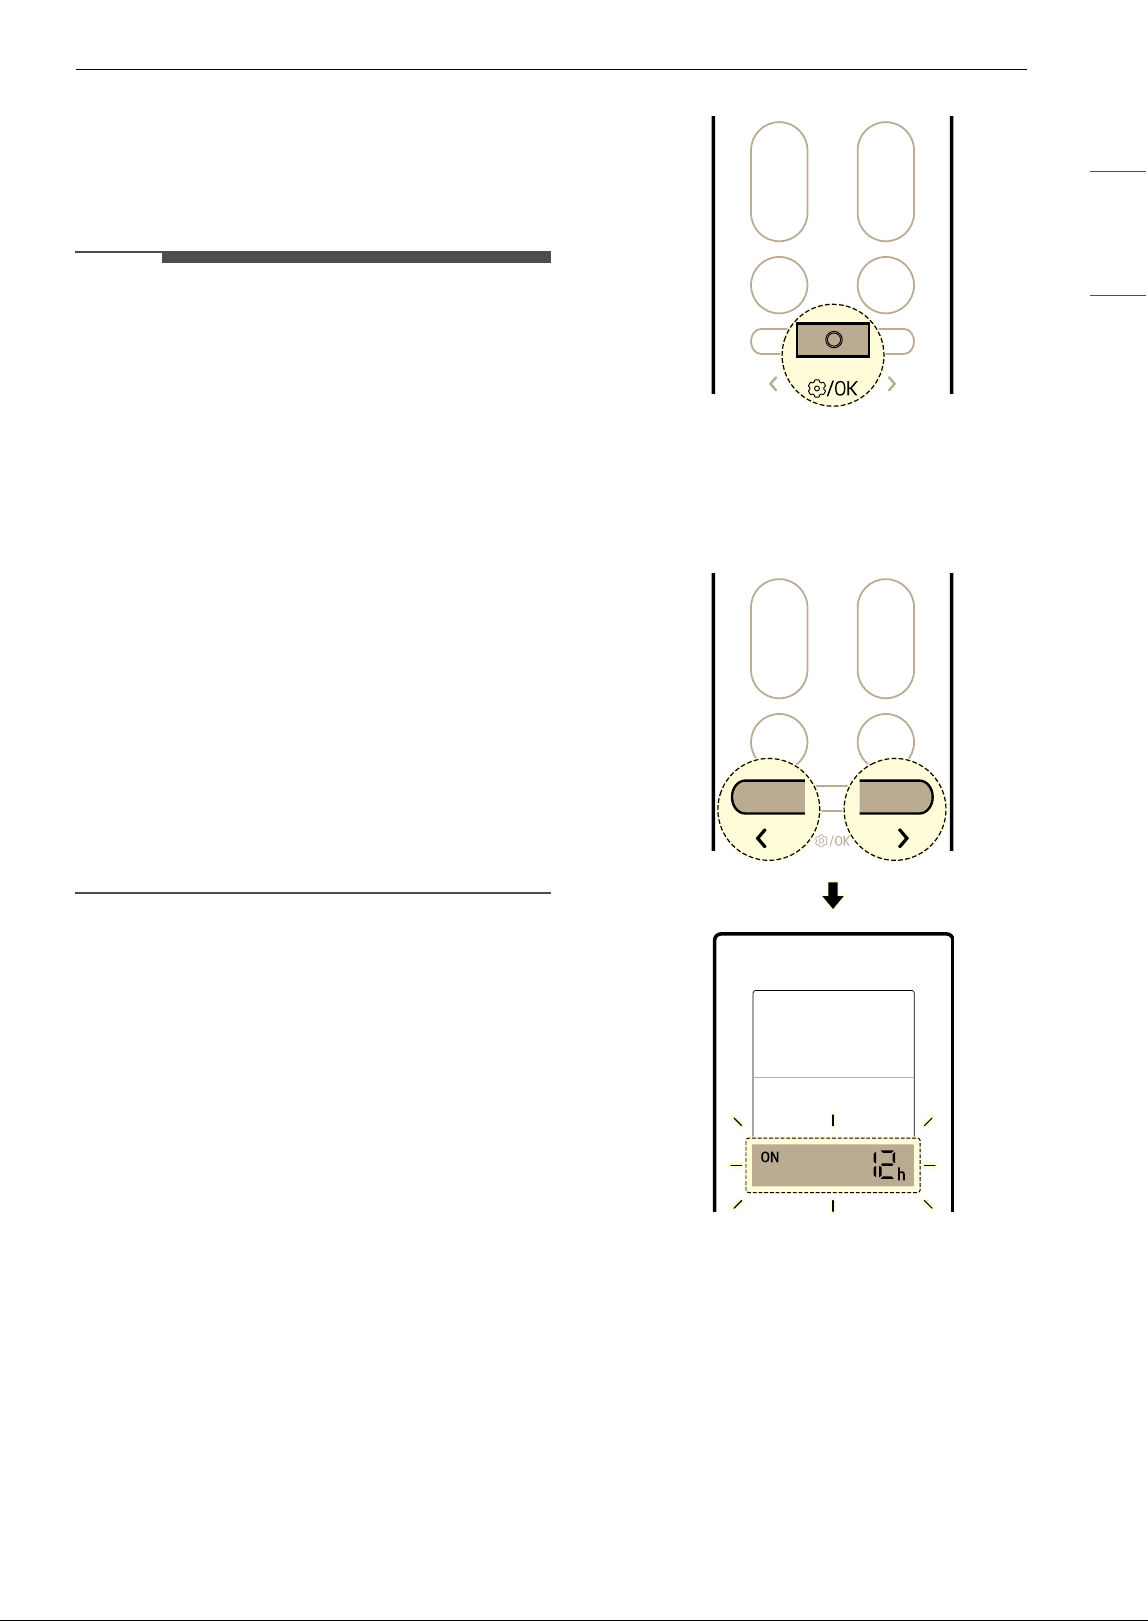
On and Off Timer
You can set the appliance to turn on and off
automatically at a desired time.
The On Timer and Off Timer can be set together.
Setting the On Timer
You can set or cancel the function whether the
appliance is turned on or off.
1 Press the Function button.
2 Press the L or M button until the below icon
flashes at the bottom of the display screen.
Then press the Function button.
3 Press the L or M button to set the desired
time. Then press the Function button.
• The time can be set up to 24 hours.
Setting the Off Timer
You can set or cancel the function whether the
appliance is turned on or off.
1 Press the Function button.
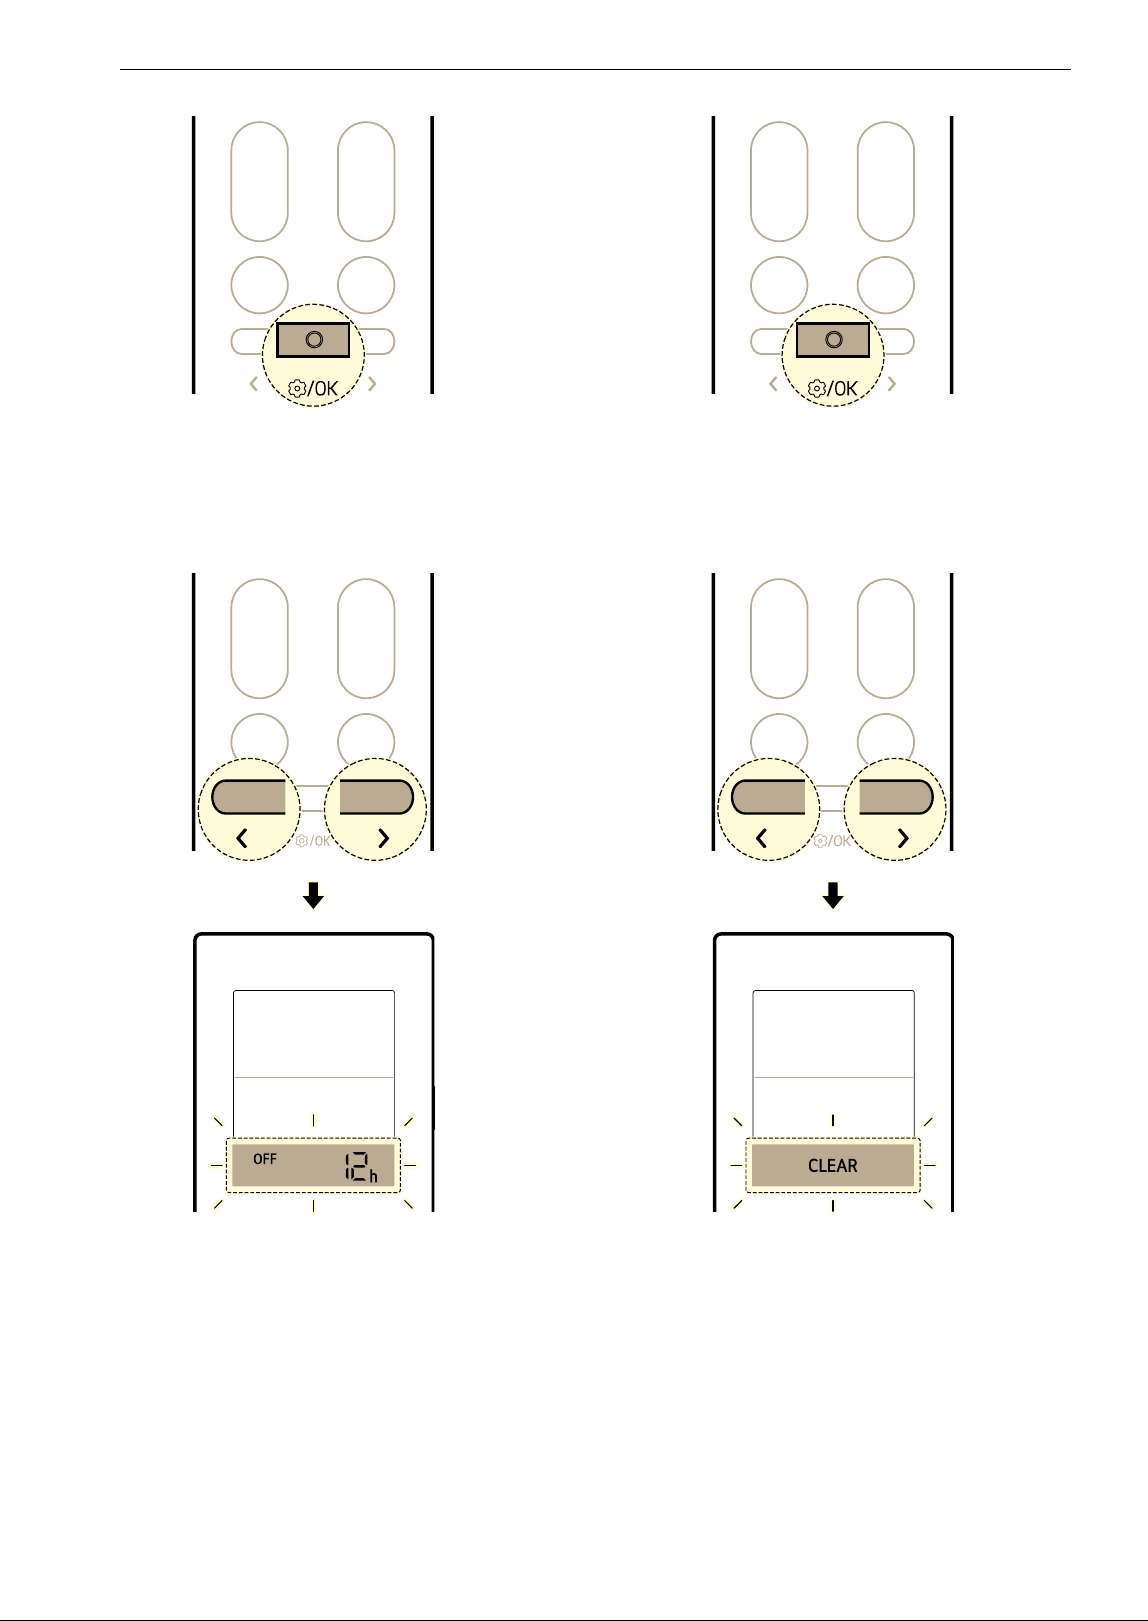
32 OPERATION
2 Press the L or M button until the below icon
flashes at the bottom of the display screen.
Then press the Function button.
3 Press the L or M button to set the desired
time. Then press the Function button.
• The time can be set up to 24 hours.
Canceling the Timer Setting
You can cancel all timer settings.
1 Press the Function button.
2 Press the L or M button until the below icon
flashes at the bottom of the display screen.
Then press the Function button.
Mute Function
You can turn on or off the buzzer sound to notify
you when you set or change the function of the air
conditioner.
1 Turn the appliance on.
2 Press the Function button.
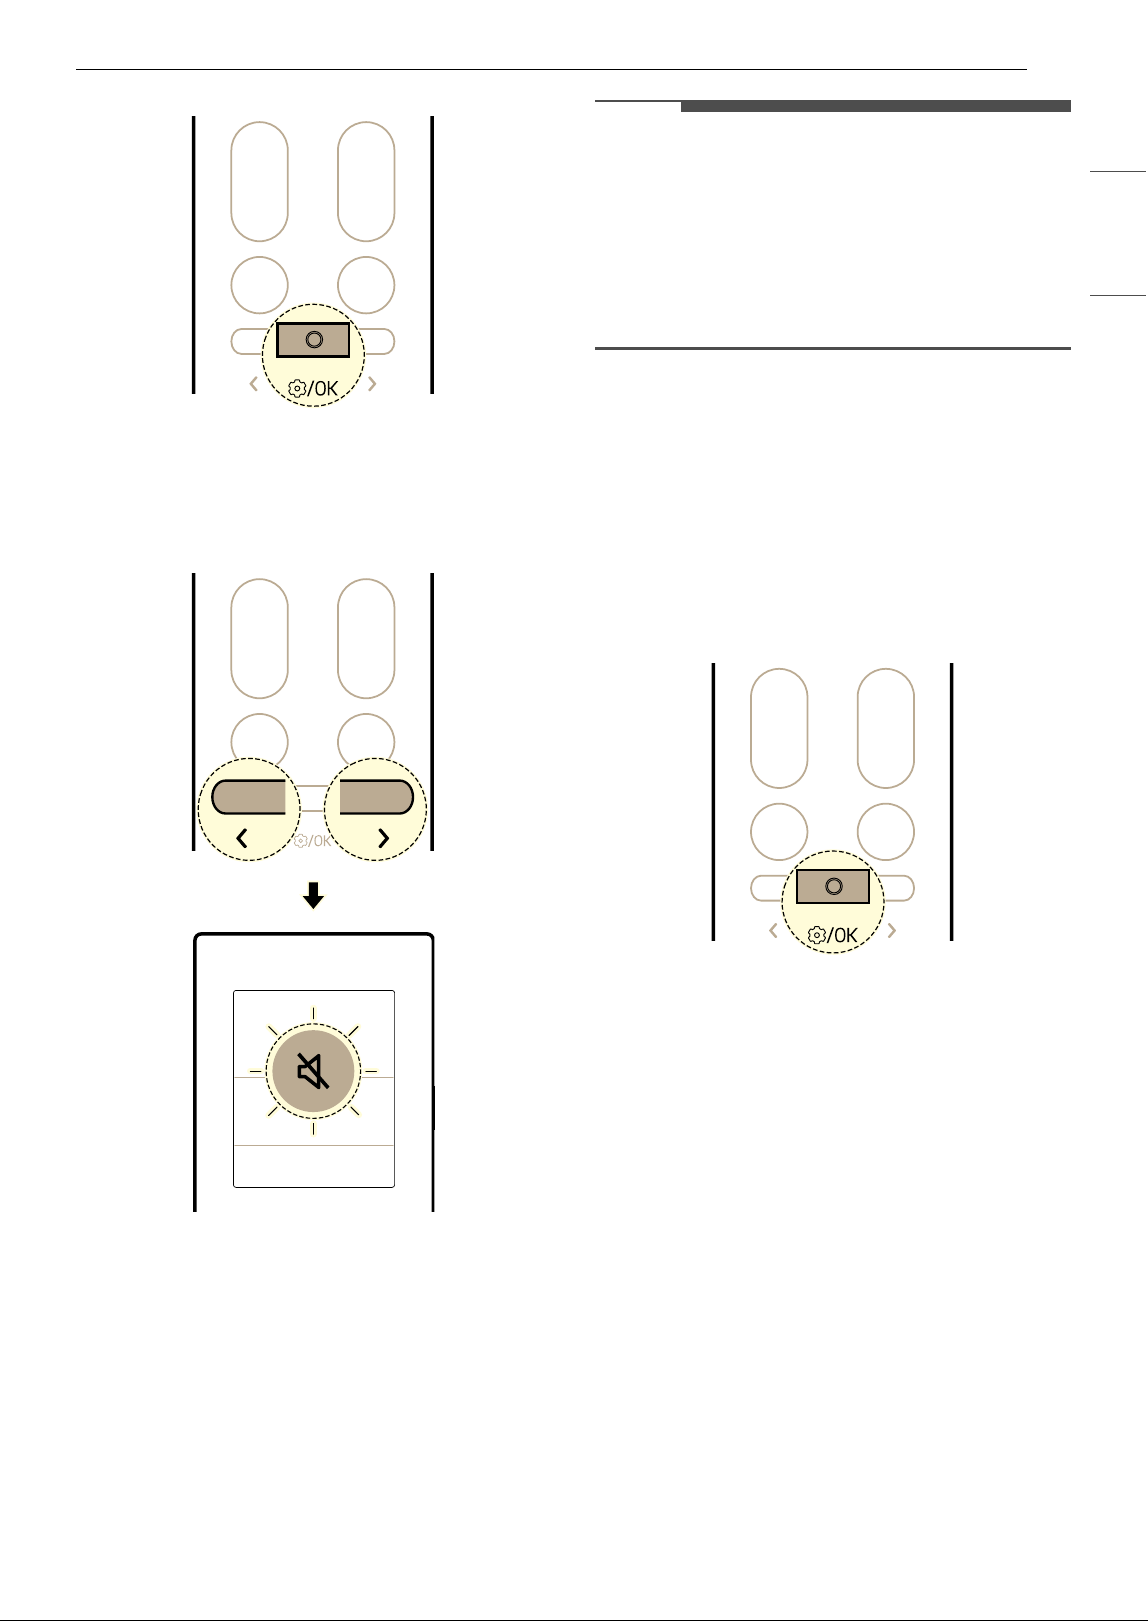
33OPERATION
ENGLISH
3 Press the L or M button until the below icon
flashes at the bottom of the display screen.
Then press the Function button.
4 Press the L or M button to set the mute
function.
• Each time button pressed, the function
changes in this order: ON
& OFF
5 Then press the Function button.
NOTE
• Set the function each time, the function changes
on and off.
• When the Mute is set,
OF appears for a moment
on the indoor unit display and the buzzer sound
turned off.
• This function may operate differently depending
on the model.
Light Off Function
You can set the brightness of the indoor unit
display screen.
1 Turn the appliance on.
2 Press the Function button.
3 Press the L or M button until the below icon
flashes at the bottom of the display screen.
Then press the Function button.
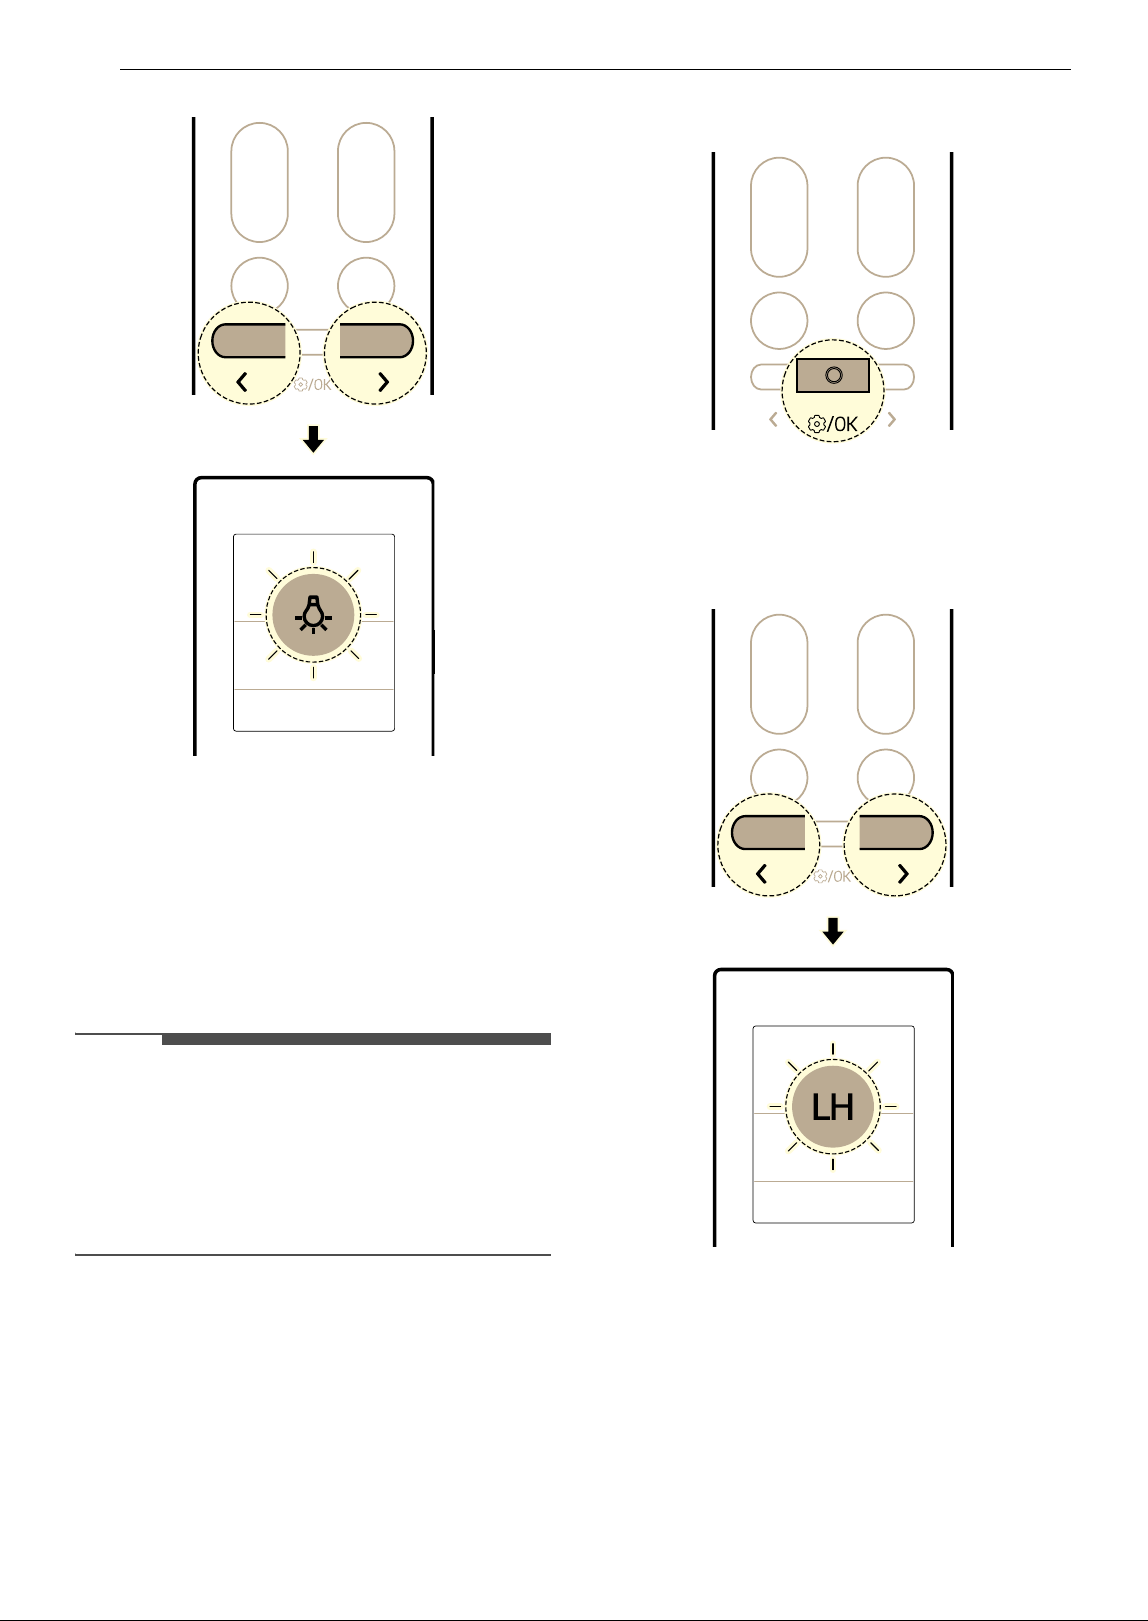
34 OPERATION
4 Press the L or M button to set the light off
function.
• Each time button pressed, the function
changes in this order: ON
& OFF
5 Then press the Function button.
NOTE
• The button turns the display screen on or off.
• If the brightness of an indoor unit's display is set
to off, pressing a button on the wireless remote
control temporarily turns the display on.
• This function may operate differently depending
on the model.
Low Ambient Heating Function (On
Some Models)
You can operate the heating system to maintain a
minimum room temperature and prevent objects
in the room from freezing when you are away from
home for extended periods.
1 Turn the appliance on.
2 Press the Function button.
3 Press the L or M button until the below icon
flashes at the bottom of the display screen.
Then press the Function button.
4 Press the L or M button to set the low
ambient heating function.
• Each time button pressed, the function
changes in this order: ON
& OFF
5 Then press the Function button.
35OPERATION
ENGLISH
NOTE
• This function is available with the Heating
mode.
• To return to the Heating mode, press the
Temperature
J, K, Fan Speed ~, ! or Mode
button.
• If the Jet Mode button is pressed while the Low
Ambient Heating function is running, the
function is disabled and the Jet Heating mode is
turned on immediately (on Jet Heating models).
• If an error occurs, operation may be interrupted
to avoid damage to the appliance.
•The Soft Air and
à button cannot be used while
the Low Ambient Heating function is in
operation.
• LH is displayed on the indoor unit.
• The room temperature is controlled to around
50
8 (10 7). The temperature is changed
according to the appliance.
• When connected to the Multi Outdoor unit, this
functions may not be supported.
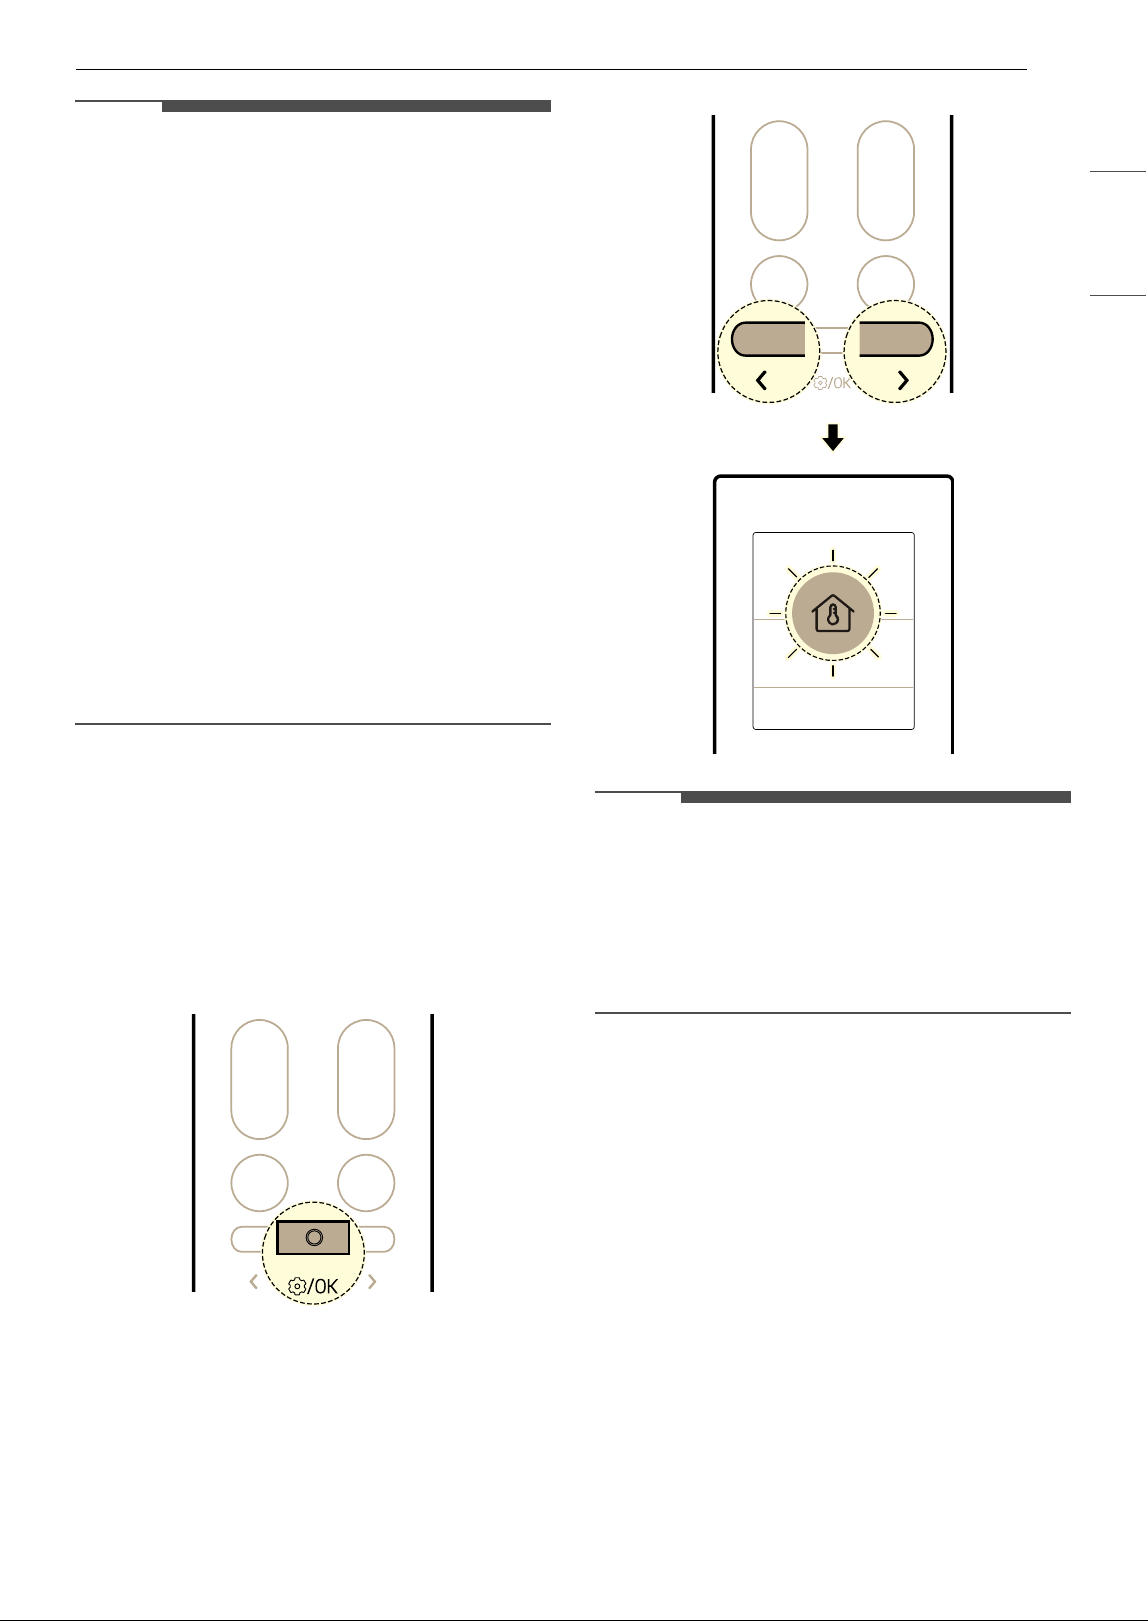
Checking Room Temperature
You can check the current room temperature.
1 Turn the appliance on.
2 Press the Function button.
3 Press the L or M button until the below icon
flashes at the bottom of the display screen.
Then press the Function button.
NOTE
• The room temperature displayed for 5 seconds
before returning to the previous display.
• This function may operate differently depending
on the model.
• In some functions, the temperature setting is
displayed instead of the room temperature.
36 SMART FUNCTIONS
SMART FUNCTIONS
LG ThinQ Application
This feature is only available on models with Wi-Fi.
The LG ThinQ application allows you to
communicate with the appliance using a
smartphone.
LG ThinQ Application Features
Communicate with the appliance from a
smartphone using the convenient smart features.
• Smart Diagnosis
TM
- If you experience a problem while using the
appliance, this Smart Diagnosis
TM
feature will
help you diagnose the problem.
• Settings
- Allows you to set various options on the
appliance and in the application.
NOTE
• In the following cases, you must update the
network information for each appliance in the
LG ThinQ application under Device Cards
~
Settings
~ Change Network.
- wireless router is changed
- wireless router password is changed
- Internet service provider is changed
• The application is subject to change for
appliance improvement purposes without notice
to users.
• Functions may vary by model.
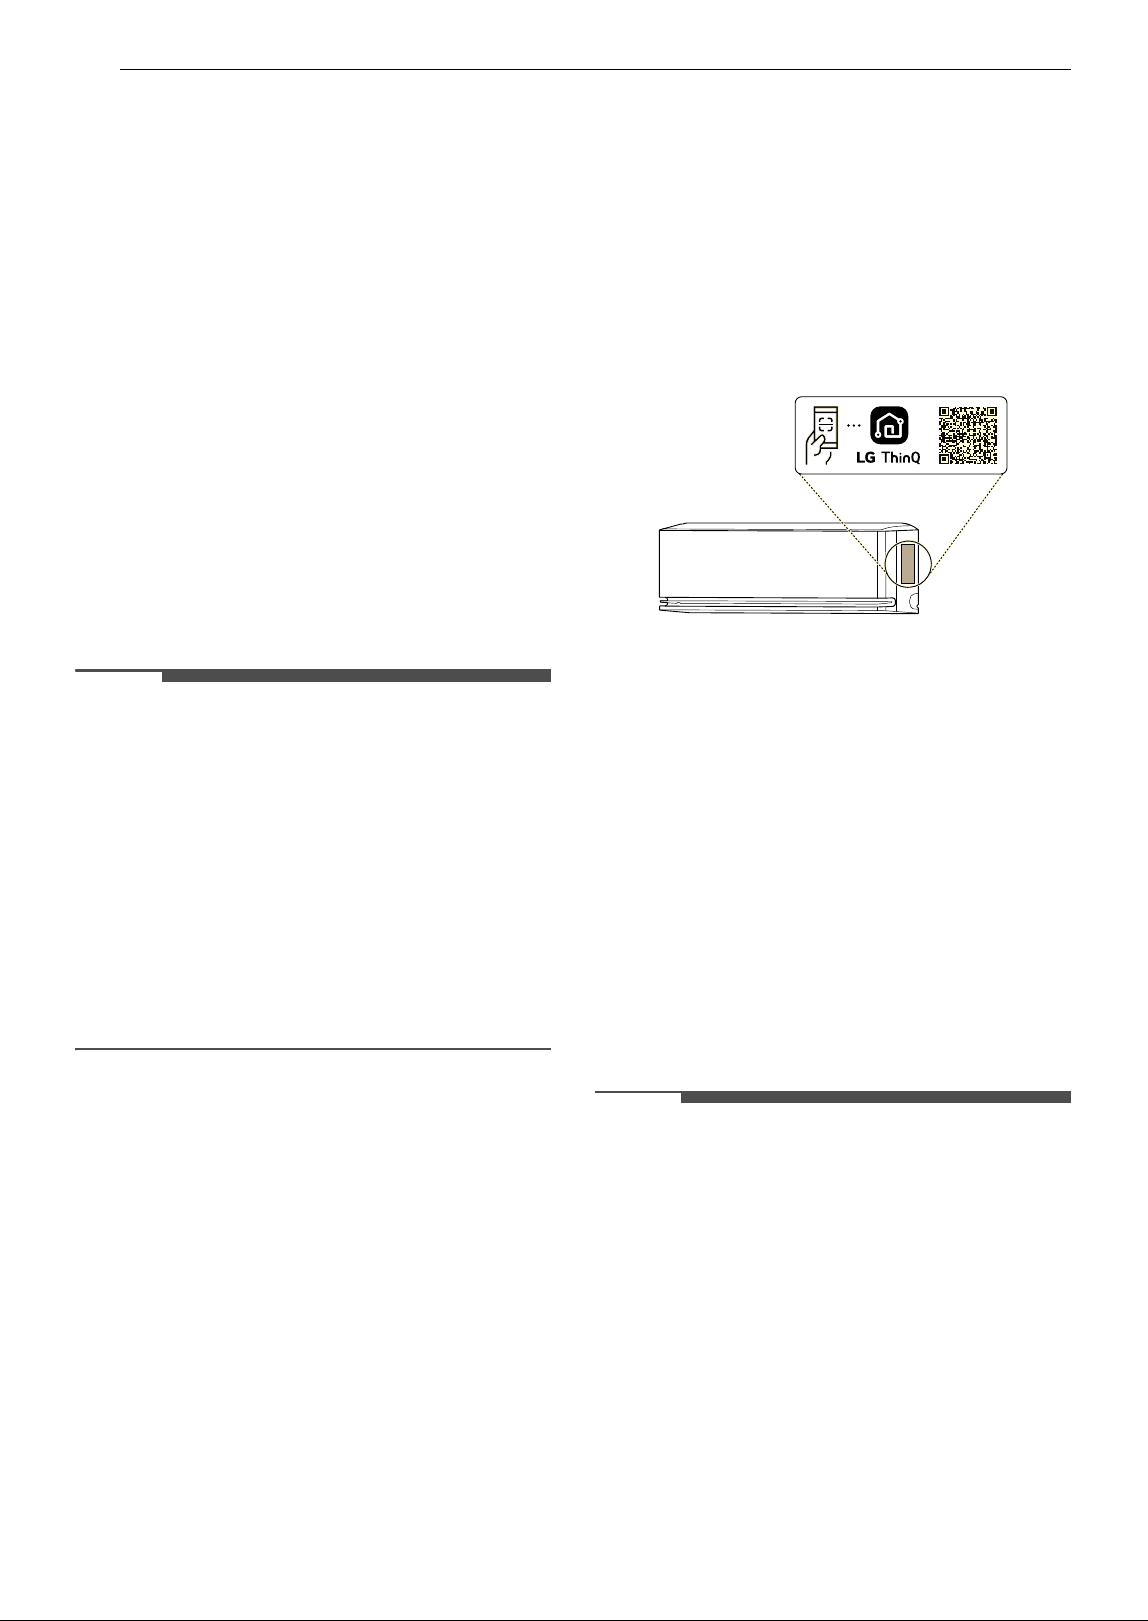
Installing LG ThinQ Application and
Connecting an LG Appliance
Models with QR Code
Scan the QR code attached to the product using
the camera or a QR code reader application on
your smartphone.
Models without QR Code
1 Search for and install the LG ThinQ
application from the Google Play Store or
Apple App Store on a smartphone.
2 Run the LG ThinQ application and sign in with
your existing account or create an LG account
to sign in.
3 Touch the add (~) button on the LG ThinQ
application to connect your LG appliance.
Follow the instructions in the application to
complete the process.
NOTE
• To verify the Wi-Fi connection, check that the Wi-
Fi indicator on the control panel is lit.
• The appliance supports 2.4 GHz Wi-Fi networks
only. To check your network frequency, contact
your Internet service provider or refer to your
wireless router manual.
• LG ThinQ is not responsible for any network
connection problems or any faults, malfunctions,
or errors caused by network connection.
• The surrounding wireless environment can
make the wireless network service run slowly.
• If the distance between the appliance and the
wireless router is too far, the signal strength
becomes weak. It may take a long time to
connect or installation may fail.
37SMART FUNCTIONS
ENGLISH
• If the appliance is having trouble connecting to
the Wi-Fi network, it may be too far from the
router. Purchase a Wi-Fi repeater (range
extender) to improve the Wi-Fi signal strength.
• The network connection may not work properly
depending on the Internet service provider.
• The Wi-Fi connection may not connect or may be
interrupted because of the home network
environment.
• The appliance cannot be connected due to
problems with the wireless signal transmission.
Unplug the appliance and wait about a minute
before trying again.
• If the firewall on your wireless router is enabled,
disable the firewall or add an exception to it.
• The wireless network name (SSID) should be a
combination of English letters and numbers. (Do
not use special characters.)
• Smartphone user interface (UI) may vary
depending on the mobile operating system (OS)
and the manufacturer.
• If the security protocol of the router is set to
WEP, you may fail to set up the network. Please
change it to other security protocols (WPA2 is
recommended) and connect the product again.
Update Your Appliance
You can update your appliance with new features
through the LG ThinQ app.
• When new features are available, an update
notification will appear on the display as shown
below when you turn on the appliance.
• After the update, the appliance function may
change from what is indicated in the user
manual.
1 Once you get an update notification, you will
also receive an update notification on your
smartphone.
2 Tap the update notification on your
smartphone to enter the Feature Updates
screen in the LG ThinQ app.
3 Once you enter the Feature Updates screen,
select the new features and tap the update
button.
• The progress of the update can be checked
on the appliance's control panel.
• Do not unplug the power plug of the
appliance during the update, as it will
interrupt the process.
4 After the update, to change the detailed
settings of the updated features, refer to the
guide within the LG ThinQ app.
NOTE
• When connected to the Multi Outdoor unit, this
functions may not be supported.
Window Open Detection (On Some
Models/LG ThinQ)
When a window is opened or outside air comes in,
the temperature change can be detected and
Energy Control mode is turned on.
To use the Window Open Detection function or
set the Energy Control Turn Off Time, connect
the appliance to the LG ThinQ application.
• If a window is opened,
8O, 6O or 4O appear on
the indoor unit display.
NOTE
•The Window Open Detection function can be
used with the Cooling and Heating modes.
•The Window Open Detection function is
cancelled in the following situations.
- If the appliance recognizes that the window is
closed
- If the Energy Control Turn Off Time has
elapsed
- If the operating mode is changed
•The Window Open Detection function does not
work in the following cases.
- If Cooling and Heating operation is run too
soon after turning on the appliance
38 SMART FUNCTIONS
NOTE
- If the temperature difference between the
indoors and outdoors is not large
- If there is insufficient ventilation through the
windows
• When connected to the Multi Outdoor unit, this
functions may not be supported.
All Cleaning (On Some Models/LG
ThinQ)
By repeatedly freezing and thawing the heat
exchanger of the air conditioner, contaminants
such as dust are washed away and the appliance is
kept clean.
After cleaning, it reduces moisture inside the
indoor unit.
On some indoor units,
AL appears on the display of
the indoor unit.
NOTE
•The All Cleaning function will end after the
appliance has dried.
• If the humidity in the room is high when the All
Cleaning function is operating, the area near
the indoor unit may become foggy.
•The All Cleaning function can be used indoors at
70
8 (21 7) to 89 8 (32 7) and outdoors at 70
8 (21 7) to 98 8 (37 7). The All Cleaning
function is a hygiene management function, not
a cooling function, so the usage conditions may
vary from the verified operation range of the
appliance.
• If the All Cleaning function is operated at a
temperature outside of the allowable range,
alarms in the LG ThinQ application and the
function does not work.
•The All Cleaning function is available even when
the appliance is running.
• If you press the
t button on the appliance or on
the remote control during the All Cleaning, the
All Cleaning function is deactivated.
•During the All Cleaning, a “tick-tick-” or “tack-
tack” noise may be heard as the appliance
expands or contracts.
• After the All Cleaning, the appliance will
automatically shut off. When the power is turned
back on, it will operate in Cooling mode.
• If the Timer function is set, the All Cleaning
function may not operate properly.
• Cool air comes out of the outlet when the All
Cleaning function is activated.
• When connected to the Multi Outdoor unit, this
functions may not be supported.
kW Manager (On Some Models/LG
ThinQ)
The air conditioner power consumption is
automatically adjusted based on a schedule and
target power consumption set by the user.
EO appears on the display of the indoor unit on
some models.
NOTE
• When using kW Manager function, cooling
output may be reduced, depending on the
remaining target power amount.
• When the target electricity consumption is
exceeded, the kW Manager function is disabled.
• When using the Heating and Auto modes, the
kW Manager function is disabled.
• When connected to the Multi Outdoor unit, this
functions may not be supported.
• The power usage shown through the LG ThinQ
application may differ from the actual power
usage shown on your utility bill.
• Power consumption information may vary
depending on the appliance.
• Power consumption may differ from results
measured using other measuring devices.
• Depending on the environment in which the
device is installed, measured power
consumption may vary.
• Measured power consumption may vary
depending on the usage environment or usage
method of the home appliance.
• When setting the usage time, the appliance does
not automatically turn on or off.
• Even during the operation of the kW Manager
function, the function set with the remote
control is reflected first.
39SMART FUNCTIONS
ENGLISH
• Actual usage may differ.
Sleep+ (On Some Models/LG ThinQ)
Use it before sleeping. The appliance will
automatically learn and adjust the temperature
and fan speed to create an even more
personalized sleep environment.
NOTE
• This function can be set when the appliance is
turned on.
• This function is available with the Cooling mode.
• When connected to the Multi Outdoor unit, this
functions may not be supported.
Open Source Software Notice
Information
To obtain the source code that is contained in this
product, under GPL, LGPL, MPL, and other open
source licenses that have the obligation to disclose
source code, and to access all referred license
terms, copyright notices and other relevant
documents, please visit https://
opensource.lge.com.
LG Electronics will also provide open source code
to you on CD-ROM for a charge covering the cost
of performing such distribution (such as the cost of
media, shipping, and handling) upon email
request to open[email protected]
.
This offer is valid to anyone in receipt of this
information for a period of three years after our
last shipment of this product.
Smart Diagnosis
TM
Use this feature to help you diagnose and solve
problems with your appliance.
NOTE
• For reasons not attributable to LGE’s negligence,
the service may not operate due to external
factors such as, but not limited to, Wi-Fi
unavailability, Wi-Fi disconnection, local app
store policy, or application unavailability.
• The feature may be subject to change without
prior notice and may have a different form
depending on where you are located.
Using LG ThinQ to Diagnose
If you experience a problem with your Wi-Fi
equipped appliance, it can transmit
troubleshooting data to a smartphone using the
LG ThinQ application.
• Launch the LG ThinQ application and select the
Smart Diagnosis
TM
feature in the menu. Follow
the instructions provided in the LG ThinQ
application.
Using Audible Diagnosis to
Diagnose Issues
Follow the instructions below to use the audible
diagnosis method.
• Launch the LG ThinQ application and select the
Smart Diagnosis
TM
feature in the menu. Follow
the instructions for audible diagnosis provided
in the LG ThinQ application.
1 Plug the power plug in the outlet properly.
2 Place the mouthpiece of your smartphone
close to the appliance.
3 Press the Function button.
40 SMART FUNCTIONS
4 Press the L or M button until the below icon
flashes at the bottom of the display screen.
Then press the Function button.
• Keep the smartphone in place until the data
transfer has finished.
5 After the data transfer is complete, the
diagnosis will be displayed in the application.
NOTE
• For best results, do not move the phone while
the tones are being transmitted.
• Be sure to keep ambient noise to a minimum or
the phone may not correctly receive the buzzer
beeps from the indoor unit.
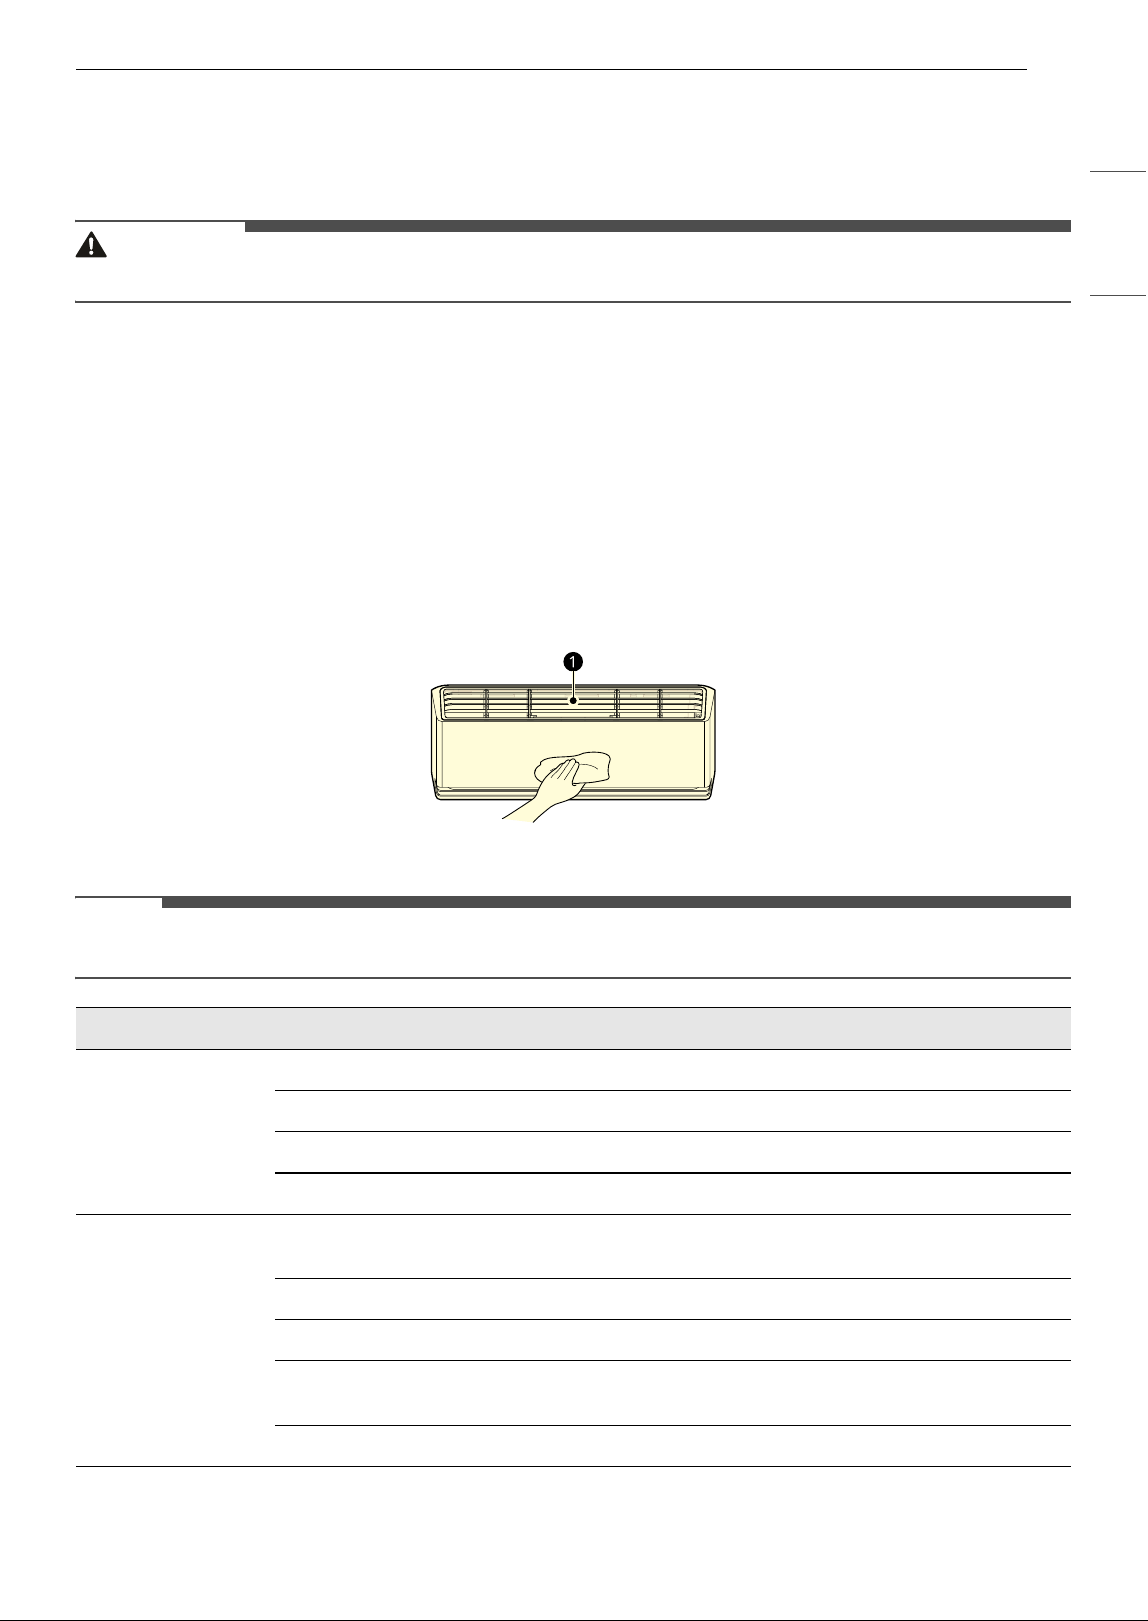
41MAINTENANCE
ENGLISH
MAINTENANCE
Cleaning
WARNING
• Before cleaning or performing maintenance, disconnect the power supply and wait until the fan stops.
Cleaning Interval
Cleaning the Appliance
If the appliance will not be used for an extended period of time, dry the appliance to maintain it in the best
condition. Clean the appliance regularly to maintain optimal performance and to prevent possible
breakdown.
• Dry the appliance in Fan mode for 3 to 4 hours and disconnect the power. There may be internal damage
if moisture is left in the appliance's components.
• Before using the appliance again, dry the inner components of the appliance in Fan mode for 3 to 4
hours. This will help to reduce the odor generated from moisture.
a Air Filter
NOTE
• The feature may vary depending on the model type.
Type Description Interval
Indoor unit Clean the surface of the indoor unit using a soft, dry cloth. Regularly
Have a professional clean the condensate drain pan. Once a year
Have a professional clean the condensate drain pipe. Every 4 months
Replace the wireless remote control batteries. Once a year
Outdoor unit Have a professional clean the heat exchanger coils and the panel
vents. (Consult with technician.)
Once a year
Have a professional clean the fan. Once a year
Have a professional clean the condensate drain pan. Once a year
Have a professional verify that all the fan assembly is firmly
tightened.
Once a year
Clean the electrical components with compressed air. Once a year
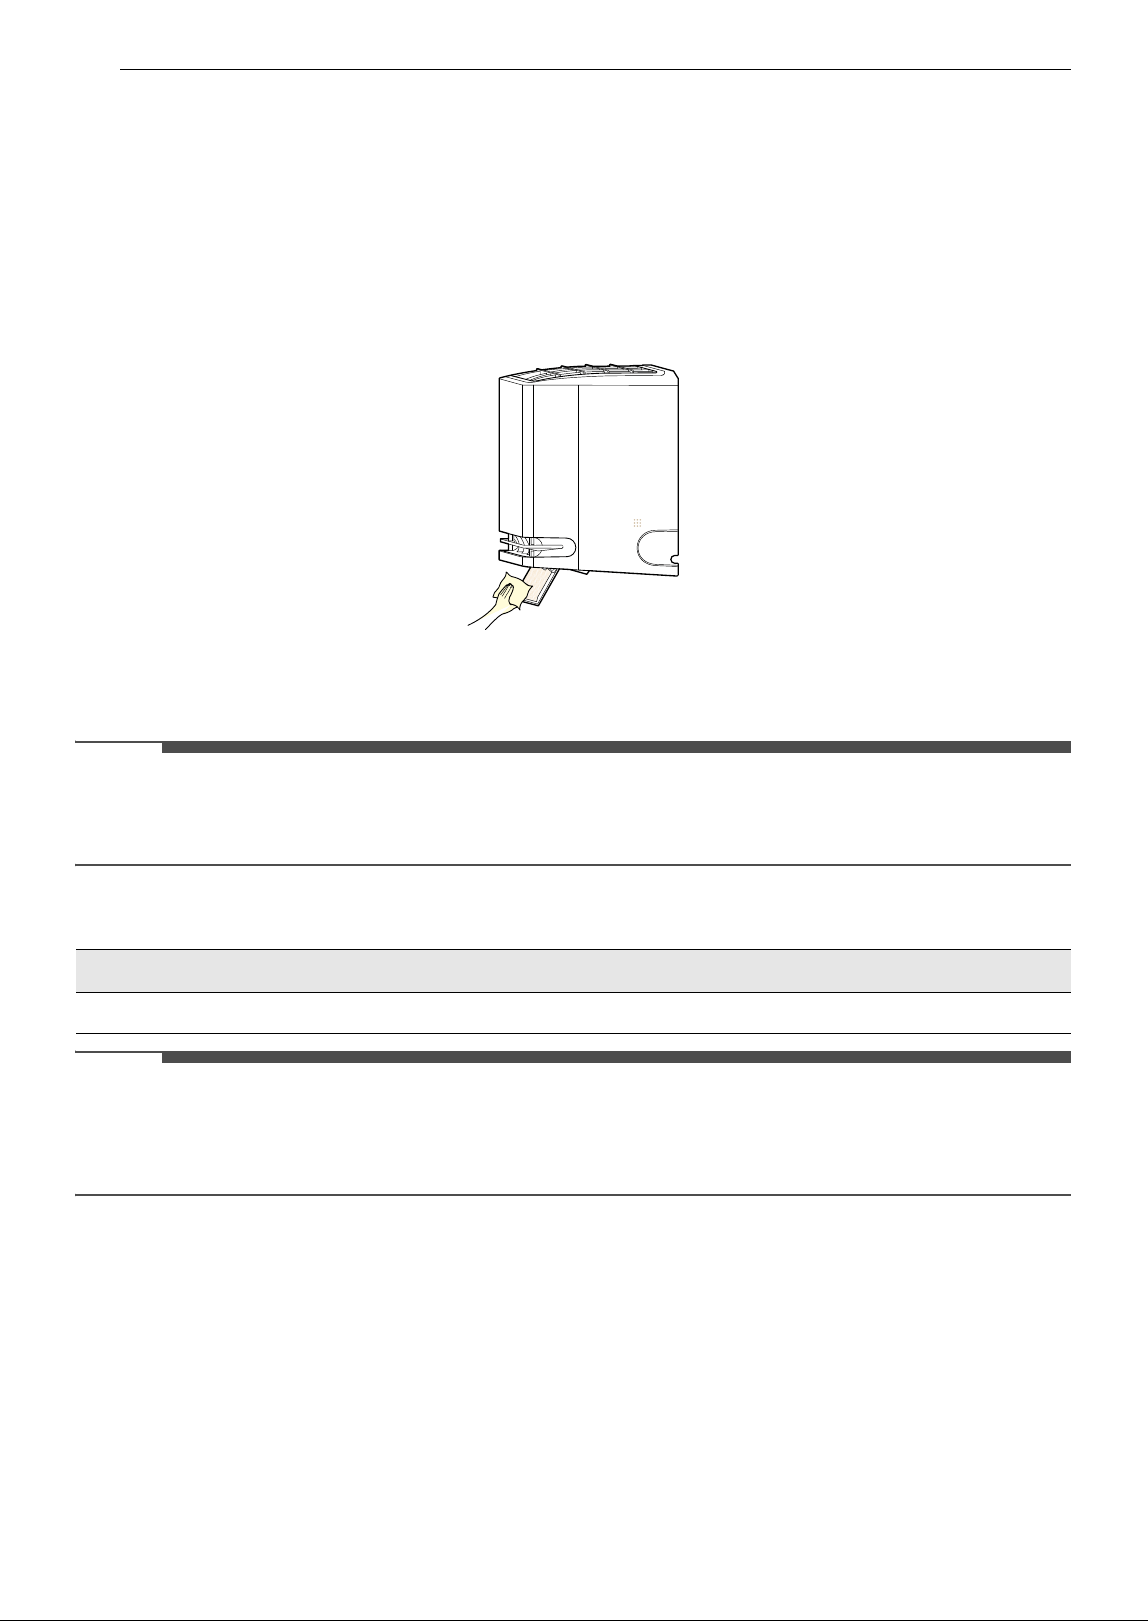
42 MAINTENANCE
Cleaning the Air Deflector
1 Turn off the appliance.
2 Press and hold the à button for about 5 seconds to open the air deflector for cleaning it easily.
3 Clean the air deflector using a soft, dry cloth.
4 Press and hold the à button for about 5 seconds to close the air deflector.
NOTE
• When you press the t button while this function is turned on, it cannot turn on the appliance.
- If you press t button repeatedly, you can turn on the appliance.
Cleaning the Filter and Other parts
NOTE
• Never use water that is higher than 104 8 (40 7) when you clean the filters. It may cause deformation or
discolouration.
• Never use volatile substances when you clean the filters. They may damage the surface of the appliance.
Type Description Interval
Air filter Clean with a vacuum or hand wash. 2 weeks
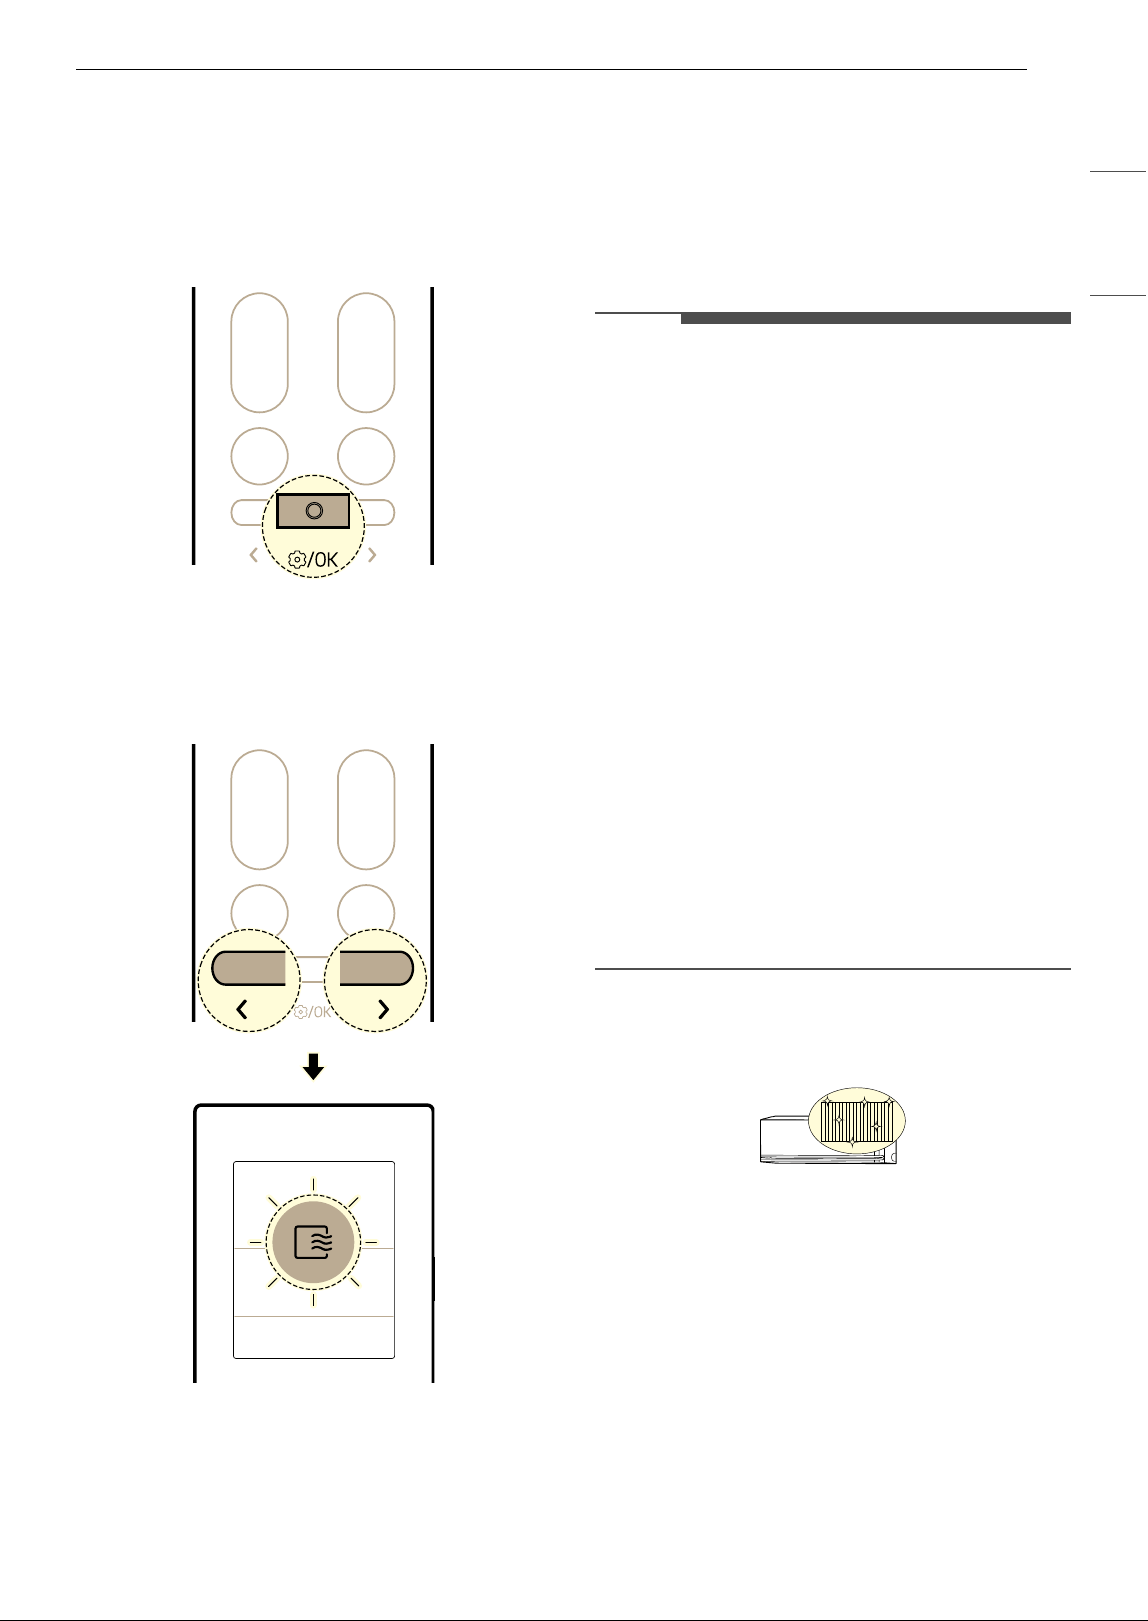
43MAINTENANCE
ENGLISH
Using Auto Clean+ Function
In the Cooling and Dehumidification modes,
moisture is generated inside the indoor unit. You
can reduce that moisture.
1 Press the Function button.
2 Press the L or M button until the below icon
flashes at the bottom of the display screen.
Then press the Function button.
3 Press the L or M button to set the desired
status of Auto Clean+ function.
• Each time button pressed, the function
changes in this order: Sto
& ON & OFF
4 Then press the Function button.
NOTE
•The Auto Clean+ function is set up when you
purchased the appliance. If you don't want to
use this function, turn it off.
•The Auto Clean+ time is automatically set
according to the appliance usage conditions,
and the progress status is displayed as the
remaining minutes on the indoor unit display.
- The Auto Clean+ time is up to 20 minutes.
• The drying condition inside the appliance may
be different depending on the temperature or
humidity of the indoor air.
- To most effectively dry the inside of the
appliance, operate the appliance in Fan mode
for more than 1 hour.
• Once the Auto Clean+ function is set, it remains
enabled until turned off.
• If the appliance will not be used for a long period
of time, run Fan mode for more than 1 hour to
completely dry the inside of the appliance before
storing it.
• You can set the Auto Clean+ function even when
the appliance is not operating.
Freeze Cleaning (On Some Models)
By repeatedly freezing and thawing the heat
exchanger of the air conditioner, contaminants
such as dust are washed away and the appliance is
kept clean.
FC appears on the display of the indoor unit and
the cleaning progress from
O to GG is displayed.
1 Press the Function button.
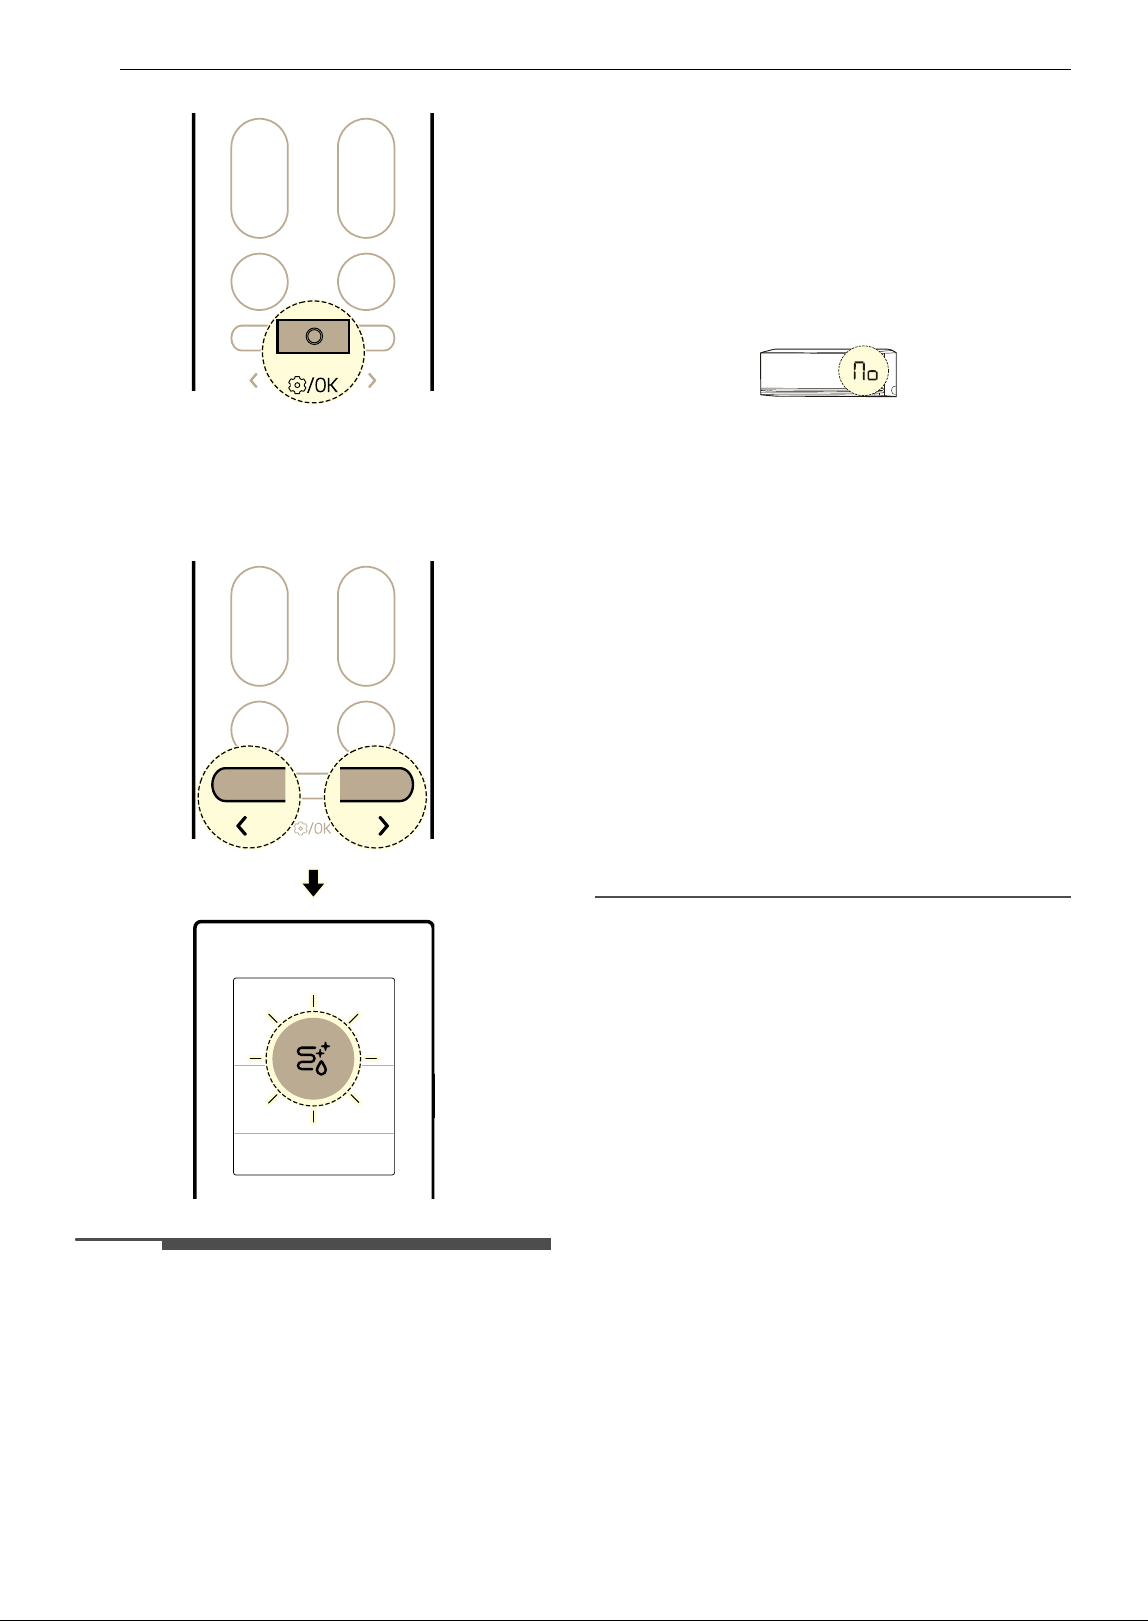
44 MAINTENANCE
2 Press the L or M button until the below icon
flashes at the display screen. Then press the
Function button.
NOTE
•The Freeze Cleaning function will end after the
appliance has dried.
• If the humidity in the room is high when the
Freeze Cleaning function is operating, the area
near the indoor unit may become foggy.
•The Freeze Cleaning function can be used
indoors at 70
8 (21 7) to 89 8 (32 7) and
outdoors at 70
8 (21 7) to 98 8 (37 7). The
Freeze Cleaning function is a hygiene
management function, not a cooling function, so
the usage conditions may vary from the
guaranteed cooling temperature of the
appliance.
• If the Freeze Cleaning function is operated at a
temperature outside of the allowable range, a
beep sounds 5 times and the function does not
work.
- The code in the image below will be displayed
on some indoor units.
•The Freeze Cleaning function is available even
when the appliance is running.
• If you press the
t button on the appliance or on
the remote control during the Freeze Cleaning,
the Freeze Cleaning function is deactivated.
•During the Freeze Cleaning, a “tick-tick-” or
“tack-tack” noise may be heard as the appliance
expands or contracts.
• After the Freeze Cleaning, the appliance will
automatically shut off. When the power is turned
back on, it will operate in Cooling mode.
• If the Timer function is set, the Freeze Cleaning
function may not operate properly.
• Cool air comes out of the outlet when the Freeze
Cleaning function is activated.
• When connected to the Multi Outdoor unit, this
functions may not be supported.
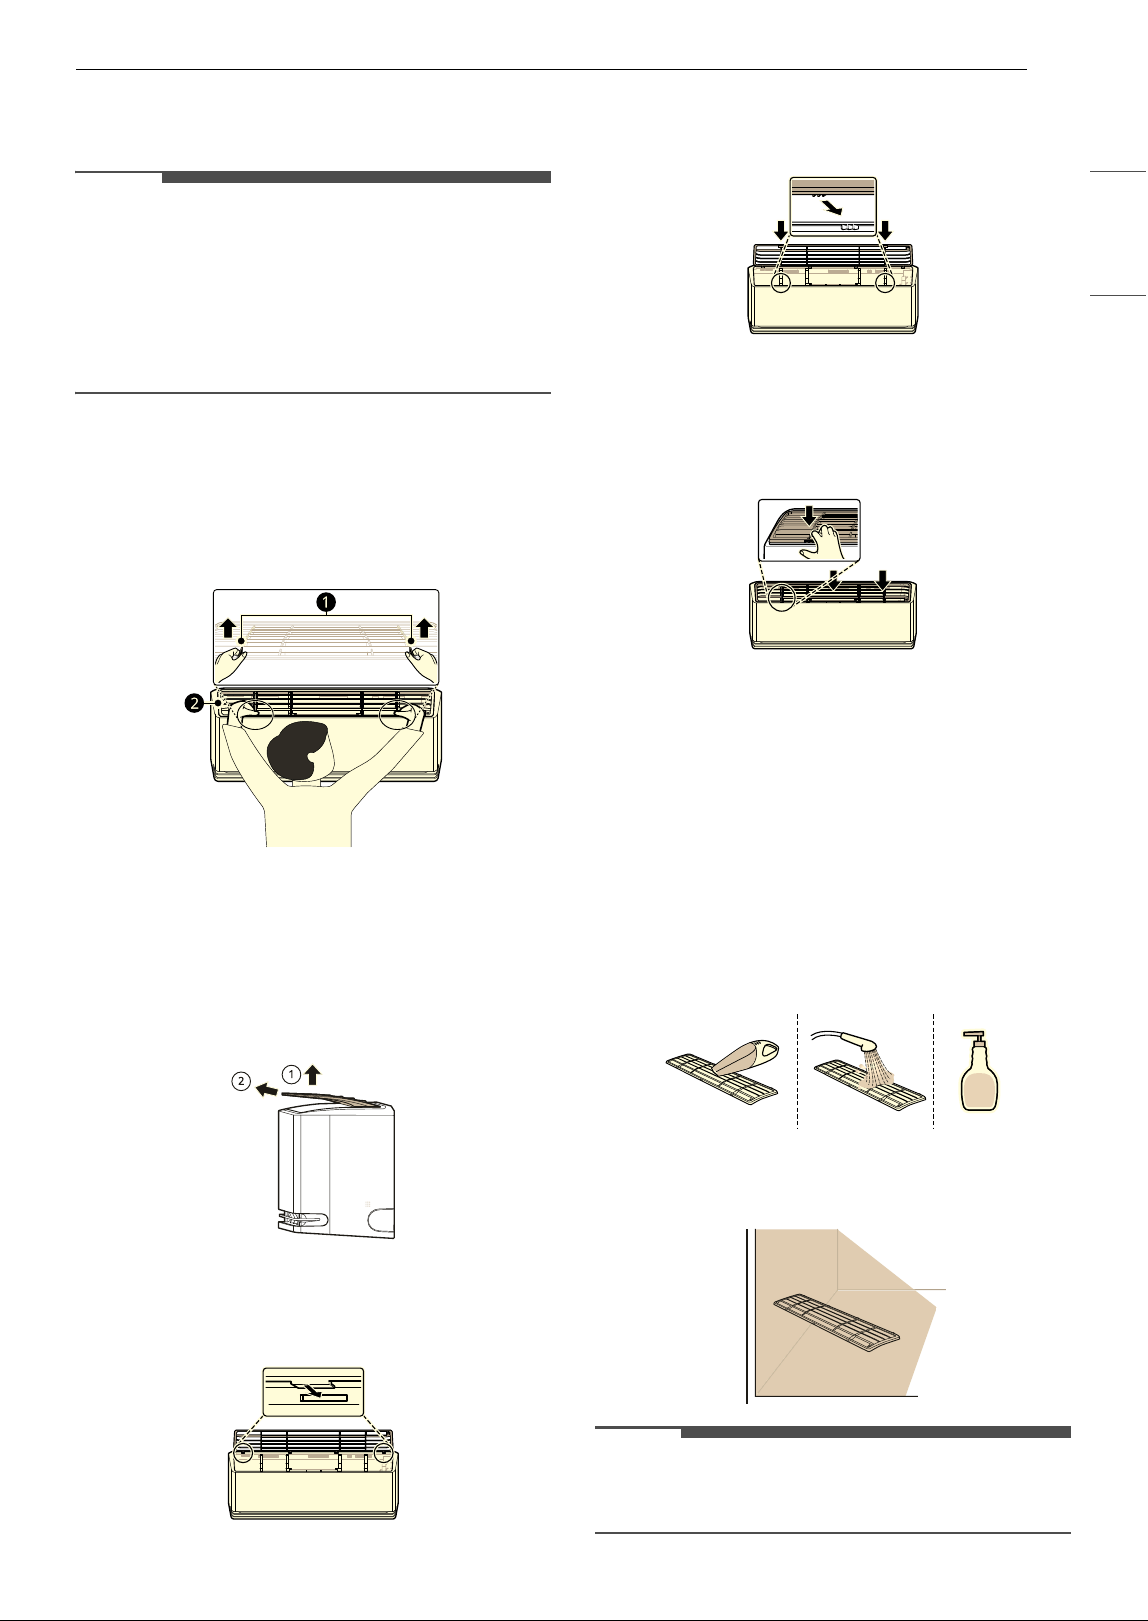
45MAINTENANCE
ENGLISH
Removing and Replacing the Air
Filter
NOTE
• Do not bend the air filter, as it may break.
• Assemble the air filter properly to prevent dust
and other substances from entering the
appliance.
• The number and location of hooks may vary
depending on the model of the appliance.
1 Turn off the power to the appliance.
2 Locate the knobs of the air filter on the top
front of the appliance.
a Knobs
b Air Filter
3 Pull the knobs upward slightly and then lift
the entire filter to remove it.
4 Insert the hooks on the air filter into the slots
on the back of the front panel.
5 Push the hooks down until they click into
place.
6 To make sure the filter is assembled properly,
press down along the entire front length of
the filter.
Cleaning the Air Filter
Clean the air filter once every 2 weeks, or more if
needed.
1 Remove the air filter from the appliance.
2 Clean the air filter with a vacuum cleaner or
wash it with lukewarm water and a mild
detergent.
3 Dry the filter in the shade.
NOTE
• Do not operate the appliance without the filter in
place.
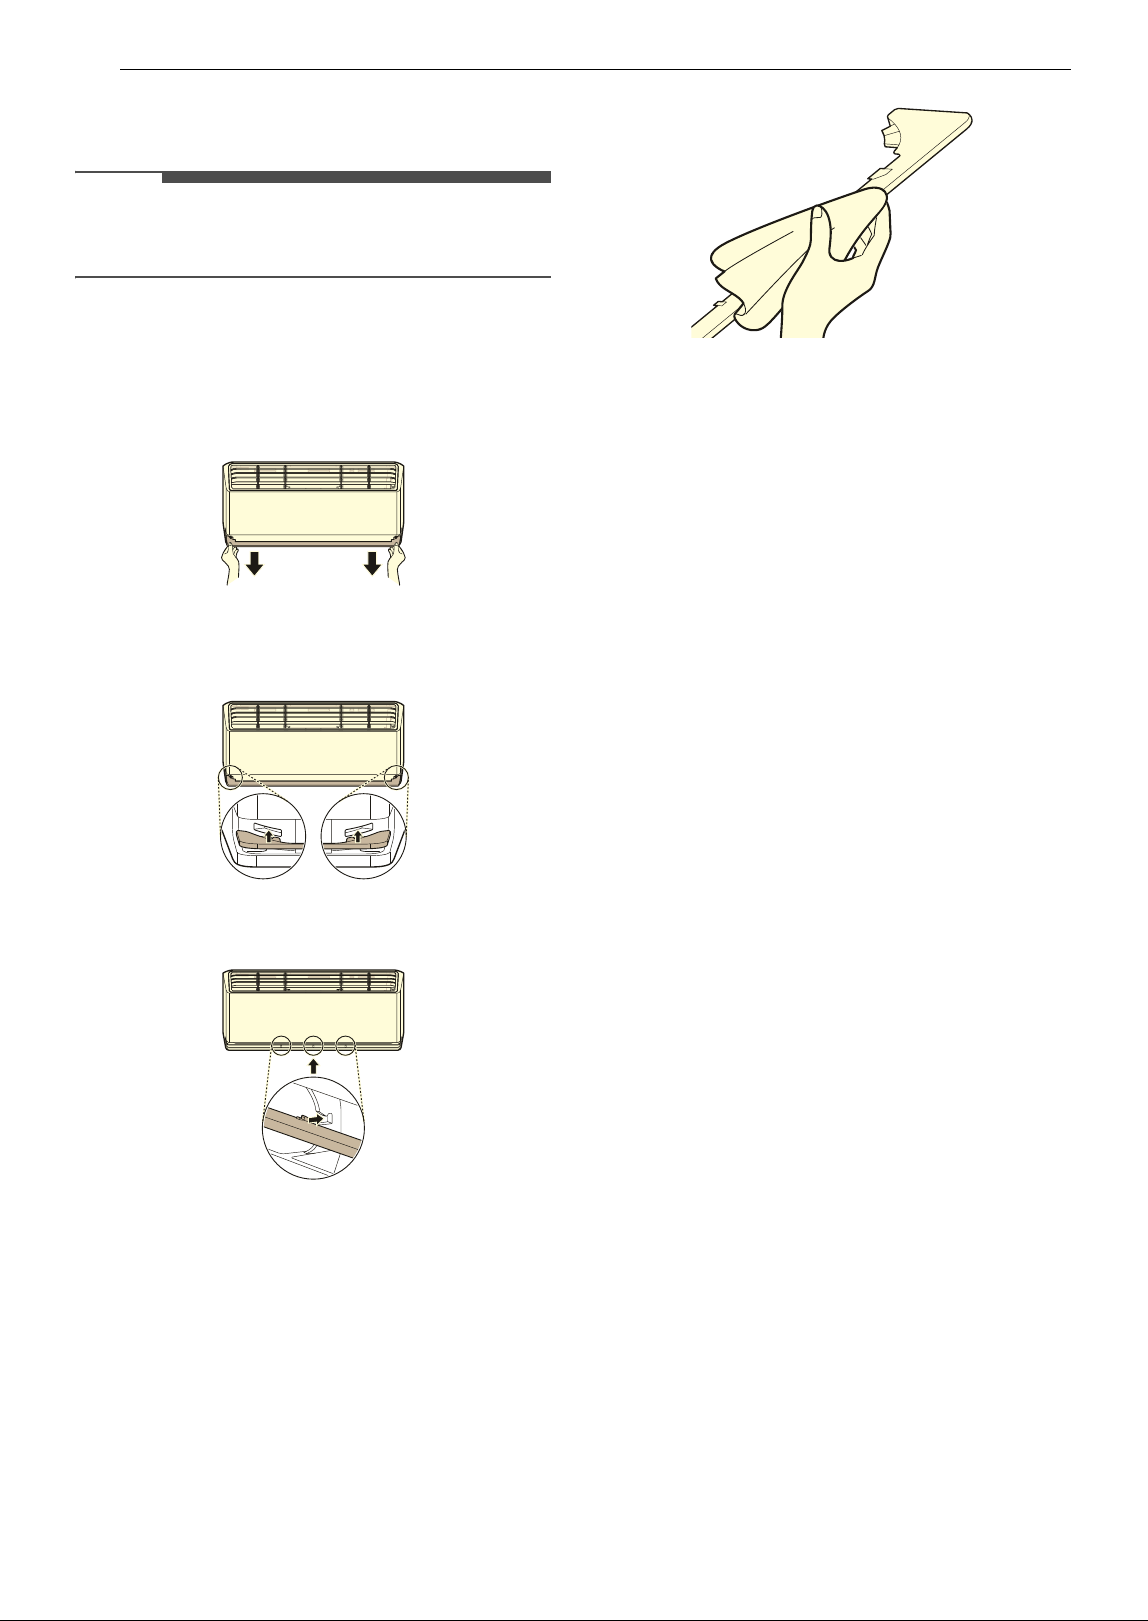
46 MAINTENANCE
Removing and Replacing the Air
Guide
NOTE
• The number and location of hooks may vary
depending on the model of the appliance.
1 Turn off the power to the appliance.
2 Pull out the air guide at the front of the indoor
unit.
3 Insert the hooks on the air guide into the
slots.
4 Push the hooks until the click into place.
Cleaning the Air Guide
1 Remove the air guide from the appliance.
2 Clean the air guide using a soft or dry cloth.
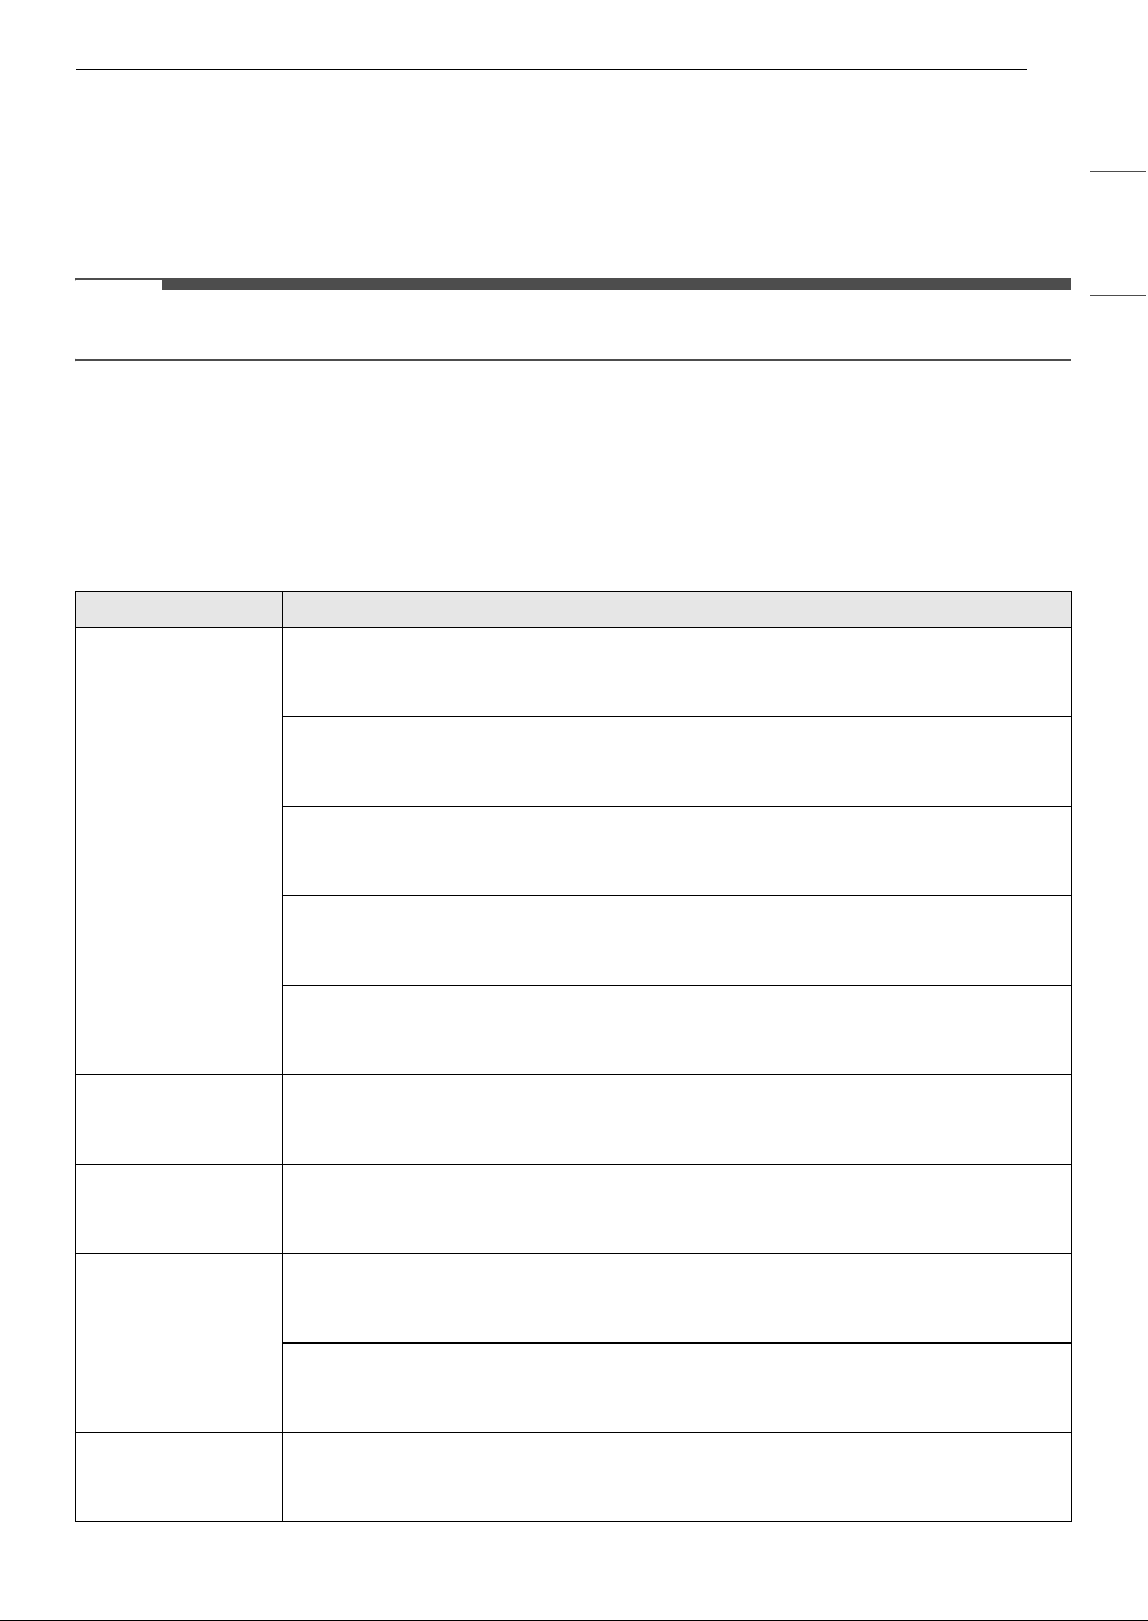
47TROUBLESHOOTING
ENGLISH
TROUBLESHOOTING
Before Calling for Service
Please check the following before you contact the service center. If the problem persists, contact your local
service center.
NOTE
• Some functions may not be supported, depending on the model.
Self-Diagnosis Function
This appliance has a built-in self-diagnosis function. If an error occurs, the lamp of the indoor unit will
flash in 2-second intervals. If this occurs, contact your local dealer or service center.
Operation
Problem Possible Cause & Solution
The appliance does
not work normally.
Burning smell and strange sounds are coming from the appliance.
• Turn off the appliance, switch off or disconnect the power supply, and contact the service
center.
Water leaks from the indoor unit even when the humidity level is low.
• Turn off the appliance, switch off or disconnect the power supply, and contact the service
center.
The power cable is damaged or it is generating excessive heat.
• Turn off the appliance, switch off or disconnect the power supply, and contact the service
center.
A switch, a circuit breaker (safety, ground) or a fuse is not operating properly.
• Turn off the appliance, switch off or disconnect the power supply, and contact the service
center.
The appliance generates an error code from its self-diagnosis.
• Turn off the appliance, switch off or disconnect the power supply, and contact the service
center.
The fan speed cannot
be adjusted.
The Jet mode or Auto Operation mode is selected.
• In some operating modes, you cannot adjust the fan speed. Select an operating mode in
which you can adjust the fan speed.
The temperature
cannot be adjusted.
The Fan mode or Jet mode is selected.
• In some operating modes, you cannot adjust the temperature. Select an operating mode
in which you can adjust the temperature.
The appliance stops
during operation.
The appliance is suddenly turned off.
•The Off Timer function may have timed out, which turns the appliance off. Check the timer
settings.
A power failure has occurred during operation.
• Wait for the power to come back on. If you have the Auto Restart function enabled, your
appliance will resume its last operation several minutes after power is restored.
The appliance does
not work.
The appliance is unplugged.
• Check whether the power cord is plugged into the outlet or the power isolators are
switched on.
48 TROUBLESHOOTING
Performance
The appliance does
not work.
A fuse exploded or the power supply is blocked.
• Replace the fuse or check if the circuit breaker has tripped.
A power failure has occurred.
• Turn off the appliance when a power failure occurs.
• When the power is restored, wait 3 minutes, and then turn on the appliance.
The voltage is too high or too low.
• Check if the circuit breaker has tripped.
The appliance was turned off automatically at a preset time.
• Turn the appliance on.
The battery setting in the wireless remote control is incorrect.
• Make sure that the batteries are inserted correctly in your wireless remote control.
• If the batteries are placed correctly, but the appliance still does not operate, replace the
batteries and try again.
The appliance does
not emit cool air.
Air is not circulating properly.
• Make sure that there are no curtains, blinds, or pieces of furniture blocking the front of the
appliance.
The air filter is dirty.
• Clean the air filter once every 2 weeks.
•See “Cleaning the Air Filter” for more information.
The room temperature is too high.
• In summer, cooling the indoor air fully may take some time. In this case, select the Jet
mode to cool the indoor air quickly.
Cold air is escaping from the room.
• Make sure that no cold air is escaping through the ventilation points in the room.
The desired temperature is higher than the current temperature.
• Set the desired temperature to a level lower than the current temperature.
There is a heating source nearby.
• Avoid using heat generators like electric ovens or gas burners while the air conditioner is
in operation.
Fan mode is selected.
•During Fan mode, air blows from the appliance without cooling or heating the indoor air.
• Switch the operating mode to cooling operation.
Outside temperature is too high.
• The cooling effect may not be sufficient.
Problem Possible Cause & Solution
The indoor unit is
still operating even
when the appliance
has been turned off.
The Auto Clean+ function is being operated.
• Allow the Auto Clean+ function to continue since it reduces any remaining moisture inside
the indoor unit. If you do not want this function, you can turn the indoor unit off.
The air outlet on the
indoor unit is
discharging mist.
The cooled air from the appliance makes mist.
• When the room temperature decreases, this phenomenon will disappear.
Problem Possible Cause & Solution
49TROUBLESHOOTING
ENGLISH
Wi-Fi
Water leaks from the
outdoor unit.
In the heating operations, condensed water drops from the heat exchanger.
• This requires that a drain hose should be installed under the base pan. Contact the
installer.
There is noise or
vibration.
A clicking sound can be heard when the appliance starts or stops due to movement of
the reversing valve.
Creaking sound: The plastic parts of the indoor unit creak when they shrink or expand
due to sudden temperature changes.
Flowing or blowing sound: This is the flow of refrigerant through the appliance.
• Noise is normal during or after operation. It is not a sign of malfunction.
The indoor unit gives
off an odor.
Odor (such as cigarette smoke) may be absorbed into the indoor unit and discharged
with airflow.
• If the smell does not disappear, you need to wash the filter. If this does not work, contact
the service center to clean your heat exchanger.
The appliance does
not emit warm air.
When the Heating mode starts, the vane is almost closed, and no air comes out, even
though the outdoor unit is operating.
• This is normal. Please wait until the appliance has generated enough warm air to blow
through the indoor unit.
The outdoor unit is in Defrosting mode.
•In Heating mode, ice and frost is built up on the coils when the outside temperature falls.
The Defrosting mode reduces a layer of frost on the coil, and it should finish in
approximately 15 minutes.
Outside temperature is too low.
• The heating effect may not be sufficient.
• The appliance must be preheated if the outside temperature has been below 32°F (0°C)
and the appliance is either not connected to the power supply or the power supply is
turned off for an extended period.
- For best performance, ensure that appliances remain powered when the outside
temperature is below 32°F (0°C).
- If the appliance is left unpowered for an extended period of time when the outside
temperature is below 32°F (0°C), power it and wait at least 2 hours before operating it. If
you supply power and operate the heating without waiting, the appliance will preheat
for about an hour before you can operate the heating. However, doing so is not
recommended as it may cause a malfunction.
Problem Possible Cause & Solution
Trouble connecting
appliance and
smartphone to Wi-Fi
network
The password for the Wi-Fi network was entered incorrectly.
• Delete your home Wi-Fi network and begin the connection process again.
Mobile data for your smartphone is turned on.
• Turn off the Mobile data on your smartphone before connecting the appliance.
The wireless network name (SSID) is set incorrectly.
• The wireless network name (SSID) should be a combination of English letters and
numbers. (Do not use special characters.)
The router frequency is not 2.4 GHz.
• Only a 2.4 GHz router frequency is supported. Set the wireless router to 2.4 GHz and
connect the appliance to the wireless router. To check the router frequency, check with
your Internet service provider or the router manufacturer.
Problem Possible Cause & Solution
50 TROUBLESHOOTING
Trouble connecting
appliance and
smartphone to Wi-Fi
network
The appliance and the router are too far apart.
• If the appliance is too far from the router, the signal may be weak and the connection may
not be configured correctly. Move the router closer to the appliance or purchase and
install a Wi-Fi repeater.
During Wi-Fi setup, the application is requesting a password to connect to the product
(on certain phones).
• Locate the network name which starts with "LG" under Settings > Networks. Note the last
part of the network name.
- If the network name looks like LGE_Appliance_XX-XX-XX, enter lge12345.
- If the network name looks like LGE_Appliance_XXXX, enter XXXX twice as your password.
For example, if the network name appears as LGE_Appliance_8b92, then you would
enter 8b928b92 as your password. In this instance, the password is case sensitive and
the last 4 characters are unique to your appliance.
Problem Possible Cause & Solution

51LIMITED WARRANTY
ENGLISH
LIMITED WARRANTY
USA
TERMS AND CONDITIONS
ARBITRATION NOTICE: THIS LIMITED WARRANTY CONTAINS AN ARBITRATION PROVISION THAT REQUIRES
YOU AND LG ELECTRONICS (“LG”) TO RESOLVE DISPUTES BY BINDING ARBITRATION INSTEAD OF IN
COURT, UNLESS YOU CHOOSE TO OPT OUT. IN ARBITRATION, CLASS ACTIONS AND JURY TRIALS ARE NOT
PERMITTED. PLEASE SEE THE SECTION TITLED “PROCEDURE FOR RESOLVING DISPUTES” BELOW.
PROCEDURE FOR RESOLVING DISPUTES:
ALL DISPUTES BETWEEN YOU AND LG ARISING OUT OF OR RELATING IN ANY WAY TO THIS LIMITED
WARRANTY OR THE PRODUCT SHALL BE RESOLVED EXCLUSIVELY THROUGH BINDING ARBITRATION, AND
NOT IN A COURT OF GENERAL JURISDICTION. BINDING ARBITRATION MEANS THAT YOU AND LG ARE EACH
WAIVING THE RIGHT TO A JURY TRIAL AND TO BRING OR PARTICIPATE IN A CLASS ACTION.
Definitions. For the purposes of this section, references to “LG” mean LG Electronics U.S.A., Inc., its
parents, subsidiaries and affiliates, and each of their officers, directors, employees, agents, beneficiaries,
predecessors in interest, successors, assigns and suppliers; references to “dispute” or “claim” shall include
any dispute, claim or controversy of any kind whatsoever (whether based in contract, tort, statute,
regulation, ordinance, fraud, misrepresentation or any other legal or equitable theory) arising out of or
relating in any way to the sale, condition or performance of the product or this Limited Warranty.
Notice of Dispute. In the event you intend to commence an arbitration proceeding, you must first notify
LG in writing at least 30 days in advance of initiating the arbitration by sending a letter to LG at LG
Electronics, USA, Inc. Attn: Legal Department-Arbitration 111 Sylvan Avenue, Englewood Cliffs, NJ 07632.
You and LG agree to engage in good faith discussions in an attempt to amicably resolve your claim. The
notice must provide your name, address, and telephone number; identify the product that is the subject of
the claim; and describe the nature of the claim and the relief being sought. If you and LG are unable to
resolve the dispute within 30 days, either party may proceed to file a claim for arbitration.
Agreement to Binding Arbitration and Class Action Waiver. Upon failure to resolve the dispute during
the 30 day period after sending written notice to LG, you and LG agree to resolve any claims between us
only by binding arbitration on an individual basis, unless you opt out as provided below. Any dispute
between you and LG shall not be combined or consolidated with a dispute involving any other person’s or
entity’s product or claim. More specifically, without limitation of the foregoing, any dispute between you
and LG shall not under any circumstances proceed as part of a class or representative action. Instead of
arbitration, either party may bring an individual action in small claims court, but that small claims court
action may not be brought on a class or representative basis.
Arbitration Rules and Procedures. To begin arbitration of a claim, either you or LG must make a written
demand for arbitration. The arbitration will be administered by the American Arbitration Association
(“AAA”) and will be conducted before a single arbitrator under the AAA’s Consumer Arbitration Rules that
are in effect at the time the arbitration is initiated (referred to as the “AAA Rules”) and under the
procedures set forth in this section. The AAA Rules are available online at www.adr.org/consumer
. Send a
copy of your written demand for arbitration, as well as a copy of this provision, to the AAA in the manner
described in the AAA Rules. You must also send a copy of your written demand to LG at LG Electronics,
USA, Inc. Attn: Legal Department-Arbitration 111 Sylvan Avenue, Englewood Cliffs, NJ 07632. If there is a
conflict between the AAA Rules and the rules set forth in this section, the rules set forth in this section will
govern. This arbitration provision is governed by the Federal Arbitration Act. Judgment may be entered on
the arbitrator’s award in any court of competent jurisdiction. All issues are for the arbitrator to decide,
except that issues relating to the scope and enforceability of the arbitration provision and to the
arbitrability of the dispute are for the court to decide. The arbitrator is bound by the terms of this
provision.
Governing Law. The law of the state of your residence shall govern this Limited Warranty and any
disputes between us except to the extent that such law is preempted by or inconsistent with applicable
federal law.

52 LIMITED WARRANTY
Fees/Costs. You do not need to pay any fee to begin an arbitration. Upon receipt of your written demand
for arbitration, LG will promptly pay all arbitration filing fees to the AAA unless you seek more than $25,000
in damages, in which case the payment of these fees will be governed by the AAA Rules. Except as
otherwise provided for herein, LG will pay all AAA filing, administration and arbitrator fees for any
arbitration initiated in accordance with the AAA Rules and this arbitration provision. If you prevail in the
arbitration, LG will pay your attorneys’ fees and expenses as long as they are reasonable, by considering
factors including, but not limited to, the purchase amount and claim amount. Notwithstanding the
foregoing, if applicable law allows for an award of reasonable attorneys’ fees and expenses, an arbitrator
can award them to the same extent that a court would. If the arbitrator finds either the substance of your
claim or the relief sought in the demand is frivolous or brought for an improper purpose (as measured by
the standards set forth in Federal Rule of Civil Procedure 11(b)), then the payment of all arbitration fees will
be governed by the AAA Rules. In such a situation, you agree to reimburse LG for all monies previously
disbursed by it that are otherwise your obligation to pay under the AAA Rules. Except as otherwise
provided for, LG waives any rights it may have to seek attorneys’ fees and expenses from you if LG prevails
in the arbitration.
Hearings and Location. If your claim is for $25,000 or less, you may choose to have the arbitration
conducted solely on the basis of (1) documents submitted to the arbitrator, (2) through a telephonic
hearing, or (3) by an in-person hearing as established by the AAA Rules. If your claim exceeds $25,000, the
right to a hearing will be determined by the AAA Rules. Any in-person arbitration hearings will be held at a
location within the federal judicial district in which you reside unless we both agree to another location or
we agree to a telephonic arbitration.
Opt Out. You may opt out of this dispute resolution procedure. If you opt out, neither you nor LG can
require the other to participate in an arbitration proceeding. To opt out, you must send notice to LG no
later than 30 calendar days from the date of the first consumer purchaser’s purchase of the product by
either: (i) sending an e-mail to [email protected]
, with the subject line: “Arbitration Opt Out” or (ii) calling 1-
800-980-2973. You must include in the opt out e-mail or provide by telephone: (a) your name and address;
(b) the date on which the product was purchased; (c) the product model name or model number; and (d)
the serial number (the serial number can be found (i) on the product; or (ii) online by accessing https://
www.lg.com/us/support and clicking on “How do I find my model number?”).
You may only opt out of the dispute resolution procedure in the manner described above (that is, by e-mail
or telephone); no other form of notice will be effective to opt out of this dispute resolution procedure.
Opting out of this dispute resolution procedure will not affect the coverage of the Limited Warranty in any
way, and you will continue to enjoy the full benefits of the Limited Warranty. If you keep this product and
do not opt out, then you accept all terms and conditions of the arbitration provision described above.

53LIMITED WARRANTY
ENGLISH
CANADA
TERMS AND CONDITIONS
ARBITRATION NOTICE: THIS LIMITED WARRANTY CONTAINS AN ARBITRATION PROVISION THAT
REQUIRES YOU AND LG TO RESOLVE DISPUTES BY BINDING ARBITRATION INSTEAD OF IN COURT,
UNLESS THE LAWS OF YOUR PROVINCE OR TERRITORY DO NOT PERMIT THAT, OR, IN OTHER
JURISDICTIONS, IF YOU CHOOSE TO OPT OUT. FOR FURTHER CLARITY, THIS ARBITRATION PROVISION
IS NOT APPLICABLE TO CONSUMERS RESIDING IN ONTARIO AND QUÉBEC. IN ARBITRATION, CLASS
ACTIONS AND JURY TRIALS ARE NOT PERMITTED. PLEASE SEE THE SECTION TITLED “PROCEDURE FOR
RESOLVING DISPUTES” BELOW.
DISCLAIMER:
IF YOU ARE A CONSUMER SUBJECT TO QUÉBEC AND ONTARIO’S CONSUMER PROTECTION ACT, THE
EXCLUSION OF WARRANTIES CONTAINED IN THIS SECTION DO NOT EXCLUDE OR LIMIT THE RIGHTS AND
REMEDIES THAT YOU MAY HAVE UNDER SUCH ACT, INCLUDING THE RIGHT TO MAKE A CLAIM UNDER ANY
OF THE STATUTORY WARRANTIES PROVIDED THEREUNDER.
PROCEDURE FOR RESOLVING DISPUTES:
EXCEPT WHERE PROHIBITED AT LAW (INCLUDING WITH RESPECT TO QUÉBEC AND ONTARIO
CONSUMERS), ALL DISPUTES BETWEEN YOU AND LG ARISING OUT OF OR RELATING IN ANY WAY TO THIS
LIMITED WARRANTY OR THE PRODUCT SHALL BE RESOLVED EXCLUSIVELY THROUGH BINDING
ARBITRATION, AND NOT IN A COURT OF GENERAL JURISDICTION. EXCEPT WHERE PROHIBITED AT LAW
(INCLUDING WITH RESPECT TO QUÉBEC AND ONTARIO CONSUMERS), YOU AND LG BOTH IRREVOCABLY
AGREE TO WAIVE THE RIGHT TO A JURY TRIAL AND TO BRING OR PARTICIPATE IN A CLASS ACTION.
Definitions. For the purposes of this section, references to “LG” mean LG Electronics Canada, Inc., its
parents, subsidiaries and affiliates, and each of their officers, directors, employees, agents, beneficiaries,
predecessors in interest, successors, assigns and suppliers; references to “dispute” or “claim” shall include
any dispute, claim or controversy of any kind whatsoever (whether based in contract, tort, statute,
regulation, ordinance, fraud, misrepresentation or any other legal or equitable theory) arising out of or
relating in any way to the sale, condition or performance of the product or this Limited Warranty.
Notice of Dispute. In the event you intend to commence an arbitration proceeding, you must first notify
LG in writing at least 30 days in advance of initiating the arbitration by sending a letter to LGECI Legal
Team at 20 Norelco Drive, North York, Ontario, Canada M9L 2X6 (the “Notice of Dispute”). You and LG
agree to engage in good faith discussions in an attempt to amicably resolve your claim. The notice must
provide your name, address, and telephone number; identify the product that is the subject of the claim;
and describe the nature of the claim and the relief being sought. If you and LG are unable to resolve the
dispute within 30 days of LG’s receipt of the Notice of Dispute, the dispute shall be resolved by binding
arbitration in accordance with the procedure set out herein. You and LG both agree that, during the
arbitration proceeding, the terms (including any amount) of any settlement offer made by either you or LG
will not be disclosed to the arbitrator until the arbitrator determines the dispute.
Agreement to Binding Arbitration and Class Action Waiver. Upon failure to resolve the dispute during
the 30 day period after LG’s receipt of the Notice of Dispute, you and LG agree to resolve any claims
between you and LG only by binding arbitration on an individual basis, unless you opt out as provided
below, or you reside in a jurisdiction that prevents full application of this clause in the circumstances of the
claims at issue (in which case if you are a consumer, this clause will only apply if you expressly agree to the
arbitration). To the extent permitted by applicable law, any dispute between you and LG shall not be
combined or consolidated with a dispute involving any other person’s or entity’s product or claim. More
specifically, without limitation of the foregoing, except to the extent such a prohibition is not permitted at
law, any dispute between you and LG shall not under any circumstances proceed as part of a class or
representative action. Instead of arbitration, either party may bring an individual action in small claims
court, but that small claims court action may not be brought on a class or representative basis except to
the extent this prohibition is not permitted at law in your province or territory of jurisdiction as it relates to
the claims at issue between you and LG. This does not apply to consumers in Ontario and Québec. In
accordance with provincial legislation, the consumer and LG may agree to resolve the dispute using any
procedure available, including commencing the action before the competent courts of those provinces.

54 LIMITED WARRANTY
Arbitration Rules and Procedures. To begin arbitration of a claim, either you or LG must make a written
demand for arbitration. The arbitration will be private and confidential, and conducted on a simplified and
expedited basis before a single arbitrator chosen by the parties under the provincial or territorial
commercial arbitration law and rules of the province or territory of your residence. You must also send a
copy of your written demand to LG at LG Electronics, Canada, Inc., Attn: Legal Department- Arbitration, 20
Norelco Drive, North York, Ontario M9L 2X6. This arbitration provision is governed by your applicable
provincial or territorial commercial arbitration legislation. For consumers in Ontario and Québec, the
applicable arbitration legislation only applies if consumers agree to submit the dispute to arbitration.
Judgment may be entered on the arbitrator’s award in any court of competent jurisdiction. All issues are
for the arbitrator to decide, except that, issues relating to the scope and enforceability of the arbitration
provision and to the arbitrability of the dispute are for the court to decide. The arbitrator is bound by the
terms of this provision.
Governing Law. The law of the province or territory of your purchase shall govern this Limited Warranty
and any disputes between you and LG except to the extent that such law is preempted by or inconsistent
with applicable federal or provincial/territorial law. Should arbitration not be permitted for any claim,
action, dispute or controversy between you and LG, you and LG attorn to the exclusive jurisdiction of the
courts of the province or territory of your purchase for the resolution of the claim, action, dispute or
controversy between you and LG.
Fees/Costs. You do not need to pay any fee to begin an arbitration. Upon receipt of your written demand
for arbitration, LG will promptly pay all arbitration filing fees unless you seek more than $25,000 in
damages, in which case the payment of these fees will be governed by the applicable arbitration rules.
Except as otherwise provided for herein, LG will pay all filing, administration and arbitrator fees for any
arbitration initiated in accordance with the applicable arbitration rules and this arbitration provision. If you
prevail in the arbitration, LG will pay your attorneys’ fees and expenses as long as they are reasonable, by
considering factors including, but not limited to, the purchase amount and claim amount. Notwithstanding
the foregoing, if applicable law allows for an award of reasonable attorneys’ fees and expenses, an
arbitrator can award them to the same extent that a court would. If the arbitrator finds either the
substance of your claim or the relief sought in the demand is frivolous or brought for an improper purpose
(as measured by the applicable laws), then the payment of all arbitration fees will be governed by the
applicable arbitration rules. In such a situation, you agree to reimburse LG for all monies previously
disbursed by it that are otherwise your obligation to pay under the applicable arbitration rules. Except as
otherwise provided for, LG waives any rights it may have to seek attorneys’ fees and expenses from you if
LG prevails in the arbitration.
Hearings and Location. If your claim is for $25,000 or less, you may choose to have the arbitration
conducted solely (1) on the basis of documents submitted to the arbitrator, (2) through a telephonic
hearing, or (3) by an in-person hearing as established by the applicable arbitration rules. If your claim
exceeds $25,000, the right to a hearing will be determined by the applicable arbitration rules. Any in-
person arbitration hearings will be held at the nearest, most mutually-convenient arbitration location
available within the province or territory in which you reside unless you and LG both agree to another
location or agree to a telephonic arbitration.
Severability and Waiver. If any portion of this Limited Warranty (including these arbitration procedures)
is unenforceable, the remaining provisions will continue in full force and effect to the maximum extent
permitted by applicable law. Should LG fail to enforce strict performance of any provision of this Limited
Warranty (including these arbitration procedures), it does not mean that LG intends to waive or has waived
any provision or part of this Limited Warranty.
Opt Out. The arbitration provision requires you and LG to resolve disputes by binding arbitration instead
of court, unless the laws of your province or territory do not permit that, or, in other jurisdictions, if you
choose to opt out. The arbitration provision does not apply to consumers in Ontario and Québec.
For individuals that fall within the binding arbitration provisions, you may opt out of this dispute resolution
procedure. If you opt out, neither you nor LG can require the other to participate in an arbitration
proceeding. To opt out, you must send notice to LG no later than 30 calendar days from the date of the
first consumer purchaser’s purchase of the product by either (i) sending an e-mail to [email protected]
, with
the subject line: “Arbitration Opt Out;” or (ii) calling 1-800-980-2973
. You must include in the opt out e-mail
or provide by telephone: (a) your name and address; (b) the date on which the product was purchased; (c)
the product model name or model number; and (d) the serial number (the serial number can be found (i)
on the product; or (ii) online by accessing https://www.lg.com/ca_en/findmodel_serial/
).

55LIMITED WARRANTY
ENGLISH
In the event that you “Opt Out”, the law of the province or territory of your residence shall govern this
Limited Warranty and any disputes between you and LG except to the extent that such law is preempted
by or inconsistent with applicable federal or provincial/territorial law. Should arbitration not be permitted
for any claim, action, dispute or controversy between you and LG, you and LG agree to attorn to the
exclusive jurisdiction of the courts of the province or territory of your residence for the resolution of the
claim, action, dispute or controversy between you and LG.
You may only opt out of the dispute resolution procedure in the manner described above (that is, by e-mail
or telephone); no other form of notice will be effective to opt out of this dispute resolution procedure.
Opting out of this dispute resolution procedure will not affect the coverage of the Limited Warranty in any
way, and you will continue to enjoy the full benefits of the Limited Warranty. If you keep this product and
do not opt out, then you accept all terms and conditions of the arbitration provision described above.
Conflict of Terms. In the event of a conflict or inconsistency between the terms of this Limited Warranty
and the End User License Agreement (“EULA”) in regards to dispute resolution, the terms of this Limited
Warranty shall control and govern the rights and obligations of the parties and shall take precedence over
the EULA.
US
Please call the installing contractor of your product, as warranty service will be
provided by them.
CANADA
Service Call Number: (888) LG Canada, (888) 542-2623
Numéro pour les appels de service : LG Canada, 1-888-542-2623