Visit Our Website
SCAN ME
PyleUSA.com
USER GUIDE
Wireless BT Streaming Home Theater Amplifier
Questions or Comments?
We are here to help!
Phone: 1.718.535.1800
PyleUSA.com/ContactUs
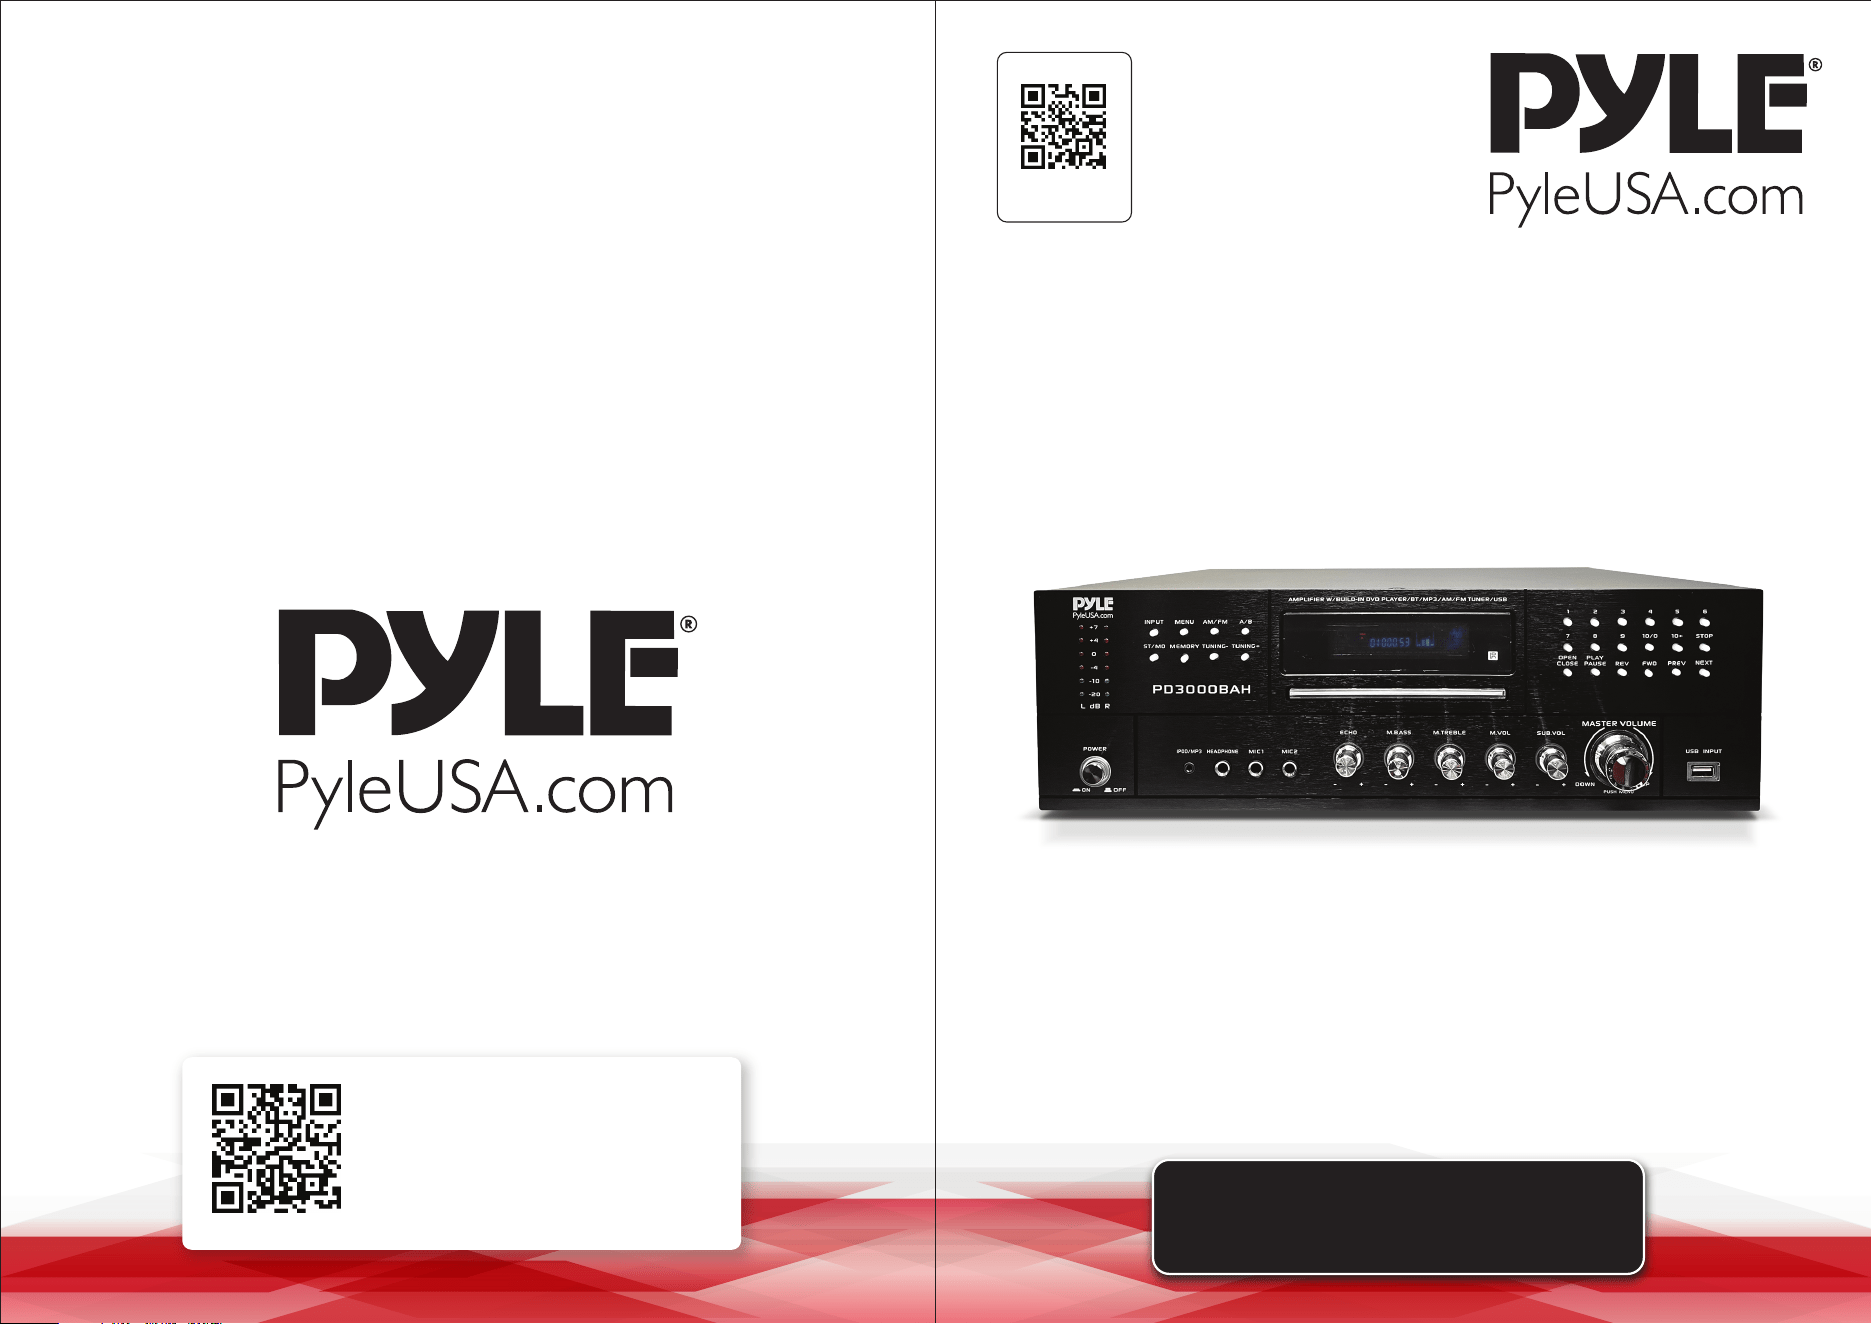
PD3000BAH
Audio/Video Receiver System with Multimedia Disc Player,
AM/FM Radio, HDMI/MP3/USB Reader (4000 Watt)

www.PyleUSA.com2 www.PyleUSA.com 3
READ ALL INSTRUCTIONS CAREFULLY BEFORE USING THIS PRODUCT.
RETAIN THIS OWNER’S MANUAL FOR FUTURE REFERENCE.
Features:
• Audio + Video Home Theater System
• Built-in Bluetooth for Wireless Audio Streaming
• Connects to TVs Soundbars Speaker Systems
• Powers up to (4) Loud Speakers
• Front Loading CD/DVD Player
• 4-Channel Receiver System
• Front Panel Control Center with Digital LED Display
• AM/FM Radio with 50 Station Memory Presets
• MP3 Digital Audio File Playback
• USB Flash Drive Readers (Support MP4 video format les)
• Aux (3.5mm) Input Jack
• (4) Pair Speaker Terminal Binding Posts
• (2) Pair RCA (L/R) Audio Inputs
• Subwoofer RCA (L/R) Output
• Optical (Digital) Audio Output
• (2) 1/4'' Microphone Inputs
• 1/4'' Headphone Jack
• Video Outputs: S-Video RCA YPbPr (Component Video) HDMI
• Output dB (Decibel) Level LED Display
• Mic Echo Treble Bass Volume Controls
• Subwoofer output Control
• Built-in Ventilation Cooling Fan
• Rack Mountable System
Bluetooth Wireless Streaming:
• Built-in Bluetooth Receiver for Wireless Music Streaming
• Works with All of Today's Latest Devices
(Smartphones, Tablets, Laptops, Computers, etc.)
• Bluetooth Wireless Network Name: PYLEUSA or BT
• Bluetooth Version: 5.1
• Wireless Range: Up to 35’ ft.
What's in the Box:
• Amplier Receiver
• Remote Control
• Detachable Rack Mount Brackets
• RCA Connection Cable
• AM + FM Antennas
• Bluetooth Antenna
• Power Cable
Technical Specs:
• MAX Output Power: 4000 Watt
• 300 Watts x 2 @ 8 Ohm
• 550 Watts x 2 @ 4 Ohm
• 800 Watts x 2 @ 2 Ohm
• Impedance: 8 Ohm
• Aspect Ratio: 4:3/16:9
• Video System: PAL/NTSC
• Audio S/N Ratio: >90dB
• Frequency Range: +/-14 dB
• Integrated IC Radio Tuner
• CD/DVD Disc Compatibility: DVD/CD/VCD/CD-R/CD-RW/MP4
• Battery Operated Remote Control, Requires (2) x ‘AAA’ Batteries, Not Included
• Power Cable Length: 4.9’ ft.
• Power Supply: 110/220 Volt Switchable
• RCA Connection Cable Size (L): 40” -inches
• AM + FM Antennas Size (L): 40” -inches
• Bluetooth Antenna Size (L): 0.4” -inches
• Dimensions (L x W x H): 16.9'' x 14.6'' x 5.7'' -inches
California Prop 65 Warning
WARNING:
This product contains Lead (Pb) which is known to the state of
California to cause cancer birth defects and other
reproductive harm. Do not ingest.
For more info go to: www.P65warnings.ca.gov
www.PyleUSA.com4 www.PyleUSA.com 5
FOREWORD
Your new Pyle Amplier gives you the power and versatility you need in a
professional sound system. The amplier's wide frequency response makes it
suitable for amplifying music or vocal program material. It can be used in
meeting halls, houses, restaurants, schools, stores, or for paging systems.
Please read this manual thoroughly before you attempt to set up and use the
amplier. It contains a range of installation suggestions as well as instructions
to ensure safe usage. Installed properly, you can expect years of trouble-free
service from this product.
NOTICES AND DISC PROTECTION
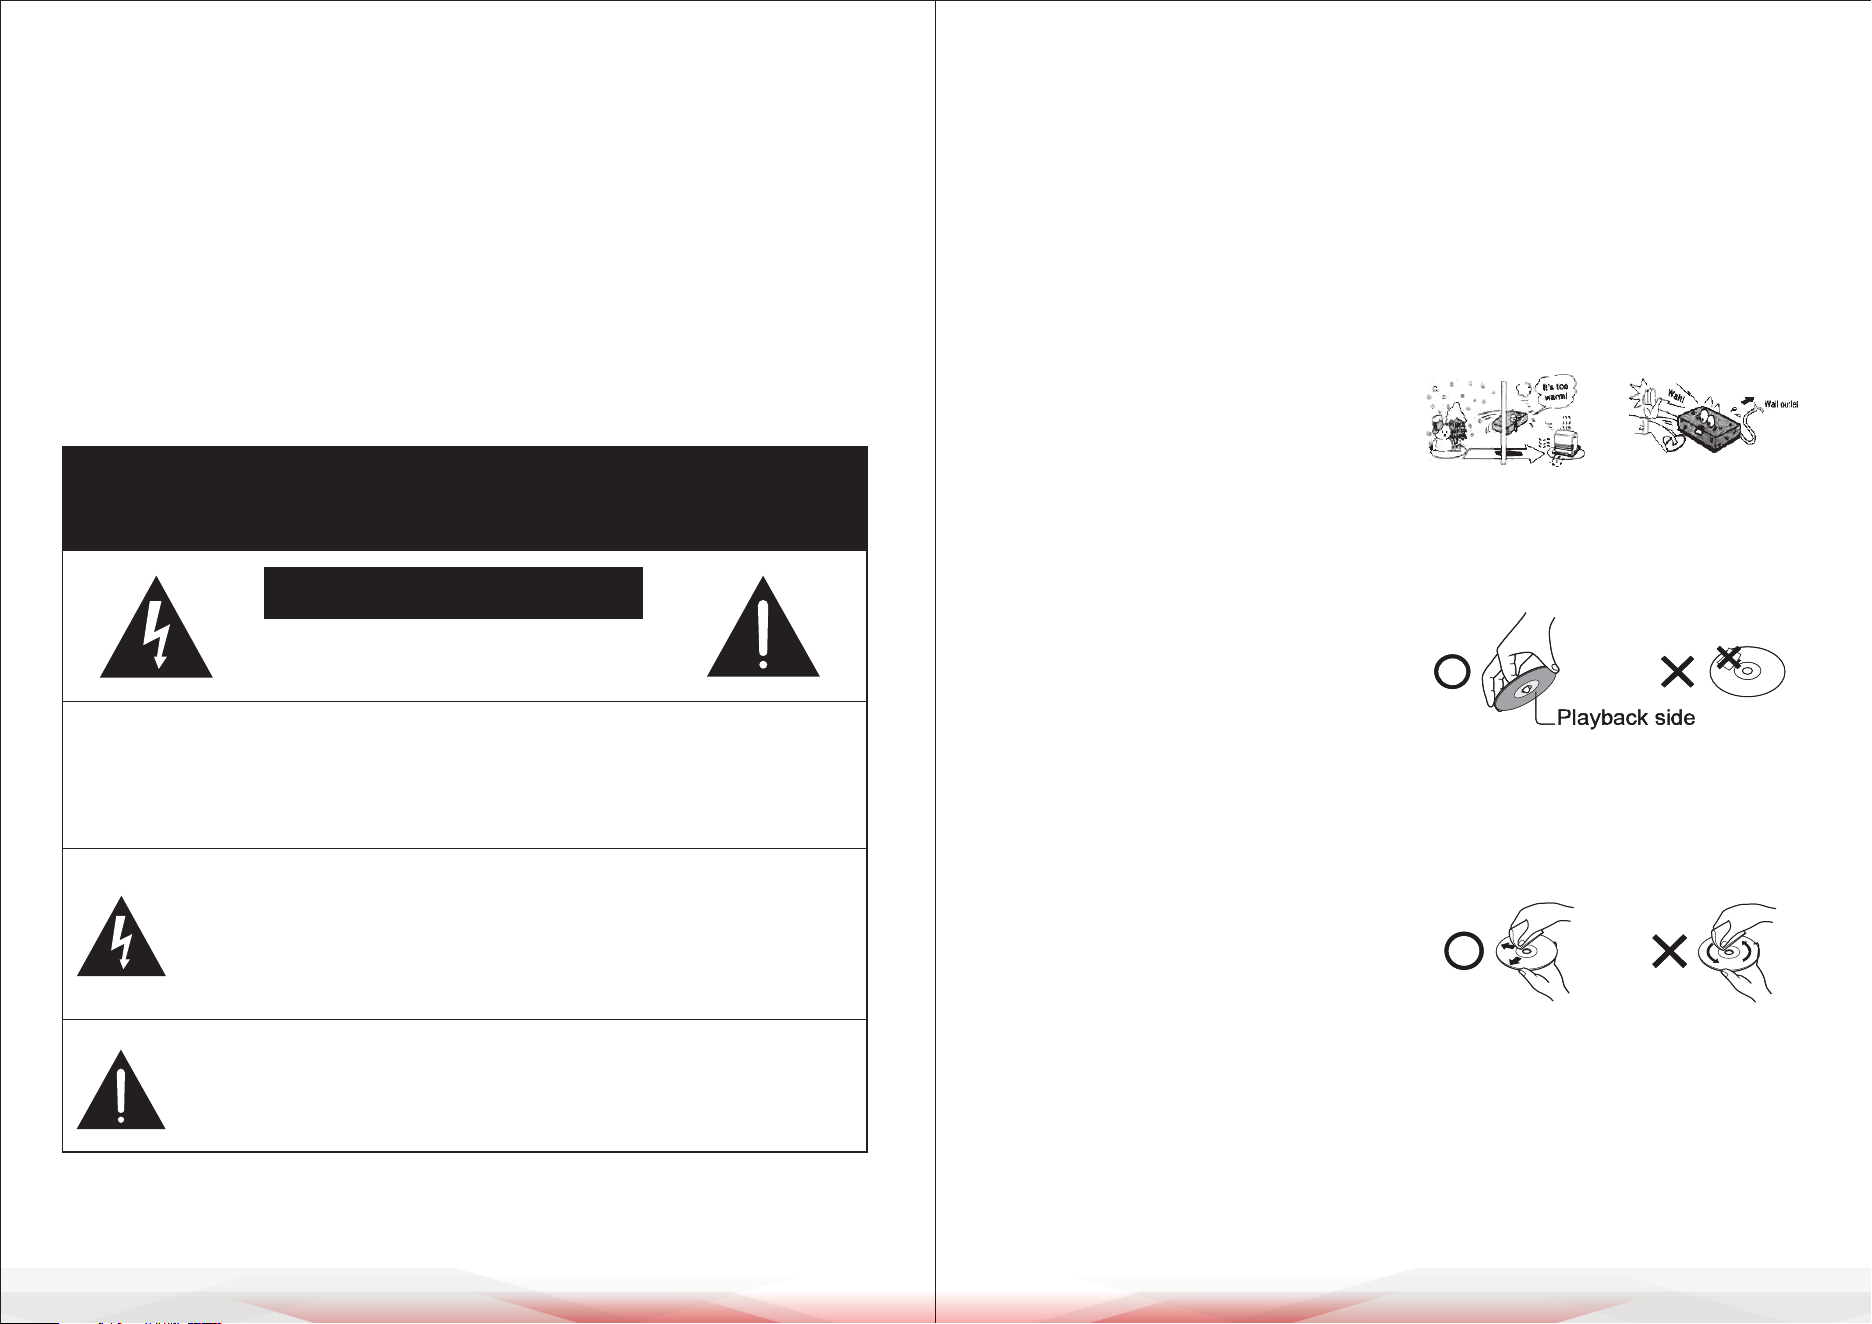
WARNING: To reduce the risk of re or shock hazard, do not expose
this product to rain or moisture.
CAUTION
RISK OF ELECTRIC SHOCK
DO NOT OPEN
CAUTION: To reduce the risk of electric shock, do not remove the
cover or back. No user-serviceable parts inside. Refer servicing to
qualied personnel.
This symbol is intended to alert the user to the presence of
uninsulated dangerous voltage within the product's enclosure.
It may have sucient magnitude to constitute a risk of electric
shock to persons.
This symbol is intended to alert the user to the presence of
important operating and maintenance (servicing) instructions
in the literature accompanying the appliance.
NOTES ON HANDLING
• The top and rear panels of the unit may
become warm after a long period of
use. This is not a malfunction.
• When the unit is not in use, be sure to
remove the disc and turn o the power.
• If you will not use the unit for a long
period, the unit may not function
properly in the future. Turn it on and use
the unit occasionally.
• Do not place foreign objects on the tray.
LOCATION
Do not locate the unit in places such as:
• Near heating devices or in an enclosed
car.
• High temperatures (116.6°F or higher)
or high humidity (90% or higher).
• Dirty places.
• Areas with direct exposure to sunlight.
DISTURBANCE
When you place this unit near a TV, radio,
or VCR, the playback picture may become
poor and the sound may be distorted. In
this case, place the unit away from the TV,
radio, or VCR.
NOTES ON MOISTURE CONDENSATION
The pickup may condense with water
under the following situations:
• When you bring the unit directly from a
cold place to a warm place.
• When you use the unit in a room where
you just turned on the heater, or a place
where the cold air from the air
conditioner directly hits the unit.
• During the summer, when you use the
unit in a hot and humid place just after
you move the unit from an air-
conditioned room.
• The room is vaporous or damp.
If condensation exists, the unit will not
operate properly. Remove the disc,
connect the power cord of the unit to the
wall outlet, turn on the unit, and leave it
for two or three hours. After two or three
hours, the unit will have warmed up and
evaporated any moisture. Keep the unit
connected to the wall outlet and moisture
condensation will seldom occur.
ON HANDLING DISCS
• Do not touch the playback side of the
disc.
• Do not attach paper or tape to the disc.
ON CLEANING DISCS
• Fingerprints and dust on the disc cause
picture and sound deterioration. Wipe
the disc from the center outward with a
soft cloth. Always keep the disc clean.
• If you cannot wipe o the dust with a
soft cloth, wipe the disc lightly with a
slightly moistened soft cloth and nish
with a dry cloth.
• Do not use any type of solvent such as
thinner, benzine, commercially available
cleaners, or antistatic spray for vinyl LPs.
It may damage the disc.
www.PyleUSA.com6 www.PyleUSA.com 7
ON STORING DISCS
• Do not store discs in a place subject to direct sunlight or near a heat source.
• Do not store discs in places subject to moisture and dust, such as a bathroom
or near a humidier.
• Store discs vertically in a case. Stacking or placing objects on discs outside of
their case may cause warping.
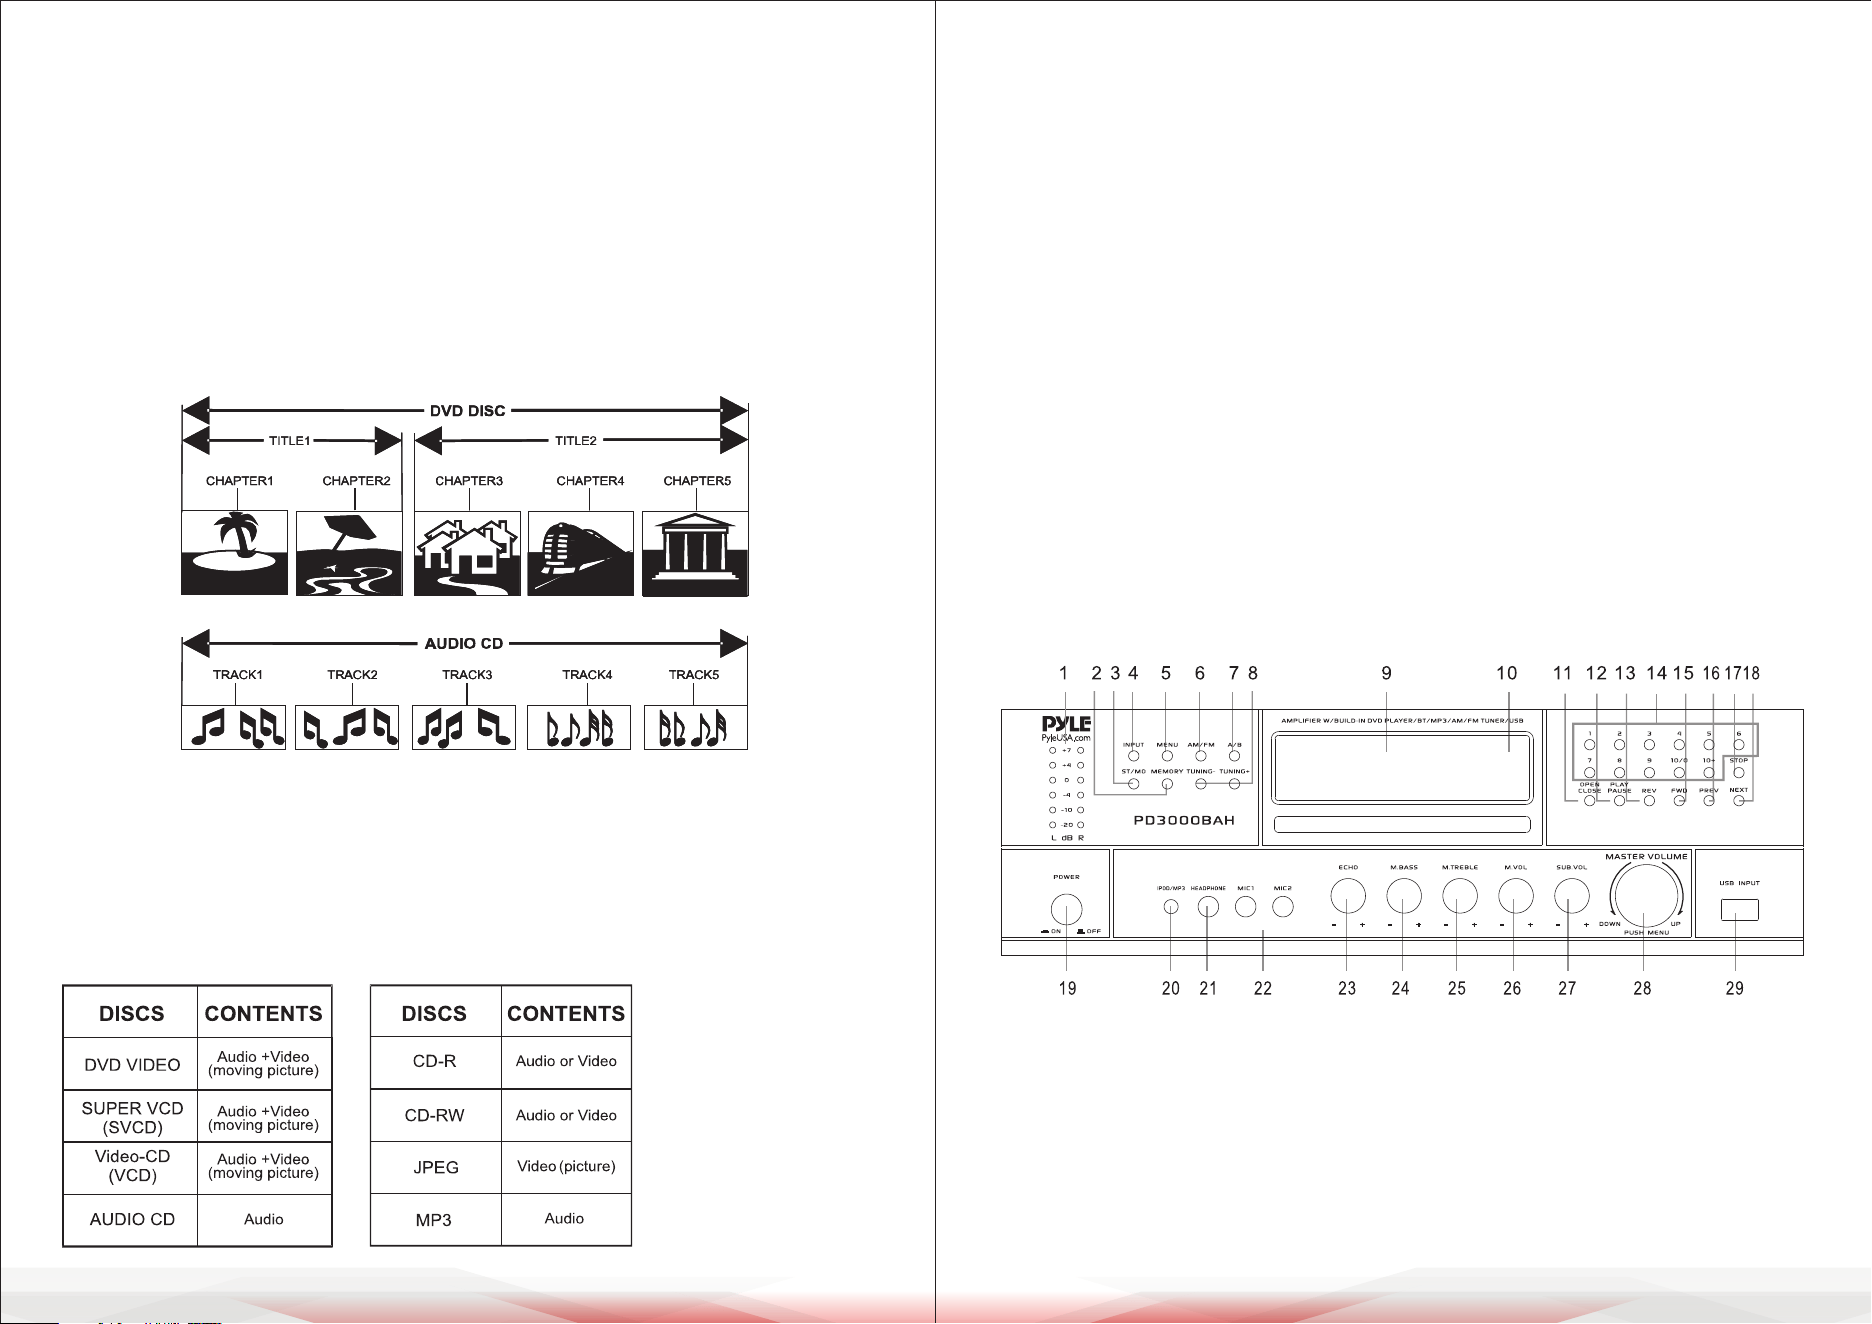
STRUCTURE OF DISC CONTENTS
Normally, DVD discs are divided into titles, and the titles are subdivided into
chapters. Audio CDs are divided into tracks.
Each title, chapter, or track has an assigned number, which is called the title
number, chapter number, or track number respectively. There may be discs that
do not have these numbers.
PLAYABLE DISCS AND ACCESSORIES
The following discs can be played:
• Discs other than those listed above cannot be played.
• Non-standardized discs, even if they may be labeled as above, cannot be played.
• The performance of a recorded disc depends on the method and quality of
disc burning. In some cases, the disc may not be played.
ACCESSORIES
• Owner's Manual - 1
• Remote Control - 1
• AM Antenna - 1
• FM Antenna - 1
• AC Power Cord - 1
• Rack Mounting Brackets with Screws - 2
• HDMI Cable - 1
FRONT PANEL AND LED FUNCTION
ATTENTION
• Wireless BT Input mode takes priority over all other audio input modes
(like MP3 Player, AM/FM Tuner, DVD player, and AUX inputs).
All audio inputs will not work if the button is pressed while in BT mode.
• First, check if Wireless BT is switched ON or OFF.
• Press the BT input mode button to switch it ON or OFF.
www.PyleUSA.com8 www.PyleUSA.com 9
26. MIC VOLUME: Adjusts the MIC volume level.
Turn the knob clockwise to increase the MIC volume.
27. SUB OUT VOLUME CONTROL
28. MASTER VOLUME CONTROL: Adjusts the volume level.
Turn the knob clockwise to increase the volume.
29. USB INPUT JACKS: Please note that this USB will only read MP3 les and
does not support PWA les. In case of any damage to this unit, select the
PAUSE button and disconnect the USB or other input source.
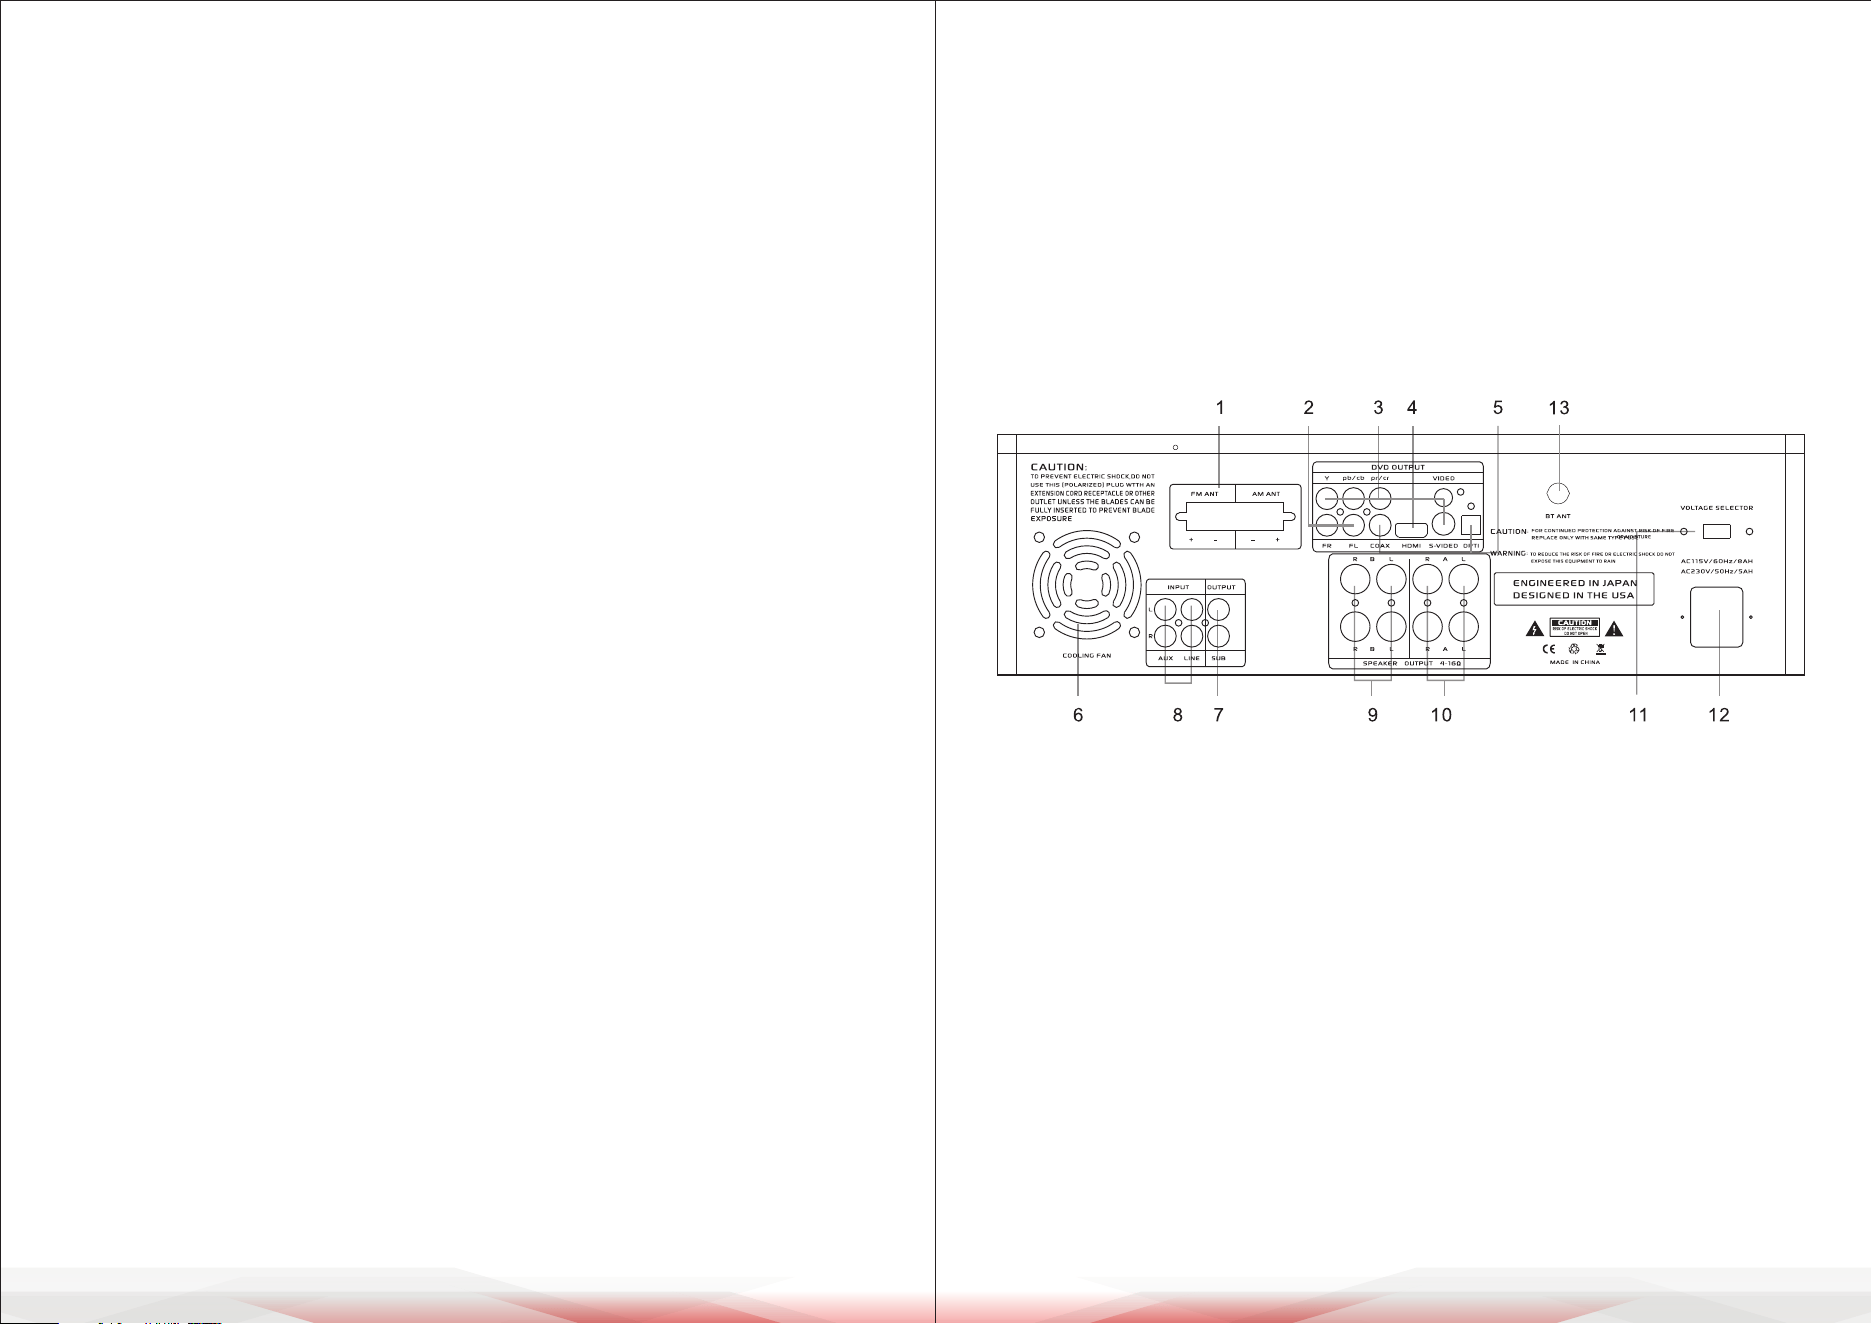
REAR PANEL FUNCTION
1. TUNER ANT: Connect AM and FM antennas.
2. R/L OUTPUT: Only for DVD sound output.
3. VIDEO OUTPUT, S-VIDEO OUTPUT, COMPONENT VIDEO OUTPUT:
Connect to the corresponding port of the TV.
4. HDMI Output: Connect to the HD port of the TV.
5. DIGITAL AUDIO OUTPUT: One coaxial and one optical output.
This output can connect the amplier with a Dolby Digital or DTS decoder to
play movies with the corresponding records.
6. COOLING FAN
7. SUB-WOOFER OUTPUT JACKS 1 & 2
8. AUDIO INPUT JACKS: Connect the audio output jacks of MP3 or AUX to
these jacks.
9. A SPEAKER OUTPUT TERMINALS: Connect your speaker system to these
terminals.
1. LIGHT: Light indicates signal intensity.
2. MEMORY: After a station has been found, you can store the station by pressing
the MEMORY button, and the screen will display "MEM" above a channel
number. Then you can press the number knob to save the station.
When the channel number display is moving from right to left, it means the
station has been saved.
3. ST/MONO: Stereo and Mono selector.
4. INPUT: This is used to select the input sources: DVD/CD/USB, TUNER, IPOD/
MP3, AUX.
5. MENU CONTROL: This is used to increment and decrement levels for the
selected functions of Master Volume, Bass, Treble, Balance, and Auto Station
Seek.
6. AM/FM: Press to select AM/FM when tuning.
7. A/B SPEAKERS OUTPUT SELECTOR: Three modes: A, B, A+B.
8. TUNING- / TUNING+: These two keys are used to adjust to the best signal of
the stations.
9. FUNCTION DISPLAYED FLUORESCENT WINDOW
10. REMOTE SENSOR WINDOW
11. OPEN/CLOSE CONTROL: Pressing this key at any play mode will always
switch to disc play mode.
12. PLAY/PAUSE: Play and pause control.
13. REV/FR: Quick backward search.
14. NUMBER KEYS: While in radio status, you can choose the music number
directly. For example, to choose “28,” press the “10+” key twice, then press “8”
to get “28.”
15. FWD/FF: Fast forward.
16. PREV/SKPR: Previous song.
17. STOP: Stop control.
18. NEXT/SKPF: Next song/next set.
19. POWER SWITCH: Press to power the unit ON or OFF.
20. IPOD/MP3 JACKS: Connect IPOD/MP3 to these jacks.
21. HEADPHONE JACKS: Connect headphones to these jacks.
22. MIC INPUT JACKS 1 & 2: Connect KARAOKE MIC to these jacks.
23. ECHO CONTROL: Turn the knob to adjust the MIC echo level.
24. MIC TREBLE: Adjusts the MIC treble.
25. MIC BASS: Adjusts the MIC bass.
www.PyleUSA.com10 www.PyleUSA.com 11
10. B SPEAKER OUTPUT TERMINALS: Connect your other speaker system(s) to
these terminals.
11. 110V/220V SWITCH: According to power voltage, push this button to the
position of 110V or 220V.
12. POWER CORD: Connects to AC 115V/60Hz & 230V/50Hz outlet.
13. BT Antenna
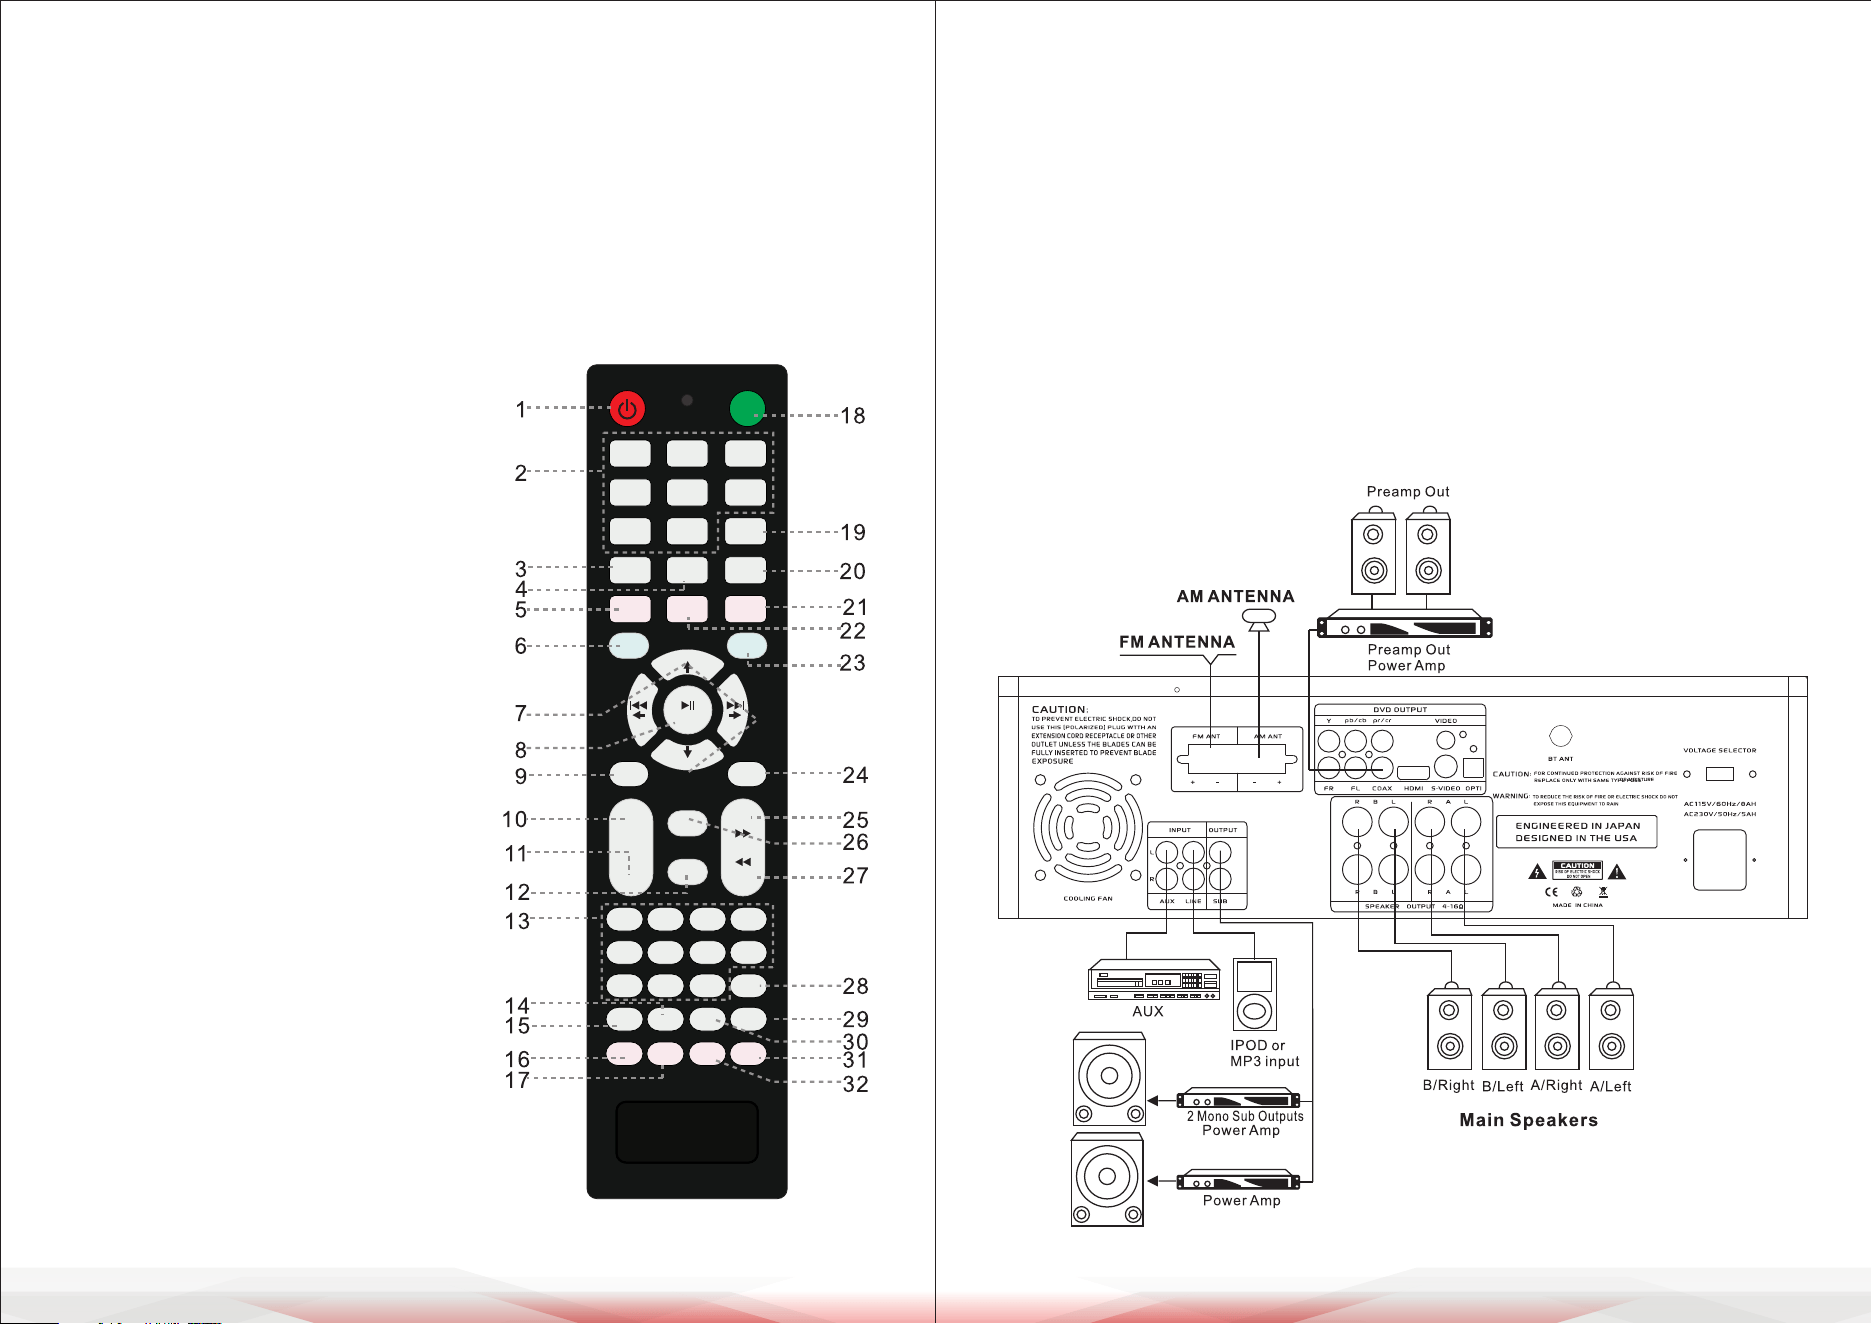
REMOTE DEVICE FUNCTION
Remote Control Operation
13. Number button
14. DVD Sound channel select button
15. DVD Language button
16. DVD PROGRAM button
17. DVD Time select button
18. DVD DISC EJECT button
19. A/B SPEAKERS OUTPUT SELECT
20. DVD/USB Repeat button
21. Music Menu button
22. Knob and Key LED ON/OFF
REAR PANEL CONNECTION
Connecting to Amplier
The remote control should be operated
within 6 meters and at an angle of 30° in
front of the receiver. Make sure that there
is no large obstacle between the remote
control and the machine. The remote
sensor should be kept away from light, as
high amounts of light can aect its
performance.
1. POWER STANDBY button: Push the
button to the standby position; all the
upper blue LED indicators will be turned
o, but all the blue LEDs under the
knobs will still be lit.
2. Source input buttons
3. Mute button
4. Stop button
5. DVD A-B Repeat button
6. DVD Setup button
7. UP/DOWN/LEFT/RIGHT-PREV/NEXT
TUNER+/TUNER-
8. Play/Enter button
9. FM/AM auto scan channel
10. Volume+ button
11. Volume- button
12. DVD SUB-Title button
USB
AUX
LINE
MP3
IPod
BT
A-B LED
DVD
P/NTIME
OSD
PROG
AM
TUNER+
TUNER-
TITLE
TITLE
SUB-
AUTO
SCAN
MASTER
VOL+
4
5
6 7
0
2
3
1
MUTE
STOP
SLOW
FREQ-
FREQ+
ZOOMLANG SOUND
REPEAT
MUSIC
MENU
8 10+
PBC
9
VOL-
MEMORY
SETUP
ENTER
MENU
FM
SP-A/B
OPEN
23. DVD MENU button
24. FM/AM channel MEMORY
25. DVD/USB Quick/forward search
26. DVD Title button
27. DVD/USB Quick/backward search
28. DVD PBC button
29. DVD OSD display button
30. DVD Video ZOOM button
31. DVD Video PAL/NTSC switch button
32. DVD Slow play button
www.PyleUSA.com12 www.PyleUSA.com 13
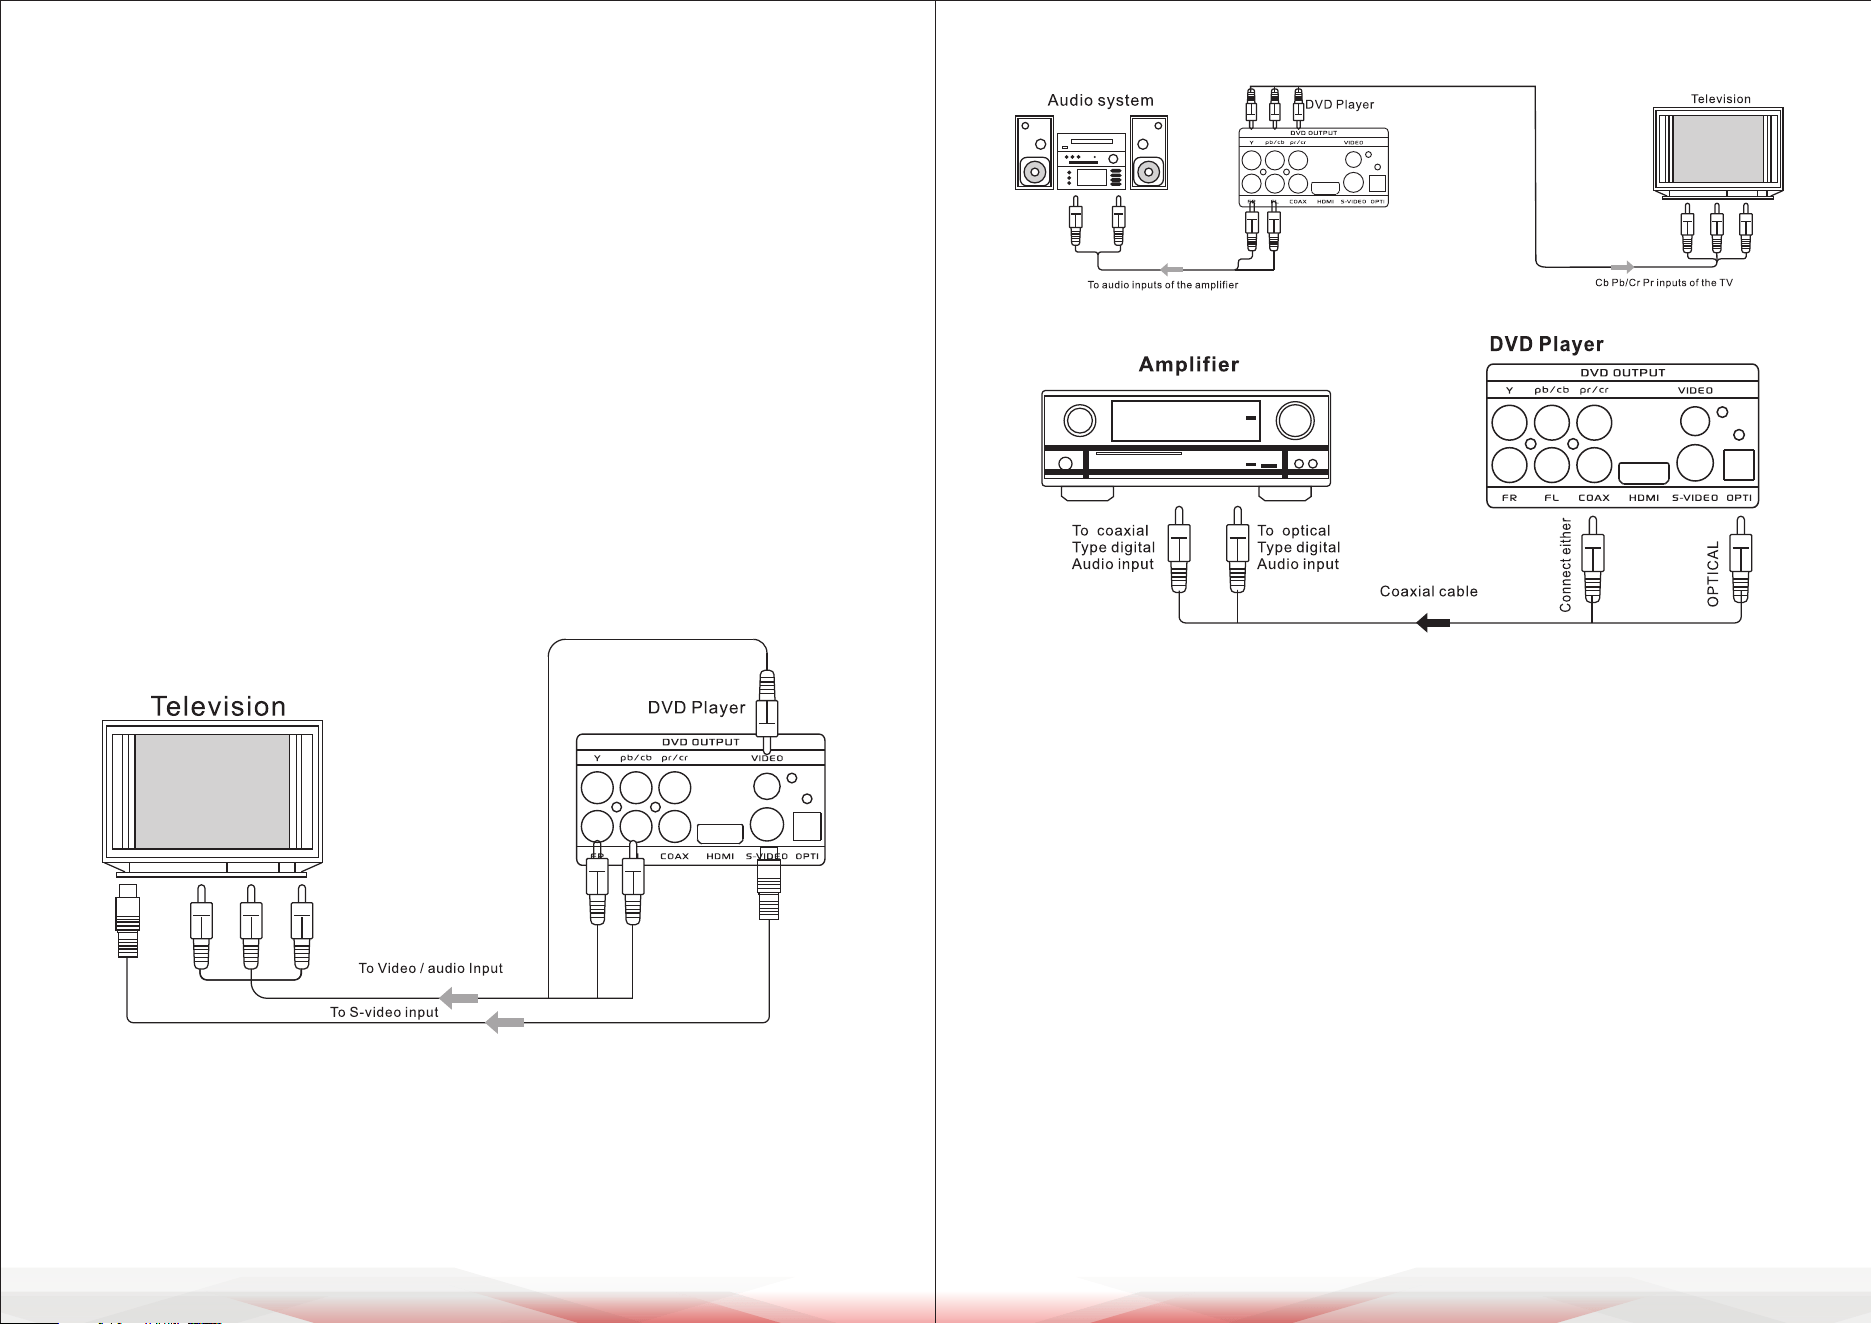
Connecting to an Audio System
Connecting to an Amplier Equipment
BASIC PLAYBACK
Preparations
When you want to view a disc, turn on the TV and select the video input
connected to the unit.
Basic Playback
1. Press the POWER switch on the front panel to turn the unit ON. The unit turns
on, and the TV screen will display the start logo. If a disc is already in the tray,
it will begin to play once the power is ON.
2. Press OPEN/CLOSE to open the disc tray and place a disc on the disc tray.
• There are two dierent disc sizes. Place the disc in the correct guide on the
disc tray. If the disc is out of the guide, it may damage the disc and cause
the unit to malfunction.
• Do not place a disc that is unplayable in this unit.
3. Press OPEN/CLOSE to close the disc tray. The playback will automatically start.
Some discs may not play automatically. You can press the PLAY button to start
playback.
4. Some discs may start playback with a menu. Use the cursor button on the
remote controller to select menu options and press PLAY to start, or press
the digits to select menu options directly.
SAFETY INSTRUCTIONS
1. Make sure that all connections are properly connected and the main volume
is set to a minimum level before turning ON the unit.
2. When more than one pair of speakers is used, especially the main speaker
output, make sure that the speakers used have the same wattage and
impedance. Otherwise, the unit may be damaged under high power or
long-term operation.
3. To avoid humming sounds and unwanted noise, make sure that all the wires
are properly inserted.
4. For speaker cords, strip o the vinyl coating and twist the wire tip. Push down
the pink jack or loosen the screw terminal before inserting the wire tip, then
fasten it and tighten the screw. Be careful not to let the wires stick out of the
terminal, as this may cause a short circuit when wires of dierent terminals
contact each other.
5. After the unit is turned ON, adjust the main volume to the desired level along
with the bass and treble volume, etc.
BASIC CONNECTION
Connecting to a TV with Audio/Video Cable
• If the TV has an S-video input, connect the DVD player with an S-video cable.
When using an S-video cable, do not connect the yellow video cable.
• If the TV has an HDMI input, connect the DVD player with an HDMI cable.
Note: The volume adjustment only works when it's connected to a power
amplier. When connected to a TV set without speakers, the volume cannot be
adjusted on this device. You can only adjust the volume on the TV set.
www.PyleUSA.com14 www.PyleUSA.com 15
LISTEN TO RADIO, LINE INPUT OPERATION ADVANCED PLAYBACK
MP3, AUX EXTERNAL CONNECTION OF AUDIO SIGNAL INPUT
Press the INPUT key on the remote control or on the unit’s panel. The unit can
input MP3/AUX and AM/FM external connection audio signals; the display
shows the status. Audio signals from any equipment can be connected.
INPUT TRANSFER TO MP3, AUX
Press the INPUT key on the remote control or on the unit’s panel. The unit can
input MP3/AUX and AM/FM external connection audio signals; the display
shows the status. Audio signals from any equipment can be connected.
LISTEN TO RADIO
Pause/Play Playback
1. Press PAUSE/PLAY to pause playback (still mode). The sound will be muted
during still mode.
2. Press PLAY to resume normal playback.
Previous and Next
While playing, press the PREV key to play the previous chapter. Press until you
reach the rst chapter. Each press of the NEXT key while playing will skip the
current chapter and play the next one.
Fast Forward and Fast Reverse
1. Press FWD to fast forward through the disc. Each time the FWD button is
pressed, the fast-forward speed changes.
2. Press ENTER/PLAY to resume normal playback.
3. Press REV to fast reverse through the disc.
Each time the REV button is pressed, the fast reverse speed changes.
4. Press ENTER/PLAY to resume normal playback.
Stop Playback
1. Press the STOP button to enter stop mode; the TV screen will show the start
logo. For some discs, the unit can recall the location where it stopped, such
as DVDs and audio CDs.
2. Press PLAY to resume playback from the location where playback stopped or
from the beginning of the disc.
3. Press STOP twice to stop completely.
Standby
Press the STANDBY key on the remote control to switch the player to standby
mode or to power ON.
NOTES:
1. "INVALID KEY" may appear on the TV screen during operation.
An "INVALID KEY" message means that the operation is not permitted by the
unit or the disc.
2. This unit can be controlled by CPU under setting mode. While in screen saver
mode, press any key to activate the unit. If you cannot use this function, you
can set SCREEN SAVER to OFF in the SYSTEM SETUP PAGE of SYSTEM SETUP.
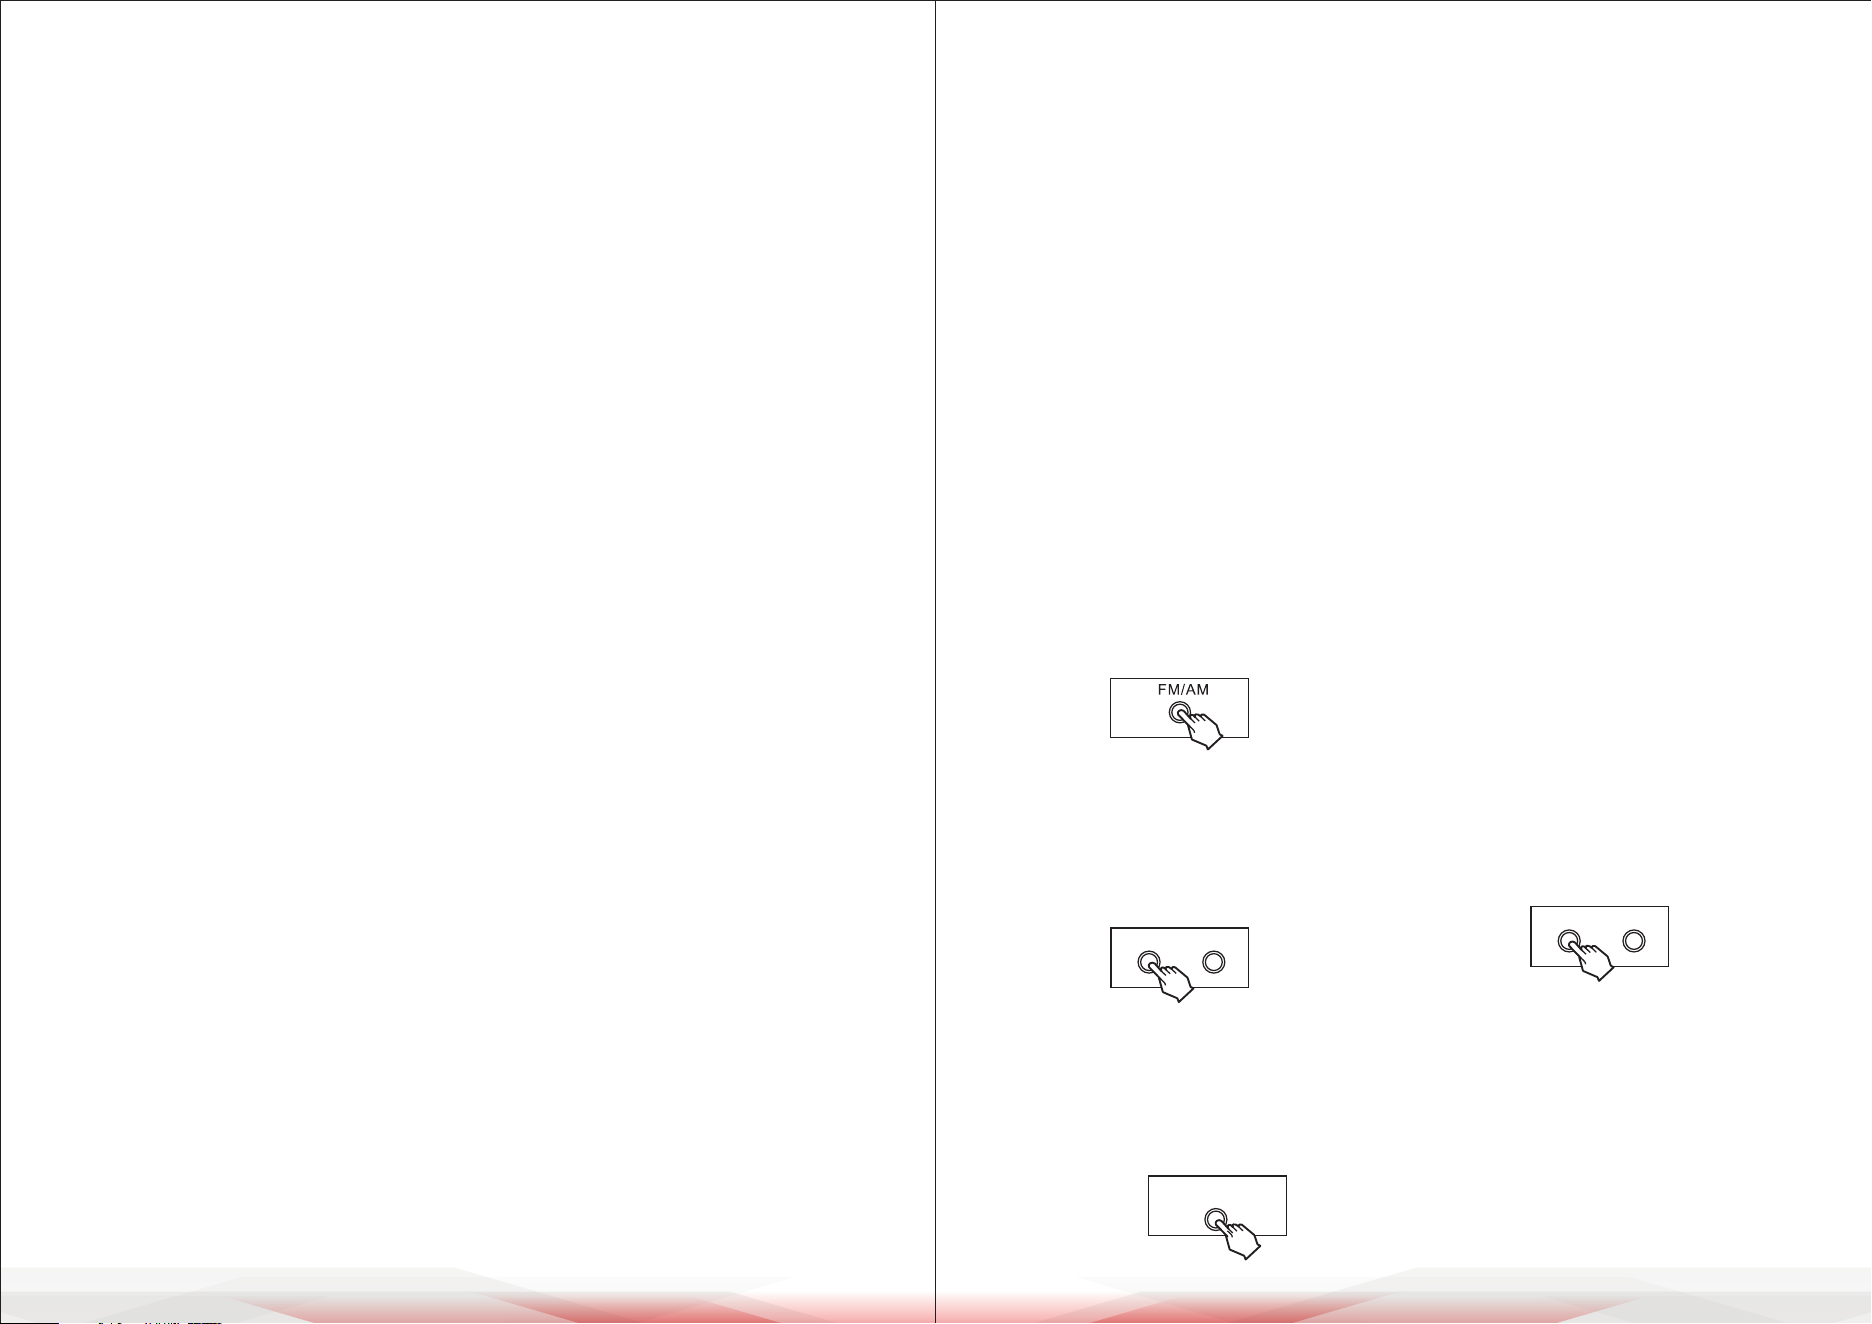
FM/AM
Press the INPUT key to switch to radio
reception, then press the [FM/AM]
key on the machine or on the remote
control. The machine will switch to
FM/AM mode, and the display will
show the frequency and the channel
number of the current radio station.
MANUAL SCAN
Press the [TUNER-] or [TUNER+] key
on the machine panel or on the remote
control to manually scan and search
for the desired station.
AUTO SCAN
Press the AUTO key on the machine
panel or on the remote control.
The machine will automatically scan
within the frequency range once
completely
NOTES:
The machine will store the radio
station into the current channel
number when the machine receives
one. The eect is much related to the
intensity of the signal. If there is no
signal or weak signal, it's better to
choose manual scan or frequency
selection scan.
CHANNEL SELECT
Press the [PREV] and [NEXT] keys on
the remote control or on the panel to
select the channel you have already
stored.
NOTES:
You can store your favorite radio
stations in continuous channels.
TUNER- TUNER+
AUTO
SCAN
PREV NEXT
www.PyleUSA.com16 www.PyleUSA.com 17
OSD
Pressing this button will display:
1. "DVD n XX/XX CH XX/XX 00:00:05 (chapter elapsed),
1/3 ENG 5.1CH 1/4 ENG
• OFF"
2. "DVD TT XX/XX CH XX/XX -00:00:00 (chapter remain)"
3. "DVD TT XX/XX CH XX/XX -00:00:00 (title elapsed)"
4. "DVD TT XX/XX CH XX/XX -00:00:00 (title remain)"
5. The sixth press will cancel the function.
LANGUAGE
Press this button on the remote control to change the mode of audio.
For example: "[1 XX 5.1CH]," where "XX" indicates the language of the
country. (The number of languages depends on the disc.)
VIDEO
In play or stop status, press the VIDEO key on the remote control to switch the
device's video output interface: TV-RGB, P-SCAN, S-VIDEO, INTERLACE YUV.
P/N
Press the key to switch between NTSC, PAL, and AUTO.
ZOOM
Press this button to zoom into the picture.
Each time the button is pressed, the magnication level will change.
SUBTITLE
Press this button and the screen will display: " [1XX]," where "XX" indicates
the language of the country. (The number of languages depends on the disc.)
PROGRAM
Press this key to store your favorite picture as the starting frame. If you have
chosen several pictures, the latest picture will be the starting frame.
You can cancel it by pressing [SETUP], then press the [ENTER] key after selecting
[RESTORE] under [LOGO SELECT] in system settings, and the system will restore
to the original frame.
MONOPHONY/STEREO MODE
SELECT
Press the [ST/MO] key on the panel to
select monophony or stereo mode to
listen to the radio.
NOTES:
We advise you to select monophony
mode when the signal of the radio
station you've chosen is not strong
enough.
AUTO STORE RADIO STATIONS
After starting the AUTO SCAN
function, the machine will store the
radio stations received into ordinal
channels. The current frequency will
be stored into the current channel
number automatically.
MANUAL STORE RADIO STATIONS
Press the [TUNER-] or [TUNER+] key
to select the radio station you want
to listen to, then press the [MEMORY]
key to store the current radio station
into the channel number you want
until the signal intensity is strong
enough.
ADVANCED PLAYBACK
TIPS:
If the reception is not good or there's
noise and it doesn't improve even
after switching to monophony mode,
you should adjust the antenna to a
better position until you get the best
reception.
USB READER FUNCTION
MP3 and WMA les have priority over
others to be played after the machine
has scanned the USB disk if it contains
several forms of playable les.
IMPORTANT NOTE:
The following function descriptions
are for DVDs. Operation and display
on-screen may dier for other disc
formats.
TIME
Once the TIME button is pressed, the
screen will display messages. Use the
LEFT/RIGHT cursor buttons to select
your preference. Press ENTER/PLAY
to conrm.
ST/MO

www.PyleUSA.com18 www.PyleUSA.com 19
TITLE/PBC
For DVD discs: Press this button to display the title menu. Press the digits to
select your preferred chapter.
For SVCD and VCD: Follow the menu instructions on the screen. Press the
digits during PBC playback.
A/B SPEAKERS OUTPUT SELECT
REPEAT
Press once to repeat the CHAPTER. Press twice to repeat the TITLE.
Press thrice to repeat ALL. Press 4 times to cancel the repeat.
A-B REPEAT
Press A-B to set a start point, press again to set an end point and complete the
setting. The selected section A-B will be repeated. The third press will cancel
this function.
PROGRAM
Press this key to store your favorite picture as the starting frame. If you have
chosen several pictures, the latest picture will be the starting frame.
You can cancel it by pressing [SETUP], then press the [ENTER] key after selecting
[RESTORE] under [LOGO SELECT] in system settings, and the system will restore
to the original frame.
TITLE/PBC
For DVD discs: Press this button to display the title menu.
Press the digits to select your preferred chapter.
For SVCD and VCD: Follow the menu instructions on the screen.
Press the digits during PBC playback.
A/B SPEAKERS OUTPUT SELECT
REPEAT
Press once to repeat the CHAPTER. Press twice to repeat the TITLE.
Press thrice to repeat ALL. Press 4 times to cancel the repeat
A-B REPEAT
Press A-B to set a start point, press again to set an end point and complete the
setting. The selected section A-B will be repeated. The third press will cancel
this function.
VOLUME AND MUTE
Press "+" at the right of the VOLUME to increase the volume, "-" to decrease the
volume. The rst press is MUTE, which will display Mute no voice; the second
press will return to normal.
MUSIC MENU
This is used to increment and decrement levels for the selected functions of
Master Volume, Bass, Treble, Balance, and Auto Station seek.
By pressing the Music MENU key, you can select the functions above. If you
want to adjust the bass, press the MENU key to select bass, then press (master
volume+) or (master volume-) on the remote control to increase or decrease
the bass. If you want to adjust treble, press the MENU key to select treble, then
press (master volume+) or (master volume-) on the remote control to increase
or decrease the treble. Other functions can also be adjusted in the same way.
SPECIAL FUNCTION PLAYBACK
JPEG DISC PLAYBACK
When playing a JPEG disc, a navigation menu will be displayed automatically if
the disc is loaded in succession. In the menu, use the UP or DOWN cursor button
to select a le, then press "ENTER/PLAY" to play it as a slideshow. Press PREV or
NEXT to select the previous or next picture. Press PAUSE to pause the current
picture for viewing, then press ENTER/PLAY to return to normal playing.
Press ZOOM to start the zoom function. When the ZOOM function is on, press
PREV or NEXT to switch between pictures. Pressing the CURSOR key can move
the enlarged picture, and the picture display direction can be changed by
pressing the "PROG" key, including RANDOM, WIPER L, WIPER R, UP-DOWN,
LEFT-RIGHT, WINDOW V, EDGE TO CENTER, etc.

www.PyleUSA.com20 www.PyleUSA.com 21
MPEG-4 DISC FUNCTION INTRODUCTION
MPEG-4 is the fourth video and audio encoding standard released by MPEG
(the abbreviation of "Moving Pictures Experts Group"). VCD is based on MPEG-1
technology, and DVD is based on MPEG-2. MPEG-4 takes advantage of narrow
bandwidth, pursuing the best picture quality by compressing and transmitting
the data in frame reconstructed technology. The audio data is compressed by
WMA standard. MPEG-4 is the most advanced compression technology stan-
dard in the AV eld. It has the highest compression rate.
By MPEG-4 technology, we can encode and compress a DVD lm into one or
two CD-R discs with good picture quality, or burn several lms with the same
quality as VCD onto one CD-R disc, or burn several lms with similar quality to
DVD onto a DVD-ROM disc.
Note:
1. The MPEG-4 discs available in the market now have many dierent formats,
such as Xvid, AVI, RM, etc. Some discs with "MPEG-4" logos in the market are
not encoded by MPEG technology. It is normal for some discs to not function
properly in this player because of incorrect encoding standards.
2. The MPEG-4 les are displayed as a list on the screen. Choose the icon using
the cursors and press the "ENTER/PLAY" button to playback the movie.
3. As AVI is the MPEG-4 format, and MPEG is the MPEG-1 format, please do not
combine AVI and MP3/JPEG together onto a disc. The player will only recognize
MP3 or JPEG in that instance. However, MP3 and JPEG can be included on
one disc together.
Playback (Normal)
When a Kodak Picture CD is inserted into the unit, an automatic slide show is
launched. Each picture in the Kodak Picture CD will be displayed consecutively
in a slide-show fashion and will be scaled to t the whole TV screen.
Some slide-show transition modes are provided; use the "PROG" key to select.
You can set transition eects for each picture. To display an image indenitely,
press the "PAUSE" key. To view the next or previous picture, press the "NEXT" or
"PREV" key. To resume the slide show, press the "ENTER/PLAY" key.
Image Rotation
There are four modes to rotate a picture: "Invert", "Mirror", " Left", and "Right".
These operations are allowed only when a picture is being displayed normally
and will be canceled automatically when a new picture is displayed.
The arrow key is used to select the dierent rotation modes:
Up Invert/Normal
Down Mirror/Normal
Left Turn left
Right Turn right
ZOOM
The "ZOOM" key is used to turn this function on or o. When this mode is on, any
picture will be displayed at the last ratio selected by the user. A message on the
screen will indicate the current zoom ratio. If zoom mode is on, the "ZOOM" key
is used to control the ratio of zoom in/out. With ZOOM mode o, a picture is
scaled to t the whole TV screen.
Notes:
During the zoom function, slide-show transition and image rotation are disabled.
To cancel the zoom function, press the "ZOOM" key again to resume the slideshow.
IMPORTANT NOTE: The quality of pictures displayed on the screen is highly
dependent on the viewing device.
USB 2.0
USB 2.0 allows data transfers of 480 Mb/s.
DivX and Xvid Video Compatibility
1. Plays most versions of DivX and Xvid Video with standard playback of DivX
and Xvid media les.
2. File Extensions: .avi and .divx (these must be used for the player to recognize
DivX video les). Note that all les with the .avi extension are recognized as
Mp4, but not all of these are necessarily DivX video les and therefore may
not be playable on this player.
www.PyleUSA.com22 www.PyleUSA.com 23
PC-Created Disc Compatibility
Discs recorded using a personal computer may not be playable in this unit due
to the settings of the application software used to create the disc.
In these particular instances, check with the software publisher for more detailed
information. Discs recorded in packet write mode (UDF format) are not
compatible with this player. Check the DVD-R/RW or CD-R/RW software disc
boxes for additional compatibility information.
SYSTEM SETUP
When you press the SETUP button on the remote control, the setup menu will
be displayed. It will include “SYSTEM SETUP”, “ LANGUAGE SETUP”, “ AUDIO
SETUP”, “ VIDEO SETUP”, “ SPEAKER SETUP”, and “DIGITAL SETUP".
1. Within the setup menu, you can use the UP, DOWN, LEFT, and RIGHT buttons
on the remote control to move the cursor, and then press the ENTER/PLAY
button to make your selection. Press LEFT to return to the previous menu.
2. To exit the setup menu, you can select the exit setup menu or press the
SETUP button.
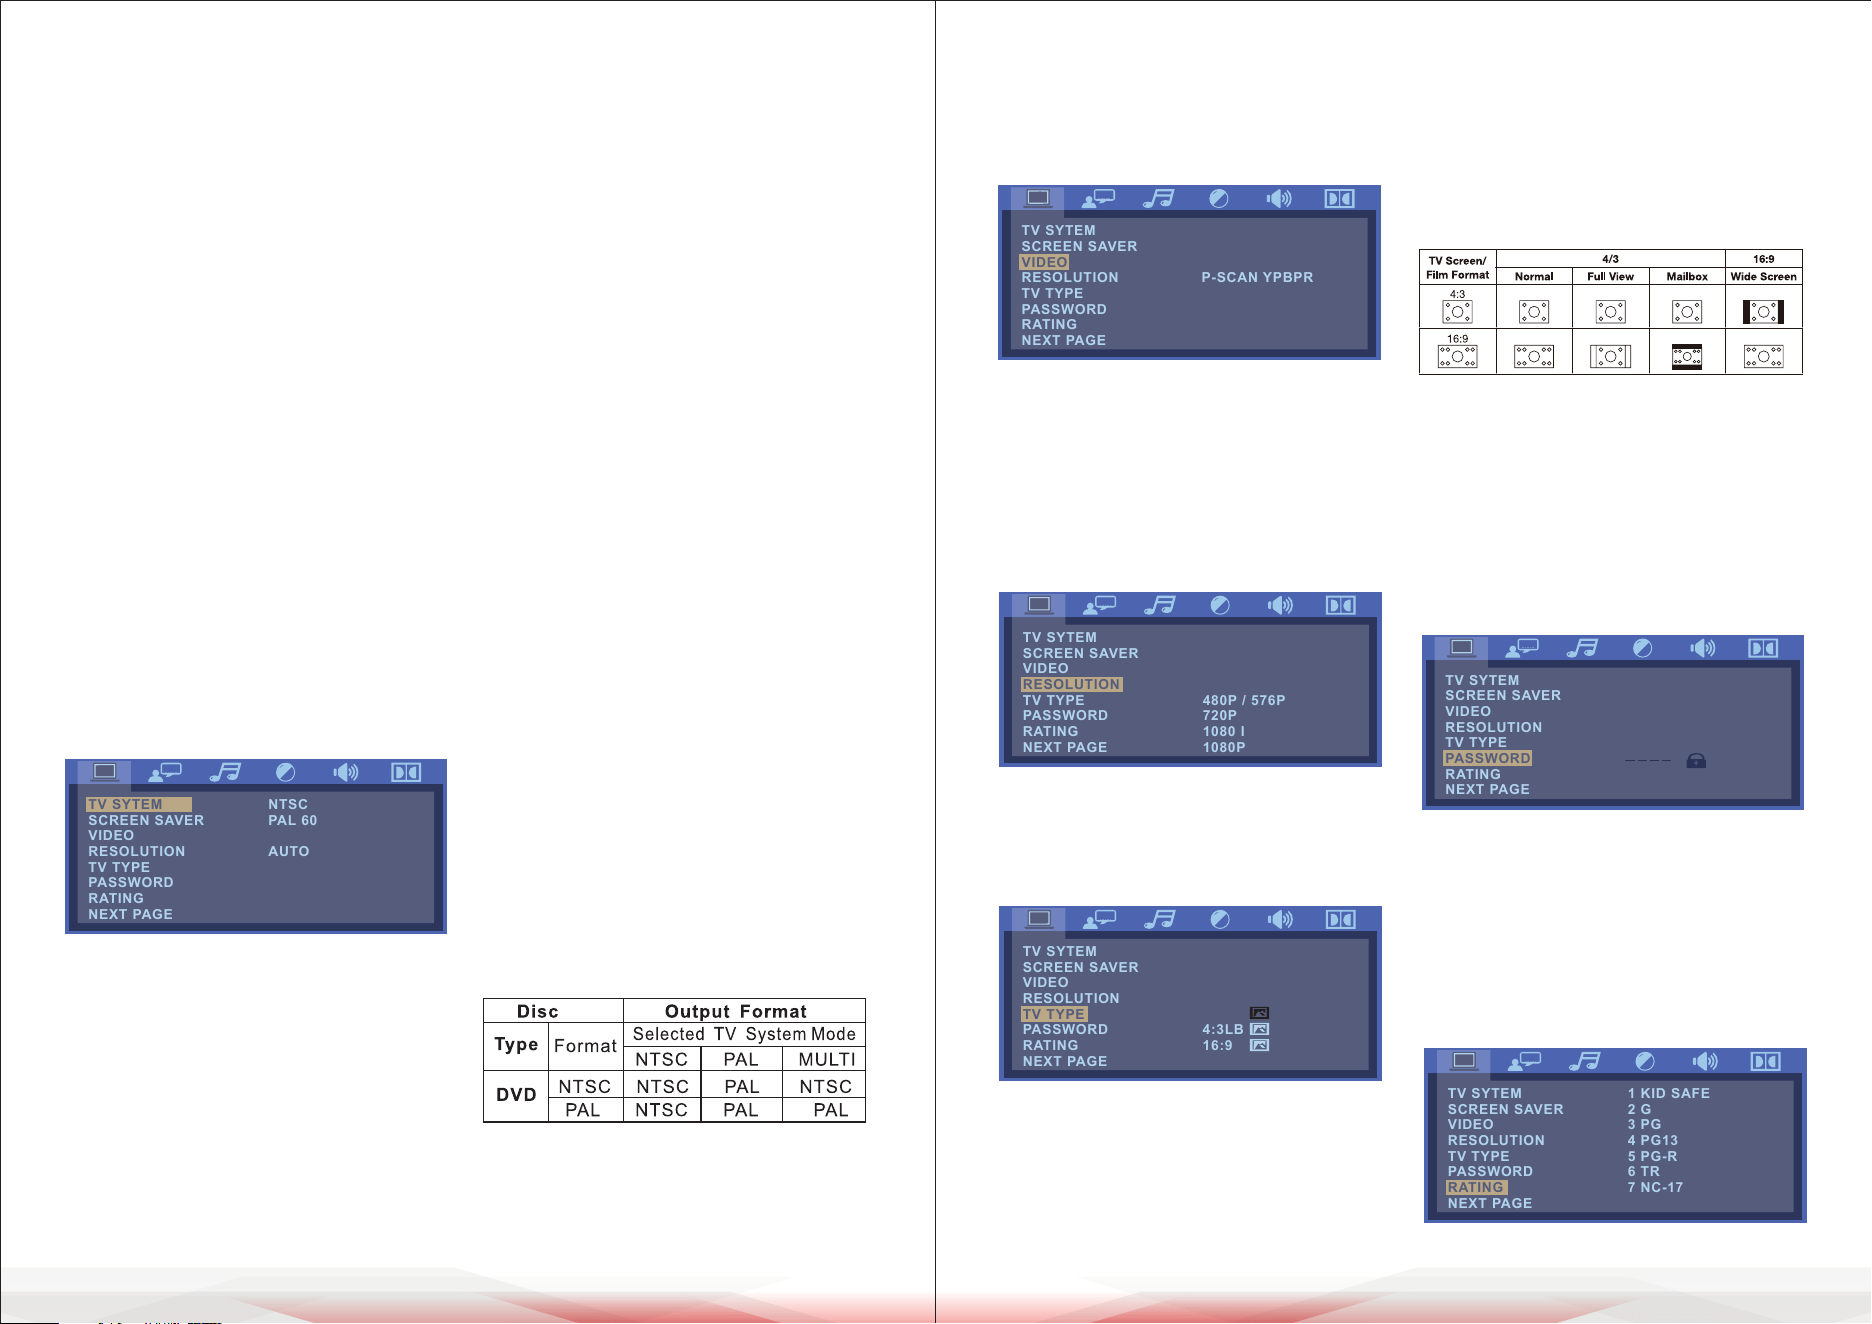
1. SYSTEM SETUP PAGE
Setup TV screen format, video type,
and all DVD functions.
1.1. TV SYSTEM
TV SYSTEM: This player supports
dierent TV output, including
AUTO, NTSC, and PAL systems.
• If your TV supports only NTSC or
PAL and you inadvertently selected
the wrong TV system, the TV screen
will icker and only black and
white colors will be displayed.
In this case, you should press the
SETUP button to set as follows:
Note: How to Set the TV Type?
• You may switch the NTSC/PAL setting
of the DVD player to match the video
signal of your TV.
• The table below shows what kinds
of discs are compatible with each
setting (AUTO, PAL, and NTSC):
1.2 Screen Saver
Use this option to turn the screen
saver ON or OFF.
1.3 VIDEO
Your video settings must correspond
with the type of connection to your
TV or other equipment.
VIDEO: Sets the video output.
1.4 Resolution
On HDMI, select one of the following
video output resolutions: 480i/576i,
480p/576p, 720p, 1080i, 1080p.
1.5 TV TYPE
Use this submenu to select the
aspect ratio.
NOTE:
Irrespective of what screen format
you have selected, if your screen
displays in 4:3, the picture will be
shown in that format.
For DVDs, the screen format is
convertible. If your screen displays in
4:3, when a DVD with a 16:9 display
format is played back, the picture will
be attened.
1.6 Password
Use the numerical keys to set your
personal 4-digit password.
The default and master password is
"0000".
1.7 Parental Control
Use this option to set an appropriate
rating to restrict viewing for children.
The options available correspond
to the lm ratings on the disc.
TV SYTEM
SCREEN SAVER
VIDEO
RESOLUTION
TV TYPE
PASSWORD
RATING
NEXT PAGE
NTSC
PAL 60
AUTO
TV SYTEM
SCREEN SAVER
VIDEO
RESOLUTION
TV TYPE
PASSWORD
RATING
NEXT PAGE
TV SYTEM
SCREEN SAVER
VIDEO
RESOLUTION
TV TYPE
PASSWORD
RATING
NEXT PAGE
P-SCAN YPBPR
INTERLACE-YUV
P-SCAN YPBPR
TV SYTEM
SCREEN SAVER
VIDEO
RESOLUTION
TV TYPE
PASSWORD
RATING
NEXT PAGE
480P / 576P
720P
1080 I
1080P
480 I / 576 I
TV SYTEM
SCREEN SAVER
VIDEO
RESOLUTION
TV TYPE
PASSWORD
RATING
NEXT PAGE
4:3LB
16:9
4:3PS
TV SYTEM
SCREEN SAVER
VIDEO
RESOLUTION
TV TYPE
PASSWORD
RATING
NEXT PAGE
1 KID SAFE
2 G
3 PG
4 PG13
5 PG-R
6 TR
7 NC-17
8 ADULT
www.PyleUSA.com24 www.PyleUSA.com 25
For DVDs, the screen format is
convertible. If your screen displays in
4:3, when a DVD with a 16:9 display
format is played back, the picture will
be attened.
1.6 Password
Use the numerical keys to set your
personal 4-digit password.
The default and master password is
"0000".
1.7 Parental Control
Use this option to set an appropriate
rating to restrict viewing for children.
The options available correspond
to the lm ratings on the disc.
1.8 Default
Use this option to restore the
default factory settings.
1.9 Resume
If this option is set to "ON" and the
power is turned o, the player will
remember where it stopped, and
when the power is resumed, it will
continue to play from that point.
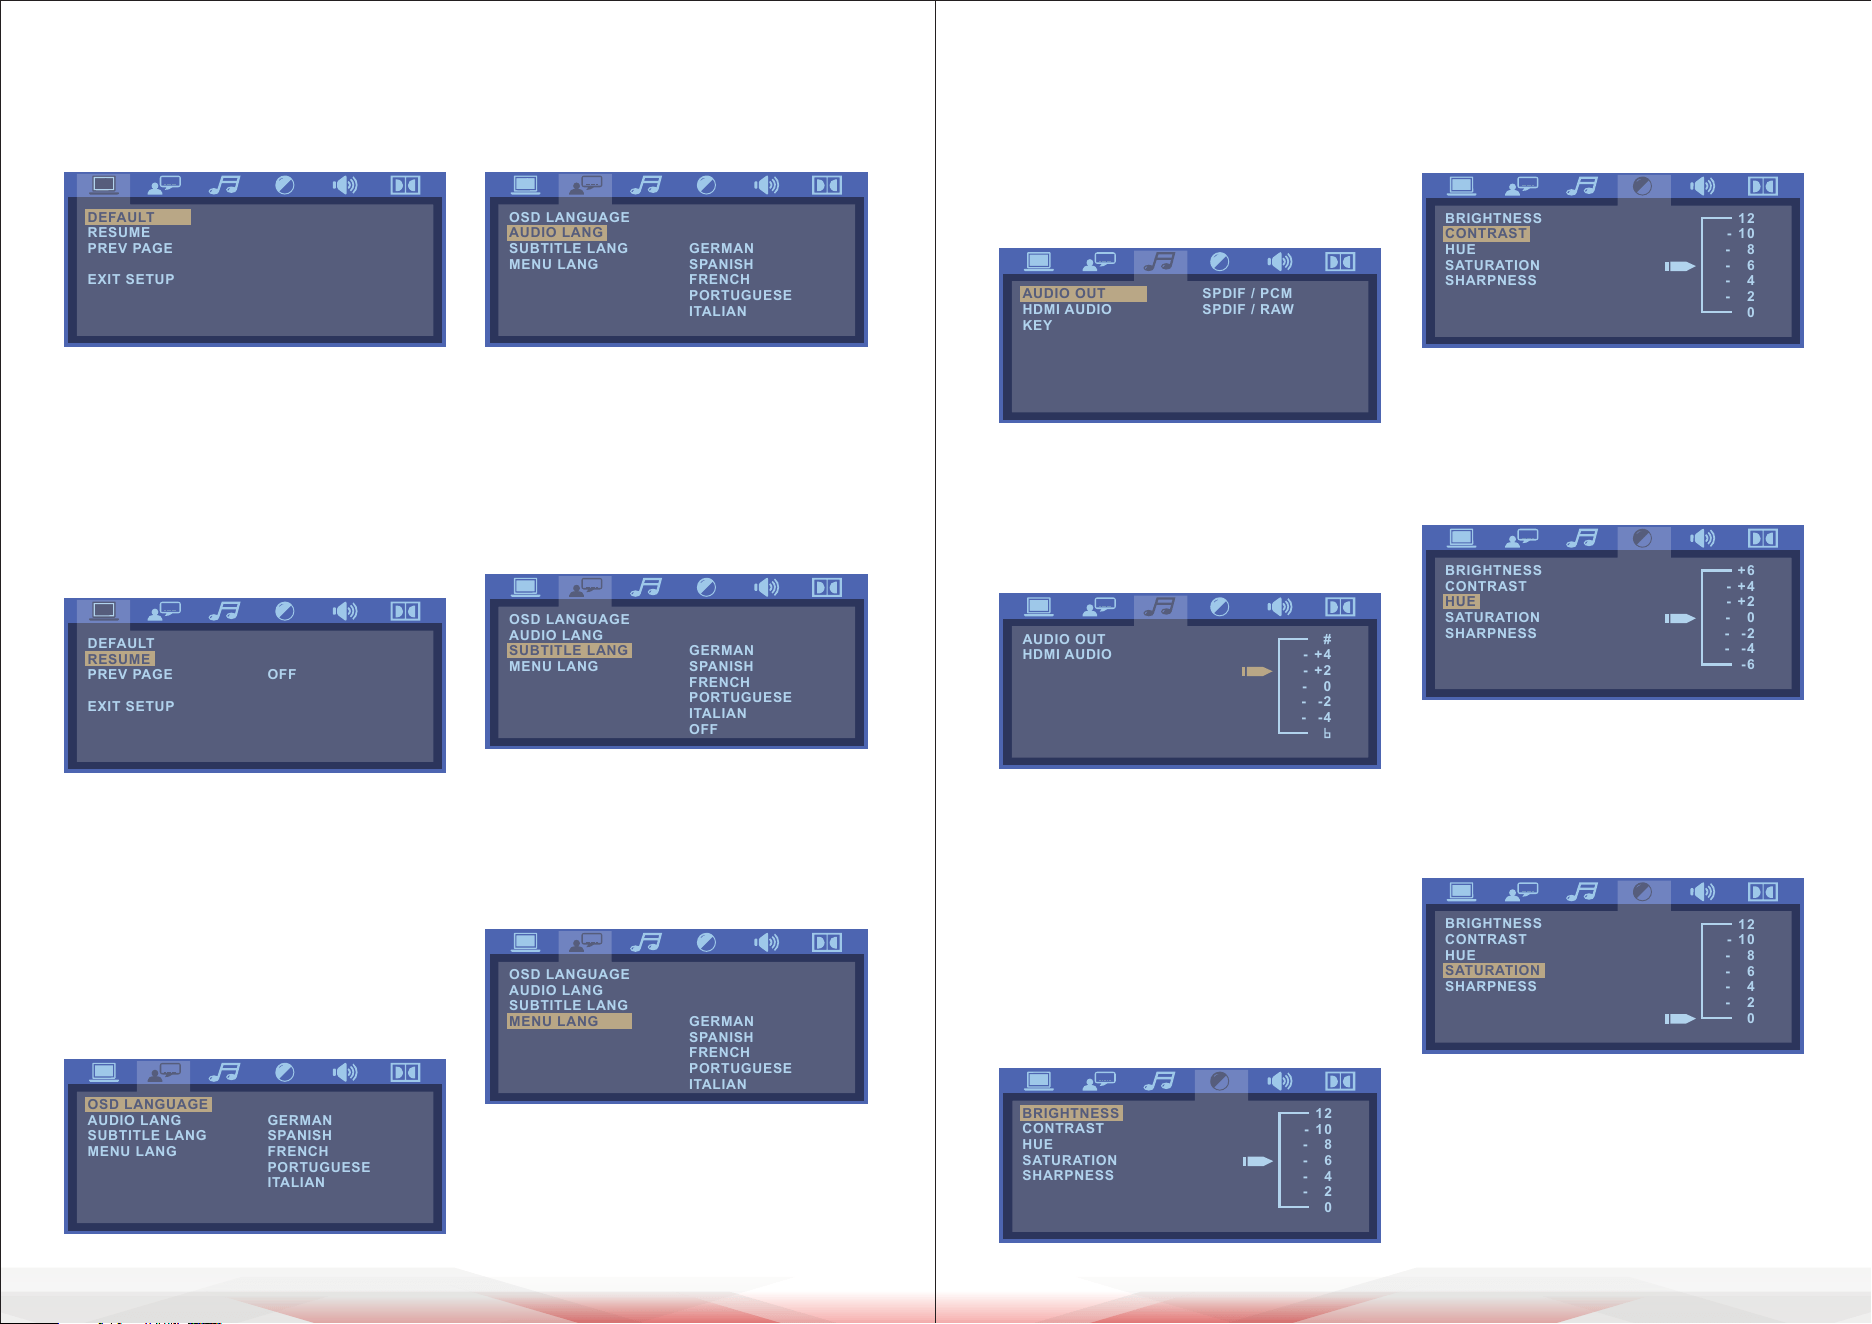
2. Language Setup
Select options for your on-screen
and menu language and subtitles.
2.1 OSD Language
Select a language to be used for
the on-screen display and setup.
2.2 Audio Language
Use this option to set the audio
(dubbing) language.
2.3 Subtitle Language
Use this option to set the subtitle
language, or choose 'o' to hide
the subtitles.
2.4 Menu Language
Use this option to set the lm's
menu language.
3. Audio Setup
3.1 Audio Out
Use this menu to select your audio
output.
3.2 Key
Use UP/DOWN arrows to adjust the
key.
4. Video Setup
Under this menu, you can select
options for your image output.
4.1 Brightness
Use UP/DOWN arrows to adjust the
brightness.
4.2 Contrast
Use UP/DOWN arrows to adjust the
contrast.
4.3 Hue
Use UP/DOWN arrows to adjust the
hue.
4.4 Saturation
Use UP/DOWN arrows to adjust the
saturation.
OSD LANGUAGE
AUDIO LANG
SUBTITLE LANG
MENU LANG
GERMAN
SPANISH
FRENCH
PORTUGUESE
ITALIAN
ENGLISH
OSD LANGUAGE
AUDIO LANG
SUBTITLE LANG
MENU LANG
GERMAN
SPANISH
FRENCH
PORTUGUESE
ITALIAN
OFF
ENGLISH
DEFAULT
RESUME
PREV PAGE
EXIT SETUP
RESTORE
DEFAULT
RESUME
PREV PAGE
EXIT SETUP
OFF
ON
OSD LANGUAGE
AUDIO LANG
SUBTITLE LANG
MENU LANG
GERMAN
SPANISH
FRENCH
PORTUGUESE
ITALIAN
ENGLISH
OSD LANGUAGE
AUDIO LANG
SUBTITLE LANG
MENU LANG
GERMAN
SPANISH
FRENCH
PORTUGUESE
ITALIAN
ENGLISH
AUDIO OUT
HDMI AUDIO
KEY
SPDIF / PCM
SPDIF / RAW
SPDIF / PCM
AUDIO OUT
HDMI AUDIO
#
- +4
- +2
- 0
- -2
- -4
KEY
BRIGHTNESS
CONTRAST
HUE
SATURATION
SHARPNESS
12
- 10
- 8
- 6
- 4
- 2
0
BRIGHTNESS
CONTRAST
HUE
SATURATION
SHARPNESS
12
- 10
- 8
- 6
- 4
- 2
0
BRIGHTNESS
CONTRAST
HUE
SATURATION
SHARPNESS
12
- 10
- 8
- 6
- 4
- 2
0
BRIGHTNESS
CONTRAST
HUE
SATURATION
SHARPNESS
+6
- +4
- +2
- 0
- -2
- -4
-6
www.PyleUSA.com26 www.PyleUSA.com 27
4.5 Sharpness
Use UP/DOWN arrows to adjust the
sharpness.
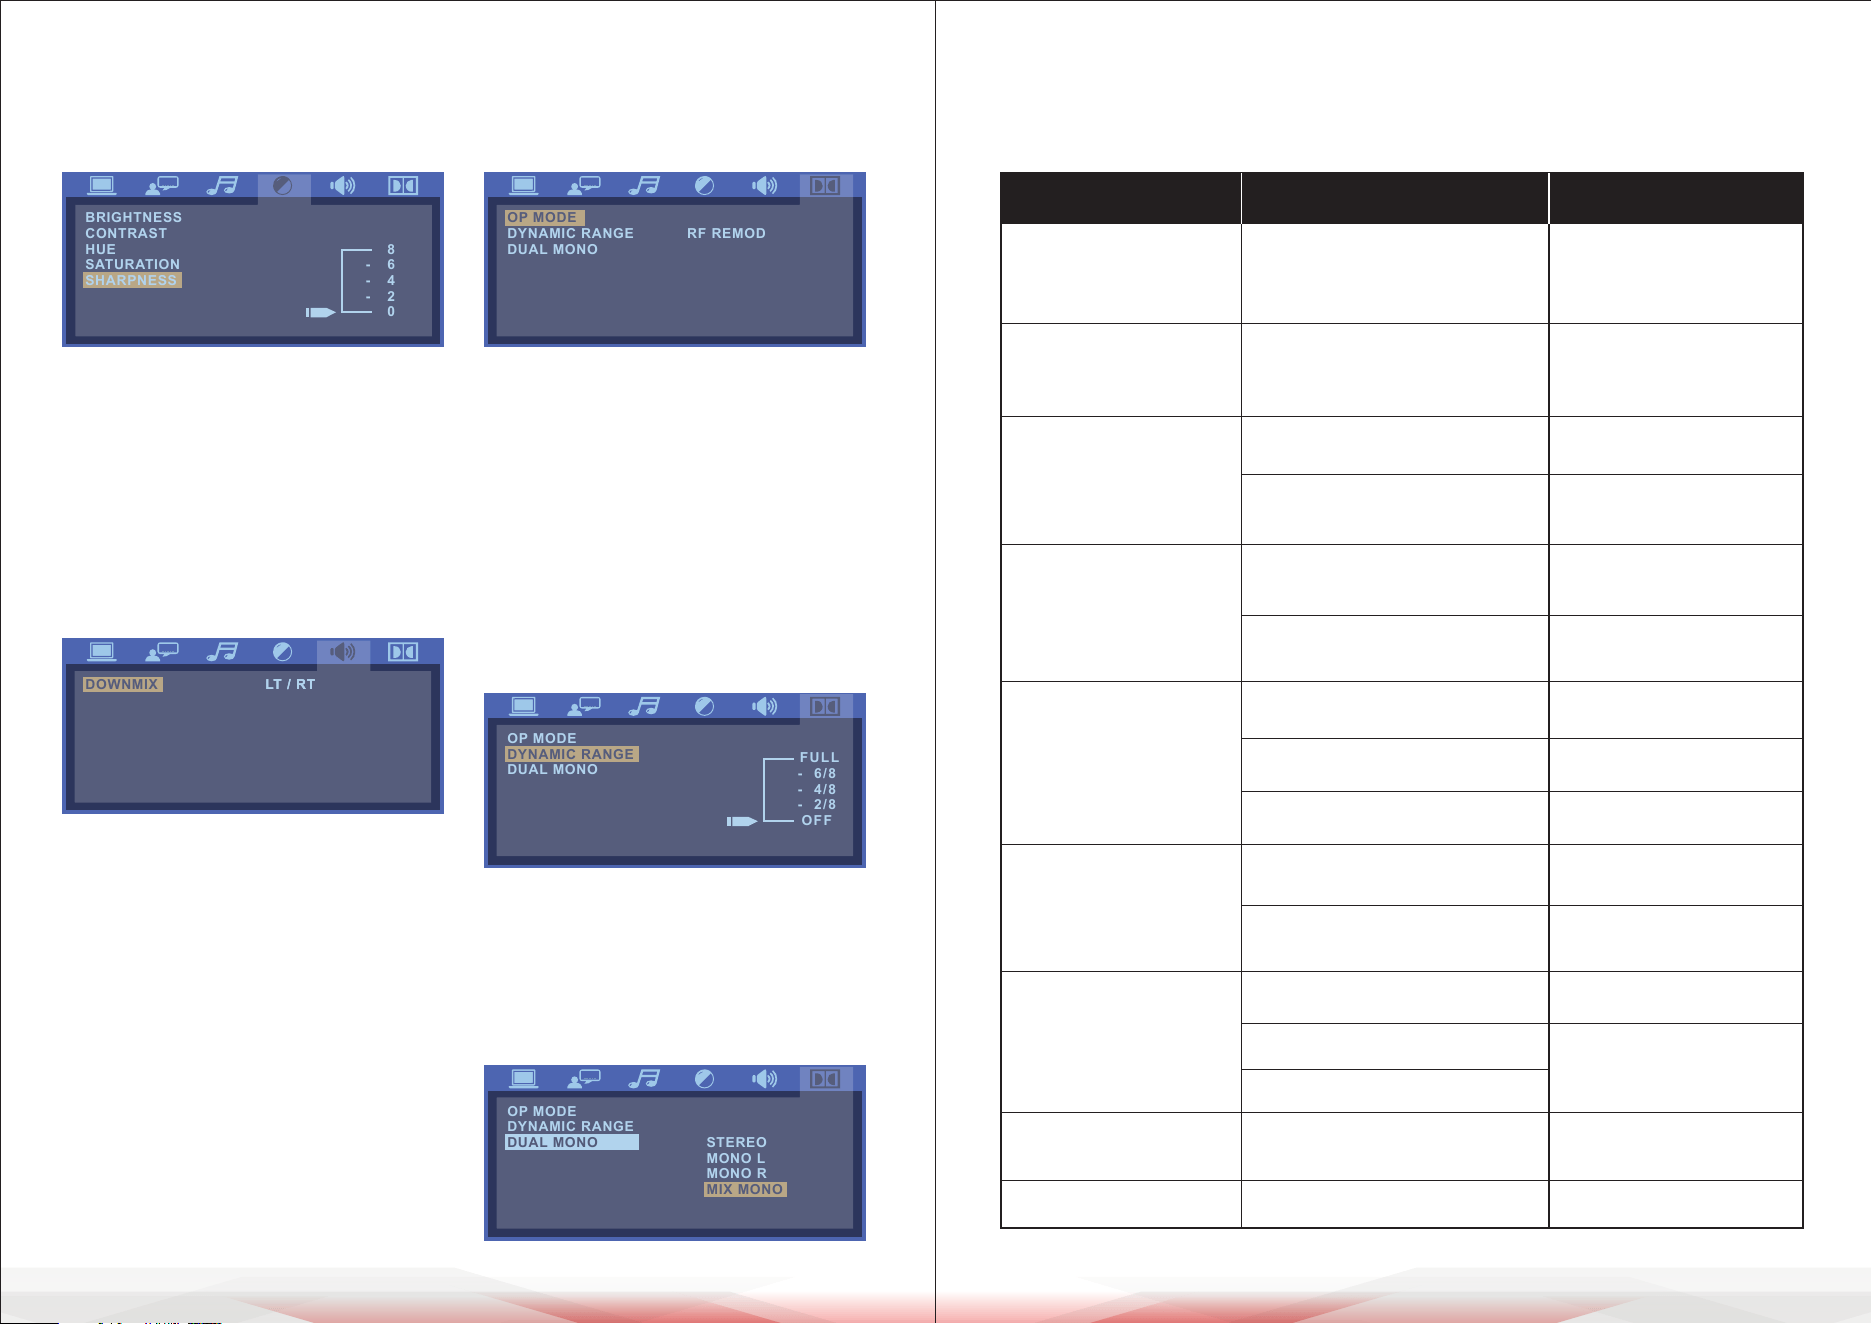
5. Speaker Setup
5.1 Downmix
This setting is for Home Theater.
If two channels are required, select
Stereo.
6. Digital Setup
Use this menu to select digital setup
options including OP, dynamic range,
and dual/mono.
6.1 OP Mode
1. For nighttime playing, select LINE
OUT to set the volume at a lower
level.
2. For daytime playing, select RF
REMOD to set the volume at a high
level.
6.3 Dynamic Range
When LINE OUT is selected, use this
setting to adjust the line-out ratio
for a dierent eect. The audio
signal peak value will be at the
minimum when set to Full; the
peak value will be at the maximum
when set to O.
6.4 Dual Mono
Choose this option to set up the
left (L) and right (R) mono output;
there are four modes in this option.
TROUBLESHOOTING
Before calling for service, you can perform the checks described in the
troubleshooting guide for immediate solutions.
PROBLEM
POSSIBLE REASON
TREATMENT
Can't play MP3 player,
AM/FM tuner, DVD
player, Aux input, etc.
Switched to BT mode
Push the BT Button on
the front panel outside
Unit can not be
turned on
The power plug is not
plugged in properly or is
damaged
Try plugging it in again
Remote control
doesn't work
No battery or batteries are o
Replace batteries
The remote control used
is out of operational range
Use it with right range
No picture
Unit was not connected
properly
Connect again
Unit was not set up properly
Check setup instructions
Disc cannot be
played
No sound
Poor picture quality
and audio
Display correctly
but no response
Without response
Disc error
loader doesn't close tray
No disc in tray
Label side should be up
Reload disc in tray
Put disc in tray
Unit not connected properly
Volume too low
Disc dirty
Disc scratched
Disc warped
Operation is wrong
Main unit is jammed
Connect it again
Adjust volume
Clean the disc
Replace Disc
Disc warped
Renew operation
Reset
BRIGHTNESS
CONTRAST
HUE
SATURATION
SHARPNESS
8
- 6
- 4
- 2
0
DOWNMIX LT / RTLT / RT
STEREO
OP MODE
DYNAMIC RANGE
DUAL MONO
RF REMOD
LINE OUT
OP MODE
DYNAMIC RANGE
DUAL MONO
STEREO
MONO L
MONO R
MIX MONO
OP MODE
DYNAMIC RANGE
DUAL MONO
FULL
- 6/8
- 4/8
- 2/8
OFF
www.PyleUSA.com28 www.PyleUSA.com 29
Register Product
Thank you for choosing PyleUSA. By registering your product,
you ensure that you receive the full benets of our exclusive
warranty and personalized customer support. Complete the
form to access expert support and to keep your PyleUSA
purchase in perfect condition.
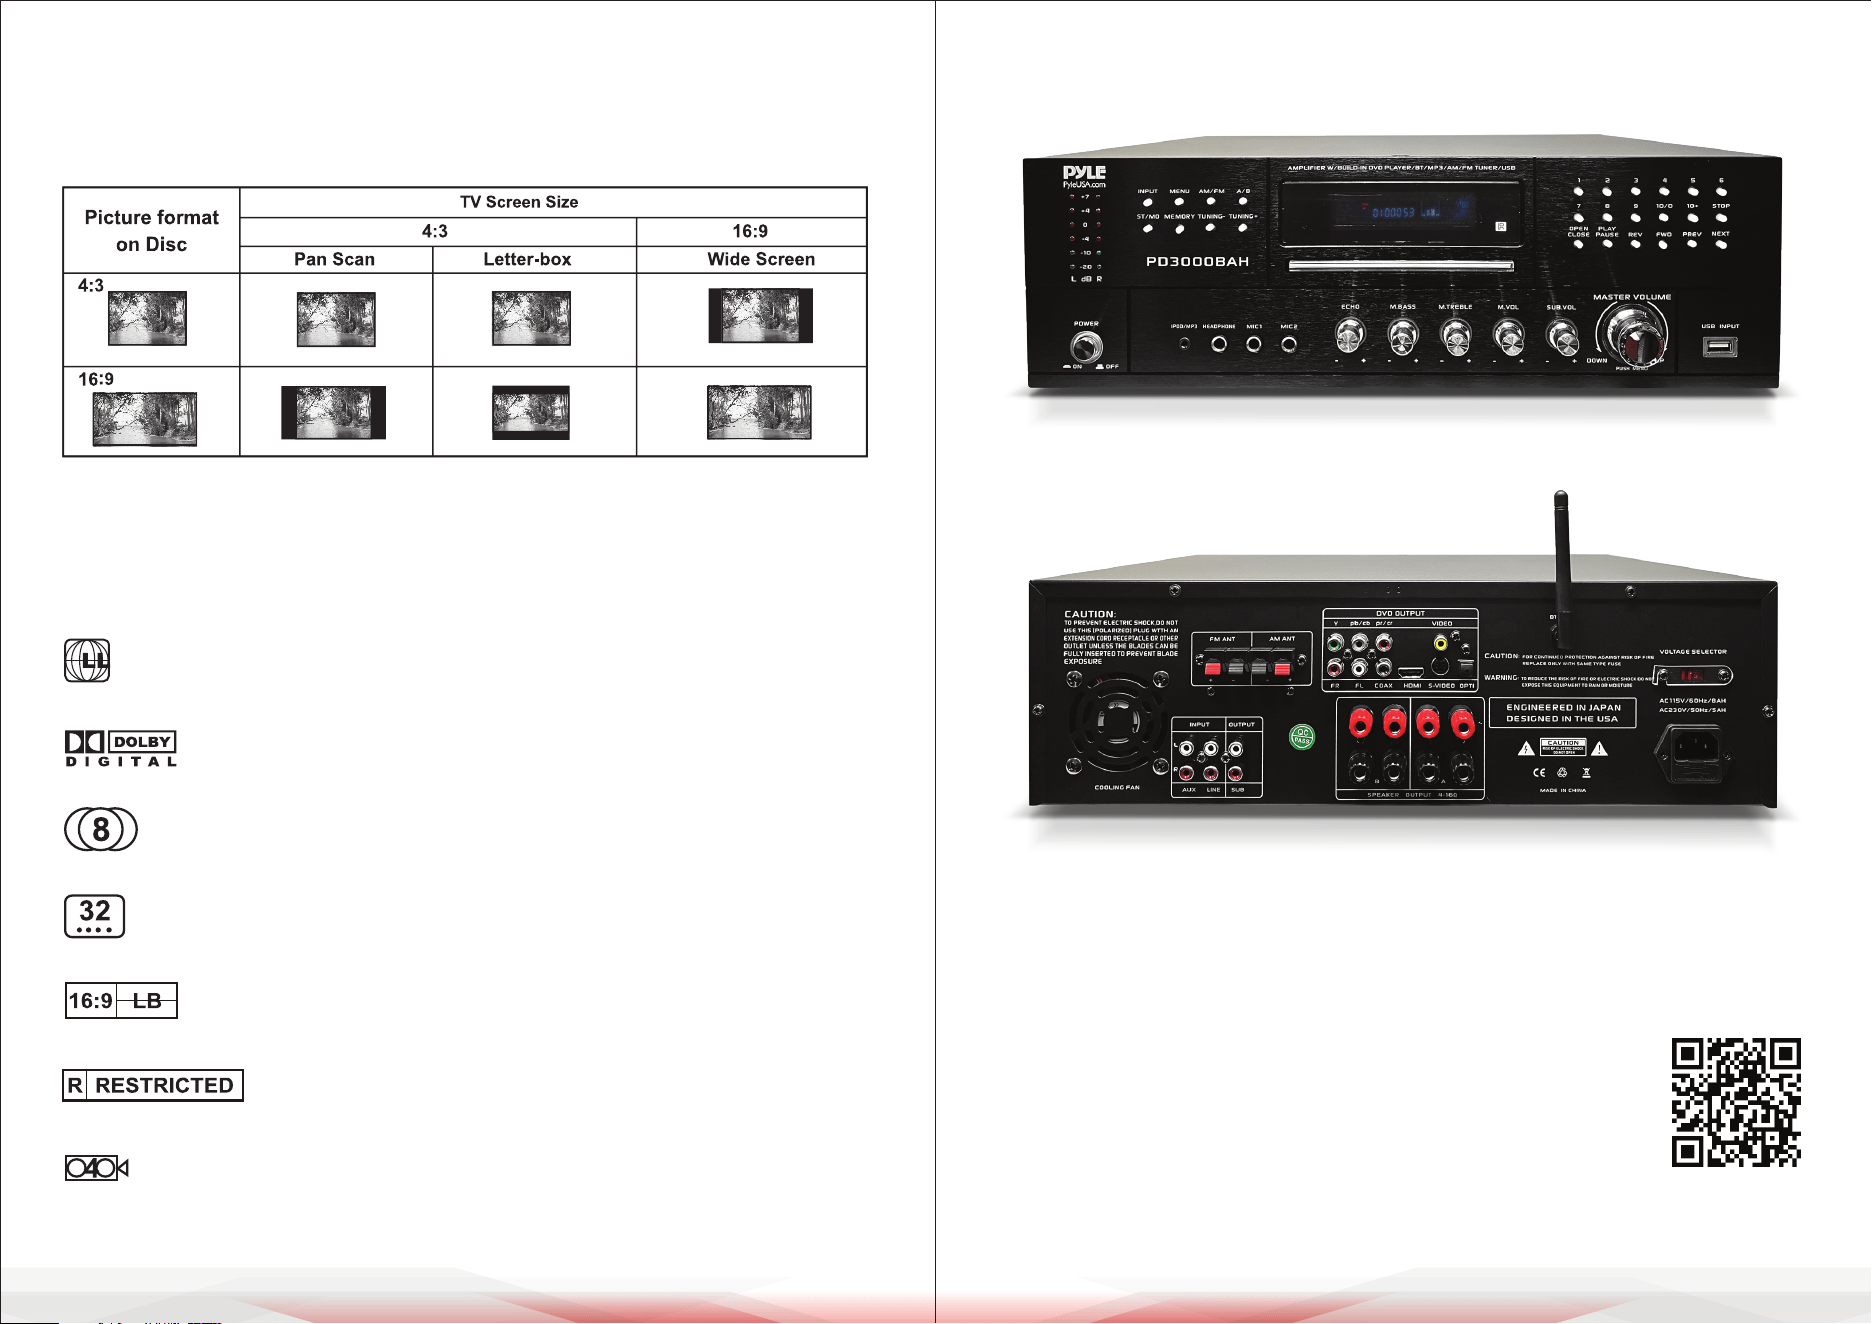
DVD SPECIAL FUNCTION
SETTING THE TV SCREEN SIZE
Multi-aspect ratio suits dierent TV screen sizes.
Functions Supported by DVD discs
There are many functions available on DVD discs, and the functions vary per
player and per manufacturer.
Regional code and signal system
Dolby digital surround sound
Number of languages
Subtitle languages
Picture proportion modes
Parental Control
Angles for viewing
Start Here
Model Number:
PD3000BAH
PyleUSA.com/pages/register