

INSTRUCTION MANUAL
MODEL NO: OM-965/OM-965B
Steam Iron

OMAIGA STEAM IRON
Congratulations on purchasing the Omaiga steam Iron. Each unit is manufactured to ensure
safety and reliability. Before using this appliance for the first time, please read the instruction
manual carefully and keep it for future reference.
IMPORTANT SAFEGUARDS
When using electrical appliances, basic safety precautions should always be followed to reduce the
risk of fire, electric shock, and/or injury to per-sons, including the following:
1. Read all instructions.
2. This appliance is not intended for use by persons (including children) with reduced physical, sensory,
or mental capabilities, or lack of experience and knowledge, unless they are closely supervised and
instructed concerning use of the appliance by a person responsible for their safety.
3. Close supervision is necessary when any appliance is used by or near children. Children should be
supervised to ensure that they do not play with the appliance.
4. Use appliance only for its intended use.
5. To avoid the risk of electric shock, do not immerse the iron in water or other liquids.
6. Always turn the iron to OFF before plugging or unplugging the iron from the electrical outlet. To unplug,
grasp the plug and pull from the outlet. Never pull from the power cord.
7. Do not let the cord touch hot surfaces. Let the iron cool completely before putting the iron away. Coil
the cord into the provided cord reel for storing.
8. Always disconnect the iron from the electrical outlet before filling the iron with water, emptying the
water from the iron, and when the iron is not in use.
9. Do not operate the iron with a damaged cord or in the event the iron has been dropped or damaged or
there are visible signs of damage or it is leaking. To avoid the risk of electric shock, do not
disassemble the iron. Supply cord replacement and iron repairs must be conducted by a qualified
serviceman or the manufacturer. Incorrect assembly might result in a risk of electric shock when the
iron is used after reassembly. Contact Customer Service for information on examination, repair, or
adjustment as set forth in the Limited Warranty.
10. The iron must be used and rested on a stable surface.
11. When placing the iron on its stand, ensure that the surface on which the stand is placed is stable.
12. Do not leave the iron unattended while the iron is connected or on an ironing board.
13. Burns can occur from touching hot metal parts, hot water, or steam. Use caution when you turn a
steam iron upside down—there might be hot water in the reservoir.
14. To avoid a circuit overload, do not operate an iron on the same circuit with another high-wattage
appliance.
15. If an extension cord is absolutely necessary, a cord with an ampere rating equal to or greater than the
maximum rating of the iron shall be used. A cord rated for less amperage can result in a risk of fire or
electric shock due to overheating. Care shall be taken to arrange the cord so that it cannot be pulled
or be tripped over.
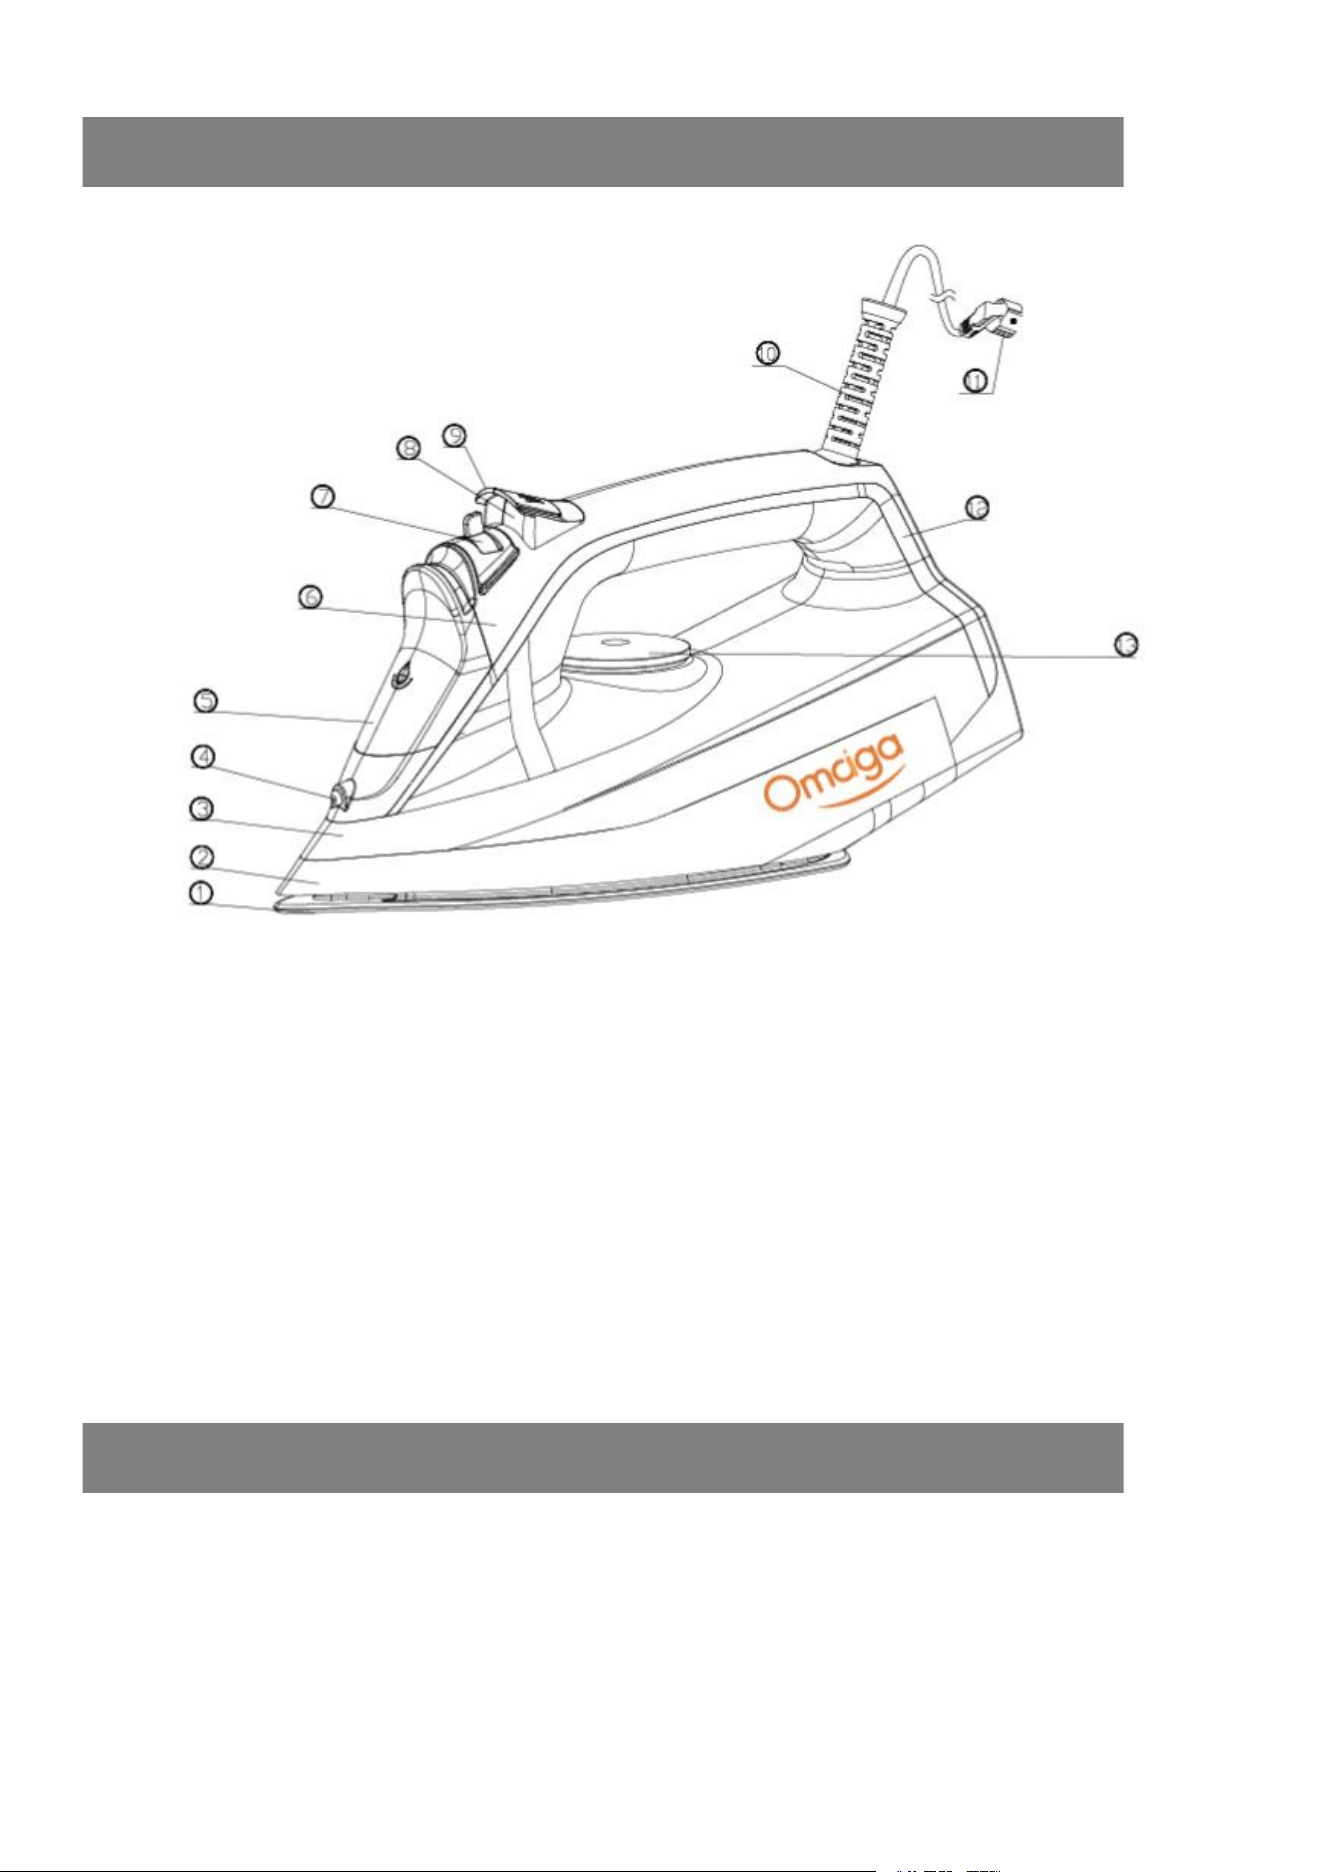
PARTS DIAGRAM
1. Soleplate
8. Spray button
2. Skirt
9. Burst button
3. Water tank
10. Cord Brushing
4. Spray Nozzle
11. Power Cord
5. Water Filler
12. Decorative Ring
6. Handle cover
13. Temperature Dial
7. Steam knob
FEARURES
120V/60Hz/1750W
Dry, steam, spray ironing
Powerful burst of steam up to 0.6 g/press
Variable steam control
Convenient swivel cord with cord wrap area
Overheat safety protection circuit
Ceramic soleplate
With indicator light and heel rest
Vertical steam feature, ideal for suits, dresses and delicate fabrics
Adjustable thermostat and steam control
Fabric temperature guide
Self-clean, Anti-calc, Anti-drip and Auto Shut Off feature
XL Water tank capacity: 400 ml
Continuous steam up to 25g /min
For domestic use only
OPERATION INSTRUCTIONS
Suggestions before using the iron for the first time
1. Certain parts of the iron have been lightly greased therefore the iron could give off a little smoke when
plugged in for the first time. This will cease after a short while.
2. Before using the iron for the first time, remove the plastic protector from the base (if it has one) clean
the base with a soft cloth.
3. Keep the base very smooth. Do not run it over metal objects (such as against the ironing board, buttons,
zips, etc. )
4. Pure wool fibres (100% wool) can be ironed with the appliance in the steam position. by preference,
select a high steam position and use a dry ironing cloth.
Selecting the temperature
1. Check the ironing instructions on the garment to be ironed.

2. If the garment does not have any ironing instructions but you know the kind of fabric in question, use
the chart below.
3. Fabrics that have some kind of finish(polishing . wrinkles , contrasts….)can be ironed at the lowest
temperatures.
4. If the fabric contains several kinds of fibres ,always select the temperature applicable ,if an article
contains 60% polyester and 40% cotton ,you must always choose the temperature corresponding to
polyester and without steam.
5. First classify the articles to be ironed according to the most suitable ironing temperature : wool with
wool, cotton with cotton, etc. as the iron heats up as fast as it cools , start by ironing the articles requiring
the lowest temperature such as those made of synthetic fibres. Progress towards those that require the
highest temperatures.
6. Turn the temperature control until it is in front of the appropriate signal according to the following:
· position for nylon and acetate
·· position for wool, silk or mixtures
··· position for cotton or linen (steam)
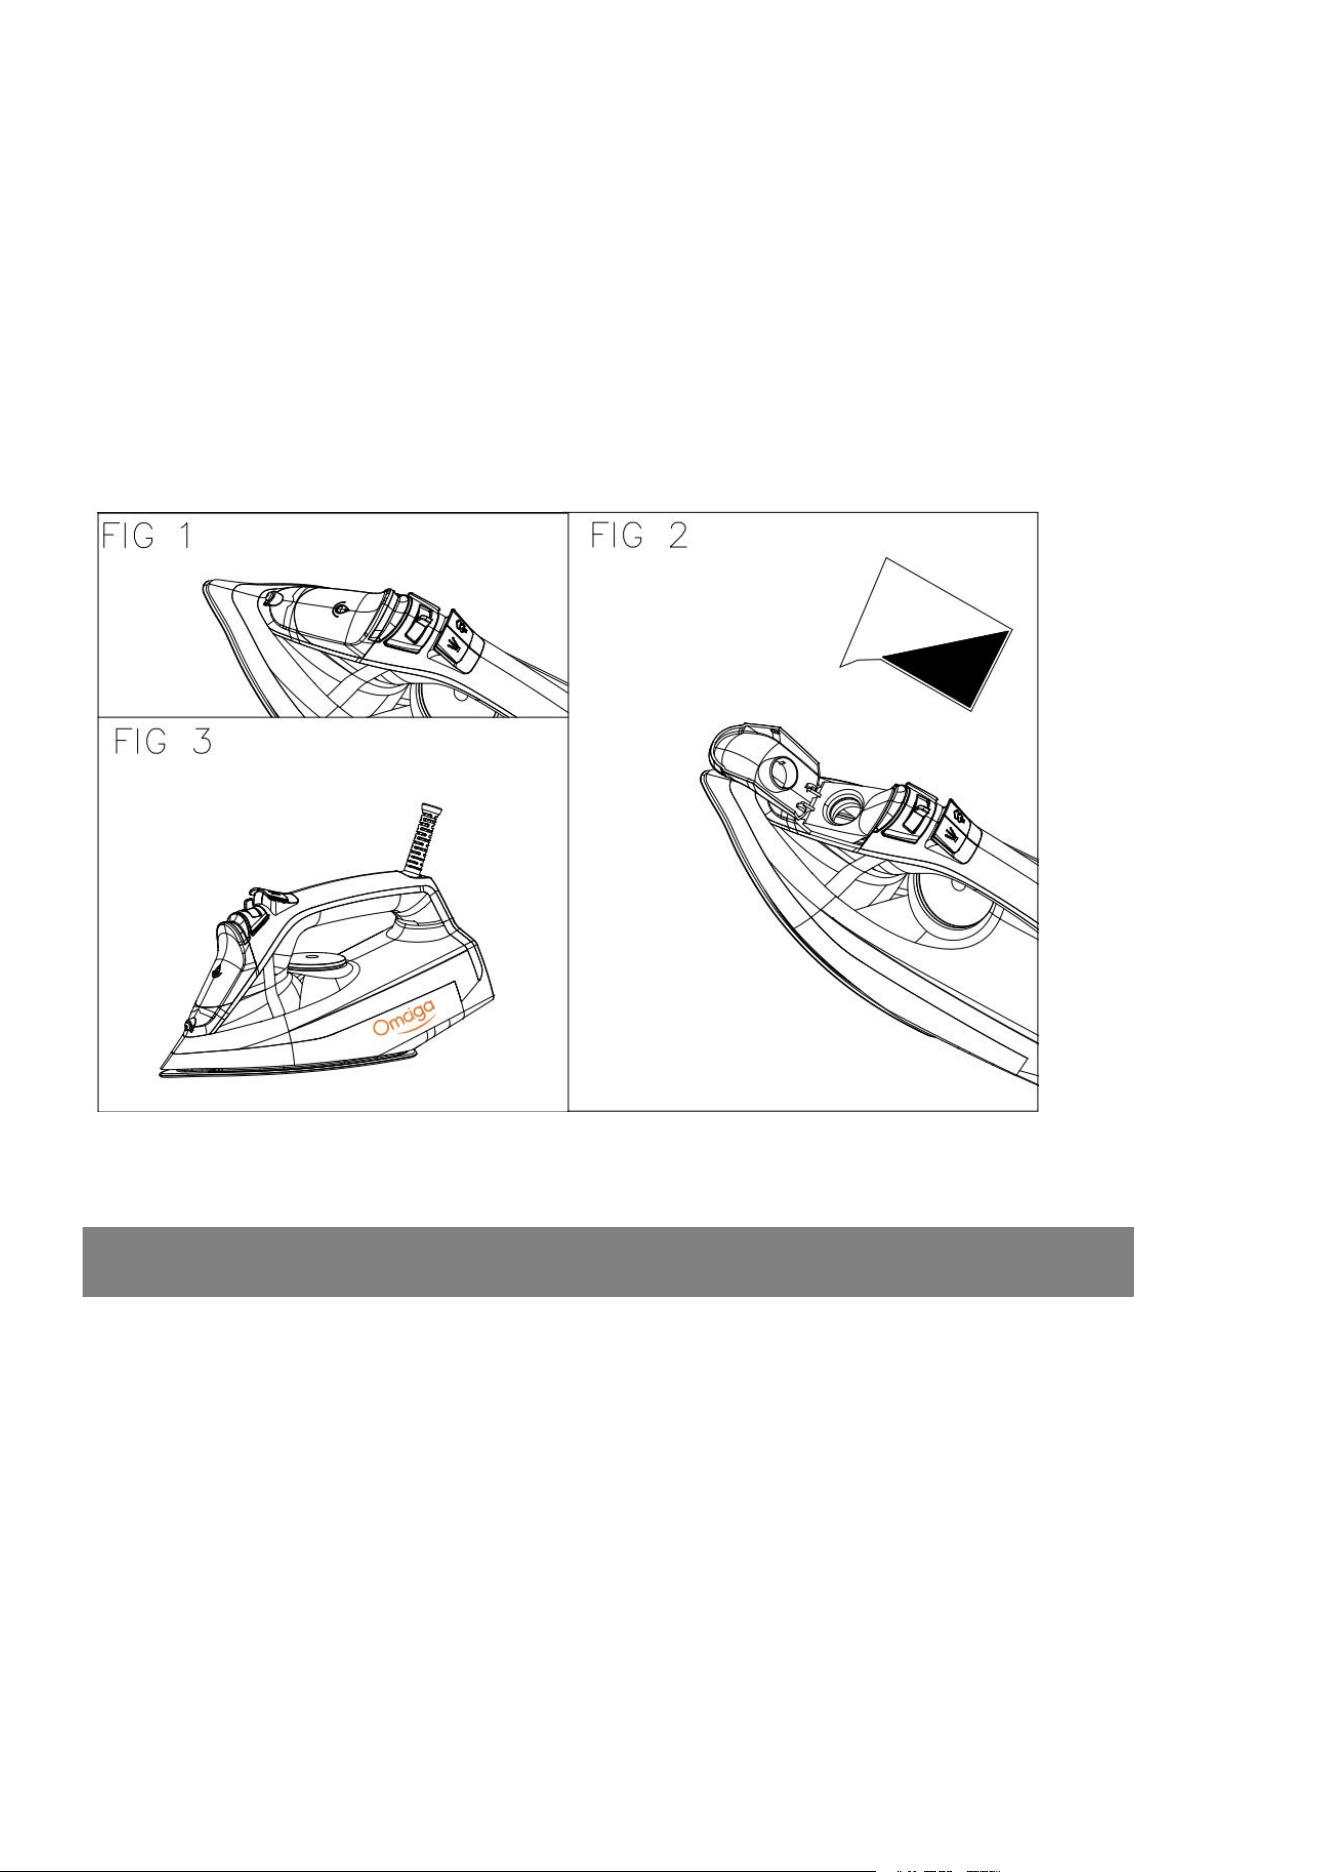
How to fill the water tank
1. Unplug the iron.
2. Set the steam button to dry ironing. (fig.1)
3. Fill the tank through the filling hole. (fig.2)
-If you have hard water, it is advisable to use only distilled or demineralized water.
-do not use chemically de-limed water or perfumed
4. Do not store the iron with water in the tank.
Steam ironing
1. Fill the iron as described in the section “how to fill the water tank”.
2. Plug the iron into the mains.
3. Steam ironing is only possible when the highest temperatures shown on the temperature control are
selected .
Otherwise ,water may escape through the soleplate.
4. Wait until the pilot light goes out, which indicates that the selected temperature has been reached.
5. Turn the steam button to the required position.
6. When the ironing is finished and during breaks in ironing, place the iron in its upright position.
7. Disconnect the iron from the mains supply. Pour of any remaining water and leave the iron to cool off.
Spray
1. The spray can be used in any position, either in dry or steam ironing, as long as the water tank is filled
with water.
2. Press the spray button for this function
NOTE: This button has to be pressed repetitively to start this function for the first time.
Shot of steam
Shot of steam give extra steam for removing persistent wrinkles.
1. Place the temperature selector at the “max” (fig.3) position and wait until the pilot light goes out
2. Wait for a few seconds for the steam to penetrate the fibre before pressing again.
NOTE: For the best steam quality, do not use more than three successive bursts each time. Several
pumping actions are needed to start this function.

Excessive use of this feature will cause the iron to cool , ensure that the pilot light is out, before
operating the shot of steam control
Defects and repairs
Do not attempt to replace a defective mains lead .The appliance has to be returned to an authorized
service centre for repair.
FAULTS-REASONS AND SOLUTIONS
Iron emits an odor or smoke
Iron gives off an odor when turned on for the first time. Oils used during manufacture need to be burnt off
allow ten minutes for odor to disappear.
Iron does not heat
The iron should be plugged into a 120 Volt, AC electrical outlet only. The temperature dial must be set at
the desired temperature.
Iron does not steam
The water tank many be empty. Turn the steam valve to
“ ”
and add water .Allow the iron to heat, and
then set the steam dial to the steam setting.
Burst of steam feature does not work
The water tank must be at least 1/4 full .Temperature must be set to steam position. Iron should be in the
horizontal position. Prime pump briefly. Allow a short pause between shots. Be sure to fully depress the
burst of steam button.
Spry mist feature does not work
The water tank must be at least 1/4 full. Fill the iron as described in the section “how to fill the water tank”.
Iron is leaking
The variable steam dial must be set on” “,until the iron is hot . The temperature setting is too low to
produce steam. Shot of steam used too much, allow iron to re-heat.
Email: omaiga_serv[email protected]
