
INSTRUCTION MANUAL
MODEL NO: OM-951RV
Corded and Cordless Iron

OMAIGA Corded&Cordless IRON
Congratulations on purchasing the Omaiga Corded & Cordless Iron. Each unit is
manufactured to ensure safety and reliability. Before using this appliance for the first time,
please read the instruction manual carefully and keep it for future reference.
IMPORTANT SAFEGUARDS
When using electrical appliances, basic safety precautions should always be followed to
reduce the risk of fire, electric shock, and/or injury to per-sons, including the following:
1. Read all instructions.
2. This appliance is not intended for use by persons (including children) with reduced physical,
sensory, or mental capabilities, or lack of experience and knowledge, unless they are closely
supervised and instructed concerning use of the appliance by a person responsible for their
safety.
3. Close supervision is necessary when any appliance is used by or near children. Children
should be supervised to ensure that they do not play with the appliance.
4. Use appliance only for its intended use.
5. To avoid the risk of electric shock, do not immerse the iron in water or other liquids.
6. Always turn the iron to OFF before plugging or unplugging the iron from the electrical outlet. To
unplug, grasp the plug and pull from the outlet. Never pull from the power cord.
7. Do not let the cord touch hot surfaces. Let the iron cool completely before putting the iron away.
Coil the cord into the provided cord reel for storing.
8. Always disconnect the iron from the electrical outlet before filling the iron with water, emptying
the water from the iron, and when the iron is not in use.
9. Do not operate the iron with a damaged cord or in the event the iron has been dropped or
damaged or there are visible signs of damage or it is leaking. To avoid the risk of electric shock,
do not disassemble the iron. Supply cord replacement and iron repairs must be conducted by a
qualified serviceman or the manufacturer. Incorrect assembly might result in a risk of electric
shock when the iron is used after reassembly. Contact Customer Service for information on
examination, repair, or adjustment as set forth in the Limited Warranty.
10. The iron must be used and rested on a stable surface.
11. When placing the iron on its stand, ensure that the surface on which the stand is placed is
stable.
12. Do not leave the iron unattended while the iron is connected or on an ironing board.
13. Burns can occur from touching hot metal parts, hot water, or steam. Use caution when you turn
a steam iron upside down—there might be hot water in the reservoir.
14. To avoid a circuit overload, do not operate an iron on the same circuit with another
high-wattage appliance.
15.
If an extension cord is absolutely necessary, a cord with an ampere rating equal to or greater
than the maximum rating of the iron shall be used. A cord rated for less amperage can result in
a risk of fire or electric shock due to overheating. Care shall be taken to arrange the cord so
that it cannot be pulled or be tripped over.
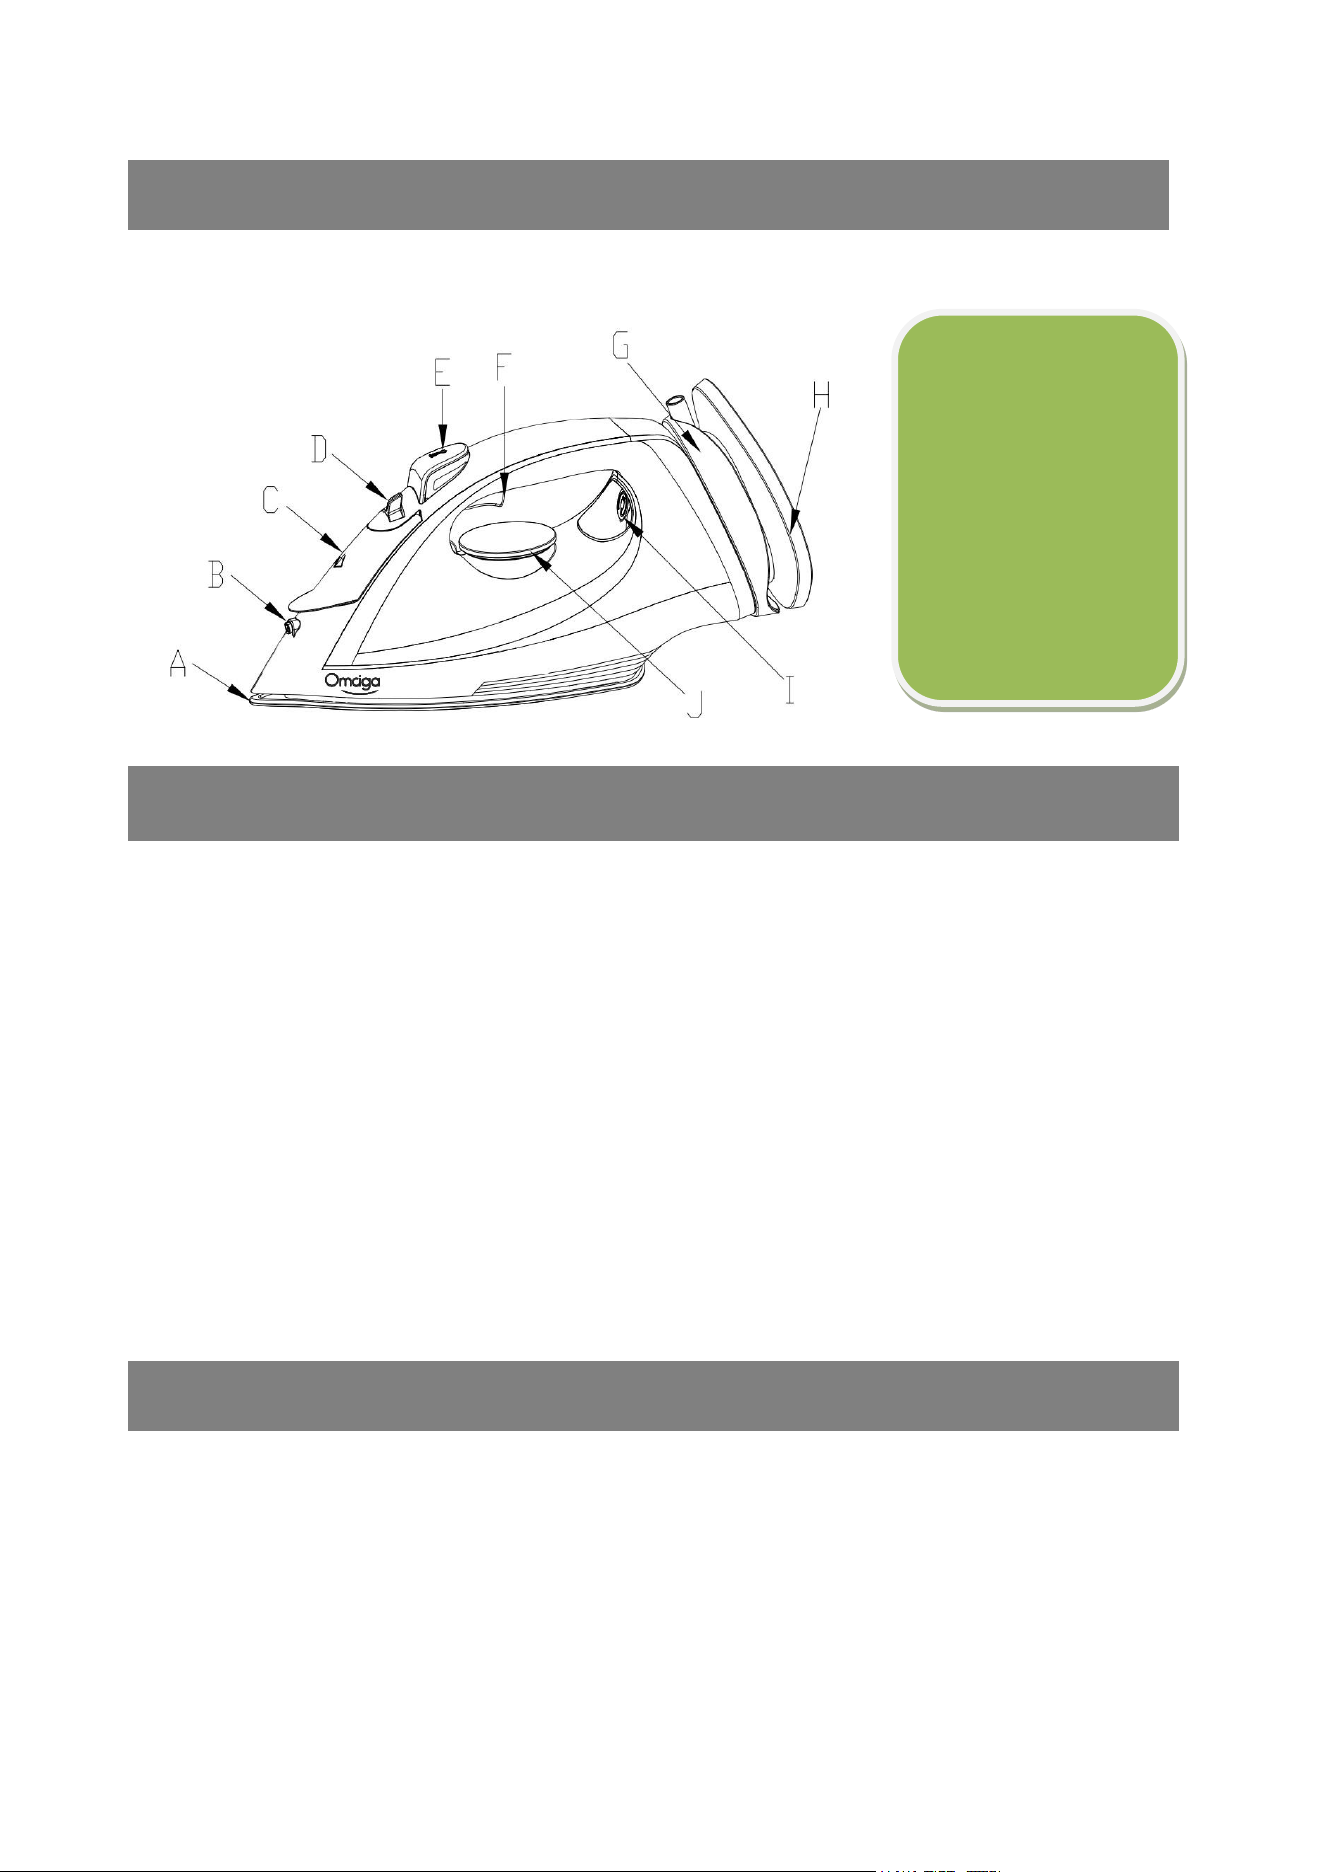
PARTS DIAGRAM
FEARURES
120V/60Hz/1550W
Corded and Cordless Iron with dry, steam, spray
Powerful burst of steam up to 0.6 g/press
Variable steam controlled through Temperature dial
Ceramic soleplate
With indicator light and heel rest
Vertical steam feature, ideal for suits, dresses and delicate fabrics
Adjustable thermostat and steam control
Fabric temperature guide
Self-clean, Anti-calc, Anti-drip and Auto Shut Off feature
Water tank capacity: 350ml
Continuous steam up to 20g /min
OPERATION INSTRUCTIONS
Before first use
1. Remove all adhesives and protective film, or the protective film of the bottom plate.
2. Follow the instructions below, fill the tank with water, set the iron to the highest setting, and
then iron a wet cloth for a few minutes to thoroughly clean the sediment.
Note: there may be peculiar smell when using for the first time. It will disappear after several
times. Please feel free to use it.
A.
Bottom board
B.
Spray nozzle
C. Water inlet cover
D. Steam button
E. Spray button
F. Button button
G. Charging base
H. Support pedestal
I. Indicator light
J. Temp knob

Description of charging base status
The whole iron set can be separated into three parts (The following pictures):respectively ①
Iron body
②
Power connection base
③
Support pedestal
The power connection base is integrated by whether the lock is stuck into the slot of the back
cover of the iron.
Lock position (The following figure left).
The lock is controlled by pressing the lock buttons on both sides of the rear end of the
power-connected base(The picture above)
1-Lock button
2-lock catch
Iron、charging base merge
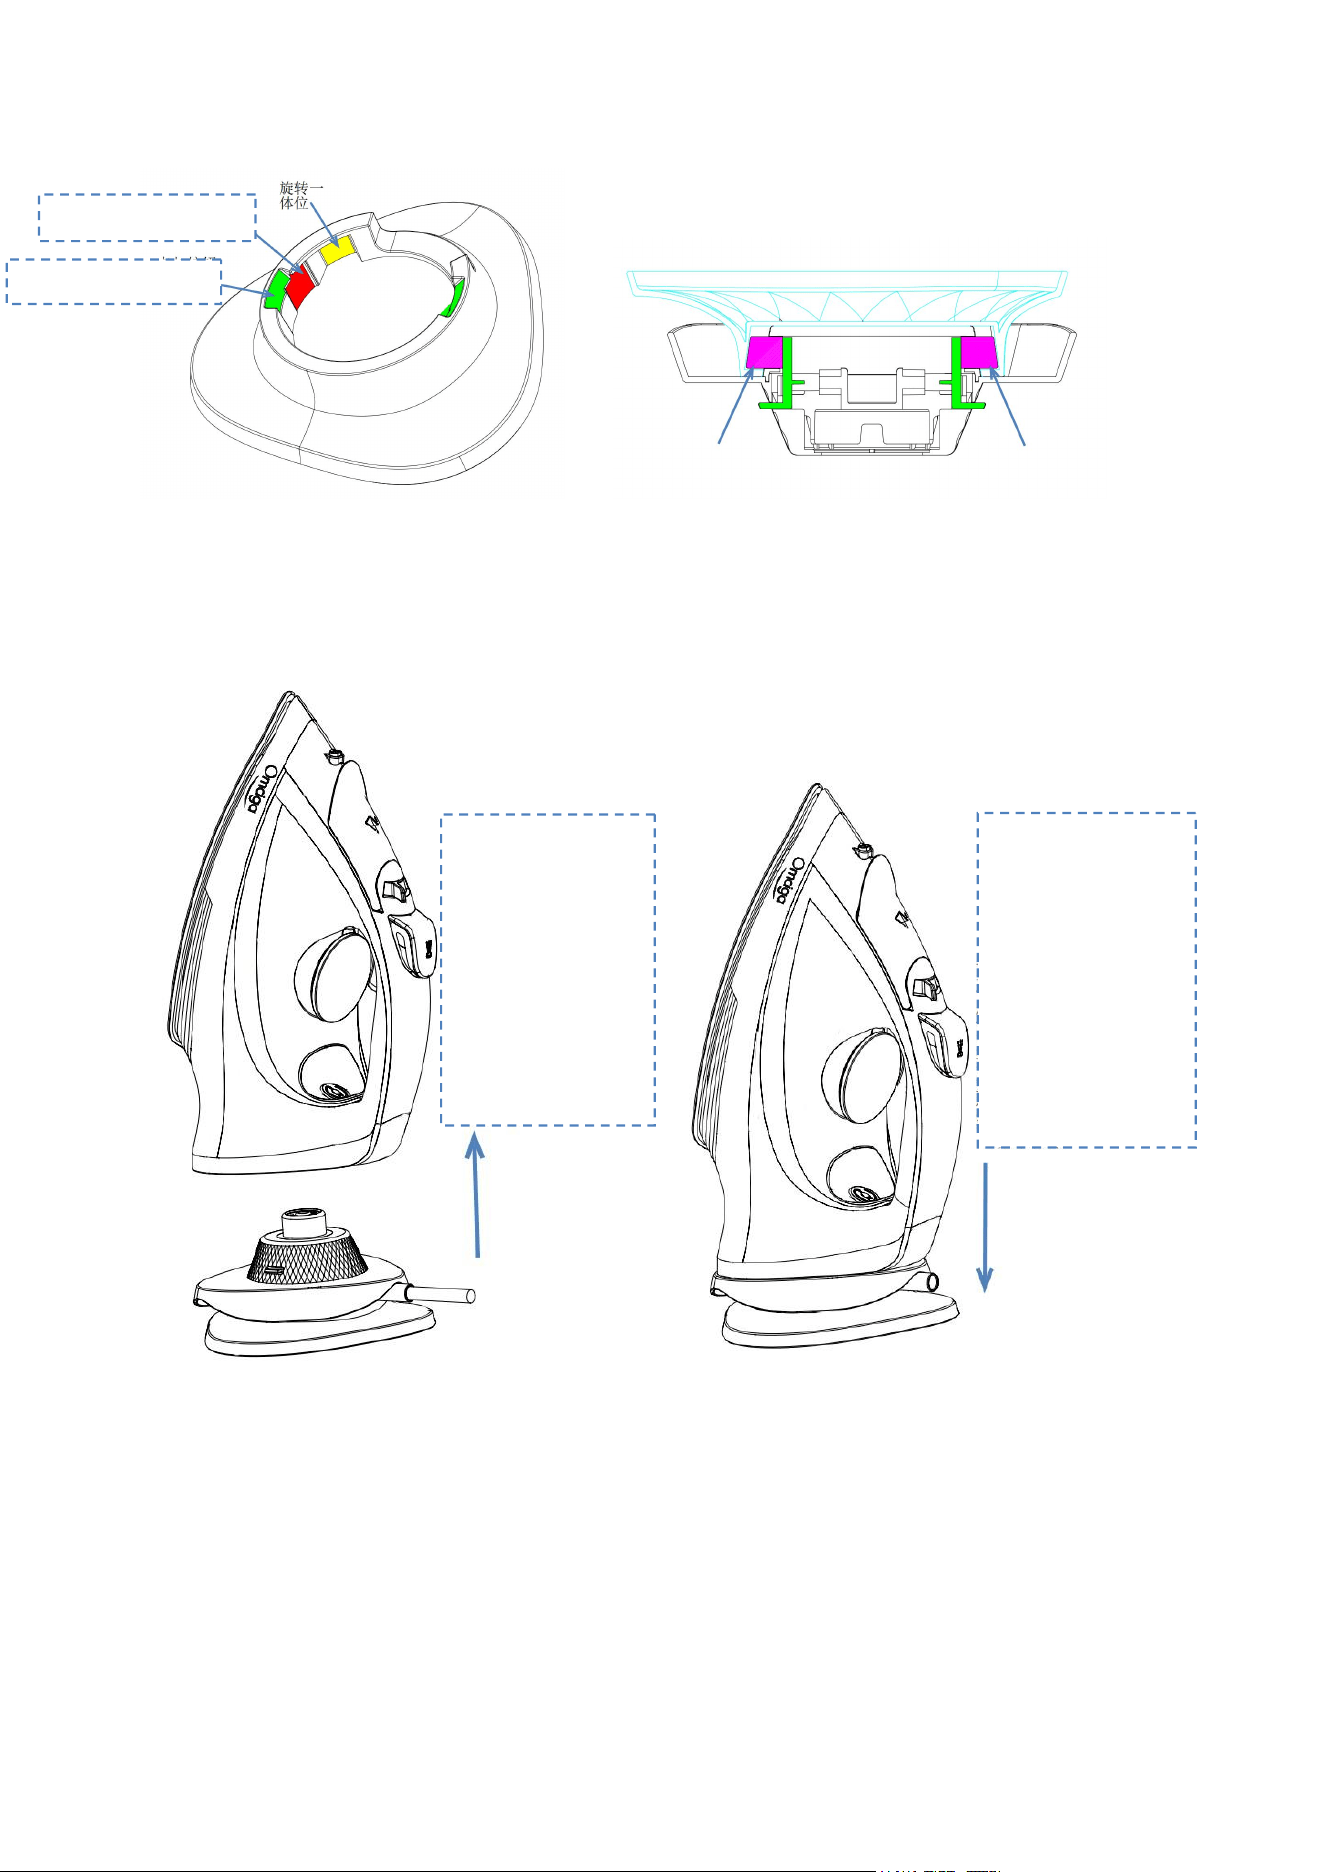
The Support pedestal card is shown on the left in the figure above. The green part shows the
locking position on both sides of the rear end of the power connection base
,
After clamping, the
support base is integrated with the power connection base by rotating to the dark red position, and
it is in a free wireless state with the iron
(
Pick up the iron is in the separation power state, otherwise
in the power state.
)
as shown in the following figure.
Then put the iron on the power connection base. When the yellow position of the support base is
rotated to the power connection base, the support base, the power connection base and the iron
are integrated. In a state of unseparated wires.
(
as illustrated in following figure
)
Iron、charging base separation
Lock button Card into the position
The charging base
assembly is placed
flat on the table, and
the iron can be
picked up and
ironed freely when
heated (Can be
separated)
Iron about 35S heat
without steam can
be put into the base
to continue heating,
the indicator light is
heating, the
indicator light is
finished heating.
(Can be separated)
In wired state, there is also no need to support the base, which can be achieved by manually pressing the lock
on both sides of the rear end of the base connected by the power supply and clamping into the back cover of
the iron.(as illustrated in following figure)
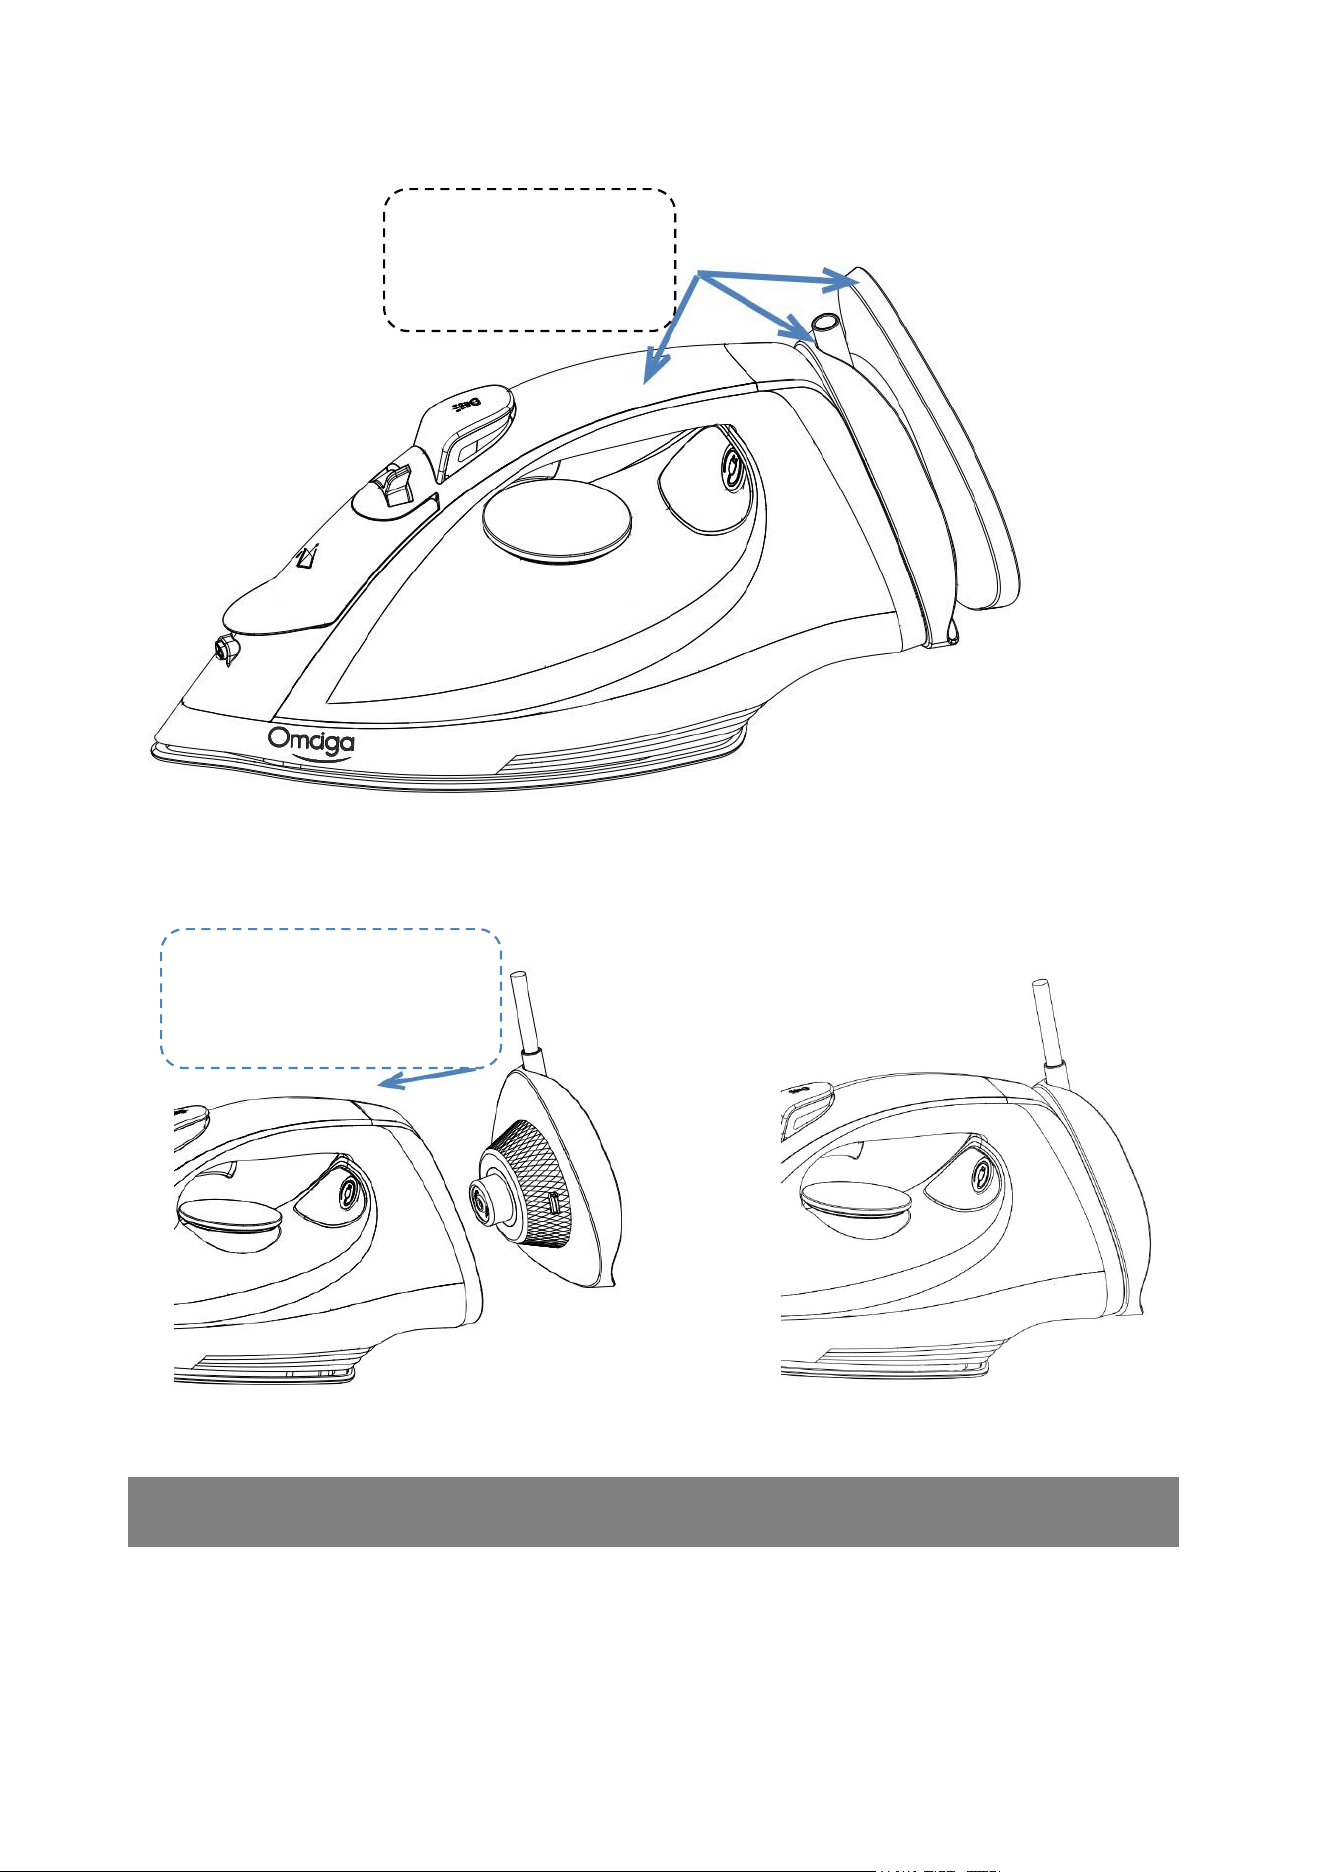
OPERATION
1. Open the cover of the water nozzle, let the iron in a slightly tilted position, and then fill the water
tank with appropriate amount of water through the water injection hole with a measuring cup.
Try to use pure water or distilled water with low calcium content to ensure that the water level
The support seat, power
connection seat and iron
are in a combined state.
This is achieved by manually
pressing the latch on both sides
of the rear end of the power
connection base into the back
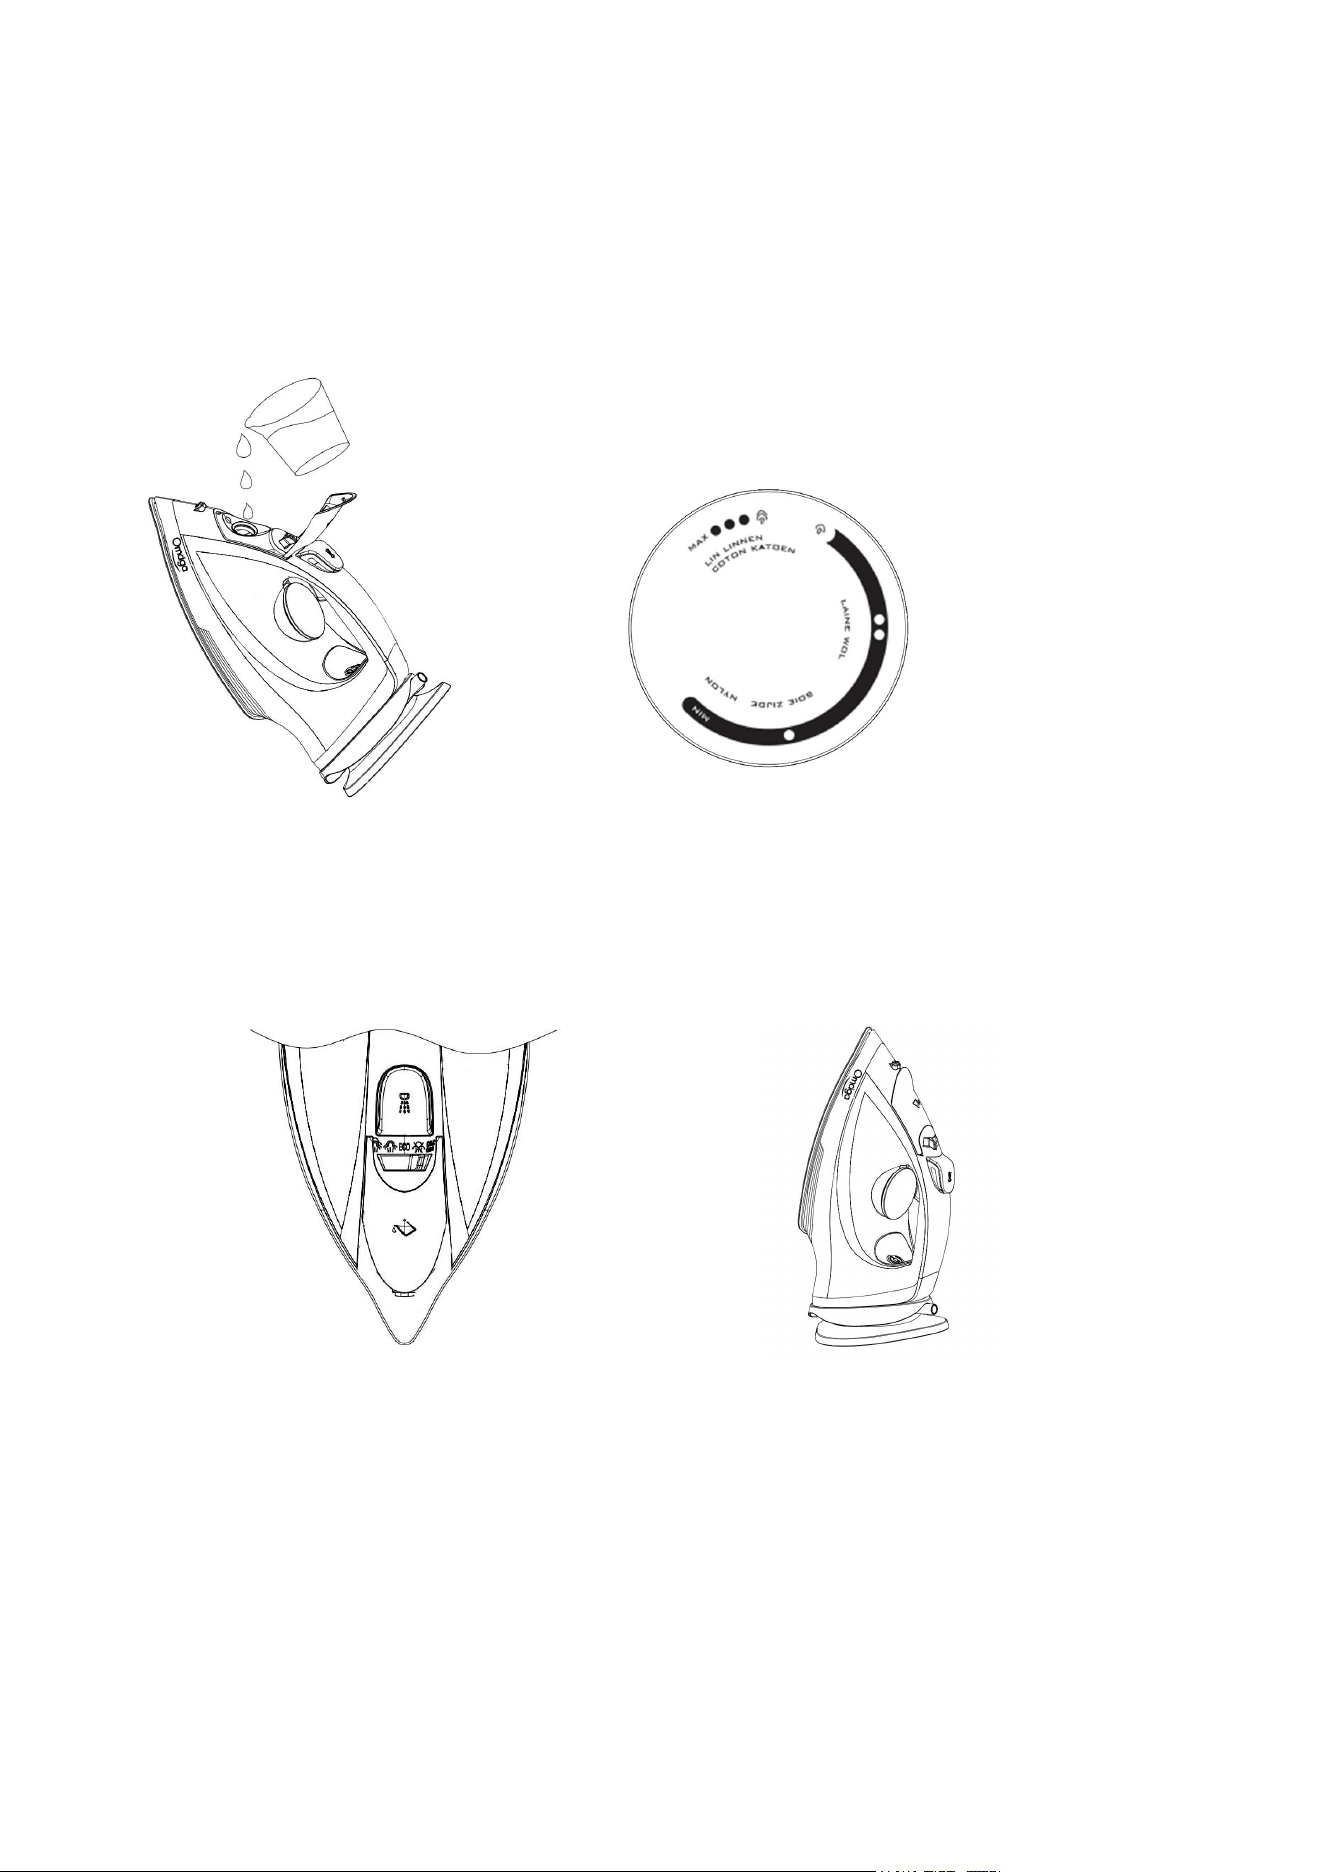
does not exceed the maximum water level
(
figure 1
)
.
2. Press down the Water Inlet cover. When the Water inlet cover is pressed into the correct position,
a stuck sound will be heard.
3. Plug in the power and turn temp knob to your desired ironing temperature (depending on
different clothes). Then the temperature indicator will turn on. Please refer to figure 2 and the
ironing instructions at the back for more details. (figure 2)
(
figure 1
)
(
figure 2
)
4. Make sure the steam knob is in the vapor-free position (figure 3). Then place the iron as shown
in figure 4
(figure3) (figure4)
5. Once the temperature of the bottom plate reaches your preset temperature, the indicator light
will go off and turn the steam knob to your desired intensity or to the vapor-free position to begin
ironing.
Warning: bottom plate temperature is very high, be careful to be ironed!
6. Moisten the clothing by pressing the spray button a few times if necessary. But before
pressing should pay attention to whether there is water in the tank.

7. Strong vapors are best used at the highest temperature. They help remove wrinkles that are
difficult to remove.
8. This iron can be erected and placed to emit a strong steam, if the ironing of hanging clothes,
curtains and other folds, this method is very convenient.
CLEANING AND MAINTENANCE
After each use
1. After ironing, unplug and drain the water tank.
2. Reconnect the iron to the power supply and remove the plug after the indicator light is off to dry
the bottom plate.
3. Allow the iron to cool thoroughly, then use a damp cloth with a non-abrasive detergent to remove
scale and other deposits from the bottom.
4. Clean the top of the iron with a damp cloth.
5. Place the iron horizontally on a dry surface and place a cloth under the bottom plate to protect it.
Cleansing function
Depending on the hardness of the water and the frequency of use, we should clean the product
regularly.
1. Fill the tank with water and set the temperature to maximum
(
MAX
)。
2. Connect the power supply, the indicator light becomes bright, confirm that the switch is in the
position of no steam, and then place it as shown in Figure 4.
Note: Do not pour vinegar or other detergent into the tank!
3. After the light is off, place the iron over the sink and push the steam button back to the automatic
cleaning position with a little force. Steam and hot water will be discharged from the bottom plate,
as well as sediment and scale.
Release the button once the water has drained from the tank.
Note: in order to keep the bottom plate smooth, try to avoid metal friction bottom
plate!
INSTRUCTIONS
·
Before ironing, check whether there is an instruction label on the ironed item. (Please refer to the
attached chart.)
Follow the ironing instructions in all cases.
· If there is no ironing instruction, but you know the material, please refer to the chart instruction.
· The chart only applies to the material used in the clothing. For specially treated textiles (gloss,
pleats, ridges, etc.), iron at a lower temperature.

· First, the clothes are sorted according to the appropriate ironing temperature: wool clothes are
ironed together, cotton clothes are ironed together in another batch, etc.
· The iron heats up faster than it cools down. Therefore, start with items requiring a lower
temperature, such as synthetic fabrics. And then it's a little bit warmer. Iron the linen and linen
last.
· Fabrics containing blends are ironed according to the lowest temperature of the material. If you
don't know what fibers clothing is made of, find a place to iron it out of sight and try what
temperature works best. (Try ironing from low temperature to select the most suitable
temperature).
· Pure wool can use steam to iron smooth, had better pad piece cloth first, add a lot of steam to
iron with medium high temperature next.
· Velvet and other shiny textiles should be lightly pressed in the wool direction. Always move the
iron when ironing.
· Synthetic and silk fabrics should be ironed inside to prevent shine. In order to avoid color stains,
do not directly spray silk and other fiber clothing.
attached list
:
Indication
label
Clothing
material
category
thermal
control
steam
injection
Strong
steam
Water spray
button
Note: "√" indicates that it can be used; X indicates that it is unavailable.
Email: omaiga_serv[email protected]
0
MAX
Synthetic
fibres/Silk
Wool
Cotton
Linen
Note: the symbol m ea n s: "T h is ar ti c le ca n no t b e ir on e d! ”
