INDOOR COOKING
GAS SELF-CLEAN RANGE w/ OPEN BURNERS - GSCR
GAS SELF-CLEAN RANGE w/ SEALED BURNERS - CGSR
USE & CARE MANUAL
INSTALLATION MANUAL
Proudly
Made In
USA
Do not store or use gasoline or other ammable vapors and Do not store or use gasoline or other ammable vapors and
liquids in the vicinity of this or any other appliance.liquids in the vicinity of this or any other appliance.
WHAT TO DO IF YOU SMELL GAS:WHAT TO DO IF YOU SMELL GAS:
1. Do not try and light any appliance.Do not try and light any appliance.
2. Do not touch any electrical switch.Do not touch any electrical switch.
3. Do not use any phone in your building.Do not use any phone in your building.
4. Immediately call your gas supplier from a neighbor’s Immediately call your gas supplier from a neighbor’s
phone. Follow the gas supplier’s instructions.phone. Follow the gas supplier’s instructions.
5. If you cannot reach your gas supplier, call the re If you cannot reach your gas supplier, call the re
department.department.
Installation and service must be performed by a qualied Installation and service must be performed by a qualied
installer, service agency, or the gas supplier.installer, service agency, or the gas supplier.
IF THE INFORMATION IN THIS MANUAL IS NOT IF THE INFORMATION IN THIS MANUAL IS NOT
FOLLOWED EXACTLY, A FIRE OR EXPLOSION FOLLOWED EXACTLY, A FIRE OR EXPLOSION
MAY RESULT CAUSING PROPERTY DAMAGE, MAY RESULT CAUSING PROPERTY DAMAGE,
PERSONAL INJURY, OR DEATH.PERSONAL INJURY, OR DEATH.
THIS INDICATES THAT DEATH OR SERIOUS INJURY
MAY OCCUR AS A RESULT OF NOT OBSERVING THIS
WARNING.
THIS INDICATES THAT MINOR OR MODERATE INJURY
MAY OCCUR AS A RESULT OF NOT OBSERVING THIS
WARNING.
THIS INDICATES THAT DAMAGE TO THE APPLIANCE
OR PROPERTY MAY OCCUR AS A RESULT OF NOT
OBSERVING THIS WARNING.
CAUTION
NOTICE
READ THESE INSTRUCTIONS CAREFULLY AND COMPLETELY
BEFORE INSTALLING OR USING YOUR APPLIANCE TO REDUCE
THE RISK OF FIRE, BURN HAZARD, OR OTHER INJURY.
KEEP THIS MANUAL FOR FUTURE REFERENCE.
INSTALLER: LEAVE THIS MANUAL WITH THE OWNER OF THE APPLIANCE.
HOMEOWNER: RETAIN THIS MANUAL FOR FUTURE REFERENCE.
Never operate the Top Surface Cooking Section of this appliance Never operate the Top Surface Cooking Section of this appliance
unattended.unattended.
Failure to follow this warning statement could result in re, Failure to follow this warning statement could result in re,
explosion, or burn hazard that could cause property damage, explosion, or burn hazard that could cause property damage,
injury, or death.injury, or death.
If a re should occur, keep away from the appliance and If a re should occur, keep away from the appliance and
immediately call your re department.immediately call your re department.
DO NOT ATTEMPT TO EXTINGUISH AN OIL/GREASE FIRE WITH WATER.DO NOT ATTEMPT TO EXTINGUISH AN OIL/GREASE FIRE WITH WATER.
SAFETY DEFINITIONS
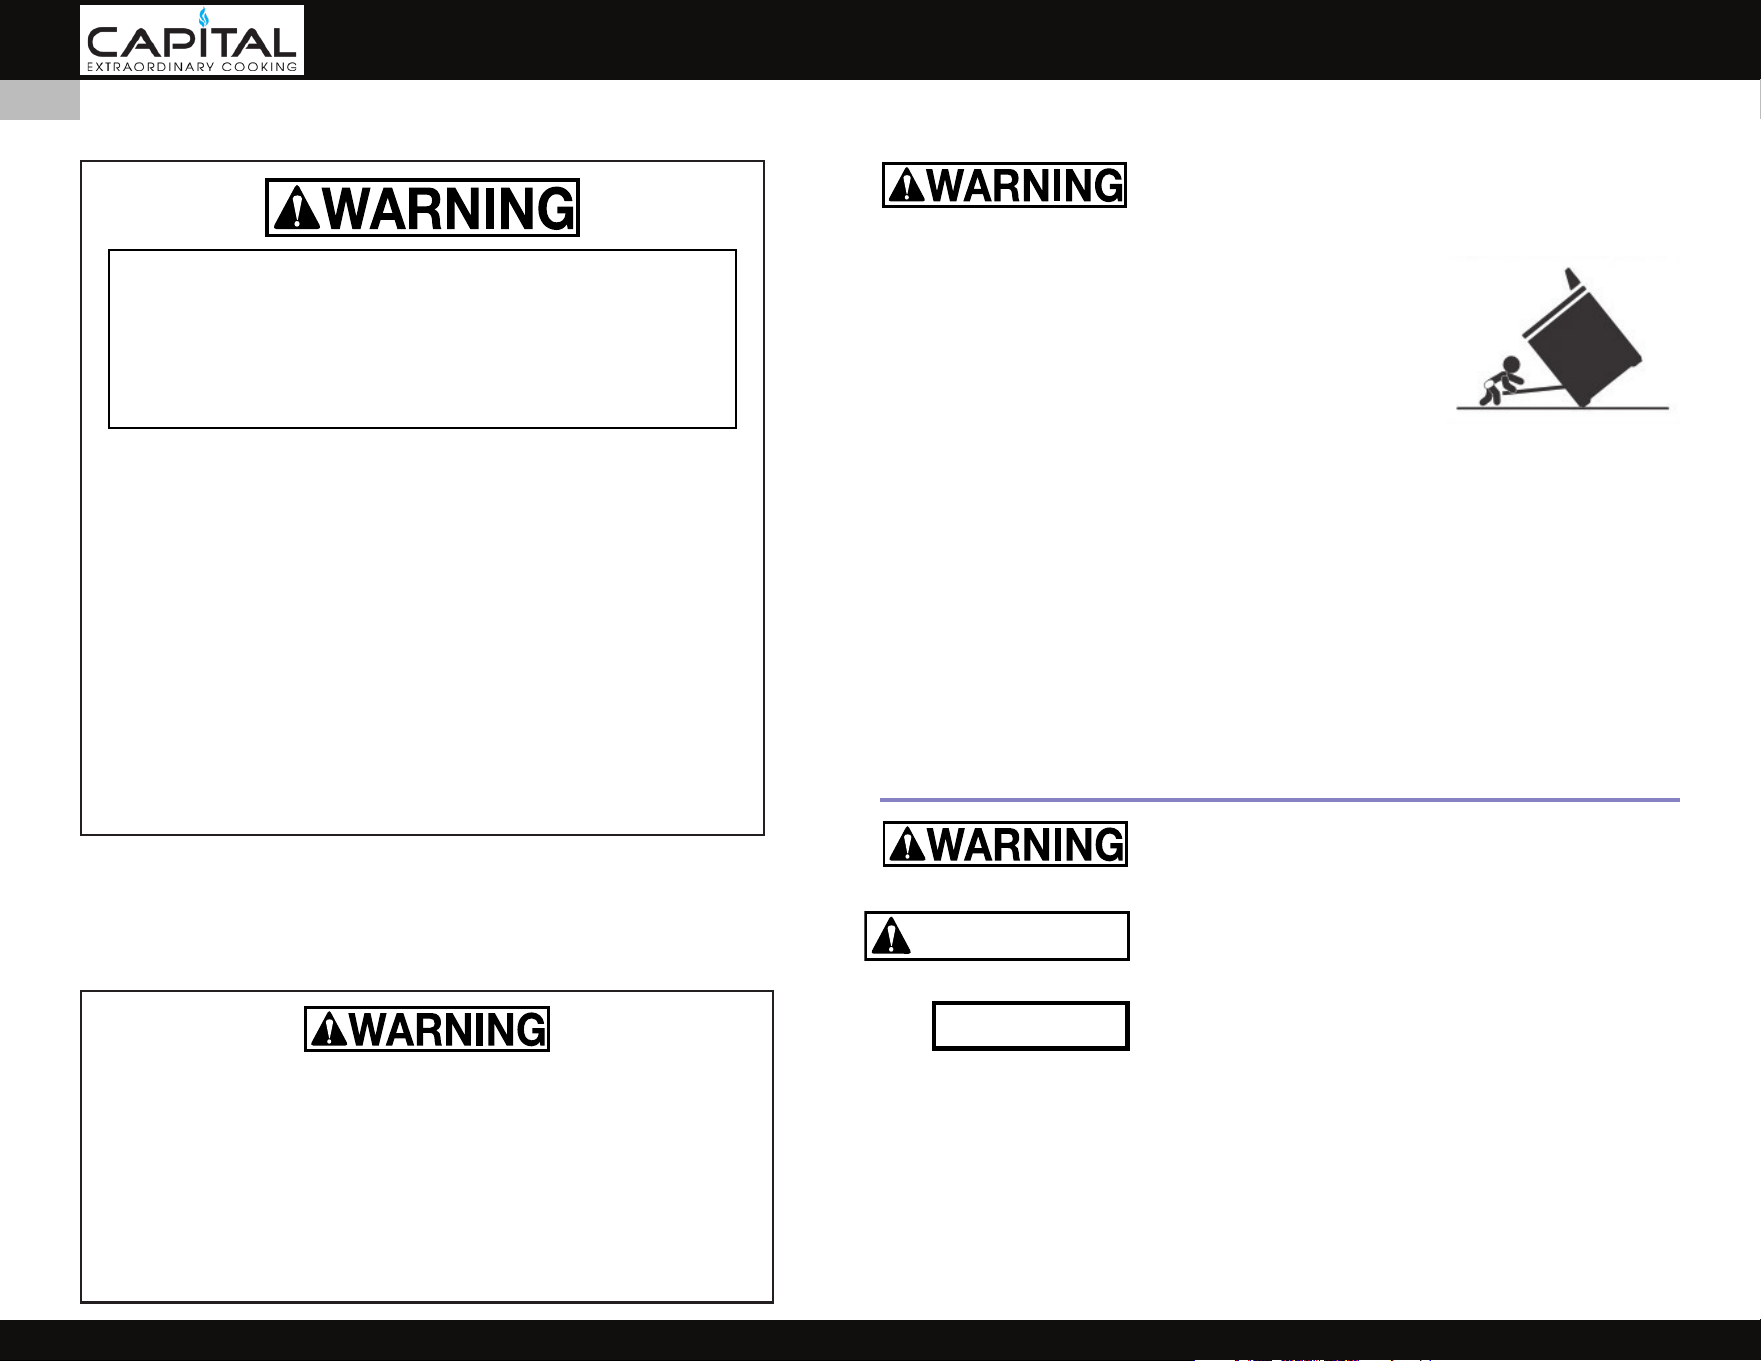
TIP OVER HAZARD
A child or adult can tip over a range and be killed.
Check installation of the anti-tip device per the
INSTALLATION INSTRUCTIONS section in this manual.
Do not operate the range without this device in place.
Check engagement of anti-tip device if range is moved,
such as when cleaning behind the unit.
To check engagement, carefully tip the range forward
while pulling from the rear of the unit. The range should not move more
than 1 inch [25 mm].
Failure to follow these instructions can result in death or serious burns to
children and adults.
To reduce the risk of burns, do not move this appliance while hot.
© 2025 Capital Cooking
EN
When properly cared for, your Capital Cooking appliance will provide many years of safe, reliable service. When using this or any appliance, basic safety
practices must be followed as outlined below.
INSTALLER: Please leave this manual with the owner.
HOMEOWNER: Please retain this manual for future reference.
This range is designed for residential use ONLY. It is NOT designed for installation in recreational vehicles or for commercial purposes. Do NOT install this
range outdoors. See the REGULATORY / CODE REQUIREMENTS section for more details.
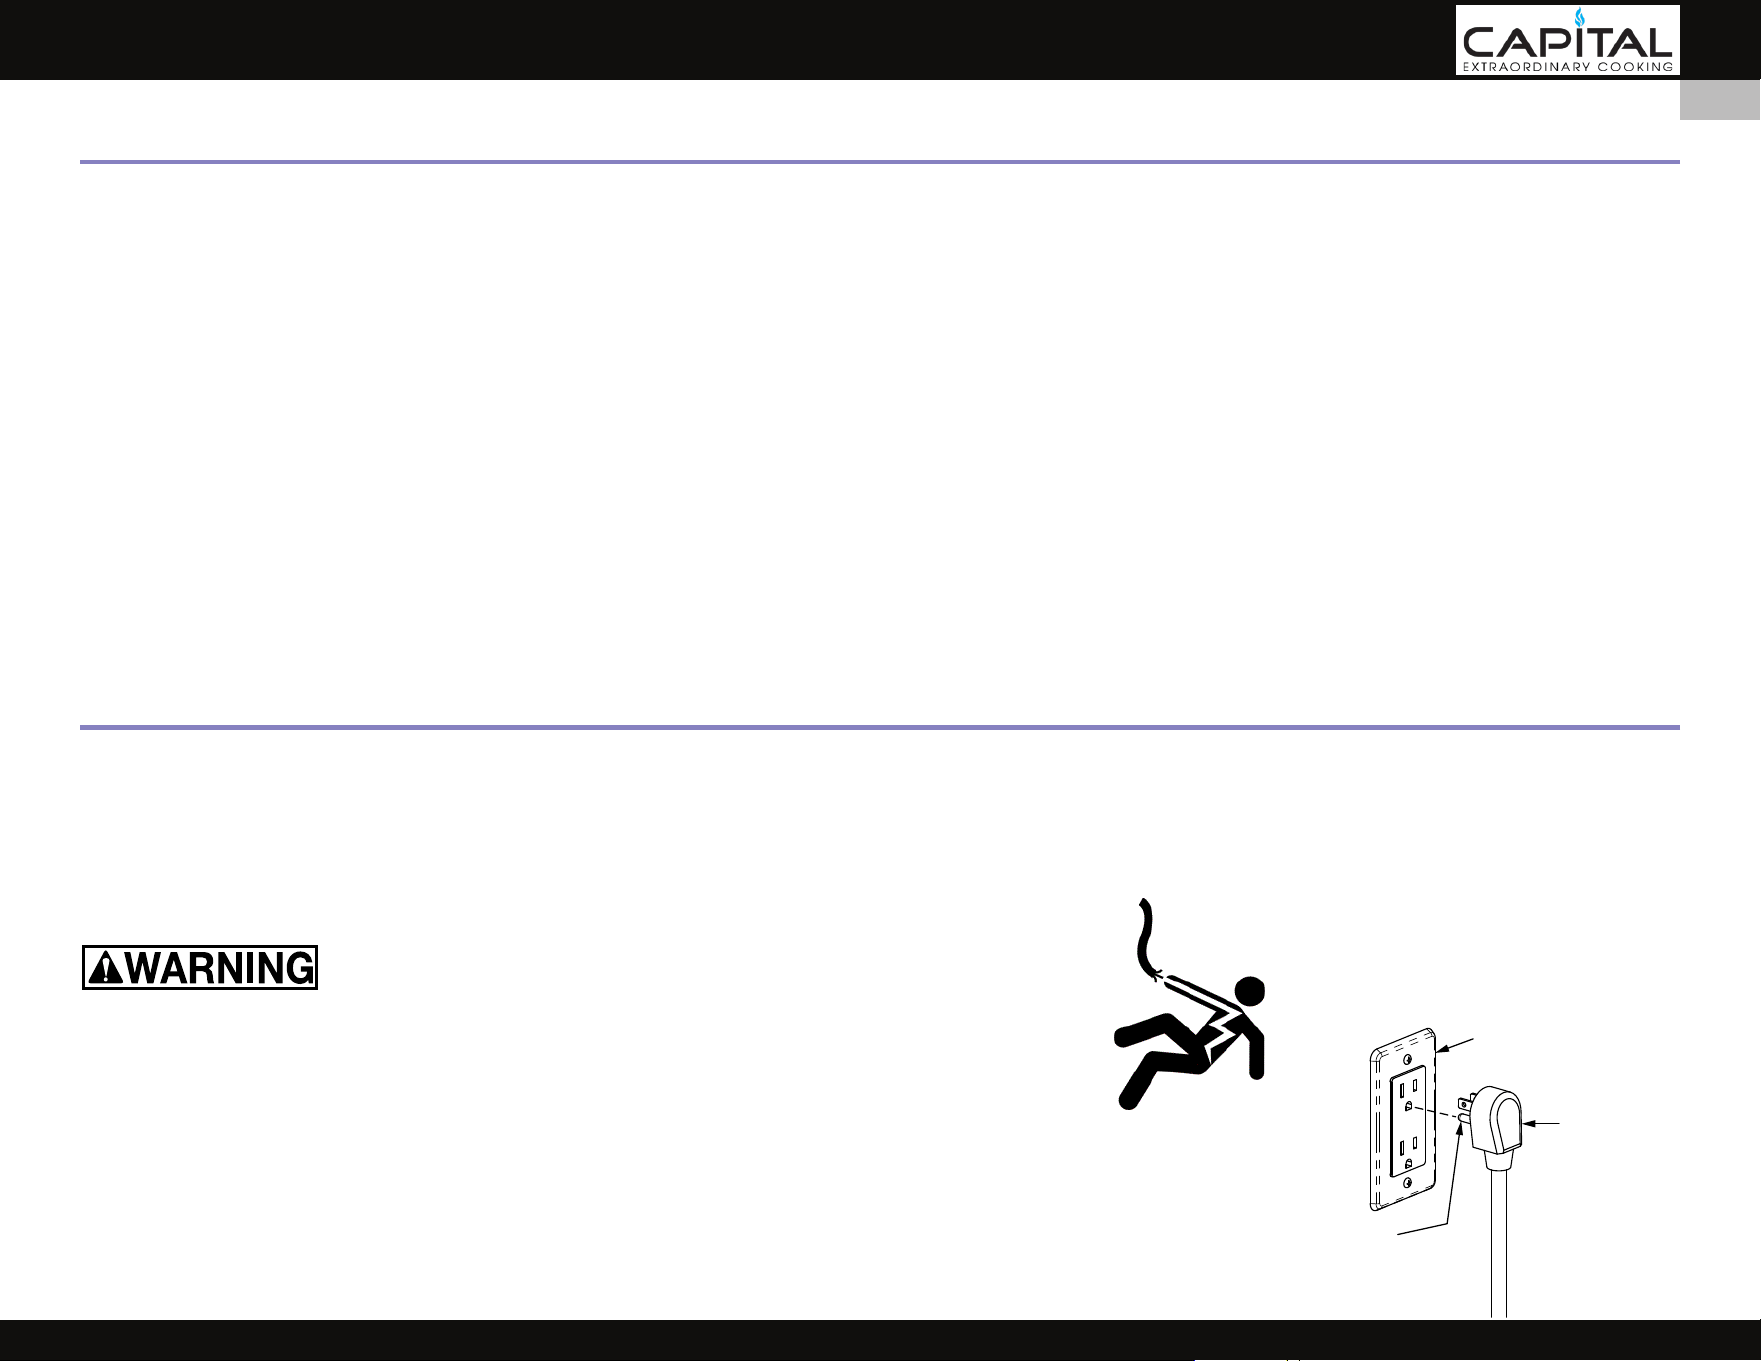
ELECTRICAL SHOCK HAZARD
Disconnect power before installing or servicing appliance. Before turning power ON, be sure all
controls are in the “OFF” position. Failure to do so can result in electrical shock or death.
ELECTRICAL GROUNDING
This appliance must be grounded. Grounding reduces the risk of electric shock in the event of a short circuit. Read
the ELECTRICAL CONNECTIONS section of the INSTALLATION INSTRUCTIONS section for complete instructions.
This appliance is equipped with a 3-prong grounding plug for your protection against shock hazard and should be
plugged directly into a properly grounded receptacle. Do not cut or remove the grounding prong from this plug.
1 SAFETY PRECAUTIONS - BEFORE YOU BEGIN
6 MODEL NUMBERS
8 RATING LABEL
8 REGULATORY / CODE REQUIREMENTS
9 GETTING STARTED WITH YOUR APPLIANCE
12 USING THE RANGETOP
15 USING THE GRIDDLE / GRILL (SOME MODELS)
18 USING THE POWER WOK (SOME MODELS)
19 USING THE OVEN - BAKE, BROIL, ROTISSERIE
26 OVEN SELF-CLEAN
27 CARE AND MAINTENANCE
31 ADDITIONAL ITEMS
32 TROUBLESHOOTING GUIDE
TABLE OF CONTENTS - USE & CARE TABLE OF CONTENTS - INSTALLATION
SAFETY PRECAUTIONS - BEFORE YOU BEGIN
34 SAFETY PRECAUTIONS - BEFORE YOU BEGIN
35 MODEL NUMBERS / RATING LABEL / REGULATORY CODE REQUIREMENTS
36 LOCATION AND INSTALLATION / VENTILATION
38 INSTALLATION CLEARANCES
40 INSTALLATION OF ANTI-TIP DEVICE
42 BACKGUARD AND ACCESSORIES
43 ELECTRICAL CONNECTIONS
44 GAS CONNECTIONS
46 FINAL SETUP - INSTALLER CHECKLIST
48 SERVICE AND PARTS
48 APPENDIX
49 WARRANTY
Grounded
Outlet Box
120V
3-Prong
Grounding
Plug
Ground
Prong
© 2025 Capital Cooking
1
EN
SAFETY PRECAUTIONS - BEFORE YOU BEGIN
(CONTINUED)
ELECTRICAL SUPPLY
This appliance must be connected to a dedicated circuit, 120 VAC, Single Phase, 60 Hz, with a current rating as shown in the model number listing on pages
6-7. Ask the installer to show you where the electric circuit breaker is located so you know how to shut o the power to this appliance. It is the responsibility
of the user to have the appliance connected by a licensed electrician in accordance with all local codes, or in the absence of local codes, in accordance with
the National Electrical Code. Read the ELECTRICAL CONNECTIONS section of the INSTALLATION INSTRUCTIONS section for complete details.
GAS SUPPLY
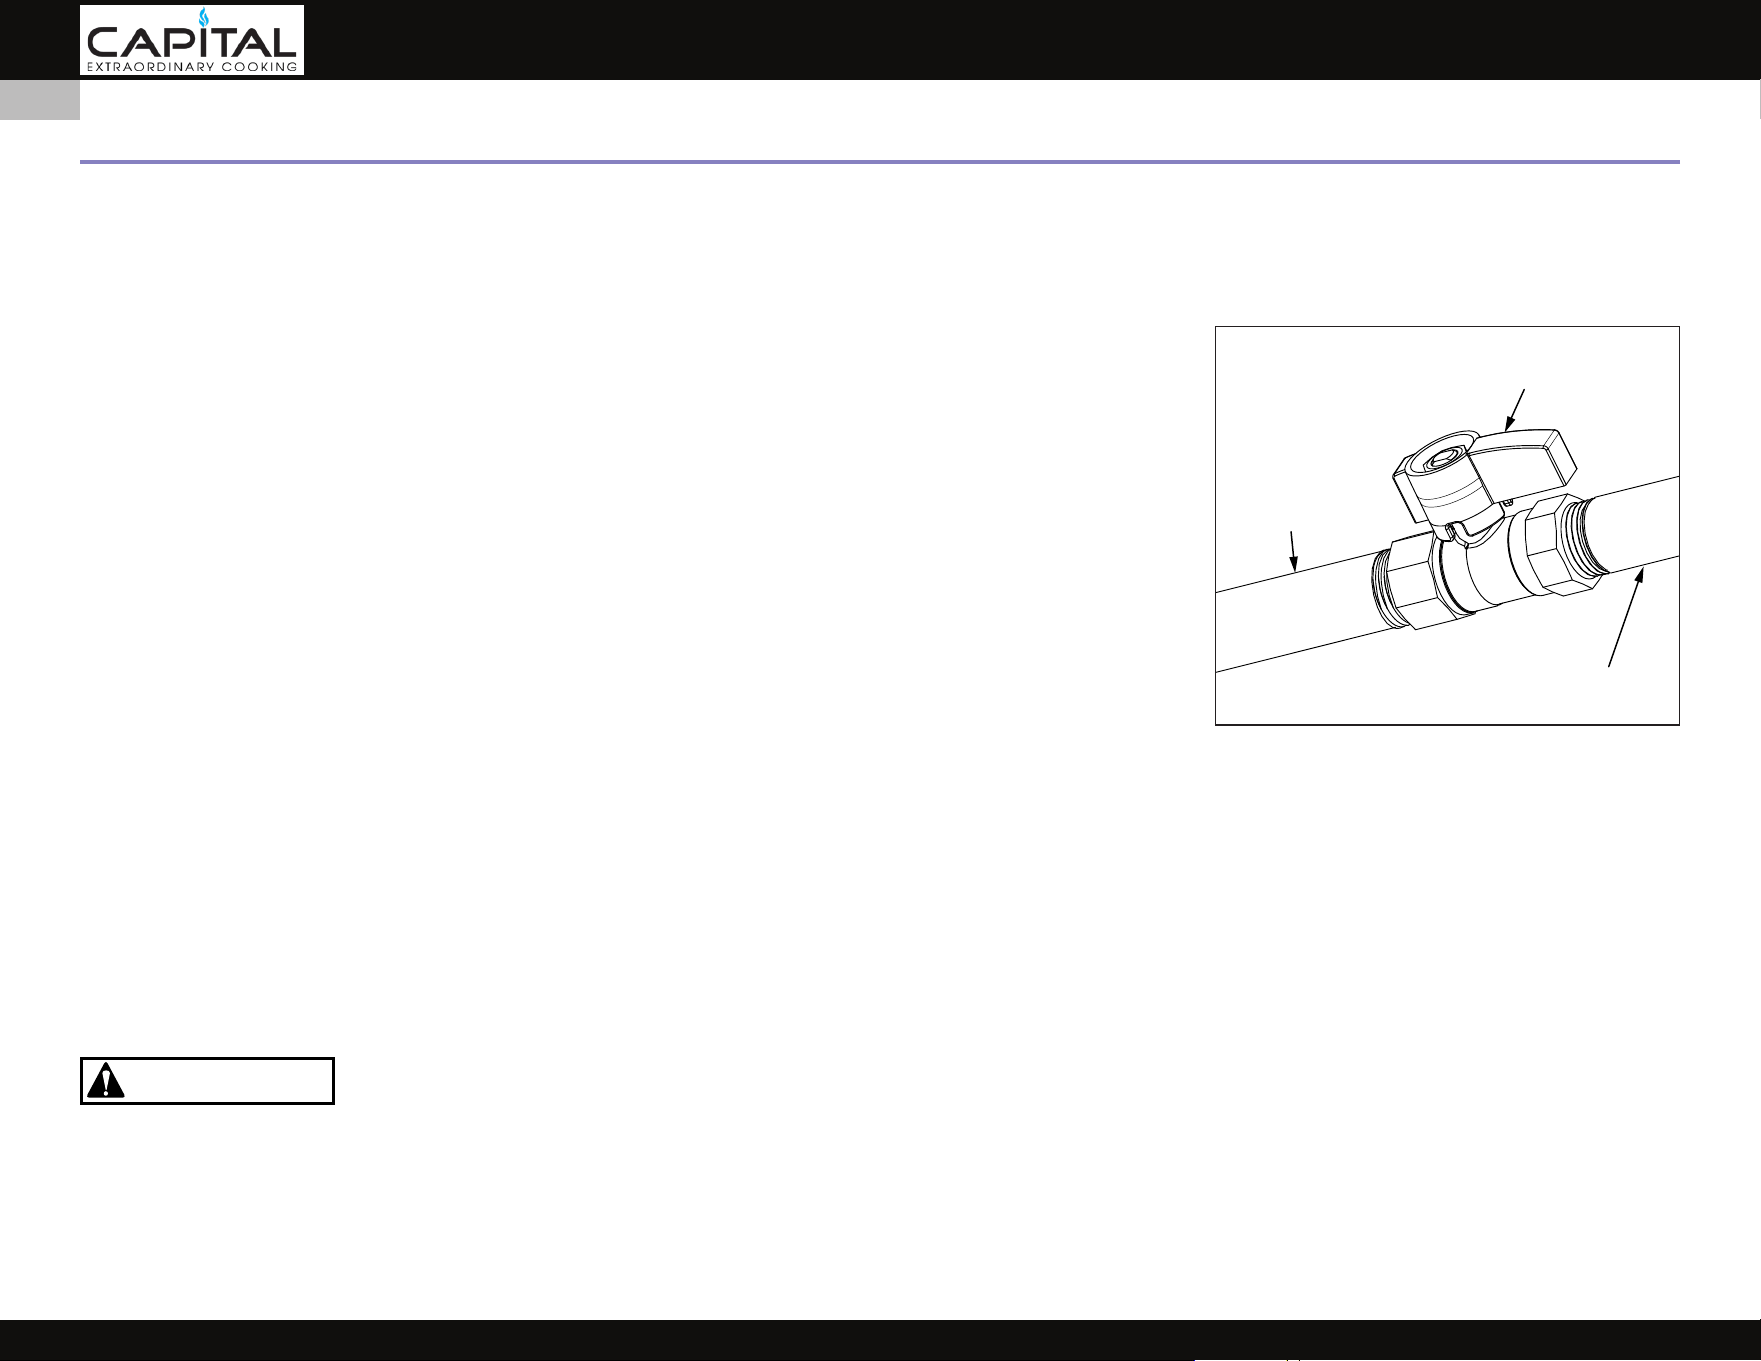
A gas shut-o valve must be located in an easily accessible location for servicing of the range. Make sure all
users of the range know where this shut-o is located, and how to shut o the gas.
The type of gas should be veried prior to installation and operation of this appliance. It is the responsibility
of the user to have the appliance connected by a licensed plumber in accordance with all local codes, or in
the absence of local codes, in accordance with the National Fuel Gas Code.
When connecting to LP gas, verify the tank is equipped with its own high pressure regulator. The pressure
of the gas supplied to the appliance must be 11-14 inch WC [2.74-3.48 kPa]. Consult the INSTALLATION
INSTRUCTIONS for details on gas type, gas pressure, connection, and leak testing instructions, etc.
A complete gas leak test must be performed before using the appliance. Read the GAS CONNECTIONS
section of the INSTALLATION INSTRUCTIONS section for complete details.
CONVERSION KITS
In the event your Capital Cooking appliance needs to be converted from NG to LP, or vice-versa, you will
need to contact Customer Service to arrange a service call. This conversion should only be performed by a
qualied technician.
HIGH ALTITUDE KITS
If you live in a high altitude area, 2,000 ft. [610 m] or more above sea level, your appliance may require dierent orices for proper combustion and
performance. You will need to contact Customer Service to arrange a service call. High Altitude kits must be installed by a qualied technician. Please have
your model and serial number information ready when you call.
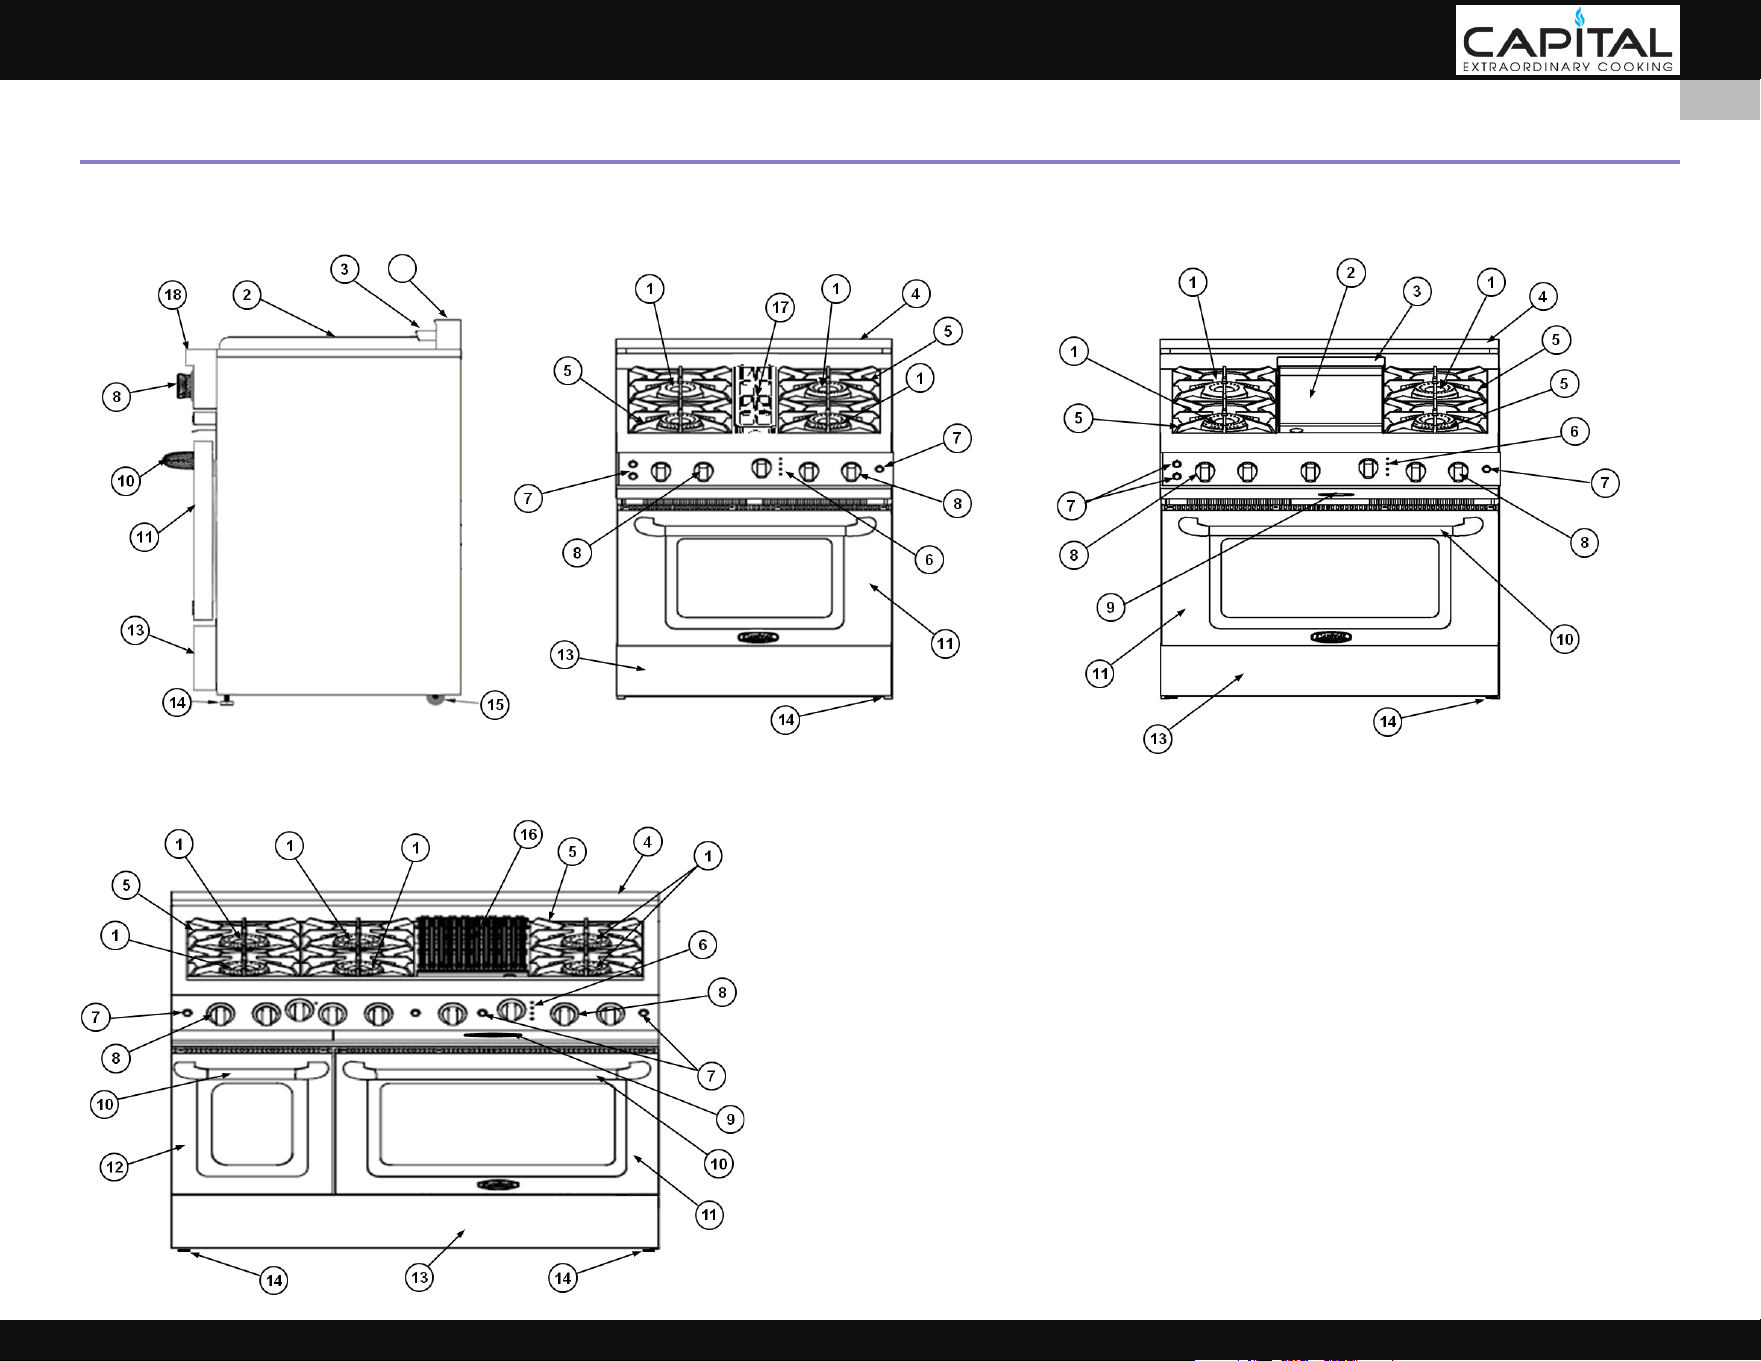
BACKGUARD
Your Capital Cooking range is supplied at the factory with an Island Trim backguard. See the APPENDIX section of the INSTALLATION INSTRUCTIONS section
for other backguard options available from your Capital Cooking dealer, or visit www.capital-cooking.com. Selection of the appropriate backguard depends
on the installation location and adjacent materials, and the type of vent hood to be used. Installation instructions are included with the backguard kit. A LOW
OR TALL BACKGUARD IS REQUIRED WHEN INSTALLING THE RANGE AGAINST A COMBUSTIBLE SURFACE - THE ISLAND TRIM IS NOT SUITABLE.
The top of the backguard serves as an exhaust for the oven when in operation, and as an exhaust vent to remove heat from under the rangetop section of the
range as well. DO NOT BLOCK or obstruct the top of the backguard. DO NOT touch the top of the backguard during appliance operation as it may get hot.
Allow sucient time to cool before touching or cleaning this area. DO NOT position plastic or other heat-sensitive items nearby which could melt or burn.
VENTILATION REQUIREMENTS
A vent hood is REQUIRED above this appliance. It is strongly recommended that this appliance be installed with a Capital Cooking vent hood. Capital
Cooking vent hoods have been matched up to the BTU output of the range. Due to the high heat output of this range, it is very important that the hood and
GAS
SUPPLY
SHUTOFF VALVE
IN OPEN POSITION
TO
APPLIANCE
CAUTION
© 2025 Capital Cooking
2
EN
SAFETY PRECAUTIONS - BEFORE YOU BEGIN
(CONTINUED)
ductwork installation meets local building codes and is installed by a qualied technician.
Do not use a down-draft style ventilation system. An air-curtain or other range hood that blows air downward onto the range shall not be used.
Do not mount a microwave oven/ventilator combination above the range. These types of units do not have sucient airow to remove the high heat output
of this range and were not tested with this type of appliance.
Consult the INSTALLATION INSTRUCTIONS section for further details.
CONSULT WITH YOUR CAPITAL COOKING DEALER ON SELECTING THE APPROPRIATE VENT HOOD FOR YOUR CAPITAL COOKING APPLIANCE.
IN CASE OF POWER OUTAGE
All the control knobs must be in the “OFF” position to prevent unintended operation at power up.
DO NOT ATTEMPT TO USE THE RANGE DURING A PROLONGED POWER FAILURE. Although the top burners can be manually lit, they should be used ONLY
WHILE BEING ATTENDED BY THE USER. See MANUAL LIGHTING / POWER FAILURE section later in this manual. On low burner settings, if the ame were to go
out, a dangerous accumulation of gas could result in an explosion. Allow gas to dissipate for at least 5 minutes before attempting to re-light a burner.
Note: The gas oven bake and infrared broiler, the grill and/or griddle burners (if equipped) CANNOT be lit manually during a power failure.
CHILD SAFETY
IT IS THE RESPONSIBILITY OF THE PARENTS OR GUARDIANS TO ENSURE CHILDREN ARE INSTRUCTED IN THE SAFE USE OF THIS APPLIANCE. This appliance is
not to be used by persons (including children) with reduced physical, sensory or mental capabilities, or lack of experience and knowledge, unless they have
been given supervision or instruction concerning the use of the appliance by a person responsible for their safety. Children should be supervised to ensure
that they do not play with the appliance. Do not allow children to use this appliance without adult supervision. Do not allow children to play in or around
the appliance, even when not in use. Items of interest to children should not be stored in or on the appliance, in cabinets above, or on the backguard of the
appliance. Children climbing on the appliance could be seriously injured.
BURN HAZARD - All parts of the range can get very hot during operation. The oven door glass and areas surrounding the door get very hot, especially
during self-cleaning operations. Do not let children touch the appliance while in operation. Failure to observe these instructions may result in severe burns
or injury.
TECHNICAL SAFETY
Installation and service on this appliance must be performed by a qualied appliance installer, or a Capital Cooking authorized service technician. Do not
repair or replace any part of the appliance unless specically instructed to do so. Defective parts must be replaced only with genuine Capital Cooking parts.
Contact Customer Service for inquiries or to arrange a service call.
The appliance must be disconnected from the power and gas supply during any service or maintenance work.
Do not carry or lift the range by the oven handle. The range can be lifted only from the bottom and sides.
CAUTION
© 2025 Capital Cooking
3
EN
SAFETY PRECAUTIONS - BEFORE YOU BEGIN
(CONTINUED)
USER SAFETY
BURN HAZARD - All parts of the range can get very hot during operation. The oven door glass and areas surrounding the door get very hot, especially
during self-cleaning operations. Do not touch the appliance while in operation. Failure to observe these instructions may result in severe burns or injury. Use
pot holders / gloves to protect yourself when placing food in the oven, adjusting the racks, etc.
Note: For Self-Clean models, the upper broil burner is behind glass, and the lower bake burner is hidden beneath the metal oor of the oven cavity. These
surfaces can be hot, even when the burners are not actively running. During or after cooking, allow sucient time for all surfaces to cool. If the upper burner
glass is broken, do not use the oven - call for service.
Use only dry or heat-resistant pot holders / gloves. Using moist or damp potholders can result in steam burns. Do not substitute dish towels or similar items
for potholders. These items could come in contact with hot surfaces and ignite.
Avoid wearing loose-tting garments or long sleeves while cooking. They could ignite. For personal safety, wear proper apparel while using the appliance.
Some synthetic fabrics are highly ammable and should not be worn while cooking.
Open the oven door slowly to allow heat and steam to escape before placing or removing food from the oven. Keep your face away from the opening to
avoid injury.
For safety considerations, NEVER use this appliance as a space heater to heat or warm the room. Doing so may result in carbon
monoxide poisoning and overheating of the oven. Do not use the oven as a storage space. The high temperatures could also ignite
ammable objects nearby.
NEVER cover any slots, holes, or passages in the oven bottom or cover an entire oven rack with materials such as aluminum foil. Doing so blocks air ow
through the oven and may cause carbon monoxide poisoning. Aluminum foil linings may also trap heat, causing a re hazard. Do not use aluminum foil to
line the surface burners. Doing so may result in a risk of electric shock or re.
Do not allow anyone to climb, stand, step on, lean against, or sit on any part of the appliance, especially the oven door. This may result in damage to the
appliance, or personal injury.
Do not hang articles from any part of the appliance or place anything against the oven door. Some fabrics are highly ammable and could ignite.
FIRE SAFETY
To reduce the risk of a re, do not leave surface burners unattended at high settings. Boil-overs could smother the ames and igniter, which would allow
unburned gas to escape into the room, which could result in an explosion.
Always turn on the ventilation hood when cooking. Clean vent hood grease lters frequently - grease should not be allowed to accumulate on the fan or
lters.
Use the appropriate pan size for the burner being used. For safety considerations, adjust the ame size so they do not travel up the sides of the pan. Ensure
drafts like those from an open window or air vents do not blow out the ames, or push the ames beyond the edges of the pan.
Keep the appliance area clear and free from combustible materials, gasoline, and other ammable vapors and liquids. NEVER store ammable liquids and
materials in, above, or on the range, or near cooking surfaces. Do not obstruct the ow of combustion and ventilation air of the appliance.
ALWAYS have a working smoke detector near the kitchen.
ALWAYS have an appropriate dry-chemical re extinguisher nearby and know how to use it. A type ABC extinguisher is the most common.
© 2025 Capital Cooking
4
EN

IN CASE OF FIRE
Smother re or ames using the lid of the utensil (pot or pan), a cookie sheet, or metal tray. Then shut o the burner if safe to do so.
Use an extinguisher, or baking soda if the re is small and relatively contained. DO NOT USE WATER ON A GREASE FIRE. Doing so may result in spreading
the re elsewhere.
NEVER pick up a aming pan. You may spill the grease on yourself and be severely burned.
If accessible, turn o the ventilation hood during a re, but do not reach through the ames.
In the event of personal clothing or hair catching re, drop and roll immediately to smother the ames. Seek medical attention if necessary.
IF THE FLAMES DO NOT GO OUT - EVACUATE AND CALL THE FIRE DEPARTMENT.
PROPER USAGE
Do not let food sit in the oven for more than one hour before or after cooking. Doing so may result in food poisoning or illness.
Do not heat unopened containers (cans) in the oven. Pressure may build up causing the container to explode, resulting in damage to the oven, or personal
injury.
Always place the oven racks at the desired height before cooking. If the racks must be moved when hot, use potholders to move them and use caution to
avoid touching the infrared broiler burner.
Only certain types of glass, heatproof glass-ceramic, earthenware, or other glazed utensils are suitable for use on the surface burners. However, these types of
materials may break with sudden temperature changes. Use only on low or medium heat settings, and according to their manufacturers’ directions.
Bakeware, such as large casserole pans, cookie sheets, etc. should not be used on the surface burners. Large griddle plates that span across 2 burners should
be used with care and on medium to low ame settings to avoid a build-up of heat which could distort the grates or the burner bowl.
Always position the handles of pot and pans so they do not extend over adjacent work areas or over the edge of the rangetop. This is to avoid knocking over
hot contents which could burn you, or result in a re.
Do not use pots or pans on the griddle (if equipped). When using the griddle or grill units, the top covers must be removed when the burner is in operation.
Do not use the griddle or grill sections (if equipped) for cooking excessively fatty foods that promote are-ups.
SAFETY DURING CLEANING
Clean the appliance only as directed in the CLEANING AND MAINTENANCE section of this manual.
Do not use a steam cleaner to clean the oven or any part of the range. Steam could penetrate into electrical components and cause a short circuit and/or
shock hazard. Do not use a power washer.
Do not use abrasive cleaners, hard objects such as brushes or scrapers, or sharp metal tools to clean the door glass. Scratches could cause the glass to shatter.
Heavy food debris should be removed before running the self-clean cycle in the oven. Remove all oven racks, broiler pans, utensils, temperature probes, etc.
from the oven before self-clean.
Do not rub, disturb, or damage the cloth-braided oven door gasket. If the gasket is damaged, it will need to be replaced. Use only genuine Capital parts.
Do not pour cold water onto hot surfaces inside the oven. The steam could cause serious burns. The sudden temperature change could also distort the metal
surfaces inside the oven resulting in cracks in the enamel. Do not use a steam cleaner or a power washer.
Use only a small toothbrush to clean the burner ports and igniter of the surface burners. Do not insert sharp objects or scratch the burner ports.
Wait until the appliance is completely cool before using any aerosol-type cleaners. Many of these cleaners use ammable propellants which could ignite in
the presence of heat.
SAFETY PRECAUTIONS - BEFORE YOU BEGIN
(CONTINUED)
© 2025 Capital Cooking
5
EN

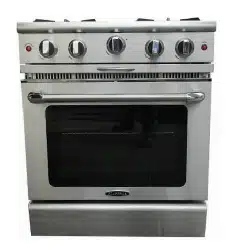
30" RANGE MODELS
MODEL NO. DESCRIPTION
CIRCUIT
BREAKER
REQUIRED
CGSR304-NG / -LP 30” SELF-CLEAN GAS RANGE WITH 4 OPEN BURNERS 20 Amp
GSCR304-NG / -LP 30” SELF-CLEAN GAS RANGE WITH 4 SEALED BURNERS 20 Amp
GSCR305-NG / -LP 30” SELF-CLEAN GAS RANGE WITH 5 SEALED BURNERS 20 Amp
GSCR302G2-NG / -LP
30” SELF-CLEAN GAS RANGE WITH 2 SEALED BURNERS, 9” GRIDDLE, 2 SEALED BURNERS
20 Amp
GSCR302B2-NG / -LP
30” SELF-CLEAN GAS RANGE WITH 2 SEALED BURNERS, 9” GRILL, 2 SEALED BURNERS
20 Amp
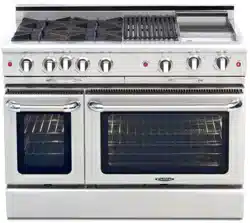
36" RANGE MODELS
MODEL NO. DESCRIPTION
CIRCUIT
BREAKER
REQUIRED
CGSR366-NG / -LP 36” SELF-CLEAN GAS RANGE WITH 6 OPEN BURNERS 20 Amp
GSCR366-NG / -LP 36” SELF-CLEAN GAS RANGE WITH 6 SEALED BURNERS 20 Amp
CGSR362G2-NG / -LP 36” SELF-CLEAN GAS RANGE WITH 2 OPEN BURNERS, 12” GRIDDLE, 2 OPEN BURNERS 20 Amp
GSCR362G2-NG / -LP 36” SELF-CLEAN GAS RANGE WITH 2 SEALED BURNERS, 12” GRIDDLE, 2 SEALED BURNERS 20 Amp
CGSR362B2-NG / -LP 36” SELF-CLEAN GAS RANGE WITH 2 OPEN BURNERS, 12” GRILL, 2 OPEN BURNERS 20 Amp
GSCR362B2-NG / -LP 36” SELF-CLEAN GAS RANGE WITH 2 SEALED BURNERS, 12” GRILL, 2 SEALED BURNERS 20 Amp
MODEL NUMBERS
GSCR362G2 CGSR604BG2
© 2025 Capital Cooking
6
EN
MODEL NUMBERS
(CONTINUED)
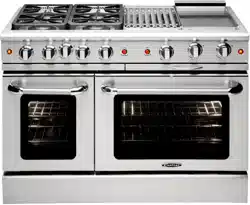
48" RANGE MODELS
MODEL NO. DESCRIPTION
CIRCUIT
BREAKER
REQUIRED
CGSR488-NG / -LP 48” SELF-CLEAN GAS RANGE WITH 8 OPEN BURNERS 20 Amp
GSCR488-NG / -LP 48” SELF-CLEAN GAS RANGE WITH 8 SEALED BURNERS 20 Amp
CGSR484G2-NG / -LP 48” SELF-CLEAN GAS RANGE WITH 4 OPEN BURNERS, 12” GRIDDLE, 2 OPEN BURNERS 20 Amp
GSCR484G2-NG / -LP 48” SELF-CLEAN GAS RANGE WITH 4 SEALED BURNERS, 12” GRIDDLE, 2 SEALED BURNERS 20 Amp
CGSR484B2-NG / -LP 48” SELF-CLEAN GAS RANGE WITH 4 OPEN BURNERS, 12” GRILL, 2 OPEN BURNERS 20 Amp
GSCR484B2-NG / -LP 48” SELF-CLEAN GAS RANGE WITH 4 SEALED BURNERS, 12” GRILL, 2 SEALED BURNERS 20 Amp
CGSR484BG-NG / -LP 48” SELF-CLEAN GAS RANGE WITH 4 OPEN BURNERS, 12” GRIDDLE, 12” GRILL 20 Amp
GSCR484BG-NG / -LP 48” SELF-CLEAN GAS RANGE WITH 4 SEALED BURNERS, 12” GRIDDLE, 12” GRILL 20 Amp
CGSR484GG-NG / -LP 48” SELF-CLEAN GAS RANGE WITH 4 OPEN BURNERS, 24” GRIDDLE 20 Amp
GSCR484GG-NG / -LP 48” SELF-CLEAN GAS RANGE WITH 4 SEALED BURNERS, 24” GRIDDLE 20 Amp
CGSR484BB-NG / -LP 48” SELF-CLEAN GAS RANGE WITH 4 OPEN BURNERS, 24” GRILL 20 Amp
GSCR484BB-NG / -LP 48” SELF-CLEAN GAS RANGE WITH 4 SEALED BURNERS, 24” GRILL 20 Amp
CGSR484CW-NG / -LP 48” SELF-CLEAN GAS RANGE WITH 4 OPEN BURNERS, 24” OPEN BURNER WOK
20 Amp
GSCR484CW-NG / -LP 48” SELF-CLEAN GAS RANGE WITH 4 SEALED BURNERS, 24” OPEN BURNER WOK 20 Amp
GSCR484W-NG / -LP 48” SELF-CLEAN GAS RANGE WITH 4 SEALED BURNERS, 24” SEALED BURNER WOK
20 Amp
60" RANGE MODELS
MODEL NO. DESCRIPTION
CIRCUIT
BREAKER
REQUIRED
CGSR6010-NG / -LP 60” SELF-CLEAN GAS RANGE WITH 10 OPEN BURNERS 20 Amp
GSCR6010-NG / -LP 60” SELF-CLEAN GAS RANGE WITH 10 SEALED BURNERS 20 Amp
CGSR604BG2-NG / -LP 60” SELF-CLEAN GAS RANGE WITH 4 OPEN BURNERS, 12” GRIDDLE, 12” GRILL, 2 OPEN BURNERS 20 Amp
GSCR604BG2-NG / -LP 60” SELF-CLEAN GAS RANGE WITH 4 SEALED BURNERS, 12” GRIDDLE, 12” GRILL, 2 SEALED BURNERS 20 Amp
CGSR604G4-NG / -LP 60” SELF-CLEAN GAS RANGE WITH 4 OPEN BURNERS, 12” GRIDDLE, 4 OPEN BURNERS 20 Amp
GSCR604G4-NG / -LP 60” SELF-CLEAN GAS RANGE WITH 4 SEALED BURNERS, 12” GRIDDLE, 4 SEALED BURNERS 20 Amp
CGSR604B4-NG / -LP 60” SELF-CLEAN GAS RANGE WITH 4 OPEN BURNERS, 12” GRILL, 4 OPEN BURNERS 20 Amp
GSCR604B4-NG / -LP 60” SELF-CLEAN GAS RANGE WITH 4 SEALED BURNERS, 12” GRILL, 4 SEALED BURNERS 20 Amp
CGSR604GG2-NG / -LP 60” SELF-CLEAN GAS RANGE WITH 4 OPEN BURNERS, 24” GRIDDLE, 2 OPEN BURNERS 20 Amp
GSCR604GG2-NG / -LP 60” SELF-CLEAN GAS RANGE WITH 4 SEALED BURNERS, 24” GRIDDLE, 2 SEALED BURNERS 20 Amp
CGSR604BB2-NG / -LP 60” SELF-CLEAN GAS RANGE WITH 4 OPEN BURNERS, 24” GRILL, 2 OPEN BURNERS 20 Amp
GSCR604BB2-NG / -LP 60” SELF-CLEAN GAS RANGE WITH 4 SEALED BURNERS, 24” GRILL, 2 SEALED BURNERS 20 Amp
CGSR606CW-NG / -LP 60” SELF-CLEAN GAS RANGE WITH 6 OPEN BURNERS, 24” OPEN BURNER WOK
20 Amp
GSCR606CW-NG / -LP 60” SELF-CLEAN GAS RANGE WITH 6 SEALED BURNERS, 24” OPEN BURNER WOK 20 Amp
GSCR606W-NG / -LP 60” SELF-CLEAN GAS RANGE WITH 6 SEALED BURNERS, 24” SEALED BURNER WOK
20 Amp
© 2025 Capital Cooking
7
EN
REGULATORY / CODE REQUIREMENTS
Installation of this cooking appliance must be made in accordance with local codes. In the absence of local codes, this unit should be installed in accordance
with the National Fuel Gas Code
ANSI Z223.1/NFPA 54
, Natural Gas and Propane Installation code
CSA B149.1
, or Propane Storage and Handling Code
B149.2
.
The installation of appliances designed for manufactured (mobile) home installation must conform with Title 24 CFR, Part 3280 [formerly Title 24, HUD (Part
280)] or with local codes where applicable.
The installation of appliances designed for recreational park trailers must conform with state or other codes or, in the absence of such codes, with ANSI A119.5.
All Electrical Components must be electrically grounded in accordance with local codes or in the absence of local codes with the National Electrical Code
ANSI/NFPA 70
, or Canadian Electrical code
CSA C22.1
.
STATE OF MASSACHUSETTS
Massachusetts requires all gas be installed using a plumber or gas tter carrying the appropriate Massachusetts license. All permanently installed natural gas
or propane installations require a T-handle type manual gas valve be installed in the gas supply line to this appliance. Flexible gas connector must not be
longer than 48” [1.2 m].
CALIFORNIA PROPOSITION 65 - WARNING
WARNING: This product can expose you to chemicals including carbon monoxide, which is known to the State of California to cause cancer, birth
defects or other reproductive harm.
For more information, go to www.P65Warnings.ca.gov.
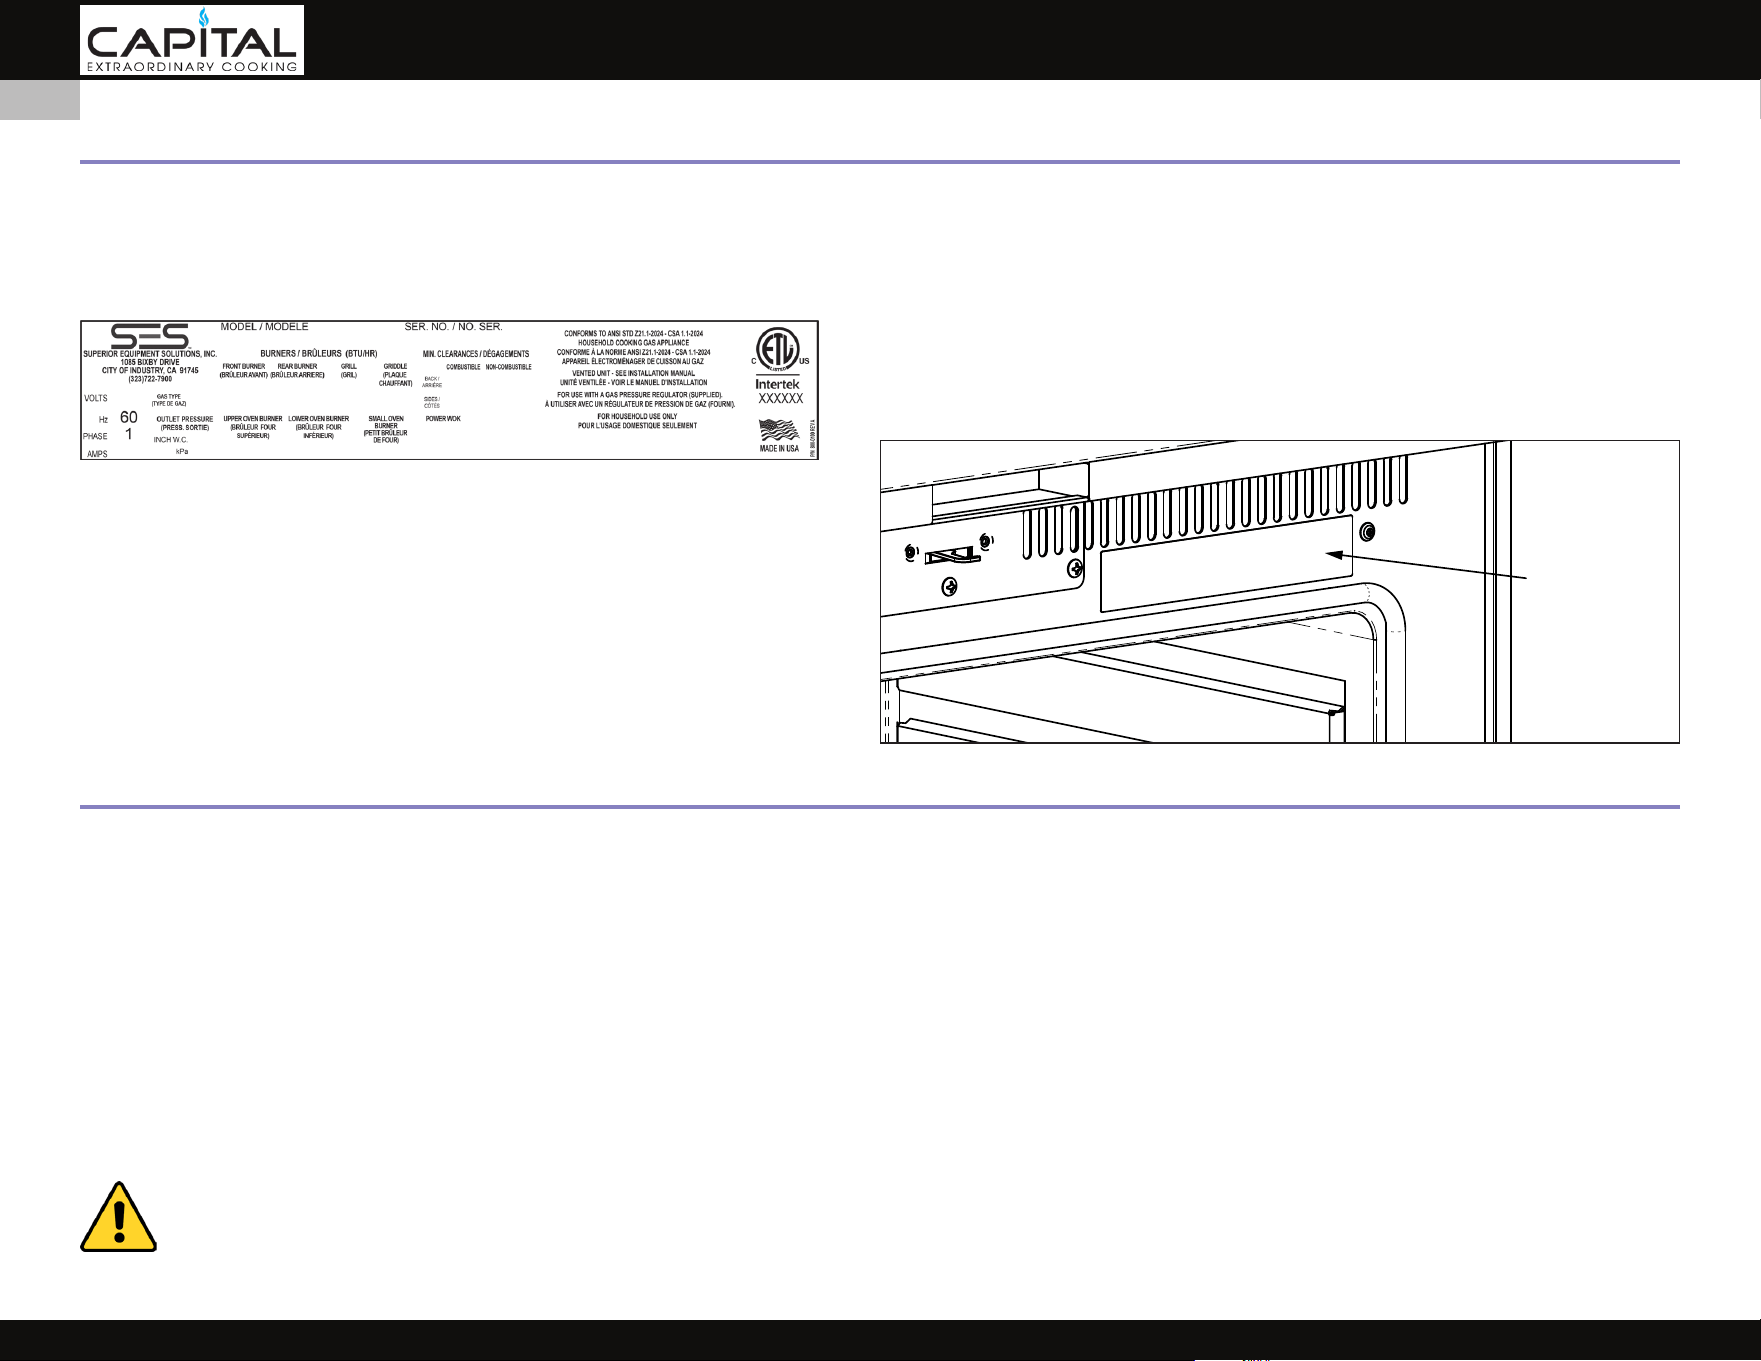
The rating label contains important information about your Capital Cooking appliance such as the model and serial number, gas type and manifold pressure,
electrical rating, the BTU rating for each burner type, and the minimum installation clearances.
The rating label is located on the door frame just above the oven cavity.
If service is necessary, contact Capital Cooking Customer Care with the model and serial number information shown on the label.
RATING
LABEL
Typical Rating Label shown.
RATING LABEL
© 2025 Capital Cooking
8
EN
GETTING STARTED WITH YOUR APPLIANCE
RANGE PARTS IDENTIFICATION - EXTERIOR
Use the images to familiarize yourself with the various parts of the rangetop and oven.
4
1. Sealed / Open Burner
2. Griddle Plate
3. Griddle Flue Cover
4. Island Trim Backguard
5. Cast Iron Grate
6. Indicating Lights
7. Switches (Oven Light, Convection Fan, Rotisserie)
8. Control Knobs
9. Drip Tray Handle
10. Oven Door Handle
11. Oven Door
12. Small Oven Door
13. Kick Plate
14. Adjustable Front Legs
15. Adjustable Rear Casters
16. BBQ Grill
17. 30” Center Grate
18. Bullnose
© 2025 Capital Cooking
9
EN
GETTING STARTED WITH YOUR APPLIANCE
(CONTINUED)
1. Small Oven
2. Main Oven
3. Vertical Rotisserie Rod Support
4. Rotisserie Rod
5. Rotisserie Forks
6. Broiler Burner (Behind Glass)
7. Halogen Oven Lights
8. Oven Thermostat Sensor
9. Convection Fan Bae
10. Convection Fan (behind bae)
11. Oven Door Gasket
12. Door Latch (self-clean models only)
13. Airow Vents
RANGE PARTS IDENTIFICATION - INTERIOR
© 2025 Capital Cooking
10
EN
GETTING STARTED WITH YOUR APPLIANCE
(CONTINUED)
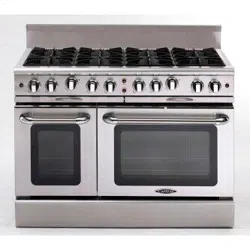
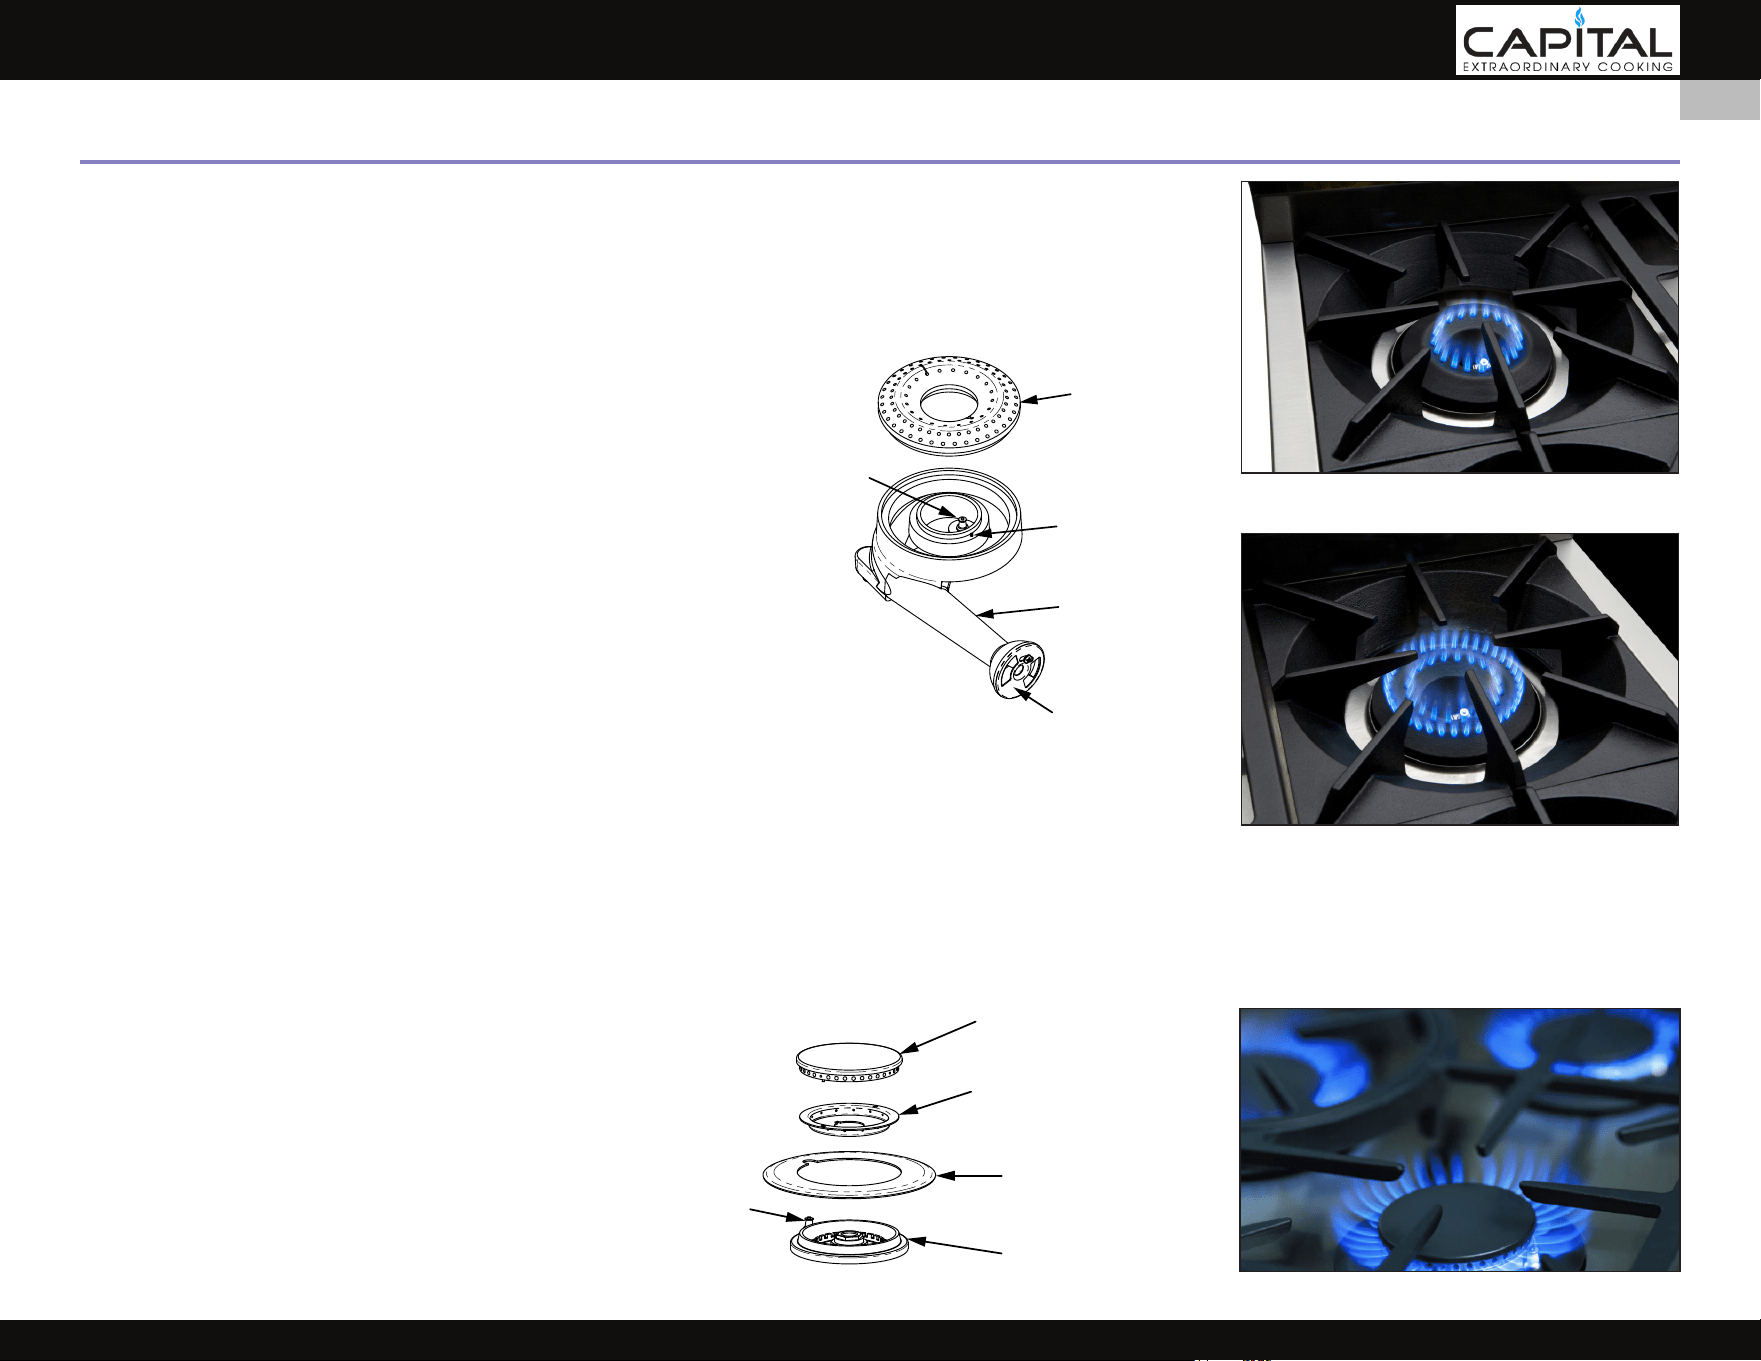
GAS SELF-CLEAN RANGE w/ OPEN BURNERS - GSCR
These models are equipped with restaurant-style Power-Flame™ open
burners made of heavy-duty cast iron bases with aluminum burner
caps. These burners are rated at 25000 BTU/Hr, making them one of
the most powerful and ecient burners in the household appliance
industry. The individual cast iron cooking grates are just like those
seen in a restaurant kitchen. The grates are removable for easy
cleaning.
All GSCR models are equipped with one small pan burner at the rear
left of the range. This burner is rated at 8000 BTU/Hr.
8000 BTU/Hr Small Pan Burner
25000 BTU/Hr Open Burner
19000 BTU/Hr Sealed Burner
BURNER CAP
ALIGNMENT PIN
BURNER BASE
AIR SHUTTER
IGNITER
BURNER CAP & RING
BASE SHIELD
BURNER BASE
SIMMER RETENTION RING
IGNITER
GAS SELF-CLEAN RANGE w/ SEALED BURNERS - CGSR
These models are equipped with modern Accu-Heat™ sealed
burners made of aluminum alloy with solid brass burner caps.
These burners are rated at 19000 BTU/Hr. Each front and rear
pair of burners features a cast iron cooking grate which aligns
with the adjacent grates to easily slide pans across the rangetop.
© 2025 Capital Cooking
11
EN
USING THE RANGETOP
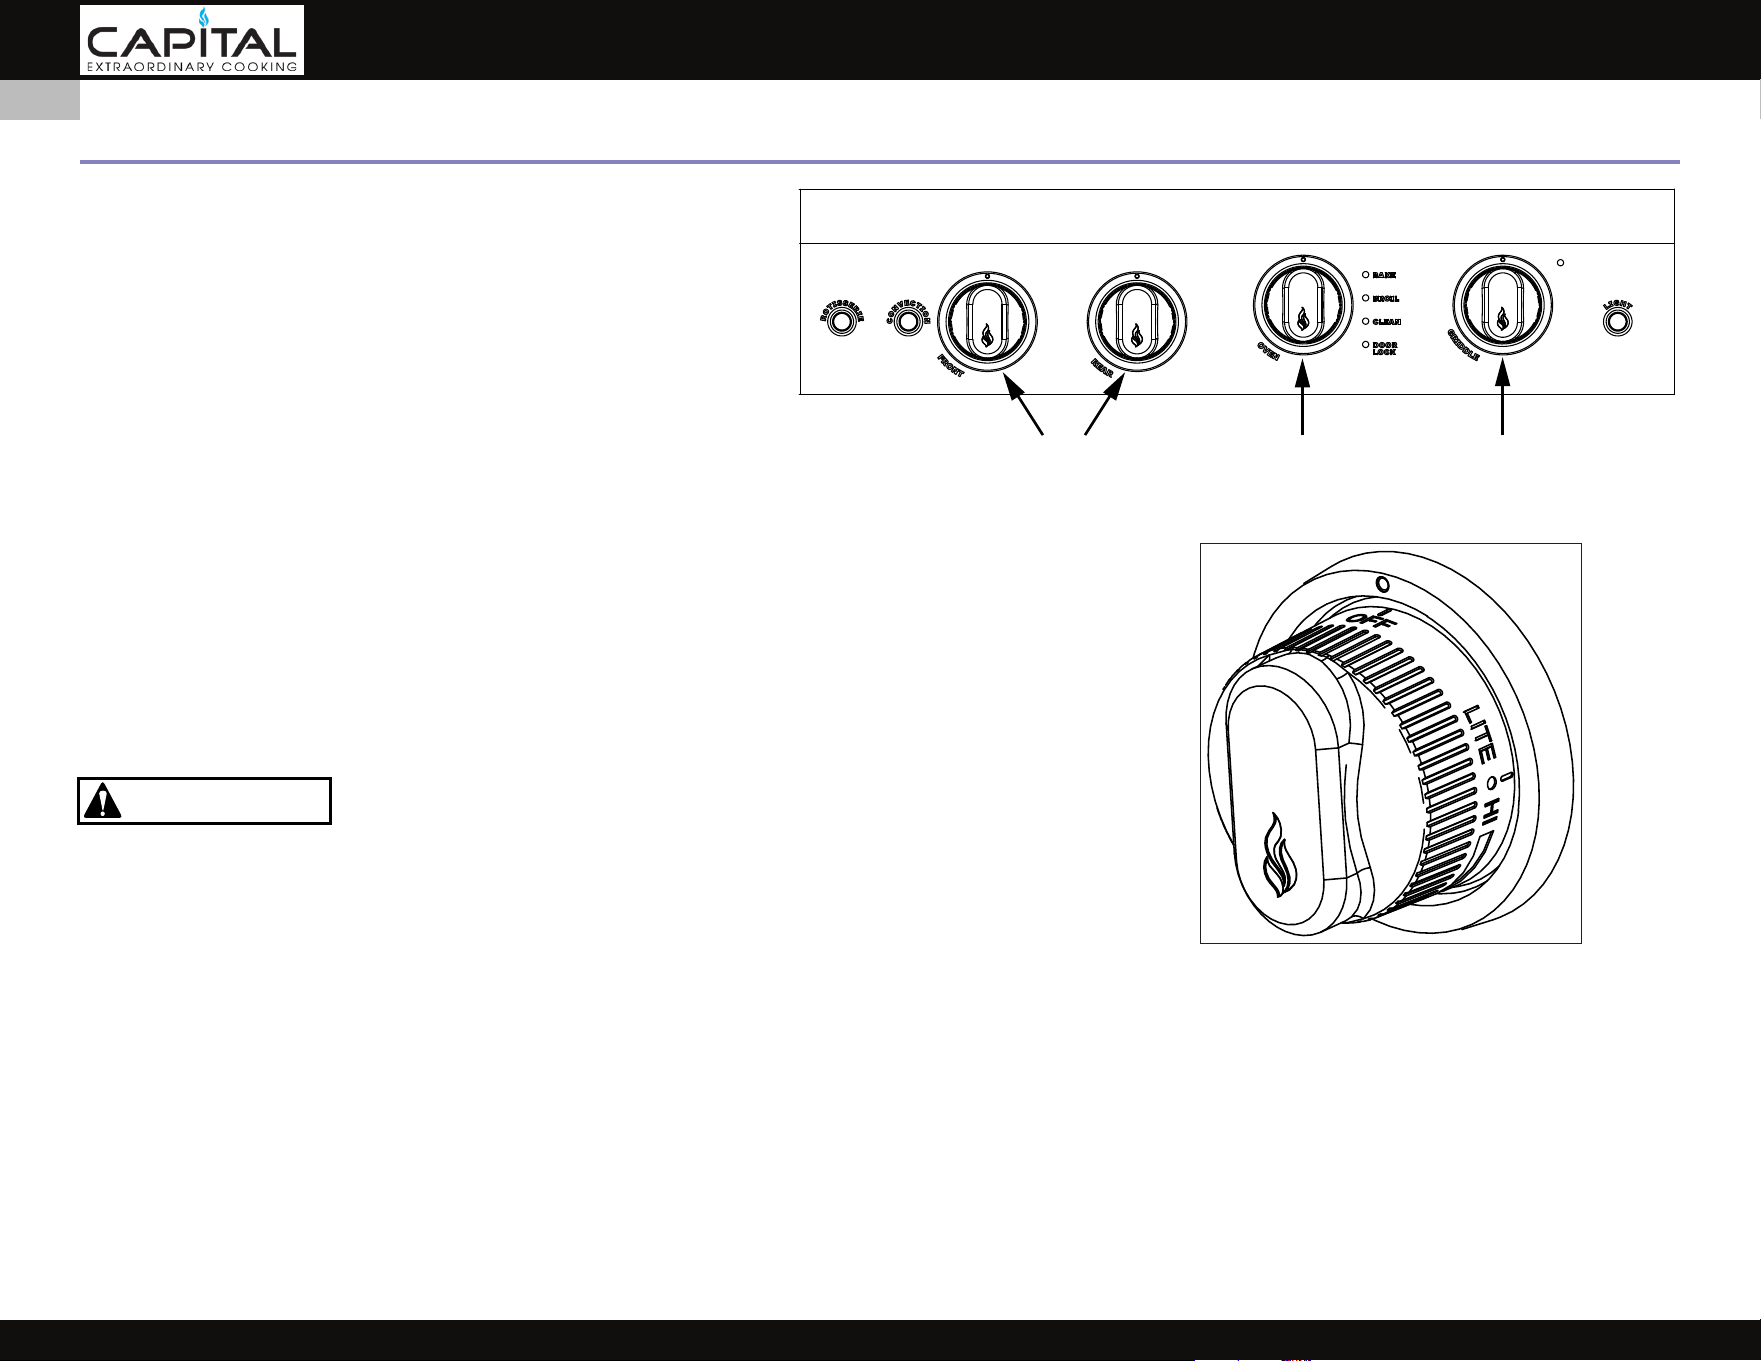
CONTROL KNOBS
The control knobs are readily associated with the items they
control. The rangetop control knobs are labeled to indicate their
respective surface burner locations (front, rear). The oven control
and griddle control (if equipped) is placed slightly higher on the
control panel than the other control knobs. This is due to the
physical size of the commercial-type thermostats used on the
product. Buttons and indicator lights are self-explanatory.
BURNER SETTINGS
The rangetop burner valves have innite settings and there are no xed positions on the control knobs
between “HI” and “SIMMER”. To turn the rangetop burner on, push in the control knob and turn it counter-
clockwise to the “LITE” position. The electronic spark igniters will make an audible clicking sound. When the
gas has been ignited, turn the knob to the desired ame setting.
Note: If the Igniter continues to click after the burner has been lit, turn the knob to a setting other than
“LITE”, or “HI”. If the problem persists, please consult the TROUBLESHOOTING section of this manual, or
contact Customer Service.
When turning on any RANGETOP burner, be sure to stop at the “LITE” position before turning the burner to a
ame setting for cooking. If the burner is not lit and it is turned beyond the “LITE” position, to “HI” or
“SIMMER”, there will be a burst of ame when the burner does light. This could cause burns or damage to
the surrounding countertop.
BURNER HEADS
If the burner head is not properly positioned, one or more of the following issues may occur:
• Flames too high
• Flames shoot out of the burners
• Burners do not ignite
• Flames are uneven
• Burner emits a gas odor
SURFACE BURNERS OVEN GRIDDLE
CAUTION
© 2025 Capital Cooking
12
EN

USING THE RANGETOP
(CONTINUED)
BURN HAZARD - To prevent burns, do not touch the burner heads or cooking grates when hot. Allow to cool completely. To prevent are-ups, do not use
the burner without all the burner heads in place and properly positioned. Do not use aluminum foil to line the surface burners. Doing so may result in a risk
of electric shock or re.
IGNITERS
All burners feature an electronic spark ignition module with ame-sensing technology and automatic re-ignition capability. If any burner should blow
out, the igniter automatically re-lights the burner. Each burner should light in less than 4 seconds. Once lit, the sparking will stop. On very low simmer, an
occasional sparking may occur. This is usually due to a breeze in the room. If an igniter continues to spark even with a ame present, there could be food
debris present, an electrical wiring issue, or some other problem. If the igniter does not click, TURN OFF THE BURNER. Check your electrical panel for a blown
fuse or a tripped circuit breaker. If the igniter still fails to operate, see the TROUBLESHOOTING section of this manual or call Customer Service.
DO NOT touch the burner or the igniters while sparking is occurring. A shock hazard or burns could occur.
MANUAL LIGHTING / POWER FAILURE
NOTE: The gas oven bake burner and the infrared broiler, the grill and/or griddle burners (if equipped) CANNOT be lit manually during a power failure.
DO NOT ATTEMPT TO USE THE RANGE DURING A PROLONGED POWER FAILURE. Although the top burners can be manually lit, they should be used ONLY
WHILE BEING ATTENDED BY THE USER. On low burner settings, if the ame were to go out, a dangerous accumulation of gas could result in an explosion.
Allow gas to dissipate for at least 5 minutes before attempting to re-light a burner.
Each burner can be manually lit in the event of a power failure. It is necessary to light each burner individually. If a power failure occurs WHILE you are using
the burners, turn all the knobs to the “OFF” position, then light manually with a match or replace lighter. Position the match or replace lighter at the port
nearest the igniter, then turn the knob to “HI” until the ame is lit. Wait until the ame has lit all the way around the burner before adjusting the knob to
“SIMMER”.
IF YOU SMELL GAS, turn all control knobs to “OFF”, then check the precautions listed in the SAFETY section of this manual.
FLAME HEIGHT
Proper ame height depends on the size of the pan being used, and the amount of food or liquid in the pan. In other words, don’t use a small pan over a large
ame. For safety reasons, control the ame height so that it doesn’t go beyond, or curl up the sides of your pot or pan. This behavior results in poor heating
of the contents of the pan, burnt food on the sides of the pan, potentially heating the handles and burning yourself, wasted fuel, etc.
Use a low or medium ame on items that heat slowly, such as glass-ceramic (Pyrex®) pots and vessels.
© 2025 Capital Cooking
13
EN
USING THE RANGETOP
(CONTINUED)
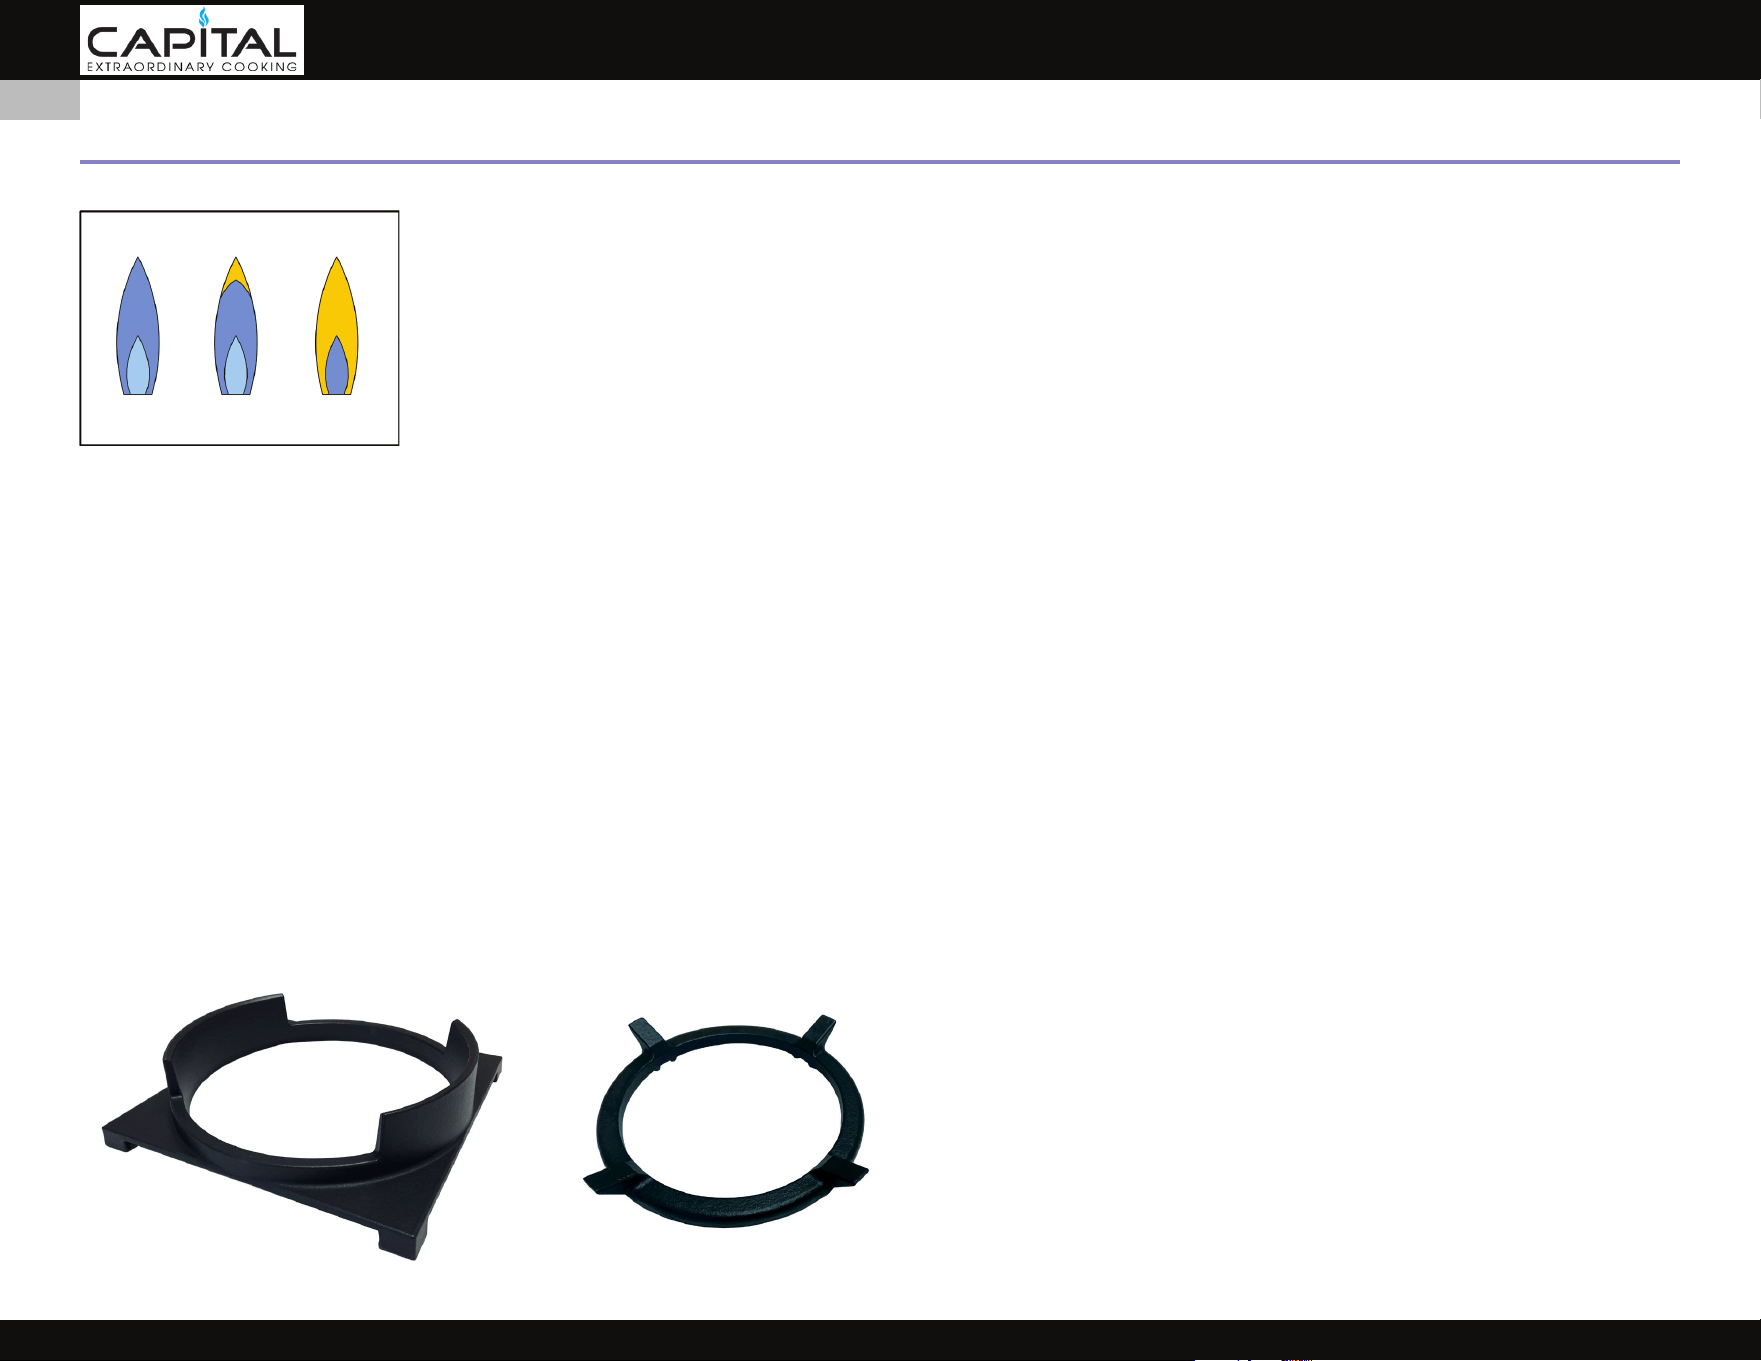
FLAME CHARACTERISTICS
Light blue ame - Natural gas normal ame
Light blue ame with yellow tips - LP gas normal ame
Yellow ame - Needs adjustment
If the ame is mostly or completely yellow, check the position of the burner heads again for proper installation, and/or review the FINAL SETUP section of the
INSTALLATION section for more details.
NOTE: If you are using propane gas, a slight pop or ash may occur at the burner ports a few seconds after the burner has been turned o. This “extinction pop” is
normal for propane gas.
PROPER COOKWARE
For best results we recommend using professional cookware. These types of utensils can be found at your ner department stores, specialty cooking shops,
or restaurant supply stores. Use only high-quality pans with metal handles. Some plastic handles can melt or bubble from the intense heat of the burners.
As previously stated on page 5 of the SAFETY PRECAUTIONS section of this manual, bakeware, such as large casserole pans, cookie sheets, etc. should not be
used on the surface burners. Large griddle plates that span across 2 burners should be used with care and on medium to low ame settings to avoid a build-
up of heat which could distort the grates or the sheetmetal areas below the burners.
Large stock pots should be staggered when used on the rangetop.
Do not cook on aluminum foil or thin, disposable aluminum pans. These can melt.
Never let a pot boil dry. If left too long, the pan could melt or damage the appliance.
WOK RING ACCESSORIES
Wok rings are available for purchase from your Capital Cooking dealer.
A 14-16 inch [36-41 cm] diameter wok is recommended for the best results.
GAS FLAME APPEARANCE
NATURAL
GAS
LP
GAS
NEEDS
ADJUSTMENT
WOK RING (CGSR OPEN BURNER) WOK RING (GSCR SEALED BURNER)
© 2025 Capital Cooking
14
EN
USING THE GRIDDLE / GRILL
GRIDDLE INFO
The 12” Thermo-Griddle is made of non-rusting 3/8” [9.5 mm] thick stainless steel plate. It features an 18000 BTU/Hr burner with a constant glow igniter for
safety, as well as a ame-safety gas valve with commercial-style thermostat. The 24” Griddle features two independent zones with two burners of 15000 BTU/
Hr each. The gutter at the front of the griddle features a drain which empties into a slide-out drip tray beneath. Be sure to clean this after each use to avoid
odors and attracting insects and critters.
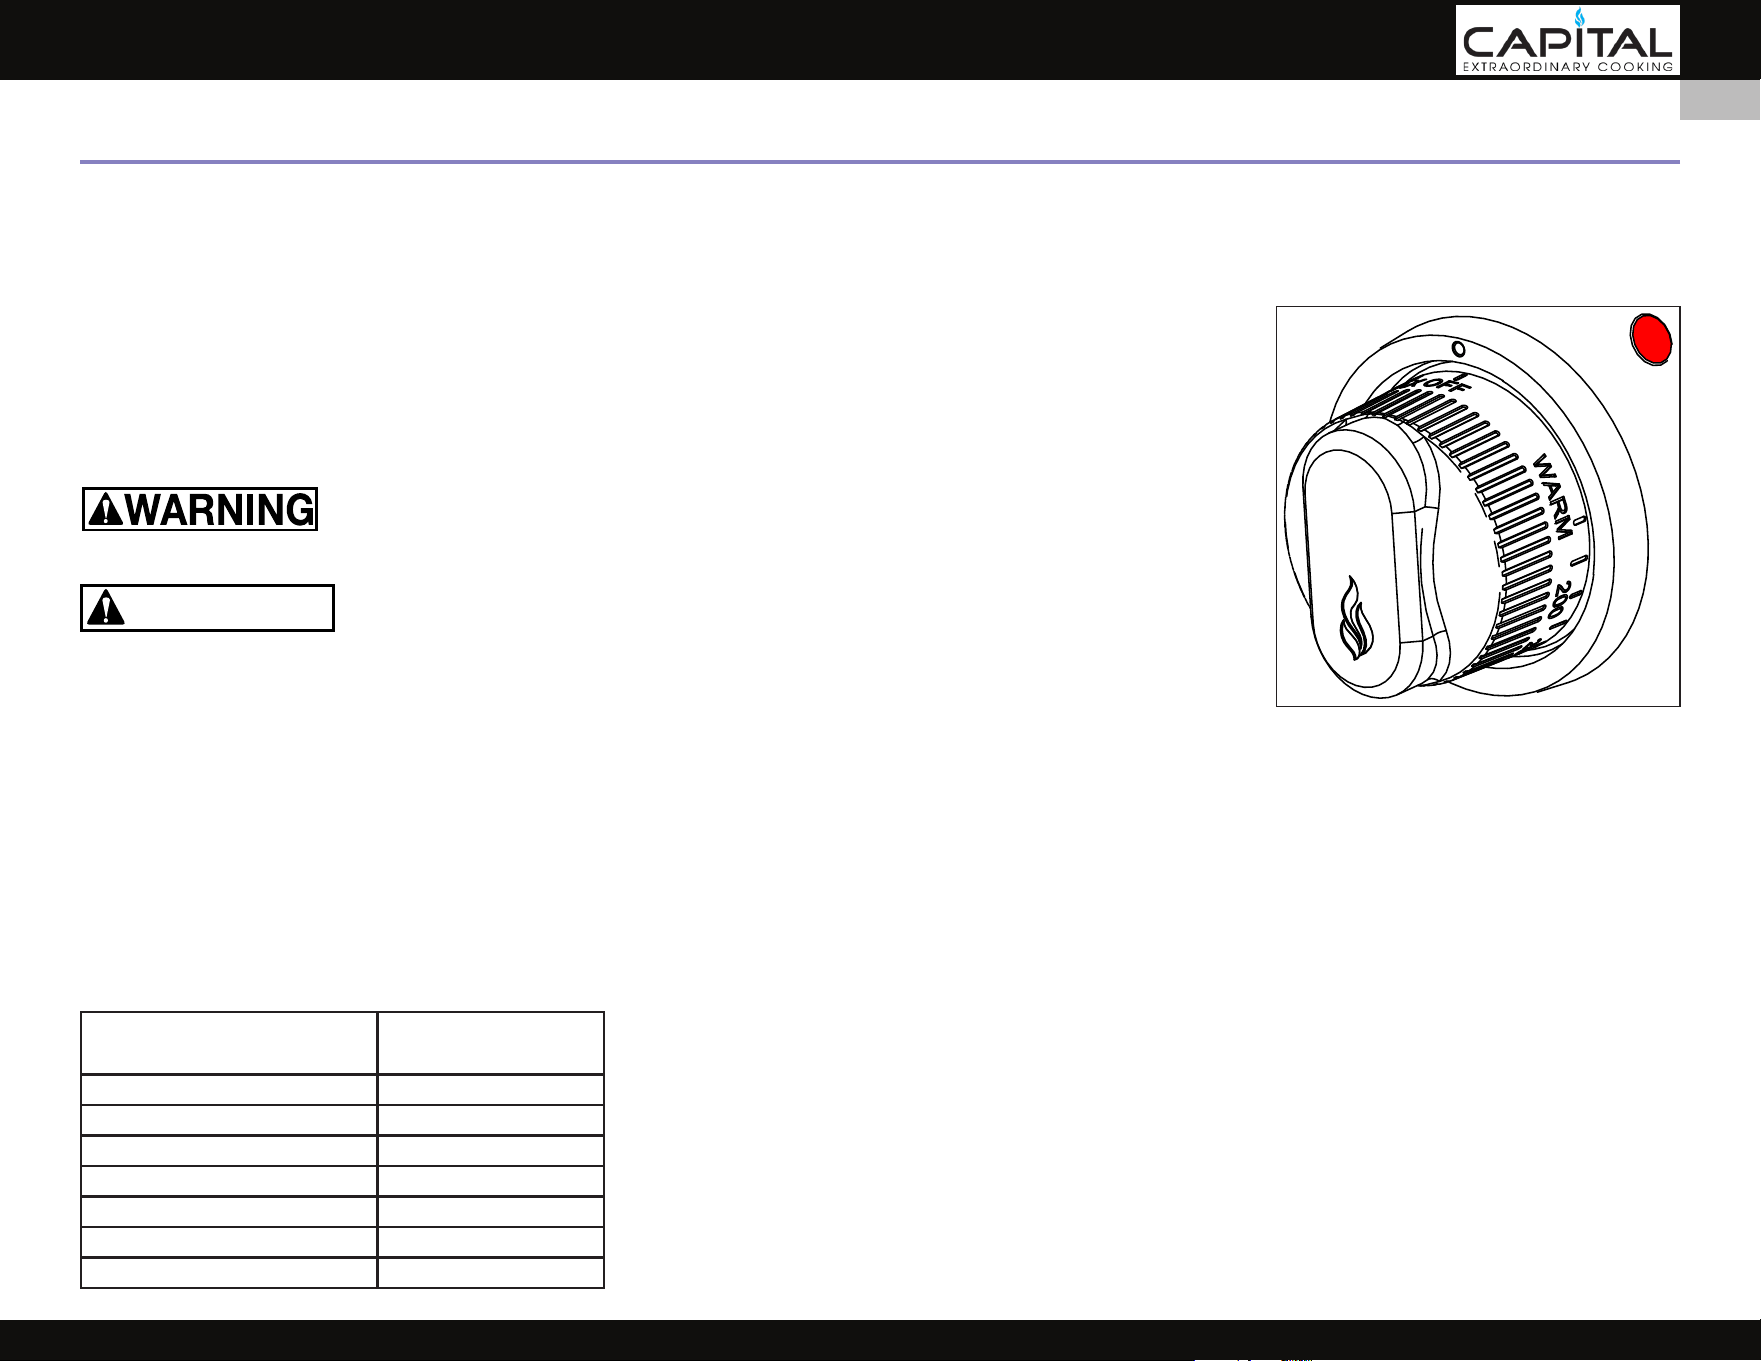
GRIDDLE CONTROL KNOB
The griddle provides a temperature range of 150° - 500°F [65 - 260°C]. Push and turn LEFT (counter-clockwise) to
select the desired temperature for the food you are cooking. Allow the plate to pre-heat for 5 - 10 minutes before
cooking. There is a small red indicator light adjacent to the knob that will be on constantly to remind you the
griddle is on.
To avoid injury DO NOT operate the griddle without the griddle plate in place. Always remove the cover before use.
The griddle is very hot after use. Allow sucient time to cool down before cleaning.
DO NOT use metal cookware (pots, pans, etc.) on the griddle plate surface. Be careful not to gouge or cause deep
scratches in the griddle plate surface. DO NOT cut directly on the griddle plate.
FIRST TIME OPERATION
Before using your griddle for the rst time, the griddle plate should be cleaned with warm, soapy water and thoroughly rinsed and dried. When you rst heat
the plate, a little smoke and some odor may be present as any remaining manufacturing oils are burned o. The stainless-steel plate will discolor, from a
straw color to a very dark brown or black, depending on what foods you cook on the surface.
The griddle may be used without butter or oil, but a small amount may be used to avor foods.
COOKING ON THE GRIDDLE
Turn on your vent hood.
It will take some practice to get to know how your griddle performs with certain foods. The table below gives a few recommendations on temperatures.
FOOD ITEM
GRIDDLE
TEMPERATURE
EGGS 300 - 325°F [149 - 163°C]
PANCAKES, FRENCH TOAST 400 - 425°F [204 - 218°C]
HASH BROWN POTATOES (frozen) 475 - 500°F [246 - 260°C]
BACON, SAUSAGE 450 - 475°F [232 - 246°C]
CHICKEN BREAST (BONELESS) 425 - 450°F [218 - 232°C]
HAMBURGER 6 oz (170 g) 450 - 475°F [232 - 246°C]
STEAK 1” (25mm) THICK 450 - 475°F [232 - 246°C]
CAUTION
© 2025 Capital Cooking
15
EN
USING THE GRIDDLE / GRILL
(CONTINUED)
CLEANING THE GRIDDLE
Read the CLEANING AND MAINTENANCE section of this manual for complete instructions.
NEVER ood the hot griddle plate with cold water. The steam could cause serious burns and can permanently warp the plate.
DO NOT clean any part of the griddle in the Self-Clean Cycle of the oven. Do not put your griddle plate into the dishwasher, as it will damage your appliance.
Wait until the appliance has cooled completely before cleaning. When emptying the drip tray, be sure to pour the grease into a proper container for grease
disposal, not down the drain. Do not scrape with metal utensils.
NOTE: A chopping block accessory is available for purchase separately. It is sized to t on top of the griddle surface when not in use.
GRILL INFO
The 12” BBQ Grill features double-sided, two position grates, constructed of cast iron. Use the concave side (channels up) for meats of higher fat content
(steaks, hamburgers, sausage patties, etc.). Use the convex side (channels down) with foods of lesser fat content (sh, vegetables). It features an 18000 BTU/
Hr burner with a constant glow igniter for safety, as well as a ame-safety gas valve. The 24” BBQ Grill features two independent zones with two burners of
15000 BTU/Hr each. The burners are protected by hybrid ceramic radiants which are encased in stainless-steel racks. These radiants vaporize the drippings
from your foods, providing true grilled avor. The channels from the grates are inclined toward the gutter at the front of the grill. The drain empties into
a slide-out drip tray beneath. Be sure to clean this after each use to avoid odors, and attracting insects and critters. The radiants are removable for further
cleaning as necessary.
GRILL CONTROL KNOB
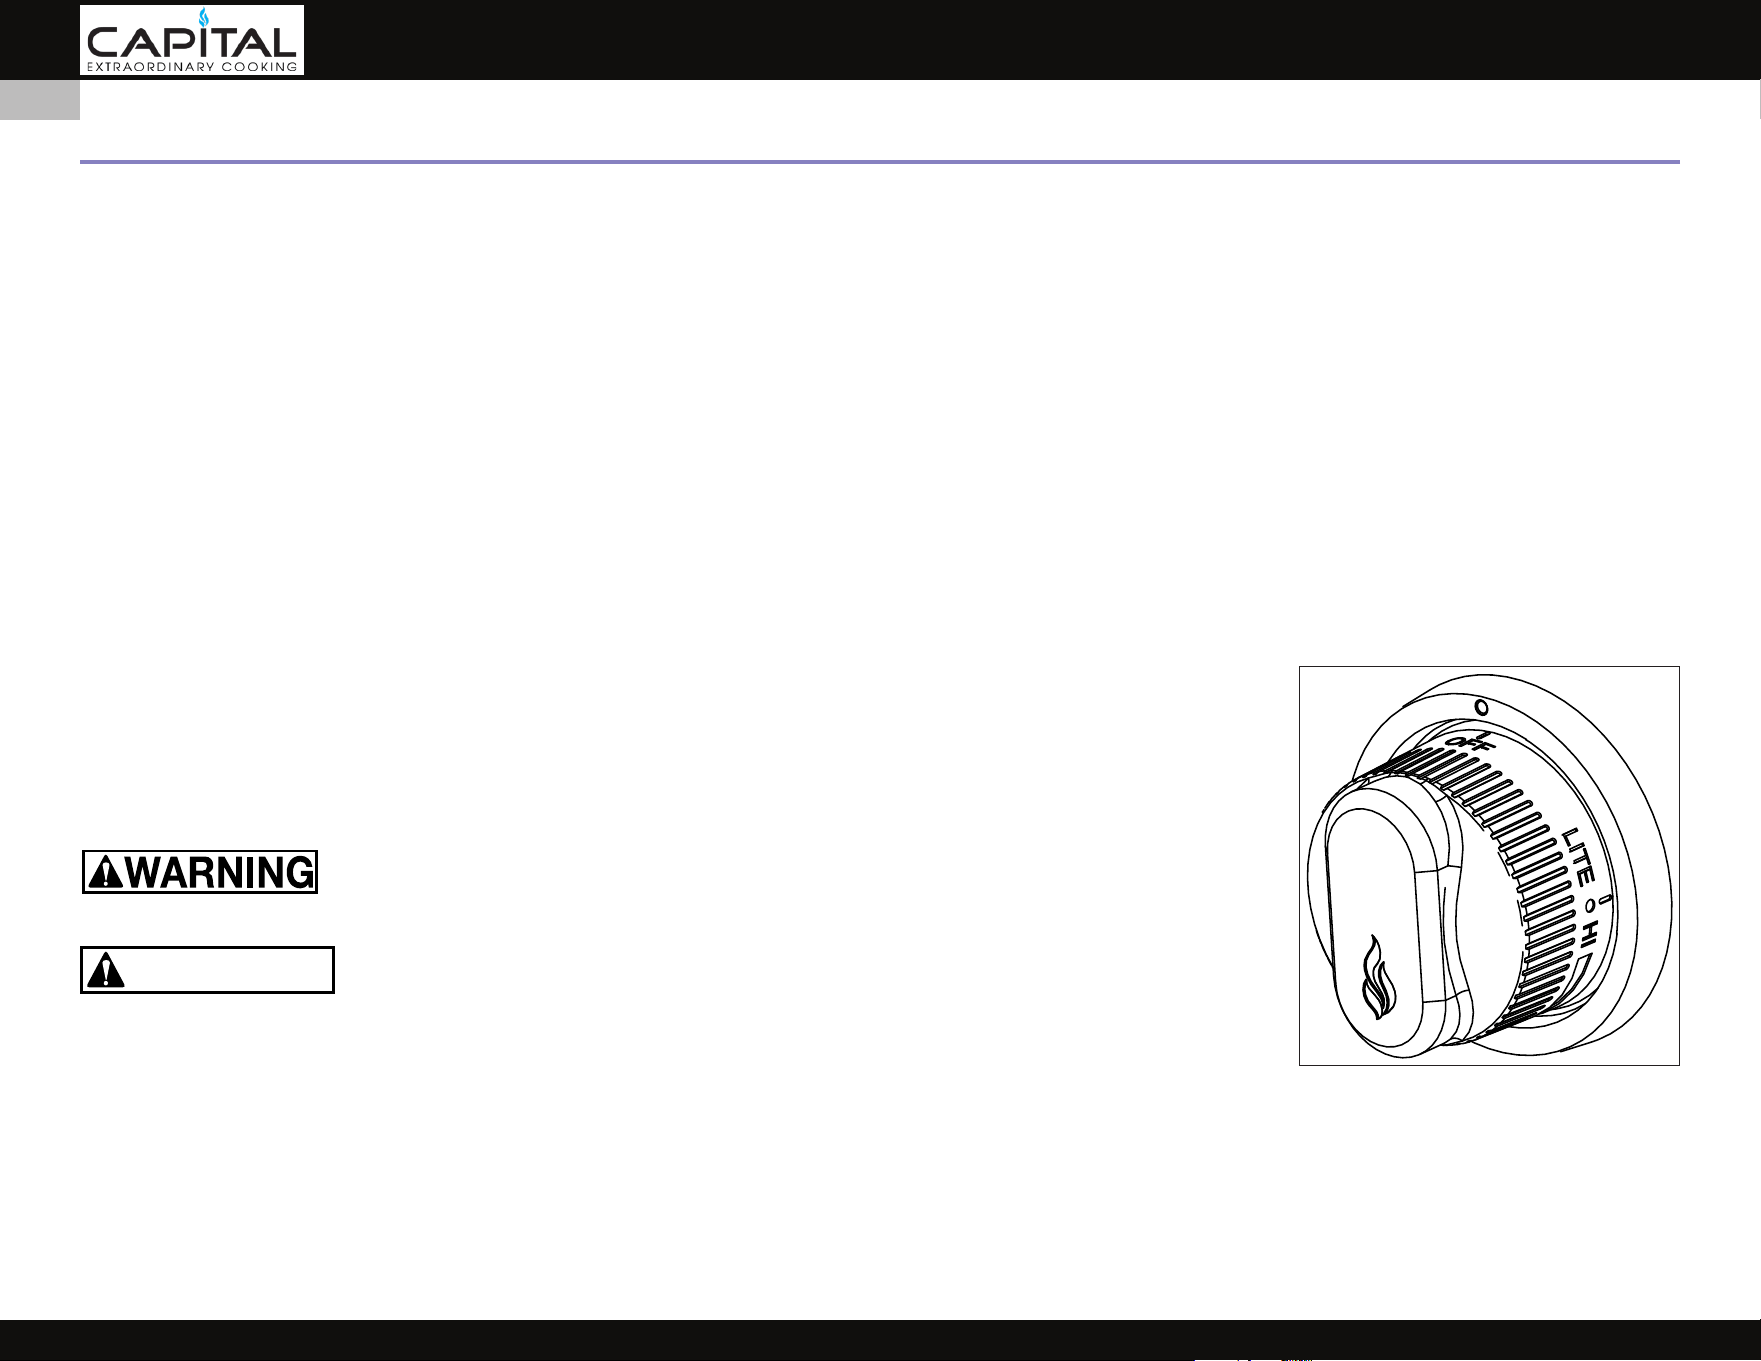
The grill control knob is the same as the surface burners and has no xed positions between “HI” and “SIMMER”. To
turn the grill burner on, push in the control knob and turn it counter-clockwise to the “LITE” position. The glow igniter
will light and gas will ow in about 30-45 seconds. When the gas has been ignited, turn the knob to the desired ame
setting. A constant orange glow may be seen through the grill grates. This is normal. Allow the grill to pre-heat for
10-15 minutes before cooking.
To avoid injury DO NOT operate the grill without the radiants and grates in place. Always remove the cover before use.
The grill is very hot after use. Allow sucient time to cool down before cleaning.
DO NOT use metal cookware (pots, pans, etc.) on the grilling surface.
FIRST TIME OPERATION
When using your grill for the rst time, a little smoke and some odor may be present as any remaining manufacturing oils are burned o.
CAUTION
© 2025 Capital Cooking
16
EN
USING THE GRIDDLE / GRILL
(CONTINUED)
COOKING ON THE GRILL
Turn on your vent hood.
Preheat the grill for 5-10 minutes minimum. The hot grill sears the food, sealing in the juices. The longer the preheat time, the faster the meat browns and the
darker the grill marks on your food.
Grilling requires high heat for optimum results. High heat is necessary for searing and proper browning. Most foods are cooked at medium heat settings
for most of the cooking time. However, when grilling large pieces of meat or poultry, it may be necessary to turn the heat to a lower setting after the initial
browning. This cooks the food through without burning the outside.
Foods cooked for a long period of time or basted with a sugary marinade may need a lower heat setting near the end of the cooking time.
Do not leave the BBQ Grill section unattended while cooking.
HANDLING EXCESSIVE FLARE-UPS
The intense heat needed for grilling may also cause are-ups, due to grease and basting sauces dripping on the hot radiants. If are-ups occur, use a long
handled spatula to move the food to another area of the grill.
Excessive ames occur when cooking meat with high fat concentration, e.g. 30% ground beef, untrimmed steaks, lamb chops, etc.
Should are-ups become excessive, remove the food from the grill and turn o the burner. Internal res or damage caused by them or by the grill being left
unattended, are not covered under the terms and conditions of our warranty.
Be cautious when turning meat over and never drop the meat on the grates.
Do not use aluminum foil to line cooking grates or the drip tray. This will alter the airow to the grill or trap excessive heat below, damaging the appliance.
Never grill without the drip tray properly in place and pushed all the way to the back of the unit.
CLEANING THE GRILL
Read the CLEANING AND MAINTENANCE section of this manual for complete instructions. After grilling, and when the food has been removed, turn the knob
to “HI” for about 10-15 minutes to burn o any excess grease that may have accumulated on the burner, radiants, and cast iron grates. Turn o the ame and
clean the cooking grates immediately by dipping a brass bristle grill brush in hot water to scrub the hot grill grate. Dip the brush frequently in the water. The
steam created as water contacts the hot grate softens any food particles and greatly assists the cleaning process. The food particles will fall through the grates
and burn. If the grill is allowed to cool before cleaning, then cleaning will be more dicult. Wear a mitt to protect your hand from the heat and steam.
After this initial cleaning and the grill has cooled down, you may remove the grates and radiants and ip them over to be heated on high for 10-15 minutes to
burn o any residual fat and food particles.
The drip tray should be cleaned after every usage of the grill. Leaving a dirty drip tray in place will result in odors and may attract insects and critters. Grease
is extremely ammable. Let hot grease cool before attempting to handle or dispose of it.
GRILLING SUGGESTIONS
• Trim any excess fat from the meat before cooking. FATTY MEATS increase the likelihood of are-ups. Make slits in the remaining fat around the edges at
1-2 inch [2.5-5 cm] intervals.
• Brush on basting sauces toward the end of cooking. Add seasoning or salt after grilling. Early salting dries out the meat.
• Use a spatula or tongs instead of a fork to turn the meat. A fork punctures the meat and lets the juices ow out.
• After the juices begin to bubble to the surface, turn the meat only once. This helps keep the juices in the meat.
• Some pieces of meat and poultry cook faster than others. Move those pieces to the cooler area of the grill until the rest has cooked.
• The doneness of meat is aected by the thickness of the cut. Chefs say it is impossible to have a rare doneness with a thin cut.
© 2025 Capital Cooking
17
EN
USING THE POWER WOK
POWER WOK INFO
The 24” Power Wok (certain models) is a dedicated wok similar to those found in Asian restaurants. These
models are equipped with a large dedicated cast iron wok ring permanently attached to the rangetop.
‘W’ versions (such as GSCR484W) feature a larger version of the Sealed Burner at 30000 BTU/Hr.
‘CW’ versions (such as CGSR484CW) feature the Open Burner at 25000 BTU/Hr.
All Power Wok models use the same electronic spark ignition as the adjacent surface burners.
The outer wok ring accommodates 14-20” [36-51 cm] round or at-bottom woks. A ‘cross grate’ insert is
provided (see photo) to allow the use of standard pans or large stockpots. Both ring and insert are made of
heavy-duty cast iron.
WOK CONTROL KNOB
The wok control knob is the same as the surface burners and has no xed positions between “HI” and “SIMMER”. To turn the wok burner on, push in the
control knob and turn it counter-clockwise to the “LITE” position. Adjust to desired ame setting after the burner is lit.
Do not rest a standard pan on the burner cap. The burner was not designed for direct contact with the pan or pot and cannot support the weight. Damage to
the appliance will occur.
The wok ring and the ‘cross grate’ insert can be very hot after use. The surrounding sheetmetal outside the ring area can get very hot as well. Allow sucient
time to cool down before cleaning. In the event of a spillover, there is a pullout drip pan below. The burner itself can be disassembled for cleaning if needed.
Do not ood the surrounding sheetmetal outside the ring area with water.
30000 BTU/Hr Sealed Wok Burner
CAUTION
© 2025 Capital Cooking
18
EN
USING THE OVEN
GENERAL INFO
Your new Capital Self-Clean Gas Range is equipped with bake and broil burners typical of those used in restaurants. For the large oven cavity, the lower bake
burner is hidden below the oor and is rated at 30000 BTU/Hr. The upper infrared broiler burner is rated at 18000 BTU/Hr. Both burners feature constant glow
igniters for safety, as well as a ame-safety gas valve with commercial-style thermostat. The large oven is equipped with a convection fan, a rotisserie, and 3
roller racks.
For 48” and 60” models, the smaller ‘companion’ oven has a single bake burner rated at 18000 BTU/Hr. All ovens feature halogen lighting.
NOTE: The ovens can be used in 5 cooking modes: convection bake, regular bake, convection broil, regular broil, rotisserie. To help you decide which way to cook your
food read this information rst. Remember this is a new oven and the thermostat has been checked for accuracy. The thermostat in your old oven may have not kept
the same accuracy over the years as when new. Check your recipes for the correct time and temperature and don’t use the old time or temperature you were using to
compensate for your old oven being o temperature.
Aluminum foil should never be used to cover the oven racks or to line the oven bottom. The trapped heat can damage the porcelain and the heated air
cannot adequately reach the food being baked.
USING REGULAR BAKE OR CONVECTION BAKE
These cooking modes are for baking or warming using one, two, or three racks. If you are going to use Regular
Bake turn the oven control knob to the temperature used in the recipe. There will be a delay of 30-45 seconds
after the control knob has been turned on to when you actually hear gas owing and the burner lighting. To use
Convection Bake, simply press the CONVECTION button located on the front panel to start the Convection Fan.
The green “BAKE” indicator light will come on to let you know that the burner is currently on.
Note: During any cooking process there is a certain amount of moisture that evaporates from the food. The amount
of moisture that condenses in the oven depends on the moisture content of the food. The moisture will condense on
any surface that is cooler than the inside of the oven, such as the control panel or the top of the door. This is normal.
CONVECTION BAKE
Convection Bake uses a fan at the back of the oven cavity to circulate hot air in a continuous pattern around the
food. This circulating hot air heats and browns the surface of the food more eectively than in a standard oven.
This allows most foods to be cooked at lower oven temperatures or in less time. You will see the most savings in
cooking time with air-leavened foods and large pieces of meat, etc. that can be cooked in low-sided baking pans. Using multiple racks at the same time will
achieve a good time savings, as you can cook more food at the same time. Preheating the oven is reduced considerably because the heat reaches the food
faster as the hot air circulates around the food.
FOODS SUITABLE FOR CONVECTION BAKE
• Air-Leavened Foods (angel food cake, soués, cream pus, meringue shells)
• Appetizers
• Breads
• Main Dishes
• Oven Meals (1 to 4 racks)
• Cookies
• Pies
• Poultry
• Roasts
CAUTION
© 2025 Capital Cooking
19
EN

USING THE OVEN
(CONTINUED)
CONVERTING RECIPES TO CONVECTION BAKE
Low sided baking utensils will provide the best results, as the hot air can reach all sides of the utensil easier. The oven temperature can be left the same as the
recipe and the food cooked a shorter period of time. The temperature can be lowered 25° - 50°F [14 - 28°C] and the food will probably take the same length of
time to cook as the recipe states. If you nd that food is adequately browned on the outside, but not done in the center, lower the temperature another 25°F
[14°C] and add to baking time. When reducing the temperature, always check the food for doneness a minute or two before the minimum time stated in the
recipe, as time can always be added. Some recipes will cook faster than others. There is no way to predict exactly how long each recipe will take when you
convert it to convection. Convection will be easier to use after you have used it a few times as you will begin to understand the way it bakes.
SELECTING UTENSILS FOR CONVECTION BAKE
Cooking by convection does not require any specially designed baking utensils. You probably have many utensils in your kitchen that are suitable to use.
When choosing a baking utensil, consider the material, the size and shape as they all aect the baking time and the appearance of the nished product.
Metal bakeware (aluminum, steel, and cast iron) result in the fastest cooking time and the best end product. Aluminum pans work best for all types of baked
goods. For the best browning when baking pies and breads, use a pan with a dark or dull nish that absorbs heat. A shiny nish works best for cakes and
cookies, since it reects some of the heat and provides a more tender surface. Cookie sheets with only one lip will give the best results, as the heated air can
circulate all around the sides of the food.
For roasting, use the bottom of the broil pan and elevate the meat on a metal roasting rack. Glass-ceramic (Pyrex®) or glass utensils do not conduct heat as
well as metal, but they can be used for foods that do not require a dark brown crust or crisping, such as soués.
Baked items cook more quickly and evenly if they are individually smaller in size, i.e. two or three small foods do better than one large piece. When single
food items are baked, always center the rack. If several foods are being baked, space them evenly on the racks.
RACK POSITIONS FOR CONVECTION BAKING
One to four racks can be used simultaneously during convection baking. Place the rack(s) in the desired position before turning the oven on. Store the
unused racks out of the oven. Rack position 2 (second from bottom) will probably be used the most for single rack convection baking.
When baking on more than one rack you should stagger the pans for better airow. Allow at least 1” of space between the oven walls and the pans so the
heated air can circulate.
REGULAR BAKE
Regular bake is baking with hot convected air without a fan. The air movement comes from natural convection. As the air heats, it moves to the top of the
oven. This oven mode is the same as you have been using for baking on one or two racks.
FOODS SUITABLE FOR REGULAR BAKE
• Appetizers
• Pies, Cakes
• Breads
• Desserts
• Main Dishes
• Oven Meals (1 to 2 racks)
• Poultry
• Roasts
© 2025 Capital Cooking
20
EN

USING THE OVEN
(CONTINUED)
RACK POSITIONS FOR REGULAR BAKING
One or two racks can be used simultaneously during baking. Place the rack(s) in the desired position before turning the oven on. Store any unused racks out
of the oven. Rack position 2 (second from bottom) will probably be used the most for single-rack baking.
If you are using two racks simultaneously, be sure to check the food on the bottom rack sooner than the minimum time. The food on the lower rack position
may cook slightly faster than the food on the upper rack, particularly if you are using large baking utensils. Stagger the utensils if possible so that one is not
directly above the other, and maintain at least one inch of space between the oven walls and the pans.
If using large or commercial size baking utensils, the food may take a few extra minutes as the air cannot circulate as freely as it does with a smaller pan. When
using commercial size baking utensils, use only one.
GETTING THE BEST RESULTS REGULAR BAKING
• Follow the recipe recommendations (ingredient amount, size and shape of the baking utensil, etc.).
• Do not open the oven door “just to peek,” use the interior oven light and look through the window. Opening the door will allow heat to escape and may
aect cooking time as the oven has to recover to the set temperature.
• Do not use the oven for storage, especially when the oven is in use. Extra utensils not being used for baking can aect the food product, baking time,
browning, and end result.
• If you are using glass utensils, lower the temperature 25°F [14°C].
• Use a minute timer and set it for the minimum time suggested in the recipe.
GETTING THE BEST RESULTS CONVECTION BAKING
• Follow the rst three recommendations above.
• Metal utensils give better results in convection than glass baking utensils. If you use glass, it is usually not necessary to lower the temperature an
additional 25°F [14°C].
• Use a minute timer and set it for less than minimum time suggested in the recipe. The rst time you use a recipe in the convection mode, be sure to note
the new baking time on your recipe for future reference.
• Be sure to read the general information on convection before using the oven for the rst time (page 19).
• Keep in mind that convection baking results vary depending on type of food (cakes, meats, etc.).
HIGH ALTITUDE BAKING
Recipes and baking times vary if you are baking at high altitude. The following document on this subject is available from Colorado State University:
https://extension.colostate.edu/docs/comm/highaltitude.pdf
USING THE OVEN ON LOW TEMPERATURE
The oven can be used to keep hot food hot, to dehydrate food, to warm plates, for slow cooking (as in a crock pot), and to defrost foods.
To keep hot, cooked food at serving temperature, set the oven to the temperature suggested in the chart on page 23. Rare meat must be eaten when it is
removed from the oven, as meat continues cooking from its own ‘carryover heat’.
© 2025 Capital Cooking
21
EN
USING THE OVEN
(CONTINUED)
To keep food moist, it must be covered with aluminum foil or a lid.
To dehydrate food, follow recipe suggestions.
To warm plates, check with the dishware manufacturer for the recommended temperatures.
To use the oven as a low cooker, set the oven control knob to 255°F [145°C]. Place the food in the oven in a pan with a tight tting lid. Follow recipes for this
type of cooking.
To thaw uncooked frozen food, set the oven control knob to 150°F [65°C]. Be sure the food is tightly wrapped in foil. Thaw the food just enough. Cook
immediately.
Do not refreeze uncooked foods.
To thaw frozen cooked food, set the oven knob to 170°F [77°C]. Loosen the freezer wrapping. Do not use plastic wrap or wax paper in the oven as it will melt.
OVEN RACK INSTALLATION
Your Capital Self-Clean Gas Range features patented Flexi-Roll® oven racks
which have roller wheels to provide smooth, easy motion. Three racks are
included.
To install a rack, rotate the hinged rails down on both sides of the rack,
insert the rack into the oven cavity at the desired position, then rotate
the rails back up as you move the rack down so the wheels rest inside the
channels in the walls. Check for smooth motion in and out before resting
any utensils on the rack. Repeat this procedure to add more racks, or for
moving racks to other positions in the oven.
INSTALLED
ROTATED
CHANNELS
IN WALLS
© 2025 Capital Cooking
22
EN
USING THE OVEN
(CONTINUED)
FOOD SAFETY
According to the United States Department of Agriculture you should not hold foods at temperatures between 40°F - 140°F [4 - 60°C] for longer than 2 hours.
Your recipe will guide you on which cooking modes are best. However, food safety (handling, cooking, storage) is very important in preventing food-borne
illness. The table below provides safe minimum temperatures and are recommended to keep you and your family safe.
FOOD ITEM SAFE MINIMUM INTERNAL TEMPERATURES
GROUND MEATS (BEEF, VEAL, LAMB, PORK) 160°F [72°C]
BEEF, VEAL, LAMB ROAST, STEAKS, CHOPS Medium Rare - 145°F [63°C]
Medium - 160°F [72°C]
Well Done - 170°F [77°C]
PORK ROAST, STEAKS, CHOPS Medium - 160°F [72°C]
Well Done - 170°F [77°C]
HAM Un-cooked - 145°F [63°C]
Reheat cooked hams packaged in USDA inspected plants to 140°F [60°C] and all others to 165°F [74°C]
GROUND CHICKEN/TURKEY 165°F [74°C]
WHOLE CHICKEN/TURKEY 180°F [82°C]
POULTRY BREAST, ROASTS 165°F [74°C]
POULTRY THIGHS AND WINGS 165°F [74°C]
STUFFING (cooked alone) 165°F [74°C]
EGG DISHES 160°F [72°C]
FISH AND SHELLFISH 145°F [63°C]
LEFTOVERS 165°F [74°C]
CASSEROLES 165°F [74°C]
Safe minimum internal temperatures per US Dept. of Agriculture Food Safety & Inspection Services guidelines.
USING REGULAR BROIL OR CONVECTION BROIL
Pay special attention when setting the Oven Control Knob to “BROIL”. If you set the knob past the “BROIL” setting, the burner will not ignite.
To use regular broil, turn the Oven Control knob to “BROIL”. To use Convection Broil, turn the Oven Control Knob to “BROIL” and press the CONVECTION
button to operate the fan. There will be a delay of 30-45 seconds after the control knob has been turned on to when you actually hear gas owing and
the burner lighting. The green “BROIL” indicator light will come on to let you know that the broiler is currently on. During the broiling process, the infrared
burner produces such an intense heat that the burner will cycle on and o to maintain an ecient yet safe interior cooking environment. This cycling feature
prevents the burner from producing range-damaging heat.
CAUTION
© 2025 Capital Cooking
23
EN

USING THE OVEN
(CONTINUED)
RACK POSITIONS FOR BROILING
The type and thickness of the food will determine the rack position. See instructions below for more information.
CONVECTION BROIL
Convection broil is cooking by intense infrared radiant heat supplied by the broil burner while the fan at the back of the oven circulates hot air in a continuous
pattern around the food. Convection broil cooks the food with better results for thicker cuts of meat. The meat sears on the outside and retains more juices
and natural avor inside with less shrinkage.
FOODS SUITABLE FOR CONVECTION BROILING:
• Thicker Cuts of Meat (1” or more) - Rack position #3 (same position for broiling)
• Thicker, Irregular-sized Pieces of Poultry (1” or more) - Rack position #2 or #3 (same position for broiling)
• Thicker, Pieces of Fish (1” or more) - Rack position #3 (same position for broiling)
• Top Browning: Casseroles and Breads - Rack position #2 or #3 (same position for broiling)
REGULAR BROIL
Broil is cooking by intense infrared radiant heat supplied by the broil burner located at the top of the oven, without a fan.
FOODS SUITABLE FOR BROILING:
• Appetizers - Rack position #3 or #4
• Meats, Poultry, Fish (under 1”) - Rack position #4
• Top Browning: Casseroles and breads - Rack position #2 or #3
USING A MEAT THERMOMETER WHEN BROILING AND CONVECTION BROILING
To accurately determine the doneness of a thick steak or chop (1-1/2” [4 cm] thick or more), use a meat thermometer. Insert the point of the thermometer
into the side of the meat to the center. Cook the rst side to 90°F [32°C] for rare meat. Cook the rst side 100°F [38°C] for medium to well done. Cook the
second side to the desired degree for the doneness you want, 140 - 145°F [60 - 63°C] for rare, 150 - 155°F [66 - 68°C] for medium, and 160 - 165°F [71 - 74°C] for
well done. If you are cooking pork, cook to 160°F [61°C].
A large two-piece broil pan is provided with your new range. When you are broiling, always use both pieces. The slots allow the grease drippings to ow into
the bottom of the pan keeping it away from the intense heat of the infrared broiler burner. This helps to minimize the smoking and spattering of the grease.
DO NOT cover the slotted grid with aluminum foil which will catch grease and could cause a re.
GETTING THE BEST RESULTS
• Defrost the food before starting to cook.
• Put food on a two-piece broiler pan, center the pan and push it to the very back of the oven rack.
• Set a minute timer for the minimum time to check the food.
• Steaks should be at least 1” [2.5 cm] thick if rare doneness is desired. It is dicult to get rare with meat that is thinner.
• After half the total cooking time, turn the food over. Turn the food only once. It is not necessary to turn over thin foods (llet of sh, ham slices, etc.). Liver
slices must be turned over.
• When top browning, use metal or glass-ceramic bakeware (Pyrex®). DO NOT use heat-proof glass or pottery as this type of glassware cannot withstand
the intense heat of the broiler burner.
NOTE: You cannot use the broiler burner and the bake burner at the same time. When one is on, the other cannot be turned on!
© 2025 Capital Cooking
24
EN
USING THE OVEN
(CONTINUED)
OPEN DOOR BROILING
Using the oven with the door open for any reason is not recommended. The door hinge does not have a dedicated open-door broil position, and the gas
burner may run continuously because so much heat is escaping the oven. The escaping heat may also damage the controls above the oven door.
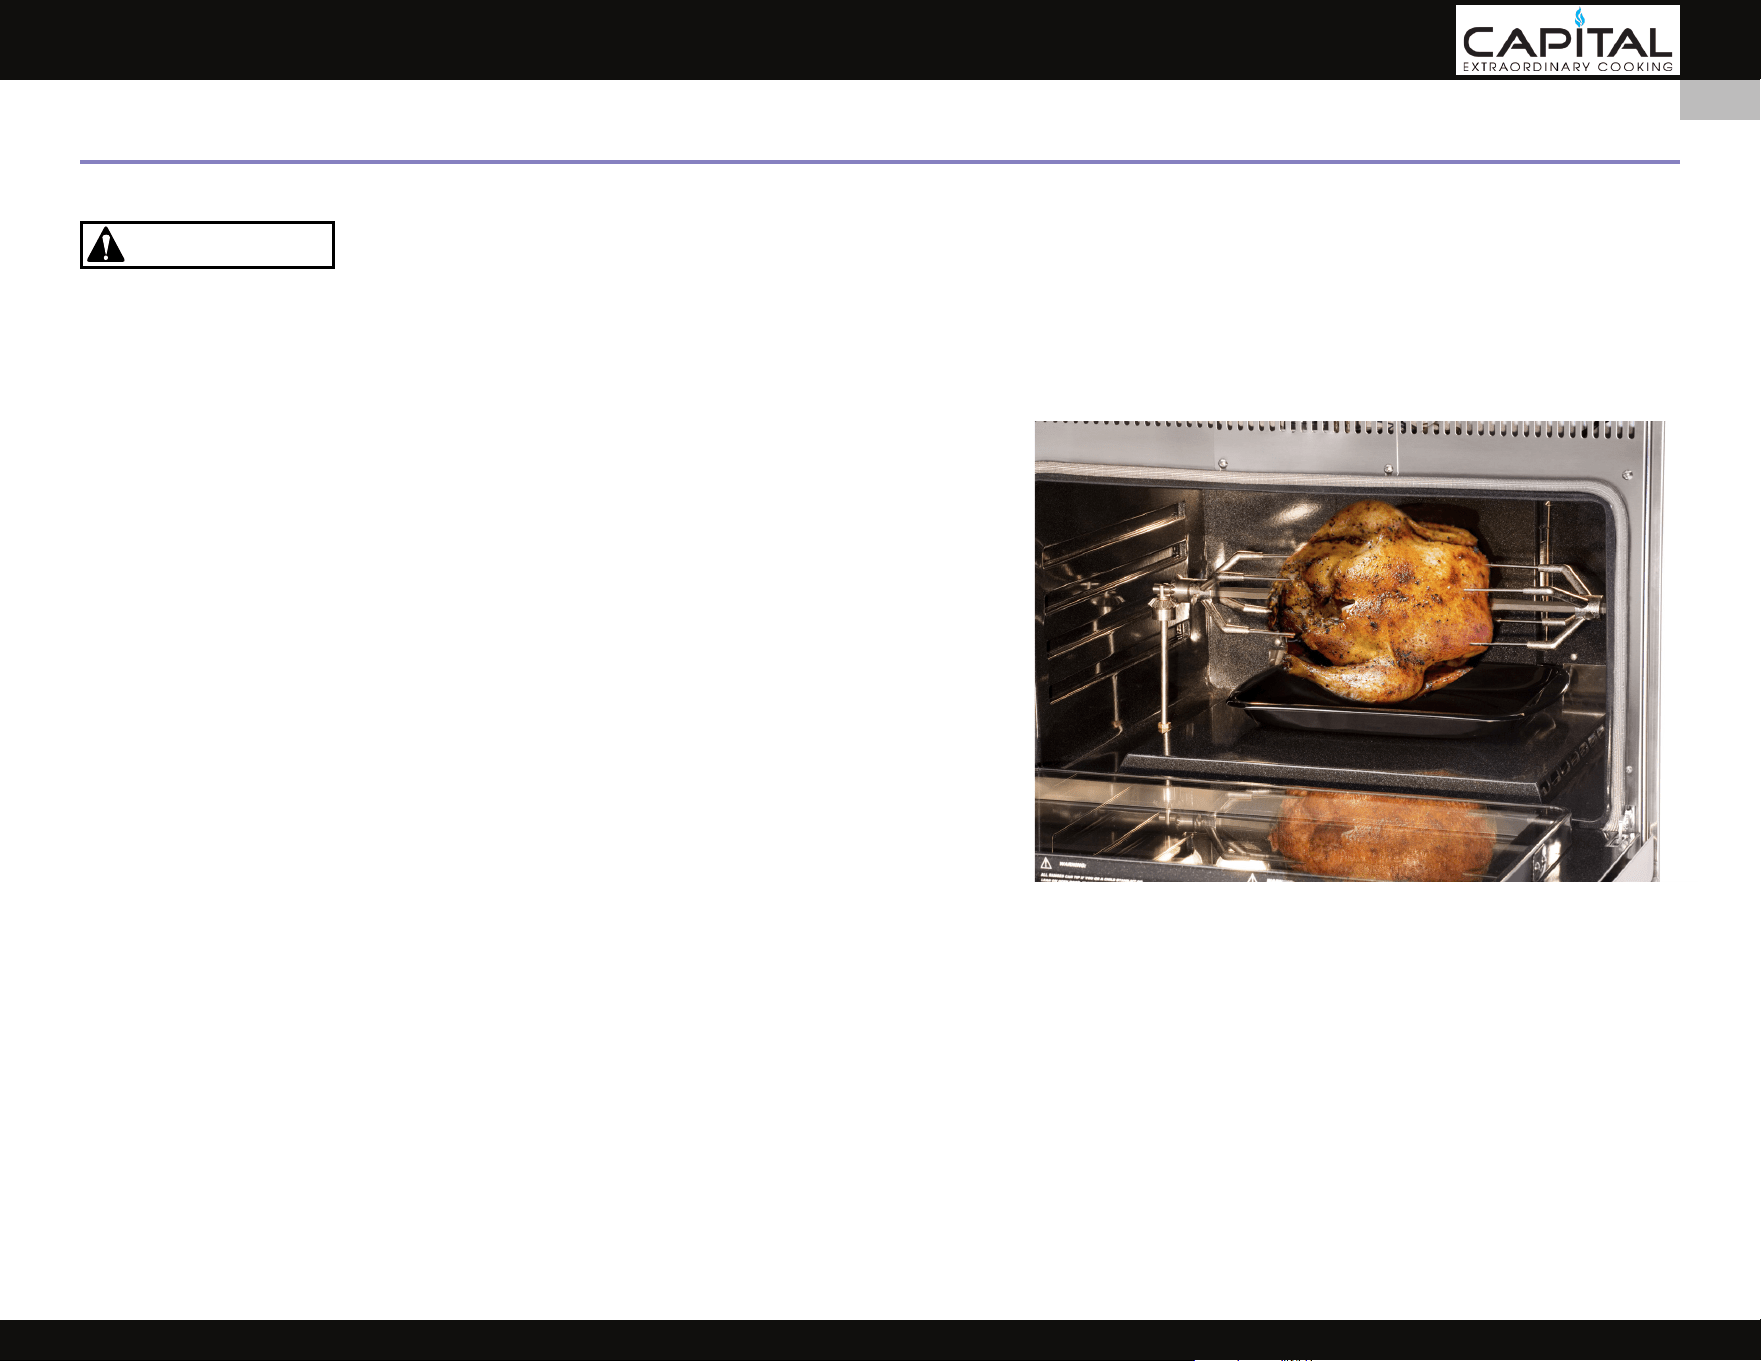
USING THE ROTISSERIE
Your Gas Self-Clean oven contains a Rotomatic™ rotisserie system, complete with a vertical
positioning rod, a U-bracket, a horizontal spit rod, and heavy-duty stainless steel forks. A
porcelain-coated, two-piece broiler pan is provided for your convenience.
Using the rotisserie is quite simple:
• Place the vertical positioning rod into the hole located in the left side of the oven cavity
oor.
• Place your rotisserie spit-rod with your prepared meat between the two forks and
mount on the U-bracket, then swing into place on the right wall bracket of the oven.
• Place the broil pan directly beneath the meat.
• Close oven door.
• Set the oven to Broil mode.
• Press the rotisserie button on the control panel which will activate the rotisserie motor.
NOTE: For Convection Rotisserie, simply follow the same steps and rst press the rotisserie
button, followed by the convection button.
NOTE: Rotisserie system can be used ONLY in the Broil Mode, and not Bake Mode.
CAUTION
© 2025 Capital Cooking
25
EN

OVEN SELF-CLEAN
SELF-CLEAN CYCLE INFORMATION
BURN HAZARD - All parts of the range can get very hot during operation. The oven door glass and areas surrounding the door get very hot, especially
during self-cleaning operations. Do not touch the appliance while in operation. Failure to observe these instructions may result in severe burns or injury.
Do not allow children to use this appliance without adult supervision. Do not allow children to play in or around the appliance, even when not in use. The
interior of the oven will still be at baking temperatures when the “DOOR LOCK” light turns o and the oven door can be opened. Use caution as the oven may
be hot enough to cause burns.
Your new Capital range features pyrolytic self-cleaning. When set in the SELF-CLEAN mode, the oven reaches a high temperature of 850 - 900°F [454 - 482°C]
that incinerates any food soil inside the oven. A little smoke and odor is common during the SELF-CLEAN cycle, depending on the content and amount of soil
remaining in the oven. If you see persistent ames, turn o the oven and allow it to cool completely before opening the door to wipe up the excessive food
debris.
NOTE: While the oven is in SELF-CLEAN, only the RANGETOP burners can be used.
NOTE: If the door is locked and the oven is not in self-clean mode, turn the knob to SELF-CLEAN for about 1 minute, then turn to “OFF”. This will reset the latch
mechanism in about 1 minute and should unlock the door.
BEFORE RUNNING SELF-CLEAN:
• Remove the oven racks, all pans, broiler pans, utensils, etc.
• Remove any debris or soil that is outside the door seal area. This appliance is designed to clean the oven interior and that portion of the door that is inside
the oven. The outer edges of the door are not in the cleaning zone. Wipe this area clean.
• Clean the oven front frame and outer door edges. Wipe up large spillovers and grease.
• Be sure the light bulbs and glass covers are in place.
• Heavy food debris should be removed before running the self-clean cycle. Wipe out puddles of grease and any loose debris that can be easily removed.
• Do not scrape the oven interior surfaces or door glass with sharp objects as this may damage the surfaces, or could leave scratches which would shatter
the glass.
• Do not pour cold water onto hot surfaces inside the oven. The steam could cause serious burns. The sudden temperature change could also distort the
metal surfaces inside the oven resulting in cracks in the porcelain.
• Turn on the ventilation hood above the range and leave it on until after the oven has completed the self-clean cycle.
• If the smell is strong, remove persons and animals from the kitchen during this period. Open any windows to further vent the odor from the room.
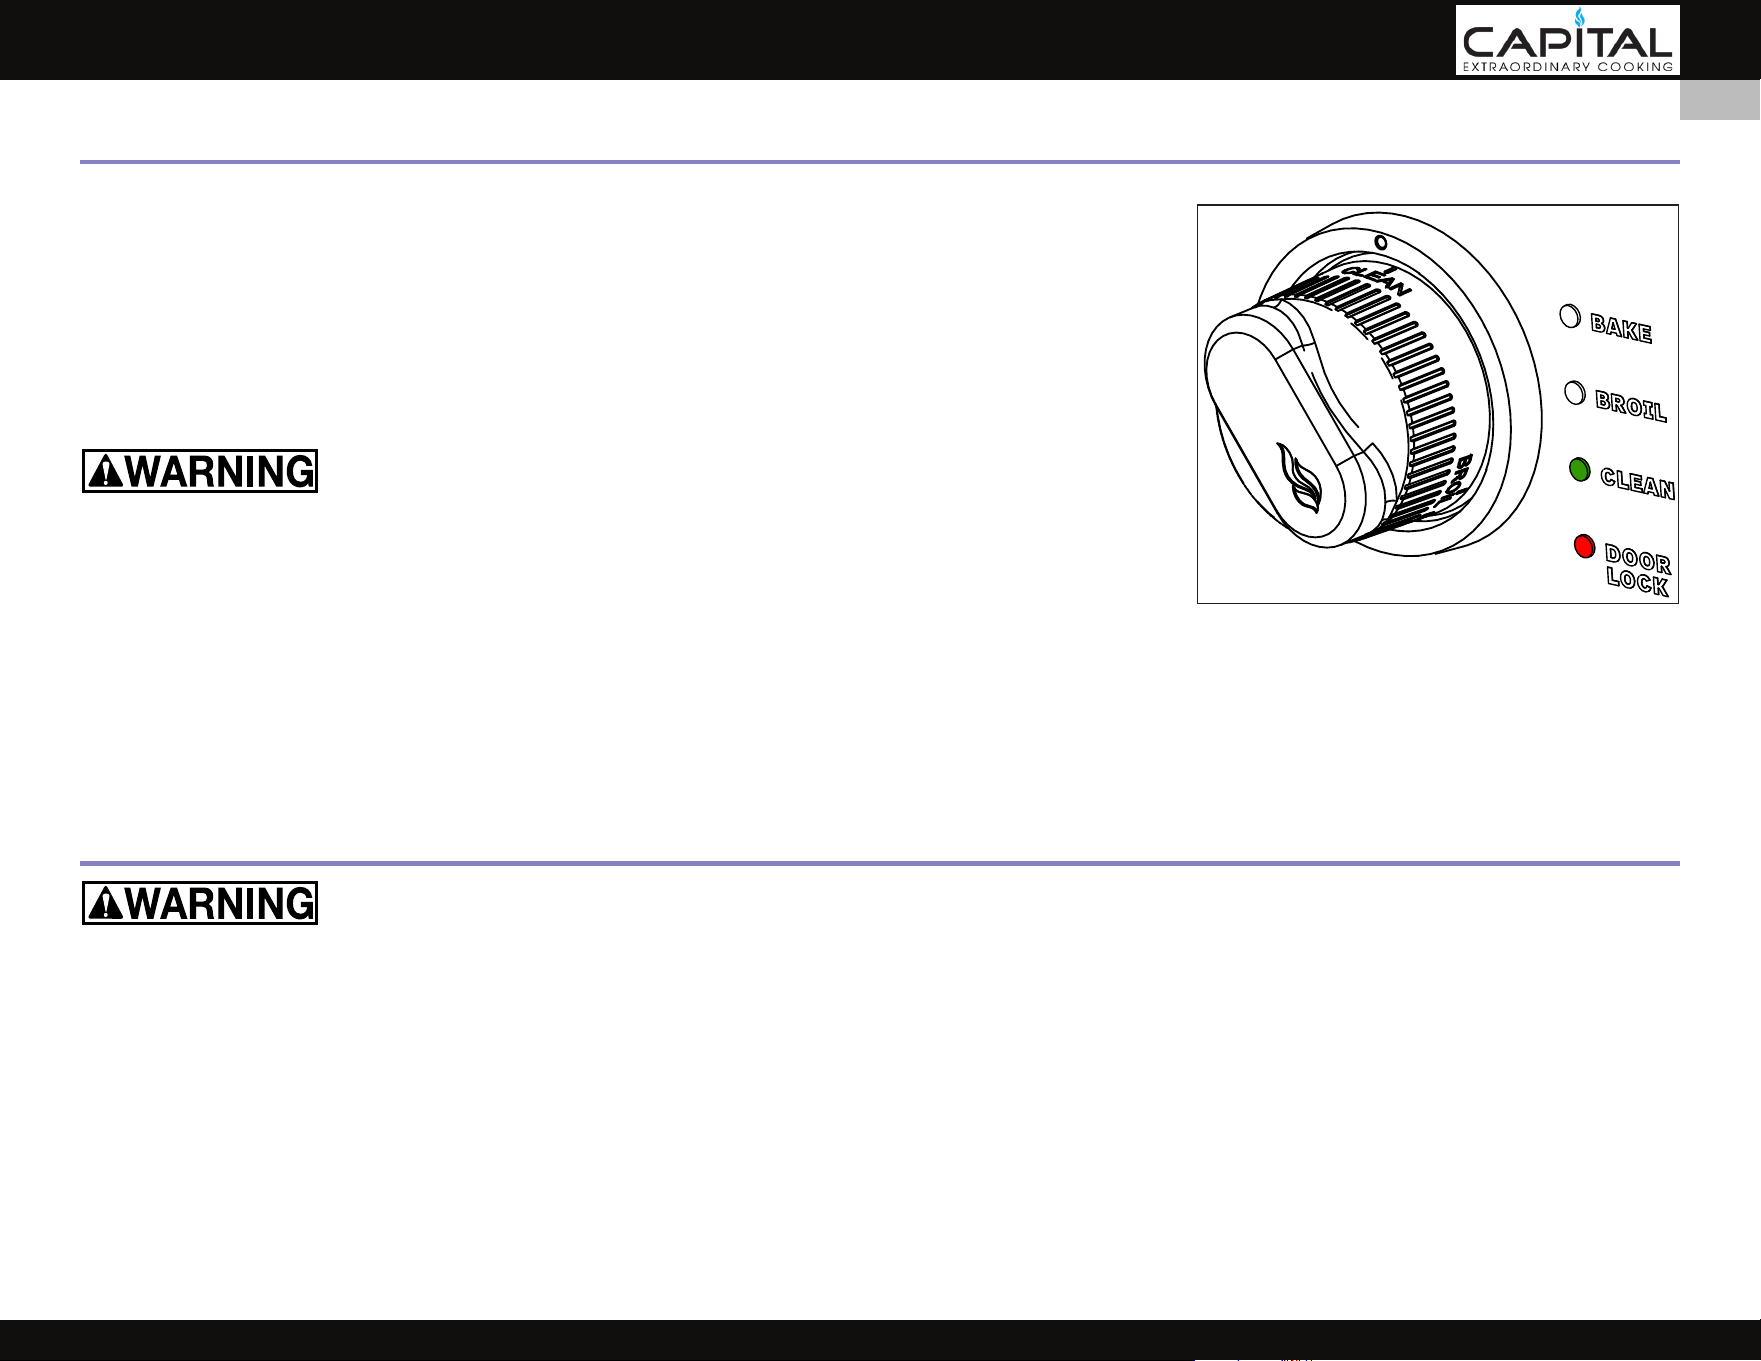
OVEN DOOR LOCK DURING SELF-CLEAN
When the self-clean cycle starts, the green “CLEAN” indicator light is on and an automatic door lock engages to prevent the user from opening the oven door
and being exposed to the high heat. The red “DOOR LOCK” indicator light turns on when the lock has fully latched.
Do not attempt to open the door when either light is on as this could damage the lock mechanism. You can stop the cycle by turning the control knob to the
“OFF” position. The indicator lights will turn o only after the oven has cooled below 550°F [288°C], and the automatic door lock has completed its cycle to
the open position.
© 2025 Capital Cooking
26
EN
OVEN SELF-CLEAN
(CONTINUED)
SETTING THE OVEN FOR SELF-CLEAN
Set Oven Control Knob to “CLEAN”. You will hear a cooling fan turn on. The green “CLEAN” light will turn on.
The red “DOOR LOCK” light turns on when the door latch engages within 10-20 seconds.
The entire door latching process takes approximately 60 seconds to complete.
AT THE END OF THE SELF-CLEAN CYCLE
The self-clean cycle takes 5 hours to complete. The “DOOR LOCK” light turns o once the cycle has nished
and the door will unlatch automatically after the oven temperature falls below 550°F [288°C]. The oven will
still be hot as it enters a cool-down period of 45-60 minutes (see warning below).
The interior of the oven will still be at high temperatures (below 550°F [288°C] when the “DOOR LOCK” light
turns o and the oven door can be opened. Use caution as the oven is still hot enough to cause burns.
Turn the Oven Control Knob to “OFF” and allow the oven to cool completely.
At the end of the self-clean cycle and when everything has cooled down completely, you may nd some
remaining gray ash or burned residue inside the oven. This is a mineral deposit that does not burn or melt. The amount of ash depends on how heavily soiled
the oven was before the oven was cleaned. It is easily removed using a damp paper towel, sponge, or cloth. Wipe o any smoke residue that remains on the
front door frame with a cleaner such as Formula 409® or Fantastik®. If a stain remains, use a mild liquid cleanser. Rinse thoroughly.
Do not rub, disturb, or damage the cloth-braided door gasket. If the gasket is damaged, it will need to be replaced. Use only genuine Capital replacement
parts.
Return the oven racks to their original locations.
BURN HAZARD - All parts of the range can get very hot during operation. The oven door glass and areas surrounding the door get very hot, especially
during self-cleaning operations. Do not touch the appliance while in operation. Failure to observe these instructions may result in severe burns or injury.
Do not allow children to use this appliance without adult supervision. Do not allow children to play in or around the appliance, even when not in use. The
interior of the oven will still be at baking temperatures when the “DOOR LOCK” light turns o and the oven door can be opened. Use caution as the oven may
be hot enough to cause burns. Cleaning any part of the appliance should be done with everything completely cool.
GENERAL CLEANING ADVICE
• All stainless steel parts of the appliance can be cleaned with hot soapy water, rinsed, dried and bued to a shine with a soft cloth.
• Always use the mildest cleaning procedure rst. Some brands of cleaners of the same type are more harsh than others; read their directions. A scent or a
propellant can make a dierence in the product. Read the ingredients. Try the product on a small area rst.
• To avoid marring the surface, always rub metal nishes in the direction of the grain lines with light pressure, and never in circular motions as this may
scratch the stainless steel. The cleaning product will be more eective when used in the direction of the grain lines.
• Use only clean sponges, soft cloths, and paper towels for cleaning or scouring. Use soap pads only with soap still in them. An empty pad can scratch.
CARE AND MAINTENANCE
© 2025 Capital Cooking
27
EN

CARE AND MAINTENANCE
(CONTINUED)
• Be sure to rinse all parts thoroughly and to wipe dry to avoid water marks.
• Use caution when cleaning near the oven door vents at the top of the oven glass. Water or cleaners could get inside and leave spots or streaks on the
inside of the glass.
• Wait until the appliance is completely cool before using any aerosol-type cleaners. Many of these cleaners use ammable propellants which could ignite
in the presence of heat.
SUGGESTED CLEANERS
Hot water and mild detergent, Formula 409®, Fantastik®, Simple Green®, SoftScrub®. These cleaners may also be eective in areas with heat discoloration.
If your Capital appliance has colored panels, use warm soapy water ONLY. Rinse and dry thoroughly.
NOTE: The use of name brands is intended only to indicate a type of cleaner. This does not constitute an endorsement. The omission of any name brand cleaner does
not imply its adequacy or inadequacy. Many products are regional in distribution and may not be available in all markets.
OVEN
MANUAL OVEN CLEANING
Minor spills and spatters inside the oven may be cleaned by hand instead of running a self-clean cycle. Try wiping up the spill with warm soapy water or a
mild cleanser such as Formula 409® or Fantastik®. Rinse and dry thoroughly. If you choose to use a commercial oven cleaner, follow the instructions on the
product label.
OVEN EXTERIOR / GLASS
Do not allow food stains or salt to remain in contact with stainless steel surfaces too long. The stainless steel exterior of the oven may be cleaned with warm
soapy water, or any number of commercial stainless steel cleaners. Check to make sure the cleaners do not contain chlorine or chlorine compounds as these
are corrosive to stainless steel. Rinse thoroughly.
OVEN RACKS
The oven racks can be removed from the oven for cleaning by hand (NEVER in the self-clean cycle). The racks may be cleaned with warm soapy water or any
number of commercial cleaners. Check to make sure the cleaners do not contain chlorine or chlorine compounds as these are corrosive to stainless steel.
Rinse thoroughly. If the racks do not slide easily after cleaning, apply a small amount of food-safe mineral oil to the roller wheels. Petroleum or silicone-based
lubricants should not be used.
RANGETOP AREA
BURN HAZARD - To prevent burns, do not touch the burner heads or cooking grates when hot. Allow to cool completely.
BURNER GRATES
When lifting the grates, be careful as they are heavy and can crack if dropped on the oor or hard surface. Place them on a protected surface so they won’t
scratch the surface they are rested on. The burner grates are made of cast iron with a matte porcelain enamel coating for durability. When cool they may be
placed in the dishwasher, or wiped while on the rangetop using hot soapy water, then rinsed and wiped dry. The occasional use of mild abrasive cleaners is
acceptable. Abrasive cleansers, used vigorously or too often, can eventually harm the enamel. Apply with a damp sponge, rinse thoroughly, and dry.
DO NOT clean the grates in a self-cleaning oven. Do not allow food stains or acidic food spills to remain on the grate surfaces too long. These stains can
degrade the enamel. For stubborn stains, use light pressure with an abrasive cleaner. Rinse thoroughly and dry immediately.
© 2025 Capital Cooking
28
EN

CARE AND MAINTENANCE
(CONTINUED)
SUGGESTED CLEANERS
Hot water and mild detergent, Bon-Ami®, Kleen King®, SoftScrub® .
RANGETOP BURNERS
The burners can be disassembled for cleaning (see images at right). Use only a small toothbrush
to clean the burner ports and igniter. DO NOT insert sharp objects or scratch the burner ports. DO
NOT use toothpicks which can break o and remain inside the burner. After cleaning, ensure the
burner heads are properly installed and seated on the burner base as shown. There are notches
and/or alignment pins on the burner base to help with proper alignment. Incorrect alignment will
produce a potentially dangerous ame and poor burner performance.
Turn o all the burners and allow the grates to cool before starting to clean the rangetop. Do
not clean hot surfaces which could burn you. Clean only when everything has cooled to room
temperature.
SUGGESTED CLEANERS
BURNER CAPS - Hot water and mild detergent.
Use caution when cleaning the burner ring/cap components. Open burner caps are aluminum and
sealed burners are brass with a high-temperature black enamel that can be damaged if scrubbed
too hard or incompatible cleaners are used. Use only mild, liquid detergent, or soak in a solution
of water and detergent to loosen soils. A nylon-bristle toothbrush may be used to clean port
openings. Rinse thoroughly and dry before reinstalling. Do not use abrasive cleaners or pads as
this may scrub o the enamel.
CERAMIC IGNITER - Hot water and mild detergent, Formula 409®, Fantastik®.
GRIDDLE, GRILL, POWER WOK (IF EQUIPPED)
BURN HAZARD - To prevent burns, do not touch these areas or the grease tray below when hot. Allow to cool completely.
NEVER ood the hot griddle plate with cold water. The steam could cause serious burns and can permanently warp the plate.
DO NOT clean any part of the Griddle, Grill, or Power Wok in the Self-Clean cycle of the oven. DO NOT put these items into the dishwasher, as it will damage
your appliance. Wait until the appliance has cooled completely before cleaning. When emptying the drip tray, be sure to pour the grease into a proper
container for grease disposal, not down the drain. DO NOT scrape with metal utensils.
Do not allow food stains or salt to remain in contact with stainless steel surfaces too long. All stainless steel exterior surfaces may be cleaned with warm
soapy water, or any number of commercial stainless steel cleaners. Check to make sure the cleaners do not contain chlorine or chlorine compounds as these
are corrosive to stainless steel. Rinse thoroughly.
SUGGESTED CLEANERS
Hot water and mild detergent, Formula 409®, Fantastik®.
ALWAYS clean stainless steel in the direction of the grain with light pressure. Wait until the appliance is completely cool before using any aerosol-type
cleaners. Many of these cleaners use ammable propellants which could ignite in the presence of heat.
BURNER CAP
ALIGNMENT PIN
BURNER BASE
AIR SHUTTER
IGNITER
BURNER CAP & RING
BASE SHIELD
BURNER BASE
SIMMER RETENTION RING
IGNITER
© 2025 Capital Cooking
29
EN

CARE AND MAINTENANCE
(CONTINUED)
CONTROL KNOBS
Knobs are made of die-cast metal with dierent nish plating options available at the time of purchase.
They can be cleaned in hot, soapy water. Do not clean in the dishwasher. To remove the knobs from the
control panel, grasp the knob and pull straight toward you. Gas valve knobs will come o with the metal
bezel attached. Other knobs will have the bezel remain on the control panel. Wash knobs by hand. Do
not soak. Rinse and dry thoroughly. It is important to replace these knobs in their correct locations on the
control panel.
BACKGUARD, LOW BACK, OR HIGH SHELF (IF INSTALLED)
These items are constructed of all stainless steel. Use the mildest cleaning procedure rst, hot soapy water,
rinse and dry. If the panel has food soil remaining, try a general kitchen cleaner, such as Formula 409®,
Fantastik®, Simple Green®. For hard to clean soil, use a stainless steel cleaner such as Bon-Ami®, or Bar
Keepers Friend®. Apply cleaner with a damp sponge, rinse thoroughly and dry. Always scrub lightly in the
direction of the grain. Do not use a steel wool pad which will scratch the surface.
To touch up noticeable scratches in the stainless steel, sand very lightly with dry 100 grit emery paper,
rubbing in the direction of the grain. After cleaning, use a stainless steel polish such as Stainless Steel
Magic®. If the rear top burners are used extensively on high, it is possible for the vertical stainless steel panel to discolor from the burner heat. This
discoloration can be removed by using Revere-Ware® stainless steel cleaner.
FRAMES, SIDES, GENERAL EXTERIOR, HEAT DEFLECTOR, KICK PLATE
These parts are made of stainless steel. Follow the directions for the Backguard (see above).
If your Capital appliance has colored panels, use warm soapy water ONLY. Rinse and dry thoroughly.
© 2025 Capital Cooking
30
EN
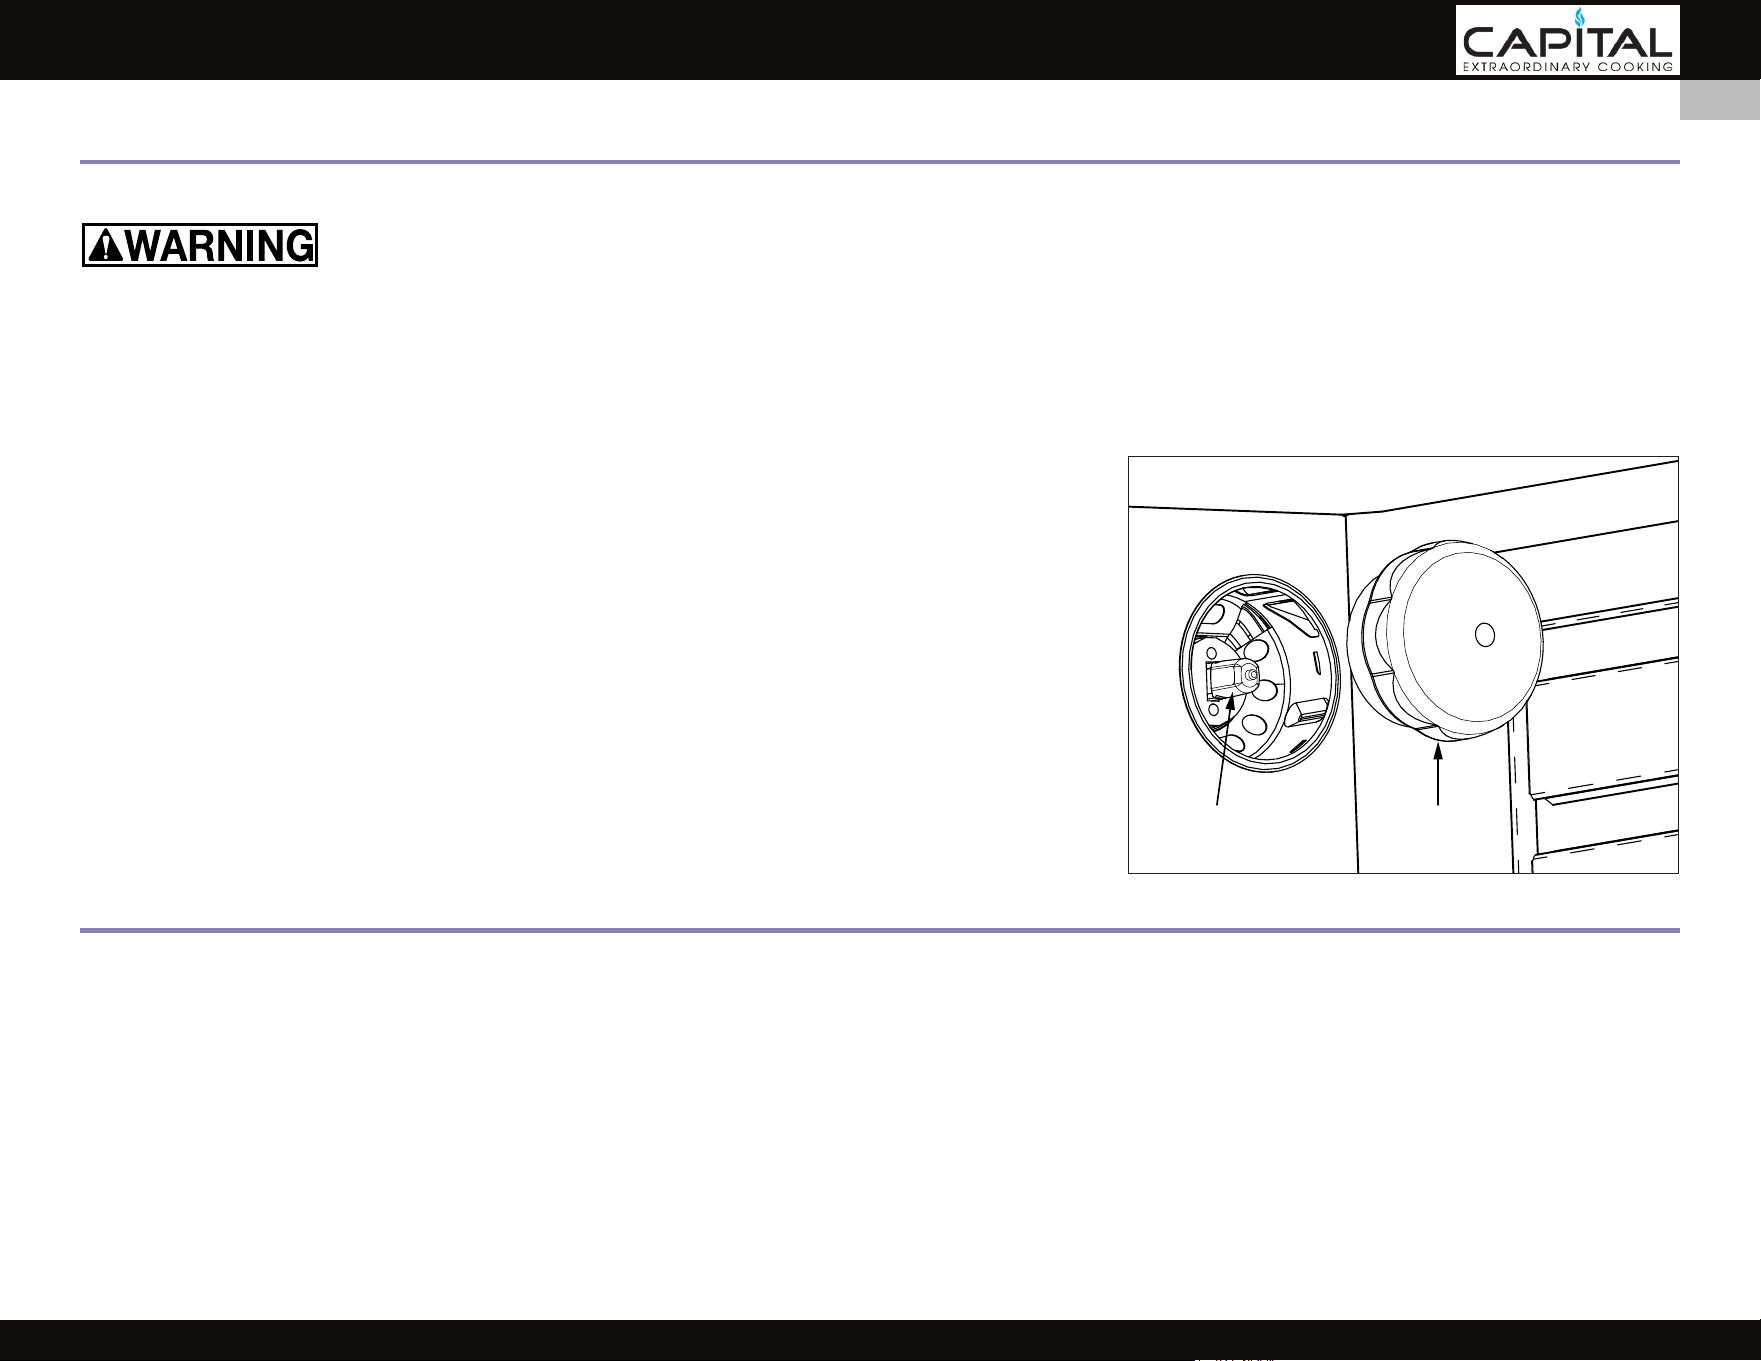
CARE AND MAINTENANCE
(CONTINUED)
REPLACING THE OVEN LIGHT BULB
ELECTRIC SHOCK HAZARD - Make sure the power has been shut o to the range. The light socket is energized when the control panel button is pushed.
Failure to shut o the power when replacing a light bulb could result in electric shock or burns.
Make sure the glass lens is cool to the touch. Use care when handling the lens. It is fragile and can break if dropped.
Use only 40 watt, 120V, halogen G9 bulbs suitable for oven appliance use. This type of bulb may be available at hardware stores and home centers or specialty
lighting stores. Call Capital Customer Service for more information.
1. MAKE SURE POWER IS OFF! Open the oven and remove the oven racks if they are in the way.
2. Place a thick towel or cloth on the oven oor below the lamp to catch the glass lens should it fall.
3. Grasp the glass lens and unscrew it (counter-clockwise) from the lamp housing. Place it aside.
4. Reach into the lamp housing and pull out the old light bulb as shown in the image.
5. Before installation, it is very important to clean the new bulb carefully with a clean, soft cloth, or
tissue paper. Grease, ngerprints, or oils in your skin can leave a residue on the glass surface of
the bulb which will create a hot-spot. The bulb will eventually crack at this hot-spot.
6. While still using a cloth or tissue paper, insert the new bulb in the lamp housing. Push the bulb
fully into the socket.
7. Re-install the glass lens by screwing into the lamp housing (clockwise).
8. Restore the power and check if the new bulb is working. Re-install any oven racks you removed
earlier.
COOLING FAN
The range features a cooling fan to protect the electronic components. The fan activates when the oven reaches a temperature around 300°F [150°C], and will
stay on throughout any oven cooking cycle, and also during self-cleaning. After cooking, even though you may have shut o the oven, the fan will remain on
until the oven cools down to a temperature near 250°F [120°C].
If you notice the fan fails to activate during any oven cycle (especially Broil or Self-Clean), do not use the oven. Call for service. Failure to do so may
permanently damage the oven.
BROILER PAN
The range is supplied with a porcelain enamel two-piece broiler pan with slotted cover. The slots allow the grease drippings to ow into the bottom of the
pan keeping it away from the intense heat of the infrared broiler burner. This helps to minimize the smoking and spattering of the grease. DO NOT cover the
slotted grid with aluminum foil which will catch grease and could cause a re.
DO NOT use aluminum foil or thin, disposable aluminum pans when broiling. These can melt.
40W - G9
BULB
GLASS
LENS
ADDITIONAL ITEMS
© 2025 Capital Cooking
31
EN
TROUBLESHOOTING GUIDE
RANGE AND RANGETOP
PROBLEM POSSIBLE CAUSE PROPOSED SOLUTION
Range non-functional (no spark at burners, no
interior lights, etc.).
No electricity.
Power cord not plugged in or no power to receptacle. Check fuse / circuit breaker.
No gas / shutoff valve closed.
Check gas shutoff valve at wall and service valve at front of unit (behind kick plate).
Technical reason. Call for service.
One or more surface burners will not light. No electricity.
Power cord not plugged in or no power to receptacle. Check fuse / circuit breaker.
No gas / shutoff valve closed.
Check gas shutoff valve at wall and service valve at front of unit (behind kick plate).
Wrong gas type. Verify gas type.
Burner ports near igniter are obstructed or dirty. Clean burners ports.
Burner head not installed correctly on base or misaligned. Align and reassemble burners.
Water in burner(s). Disassemble and dry burners.
Dirty Igniter electrode. Clean burner electrode.
Defective or clogged burner valve. Call for service.
Incorrect or clogged orifice. Call for service.
Igniter or ignition module defective (not sparking) Call for service.
Low gas pressure to unit / Defective regulator Call for service.
Other technical reason. Call for service.
Burner will not stay lit. Burner ports obstructed or dirty. Clean burner ports / igniter.
Vent plugged on regulator or regulator installed improperly. Call for service.
Low gas pressure. Call for service.
Burner not working well.
Lazy, sooty, or yellow flame.
Too large or small flame.
Verify gas type and other items in this section. Call for service.
Poor combustion, air-fuel mixture not adjusted properly. Call for service.
Gas pressure or type incorrect / incorrect regulator. Call for service.
Orifice sized incorrectly for gas type. Call for service.
Mis-aligned burner assembly. Realign and reassemble burner assembly.
Gas odor Burner went out or did not light. Relight burner.
Burner head not installed correctly on base or misaligned. Align and reassemble burners.
Burner ports obstructed or dirty. Clean burner ports / igniter.
Ruptured regulator. Turn shutoff valve to “OFF” position and call for service.
Poor combustion, air-fuel mixture not adjusted properly. Turn shutoff valve to “OFF” position and call for service.
© 2025 Capital Cooking
32
EN
TROUBLESHOOTING GUIDE
(CONTINUED)
Griddle / Grill does not light. No electricity.
Power cord not plugged in or no power to receptacle. Check fuse / circuit breaker.
No gas / shutoff valve closed.
Check gas shutoff valve at wall and service valve at front of unit (behind kick plate).
Safety valve, glow igniter defective. Call for service.
Burner is dirty. Clean burner.
OVEN
PROBLEM POSSIBLE CAUSE PROPOSED SOLUTION
Oven light(s) not working. No electricity.
Power cord not plugged in or no power to receptacle. Check fuse / circuit breaker.
Bulb is loose or burned out. Check / replace bulb.
Heat escaping from top of oven door. Oven door not sealing correctly. Check / Clean oven gasket. Replace if worn.
Check if oven door is properly installed (if recently removed).
Fan noise / hot air coming from appliance, even
when off.
Oven cooling down. This is normal. However if you DO NOT hear the fan running during or after using the oven,
call for service.
No oven heat (bake) No gas / shutoff valve closed.
Check gas shutoff valve at wall, and service valve at front of unit (behind kick plate).
No electricity (check oven light). Power cord not plugged in, or no power to receptacle. Check fuse / circuit breaker.
Improper settings. Verify proper settings on control knob.
No oven broil Improper settings. Verify proper settings on control knob.
Uneven baking Insufficient pre-heat time. Allow oven to pre-heat at least 15 minutes before baking.
Improper utensils / placement. Use proper utensils and place them correctly in the proper rack positions for the type of
food being baked.
Improper settings. Verify proper settings on control knob.
No convection. No convection fan or fan defective. Check for air movement. Call for service.
Convection noisy. Technical reason. Call for service.
Rotisserie not working. Vertical rotisserie rod not firmly in place. Place rod firmly in hole in oven floor.
Rotisserie motor defective. Call for service.
Rotisserie noisy. Technical reason. Call for service.
© 2025 Capital Cooking
33
EN
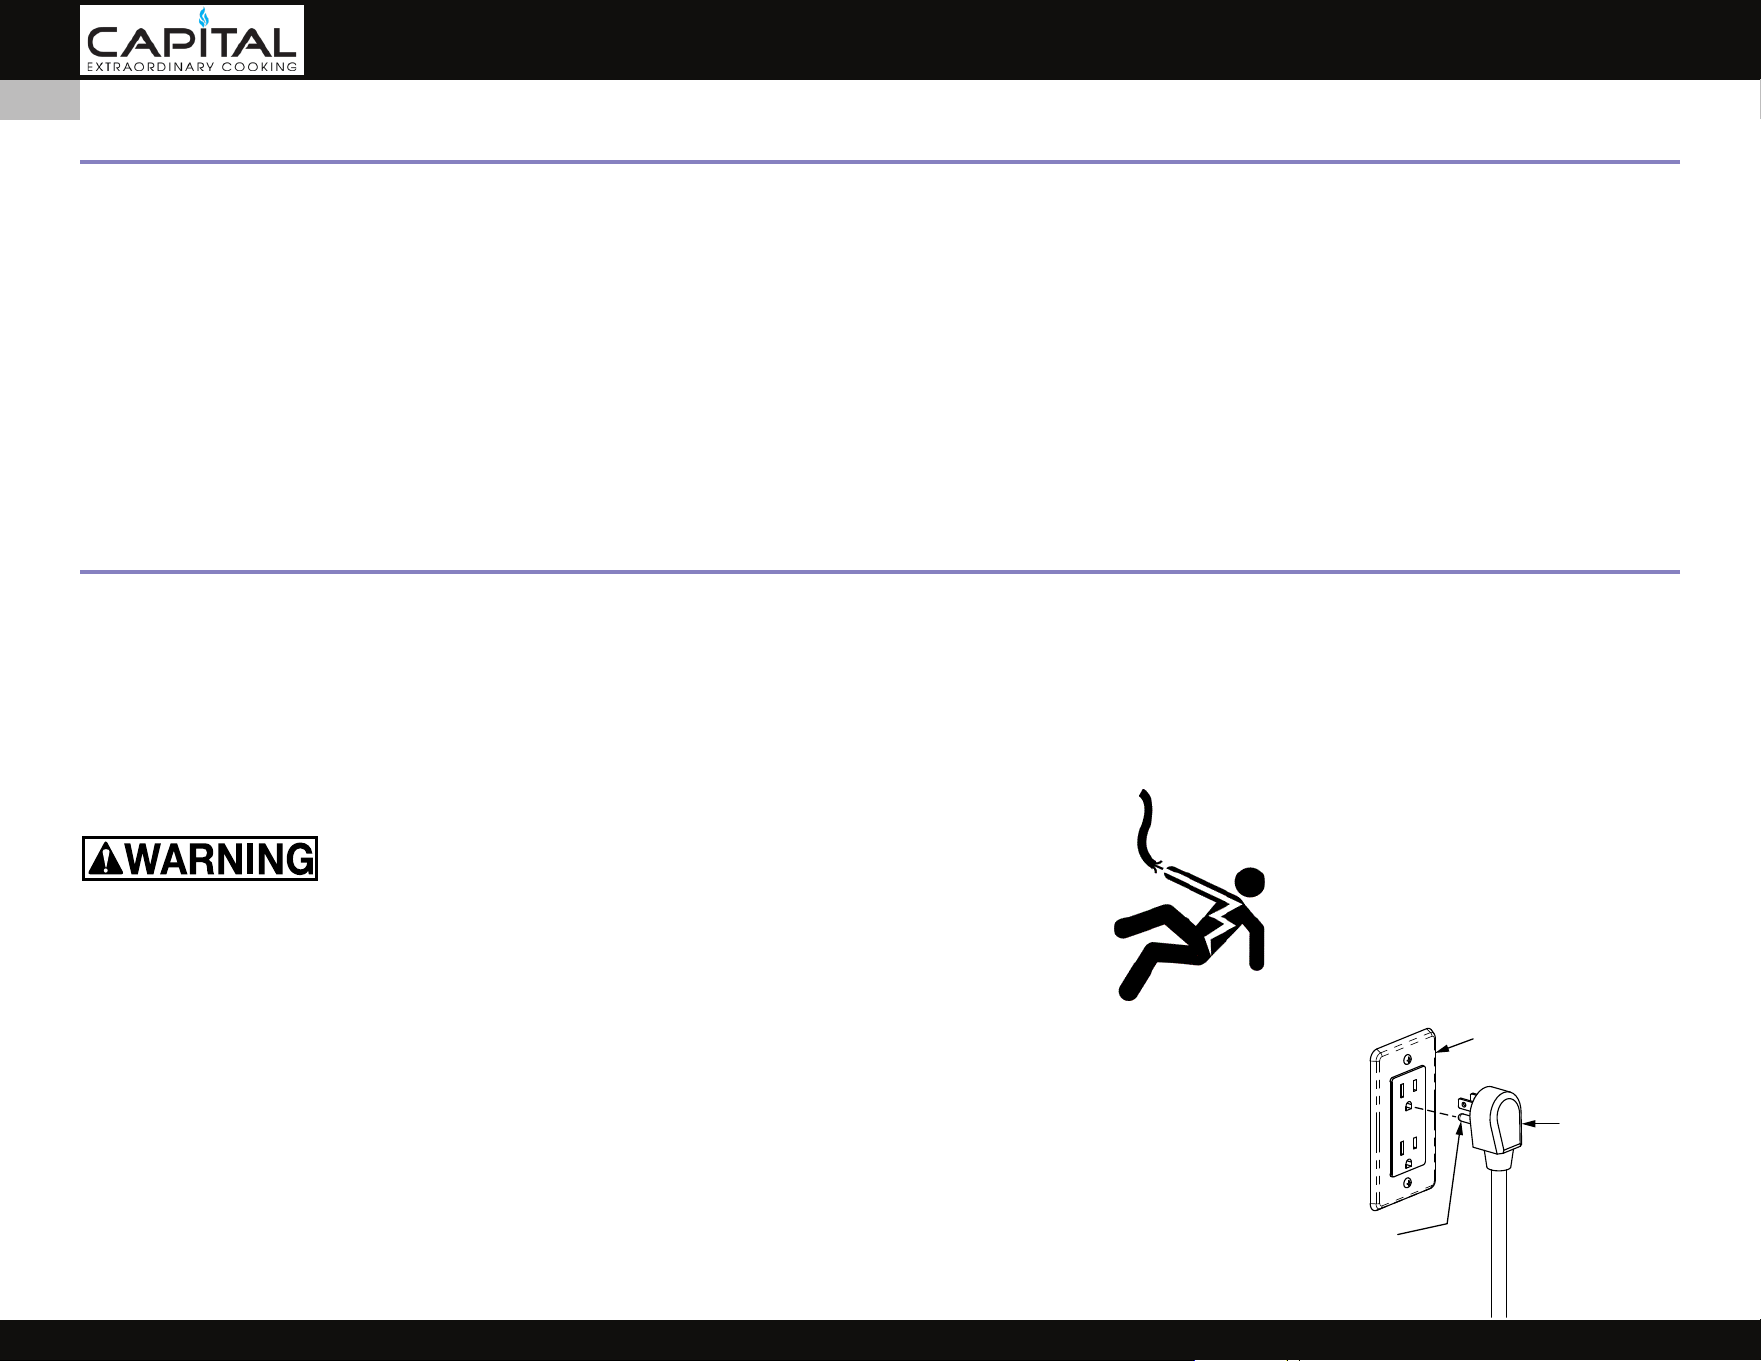
When properly cared for, your Capital Cooking appliance will provide many years of safe, reliable service. When using this or any appliance, basic safety
practices must be followed as outlined below.
IMPORTANT: Save these instructions for the local Gas or Utility Inspector’s use.
INSTALLER: Please leave this manual with the owner.
OWNER: Please retain this manual for future reference.
This range is designed for residential use ONLY. It is NOT designed for installation in recreational vehicles or for commercial purposes. DO NOT install this
range outdoors. See the REGULATORY-CODE REQUIREMENTS section for more details.
ELECTRICAL SHOCK HAZARD
Disconnect power before installing or servicing appliance. Before turning power ON, be sure all
controls are in the “OFF” position. Failure to do so can result in electrical shock or death.
ELECTRICAL GROUNDING
This appliance must be grounded. Grounding reduces the risk of electric shock in the event of a short circuit. Read the
ELECTRICAL CONNECTIONS section for complete instructions.
This appliance is equipped with a 3-prong grounding plug for your protection against shock hazard and should be
plugged directly into a properly grounded receptacle. Do not cut or remove the grounding prong from this plug.
ELECTRICAL SUPPLY
The appliance must be on its own dedicated circuit - 120 VAC, Single Phase, 60 Hz, with a current rating as shown
in the model number listing on pages 6-7. Have the installer show you where the electric circuit breaker is located
so you know how to shut o the power to this appliance. It is the responsibility of the user to have the appliance
connected by a licensed electrician in accordance with all local codes, or in the absence of local codes, in accordance
with the National Electrical Code. Read the ELECTRICAL CONNECTIONS section of this manual for complete details.
Grounded
Outlet Box
120V
3-Prong
Grounding
Plug
Ground
Prong
TABLE OF CONTENTS - INSTALLATION
SAFETY PRECAUTIONS - BEFORE YOU BEGIN
34 SAFETY PRECAUTIONS BEFORE YOU BEGIN
35 MODEL NUMBERS / RATING LABEL / REGULATORY-CODE REQUIREMENTS
36 LOCATION AND INSTALLATION / VENTILATION
38 INSTALLATION CLEARANCES
40 INSTALLATION OF ANTI-TIP DEVICE
42 BACKGUARD AND ACCESSORIES
43 ELECTRICAL CONNECTIONS
44 GAS CONNECTIONS
46 FINAL SETUP - INSTALLER CHECKLIST
48 SERVICE AND PARTS
48 APPENDIX
49 WARRANTY
© 2025 Capital Cooking
34
EN
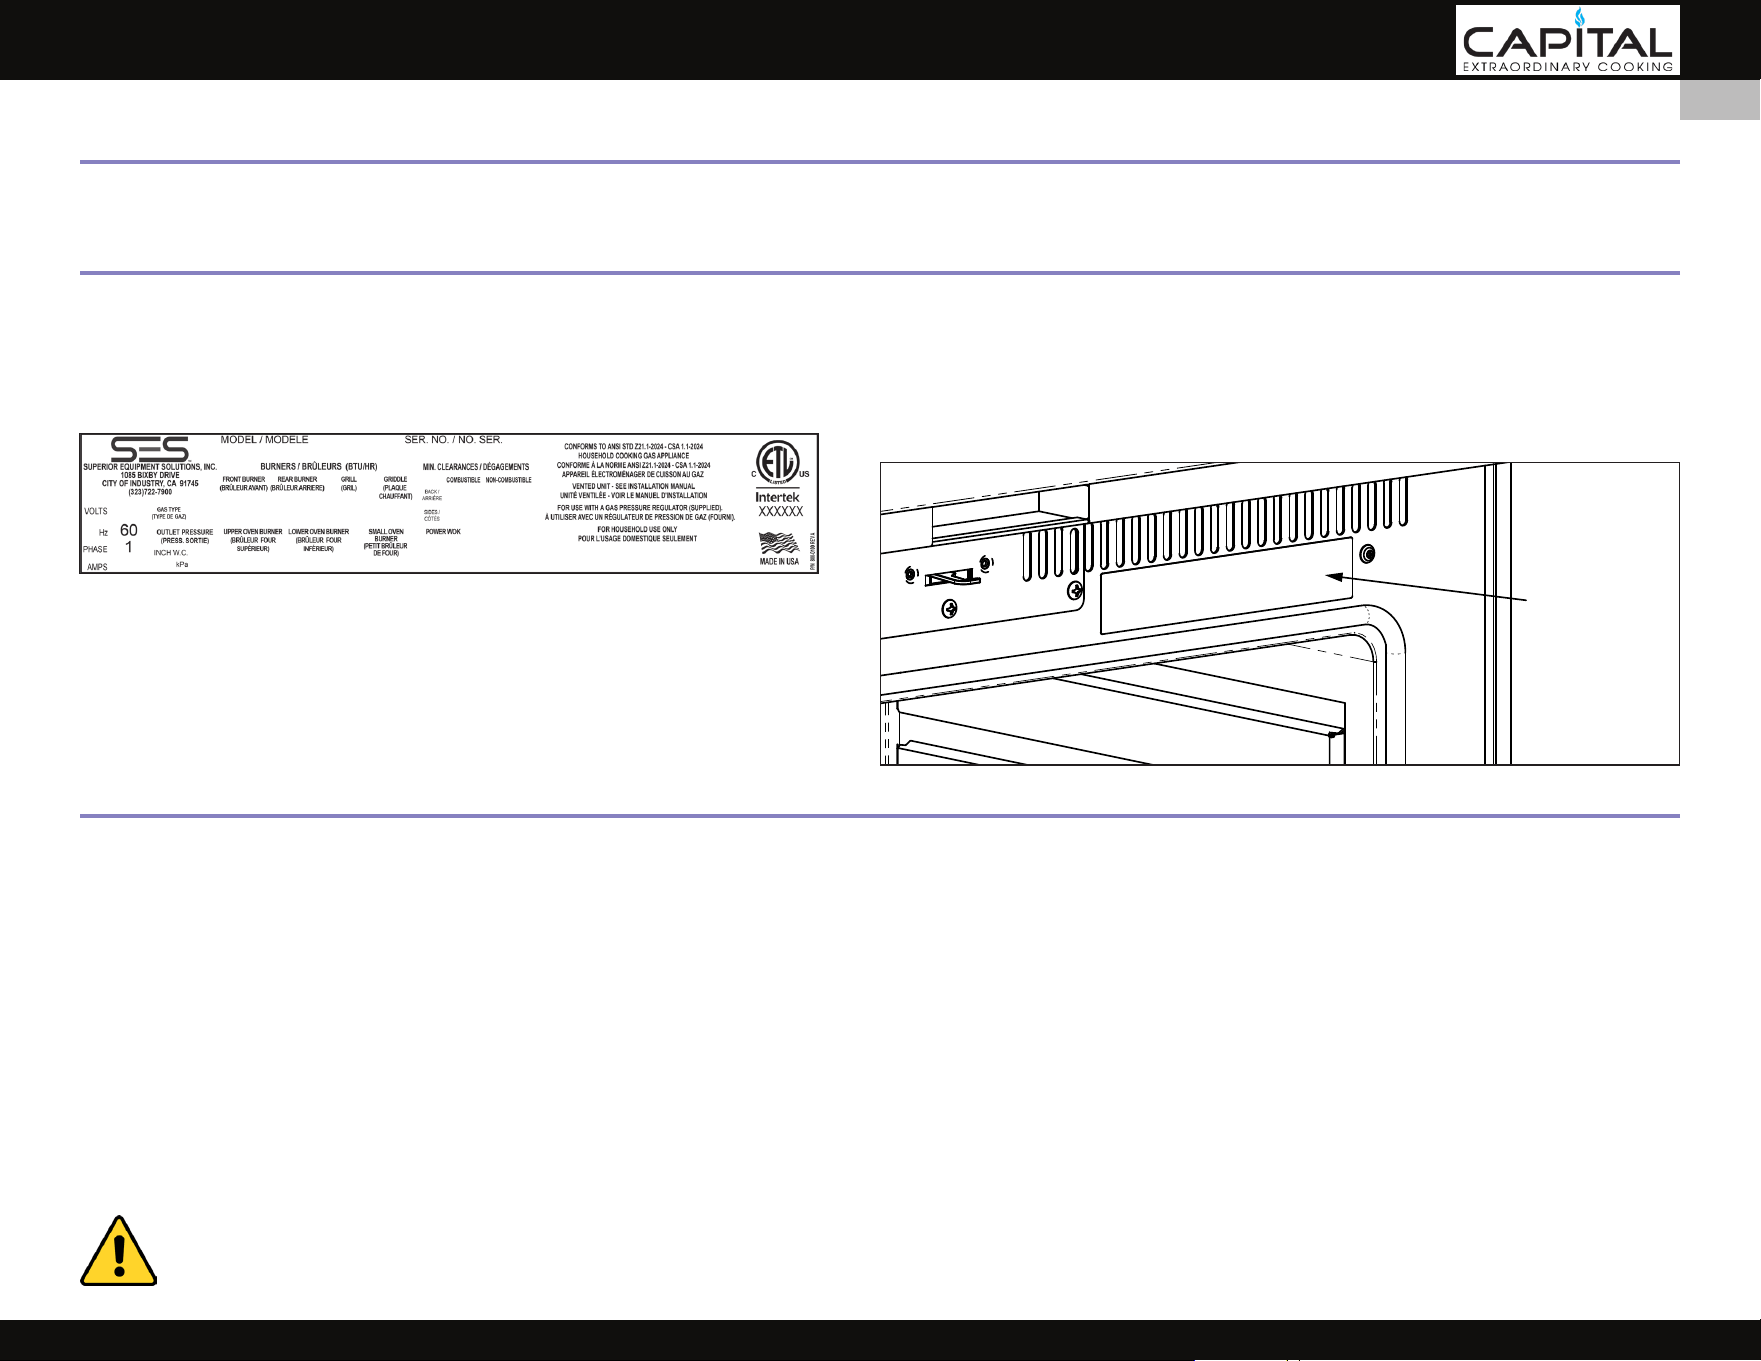
MODEL NUMBERS
REGULATORY - CODE REQUIREMENTS
Installation of this cooking appliance must be made in accordance with local codes. In the absence of local codes, this unit should be installed in accordance
with the National Fuel Gas Code
ANSI Z223.1/NFPA 54
, Natural Gas and Propane Installation code
CSA B149.1
, or Propane Storage and Handling Code
B149.2
.
The installation of appliances designed for manufactured (mobile) home installation must conform with Title 24 CFR, Part 3280 [formerly Title 24, HUD (Part
280)] or with local codes where applicable.
The installation of appliances designed for recreational park trailers must conform with state or other codes or, in the absence of such codes, with ANSI A119.5.
All Electrical Components must be electrically grounded in accordance with local codes or in the absence of local codes with the National Electrical Code
ANSI/NFPA 70
, or Canadian Electrical code
CSA C22.1
.
STATE OF MASSACHUSETTS
Massachusetts requires all gas be installed using a plumber or gas tter carrying the appropriate Massachusetts license. All permanently installed natural
gas or propane installations require a T-handle type manual gas valve be installed in the gas supply line to this appliance. Flexible gas connector must not be
longer than 48” [1.2 m].
CALIFORNIA PROPOSITION 65 - WARNING
WARNING: This product can expose you to chemicals including carbon monoxide, which is known to the State of California to cause cancer, birth
defects or other reproductive harm.
For more information, go to www.P65Warnings.ca.gov.
The rating label contains important information about your Capital Cooking appliance such as the model and serial number, gas type and manifold pressure,
electrical rating, the BTU rating for each burner type, and the minimum installation clearances.
The rating label is located on the door frame just above the oven cavity.
If service is necessary, contact Capital Cooking Customer Care with the model and serial number information shown on the label.
RATING
LABEL
Typical Rating Label shown.
RATING LABEL
See the list of all model numbers on pages 6-7.
© 2025 Capital Cooking
35
EN
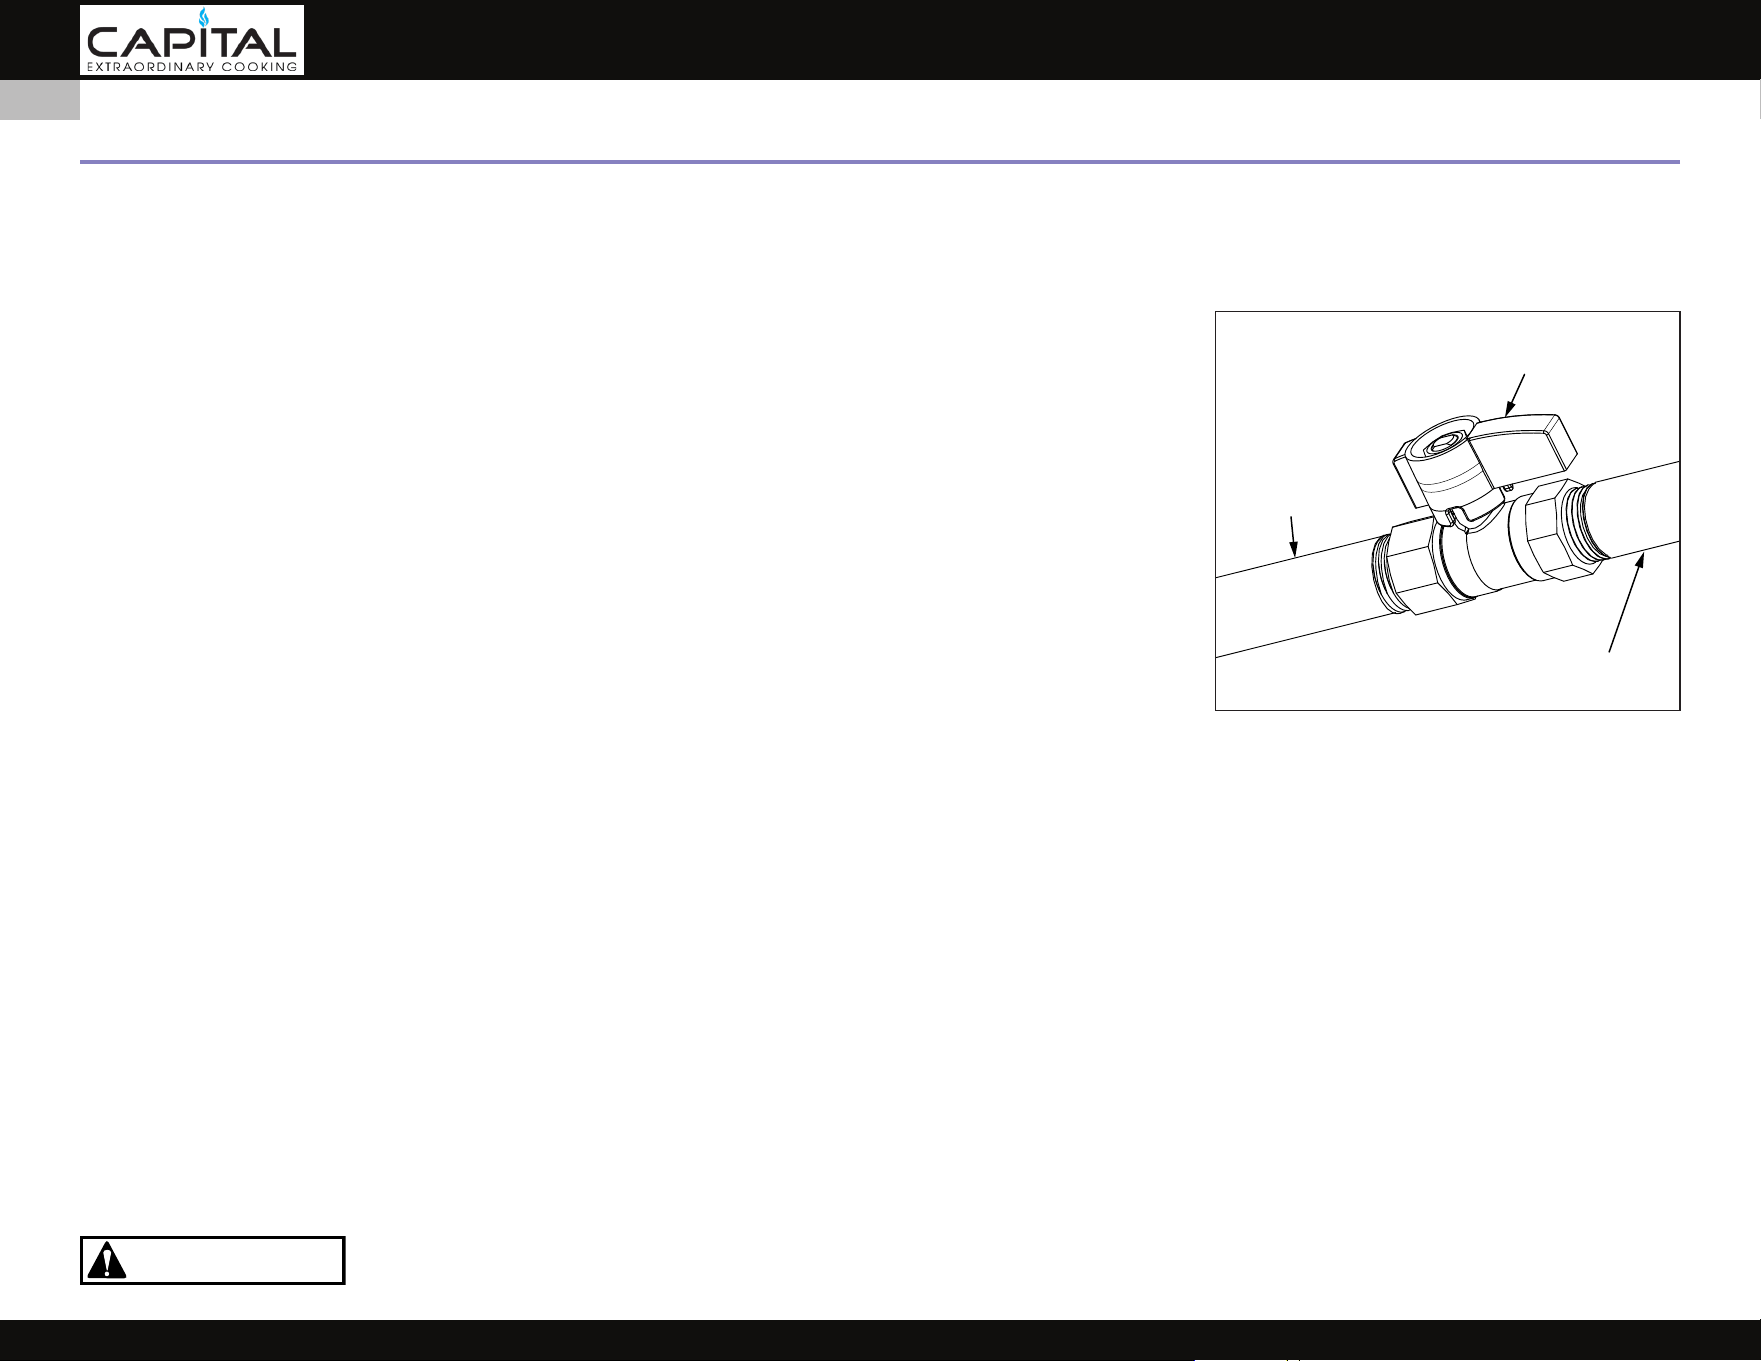
LOCATION AND INSTALLATION / VENTILATION
PREPARATION
Before moving the range, protect any nished ooring and secure the oven door(s) closed to prevent damage. The range is held onto the shipping pallet with
screws at the rear. Remove these screws and then move the range to the oor with the help of 2 persons. The unit is very heavy and should be handled with
care. Use proper safety equipment, such as gloves. Do not lift by the oven door handle!
GAS AND ELECTRICAL SUPPLY CLEARANCES
If not already in place, install a gas shut-o valve in an easily accessible location for servicing of the range.
Make sure all users of the range know where this shuto is located and how to shut o the gas. Any openings
in the wall or oor behind the appliance must be sealed.
The INSTALLATION CLEARANCES on the following pages show where the “GAS” and “ELEC” zones should be
located. The range is designed to be installed nearly ush to the rear wall*. It may be necessary to reposition
the gas supply and power receptacle / junction box in order to accommodate the range when pushed back
against the wall. The back of the range is recessed 3” [7.6 cm] to provide room for the power cord and gas
pipe.
* Unless installed in an island with no rear wall.
CABINETRY
To eliminate the risk of burns or re by reaching over heated surface units, cabinet storage space located
above the surface units should be avoided. If cabinet storage is to be provided, the risk can be reduced by
installing the required vent hood that projects horizontally a minimum of 5” [12.7 cm] beyond the bottom of
the cabinets.
VENTILATION REQUIREMENTS
A vent hood is REQUIRED above this appliance. It is strongly recommended that this appliance be installed with a Capital vent hood. Due to the high heat
output of this range, it is very important that the hood and ductwork installation meets local building codes and is installed by a qualied technician.
Do not use a down-draft style ventilation system.
Do not mount a microwave oven/ventilator combination above the range. These types of units do not have sucient airow to remove the high heat output
of this range and were not tested with this type of appliance.
For non-Capital approved vent hoods, a general rule of thumb is the vent hood and/or blower unit must be rated at 1 CFM [1.7m³/hr] for every 100 BTU [.03
kW]. (See rating label for BTU rating of your unit.)
NOTE: If the range has a 12” Griddle, Grill, or Power Wok, add an additional 200 CFM [340 m³/hr] to the blower capacity. For 24” units, add 400 CFM [680 m³/hr].
For island applications, it is recommended to use a vent hood that is 6” [15.2 cm] wider than the appliance, to allow for 3” [7.6 cm] of overlap on the left and
right of the appliance. Keep duct runs as short and straight as possible. Elbows and transition ttings reduce airow eciency. Capital recommends keeping
the duct run under 50 ft. [15.2 m]. Consult with your Capital dealer on selecting the appropriate vent hood for your Capital appliance.
LEVELING
The range must be level, especially those models featuring a griddle or grill. Raise or lower the range to the desired height by adjusting the leveling legs at
the front of the range, and leveling casters at the rear. It may be necessary to use a lever or other lifting device to assist in temporarily raising the unit to make
the adjustments. To prevent damage, do not lift or lever from the front or back, only from the sides of the range.
The appliance top must be level or higher than the adjacent countertop surfaces. Failure to adjust the height may expose the
adjacent cabinets to excessive heat which may damage the cabinets or countertop.
GAS
SUPPLY
SHUTOFF VALVE
IN OPEN POSITION
TO
APPLIANCE
CAUTION
© 2025 Capital Cooking
36
EN
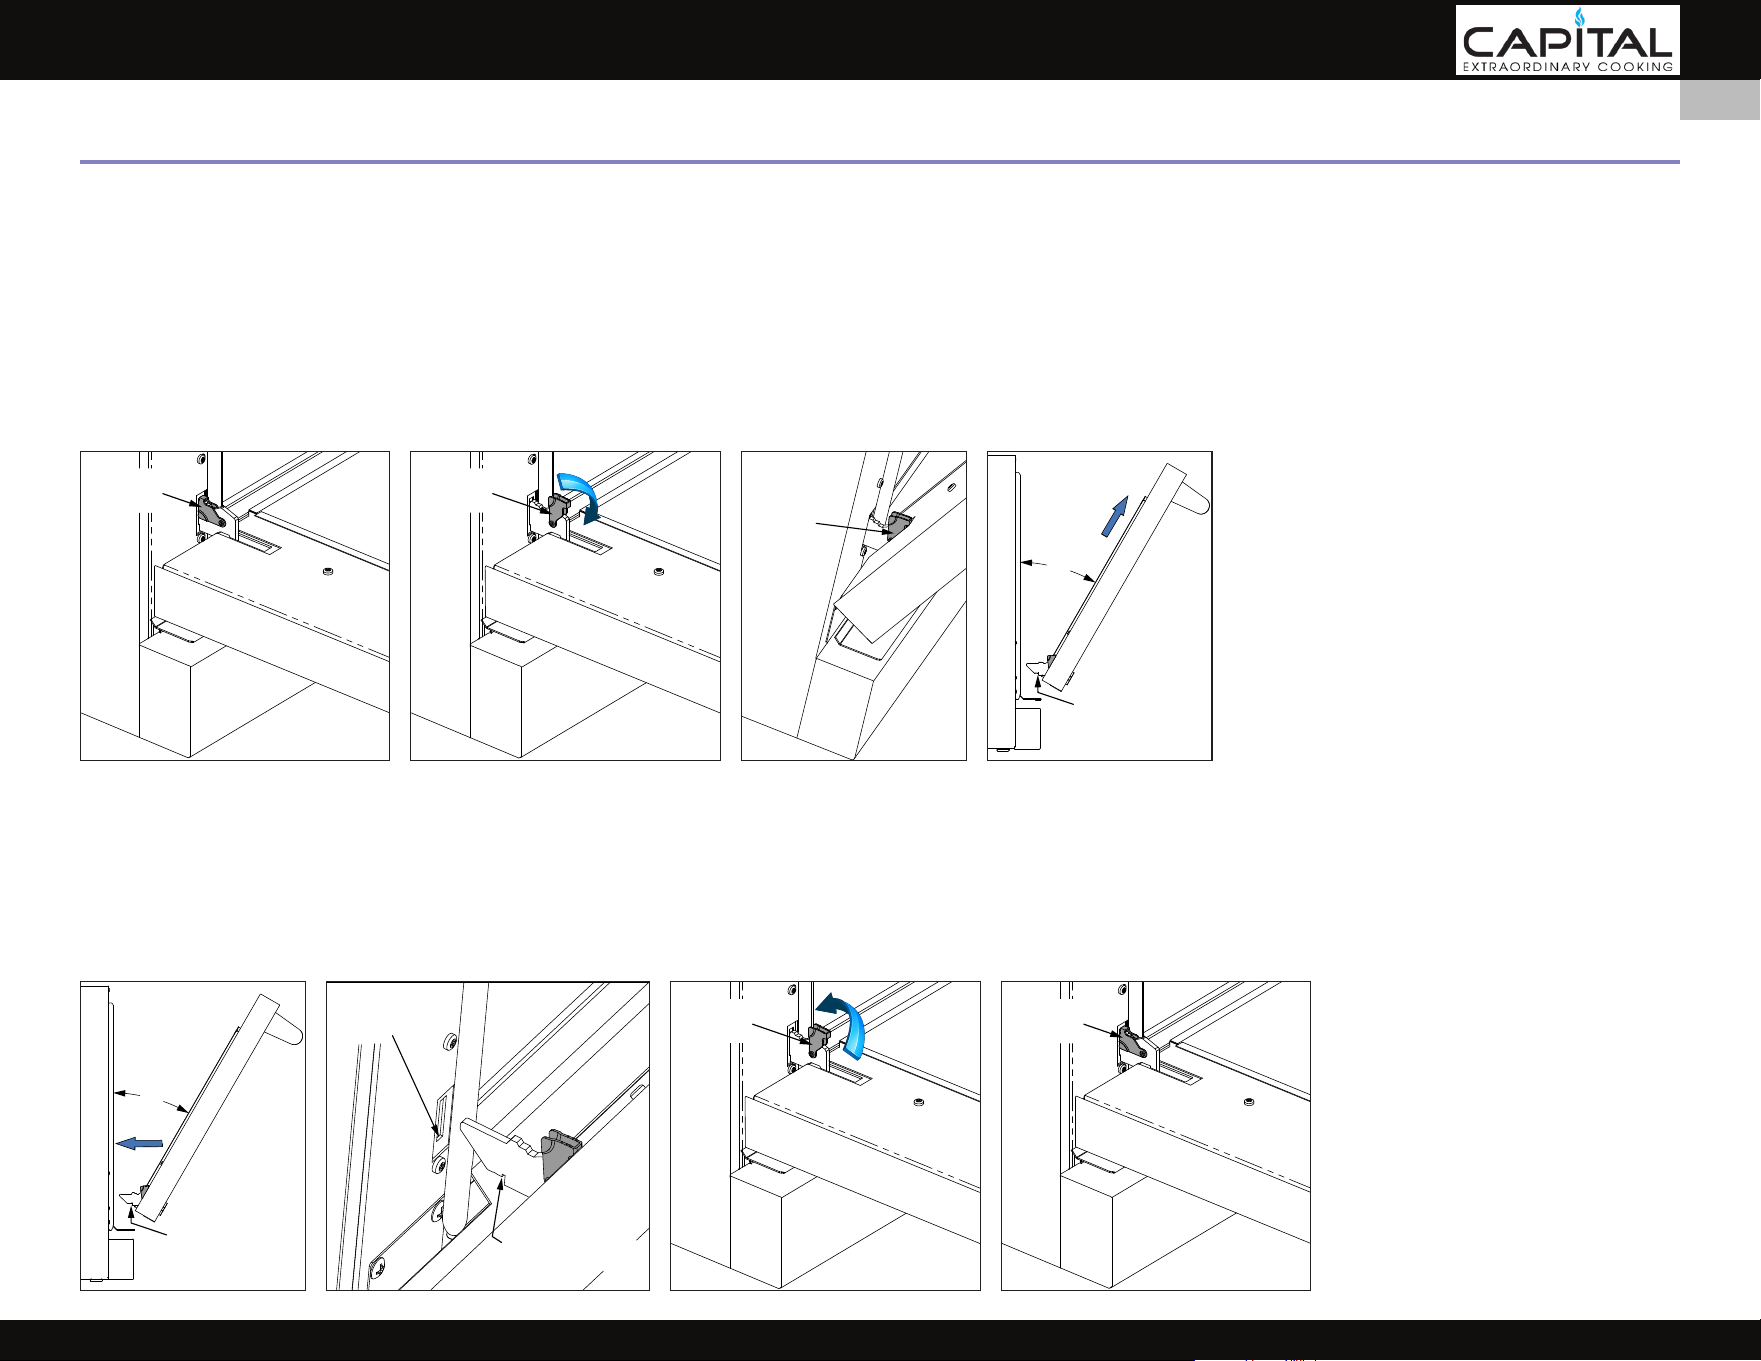
LOCATION AND INSTALLATION / VENTILATION
(CONTINUED)
OVEN DOOR REMOVAL
If you have a very narrow door opening to your kitchen, the oven door(s) can be removed. REMOVE ONLY IF ABSOLUTELY NECESSARY. Door removal should
be done only by a certied installer or service technician. Be sure the oven has completely cooled and the electrical power is o. Failure to do so may result in
electric shock or burn injury. Use caution when removing the door as it is heavy.
1. Open oven door completely. [ 1 ]
2. At each hinge location, swing the hinge claw forward until it stops. A screwdriver may be needed to do this. [ 2 ]
3. Gently close the oven door until it stops against the hinge claws, or approximately 40° from the closed position. Hold on rmly to both sides of the door
(NOT FROM THE HANDLE) and pull the door straight out and up o the hinges. Place the oven door in a safe location until needed. NEVER release the
hinge claws and try to close the hinges. Doing so will snap the hinges closed with great force which could cause injury. [ 3 & 4 ]
RE-INSTALL OVEN DOOR
1. Hold the door rmly on both sides (NOT FROM THE HANDLE) at approximately 40° from the closed position and insert the hinges into the slots in the
oven. The bottom edge of each hinge has a notch which must seat inside the slot opening. DO NOT FORCE OR BEND OR TWIST THE DOOR! [ 5 & 6 ]
2. Slowly open the door all the way open. Swing the hinge claws away from you until completely inside the slot opening and fully seated. A screwdriver
may help you do this. [ 7 & 8 ]
3. Gently close the oven door to check for smooth operation.
1
Hinge
Claw
2
Hinge
Claw
3
Hinge
Claw
40°
4
Notch
40°
5
Notch
6
Slot In
Door
Frame
Notch
7
Hinge
Claw
8
Hinge
Claw
© 2025 Capital Cooking
37
EN
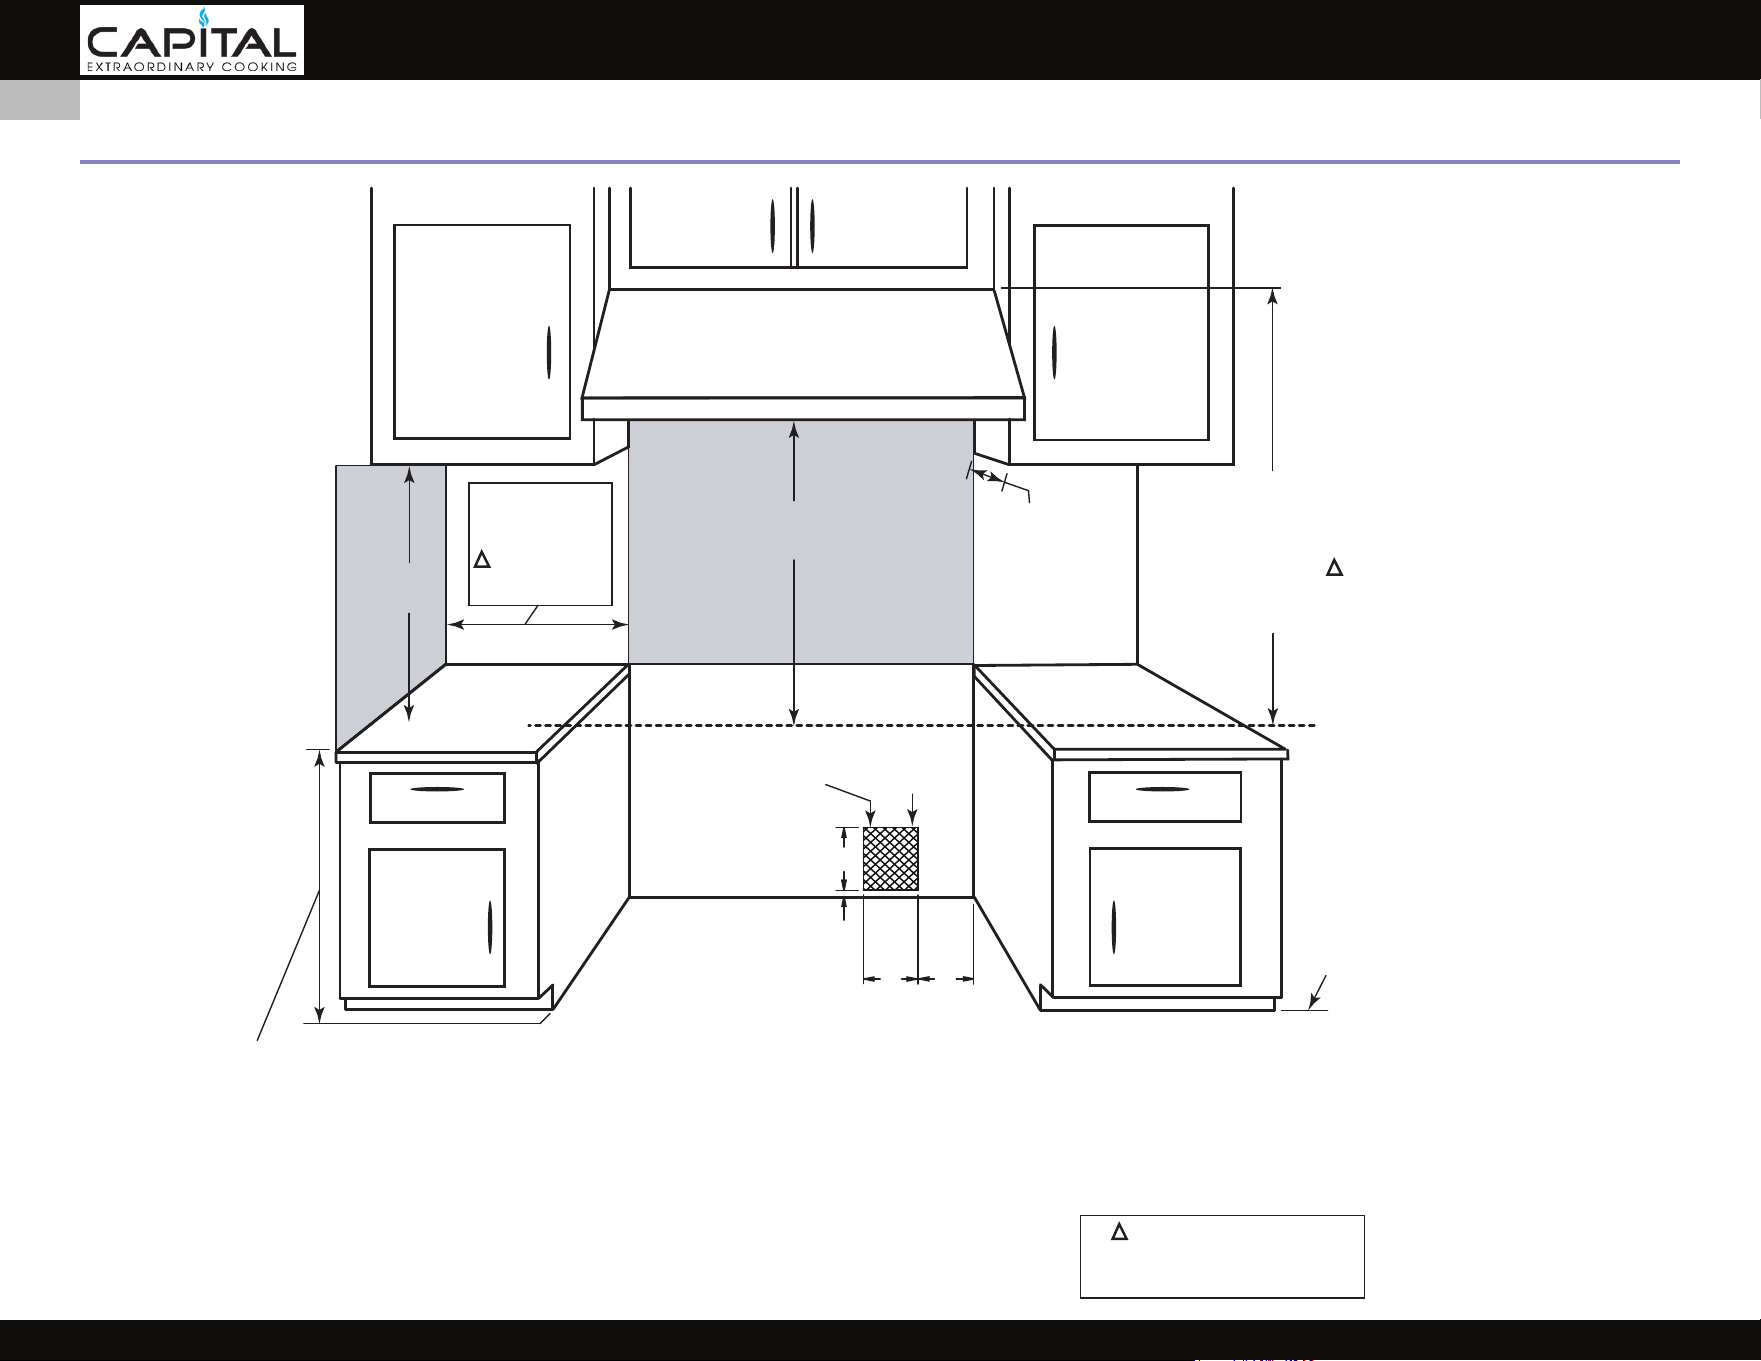
INSTALLATION CLEARANCES
As defined in the
National Fuel Gas Code
(ANSI Z223.1, Latest Edition)
35-3/8” [89.9] max. for level to countertop.
36-3/4” [93.3] max. with range leveling legs fully extended.
The range height is adjustable. Appliance rangetop must
be same level or above the countertop surfaces.
Shaded areas indicate where combustible materials are
not allowed.
Range Widths: Cutout Widths:
Range 30: 29-7/8” [75.9] 30-1/8” [76.5]
Range 36: 35-7/8” [91.1] 36-1/8” [91.8]
Range 48: 47-7/8” [121.6] 48-1/8” [122.2]
Range 60: 59-7/8” [152.1] 60-1/8” [152.7]
DIMENSIONS IN BRACKETS [ ] ARE IN CM.
Cooking
Surface
30” [76.2] Typ.
to Hood
Min. 30, 36, 48, 60 wide
Vent Hood REQUIRED
12” [30.5] min.
to Combustible
Materials
Each Side
13” [33] max.
CAUTION
36” [91.4] min. to
Combustible
Materials
From Cooking
Surface
GAS
ELEC.
18” [45.7]
min.
8”
[20.3]
7”
[17.8]
1” [2.5]
9” [22.9]
Finished
Floor
© 2025 Capital Cooking
38
EN
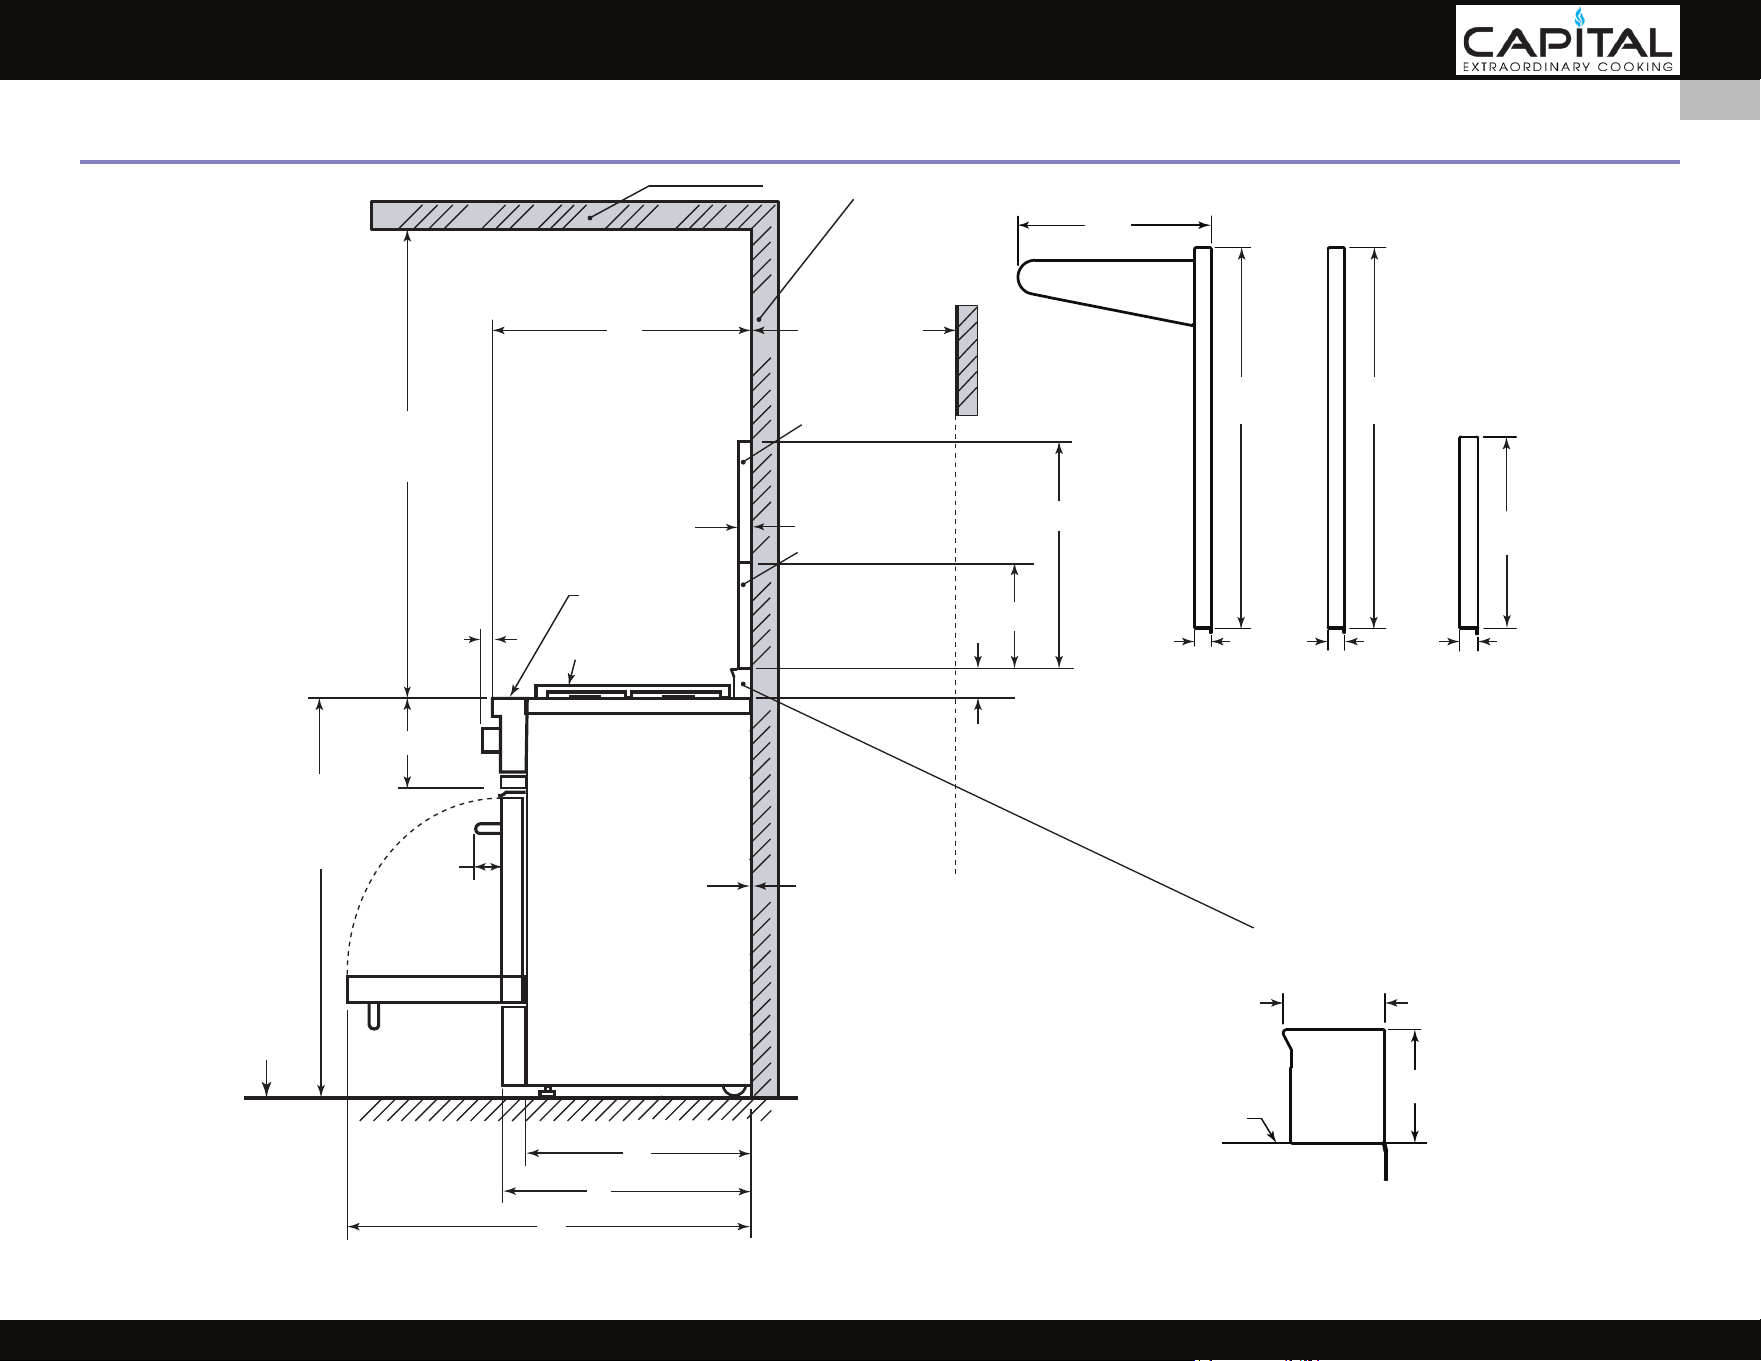
INSTALLATION CLEARANCES
(CONTINUED)
C
A
F
B
D
E
PxxSLB
PxxSHB
PxxSHS
CGSR/ GSCR
(pre-installed -
cannot be removed)
SURFACE OF
LANDING LEDGE
2-3/4” [7]
3” [7.62]
Island Trim
(included with range)
Low Back
High Back
High Shelf
Wall Protector Accessories (sold separately)
These are wall-mounted with included brackets.
These must be installed when combustible
construction is present.
9”
[22.9]
9”
[22.9]
18”
[45.7]
18”
[45.7]
0.78” [2] 0.78” [2] 0.85” [2.16]
A) 25-1/8” [63.8]
B) 27-3/8” [69.5]
C) 44” [111.8]
D) 7/8” [2.22]
E) 28-1/2” [72.4]
F) 7-3/4” [19.9]
Island Trim
Low Back
Landing Ledge
High Back or
High Shelf
0” Clearance
Adjustable
Height
Combustible Materials
36” [91.4] min.
to Combustible
Materials
12” [30.5] min. to
Combustibles
Without Wall
Protector
1-1/4”
[3.18]
36” to 36-5/8”
[91.4] [93]
3”
[7.62]
18” [45.7]
9” [22.9]
Cooking Surface
Finished
Floor
DIMENSIONS IN BRACKETS [ ] ARE IN CM.
© 2025 Capital Cooking
39
EN
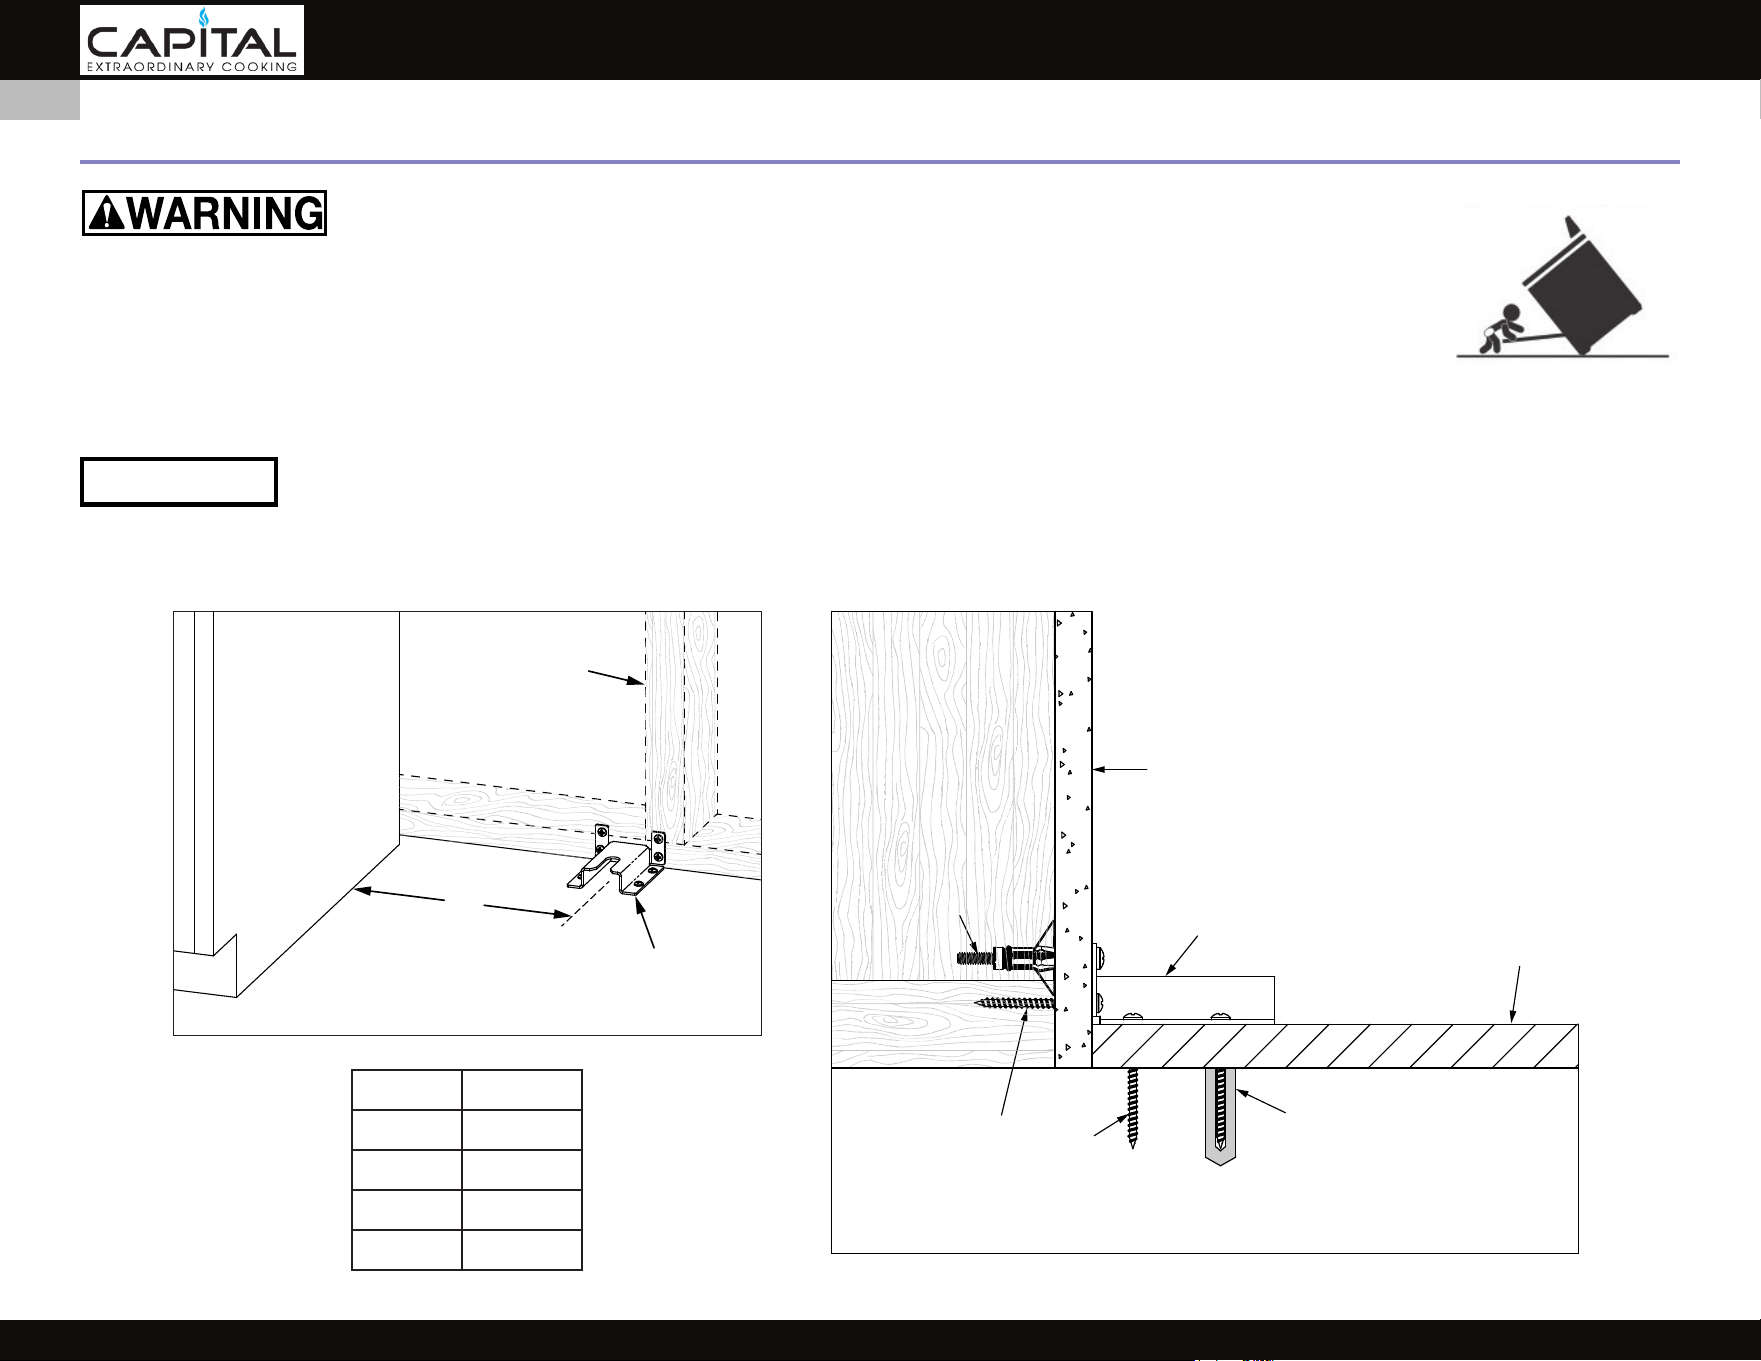
INSTALLATION OF ANTI-TIP DEVICE
THE ANTI-TIP DEVICE PROVIDED WITH THIS RANGE MUST BE INSTALLED!
A child or adult can tip over a range and be killed. Do not operate the range without this device in place. Check
engagement of anti-tip device if the range is moved, such as when cleaning behind the unit.
To check engagement, carefully tip the range forward while pulling from the rear of the unit. The range should not move more
than 1 inch [25 mm]. Failure to follow these instructions can result in death or serious burns to children and adults. To reduce the
risk of burns, do not move this appliance while hot.
PREPARATION
POSSIBLE PROPERTY DAMAGE.
Use a qualied installer or contractor to determine the proper method of attaching the anti-tip bracket to the rear wall or oor behind your range. Special
drills or tools may be needed to drill holes in the wall or oor (ceramic tile, hardwood ooring, etc.). Do not slide the range across an unprotected oor.
NOTICE
FINISHED
FLOOR
ANTI-TIP
BRACKET
FLOOR SUB-STRUCTURE
(WOOD OR CONCRETE)
#12 X 1-1/2” LONG
SCREW & WASHER
MASONRY
ANCHOR
DRYWALL
ANCHOR
DRYWALL
Anti-Tip Bracket must be attached to
the wall structure (studs), and/or the
floor sub-structure.
WOOD STUD
IN WALL
A
ANTI-TIP
BRACKET
WOOD STUD
IN WALL
MODEL DIM. A
30” 15” [38.1]
36” 18” [45.7]
48” 24” [61.0]
60” 25” [63.5]
© 2025 Capital Cooking
40
EN

ELECTRICAL SHOCK HAZARD
Use extreme caution when drilling holes into the wall or
oor as there may be hidden wires. Identify the electrical
circuits that could be aected by the installation of the anti-
tip bracket. Shut o the power to these circuits. Failure to
follow these instructions may result in electrical shock or
death.
HOLE PREPARATION
The anti-tip bracket must be installed in sound materials, such as wood studs in the wall and/or the oor joists/concrete under the
nished oor (see diagrams on previous page). They must be able to withstand the forces exerted on the bracket by the range
should it tip-over. If wood studs or other suitable materials are not in the designated area behind the range, you must attach the
bracket using appropriate drywall anchors or similar fasteners.
DRYWALL INSTALLATION
After positioning the bracket as per the diagram on the previous page, mark the locations and drill the holes as per the instructions
supplied with the wall anchors. For hardboard or solid plaster walls, you may need dierent wall anchors, available at your local hardware store or home
center.
WOOD FLOOR INSTALLATION
After positioning the bracket as per the diagram on the previous page, mark the locations and drill the appropriate holes for #12 or similar large wood screws,
at least 1.5” [3.8 cm] in length. Use washers as well. All hardware is available at your local hardware store or home center.
CONCRETE FLOOR INSTALLATION
After positioning the bracket as per the diagram on the previous page, mark the holes and drill the appropriate holes for #12 or similar large masonry anchors,
at least 1.5” [3.8 cm] in length. Use washers as well. A special drill bit will be necessary to drill into concrete/masonry. All hardware is available at your local
hardware store or home center.
LOCATING THE WALL BRACKET AND ENGAGING THE ADJUSTABLE FOOT
After leveling the range, and after the bracket has been attached as per the installation steps described above, adjust the anti-tip adjustable foot at the back
of the range so the top of the foot is 1” [25 mm] maximum from the oor. Slide the range into the opening of the bracket and verify the bolt is engaged in the
bracket. Carefully tip the range forward to check. Adjust the foot as needed. The range should not move more than 1” [2.5 cm].
MODEL DIM. A
30” 15” [38.1]
36” 18” [45.7]
48” 24” [61.0]
60” 25” [63.5]
A
ADJUSTABLE
FOOT
ANTI-TIP
BRACKET
INSTALLATION OF ANTI-TIP DEVICE
(CONTINUED)
© 2025 Capital Cooking
41
EN
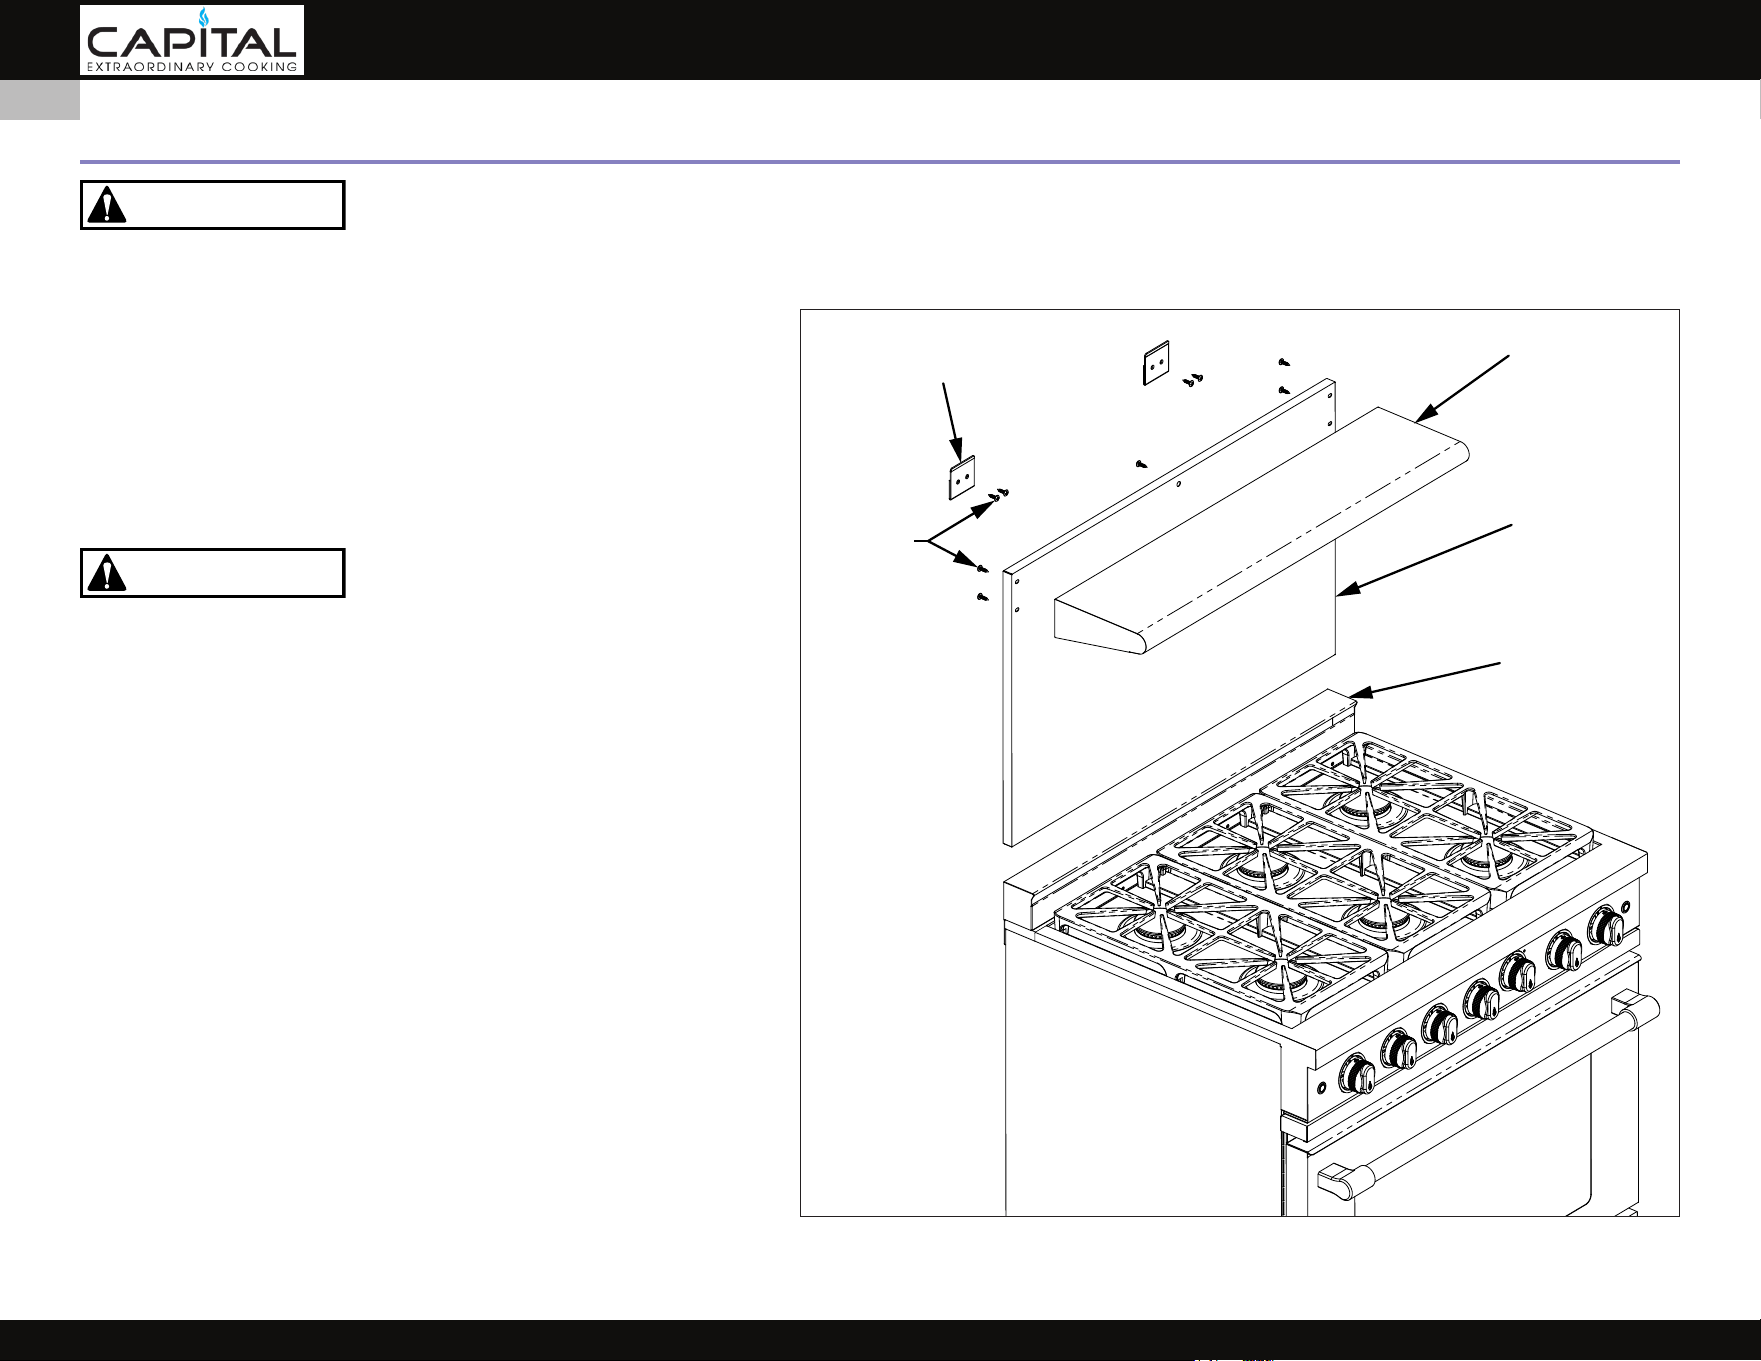
The sheetmetal backguard and areas at the rear of the range may have sharp edges. Wear work gloves while handling and installing these items.
BACKGUARD
Your Capital range is supplied with an Island Trim Backguard pre-
installed at the factory. See the APPENDIX section of this manual for
other backguard options available from your Capital dealer.
Selection of the appropriate backguard depends on the installation
location and adjacent materials and the type of vent hood to be
used. A LOW BACK OR HIGH BACK / HIGH SHELF IS REQUIRED WHEN
INSTALLING THE RANGE AGAINST A COMBUSTIBLE SURFACE - THE
ISLAND TRIM IS NOT SUITABLE. See page 38-39 for details.
The top of the backguard serves as an exhaust for the oven when
in operation and as an exhaust vent to remove heat from under
the rangetop section of the range as well. It is pre-installed at the
factory and cannot be removed.
• DO NOT BLOCK or obstruct the top of the backguard.
• DO NOT touch the top of the backguard during appliance operation
as it may get hot. Allow sucient time to cool before touching or
cleaning this area.
• DO NOT position plastic or other heat-sensitive items nearby which
could melt or burn.
After the range has been leveled and placed against the wall, secure
the wall protector (18” High Back, High Shelf, or 9” Low Back) directly
onto the wall behind the range and above the factory installed
island trim. Complete installation instructions are included with the
backguard kit.
CAUTION
WALL MOUNTING
BRACKET
HIGH
SHELF
WALL
PROTECTOR
SCREWS
ISLAND TRIM
(PRE-INSTALLED)
CAUTION
BACKGUARD AND ACCESSORIES
TYPICAL INSTALLATION OF BACKGUARD (HIGH SHELF P36SHS SHOWN)
© 2025 Capital Cooking
42
EN
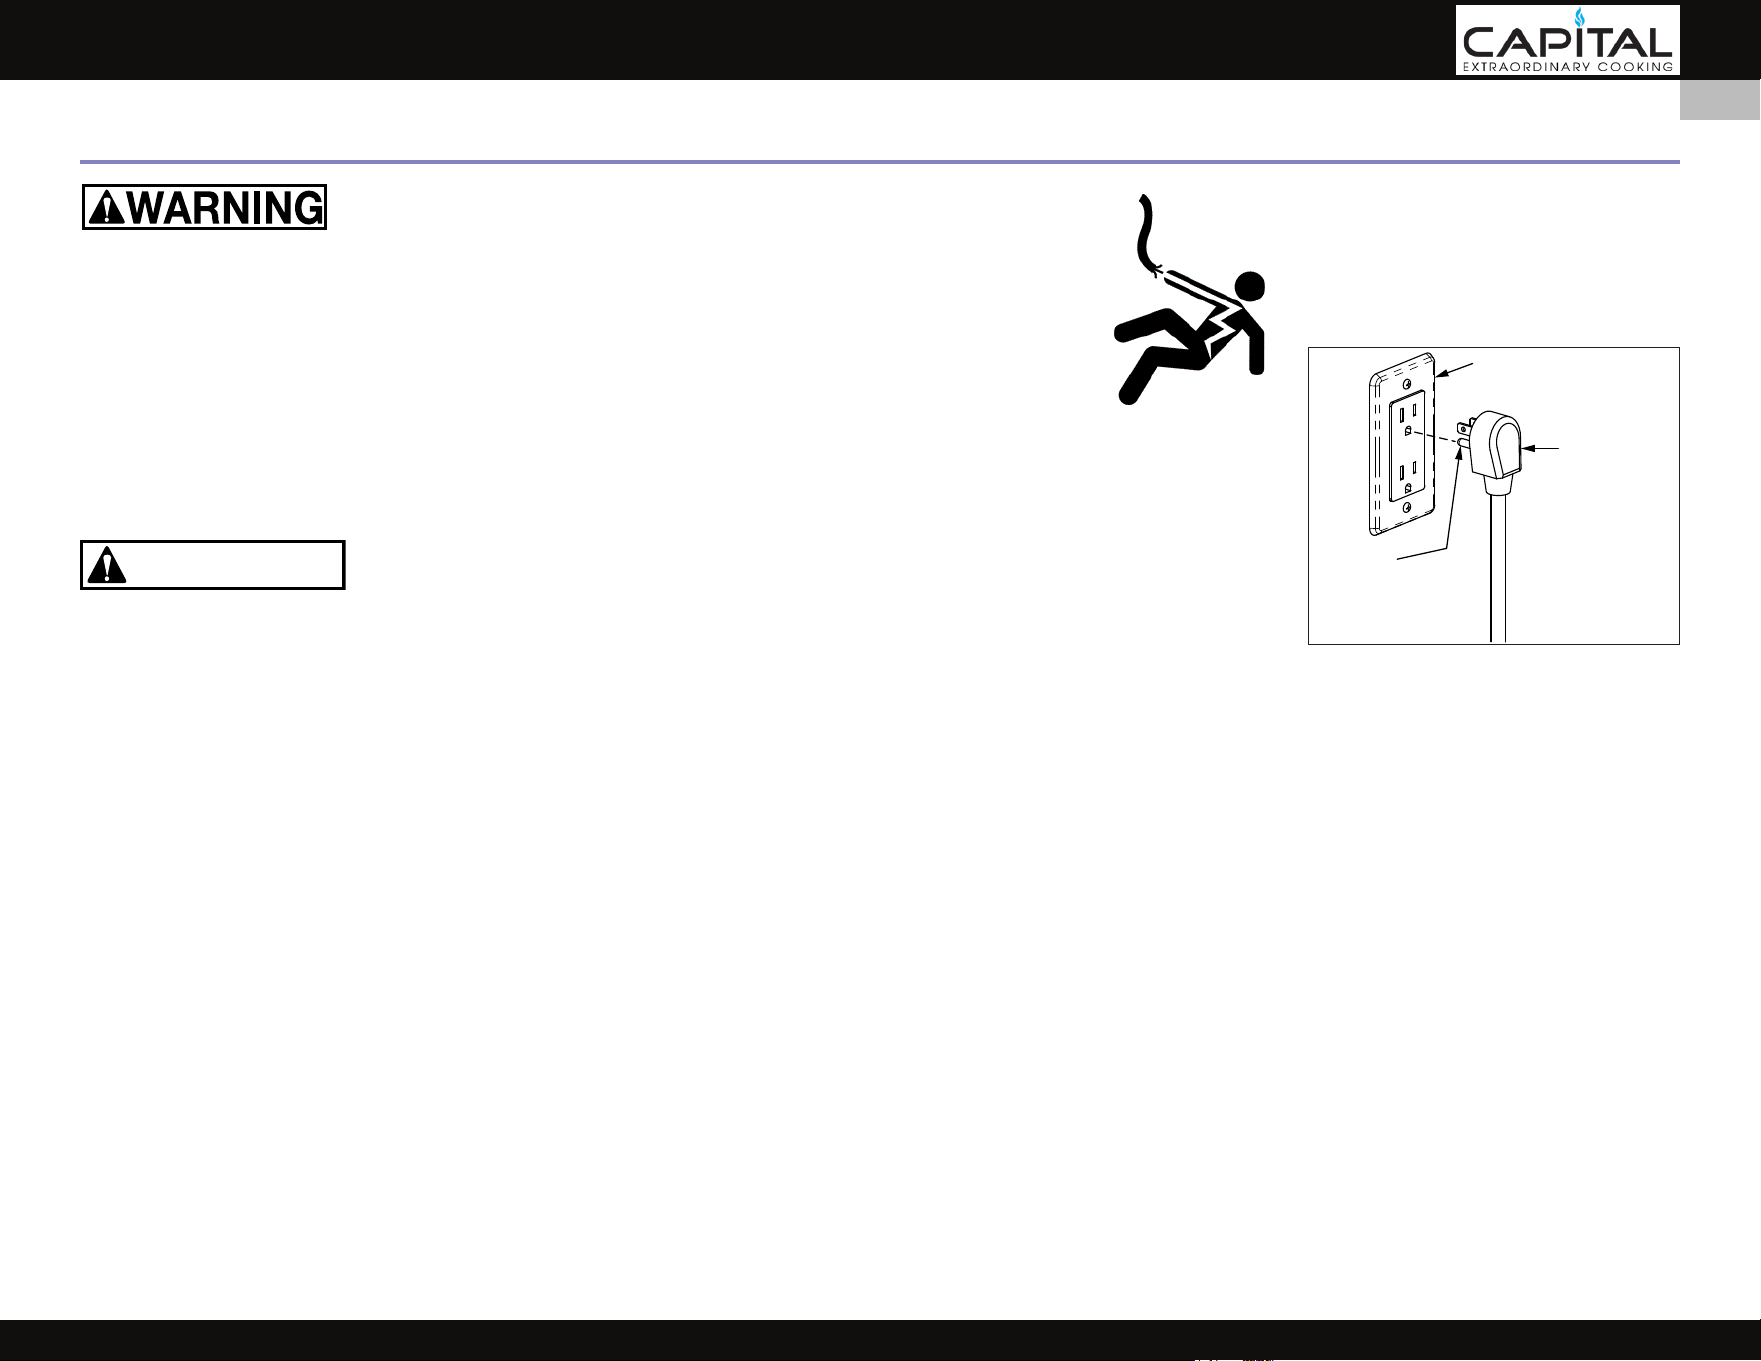
ELECTRICAL CONNECTIONS
ELECTRICAL SHOCK HAZARD
Disconnect power before installing or servicing appliance. Before turning power ON, be sure all
controls are in the “OFF” position. Failure to do so can result in electrical shock or death.
ELECTRICAL GROUNDING
This appliance must be grounded. Grounding reduces the risk of electric shock in the event of
a short circuit. Grounding through the neutral conductor is prohibited for new branch circuit
installations (1996 NEC), mobile homes, and recreational vehicles, or in an area where local codes
prohibit it. Your Capital range is equipped with a 3-prong, grounding type plug which must be
plugged into a grounded, 3-prong 120V receptacle. Do not cut or remove the grounding prong
from this plug.
Improper grounding will cause malfunctions in the unit, such as continuous sparking of the
igniters. This can damage the appliance and create a shock hazard condition.
ELECTRICAL SUPPLY
The appliance must be on its own dedicated circuit - 120 VAC, Single Phase, 60 Hz, with a current rating as shown in the model number listings on pages 6-7.
If this is not available, a licensed electrician must install the appropriately dedicated and grounded receptacle. The installation must be done in accordance
with local codes, or in the absence of local codes, it must be installed in accordance with the National Electrical Code, ANSI/NFPA 70.
See the diagram in the INSTALLATION CLEARANCES section on page 38 for the “ELEC” zone behind the range. The range is designed to be installed nearly
ush to the rear wall*. It may be necessary to reposition the power receptacle / outlet box in order to accommodate the range when pushed back against the
wall. The back of the range is recessed 3” [7.6 cm] to provide room for the power cord.
* Unless installed in an island with no rear wall.
1. Make sure power is o at the supply panel / breaker.
2. Plug the appliance into the wall receptacle. Secure extra appliance cord out of the way so it cannot be snagged or pinched behind your range.
3. Before restoring power at the supply panel / breaker, be sure all controls are in the “OFF” position.
Grounded
Outlet Box
120V
3-Prong
Grounding
Plug
Ground
Prong
CAUTION
© 2025 Capital Cooking
43
EN
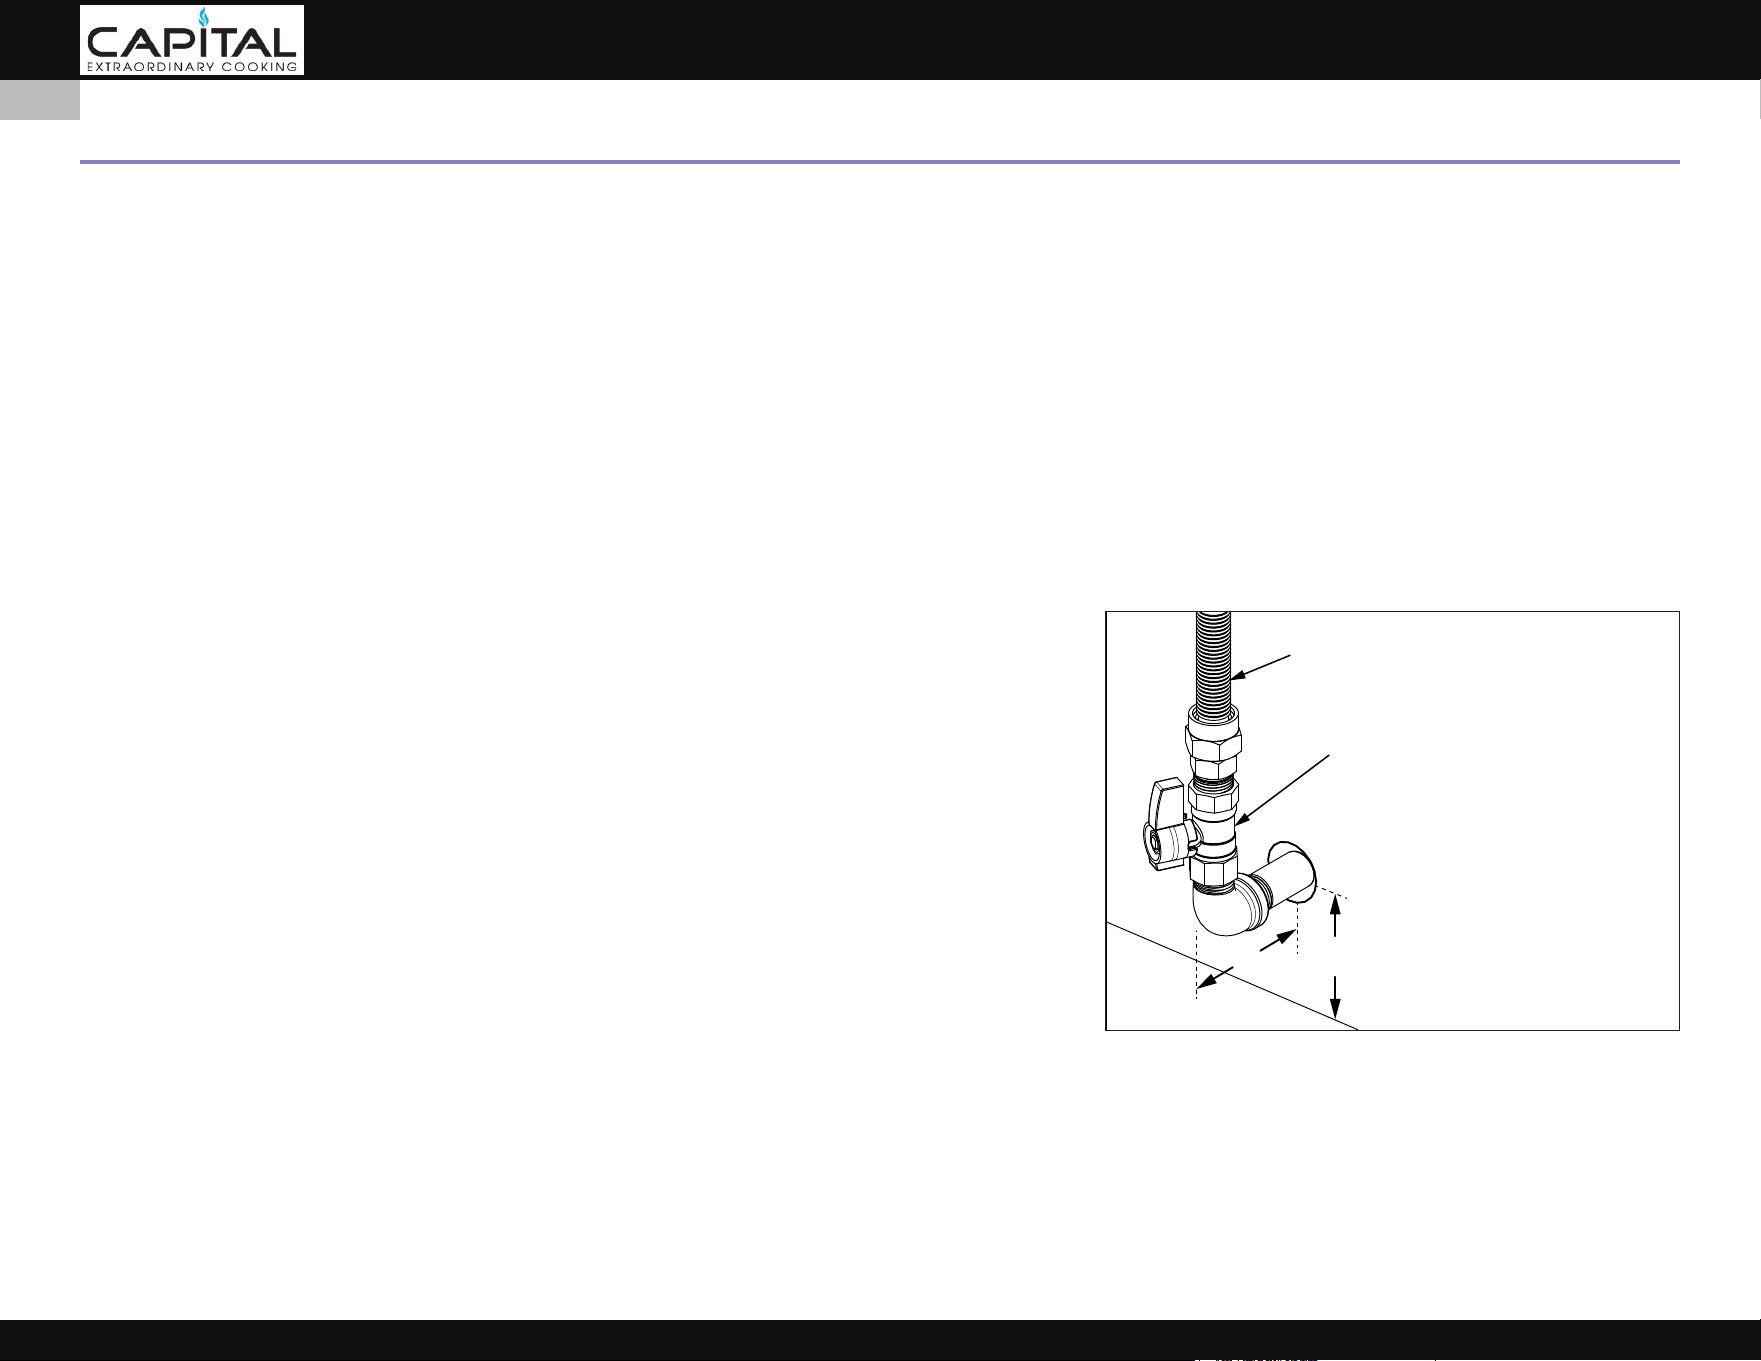
GAS CONNECTIONS
GAS SUPPLY
The appliance is shipped from the factory pre-congured for Natural (NG) or Propane (LP) gas. Verify the type of gas used at the installation site matches the
gas type of the appliance. The local gas authority or supplier should be consulted at the installation planning stage in order to establish the availability of
an adequate supply of gas (NG or LP). If it is a new installation, have the gas authorities or supplier check the meter size and piping to assure that the unit is
supplied with the necessary amount of gas supply and pressure to operate the appliance(s).
Gas connections should be made by a qualied plumber or your professional appliance installer.
All appliances must be tted with an externally-mounted upstream gas shuto valve as a means of isolating the appliance for emergency shut o and for
servicing. This valve must be located in an easily accessible location behind the range.
Make certain new piping and connections have been made in a clean manner and have been purged so that piping compound, chips, etc. will not clog
regulators, valves, orices, or burners. Use pipe joint compound / thread sealant approved for natural and LP gases.
The appliance and its individual manual shuto valve must be disconnected from the gas supply piping system during any pressure testing of that system at
test pressures in excess of 1/2 psi [3.5 kPa].
The appliance must be isolated from the gas supply piping system by closing its individual manual shuto valve during any pressure testing of that system at
test pressures equal to or less than 1/2 psi [3.5 kPa].
NEVER CONNECT THE APPLIANCE TO AN UNREGULATED GAS SUPPLY. Before proceeding,
ensure the appliance is tted for Natural or Liquid Propane gas. Connecting to an improper gas
type will result in poor performance and increased risk of damage or injury. Gas type and gas
consumption (BTU/hour) for each burner type is shown on the rating label.
Installation of this cooking appliance must be made in accordance with local codes. In the absence
of local codes, this unit should be installed in accordance with the National Fuel Gas Code No.
Z223.1/NFPA 54, Natural Gas and Propane Installation code CSA B149-1, or Propane Storage and
Handling Code B149.2.
NOTE: See rating label for manifold pressure for the type of gas of your appliance.
The gas connection at the back of the range (see right) features 1/2”NPT threads. Connect to gas
supply using a minimum 5/8” inside diameter (3/4” OD) exible (semi–rigid) stainless steel gas hose
with appropriate end ttings to prevent gas starvation. This hose should be no more than 48” [1.2
m] in length. Use the appropriate thread sealant on all connections. Do not apply sealant to are
ttings. Never use a hose made of rubber or synthetic materials.
The supply line must not interfere with the rear of the range. See image for the proper amount of
space to allow for the gas supply and shut-o valve. Use caution when pushing the range against
the back wall, so that you do not kink or crimp the ex hose as this could result in a gas leak. Do
not tuck the ex hose inside the rear cover of the range.
CONVERSION KITS
In the event your Capital appliance needs to be converted from NG to LP, or vice-versa, you will need to contact Capital Customer Service to arrange a service
call. This conversion should be performed only by a qualied technician. Please have your model and serial number information ready when you call.
HIGH ALTITUDE KITS
If you live in a high altitude area, 2,000 ft. [610 m] or more above sea level, your appliance may require dierent orices for proper combustion and
performance. You will need to contact Capital Customer Service to arrange a service call. High Altitude kits must be installed by a qualied technician. Please
have your model and serial number information ready when you call.
H
D
GAS FLEX HOSE TO RANGE
48” [1.2m] MAX. LENGTH
GAS SHUT-OFF VALVE
MUST BE EASILY ACCESSIBLE
3” [7.6 cm] max.
protrusion from wall.
2” [5 cm] min. height
above floor.
D =
H =
© 2025 Capital Cooking
44
EN
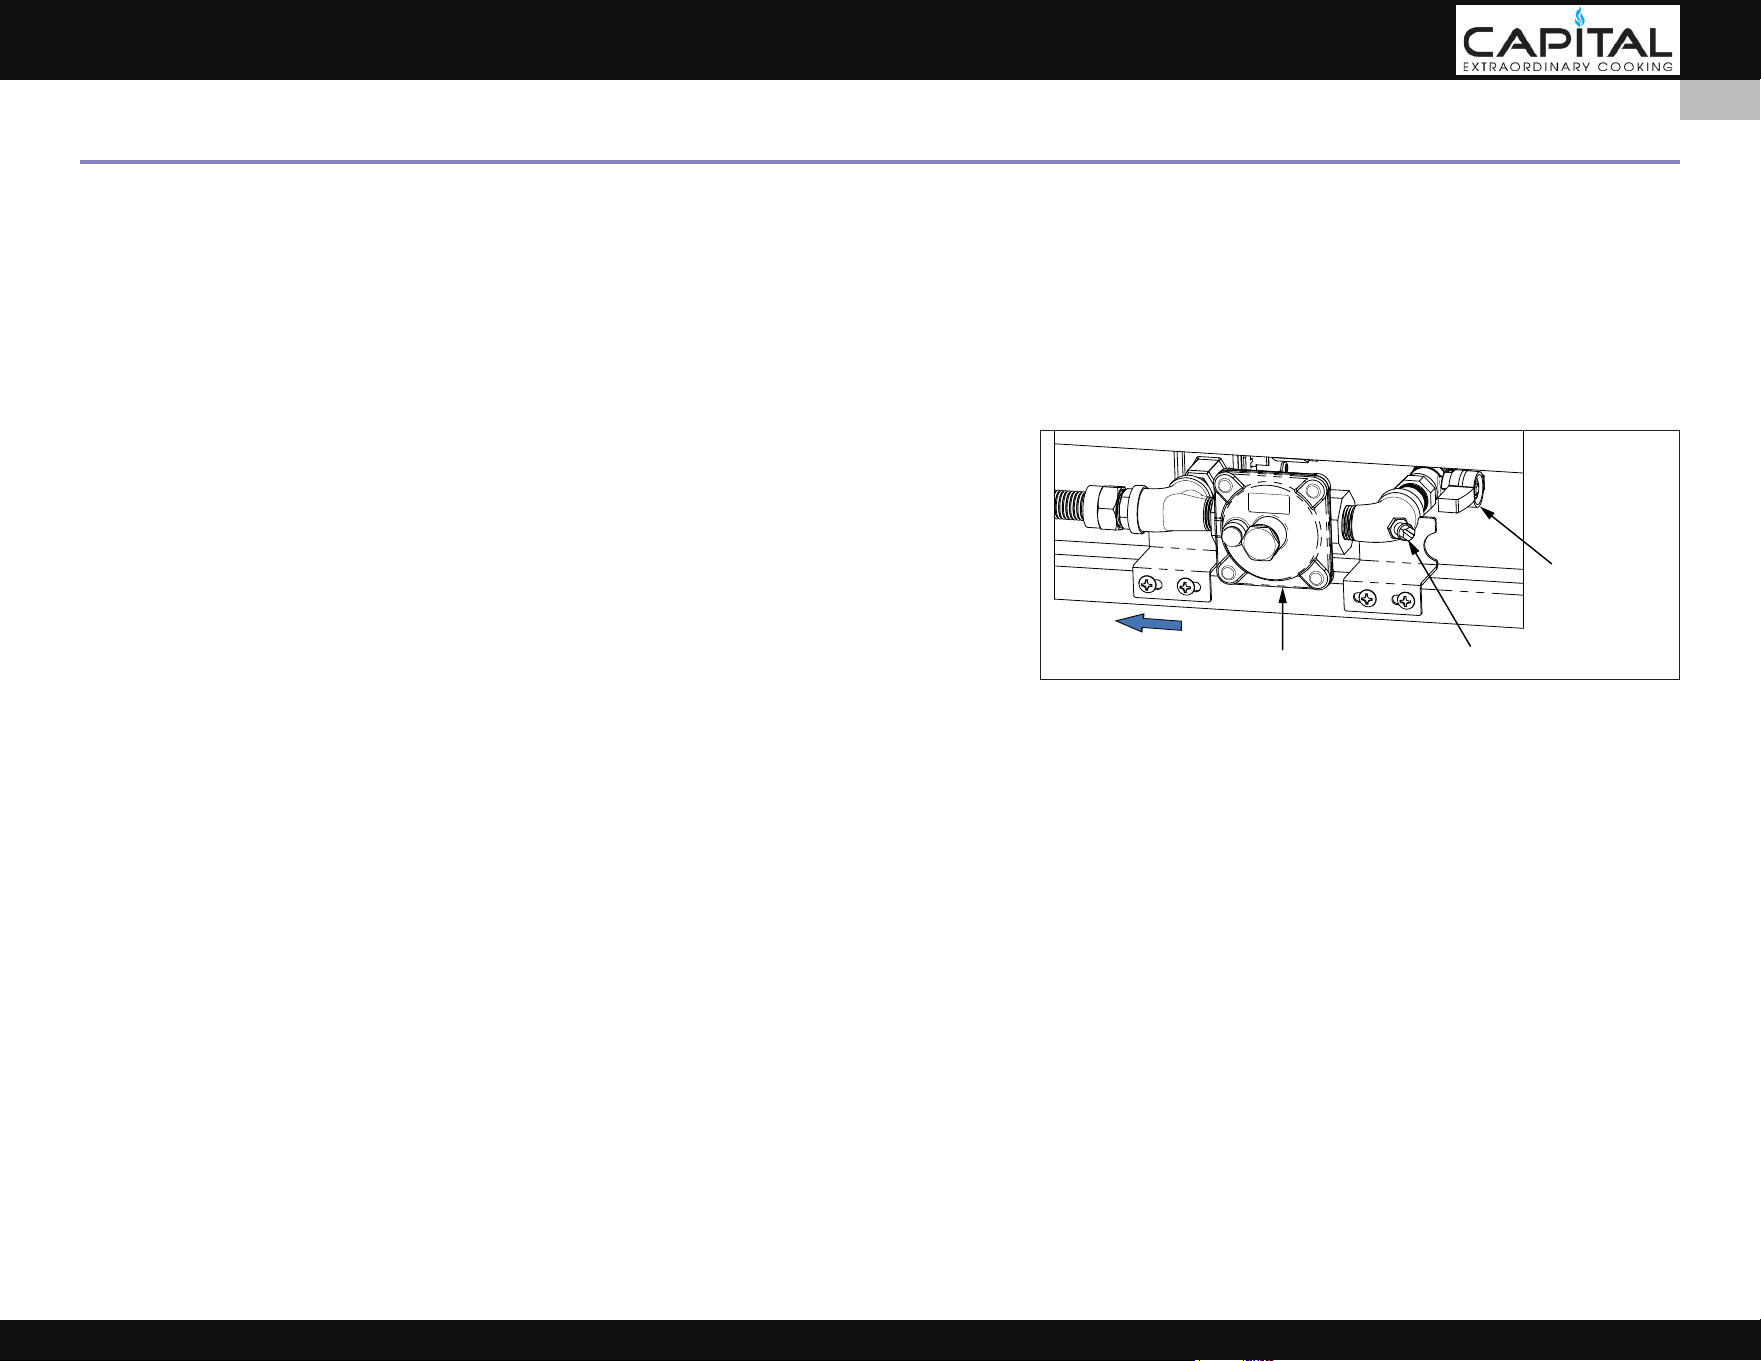
GAS CONNECTION - NATURAL GAS (NG)
If you purchased a NG version of your appliance, it will be supplied with a gas pressure regulator already congured for natural gas and already installed
(located behind the kick plate). To ensure proper heating performance of this appliance, verify that the gas line supply pressure is adequate. This regulator
is set for a supply (inlet) pressure of 7-14 inch WC [1.74-3.48 kPa] to maintain 5 inch WC [1.24 kPa] nominal outlet (manifold) pressure. Do not attempt any
adjustments to the regulator.
GAS CONNECTION - LIQUID PROPANE (LP)
If you purchased an LP version of your appliance, it will be supplied with a gas pressure regulator already congured for LP gas and already installed (located
behind the kick plate). When connecting to LP gas, verify the supply tank is equipped with its own high pressure regulator. The pressure of the gas supplied
to the appliance must be 11-14 inch WC [2.74-3.48 kPa] to maintain 10 inch WC [2.49 kPa]
nominal outlet (manifold) pressure. Do not attempt any adjustments to the regulator.
A pressure test point and service valve are provided next to the regulator. Be sure this valve
is in the open position as shown here. This service valve is provided to isolate the range from
the gas supply at the rear of the range should there be a need to service the range.
LEAK TESTING
GENERAL
Although all gas connections on your Capital appliance are leak tested at the factory prior to
shipment, a complete gas tightness check must be performed at the installation site due to
possible movement in shipment, or excessive pressure unknowingly being applied to parts of the unit.
Immediately check if the smell of gas is detected. Leak testing of the appliance shall be conducted according to the instructions below:
BEFORE TESTING
• DO NOT SMOKE WHILE LEAK TESTING !!
• Never leak test with an open ame.
• Make a soap solution of one part liquid detergent and one part water for leak testing purposes.
• Apply the solution to the gas ttings and ex hoses by using a spray bottle or a brush.
TO TEST
• Make sure all control knobs are in the “OFF” position.
• Apply the soap solution to all ttings and ex hoses.
• Turn the gas supply on.
• Check all connections from the supply line up to the regulator connection at the front of the appliance.
• Soap bubbles will appear where a leak is present. If a leak is present, immediately turn o gas supply, tighten any leaking ttings, turn the gas supply
back on, and recheck.
• If you cannot stop a gas leak, turn o the gas supply and call the dealer where you purchased your appliance.
• Do not use the appliance until all connections have been checked and do not leak.
FLOW DIRECTION
REGULATOR
TEST POINT
SERVICE
VALVE
GAS CONNECTIONS
(CONTINUED)
© 2025 Capital Cooking
45
EN
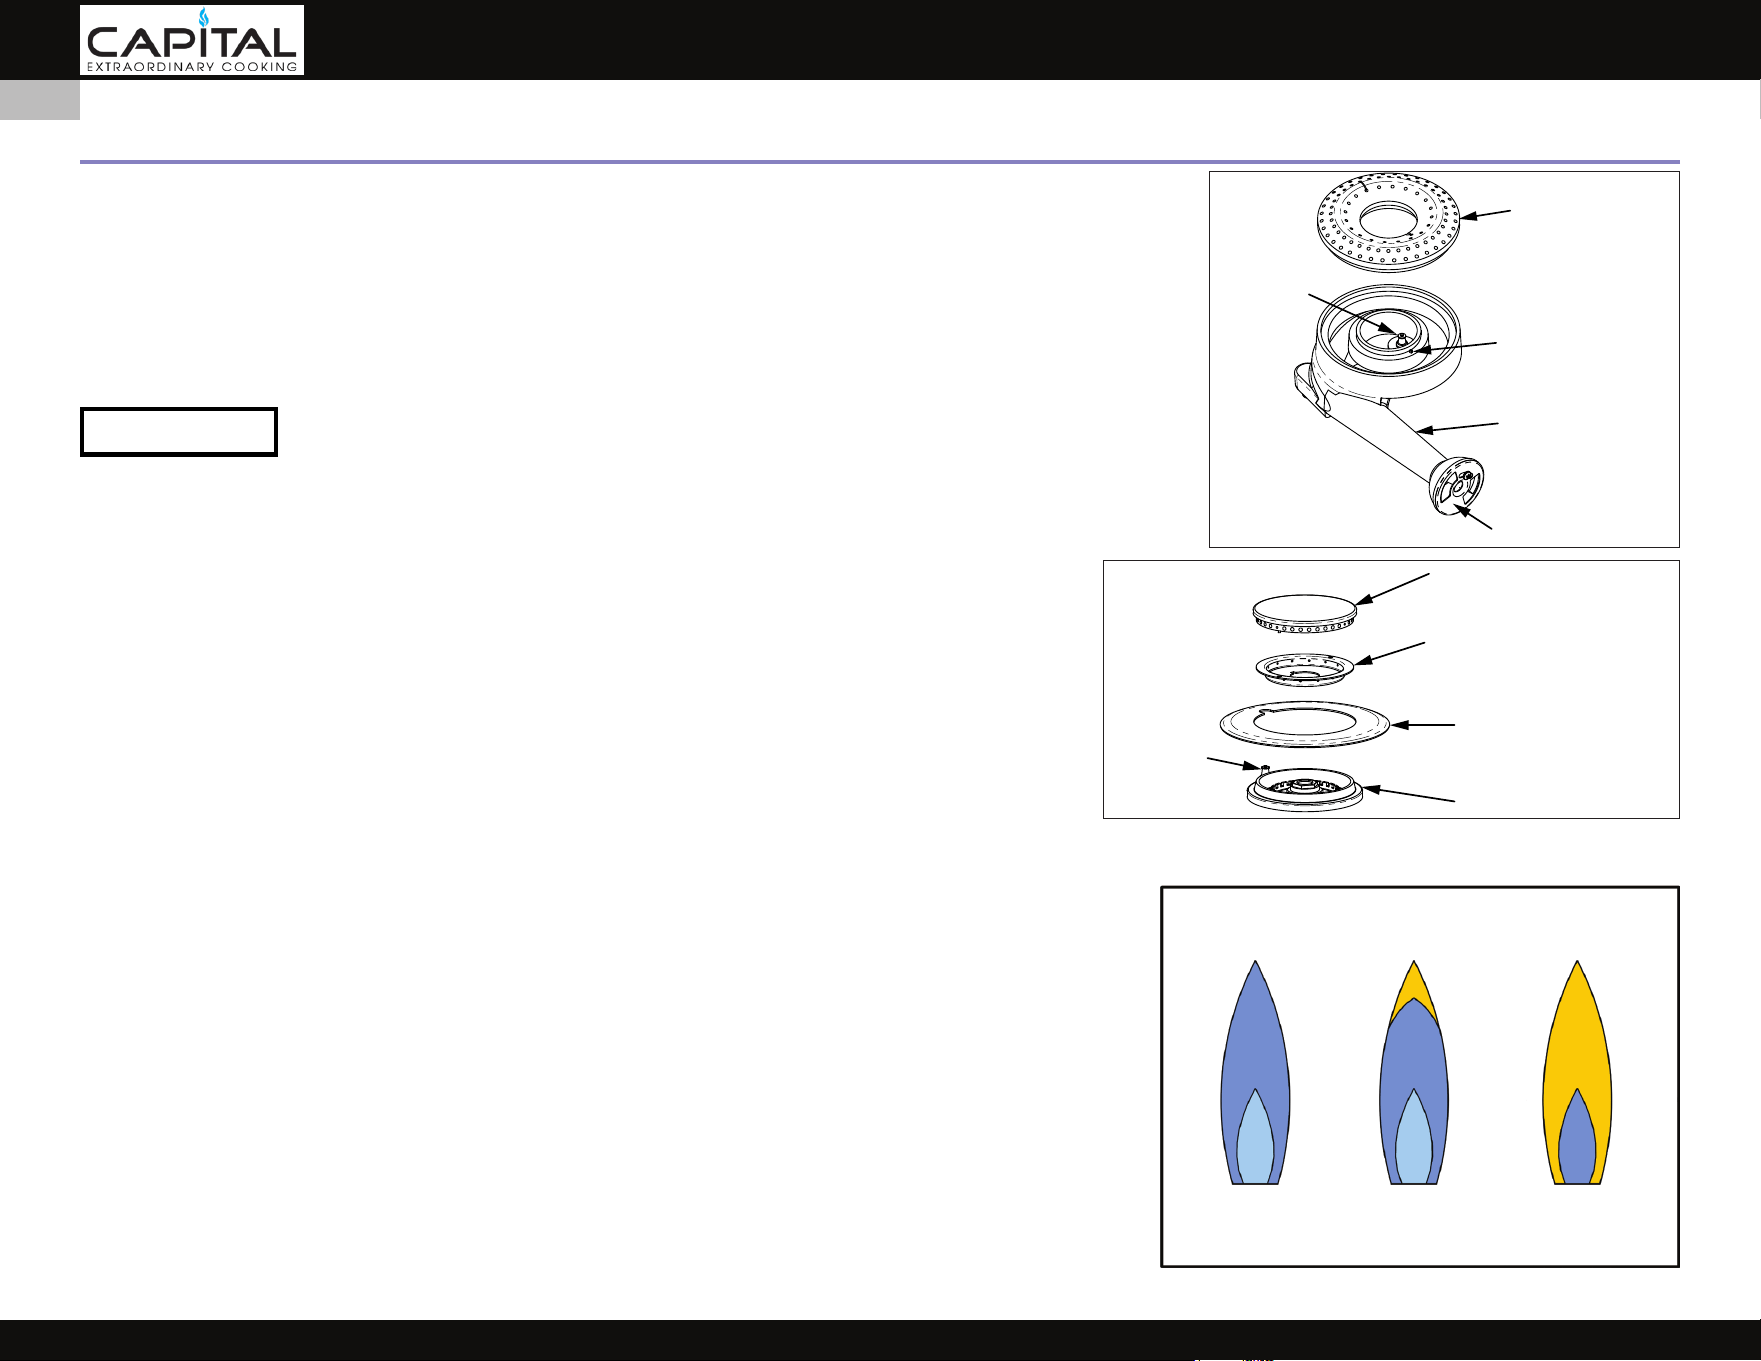
FINAL SETUP - INSTALLER CHECKLIST
Remove any nal packaging materials and any remaining protective lm from all exterior surfaces.
Check all oven cavities for other packaging materials, tape or plastic tie-wraps on oven racks,
etc. Install any loose items such as burner caps, cooking grates, etc. Ensure the burner heads
are properly installed and seated on the burner bases as shown here. There are notches and/
or alignment pins on the burner base to help with proper alignment. Incorrect alignment will
produce a potentially dangerous ame and poor burner performance.
Be sure all gas connections were carefully checked for leaks and electrical power has been restored
to the unit. Turn the gas shut-o valve to the open position.
All the control knobs must be in the “OFF” position to prevent unintended operation at power up.
In the event of a power failure, the oven will shut o. The surface burners will continue to burn, but
must be ignited manually with suitable lighter or match. Please turn all knobs to “OFF” during the
power failure. When the power is restored, you may resume normal use.
DO NOT ATTEMPT TO USE THE RANGE DURING A PROLONGED POWER FAILURE.
Verify ignition at each burner. The igniter will make a clicking sound until the ame lights within 4
seconds, then the clicking will stop. Check ame appearance at each burner per the descriptions
and image shown here. Flame may need to burn for a few minutes to purge the gas lines of
impurities. These appear as intermittent orange tips or even tiny sparks in the ame. This is normal
and the ame will eventually stabilize like those shown in the image here. Flames should be stable
and not utter or lift o the burner ports. Flames should not be excessively noisy.
If after a few minutes the ames continue to burn mostly yellow, verify that the burner head is
properly installed on top of the base, then retest. Use caution when handling the burner heads.
They can be very hot.
Turn down the control knob to the simmer setting to check function.
Check each burner individually, then check that they operate satisfactorily with other burners on.
• Light blue ame - Natural gas normal ame
• Light blue ame with yellow tips - LP gas normal ame
• Yellow ame - Needs adjustment
Turn all burners o when testing is complete.
If after all the above tests still result in mostly yellow ames, or the burners do not light, contact Capital
customer service to schedule a service call.
NOTICE
GAS FLAME APPEARANCE
NATURAL
GAS
LP
GAS
NEEDS
ADJUSTMENT
BURNER CAP
ALIGNMENT PIN
BURNER BASE
AIR SHUTTER
IGNITER
BURNER CAP & RING
BASE SHIELD
BURNER BASE
SIMMER RETENTION RING
IGNITER
© 2025 Capital Cooking
46
EN

FINAL SETUP - INSTALLER CHECKLIST
(CONTINUED)
GAS GRIDDLE / GRILL / POWER WOK (IF EQUIPPED)
The gas griddle, grill and wok were adjusted at the factory and do not have adjustments. Turn the griddle control knob to 350°F to verify that the griddle
heats up. Turn the grill or wok control knob to “HI” to verify that the burner ignites. A constant orange glow may be seen through the grill grates. This is
normal during grill operation.
Turn all burners o when testing is complete.
If during the tests you notice mostly yellow, noisy or lifting ames, or the burners do not light, contact Capital customer service to schedule a service call.
OVEN OPERATION
All rangetop checks to be performed prior to oven operation check.
Open and close oven door to check for smooth operation. Check the oven lights, rotisserie, and convection fan operation.
With the door open, set the control knob to 350°F. The green “BAKE” indicator light will turn on. The glow igniter for the bake burner (located below the oven
oor) begins to glow and once it reaches proper temperature, the gas valve is energized. You can see this happening through small vent openings in the oven
oor bottom plate. Verify ignition and ame characteristics of the bake burner.
Close the oven door. Set the control knob to “BROIL”. The glow igniter for the broil burner (located in the oven ceiling) begins to glow and once it reaches
proper temperature, the gas valve is energized. Verify ignition and ame characteristics of the broil burner which will begin as a uniform blue glow all over
the mesh screen, then turn to a uniform orange glow all over the mesh screen.
During these oven tests, verify that the cooling fan is running.
Turn oven o. The cooling fan may continue running. This is normal.
If during the tests you notice mostly yellow, noisy or lifting ames, or the burners do not light, contact Capital customer service to schedule a service call.
NOTE: A small amount of smoke and odor may be noticed during this test, and during the initial break-in period.
INSTALLER CHECKLIST
INITIAL ITEMS
□ Placement of unit.
□ Specied clearances maintained to cabinet surfaces.
□ Unit Level – front to back – side to side.
□ Burner caps and retention rings positioned properly on burner bases.
□ All packing materials removed.
□ Island trim / wall protector is attached (if horizontal clearance to
combustible materials behind cooking surface is less than 12” [30.5 cm]).
□ Check oven door adjustment and hinge claws are in locked position.
□ Anti-tip bracket is installed and the range is engaged and does not tip.
GAS SUPPLY
□ Connection: 1/2” NPT with a minimum of 5/8” diameter ex hose.
□ The appliance is connected only to the type of gas for which it is certied
for use.
□ Manual gas shut-o valve installed in an easily accessible location.
□ Unit tested and free of gas leaks.
□ Gas supply pressures are correct for NG or LP gas.
ELECTRICAL
□ Receptacle with correct grounding is provided for service cord
connection.
□ Proper ground connection.
□ Proper polarity at receptacle.
□ Kick Panel below oven door in place and secured with screws.
OPERATION
□ All internal packaging materials removed. Check below grates and grill
pans and inside the ovens.
□ If using Propane gas, verify that the propane gas supply is equipped with
its own high-pressure regulator in addition to the pressure regulator
supplied with appliance.
□ Burner caps properly seated into burner bases.
□ Grill components properly seated (some models).
□ Bezels centered on burner knobs and knobs turn freely.
□ Each burner lights satisfactorily, both individually and with other burners
operating.
□ Burner grates correctly positioned, level, and do not rock.
© 2025 Capital Cooking
47
EN
SERVICE AND PARTS
All warranty and non-warranty repairs should be performed by qualied service personnel. To locate an authorized service agent in your area, contact your
Capital Cooking dealer, local representative, or Capital Cooking directly. Before you call, please have the model number and serial number information, date
of purchase, etc. on hand. Your satisfaction is our top priority. If the problem persists, or is not resolved to your satisfaction by our service consultant, please
call or e-mail us.
CAPITAL COOKING
Manufactured by Superior Equipment Solutions
1085 Bixby Drive
City of Industry, CA 91745-1704
Toll-Free: (888) 383-8800
International: (323) 722-7900
Fax: (323) 726-4700
Service: (888) 203-5607
Email: [email protected]
Please visit the Capital Cooking website to access the parts list for your Capital appliance: www.capital-cooking.com
HOW TO OBTAIN WARRANTY SERVICE
If the appliance fails during the warranty period for reasons covered by this warranty, the purchaser must immediately contact the dealer from whom the
appliance was purchased or Capital Customer Service.
Purchaser is responsible for making the appliance reasonably accessible for service or for paying the cost to make the appliance reasonably accessible for
service. Service is to be provided during normal business hours of the authorized Capital service provider. To the extent purchaser requests service outside of
the normal business hours, purchaser will pay the dierence between regular rates and overtime or premium rates. Purchaser may also be required to pay for
travel costs, overtime, or premium rates.
APPENDIX
BACKGUARD OPTIONS
RANGE
MODEL
BACKGUARD MODEL DESCRIPTION
CGSR48xxxx
GSCR48xxxx
ISLAND TRIM ISLAND TRIM, 48” (included with range)
P48SLB
LOW BACK WALL PROTECTOR, 48”
P48SHB
HIGH BACK WALL PROTECTOR, 48”
P48SHS
HIGH SHELF WALL PROTECTOR, 48”
CGSR60xxxx
GSCR60xxxx
ISLAND TRIM ISLAND TRIM, 60” (included with range)
P60SLB
LOW BACK WALL PROTECTOR, 60”
P60SHB
HIGH BACK WALL PROTECTOR, 60”
P60SHS
HIGH SHELF WALL PROTECTOR, 60”
BACKGUARD OPTIONS
RANGE
MODEL
BACKGUARD MODEL DESCRIPTION
CGSR30xxxx
GSCR30xxxx
ISLAND TRIM ISLAND TRIM, 30” (included with range)
P30SLB
LOW BACK WALL PROTECTOR, 30”
P30SHB
HIGH BACK WALL PROTECTOR, 30”
P30SHS
HIGH SHELF WALL PROTECTOR, 30”
CGSR36xxxx
GSCR36xxxx
ISLAND TRIM ISLAND TRIM, 36” (included with range)
P36SLB LOW BACK WALL PROTECTOR, 36”
P36SHB HIGH BACK WALL PROTECTOR, 36”
P36SHS HIGH SHELF WALL PROTECTOR, 36”
© 2025 Capital Cooking
48
EN

WARRANTY
WARRANTY PERIODS
Warranty period begins from the date of original retail purchase or closing date for new construction, whichever period is longer.
COOKING PRODUCTS (including ventilation)
TWO (2) Years - Full parts and labor (IN HOME warranty) covers the entire product with the exception of painted or decorative parts listed below*. (Light bulbs covered for 60 days after
installation). Repair parts will be shipped via standard shipping only. Expedited shipping will be at customers’ expense.
*Painted and decorative parts will be warranted for 90 days from the date of original purchase. Any damages or defects must be reported within this time frame. Replacement painted parts may
have slight color variations from the original parts due to normal manufacturing variables.
FIVE (5) Years - Limited part replacement warranty. Covers part replacement, as noted below, due to malfunction during normal operation. Parts will be provided at no cost to the owner with
proof-of-purchase. All other expenses, such as labor and freight, will be the responsibility of the owner.
Ranges*, Rangetops*, and Wall Ovens*: All burners**, heating elements, grates*, griddle plates, and oven racks.
*Excludes porcelain enamel coating for ovens and grates. Porcelain enamel is prone to wear over time and use.
** Unless covered by LIFETIME warranty.
LIFETIME - LIFETIME warranty (non-transferable) on stainless steel sheet metal body parts, and stainless steel tubular burners, against corrosion (excludes stainless steel grill grates and coverage
for neglect, abuse, damage, normal wear discoloration). Proof-of-purchase required. Freight not included.
WILL PAY FOR:
Repair labor and parts found to be defective due to materials or workmanship pursuant to the periods mentioned above.
This does not apply if the unit was subjected to other than normal household use. An authorized Factory Service Agent must provide service during normal working hours. No charges will be
made for repair or replacement at the location of original installation. No charges will be made for defective factory parts returned pre-paid, through the dealer, and claimed within the warranty
period.
All claims, regardless of warranty or non-warranty must be documented with photos and detailed description and/or narrative of the problem and submitted to Capital Cooking’s service
department.
Warranty replacement of parts for the rst two (2) years will be freight prepaid by Capital Cooking via regular ground shipment. Any requests for other than standard ground shipments or
expedited shipments must be paid by customer. The company will not be liable for additional transportation costs, labor cost, taxes, or export/import duties.
This warranty shall not apply, nor can we assume responsibility for damage that might result from failure to follow manufacturer’s instructions or local codes, where the appliance has been
tampered with or altered in any way, or which in our judgment has been subjected to misuse, negligence, or accident.
Implied warranty shall not extend beyond the duration of this written warranty. This warranty is in lieu of all warranties, expressed or implied and all other obligations or liability in connection
with the sale of this product.
WILL NOT PAY FOR:
• Installation or start-up. Improper installation. Service visit to teach you how to operate the appliance, correct the installation, reset circuit breakers, or replace fuses.
• Shipping damage that is not a direct result of packaging (for example freight handling).
• Service by an unauthorized service agency and/or use of unauthorized parts.
• Service during hours other than normal working hours.
• Repair other than normal household use (normal wear and tear).
• Failure or damage caused by accident, abuse, alteration, misuse, incorrect installation or installation not in accordance with local codes, re, natural disaster, commercial use of the
appliance, or loss of electrical power or gas supply to the appliance.
• Unit(s) installed in non-residential applications.
• Color variations in color nishes or other cosmetic damage. Damage from exposure of the appliance to a corrosive atmosphere containing chlorine, uorine, or any other damaging
chemicals.
• Damage resulting from the failure to provide normal care and maintenance to the appliance.
This warranty applies to appliances used in residential applications only. It does not cover their use in commercial applications. This warranty is for appliances purchased and retained in the
50 United States, the District of Columbia, and Canada. This warranty applies even if you should move during the warranty period. Should the original purchaser sell the appliance during the
warranty period, the new owner continues to be protected until the expiration date of the original purchaser’s warranty period. This warranty gives you specic legal rights. You may also have
other rights, which vary from State to State.
No oral or written representation or commitment given by anyone, including but not limited to an employee representative or agent of Capital Cooking will create a warranty or in any way
increase the scope of this express warranty. Any questions about this warranty may be directed to Capital Cooking customer service.
© 2025 Capital Cooking
49
EN

Capital Cooking
Manufactured by Superior Equipment Solutions
1085 Bixby Drive
City of Industry, CA 91745-1704
Toll-Free: (888) 383-8800
International: (323) 722-7900
Fax: (323) 726-4700
Service: (888) 203-5607
Email: [email protected]
Website: www.capital-cooking.com
All product details and specifications are subject to change without notice.
All specifications are for planning purposes only. Refer to installation instructions and consult your countertop supplier prior to making counter opening. If you have
any questions, please contact Customer Service prior to cutting any openings.
Consult with a heating and ventilating engineer for your specific ventilation requirements.
For the most up to date use and care and installation instructions, contact Capital Cooking indicating the model number.
CERTIFIED FOR USA AND CANADA
Proudly
Made In
USA
RETAIN THIS MANUAL FOR FUTURE REFERENCE.
© 2025 Capital Cooking
195-0139-EN Rev A