
These instructions accompanying the product are the original instructions. This document is part of the product,
keep it for the life of the product passing it on to any subsequent holder of the product. Read all these
instructions before assembling, operating or maintaining this product.
This manual has been compiled by Draper Tools describing the purpose for which the product has been
designed, and contains all the necessary information to ensure its correct and safe use. By following all the
general safety instructions contained in this manual, it will ensure both product and operator safety, together
with longer life of the product itself.
AlI photographs and drawings in this manual are supplied by Draper Tools to help illustrate the operation of the
product.
Whilst every effort has been made to ensure the accuracy of information contained in this manual, the Draper
Tools policy of continuous improvement determines the right to make modifications without prior warning.
83811/84121.
�
AIR
DRILL
Stock No.83811
Stock No.84121

1. TITLE PAGE
1.1 INTRODUCTION:
USER MANUAL FOR: Air Drill
Stock No’s: 83811, 84121.
Part No’s: DAT-RAD10, DAT-RAD13.
As our user manuals are continually updated, users should make sure that they use
the very latest version.
Downloads are available from: http://drapertools.com/manuals
Draper Tools Limited
Hursley Road
Chandler’s Ford
Eastleigh
Hampshire
SO53 1YF
UK
Website: drapertools.com
Product Helpline: +44 (0) 23 8049 4344
General Fax: +44 (0) 23 8026 0784
1.3 UNDERSTANDING THIS MANUALS SAFETY CONTENT:
WARNING! – Information that draws attention to the risk of injury or death.
CAUTION! – Information that draws attention to the risk of damage to the product or
surroundings.
1.4 COPYRIGHT © NOTICE:
Copyright © Draper Tools Limited.
Permission is granted to reproduce this publication for personal and educational use
only. Commercial copying, redistribution, hiring or lending is prohibited.
No part of this publication may be stored in a retrieval system or transmitted in any
other form or means without written permission from Draper Tools Limited.
In all cases this copyright notice must remain intact.
1.2 REVISIONS:
Date first published: October 2017.
Date first revised: July 2021.

2. CONTENTS
1. TITLE PAGE
1.1 INTRODUCTION..........................................................................................................2
1.2 REVISION HISTORY ..................................................................................................2
1.3 UNDERSTANDING THIS MANUAL .............................................................................2
1.4 COPYRIGHT NOTICE .................................................................................................2
2. CONTENTS
2.1 CONTENTS .................................................................................................................... 3
3. GUARANTEE
3.1 GUARANTEE ............................................................................................................... 4
4. INTRODUCTION
4.1 SCOPE.........................................................................................................................5
4.2 SPECIFICATION ..........................................................................................................5
4.3 HANDLING AND STORAGE........................................................................................5
5. HEALTH AND SAFETY INFORMATION
5.1 GENERAL SAFETY INSTRUCTIONS FOR POWER TOOL USE ............................6-7
5.2 ADDITIONAL SAFETY INSTRUCTIONS FOR AIR DRILLS ........................................ 8
5.3 RESIDUAL RISK .........................................................................................................9
6. TECHNICAL DESCRIPTION
6.1 IDENTIFICATION .......................................................................................................10
7. UNPACKING AND CHECKING
7.1 PACKAGING ............................................................................................................. 11
7.2 WHAT’S IN THE BOX?............................................................................................... 11
8. AIR SUPPLY
8.1 AIR TOOL OIL SPECIFICATION ...............................................................................12
8.2 RECOMMENDED AIR SUPPLY SET UP...................................................................12
9. ASSEMBLY
9.1 CONNECTION TO THE AIR SUPPLY........................................................................ 13
10. OPERATION
10.1 KEYLESS CHUCK .....................................................................................................14
10.2 TRIGGER SWITCH....................................................................................................14
10.3 DIRECTION CONTROL .............................................................................................14
10.4 USING DRILL............................................................................................................. 15
10.5 EXHAUST PORT........................................................................................................ 15
11. MAINTENANCE
11.1 EVERY-DAY MAINTENANCE CHECKS ....................................................................16
11.2 AFTER USE MAINTENANCE CHECKS ....................................................................16
12. TROUBLESHOOTING
12.1 TROUBLESHOOTING GUIDE.................................................................................... 17
13. EXPLANATION OF SYMBOLS
13.1 EXPLANATION OF SYMBOLS................................................................................... 18
14. DISPOSAL
14.1 DISPOSAL .................................................................................................................19
DECLARATION OF CONFORMITY .............................................................................. ENCLOSED
- 3 -

3. GUARANTEE
3.1 GUARANTEE
Draper tools have been carefully tested and inspected before shipment and are guaranteed to be
free from defective materials and workmanship.
Should the tool develop a fault, please return the complete tool to your nearest distributor or
contact:
Draper Tools Limited, Chandler's Ford, Eastleigh, Hampshire, SO53 1YF. England.
Telephone Sales Desk: (023) 8049 4333 or:
Product Helpline (023) 8049 4344.
A proof of purchase must be provided.
If upon inspection it is found that the fault occurring is due to defective materials or workmanship,
repairs will be carried out free of charge. This guarantee period covering parts/labour is 12 months
from the date of purchase except where tools are hired out when the guarantee period is 90 days
from the date of purchase. This guarantee does not apply to normal wear and tear, nor does it
cover any damage caused by misuse, careless or unsafe handling, alterations, accidents, or
repairs attempted or made by any personnel other than the authorised Draper warranty repair
agent.
Note: If the tool is found not to be within the terms of warranty, repairs and carriage charges will be
quoted and made accordingly.
This guarantee applies in lieu of any other guarantee expressed or implied and variations of its
terms are not authorised.
Your Draper guarantee is not effective unless you can produce upon request a dated receipt or
invoice to verify your proof of purchase within the guarantee period.
Please note that this guarantee is an additional benefit and does not affect your statutory rights.
Draper Tools Limited.
- 4 -

4. INTRODUCTION
4.1 SCOPE
Air drills with reversible feature and keyless chuck suitable for drill bits with shanks up to 10mm
(Stock No.83811), 13mm (Stock No.84121) diameter.
4.2 SPECIFICATION
Stock No. .................................................................. 83811 ................................................. 84121
Part No. ............................................................... DAT-RAD10 ...................................DAT-RAD13
Chuck capacity...................................................... 10mm (
3
⁄
8
") .....................................13mm (½")
Max. operating air pressure ................................ 90psi (6.2bar)............................... 90psi (6.2bar)
Average air consumption..................................5.5cfm (155L/min) .................... 6.5cfm (184L/min)
Revolutions per minute (no load) ............................ 2200min ..............................................700min
Minimum air line size..................................................
3
⁄
8
"ID .....................................................
3
⁄
8
"ID
Air inlet......................................................................¼" BSP.............................................. ¼" BSP
Sound pressure level* ..............................................87dB(A) ............................................ 87dB(A)
Sound power level** .................................................98dB(A) ............................................ 98dB(A)
Vibration level........................................................... 1.0m/s
2
.............................................. 1.0m/s
2
Weight ......................................................................1.48kgs..............................................1.66kgs
Warning: Wear approved safety glasses and ear defenders.
*Continuous A-Weighted Sound Pressure Level at the workstation in accordance to prEN ISO
15744:1999 and declared according to EN ISO 4871.
**A-Weighted Sound Power Level in accordance to prEN ISO 15744:1999 and declared according
to EN ISO 4871.
- 5 -

5. HEALTH AND SAFETY INFORMATION
5.1 GENERAL SAFETY INSTRUCTIONS FOR POWER TOOL USE
When using any type of power tool there are steps that should be taken to make sure that you, as
the user, remain safe.
Common sense and a respect for the tool will help reduce the risk of injury.
Read the instruction manual fully. Do not attempt any operation until you have read and
understood this manual.
Most important you must know how to safely start and stop this machine, especially in an
emergency.
Keep the work area tidy and clean. Attempting to clear clutter from around the machine during use
will reduce your concentration. Mess on the floor creates a trip hazard. Any liquid spilt on the floor
could result in you slipping.
Find a suitable location. If the machine is bench mounted; the location should provide good
natural light or artificial lighting as a replacement. Avoid damp and dust locations as it will have a
negative effect on the machine’s performance.
If the machine is portable; do not expose the tool to rain. In all cases do not operate power tools
near any flammable materials.
Keep bystanders away. Children, onlookers and passers by must be restricted from entering the
work area for their own protection. The barrier must extend a suitable distance from the tool user.
Disconnect and house all power tools that are not in use. An air tool should never be left
unattended while connected to the power supply. They must be housed in a suitable location,
away locked up and from children.
Do not overload or misuse the tool. All tools are designed for a purpose and are limited to what
they are capable of doing. Do not attempt to use a power tool (or adapt it in any way) for an
application it is not designed for. Select a tool appropriate for the size of the job. Overloading a
tool will result in tool failure and user injury: This covers the use of accessories.
Dress properly. Loose clothing, long hair and jewellery are all dangerous because they can
become entangled in moving machinery: This can also result in parts of body being pulled into the
machine.
Clothing should be close fitted, with any long hair tired back and jewellery and neck ties removed.
Footwear must be fully enclosed and have a nonslip sole.
- 6 -

5. HEALTH AND SAFETY INFORMATION
Wear personal protective equipment (PPE). Dust, noise, vibration and swarf can all be
dangerous if not suitably protected against. If the work involving the power tool creates dust or
fumes; wear a dust mask. Vibration to the hand, caused by operating some tools for longer
periods must be protected against. Wear vibration reducing gloves and allow long breaks between
uses. Protect against dust and swarf by wearing approved safety goggles or a face shield. These
are some of the more common hazards and preventions; however, always find out what hazards
are associated with the machine/work process and wear the most suitable protective equipment
available.
Do not breathe contaminated air. If the work creates dust or fumes; connect the machine (if
possible) to an extraction system either locally or remotely. Working outdoors can also help if
possible.
Move the machine as instructed. If the machine is hand held, do not carry it by the air line. If
the product is heavy; employ a second or third person to help move it safely or use a mechanical
device. Always refer to the instructions for the correct method.
Do not overreach. Extending your body too far can result in a loss of balance and you falling.
This could be from a height or onto a machine and will result in injury.
Maintain your tools correctly. A well maintained tool will do the job safely. Replace any
damaged or missing parts immediately with original parts from the manufacturer. As applicable;
keep blades sharp; moving parts clean, oiled or greased; handles clean; and emergency devices
working.
Wait for the machine to stop. Unless the machine is fitted with a safety brake; some parts may
continue to move due to momentum. Wait for all parts to stop; then disconnect it from the air line
before making any adjustments, carrying out maintenance operations or just finishing using the
tool.
Remove and check setting tools. Some machinery requires the use of additional tools or keys
to set, load or adjust the power tool. Before starting the power tool always check to make certain
they have been removed and are safely away from the machine.
Prevent unintentional starting. Before connecting any machine in to the air supply, make sure
the switch is in the OFF position. If the machine is portable; do not hold the machine near the
switch and take care when putting the machine down; that nothing can operate the switch.
Concentrate and stay alert. Distractions are likely to cause an accident. Never operate a power
tool if you are under the influence of drugs (prescription or otherwise), including alcohol or if you
are feeling tired. Being disorientated will result in an accident.
- 7 -

5. HEALTH AND SAFETY INFORMATION
Have this tool repaired by a qualified person. This tool is designed to confirm to the relevant
international and local standards and as such should be maintained and repaired by someone
qualified; using only original parts supplied by the manufacturer: This will ensure the tool remains
safe to use.
5.2 ADDITIONAL SAFETY INSTRUCTIONS FOR AIR DRILLS
Important: Draper Tools Limited recommends that this machine should not be modified or used for
any application other than that for which it was designed. If you are unsure of its relative
applications do not hesitate to contact us in writing and we will advise you.
– Power tools shall not be used in potentially explosive atmospheres unless specifically designed
for that purpose;
– Unexpected tool movement due to reaction forces or breakage of inserted tool or solid objects
may cause injuries;
– Power tools shall be isolated from the energy source before changing or adjusting the inserted
tool;
– Warning:
• There is a risk of crushing by torque between the drill and the workpiece;
• There is a risk of loose clothing, hair etc., being caught in the rotating spindle of the power
tool;
• There is a risk of being injured if hands are not kept away from the workpiece, specially
observed when unscrewing in confined work spaces;
• There is a risk of being injured if hands are not kept away from the inserted accessory;
• There is a risk of danger to persons from high speed swarf being emitted from the air drill
during use.
• There is a risk of being injured by whipping air hoses.
– Unexpected direction of inserted tool movement can cause a hazardous situation;
– Use only accessories which are in good condition and are intended for use with power tools;
– Adopt a suitable posture to counteract normal or unexpected movement of the power tool due
to reaction forces from the power tool;
– Release the start and stop device in the case of an interruption of the air supply;
– Only lubricants recommended by the manufacturer shall be used;
– Release pressure when not in use. Disconnect from air line;
– Do not modify this air drill in any way.
– Do not carry or move the tool by the air line.
- 8 -
9. ASSEMBLY
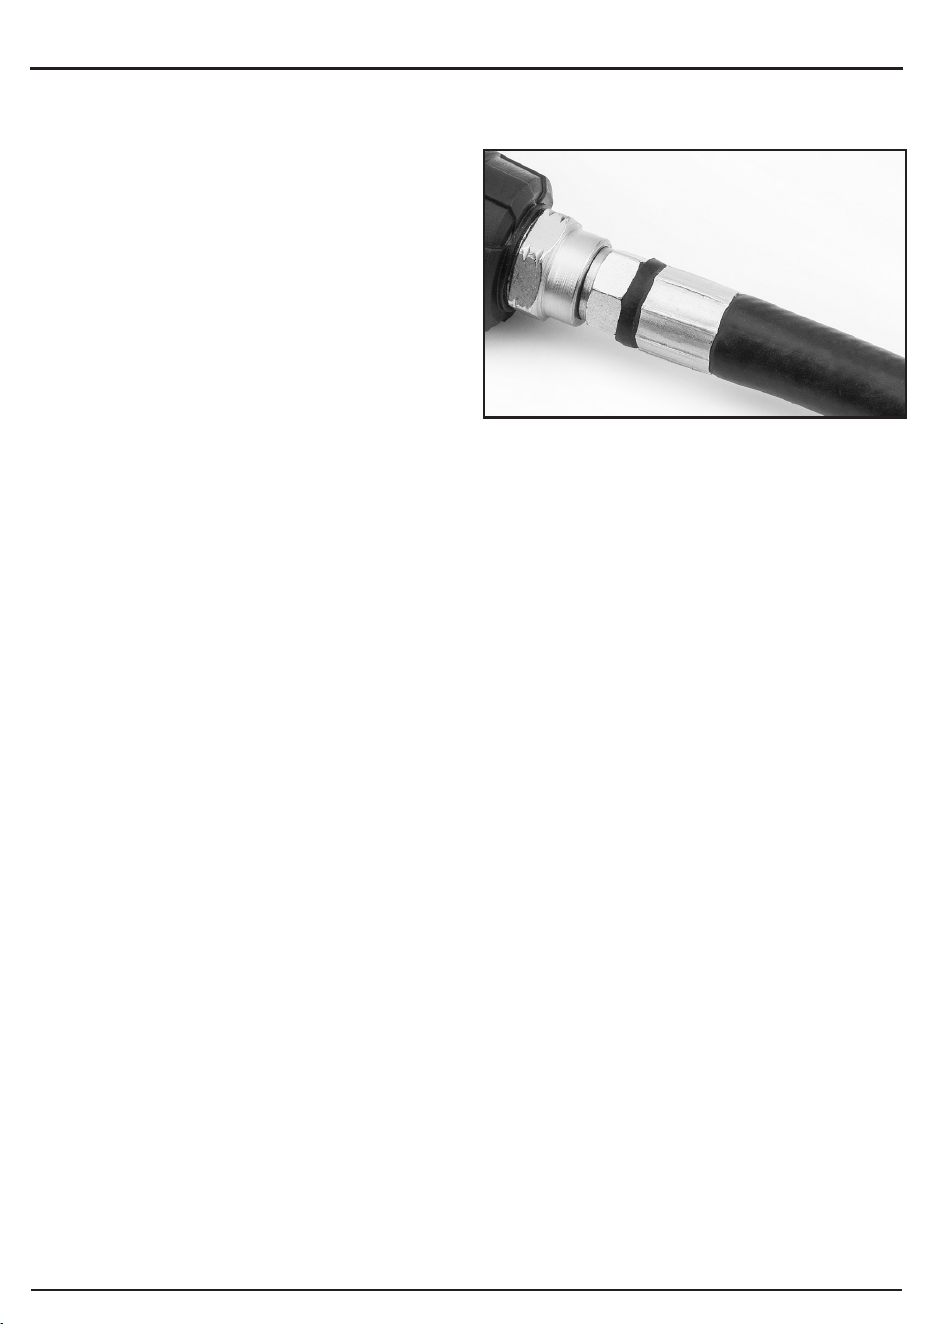
9.1 CONNECTION TO THE AIR SUPPLY
Whip hose:
To connect the air ratchet to an air line, a ¼"BSP
male thread whip hose* will be required. Wind a
length of PTFE tape** around the thread before
securing the hose in place. The connection must
be tight for an airtight union.
* Draper Stock No.54438.
** Draper Stock No.63389.
- 13 -

5. HEALTH AND SAFETY INFORMATION
– When starting or finishing the removal and installation of fasteners there is a risk of crushing
between the tool and the workpiece due to sudden movement or reaction forces.
5.3 RESIDUAL RISK
Important note:
– Although the safety instructions and operating manuals for our tools contain extensive
instructions of safe working with power tools, every power tool involves a certain residual risk
which can not be completely excluded by safety mechanisms. Power tools must therefore
always be operated with caution!
- 9 -
6. TECHNICAL DESCRIPTION
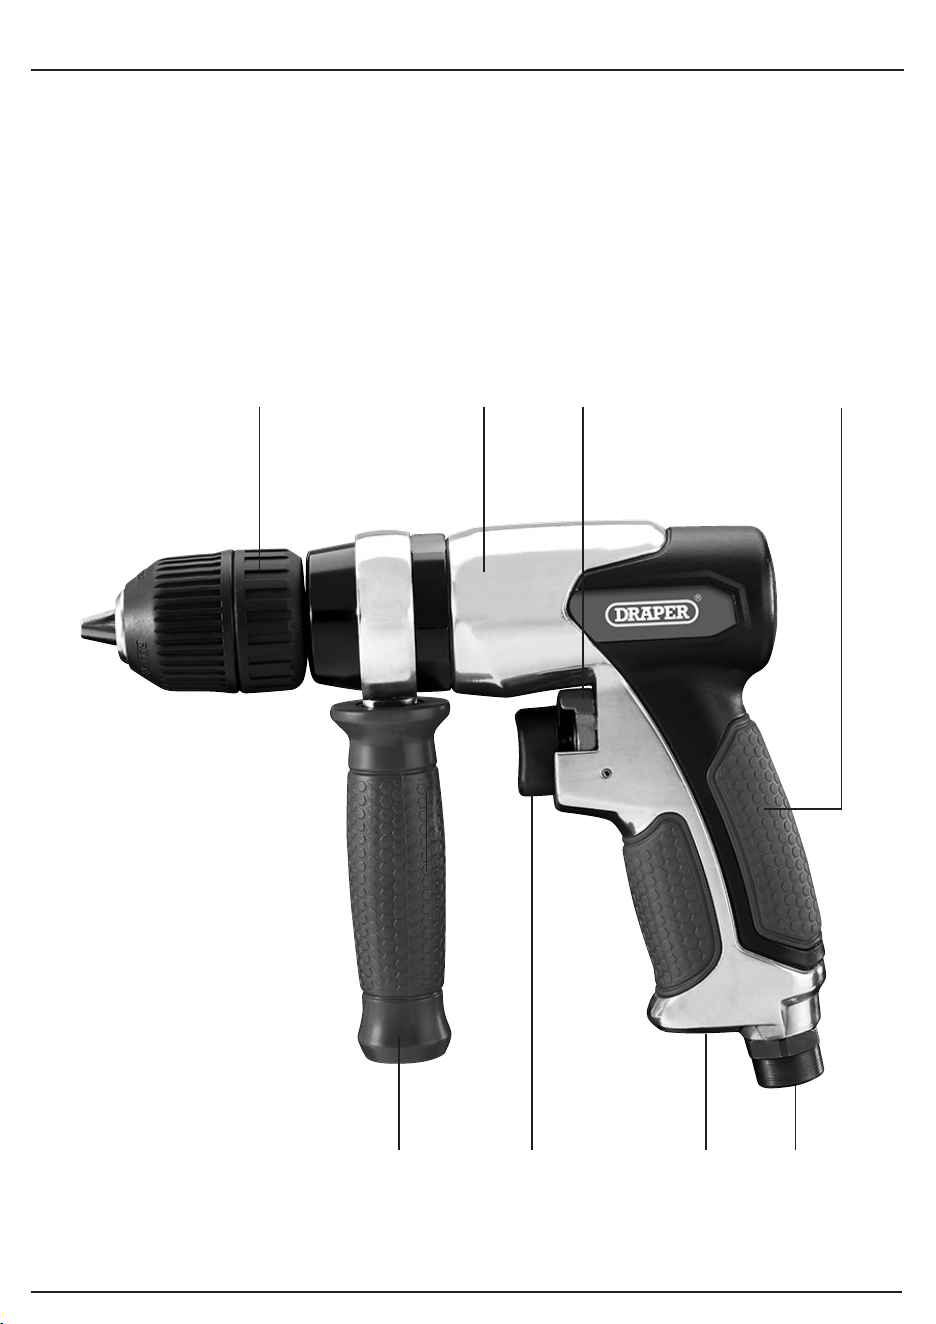
6.1 IDENTIFICATION
(1) Keyless chuck.
(2) Aluminium body.
(3) Forward and Reverse.
(4) Low vibration soft grip.
(5) ¼" BSP (female air inlet).
(6) Air exhaust.
(7) Trigger.
(8) Side handle.
(1) (2) (3) (4)
(5)(7)
(8)
(8) (6)
Stock No.83811
- 10 -
7. UNPACKING AND CHECKING
7.1 PACKAGING
Carefully remove the machine from the packaging and examine it for any sign of damage that may
have happened during shipping. Lay the contents out and check them against the parts shown
below. If any part is damaged or missing; please contact the Draper Helpline (the telephone
number appears on the Title page) and do not attempt to use the machine.
The packaging material should be retained at least during the guarantee period: in case the
machine needs to be returned for repair.
Warning! Some of the packaging materials used may be harmful to children. Do not leave any of
these materials in the reach of children.
If any of the packaging is to be thrown away, make sure they are disposed of correctly; according
to local regulations.
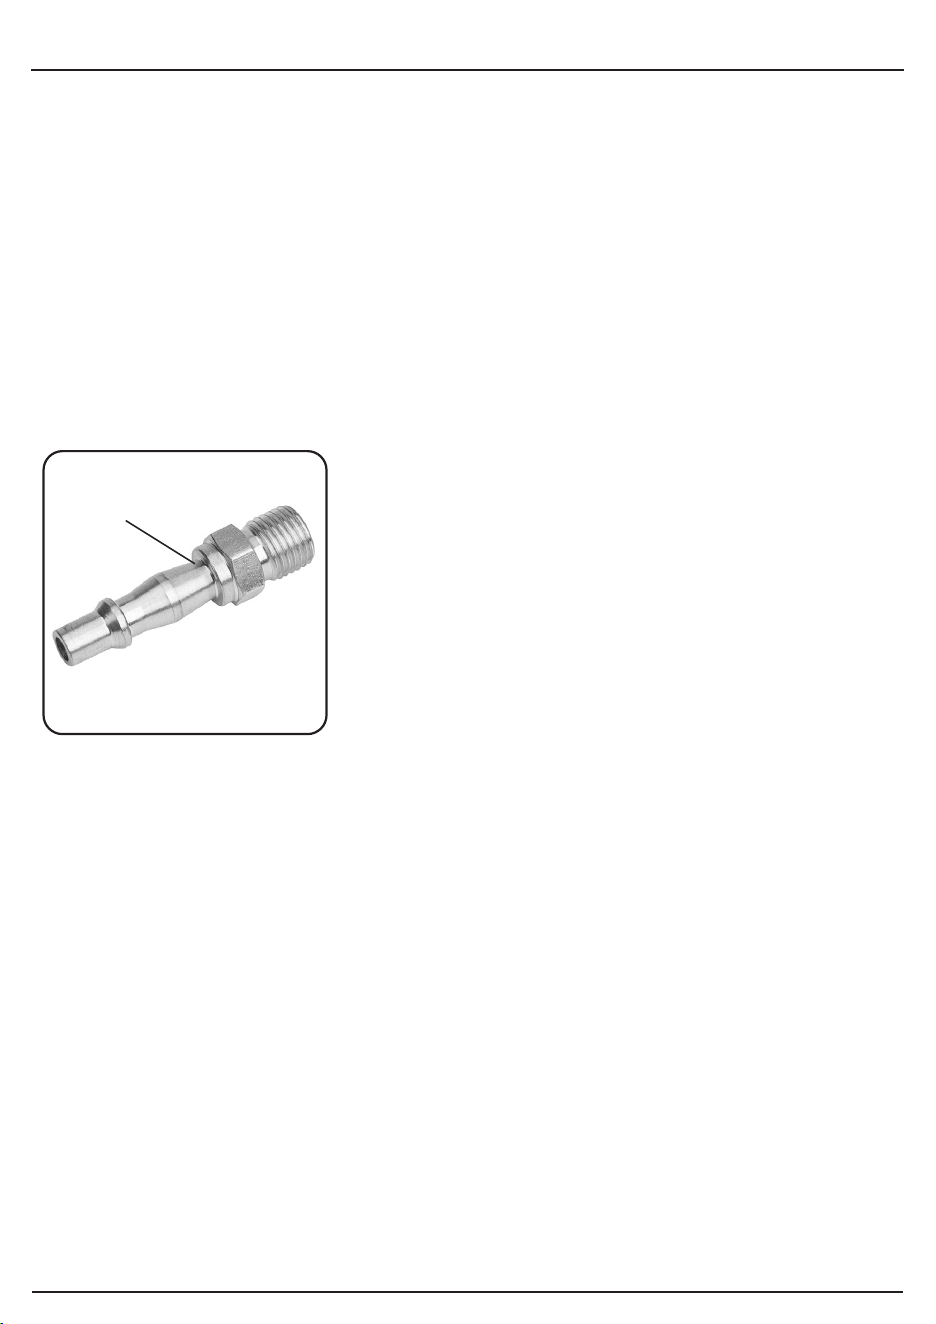
7.2 WHAT´S IN THE BOX?
Lay out the contents and check off the items against those featured below.
(9) Airline coupling screw adaptor.
(9)
- 11 -
8. AIR SUPPLY
8.1 AIR TOOL OIL SPECIFICATION
Failure to follow these instructions will lead to premature malfunction of the equipment which is not
covered by the guarantee.
Air tool oil viscosity refers to it’s properties to flow and how it reacts with heat. A low viscosity is
thinner than a high viscosity.
Air tool oil becomes thinner as it heats so choosing the right viscosity is essential. If the viscosity is
too low it may provide insufficient lubrication when heated. Equally, if it is too high, the fluid may
provide excessive resistance to move through the lines when cold.
The ISO (International Standards Organisation) viscosity grading system measures the kinematic
viscosity in centistokes (cSt) at 40º which is todays accepted standard. The SAE (Society of
Automotive Engineers) viscosity grade value is based on a scale.
This equipment is suited to an ISO grade 22 – 32 (SAE grade 5W – 15W) monograde oil.
The oil must be constantly supplied to the equipment during use to ensure complete lubrication
and optimum performance is achieved. It also acts as a rust inhibitor when the equipment is not in
use.
We recommend the use of Draper Air Tool Oil:
250ml = Stock No.34679, 500ml = Stock No.34681, 1Litre = Stock No.34682.
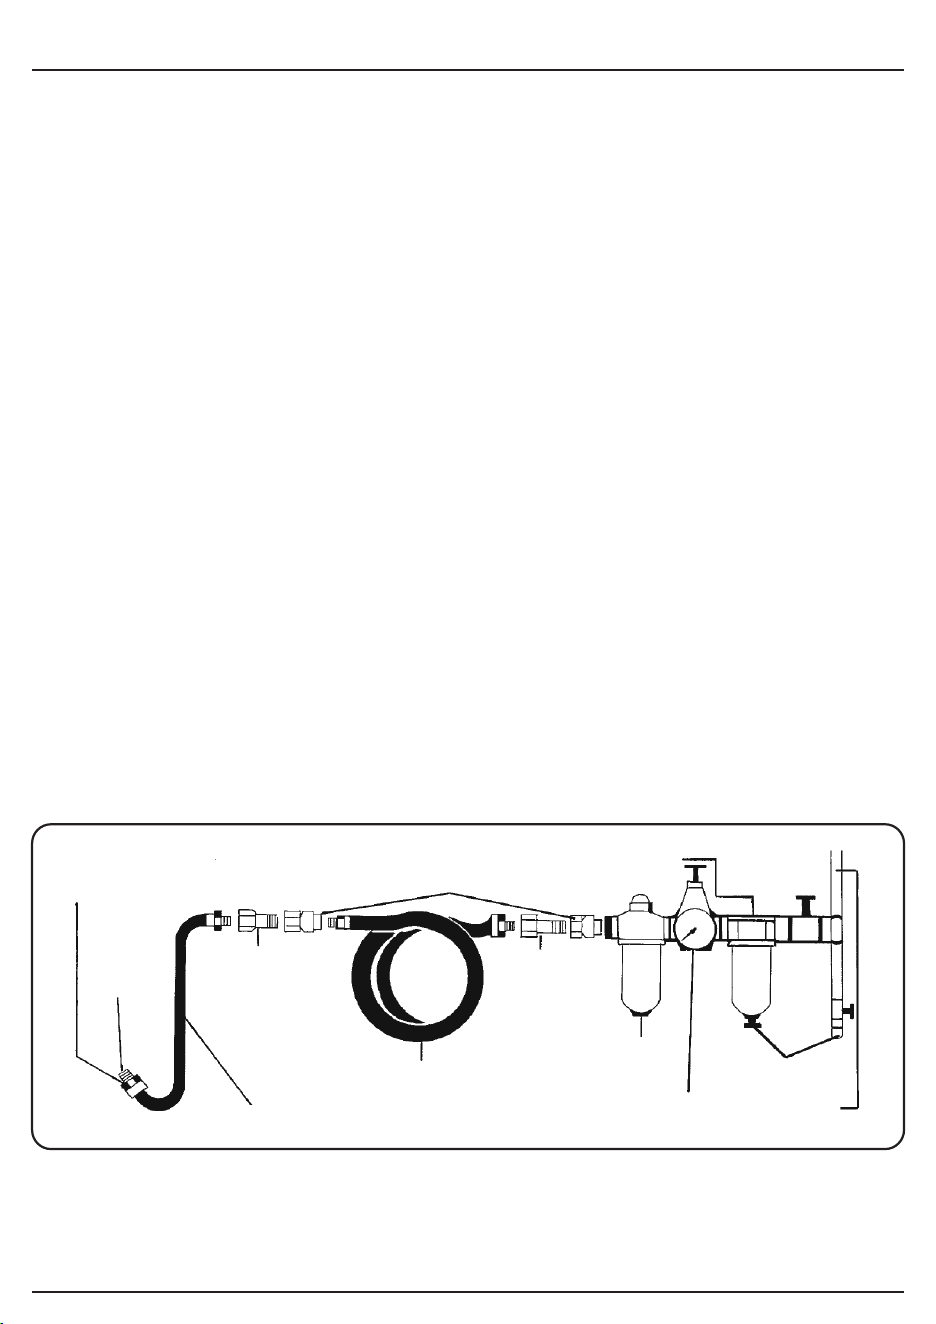
This air tool operates at a maximum pressure of 90psi and must be controlled via a combination
pressure regulator, in-line lubricator and moisture filter such as the Draper range (see you local
Draper stockist) which with proper maintenance will ensure a constant supply of dry air and
lubricating oil at all times (see illustration below). Always check machine operating pressure before
use.
Water in the compressor tank will cause serious corrosion to your air tools and should be drained
daily to avoid excessive water in your air supply. Dirty wet air rapidly shortens the life of your air
tool.
If you are using an air tool on a hose over 25ft long it is advisable to increase the bore of the hose
to the next larger size available, i.e., ¼" increases 3⁄8". This will ensure adequate pressure and
volume of air to power the machine.
8.2 RECOMMENDED AIR SUPPLY SET UP
Do not install quick
coupling here.
Quick coupler
Water separation
Nipple
Nipple
To your
air tool
Oiler
Regulator
Drain daily
Air supply
Air line hose
Whip hose
After each use and before prolonged storage, lubricate the equipment with approximately 1.5ml of
air tool oil directly down the air inlet.
- 12 -
10. OPERATION
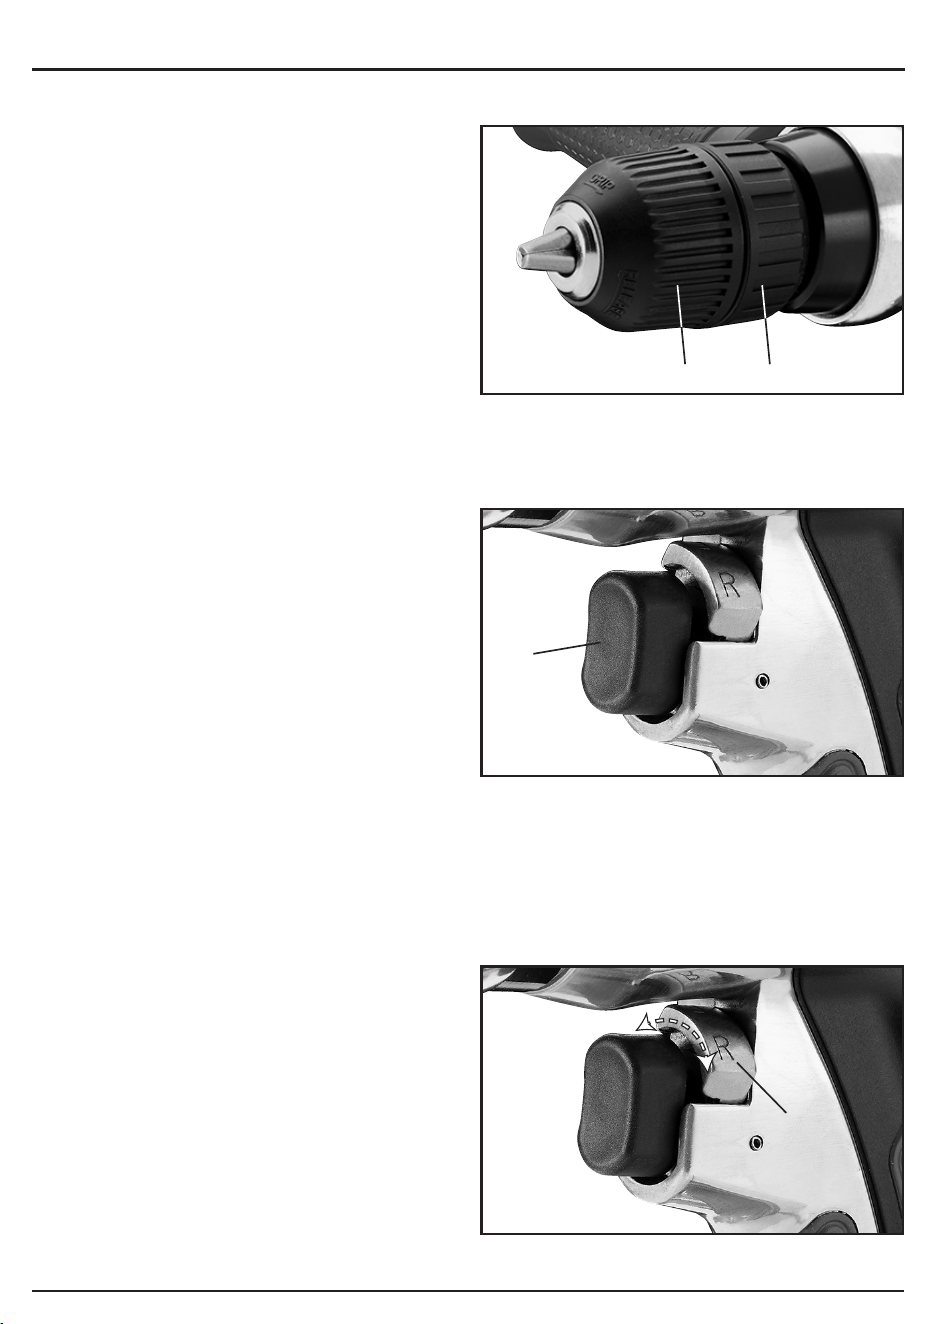
10.1 KEYLESS CHUCK
The drill is equipped with a keyless chuck,
which negates the requirement for a separate
key to secure the accessory in the jaws.
Selection of the correct accessory is dependant
on material type and the job in hand. Ensure the
selected accessory is suitable and speed
compatible with the drill.
Place the accessory into the chuck. Hold the
back of the chuck (1.1) and rotate the body (1.2)
as indicated to grip.
Warning: Prior to any drilling, carefully check
the surface for the presence of electric cable,
gas or water pipes and other dangerous or
damaging contents. If unsure do not proceed.
10.2 TRIGGER SWITCH
Note: Before connecting the drill to the air
supply reduce the line pressure according to the
specification.
Confirm direction of rotation prior to starting.
Pull trigger (7) to operate the drill. Release the
trigger to stop the drill.
Caution: Applying pressure on the machine as
the drill bit breaks through can result in loss of
control and injury.
Note: Before tool operation and work
commences ensure the compressor reservoirs
are drained of condensate along with all
connected air lines. Check and drain the air line
regulator's water trap & fill up the lubrication
reservoir.
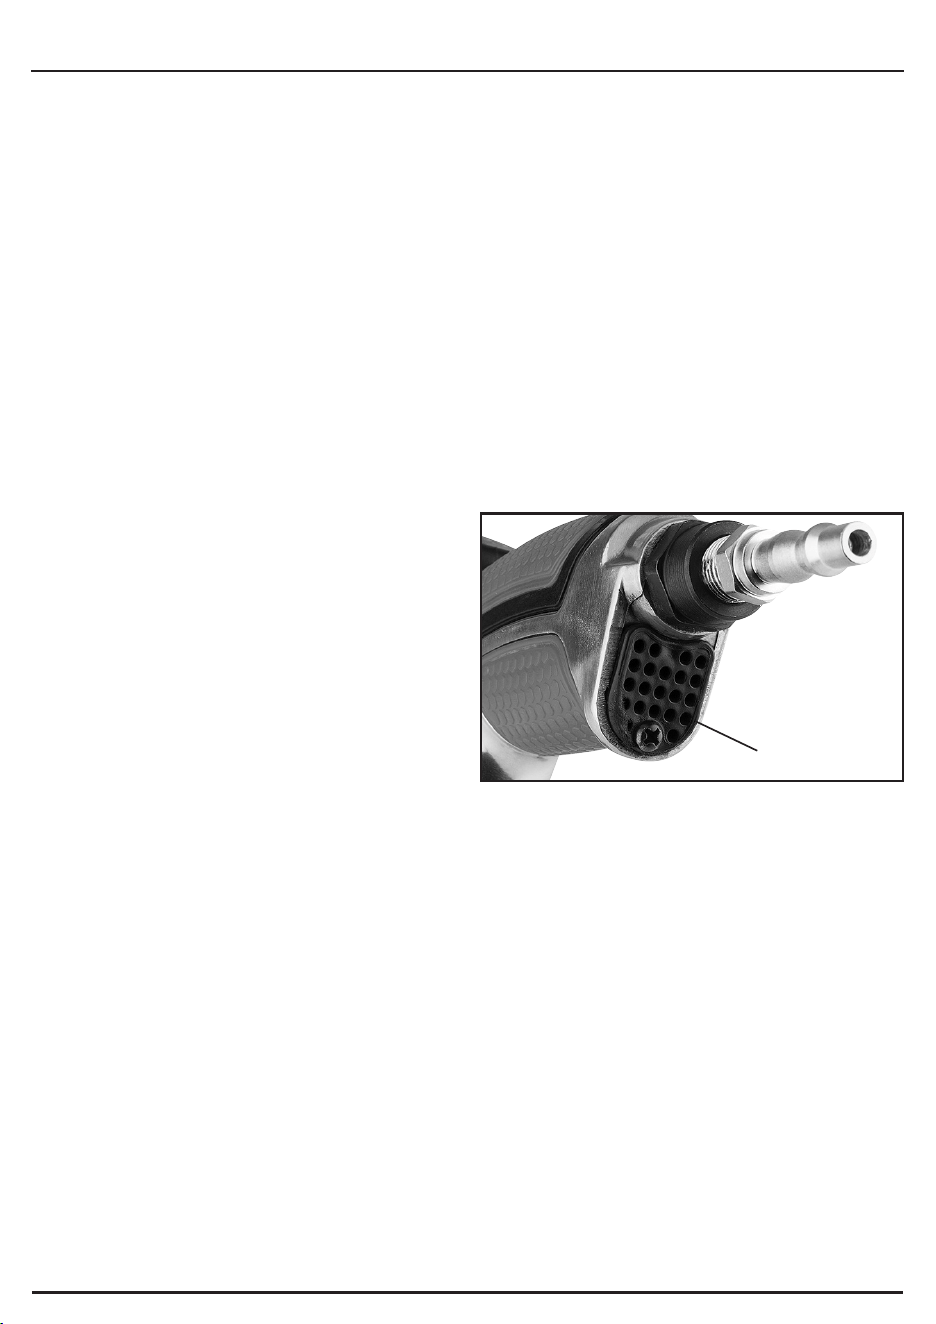
10.3 DIRECTION CONTROL
Slide the switch (3) toward the left or right to
engage forward (F) or reverse (R).
Use the trigger to adjust the speed setting most
appropriate for the application. Only switch
direction after the chuck has finished spinning.
Warning: Changing direction with the chuck
turning will damage the gearbox.
NOTE: Disconnect from the air supply before carrying out adjustment, servicing or maintenance.
(7)
(3)
(1.2) (1.1)
- 14 -
10. OPERATION
10.4 USING DRILL
DUST AND SWARF: A correctly fitted dust mask, suitable for the activity and in accordance to the
relevant standard, must be worn. For work activities involving exposure to fine wood dust, a mask
rated to at least FFP2 should be used. Swarf produced by metal drilling is extremely sharp. Take
precautions when clearing swarf. The burr left on the workpiece edge is also sharp and should be
removed with a suitable tool. Always wear safety goggles.
DRILLING WOOD AND PLASTIC: To prevent splitting around the drill holes on the reverse side,
place a piece of scrap timber under the material to be drilled.
DRILLING METAL: Metals such as sheet steel, aluminium and brass may be drilled. Mark the
point to be drilled with a centre punch to help the drill bit tip to locate. A drop of oil on the cutting
point will help aid penetration and prolong the life of the drill bit.
SCREWDRIVING: To prevent slip or damage to the screwhead, match the screwdriver bit to the
screwhead size. To remove screws, move the direction switch to the reversing position and apply
pressure to the screwhead and depress the trigger slowly.
Note: Disconnect from the air supply before carrying out adjustment, servicing or maintenance.
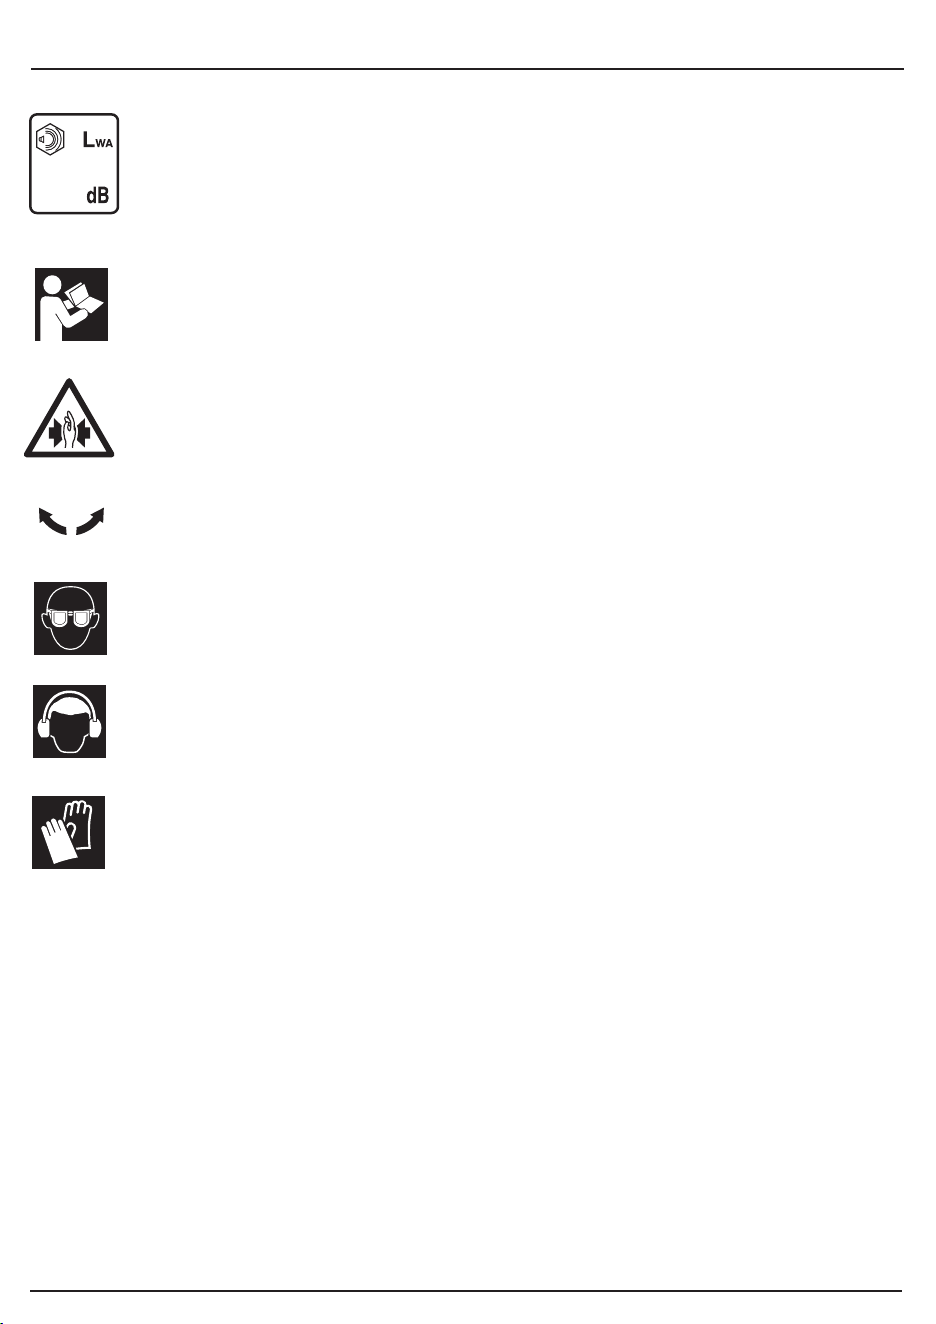
10.5 EXHAUST PORT
Ensure the exhaust port (6) is directed away
from yourself and that it does not agitate any
dust in close proximity.
(6)
- 15 -

11. MAINTENANCE
11.1 EVERY-DAY MAINTENANCE CHECKS
Before connection to the air supply:
• Drain the compressor reservoir of condensate.
• Drain the air lines of condensate.
• Drain the combined separator filter, regulator, water trap.
• Fill up the combined separator filter, regulator, lubricant reservoir.
• Check the line pressure is correct for the tool.
11.2 AFTER USE MAINTENANCE CHECKS
• Repeat the above procedures.
• Lubricate the tool with approximately 1.5ml of oil directly down the air inlet.
- 16 -

12. TROUBLESHOOTING
12.1 TROUBLESHOOTING GUIDE
Problems
• Tool will not operate. Air
flows slightly from
exhaust. Spindle turns
freely.
• Tool runs slowly. Air flows
freely from exhaust.
• Rotor vane seized. • Pour air tool lubricating oil
into air inlet.
• Operate tool in short
bursts.
• Tap motor housing gently
with plastic mallet.
• If still not functional,
return to service centre.
• Motor or throttle seized
with dirt.
• Check for dirt in air inlet.
• Pour air tool lubricating oil
into air inlet.
• Operate trigger in short
bursts.
• Disconnect air line supply,
then turn spindle by hand.
Reconnect air supply.
• If motor fails to turn return
to service centre.
Possible cause Required action
• Spindle seized. • Motor vane broken. • Return to service centre.
• Tool will not shut off. • ‘O’ rings throttle valve
dislodged from seat inlet
valve.
• Replace ‘O’ ring or return
to service centre.
We recommend the use of Draper Air Tool Oil:
250ml = Stock No.34679, 500ml = Stock No.34681, 1Litre = Stock No.34682.
- 17 -
13. EXPLANATION OF SYMBOLS
98
Single value noise marking.
(Maximum declared
A-Weighted sound power level
in decibels).
13.1 EXPLANATION OF SYMBOLS
The operator's instruction
must be read before work starts.
WARNING: Risk of crushing.
Direction of rotation.
Wear safety glasses.
Wear ear defenders.
Wear gloves.
- 18 -

14. DISPOSAL
14.1 DISPOSAL
- At the end of the machine’s working life, or when it can no longer be repaired, ensure that it is
disposed of according to national regulations.
- Contact your local authority for details of collection schemes in your area.
In all circumstances:
• Do not dispose of power tools with domestic waste.
• Do not incinerate.
• During decommissioning of the equipment, certain hazards should be understood and
avoided:
- Only with the line pressure released shall the equipment be disassembled.
Goggles should be worn.
- 19 -

Draper Tools Limited, Hursley Road,
Chandler's Ford, Eastleigh, Hampshire. SO53 1YF. U.K.
Helpline: (023) 8049 4344
Sales Desk: (023) 8049 4333
Internet: drapertools.com
E-mail: [email protected]
General Enquiries: (023) 8026 6355
Service/Warranty Repair Agent:
For aftersales servicing or warranty repairs, please contact the
Draper Tools Helpline for details of an agent in your local area.
©Published by Draper Tools Limited.
No part of this publication may be reproduced, stored in a retrieval system or transmitted in any form or by any means,
electronic, mechanical photocopying, recording or otherwise without prior permission in writing from Draper Tools Ltd.
CONTACTS
YOUR DRAPER STOCKIST
DBTL0721