Caution : Please read the manual before your first ride!
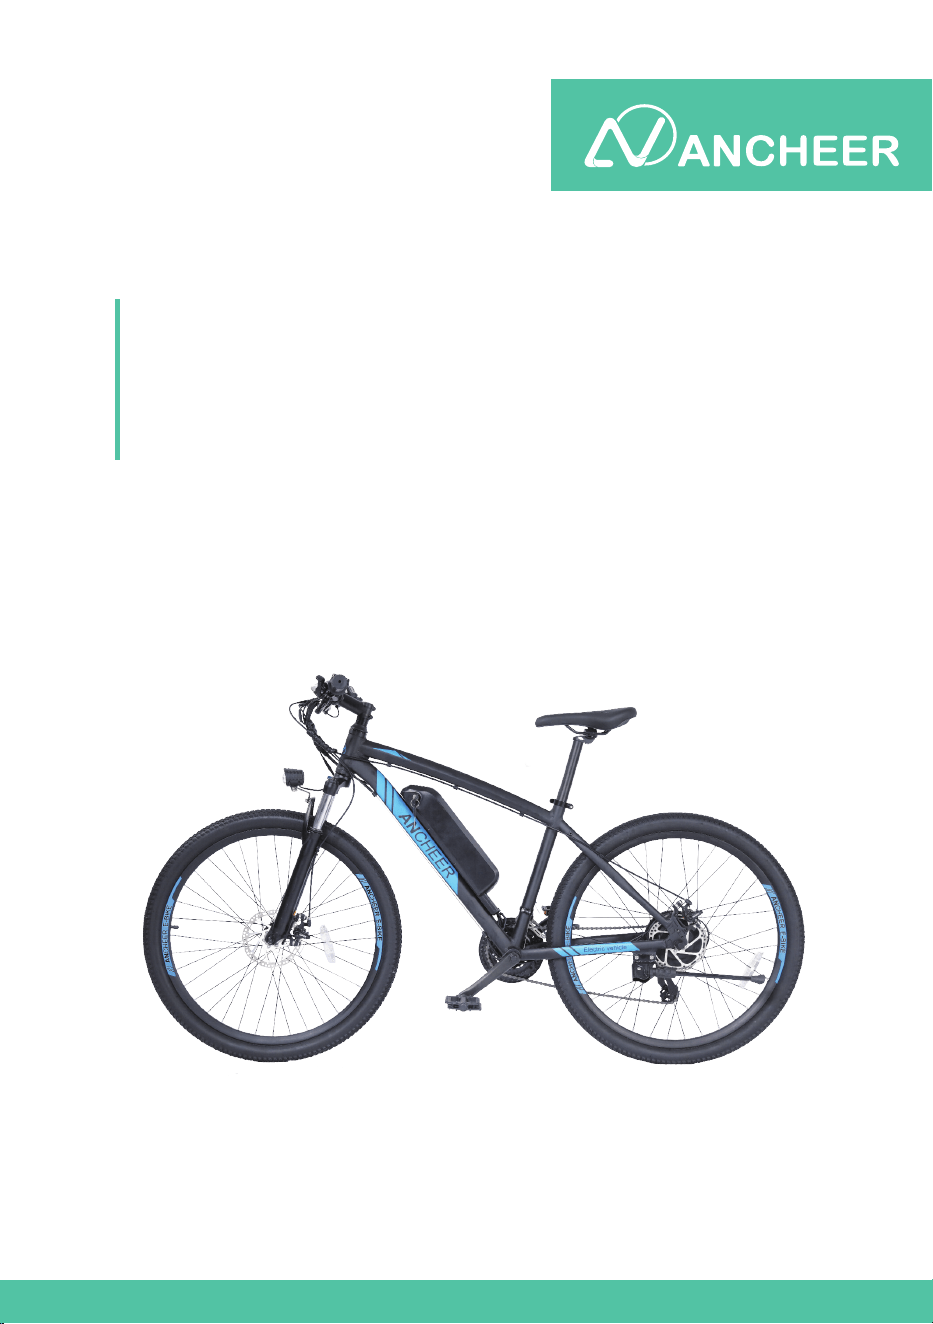
E-Bike
PRODUCT INSTRUCTION
MANUAL

WARRANTY
ATTACHMENTS
WARNING
IMPORTANT SAFTY INSTRUCTION
GENERAL INFORMATION
BIKE USAGE
INSTALLATION AND ADJUSTMENT
METER OPERATION
BATTERY AND CHARGING
MAINTENANCE
01
03
07
08
16
23
26
27
28
30
CONTENTS
01
WHEN USING THIS PRODUCT BASIC PRECATIONS SHOULD ALWAYS BE FOLLOWED,
INCLUDING THE FOLLOWING:
Things To Know Before Use
Read all the instructions before using the product.
To reduce the risk of injury, close supervision is necessary when the product is used
near children.
Do not use this product if the flexible power cord or output cable is frayed, has broken
insulation, or any other signs of damage.
Do NOT put your fingers, hands or feet into the rotating wheel.
Don't lend this product to people who can't operate it, so as not to cause harm; if you
lend the bike, please let the user follow instructions, it could help to decrease the risk
of accident.
The E-bike cannot be used as off-road vehicles or used for extreme bicycle sports;
when riding the bicycle, please wear a safety helmet and protective gear. It is
forbidden to ride with one hand.
Please abide by the traffic rules and prohibit riding on motorized lanes and roads with
multiple pedestrians.
Carry people or objects in accordance with the requirements of laws and regulations,
and do not park in the building's lobby, evacuation stairs, walkways, and safe
entrances and exits.
It is recommended to charge and park in an outdoor dedicated parking hall, while
avoiding rain; when charging, keep away from combustibles, and the charging time
should not be too long.
For safety reasons, please do not change the default speed setting of the electric
bicycle and do not exceed speed limit in accordance with the traffic rule. Riding on
non-motorized lanes, downhills and paved roads not exceeding 15km/h;
When adjusting the handlebar or saddle, please be careful not to exceed the safety
line markings on the handlebar and saddle;
When using the motor, please be careful not to hit vigorously and keep the rotating
shaft lubricated;
IMPORTANT SAFTY INSTRUCTION
●
●
●
●
●
●
●
●
●
●
●
●
02
IMPORTANT SAFTY INSTRUCTION
Try to avoid traveling in severe weather such as heavy rain and snow.
It is not allowed to exceed the maximum load of the vehicle body when riding (the
maximum load is 120KG).
It is suitable for people of 16+ years old and physically fit adults, and it is strictly
forbidden to drive electric bicycles on the road by people under 16 years old.
Slow down when riding in rain or snow since the the braking distance will be increased
in such slippery conditions.
●
●
●
●
03
GENERAL INFORMATION
1. About ANCHEER Electric Bike
ANCHEER electric bike is a leading icon of e-bikes. For years, ANCHEER has been not only
dedicating to innovation, cutting-edge technology and premium materials, but also
providing cost effective e-bikes, to satisfy riders' various needs of transportation and even
desire of exploring sports & outdoors life. Just ride freely with ANCHEER !
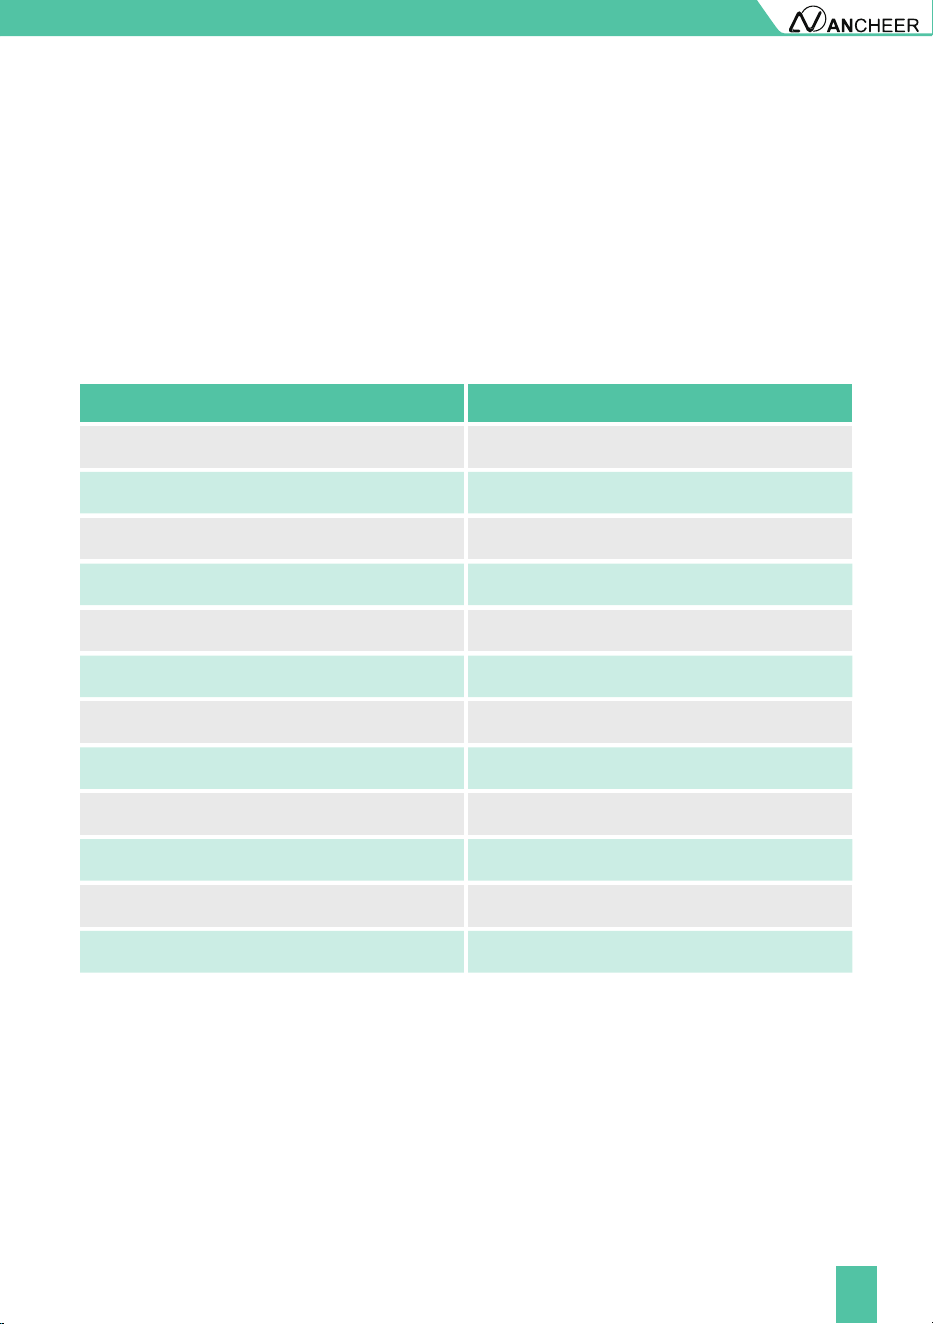
2.What’s In the Box (Parts List)
Description Quantity
ANCHEER Electric Bike
Pedal
Reflector
2
1
User Manual
Saddle 1
1
Key
Saddle Tube 1
2
Charging Adapter
Kickstand
1
1
1
Battery
Quick Release Skewer
Tools Bag
1
1
1
04
GENERAL INFORMATION
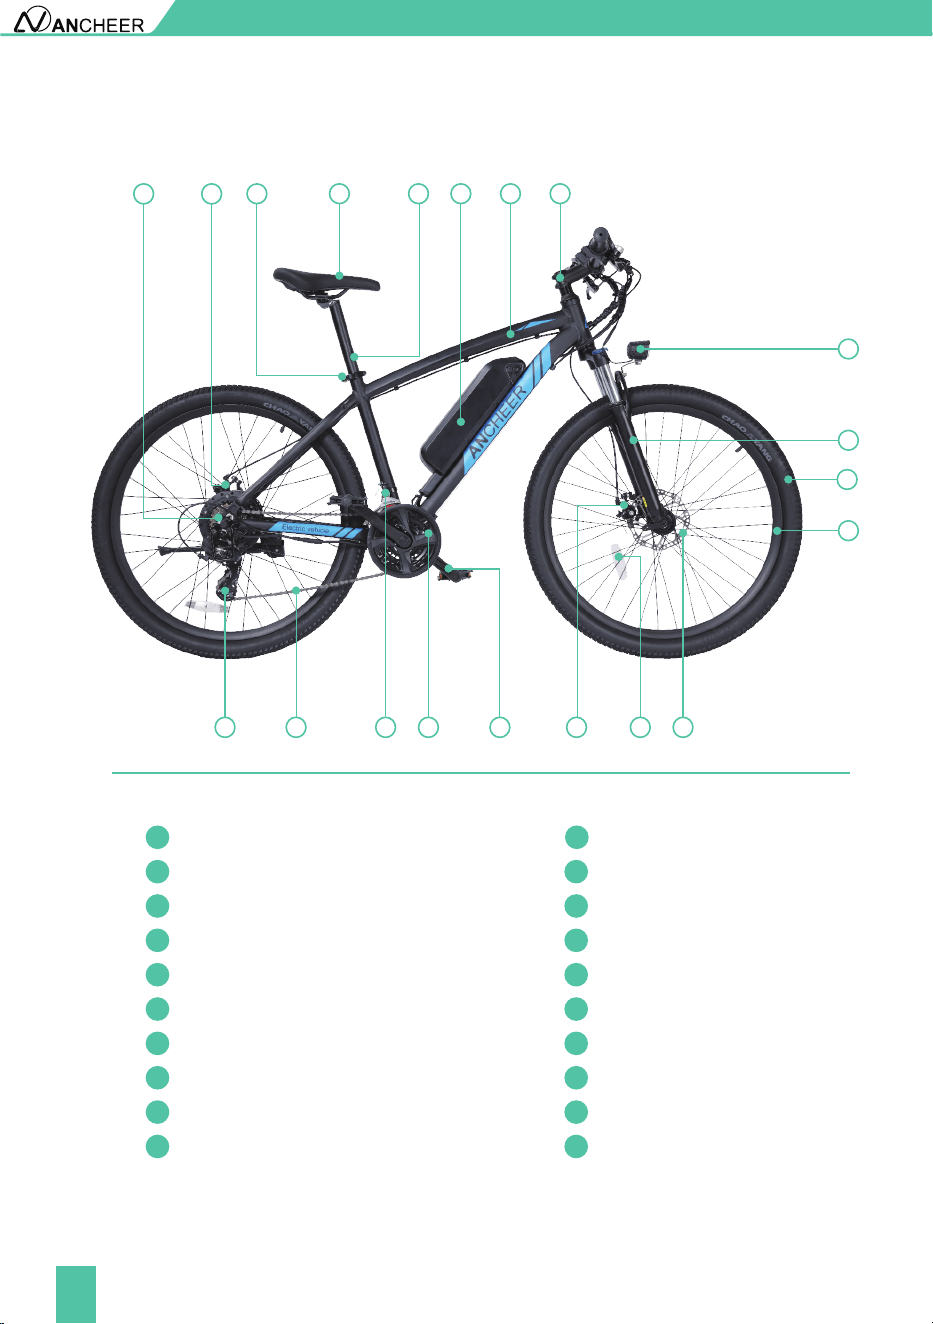
3. Bike Components
1
2
3
4
5
9
1112
13 14
10
678
2
1
3
4
5
6
7
8
9
10
11
13
12
14
15
16
17
18
19
20
Rim
Flywheel
Front Fork
Chain
Tyre
Rear Derailleur
Head Light/Front Light
Stem
Front Derailleur
Frame Chain Wheel
Battery
Crank
Saddle Post/ Seat Tube Front Disc Brake Calipers
Saddle Wheel Reflector
Seat Post Clamp/ Seat Clamp
Disc
Rear Disc Brake Callipers
15 16 17 18 19 20
05
GENERAL INFORMATION
21
28
29
30
31
32
22
23
24
25
26
27
23
22
24
25
26
27
29
28
30
31
32
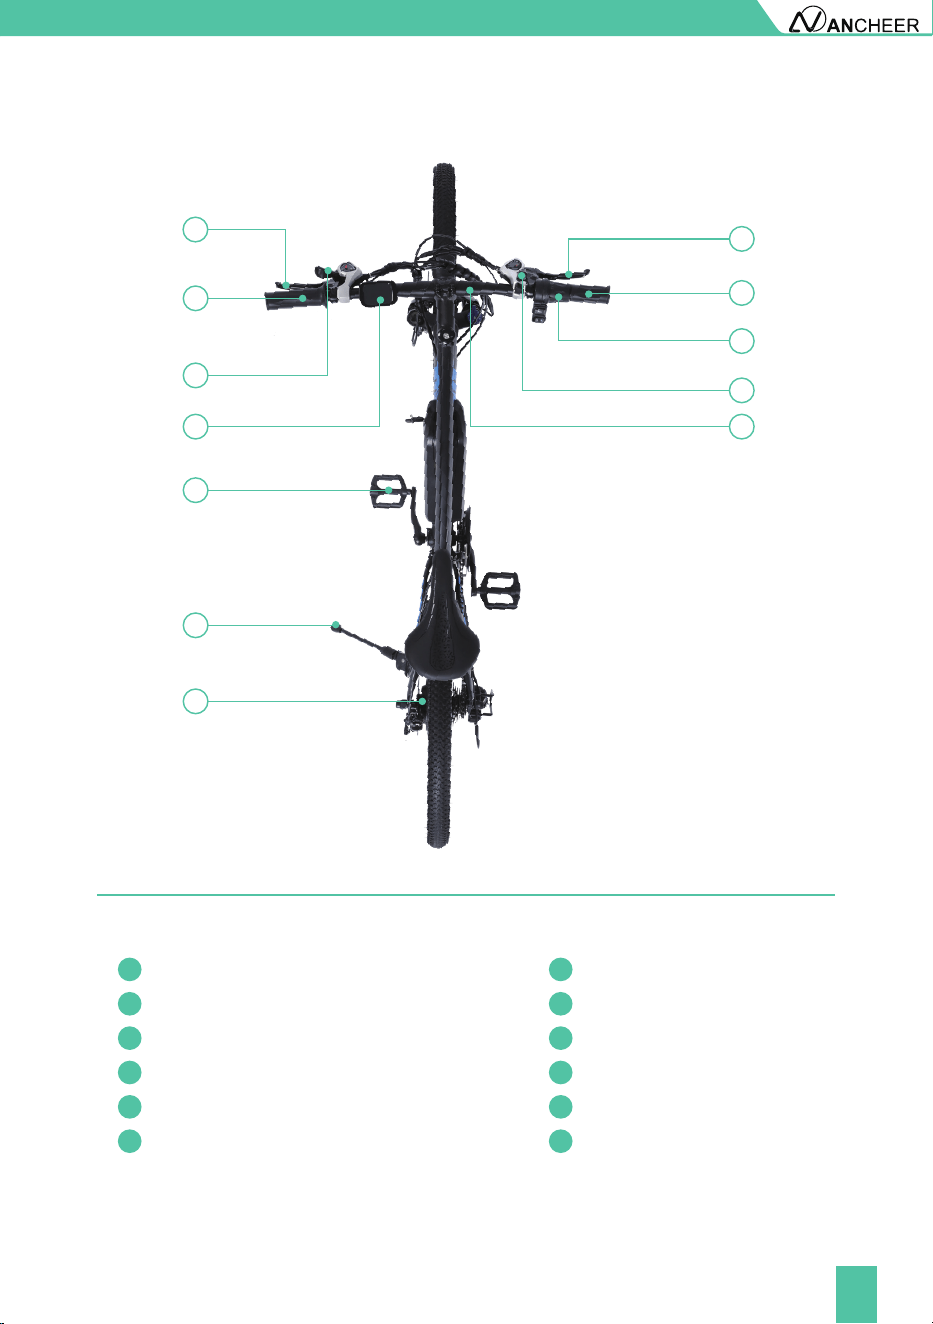
Left Brake Lever Motor
Front Derailleur Handle Right Grip
Left Grip Right Brake Lever
Meter Throttle/ Twister
Pedal Rear Shifter
Kickstand Handle Bar
21
06
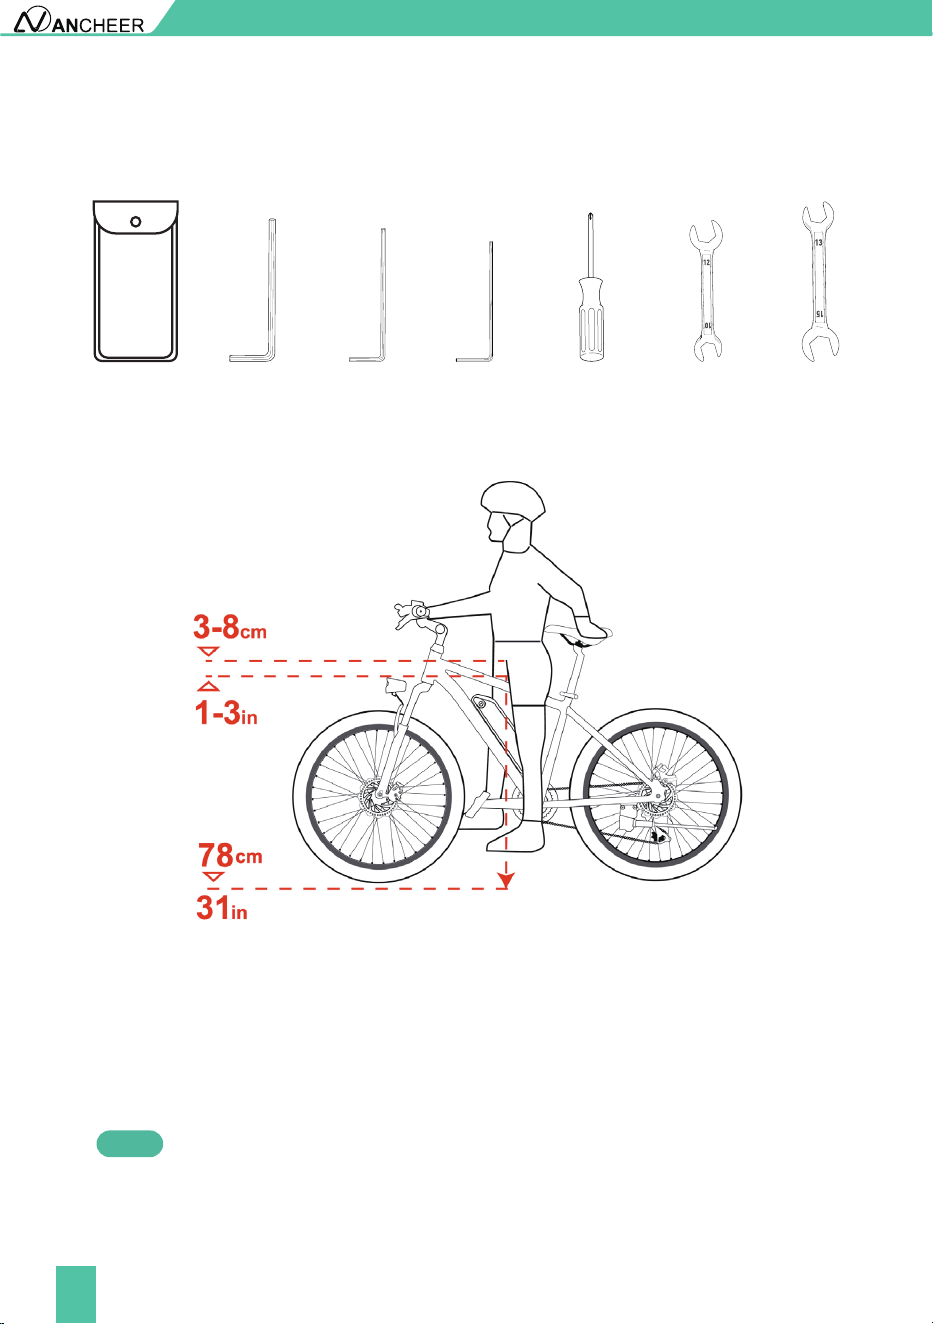
4. Tool List
5. Standover Height
For the sake of safety and comfortable riding, when the rider stands on the ground there
should be clearance of 78cm/31in from ground to the crotch of the rider. Also, at least
3-8cm/1-3in between the crotch and the top tube of the bike.
Standover height does not apply to bicycles with step-through frames. Instead, the limiting
dimension is determined by saddle height range. You should adjust your saddle position
without exceeding the limit line on the saddle tube.
Note
GENERAL INFORMATION
Tool bag
0.12 inch (3mm)
Allen Key
0.16 inch (4mm)
Allen Key
0.20 inch (5mm)
Allen Key
Phillips-Slotted
Head Screwdriver
10-12 Open
End Wrenchr
13-15 Open
End Wrench

07
BIKE USAGE
Before Riding
During Riding
Before riding the bike on the open road, try all the settings on the electric bike, and get
used to various results in a safe and controllable environment.
Please check the power circuit, lighting circuit, and test the brake system before cycling.
Always check the tire pressure before starting to ride, and make sure that the tire is inflated
to a pressure within the specified range.
In order to ensure the safety of riding, please check regularly for loose parts or screws.
The places that need to be checked include but not limited to the seat tube, wheels,
handlebars and pedals.
If necessary, please confirm whether the battery capacity can meet you riding demand.
2.
1.
If the pressure exceeds the recommended maximum value, the tire may blow out
of the rim, which may damage the bicycle and cause injury to the cyclist and nearby
people.
If the pressure is too low, the wheel may be damaged, or the inner tube may be
squeezed, causing the tire to leak air.
Please wear helmets and riding gear that meet the requirements in accordance with
regulations.
Avoid traveling in severe weather such as heavy rain and snow,etc.
Carry people or objects in accordance with the requirements of laws and regulations, and
the load of the entire bike should not exceed 120kg.
Obey the traffic rules.
●
●
●
●
●
●
●
●
●
After Riding
After heavy use, do not touch the hot surface, such as the disc brake rotor or the side edge
of the brake rim.
When folding the kickstand, always make sure that the stand is secure and the base is firm
to prevent the bicycle from falling.
If the bicycle is splashed with moisture, please wipe it dry and clean in time.
●
●
●
08
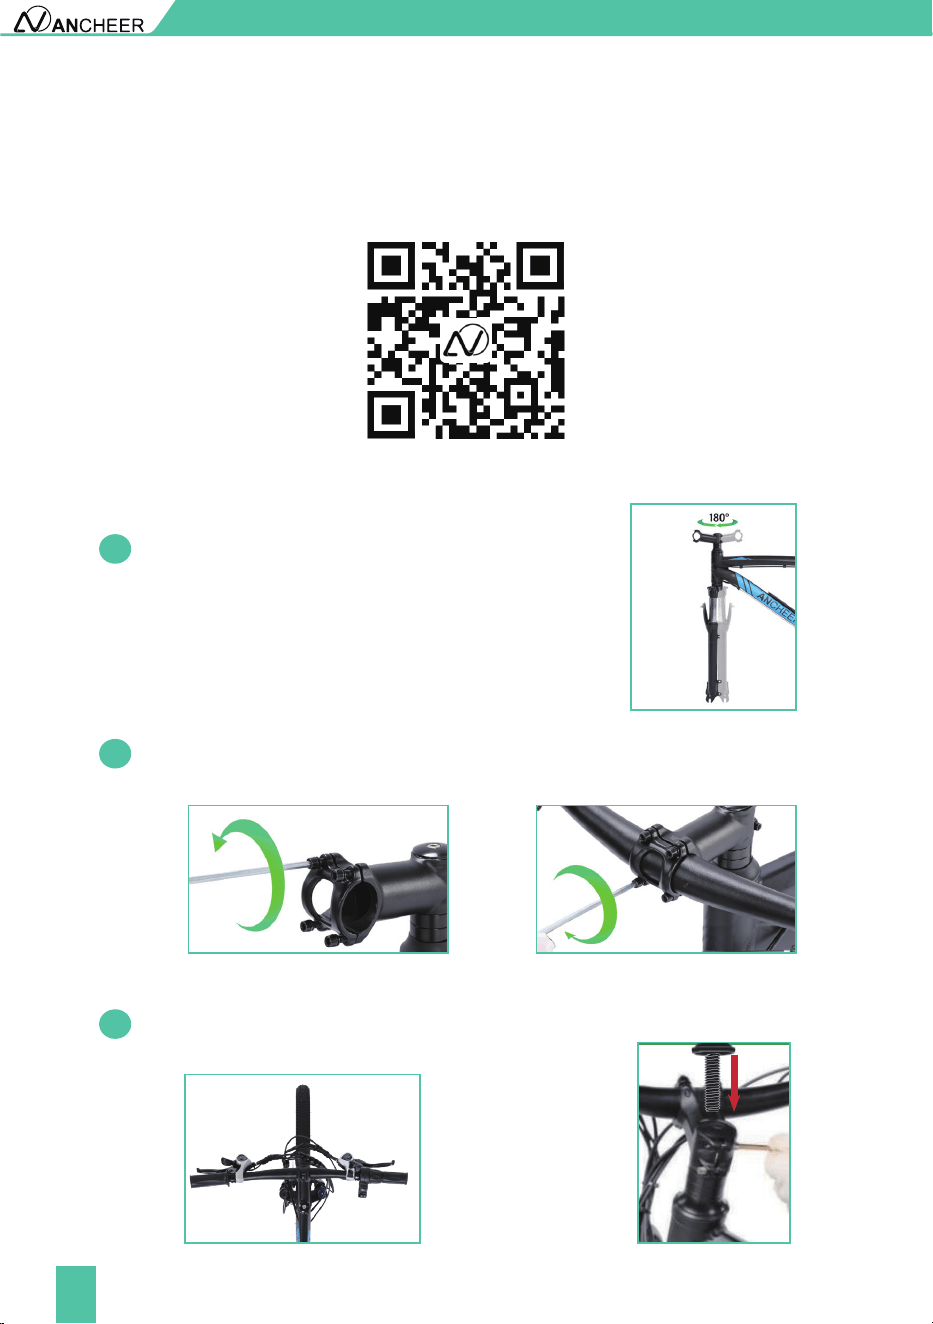
1. Install The Handlebar
Open the package of the bike, take out the electric bike and all the parts inside and use the
tool to cut off the packing rope. Please follow our YouTube channel- ANCHEER SPORT, we
have provided installation tutorial.
Turn the stem 180° to the forward direction, also make
sure the front fork also rotates 180° horizontally, then
both the stem and the fork bridge of the front fork are
facing forward.
INSTALLATION AND ADJUSTMENT
1.1
1.2
1.3
Using the hex key from tool kit to loosen the four screws and put the handlebar into
the stem in balance and tighten the screw.
Adjust the angle of the stem to ensure that the handlebar is level, and use the tool to
lock one screw on top and two screws on the size.
Installation Video
09
INSTALLATION AND ADJUSTMENT
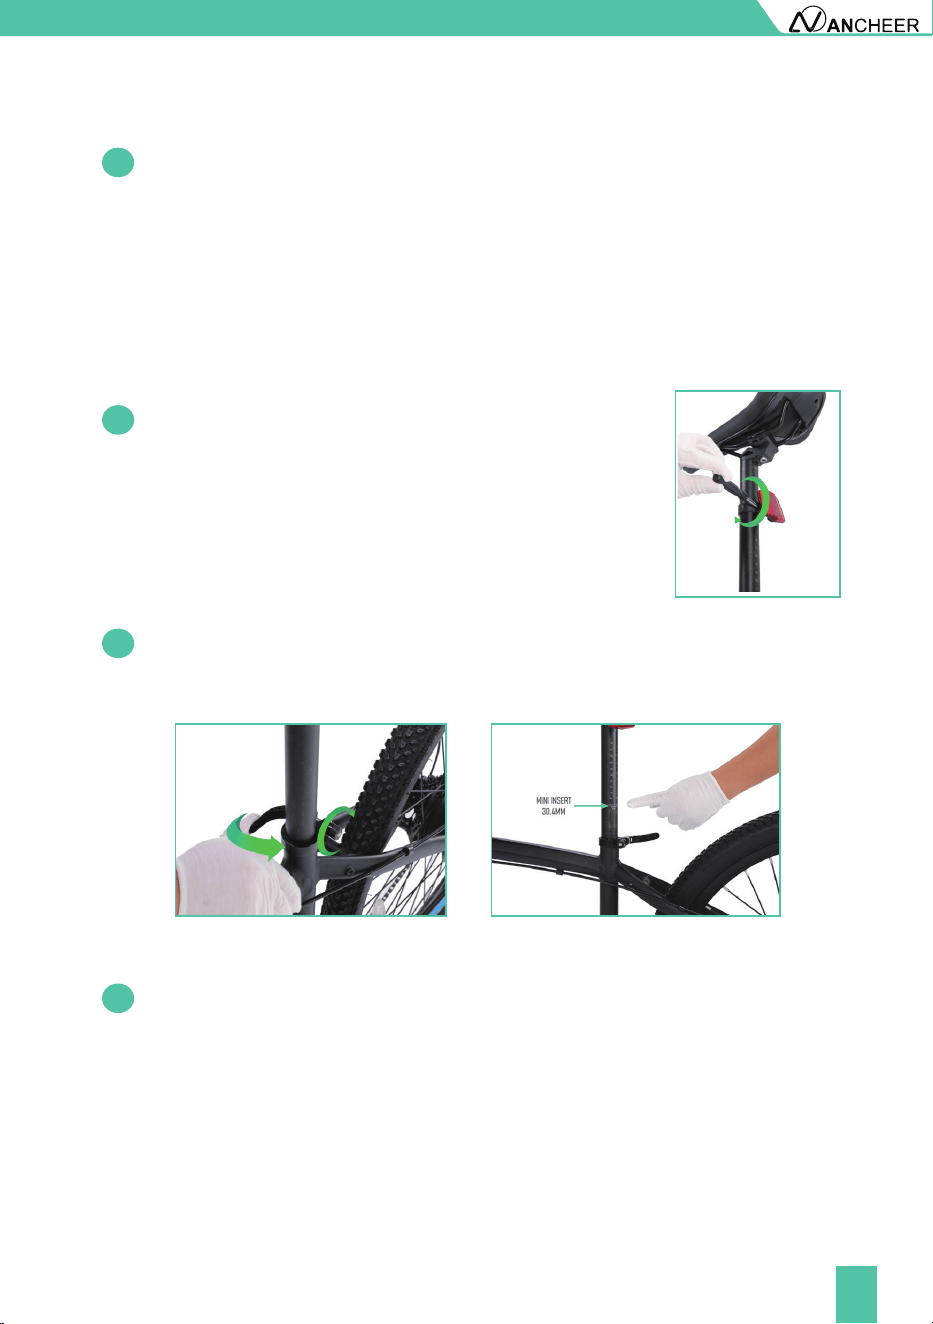
2. Install The Seat
2.1
2.2
1.4
2.3
First attach the reflector to the seat tube and tighten the
screws of the reflector.
Install the saddle tube into post receiver. Set right its position and adjust height to fit
your ridding habit. (Note: please be careful not to exceed the limit line) Tighten the
fastening nut clockwise first, and then fasten the seat tube clamp.
If you find the handlebar is not in the right direction, loosen the top screw, adjust
the angle of the handlebar to keep it in horizontal direction, then tighten the top
bolt.
Adjust the seat angle to the most comfortable position.
10
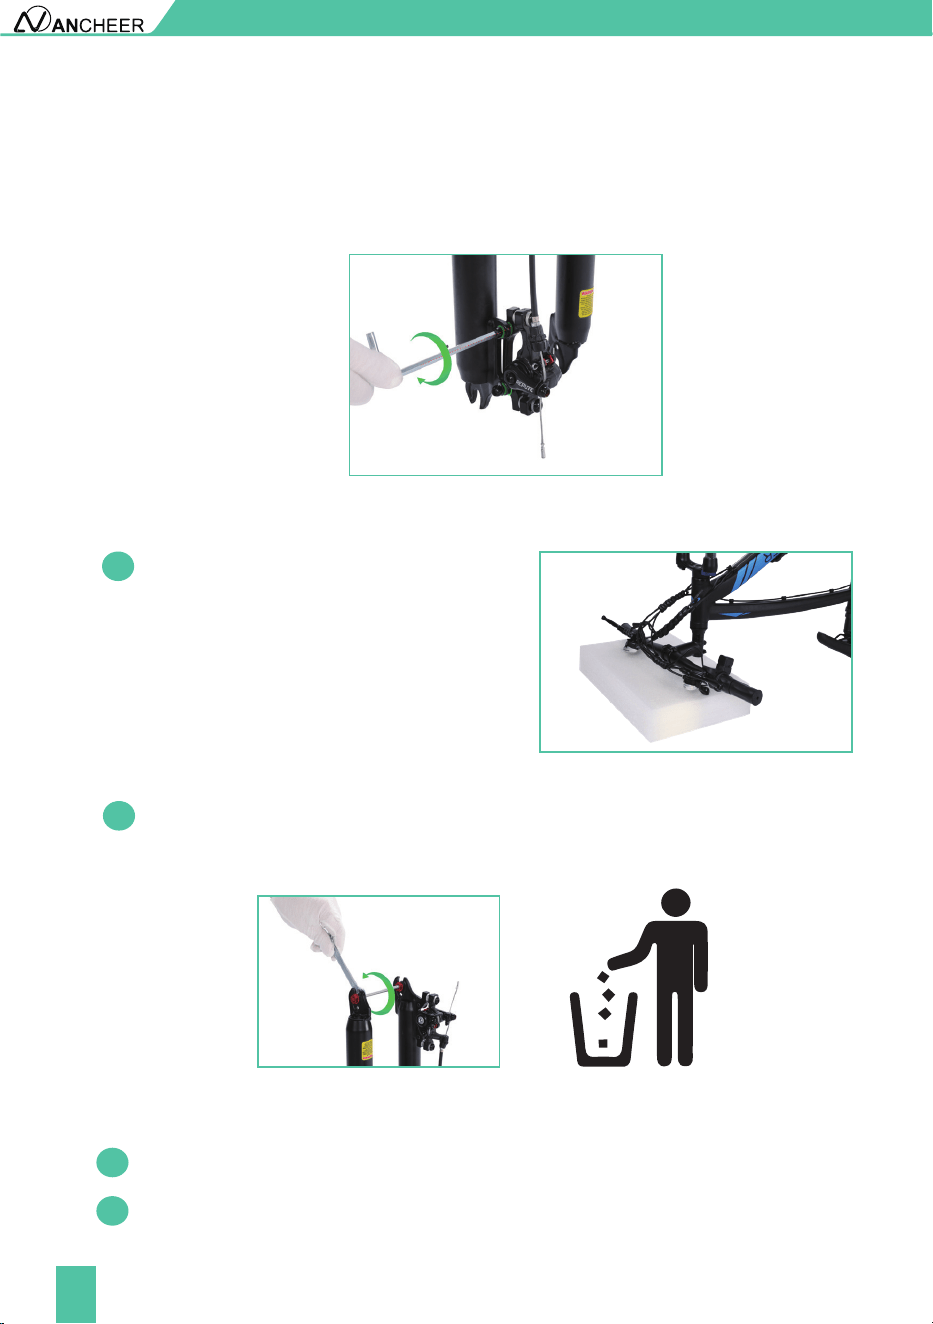
4.2
Using the wrench to loosen the fixing rod of the front fork and remove it (this accessory
is to prevent the front fork from being deformed during delivery but not a needed part
for the installed bike).
INSTALLATION AND ADJUSTMENT
3. Install The Front Disc Brake
4. Install The Front Disc Brake
Align the two screw holes of the front disc brake with the screw holes of the front fork,
and tighten the screws clockwise.
4.1
Flip the e bike upside down. Pad the handlebar
with foam to protect the components on it
from being scratched or broken.
Figure 4.1
Figure 4.2
4.3
4.4
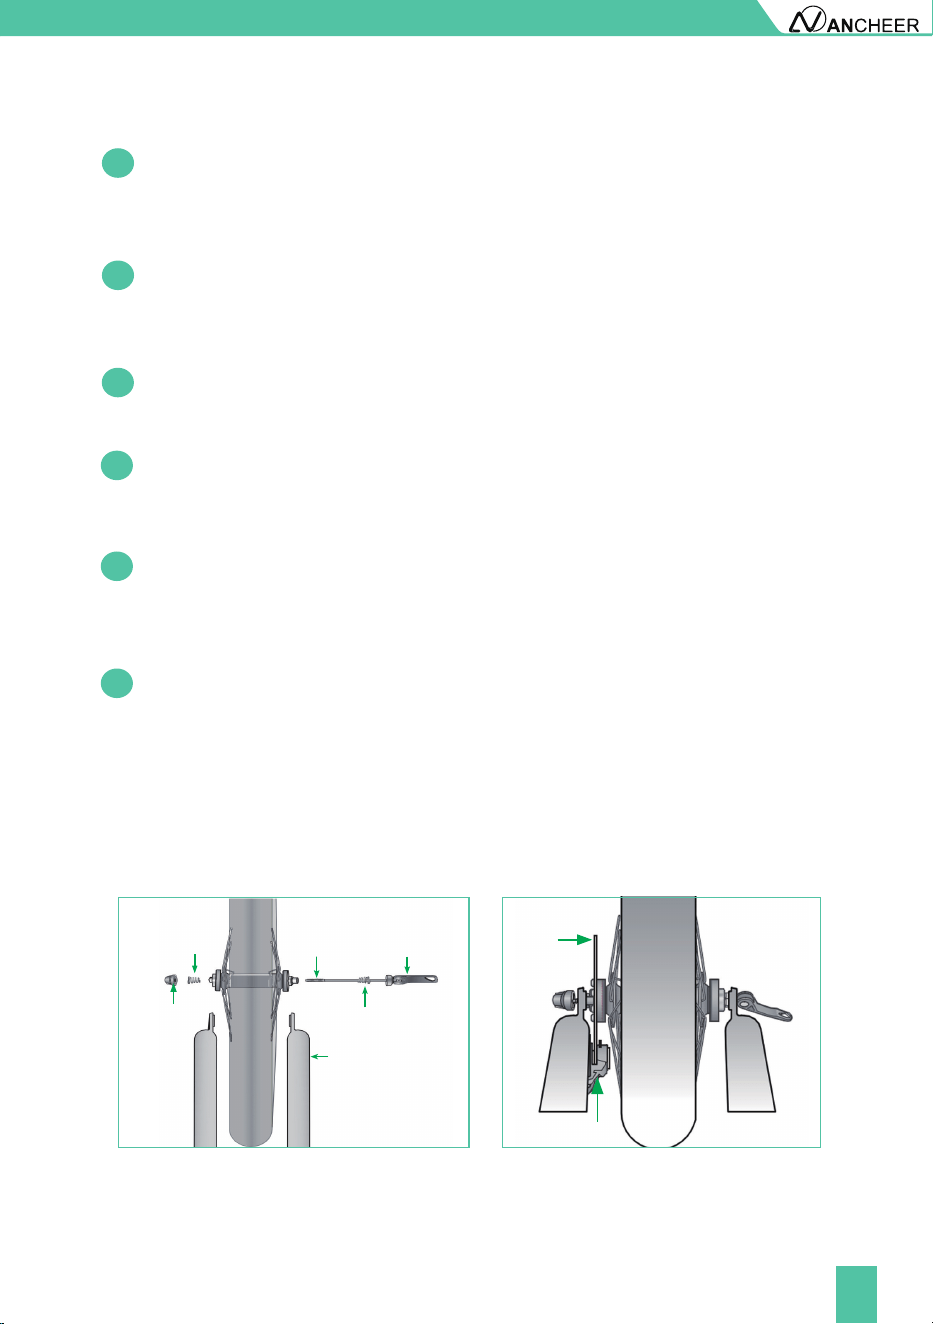
Take out the quick release from the small carton of your bicycle.
Slide the wheel into the fork dropout slots. Insert the disc rotor into the center of the disc
brake at the same time you are inserting the wheel axle into the fork drop out. Figure 4.3
11
INSTALLATION AND ADJUSTMENT
4.7
4.6
4.5
Thread the adjustment nut back onto the skewer, but do not tighten too far. Figure 4.3
Slide the outer spring over the end of the skewer. Figure 4.3
Unscrew the adjustment nut from the skewer, remove outer spring and slide the
skewer through the front wheel axle so the quick-release lever is on the same side of
the chain. Figure 4.3
Note: The smaller end of the spring should be in towards the wheel.
4.8
4.9
4.10
Re-check that the handlebars are perpendicular to the front wheel. Adjust if needed.
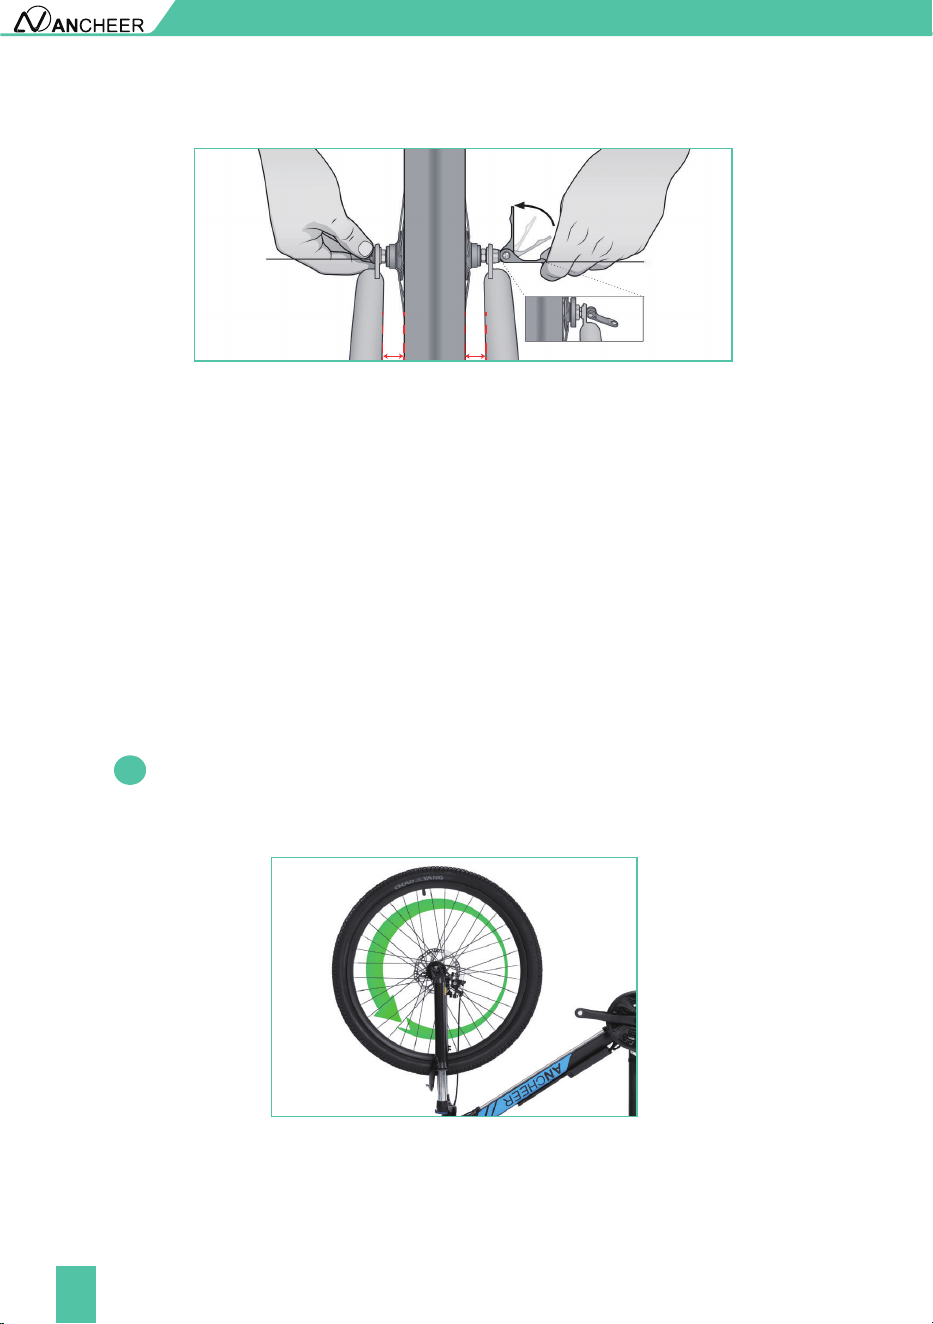
So you can adjust the distance A=distance B. Figure 4.4
Move the quick-release lever into the open position. With one hand on the quick release
lever and one hand on the adjustment nut, start to hand tighten the adjustment nut
until you start to feel some resistance against the fork. Figure 4.4
Try to close the quick-release lever. If it closes easily, open it up and tighten the
adjustment nut further. If it is too difficult to close, open the quick-release lever up and
loosen the adjustment nut a little and try again. Figure 4.4
NOTE: Do not attempt to tighten by turning the quick-release lever. The quick-release
lever is for closing, the adjustment nut is for adjusting the tension.
Figure 4.3
Outer
spring
Adjustment
nut
Front Fork
Skewer
Inner spring
Quick-release
lever
Disc
rotor
Caliper
12
INSTALLATION AND ADJUSTMENT
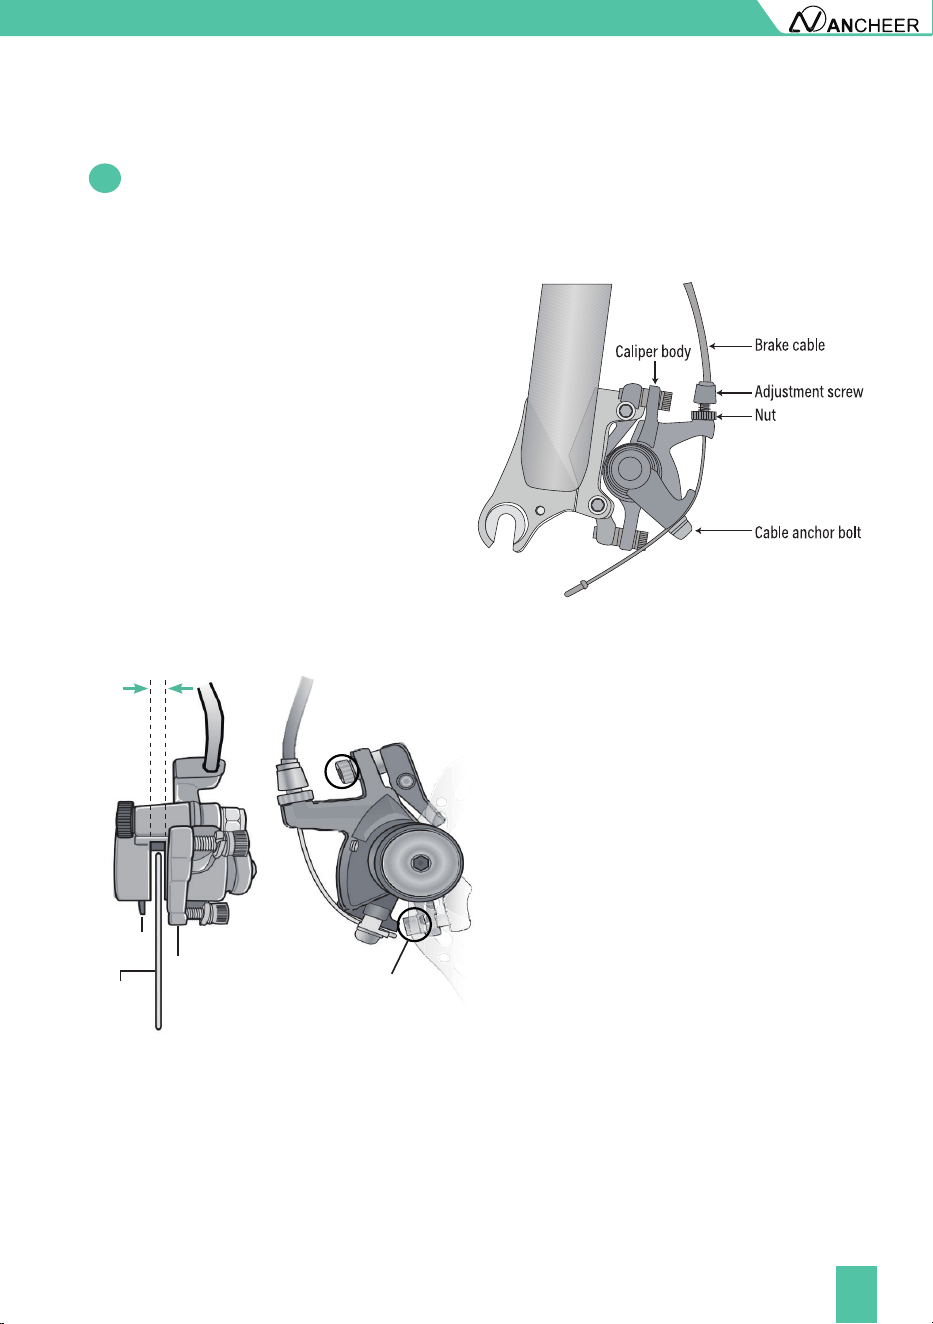
5. Check The Front Wheel Rotates Smoothly
5.1
After installing the front wheel, rotate it to see whether it rotates smoothly. If the
disc brake rubs, please adjust the break.
NOTE: Make sure the wheel is in the middle of the fork. Length A= lenght B
Quick release
Attention:
Tighten the quick release
with the adjustment nut
only!
lever in the
closed position
Quick release
lever in the open
position
A
A = B
B
Figure 4.4
Important! You should feel resistance when you close the quick-release lever that
should leave a temporary impression on your fingers. Open and close the handle to
ensure the wheel is securely locked in place.
13
INSTALLATION AND ADJUSTMENT
5.2
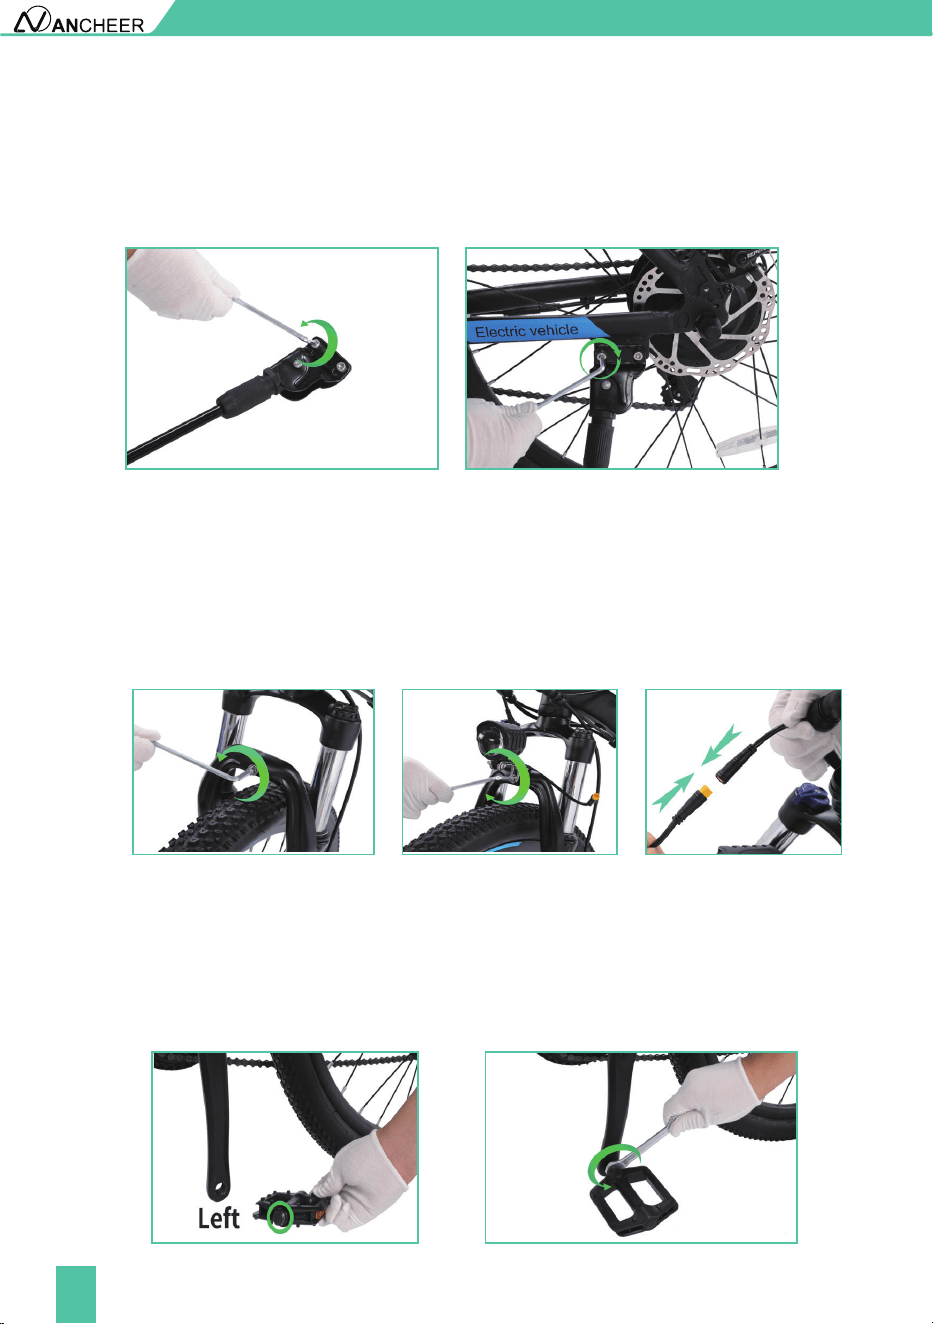
Brake Adjustment
If the brake is not sensitive, loosen the
anchor bolt of the brake cable to shorten
the brake distance of the brake cable and
then tighten the bolt. Or, lengthen the
distance of the brake cable when the brake
is too sensitive.
If the rotor always rubs against the
brake pad or the gap is too large, loose
the two centering adjustment screws,
but do not remove them. Slowly rotate
the wheel and check the space between
the rotor and the brake pad; adjust the
position of the brake pad and the rotor.
Centering the rotor and the pads to
avoid friction. After the adjustment is
complete, tighten the screws.
Ensure that the brake cables are properly inserted into the brake levers before aligning a
mechanical disc brake. If the disc rotor is bent or damaged, replace the rotor first.
Leave the same clearance on
both sides of the disc rotor
Brake pad
Disc rotor
Adjust caliper to
center the rotor
Centering
adjustment screws
●
●
14
INSTALLATION AND ADJUSTMENT
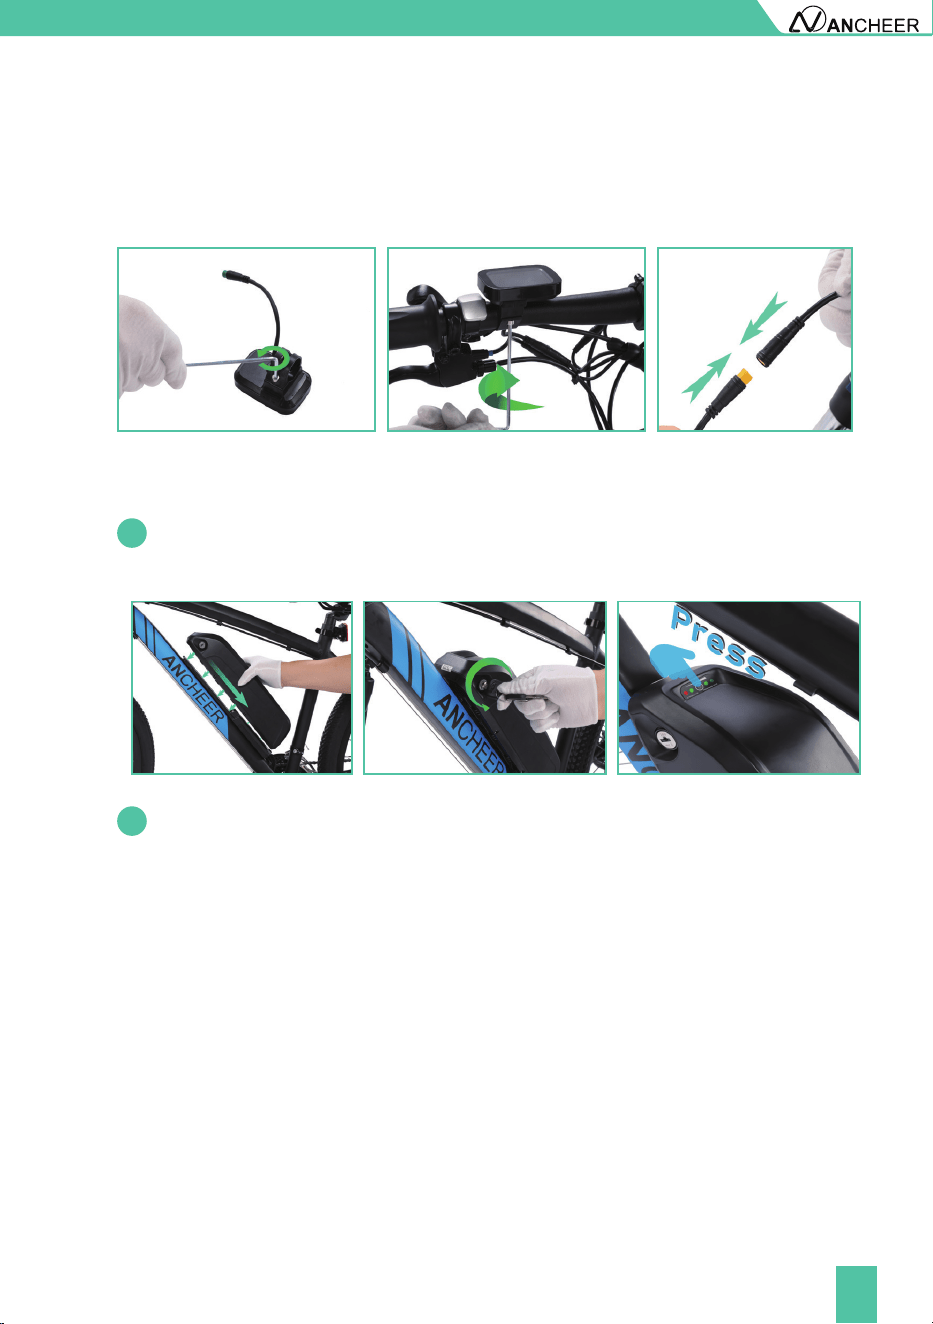
6. Install Kickstand
7. Install The Headlight
8. Install The Pedals
Unscrew the screw in the kickstand, and install the kickstand. Then tighten with tool.
Loosen the screw on the fork with the hex key. Put the light in this position. Tighten the
screw that secures the light.Then connect the plug when the arrow on the plug surface
is aligned with the arrow.
Ensure that the thread of each pedal is fully inserted into the crank arm. Tighten the
pedals completely with a wrench. (Counterclockwise screw the pedal marked "L" on the
left side crank. Clockwise screw the pedal marked "R" on the right side crank.)
15
INSTALLATION AND ADJUSTMENT
9. Install LCD Meter
10. Install The Headlight
Loosen the screw on the back of the meter with the hex key, then install the meter on the
right side of the handlebar.Tighten the screw, and connect the connector of the meter.
Push the battery into the battery support until it is closely connected to the socket on
the pipe of the frame battery support.
Then insert the key and turn the key to lock it.
11. Adjust Angle Of Brake Lever, Meter, Gear Shifter, Throttle And
Louder Controller On Handlebar, Then Tightens Them With Tools.
Shifting Recommendations
In order to increase the range, we recommend shifting according to the speed.
So far, congratulations! You have completed the assembly of the entire bike.
For starting and low-speed riding, it is best to use a low-speed gear.
At higher speeds, a higher gear should be selected.
10.1
10.2
●
●
16
METER OPERATION
1. Product Name
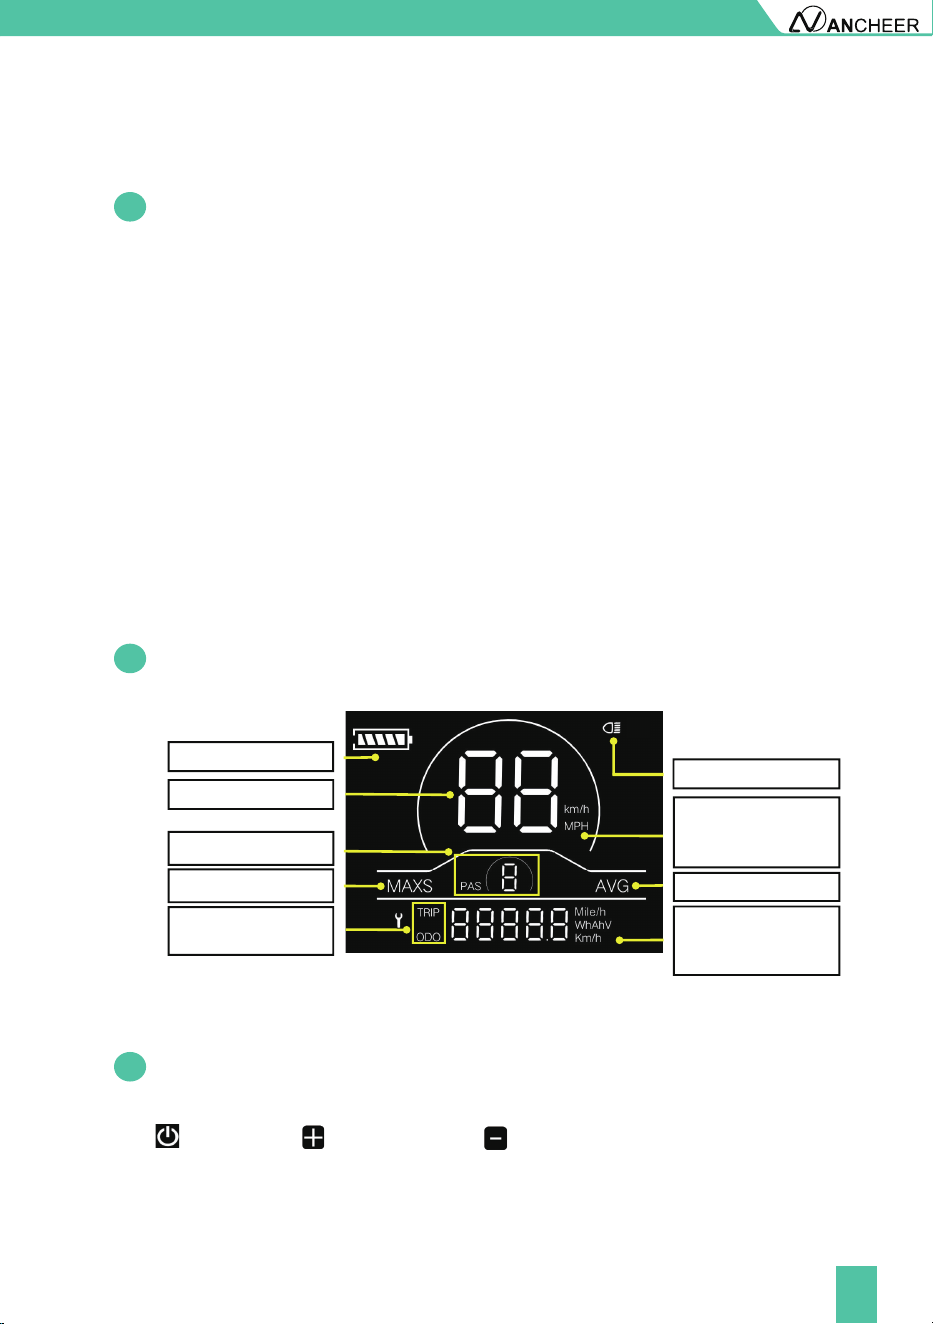
2. Appearance And Dimensions
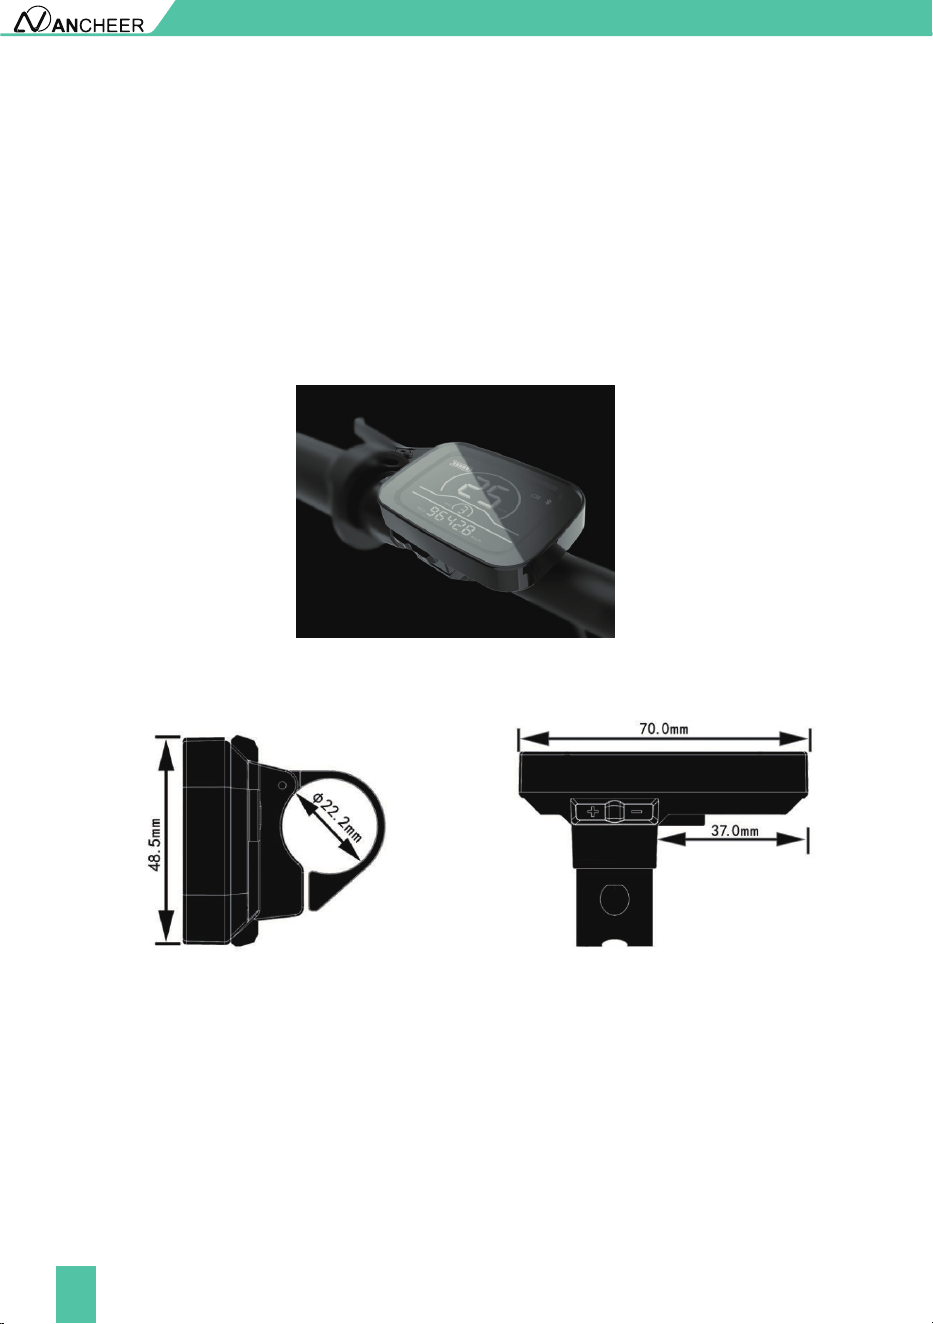
Intelligent LCD display for e-bike.
Fig. 2-2
Top View of Display Dimensions
Fig. 2-3
Side View of Display Dimensions
Fig. 2-1 Picture of Display
17
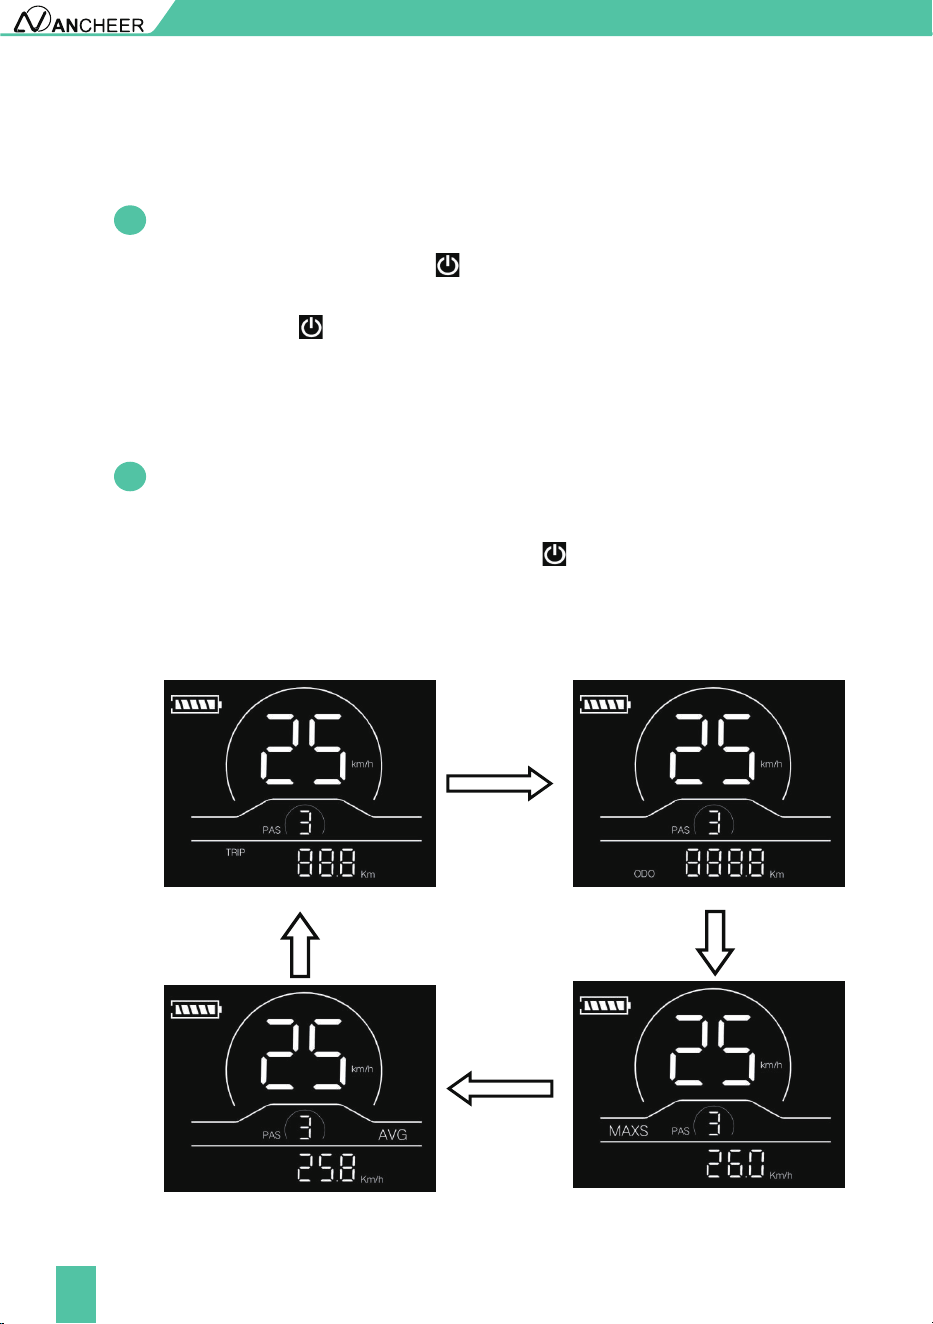
Display YL81C provides a variety of functions to meet the riding needs of users, including:
There are three buttons on the operating unit of display YL81C, i.e., the on/off button
, plus button and minus button .
3. Assemble The Saddle Tube And Reflector
3.1
3.2
3.3
Function Overview
Functional Area Layout
Button Definitions
Battery level indicator
Assist level adjustment and indication
Headlight indicator
Speed indicator (including real-time speed, maximum speed (MAXS) and average
speed (AVG))
Mileage indicator (including total mileage(ODO) and trip distance (Trip))
Error code indicator
Parameter setting function
●
●
●
●
●
●
●
METER OPERATION
Battery level indicator
Headlight indicator
Average speed indicator
Distance/speed unit
Metric system: km, km/h
Imperial system: mile,
Speed unit Metric
system: km/h Imperial
system: MPH
Speed indicator
Assist level indicator
Maximum speed
Trip distance indicator
ODO
18
By pressing and holding the button , the display will start to work and the working
power supply of the controller will be turned on. In the power-on state, by pressing and
holding the button , your e-bike will be powered off.
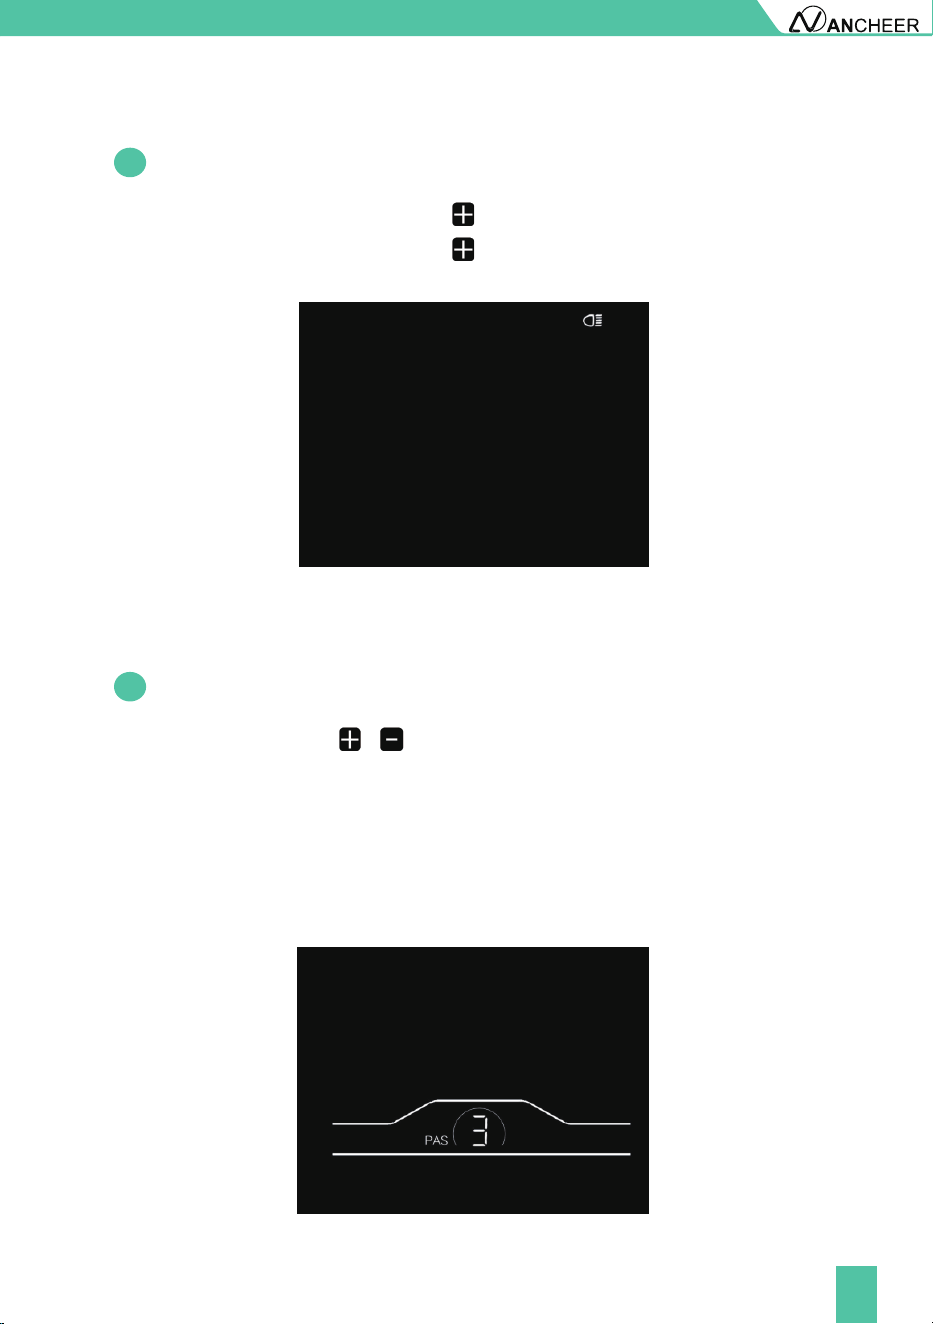
After the display is turned on, the display will show the real-time speed (mph) and the
mileage (mile) by default. By pressing the button , the information displayed will be
switched between the mileage (mile), ODO (mile), maximum speed (mph) and average
speed (mph).
When the mileage reaches 9999.9 km, it will be automatically reset to zero.
If your e-bike is not used for more than 10 minutes, the display will be
automatically powered off.
4. General Operation
4.1
4.2
Power on/off
Display interface
METER OPERATION
■
Fig. 4-1 Display Interface Switching
Mileage indicator
Average speed indicator
ODO
Maximum speed indicator
19
4.3
4.4
Headlight on/off
Assist level selection
METER OPERATION
By pressing and holding the button , the display backlight will turn less bright.
By pressing and holding the button again, the display backlight will resumes the
luminance.
By pressing the button / , the e-bike assist level will be switched to change the
motor output power. The assist levels available are levels 0-5. Level 0 is pure electric
mode (throttle mode). PAS 1-5 are power-assisted mode, and the default mode is level 1.
Cruise mode: When twisting and hold the throttle for 8 seconds, the gear signal
flashes, it will enter the auto cruise state, then release the speed accelerator at this
time, the electric bicycle will keep the current speed and continue to drive. After
braking or twist the throttle again, you can cancel the cruise state. Please pay attention
to the road conditions and use cruiser mode carefully.
Fig. 4-2 Headlight-on Indicator Interfac
Fig. 4-4 Assist Level Switching Interface
20
4.5
4.6
Battery level indicator
Error code indicator
METER OPERATION
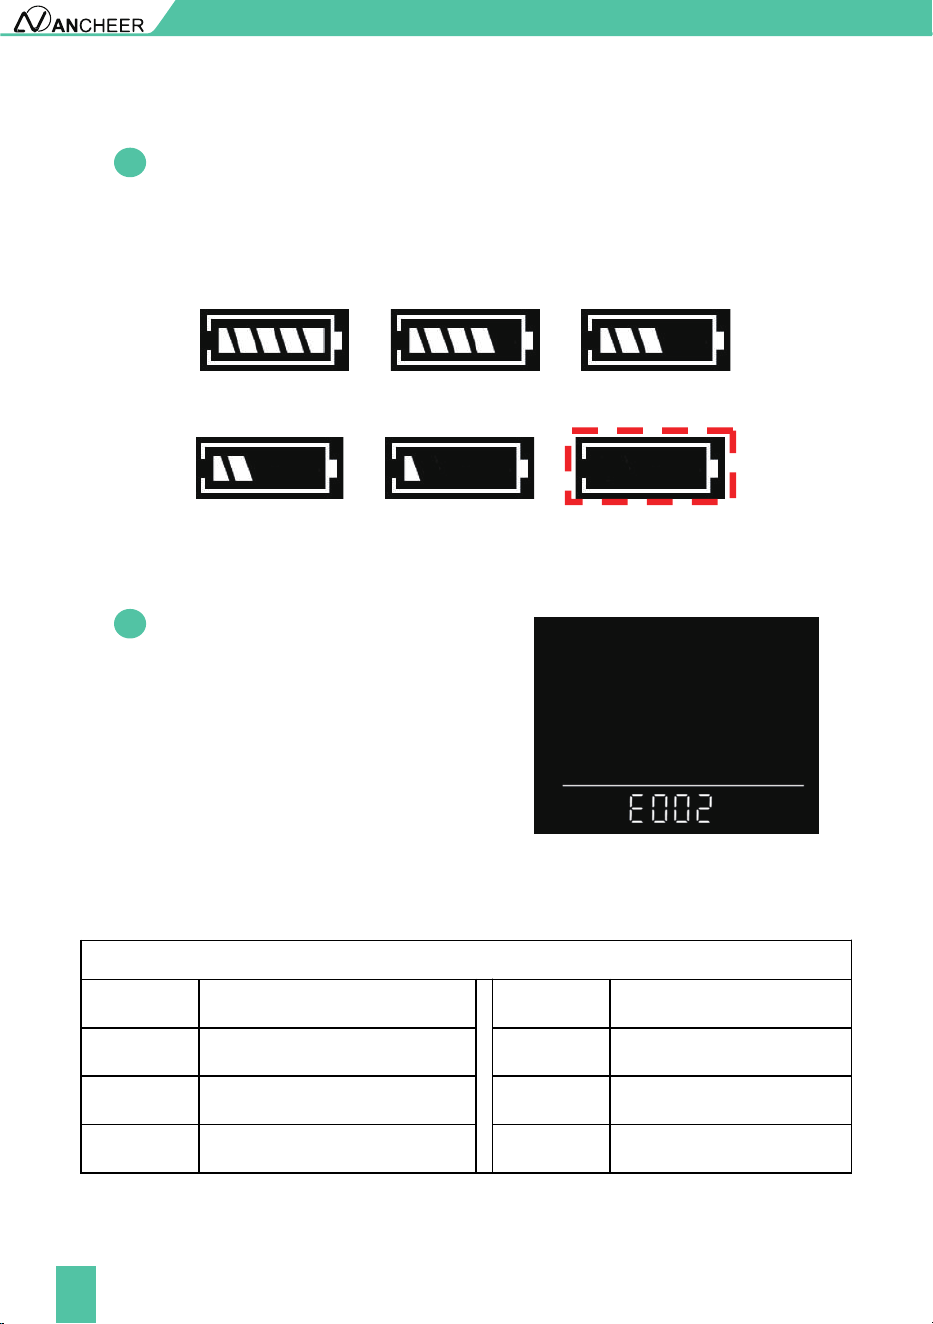
The battery level indicator consists of five segments. When the battery is fully
charged, the five segments will be all on. In case of undervoltage, the outline
of the battery indicator will flash, which means the battery has to be charged
immediately.
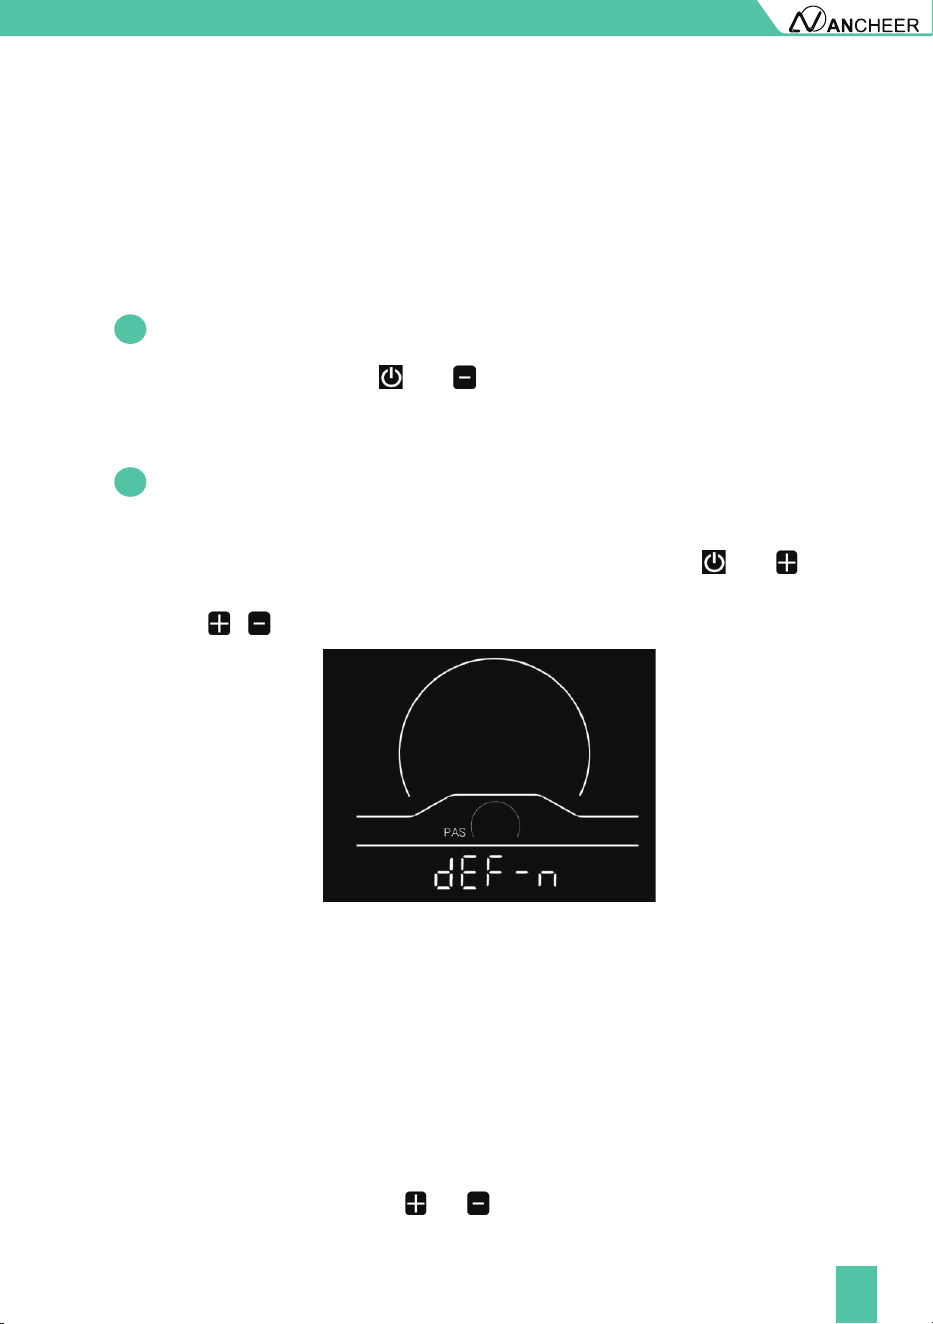
When a fault occurs in the electronic
control system of your e-bike, the display
will automatically indicate the error code
in the mileage area in the format of E0**.
Detailed definitions of error codes are
shown in Schedule 1.
When an error code appears on the display, please conduct troubleshooting in
time. Otherwise, your e-bike will not work normally.
Fig. 4-6 Error Code Indicator Interface
Schedule1 Error Code Definitions
Error codes
Error codes Error codes Definition Definition
Controller Abnormality Throttle Abnormality
Communication Abnormality Brake Abnormality
Motor Hall Signal Abnormality Motor Phase Abnormality
E001 E004
E002 E005
E003 E006
Fig. 4-4 Assist Level Switching Interface
Full battery level
indication
2-segment indication
4-segment indication
1-segment
3-segment indication
Undervoltage flashing
■
21
5. General Setting
6. Custom Setting
5.1
5.2
Trip distance reset
Factory reset
METER OPERATION
All parameters can only be set when your e-bike stops. The steps for general setting
are as follows:
In the power-on state, when the display shows the speed of 0,
All parameters can only be set when your e-bike stops. The steps for custom setting
are as follows:
In the power-on state, when the display shows the speed of 0,
Press and hold the buttons and at the same time for more than 2 seconds
to enter the selection interface of custom setting options;
■
■
Press and hold the buttons and at the same time for more than 2 seconds to
reset the mileage.
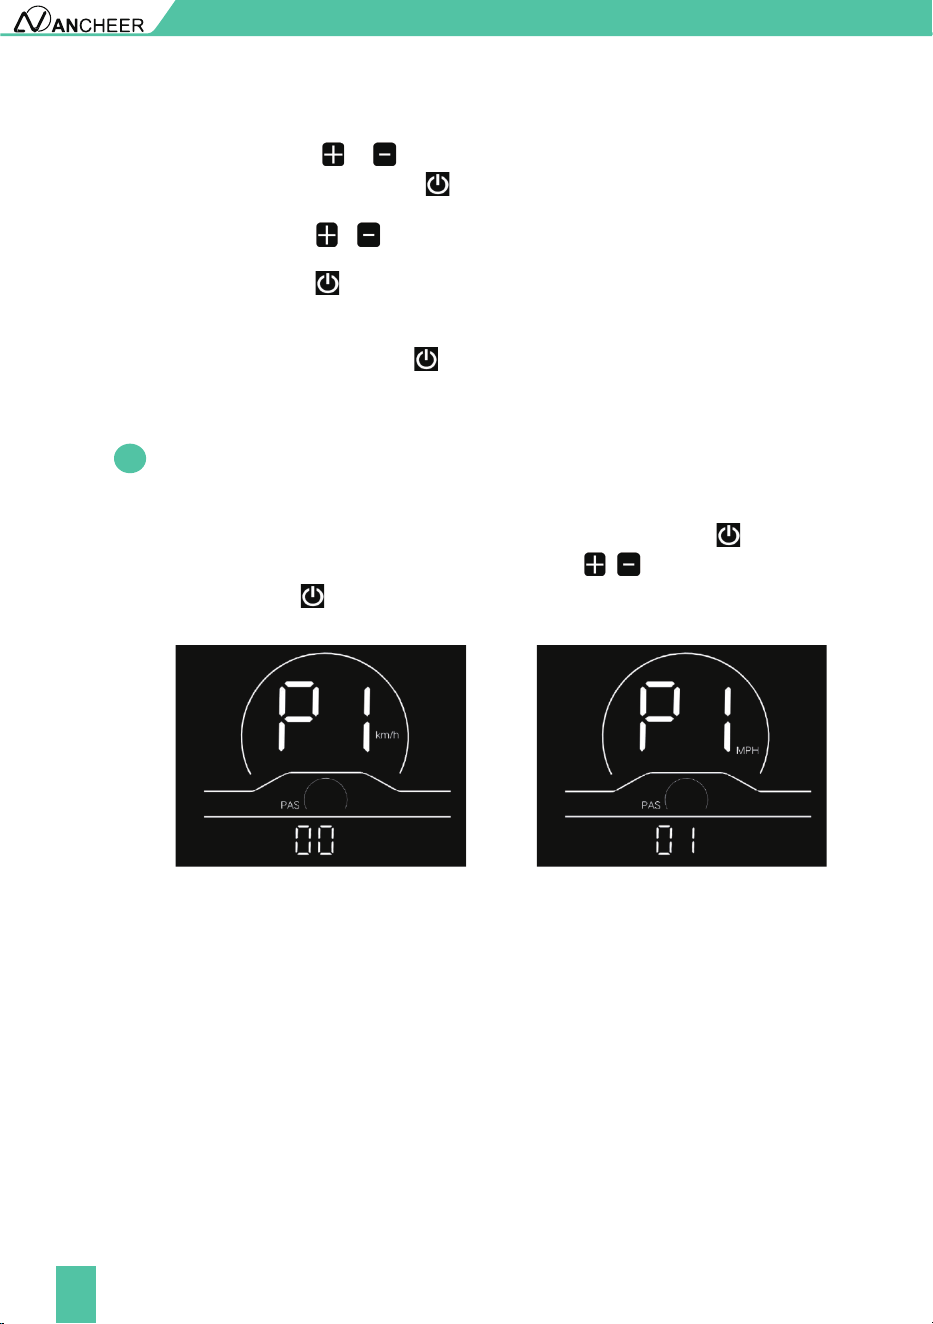
dEF refers to factory reset. dEF-n represents not to restore factory settings, and dEF-y
represents to restore factory settings. Press and hold the buttons and at the
same time for more than 2 seconds to enter the factory reset interface, and press the
button / to select a parameter.
Fig. 6-1 Factory Reset Interface
❶
22
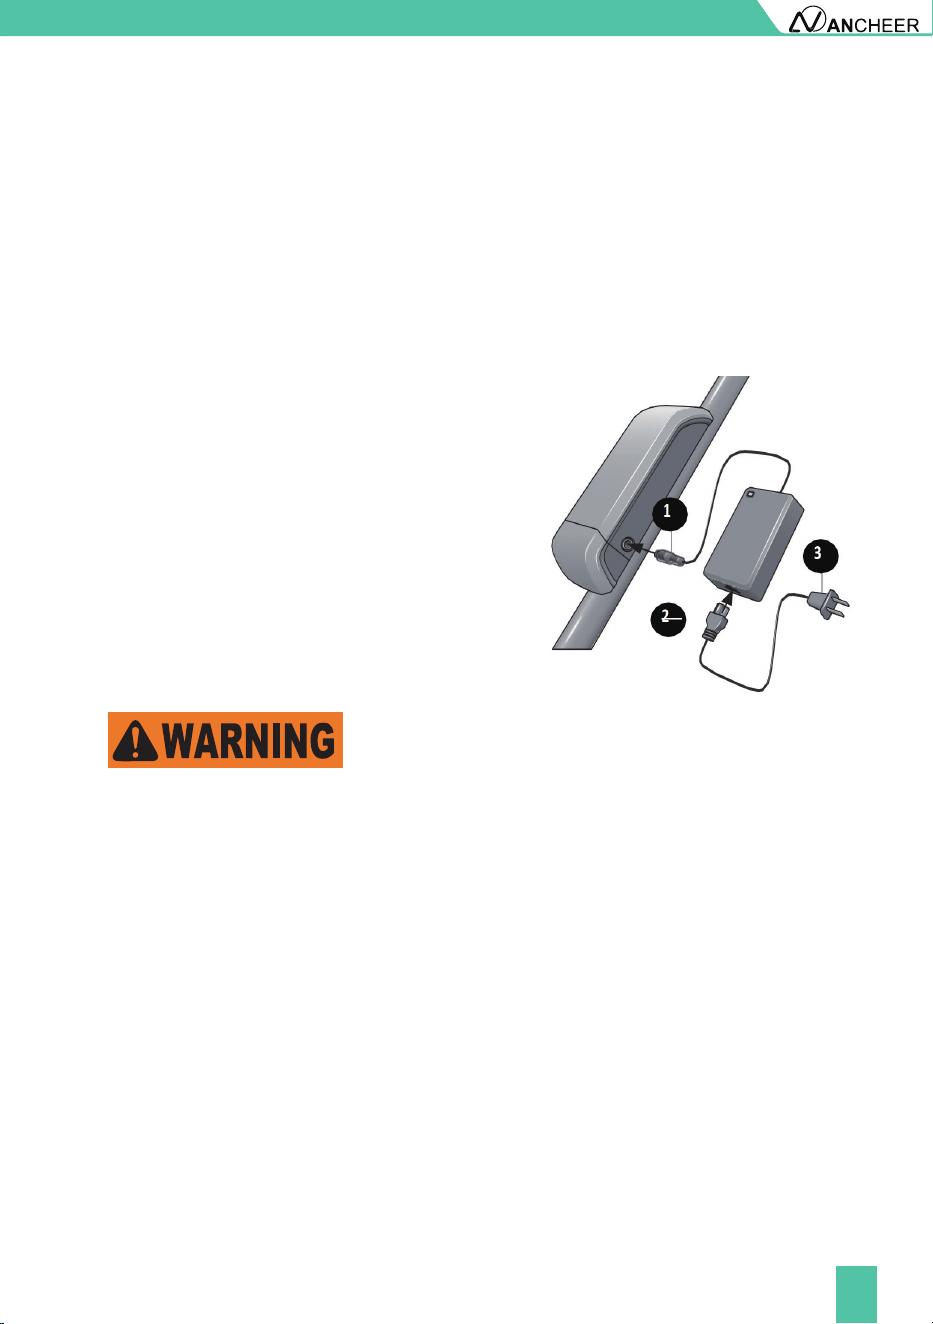
P1 refers to the metric/imperial system setting option. 00 represents the metric
system, and 01 represents the imperial system. Press the button to enter the
parameter modification interface. Press the button / for parameter selection.
Press the button to save the parameter and return to the selection interface
of general setting options.
Please use safely, and do not plug or unplug the display when it is powered on.
Please avoid bumping as far as possible.
Please do not alter the background parameter settings of the display at will, otherwise
normal riding cannot be guaranteed.
If the display fails to work normally, it should be repaired as soon as possible.
Due to product upgrades of the Company, part of the displayed contents or functions of
the product you bought may be different from the manual, depending on the actual model.
7. CAUTIONS
METER OPERATION
Press the button / to switch the selection interface of general setting
options, and press the button to enter the parameter modification interface;
Press the button / for parameter selection;
Press the button to save the parameter and return to the selection interface
of custom setting options;
Press and hold the button to save the parameter and exit the selection
interface of custom setting options.
6.1
Metric/imperial system setting
Metric system indicator interface Imperial system indicator interface
Fig. 6-1 Metric/imperial System Setting Interface
●
●
●
●
❷
❸
❹
❺
23
BATTERY AND CHARGING
Charging: Safe Operation Guide
When Charging The Battery
Safty Information
Please follow the instructions for use, otherwise the consequences are at his own risk.
Please use the original special charger. It is strictly prohibited to use other chargers.
Pay attention to the battery type and applicable voltage that the charger can charge,
and it is strictly forbidden to mix them. The charging time shall not exceed 12 hours,
and the charging current shall not exceed 3A.
Keep the battery dry, do not put the battery in acidic, alkaline liquid or combustibles,
keep away from rain, fire and high temperature environment.
It is strictly forbidden to connect the positive and negative poles of the battery
reversely, and it is strictly forbidden to damage,disassemble or short-circuit the
battery. Contact between the battery contacts and metal objects such as paper clips,
coins, keys, nails, screws or other metal items could result in shorting out the battery
and cause electrical fires, explosion, or severe burns.
Used batteries are hazardous chemicals, and the used batteries should not be
disassembled without authorization, and recycled by relevant professional
departments.
It is forbidden to modify the battery, electronic control system and the frame structure
of the bike, etc. Otherwise, it may cause safety hazards and void the warranty service.
If you continue to do so, all will be at your own peril.
Use the original battery.
Do not replace it with other brand’s or product’s battery.
Insert the charger probe into the charger port
on the e-bike battery. As shown in the figure.
Insert the pronged end of the battery cord
into the battery charger.
Insert the AC plug into an AC outlet.
The red indicator light turns on and will remain
red until it is fully charged. The indicator light
turns green once the battery is fully charged.
Failure to observe the following warnings could result in electrical fires, explosion, severe
burns or electrocution.
●
●
●
●
●
●
●
●
❶
❷
❸
❹

24
BATTERY AND CHARGING
The battery and battery charger contain hazardous materials. Always keep the battery
and battery charger away from children, animals, or persons incapable of understanding
the potential hazards.
A damaged battery or battery charger (e.g. cable, plug or housing) may result in leakage
of hazardous materials or be a potential source of sparking and fire. Always examine the
battery and battery charger before each use. Never charge a damaged battery or use a
damaged battery charger.
Please use the original special charger. It is strictly prohibited to use other chargers.
Charging the battery with an incompatible battery charger may result in electrical fires,
explosion, severe burns or electrocution. Ensure the battery charger and the A/C outlet
are the same voltage before charging the battery. Never use the battery charger to
charge any other batteries.
Pay attention to the battery type and applicable voltage that the charger can charge,
and it is strictly forbidden to mix them.
The charging time shall not exceed 12 hours, and the charging current shall not exceed 3A.
Charging at 0°C~40°C/ 32°F~104°F, and discharging at -5°C~40°C/ 23°F~104°F. Please do
not store the battery in temperatures above 35°C/ 95°F or below -5°C/ 23°F.
The battery and battery charger contain no serviceable parts. Do not open, disassemble,
or modify the battery or charger.
Improper handling of the battery and battery charger may result in electrical fires,
explosion, severe burns or electrocution.
Do not move the battery or battery charger during charging.
Do not hold the battery charger during a thunder or lighting storm.
Do not plug or unplug the battery charger with wet hands.
Do not place any items on the battery charger.
When charging, it should be placed in a ventilated environment, and it is strictly
forbidden to charge in a confined space, residential building or in a hot environment.
The charger should not be carried with the ebike as much as possible. If it is really
necessary to carry it, it should be placed in the toolbox after the shock absorption
treatment is done. It is not allowed to disassemble or replace the components in the
charger by yourself.
It is recommended to charge the battery in the fireproof battery charging cover when charging.
And the battery should be stored in the fireproof battery charging cover when not in use.
When not in use for a long time, keep the battery in a cool and dry place, and charge the
battery for two hours a month.
●
●
●
●
●
●
●
●
●
●
●
●
●
●
●
●
25
BATTERY AND CHARGING
Reminder
It is recommended to charge the battery in the fireproof battery charging
cover when charging. And the battery should be stored in the fireproof
battery charging cover when not in use.
Charge a new battery 4 hours before you use it in your product for the first time.
If the battery is dropped or damaged due to a bicycle accident, there may be a danger of
electrolyte leakage. Please stop using it immediately.
It is better not to wait until the power is completely exhausted before charging, which
can more effectively extend the battery life. Besides, Overheating or undercharging the
battery may shorten battery life.
How far can a fully charged battery go?
It depends on the load weight, road conditions and battery capacity. But under the same
conditions, the average speed can last longer riding distances. Using pedal assist mode
allows you to go further.
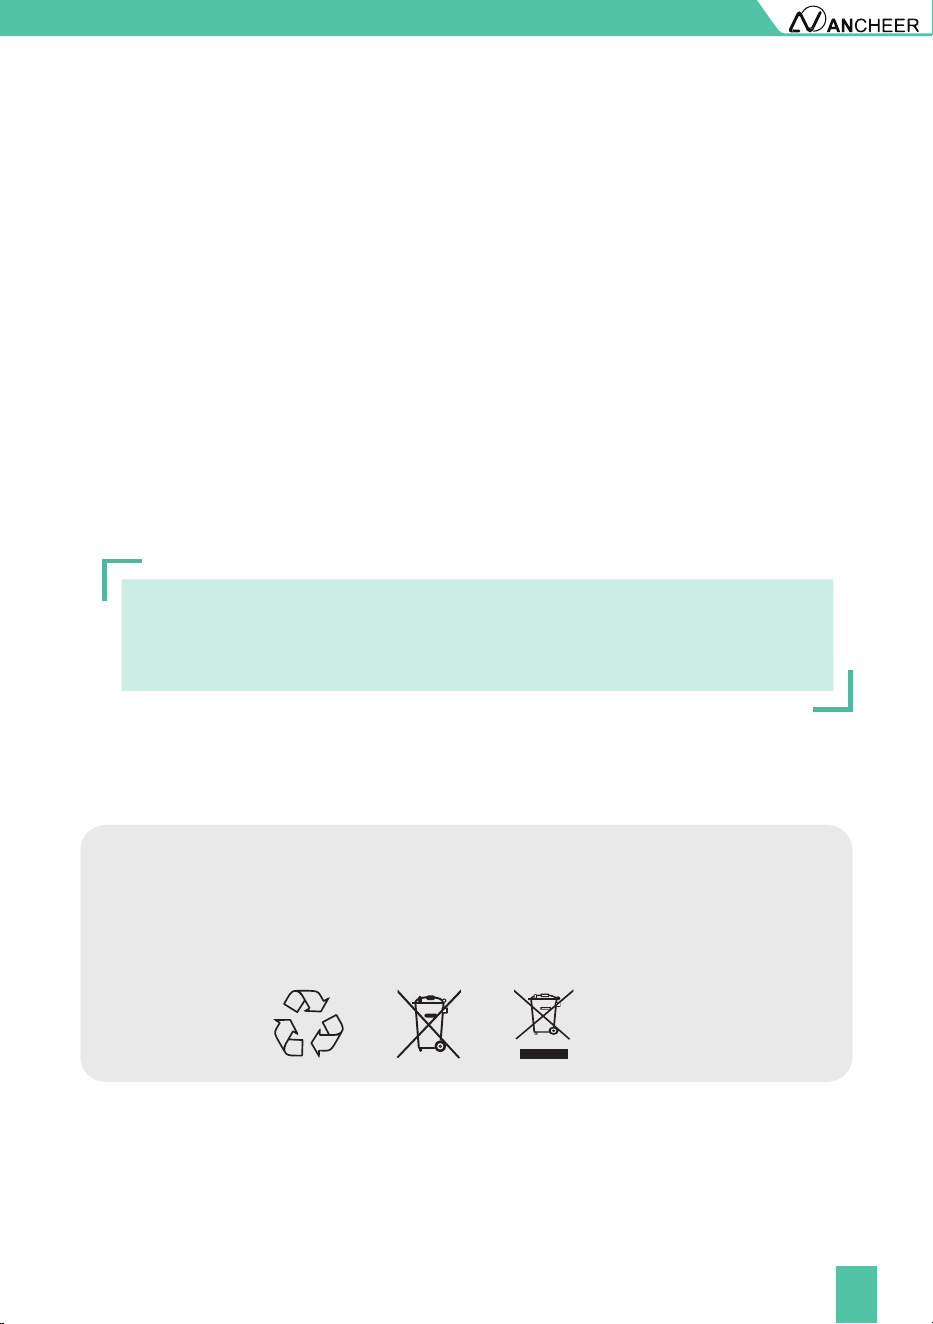
Battery must be recycled or disposed of in an environmentally sound manner.
Do not dispose of the battery in a fire. The battery may explode or leak.
Do not dispose of a battery in your regular household trash.
●
●
●
Battery Disposal

26
MAINTENANCE
The front and rear wheels of the vehicle should be located in the center of the front
fork or frame.
After riding, please store the bike in a place without sunlight and rain.
Water showering is forbidden, and the surface of the bike body can be wiped with a
semi-dry cloth.
Do not touch the charging hole on the bicycle, or touch it with metal or liquid, otherwise,
it may cause an accident due to an instantaneous short circuit of the current.
Check all cables and cable housings for fraying, breaks, rust, or corrosion and replace
if necessary.
Check the motor and brake frequently, and do not fill the brake area with oil.
Additionally, check the brake pads for any damage as they will be worn over time and
eventually need replacement.
Regularly check the various screws of the bike and the places that need to be fastened,
and regularly reinforce to prevent injury and unnecessary wear and tear on your e-bike..
Recommended torque (unit: kg.cm): the horizontal screw 60-80, the stem screw 175-
200, the seat cushion screw 175-250, the wheel screw 320-450.
Regularly check the tension of the chain, which can be adjusted by the chain regulator.
Always check the tire for scratches, cracks, or excessive wear. The inner tube and
the valve should be perpendicular to the wheel hub and not crooked. Accidentally
punctured, damaged or excessively worn inner and outer tires need to be replaced
immediately, please seek professional technicians to repair or replace your tires.
It is forbidden to modify key structural parts such as the frame, front fork, standpipe, and
electrical function parts. If damaged, use the original parts to replace it. Otherwise, the
guarantee service will not be provided. Any loss or damage caused by the modification
shall be solely responsible.
●
●
●
●
●
●
●
●
●
●
●
27
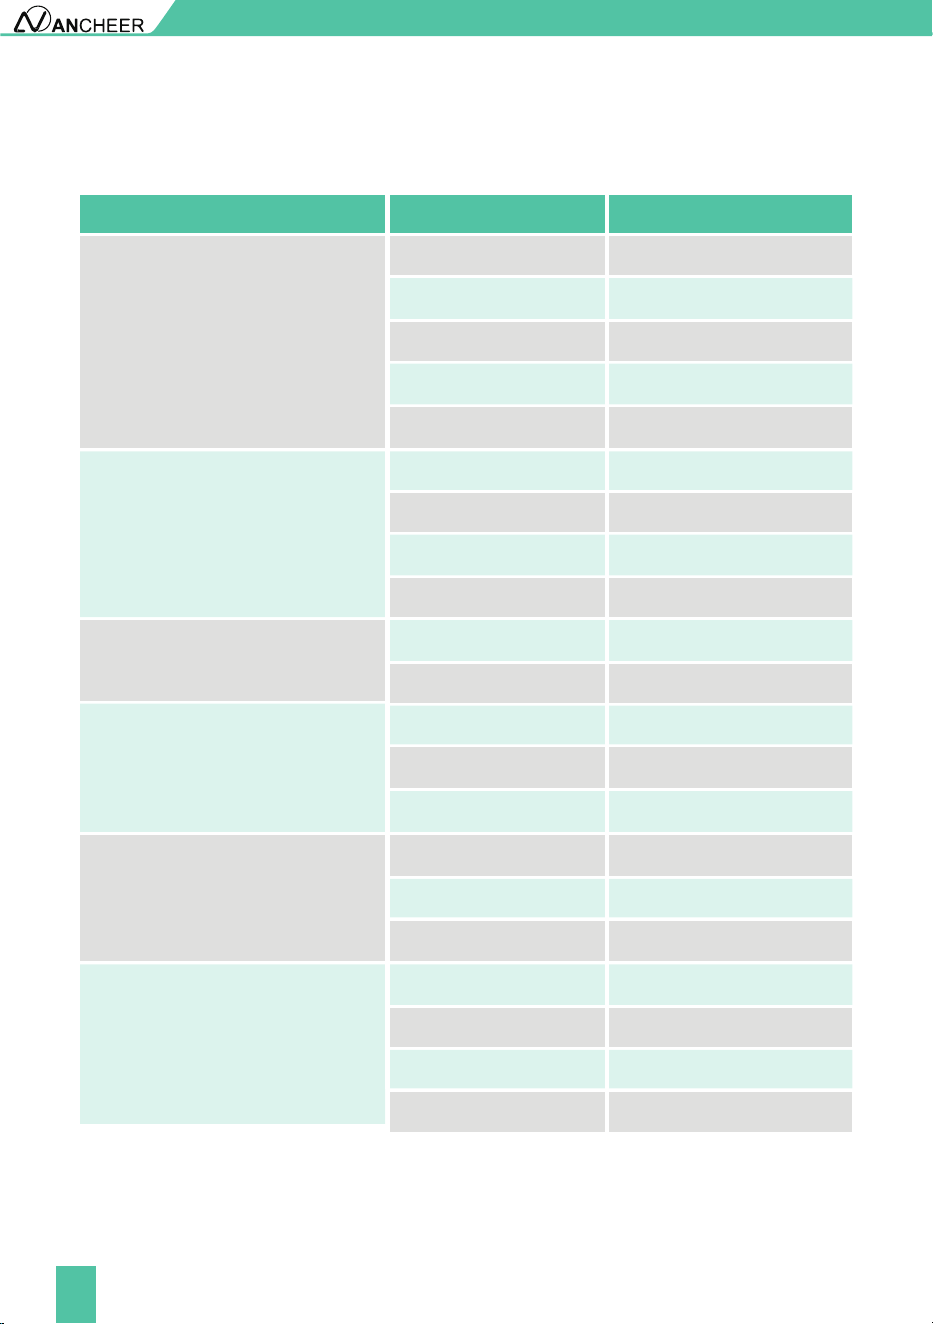
One-Year Limited Hardware Warranty
Your electric bike includes a One Year Limited Hardware Warranty. ANCHEER provides
warranty service for the electric bikes. If there is a hardware defect and a valid claim is
received during the warranty period, we will resend new parts within the scope permitted
by law.
The Warranty covers product defects in materials and workmanship under normal use. This
Warranty is limited to original purchasers and is not assignable or transferable.
The Warranty starts on the date of your purchase and lasts for one year (the "Warranty
Period") and the Warranty Period is not extended if the product is repaired or replaced.
The Warranty does not cover any damage due to: improper use; failure to follow the product
instructions or to perform any preventive maintenance; unauthorized repair; external causes
such as accidents, abuse, or other actions or events beyond our reasonable control.
Support Services
We provide lifetime customer support services. For any questions about the product, please
contact customer service from where you brought the equipment. We will be happy to
answer your questions.
Accessories Warranty Period
Service Content
Quality Problem
A year
A year
A year
A year
A year
Motor
Controller
Charger
Lithium
Battery
Accelerator
Free delivery of parts
Free delivery of parts
Free delivery of parts
Free delivery of parts
Free delivery of parts
Motor will not be able to
use
Natural conditions (such
as impact force cannot be
used except damage)
Failure occurs under normal
use
Failure occurs under normal
use
Can't charge discharge
under normal use
WARRANTY
28
ATTACHMENT
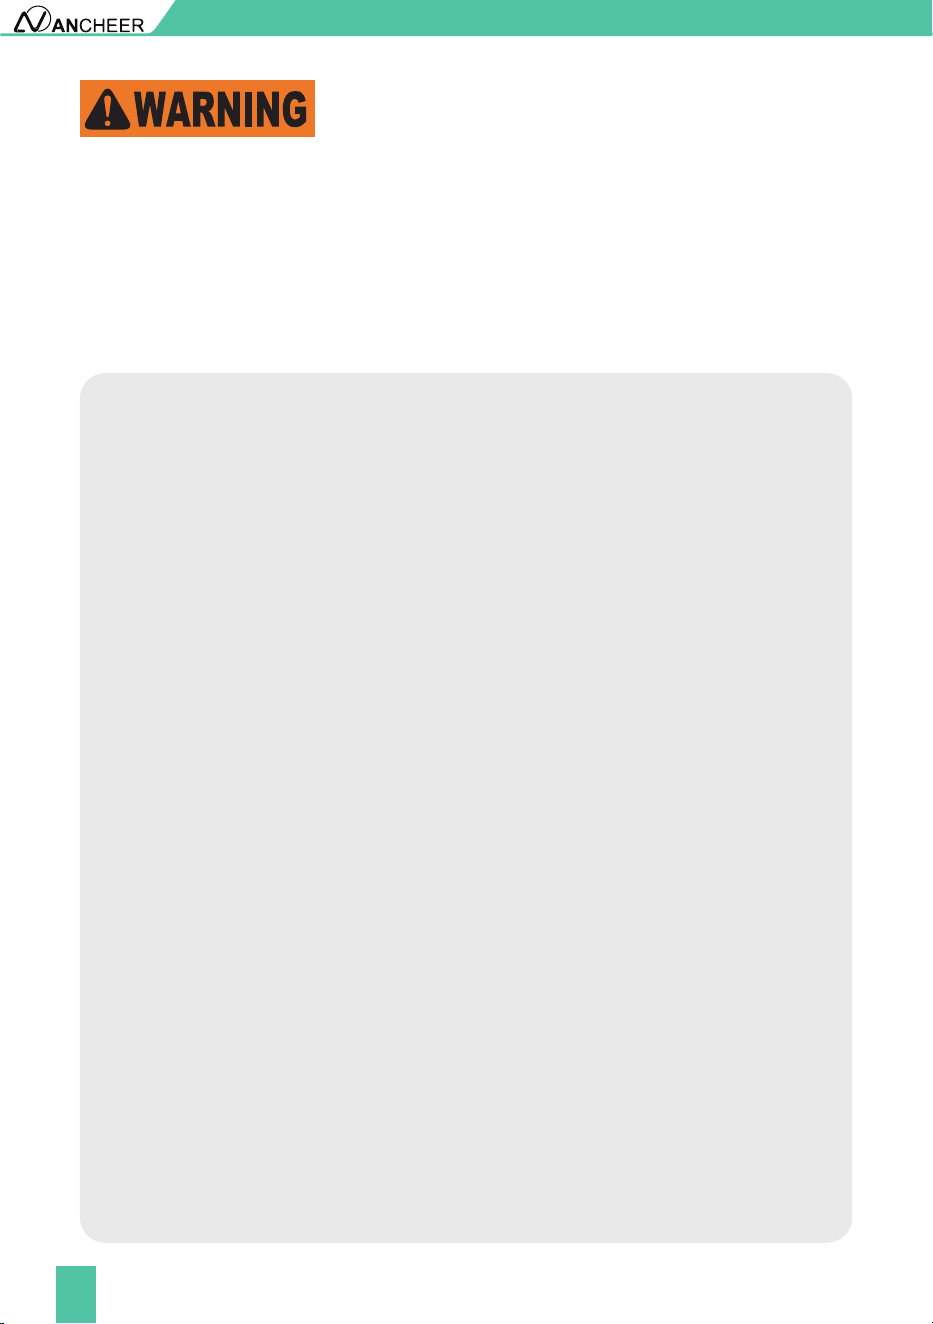
Technical Parameters
Performance index Project Parameter
Wheel Size
Vehicle Size
27.5*1.95 Inches
Frame Material Aluminium Alloy
Maximum Load 265 lbs (120KG)
Vehicle Weight 49 lbs (22KG)
Maximum Speed 20 mph (32km/h)
Rear Derailleur 7-Speed
Front Derailleur 3-Speed
Working Temperature 23°F-104°F (-5℃~40℃)
Rated Voltage 48V
Battery Capacity 10.4Ah
Output Current 3A
Motor Power
Display
500W
LCD Display
Motor Type
Brake
Light
Suspension
Brushless Gear Motor
Disc brake
Front light
Suspension front fork
Maximum Torque 55N.m
Input Voltage AC100-240V
Output Voltage DC54.6V
1760*630*1000mm
Basic Parameters
Performance Parameters
Battery Parameters
Motor Parameters
Other Parameters
Charger Parameters

29
Remarks:
The amount of battery remaining, load of the bike(weight of rider and cargo), tire
pressure, road environment, chain and wheel axle lubrication, etc. will affect the
maximum speed;
Riding habits, temperature, load, tire pressure, road environment and other factors will
affect the riding range.
●
●
ATTACHMENT
30
Operation General
Personal Restrictions
Only use the e-bike and the drive assist system for safe, recreational riding. Use of the
e-bike for a purpose it was not intended for is dangerous and could result in property
damage, serious injury or death. Always follow the instructions for intended use and
limitations.
Use of this e-bike by persons (including children) with reduced physical, sensory or
mental capabilities or persons lacking experience and knowledge in the use of the
e-bike could result in serious injury or death. The owner of this e-bike must ensure this
product is not used by people with the conditions described above. Always follow the
rules, regulations and laws (including age limits) related to the use of an e-bike in its
area of use.
A child may not realize or understand the e-bike has moving parts and components
(e.g. battery). Never allow children to play or come into contact with the e-bike or its
parts. Always follow all rules, regulations and laws regarding age limits and operation
in the e-bike area of use.
Riding the e-bike through water could result in loss of control and damage to the drive
assist system. Do not ride into, or attempt to ride through, water or sub-merge any
part of the e-bike.
Riding with the kickstand in the down position may result in unexpected contact with
the ground or other objects causing loss of control. Always ensure the kickstand is in
the up position and securely locked in place before riding the e-bike.
Sitting on the e-bike with the kickstand down may result in the e-bike tipping over.
Never sit on the e-bike when it is only supported and stabilized by the kickstand. The
kickstand is not designed to support the weight of a person.
Overloading a rear basket could create dangerous riding conditions. Always observe
the maximum weight limit. Never overload the rear basket.
An improperly secured load on a rear rack could create dangerous riding conditions.
Always ensure the load on the rear rack is properly secured before riding.
Never move the shifter while pedaling backward, nor pedal backwards immediately
after having moved the shifter. This could jam the chain and cause serious damage to
the bicycle.
Like any mechanical device, a bicycle and its components are subject to wear and
stress. Different materials and mechanisms wear or fatigue from stress at different rates
and have different life cycles. If a component’s life cycle is exceeded, the component
can suddenly and catastrophically fail, causing serious injury or death to the rider.
●
●
●
●
●
●
●
●
●
●
31
Operation Details:
Scratches, cracks, fraying and discoloration are signs of stress caused fatigue and
indicate that a part is at the end of its useful life and needs to be replaced. Product life
is often related to the kind of riding you do and to the treatment to which you submit
the bicycle. The bicycle’s warranty is not meant to suggest that the bicycle cannot be
broken or will last forever. It only means that the bicycle is covered subject to the terms
of the warranty.
Frequent inspection of your bike is important to your safety. Periodic, more detailed
inspection of your bicycle is important. How often this more detailed inspection is
needed depends upon you.You, the rider/owner, have control and knowledge of how
often you use your bike, how hard you use it and where you use it. The materials used to
make your bike determine how and how frequently to inspect. Ignoring this WARNING
can lead to frame, fork or other component failure, which can result in serious injury
or death.
Correct tightening force on fasteners- nuts, bolts, screws- on your bicycle is important.
Too little force, and the fastener may not hold securely. Too much force, and the
fastener can strip threads, stretch, deform or break. Either way, incorrect tightening
force can result in component failure, which can cause you to loose control and fall.
Loose or damaged handlebar grips or extensions can cause you to lose control and
fall. Unplugged handlebars or extensions can cut you and cause serious injury in an
otherwise minor accident.
The area in which you ride may require specific safety devices. It is your responsibility
to familiarize yourself with the laws of the area where you ride and to comply with
all applicable laws, including properly equipping yourself and your bike as the law
requires. Observe all local bicycle laws and regulations. Observe regulations about
bicycle lighting, licensing of bicycles, riding on sidewalks, laws regulating bike path
and trail use, helmet laws, child carrier laws, special bicycle traffic laws. It’s your
responsibility to know and obey the laws. Failure to wear a helmet when riding may
result in serious injury or even death.
Do not remove the front or rear reflectors or reflector brackets from your bicycle. They
are an integral part of the bicycle’s safety system. Removing the reflectors reduces
your visibility to others using the roadway.Being struck by other vehicles may result in
serious injury or death.The reflector brackets may protect you from a brake straddle
cable catching on the tire in the event of brake cable failure. If a brake straddle cable
catches on the tire, it can cause the wheel to stop suddenly, causing you to lose control
and fall.
●
●
●
●
●

32
Although many catalogs, advertisements and articles about bicycling depict riders
engaged in extreme riding, this activity is extremely dangerous, increases your
risk of injury or death, and increases the severity of any injury. Remember that the
action depicted is being performed by professionals with many years of training and
experience. Know your limits and always wear a helmet and other appropriate safety
gear. Even with state- of the-art protective safety gear, you could be seriously injured
or killed when jumping, stunt riding, riding downhill at speed or in competition.
Bicycles and bicycle parts have limitations with regard to strength and integrity, and
this type of riding can exceed those limitations or dramatically reduce the length of
their safe use.
Failure to confirm compatibility, properly install, operate and maintain any component
or accessory can result in serious injury or death.Exposed springs on the saddle of
any bicycle fitted with a child seat can cause serious injury to the child.Changing the
components on your bike with other than genuine replacement parts may compromise
the safety of your bicycle and may void the warranty. Contact customer service before
changing the components on your bike.
If your seat post is not inserted in the seat tube, the seat post, binder or even frame
may break, which could cause you to lose control and fall.
When making saddle angle adjustments with a single bolt saddle clamp, always check
to make sure that the serrations on the mating surfaces of the clamp are not worn.
Worn serrations on the clamp can allow the saddle to move, causing you to lose
control and fall. Always tighten fasteners to the correct torque. Bolts that are too tight
can stretch and deform. Bolts that are too loose can move and fatigue. Either mistake
can lead to a sudden failure of the bolt, causing you to lose control and fall.
An insufficiently tightened stem clamp bolt, handlebar clamp bolt or bar end extension
clamping bolt may compromise steering action, which could cause you to lose control
and fall. Place the front wheel of the bicycle between your legs and attempt to twist the
handlebar/stem assembly. If you can twist the stem in relation to the front wheel, turn
the handlebars in relation to the stem, or turn the bar end extensions in relation to the
handlebar, the bolts are insufficiently tightened.Be aware that adding aerodynamic
extensions to handlebars will change the steering and braking response of the bicycle.
Bolt or bar end extension clamping bolt may compromise steering action, which could
cause you to lose control and fall. Place the front wheel of the bicycle between your
legs and attempt to twist the handlebar/stem assembly. If you can twist the stem in
relation to the front wheel, turn the handlebars in relation to the stem, or turn the bar
end extensions in relation to the handlebar, the bolts are insufficiently tightened.Be
aware that adding aerodynamic extensions to handlebars will change the steering and
braking response of the bicycle.
●
●
●
●
●
●
33
WARNING! The shorter the brake lever reach, the more critical it is to have correctly
adjusted brakes, so that full braking power can be applied within available brake lever
travel. Brake lever travel insufficient to apply full braking power can result in loss of
control, which may result in serious injury or death.
All quick-release levers should be inspected before every ride to be sure they are
fully closed and secure. Failure to properly close a quick-release lever can cause loss
of control of the bicycle resulting in injury or death.Make sure the wheel is properly
seated and the quick-release lever is properly closed.
Disregarding or misunderstanding of the following safety warnings, the safety
warnings in the manuals associated with the e-bike parts, and safety labels on the
e-bike could result in serious injury or death.
Anyone assembling, using, maintaining, transporting or storing this e-bike must read,
understand, and follow these safety warnings before performing any of the actions
stated.
SAVE THESE INSTRUCTIONS.
●
●
●
Input: DC 54.6V, 3A max
Max Speed: 20 mph (32km/h)
Power: 500W
Tel: +1 626 688 9296
Monday-Friday
9:00-12:00 AM PST
14:00-18:00 PM PST
ANCHEER Customer Service
Customer Service
Dongguan XiaoBai Intelligent Mobility Co., Ltd
Made in China
Model: AMA005874
E Bike